Kidde Clipsal 755 755Rl English 110926D Owner S Manual 110 926D
2014-07-06
: Kidde Kidde-Clipsal-755-755Rl-English-110926D-Owner-S-Manual kidde-clipsal-755-755rl-english-110926d-owner-s-manual kidde pdf
Open the PDF directly: View PDF ![]() .
.
Page Count: 14
110-926D F1611
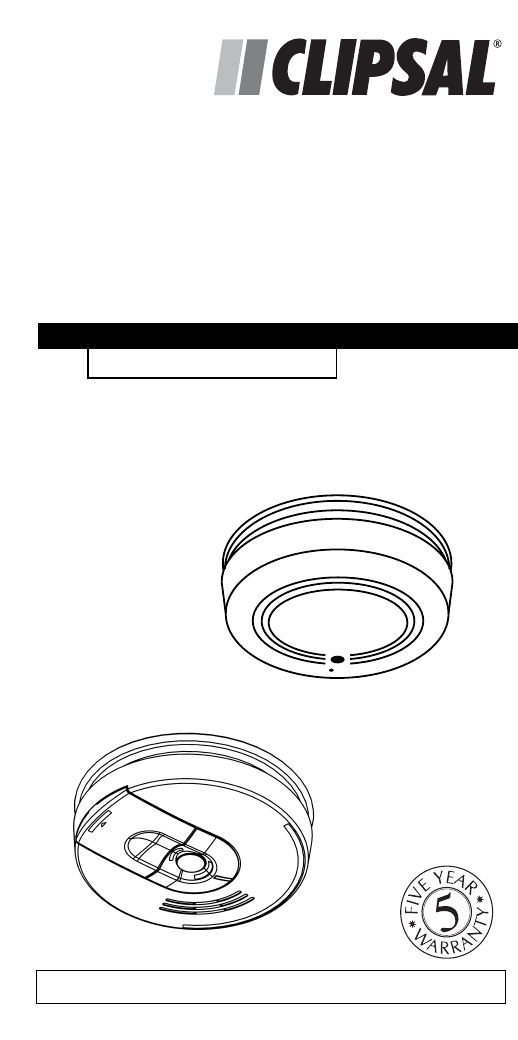
Clipsal Lifesaver®Smoke Alarm
Installation/Operating Instructions and Warranty
755 Ionisation Series
240V a.c. Ionisation Smoke Alarm with battery backup
Suitable for single use or interconnection of up to 40 alarms.
Tested and passed to AS3786 — 1993.
IMPORTANT: Please leave this manual with the owner.
755
755RL

SMOKE ALARM DESCRIPTION
Model 755 Ionisation 240V~ Smoke Alarm with
9VDC non-rechargeable alkaline
battery backup.
Model 755RL Ionisation 240V~ Smoke Alarm with
12VDC rechargeable lithium
battery backup.
Thank you for purchasing a quality Clipsal Lifesaver®755 Series
Smoke Alarm. The 755 Series are mains powered smoke alarms,
with a battery backup that will operate in the event of a mains
power failure. The alarm will sound when smoke produced at the
start of a fire enters the unit’s detection chamber. These units
are not designed to detect heat or flame. A five-year warranty
(excluding batteries) is included.
Please read the following instructions carefully to ensure correct
installation and maintenance.
Installation of the Clipsal Lifesaver®755 Series Smoke Alarm
must be carried out by a licensed electrician or similarly qualified
person to SAA Wiring Rules (AS3000) and relevant Building
Codes.
All ionisation Smoke Alarms use an extremely small amount of a
radioactive element in their ionisation chambers. Accordingly,
this product contains 37 kBq of Americium 241, a radioactive
material, and is manufactured in compliance with U.S. NRC
safety criteria in 10CFR 32.27. The purchaser is exempt from
any regulatory requirements (U.S. License No. 12-15537-02E).
Do not attempt to remove or tamper with this radioactive
source. Never try to repair or dispose of the unit yourself. Return
it to the supplier for repairs or safe disposal. It is illegal to send
products containing radioactivity through Australia Post. Check
for similar conditions with any other forwarding agency before
sending this product to the supplier.
SMOKE ALARMS HAVE LIMITATIONS
The Clipsal Lifesaver®Series Smoke Alarm is not fool-proof and
is not warranted to protect lives or property from fire. Smoke
Alarms are not a substitute for insurance. In addition, it is possi-
ble for the Smoke Alarm to fail at any time.
FOR THIS REASON YOU MUST TEST THE SMOKE ALARM
WEEKLY AND REPLACE EVERY TEN YEARS.
2
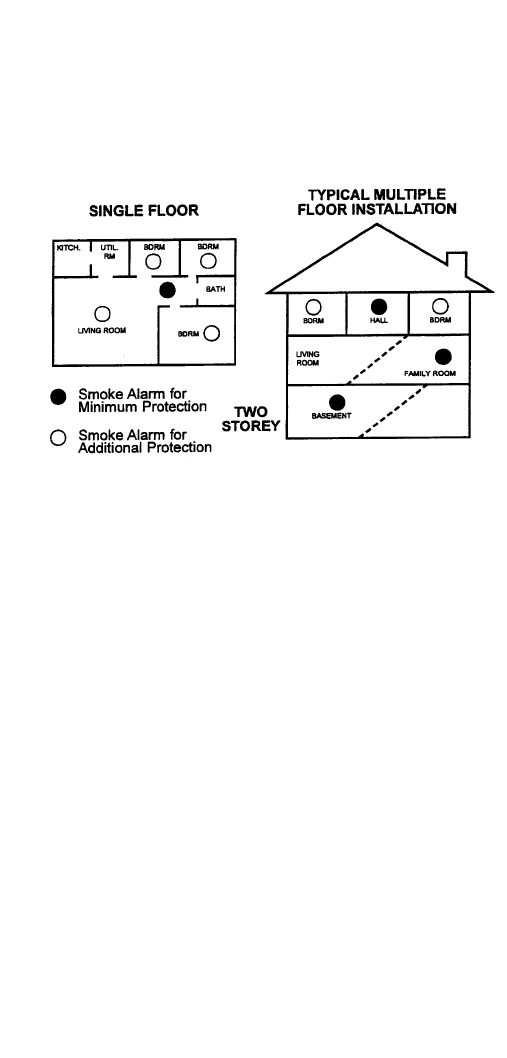
RECOMMENDED LOCATIONS OF ALARMS
The Clipsal Lifesaver®755 Series Smoke Alarms are domestic
units designed to be mounted on ceilings in single or multi-
storey residential dwellings, such as houses, home units and
apartments. If the alarm cannot be installed on the ceiling, wall
mounting is acceptable in most instances. Recommended loca-
tions are as follows:
• Install at least one Smoke Alarm on each level or storey of a
multi-storey dwelling.
• A Smoke Alarm should be installed in the immediate
vicinity of the bedrooms. If there is more than one sleeping
area, locate additional alarms in the immediate vicinity of
each of these areas.
• Sleeping areas are often located furthest from the exits of
a house. Therefore, Smoke Alarms should be installed on
all exit routes from bedrooms.
• A Smoke Alarm should be installed inside every room in
which a smoker sleeps and inside any room where a
person sleeps with the door closed.
• A closed door can stop smoke easily reaching the alarm
and can prevent the occupant hearing the alarm sounding.
• Install additional alarms in hallways that are longer than 9
metres.
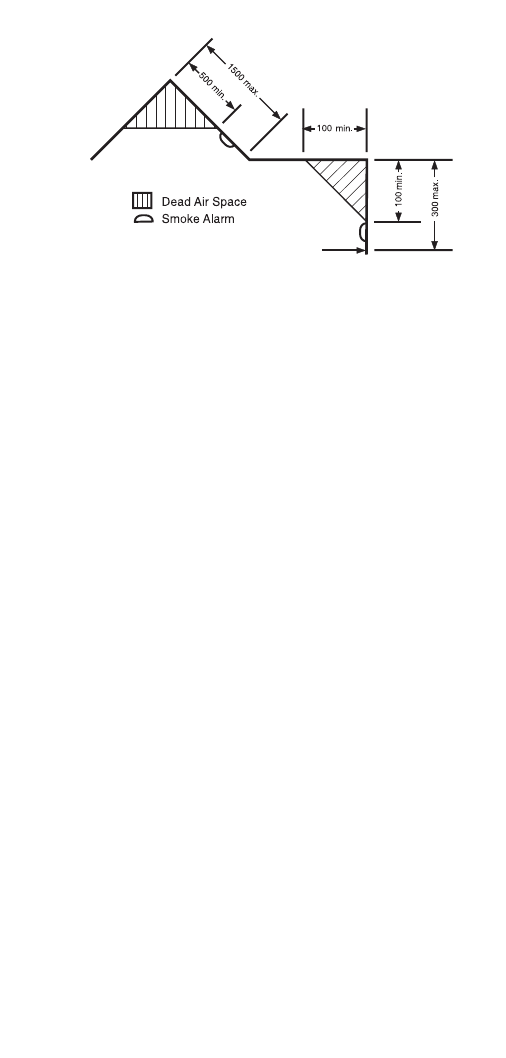
• Smoke Alarms should be mounted on the ceiling as close to
the centre as possible. If this is not practical, mount no closer
than 100mm from any wall or corner.
• If the alarm is to be mounted on a wall, install it not less
than 100mm and not more than 300mm from the ceiling
and no closer than 100mm from any corners.
3
LOCATIONS TO AVOID
Installing a Smoke Alarm in an unsuitable location creates two
main problems.
1. Obstructions can prevent the alarm from giving early
warning in the event of a fire.
2. Its location may lead to nuisance (false) alarms.
To avoid these situations, Clipsal Lifesaver®755 Series
Smoke Alarms should not be installed in any of the
following locations:
• The garage. Combustible products are present in the air
when you start and run your vehicle’s engine.
• In front of forced air movement from air-conditioners,
heaters, fans, etc.
• In dead air spaces where early smoke may not enter,
e.g., upper sections of sloping or A-frame ceilings or
exposed ceiling beams, where air does not circulate.
• In dusty areas. Dust may cause a Smoke Alarm to
false alarm or even fail to alarm.
• In spray painting areas.
• In areas where temperatures may fall below 5°C or rise
above 45°C.
• In areas where relative humidity may fall below 10% or
rise above 93%.
• In or near very humid areas such as bathrooms. Moisture
can cause false alarms.
• Near hot water heaters, space heaters or fireplaces.
• In any area that attracts insects. Some lights attract
insects, particularly fluorescent and mercury vapour lamps.
• When installing a Smoke Alarm on the ceiling, do not
install it near any protrusions that may prevent smoke
spreading quickly to the alarm.
4
Side wall

LOCATING A SMOKE ALARM IN A CARAVAN
OR MOBILE HOME
• Many mobile homes may not be well insulated, enabling
extreme heat or cold to be transferred from outside the
home through the walls and roof. This may create a thermal
barrier which can prevent smoke from reaching a Smoke
Alarm mounted on the ceiling. If this situation exists, install
the Smoke Alarm on an inside partition between
300mm and 500mm from the ceiling.
• If you are not sure about insulation in a mobile
home, or if you notice the walls and ceilings are
either hot or cold, install the alarm on an inside wall.
For minimum protection, install one alarm close to
the bedrooms.
For additional protection, refer to the single floor
plan on page 3.
• In mobile homes and caravans it is particularly
important to install Smoke Alarms as far away as
possible from cooking areas to reduce the potential for
nuisance alarms.
• Other areas to avoid are listed under the heading
“Locations to Avoid”.
5

BUILT-IN FALSE ALARM CONTROL — Warning
Before using the alarm’s false alarm feature, fully
identify the source of the smoke and make certain
that the area is safe. Nuisance sources such as
kitchen cooking areas can cause nuisance or false
alarms. Built into Clipsal Lifesaver®755 Series
Smoke Alarms is a special False Alarm Control
feature that lets you silence false alarms from
nuisance sources.
Features
• The False Alarm Control will temporarily silence the
alarm for approximately 15 minutes.
• After 15 minutes the unit will automatically revert to
the fully alert mode.
• Very dense smoke will override the False Alarm
Control and sound the alarm.
• The False Alarm Control feature can be used repeatedly
to silence the alarm until the air is cleared.
• This feature is to be used only when a known
condition (e.g., smoke from cooking) activates the
alarm.
• To operate, push the FALSE ALARM/TEST button.
The alarm will silence immediately and the red light
will blink approximately every 10 seconds for the next
15 minutes.
• At the end of 15 minutes the Smoke Alarm will beep
twice. This signals the end of the False Alarm Control.
• It will then automatically revert to the fully alert
condition. If smoke particles are still present, the
alarm will sound again.
• If interconnected alarms are installed, the unit that
detects the smoke and sounds the alarm cannot be
inadvertently silenced by the FALSE ALARM/TEST
button of other units. In this case all of the alarms
will continue to sound for as long as smoke is
detected or until the FALSE ALARM/TEST button of the
triggering alarm is pressed.
• The Smoke Alarm produces an audible sound of 85
decibel alarm at 3 metres.
• The initiating alarm LED in an interconnected system will flash
3 times per minute until reset by pressing the FALSE
ALARM/TEST button (Model 755 only).
6
INSTALLATION
The Clipsal Lifesaver®755 Series Smoke Alarms are 240V a.c.
units with battery backup. Unless a 9VDC battery is installed (755
Model), disconnection of this unit from its mounting plate or loss
of mains power will render this device inoperative.
This Smoke Alarm must be connected to a continuous 240V a.c.
50Hz supply which cannot be inadvertently switched off.
Interconnected alarms must be wired on the same final sub-circuit.
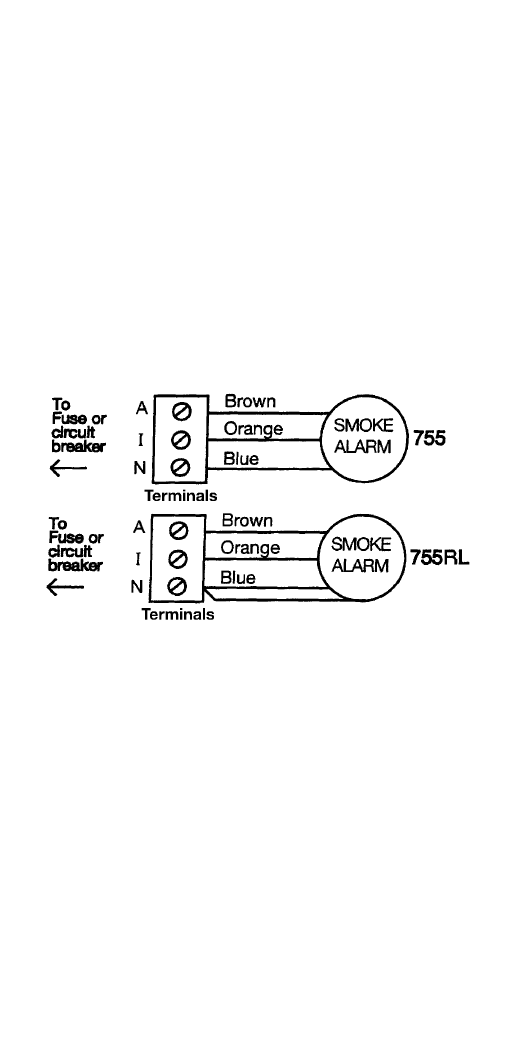
WIRING INSTRUCTIONS
• 240V a.c. installation must be carried out by a licensed
electrician or similarly qualified person in accordance
with the SAA Wiring Rules (AS3000).
• Do not conduct an insulation resistance test to any
circuit with the Smoke Alarms connected (if supplied).
• It is important that the alarm is wired correctly and
fitted with a 9V d.c. battery backup (755 Model only) to ensure
correct operation.
• Turn to remove the mounting plate as indicated by arrows.
• Fix mounting plate in position.
• Slide the terminal shroud over the circuit wiring, prior to
fitting off the terminal connector.
• Connect circuit wiring to terminal connector as set out in
diagram and fit the shroud over the terminal connector.
• Insert terminal connector into base of smoke alarm.
• Use nylon clip to attach shroud to the base.
• Fit the Smoke Alarm to the mounting plate, rotate until it
snaps into place.
• Remove arrow tab and close battery door. Smoke alarm may
beep briefly as door is closed.
• Turn on power and check the green light on alarm cover.
It should be lit when mains connected.
• Test alarm by pushing on FALSE ALARM/TEST button
for 5 seconds.
7
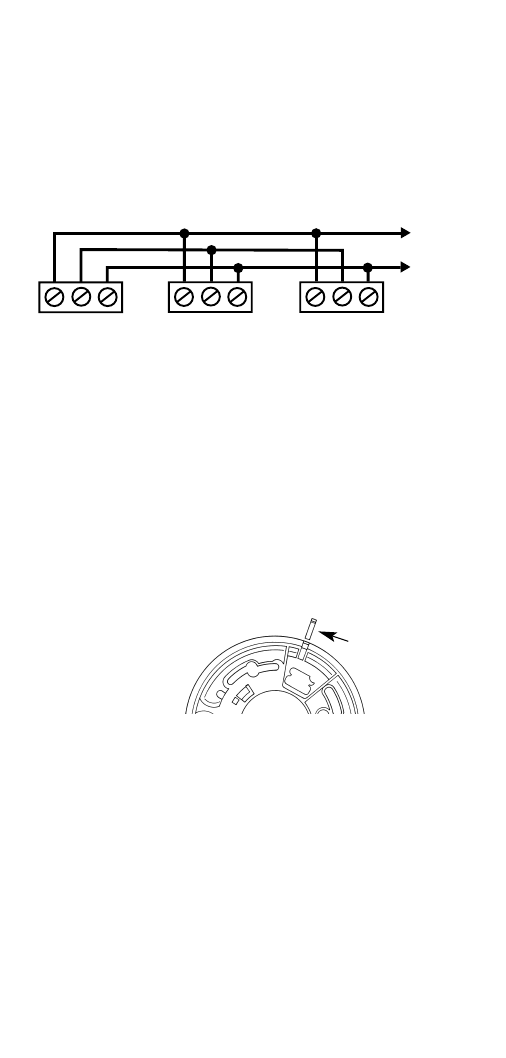
MULTIPLE ALARM WIRING
• Use 1.5mm2minimum solid or stranded wire with a rating
of 240V. When interconnecting, the maximum wire length
between any two Smoke Alarms is 450m for 1.5mm2
(20 OHMS loop resistance).
• This Smoke Alarm may be interconnected with as many
as 39 Clipsal Lifesaver®755 Series Smoke Alarms.
Do not connect to any other type or model Smoke Alarm.
• Connect Smoke Alarms to a same phase.
Connecting in any other way to that shown in this instruction
may result in damage to the alarm, failure to operate or an elec-
trical shock hazard. It will also void the warranty.
FITTING TAMPER PIN
A tamper resistant feature on the Smoke Alarm may be used to
prevent unauthorised removal of the Smoke Alarm from the
mounting plate.
• From the back of the Smoke Alarm remove the mounting
plate. Twist out and remove one of the pins moulded into
the plate. (Both pins are exactly the same.)
• Position Smoke Alarm to mounting plate and turn
clockwise to lock into place. To engage tamper resist
feature, insert pin into notch on edge of Smoke Alarm.
BATTERY INSTALLATION AND REPLACEMENT
The Clipsal Lifesaver®755 Series Smoke Alarm uses one 9V d.c.
battery which automatically provides backup power for the alarm
in the event of the mains power failing. A fresh battery will oper-
ate the alarm for approximately one to three months with a.c.
power off. This Smoke Alarm has a low/missing battery indicator
which will beep at intervals of approximately 60 seconds. It is
vital for your safety that you renew the battery when this occurs.
An inactive alarm will not save lives. Replace the battery with a
new one at least every year (755) to ensure correct operation.
NOTE: The battery used in the 755RL is fixed and cannot be
replaced during the service life of the product of 10 years.
1. To replace the battery, turn off power to smoke alarm at the
switchboard.
8
AIN AIN AIN
Brown
Blue
Active
Neutral FUSE OR
CIRCUIT
BREAKER
Insert pin here
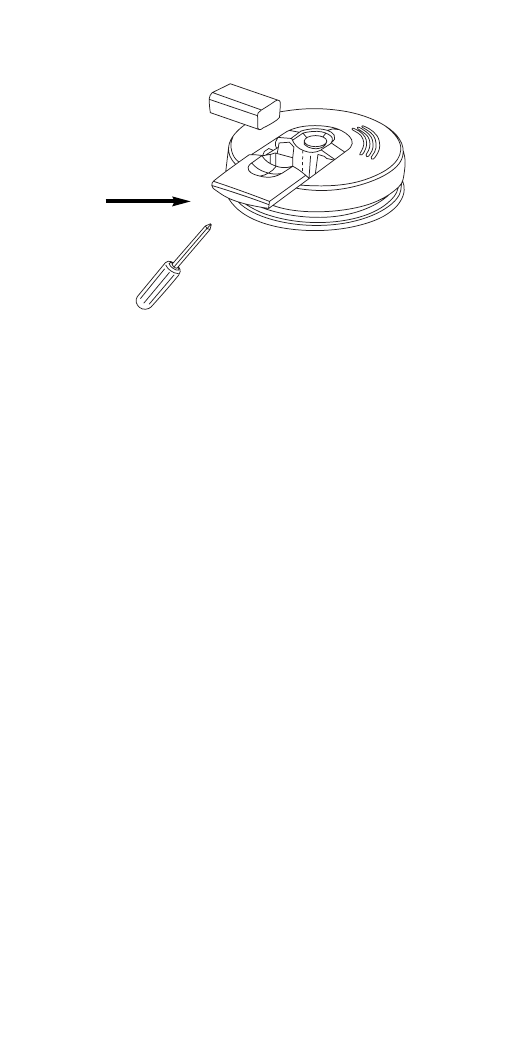
2. To open battery door, insert screwdriver into slot and depress
while sliding door open.
3. Remove drained battery from compartment and discard.
4. Insert a fresh 9-volt battery.
5. Slide battery door closed.
6. Turn on power and test smoke alarm using FALSE
ALARM/TEST button.
7. For item 755 only, confirm that red LED is not flashing. If not,
repeat testing procedure until it does.
Use only the following batteries as replacements: Model 755
Eveready 522, 216, 1222 or Duracell MN 1604.
WARNING: Using inferior batteries or the incorrect type may
cause the alarm to malfunction.
NOTE: The 755RL rechargeable lithium batteries are permanent-
ly mounted and sealed in the tamper-proof housing. These cells
are designed to last the useful life of the Smoke Alarm of 10
years. The 755 has a front access battery door which allows a
home owner to safely change the battery.
OPERATION AND TESTING
• The Clipsal Lifesaver®755 Series Smoke Alarms are opera-
tional once all of the connections are correctly made, the 9V
battery installed (model 755) and mains power restored.
• Test the alarm by pushing the FALSE ALARM/TEST button
for 5 seconds. The alarm should sound simultaneously.
• This test should be done at least once a week to ensure that
the alarm is operating correctly.
• The 755 has a ramp-up test feature that emits two reduced-
volume beeps before reaching the full 85dB level during
testing.
• If interconnected alarms are installed, pushing the FALSE
ALARM/TEST button on one unit should cause all
interconnected units to sound.
• If the alarm does not sound, check the wiring, 9V battery,
fuses or circuit breaker and make sure that the alarm is con-
nected to a 240V a.c. supply which cannot be inadvertently
turned off.
9
Insert
Screwdriver here

• The green light indicates that the unit is operating with a.c.
power. If this light is off, the a.c. power is off and the backup
battery will operate the unit.
• You will not be safeguarded if the a.c. power goes off and the
unit is not fitted with a fresh battery.
• The red light should flash once approximately every 60 sec-
onds to indicate the unit is functioning and alert. It will flash
rapidly when the unit goes into alarm. The flashing light and
pulsating loud alarm will continue until the air is cleared. For
interconnected alarms, only the unit which senses smoke (or
is being tested) will flash rapidly. All other units will sound
their alarms but not flash.
• Do not apply excessive force to FALSE ALARM/TEST button.
Doing so may damage the unit and void the warranty.
• Never use an open flame of any type to test the alarm. You
may damage the alarm or set fire to your home. Operating the
FALSE ALARM/TEST button will check for correct functioning.
LED INDICATORS
Model 755 features one combined LED indicator. The following
section explains what condition the LED indicator is describing:
• Constant GREEN on – AC power is present.
• GREEN is off – AC power is NOT present.
• RED blinks once a minute – indicates presence of working
battery.
• RED blinks once a second – smoke alarm senses smoke and
simultaneously sounds an audible alarm.
• RED blinks once every 10 seconds – smoke alarm is quieting
an unwanted alarm.
• RED is off (interconnected systems only) – another smoke alarm
in the network has sensed smoke and is signaling this alarm.
• RED light blinks 3 times every minute (Item 755 only) – indicates
this alarm initiated an alarm in an interconnected system. (Press
the TEST button to reset.)
• RED light blinks 4 times every minute preceded by an audible
chirp – indicates a weak or improperly installed battery.
10

MAINTENANCE AND CLEANING
• If a zinc oxide or alkaline battery is used, the battery
should be renewed at least once a year.
• The Clipsal Lifesaver®755 Series Smoke Alarms are
virtually maintenance free. However, vacuuming the
unit at least once every six months will remove dust.
• Wipe the enclosure clean with a water moistened cloth. Do
not immerse this unit or use household cleaners. Do not
apply paint or spray with any liquid.
• All Clipsal smoke alarms are manufactured and tested to
rigorous quality standards and have a minimum life
expectancy of 10 years. However, for your safety we
recommend replacing your smoke alarm with a new
Clipsal unit after 10 years. This will ensure that you are
always protected by a Smoke Alarm that is operating within
the limits of its life expectancy.
REPAIRS AND SERVICE
This Smoke Alarm has no user serviceable parts. Dangerous
voltages are contained within, so do not attempt to repair this
unit yourself. Instead, this Smoke Alarm should be returned to
the supplier for service. Never send this unit through the post.
RETURN UNIT TO SUPPLIER OR DEPARTMENT OF HEALTH
FOR DISPOSAL.
LIMITATIONS OF SMOKE ALARMS
When installed and maintained correctly, Smoke Alarms are an
excellent and inexpensive way of providing your family with an
early warning of possible fires. It must be remembered, however,
that Smoke Alarms do have their limitations and that this prod-
uct should not be a substitute for basic safety precautions and
fire prevention.
• Alarms cannot provide an alarm if smoke does not reach the
unit. It may not sense a fire that is on the other side of a
closed door, or fires that start in chimneys, walls, ceilings,
roofs, or on another storey.
• Alarms located outside bedrooms on the other side of a
closed door may not wake a sound sleeper.
• Smoke Alarms must be tested regularly to ensure that batter-
ies and alarm circuits are in good condition. A Smoke Alarm
with a flat or missing battery offers no protection in the event
of a mains power failure.
• Smoke Alarms do have a limited life and should be
replaced after 10 years service.
• People with impaired hearing are advised to use special
purpose Smoke Alarms that use flashing lights or vibrating
devices to indicate alarm conditions.
11

DEVELOPING AN ESCAPE PLAN
A mains powered Smoke Alarm with battery backup, correctly
installed and maintained is the most effective way of giving
your family early warning of a fire. Other precautions are to
reduce the risks of a fire starting in your home and to develop
a fire escape plan with all family members.
Here are some suggestions for developing your escape plan:
1. Make a floor plan which clearly indicates all doors and win-
dows in your home and at least two escape routes from each
room. Multi-storey dwellings require special attention. For
instance, upper storey windows may need a chain ladder or
other fire stairway as a means of exit.
2. Determine a place outside your home (e.g. the letter box or
front fence) where all family members can assemble if a fire
occurs.
3. Discuss your escape plan with all members of your family.
Show everyone, particularly young children, what to do in
case of a fire.
4. Make sure all family members are familiar with the sound of
the Smoke Alarm.
5. At least every six months, sound the alarm and practice your
family’s fire drill.
Remember:
In the event of a fire, you may not be able to reach your children.
Therefore, it is important for all family members, including small
children, to know exactly what to do.
WHAT TO DO IF THE ALARM SOUNDS
1. Leave immediately, following your family’s escape plan.
2. As you leave, don’t open any inside doors without first feeling its
surface. If the door is hot, or if you see smoke coming through
the cracks, do not open the door. Use an alternative exit.
3. If the inside of the door is cool, place your shoulder against it,
open it slightly and be ready to slam it shut if heat and smoke
rush in.
4. If the air is smoky, stay as close to the floor as possible.
5. Breathe shallowly through a cloth, which if possible should
be wet.
6. Once outside, go to your pre-selected assembly area and
make sure everyone else is there.
7. Call the Fire Service from a neighbour’s home - never from
your own.
8. Do not return to your home until fire officials give you permis-
sion to do so.
For further information on fire safety, contact your local
Fire Service.
12

TROUBLESHOOTING
To be carried out by licensed electrician or similarly qualified person.
DANGER: Always turn off power at main fuse box
or circuit breaker before taking trouble-
shooting action.
WARNING: DO NOT disconnect battery or a.c. power to
quiet an unwanted alarm. This will remove
your protection. Fan the air or open a win-
dow to remove smoke or dust.
PROBLEM SOLUTION
Smoke Alarm does not 1. Check that a.c. power is
sound when tested. turned on and the green
light is on.
NOTE: Push FALSE 2. Turn off power. Remove
ALARM/TEST button Smoke Alarm from mounting
for at least five (5) plate and check that
seconds while testing! connector plug is securely
attached. Check that battery
is properly installed (Model
755 only).
3. Clean Smoke Alarm.
Smoke Alarm beeps 1. Turn off power and replace
about once a minute. battery (See “Battery
Installation and Replacement”
section.)
2. Clean Smoke Alarm.
3. On Model 755 be sure the
flashing red LED is extin-
guished after replacing battery.
4. Verify that the unit has been
under mains operation for a
minimum of 2 full days. If the
beeping persists after the
required charging period,
return the unit for service
(Model 755RL only).
Smoke Alarm sounds 1. Get an electrician to
unwanted alarms when move Smoke Alarm to a
residents are cooking new location.
taking showers, etc. See “Recommended
Locations of Alarms”.
2. Clean Smoke Alarm.
Interconnected Smoke 1. Press and hold FALSE
Alarms do not sound ALARM/TEST button for at
when system is tested. least three seconds after
the first unit sounds.
2. Have an electrician check
the connections if intercon-
nected alarms still do not
sound.
!
!
!
!
!
!
13

Product of Gerard Industries Pty Ltd
ACN 007 873 529
Head Office
12 Park Terrace, Bowden,
South Australia 5007
Telephone (08) 8269 0511
Facsimile (08) 8340 1724
Internet http://www.clipsal.com.au
E-Mail plugin@clipsal.com.au
Registered offices in all States:
New South Wales (02) 9794 9200
Victoria (03) 9207 3200
Queensland (07) 3244 7477
South Australia (08) 8269 0555
Western Australia (09) 9442 4444
Northern Territory (08) 8947 0278
Tasmania (03) 6272 3177
The benefits conferred by this warranty are in addition to all
other rights and remedies in respect of the product which the
consumer has under the Trade Practices Act and similar State
and Territory Laws.
The original purchaser of this Clipsal Lifesaver®755 Series Smoke
Alarm is provided with the following warranty and subject to the
following conditions. Gerard Industries Pty Ltd warrants this prod-
uct for a period of 5 years from the date of purchase for all parts
defective in workmanship or materials. All defective parts will be
replaced free of charge. The following exclusions do not preclude
the purchaser from those statutory rights consumers have under
the Trade Practices Act and similar State and Territory Laws.
WARRANTY CONDITIONS
1. This warranty is only valid for products installed according to
the manufacturer’s instructions.
2. This product must not be modified or changed in any way.
3. All wiring must be carried out by a licensed electrician or
similarly qualified person and must be connected to the voltage
requirements as specified in the ratings label.
4. The manufacturer does not accept liability for any direct or
consequential damage, loss or other expense arising from
misuse or incorrect installation and operation of this product.
5. Warranty will only be given on products with proof of purchase
date (e.g. original invoice).
6. This warranty does not extend to cover batteries or any faults
caused by batteries when incorrectly installed, leaking or
otherwise installed in non-accordance with manufacturer’s
directions.
Note: It is illegal to send radioactive material through Australia
Post. Send by courier. Check for similar conditions with any
forwarding agency before sending this product.
As a record of purchase, please complete the following details
and file this information with your purchase invoice.
Clipsal Lifesaver®Smoke Alarm
MODEL 755 755RL
Serial Alarm _______________________________________________
Purchased From ___________________________________________
Date of Purchase___________________________________________
110-926D 14
WARRANTY
