User Manual
– 1 –
ESPAÑOL: PÁGINA 5 • FRANÇAISE : PAGE 9
IMPORTANT! KEEP FOR FUTURE REFERENCE.
30877
move & go music mirror
Instruction Sheet
Congratulations on your purchase of a new Baby Einstein™
product! Please read all instructions before assembly and use
of the music mirror toy.
WARNING
Safety Guidelines to Prevent Injury
•The music mirror is intended for visual stimulation
and is not intended to be grasped by the child.
• Do not use music mirror as floor toy for child.
POSSIBLE ENTANGLEMENT OR STRANGULATION
HAZARD:
• Keep the music mirror out of the baby’s reach.
• NEVER attach any additional strings or straps to the
music mirror.
IMPORTANT:
• Adult assembly is required to mount the product and
to change the batteries.
• Care should be taken when unpacking the product.
• Examine product frequently for damaged, missing,
or loose parts.
• Do not use product if damaged or broken.
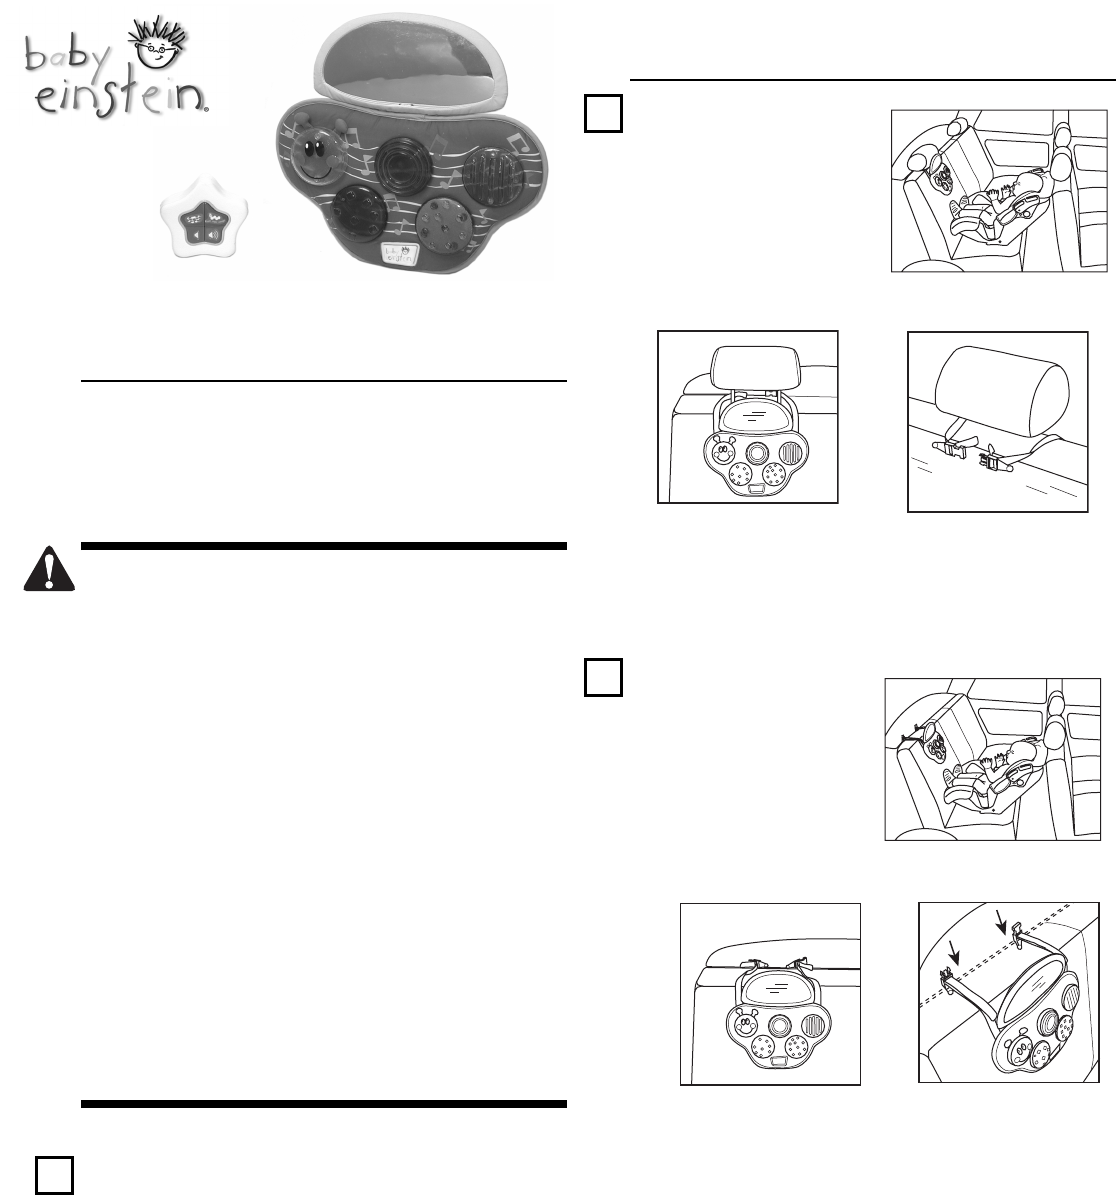
Mounting Instructions
1
Choose the proper mounting configuration...
1A: Rear-facing infant; rear seat with headrest
1B: Rear-facing infant; rear seat without headrest
1C: Forward-facing child
Skip to the proper step (1A, 1B, or 1C) and follow the
instructions.
1A
For rear-facing infant,
rear seat with headrest...
ARaise the rear seat headrest
that the infant will be
facing.
BUnbuckle the straps on the
music mirror unit.
CPosition the music mirror on the rear seat as shown.
DBuckle the straps around the headrest supports.
EAdjust both straps so that your child can easily see the
music mirror unit while seated.
Skip to Step 2.
1B
For rear-facing infant,
rear seat without
headrest...
AUnbuckle the straps on the
music mirror unit.
BPosition the music mirror
on the rear seat as shown.
COrient the strap anchors toward the rear seat.
DInsert each strap anchor approximately 1.5” (4 cm) into
the crevice between the top edge of the rear seat and the
shelf (rear deck) at the rear window.
EAdjust both straps so that your child can easily see the
music mirror unit while seated.
Skip to Step 2.
– 2 –
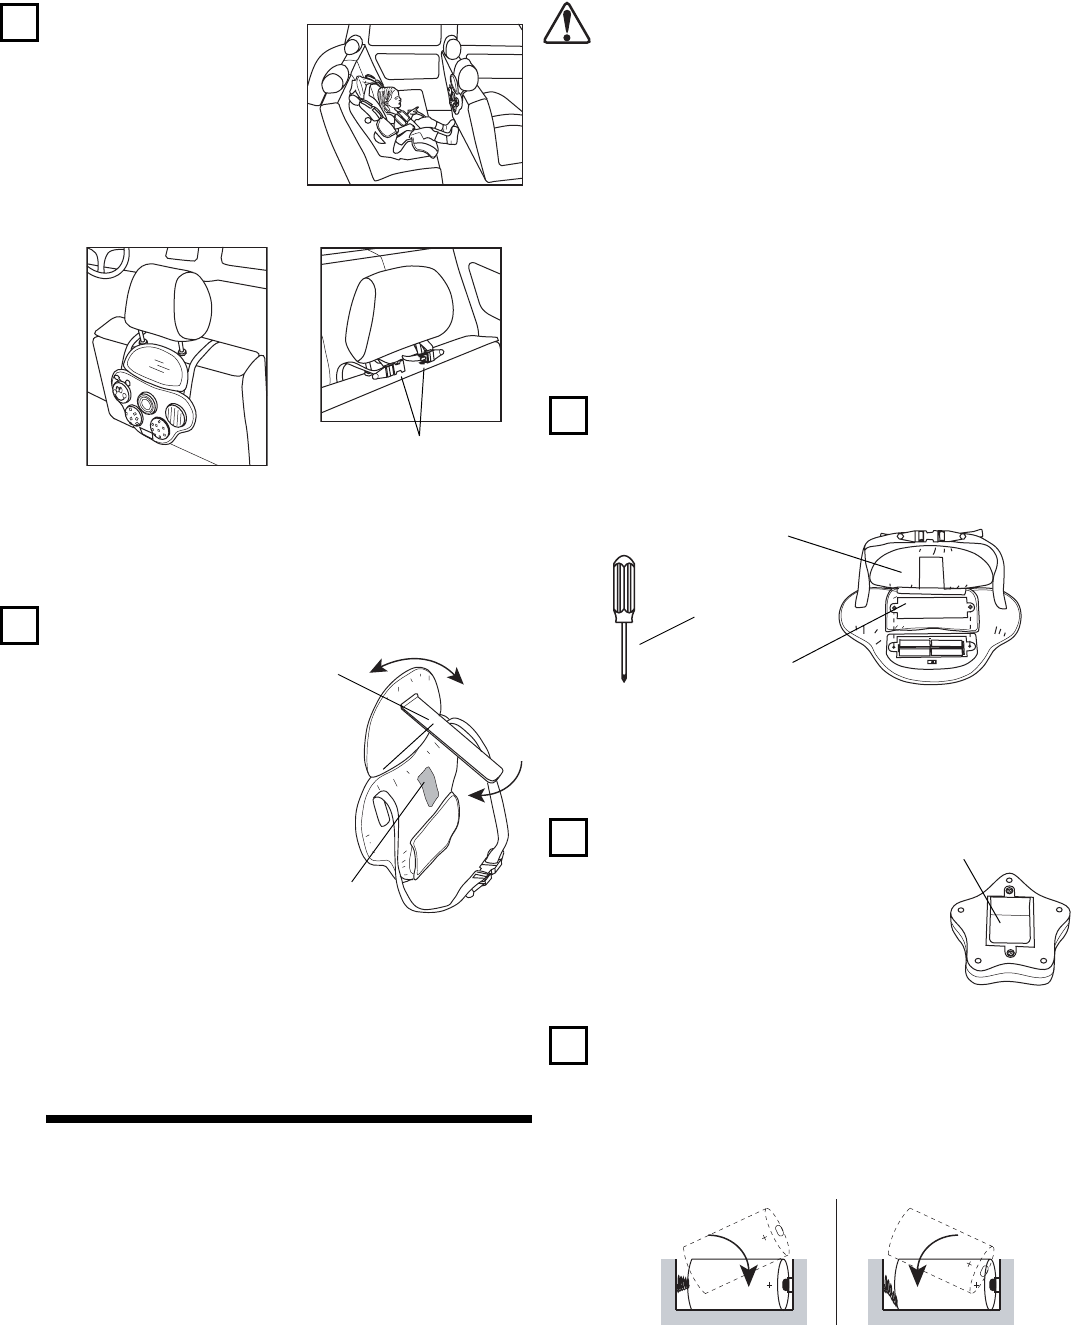
1C
For forward-facing
child
ARaise the front-seat
headrest that will be in
front of the child.
BUnbuckle the straps on the
music mirror unit.
CHold the music mirror behind the front seat as shown.
DBuckle the straps around the headrest supports.
EAdjust both straps so that your child can easily see the
music mirror unit while seated.
Continue with Step 2.
2
Adjust the mirror.
AReach behind the
music mirror unit and
unfasten the mirror
support strap from the
hook-and-loop patch.
BHold the mirror in
position according to
your child’s car seat
configuration:
• For rear-facing
infant – Aim the
mirror so that the driver can see the infant in their
rear-view mirror.
• For forward-facing child – Aim the mirror so that the
child can see him/herself in the mirror.
CFasten the mirror support strap to the back of the unit,
locking it into position.
Installing the Batteries
The move & go music mirror requires two sets of batteries:
•music mirror unit – requires (4) size AA (1.5V) batteries
(included)
• RF remove control – requires (3) size AAA (1.5V)
batteries (not included)
Please use alkaline batteries for better performance.
Buckles
Mirror
support
strap
Hook-
and-
loop
patch
CAUTION: Follow the battery guidelines in this section.
Otherwise, battery life may be shortened or the batteries
may leak or rupture.
• Always keep batteries away from children. • Do not mix
old and new batteries. • Do not mix alkaline, standard or
rechargeable batteries. • Only batteries of the same or
equivalent type as recommended are to be used. • Install
the batteries so that the polarity of each one matches the
markings in the battery compartment. • Do not short-circuit
the batteries. • Do not store batteries in areas that have
extreme temperatures (such as attics, garages, or automo-
biles). • Remove exhausted batteries from the battery
compartment. • Never attempt to recharge a battery unless
it is specifically marked “rechargeable.” • Rechargeable
batteries are to be removed from the toy before being
charged. • Rechargeable batteries are only to be charged
under adult supervision. • Do not use rechargeable alkaline
batteries in a Ni-Cad or Ni-MH battery charger.
1
To access the music mirror unit batteries...
ARemove the unit from the car seat mounting location.
BUnfasten the fabric cover on the back of the music mirror
unit.
CLoosen the (2) screws that secure the battery
compartment cover. (The screws are retained in the
battery cover.
DTemporarily remove the cover.
2
To access the RF remote
control batteries...
ALoosen the (2) screws that secure the
battery compartment cover. (The
screws are retained in the battery
cover.)
BTemporarily remove the cover.
3
Install the batteries.
AUse the required battery type for the music mirror unit or
the RF remote control.
BObserve the polarity markings embossed on the bottom
of the compartment.
CReplace the battery cover on the music mirror unit and/or
RF remote control and tighten the screw(s). Do not
overtighten.
Phillips
screwdriver
Battery cover
Fabric cover
Battery cover
Correct Incorrect
– 3 –
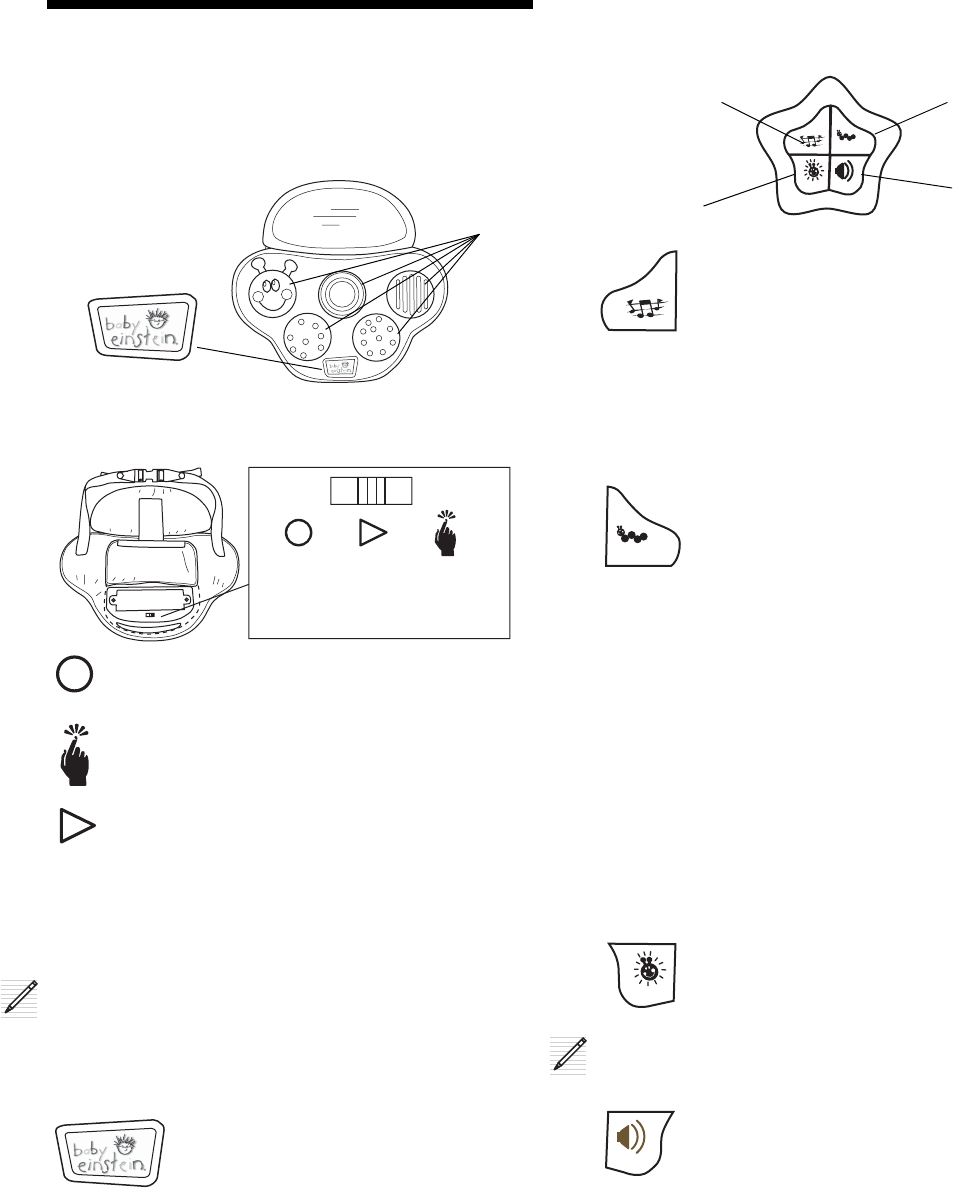
Operating Instructions
Introduction
The baby einstein™ button and the caterpillar character’s
five color lenses are on the front of the music mirror unit.
The Power/Mode Switch on the back of the music mirror
unit allows you to set the operating mode.
Slide the Power/Mode Switch on the back of the music
mirror unit to the Play Mode position for normal use of the
move & go music mirror. The music mirror unit must be in
Play Mode in order to respond to the RF remote control.
NOTE: If the RF remote control is not available or it has
low batteries, use the baby einstein™ button instead. See
“Front Panel Control” on page 3.
Power ON/OFF
Power ON – Press the baby einstein™
button on the front of the music mirror unit
to power ON the unit. A short musical
fanfare announces that the unit is ready to
accept control input from either the RF
remote control or the front panel button.
Power OFF – The music mirror unit prepares for auto-
shutoff 30 minutes after the last melody or learning program
has completed. The short musical fanfare plays one minute
before the auto-shutoff occurs. Press any button on the RF
remote control to resume melody play and reset the timer.
Color
lenses
baby
einstein™
button
OFF Play
Mode
Try-Me
Mode
OFF – Turns OFF the electronics in the unit and
resets the timers for the music and lights.
Try-Me Mode – For in-store demonstrations;
designed to conserve battery life. Press the baby
einstein™ button to activate the music mirror unit.
Play Mode – For RF remote control operation of the
music mirror. This is the normal operating mode.
RF Remote Control
Press any of the four buttons to control the music mirror unit.
Music Play Button – Press to start a randomly
selected melody. Dancing lights in the color
lenses accompany the music. Press the Music
Play Button during any melody to pause the
music. Press again to resume music with the next
melody.
The music mirror unit plays the song list twice and stops.
(See song list in next section.) Press the Music Play Button
again to restart the melodies.
Learning Colors Button – Press this button to
to begin a color learning program. It covers
English, Spanish, and French color names for
each of the five color lenses on the music mirror
unit. The learning program is in two parts:
1Part 1 – A five-color lesson for each language: The
music mirror unit will say each of the five color names in
English while lighting the corresponding color lens. A
short melody follows each color name, and the color
lenses dance to the music (pulse in order, left to right).
The color lesson is repeated in Spanish and then again in
French.
2Part 2 – One five-color lesson, combined languages: The
music mirror unit will say each of the five color names in
English, Spanish, and French in succession. The corre-
sponding color lens illuminates for each color. A melody
follows each color name, and the color lenses dance to
the music (pulse in order, left to right).
Lights Enable/Disable Button – Press this
button to disable the lighted color lenses during
Music Play operation. This function allows
music-only operation for nighttime driving.
NOTE: The lights cannot be disabled during the Learning
Colors Program (works only during Music Play).
Volume Control Button – Press this button to
change the music volume. The settings alternate
among low, high, and mute. Use mute when you
need lights-only operation without interrupting
the play sequence of the music mirror unit.
Front Panel Control
Use the baby einstein™ button for basic operation of the
music mirror unit or when the RF remote control is not
available. Press the button once to play all the melodies on
the song list. After the last melody plays the colors learning
program begins. The learning program includes both parts as
described in the previous RF remote control section.
colors
couleurs
colores
Music Play Learning
Colors
Lights
Enable/
Disable
Volume
Control
colors
couleurs
colores
– 4 –
Kids II US Mexico S.A. de C.V. • World Trade Center
Montecito 38 Piso 16 Oficina 32 • Col. Napoles
México DF. 03810 México
Kids II Canada Co. • Mississauga, Ontario L4W 5A6 Canada
Kids II Australia Pty Ltd. • Castle Hill, NSW, 2154 Australia
Kids II UK Ltd. • 960 Capability Green
Luton, Bedfordshire LU1 3PE UK
Kids II, Inc. • Alpharetta, GA 30022 USA
www.kidsii.com
Customer Service • Servicios al consumidor • Service consommateurs
www.kidsii.com/customerservice
US/Canada 1-800-230-8190
Mexico (55) 5488-2908
Australia (02) 9894 1855
UK +44 (0) 870 351 7286
© 2005 Kids II, Inc. • Printed in China • 30877_IS120905R1
© The Baby Einstein Company, LLC. All Rights Reserved.
Baby Einstein
,
Baby Neptune
, and the Boy's Head Logo are trademarks of The Baby Einstein Company, LLC. All Rights
Reserved. EINSTEIN and ALBERT EINSTEIN are trademarks of the Hebrew University of Jerusalem. All Rights Reserved. • www.albert-einstein.org • www.babyeinstein.com
Press the button once during Part 1 of the colors learning
program to advance to Part 2. After the colors learning
program is complete, the unit performs an auto-shut-off.
Press the baby einstein™ button to power ON the unit again.
Song List
The move & go music mirror includes the following
melodies:
Full-length versions of these melodies and others are
available on Baby Einstein™ series children’s music CDs:
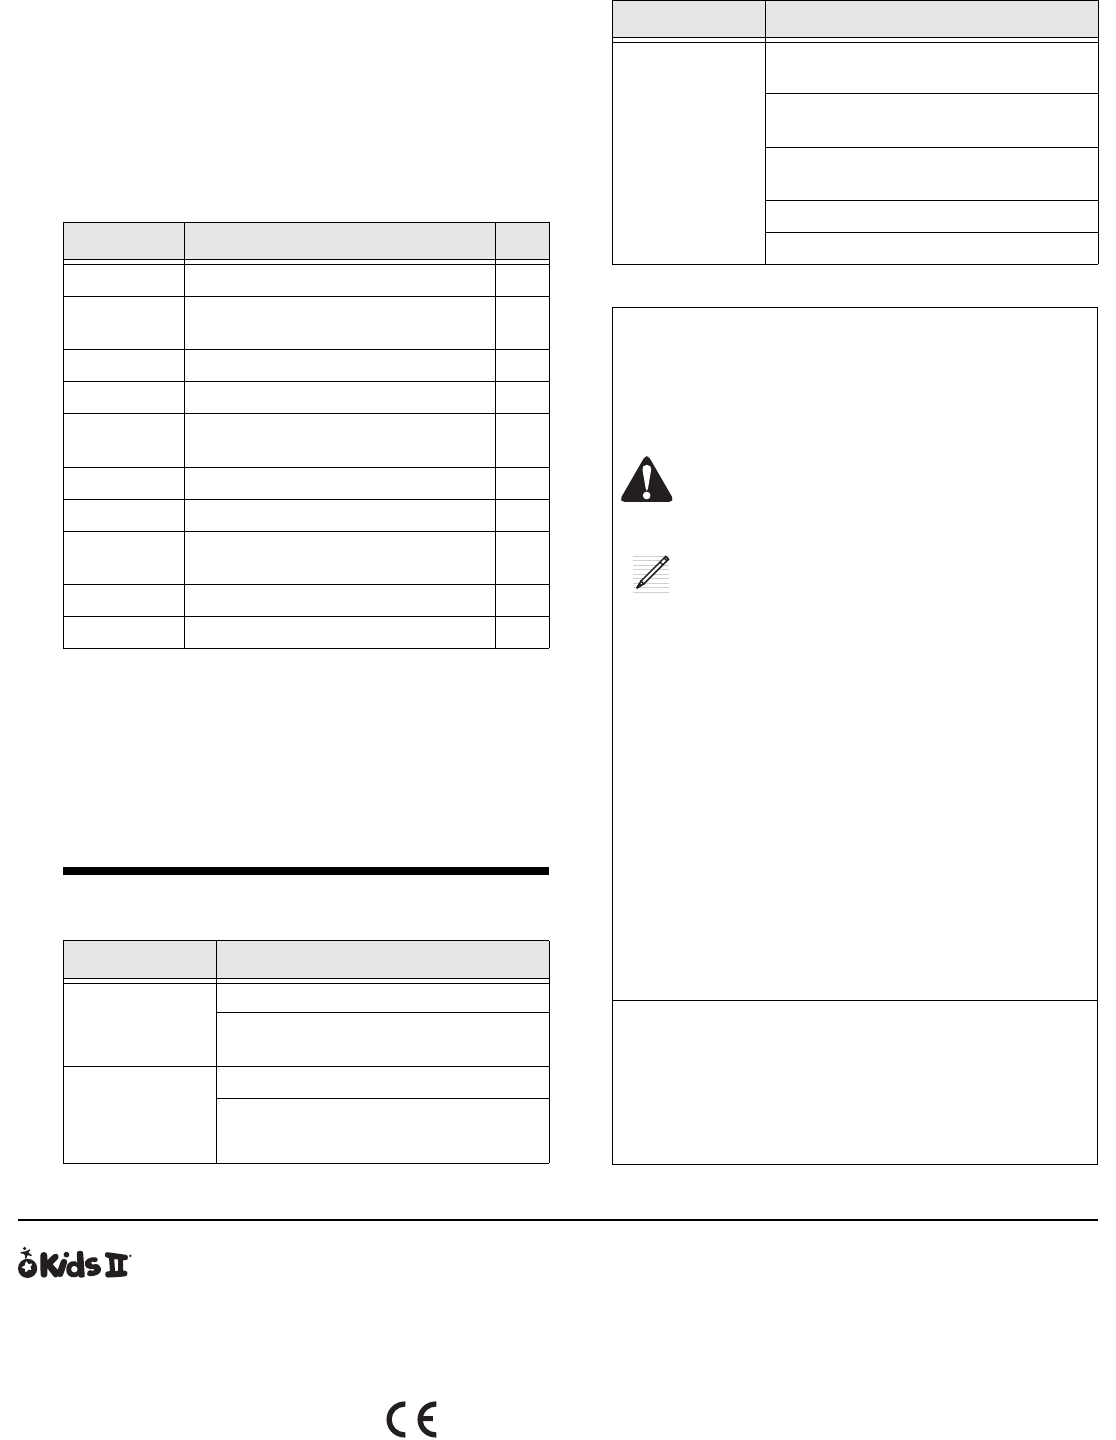
Troubleshooting
Composer Melody CD
Mendelssohn Spring Song #2
Mozart Variations (Twinkle, Twinkle), K265-
300e #3
Telemann Concerto in A #1
Vivaldi Four Seasons, Spring, 1st movement #1
Mozart Piano Concerto No. 21 in C, K467, 2nd
movement #3
Beethoven Contradance No. 11 #1
Mozart Nocturne No. 6, K239, 1st movement #1
Vivaldi Concerto in D Major, RV93, 1st
movement #5
Mozart Piano Sonata in C, K545, 1st movement #4
Beethoven Rhondo a Capriccio in G, Op. 129 #6
Problem Probable Cause / Solution
Music volume is
too low or color
lights are dim
Weak batteries in music mirror unit
Incorrect battery installation in music
mirror unit
Music does not
play after
pressing baby
einstein™ button
Power/Mode Switch is in OFF position
Exhausted batteries in music mirror unit
• CD #1: Baby Neptune™
• CD #2: Lullaby Classics
• CD #3: Galileo
• CD #4: Baby Mozart
• CD #5: Baby Newton
• CD #6: Baby Beethoven
RF remote
control does not
work
Music mirror unit is in auto-shutoff. (Press
baby einstein™ button.)
Power/Mode Switch is in OFF or Try Me
position
RF remote control is out of range of unit.
Use within 10 ft. (3.3m).
Exhausted batteries in music mirror unit
Exhausted batteries in RF remote control
Problem Probable Cause / Solution
FCC Statement
This device complies with Part 15 of the FCC rules. Operation is
subject to the following two conditions:
1. this device may not cause harmful interference, and
2. this device must accept any interference received, including
interference that may cause undesired operation.
WARNING: Changes or modifications to this unit not
expressly approved by the party responsible for
compliance could void the user’s authority to operate the
equipment.
NOTE: This equipment has been tested and found to
comply with the limits for a Class B digital device,
pursuant to Part 15 of the FCC Rules. These limits are
designed to provide reasonable protection against harmful inter-
ference in a residential installation. This equipment generates,
uses and can radiate radio frequency energy and, if not installed
and used in accordance with the instructions, may cause harmful
interference to radio communications.
However, there is no guarantee that interference will not occur in
a particular installation. If this equipment does cause harmful
interference to radio or television reception, which can be deter-
mined by turning the equipment off and on, the user is
encouraged to try to correct the interference by one or more of
the following measures:
• Reorient or relocate the receiving antenna.
• Increase the separation between the equipment and receiver.
• Connect the equipment into an outlet on a circuit different from
that to which the receiver is connected.
• Consult the dealer or an experienced radio/TV technician for
help.
Canada 310 Statement
This radiocommunication device complies with all the require-
ments of Industry Canada Standard RSS-310.
Ce dispositif de radiocommunication rencontre toutes les
exigences de la norme CNR-310 d'Industrie Canada.
Carrier frequency: 27.145MHz; Field strength: 53.7dBµV/m at 3m