King Champion Electronics KP100IB0001 Internet Radio with iPod Dock User Manual
King Champion Electronics Ltd. Internet Radio with iPod Dock
user manual
S
TA
N
D
B
Y
R
E
P
LY
B
A
C
K
User
Manual
Internet
Radio With iPod docking
1
2
3
King Champion
KP-100i
Please
read
this
user
manual
carefully
before
using
the
receiver.
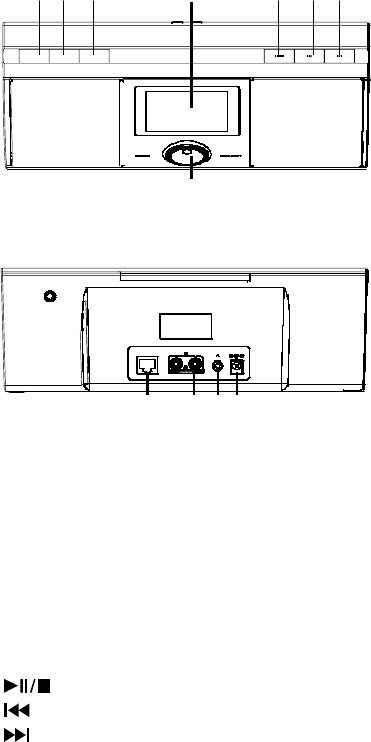
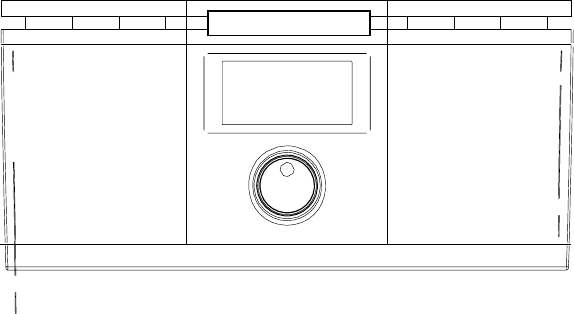
LOCATION
OF
CONTROLS
1 2 3
STAN
D
B
Y
R
EPLY
BA
C
K
L
A
N
4
8
D
C
9
V
5 6 7
1
2
3
1.
Standby
2.
Reply
3.
Back
4.
LCD
Display
5.
Play/Pause/Stop
or
Preset
1
6.
Previous
or
Preset
2
7.
Next
or
Preset
3
8.
Tune/
Volume/
Select
Key
Functions:
9 10 11 12
9.
LAN
Jack
10.
Audio
Output
11.
Earphone
Socket
12.
DC
Socket
BACK:
Press
to
go
back
to
the
previous
display.
REPLY:
Reserved
for
future
services.
1,
2
,
3
:
Use
to
store
and
play
up
to
the
radios.
:
Press
to
pause
or
playback
and
hold
to
stop
playback.
:
Press
to
start
playback
at
the
previous
track.
:
Press
to
start
playback
at
the
next
track.
Tune/
Volume:
Use
to
search
for
stations,
use
to
change
the
option
shown
on
the
display,
Use
to
adjust
the
volume.
Stanby:
Press
to
switch
the
internet
radio
Stand
By
on/off.

Note: This equipment has been tested and found to comply wit the limits
for a Class B digital device, pursuant to Part 15 of the FCC Rules, These
limits are designed to provide reasonable protection against harmful
interference in a residential installation, This equipment generates, uses
and can radiate radio frequency energy and, if not installed and used in
accordance with the instructions, may cause harmful interference to radio
communications, However, there is no guarantee that interference will not
occure in a particular installation, which can be determined by turning the
equipment off and on, the user is encouraged to try to correct the
interference by one or more of the following measures:
• Reorient or relocate the receiving antenna.
• Increase the separation between the equipment and receiver.
• Connect the equipment into an outlet on a circuit different from
that to which the receiver is connected.
• Consult the dealer or an experienced radio/TV technician for
help.”
“To comply with FCC RF exposure compliance requirements, a separation
distance of at least 20 cm must be maintained between the antenna of this
device and all persons. This device must not be co-located or operating in
conjunction with any other antenna or transmitter.”
INTERNET
SERVICE
Configuring
‘My
Stuff’
Registering
an
account
on
Reciva’s
website
1.
Open
the
website,
http://www.reciva.com,
from
your
internet
browser.
2.
Click
on
the
‘My
Account’
link
and
follw
the
on-screen
instructions
to
register
an
account.
Please
note,
during
the
registration
process,
a
validation
code
will be
sent
to
you
via
email.
Please
enter
this
code
when
prompted
to
do
so.
3.
After
logging
into
your
account,
you
will
be
able
to
edit
your
information
for
‘My
Stations’,’My
streams’,
’My
Detail’
and
“My
Radios”
from
the
‘My
Account’
section.
4.
Yo u
can
now
add
your
Internet
Radio
to
your
account
on
the
website
by
accessing
the
‘My
radios’
link.
From
the
‘My
Radios’
section,
you
will
need
to
enter
in
your
radio’s
eight-digit
serial
number,
which
can
be
found
from
the
‘Configure>
Version’
menu
on
the
radio,
and
you
will
also
need
to
enter
in
your
radio’s
registration
code-which
can
be
found
from
the
‘Configure>
Register’
menu
on
the
radio.
Configuring
‘My
stations’

1.
It’s
possible
to
search
for
radio
stations
that
are
available
in
Reciva’s
stations’ database
from
Reciva’s
Website.
When
ever
stations
are
searched
for
on
the website,
then
will
be
displayed
in
a
list
of
search
results
together
with
a
link
to
‘Add
to
my
stations’.
2.
Clicking
on
the
‘Add
to
my
stations’
link,
will
add
the
station
to
your
account’s
‘My
stations’
list.
This
list
can
be
edited
by
clicking
on
‘My
stations’
under
the
‘My
account’
section
on
the
website.
3.
Once
you
have
internet
station
available
in
you
‘My
stations’
list,
you
may
play
these
stations
from
your
Internet
Radio.
These
stations
will
be
available
on
your
radio
from
the
menu
item:’
Stations>My
Stuff>
My
stations’.
Please
note
,
the
stations
will
only
be
available
to
your
radio
once
your
radio
has
downloaded
a
new
stations’
list.
To
cause
the
radio
to
download
a
new
stations’
list
immediately,
please
remove
and
reconnect
the
power
to
your
radio.
Configuring
‘My
Streams’
1.
once
logged
into
your
Reciva
website
account,
you
can
add
your
own
internet radio
streams
to
the
‘My
streams’
section,
which
is
listed
under
the
‘
My account’
section
2.
Clicking
on’
My
streams’
sill
prompt
you
to
enter
the
station’s
name
and
its
media
stream
URL.
The
media
stream
URL
should
be
a
link
to
a
website’s
actual
audio
stream.
If
you
have
any
doubt
about
locating
the
media
stream URL
from
a
webpage,
then
please
refer
to
the
FAQs
section
on
Reciva’s website,
http://www.reciva.com
3.
Once
you
have
Internet
radio
streams
available
in
you
‘My
streams’
list,
you may
play
these
stations
from
your
internet
radio.
These
station
will
be
available
on
your
radio
from
the
menu
item:’
Stations
>My
stuff>
My
streams’.
Please
note,
the
streams
will
only
be
available
to
your
radio
once
your
radio
has
downloaded
a
new
station’
list.
To
cause
the
radio
to
download
a
new
stations’
list
immediately,
please
remove
and
reconnect
the
power
to
your
radio.

SETTING
UP
Those
steps
for
connecting
your
radio
to
your
network
Step
1-
Switching
on
the
radio;
Plug
the
cable
from
the
AC
adapter
into
the
socket
labeled
9V
DC
on
the
back
of
the
radio,
then
switch
on
at
the
mains.
Caution:
Use
only
the
mains
adapter
supplied
with
the
radio.
Connecting
a
power
supply
with
a
different
rating
will
cause
permanent
damage
to
the
radio
and
may
be
hazardous.
The
display
on
the
front
of
the
radio
will
light
up
and
say:
Internet
Radio
Then
Reciva
Enabled
ARM
Powered
After
a
few
seconds,
this
will
change
to
show:
Finding
Gateway
Step
2
Connect
to
the
network;
Note:
At
first,
you
need
to
select
network;
(1)
Press
the
SELECT
button;
(2)
Turn
the
TUNE
until
the
display
says<Configure>;
Configure
(3)
Press
the
SELECT
button;
(4)Turn
the
TUNE
until
the
display
says<Network
Config>;
Network
Config
-1-

(5)Press
the
SELECT
button;
(6)Turn
the
TUNE
until
the
display
says<Wired/Wireless>;
Wired/Wireless
(7)
Turn
the
TUNE
until
your
appropriate
equipment;
Autio wired
only wireless
only
If
you
select
Auto
,
it
will
be
select
automatically.
If
you
select
Wired
Only,
It
will
be
only
used
for
Wired
Ethernet.
If
you
select
Wireless
Only,
It
will
be
only
used
for
Wireless
Wi-Fi
connection.
(8)
When
the
ESSID
for
the
access
point
you
want
to
connect
to
be
displayed
on
the
screen,
press
the
SELECT
button.
You
might
need
to
enter
the
correct
WEP(Wired
Equivalent
Privacy)
or
WPA(Wi-Fi
Protected
Access)
code.
If
your
network
is
not
configured
to
need
a
WEP
or
a
WPA
code.
The
display
will
show:
Network
OK
If
the
screen
displays:
Encryption
Key
Required
Then
the
network
is
using
one
of
the
encryption
systems:
Wired
Equivalent
Privacy
(WEP)
or
Wi-Fi
protected
Access
(WPA).
You
therefore
need
to
enter
the
correct
WEP
or
WPA
code
into
the
radio
for
it
to
communicate
with
you
network.
Note:
The
encryption
code
would
have
been
set
up
by
the
person
who
set
up
and
configured
your
network.
After
3seconds
the
display
goes
into
the
code
entry
mode
or
press
select.
-2-

Note
If
the
display
does
not
automatically
go
into
code
entry
mode,
press
the
SELECT button.
To
enter
the
code,
use
the
TUNE
to
select
each
character
of
the
code
in turn,
pressing
the
SELECT
button
after
each
character.
Note
Make
sure
the
character
you
want
is
shown
in
the
centre
of
the
display
to
be
able
to
select
it.
<
{}~
END
<
>
0
The
display
shows
“
Connecting
to
network”
as
the
radio
connects
to
the
network.
:
Connecting
to
network
Then
it
will
be
displayed:
Network
OK
Note:
<How
to
scan
for
networks>
(1)
Press
the
BACK
button;
(2)
Turn
the
TUNE
until
display
says
<Configure>;
Configure
(3)
Press
the
Select
button;
(4)
Turn
the
TUNE
until
display
says<Network
Config>
Network
Config
(5)
Press
the
Select
button;
-3-

(6)
Turn
the
TUNE
until
display
says<Scan
for
network>;
Scan
for
network
(7)
Press
the
SELECT
button
to
be
Scanning
the
network;
(8)
Then
turn
the
TUNE
to
select
your
appropriate
equipment;
THEN:
Connecting
to
network
Network
OK
Note
We
advise
that
you
switch
the
power
off,
before
connecting
or
disconnecting
any
external
accessories.
-4-

USING
THE
PRODUCT
Choosing
a
radio
station
to
listen
to
When
playing
a
stream,
the
Internet
Radio,
downloads
a
small
amount
of
the
stream
before
it
starts
playing.
This
will
occur
before
your
selected
station
starts
to
play.
1.
With
<Station>
the
highlighted
menu,
press
the
select
button.
Stations
Or
if
the
screen
does
not
display<stations>,
turn
the
TUNE
until
it
does
and
then
press
the
SELECT
button.
2.
Turn
the
TUNE
to
choose
from
<Location>or
<Genre>.
<Location>enables
you
to
choose
a
Continent
and
then
a
country
from
that
continent.
You
can
then
select
from
a
list
of
radio
stations
from
your
chose
country.
<Genre>
enables
you
to
choose
radio
stations
according
to
their
content,
for
example
90s,
Classical,
Dance
or
Rock.
3.
Press
the
Select
button
to
choose
the
option
you
want:
Genre
A
,Turn
the
TUNE
until
the
display
shows
the
type
of
music
you
want
to
listen
to
(e.g.
Rock)and
press
the
SELECT
button.
B,
Turn
the
TUNE
until
the
display
shows
the
station
you
want
and
press
the
SELECT
button.
Or:
location
A,
Turn
the
TUNE
until
the
display
shows
the
continent
you
want
and
then
press
select(or
select
‘all’
to
display
all
countries).
B,
Turn
the
TUNE
until
the
display
shows
the
country
you
want
and
press
the
SELECT
button.
loading
-5-

Above
screen
Is
displayed,
while
the
station
are
buffering.
Then
the
first
available
station
name
is
displayed.
Choosing iPod to listen to:
Instructions for iPod:
1. Select iPod on the radio. Switch on the internet radio and press Back until
you are at the top level menu. Turn the TUNE until iPod is displayed highlight
and press the SELECT button
2. Press Back exit the Ipod Mode;
3. Turn the encoder clockwise and anti-clockwist to adjust the Volume up/down ;
4. Press Play button to palyback the iPod streaming, press Prev/Next to
playback previous and next tracks, and Press and hold the Prev/next to
playback the streaming fast forward and fast rewind;
5. Press Select encoder and hold 3sec, it will enter into iPod menu nevigation
mode; It can be operated the iPod menu by using the buttons of the radio;
1. Press and Hold 3 seconds to exit the Ipod nevigation mode;
Note: It couldn’t tune the volume down/up when menu nevigation mode!
iPod
iPod
Menu Mode

Changing
the
volume:
You
can
change
the
volume
by
turning
the
TUNE
clockwise
to
increase
the
volume
and
anticlockwise
to
decrease
the
volume.
The
display
shows
the
volume bar.
You
cannot
change
the
volume
when
you
are
in
a
menu
or
when
the
radio
is connecting
to
a
station.
Storing
a
radio
station
in
a
preset
by
the
front
panel
control:
When
a
radio
station
is
playing,
just
hold
down
one
of
the
preset
buttons
to
store
the
station.
E.g.
to
store
preset1:
press
and
hold
the
preset
Assigned
to
Preset
1
Playing
a
preset
radio
station
When
a
radio
station
is
playing,
briefly
press
the
preset
button
(
,
,
)
for
the
station
you
want.
Storing
a
radio
station
in
a
preset
by
the
front
remote
control:
To
store
a
preset,
you
must
first
be
listening
to
the
station
that
you
would
like
to
save,
then
press
STORE
button.
Then
press
the
preset
number
you
would
like
to
save
and
allow
2
seconds
to
store
the
station
into
the
preset.
The
LCD
will
then
show
<Assigned
to
preset
#>.
Once
you
have
saved
a
station
to
one
of
the
presets,
you
can
recall
it
by
pressing
RECALL
button.
Then
press
the
preset
number
you
would
like
to
recall
and
the
radio
will
connect
to
your
station
that
you
recalled.
Requesting
a
station
that
is
currently
unavailable
on-line
If
you
want
to
listen
to
a
particular
radio
station
which
is
currently
not
available
on
line,
you
can
visit
the
Reciva
website
at
http://www.reciva.com/
and
put
in
a
request
to
add
the
station
to
the
list.
Switch
the
radio
OFF
and
ON
-6-

To
switch
off,
press
STANDBY
once
and
the
clock
will
be
displayed.
To
switch
on,
press
STANDBY
once
and
the
radio
will
take
up
to
60
seconds
to
start
playing
again,
as
it
finds
the
radio
station
you
were
last
connected
to
and
loads
it
into
the
buffer.
Setting
the
CLOCK
1.
Press
the
BACK
button.
2.
Turn
the
TUNE
until
the
display
says<Configure>.
Configure
3.
Press
the
SELECT
button.
4.
Turn
the
TUNE
until
the
display
says<Clock>.
Clock
5.
Press
the
SELECT
button.
6.
Turn
the
TUNE
until
the
display
say<Set
Time>.
Set
Time
7.
Press
the
SELECT
button
Set
Time
12:10
8.
Turn
the
TUNE
until
the
hour
setting
is
correct,
then
press
the
SELECT
button.
Set
Time
13:10
9.
Turn
the
TUNE
until
the
minute
setting
is
correct,
then
press
the
SELECT
button.
Set
Time
13:11
-7-

The
display
says
Time
Set
with
the
new
time
shown
beneath
for
3
seconds,
and
then
returns
to
the
radio
station
display.
Setting
the
ALARM
1.
Press
the
BACK
button.
2.ROTATE
the
TUNE
until
the
display
says
<Alarm
clock>
Alarm
Clock
3.
Press
the
SELECT
button.
4.
Turn
the
TUNE
until
the
display
says<Set
Alarms>.
Set
Alarms
5.You
can
select
Disable
all
to
delete
all
the
alarm
setting,
or
you
can
set
up
to
5
alarms
in
the
radio.
6.Rotate
the
TUNE
to
1
group
of
clock
alarm
setting,
then
press
the
SELECT
button.
Enable
Alarm
Yes/No
7.
After
you
select
‘
Yes’,
you
are
able
to
rotate
the
TUNE
until
the
hour
setting
is
correct,
then
press
the
SELECT
button.
Set
Alarm
7:12
AM
8.
Rotate
the
TUNE
until
the
minute
setting
is
correct,
then
press
the
SELECT
button.
-8-

Set
Alarm
7:20
AM
9.
According
to
different
time
necessary,
you
can
select
your
favourite
setting
for
the
alarm
setting;
Once\Every
day
\Weekly
\Weekdays
/Weekends
options
are
available;
10
And
you
can
set
the
Alarm
'beeps'
sound
or
internet
radio
station
for
the
alarm
to
alert
the
customer
when
the
Alarm
expires;
Setting
the
“Sleep
Timer
1.
Press
the
BACK
button.
2.ROTATE
the
TUNE
until
the
display
says
<Alarm
clock>
Alarm
Clock
3.
Press
the
SELECT
button.
4.
Turn
the
TUNE
until
the
display
says<Sleep
Timer>.
Sleep
Timer
5.
Rotate
the
TUNE
to
change
to
sleep
timer
value
and
then
press
SELECT
to
begin
the
sleep
timer;
You
will
be
able
to
select
OFF
or
from
00:15
to
03:15
<one
step
for15
minutes
>as
the
sleep
timeout
setting;
Note:
When
you
set
that
the
radio
will
continue
to
play
as
normal,
but
it
will
go
into
standby
mode
after
the
sleep
timer
has
expired.
To
turn
the
radio
back
on
again,
simply
press
the
ON/OFF
button.
-9-
GETTING
STARTED
WITH
THE
MEDIA
PLAYER
In
order
to
play
the
music
files
you
have
stored
on
your
PC
via
the
Media
player
you
must
ensure
the
following:
1.
Your
PC
has
the
correct
type
of
music
files
saved
on
it
which
are
explained
in
the
following
paragraphs.
2.
The
music
files
on
your
PC
are
not
'protected';
3.
Te
music
files
are
stored
in
the
correct
location
on
your
PC.
4.
The
PC
has
file
sharing
turned
on.
5.
The
music
files
can
be
'shared'
on
the
network.
6.
You
know
the
name
of
your
PC
MUSIC
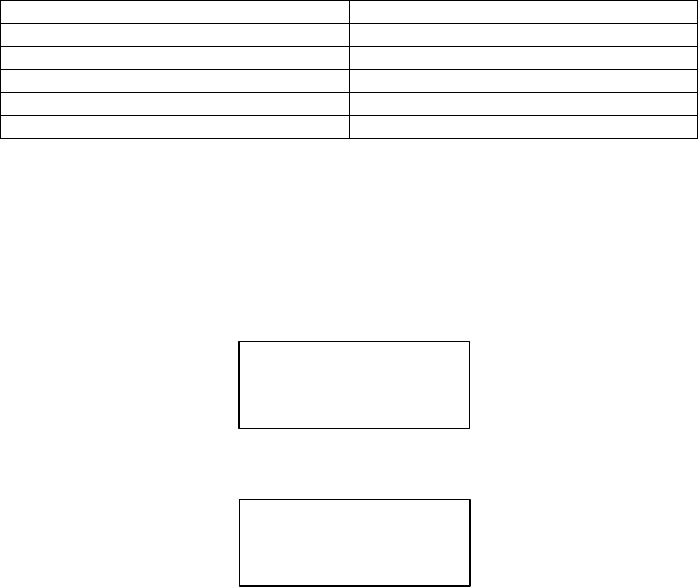
CONTENT
The
internet
radio
plays
the
most
popular
music
types,
FLIE
TYPE
FLIE
EXTENSION
SHOWN
ON
PC
MP3
.mp3
Windows
Media
.wma
Real
.Ra
itunes
.aac
Ogg
Vorbis
.ogg
(These
are
the
letters
that
appear
after
the
file
name.
e.g.
MUSIC.mp3)
Instructions
for
streaming
1.
Select
Media
Player
on
the
radio.
Switch
on
the
internet
radio
and
press
Back until
you
are
at
the
top
level
menu.
Turn
the
TUNE
until
Media
Player
is
displayed and
press
the
SELECT
button.
Media
Player
2.
You
will
be
able
to
choose
from
2
playback
tracks;
Windows
Shares
UPNP
Servers
-10-
If
you
select
‘Windows
Shares’
menu:
(1)
Scan
for
PCs
is
displayed,
press
the
SELECT
button.
Your
computer
network
will
scan
and
a
list
of
all
available
PCs
Will
be
displayed
on
you
internet
radio.
Note:
If
a
PC
does
not
have
global
file
sharing
turned
on,
or
a
third
party
firewall
is
protecting
the
PC
it
will
not
be
visible
when
you
scan
for
it.
(2)Turn
the
TUNE
to
highlight
the
PC
you
want
to
play
music
from
and
press
the
SELECT
button.
Note:
you
may
be
asked
to
enter
a
username
and
password
to
access
the
PC
you
have
selected.
This
is
the
same
user
name
and
password
you
would
enter
if
actually
sitting
in
front
of
the
machine.
(3)Finding
folders
The
internet
radio
will
now
scan
the
PC
you
have
selected
and
display
a
list
of
any
folder
which
have
got
'sharing'
enabled.
Note:
Your
PC
may
have
folder
shared
which
do
not
contain
the
internet
radio
is
just
searching
for
shared
folders,
so
will
find
all
shared
folder,
regardless
of
content.
Turn
the
TUNE
to
select
the
folder
that
contains
the
saved
music,
and
press
the select
button.
(4)
Selecting
music
You
can
now
view
the
content
of
the
shared
folder
by
Album
or
Artist.
Use
the
TUNE
to
move
through
the
list.
(5)Adding
music
to
the
queue
and
managing
the
queue.
When
you
select
music
to
be
played,
it
is
added
to
the
play
queue
and
played
sequentially.
Set
up
your
Windows
PC
to
allow
the
radio
to
access
your
audio
files
via
Windows
Shares
1.
Please
ensure
that
your
PC
is
available
on
the
network
for
you
Internet radio,
then,
using
windows
Explorer,
locate
the
folder
where
your
audio files
are
stored.
2.
Right
Click
on
the
folder.
-11-
3.
Select
‘
Properties’.
4.
Click
on
‘Sha
ring’.
5.
Press
the
SELECT
button,
turn
the
knob
until
‘Sc
an
for
PCs’
is
displayed
and
press
SELECT
again.
6.
The
radio
will
now
display
‘Finding
PCs
’.
Once
the
radio
has
finished,
turn the
knob
to
highlight
the
correct
PC.
7.
Press
the
SELECT
button.
The
radio
will
search
for
shared
folder.
8.
Turn
the
knob
to
highlight
the
correct
shared
folder
and
press
SELECT.
9.
The
radio
will
display
‘File
Scan…’
as
it
scans
through
the
media
files
in the
shared
folder.
Text
on
the
bottom
row
of
the
display
will
change
to
indicate
that
the
file
scan
is
in
progress.
If
you
have
a
large
number
of
audio
files
this
could
take
several
minutes
to
complete.
10.
Once
the
radio
has
finished
scanning,
it
will
display’
By
Album’.
You
can
now
browse
through
the
scanned
media
files,
which
will
now
be
organized
‘
By
Album’,’By
Artist’-
if
available.
Note
that
the
first
time
the
file
scan
is
done
a
file
called
‘.reciva_media_cache’
is
written
to
the
folder
where
the
audio
files
are
stored.
This
is
in
order
to
speed
up
subsequent
file
scans.
Listening
to
a
single
shared
track
1.
Turn
the
knob
until
‘
By
Artist’
is
displayed.
2.
Press
the
SELECT
button.
3.
Turn
the
knob
Until
the
required
artist
is
displayed.
4.
Press
the
SELECT
button.
5.
Turn
the
knob
until
the
required
album
name
is
displayed.
6.
Press
the
SELECT
button.’
[Add
to
Queue]’
will
be
displayed.
7.
Turn
the
knob
until
the
required
tack
is
displayed.
-12-
8.
Press
the
SELECT
button.
The
track
will
begin
playing.
Listening
to
a
complete
shared
album
1.
Turn
the
knob
until
‘B
y
Artist’
is
displayed.
2.
Press
the
SELECT
button.
3.
Turn
the
knob
until
the
required
artist
is
displayed.
4.
Press
the
SELECT
button.
5.
Turn
the
knob
until
the
required
album
name
is
displayed.
6.
Press
the
SELECT
button.
‘[Add
to
Queue]
‘
will
be
displayed.
7.
Press
the
SELECT
button.
The
album
will
begin
playing.
Queuing
up
tracks
for
playback
later
1.
Highlight
the
required
track.
2.
Press
the
SELECT
button.
‘Track
Added
To
Queue’
will
be
displayed.
Queuing
up
albums
for
playback
later.
1.
Highlight
the
required
album.
2.
Press
the
SELECT
Button.
3.
Turn
the
knob
until
‘[
Add
To
Queue]’
is
displayed.
4.
Press
the
SELECT
button.’
Tracks
Added
to
Queue’
will
be
displayed.
Controlling
playback
1.
Use
the
STOP
button
to
stop
playback.
2.
Use
the
PLAY/PAUSE/STOP
button
to
either
pause
a
currently
playing
track
or
to
restart
a
currently
paused
track
or
to
restart
a
stopped
track.
3.
Use
the
PLAY/PAUSE/STOP
button
to
stop
a
currently
playing
when
you
-13-
press
and
hold
the
button
for
2
seconds.
4.
Use
the
PREVIOUS
button
to
start
playback
of
the
previous
track
in
the
queue.
5.
Use
the
NEXT
button
to
start
playback
of
the
next
track
in
the
queue.
Browsing
the
list
of
tracks
currently
queued
up
for
playback
1.
Press
the
BROWSE
button.
The
currently
playing
track
name
will
be
displayed.
2.
Turn
the
knob
to
see
which
tracks
are
queued
up
for
playback.
3.
If
you
want
to
jump
to
a
particular
place
in
the
queue
the
SELECT
button
when
the
required
track
is
displayed.
Playing
tracks
in
random
order
1.
Select
the
individual
tracks
as
described
previously.
2.
Navigate
to
top-level
menu
item
‘
Media
Player’
using
the
SELECT
and
BACK
buttons.
3.
Press
the
SELECT
button.
4.
Turn
the
knob
until
‘P
layback
Mode’
is
displayed.
5.
Press
the
SELECT
button.
6.
Turn
the
knob
until
‘S
HUFFLE’
is
displayed.
7.
Press
the
SELECT
button.
8.
Turn
the
knob
to
select
YES/NO
the
confirm
that
shuffle
mode
should
be
enabled.
Playing
tracks
in
the
queue
repeatedly
1.
Select
the
individual
tracks
as
described
previously.
2.
Navigate
to
top-level
menu
item
‘
Media
Player’
using
the
SELECT
and
BACK
buttons.
-14-
3.
Press
the
SELECT
button.
4.
Turn
the
knob
until
‘P
layback
Mode’
is
displayed.
5.
Press
the
SELECT
button.
6.
Turn
the
knob
until
‘Repeat’
is
displayed.
7.
Press
the
SELECT
button.
8.
Turn
the
knob
to
select
YES/NO
the
confirm
that
shuffle
mode
should
be
enabled.
If
you
select
‘UPnP
Severs’
menu:
Locating
and
playing
media
files
using
the
radio
and
UPnP
1.
Once
the
UPnP
server
is
configure
to
share
media
files
with
the
internet
radio,
you
can
play
the
files
by
doing
the
following
on
the
radio.
2.
Keep
pressing
BACK
to
get
to
the
radio’s
top-level
menu
and
then
turn
the
knob
to
select
‘Media
Player’.
3.
Press
SELECT
and
then
turn
the
knob
to
highlight
‘UPn
P
Severs’.
4.
Press
SELECT
and
the
radio
will
scan
for
all
available
UPnP
servers.
Note,
this
may
take
a
few
seconds
for
the
radio
to
complete
its
scan
and
before
the scan
has
completed,
the
radio
will
display
‘[Em
pty]’.
The
radio
will
continue
to display
‘[Empty]
if
no
UPnP
servers
are
found.
5.
After
a
successful
scan
,
select
your
UPnP
server,
by
rotating
the
knob
if
there
is
more
than
on
UPnP
server,
and
then
press
SELECT.
6.
The
radio
will
now
list
the
media
categories
available
from
the
UPnP
server,
e.g.
‘Mu
sic’,
‘Play
lists’
etc.
Turn
the
knob
to
select
which
category
you
wish
to browse,
press
SELECT
and
turn
the
knob
to
highlight
a
sub
category
and
press
SELECT
again.
For
example,
you
could
select
‘
Music’
and
then
‘Album
’.
7.
Turn
the
knob
to
highlight
the
media
files
that
you
wish
to
play
and
press
SELECT.
8.
The
radio
will
display
‘[A
dd
to
Queue]’,
press
SELECT
and
the
radio
will
add
the
tracks
to
its
queue
and
begin
playing
them
automatically.
Setup
a
Windows
PC
to
allow
the
radio
to
access
you
audio
files
via
a
UPnP
serves
1.
If
your
PC
is
running
Microsoft
Windows
XP,
then
you
can
use
Windows
Media
Player
11(WMP11)
to
act
as
your
UPnP(
Universal
Plug
and
Play)
media
-15-
server
1.0.
Windows
Media
Player
11
may
be
downloaded
from
Microsoft’s
website
and
install
by
following
the
instructions
detailed
in
its
installation
wizard.
2.
Once
installed
,
Windows
Media
Player
11
will
create
a
library
from
all
the
media
files
available
to
it
on
your
PC.
To
add
new
media
files
to
the
library,
select’
File
>
Add
to
Library…>
Advanced
Options’,
Click
‘Add’
and
choose
the
files
you
wish
to
add
and
click’
OK’.
3.
You
will
now
need
to
connect
your
Internet
radio
to
Windows
Media
Player
11
and
configure
it
to
allow
the
radio
to
access
your
media
library.
In
order
to
this
,
you
will
need
to
do
the
following:
a.
Keep
pressing
BACK
to
get
to
the
radio’s
top-level
menu
and
then
turn
the
rotary
knob
to
select
‘Media
Player’.
b.
Press
SELECT
and
then
turn
the
knob
to
highlight
‘
UPnP
Serves’.
c.
Press
SELECT
and
the
radio
will
scan
for
all
available
UPnP
servers
. Note,
this
may
take
a
few
seconds
for
the
radio
to
complete
its
scan
and before
the
scan
has
completed
,
the
radio
will
display
‘[Empty]’.
The
radio will
continue
to
display
‘[Empty]’
if
no
UPnP
servers
and
found.
d.
After
a
successful
scan.
Select
your
UPnP
server,
by
rotating
the
knob
if
there
is
more
than
one
UPnP
server,
and
then
press
SELECT
(note,
your
radio
will
display’
Access
Denied’
at
this
stage)
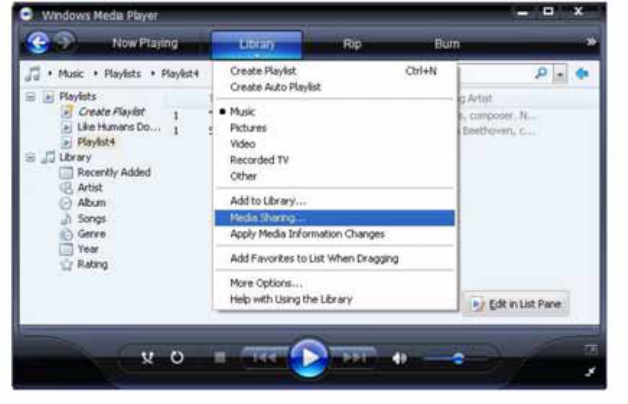
4.
Your
PC
will
now
prompt
you
that
a
device
has
attempted
to
connect
to
your
UPnP
server.
In
order
to
allow
the
radio
to
have
access
to
the
media
files,
you
will
need
to
click
the
‘Library’
tab
from
Windows
Media
Player
11
and
select
the
‘Media
Sharing…’
item
to
open
the
‘Media
Sharing’
window.
Selecting
‘Media
Sharing…’
for
Windows
Media
Player11
:
-16-
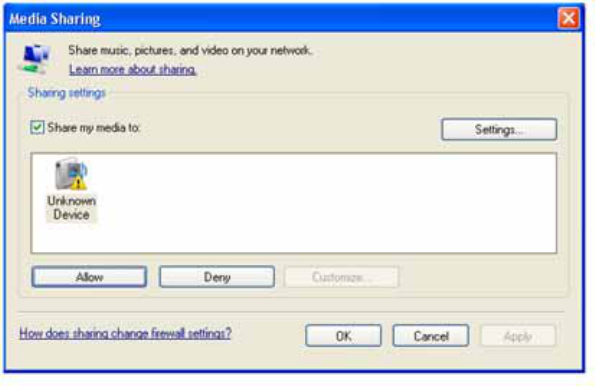
5.
From
the
‘Media
Sharing’
windows
,
the
radio
will
be
listed
as
an
unknown
device.
Click
on
the
unknown
device
listed,
then
click
the
‘Allow’
button
and
then
click
‘OK’.
Allowing
the
Radio
to
Connect:
Configure
Menu
Choosing
the
option
you
want
from
the
Configure
Menu
1.
Press
the
SELECT
button.
2.
Turn
the
knob
until
‘Configure’
is
displayed
3.
Press
the
SELECT
button.
4.
Turn
the
knob
until
the
display
shows
the
option
you
want.
5.
Press
the
SELECT
button
to
choose
the
option
shown
on
the
display.
The
options
are
explained
below.
<Network
Config>
Enables
you
to
configure
your
radio’s
network
settings,
scan
again
for
a
connection
to
another
wireless
network
,
or
to
manually
configure
the
network
parameters.
This
is
useful
if
you
take
the
Internet
radio
to
another
building
where
you
want
to
use.
-17-
It
is
possible
to
configure
your
radio
to
connect
to
your
network
via
an
available
Ethernet
connection
(RJ45)
or
via
a
Wi-Fi
router:
Configuring
the
radio
to
only
use
a
wired
Ethernet
connection
From
the
radio’s
‘network
config’
menu,
select
‘Wire/Wireless’.
This
menu
will
present
you
with
three
options:
‘Wireless
Only’,
‘Wired’
and
‘Auto’.
Selecting
‘Wired
Only’
will
allow
cause
the
radio
to
reboot
and
then
only
use
its
Ethernet
connection
to
communicate
with
the
network.
The
radio
will
also
disable
its
wireless
network
capabilities.
Configuring
the
radio
to
only
use
a
Wi_Fi
connection
Selecting
the
‘Wireless
Only
‘
option
from
the
‘
WIRED/Wireless’
menu
will
allow
cause
the
radio
to
reboot
and
then
only
use
its
Wi_Fi
connection
to
communicate
with
the
network.
The
radio
will
also
disable
its
Ethernet
connection.
Configuring
the
radio
to
use
either
an
Ethernet
or
a
wireless
connection
Selecting
the
‘Auto’
option
from
the
‘Wired/Wireless’
menu
will
allow
cause
the
radio
to
reboot
and
then
attempt
to
establish
and
then
attempt
to
establish
an
Ethernet
connection,
if
it
is
available,
to
communicate
with
the
network.
Otherwise,
the
radio
will
attempt
to
establish
a
Wi_Fi
connection
to
the
network.
Once
the
radio
has
establish
a
certain
type
of
connection
to
the
network
,
then
this
type
of
connection
will
remain
in
use
while
the
radio
is
on.
The
‘Network
Config’
menu
also
allows
you
to
choose
whether
or
not
the
Internet
radio
displays
a
warning
message
when
its
network
signal
strength
is
low.
Yo u
can
enable
this
feature
by
selecting
‘Signal
Warning’
and
then
‘Yes’
<Version>
Displays
the
versions
numbers
of
the
various
parts
of
software
the
hardware
on
you
Internet
radio.
The
radio
will
attempt
to
establish
a
Wi_Fi
connection
to
the
network.
Once
the
radio
has
establish
a
certain
type
of
connection
to
the
network
,
then
this
type
of
connection
will
remain
in
use
while
the
radio
is
on.
The
‘Network
Config’
menu
also
allows
you
to
choose
whether
or
not
the
Internet
radio
displays
a
warning
message
when
its
network
signal
strength
is
low.
Yo u
can
enable
this
feature
by
selecting
‘Signal
Warning’
and
then
‘Yes’
<Version>
Displays
the
versions
numbers
of
the
various
parts
of
software
the
hardware
on
you
Internet
radio.
<Upgrade
Firmware>
Use
this
option
to
download
new
firmware
for
the
radio
from
the
Reciva
portal
on
the
internet
.
if
there
is
new
firmware
available,
the
radio
will
prompt
you
if
you
want
to
download
it
or
not.
Note,
at
this
stage,
you
can
press
the
radio’s
BACK
-18-
button
to
cancel
the
radio
beginning
a
firmware
upgrade.
A
firmware
upgrade
may
take
several
minutes,
so
do
no
switch
off
the
power
to
the
radio
until
the
operation
is
complete
otherwise
the
radio
may
become
permanently
damaged.
<Language>
Allows
you
to
change
the
display
language.
<Factory
Reset>
Puts
all
the
setting
back
to
their
default
as
they
were
when
they
left
the
factory.
If
you
perform
a
factory
reset
on
your
radio
you
will
loss
all
you
presets
and
your
wireless
network
connection.
<Register>
This
will
display
a
key
that
can
be
used
to
register
the
radio
on
the
Reciva
Customer
portal.
<Clock>
Use
this
option
to
set
the
time
,
to
set
an
alarm
and
to
view
the
current
alarm
setting
,
see’’
Setting
the
clock’’,
‘’Setting
the
alarm’’.
<Backlight>
Selecting
this
option
will
alter
the
internet
radio’s
backlight
values.
1.
After
select
the
‘Backlight’
menu
item,
the
radio
will
display
its
list
of
three
menu
modes:
‘Inactive’,
‘Active’
and
‘Standby’.
These
three
states
are
explained
below:
.
The
radio
gets
into
its
‘inactive’
state
when
there
is
no
user
activity
for
30
seconds.
.
The
‘active’
state
is
when
there
is
user
activity.
.
‘Standby’
is
the
state
when
the
radio
has
been
turned
off
2.
Rotate
the
knob
to
highlight
the
desired
menu
mode
and
press
SELECT.
3.
The
radio
will
now
display
the
current
backlight
value
for
the
menu
mode.
Yo u
can
alter
this
value
by
rotating
the
knob
to
increase
or
decrease
it.
<Contrast>
Selecting
this
option
will
alter
the
Display
’s
contrast
ratio
values.
1,
After
select
the
‘Contrast’
menu
item,
the
radio
will
display
the
current
value
of
LCD
contrast
ratio.
2,
Turn
the
knob
to
increase
or
decrease
it
until
the
optimum
display
angle..
3,
Press
SELECT
to
save,
then
quit
.
<Equalisation>
After
selecting
this
option,there
are
3
options
in
the
menu;
Yo u
can
change
the
audio
frequency
response
as
your
favourite;
-19-
1,”Treble
“
tone
control:
Yo u
can
turn
the
knob
to
increase
or
decrease
between
-6
–
9
levels;
2,”Bass”
tone
control:
Yo u
can
turn
the
knob
to
increase
or
decrease
between
-6
–
9
levels;
3,”Presets”
tone
control:
Including
<Bass/Classical/Jazz/Pop/Rock/Flat>
6
styles;
Press
“Select”
button
to
alter
the
highlight
option;
<WiFi
Strength>
If
you
were
using
WiFi
access
to
the
network,
you
can
check
the
current
WiFi
strength
in
this
menu..
-20-

TROUBLESHOOTING
1.
If
you
have
trouble
connecting
the
radio
to
your
wireless
network,
these
steps
may
help
to
resolve
the
problem:
Confirm
that
a
Wi-Fi
or
Ethernet
Wired
connected
PC
can
access
the
internet
(i.e.
can
browse
the
web)
using
the
same
network.
Check
that
a
DHCP
server
is
available,
or
that
you
have
configured
a
static
IP
address
on
the
radio.
Check
that
you
firewall
is
not
blocking
any
outgoing
ports.
As
a
minimum
the
radio
needs
access
to
UDP
and
TCP
ports
80,554,1755,5000,and
7070.
Some
access
points
may
be
set
so
that
only
equipment
with
registered
MAC
addresses
can
connect
to
them.
This
is
one
possible
cause
of
the
Internet
Radio
being
unable
to
connect
to
the
Wi-Fi
network,
and
the
Internet
Radio
display
will
show
Bad
ESSID
or
key.
To
overcome
this
problem
you
will
need
to
add
the
Internet
Radio’s
MAC
address
to
the
list
of
allowed
equipment
in
your
access
point.
The
Internet
Radio’s
MAC
address
can
be
found
using
the
menu
item
Configure->Network
Config
->View
Config
->
MAC
address.
Yo u
will
need
to
refer
to
the
guide
for
you
Access
Point
in
order
to
enter
the
Internet
Radio
as
an
allowed
piece
of
equipment.
If
you
have
an
encrypted
network,
check
that
you
have
entered
the
correct
key
or
passphrase
into
the
radio.
Remember
that
text-format
keys
are
case
sensitive.
If
your
wireless
network
name(ESSID)
is
‘
Hidden’(a
setting
on
the
wireless
access
point),
then
you
can
either
turn
on
the
name,
or
you
can
manually
enter
the
name
into
the
internet
radio
and
media
player,
Select
Configure,
Select
network,
Enter
ESSID.
Confirm
if
the
Network
is
encrypted,
e.g.
requires
a
WEP
or
WPA
key,
then
enter
the
network
name.
2.
If
your
radio
can
connect
to
the
network
successfully,
but
is
unable
to
play
particular
stations,
it
may
be
due
to
one
of
the
following
reasons:
The
station
is
not
broadcasting
at
this
time
of
the
day
(remember
it
may
be
located
in
a
different
time
zone).
The
station
has
too
many
people
trying
to
attach
to
the
radio
station
server
and
the
server
capacity
is
not
large
enough.
The
station
has
reached
the
maximum
allowed
number
of
simultaneous
listeners.
The
station
is
not
broadcasting
anymore.
The
link
on
the
radio
is
out
of
date.
This
is
updated
automatically
every
day,
so
the
next
time
you
turn
on
the
link
will
be
recognised.
The
internet
connection
between
the
server
(often
located
in
a
different
country)and
you
is
slow.
Some
internet
service
providers
may
fail
to
stream
in
certain
geographical
areas.
Try
using
a
PC
to
play
back
the
stream
via
the
broadcaster’s
web
sit.
If
you
can
play
back
the
station
with
a
PC,
use
the
form
at
http://www.reciva.com/station/add_station.asp
to
notify
us
so
that
we
can
change
the
station
data
that
is
used
by
the
radio.
If
you
have
a
laptop,
try
connecting
it
if
your
Internet
Radio
cannot
find
the
station.
-21-
3.
When
you
scan
for
PCS
none
can
be
found,
or
the
PC
you
are
looking
for
does
not
appear
in
the
list:
Global
File
sharing
is
not
enabled
on
the
PC.
The
PC
you
are
looking
for
is
in
another
part
of
the
network
separated
by
a
router.(This
may
happen
if
you
have
two
access
points
on
the
same
network,
and
the
Media
source
is
on
one
Access
Point
and
the
internet
Radio
is
on
another).
The
PC
with
the
Media
content
may
not
have
the
same
workgroup
as
the
server
managing
the
network.
The
easiest
solution
is
to
change
the
PC
workgroup
name
to
the
same
as
that
being
supported
by
the
server.
Yo u
have
not
connected
to
the
wireless
Access
point.
On
the
internet
radio
,
select
‘Con
figure’,
‘
Network
Configure’,
‘
Select
Network’,
‘Scan’
and
then
select your
Wireless
network.
(You
may
need
to
enter
a
security
key
to
access
the network
wirelessly).
Yo u
have
not
enabled
simple
file
sharing
on
Windows
2000.
In
Windows
200
the
simple
file
sharing
can
be
turned
on
by
going
to
the
Control
Pane,
selecting
Folder options,
view
Ta b .
The
safest
way
for
users
to
enable
the
service
is
to
run
the
‘S
et up
a
home
or
small
office
network’
wizard
from
Control
Panel,
Network
Connections.
Yo u
have
a
firewall
set
on
your
PC
which
is
stopping
you
accessing
shared
files.
Windows
2K
doesn’t
come
with
a
real
firewall
so
unless
you
have
installed
one
this
should
not
be
a
problem.
Yo u
have
a
third
party
firewall
in
your
network,
which
is
preventing
file
sharing.
If
you
have
a
third
party
firewall
(Like
Norton,
or
Zone
Alarm)
that
will
have
its
own
control
panel
and
you
will
need
to
consult
the
manual
for
your
firewall.
If
your
PC
is
connected
to
a
managed
network,
with
a
server
sometimes
the
PC
being
searched
for
needs
to
be
server
Workgroup.
4.
You
can
see
the
PC
you
want
to
play
music
from,
but
cannot
find
any
folders
on
the
PC:
The
folder
which
has
your
music
in
it
is
not
shared.
Yo u
will
need
to
locate
the
file
you
want
to
share,
right
click
on
the
folder,
and
select
‘
Properties’,
Then
tick
share
this
file.
The
folder
is
not
in
an
accessible
place,
i.e.
it
is
in,
My
music,
My
documents
or
on
the
Desktop.
Yo u
will
need
to
mode
the
folder
to
the
root
directory.
Yo u
have
entered
the
wrong
user
name
or
password
for
the
PC
account
you
are
trying
to
access.
Check
and
re-enter
the
user
name
and
password,
note
the
password
is
case
sensitive.
Yo u
have
a
firewall
running
which
is
preventing
the
internet
radio
from
seeing
the
shared
folder.
As
a
quick
check,
you
can
disable
firewalls
like
Norton
to
see
if
this
overcomes
the
problem,
if
this
resolves
the
issue
then
you
can
either
leave
the
firewall
off,
or
allow
file
sharing
through
the
fire
wall.
Note:
If
you
firewall
is
required
to
provide
security
for
your
system,
it
should
not
be
left
off.
Note:
Although
you
can
share
a
CD
drive,
you
cannot
stream
music
directly
from
the
drive.
-22-
5.
Whenever
I
enter
my
media
folder
,
the
internet
radio
rescans
the
content
of
the
folder:
Although
the
folder
with
your
music
in
it
is
shared
,
it
is
‘
write
protected’,
so
the
Internet
Radio
cannot
save
a
list
of
the
folder’s
content
back
onto
the
PC,
as
it
needs
to
rescan
each
time.
Tick
the
box
that
allows
the
Folder
to
be
modified
across
the
network.
6.
Although
I
can
see
my
music
files
in
the
folder,
I
cannot
play
them
and
the
Internet
Radio
says
they
are
‘Pro
tected’:
When
you
copied
the
music
files
to
the
hard
drive
you
had
‘Person
al
Rights
management’
turned
on,
this
protects
the
files
from
being
played
by
a
third
party
device
like
the
Internet
Radio,
you
will
need
to
copy
the
music
files
again,
but
with
the
protection
turned
off.
Yo u
are
trying
to
play
I-Tune
files
which
have
been
purchased
from
the
I-Tunes
on
line
store,
these
are
protected
and
can
only
be
played
on
an
I-Pod.
Locally
created
or
‘
ripped’
files
for
I-Pods
can
be
played
as
they
do
not
carry
the
extra
layer
of
Media
Protection.
7.
I
can
access
the
PC
with
my
Media,
but
when
I
change
to
the
Use
Account,
I
cannot
see
the
folder
,
although
it
is
shared
when
I
check
my
PC:
The
Alternative
account
on
the
machine
may
be
Private.
If
when
the
account
was
created,
the
‘Mak
e
this
account
Private’
option
was
selected,
then
the
contents
of
this
account
cannot
be
seen
over
the
network.
Yo u
will
need
to
move
the
music
to an
accessible
account.
8.
I
can’t
share
a
folder
,
as
the
option
is
not
highlighted:
The
share
folder
option
will
not
be
available
until
you
have
turned
simple
file
sharing
on.
Run
the
wizard.
Scan
Error:
When
the
internet
radio
is
scanning
the
content
of
the
folders
on
a
PC,
it
is
possible
that
a
scan
error
may
occur
if
the
windows
file
sharing
application
times
out.
This
is
most
likely
to
occur
if
both
the
PC
with
the
media
content
and
the
Internet
Radio
are
connected
wirelessly.
Try
re-connecting
the
PC
with
the
media
content
into
the
network
via
cable.
This
will
dramatically
increase
the
speed
at
which
the
Internet
Radio
is
able
to
scan
the
content
of
the
Media
PC.
Playlists:
Some
media
ripping
applications
allow
‘P
laylists’
to
be
created.
The
Internet
Radio
is
able
to
detect
and
stream
these
playlists,
but
they
must
be
stored
in
the
folder
with
the
rest
of
the
Media
content
and
they
must
have
the
file
extension.m3u.
Windows
Media
player
can
create
suitable
playlist,
just
select
‘
create
new
playlist’,
drag
and
drop
the
tracks
you
want
into
the
playlist,
then
use
‘Save
as’
to
ensure
the
file
type
is
.m3u.
(Existing
play
lists
can
be
opened
and
re-saved
in
this
format)
-23-
When
the
Internet
Radio
detects
you
have
playlists,
it
will
enable
a
new
menu
option
allowing
the
playlist
to
be
selected
and
added
to
the
queue.
If
you
re-connect
to
another
PC
of
folder,
which
does
not
have
any
Playlists
in
the
.m3u.
format,
the
playlist
option
will
not
be
presented
in
the
menu.
9.
If
the
Internet
Radio
keeps
re-buffering
radio
station:
The
Internet
Radio
is
streaming
the
data
from
the
radio
station
via
your
broadband
connection,
if
there
is
a
high
error
rate
on
your
broadband
connection,
or
the
connection
is
intermittent,
then
it
will
cause
the
Internet
Radio
to
pause
until
the
connection
is
re-established
and
it
has
received
enough
data
to
start
playing
again.
If
your
Internet
Radio
keeps
stopping,
please
check
the
DSL
modem
to
ensure
that
the
Broadband
line
is
not
suffering
a
high
error
rate
or
disconnections.
If
you
are
experiencing
these
problems,
you
will
need
to
contact
your
broadband
supplier.
10.
What
is
Buffering?
When
playing
a
stream,
the
Internet
Radio/Media
player,
downloads
a
small
amount
of
the
stream
before
it
starts
playing.
This
is
used
to
fill
in
any
gaps
in
the
stream
that
may
occur
if
the
internet
or
the
wireless
network
is
busy.
The
Internet
Radio
streams
music
data
from
the
PC
while
you
are
listening.
If
a
stream
gets
blocked
or
experiences
Internet
congestion
while
transferring
it
may
stop/interfere
with
the
quality
of
play.
If
this
happens,
check
your
internet
connection
speed-
it
must
be
faster
than
the
speed
of
the
streams.
Warning
Any changes or modifications not expressly approved by the party responsible for
compliancecould void the user's authority to operate the equipment
The apparatus shall not be exposed to dripping or splashing and that no objects filled with
liquids,such as vases.
Excessive sound pressure from earphones and headphones can cause hearing loss.
An appliance coupler is used as the disconnect device and it shall remain readily
operable. To be completely disconnected the power input, the appliance shall be
disconnected from the mains completely.
Batteries shall not be exposed to excessive heat such as sunshine, fire or the like; danger
of explosion if battery is incorrectly replaced, Replaced only with the same or equivalent
type.
The plug portion of power supply is used as the disconnect device and it shall remain
readily operable. The power supply shall be disconnected completely, if any.
Power Adaptor
Vendor: DONGGUAN GAOBU YINGCHENG ELECTRONIC FACTORY
Model No: DYS18-090200W-3
Input : 100-240V AC 50/60Hz
Output: 9.0V DC 2000mA -24-
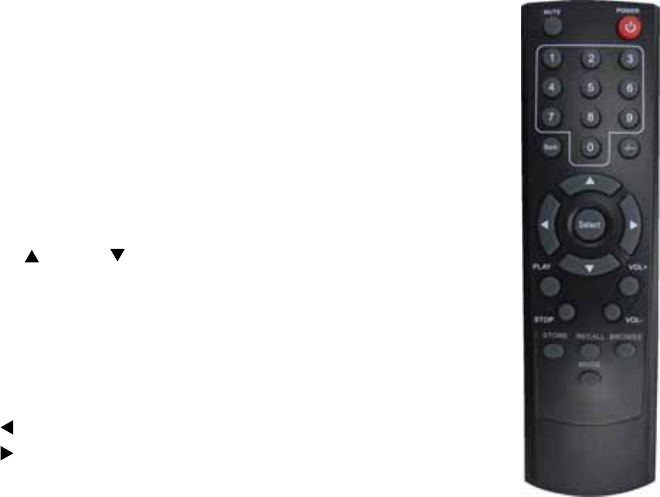
Remoter
controller:
1.
Power:
<Press
to
switch
the
internet
radio
ON/OFF>
2.
Mute:
<
Press
to
mute
the
voice>
3.
Reply:
<Reserved
for
future
services>
4.
0---9:
<Numeric
buttons
for
Store
and
Recall
functions>
5.
Store:
<Use
to
store
99
radio
stations>
6.
Recall:
<Use
to
Play
up
the
pre-setting
stations>
7.
--/-
:
<Select
the
numeric
bits>
8.
Select:
<Press
to
select
a
displayed
option>
9.
Back:
<Press
to
go
back
to
the
previous
display>
10.
+
VOL
-:
<Use
to
adjust
the
volume>
11 .
UP
\DOWN
:
<Use
to
search
for
stations,
and
use
to
change
the
option
show
on
the
display>
12.
Browse:
<Press
to
view
the
name
of
the
track
currently
playing
and
then
turn
the
TUNE
to
see
the
list
of
tracks
waiting
in
the
play
queue>
13.
Play/Pause:
<Press
to
play/pause
playback>
14,
Stop:
<Press
to
stop
playback,
with
a
track
name
displayed,
press
and
hold
to
delete
the
track>
15.
:
<Press
to
start
playback
at
the
previous
track>
16.
:
<Press
to
start
playback
at
the
next
track>
17.
MODE:<Press
to
swtich
Flat/Bass/Classical/Jazz/Pop/Rock
equalizations,Flat
style
as
default>
.
Front
Figure.
-25-