King Champion Electronics MXA10CI00001 Internet Radio User Manual MX 10C
King Champion Electronics Ltd. Internet Radio MX 10C
UserManual.wiki
>
King Champion Electronics
>
MXA10CI00001 User Manual
user manual 6.24
Navigation menu
Upload a User Manual
Namespaces
Wiki Guide
HTML
PDF
Info
Views
User Manual
Discussion / Help
Navigation
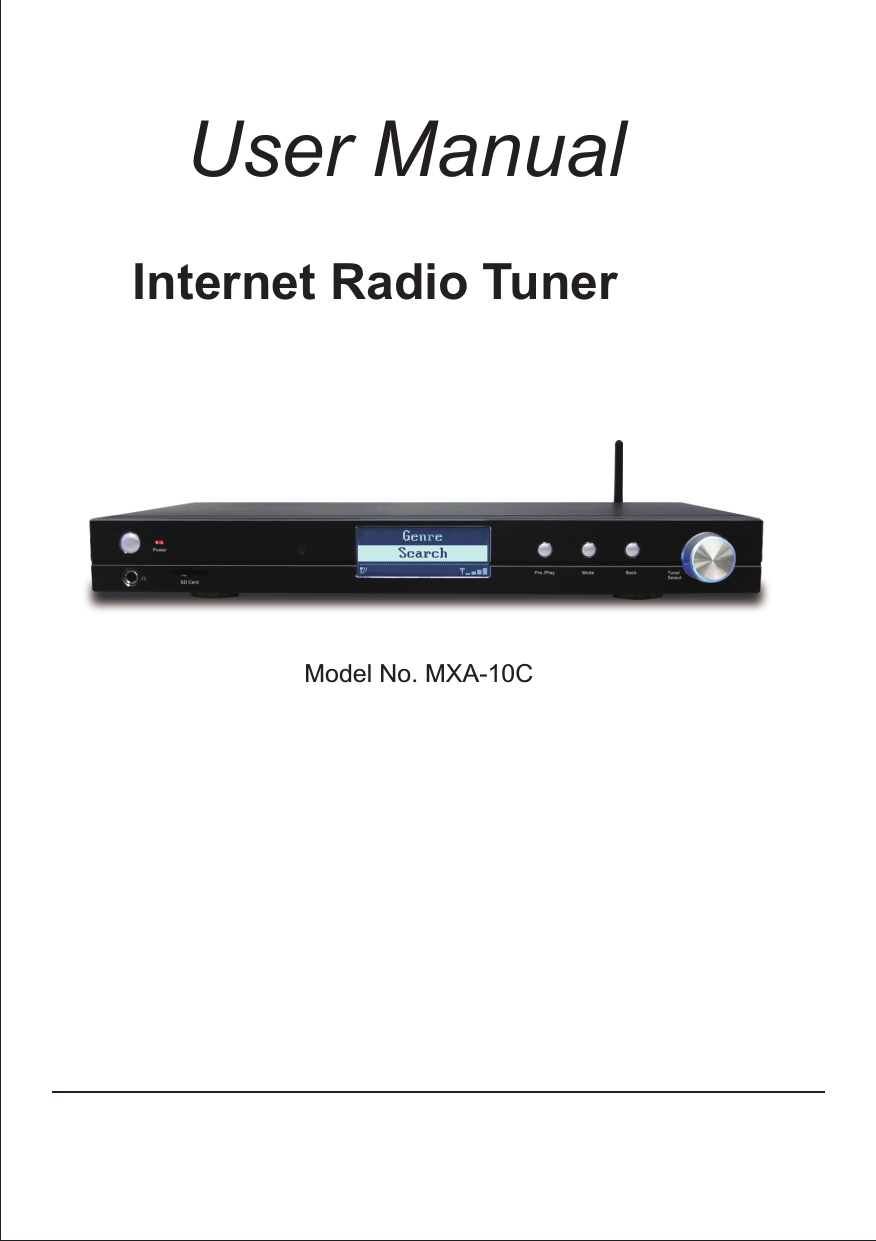
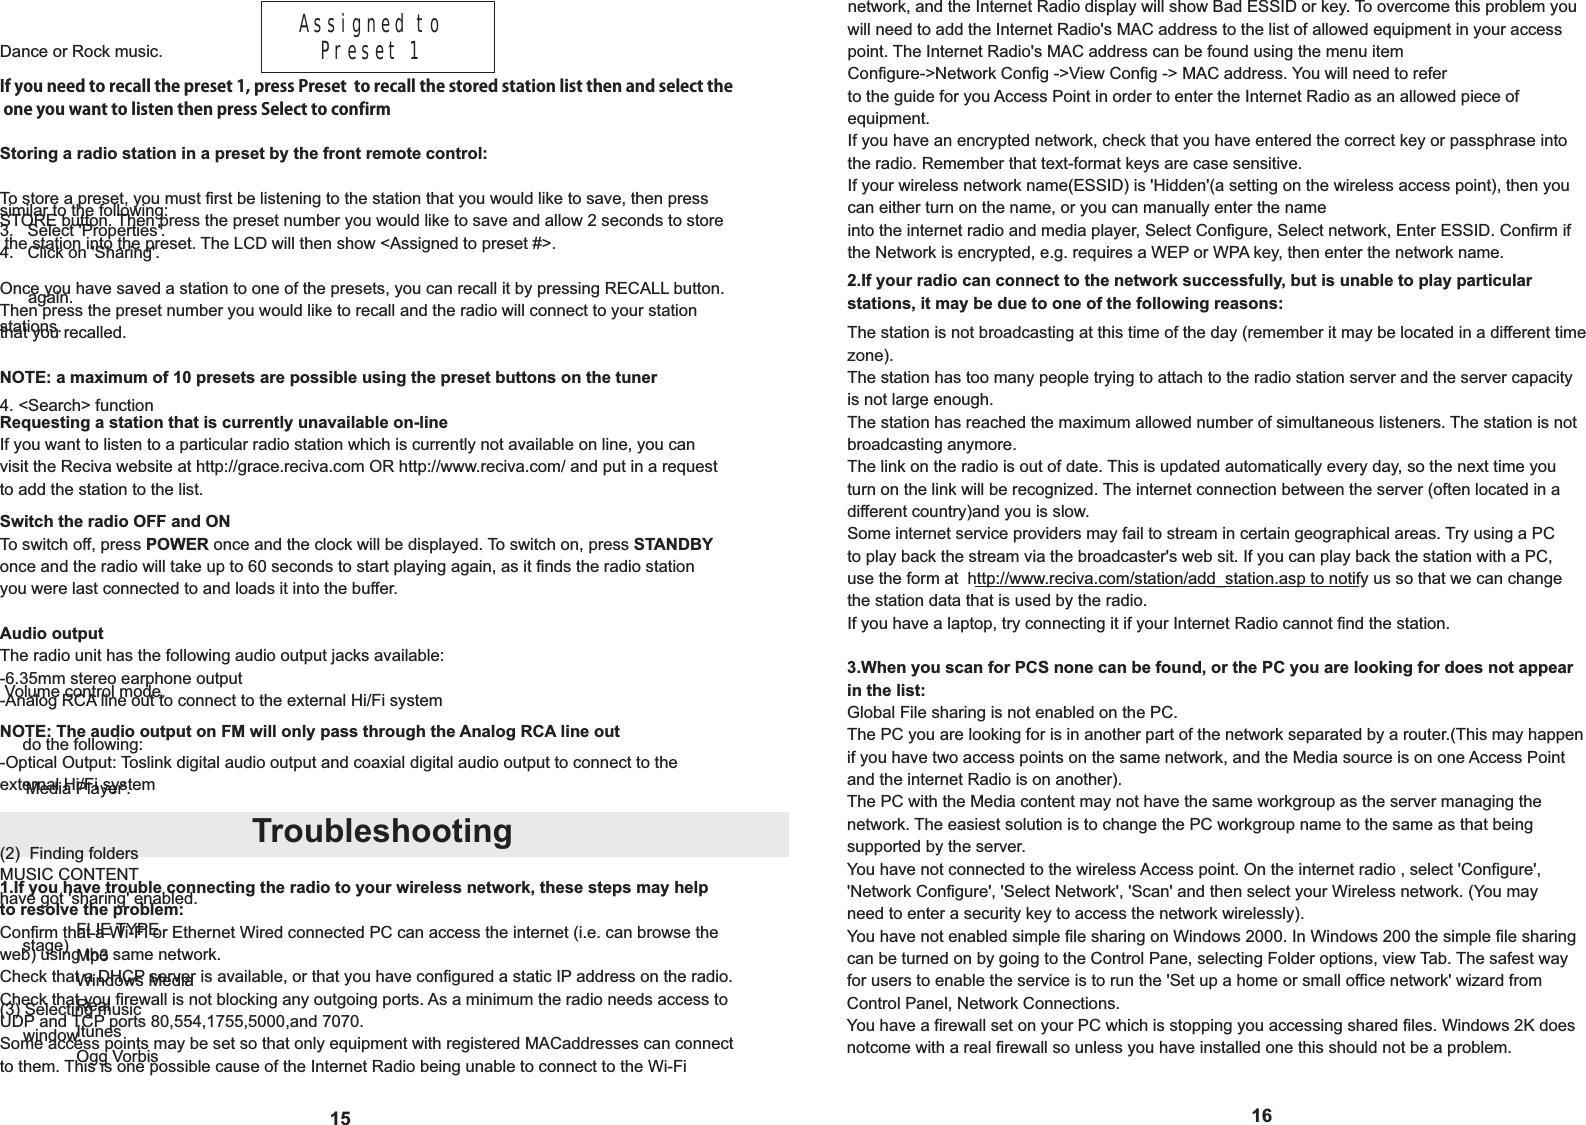
![72. Select the station by <Genre>:Choose the stations by category or by the type of music, such as the music from 90s, Classical, 90s Adult3. Press the Select button to choose the station you want to listen to, and the display will appear Loading xxx stations …BBC Radio 1BBS Radio 1XtraYou can search your favorite station by entering the station name. Select <Search> from the menu, and then input the name of the station by using the Tune /Select button. Tuning the button to select the letter and push down to confirm. Searching …BBC Radio 1BBS Radio 2< END <> A BCDEF > B/8How to enjoy your Media stream(These are the letters that appear after the file name. e.g. MUSIC.mp3)Select Media Player' on the menu:My StuffMedia PlayerPlayback music from SD card or USB drive1. To playback music files from the SD card or USB drive, select <Local Media> from the menu, then press Select to enter your local media player.Windows Shares Local Media2. The unit begins scanning the files from the SD card or USB drive. File Scanning…Loading…The music in the local media can be sorted by Album and by Artist:By AlbumBy ArtistIMPORTANT: Please always insert the SD card or USB drive before you turn on the unit. The file cannot be accessed if the SD card or USB drive are inserted under other operationof the unit.Go to <media player>, you can enjoy the music from your PC, SD card or USB drive.The internet radio is able to playback the following formats:FLIE EXTENSION SHOWN ON PC.mp3.wma.Ra.aac.ogg3. You can play the music by track. Select your desired music, then confirm by selecting Add to Queue. Or you can add the whole music folder into the playback queue:[Add to Queue]Music oneStreaming music from your PC by UPNP or Windows Shares:UPnP ServersWindows SharesPlayback music via 'Windows Shares':In order to play the music files you have stored on your PC via the Media player you must ensure the following:](https://usermanual.wiki/King-Champion-Electronics/MXA10CI00001/User-Guide-1302053-Page-6.png)
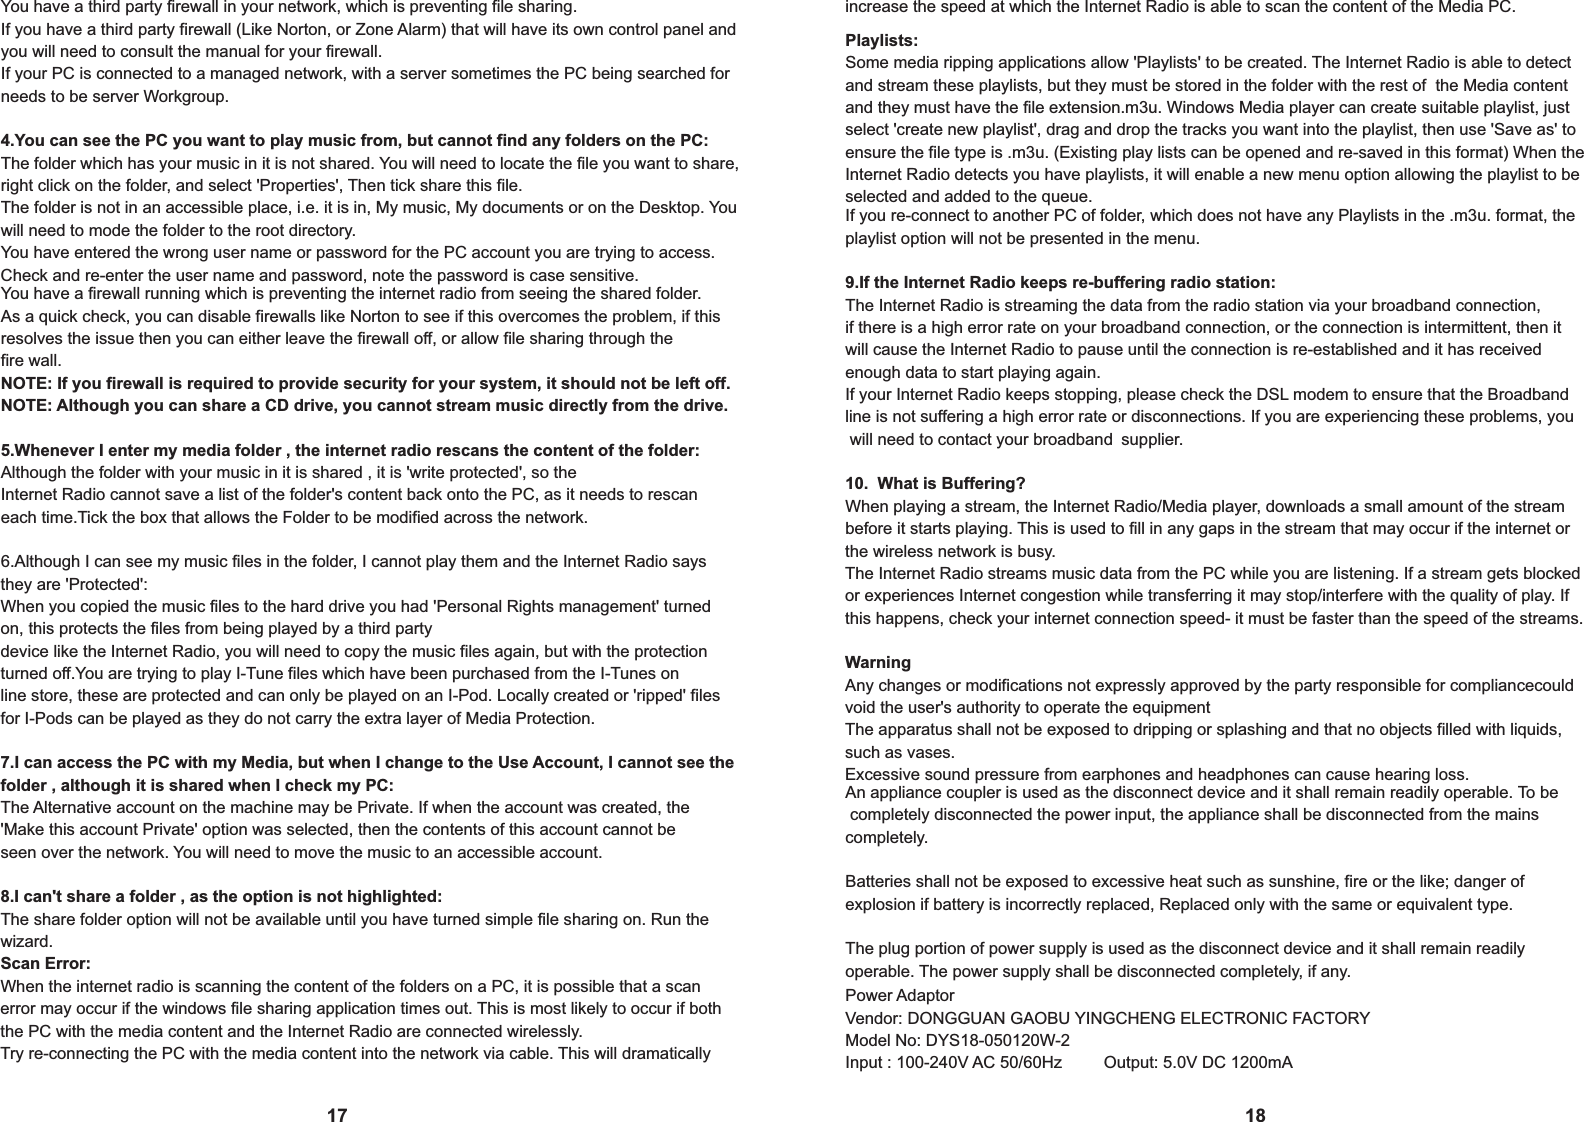
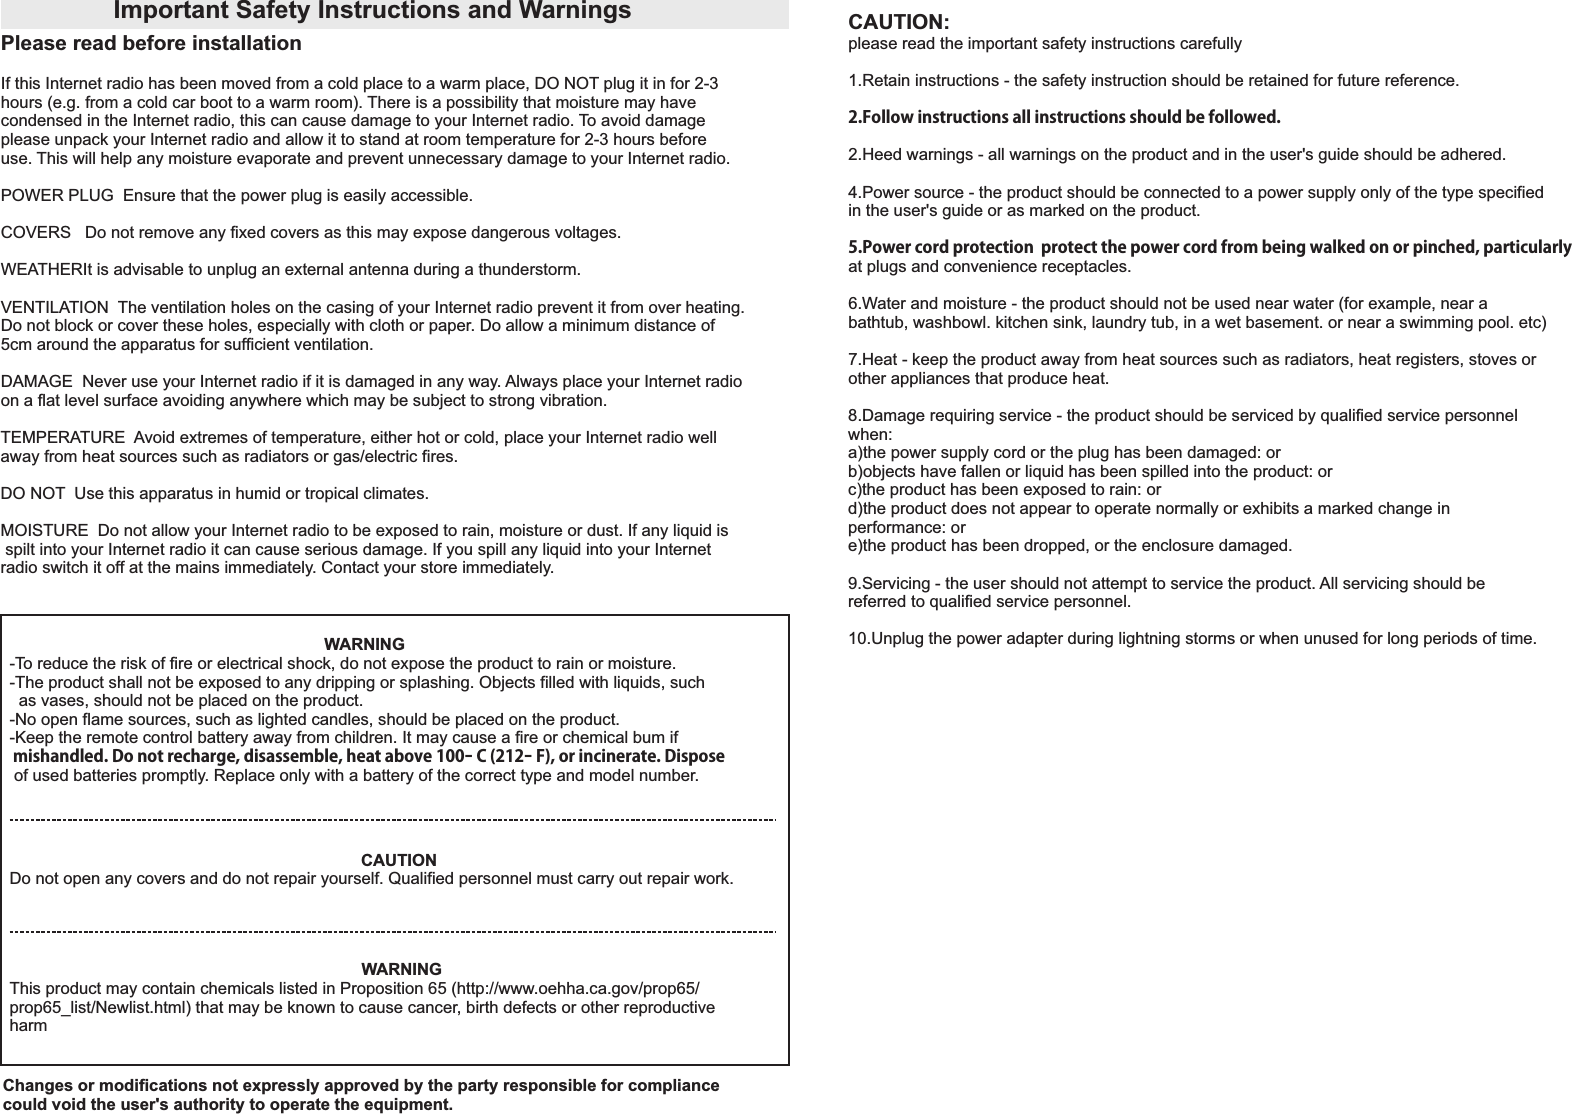
![9-Your PC has the type of music files as listed in the table below-The music files on your PC are not 'protected'-The music files are stored in the correct location on your PC- The music files on your PC are shared on the network-You know the name of your PCSet up your Windows PC to allow your radio to access your audio files via Windows Shares1. Please ensure that your PC is available on the network for you Internet radio, then, using windows Explorer, locate the folder where your audio files are stored.2. Right Click on the folder.5. Press the SELECT button, turn the knob until 'Scan for PCs' is displayed and press SELECT 6. The radio will now display 'Finding PCs '. Once the radio has finished, turn the knob to highlight the correct PC.7. Press the SELECT button. The radio will search for shared folder.8. Turn the knob to highlight the correct shared folder and press SELECT.9. The radio will display 'File Scan' as it scans through the media files in the shared folder. Text on the bottom row of the display will change to indicate that the file scan is in progress. If you have a large number of audio files this could take several minutes to complete.10. Once the radio has finished scanning, it will display' By Album'. You can now browse through the scanned media files, which will now be organized 'By Album',' By Artist'- if available.NOTE: the first time the file scan is done a file called '.reciva_media_cache' is written to the folder where the audio files are stored. This is in order to speed up subsequent file scans.10Listening the music by Artist1. Turn the knob until ' By Artist' is displayed.2. Press the SELECT button.3. Turn the knob until the required artist is displayed.4. Press the SELECT button.Listening the music by Album1 Turn the knob until the required album name is displayed.2. Press the SELECT button.' [Add to Queue]' will be displayed.3. Turn the knob until the required track is displayed.4. Press the SELECT button. The track will begin playing.Listening to a complete shared album1. Turn the knob until 'By Artist' is displayed.2. Press the SELECT button.3. Turn the knob until the required artist is displayed.4. Press the SELECT button.5. Turn the knob until the required album name is displayed.6. Press the SELECT button. '[Add to Queue]' will be displayed.7. Press the SELECT button. The album will begin playing.Queuing up tracks for playback later1. Select the desired track.2. 'Track Added To Queue' will be displayed.Queuing up albums for playback later.1. Select the desired album.2. Press the SELECT Button.3. Turn the knob until '[Add To Queue]' is displayed.4. Press the SELECT button.' Tracks Added to Queue' will be displayed. Listening to the music from Windows Shares(1) By selecting the Windows Share feature, it will scan out the PCs available from the network. Please follow the steps described above to enable the folders shared successfully from your PC. Select the name of your PC, the press the SELECT button. NOTE: If the PC does not have global file sharing turned on, or a third party firewall is protecting the PC it will not be visible when you scan for it.You may be asked to enter a username and password to access the PC you have selected. This is the same user name and password you would enter for the PC. The internet radio will now scan the PC you have selected and display a list of any folders which NOTE: It will scan out the shared folders from your PC regardless of the type/content of thefolder. Select the folders which have the music file, and press the select button.You can now view the content of the shared folder by Album or Artist. Use the TUNE/SELECT button to browse through the list.Controlling playback1. Use the STOP button to stop playback.2. Use the PLAY/PAUSE/STOP button to either pause a currently playing track or to restart a currently paused track or to restart a stopped track.3. Use the PLAY/PAUSE/STOP button to stop a currently playing when you press and hold the button for 2 seconds.4. Use the Left arrow button (<)on the remote control to start playback of the previous track in the queue.5. Use the Right arrow button (>) to start playback of the next track in the queue.Browsing the list of tracks currently queued up for playback1. Press the BROWSE button on the remote control. The currently playing track name will be displayed.2. Turn the Tune/Select knob to see which tracks are queued up for playback.3. If you want to jump to a particular place in the queue the SELECT button when the required track is displayed.](https://usermanual.wiki/King-Champion-Electronics/MXA10CI00001/User-Guide-1302053-Page-7.png)
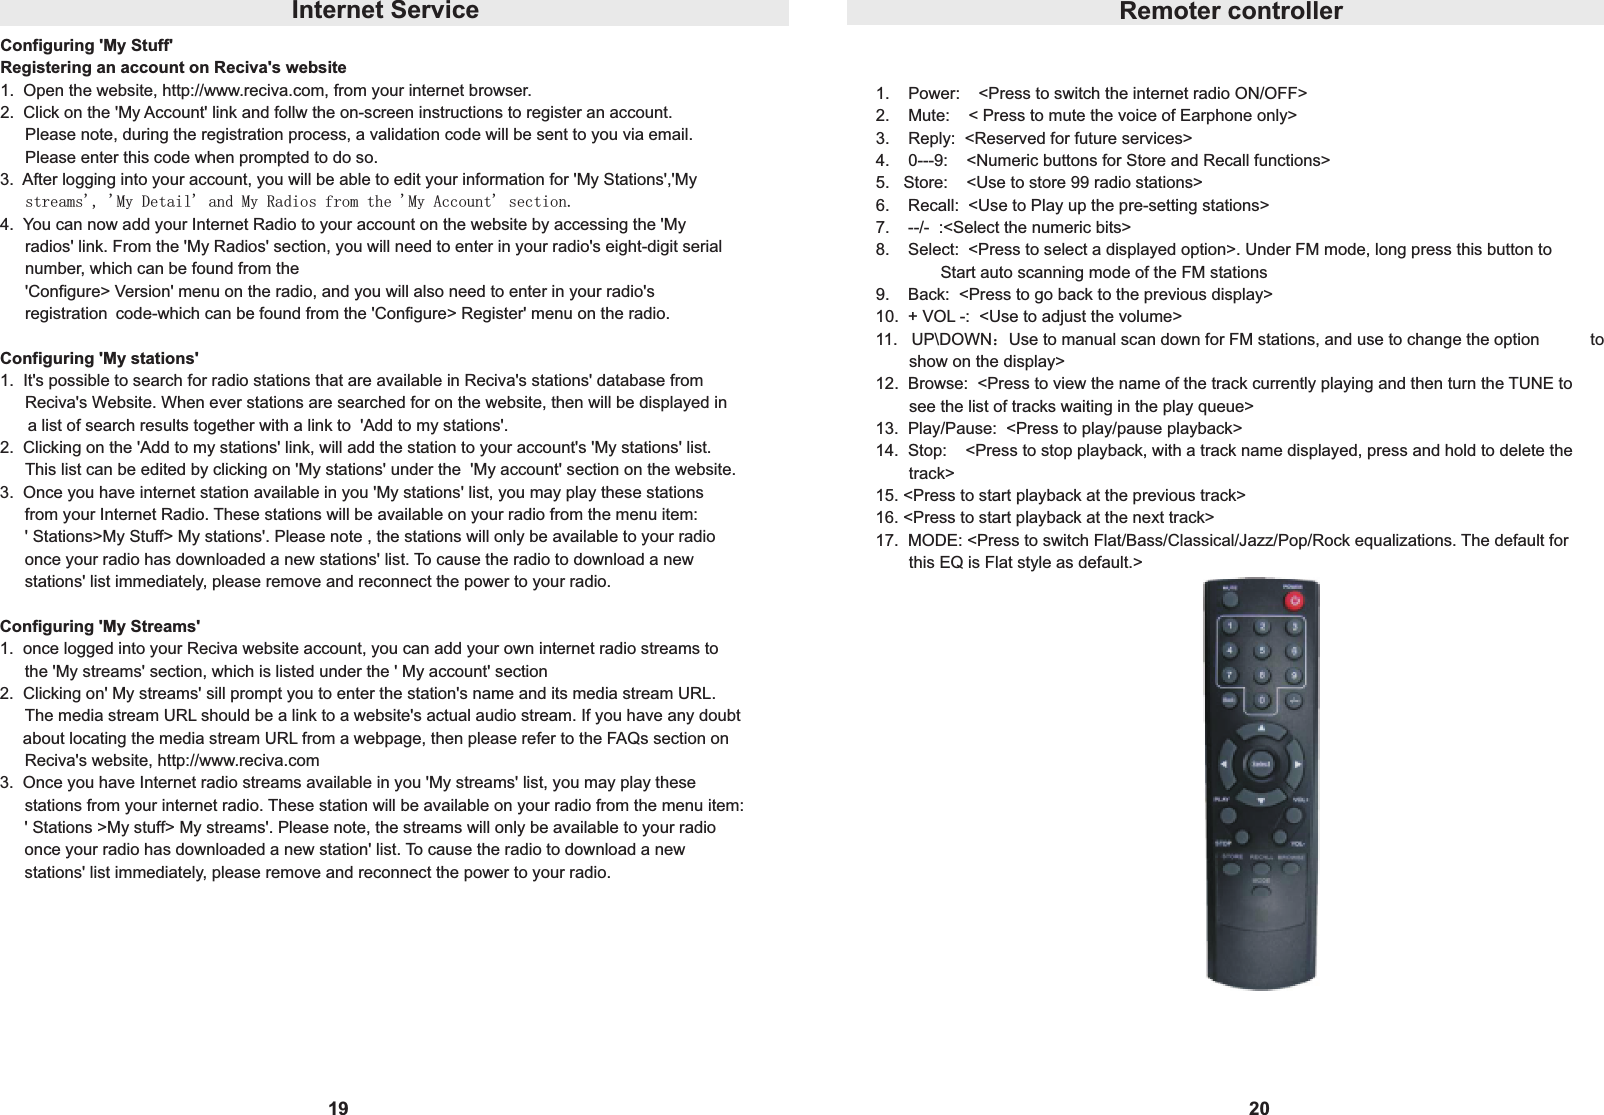
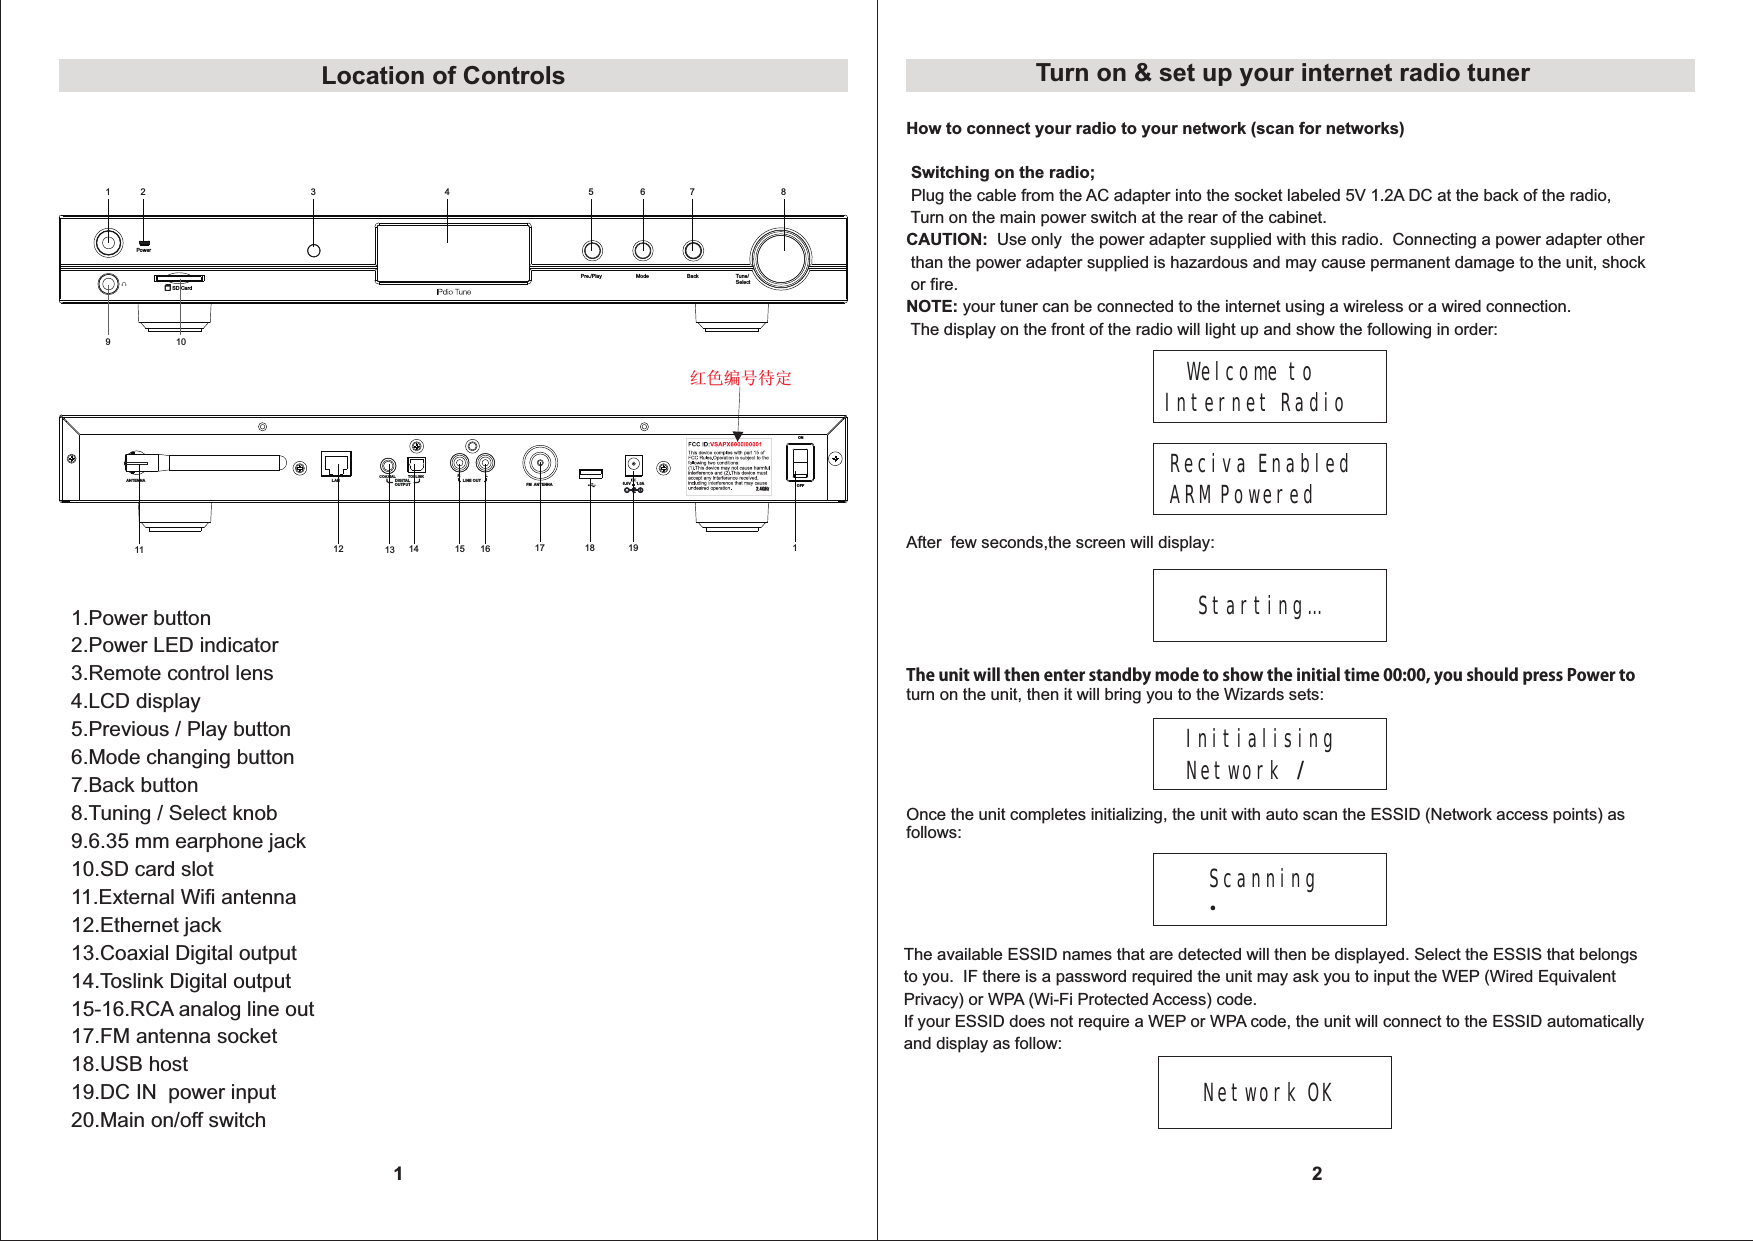
![Playing tracks in random order1. Navigate to top-level menu item 'Media Player' using the SELECT and BACK buttons.2. Press the SELECT button.3. Turn the knob until 'Playback Mode' is displayed.4. Press the SELECT button.5. Turn the knob until 'SHUFFLE' is displayed.6. Press the SELECT button.7. Turn the knob to select YES/NO to confirm that shuffle mode should be enabled.Playing tracks in the queue repeatedly1. Select the individual tracks as described previously.2. Navigate to top-level menu item 'Media Player' using the SELECT and BACK buttons.3. Press the SELECT button.4. Turn the knob until 'Playback Mode' is displayed.5. Press the SELECT button.6. Turn the knob until 'Repeat' is displayed.7. Press the SELECT button.8. Turn the knob to select YES/NO to confirm that shuffle mode should be enabled.Playback music from 'UPnP Severs' You can enjoy the music from the UPnP device, follow the steps below:Setup a Windows PC to allow the radio to access you audio files via a UPnP serves1. If your PC is running Microsoft Windows XP, then you can use Windows Media Player 11 (WMP11) to act as your UPnP( Universal Plug and Play) media server 1.0. Windows Media Player 11 may be downloaded from Microsoft's website and install by following the instructions detailed in its installation wizard.2. Once installed , Windows Media Player 11 will create a library from all the media files available to it on your PC. To add new media files to the library,select' File > Add to Library> Advanced Options', Click 'Add' and choose the files you wish to add and click' OK'.3. You will now need to connect your Internet radio to Windows Media Player 11 and configure it to allow the radio to access your media library. In order to this , you will need to a. Keep pressing BACK to get to the radio's top-level menu and then turn the rotary knob to select b. Press SELECT and then turn the knob to highlight ' UPnP Serves'.c. Press SELECT and the radio will scan for all available UPnP servers . Note, this may take a few seconds for the radio to complete its scan and before the scan has completed , the radio will display '[Empty]'. The radio will continue to display '[Empty]' if no UPnP servers and found.d. After a successful scan. Select your UPnP server, by rotating the knob if there is more than one UPnP server, and then press SELECT (note, your radio will display' Access Denied' at this 114. Your PC will now prompt you that a device has attempted to connect to yourUPnP server. In order to allow the radio to have access to the media files, you will need to click the 'Library' tab from Windows Media Player 11 and select the 'Media Sharing' item to open the 'Media Sharing' 125.From the 'Media Sharing' windows, the radio will be listed as an unknown device. Click on the unknown device listed, then click the 'Allow' button and then click 'OK' Allowing the Radio to Connect:Selecting 'Media Sharing' for Windows Media Player11 :6. Once the UPnP server is configure to share media files with the internet radio, you can play the files by doing the following on the radio.7. Select 'Media Player' from the main menu.8. Press SELECT and then select 'UPnP Severs'.9. Press SELECT and the radio will scan for all available UPnP servers. Note: This may take a few seconds for the radio to complete its scan and before the scan has completed, the radio will display '[Empty]' if no UPnP servers are found.](https://usermanual.wiki/King-Champion-Electronics/MXA10CI00001/User-Guide-1302053-Page-8.png)
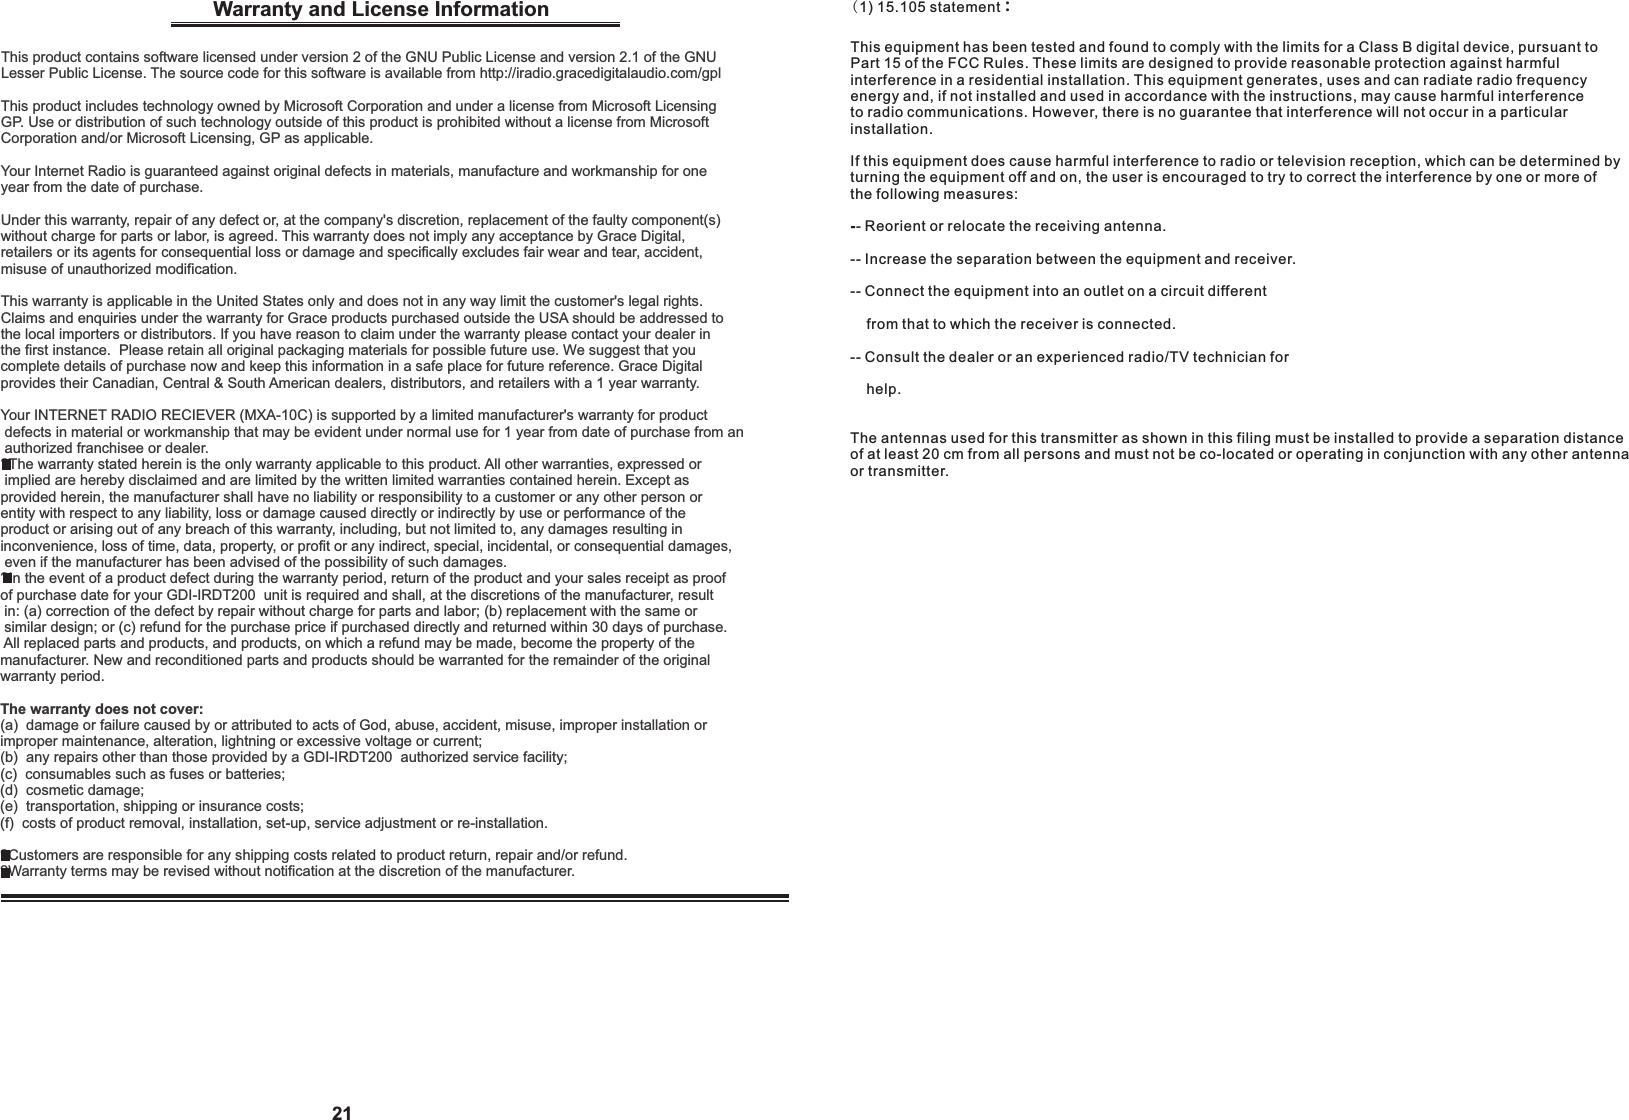
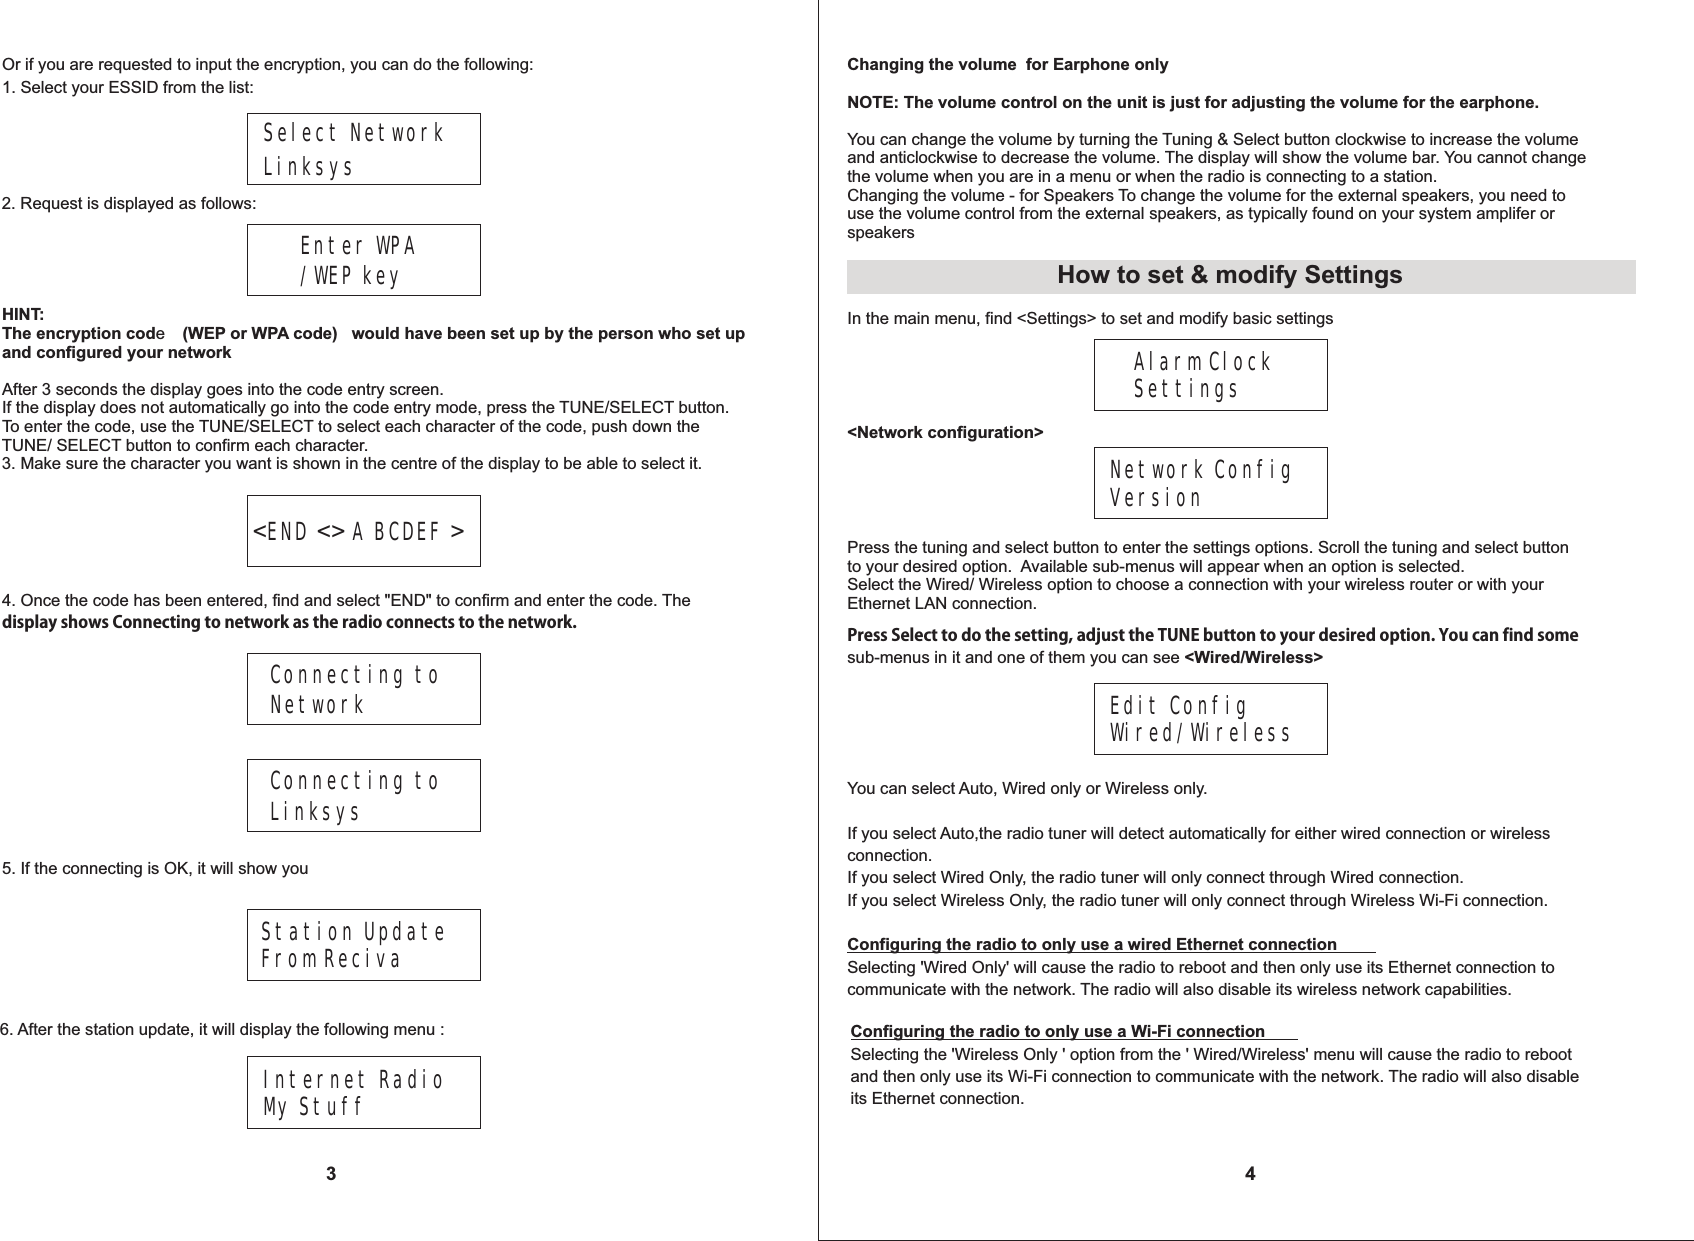
![13Media Player FM1. Push and hold the Tune/Select button, it will automatically scan up the FM frequency and play the next one station, it can scan from 87.5MHz to 108MHz. NOTE: You can only scan up 88.8MHz 89.8MHz.2. If you want to fine tune the FM frequency, you can press the Select once to shift the Volume control function to Frequency control as below14Frequency:89.8MHz FMThen you can turn the knob to adjust the frequency up or down to select the station. If you want to adjust the volume, press the Tune/Select button again to switch from the Frequency mode to NOTE: If you want to scan or auto scan the most clear and more stations, please place your wire antenna (supplied in the package) in the position as far as it can be extend. Set Time09:06Turn the knob to set the hours, then press Select to confirm the cursor will jump to minute, so you can adjust the minute.The Select to finish the time setting,and bring you to set the DateTime and Date SetThe display will show <Time Set> with the new time for 3 seconds, and then returns to the radio station display.Set Alarm Sleep timer2. You can select Disable all to disable all the alarm settings, or you can set to enable the 5 alarms.3. Rotate the knob to 1 group of clock alarm setting, then press the SELECT button.Set Alarm 08:20Select FM on the main menu. Press Select to confirm and you can listen to your desired FM Listening to FM stations How to set the Time/DateUnder <settings> menu, select <Time/Date>, you can then set the time:How to set the Alarm1. On the main menu, select <Alarm/Clock> to set the Alarm clock:Set Date19.MAY.09Turn the knob to set the day ,press "select" to confirm the coursor will jump to month set,and year ,you ocnfirm all the sets are OK,press "select" to complete the Time/Date seting.10. After a successful scan, select your UPnP server, by rotating the knob if there is more than on UPnP server, and then press SELECT.11. The radio will now list the media categories available from the UPnP server,e.g. 'Music', 'Playlists' etc. Turn the knob to select which category you wish to browse, press SELECT and turnthe knob to highlight a sub category and press SELECT again. For example, you could select'Music' and then 'Album'.12. Select the music files that you wish to play.13. The radio will display '[Add to Queue]', press SELECT and the radio will add the tracks to its queue and begin playing them automatically.5. There are 3 options of the wake to alarm for you to choose from: Buzzer, Preset Internet radio station or last listened FM station.Sleep Timeout 00:45Select Sleep Timer from the Alarm clock menu. Rotate the Knob to change the sleep timer and then press SELECT to begin the sleep timer;The range of the sleep timer is available from 00:15 to 03:15 < 15 minutes for each step >.Select OFF to turn off the sleep timer.4. Adjust your desired time of Alarm.NOTE: According to different time necessary, you can select your favorite setting for the alarm setting;Once/Every day /Weekly /Weekdays / Weekends options are available; How to set the Sleep Timer When a radio station (FM radio or internet radio) is being played, to store the station as a preset,press Pre.Play once and select the Preset 1. Then press and hold the Select key to store the playing station to preset 1How to store and listen the Preset station](https://usermanual.wiki/King-Champion-Electronics/MXA10CI00001/User-Guide-1302053-Page-9.png)