King of Fans BTADLK380950 Bluetooth Audio Light Kit User Manual
King of Fans, Inc. Bluetooth Audio Light Kit
user manual

Instruction Manual
ETL Model #Bluetooth Audio LK
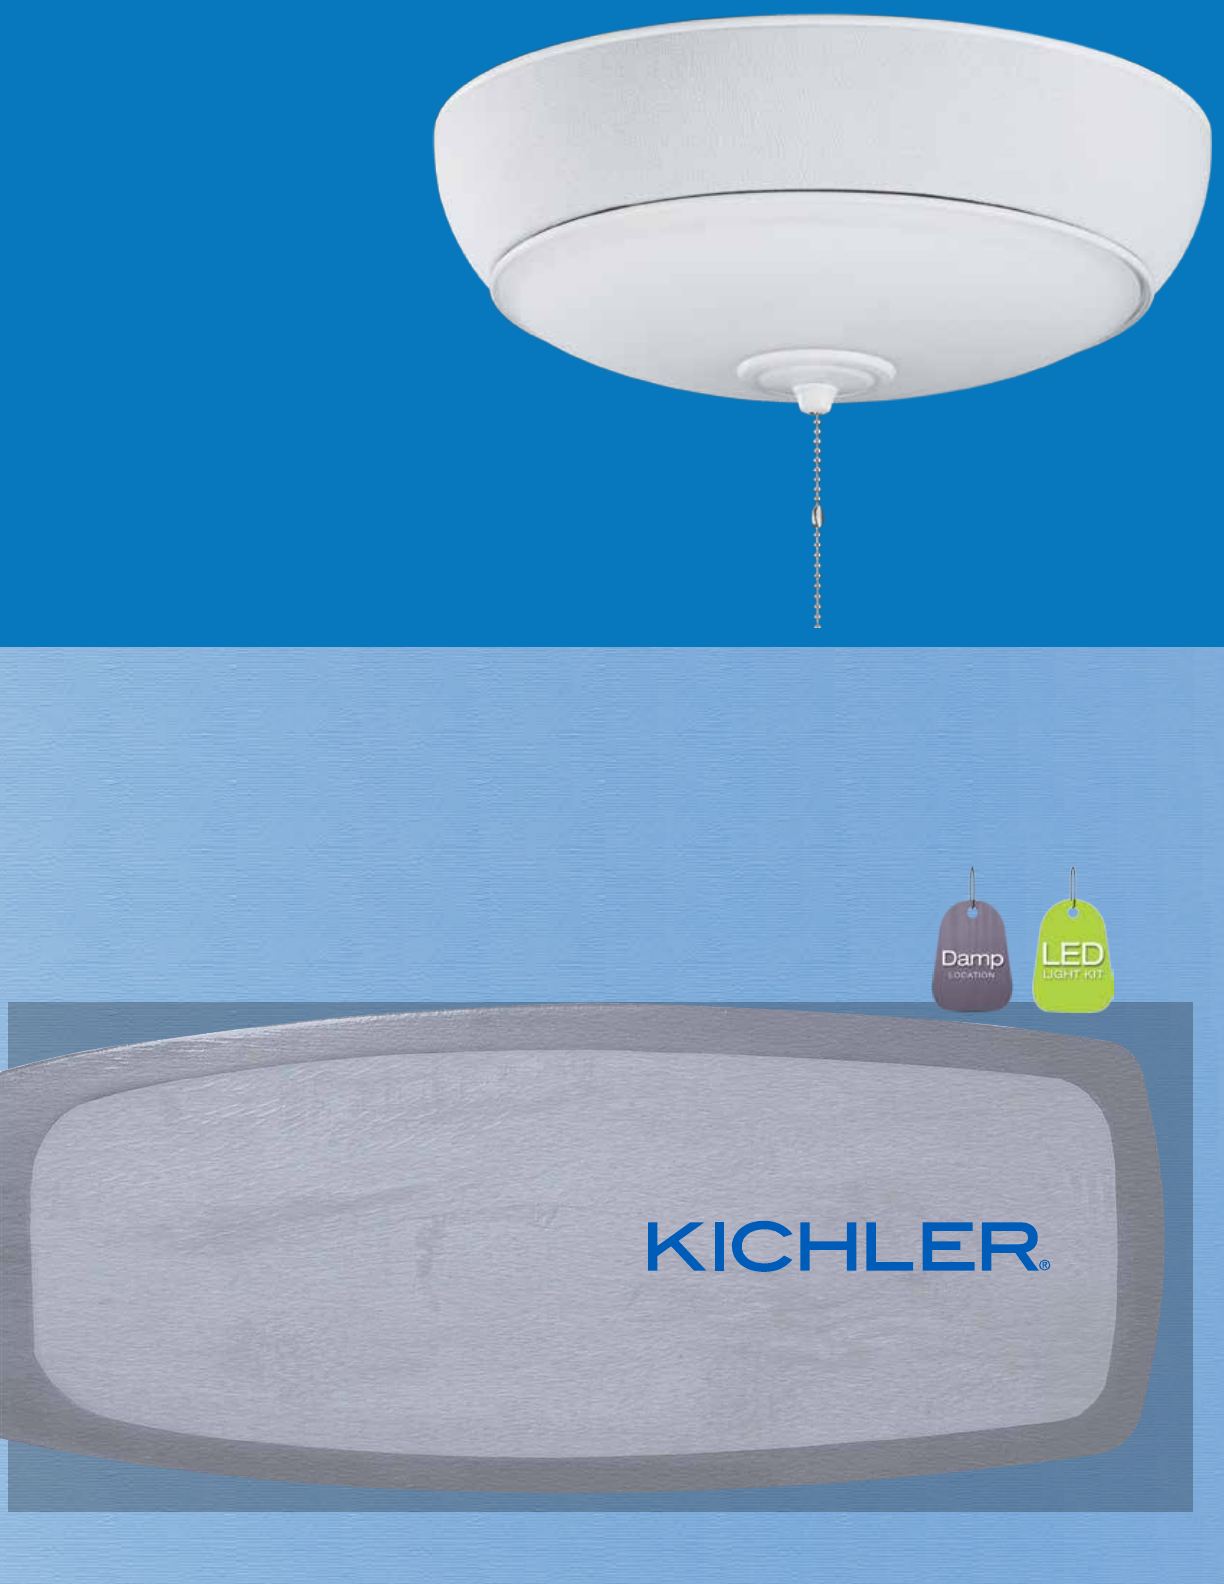
LED Ceiling Fan Audio Light Kit
Featuring BLUETOOTH® Technology
380950

However, there is no guarantee that interference will not occur in a particular installation. If this equipment does cause
4:Consult the dealer or an experienced radio/TV technician for help.
3:Connect the equipement into an outlet on a circuil different from that to which the receiver is connected.
2:Increase the separation between the equipment and receiver.
1:Reorient or relocate the receiving antenna.
harmful interference to radio or television reception, which can be determined by turning the equipment off and on, the
user is encouraged to try to correct the interference by one or more of the following measures:
and used in accordance with the instructions, may cause harmful interference to radio communications.
in a residential installation. This equipment generates uses and can radiate radio frequency energy and, if not installed
Part 15 of the FCC Rules. These limits are designed to provide reasonable protection against harmful interference
NOTE: This equipment has been tested and found to comply with the limits for a Class B digital device, pursuant to
77N.W.: 5.6KGS, G.W.:7 7
FCC ID:RGB-BTADLK380950
IC:10907
RSS standard(s). Operation is subject to the following two conditions: (1) this device may not cause interference, and
(2) this device must accept any interference, including interference that may cause undesired operation of the device.
777777777777777A-BTLK###0380950.This device complies with Part 15 of the FCC Rules and Industry Canada licence-exempt
1
1. SAFETY RULES (READ AND SAVE THESE INSTRUCTIONS)
1. To reduce the risk of electric shock, insure
electricity has been turned off at the circuit
breaker or fuse box before beginning.
2. All wiring must be in accordance with
the National Electrical Code and local
electrical codes. Electrical installation
should be performed by a qualied licensed
electrician.
3. CAUTION: All glass is fragile, use care
when handing the glass bowl.
4. CAUTION: To avoid accidental burning,
allow the bulb and glass bowl to cool
completely before touching or replacing the
glass bowl or bulbs.
5. CAUTION: To reduce the risk of electrical
shock, This light kit is suitable to be used in
damp locations.
6. WARNING: Changes or modications to
this unit not expressly approved by the party
responsible for compliance could void the
user’s authority to operate the equipment.
This product may cause interference to radio equipment and should not be installed near maritime safety communications
equipment, ships at sea or other critical navigation or communications equipment operating between 0.45-30 Mhz.
CAUTION:
To reduce the risk of electrical shock, this light should be used only with the fan model listed below:
Model: K52-403
Manufactured by company:
Chein Luen Industries (Zhongshat)LTD
7.9KGS
2
LED Ceiling Fan Audio Light Kit
Featuring BLUETOOTH® Technology
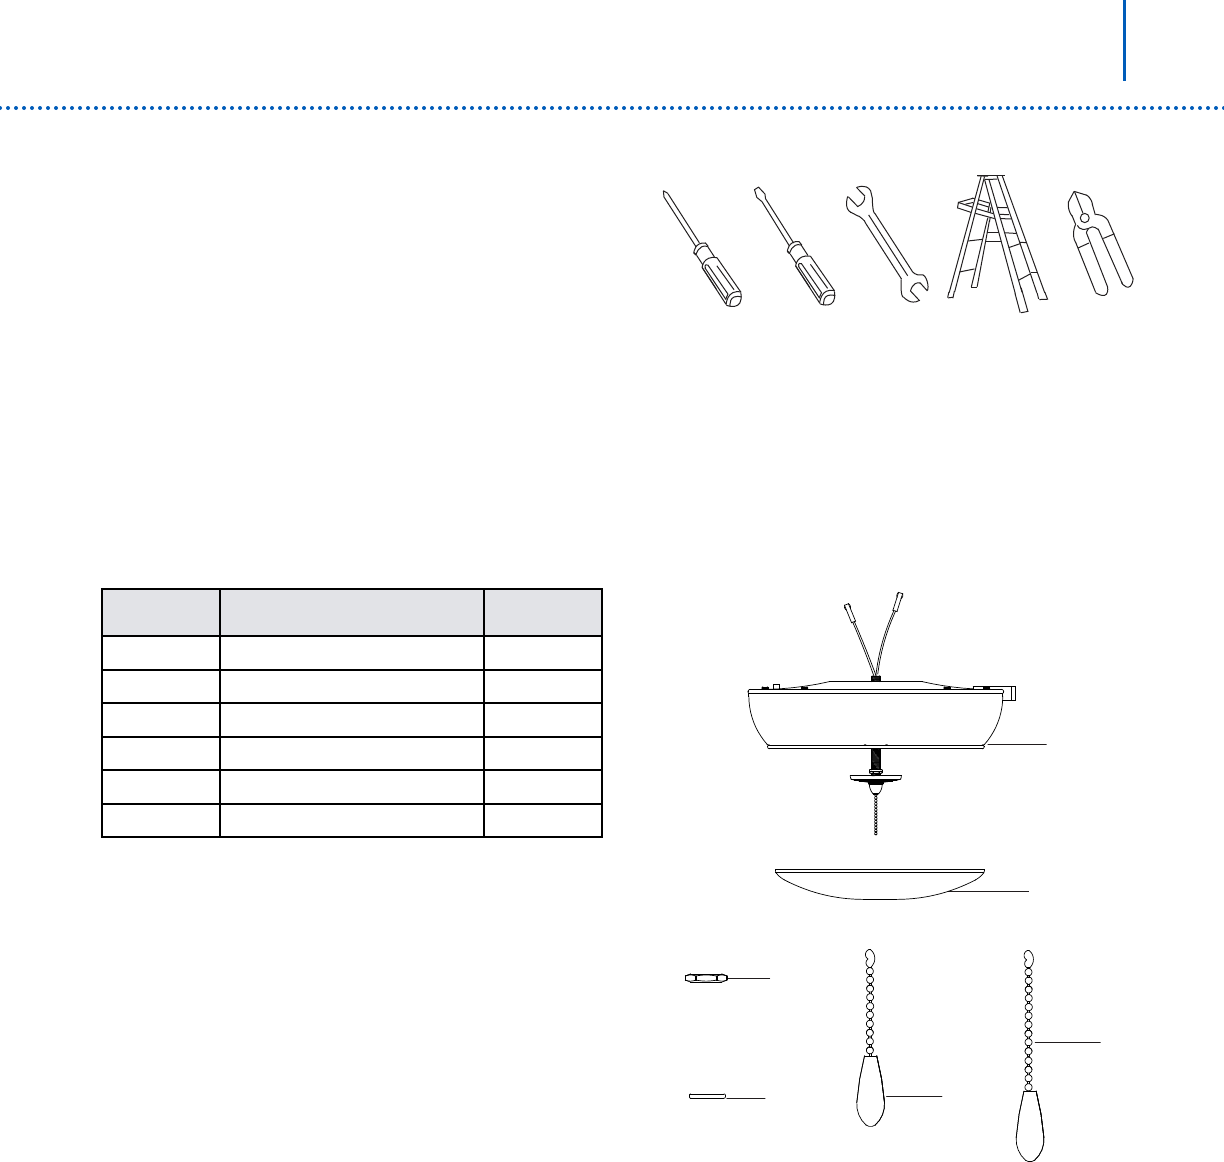
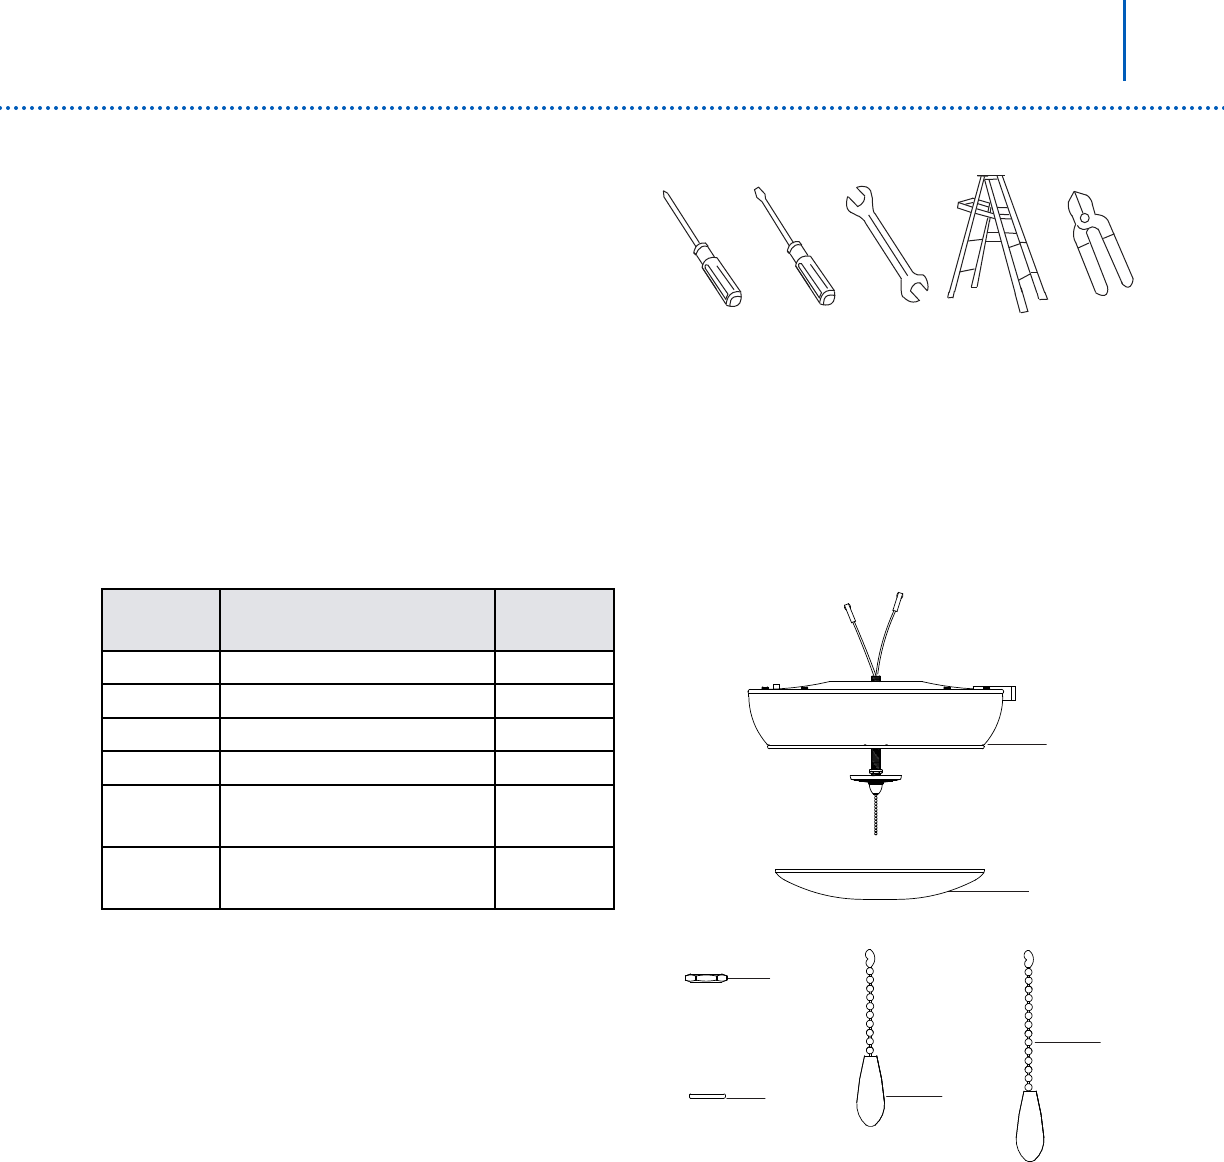
2. TOOLS AND MATERIALS REQUIRED
• Phillips screw driver
• Blade screw driver
• 11mm wrench
• Step ladder
• Wire cutters
• Electrical tape
3. PACKAGE CONTENTS
Unpack your fan and check the contents.
You should have the following items:
Part No. Description Quantity
aLight kit tter assembly 1
b Glass bowl 1
cHex nut 1
dRubber washer 1
e 4” Pull chain 1
f7” Pull chain 1
c
d
e
a
b
f
3
4. PREPARING THE FAN
Step 1. Remove the ceiling fan switch cup cover
from the ceiling fan assembly by removing the three
mounting screws.
Step 2. Remove the center plug from the switch cup
cover.
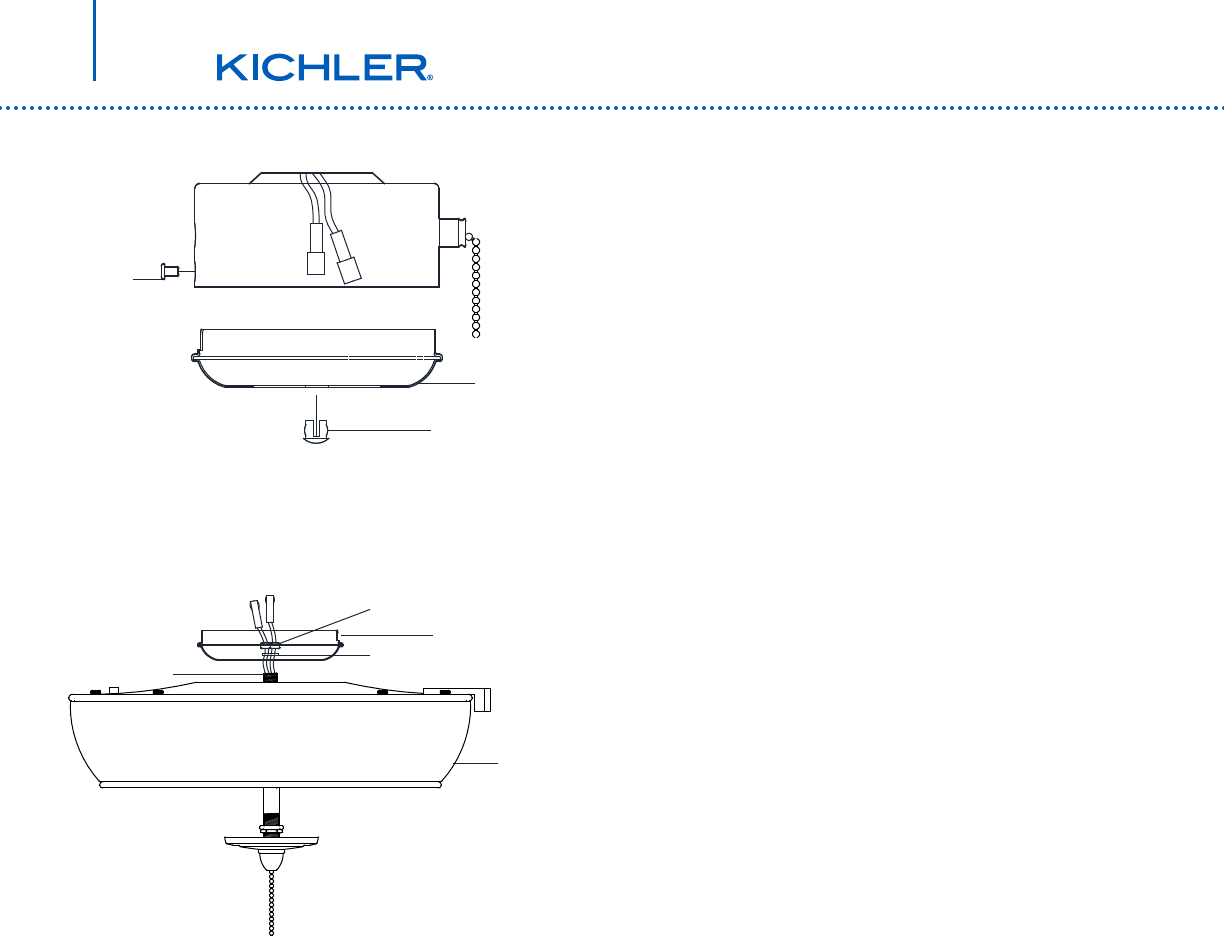
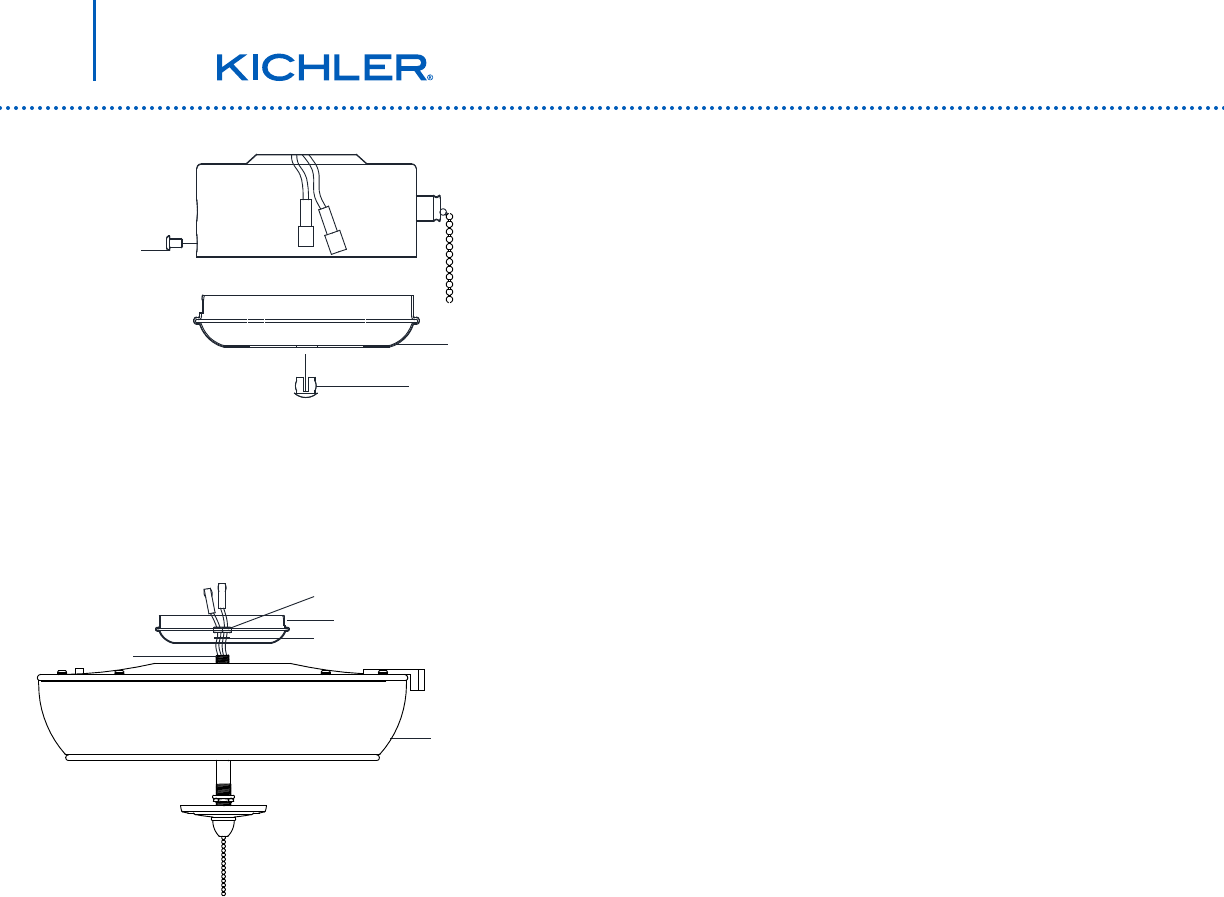
5. PREPARING THE LIGHT KIT
Step 1. Insert the black wire and white wire from
the light kit through the center hole of the ceiling fan
switch cup cover.
Step 2. Thread the ceiling fan switch cup cover onto
the threaded nipple on the top of the light kit.
Step 3. Take out the lockwasher and hex nut from the
hardware pack. Insert the black wire and white wire
through the lockwasher and hex nut, tighten them
securely.
Switch cup
cover
Center plug
Mounting
screws
Lockwasher
Light kit
Threaded nipple
Hex nut
Switch cup cover
4
LED Ceiling Fan Audio Light Kit
Featuring BLUETOOTH® Technology
6. WIRING THE LIGHT KIT TO THE FAN
REMEMBER to turn off the power before you
begin.
Step 1. Locate the blue and white wires inside
the ceiling fan switch cup for light connection.
Step 2. Connect the blue wire form the ceiling
fan switch cup to the black wire from the light kit.
Step 3. Connect the white wire from the ceiling
fan switch cup to the white wire from the light kit
by connecting the molded plugs together.
Step 4. Reattach the switch cup cover to the
ceiling fan switch cup and secure with the
screws that were removed in step of preparing
the fan.
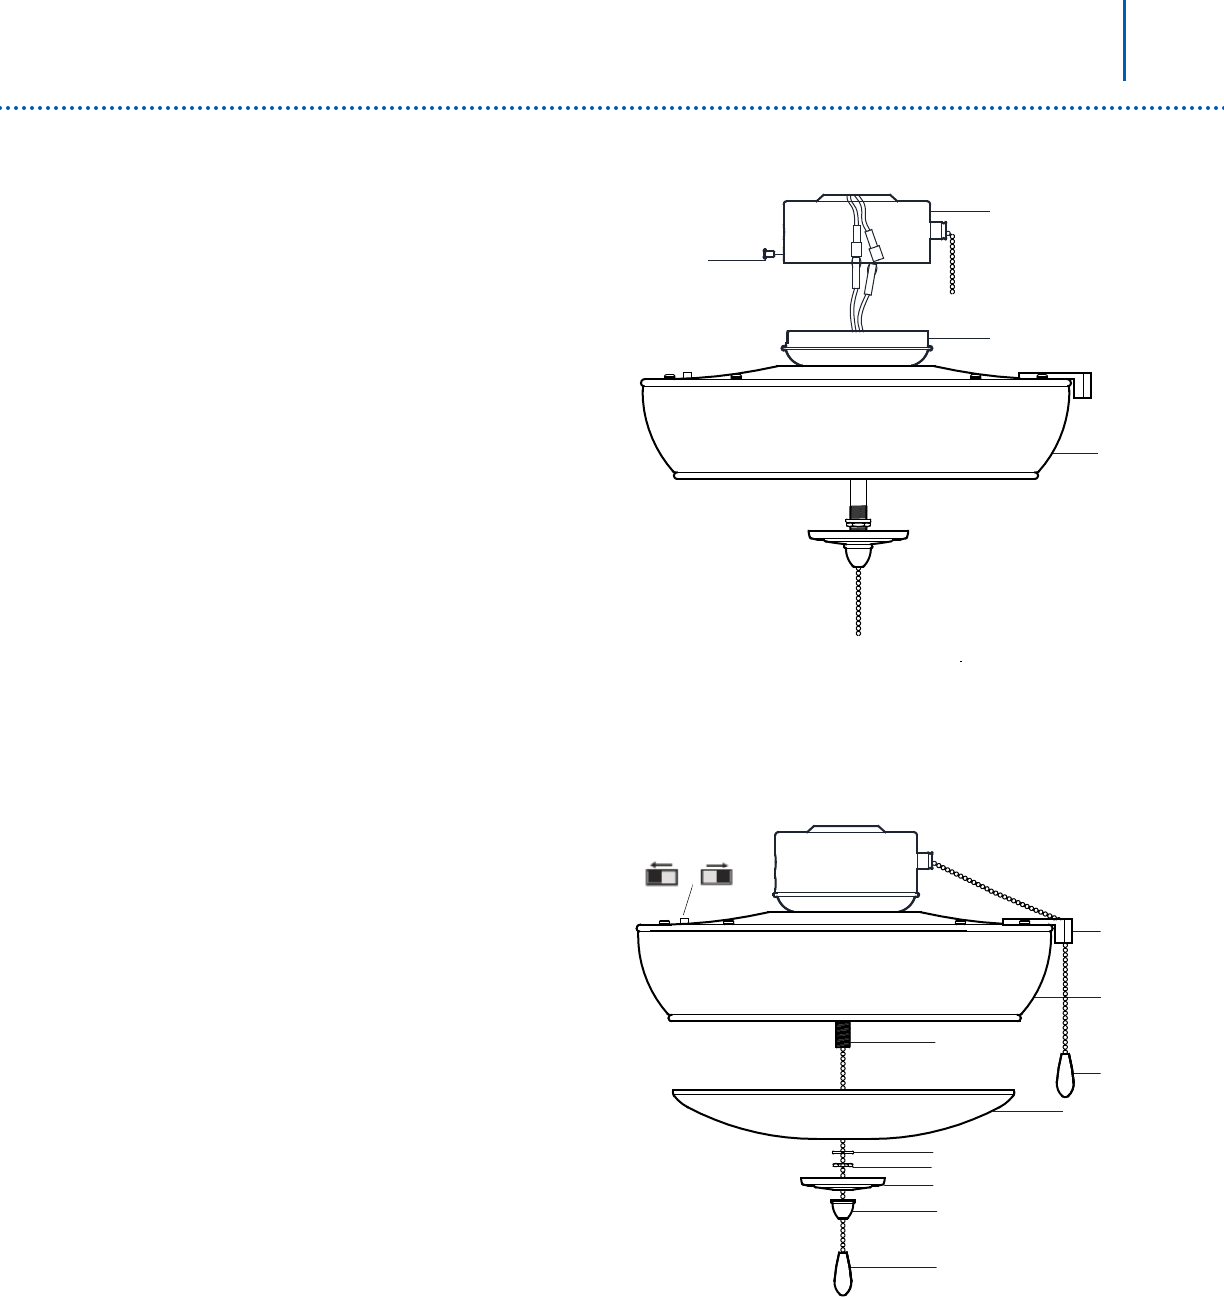
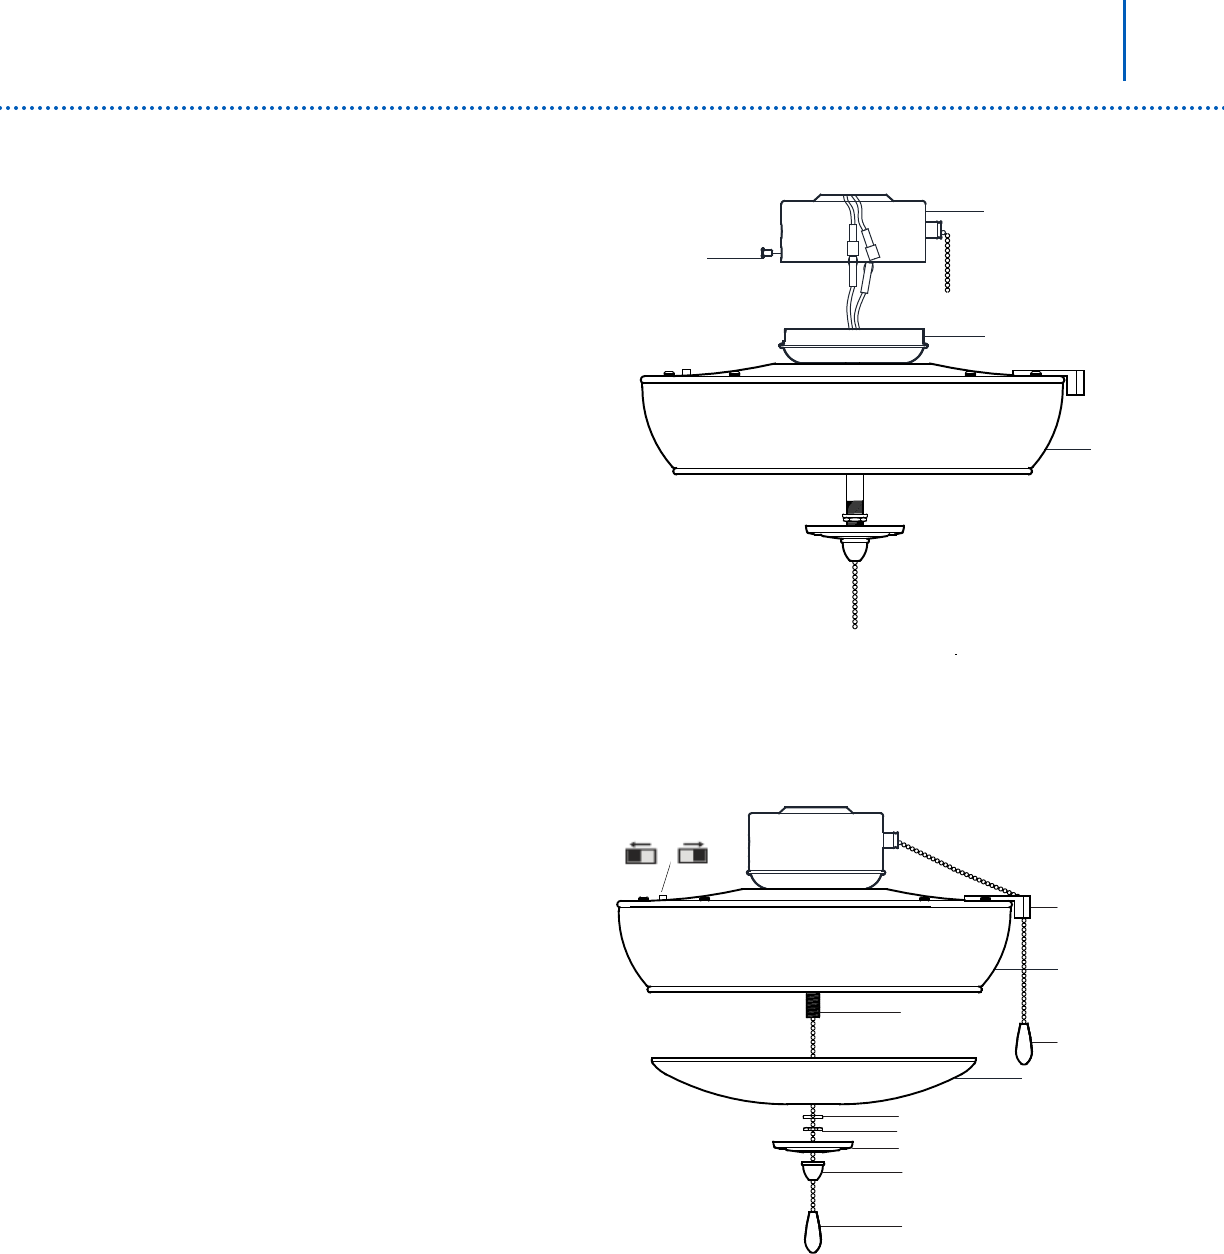
7. INSTALLING THE GLASS BOWL FOR
FANS WITH PULL CHAINS
CAUTION: Do not over-tighten the hex nut.
Over-tightening the hex nut may cause the glass
bowl to crack or break.
Step 1. Pass the fan switch chain through the
hole of the pull chain guide.
Step 2. Remove the pre-installed nial, outer
bowl cap, hex nut and rubber washer from the
light kit and save them for later use.
Step 3. Align the glass bowl over the threaded
nipple and raise the glass bowl up to the light kit.
Step 4. Pass the chain through rubber washer,
hex nut and tighten them with the screw driver.
Step 5. Pass the chain through the outer bowl
cap and align it on the threaded nipple and lock
it with the nial. Finger tighten.
Step 6. Attach the pull chain extensions to the
light switch chain and the fan switch chain.
Switch cup
Switch cup cover
Screws
Light kit
Light kit
Glass bowl
Pull chain
guide
Pull chain
extensions
OO
Rubber washer
Hex rut
Pre-installed finial
Pull chain extensions
Outer bowl cap
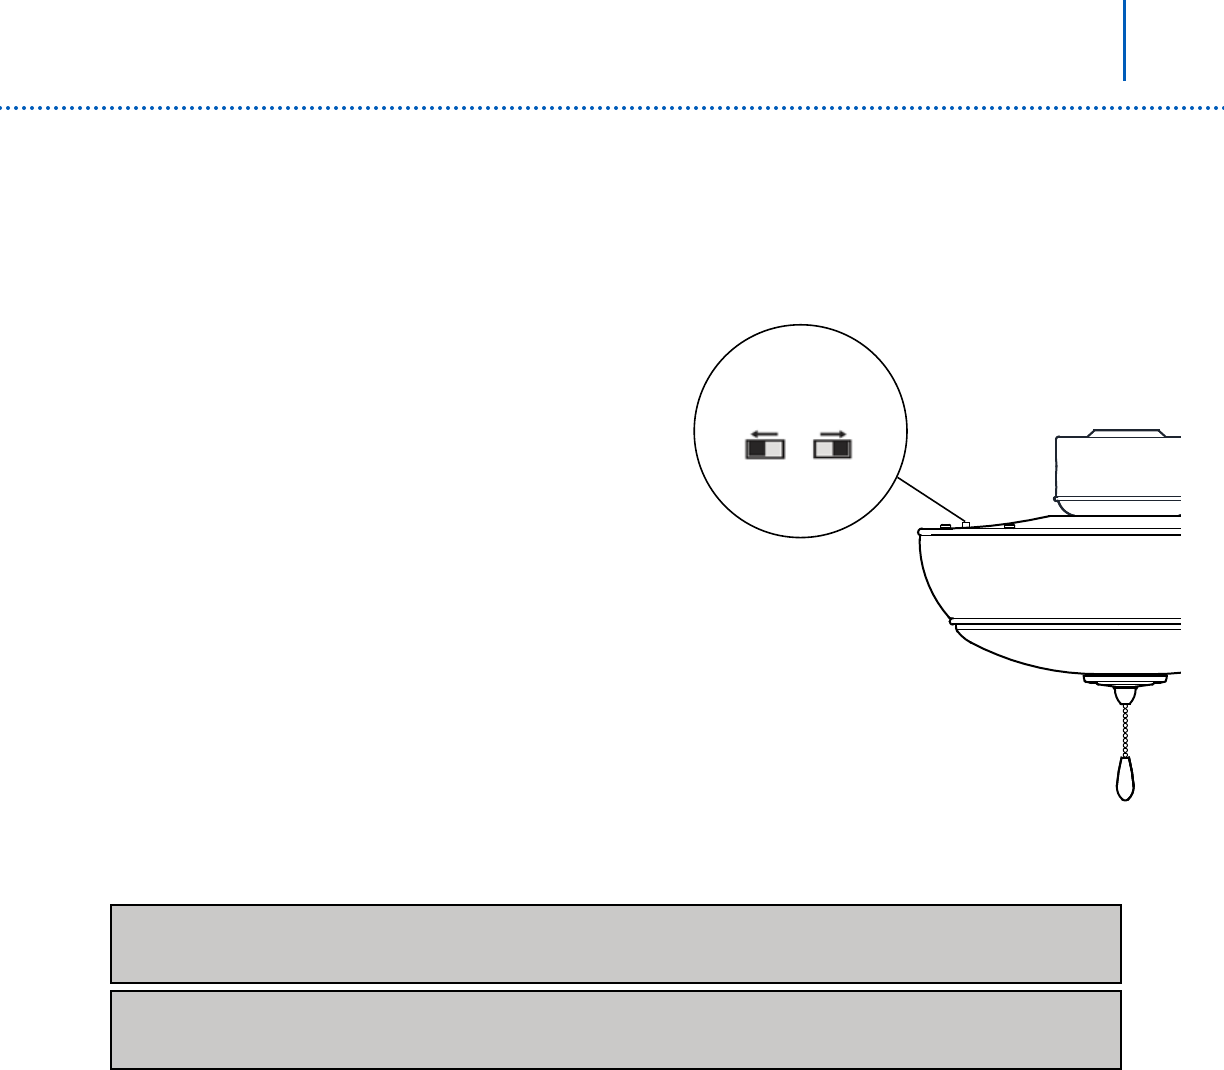
Secondary Mode
Primary Mode

5
NOTE: The ceiling fan audio light kit with BLUETOOTH® Technology is compatible with iPhone, iPad,
Android, Blackberry, or similar devices whose BLUETOOTH protocol is compatible with 4.1 protocol. To
pair, ensure the light kit is powered up.
Step 1. Pull the chain switch of the light kit to ensure the light kit is powered up. The BLUETOOTH®
function turns on automatically.
Step 2. On your BLUETOOTH® enabled device, search for a new BLUETOOTH® device called “BT Audio
LK” under the list of devices available.
Step 3. Pairing is successful when you hear a short conrmation tone from the audio light kit.
Step 4. Start streaming audio from your music source.
Step 5. For some BLUETOOTH® devices and mobile phones, “Stereo Speaker” mode should be enabled
to stereo audio wireless.
Step 6. The audio light kit is compatible with the 4.1 protocol. Full BLUETOOTH® functionality and volume
control cannot be guaranteed if the audio source has an older BLUETOOTH protocol.
Step 7. To pair to a new BLUETOOTH® device, you need to disable the current paired device. Open
searching function of the new BLUETOOTH® device and repeat the pairing steps as previously
mentioned.
8. BLUETOOTH® PAIRING
6
LED Ceiling Fan Audio Light Kit
Featuring BLUETOOTH® Technology
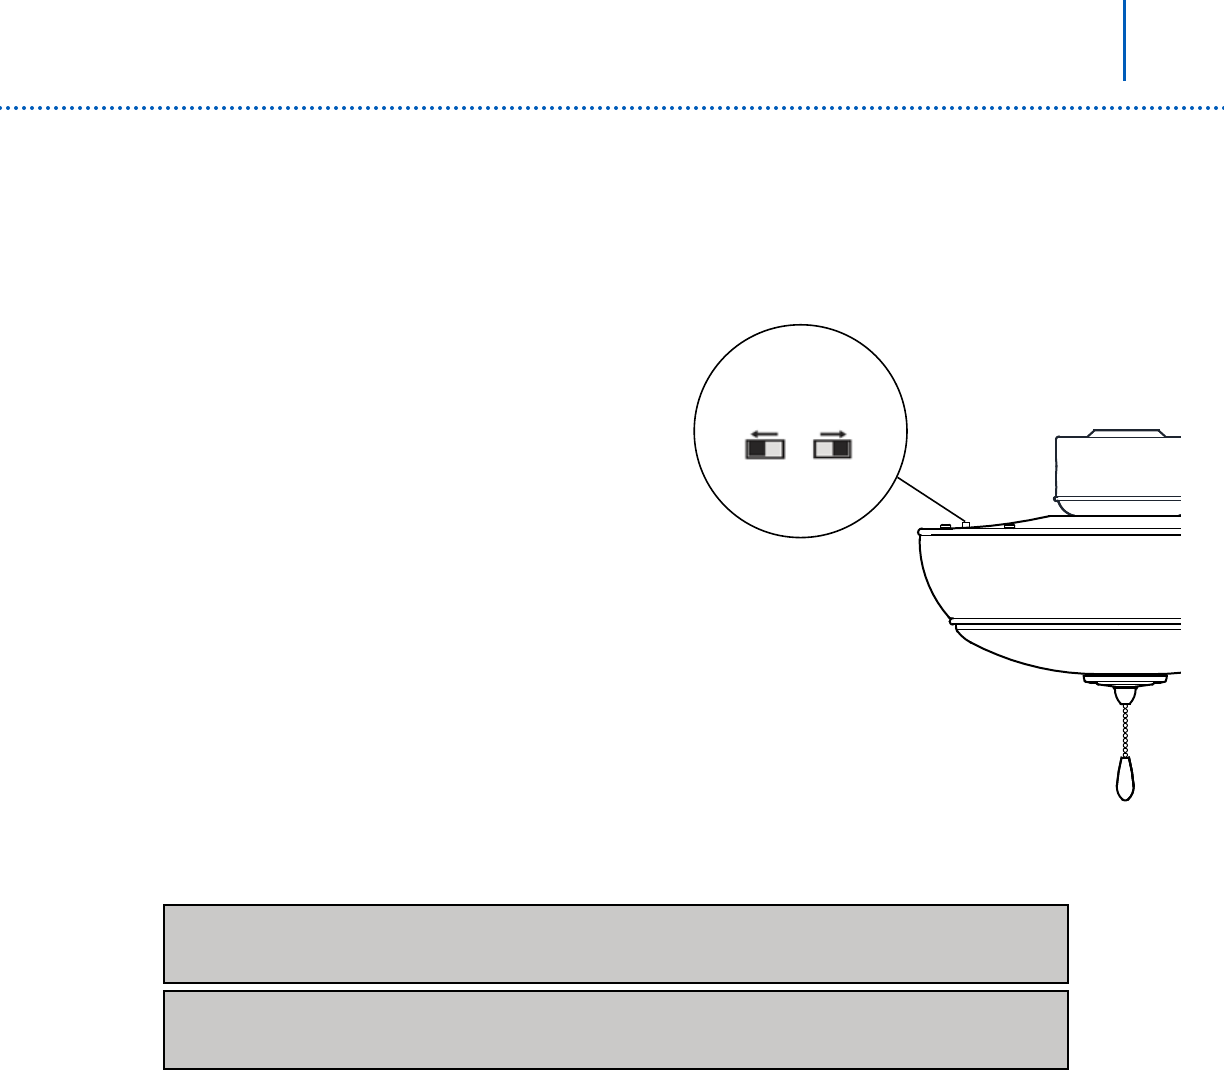
9. BLUETOOTH® AUDIO PRIMARY AND SECONDARY FUNCTION
The primary instructions:
Step 1. If you are using the product without other Audio
Light Kits, the switch on the top of the light kit should
be placed into the Primary mode. When the unit is in
Primary mode, it can be connected via BLUETOOTH
allowing audio to be enjoyed via the speakers.
Step 2. If you have two Audio Light Kits, they can work
independently or work simultaneously by pairing. When
pairing, one unit must be placed into the primary mode
and the other unit must be placed into secondary mode.
The unit in secondary mode will then be able to receive
the audio signal from the primary unit.
Primary/Secondary Mode Pairing Instruction:
Keep the distance between the two audio light kits
under 10 meters and turn off power. One unit must
be placed into primary mode and the other must be
placed into secondary mode. Turn on both units at the
same time, the primary audio light kit will search for
the secondary audio light kit automatically within 30
seconds. Pairing is successful when you hear a short
conrmation tone from the audio light kit.
10. BLUETOOTH® AUDIO PLAY
Step 1. Once paired, you will be able to control the playback and volume through your device.
Step 2. If available on your device, access the sound settings or equalizer settings. Selecting the correct audio
prole or sometimes turning on the equalizer will improve the quality and maximum volume for the playback.
Step 3. If you wander out of range of the BLUETOOTH® device and the device is disconnected, simply move
closer to the audio light kit and re-click ”BT Audio LK”. Bluetooth device will regain connection; if the Bluetooth
device is still connected, then no pairing actions will be needed, the devices will regain the connection
automatically.
Step 4. The ceiling fan audio light kit with BLUETOOTH® Technology features a built-in privacy mode which
disconnects speaker playback when a phone call is being received from the device. It will automatically resume
playback when the call is completed.
NOTE:
Audio Light Kits must be turned on within 5 seconds from each other for the pairing to be successful.
Secondary Mode
Primary Mode
NOTE:
Only one secondary Audio Light Kit can be paired per primary Audio Light Kit.

Kichler® Lighting
7711 East Pleasant Valley Road
P.O. Box 318010
Cleveland, Ohio 44131-8010
Customer Service
866.558.5706
8:30 AM to 5:00 PM EST,
Monday - Friday
Guide d’instructions
Modèle ETL, luminaire à audio Bluetooth
Luminaire à audio
pour ventilateur de plafond à DEL
Avec la technologie BLUETOOTH®
380950

CODE D’IDENTIFICATION DE LA BTLK0380950. Le présent appareil est conforme aux CNR d’Industrie
1
1. CONSIGNES DE SÉCURITÉ (LISEZ ET CONSERVEZ CES INSTRUCTIONS)
1. Pour réduire les risques d’électrocution,
s’assurer que le courant est coupé au
niveau de la boîte de disjoncteurs ou de
fusibles avant de procéder à l’installation.
2. Tout le câblage doit être conforme aux
codes électriques locaux et au Code
électrique national. L’installation électrique
doit être effectuée par un électricien qualié
accrédité.
3. ATTENTION : Tout verre est fragile,
faites preuve de prudence lorsque vous
manipulez le diffuseur en verre.
4. ATTENTION : Pour éviter toute brûlure
accidentelle, laissez l’ampoule et le
diffuseur en verre refroidir complètement
avant de les toucher ou de les remplacer.
5. ATTENTION : Pour réduire les risques de
choc électrique, ce luminaire convient à une
utilisation dans les emplacements humides.
6. AVERTISSEMENT : En cas de
changement ou de modication apporté(e)
au produit, qui n’est pas expressément
approuvé(e) par la partie responsable
d’assurer la conformité, l’utilisateur pourrait
se voir refuser le droit d’utiliser l’appareil.
Canada applicables aux appareils radio exempts de licence. L’exploitation est autorisée aux deux conditions suivantes:
(1) l’appareil ne doit pas produire de brouillage, et (2) l’utilisateur de l’appareil doit accepter tout brouillage
radioélectrique subi, même si le brouillage est susceptible d’en compromettre le fonctionnement.
Ce produit peut causer des interférences gênantes pour l’équipement radiotéléphonique et ne doit pas être installé près
d’équipement de communications maritimes de sécurité, de navires en mer ou d’équipement de navigation critique ou
d’équipement de communication fonctionnant entre 0,45 et 30 MHz.
ATTENTION:
Pour réduire le risque de choc électrique, cette lumière doit être utilisé uniquement avec le modèle
de ventilateur ci-dessous:
Modèle: K52-403
Fabriqué par la société:
Chein Luen Industries (Zhongshat)LTD
POIDS NET.:5.6KGS,POIDS BRUT:7.9KGS
:10907A-
FCC ID:RGB-BTADLK380950
2
Luminaire à audio pour ventilateur de plafond à DEL
Avec la technologie BLUETOOTH®
2. OUTILS ET ÉQUIPEMENT REQUIS
• Tournevis cruciforme
• Tournevis plat
• Clé de 11 mm
• Escabeau
• Coupe-ls
• Ruban isolant
3. CONTENU DE L’EMBALLAGE
Déballez votre ventilateur et vériez le contenu
de l’emballage. Les articles suivants devraient s’y trouver :
N° de
pièce Description Quantité
a Adaptateur de luminaire 1
b Diffuseur en verre 1
c Écrou hexagonal 1
d Rondelle en caoutchouc 1
eChaîne (tirette)
de 10,16 cm (4 po) 1
fChaîne (tirette) de
17,78 cm (7 po) 1
c
d
e
a
b
f
3
4. PRÉPARATION DU VENTILATEUR
Étape 1. Enlevez le couvercle de la boîte de
branchement du ventilateur de plafond en retirant les
trois vis de montage.
Étape 2. Retirez le bouchon central du couvercle
de la boîte de branchement.
5. PRÉPARATION DU LUMINAIRE
Étape 1. Faites passer le l noir et le l blanc du
luminaire par l’orice central du couvercle de la boîte
de branchement du ventilateur de plafond.
Étape 2. Enlez le couvercle de la boîte de branchement
du ventilateur de plafond sur la tige letée sur le dessus
du luminaire.
Étape 3. Retirez la rondelle de blocage et l’écrou
hexagonal de la trousse de quincaillerie. Faites passer
le l noir et le l blanc par la rondelle de blocage et
l’écrou hexagonal, puis serrez-les complètement.
Couvercle de la boîte
de branchement
Bouchon central
Vis de montage
Rondelle de blocage
Luminaire
Tige filetée
Écrou hexagonal
Couvercle de la boîte de branchement
4
Luminaire à audio pour ventilateur de plafond à DEL
Avec la technologie BLUETOOTH®
6. BRANCHEMENT DU LUMINAIRE AU VENTILATEUR
N’OUBLIEZ PAS de couper l’alimentation
électrique avant de commencer.
Étape 1. Repérez les ls bleu et blanc qui se
trouvent à l’intérieur de la boîte de branchement du
ventilateur de plafond pour connecter le luminaire.
Étape 2. Connectez le l bleu de la boîte de
branchement du ventilateur de plafond au l noir
du luminaire.
Étape 3. Connectez le l blanc de la boîte de
branchement du ventilateur de plafond au l blanc
du luminaire en branchant les ches moulées
ensemble.
Étape 4. Rattachez le couvercle de la boîte
de branchement à la boîte de branchement
du ventilateur de plafond et xez solidement à
l’aide des vis qui ont été retirées à l’étape 1 de
préparation du ventilateur.
7. INSTALLATION DU DIFFUSEUR EN VERRE SUR
VENTILATEURS AVEC CHAÎNES (TIRETTES)
ATTENTION : Ne serrez pas trop l’écrou
hexagonal. Trop serrer l’écrou hexagonal pourrait
ssurer ou briser le diffuseur en verre.
Étape 1. Faites passer la chaîne de l’interrupteur
du ventilateur dans le guide de la chaîne (tirette).
Étape 2. Retirez le faîteau, le capuchon externe
du diffuseur, l’écrou hexagonal et la rondelle en
caoutchouc pré-installés du luminaire et mettez-les
de côté pour un usage ultérieur.
Étape 3. Positionnez le diffuseur par-dessus la tige
letée et soulevez le diffuseur jusqu’au luminaire.
Étape 4. Faites passer la chaîne dans la rondelle
en caoutchouc, l’écrou hexagonal et serrez-les
avec le tournevis.
Étape 5. Faites passer la chaîne dans le capuchon
externe du diffuseur et alignez-le sur la tige letée,
puis verrouillez-le avec le faîteau. Serrez à la main.
Étape 6. Attachez les rallonges de chaîne (tirette)
à la chaîne de l’interrupteur du luminaire et de
l’interrupteur du ventilateur.
Boîte de
branchement
Couvercle de la boîte
de branchement
Vis
Luminaire
Luminaire
Diffuseur en verre
Guide de la chaîne
(tirette)
Rallonges
de chaîne (tirette)
OO
Rondelle en caoutchouc
Écrou hexagonal
Faîteau pré-installé
Rallonges de chaîne (tirette)
Capuchon externe du diffuseur
Mode secondaire
Mode primaire

5
REMARQUE : Le luminaire à audio du ventilateur de plafond avec technologie BLUETOOTH® est compatible
avec les iPhone, iPad, Android, Blackberry et autres appareils similaires dont le protocole BLUETOOTH est
compatible avec le protocole 4.1. Pour jumeler, assurez-vous que le luminaire est sous tension.
Étape 1. Pour mettre le luminaire sous tension, il vous suft de tirer sur l’interrupteur à chaîne du luminaire.
La fonction BLUETOOTH® se met automatiquement en marche.
Étape 2. Sur votre dispositif à BLUETOOTH®, recherchez un nouveau dispositif à BLUETOOTH® appelé
« BT Audio LK (Bluetooth pour luminaire à audio) » dans la liste des dispositifs disponibles.
Étape 3. Le jumelage est réussi quand vous entendez une brève tonalité de conrmation en provenance
du luminaire à audio.
Étape 4. Commencez à diffuser à partir de votre source musicale.
Étape 5. Pour certains dispositifs et téléphones cellulaires BLUETOOTH®, le mode « Stereo Speaker
(Enceinte stéréo) » doit être activé pour diffuser de la musique sans l.
Étape 6. Le luminaire à audio est compatible avec le protocole 4.1. La totalité des fonctions BLUETOOTH®
et le contrôle du volume ne sont pas garantis si votre dispositif audio utilise un protocole BLUETOOTH
moins récent.
Étape 7. Pour jumeler à un nouveau dispositif BLUETOOTH®, vous devez désactiver le dispositif
présentement jumelé. Ouvrez la fonction « recherche » du nouveau dispositif BLUETOOTH® et répétez
les étapes de jumelage mentionnées auparavant.
8. JUMELAGE BLUETOOTH®
6
Luminaire à audio pour ventilateur de plafond à DEL
Avec la technologie BLUETOOTH®
9. FONCTION BLUETOOTH® AUDIO PRIMAIRE ET SECONDAIRE
Les directives primaires :
Étape 1. Si vous utilisez le produit sans autre luminaire
à audio, l’interrupteur sur le dessus du luminaire doit être
placé en mode primaire. Une fois que l’appareil est en
mode primaire, il peut être connecté par l’entremise de
BLUETOOTH, pour vous permettre de proter de l’audio
par les enceintes.
Étape 2. Si vous avez deux luminaires à audio, ils
fonctionneront indépendamment ou simultanément grâce
au jumelage. En cas de jumelage, un appareil doit être
placé en mode primaire et l’autre en mode secondaire.
L’appareil en mode secondaire pourra alors recevoir le
signal audio de l’appareil primaire.
Instructions de jumelage en mode primaire/secondaire :
Maintenez une distance entre les deux luminaires à audio
inférieure à 10 mètres et coupez l’alimentation électrique.
Un appareil doit être placé en mode primaire et l’autre en
mode secondaire. Mettez les deux appareils en marche
en même temps; le luminaire à audio primaire cherchera
automatiquement le luminaire à audio secondaire
dans les 30 secondes. Le jumelage est réussi quand
vous entendez une brève tonalité de conrmation en
provenance du luminaire à audio.
10. LECTURE AUDIO BLUETOOTH®
Étape 1. Une fois jumelé, vous pourrez contrôler la lecture et le volume au moyen de votre dispositif.
Étape 2. Si votre dispositif les offre, accédez aux paramètres de son ou d’égaliseur. Le choix du bon prol audio,
ou le fait d’allumer parfois l’égaliseur peut améliorer la qualité et le volume maximum de la lecture.
Étape 3. Si vous vous éloignez trop du dispositif BLUETOOTH® et qu’il est déconnecté, il vous suft de vous
rapprocher du luminaire à audio et de cliquer à nouveau sur « BT Audio LK (Bluetooth pour luminaire à audio) ».
Le dispositif Bluetooth récupérera la connexion; si le dispositif Bluetooth est toujours connecté, aucun jumelage n’est
nécessaire puisque les dispositifs se reconnecteront automatiquement.
Étape 4. Le luminaire à audio pour ventilateur de plafond à technologie BLUETOOTH® comporte un mode
condentialité intégré qui déconnecte automatiquement la diffusion par les enceintes quand votre dispositif reçoit
un appel téléphonique. La diffusion reprend automatiquement à la n de l’appel.
REMARQUE :
Les luminaires à audio doivent être allumés à 5 secondes d’écart maximum pour assurer le succès du jumelage.
Mode secondaire
Mode primaire
REMARQUE :
Un seul luminaire à audio secondaire peut être jumelé avec chaque luminaire à audio primaire.

Kichler® Lighting
7711 East Pleasant Valley Road
P.O. Box 318010
Cleveland, Ohio 44131-8010
Service à la clientèle
866 558-5706
entre 8h30 et 17h, HNE,
du lundi au vendredi
Luminaire à audio
pour ventilateur de plafond à DEL
Avec la technologie BLUETOOTH®
380950