Kingston Digital WID WI-DRIVE User Manual
Kingston Digital Inc. WI-DRIVE Users Manual
Users Manual
Getting Started
Step 1 – Charge your Wi-Drive Device
Before using, make sure your Wi-Drive™ is fully charged. To
charge, connect the included USB cable to your Wi-Drive’s
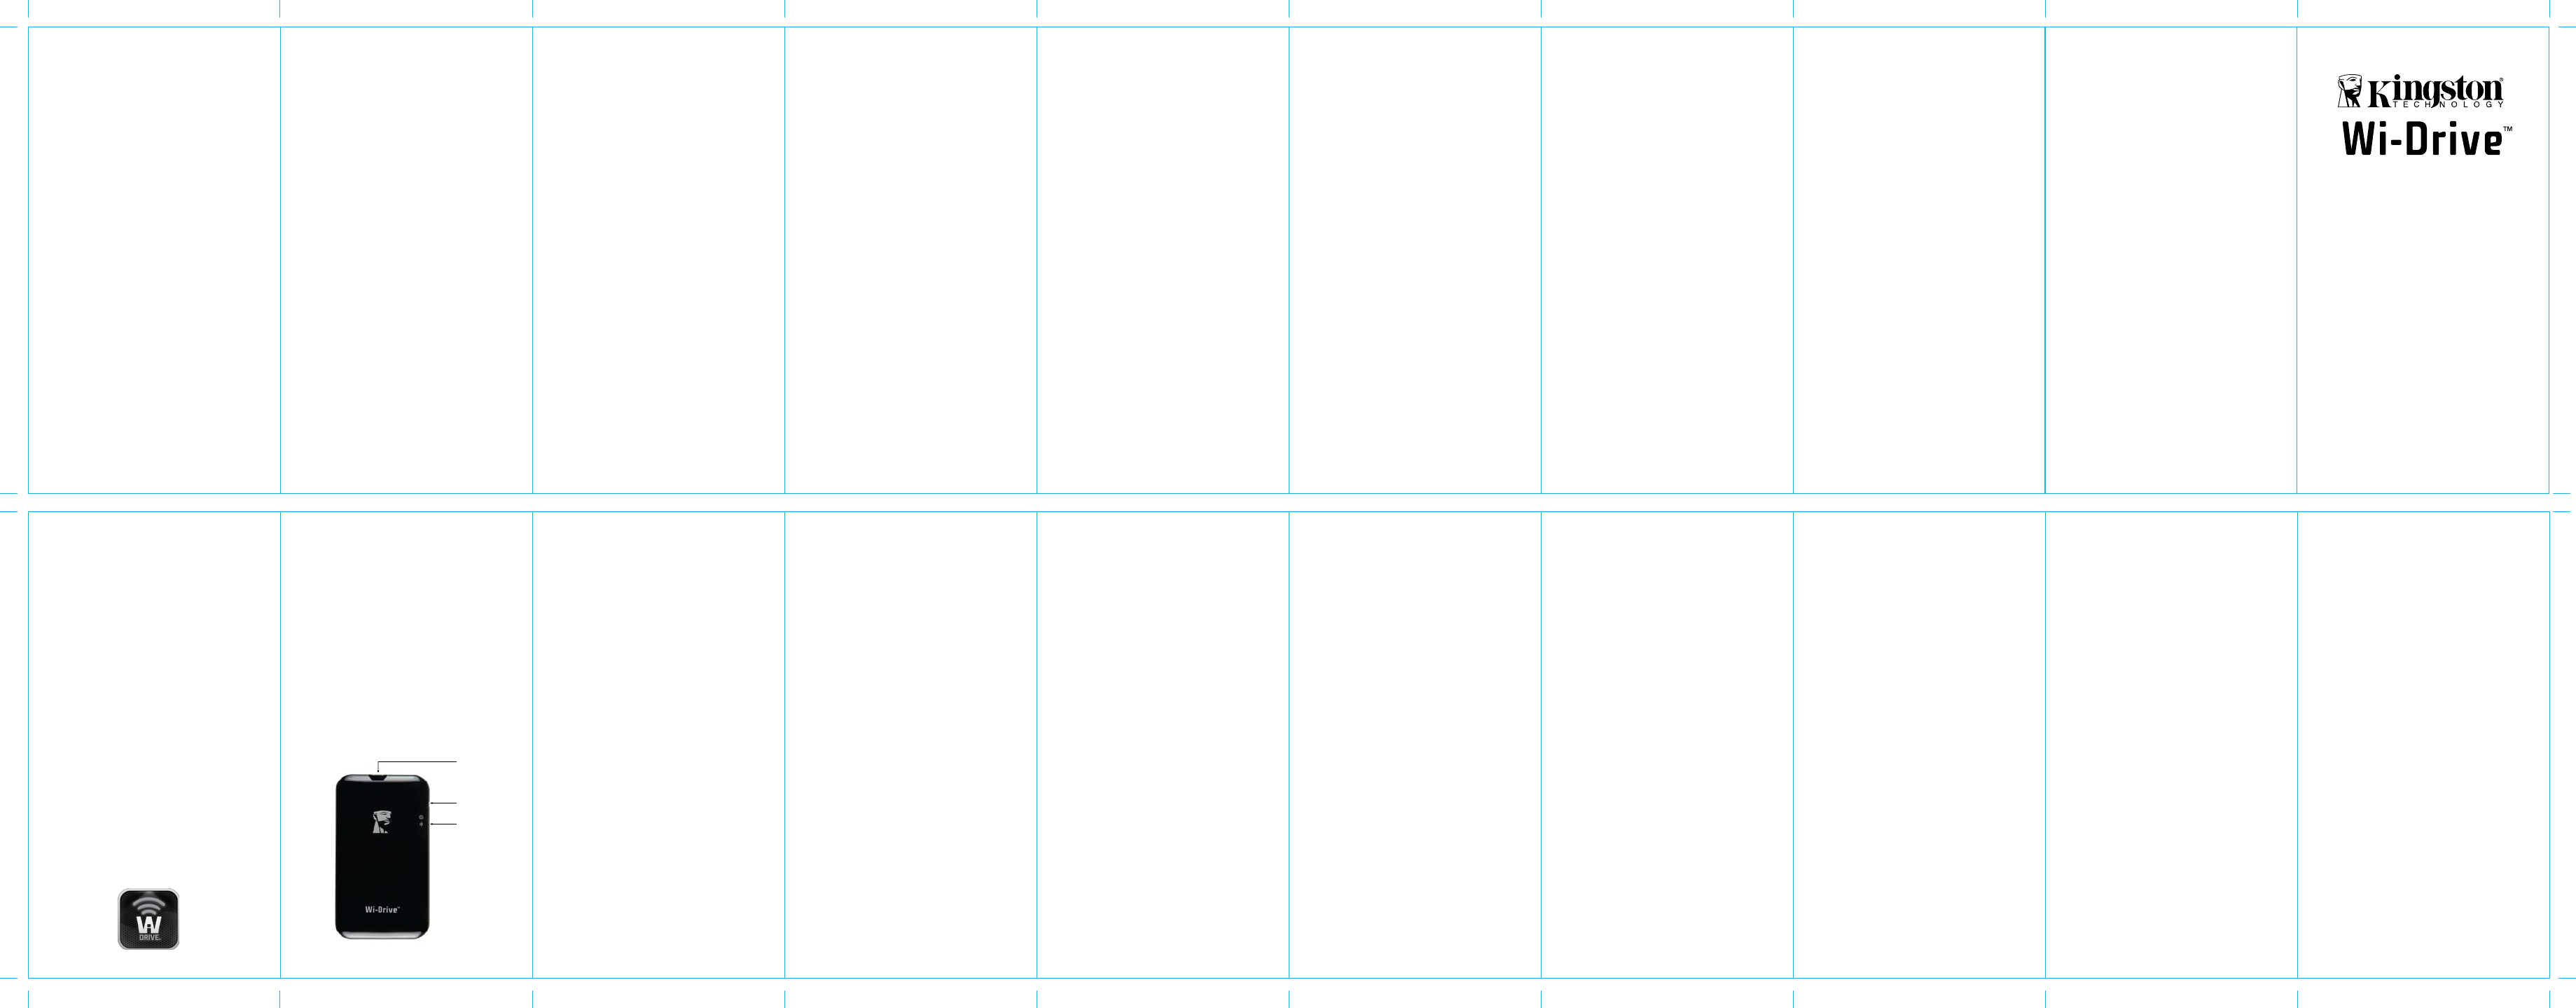
mini USB port (1) and the other end into an available USB
port on your computer or to a USB wall adapter. The green
power light will stop ashing when Wi-Drive is fully charged.
Step 2 – Add Content to your Wi-Drive
Windows users: When connecting your Wi-Drive to your
computer, two drive letters will appear in Windows Explorer
— one Read-Only labeled “CDROM” and one Removable
Disk labeled “WI-DRIVE” Double-click on the drive labeled
“WI-DRIVE” to add your content. Transfer your les the same
as you would for any USB drive; drag or copy les from your
computer to your Wi-Drive device
Mac users: By default when connecting your Wi-Drive to
your computer, two drives will appear on your desktop —
one Read-Only labeled “CDROM” and one Removable Disk
labeled “WI-DRIVE” Double-click on the drive labeled
“WI-DRIVE” to add your content. Transfer your les the same
as you would for any USB drive; drag or copy les from your
computer to your Wi-Drive device.
(It is recommended that you organize your content
by creating folders, e.g., “Videos, Music, Pictures
and Documents”)
Step 3 – Download Kingston’s Free Wi-Drive App from the
App Store
Visit Apple’s App Store and search for “Kingston Wi-Drive”.
Step 4
Power on the Wi-Drive by pressing the On/O button
(2).*
*Note: After you power on, wait for Blue Wi-Fi Activity
Light to start ashing before proceeding to the next
step(3).
Step 5
Go to the Settings icon on your iPad®, iPhone®, or iPod® touch
and select Wi-Fi. Conrm that Wi-Fi is ON. Select “Kingston
Wi-Drive” under “Choose a Network” and click on it to
connect to it.
Step 6
Once connected, open the Kingston Wi-Drive app on your
iPad, iPhone, or iPod touch and enjoy your new expanded
storage.
Step 7
Share your content with as many as three users by having
them follow steps 3 to 6.
FRENCH
Step 1 – Charge your Wi-Drive Device
Before using, make sure your Wi-Drive™ is fully charged. To
charge, connect the included USB cable to your Wi-Drive’s
mini-USB port and the other end into an available USB port
on your computer or to a USB wall adapter. The green power
light will stop ashing when Wi-Drive is fully charged.
Step 2 – Add Content to your Wi-Drive
Windows users: When connecting your Wi-Drive to your
computer, two drive letters will appear in Windows Explorer
— one Read-Only labeled “CDROM” and one Removable
Disk labeled “WI-DRIVE” Double-click on the drive labeled
“WI-DRIVE” to add your content. Transfer your les the same
as you would for any USB drive; drag or copy les from your
computer to your Wi-Drive device
Mac users: By default when connecting your Wi-Drive to
your computer, two drives will appear on your desktop —
one Read-Only labeled “CDROM” and one Removable Disk
labeled “WI-DRIVE” Double-click on the drive labeled
“WI-DRIVE” to add your content. Transfer your les the same
as you would for any USB drive; drag or copy les from your
computer to your Wi-Drive device.
(It is recommended that you organize your content
by creating folders, e.g., “Videos, Music, Pictures
and Documents”)
Step 3 – Download Kingston’s Free Wi-Drive App from the
App Store
Visit Apple’s App Store and search for “Kingston Wi-Drive”.
Step 4
Power on the Wi-Drive by pressing the On/O button
(see Figure 2).*
*Note: After you power on, wait for Blue Wi-Fi Activity
Light to start ashing before proceeding to the next step.
Step 5
Go to the Settings icon on your iPad®, iPhone®, or iPod® touch
and select Wi-Fi. Conrm that Wi-Fi is ON. Select “Kingston
Wi-Drive” under “Choose a Network” and click on it to
connect to it.
Step 6
Once connected, open the Kingston Wi-Drive app on your
iPad, iPhone, or iPod touch and enjoy your new expanded
storage.
Step 7
Share your content with as many as three users by having them
follow steps 3 to 6.
GERMAN
Step 1 – Charge your Wi-Drive Device
Before using, make sure your Wi-Drive™ is fully charged. To
charge, connect the included USB cable to your Wi-Drive’s
mini-USB port and the other end into an available USB port
on your computer or to a USB wall adapter. The green power
light will stop ashing when Wi-Drive is fully charged.
Step 2 – Add Content to your Wi-Drive
Windows users: When connecting your Wi-Drive to your
computer, two drive letters will appear in Windows Explorer
— one Read-Only labeled “CDROM” and one Removable
Disk labeled “WI-DRIVE” Double-click on the drive labeled
“WI-DRIVE” to add your content. Transfer your les the same
as you would for any USB drive; drag or copy les from your
computer to your Wi-Drive device
Mac users: By default when connecting your Wi-Drive to
your computer, two drives will appear on your desktop —
one Read-Only labeled “CDROM” and one Removable Disk
labeled “WI-DRIVE” Double-click on the drive labeled
“WI-DRIVE” to add your content. Transfer your les the same
as you would for any USB drive; drag or copy les from your
computer to your Wi-Drive device.
(It is recommended that you organize your content
by creating folders, e.g., “Videos, Music, Pictures
and Documents”)
Step 3 – Download Kingston’s Free Wi-Drive App from the
App Store
Visit Apple’s App Store and search for “Kingston Wi-Drive”.
Step 4
Power on the Wi-Drive by pressing the On/O button
(see Figure 2).*
*Note: After you power on, wait for Blue Wi-Fi Activity
Light to start ashing before proceeding to the next step.
Step 5
Go to the Settings icon on your iPad®, iPhone®, or iPod® touch
and select Wi-Fi. Conrm that Wi-Fi is ON. Select “Kingston
Wi-Drive” under “Choose a Network” and click on it to
connect to it.
Step 6
Once connected, open the Kingston Wi-Drive app on your
iPad, iPhone, or iPod touch and enjoy your new expanded
storage.
Step 7
Share your content with as many as three users by having them
follow steps 3 to 6.
ITALIAN
Step 1 – Charge your Wi-Drive Device
Before using, make sure your Wi-Drive™ is fully charged. To
charge, connect the included USB cable to your Wi-Drive’s
mini-USB port and the other end into an available USB port
on your computer or to a USB wall adapter. The green power
light will stop ashing when Wi-Drive is fully charged.
Step 2 – Add Content to your Wi-Drive
Windows users: When connecting your Wi-Drive to your
computer, two drive letters will appear in Windows Explorer
— one Read-Only labeled “CDROM” and one Removable
Disk labeled “WI-DRIVE” Double-click on the drive labeled
“WI-DRIVE” to add your content. Transfer your les the same
as you would for any USB drive; drag or copy les from your
computer to your Wi-Drive device
Mac users: By default when connecting your Wi-Drive to
your computer, two drives will appear on your desktop —
one Read-Only labeled “CDROM” and one Removable Disk
labeled “WI-DRIVE” Double-click on the drive labeled
“WI-DRIVE” to add your content. Transfer your les the same
as you would for any USB drive; drag or copy les from your
computer to your Wi-Drive device.
(It is recommended that you organize your content
by creating folders, e.g., “Videos, Music, Pictures
and Documents”)
Step 3 – Download Kingston’s Free Wi-Drive App from the
App Store
Visit Apple’s App Store and search for “Kingston Wi-Drive”.
Step 4
Power on the Wi-Drive by pressing the On/O button
(see Figure 2).*
*Note: After you power on, wait for Blue Wi-Fi Activity
Light to start ashing before proceeding to the next step.
Step 5
Go to the Settings icon on your iPad®, iPhone®, or iPod® touch
and select Wi-Fi. Conrm that Wi-Fi is ON. Select “Kingston
Wi-Drive” under “Choose a Network” and click on it to
connect to it.
Step 6
Once connected, open the Kingston Wi-Drive app on your
iPad, iPhone, or iPod touch and enjoy your new expanded
storage.
Step 7
Share your content with as many as three users by having them
follow steps 3 to 6.
POLISH
Step 1 – Charge your Wi-Drive Device
Before using, make sure your Wi-Drive™ is fully charged. To
charge, connect the included USB cable to your Wi-Drive’s
mini-USB port and the other end into an available USB port
on your computer or to a USB wall adapter. The green power
light will stop ashing when Wi-Drive is fully charged.
Step 2 – Add Content to your Wi-Drive
Windows users: When connecting your Wi-Drive to your
computer, two drive letters will appear in Windows Explorer
— one Read-Only labeled “CDROM” and one Removable
Disk labeled “WI-DRIVE” Double-click on the drive labeled
“WI-DRIVE” to add your content. Transfer your les the same
as you would for any USB drive; drag or copy les from your
computer to your Wi-Drive device
Mac users: By default when connecting your Wi-Drive to
your computer, two drives will appear on your desktop —
one Read-Only labeled “CDROM” and one Removable Disk
labeled “WI-DRIVE” Double-click on the drive labeled
“WI-DRIVE” to add your content. Transfer your les the same
as you would for any USB drive; drag or copy les from your
computer to your Wi-Drive device.
(It is recommended that you organize your content
by creating folders, e.g., “Videos, Music, Pictures
and Documents”)
Step 3 – Download Kingston’s Free Wi-Drive App from the
App Store
Visit Apple’s App Store and search for “Kingston Wi-Drive”.
Step 4
Power on the Wi-Drive by pressing the On/O button
(see Figure 2).*
*Note: After you power on, wait for Blue Wi-Fi Activity
Light to start ashing before proceeding to the next step.
Step 5
Go to the Settings icon on your iPad®, iPhone®, or iPod® touch
and select Wi-Fi. Conrm that Wi-Fi is ON. Select “Kingston
Wi-Drive” under “Choose a Network” and click on it to
connect to it.
Step 6
Once connected, open the Kingston Wi-Drive app on your
iPad, iPhone, or iPod touch and enjoy your new expanded
storage.
Step 7
Share your content with as many as three users by having them
follow steps 3 to 6.
SPANISH/CASTILLIAN
Step 1 – Charge your Wi-Drive Device
Before using, make sure your Wi-Drive™ is fully charged. To
charge, connect the included USB cable to your Wi-Drive’s
mini-USB port and the other end into an available USB port
on your computer or to a USB wall adapter. The green power
light will stop ashing when Wi-Drive is fully charged.
Step 2 – Add Content to your Wi-Drive
Windows users: When connecting your Wi-Drive to your
computer, two drive letters will appear in Windows Explorer
— one Read-Only labeled “CDROM” and one Removable
Disk labeled “WI-DRIVE” Double-click on the drive labeled
as you would for any USB drive; drag or copy les from your
computer to your Wi-Drive device.
(It is recommended that you organize your content
by creating folders, e.g., “Videos, Music, Pictures
and Documents”)
Step 3 – Download Kingston’s Free Wi-Drive App from the
App Store
Visit Apple’s App Store and search for “Kingston Wi-Drive”.
Step 4
Power on the Wi-Drive by pressing the On/O button
(see Figure 2).*
*Note: After you power on, wait for Blue Wi-Fi Activity
Light to start ashing before proceeding to the next step.
Step 5
Go to the Settings icon on your iPad®, iPhone®, or iPod® touch
and select Wi-Fi. Conrm that Wi-Fi is ON. Select “Kingston
Wi-Drive” under “Choose a Network” and click on it to
connect to it.
Step 6
Once connected, open the Kingston Wi-Drive app on your
iPad, iPhone, or iPod touch and enjoy your new expanded
storage.
Step 7
Share your content with as many as three users by having them
follow steps 3 to 6.
RUSSIAN
Step 1 – Charge your Wi-Drive Device
Before using, make sure your Wi-Drive™ is fully charged. To
charge, connect the included USB cable to your Wi-Drive’s
mini-USB port and the other end into an available USB port
on your computer or to a USB wall adapter. The green power
light will stop ashing when Wi-Drive is fully charged.
Step 2 – Add Content to your Wi-Drive
Windows users: When connecting your Wi-Drive to your
computer, two drive letters will appear in Windows Explorer
— one Read-Only labeled “CDROM” and one Removable
Disk labeled “WI-DRIVE” Double-click on the drive labeled
“WI-DRIVE” to add your content. Transfer your les the same
as you would for any USB drive; drag or copy les from your
computer to your Wi-Drive device
Mac users: By default when connecting your Wi-Drive to
your computer, two drives will appear on your desktop —
one Read-Only labeled “CDROM” and one Removable Disk
labeled “WI-DRIVE” Double-click on the drive labeled
“WI-DRIVE” to add your content. Transfer your les the same
as you would for any USB drive; drag or copy les from your
computer to your Wi-Drive device.
(It is recommended that you organize your content
by creating folders, e.g., “Videos, Music, Pictures
and Documents”)
Step 3 – Download Kingston’s Free Wi-Drive App from the
App Store
Visit Apple’s App Store and search for “Kingston Wi-Drive”.
Step 4
Power on the Wi-Drive by pressing the On/O button
(see Figure 2).*
*Note: After you power on, wait for Blue Wi-Fi Activity
Light to start ashing before proceeding to the next step.
Step 5
Go to the Settings icon on your iPad®, iPhone®, or iPod® touch
and select Wi-Fi. Conrm that Wi-Fi is ON. Select “Kingston
Wi-Drive” under “Choose a Network” and click on it to
connect to it.
Step 6
Once connected, open the Kingston Wi-Drive app on your
iPad, iPhone, or iPod touch and enjoy your new expanded
storage.
Step 7
Share your content with as many as three users by having them
follow steps 3 to 6.
SIMPLIFIED CHINESE
Step 1 – Charge your Wi-Drive Device
Before using, make sure your Wi-Drive™ is fully charged. To
charge, connect the included USB cable to your Wi-Drive’s
mini-USB port and the other end into an available USB port
on your computer or to a USB wall adapter. The green power
light will stop ashing when Wi-Drive is fully charged.
Step 2 – Add Content to your Wi-Drive
Windows users: When connecting your Wi-Drive to your
computer, two drive letters will appear in Windows Explorer
— one Read-Only labeled “CDROM” and one Removable
Disk labeled “WI-DRIVE” Double-click on the drive labeled
“WI-DRIVE” to add your content. Transfer your les the same
as you would for any USB drive; drag or copy les from your
computer to your Wi-Drive device
Mac users: By default when connecting your Wi-Drive to
your computer, two drives will appear on your desktop —
one Read-Only labeled “CDROM” and one Removable Disk
labeled “WI-DRIVE” Double-click on the drive labeled
“WI-DRIVE” to add your content. Transfer your les the same
as you would for any USB drive; drag or copy les from your
computer to your Wi-Drive device.
(It is recommended that you organize your content
by creating folders, e.g., “Videos, Music, Pictures
and Documents”)
“WI-DRIVE” to add your content. Transfer your les the same
as you would for any USB drive; drag or copy les from your
computer to your Wi-Drive device
Mac users: By default when connecting your Wi-Drive to
your computer, two drives will appear on your desktop —
one Read-Only labeled “CDROM” and one Removable Disk
labeled “WI-DRIVE” Double-click on the drive labeled
“WI-DRIVE” to add your content. Transfer your les the same
as you would for any USB drive; drag or copy les from your
computer to your Wi-Drive device.
(It is recommended that you organize your content
by creating folders, e.g., “Videos, Music, Pictures
and Documents”)
Step 3 – Download Kingston’s Free Wi-Drive App from the
App Store
Visit Apple’s App Store and search for “Kingston Wi-Drive”.
Step 4
Power on the Wi-Drive by pressing the On/O button
(see Figure 2).*
*Note: After you power on, wait for Blue Wi-Fi Activity
Light to start ashing before proceeding to the next step.
Step 5
Go to the Settings icon on your iPad®, iPhone®, or iPod® touch
and select Wi-Fi. Conrm that Wi-Fi is ON. Select “Kingston
Wi-Drive” under “Choose a Network” and click on it to
connect to it.
Step 6
Once connected, open the Kingston Wi-Drive app on your
iPad, iPhone, or iPod touch and enjoy your new expanded
storage.
Step 7
Share your content with as many as three users by having them
follow steps 3 to 6.
PORTUGUESE
Step 1 – Charge your Wi-Drive Device
Before using, make sure your Wi-Drive™ is fully charged. To
charge, connect the included USB cable to your Wi-Drive’s
mini-USB port and the other end into an available USB port
on your computer or to a USB wall adapter. The green power
light will stop ashing when Wi-Drive is fully charged.
Step 2 – Add Content to your Wi-Drive
Windows users: When connecting your Wi-Drive to your
computer, two drive letters will appear in Windows Explorer
— one Read-Only labeled “CDROM” and one Removable
Disk labeled “WI-DRIVE” Double-click on the drive labeled
“WI-DRIVE” to add your content. Transfer your les the same
as you would for any USB drive; drag or copy les from your
computer to your Wi-Drive device
Mac users: By default when connecting your Wi-Drive to
your computer, two drives will appear on your desktop —
one Read-Only labeled “CDROM” and one Removable Disk
labeled “WI-DRIVE” Double-click on the drive labeled
“WI-DRIVE” to add your content. Transfer your les the same
as you would for any USB drive; drag or copy les from your
computer to your Wi-Drive device.
(It is recommended that you organize your content
by creating folders, e.g., “Videos, Music, Pictures
and Documents”)
Step 3 – Download Kingston’s Free Wi-Drive App from the
App Store
Visit Apple’s App Store and search for “Kingston Wi-Drive”.
Step 4
Power on the Wi-Drive by pressing the On/O button
(see Figure 2).*
*Note: After you power on, wait for Blue Wi-Fi Activity
Light to start ashing before proceeding to the next step.
Step 5
Go to the Settings icon on your iPad®, iPhone®, or iPod® touch
and select Wi-Fi. Conrm that Wi-Fi is ON. Select “Kingston
Wi-Drive” under “Choose a Network” and click on it to
connect to it.
Step 6
Once connected, open the Kingston Wi-Drive app on your
iPad, iPhone, or iPod touch and enjoy your new expanded
storage.
Step 7
Share your content with as many as three users by having them
follow steps 3 to 6.
TURKISH
Step 1 – Charge your Wi-Drive Device
Before using, make sure your Wi-Drive™ is fully charged. To
charge, connect the included USB cable to your Wi-Drive’s
mini-USB port and the other end into an available USB port
on your computer or to a USB wall adapter. The green power
light will stop ashing when Wi-Drive is fully charged.
Step 2 – Add Content to your Wi-Drive
Windows users: When connecting your Wi-Drive to your
computer, two drive letters will appear in Windows Explorer
— one Read-Only labeled “CDROM” and one Removable
Disk labeled “WI-DRIVE” Double-click on the drive labeled
“WI-DRIVE” to add your content. Transfer your les the same
as you would for any USB drive; drag or copy les from your
computer to your Wi-Drive device
Mac users: By default when connecting your Wi-Drive to
your computer, two drives will appear on your desktop —
one Read-Only labeled “CDROM” and one Removable Disk
labeled “WI-DRIVE” Double-click on the drive labeled
“WI-DRIVE” to add your content. Transfer your les the same
Step 3 – Download Kingston’s Free Wi-Drive App from the
App Store
Visit Apple’s App Store and search for “Kingston Wi-Drive”.
Step 4
Power on the Wi-Drive by pressing the On/O button
(see Figure 2).*
*Note: After you power on, wait for Blue Wi-Fi Activity
Light to start ashing before proceeding to the next step.
Step 5
Go to the Settings icon on your iPad®, iPhone®, or iPod® touch
and select Wi-Fi. Conrm that Wi-Fi is ON. Select “Kingston
Wi-Drive” under “Choose a Network” and click on it to
connect to it.
Step 6
Once connected, open the Kingston Wi-Drive app on your
iPad, iPhone, or iPod touch and enjoy your new expanded
storage.
Step 7
Share your content with as many as three users by having them
follow steps 3 to 6.
TRADITIONAL CHINESE
Step 1 – Charge your Wi-Drive Device
Before using, make sure your Wi-Drive™ is fully charged. To
charge, connect the included USB cable to your Wi-Drive’s
mini-USB port and the other end into an available USB port
on your computer or to a USB wall adapter. The green power
light will stop ashing when Wi-Drive is fully charged.
Step 2 – Add Content to your Wi-Drive
Windows users: When connecting your Wi-Drive to your
computer, two drive letters will appear in Windows Explorer
— one Read-Only labeled “CDROM” and one Removable
Disk labeled “WI-DRIVE” Double-click on the drive labeled
“WI-DRIVE” to add your content. Transfer your les the same
as you would for any USB drive; drag or copy les from your
computer to your Wi-Drive device
Mac users: By default when connecting your Wi-Drive to
your computer, two drives will appear on your desktop —
one Read-Only labeled “CDROM” and one Removable Disk
labeled “WI-DRIVE” Double-click on the drive labeled
“WI-DRIVE” to add your content. Transfer your les the same
as you would for any USB drive; drag or copy les from your
computer to your Wi-Drive device.
(It is recommended that you organize your content
by creating folders, e.g., “Videos, Music, Pictures
and Documents”)
Step 3 – Download Kingston’s Free Wi-Drive App from the
App Store
Visit Apple’s App Store and search for “Kingston Wi-Drive”.
Step 4
Power on the Wi-Drive by pressing the On/O button
(see Figure 2).*
*Note: After you power on, wait for Blue Wi-Fi Activity
Light to start ashing before proceeding to the next step.
Step 5
Go to the Settings icon on your iPad®, iPhone®, or iPod® touch
and select Wi-Fi. Conrm that Wi-Fi is ON. Select “Kingston
Wi-Drive” under “Choose a Network” and click on it to
connect to it.
Step 6
Once connected, open the Kingston Wi-Drive app on your
iPad, iPhone, or iPod touch and enjoy your new expanded
storage.
Step 7
Share your content with as many as three users by having them
follow steps 3 to 6.
JAPANESE
Step 1 – Charge your Wi-Drive Device
Before using, make sure your Wi-Drive™ is fully charged. To
charge, connect the included USB cable to your Wi-Drive’s
mini-USB port and the other end into an available USB port
on your computer or to a USB wall adapter. The green power
light will stop ashing when Wi-Drive is fully charged.
Step 2 – Add Content to your Wi-Drive
Windows users: When connecting your Wi-Drive to your
computer, two drive letters will appear in Windows Explorer
— one Read-Only labeled “CDROM” and one Removable
Disk labeled “WI-DRIVE” Double-click on the drive labeled
“WI-DRIVE” to add your content. Transfer your les the same
as you would for any USB drive; drag or copy les from your
computer to your Wi-Drive device
Mac users: By default when connecting your Wi-Drive to
your computer, two drives will appear on your desktop —
one Read-Only labeled “CDROM” and one Removable Disk
labeled “WI-DRIVE” Double-click on the drive labeled
“WI-DRIVE” to add your content. Transfer your les the same
as you would for any USB drive; drag or copy les from your
computer to your Wi-Drive device.
(It is recommended that you organize your content
by creating folders, e.g., “Videos, Music, Pictures
and Documents”)
Step 3 – Download Kingston’s Free Wi-Drive App from the
App Store
Visit Apple’s App Store and search for “Kingston Wi-Drive”.
Step 4
Power on the Wi-Drive by pressing the On/O button
(see Figure 2).*
*Note: After you power on, wait for Blue Wi-Fi Activity
Light to start ashing before proceeding to the next step.
Step 5
Go to the Settings icon on your iPad®, iPhone®, or iPod® touch
and select Wi-Fi. Conrm that Wi-Fi is ON. Select “Kingston
Wi-Drive” under “Choose a Network” and click on it to
connect to it.
Step 6
Once connected, open the Kingston Wi-Drive app on your
iPad, iPhone, or iPod touch and enjoy your new expanded
storage.
Step 7
Share your content with as many as three users by having them
follow steps 3 to 6.
(2) Power LED (On/O)
(3) Wi-Fi Activity LED
(1) mini USB Port
Figure 1 – Kingston’s Wi-Drive App Icon Figure 2 – Kingston’s Wi-Drive
Getting Started
©2011 Kingston Technology Corporation. All rights reserved. All registered trademarks
and trademarks are the property of their respective owners Printed in the U.S.A.
4402103-001.A00
For the complete User Manual and list of FAQs, please visit us
online at www.kingston.com/support/widrive.

FCC Compliance and Advisory Statement
This device complies with Part 15 of the FCC rules. Operation is subject to the following two
conditions:(1) this device may not cause harmful interference, and (2) this device must accept
any interference received, including interference that may cause undesired operation.
This equipment has been tested and found to comply with the limits for a Class B digital
device,
according to Part 15 of the FCC rules. These limits are designed to provide reasonable
protection against harmful interference in a residential installation. This equipment generates,
uses and can radiate radio frequency energy and if not installed and used in accordance with
the instructions, may cause harmful interference to radio communications. However, there is
no guarantee that interference will not occur in a particular installation. If this equipment does
cause harmful interference to radio or television reception, which can be determined by turning
the equipment off and on, the user is encouraged to try correct the interference by one or more
of the following measures:
1.Reorient the receiving antenna.
2.Increase the separation between the equipment and receiver.
3.Connect the equipment into and outlet on a circuit different from that to which the receiver is
connected.
4.Consult the dealer or an experienced radio/TV technician for help.
Any special accessories needed for compliance must be specified in the instruction manual.
Warning: A shielded-type power cord is required in order to meet FCC emission limits and
also to prevent interference to the nearby radio and television reception. It is essential that
only the supplied power cord be used. Use only shielded cables to connect I/O devices to this
equipment.
CAUSION: Any changes or modifications not expressly approved by the party responsible for
compliance could void your authority to operate the equipment.
FCC ID: ZME-WID