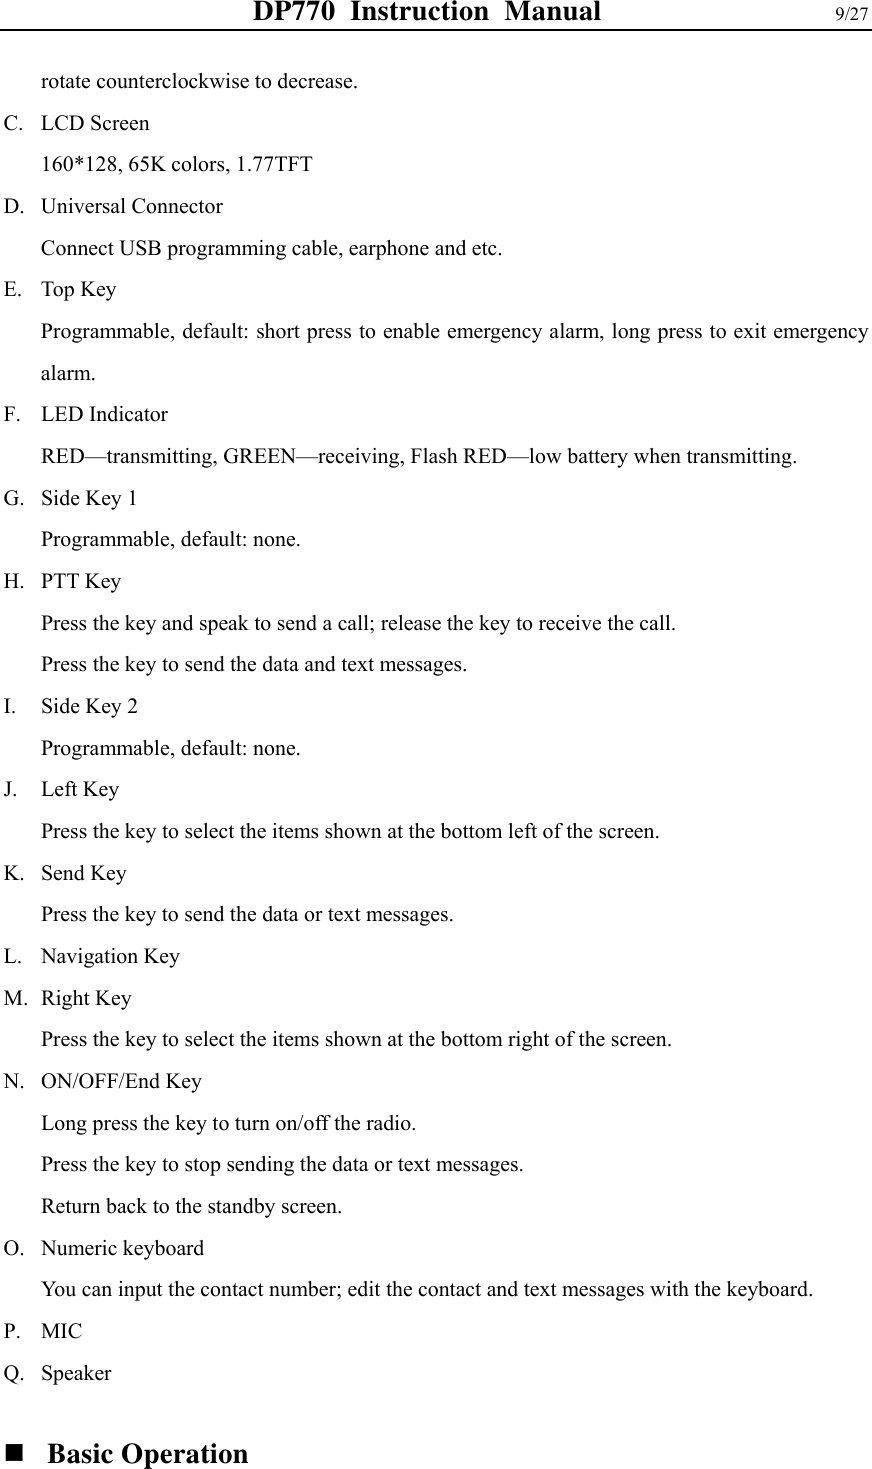
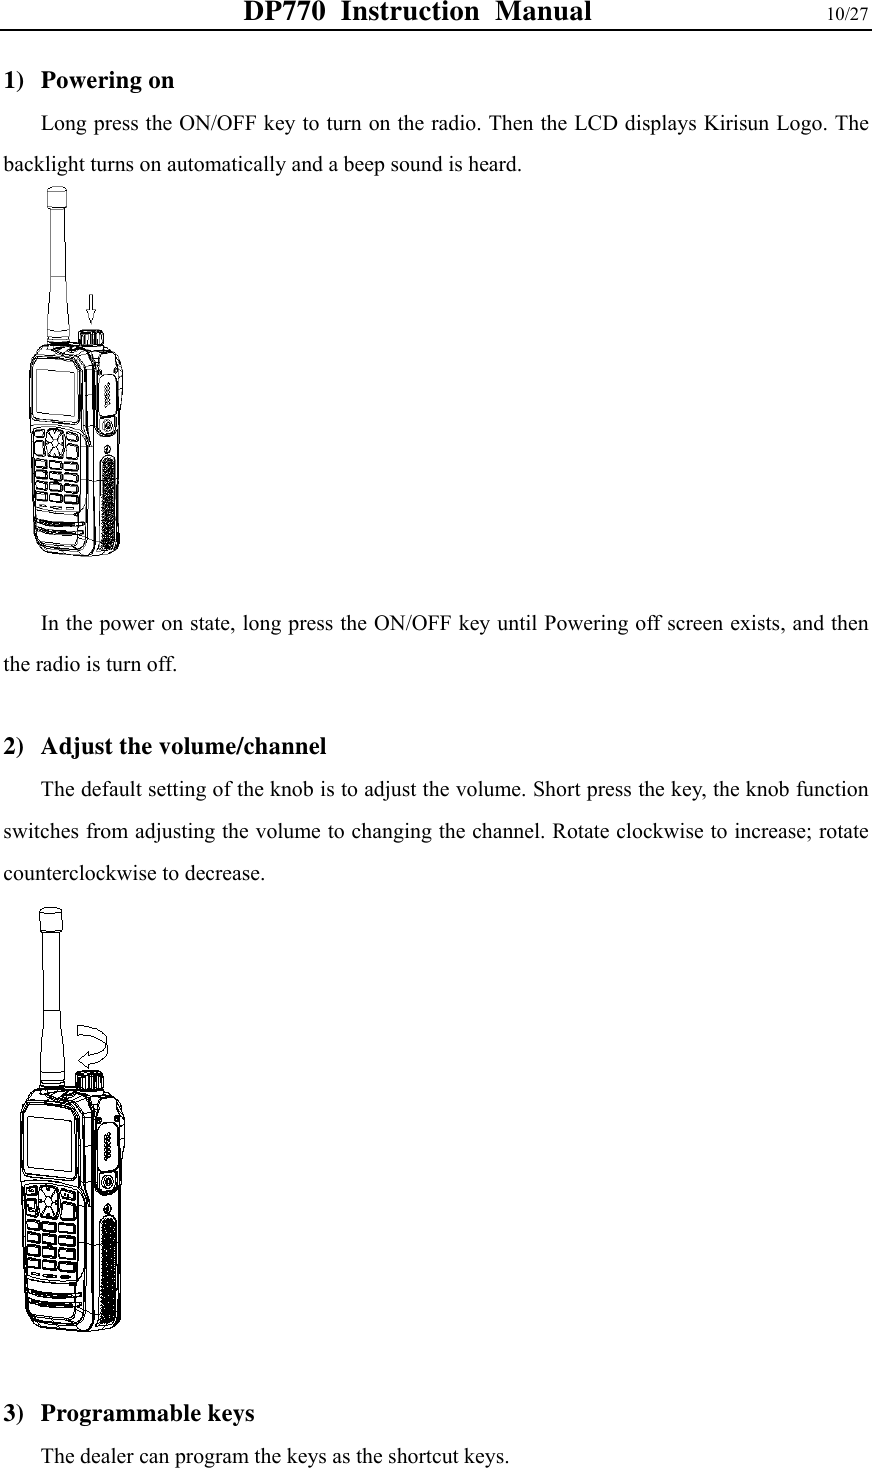
Kirisun Communication DP770 DMR Two Way Radio User Manual
Kirisun Communications Co., Ltd DMR Two Way Radio Users Manual
UserManual.wiki
>
Kirisun Communication
>
DP770 User Manual
Users Manual
Navigation menu
Upload a User Manual
Namespaces
Wiki Guide
HTML
PDF
Info
Views
User Manual
Discussion / Help
Navigation


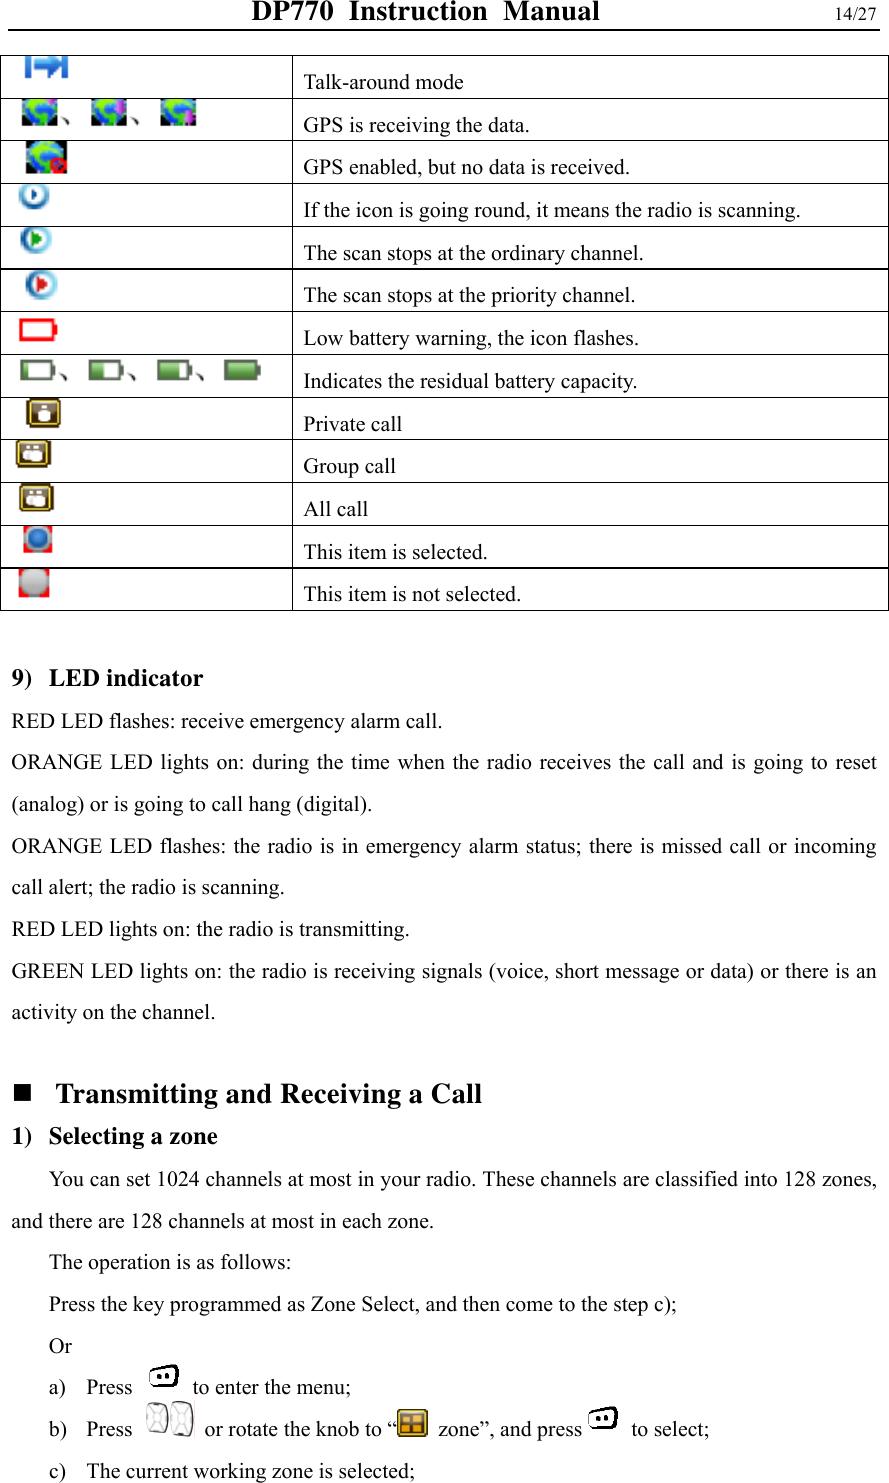
![DP770 Instruction Manual 13/27 7 P Q R S 8 T U V 9 W X Y Z 0 Blank * Input punctuation: ',', '.', '/', '\\', '?', '!', ':', ';', '\'', '"', '~', '@', '*', '#', '%', '(', ')', '[', ']', '{', '}', '<', '>' 6) PTT key There are two functions for the PTT key: (1) During the call, press the PTT key to call the other members joined in this call. Press down the key and talk to send the call; release it to receive the call. (2) Press the PTT key to make a new call. 7) Switching between digital and analog mode Each channel in the radio can be set as digital channel or analog channel. Rotate the Channel knob to switch between digital and analog mode. When switching from digital mode to analog mode, some of the functions are unavailable, e.g. short message. Icons representing the digital function will not display on the screen, the items will not display in the menu either. 8) Icons indication Signal strength indication: each bar indicates one level of the signal strength. Four bars are the strongest. This icon displays only when receiving signal. High power Low power Mute There is unread message in the inbox. The inbox is full. Keyboard is locked. Emergency alarm mode Alarm clock](https://usermanual.wiki/Kirisun-Communication/DP770/User-Guide-1976516-Page-13.png)

![DP770 Instruction Manual 18/27 to select. b) The target ID/alias displays on the LCD screen, indicating that the radio check order is sending, and the RED LED indicator lights on. c) Wait for the response. d) If the target radio is active in the system, LCD displays “Target Radio Available”, or otherwise “Target Radio Not Available”. By menu operation: In the standby screen, press [Contacts] key to come to step c), or a) Press key to enter the menu; b) Press , or rotate the knob to select “ Contacts”, and press to select; c) Press , or rotate the knob to select “Contacts List”, and press to select. Then press , or rotate the knob to select the target private call contact, and press to select. Or Press , or rotate the knob to select “Manual Dial”, and press to select. Then input the target ID with the keyboard and press to select. d) Press , or rotate the knob to select “Radio Check”, and press to select. e) The target ID/alias displays on the LCD screen, indicating that the radio check order is sending, and the RED LED indicator lights on. f) Wait for the response. g) If the target radio is active in the system, LCD displays “Target Radio Available”, or otherwise “Target Radio Not Available”. h) The radio returns to the target ID/alias list screen. Note: During when the “Radio Check” order is sent out and the radio is waiting for the response, press , the radio will terminate the order and exit “Radio Check” mode. Or If the time to wait for the response is over, the radio will automatically exit this mode and displays “Target Radio Not Available”. 2) Call Alert Call alert function allows the user to ask another user to call back.](https://usermanual.wiki/Kirisun-Communication/DP770/User-Guide-1976516-Page-18.png)
![DP770 Instruction Manual 19/27 (1) Receiving and answer the call alert When receiving call alert and the call alert decoding is enabled, the radio will automatically answer the call. The LCD screen displays the caller’s alias/ID. The radio sends out the call alert tone periodically, and the ORANGE LED indicator flashes. Press the PTT key to call back the caller, or press other keys to neglect the call alert. (2) Sending a call alert By pressing the programmed “Call Alert” key: * a) Press the navigation keys , or rotate the knob to select the target contact, and press to select. b) The target ID/alias displays on the LCD, indicating that the call alert is sending out, and the RED LED indicator lights on. c) Wait for the response. d) If the response is received, the LCD displays “Call Alert Successful”, or otherwise displays “Call Alert Failed”. By menu operation: In standby screen, press [Contacts] key to come to step c), or a) Press to enter the menu; b) Press , or rotate the knob to select “ contacts”, and press to select. c) Press , or rotate the knob to select “Contacts List”, and press to select. And press , or rotate the knob to select the target private call contact, press to select. Or Press , or rotate the knob to select “Manual Dial”, and press to select. Input the target ID with the keyboard, and press to select. d) Press , or rotate the knob to select “Call Alert”, and press to select. e) The target ID/alias displays on the LCD, indicating that the call alert is sending out, and the RED LED indicator lights on. f) Wait for the response. g) If the response is received, the LCD displays “Call Alert Successful”, or otherwise displays “Call Alert Failed”. Note:](https://usermanual.wiki/Kirisun-Communication/DP770/User-Guide-1976516-Page-19.png)
![DP770 Instruction Manual 21/27 By menu operation: In standby screen, press [Contacts] key to come to step c), or a) Press to enter the menu; b) Press , or rotate the knob to select “ contacts”, and press to select. c) Press , or rotate the knob to select “Contacts List”, and press to select. Then press , or rotate the knob to select the target private call contact, press to select. Or Press , or rotate the knob to select “Manual Dial”, and press to select. Input the target ID with the keyboard, and press to select. d) Press , or rotate the knob to select “Radio Kill/Revive”, and press to select. e) The target ID/alias displays on the LCD, indicating that the Radio kill/revive order is sending out, and the RED LED indicator lights on. f) Wait for the response. g) If the response is received, the LCD displays “Radio kill/revive Successful”, or otherwise displays “Radio kill/revive Failed”. Note: During when the “Radio kill/revive” order is sent out and the radio is waiting for the response, press , the radio will terminate the order and exit “Radio kill/revive” mode. Or If the time to wait for the response is over, the radio will automatically exit this mode and displays “Radio kill/revive Failed”. 4) Remote Monitor This function is used to enable the target radio’s MIC, and there is no visible or audible sign on the monitored radio. You can use this function to remote monitor the sound around the target radio. (1) Sending remote monitor By the programmed “Remote Monitor” key: * a) Press the navigation keys , or rotate the knob to select the target contact, and press to select. b) The target ID/alias displays on the LCD, indicating that the remote monitor order is sending](https://usermanual.wiki/Kirisun-Communication/DP770/User-Guide-1976516-Page-21.png)
![DP770 Instruction Manual 22/27 out, and the RED LED indicator lights on. c) Wait for the response. d) If the response is received, the LCD displays “Remote Monitor Successful”, or otherwise displays “Remote Monitor Failed”. By menu operation: In standby screen, press [Contacts] key to come to step c), or a) Press to enter the menu; b) Press , or rotate the knob to select “ contacts”, and press to select. c) Press , or rotate the knob to select “Contacts List”, and press to select. Then press , or rotate the knob to select the target private call contact, press to select. Or Press , or rotate the knob to select “Manual Dial”, and press to select. Input the target ID with the keyboard, and press to select. d) Press , or rotate the knob to select “Remote Monitor”, and press to select. e) The target ID/alias displays on the LCD, indicating that the Remote Monitor order is sending out, and the RED LED indicator lights on. f) Wait for the response. g) If the response is received, the LCD displays “Remote Monitor Successful”, or otherwise displays “Remote Monitor Failed”. Note: During when the “Remote Monitor” order is sent out and the radio is waiting for the response, press , the radio will terminate the order and exit “Remote Monitor” mode. Or If the time to wait for the response is over, the radio will automatically exit this mode and displays “Remote Monitor Failed”. Emergency Alarm If enabled and the user is in danger, the user can send out a confirmed emergency alarm signal and an emergency voice to the administrator user. The user can send the alarm in any time, even if the current channel is receiving the signal. Your radio supports the following three means of emergency alarm mode: Emergency alarm only](https://usermanual.wiki/Kirisun-Communication/DP770/User-Guide-1976516-Page-22.png)
![DP770 Instruction Manual 25/27 the target radio’s PTT key, (the alert tone indicates that the channel is idle) which means that the channel is idle and you can answer the call. Press the PTT key to answer the call or long press the programmed “Emergency Alarm” key to end the alarm. i) The radio returns to the standby screen. If your radio sets as Silent, there is no sound or sign in Emergency alarm mode. And the radio cannot receive the response from other radios, unless you press down the PTT key. If your radio sets as Silent with voice, there is no sound or sign in Emergency alarm mode or in receiving the calls from other radio, unless you press the PTT key to make a call or answer the call. (5) Sending an emergency alarm with voice to follow This function allows you to send an Emergency Alarm to the other radio, and then enables your radio’s MIC automatically, so that you can communicate with other radios without pressing the PTT key. The state of which MIC is activated automatically is called “Hot MIC” state. [Hot MIC Duration] can be set by CPS in the digital emergency system settings. During Hot MIC Duration, press the PTT key, the radio will neglect the PTT operation and stays at the emergency mode. a) Press the key programmed as “Emergency Alarm”, the radio enters emergency alarm mode, and the LCD displays . b) The LCD also displays alarm call group alias/ID, emergency alarm icon and this icon . c) Keep your mouth 1~2 inches away from the microphone and speak to it. If Hot MIC enabled, the radio transmits automatically without pressing the PTT key until Hot MIC Duration is over. d) During transmission, the RED LED indicator lights on, and the group call icon displays on the LCD. e) When Hot MIC Duration is over, the radio stops transmitting automatically. You can press the PTT key to continue transmitting. If your radio sets as Silent, there is no sound or sign displayed in Emergency alarm mode. And the radio cannot receive the response from other radios until Hot MIC Duration is over and you can press down the PTT key to make a call.](https://usermanual.wiki/Kirisun-Communication/DP770/User-Guide-1976516-Page-25.png)