Kitchenaid KEMS376SBL0 User Manual BUILT IN OVEN W/MICROWAVE Manuals And Guides L0804033
KITCHENAID Built In Oven, Electric with Microwave Manual L0804033 KITCHENAID Built In Oven, Electric with Microwave Owner's Manual, KITCHENAID Built In Oven, Electric with Microwave installation guides
User Manual: Kitchenaid KEMS376SBL0 KEMS376SBL0 KITCHENAID BUILT-IN OVEN W/MICROWAVE - Manuals and Guides View the owners manual for your KITCHENAID BUILT-IN OVEN W/MICROWAVE #KEMS376SBL0. Home:Kitchen Appliance Parts:Kitchenaid Parts:Kitchenaid BUILT-IN OVEN W/MICROWAVE Manual
Open the PDF directly: View PDF ![]() .
.
Page Count: 35
Microwave-Convection
Oven

CONTENTS
Contents ............................................... Inside i=ront Cover
Precautions to Avoid Possible Exposure to Excessive Microwave Energy ........ 3
Microwave-Convection Oven Features ................................... 4
Features and Benefits ................................................. 5
Touch Control Panel ................................................. 6
Touch Operation Check ............................................... 7
Service Call Check ............................................ 8
Operation of Touch Control Panel -Programming Directions .................. 9
To set the Clock ........................................... 10
Minute Timer ............................................. 11
Microwave Cooking ......................................... 12
To cook at HIGH ......................................... 12
Variable Cooking Control ................................... 13
Multiple Sequence Microwave Cooking ........................... 14
Convection Cooking ......................................... 15
To Preheat ............................................. 15
To Cook by Convection ..................................... 16
To Preheat and Cook by Convection ............................. 17
Automatic Mix Cooking ...................................... 19
To Change convection temperature of Mix settings ................... 20
To preheat and cook with Mix settings ........................... 21
Convection and Microwave Cooking ............................ 23
Broiling ................................................. 24
Slow Cook ............................................... 25
Auto Start ............................................... 26
Use the STOP!CLEAR Pad To: .................................. 27
To Cancel a Program During Cooking .............................. 27
When Electrical Power is Interrupted .............................. 27
Cleaning and Care ............................................ 28
Condensation ............................................... 29
Cautions Reminders .......................................... 29
Reminders ................................................. 29
Convection Cooking Guidelines ................................... 30
Accessories ............................................... 31
Convection Heating ......................................... 32
Convection Broiling ......................................... 33
Combination Roasting ....................................... 33
Combination Baking ......................................... 34
PRECAUTIONS TO AVOID POSSIBLE
EXPOSURE TO EXCESSIVE
MICROWAVE ENERGY
(a) Do not attempt to operate this oven with the door open since open-door operation
can result in harmful exposure to microwave energy. It is important not to defeat or
tamper with the safety interlocks.
(b) Do not place any object between the oven front face and the door or allow soil or
cleaner residue to accumulate on sealing surfaces.
(c) Do not operate the oven if it is damaged. It is particularly important that the oven
door closes properly and that there is no damage to the:
(1) door (bent), (2) hinges and latches (broken or loosened), (3) door seals and sealing
surfaces.
(d) The oven should not be adjusted or repaired by anyone except properly qualified
service personnel.
BEFORE YOU BEGIN COOKING...
This Use and Care Guide is a companion to your new Microwave-Convection Cookbook.
Before you begin cooking, read the Introductory Section of your cookbook. Topics dis
cussed there include:
- What are microwaves?
- Microwave Utensils
- Microwave Cooking Techniques
- Learn While You Cook
- What is Convection Cooking?
- Microwave-Convection Utensils
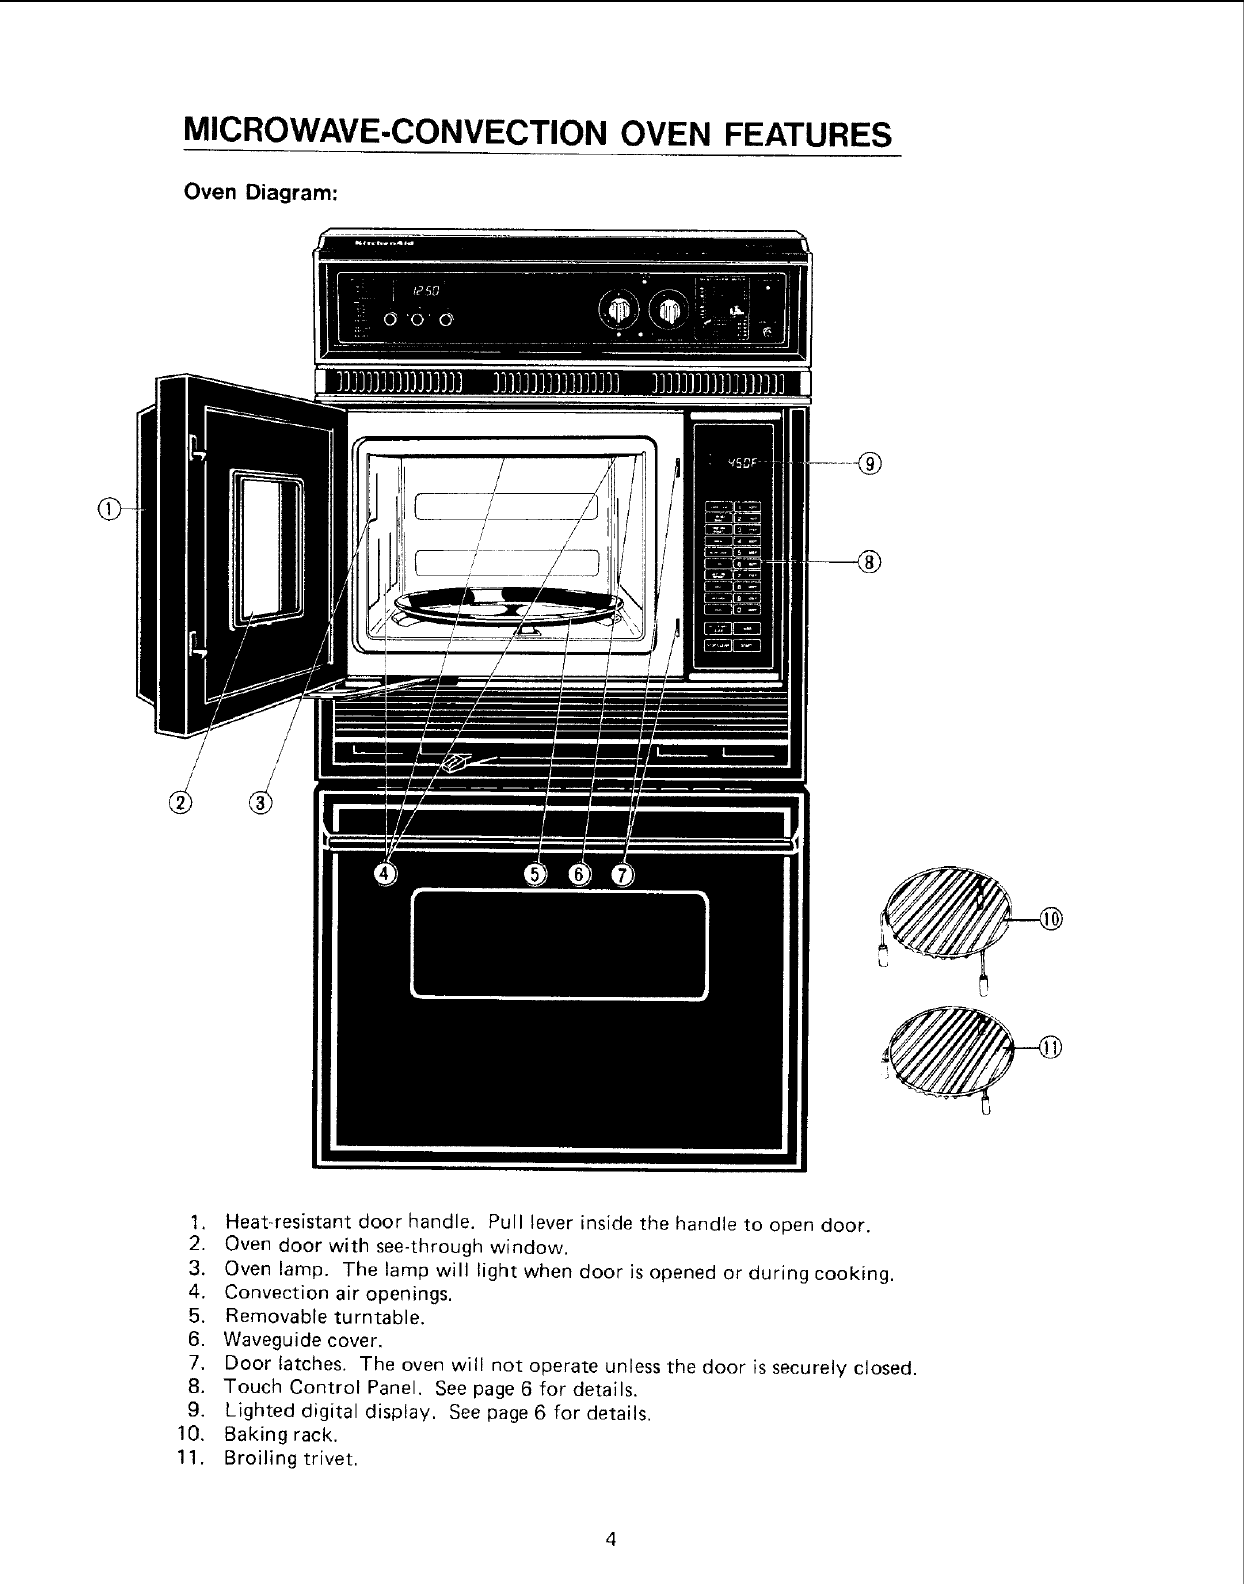
MICROWAVE-CONVECTION OVEN FEATURES
Oven Diagram:
1. Heat-resistant door handle. Pull lever inside the handle to open door.
2. Oven door with see-through window.
3. Oven lamp. The lamp will light when door is opened or during cooking.
4. Convection air openings.
5. Removable turntable.
6. Waveguide cover.
7. Door latches. The oven will not operate unless the door is securely closed.
8. Touch Control Panel. See page 6 for details.
9. Lighted digital display. See page 6 for details.
10. Baking rack.
11. Broiling trivet.
Features and Benefits
•Turntable system provides more uniform cooking than ever before possible. Automatical-
ly turns the food for even cooking.
•Microprocessor touch control panel for wide variety of cooking programs not achievable
by conventional methods. Entry signal tone.
• Variable cooking control for choosing the rate of microwave cooking: HIGH, MEDIUM
HIGH, MEDIUM, MEDIUM LOW/DEFROST and LOW.
• Automatic defrost cycle at MEDIUM LOW/DEFROST setting.
•Convection temperature control with automatic preheat feature.
• Two mix settings to automatically combine microwave and convection cooking in one
simple step.
• Four sequence programmable cooking.
• Baking rack for two level convection or combination cooking.
• Broiling trivet for roasting or broiling meat.
• Easy to open handle door with triple-safe locking system (three separate safety switches,
door interlocks and concealed interlocks).
• Auto Start for delayed cooking.
• Lighted digital display for accurate, precise time and temperature settings.
• Oven light to view foods as they cook.
• In compliance with standards set by:
FCC - Federal Communications Commission Type Approved
DHHS - Complies with Department of Health and Human Services (DHHS) rule, CFR,
Title 21, Chapter I, Subchapter J.

TOUCH CONTROL PANEL
L
MIX DEF MID
CONV LOW MLOW MHIGH HIGH
AUTO
AUTO SAR{ l[
CLOCK TIMER
I
STOP,'CL EAR START
I
I
!
J
r
]
I
]
I
J
CONVECTION FAN SYMBOL
LIGHTED DIGITAL DISPLAY
Shows readout of cooking time, convection
temperature or time of day.
.INDICATORS
Indicator lights for Convection (CONV), Variable
Cooking, Cook, Mix and Auto Start (AUTO).
COOKING FUNCTION PADS
Touch to select Convection, Mix, Broil or Slow
Cook settings.
NUMBER AND TEMPERATURE SELECTION
(CONVECTION) PADS
Touch to enter cooking times, clock time or
convection temperature.
VARIABLE COOKING CONTROL SETTING
PADS
Touch to select microwave power setting. If not
touched, HIGH is automatically selected.
.TIMER PAD
Touch to set minute timer.
AUTO START/CLOCK PAD
Touch to set clock or auto start time.
START PAD
Touch to start oven.
STOP/CLEAR PAD
Touch to erase during programming.
Touch once to stop operation of oven during
cooking; touch twice to cancel cooking program.
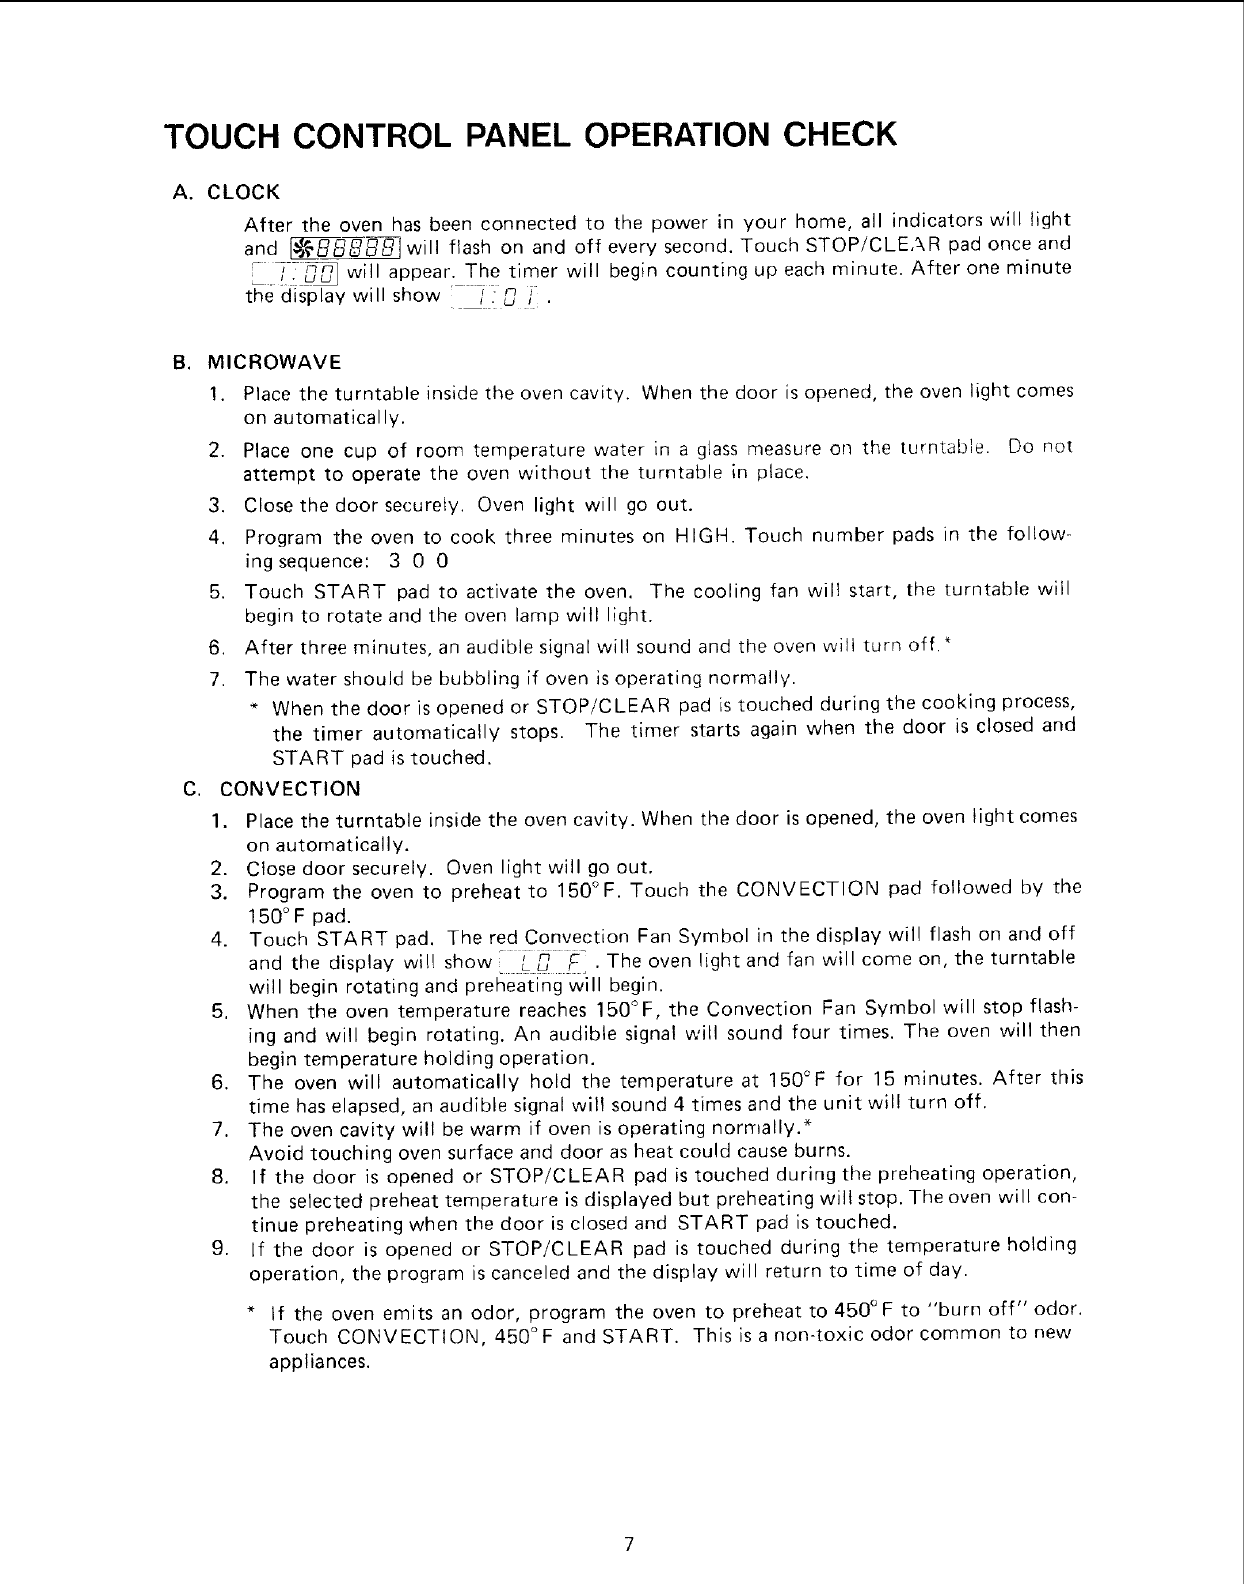
TOUCH CONTROL PANEL OPERATION CHECK
A° CLOCK
After the oven has been connected to the power in your home, all indicators will light
and _SBSIwill flash on and off every second. Touch STOP/CLE,_,R pad once and
- -7-_ m m
_. t_:_ will appear. The timer will begin counting up each minute. After one minute
the display will show /!_ j .
B,
C,
MICROWAVE
1. Place the turntable inside the oven cavity. When the door is opened, the oven light comes
on automatical ly.
2. Place one cup of room temperature water in a glass measure on the turntable. Do not
attempt to operate the oven without the turntable in place.
3. Close the door securely. Oven light will go out.
4. Program the oven to cook three minutes on HIGH. Touch number pads in the follow-
ing sequence: 3 0 0
5. Touch START pad to activate the oven. The cooling fan will start, the turntable will
begin to rotate and the oven lamp will light.
6. After three minutes, an audible signal will sound and the oven will turn off.*
7. The water should be bubbling if oven is operating normally.
* When the door is opened or STOP/CLEAR pad is touched during the cooking process,
the timer automatically stops. The timer starts again when the door is closed and
START pad is touched.
CONVECTION
1. Place the turntable inside the oven cavity. When the door is opened, the oven light comes
on automatically.
2. Close door securely. Oven light will go out.
3. Program the oven to preheat to 150°F. Touch the CONVECTION pad followed by the
150 ° F pad.
4. Touch START pad. The red Convection Fan Symbol in the display wil! flash on and off
and the display will show i _ # The oven light and fan will come on, the turntable
L LU t, •
will begin rotating and preheating will begin.
5. When the oven temperature reaches 150°F, the Convection Fan Symbol will stop flash-
ing and will begin rotating. An audible signal will sound four times. The oven will then
begin temperature holding operation.
6. The oven will automatically hold the temperature at 150°F for 15 minutes. After this
time has elapsed, an audible signal will sound 4 times and the unit wil! turn off.
7. The oven cavity will be warm if oven is operating normally.*
Avoid touching oven surface and door as heat could cause burns.
8. If the door is opened or STOP/CLEAR pad is touched during the preheating operation,
the selected preheat temperature is displayed but preheating wilt stop. The oven will con-
tinue preheating when the door is closed and START pad is touched.
9. If the door is opened or STOP/CLEAR pad is touched during the temperature holding
operation, the program is canceled and the display will return to time of day.
* If the oven emits an odor, program the oven to preheat to 450 ° F to "burn off" odor.
Touch CONVECTION, 450°F and START. This is a non-toxic odor common to new
appliances.
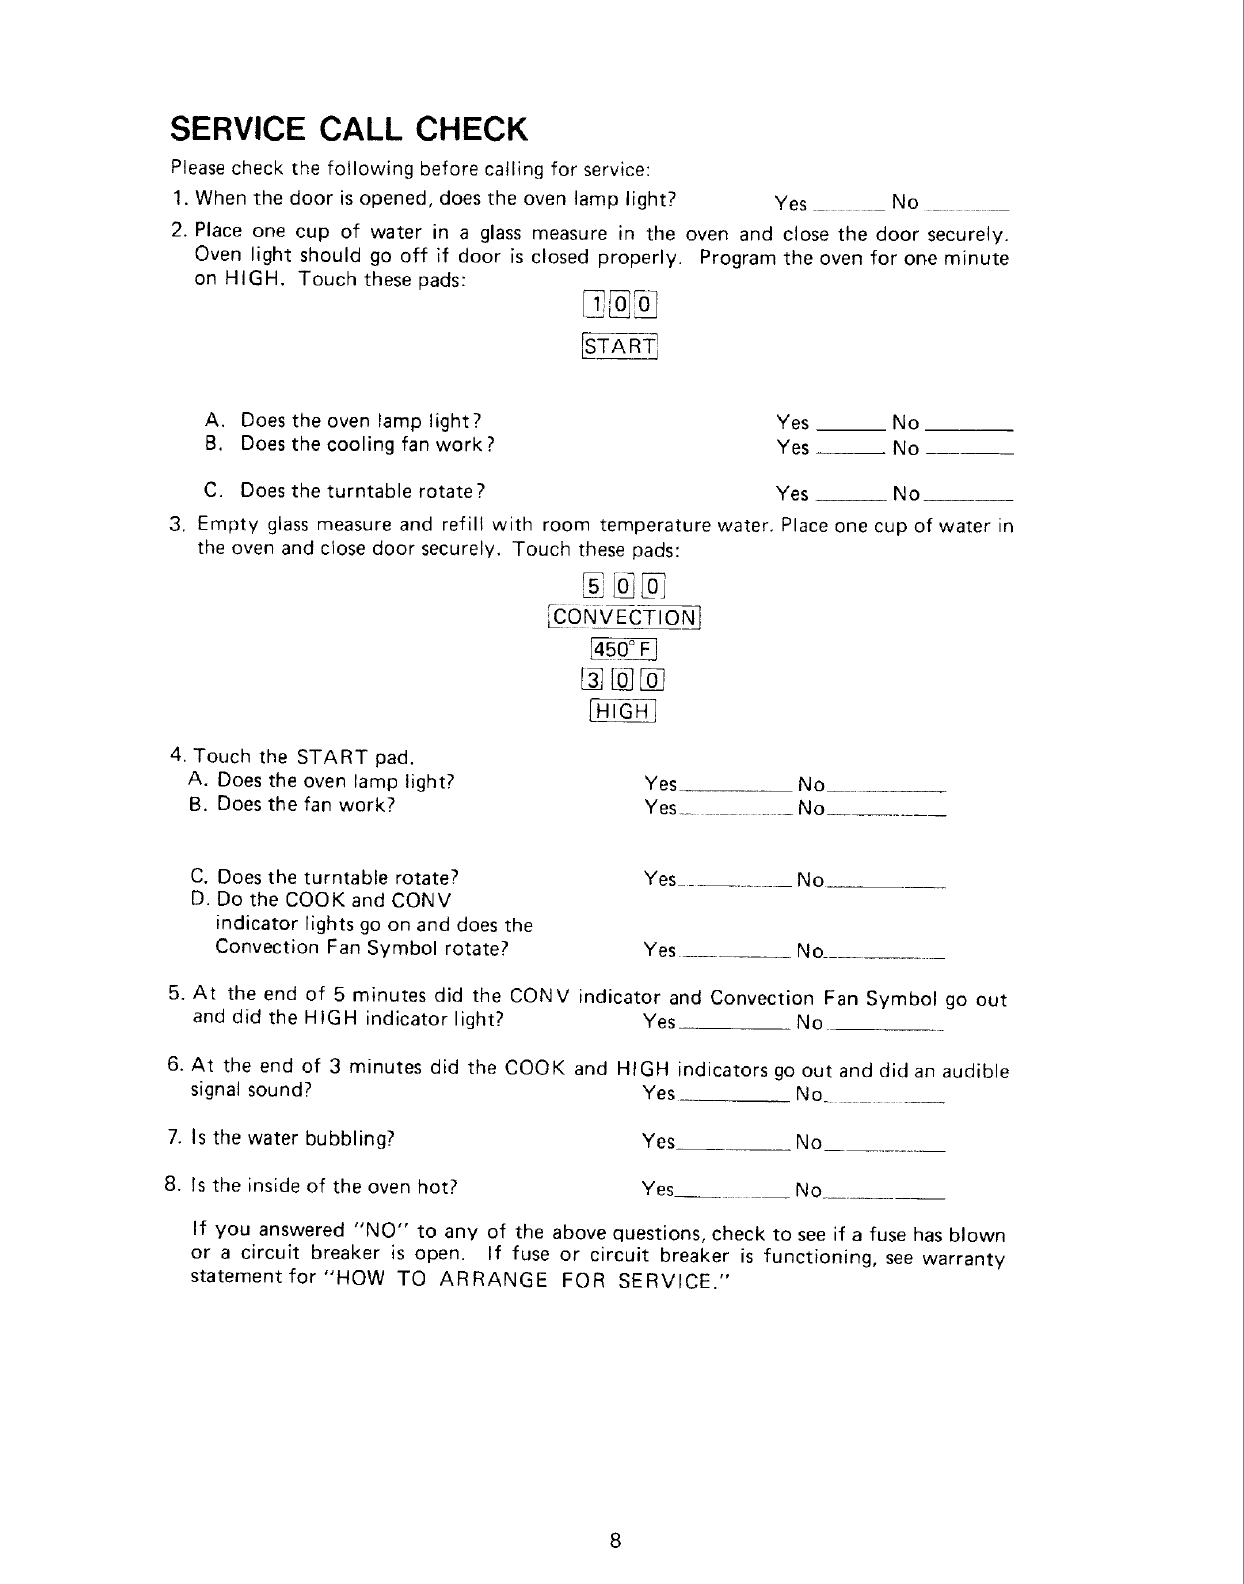
SERVICE CALL CHECK
Please check the following before calling for service:
1. When the door is opened, does the oven lamp light? Yes No
2. Place one cup of water in a glass measure in the oven and close the door securely.
Oven light should go off if door is closed properly. Program the oven for one minute
on HIGH. Touch these pads:
A. Does the oven lamp light? Yes No
B. Does the cooling fan work? Yes No
,
C. Does the turntable rotate? Yes No
Empty glass measure and refill with room temperature water, Place one cup of water in
the oven and close door securely. Touch these pads:
Zcoav
4. Touch the START pad.
A. Does the oven lamp light?
B. Does the fan work? Yes No .............
Yes ..... No_
C. Does the turntable rotate?
D. Do the COOK and CONV
indicator lights go on and does the
Convection Fan Symbol rotate?
Yes...... No
Yes .... No.........
5. At the end of 5 minutes did the CONY indicator and Convection Fan Symbol go out
and did the HIGH indicator light? Yes No
6. At the end of 3 minutes did the COOK and HIGH indicators go out and did an audible
signal sound? Yes No
7. Is the water bubbling? Yes__ No
8. Is the inside of the oven hot? Yes ...... No ....
If you answered "NO" to any of the above questions, check to see if a fuse has blown
or a circuit breaker is open. If fuse or circuit breaker is functioning, see warranty
statement for"HOW TO ARRANGE FOR SERVICE."
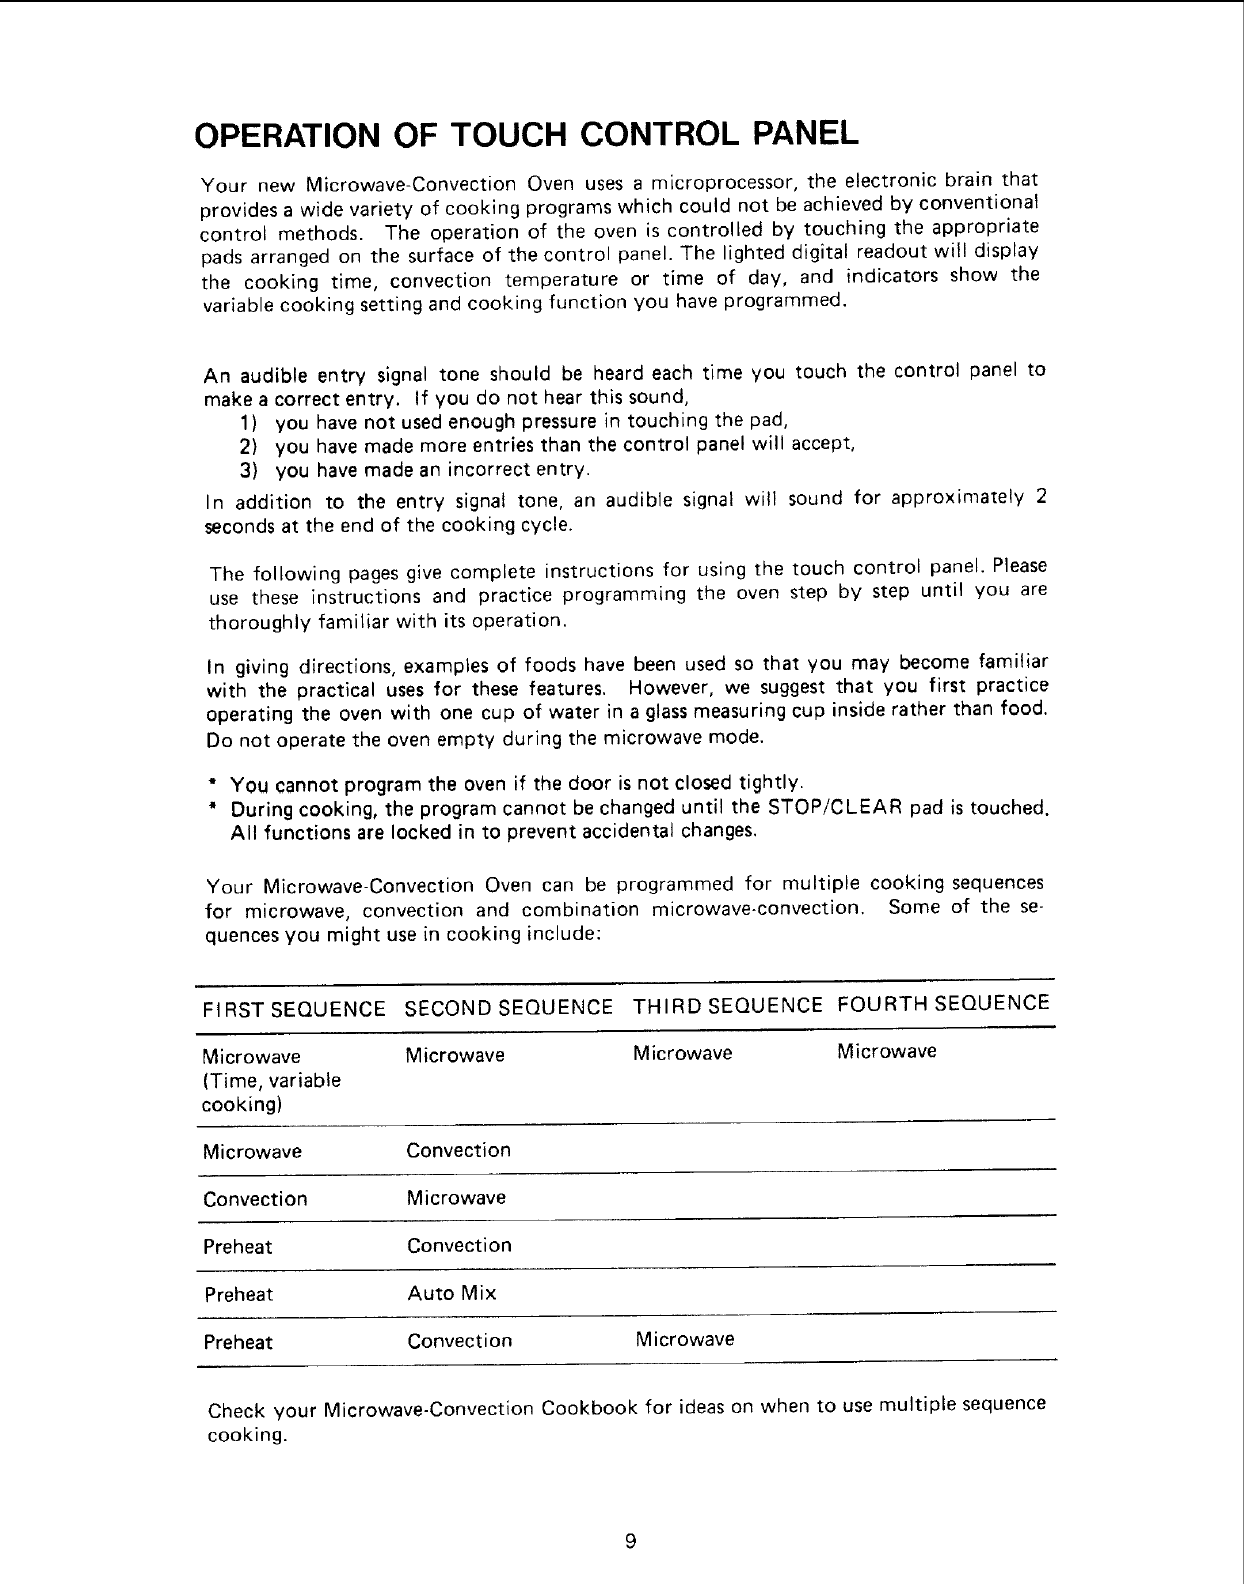
OPERATION OF TOUCH CONTROL PANEL
Your new Microwave-Convection Oven uses a microprocessor, the electronic brain that
provides a wide variety of cooking programs which could not be achieved by conventional
control methods. The operation of the oven is controlled by touching the appropriate
pads arranged on the surface of the control panel. The lighted digital readout will display
the cooking time, convection temperature or time of day, and indicators show the
variable cooking setting and cooking function you have programmed.
An audible entry signal tone should be heard each time you touch the control panel to
make a correct entry. If you do not hear this sound,
1) you have not used enough pressure in touching the pad,
2) you have made more entries than the control panel will accept,
3) you have made an incorrect entry.
In addition to the entry signal tone, an audible signal will sound for approximately 2
seconds at the end of the cooking cycle.
The following pages give complete instructions for using the touch control panel. Please
use these instructions and practice programming the oven step by step until you are
thoroughly familiar with its operation.
In giving directions, examples of foods have been used so that you may become familiar
with the practical uses for these features. However, we suggest that you first practice
operating the oven with one cup of water in a glass measuring cup inside rather than food.
Do not operate the oven empty during the microwave mode.
* YOU cannot program the oven if the door is not closed tightly.
* During cooking, the program cannot be changed until the STOP/CLEAR pad is touched.
All functions are locked in to prevent accidental changes.
Your Microwave-Convection Oven can be programmed for multiple cooking sequences
for microwave, convection and combination microwave-convection. Some of the se-
quences you might use in cooking include:
FIRST SEQUENCE SECOND SEQUENCE THIRD SEQUENCE FOURTH SEQUENCE
Microwave Microwave Microwave Microwave
(Time, variable
cooking)
Microwave Convection
Convection Microwave
Preheat Convection
Preheat Auto Mix
Preheat Convection Microwave
Check your Microwave-Convection Cookbook for ideas on when to use multiple sequence
cooking.
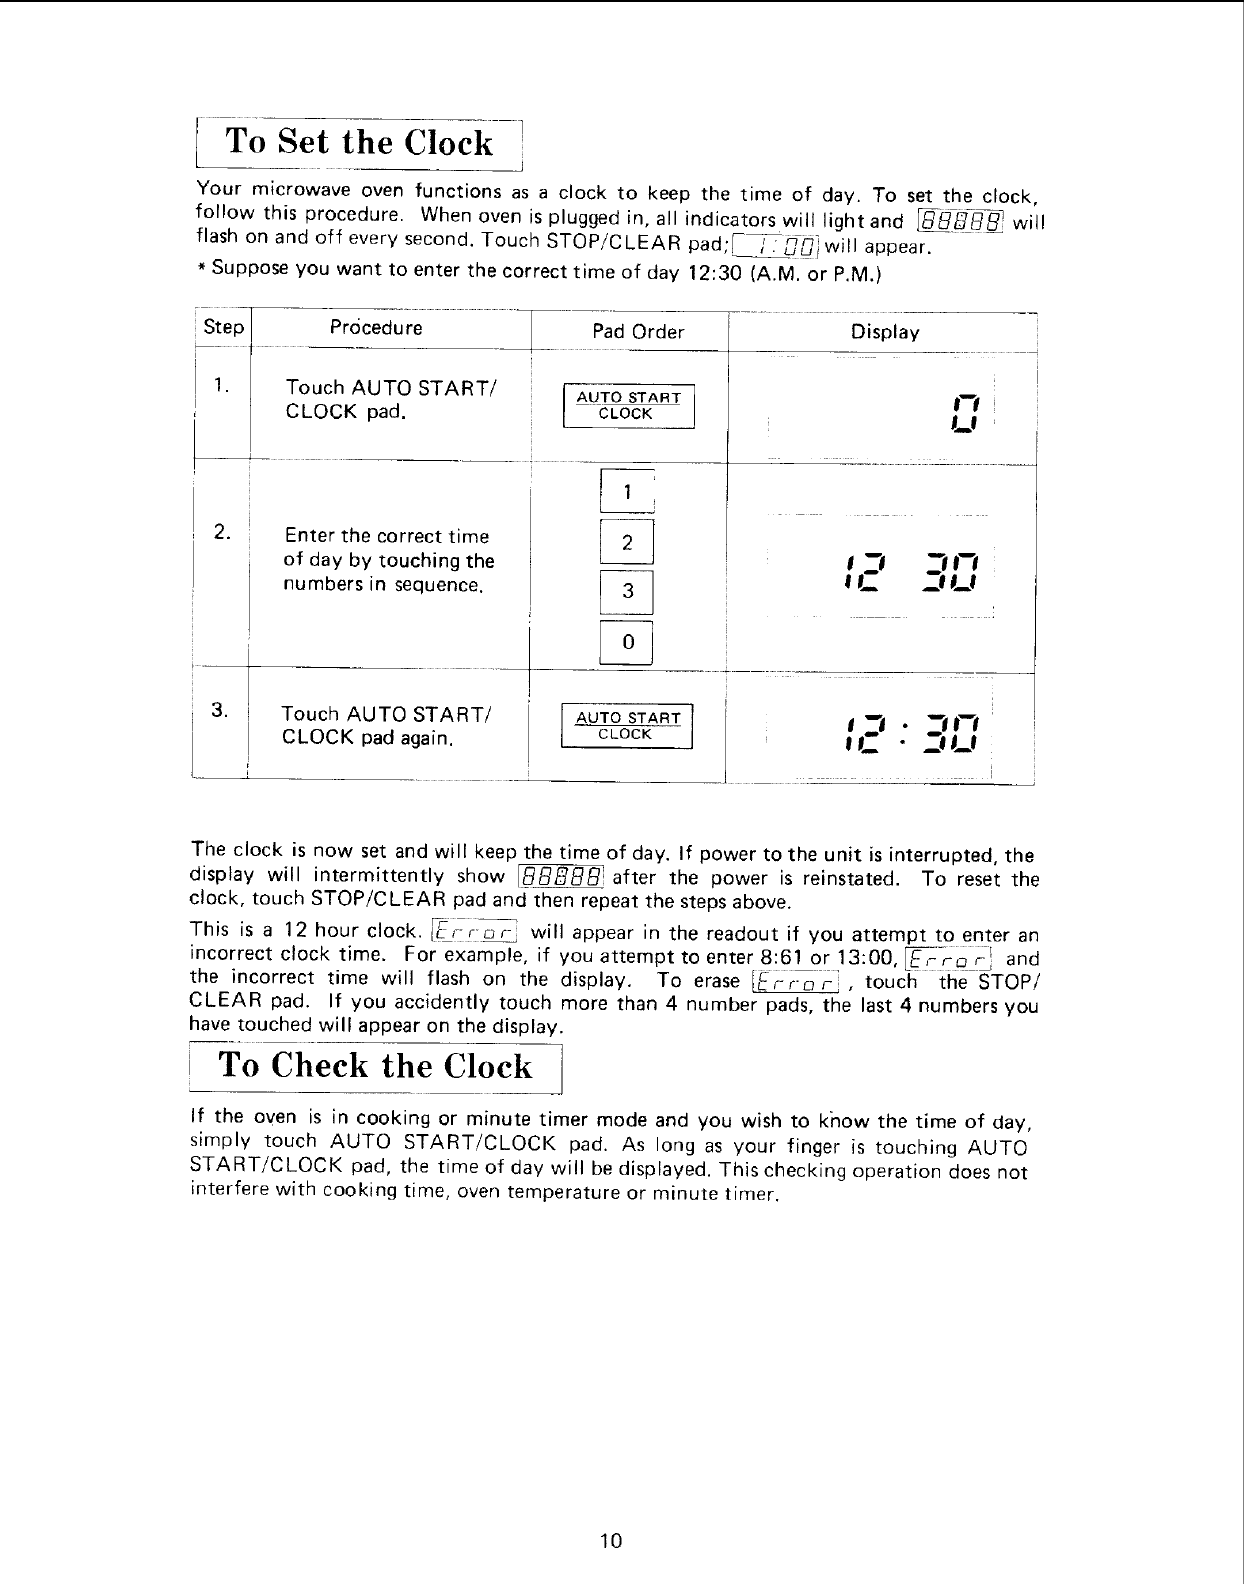
To Set the Clock J
Your microwave oven functions as a clock to keep the time of day. To set the clock,
follow this procedure. When oven is plugged in, all indicators will light and _/J-_ will
flash on and off every second. Touch STOP/CLEAR pad,[-_C nw II appear.
* Suppose you want to enter the correct time of day 12:30 (A.M. or P.M.)
Step
,
.
,
Procedure Pad Order Display
Touch AUTO START/
CLOCK pad.
Enter the correct time
of day by touching the
numbers in sequence.
Touch AUTO START/
CLOCK pad again.
AUTO START
CLOCK
[,
]t__!
II_ .j!_l
AUTO START ]
CLOCK lt__ - _lt_l
.i
The clock is now set and will keep the time of day, If power to the unit is interrupted, the
display will intermittently show _ after the power is reinstated. To reset the
clock, touch STOP/CLEAR pad and then repeat the steps above.
This is a 12 hour clock. _i--__ will appear in the readout if you attempt to enter an
E_-_- __ and
incorrect clock time. For example, if you attempt to enter 8:61 or 13:00, EFFo,-I
the incorrect time will flash on the display. To erase [Er-ro_, touch the STOP/
CLEAR pad. If you accidently touch more than 4 number pads, the last 4 numbers you
have touched will appear on the display.
i To Check the Clock /
J
If the oven is in cooking or minute timer mode and you wish to know the time of day,
simply touch AUTO START/CLOCK pad. As long as your finger is touching AUTO
START/CLOCK pad, the time of day will be displayed. This checking operation does not
interfere with cooking time, oven temperature or minute timer.
10
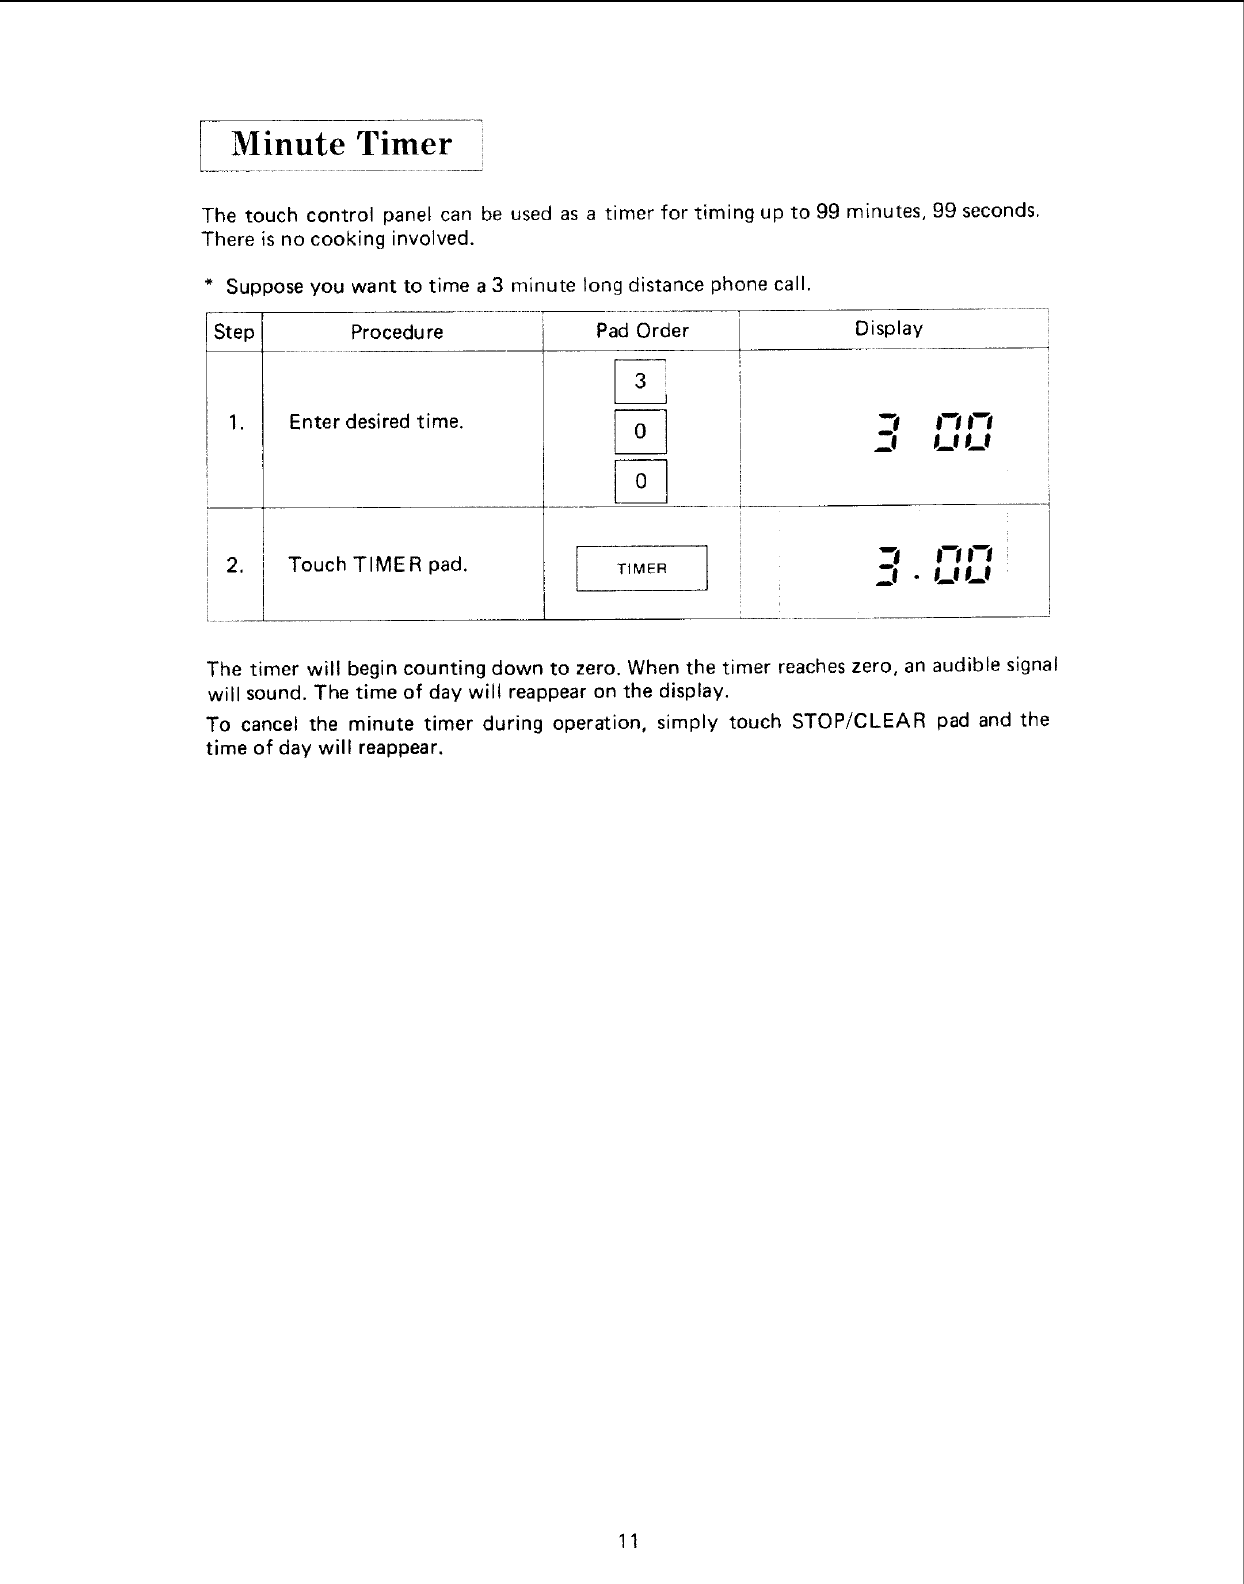
Thetouchcontrol panelcanbeusedasa timerfor timingupto 99minutes,99seconds.
Thereisnocookinginvolved.
* Supposeyouwantto timea3 minutelongdistancephonecall.
Step
1.
Procedure Pad Order
Enter desired time.
Touch TIMER pad.
Display
TIMER ] _1 _wlDwl_! • I_l I_e
The timer will begin counting down to zero. When the timer reaches zero, an audible signal
will sound. The time of day wilt reappear on the display.
To cancel the minute timer during operation, simply touch STOP/CLEAR pad and the
time of day will reappear.
11
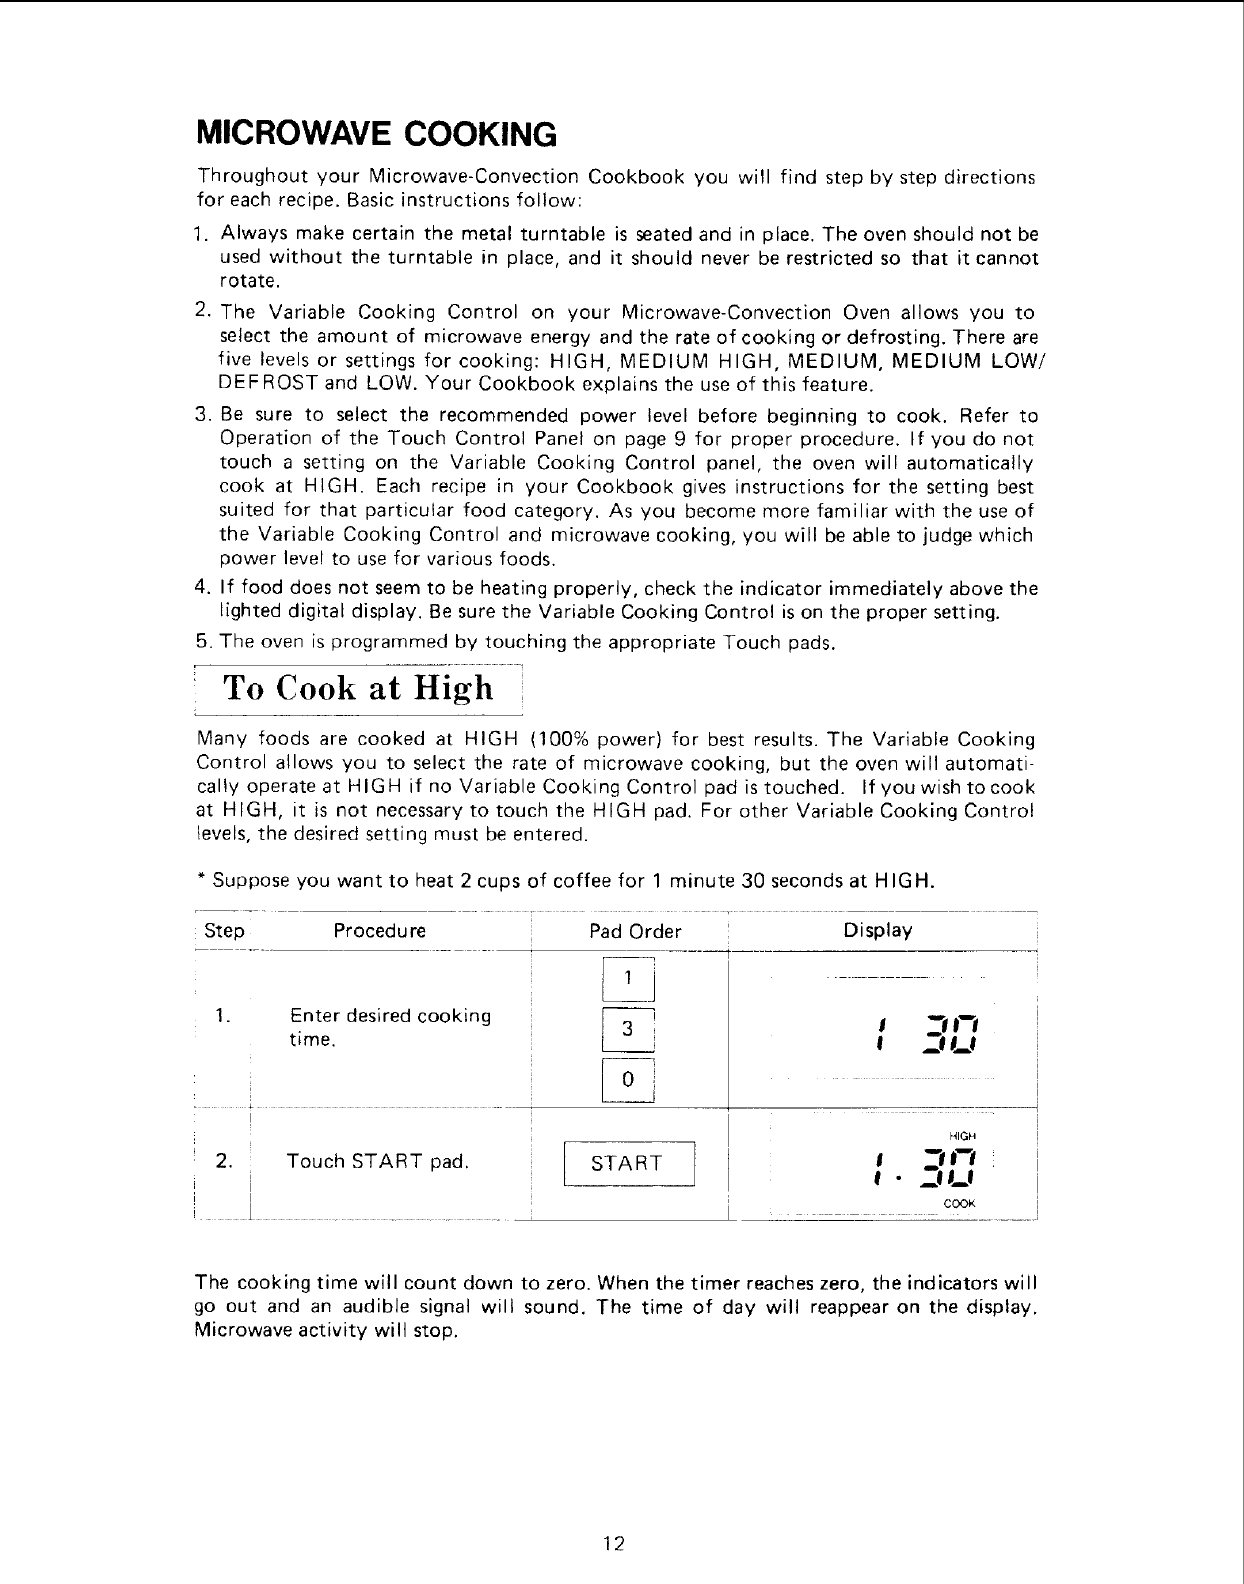
MICROWAVE COOKING
Throughout your Microwave-Convection Cookbook you will find step by step directions
for each recipe. Basic instructions follow:
1. Always make certain the metal turntable is seated and in place. The oven should not be
used without the turntable in place, and it should never be restricted so that it cannot
rotate.
2. The Variable Cooking Control on your Microwave-Convection Oven allows you to
select the amount of microwave energy and the rate of cooking or defrosting. There are
five levels or settings for cooking: HIGH, MEDIUM HIGH, MEDIUM, MEDIUM LOW/
DEFROST and LOW. Your Cookbook explains the use of this feature.
3. Be sure to select the recommended power level before beginning to cook. Refer to
Operation of the Touch Control Panel on page 9 for proper procedure. If you do not
touch a setting on the Variable Cooking Control panel, the oven will automatically
cook at HIGH. Each recipe in your Cookbook gives instructions for the setting best
suited for that particular food category. As you become more familiar with the use of
the Variable Cooking Control and microwave cooking, you will be able to judge which
power level to use for various foods.
4. If food does not seem to be heating properly, check the indicator immediately above the
lighted digital display. Be sure the Variable Cooking Control is on the proper setting.
5. The oven is programmed by touching the appropriate Touch pads.
To Cook at High
Many foods are cooked at HIGH (100% power) for best results. The Variable Cooking
Control allows you to select the rate of microwave cooking, but the oven will automati-
cally operate at HIGH if no Variable Cooking Control pad is touched. If you wish to cook
at HIGH, it is not necessary to touch the HIGH pad. For other Variable Cooking Control
levels, the desired setting must be entered.
* Suppose you want to heat 2 cups of coffee for 1 minute 30 seconds at HIGH.
Step Procedu re
Enter desired cooking
time.
i
Pad Order Display
_rim
Z-ILl
2. Touch START pad.
!
I
I
START l
i
I
HIGH
l.__J_l
C_K
The cooking time will count down to zero. When the timer reaches zero, the indicators will
go out and an audible signal will sound. The time of day will reappear on the display.
Microwave activity will stop.
12

Variable Cooking Control
The Variable Cooking Control on your oven allows you to select the rate of cooking:
Approximate percentage of microwave power
HIGH 100%
MEDIUM HIGH 70%
MEDIUM 50%
MEDIUM LOW!DEFROST 30%
LOW 10%
Some foods give best results when cooked more sLowly at a lower cooking power. Your
cookbook will indicate the recommended variable setting for each recipe. See your
Microwave-Convection Cookbook for guidelines on how to use the Variable Cooking
Control.
* Suppose you want to heat soup for 2 minutes 15 seconds at MEDIUM.
Step Procedure ! Pad Order
,
,
Enter desired cooking
ti me.
Select second Variable
Cooking Control setting.
Touch START pad.
3,
Display
Iff"
MED
. !_J
MED
START I
COOK
The cooking time will count down to zero. When the timer reaches zero, all indicators will
go out and an audible signal will sound. The time of day will reappear on the display.
NOTE: If you accidentally touch the wrong Variable Cooking Control pad, immediately
touch the correct pad. The last pad touched will be the setting the oven accepts. For
example, if you touch MEDIUM HIGH and then immediately touch MEDIUM, the oven
will cook at MEDIUM.
13
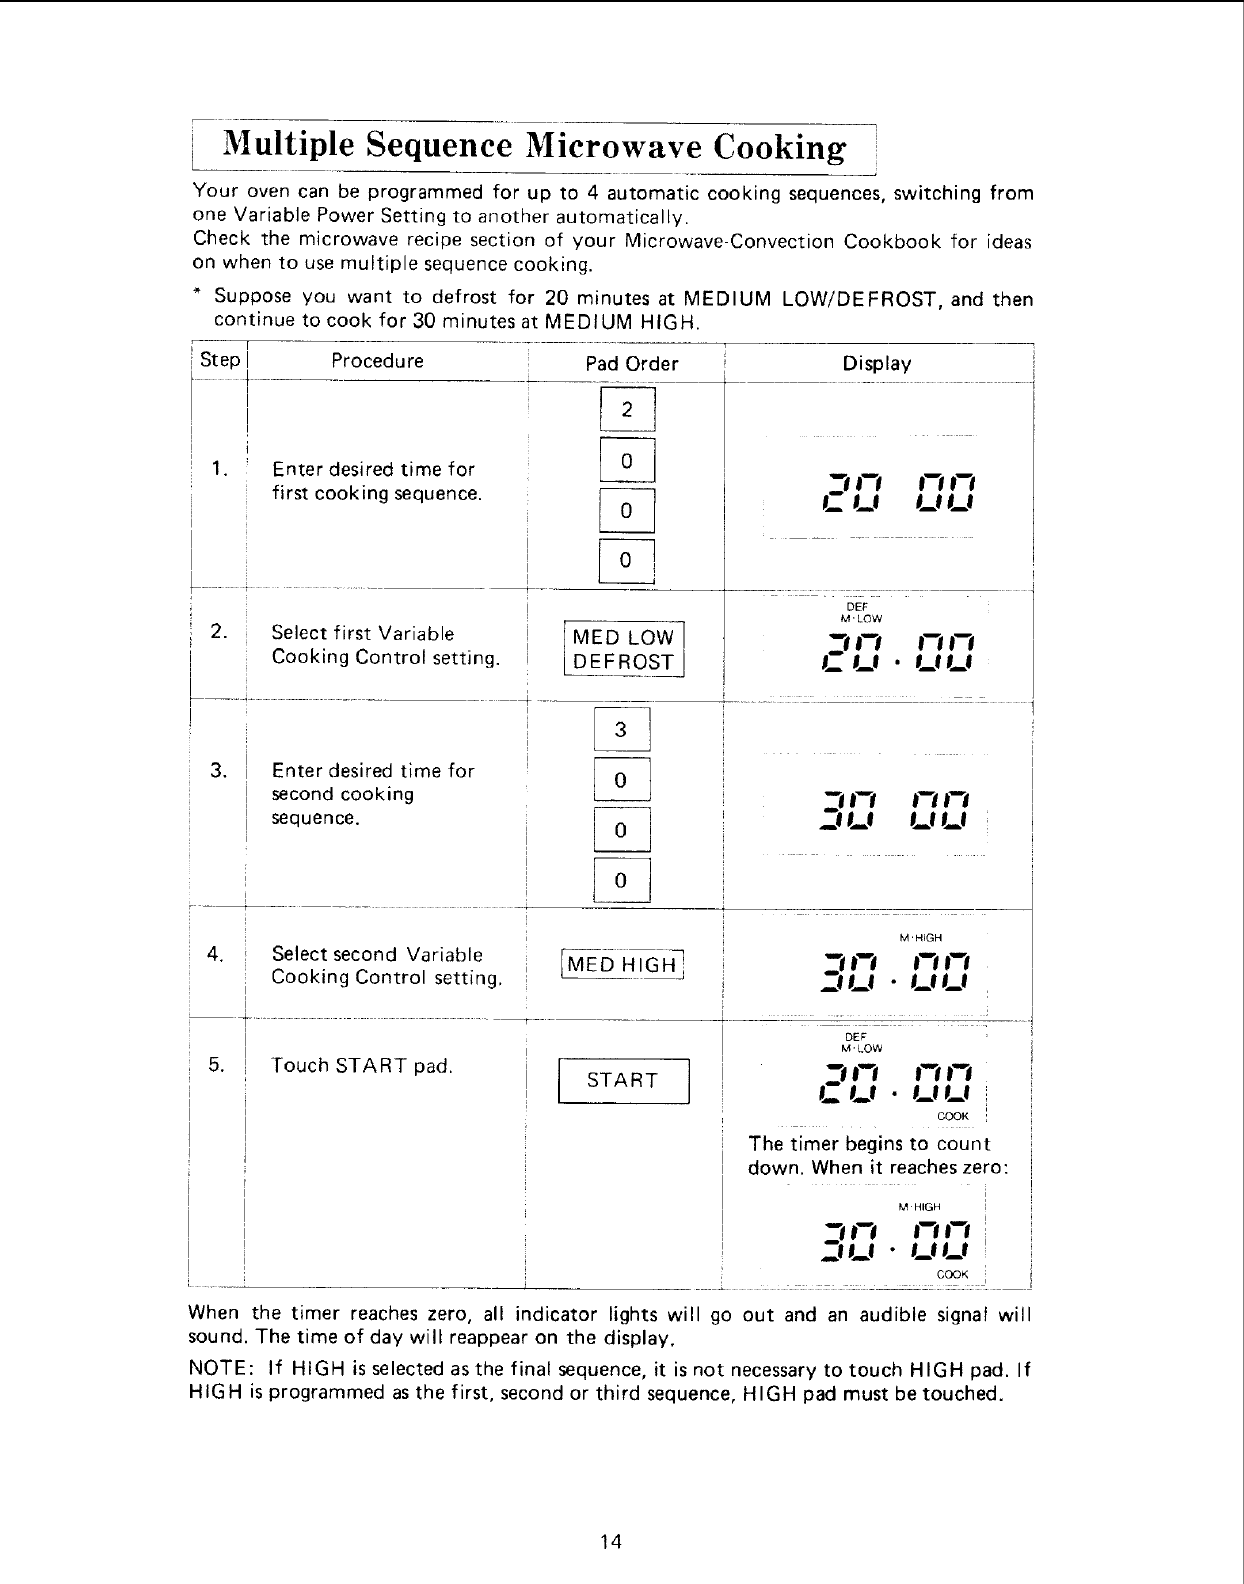
Multiple Sequence Microwave Cooking
Your oven can be programmed for up to 4 automatic cooking sequences, switching from
one Variable Power Setting to another automatically.
Check the microwave recipe section of your Microwave-Convection Cookbook for ideas
on when to use multiple sequence cooking.
* Suppose you want to defrost for 20 minutes at MEDIUM LOW!DEFROST, and then
continue to cook for 30 minutes at MEDIUM HIGH.
I
Step l Procedure Pad Order Display
1. Enter desired time for _] I--I t--_
3J-t
first cooking sequence. _ !_ I,J I_t I__1
...... + ..........
DEF
M" LOW
2. Select first Variable [ ME D LOW ] 3t I--t t--1I--I
Cooking Control setting. DEFROST J I_ I_! .I_11_t
3. I Enter desired time for
second cooking __t1"t t--I I--t
sequence. _] _ ._1 I__I I__II__I
i
1 M'HIGH
4. _ Select second Variable M_-[]HIGH_ _11--t I--'tt'--'1
Cooking Control setting. ._1t__1 •I_1t_1
I
i
IDEF
M" LOW i
LU.UU_
COOK !
The timer begins to count
down. When it reaches zero:
M HIGH
_--i1-I I--I 1"1
_11_1 • UtJ
COOK
When the timer reaches zero, all indicator lights will go out and an audible signal will
sound. The time of day will reappear on the display.
NOTE: If HIGH is selected as the final sequence, it is not necessary to touch HIGH pad. lf
HIGH is programmed as the first, second or third sequence, HIGH pad must be touched.
14
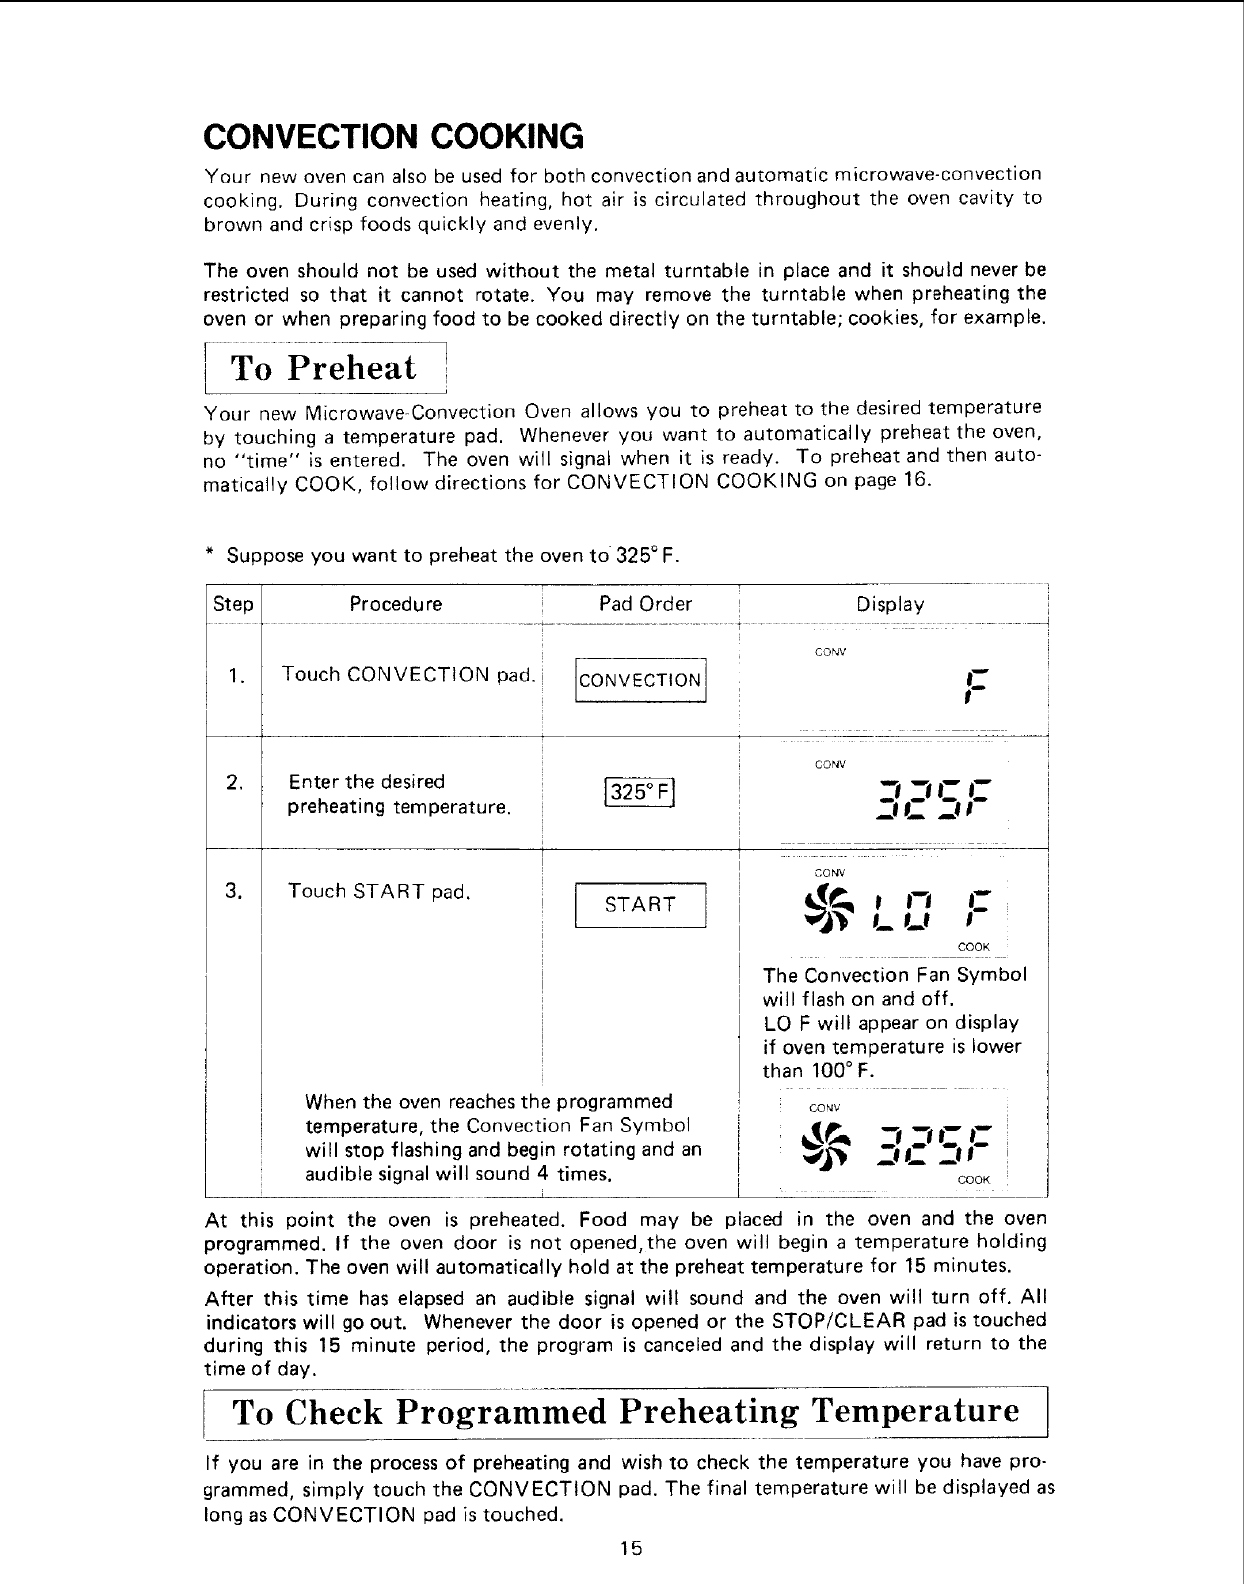
CONVECTION COOKING
Your new oven can also be used for both convection and automatic microwave-convection
cooking. During convection heating, hot air is circulated throughout the oven cavity to
brown and crisp foods quickly and evenly.
The oven should not be used without the metal turntable in place and it should never be
restricted so that it cannot rotate. You may remove the turntable when preheating the
oven or when preparing food to be cooked directly on the turntable; cookies, for example.
L
Your new Microwave-Convection Oven allows you to preheat to the desired temperature
by touching a temperature pad. Whenever you want to automatically preheat the oven,
no "time" is entered. The oven will signal when it is ready. To preheat and then auto-
matically COOK, follow directions for CONVECTION COOKING on page 16.
* Suppose you want to preheat the oven to 325 ° F.
Step Procedure Pad Order Display
CONV
1. Touch CONVECTION pad. i [CONVECTION ; F
.Enter the desired
preheating temperature.
3. Touch START pad. START
When the oven reaches the programmed
temperature, the Convection Fan Symbol
will stop flashing and begin rotating and an
audible signal will sound 4 times.
At this point the oven is preheated. Food may be placed
CONV
CONV
!_I_I
COOK
The Convection Fan Symbol
will flash on and off.
LO F will appear on display
if oven temperature is lower
than 100 ° F.
CONV
_I1_ _l i
COOK !
in the oven and the oven
programmed. If the oven door is not opened,the oven will begin a temperature holding
operation. The oven will automatically hold at the preheat temperature for 15 minutes.
After this time has elapsed an audible signal will sound and the oven will turn off. All
indicators will go out. Whenever the door is opened or the STOP/CLEAR pad is touched
during this 15 minute period, the program is canceled and the display will return to the
time of day.
To Check Programmed Preheating Temperature
If you are in the process of preheating and wish to check the temperature you have pro-
grammed, simply touch the CONVECTION pad. The final temperature will be displayed as
long as CONVECTION pad is touched.
15

r To Cook by Convection
[
Your Microwave-Convection Oven can be programmed for ten different convection cook-
ing temperatures for up to 99 minutes, 99 seconds.
* Suppose you want to cook at 350°F for 12 minutes.
Step Procedure Pad Order Display
.
.
Enter desired cooking
time.
Touch CONVECTION pad.
3. Enter desired
temperatu re.
,Touch START pad.
CONVECTION!
i
I
J
4
START
Ip_ t=lLJ
CONY F
i
CONY
_-ICI-IC _
CONV
I!_ •1_11_1
COOK
-Convection Fan symbOl
will rotate.
The cooking time will count down to zero. When timer reaches zero, all indicators will go
out and audible signal will sound. The time of day will reappear on the display. The
cooling fan will remain on until the oven cavity has cooled.
To Check Programmed Cooking Temperature
If you are cooking and wish to check the temperature you have programmed, simply touch
the CONVECTION pad. The programmed temperature will be displayed as long as CON-
VECTION pad is touched.
16
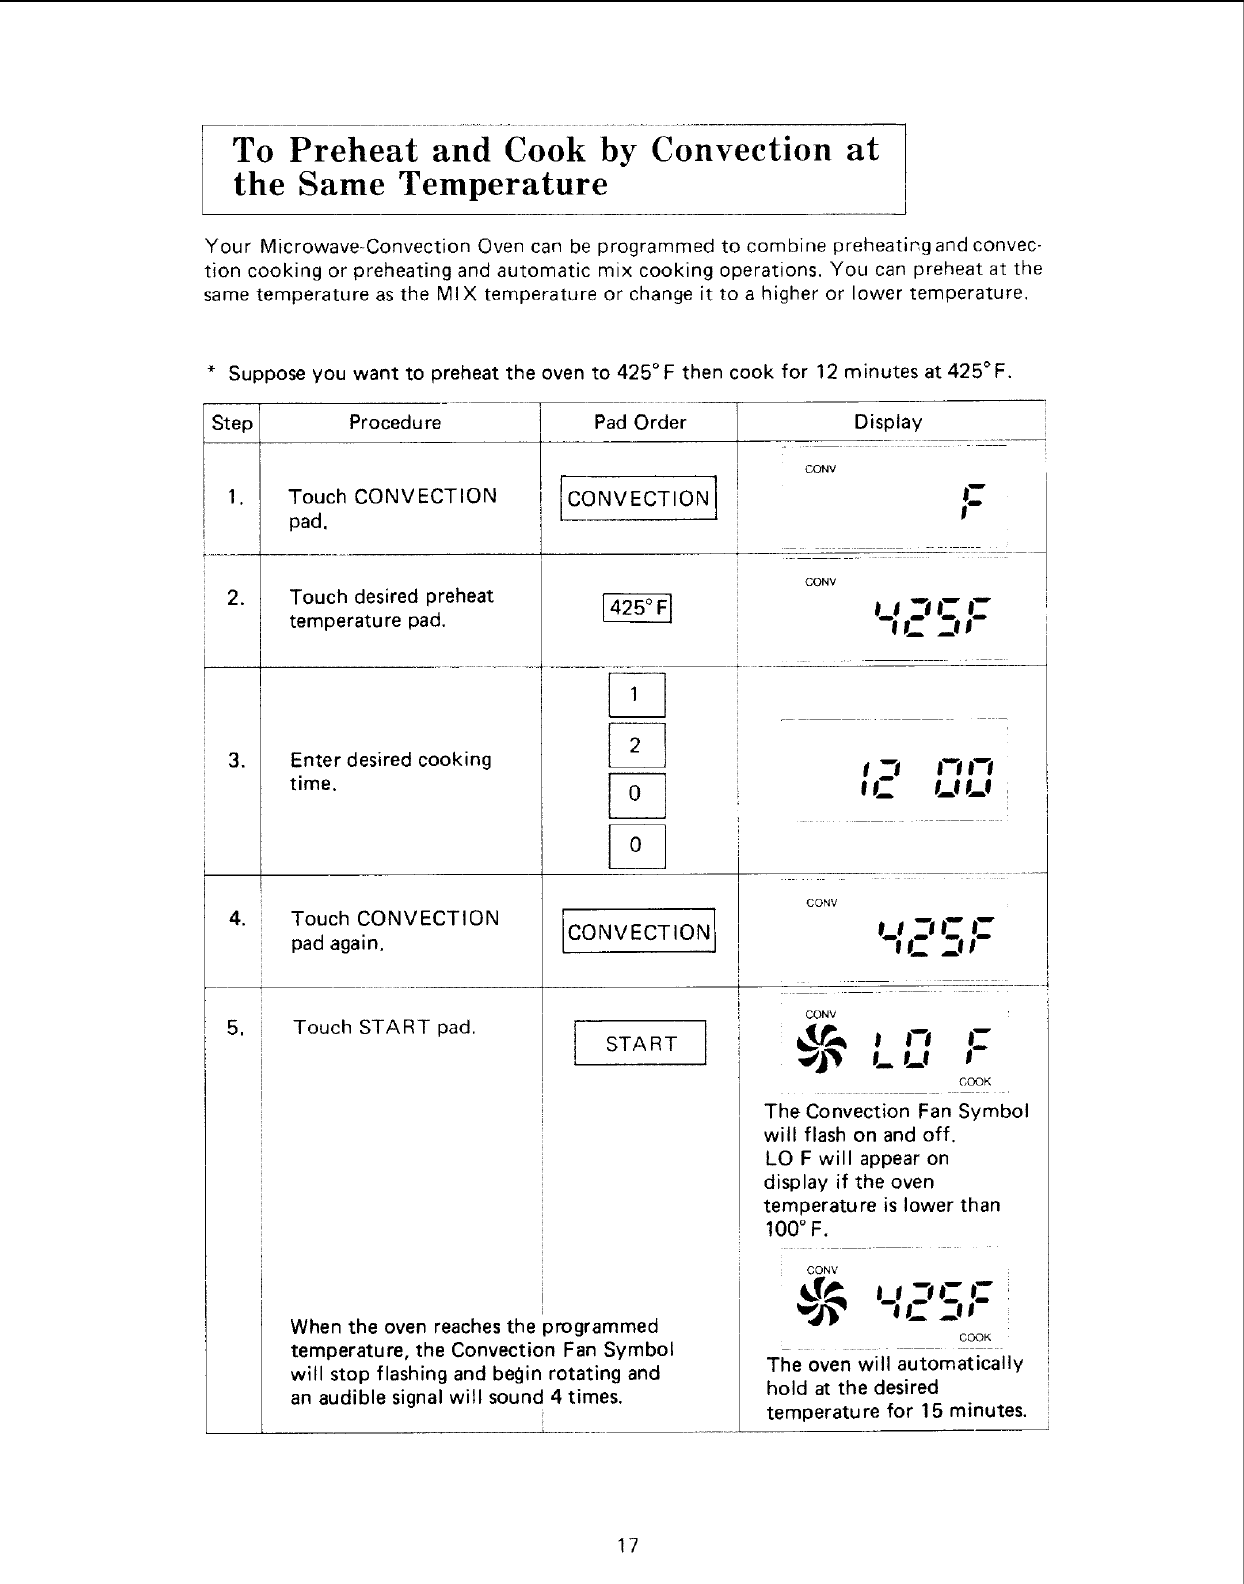
To Preheat and Cook by Convection at
the Same Temperature
Your Microwave-Convection Oven can be programmed to combine preheating and convec-
tion cooking or preheating and automatic mix cooking operations. You can preheat at the
same temperature as the MIX temperature or change it to a higher or lower temperature.
* Suppose you want to preheat the oven to 425°F then cook for 12 minutes at 425°F.
Step
1.
.
.
4.
,
Procedure Pad Order
Touch CONVECTION
pad.
Touch desired preheat
temperature pad.
Enter desired cooking
time.
Touch CONVECTION
pad again.
Touch START pad.
Display
CONV
CO.V CT,O.] F
CONV
I!_ _11
CONVECTION
START
When the oven reaches the programmed
temperature, the Convection Fan Symbol
will stop flashing and be_]in rotating and
an audible signal will sound 4 times.
CONV
CONV
_j_ __I_1 CC_K
The Convection Fan Symbol
will flash on and off.
LO F will appear on
display if the oven
temperature is lower than
100 ° F.
CONV '-'-"-F
IE_.J
COOK
The oven will automatically
hold at the desired
temperature for 15 minutes,
17
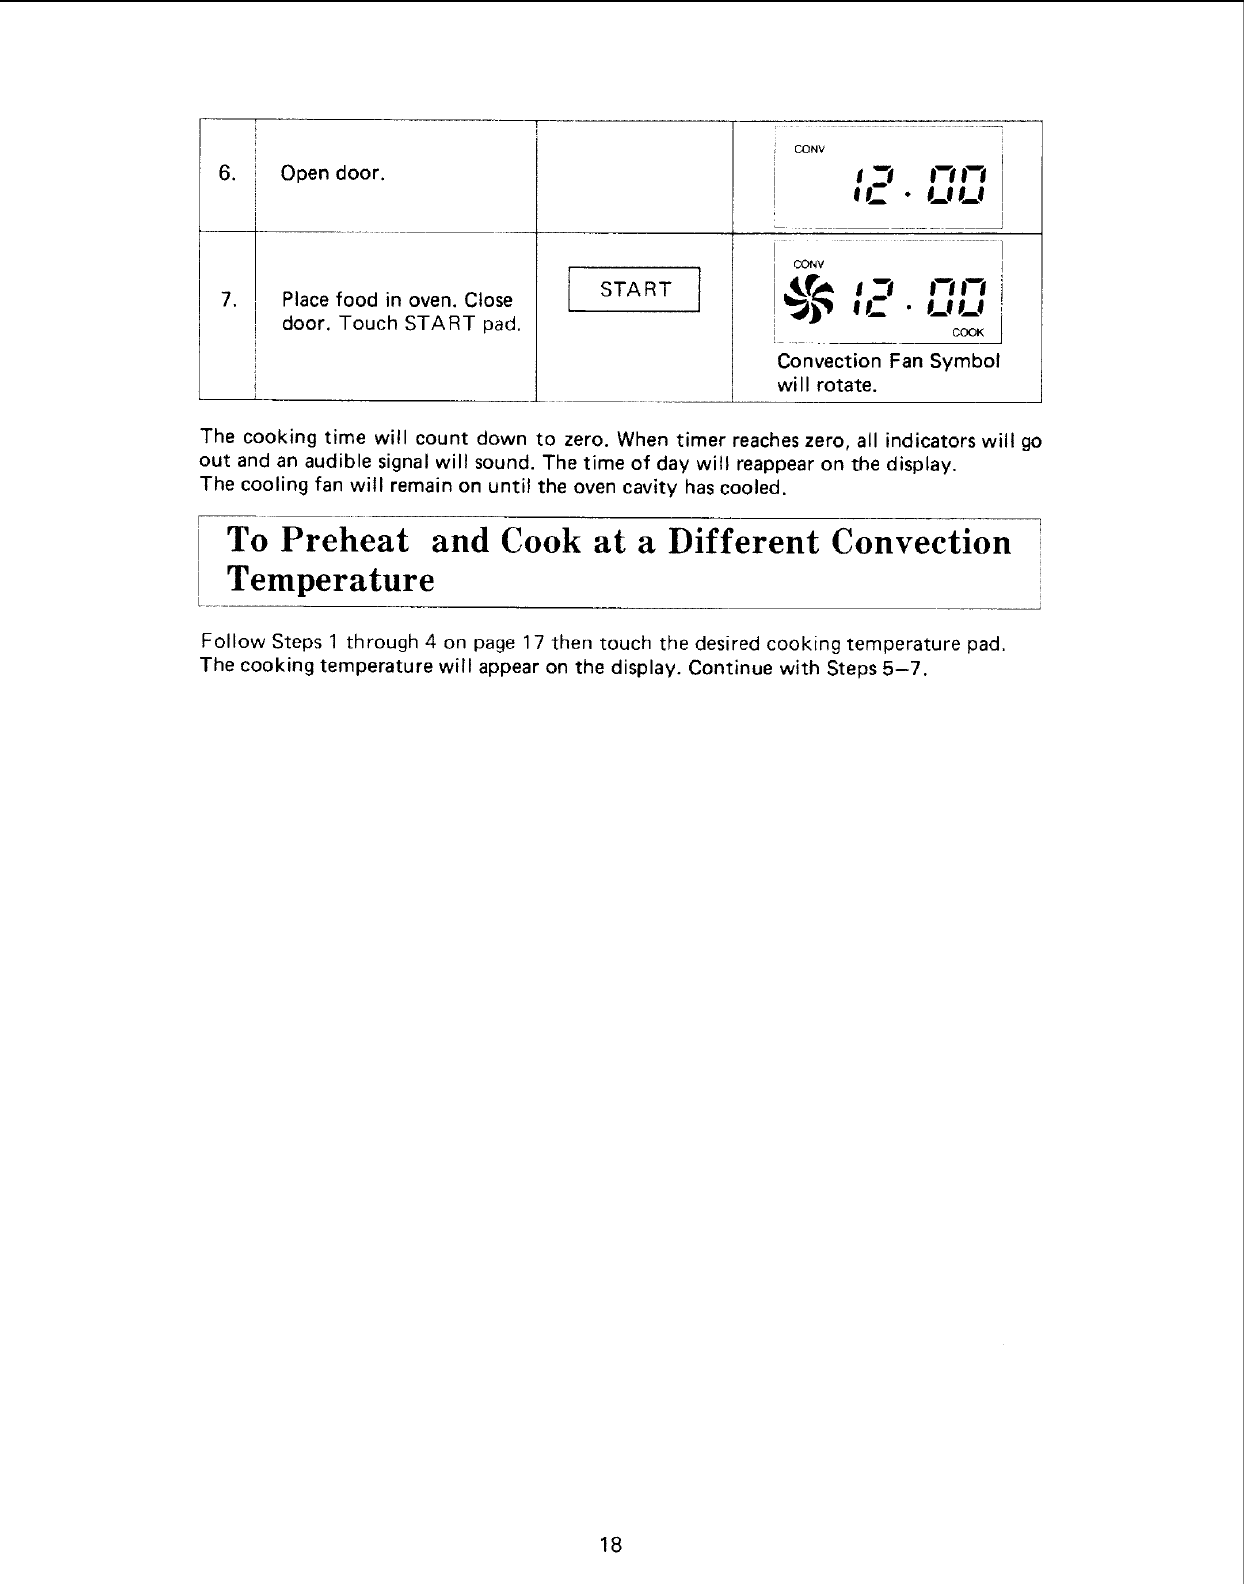
6,
,
Open door.
.0eLiLencL
door. Touch START pad.
START I
CONV
t31 _-i i-i
lt_ • l_tLI
CONy
_ -I r"lJ-i
I!__ • I_!I_I
COOK
Convection Fan Symbol
will rotate.
The cooking time will count down to zero. When timer reaches zero, all indicators will go
out and an audible signal will sound. The time of day will reappear on the display.
The cooling fan will remain on until the oven cavity has cooled.
To Preheat and Cook at a Different Convection
Temperature
Follow Steps 1 through 4 on page 17 then touch the desired cooking temperature pad.
The cooking temperature will appear on the display. Continue with Steps 5-7.
18
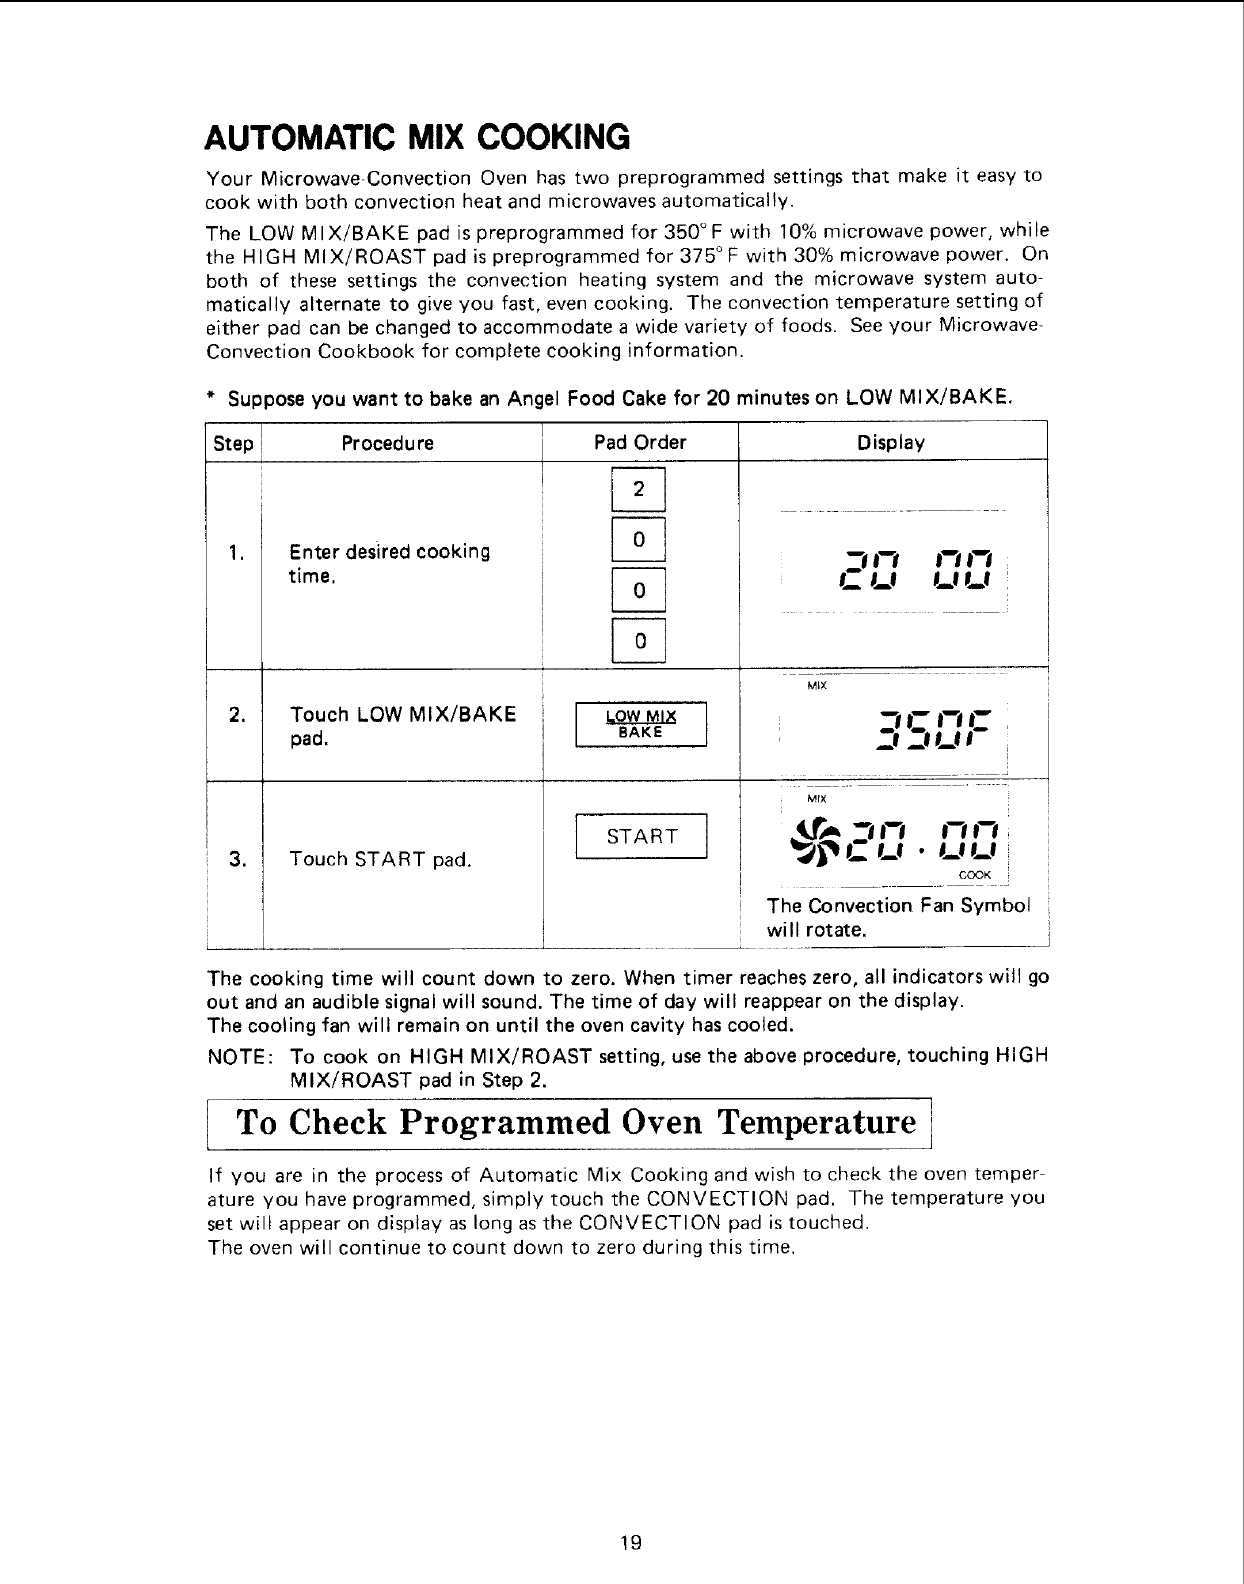
AUTOMATIC MIX COOKING
Your Microwave-Convection Oven has two preprogrammed settings that make it easy to
cook with both convection heat and microwaves automatically.
The LOW MIX/BAKE pad is preprogrammed for 350°F with 10% microwave power, while
the HIGH MIX/ROAST pad is preprogrammed for 375°F with 30% microwave power. On
both of these settings the convection heating system and the microwave system auto-
matically alternate to give you fast, even cooking. The convection temperature setting of
either pad can be changed to accommodate a wide variety of foods. See your Microwave-
Convection Cookbook for complete cooking information.
*Suppose you want to bake an Angel Food Cake for 20 minutes on LOW MIX/BAKE.
Step l, Procedure I Pad Order Display
1. Enter desired cooking I0_
time. i
!
2. ToUChpad.LOW MIX/BAKE i
3.
Touch START pad.
, I
--I1--1 I--I I--I
Gu uu I
ML×
.J L- _,
Mr×
u • COOK
The Convection Fan Symbol
will rotate.
The cooking time will count down to zero. When timer reaches zero, all indicators will go
out and an audible signal will sound. The time of day will reappear on the display.
The cooling fan will remain on until the oven cavity has cooled.
NOTE: To cook on HIGH MIX/ROAST setting, use the above procedure, touching HIGH
MIX/ROAST pad in Step 2.
To Check Programmed Oven Temperature I
If you are in the process of Automatic Mix Cooking and wish to check the oven temper-
ature you have programmed, simply touch the CONVECTION pad. The temperature you
set will appear on display as long as the CONVECTION pad is touched.
The oven will continue to count down to zero during this time.
!9
i
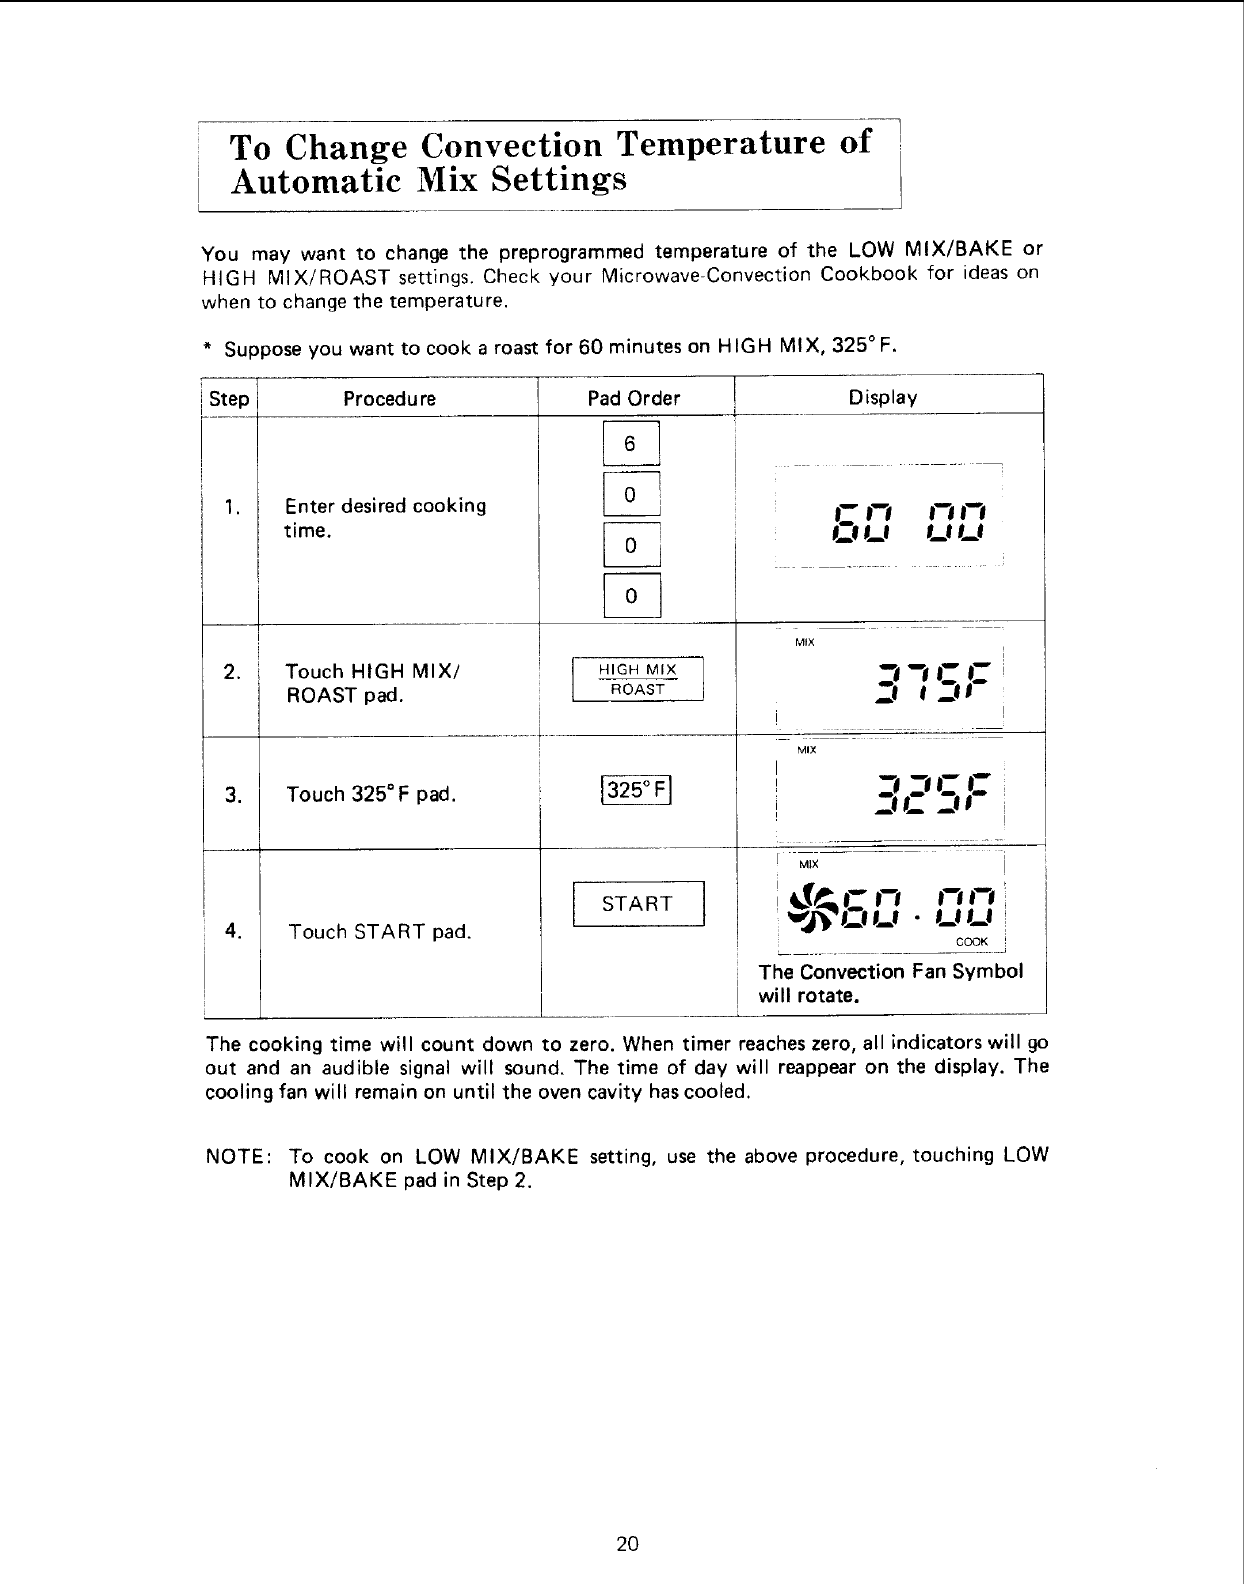
I
To Change Convection Temperature of
Automatic Mix Settings
You may want to change the preprogrammed temperature of the LOW MIX/BAKE or
HIGH MIX/ROAST settings. Check your Microwave-Convection Cookbook for ideas on
when to change the temperature.
* Suppose you want to cook a roast for 60 minutes on HIGH MIX, 325° F.
Step Procedure Display
I 1.
.
.
.
Enter desired cooking
time.
Pad Order
Touch HIGH MIX/ [ HIGHMIX
ROAST pad. [ ROAST
Touch 325°F pad.
Touch START pad.
%
STA RT 1
t.__lLo I_l t.J
MIX
i
_-I'_J_ C i
z_l ._ll
i!
MIX
_-e_lm_-c
!
MiX !
I_ll_! • I_II_l
COOK
The Convection Fan Symbol
will rotate.
The cooking time will count down to zero. When timer reaches zero, all indicators will go
out and an audible signal will sound. The time of day will reappear on the display. The
cooling fan will remain on until the oven cavity has cooled.
NOTE: To cook on LOW MIX/BAKE setting, use the above procedure, touching LOW
MIX/BAKE pad in Step 2.
20

To Preheat and Cook with Automatic Mix
Settings 1
* Suppose you want to preheat the oven to 375°F,then cook for 25 minutes on HIGH
MIX/ROAST.
Step Procedure Pad Order Display
CONV
.
,
.
,
,
l
J
Touch CONVECTION pad.
CONV
Touch desired preheat
temperature pad.
Enter desired cooking
time.
CONVECTION
J
l
Touch HIGH MIX/
ROAST pad.
J
i
HIGH MIXROAST
Touch START pad. START
i
F
When the oven reaches the programmed
temperature, the Convection Fan Symbol
will stop flashing and begin rotating and
audible signal will sound 4 times.
i
6. Open door.
!
F
MiX
CONV
''-' F
t.U
COOK
The Convection Fan Symbol
will flash on and off.
CONV
COOK
The oven will automatically
hold at the desired temperature
for 15 minutes.
MIX
L__C I"t1-t
_1. UU
21
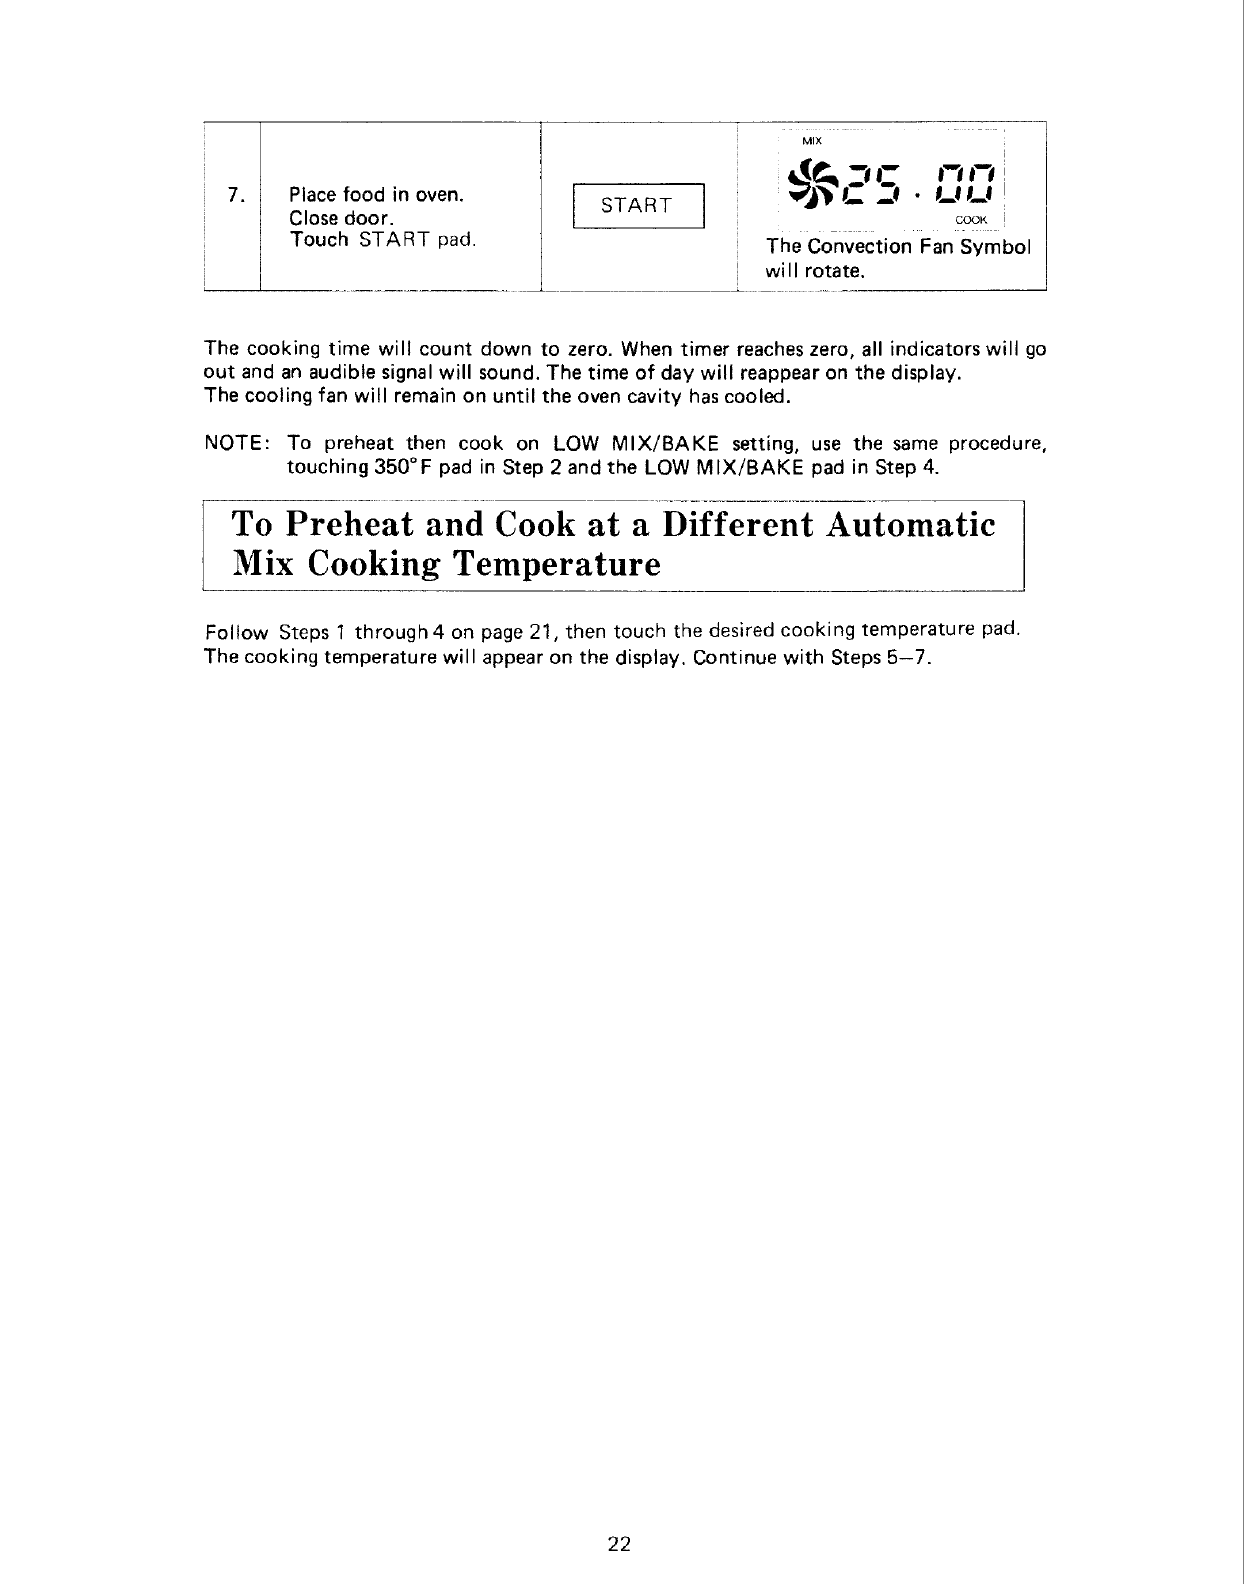
.Place food in oven.
Close door.
Touch START pad.
START
MIX '-"-'
_! • l_!!_I
COOK
The Convection Fan Symbol
will rotate,
The cooking time will count down to zero. When timer reaches zero, all indicators will go
out and an audible signal will sound. The time of day will reappear on the display.
The cooling fan will remain on until the oven cavity has cooled.
NOTE: To preheat then cook on LOW MIX/BAKE setting, use the same procedure,
touching 350°F pad in Step 2 and the LOW MIX/BAKE pad in Step 4.
To Preheat_and Cook at a Dif-f-er-ent-Automaticc
l Mix Cooking Temperature
Follow Steps 1 through4 on page 21, then touch the desired cooking temperature pad.
The cooking temperature will appear on the display. Continue with Steps 5-7.
22
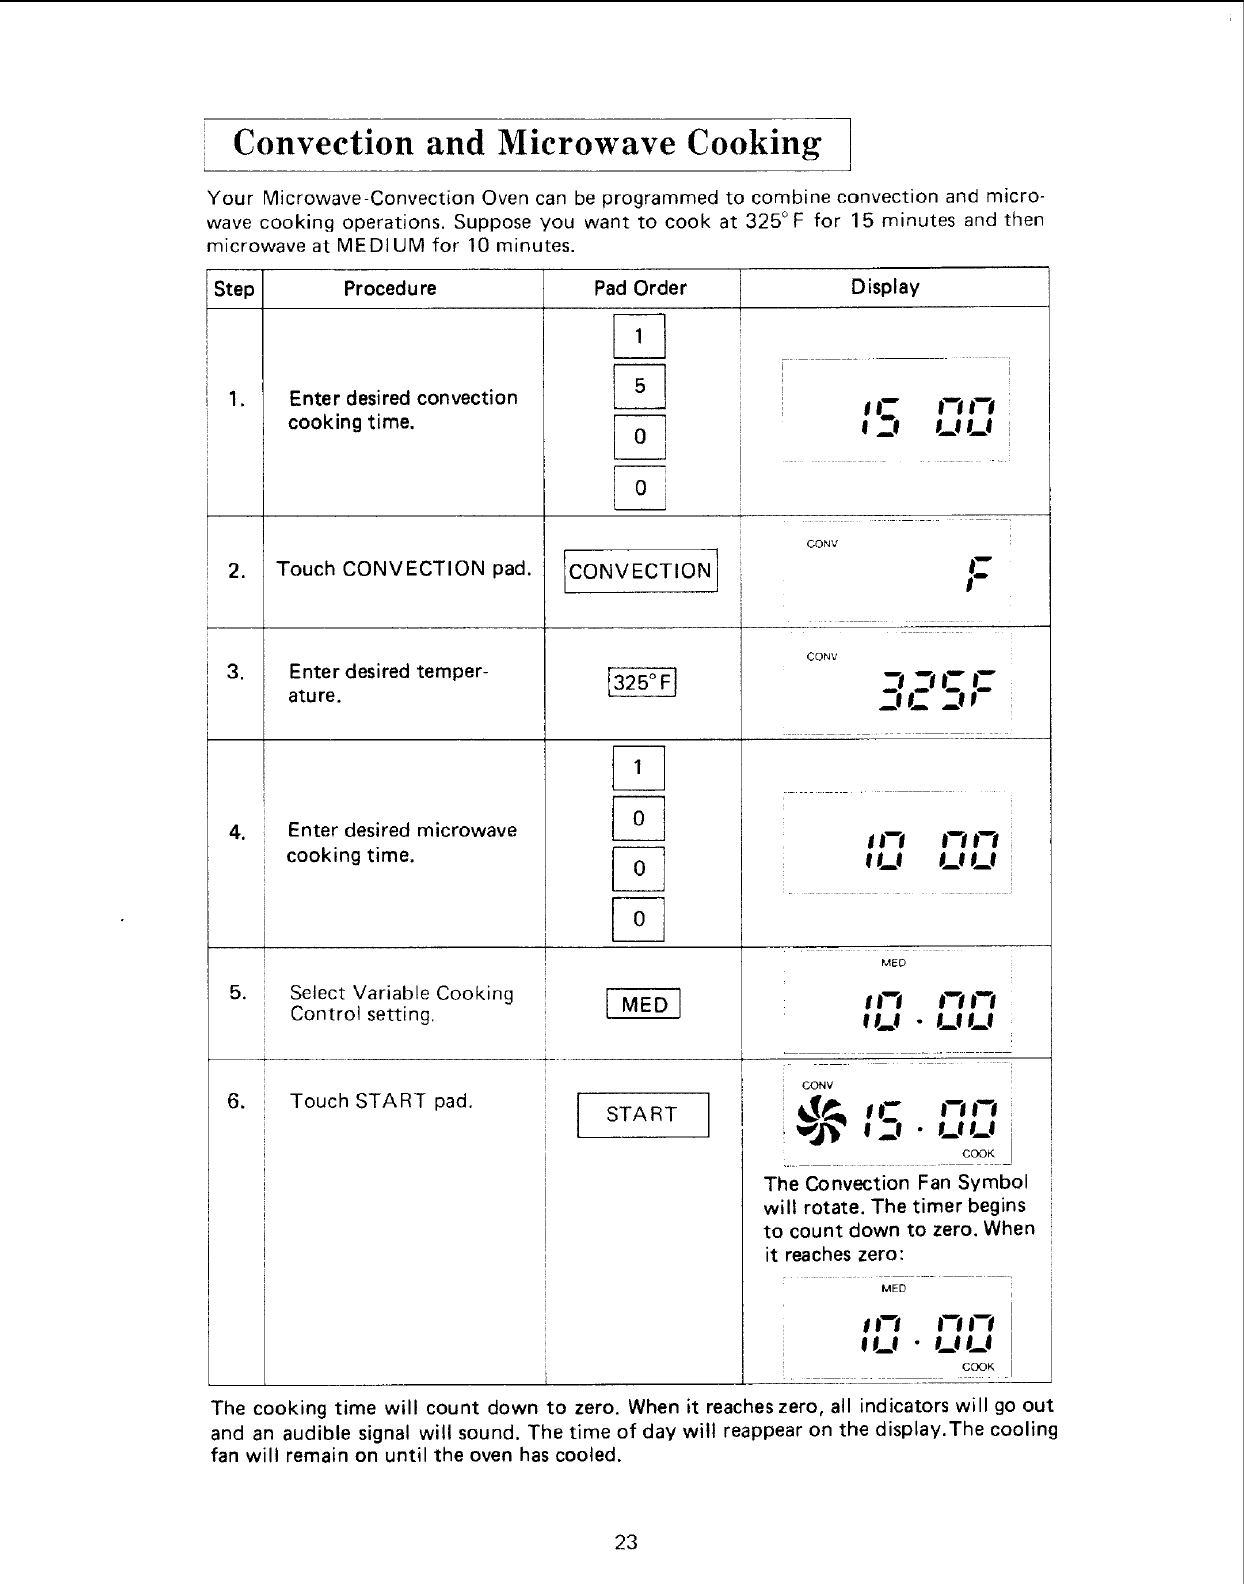
Convection and Microwave Cooking
Your Microwave-Convection Oven can be programmed to combine convection and micro-
wave cooking operations. Suppose you want to cook at 325°F for 15 minutes and then
microwave at MEDIUM for 10 minutes.
Step Procedu re D isplay
.
.
i 3.
I
J
I
.
.
6,
Enter desired convection
cooking time,
Touch CONVECTION pad.
Enter desired temper-
ature.
Enter desired microwave
cooking time.
Select Variable Cooking
Control setting.
Touch START pad.
Pad Order
Fq
0i
[CONVECTION]
I START
i
= Ira: w-,m-,
CONV F
CONV
, l___! l_l !_l
MED
IJ-I I-1 _-I
_l_! -l_!l_l z
iCONV
COOK
The Convection Fan Symbol
will rotate. The timer begins
to count down to zero. When
it reaches zero:
MED
ll-I I-I I-I
I!_I •__ll_l
COOK
The cooking time will count down to zero. When it reaches zero, all indicators will go out
and an audible signal will sound. The time of day will reappear on the display.The cooling
fan will remain on until the oven has cooled.
23
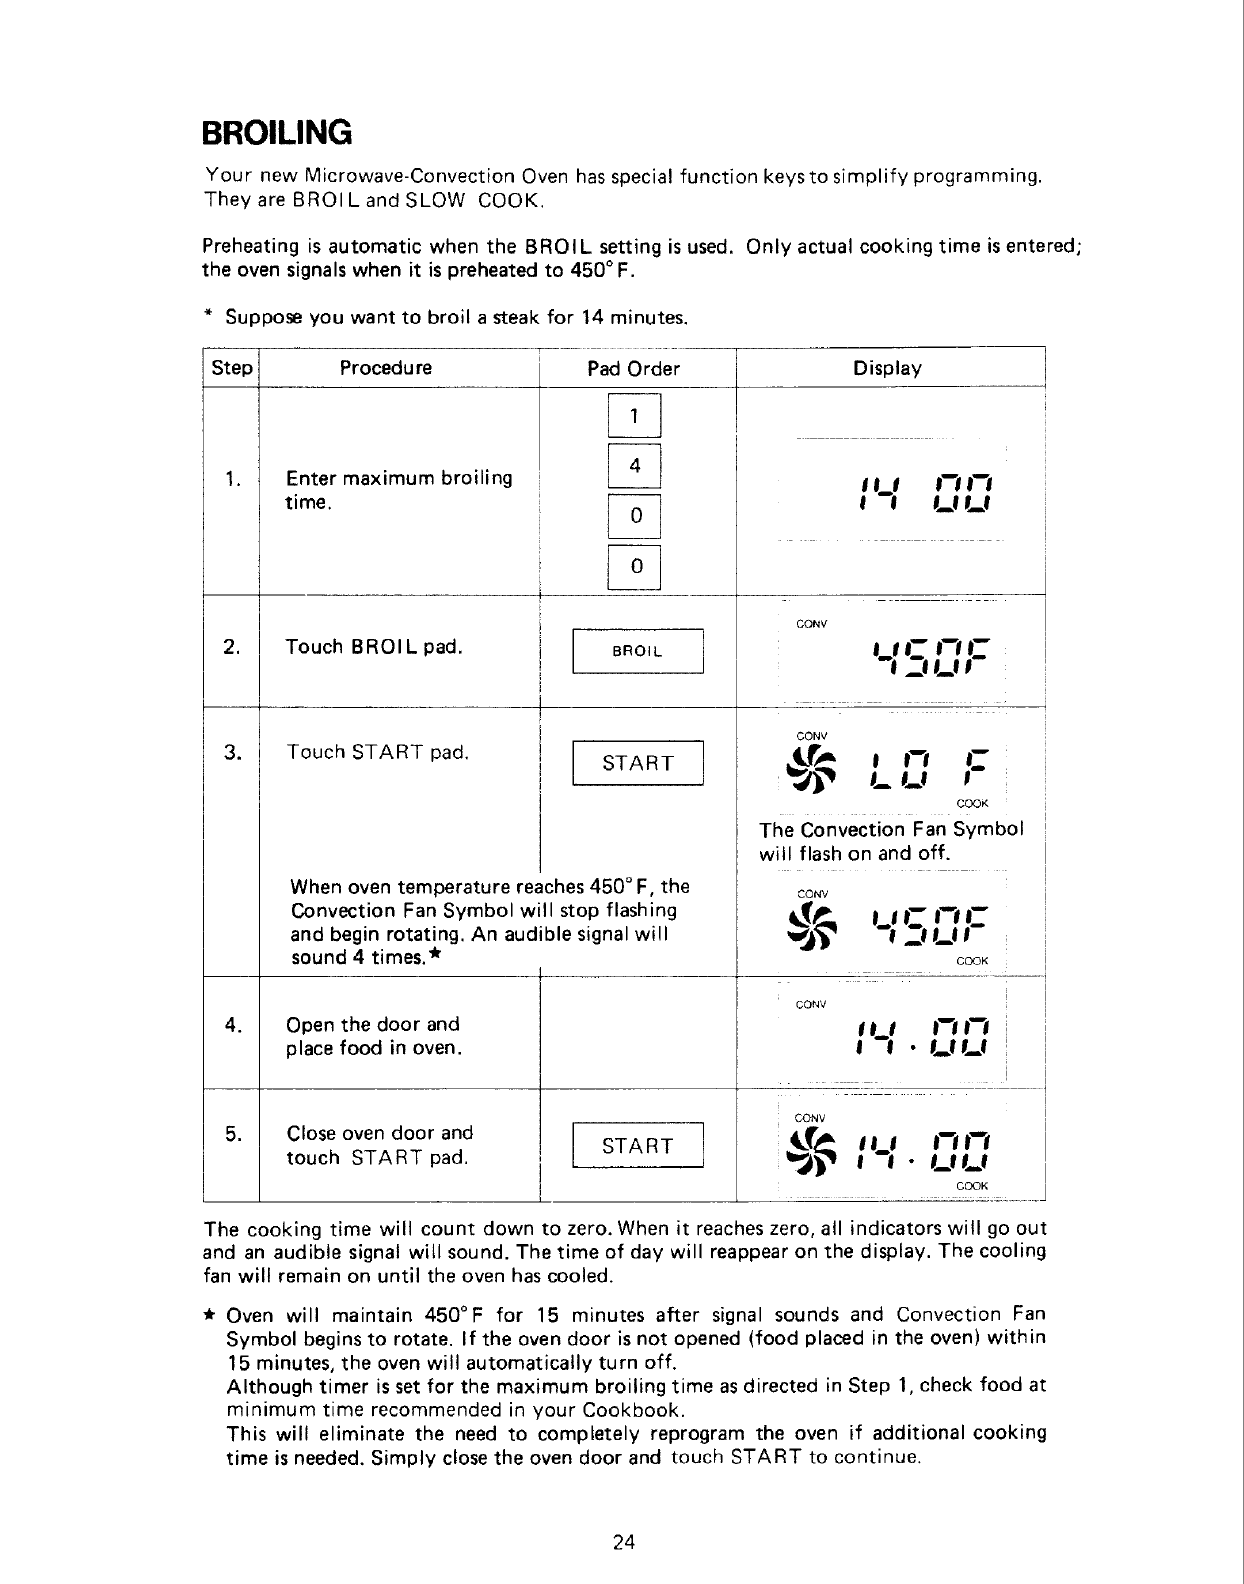
BROILING
Your new Microwave-Convection Oven has special function keys to simplify programming.
They are BROI L and SLOW COOK.
Preheating is automatic when the BROIL setting is used. Only actual cooking time is entered;
the oven signals when it is preheated to 450 ° F.
Step
Suppose you want to broil a steak for 14 minutes.
T
Procedure Pad Order
.
.
.
,
Enter maximum broiling
time.
Touch BROIL pad.
Touch START pad.
i
i
I BROIL
I
i
i
i [ START
I
When oven temperature reaches 450 ° F, the
Convection Fan Symbol will stop flashing
and begin rotating. An audible signal will
sound 4 times.*
Open the door and
place food in oven.
Close oven door and
touch START pad. I [ START
]
]
Display
EI_E I--EI--E
I e !_l __l
CONV
CONV
F
I_t_J
COOK
The Convection Fan SYmbol
will flash on and off.
CONV
_11_tl
COOK
i1_1 t--t i--t
t 1.1_!1_1
CONV
CONV l'-; '-"-'
•t_11_1
COOK
i
]
J
The cooking time will count down to zero. When it reaches zero, all indicators will go out
and an audible signal will sound. The time of day will reappear on the display. The cooling
fan will remain on until the oven has cooled.
*Oven will maintain 450°F for 15 minutes after signal sounds and Convection Fan
Symbol begins to rotate. If the oven door is not opened (food placed in the oven) within
15 minutes, the oven will automatically turn off.
Although timer is set for the maximum broiling time as directed in Step 1, check food at
minimum time recommended in your Cookbook.
This will eliminate the need to completely reprogram the oven if additional cooking
time is needed. Simply close the oven door and touch START to continue.
24
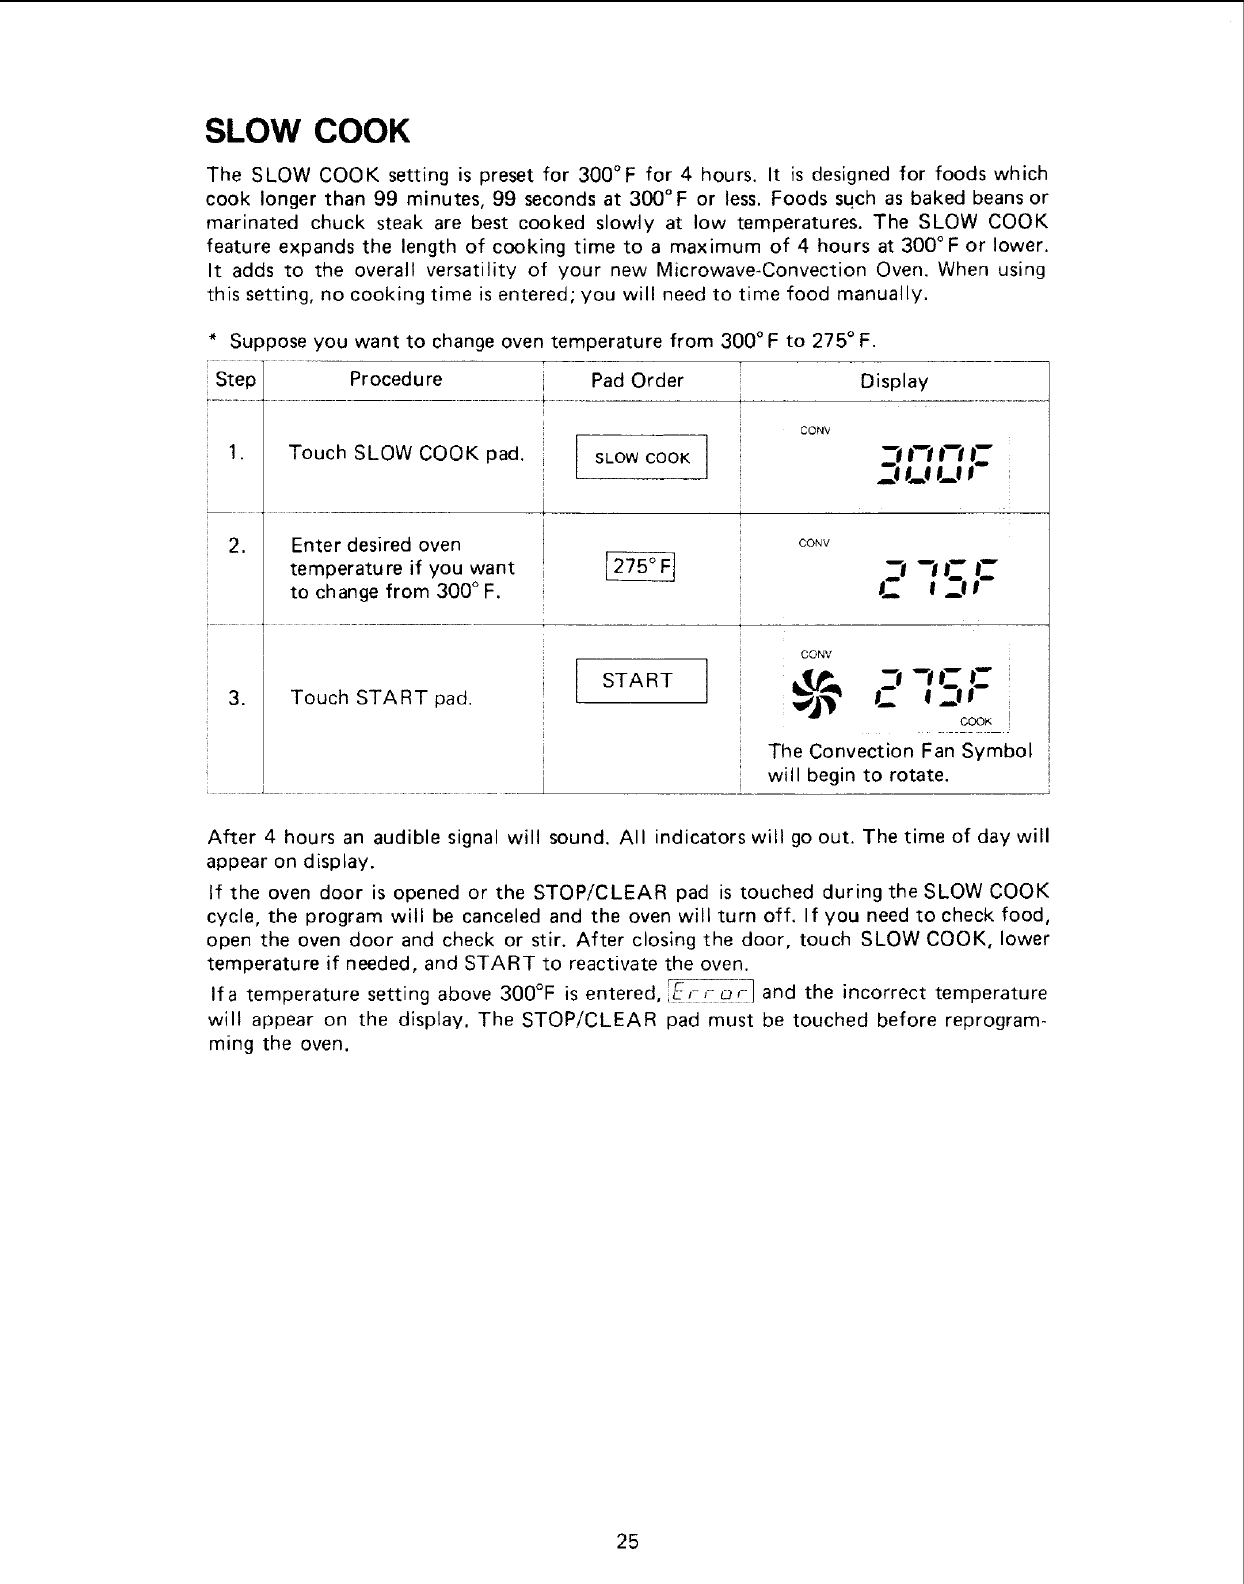
SLOW COOK
The SLOW COOK setting is preset for 300°F for 4 hours. It is designed for foods which
cook longer than 99 minutes, 99 seconds at 300°F or less. Foods sqch as baked beans or
marinated chuck steak are best cooked slowly at low temperatures. The SLOW COOK
feature expands the length of cooking time to a maximum of 4 hours at 300°F or lower.
It adds to the overall versatility of your new Microwave-Convection Oven. When using
this setting, no cooking time is entered; you will need to time food manually.
Step Procedu re i
......... i
1. Touch SLOW COOK pad. :i
i
i
2. Enter desired oven
temperature if you want i
to change from 300 ° F. !
i !
3. Touch START pad. !
[
I
i
[ ...................
Suppose you want to change oven temperature from 300 ° F to 275 ° F.
Pad Order Display
SLOW COOK J
CONV
CONV
START
CONV
LIJJ cook i
The Convection Fan Symbol
will begin to rotate.
After 4 hours an audible signal will sound. All indicators will go out. The time of day will
appear on display.
If the oven door is opened or the STOP/CLEAR pad is touched during the SLOW COOK
cycle, the program will be canceled and the oven will turn off. If you need to check food,
open the oven door and check or stir. After closing the door, touch SLOW COOK, lower
temperature if needed, and START to reactivate the oven.
Ifa temperature setting above 300°F is entered, _.E,-,-_!-1 and the incorrect temperature
wilt appear on the display. The STOP/CLEAR pad must be touched before reprogram-
ming the oven.
25
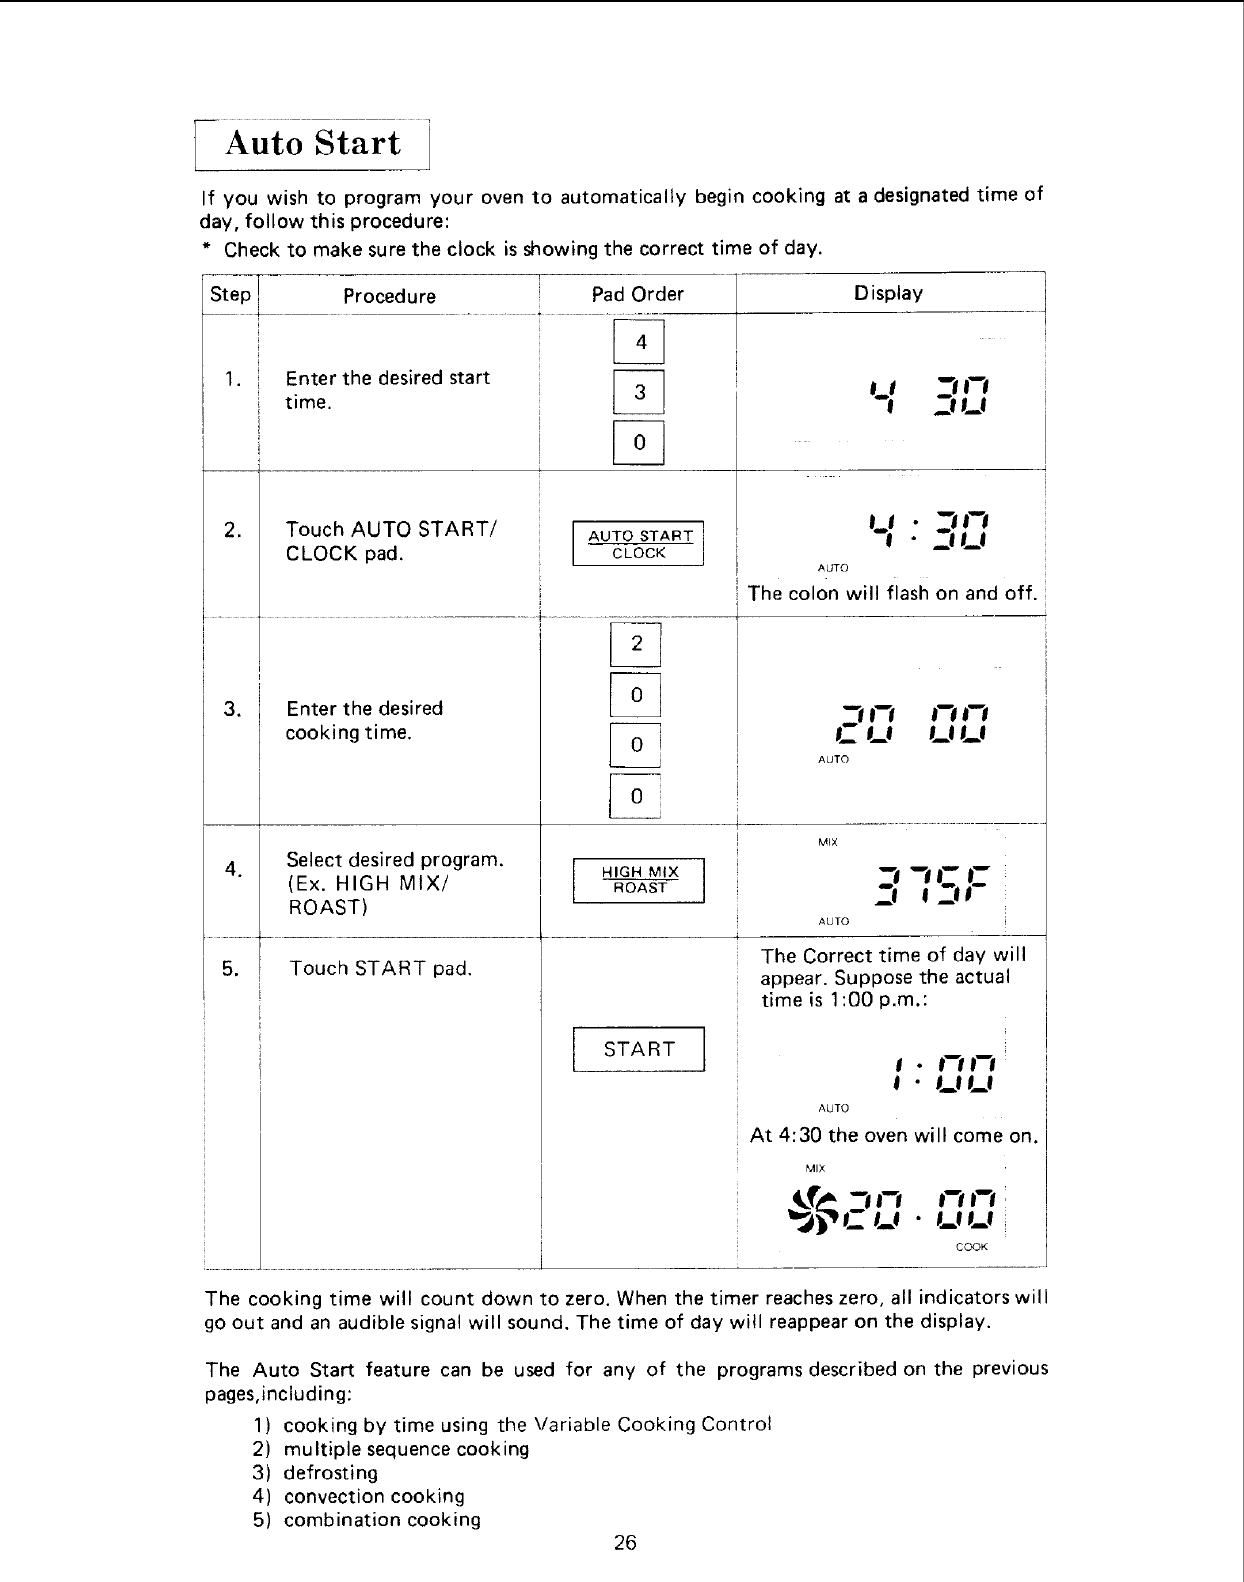
If you wishto programyour ovento automaticallybegincookingatadesignatedtimeof
day,follow thisprocedure:
* Checkto makesuretheclockisshowingthecorrecttimeof day.
tep_ Procedure ; Pa er Display
L 1. Enterthedesiredstart
-time. _ I.._ ___1_
_ILl
I
i
Touch AUTO START/
CLOCK pad.
.
i
Enter the desired
cooking time.
AUTO START ]CLOCK
Select desired program.
(Ex. HIGH MIX/
ROAST)
Touch START pad.
HIGH MIX
ROAST
START I
•.2ll_l
AUTO
The colon will flash on and off.
_1_1 I_1 I.J
AUTO
MiX
AUTO
The Correct time of day will
appear. Suppose the actual
time is 1:00 p.m.:
t•NI--I
AUTO
At 4:30 the oven will come on.
MIX
Cu • uu
COOK
The cooking time will count down to zero. When the timer reaches zero, all indicators wil
go out and an audible signal will sound. The time of day will reappear on the display.
The Auto Start feature can be used for any of the programs described on the previous
pages,including:
1) cooking by time using the Variable Cooking Control
2) multiple sequence cooking
3) defrosting
4) convection cooking
5) combination cooking 26
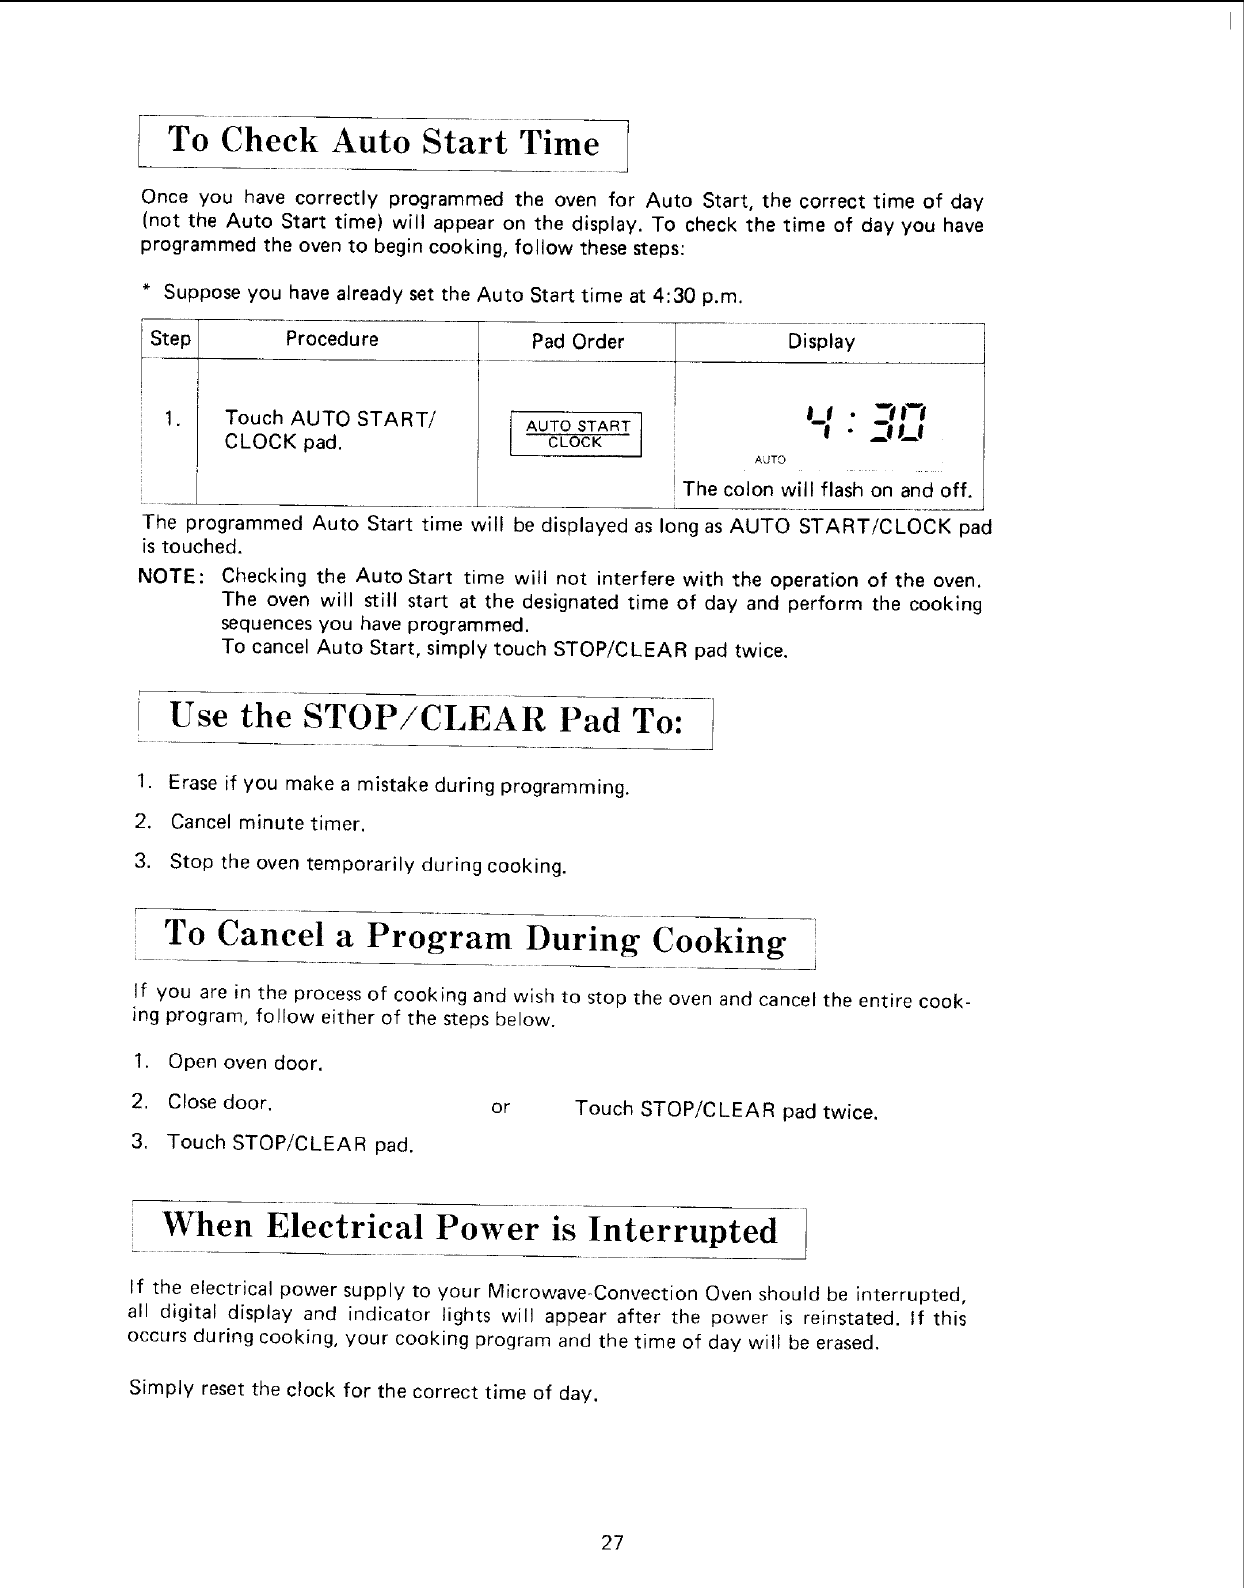
_To Check Auto Start Tim_e
Once you have correctly programmed the oven for Auto Start, the correct time of day
(not the Auto Start time) will appear on the display. To check the time of day you have
programmed the oven to begin cooking, follow these steps:
* Suppose you have already set the Auto Start time at 4:30 p.m.
i Step
1.
Procedure
Touch AUTO START/
CLOCK pad.
Pad Order
AUTO START
CLOCK
Display
L_" _-'1I-I
• JU
AUTO
The colon will flash on and off.
The programmed Auto Start time will be displayed as long as AUTO START/CLOCK pad
is touched.
NOTE :Checking the Auto Start time will not interfere with the operation of the oven.
The oven will still start at the designated time of day and perform the cooking
sequences you have programmed.
To cancel Auto Start, simply touch STOP/CLEAR pad twice.
r
Use the STOP/CLEAR Pad To:
1. Erase if you make a mistake during programming.
2. Cancel minute timer.
3. Stop the oven temporarily during cooking.
To Cancel a Program During Cooking '
+
If you are in the process of cooking and wish to stop the oven and cancel the entire cook-
ing program, follow either of the steps below.
1. Open oven door.
2. Close door.
3. Touch STOP/CLEAR pad.
or Touch STOP/CLEAR pad twice.
When Electrical Power is Interrupted
If the electrical power supply to your Microwave-Convection Oven should be interrupted,
all digital display and indicator lights will appear after the power is reinstated. If this
occurs during cooking, your cooking program and the time of day will be erased.
Simply reset the clock for the correct time of day.
27
CLEANING AND CARE
Touch Control Panel:
Care should be taken in cleaning the touch control panel. If the control panel becomes
soiled, open the oven door before cleaning. This will inactivate the control panel. Wipe the
panel with a cloth dampened slightly with water only. Do not scrub or use any sort of
chemical cleaners. Avoid the use of excess water.
Interior:
1. The oven walls and floor are stainless steel. For easy cleaning, wipe up any spatters
or spills with a soft, damp cloth or sponge after each use, or clean with mild
detergent and water.
For heavier soil, use a mild cleanser such as Soft Scrub ® or Bon Ami ® , following
manufacturer's instructions, or use a paste of baking soda and water. Apply to
stainless steel walls, floor or turntable only; DO NOT USE CLEANSER ON OVEN
CEILING. Plastic or nylon scouring sponges or pads recommended for use on
Teflon* and Silverstone* can be used on the oven walls or turntable, but not on
the ceiling. Be sure to rinse with a damp cloth or sponge after cleaning to com-
pletely remove all cleanser residue. Dry with a soft cloth.
Do not use strong chemical cleaners or harsh abrasives.
2. The ceiling of the oven has a continuous clean finish, a specially formulated
catalytic surface which permits the gradual oxidation of most soils during normal
cooking cycles. The surface will be damaged by contact with commercial oven
cleaners, abrasives, powder cleaners or scouring pads. DO NOT USE COMMER-
CIAL OVEN CLEANER.
Some manual cleaning of the continuous clean finish may be necessary if excess
spattering occurs; use a paper towel or sponge to blot up and remove excess spatter
while the oven is still warm and the soil is soft and pliable. Operate the oven empty
at 450°F convection cycle for 30 minutes or more to fully activate the continuous
clean finish.
3. The waveguide cover can be easily removed for cleaning. Slide the cover to the left,
grasp and pull down. Use mild soap and water to remove excess grease buildup
before it bakes on. The cover must be kept clean to avoid uneven microwave distri-
bution.
* Du Pont's registered trademark
Turntable:
The turntable can be removed for easy cleaning. Wash the turntable in mild, sudsy water;
for stubborn stains use a mild cleanser and scouring sponge as described above. The turn-
table is dishwasher-safe.
The turntable motor shaft is sealed, but excess water or spills should not be allowed to
stand in this area.
Door:
Wipe the window on both sides with a cloth dampened with mild soap and warm water.
Metal parts will be easier to maintain if wiped frequently with a damp cloth.
28
CONDENSATION
Occasionally some foods will cause the oven to "sweat". The humidity and moisture in
food will influence the amount of moisture in the oven. Generally, covered foods will not
cause as much condensation as uncovered foods.
Condensation is a normal part of microwave cooking.
CAUTIOUS REMINDERS:
1. Do not operate the oven empty in the microwave mode. Either food or water should
always be in the oven during operation to absorb microwave energy.
2. Limit use of metal to those specific examples given in the utensil section of your Cook-
book. Generally speaking, metal should not be used during operation of microwave
mode alone. Metal utensils can be used for convection and combination cooking.
3. Do not cook eggs in the shell. Pressure will build up inside the shell and it will explode.
Do not reheat cooked eggs unless they are scrambled or chopped. Puncture the yolk
before cooking eggs.
4. Avoid canning in your microwave oven.
5. Do not heat oil or fat for deep fat frying.
6. Pierce the "skin" of potatoes, whole squash, apples or any fruit or vegetabJe with a
skin covering before cooking.
7. Popcorn should be cooked only in special microwave poppers carefully following
manufacturer's recommendations. Do not pop popcorn in paper bags or glass utensils.
Microwave popped corn produces a lower yield than conventional popping; there will
be a number of unpopped kernels. Do not use oil unless specified by the manufacturer.
Do not remove the turntable while oven is in use or heat longer than recommended on
instructions.
8. Do not use plastic or styrofoam utensils for microwave cooking if the oven is hot from
convection cooking. The utensils may melt.
9. Do not use paper towels, plates or other utensils made from recycled paper for micro-
wave cooking. Recycled paper products may contain certain impurities which could
cause the paper to ignite during microwave cooking.
10. Unlike microwave-only ovens, all microwave-convection ovens have a tendency to
become hot on the cabinet and oven door, as do conventional ovens and convection-
only ovens. Be careful when touching parts other than the handle or control panel
during or immediately following convection cooking.
REMINDERS
Door Seal:
The door seal is designed to prevent leakage of microwave energy during cooking. Oc-
casionally moisture may appear around the oven door. This is not abnormal and does not
necessarily indicate the oven is leaking microwave energy.
Arcing:
Some metal baking utensils may cause arcing when they come in contact with the turn-
table, oven walls or accessory racks. DO NOT use metal utensils for microwave cooking
alone unless directions specify, and metal utensils should not come in contact with oven
walls. Please refer to page 8 in your Cookbook for more specific information.
29
30
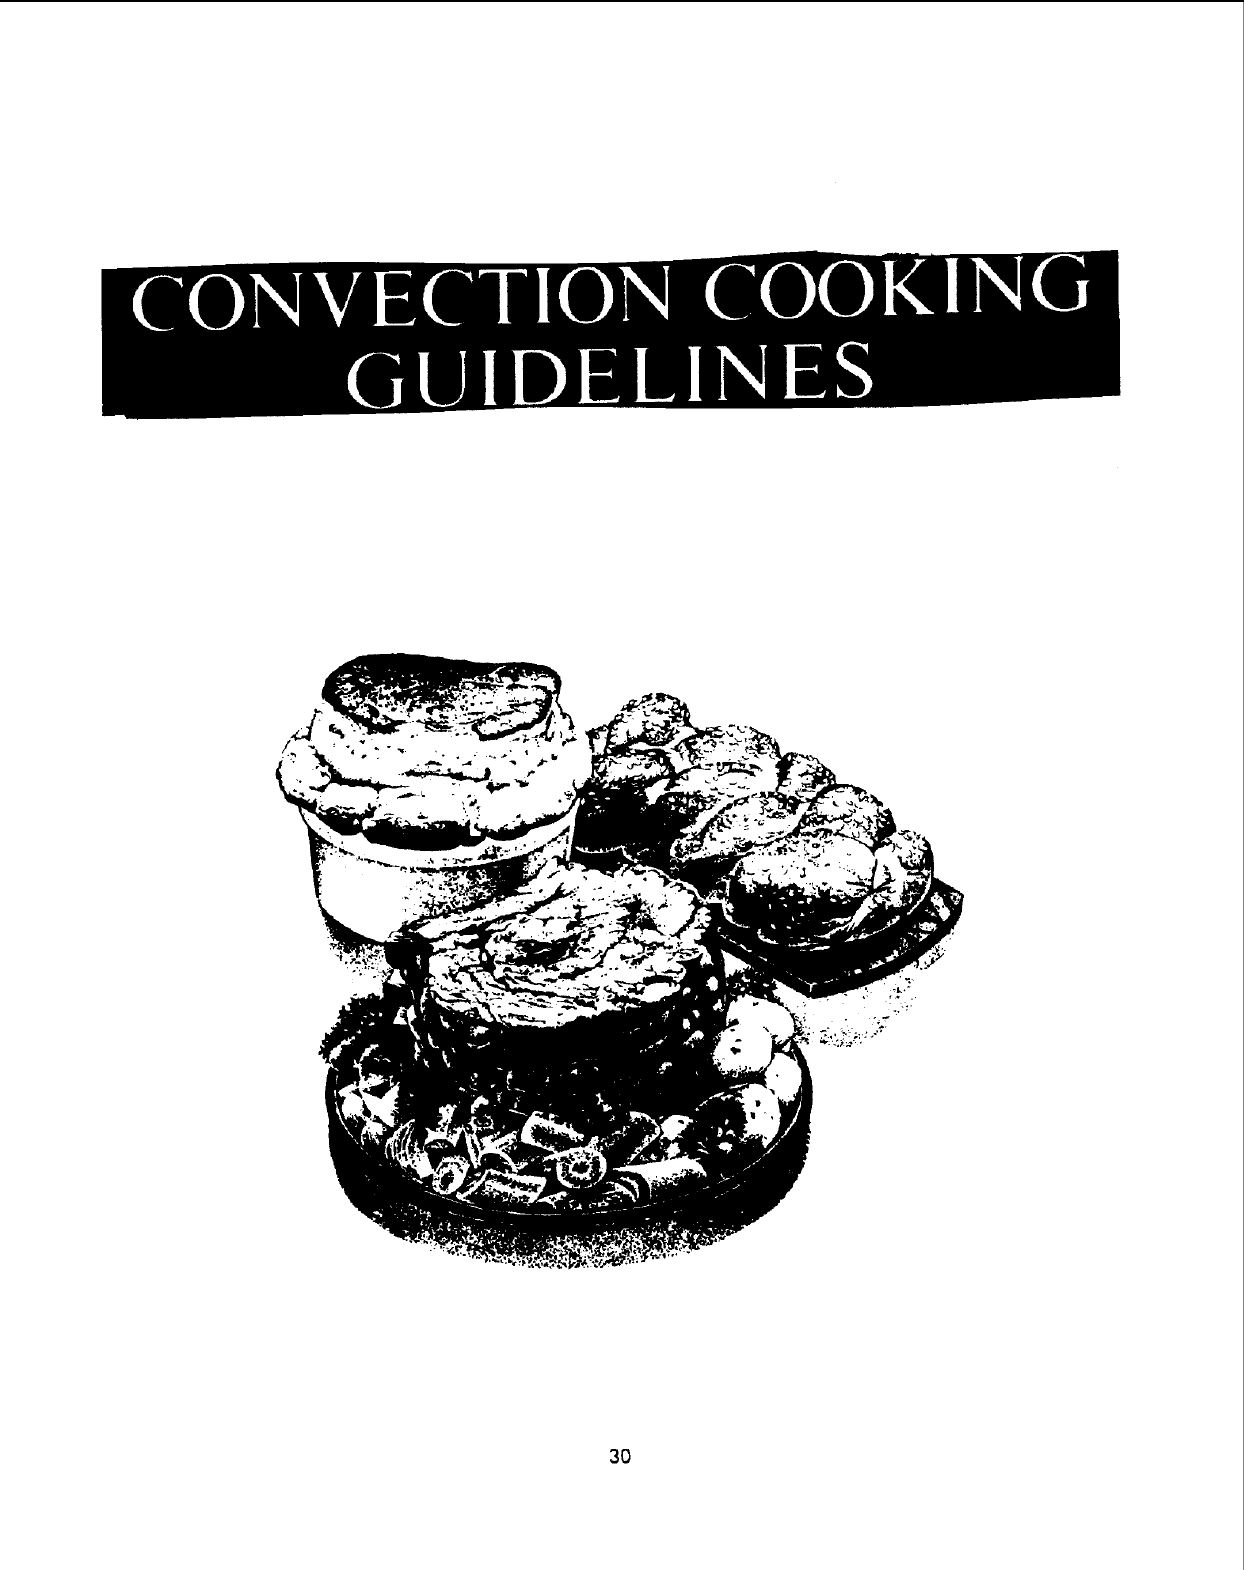
CONVECTION COOKING GUIDELINES
This section of the operation manual is intended as a guide for the best cooking results using
Convection heating alone and combination cooking. Please use it as a guide along with your
new Microwave-Convection Cookbook.
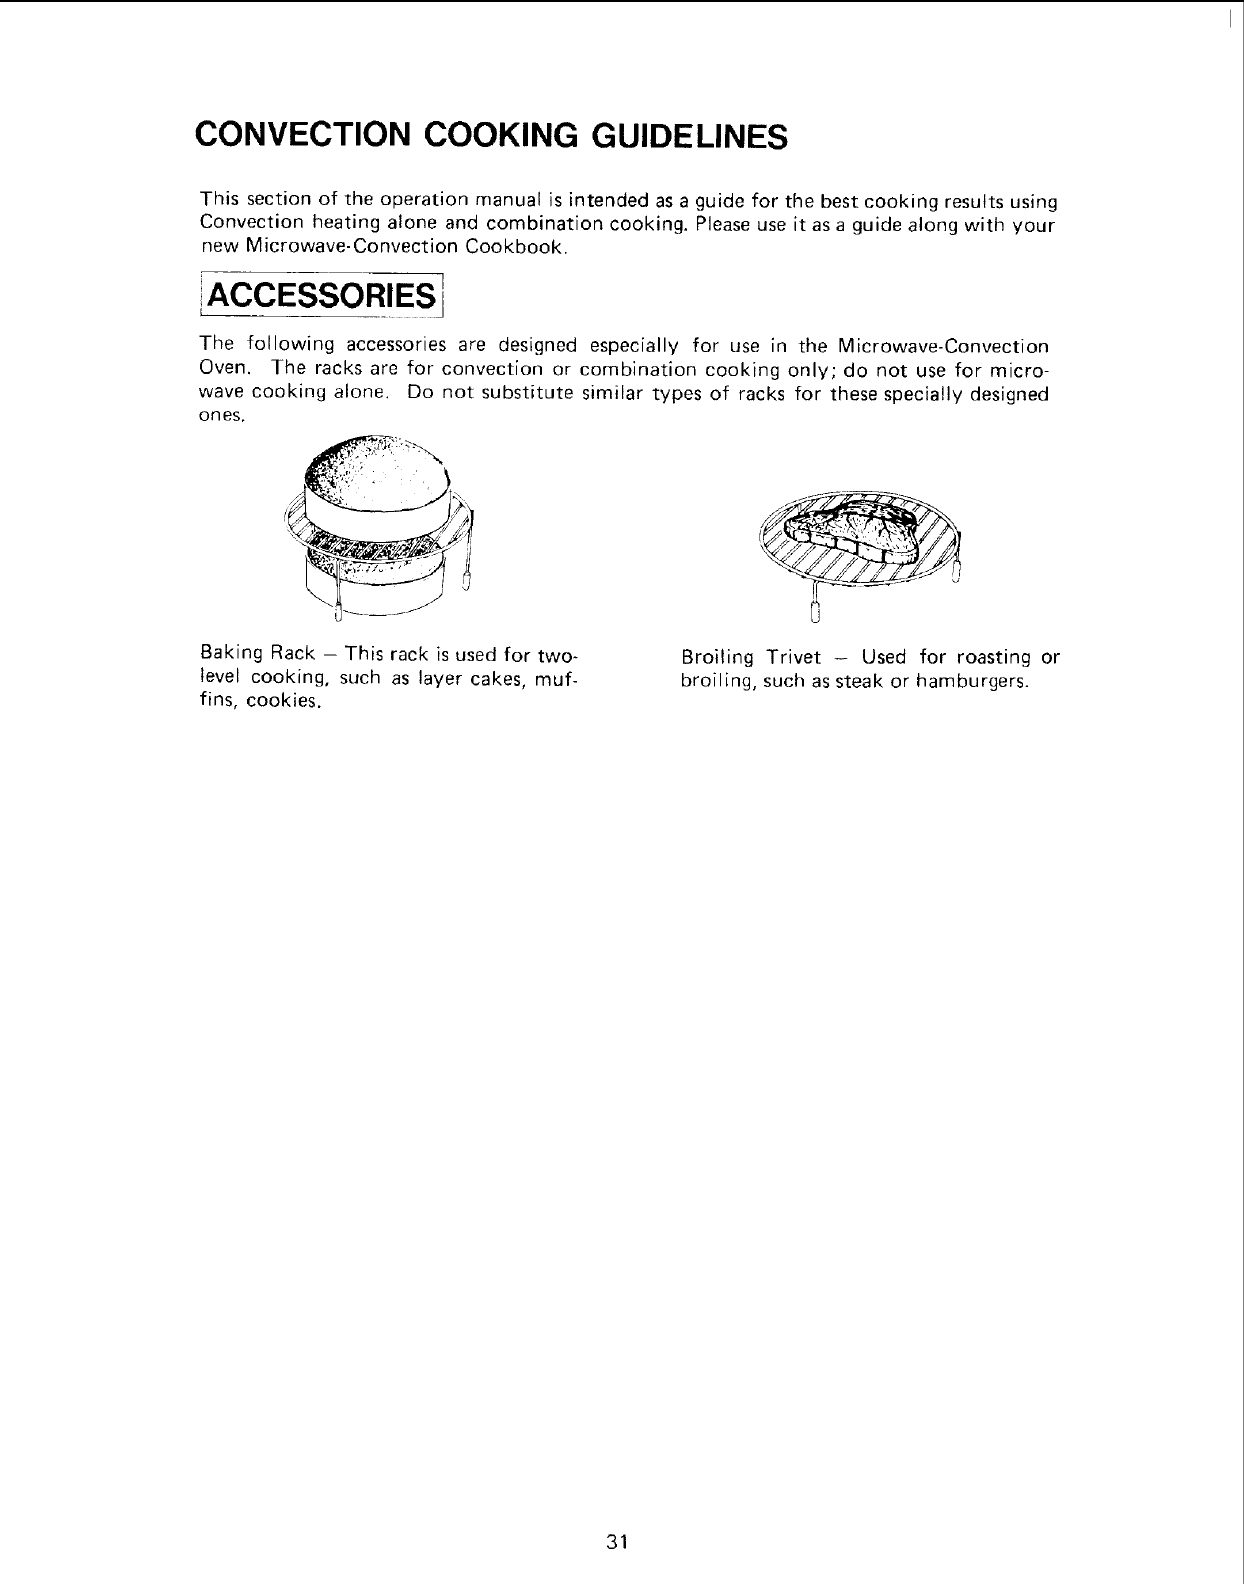
ACCESSORIES I
The following accessories are designed especially for use in the Microwave-Convection
Oven. The racks are for convection or combination cooking only; do not use for micro-
wave cooking alone. Do not substitute similar types of racks for these specially designed
ones.
Baking Rack - This rack is used for two-
level cooking, such as layer cakes, muf-
fins, cookies.
Broiling Trivet - Used for roasting or
broil ing, such as steak or hamburgers.
31
CONVECTION HEATING-,
Some foods are best when cooked using convection heat alone. These are foods which
often have a cooking time of 15 minutes or less and usually need quick crisping and
browning.
These include:
Appetizers -frozen, pastry-type, or other
Biscuits and rolls -dairy case, brown n'serve, your recipe
Brownies- mix, your recipe
Cookies - mix, slice n'bake, frozen, your recipe
Cream puffs, puff pastry, turnovers, etc.
Fish sticks - frozen, breaded
Muffins-- mix, your recipe
Pie crust - frozen, mix, your recipe
Pizza - fresh, frozen, your recipe
Souffles
Basic Convection Heating Procedure:
1. Consult recipe or package directions for temperature and time.
2. Preheat oven if required by package directions or recipe.
3. Food may be cooked directly on turntable if appropriate, or on two levels using baking
rack and appropriate baking vessel. Example: Fish sticks may be cooked directly on
turntable. Muffins may be cooked on 2 levels using the baking rack and two 6-muffin
baking pans.
4. Check for doneness at the end of cooking time.
Helpful Hints:
1. Do not cover turntable or baking rack with aluminum foil. It interferes with the flow of
air that cooks food.
2. If food is not done when checked after cooking time, let stand in oven one or two min-
utes to complete cooking.
3. Round pizza pans are excellent cooking utensils for many convection-only items.
Choose pans that do not have extended handles.
Recommended Cooking Utensils:
Metal turntable
Baking Rack
Metal baking pans
Ovenable paperboard containers
Aluminum foil containers
Heat resistant glass
Coming Ware ®
32
................. 1
CONVECTION BROILING 1
Your Microwave-Convection Oven will broil meats, fresh or frozen to perfection! As in
conventional cooking, broiling time will vary with thickness as well as weight. For best
results use the directions that follow:
Basic Convection Broiling Procedure:
1. Preheat oven 15 minutes at 450°F.
2. Prepare and season meat on both sides, as desired.
3. Place meat on broiling trivet or turntable.
4. Consult broiling chart in your Cookbook; set time for correct cooking time.
5. Turning meat over is not necessary.
6. Test for doneness; slit center of meat, check for desired color; red - rare, pink -
medium, gray - well done.
Helpful Hints:
1. Do not cover broiling trivet with aluminum foil. It interferes with the flow of air that
cooks food.
2. For faster clean-up spray trivet and turntable with non-stick vegetable spray.
3. To eliminate excess fat in broiling, use broiling trivet.
4. Broiling may be done ahead of time, then individual portions sliced and reheated with
microwave power (MEDIUM setting) as needed.
5. Hot dogs cooked on the broiling trivet may be turned over to give an even, grilled
appearance,
Recommended Broiling Utensils:
Use only the metal turntable and the broiling trivet that are included with the oven.
ICOMBINATION COOKING
With the exception of those foods that cook best by convection heating alone, most foods
are well suited to combination cooking; that is convection heating combined with micro-
wave cooking.
The marriage of these two cooking methods produces juicy roasts, moist and tender cakes
and fine textured breads, all with just the right amount of browning and crispness.
ATiON-ROASTiNG
Combination roasting in your oven isa simple task when you follow the instructions
given below. The results are juicy, crisp browned meats done to your liking.
Basic Roasting Procedure:
1. Place meat directly on turntable or on the metal broiling trivet, or in a shallow roasting
pan on the turntable, as you prefer.
2. Season, as desired.
3. Consult chart in your Cookbook for roasting temperature and timing.
4. Program oven for appropriate cooking time and mix setting. Change temperature if
recipe requires.
5. Check for desired doneness using a meat thermometer. If desired, a dual safe microwave/
conventional thermometer may be inserted in the meat at the beginning of cooktime.*
6. Let meat stand tented with aluminum foil 5 to 10 minutes before slicing.
* A dual safe thermometer is specially designed to withstand high temperature and can
safely be used with heat or microwaves. Do not use conventional meat thermometers for
combination cooking and do not use microwave only thermometers for combination
cooking.
33
Helpful Hints:
1. If roasting frozen meat, insert dual safe meat thermometer halfway through cooking
time.
2. Thin sections of meat and wingtips and legs of birds that may overcook can be shielded
with small pieces of aluminum foil.
3. Less tender cuts of beef can be roasted and tenderized using oven cooking bags.
4. For true roasting, and fewer calories, use broiling trivet to hold meat out of its juices.
5. If gravy is desired, roast in glass utility dish, remove meat to carving board, then micro-
wave gravy.
Recommended Roasting Utensils:
Metal turntable
Broiling Trivet
Shallow metal roasting pans
Aluminum foil containers
Heat resistant glass
Coming Ware ®
coMBINA-TION BAKIN
Baking with the Microwave-Convection Oven is fast and simple. Convection heat gives
baked goods their structure and, of course, their browned appearance and microwaves
shorten the cooking time.
Basic Microwave-Convection Baking Procedure:
1. Consult Microwave-Convection Baking and Desserts section in your Cookbook for bak-
ing techniques.
2. Preheat oven if recipe directs.
3. Program oven for appropriate cooking time and mix setting. Change temperature if
recipe requires.
4. Check for doneness after baking time has elapsed. If not completely done, let stand in
oven a few minutes to complete cooking.
Recommended Baking Utensils:
Metal turntable
Baking Rack
Broiling Trivet
Metal baking pans
Ovenable paperboard containers
Aluminum foil containers
Heat resistant glass
Corn ing Ware ®
NOTE:
During combination baking some metal baking utensils may cause arcing when they come
in contact with the turntable, oven walls or accessory racks. Arcing is a discharge of
electricity that occurs when microwaves come in contact with metal.
If arcing occurs when using a fluted tube pan, place a heat resistant dish (Pyrex ® pie plate,
glass pizza dish or dinner plate) between the pan and the turntable. If arcing occurs with
other metal baking utensils, discontinue their use for combination cooking.
34

F-8938 Specificationssubjectto changewithout notice. INSEA025-A51
Printed in Japan
