Klipsch IFIR Hand-Held Remote Control User Manual Layout 1
Klipsch L.L.C. Hand-Held Remote Control Layout 1
Klipsch >
Users Manual

Klipsch iFi is The Ultimate Sound
Experience for your Apple iPod.
Reveal the true power, detail and
emotion behind every song.
Discover the passion of high-
performance audio that only
Klipsch delivers.
™
™

®
®
he Ultimate Sound
your Apple iPod.
power, detail and
nd every song.
passion of high-
audio that only
s.
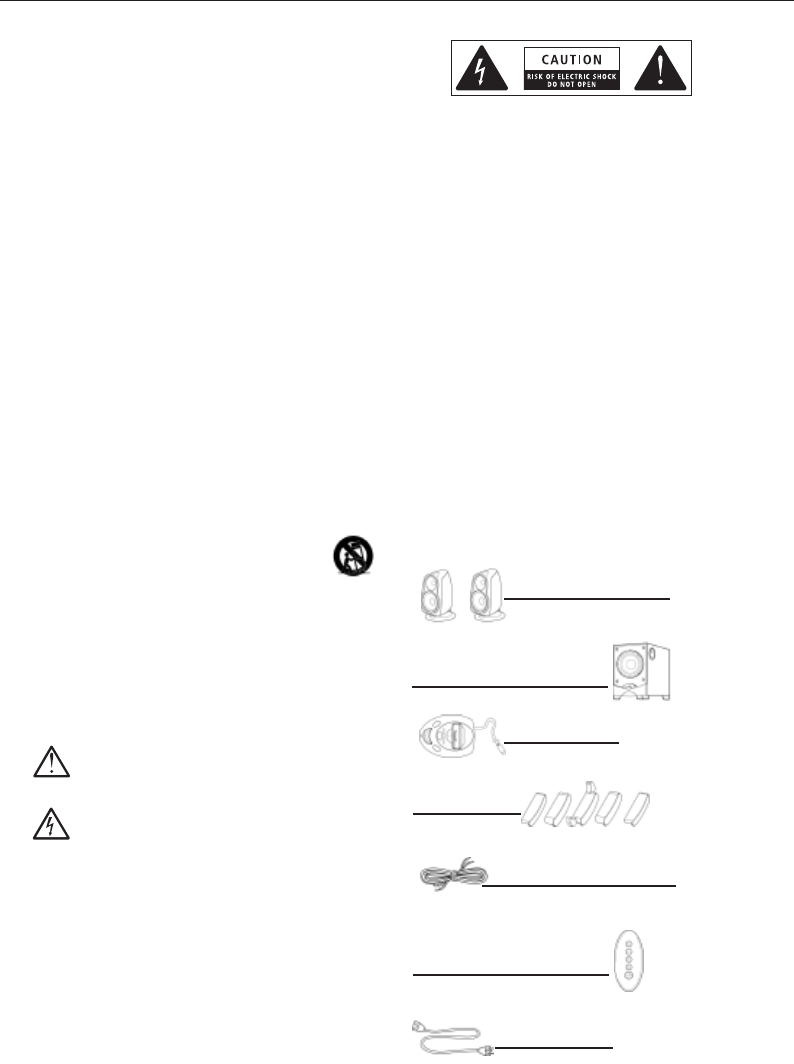
IMPORTANT SAFETY INSTRUCTIONS
1. READ these instructions.
2. KEEP these instructions.
3. HEED all warnings.
4. FOLLOW all instructions.
5. DO NOT use this apparatus near water.
6. CLEAN ONLY with dry cloth.
7. DO NOT block any ventilation openings. Install in accordance
with the manufacturer's instructions.
8. DO NOT install near any heat sources such as radiators, heat
registers, stoves, or other apparatus (including amplifiers) that
produce heat.
9. DO NOT defeat the safety purpose of the polarized or grounding
type plug. A polarized plug has two blades with one wider than
the other. A grounding type plug has two blades and a third
grounding prong. The wider blade or the third prong are provided
for your safety. If the provided plug does not fit into your outlet,
consult an electrician for replacement of the obsolete outlet.
10. PROTECT the power cord from being walked on or pinched,
particularly at plugs, convenience receptacles, and the point
where they exit from the apparatus.
11. ONLY USE attachments/accessories specified by the
manufacturer.
12. USE only with a cart, stand, tripod, bracket, or table specified
by the manufacturer, or sold with the apparatus. When a cart is
used, use caution when moving the cart/apparatus
combination to avoid injury from tip-over.
13. UNPLUG this apparatus during lightning storms or when unused
for long periods of time.
14. REFER all servicing to qualified service personnel. Servicing is
required when the apparatus has been damaged in any way,
such as power-supply cord or plug is damaged, liquid has been
spilled or objects have fallen into the apparatus, the apparatus
has been exposed to rain or moisture, does not operate
normally, or has been dropped.
This symbol indicates that there are important
operating and maintenance instructions in the
literature accompanying this unit.
This symbol indicates that dangerous voltage
constituting a risk of electric shock is present within
this unit.
To reduce the risk of fire or electrical shock, do not expose this
product to rain or moisture. The product must not be exposed to
dripping and splashing and no object filled with liquids - such as a
vase of flowers - should be placed on the product.
No naked flame sources - such as candles - should be placed on
the product.
WARNING: The main power switch for this appliance is located on
the rear panel. To permit free access to this switch, the apparatus
must be located in an open area without any obstructions.
WARNING: Voltages in this equipment are hazardous to life. No
user-serviceable parts inside. Refer all servicing to qualified
service personnel.
CAUTION: Changes or modifications not expressly approved by the
manufacturer could void the user’s authority to operate this device.
ABOUT YOUR KLIPSCH PURCHASE
Thank you for your purchase of the Klipsch iFi™Speaker System.
After reading this manual and connecting your system, you will
hear the result of over 55 years of stringent engineering and
class-leading research and development. Like all Klipsch
products, your system features Klipsch horn-loaded technology –
the guiding design for the first Klipschorn®developed in 1946
and for every product that has followed. Horn loading allows your
speakers to deliver high-sensitivity, low distortion, flat frequency
response and wide dispersion, which translate to unequaled
power, detail and dynamics, the hallmarks of the “Klipsch
Sound.” Please be sure to fill out the enclosed warranty card or
online at www.klipsch.com so we are better able to serve you.
Again, thank you for choosing Klipsch and we hope that your
speakers bring life to you music and movies for many years.
PACKAGE CONTENTS
2 RSX-3 satellite speakers
1 8-inch long-throw subwoofer
with slotted port
1 iFi control dock
5 dock adapters
2 pairs 6-foot speaker cables
1 radio-frequency (RF) handheld
remote control
1 AC power cord
iFi SPEAKER SYSTEM

SYSTEM SETUP
Control Dock
The iFi system comes with five adapters that allow different
model iPods to work with the control dock. Choose the adapter
that matches your iPod and insert it in the top of the dock until it
is snugly in place, with the slot centered over the multipin
docking connector.
Your iPod should now fit easily but securely into the top of the
dock, with the multipin connector at the base of the slot sliding
into the socket along the iPod’s bottom edge. The iFi dock will
flex slightly when you insert your iPod to relieve stress on the
connector. To avoid damage, do not apply excessive force when
inserting the iPod.
All iPod functions are available when it is in the iFi dock.
Basic System Connections
The control dock and the two satellite speakers connect to the
subwoofer,which powers the entire system.
• Turn the Power switch on the subwoofer’s back panel Off and
unplug the AC power cord.
• The control dock has an attached cable. Connect the end of
that cable to the matching jack on the subwoofer.
• Use the supplied twin-conductor speaker cables to connect
the satellite speakers to the binding-post output terminals on
the subwoofer’s back panel. Follow these directions carefully
to ensure correct operation. Loosen the nuts on the speaker
binding posts until the holes through the metal posts are
fully exposed. For each conductor, insert the bare wire at the
end through one of the binding post holes and screw the nut
on the post down finger-tight against the wire. Make
sure that no strands of bare wire touch between adjacent
black and red binding posts, as this may cause amplifier
malfunction or damage. Also be sure that the conductor
attached to the black (negative) terminal on each satellite is
attached to the matching black spring clip on the subwoofer
and that the red (positive) terminal on each satellite is
connected to the matching red spring clip on the subwoofer.
Reversing these connections (black to red and red to black)
will reduce bass output and impair overall sound quality.
The dashed line on the speaker cable will help in making
a correct connection.
• Attach the female end of the power cord to the matching
socket on the subwoofer and the male end to an AC
wall outlet.
• The speakers can be used with or without their grilles
attached. The grilles are held in place by magnetic catches. To
remove a grille, pull it forward; to replace, just line its edges
up with the speaker’s front panel and let it snap into position.
WARNING: Do not attempt to remove the subwoofer grille as it
is permanently attached.
Auxiliary Audio Input
The control dock also has a 3.5mm stereo minijack auxiliary
audio input on its back panel. It allows you to listen to an
external source (a portable CD player, for example) through the
system. When a plug is inserted in this jack, the system
automatically switches to the auxiliary input. To switch back to
the iPod, disconnect the auxiliary input.
A similar input on the subwoofer’s back panel can also be used
with any external source, but it is primarily intended to connect to
the audio output from a computer. This input is mixed with the
iFi SPEAKER SYSTEM
signal from the dock, whether from the iPod or from that auxil-
iary input, so that both sources are heard simultaneously. This
allows for, as an example, the sound from your computer to be
heard while music is playing from an iPod in the dock.
Subwoofer and Speaker Placement
Although you can place the components of the iFi system almost
any way that’s convenient, speaker location will affect sound
quality. The subwoofer will generally perform best when placed
on the floor in a corner, if that’s feasible. A good second option is
to place it six to 12 inches from a wall. The farther it is moved
toward the middle of the room, the lower the bass output.
You will get the best stereo effect with the satellite speakers
placed equidistant from the listening position. Wide separation
will tend to make the sound more spacious. If possible, avoid
locating either satellite closer than two feet to a side wall. Place
them at seated ear height, or, if that is not practical, adjust the
stands’ ball joints to aim the satellites up or down toward the
listening position.
RF Remote Control
Your radio-frequency (RF) remote control comes matched to the
iFi dock with its battery already installed. If you find the remote
control is not properly configured to run the iFi system, see the
“Remote Control Operation” section for instructions on synching
the dock with the remote control.
SYSTEM OPERATION
Power
The Main Power switch on the rear of the iFi subwoofer must be
on for the system to operate. You can switch the system
between Standby and On modes from the control dock and from
Standby to On with the remote control. The Power LED on the
control dock will glow amber in Standby mode and green when
the system is On. No light indicates that the Master Power switch
on the subwoofer is turned off or that the power cord is
unplugged.
Standby/Mute button
In Standby mode, pushing the Standby/Mute button will switch
the iFi system On. If an iPod is in the dock, it will be turned on
as well.
When the system is On, pressing the Standby/Mute button will
mute the sound and pause the iPod. Pressing the button again
will unmute the system. Pressing and holding the Standby/Mute
button will switch the system to Standby. In Standby mode, the
iPod will continue to charge.
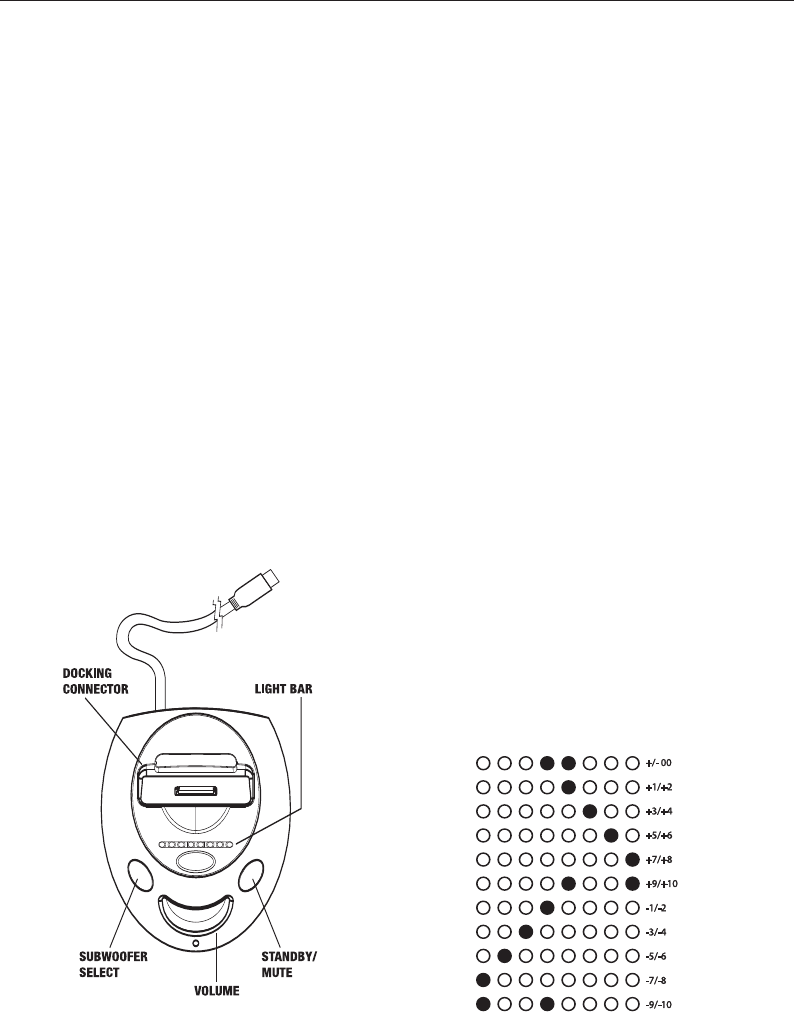
Volume/Subwoofer Select button
The default function of the Volume knob is to adjust the overall
sound level up and down, but it can also be used to adjust the
subwoofer output relative to the satellites.
To adjust the subwoofer level, first push the Volume/Subwoofer
Select button, then turn the Volume knob. The Light Bar will now
indicate the relative subwoofer level. Pressing the Volume/
Subwoofer Select button again will switch the knob back to
master volume control, or after five seconds, the system will
automatically revert.
Light Bar
The light bar on the control dock indicates current master
volume or subwoofer level, depending on the setting of the
Volume/Subwoofer Select button. Volume is indicated by
consecutive LEDs, from left to right. Muting the system turns all
the LEDs off.
When subwoofer level is being adjusted, the light bar will
indicate the relative subwoofer level as shown below.

REMOTE CONTROL
The remote has five buttons to control basic player functions
when an iPod is in the dock. Because it uses radio-frequency
(RF) rather than infrared signaling, it does not have to be pointed
at the iFi dock. The remote control can operate the iFi system up
to 100 feet away, depending on the conditions, and even works
through walls and floors! As long as the Master Power switch on
the subwoofer is on, pressing any button on the remote will
switch the system from Standby to On.
Volume Up/Volume Down
Pressing the Volume Up button raises the sound level; pressing
the Volume Down button lowers the sound level.
Play/Pause
When the iPod is not playing, pressing the Play/Pause button
once will initiate play. When the iPod is playing, pressing the
Play/Pause button once will pause the current track. When the
iPod is paused, pressing the Play/Pause button once will resume
play of the current track.
Holding the Play/Pause button down for several seconds will
switch the iFi system and any iPod docked in it to Standby
mode. The iPod will continue to charge as long as the
subwoofer’s Master Power switch is on.
Skip Forward/Skip Back
When the iPod is playing, pressing the Skip FWD button will skip
to the next track in the playlist. Pressing the Skip REV button
skips back to the beginning of the current track. Pressing the
Skip REV button at the beginning of a track skips back to the
previous track in the playlist. Holding the Skip FWD or Skip REV
button down for a few seconds will fast-forward or rewind the
current track.
Synching the Remote to the Control Dock
The iFi remote is configured at the factory to operate the system
with which it is packaged. If you buy a second remote control for
the iFi, or if the system stops responding to the remote that
came with it, use the following procedure to synch the remote
and dock.
Make sure the control dock is empty (no iPod inserted) and that
the system is On. Press the Volume/Subwoofer Select and
Standby/Mute buttons simultaneously for five seconds. The out-
side and middle LEDs of the light bar will blink continually for five
seconds to indicate that the system is in Remote Control
Configuration mode.
After the light bar starts blinking, press any button on the remote
control within five seconds to synch the remote to the control
dock. Perform this procedure separately for each remote that will
be used with the system. (As many as six remote controls can be
used with a single iFi system.)
Remote Control Battery Replacement
To replace the battery, remove the two screws on back of the
remote and disassemble as shown.
CARE AND CLEANING
The only thing you should ever need to do to your speakers is
dust them occasionally. Never apply any abrasive or solvent-
based cleaner or any harsh detergent. You can clean the grilles
with the brush attachment of a vacuum cleaner.
TROUBLESHOOTING
iPod does not dock properly in the system
• Make sure the proper docking adapter for your iPod is
inserted in the control dock.
• Remove the iPod; check the connectors on the control
dock and the bottom of the iPod to ensure there are
no obstructions.
No sound
• Make sure the power cord is connected to the rear of the sub-
woofer and to an AC outlet, that the master power switch is
set to the On position, and that the iFi system is switched On.
The power LED on the control dock should be green.
• Make sure the iPod is seated properly in the control dock,
turned on, and playing.
• If an external device is connected to the control dock’s
auxilary input, make certain that device is on and playing. If
you are trying to listen to an iPod in the dock, unplug the
auxiliary input on the rear panel.
• Make certain that the volume is turned up, as indicated by the
Light Bar on the control dock.

iFi SPEAKER SYSTEM
iPod not charging
• Make sure the iPod is properly seated in the control dock.
• Make sure the system is plugged in and that the Master
Power switch on the subwoofer is turned On. The iPod will not
charge if the Master Power switch is in the Off position.
Remote control will not operate the system
• Make sure the battery is properly installed.
• If the battery is old, it may need to be replaced.
• The remote may not be properly synched to the system. Use
the procedure detailed in the “Remote Control Operation”
section to synch the remote control to the iFi control dock.
WARRANTY—U.S. AND CANADA ONLY
KLIPSCH, LLC ("KLIPSCH") warrants this product to be free from
defects in materials and workmanship (subject to the terms set
forth below) for a period of one (1) year from the date of purchase.
During the warranty period, KLIPSCH will repair or replace (at
KLIPSCH's option) this product or any defective parts. Proof of
purchase in the form of a bill of sale or receipted invoice from an
authorized Klipsch dealer, which is evidence that this product is
within the warranty period, must be presented or included to obtain
warranty service. This warranty does not cover damage due to
misuse, abuse, negligence, acts of God, accident, commercial use
or modification of, or to any part of this product. This warranty
does not cover damage due to improper operation, maintenance or
installation, or attempted repair by anyone other than KLIPSCH or
someone authorized by KLIPSCH to do warranty work. Any
unauthorized repairs will void this warranty. This warranty does not
cover product sold AS IS or WITH ALL FAULTS. This warranty is
invalid if the factory applied serial number or date stamp has been
altered or removed from this product.
REPAIRS OR REPLACEMENTS AS PROVIDED UNDER THIS
WARRANTY ARE THE EXCLUSIVE REMEDY OF THE CONSUMER.
KLIPSCH SHALL NOT BE LIABLE FOR ANY INCIDENTAL OR
CONSEQUENTIAL DAMAGES FOR BREACH OF ANY EXPRESS OR
IMPLIED WARRANTY ON THIS PRODUCT. EXCEPT TO THE EXTENT
PROHIBITED BY LAW, THIS WARRANTY IS EXCLUSIVE AND IN
LIEU OF ALL OTHER EXPRESS AND IMPLIED WARRANTIES
WHATSOEVER, INCLUDING BUT NOT LIMITED TO, THE WARRANTY
OF MERCHANTABILITY AND FITNESS FOR A PRACTICAL PURPOSE.
Some states do not allow the exclusion or limitation of incidental
or consequential damages or implied warranties so the above
exclusions may not apply to every customer. This warranty gives
you specific legal rights, and you may have other rights which vary
from State to State.
To obtain warranty service, please follow these directions:
1. If you purchased this product from a retail store, please return
this product to such store in its original packaging along with
proof of purchase.
2. If you purchased this product from a computer manufacturer,
please contact that manufacturer.
3. For purchases made through www.klipsch.com, please call
KLIPSCH Customer Service at 1-888-554-5665. Product may
only be returned to KLIPSCH after a Return Authorization
number has been obtained from KLIPSCH.
Returned product must be shipped, freight prepaid to KLIPSCH in
either its original packaging or packaging affording an equal
degree of protection along with proof of purchase.
WARRANTY OUTSIDE THE UNITED STATES AND CANADA
The Warranty on this product if it is sold to a consumer outside of
the United States or Canada shall comply with applicable law and
shall be the sole responsibility of the distributor that supplied this
product. To obtain any applicable warranty service, please contact
the dealer from which you purchased this product, or the distributor
that supplied this product.
FCC AND CANADA COMPLIANCE INFORMATION:
Note: This equipment has been tested and found to comply with
the limits for a Class B digital device, pursuant to part 15 of
the FCC Rules. These limits are designed to provide reasonable
protection against harmful interference in a residential
installation. This equipment generates, uses and can radiate
radio frequency energy and, if not installed and used in
accordance with the instructions, may cause harmful
interference to radio communications. However, there is no
guarantee that interference will not occur in a particular
installation. If this equipment does cause harmful interference
to radio or television reception, which can be determined by
turning the equipment off and on, the user is encouraged to
try to correct the interference by one or more of the following
measures:
• Reorient or relocate the receiving antenna.
• Increase the separation between the equipment and receiver.
• Connect the equipment into an outlet on a circuit different
from that to which the receiver is connected.
• Consult the dealer or an experienced radio/TV technician
for help.
Modifications not expressly approved by the manufacturer
could void the user's authority to operate the equipment
under FCC rules.
This class B digital apparatus complies with Canadian ICES-003.
Cet appareil numerique de la classe B est conforme a la norme
NMB-003 du Canada.
iFi Transmitter Information
This device complies with part 15 of the FCC Rules. Operation is
subject to the following two conditions:
1. This device may not cause harmful interference, and
2. this device must accept any interference received, including
interference that may cause undesired operation.
L'utilisation de ce dispositif est autorisee seulement aux condi-
tions suivantes :
1. il ne doit pas produire de brouillage et
2. l'utilisateur du dispositif doit etre pret a accepter tout
brouillage radioelectrique recu, meme si ce brouillage
est susceptible de compromettre le fonctionnement du
dispositif.
iFi Receiver Information:
FCC Declaration of Conformity
Trade Name: Klipsch Audio Technologies
Product Name: Klipsch iFi Audio System
Model Number: iFi
These devices were tested and found to comply with Part 15 of
the FCC Rules. Operation is subject to the following conditions:
The devices may not cause harmful interference, and the devices
must accept any interference received, including interference
that may cause undesired operation.
Responsible Party
Manufacturer: Klipsch Audio Technologies
Address: 3502 Woodview Trace, Suite 200
Indianapolis, IN 46268
Telephone: 317-860-8100
Date: 3/3/05
Signature:
Printed Name: Clinton Bradley

SYSTÈME D'ENCEINTES iFi
CONSIGNES DE SECURITE IMPORTANTES
1. LIRE ces instructions.
2. CONSERVER ces instructions.
3. RESPECTER tous les avertissements.
4. SUIVRE toutes les instructions.
5. NE PAS utiliser cet appareil à proximité de l’eau.
6. NETTOYER UNIQUEMENT avec un chiffon sec.
7. NE PAS OBSTRUER les orifices de ventilation. Installer confor-
mément aux instructions du constructeur.
8. NE PAS installer à proximité de sources de chaleur telles que
les radiateurs, les grilles de chauffage, les cuisinières et les
autres appareils (notamment les amplificateurs) dégageant de
la chaleur.
9. NE PAS neutraliser le dispositif de sécurité que constitue la
fiche polarisée ou à broche de terre. Une fiche polarisée a une
lame plus large que l’autre. Une fiche à broche de terre est
munie de deux lames et d’une troisième broche pour la terre.
La lame large et la troisième broche sont prévues pour la
sécurité de l’utilisateur. Si la fiche fournie ne rentre pas dans la
prise de courant, demander à un électricien de remplacer cette
prise d’un type ancien. (Cet appareil doit être branché sur une
prise de courant par une fiche conforme aux normes locales
de mise à la terre et de polarité électrique.)
10. PROTÉGER le cordon d’alimentation en s’assurant qu’il ne
risque pas d’être piétiné ou écrasé, en particulier près des fich
es, des blocs multiprises et de son point de sortie de l’appareil.
11. UTILISER UNIQUEMENT les accessoires préconisés par le
constructeur.
12. UTILISER exclusivement avec un chariot, un support,
un trépied, une console ou un bâti recommandé par
le fabricant ou vendu avec l’appareil. Lorsqu’un
chariot est utilisé, faire preuve de prudence pour déplacer
l’ensemble chariot/appareil afin d’éviter un
renversement pouvant causer des blessures.
13. DÉBRANCHER cet appareil en cas d’orage ou lorsqu’il reste
inutilisé pendant une longue durée.
14. CONFIER tout travail de dépannage à un réparateur
professionnel compétent. Faire réparer l’appareil en cas de
dommages, par exemple si la fiche ou le cordon d’alimentation
a été endommagé, si un liquide a été renversé ou si un objet a
pénétré à l’intérieur de l’appareil, si l’appareil a été exposé à la
pluie ou à l’humidité, s’il ne fonctionne pas normalement ou
s’il a subi une chute.
Ce symbole indique d’importantes instructions d’utilisa-
tion et d’entretien dans la documentation accompagnant
cet appareil.
Ce symbole indique qu’une tension dangereuse présen-
tant un risque d’électrocution est présente dans l’appareil.
Pour réduire les risques d’incendie et d’électrocution, ne pas
exposer cet appareil à la pluie ni à l’humidité. Ne pas exposer ce
produit à des écoulements goutte à goutte ou à des éclabous-
sures, et veiller à ce qu’aucun récipient rempli de liquide, tel qu’un
vase de fleurs, ne soit posé dessus.
Ne pas poser sur ce produit de sources de flammes nues telles
que des bougies.
AVERTISSEMENT : L'interrupteur général pour cet appareil est
situé sur le panneau arrière. Pour permettre d'accéder facilement à
cet interrupteur, l'appareil doit être situé dans un emplacement
dont l'accès n'est entravé par aucun obstacle.
AVERTISSEMENT : Les tensions présentes dans cet appareil peu-
vent être mortelles. Cet appareil ne contient pas de pièces pouvant
être remplacées par l’utilisateur. Tout travail de dépannage doit être
confié à un réparateur professionnel compétent.
ATTENTION : Les changements ou modifications non expressé-
ment approuvés par le fabricant peuvent annuler le droit de l’util-
isateur à utiliser cet appareil.
À PROPOS DE VOTRE ACHAT DE PRODUIT KLIPSCH
Merci d'avoir acheté ce système d'enceintes Klipsch iFi™.
Lorsque vous aurez lu ce manuel et raccordé le système, vous
bénéficierez des résultats de plus de 55 ans d’études techniques
rigoureuses et d’un programme supérieur de recherche et
développement. Comme tous les produits Klipsch, ce système
bénéficie de la technologie de haut-parleur à pavillon Klipsch qui a
servi de ligne directrice au premier modèle Klipschorn® développé
en 1946 et à tous les produits qui ont suivi. Le haut-parleur à
pavillon permet aux enceintes d’offrir une réponse dotée de haute
sensibilité, de faible distorsion, de réponse en fréquence uniforme
et de large dispersion, ce qui se traduit par une supériorité inégalée
du « son Klipsch » au niveau de la puissance, des détails et de la
dynamique. Pour que nous puissions mieux vous servir, n’oubliez
pas de remplir la fiche de garantie ci-jointe ou en ligne sur
www.klipsch.com. Encore une fois, merci d’avoir choisi Klipsch.
Nous espérons que ces enceintes vous permettront d’apprécier
pleinement votre musique et vos films pendant de nombreuses
années.
CONTENU DU COFFRET
2 enceintes satellites RSX-3
Un amplificateur des graves longue
portée de 1,8" avec port à fente
1 station de commande iFi
5 adaptateurs de station
2 paires de câbles d'enceintes de 1,8 m (6 pieds)
1 télécommande manuelle HF
1 cordon d'alimentation secteur
CONFIGURATION DU SYSTÈME
Station de commande
Le système iFi est livré avec cinq adaptateurs qui permettent à dif-
férents modèles iPod de fonctionner sur la station de commande.
Choisissez l'adaptateur qui correspond à votre iPod et insérez-le
par le haut de la station jusqu'à ce qu'il se loge en place, avec la
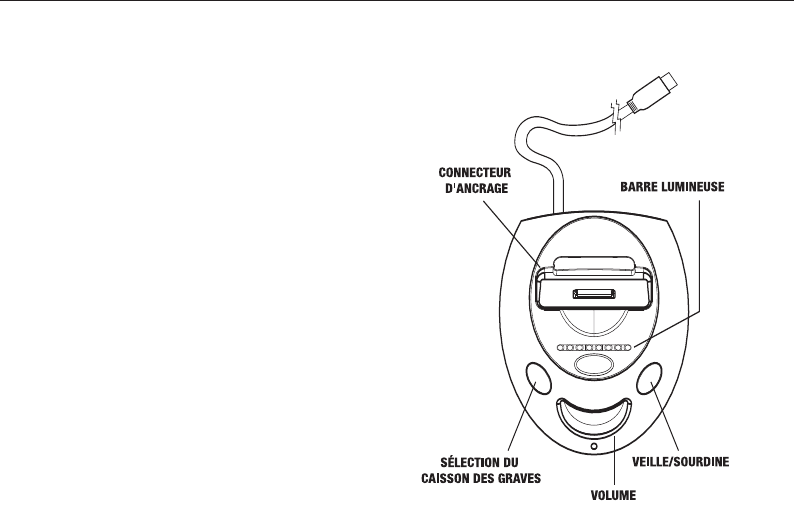
fente centrée sur le connecteur d'ancrage à plusieurs broches.
Votre iPod doit maintenant se loger facilement mais solidement
dans la station avec le connecteur à plusieurs broches situé à la
base de la fente d'insertion dans la prise le long du bord inférieur
de l'iPod. La station iFI se plie légèrement lorsque vous insérez
votre iPod afin d'alléger la contrainte sur le connecteur. Pour
éviter tout dommage, n'exercez aucune force excessive en
insérant l'iPod.
Toutes les fonctions sont disponibles quand l'iPod est inséré dans
la station iFi.
Branchements de base du système
La station de commande et les deux enceintes satellites se raccor-
dent au caisson des graves qui alimente tout le système.
• Placez l'interrupteur d'alimentation en position d'arrêt sur le
panneau arrière du caisson des graves et débranchez le cordon
d'alimentation.
• La station de commande est munie d'un câble fixée. Raccordez
l'extrémité du câble à la prise jack correspondante sur le caisson
des graves.
• Utilisez les câbles d'enceintes à conducteur jumelé pour
raccorder les enceintes satellites aux bornes de sortie de
raccordement sur le panneau arrière du caisson des graves.
Suivez strictement ces instructions pour assurer un branchement
correct. Desserrez les écrous sur les bornes de raccordement
des enceintes de façon à faire apparaître les trous traversants.
Pour chaque conducteur, insérez le fil nu à l'extrémité par l'un
des trous des bornes de raccordement et vissez l'écrou sur la
borne en serrant à la main contre le fil. Assurez-vous que les
brins de fil nu ne se touchent pas entre eux aux bornes de
raccordement adjacentes noires et rouges car tout contact
pourrait endommager l'amplificateur ou provoquer un mauvais
fonctionnement. Assurez-vous aussi que le conducteur fixé à la
borne noire (négative) sur chaque satellite est fixé à l'agrafe à
ressort noire correspondante sur le caisson des graves et que la
borne rouge (positive) sur chaque satellite est raccordée à
l'agrafe à ressort rouge sur le caisson des graves. L'inversion de
ces branchements (noir à rouge et rouge à noir) réduirait la
sortie des graves et provoquerait un son de mauvaise qualité. La
ligne en pointillé sur le câble de l'enceinte aide à effectuer un
raccordement correct.
• Fixez l'extrémité femelle du cordon d'alimentation à la prise cor
respondante sur le caisson des graves et l'extrémité mâle à la
sortie murale secteur.
• Les enceintes peuvent être utilisées avec ou sans leurs grilles
fixées. Les grilles sont maintenues en place par des loquets
aimantés. Pour retirer une grille, tirez-la vers l'avant. Pour la
replacer, alignez ses bords avec le panneau avant de l'enceinte
et enclenchez-la dans sa position.
AVERTISSEMENT : N'essayez pas de retirer la grille du caisson
des graves car elle est fixée de façon inamovible.
SYSTÈME D'ENCEINTES iFi
La station de commande a également une entrée audio auxiliaire
de type minijack stéréo de 3,5 mm sur son panneau arrière. Elle
vous permet d'écouter à une source externe (par exemple un
lecteur de CD portable) par l'intermédiaire du système. Quand une
fiche est insérée dans cette prise jack, le système passe automa-
tiquement à l'entrée auxiliaire. Pour revenir au iPod, débranchez
l'entrée auxiliaire.
Une entrée similaire sur le panneau arrière du caisson des graves
peut être aussi utilisée avec une source externe mais elle est prin-
cipalement destinée à raccorder la sortie audio à partir d'un ordi-
nateur. Le signal de cette entrée est mélangé à celui provenant de
la station que ce soit de l'iPod ou de l'entrée auxiliaire afin que les
deux sources puissent être entendues simultanément. Par exem-
ple, vous pouvez écouter le son provenant de votre ordinateur ainsi
que de la musique d'un iPod dans la station de commande.
Placement du caisson des graves et des enceintes
Vous pouvez placer les différents composants du système iFi de la
façon qui vous est la plus commode. Toutefois, l'emplacement des
enceintes a un impact sur la qualité du son. En général, le caisson
des graves donne un résultat optimal lorsqu'il est posé au sol,
dans un angle si possible. Une autre solution consiste à le placer
entre 15 et 30 cm d'un mur. Plus le caisson est éloigné du mur
vers le centre de la pièce, plus le niveau de restitution des graves
est réduit.
Vous obtenez le meilleur effet stéréo en plaçant les enceintes
satellites à égale distance de la position d'écoute. Un écart impor-
tant a tendance à donner plus de profondeur au son. Si possible,
évitez de placer l'une ou l'autre des enceintes satellites à moins de
60 centimètres d'un mur. Dans la mesure du possible, mettez-les
à la hauteur d'un auditeur assis. Sinon, réglez les joints sphériques
pour orienter les enceintes satellites vers le haut ou le bas en
direction de la zone d'écoute.
Télécommande HF
Votre télécommande haute fréquence (HF) est livrée assortie à la
station iFi avec sa batterie déjà installée. Si vous trouvez que la
télécommande n'est pas correctement configurée pour le fonction-
nement correct du système iFi, voir la section « Fonctionnement de
la télécommande » pour obtenir des instructions sur la synchroni-
sation de la station de commande avec la télécommande.
FONCTIONNEMENT DU SYSTÈME
Alimentation
L'interrupteur général situé à l'arrière du caisson des graves du
système iFi doit être sur marche pour que le système puisse fonc-
tionner. Vous pouvez faire basculer le système entre le mode veille
et le mode marche à partir de la station de commande et entre le
mode veille et le mode marche avec la télécommande. La DEL
d'alimentation sur la station de commande s'allume en orange en
mode veille et en vert quand le système est en mode marche.
Aucun voyant lumineux n'indique que l'interrupteur général sur le
caisson de graves est sur arrêt quand le cordon d'alimentation est
débranché.
Bouton Veille/Sourdine
Si vous êtes en mode veille, poussez le bouton Veille/Sourdine pour
mettre le système iFi sous tension. Si un iPod est inséré dans la
station de commande, il passe également sous tension.
Quand le système est sous tension, appuyez sur le bouton
Veille/Sourdine pour mettre en sourdine le son et faire passer
l'iPod en pause. Appuyez à nouveau sur le bouton pour entendre le
son provenant du système. Si vous appuyez sur le bouton
Veille/Sourdine et que vous le tenez enfoncé, le système passe en
mode veille. En mode veille, l'iPod continue de se recharger.
Bouton Volume/Sélection du caisson des graves
La fonction par défaut du bouton Volume est de régler le niveau
général du son mais ce bouton peut également être utilisé pour
régler la sortie du caisson des graves par rapport aux enceintes
satellites.
Pour régler le niveau du caisson des graves, poussez d'abord le
bouton Volume/Sélection du caisson de graves, puis tourner le
bouton Volume. La barre lumineuse indique alors le niveau relatif
du caisson des graves. Appuyez à nouveau sur le bouton
Volume/Sélection du caisson des graves pour revenir à la com-
mande principale du volume ; après cinq secondes, le système
rétablit automatiquement sa fonction par défaut.
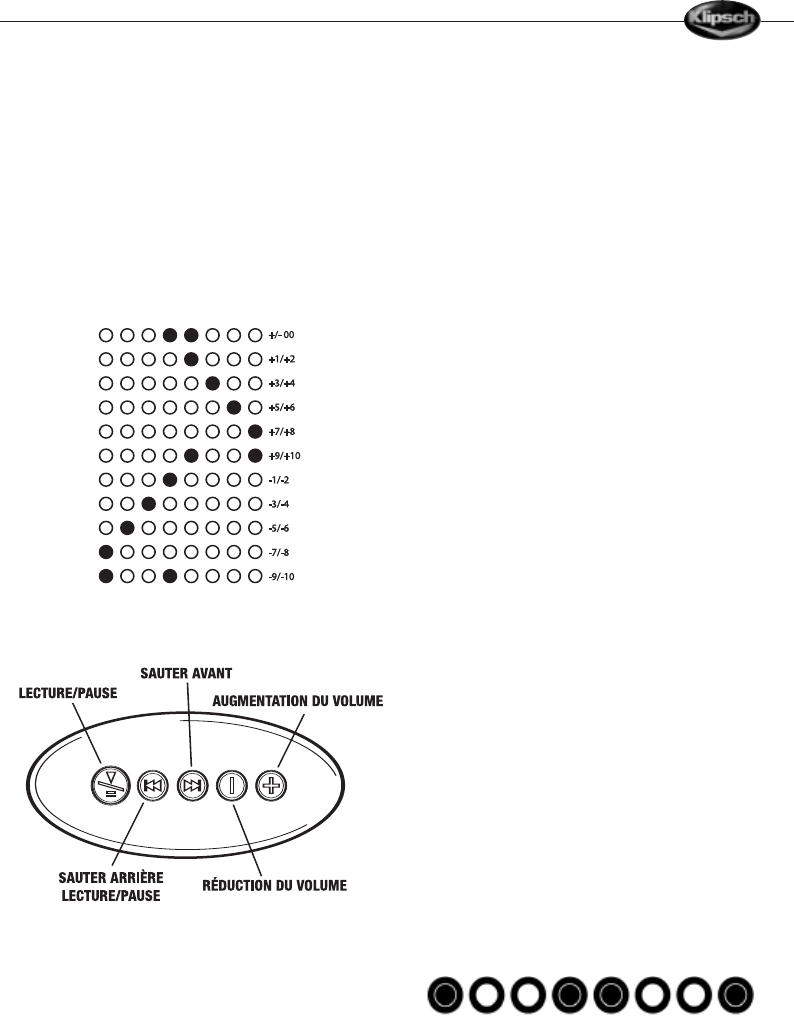
Barre lumineuse
La barre lumineuse sur la station de commande indique le volume
principal actuel ou le niveau du caisson des graves, selon le
paramétrage du bouton Volume/Sélection du caisson des graves.
Le volume est indiqué par les DEL consécutives de gauche à
droite. La mise en sourdine du système éteint toutes les DEL.
Quand le niveau du caisson de graves est cours de réglage, la
barre lumineuse indique le niveau relatif du caisson des graves,
comme indiqué ci-dessous.
TÉLÉCOMMANDE
La télécommande est munie de cinq bouton permettant de
contrôler les fonctions de base du lecteur quand un iPod est placé
dans la station de commande. Comme c'est un dispositif à la
haute fréquence (HF) et non pas à infrarouge, il n'est pas
nécessaire de pointer vers la station iFi.
La télécommande peut faire fonctionner le système iFi dans un
rayon de 30 mètres, selon les conditions, même à travers les cloi-
sons et les planchers! Si l'interrupteur général est sur marche sur
le caisson des graves, vous pouvez appuyer sur n'importe quel
bouton de la télécommande pour faire passer le système du mode
veille au mode marche.
Augmentation/réduction du volume
Appuyez sur le bouton d'augmentation du volume pour augmenter
le niveau sonore. Appuyez sur le bouton de réduction du volume
pour diminuer le niveau sonore.
Lecture/Pause
Quand l'iPod n'est pas en lecture, appuyez une fois sur le bouton
Lecture/Pause pour démarrer la lecture. Quand l'iPod est en
lecture, appuyez une fois sur le bouton Lecture/Pause pour que la
piste active passe en pause. Quand l'iPod est en pause, appuyez
une fois sur le bouton Lecture/Pause pour reprendre la lecture de
la piste active.
Si vous maintenez enfoncé le bouton Lecture/Pause pendant
quelques secondes, le système iFi et l'iPod inséré dans la station
passent en mode veille. L'iPod continue de se recharger si l'inter-
rupteur général du caisson des graves est en position de marche.
Sauter avant/Sauter arrière
Quand l'iPod est en lecture, si vous appuyez sur le bouton Sauter
avant, vous passez à la piste suivante de la liste. Si vous appuyez
sur le bouton Sauter arrière, vous revenez au début de la piste en
cours. Si vous appuyez sur le bouton Sauter arrière au début d'une
piste, vous revenez à la piste précédente de la liste de lecture.
En maintenant enfoncé pendant quelques secondes le bouton
Sauter avant ou sauter arrière, la piste en cours avance ou
recule rapidement.
Synchronisation de la télécommande à la station de commande
La télécommande iFi est configurée en usine afin de piloter le sys-
tème avec lequel elle est incluse. Si vous achetez une autre télé-
commande pour le système iFi ou si le système ne répond plus à
la télécommande incluse dans le coffret d'origine, procédez de la
façon suivante pour synchroniser la télécommande et la station de
commande.
Assurez-vous que la station de commande est vide (sans iPod
inséré) et que le système est sous tension. Appuyez simultanément
sur les boutons Volume/Sélection de caisson des graves/Sourdine
pendant cinq secondes. Les voyants latéraux et centraux de la
barre lumineuse clignotent alors en continu pendant cinq secondes
pour indiquer que le système est en mode de configuration de télé-
commande.
Avec la barre lumineuse qui clignote, appuyez sur un bouton quel-
conque de la télécommande pendant cinq secondes pour synchro-
niser la télécommande avec la station de commande. Procédez de
cette façon séparément pour chaque télécommande devant être
utilisée avec le système. (Il est possible d'utiliser jusqu'à six
télécommandes avec un seul système iFi.)
Remplacement de la batterie de fonctionnement de
la télécommande
Pour remplacer la batterie, retirez les deux vis situées à l'arrière de
la télécommande et désassemblez comme indiqué.

ENTRETIEN ET MAINTENANCE
Le nettoyage de vos enceintes ne demande qu’un époussetage de
temps en temps. N’utilisez jamais de produits de nettoyage
abrasifs ou à base de solvant ni de détergents puissants. Vous
pouvez nettoyer les grilles à l’aide d’une brosse d’aspirateur.
RÉSOLUTION DES PROBLÈMES
L'iPod ne s'insère pas correctement dans le système
• Vérifiez que vous utilisez l'adaptateur d'ancrage correct pour
votre iPod inséré dans la station de commande.
• Sortez l'iPod; vérifiez les connecteurs de la station de commande
ainsi que le bas de l'iPod pour détecter toute obstruction
éventuelle.
Aucun son
• Vérifiez que le cordon d'alimentation est connecté à l'arrière du
caisson des graves et à un prise secteur, que l'interrupteur
général est en position de marche et que le système iFi est sous
tension. La DEL d'alimentation sur la station de commande doit
être verte.
• Vérifiez que l'iPod est bien en place dans la station de com
mande, sous tension et en mode de lecture.
• Si un appareil externe est raccordé à l'entrée auxiliaire de la
station de commande, vérifiez que cet appareil est sous tension
et en mode de lecture. Si vous essayez d'écouter un iPod
inséré dans la station, débranchez l'entrée auxiliaire du
panneau arrière.
• Vérifiez que le volume est suffisamment fort suivant l'indication
de la barre lumineuse de la station de commande.
L'iPod ne se recharge pas
• Vérifiez que l'iPod est bien en place dans la station
de commande.
• Vérifiez que le système est branché et que l'interrupteur général
sur le caisson des graves est en marche. L'iPod ne se recharge
pas si l'interrupteur général est en position d'arrêt. La télécom
mande ne pilote pas le système
• Vérifiez que la batterie est correctement installée.
• Une batterie ancienne peut nécessiter un remplacement.
• La télécommande peut ne pas être correctement synchroniser
avec le système. Utilisez les instructions détaillées de la section
“Fonctionnement de la télécommande” pour synchroniser la
télécommande avec la station de commande iFi.
GARANTIE (ÉTATS-UNIS ET CANADA UNIQUEMENT)
KLIPSCH, LLC (“KLIPSCH”) garantit ce produit contre tout vice de
matériaux et de fabrication (sous réserve des termes établis ci-
dessous) pendant une période d’un an à partir de la date d’achat.
Pendant la période de garantie, KLIPSCH réparera ou remplacera
(selon son choix) ce produit ou toute pièce défectueuse. Une
preuve d’achat telle qu’une facture ou un reçu d’un revendeur
agréé Klipsch, attestant que le produit est toujours couvert par la
garantie d’un an, doit être présentée ou incluse pour pouvoir béné-
ficier de la garantie. Cette garantie ne couvre pas les dégâts résul-
tant d’une utilisation abusive, d’une utilisation à mauvais escient,
d’un cas de force majeure, d’un accident, d’une utilisation com-
merciale ou de la modification de ce produit ou de l’un de ses
composants. Cette garantie ne couvre pas les dégâts résultant
d’une utilisation, d’un entretien ou d’une installation incorrecte, ou
d’une tentative de réparation par quiconque autre que KLIPSCH ou
par une personne non autorisée par KLIPSCH à effectuer une
réparation sous garantie. Toute réparation non autorisée annule la
présente garantie. Cette garantie ne couvre pas les produits ven-
dus EN L’ÉTAT. Cette garantie est nulle si la date ou le numéro de
série apposé en usine a été modifié ou retiré de ce produit.
LE SEUL RECOURS DU CLIENT EST LA RÉPARATION OU LE REM-
PLACEMENT SELON LES TERMES DE CETTE GARANTIE. KLIPSCH
DÉCLINE TOUTE RESPONSABILITÉ POUR TOUT DOMMAGE DIRECT
OU INDIRECT RÉSULTANT DU NON RESPECT DE TOUTE GARANTIE
EXPRESSE OU IMPLICITE RELATIVE À CE PRODUIT. À L’EXCEPTION
DES CAS OÙ LA LÉGISLATION L’INTERDIT, CETTE GARANTIE EST
EXCLUSIVE ET REMPLACE TOUTE AUTRE GARANTIE EXPRESSE
OU IMPLICITE, Y COMPRIS, MAIS SANS S’Y LIMITER, LES
GARANTIES DE VALEUR MARCHANDE OU D’ADÉQUATION
À UN USAGE PARTICULIER.
Certaines juridictions ne permettent pas l’exclusion ou la limitation
des garanties implicites ou des dommages directs ou indirects. Il
est donc possible que les exclusions ci-dessus ne s’appliquent pas
à tous les clients. Cette garantie vous confère des droits spéci-
fiques, et vous pouvez également bénéficier d’autres droits vari-
ables d’une juridiction à l’autre.
Pour bénéficier d’une intervention sous garantie, procédez ainsi :
1. Si ce produit a été acheté chez un détaillant, rapportez-le au
magasin dans son emballage d’origine avec la preuve d’achat.
2. Si ce produit a été vendu par un constructeur d’ordinateurs,
contactez ce constructeur.
3. Pour les achats effectués sur le site www.klipsch.com, contactez
le service clientèle de KLIPSCH au 1-888-554-5665. Vous ne
pouvez renvoyer le produit à KLIPSCH qu'après avoir obtenu un
numéro d'autorisation de retour auprès de KLIPSCH.
Le produit doit être retourné à KLIPSCH en port payé soit dans son
emballage d’origine, soit dans un emballage offrant un degré de
protection identique, accompagné d’une preuve d’achat.
GARANTIE DANS LES PAYS AUTRES QUE LES ÉTATS-UNIS ET
LE CANADA
Si ce produit est vendu dans des pays autres que les États-Unis et
le Canada, la garantie doit être conforme aux lois en vigueur et
n’engage que la responsabilité du distributeur qui a fourni ce pro-
duit. Pour bénéficier de toute intervention sous garantie applicable,
contactez le vendeur auprès duquel le produit a été acheté ou le
distributeur ayant fourni le produit.
SYSTÈME D'ENCEINTES iFi
