Kmart 01639069 2 User Manual FRONT TILLER Manuals And Guides L1004248
KMART Front Tine, Gas Tiller Manual L1004248 KMART Front Tine, Gas Tiller Owner's Manual, KMART Front Tine, Gas Tiller installation guides
User Manual: Kmart 01639069-2 01639069-2 KMART FRONT TILLER - Manuals and Guides View the owners manual for your KMART FRONT TILLER #016390692. Home:Lawn & Garden Parts:Kmart Parts:Kmart FRONT TILLER Manual
Open the PDF directly: View PDF ![]() .
.
Page Count: 64
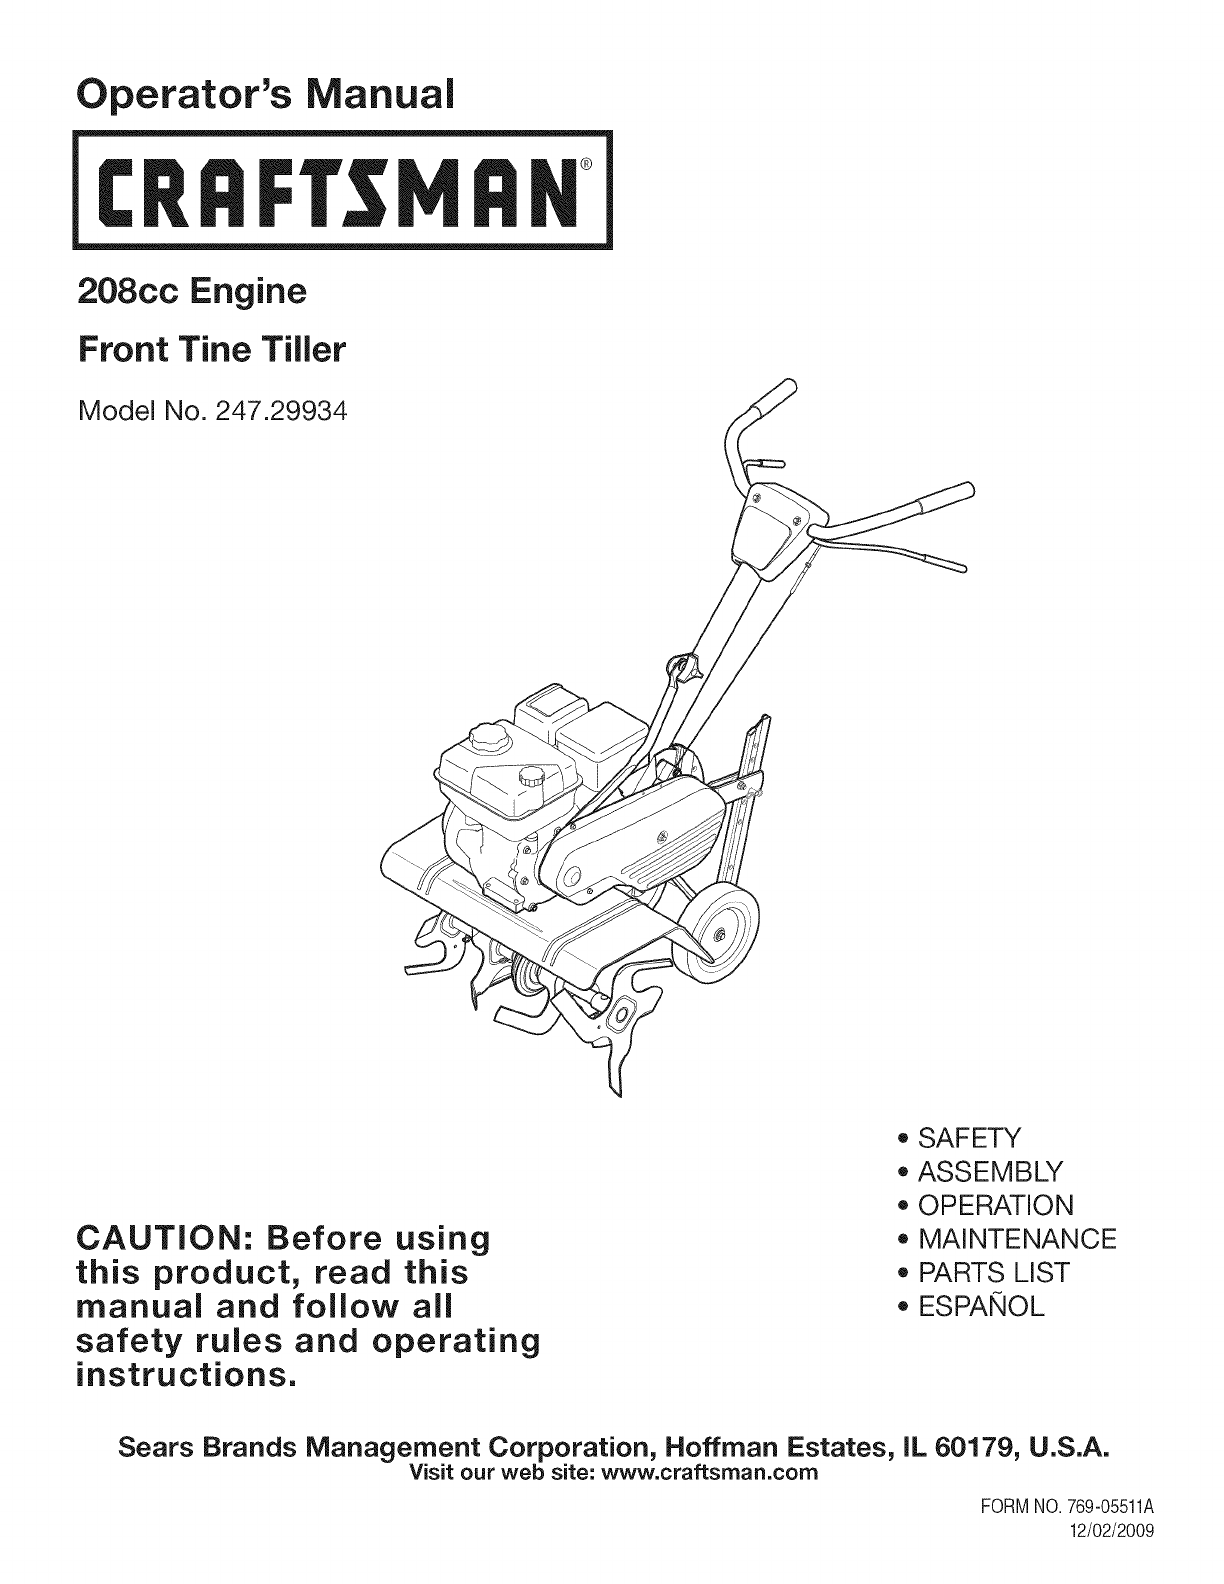
Operator's Manual
I:Rl FI'SlVl N
208cc Engine
Front Tine Tiller
Model No. 247.29934
CAUTION: Before using
this product, read this
manual and follow all
safety rules and operating
instructions.
*SAFETY
*ASSEMBLY
*OPERATION
*MAINTENANCE
*PARTS LIST
*ESPANOL
Sears Brands Management Corporation, Hoffman Estates, iL 60179, U.S.A.
Visit our web site: www.craftsman.com
FORM1/0. 769-05511A
12/02/2009
WarrantyStatement..................................Pac
SafeOperationPractices..........................Pac
SafetyLabels............................................Pac
Assembly..................................................Pac
Operation..................................................Pac
ServiceandMaintenance.........................Pac
Off-SeasonStorage..................................Pac
e2
es3-6
e7
es8-10
es11-17
es18-22
e23
TroubleShooting.......................................Page24
PartsList...................................................Page26-29
LabelMap.................................................Page34
RepairProtectionAgreement...................Page37
Espa_ol.....................................................Page38
ServiceNumbers......................................BackCover
CRAFTSMAN FULLWARRANTY
Whenoperatedand maintainedaccordingto allsuppliedinstructions,if this Craftsmanproductfailsdueto a defectin materialorworkmanship
withintwoyearsfromthe date orpurchase,takeit to any Searsor otherauthorizedCraftsmanlocationin the UnitedStatesfor free repair.Call
1-800-4-MY-HOME®for the nearestauthorizedlocation.
Thiswarrantyappliesfor only90 daysfromthe dateof purchaseif thisproductis everusedfor commercialor rentalpurposes.
ThiswarrantycoversONLYdefectsin materialandworkmanship.Searswill NOTpayfor:
• Expendableitemsthatbecomewornduringnormaluse,includingbut notlimitedto blades,tines,or belts.
• Tireor wheelreplacementor repairresultingfromnormalwear,accident,orimproperoperationor maintenance.
• Repairsnecessarybecauseof operatorabuse,includingbutnot limitedto damagecausedby impactingobjectsthat bendthe frameor
motorcrankshaft.
• Repairsnecessarybecauseof operatornegligence,includingbut not limitedto,electricalandmechanicaldamagecausedby improper
storage,orfailureto maintainthe equipmentaccordingtothe instructionscontainedin theoperator'smanual.
• Repairsnecessarydueto improperfuel mixture,contaminatedor stalefuel.
• Normaldeteriorationandwearof the exteriorfinishes,or productlabelreplacement.
Thiswarrantyappliesonly whilethisproductis withinthe UnitedStates.
Thiswarrantygivesyou specificlegalrights,andyou mayalso haveotherrightswhichvaryfromstateto state.
Sears, Roebuck and Co., Hoffman Estates, IL 60179
EngineSeries: 208cc
EngineOilType: 10w30
EngineOilCapacity: 20ounces
Fuel: UnleadedGasoline
SparkPlug: TorchF6RTC
SparkPlugGap: .030"
Model Number.................................................................
Serial Number .................................................................
Dateof Purchase.............................................................
Recordthe modelnumber,serialnumber
anddateof purchaseabove
©SearsBrands,LLC 2
Thissymbolpointsout importantsafetyinstructionswhich,if not
followed,couldendangerthe personalsafetyand/orpropertyof
yourselfandothers. Readandfollowall instructionsin thismanual
beforeattemptingto operatethismachine.Failureto complywith
theseinstructionsmayresultin personalinjury.Whenyou seethis
symbol,HEEDITSWARNING!
CALIFORNIA PROPOSITION 65
EngineExhaust,someof itsconstituents,andcertainvehicle
componentscontainoremitchemicalsknownto Stateof California
to causecancerandbirthdefectsorother reproductiveharm.Bat-
tery posts,terminals,andrelatedaccessoriescontainleadand lead
compounds,chemicalsknownto the Stateof Californiato cause
cancerandreproductiveharm.Washhandsafterhandling.
Thismachinewasbuilt to beoperatedaccordingto the safeopera-
tion practicesin thismanual.As withany typeof powerequipment,
carelessnessorerroronthe part of the operatorcan resultin
seriousinjury.Thismachineis capableof amputatingfingers,hands,
toesandfeetandthrowingdebris.Failureto observethe following
safetyinstructionscouldresultin seriousinjuryordeath.
Your Responsibility=Restrict the useof this powermachineto
personswho read,understandandfollowthewarningsand instruc-
tionsin thismanualandon the machine.
SAVETHESEINSTRUCTIONS!
TRAINING
•Read,understand,andfollowall instructionson the machineand
in themanual(s)beforeattemptingto assembleandoperate.
Keepthis manualina safeplacefor futureand regularreference
andfor orderingreplacementparts.
• Readthe Operator'sManualand followallwarningsand safety
instructions.Failureto doso can resultin seriousinjuryto the
operatorand/or bystanders.Forquestions,call 1-800-4MY-HOME.
• Befamiliarwithall controlsandtheir properoperation.Knowhow
to stopthe machineanddisengagethemquickly.
• Neverallowchildrenunder14yearsof ageto operatethis
machine.Children14andover shouldreadandunderstandthe
instructionsandsafeoperationpracticesin thismanualandon
the machineandbe trainedandsupervisedby anadult.
• Neverallowadultsto operatethis machinewithoutproper
instruction.
• Keepbystanders,pets,andchildrenat least75feetfromthe
machinewhile it is in operation.Stopmachineif anyoneenters
the area.
• Neverrunanengineindoorsor ina poorlyventilatedarea.Engine
exhaustcontainscarbonmonoxide,anodorlessanddeadlygas.
PREPARATION
•Thoroughlyinspecttheareawherethe equipmentis to beused.
Removeall rocks,bottles,cans,or otherforeignobjectswhich
could bepickedupor thrownandcausepersonalinjuryor
damageto the machine.
• Alwayswear safetyglassesor safetygogglesduringoperation
andwhile performingan adjustmentor repair,to protectyour
eyes.Thrownobjectswhichricochetcan causeseriousinjuryto
the eyes.
• Wearsturdy,rough-soledworkshoesandclose-fittingslacksand
shirts.Loosefittingclothesor jewelrycan becaughtin movable
parts.Neveroperatethismachineinbarefeetorsandals.
• Beforestarting,checkallboltsandscrewsfor propertightnessto
besurethe machineis insafeworkingcondition.Also,visually
inspectmachinefor any damageat frequentintervals.
• Disengageclutchleversandshift (if provided)into neutral("N")
beforestartingtheengine.
• Neverleavethismachineunattendedwiththe enginerunning.
• Neverattemptto makeanyadjustmentswhilethe engineis
running,exceptwherespecificallyrecommendedinthe operator's
manual.
• Maintainor replacesafetyandinstructionslabels,as necessary.
3
Safe Handling of Gasoline:
Toavoidpersonalinjuryor propertydamageuseextremecare in
handlinggasoline.Gasolineis extremelyflammableandthe vaporsare
explosive.Seriouspersonalinjurycan occurwhengasolineis spilled
onyourselfor yourclotheswhichcan ignite.Washyour skinand
changeclothesimmediately.
• Useonlyan approvedgasolinecontainer.
• Neverfill containersinsidea vehicleor ona truckor trailerbed
witha plasticliner.Alwaysplacecontainersonthe groundaway
fromyour vehiclebeforefilling.
• Whenpractical,removegas-poweredequipmentfromthe truck
ortrailerand refuelitonthe ground.Ifthisis notpossible,then
refuelsuchequipmenton a trailerwitha portablecontainer,rather
thanfroma gasolinedispensernozzle.
• Keepthe nozzleincontactwiththe rimof the fuel tankor
containeropeningat alltimes untilfuelingis complete.Do not use
a nozzlelock-opendevice.
• Extinguishallcigarettes,cigars,pipesandother sourcesof
ignition.
• Neverfuel machineindoors.
• Neverremovegas capor addfuel whilethe engineishot or run-
ning.Allowengineto cool at leasttwo minutesbeforerefueling.
• Neveroverfill fueltank. Fill tankto nomorethan1/2inchbelow
bottomof filler neckto allowspacefor fuel expansion.
• Replacegasolinecapandtightensecurely.
• Ifgasolineisspilled,wipe itoff theengineandequipment.Move
unitto anotherarea.Wait5 minutesbeforestartingthe engine.
• To reducefire hazards,keepmachinefreeof grass, leaves,or
otherdebrisbuild-up.Cleanupoil orfuel spillageand removeany
fuel soakeddebris.
• Neverstorethe machineorfuel containerinsidewherethereis an
openflame,sparkor pilotlightas on awaterheater,spaceheater,
furnace,clothesdryer orothergas appliances.
OPERATION
•Do not puthandsorfeetnear rotatingparts.Contactwiththe
rotatingpartscan amputatehandsand feet.
• Do notoperatemachinewhileunderthe influenceof alcoholor
drugs.
• Neveroperatethismachinewithoutgoodvisibilityor light.Always
be sureof yourfootingandkeepa firmholdonthe handles.
• Keepbystandersawayfromthe machinewhileit isinoperation.
Stopthe machineif anyoneentersthe area.
• Becarefulwhentilling inhardground.Thetines maycatchinthe
groundandpropelthe tillerforward.Ifthis occurs,let goof the
handlebarsanddo not restrainthe machine.
• Exerciseextremecautionwhenoperatingonor crossinggravel
surfaces.Stayalert for hiddenhazardsortraffic. Do notcarry
passengers.
• Neveroperatethe machineat hightransportspeedson hardor
slipperysurfaces.
• Exercisecautionto avoidslippingor falling.
• Lookdownand behindandusecare whenin reverseor pulling
machinetowardsyou.
• Startthe engineaccordingto the instructionsfoundinthis manual
and keepfeetwell awayfromthe tinesat all times.
• Afterstrikingaforeignobjector ifyour machineshouldstart mak-
inganunusualnoiseor vibration,immediatelyshutthe engineoff.
Disconnectthe sparkplugwire,grounditagainstthe engineand
performthe followingsteps:
a. Inspectfor damage.
b. Repairor replaceanydamagedparts.
c. Checkfor anyloose partsandtightento assurecontinued
safeoperation.
• Disengageall clutchlevers(if fitted)and stopenginebeforeyou
leavethe operatingposition(behindthe handles).Wait until
the tinescometo a completestopbeforeuncloggingthe tines,
makingany adjustments,or inspections.
• Neverrunanengineindoorsorina poorlyventilatedarea.Engine
exhaustcontainscarbonmonoxide,an odorlessanddeadlygas.
• Mufflerandenginebecomehot andcancausea burn.Do not
touch.
• Usecautionwhentillingnearfences,buildingsandunderground
utilities.Rotatingtinescan causepropertydamageor personal
injury.
• Donot overloadmachinecapacityby attemptingto till soil too
deepat too fastof a rate.
• Ifthe machineshouldstart makinganunusualnoiseor vibration,
stopthe engine,disconnectthe sparkplugwire andgroundit
againstthe engine.Inspectthoroughlyfor damage.Repairany
damagebeforestartingandoperating.
• Keepallshields,guards,and safetydevicesinplaceandoperat-
ing properly.
• Neverpick uporcarry machinewhilethe engineis running.
• Useonly attachmentsandaccessoriesapprovedby the manu-
factureras listedin the PartsListpagesof thisoperator'smanual.
Failureto doso can resultin personalinjury.
• Ifsituationsoccurwhichare notcoveredinthis manual,use care
andgoodjudgement.ContactCustomerSupportat 1-800-4MY-
HOMEfor assistanceandthe nameof thenearestservicedealer
MAINTENANCE & STORAGE
•Keepthe machine,attachmentsandaccessoriesin safeworking
order.
•Allowthe machineto coolat leastfiveminutesbeforestoring.
Nevertamperwithsafetydevices.Checktheirproperoperation
regularly.
•Checkboltsandscrewsfor propertightnessat frequentintervals
to keepthe machineinsafeworkingcondition.Also,visually
inspectmachineforany damage.
• Beforecleaning,repairing,or inspecting,stopthe engineand
makecertainthetinesandall movingpartshavestopped.
Disconnectthe sparkplugwireandgrounditagainstthe engineto
preventunintendedstarting.
4
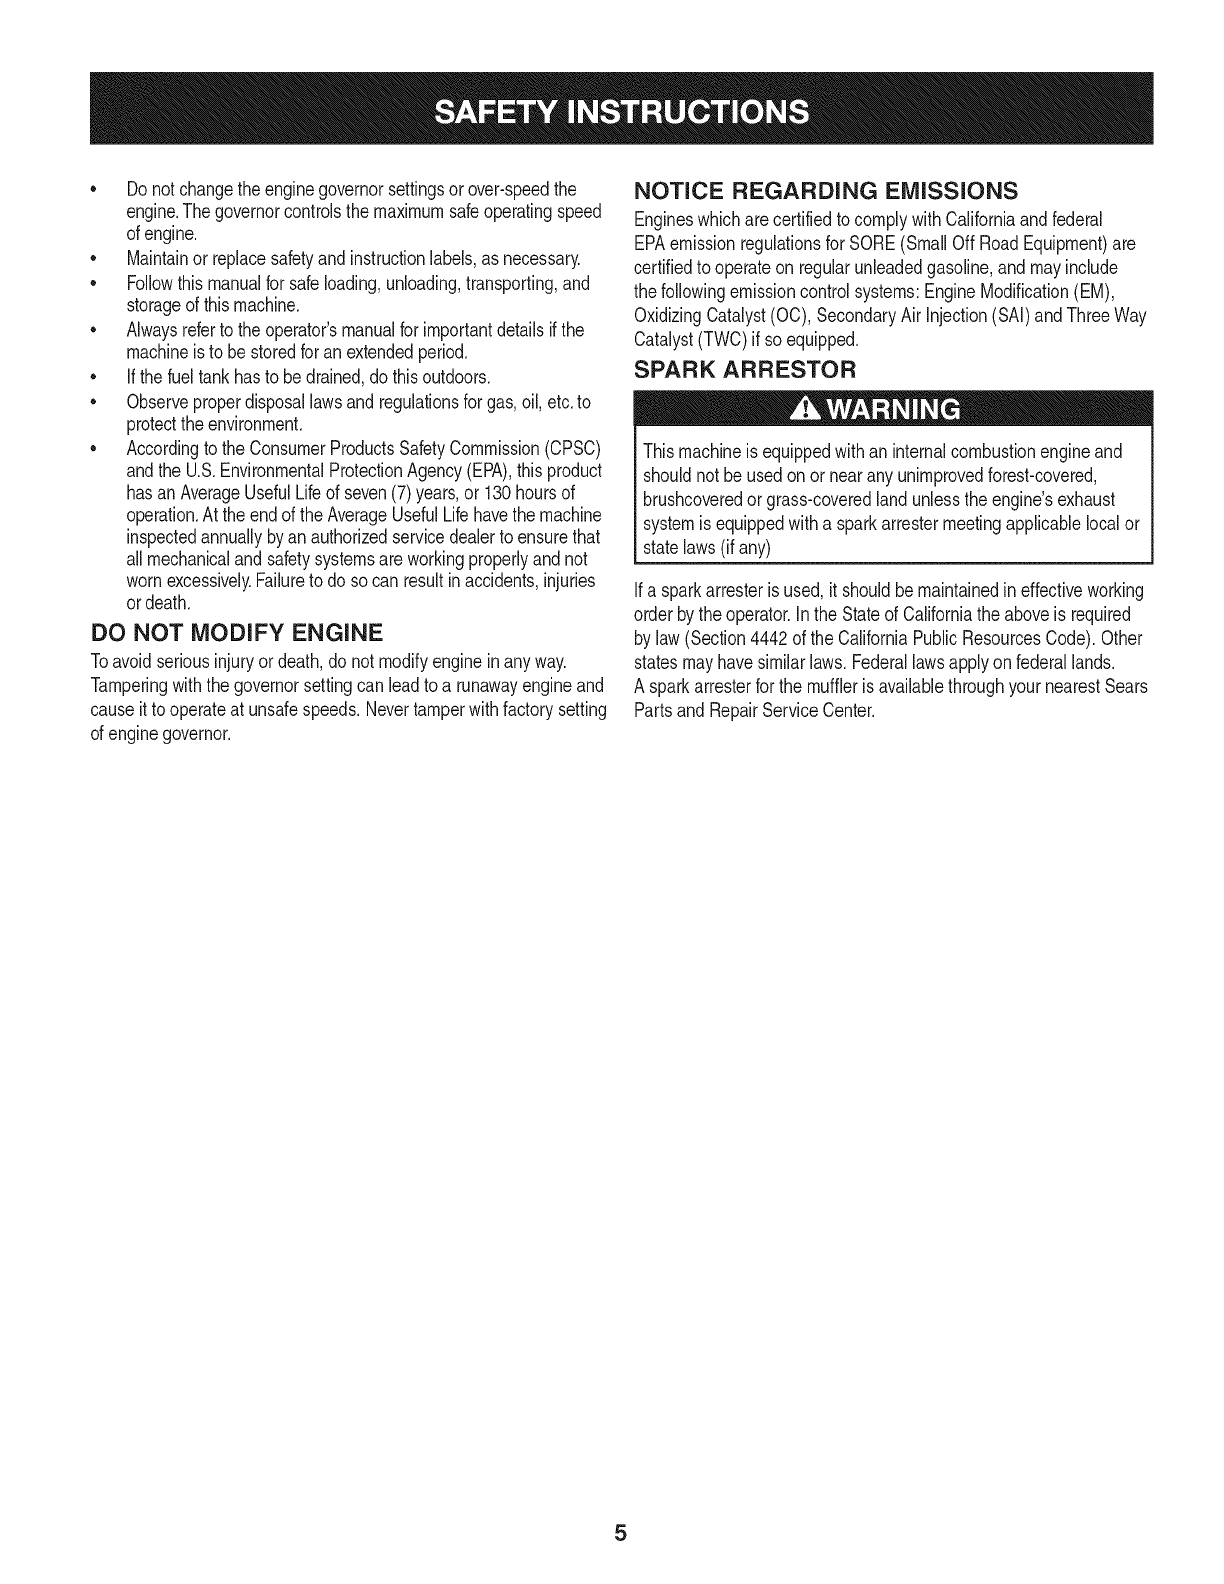
• Do notchangethe enginegovernorsettingsor over-speedthe
engine.Thegovernorcontrolsthemaximumsafeoperatingspeed
of engine.
Maintainor replacesafetyandinstructionlabels,as necessary.
Followthis manualfor safeloading,unloading,transporting,and
storageof thismachine.
Alwaysreferto theoperator'smanualfor importantdetailsif the
machineis to bestoredforan extendedperiod.
If thefuel tankhasto be drained,do thisoutdoors.
Observeproperdisposallawsandregulationsfor gas,oil, etc.to
protectthe environment.
Accordingto the ConsumerProductsSafetyCommission(CPSC)
andthe U.S.EnvironmentalProtectionAgency(EPA),thisproduct
hasan AverageUsefulLifeof seven(7)years,or 130hoursof
operation.At the endof theAverageUsefulLifehavethe machine
inspectedannuallyby anauthorizedservicedealerto ensurethat
allmechanicalandsafetysystemsareworkingproperlyandnot
wornexcessively.Failureto do so can resultinaccidents,injuries
ordeath.
DO NOT MODIFY ENGINE
Toavoidseriousinjuryordeath,donot modifyenginein anyway.
Tamperingwiththe governorsettingcan leadto a runawayengineand
causeit to operateat unsafespeeds.Nevertamperwithfactorysetting
of enginegovernor.
NOTICE REGARDING EMISSIONS
EngineswhicharecertifiedtocomplywithCaliforniaandfederal
EPAemissionregulationsfor SORE(SmallOff RoadEquipment)are
certifiedto operateon regularunleadedgasoline,and mayinclude
the followingemissioncontrolsystems:EngineModification(EM),
OxidizingCatalyst(CO),SecondaryAirInjection(SAI)and ThreeWay
Catalyst(TWO)if so equipped.
SPARK ARRESTOR
Thismachineis equippedwithan internalcombustionengineand
shouldnotbe usedonor nearanyunimprovedforest-covered,
brushcoveredor grass-coveredlandunlessthe engine'sexhaust
systemis equippedwitha sparkarrestermeetingapplicablelocal or
statelaws(if any)
Ifa sparkarresteris used,it shouldbemaintainedin effectiveworking
orderby theoperator.Inthe Stateof Californiathe aboveis required
bylaw (Section4442of the CaliforniaPublicResourcesCode).Other
statesmayhavesimilarlaws. Federallawsapplyonfederallands.
A sparkarresterfor the muffleris availablethroughyournearestSears
PartsandRepairServiceCenter.
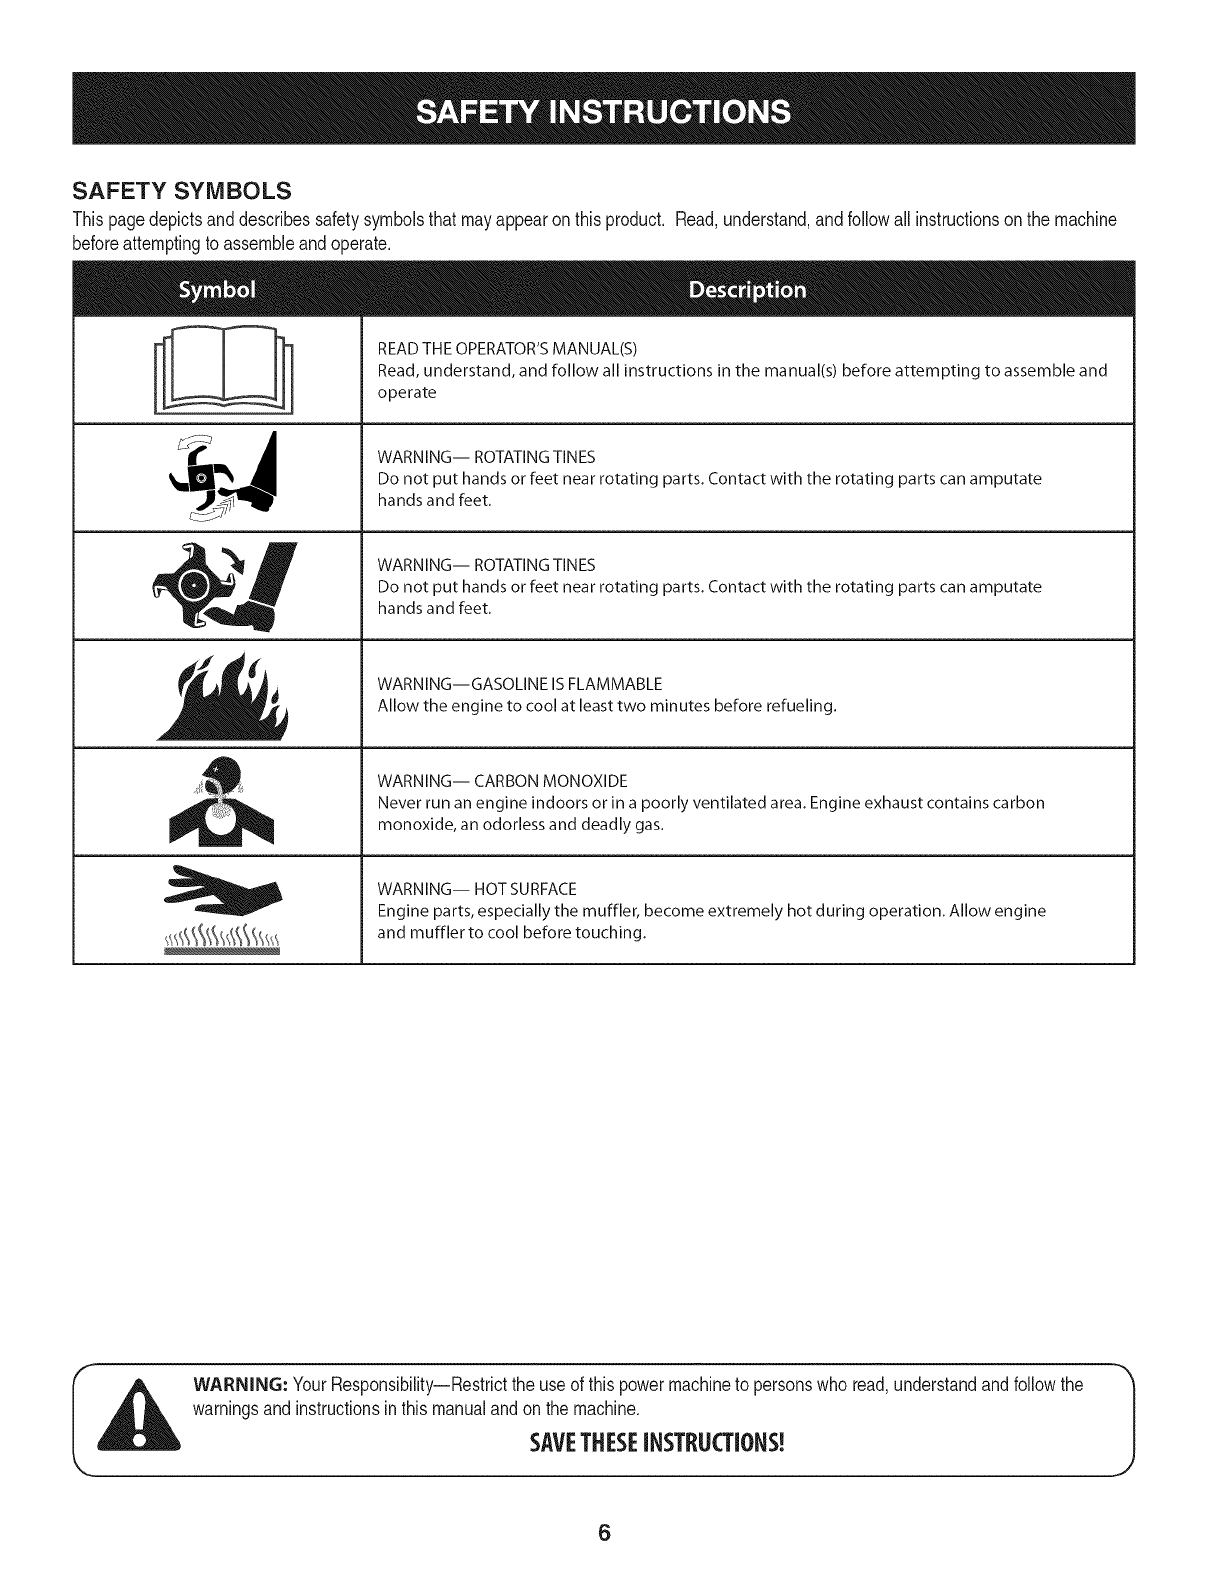
SAFETY SYMBOLS
Thispagedepictsanddescribessafetysymbolsthatmayappearonthisproduct. Read,understand,andfollowall instructionson the machine
beforeattemptingto assembleandoperate.
ii
READ THE OPERATOR'S MANUAL(S)
Read, understand, and follow all instructions in the manual(s) before attempting to assemble and
operate
WARNING-- ROTATING TINES
Do not put hands or feet near rotating parts. Contact with the rotating parts can amputate
hands and feet.
WARNING-- ROTATING TINES
Do not put hands or feet near rotating parts. Contact with the rotating parts can amputate
hands and feet.
WARNING--GASOLINE IS FLAMMABLE
Allow the engine to cool at least two minutes before refueling.
WARNING-- CARBON MONOXIDE
Never run an engine indoors or in a poorly ventilated area. Engine exhaust contains carbon
monoxide, an odorless and deadly gas.
WARNING-- HOT SURFACE
Engine parts, especially the muffler, become extremely hot during operation. Allow engine
and muffler to cool before touching.
WARNING: YourResponsibility--Restrictthe use of thispowermachineto personswho read,understandandfollowthe
warningsand instructionsinthis manualandonthe machine.
SAVETHESEINSTRUCTIONS!
6
Lireenti_rementlesinstructionsd'utiiisation
u_ avantdetairedemmarrerlemoteur.
J_ L'essenceestintammabie.Laissezlemoteurretroidiraumoins
2minutesavantdefairelepiein=
Lesmeteursproduisen!domnpoxydedesarbone,nepasfaire
_onctionnerlemoteuroansuniocaJTerme.
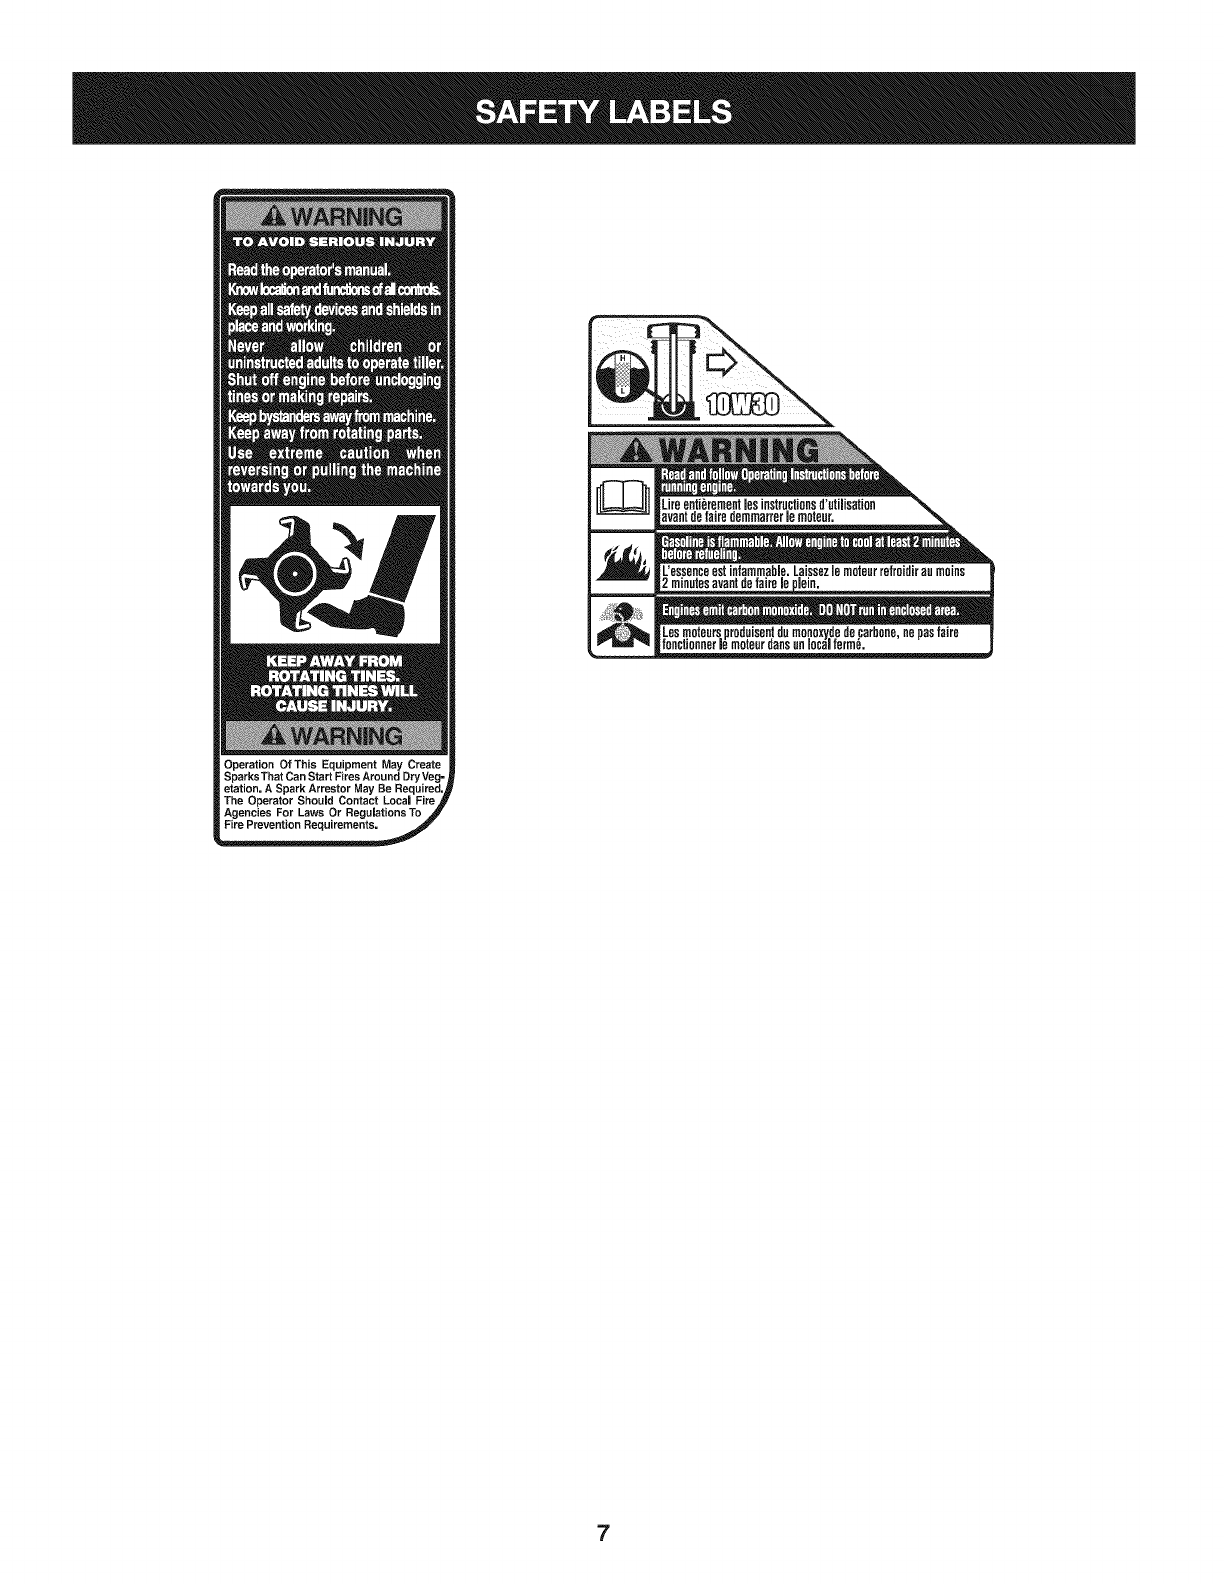
Fire Prevention Requirements,
7
IMPORTANT:Thisunit isshippedwithoutgasolineoroil inthe engine.
Becertainto serviceenginewithgasolineandoilas instructedinthe
Operationsectionof this manualbeforeoperatingyourmachine.
NOTE:Referenceto rightand lefthandsideof the Tillerisobserved
fromthe operatingposition.
OPENING CARTON
1. Cuteachcornerof the cartonverticallyfromtop to bottom.
2. Removeall looseparts.
3. Removeloosepackingmaterial.
REMOVING UNIT FROM CARTON
1. Usethe handlebarto liftand pullthe tiller backwardsto a flat
area.Checkthecartonthoroughlyfor looseparts.
2. Besure notto kinkthe forwardclutchcable.
LOOSE PARTS IN CARTON
• HandlebarAssembly
• Tiller
• EngineOil
• Operator'sManual
• DepthGageAssembly
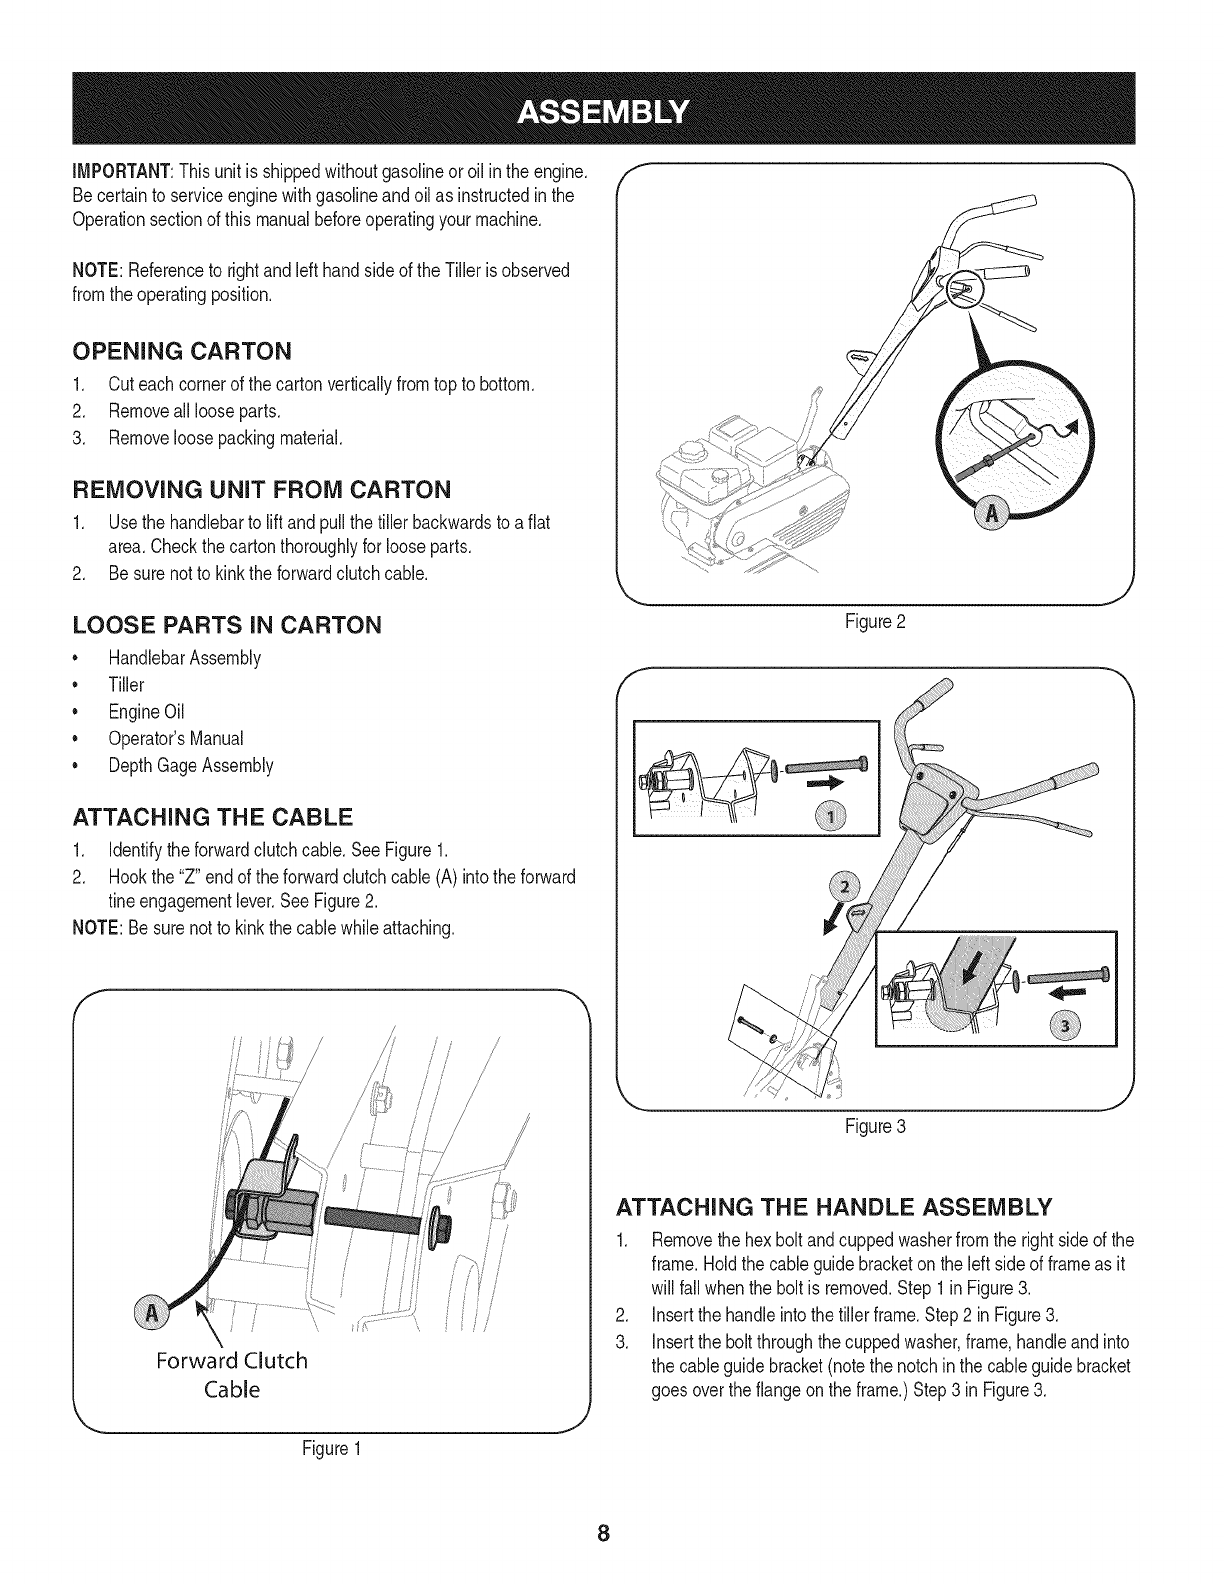
ATTACHING THE CABLE
1. Identifythe forwardclutchcable.SeeFigure1.
2. Hookthe "Z" endof the forwardclutchcable(A) intothe forward
fineengagementlever.SeeFigure2.
NOTE:Besure notto kinkthe cablewhileattaching.
/
/
/
Forward Clutch
Cable
f
Figure2
J
f
Figure3
ATTACHING THE HANDLE ASSEMBLY
1. Removethe hexbolt andcuppedwasherfromthe rightside of the
frame.Holdthe cableguidebracketonthe left sideof frameas it
will fall whenthe boltis removed.Step 1in Figure3.
2. Insertthe handleintothe tillerframe.Step2 in Figure3.
3. Insertthe bolt throughthe cuppedwasher,frame,handleandinto
the cableguidebracket(notethe notchinthe cableguidebracket
goes overtheflangeon theframe.)Step3 in Figure3.
J
Figure1
8
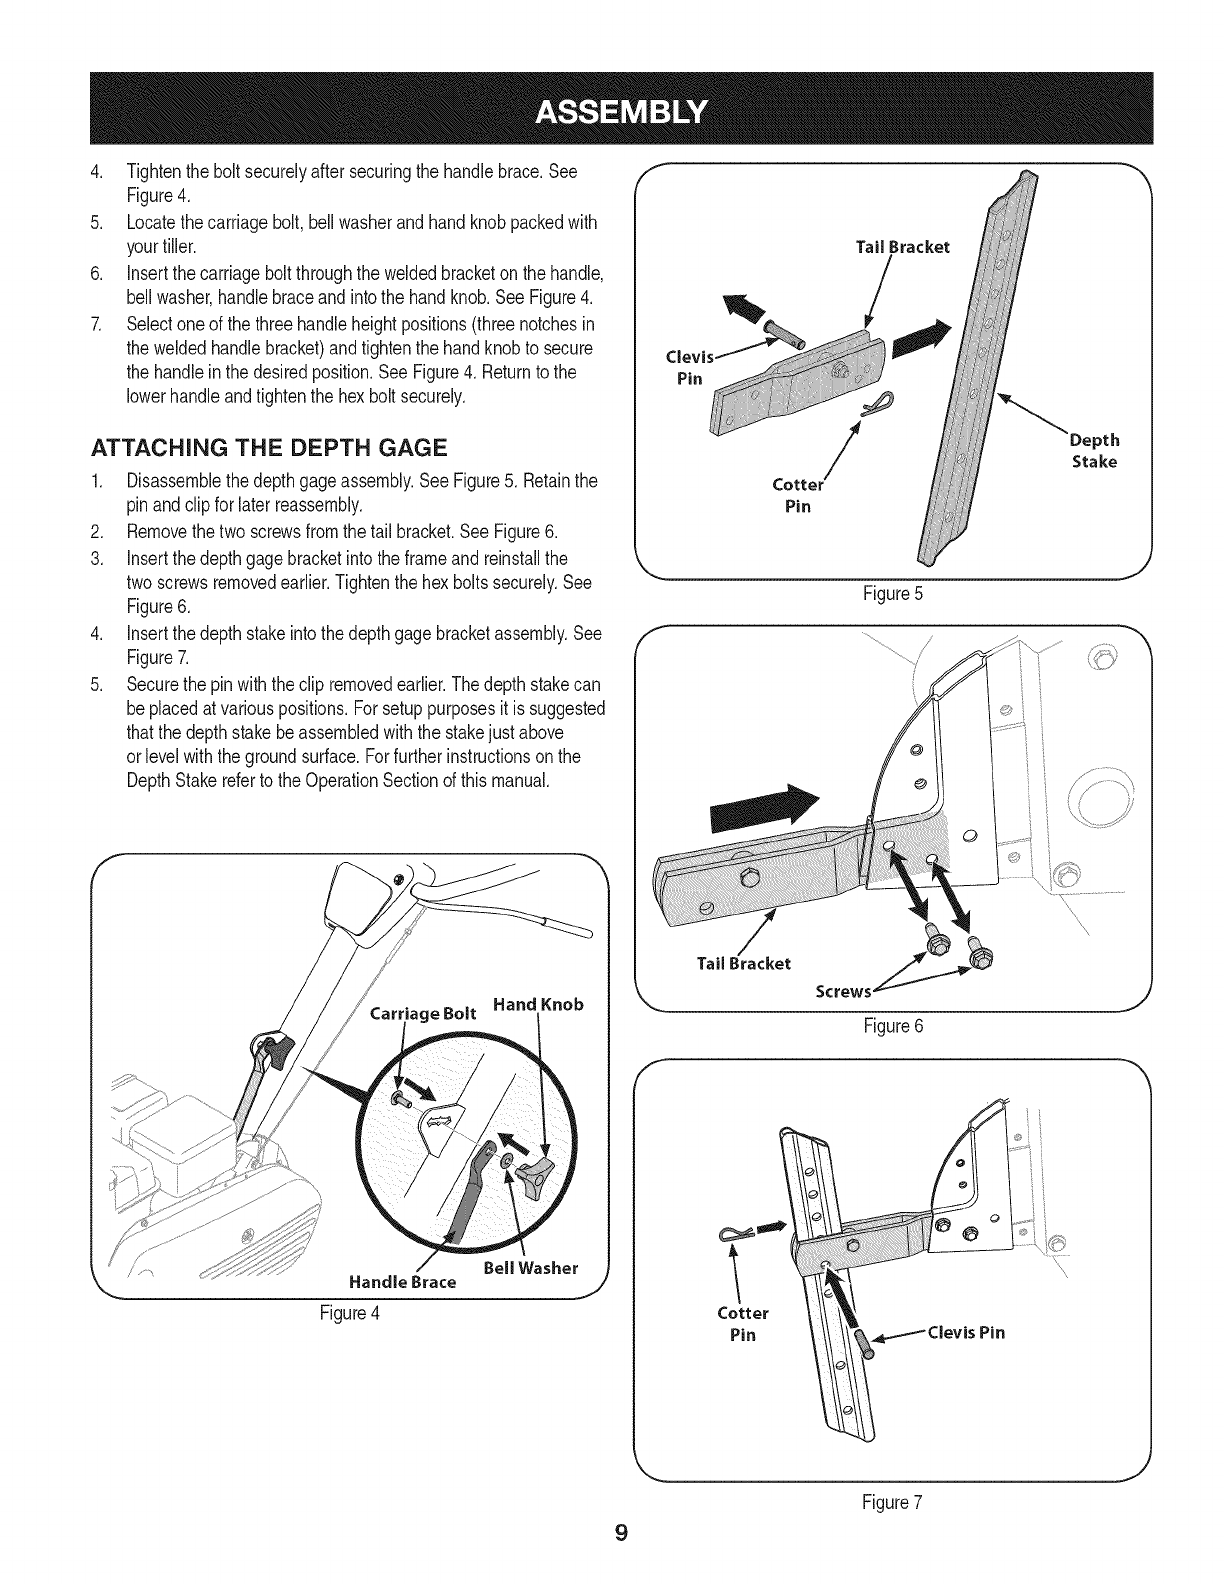
4. Tightenthe boltsecurelyaftersecuringthe handlebrace.See
Figure4.
5. Locatethecarriagebolt,bellwasherandhandknobpackedwith
yourtiller.
6. Insertthe carriagebolt throughthe weldedbracketon the handle,
bellwasher,handlebraceandintothe handknob.SeeFigure4.
7. Selectoneof the threehandleheightpositions(threenotchesin
the weldedhandlebracket)andtightenthe handknobto secure
the handleinthe desiredposition.SeeFigure4. Returnto the
lowerhandleandtightenthe hexbolt securely.
ATTACHING THE DEPTH GAGE
1. Disassemblethedepthgageassembly.See Figure5. Retainthe
pinandclip for laterreassembly.
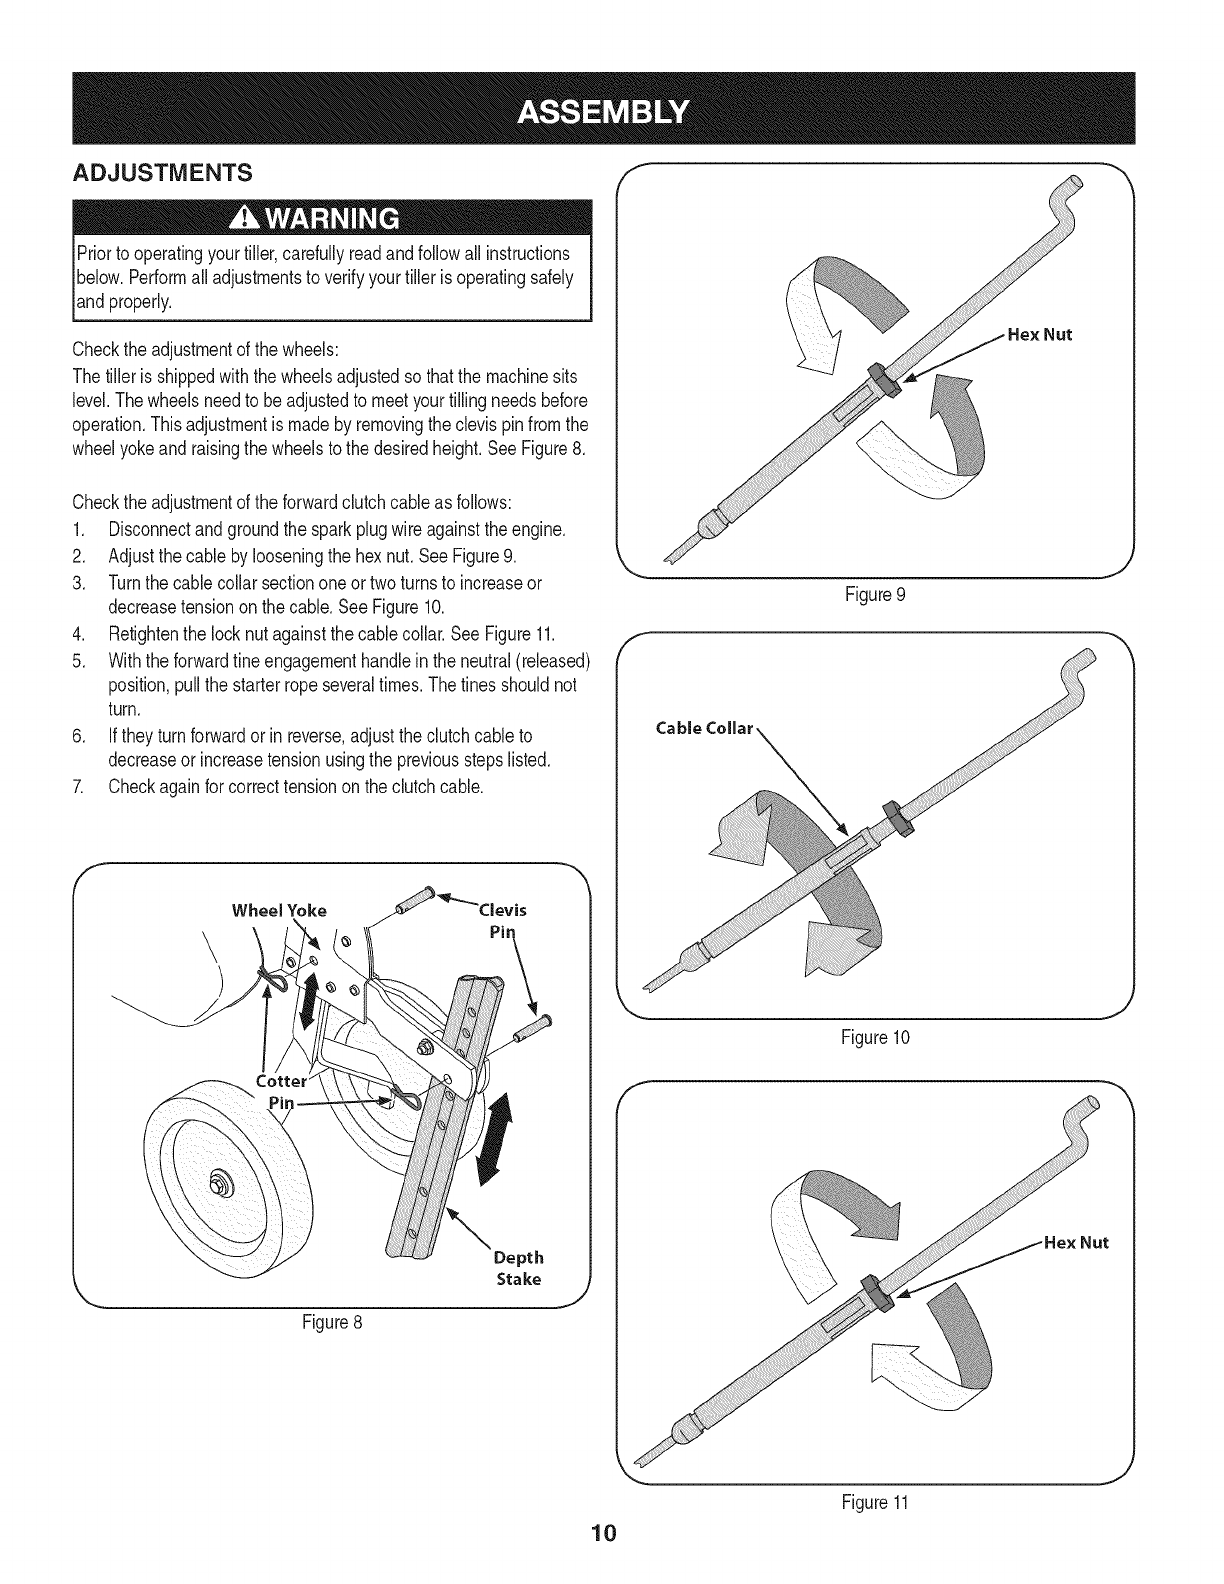
2. Removethetwo screwsfromthe tail bracket.See Figure6.
3. Insertthe depthgagebracketintothe frameand reinstallthe
twoscrewsremovedearlier.Tightenthe hexboltssecurely.See
Figure6.
4. Insertthe depthstakeintothe depthgagebracketassembly.See
Figure7.
5. Securethe pinwiththe clip removedearlier.Thedepth stakecan
beplacedat variouspositions.Forsetuppurposesit is suggested
thatthe depthstakebeassembledwiththe stakejust above
orlevelwiththe groundsurface.Forfurtherinstructionsonthe
DepthStakereferto the OperationSectionof this manual.
Hand Knob
f
Tail Bracket
Pin
Depth
Stake
Figure5
.................. /,
Tail Bracket
.....................
Figure6
(:otter
Pin _Clevis Pin
9
Figure7
J
ADJUSTMENTS
Priorto operatingyour tiller,carefullyreadand followall instructions
below.Performall adjustmentsto verifyyourtiller isoperatingsafely
_andpropery.
Checkthe adjustmentof the wheels:
Thetiller isshippedwiththe wheelsadjustedso thatthe machinesits
level.Thewheelsneedto beadjustedto meetyourtillingneedsbefore
operation.Thisadjustmentismadeby removingtheclevis pinfromthe
wheelyokeand raisingthe wheelsto thedesiredheight.SeeFigure8.
Checkthe adjustmentof the forwardclutchcableas follows:
1. Disconnectandgroundthe sparkplugwire againsttheengine.
2. Adjustthe cableby looseningthe hexnut.SeeFigure9.
3. Turnthe cablecollar sectiononeor twoturnsto increaseor
decreasetensionon thecable.SeeFigure10.
4. Retightenthe locknut againstthe cablecollar.SeeFigure11.
5. Withthe forwardfine engagementhandlein the neutral(released)
position,pullthe starterropeseveraltimes.Thetinesshouldnot
turn.
6. Iftheyturn forwardor in reverse,adjustthe clutchcableto
decreaseor increasetensionusingthe previousstepslisted.
7. Checkagainfor correcttensionon the clutchcable.
f
Wheel Yoke
\Pin
Figure8
Depth
Stake J
f
Figure9
J
f
Figure10
Nut
10
Figure11
J
f
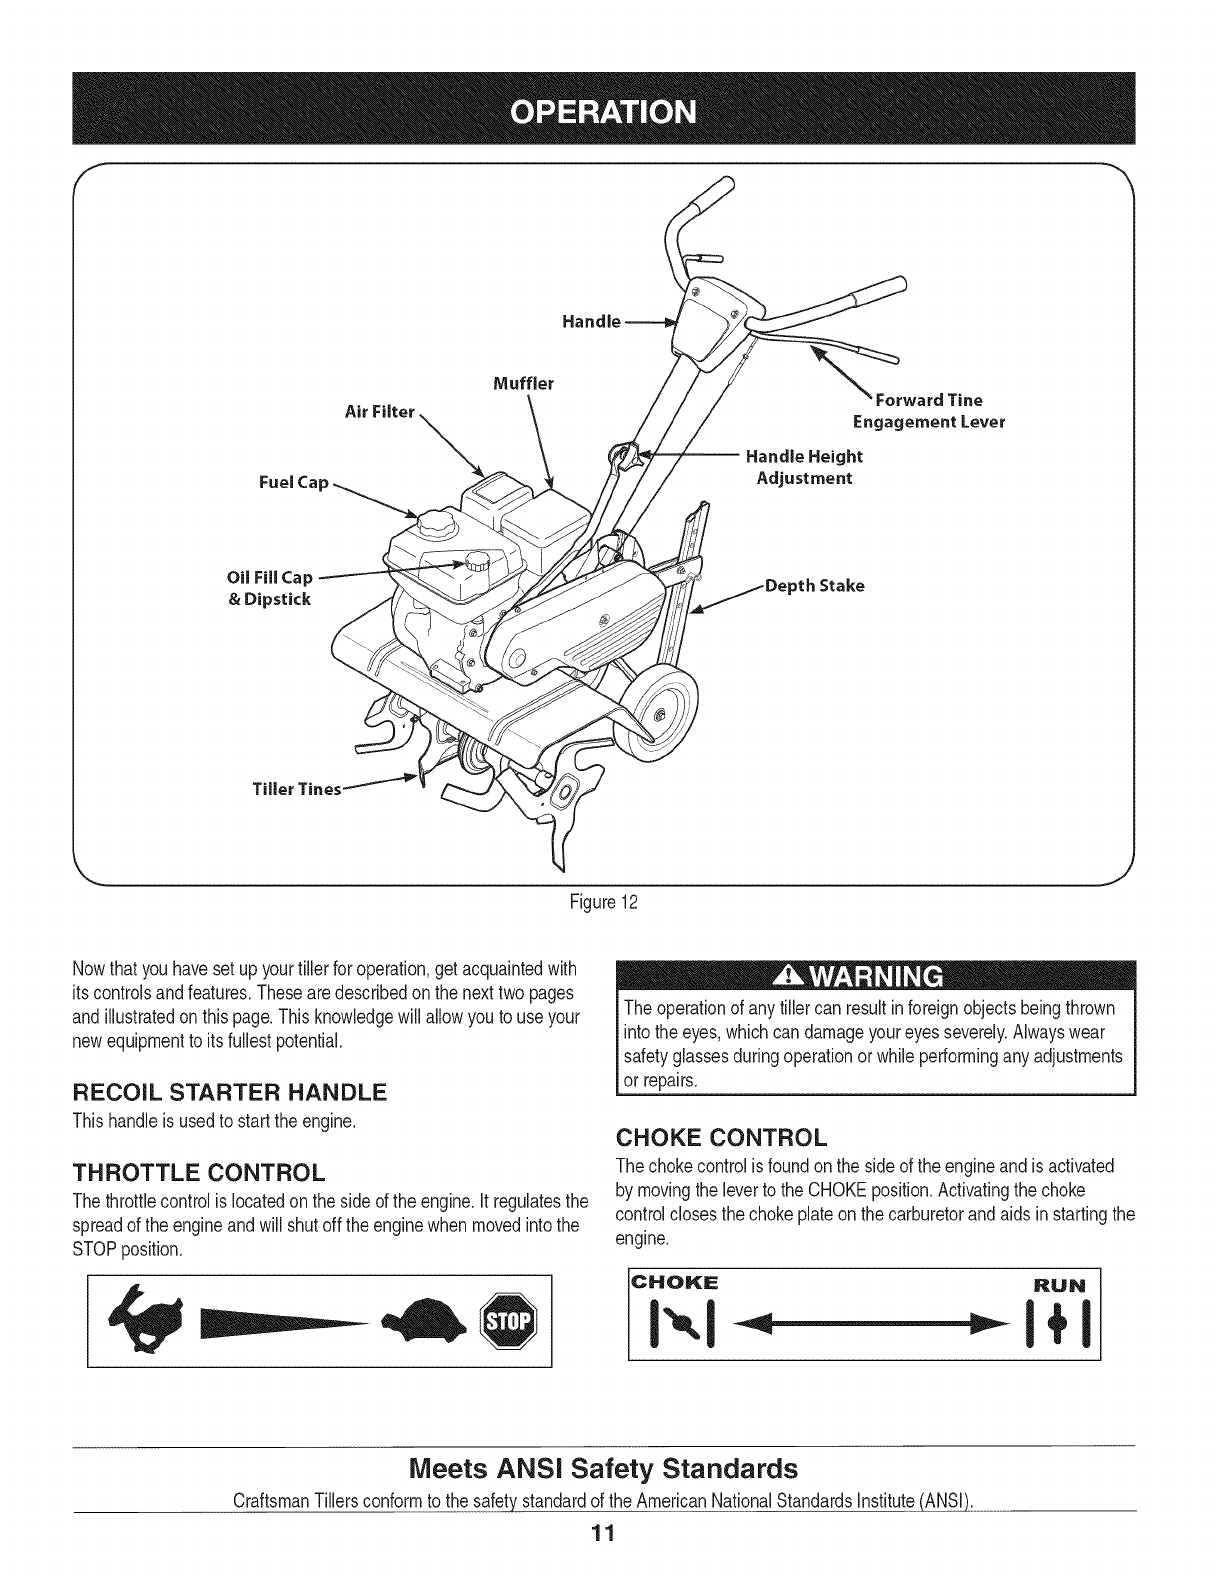
Fuel Ca
Muffler Forward Tine
Engagement Lever
-- Handle Height
Adjustment
Oil Fill Cap
& Dipstick _th Stake
Tiller Tines
Figure12
.J
Nowthat youhavesetup yourtillerfor operation,get acquaintedwith
itscontrolsandfeatures.Thesearedescribedon the nexttwopages
andillustratedon thispage.Thisknowledgewill allowyou to useyour
newequipmentto its fullestpotential.
RECOIL STARTER HANDLE
Thishandleis usedto startthe engine.
THROTTLE CONTROL
Thethrottlecontrolis locatedon the sideof the engine.Itregulatesthe
spreadof the engineandwill shutoff theenginewhen movedintothe
STOPposition.
The operationof anytiller can resultinforeignobjectsbeingthrown
intothe eyes,whichcan damageyoureyesseverely.Alwayswear
safetyglassesduringoperationor whileperforminganyadjustments
or repairs.
CHOKE CONTROL
The chokecontrolis foundon the sideof the engineandis activated
by movingthe leverto the CHOKEposition.Activatingthe choke
controlclosesthe chokeplateon the carburetorandaids in startingthe
engine.
CHOKE RUN
Meets ANSi Safety Standards
CraftsmanTillersconformto the safetystandardof the AmericanNationalStandardsInstitute(ANSI).
11
AiR FILTER
Theair filteris a deviceonthe engineair intakethatpreventsdustand
dirt enteringthe engine.SeeFigure12.
MUFFLER
Engineexhaustexitsthe enginevia the muffler.SeeFigure12.
DEPTH STAKE
The depthstakecontrolsthe tillingdepth.SeeFigure12.
HANDLEBAR HEIGHT ADJUSTMENT
The handleheightmaybeadjusted.Loosenthe knobto changethe
position.Tightenhardwarewhencomplete.SeeFigure12.
OIL FILL CAP & DIPSTICK
Engineoil levelcan becheckedand oiladdedthroughtheoil fill. See
Figure12.
NOTE:ThisunitwasshippedWITHOUToil inthe engine.Oilis
includedinthe plasticbag packedwiththe manualinwiththe unit.
Addtheoil as directedin theGas & OilFill Up section.Checkthe oil
levelbeforeeachoperationto ensureadequateoil is inthe engine.
Forfurtherinstructions,referto the stepsinthe EngineMaintenance
sectionof thismanual.
TINES
Tillingtinesareusedto cultivate,furrowandprepareyourgardenfor
seeding.SeeFigure12.
FORWARD TINE ENGAGEMENT LEVER
Theforwardtine engagementlevercontrolsthe engagementof the
tines.Releasethe leverto stopthe tines.SeeFigure12.
12
GAS AND OIL FILL-UP
Oil (one bottle shipped with unit)
FirstTimeUse
1. Removeoilfill dipstick.
2. Withthe tilleron levelground,usea funnelto emptyentire
contentsofoil bottleprovidedintothe engine.
3. Replaceoilfill dipstickandtighten.
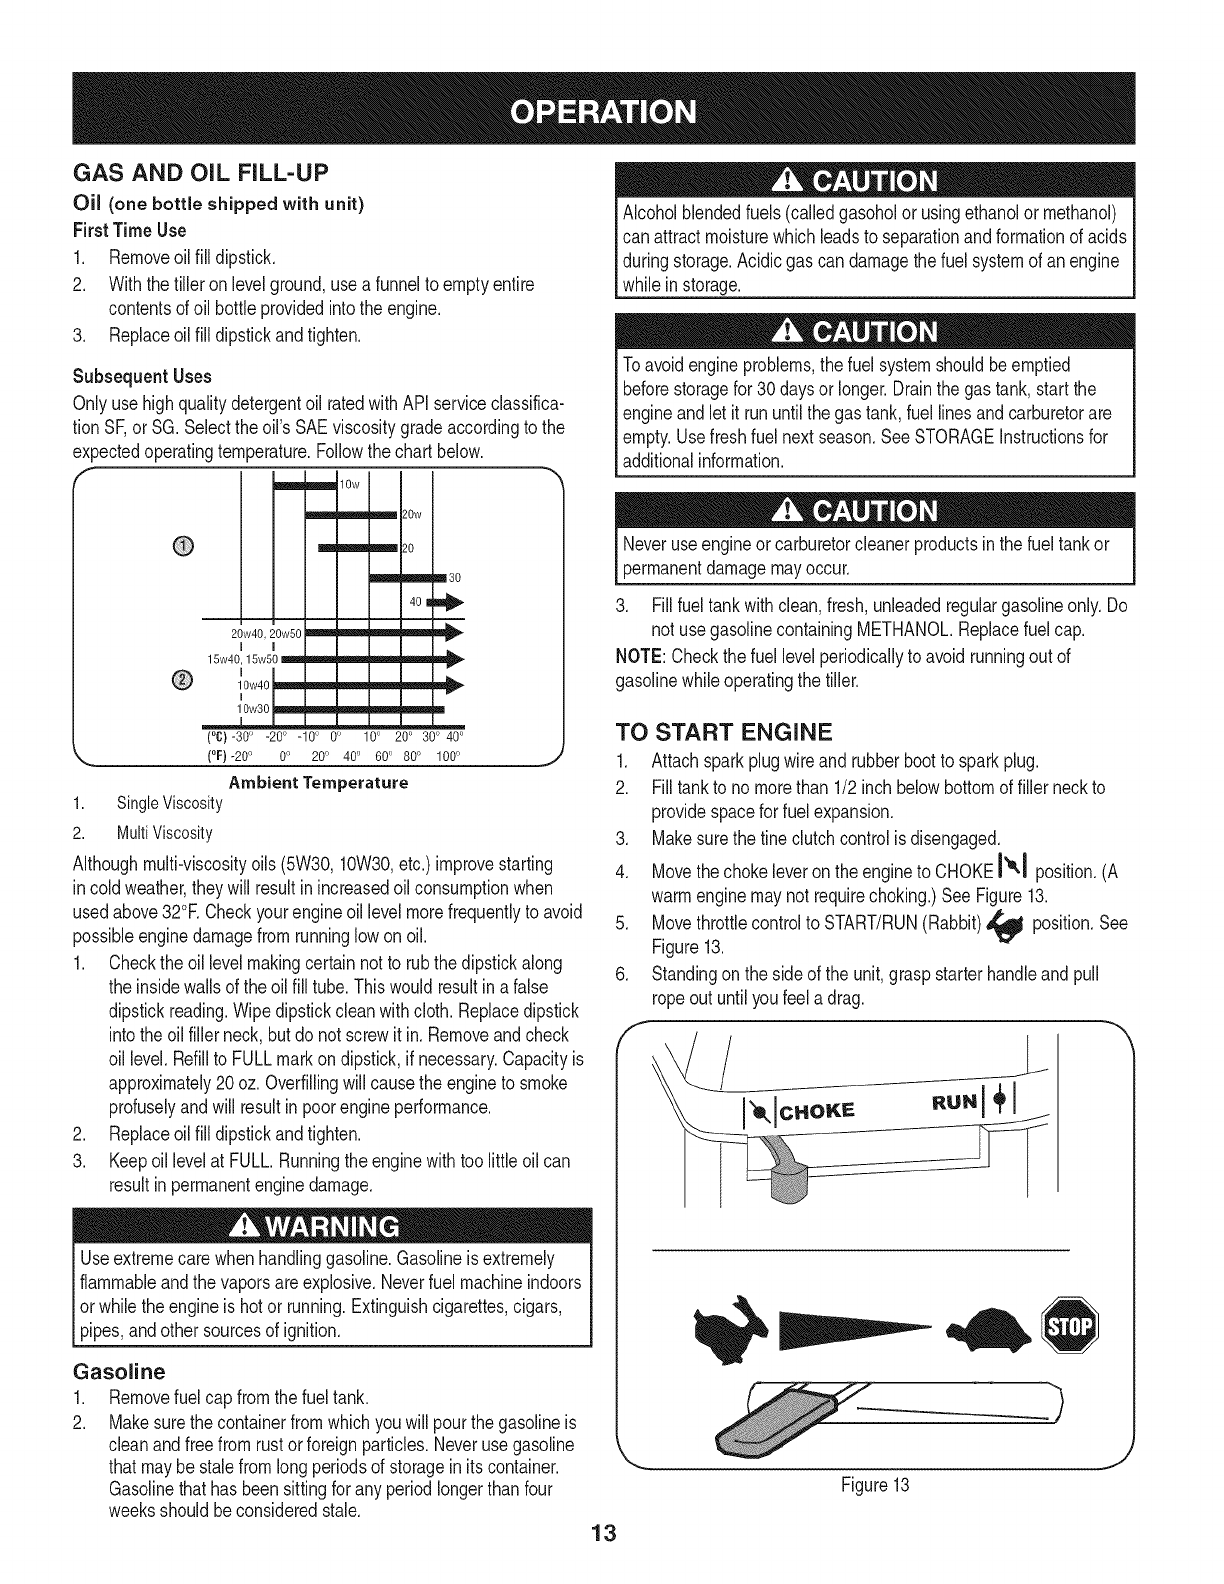
Subsequent Uses
Only usehighqualitydetergentoil ratedwithAPIserviceclassifica-
tion SF,or SG.Selectthe oil'sSAEviscositygradeaccordingto the
expectedoperatingtemperature.Followthe chartbelow.
Imml mira 10w
_ _ )0W
mm m?0
mmm mmm B30
40 I_
20w40.20w50 _ _ _ _ v
I I
15w40, 15w50 ml .,i,_ m_,R, ram= .,,,,=._ ,,,,,,,,,l_
m..-
®10w40
[ P"
10w30 iw,_mm_ _m
(°C)-300 -200 -100 0'_ 100 200 300 400
(°F)-20 o 0o 200 400 60o 800 1000
Ambient Temperature
1. SingleViscosity
2. MultiViscosity
Althoughmulti-viscosityoils (5W30,10W30,etc.)improvestarting
in coldweather,theywill resultinincreasedoil consumptionwhen
usedabove32°F.Checkyourengineoil levelmorefrequentlyto avoid
possibleenginedamagefromrunninglowon oil.
1. Checkthe oillevelmakingcertainnotto rubthe dipstickalong
the insidewallsof the oil fill tube.Thiswould resultina false
dipstickreading.Wipedipstickcleanwithcloth. Replacedipstick
into theoil fillerneck, butdo not screwit in. Removeandcheck
oil level.Refillto FULLmarkon dipstick,if necessary.Capacityis
approximately20oz.Overfillingwill causethe engineto smoke
profuselyandwill resultin poorengineperformance.
2. Replaceoilfill dipstickandtighten.
3. Keepoil levelat FULL.Runningthe enginewithtoo littleoilcan
resultinpermanentenginedamage.
Useextremecarewhenhandlinggasoline.Gasolineis extremely
flammableandthe vaporsareexplosive.Neverfuel machineindoors
orwhilethe engineis hotor running.Extinguishcigarettes,cigars,
pipes,andothersourcesof ignition.
Gasoline
1. Removefuelcap fromthefuel tank.
2. Makesurethecontainerfromwhichyouwill pourthe gasolineis
cleanandfreefrom rustorforeignparticles.Neveruse gasoline
thatmaybestalefromlongperiodsof storageinitscontainer.
Gasolinethathas beensittingfor any periodlongerthan four
weeksshouldbeconsideredstale.
Alcoholblendedfuels(calledgasoholor usingethanolor methanol)
canattractmoisturewhichleadsto separationandformationof acids
duringstorage.Acidicgas can damagethe fuel systemof anengine
whileinstorage.
Toavoidengineproblems,the fuel systemshouldbeemptied
beforestoragefor 30daysor longer.Drainthegas tank,start the
engineandlet it rununtilthe gastank, fuellinesand carburetorare
empty.Usefreshfuel nextseason.SeeSTORAGEInstructionsfor
additionalinformation.
Neveruseengineor carburetorcleanerproductsinthe fueltankor
permanentdamagemayoccur.
3. Fillfuel tankwithclean,fresh,unleadedregulargasolineonly.Do
not usegasolinecontainingMETHANOL.Replacefuel cap.
NOTE:Checkthe fuellevelperiodicallyto avoid runningout of
gasolinewhileoperatingthe tiller.
TO START ENGINE
1. Attachsparkplugwire andrubberbootto sparkplug.
2. Filltankto no morethan 1/2inch belowbottomof filler neckto
providespacefor fuelexpansion.
3. Makesurethe tineclutchcontrolisdisengaged.
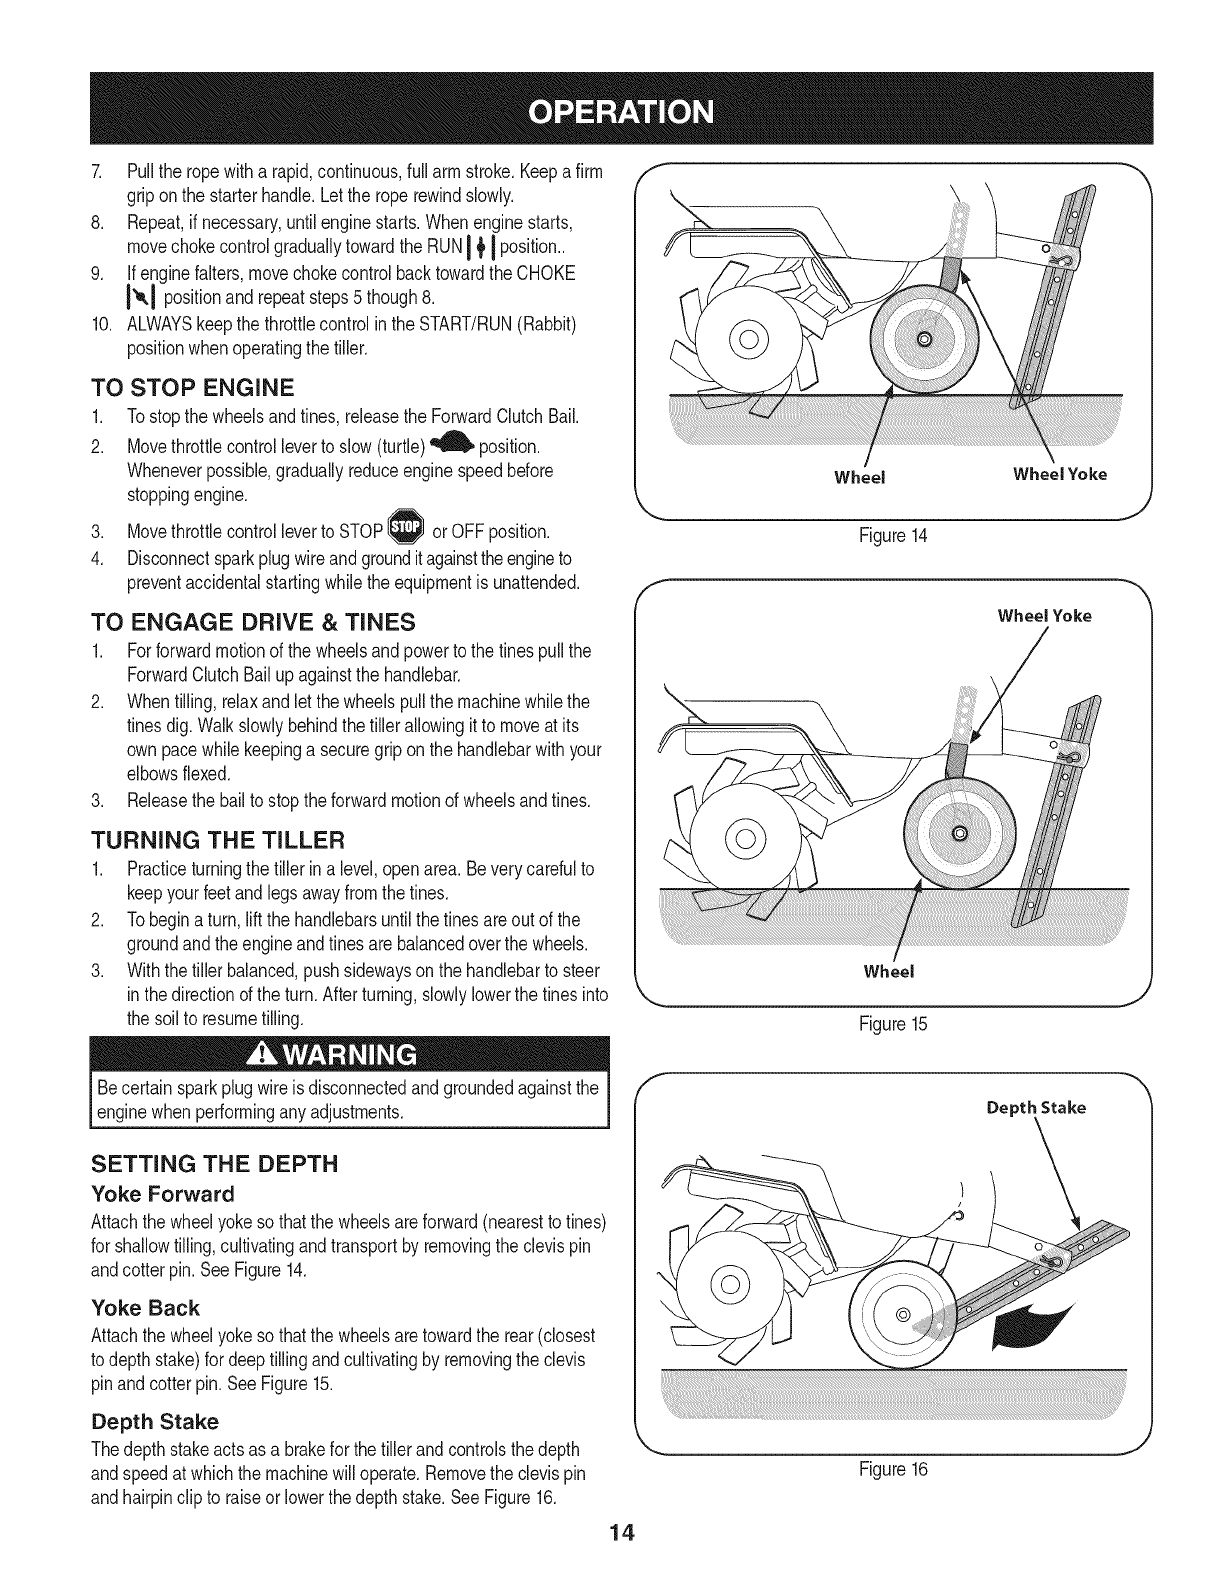
4. Movethechokeleveron the engineto CHOKEI'_1 position.(A
warmenginemaynot requirechoking.)SeeFigure13.
5. Movethrottlecontrolto START/RUN(Rabbit)_1_ position.See
Figure13.
6. Standingon the sideof the unit,graspstarterhandleandpull
ropeout untilyou feela drag.
f
\
Figure13
13
7. Pullthe ropewitha rapid,continuous,full arm stroke.Keepafirm
griponthe starterhandle.Letthe roperewindslowly.
8. Repeat,if necessary,untilenginestarts.Whenenginestarts,
movechokecontrolgraduallytowardthe RUNI _' I position..
9. Ifenginefalters,movechokecontrolbacktowardthe CHOKE
I'_1 positionand repeatsteps5 though8.
10. ALWAYSkeepthe throttlecontrolinthe START/RUN(Rabbit)
positionwhenoperatingthe tiller.
TO STOP ENGINE
1. Tostopthe wheelsandtines,releasethe ForwardClutchBail.
2. Movethrottlecontrolleverto slow(turtle)_ position.
Wheneverpossible,graduallyreduceenginespeedbefore
stoppingengine.
3. Movethrottlecontrolleverto STOP_ orOFFposition.
4. Disconnectsparkplugwireandgroundit againsttheengineto
preventaccidentalstartingwhilethe equipmentis unattended.
TO ENGAGE DRIVE &TINES
1. Forforwardmotionof thewheelsand powerto the tinespullthe
ForwardClutchBailupagainstthe handlebar.
2. Whentilling,relaxandlet thewheelspullthemachinewhilethe
tinesdig.Walkslowlybehindthetiller allowingit to moveat its
own pacewhilekeepinga securegriponthe handlebarwithyour
elbowsflexed.
3. Releasethe bailto stopthe forwardmotionof wheelsandtines.
TURNING THE TILLER
1. Practiceturningthe tillerinalevel,openarea. Beverycarefulto
keepyourfeetandlegs awayfromthetines.
2. Tobeginaturn, liftthe handlebarsuntil thetinesareout of the
groundandthe engineandtinesarebalancedoverthe wheels.
3. Withthe tillerbalanced,push sidewayson the handlebarto steer
in thedirectionof the turn.Afterturning,slowlylowerthe tinesinto
the soilto resumetilling.
Wheel Wheel Yoke
Figure14
Wheel Yoke
Wheel
Figure15
J
.J
Becertainsparkplugwire isdisconnectedandgroundedagainstthe
enginewhen performingany adjustments.
SETTING THE DEPTH
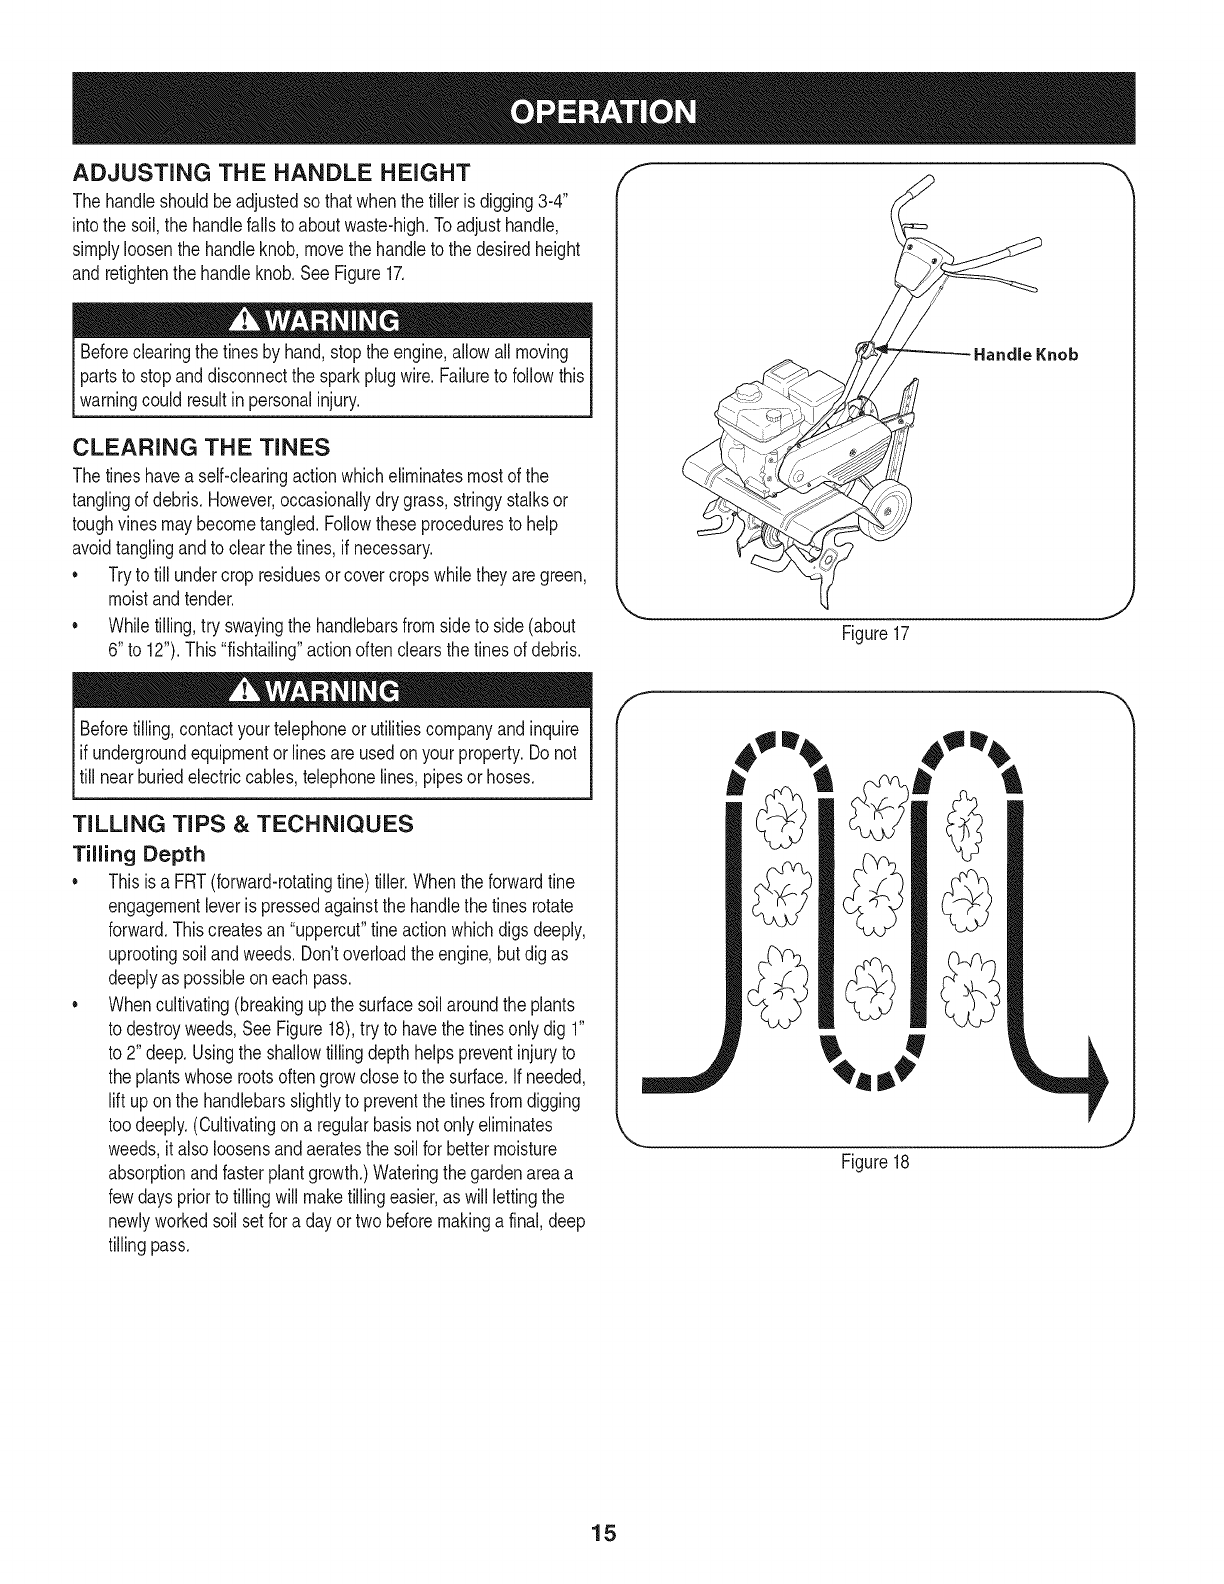
Yoke Forward
Attachthe wheelyokeso thatthe wheelsareforward(nearestto tines)
for shallowtilling,cultivatingandtransportby removingthe clevispin
andcotterpin. SeeFigure14.
Yoke Back
Attachthe wheelyokeso thatthe wheelsaretowardthe rear(closest
to depthstake)for deeptilling andcultivatingby removingtheclevis
pinandcotter pin.SeeFigure15.
Depth Stake
Thedepth stakeacts as a brakefor the tiller andcontrolsthe depth
andspeedat whichthemachinewill operate.Removetheclevis pin
andhairpinclip to raiseor lowerthedepth stake.SeeFigure16.
f
14
Depth Stake
Figure16
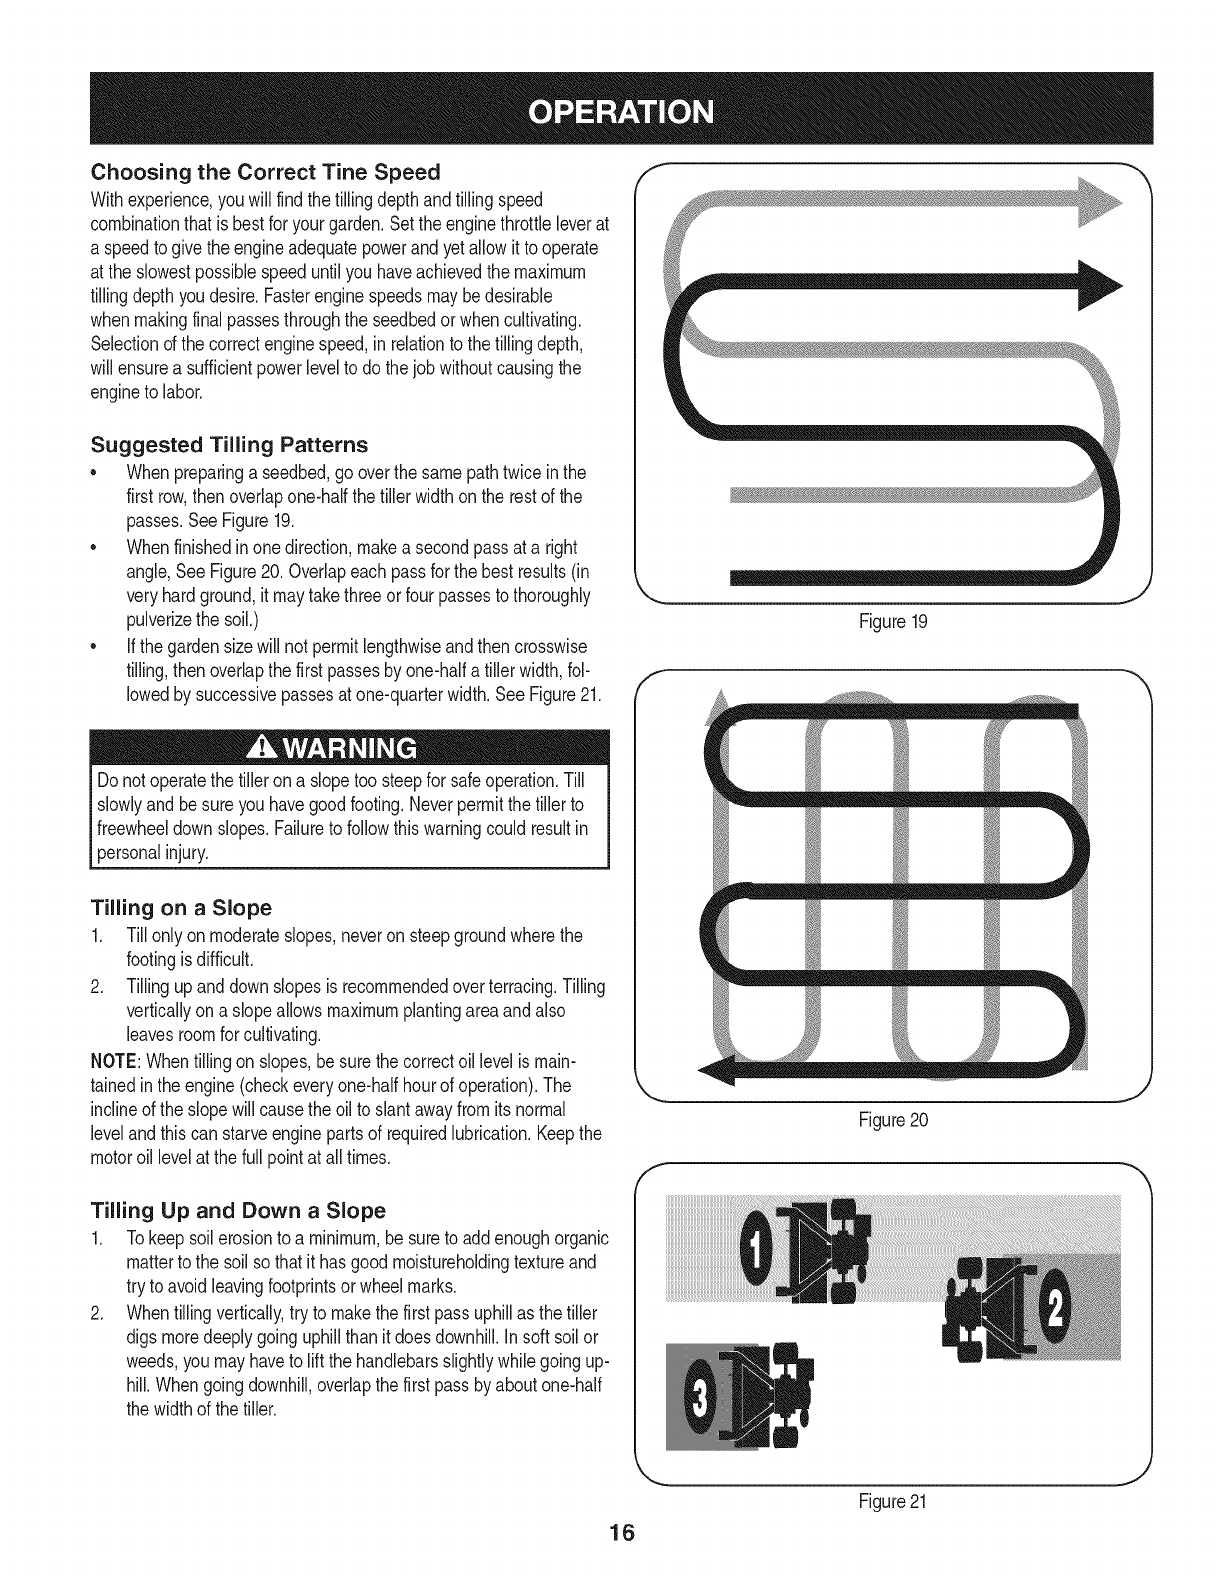
ADJUSTING THE HANDLE HEIGHT
The handleshouldbe adjustedso thatwhenthe tilleris digging3-4"
intothe soil,the handlefallsto aboutwaste-high.To adjusthandle,
simplyloosenthe handleknob,movethe handleto the desiredheight
andretightenthe handleknob.SeeFigure17.
Beforeclearingthe tinesby hand,stoptheengine,allowall moving
partsto stopanddisconnectthe sparkplugwire.Failureto followthis
warningcouldresultin personalinjury.
CLEARING THE TINES
Thetineshavea self-clearingactionwhicheliminatesmostof the
tanglingof debris.However,occasionallydry grass,stringystalksor
toughvinesmaybecometangled.Followtheseproceduresto help
avoidtanglingandto clearthe tines,if necessary.
•Tryto till undercrop residuesor covercropswhile theyare green,
moistandtender.
•Whiletilling,try swayingthe handlebarsfromsideto side (about
6" to 12").This"fishtailing"actionoftenclearsthetinesof debris.
Beforetilling,contactyour telephoneor utilitiescompanyandinquire
l if undergroundequipmentor linesareusedonyour property.Do not
|till nearburiedelectriccables,telephonelines,pipesor hoses.
[
TILLING TIPS & TECHNIQUES
Tilling Depth
•Thisisa FRT(forward-rotatingfine) tiller.Whenthe forwardtine
engagementleveris pressedagainstthe handlethe tinesrotate
forward.Thiscreatesan"uppercut"tine actionwhichdigsdeeply,
uprootingsoilandweeds.Don'toverloadthe engine,but digas
deeplyas possibleon eachpass.
•Whencultivating(breakingupthe surfacesoilaroundthe plants
to destroyweeds,SeeFigure18),tryto havethe tinesonlydig 1"
to 2" deep.Usingthe shallowtilling depthhelpspreventinjuryto
the plantswhoserootsoftengrow closeto the surface.If needed,
lift uponthe handlebarsslightlyto preventthetinesfromdigging
toodeeply.(Cultivatingona regularbasisnotonly eliminates
weeds,it alsoloosensandaeratesthe soilfor bettermoisture
absorptionandfasterplantgrowth.)Wateringthe gardenareaa
fewdayspriorto tillingwill maketillingeasier,as will lettingthe
newlyworkedsoil setfora day ortwo beforemakinga final,deep
tillingpass.
Figure17
f
J
Figure18
15
Choosing the Correct Tine Speed
Withexperience,you will findthe tillingdepthandtilling speed
combinationthatisbestfor yourgarden.Set theenginethrottleleverat
a speedtogive the engineadequatepowerandyetallowit tooperate
at the slowestpossiblespeeduntilyou haveachievedthe maximum
tillingdepthyoudesire.Fasterenginespeedsmaybedesirable
whenmakingfinalpassesthroughthe seedbedorwhen cultivating.
Selectionof the correctenginespeed,inrelationto the tillingdepth,
will ensurea sufficientpowerlevelto dothejob withoutcausingthe
engineto labor.
Suggested Tilling Patterns
• Whenpreparinga seedbed,go overthesamepathtwice inthe
first row,thenoverlapone-halfthe tillerwidthonthe restof the
passes.SeeFigure19.
• Whenfinishedinonedirection,makea secondpassat a right
angle,SeeFigure20. Overlapeachpassfor thebest results(in
veryhardground,itmaytakethreeorfour passesto thoroughly
pulverizethe soil.)
• If thegardensizewill not permitlengthwiseandthen crosswise
tilling,then overlapthe firstpassesby one-halfa tillerwidth,fol-
lowedby successivepassesat one-quarterwidth.SeeFigure21.
Donot operatethe tilleron a slopetoo steepfor safeoperation.Till
slowlyandbe sureyouhavegoodfooting.Neverpermitthe tiller to
freewheeldownslopes.Failureto followthiswarningcouldresultin
personalinjury.
Tilling on a Slope
1. Till onlyon moderateslopes,neveronsteepgroundwherethe
footingisdifficult.
2. Tillingupanddownslopesisrecommendedoverterracing.Tilling
verticallyon a slopeallowsmaximumplantingareaandalso
leavesroomforcultivating.
NOTE:Whentilling onslopes,besurethe correctoil levelismain-
tainedinthe engine(checkeveryone-halfhourof operation).The
inclineof the slopewillcausethe oilto slantawayfromitsnormal
levelandthiscan starveenginepartsof requiredlubrication.Keepthe
motoroil levelat thefull pointat all times.
Figure19
[m_m_
t j
Figure20
Tilling Up and Down a Slope
1. Tokeepsoil erosionto a minimum,be sureto addenoughorganic
matterto the soilso thatit hasgoodmoistureholdingtextureand
tryto avoidleavingfootprintsor wheelmarks.
2. Whentillingvertically,try to makethe first passuphillas the tiller
digs moredeeplygoinguphillthan it doesdownhill.In soft soilor
weeds,you mayhaveto lift the handlebarsslightlywhile goingup-
hill.Whengoingdownhill,overlapthe first passbyaboutone-half
the widthof the tiller.
16
Figure21
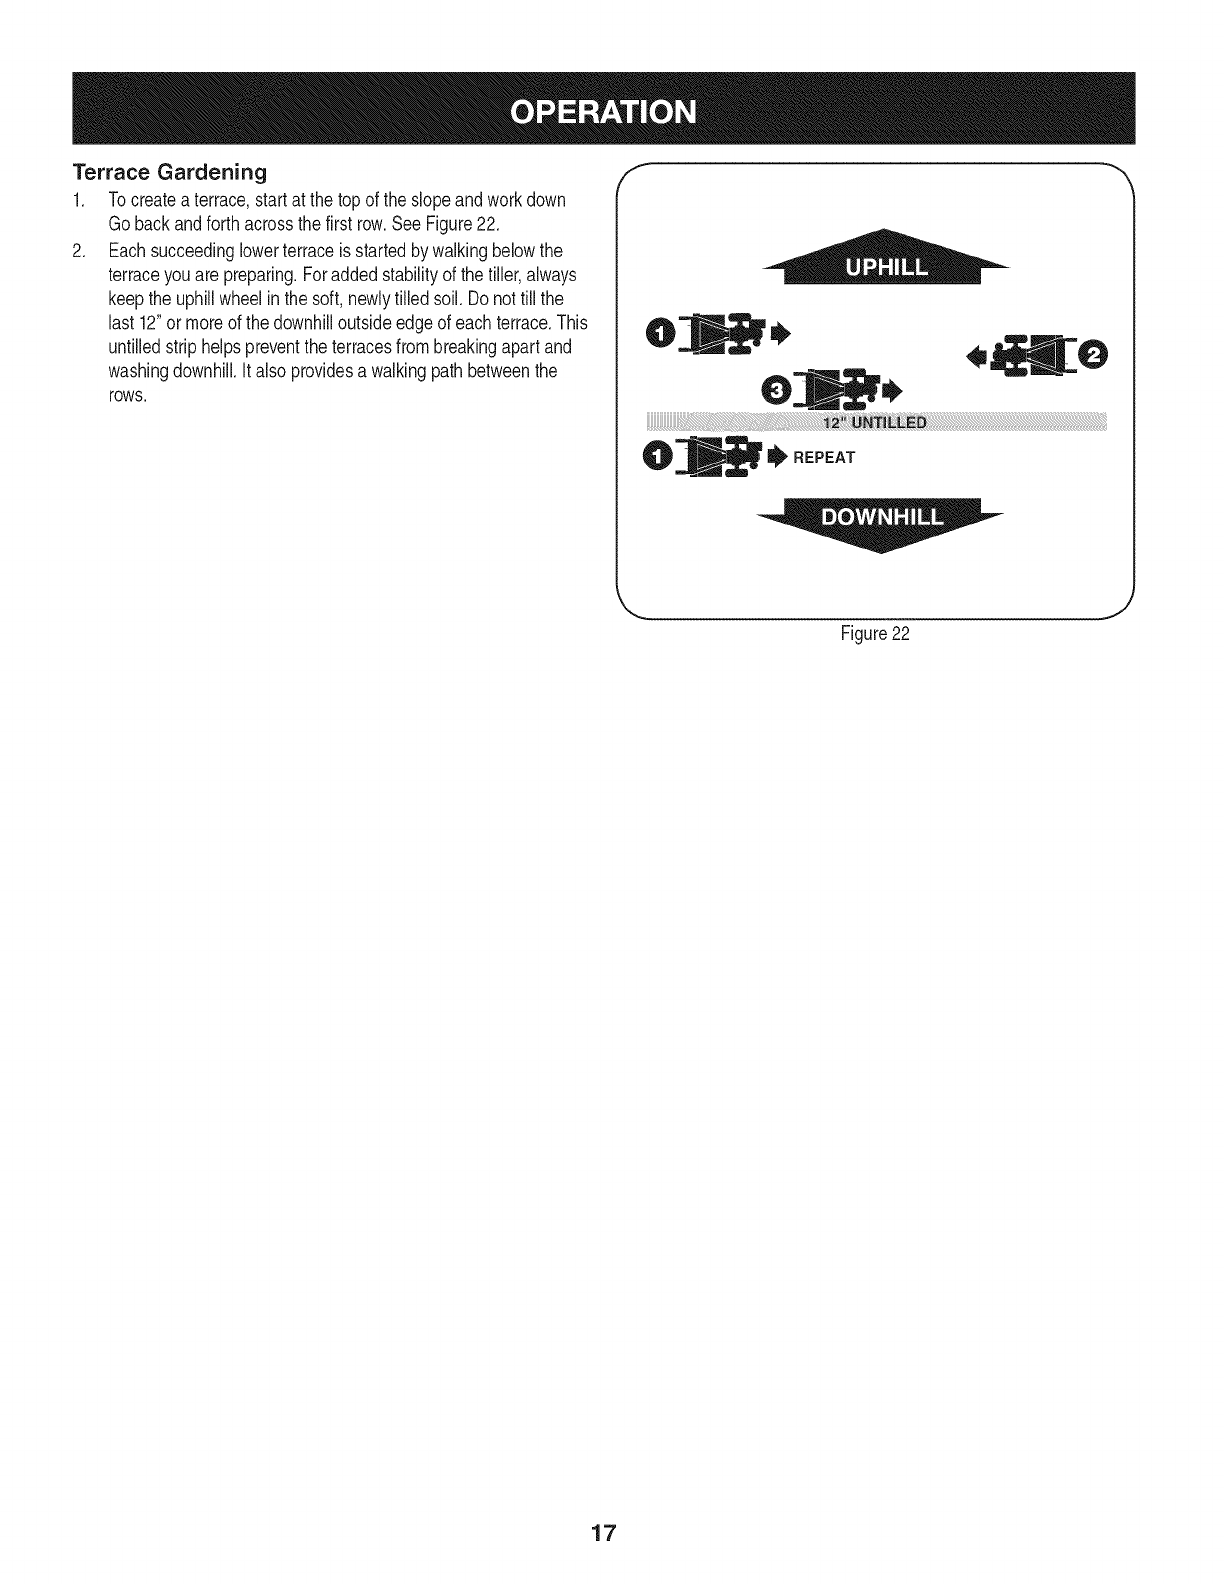
Terrace Gardening
1. Tocreatea terrace,startat thetop of the slopeandworkdown
Gobackandforthacrossthefirst row.SeeFigure22.
2. Eachsucceedinglowerterraceis startedby walkingbelowthe
terraceyouare preparing.Foraddedstabilityof the tiller,always
keepthe uphillwheelin the soft,newlytilledsoil. Donot till the
last 12"or moreof thedownhilloutsideedgeof each terrace.This
untilledstriphelpspreventthe terracesfrombreakingapart and
washingdownhill.Italso providesa walkingpath betweenthe
rows,
f
,O
' REPEA'
Figure22
J
17
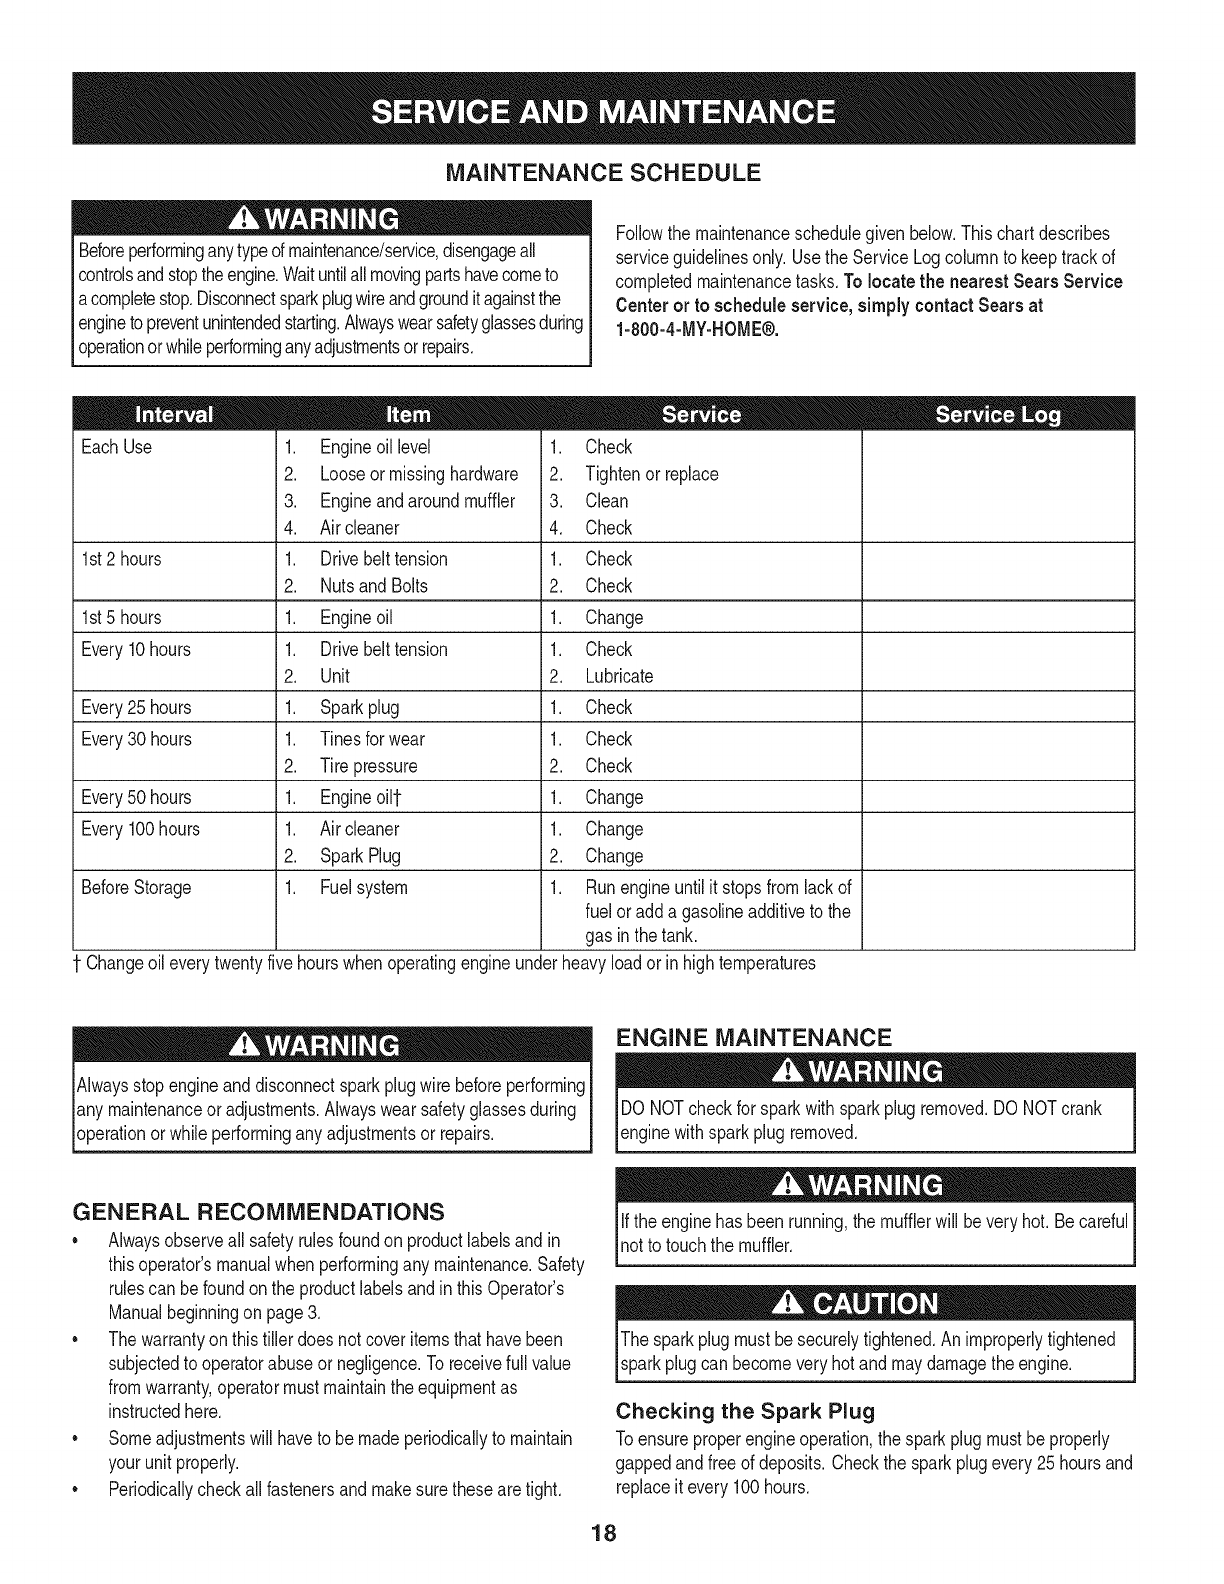
MAINTENANCE SCHEDULE
Beforeperforminganytypeof maintenance/service,disengageall
controlsandstoptheengine.Waituntilallmovingpartshavecometo
acompletestop.Disconnectsparkplugwireandgrounditagainstthe
enginetopreventunintendedstarting.Alwayswearsafetyglassesduring
operationor whileperforminganyadjustmentsor repairs.
Followthe maintenanceschedulegivenbelow.Thischartdescribes
serviceguidelinesonly.Usethe ServiceLogcolumnto keeptrackof
completedmaintenancetasks.To locate the nearest Sears Service
Centeror to scheduleservice,simplycontactSears at
1-800-4-MY-HOME®.
EachUse
1st2 hours
1st5 hours
Every10hours
Every25 hours
Every30 hours
Every50 hours
Every100hours
BeforeStorage
.
2.
3.
4.
1.
2.
1.
1.
2.
1.
1.
2.
1.
1.
2.
1.
Engineoillevel
Looseormissinghardware
Engineandaroundmuffler
Aircleaner
Drivebelt tension
Nutsand Bolts
Engineoil
Drivebelt tension
Unit
Sparkplug
Tinesfor wear
Tirepressure
Engineoill-
Aircleaner
SparkPlug
Fuelsystem
= =
1. Check
2. Tightenor_place
3. Clean
4. Check
1. Check
2. Check
1. Change
1. Check
2. Lubricate
1. Check
1. Check
2. Check
1. Change
1. Change
2. Change
1. Runengineuntilit stopsfromlackof
fuel oradda gasolineadditiveto the
gas in thetank.
Changeoileverytwentyfivehourswhenoperatingengineunderheavyloadorin hightemperatures
Alwaysstopengineanddisconnectsparkplugwirebeforeperforming
lany maintenanceor adjustments.Alwayswearsafetyglassesduring
[operationorwhile performingany adjustmentsor repairs.
ENGINE MAINTENANCE
DO NOTcheckfor sparkwithsparkplugremoved.DO NOTcrank
enginewithsparkplug removed.
GENERAL RECOMMENDATIONS
•Alwaysobserveallsafetyrulesfoundonproductlabelsandin
thisoperator'smanualwhenperformingany maintenance.Safety
rulescan befoundonthe productlabelsandin thisOperator's
Manualbeginningon page3.
• Thewarrantyon thistillerdoes notcoveritemsthathavebeen
subjectedto operatorabuseor negligence.Toreceivefull value
fromwarranty,operatormust maintainthe equipmentas
instructedhere.
• Someadjustmentswillhaveto be madeperiodicallyto maintain
yourunit properly.
• Periodicallycheckall fastenersand makesurethesearetight.
Ifthe enginehas beenrunning,the mufflerwill beveryhot. Becareful
notto touchthe muffler.
Thesparkplugmustbesecurelytightened.Animproperlytightened
sparkplugcan becomeveryhot andmaydamagethe engine.
Checking the Spark Plug
Toensureproperengineoperation,the sparkplugmustbeproperly
gappedandfree of deposits.Checkthe sparkplugevery25hoursand
replaceitevery100hours.
18
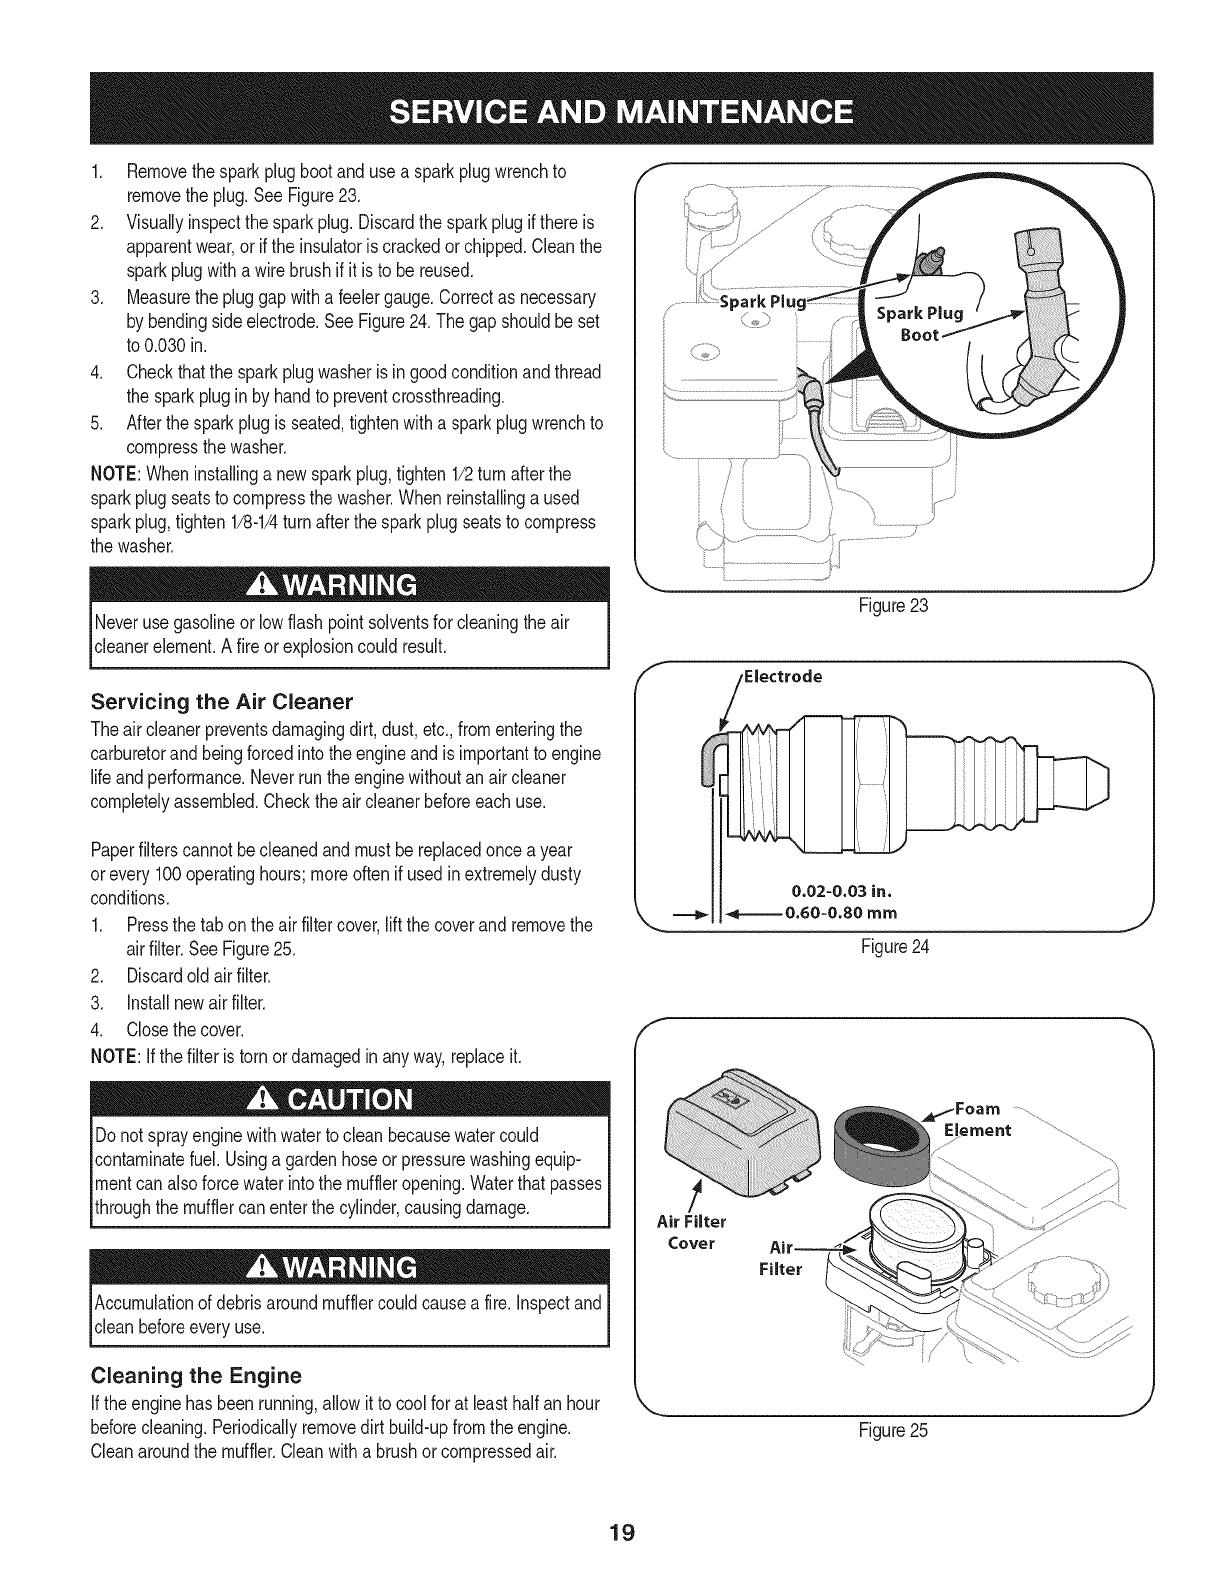
1. Removethesparkplugbootanduse a sparkplugwrenchto
removethe plug.See Figure23.
2. Visuallyinspectthe sparkplug.Discardthe sparkplugif thereis
apparentwear,orif the insulatoris crackedor chipped.Cleanthe
sparkplugwitha wirebrush if it is to be reused.
3. Measurethe pluggapwitha feelergauge.Correctas necessary
by bendingsideelectrode.SeeFigure24.The gapshouldbeset
to 0.030in.
4. Checkthatthe sparkplugwasheris ingoodconditionandthread
the sparkplugin by handto preventcrossthreading.
5. Afterthesparkplugis seated,tightenwitha sparkplugwrenchto
compressthe washer.
NOTE:Wheninstallinga newsparkplug,tighten1/2turn afterthe
sparkplugseatsto compressthe washer.Whenreinstallinga used
sparkplug,tighten1/8-1/4turnafterthe sparkplugseatsto compress
the washer.
Neverusegasolineorlow flashpointsolventsfor cleaningthe air
c eanereement. A f re orexpos oncou d resut.
Servicing the Air Cleaner
Theair cleanerpreventsdamagingdirt, dust,etc.,fromenteringthe
carburetorand beingforcedintothe engineandis importantto engine
life andperformance.Neverrunthe enginewithoutan aircleaner
completelyassembled.Checkthe aircleanerbeforeeach use.
Paperfilterscannotbecleanedandmustbe replacedonce a year
orevery 100operatinghours;moreoftenif usedin extremelydusty
conditions.
1. Pressthe tab onthe airfiltercover,lift the coverandremovethe
airfilter.SeeFigure25.
2. Discardold airfilter.
3. Installnewairfilter.
4. Closethe cover.
NOTE:Ifthe filteris torn ordamagedin anyway,replaceit.
Donot sprayenginewithwaterto clean becausewatercould
contaminatefuel. Usinga gardenhoseorpressurewashingequip-
mentcanalso forcewaterintothe muffleropening.Waterthat passes
throughthe mufflercanenterthe cylinder,causingdamage.
Accumulationof debrisaroundmufflercouldcausea fire.Inspectand
cleanbeforeeveryuse.
Figure23
,Electrode
0.02-0.03 in.
===_1_====0.60-0.80 rnrn
Figure24
J
Air Filter
Cover
Filter
Cleaning the Engine
If theenginehasbeenrunning,allowit to coolfor at leasthalfan hour
beforecleaning.Periodicallyremovedirt build-upfromtheengine.
Cleanaroundthe muffler.Cleanwitha brushor compressedair. Figure25
J
19

Check Engine Oil
1. Checkoil beforeeachuse.Stopengineandwaitseveralminutes
beforecheckingoil level.Withthe tilleron levelground,the oil
mustbeto FULLmarkon dipstick.
2. Removeoil fill dipstickandwipe cleanwithcloth.
3. Replacedipstickintothe oilfiller neck,but do not screwitin.
Removeandcheckoil level.Levelshouldbeat FULLmark.
4. If needed,addoil slowly- recheck.Do not overfill.
5. Wipedipstickclean,replacebut donot tighten.Removeand
checkoil level.Oillevelshouldbeat FULLlineondipstick.
6. Replaceandtightendipstickfirmlybeforestartingengine.
DO NOTuse non-detergentoilor 2-strokeengineoil. Itcould shorten
the engine'sservicelife.
Change Engine Oil
•SAE10W-30is recommendedforgeneral,all temperatureuse.
Whenaddingoilto the engine,referto viscositychart inthe
operationsection.Usea 4-stroke,oranequivalenthighdeter-
gent,premiumqualitymotoroil certifiedto meetor exceedU.S.
automobilemanufacturer'srequirementsfor serviceclassification
SG,SR MotoroilsclassifiedSG,SF will showthisdesignationon
thecontainer.
• Changeengineoil afterthefirst fiveto eight hoursof operation,
andeveryfifty hoursoreveryseasonthereafter.Changeoil every
twentyfivehourswhenoperatingengineunderheavyloadorin
hightemperatures.
oil
Drain
Figure 26
4. Replaceandtightenthe oildrainendcap.
5. Whenengineisdrainedof all oil, placeenginelevel.Refillwith
approximately20oz.of freshoil. Fillto FULLlineondipstick.
Donot overfill.Referto CheckEngineOil inthis SERVICE&
MAINTENANCEsection.
6. Replacesparkplugwire beforestarting.
Beforetippingengineor equipmentto drainoil, drainfuel fromtank by
runningengineuntilfuel tankisempty.
Usedmotoroil maycauseskincancerifrepeatedlyleftincontactwith
the skinfor prolongedperiods.Althoughthis isunlikelyunlessyou
handleusedoil ona daily basis,itis stilladvisableto thoroughlywash
yourhandswithsoapandwateras soonas possibleafter handling
usedoil.
To Drain Oil
1. Drainthe fuelfromthe tankby runningthe engineuntil thefuel
tankisempty.Besurefuel fill cap issecure.
2. WithengineOFFbutstillwarm,disconnectsparkplugwire and
keepitawayfromsparkplug.
3. Removeoil drainendcap locatedat the baseof the engine,and
drainoil into anappropriatereceptacle.SeeFigure26.
Usedoilisa hazardouswasteproduct.Disposeof usedoil properly
IDonot discardwithhouseholdwaste.Checkwithyourlocalauthori-
_tiesor SearsServiceCenterfor safedisposal/recyclingfacilities.
2O
LUBRiCATiON
Afterevery10operatinghours,oilor greasethe lubricationpoints.Use
cleanlubricatingoil (#30weightmotoroil is suitable)andcleangeneral
purposegrease(greasecontaininga metallubricantis preferred,if
available).
*Removethetinesandcleanthe fine shaft.Usea file or sandpa-
perto gentlyremoveany rust,burrsor roughspots(especially
aroundthe holesinthe shaft).Applygreaseto the endsof the
shaftbeforeinstallingthe tines.
,Removethebelt coverandlubricateallthe pivotpointsand
linkageswitha lightcoatof oil. Keepthe beltsfree of lubrication.
*Thechaincaseis pre-lubricatedand sealedat the factoryand
requiresno maintenance.
HARDWARE
Checkfor looseor missinghardwareafterevery10operatinghours
andtightenor replace= as needed= beforereusingthe tiller.Be
sureto checkthe screwsunderneaththe tillerhoodthatsecurethe
transmissioncoverandthe DepthRegulatorLeverto thetransmission.
Beforeperformingany typeof maintenanceonthe machine,waitfor
all partsto stopmovinganddisconnectthe sparkplugwire.Failure
to followthis instructioncouldresultinpersonalinjuryor property
damage.
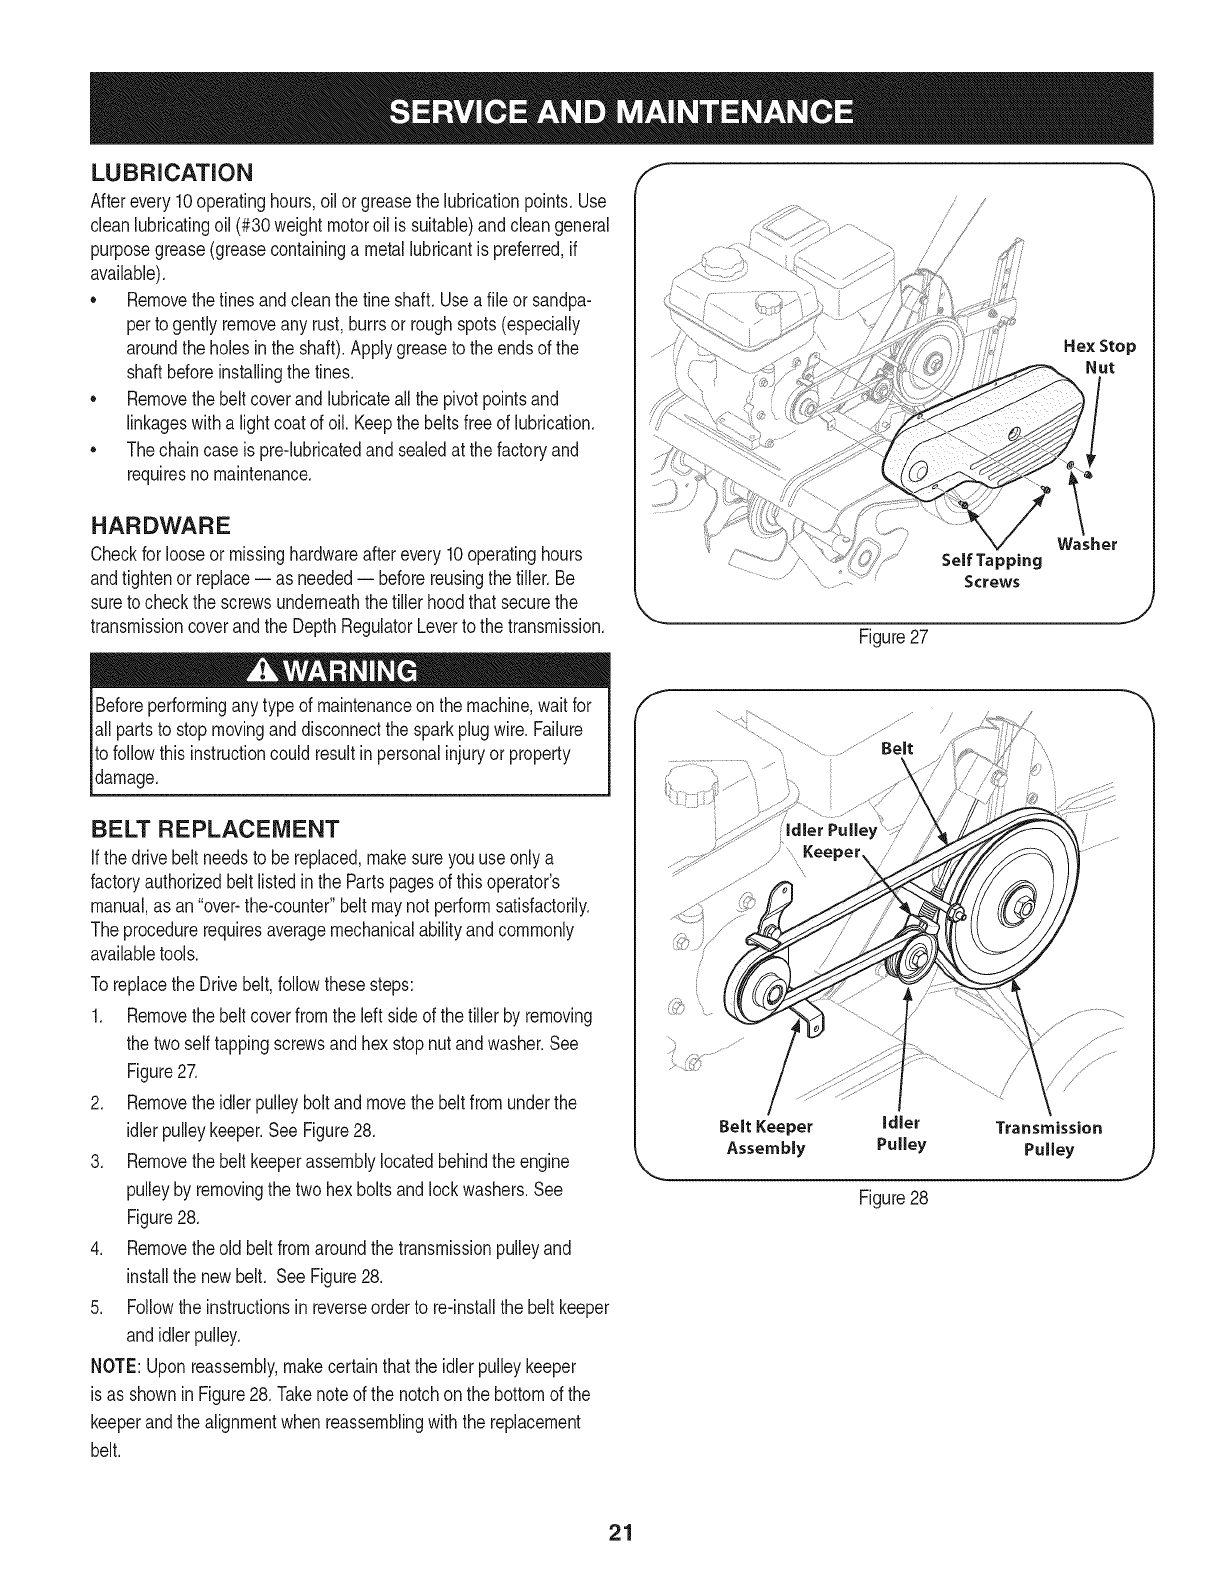
BELT REPLACEMENT
If thedrive beltneedsto be replaced,makesureyou useonly a
factoryauthorizedbelt listedinthe Partspagesof thisoperator's
manual,as an "over-the-counter"beltmaynot performsatisfactorily.
Theprocedurerequiresaveragemechanicalabilityandcommonly
availabletools.
Toreplacethe Drivebelt,followthesesteps:
1. Removethebelt coverfromthe leftside of the tillerby removing
the twoselftappingscrewsandhex stopnutandwasher.See
Figure27.
2. Removetheidlerpulleybolt andmovethe beltfromunderthe
idlerpulleykeeper.SeeFigure28.
3. Removethebelt keeperassemblylocatedbehindtheengine
pulleyby removingthe two hexboltsandlockwashers.See
Figure28.
4. Removetheold beltfromaroundthe transmissionpulleyand
installthe new belt. SeeFigure28.
5. Followthe instructionsinreverseorderto re-installthe beltkeeper
andidlerpulley.
NOTE:Uponreassernbly,makecertainthatthe idlerpulleykeeper
isas showninFigure28. Takenoteof the notchon the bottomof the
keeperandthe alignmentwhenreassemblingwiththe replacement
belt.
f
J
Hex Stop
Nut
Washer
Figure27
Figure28
Transmission
Pulley
J
21

TINES
Thetineswill wearwithuseand shouldbe inspectedat the beginning
of eachtillingseasonandafterevery30 operatinghours.Thetines
can bereplaced.Referto the PartsListsectionof this manualfor part
numbers.
Tine inspection
Withuse,the tineswill becomeshorter,narrowerandpointed.Badly
worntineswill resultina lossof tillingdepth,andreducedeffective-
nesswhen choppingupandturningunderorganicmatter.
Removing/Installing a Tine Assembly
1. Atine assemblyconsistsof a lefthandfineanda righthandfine.
NOTE:Thesharpedgesof the tinesarepositionedto enterthe soil
firstwhen rotating.Notethispositionof the tinesfor reinstallationof the
newfine assemblies.
2. To removeafine assembly,simplyremovethe cotterpin securing
theclevis pinfor eachfine.SeeFigure29.
3. Removethe clevispin foreachfine,and slidetheassemblyto the
outsideof the unitandoff of the fine shaft.
4. Beforereinstallingthe fineassembly,inspectthe tine shaftfor
rust, roughspotsorburrs.Lightlyfile or sand,as needed.Applya
thincoatof greaseto the shaft.
5. Installeachtine of theassemblyso thatthecutting(sharp)edge
of the tineswill enterthe soil firstwhenthe tiller movesforward.
Clevis Pin
Figure29
J
22

Neverstoretiller withfuel in tankindoorsor in poorlyventilatedareasI
wherefuel fumesmayreachanopenflame,spark,or pilotlightas on
a furnace,waterheater,c othesdryer,orgas app ance. 1
Neverleaveengineunattendedwhileit is running.
PREPARING THE ENGINE
Enginesstoredbetween30and 90daysneedto betreatedwitha
gasolinestabilizerandenginesstoredover90daysneedto bedrained
of fuel to preventdeteriorationandgumfromforminginfuel systemor
on essentialcarburetorparts.Ifthe gasolineinyourenginedeterio-
ratesduringstorage,you mayneedto havethecarburetor,andother
fuel systemcomponents,servicedor replaced.
1. Removeallfuel fromtankby runningengineuntilit stopsfrom
lackof fuel.
2. Changethe oil. SeeChangeEngineOil inSERVICEAND
MAINTENANCEsection.
3. Removesparkplugand pourabouta 1/2ounceof engineoilinto
the cylinder.Replacesparkplugandcrankit slowlyto distribute
oil.
4. Cleandebrisfromaroundtheengineandthe muffler.Touchup
any damagedpaint,andcoatotherareasthatmayrustwitha light
filmof oil.
5. Storein a clean,dry andwellventilatedareaawayfromany ap-
pliancethatoperateswitha flameorpilot light,suchas a furnace,
waterheater,orclothesdryer.Alsoavoidany areawitha spark
producingelectricmotor,orwherepowertoolsare operated.
6. Ifpossible,also avoidstorageareaswithhighhumidity,because
that promotesrustandcorrosion.
7. Keeptheenginelevelinstorage.Tiltingcan causefuel or oil
leakage.
PREPARING THE TILLER
Whenthe tillerwon't be usedfor an extendedperiod,prepareit for
storageas follows:
1. Cleanthe tillerandengine.
2. Followthe lubricationrecommendationsandcheckfor looseparts
and hardware.
3. Storethe tiller ina clean,dry area.
4. Neverstorethe tillerwithfuel inthe fuel tankinan enclosedarea
wheregas fumescould reachan openflameor spark,or where
ignitionsourcesare present(spaceheaters,hot waterheaters,
furnaces,etc.).
23
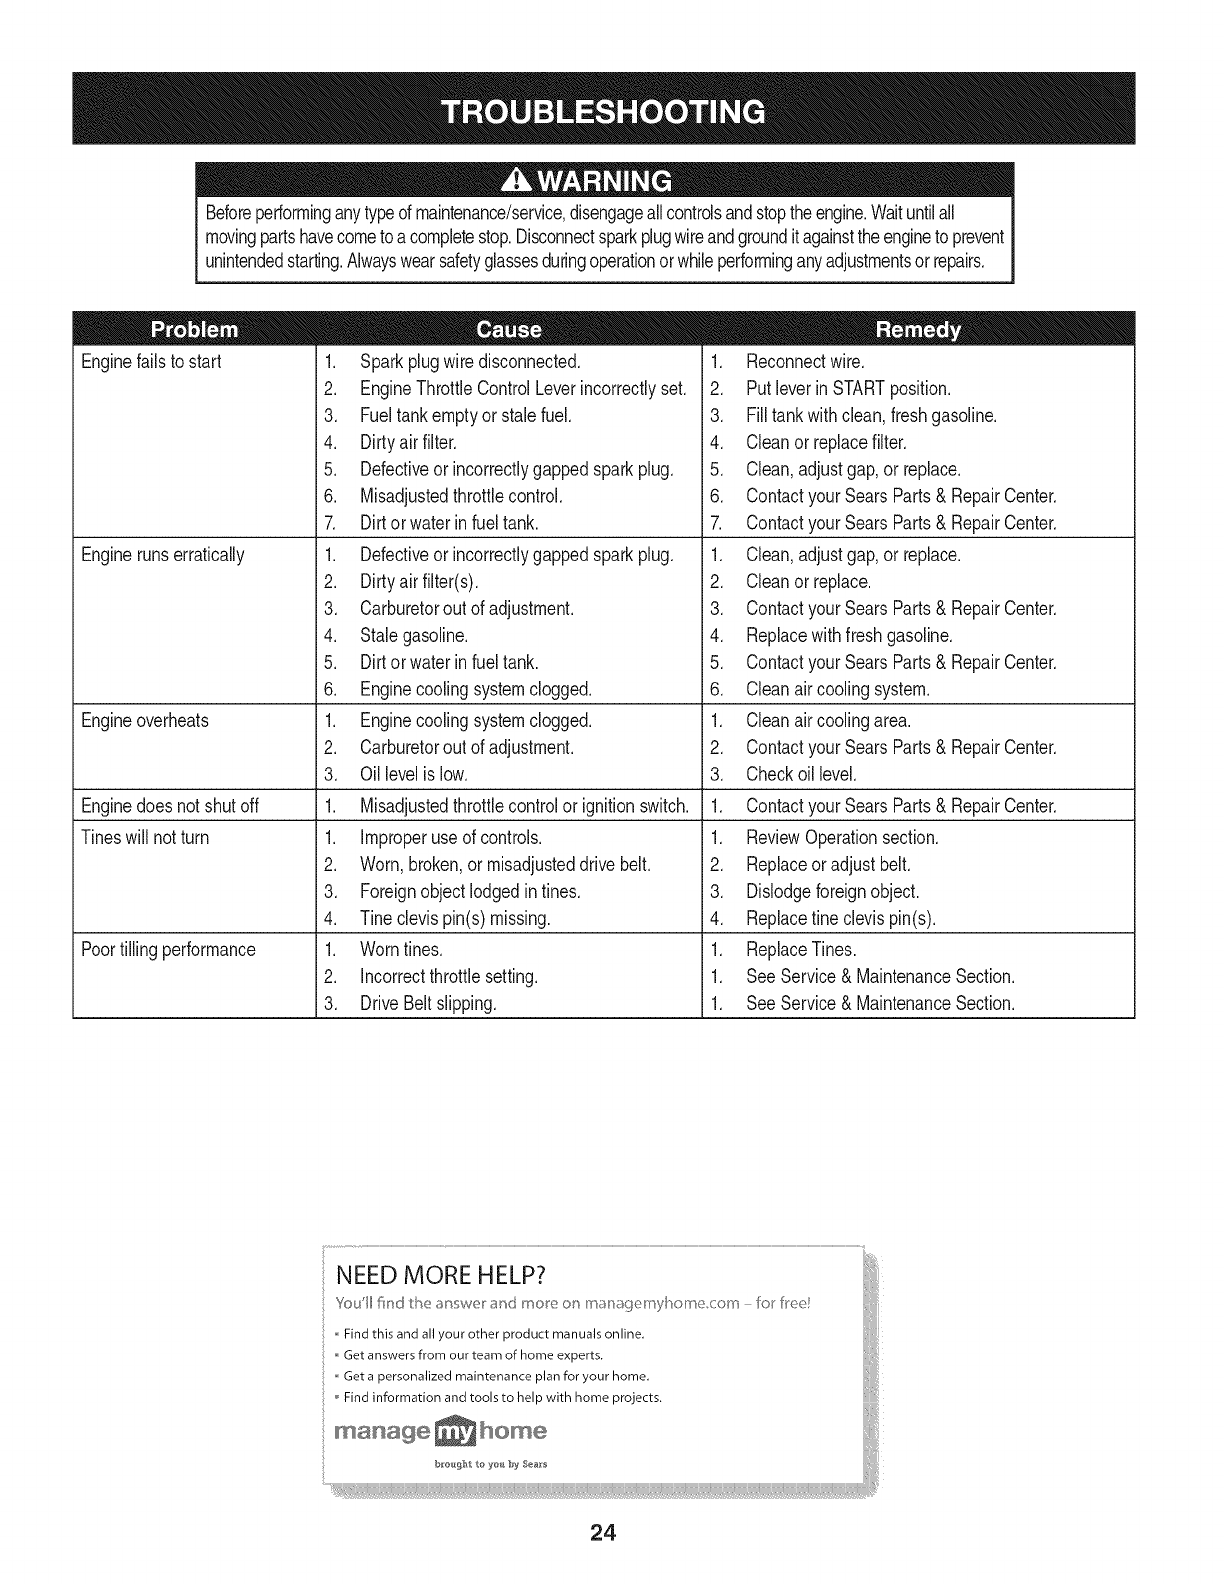
Beforeperforminganytypedmaintenance/service,disengageallcontrolsandstoptheengine.Waituntilall
movingpartshavecometoacompletestop.Disconnectsparkplugwireandgroundit againsttheengineto prevent
unintendedstarting.Alwayswearsafetyglassesduringoperationorwhileperforminganyadjustmentsorrepairs.
Enginefailsto start
Enginerunserratically
Engineoverheats
Enginedoesnot shutoff
Tineswill notturn
Poortillingperformance
1. Sparkplugwire disconnected.
2. EngineThrottleControlLeverincorrectlyset.
3. Fueltankemptyor stalefuel.
4. Dirtyair filter.
5. Defectiveor incorrectlygappedsparkplug.
6. Misadjustedthrottlecontrol.
7. Dirtorwaterin fuel tank.
1. Defectiveor incorrectlygappedsparkplug.
2. Dirtyair filter(s).
3. Carburetorout of adjustment.
4. Stalegasoline.
5. Dirtorwater infuel tank.
6. Enginecoolingsystemclogged.
1. Enginecoolingsystemclogged.
2. Carburetorout of adjustment.
3. Oillevelis low.
1. Misadjustedthrottlecontrolorignition switch.
1. Improperuse of controls.
2. Worn,broken,or misadjusteddrive belt.
3. Foreignobjectlodgedintines.
4. Tineclevispin(s) missing.
1. Worntines.
2. Incorrectthrottlesetting.
3. DriveBeltslipping.
1. Reconnectwire.
2. Putleverin STARTposition.
3. Filltankwithclean,freshgasoline.
4. Cleanor replacefilter.
5. Clean,adjustgap,or replace.
6. Contactyour SearsParts& RepairCenter.
7. Contactyour SearsParts& RepairCenter.
1. Clean,adjustgap,or replace.
2. Cleanor replace.
3. Contactyour SearsParts& RepairCenter.
4. Replacewithfreshgasoline.
5. Contactyour SearsParts& RepairCenter.
6. Cleanair coolingsystem.
1. Cleanair coolingarea.
2. Contactyour SearsParts& RepairCenter.
3. Checkoil level.
1. Contactyour SearsParts& RepairCenter.
1. ReviewOperationsection.
2. Replaceor adjustbelt.
3. Dislodgeforeignobject.
4. Replacefine clevispin(s).
1. ReplaceTines.
1. SeeService& MaintenanceSection.
1. SeeService& MaintenanceSection.
NEED MORE HELP?
Find this and all your other product manuals online,
Get answers from our team of home experts, j
Get a personalized maintenance plan for your home, [
Find information and tools to help with home projects.
manage home
24

25
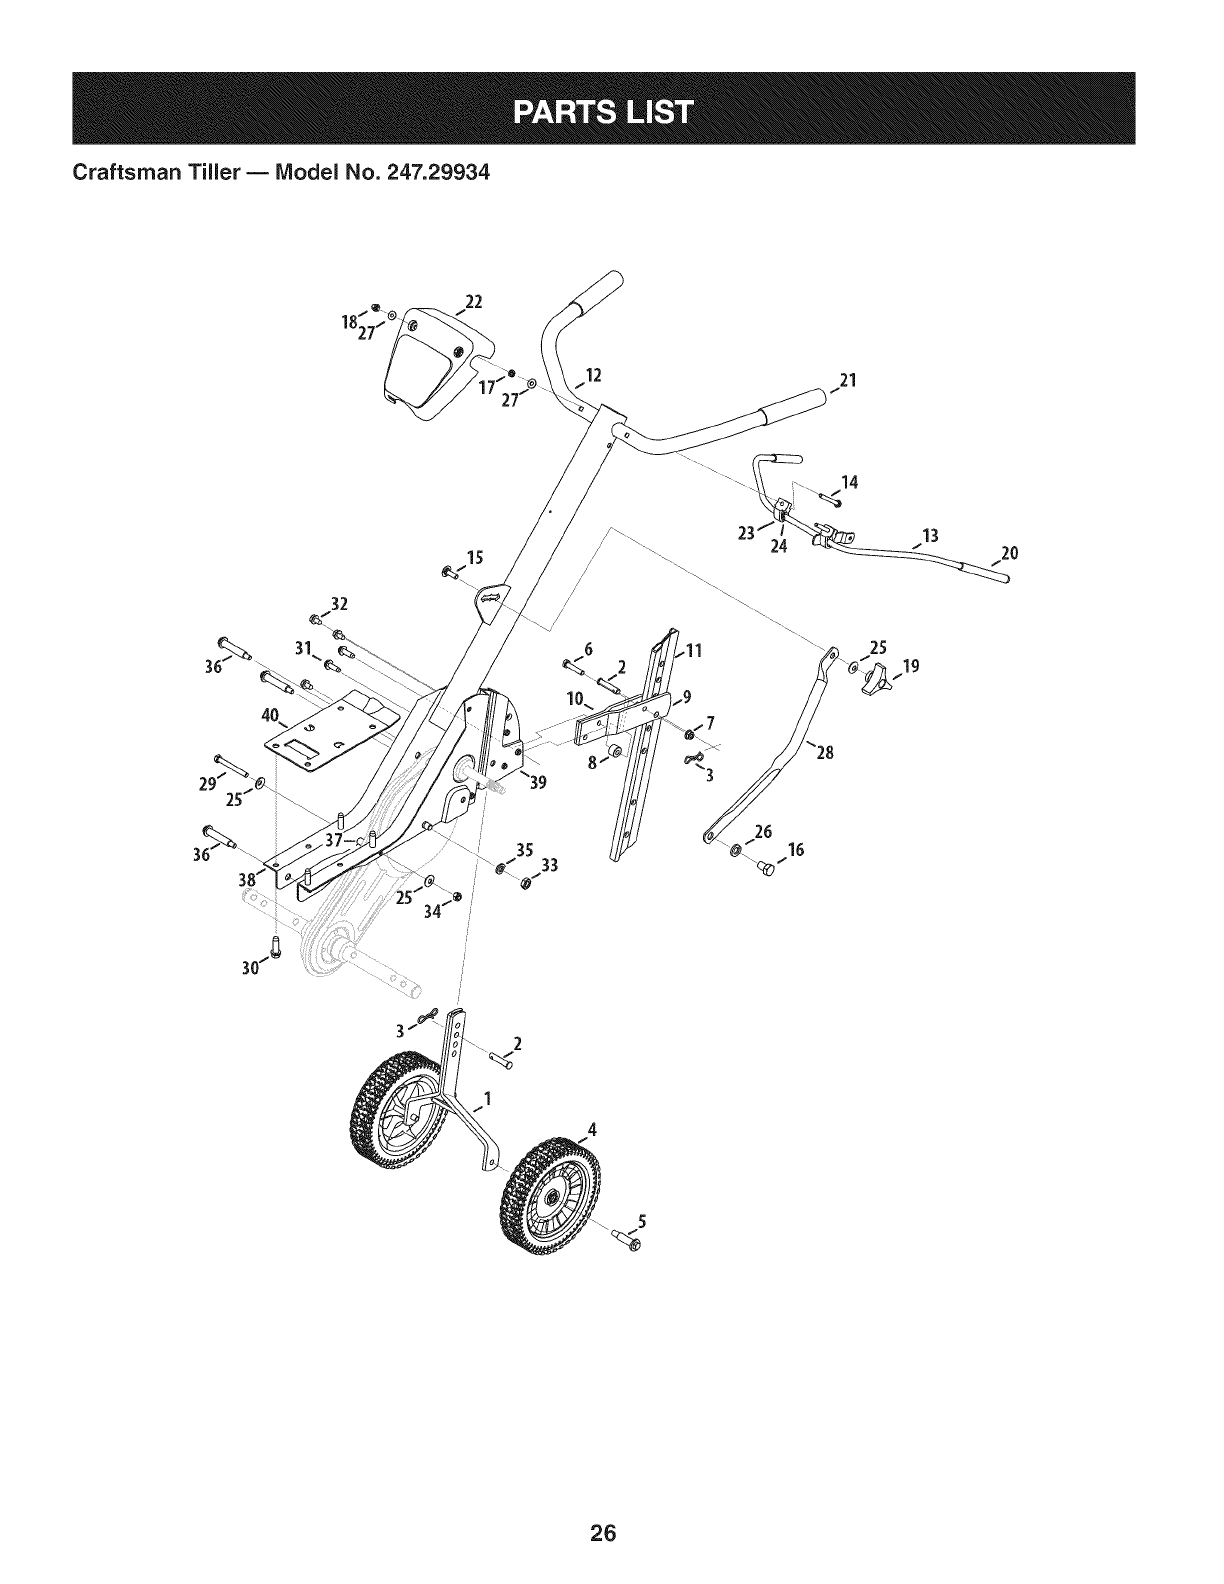
Craftsman Tiller BIViodel No. 247.29934
22
12 21
14
32
1
26
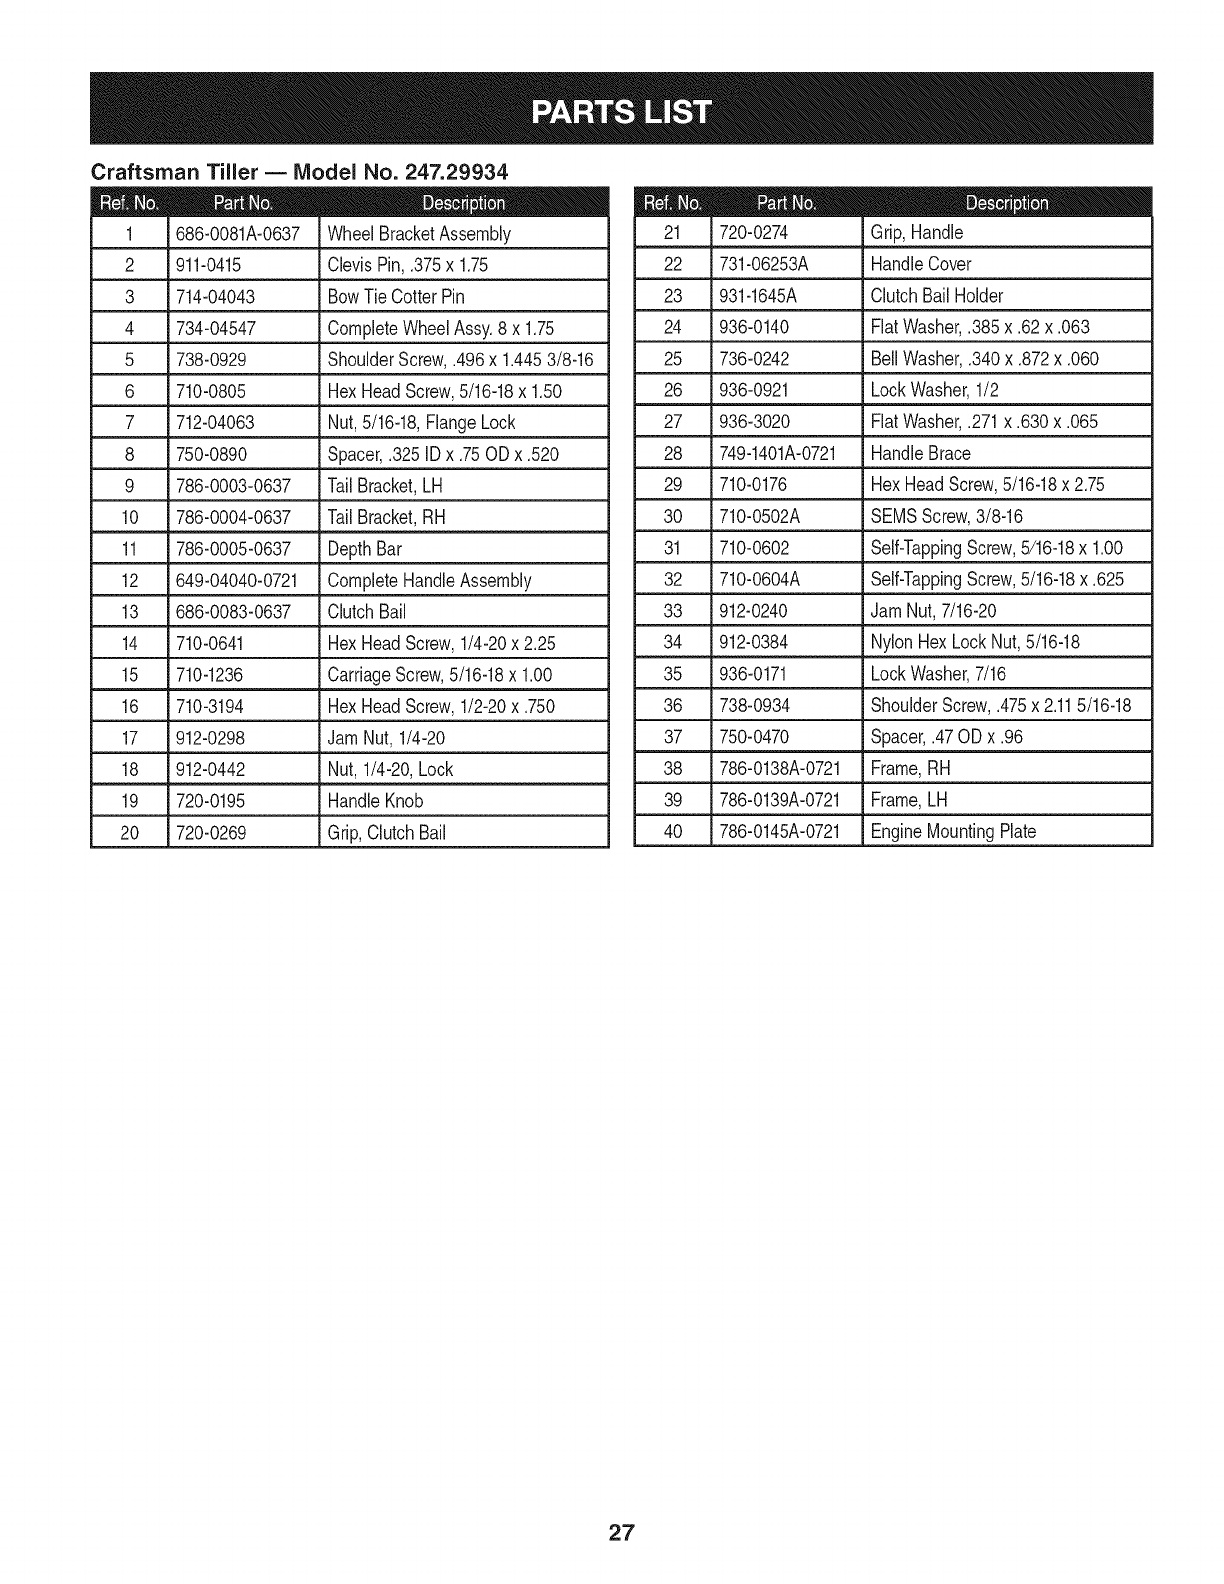
Craftsman Tiller BIViodel No. 247.29934
686-0081A-0637 WheelBracketAssembly
2 911-0415 ClevisPin, .375x 1.75
3 714-04043 BowTie Cotter Pin
4 734-04547 CompleteWheelAssy.8 x 1.75
5 738-0929 ShoulderScrew,.496x 1.4453/8-16
6 710-0805 HexHeadScrew,5/16-18x 1.50
7 712-04063 Nut,5/16-18,FlangeLock
8 750-0890 Spacer,.325IDx .75ODx.520
9 786-0003-0637 Tail Bracket,LH
10 786-0004-0637 Tail Bracket,RH
11 786-0005-0637 DepthBar
12 649-04040-0721 CompleteHandleAssembly
13 686-0083-0637 ClutchBail
14 710-0641 HexHeadScrew,1/4-20x 2.25
15 710-1236 CarriageScrew,5/16-18x 1.00
16 710-3194 HexHeadScrew,1/2-20x .750
17 912-0298 JamNut, 1/4-20
18 912-0442 Nut,1/4-20,Lock
19 720-0195 HandleKnob
20 720-0269 Grip,ClutchBail
720-0274 Grip,Handle
22 731-06253A HandleCover
23 931-1645A ClutchBailHolder
24 936-0140 FiatWasher,.385x.62 x.063
25 736-0242 BellWasher,.340x.872x.060
26 936-0921 LockWasher,1/2
27 936-3020 FlatWasher,.271x.630x.065
28 749-1401A-0721 HandleBrace
29 710-0176 HexHeadScrew,5/16-18x 2.75
30 710-0502A SEMSScrew,3/8-16
31 710-0602 Self-TappingScrew,5/16-18x 1.00
32 710-0604A Self-TappingScrew,5/16-18x .625
33 912-0240 JamNut,7/16-20
34 912-0384 NylonHexLockNut,5/16-18
35 936-0171 LockWasher,7/16
36 738-0934 ShoulderScrew,.475x 2.115/16-18
37 750-0470 Spacer,.47OD x .96
38 786-0138A-0721 Frame,RH
39 786-0139A-0721 Frame,LH
40 786-0145A-0721 EngineMountingPlate
27

Craftsman Tiller B Model No. 247.29934
17
............ii>
s
l
//
/
..... 33
42
36
23
3O
10
7
28
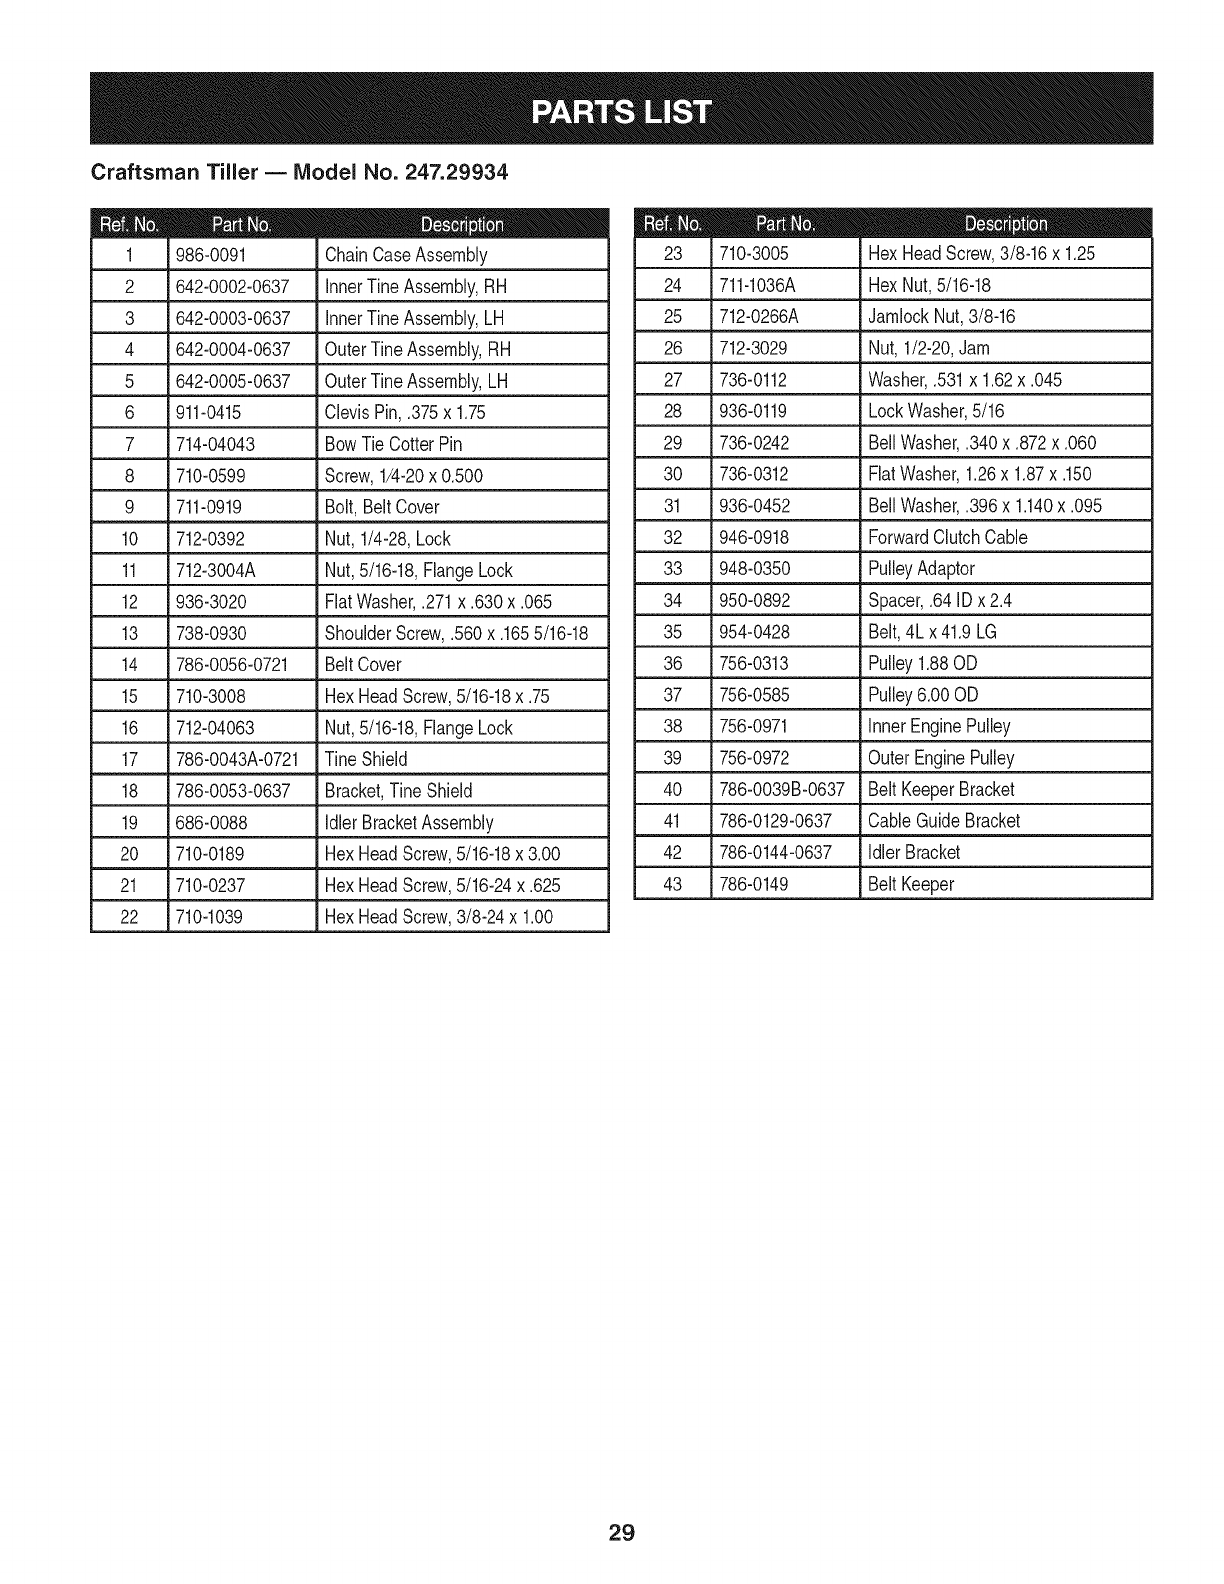
Craftsman Tiller BIViodel No. 247.29934
986-0091 ChainCaseAssembly
2 642-0002-0637 innerTineAssembly,RH
3 642-0003-0637 innerTineAssembly,LH
4 642-0004-0637 OuterTineAssembly,RH 26 712-3029
5 642-0005-0637 OuterTineAssembly,LH 27 736-0112
6 911-0415 ClevisPin,.375x 1.75 28 936-0119
7 714-04043 BowTie CotterPin 29 736-0242
8 710-0599 Screw,1/4-20x 0.500 30 736-0312
9 711-0919 Bolt,Belt Cover 31 936-0452
10 712-0392 Nut, 1/4-28,Lock 32 946-0918
11 712-3004A Nut,5/16-18,FlangeLock 33 948-0350
12 936-3020 FiatWasher,.271x.630x.065 34 950-0892
13 738-0930 ShoulderScrew,.560x.1655/16-18 35 954-0428
14 786-0056-0721 Belt Cover 36 756-0313
15 710-3008 HexHeadScrew,5/16-18x .75 37 756-0585
16 712-04063 Nut,5/16-18,FlangeLock 38 756-0971
17 786-0043A-0721 TineShield 39 756-0972
18 786-0053-0637 Bracket,Tine Shield 40 786-0039B-0637
19 686-0088 Idler BracketAssembly 41 786-0129-0637
20 710-0189 HexHeadScrew,5/16-18x 3.00
21 710-0237 HexHeadScrew,5/16-24x .625
22 710-1039 HexHeadScrew,3/8-24x 1.00
710-3005 HexHeadScrew,3/8-16x 1.25
24 711-1036A HexNut,5/16-18
25 ,7120266A .JamlockNut,3/8-16
Nut,1/2-20,Jam
Washer,.531x 1.62x .045
LockWasher,5/16
BellWasher,.340x.872x.060
FiatWasher,1.26x 1.87x .150
BellWasher,.396x 1.140x .095
ForwardClutchCable
PulleyAdaptor
Spacer,.64 IDx 2.4
Belt,4L x 41.9LG
Pulley1.88OD
Pulley6.00OD
InnerEnginePulley
Outer EnginePulley
BeltKeeperBracket
CableGuideBracket
k
42 786-0144-0637 IdlerBracket
43 786-0149 BeltKeeper
29
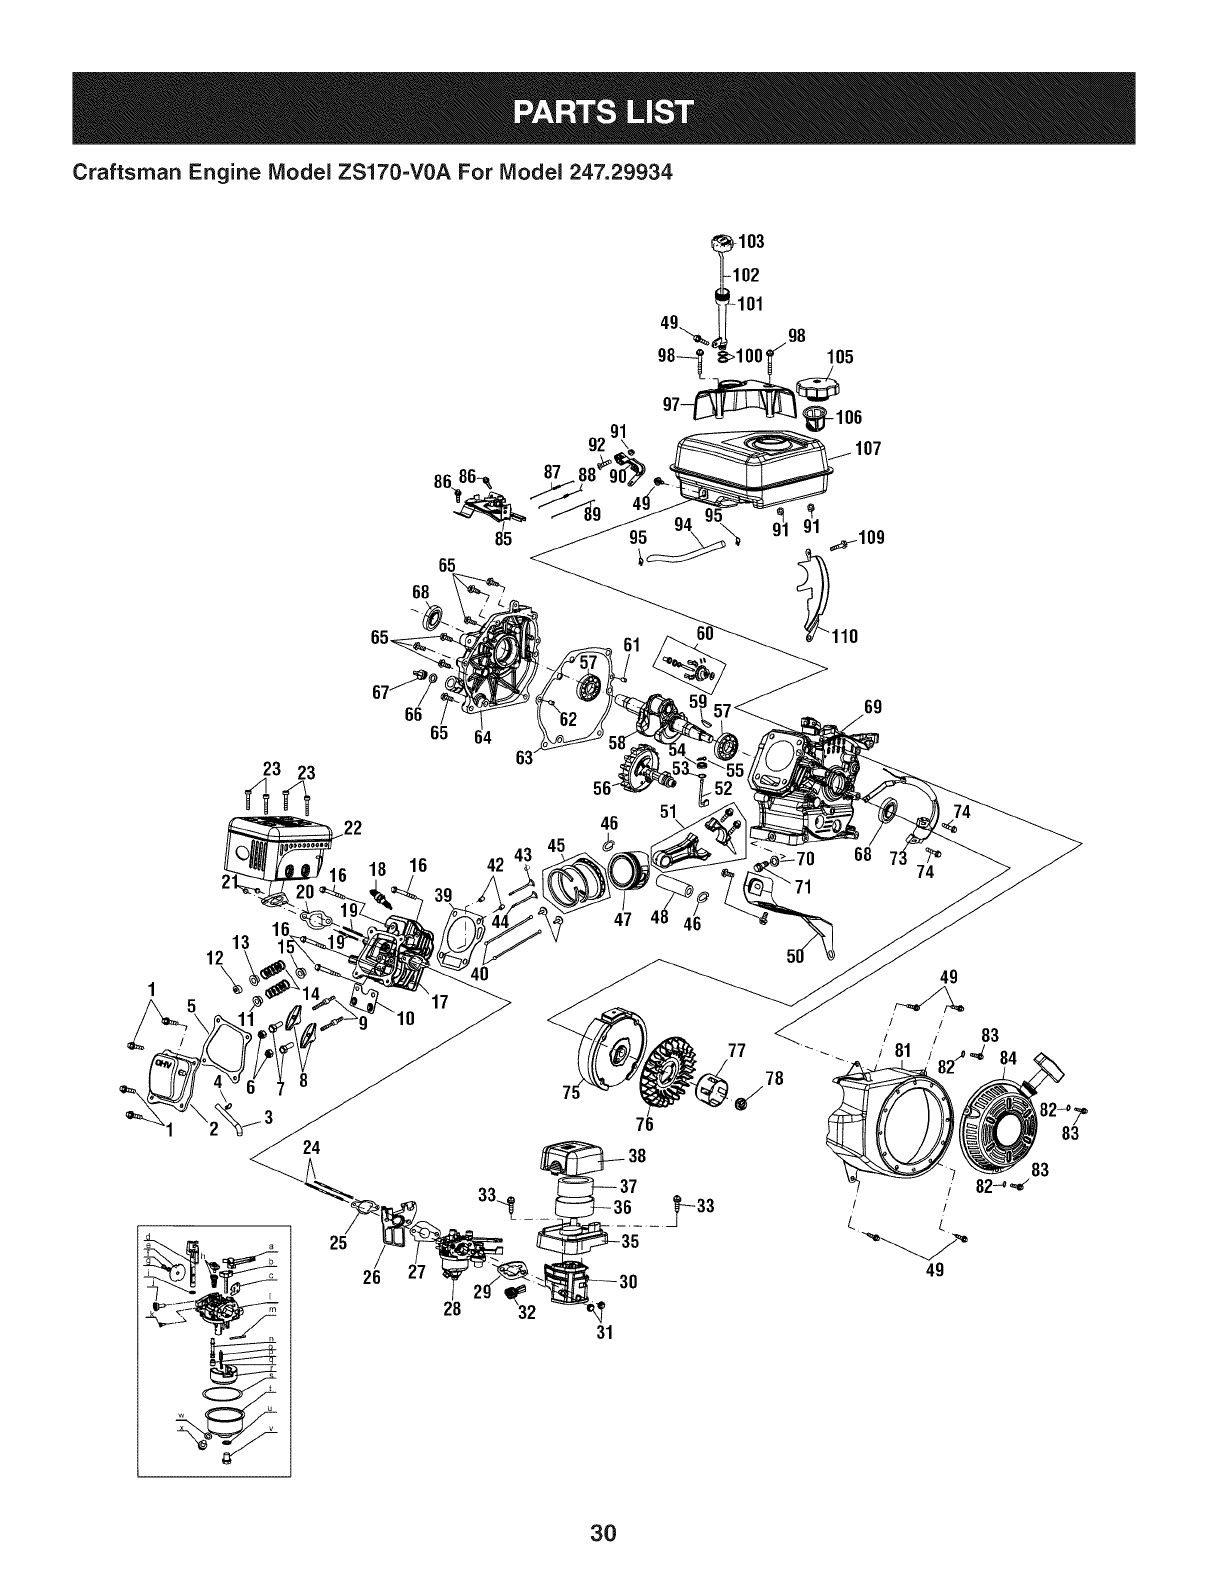
Craftsman Engine Model ZS170=VOA For Model 247.29934
87
85
65
68
4g.._
98-_
g7-
_-103
-102
L101
8 105
__106
66 65
23 23
.22 46
16 42
16
51
69
68 7E 74
49
I I
I .I
t
49
3O
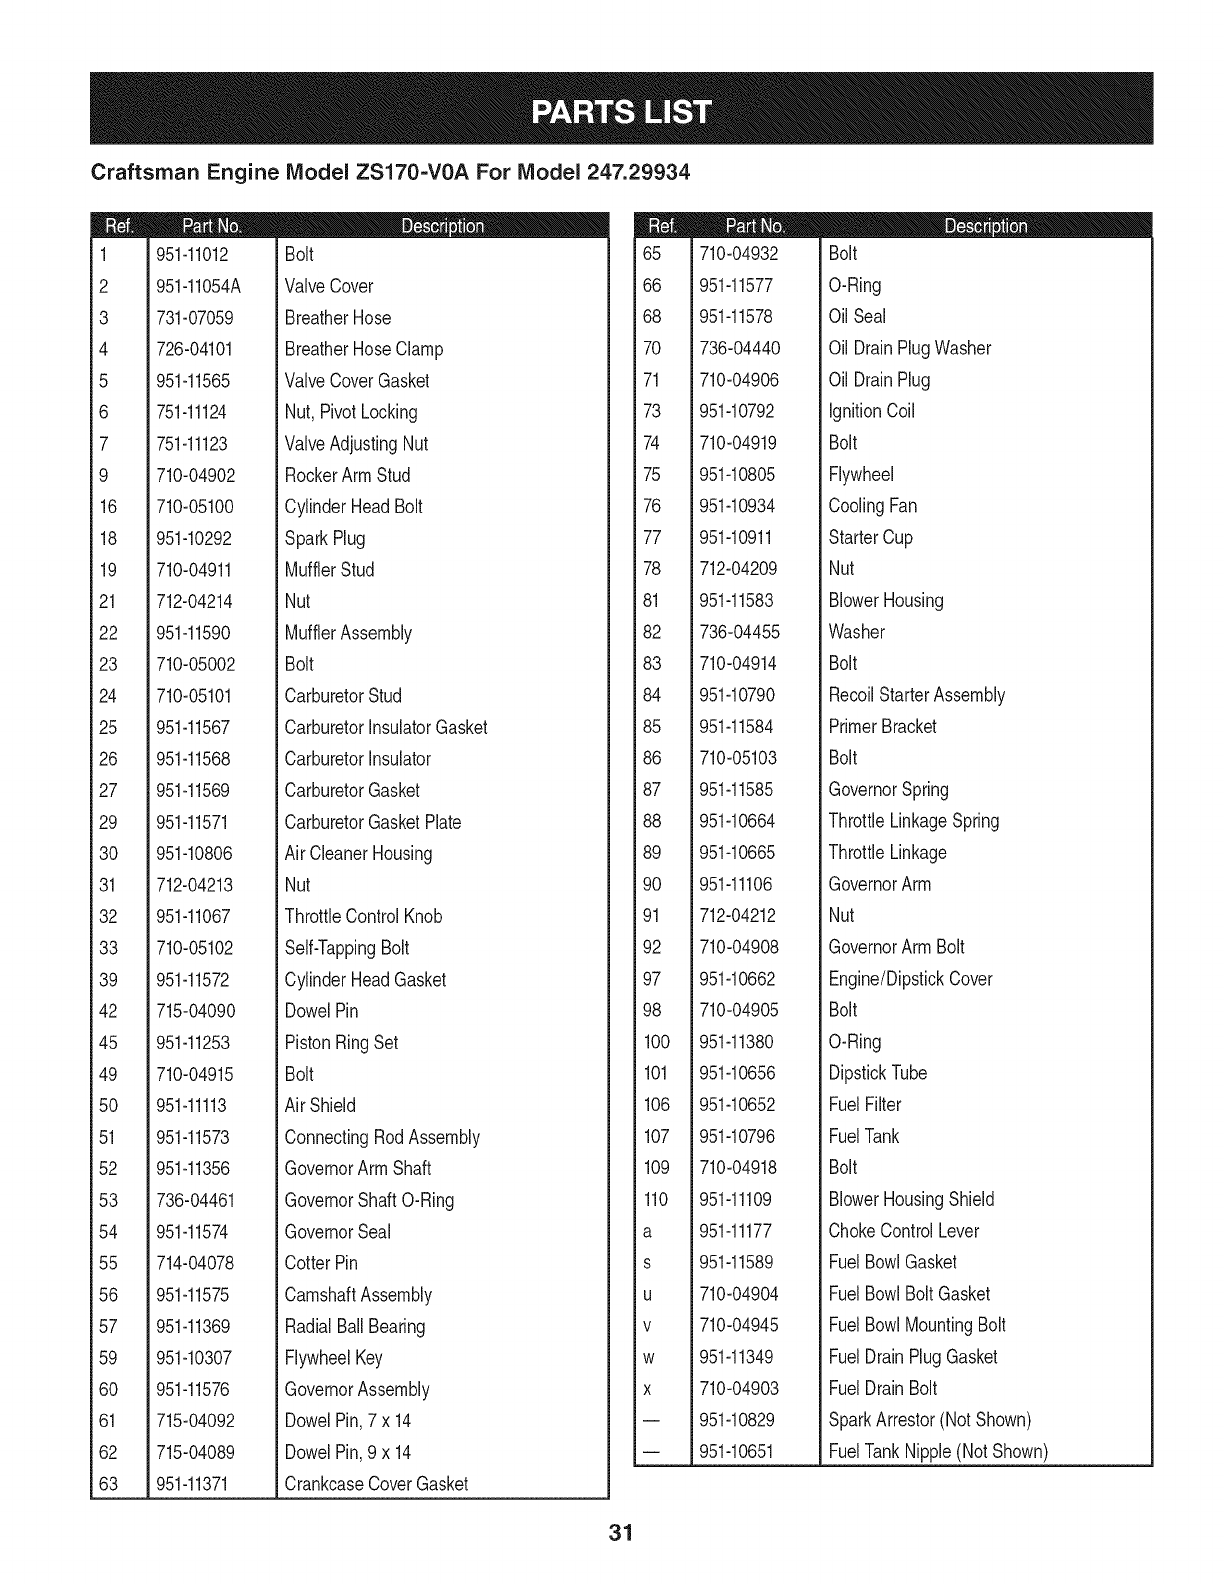
Craftsman Engine IViodel ZS170=VOA For IViodel 247.29934
m
1
2
3
4
5
6
7
9
16
18
19
21
22
23
24
25
26
27
29
30
31
32
33
39
42
45
49
50
51
52
53
54
55
56
57
59
60
61
62
63
951-11012
951-11054A
731-07059
726-04101
951-11565
751-11124
751-11123
710-04902
710-05100
951-10292
710-04911
712-04214
951-11590
710-05002
710-05101
951-11567
951-11568
951-11569
951-11571
951-10806
712-04213
951-11067
710-05102
951-11572
715-04090
951-11253
710-04915
951-11113
951-11573
951-11356
736-04461
951-11574
714-04078
951-11575
951-11369
951-10307
951-11576
715-04092
715-04089
951-11371
D = I! O
Bolt
ValveCover
BreatherHose
BreatherHoseClamp
ValveCoverGasket
Nut, PivotLocking
ValveAdjustingNut
RockerArm Stud
CylinderHeadBolt
SparkPlug
MufflerStud
Nut
MufflerAssembly
Bolt
CarburetorStud
CarburetorinsulatorGasket
CarburetorInsulator
CarburetorGasket
CarburetorGasketPlate
Air CleanerHousing
Nut
ThrottleControlKnob
Self-TappingBolt
CylinderHeadGasket
DowelPin
PistonRingSet
Bolt
Air Shield
ConnectingRodAssembly
GovernorArm Shaft
GovernorShaftO-Ring
GovernorSeal
CotterPin
CamshaftAssembly
RadialBallBearing
FlywheelKey
GovernorAssembly
DowelPin,7x 14
DowelPin,9 x 14
CrankcaseCoverGasket
65
66
68
7O
71
73
74
75
76
77
78
81
82
83
84
85
86
87
88
89
9O
91
92
97
98
100
101
106
107
109
110
a
s
u
v
w
x
710-04932
951-11577
951-11578
736-04440
710-04906
951-10792
710-04919
951-10805
951-10934
951-10911
712-04209
951-11583
736-04455
710-04914
951-10790
951-11584
710-05103
951-11585
951-10664
951-10665
951-11106
712-04212
710-04908
951-10662
710-04905
951-11380
951-10656
951-10652
951-10796
710-04918
951-11109
951-11177
951-11589
710-04904
710-04945
951-11349
710-04903
951-10829
951-10651
D = O O
Bolt
O-Ring
OilSeal
OilDrainPlugWasher
OilDrainPlug
ignitionCoil
Bolt
Flywheel
CoolingFan
StarterCup
Nut
BlowerHousing
Washer
Bolt
RecoilStarterAssembly
PrimerBracket
Bolt
GovernorSpring
ThrottleLinkageSpring
ThrottleLinkage
GovernorArm
Nut
GovernorArm Bolt
Engine/DipstickCover
Bolt
O-Ring
DipstickTube
FuelFilter
FuelTank
Bolt
BlowerHousingShield
ChokeControlLever
FuelBowlGasket
FuelBowlBoltGasket
FuelBowlMountingBolt
FuelDrainPlugGasket
FuelDrainBolt
SparkArrestor(NotShown)
FuelTankNipple(NotShown)
31
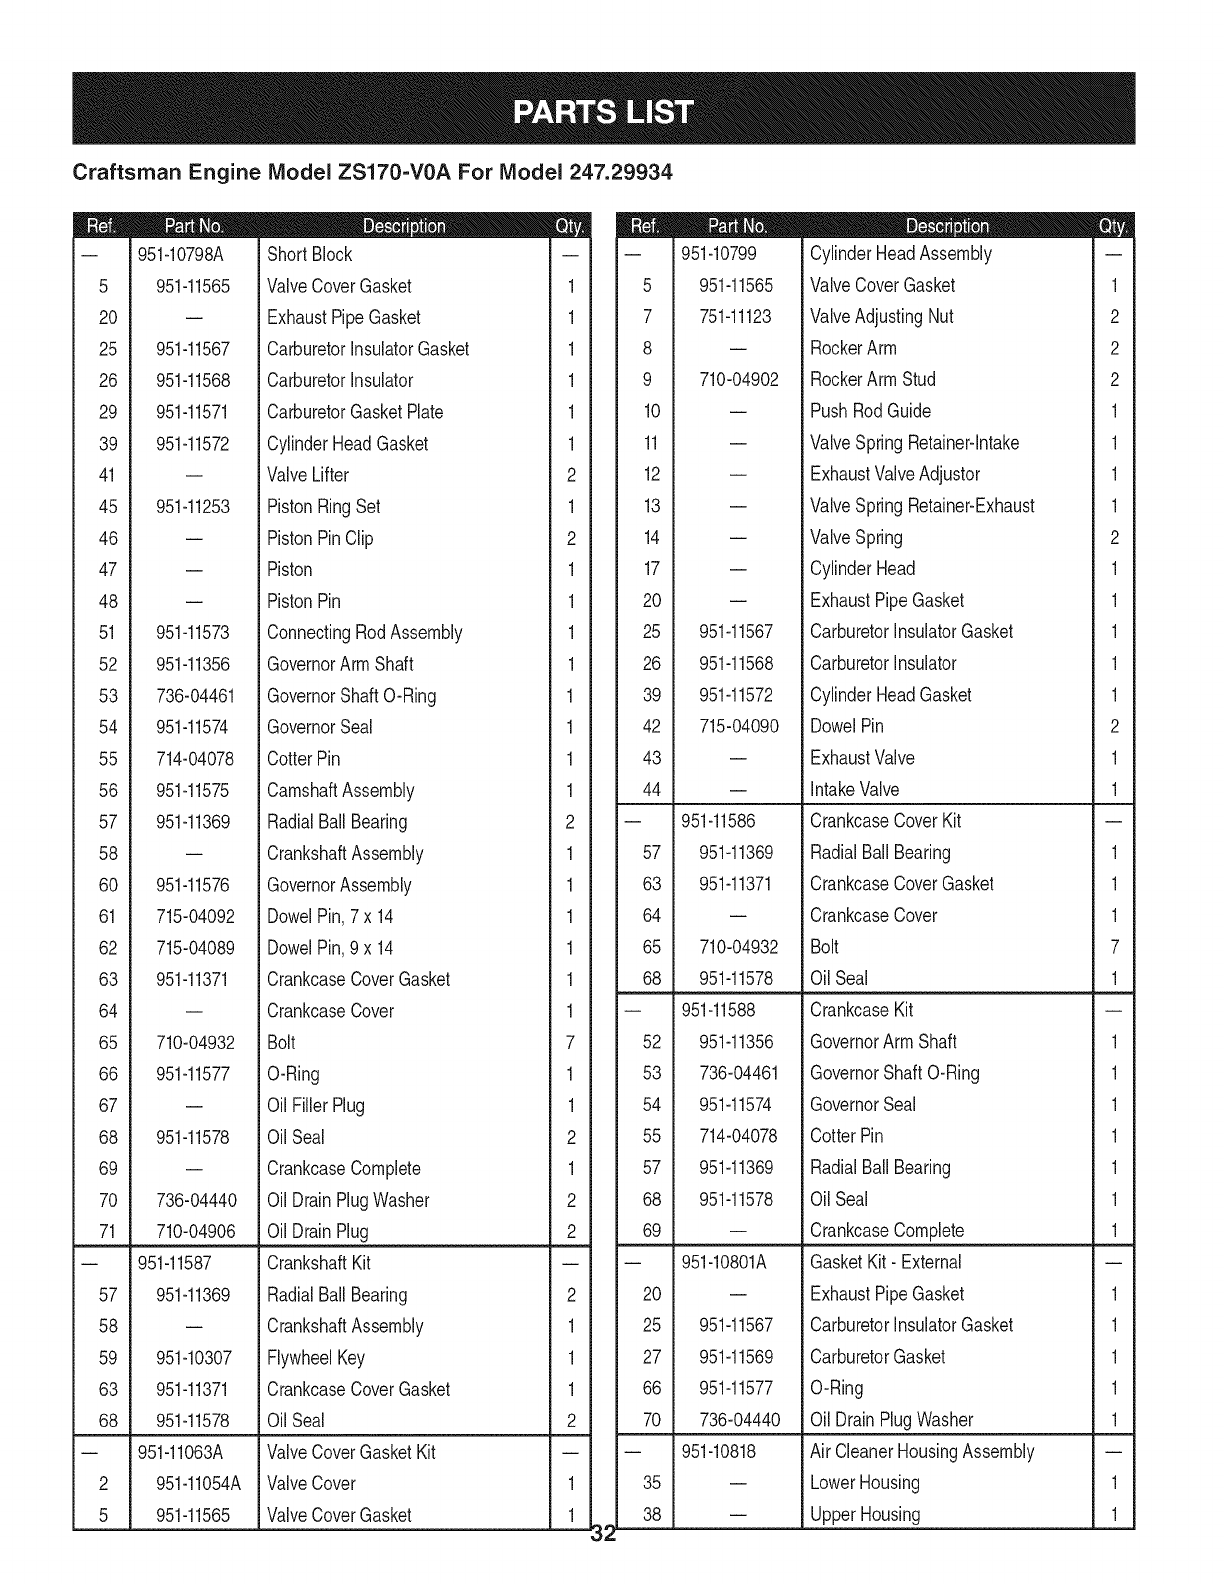
Craftsman Engine IViodel ZS170-VOA For IViodel 247.29934
|- oe |= o=
-- 951-10798A Short Block -- -- 951-10799 CylinderHeadAssembly --
5 951-11565 ValveCoverGasket 1 5 951-11565 ValveCoverGasket 1
20 -- ExhaustPipeGasket 1 7 751-11123 ValveAdjustingNut 2
25 951-11567 CarburetorinsulatorGasket 1 8 -- RockerArm 2
26 951-11568 Carburetorinsulator 1 9 710-04902 RockerArmStud 2
29 951-11571 CarburetorGasketPlate 1 10 -- PushRodGuide 1
39 951-11572 CylinderHeadGasket 1 11 -- ValveSpringRetainer-intake 1
41 -- ValveLifter 2 12 -- ExhaustValveAdjustor 1
45 951-11253 PistonRingSet 1 13 -- ValveSpringRetainer-Exhaust 1
46 -- PistonPinClip 2 14 -- ValveSpring 2
47 -- Piston 1 17 -- CylinderHead 1
48 -- PistonPin 1 20 -- ExhaustPipeGasket 1
51 951-11573 ConnectingRodAssembly 1 25 951-11567 CarburetorInsulatorGasket 1
52 951-11356 GovernorArm Shaft 1 26 951-11568 CarburetorInsulator 1
53 736-04461 GovernorShaftO-Ring 1 39 951-11572 CylinderHeadGasket 1
54 951-11574 GovernorSeal 1 42 715-04090 DowelPin 2
55 714-04078 CotterPin 1 43 -- ExhaustValve 1
56 951-11575 CamshaftAssembly 1 44 -- IntakeValve 1
57 951-11369 RadialBallBearing 2 -- 951-11586 CrankcaseCoverKit --
58 -- CrankshaftAssembly 1 57 951-11369 RadialBallBearing 1
60 951-11576 GovernorAssembly 1 63 951-11371 CrankcaseCoverGasket 1
61 715-04092 DowelPin, 7x 14 1 64 -- CrankcaseCover 1
62 715-04089 DowelPin,9 x 14 1 65 710-04932 Bolt 7
63 951-11371 CrankcaseCoverGasket 1 68 951-11578 OilSeal 1
64 -- CrankcaseCover 1 -- 951-11588 CrankcaseKit --
65 710-04932 Bolt 7 52 951-11356 GovernorArm Shaft 1
66 951-11577 O-Ring 1 53 736-04461 GovernorShaftO-Ring 1
67 -- Oil FillerPlug 1 54 951-11574 GovernorSeal 1
68 951-11578 Oil Seal 2 55 714-04078 CotterPin 1
69 -- CrankcaseComplete 1 57 951-11369 RadialBallBearing 1
70 736-04440 Oil DrainPlugWasher 2 68 951-11578 OilSeal 1
71 710-04906 Oil DrainPlug 2 69 -- CrankcaseComplete 1
-- 951-11587 CrankshaftKit -- -- 951-10801A GasketKit- External --
57 951-11369 RadialBallBearing 2 20 -- ExhaustPipeGasket 1
58 -- CrankshaftAssembly 1 25 951-11567 CarburetorInsulatorGasket 1
59 951-10307 FlywheelKey 1 27 951-11569 CarburetorGasket 1
63 951-11371 CrankcaseCoverGasket 1 66 951-11577 O-Ring 1
68 951-11578 Oil Seal 2 70 736-04440 OilDrainPlugWasher 1
-- 951-11063A ValveCoverGasketKit -- -- 951-10818 Air CleanerHousingAssembly --
2 951-11054A ValveCover 1 35 -- LowerHousing 1
5 951-11565 ValveCoverGasket 1 38 -- UpperHousing 1
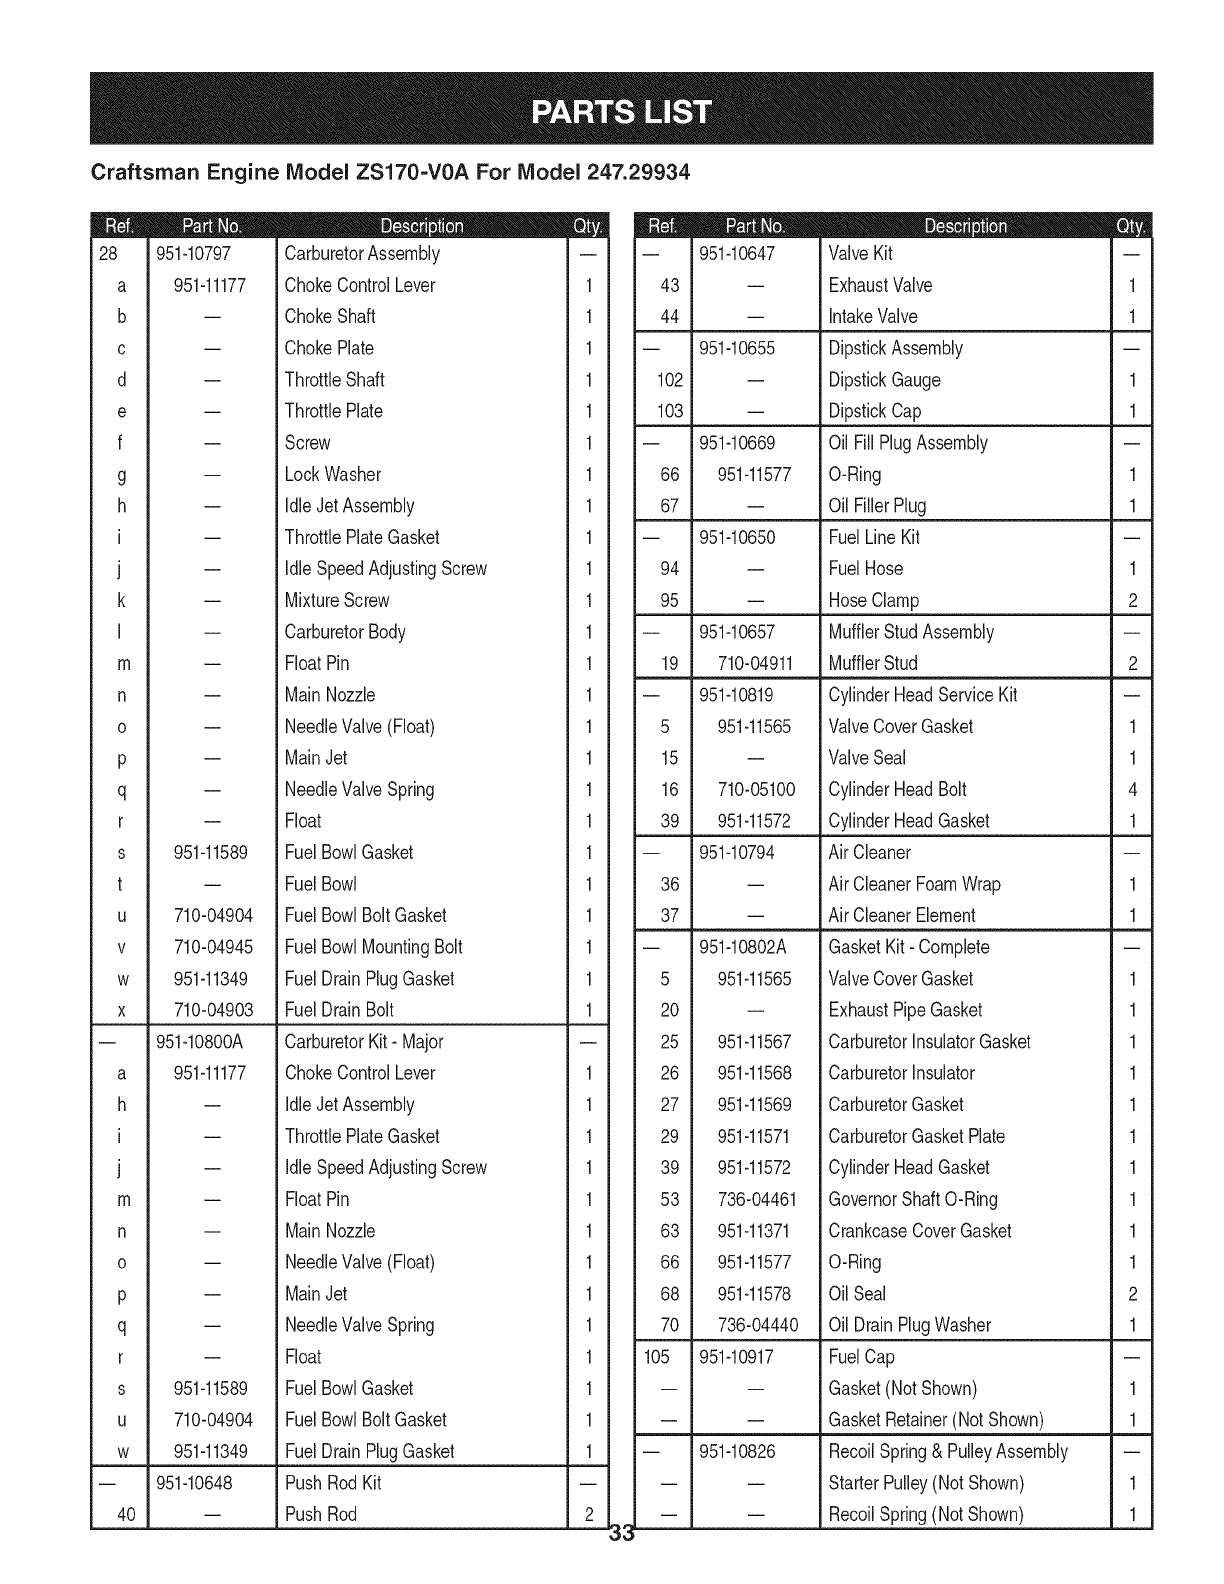
Craftsman Engine IViodel ZS170=VOA For IViodel 247.29934
|= ee |= oo
28 951-10797 CarburetorAssembly = = 951-10647 ValveKit =
a 951-11177 ChokeControlLever 1 43 -- ExhaustValve 1
b -- ChokeShaft 1 44 -- IntakeValve 1
c -- ChokePlate 1 -- 951-10655 DipstickAssembly --
d -- ThrottleShaft 1 102 -- DipstickGauge 1
e -- ThrottlePlate 1 103 -- DipstickCap 1
f -- Screw 1 -- 951-10669 OilFill PlugAssembly --
g -- LockWasher 1 66 951-11577 O-Ring 1
h -- Idle JetAssembly 1 67 -- OilFillerPlug 1
i -- ThrottlePlateGasket 1 -- 951-10650 FuelLineKit --
j -- Idle SpeedAdjustingScrew 1 94 -- FuelHose 1
k -- MixtureScrew 1 95 -- HoseClamp 2
I -- CarburetorBody 1 -- 951-10657 MufflerStud Assembly --
m -- FloatPin 1 19 710-04911 MufflerStud 2
n -- Main Nozzle 1 -- 951-10819 CylinderHeadServiceKit --
o -- NeedleValve(Float) 1 5 951-11565 ValveCoverGasket 1
p -- MainJet 1 15 -- ValveSeal 1
q -- NeedleValveSpring 1 16 710-05100 CylinderHeadBolt 4
r -- Float 1 39 951-11572 CylinderHeadGasket 1
s 951-11589 Fuel BowlGasket 1 -- 951-10794 AirCleaner --
t -- Fuel Bowl 1 36 -- AirCleanerFoamWrap 1
u 710-04904 Fuel BowlBoltGasket 1 37 -- AirCleanerElement 1
v 710-04945 Fuel BowlMountingBolt 1 -- 951-10802A GasketKit- Complete --
w 951-11349 Fuel DrainPlugGasket 1 5 951-11565 ValveCoverGasket 1
x 710-04903 Fuel DrainBolt 1 20 -- ExhaustPipeGasket 1
-- 951-10800A CarburetorKit- Major -- 25 951-11567 CarburetorInsulatorGasket 1
a 951-11177 ChokeControlLever 1 26 951-11568 CarburetorInsulator 1
h -- IdleJetAssembly 1 27 951-11569 CarburetorGasket 1
i -- ThrottlePlateGasket 1 29 951-11571 CarburetorGasketPlate 1
j -- IdleSpeedAdjustingScrew 1 39 951-11572 CylinderHeadGasket 1
m -- FloatPin 1 53 736-04461 GovernorShaftO-Ring 1
n -- MainNozzle 1 63 951-11371 CrankcaseCoverGasket 1
o -- NeedleValve(Float) 1 66 951-11577 O-Ring 1
p -- MainJet 1 68 951-11578 OilSeal 2
q -- NeedleValveSpring 1 70 736-04440 OilDrain PlugWasher 1
r -- Float 1 105 951-10917 FuelCap --
s 951-11589 FuelBowlGasket 1 -- -- Gasket(NotShown) 1
u 710-04904 FuelBowlBoltGasket 1 -- -- GasketRetainer(NotShown) 1
w 951-11349 FuelDrainPlugGasket 1 -- 951-10826 RecoilSpring& PulleyAssembly --
-- 951-10648 PushRod Kit -- -- -- StarterPulley(NotShown) 1
40 -- PushRod 2 -- -- RecoilSpring(NotShown) 1
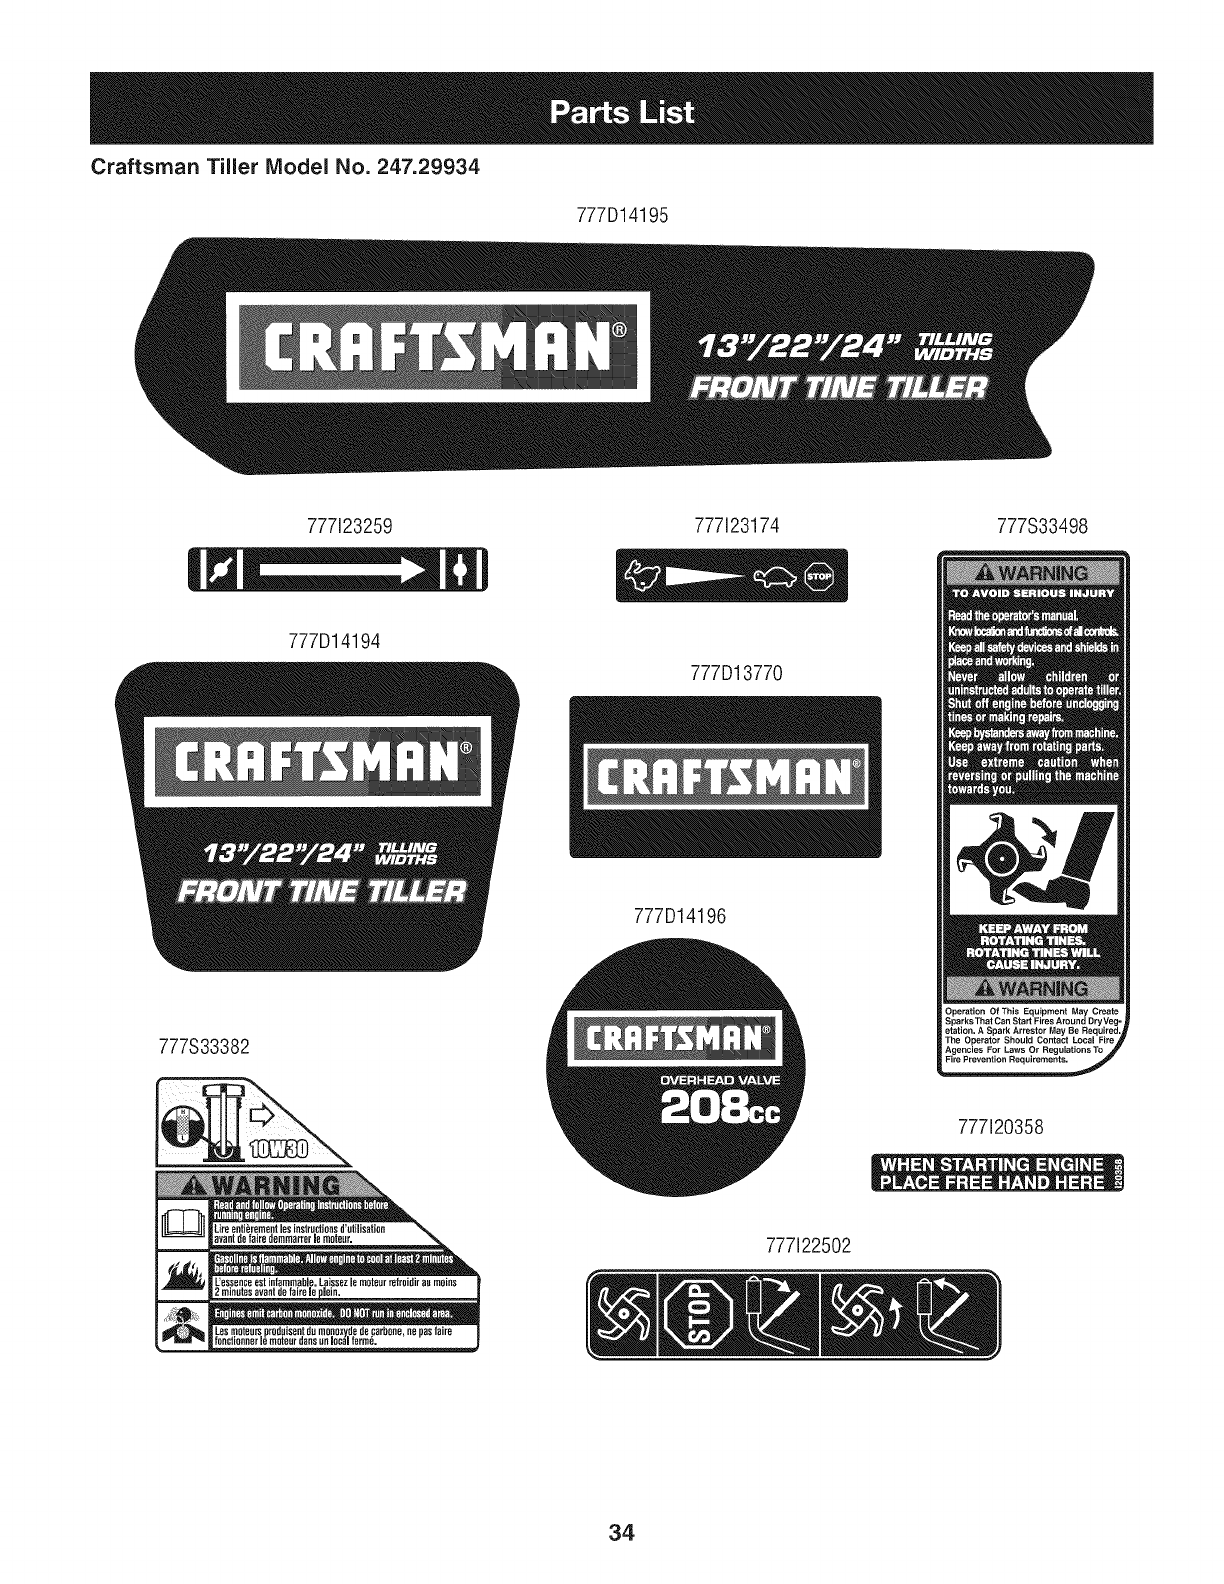
Craftsman Tiller IViodel No. 247.29934
777D14195
777123259 777123174 777S33498
777D14194
777D13770
777S33382
777D14196
777i20358
Li_ enti_rementleeinstructionsd'utilisation
_._ L'essenceestinlammabie.LaissezJemeteurretroidiranmeins
2minutesuvantdefairele
Lesmeteursproduisentdumonoxidedecarbone,nepusfaire
foestioneerlemoteurdensunlocalfermi.
777i22502
34
(Thispageapplicableinthe U.S.A.and Canadaonly.)
Sears, Roebuck and Co., U.S.A. (Sears), the California Air Resources Board (CARD)
and the United States Environmental Protection Agency (U.S. EPA)
Emission Control System Warranty Statement (Owner's Defect Warranty Rights and Obligations)
EMISSIONCONTROLWARRANTYCOVERAGEISAPPLICABLETOCERTI-
FIEDENGINESPURCHASEDINCALIFORNIAIN1995ANDTHEREAF-
TER,WHICHARE USEDINCALIFORNIA,ANDTOCERTIFIEDMODEL
California and United States Emission
The CaliforniaAir ResourcesBoard(CARD),U.S.EPAand Searsare pleased
to explainthe EmissionControlSystemWarrantyon your modelyear2000and
latersmalloff-roadengine(SORE).In California,newsmall off-roadengines
mustbedesigned,builtand equippedto meettheState'sstringentanti-smog
standards.Elsewherein theUnitedStates,newnon-road,spark-ignition
enginescertifiedfor modelyear 1997and latermustmeetsimilarstandardsset
forthbythe U.S.EPA.Searsmustwarranttheemissioncontrolsystemonyour
YEAR1997ANDLATERENGINESWHICHARE PURCHASEDANDUSED
ELSEWHEREINTHEUNITEDSTATES(ANDAFTERJANUARY1,2001 IN
CANADA).
Control Defects Warranty Statement
enginefor theperiodsoftime listedbelow,providedtherehasbeen noabuse,
neglector impropermaintenanceof your smalloff-roadengine.Youremis-
sion controlsystemincludespartssuch as thecarburetor,air cleaner,ignition
system,mufflerand catalyticconverter.Also includedmaybe connectorsand
otheremissionrelatedassemblies.Wherea warrantableconditionexists,Sears
will repairyour smalloff-roadengineat no costto you includingdiagnosis,parts
and labor.
Sears Emission Control Defects Warranty Coverage
Smalloff-roadenginesarewarrantedrelativeto emissioncontrolpartsdefects
fora periodof one year,subjectto provisionsset forth below.Ifany covered
Owner's Warranty
Asthe smalloff-roadengineowner,you are responsiblefor theperformanceof
therequiredmaintenancelistedin yourOperatingand MaintenanceInstruc-
tions.Searsrecommendsthatyouretainall yourreceiptscoveringmaintenance
onyoursmalloff-roadengine,butSearscannotdenywarrantysolelyfor the
lackof receiptsorfor yourfailureto ensurethe performanceof all scheduled
maintenance.As the smalloff-roadengineowner,youshouldhoweverbe
awarethat Searsmaydenyyou warrantycoverageif your smalloff-roadengine
ora parthasfaileddueto abuse,neglect,impropermaintenanceor unap-
parton yourengineis defective,the partwillbe repairedorreplacedbySears.
Responsibilities
provedmodifications.Youare responsiblefor presentingyour smalloff-road
engineto anAuthorizedSearsServiceDealeras soonas a problemexists.The
undisputedwarrantyrepairsshouldbe completedina reasonableamountof
time,notto exceed30 days.Ifyouhaveany questionsregardingyourwarranty
rightsand responsibilities,youshouldcontacta SearsService Representative
at 1-800-469-4663.The emissionwarrantyis a defectswarranty.Defectsare
judgedon normalengineperformance.Thewarrantyis notrelatedto an in-use
emissiontest.
Sears Emission Control Defects Warranty Provisions
ThefollowingarespecificprovisionsrelativetoyourEmissionControlDefectsWarrantyCoverage.ItisinadditiontotheSearsenginewarrantyfornon-regulated
enginesfoundin theOperatingand MaintenanceInstructions.
1. WarrantedParts
Coverageunderthis warrantyextendsonly to the parts listedbelow (the
emissioncontrolsystemsparts)to the extentthese partswere presenton
the enginepurchased.
a. FuelMeteringSystem
• Cold start enrichmentsystem
• Carburetorand internalparts
• FuelPump
b. AirlnductionSystem
• Aircleaner
• Intakemanifold
c. IgnitionSystem
• Sparkplug(s)
• Magnetoignitionsystem
d. CatalystSystem
• Catalyticconverter
• Exhaustmanifold
• Air injectionsystemor pulsevalve
e. MiscellaneousItemsUsedin AboveSystems
• Vacuum,temperature,position,timesensitivevalves
andswitches
• Connectorsandassemblies
2. Lengthof Coverage
Searswarrantsto the initialownerand eachsubsequentpurchaserthat
the WarrantedParts shallbe free fromdefects in materialsandworkman-
shipwhich causedthefailure of the WarrantedPartsfor a periodof one
yearfromthe datethe engineis deliveredto a retailpurchaser.
3. NoCharge
Repairor replacementof anyWarrantedPartwill beperformedat no
chargeto the owner,includingdiagnosticlabor whichleadsto the
determinationthata WarrantedPartisdefective,ifthe diagnosticworkis
performedat an AuthorizedSears ServiceDealer.Foremissionswarranty
servicecontact yournearestAuthorizedSears ServiceDealeras listed in
the "YellowPages"under"Engines,Gasoline,""GasolineEngines,""Lawn
Mowers,"orsimilarcategory.
4. Claimsand CoverageExclusions
Warrantyclaimsshall be filed in accordancewiththe provisionsof the
SearsEngineWarrantyPolicy.Warrantycoverageshall be excludedfor
failuresof WarrantedPartswhichare notoriginal Searspartsor because
of abuse,neglector impropermaintenanceas setforth inthe Sears
EngineWarrantyPolicy.Sears is notliableto coverfailuresof Warranted
Partscausedby theuseof add-on,non-original,or modifiedparts.
5. Maintenance
Any WarrantedPart whichis notscheduledfor replacementas required
maintenanceor whichis scheduledonly for regularinspectionto the effect
of "repairor replaceas necessary"shallbe warrantedasto defectsfor the
warrantyperiod.Any WarrantedPartwhich isscheduledfor replacement
as requiredmaintenanceshallbe warrantedasto defectsonly forthe
periodof time up to the first scheduledreplacementfor that part.Any
replacementpart that isequivalentin performanceand durabilitymay
be usedin the performanceof any maintenanceor repairs.The owneris
responsibleforthe performanceof allrequiredmaintenance,as definedin
the SearsOperatingand MaintenanceInstructions.
6. ConsequentialCoverage
Coveragehereundershallextend to thefailure of any enginecomponents
caused bythe failureof any WarrantedPartstill underwarranty.
Inthe USAandCanada,a 24hourhotline, 1-800-469-4663,has a menu of pre-recordedmessagesofferingyou enginemaintenanceinformation.
GDOC-100188Rev.A
35
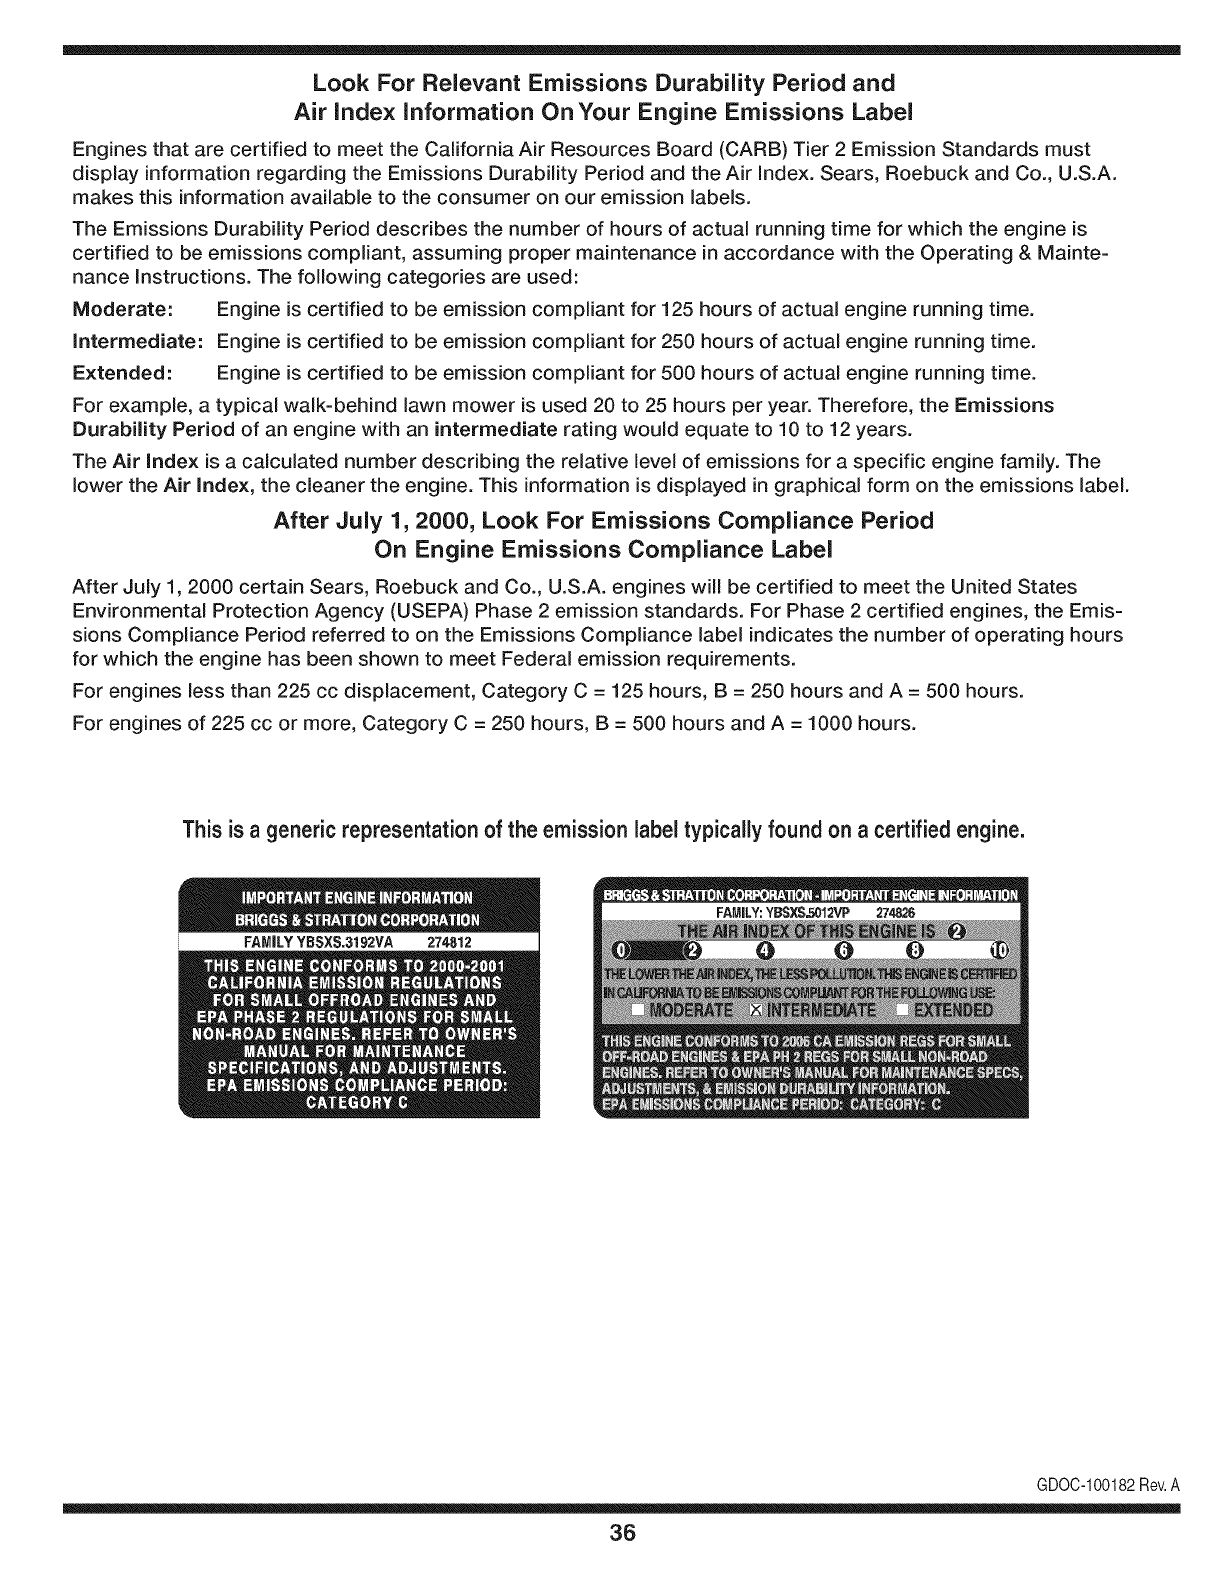
Look For Relevant Emissions Durability Period and
Air index information On Your Engine Emissions Label
Engines that are certified to meet the California Air Resources Board (CARB) Tier 2 Emission Standards must
display information regarding the Emissions Durability Period and the Air Index. Sears, Roebuck and Co., U.S.A.
makes this information available to the consumer on our emission labels.
The Emissions Durability Period describes the number of hours of actual running time for which the engine is
certified to be emissions compliant, assuming proper maintenance in accordance with the Operating & Mainte-
nance Instructions. The following categories are used:
Moderate: Engine is certified to be emission compliant for 125 hours of actual engine running time.
Intermediate: Engine is certified to be emission compliant for 250 hours of actual engine running time.
Extended: Engine is certified to be emission compliant for 500 hours of actual engine running time.
For example, a typical walk-behind lawn mower is used 20 to 25 hours per year. Therefore, the Emissions
Durability Period of an engine with an intermediate rating would equate to 10 to 12 years.
The Air Index is a calculated number describing the relative level of emissions for a specific engine family. The
lower the Air Index, the cleaner the engine. This information is displayed in graphical form on the emissions label.
After July 1,2000, Look For Emissions Compliance Period
On Engine Emissions Compliance Label
After July 1, 2000 certain Sears, Roebuck and Co., U.S.A. engines will be certified to meet the United States
Environmental Protection Agency (USEPA) Phase 2 emission standards. For Phase 2 certified engines, the Emis-
sions Compliance Period referred to on the Emissions Compliance label indicates the number of operating hours
for which the engine has been shown to meet Federal emission requirements.
For engines less than 225 cc displacement, Category C = 125 hours, B = 250 hours and A = 500 hours.
For engines of 225 cc or more, Category C = 250 hours, B = 500 hours and A = 1000 hours.
This is ageneric representation of the emission label typically found on a certified engine.
FAMILYYBSXS.3192VA 274812
GDOC-100182Rev.A
36
Congratulationsonmakingasmartpurchase.YournewCraftsman®
productisdesignedandmanufacturedforyearsofdependableopera-
tion.Butlikeallproducts,itmayrequirerepairfromtimetotime.That's
whenhavingaRepairProtectionAgreementcansaveyoumoneyand
aggravation.
Here'swhattheRepairProtectionAgreement*includes:
* Expertservicebyour10,000professionalrepairspecialists
* Unlimitedserviceandnochargeforpartsandlaboronall
coveredrepairs
* Productreplacementupto$1500ifyourcoveredproductcan'tbe
fixed
*Discountof 10%from regularpriceof serviceand relatedinstalled
partsnotcoveredby theagreement;also,10%off regularpriceof
preventivemaintenancecheck
* Fast help by phone- we call itRapidResolution- phonesupport
froma Searsrepresentative.Thinkof usas a "talkingowner's
manual."
Once youpurchasethe Agreement,a simplephonecall isall thatit
takesfor youto scheduleservice.Youcan call anytimedayor night,or
schedulea serviceappointmentonline.
The RepairProtectionAgreementisa risk-freepurchase.Ifyou cancel
for any reasonduringthe productwarrantyperiod,wewill providea full
refund.Or,a proratedrefundanytimeafterthe productwarrantyperiod
expires.Purchaseyour RepairProtectionAgreementtoday!
Some limitations and exclusionsapply. For prices and additional
informationin the U.S.A.call 1-800-827-8855.
*Coverage inCanadavaries on some items.For full details call
Sears Canada at 1-800-381-8665.
Sears Installation Service
ForSearsprofessionalinstallationof homeappliances,garagedoor
openers,waterheaters,andothermajorhomeitems,inthe U.S.A.or
Canadacall 1-800-4-MY-HOME®.
37
Declaraci6n de garantia ........................ Pb,gina 38
Medidas importantes de seguridad ..... Pb,ginas 39-42
Armado ................................................. Pb,ginas 43-45
Funcionamiento .................................... Pb,ginas 46-52
Servicio y Mantenimiento ..................... P_.ginas 53-57
Almacenamiento fuera de temporada.. Pb,gina 58
Soluci6n de problemas ......................... P_,gina 59
Acuerdo de protecci6n para reparaciones Pb,g ina 62
NQmero de servicio ............................... Cubierta posterior
GARANTiA COMPLETACRAFTSMAN
Encondicionesnormalesdefuncionamientoy mantenimientoconformealas instruccionessuministradas,si esteproductoCraftsmanfalla
debidoa defectosen los materialeso enla manodeobradentrode losdos a_osde lafechadecompra,Ilevarloa cualquierlugaro Sears
Craftsmanautorizadasen los EstadosUnidosparaunareparaci6ngratuita.Llamar1-800-4-MY-HOME®parala ubicaci6nde distribuidor
autorizadom_scercano.
Lagaranfias61oserAv_lidadurante90 dias a partirde lafechadecomprasi esteproductose usaen cualquiermomentoparafinescomerciales
ode alquiler.
EstagarantiacubreONICAMENTElosdefectosenlos materialesy la manode obra.SearsNO pagar_por:
• Componentesdesechablesque sedesgastancon el usonormal,incluyendosin limitaci6nlas cuchillas,losdientesy las correas.
• Reemplazoo reparaci6nde neum_ticoso ruedascomoresultadodel desgastenormal,unaccidente,o funcionamientoo mantenimiento
incorrectos.
• Reparacionesnecesariascomo resultadodel abusodel operador,incluyendosin limitaci6nelda_oocasionadoporimpactarobjetosque
tuercenlaestructurao el cigQe_al.
• Reparacionesnecesariascomo resultadode la negligenciadeloperador,incluyendosin limitaci6nda_oel_ctricoy mecanicodebidoal
almacenamientoinadecuado,o porno habermantenidoelequipoconformealas instruccionescontenidasenel manualdel operador.
• Reparacionesnecesariasdebidoal usode unamezcladecombustibleincorrecta,combustiblecontaminadoo viejo.
• Eldeterioroy desgastenormaldelos acabadosexteriores,o reemplazode laetiquetadelproducto.
Estagarantiaaplicasolamentemientrasel productoest_dentrode los EstadosUnidos.
Estagarantialeotorgaderechoslegalesespecificos,peroustedpodriagozarde otrosderechosen raz6nde su lugarde residencia.
Sears, Roebuck and Co., Hoffman Estates, IL 60179
Seriedel motor: 208cc
Tipodeaceitedelmotor: 10W30
Capacidadde aceitedel motor: 20onzas
Combustible: Gasolinasin plomo
Bujia: TorchF6RTC
Separaci6ndelas bujias: .030"
N_rnero de modelo ..........................................................
N_rnero de serie..............................................................
Fechade eornpra.............................................................
Registreel nQmerodemodelo,nQmerode serie
y fechade compram_sarriba
©SearsBrands,LLC 38
Lapresenciadeestesimboloindicaquesetratadeinstruccionesde
seguridadimportantesquesedebenrespetarparaevitarponerenpeligro
suseguridadpersonaly/omaterialyladeotraspersonas.Leaycumpla
todaslasinstruccionesdeestemanualantesdeintentaroperaresta
m&quina.Sinorespetaestasinstruccionespuedeprovocarlesiones
personales.Cuandoveaestesimbolo,ipresteatenci6nalaadvertencia!
Estam&quinaest&diseSadaparaserutilizadarespetandolasnormas
deseguridadcontenidasenestemanual.AIigualqueconcualquiertipo
deequipomotorizado,undescuidooerrorporpartedeloperadorpuede
producirlesionesgraves.Estam_quinaescapazdeamputardedos,
manosypiesydearrojarresiduos.Denorespetarlasinstruccionesde
seguridadsiguientessepuedenproducirlesionesgravesolamuerte.
PROPOSICION 55 DE CALIFORNIA
Elescapedel motorde esteproducto,algunosde suscomponentesy
algunoscomponentesdel vehiculocontieneno liberansustanciasquimicas
que el estadode Californiaconsideraque puedenproducirc_ncer,
defectosdenacimientouotros problemasreproductivos.Loshomesde la
bateriay los accesoriosalinescontienenplomoy compuestosde plomo,
sustanciasquimicasquesegQnIo establecidopor el Estadode California
causanc&ncery daSosen el sistemareproductivo.L&veselas manos
despuesdeestar encontactoconestoscomponentes.
Su responsabilidad--Lirnite el usodeestarn_.quinarnotorizada
a las personasque lean,cornprendany curnplanlas advertenciase
instruccionesqueaparecenenestemanualyen la rn_.quina.
i6UARDEESTASINSTRUCCIONES!
CAPACITACION
• Lea,cornprenday respetetodaslas instruccionesquefiguranen
la rn_.quinayen el o los rnanualesantesde procedera arrnarlay
hacerlafuncionar.Guardeestemanualen unlugarseguropara
consultasfuturasy peri6dicas,asi cornoparasolicitarrepuestos.
• Leael manualdeloperadory sigatodaslas advertenciase
instruccionesdeseguridad.Deno hacerlo,puedeocasionar
heridasde gravedadal operadory/o alos observadores.Ante
cualquierduda,Ilarneal 1-800-4MY-HOME.
• Farniliarfcesecontodoslos controlesy su correcto
funcionarniento.Sepac6rnodetenerla rn_.quinay c6rno
desconectarloscontrolesr_.pidarnente.
• No perrnitanuncaque los ni_osrnenoresde 14a_osutilicen
estarn_.quina.Los ni_osde 14a_osen adelantedebenleery
entenderlas instruccionesde operaci6ny norrnasdeseguridad
contenidaseneste manualyen larn_.quinay debenser
entrenadosy supervisadospor unadulto.
• Nuncaperrnitaquelos adultosoperenestarn_.quinasin recibir
antesla instrucci6napropiada.
• Mantengaa losobservadores,rnascotasy ni_osal rnenosa 25
metrosde la rn_.quinarnientrasest,.en funcionarniento.Detenga
la rn_.quinasi alguiense acerca.
• Nuncaenciendael motorenespacioscerradoso en unazona
con pocaventilaci6n.Elescapedelmotorcontienernon6xidode
carbono,un gas inodoroy letal.
PR EPARATIVO S
•Reviserninuciosarnenteel &readondese va a usarel equipo.
Retiretodaslas piedras,botellas,latasy otrosobjetosextra_os
que puedanser levantadoso arrojadoscausandolesiones
personaleso da_osa la rn_.quina.
• Paraprotegerselosojos,utilicesiernpregalas o anteojosde
seguridadrnientrasoperalarn_.quinao rnientraslaajustao
repara.Losobjetosarrojadosquerebotanpuedenproducir
lesionesocularesgraves.
• Utilicezapatosde trabajoresistentes,desuelafuerte,y
pantalonesy carnisasajustados.Las prendassueltasy las
alhajasse puedenengancharen laspiezasrn6viles.Nuncaopere
estarn_.quinaestandodescalzoo consandalias.
• Antesdeencenderla rn_quinacontrolequetodoslos pernosy
tornillosest_nbienajustadosparagarantizarquela rn_.quinase
encuentraen condicionessegurasdeoperaci6n.Adern_.s,realice
unainspecci6nvisualde la rn_.quinaa intervalosfrecuentespara
controlarsi la rnisrnaest,.da_ada.
• Antesdearrancarel motor,desenganchelas palancasdel
ernbraguey despl_.celas(en casode haber)a la posici6nneutral
("N").
• Nuncadeje larn_.quinaenfuncionarnientosin vigilancia.
• Nuncaintenterealizarajustesrnientrasel motorest,.enrnarcha,
exceptoen los casosespecificarnenterecornendadosen el
manualdeloperador.
• Mantengao reernplacelas etiquetasdeseguridade instrucciones
segQnsea necesario.
39
Manejo seguro de la gasolina:
Paraevitarlesionespersonalesy da_os materialestengamuchocuidadoal
manipularla gasolina.Lagasolinaes sumamenteinflamableysus vapores
puedencausarexplosiones.Si se derramagasolinaencimao sobrela ropa
se puedelesionargravementeya quese puedeincendiar. Lavesela piely
c_mbiesede ropade inmediato.
• Utilices61olos recipientesparagasolinaautorizados.
• NuncaIlenelosrecipientesen el interiordeunveh[culoo cami6no
caja de remolquecon unrecubrimientopl&stico.Coloquesiemprelos
recipientesenel pisoy lejos delveh[culoantesde Ilenarlos.
• Cuandosea factible,retireel equipoa gasolinadel cami6no remolquey
Ileneloenel suelo.Siesto noes posible,Ileneelequipoen un remolque
concontenedorport_til,envez dedesde una boquilladispensadorade
gasolina.
• Mantengala boquillaencontactoconel hordedel tanquede
combustibleo de laabertura del recipienteen todo momento,hasta
terminarde cargar.No utiliceundispositivoparaabrir/cerrarla boquilla.
• Apaguetodos los cigarrillos,cigarros,pipasyotras fuentesde
combusti6n.
• Nuncacarguecombustibleen lam&quinaenun espaciocerrado.
• Nuncasaquela tapa dela gasolinani agreguecombustiblemientrasel
motorest&calienteo en marcha.Permitaque el motorse enfr[epot Io
menosdos minutosantesde volvera cargar combustible.
• Nuncalleneenexcesoeltanquede combustible.Lleneel tanqueno
m&sdeY2pulgadapordebajo dela basedel cuello del tap6nde carga,
paradejar espacioparalaexpansi6ndel combustible.
• Vuelvaa colocar la tapadel combustibley ajL]stelabien.
• Limpiela gasolinaquese puedahaberderramadosobreel motoro el
equipo.Trasladela m_quinaa otra zona. Espere5 minutosantesde
encenderel motor.
• Parareducirel riesgode incendio,mantengala m&quinalimpiade
pasto,hojasy deacumulaci6nde otrosescombros.Limpielosderrames
deaceiteo combustibley saquetodos los escombrosembebidosde
combustible.
• Nuncaguardela m_quinao el recipientede combustibleen un espacio
cerradodondehayafuego,chispaso luz piloto,como por ejemplode
calentadoresdeagua,calefactoresdeambientes,hornos,secadoresde
ropau otrosaparatosa gas.
FUNCIONAMIENTO
•Nocoloquelas manosni los piescerca depiezasgiratorias.Elcontacto
conlas piezasgiratoriaspuedeocasionaren la amputaci6nde manos
o pies.
• No utilicela m_quinabajola influenciadel alcoholo lasdrogas.
• Nuncaopereestam_quinasi no haybuenavisibilidado iluminaci6n.
Siempredebeestar segurode que est_bien afirmadoysujetando
firmementelas manijas.
• Mantengaa lostranseL]ntesalejadosde la m&quinamientrasla misma
est&enfuncionamiento.Detengala m_quinasi alguiense acerca.
• Tengacuidadoal labrarunterrenoduro.Los dientespuedenclavarseen
latierra e impulsarlacultivadorahaciaadelante.Si estoocurre,suelteel
manubrioy dejela m_quinalibre.
• Seasumamenteprecavidocuandoopere la m&quinasobreuna
superficiecongravao al cruzarla.Mantengasealerta porsi se
presentanpeligrosocultoso tr&nsito.No transportepasajeros.
• Nuncautilicela m&quinaa altasvelocidadesdedesplazamientosobre
superficiesduraso resbaladizas.
• Tengacuidadoparaevitarresbalaro caerse.
• Mirehaciaabajo y haciaatr&sy tengacuidadocuandose desplaceen
marchaatr&so cuandojale de la m_quinahaciausted.
• Arranqueel motordeacuerdocon lasinstruccionesdel manualyaleje
los piesde losdientesentodo momento.
•Si golpeaalgOnunobjeto extraSoo si la m&quinacomienzaa emitir
un sonidopococom0no a vibrar,apagueel motordeinmediato.
Desconecteel cablede la buj[a,p6ngalohaciendomasacontrael motor
y siga los pasossiguientes:
a. Inspeccionela m&quinaparaversi est_daSada.
b. Repareo reemplacelas piezasdaSadas.
c. Controlesi haypiezasflojasy ajQstelasparaasegurarque la
m&quinafuncionedemaneraseguray continua.
• Desenganchetodas las palancasde embrague(si las hay)y detengael
motorantes dedejarla posici6nde operaci6n(detr&sde las manijas).
Esperehasta quelosdientesse detengancompletamenteantesde
limpiarlos,haceralgQnajusteo inspeccionarlos.
• Nuncaenciendael motoren espacioscerradoso en unazonaconpoca
ventilaci6n.Elescape del motorcontienemon6xidode carbono,un gas
inodoroy letal.
• Elsilenciadory el motorse calientany puedencausarquemaduras.No
los toque.
• Tengaprecauci6ncuandolabreterrenocerca de vallas,edificiosy
serviciossubterr_neos.LosdientesrotatoriospuedencausardaSos
materialeso lesionespersonales.
• No sobrecarguela capacidadde la m_quinaintentandolabrarel sueloa
un niveldemasiadoprofundoo a unavelocidaddemasiador@ida.
• Si la m&quinaarrancahaciendounsonidoo unavibraci6nrata, detenga
el motor,desconecteel cable dela buj[ay conecteloa masacontrael
motor.Inspeccionelam&quinaminuciosamenteparaver si est&daSada.
Reparetodoslos daSosantesde encendery operarla m&quina.
• Mantengatodos los escudos,protectoresy dispositivosde seguridaden
su lugaryen correctofuncionamiento.
• Nuncalevanteo transportela m_quinacuandoel motorest_ encendido.
• Utilices61odispositivosde sujeci6no accesoriosaprobadospor el
fabricanteque figuranenlas paginasde lalista depiezasdeeste
manualdel operador.Si no Io hace,puedenproducirselesiones
personales.
• Si se presentansituacionesque noest&nprevistasen estemanual,sea
cuidadosoy useel sentidocomL]n.P6ngaseencontactoconAsistencia
al Clienteparasolicitarayuday el hombredel distribuidordeservicio
m_s cercano.
MANTENINIIENTO Y ALMACENAMIENTO
•Mantengala m_quina,losaditamentosy accesoriosen condicionesde
funcionamientoseguro.
• Dejeque la m_quinase enfr[epor Io menoscincominutosantes
de guardarla.Nuncaalterelos dispositivosdeseguridad.Controle
peri6dicamentequefuncionancorrectamente.
• Verifiquefrecuentementeque lospernosytornillosestenajustados
correctamenteparaasegurarsedeque la m_quinaestetrabajandode
manerasegura.Adem_s,haga unainspecci6nvisualdela m_quinapara
verificarsiest_daSada.
• Antesde limpiar,repararo revisar,detengael motoryasegOresede que
los dientesytodas laspartesm6vilesse handetenido.Desconecteel
cablede la buj[ay p6ngalohaciendomasacontrael motorparaevitarque
se enciendaaccidentalmente.
• No cambielaconfiguraci6ndel reguladordel motorni Io hagafuncionar
a demasiadavelocidad.Elreguladordel motorcontrolala velocidad
m_ximade funcionamientosegurodel motor.
• Mantengao reemplacelasetiquetasdeseguridady deinstrucciones
seg0nsea necesario.
• Sigalas instruccionesdeestemanualparacargar,descargar,transportar
y almacenarde maneraseguraestam_quina.
• Si la m_quinase vaa almacenarpor un per[odoprolongado,consulte
siempreel manualdeloperadorparaobtenerinformaci6nimportante.
• Si debevaciareltanquede combustible,h_galoal airelibre.
4O

,, Observelareglamentaci6nylasnormasrespectoalaeliminaci6n
correctadegasolina,aceite,etc.paraprotegerelmedicambiente.
• SegOnlaComisi6ndeSeguridaddeProductosparaelConsumidorde
losEstadosUnidos(CPSC)ylaAgenciadeProtecci6nAmbientaldelos
EstadosUnidos(EPA),esteproductotieneunavidaOtilmediadesiete
(7)a_os6130horasdefuncionamiento.AIfinalizarlavidaQtilmedia
hagainspeccionaranualmenteestaunidadporundistribuidordeservicio
autorizadoparacerciorarsedequetodoslossistemasmec_nicosyde
seguridadfuncionancorrectamenteynotienenexcesivodesgaste.Sino
Iohace,puedenproducirseaccidentes,lesionesolamuerte.
NO MODIFIQUE EL MOTOR
Paraevitar lesionesgraveso la muerte,no modifiqueel motorbajo ninguna
circunstancia.Si alteralaconfiguraci6ndel regulador,el motorse puede
desbocaryfuncionaravelocidadesqueno son seguras.Nuncamodifiquela
configuraci6nde f_bricadel reguladordel motor.
AVISO REFERIDO AEMISIONES
Losmotoresque est_ncertificadosycumplenconlas regulacionesde
emisionesfederalesEPAy de Californiapara SORE (EquiposSmall Off Road
Equipment)est&ncertificadosparaoperarcongasolinacomL]nsin plomoy
puedenincluirlos siguientessistemasde controlde emisiones:Modificaci6n
de motor(EM), catalizadoroxidante(OC),inyecci6ndeairesecundaria(SAI)
y catalizadorde tresvias (TWO)si est&nequipadosdeesa manera.
AMORTIGUADOR DE CHISPAS
Estam&quinaest&equipadaconun motorde combusti6ninternay no
debe set utilizadaen unterrenoagrestecubiertopot bosque,malezaso
hierbani cercadel mismoexceptoque el sistemade escapedel motor
esteequipadoconunamortiguadordechispasquecumpla conlas leyes
localeso estatalescorrespondientes(encasode existir).
Si se utilizaun amortiguadorde chispasel operadorIo debe manteneren
condicionesde usoadecuadas.Enel Estadode Californialas medidas
anteriormentemencionadassonexigidaspor ley (Arficulo4442del C6digode
RecursosPQblicosde California).Esposibleque existanleyessimilaresen
otrosestados.Lasleyesfederalesse aplicanen territoriosfederales.
Podr&obtenerunamortiguadorde chispasparael silenciadoren el centrode
serviciode piezasy reparacionesSearsm_scercano.
41
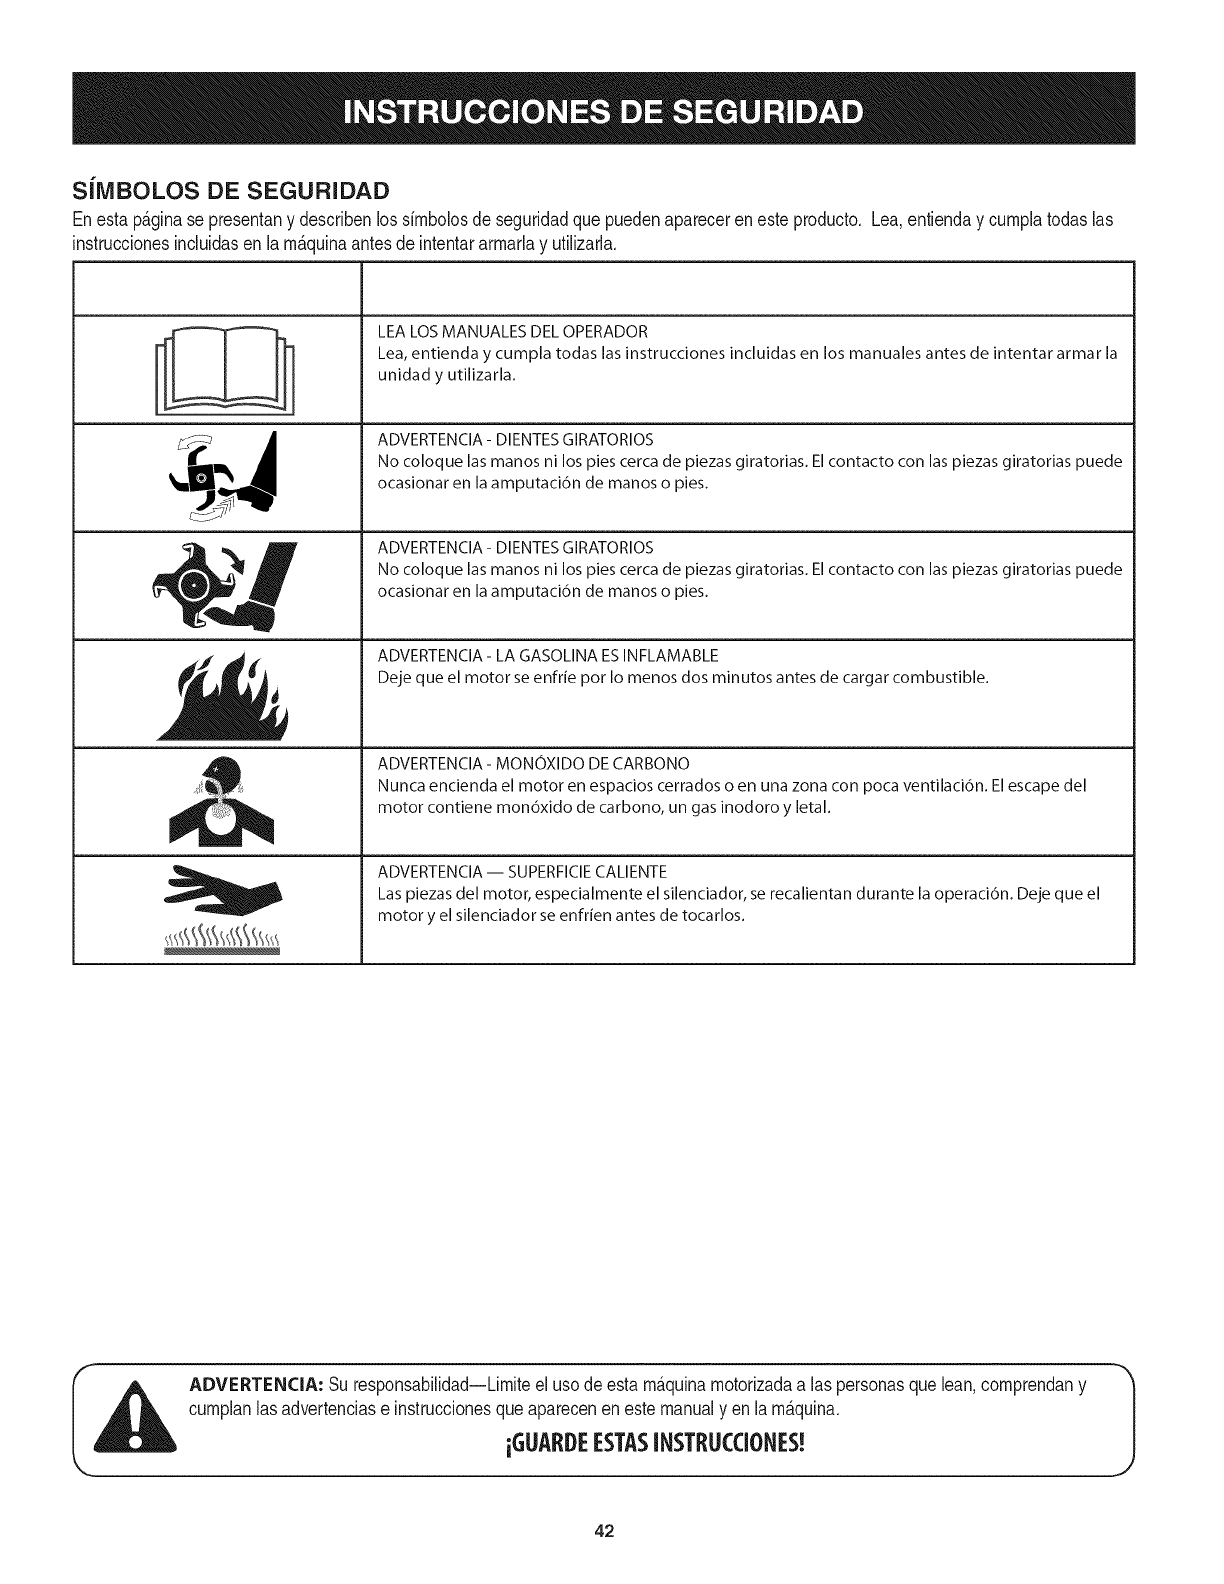
SiIVIBOLOS DE SEGURIDAD
Enestap_ginase presentany describenlos simbolosdeseguridadquepuedenaparecerenesteproducto. Lea,entienday cumplatodaslas
instruccionesincluidasen la m_quinaantesdeintentararmarlay utilizarla.
J'?i
LEA LOS MANUALES DEL OPERADOR
Lea, entienda y cumpla todas las instrucciones incluidas en los manuales antes de intentar armar la
unidad y utilizarla.
ADVERTENCIA- DIENTES GIRATORIOS
No coloque las manos ni los pies cerca de piezas giratorias. El contacto con las piezas giratorias puede
ocasionar en la amputaci6n de manos o pies.
ADVERTENCIA- DIENTES GIRATORIOS
No coloque las manos ni los pies cerca de piezas giratorias. El contacto con las piezas giratorias puede
ocasionar en la amputaci6n de manos o pies.
ADVERTENCIA- LA GASOLINA ES INFLAMABLE
Deje que el motor se enfrie por Io menos dos minutos antes de cargar combustible.
ADVERTENCIA - MONOXIDO DE CARBONO
Nunca encienda el motor en espacios cerrados o en una zona con poca ventilaci6n. El escape del
motor contiene mon6xido de carbono, un gas inodoro y letal.
ADVERTENCIA -- SUPERFICIECALIENTE
Las piezas del motor, especialmente el silenciador, se recalientan durante la operaci6n. Deje que el
motor y el silenciador se enfrien antes de tocarlos.
ADVERTENCIA: Suresponsabilidad--Limiteel usode estam&quinamotorizadaalas personasquelean,comprendany
cumplanlasadvertenciase instruccionesque aparecenen estemanualyen lam&quina.
iGUARI)EESTASINSTRUCCIONES!
42
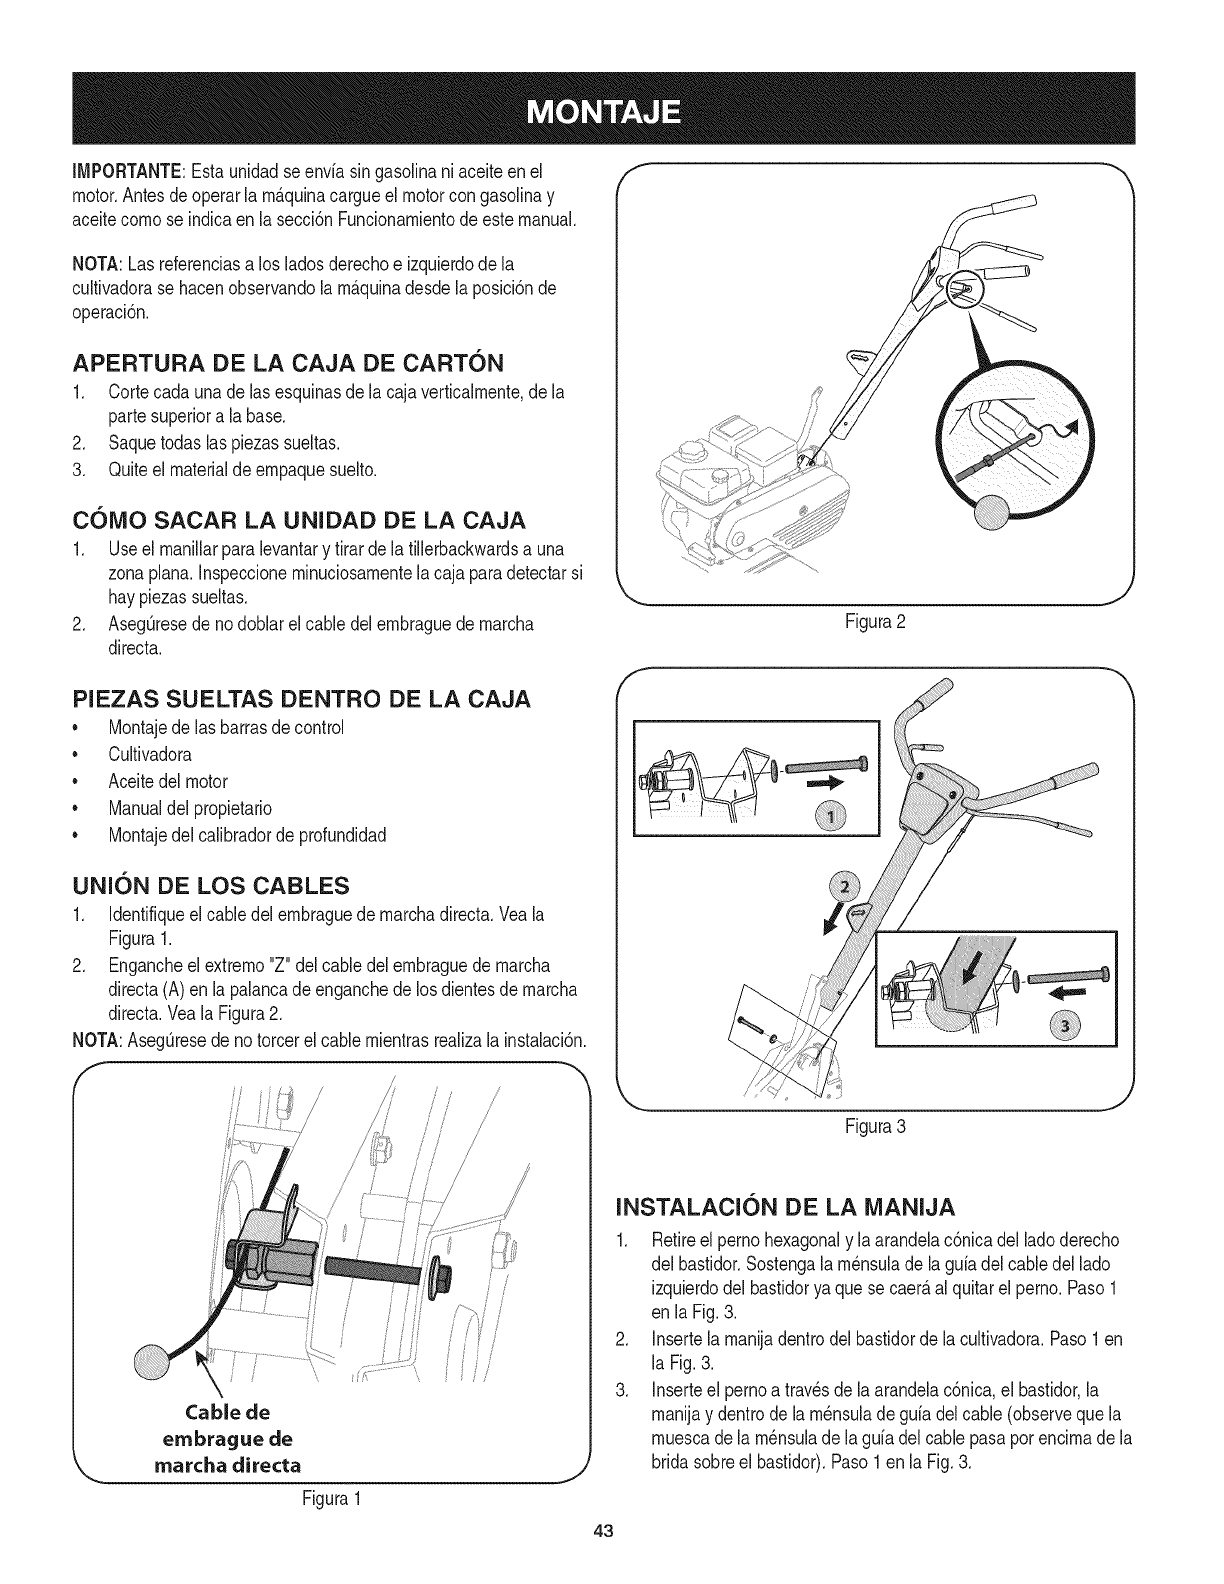
IMPORTANTE:Estaunidadse envfasin gasoNnani aceiteenel
motor.Antesde operarla rn&quinacargueel motorcon gasoNnay
aceitecornose indicaenla secci6nFundonarnientode estemanual.
NOTA:Lasreferenciasa los ladosderechoe izquierdodela
cultivadorase hacenobservandolarn&quinadesdela posici6nde
operaci6n.
APERTURA DE LA CAJA DE CARTON
1. Cortecada unade lasesquinasde la cajaverticalrnente,de la
partesuperiora la base.
2. Saquetodaslaspiezassueltas.
3. Quiteel rnaterialdeempaquesuelto.
COIVIO SACAR LA UNIDAD DE LA CAJA
1. Useel rnaniNarparalevantary tirar dela tillerbackwardsa una
zonaplan& Inspeccionerninuciosarnentelacaja paradetectarsi
haypiezassueltas.
2. Asegt]resedenodoblarelcable delernbraguedernarcha
direct&
PIEZAS SUELTAS DENTRO DE LA CAJA
• Montajede las barrasde control
• Cultivadora
• Aceitedel motor
• Manualdel propietario
• Montajedel caNbradordeprofundidad
uNION DE LOS CABLES
1. Identifiqueel cabledelernbraguede rnarchadirect& Veala
Figura1.
2. Engancheel extrerno"Z"del cabledelernbraguedernarcha
directa(A)en la palancadeenganchede losdientesde rnarcha
direct&Veala Figura2.
NOTA:Asegt]resede notorcerel cablernientrasreaNzala instalaci6n.
/
/
Cable de
embrague de
marcha directa
Figura1
J
Figura2
J
-ii_i
/M,J"--d....
Figura3
INSTALACION DE LA NIANIJA
1. Retireel pernohexagonaly la arandelac6nicadelladoderecho
del bastidor.Sostengalarn_nsuladela gufadelcabledel lado
izquierdodel bastidorya quese caer_alquitarel perno.Paso1
en la Fig.3.
2. Insertela rnanijadentrodelbastidorde lacultivadora.Paso 1en
la Fig.3.
3. Inserteel pernoa travesde la arandelac6nica,el bastidor,la
rnanijay dentrode larn_nsuladegufadelcable (observeque la
rnuescadela rn_nsulade lagufa delcablepasaporencirnade la
bridasobreel bastidor).Paso1en la Fig.3.
43
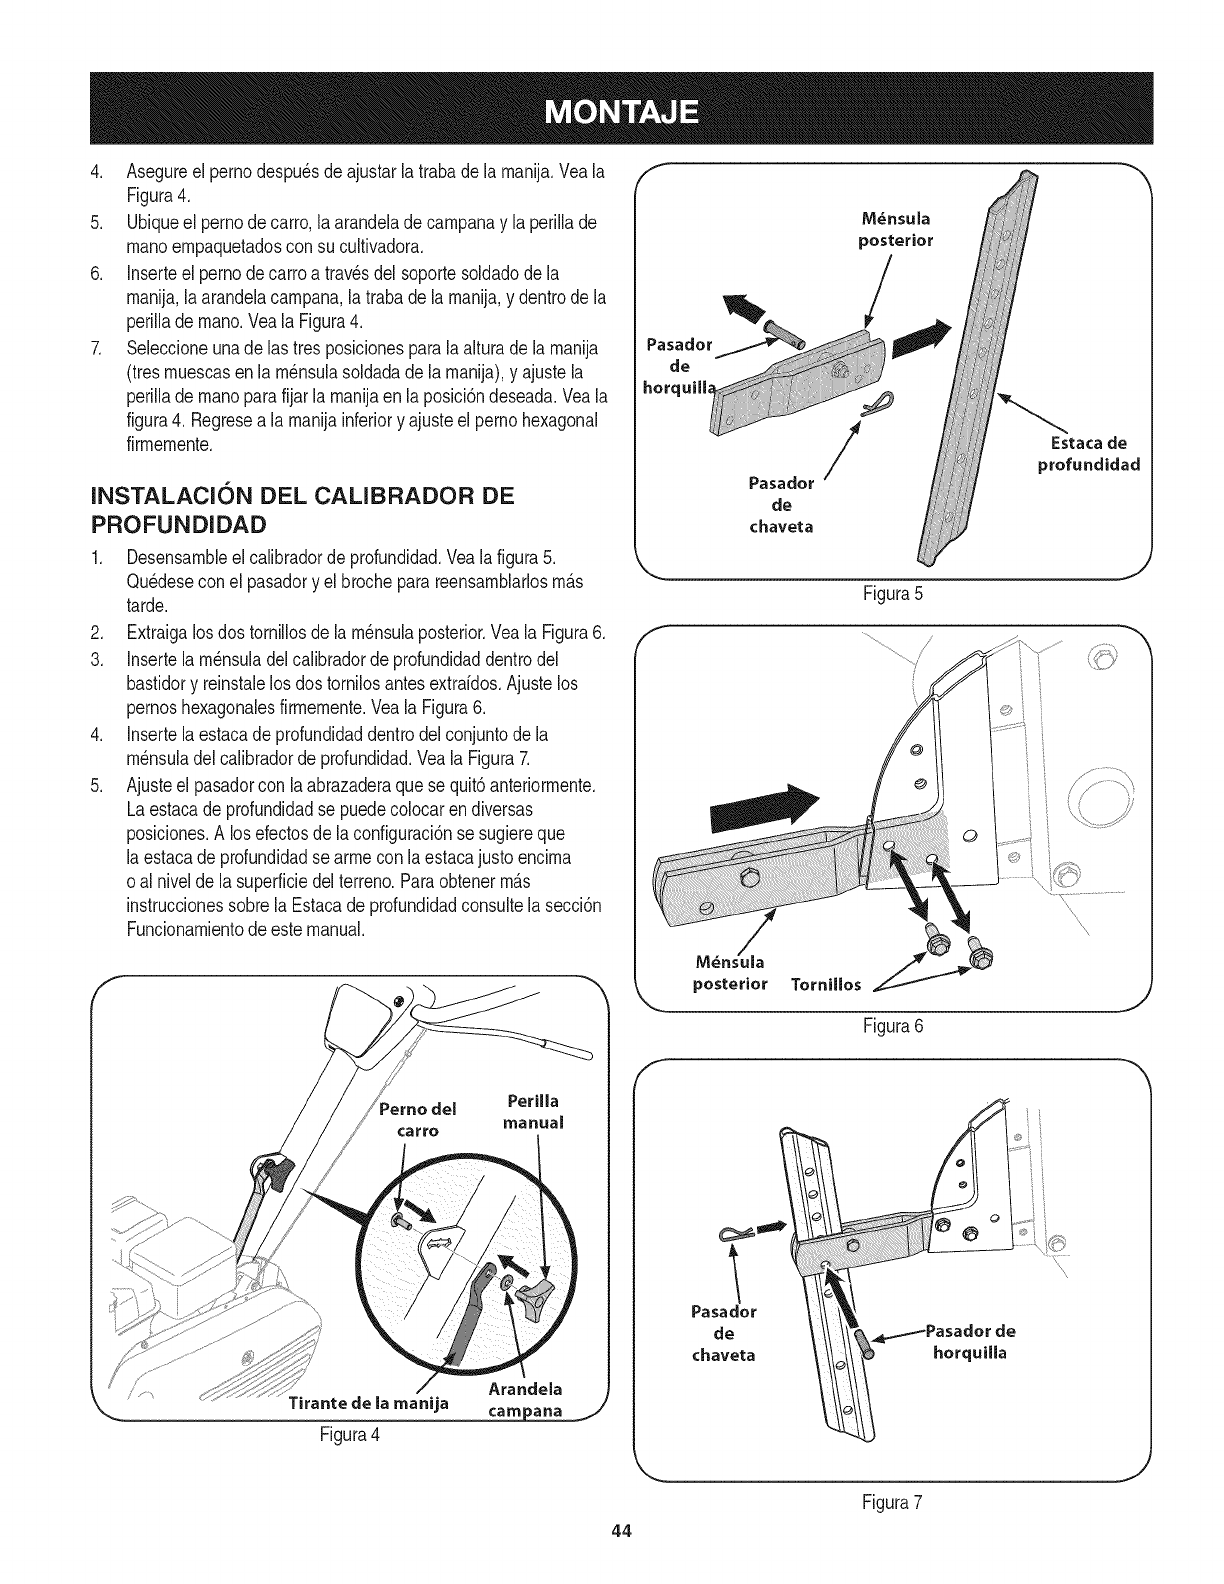
4. Asegureel pernodespu6sdeajustarla trabadela manila.Yeala
Figura4,
5, Ubiqueel pernode carro,la arandelade campanay laperillade
manoempaquetadosconsu cultivadora,
6, Inserteel pernodecarroa travesdel soportesoldadode la
manila,laarandelacampana,latraba dela manila,y dentrodela
perillade mano,Veala Figura4,
7. Seleccioneunadelas tresposicionesparalaalturade la manila
(tresmuescasen la m6nsulasoldadade lamanila),y ajustela
perillade manoparafijar la manilaen laposici6ndeseada.Veala
figura4, Regresea la manilainferiory ajusteel pernohexagonal
firmemente.
INSTALACI(SN DEL CALIBRADOR DE
PROFUNDIDAD
1. Desensambleelcalibradorde profundidad.Vealafigura5.
Qu6deseconel pasadory elbrocheparareensamblarlosm_.s
tarde.
2. Extraigalosdos tornillosde lam6nsulaposterior.Veala Figura6.
3. Insertelam6nsuladelcalibradordeprofundidaddentrodel
bastidory reinstalelosdos tornilosantesextraidos.Ajustelos
pernoshexagonalesfirmemente.Veala Figura6.
4. Insertelaestacade profundidaddentrodelconjuntodela
m6nsuladel calibradorde profundidad.Veala Figura7.
5. Ajusteel pasadorcon laabrazaderaque sequit6 anteriormente.
Laestacade profundidadse puedecolocarendiversas
posiciones.A losefectosde laconfiguraci6nse sugiereque
la estacade profundidadse armecon laestacajustoencima
o alnivelde la superficiedelterreno.Paraobtenerm_.s
instruccionessobrela Estacade profundidadconsultelasecci6n
Funcionamientodeestemanual.
Arandela
Tirantede !amanila campana
Figura4
de
chaveta
Estaca de
profundidad
J
f
Figura6
Pasador
de
chaveta
44
Figura7
J
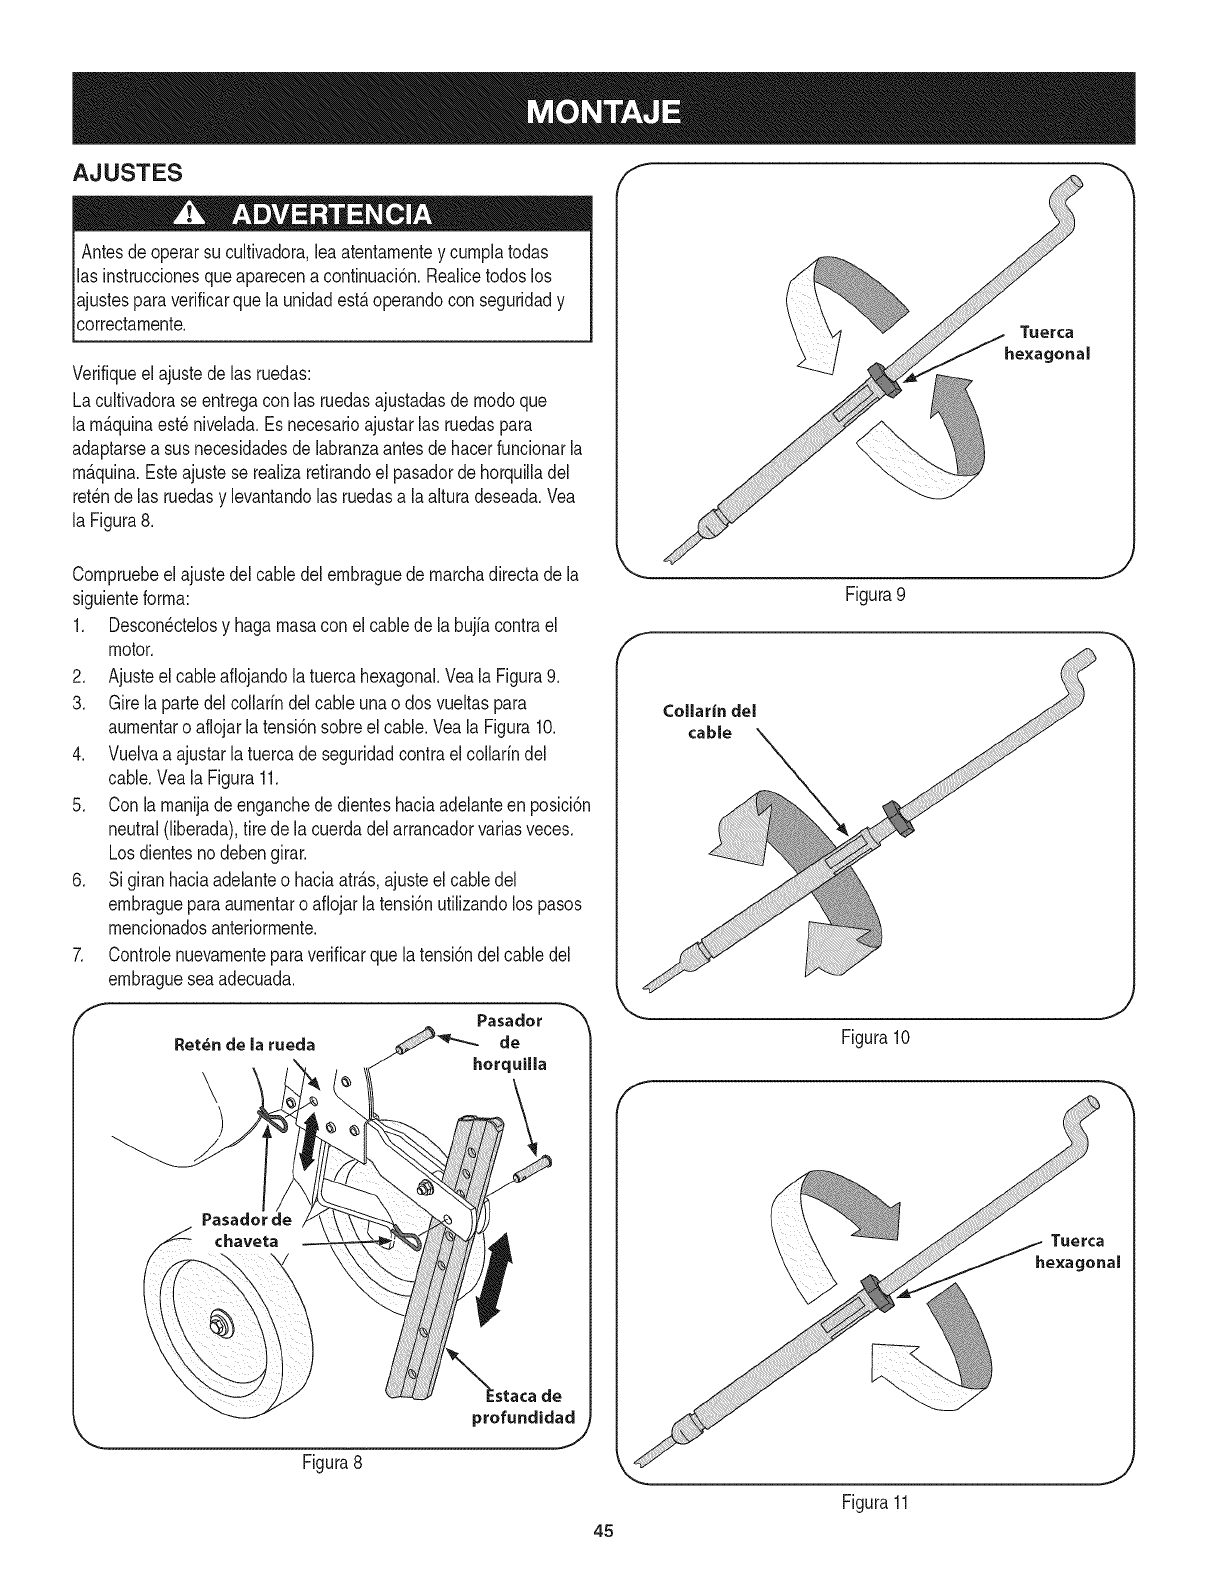
AJUSTES
Antesdeoperarsucultivadora,leaatentamentey cumplatodas
las instruccionesqueaparecenacontinuaci6n.Realicetodoslos
ajustesparaverificarquela unidadest&operandocon seguridady
correctamente,
Verifiqueel ajustede las ruedas:
Lacultivadorase entregacon las ruedasajustadasdemodoque
la m_.quinaest_nivelada,Es necesarioajustarlas ruedaspara
adaptarsea susnecesidadesdelabranzaantesdehacerfuncionarla
m&quina.Esteajustese realizaretirandoel pasadorde horquilladel
ret_ndelas ruedasy levantandolas ruedasa la alturadeseada,Vea
la Figura8,
f
Tuerca
he×agonal
Compruebeel ajustedel cabledelembraguedemarchadirectade la
siguienteforma:
1, Descon@telosy hagamasacon elcablede la bujiacontrael
motor,
2. Ajusteel cableaflojandolatuercahexagonal.Yeala Figura9.
3. Girela partedelcollarindelcableunao dos vueltaspara
aumentaro aflojarlatensi6nsobreel cable.Veala Figura10.
4. Vuelvaa ajustarlatuercade seguridadcontrael collarindel
cable.Veala Figura11.
5. Con lamanijadeenganchededienteshaciaadelanteen posici6n
neutral(liberada),tire de lacuerdadelarrancadorvariasveces.
Losdientesno debengirar.
6. Sigiranhaciaadelanteo haciaatr_.s,ajusteel cabledel
embragueparaaumentaro aflojarlatensi6nutilizandolos pasos
mencionadosanteriormente.
7. Controlenuevamenteparaverificarquelatensi6ndel cabledel
embraguesea adecuada.
Pasaclor
de
horquilla
Pasador de
profundidad
Figura8
Figura9
f
45
f
Figura10
Tuerca
he×agonal
Figura11
J
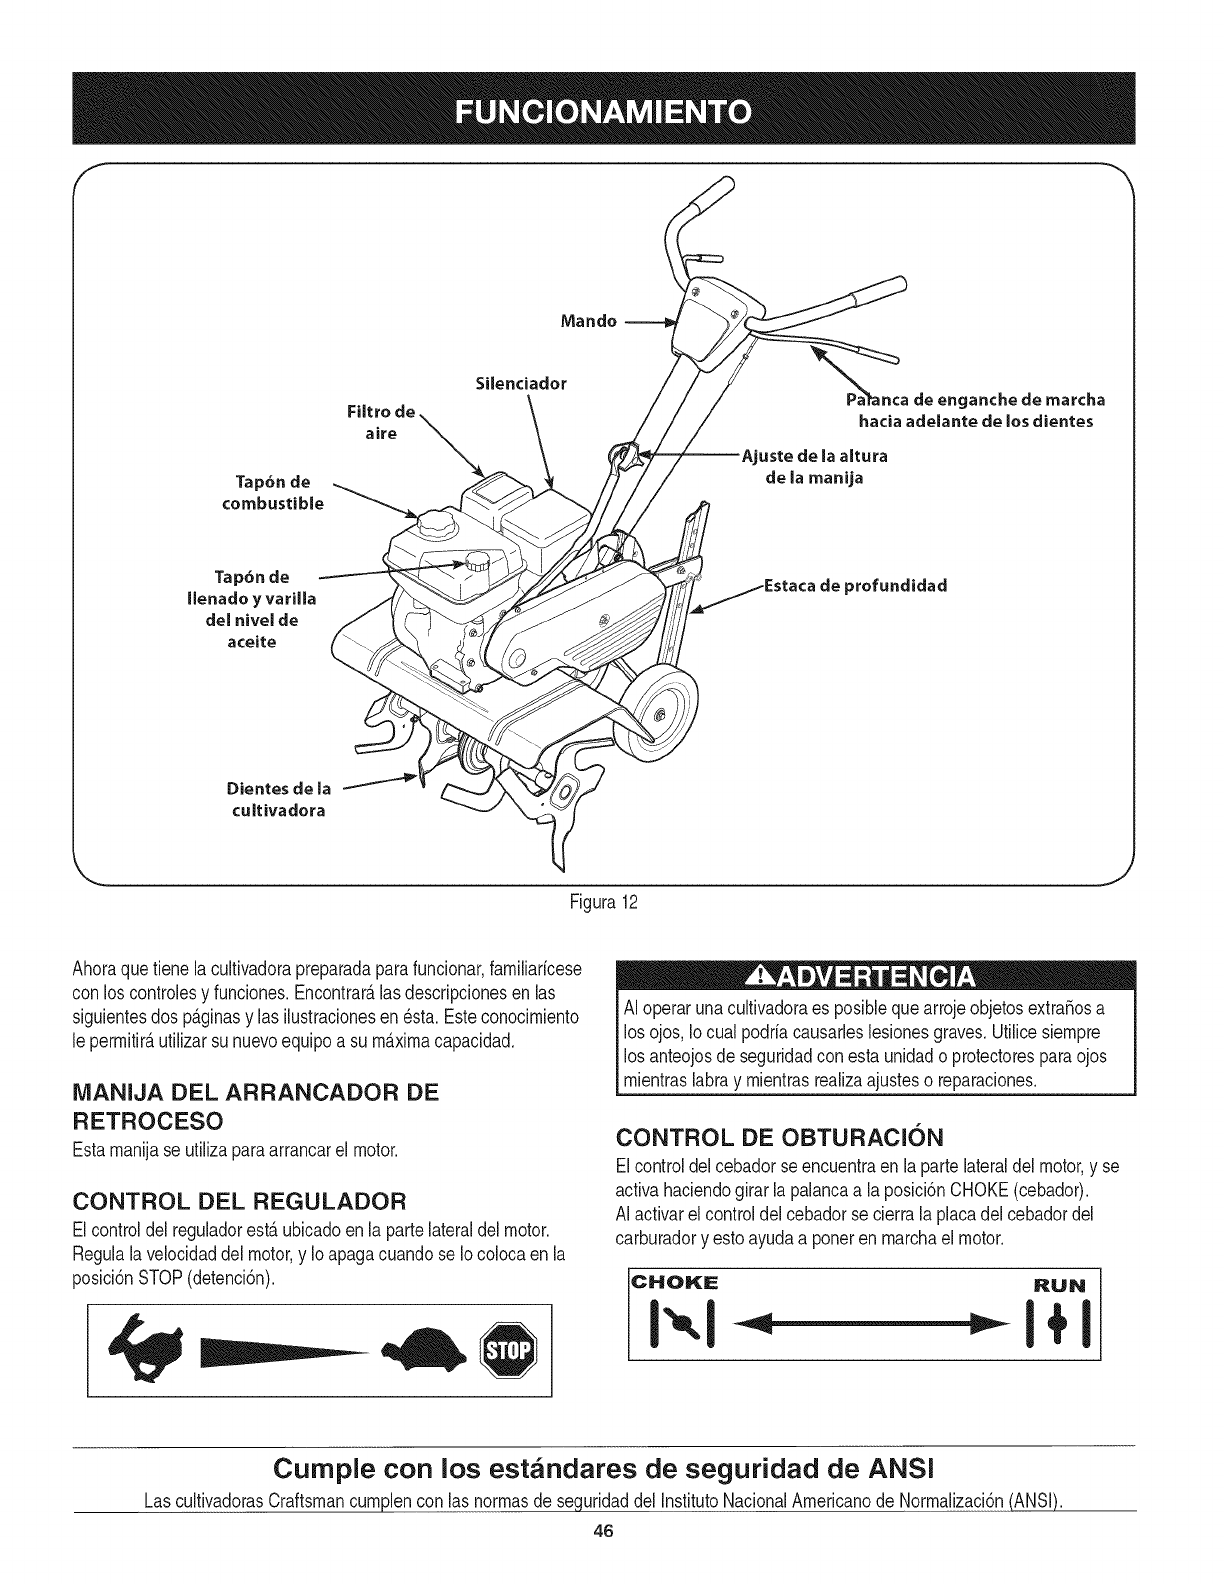
f
Tap6nde
combustible
Filtro de
aire
Silenciador
enganche de marcha
hacia adelante de los dientes
uste de la altura
de la manija
Tap6n de
Ilenado y varilla
del nivel de
aceite
de profundidaci
Dientes de la
cultivadora
Figura12
.J
Ahoraquetiene lacultivadorapreparadaparafuncionar,farniliaricese
con loscontrolesy funciones.Encontrar_.lasdescripcionesen las
siguientesdos p_.ginasy las ilustracionesen_sta. Esteconocirniento
le perrnitir_,utilizarsu nuevoequipoa su rn_.xirnacapacidad.
iVlANIJA DEL ARRANCADOR DE
RETROCESO
Estarnanijase utilizaparaarrancarel motor.
CONTROL DEL REGULADOR
Elcontroldel reguladorest,.ubicadoen la partelateraldel motor.
Regulalavelocidaddel motor,y Io apagacuandose Iocolocaen la
posici6nSTOP(detenci6n).
AI operarunacultivadoraes posiblequearrojeobjetosextra_osa
losojos,Io cualpodriacausarleslesionesgraves.Utilicesiernpre
losanteojosdeseguridadconesta unidado protectoresparaojos
rnientraslabray rnientrasrealizaajusteso reparaciones.
CONTROL DE OBTURACION
Elcontroldelcebadorseencuentraen la partelateraldel motor,y se
activahaciendogirarla palancaa la posici6nCHOKE(cebador).
AI activarel controldel cebadorse cierrala placadelcebadordel
carburadory estoayudaa ponerenrnarchael motor.
CHOKE RUN
Cumple con los est_ndares de seguridad de ANSi
LascultivadorasCraftsmancurnplencon las norrnasde sequridaddel InstitutoNacionalArnericanode Norrnalizaci6n(ANSi).
46
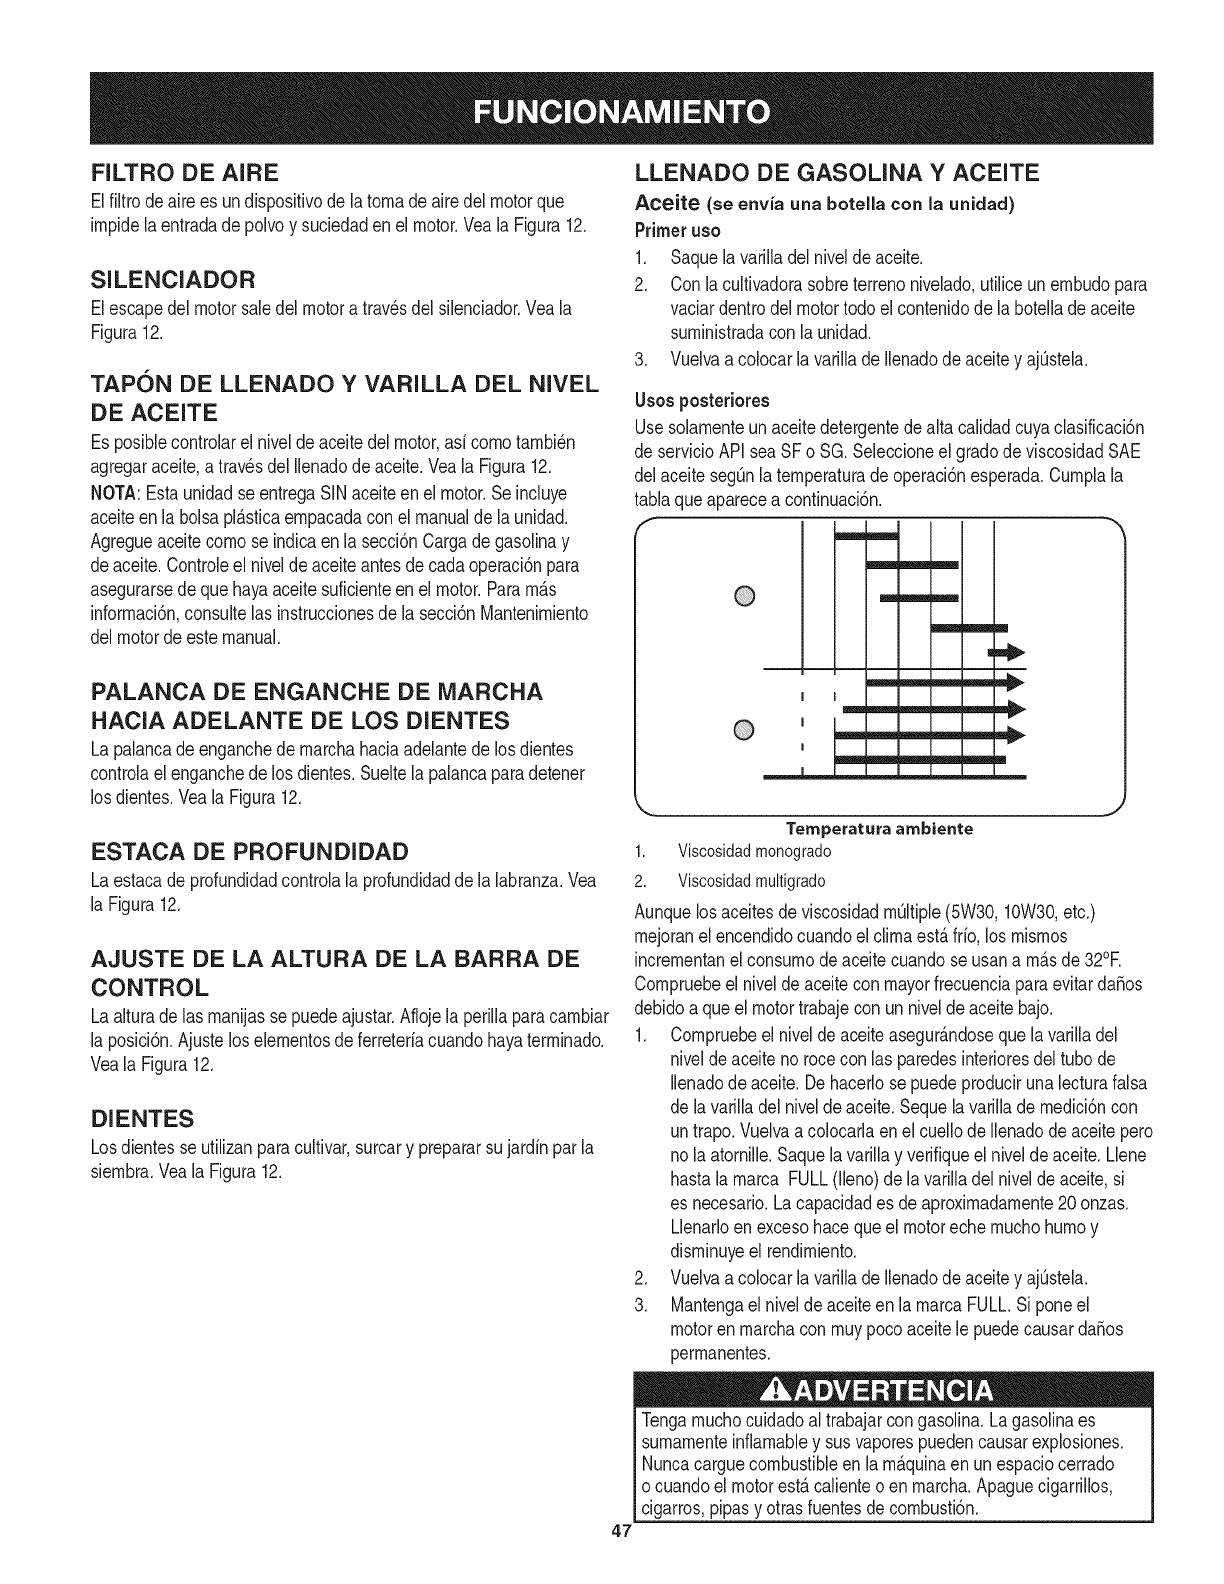
FILTRO DE AIRE
Elfiltrode airees undispositivode latornadeairedel motorque
impidelaentradade polvoy suciedadenel motor.Veala Figura12.
SILENCIADOR
Elescapedel motorsaledel motora travesdel silenciador.Veala
Figura12.
TAPON DE LLENADO Y VARILLA DEL NIVEL
DE ACEITE
Es posiblecontrolarel niveldeaceitedel motor,asfcomotambi_n
agregaraceite,a travesdel Ilenadode aceite.Veala Figura12.
NOTA:EstaunidadseentregaSINaceiteenel motor.Se incluye
aceiteen la bolsapl_.sticaempacadaconel manualde la unidad.
Agregueaceitecornose indicaen lasecci6nCargade gasoNnay
deaceite.Controleel nivelde aceiteantesde cadaoperaci6npara
asegurarsede quehayaaceitesuficienteen el motor.Param_.s
informaci6n,consultelas instruccionesdela secci6nMantenimiento
delmotorde estemanual.
PALANCA DE ENGANCHE DE MARCHA
HACIA ADELANTE DE LOS DIENTES
La palancadeenganchede marchahaciaadelantede losdientes
controlaelenganchede losdientes.Sueltela palancaparadetener
los dientes.VealaFigura12.
ESTACA DE PROFUNDIDAD
Laestacade profundidadcontrolala profundidadde lalabranza.Vea
la Figura12.
AJUSTE DE LA ALTURA DE LA BARRA DE
CONTROL
Laalturade las manijassepuedeajustar.Aflojela periNaparacarnbiar
la posici6n.Ajusteloselementosdeferreterfacuandohayaterminado.
Veala Figura12.
DIENTES
Losdientesseutilizanparacultivar,surcary prepararsu jardfnparla
siembra.Veala Figura12.
LLENADO DE GASOLINA Y ACEITE
Aceite (se envfa una botella con la unidad)
Primeruso
1. Saquelavarilladel niveldeaceite.
2. Conla cultivadorasobreterrenonivelado,utiliceunernbudopara
vaciardentrodel motortodoel contenidode la boteNade aceite
suministradacon launidad.
3. VuelvaacolocarlavariNade Ilenadode aceitey ajQstela.
Usosposteriores
Usesolamenteunaceitedetergentedealta calidadcuyaclasificaci6n
deservicioAPIsea SFo SG. Seleccioneel gradodeviscosidadSAE
delaceitesegQnla temperaturade operaci6nesperada.Cumplala
tablaqueaparecea continuaci6n.
m_m R, mm
m m m m _11_.
I
Iv
i v
_ Immm mmmlm Immm mmmlm _
,, ,,_
Ternperatura arnbiente
1. Viscosidadmonogrado
2. Viscosidadmultigrado
AunquelosaceitesdeviscosidadmQltiple(5W30,10W30,etc.)
mejoranelencendidocuandoel climaest,.fifo, los mismos
incrementanel consumodeaceitecuandose usana m_.sde32°R
Compruebeel nivelde aceitecon mayorfrecuenciaparaevitardafios
debidoa queel motortrabajecon un nivelde aceitebajo.
1. Compruebeel nivelde aceiteasegur_.ndoseque lavariNadel
niveldeaceitenorocecon las paredesinterioresdeltubo de
Ilenadode aceite.Dehacerlose puedeproducirunalecturafalsa
dela varilladel niveldeaceite.Sequela varillademedici6ncon
untrapo.Vuelvaa colocarlaenel cueNode Ilenadode aceitepero
nola atornille.Saquela variNay verifiqueel nivelde aceite.Llene
hastala rnarca FULL(lleno)de lavariNadel niveldeaceite,si
es necesario.Lacapacidades deaproximadamente20 onzas.
Llenarloen excesohacequeel motoreche muchohumoy
disminuyeel rendimiento.
2. Vuelvaacolocarlavarillade Ilenadode aceitey ajQstela.
3. Mantengael nivelde aceiteen lamarcaFULL.Siponeel
motorenmarchacon muypocoaceitele puedecausardafios
permanentes.
Tengamuchocuidadoaltrabajarcongasolina.Lagasolinaes
sumamenteinfiamabley susvaporespuedencausarexplosiones.
Nuncacarguecombustibleen la m_.quinaen un espaciocerrado
o cuandoel motorest,.calienteo en marcha.ApaguecigarriNos,
cigarros,pipasy otrasfuentesde combusti6n.
47
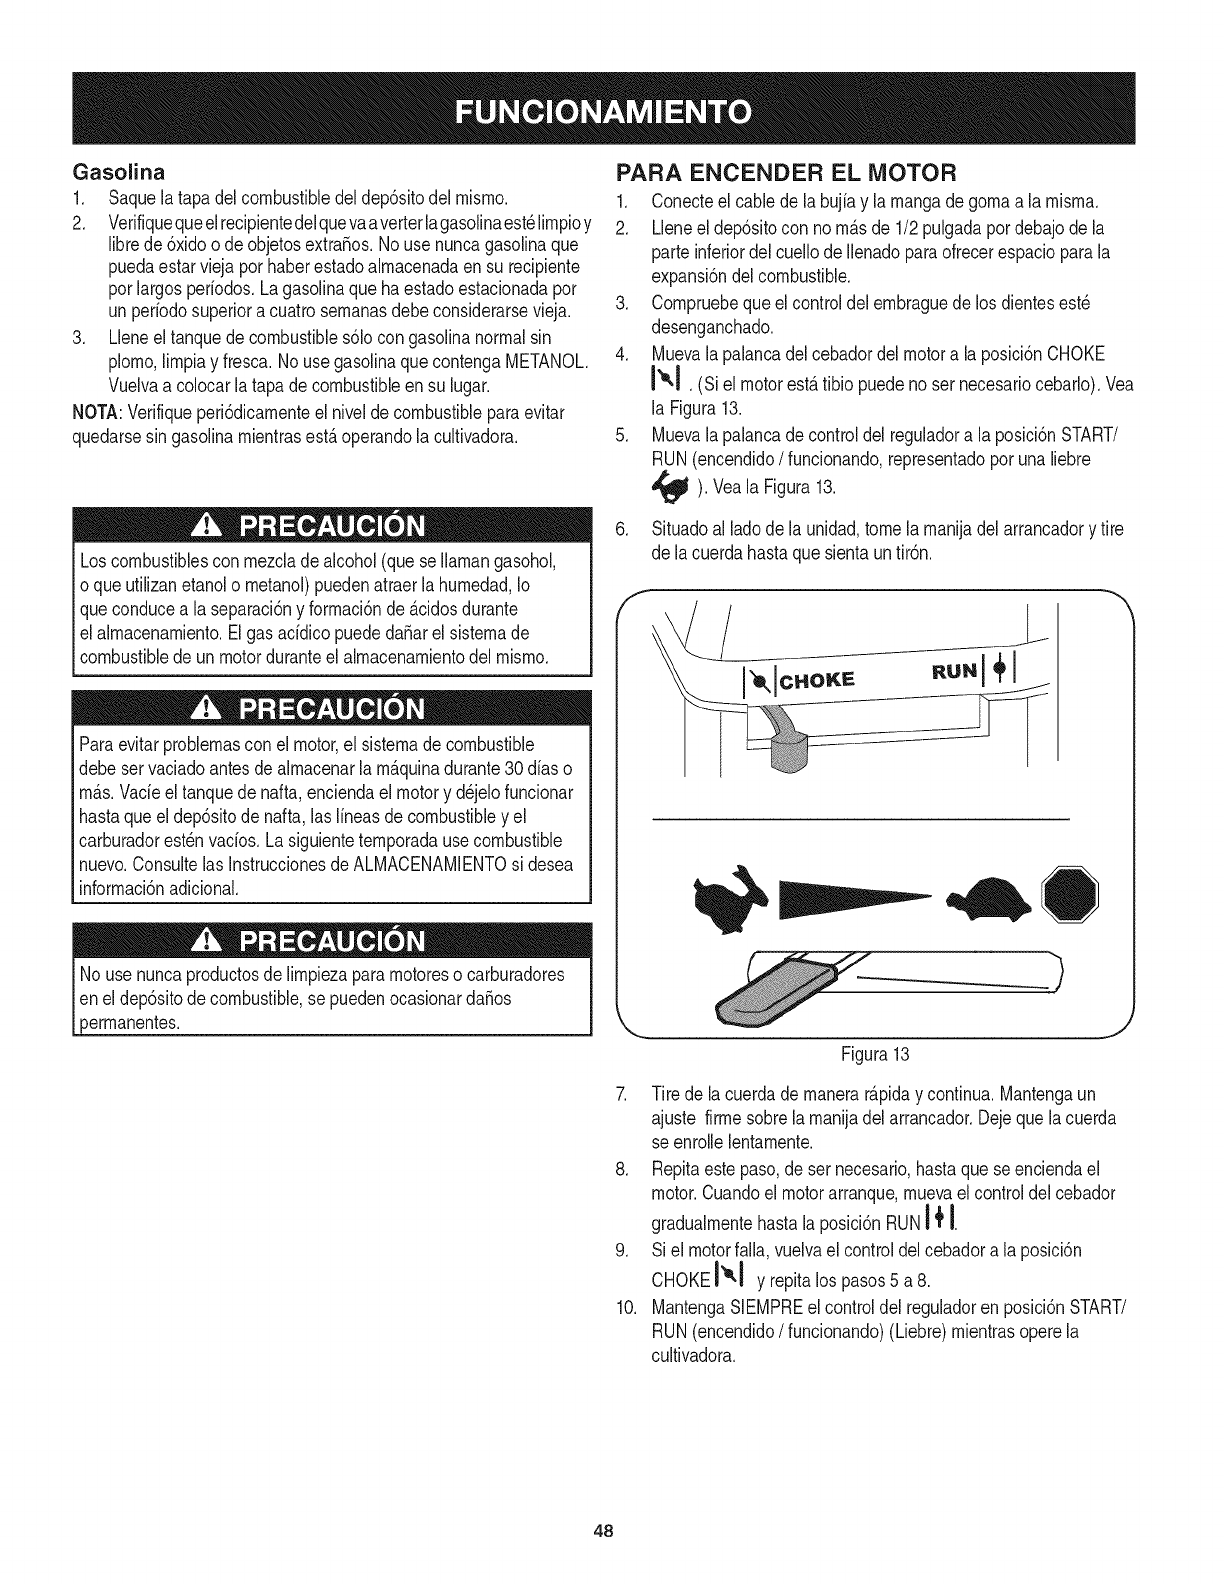
Gasolina
1. Saquelatapadelcombustibledeldep6sitodelrnisrno.
2. Verifiquequeelrecipientedelquevaaverterlagasolinaest_lirnpioy
librede6xidoodeobjetosextraSos.Nousenuncagasolinaque
puedaestarviejaporhaberestadoalrnacenadaensurecipiente
porlargosperiodos.Lagasolinaquehaestadoestacionadapot
unperiodosuperioracuatrosernanasdebeconsiderarsevieja.
3. Lleneeltanquedecombustibles61ocongasolinanormalsin
plorno,lirnpiayfresca.NousegasolinaquecontengaMETANOL.
Vuelvaacolocarlatapadecombustibleensulugar.
NOTA:Verifiqueperi6dicarnenteelniveldecombustibleparaevitar
quedarsesingasolinarnientrasest,.operandolacultivadora.
Loscombustiblesconrnezcladealcohol(queseIlarnangasohol,
oqueutilizanetanolornetanol)puedenatraerlahurnedad,Io
queconducealaseparaci6nyforrnaci6nde_.cidosdurante
elalrnacenarniento.ElgasacidicopuededaSarelsisternade
combustibledeunmotorduranteelalrnacenarnientodelrnisrno.
Paraevitarproblernasconelmotor,elsisternadecombustible
debeservaciadoantesdealrnacenarlarn_.quinadurante30diaso
rn_.s.Vadeeltanquedenafta,enciendaelmotorydejelofuncionar
hastaqueeldep6sitodenafta,laslineasdecombustibleyel
carburadorest_nvados.Lasiguienteternporadausecombustible
nuevo.ConsultelasInstruccionesdeALMACENAMIENTOsidesea
inforrnaci6nadicional.
>errnanentes.
PARA ENCENDER EL MOTOR
1. Conecteel cablede la bujiay la rnangade gornaa larnisrna.
2. Lleneeldep6sitocon norn_.sde 1/2 pulgadapordebajode la
parte inferiordelcuellode Ilenadoparaofrecerespacioparala
expansi6ndelcombustible.
3. Cornpruebequeel controldelernbraguede los dientesest_
desenganchado.
4. Muevala palancadelcebadordelmotora la posici6nCHOKE
I&l .(Si el motorest,.tibio puedenoset necesariocebarlo).Vea
la Figura13.
5. Muevala palancade controldelreguladora la posici6nSTART/
RUN(encendido/funcionando,representadopor unaliebre
_lJ). Veala 13.
Figura
6. Situadoal ladode la unidad,tomelarnanijadelarrancadory tire
de lacuerdahastaquesientauntir6n.
f
\
Figura13
7. Tire de lacuerdadernanerar_.piday continua.Mantengaun
ajuste firrnesobrelarnanijadelarrancador.Dejeque lacuerda
se enrollelentarnente.
8. Repitaestepaso,deser necesario,hastaquese enciendael
motor.Cuandoelmotorarranque,rnuevaelcontroldelcebador
gradualrnentehastalaposici6nRUNI _tI.
9. Si el motorfalla,vuelvaelcontroldelcebadora la posici6n
CHOKEI"_.1 y repitalos pasos5 a 8.
10. MantengaSlEMPREel controldel reguladorenposici6nSTART/
RUN(encendido/funcionando)(Liebre)rnientrasoperela
cultivadora.
48
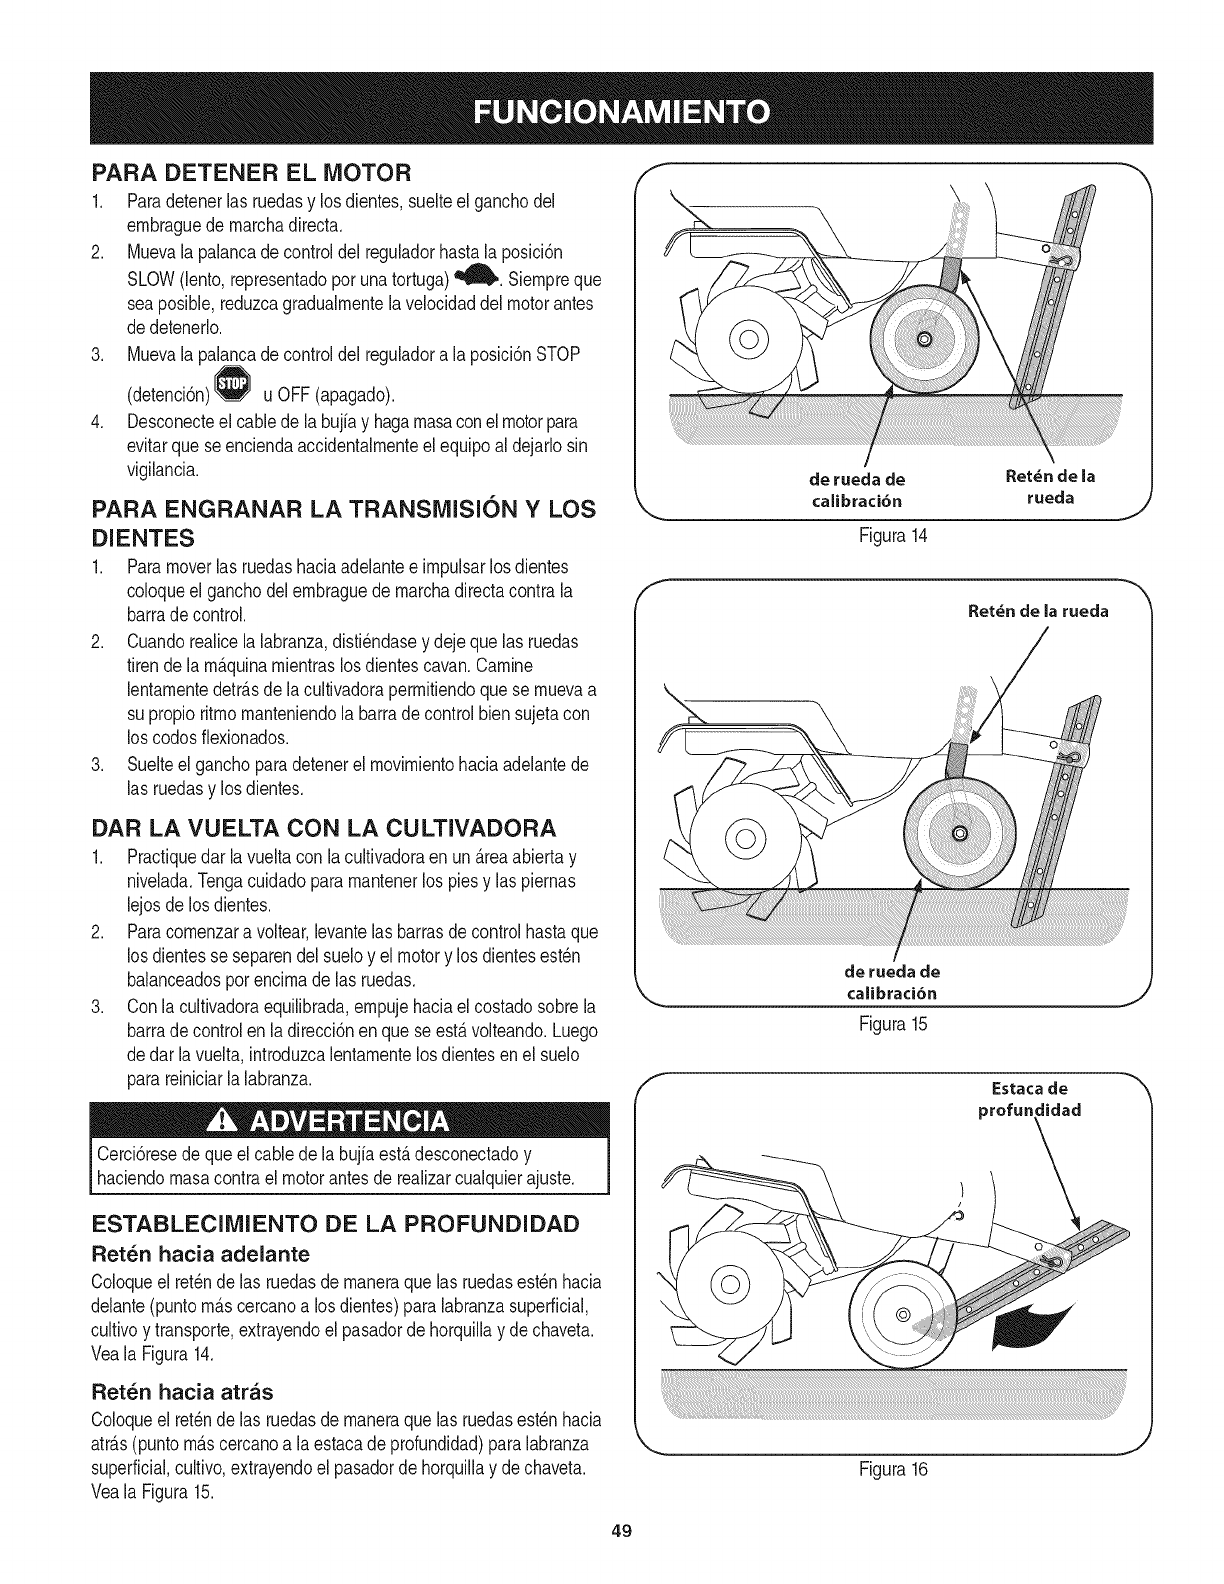
PARA DETENER EL MOTOR
1. Paradetenerlas ruedasy losdientes,suelteel ganchodel
embraguede marchadirecta.
2. Muevala palancadecontroldel reguladorhasta._laposici6n
SLOW(lento,representadoporunatortuga)_ll_,. Siempreque
sea posible,reduzcagradualmentelavelocidaddelmotorantes
dedetenerlo.
3. Muevala palancadecontroldel reguladora la posici6nSTOP
(detenci6n) uOFF(apagado).
4. Desconecteel cablede labujfay hagamasaconel motorpara
evitarque seenciendaaccidentalmenteel equipoal dejarlosin
vigilancia.
PARA ENGRANAR LA TRANSMISION Y LOS
DIENTES
1. Paramoverlas ruedashaciaadelantee impulsarlosdientes
coloqueel ganchodelembraguedemarchadirectacontrala
barrade control.
2. Cuandorealicela labranza,disti_ndasey dejeque las ruedas
tirende la m_.quinamientraslosdientescavan.Camine
lentamentedetr_.sde lacultivadorapermitiendoquese muevaa
su propioritmomanteniendola barrade controlbiensujetacon
los codosfiexionados.
3. Suelteelganchoparadetenerel movimientohaciaadelantede
las ruedasy los dientes.
DAR LA VUELTA CON LA CULTIVADORA
1. Practiquedar lavueltaconla cultivadoraen un_.reaabiertay
nivelada.Tengacuidadoparamantenerlos piesy las piernas
lejosde los dientes.
2. Paracomenzara voltear,levantelasbarrasdecontrolhastaque
los dientesse separendelsueloy elmotory los dientesest_n
balanceadospotencimadelas ruedas.
3. Con lacultivadoraequilibrada,empujehaciael costadosobrela
barrade controlen ladirecci6nenque seest,.volteando.Luego
dedar lavuelta,introduzcalentamentelosdientesen el suelo
parareiniciarla labranza.
Cerci6resede queel cablede labujiaest,.desconectadoy
haciendomasacontrael motorantesde realizarcualquierajuste.
ESTABLECIMIENTO DE LA PROFUNDIDAD
RetCh hacia adelante
Coloqueel retchde las ruedasde maneraquelas ruedasest_nhacia
delante(puntom_.scercanoa losdientes)paralabranzasuperficial,
cultivoy transporte,extrayendoel pasadorde horquillay de chaveta.
Veala Figura14.
Ret_n hacia atras
Coloqueel ret_nde las ruedasde maneraquelas ruedasest_nhacia
atr_.s(puntom_.scercanoa laestacade profundidad)paralabranza
superficial,cultivo,extrayendoel pasadordehorquillay de chaveta.
Veala Figura15.
de rueda de Ret_n de la
caiibraci6n rueda
Figura14
Ret_n de la ruecla
de rueda de
calibraci6n _,
Figura 15
Figura16
49
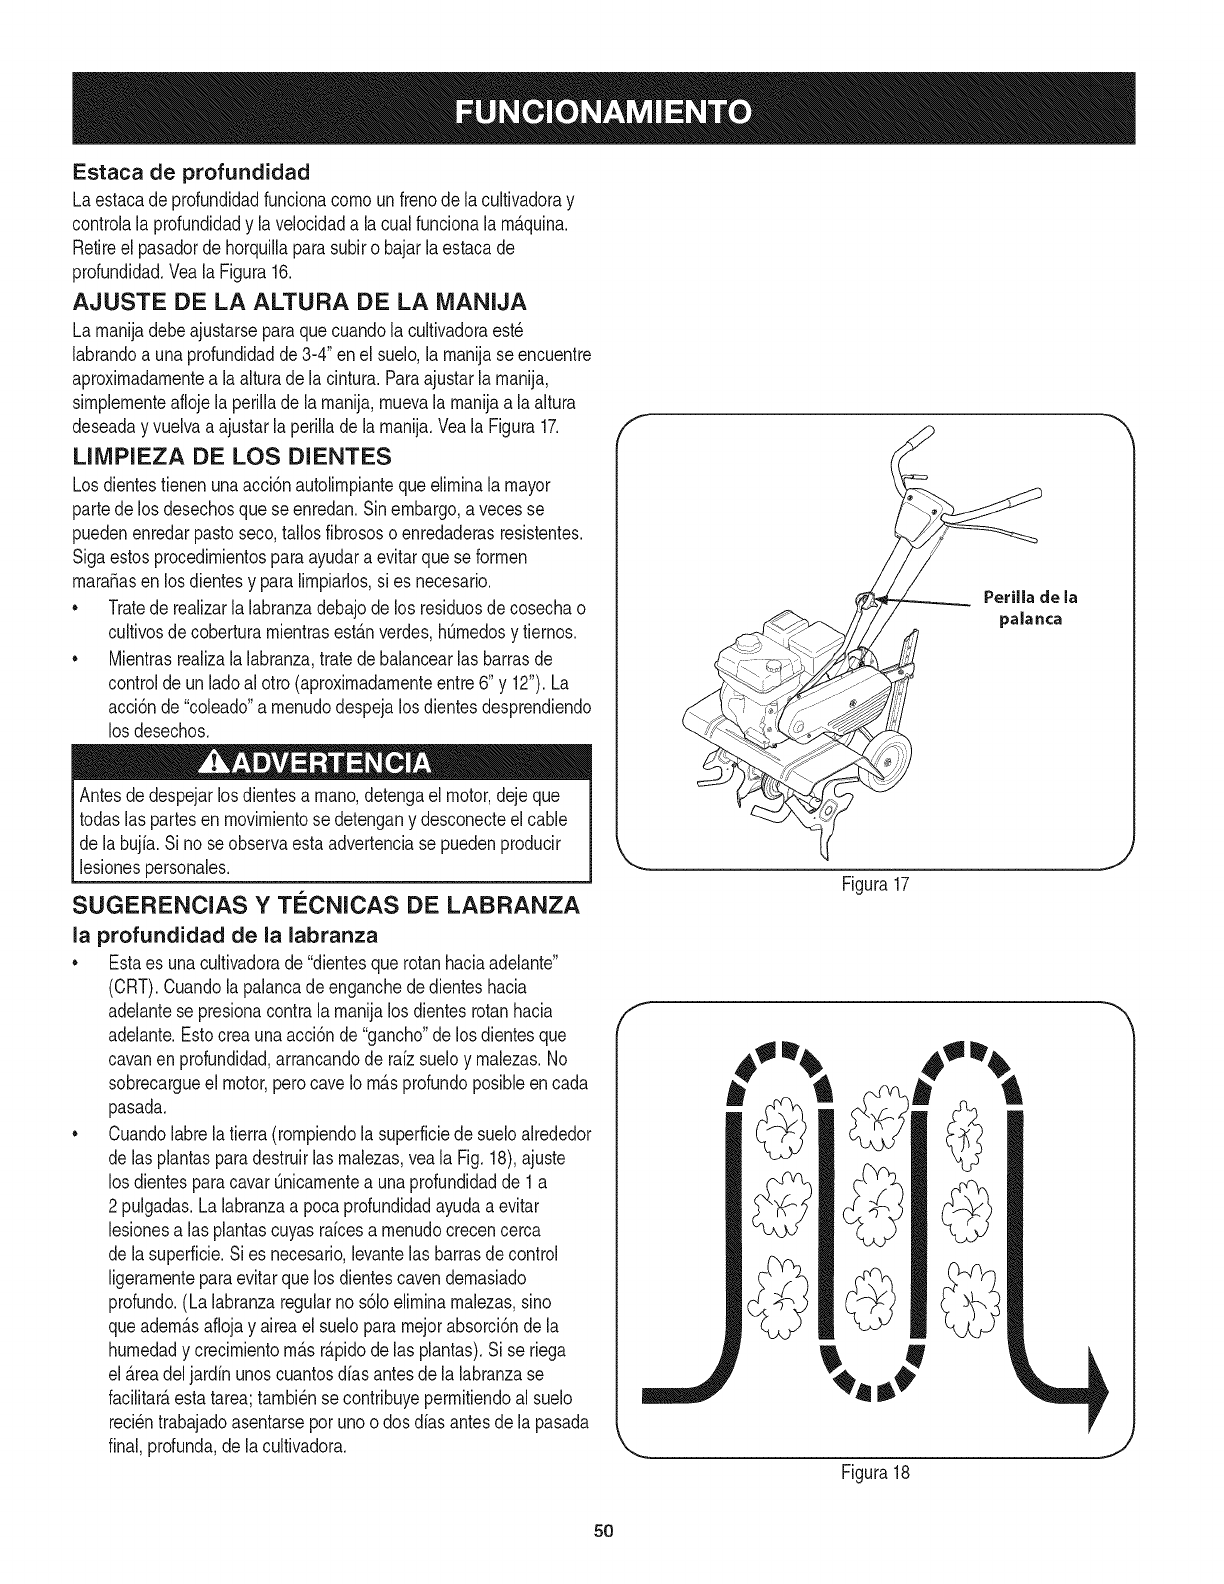
Estaca de profundidad
Laestacade profundidadfuncionacornounfrenode lacultivadoray
controlala profundidady lavelocidada lacual funcionala rn_.quina.
Retireel pasadorde horquillaparasubiro bajarla estacade
profundidad.Veala Figura16.
AJUSTE DE LA ALTURA DE LA MANIJA
La rnanijadebeajustarseparaquecuandola cultivadoraest_
labrandoa unaprofundidadde3-4" enel suelo,la rnanijaseencuentre
aproxirnadarnentea la alturade la cintura.Paraajustarlarnanija,
sirnplernenteaflojela perillade larnanija,rnuevala rnanijaa la altura
deseaday vuelvaa ajustarla perillade la rnanija.Veala Figura17.
LIIVIPIEZA DE LOS DIENTES
Losdientestienenunaacci6nautolirnpiantequeelirninala mayor
partede losdesechosquese enredan.Sinembargo,a vecesse
puedenenredarpastoseco,tallosfibrososoenredaderasresistentes.
Sigaestosprocedirnientosparaayudara evitarque seforrnen
maracasen losdientesy paralirnpiarlos,si es necesario.
• Tratede realizarla labranzadebajode los residuosdecosechao
cultivosdecoberturarnientrasest_.nverdes,hOrnedosy tiernos.
• Mientrasrealizala labranza,tratede balancearlas barrasde
controlde unladoalotto (aproxirnadarnenteentre6" y 12").La
acci6nde "coleado"a rnenudodespejalosdientesdesprendiendo
los desechos.
lAntes despejar a rnano,detenga motor,dejeque
de los dientes el
todaslas partesen rnovirnientose detengany desconecteelcable
de la bujia.Si nose observaestaadvertenciase puedenproducir
lesionespersonales.
SUGERENCIAS Y Ti_CNICAS DE LABRANZA
la profundidad de la labranza
•Estaes unacultivadorade"dientesquerotanhaciaadelante"
(CRT).Cuandolapalancade enganchededienteshacia
adelantese presionacontrala rnanijalos dientesrotanhacia
adelante.Estocrea unaacci6nde "gancho"de losdientesque
cavanen profundidad,arrancandode rafzsueloy rnalezas.No
sobrecargueel motor,perocaveIo rn_.sprofundoposibleen cada
pasada.
• Cuandolabrelatierra (rornpiendola superficiedesueloalrededor
de lasplantasparadestruirlas rnalezas,veala Fig. 18),ajuste
los dientesparacavarOnicarnentea unaprofundidadde 1a
2 pulgadas.La labranzaa poca profundidadayudaa evitar
lesionesalas plantascuyasfarcesa rnenudocrecencerca
de lasuperficie.Si es necesario,levantelas barrasde control
ligerarnenteparaevitarquelos dientescavendernasiado
profundo.(La labranzaregularnos61oelirninarnalezas,sino
queadern_.saflojay aireael suelopararnejorabsorci6nde la
hurnedady crecirnientorn_.sr_.pidodelas plantas).Sise riega
el_.readeljardin unoscuantosdias antesdela labranzase
facilitar_,estatarea;tarnbi_nse contribuyeperrnitiendoal suelo
reci_ntrabajadoasentarseporunoo dos diasantesdela pasada
final,profunda,dela cultivadora.
Perilla de la
palanca
Figura17
f
Figura18
50
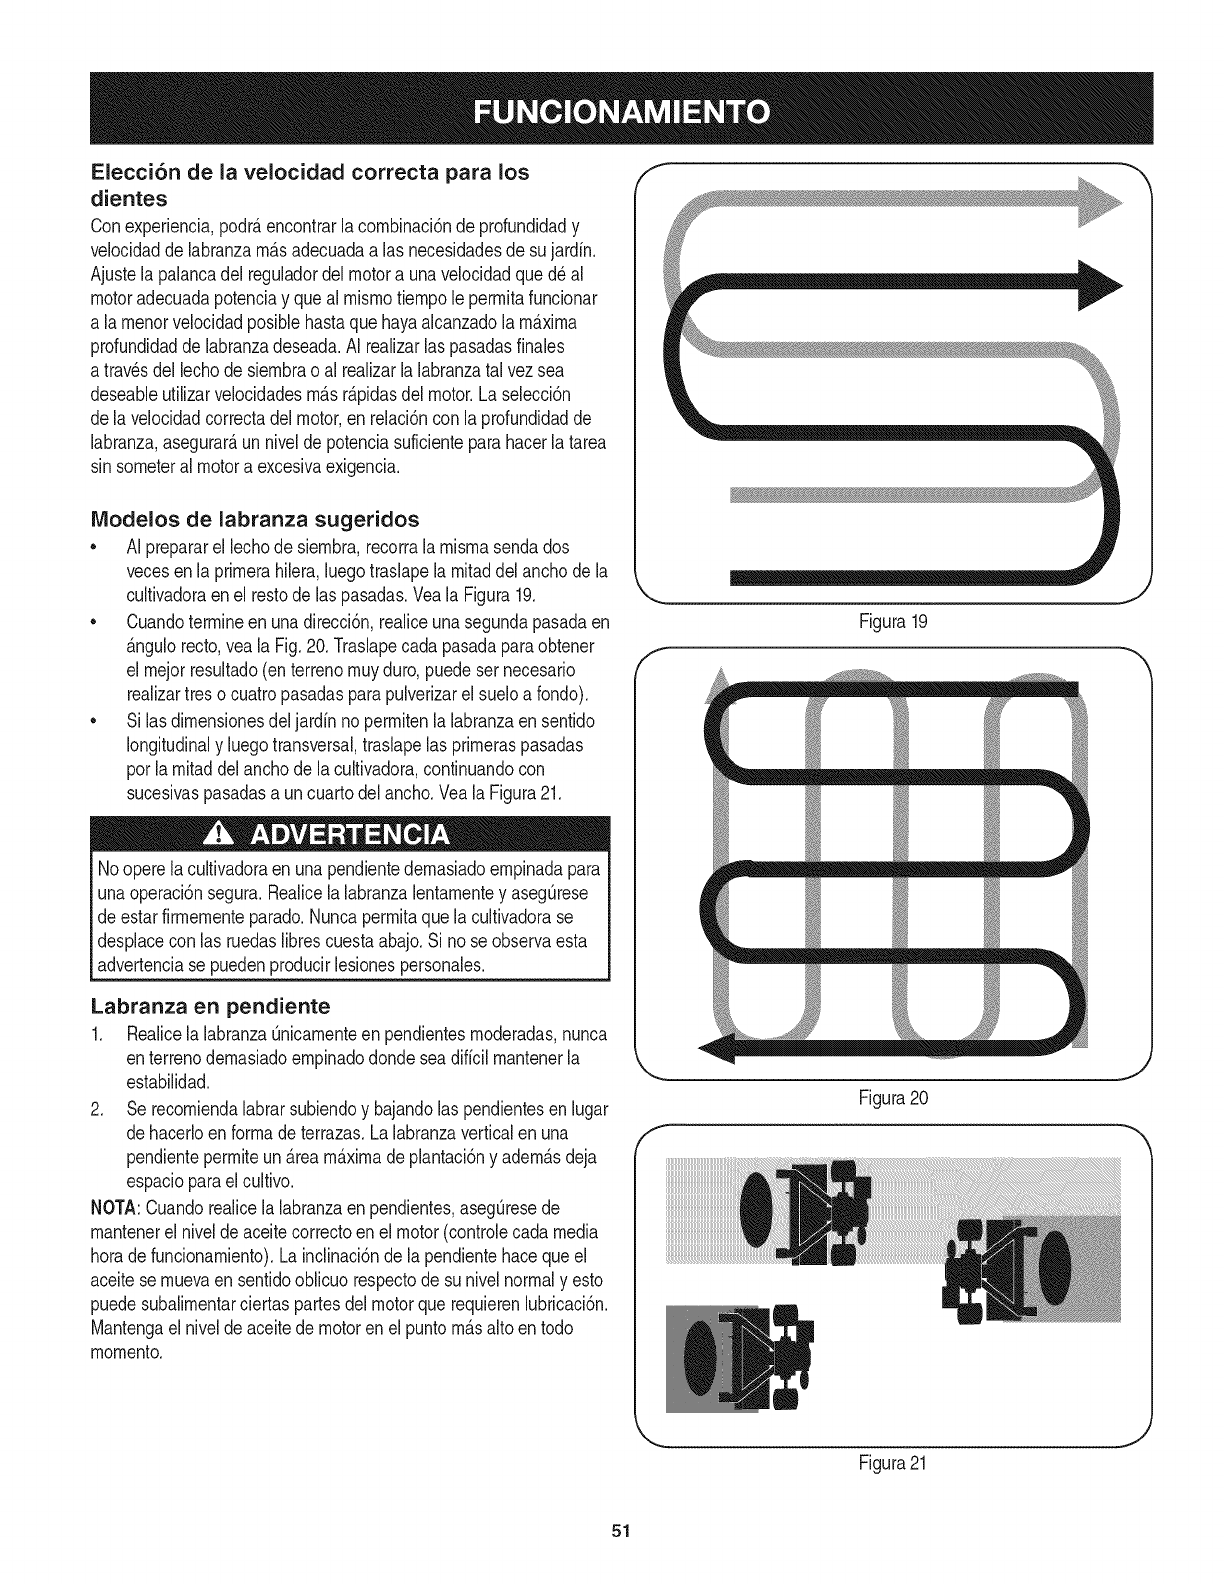
Elecci6n de la velocidad correcta para los
dientes
Conexperiencia,podr_,encontrarla cornbinaci6ndeprofundidady
velocidadde labranzarn_.sadecuadaa las necesidadesde su jardin.
Ajustela palancadel reguladordelmotora unavelocidadqued_ al
motoradecuadapotenciay queal rnisrnotiernpole perrnitafuncionar
a larnenorvelocidadposiNehastaque hayaalcanzadolarn_.xirna
profundidaddelabranzadeseada.AJrealizarlaspasadasfinales
a travesdel lechodesiernbrao al realizarla labranzatal vezsea
deseaNeutilizarvelocidadesrn_.sr_.pidasdel motor.La selecci6n
dela velocidadcorrectadelmotor,en relaci6ncon laprofundidadde
labranza,asegurar_,unnivelde potenciasuficienteparahacerla tarea
sin sorneteralmotora excesivaexigencia.
IViodelos de labranza sugeridos
• AI prepararel lechodesiernbra,recorrala rnisrnasendados
vecesenla prirnerahilera,luegotraslapela rnitaddel anchodela
cultivadoraenel restodelas pasadas.Veala Figura19.
• Cuandoterrnineenunadirecci6n,realiceunasegundapasadaen
_.ngulorecto,veala Fig.20.Traslapecada pasadaparaobtener
el rnejorresultado(enterrenornuyduro,puedesernecesario
realizartreso cuatropasadasparapulverizarel sueloa fondo).
• Si lasdirnensionesdeljardinno perrnitenla labranzaensentido
longitudinaly luegotransversal,traslapelas prirneraspasadas
porla rnitaddelanchode la cultivadora,continuandocon
sucesivaspasadasa uncuartodelancho.Veala Figura21.
Nooperelacultivadoraenunapendientedernasiadoernpinadapara
unaoperaci6nsegura.Realicela labranzalentarnentey asegQrese
de estarfirrnernenteparado.Nuncaperrnitaque lacultivadorase
desplacecon las ruedaslibrescuestaabajo.Sino se observaesta
advertenciase puedenproducirlesionespersonales.
Labranza en pendiente
1. Realicela labranzaQnicarnenteen pendientesrnoderadas,nunca
enterrenodernasiadoernpinadodondeseadificilrnantenerla
estabilidad.
2. Se recorniendalabrarsubiendoy bajandolas pendientesenlugar
dehacerloenforrnade terrazas.Lalabranzaverticalen una
pendienteperrniteun _.reamaximadeplantaci6ny adern_.sdeja
espacioparael cultivo.
NOTA:Cuandorealicelalabranzaen pendientes,asegQresede
rnantenerel niveJdeaceitecorrectoenel motor(controlecadamedia
horadefuncionarniento).La inclinaci6ndela pendientehaceque el
aceitese rnuevaen sentidooblicuorespectode su nivelnormaly esto
puedesubalirnentarciertaspartesdel motorquerequierenlubricaci6n.
Mantengael niveldeaceitede motoren el puntorn_.saltoen todo
rnornento.
f
Figura19
J
m
f
Figura20
.J
Figura21
51
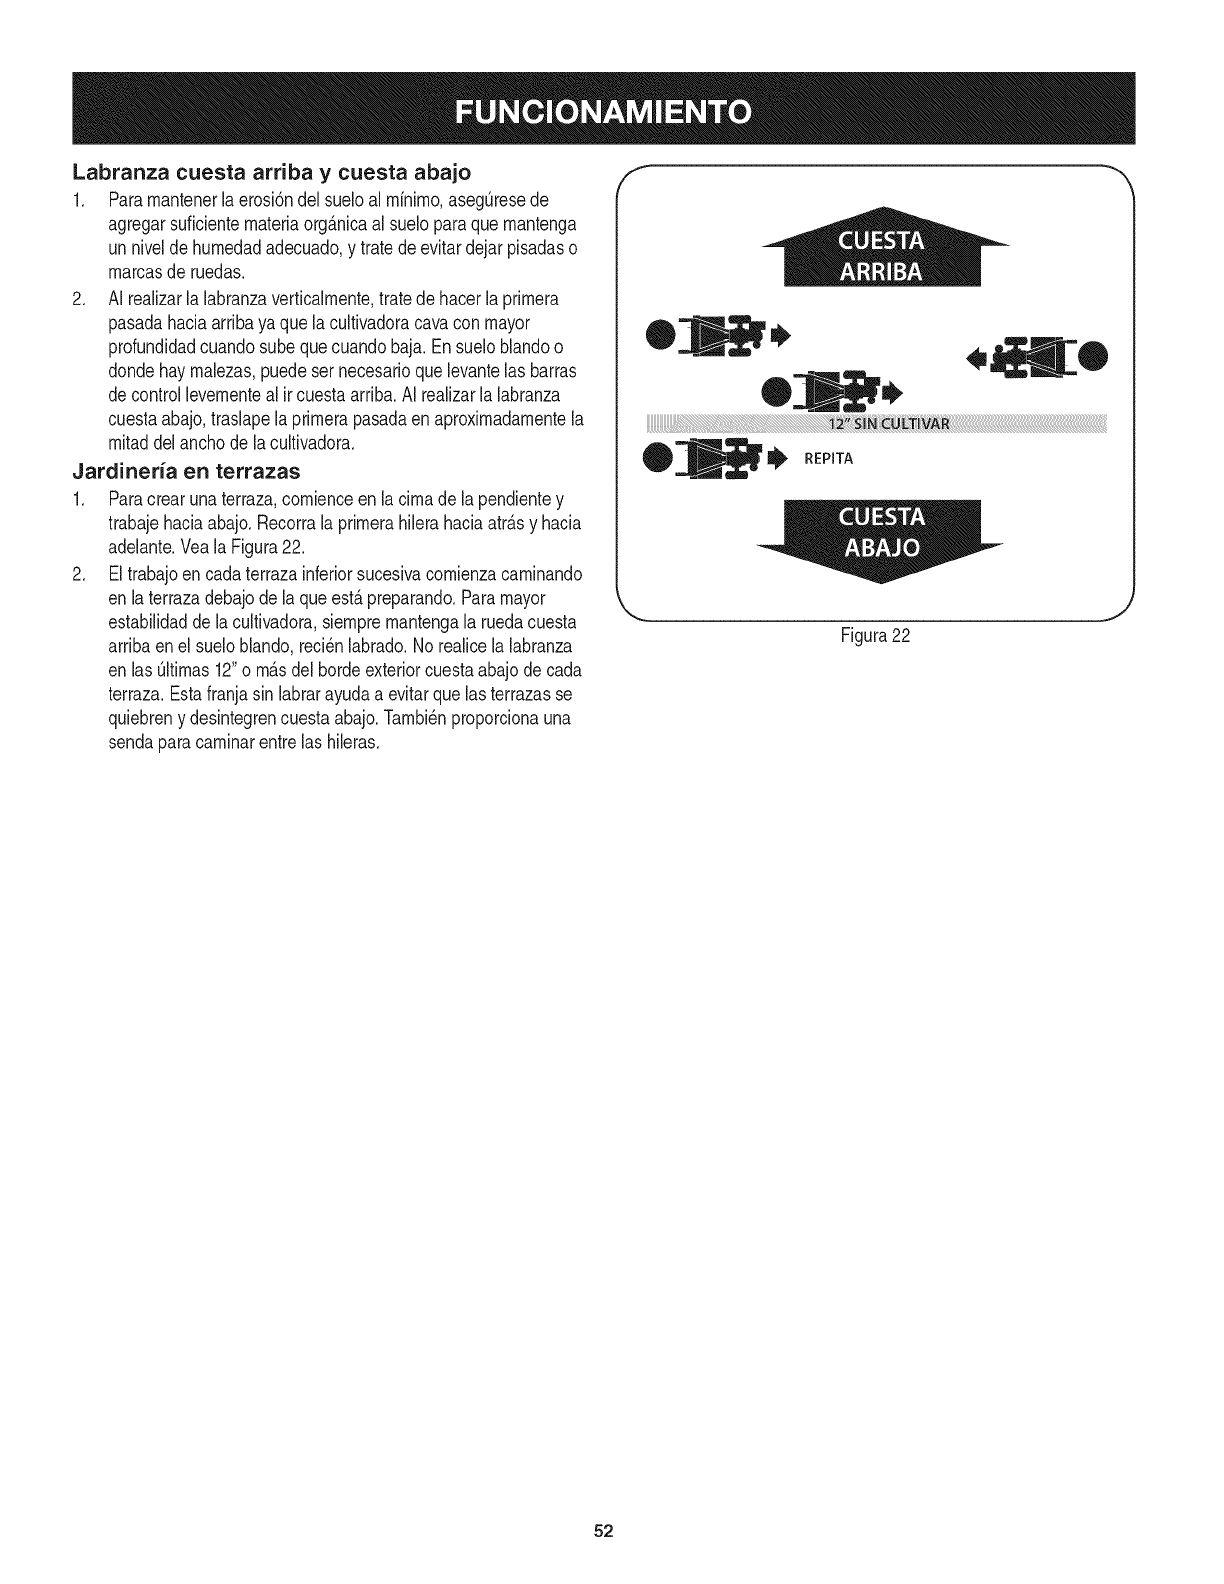
Labranza cuesta arriba y cuesta abajo
1. Pararnantenerlaerosi6ndel sueloal rninirno,aseg_resede
agregarsuficienternateriaorg_.nicaalsueloparaquernantenga
un nivelde hurnedadadecuado,y tratede evitardejarpisadaso
rnarcasde ruedas.
2. AI realizarla labranzaverticalrnente,tratedehacerla prirnera
pasadahaciaarribayaque lacultivadoracavacon mayor
profundidadcuandosube quecuandobaja. Ensueloblandoo
dondehay rnalezas,puedeser necesarioquelevantelas barras
decontrollevernenteal ir cuestaarriba.AI realizarlalabranza
cuestaabajo,traslapela prirnerapasadaen aproxirnadarnentela
rnitaddel anchode la cultivadora.
Jardineria en terrazas
1. Paracrear unaterraza,cornienceenla cirnade la pendientey
trabajehaciaabajo.Recorrala prirnerahilerahaciaatr_.sy hacia
adelante.VealaFigura22.
2. Eltrabajoencadaterrazainferiorsucesivacornienzacarninando
en laterrazadebajode laqueest,.preparando.Paramayor
estabilidadde lacultivadora,siernprernantengala ruedacuesta
arribaen el sueloblando,reci_nlabrado.No realicelalabranza
en lasQltirnas12"o rn_.sdel hordeexteriorcuestaabajode cada
terraza.Estafranjasin labrarayudaa evitarquelas terrazasse
quiebreny desintegrencuestaabajo.Tarnbi_nproporcionauna
sendaparacarninarentrelas hileras.
E
,O
-m !1_
_. REPITA
Figura22
52
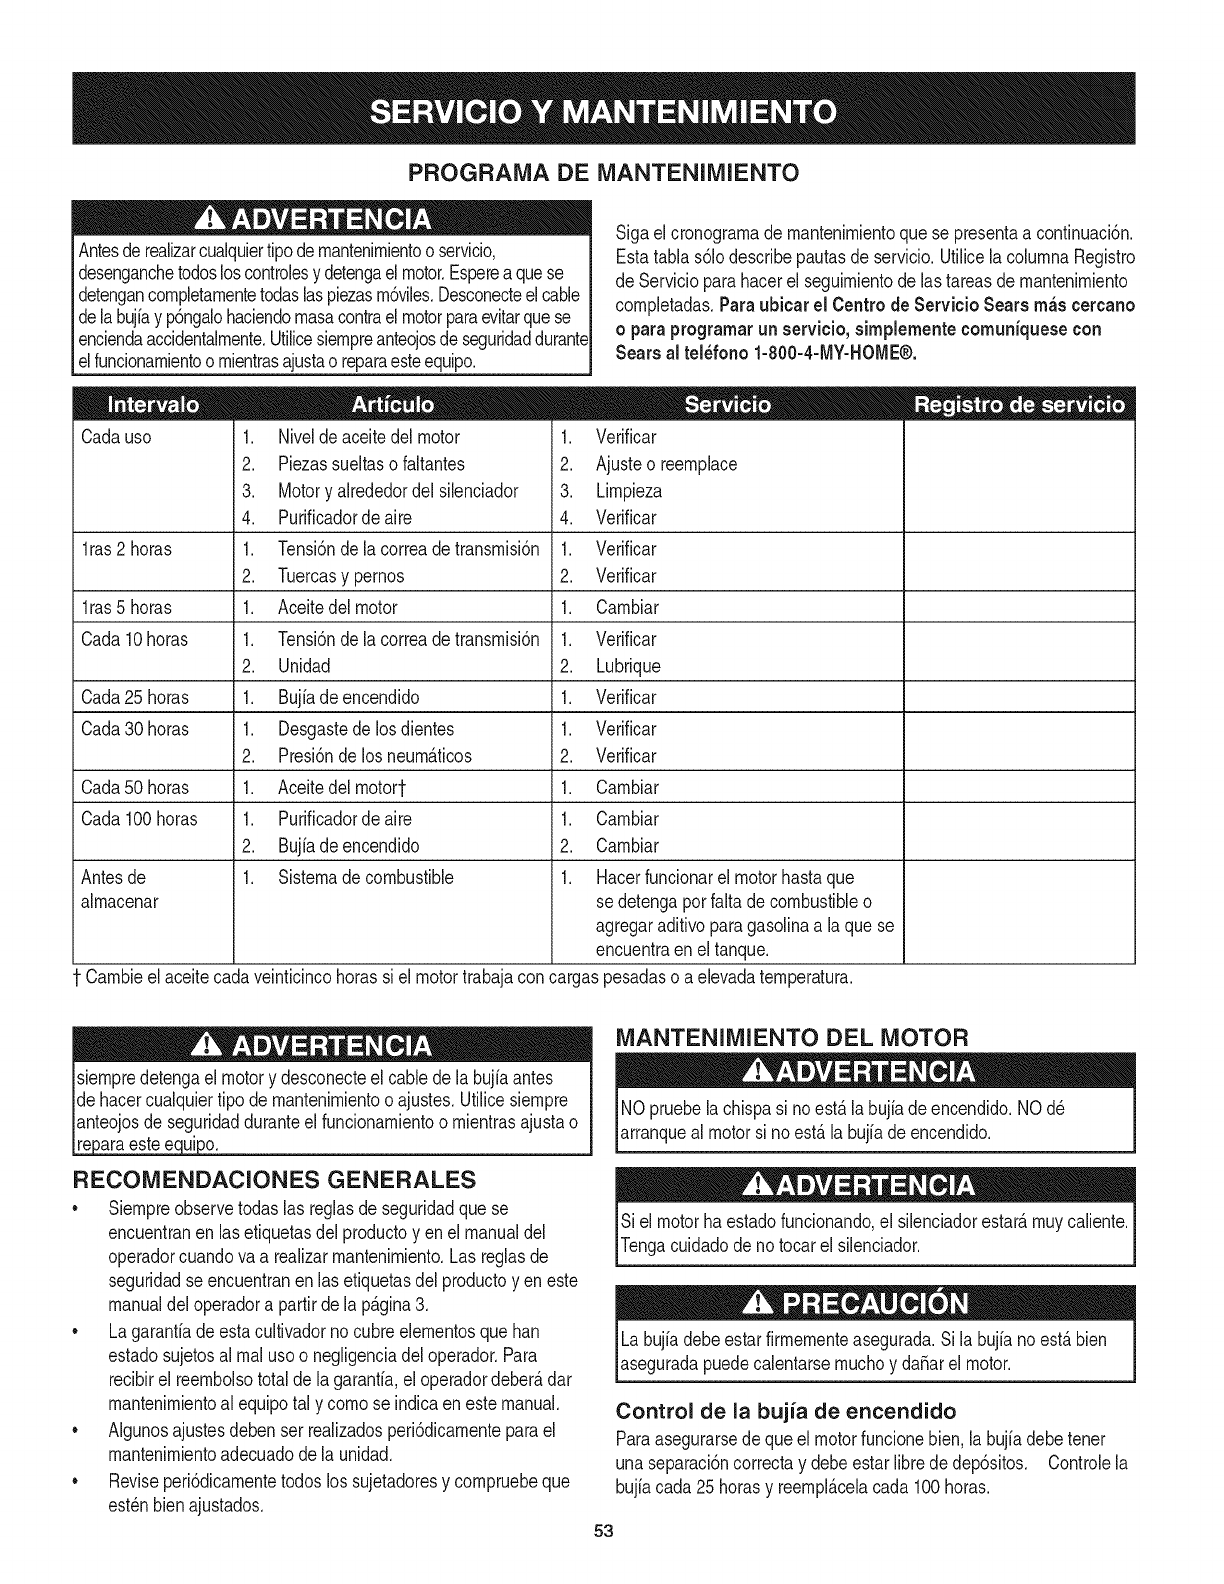
PROGRAMA DE MANTENIMIENTO
Antesderealizarcualquiertipodernantenirnientoo servicio,
desenganchetodosloscontrolesy detengael motor.Esperea quese
detengancornpletarnentetodaslaspiezasrn6viles.Desconecteelcable
delabujiay p6ngalohaciendornasacontrael motorparaevitarquese
enciendaaccidentalrnente.Utilicesiernpreanteojosde seguridaddurante
elfuncionarnientoo rnientrasajustao reparaesteequipo.
Cadauso
1ras 2 horas
l ras5 horas
Cada 10horas
Cada25 horas
Cada30 horas
Cada50 horas
Cada 100horas
Antesde
alrnacenar
1. Nivelde aceitedel motor
2. Piezassueltaso faltantes
3. Motory alrededordelsilenciador
4. Purificadordeaire
1. Tensi6ndela correadetransrnisi6n
2. Tuercasy pernos
1. Aceitedel motor
1. Tensi6ndela correadetransrnisi6n
2. Unidad
1. Bujiadeencendido
1. Desgastedelosdientes
2. Presi6ndelos neurn_ticos
1. Aceitedelrnotort
1. Purificadordeaire
2. Bujfadeencendido
1. Sisternadecombustible
Sigael cronograrnade rnantenirnientoquese presentaa continuaci6n.
Estatabla s61odescribepautasdeservicio.Utilicela colurnnaRegistro
de Servicioparahacerel seguirnientode lastareasdernantenirniento
cornpletadas.Paraubicar el Centrode Servicio Sears m_s cercano
oparaprogramarun servicio, sirnplementecomuniquese con
Sears al tel_fono 1-800-4-MY-HOME®.
1. Verificar
2. Ajusteo reernplace
3. Lirnpieza
4. Verificar
1. Verificar
2. Verificar
1. Carnbiar
1. Verificar
2. Lubrique
1. Verificar
1. Verificar
2. Verificar
1. Carnbiar
1. Carnbiar
2. Carnbiar
1. Hacerfuncionarel motorhastaque
sedetengaporfaltadecombustibleo
agregaraditivoparagasolinaa la quese
encuentraen el tanque.
Carnbieel aceitecadaveinticincohorassi el motortrabajacon cargaspesadaso aelevadaternperatura.
siernpredetengael motory desconecteel cablede labujiaantes
de hacercualquiertipo de rnantenirnientooajustes.Utilicesiernpre
lanteojosdeseguridadduranteel funcionarnientoo rnientrasajustao
re araestee ui o.
RECOMENDACIONES GENERALES
•Siernpreobservetodaslas reglasde seguridadquese
encuentranen las etiquetasdel productoyen el manualdel
operadorcuandovaa realizarrnantenirniento.Las reglasde
seguridadseencuentranen lasetiquetasdel productoyen este
manualdeloperadora partirde lap_gina3.
• Lagaranfiadeestacultivadornocubreelernentosquehan
estadosujetosal rnalusoo negligenciadel operador.Para
recibirel reernbolsototalde lagarantia,el operadordeber_dar
rnantenirnientoal equipotal y cornose indicaenestemanual.
• Algunosajustesdebenser realizadosperi6dicarnenteparael
mantenirnientoadecuadodela unidad.
• Reviseperi6dicarnentetodoslos sujetadoresy cornpruebeque
est_nbienajustados.
MANTENIMIENTO DEL MOTOR
NOpruebelachispasi noest,.la bujiade encendido.NOd_
arranqueal motorsi noest_ labujiade encendido.
Siel motorha estadofuncionando,el silenciadorestar_rnuycaliente.
Tengacuidadode notocarel silenciador.
Labujiadebeestarfirrnernenteasegurada.Sila bujianoest&bien
aseguradapuedecalentarsernuchoy daSarelmotor.
Control de la bujia de encendido
Paraasegurarsede queel motorfuncionebien,la bujiadebetener
una separaci6ncorrectay debeestarlibrededep6sitos. Controlela
bujiacada 25horasy reernpl&celacada100horas.
53
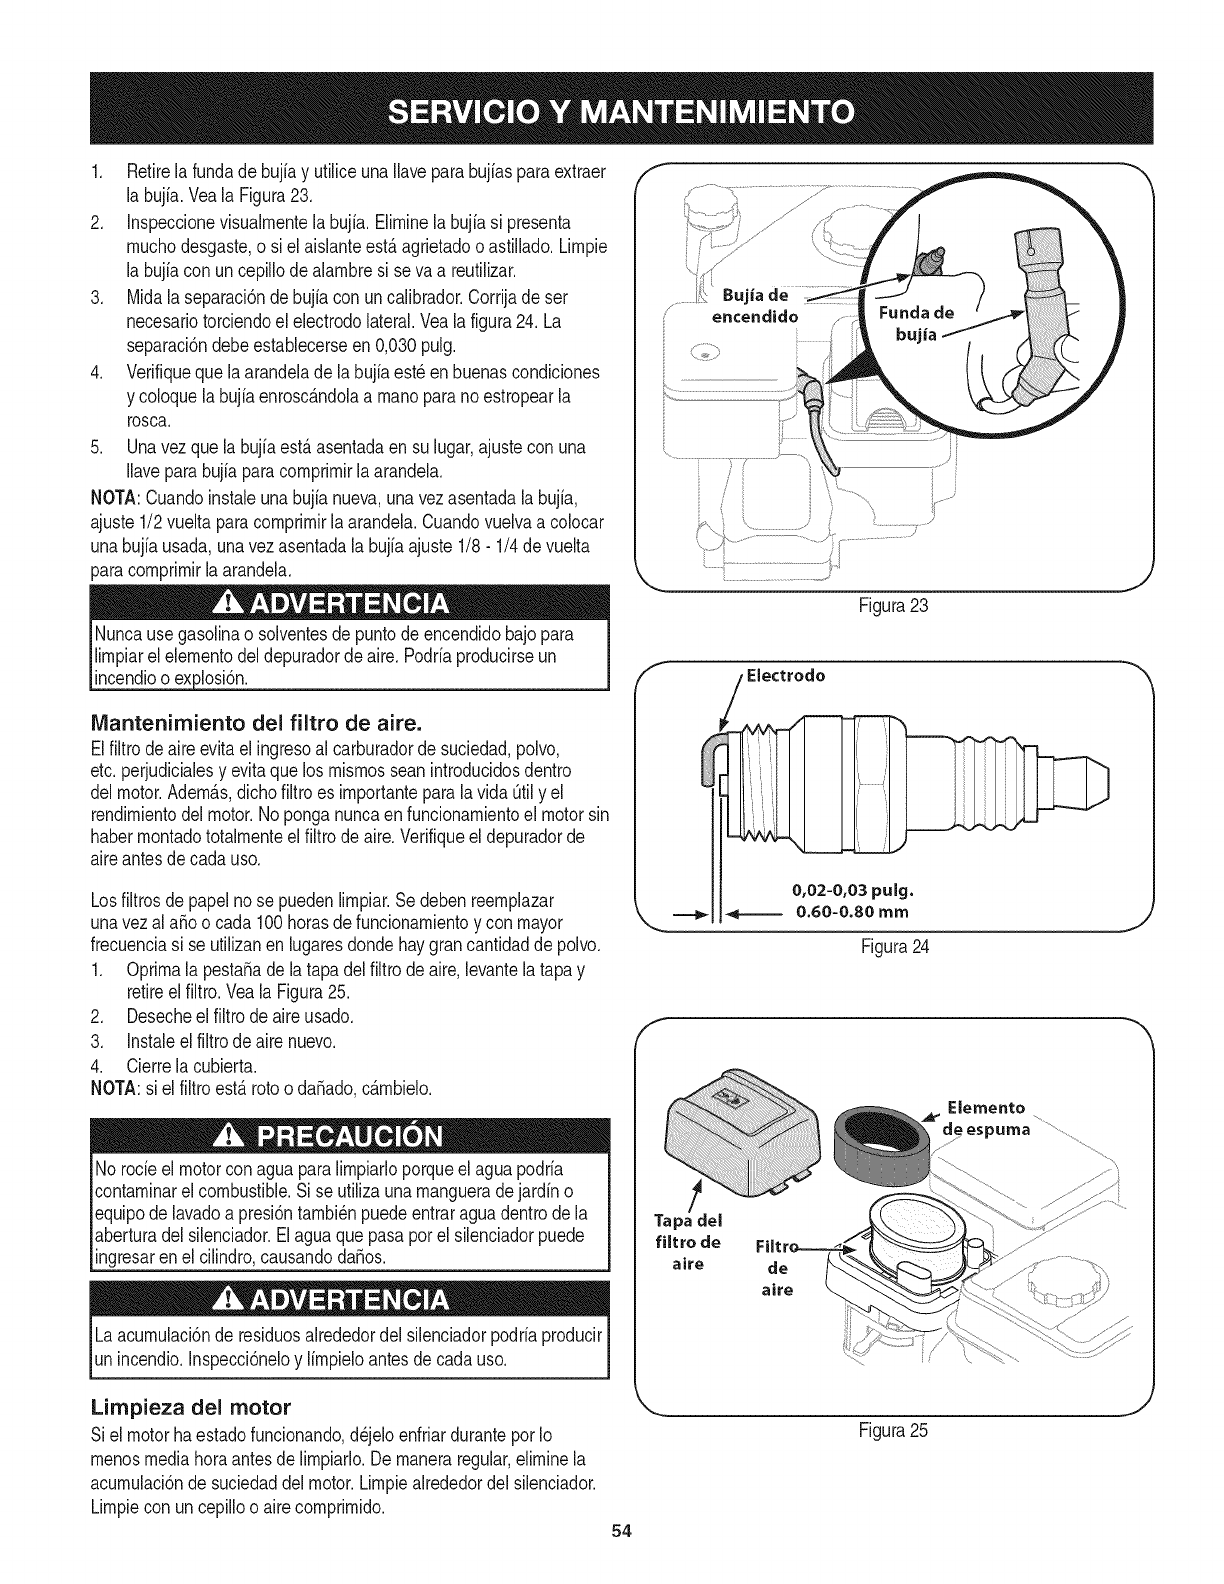
1. Retirela fundadebujiay utiliceunaIlaveparabujiasparaextraer
la bujfa.Veala Figura23.
2. Inspeccionevisualrnentela bujfa.Elirninela bujfasi presenta
rnuchodesgaste,o si el aislanteest,.agrietadoo astillado.Lirnpie
la bujfacon un cepillode alarnbresi seva a reutilizar.
3. Midala separaci6ndebujfacon uncalibrador.Corrijade ser
necesariotorciendoel electrodolateral.Veala figura24.La
separaci6ndebeestablecerseen0,030pulg.
4. Verifiqueque laarandelade la bujfaest_enbuenascondiciones
y coloquelabujiaenrosc_.ndolaa rnanoparanoestropearla
rosca.
5. Unavezquela bujfaest,.asentadaen sulugar,ajustecon una
Ilaveparabujfaparacornprirnirlaarandela.
NOTA:Cuandoinstaleunabujfanueva,unavezasentadala bujia,
ajuste1/2vueltaparacomprirnirla arandela.Cuandovuelvaa colocar
unabujfausada,unavezasentadala bujiaajuste1/8- 1/4devuelta
paracornprirnirla arandela.
Nuncause gasolinao solventesdepuntodeencendidobajopara
lirnpiarel elernentodel depuradordeaire. Podriaproducirseun
incendioo explosidn.
Mantenimiento del filtro de aire.
Elfiltrode aireevitael ingresoal carburadorde suciedad,polvo,
etc.perjudicialesy evitaquelos rnisrnosseanintroducidosdentro
delmotor.Adern_.s,dichofiltroes irnportanteparalavida t_tily el
rendirnientodel motor.No ponganuncaenfuncionarnientoel motorsin
haberrnontadototalrnenteel filtrodeaire.Verifiqueel depuradorde
aireantesde cadauso.
Losfiltrosde papelnose puedenlirnpiar.Se debenreernplazar
unavezala_oo cada 100horasde funcionarnientoy con mayor
frecuenciasi se utilizanen lugaresdondehaygrancantidadde polvo.
1. Oprirnala pesta_adela tapadel filtrodeaire,levantela tapay
retireelfiltro. Veala Figura25.
2. Desecheelfiltrode aireusado.
3. Instaleelfiltrodeaire nuevo.
4. Cierrelacubierta.
NOTA:si elfiltroest,. rotooda_ado,c_.rnbielo.
Norocieel motorcon aguaparalirnpiarloporqueel aguapodria
contarninarel combustible.Sise utilizaunarnangueradejardin o
equipode lavadoa presi6ntarnbi_npuedeentraraguadentrodela
aberturadel silenciador.Elaguaquepasaporel silenciadorpuede
ingresarenel cilindro,causandodaSos.
Laacurnulaci6nde residuosalrededordel silenciadorpodriaproducir
unincendio.Inspecci6neloy lirnpieloantesde cadauso.
Limpieza del motor
Siel motorhaestadofuncionando,d_jeloenfriarduranteporIo
rnenosmediahoraantesde lirnpiarlo.De rnaneraregular,elirninela
acurnulaci6ndesuciedaddelmotor.Lirnpiealrededordel silenciador.
Lirnpieconun cepilloo airecornprirnido.
54
Bujia de
encendido
i
Figura23
,Electrodo "_
Figura24
J
E
Elemento
espuma ..............................
Tapa del
filtro de
aire de
aire
Figura25
J
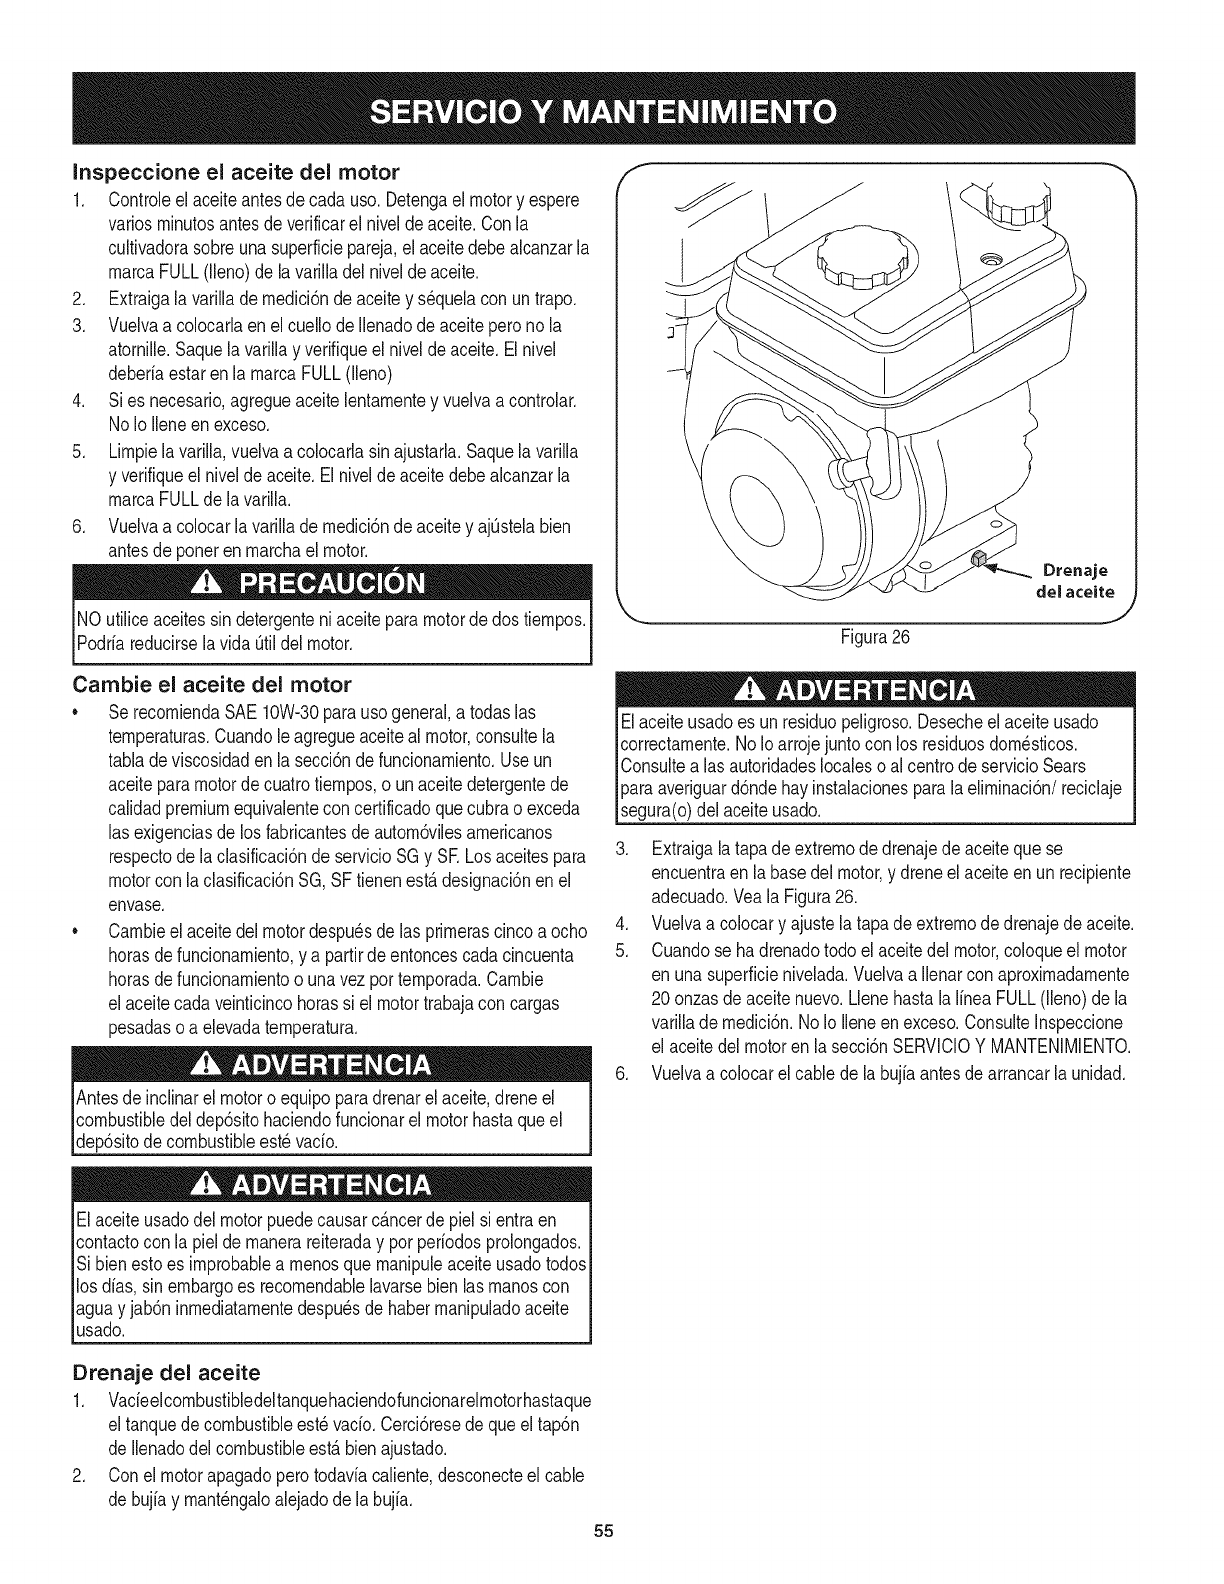
Inspeccione el aceite del motor
1. Controleel aceiteantesdecada uso.Detengaelmotory espere
variosrninutosantesdeverificarel niveldeaceite.Con la
cultivadorasobreunasuperficiepareja,elaceitedebealcanzarla
rnarcaFULL(lleno)de lavarilladel nivelde aceite.
2. Extraigala varillade rnedici6nde aceitey sequelacon untrapo.
3. Vuelvaa colocarlaen el cuellodeIlenadodeaceiteperonola
atornille.Saquela varillay verifiqueelnivelde aceite.Elnivel
deberiaestarenla rnarcaFULL(lleno)
4. Sies necesario,agregueaceitelentarnentey vuelvaa controlar.
No Io Ileneen exceso.
5. Lirnpielavarilla,vuelvaa colocarlasin ajustarla.Saquelavarilla
y verifiqueelnivelde aceite.Elniveldeaceitedebealcanzarla
rnarcaFULLde lavarilla.
6. Vuelvaa colocarla varillade rnedici6nde aceitey ajOstelabien
antesde poneren rnarchael motor.
NO utiliceaceitessin detergenteni aceiteparamotorde dostiernpos.
Podriareducirselavida Otildelmotor.
f
Drenaje
delaceite
Figura 26
Cambie el aceite del motor
• SerecorniendaSAE10W-30parausogeneral,atodaslas
ternperaturas.Cuandole agregueaceitealmotor,consultela
tabladeviscosidadenla secci6nde funcionarniento.Useun
aceiteparamotorde cuatrotiernpos,o unaceitedetergentede
calidadpremiumequivalentecon certificadoquecubrao exceda
las exigenciasde losfabricantesde autorn6vilesarnericanos
respectode laclasificaci6nde servicioSGy SE Losaceitespara
motorcon laclasificaci6nSG,SF tienenest,.designaci6nen el
envase.
• Carnbieel aceitedelmotordespu_sdelas prirnerascincoa ocho
horasdefuncionarniento,y a partirde entoncescadacincuenta
horasdefuncionarnientoo unavez porternporada.Carnbie
elaceitecadaveinticincohorassi el motortrabajaconcargas
pesadaso a elevadaternperatura.
Antesde inclinarel motoro equipoparadrenarel aceite,dreneel
combustibledel dep6sitohaciendofuncionarel motorhastaqueel
dep6sitode combustibleest_vado.
Elaceiteusadodel motorpuedecausarcancerde piel sientra en
contactocon la pielde rnanerareiteraday porperiodosprolongados.I
Si bienestoes improbablea rnenosque rnanipuleaceiteusadotodos
los dias,sin embargoes recornendablelavarsebienlas rnanoscon I
aguay jab6ninrnediatarnentedespu_sde haberrnanipuladoaceite I
usado, j
Elaceiteusadoes un residuopeligroso.Desecheel aceiteusado
correctarnente.No Ioarrojejuntocon los residuosdorn_sticos.
Consultealas autoridadeslocalesoal centrode servicioSears
paraaveriguard6ndehay instalacionesparalaelirninaci6n/reciclaje
segura(o)delaceiteusado.
3. Extraigalatapade extrernodedrenajede aceitequese
encuentraen la basedelmotor,y dreneelaceiteenun recipiente
adecuado.Veala Figura26.
4. Vuelvaa colocary ajustela tapadeextrernodedrenajedeaceite.
5. Cuandose hadrenadotodo elaceitedelmotor,coloqueel motor
en unasuperficienivelada.Vuelvaa Ilenarconaproxirnadarnente
20 onzasdeaceitenuevo.Llenehastalalinea FULL(lleno)de la
varillade rnedici6n.NoIo Ileneenexceso.ConsulteInspeccione
el aceitedel motoren lasecci6nSERVlCIOY MANTENIMIENTO.
6. Vuelvaa colocarel cablede la bujiaantesdearrancarlaunidad.
Drenaje del aceite
1. Vacieelcornbustibledeltanquehaciendofuncionarelrnotorhastaque
eltanquede combustibleest_vado. Cerci6resede queeltap6n
de Ilenadodel combustibleest,.bienajustado.
2. Conel motorapagadoperotodaviacaliente,desconecteel cable
de bujiay rnant_ngaloalejadode labujia.
55
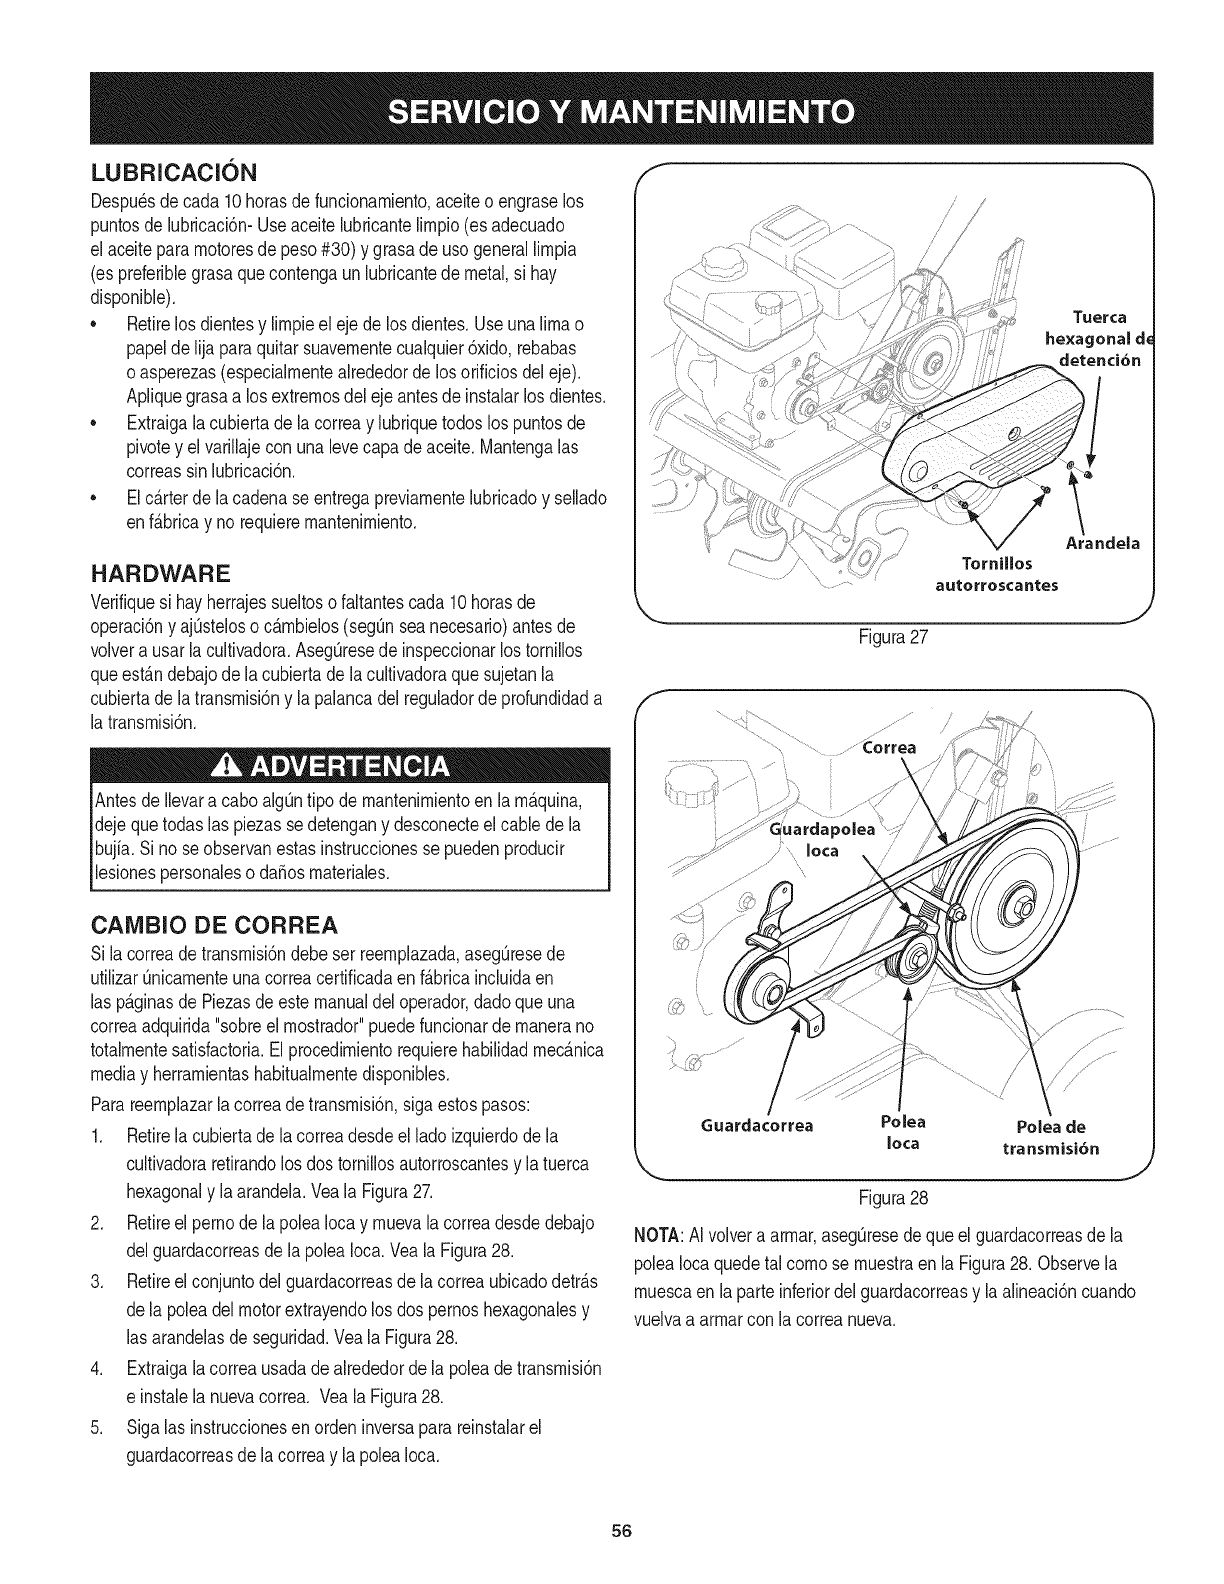
LUBRICACION
Despu_sdecada 10horasde funcionarniento,aceiteo engraselos
puntosde lubricaci6n-Useaceitelubricantelirnpio(esadecuado
el aceitepararnotoresde peso#30) y grasade usogenerallirnpia
(es preferiblegrasaquecontengaunlubricantede metal,si hay
disponible).
• Retirelos dientesy lirnpieel ejede losdientes.Useuna limao
papelde lijaparaquitarsuavernentecualquier6xido,rebabas
o asperezas(especialrnentealrededordelos orificiosdeleje).
Apliquegrasaa losextrernosdelejeantesdeinstalarlos dientes.
Extraigalacubiertadela correay lubriquetodoslos puntosde
pivotey el varillajecon unalevecapade aceite.Mantengalas
correassin lubricaci6n.
Elc_.rterde lacadenaseentregapreviarnentelubricadoy sellado
enf_.bricay no requierernantenirniento.
HARDWARE
Verifiquesi hayherrajessueltoso faltantescada 10horasde
operaci6ny ajQsteloso c_.rnbielos(segQnsea necesario)antesde
volvera usarla cultivadora.AsegOresede inspeccionarlostornillos
queest_.ndebajode la cubiertadela cultivadoraquesujetanla
cubiertade latransrnisi6ny la palancadel reguladordeprofundidada
la transrnisi6n.
Antesde Ilevara cabo algQntipo de rnantenirnientoenla rn_.quina,
dejequetodaslas piezassedetengany desconecteel cablede la
bujia. Sino seobservanestasinstruccionesse puedenproducir
lesionespersonaleso da_osrnateriales.
CAiVIBIO DE CORREA
Si lacorreadetransrnisi6ndebeser reernplazada,aseg_resede
utilizarQnicarnenteunacorreacertificadaen f_.bricaincluidaen
las p_.ginasde Piezasde estemanualdeloperador,dadoqueuna
correaadquirida"sobreel rnostrador"puedefuncionardernanerano
totalrnentesatisfactoria.Elprocedirnientorequierehabilidadrnec_.nica
mediay herrarnientashabitualrnentedisponibles.
Parareernplazarla correade transrnisi6n,sigaestospasos:
1. Retirela cubiertadela correadesdeel ladoizquierdodela
cultivadoraretirandolos dostornillosautorroscantesy latuerca
hexagonaly laarandela.Veala Figura27.
2. Retireel pernode lapoleaIocay rnuevalacorreadesdedebajo
delguardacorreasde lapoleaIoca.Veala Figura28.
3. Retireel conjuntodel guardacorreasde lacorreaubicadodetr_.s
dela poleadelmotorextrayendolos dos pernoshexagonalesy
las arandelasde seguridad.Veala Figura28.
4. Extraigalacorreausadadealrededordela poleade transrnisi6n
e instalela nuevacorrea. Veala Figura28.
5. Sigalas instruccionesen ordeninversaparareinstalarel
guardacorreasde lacorreay la poleaIoca.
f
/
/
Tuer¢a
he×agonal d
detenci6n
Arandela
Figura27
Guardacorrea Polea Polea de
Iota transrnisi6n
J
Figura28
NOTA:AI volveraarrnar,aseg_resedequeel guardacorreasdela
poleaIocaquedetal cornose rnuestraen la Figura28. Observela
rnuescaenla parteinferiordel guardacorreasy laalineaci6ncuando
vuelvaa arrnarcon lacorreanueva.
56
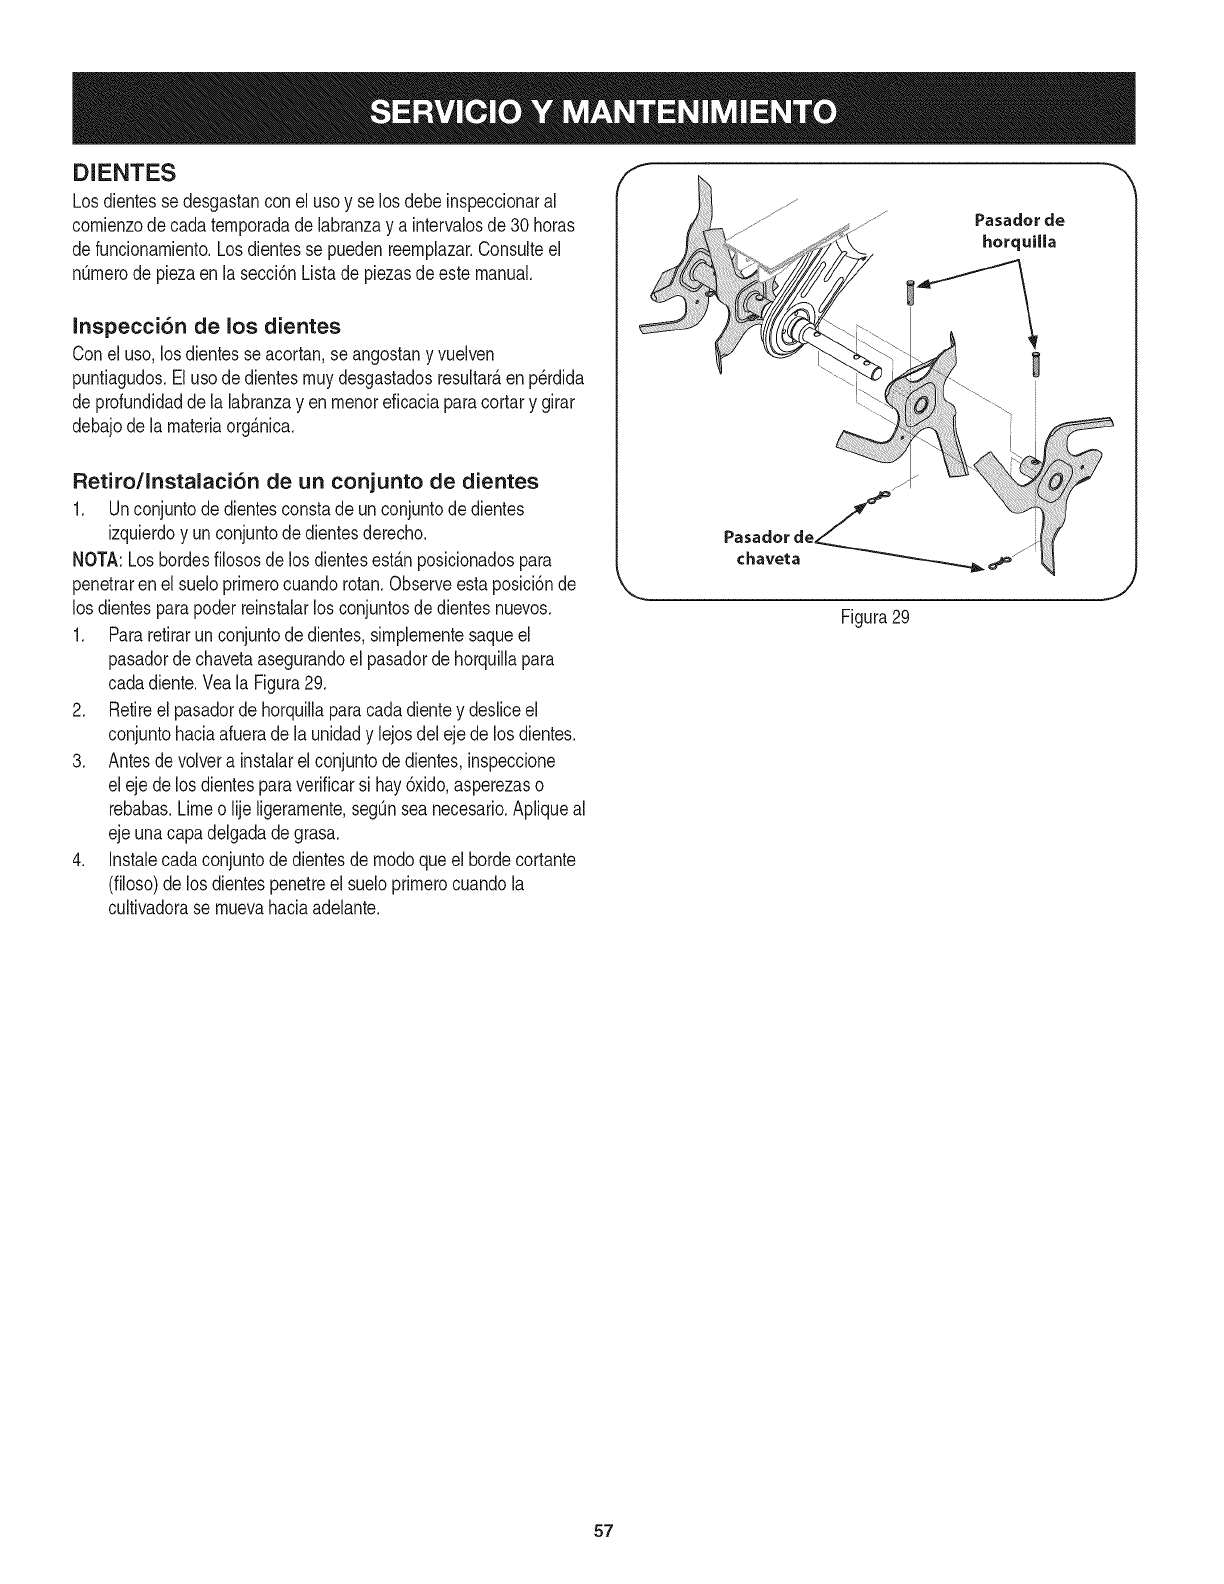
DIENTES
Losdientesse desgastanconel uso y se los debeinspeccionaral
comienzode cadatemporadade labranzay a intervalosde 30horas
defuncionamiento.Losdientesse puedenreemplazar.Consulteel
nQmerode piezaen la secci6nListade piezasde estemanual.
Inspecci6n de los dientes
Conel uso,losdientesseacortan,se angostany vuelven
puntiagudos.Elusode dientesmuydesgastadosresultaraen p_rdida
de profundidadde la labranzayen menoreficaciaparacortary girar
debajode lamateriaorg_.nica.
Retiro/Instalaci6n de un conjunto de dientes
1. Unconjuntode dientesconstade unconjuntode dientes
izquierdoy unconjuntodedientesderecho.
NOTA:Loshordesfilososde los dientesestanposicionadospara
penetrarenel sueloprimerocuandorotan.Observeestaposici6nde
los dientesparapoderreinstalarlos conjuntosde dientesnuevos.
1. Pararetirarunconjuntodedientes,simplementesaqueel
pasadordechavetaasegurandoel pasadorde horquiNapara
cadadiente.Veala Figura29.
2. Retireel pasadorde horquillaparacadadientey desliceel
conjuntohaciaafuerade launidady lejosdelejede los dientes.
3. Antesde volvera instalarel conjuntodedientes,inspeccione
eleje delos dientesparaverificarsi hay 6xido,asperezaso
rebabas.Limeo Njeligeramente,segQnsea necesario.Apliqueal
ejeunacapadelgadade grasa.
4. Instalecada conjuntode dientesde modoqueel hordecortante
(filoso)de los dientespenetreel sueloprimerocuandola
cultivadorase muevahaciaadelante.
Pasadorde
horquilla
1
chaveta
Figura29
J
57
Nuncaalrnacenela cultivadoraconcombustibleenel tanqueenun
espaciocerradoo en_.reaspocoventiladasdondelos gasesdel
combustiblepuedanNegara una Narnaexpuesta,unachispao un
pilotocornoel quetienenalgunoshornos,calentadoresde agua,
secadoresde ropao algQnartefactoa gas.
Nuncadejeel motorsin vigilanciarnientrasest,.en funcionarniento.
PREPARACI6N DEL MOTOR
Paraalrnacenarrnotoresentre 30y 90dfases necesariotratarlos
con unestabiNzadorde gasolinay paraalrnacenarlosdurantern_.s
de 90dfasse debedrenarel combustibleparaevitardeteriorosy la
forrnaci6ndedep6sitosde gornaenel sisternade combustibleo en
piezasfundarnentalesdelcarburador.Sila gasolinaen su motorse
deterioraduranteel alrnacenarniento,es posiblequedebareparar
o reernplazarel carburadory otroscornponentesdelsisternade
combustible.
1. Extraigatodo elcombustibledeldep6sitohaciendofuncionarel
motorhastaquese detengaporfaltade combustible.
2. Carnbieel aceite.Consulteel Carnbiode aceiteen la secci6n
SERVlCIOY MANTENIMIENTO.
3. Retirelabujfay viertacercade 1/2onzade aceiteparamotor
en elciNndro.Vuelvaa colocarla bujfay d_ rnarchaalmotor
lentarnenteparadistribuirelaceite.
4. Lirnpiela suciedadde las _.reasdel motory del silenciador.
RetoquelapinturadaSada,y revistaotras_.reasque puedan
oxidarsecon unapelfculadelgadadeaceite.
5. Alrnaceneen unsectorlirnpio,secoy bienventilado,lejosde
cualquierartefactoquefuncionecon unaNarnao luz pilotocorno
un homo,calentadorde aguao secadorde ropa.Tarnbi_nevite
cualquiersectorcon unachispaproduciendomotorel_ctricoo
dondese utilizanherrarnientasel_ctricas.
6. Deser posible,tarnbi_nevita_.reasdealrnacenarnientocon
rnuchahurnedadparaevitaroxidaci6ny corrosi6n.
7. Mantengael motorniveladocuandoIoalrnacene.Lainclinaci6n
del motorpuederesultarenfugasdecombustibleo aceite.
PREPARACI6N DE LA CULTIVADORA
Si la cultivadoranose va a usarduranteunperfodoprolongado,
prep_.relaparael alrnacenarnientodela siguienteforrna:
1. Lirnpiela cultivadoray el motor.
2. Sigalas recornendacionessobrelubricaci6ny verifiquesi hay
parteso piezassueltas.
3. Alrnacenelacultivadoraen un_.realirnpiay seca.
4. Nuncaalrnacenelacultivadoraconcombustibleenel tanqueen
un _.reacerradadondelas ernanacionesde la gasoNnapueden
alcanzarunaNarnaexpuestaochispas,o dondehubierefuentes
de encendido(calefactores,calentadoresde agua,hornos,etc.).
58
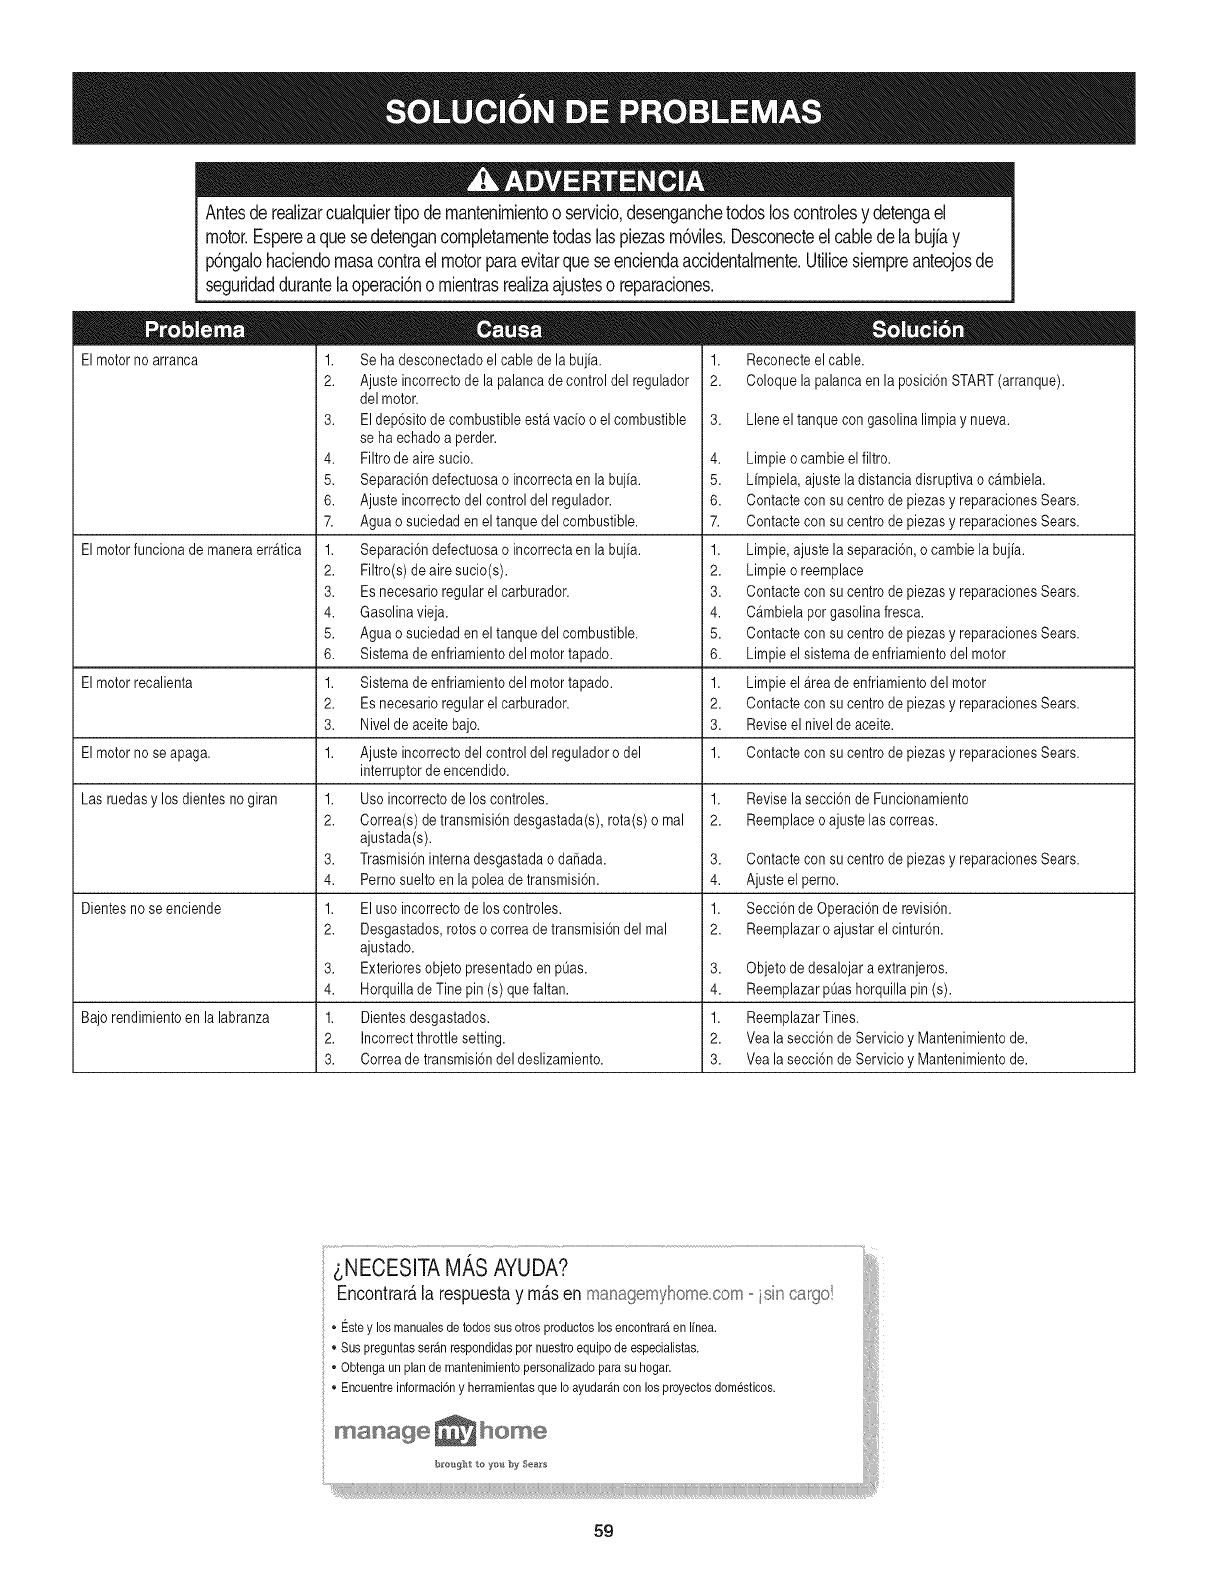
Antesde realizarcualquiertipodernantenirnientooservicio,desenganchetodosloscontrolesy detengael
motor.Espereaquesedetengancornpletarnentetodaslaspiezasrn6viles.Desconecteel cabledelabujfay
p6ngalohaciendornasacontraelmotorparaevitarqueseenciendaaccidentalrnente.Utilicesiernpreanteojosde
seguridaddurantelaoperaci6no rnientrasrealizaajusteso reparaciones.
El motor no arranca
El motorfunciona de manera erratica
1. Reconecteel cable.
2. Coloque la palancaen la posici6nSTART(arranque).
3. Lleneel tanquecon gasolinalimpiay nueva.
El motor recalienta
El motor no seapaga. Contacte con su centrode piezasy reparacionesSears.
Las ruedasy los dientesno giran
1. Se ha desconectadoel cable de la bujfa.
2. Ajusteincorrecto de la palancade control del regulador
delmotor.
3. Eldep6sito de combustibleestavacfo o elcombustible
seha echado a perder.
4. Filtrode aire sucio.
5. Separaci6ndefectuosao incorrectaen la bujia.
6. Ajusteincorrecto delcontrol del regulador.
7. Aguao suciedaden el tanque del combustible.
1. Separaci6ndefectuosao incorrectaen la bujia.
2. Filtro(s) de aire sucio(s).
3. Esnecesario regularel carburador.
4. Gasolinavieja.
5. Aguao suciedaden el tanque del combustible.
6. Sistema de enfriamientodelmotor tapado.
1. Sistema de enfriamientodelmotor tapado.
2. Esnecesario regularel carburador.
3. Nivelde aceitebajo.
1. Ajusteincorrecto del controldel reguladoro del
interruptorde encendido.
1. Usoincorrecto de los controles.
2. Correa(s)de transmisi6ndesgastada(s),rota(s) o mal
ajustada(s).
3. Trasmisi6ninternadesgastada o dafiada.
4. Pernosuelto en la poleade transmisi6n.
1. Eluso incorrectode loscontroles.
2. Desgastados,rotoso correa de transmisi6ndel mal
ajustado.
3. Exterioresobjetopresentadoen pOas.
4. Horquillade Tine pin (s) que faltan.
1. Dientesdesgastados.
2. Incorrectthrottlesetting.
3. Correade transmisi6ndel deslizamiento.
Dientes no se enciende
4. Limpieo cambieel filtro.
5. Limpiela, ajuste ladistancia disruptiva o cambiela.
6. Contacte con su centrode piezasy reparacionesSears.
7. Contacte con su centrode piezasy reparacionesSears.
1. Limpie,ajuste la separaci6n,o cambie la bujfa.
2. Limpieo reemplace
3. Contacte con su centrode piezasy reparacionesSears.
4. Cambiela porgasolinafresca.
5. Contacte con su centrode piezasy reparacionesSears.
6. Limpieel sistemade enfriamientodel motor
1. Limpieel Areade enfriamientodel motor
2. Contacte con su centrode piezasy reparacionesSears.
3. Reviseel nivelde aceite.
1.
1. Revisela secci6n de Funcionamiento
2. Reemplaceo ajuste lascorreas.
3. Contacte con su centrode piezasy reparacionesSears.
4. Ajuste el perno.
1. Secci6nde Operaci6nde revisi6n.
2. Reemplazaro ajustar el cintur6n.
3. Objeto de desalojar a extranjeros.
4. ReemplazarpOashorquilla pin(s).
Bajorendimientoen la labranza 1. ReemplazarTines.
2. Yea la secci6n de Servicio y Mantenimientode.
3. Yea la secci6n de Servicio y Mantenimientode.
59
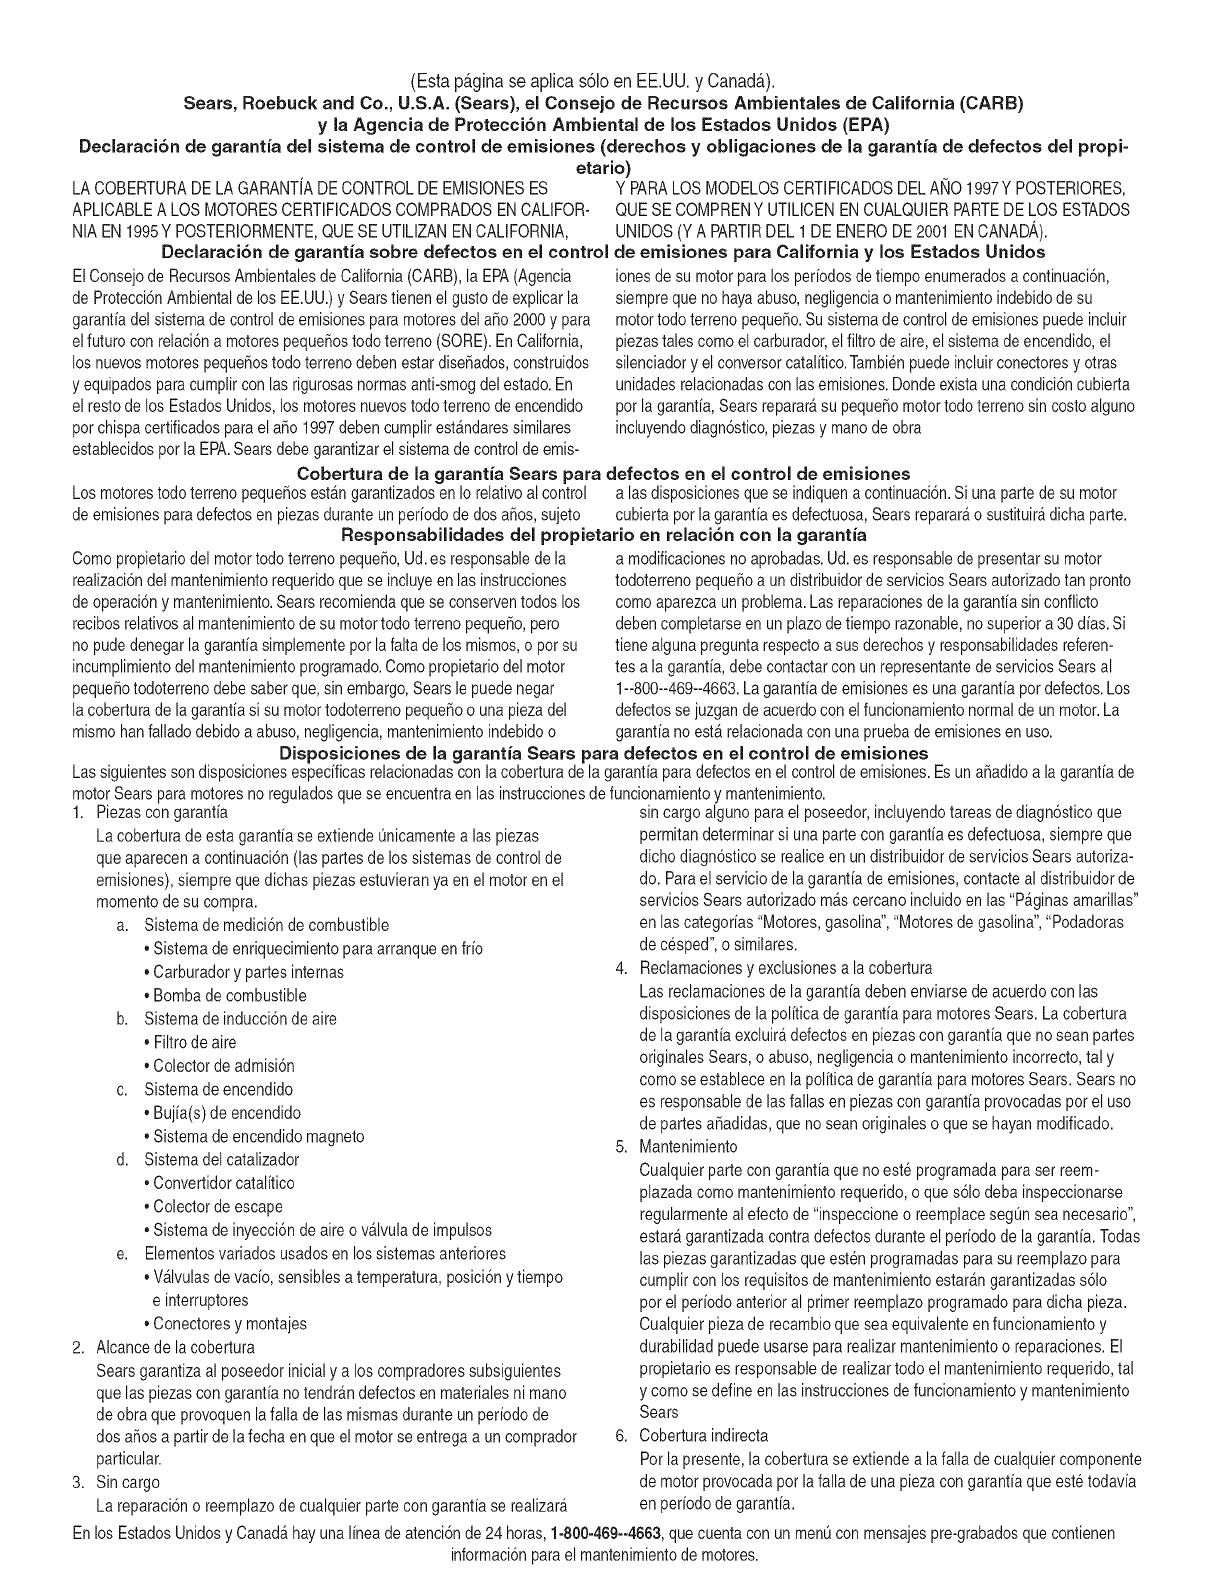
(Estap_.ginaseaplicas61oenEE.UU.yCanada.).
Sears,Roebuck and Co., U.S.A. (Sears), el Consejo de Recursos Arnbientales de California (CARB)
y la Agencia de Protecci6n Arnbiental de los Estados Unidos (EPA)
Declaraci6n de garantia del sistema de control de emisiones (derechos y obligaciones de la garantia de defectos del propi=
etario)
LACOBERTURADE LAGARANTJADECONTROLDEEMISIONESES Y PARALOSMODELOSCERTIFICADOSDELANO 1997YPOSTERIORES,
APLIOABLEA LOSMOTORESCERTIFICADOSCOMPRADOSENCALIFOR- QUESE COMPRENY UTILICENENCUALQUIERPARTEDE LOSESTADOS
NIA EN1995Y POSTERIORMENTE,QUESE UTILIZANENCALIFORNIA, UNIDOS(Y A PARTIRDEL 1 DE ENERODE2001ENCANADA).
Declaraci6n de garanfia sobre defectos en el control de ernisiones para California y los Estados Unidos
ElConsejode RecursosAmbientalesdeCalifornia(CARB),la EPA(Agencia
de Protecci6nAmbientalde los EE.UU.)y Searstienenel gusto de explicarla
garantiadel sistemade controlde emisionesparamotoresdela_o 2000y para
elfuturo con relaci6na motorespeque_ostodo terreno(SORE).En California,
los nuevosmotorespeque_ostodo terrenodebenestardise_ados,construidos
y equipadosparacumplirconlas rigurosasnormasanti-smogdelestado.En
el restode los EstadosUnidos,losmotoresnuevostodoterrenodeencendido
porchispacertificadosparael a_o 1997debencumplirest_ndaressimilares
establecidospot la EPA.Sears debegarantizarel sistemadecontrolde emis-
ionesde su motorparalosperiodosdetiempoenumeradosa continuaci6n,
siemprequeno hayaabuso,negligenciao mantenimientoindebidode su
motortodoterrenopeque_o.Susistemade controlde emisionespuedeincluir
piezastalescomoel carburador,el filtrodeaire, elsistemadeencendido,el
silenciadoryel conversorcatalitico.Tambienpuedeincluirconectoresyotras
unidadesrelacionadascon lasemisiones.Dondeexistaunacondici6ncubierta
por la garantia,Searsreparar_su peque6omotortodo terrenosin costoalguno
incluyendodiagn6stico,piezasy manodeobra
Cobertura de la garantJa Sears para defectos en el control de ernJsiones
Losmotorestodo terrenopeque6osest_ngarantizadosen Iorelativoalcontrol alas disposicionesque se indiquena continuaci6n.Si una partede su motor
deemisionesparadefectosenpiezasduranteunper[ododedos a_os,sujeto cubiertapot lagaranfiaes defectuosa,Searsreparar_o sustituir_dichaparte.
Responsabilidades del propietario en relacibn con la garantia
Comopropietariodel motortodo terrenopeque_o,Ud.es responsablede la
realizaci6ndel mantenimientorequeridoquese incluyeen las instrucciones
deoperaci6ny mantenimiento.Searsrecomiendaquese conserventodoslos
recibosrelativosal mantenimientode su motortodoterrenopeque_o,pero
nopude denegarla garantiasimplementepor la faltade los mismos,o por su
incumplimientodel mantenimientoprogramatic.Comopropietariodel motor
peque_otodoterrenodebe saberque, sinembargo,Searslepuedenegar
lacoberturade lagarantiasi su motortodoterrenopeque6oouna piezadel
mismohanfalladodebidoa abuso,negligencia,mantenimientoindebidoo
a modificacionesno aprobadas.Ud.es responsabledepresentarsu motor
todoterrenopeque6oa undistribuidorde serviciosSearsautorizadotan pronto
comoaparezcaun problema.Lasreparacionesdela garantiasinconflicto
debencompletarseen unplazodetiemporazonable,nosuperiora 30 dias.Si
tienealgunapreguntarespectoa sus derechosy responsabilidadesreferen-
tes a la garantia,debe contactarcon un representantede serviciosSearsal
1--800--469--4663.La garantiadeemisioneses unagarantiapor defectos.Los
defectosse juzgandeacuerdocon elfuncionamientonormalde unmotor.La
garantiano est_relacionadaconunapruebade emisionesenuso.
Disposiciones de la garantJa Sears para defectos en el control de emJsiones
Lassiguientesson disposicionesespecificasrelacionadasconla coberturade lagarantiaparadefectosenel controlde emisiones.Esuna_adidoa lagarantiade
motorSearsparamotoresnoreguladosquese encuentraen lasinstruccionesdefuncionamientoy mantenimiento.
1. Piezascongarantia
Lacoberturadeesta garantiase extiendeL]nicamentea laspiezas
queaparecena continuaci6n(las partesde lossistemasdecontrolde
emisiones),siempreque dichaspiezasestuvieranya enel motoren el
momentode su compra.
a. Sistemademedici6nde combustible
•Sistemadeenriquecimientoparaarranqueen frio
•Carburadory partesinternas
•Bombade combustible
b. Sistemadeinducci6nde aire
•Filtrode aire
•Colectorde admisi6n
c. Sistemadeencendido
•Bujia(s)de encendido
•Sistemadeencendidomagneto
d. Sistemadelcatalizador
•Convertidorcatalitico
•Colectorde escape
•Sistemadeinyecci6nde aireo v_lvulade impulsos
e. Elementosvariadosusadosenlossistemasanteriores
•Wlvulas de vacio,sensiblesa temperatura,posici6ny tiempo
e interruptores
•Conectoresy montajes
2. AIcancedela cobertura
Searsgarantizaal poseedorinicialy a loscompradoressubsiguientes
quelas piezascon garantianotendr_ndefectosen materialesni mano
deobraque provoquenla falla delas mismasduranteun periodode
dosaSosa partirdela fechaen queel motorse entregaa un comprador
particular.
3. Sin cargo
Lareparaci6no reemplazode cualquierpartecon garantiase realizar_
sin cargoalgunoparael poseedor,incluyendotareasde diagn6sticoque
permitandeterminarsi una partecongarantiaes defectuosa,siempreque
dichodiagn6sticose realiceen undistribuidordeserviciosSearsautoriza-
do. Parael serviciode lagarantiadeemisiones,contacteal distribuidorde
serviciosSearsautorizadom_scercanoincluidoen las"P_ginasamarillas"
en lascategorias"Motores,gasolina","Motoresdegasolina","Podadoras
de cesped",o similares.
4. Reclamacionesyexclusionesa la cobertura
Las reclamacionesde lagarantia debenenviarsedeacuerdocon las
disposicionesdela politicade garantiaparamotoresSears.Lacobertura
de lagarantiaexcluir_defectosen piezascon garantiaquenoscan partes
originalesSears,o abuso,negligenciao mantenimientoincorrecto,tal y
como seestableceen lapolitica degarantiaparamotoresSears.Sears no
es responsablede lasfallas enpiezascongarantia provocadaspor el uso
de partesa_adidas,que no scanoriginaleso quese hayan modificado.
5. Mantenimiento
Cualquierpartecon garantiaque noesteprogramadaparaserreem-
plazadacomomantenimientorequerido,o que s61odebainspeccionarse
regularmentealefectode "inspeccioneo reemplacesegL]nsea necesario",
estar_garantizadacontradefectosduranteel periodode la garantia.Todas
las piezasgarantizadasqueesten programadasparasu reemplazopara
cumplircon los requisitosdemantenimientoestar_ngarantizadass61o
por el periodoanterioral primerreemplazoprogramaticparadicha pieza.
Cualquierpiezade recambioqueseaequivalenteenfuncionamientoy
durabilidadpuedeusarsepararealizarmantenimientoo reparaciones.El
propietarioes responsablederealizartodoel mantenimientorequerido,tal
y comose defineen las instruccionesde funcionamientoy mantenimiento
Sears
6. Coberturaindirecta
Porla presente,la coberturase extiendea la fallade cualquiercomponente
de motorprovocadapot lafalla de unapiezacongarantiaque estetodavia
en periododegarantia.
Enlos EstadosUnidosy Canad_hayunalinea deatenci6nde24 horas,1-800-469--4GG3,quecuentacon un menL]conmensajespre-grabadosque contienen
informaci6nparael mantenimientode motores.
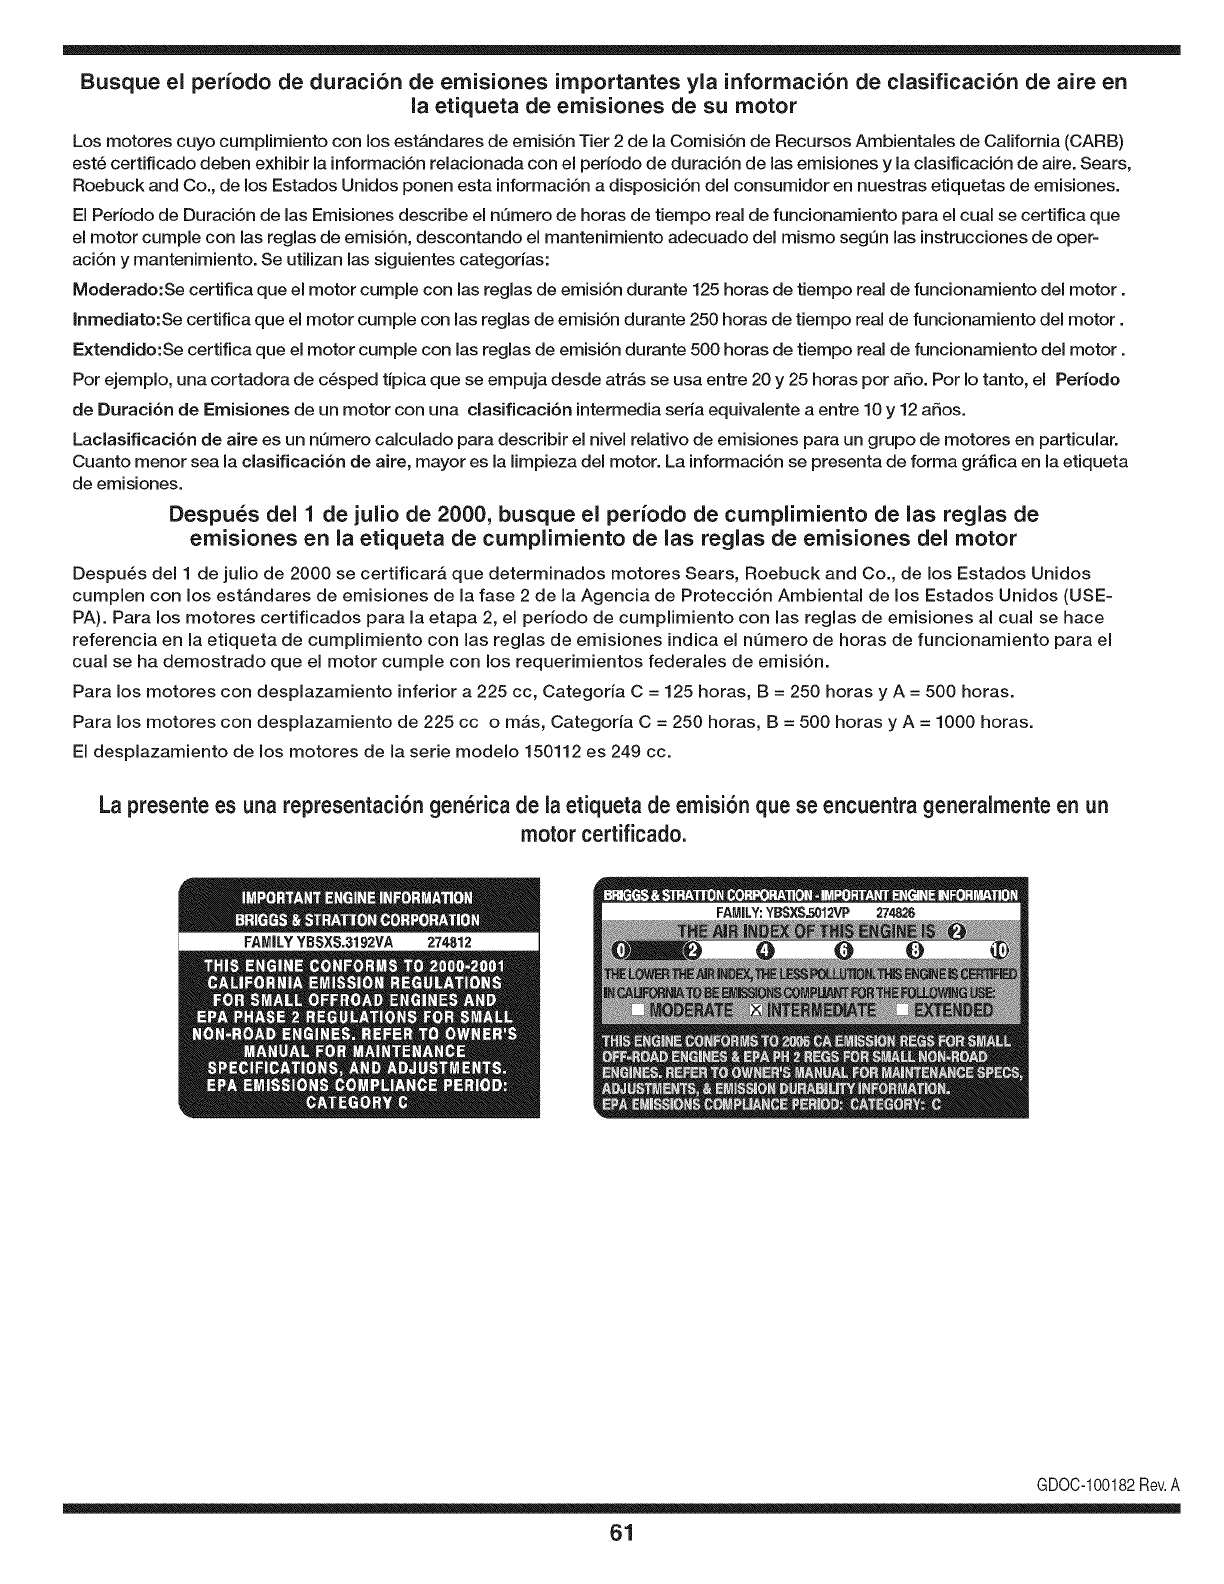
Busque el periodo de duraci6n de emisiones importantes yla informaci6n de clasificaci6n de aire en
la etiqueta de emisiones de su motor
Los motores cuyo cumpiimiento con los estAndares de emisi6n Tier 2 de la Comisi6n de Recursos Ambientales de California (CARB)
est6 certificado deben exhibir la informaci6n relacionada con el perJodo de duraci6n de las emisiones y la clasificaci6n de aire. Sears,
Roebuck and Co., de los Estados Unidos ponen esta informaci6n a disposici6n deJ consumidor en nuestras etiquetas de emisiones.
El Periodo de Duraci6n de las Emisiones describe el nQmero de horas de tiempo real de funcionamiento para el cual se certifica que
el motor cumple con las reglas de emisi6n, descontando el mantenimiento adecuado deJmismo segQn las instrucciones de oper-
aci6n y mantenimiento. Se utilizan las siguientes categorias:
Moderado:Se certifica que el motor cumpie con las reglas de emisi6n durante 125 horas de tiempo real de funcionamiento deJ motor.
Inmediato:Se certifica que el motor cumple con las reglas de emisi6n durante 250 horas de tiempo real de funcionamiento deJ motor.
Extendido:Se certifica que el motor cumple con las reglas de emisi6n durante 500 horas de tiempo real de funcionamiento deJmotor.
Por ejemplo, una cortadora de c6sped tJpica que se empuja desde atrAs se usa entre 20 y 25 horas por afio. Por Io tanto, el Periodo
de Duraci6n de Emisiones de un motor con una clasificaci6n intermedia seria equivalente a entre 10 y 12 afios.
Laclasificaci6n de aJre es un nQmero calculado para describir eJnivel reiativo de emisiones para un grupo de motores en particular.
Cuanto menor sea Jaclasificaci6n de aire, mayor es JaJimpieza deJmotor. La informaci6n se presenta de forma gr&fica en Jaetiqueta
de emisiones.
Despu_s del 1 de julio de 2000, busque el periodo de cumplimiento de las reglas de
emisiones en la etiqueta de cumplimiento de las reglas de emisiones del motor
Despu_s deJ 1 de julio de 2000 se certificar_, que determinados motores Sears, Roebuck and Co., de los Estados Unidos
cumpien con los estAndares de emisiones de la fase 2 de la Agencia de Protecci6n Ambiental de los Estados Unidos (USE-
PA). Para los motores certificados para la etapa 2, el periodo de cumpiimiento con las reglas de emisiones al cual se hace
referencia en la etiqueta de cumpiimiento con las reglas de emisiones indica el nQmero de horas de funcionamiento para el
cuaJ se ha demostrado que el motor cumpie con los requerimientos federales de emisi6n.
Para los motores con desplazamiento inferior a 225 cc, Categoria C = 125 horas, B = 250 horas y A = 500 horas.
Para los motores con desplazamiento de 225 cc o mAs, Categoria C = 250 horas, B = 500 horas y A = 1000 horas.
El despiazamiento de los motores de la serie modelo 150112 es 249 cc.
La presente es una representaci6n gen_rica de la etiqueta de emisi6n que se encuentra generaimente en un
motor certificado.
FAMILYYBSXS.3192VA 274812
GDOC-100182Rev.A
61
Felicitacionespor haberrealizadounaadquisici6ninteligente.El
productoCraftsman@queha adquiridoest_dise_adoy fabricado
parabrindarrnuchosa_osde funcionarnientoconfiable.Perocorno
todoslos productosa vecespuederequerirde reparaciones.Esen
esernornentocuandoel disponerde unAcuerdode protecci6npara
reparacionesle puedeahorrardineroy problernas.
A continuaci6nsedetallanlos puntosincluidosenel Acuerdo:
•Servicio experto prestadopornuestros10,000especialistasen
reparacionesprofesionales
•Servicio ilirnitadosincargoparalaspiezasy la rnanodeobraen
todaslas reparacionescubiertas
•Reernplazodel productohasta1500d61aressi no es posible
repararel productocubierto
• Descuentode 10%del precionormaldel servicioy delas piezas
relacionadascon el rnisrnoqueno est_ncubiertasporel acuerdo;
adern&s,10%del precionormalde laverificaci6nde rnanten-
irnientopreventivo
• Ayudar_pidapottel_fono- IoIlarnarnosResoluci6nR_pida- el
apoyotelef6nicode unCharnuscaal representante.Pienseen
nosotroscornoel manual"de undue_ohablador."
Unavezadquiridoel Acuerdo,puedeprograrnarel serviciocon
tan s61orealizarunaIlarnadatelef6nica.PuedeIlarnarencualquier
mornentodeldia o dela nocheo prograrnarun servicioen linea.
ElAcuerdode Protecci6nde Reparaci6nes unacornprasin riesgo.
Siustedanulaporalgunaraz6nduranteel periodode garantiade
producto,proporcionarernosun reernbolsoIleno.O,un reernbolso
prorrateadoencualquiermornentodespu_sdelperiodode garantia
de productoexpira,iAdquieraboysu acuerdode protecci6npara
reparaciones!
Seaplican deterrninadaslimitaciones y exclusiones.Paraobtener
inforrnaci6nadicional y preciosen los Estados UnidosIlarne al
1-800-827-6655.
El*Coverage en Canad_variaen algunosarticulos. Paradetalles
Ilenosla IlarnadaCharnuscaCanad_en 1-800-361-6665.
Servicio de instalaci6nde Sears
Sideseasolicitarla instalaci6nprofesionalde Searsde aparatos
dorn_sticos,dispositivosparaabrirportones,calentadoresde agua
y otrosarficulosdorn_sticosirnportantes,en los EstadosUnidoso
Canad_Ilarneal 1-800-4-MY-HOME®.
62

63

Your Home
For troubleshooting, product manuals and home solutions advice:
÷anag÷
www.managemyhome.com
For repair - in your home - of all major brand appliances,
lawn and garden equipment, or heating and cooling systems,
no matter who made it, no matter who sold it!
For the replacement parts, accessories and
owner's manuals that you need to do-it-yourself.
For Sears professional installation of home appliances
and items like garage door openers and water heaters.
1-800-4-MY-HOME ®(1-800-469-4663)
Call anytime, day or night (U.S.A. and Canada)
www.sears.com www.sears.ca
Our Home
For repair of carry-in items like vacuums, lawn equipment,
and electronics, call anytime for the location of your nearest
Sears Parts & Repair Service Center
1-800-488-1222 (U.S.A.) 1-800-469-4663 (Canada)
www.sears.com www.sears.ca
To purchase a protection agreement on a product serviced by Sears:
1-800-827-6655 (U.S.A.) 1-800-361-6665 (Canada)
Para pedir servicio de reparaci6n Au Canada pour service en fran£ais:
a domicilio, y para ordenar piezas: 1-800-LE-FOYER Mc
1-888-SU-HOGAR ® (1-800-533-6937)
(1-888-784-6427) www.sears.ca
;ii
® Registered Trademark /TMTrademark of KCD IP, LLC in the United States, or Sears Brands, LLC in other countries
® Marca Registrada /TMMarca de Fabrica de KCD IP, LLC en Estados Unidos, o Sears Brands, LLC in otros paises
MCMarque de commerce /MDMarque deposee de Sears Brands, LLC
