Kobian Canada 7DTB26 HS-7DTB26-4GB with Wi-Fi User Manual RK3026 4 2 english Manual
Kobian Canada Inc., HS-7DTB26-4GB with Wi-Fi RK3026 4 2 english Manual
USERS MANUAL
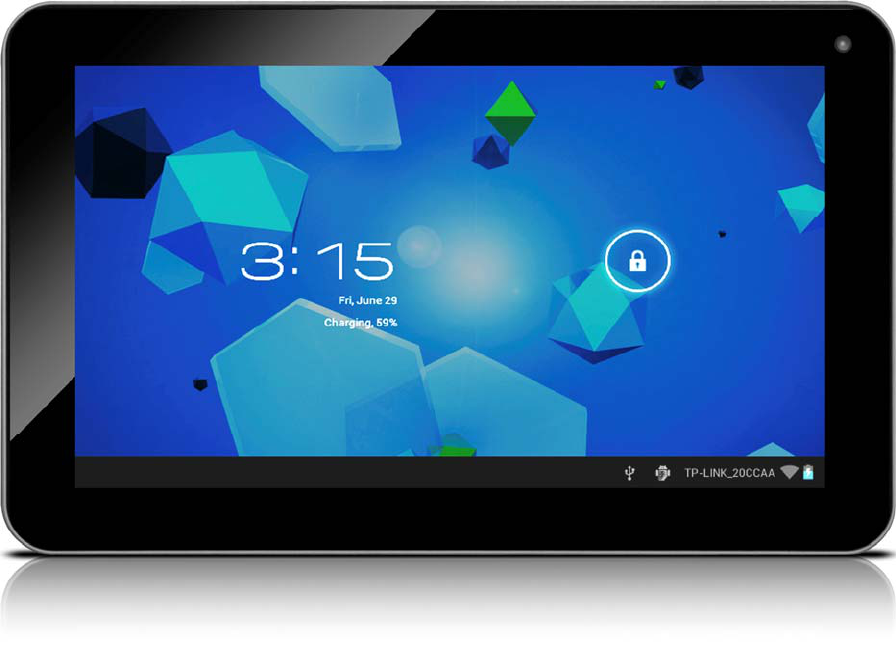
HS-7DTB26-4GB User Manual
Thanks for buying the Tablet PC HS-7DTB26-4GB. This manual is to introduce the
functions of the device, as well as matters which need attention. Please read this
manual before you use the device.
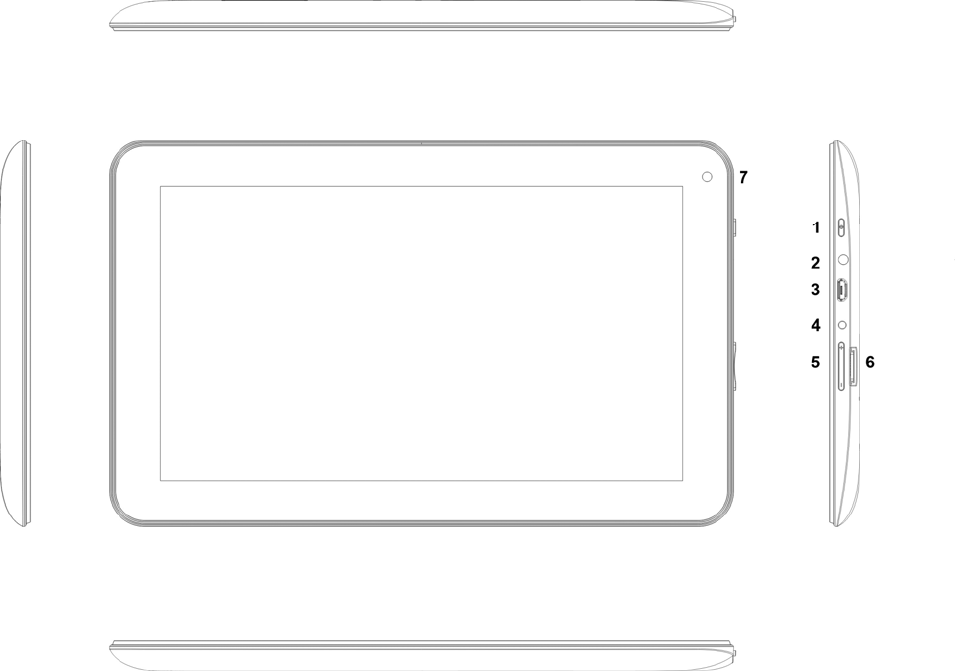
1. Power button
2. Earpieces Jack
3. USB
4. DC Socket
5. TF Card
6. RESET
7. Camera
FCC Statement
This device complies with part 15 of the FCC Rules. Operation is subject to the following two conditions: (1)
This device may not cause harmful interference, and (2) this device must accept any interference received,
including interference that may cause undesired operation.
NOTE 1: This equipment has been tested and found to comply with the limits for a Class C digital device,
pursuant to part 15 of the FCC Rules. These limits are designed to provide reasonable protection against harmful
interference in a residential installation. This equipment generates, uses and can radiate radio frequency energy
and, if not installed and used in accordance with the instructions, may cause harmful interference to radio
communications. However, there is no guarantee that interference will not occur in a particular installation. If
this equipment does cause harmful interference to radio or television reception, which can be determined by
turning the equipment off and on, the user is encouraged to try to correct the interference by one or more of the
following measures:
-Reorient or relocate the receiving antenna.
-Increase the separation between the equipment and receiver.
-Connect the equipment into an outlet on a circuit different from that to which the receiver is connected.
-Consult the dealer or an experienced radio/TV technician for help.
NOTE 2: Any changes or modifications to this unit not expressly approved by the party responsible for
compliance could void the user’s authority to operate the equipment.
NOTE 3: The manufacturer is not responsible for any radio or tv interference caused by unauthorized
modifications to this equipment. Such modifications could void the user’s authority to operate the equipment.
IC Statement:
This device complies with Industry Canada licence-exempt RSS standard(s). Operation is subject to the
following two conditions: (1) this device may not cause interference, and (2) this device must accept any
interference, including interference that may cause undesired operation of the device.
Le présent appareil est conforme aux CNR d'Industrie Canada applicables aux appareils radio exempts de licence.
L'exploitation est autorisée aux deux conditions suivantes : (1) l'appareil ne doit pas produire de brouillage, et (2)
l'utilisateur de l'appareil doit accepter tout brouillage radioélectrique subi, même si le brouillage est susceptible
d'en compromettre le fonctionnement.
This device complies with Canadian ICES-003 and RSS-210

1. Announcements
①. Please keep the device away from moist and dust.
②. Do not put the device in high-temperature environment, especially closed car in hot weather.
③. Do not drop or strike the device.
④. Do not shake the device violently, especially the LCD Screen part. Or, it will cause abnormal
display on the screen.
⑤. Please choose proper volume when using the earphone which will be good for your ear.
⑥. Please charge the device when
(1) The power icon shows lowest power.
(2) The device is turned off automatically, and when you turn on it, it is turned off
automatically again.
(3) No response when operating the buttons.
Attention: Please use the charger offered by manufacturer to charge, other charges may
causes damage to the device.
Input: 100-240V ~ 50/60 Hz
Output: 5V 2000 mA
⑦. Do not disconnect the device from PC when downloading, uploading or formatting, or it will
cause programming errors of the device.
⑧. Do not dismounting the device privately without professional guidance.
⑨. Do not use alcohol, thinner or benzene-chemical to clean the surface of the device.
⑩. Do not use the device in forbidden place, like airplane.
⑪. Please back-up your files in device’s memory always. The manufacturer is not responsible for
the clear of files after damage or repair of the device.
⑫. The manufacture reserves all right of device’s technology and design, and will have no
obligation to inform the user if there are new versions or designs been developed.
⑬. The device is NOT water-proof; please keep it away from water.
The turn on time of this device is about 20 seconds; please don’t operate the device when it is
turned on in 20 seconds.

2. Introduction
2.1 Packing Details.
Each unit of Tablet PC has the following items: Tablet PC device*1, charger*1, earphone*1, USB
cable*1,OTG cable*1 and user manual*1. Warranty paper *1 .All items are packed in gift box.
2.2 Instructions on Keys.
Name Description
POWER Press this button shortly to enter sleeping/wake up mode, long
press to switch ON/OFF
MENU Press this button shortly to enter the submenu
ESC Press shortly to return,
TF Card Slot For external TF card, 1GB to 16GB
Stereo Earpieces Jack Stereo earpieces jack for earphone
DC Socket Connect with 5V DC charger
MINI USB Port MINI_5 PIN USB Port
Display HD Display area
Long Press: Press the item for more than 1--2 seconds.
2.3 Features Overview
CPU: Rockchip3026(Dual Core), 1.0GHz. With ANDROID 4.2 operation system.
7" TFT touch panel LCD display, 800*480 pixel resolution.
Support 4~16GB built-in Flash Memory, support 128MB-32GB external TF card.
Support Medias playing: Video, audio, pictures, Ebooks, etc.
Built-in Wi-Fi. Support external 3G USB-DONGLE wireless network card (3G card or
USB-Dongle are not provided by the Tablet PC manufacturer).
Various applications are available in the ANDROIED4.2 OS. (APK applications only).
Support built-in microphone record function (optional).
Support USB-HOST and external U-disk, MP3, MP4, Mouse, keyboard, etc.
Support G-sensor screen rotation function.
Support Stereo Earpieces and speaker.
Supports multiple languages.
The device can be used as USB portable hard disk, driver not needed for WIN2000 or above.
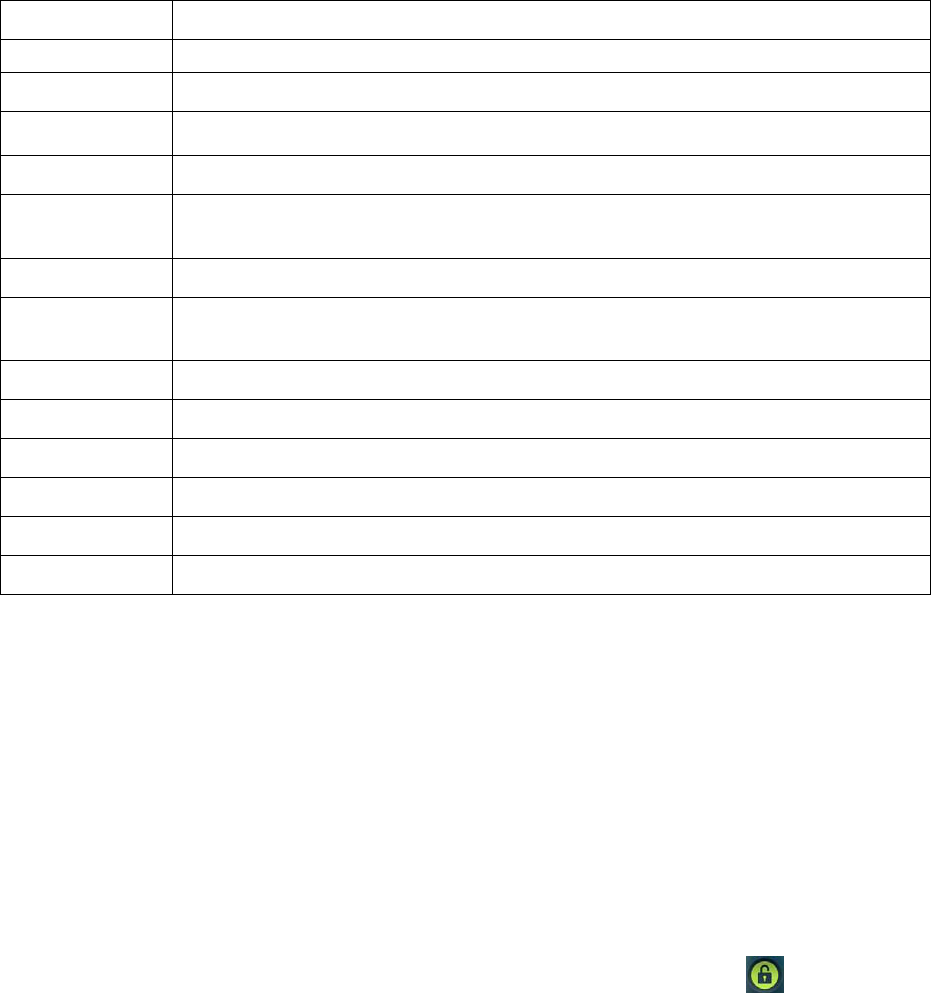
2.4 Technical Specifications
Screen 7 inch capacitive Multi touch screen ,Resolution: 800 x 480. 16:9
CPU Chipset: Rockchip3026(Dual Core); Frequency: 1.0GHz
RAM DDR3 1GB
Storage 8GB NAND Flash(Micro Sd Card Max to 32GB)
System Android 4.2 Jelly Bean0
Network Wifi: Built-in Wifi Module. IEEE 802.11b/g/n. 11Mbps to 150Mbps
3G: External 3G by USB Dongle.
Applications APK format applications
Video RM, RMVB, AVI, MOV, WMV, MP4, ASF, 3GP, TS, MKV, MPEG, etc. All videos
support HD 2160P.
Music MP3, WMA, WAV, APE, FLAC, AAC, OGG, etc.
Pictures JPG, JPEG, GIF, BMP, PNG
Ebooks TXT, EPUB, PDF,WORD,EXCEL, POWERPOINTS
Office Files Supported files: Word, Excel, PDF, etc.
PC Connection MINI USB2.0 x 1
Battery Built-in Lithium Battery:2400mAh
3. Quick Guides
3.1 About Touch Panel
The touch screen is capacitive touch screen; you can use five fingers to touch the screen at the
same time.
3.2 Switch On/Off.
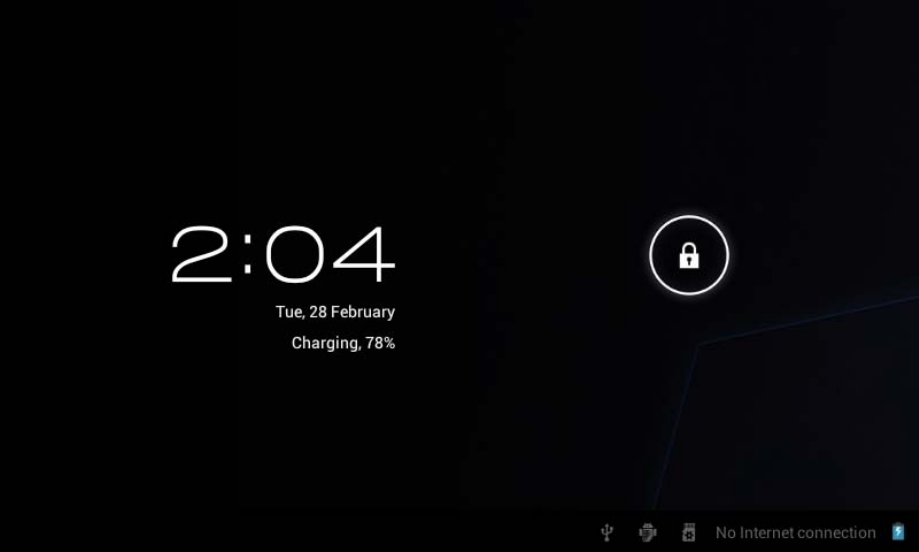
Switch On and Unlock: When the device is in the OFF mode, press and hold “Power” key for 3
seconds to enter the Android startup progress bar, it need about 20 seconds enter to the system
desktop, when the LCD is under locked mode, please press and pull the icon to the green
point, then the LCD will unlocked automatically, see the figures below,
3.3 Power Saving Modes and lock screen.
¾ Press the “POWER” key shortly after starting up, system enter to power save and lock mode.
¾ Press the “POWER” key or tap the touch screen, system will return to bright in 1 second
¾ The primary operation of the device will not stop under the power save mode, just the LCD is
shut and with black screen. For example: playing music, movie, etc
¾ Switch OFF: When the device is in the OFF mode, press and hold the “POWER” key for 3
seconds, the screen will display the power off interface, choose the power off item to confirm,
the system will shut automatically
【Note】When the device with low battery it will alarm continuous and shut automatically without
charging. If the device can not start up please check if the battery is low, and try it again after the
battery is charged.
3.4 Battery management and charging.
3.4.1 Charge the battery for 8-12 hours to make sure the battery is fully charged when firstly use.
3.4.2 Insert the micro port of the battery adaptor into DC slot on the device, and connect the other
side with the power socket. Then the desktop icon of the battery keep rolling which shows it is
charging, please wait until the battery is fully charged, don’t disconnect the power when charging.
Once the battery is fully charged, the Icon on the desktop will stop rolling.
【Note】In order to keep the battery working in the best condition, please pay attention as below:
z Please don’t charge the power in high temperature.
z No need to release the power for this Li- battery, you can charge the power even there is still
some power in the battery, no need to wait it runs out.
z In order to keep the battery in good condition, please make sure to charge the power once per
two weeks if you don’t use this device for a long time.
3.5 Definition for the icons of the Functions
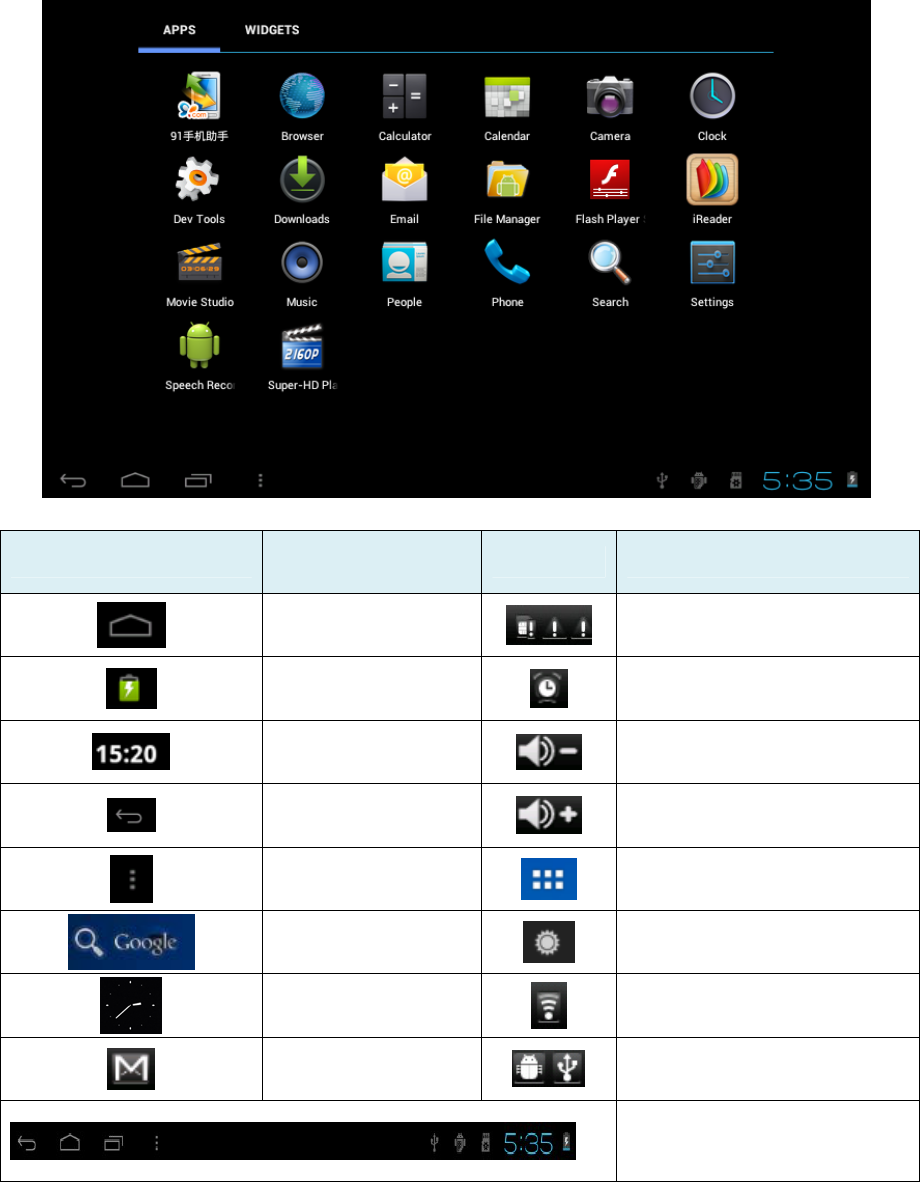
Icon Function
instruction Icon Function instruction
Back to main menu Note when the system
finds new devices.
Show current
power status Set the alert time
The current
system time Reduce the volume
Back Louder the volume
Menu Menu for Function Block.
Google search Adjust screen brightness
System clock WIFI on/off
New mail USB Connection
Status Bar
3.6 USB HOST Function
3.6.1 USB- HOST Definition
The Mini USB on the device can be used as USB Host.
3.6.2 Read U-disk:
Insert the U-disk into the HOST port, press the Resource manager in the desktop, press USB
enter into u-disk.
3.6.3 External 3G USB Dongle. (See network access guidance in item 4)
3.7 TF Card Storage
There is a TF card slot in this device, it support reading the files in TF card. Insert the TF card
into the card slot in right way, when take it out, just push the TF toward to the inside, then the
slot will release the TF card, the TF card will pop out automatically, take it then.
3.7.1 Please insert the TF into the card slot in the right side of the device.
3.7.2 Don’t pull out the card when operating ( reading, copying), or it may cause date error.
3.7.3 Don’t use the TF card under high temperature condition.
3.7.4 Keep the TF card far from the liquid and erosive materials.
4. Network Access
The device support Wi-Fi network and external 3G network.
4.1 Network Access by Wi-Fi
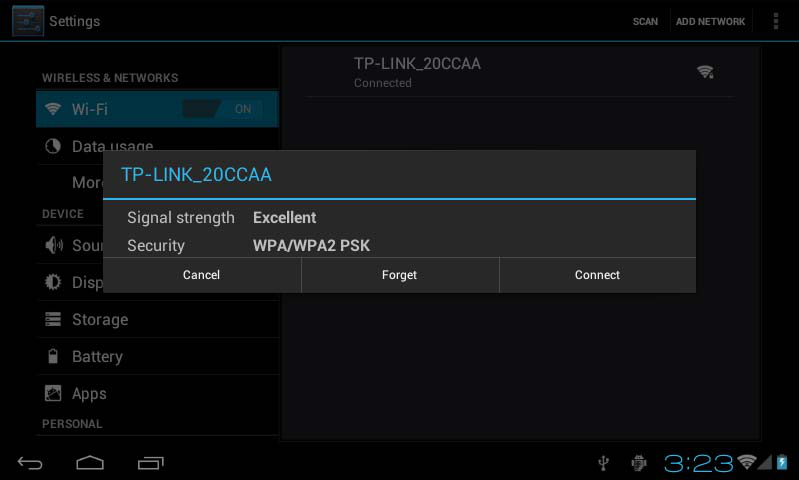
4.1.1 Turn on Wi-Fi, and Press Wi-Fi settings. The device will scans automatically for available
Wi-Fi networks.
4.1.2 Choose the Wi-Fi network that you want to connect to.
4.1.3 Press Connect. Some network may need you input the password.
4.1.4 On the Wi-Fi settings screen, press the Menu key, touch Advanced, you will get more
settings for Wi-Fi.
4.2 Network Access by 3G
4.2.1 Turn OFF Wi-Fi if it is working.
4.2.2 Access Mobile network setting, make sure Data enabled was chosen. Then go back to
Wireless & Networks.
4.2.3 Insert External 3G by USB host.
4.2.4 Choose Mobile network, then wait for the 3G network connection, soon you can access
network via 3G..
5. Storage File Copy
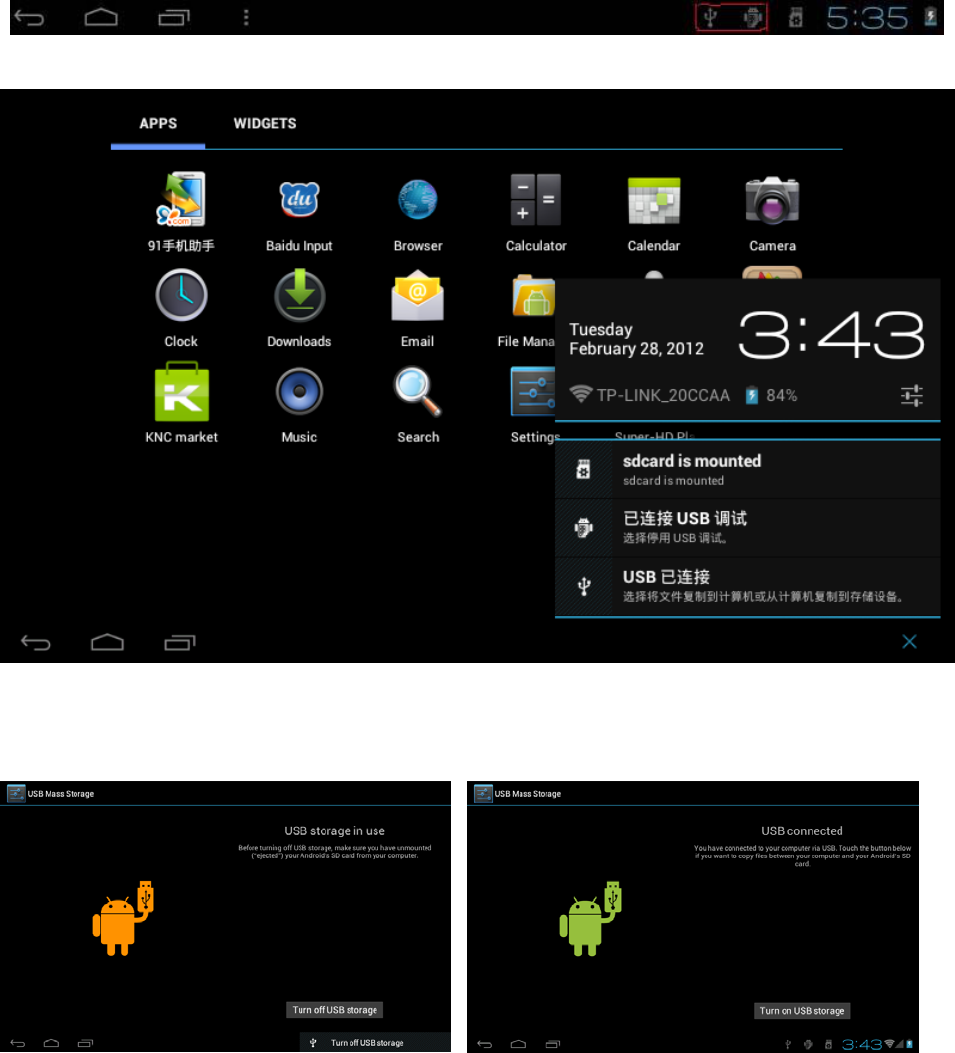
A) Connect the device to computer by USB Cable, there will be notification in the status bar that
USB connected.
B) Choose USB Connected
C) Choose USB Connected. Then, Turn on USB storage.
The left picture shows that device storage content could be viewed and modified from computer.
The right picture means that device storage content could NOT be viewed or modified from computer.
6. Main Functions Introduction
6.1 Audio Function
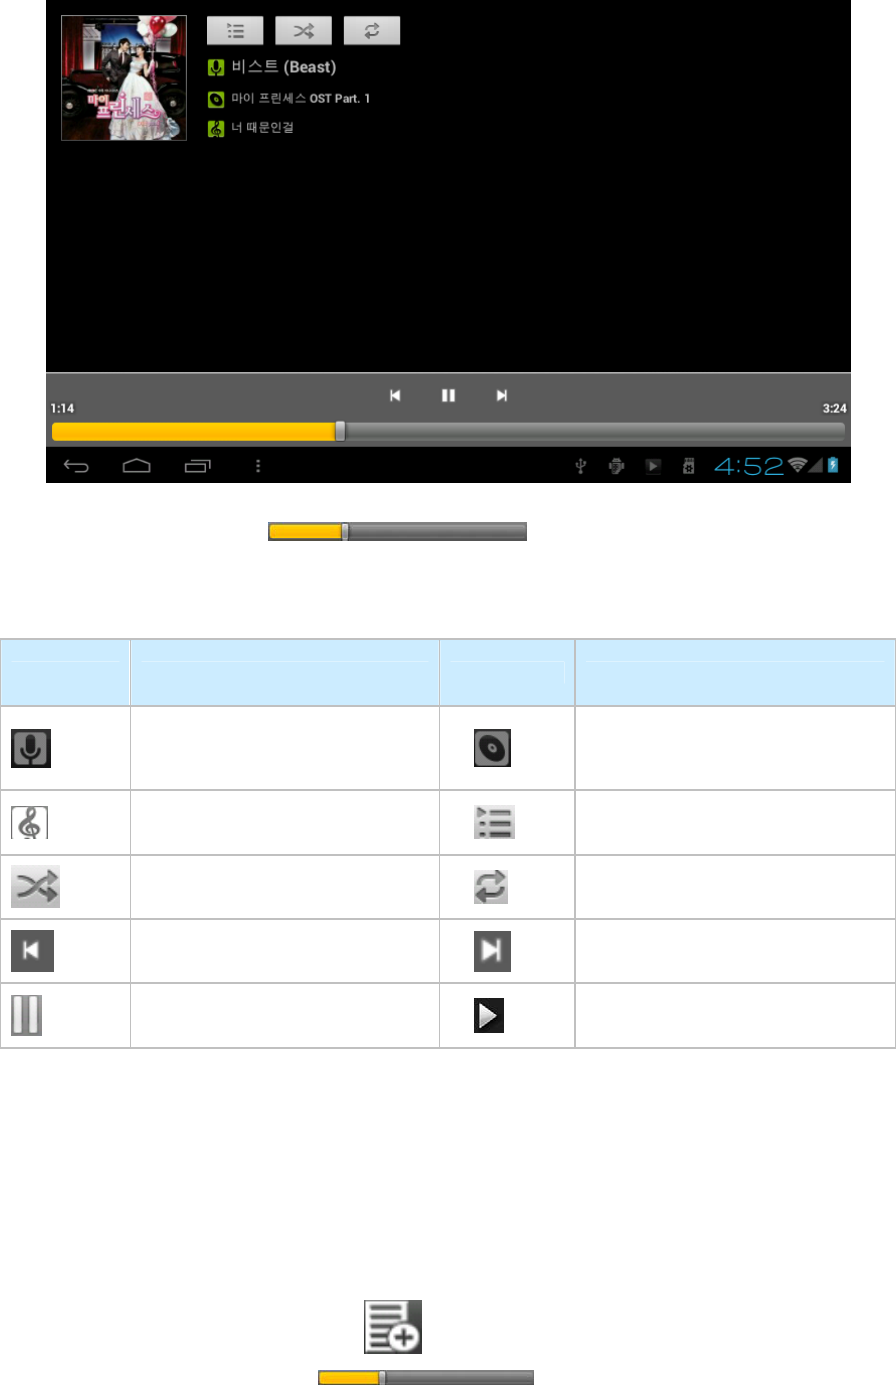
Enter the music player: In music player mode, double-click the favorite in the list to play music as
shown in the following picture
Drag the playing progress bar ,to adjust the playing process.
Instructions of the buttons in the Music player
Button Instruction button Instruction
Artist Album
Song Playing Music list
Random Play Loop playback
Play the last song Play the next song
Pause Play
z When no music files in the audio player playlist, the system will automatically load the music
files from the card to the audio player playlist after turning on the audio player (the device
supported audio file format: mp3, wav, midi, wma). The playlist as shown in the above figure
z If two more songs in the Music playlist area, slide up/down the touch screen to page up/down
z Double-click the favorite in the list to play music.
z In the music playing interface, click enter the audio playing list.
z Drag the playback progress bar to adjust audio playback progress.
6.2 Video Function
z Click the Video player icon to enter the video player interface, open the video files,
z The device supported audio file format: MKV、AVI、RM、RMVB、MP4、MOV、VOB、
DAT、FLV、3GP、etc.
z When no video files in the video player playlist, the system will automatically load the video
files from the card to the video player playlist after turning on video player.
z Drag the playback progress bar to adjust video playback progress.
6.3 Picture Function
z Click the HD Video Player to enter the viewing interface
z Add image(supports the format of picture: BMP、JPG、JPEG、PNG、GIF)
When there is no file in the photo list, the system will automatically load the image files from the
card to the photo browsing list after opening the photo browser.
Open the corresponding folder, find the image file and add the picture you want.
z Click menu button, the photo can be set as wallpaper.
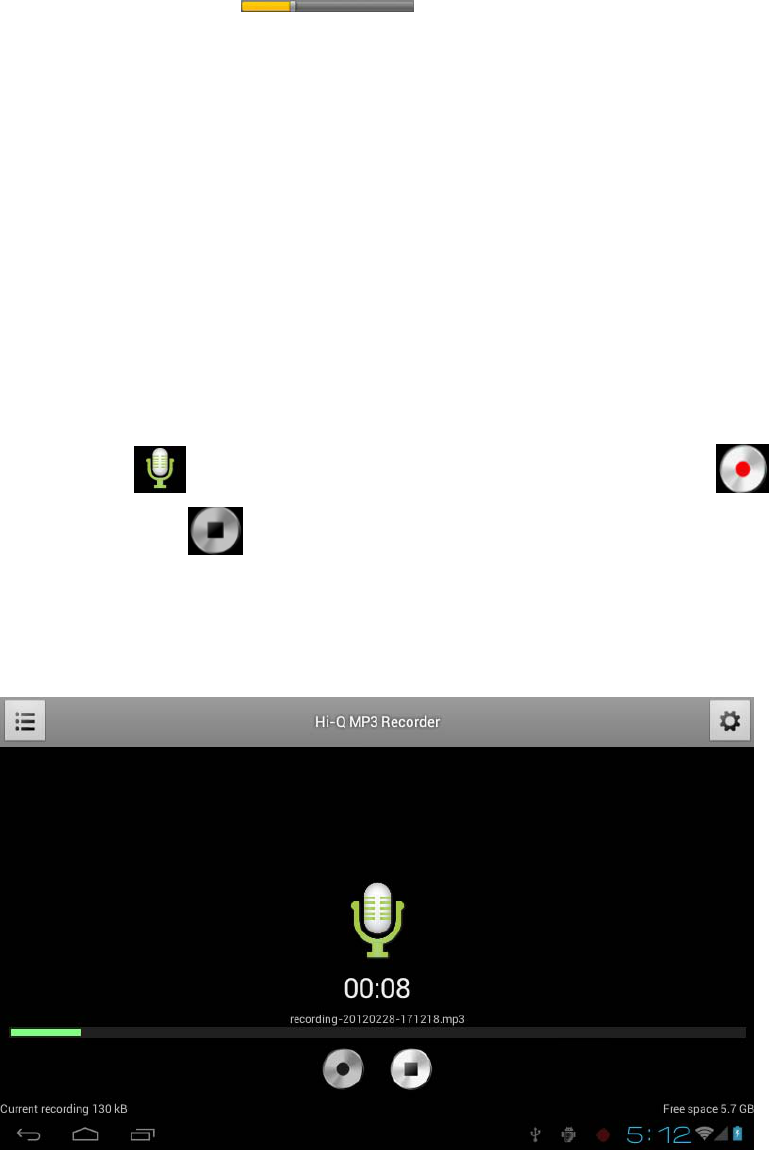
6.4 Record Function
Click the record icon to enter the record interface, click record button to start
recording, click this button to stop recording, the system will remind you to use this
recording or give up, please select manually.
Recording playing: please select audio player to play the recording, firstly select the record files
from the explorer, then click it and playing, further details please refer to Audio Function.
6.5 File Manager
In file manager, you can check all files in the device, including files in built-in Memory and
external card. Also there is a quick view for pictures and videos.
6.6 E-book Function.
Support formats of E-Book: TXT、LRC、PDF、HTML、HTM、EPUB, etc.
6.7 Internet Browser
z Before you use internet browse function, please make sure your network is connected. See
network access guidance in former part.
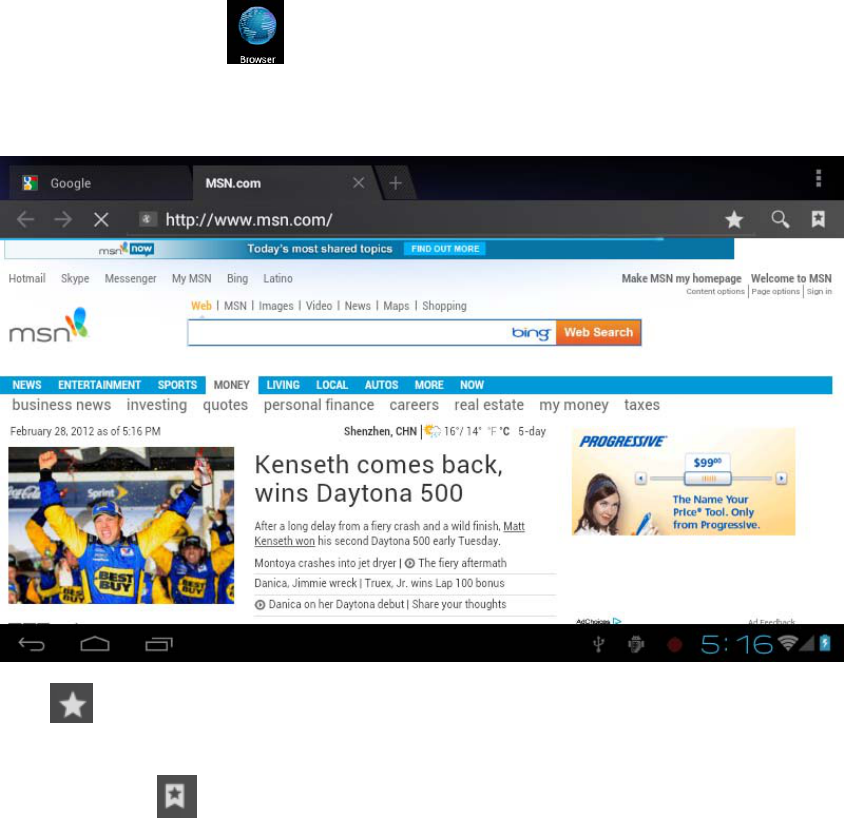
z Click IE Browser icon to enter to the IE interface, click the address bar and input
website and click Go to enter a corresponding web page, you can view the corresponding
website information.
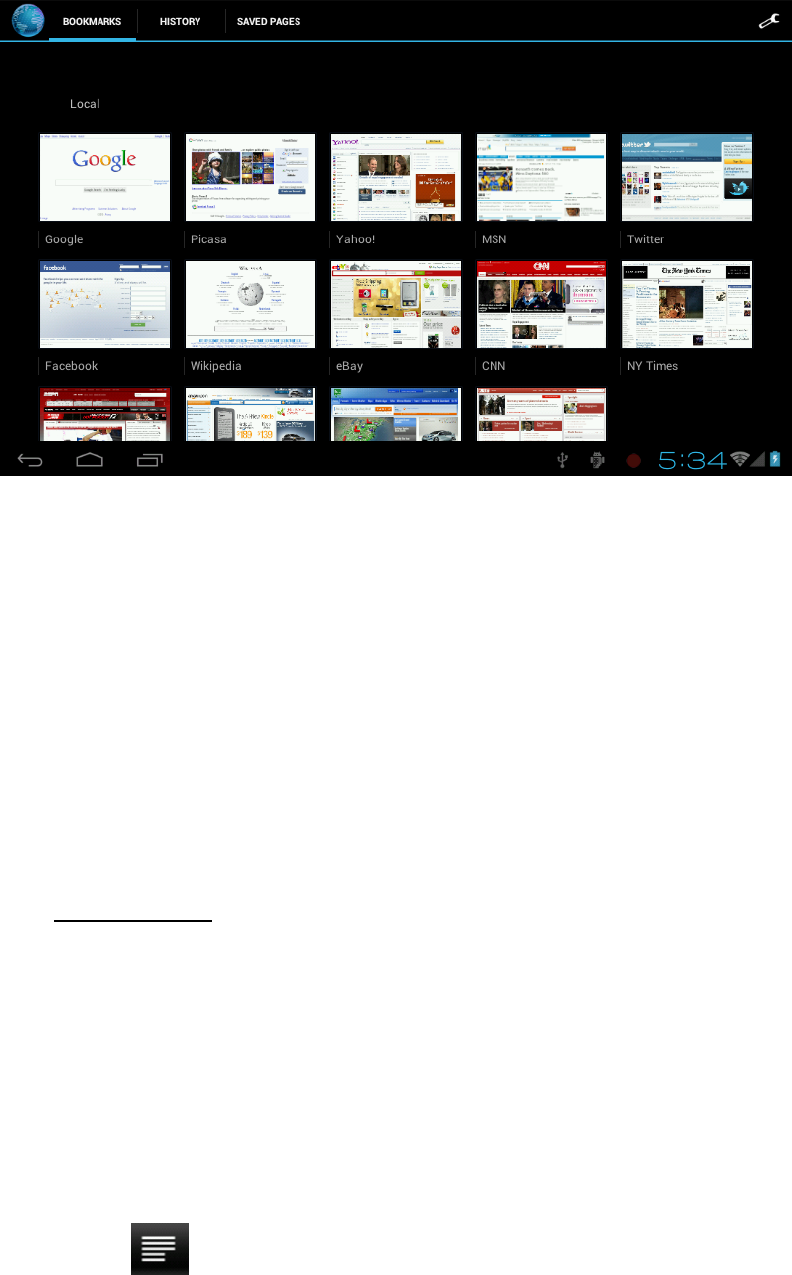
z Click icon to view bookmark and history record.
z Click menu icon to access settings
z The device also supports other internet browsers, detail functions of those internet browsers
refer to their own instructions.
6.8 Email Function
z Before you use email function, please make sure your network is connected. See network
access guidance in former part.
z When you firstly use this function, you need to add an email account to the device. The device
supports several accounts working together.
z Portal sites email accounts and enterprise email account adding methods are different.
Add portal sites email accounts. ( Example: Gmail, MSN, Yahoo, etc. )
Take Google email account for an example here.
Account: dxtreme.com.au
Password: *********
z For portal sites email accounts, directly input your email address and password, then click
next.
z After successful connection, input Account Name and Your Name. Account Name means the
name of this account in the device, Your Name means the displayed name of your email in
receivers’ account.
z Then you will access the account. Click email titles to read emails, long press email titles to
access options.
z Click menu icon to access settings
Refresh: Checking new emails.
Compose: Write new emails.
Folders: Manage emails to different folders.
Accounts: View accounts in the device, add new accounts, delete accounts, set main account.
Accounts settings: More options for email account.
6.9Calendar
Click Calendar icon to enter calendar interface.
z In calendar mode, press and pull up/down the screen to reduce/increase the Months; or to turn
the pages.
z Auto adjusts Years when the month exceeds December or January.
z Enter interface, the number in the orange form is the intraday date, you can change the date in
setting function; details as the setting section. .
Click to return to main menu.
6.10 Calculator Click Calculator icon to enter calculator interface.
6.11 Alarm Clock
z Click Clock icon to enter time interface, then click the clock to access alarm interface, and you
can add new alarms or edit former alarms now.
z Long press former alarms to choose turn alarm on/off, edit alarm, and delete alarm. Click
alarms to edit alarm.
z You can edit alarms’ time, repeat mode, ringtone, and lable.
z In alarm interface, click menu icon to access settings. The following items
could be set.
6.12 APK Installer
z This device supports the third party’s Application Package (APK format) based on Android
OS. Many Application Package can be downloaded from internet, or copied from other
devices into the storage.
z If the Application Package is not downloaded from Google Android Market, you should
operate the following steps before installation. Please check Settings – Applications, make
sure Unknown sources is chosen.
z Click the File Manager icon and Choose the file you want to install APK, press prompted
to install
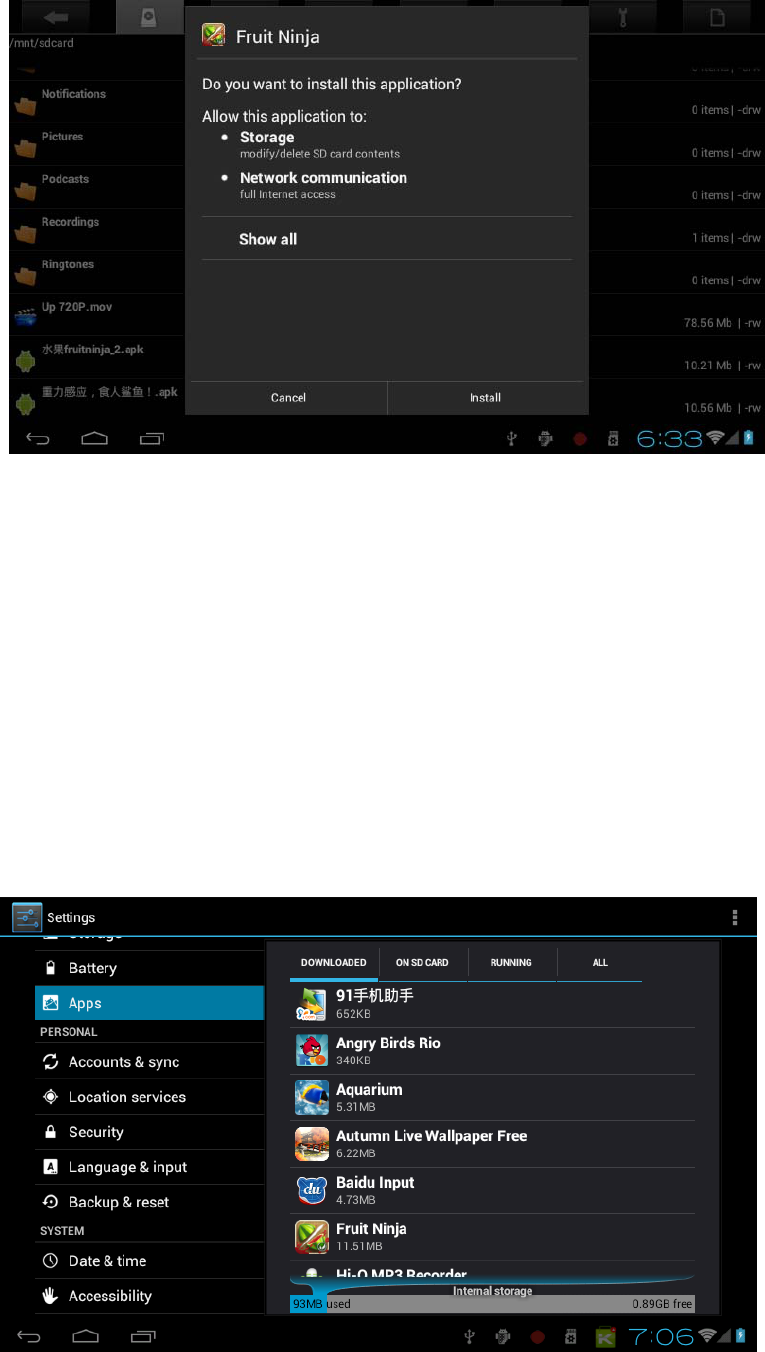
6.12.1 Install: Click Install, enter into the APK installer interface.
¾ Internal Memory means built-in Flash memory, SD card means inserted T-Flash;
¾ After entering, select the APK format setting program in the right side, click the application
to install, back to the main interface when complete this operation, then it finished the
installing, and there will be a relevant icon in application list.
6.12.2 Manage: Click settings and Choose APPS
¾ Click the APPS, Choose the file you want to cancel software
¾ Click the software, uninstall the software.
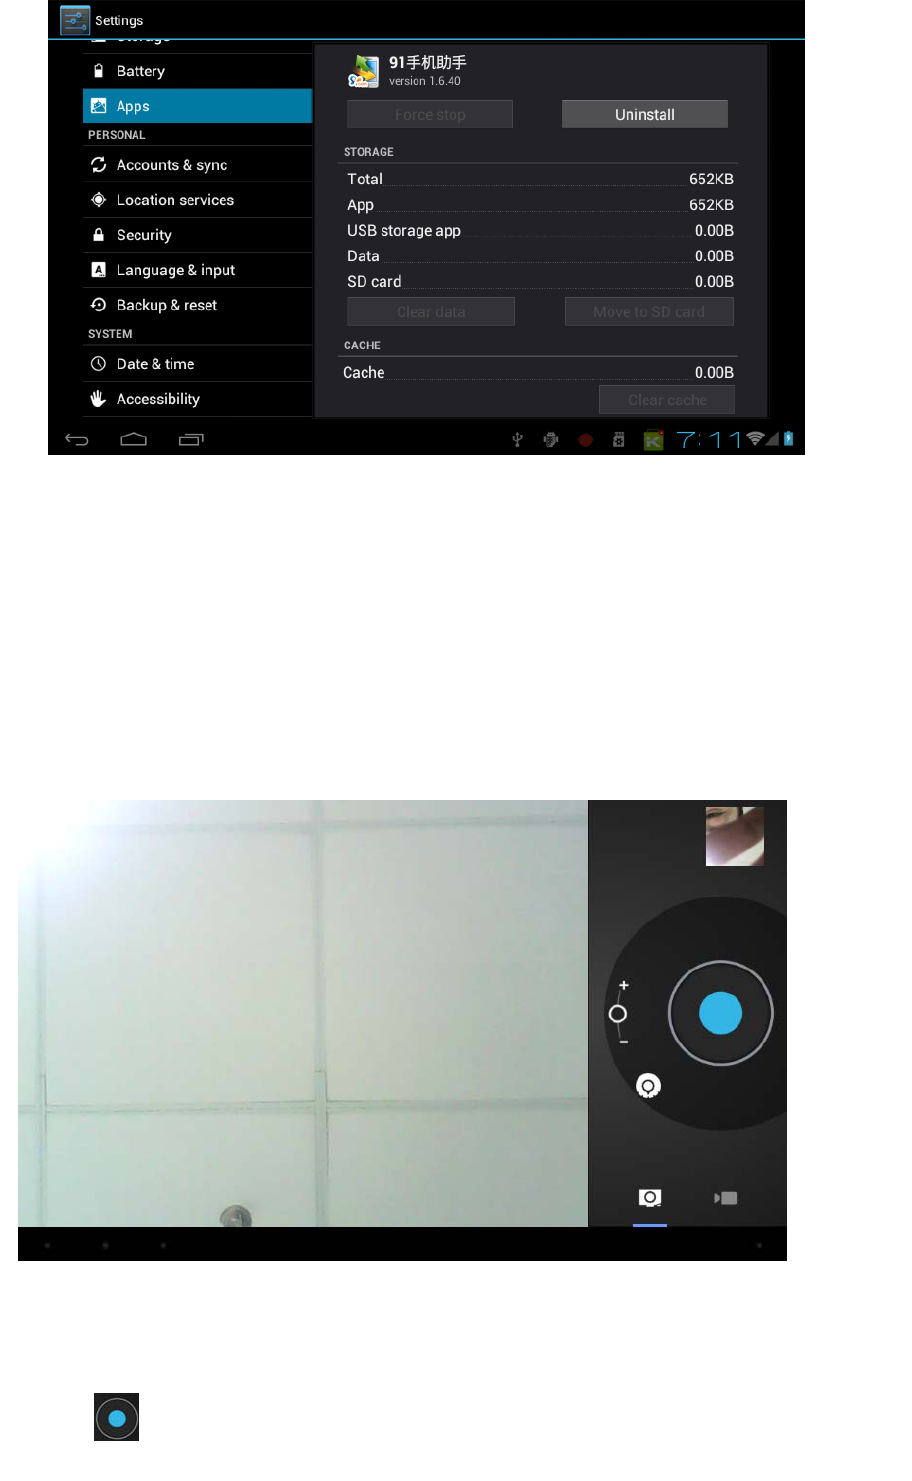
6.12.3 Exit: Go back to the main interface.
Note: All installed applications will be shown in application list menu. Here applications include
games, chatting TM, internet browser, media player, system tool, etc.
6.13 CAMERA AND PHOTOGRAPH
This machine is equipment with camera in the front, you can take photograph and record
video clips.
¾ Click on the applications tab to display all applications,then click "take photos" or "camera
shooting " into the shooting model.
¾ Befor filming,you can click on camera's work environment to have associate setting ,like:
white balance, photos size, photo quality, point mode etc.
¾ Click on button to start or end shooting .
¾ The photographs or video can be previewed in the preview window.

¾ If you want play the video you shooted ,turn on the video player and choose which video you
want to play.
¾ If you want to see the photograph you taken,turn into the photo model,and choose which
pictures you want to see.
7. System Settings
Click setting icon to enter system settings, then you can change wireless & networks, sound,
display, location & security, Applications, accounts & sync, Privacy, Storage, language & keyboard,
voice input & output, and date & time.
7.1 Wireless & Networks Setting, See item 4.
7.2 Sound Setting. You can adjust Silent mode, Volume, Notification ringtone, Audible selection,
Screen lock sounds, and Haptic feedback.
7.3 Display Setting. You can adjust Brightness, Auto-rotate screen, Animation, Screen timeout.
7.4 Location & Security Setting. In this Setting, you can set up screen lock and device
administrators, as well as TF card password.
7.5 Applications Setting. You can manage applications here, and check storage & battery usage.
Notice: If you want to install applications which are not downloaded from Google Android Market,
you should turn on Unknown sources in advance.
7.6 Accounts & sync Setting. In this setting, you can manage accounts in the device.
7.7 Privacy Setting. In this setting, you can back up data, and reset factory default.
7.8 Storage Setting. In this setting, you can check storage use and Mount & Erase TF cards.
Notice: Before you fetch out TF Card (if you have inserted TF card), please Unmount TF card first,
in case that some applications will arise problems.
7.9 Language & Keyboard Setting. In this setting, you can change the language of system, and
choose keyboard inputs.
Notice: If you have installed an input and you want to use it, please remember to turn on it in this
setting (All inputs could be turned on here). Long Press the blank where you want to type, there
will be popup to choose inputs.
7.10 Date & time Setting. In this setting, you can adjust date and time.
7.11 About device. Check device information.

8. FAQ
1) How can I change languages if I mistakenly choose an unknown language?
·Find setting icon in Menu Page to enter Settings.
·Then, choose icon to enter language & keyboard setting, the first option is language setting.
2) How can I change input when I am typing?
Long Press the blank where you are typing, there will be popup to choose inputs.
3) I already installed some applications, but I can not find them now, why?
·By default, some applications are installed in external TF card, so if you fetched out the TF card
from the device, you will not see these applications.
4) The machine can not be turned on.
·Check the battery and charge it if there is no power.
·Connect the machine to AC Adapter.
·Contact the seller if the machine still can not be turned on after charged.
5) There is no voice in the earphone.
·Check if the device is in Mute mode.
·Check the volume setting in case it is 0.
·Check the connection of earphone.
6) Why I can not install applications?
Please check Settings – Applications, make sure Unknown sources is chosen.
7) There is Error Codes on the screen.
·System error, restart the device.
·The language you are browsing is not supported by built-in languages, please contact the original
manufacturer to debug.
8) There are problems of system, many popup of error.
¾ Restart the device by POWER button for 10 seconds, the device will restart
¾ If you have restarted the device and error popup still exist, you can check active applications
to see if there is any unknown application, uninstall it if any.
¾ There may be virus in the device, please install security applications and protect your device.
¾ If you have problems after above operations, the device’s firmware needs rebuilt ( the
operation is named “flash”). Notice: Before you flash the device, please back up your
storage, the flashing will make all settings and files turn to factory default. Flashing
operation need flashing tool and firmware, please contact original manufacturer for flashing
operation.
9. Manual Version
This user manual is ONLY for ******, manual version: ******