Kobian Canada T29ABT MP4 User Manual J13 033 HS T29A 8GBSL QSG ENGLISH indd
Kobian Canada Inc., MP4 J13 033 HS T29A 8GBSL QSG ENGLISH indd
User Manual

QUICK START GUIDE
BLUETOOTH® VIDEO MP4 PLAYER
www.hipstreet.com
T29ABT-8GB-SL
FCC ID:YH5T29ABT
IC:8012A-T29ABT

SERIES / SÉRIE
A
C
B
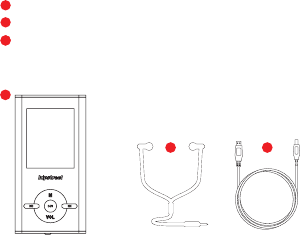
Getting started
What’s in the box:
Thank you for your purchase of this Hipstreet® Bluetooth® Video
MP3 player. This manual is designed to help you easily set up and
begin using your new device right away. Please read this manually
carefully and be sure to retain it for future reference.
We hope this high quality product offers you endless hours of
entertainment. Please visit our website at www.hipstreet.com
for any questions or additional information you may need.
1 x Bluetooth
A
B
B
C
1 x Earphones
1 x Mini-USB charging cable
1 x User Manual
01
Video Mp4 player
Video MP4 Player:
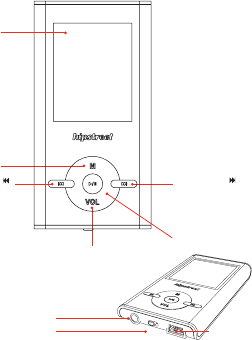
Getting started
Getting to Know Your Bluetooth®
Easy-to-Use Controls
Button Functions:
Main Power
On / Off
Menu
Volume Adjust
02
Next/Play Fast
(music or voice mode)
Play/Pause
Previous/Back Fast
(music or voice mode)
Display
Earphone Jack
Mini USB Port

Getting started
Power On / Off:
Slide the master power switch to the “ON” position.
Press and hold for 3 seconds to turn the player on,
press and hold again to turn it off.
Note:
The master power can be left on, unless the user
intends not to use the player for a long period of time.
Note:
This function is invalid when the player is connected to
a PC or while charging.
Note:
When charging the player from your computer, be sure the
system is on, or charging will not occur.
The battery icon on the top right will show “Full” when the
charging is completed. Disconnect the unit when it is done.
Charging the player:
When the battery is low, a prompt screen will appear and
then the player will automatically shut down.
Use the supplied USB cable to connect player to the computer
or AC charger (not included) for charging and fi le transfer.
The player will prompt you to choose “Charge & transfer” or
“Charge & play”. “Charge and play”, lets you use the player
while charging. “Charge & transfer”, connects the player your
computer for fi le transfer, as well as charging.
Select your desired choice by pressing and to select,
then to confi rm.
When the auto-off timer customized by the user has elapsed,
the player will automatically be turned off.
03
Press and hold for 3 seconds to turn the player on,
Press and hold for 3 seconds to turn the player on,
Press and hold for 3 seconds to turn the player on,
Press and hold for 3 seconds to turn the player on,
Press and hold for 3 seconds to turn the player on,
Select your desired choice by pressing and to select,
Select your desired choice by pressing and to select,
Select your desired choice by pressing and to select,
Select your desired choice by pressing and to select,
Select your desired choice by pressing and to select,
Select your desired choice by pressing and to select,
Select your desired choice by pressing and to select,
Select your desired choice by pressing and to select,
Select your desired choice by pressing and to select,
Select your desired choice by pressing and to select,
then to confi rm.
then to confi rm.
then to confi rm.

File Transfer:
Your player by default will be displayed as “Removable Disk” on
Windows and “NO NAME” on Mac. You can access your player as
“Removable Disk” by going to My Computer or Computer on a
Windows based system. “NO NAME” is accessible on the
Mac desktop.
To add fi les onto the player, use the drag and drop method to
move supported fi les over from your computer to the player.
Supported fi le type:
Music :
MP3, WMA
Video:
Converted fi les (please refer to the video conversion section)
Photo:
JPG, BMP, GIF
EBook:
TXT
Note:
Do not disconnect the player while it’s uploading or downloading
fi les with your computer.
Music:
Press and to browse through the main menu.
Select Music from the main menu, and press to enter music
interface.
In music interface, select ALL songs and press to display
a list of all your songs on the player. Press to begin playing,
04
Press and to browse through the main menu.
Press and to browse through the main menu.
Press and to browse through the main menu.
Press and to browse through the main menu.
Press and to browse through the main menu.
Press and to browse through the main menu.
Press and to browse through the main menu.
Press and to browse through the main menu.
Press and to browse through the main menu.
Press and to browse through the main menu.
Select Music from the main menu, and press to enter music
Select Music from the main menu, and press to enter music
Select Music from the main menu, and press to enter music
songs and press to display
songs and press to display
songs and press to display
a list of all your songs on the player. Press to begin playing,
a list of all your songs on the player. Press to begin playing,
a list of all your songs on the player. Press to begin playing,

05
and again to pause or stop. You can select a specifi c song by
scrolling through the list with and then to play.
During playback:
Press to skip next track and to go back previous track.
Hold and key to Fast Forward or Fast Reverse.
Press and hold VOL to enter volume adjustment mode.
Press it one time to exit or return to previous screen
Press M to bring up the option menu for play mode, sound
settings, delete, etc.
Video:
Select Videos from the main menu, and press to enter
videos interface.
In video interface, select a fi le you wish to play by scrolling
through the list with and then to play. Press again
to pause or stop.
During video playback:
Press to skip to the next fi le and to go back to
the previous fi le.
Hold and key to Fast Forward or Fast Reverse.
Press and hold VOL to enter volume adjustment mode.
Press it one time to exit or return to previous screen
Press M to bring up the option menu for brightness, repeat, etc.
Recordings:
Select Recorder from the main menu, and press to enter
scrolling through the list with and then to play.
scrolling through the list with and then to play.
scrolling through the list with and then to play.
scrolling through the list with and then to play.
scrolling through the list with and then to play.
Press to skip next track and to go back previous track.
Press to skip next track and to go back previous track.
Press to skip next track and to go back previous track.
Press to skip next track and to go back previous track.
Press to skip next track and to go back previous track.
Press to skip next track and to go back previous track.
Press to skip next track and to go back previous track.
Press to skip next track and to go back previous track.
Press to skip next track and to go back previous track.
Press to skip next track and to go back previous track.
Hold and key to Fast Forward or Fast Reverse.
Hold and key to Fast Forward or Fast Reverse.
Hold and key to Fast Forward or Fast Reverse.
Hold and key to Fast Forward or Fast Reverse.
Hold and key to Fast Forward or Fast Reverse.
through the list with and then to play. Press again
through the list with and then to play. Press again
through the list with and then to play. Press again
through the list with and then to play. Press again
through the list with and then to play. Press again
through the list with and then to play. Press again
through the list with and then to play. Press again
through the list with and then to play. Press again
through the list with and then to play. Press again
through the list with and then to play. Press again
Press to skip to the next fi le and to go back to
Press to skip to the next fi le and to go back to
Press to skip to the next fi le and to go back to
Press to skip to the next fi le and to go back to
Press to skip to the next fi le and to go back to
Press to skip to the next fi le and to go back to
Press to skip to the next fi le and to go back to
Press to skip to the next fi le and to go back to
Press to skip to the next fi le and to go back to
Press to skip to the next fi le and to go back to
Hold and key to Fast Forward or Fast Reverse.
Hold and key to Fast Forward or Fast Reverse.
Hold and key to Fast Forward or Fast Reverse.
Hold and key to Fast Forward or Fast Reverse.
Hold and key to Fast Forward or Fast Reverse.
Hold and key to Fast Forward or Fast Reverse.
Hold and key to Fast Forward or Fast Reverse.
Hold and key to Fast Forward or Fast Reverse.
Hold and key to Fast Forward or Fast Reverse.
Hold and key to Fast Forward or Fast Reverse.
Hold and key to Fast Forward or Fast Reverse.
Hold and key to Fast Forward or Fast Reverse.
Hold and key to Fast Forward or Fast Reverse.
Hold and key to Fast Forward or Fast Reverse.
Hold and key to Fast Forward or Fast Reverse.
scrolling through the list with and then to play.
scrolling through the list with and then to play.
scrolling through the list with and then to play.
scrolling through the list with and then to play.
scrolling through the list with and then to play.
scrolling through the list with and then to play.
scrolling through the list with and then to play.
scrolling through the list with and then to play.
from the main menu, and press to enter
from the main menu, and press to enter
from the main menu, and press to enter
through the list with and then to play. Press again
through the list with and then to play. Press again
through the list with and then to play. Press again
Select Recorder from the main menu, and press to enter
Select Recorder from the main menu, and press to enter
Select Recorder from the main menu, and press to enter
through the list with and then to play. Press again
through the list with and then to play. Press again
through the list with and then to play. Press again

06
recorder interface.
In recorder interface, select Start voice recording then press to
begin recording. Press to pause and VOL to save the recording.
To playback recording:
In recorder interface, select Recordings library then press to
display a list of all recorded fi les on the player. Press to begin
playing and again to pause or stop. You can select a specifi c fi le by
scrolling through the list with and then to play.
Pictures:
Select Pictures from the main menu, and press to enter
pictures interface.
In pictures interface, select a photo you wish to view by scrolling
through the list with and then to open.
Viewing photos:
Press to start slideshow, and again to pause.
Press to skip to the next photo and to go back to the
previous photo.
Press VOL to exit or return to previous screen
Press M to bring up the option menu for brightness,
slideshow settings, etc.

FM Radio:
Select Radio from the main menu, and press to enter fm
radio interface.
In radio interface, select Manual tune and press to enter
frequency tuning interface. Press and to tune.
Note:
Headset needs to be plugged in as an antenna for reception.
To save a channel:
Press M to bring up the option menu, select Save to preset
and press to choose a preset slot (1-30) then press to save.
To load a saved channel:
In radio interface, select Presets and press to display a list of
the preset channels. Scroll through the list with and then
to load the channel.
To delete a channel:
Select the channel you wish to delete from the preset list, press
to bring up the option menu, choose Clear preset
and press to delete.
EBooks:
Select EBooks from the main menu, and press to enter
ebooks interface.
In ebooks interface, select a book you wish to read by scrolling
through the list with and then press to open.
07
Select Radio from the main menu, and press to enter fm
Select Radio from the main menu, and press to enter fm
Select Radio from the main menu, and press to enter fm
In radio interface, select Manual tune and press to enter
In radio interface, select Manual tune and press to enter
In radio interface, select Manual tune and press to enter
and press to choose a preset slot (1-30) then press to save.
and press to choose a preset slot (1-30) then press to save.
and press to choose a preset slot (1-30) then press to save.
and press to choose a preset slot (1-30) then press to save.
and press to choose a preset slot (1-30) then press to save.
and press to choose a preset slot (1-30) then press to save.
In radio interface, select Presets and press to display a list of
In radio interface, select Presets and press to display a list of
In radio interface, select Presets and press to display a list of
to load the channel.
to load the channel.
to load the channel.
to bring up the option menu, choose Clear preset
to bring up the option menu, choose Clear preset
to bring up the option menu, choose Clear preset
and press to delete.
and press to delete.
and press to delete.
through the list with and then press to open.
through the list with and then press to open.
through the list with and then press to open.
Select EBooks from the main menu, and press to enter
Select EBooks from the main menu, and press to enter
Select EBooks from the main menu, and press to enter
frequency tuning interface. Press and to tune.
frequency tuning interface. Press and to tune.
frequency tuning interface. Press and to tune.
frequency tuning interface. Press and to tune.
frequency tuning interface. Press and to tune.
through the list with and then press to open.
through the list with and then press to open.
through the list with and then press to open.
through the list with and then press to open.
through the list with and then press to open.
through the list with and then press to open.
through the list with and then press to open.
through the list with and then press to open.
through the list with and then press to open.
through the list with and then press to open.
the preset channels. Scroll through the list with and then
the preset channels. Scroll through the list with and then
the preset channels. Scroll through the list with and then
the preset channels. Scroll through the list with and then
the preset channels. Scroll through the list with and then
the preset channels. Scroll through the list with and then
the preset channels. Scroll through the list with and then
the preset channels. Scroll through the list with and then
the preset channels. Scroll through the list with and then
the preset channels. Scroll through the list with and then
frequency tuning interface. Press and to tune.
frequency tuning interface. Press and to tune.
frequency tuning interface. Press and to tune.
frequency tuning interface. Press and to tune.
frequency tuning interface. Press and to tune.

08
Reading a book:
Press will turn the page automatically after a few seconds set
by the user.
Press to turn next page and to go back previous page.
Press VOL to exit or return to previous screen.
Press M to bring up the option menu for Playsetting,
Add bookmark, etc.
Folder View (Browse):
Select Browse from the main menu, and press to enter
browse interface.
In browse interface, select a fi le from the list then press to
open using the associated function.
To delete a fi le:
Select a fi le from the list, then press M to bring up the option
menu. Choose Delete from the list then press to delete.
Tools (Applications):
Select Tools from the main menu, and press to enter
tools interface.
In tools interface, select an application from the list then press
to open.
Press will turn the page automatically after a few seconds set
Press will turn the page automatically after a few seconds set
Press will turn the page automatically after a few seconds set
from the main menu, and press to enter
from the main menu, and press to enter
from the main menu, and press to enter
interface, select a fi le from the list then press to
interface, select a fi le from the list then press to
interface, select a fi le from the list then press to
from the list then press to delete.
from the list then press to delete.
from the list then press to delete.
from the main menu, and press to enter
from the main menu, and press to enter
from the main menu, and press to enter
Press to turn next page and to go back previous page.
Press to turn next page and to go back previous page.
Press to turn next page and to go back previous page.
Press to turn next page and to go back previous page.
Press to turn next page and to go back previous page.
Press to turn next page and to go back previous page.
Press to turn next page and to go back previous page.
Press to turn next page and to go back previous page.
Press to turn next page and to go back previous page.
Press to turn next page and to go back previous page.

Settings:
Select Settings from the main menu, and press to enter
settings interface.
In settings interface, select an option from the list then
press to enter.
Playmode:
To set repeat and shuffl e for music playback.
Sound settings:
To set equalizer, volume limit, and keytone.
Sleep timer:
To set sleep time.
Display settings:
To set brightness, backlight, and screensaver.
Date and time:
To set the date and time.
Slideshow settings:
To confi gure how photo slideshow should be displayed.
Language:
To change the language on the player.
Information:
To display software version and memory information.
Format device:
To completely delete all data on the player.
Factory settings:
To restore factory settings.
Bluetooth® (Bluetooth Setup):
Select Bluetooth® from the main menu, and press to
enter Bluetooth® interface.
from the main menu, and press to from the main menu, and press to from the main menu, and press to
from the main menu, and press to
from the main menu, and press to
09

To turn on Bluetooth®:
In Bluetooth® interface, select BT Control from the list then press
to enable or disable Bluetooth®.
To pair a Bluetooth
®
device (e.g. speaker, headphones, etc.):
Activate pairing mode on the Bluetooth® device you wish to connect
with the player (See the user guide of your Bluetooth® device for
specifi c instructions if necessary).
In Bluetooth® interface, select Search Device from the list then
press to begin searching for nearby devices. A list of found
devices will display, select your Bluetooth device and press
to pair.
To play music with Bluetooth®:
After pairing is successful, select BT Now Playing from the
Bluetooth® interface then press to begin playing.
Video conversion:
The video conversion tool is used to convert video fi les into a
playable format suited specifi cally for this player. The video
conversion tool is used to convert video fi les into a playable
format suited specifi cally for this player. Please refer to separate
instructions and software provided on the mini DVD included with
this device.
Troubleshooting:
If you have problems in operating your player, please check the
points below before sending it to the service center.
Player will not start:
Check whether the battery on the player is low.
Connect the player to your computer to charge.
to enable or disable Bluetooth
to enable or disable Bluetooth
to enable or disable Bluetooth
press to begin searching for nearby devices. A list of found
press to begin searching for nearby devices. A list of found
press to begin searching for nearby devices. A list of found
devices will display, select your Bluetooth device and press
devices will display, select your Bluetooth device and press
devices will display, select your Bluetooth device and press
interface then press to begin playing.
interface then press to begin playing.
interface then press to begin playing.
10
No sound from headset/earphones:
Check to see if the volume is set to zero.
Check whether the headset/earphones plug has been
correctly inserted
Serious noise:
Check that the headphone plug is clean - dirt can cause noise.
Please check whether the music file is damaged.
Try playing different file. If the file has been damaged, it may
lead to serious noise or skips.
FM reception is poor:
Please adjust the direction and location of the player.
Make sure that the headphone/earphone cable is stretched out.
The cable is your antenna.
Check whether there is interference from other electronic
equipment.
Garbled screen:
Please check that the correct language setting option has
been chosen.
Cannot download:
Make sure the computer and the player are properly connected.
Make sure that there is enough storage space in the
internal memory.
Make sure the USB cable is not damaged.
Contact us
Need assistance? Please contact us!
For troubleshooting and support, please visit our website at
www.hipstreet.com and check our Support section to view
Frequently Asked Questions (FAQ’s), video tutorials and more.
11
If these resources do not quickly resolve the problem, please
call or email us. Our Technical Support representatives are
ready to help.
Phone: 1-888-456-2426
Monday to Friday: 8:30am – 5:00pm EST
Email: support@hipstreet.com
Web: www.hipstreet.com
We want you to start enjoying your product right away!
FCC Warning
This device complies with part 15 of the FCC Rules. Operation
is subject to the following two conditions: (1) This device may
not cause harmful interference, and (2) this device must accept
any interference received, including interference that may
cause undesired operation.
NOTE 1: This equipment has been tested and found to comply
with the limits for a Class B digital device, pursuant to part
15 of the FCC Rules. These limits are designed to provide
reasonable protection against harmful interference in a
residential installation. This equipment generates, uses and
can radiate radio frequency energy and, if not installed and
used in accordance with the instructions, may cause harmful
interference to radio communications. However, there is no
guarantee that interference will not occur in a particular
installation. If this equipment does cause harmful interference
to radio or television reception, which can be determined by
turning the equipment off and on, the user is encouraged to
try to correct the interference by one or more of the following
measures:
-Reorient or relocate the receiving antenna.
-Increase the separation between the equipment and receiver.
-Connect the equipment into an outlet on a circuit different
from that to which the receiver is connected.
-Consult the dealer or an experienced radio/TV technician
for help.
NOTE 2: Any changes or modifications to this unit not
expressly approved by the party responsible for compliance
could void the user’s authority to operate the equipment.
IC Warning
This device complies with Industry Canada license-exempt
RSS standard(s). Operation is subject to the following two
12
conditions: (1) this device may not cause interference, and
(2) this device must accept any interference, including
interference that may cause undesired operation of the device.
This device complies with Canadian ICES-003 and RSS-210
Battery Statement
Product and Battery Disposal
This product contains a built-in lithium battery and should
not be disposed of in normal household waste. The battery in
this device is not intended to be removed by the individual or
end user. For disposal and recycling, please contact your local
waste management authorities.
The recycling and processing of electronic waste will make
a significant contribution towards helping protect the
environment.
Warning: To reduce the risk of fire and burns; do not
disassemble, crush, puncture, short external contacts,
or dispose of in fire or water.
Device is pre-loaded with MediaMonkey
MediaMonkey will help you manage and play very large music
collections, consisting of a variety music formats (MP3, WMA,
AAC/M4A/M4P, OGG, APE, FLAC, MPC, VQF, WAV files) and/or
audio CDs. MediaMonkey gives you a capable, yet nimble tool
to organize, tag, create playlists, rename files, convert
file formats, sync, level volume, and more.
For questions or support using MediaMonkey, please visit:
http://www.mediamonkey.com/support
MediaMonkey
13
Le présent appareil est conforme aux CNR d'Industrie Canada
applicables aux appareils radio exempts de licence.
L'exploitation est autorisée aux deux conditions suivantes :
l'utilisateur de l'appareil doit accepter tout brouillage
radioélectrique subi, même si le brouillage est susceptible
d'en compromettre le fonctionnement.
(1) l'appareil ne doit pas produire de brouillage, et
(2)

North America: 1 888 456 2426
UK: 0800 051 8330
Netherlands: 0800 404 0006
Germany: 0800 180 7686