Kodak Alaris 305-PRINTER Digital Photo Printer User Manual 2
Kodak Alaris Digital Photo Printer 2
Contents
- 1. User Manual 1
- 2. User Manual 2
User Manual 2
11
OTHERSPRECAUTIONS FEATURES PREPARATION TROUBLE-
SHOOTING CONTENTS
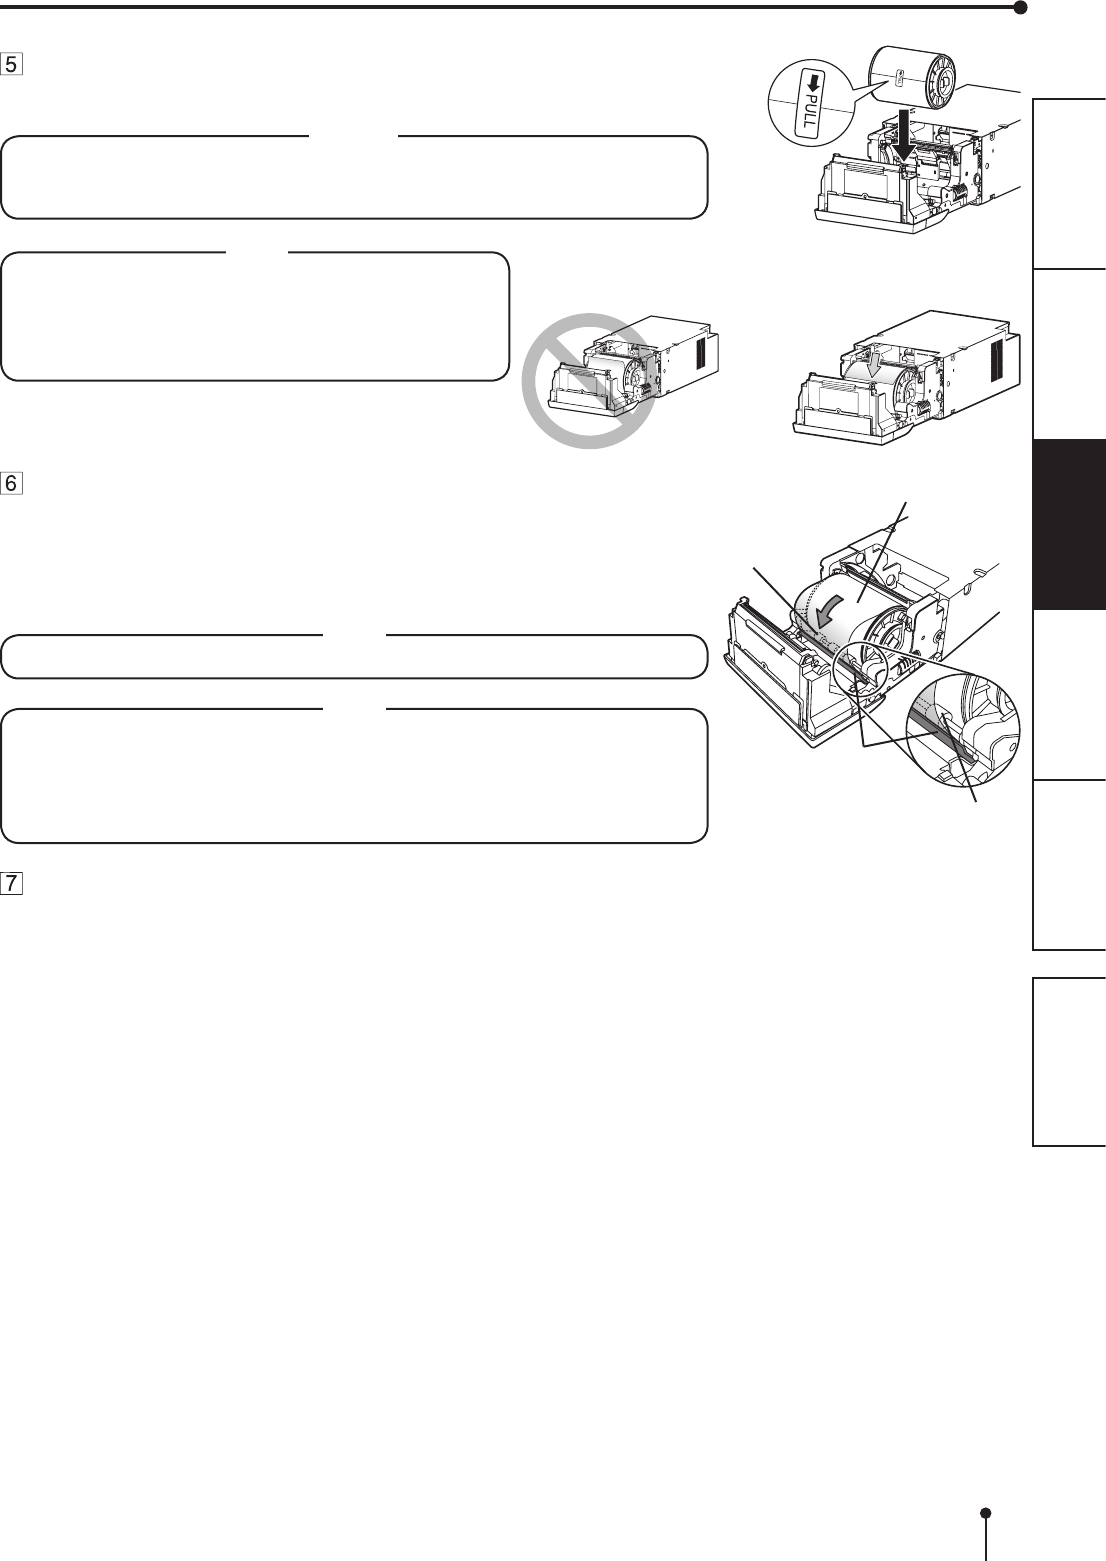
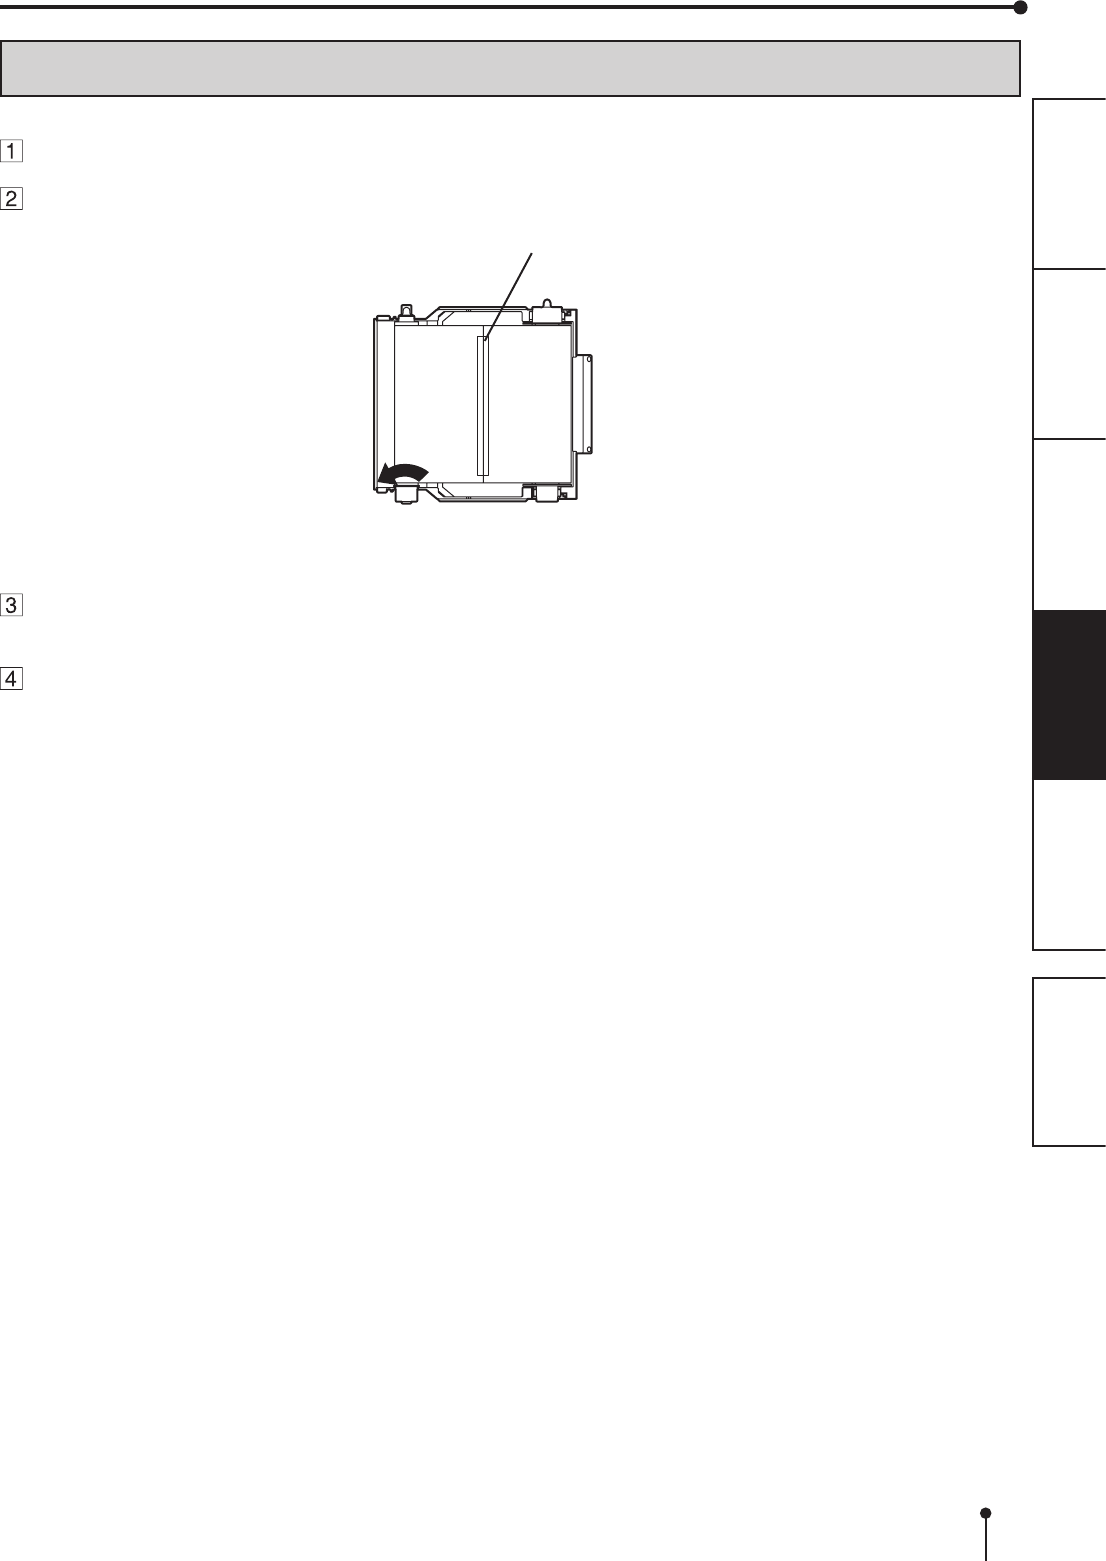
Install the print paper into the printer.
Place the printing paper in the correct orientation.
Make sure the paper roll is rmly installed.
CAUTION
Do not push down on the printing unit or the door.
If you push down on the printing unit or the door when they are open, this printer
may fall and it can cause damage or injury.
Roller
Print paper
Remove the sticker and insert the print paper between the roller
and guide as shown right to feed it. When the buzzer sounds,
stop the paper feeding.
Remove the sticker before inserting the print paper between roller and guide. Make
sure to insert the paper straight.
Buzzer continues to sound until the printing unit is closed.
NOTE
• Keep the rollers clean. Dirt on the rollers may produce poor print quality.
NOTE
• When taking the print paper out, pull it up toward you by holding the paper
anges.
• Make sure to turn on the power before replacing the print paper.
• Make sure to eliminate any slack from the print paper. If you carry out the
following steps without eliminating the slack, the print paper may be damaged.
Close the door.
Guide
Direction of paper insertion
BEFORE OPERATION
Roller
NOTE
• Make sure to turn on the power before installing the
print paper. Otherwise, a paper jam may occur.
• Load the paper roll slowly into the printer. If it is
dropped along the ditches, the printer or accessories
may be damaged.

12
OTHERSPRECAUTIONS FEATURES PREPARATION TROUBLE-
SHOOTING CONTENTS
BEFORE OPERATION
RIBBON INSTALLATION
After installing the print paper, install the ribbon cassette into this printer.
Before installing the ribbon cassette into this printer, load the ribbon in the ribbon
cassette.
It is recommended to clean the thermal head to keep good print quality when you replace
the print paper and ribbon.
NOTE
• Place the ribbon cassette on a at surface, when loading the ribbon.
• Select a place that is free of dust when loading the ribbon. Dust or dirt settling
on the ribbon results in poor print quality.
• Make sure that the shafts of the ribbon t into the ribbon cassette rmly.
Load the ribbon in the ribbon cassette as shown below.
Make sure to load it in the correct position.
34
1 2
34
1 2
Ribbon
Shaft
Ribbon cassette
Handle
Ditch
Make sure to set the ribbon roller to the ditches rmly.
Turn the shaft to eliminate any slack.
Place the ribbon cassette containing the ribbon in the
position as shown in the illustration.
To insert the ribbon cassette, align the protrusions on both sides of the
cassette with the right and left guides inside the printing unit and slide it in
a slanting direction.
Mount the ribbon cassette to the back rmly by holding the handle.
NOTE
Do not touch the thermal head.
Fingerprints or dust on the thermal head will degrade the print quality.
CAUTION
Do not touch the thermal head right after printing because it is
extremely hot. Otherwise you may get burned or injured.
NOTE
Note that the thermal head is quite sensitive to static electricity. When
you touch the thermal head while carrying static electricity on your
body, the thermal head may be damaged.
Handle
Protrusion
Guides
13
OTHERSPRECAUTIONS FEATURES PREPARATION TROUBLE-
SHOOTING CONTENTS
BEFORE OPERATION
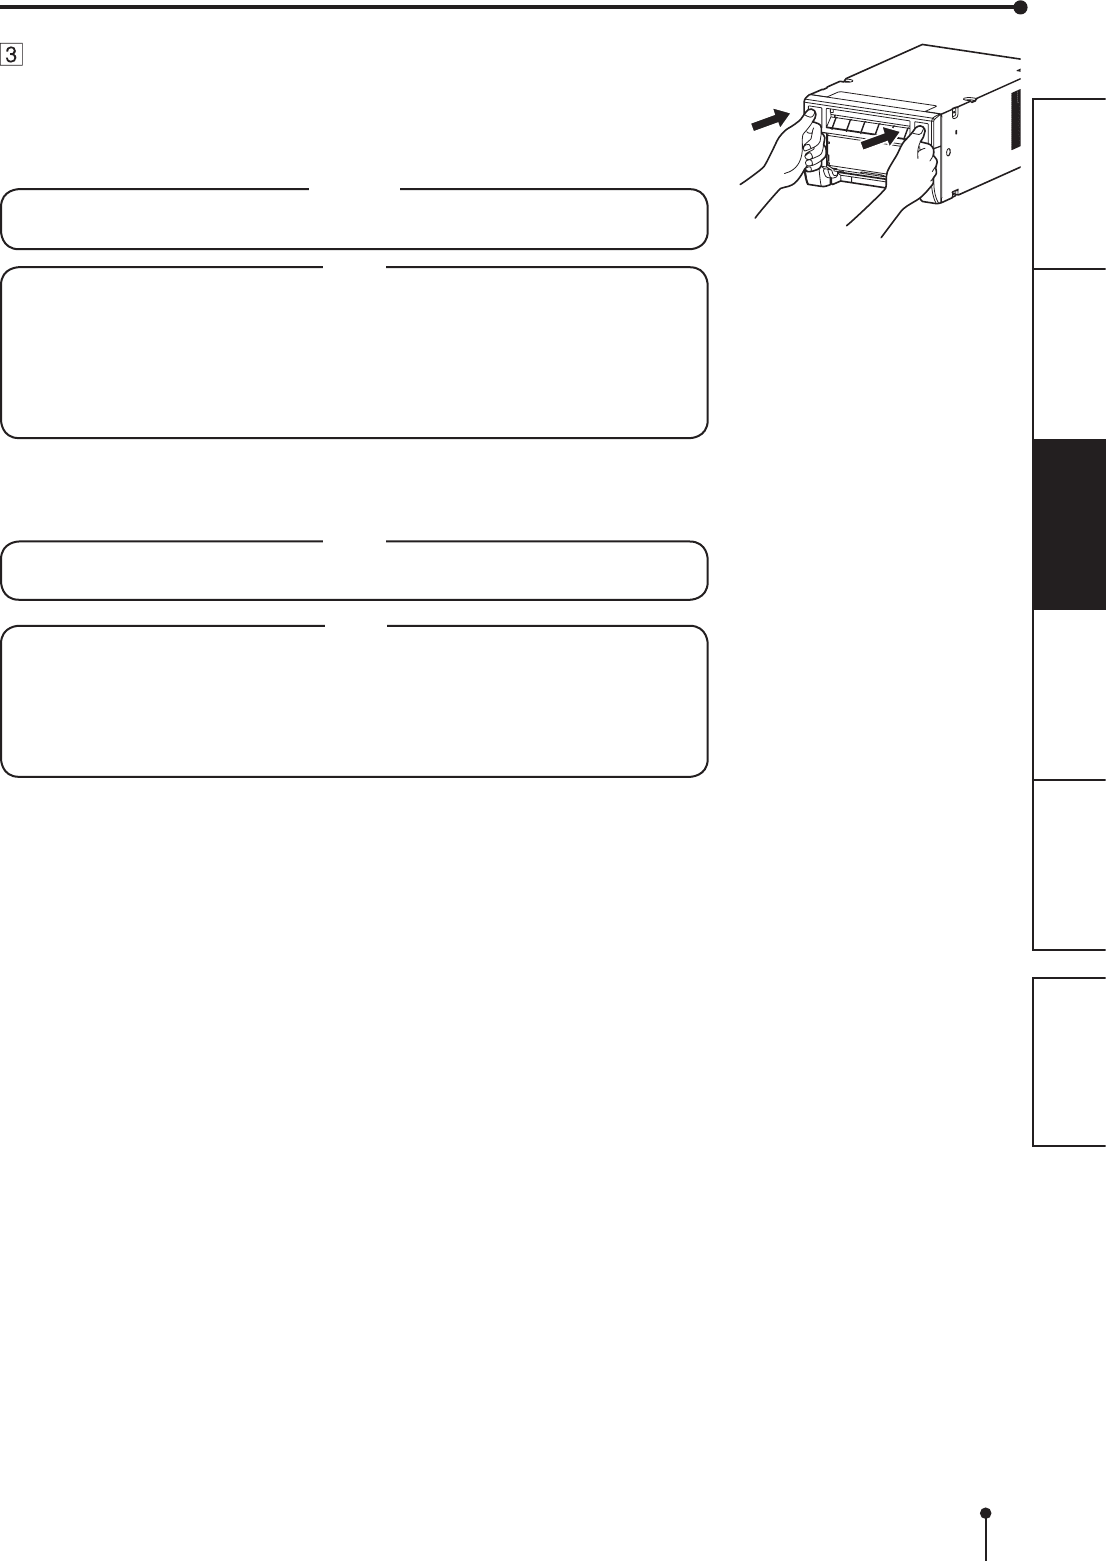
Push the printing unit to close.
Close the printing unit by pushing the right and left sides of the unit from the front
with both hands.
When a new paper is loaded and the printing unit is closed with the power turned
on, the paper will be automatically fed and cut.
CAUTION
When closing the printing unit, be careful not to get your hands caught
between the printer and the printing unit. Otherwise, you may get injured.
NOTE
• When closing the printing unit, push it until a click is heard.
• If the PAPER RIBBON indicator illuminates when the printing unit is closed, the
print paper may have not been installed correctly.
In this case, open the printing unit to make sure that the print paper has been
installed correctly. Then close the printing unit again.
• When the paper roll is reinstalled more than three times, the print paper may be
used up earlier than the ribbon.
Installation of the print paper and the ribbon is completed.
NOTE
• Make sure to replace the print paper and the ribbon simultaneously. A large
amount of print paper may remain depending on the used condition.
NOTE
• Empty the trim tray frequently to prevent jamming the strips at the print outlet.
Whenever you replace the paper and ribbon, make sure to throw away the
paper strips in the trim tray.
• Whenever you replace the print paper and the ribbon, clean the thermal head
and the platen roller. For the cleaning procedures, see “CLEANING” (on pages
20 and 21).

14
OTHERSPRECAUTIONS FEATURES PREPARATION TROUBLE-
SHOOTING CONTENTS
BEFORE OPERATION
HANDLING OF PAPER / RIBBON KIT
BEFORE PRINTING
• Fingerprints or dust on the paper printing surface may produce poor print quality and cause paper jams.
• When the print paper or ribbon is abruptly transferred from a cool place to a hot place, vapor or dew is generated on the
surface, which causes paper jams or degraded print quality. Leave the print paper in the room to stabilize its temperature
before use.
• If you repeat the PRINT PAPER INSTALLATION procedure more than the designated number of times, the indicated
number of prints may not be made. In addition, if you replace the print paper before it is used up, the indicated number of
prints may not be made.
AFTER PRINTING
• If the paper absorbs nonvolatile organic solvents (alcohol, ester, ketone, etc.) the print may be discolored.
• Discoloration of prints is accelerated if the print paper comes into contact with soft vinyl chloride such as transparent
tape.
• Avoid storing prints in direct sunlight or places with high humidity.
STORAGE OF PAPER / RIBBON KIT
• Do not store the print paper and ribbon in the container made of soft polyvinyl chloride. They may be discolored because
of chemical reaction.
• Store the print paper and ribbon out of direct sunlight and away from heating appliances in a cool, dark place where the
temperature is 5˚C to 30˚C and the humidity is 20% to 60% RH.
15
OTHERSPRECAUTIONS FEATURES PREPARATION TROUBLE-
SHOOTING CONTENTS
BEFORE OPERATION
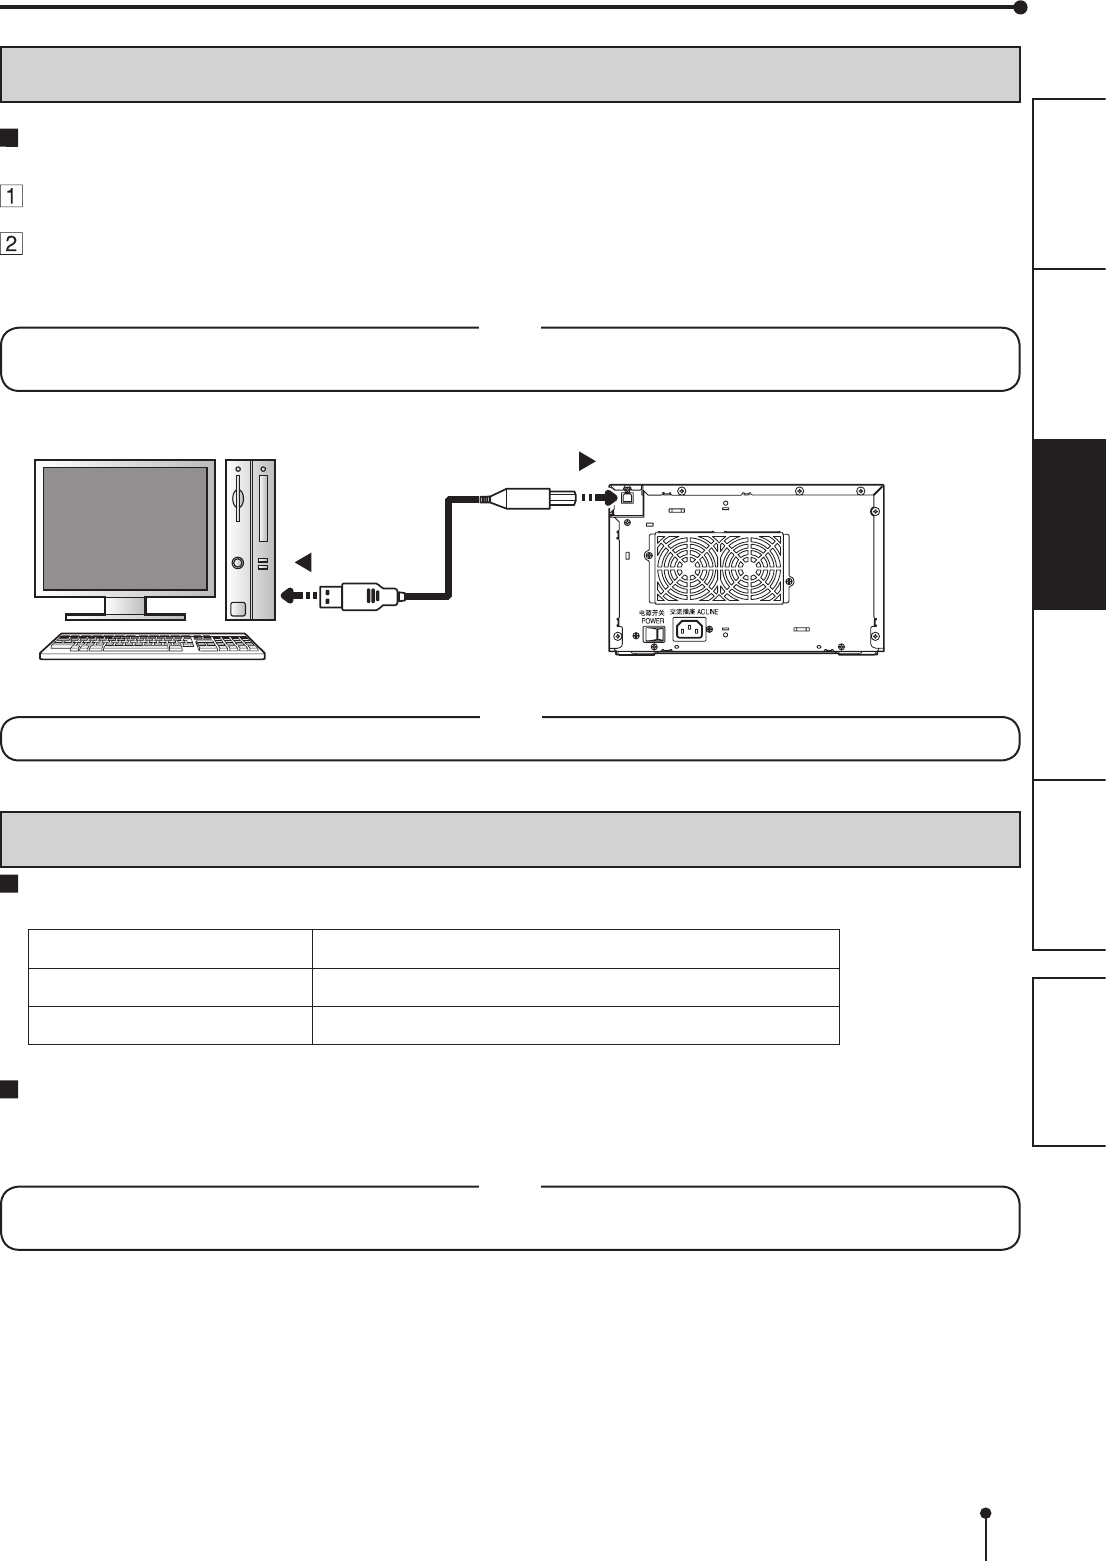
CONNECTION WITH USB DATA SIGNAL EQUIPMENT
To USB port
Personal computer Kodak 305 Photo Printer
To USB port
CONNECTING TO PERSONAL COMPUTER (EXAMPLE)
Check that the printer is turned on before connecting procedure.
Turn on the power of a personal computer.
Connect the printer and a personal computer with a USB cable. (when the operation system
to be applied is other than Windows® 7)
Connect the printer to a personal computer as shown below.
NOTE
For Windows® 7 users, do not connect the printer to the computer.
Refer to the PRINTER DRIVER GUIDE in the CD-ROM for details.
PRINTER DRIVER INSTALLATION
The printer driver is required to print the data from the personal computer connected with this printer.
The printer driver for Windows® is supplied with this printer.
Product name Required operating system
EK305_WinXP Applies for Microsoft Windows® XP operation system
EK305_WinVista7 Applies for Windows Vista® and Windows® 7 operation system
Refer to the PRINTER DRIVER GUIDE in the CD-ROM for installing the printer driver.
Microsoft, Windows, Windows XP, Windows Vista and Windows 7 are the trademarks or the registered trademarks of
Microsoft Corporation in the U.S.A. and other countries.
NOTE
Refer to the following website to check the latest version of the printer driver and the printer information.
http://www.kodak.com/go/rss
NOTE
A USB cable is not supplied with this printer. Use the USB 2.0 certied cable of 2 m or less in length.

16
PREPARATION TROUBLE-
SHOOTING
FEATURESPRECAUTIONS OTHERS CONTENTS
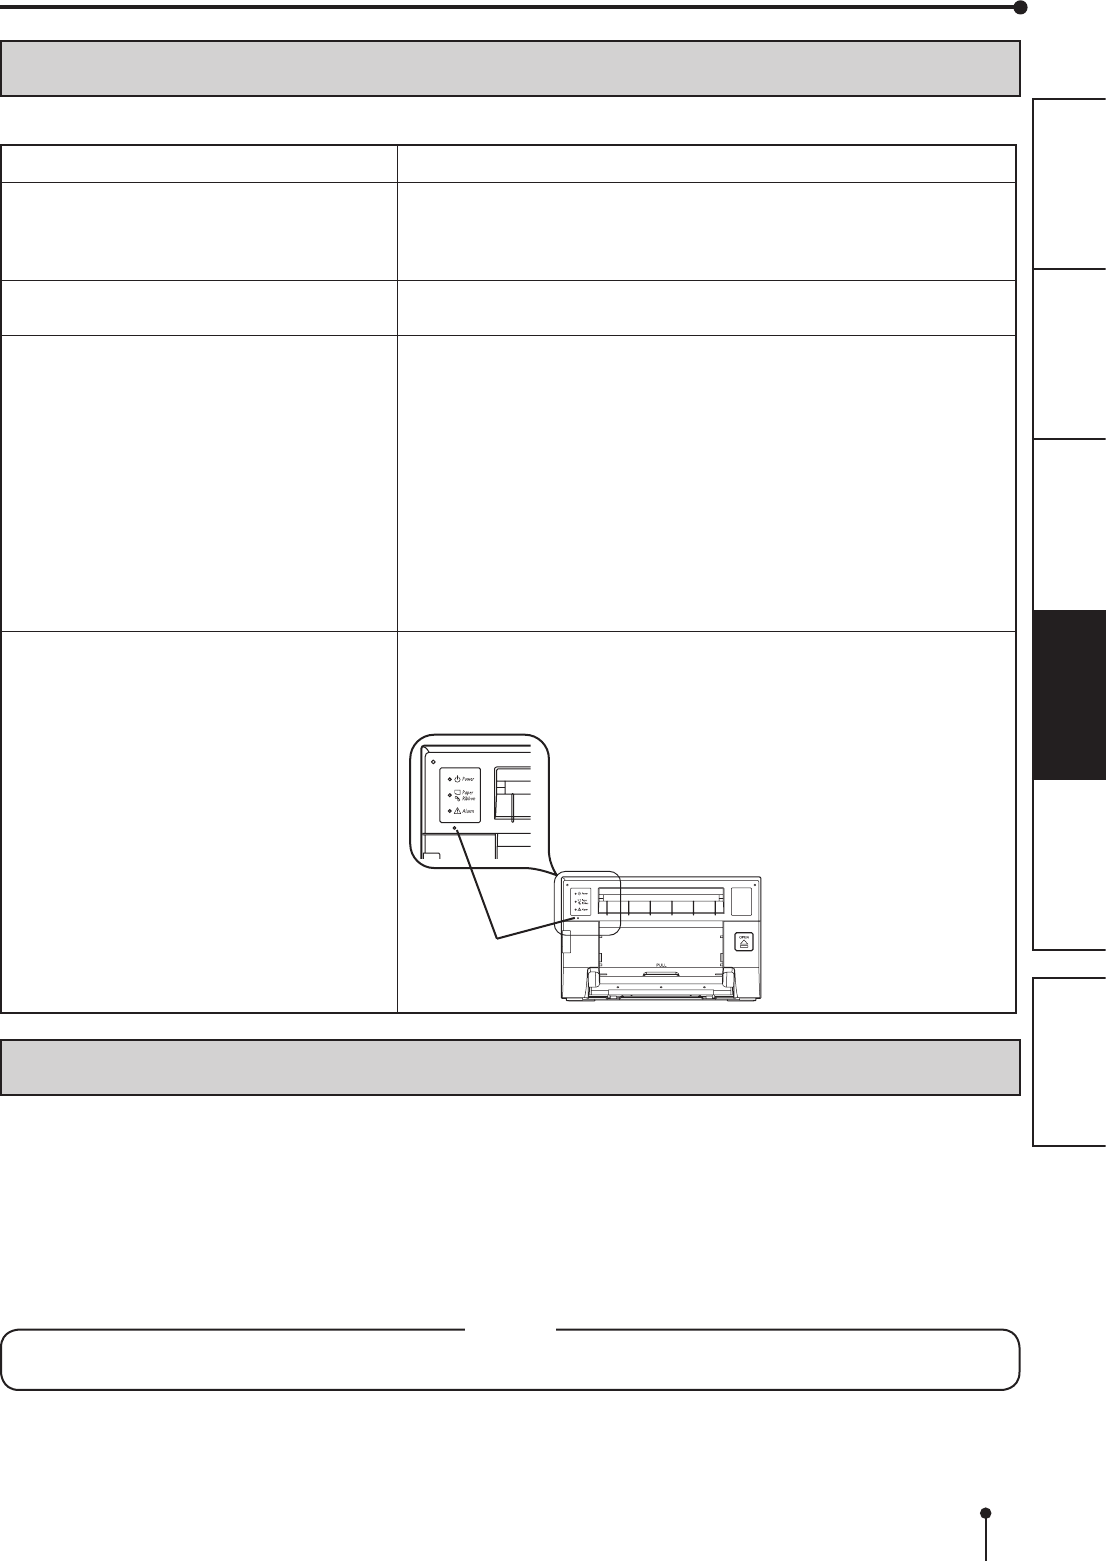
ERROR MESSAGES AND COUNTERMEASURES
INDICATIONS ON THE FRONT PANEL AND COUNTERMEASURES
If, for some reason, printing is not possible or an error occurs during printing, the indicators on the front panel will
illuminate or blink. In this case, follow the procedure described below.
: Steady on : Off : Blinking
ALARM PAPER RIBBON POWER Causes and Countermeasures Page
(Orange)
This printer is in standby mode.
Connect a USB cable to the printer when not
connected.
It may take time that the printer is ready to print
images after the image data is sent.
7
15
(Green)
The printing unit is open.
• Close the printing unit.
7
(Green)
A paper jam or a problem concerning the ribbon
occurs.
• Refer to “Overcoming paper jams.”
17
(Green)
The temperature of the thermal head is too high
or too low.
• Wait until the indication goes off. When the
indicator stops blinking, the printer resumes
printing automatically.
While the printer is working, do not open the door
or turn off the power.
7
(Green)
The ribbon which is not available to this printer is
installed.
• Replace the ribbon with a new one.
The actual combination of ribbon and print paper
is inconsistent with the setting made by the
personal computer.
• Open the printing unit and conrm that the
actual combination of ribbon and print paper
is consistent with the setting made by the
personal computer. After checking, close the
printing unit.
12-13
(Green)
The print paper or ribbon is not installed.
The print paper or ribbon is used up.
• Install new print paper or ribbon.
10-13
(Green)
Other errors 19
When the ALARM or the PAPER RIBBON indicator illuminates or blinks, open the door and carry out the above
countermeasures.
17
PREPARATION TROUBLE-
SHOOTING
FEATURESPRECAUTIONS OTHERS CONTENTS
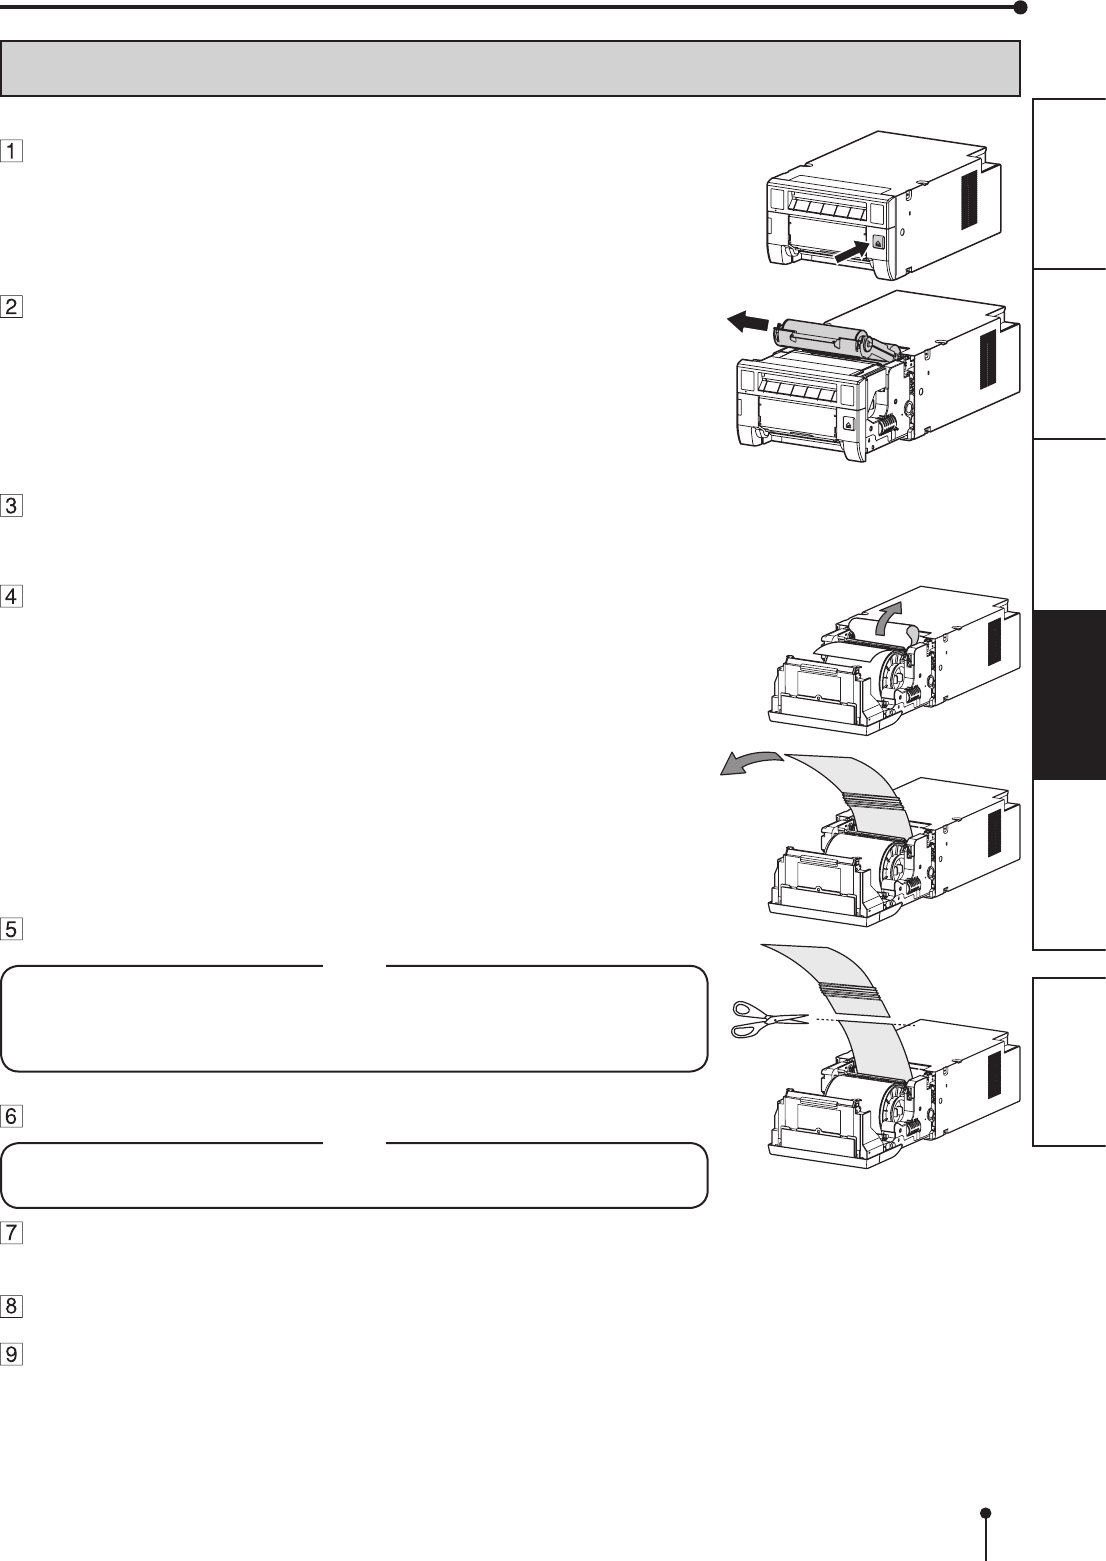
OVERCOMING PAPER JAMS
ERROR MESSAGES AND COUNTERMEASURES
Press the OPEN button to open the printing unit.
Make sure that the power is turned on before opening the printing unit.
Remove the ribbon cassette.
Open the door.
Pull out the defective part of the print paper to the direction of
an arrow.
Cut off the defective part of the print paper with scissors.
NOTE
• Make sure to cut off the printed part of the print paper. Failure to do this may
result in the ribbon sticking to the print paper and being torn.
•
Make sure to clean the thermal head and the platen roller. Refer to “CLEANING”
(on pages 20 and 21).
Remove the print paper.
NOTE
• Remove the slack from the print paper completely. If the door is closed with the
print paper slacked, it may cause a paper jam.
Install the print paper and the ribbon cassette with the ribbon.
(Refer to pages 10-14.)
Close the door.
Close the printing unit by pushing it.
18
PREPARATION TROUBLE-
SHOOTING
FEATURESPRECAUTIONS OTHERS CONTENTS
REPAIRING A TORN RIBBON
Positiontheribboncassettewiththetornribbononaat,cleansurface.
Place a piece of transparent adhesive cellophane tape on the center of the ribbon.
ERROR MESSAGES AND COUNTERMEASURES
Wind the shaft of the ribbon in the direction of the arrow so that the cellophane tape is not
seen.
Install the ribbon cassette in the printer.
Cellophane tape
Direction to turn
the shaft
19
PREPARATION TROUBLE-
SHOOTING
FEATURESPRECAUTIONS OTHERS CONTENTS
INSTRUCTIONS FOR TRANSPORTATION
When transporting this printer for some reason such as repair, follow the instructions below.
1. Use the original packaging.
The genuine package unit may not endure more than one round trip. If the printer is transported with the package unit more
than one round trip, it may not be guaranteed.
Purchase another package unit when transporting this printer again.
Pack the printer with the accessories (ribbon and print paper) removed.
2. Closetheprintingunitrmly.
When closing the printing unit, push it until a click is heard.
CAUTION
When the printing unit is not closed rmly or you press the OPEN button accidentally, the printing unit may open. It can
cause injury or damage.
3. If the ribbon, print paper, or ribbon cassette can not be taken out, consult with your dealer.
ERROR MESSAGES AND COUNTERMEASURES
BEFORE CALLING FOR SERVICE
For the following symptoms, check the printer again before calling for service.
Symptom Check & Remedy
The power is not turned on. Is the power cord plug disconnected from the outlet?
→ Connect the power cord plug to the outlet rmly.
→ The protective circuit may be working. Turn off the power and wait for
about two minutes. Then turn on the power again.
The printing unit doesn’t open. Are you turning off the power during printing procedure?
→ Turn on the power and then open the printing unit.
The image is not printed. Is the PAPER RIBBON indicator or the ALARM indicator illuminating or
blinking?
→ Refer to “Overcoming paper jams.”
Is the appropriate size of data sent to this printer?
→ Make sure that the appropriate size of image data is sent to this printer.
Is the print paper or the ribbon used up?
→ Check them.
Is the printing unit set rmly?
→ Set the printing unit rmly.
→ When the indicators keep illuminating or blinking though the above
operations are performed, remove the ribbon and print paper and
reinstall them.
An error can not be resolved. → Turn off and on the power of the printer with the printing unit set rmly.
This printer starts initialization.
→ Press the switch inside of the hole of the front panel with a thin stick or
the like for 5 seconds or more.
Switch
20
PREPARATION TROUBLE-
SHOOTING
FEATURESPRECAUTIONS OTHERS CONTENTS
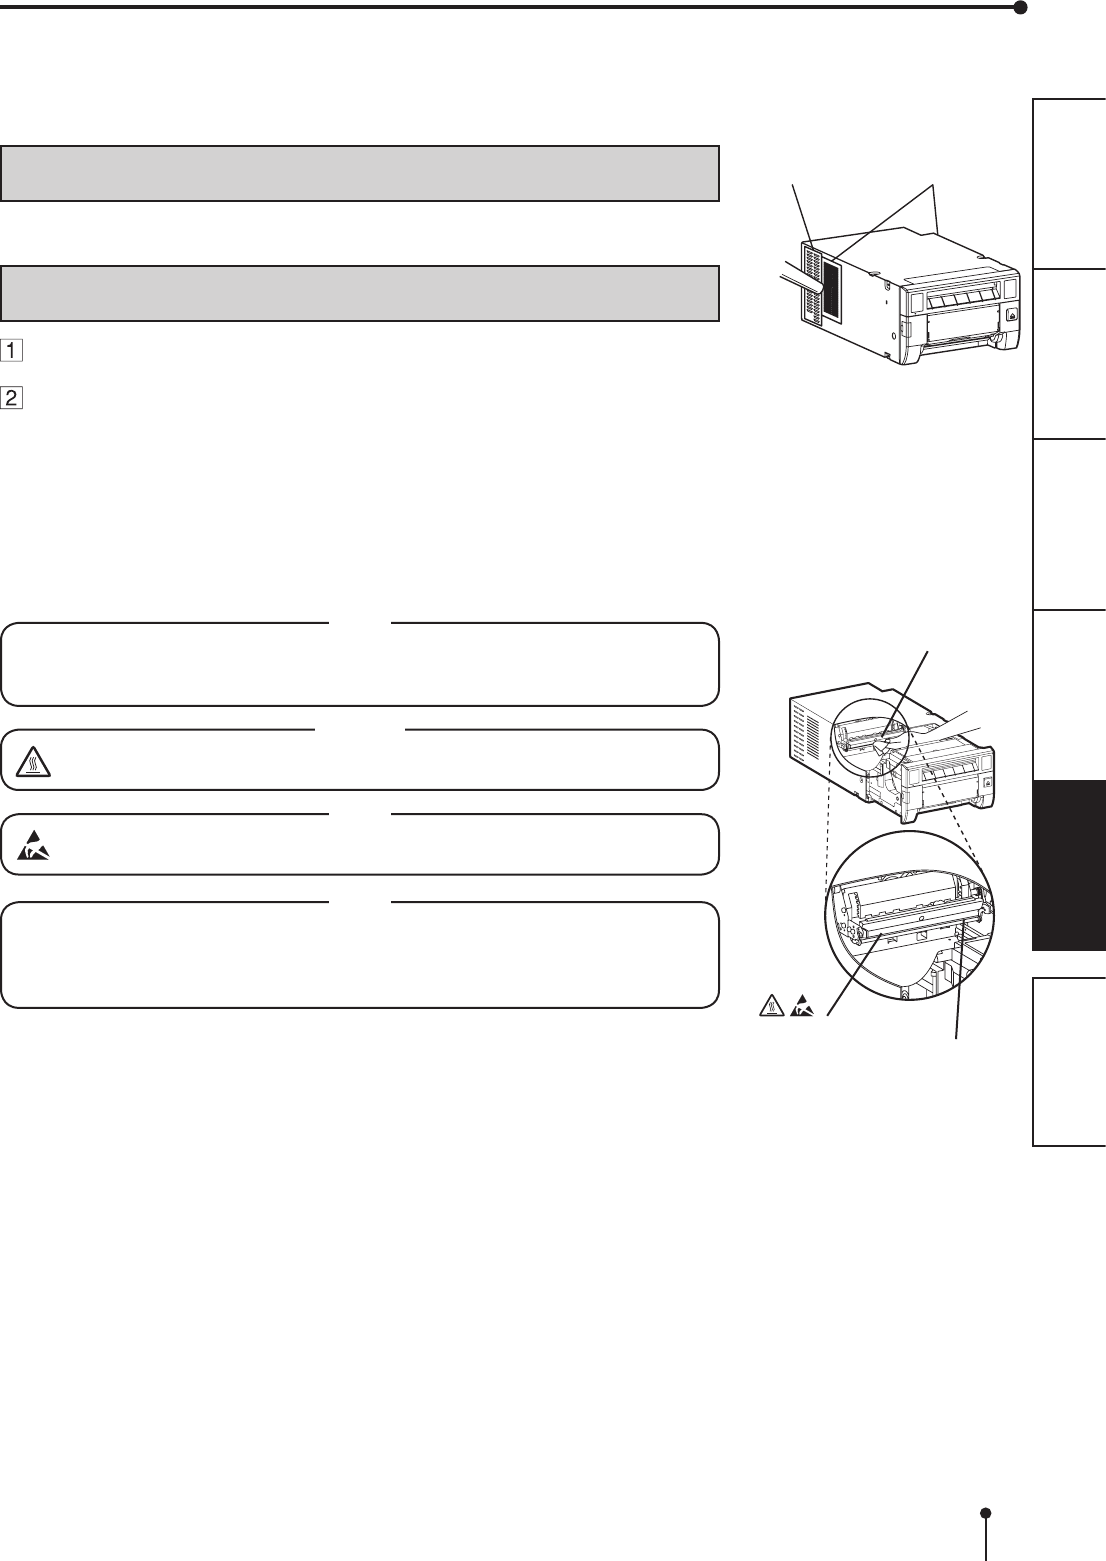
FILTER CLEANING
Clean the lter part and the ventilation inlet with a vacuum as shown right.
THERMAL HEAD CLEANING
Press the OPEN button to open the printing unit.
Take the ribbon cassette out of the printer.
Preparations
Alcohol (ethyl alcohol, etc.)
Soft and clean cloth
When lines appear on the printed images, clean the thermal head.
Wipe the head cleaning part carefully with cloth dampened with a small amount of
alcohol.
NOTE
• Do not damage the thermal head.
• When the poor print quality is not corrected even if the head has been cleaned,
replacement of the thermal head may be required. Contact your dealer.
CAUTION
Thermal head is hot right after printing. Wait until the head cools before
cleaning the thermal head.
NOTE
The thermal head may be damaged if you touch it while static electricity builds
up on your body.
NOTE
When you clean the thermal head, make sure not to apply excessive force to the
peeling roller on the bottom of the thermal head. When the excessive force is
applied to the roller, the roller may be deformed, resulting in deterioration of the
printing quality.
Cleaning as indicated below will help maintain stable printer operation and extend the printer’s life.
Wearing gloves at cleaning is recommended to prevent injury.
Make sure to turn off the power before cleaning.
CLEANING
Cleaning part of thermal head
Filter (inside)
Thermal head
Ventilation inlet
Peeling roller
21
PREPARATION TROUBLE-
SHOOTING
FEATURESPRECAUTIONS OTHERS CONTENTS
CLEANING
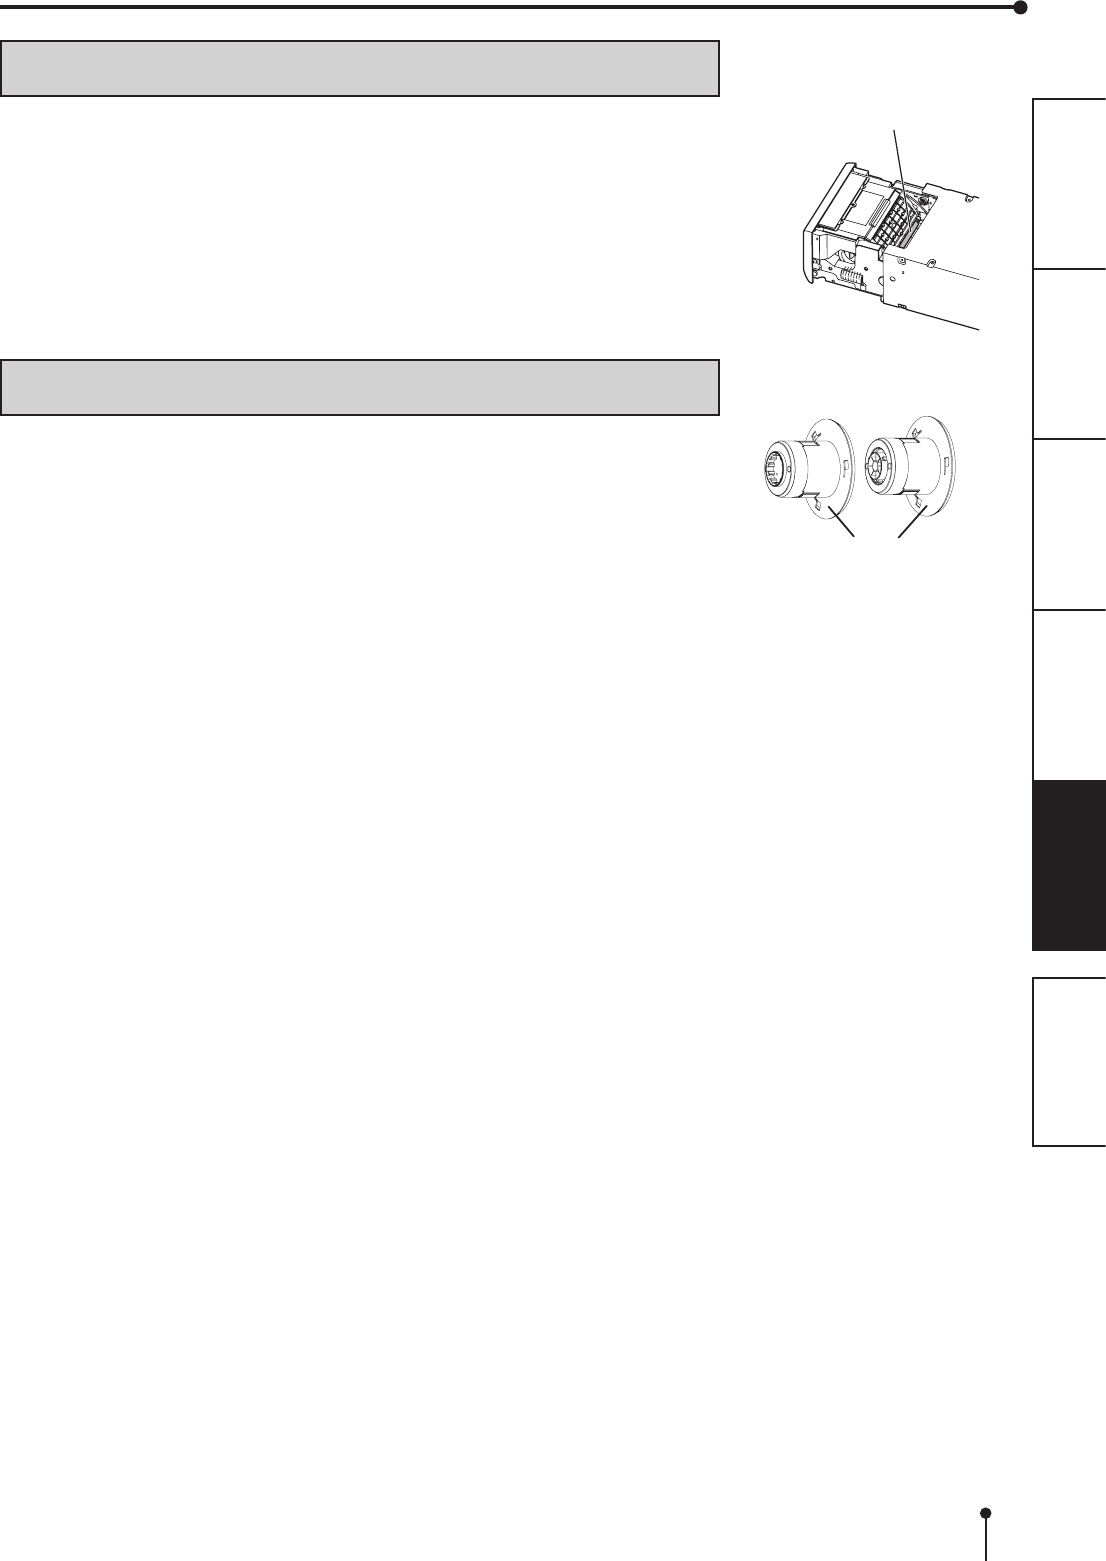
PLATEN ROLLER CLEANING
Preparations
Alcohol (ethyl alcohol, etc.)
Soft and clean cloth
Clean the black part of the roller.
Wipe the black part carefully with cloth dampened with a small amount of alcohol.
Wipe the whole roller by turning it.
Cleaning part
PAPER FLANGE CLEANING
Clean the parts that contact the print paper sides as shown right.
Wipe the parts carefully with cloth dampened with a small amount of alcohol.
Platen roller
22
PREPARATION TROUBLE-
SHOOTING
FEATURESPRECAUTIONS OTHERS CONTENTS
SPECIFICATIONS
SPECIFICATIONS
Class Digital Photo Printer
Model Kodak 305 Photo Printer
Printing method Sublimation Dye Thermal Transfer line print
3-color faces progressive printing (yellow, magenta, and cyan) and surface lamination
Print’s resolution 300 x 300 dpi (dpi : dots per inch)
Dot resolution 10x15 (4x6”)
15x20 (6x8”)
1218 x 1864 dots
1864 x 2422 dots
Print size 10x15 (4x6”)
15x20 (6x8”)
102 x 152mm (without frame)
152 x 203mm (without frame)
Gradations 256 (8 bits) for each color
Supply method Automatic
Interface Hi-Speed USB (Ver.2.0)
Power supply 220 - 240 V AC 50/60 Hz, 120 V AC 50/60 Hz
Power consumption 2.4 A (220 - 240 V AC, 50/60 Hz)
4.6 A (120 V AC, 50/60 Hz)
Operating conditions Temperature : 15°C - 30°C
Humidity : 30% - 80% RH (no dewing)
Installation conditions Operating attitude : Horizontal ±5°
Outside dimensions 275(W) x 446(D) x 170(H) mm
Weight Approx. 12 kg (excluding accessories)
Standard accessories
Ribbon cassette (1), CD-ROM (1), Paper ange (1 set), Quick set up guide (1), Trim tray (1),
Paper tray (1)
Print size and outside dimensions show typical value.
Design and specications are subject to change without notice.
Contents of CD-ROM
• User’s guide
• Printer driver
• PRINTER DRIVER GUIDE

Kodak Alaris Inc.
Rochester, NY 14615 U.S.A.
© Kodak, 2011.
TM: Kodak. All rights reserved.
P/N 4J7879
copyrightの文言を表示予定
919C176C40