KASTMXASPCK 1200W Deluxe Stand Mixer Accessory Pack User Manual A
2015-09-18
: Kogan Kastmxaspck-A KASTMXASPCK-A usermanuals files
Open the PDF directly: View PDF ![]() .
.
Page Count: 9


Table of Contents
Component Overviews....................................................................................................................2
Meat Grinder ..................................................................................................................................2
Salad Express, Pasta Maker & Blender.................................................................................3
Meat Mincer Usage............................................................................................................................4
General..............................................................................................................................................4
Mincing..............................................................................................................................................4
Sausage Attachment ..................................................................................................................5
Biscuit Attachment .....................................................................................................................6
Salad Express Usage........................................................................................................................6
General..............................................................................................................................................6
Operation.........................................................................................................................................6
Pasta Maker Usage............................................................................................................................7
General..............................................................................................................................................7
Operation ........................................................................................................................................7
Blender Usage.....................................................................................................................................7
General..............................................................................................................................................7
Operation ........................................................................................................................................8
Useful Tips........................................................................................................................................8
Cleaning.................................................................................................................................................8
Mincer................................................................................................................................................8
Salad Express, Pasta Maker & Blender.................................................................................8
1
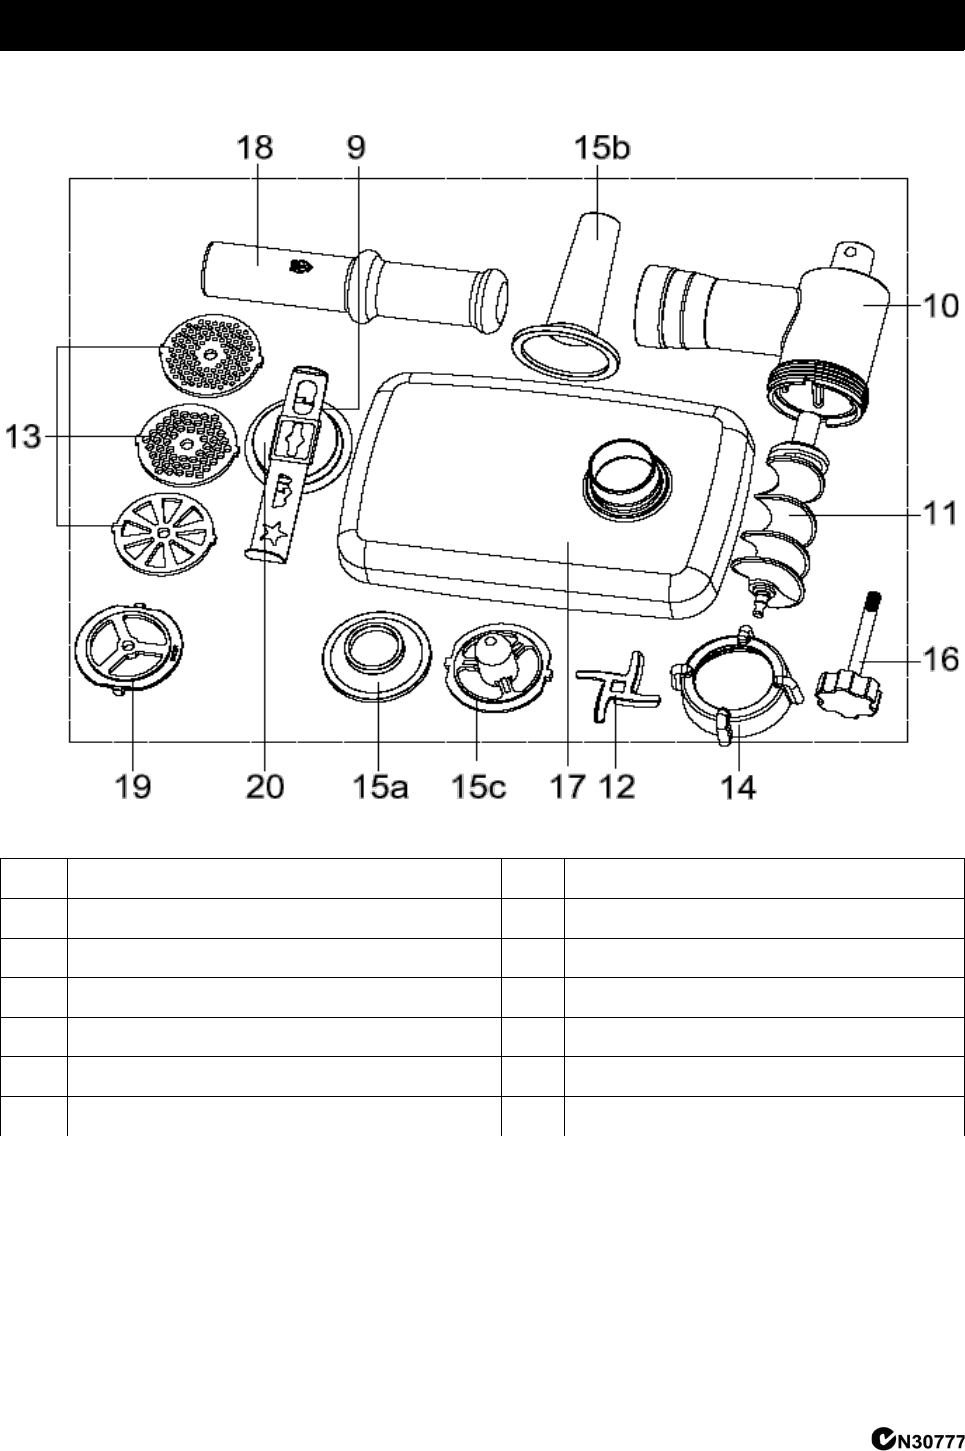
Component Overviews
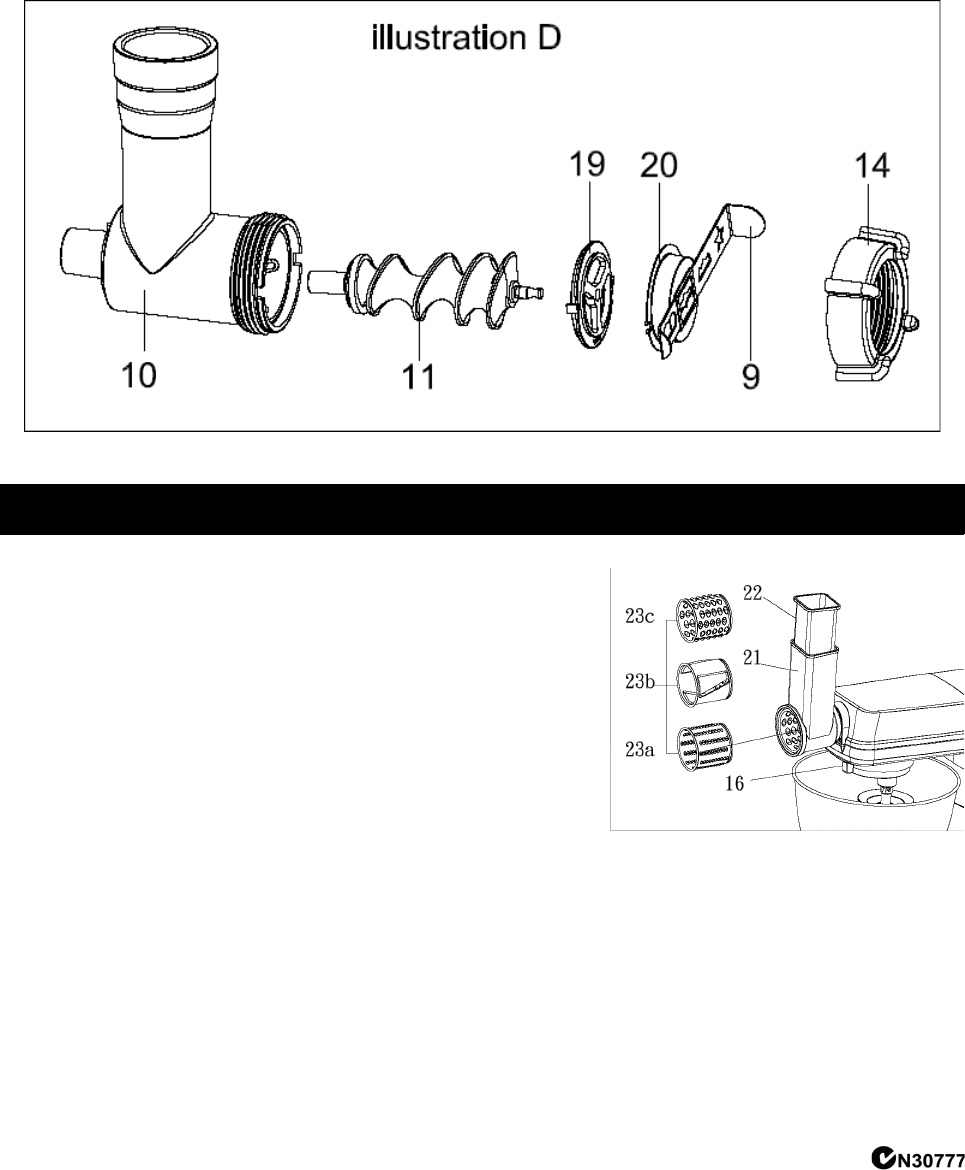
Meat Grinder
Main Components and Standard Accessories
9 Slide 15b Sausage attachment, small
10 Spiral housing 15c Adapter for 15
11 Spiral 16 Filling tray
12 Blades 17 Presser meat mincer
13 Sieve 18 Presser
14 Lock 19 Biscuit attachment
15 Sausage attachment, large 20 Biscuit attachment
2
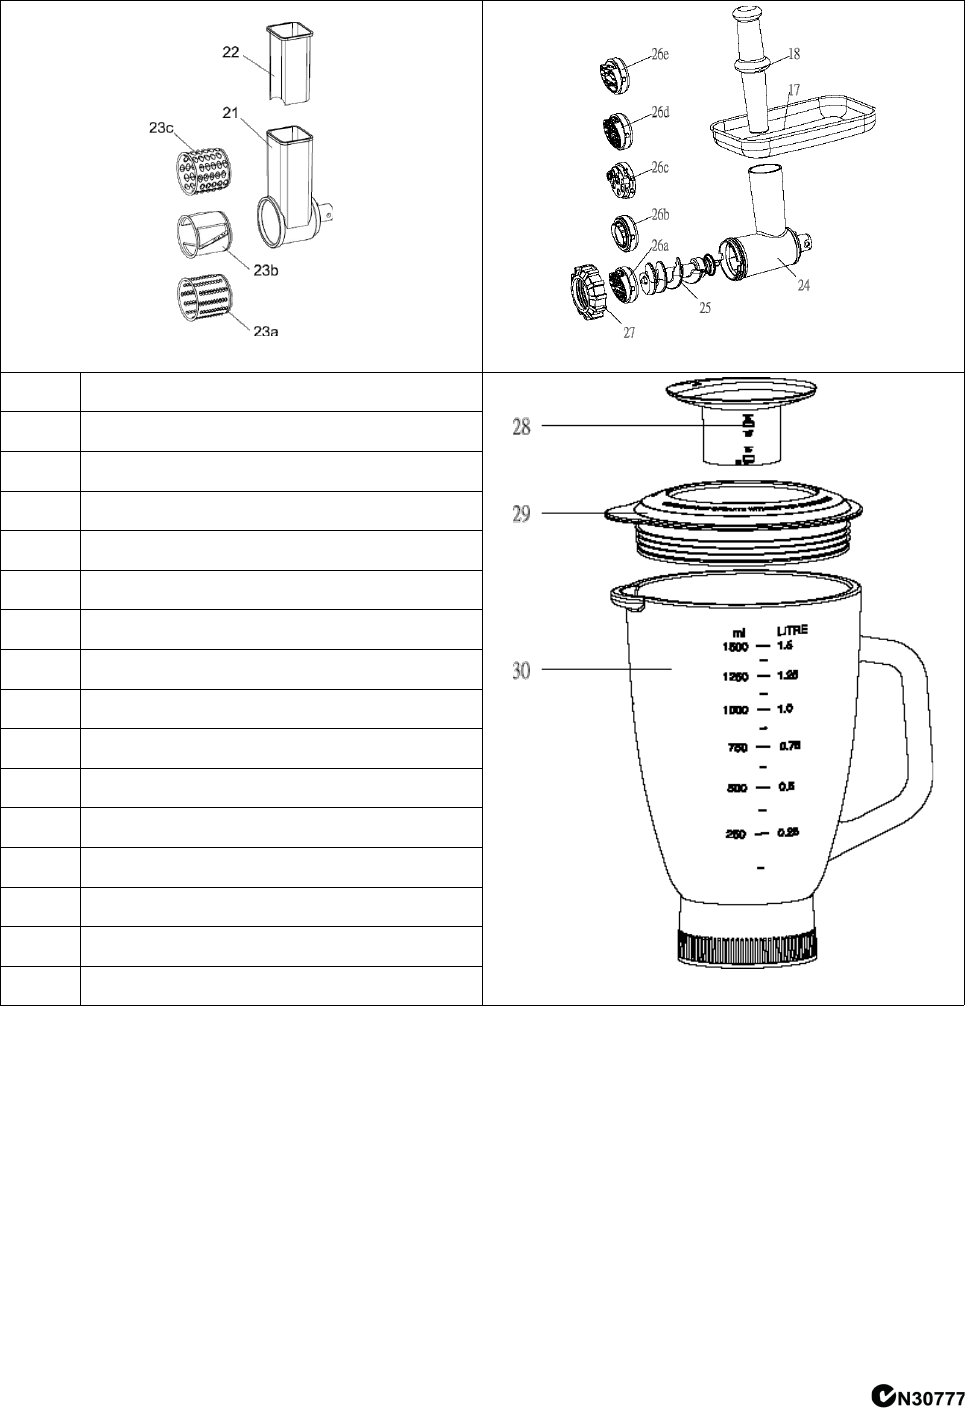
Salad Express, Pasta Maker & Blender
Salad Express Pasta Maker
21 Salad express housing
Blender
22 Salad express pusher
23a Fine rasping
23b Slice cutter
23c Coarse rasping
24 Pasta maker housing
25 Spiral driver
26a Spaghetti disk
26b Parpabelle disk
26c Macaroni disk
26d Spaghetti disk
26e Fettucine disk
27 Pasta lock
28 Lock lid
29 Lid Cover
30 Blender jar
3
Meat Mincer Usage
General
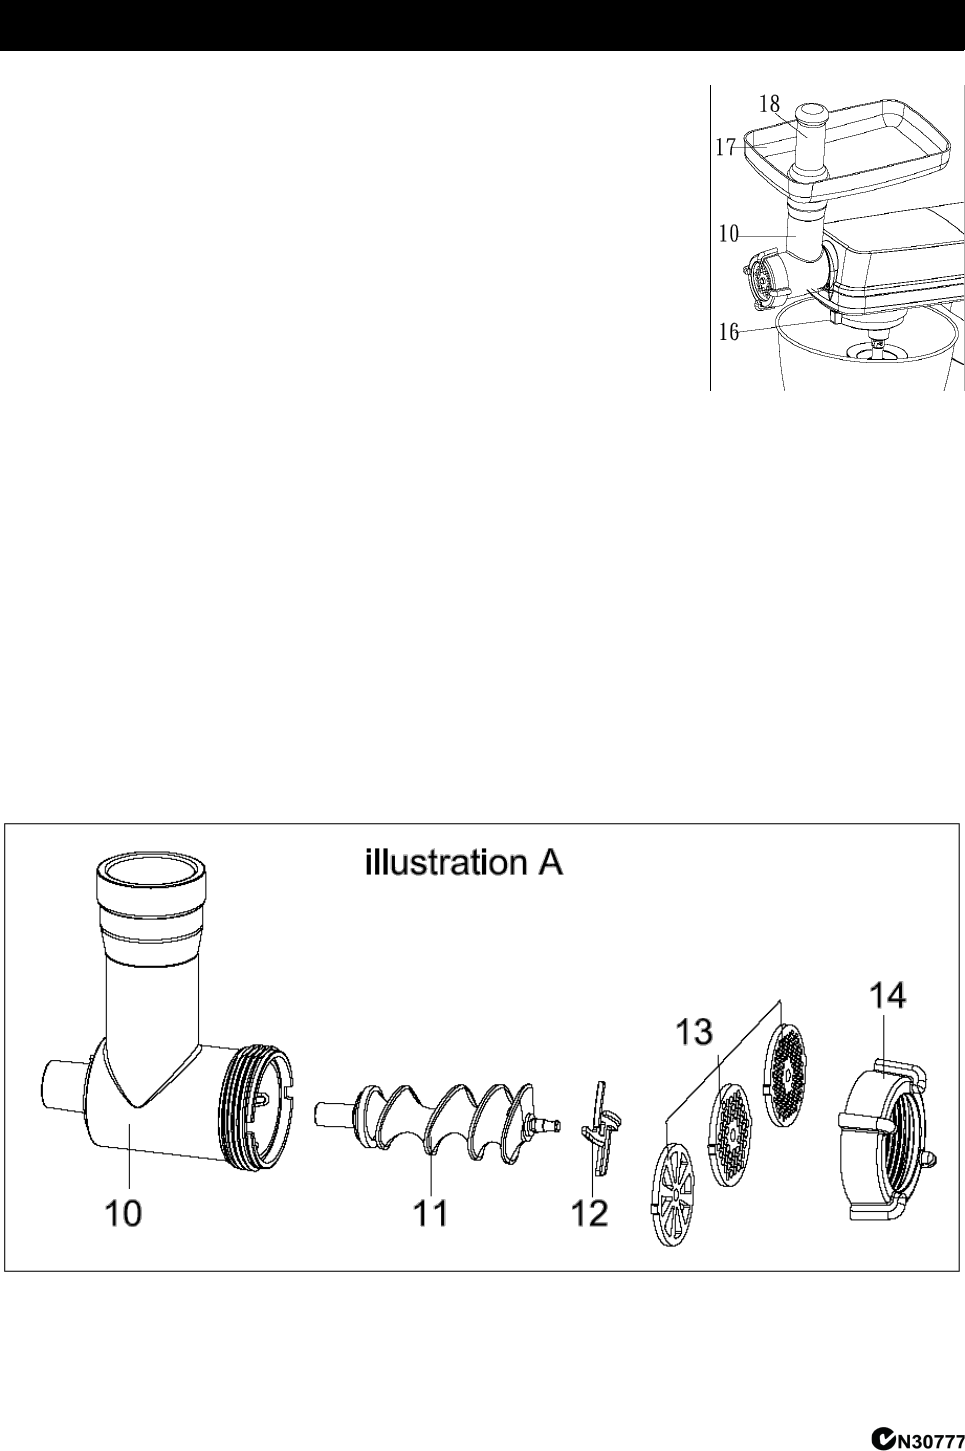
1. Remove the cover (3a) from the helix drive and take out the
screw (16).
2. Place the spiral housing (10) with the filler neck facing upwards
into the spiral drive and turn the screw (16) clockwise until it is
closed.
3. Place the filling tray on the filler neck in such a way that the
receptacle of the tray is positioned under the arm.
4. Push the spiral into the horizontal section of the spiral housing
until the axle locks in place. Please see the sections on
“Operating the Mincer” and “Sausage Attachment”.
Mincing
1. First place the blade on the end of the helix and then a screen of your choice. Please pay
attention to the screen and the recesses on the helix housing. Screw the lock (14) on until
it is “hand tight”.
2. Put the pieces of meat on to the filling tray (17) and into the fi ller neck.
3. Place a vessel under the exit.
4. Please ensure that the function switch (5) is turned to “Off”.
5. Connect the device to a 230 V, 50 Hz power socket.
6. Turn the mincer on by the switch (5).
7. If necessary push the meat with the presser (18). NEVER follow this up with your fingers.
Note
•Cut the meat into pieces of about 2.5cm. Please ensure that the meat does not contain
any bones or sinews.
4
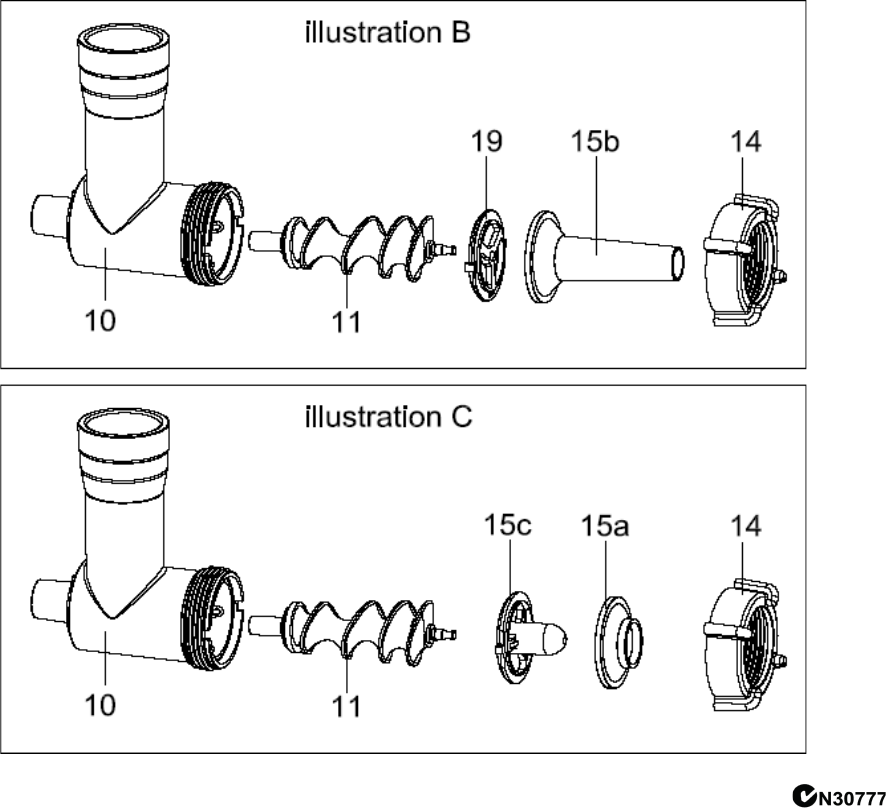
Sausage Attachment
1. Place the adapter (15c) on the axle of the spiral auger.
2. Insert a sausage attachment (15a or b) into the lock. Attachment A is a for thick sausages,
attachment b for thin sausages.
3. Turn the lock “hand tight” on to the spiral housing.
4. Push the sausage skin (using either real or synthetic skin) over the sausage skin and knot
the end.
5. Fill the sausage paste on to the filling tray and into the filler neck.
6. Repeat steps 4 to 7 as described in “Meat Mincer - Mincing”.
7. The sausage mixture is pressed through the sausage attachment and filled into the
sausage skin.
8. When the first sausage has reached the desired length, squeeze it together with your
fingers at the end of the sausage top. Turn the sausage around its own axis once or
twice.
Notes:
•Cut Levels 1 to 4 are suitable for mincer operation.
•Do not operate the device for more than 10 minutes. After 10 minutes use, shut it down
and then allow it to cool for a further 10 minutes.
•You can turn off the device after each single sausage length until you are more
experienced.
•Carry out step 8 as described. Then turn on the meat mincer again.
•If you decide to use real skin, let it soak in water for a while before use.
•Take care that the sausage skin is filled “loosely” as during boiling or frying the sausage
expands and the skin might tear.
5
Biscuit Attachment
1. Please follow points 1 to 4 as described under “Meat Mincer - General”.
2. Unscrew the biscuit attachment and select the desired biscuit cutter.
3. Put the mixture on to the filling tray and the filler neck.
4. Please ensure that the function switch (5) is turned to “Off”.
5. Connect the device to a 230 V, 50 Hz power socket.
6. Turn the mincer on by the screw (16).
7. If necessary, push the mixture further down with the pusher (18). Do not touch with your
fingers.
8. Hold the elongated mixture at the exit and cut it off at the desired length.
Salad Express Usage
General
1. Remove the cover (3a) from the helix drive and take
out the screw (16).
2. Place the salad express housing (21)with the filler
neck facing upwards into the spiral drive and turn
the screw (16) clockwise until it is closed.
3. Choose a cylinder cutter [ Fine Rasping (23a) /
Coarse Rasping (23c) or Slice Cutter (23b)] Place
the cylinder cutter into the salad express housing
with opening facing to the front.
Operation
1. Please ensure that the function switch (5) is turned to “Off”.
2. Connect the device to a 230 V, 50 Hz power socket.
3. Turn the salad express on and adjusting the levels at 5-6 by the switch (7).
4. Push the food further down with the pusher (22). Do not touch with your fingers.
6
Pasta Maker Usage
General
1. Prepare dough with flour and water in 5:2 rates. (eg. 500g flour and 200g water, or 500g
flour, 2 eggs and 100g water. Mixing with beater (8c) at 1-4 levels for 2-3minutes).
2. Remove the cover (3a) from the helix drive and take out the screw (16).
3. To choose a pasta disk (25a/ 26b/ 26c/ 26d or 26e) that what you wish.
4. Place the spiral driver (25) and chosen pasta disk into the pasta maker housing. Screw
the pasta lock (27) on until it is “hand tight”.
5. Place the pasta maker housing (24) with the filler neck facing upwards into the spiral
drive and turn the screw (16) clockwise until it is closed.
Operation
1. Please ensure that the function switch (5) is turned to “Off”.
2. Connect the device to a 230 V, 50 Hz power socket.
3. Turn the pasta maker on and adjusting the levels at 5-6 by the switch (7).
4. Push the dough further down with the pusher (18). Do not touch with your fingers.
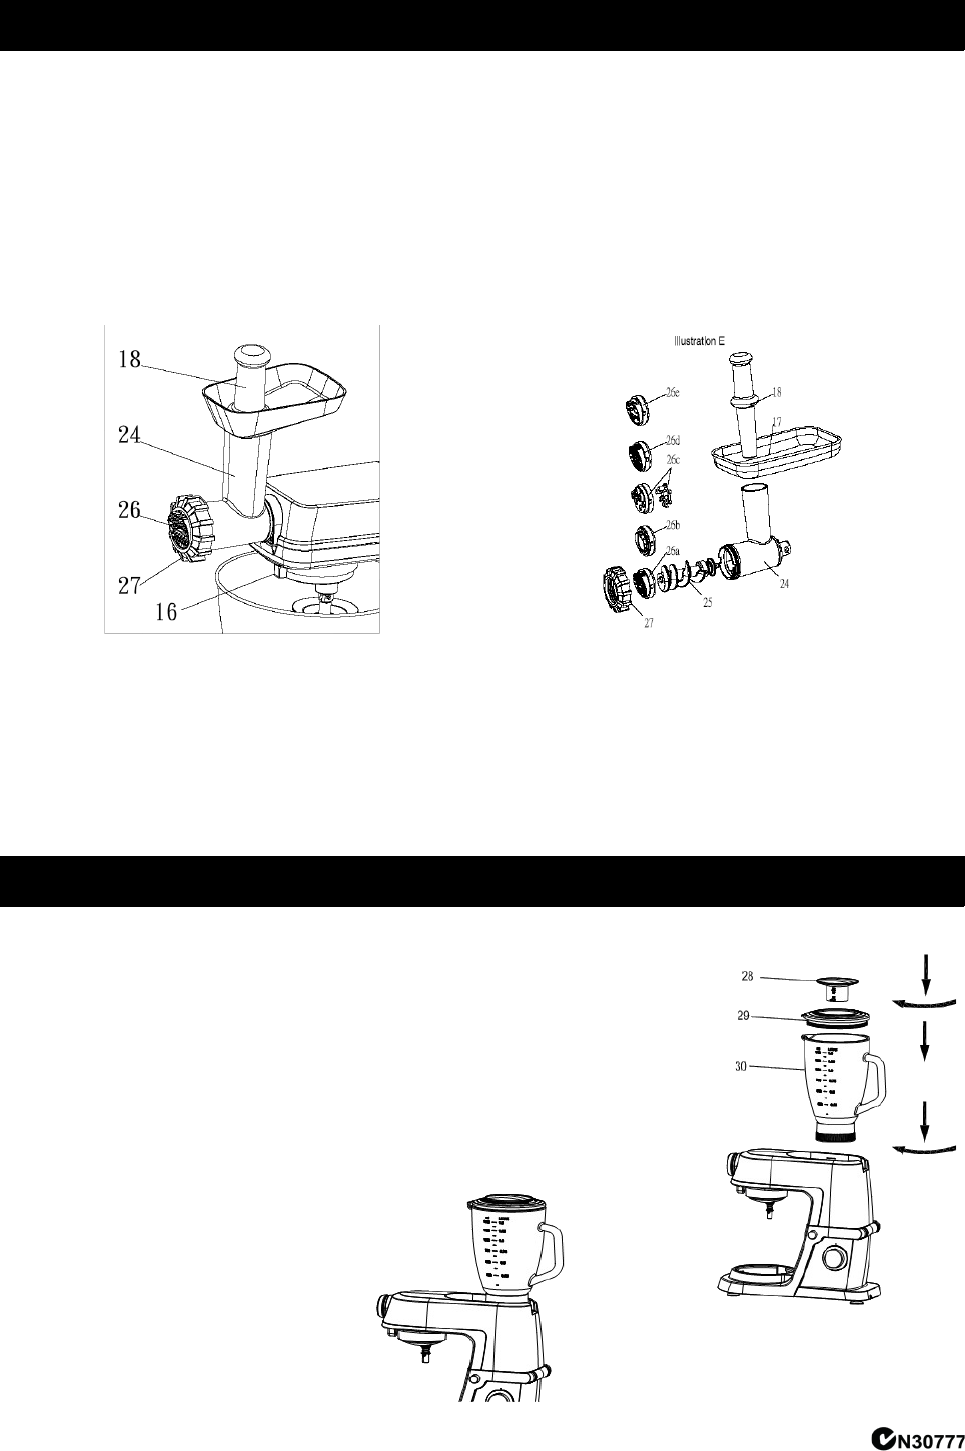
Blender Usage
General
1. Remove the back cover(3b)
2. Place the food you wish to process into the blender jar (30)
3. Press the lid cover into place and it is firmly fixed.
4. Place the lock lid (28) into the hole in the lid cover (29) and turn
clockwise to lock.
5. Mount the blender jar (30) onto the attaching hole and turn it
clockwise until it is firmly fixed.
6. Assemble the mixing bowl (7) and splash guard (31)
7

Operation
1. Please ensure that the function switch (5) is turned to “Off”.
2. Connect the device to a 230 V, 50 Hz safety contact power socket.
3. Turn the blender on and adjusting the suitable speed levels the switch (5).
•Level 5 for light usage with liquids
•Level 6 for a firmer consistency – for the mixing of liquids and solid foods.
•Moment Level for use in short, powerful bursts. (The switch does not stay in the “Pulse”
position. Hold the switch down in the “Pulse” position or turn it repeatedly to the “Pulse”
position.)
Useful Tips
•Danger of burns! Be careful with hot liquids.
•The opening in the lock lid (28) can be used to add ingredients while the blender is
running. To do so, remove the stopper from the blender lid (29).
•It may be necessary to switch off the appliance from time to time to remove pieces of
food slicking to the inside of the blender jar.
•Switch off the appliance and unplug it.
•Remove the lock lid (28) and lid cover(29)
•Remove pieces slicking to the inside of the blender jar (30) with a soft spatula.
•Keep the spatula at a safe distance from the blades.
Cleaning
Mincer
•Components are not suitable for cleaning in a dishwasher.
•Components that come into contact with food should be cleaned with hot soapy water.
•The blade of the mincer is very sharp!
Salad Express, Pasta Maker & Blender
•Components that come into contact with food should be cleaned with hot soapy water.
•Allow parts to dry thoroughly before reassembling.
•If the pasta is not able to be removed from the discs easily, wait for the pasta to dry. It
can then be picked off.
•The blades of the cylinder cutters are very sharp!
If you have any further questions regarding the use of these accessories,
please contact the Kogan customer support team.
8
