Konica Minolta Bizhub C550 Users Manual
bizhub C550 to the manual b4acdca3-8a7c-4c91-afb1-3f8101a69cf4
2014-12-13
: Konica-Minolta Konica-Minolta-Bizhub-C550-Users-Manual-124535 konica-minolta-bizhub-c550-users-manual-124535 konica-minolta pdf
Open the PDF directly: View PDF ![]() .
.
Page Count: 400 [warning: Documents this large are best viewed by clicking the View PDF Link!]
- Introduction
- 1 Overview
- 2 Installing the printer driver
- 2.1 Printer drivers and supported operating systems
- 2.2 When used with Windows
- Automatic installation using the installer
- To install the printer driver
- Installing the printer driver using the Add Printer Wizard
- For Windows XP/Server 2003
- For Windows Vista
- When using Web service printing under Windows Vista
- For Windows 2000/NT 4.0
- Installing the printer driver using Plug and Play
- For Windows 2000
- For Windows XP/Server 2003
- For Windows Vista
- Uninstalling the printer driver
- When the printer driver contains the delete function
- When the printer driver does not contain the delete function
- 2.3 When used with Macintosh
- 3 Setting up network printing
- 3.1 Overview of network functions
- 3.2 Setting the IP address for this machine
- 3.3 Accessing PageScope Web Connection
- 3.4 SMB printing
- 3.5 LPR printing
- 3.6 Port 9100 printing (Windows 2000/XP/Server 2003/ Vista)
- 3.7 IPP printing (Windows 2000/XP/Server 2003/Vista)
- 3.8 Printing with NetWare
- Network printing in a NetWare environment
- For Remote Printer mode with NetWare 4.x bindery emulation
- For Print Server mode with NetWare 4.x bindery emulation
- For NetWare 4.x Remote Printer mode (NDS)
- For NetWare 4.x/5.x/6 Print Server mode (NDS)
- For NetWare 5.x/6 Novell Distributed Print Service (NDPS)
- Specifying client (Windows) settings when using the NetWare server
- 3.9 Printing with Macintosh
- 4 Various printing methods
- 4.1 Printing operations
- 4.2 Setting the printing functions
- Function list
- Function overview
- Original Orientation
- Original Size and Paper Size
- Zoom (enlargement and reduction)
- Paper Tray (paper source)
- Paper Type
- Output Method (job management)
- User Authentication
- Account Track
- Collate and Offset
- Combination/Poster Mode
- Skip Blank Pages (saving paper)
- Chapters
- Print Type (duplex printing/booklet printing)
- Image Shift
- Stapling and hole punching
- Center Staple and Fold/Fold
- Paper Arrangement
- Cover Mode and Transparency Interleave
- Per Page Setting
- Watermark
- Overlay
- Copy Protect
- Date/Time and Page Number
- Header/Footer
- Quality Adjustment
- Use Printer Fonts (substitute fonts)
- 4.3 Specifying the printer driver basic settings
- 5 Setting up the PCL driver (Windows)
- 5.1 Settings
- 5.2 Specifying the Basic tab settings
- 5.3 Specifying the Layout tab settings
- 5.4 Specifying the Finish tab settings
- 5.5 Specifying the Cover Mode tab settings
- 5.6 Specifying the Stamp/Composition tab settings
- 5.7 Specifying the Quality tab settings
- 5.8 Specifying the Other tab settings
- 5.9 Specifying the Configure tab settings
- 5.10 Specifying the Settings tab settings
- 5.11 Saving the driver settings
- 6 Setting up the PostScript driver (Windows)
- 6.1 Settings
- 6.2 Specifying the Basic tab settings
- 6.3 Specifying the Layout tab settings
- 6.4 Specifying the Finish tab settings
- 6.5 Specifying the Cover Mode tab settings
- 6.6 Specifying the Stamp/Composition tab settings
- 6.7 Specifying the Quality tab settings
- 6.8 Specifying the Other tab settings
- 6.9 Specifying the Configure tab settings
- 6.10 Specifying the Settings tab settings
- 6.11 Saving the driver settings
- 7 Setting up the PPD driver (Mac OS 9.2)
- 8 Setting up the PPD driver (Mac OS X)
- 9 Various settings
- 9.1 Print settings in Utility mode
- Default settings
- To display the User Settings screen
- PDL Setting
- Number of Copies
- Original Direction
- Spool setting
- Paper size change
- Banner Sheet Setting
- Binding Direction Adjustment
- Line Width Adjustment
- Paper Tray
- Paper Size
- 2-Sided Print
- Binding Position
- Staple
- Punch
- Banner Paper Tray
- Font Settings
- Symbol Set
- Font Size
- Line/Page
- CR/LF Mapping
- Print PS Errors
- ICC Profile Settings
- Verify XPS Digital Signature
- Print Reports
- 9.2 Print settings in Administrator mode
- 9.3 Print job management
- Specifying job operations
- Specifying settings (for Windows)
- Specifying settings (for Mac OS X)
- Job storage
- Recalling jobs (Proof Print)
- Recalling jobs (Secure Print)
- When “Confidental Document Access Method” is set to “Mode 1”
- When “Confidental Document Access Method” is set to “Mode 2”
- Recalling jobs (Save in User Box)
- Printing with this machine when user authentication settings have been applied
- Specifying settings (for Windows)
- Specifying settings (for Mac OS X)
- Printing with this machine when account track settings have been applied
- Specifying settings (for Windows)
- Specifying settings (for Mac OS X)
- Job operations on PageScope Web Connection
- 9.1 Print settings in Utility mode
- 10 Troubleshooting
- 11 Appendix
- 12 Index

User’s Guide [Print Operations]

Introduction
C550 x-1
Introduction
Thank you for purchasing this machine.
The bizhub C550 is equipped with an integrated printer controller that allows
you to print directly from Windows-compatible computers or Macintosh
computers.
This User’s Guide describes the printing functions, operations, usage, and
safety precautions of the printer controller. In order to ensure that this ma-
chine is used efficiently, carefully read this manual before using the machine.
In order to ensure that this machine is used safely, carefully read the Quick
Guide [Copy/Print/Fax/Scan/Box Operations] before using the machine.
The illustrations used in this User’s Guide may differ from the actual model.
Trademarks and copyright
-KONICA MINOLTA, the KONICA MINOLTA logo, and The essentials of
imaging are registered trademarks of KONICA MINOLTA HOLDINGS,
INC.
-PageScope and bizhub are registered trademarks or trademarks of
KONICA MINOLTA BUSINESS TECHNOLOGIES INC.
-Netscape is a registered trademark of Netscape Communications Corpo-
ration in the United States and other countries.
-Mozilla and Firefox are trademarks of the Mozilla Foundation.
-Novell and Novell NetWare are registered trademarks of Novell, Inc. in the
United States and other countries.
-Microsoft, Windows, and Windows NT are either registered trademarks
or trademarks of Microsoft Corporation in the United States and/or other
countries.
-PowerPC is a trademark of IBM Corporation in the United States, or other
countries, or both.
-In regard to the Citrix access Partner Network Premier
KONICA MINOLTA BUSINESS TECHNOLOGIES, Inc. is a member of the
Citrix access Partner Network.
The Citrix access Partner Network is a program that, in combination with
a solution of Citrix, promotes and develops solutions to provide the cus-
tomers with better solutions.

Introduction
C550 x-2
-Apple, Macintosh and Mac OS are registered trademarks of Apple Com-
puter, Inc. Safari is a trademark of Apple Computer, Inc.
-Adobe, the Adobe logo, Acrobat and PostScript are either registered
trademarks or trademarks of Adobe Systems Incorporated in the United
States and/or other countries.
-Ethernet is a registered trademark of Xerox Corporation.
-PCL is a registered trademark of Hewlett-Packard Company Limited.
-CUPS and CUPS logo are registered trademark of Easy Software Prod-
ucts.
-All other product and brand names are trademarks or registered trade-
marks of their respective companies or organizations.
-This machine and PageScope Box Operator are based in part on the
work of the Independent JPEG Group.
-Compact-VJE
Copyright 1986-2003 VACS Corp.
-RC4® is a registered trademark or trademark of RSA Security Inc. in the
United States and/or other countries.
-RSA® is a registered trademark or trademark of RSA Security Inc. RSA
BSAFE® is a registered trademark or trademark of RSA Security Inc. in
the United States and/or other countries.
License information
This product includes RSA BSAFE Cryptographic software
from RSA Security Inc.
OpenSSL statement
OpenSSL license
Copyright © 1998-2004 The OpenSSL Project. All rights reserved.
Redistribution and use in source and binary forms, with or without modifica-
tion, are permitted provided that the following conditions are met:
1. Redistributions of source code must retain the above copyright notice,
this list of conditions and the following disclaimer.
2. Redistributions in binary form must reproduce the above copyright no-
tice, this list of conditions and the following disclaimer in the documen-
tation and/or other materials provided with the distribution.
3. All advertising materials mentioning features or use of this software must
display the following acknowledgment:
“This product includes software developed by the OpenSSL Project for
use in the OpenSSL Toolkit. (http://www.openssl.org/)”

Introduction
C550 x-3
4. The names “OpenSSL Toolkit” and “OpenSSL Project” must not be used
to endorse or promote products derived from this software without prior
written permission. For written permission, please contact openssl-
core@openssl.org.
5. Products derived from this software may not be called “OpenSSL” nor
may “OpenSSL” appear in their names without prior written permission
of the OpenSSL Project.
6. Redistributions of any form whatsoever must retain the following ac-
knowledgment:
“This product includes software developed by the OpenSSL Project for
use in the OpenSSL Toolkit (http://www.openssl.org/)”
THIS SOFTWARE IS PROVIDED BY THE OpenSSL PROJECT “AS IS” AND
ANY EXPRESSED OR IMPLIED WARRANTIES, INCLUDING, BUT NOT LIM-
ITED TO, THE IMPLIED WARRANTIES OF MERCHANTABILITY AND FIT-
NESS FOR A PARTICULAR PURPOSE ARE DISCLAIMED. IN NO EVENT
SHALL THE OpenSSL PROJECT OR ITS CONTRIBUTORS BE LIABLE FOR
ANY DIRECT, INDIRECT, INCIDENTAL, SPECIAL, EXEMPLARY, OR CON-
SEQENTIAL DAMAGES (INCLUDING, BUT NOT LIMITED TO, PROCURE-
MENT OF SUBSTITUTE GOODS OR SERVICES; LOSS OF USE, DATA, OR
PROFITS; OR BUSINESS INTERRUPTION) HOWEVER CAUSED AND ON
ANY THEORY OF LIABILITY, WHETHER IN CONTRACT, STRICT LIABILITY,
OR TORT (INCLUDING NEGLIGENCE OR OTHERWISE) ARISING IN ANY
WAY OUT OF THE USE OF THIS SOFTWARE, EVEN IF ADVISED OF THE
POSSIBILITY OF SUCH DAMAGE.
This product includes cryptographic software written by Eric Young
(eay@crypt-Soft.com). This product includes software written by Tim Hud-
son (tjh@cryptsoft.com).
Original SSLeay license
Copyright © 1995-1998 Eric Young (eay@cryptsoft.com) All rights reserved.
This package is an SSL implementation written by Eric Young (eay@crypt-
soft.com).
The implementation was written so as to conform with Netscapes SSL.
This library is free for commercial and non-commercial use as long as the fol-
lowing conditions are aheared to. The following conditions apply to all code
found in this distribution, be it the RC4, RSA, Ihash, DES, etc., code; not just
the SSL code.
The SSL documentation included with this distribution is covered by the
same copyright terms except that the holder is Tim Hudson (tjh@crypt-
soft.com).
Copyright remains Eric Young’s, and as such any Copyright notices in the
code are not to be removed. If this package is used in a product, Eric Young
should be given attribution as the author of the parts of the library used. This
can be in the form of a textual message at program startup or in documen-
tation (online or textual) provided with the package.

Introduction
C550 x-4
Redistribution and use in source and binary forms, with or without modifica-
tion, are permitted provided that the following conditions are met:
1. Redistributions of source code must retain the copyright notice, this list
of conditions and the following disclaimer.
2. Redistributions in binary form must reproduce the above copyright no-
tice, this list of conditions and the following disclaimer in the documen-
tation and/or other materials provided with the distribution.
3. All advertising materials mentioning features or use of this software must
display the following acknowledgement:
“This product includes cryptographic software written by Eric Young
(eay@crypt-soft.com)”
The word ‘cryptographic’ can be left out if the rouines from the library be-
ing used are not cryptographic related.
4. If you include any Windows specific code (or a derivative thereof) from
the apps directory (application code) you must include an acknowledge-
ment:
“This product includes software written by Tin Hudson (tjh@crypt-
soft.com)”
THIS SOFTWARE IS PROVIDED BY ERIC YOUNG “AS IS” AND ANY EX-
PRESS OR IMPLIED WARRANTIES, INCLUDING, BUT NOT LIMITED TO,
THE IMPLIED WARRANTIES OF MERCHANTABILITY AND FITNESS FOR A
PARTICULAR PURPOSE ARE DISCLAIMED. IN NO EVENT SHALL THE AU-
THOR OR CONTRIBUTORS BE LIABLE FOR ANY DIRECT, INDIRECT, INCI-
DENTAL, SPECIAL, EXEMPLARY, OR CONSEQUENTIAL DAMAGES
(INCLUDING, BUT NOT LIMITED TO, PROCUREMENT OF SUBSTITUTE
GOODS OR SERVICES; LOSS OF USE, DATA, OR PROFITS; OR BUSINESS
INTERRUPTION) HOWEVER CAUSED AND ON ANY THEORY OF LIABILI-
TY, WHETHER IN CONTRACT, STRICT LIABILITY, OR TORT (INCLUDING
NEGLIGENCE OR OTHERWISE) ARISING IN ANY WAY OUT OF THE USE
OF THIS SOFTWARE, EVEN IF ADVISED OF THE POSSIBILITY OF SUCH
DAMAGE.
The licence and distribution terms for any publically available version or de-
rivative of this code cannot be changed. i.e. this code cannot simply be cop-
ied and put under another distribution licence [including the GNU Public
Licence.]
NetSNMP License
Part 1: CMU/UCD copyright notice: (BSD like)
Copyright 1989, 1991, 1992 by Carnegie Mellon University Derivative Work -
1996, 1998-2000
Copyright 1996, 1998-2000 The Regents of the University of California All
Rights Reserved

Introduction
C550 x-5
Permission to use, copy, modify and distribute this software and its docu-
mentation for any purpose and without fee is hereby granted, provided that
the above copyright notice appears in all copies and that both that copyright
notice and this permission notice appear in supporting documentation, and
that the name of CMU and The Regents of the University of California not be
used in advertising or publicity pertaining to distribution of the software with-
out specific written permission.
CMU AND THE REGENTS OF THE UNIVERSITY OF CALIFORNIA DISCLAIM
ALLWARRANTIES WITH REGARD TO THIS SOFTWARE, INCLUDING ALL
IMPLIEDWARRANTIES OF MERCHANTABILITY AND FITNESS. IN NO
EVENT SHALL CMU OR THE REGENTS OF THE UNIVERSITY OF CALIFOR-
NIA BE LIABLE FOR ANY SPECIAL, INDIRECT OR CONSEQUENTIAL DAM-
AGES OR ANY DAMAGES WHATSOEVER RESULTING FROM THE LOSS
OF USE, DATA OR PROFITS, WHETHER IN AN ACTION OF CONTRACT,
NEGLIGENCE OR OTHER TORTIOUS ACTION, ARISING OUT OF OR IN
CONNECTION WITH THE USE OR PERFORMANCE OF THIS SOFTWARE.
Part 2: Networks Associates Technology, Inc copyright notice (BSD)
Copyright © 2001-2003, Networks Associates Technology, Inc
All rights reserved.
Redistribution and use in source and binary forms, with or without modifica-
tion, are permitted provided that the following conditions are met:
-Redistributions of source code must retain the above copyright notice,
this list of conditions and the following disclaimer.
-Redistributions in binary form must reproduce the above copyright no-
tice, this list of conditions and the following disclaimer in the documen-
tation and/or other materials provided with the distribution.
-Neither the name of the Networks Associates Technology, Inc nor the
names of its contributors may be used to endorse or promote products
derived from this software without specific prior written permission.
THIS SOFTWARE IS PROVIDED BY THE COPYRIGHT HOLDERS AND
CONTRIBUTORS “AS IS” AND ANY EXPRESS OR IMPLIED WARRANTIES,
INCLUDING, BUT NOT LIMITED TO, THE IMPLIED WARRANTIES OF MER-
CHANTABILITY AND FITNESS FOR A PARTICULAR PURPOSE ARE DIS-
CLAIMED. IN NO EVENT SHALL THE COPYRIGHT HOLDERS OR
CONTRIBUTORS BE LIABLE FOR ANY DIRECT, INDIRECT, INCIDENTAL,
SPECIAL, EXEMPLARY, OR CONSEQUENTIAL DAMAGES (INCLUDING,
BUT NOT LIMITED TO, PROCUREMENT OF SUBSTITUTE GOODS OR
SERVICES; LOSS OF USE, DATA, OR PROFITS;OR BUSINESS INTERRUP-
TION) HOWEVER CAUSED AND ON ANY THEORY OF LIABILITY, WHETH-
ER IN CONTRACT, STRICT LIABILITY, OR TORT (INCLUDING
NEGLIGENCE OR OTHERWISE) ARISING IN ANY WAY OUT OF THE USE
OF THIS SOFTWARE, EVEN IF ADVISED OF THE POSSIBILITY OF SUCH
DAMAGE.

Introduction
C550 x-6
Part 3: Cambridge Broadband Ltd. copyright notice (BSD)
Portions of this code are copyright © 2001-2003, Cambridge Broadband Ltd.
All rights reserved.
Redistribution and use in source and binary forms, with or without modifica-
tion, are permitted provided that the following conditions are met:
-Redistributions of source code must retain the above copyright notice,
this list of conditions and the following disclaimer.
-Redistributions in binary form must reproduce the above copyright no-
tice, this list of conditions and the following disclaimer in the documen-
tation and/or other materials provided with the distribution.
-The name of Cambridge Broadband Ltd. may not be used to endorse or
promote products derived from this software without specific prior writ-
ten permission.
THIS SOFTWARE IS PROVIDED BY THE COPYRIGHT HOLDER “AS IS”
AND ANYEXPRESS OR IMPLIED WARRANTIES, INCLUDING, BUT NOT
LIMITED TO, THEIMPLIED WARRANTIES OF MERCHANTABILITY AND FIT-
NESS FOR A PARTICULAR PURPOSE ARE DISCLAIMED.IN NO EVENT
SHALL THE COPYRIGHT HOLDER BE LIABLE FOR ANY DIRECT, INDI-
RECT, INCIDENTAL, SPECIAL, EXEMPLARY, OR CONSEQUENTIAL DAM-
AGES (INCLUDING, BUT NOT LIMITED TO, PROCUREMENT OF
SUBSTITUTE GOODS OR SERVICES; LOSS OF USE, DATA, OR PROFITS;
OR BUSINESS INTERRUPTION) HOWEVER CAUSED AND ON ANY THEO-
RY OF LIABILITY, WHETHER IN CONTRACT, STRICT LIABILITY, OR TORT
(INCLUDING NEGLIGENCE OR OTHERWISE) ARISING IN ANY WAY OUT
OF THE USE OF THIS SOFTWARE, EVEN IF ADVISED OF THE POSSIBILITY
OF SUCH DAMAGE.
Part 4: Sun Microsystems, Inc. copyright notice (BSD)
Copyright © 2003 Sun Microsystems, Inc., 4150 Network Circle, Santa Clara,
California 95054, U.S.A. All rights reserved.
Use is subject to license terms below.
This distribution may include materials developed by third parties.
Sun, Sun Microsystems, the Sun logo and Solaris are trademarks or regis-
tered trademarks of Sun Microsystems, Inc. in the U.S. and other countries.
Redistribution and use in source and binary forms, with or without modifica-
tion, are permitted provided that the following conditions are met:
-Redistributions of source code must retain the above copyright notice,
this list of conditions and the following disclaimer.
-Redistributions in binary form must reproduce the above copyright no-
tice, this list of conditions and the following disclaimer in the documen-
tation and/or other materials provided with the distribution.

Introduction
C550 x-7
-Neither the name of the Sun Microsystems, Inc. nor the names of its con-
tributors may be used to endorse or promote products derived from this
software without specific prior written permission.
THIS SOFTWARE IS PROVIDED BY THE COPYRIGHT HOLDERS AND
CONTRIBUTORS “AS IS” AND ANY EXPRESS OR IMPLIED WARRANTIES,
INCLUDING, BUT NOT LIMITED TO, THE IMPLIED WARRANTIES OF MER-
CHANTABILITY AND FITNESS FOR A PARTICULAR PURPOSE ARE DIS-
CLAIMED. IN NO EVENT SHALL THE COPYRIGHT HOLDERS OR
CONTRIBUTORS BE LIABLE FOR ANY DIRECT, INDIRECT, INCIDENTAL,
SPECIAL, EXEMPLARY, OR CONSEQUENTIAL DAMAGES (INCLUDING,
BUT NOT LIMITED TO, PROCUREMENT OF SUBSTITUTE GOODS OR
SERVICES; LOSS OF USE, DATA, OR PROFITS;OR BUSINESS INTERRUP-
TION) HOWEVER CAUSED AND ON ANY THEORY OF LIABILITY, WHETH-
ER IN CONTRACT, STRICT LIABILITY, OR TORT (INCLUDING
NEGLIGENCE OR OTHERWISE) ARISING IN ANY WAY OUT OF THE USE
OF THIS SOFTWARE, EVEN IF ADVISED OF THE POSSIBILITY OF SUCH
DAMAGE.
Part 5: Sparta, Inc copyright notice (BSD)
Copyright © 2003-2004, Sparta, Inc All rights reserved.
Redistribution and use in source and binary forms, with or without modifica-
tion, are permitted provided that the following conditions are met:
-Redistributions of source code must retain the above copyright notice,
this list of conditions and the following disclaimer.
-Redistributions in binary form must reproduce the above copyright no-
tice, this list of conditions and the following disclaimer in the documen-
tation and/or other materials provided with the distribution.
-Neither the name of Sparta, Inc nor the names of its contributors may be
used to endorse or promote products derived from this software without
specific prior written permission.
THIS SOFTWARE IS PROVIDED BY THE COPYRIGHT HOLDERS AND
CONTRIBUTORS “AS IS” AND ANY EXPRESS OR IMPLIED WARRANTIES,
INCLUDING, BUT NOT LIMITED TO, THE IMPLIED WARRANTIES OF MER-
CHANTABILITY AND FITNESS FOR A PARTICULAR PURPOSE ARE DIS-
CLAIMED. IN NO EVENT SHALL THE COPYRIGHT HOLDERS OR
CONTRIBUTORS BE LIABLE FOR ANY DIRECT, INDIRECT, INCIDENTAL,
SPECIAL, EXEMPLARY, OR CONSEQUENTIAL DAMAGES (INCLUDING,
BUT NOT LIMITED TO, PROCUREMENT OF SUBSTITUTE GOODS OR
SERVICES; LOSS OF USE, DATA, OR PROFITS;OR BUSINESS INTERRUP-
TION) HOWEVER CAUSED AND ON ANY THEORY OF LIABILITY, WHETH-
ER IN CONTRACT, STRICT LIABILITY, OR TORT (INCLUDING
NEGLIGENCE OR OTHERWISE) ARISING IN ANY WAY OUT OF THE USE
OF THIS SOFTWARE, EVEN IF ADVISED OF THE POSSIBILITY OF SUCH
DAMAGE.
Part 6: Cisco/BUPTNIC copyright notice (BSD)

Introduction
C550 x-8
Copyright © 2004, Cisco, Inc and Information Network Center of Beijing Uni-
versity of Posts and Telecommunications. All rights reserved.
Redistribution and use in source and binary forms, with or without modifica-
tion, are permitted provided that the following conditions are met:
-Redistributions of source code must retain the above copyright notice,
this list of conditions and the following disclaimer.
-Redistributions in binary form must reproduce the above copyright no-
tice, this list of conditions and the following disclaimer in the documen-
tation and/or other materials provided with the distribution.
-Neither the name of Cisco, Inc, Beijing University of Posts and Telecom-
munications, nor the names of their contributors may be used to endorse
or promote products derived from this software without specific prior
written permission.
THIS SOFTWARE IS PROVIDED BY THE COPYRIGHT HOLDERS AND
CONTRIBUTORS “AS IS” AND ANY EXPRESS OR IMPLIED WARRANTIES,
INCLUDING, BUT NOT LIMITED TO, THE IMPLIED WARRANTIES OF MER-
CHANTABILITY AND FITNESS FOR A PARTICULAR PURPOSE ARE DIS-
CLAIMED. IN NO EVENT SHALL THE COPYRIGHT HOLDERS OR
CONTRIBUTORS BE LIABLE FOR ANY DIRECT, INDIRECT, INCIDENTAL,
SPECIAL, EXEMPLARY, OR CONSEQUENTIAL DAMAGES (INCLUDING,
BUT NOT LIMITED TO, PROCUREMENT OF SUBSTITUTE GOODS OR
SERVICES; LOSS OF USE, DATA, OR PROFITS;OR BUSINESS INTERRUP-
TION) HOWEVER CAUSED AND ON ANY THEORY OF LIABILITY, WHETH-
ER IN CONTRACT, STRICT LIABILITY, OR TORT (INCLUDING
NEGLIGENCE OR OTHERWISE) ARISING IN ANY WAY OUT OF THE USE
OF THIS SOFTWARE, EVEN IF ADVISED OF THE POSSIBILITY OF SUCH
DAMAGE.
Copyright
© 2006 Konica Minolta Business Technologies, Inc. All Rights Reserved.
Note
-This User’s Guide may not be reproduced in part or in full without permis-
sion.
-Konica Minolta Business Technologies, Inc. will not be held liable for any
incidents caused by using this printing system or User’s Guide.
-Information included in this User’s Guide is subject to change without no-
tice.
-Konica Minolta Business Technologies, Inc. maintains the copyright of
the printer drivers.

Introduction
C550 x-9
SOFTWARE LICENSE AGREEMENT
This package contains the following materials provided by Konica Minolta
Business Technologies, Inc. (KMBT): software included as part of the printing
system, the digitally-encoded machine-readable outline data encoded in the
special format and in the encrypted form (“Font Programs”), other software
which runs on a computer system for use in conjunction with the Printing
Software (“Host Software”), and related explanatory written materials (“Doc-
umentation”). The term “Software” shall be used to describe Printing Soft-
ware, Font Programs and/or Host Software and also include any upgrades,
modified versions, additions, and copies of the Software.
The Software is being licensed to you under the terms of this Agreement.
KMBT grants to you a non-exclusive sublicense to use the Software and
Documentation, provided that you agree to the following:
1. You may use the Printing Software and accompanying Font Programs for
imaging to the licensed output de-vice(s), solely for your own internal
business purposes.
2. In addition to the license for Font Programs set forth in Section 1 (“Print-
ing Software”) above, you may use Roman Font Programs to reproduce
weights, styles, and versions of letters, numerals, characters and sym-
bols (“Typefaces”) on the display or monitor for your own internal busi-
ness purposes.
3. You may make one backup copy of the Host Software, provided your
backup copy is not installed or used on any computer. Notwithstanding
the above restrictions, you may install the on any number of computers
solely for use with one or more printing systems running the Printing Soft-
ware.
4. You may assign its rights under this Agreement to an assignee of all of
Licensee’s right and interest to such Software and Documentation (“As-
signee”) provided you transfer to Assignee all copies of such Software
and Documentation Assignee agrees to be bound by all of the terms and
conditions of this Agreement.
5. You agree not to modify, adapt or translate the Software and Documen-
tation.
6. You agree that you will not attempt to alter, disassemble, decrypt, re-
verse engineer or decompile the Software.
7. Title to and ownership of the Software and Documentation and any re-
productions thereof shall remain with KMBT and its licensor.
8. Trademarks shall be used in accordance with accepted trademark prac-
tice, including identification of the trademark owner’s name. Trademarks
can only be used to identify printed output produced by the Software.
Such use of any trademark does not give you any rights of ownership in
that trademark.

Introduction
C550 x-10
9. You may not rent, lease, sublicense, lend or transfer versions or copies
of the Software Licensee does not use, or Software contained on any un-
used media, except as part of the permanent transfer of all Software and
Documentation as described above.
10. IN NO EVENT WILL KMBT OR ITS LICENSOR BE LIABLE TO YOU FOR
ANY CONSEQUENTIAL, INCIDENTAL INDIRECT, PUNITIVE OR SPE-
CIAL DAMAGES, INCLUDING ANY LOST PROFITS OR LOST SAVING,
EVEN IF KMBT HAS BEEN ADVISED OF THE POSSIBILITY OF SUCH
DAMAGES, OR FOR ANY CLAIM BY ANY THIRD PARTY. KMBT OR ITS
LICENSOR DISCLAIMS ALL WARRANTIES WITH REGARD TO THE
SOFTWARE, EXPRESS OR IMPLIED, INCLUDING, WITHOUT LIMITA-
TION IMPLIED WARRANTIES OF MERCHANTABILITY, FITNESS FOR A
PARTICULAR PURPOSE, TITLE AND NON-INFRINGEMENT OF THIRD
PARTY RIGHTS. SOME STATES OR JURISDICTIONS DO NOT ALLOW
THE EXCLUSION OR LIMITATION OF INCIDENTIAL, CONSEQUENTIAL
OR SPECIAL DAMAGES, SO THE ABOVE LIMITATIONS MAY NOT AP-
PLY TO YOU.
11. Notice to Government End Users: The Software is a “commercial item,”
as that term is defined at 48 C.F.R.2.101, consisting of “commercial com-
puter software” and “commercial computer software documentation,” as
such terms are used in 48 C.F.R. 12.212. Consistent with 48 C.F.R.
12.212 and 48 C.F.R. 227.7202-1 through 227.7202-4, all U.S. Govern-
ment End Users acquire the Software with only those rights set forth
herein.
12. You agree that you will not export the Software in any form in violation of
any applicable laws and regulations regarding export control of any
countries.

Introduction
C550 x-11
About Adobe Color Profile
ADOBE SYSTEMS INCORPORATED
COLOR PROFILE LICENSE AGREEMENT
NOTICE TO USER: PLEASE READ THIS CONTRACT CAREFULLY. BY US-
ING ALL OR ANY PORTION OF THE SOFTWARE YOU ACCEPT ALL THE
TERMS AND CONDITIONS OF THIS SOFTWARE YOU ACCEPT ALL THE
TERMS AND CONDITIONS OF THIS AGREEMENT. IF YOU DO NOT AGREE
WITH THE TERMS OF THIS AGREEMENT, DO NOT USE THE SOFTWARE.
1. DEFINITIONS In this Agreement, “Adobe” means Adobe Systems Incor-
porated, a Delaware corporation, located at 345 Park Avenue, San Jose,
California 95110. “Software” means the software and related items with
which this Agreement is provided.
2. LICENSE Subject to the terms of this Agreement, Adobe hereby grants
you the worldwide, non-exclusive, nontransferable, royalty-free license
to use, reproduce and publicly display the Software. Adobe also grants
you the rights to distribute the Software only (a) as embedded within dig-
ital image files and (b) on a standalone basis. No other distribution of the
Software is allowed; including, without limitation, distribution of the Soft-
ware when incorporated into or bundled with any application software. All
individual profiles must be referenced by their ICC Profile description
string. You may not modify the Software. Adobe is under no obligation to
provide any support under this Agreement, including upgrades or future
versions of the Software or other items. No title to the intellectual proper-
ty in the Software is transferred to you under the terms of this Agreement.
You do not acquire any rights to the Software except as expressly set
forth in this Agreement.
3. DISTRIBUTION If you choose to distribute the Software, you do so with
the understanding that you agree to defend, indemnify and hold harmless
Adobe against any losses, damages or costs arising from any claims,
lawsuits or other legal actions arising out of such distribution, including
without limitation, your failure to comply with this Section 3. If you distrib-
ute the Software on a standalone basis, you will do so under the terms of
this Agreement or your own license agreement which (a) complies with
the terms and conditions of this Agreement; (b) effectively disclaims all
warranties and conditions, express or implied, on behalf of Adobe; (c) ef-
fectively excludes all liability for damages on behalf of Adobe; (d) states
that any provisions that differ from this Agreement are offered by you
alone and not Adobe and (e) states that the Software is available from you
or Adobe and informs licensees how to obtain it in a reasonable manner
on or through a medium customarily used for software exchange. Any
distributed Software will include the Adobe copyright notices as included
in the Software provided to you by Adobe.
4. DISCLAIMER OF WARRANTY Adobe licenses the Software to you on an
“AS IS” basis. Adobe makes no representation as to the adequacy of the

Introduction
C550 x-12
Software for any particular purpose or to produce any particular result.
Adobe shall not be liable for loss or damage arising out of this Agreement
or from the distribution or use of the Software or any other materials.
ADOBE AND ITS SUPPLIERS DO NOT AND CANNOT WARRANT THE
PERFORMANCE OR RESULTS YOU MAY OBTAIN BY USING THE
SOFTWARE, EXCEPT FOR ANY WARRANTY, CONDITION, REPRESEN-
TATION OR TERM TO THE EXTENT TO WHICH THE SAME CANNOT OR
MAY NOT BE EXCLUDED OR LIMITED BY LAW APPLICABLE TO YOU
IN YOUR JURISDICTION, ADOBE AND ITS SUPPLIERS MAKE NO WAR-
RANTIES, CONDITIONS, REPRESENTATIONS OR TERMS, EXPRESS
OR IMPLIED, WHETHER BY STATUTE, COMMON LAW, CUSTOM, US-
AGE OR OTHERWISE AS TO ANY OTHER MATTERS, INCLUDING BUT
NOT LIMITED TO NONINFRINGEMENT OF THIRD PARTY RIGHTS, IN-
TEGRATION, SATISFACTORY QUALITY OR FITNESS FOR ANY PAR-
TICULAR PURPOSE. YOU MAY HAVE ADDITIONAL RIGHTS WHICH
VARY FROM JURISDICTION TO JURISDICTION. The provisions of Sec-
tions 4, 5 and 6 shall survive the termination of this Agreement, howso-
ever caused, but this shall not imply or create any continued right to use
the Software after termination of this Agreement.
5. LIMITATION OF LIABILITY IN NO EVENT WILL ADOBE OR ITS SUPPLI-
ERS BE LIABLE TO YOU FOR ANY DAMAGES, CLAIMS OR COSTS
WHATSOEVER OR ANY CONSEQUENTIAL, INDIRECT, INCIDENTAL
DAMAGES, OR ANY LOST PROFITS OR LOST SAVINGS, EVEN IF AN
ADOBE REPRESENTATIVE HAS BEEN ADVISED OF THE POSSIBILITY
OF SUCH LOSS, DAMAGES, CLAIMS OR COSTS OR FOR ANY CLAIM
BY ANY THIRD PARTY. THE FOREGOING LIMITATIONS AND EXCLU-
SIONS APPLY TO THE EXTENT PERMITTED BY APPLICABLE LAW IN
YOUR JURISDICTION. ADOBEfS AGGREGATE LIABILITY AND THAT OF
ITS SUPPLIERS UNDER OR IN CONNECTION WITH THIS AGREEMENT
SHALL BE LIMITED TO THE AMOUNT PAID FOR THE SOFTWARE.
Nothing contained in this Agreement limits Adobe’s liability to you in the
event of death or personal injury resulting from Adobe’s negligence or for
the tort of deceit (fraud). Adobe is acting on behalf of its suppliers for the
purpose of disclaiming, excluding and/or limiting obligations, warranties
and liability as provided in this Agreement, but in no other respects and
for no other purpose.
6. TRADEMARKS Adobe and the Adobe logo are the registered trademarks
or trademarks of Adobe in the United States and other countries. With the
exception of referential use, you will not use such trademarks or any oth-
er Adobe trademark or logo without separate prior written permission
granted by Adobe.
7. TERM This Agreement is effective until terminated. Adobe has the right
to terminate this Agreement immediately if you fail to comply with any
term hereof. Upon any such termination, you must return to Adobe all full
and partial copies of the Software in your possession or control.

Introduction
C550 x-13
8. GOVERNMENT REGULATIONS If any part of the Software is identified as
an export controlled item under the United States Export Administration
Act or any other export law, restriction or regulation (the “Export Laws”),
you represent and warrant that you are not a citizen, or otherwise located
within, an embargoed nation (including without limitation Iran, Iraq, Syria,
Sudan, Libya, Cuba, North Korea, and Serbia) and that you are not oth-
erwise prohibited under the Export Laws from receiving the Software. All
rights to use the Software are granted on condition that such rights are
forfeited if you fail to comply with the terms of this Agreement.
9. GOVERNING LAW This Agreement will be governed by and construed in
accordance with the substantive laws in force in the State of California as
such laws are applied to agreements entered into and to be performed
entirely within California between California residents. This Agreement
will not be governed by the conflict of law rules of any jurisdiction or the
United Nations Convention on Contracts for the International Sale of
Goods, the application of which is expressly excluded. All disputes aris-
ing out of, under or related to this Agreement will be brought exclusively
in the state Santa Clara County, California, USA.
10. GENERAL You may not assign your rights or obligations granted under
this Agreement without the prior written consent of Adobe. None of the
provisions of this Agreement shall be deemed to have been waived by
any act or acquiescence on the part of Adobe, its agents, or employees,
but only by an instrument in writing signed by an authorized signatory of
Adobe. When conflicting language exists between this Agreement and
any other agreement included in the Software, the terms of such included
agreement shall apply. If either you or Adobe employs attorneys to en-
force any rights arising out of or relating to this Agreement, the prevailing
party shall be entitled to recover reasonable attorneys’ fees. You ac-
knowledge that you have read this Agreement, understand it, and that it
is the complete and exclusive statement of your agreement with Adobe
which supersedes any prior agreement, oral or written, between Adobe
and you with respect to the licensing to you of the Software. No variation
of the terms of this Agreement will be enforceable against Adobe unless
Adobe gives its express consent, in writing, signed by an authorized sig-
natory of Adobe.

Introduction
C550 x-14
ICC Profile for TOYO INK Standard Color on Coated paper
(TOYO Offset Coated 2.0)
This ICC Profile (TOYO Offset Coated 2.0) characterizes Japanese offset
press on Coated paper and is fully compatible with ICC profile format.
About “TOYO INK Standard Color on Coated paper”
This is the standard for color reproduction of sheet-fed offset press on Coat-
ed paper made by TOYO INK MFG.CO., LTD. (“TOYO INK”).
This standard is made from printing test with using TOYO INK’s sheet-fed
offset printing inks and TOYO INK’s own printing conditions.
“TOYO INK Standard Color on Coated paper” is compatible with “JAPAN
COLOR”.
Agreement
1. The reproduction of images on a printer or a monitor using this ICC Profile
do not completely match the TOYO INK Standard Color on Coated pa-
per.
2. Any and all copyrights of this ICC Profile shall remain in TOYO INK; there-
fore you shall not transfer, provide, rent, distribute, disclose, or grant any
rights in this ICC Profile to any third party without the prior written con-
sent of TOYO INK.
3. In no event will TOYO INK its directors, officers, employees or agents be
liable to you for any consequential or incidential, either direct or indirect,
damages (including damages for loss of business profits, business inter-
ruption, loss of business information, and the like) arising out of the use
or inability to use this ICC Profile.
4. TOYO INK shall not be responsible for answering any question related to
this ICC Profile.
5. All company names and product names used in this document is the
trademarks or registered trademarks of their respective holder.
This ICC Profile made by GretagMacbeth ProfileMaker and granted
TOYO INK certain license to distribute by GretagMacbeth AG.
TOYO Offset Coated 2.0 © TOYO INK MFG. CO., LTD. 2004

Introduction
C550 x-15
DIC STANDARD COLOR PROFILE LICENSE AGREEMENT
IMPORTANT: PLEASE READ THIS STANDARD COLOR PROFILE LICENSE
AGREEMENT (“LICENSE AGREEMENT”) CAREFULLY BEFORE USING THE
DIC STANDARD COLOR PROFILE, INCLUDING THE DIC STANDARD
COLOR SFC1.0.1, DIC STANDARD COLOR SFC1.0.2, DIC STANDARD
COLOR SFM1.0.2, DIC STANDARD COLOR SFU1.0.2, PROVIDED BY DIC
HEREWITH, AND ANY CORRESPONDIMG ONLINE OR ELECTRONC DOC-
UMENTATION AND ALL UPDATES OR UPGRADES OF THE ABOVE THAT
ARE PROVIDED TO YOU (COLLECTIVELY, THE “PROFILE”).
THIS LICENSE AGREEMENT IS A LEGAL AGREEMENT BETWEEN YOU (EI-
THER AN INDIVIDUAL OR, IF ACQUIRED BY OR FOR AN ENTITY, AN EN-
TITY) AND DAINIPPON INK & CHEMICALS, INC., A JAPANESE COMPANY
(“DIC”). THIS LICENSE AGREEMENT PROVIDES A LICENSE TO USE THE
PROFILE AND CONTAINS WARRANTY INFORMATION AND LIABILITY DIS-
CLAIMERS. IF YOU DO NOT AGREE TO BE BOUND BY ALL OF THESE
TERMS, YOU MAY NOT USE THE PROFILE.
1. License Grant
DIC grants you a gratis non-exclusive and non-transferable license to use
the Profile and to allow your employees and authorized agents, if any, to
use the Profile, solely in connection with their work for you, subject to all
of the limitations and restrictions in this License Agreement.
2. Ownership
The foregoing license gives you limited license to use the Profile. You will
own the rights in the media containing the recorded Profile, but DIC re-
tains all right, title and interest, including all copyright and intellectual
property rights, in and to, the Profile and all copies thereof. All rights not
specifically granted in this License Agreement, including all copyrights,
are reserved by DIC.
3. Term
a. This License Agreement is effective until terminated.
b. You may terminate this License Agreement by notifying DIC in writing
of your intention to terminate this License Agreement and by destroying,
all copies of the Profile in your possession or control.
c. DIC may terminate this License Agreement without prior notice to you
if you fail to comply with any of the terms and conditions of this License
Agreement (either directly or through your employees or agents), retroac-
tive to the time of such failure to comply. In such event, you must imme-
diately stop using the Profile and destroy all copies of the Profile in your
possession or control.
d. All provisions in this License Agreement relating to warranty disclaim-
ers (Section 5) and the limitation of liability (Section 6) shall survive any
termination of this License Agreement.
4. License Method and Restrictions
a. You may install and use the Profile on a single desktop computer; pro-

Introduction
C550 x-16
vided, however, that, notwithstanding anything contrary contained here-
in, you may not use the Profile on any network system or share, install or
use the Profile concurrently on different computers, or electronically
transfer the Profile from one computer to another or over a network.
b. You may not make or distribute copies, fix, alter, merge, modify, adapt,
sublicense, transfer, sell, rent, lease, gift or distribute all or a portion of
the Profile, or modify the Profile or create derivative works based upon
the Profile.
c. You acknowledge that the Profile is not intended for any usage which
may cause death or physical injury or environmental damage and agree
not to use the Profile for such usage.
d. You shall not use the Profile to develop any software or other technol-
ogy having the same primary function as the Profile, including but not lim-
ited to using the Profile in any development or test procedure that seeks
to develop like software or other technology, or to determine if such soft-
ware or other technology performs in a similar manner as the Profile.
e. DIC and other trademarks contained in the Profile are trademarks or
registered trademarks of DIC in Japan and/or other countries. You may
not remove or alter any trademark, trade names, product names, logo,
copyright or other proprietary notices, legends, symbols or labels in the
Profile. This License Agreement does not authorize you to use DIC’s or
its licensors’ names or any of their respective trademarks.
5. WARRANTY DISCLAIMER
a. THE PROFILE IS PROVIDED TO YOU FREE OF CHARGE, AND ON AN
“AS-IS” BASIS, IN ACCORDANCE WITH THE TERMS AND COONDI-
TIONS OF THIS LICENSE AGREEMENT. DIC PROVIDES NO TECHNI-
CAL SUPPORT, WARRANTIES OR REMEDIES FOR THE PROFILE.
b. DIC DISCLAIMS ALL WARRANTIES AND REPRESENTATIONS,
WHETHER EXPRESS, IMPLIED, OR OTHERWISE, INCLUDING BUT
NOT LIMITED TO, THE WARRANTIES OF MERCHANTABILITY OR FIT-
NESS FOR A PARTICULAR PURPOSE, NON-INFRINGEMENT, TITLE
AND QUIET ENJOYMENT. YOU SHALL ASSUME AND BE FULLY LIA-
BLE AND RESPONSIBLE FOR ALL RISKS IN CONNECTION WITH
YOUR USE OF THE PROFILE. DIC DOES NOT WARRANT THAT THE
PROFILE IS FREE OF DEFECTS OR FLAWS OR WILL OPERATE WITH-
OUT INTERRUPTION, AND IS NOT RESPONSIBLE FORCORRECTING
OR REPAIRING ANY DEFECTS OR FLAWS, FOR FEE OR GRATIS. NO
RIGHTS OR REMEDIES WILL BE CONFERRED ON YOU UNLESS EX-
PRESSLY GRANTED HEREIN.
6. LIMITATION OF LIABILITY
DIC SHALL NOT BE LIABLE TO YOU OR ANY THIRD PARTY FOR ANY
DIRECT, INDIRECT, SPECIAL, INCIDENTAL, PUNITIVE, COVER OR
CONSEQUENTIAL DAMAGES (INCLUDING, BUT NOT LIMITED TO,
DAMAGES FOR THE INABILITY TO USE EQUIPMENT OR ACCESS DA-
TA, LOSS OF BUSINESS, LOSS OF PROFITS, BUSINESS INTERRUP-
TION OR THE LIKE), ARISING OUT OF THE USE OF, OR INABILITY TO

Introduction
C550 x-17
USE, THE PROFILE AND BASED ON ANY THEORY OF LIABILITY IN-
CLUDING BREACH OF CONTRACT, BREACH OF WARRANTY, TORT
(INCLUDING NEGLIGENCE), PRODUCT LIABILITY OR OTHERWISE,
EVEN IF DIC OR ITS REPRESENTATIVES HAVE BEEN ADVISED OF THE
POSSIBILITY OF SUCH DAMAGES.
THE FOREGOING LIMITATIONS ON LIABILITY SHALL APPLY TO ALL
ASPECTS OF THIS LICENSE AGREEMENT.
7. General
a. This License Agreement shall be governed and construed in accord-
ance with the laws of Japan, without giving effect to principles of conflict
of laws. If any provision of this License Agreement shall be held by a
court of competent jurisdiction to be contrary to law, that provision will
be enforced to the maximum extent permissible, and the remaining pro-
visions of this License Agreement will remain in full force and effect. You
hereby consent to the exclusive jurisdiction and venue of Tokyo District
Court to resolve any disputes arising under this License Agreement.
b. This License Agreement contains the complete agreement between
the parties with respect to the subject matter hereof, and supersedes all
prior or contemporaneous agreements or understandings, whether oral
or written. You agree that any varying or additional terms contained in
any written notification or document issued by you in relation to the Pro-
file licensed hereunder shall be of no effect.
c. The failure or delay of DIC to exercise any of its rights under this Li-
cense Agreement or upon any breach of this License Agreement shall not
be deemed a waiver of those rights or of the breach.

Introduction
C550 x-18
Contents
Introduction
NetSNMP License .......................................................................... x-4
Copyright ........................................................................................ x-8
SOFTWARE LICENSE AGREEMENT ................................................x-9
About Adobe Color Profile .............................................................x-11
ICC Profile for TOYO INK Standard Color on Coated paper
(TOYO Offset Coated 2.0) ...............................................................x-14
DIC STANDARD COLOR PROFILE LICENSE AGREEMENT ........ x-15
Contents ...........................................................................................x-18
About this user’s guide ...................................................................x-29
User’s Guides .................................................................................. x-29
Printed manuals ............................................................................ x-29
User’s Guide CD manuals ............................................................ x-29
Notations ...................................................................................... x-30
Screen images in this user’s guide ............................................... x-31
Using this user’s guide ................................................................. x-32
1 Overview
1.1 Printer controller ...............................................................................1-1
Role of the printer controller ........................................................... 1-1
Available printer controller functions .............................................. 1-1
Machine modes ..............................................................................1-3
Printing flow ....................................................................................1-4
1.2 Operating environment .....................................................................1-5
Compatible computers and operating systems ............................. 1-5
Compatible interfaces .................................................................... 1-6
1.3 Setting up the system .......................................................................1-8
To set up the printing system ......................................................... 1-8
2 Installing the printer driver
2.1 Printer drivers and supported operating systems .........................2-1
2.2 When used with Windows ................................................................2-3
Automatic installation using the installer ........................................2-4
To install the printer driver .............................................................. 2-5
Installing the printer driver using the Add Printer Wizard ............... 2-7
For Windows XP/Server 2003 ........................................................ 2-8
For Windows Vista ........................................................................2-10

Introduction
C550 x-19
When using Web service printing under Windows Vista .............. 2-14
For Windows 2000/NT 4.0 ............................................................ 2-15
Installing the printer driver using Plug and Play ........................... 2-18
For Windows 2000 ........................................................................ 2-18
For Windows XP/Server 2003 ...................................................... 2-19
For Windows Vista ........................................................................2-20
Uninstalling the printer driver ....................................................... 2-21
When the printer driver contains the delete function ...................2-21
When the printer driver does not contain the delete function ...... 2-22
2.3 When used with Macintosh ............................................................2-24
Installing the printer driver ............................................................ 2-24
For Mac OS X ...............................................................................2-24
Selecting a printer ........................................................................2-25
For Mac OS X ...............................................................................2-25
For Mac OS 9.2 ............................................................................2-27
Uninstalling the printer driver ....................................................... 2-29
For Mac OS X ...............................................................................2-29
For Mac OS 9.2 ............................................................................2-30
3 Setting up network printing
3.1 Overview of network functions ........................................................3-1
Network functions ..........................................................................3-1
Features of the network functions .................................................. 3-2
Network connection methods that can be selected in each
Windows operating system ............................................................ 3-3
Network printing from a Windows operating system ..................... 3-3
Network printing in a NetWare environment ..................................3-3
3.2 Setting the IP address for this machine ..........................................3-4
3.3 Accessing PageScope Web Connection ........................................3-7
3.4 SMB printing ......................................................................................3-8
Operations on this machine ............................................................ 3-8
Printer driver settings .....................................................................3-9
3.5 LPR printing .....................................................................................3-10
Operations on this machine ..........................................................3-10
Printer driver settings ...................................................................3-10
For Windows 2000/XP/Server 2003/Vista .................................... 3-10
For Windows NT 4.0 .....................................................................3-11
3.6 Port 9100 printing (Windows 2000/XP/Server 2003/Vista) ...........3-12
Operations on this machine ..........................................................3-12
Printer driver settings (Windows 2000/XP/Server 2003/Vista) ..... 3-12
3.7 IPP printing (Windows 2000/XP/Server 2003/Vista) .....................3-14
Operations on this machine ..........................................................3-14

Introduction
C550 x-20
Installing the printer driver (Windows 2000/XP/Server 2003) ....... 3-17
Installing the printer driver (Windows Vista) ................................. 3-19
3.8 Printing with NetWare .....................................................................3-21
Network printing in a NetWare environment ................................3-21
For Remote Printer mode with NetWare 4.x bindery
emulation ......................................................................................3-21
For Print Server mode with NetWare 4.x bindery emulation ........3-24
For NetWare 4.x Remote Printer mode (NDS) ..............................3-28
For NetWare 4.x/5.x/6 Print Server mode (NDS) ..........................3-32
For NetWare 5.x/6 Novell Distributed Print Service (NDPS) .........3-36
Specifying client (Windows) settings when using the NetWare
server ............................................................................................3-37
3.9 Printing with Macintosh ..................................................................3-39
Operations on this machine ..........................................................3-39
Specifying the AppleTalk settings ................................................ 3-39
Specifying the Bonjour settings .................................................... 3-40
Setting the Macintosh computer ..................................................3-41
For Mac OS X ...............................................................................3-42
For Mac OS 9.2 ............................................................................3-42
4 Various printing methods
4.1 Printing operations ...........................................................................4-1
For Windows ...................................................................................4-1
Test printing ....................................................................................4-2
For Macintosh .................................................................................4-3
For Mac OS X ................................................................................. 4-3
For Mac OS 9.2 ..............................................................................4-4
4.2 Setting the printing functions ..........................................................4-5
Function list ....................................................................................4-5
Function overview ..........................................................................4-8
Original Orientation .........................................................................4-8
Original Size and Paper Size .......................................................... 4-9
Zoom (enlargement and reduction) .............................................. 4-10
Paper Tray (paper source) ............................................................4-11
Paper Type ...................................................................................4-11
Output Method (job management) ............................................... 4-12
User Authentication ...................................................................... 4-12
Account Track ..............................................................................4-12
Collate and Offset .........................................................................4-13
Combination/Poster Mode ...........................................................4-14
Skip Blank Pages (saving paper) ..................................................4-15
Chapters .......................................................................................4-15
Print Type (duplex printing/booklet printing) ................................4-16
Image Shift ...................................................................................4-17

Introduction
C550 x-21
Stapling and hole punching ..........................................................4-18
Center Staple and Fold/Fold ........................................................4-19
Paper Arrangement ......................................................................4-20
Cover Mode and Transparency Interleave ...................................4-20
Per Page Setting ...........................................................................4-21
Watermark ....................................................................................4-21
Overlay ..........................................................................................4-22
Copy Protect ................................................................................4-22
Date/Time and Page Number .......................................................4-23
Header/Footer .............................................................................. 4-23
Quality Adjustment .......................................................................4-23
Use Printer Fonts (substitute fonts) ..............................................4-23
4.3 Specifying the printer driver basic settings ..................................4-24
For Windows .................................................................................4-24
For Macintosh ...............................................................................4-27
For Mac OS X ...............................................................................4-27
For Mac OS 9.x ............................................................................ 4-28
5 Setting up the PCL driver (Windows)
5.1 Settings ..............................................................................................5-1
Common settings ...........................................................................5-1
Basic tab .........................................................................................5-2
Layout tab .......................................................................................5-3
Finish tab ........................................................................................5-3
Cover Mode tab ..............................................................................5-3
Stamp/Composition tab ................................................................. 5-4
Quality tab ......................................................................................5-4
Other tab .........................................................................................5-4
Configure tab ..................................................................................5-5
Settings tab ....................................................................................5-5
5.2 Specifying the Basic tab settings ....................................................5-7
Printing to suit the paper size ......................................................... 5-7
Specifying a custom size ................................................................ 5-8
Selecting the paper tray .................................................................5-8
Specifying the paper type for a paper tray .....................................5-9
Selecting the output method ........................................................5-10
Specifying the user authentication settings ................................. 5-13
Specifying the account track settings ..........................................5-15
5.3 Specifying the Layout tab settings ................................................5-17
Printing multiple pages on one page (N in 1, Poster Mode) ......... 5-17
Chapters .......................................................................................5-18
Specifying duplex/booklet printing ...............................................5-18
Setting the binding margin ........................................................... 5-19
Shifting images .............................................................................5-20

Introduction
C550 x-22
5.4 Specifying the Finish tab settings .................................................5-21
Stapling .........................................................................................5-21
Specifying the center staple and fold setting ...............................5-22
Hole punching ..............................................................................5-22
Folding ..........................................................................................5-23
Specifying the output tray ............................................................ 5-23
Specifying the procedure for adjusting the binding position ........ 5-23
5.5 Specifying the Cover Mode tab settings .......................................5-24
Printing documents with a front cover/back cover ......................5-24
Printing documents with a front cover/back cover from a post
inserter ..........................................................................................5-24
Printing multiple pages .................................................................5-25
Printing with transparency interleaves ..........................................5-26
5.6 Specifying the Stamp/Composition tab settings .........................5-27
Printing a watermark ....................................................................5-27
Editing a watermark ...................................................................... 5-28
Printing different original documents together (overlay) ...............5-29
Editing an overlay file .................................................................... 5-31
Creating an overlay file .................................................................5-32
Registering an overlay file ............................................................5-34
Printing with copy protection .......................................................5-35
Printing the date and page numbers ............................................5-37
Printing a header and a footer ......................................................5-38
5.7 Specifying the Quality tab settings ................................................5-39
Adjusting the color and quality ..................................................... 5-39
Font Settings ................................................................................5-40
5.8 Specifying the Other tab settings ..................................................5-42
5.9 Specifying the Configure tab settings ...........................................5-43
Selecting a model name and an option ........................................ 5-43
Specifying the paper tray .............................................................5-44
Changing an encryption passphrase ............................................ 5-45
Starting up a software tool ........................................................... 5-46
5.10 Specifying the Settings tab settings ..............................................5-47
Specifying the default settings ..................................................... 5-47
Registering custom paper sizes ...................................................5-48
5.11 Saving the driver settings ...............................................................5-50
Saving the driver settings .............................................................5-50
Recalling the settings ...................................................................5-51
Editing the settings .......................................................................5-52
Importing and exporting the driver settings ................................. 5-53

Introduction
C550 x-23
6 Setting up the PostScript driver (Windows)
6.1 Settings ..............................................................................................6-1
Common settings ...........................................................................6-1
Basic tab .........................................................................................6-2
Layout tab .......................................................................................6-3
Finish tab ........................................................................................6-3
Cover Mode tab ..............................................................................6-3
Stamp/Composition tab ................................................................. 6-4
Quality tab ......................................................................................6-4
Other tab .........................................................................................6-4
Advanced tab .................................................................................6-5
Device Settings tab ........................................................................6-5
Configure tab ..................................................................................6-6
Settings tab ....................................................................................6-6
6.2 Specifying the Basic tab settings ....................................................6-7
Printing to suit the paper size ......................................................... 6-7
Specifying a custom size ................................................................ 6-8
Selecting the paper tray .................................................................6-8
Specifying the paper type for a paper tray .....................................6-9
Selecting the output method ........................................................6-10
Specifying the user authentication settings ................................. 6-13
Specifying the account track settings ..........................................6-15
6.3 Specifying the Layout tab settings ................................................6-17
Printing multiple pages on one page (N in 1) ...............................6-17
Chapters .......................................................................................6-18
Specifying duplex/booklet printing ...............................................6-18
Setting the binding margin ........................................................... 6-19
Shifting images .............................................................................6-20
6.4 Specifying the Finish tab settings .................................................6-21
Stapling .........................................................................................6-21
Specifying the center staple and fold setting ...............................6-22
Hole punching ..............................................................................6-22
Folding ..........................................................................................6-23
Specifying the output tray ............................................................ 6-23
Specifying the procedure for adjusting the binding position ........ 6-23
6.5 Specifying the Cover Mode tab settings .......................................6-24
Printing documents with a front cover/back cover ......................6-24
Printing documents with a front cover/back cover from a post
inserter ..........................................................................................6-24
Printing multiple pages .................................................................6-25
Printing with transparency interleaves ..........................................6-27
6.6 Specifying the Stamp/Composition tab settings .........................6-28
Printing a watermark ....................................................................6-28

Introduction
C550 x-24
Editing a watermark ...................................................................... 6-29
Printing different original documents together (overlay) ...............6-30
Editing an overlay file .................................................................... 6-32
Creating an overlay file .................................................................6-33
Registering an overlay file ............................................................6-35
Printing with copy protection .......................................................6-36
Printing the date and page numbers ............................................6-38
Printing a header and a footer ......................................................6-39
6.7 Specifying the Quality tab settings ................................................6-40
Adjusting the color and quality ..................................................... 6-40
Controlling the color profile ..........................................................6-41
Font Settings ................................................................................6-43
6.8 Specifying the Other tab settings ..................................................6-44
6.9 Specifying the Configure tab settings ...........................................6-45
Selecting a model name and an option ........................................ 6-45
Specifying the paper tray .............................................................6-46
Changing an encryption passphrase ............................................ 6-47
Starting up a software tool ........................................................... 6-48
6.10 Specifying the Settings tab settings ..............................................6-49
Specifying the default settings ..................................................... 6-49
6.11 Saving the driver settings ...............................................................6-51
Saving the driver settings .............................................................6-51
Recalling the settings ...................................................................6-53
Editing the settings .......................................................................6-53
Importing and exporting the driver settings ................................. 6-55
7 Setting up the PPD driver (Mac OS 9.2)
7.1 Settings ..............................................................................................7-1
Page Setup dialog box ...................................................................7-1
Print dialog box ..............................................................................7-2
7.2 Page Setup .........................................................................................7-5
Page Attributes (basic settings) ......................................................7-5
Custom Page Sizes ........................................................................ 7-6
PostScript Options .........................................................................7-7
7.3 Printing ...............................................................................................7-8
General (basic settings) ..................................................................7-8
Layout (printing multiple pages on one page) ................................7-9
Printer specific options (Finishing Options 1 to 5) ........................7-10
7.4 Setting options ................................................................................7-12

Introduction
C550 x-25
8 Setting up the PPD driver (Mac OS X)
8.1 Settings ..............................................................................................8-1
Page Setup dialog box ...................................................................8-1
Print dialog box ..............................................................................8-2
Common settings in the Print dialog box .......................................8-5
8.2 Page Setup .........................................................................................8-7
Page Attributes (basic settings) ......................................................8-7
Custom Page Sizes ........................................................................ 8-8
8.3 Printing ...............................................................................................8-9
General settings ..............................................................................8-9
8.4 Output Method ................................................................................8-10
Selecting the output method ........................................................8-11
Specifying the user authentication settings ................................. 8-14
Specifying the account track settings ..........................................8-15
Checking the Output Method setting details ................................8-16
8.5 Layout/Finish ...................................................................................8-19
Shifting images .............................................................................8-22
Chapters .......................................................................................8-23
Checking the Layout/Finish setting details ..................................8-24
8.6 Paper Tray/Output Tray ..................................................................8-25
Specifying the paper type for a paper tray ................................... 8-26
8.7 Cover Mode/Transparency Interleave ...........................................8-27
8.8 Per Page Setting .............................................................................8-29
Adding and editing the settings in Per Page Setting ....................8-30
8.9 Stamp/Composition ........................................................................8-32
Printing with copy protection .......................................................8-32
Printing the date and time ............................................................8-35
Printing the page numbers ...........................................................8-36
Printing a header and a footer ......................................................8-37
8.10 Quality ..............................................................................................8-38
Controlling the color profile ..........................................................8-39
8.11 Setting options ................................................................................8-41
8.12 Saving the driver settings ...............................................................8-42
Saving the driver settings .............................................................8-42
Recalling the settings ...................................................................8-42
Changing the settings ...................................................................8-43

Introduction
C550 x-26
9 Various settings
9.1 Print settings in Utility mode ............................................................9-1
Default settings ............................................................................... 9-1
To display the User Settings screen ............................................... 9-1
PDL Setting .................................................................................... 9-2
Number of Copies ..........................................................................9-4
Original Direction ............................................................................9-5
Spool setting ..................................................................................9-6
Paper size change ..........................................................................9-7
Banner Sheet Setting .....................................................................9-8
Binding Direction Adjustment ....................................................... 9-10
Line Width Adjustment ................................................................. 9-11
Paper Tray ....................................................................................9-12
Paper Size ....................................................................................9-14
2-Sided Print .................................................................................9-15
Binding Position ........................................................................... 9-16
Staple ...........................................................................................9-17
Punch ...........................................................................................9-18
Banner Paper Tray ........................................................................ 9-19
Font Settings ................................................................................9-20
Symbol Set ...................................................................................9-22
Font Size .......................................................................................9-23
Line/Page ......................................................................................9-24
CR/LF Mapping ............................................................................9-25
Print PS Errors ..............................................................................9-27
ICC Profile Settings ......................................................................9-28
Verify XPS Digital Signature ......................................................... 9-29
Print Reports ................................................................................. 9-31
9.2 Print settings in Administrator mode ............................................9-33
To display the Administrator Settings screen ...............................9-33
Print/Fax Output Setting ...............................................................9-35
Output Tray Setting ......................................................................9-36
To delete secure print documents ................................................9-37
To specify the secure document delete time ...............................9-38
Printing without specifying the authentication setting ..................9-39
I/F Timeout ...................................................................................9-40
Print XPS Errors ............................................................................9-41
Print Data Capture ........................................................................9-42
Driver Password Encryption Setting .............................................9-43
9.3 Print job management ....................................................................9-46
Specifying job operations ............................................................. 9-46
Specifying settings (for Windows) ................................................ 9-46
Specifying settings (for Mac OS X) ............................................... 9-48
Job storage ...................................................................................9-49

Introduction
C550 x-27
Recalling jobs (Proof Print) ...........................................................9-49
Recalling jobs (Secure Print) .........................................................9-51
When “Confidental Document Access Method” is set to
“Mode 1” ......................................................................................9-52
When “Confidental Document Access Method” is set to
“Mode 2” ......................................................................................9-55
Recalling jobs (Save in User Box) ................................................. 9-58
Printing with this machine when user authentication settings
have been applied ........................................................................9-60
Specifying settings (for Windows) ................................................ 9-61
Specifying settings (for Mac OS X) ............................................... 9-62
Printing with this machine when account track settings have
been applied .................................................................................9-63
Specifying settings (for Windows) ................................................ 9-64
Specifying settings (for Mac OS X) ............................................... 9-65
Job operations on PageScope Web Connection .........................9-66
10 Troubleshooting
10.1 Unable to Print .................................................................................10-1
10.2 Unable to specify desired settings or unable to print as
specified ...........................................................................................10-3
10.3 Error message .................................................................................10-5
11 Appendix
11.1 Specifications ..................................................................................11-1
11.2 Configuration page .........................................................................11-3
11.3 Font list ............................................................................................11-4
PCL font list ..................................................................................11-4
PS font list ....................................................................................11-5
Demo page ...................................................................................11-6
11.4 PPD driver (Linux and applications) ..............................................11-7
PPD driver types ........................................................................... 11-7
About the PPD driver for Linux .....................................................11-7
To register the PPD driver for Linux .............................................11-7
To set up the PPD driver for Linux ...............................................11-7
To register the PPD driver for OpenOffice ....................................11-8
To print with OpenOffice ..............................................................11-8
About the PPD driver for applications ..........................................11-9
To print ......................................................................................... 11-9
11.5 Glossary .........................................................................................11-10


Introduction
C550 x-29
About this user’s guide
This User’s Guide contains information for using the printing functions of the
Konica Minolta printer controller. For details on the copy functions, scanning
functions, box functions, and fax functions, refer to the respective User’s
Guide.
This User’s Guide is aimed at users who already have a basic knowledge of
computer and this machine operations. For Windows or Macintosh operating
system and application operations, refer to the operation manual of the re-
spective product.
User’s Guides
This machine is provided with printed manuals and PDF manuals on the Us-
er’s Guide CD.
Printed manuals
Quick Guide [Copy/Print/Fax/Scan/Box Operations]
This manual contains operating procedures and descriptions of the most fre-
quently used functions, allowing the machine to immediately be used.
In addition, this manual contains notes and precautions that should be fol-
lowed for safe use of the machine.
Be sure to read this manual before using the machine.
User’s Guide [Enlarge Display Operations]
This manual contains details on operating procedures in Enlarge Display
mode.
Refer to this manual for details on using copy, network scanner and fax func-
tions in Enlarge Display mode.
User’s Guide CD manuals
User’s Guide [Copy Operations]
This manual contains descriptions of the Copy mode operations and ma-
chine maintenance. Refer to this manual for details on the paper and docu-
ments, copy procedures using convenient Application functions, replacing
consumables, and troubleshooting operations such as clearing paper mis-
feeds.
User’s Guide [Print Operations] (this manual)
This manual contains details of the printing functions that can be specified
with the standard built-in printer controller. Refer to this manual for operating
procedures on using the printing functions.

Introduction
C550 x-30
User’s Guide [Box Operations]
This manual contains operating procedures for using the user boxes on the
hard disk. Refer to this manual for details on saving data in user boxes, re-
trieving data from user boxes and transferring data.
User’s Guide [Network Scanner Operations]
This manual contains descriptions on specifying network settings for stand-
ard equipment and operating procedures for scanning functions. Refer to
this User’s Guide for details on using network functions and the Scan to E-
Mail, Scan to FTP and Scan to SMB operations.
User’s Guide [PageScope Web Connection Operations]
This manual contains descriptions on the machine settings that can be spec-
ified remotely with PageScope Web Connection from a Web browser on a
computer. Refer to this manual for details on operating procedures for using
PageScope Web Connection.
User’s Guide [Fax Operations]
This manual contains descriptions of the G3 fax operations. Refer to this
manual for details on using the G3 fax operations when the optional fax kit is
installed.
In order to use the fax functions, the optional fax kit must be purchased sep-
arately.
User’s Guide [Network Fax Operations]
This manual contains details on the network fax functions. Refer to this man-
ual for operating procedures on Internet faxing and IP address faxing.
User’s Guide [Fax Driver Operations]
This manual contains details of the fax driver functions that can be used to
send a fax directly from a computer.
Refer to this manual for operating procedures on using the PC-FAX func-
tions.
In order to use the fax functions, the optional fax kit must be purchased sep-
arately.
Notations
Product name
bizhub C550
This machine
This machine or printer
Integrated network controller Network controller
Printer controller, including this
machine, and printing system
Printing system

Introduction
C550 x-31
Screen images in this user’s guide
Unless stated otherwise, the printer driver functions are described using the
printer driver for Windows XP.
Microsoft Windows Windows
Product name
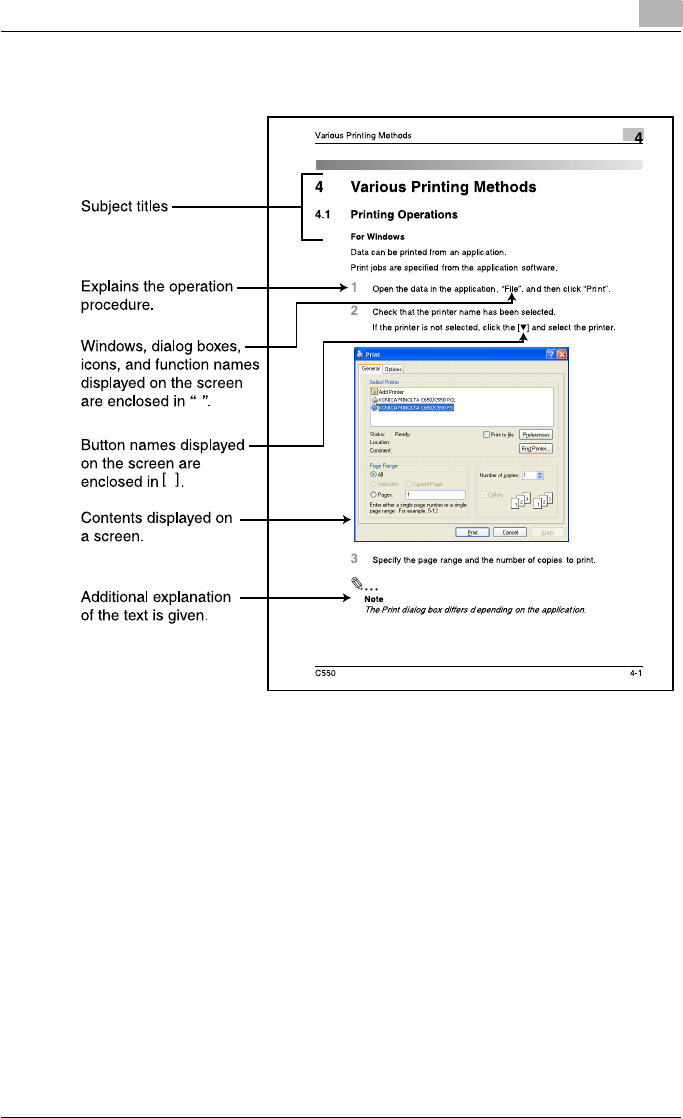
Introduction
C550 x-32
Using this user’s guide
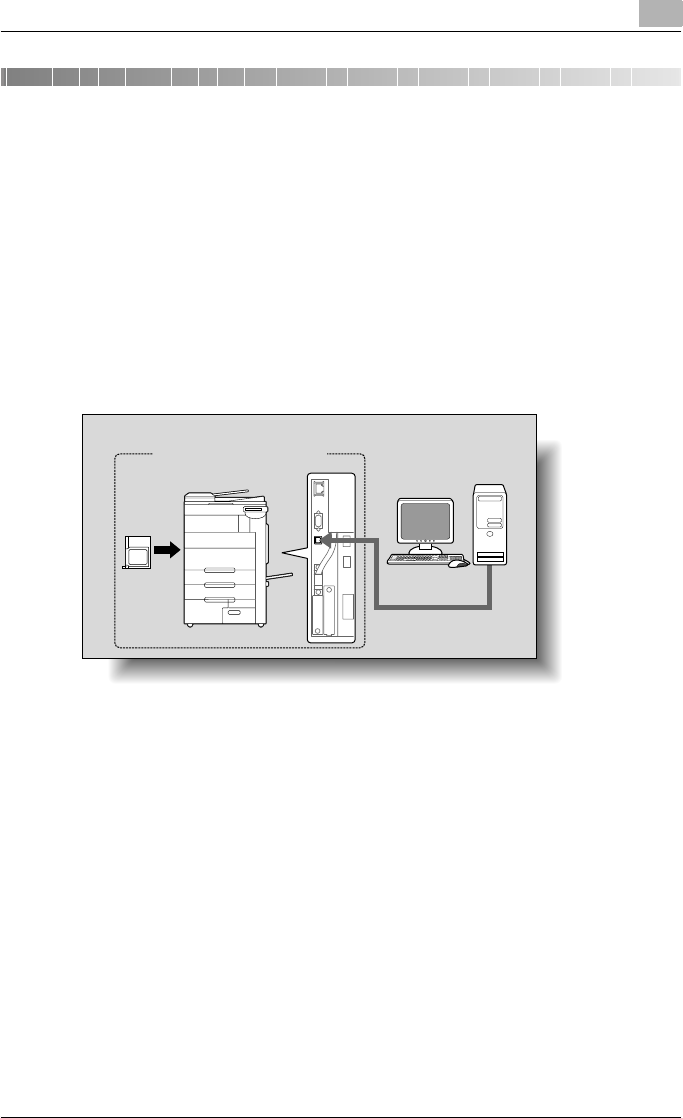
Overview 1
C550 1-1
1Overview
1.1 Printer controller
The printer controller is a device for performing printing functions and net-
work printing functions with this machine.
Role of the printer controller
The printer controller is built into the machine.
You can print from applications on the computer connected to the printing
system. When using this machine as a network printer, you can print from
applications on the computer.
Available printer controller functions
The printer controller provides the following functions.
-Printing of data that is sent from a printer driver installed on a computer
-Support of network protocols including TCP/IP (IPv4/IPv6), IPX/SPX, and
AppleTalk
-Direct printing over a network using SMB (Windows), LPR, and IPP print-
ing
-Access to settings for this machine and the printer controller from a client
computer over the network (using a Web browser)
-Control of the number of pages printed (“User Authentication” and “Ac-
count Track” functions)
-Fax operations using a computer (PC-fax transmission)
Printing system
Machine
Printer
controller
Computer

Overview 1
C550 1-2
2
Note
To perform fax operations, optional fax kit FK-502 is required.
!
Detail
For details on the PC-fax transmission, refer to the User’s Guide [Fax
Driver Operations].
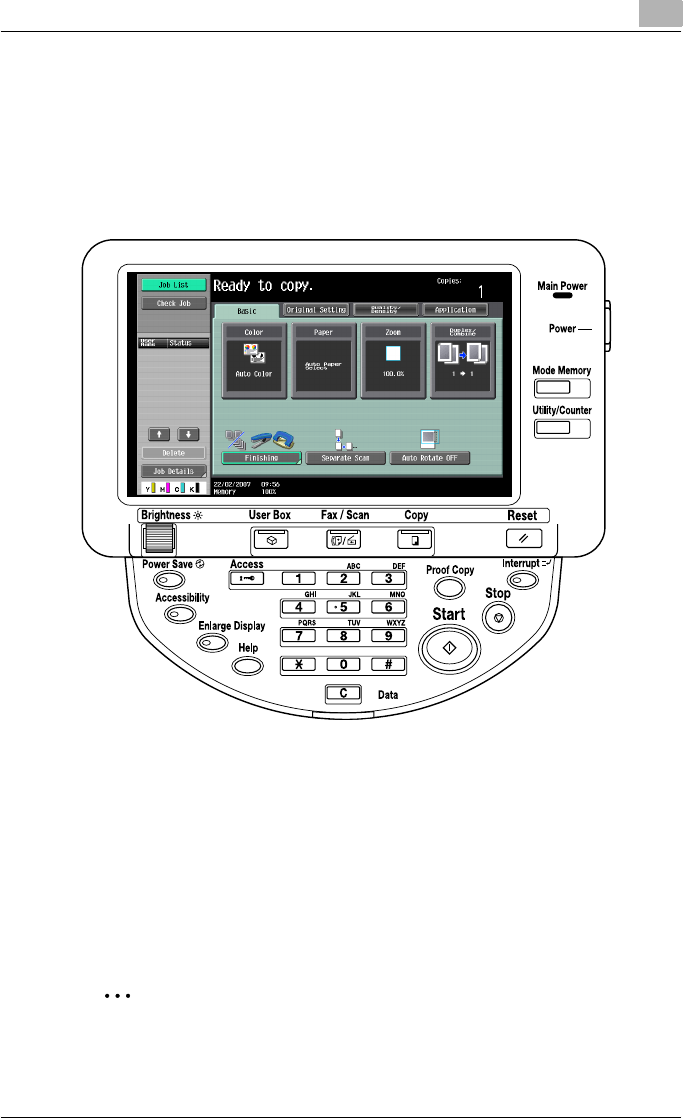
Overview 1
C550 1-3
Machine modes
The printer driver settings are mainly set using a computer, however, the font
list can be printed, and the printer controller settings and default print set-
tings can be set using the control panel of this machine. In addition, fax and
scanning operations can be used by switching the mode.
To switch between modes, press the mode keys on the control panel.
[Copy]
This machine can be used as a copier.
[Fax/Scan]
This machine can be used as a fax or as a scanner.
[User Box]
This machine can be used to store jobs and as a document folder for for-
warding data to a computer over the network.
2
Note
You can use this machine as a printer in all modes.
Change the default print settings in the Utility mode.
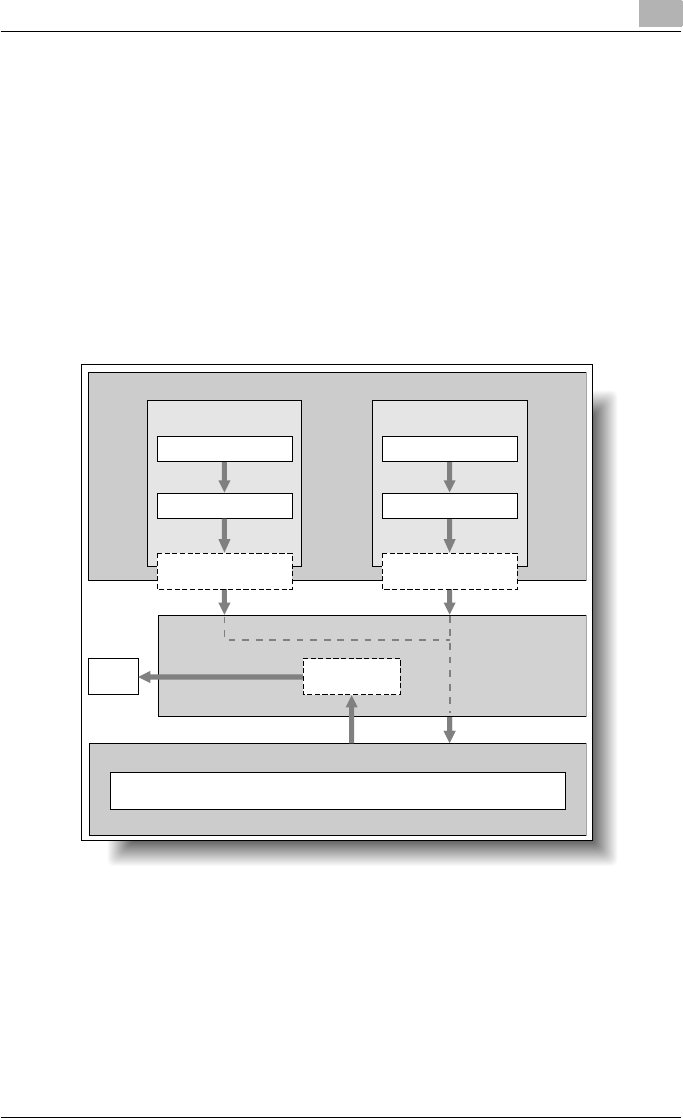
Overview 1
C550 1-4
Printing flow
When using this printing system as a printer, the flow of the main process is
described below.
Print commands transmitted from the application are received by the printer
driver.
Data is transmitted to this machine over a USB interface when this machine
is used as a USB printer, or over an Ethernet interface (TCP/IP, IPX/SPX, Ap-
pleTalk) when this machine is used as a network printer. The data is then de-
livered from this machine to the printer controller, which performs image
rasterization (development of output characters and images to bitmap data).
Finally, this data is printed from this machine.
Original documents can be scanned in the copy function or network scan
function while this machine is operating as a printer.
To use this machine as a copier, press the [Copy] key on the control panel.
When a print job is received during copying, the data is stored in the memory
of this machine. When copying is complete, the print job is automatically
printed.
Computer
Used as a USB
printer
Application Application
Used as a
network printer
Printer driver Printer driver
USB
Ethernet (TCP/IP, IPX/
SPX, or AppleTalk)
Machine
Print
Printer controller
PS/PCL processing (rasterizing)

Overview 1
C550 1-5
1.2 Operating environment
The system requirements for using this printing system and the interfaces
used for connection are explained below.
Compatible computers and operating systems
Check that the computer being connected meets the following conditions.
Windows
Macintosh
Item Operating environment
Operating System Windows NT Workstation /Server Version4.0 (Service Pack 6
or later), Windows 2000 Professional/Server (Service Pack 3
or later), Windows XP Home Edition/Windows XP Profession-
al, Windows XP Professional x64 Edition, Windows Vista
Home Basic/Home Premium/Ultimate/Business/Enterprise,
Windows Vista Home Basic/Home Premium/Ultimate/Busi-
ness/Enterprise x64 Edition, Windows Server 2003 Standard
Edition, Windows Server 2003 x64 Edition
Processor Environment recommended for the operating system or high-
er
Memory Capacity recommended for the operating system
With sufficient memory resources in the operating system and
application being used
Drive CD-ROM
Web Browser (when using Pag-
eScope Web Connection)
Microsoft Internet Explorer 6 or later recommended (JavaS-
cript enabled, Cookies enabled)
Netscape Navigator 7.02 or later (JavaScript enabled, Cook-
ies enabled)
Mozilla Firefox 1.0 or later (JavaScript enabled, Cookies ena-
bled)
Adobe® Flash® (If “Flash” is selected in View Mode, version
7.0 or later plugin is required.)
Item Operating environment
Operating System Mac OS 9.2, Mac OS X 10.2.8, Mac OS X 10.3, or Mac OS X
10.4
Processor PowerPC, Intel Processor
(Intel Processor for Mac OS X 10.4 only)
Memory Capacity recommended for the operating system
Drive CD-ROM
Web Browser (when using Pag-
eScope Web Connection)
Netscape Navigator 7.02 or later (JavaScript enabled, Cook-
ies enabled)
Mozilla Firefox 1.0 or later (JavaScript enabled, Cookies ena-
bled)
Adobe® Flash® (If “Flash” is selected in View Mode, version
7.0 or later plugin is required.)

Overview 1
C550 1-6
Compatible interfaces
The various interfaces that can be used to connect this printing system to a
computer are described below.
Ethernet interface
Connect when using this printing system as a network printer.
Supports 10Base-T, 100Base-TX and 1000Base-T standards. In addition,
the Ethernet interface supports the TCP/IP (LDP/LPR, peer-to-peer), IPX/
SPX (NetWare), and AppleTalk (EtherTalk).
USB interface
Connect when using this printing system as a network printer.
The USB interface can be connected to a computer running Windows. A
USB cable is required for connection. Use a type A (4 pin, male) or type B (4
pin, male) USB cable. A USB cable measuring 3 meters or less is recom-
mended.
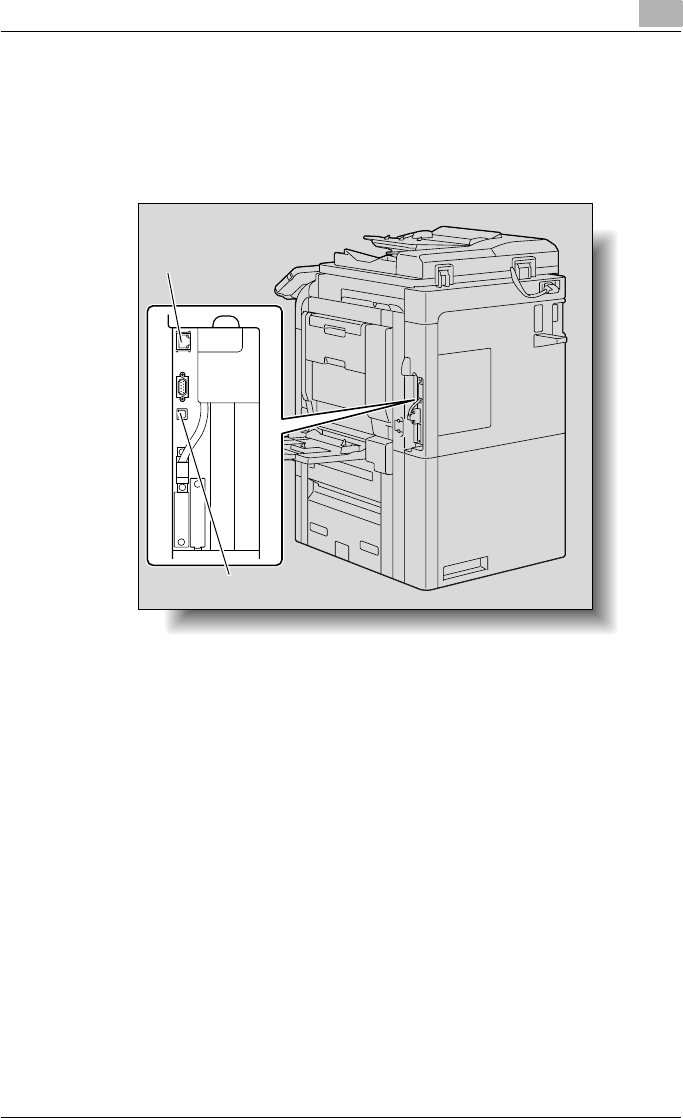
Overview 1
C550 1-7
Connection diagram
The printer cables can be connected to each port at the back of this ma-
chine.
Machine (rear view)
Ethernet port
(10Base-T/100Base-
TX/1000Base-T)
USB port

Overview 1
C550 1-8
1.3 Setting up the system
In order to use this printing system, it must first be set up.
Setup consists of connecting this machine to a computer and installing the
printer driver onto the computer being used.
To set up the printing system
Setup of the printing system as described below.
1Connect this machine to a computer. (Refer to “Compatible interfaces”
on page 1-6.)
2When using a network connection, set up the network. (Refer to “Set-
ting up network printing” on page 3-1.)
3Install the printer driver. (Refer to “Installing the printer driver” on
page 2-1.)
4Check the setup by printing a test page. (Refer to “Test printing” on
page 4-2.)
5Install the screen fonts.
– The CD-ROM contain the Latin TrueType fonts as screen fonts.
– Install the screen fonts after adding the operating system standard
fonts.
– For details, refer to Help of the operating system.
– The CD-ROM “ScreenFont” or “Screen Fonts” folder contains the
screen fonts.
– The Macintosh fonts are compressed. Install the fonts after decom-
pressing them.
Installation of the printer driver may differ depending on the connection
method used with this machine in addition to the operating system of the
computer and the type of printer driver being used.
!
Detail
For details on connecting this machine to a computer, refer to “Compat-
ible interfaces” on page 1-6.

Overview 1
C550 1-9
2
Note
To update an existing printer driver, delete the existing printer driver first.
For details, refer to “Uninstalling the printer driver” on page 2-21 and
page 2-29.
As necessary, set the interface timeout settings in the Utility mode on the
control panel. For details, refer to “Print settings in Administrator mode”
on page 9-33.

Overview 1
C550 1-10

Installing the printer driver 2
C550 2-1
2 Installing the printer driver
2.1 Printer drivers and supported operating systems
In order to use this printing system, the printer driver must be installed. The
printer driver is a program that controls the processing of data for output. In-
stall the printer driver onto the computer from the provided CD-ROM.
The printer drivers included on the CD and the supported computer operat-
ing systems are listed below. Install the required printer driver.
Printer driver Page description
language
Supported operating systems
Konica Minolta PCL
Driver
(PCL driver)
PCL6 Windows NT Workstation /Server Version4.0
(Service Pack 6 or later), Windows 2000 Pro-
fessional/Server (Service Pack 3 or later), Win-
dows XP Home Edition/Windows XP
Professional, Windows XP Professional x64
Edition, Windows Vista Home Basic/Home
Premium/Ultimate/Business/Enterprise, Win-
dows Vista Home Basic/Home Premium/Ulti-
mate/Business/Enterprise x64 Edition,
Windows Server 2003 Standard Edition, Win-
dows Server 2003 x64 Edition
Konica Minolta Post-
Script Driver
(PS driver)
PostScript3
Emulation
Windows 2000 Professional/Server (Service
Pack 3 or later), Windows XP Home Edition/
Windows XP Professional, Windows XP Pro-
fessional x64 Edition, Windows Vista Home
Basic/Home Premium/Ultimate/Business/En-
terprise, Windows Vista Home Basic/Home
Premium/Ultimate/Business/Enterprise x64
Edition, Windows Server 2003 Standard Edi-
tion, Windows Server 2003 x64 Edition
PostScript PPD driver
(PS-PPD)
Mac OS 9.2 or later
Mac OS X 10.2.8, Mac OS X 10.3, and Mac OS
X 10.4
Fax driver Windows NT Workstation /Server Version4.0
(Service Pack 6 or later), Windows 2000 Pro-
fessional/Server (Service Pack 3 or later), Win-
dows XP Home Edition/Windows XP
Professional, Windows XP Professional x64
Edition, Windows Vista Home Basic/Home
Premium/Ultimate/Business/Enterprise, Win-
dows Vista Home Basic/Home Premium/Ulti-
mate/Business/Enterprise x64 Edition,
Windows Server 2003 Standard Edition, Win-
dows Server 2003 x64 Edition

Installing the printer driver 2
C550 2-2
!
Detail
For details on the fax driver, refer to the User’s guide [Fax Driver Opera-
tions].

Installing the printer driver 2
C550 2-3
2.2 When used with Windows
The installation procedure for the Windows printer driver differs depending
on how this machine is connected to the computer and depending on which
printer driver is used. The installation method also differs depending on the
version of Windows that you are using. Refer to the table below for the ap-
propriate procedure for installing the printer driver on your computer.
2
Note
For details on installing the printer driver in a network environment, refer
to “Setting up network printing” on page 3-1. Because it is necessary to
specify other network settings in advance when installing the printer driv-
er using a network connection, install it using a local connection at this
time.
To install the printer driver under Windows Vista, Windows XP, Windows
Server 2003, Windows 2000, or Windows NT 4.0, log on using a user
name that is authorized by the administrator.
Printer driver Connection
method
Refer to
Konica Minolta
PCL Driver
Konica Minolta
PostScript Driver
Fax driver
All connec-
tion methods
“Automatic installation using the installer” on page 2-4
Konica Minolta
PCL Driver
Konica Minolta
PostScript Driver
PostScript PPD
Fax driver
Network con-
nection
“Installing the printer driver using the Add Printer Wizard”
on page 2-7
“For Windows 2000/NT 4.0” on page 2-15
“For Windows XP/Server 2003” on page 2-8
“For Windows Vista” on page 2-10
“When using Web service printing under Windows Vista”
on page 2-14
USB connec-
tion
“Installing the printer driver using Plug and Play” on
page 2-18
“For Windows 2000” on page 2-18
“For Windows XP/Server 2003” on page 2-19
“For Windows Vista” on page 2-20

Installing the printer driver 2
C550 2-4
Automatic installation using the installer
With the installer, this machine is detected to determine whether it is con-
nected by USB or is on the same TCP/IP network as the computer, and then
the required printer is automatically installed. You can also manually specify
the printer driver to be installed.
2
Note
Since this machine is automatically detected with a network connection,
be sure to set the IP address for this machine before connecting it. For
the setting procedure, refer to “Setting the IP address for this machine”
on page 3-4.
When installing on Windows NT 4.0, 2000, XP, Server 2003, or Vista, ad-
ministrator permissions are required.
If the wizard starts up in order to add new hardware with a USB connec-
tion, click [Cancel].
When using IPPS printing, a certificate must be registered to this ma-
chine. For details, refer to User’s Guide [PageScope Web Connection
Operations].
Installer operating environment
* With Windows NT 4.0, in order to install a machine that is connected directly to a network using
the TCP/IP protocol, Microsoft TCP/IP Printing Services must first be installed on the computer
being used.
Operating system Windows NT Workstation /Server Version4.0 (Service Pack 6 or later),
Windows 2000 Professional/Server (Service Pack 3 or later), Windows XP
Home Edition/Windows XP Professional, Windows XP Professional x64
Edition, Windows Vista Home Basic/Home Premium/Ultimate/Business/
Enterprise, Windows Vista Home Basic/Home Premium/Ultimate/Busi-
ness/Enterprise x64 Edition, Windows Server 2003 Standard Edition,
Windows Server 2003 x64 Edition
Processor Environment recommended for the operating system or higher
Memory Capacity recommended for the operating system
With sufficient memory resources in the operating system and application
being used
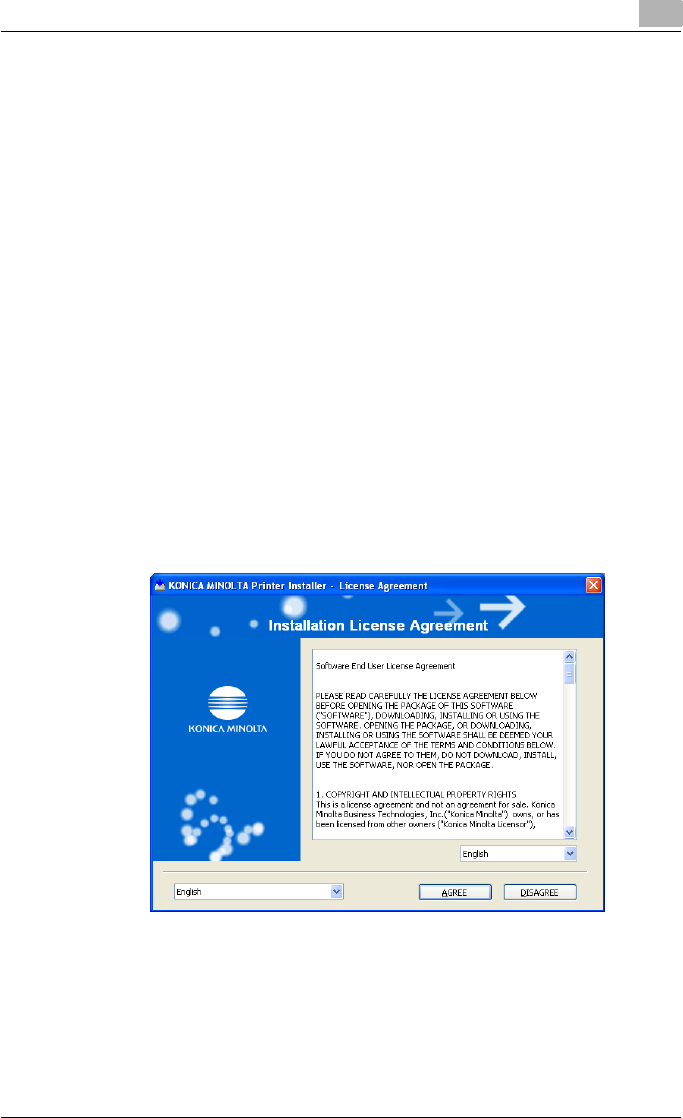
Installing the printer driver 2
C550 2-5
To install the printer driver
1Insert the printer driver CD-ROM into the computer’s CD-ROM drive.
– Check that the installer starts up, and then continue with step 2.
– If the installer does not start up, open the printer driver folder on the
CD-ROM, double-click “Setup.exe”, and then continue with step 3.
2Click “Printer Install”.
– When installing the printer driver under Windows Vista and the User
Account Control dialog box appears, click the [Yes] button or the
[Continue] button.
The installation of the printer driver starts.
3Click the [AGREE] button if you agree with all terms and conditions of
the license agreement.
– If you do not agree with the terms and conditions of the license
agreement, the software cannot be installed.
– You can change the display language of the installer box in the low-
er-left corner.
– You can change the language of the Installation License Agreement
from the lower-right drop-down list.
4When the setup selection dialog box appears, click the [Install printers/
MFPs] button, and then click the [Next] button.
The connected printers and copiers are detected.
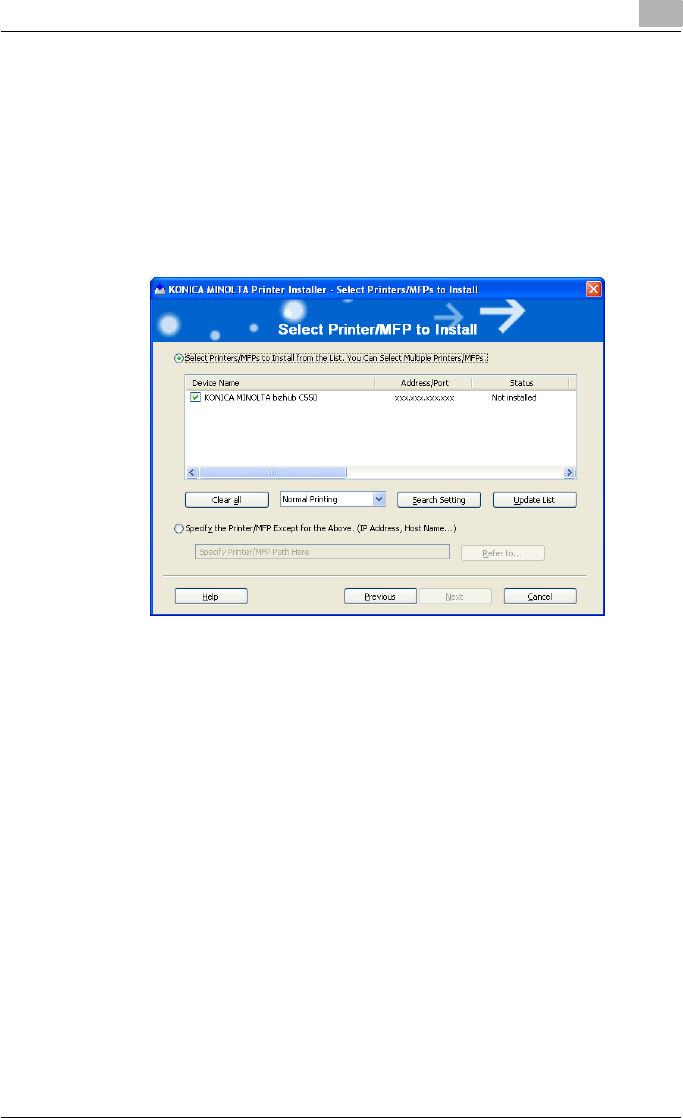
Installing the printer driver 2
C550 2-6
5Select this machine, and then click the [Next] button.
– If the connection of this machine cannot be recognized, the ma-
chine will not be listed. When this occurs, select “Specify the Print-
er/MFP Except for the Above. (IP Address, Host Name)”, and then
specify this machine directly.
– In addition to “Normal Printing”, “Internet Printing” (IPP) or “Secure
Printing” (IPPS) can also be selected as the printing method. Se-
cure Print (IPPS) can be used when SSL is enabled from Page-
Scope Web Connection and IPP is enabled.
– For Windows Vista, an IPPS connection (security printing) cannot
be set up using the installer. To set up an IPPS connection, use the
Add Printer Wizard.
6Check the installation settings.
– To change the settings, click the [Installation Settings] button, and
then continue with step 7.
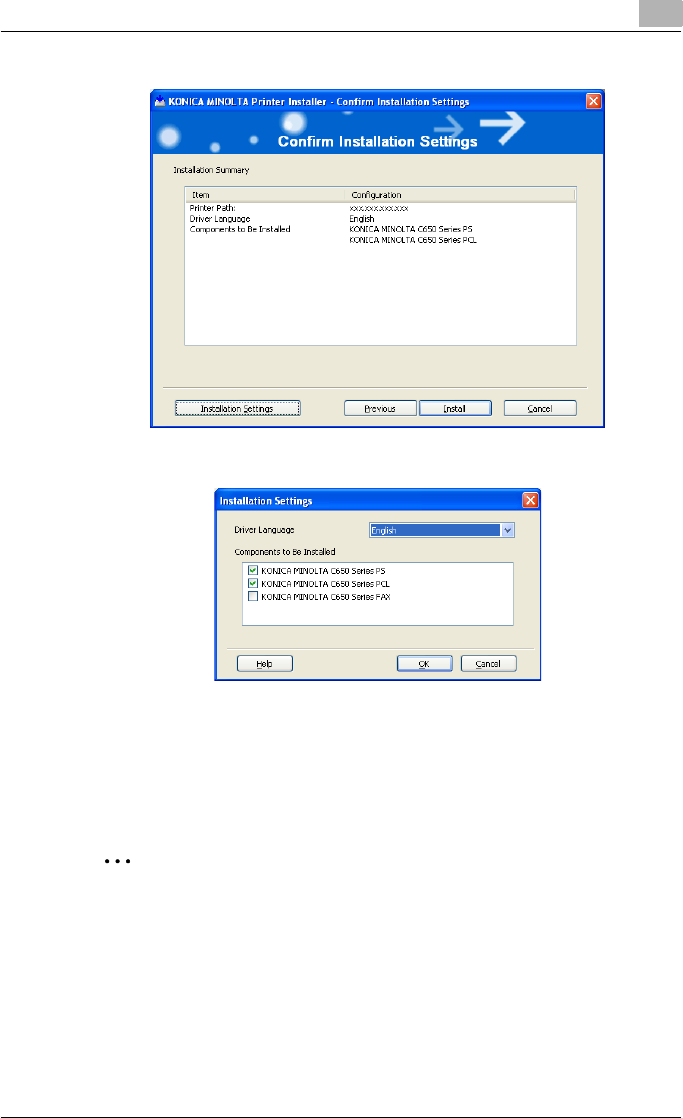
Installing the printer driver 2
C550 2-7
– If not changing the settings, skip to step 8.
7Select the components to be installed, and then click the [OK] button.
– For details on the fax driver, refer to the User’s guide [Fax Driver
Operations].
8In the Confirm Installation Settings dialog box, click the [Install] button.
Follow the on-screen instructions to complete the installation.
2
Note
When the Windows Logo Test, Windows Security or Digital Signature
message appears, click the [Continue] button or the [Yes] button.
Installing the printer driver using the Add Printer Wizard
For details on installing the printer driver in a network environment, refer to
“Setting up network printing” on page 3-1. Because it is necessary to specify
other network settings in advance when installing the printer driver using a
network connection, install it using a local connection at this time.
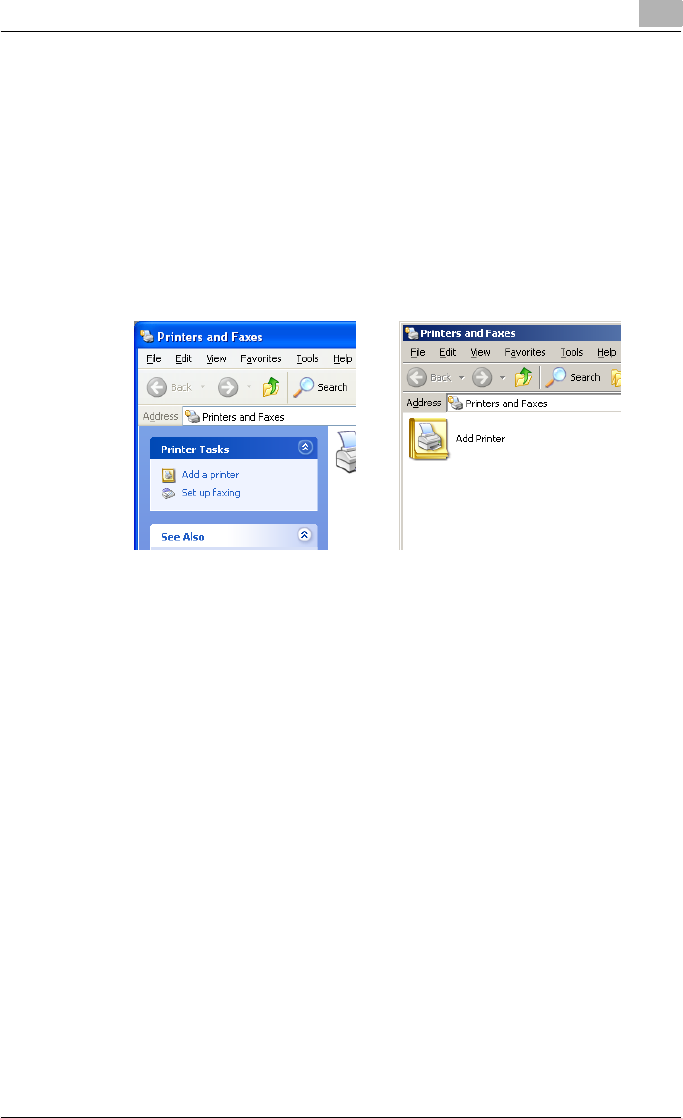
Installing the printer driver 2
C550 2-8
For Windows XP/Server 2003
1Insert the printer driver CD-ROM into the computer’s CD-ROM drive.
2Click the [Start] button, and then click “Printers and Faxes”.
– If “Printers and Faxes” does not appear in the Start menu, open the
Control Panel from the Start menu, select “Printers and Other Hard-
ware”, and then select “Printers and Faxes”.
3For Windows XP, click “Add a printer” on the “Printer Tasks” menu.
For Windows Server 2003, double-click the “Add Printer” icon.
The Add Printer Wizard starts up.
4Click the [Next] button.
5Select “Local printer attached to this computer”, and then click the
[Next] button.
Windows XP Windows Server 2003
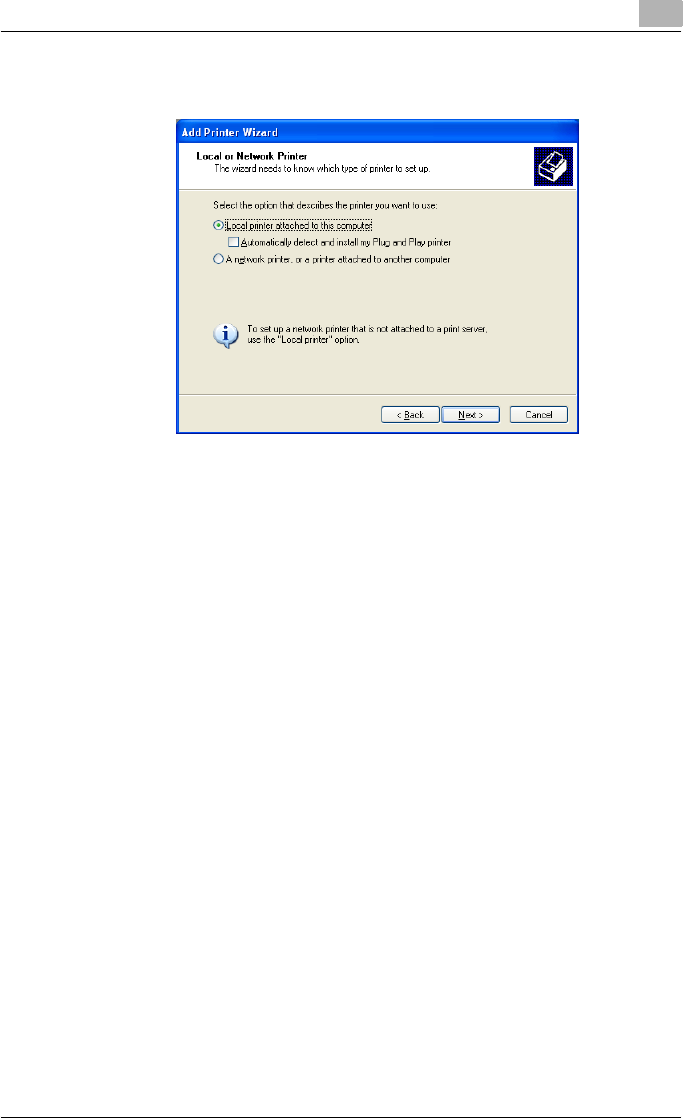
Installing the printer driver 2
C550 2-9
– Clear the “Automatically detect and install my Plug and Play print-
er” check box.
6The Select a Printer Port dialog box appears. Select “LPT1” here, and
then click the [Next] button.
7Click the [Have Disk] button.
8Click the [Browse] button.
9Specify the desired folder on the CD-ROM that contains the printer
driver, and then click the [OK] button.
– Select the specified folder according to the printer driver to be
used, the operating system, and the language.
– Printer drivers that can be selected:
Windows XP/Server 2003: PCL driver, PS driver, Fax driver
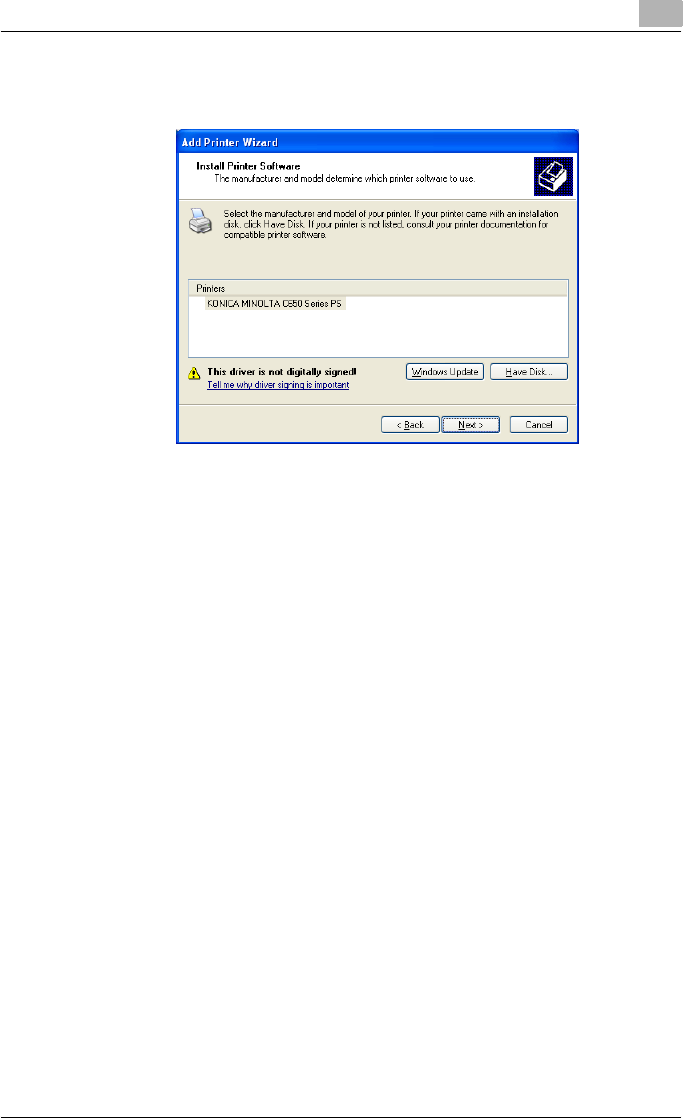
Installing the printer driver 2
C550 2-10
10 Click the [OK] button.
The “Printers” list appears.
11 Click the [Next] button.
12 Follow the on-screen instructions.
– When the Digital Signature dialog box appears, click the [Continue
Anyway] button.
– When using a network connection, perform a test print after the net-
work settings have been specified.
13 When installation is complete, make sure that the icon of the installed
printer appears in the Printers and Faxes window.
14 Remove the CD-ROM from the CD-ROM drive.
This completes the printer driver installation.
For Windows Vista
1Insert the printer driver CD-ROM into the computer’s CD-ROM drive.
2Click the [Start] button, and then click “Control Panel”.
3Click “Hardware and Sound”, and then click “Printers”.
– If the control panel is in the classic view, double-click “Printers”.
The Printers window appears.
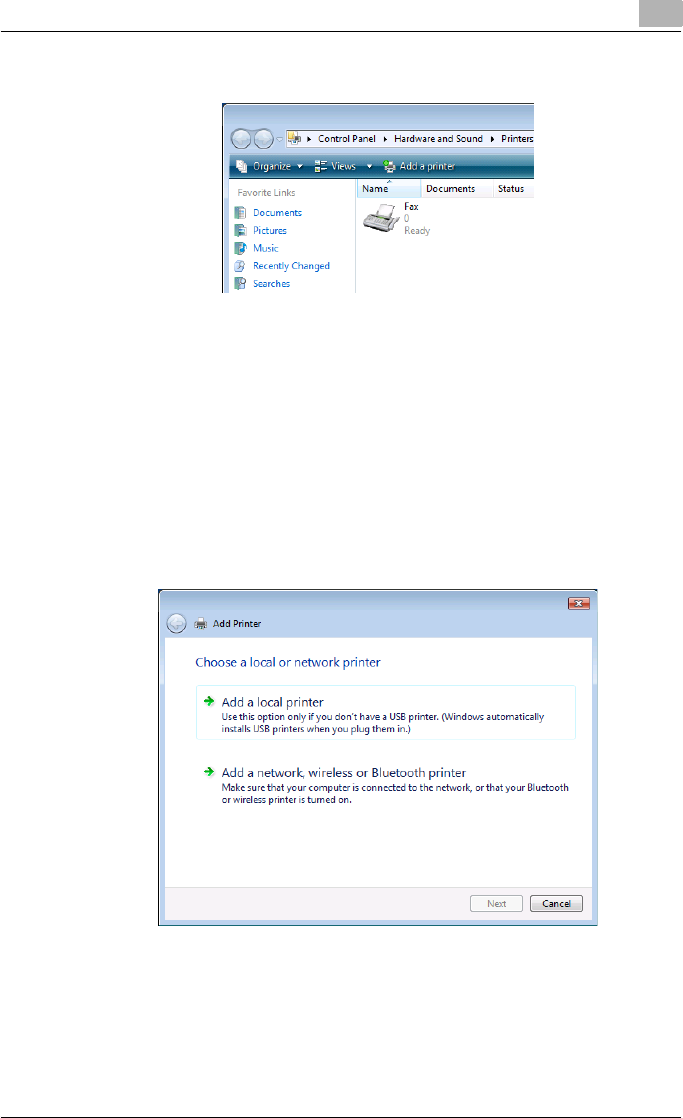
Installing the printer driver 2
C550 2-11
4Click “Add a printer” on the toolbar.
The “Add Printer” dialog box appears.
5Click “Add a local printer”.
– For details on installing the printer driver in a network environment,
refer to “Setting up network printing” on page 3-1. Because it is
necessary to specify other network settings in advance when in-
stalling the printer driver using a network connection, install it using
a local connection at this time.
– If an IP address is specified on this machine, the machine can be
installed by retrieving it on the network by clicking “Add a network,
wireless or Bluetooth printer”.
The Choose a printer port dialog box appears.
Installing the printer driver 2
C550 2-12
6Select “LPT1: (Printer Port)” from “Use an existing port”, and then click
the [Next] button.
7Click the [Have Disk] button.
8Click the [Browse] button.
9Specify the desired folder on the CD-ROM that contains the printer
driver, and then click the [OK] button.
Select the specified folder according to the printer driver to be used,
the operating system, and the language.
Printer drivers that can be selected:
Windows Vista: PCL driver, PS driver, Fax driver
10 Click the [OK] button.
The “Printers” list appears.
Installing the printer driver 2
C550 2-13
11 Select the printer to be installed, and then click the [Next] button.
12 Follow the on-screen instructions.
– If the User Account Control dialog box appears, click the [Continue]
button.
– If the Windows Security dialog box appears, click “Install this driver
software anyway”.
– When using a network connection, perform a test print after the net-
work settings have been specified.
13 When installation is complete, make sure that the icon of the installed
printer appears in the Printers window.
14 Remove the CD-ROM from the CD-ROM drive.
This completes the printer driver installation.

Installing the printer driver 2
C550 2-14
When using Web service printing under Windows Vista
In Windows Vista, you can retrieve and install a printer that is on the network
that is compatible for Web service printing.
!
Detail
Be sure to specify the IP address from TCP/IP Settings on this machine.
For the setting procedure, refer to “Setting the IP address for this ma-
chine” on page 3-4.
If using Web service printing, be sure to enable the print function from
Web Service Settings on this machine. For details, refer to User’s Guide
[PageScope Web Connection Operations].
After installing the printer driver, be sure to delete any existing printer
drivers for each package first when installing a different type of printer
driver. For details, refer to “Uninstalling the printer driver” on page 2-21.
When installing a printer driver in Windows Vista, the administrator per-
missions are required.
1Turn the power of the machine on when it is connected to the network.
– Since the printer is retrieved during installation, leave the machine
connected to the network.
2When using Web service printing, check that Network discovery is en-
abled in Network and Sharing Center on the computer.
3Insert the printer driver CD-ROM into the computer’s CD-ROM drive.
4Click the [Start] button, and then click “Network”.
The Network window appears and the computers and devices that are
connected are located.
5Select the device name of this machine, and then click “Install” on the
toolbar.
– If the User Account Control dialog box appears, click the [Continue]
button.
– If the confirmation dialog box for whether to locate a device online
appears, click “Do not search online”.
The printer that was selected for Web service printing is located and
the Found New Hardware dialog box appears.

Installing the printer driver 2
C550 2-15
6Click “Locate and install driver software (recommended)”.
The locate method confirmation dialog box appears.
7Click “Browse my computer for driver software (advanced)”.
8Click the [Browse] button.
9Specify the desired folder on the CD-ROM that contains the printer
driver, and then click the [Open] button.
Select the specified folder according to the printer driver to be used,
the operating system, and the language.
Printer drivers that can be selected:
Windows Vista: PCL driver, PS driver, Fax driver
10 Click the [Next] button.
11 Follow the on-screen instructions.
– If the User Account Control dialog box appears, click the [Continue]
button.
– If the Windows Security dialog box appears, click “Install this driver
software anyway”.
12 Click the [Close] button.
13 When installation is complete, make sure that the icon of the installed
printer appears in the Printers window.
14 Remove the CD-ROM from the CD-ROM drive.
This completes the printer driver installation.
!
Detail
Installing with Web service printing can also be specified from the add
port function in the Printers window. Specify “Web Service Device” by
creating “Standard TCP/IP Port”.
For Windows 2000/NT 4.0
1Insert the printer driver CD-ROM into the computer’s CD-ROM drive.
2Click the [Start] button, point to “Settings”, and then click “Printers”.
The Printers window appears.
Installing the printer driver 2
C550 2-16
3Double-click the “Add Printer” icon.
The Add Printer Wizard starts up.
4Follow the on-screen instructions.
5In the screen for selecting the printer connection, select “Local Printer”.
6Click the [Next] button.
– If the screen for specifying the port appears, select “LPT1” here.
7Click the [Have Disk] button.
8Click the [Browse] button.
9Specify the desired folder on the CD-ROM that contains the printer
driver, and then click the [OK] button.
– Select the specified folder according to the printer driver to be
used, the operating system, and the language.
– Printer drivers that can be selected:
Windows 2000: PCL driver, PS driver, Fax driver
Windows NT 4.0: PCL driver, Fax driver
Installing the printer driver 2
C550 2-17
10 Click the [OK] button.
The “Printers” list appears.
11 Click the [Next] button.
12 If the screen for specifying the port appears, select “LPT1” here.
13 Follow the on-screen instructions.
– When the Digital Signature dialog box appears, click the [Yes] but-
ton.
– When using a network connection, perform a test print after the net-
work settings have been specified.
14 When installation is complete, make sure that the icon of the installed
printer appears in the Printers window.
15 Remove the CD-ROM from the CD-ROM drive.
This completes the printer driver installation.

Installing the printer driver 2
C550 2-18
Installing the printer driver using Plug and Play
For Windows 2000
1After using a USB cable to connect this machine to a computer, turn
on the computer.
– Do not disconnect or connect the cable while the computer is start-
ing up.
2Insert the printer driver CD-ROM into the computer’s CD-ROM drive.
3Turn the main power of this machine on.
The Found New Hardware Wizard starts up.
4Select “Search for a suitable driver for my device (recommended)”, and
then click the [Next] button.
5Select “Specify location”, and then click the [Next] button.
6Specify the desired folder on the CD-ROM that contains the printer
driver, and then click the [OK] button.
– Select the specified folder according to the printer driver to be
used, the operating system, and the language.
– Printer drivers that can be selected: Windows 2000: PCL driver, PS
driver, Fax driver
7Click the [OK] button, and then follow the on-screen instructions.
8Click the [Finish] button.
9When installation is complete, make sure that the icon of the installed
printer appears in the Printers window.
10 Remove the CD-ROM from the CD-ROM drive.
This completes the printer driver installation.

Installing the printer driver 2
C550 2-19
For Windows XP/Server 2003
1After using a USB cable to connect this machine to a computer, turn
the computer on.
– Do not disconnect or connect the cable while the computer is start-
ing up.
2Insert the printer driver CD-ROM into the computer’s CD-ROM drive.
3Turn the main power of this machine on.
– If the Add New Hardware Wizard does not start up, turn the main
power off, then on again.
– When turning the power off, then on again, wait at least 10 seconds
before turning the power on again; otherwise, this machine may not
function properly.
The Found New Hardware Wizard dialog box appears.
4Select “Install from a list or specific location (Advanced)”, and then
click the [Next] button.
– If the Windows connect to Windows Update dialog box appears,
select “NO”.
5From “Search for the best driver in these locations”, select “Include this
location in the search”, and then click the [Browse] button.
6Specify the desired folder on the CD-ROM that contains the printer
driver, and then click the [OK] button.
– Select the specified folder according to the printer driver to be
used, the operating system, and the language.
– Konica Minolta PCL Driver: Windows XP/Server 2003: PCL driver,
PS driver, Fax driver
7Click the [Next] button, and then follow the on-screen instructions.
– When the Digital Signature dialog box appears, click the [Continue]
button.
8Click the [Finish] button.
9When installation is complete, make sure that the icon of the installed
printer appears in the Printers and Faxes window.
10 Remove the CD-ROM from the CD-ROM drive.
This completes the printer driver installation.

Installing the printer driver 2
C550 2-20
For Windows Vista
1After using a USB cable to connect this machine to a computer, turn
the computer on.
– Do not disconnect or connect the cable while the computer is start-
ing up.
2Turn the main power of this machine on.
The Found New Hardware dialog box appears.
– If the Found New Hardware dialog box does not appear, turn the
main power off, then on again.
– When turning the power off, then on again, wait at least 10 seconds
before turning the power on again; otherwise, this machine may not
function properly.
3Click “Locate and install driver software (recommended)”.
The dialog box for requesting the CD-ROM appears.
– If the CD-ROM is not available, click “I don’t have the disk. Show
me other options”. In the next dialog box, select “Browse my com-
puter for driver software (advanced)”, and then select the desired
printer driver folder.
4Insert the printer driver CD-ROM into the computer’s CD-ROM drive.
The information on the CD-ROM is retrieved and a list of the software
that is compatible for this machine appears.
5Specify the desired printer driver name, and then click the [Next] but-
ton.
Printer drivers that can be selected:
Windows Vista: PCL driver, PS driver, Fax driver
6Follow the on-screen instructions.
– If the User Account Control dialog box appears, click the [Continue]
button.
– If the Windows Security dialog box appears, click “Install this driver
software anyway”.
7When the installation is complete, click the [Close] button.
8When installation is complete, make sure that the icon of the installed
printer appears in the Printers window.
9Remove the CD-ROM from the CD-ROM drive.
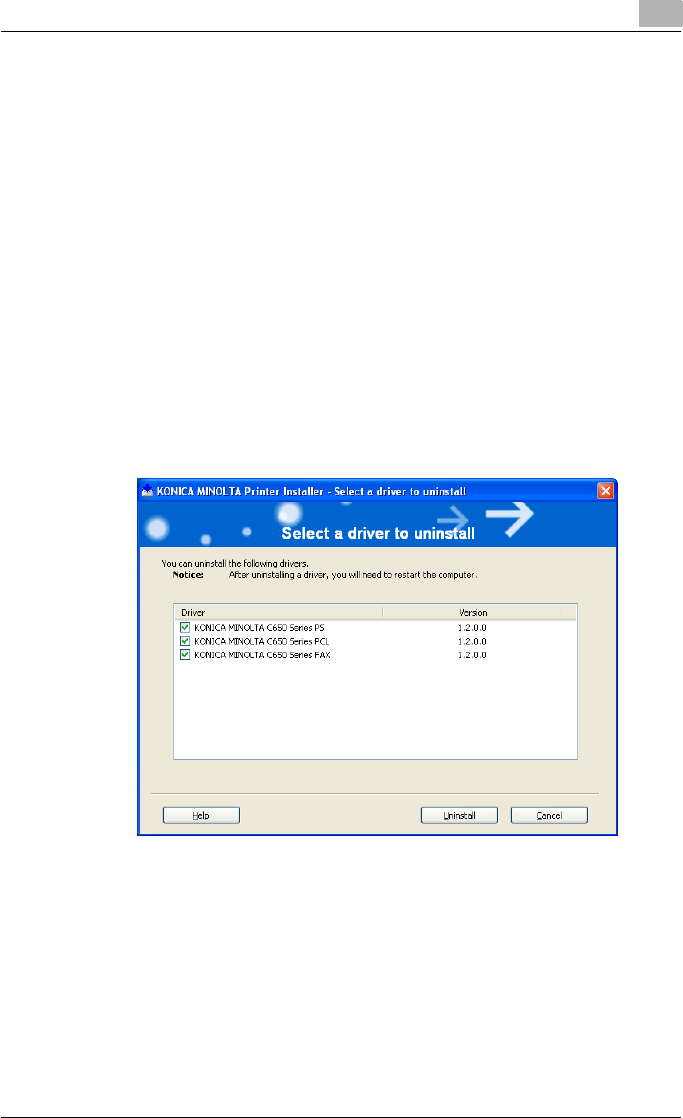
Installing the printer driver 2
C550 2-21
This completes the printer driver installation.
Uninstalling the printer driver
If it becomes necessary to delete the printer driver, for example, when you
want to reinstall the printer driver, follow the procedure below to delete the
driver.
When the printer driver contains the delete function
If the printer driver was installed with an installer, the delete function of the
printer driver is included.
1Click the [Start] button, point to “All Programs” (or “Programs”), then to
“KONICA MINOLTA”, and then click “bizhub C650_Series”-“Uninstall
Printer Driver”.
2Select the components to be deleted, and then click the [Uninstall] but-
ton. Follow the on-screen instructions.
3If the restart dialog box appears, click [OK] to restart the computer.

Installing the printer driver 2
C550 2-22
When the printer driver does not contain the delete function
If the printer driver was not installed with an installer, the delete function of
the printer driver is not included.
1For Windows 2000/NT 4.0, click the [Start] button, point to “Settings”,
and then click “Printers”.
For Windows XP/Server 2003, click the [Start] button, and then click
“Printers and Faxes”.
For Windows Vista, click the [Start] button, and then click “Control pan-
el”, “Hardware and Sound”, and “Printers”.
– If “Printers and Faxes” does not appear in the Start menu in Win-
dows XP/Server 2003, open the Control Panel from the Start menu,
select “Printers and Other Hardware”, and then select “Printers and
Faxes”.
– For Windows Vista, if the control panel is in the classic view, dou-
ble-click “Printers”.
2In the Printers window (for Windows XP/Server 2003, Printers and Fax-
es window), select the icon of the printer that you want to delete.
3Press the [Delete] key on the computer keyboard to delete the printer
driver.
4Follow the on-screen instructions.
– When the printer driver has been deleted, the printer icon will dis-
appear from the Printers window (for Windows XP/Server 2003,
Printers and Faxes window).
For Windows NT 4.0, this completes the uninstallation procedure.
For Windows 2000/XP/Sever 2003/Vista, delete the driver from the
server properties.
5Open “Server Properties”.
– For Windows 2000/XP/Server 2003, click the File menu, and then
click “Server Properties”.
– For Windows Vista, right-click on the Printer dialog box, and then
click Run as administrator - Server Properties.
6Click the Driver tab.
7Select the printer driver to be deleted from the Installed Printer Drivers
list, and then click the [Delete] button.
– For Windows 2000/XP/Server 2003, proceed to step 9.
– For Windows Vista, continue with step 8.

Installing the printer driver 2
C550 2-23
8Select “Remove driver and driver package” from the deletion confirma-
tion dialog box, and then click the [OK] button.
9In the deletion confirmation dialog box, click the [Yes] button.
– In Windows Vista, the deletion confirmation dialog box is already
displayed, therefore, click the [Delete] button.
10 Close the Print Server Properties dialog box and Printers window (for
Windows XP/Server 2003, Printers and Faxes window).
11 Restart the computer.
This completes the printer driver uninstallation procedure.
2
Reminder
Be sure to restart the computer.
2
Note
Even if the printer driver is deleted using the method described above,
the model information file will remain in the computer for Windows 2000/
XP/Server 2003. Therefore, the driver may not be able to be overwritten
when reinstalling the same version of the printer driver. When installing
the same version of the printer driver, be sure to also delete the files de-
scribed below.
Check the “C:\WINDOWS\system32\spool\drivers\w32x86” folder and
delete the folder of the corresponding model if it is available. If the Konica
Minolta PCL driver, the Konica Minolta PostScript driver, and the fax driv-
er are all installed, the model information of all drivers is deleted. If anoth-
er driver is remaining, do not delete it.
Delete the “oem*.inf” and “oem*.PNF” files in the “C:\WINDOWS\inf”
folder. (The asterisk (*) in the file name displays a number, and the
number varies according to the environment of the computer.) Before de-
leting the files, open the INF file, check that the model name is described
in the last several lines, and then check that the file of the corresponding
model is available. The PNF file is the same number as the INF file.
In Windows Vista, if operated under “Remove driver and driver package”,
this procedure is not necessary.

Installing the printer driver 2
C550 2-24
2.3 When used with Macintosh
The installation procedure for the Macintosh printer driver differs depending
on the Mac OS version and printer driver being used. Refer to the table below
for the appropriate procedure for installing the printer driver on your Macin-
tosh computer.
Installing the printer driver
For Mac OS X
1Turn the Macintosh computer on.
2Insert the printer driver CD-ROM into the computer’s CD-ROM drive.
– Quit all running applications that may have started when the Mac-
intosh computer was turned on.
3Open the desired folder on the CD-ROM that contains the printer driv-
er.
Select the specified folder according to the printer driver to be used,
the operating system, and the language.
4Select the Mac OS version being used, and then copy the drive file onto
the desktop.
Mac OS X 10.2: KONICAMINOLTA_C650_102.pkg
Mac OS X 10.3: KONICAMINOLTA_C650_103.pkg
Mac OS X 10.4: KONICAMINOLTA_C650_103.pkg
5Double-click the file copied onto the desktop.
– Enter the requested administrator’s name and password.
– For the administrator’s name and password, ask your network ad-
ministrator.
– To quit the installation, click the [Cancel] button.
6Click the [Continue] button and follow the on-screen instructions until
the Easy Install dialog box appears.
Mac OS Printer driver Refer to
Mac OS X 10.2, Mac
OS X 10.3, and Mac
OS X 10.4
PostScript PPD “Installing the printer driver” on page 2-24
Mac OS 9.2 or later PostScript PPD “Selecting a printer” on page 2-25
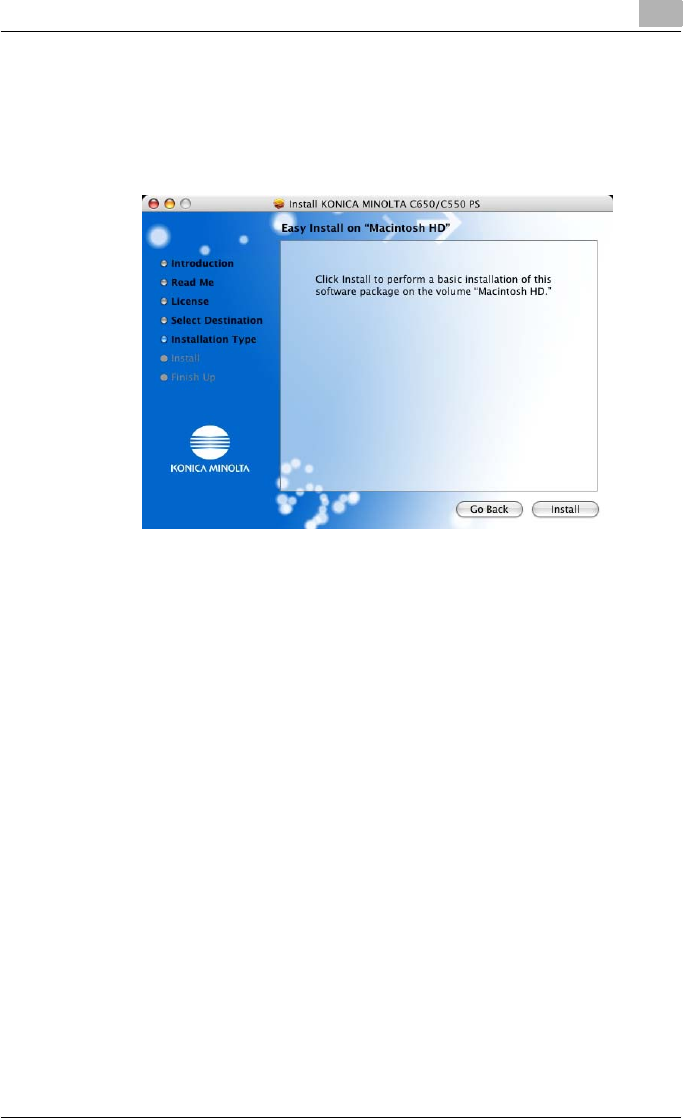
Installing the printer driver 2
C550 2-25
7In the Easy Install dialog box, click the [Install] button.
– From the second time the printer driver is installed and thereafter,
the [Install] button may appear as the [Upgrade] button.
The printer driver is installed onto the Macintosh computer. When in-
stallation is complete, a message appears.
8Click the [Close] button.
This completes the printer driver installation.
Next, select a printer.
Selecting a printer
For Mac OS X
After connecting this machine to a Macintosh computer, it can be used as a
printer by selecting it in Print Center or Printer Setup Utility as the printer to
be used.
1Open Print Center or Printer Setup Utility, located in “Applications” –
“Utilities” of “Hard Disk”.
2When the Add Printer dialog box appears, click the [Add] button. When
the printer list appears, click the [Add] button.
– For Mac OS X 10.4, continue with step 3.
– For Mac OS X 10.2 and Mac OS X 10.3, skip to step 4.
– If usable printers have already been set up, the Add Printer dialog
box does not appear.
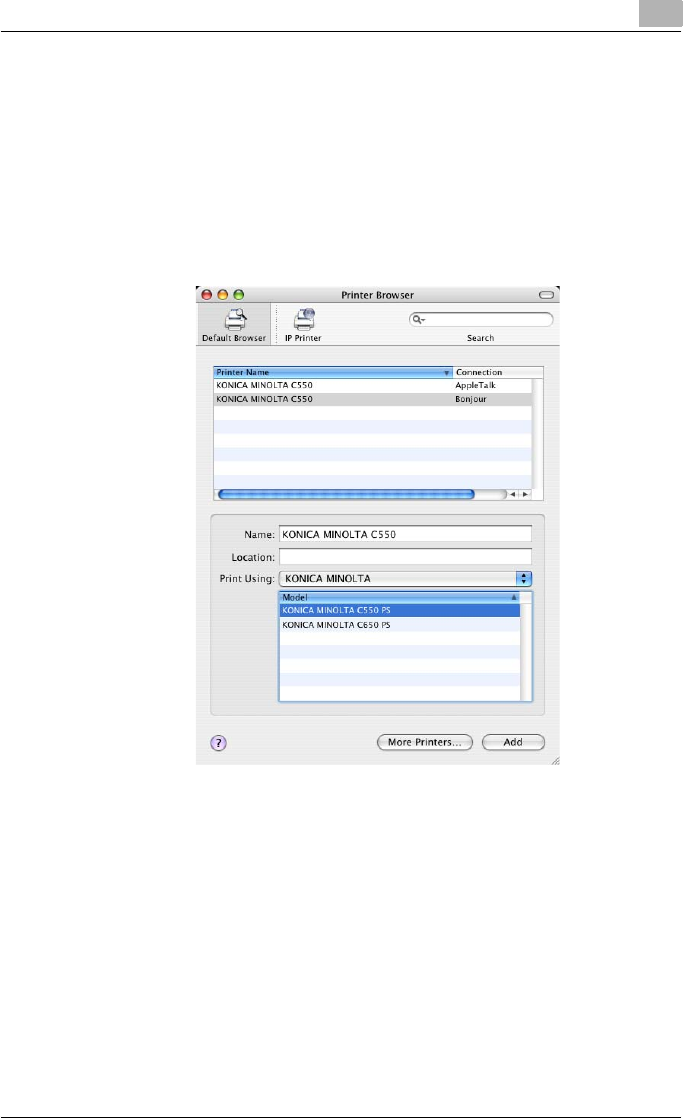
Installing the printer driver 2
C550 2-26
3If this machine appears as a printer with a Bonjour connection, select
“KONICA MINOLTA” from the “Print Using” drop-down list, select
“KONICA MINOLTA C550 PS” in the model list, and then click the [Add]
button.
– If the selected printer is registered in the printer list, this completes
the setting procedure.
– When connecting with AppleTalk and this machine does not appear
as a printer, click the [More Printers] button, and then continue with
step 4.
– If connecting using Bonjour with Mac OS X 10.4, the Bonjour set-
tings must be specified on this machine. For specifying the Bonjour
settings, refer to “Printing with Macintosh” on page 3-39.
4Select the applicable connection method and printer name.
– To specify an AppleTalk zone for an AppleTalk connection, select
“Local AppleTalk Zone”.
– If connecting using AppleTalk, the AppleTalk settings on this ma-
chine must be specified. For specifying the AppleTalk settings, re-
fer to “Printing with Macintosh” on page 3-39.
– If connecting using Rendezvous, the Bonjour settings on this ma-
chine must be specified. For specifying the Bonjour settings, refer
to “Printing with Macintosh” on page 3-39.

Installing the printer driver 2
C550 2-27
– When “IPP” is selected as the protocol in IP Printer, the text box for
entering the queue name appears. For Mac OS 10.3, leave the
queue name text box empty. For Mac OS 10.4, enter “ipp” in the
queue name text box.
5Select “KONICA MINOLTA” from the “Printer Model” drop-down list.
6Select “KONICA MINOLTA C550 PS”, and then click the [Add] button.
The selected printer is registered in the printer list.
For Mac OS 9.2
After connecting this machine, it can be used as a printer by selecting “Post-
Script printer” under “Chooser” and by specifying the printer description
(PPD) File.
First, copy the printer description (PPD) file onto the Macintosh computer.
1Insert the printer driver CD-ROM into the computer’s CD-ROM drive.
2Open the desired folder on the CD-ROM that contains the printer driv-
er. Select the specified folder according to the printer driver to be used,
the operating system, and the language.
3Select PPD file “KONICAMINOLTAC650UVxxx.ppd”, and then copy it
into the “Printer Descriptions” folder in “System Folder” – “Extensions”
of “Hard Disk”.
Next, select a printer.
The printer driver can use a standard Macintosh LaserWriter.
4On the Apple menu, click “Chooser”.
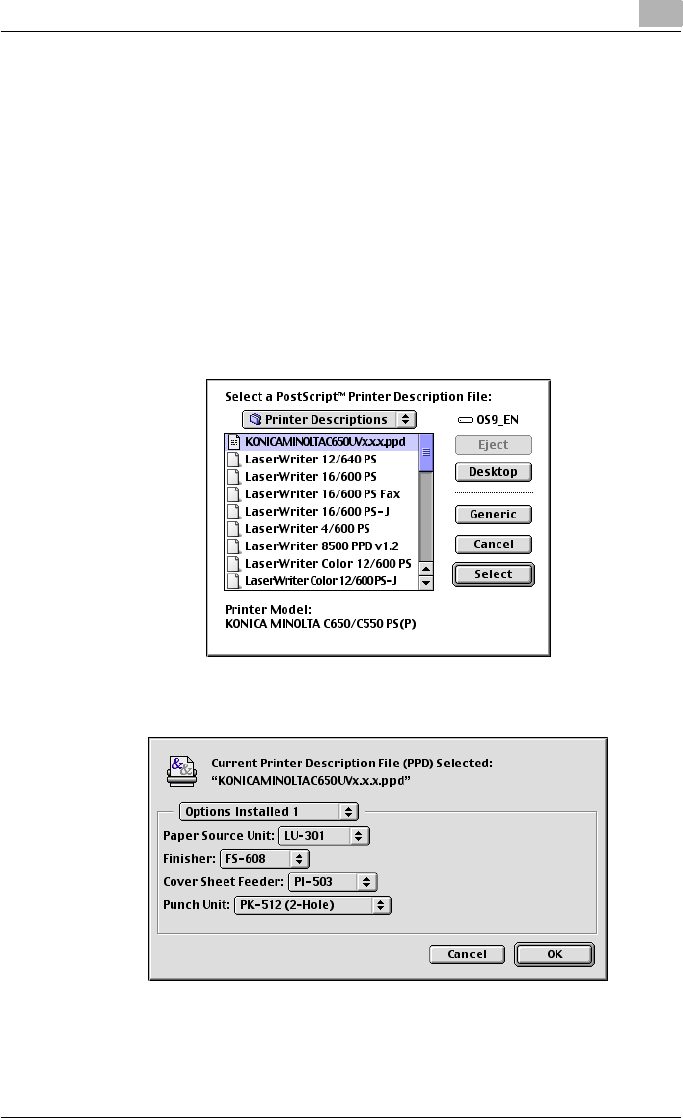
Installing the printer driver 2
C550 2-28
5Make sure that “AppleTalk” is set to “Active”, and then click the [Laser-
Writer] icon.
6From the “Select a PostScript Printer” list, click the applicable printer
for the printing system, and then click the [Create] button.
– If a different PPD file has already been selected, click the [Setup]
button in step 6, and then click the [Select PPD] button from the
screen that is already displayed.
The PostScript printer description (PPD) file selection screen appears.
7Select the applicable PPD file, and then click the [Select] button or
[Open] button.
The setting screen for adding options appears.
8Select the options that are installed on this machine from the Options
Installed 1 dialog box and the Options Installed 2 dialog box.
9Click the [OK] button.
The Chooser window appears again.

Installing the printer driver 2
C550 2-29
10 Close the Chooser window.
Uninstalling the printer driver
If it becomes necessary to delete the printer driver, for example, when you
want to reinstall the printer driver, follow the procedure below to delete the
driver.
2
Note
Quit all running applications that may have started when the Macintosh
computer was turned on.
For Mac OS X
1Open the Printer Setup Utility or Print Center, located in “Applications”
– “Utilities” of “Hard Disk”.
2Select the name of the printer to be deleted, and then click the [Delete]
button.
The selected printer is deleted.
3Close the printer list.
4Drag the following file, which is located in “Library” – “Printers” –
“PPDs” – “Contents” – “Resources” – “en.lproj” of “Hard Disk”, to the
“Trash” icon.
– “KONICA MINOLTA C650.gz”
5Delete the unnecessary files from “Library”–“Printers”.
Drag the “C650” folder, which is located in “Library” – “Printers” –
“KONICAMINOLTA”, to the “Trash” icon.
For Mac OS 10.2, drag all the “KONICA MINOLTA C650” folders, which
are located in “Library” – “Printers” – “PPD Plugins”, to the “Trash”
icon.
6Restart the computer.
This completes the printer driver uninstallation procedure.

Installing the printer driver 2
C550 2-30
For Mac OS 9.2
1Drag PPD file “KONICAMINOLTAC650UVxxx.ppd”, which is located in
“System Folder” – “Extensions” – “Printer Descriptions” of “Hard Disk”,
to the “Trash” icon.
The related printer driver files are deleted.
2Restart the computer.
This completes the printer driver uninstallation procedure.
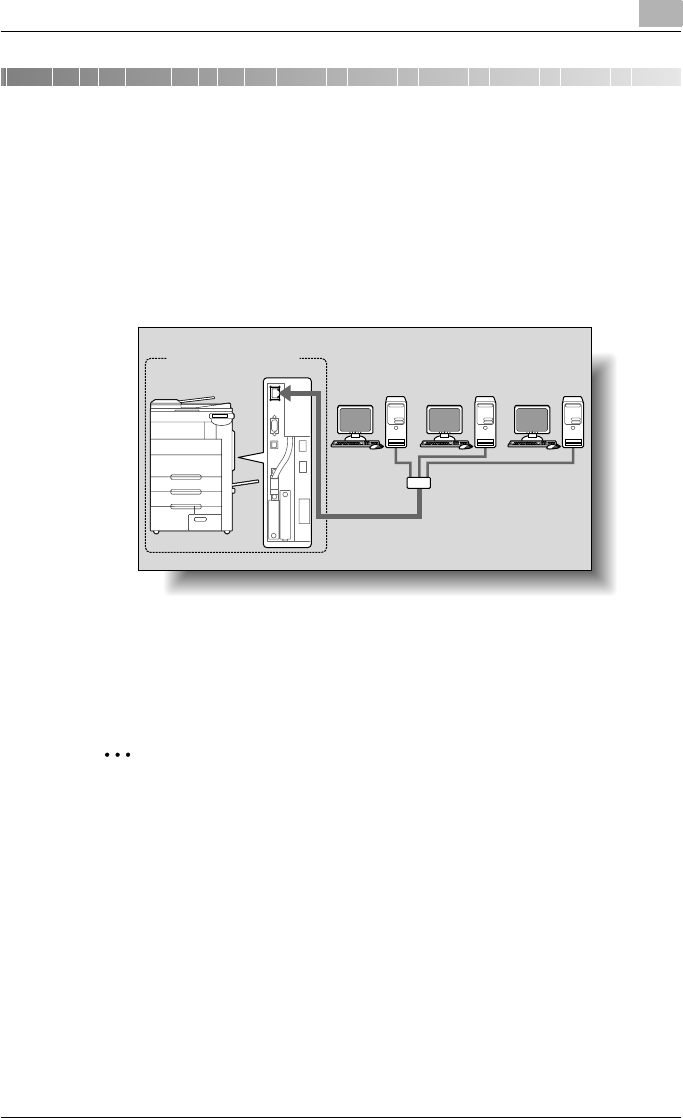
Setting up network printing 3
C550 3-1
3 Setting up network printing
3.1 Overview of network functions
Network functions
By connecting this machine to a network through the Ethernet port, this
printing system can be used as a network printer.
This printing system supports 10Base-T, 100Base-TX and 1000Base-T
standards. In addition, the Ethernet interface supports the TCP/IP (LDP/LPR,
IPP, SMB), IPX/SPX (NetWare), and AppleTalk (EtherTalk) protocols.
2
Note
When setting up the network, the administrator password is required to
enter Administrator mode.
Ask the administrator of this machine for the administrator password.
Printing system
This machine Ethernet Network
Hub

Setting up network printing 3
C550 3-2
Features of the network functions
This printing system is equipped with the following network functions to flex-
ibly support various network environments.
-Automatic selection of 10Base-T, 100Base-TX or 1000Base-T (Fast Eth-
ernet)
-Obtains the IP address automatically from DHCP or BOOTP
-Printing with SMB printing (Windows 2000/XP/Server 2003/Vista)
You can print with SMB in Windows 2000, Windows XP, Windows Server
2003, or Windows Vista.
-Printing with LPR printing (Windows NT 4.0/2000/XP/Server 2003/Vista)
You can print with LPD/LPR in Windows NT 4.0, Windows 2000, Win-
dows XP, Windows Server 2003, or Windows Vista.
LPR (Line Printer Request): This print request system can be used under
Windows NT 4.0, Windows 2000, Windows XP, Windows Server 2003, or
Windows Vista. Enter the queue name as “Print”.
-Printing with Port 9100 (Windows 2000/XP/Server 2003/Vista)
You can print with Port 9100 in Windows 2000, Windows XP, Windows
Server 2003, or Windows Vista.
-Supports Novell NetWare PServer and Rprinter (Nprinter)
-Supports the Novell NetWare print server functions and supports both
bindery mode and Novell Directory Service (NDS)
With NetWare
The Novell NetWare 4.x–6 print server functions are supported.
You can connect this printing system to a network using Novell NetWare 4.x–
6 as the network operating system and send print jobs from the client to the
print server (network controller). The three modes supported are as follows:
-Nprinter
-PServer
-NDS/NDPS
2
Note
For details on the NetWare functions, refer to the NetWare operation
manual.
With Macintosh
You can print from your Macintosh computer using LPR, AppleTalk, or Bon-
jour/Rendezvous.
You can also connect this printing system to a print server in an AppleTalk or
a Bonjour/Rendezvous environment and send print jobs from the Macintosh
computer to this machine.

Setting up network printing 3
C550 3-3
Network connection methods that can be selected in each Windows op-
erating system
This chapter describes the settings that must be specified for network print-
ing.
Setting procedures differ depending on the method of networking printing
used (SMB, LPR, or IPP printing). Select the best method of network printing
for your Windows environment.
Network printing from a Windows operating system
2
Reminder
Before setting up network printing, install the printer driver. For details on
installing the printer driver, refer to “Installing the printer driver” on
page 2-1.
To perform network printing, change the printer port for the installed
printer driver to one for a network connection, and then change the set-
tings on this machine as necessary.
For an IPP connection, it is necessary to install the printer driver first.
Network printing in a NetWare environment
Protocol
used
Windows
2000
Windows XP Windows NT
4.0
Windows
Server 2003
SMB printing TCP/IP, Net-
BEUI
oo o
LPR printing TCP/IP oooo
IPP printing TCP/IP oo o
Port 9100
printing
TCP/IP oo o
NetWare version Protocol used Emulation Service mode
NetWare 4.x IPX NDS/Bindery PServer/Nprinter
NetWare 5.x/6 IPX NDS PServer
TCP/IP NDPS(lpr)
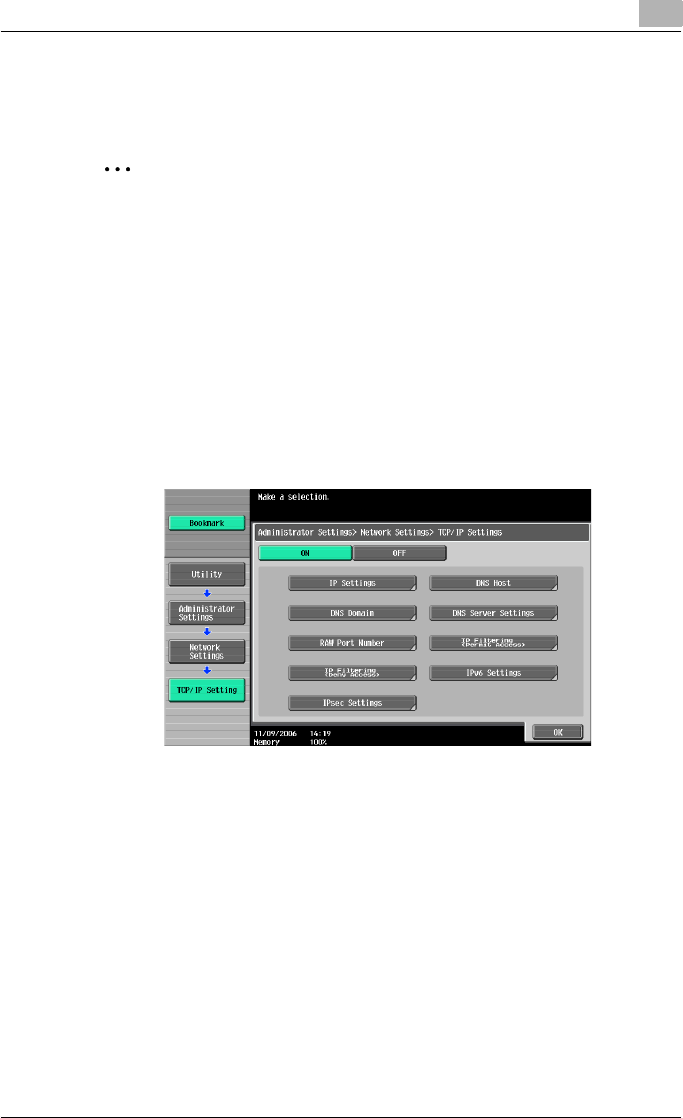
Setting up network printing 3
C550 3-4
3.2 Setting the IP address for this machine
Use this machine’s control panel to assign an IP address to this machine.
2
Reminder
When specifying network settings, follow the instructions of the network
administrator.
1Press the [Utility/Counter] key in this machine’s control panel, touch
[Administrator Settings], and then enter the administrator password.
– The administrator password is required to enter Administrator
mode. Ask the administrator of this machine for the administrator
password.
2Touch [Network Settings], then [TCP/IP Settings].
3Touch [ON].
4Touch [IP Settings].
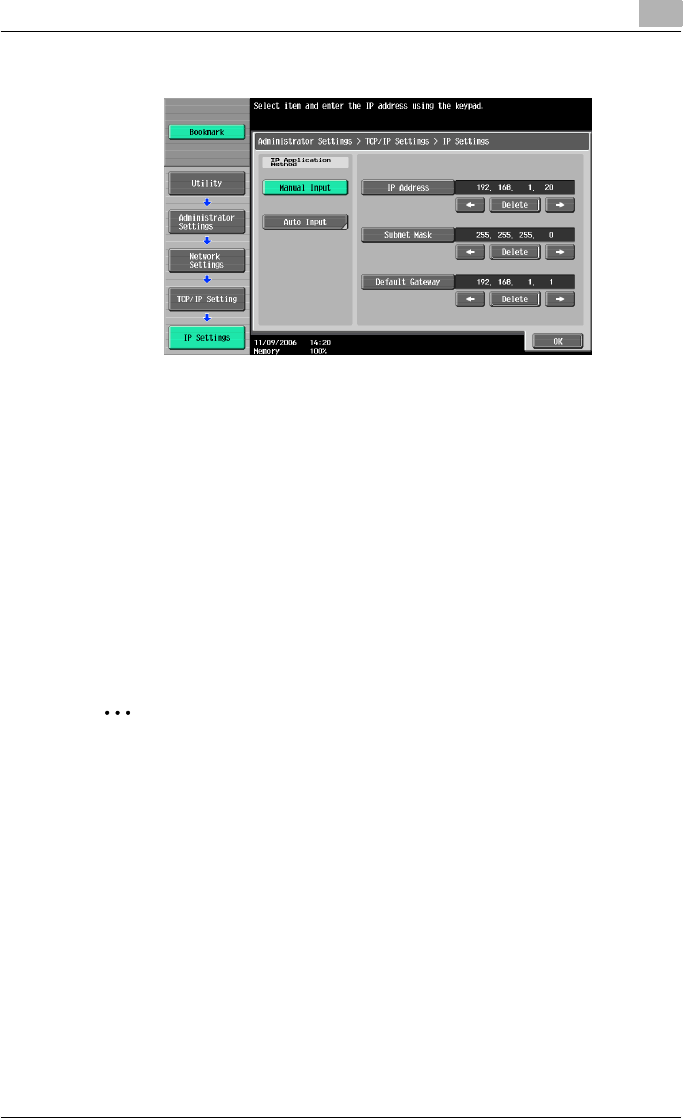
Setting up network printing 3
C550 3-5
5Touch [Manual Input] under “IP Application Method”.
6Specify settings for the following:
– IP Address: Specify the IP address of this machine.
– Subnet Mask: Specify the subnet mask for the network to which
you are connecting.
– Default Gateway: Specify the default gateway address for the net-
work to which you are connecting.
7Touch [OK].
8To apply the settings, restart this machine (turn the main power off,
then on again).
Turn this machine back on to apply the IP address.
2
Reminder
When turning the power off, then on again, wait at least 10 seconds be-
fore turning the power on again; otherwise, this machine may not function
properly.

Setting up network printing 3
C550 3-6
!
Detail
Although the method for entering a static IP address without using the
DHCP server is described in the procedure here, it is also possible to au-
tomatically assign the IP address from the DHCP server. When “IP Appli-
cation Method” is specified as “Auto Input” and “DHCP Settings” is set
to “ON” in the setting screen that is displayed, the IP address, subnet
mask, and gateway address settings are automatically assigned from the
DHCP server on the network, so it is not necessary to assign them man-
ually. However, note the following when setting “DHCP Settings” to
“ON”.
Check with the network administrator that the DHCP server exists. If the
DHCP server does not exist, be sure to specify settings for “IP Address”,
“Subnet Mask”, and “Default Gateway”.
If the settings for the IP address and other items have been assigned us-
ing the DHCP server, there is a possibility that they may be automatically
changed. When the settings for the IP address and other items are
changed, if the IP address has been used to specify a printer on the net-
work for printing, there is a possibility that printing may not be possible
because this machine cannot communicate with the network. If “DHCP
Settings” has been set to “ON”, it is recommended that the IP address
assigned to this machine be fixed in the DHCP server settings.

Setting up network printing 3
C550 3-7
3.3 Accessing PageScope Web Connection
Setting the IP address for this machine enables you to access PageScope
Web Connection.
With PageScope Web Connection, you can change the network settings of
this machine from a computer.
Use your Web browser to directly access PageScope Web Connection.
1Start up the Web browser.
2In the “Address” bar, enter the IP address for this machine as shown
below, and then press the [Enter] key.
– http://<IP_address_for_this_machine>/
Example: If the IP address for this machine is 192.168.1.20
http://192.168.1.20/
– If IPv6 is enabled and a Web browser other than Internet Explorer
is used, enter the IPv6 address enclosed in brackets to access Pa-
geScope Web Connection.
http://[IPv6_address_for_this_machine]/
Example: If the IPv6 address for this machine is
fe80::220:6bff:fe10:2f16
http://[fe80::220:6bff:fe10:2f16]/
– If IPv6 is enabled and Internet Explorer is used, edit the hosts file to
note “fe80::220:6bff:fe10:2f16IPv6 IPv6_MFP_1” and specify the
URL according to the domain name.
The initial page of PageScope Web Connection appears.
For further details on PageScope Web Connection, refer to the User’s Guide
[Page Scope Web Connection Operations].
2
Note
If the user authentication function is enabled, you must enter a user name
and password.
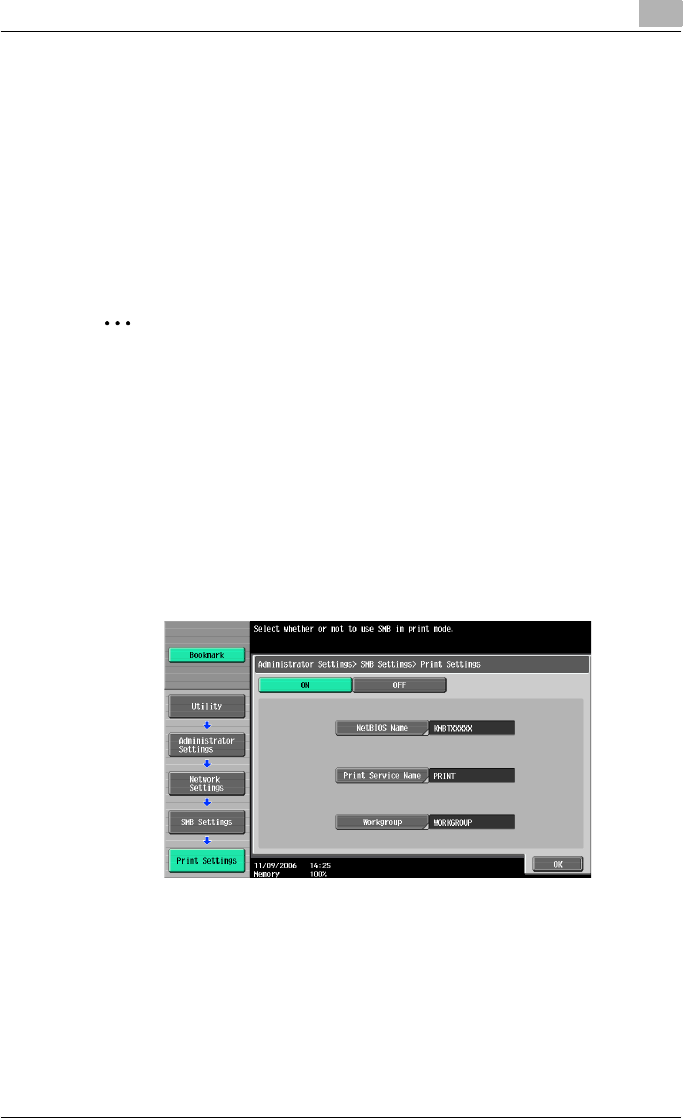
Setting up network printing 3
C550 3-8
3.4 SMB printing
You can use SMB printing (Windows printing) to print directly over the Micro-
soft network from computers running Windows.
Operations on this machine
Set the IP address for this machine. For the setting procedure, refer to “Set-
ting the IP address for this machine” on page 3-4.
Next, specify the SMB print settings for this machine as described below.
2
Note
The settings can also be specified from PageScope Web Connection.
1Press the [Utility/Counter] key in this machine’s control panel, touch
[Administrator Settings], and then enter the administrator password.
– The administrator password is required to enter Administrator
mode. Ask the administrator of this machine for the administrator
password.
2Touch [Network Settings], [SMB Settings], then [Print Settings].
3Touch [ON].
4Specify settings for the following. After specifying the settings, touch
[OK].
– NetBIOS Name: Specify the NetBIOS name (up to 15 characters).
– Print Service Name: Specify the printing service name (up to 12
characters).
– Workgroup: Specify the work group name (up to 15 characters).

Setting up network printing 3
C550 3-9
5To apply the settings, restart this machine (turn the main power off,
then on again).
2
Reminder
When turning the power off, then on again, wait at least 10 seconds be-
fore turning the power on again; otherwise, this machine may not function
properly.
Printer driver settings
1For Windows 2000, click the [Start] button, point to “Settings”, and
then click “Printers”.
For Windows XP/Server 2003, click the [Start] button, and then click
“Printers and Faxes”.
For Windows Vista, click the [Start] button, and then click “Control pan-
el”, “Hardware and Sound”, and “Printers”.
– If “Printers and Faxes” does not appear in the Start menu in Win-
dows XP/Server 2003, open the Control Panel from the Start menu,
select “Printers and Other Hardware”, and then select “Printers and
Faxes”.
– For Windows Vista, if the control panel is in the classic view, dou-
ble-click “Printers”.
2Right-click the icon of the installed printer, and then click “Properties”.
3Click the [Add Port] button on the Ports tab, double-click “Local Port”
or select “Local Port” and click the [New Port] button, and then enter
“\\<NetBIOS_name>\<printing_service_name>”.
– Enter the same NetBIOS name and print service name that you en-
tered for the SMB print settings for this machine. For the setting
procedure, refer to “Operations on this machine” on page 3-8.
4Click the [Close] button to apply the setting.

Setting up network printing 3
C550 3-10
3.5 LPR printing
The LPR print service is supported as standard in Windows 2000, Windows
XP, Windows NT 4.0, Windows Server 2003, and Windows Vista. TCP/IP is
used as the network protocol.
Operations on this machine
Set the IP address for this machine. For the setting procedure, refer to “Set-
ting the IP address for this machine” on page 3-4.
Printer driver settings
For Windows 2000/XP/Server 2003/Vista
1For Windows 2000, click the [Start] button, point to “Settings”, and
then click “Printers”.
For Windows XP/Server 2003, click the [Start] button, and then click
“Printers and Faxes”.
For Windows Vista, click the [Start] button, and then click “Control pan-
el”, “Hardware and Sound”, and “Printers”.
– If “Printers and Faxes” does not appear in the Start menu in Win-
dows XP/Server 2003, open the Control Panel from the Start menu,
select “Printers and Other Hardware”, and then select “Printers and
Faxes”.
– For Windows Vista, if the control panel is in the classic view, dou-
ble-click “Printers”.
2Right-click the icon of the installed printer, and then click “Properties”.
3On the Ports tab, click the [Add Port] button.
4In the “Available Printer Ports” list, select “Standard TCP/IP Port”, and
then click the [New Port] button.
5When the Add Standard TCP/IP Printer Port Wizard starts up, click the
[Next] button.
6In the “Name of printer or IP address” box, enter the IP address for this
machine, and then click the [Next] button.
7Select “Custom”, and then click the [Settings] button.
8Select “LPR”, enter “Print” in the “Queue Name” box, and then click the
[OK] button.
The uppercase letters and lowercase letters must be entered correctly.

Setting up network printing 3
C550 3-11
9Click the [Next] button, and then click the [Finish] button to apply the
setting.
For Windows NT 4.0
1Click the [Start] button, point to “Settings”, and then click “Printers”.
2Right-click the icon of the installed printer, and then click “Properties”.
3On the Ports tab, click the [Add Port] button.
4In the “Available Printer Ports” list, select “LPR Port”, and then click the
[New Port] button.
– If “LPR Port” is not in the list, click the [Start] button, point to “Con-
trol Panel”, and then click “Network”. Then, on the Service tab, click
the [Add] button and install the Microsoft TCP/IP Printing Services.
5In the “Name or address of server providing lpd” box on the Add LPR
Compatible Printer dialog box, enter the IP address for this machine.
6In the “Name of printer or print queue on that server” box, enter “Print”.
The uppercase letters and lowercase letters must be entered correctly.
7Click the [OK] button to apply the setting.
!
Detail
If LPD printing is not used with the LPD setting, printing cannot be per-
formed. To specify the LPD settings, refer to User’s Guide [PageScope
Web Connection Operations].

Setting up network printing 3
C550 3-12
3.6 Port 9100 printing (Windows 2000/XP/Server 2003/
Vista)
The Port 9100 print service is supported as standard in Windows 2000, Win-
dows XP, Windows Server 2003, and Windows Vista. TCP/IP is used as the
network protocol.
Operations on this machine
Set the IP address for this machine. For the setting procedure, refer to “Set-
ting the IP address for this machine” on page 3-4.
Printer driver settings (Windows 2000/XP/Server 2003/Vista)
When using Port 9100 to print, change the printer driver port to the Port 9100
port.
1For Windows 2000, click the [Start] button, point to “Settings”, and
then click “Printers”.
For Windows XP/Server 2003, click the [Start] button, and then click
“Printers and Faxes”.
For Windows Vista, click the [Start] button, and then click “Control pan-
el”, “Hardware and Sound”, and “Printers”.
– If “Printers and Faxes” does not appear in the Start menu in Win-
dows XP/Server 2003, open the Control Panel from the Start menu,
select “Printers and Other Hardware”, and then select “Printers and
Faxes”.
– For Windows Vista, if the control panel is in the classic view, dou-
ble-click “Printers”.
2Right-click the icon of the installed printer, and then click “Properties”.
3On the Ports tab, click the [Add Port] button.
4In the “Available Printer Ports” list, select “Standard TCP/IP Port”, and
then click the [New Port] button.
5When the Add Standard TCP/IP Printer Port Wizard starts up, click the
[Next] button.
6In the “Name of printer or IP address” box, enter the IP address for this
machine, and then click the [Next] button.
7Select “Custom”, and then click the [Settings] button.
8Select “RAW”, and then enter the RAW port number (the default setting
is “9100”) in the “Port Number” box.

Setting up network printing 3
C550 3-13
9Click the [Next] button, and then click the [Finish] button to apply the
setting.
2
Note
If the RAW port is not specified to be used in the TCP/IP setting, printing
cannot be performed.
To specify the RAW port settings, refer to User’s Guide [PageScope Web
Connection Operations].

Setting up network printing 3
C550 3-14
3.7 IPP printing (Windows 2000/XP/Server 2003/Vista)
The IPP (Internet Printing Protocol) print service is supported as standard in
Windows 2000, Windows XP, Windows Server 2003, and Windows Vista.
TCP/IP is used as the network protocol.
Operations on this machine
Set the IP address for this machine. For the setting procedure, refer to “Set-
ting the IP address for this machine” on page 3-4.
Next, specify the IPP settings for this machine as described below.
2
Note
The settings can also be specified from PageScope Web Connection.
1Press the [Utility/Counter] key in this machine’s control panel, touch
[Administrator Settings], and then enter the administrator password.
– The administrator password is required to enter Administrator
mode. Ask the administrator of this machine for the administrator
password.
2Touch [Network Settings], then [HTTP Server Settings].
3Touch [ON]. After specifying the settings, touch [Forward].
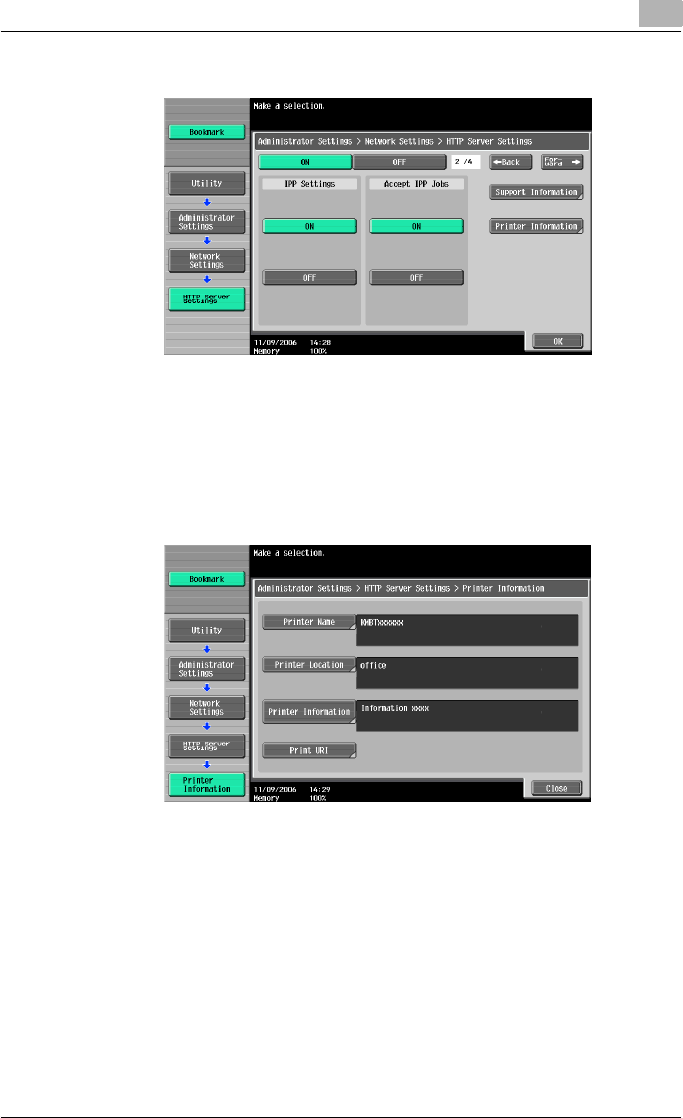
Setting up network printing 3
C550 3-15
4Touch [ON] under “IPP Settings” and “Accept IPP Jobs”.
5Touch [Printer Information], and then specify settings for the following.
After specifying the settings, touch [Close].
– Printer Name: Specify the printer name (up to 127 characters).
– Printer Location: Specify the printer location (up to 127 characters).
– Printer Information: Specify the printer manufacturer details (up to
127 characters).
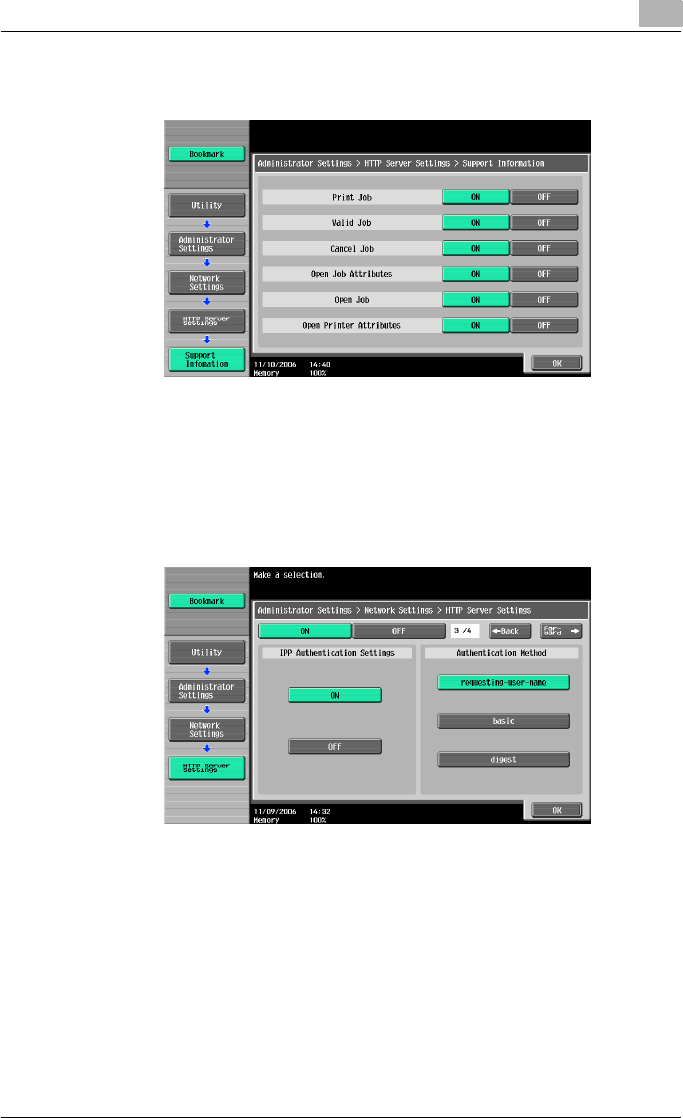
Setting up network printing 3
C550 3-16
6Touch [Support Information], and then specify the print operations sup-
ported by IPP. After specifying the settings, touch [OK].
7Touch [Forward].
8Specify settings for the following. After specifying the settings, touch
[Forward].
– IPP Authentication Settings: Select [ON].
– Authentication Method: Select the IPP authentication method.

Setting up network printing 3
C550 3-17
9Specify the user name and password. After specifying the settings,
touch [OK].
10 To apply the settings, restart this machine (turn the main power off,
then on again).
2
Reminder
When turning the power off, then on again, wait at least 10 seconds be-
fore turning the power on again; otherwise, this machine may not function
properly.
!
Detail
When using IPPS printing, a certificate must be registered to this ma-
chine. For details, refer to User’s Guide [PageScope Web Connection
Operations].
Installing the printer driver (Windows 2000/XP/Server 2003)
For IPP printing, reinstall the printer driver.
1Insert the printer driver CD-ROM into the computer’s CD-ROM drive.
2For Windows 2000, click the [Start] button, point to “Settings”, and
then click “Printers”.
For Windows XP/Server 2003, click the [Start] button, and then click
“Printers and Faxes”.
– If “Printers and Faxes” does not appear in the Start menu in Win-
dows XP/Server 2003, open the Control Panel from the Start menu,
select “Printers and Other Hardware”, and then select “Printers and
Faxes”.

Setting up network printing 3
C550 3-18
3For Windows 2000/Server 2003, double-click the “Add Printer” icon.
For Windows XP, click “Add a printer” on the “Printer Tasks” menu.
The Add Printer Wizard starts up.
4Click the [Next] button.
5In the Local or Network Printer dialog box, select “Network printer”,
and then click the [Next] button.
6In the Locate Your Printer dialog box, select “Connect to a printer on
the Internet or on your intranet”.
7In the “URL” field, enter the URL for this machine in the following for-
mat, and then click the [Next] button.
– http://<IP_address_for_this_machine>/ipp
Example: If the IP address for this machine is 192.168.1.20
http://192.168.1.20/ipp
8When the confirmation dialog box appears, click the [OK] button.
9Click the [Have Disk] button.
10 Specify the desired folder on the CD-ROM that contains the printer
driver, and then click the [OK] button. Select the specified folder ac-
cording to the printer driver to be used, the operating system, and the
language.
Printer drivers that can be selected:
Windows XP/Server 2003: PCL driver, PS driver
11 Check that the printer name is displayed in the “Printers” list, and then
click the [Next] button.
12 Select whether to set the printer as the default printer, and then click
the [Next] button.
13 Click the [Finish] button to exit the Add Printer Wizard.
Once the settings for the printer have been specified, you can use the printer
in the same way as a default local printer. Also, if you set up the printer for
sharing in Windows, it can be used as a network printer by other Windows
computers over the network.

Setting up network printing 3
C550 3-19
Installing the printer driver (Windows Vista)
1Insert the printer driver CD-ROM into the computer’s CD-ROM drive.
2Click the [Start] button, and then click “Control Panel”.
3Click “Hardware and Sound”, and then click “Printers”.
– If the control panel is in the classic view, double-click “Printers”.
The Printers window appears.
4Click “Add a printer” on the toolbar.
The “Add Printer” dialog box appears.
5Click “Add a network, wireless or Bluetooth printer”.
The printer that is connected is located.
6In the dialog box of the located printer, click “The printer that I want
isn’t Listed”.
7In the “Select a shared printer by name” text box, enter the URL for this
machine in the following format, and then click the [Next] button.
– http:// <IP_address_for_this_machine> /ipp
Example: If the IP address for this machine is 192.168.1.20
http://192.168.1.20/ipp
– If specifying settings for IPPS printing, enter “https://
<host_name>.<domain_name>/ipp”. For the <host_name> and
<domain name>, specify the name that was registered in using
DNS server.
– If the certificate of this machine is not issued by a certificate author-
ity, it is necessary to register the certificate of the machine in Win-
dows Vista as a certificate of the Trusted Publishers for the
Computer account. When the certificate is registered to this ma-
chine, check that <host_name> and <domain_name> is displayed
in common name of the certificate.
8Click the [Have Disk] button.
9Click the [Browse] button.
10 Specify the desired folder on the CD-ROM that contains the printer
driver, and then click the [OK] button.
Select the specified folder according to the printer driver to be used,
the operating system, and the language.

Setting up network printing 3
C550 3-20
Printer drivers that can be selected:
Windows Vista: PCL driver, PS driver, Fax driver
11 Click the [OK] button.
The “Printers” list appears.
12 Click the [Next] button.
13 Follow the on-screen instructions.
– If the User Account Control dialog box appears, click the [Continue]
button.
– If Verify the publisher in the Windows Security dialog box appears,
click “Install this driver software anyway”.
14 Click the [Finish] button.
15 When installation is complete, make sure that the icon of the installed
printer appears in the Printers window.
16 Remove the CD-ROM from the CD-ROM drive.
This completes the printer driver installation.
Once the settings for the printer have been specified, you can use the printer
in the same way as a default local printer. Also, if you set up the printer for
sharing in Windows, it can be used as a network printer by other Windows
computers over the network.

Setting up network printing 3
C550 3-21
3.8 Printing with NetWare
The printer controller supports the following environments.
Network printing in a NetWare environment
For Remote Printer mode with NetWare 4.x bindery emulation
2
Note
Before using bindery emulation, check that bindery emulation is compat-
ible with the NetWare server.
1Log on to NetWare as Bindery under the administrator authority from a
client computer.
2Start up Pconsole.
3From the “Available Options” list, select “Quick Setup”, and then click
the [Enter] button.
4Enter the appropriate names in the “Printer Server Name”, “Printer
Name”, and “Print Queue Name” fields, select “Other/Unknown” from
the “Printer type” field, and then save the specified settings.
5Click the [Esc] button to quit Pconsole.
6Use the NetWare server console to load PSERVER.NLM.
!
Detail
For queue user privileges, printer notification options, assignment of mul-
tiple queues, and passwords, refer to the NetWare documentation, and
specify the settings as necessary.
Next, specify the NetWare settings for this machine as described below.
NetWare version Protocol used Emulation Service mode
NetWare 4.x IPX NDS/Bindery PServer/Nprinter
NetWare 5.x/6 IPX NDS PServer
TCP/IP NDPS(lpr)
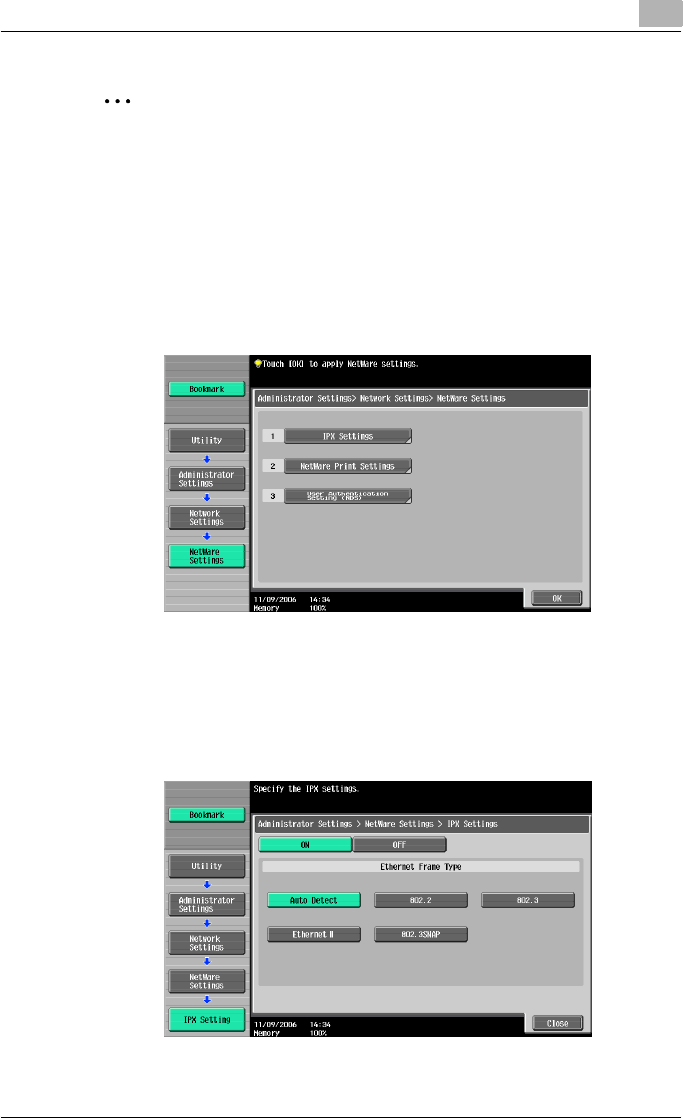
Setting up network printing 3
C550 3-22
2
Note
The settings can also be specified from PageScope Web Connection.
1Press the [Utility/Counter] key in this machine’s control panel, touch
[Administrator Settings], and then enter the administrator password.
– The administrator password is required to enter Administrator
mode. Ask the administrator of this machine for the administrator
password.
2Touch [Network Settings], then [NetWare Settings].
3Touch [IPX Settings], and then specify settings for the following. After
specifying the settings, touch [Close].
– IPX Setting: Select [ON].
– Ethernet Frame Type: Select “Auto Detect”. (Select the frame type
according to the network environment.)
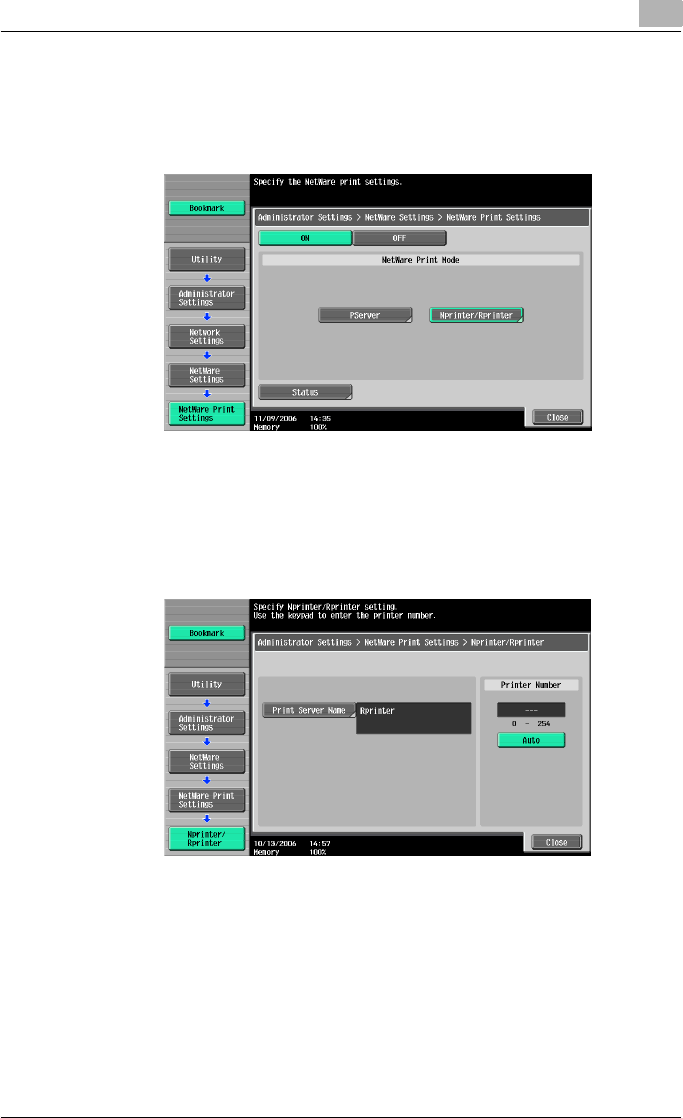
Setting up network printing 3
C550 3-23
4In the NetWare Settings screen, touch [NetWare Print Settings], and
then specify settings for the following.
– NetWare Print Settings: Select [ON].
– NetWare Print Mode: Select [Nprinter/Rprinter].
5Specify settings for the following. After specifying the settings, touch
[Close].
– Print Server Name: Specify the Print Server Name.
– Printer Number: Specify the printer number (0 to 254), or select [Au-
to].
6Touch [Close].

Setting up network printing 3
C550 3-24
7In the NetWare Settings screen, touch [User Authentication Setting
(NDS)], and then specify settings for the following. After specifying the
settings, touch [Close].
– User Authentication Setting (NDS): Select [ON]. (Depending on the
network environment, select [OFF].)
8In the NetWare Settings screen, touch [Close].
9Restart this machine (turn the main power off, then on again).
10 Use the NetWare server console to display the print server screen, and
then check that the created printer is shown as “Waiting for Job” for
the connected printer (0).
2
Reminder
When turning the power off, then on again, wait at least 10 seconds be-
fore turning the power on again; otherwise, this machine may not function
properly.
For Print Server mode with NetWare 4.x bindery emulation
2
Note
Before using bindery emulation, check that bindery emulation is compat-
ible with the NetWare server.
1Log on to NetWare as Bindery under the administrator authority from a
client computer.
2Start up Pconsole.
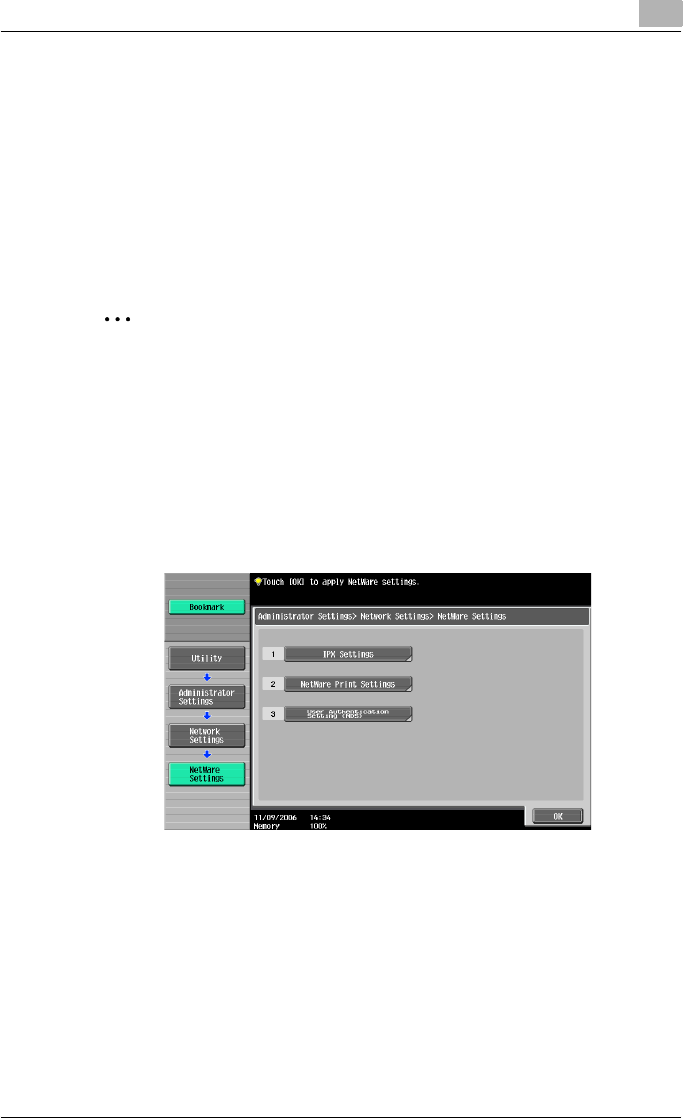
Setting up network printing 3
C550 3-25
3From the “Available Options” list, select “Quick Setup”, and then click
the [Enter] button.
4Enter the appropriate names in the “Printer Server Name”, “Printer
Name”, and “Print Queue Name” fields, select “Other/Unknown” from
the “Printer type” field, and then save the specified settings.
5Click the [Esc] button to quit Pconsole.
Next, specify the NetWare settings for this machine as described below.
2
Note
The settings can also be specified from PageScope Web Connection.
1Press the [Utility/Counter] key in this machine’s control panel, touch
[Administrator Settings], and then enter the administrator password.
– The administrator password is required to enter Administrator
mode. Ask the administrator of this machine for the administrator
password.
2Touch [Network Settings], then [NetWare Settings].
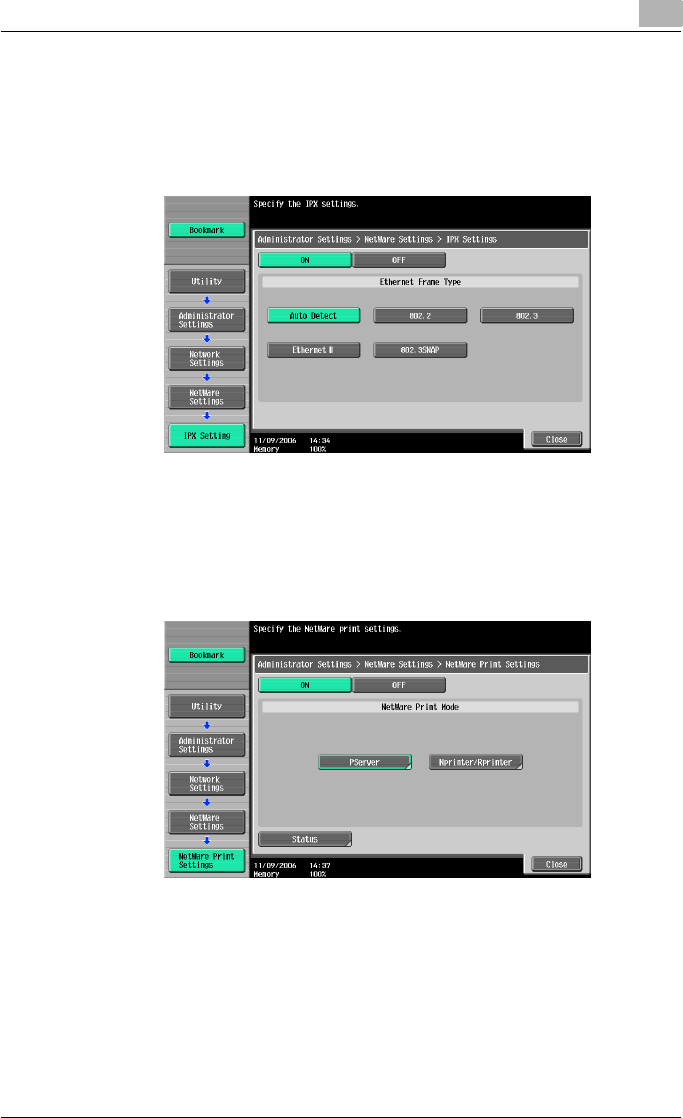
Setting up network printing 3
C550 3-26
3Touch [IPX Settings], and then specify settings for the following. After
specifying the settings, touch [Close].
– IPX Setting: Select [ON].
– Ethernet Frame Type: Select “Auto Detect”. (Select the frame type
according to the network environment.)
4In the NetWare Settings screen, touch [NetWare Print Settings], and
then specify settings for the following. After the NetWare print mode is
selected, the screen switches automatically.
– NetWare Print Settings: Select [ON].
– NetWare Print Mode: Select [PServer].
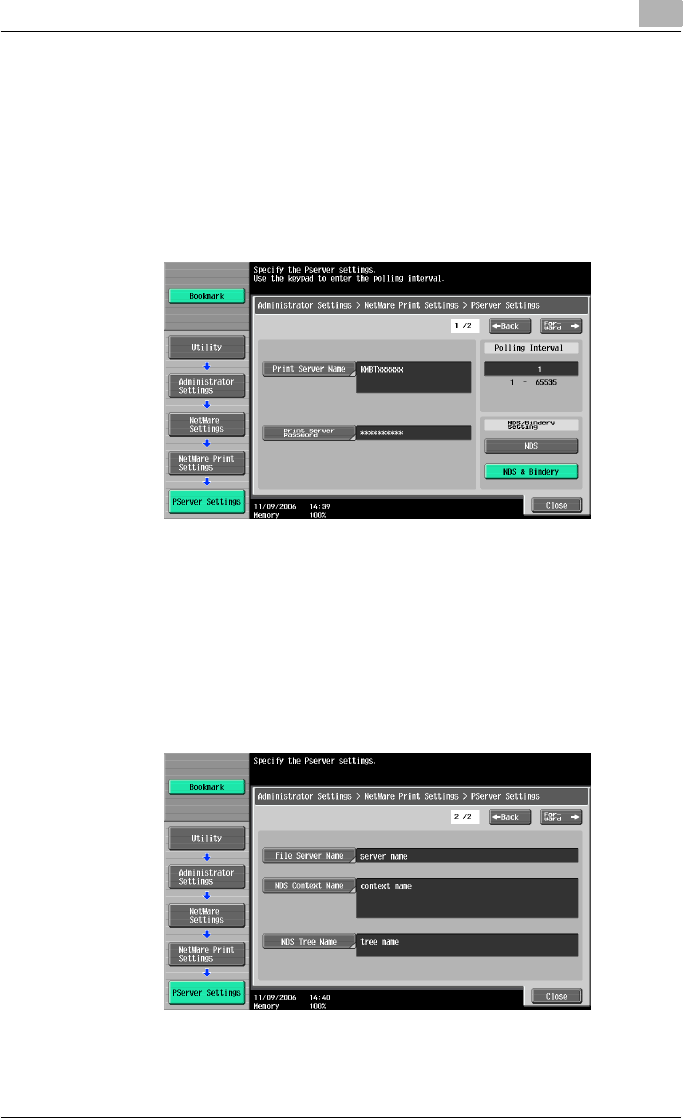
Setting up network printing 3
C550 3-27
5Specify settings for the following. After specifying the settings, touch
[Forward].
– Print Server Name: Specify the print server name created with
Pconsole.
– Print Server Password: Specify only when setting from the NetWare
server.
– Polling Interval: Specify 1. (Change as necessary.)
– NDS/Bindery Setting: Select [NDS & Bindery].
6Specify settings for the following. After specifying the settings, touch
[Close].
– File Server Name: Specify the name of the file server that connects
to the PServer.
– NDS Context Name: Specify the name of the context that connects
to the PServer.
– NDS Tree Name: Specify the name of the tree that PServer logs on
to.
7Touch [Close].
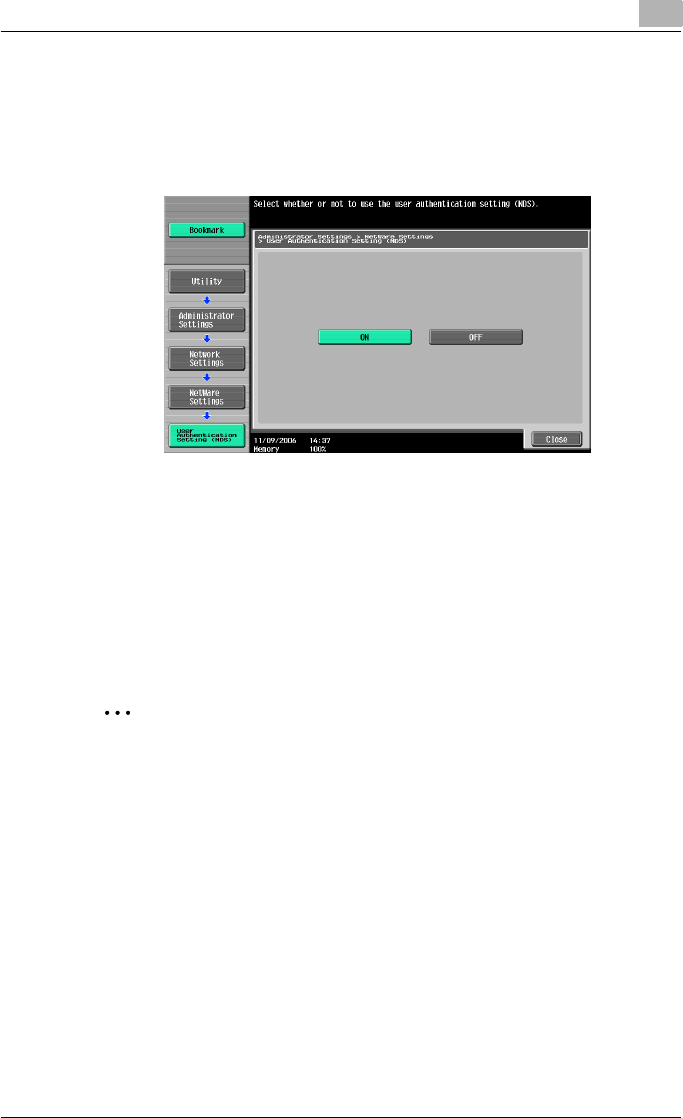
Setting up network printing 3
C550 3-28
8In the NetWare Settings screen, touch [User Authentication Setting
(NDS)], and then specify settings for the following. After specifying the
settings, touch [Close].
– User Authentication Setting (NDS): Select [ON]. (Depending on the
network environment, select [OFF].)
9In the NetWare Settings screen, touch [Close].
10 Restart this machine (turn the main power off, then on again).
11 Use the NetWare server console to load MONITOR.NLM.
12 Select the connection information and, in the active connection col-
umn, check that the created PServer is connected.
2
Reminder
When turning the power off, then on again, wait at least 10 seconds be-
fore turning the power on again; otherwise, this machine may not function
properly.
For NetWare 4.x Remote Printer mode (NDS)
1Log on to NetWare as an administrator from a client computer.
2Start up NWadmin.
3Select either the organization or organizational unit container that of-
fers the print service, and then click “Print Services Quick Setup” on
the “Tools” menu.

Setting up network printing 3
C550 3-29
4Enter the appropriate names in the “Printer Server Name”, “Printer
Name”, “Print Queue Name”, and “Print Queue Volume” fields, select
“Other/Unknown” from the “Printer type” field, and then save the spec-
ified settings.
!
Detail
For queue user privileges, printer notification options, assignment of mul-
tiple queues, and passwords, refer to the NetWare documentation, and
specify the settings as necessary.
Next, specify the NetWare settings for this machine as described below.
2
Note
The settings can also be specified from PageScope Web Connection.
1Press the [Utility/Counter] key in this machine’s control panel, touch
[Administrator Settings], and then enter the administrator password.
– The administrator password is required to enter Administrator
mode. Ask the administrator of this machine for the administrator
password.
2Touch [Network Settings], then [NetWare Settings].
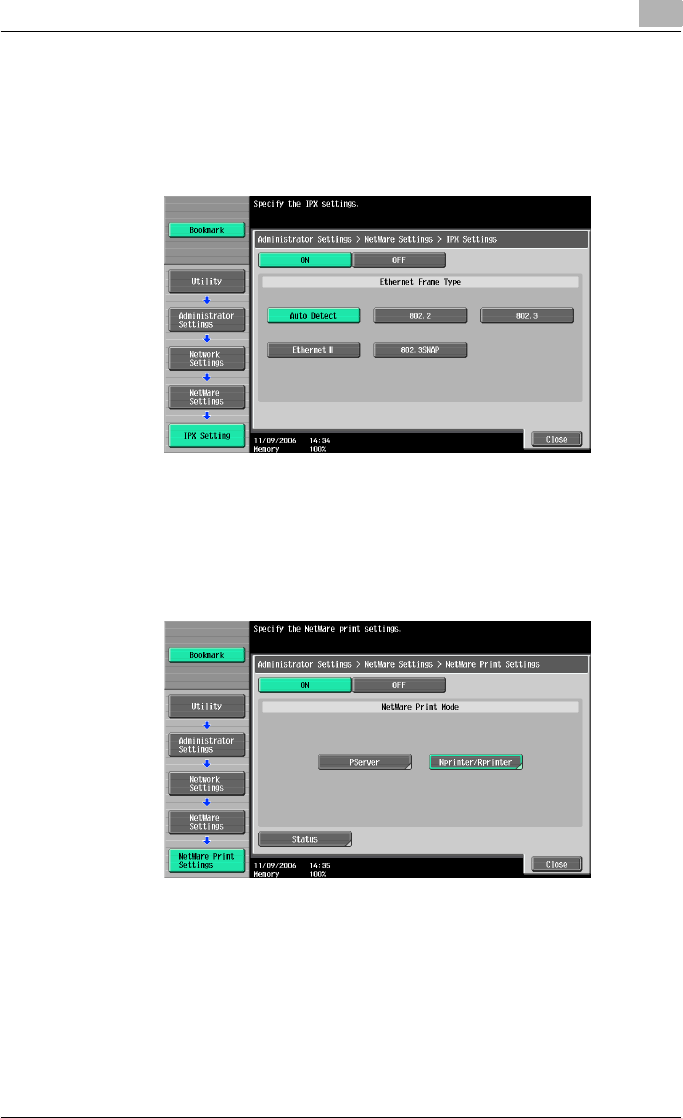
Setting up network printing 3
C550 3-30
3Touch [IPX Settings], and then specify settings for the following. After
specifying the settings, touch [Close].
– IPX Setting: Select [ON].
– Ethernet Frame Type: Select “Auto Detect”. (Select the frame type
according to the network environment.)
4In the NetWare Settings screen, touch [NetWare Print Settings], and
then specify settings for the following. After the NetWare print mode is
selected, the screen switches automatically.
– NetWare Print Settings: Select [ON].
– NetWare Print Mode: Select [Nprinter/Rprinter].

Setting up network printing 3
C550 3-31
5Specify settings for the following. After specifying the settings, touch
[Close].
– Print Server Name: Specify the Print Server Name.
– Printer Number: Specify the printer number (0 to 254), or select [Au-
to].
6Touch [Close].
7In the NetWare Settings screen, touch [User Authentication Setting
(NDS)], and then specify settings for the following. After specifying the
settings, touch [Close].
– User Authentication Setting (NDS): Select [ON]. (Depending on the
network environment, select [OFF].)
8In the NetWare Settings screen, touch [Close].
9Restart this machine (turn the main power off, then on again).
10 Use the NetWare server console to load PSERVER.NLM.

Setting up network printing 3
C550 3-32
11 Use the NetWare server console to display the print server screen, and
then check that “C550” (created printer) is shown as “Waiting for Job”
for the connected printer (0).
2
Reminder
When turning the power off, then on again, wait at least 10 seconds be-
fore turning the power on again; otherwise, this machine may not function
properly.
For NetWare 4.x/5.x/6 Print Server mode (NDS)
2
Note
To use the Print Server mode, the IPX protocol must be loaded on the
NetWare server.
1Log on to NetWare as an administrator from a client computer.
2Start up NWadmin.
3Select either the organization or organizational unit container that of-
fers the print service, and then click “Print Services Quick Setup (non-
NDPS)” on the “Tools” menu.
4Enter the appropriate names in the “Printer Server Name”, “Printer
Name”, “Print Queue Name”, and “Print Queue Volume” fields, select
“Other/Unknown” from the “Printer Type” field, and then click the [Cre-
ate] button.
!
Detail
For queue user privileges, printer notification options, assignment of mul-
tiple queues, and passwords, refer to the NetWare documentation, and
specify the settings as necessary.
Next, specify the NetWare settings for this machine as described below.
2
Note
The settings can also be specified from PageScope Web Connection.

Setting up network printing 3
C550 3-33
1Press the [Utility/Counter] key in this machine’s control panel, touch
[Administrator Settings], and then enter the administrator password.
– The administrator password is required to enter Administrator
mode. Ask the administrator of this machine for the administrator
password.
2Touch [Network Settings], then [NetWare Settings].
3Touch [IPX Settings], and then specify settings for the following. After
specifying the settings, touch [Close].
– IPX Setting: Select [ON].
– Ethernet Frame Type: Select “Auto Detect”. (Select the frame type
according to the network environment.)
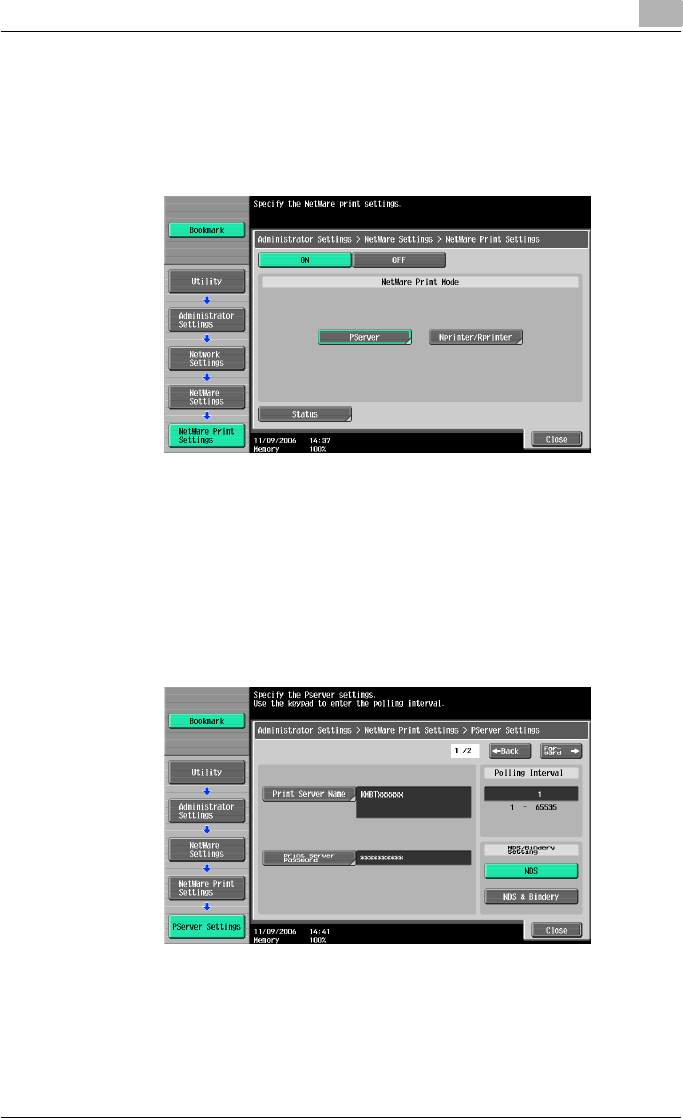
Setting up network printing 3
C550 3-34
4In the NetWare Settings screen, touch [NetWare Print Settings], and
then specify settings for the following. After the NetWare print mode is
selected, the screen switches automatically.
– NetWare Print Settings: Select [ON].
– NetWare Print Mode: Select [PServer].
5Specify settings for the following. After specifying the settings, touch
[Close].
– Print Server Name: Specify the print server name created in NWad-
min.
– Print Server Password: Specify only when setting from the NetWare
server.
– Polling Interval: Specify 1. (Change as necessary.)
– NDS/Bindery Setting: Select [NDS].
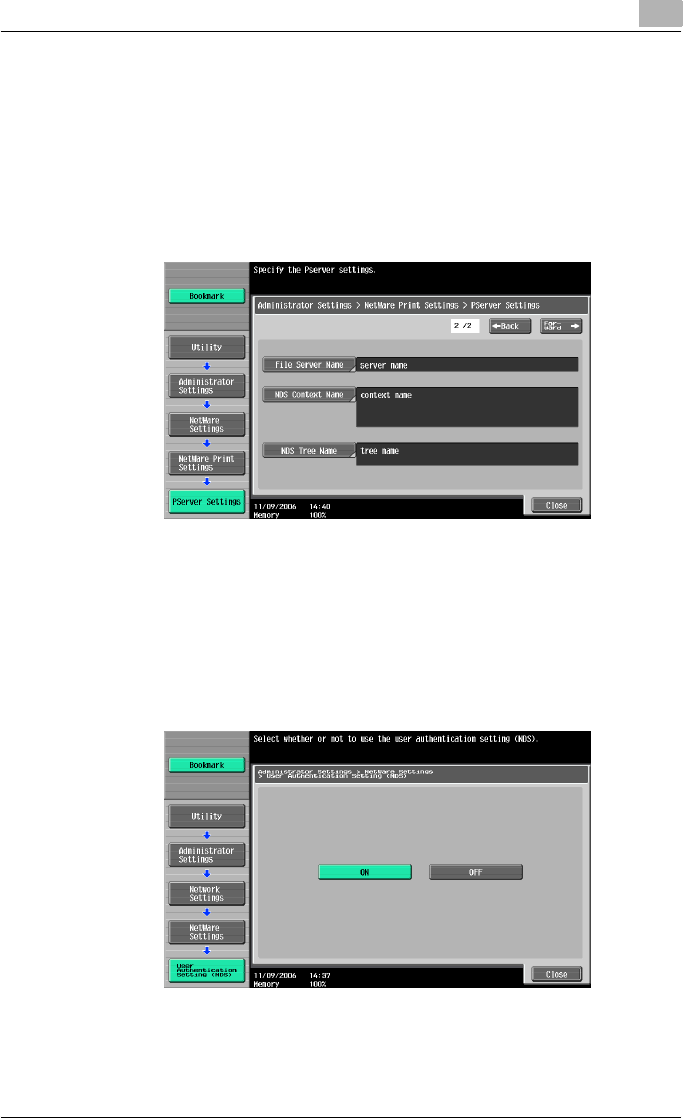
Setting up network printing 3
C550 3-35
6Specify settings for the following. After specifying the settings, touch
[Close].
– File Server Name: Specify the name of the file server that connects
to the PServer.
– NDS Context Name: Specify the name of the context that connects
to the PServer.
– NDS Tree Name: Specify the name of the tree that PServer logs on
to.
7Touch [Close].
8In the NetWare Settings screen, touch [User Authentication Setting
(NDS)], and then specify settings for the following. After specifying the
settings, touch [Close].
– User Authentication Setting (NDS): Select [ON]. (Depending on the
network environment, select [OFF].)
9In the NetWare Settings screen, touch [Close].
10 Restart this machine (turn the main power off, then on again).

Setting up network printing 3
C550 3-36
11 Use the NetWare server console to load MONITOR.NLM.
12 Select the connection information and, in the active connection col-
umn, check that the created PServer is connected.
2
Reminder
When turning the power off, then on again, wait at least 10 seconds be-
fore turning the power on again; otherwise, this machine may not function
properly.
For NetWare 5.x/6 Novell Distributed Print Service (NDPS)
2
Note
Before specifying settings for NDPS, check that the NDPS broker and
NDPS manager have been created and loaded.
Also, before performing the following procedure, check that the TCP/IP
protocol has been set in the NetWare server, and check that the IP ad-
dress has been set for this machine and that this machine is on.
1Log on to NetWare as an administrator from a client computer.
2Start up NWadmin.
3Right-click the organization or organizational unit container where you
will create the printer agent, and then click “NDPS Printer” on the “Cre-
ate” sub-menu.
4In the “NDPS Printer Name” box, enter the printer name.
5In the “Printer Agent Source” column, select “Create a New Printer
Agent”, and then click the [Create] button.
6Check the printer agent name, and then in the “NDPS Manager Name”
box, browse through the NDPS manager names, and register one.
7In “Gateway Types”, select “Novell Printer Gateway”, and then register
it.
8In the Configure Novell PDS for Printer Agent window, select “(None)”
for the printer type and “Novell Port Handler” for the port handler type,
and then register the settings.

Setting up network printing 3
C550 3-37
9In “Connection type”, select “Remote (LPR on IP)”, and then register it.
10 Enter the IP address set for this machine as the host address, enter
“Print” as the printer name, and then click the [Finish] button to register
the settings.
11 The printer driver registration screen appears. Select “None” for each
operating system to complete the registration.
!
Detail
For printer user rights, printer notification options, and assignment of
queues, refer to the NetWare documentation, and specify the settings as
necessary.
Specifying client (Windows) settings when using the NetWare server
1For Windows 2000/NT 4.0, click the [Start] button, point to “Settings”,
and then click “Printers”.
For Windows XP/Server 2003, click the [Start] button, and then click
“Printers and Faxes”.
For Windows Vista, click the [Start] button, and then click “Control pan-
el”, “Hardware and Sound”, and “Printers”.
– If “Printers and Faxes” does not appear in the Start menu in Win-
dows XP/Server 2003, open the Control Panel from the Start menu,
select “Printers and Other Hardware”, and then select “Printers and
Faxes”.
– For Windows Vista, if the control panel is in the classic view, dou-
ble-click “Printers”.
2For Windows 2000/NT 4.0/Server 2003, double-click the “Add Printer”
icon.
For Windows XP, click “Add a printer” on the “Printer Tasks” menu.
For Windows Vista, click “Add a printer” on the toolbar.
The Add Printer Wizard starts up.
3In the port settings, browse the network, and specify the name of the
created queue (or NDPS printer name).
4From the printer model list, specify the desired folder on the CD-ROM
that contains the printer driver.
– Select the specified folder according to the printer driver to be
used, the operating system, and the language.

Setting up network printing 3
C550 3-38
– Printer drivers that can be selected:
Windows 2000/XP/Server 2003/Vista: PCL driver, PS driver
Windows NT 4.0: PCL driver
5Follow the on-screen instructions to complete the installation.

Setting up network printing 3
C550 3-39
3.9 Printing with Macintosh
This section describes this machine’s settings and the Macintosh network
settings.
Specify the printer network port settings after installing the printer driver and
when selecting a printer. To select a printer, refer to “Selecting a printer” on
page 2-25.
Operations on this machine
Set the IP address for this machine. For the setting procedure, refer to “Set-
ting the IP address for this machine” on page 3-4.
Next, specify the AppleTalk or Bonjour settings for this machine as described
below.
2
Note
The settings can also be specified from PageScope Web Connection.
Specifying the AppleTalk settings
When connecting this machine to a Macintosh computer using AppleTalk,
the AppleTalk settings must be specified.
1Press the [Utility/Counter] key in this machine’s control panel, touch
[Administrator Settings], and then enter the administrator password.
– The administrator password is required to enter Administrator
mode. Ask the administrator of this machine for the administrator
password.
2Touch [Network Settings], then [AppleTalk Settings].
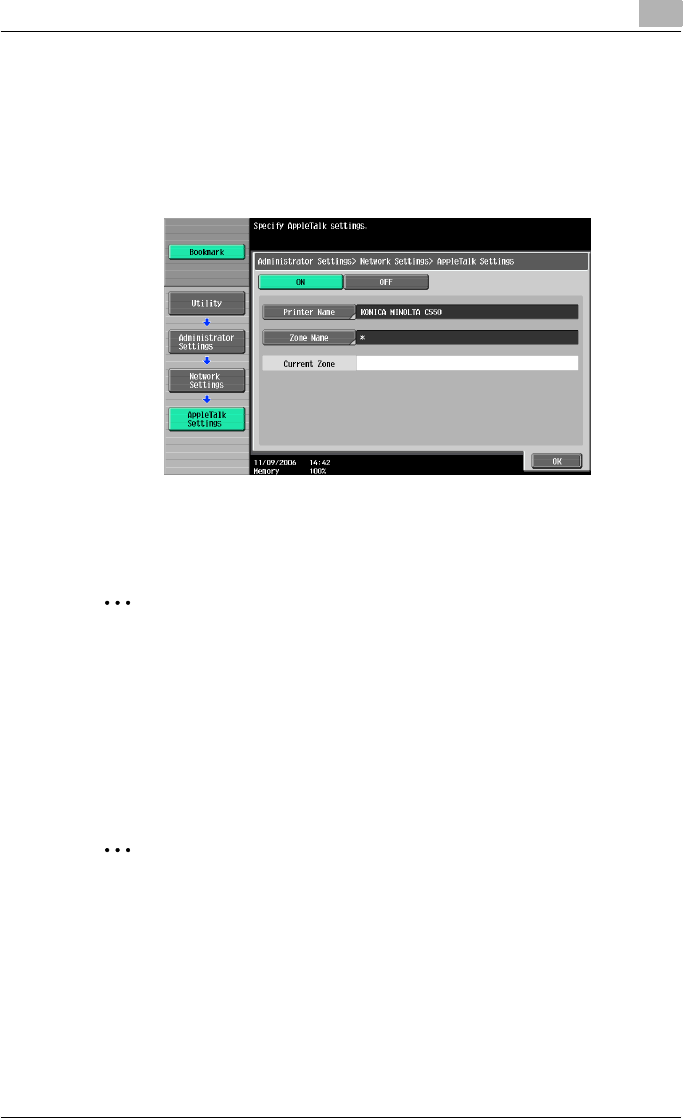
Setting up network printing 3
C550 3-40
3Specify settings for the following. After specifying the settings, touch
[OK].
– AppleTalk Setting: Select [ON].
– Printer Name: Specify the printer name (up to 31 characters).
– Zone Name: Specify the zone being connected to (up to 31 charac-
ters).
4To apply the settings, restart this machine (turn the main power off,
then on again).
2
Reminder
When turning the power off, then on again, wait at least 10 seconds be-
fore turning the power on again; otherwise, this machine may not function
properly.
Specifying the Bonjour settings
When connecting this machine to a Macintosh computer using Bonjour/Ren-
dezvous, the Bonjour settings must be specified.
2
Note
The Bonjour connection is a Mac OS X 10.4 function, it is the same func-
tion as the Rendezvous connection in Mac OS 10.3 or earlier.
1Press the [Utility/Counter] key in this machine’s control panel, touch
[Administrator Settings], and then enter the administrator password.
– The administrator password is required to enter Administrator
mode. Ask the administrator of this machine for the administrator
password.
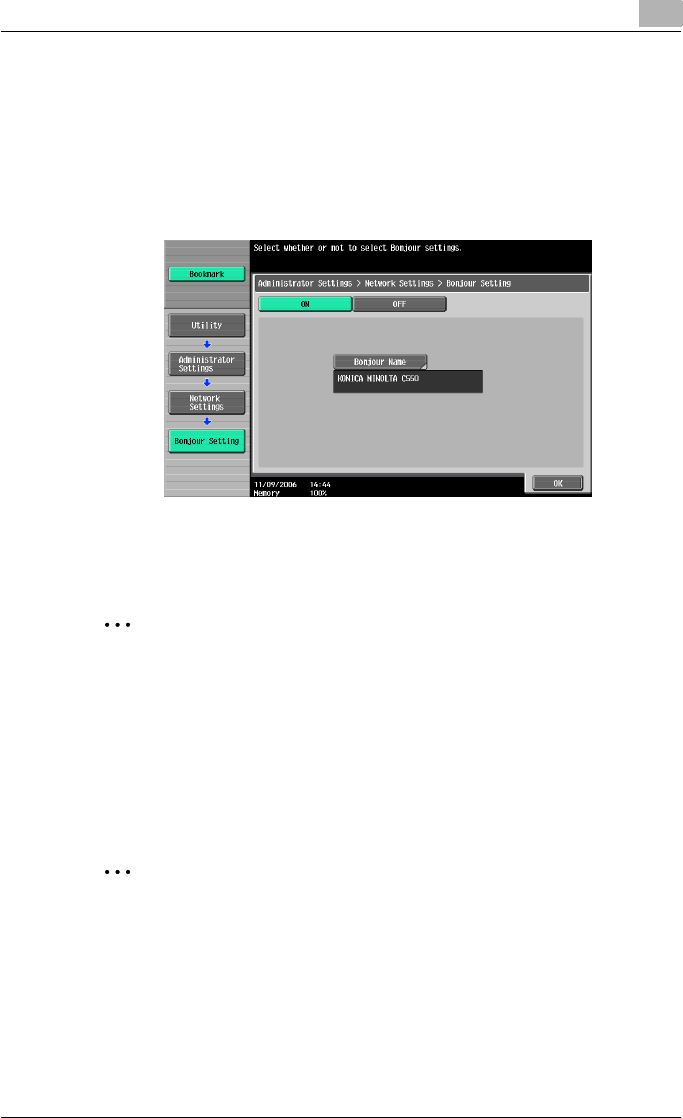
Setting up network printing 3
C550 3-41
2Touch [Network Settings], then [Bonjour Setting].
3Specify settings for the following. After specifying the settings, touch
[OK].
– Bonjour Setting: Select [ON].
– Bonjour Name: Specify the Bonjour name that is to appear as the
connected device name (up to 63 characters).
4To apply the settings, restart this machine (turn the main power off,
then on again).
2
Reminder
When turning the power off, then on again, wait at least 10 seconds be-
fore turning the power on again; otherwise, this machine may not function
properly.
Setting the Macintosh computer
Use the Macintosh computer that is connected to specify the TCP/IP and
AppleTalk settings.
2
Note
For network settings, consult the network administrator.
For the printer driver installation procedure, refer to “Installing the printer
driver” on page 2-1.
Since Bonjour (a Mac OS X 10.4 function) is always enabled, it is not re-
quired to change the settings.
Bonjour/Rendezvous is a Mac OS X function. For Mac OS 9.2, connect
using AppleTalk.

Setting up network printing 3
C550 3-42
For Mac OS X
1On the Apple menu, select “System Preferences”.
2Click the “Network” icon.
3From “Show”, select “Built-in Ethernet”.
4Click the TCP/IP tab.
5Select the items from “Configure” that correspond to the network set-
tings for the Macintosh computer that is connected to the network, and
then set the IP address and subnet mask.
6If using an AppleTalk connection, click the AppleTalk tab, and then
check that the “Make AppleTalk Active” check box is selected.
7Click the close button at the top left of the dialog box.
The “Apply configuration changes?” message appears.
8Click the [Apply] button.
The changed setting are saved.
For Mac OS 9.2
1On the Apple menu, point to “Control Panel”, and then click “Apple-
Talk”.
2From the “Connect via” drop-down list, select “Ethernet”.
3On the Apple menu, point to “Control Panel”, and then click “TCP/IP”.
4From the “Connect via” drop-down list, select “Ethernet”.
5Select the items from “Configure” that correspond to the network set-
tings for the Macintosh computer that is connected to the network, and
then set the IP address and subnet mask.
6Click the close button at the top left of the dialog box.
The “Save changes to the current configuration?” message appears.
7Click the [Save] button.
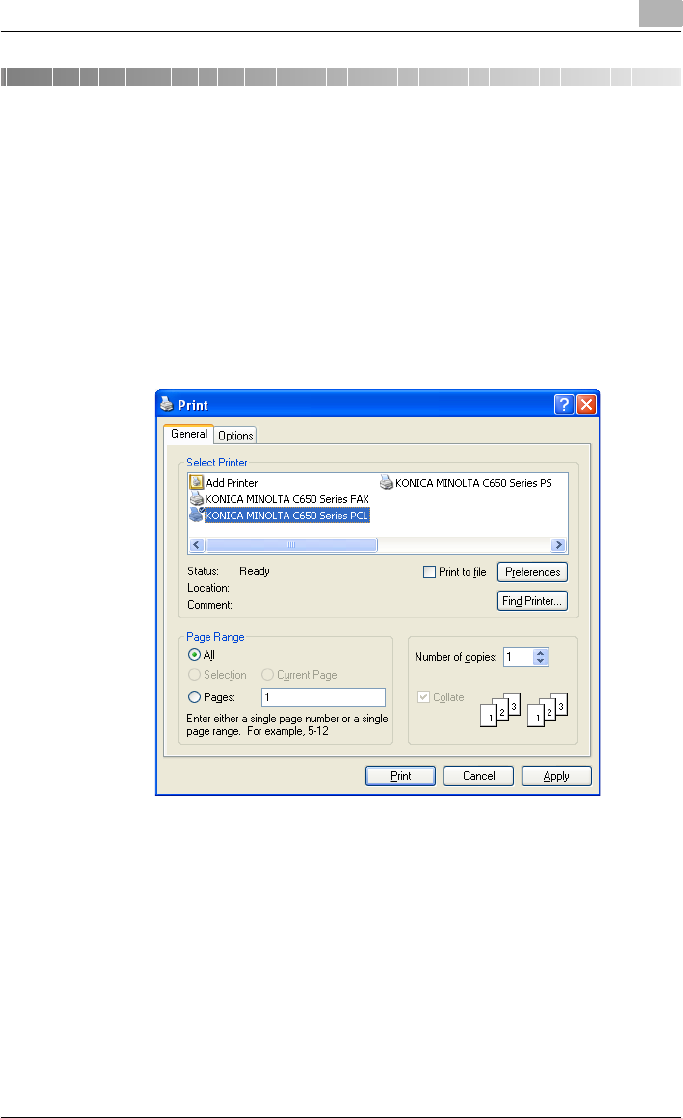
Various printing methods 4
C550 4-1
4 Various printing methods
4.1 Printing operations
For Windows
Print jobs are specified from the application software.
1Open the data in the application, click [File], and then click [Print].
2Check that the printer name has been selected in “Printer Name” or
“Select Printer”. If the printer is not selected, click to select the printer.
– The Print dialog box differs depending on the application.
3Specify the print range and the number of copies to print.
4Click the [Properties] button or the [Preferences] button to change the
printer driver settings as necessary.
– By clicking the [Preferences] button or the [Properties] button in the
Print dialog box, you can specify the settings of each model in the
printer driver dialog box that appears. For details, refer to “Setting
up the PCL driver (Windows)” on page 5-1, or “Setting up the Post-
Script driver (Windows)” on page 6-1.

Various printing methods 4
C550 4-2
– If the changed settings are not saved in the Print dialog box, the
original settings are restored when the application is quit.
5Click the [Print] button.
The Data indicator of this machine flashes.
Test printing
Printing is possible when the printer driver is installed and the network set-
tings have been specified. To check that the connection has been made
properly, you can print the standard Windows test page.
Print a test page from the printer driver Properties dialog box.
1For Windows 2000/NT 4.0, click the [Start] button, point to “Settings”,
and then click “Printers”.
For Windows XP/Server 2003, click the [Start] button, and then click
“Printers and Faxes”.
For Windows Vista, click the [Start] button, and then click “Control pan-
el”, “Hardware and Sound”, and “Printers”.
– If “Printers and Faxes” does not appear in the Start menu in Win-
dows XP/Server 2003, open the Control Panel from the Start menu,
select “Printers and Other Hardware”, and then select “Printers and
Faxes”.
– For Windows Vista, if the control panel is in the classic view, dou-
ble-click “Printers”.
2Right-click the icon of the installed printer, and then click “Properties”.
3Click the General tab, and then click the [Print Test Page] button or the
[Print Test] button.
The test page is printed and the confirmation dialog box appears.
4Check the printout, and then click the [OK] button or the [Yes] button.
2
Note
If the test page is not printed properly, check that the printer driver has
been installed properly and that the network settings are complete.
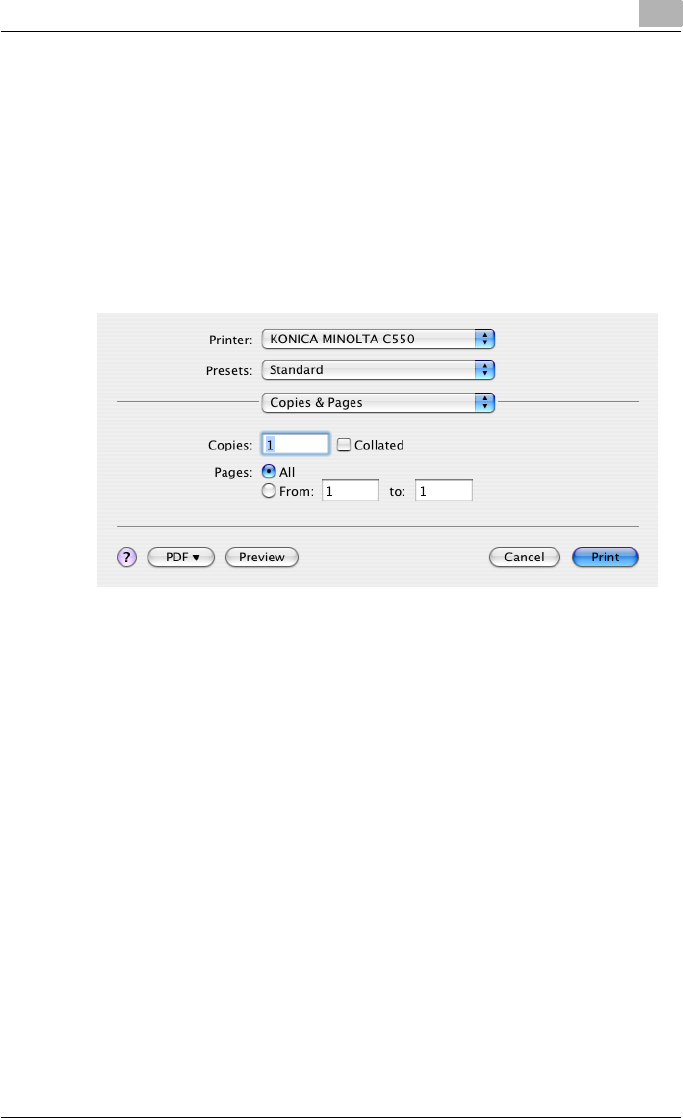
Various printing methods 4
C550 4-3
For Macintosh
Printing is possible when the printer driver is installed and the network set-
tings have been specified. Print jobs are specified from the application soft-
ware.
For Mac OS X
1Open the data in the application, click [File], and then click “Print”.
2Check that the printer name has been selected.
3Specify the print range and the number of copies to print, and then
click the [Print] button.
– If the printer name does not appear in the list, select the printer in
Print Center or Print Setup Utility. For details, refer to “Selecting a
printer” on page 2-25.
– The Print dialog box differs depending on the application.
The Data indicator of this machine flashes.
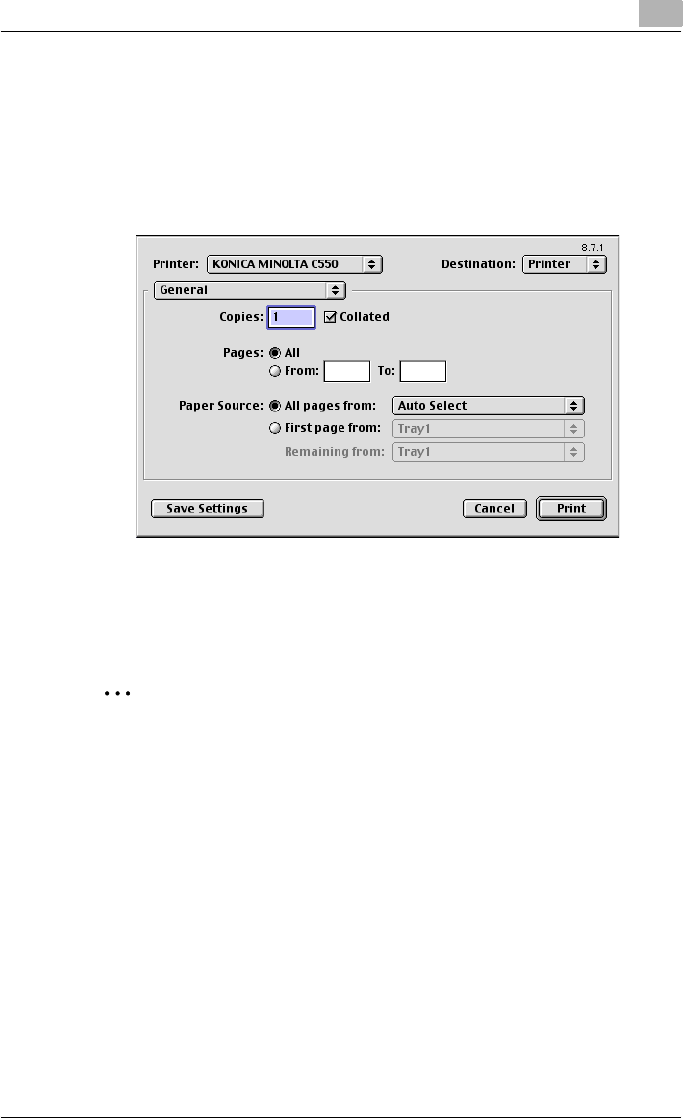
Various printing methods 4
C550 4-4
For Mac OS 9.2
1Open the data in the application, click [File], and then click “Print”.
2Check that the printer name has been selected.
3Select “General”.
4Specify the print range and the number of copies to print, and then
click the [Print] button.
The Data indicator of this machine flashes.
2
Note
If the printer name does not appear in the list, select the printer from the
Chooser window. For details, refer to “Selecting a printer” on page 2-25.
The Print dialog box differs depending on the application.
The settings can be saved by clicking the [Save Settings] button.
Various printing methods 4
C550 4-5
4.2 Setting the printing functions
The functions of this machine such as sorting and folding can be set when
printing from a computer. Depending on the operating system running on the
connected computer, the setting procedure of this machine’s functions may
differ.
Function list
The function list contains a summary of the main settings related to printing
and printer driver support.
2
Note
The function names in this list are based on those displayed by the PCL
printer driver in Windows XP. In addition, the items and setting values dis-
played may differ depending on whether the options are installed or the
settings are available.
Function Overview Printer driver
PCL Post
Script
Mac OS
X
Mac OS
9
Original Orien-
tation
Specifies the orientation of the
original document.
oo o o
Original Size Specifies the size of the original
document.
oo o o
Paper Size Specifies the output paper size. oo o
Zoom Specifies the enlargement and re-
duction ratio.
oo o o
Paper Tray Selects the paper tray for printing. oo o o
Paper Type Selects the paper type for print-
ing.
oo o o
Output Method
(job manage-
ment)
For non-conventional printing, se-
lects special output methods such
as “Secure Print” or “Save in User
Box”.
oo o +
(Proof
Print on-
ly)
User Authenti-
cation
Specifies the user name and
password for user authentication.
oo o
Account Track Specifies the department name
and password for account track
authentication.
oo o
Copies Specifies the number of copies to
print.
oo o o
Collate Specifies whether to print multiple
copies in sets.
oo o o
Various printing methods 4
C550 4-6
Offset When printing multiple copies,
shifts the output position of each
set.
oo o o
Combination/
Poster Mode
Specifies whether to print multiple
pages of text on one page with N
in 1 printing, or print one sheet of
an original document divided on
multiple pages with Poster Mode
printing.
o+
(N in 1
printing
only)
o+
(N in 1
printing
only)
Skip Blank
Pages
Does not print blank pages in the
data.
o
Chapters Specifies the page to be printed
on the front side.
oo o
Print Type Specifies duplex printing and
booklet printing.
oo o o
Binding Posi-
tion
Specifies the binding position. oo o o
Binding Margin Specifies the binding margin. oo
Image Shift Prints by shifting the entire print
image.
oo o
Staple Specifies stapling. oo o o
Punch Specifies hole punching. oo o o
Fold Specifies folding. oo o o
Center Staple
and Fold
Specifies to saddle stitch a print-
ed document.
oo o o
Output Tray Specifies the tray where to output
the printed pages.
oo o o
Paper Arrange-
ment
Specifies the method for adjusting
the binding position.
oo o
Front Cover Attaches a front cover page. oo o o
Back Cover Attaches a back cover page. oo o o
Front Cover
from Post In-
serter
Attaches a front cover from the
post inserter.
oo o o
Back Cover
from Post In-
serter
Attaches a back cover from the
post inserter.
oo o o
Per Page Set-
ting
Inserts paper between pages and
switches the paper and tray for
each page.
oo o
Transparency
Interleave
Outputs and inserts interleaves
when printing overhead projector
transparencies.
oo o o
Function Overview Printer driver
PCL Post
Script
Mac OS
X
Mac OS
9

Various printing methods 4
C550 4-7
Watermark Prints a watermark (text stamp) on
the page being printed.
oo
Create Overlay
File
Prints an original document on top
of an overlay that was created
separately.
oo
Copy Protect Prints a special pattern to prevent
copying.
oo o
Date/Time Prints the date and time. oo o
Page Number Prints the page number. oo o
Header/Footer Prints a header and a footer. oo o
Select Color Selects color printing and mono-
chrome printing.
o+
(No two
color se-
lection)
+
(No two
color se-
lection)
+
(No two
color se-
lection)
Quality Adjust-
ment
Adjusts the image quality. oo o o
Color Settings Prints with a quality suitable for
the selected original document.
oo o o
Pattern Specifies the graphic pattern de-
tails.
o
Image Com-
pression
Specifies the compression ratio
for a graphic image.
o
Glossy Mode Prints using a gloss finish. oo o o
Use Printer
Fonts
Specifies the replacement of Tru-
eType fonts with printer fonts.
oo
Function Overview Printer driver
PCL Post
Script
Mac OS
X
Mac OS
9
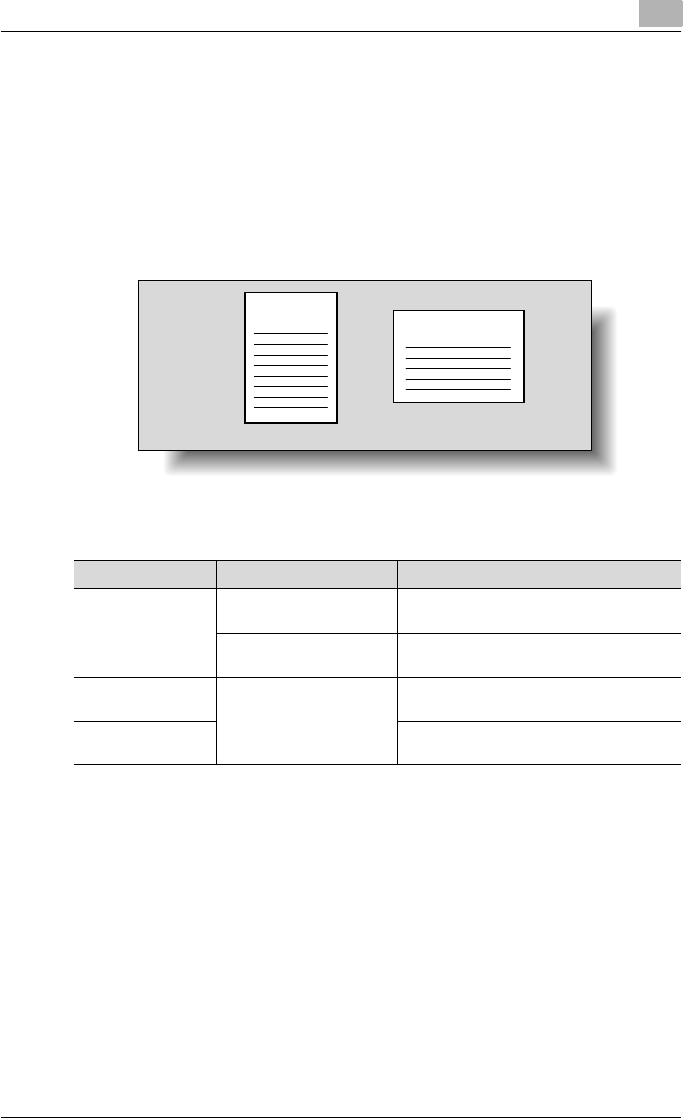
Various printing methods 4
C550 4-8
Function overview
An overview of each function is summarized in this section.
Original Orientation
You can specify “Portrait” or “Landscape” as the orientation of the page be-
ing printed.
Operating system Printer driver Refer to
Windows Konica Minolta PCL “Specifying the Basic tab settings” on
page 5-7
Konica Minolta PostScript “Specifying the Basic tab settings” on
page 6-7
Mac OS X PostScript PPD “Page Attributes (basic settings)” on
page 8-7
Mac OS 9.2 “Page Attributes (basic settings)” on
page 7-5
ABCD ABCDEF
Portrait Landscape

Various printing methods 4
C550 4-9
Original Size and Paper Size
You can specify the original document size and the output paper size. By
specifying each size, you can specify the enlargement and reduction ratio.
2
Note
Only the output paper sizes can be specified with the PostScript PPD
driver for the Macintosh.
Operating system Printer driver Refer to
Windows Konica Minolta PCL “Specifying the Basic tab settings” on
page 5-7
Konica Minolta PostScript “Specifying the Basic tab settings” on
page 6-7
Mac OS X PostScript PPD “Page Attributes (basic settings)” on
page 8-7
Mac OS 9.2 “Page Attributes (basic settings)” on
page 7-5
Original size Output size
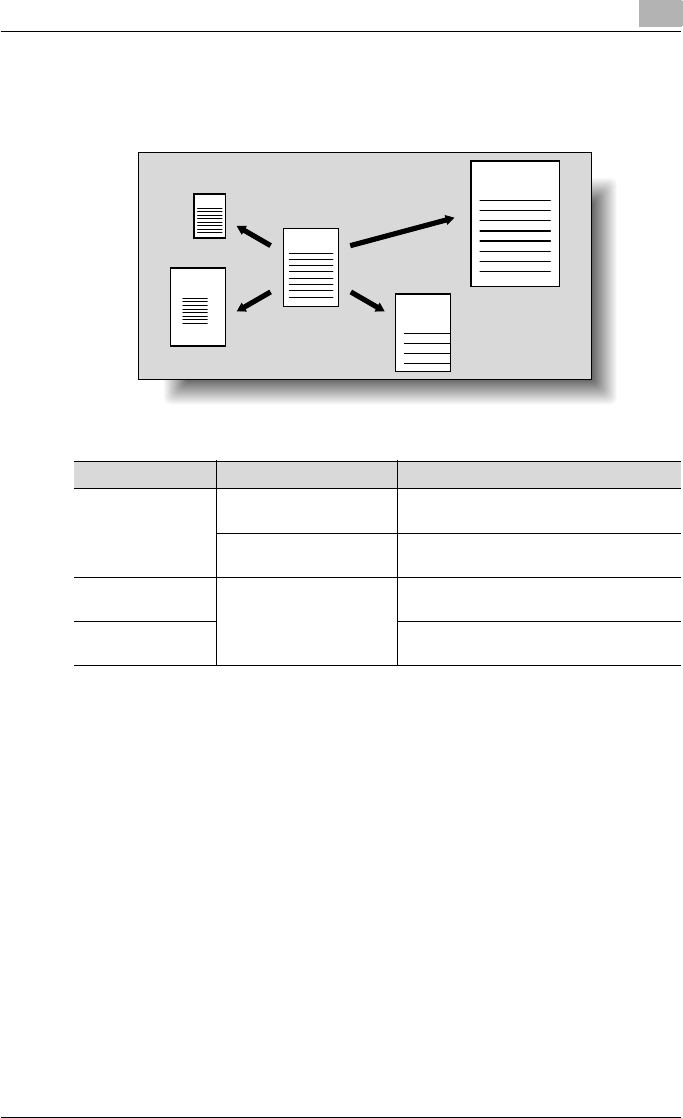
Various printing methods 4
C550 4-10
Zoom (enlargement and reduction)
You can specify the enlargement or reduction ratio using numeric values.
Operating system Printer driver Refer to
Windows Konica Minolta PCL “Specifying the Basic tab settings” on
page 5-7
Konica Minolta PostScript “Specifying the Basic tab settings” on
page 6-7
Mac OS X PostScript PPD “Page Attributes (basic settings)” on
page 8-7
Mac OS 9.2 “Page Attributes (basic settings)” on
page 7-5
ABCD
ABCD
ABCD
ABCD
AB
C
Original Enlarged
Reduced
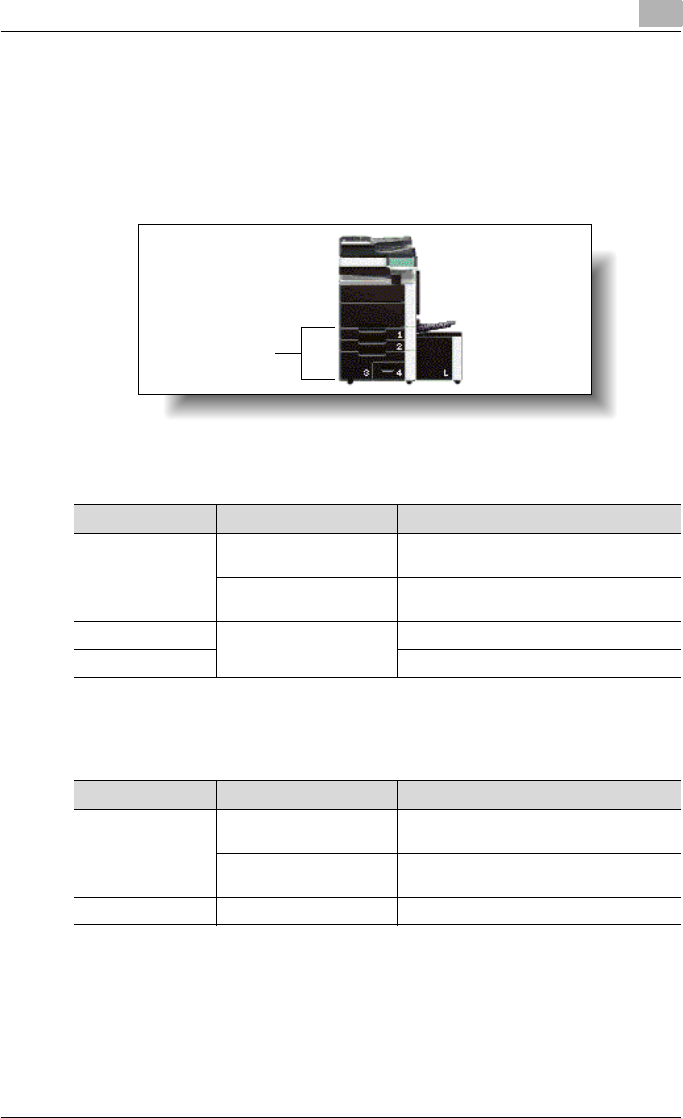
Various printing methods 4
C550 4-11
Paper Tray (paper source)
You can select the paper tray for printing from the “Paper Tray” drop-down
list. When changing the paper type, you can select a paper tray according to
the desired paper type.
Paper Type
You can specify the paper type to be printed.
Operating system Printer driver Refer to
Windows Konica Minolta PCL “Specifying the Basic tab settings” on
page 5-7
Konica Minolta PostScript “Specifying the Basic tab settings” on
page 6-7
Mac OS X PostScript PPD “Paper Tray/Output Tray” on page 8-25
Mac OS 9.2 “General (basic settings)” on page 7-8
Operating system Printer driver Refer to
Windows Konica Minolta PCL “Specifying the Basic tab settings” on
page 5-7
Konica Minolta PostScript “Specifying the Basic tab settings” on
page 6-7
Mac OS X PostScript PPD “Paper Tray/Output Tray” on page 8-25
Tray
Various printing methods 4
C550 4-12
Output Method (job management)
You can select output methods such as “Secure Print”, which requires a
password to print, or “Save in User Box”, which saves documents in a doc-
ument folder.
User Authentication
When the authentication settings have been applied on this machine, you
must enter the required user name and password.
Account Track
You can specify this setting when this machine is operating in Account
Track.
Operating system Printer driver Refer to
Windows Konica Minolta PCL “Specifying the Basic tab settings” on
page 5-7
Konica Minolta PostScript “Specifying the Basic tab settings” on
page 6-7
Mac OS X PostScript PPD “Output Method” on page 8-10
Mac OS 9.2 “Printer specific options (Finishing Options
1 to 5)” on page 7-10
Operating system Printer driver Refer to
Windows Konica Minolta PCL “Specifying the Basic tab settings” on
page 5-7
Konica Minolta PostScript “Specifying the Basic tab settings” on
page 6-7
Mac OS X PostScript PPD “Output Method” on page 8-10
Operating system Printer driver Refer to
Windows Konica Minolta PCL “Specifying the Basic tab settings” on
page 5-7
Konica Minolta PostScript “Specifying the Basic tab settings” on
page 6-7
Mac OS X PostScript PPD “Output Method” on page 8-10
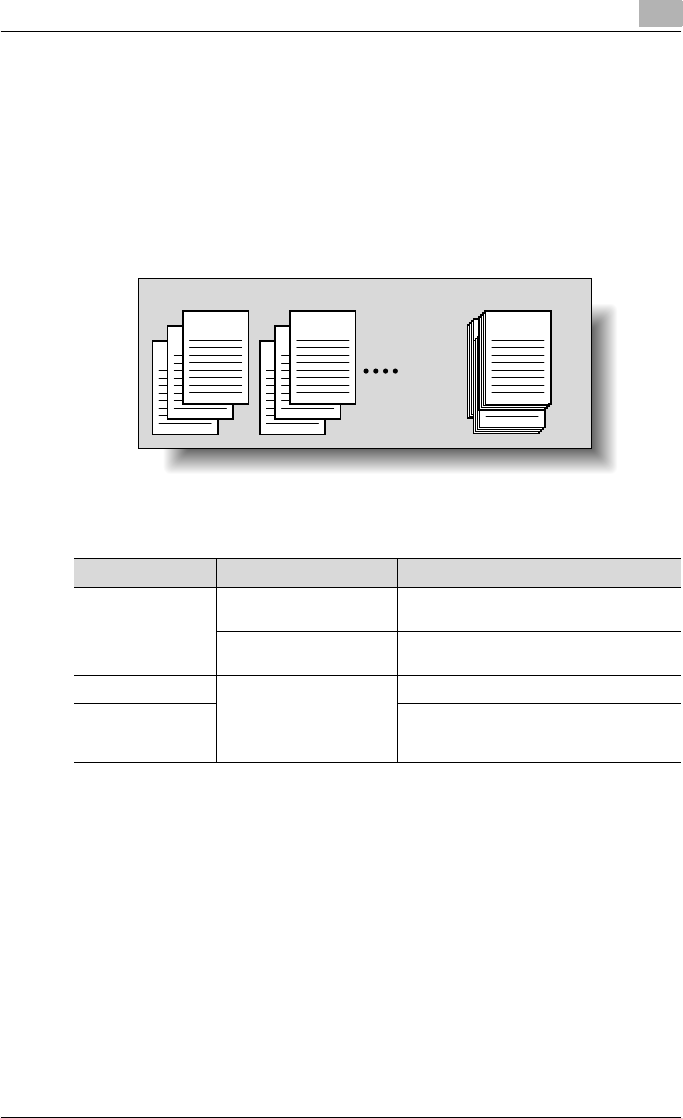
Various printing methods 4
C550 4-13
Collate and Offset
You can print the complete document sets the specified number of times or
each page the specified number of times.
By specifying offset, the output position can be shifted and output to the
front and back for each copy. (Multiple paper sources are used when a shift-
ing finisher is installed and when no finisher is installed.)
Operating system Printer driver Refer to
Windows Konica Minolta PCL “Specifying the Basic tab settings” on
page 5-7
Konica Minolta PostScript “Specifying the Basic tab settings” on
page 6-7
Mac OS X PostScript PPD “Output Method” on page 8-10
Mac OS 9.2 “General (basic settings)” on page 7-8, and
“Printer specific options (Finishing Options
1 to 5)” on page 7-10
ABCD
ABCD
3
ABCD
2
ABCD
1
ABCD
3
ABCD
2
ABCD
1
ABCD ABCD
Collate Offset
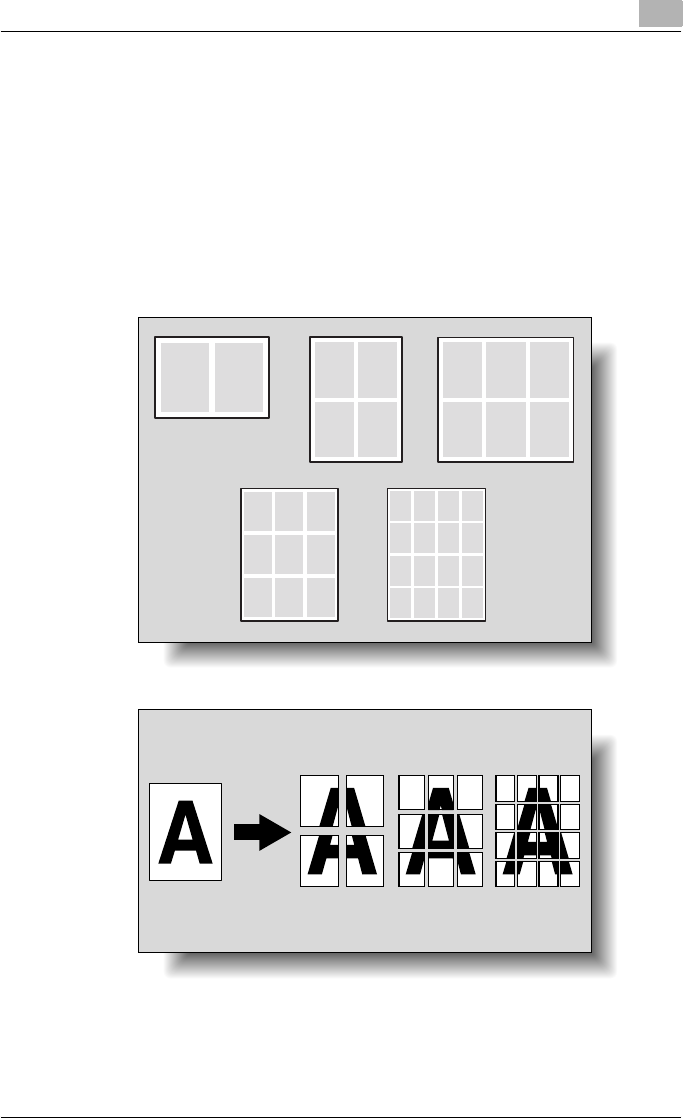
Various printing methods 4
C550 4-14
Combination/Poster Mode
You can specify whether to print multiple pages of text on one page with N
in 1 printing, or print one sheet of an original document divided on multiple
pages with Poster Mode printing.
N in 1 printing comes in handy when you want to reduce the number of out-
put pages.
Poster Mode printing allows you want to enlarge the print size when large pa-
per sizes are not available (PCL printer driver and Mac OS X printer driver on-
ly).
12 12
34
12
45
3
6
12
45
3
6
789
12
56
3
7
91011
4
8
12
13 14 15 16
2in1
4in1 6in1
9in1 16in1
2 × 2 3 × 3 4 × 4
Various printing methods 4
C550 4-15
Skip Blank Pages (saving paper)
You can specify not to print blank pages in the data.
Chapters
You can specify the page you want to print on the front side when duplex
printing or booklet printing.
Even if a specified page comes up to be printed on the back side in duplex
printing or booklet printing, the specified page is moved and printed on the
front side.
Operating system Printer driver Refer to
Windows Konica Minolta PCL “Specifying the Layout tab settings” on
page 5-17
Konica Minolta PostScript “Specifying the Layout tab settings” on
page 6-17
Mac OS X PostScript PPD “Print dialog box” on page 8-2
“Layout/Finish” on page 8-19
Mac OS 9.2 “Layout (printing multiple pages on one
page)” on page 7-9
Operating system Printer driver Refer to
Windows Konica Minolta PCL “Specifying the Layout tab settings” on
page 5-17
Operating system Printer driver Refer to
Windows Konica Minolta PCL “Specifying the Layout tab settings” on
page 5-17
Konica Minolta PostScript “Specifying the Layout tab settings” on
page 6-17
Mac OS X PostScript PPD “Layout/Finish” on page 8-19
Various printing methods 4
C550 4-16
Print Type (duplex printing/booklet printing)
You can print onto both sides of a page or in a booklet format (two facing
pages or center binding). This comes in handy when you want to bind multi-
ple-page documents.
The binding area can be specified by specifying the binding position.
Duplex printing
Booklet printing
Operating system Printer driver Refer to
Windows Konica Minolta PCL “Specifying the Layout tab settings” on
page 5-17
Konica Minolta PostScript “Specifying the Layout tab settings” on
page 6-17
Mac OS X PostScript PPD “Layout/Finish” on page 8-19
Mac OS 9.2 “Printer specific options (Finishing Options
1 to 5)” on page 7-10
Left binding
Printout
Top binding
PrintoutPrint data Print data
Print data Printout
Various printing methods 4
C550 4-17
Image Shift
You can specify whether to shift the entire print image according to the bind-
ing margins, then print. You can specify the shift direction and set the values
for the print position. For duplex printing, the front side and back side of a
page can be specified separately.
Operating system Printer driver Refer to
Windows Konica Minolta PCL “Specifying the Layout tab settings” on
page 5-17
Konica Minolta PostScript “Specifying the Layout tab settings” on
page 6-17
Mac OS X PostScript PPD “Layout/Finish” on page 8-19
Mac OS 9.2 “Printer specific options (Finishing Options
1 to 5)” on page 7-10
ABCD
Right shiftLeft shift
Up shift
Down shift
Various printing methods 4
C550 4-18
Stapling and hole punching
Documents can be stapled together or holes can be punched into the docu-
ment.
By specifying the binding margin, you can specify the margin for stapling or
hole punching.
2
Reminder
The staple function is available only when the optional finisher is installed.
The hole punch function is available only when the punch kit is installed
on the optional finisher.
Operating system Printer driver Refer to
Windows Konica Minolta PCL “Specifying the Finish tab settings” on
page 5-21
Konica Minolta PostScript “Specifying the Finish tab settings” on
page 6-21
Mac OS X PostScript PPD “Layout/Finish” on page 8-19
Mac OS 9.2 “Printer specific options (Finishing Options
1 to 5)” on page 7-10
ABCD ABCDEF ABCD ABCDEF
Stapling Hole punching
Various printing methods 4
C550 4-19
Center Staple and Fold/Fold
You can specify whether to fold a printed document in half or in three, or to
fold a printed document in half and to staple in the center.
2
Reminder
The center staple and fold function and fold function are available only
when optional finisher FS-608 is installed.
The tri-fold function is available only when optional finisher FS-608 is in-
stalled.
Operating system Printer driver Refer to
Windows Konica Minolta PCL “Specifying the Finish tab settings” on
page 5-21
Konica Minolta PostScript “Specifying the Finish tab settings” on
page 6-21
Mac OS X PostScript PPD “Layout/Finish” on page 8-19
Mac OS 9.2 “Printer specific options (Finishing Options
1 to 5)” on page 7-10
Half-fold Tri-fold Center staple and fold
Various printing methods 4
C550 4-20
Paper Arrangement
When printing a document with duplex printing, you can specify whether to
adjust the binding position with “Prioritize Arranging Papers”, which prints
after all the print data is received, or with “Prioritize Productivity”, which
prints the data simultaneously as it is received.
Cover Mode and Transparency Interleave
A front cover and back cover can be added and interleaves can be inserted
between overhead projector transparencies.
Operating system Printer driver Refer to
Windows Konica Minolta PCL “Specifying the Finish tab settings” on
page 5-21
Konica Minolta PostScript “Specifying the Finish tab settings” on
page 6-21
Mac OS X PostScript PPD “Layout/Finish” on page 8-19
Mac OS 9.2 “Printer specific options (Finishing Options
1 to 5)” on page 7-10
Operating system Printer driver Refer to
Windows Konica Minolta PCL “Specifying the Cover Mode tab settings”
on page 5-24
Konica Minolta PostScript “Specifying the Cover Mode tab settings”
on page 6-24
Mac OS X PostScript PPD “Cover Mode/Transparency Interleave” on
page 8-27
Mac OS 9.2 “Printer specific options (Finishing Options
1 to 5)” on page 7-10
ABCD
ABCD
ABCD ABCD
Back coverFront cover
Various printing methods 4
C550 4-21
Per Page Setting
You can specify to have paper inserted between pages, and specify the sim-
plex or duplex print type and the paper to be printed for each page.
Watermark
You can print a watermark (text stamp) on the page being printed.
Watermark
Operating system Printer driver Refer to
Windows Konica Minolta PCL “Specifying the Cover Mode tab settings”
on page 5-24
Konica Minolta PostScript “Specifying the Cover Mode tab settings”
on page 6-24
Mac OS X PostScript PPD “Per Page Setting” on page 8-29
Operating system Printer driver Refer to
Windows Konica Minolta PCL “Specifying the Stamp/Composition tab
settings” on page 5-27
Konica Minolta PostScript “Specifying the Stamp/Composition tab
settings” on page 6-28
Confidential
Various printing methods 4
C550 4-22
Overlay
You can print an original document on top of overlay data that was created
separately.
Overlay
Copy Protect
You can print a special pattern on an entire page while printing.
When the pattern on the printed page is copied, the characters embedded in
the pattern appear to prevent an illegal copy.
Operating system Printer driver Refer to
Windows Konica Minolta PCL “Specifying the Stamp/Composition tab
settings” on page 5-27
Konica Minolta PostScript “Specifying the Stamp/Composition tab
settings” on page 6-28
Operating system Printer driver Refer to
Windows Konica Minolta PCL “Specifying the Stamp/Composition tab
settings” on page 5-27
Konica Minolta PostScript “Specifying the Stamp/Composition tab
settings” on page 6-28
Mac OS X PostScript PPD “Stamp/Composition” on page 8-32
New Product New Product
Form data Created data
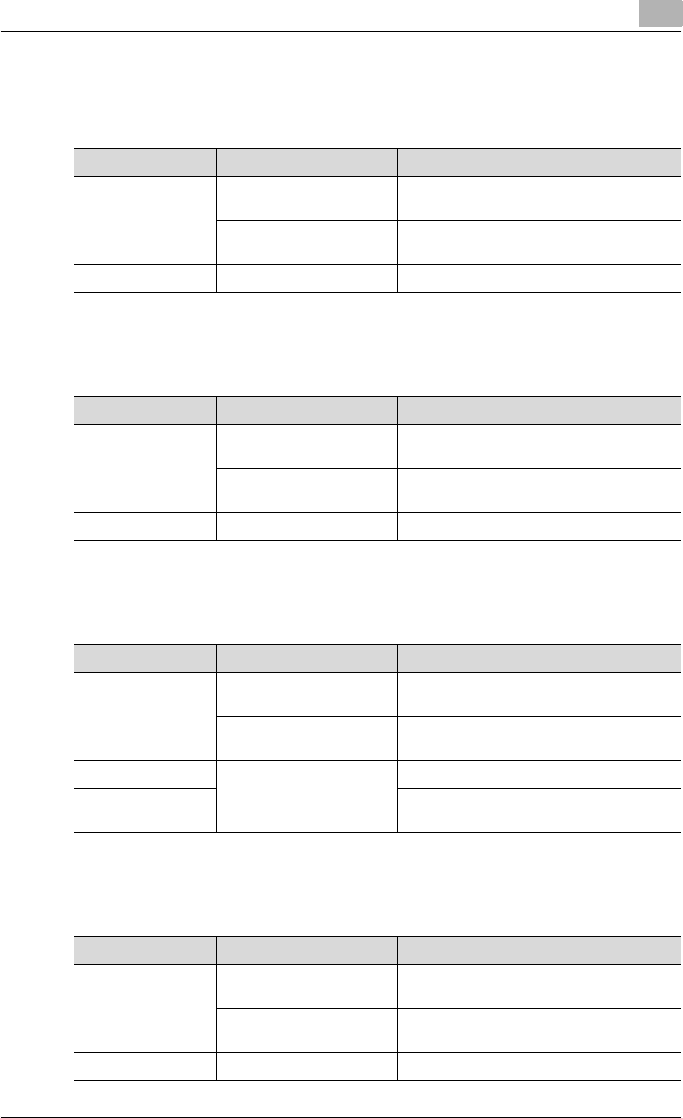
Various printing methods 4
C550 4-23
Date/Time and Page Number
You can print the date, time, or page numbers on a document.
Header/Footer
You can print a header and a footer on a document.
Quality Adjustment
You can adjust the image quality.
Use Printer Fonts (substitute fonts)
You can specify whether to replace the TrueType fonts with printer fonts.
Operating system Printer driver Refer to
Windows Konica Minolta PCL “Specifying the Stamp/Composition tab
settings” on page 5-27
Konica Minolta PostScript “Specifying the Stamp/Composition tab
settings” on page 6-28
Mac OS X PostScript PPD “Stamp/Composition” on page 8-32
OS Printer driver Refer to
Windows Konica Minolta PCL “Specifying the Stamp/Composition tab
settings” on page 5-27
Konica Minolta PostScript “Specifying the Stamp/Composition tab
settings” on page 6-28
Mac OS X PostScript PPD “Stamp/Composition” on page 8-32
Operating system Printer driver Refer to
Windows Konica Minolta PCL “Specifying the Quality tab settings” on
page 5-39
Konica Minolta PostScript “Specifying the Quality tab settings” on
page 6-40
Mac OS X PostScript PPD “Quality” on page 8-38
Mac OS 9.2 “Printer specific options (Finishing Options
1 to 5)” on page 7-10
Operating system Printer driver Refer to
Windows Konica Minolta PCL “Specifying the Quality tab settings” on
page 5-39
Konica Minolta PostScript “Specifying the Quality tab settings” on
page 6-40
Mac OS 9.2 PostScript PPD “PostScript Options” on page 7-7

Various printing methods 4
C550 4-24
4.3 Specifying the printer driver basic settings
The settings specified for the functions of this machine when printing can
only be applied while using the application. When the application is quit, the
settings return to their default settings.
When registering the settings, change the printer driver basic settings (de-
fault settings) or use the function for saving settings.
For Windows
The functions of this machine that can be used when printing can be speci-
fied in the printer driver setup dialog box, which can be displayed from the
Printers window (for Windows XP/Server 2003, Printers and Faxes window).
Settings specified in the printer driver setup dialog box displayed using the
procedure described below will be applied when printing from any applica-
tion.
1For Windows 2000/NT 4.0, click the [Start] button, point to “Settings”,
and then click “Printers”.
For Windows XP/Server 2003, click the [Start] button, and then click
“Printers and Faxes”.
For Windows Vista, click the [Start] button, and then click “Control pan-
el”, “Hardware and Sound”, and “Printers”.
– If “Printers and Faxes” does not appear in the Start menu in Win-
dows XP/Server 2003, open the Control Panel from the Start menu,
select “Printers and Other Hardware”, and then select “Printers and
Faxes”.
– For Windows Vista, if the control panel is in the classic view, dou-
ble-click “Printers”.
2For Windows 2000/XP/Server 2003/Vista, right-click the icon of the in-
stalled printer, and then click “Printing Preferences”.
For Windows 4.0, right-click the icon of the installed printer, and then
click “Document Defaults”.
The following printer driver setting dialog box appears.
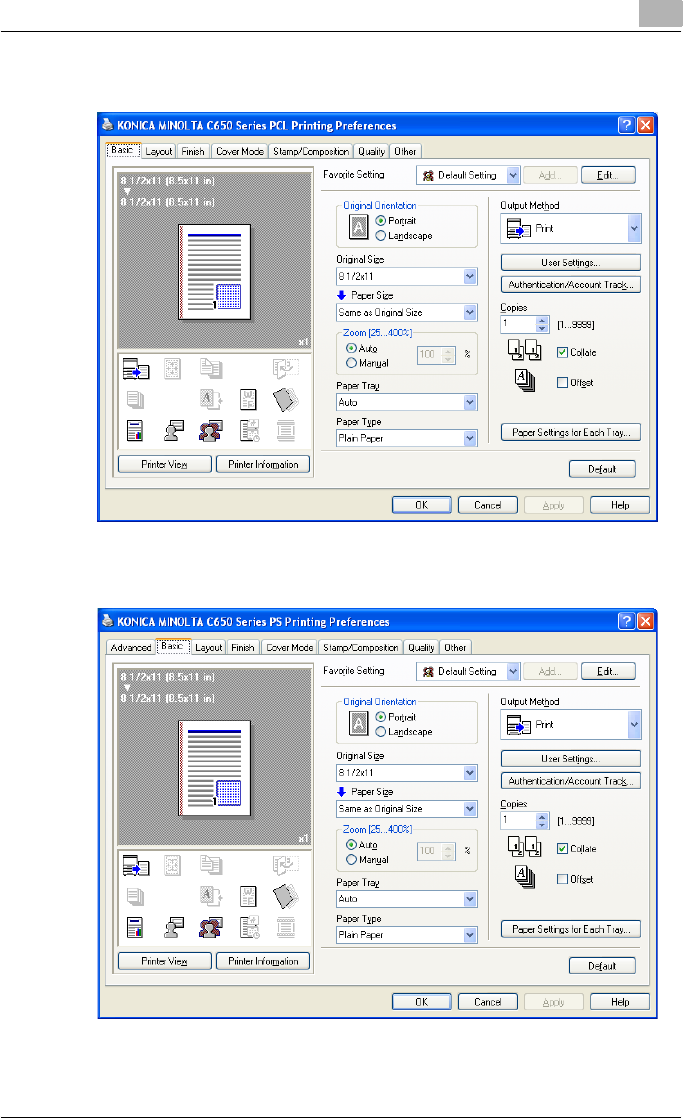
Various printing methods 4
C550 4-25
PCL driver
PostScript driver

Various printing methods 4
C550 4-26
2
Note
For the settings that can be specified with each printer driver, refer to the
following:
Konica Minolta PCL Driver: “Setting up the PCL driver (Windows)” on
page 5-1
Konica Minolta PostScript Driver: “Setting up the PostScript driver (Win-
dows)” on page 6-1
Use each tab in the dialog box to set up the printer driver.
To specify custom settings, click Print in the application, and then click
the [Properties] or the [Preferences] button in the Print dialog box. The
settings specified in the Print dialog box apply only to the current file.
For the function for saving settings, refer to the follow:
Konica Minolta PCL Driver: “Saving the driver settings” on page 5-50
Konica Minolta PostScript Driver: “Saving the driver settings” on
page 6-51
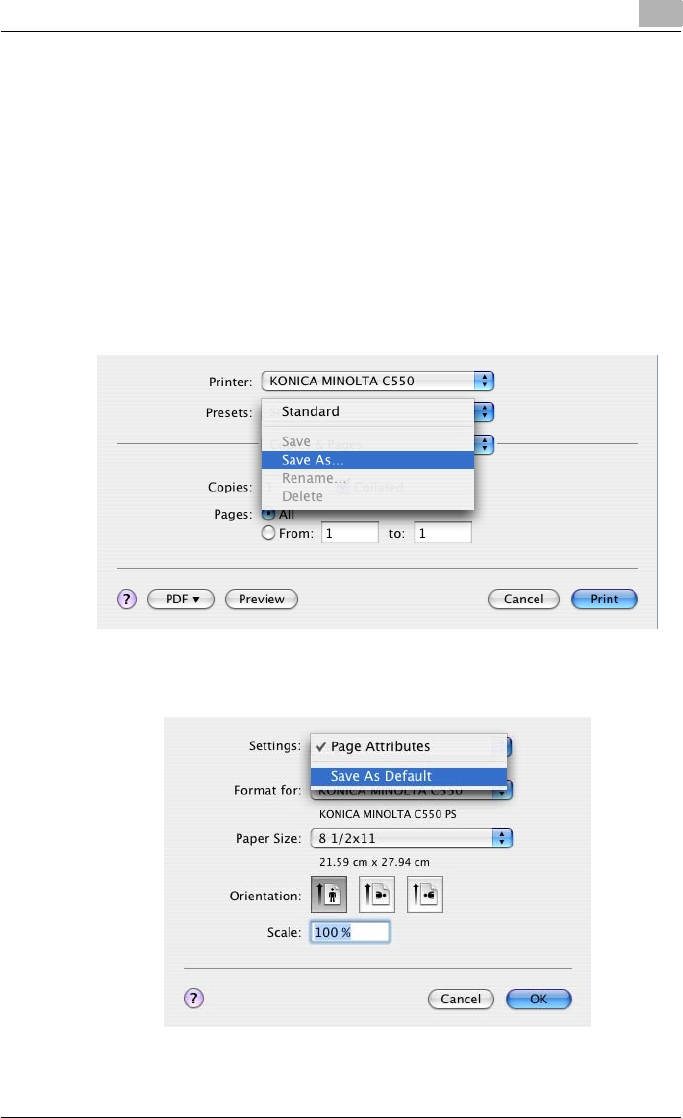
Various printing methods 4
C550 4-27
For Macintosh
The functions of this machine that can be used when printing can be speci-
fied in the Print dialog box or the Page Setup dialog box.
The settings can only be applied while using the application. When the ap-
plication is quit, the settings return to their default settings.
To specify the settings, save the settings in the printer driver dialog box.
For Mac OS X
In the Print dialog box, save the settings from the “Presets” function.
For saving the settings, refer to “Saving the driver settings” on page 8-42.
In the Page Setup dialog box, save the settings by selecting “Save as De-
fault” from “Settings”.
Various printing methods 4
C550 4-28
2
Note
For details on the settings that can be specified in the printer driver, refer
to “Setting up the PPD driver (Mac OS X)” on page 8-1.
For Mac OS 9.x
In the Print dialog box, save the settings by clicking the [Save Settings] but-
ton.
2
Note
The settings cannot be saved from the Page Setup dialog box.
“General” cannot be saved from the Print dialog box.
For details on the settings that can be specified in the printer driver, refer
to “Setting up the PPD driver (Mac OS 9.2)” on page 7-1.
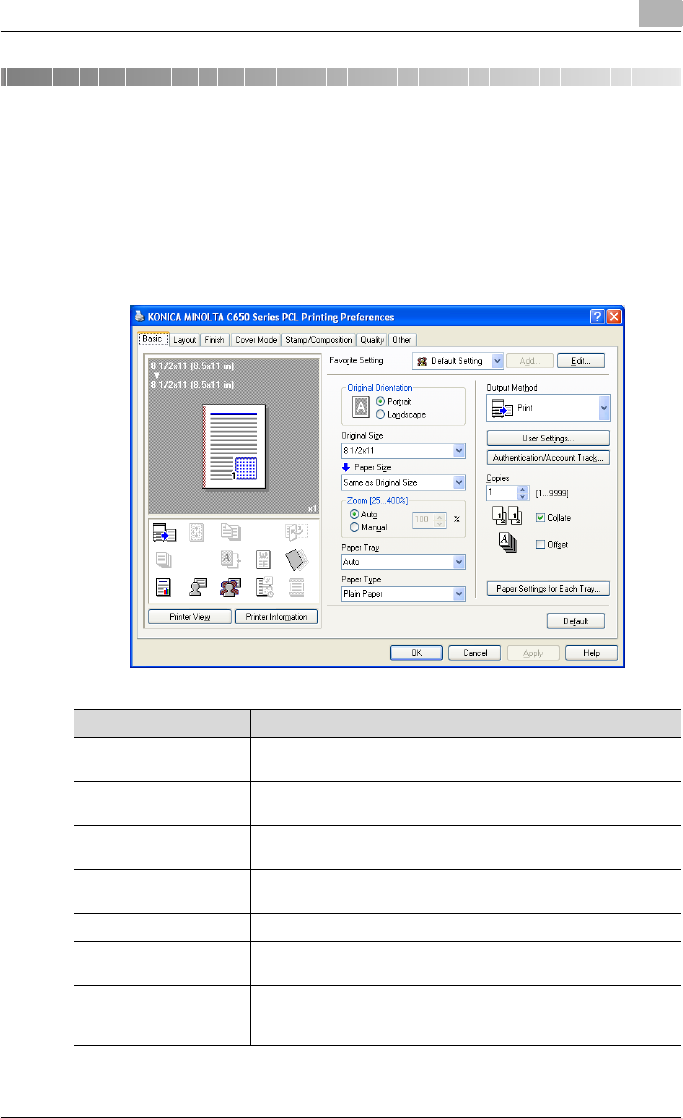
Setting up the PCL driver (Windows) 5
C550 5-1
5 Setting up the PCL driver (Windows)
5.1 Settings
Common settings
The following describes the common settings and buttons that are displayed
on all tabs.
Button Function
OK Click this button to close the dialog box and apply any settings that
have been changed.
Cancel Click this button to cancel any settings that have been changed and
close the dialog box.
Help Click this button to display the help for each item on the currently
displayed dialog box.
Add (Favorite Setting) Click this button to save the current settings and to view them at a
later time.
Edit (Favorite Setting) Click this button to change the saved settings.
Default Click this button to return the settings to their defaults, which were
selected when the driver was installed.
Printer Information Click this button to start up PageScope Web Connection and check
the information of the machine. This is enabled when communica-
tion with the machine is possible.
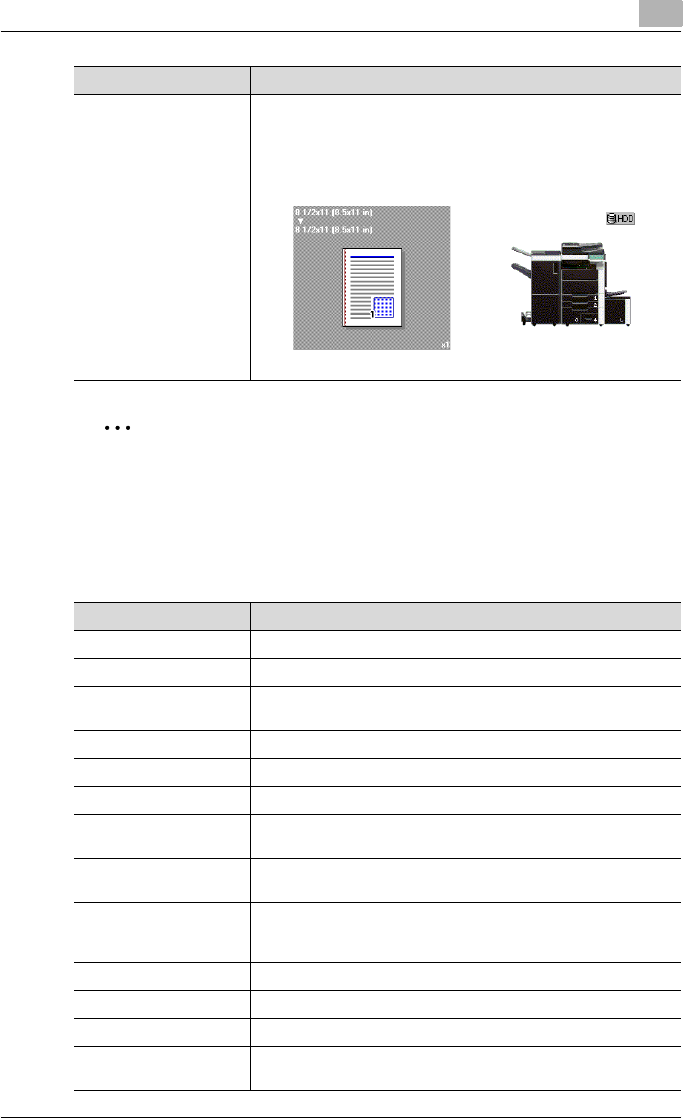
Setting up the PCL driver (Windows) 5
C550 5-2
2
Note
To enable any installed options, you must specify the Device Option set-
tings. For details, refer to “Specifying the Configure tab settings” on
page 5-43.
Basic tab
View When the [Paper View] button is clicked, a preview of the page lay-
out as specified in the current settings is displayed and a preview
image of the print job can be checked.
When the [Printer View] button is clicked, a printer figure is dis-
played showing any options, such as the paper tray, that are in-
stalled on this machine.
Button Function
Paper Printer
Item Function
Original Orientation Specifies the orientation of the original document.
Original Size Specifies the size of the original document.
Paper Size Specifies the output paper size. Automatically enlarges or reduces
when the Original Size setting is changed.
Zoom Specifies the enlargement and reduction ratio.
Paper Tray Selects the paper tray for printing.
Paper Type Selects the paper type for printing.
Output Method For non-conventional printing, selects special output methods such
as “Secure Print” or “Save in User Box”.
[User Settings] Specifies the ID and password, or the file name and box number
when performing “Secure Print” or “Save in User Box”.
[Authentication/Account
Track]
Specifies the user name and password when performing user au-
thentication, and the department name and password when per-
forming account track on this machine.
Copies Specifies the number of copies to print.
Collate Specifies whether to print multiple copies in sets.
Offset When printing multiple copies, shifts the output position of each set.
Paper Settings for Each
Tray
Specifies the paper type for each paper tray.
Setting up the PCL driver (Windows) 5
C550 5-3
Layout tab
Finish tab
Cover Mode tab
Item Function
Combination Prints multiple pages on one page, or prints one sheet of an origi-
nal document divided on multiple pages. Details can be specified
by clicking the [Combination Details] button.
Rotate 180 Prints the image rotated 180°.
Skip Blank Pages Does not print blank pages in the data.
Chapters Specifies the page to be printed on the front side.
Print Type Specifies duplex printing and booklet printing.
Binding Position Specifies the binding position.
Binding Margin Specifies the binding margin. Click the [Binding Margin Settings]
button to specify the margin values.
Image Shift Prints by shifting the entire print image. Click the [Image Shift Set-
tings] button to specify the image shift values.
Item Function
Staple Specifies stapling.
Center Staple and Fold Specifies to saddle stitch a printed document.
Punch Specifies hole punching.
Fold Specifies folding.
Output Tray Specifies the tray where to output the printed pages.
Paper Arrangement Specifies the method for adjusting the binding position.
Item Function
Front Cover Attaches a front cover page.
Front Cover Tray Selects the paper tray for the front cover.
Back Cover Attaches a back cover page.
Back Cover Tray Selects the paper tray for the back cover.
Front Cover from Post
Inserter
Attaches a front cover from the post inserter.
Back Cover from Post
Inserter
Attaches a back cover from the post inserter.
Per Page Setting Inserts paper between pages and switches the paper and tray for
each page.
Setting up the PCL driver (Windows) 5
C550 5-4
Stamp/Composition tab
Quality tab
Other tab
Transparency Interleave Outputs and inserts interleaves when printing overhead projector
transparencies.
Interleave Tray Selects the input tray for the transparency interleaves.
Item Function
Item Function
Watermark Prints a watermark (text stamp) on the page being printed. Water-
marks can be added, changed, or deleted by clicking the [Edit]
button.
Create Overlay File Prints an original document on top of an overlay that was created
separately.
Copy Protect Prints a special pattern to prevent copying.
Date/Time Prints the date and time.
Page Number Prints the page number.
Header/Footer Prints a header and a footer.
Item Function
Select Color Specifies the color for printing.
Quality Adjustment Adjusts the image quality. You can select “Simple” to adjust entire
documents or “Detail” to adjust the text, photos, figures, tables,
and graphs in the document.
Color Settings Prints with a quality suitable for the selected original document.
Pattern Specifies the graphic pattern details.
Image Compression Specifies the compression ratio for a graphic image.
Glossy Mode Prints with a gloss.
Font
Settings
Download Font
Format
Selects whether the fonts are downloaded to the printer as bitmap
or outline.
Use Printer
Fonts
Selects whether to use TrueType fonts or the printer fonts when
printing.
Item Function
Excel Job Control Controls jobs so that they are not separated when printing in Mi-
crosoft Excel.
Setting up the PCL driver (Windows) 5
C550 5-5
Configure tab
2
Note
To display the Configure tab in Windows 2000/XP/NT 4.0/Server 2003/
Vista, right-click the icon of the installed printer, and then click “Proper-
ties”.
You cannot use the “Acquire Device Information” function if you are not
connected to or able to communicate with this machine.
Settings tab
Remove White Back-
ground
Removes the white background when creating an overlay file with
Microsoft PowerPoint. If this check box is cleared, the background
is not removed and the overlay file is created according to the orig-
inal document data.
Check Driver Version Displays the version information of the printer driver.
Item Function
Item Function
Device Option Specifies the status of the options that are installed on this ma-
chine and the status of the user authentication and account track
functions. Specify the status of each item from the “Setting” drop-
down list.
Paper Tray Information Shows the paper type specified for each tray. Click the [Paper Tray
Settings] button to specify the settings for each paper tray.
Acquire Device Informa-
tion
Communicates with this machine to read the status of the installed
options.
Acquire Settings Specifies the status of the connection that executes getting the
option information.
Encrypt. Passphrase Enters the encryption passphrase when it is user defined by
communicating with this machine.
Software Tools Starts up software tools such as PageScope Web Connection.
Item Function
EMF Spool When using an original system environment, select this check box
if a metafile (EMF) spool is required.
Display Constraint Mes-
sage
Displays a message when functions that cannot be specified at the
same time were enabled from the printer driver.
Display paper set in Print
Server Properties.
Uses the paper that was added in [Server Properties] of the printer
folder.
Verify Authentication set-
tings before printing
Verifies the authentication settings for this machine before printing
and displays a message if the settings are not compatible.

Setting up the PCL driver (Windows) 5
C550 5-6
2
Note
To display the Settings tab in Windows 2000/XP/NT 4.0/Server 2003/Vis-
ta, right-click the icon of the installed printer, and then click “Properties”.
Popup Authentication Dia-
log when printing
Displays the User Authentication/Account Track dialog box when
a print job is specified to enter the user name and department
name.
Save Custom Size Saves the custom paper sizes.
Item Function

Setting up the PCL driver (Windows) 5
C550 5-7
5.2 Specifying the Basic tab settings
Printing to suit the paper size
You can enlarge or reduce documents created when printing to match the
output paper size.
1Click the Basic tab.
2From the “Original Size” and “Paper Size” drop-down lists, select the
desired settings.
– You can also specify any enlargement or reduction ratio in the
“Zoom” box.
2
Note
“12 × 18” paper size is one size larger than A3 paper size at 504.8 × 457.2
mm.
To print on paper sizes other than the standard sizes, be sure to set the
custom paper sizes in Custom Size Settings first.
When “W” is selected for each standard paper size from the printer driv-
er, the data can be centered and printed.
For example, if A4 size data is created and you want to center and print
on A3 size paper, select “A4W” as the paper size and “Tray 1” or “Bypass
Tray” as the paper tray from the printer driver.
To print, load A3 size paper in the tray (“Tray 1” or “Bypass Tray”) of this
machine that was specified from the printer driver, and then specify the
Setting up the PCL driver (Windows) 5
C550 5-8
settings described below from [Basic (Paper)] – [Change Tray Settings] –
[Wide Paper] in the control panel.
Select “A4W”.
Enter the A3 paper size (420.0 × 297.0) in [Change Size].
Specifying a custom size
When printing on paper of a custom size, you can select a preregistered cus-
tom paper size or specify a paper size value as described below.
1From the “Original Size” or the “Paper Size” drop-down list, select
“Custom Size”.
The Custom Size Settings dialog box appears.
2Specify settings for the following:
– Width: Specifies the width of the custom paper size according to
the selected measurement unit.
– Length: Specifies the length of the custom paper size according to
the selected measurement unit.
– Unit: Selects the measurement unit that specifies the size.
3Click the [OK] button.
2
Note
For custom sizes that are used often, it comes in handy if you add them
to the paper size list. Add a custom paper size from the Settings tab. For
details, refer to “Specifying the Settings tab settings” on page 5-47.
Selecting the paper tray
You can specify the paper you want to use for printing by selecting the paper
tray that contains the loaded paper.
Setting up the PCL driver (Windows) 5
C550 5-9
1Click the Basic tab.
2From the “Paper Tray” drop-down list, select the desired paper tray.
2
Note
If “Auto” is specified as the paper tray, you can select the paper type. If
the paper tray setting is changed to a setting other than “Auto”, the paper
type is fixed to its preregistered setting. Specify a paper type by clicking
the [Paper Settings for Each Tray] button. For details, refer to “Specifying
the paper type for a paper tray” on page 5-9.
Specifying the paper type for a paper tray
You can specify the paper type for a paper tray.
1Click the Basic tab.
2Click the [Paper Settings for Each Tray] button.
The Paper Settings for Each Tray dialog box appears.
3From “Paper Type Settings”, select the desired paper tray, and then
select the paper type to be specified from the “Paper Type” drop-down
list.

Setting up the PCL driver (Windows) 5
C550 5-10
4Click the [OK] button.
2
Note
The current specified settings can be checked in “Device Status”.
Click the [Restore Device Status] button to communicate with this ma-
chine and read the status of the settings specified on this machine. You
cannot use this function if you are not connected to or able to communi-
cate with this machine.
The paper type for a paper tray can also be specified from the Configure
tab, and the paper size and paper orientation can be specified as well.
For details, refer to “Specifying the Configure tab settings” on page 5-43.
Specify “Duplex Side 2” to print on the back side of a page.
Selecting the output method
Not only can you print directly, but you can select “Secure Print”, which re-
quires a password to print, or “Save in User Box”, which saves data in the
boxes that were created on the HDD.
1Click the Basic tab.
2From the “Output Method” drop-down list, select the output method.
– Print: Prints immediately.
– Secure Print: Saves the document to be printed in “Secure Print
User Box” of this machine. When printing, you are required to enter
the ID and password in this machine’s control panel. Select when
printing highly confidential documents.
– Save in User Box: Saves the document to be printed in a box on this
machine.
– Save in User Box and Print: Saves the document in a box and prints
at the same time.
– Proof Print: After a part of the document has been printed, this ma-
chine stops printing temporarily. Select to avoid misprinting a large
volume of print jobs.
Setting up the PCL driver (Windows) 5
C550 5-11
Secure Print
If “Secure Print” was selected, enter the ID and password in the dialog box
that appeared.
2
Note
The ID and password that are required for “Secure Print” can be prereg-
istered by clicking the [User Settings] button under “Output Method”. If
the ID and password are already registered, the dialog box to enter the
ID and password does not appear when “Secure Print” is selected.
To print, specify “Secure Print Document Box” from the Box mode in this
machine’s control panel, and then enter the ID and password. For details,
refer to “Print job management” on page 9-46. For details on the box
functions of this machine, refer to the User’s Guide [Box Operations].
When password rules are enabled on this machine, the passwords that
can be used for secured printing are limited and the jobs are deleted
when a password that does not comply with the password rule is
entered. For the password rules, refer to the User’s Guide [Copy
Operations].
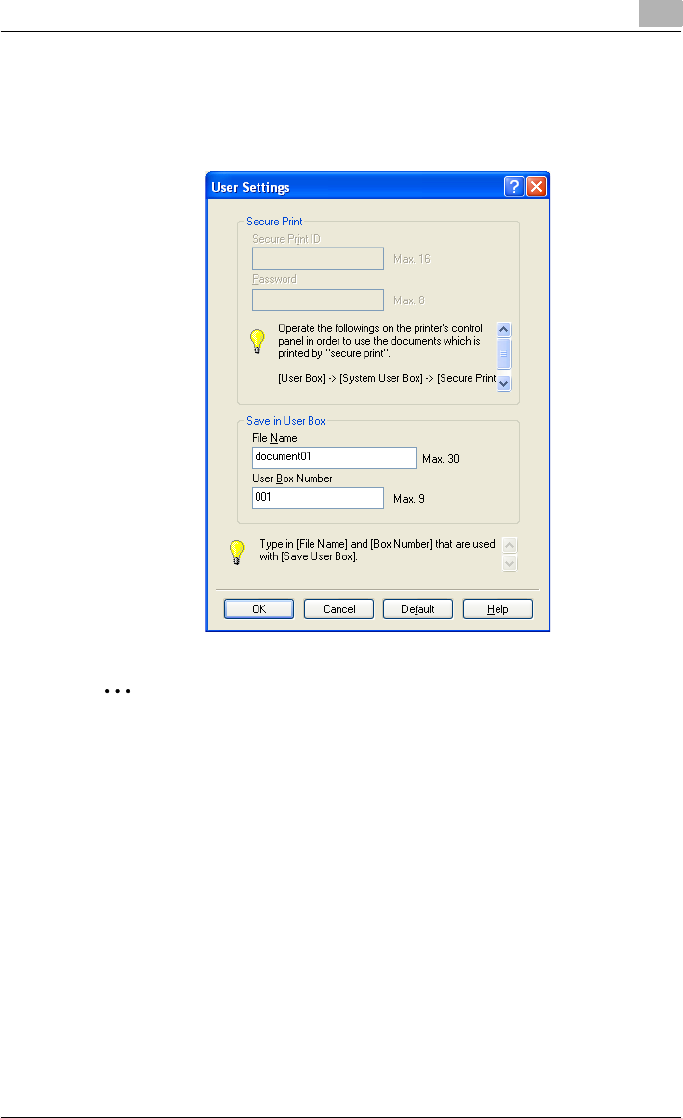
Setting up the PCL driver (Windows) 5
C550 5-12
Save in User Box
When “Save in User Box” or “Save in User Box and Print” is selected, specify
the file name to be saved and the box number for the save location in the di-
alog box that appears for entering the file name and box number.
2
Note
The file name and box number that are required for “Save in User Box”
can be preregistered by clicking the [User Settings] button under “Output
Method”. If the file name and box number are already registered, the di-
alog box to enter the file name and box number does not appear when
“Save in User Box” is selected.
Be sure to create the box of the save location in advance with the box
function of this machine. For details on the box functions of this machine,
refer to the User’s Guide [Box Operations].
When password rules are enabled on this machine, specify the box that
was created on this machine.

Setting up the PCL driver (Windows) 5
C550 5-13
Proof Print
When a print job is sent, this machine stops printing temporarily after part of
the document has been printed. The remaining print job is stored in this ma-
chine as a print job. When printing multiple copies, you can print the remain-
ing part of the print job after checking the print results.
2
Note
To print the document, release the held document from the Job mode in
this machine’s control panel. For details, refer to “Print job management”
on page 9-46.
Specifying the user authentication settings
If the user authentication settings have been specified on this machine, you
must enter a user name and password.
2
Note
If a job is printed using a user name or password that is not a registered
account on this machine, or if a job is printed without selecting a user un-
der “User Authentication”, the operation is not authenticated by this ma-
chine and the job is canceled.
If the user authentication settings are specified on this machine and the
authentication operation restriction function is in mode 2, the applicable
user is locked and cannot be accessed if the authentication information
is not entered correctly.
If the user authentication settings are not specified on the Configure tab,
user authentication cannot be performed. If using the user authentication
function, be sure to specify the settings on the Configure tab. For details,
refer to “Specifying the Configure tab settings” on page 5-43.
1Click the Basic tab.
2Click the [Authentication/Account Track] button.
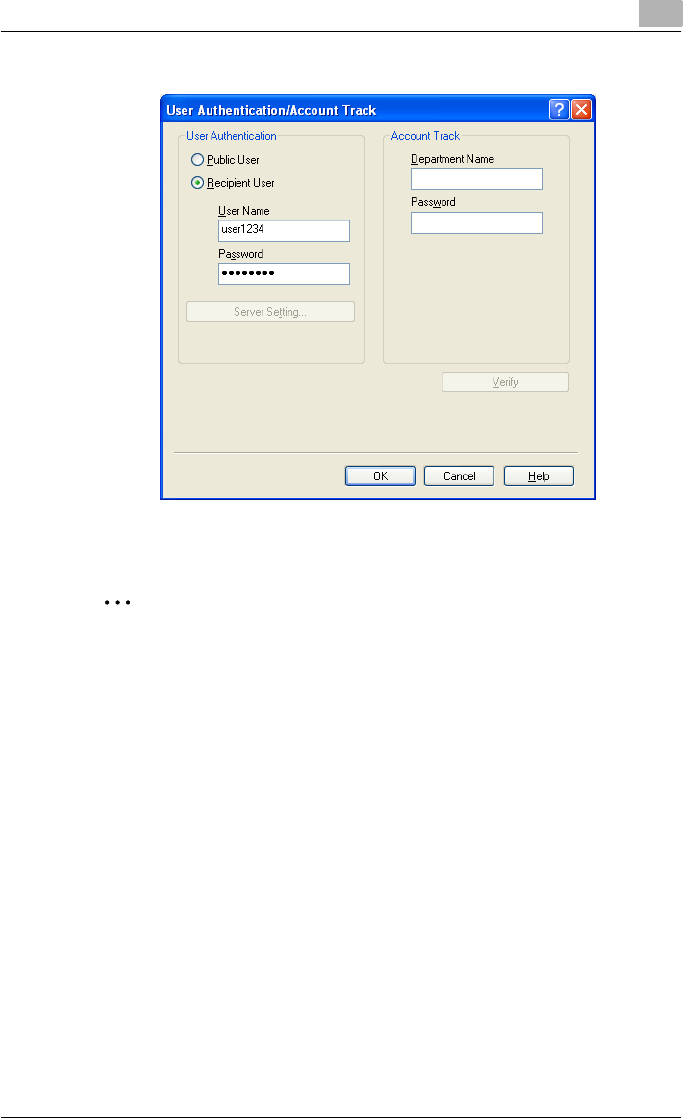
Setting up the PCL driver (Windows) 5
C550 5-14
3Select “Recipient User”, and then enter the user name and password.
4Click the [OK] button.
2
Note
If this machine has been set to permit public users, the machine can be
used without a user name and password.
If performing user authentication on a server, the server settings must be
specified. Click the [Server Setting] button to select the server.
Click the [Verify] button to communicate with this machine and to check
whether authentication can be performed with the user that was entered.
You cannot use this function if you are not connected to or able to com-
municate with this machine.
If printing is not allowed, printing cannot be performed even when used
by a registered user. For details on the user authentication function, con-
sult the administrator of this machine.
If performing user authentication with an optional authentication unit, en-
ter the user name and password in step 3. For details, refer to the oper-
ation manual of the authentication unit.
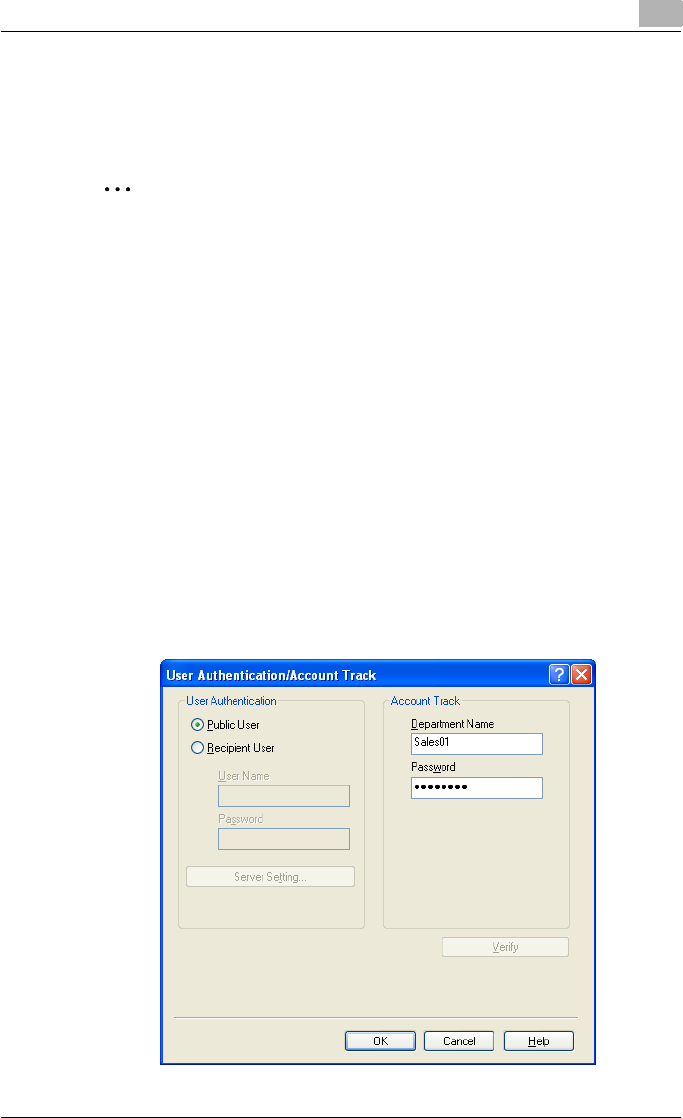
Setting up the PCL driver (Windows) 5
C550 5-15
Specifying the account track settings
If the account track settings have been specified on this machine, you must
enter a department name and password.
2
Note
If a job is printed using a department name or password that is not a reg-
istered account on this machine, or if a job is printed without “Account
Track” selected, the operation is not authenticated by this machine and
the job is canceled.
When the account track settings are specified on this machine, the au-
thentication operation restriction function is in mode 2, and the authenti-
cation information is not entered correctly, the applicable account is
locked and cannot be accessed.
If the account track settings are not specified on the Configure tab, ac-
count track cannot be performed. If using the account track function, be
sure to specify the settings on the Configure tab. For details, refer to
“Specifying the Configure tab settings” on page 5-43.
1Click the Basic tab.
2Click the [Authentication/Account Track] button.
3Enter the department name and password.

Setting up the PCL driver (Windows) 5
C550 5-16
4Click the [OK] button.
2
Note
Click the [Verify] button to communicate with this machine and to check
whether authentication can be performed with the user that was entered.
You cannot use this function if you are not connected to or able to com-
municate with this machine.
If printing is not allowed, printing cannot be performed even when used
by a registered account. For details on the account track function, con-
sult the administrator of this machine.
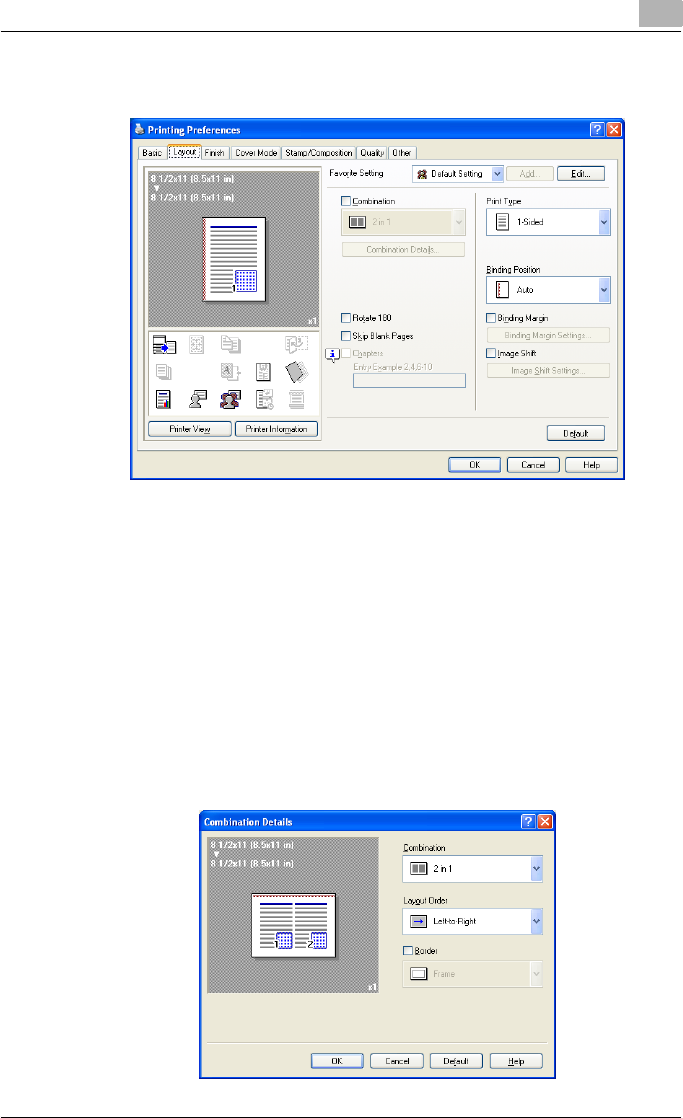
Setting up the PCL driver (Windows) 5
C550 5-17
5.3 Specifying the Layout tab settings
Printing multiple pages on one page (N in 1, Poster Mode)
You can specify whether to print multiple pages of text on one page with N
in 1 printing, or print one sheet of an original document divided on multiple
pages with Poster Mode printing.
1Click the Layout tab.
2Select the “Combination” check box, and then specify the setting from
the drop-down list.
– To change the “Border” and “Overlap width line” settings, click the
[Combination Details] button, and then change the settings in the
dialog box that appears.

Setting up the PCL driver (Windows) 5
C550 5-18
2
Reminder
When printing a job that contains pages of different sizes and orienta-
tions, images may be missing or overlapping when the document is print-
ed.
Chapters
You can specify the page you want to print on the front side when duplex
printing or booklet printing.
Even if a specified page comes up to be printed on the back side in duplex
printing or booklet printing, the specified page is moved and printed on the
front side.
1Click the Layout tab.
2Select the “Chapters” check box.
3Enter the page number of the page you want to print on the front side.
2
Note
When entering multiple page numbers, separate the page numbers with
commas such as “2, 4, 6” or enter a page range using a hyphen such as
“6-10”.
The “Chapters” check box can only be selected when the duplex printing
or the booklet printing setting is enabled.
Specifying duplex/booklet printing
You can print a document onto both sides of a page or in a booklet format
(two facing pages). This comes in handy when you want to bind multiple-
page documents.
1Click the Layout tab.
2From the “Print Type” drop-down list, select “2-Sided” or “Booklet”.
2
Note
The binding position can be specified from the “Binding Position” drop-
down list.
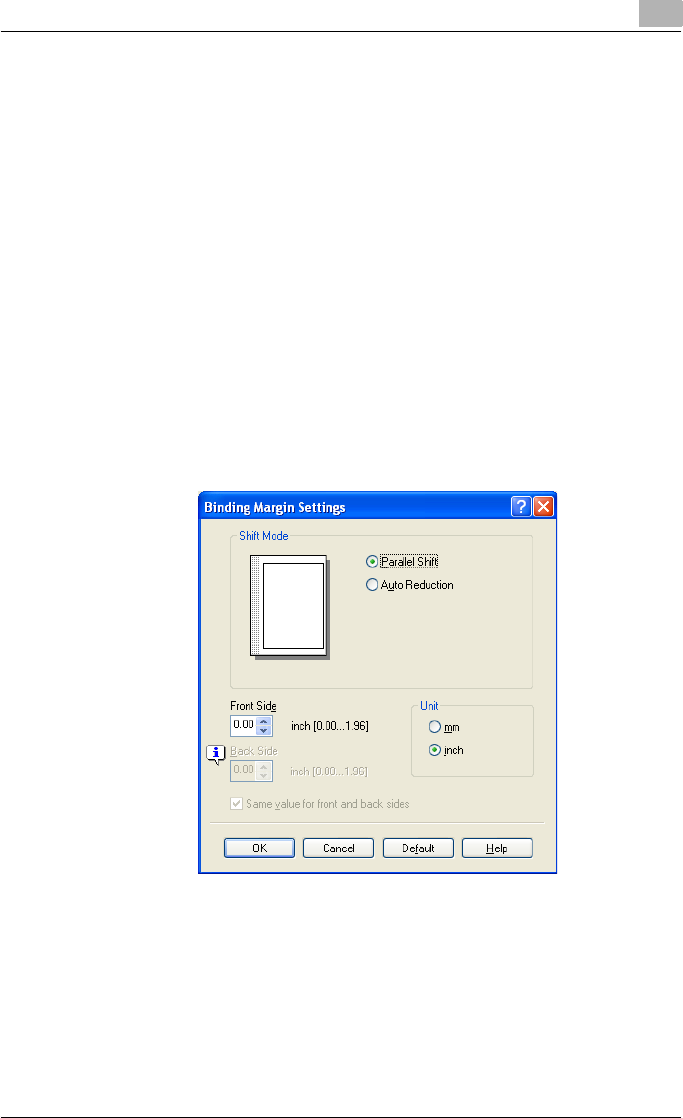
Setting up the PCL driver (Windows) 5
C550 5-19
Setting the binding margin
Binding margins are added to the document before it is printed.
1Click the Layout tab.
2From the “Binding Position” drop-down list, select the binding position.
3Select the “Binding Margin” check box.
4To set the width of the binding margin, click the [Binding Margin Set-
tings] button, and then specify the desired settings in the Binding Mar-
gin Settings dialog box that appears.
– Shift Mode: To add a binding margin, select how the image is to be
shifted.
– Front Side/Back Side: Sets the binding margin values. By clearing
the “Same value for front and back sides” check box, you can
specify separate values for the front and back sides.
– Unit: Selects the measurement unit that specifies the size.
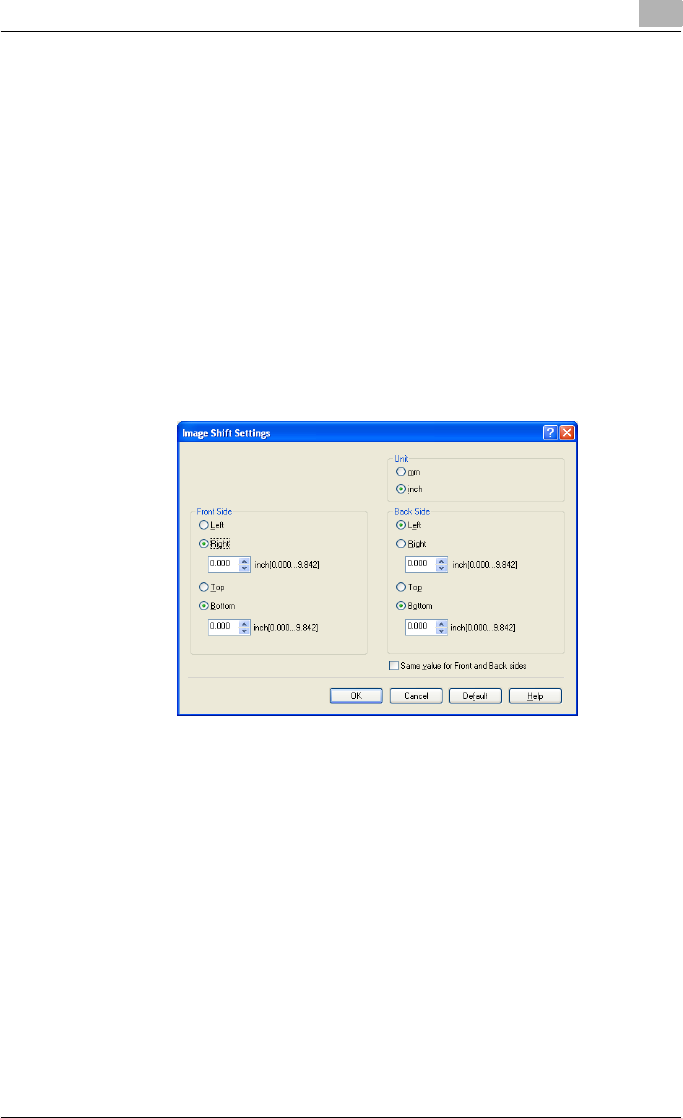
Setting up the PCL driver (Windows) 5
C550 5-20
Shifting images
The entire print image of a document is shifted and then printed. You can use
this function when you want to adjust the print position.
1Click the Layout tab.
2Select the “Image Shift” check box.
3To set the image shift settings, click the [Image Shift Settings] button,
and then specify the desired settings in the Image Shift Settings dialog
box that appears.
– Unit: Selects the measurement unit that specifies the size.
– Front Side/Back Side: Specifies the shift direction and sets the val-
ues. By clearing the “Same value for Front and Back sides” check
box, you can set separate values for the front and back sides.
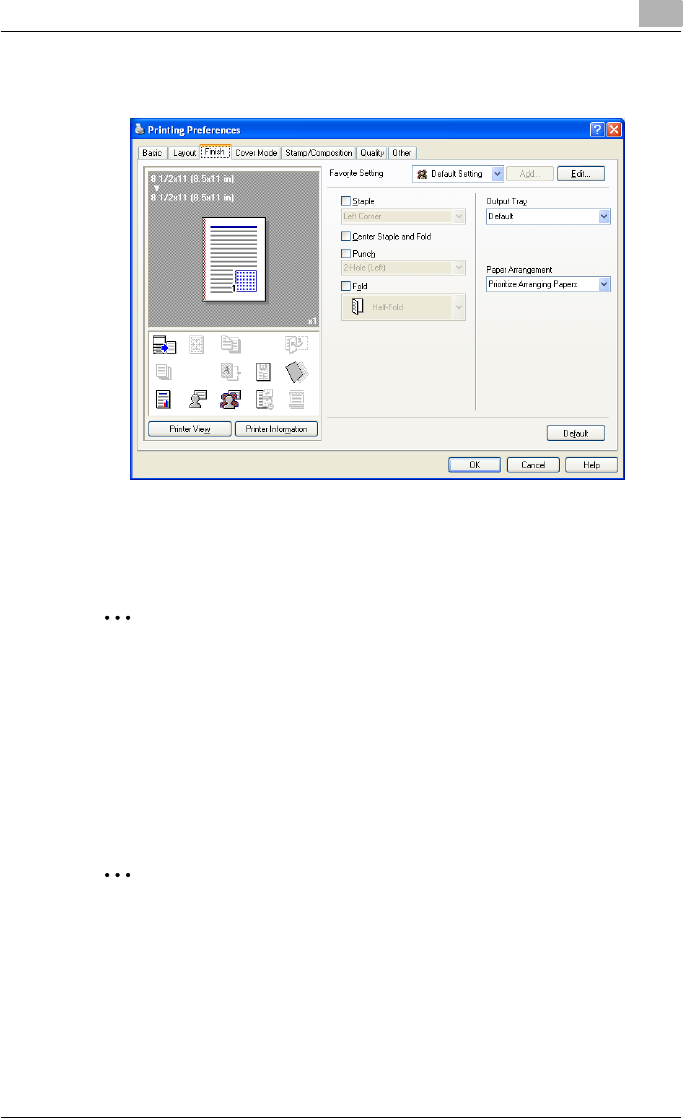
Setting up the PCL driver (Windows) 5
C550 5-21
5.4 Specifying the Finish tab settings
Stapling
Multiple-page documents can be stapled.
2
Reminder
The staple function is available only when the optional finisher is installed.
1Click the Finish tab.
2Select the “Staple” check box.
3From the drop-down list, specify the number of staples and the sta-
pling position.
2
Note
Specify the staple position noting the binding position specified in “Bind-
ing Position”.

Setting up the PCL driver (Windows) 5
C550 5-22
Specifying the center staple and fold setting
You can specify to center staple and fold a printed document. By specifying
the center staple and fold setting, printed documents can be folded in half
and stapled.
2
Reminder
The center staple and fold function is available only when optional finisher
FS-608 is installed.
1Click the Finish tab.
2Select the “Center Staple and Fold” check box.
2
Note
The center staple and fold function cannot be specified when the staple,
punch, or fold function is specified.
The center staple function and the thick paper function cannot be spec-
ified when finisher FS-608 is installed.
Hole punching
Holes can be punched into the printed document.
2
Reminder
The hole punch function is available only when the punch kit is installed
on the optional finisher.
1Click the Finish tab.
2Select the “Punch” check box.
3From the drop-down list, specify the number of punched holes.
2
Note
The hole-punch position changes according to the binding position spec-
ified from “Binding Position”.
The number of punch holes that can be selected may vary depending on
the punch kit that is installed.

Setting up the PCL driver (Windows) 5
C550 5-23
Folding
You can specify to fold a printed document.
2
Reminder
The fold function is available only when optional finisher FS-608 is in-
stalled.
1Click the Finish tab.
2Select the “Fold” check box.
3From the drop-down list, specify the folding condition.
2
Note
The fold function cannot be specified when the staple, punch, or saddle
stitch function is specified.
Specifying the output tray
You can specify the tray to which the printed document is output.
1Click the Finish tab.
2From the “Output Tray” drop-down list, specify the output tray.
Specifying the procedure for adjusting the binding position
You can specify the procedure for adjusting the binding position for duplex
printing.
If “Prioritize Arranging Papers” is selected, all pages can be processed to a
suitable quality by this machine because the binding position is adjusted af-
ter all the print data is received. If “Prioritize Productivity” is selected, the
printing process is performed efficiently because the binding position is ad-
justed while the data is printed simultaneously as it is being received.
If you want to increase the print efficiency, select “Prioritize Productivity”. If
the desired binding position and width cannot be achieved, select “Prioritize
Arranging Papers”.
1Click the Finish tab.
2From the “Paper Arrangement” drop-down list, specify the processing
method.

Setting up the PCL driver (Windows) 5
C550 5-24
5.5 Specifying the Cover Mode tab settings
Printing documents with a front cover/back cover
1Click the Cover Mode tab.
2Select the “Front Cover” and “Back Cover” check boxes.
3From the “Front Cover” and “Back Cover” drop-down lists, select the
desired print settings.
To print on the front cover and back cover, select “Print”. To only add
a blank page, select “Blank”.
4Select the paper tray that contains the loaded paper for the front cover
and back cover.
Printing documents with a front cover/back cover from a post inserter
1Click the Cover Mode tab.
2Select the “Front Cover from Post Inserter” and the “Back Cover from
Post Inserter” check boxes.
3Select the PI tray that contains the loaded paper for the Front Cover
from Post Inserter function and the Back Cover from Post Inserter func-
tion.
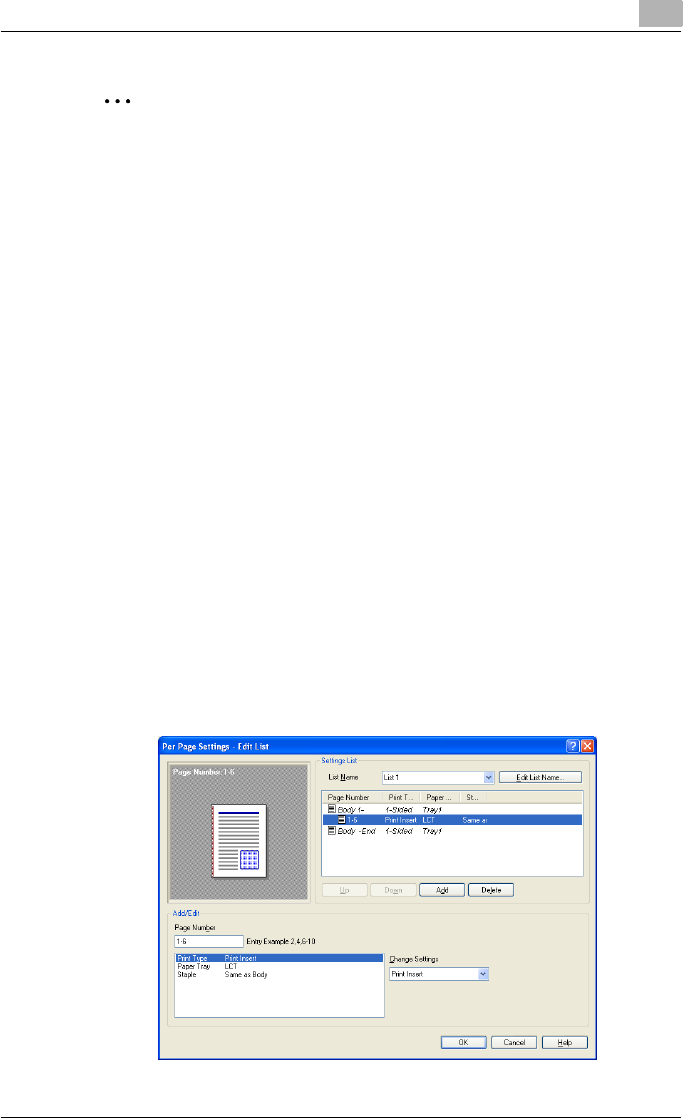
Setting up the PCL driver (Windows) 5
C550 5-25
2
Note
The Front Cover from Post Inserter function and the Back Cover from
Post Inserter function are available only when an optional post inserter is
installed.
The Front Cover from Post Inserter function and the Back Cover from
Post Inserter function cannot be specified when the Front Cover function
and the Back Cover function are specified.
Printing multiple pages
You can specify the print type and paper tray for each page. This comes in
handy when you want to change the paper tray during a print job when print-
ing multiple pages.
1Click the Cover Mode tab.
2Select the “Per Page Setting” check box.
3From the “Per Page Setting” drop-down list, select the desired list
name.
4Click the [Edit List] button.
The Per Page Settings – Edit List dialog box for specifying the print set-
tings appears.
5Click the [Add] button.
A new row for specifying the print settings is added to “Settings List”.

Setting up the PCL driver (Windows) 5
C550 5-26
6Select the row that was added to the list, and then specify the print set-
tings in “Add/Edit”.
– Page Number: Enters the page number. When entering multiple
page numbers, separate the page numbers with commas such as
“2, 4, 6” or enter a page range using a hyphen such as “6-10”.
– Print Type: Specifies Print Insert, Insert Blank Sheet, Print (1-Sid-
ed), and Print (2-Sided).
– Paper Tray: Specifies the paper tray.
– Staple: Specifies the number of staples and the stapling position.
7Click the [OK] button.
2
Note
To change existing print settings, select the desired row and change the
settings. To delete existing print settings, select the desired row, and
then click the [Delete] button.
Click the [Up] or the [Down] button to change the page number starting
with the smallest page number.
The list name can be changed by clicking the [Edit List Name] button.
Printing with transparency interleaves
If “Transparency” is selected as the paper type, you can select the “Trans-
parency Interleave” check box to enable the transparency interleave setting.
By selecting the “Transparency Interleave” check box, overhead projector
transparencies can be inserted between the printed pages.
1Click the Cover Mode tab.
2Select the “Transparency Interleave” check box.
3From the “Transparency Interleave” drop-down list, specify the printing
conditions.
4From the “Transparency Interleave” drop-down list, select the paper
tray that contains the paper to be used.
Setting up the PCL driver (Windows) 5
C550 5-27
5.6 Specifying the Stamp/Composition tab settings
Printing a watermark
You can print specific text in the background as a watermark.
1Click the Stamp/Composition tab.
2Select the “Watermark” check box.
3From the list, select the watermark that you want to print.
!
Detail
For Windows Vista x64, the watermark function cannot be specified
when the following functions are specified at the same time.
User Authentication
Account Track
Per Page Setting
Verify Authentication settings before printing
Popup Authentication Dialog when printing
Setting up the PCL driver (Windows) 5
C550 5-28
Editing a watermark
You can change the fonts and position of the watermark and you can register
a new one.
1Click the Stamp/Composition tab.
2Select the “Watermark” check box.
3Click the [Edit] button under “Watermark”.
The Edit Watermark dialog box appears.
4To create a watermark, click the [Add] button.
To change a watermark, select the watermark from the “Current Wa-
termark” list.
5Specify settings for the following:
– Watermark Name: Enters the name of the watermark.
– Watermark Text: Enters the text to be printed as a watermark.
– [Add]: Click to create a new watermark.
– [Delete]: Click to delete the selected watermark.
– Position: Specifies the vertical and horizontal positions. The water-
mark position can also be specified by using the horizontal and ver-
tical sliders in the dialog box.
– Text Angle: Specifies the watermark print angle.
– Font Name: Specifies the font.
– Size: Specifies the size.
– Style: Specifies the font style.
– Frame: Specifies the frame style.

Setting up the PCL driver (Windows) 5
C550 5-29
– Text Color: Specifies the watermark text color.
– Sharing: Specifies whether to register the watermark as public or
private.
– Transparent: Prints the watermark as a transparent image.
– 1st Page Only: Prints the watermark on the first page only.
– Repeat: Prints several watermarks on a single page.
6Click the [OK] button.
2
Note
Up to 30 watermarks can be registered with the shared setting, and up to
20 watermarks can be registered with the private setting.
Only the administrator can select a setting under “Sharing”.
Printing different original documents together (overlay)
An original document can be printed on top of the overlay data that was cre-
ated separately. This function comes in handy when creating fax cover let-
ters or form letters.
2
Note
You must create and preregister the overlay file to be printed. For details,
refer to “Editing an overlay file” on page 5-31.
1Create the print data using any application.
2From the [File] menu, select “Print”.
3Select this machine in “Printer Name”, and then click the [Properties]
button or the [Preferences] button.
4Click the Stamp/Composition tab.
Setting up the PCL driver (Windows) 5
C550 5-30
5Select the “Print in Overlay” check box.
6From the list, select the overlay that you want to print.
7Click the [Edit] button under “Print in Overlay”.
The Edit Print In Overlay dialog box appears.
Setting up the PCL driver (Windows) 5
C550 5-31
8Specify the overlay printing method.
– Pages: Specifies the pages to print.
– Overwrite: Specifies the sequence for printing the overlay on top of
the original document.
9Click the [OK] button.
The Stamp/Composition tab appears again.
10 Click the [OK] button.
The Print dialog box appears again.
11 Click the [Print] button.
The printing of the overlay is performed.
Editing an overlay file
To use an overlay, an overlay file must be created and added to the overlay
file list. You can create and save a new overlay file by selecting the “Create
Overlay File” check box, specifying the document that you want to create as
an overlay file, then clicking the [Print] button on the Print dialog box. To add
an existing overlay file that was created to the list, specify the file.
Setting up the PCL driver (Windows) 5
C550 5-32
Creating an overlay file
1Create the overlay file data using any application.
2From the [File] menu, select “Print”.
3Select this machine in “Printer Name”, and then click the [Properties]
button or the [Preferences] button.
4Click the Stamp/Composition tab.
5Select the “Create Overlay File” check box.
6Click the [OK] button.
The Print dialog box appears again.
7Click the [Print] button.
The dialog box to save the overlay file appears.
Setting up the PCL driver (Windows) 5
C550 5-33
8Specify the storage location for the overlay file, enter the file name in
the “File Name” box, and then enter the overlay name or a comment in
the “Overlay Name” text box.
9Click the [Save] button.
Instead of executing a print, the overlay file is saved and is added to
the list to be used for the next operation. The file extension is “.KFO”.
Setting up the PCL driver (Windows) 5
C550 5-34
Registering an overlay file
1Click the Stamp/Composition tab.
2Click the [Edit] button under “Print in Overlay”.
The Edit Print In Overlay dialog box appears.
3Click the [Browse Files] button to open the overlay file.
The overlay file is added to the “Select Overlay File” list.
2
Note
By clicking the [Delete] button in the Edit Print In Overlay dialog box, the
selected overlay file can be deleted from the overlay file list. The file itself
is not deleted.
Setting up the PCL driver (Windows) 5
C550 5-35
Printing with copy protection
You can print a special pattern on an entire page while printing.
When copying a printed page, the characters embedded in the pattern ap-
pear to prevent an illegal copy.
1Click the Stamp/Composition tab.
2Select the “Copy Protect” check box.
3Click the [Edit] button under “Copy Protect”.
The Edit Copy Protect dialog box appears.
4Specify the copy protection type and the position.
Multiple print items can be specified.
– Characters: Embeds the selected character string in a pattern. A
preregistered character string (common stamp) or a character
string registered on this machine (registered stamp) can be speci-
fied.
– Date/Time: Embeds the selected date and time in a pattern. By
clicking the [Edit] button under “Format”, you can specify the dis-
play type or the time format.
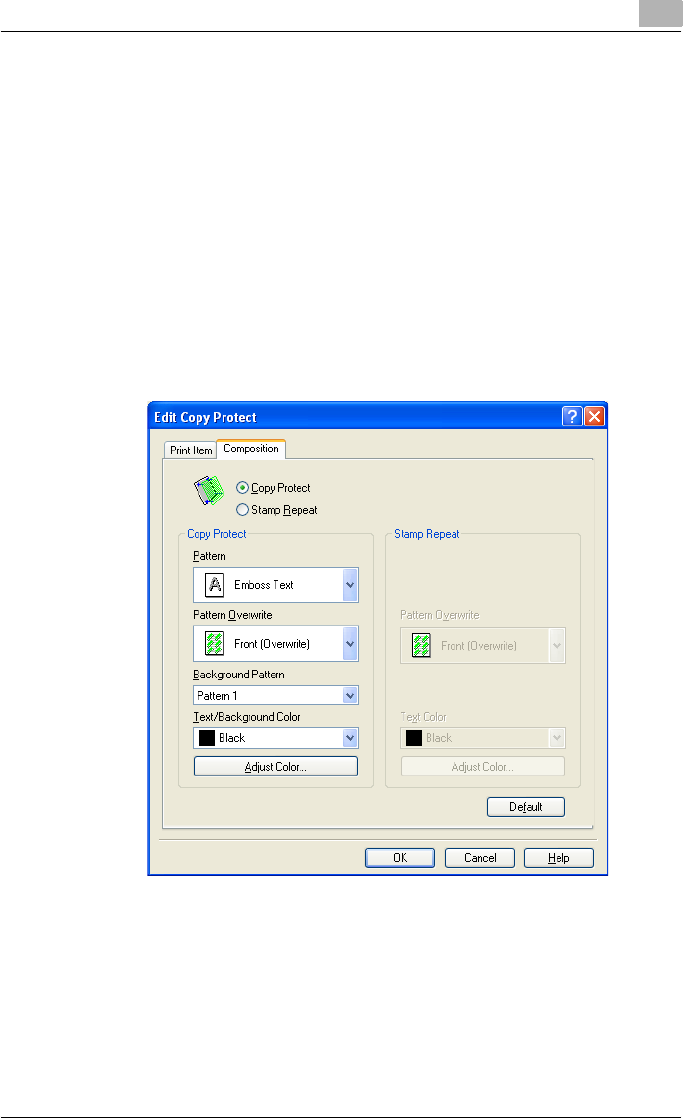
Setting up the PCL driver (Windows) 5
C550 5-36
– Serial Number: Embeds the serial number of this machine in a pat-
tern.
– Distribution Control Number: Embeds the number of copies in a
pattern when printing multiple copies. By clicking the [Edit] button
under “Start Number”, you can specify the start number or the dis-
play type.
– Job Number: Embeds the print job number in a pattern for docu-
ments that are automatically paginated.
– Text Size: Specifies the text size of a pattern.
– Angle: Specifies the pattern angle.
5Select the composition method for copy protection.
Select “Copy Protect” to specify the desired results when copying, or
simply select “Stamp Repeat”. In addition, you can select the embed-
ding conditions.
– Pattern: Specifies the embedding method of a pattern.
– Pattern Overwrite: Specifies the order for printing a pattern on the
original document.
– Background Pattern: Specifies the pattern background.
– Text/Background Color: Specifies the pattern color. The density
and color contrast can be specified by clicking the [Adjust Color]
button.
6Click the [OK] button.
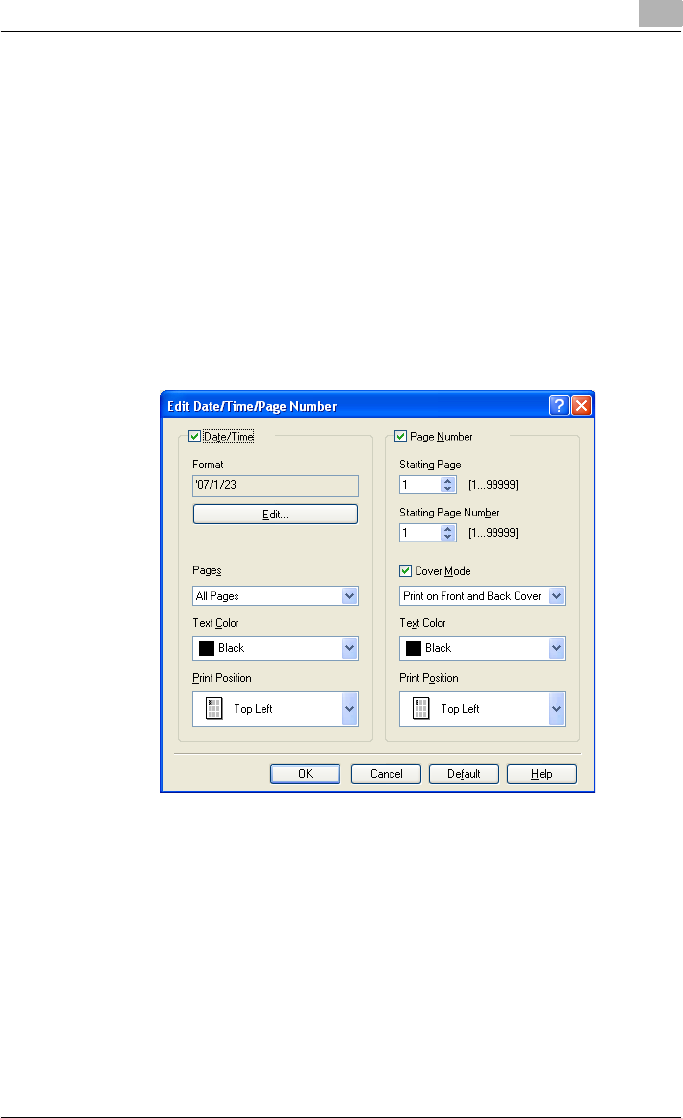
Setting up the PCL driver (Windows) 5
C550 5-37
Printing the date and page numbers
You can print the date and page numbers on a document.
1Click the Stamp/Composition tab.
2Select the “Date/Time” or the “Page Number” check box.
The “Date/Time” and “Page Number” check boxes can be selected at
the same time.
3Click the [Edit] button under “Page Number”.
The Edit Date/Time/Page Number dialog box appears.
4Specify the format and print position for the date, time, and page
number.
– Format: Displays the format for the date and time to be printed. By
clicking the [Edit] button, you can specify the display type or the
time format.
– Pages: Specifies the pages to print the date and time.
– Text Color: Specifies the text color to print.
– Print Position: Specifies the print position.
– Starting Page: Specifies the page to start printing the page number.
– Starting Page Number: Specifies the start number for printing the
page number.
– Cover Mode: If cover pages are attached, specifies whether to print
the page number on the front cover page or the back cover page.
5Click the [OK] button.
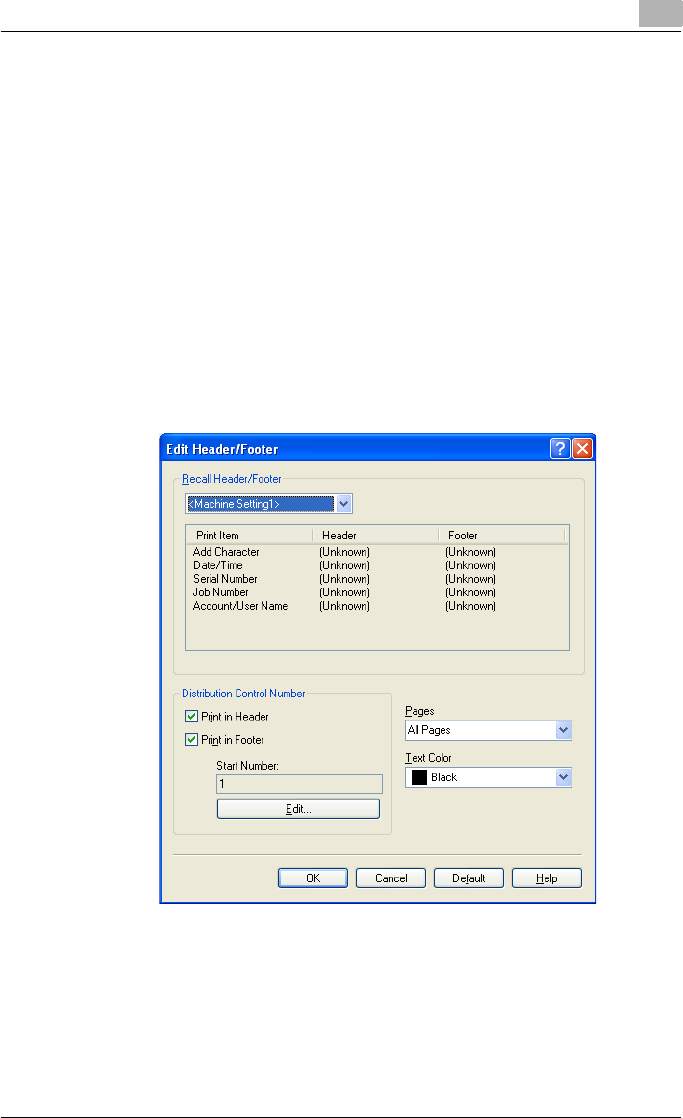
Setting up the PCL driver (Windows) 5
C550 5-38
Printing a header and a footer
1Click the Stamp/Composition tab.
2Select the “Header/Footer” check box.
3From the drop-down list, select the Header/Footer setting.
– To specify the header and the footer details, continue with step 4.
4Click the [Edit] button under “Header/Footer”.
The Edit Header/Footer dialog box appears.
5Specify the print settings and pages for the header and the footer.
– The number of digits for the distribution control number can be
specified by clicking the [Edit] button.
6Click the [OK] button.
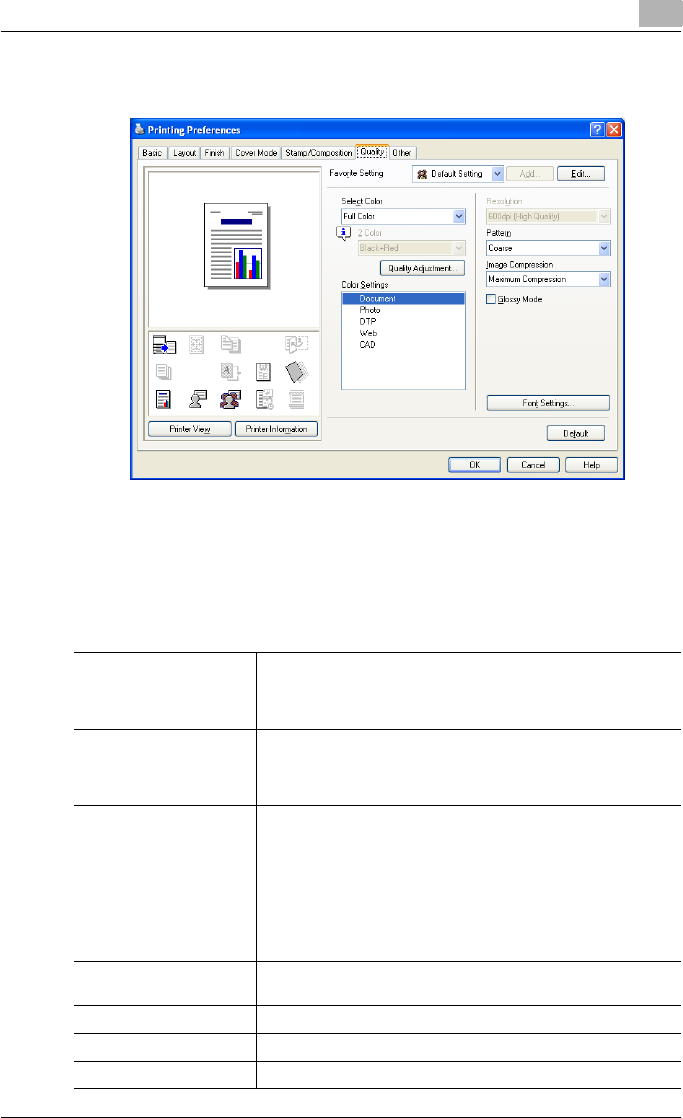
Setting up the PCL driver (Windows) 5
C550 5-39
5.7 Specifying the Quality tab settings
Adjusting the color and quality
1Click the Quality tab.
2Specify settings for the following:
Select Color Specifies the color for printing.
Full Color: Prints in color.
Grayscale: Prints in grayscale.
2 Color: Prints the two colors selected from the drop-down list.
Quality Adjustment Adjusts the image quality.
Simple: Adjusts the entire document.
Detail: Adjusts the text, photos, and charts of each object in a doc-
ument.
Color Settings Specifies the contents of the original document. Prints with a qual-
ity suitable for the original document.
Document: Prints with a quality suitable for documents with many
characters.
Photo: Prints with a quality suitable for photos.
DTP: Prints with a quality suitable for documents produced using
DTP.
Web: Prints with a quality suitable for Web page printing.
CAD: Prints with a quality suitable for CAD data printing.
Resolution Displays the resolution. (The resolution cannot be changed on this
machine.)
Pattern Selects the print pattern.
Image Compression Specifies the compression ratio for an image.
Glossy Mode Prints using a gloss finish.
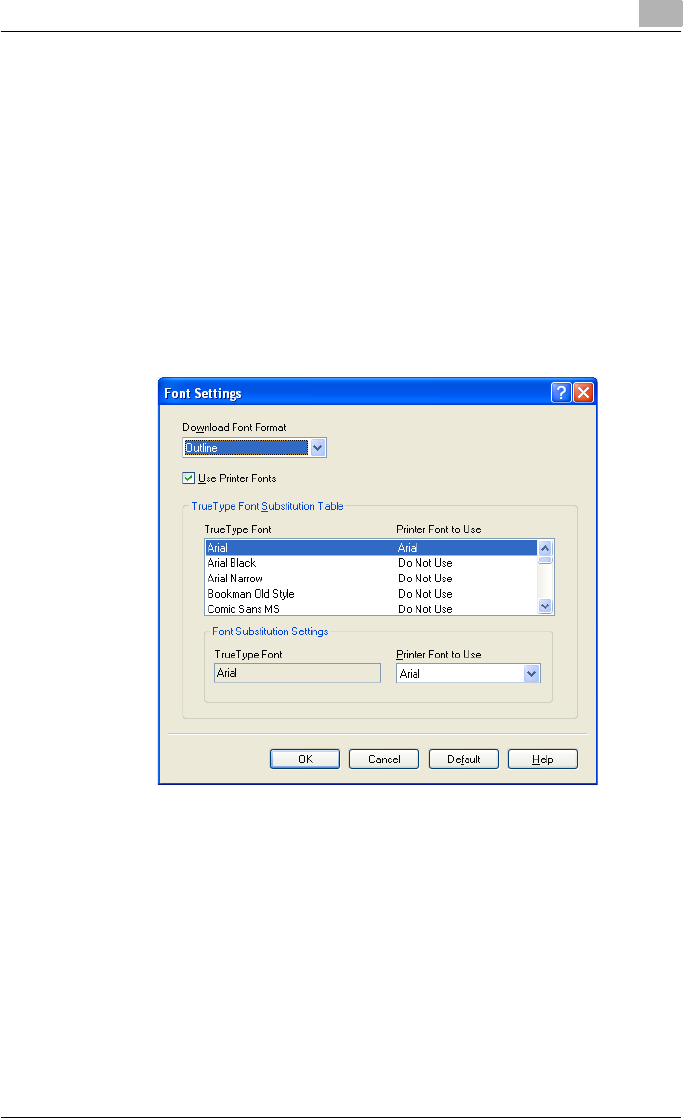
Setting up the PCL driver (Windows) 5
C550 5-40
Font Settings
You can replace the TrueType fonts used in Windows with the printer fonts
of this machine.
1Click the Quality tab.
2Click the [Font Settings] button.
3Specify settings for the following:
– Download Font Format: Selects the TrueType font downloading
method.
– Use Printer Fonts: Replaces the TrueType fonts with the printer
fonts.
4To use the printer fonts, change the fonts in “TrueType Font Substitu-
tion Table” as necessary.
From the list shown in the dialog box above, select the TrueType font
that you want to replace, and then select the printer font from the
“Printer Font to Use” drop-down list.

Setting up the PCL driver (Windows) 5
C550 5-41
2
Note
Using the printer fonts will shorten the printing time, however, there may
be a difference in the screen display and the print results.
By selecting the TrueType font download method from the “Download
Font Format” drop-down list, you can select the TrueType font type to
download when downloading the TrueType fonts and not using the print-
er fonts. When using TrueType fonts, select the font type to be download-
ed to the printer.
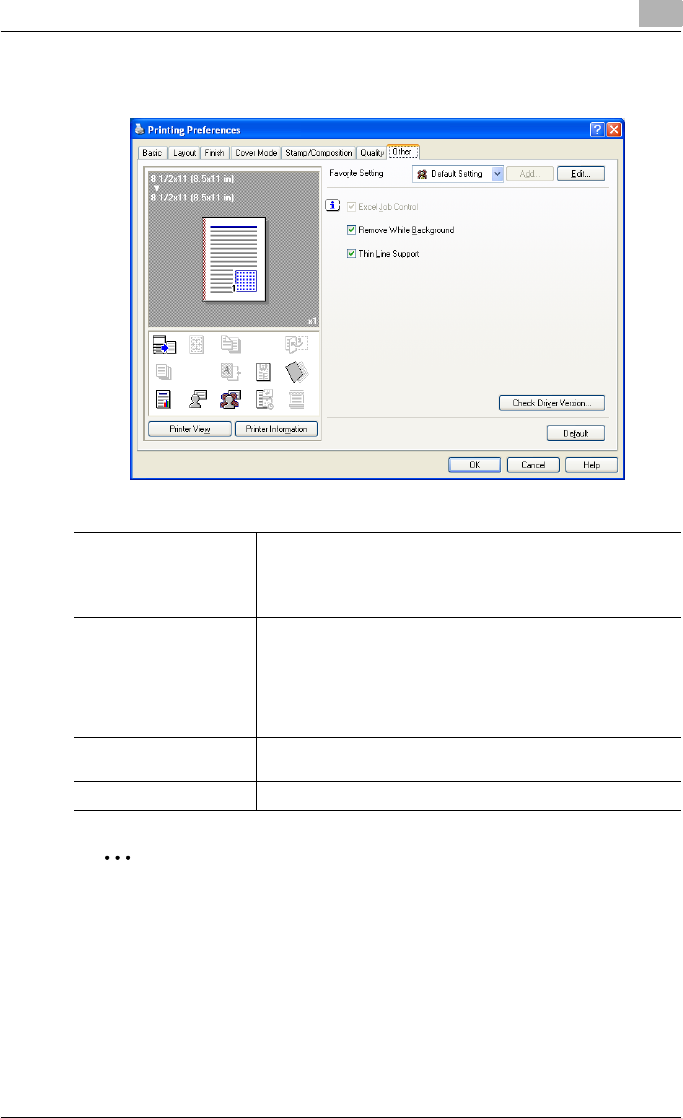
Setting up the PCL driver (Windows) 5
C550 5-42
5.8 Specifying the Other tab settings
2
Note
The “Excel Job Control” setting and the “Remove White Background”
setting cannot be used with Windows XP Professional x64 or Windows
Server 2003 x64.
The “Excel Job Control” setting can only be changed when the printer
driver dialog box is displayed from the Printers window (for Windows XP/
Server 2003, Printers and Faxes window).
Excel Job Control When printing multiple sheets in Microsoft Excel that
have different page settings, the jobs may be separated
by sheet depending on the data. Select this function to
control jobs so that they are not separated.
Remove White Back-
ground
When printing an overlay file over Microsoft PowerPoint
data, removes the white part so that the white back-
ground of the PowerPoint data does not conceal the
overlay file. If this check box is cleared, the background
is not removed and the job is printed according to the
original document data.
Thin Line Support When printing the document reduced, thin line may be blurred. Se-
lect this function to prevent disappering the thin line.
Check Driver Version Displays the version information of the printer driver.
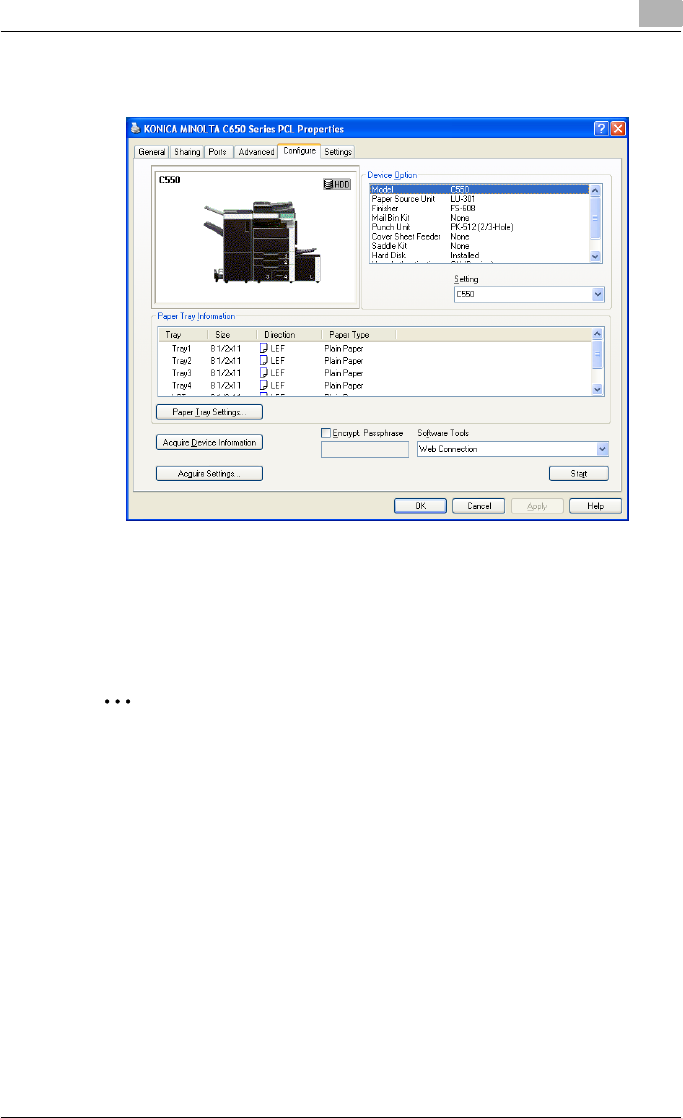
Setting up the PCL driver (Windows) 5
C550 5-43
5.9 Specifying the Configure tab settings
Selecting a model name and an option
The functions of this machine can be used from the printer driver if the model
name, the installed options, and the user authentication and account track
functions are specified.
2
Reminder
If the installed options and the user authentication and account track
functions are not specified on the Configure tab, the option functions
cannot be used from the printer driver. When installing options or using
the authentication function, be sure to make the proper settings.
1For Windows 2000/NT 4.0, click the [Start] button, point to “Settings”,
and then click “Printers”.
For Windows XP/Server 2003, click the [Start] button, and then click
“Printers and Faxes”.
For Windows Vista, click the [Start] button, and then click “Control pan-
el”, “Hardware and Sound”, and “Printers”.
– If “Printers and Faxes” does not appear in the Start menu in Win-
dows XP/Server 2003, open the Control Panel from the Start menu,
select “Printers and Other Hardware”, and then select “Printers and
Faxes”.

Setting up the PCL driver (Windows) 5
C550 5-44
– For Windows Vista, if the control panel is in the classic view, dou-
ble-click “Printers”.
2Right-click the icon of the installed printer, and then click “Properties”.
3Click the Configure tab.
4From “Device Option”, select “Model”.
5Select the model to be used from the “Setting” drop-down list.
6Select the options to be specified under “Device Option”.
7Select the status of the option that is installed from the “Setting” drop-
down list.
2
Note
Click the [Acquire Device Information] button to communicate with this
machine and read the status of the settings specified on this machine.
You cannot use this function if you are not connected to or able to com-
municate with this machine. The connection can be specified by clicking
the [Acquire Settings] button.
Specifying the paper tray
You can register the paper size, paper orientation, and paper type for the pa-
per that is loaded in a paper tray.
2
Reminder
If the paper loaded in this machine and the paper specified from the print-
er driver are different, printing cannot be performed correctly. Be sure to
make the proper settings.
1Click the Configure tab.
2Click the [Paper Tray Settings] button.
The Paper Tray Settings dialog box appears.
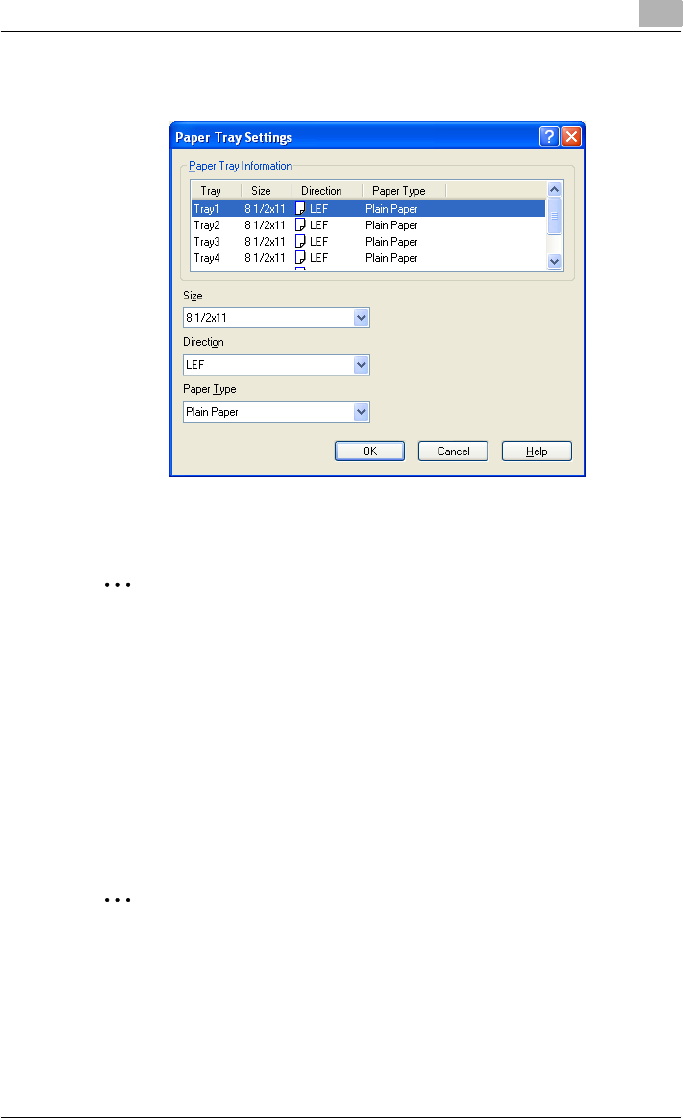
Setting up the PCL driver (Windows) 5
C550 5-45
3Select the desired tray in “Paper Tray Information”, and then specify
the paper size, paper orientation, and paper type.
4Click the [OK] button.
2
Note
The paper type for a paper tray can also be specified from the Basic tab.
For details, refer to “Specifying the Basic tab settings” on page 5-7.
Specify “Duplex Side 2” to print on the back side of a page.
Changing an encryption passphrase
You can specify an encryption passphrase when it is user defined by com-
municating with this machine.
The encryption key is automatically generated according to the entered char-
acters and it is used to communicate with this machine.
2
Reminder
Specify “Encrypt. Passphrase” according to the encryption passphrase
that was specified in “Driver Password Encryption Setting” of this ma-
chine. For details, refer to “Driver Password Encryption Setting” on
page 9-43.
1Click the Configure tab.

Setting up the PCL driver (Windows) 5
C550 5-46
2Select the “Encrypt. Passphrase” check box.
3Enter the encryption passphrase in the “Encrypt. Passphrase” text box.
Starting up a software tool
You can start up tools such as PageScope Web Connection that can be used
by this machine.
1Click the Configure tab.
2From the “Software Tools” drop-down list, select the function.
3Click the [Start] button.

Setting up the PCL driver (Windows) 5
C550 5-47
5.10 Specifying the Settings tab settings
Specifying the default settings
You can change the default settings for displaying the confirmation messag-
es or the dialog box for entering the authentication settings.
1For Windows 2000/NT 4.0, click the [Start] button, point to “Settings”,
and then click “Printers”.
For Windows XP/Server 2003, click the [Start] button, and then click
“Printers and Faxes”.
For Windows Vista, click the [Start] button, and then click “Control pan-
el”, “Hardware and Sound”, and “Printers”.
– If “Printers and Faxes” does not appear in the Start menu in Win-
dows XP/Server 2003, open the Control Panel from the Start menu,
select “Printers and Other Hardware”, and then select “Printers and
Faxes”.
– For Windows Vista, if the control panel is in the classic view, dou-
ble-click “Printers”.
2Right-click the icon of the installed printer, and then click “Properties”.
3Click the Settings tab.
4Specify settings for the following:

Setting up the PCL driver (Windows) 5
C550 5-48
– EMF Spool: When using an original system environment, select this
check box if a metafile (EMF) spool is required.
– Display Constraint Message: Specifies whether to display a mes-
sage when functions that cannot be specified at the same time
were enabled from the printer driver.
– Display paper set in Print Server Properties: Specifies whether to
use the paper that was added in [Server Properties] of the printer
folder.
– Verify Authentication settings before printing: Specifies whether to
verify the authentication settings for this machine before printing. A
message appears if the results verified are not compatible.
– Popup Authentication Dialog when printing: Displays the User Au-
thentication/Account Track dialog box when a print job is specified
to enter a user name or a department name.
Registering custom paper sizes
You can register the custom paper sizes that you use often. The paper reg-
istered is shown in the paper size list and can be selected like the other paper
sizes.
1Click the Settings tab.
2Click the [Save Custom Size] button.
The Save Custom Size dialog box appears.
3Click the [Add] button.
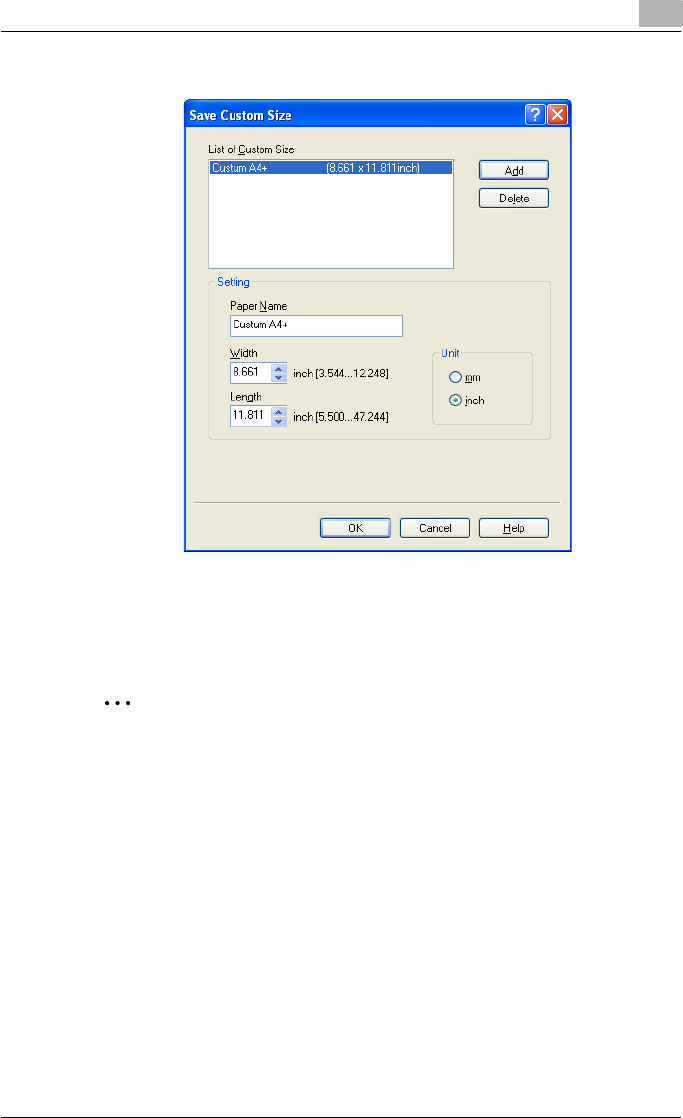
Setting up the PCL driver (Windows) 5
C550 5-49
The new paper size is added to “List of Custom Size”.
4Specify the paper name and size.
5Click the [OK] button.
2
Note
Up to 10 custom paper sizes can be registered.
Up to 16 characters can be entered in the “Paper Name” text box.
From the Save Custom Size dialog box, the selected custom paper size
can be deleted by clicking the [Delete] button. To edit a custom paper
size, select the custom paper size and change the paper name and paper
size.
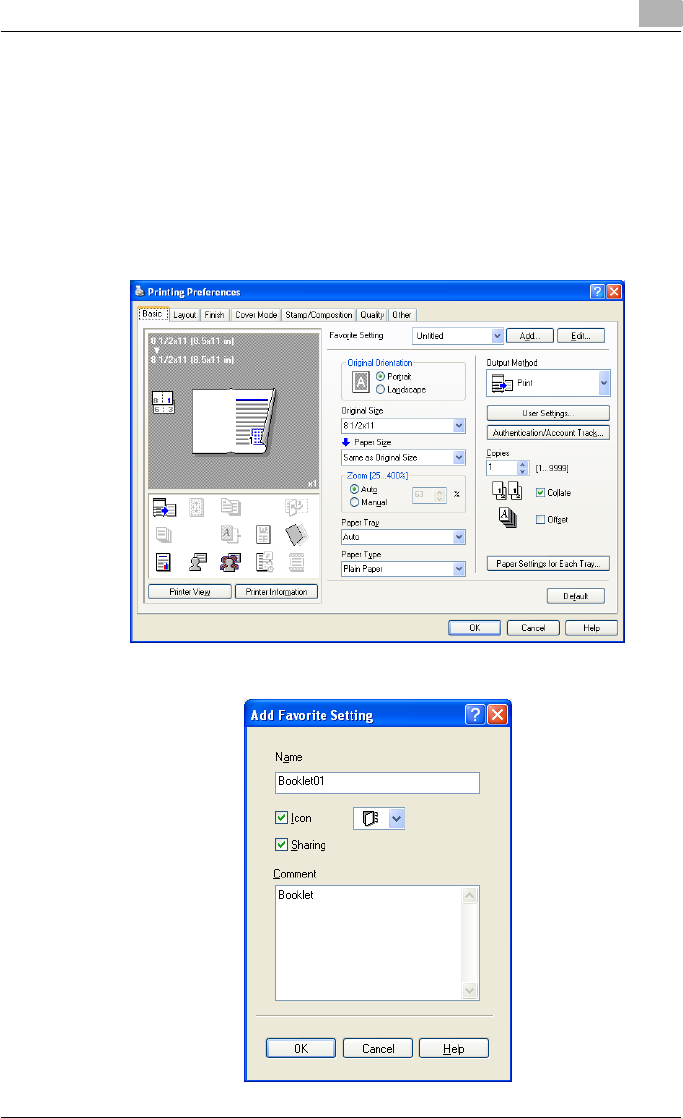
Setting up the PCL driver (Windows) 5
C550 5-50
5.11 Saving the driver settings
You can save the setting values of the changed driver and recall them as
necessary.
Saving the driver settings
1Change the driver settings from the Basic tab and the Layout tab.
2Click the [Add] button next to the “Favorite Setting” drop-down list.
3Specify settings for the following:

Setting up the PCL driver (Windows) 5
C550 5-51
– Name: Enters the specified registration name.
– Icon: Specifies the icon. The settings can be registered even if the
icon is not specified.
– Sharing: Specifies whether to register the specified file as public or
private.
– Comment: Enters the detailed description of the specified file, if
necessary.
4Click the [OK] button.
The specified settings are registered in the “Favorite Setting” drop-
down list.
2
Note
Up to 30 shared settings and up to 20 private settings can be registered.
Up to 30 characters can be entered in the “Name” text box. Up to 255
characters can be entered in the “Comment” text box.
Only the administrator can select a setting under “Sharing”.
The settings that were specified can also be saved (exported) to a file. For
details, refer to “Importing and exporting the driver settings” on
page 5-53.
Recalling the settings
You can select the settings to recall from the “Favorite Setting” drop-down
list on the Printing Preferences dialog box.
The setting values are recalled, and the settings for the printer driver are
changed.
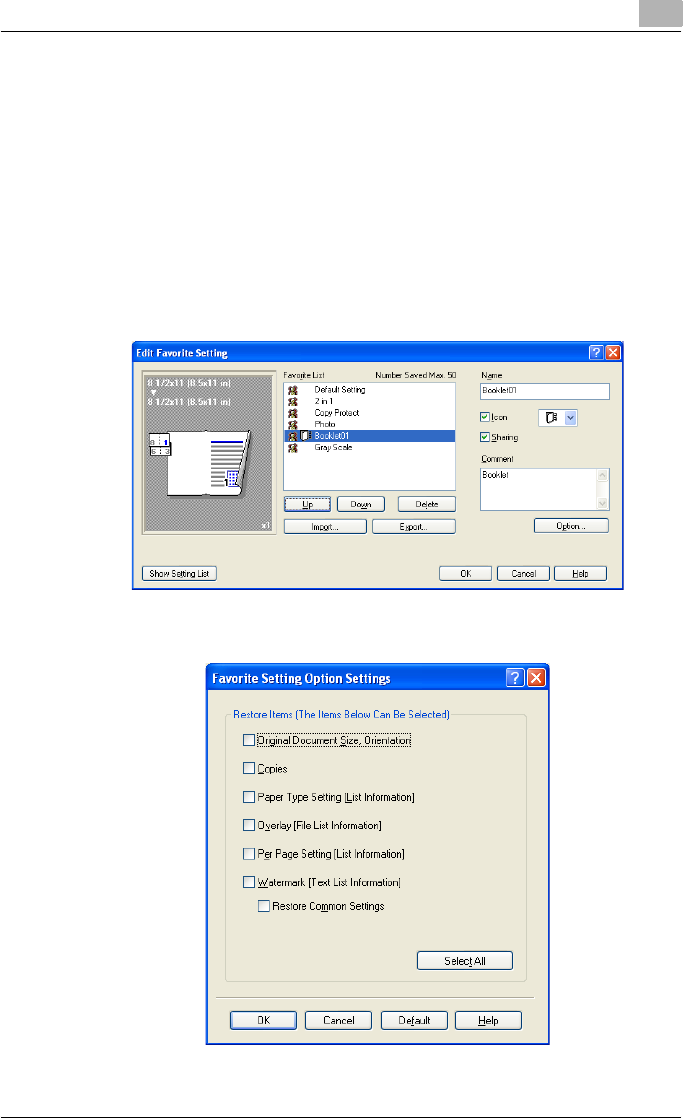
Setting up the PCL driver (Windows) 5
C550 5-52
Editing the settings
You can edit the recalled function items such as the specified names and
comments.
1In the Printing Preferences dialog box, click the [Edit] button next to the
“Favorite Setting” drop-down list.
2From the list, select the specified name that you want to change, and
then change the setting.
To delete a setting, click the [Delete] button.
To switch the order displayed, click the [Up] button or the [Down] but-
ton.
3Click the [Option] button, select the check box of the function that you
want to recall, and then click the [OK] button.
4Click the [OK] button.
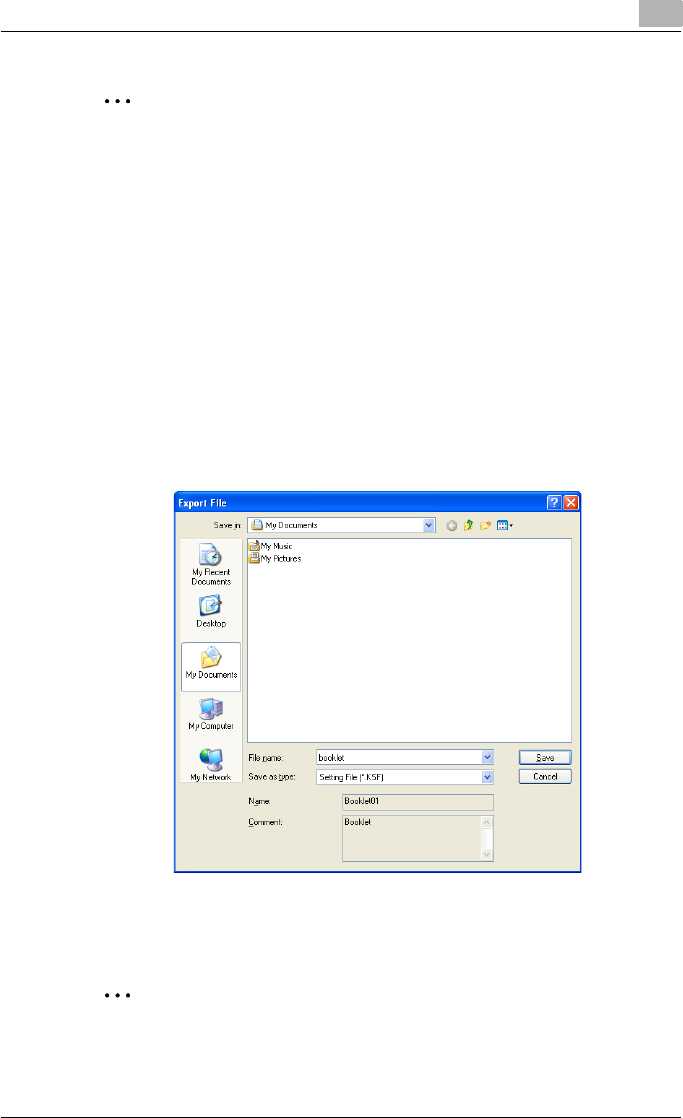
Setting up the PCL driver (Windows) 5
C550 5-53
2
Note
The specified settings of the driver functions cannot be changed.
Importing and exporting the driver settings
You can also save (export) or read (import) the settings that were specified
to a file. This comes in handy when you want to use the same settings on an-
other computer.
1In the Printing Preferences dialog box, click the [Edit] button next to the
“Favorite Setting” drop-down list.
2From the list, select the specified name that you want to export, and
then click the [Export] button.
The dialog box to save the specified file appears.
3Specify the location to save the file and enter the file name.
4Click the [Save] button.
The specified file is created. The file extension is “.KSF”.
2
Note
To read the specified file that was saved in the “Favorite Setting” drop-
down list, click the [Import] button and specify the file.

Setting up the PCL driver (Windows) 5
C550 5-54
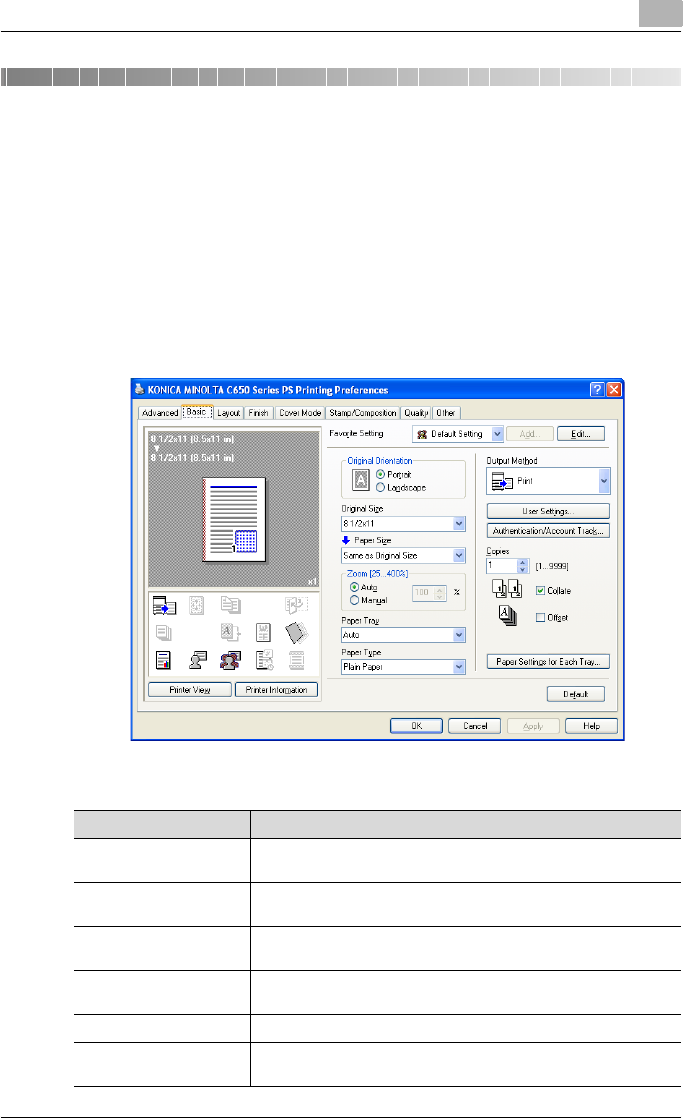
Setting up the PostScript driver (Windows) 6
C550 6-1
6 Setting up the PostScript driver (Win-
dows)
6.1 Settings
Common settings
The following describes the common settings and buttons that are displayed
on all tabs.
Button Function
OK Click this button to close the dialog box and apply any settings that
have been changed.
Cancel Click this button to cancel any settings that have been changed and
close the dialog box.
Help Click this button to display the help for each item on the currently
displayed dialog box.
Add (Favorite Setting) Click this button to save the current settings and to view them at a
later time.
Edit (Favorite Setting) Click this button to change the saved settings.
Default Click this button to return the settings to their defaults, which were
selected when the driver was installed.
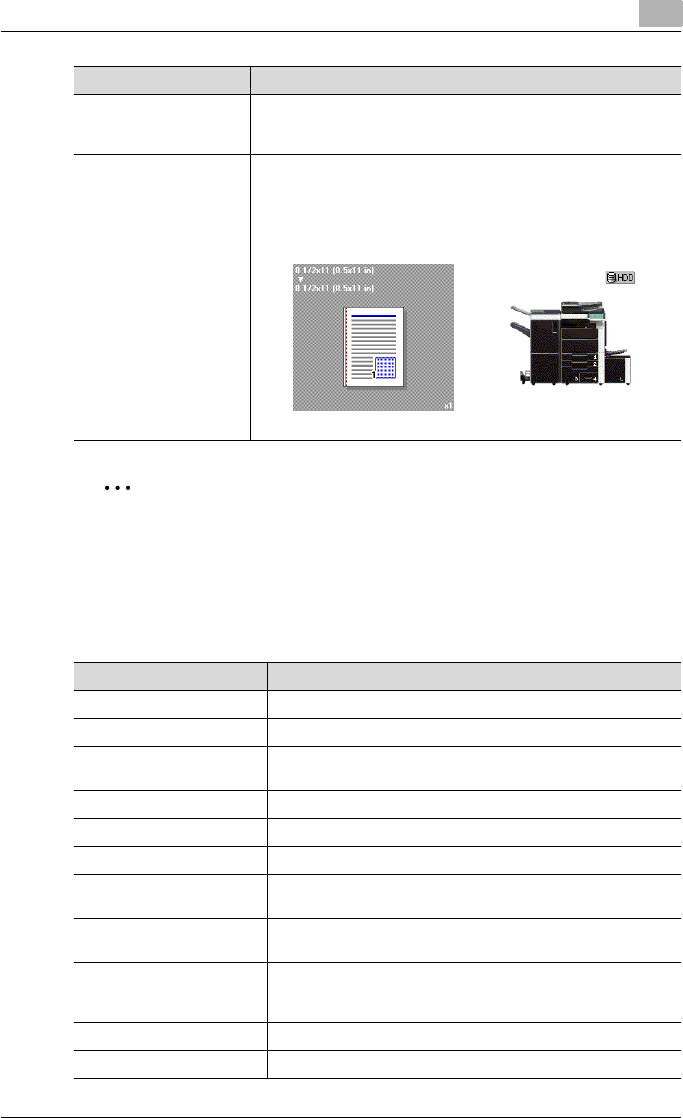
Setting up the PostScript driver (Windows) 6
C550 6-2
2
Note
To enable any installed options, you must specify the Device Option set-
tings. For details, refer to “Specifying the Configure tab settings” on
page 6-45.
Basic tab
Printer Information Click this button to start up PageScope Web Connection and check
the information of the machine. This is enabled when communica-
tion with the machine is possible.
View When the [Paper View] button is clicked, a preview of the page lay-
out as specified in the current settings is displayed and a preview
image of the print job can be checked.
When the [Printer View] button is clicked, a printer figure is dis-
played showing any options, such as the paper tray, that are in-
stalled on this machine.
Button Function
Paper Printer
Item Function
Original Orientation Specifies the orientation of the original document.
Original Size Specifies the size of the original document.
Paper Size Specifies the output paper size. Automatically enlarges or reduc-
es when the Original Size setting is changed.
Zoom Specifies the enlargement and reduction ratio.
Paper Tray Selects the paper tray for printing.
Paper Type Selects the paper type for printing.
Output Method For non-conventional printing, selects special output methods
such as “Secure Print” or “Save in User Box”.
[User Settings] Specifies the ID and password, or the file name and box number
when performing “Secure Print” or “Save in User Box”.
[Authentication/Account
Track]
Specifies the user name and password when performing user
authentication, and the department name and password when
performing account track on this machine.
Copies Specifies the number of copies to print.
Collate Specifies whether to print multiple copies in sets.
Setting up the PostScript driver (Windows) 6
C550 6-3
Layout tab
Finish tab
Cover Mode tab
Offset When printing multiple copies, shifts the output position of each
set.
Paper Settings for Each Tray Specifies the paper type for each paper tray.
Item Function
Item Function
Combination Prints multiple pages on one page. Details can be specified
by clicking the [Combination Details] button.
Rotate 180 Prints the image rotated 180°.
Chapters Specifies the page to be printed on the front side.
Print Type Specifies duplex printing and booklet printing.
Binding Position Specifies the binding position.
Binding Margin Specifies the binding margin. Click the [Binding Margin
Settings] button to specify the margin values.
Image Shift Prints by shifting the entire print image. Click the [Image
Shift Settings] button to specify the image shift values.
Item Function
Staple Specifies stapling.
Center Staple and Fold Specifies to saddle stitch a printed document.
Punch Specifies hole punching.
Fold Specifies folding.
Output Tray Specifies the tray where to output the printed pages.
Paper Arrangement Specifies the method for adjusting the binding position.
Item Function
Front Cover Attaches a front cover page.
Front Cover Tray Selects the paper tray for the front cover.
Back Cover Attaches a back cover page.
Back Cover Tray Selects the paper tray for the back cover.
Front Cover from Post Inserter Attaches a front cover from the post inserter.
Back Cover from Post Inserter Attaches a back cover from the post inserter.
Setting up the PostScript driver (Windows) 6
C550 6-4
Stamp/Composition tab
Quality tab
Other tab
Per Page Setting Inserts paper between pages and switches the paper and
tray for each page.
Transparency Interleave Outputs and inserts interleaves when printing overhead
projector transparencies.
Interleave Tray Selects the input tray for the transparency interleaves.
Item Function
Item Function
Watermark Prints a watermark (text stamp) on the page being printed.
Watermarks can be added, changed, or deleted by clicking
the [Edit] button.
Create Overlay File Prints an original document on top of an overlay that was
created separately.
Copy Protect Prints a special pattern to prevent copying.
Date/Time Prints the date and time.
Page Number Prints the page number.
Header/Footer Prints a header and a footer.
Item Function
Select Color Specifies the color for printing.
Quality Adjustment Adjusts the image quality. You can select “Simple” to ad-
just entire documents or “Detailed” to adjust the text, pho-
tos, and charts in the document.
The profile can also be controlled.
Color Settings Prints with a quality suitable for the selected original docu-
ment.
Glossy Mode Prints with a gloss.
Font Settings Download Font
Format
Selects whether the fonts are downloaded to the printer as
bitmap or outline.
Use Printer
Fonts
Selects whether to use TrueType fonts or the printer fonts
when printing.
Item Function
Excel Job Control Controls jobs so that they are not separated when print-
ing in Microsoft Excel.
Check Driver Version Displays the version information of the printer driver.
Setting up the PostScript driver (Windows) 6
C550 6-5
Advanced tab
Device Settings tab
2
Note
To display the Device Settings tab in Windows 2000/XP/Server 2003/Vis-
ta, right-click the icon of the installed printer, and then click “Properties”.
Item Function
Advanced Printing Features Specifies whether to enable detailed print functions (book-
let).
PostScript Output Option Specifies the PostScript file output format.
Send PostScript Error Handler Specifies whether to print an error report when a PostScript
error occurs.
Mirrored Output Reverses horizontally, then prints.
PostScript Pass through Allows applications to print directly without using a GDI.
Item Function
Font Substitution Table Specifies the replacement of TrueType fonts with printer
fonts.
Available PostScript Memory Specifies the usable PostScript memory size.
Output Protocol Specifies the protocol for transmitting to the printer.
Send CTRL-D Before Each Job Specifies whether to reset printer before printing.
Send CTRL-D After Each Job Specifies whether to reset printer after printing.
Convert Gray Text to PostScript
Gray
Specifies whether to convert gray text in a document to
PostScript gray.
Convert Gray Graphics to Post-
Script Gray
Specifies whether to convert gray graphics in a document
to PostScript gray.
Add Euro Currency Symbol to
PostScript Fonts
Specifies whether to convert the Euro currency symbol in a
document to PostScript fonts.
Job Timeout Printer stops printing when a print job is not completed
within the specified time.
Wait Timeout Printer stops printing when the printer does not receive
data within the specified time from when the job was sent.
Minimum Font Size to Download-
ed as Outline
Specifies the minimum font size (pixels) when downloading
TrueType fonts as outline fonts. Fonts smaller than the min-
imum specified size are downloaded as bitmap fonts.
Maximum Font Size to Download
as Bitmap
Specifies the maximum font size (pixels) when download-
ing TrueType fonts as bitmap fonts. Fonts larger than the
maximum specified size are downloaded as outline fonts.
Setting up the PostScript driver (Windows) 6
C550 6-6
Configure tab
2
Note
To display the Configure tab in Windows 2000/XP/Server 2003/Vista,
right-click the icon of the installed printer, and then click “Properties”.
You cannot use the [Acquire Device Information] function if you are not
connected to or able to communicate with this machine.
Settings tab
2
Note
To display the Settings tab in Windows 2000/XP/Server 2003/Vista, right-
click the icon of the installed printer, and then click “Properties”.
Item Function
Device Option Specifies the status of the options that are installed on this
machine and the status of the user authentication and ac-
count track functions. Specify the status of each item from
the “Setting” drop-down list.
Paper Tray Information Shows the paper type specified for each tray. Click the [Pa-
per Tray Settings] button to specify the settings for each
paper tray.
Acquire Device Information Communicates with this machine to read the status of the
installed options.
Acquire Settings Specifies the status of the connection that executes getting
the option information.
Encrypt. Passphrase Enters the encryption passphrase when it is user defined
by communicating with this machine.
Software Tools Starts up software tools such as PageScope Web Connec-
tion.
Item Function
Display Constraint Message Displays a message when functions that cannot be speci-
fied at the same time were enabled from the printer driver.
Display paper set in Print Server
Properties.
Uses the paper that was added in [Server Properties] of the
printer folder.
Verify Authentication settings be-
fore printing
Verifies the authentication settings for this machine before
printing and displays a message if the settings are not com-
patible.
Popup Authentication Dialog
when printing
Displays the User Authentication/Account Track dialog box
when a print job is specified to enter the user name and de-
partment name.
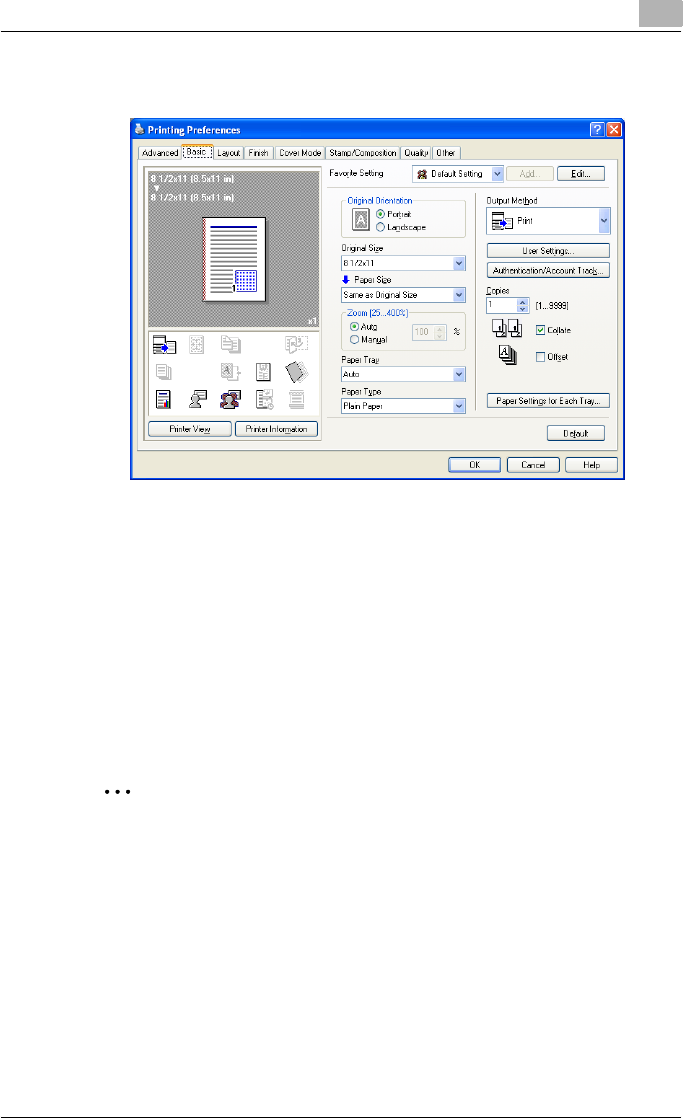
Setting up the PostScript driver (Windows) 6
C550 6-7
6.2 Specifying the Basic tab settings
Printing to suit the paper size
You can enlarge or reduce documents created when printing to match the
output paper size.
1Click the Basic tab.
2From the “Original Size” and “Paper Size” drop-down lists, select the
desired settings.
– You can also specify any enlargement or reduction ratio in the
“Zoom” box.
2
Note
“12 × 18” paper size is one size larger than A3 paper size at 504.8 × 457.2
mm.
To print on paper sizes other than the standard sizes, be sure to set the
custom paper sizes in Custom Size Settings first.
When “W” is selected for each standard paper size from the printer driv-
er, the data can be centered and printed.
For example, if A4 size data is created and you want to center and print
on A3 size paper, select “A4W” as the paper size and “Tray 1” or “Bypass
Tray” as the paper tray from the printer driver.
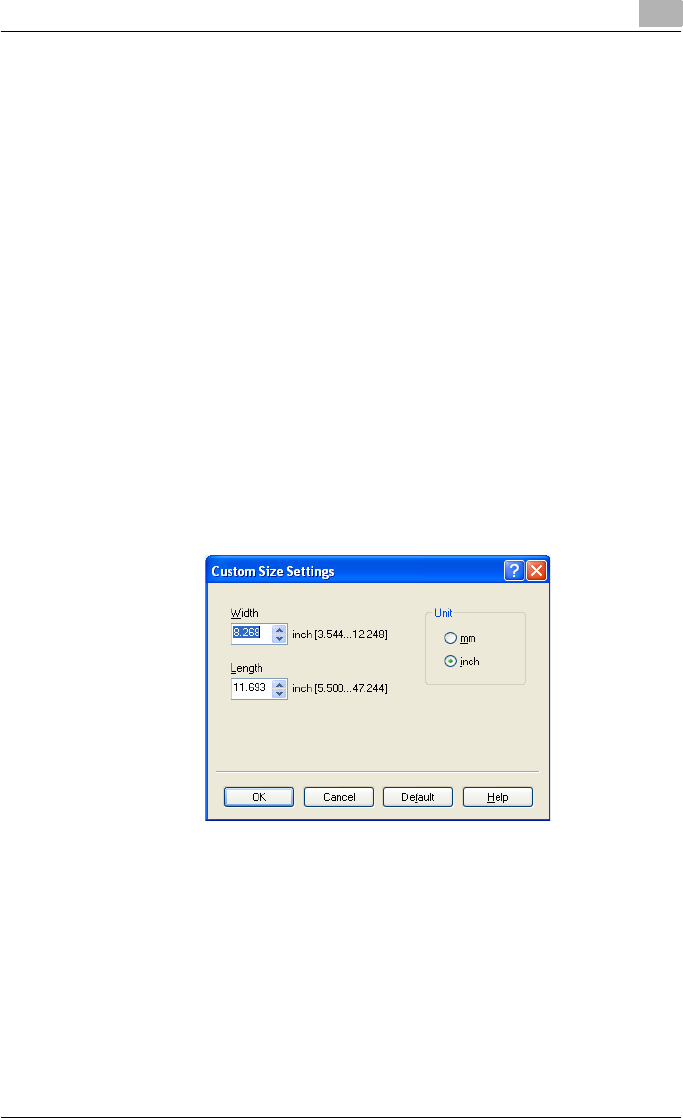
Setting up the PostScript driver (Windows) 6
C550 6-8
To print, load A3 size paper in the tray (“Tray 1” or “Bypass Tray”) of this
machine that was specified from the printer driver, and then specify the
settings described below from [Basic (Paper)] – [Change Tray Settings] –
[Wide Paper] in the control panel.
“A4W”.
Enter the A3 paper size (420.0 × 297.0) in [Change Size].
Specifying a custom size
When printing on paper of a custom size, you can specify the paper size val-
ues by following the procedure described below.
1From the “Original Size” or the “Paper Size” drop-down list, select
“Custom Size”.
The Custom Size Settings dialog box appears.
2Specify settings for the following:
– Width: Specifies the width of the custom paper size according to
the selected measurement unit.
– Length: Specifies the length of the custom paper size according to
the selected measurement unit.
– Unit: Selects the measurement unit that specifies the size.
3Click the [OK] button.
Selecting the paper tray
You can specify the paper you want to use for printing by selecting the paper
tray that contains the loaded paper.
1Click the Basic tab.
2From the “Paper Tray” drop-down list, select the desired paper tray.
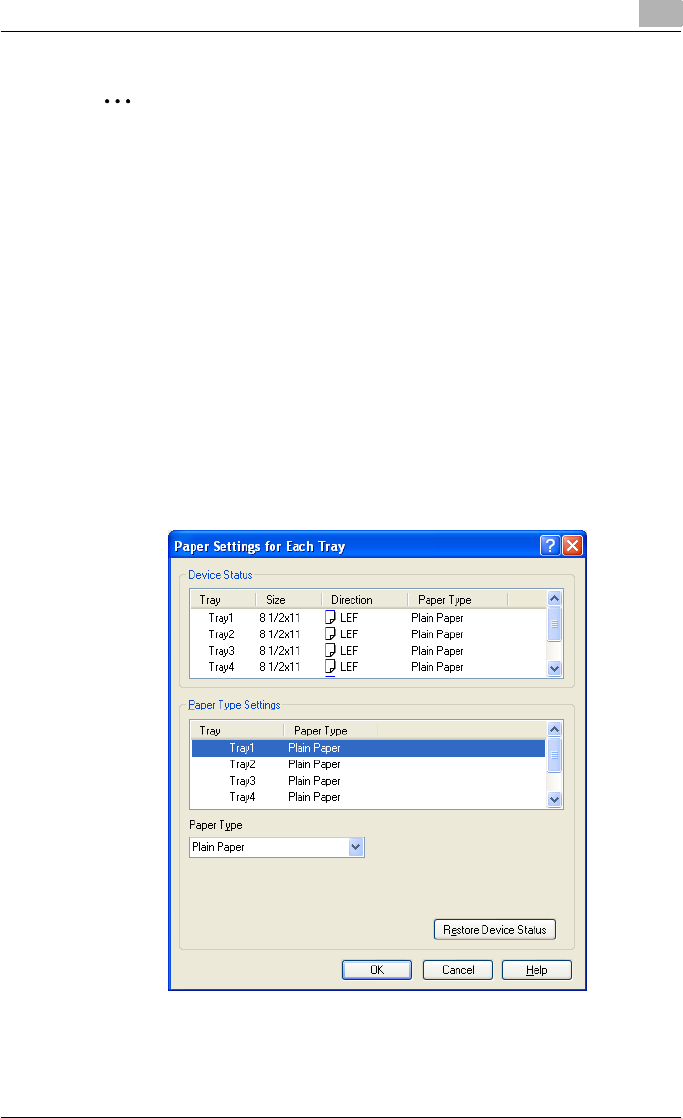
Setting up the PostScript driver (Windows) 6
C550 6-9
2
Note
If “Auto” is specified as the paper tray, you can select the paper type. If
the paper tray setting is changed to a setting other than “Auto”, the paper
type is fixed to its preregistered setting. Specify a paper type by clicking
the [Paper Settings for Each Tray] button. For details, refer to “Specifying
the paper type for a paper tray” on page 6-9.
Specifying the paper type for a paper tray
You can specify the paper type for a paper tray.
1Click the Basic tab.
2Click the [Paper Settings for Each Tray] button.
The Paper Settings for Each Tray dialog box appears.
3From “Paper Type Settings”, select the desired paper tray, and then
select the paper type to be specified from the “Paper Type” drop-down
list.
4Click the [OK] button.

Setting up the PostScript driver (Windows) 6
C550 6-10
2
Note
The current specified settings can be checked in “Device Status”.
Click the [Restore Device Status] button to communicate with this ma-
chine and read the status of the settings specified on this machine. You
cannot use this function if you are not connected to or able to communi-
cate with this machine.
The paper type for a paper tray can also be specified from the Configure
tab, and the paper size and paper orientation can be specified as well.
For details, refer to “Specifying the Configure tab settings” on page 6-45.
Specify “Duplex Side 2” to print on the back side of a page.
Selecting the output method
Not only can you print directly, but you can select “Secure Print”, which re-
quires a password to print, or “Save in User Box”, which saves data in the
boxes that were created on the HDD.
1Click the Basic tab.
2From the “Output Method” drop-down list, select the output method.
– Print: Prints immediately.
– Secure Print: Saves the document to be printed in “Secure Print
User Box” of this machine. When printing, you are required to enter
the ID and password in this machine’s control panel. Select when
printing highly confidential documents.
– Save in User Box: Saves the document to be printed in a box on this
machine.
– Save in User Box and Print: Saves the document in a box and prints
at the same time.
– Proof Print: After a part of the document has been printed, this ma-
chine stops printing temporarily. Select to avoid misprinting a large
volume of print jobs.
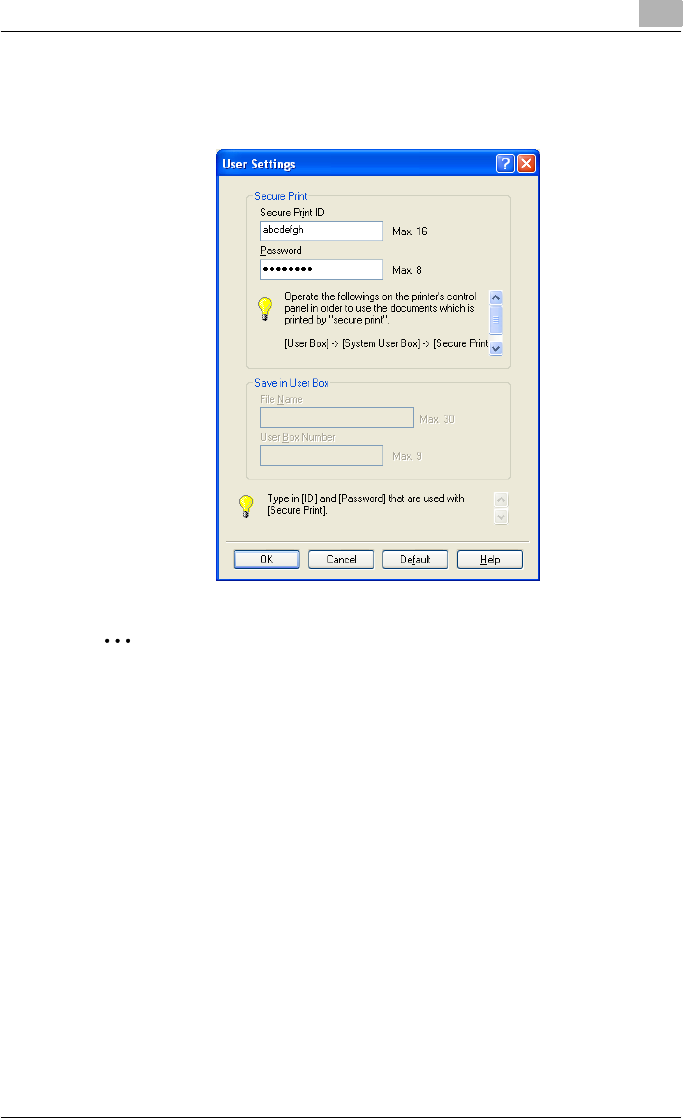
Setting up the PostScript driver (Windows) 6
C550 6-11
Secure Print
If “Secure Print” was selected, enter the ID and password in the dialog box
that appeared.
2
Note
The ID and password that are required for “Secure Print” can be prereg-
istered by clicking the [User Settings] button under “Output Method”. If
the ID and password are already registered, the dialog box to enter the
ID and password does not appear when “Secure Print” is selected.
To print, specify “Secure Print Document Box” from the Box mode in this
machine’s control panel, and then enter the ID and password. For details,
refer to “Print job management” on page 9-46. For details on the box
functions of this machine, refer to the User’s Guide [Box Operations].
When password rules are enabled on this machine, the passwords that
can be used for secured printing are limited and the jobs are deleted
when a password that does not comply with the password rule is
entered. For the password rules, refer to the User’s Guide [Copy
Operations].
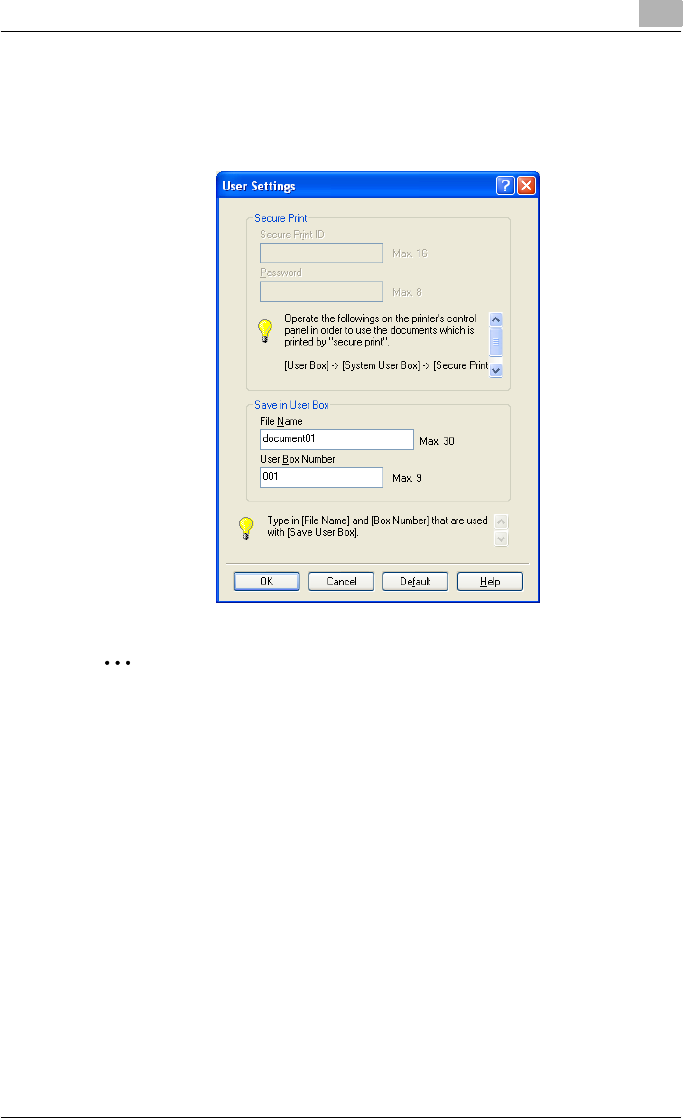
Setting up the PostScript driver (Windows) 6
C550 6-12
Save in User Box
When “Save in User Box” or “Save in User Box and Print” is selected, specify
the file name to be saved and the box number for the save location in the di-
alog box that appears for entering the file name and box number.
2
Note
The file name and box number that are required for “Save in User Box”
can be preregistered by clicking the [User Settings] button under “Output
Method”. If the file name and box number are already registered, the di-
alog box to enter the file name and box number does not appear when
“Save in User Box” is selected.
Be sure to create the box of the save location in advance with the box
function of this machine. For details on the box functions of this machine,
refer to the User’s Guide [Box Operations].
When password rules are enabled on this machine, specify the box that
was created on this machine.

Setting up the PostScript driver (Windows) 6
C550 6-13
Proof Print
When a print job is sent, this machine stops printing temporarily after part of
the document has been printed. The remaining print job is stored in this ma-
chine as a print job. When printing multiple copies, you can print the remain-
ing part of the print job after checking the print results.
2
Note
To print the document, release the held document from the Job mode in
this machine’s control panel. For details, refer to “Print job management”
on page 9-46.
Specifying the user authentication settings
If the user authentication settings have been specified on this machine, you
must enter a user name and password.
2
Reminder
If a job is printed using a user name or password that is not a registered
account on this machine, or if a job is printed without selecting a user un-
der “User Authentication”, the operation is not authenticated by this ma-
chine and the job is canceled.
If the user authentication settings are specified on this machine and the
authentication operation restriction function is in mode 2, the applicable
user is locked and cannot be accessed if the authentication information
is not entered correctly.
If the user authentication settings are not specified on the Configure tab,
user authentication cannot be performed. If using the user authentication
function, be sure to specify the settings on the Configure tab. For details,
refer to “Specifying the Configure tab settings” on page 6-45.
1Click the Basic tab.
2Click the [Authentication/Account Track] button.
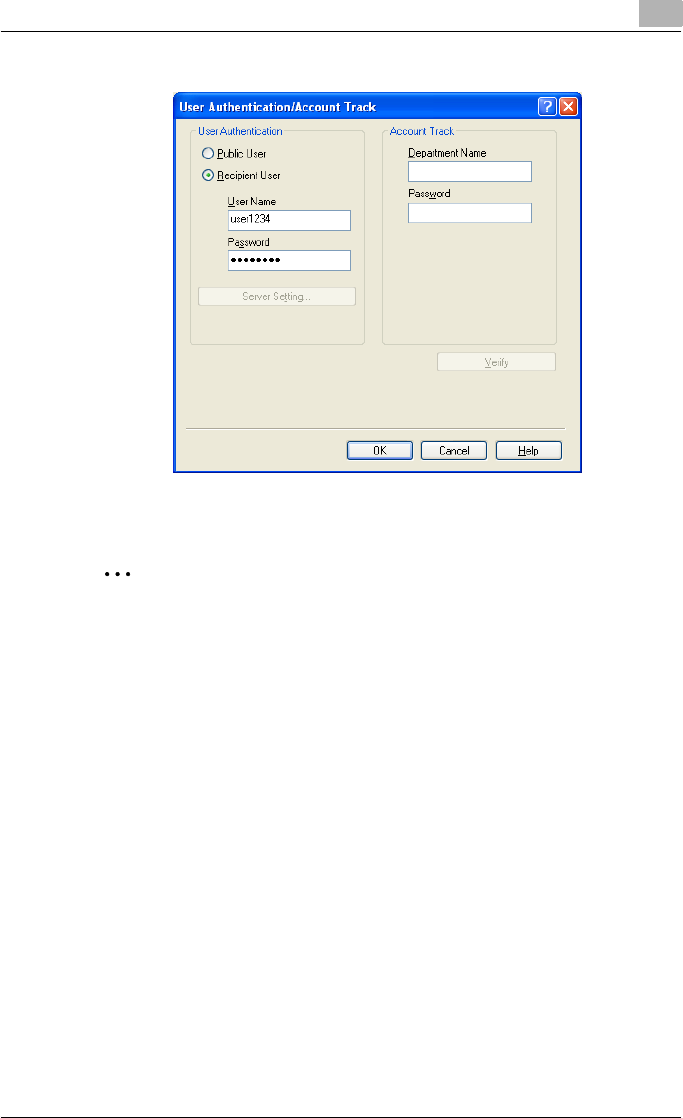
Setting up the PostScript driver (Windows) 6
C550 6-14
3Select “Recipient User”, and then enter the user name and password.
4Click the [OK] button.
2
Note
If this machine has been set to permit public users, the machine can be
used without a user name and password.
If performing user authentication on a server, the server settings must be
specified. Click the [Server Setting] button to select the server.
Click the [Verify] button to communicate with this machine and to check
whether authentication can be performed with the user that was entered.
You cannot use this function if you are not connected to or able to com-
municate with this machine.
If printing is not allowed, printing cannot be performed even when used
by a registered user. For details on the user authentication function, con-
sult the administrator of this machine.
If performing user authentication with an optional authentication unit, en-
ter the user name and password in step 3. For details, refer to the oper-
ation manual of the authentication unit.
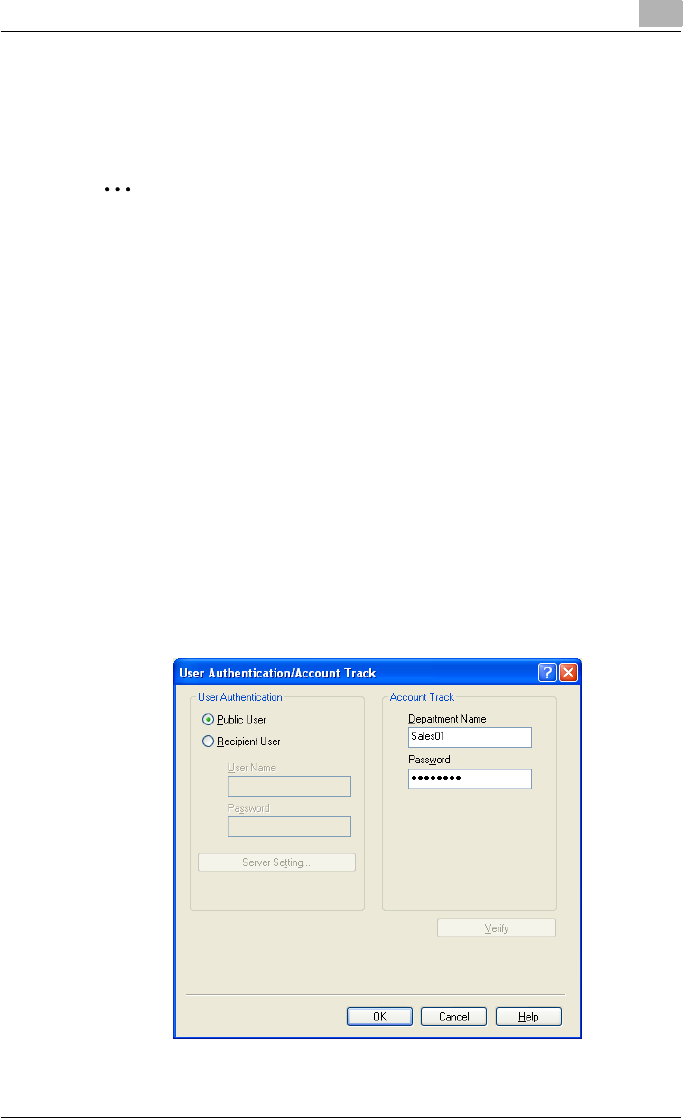
Setting up the PostScript driver (Windows) 6
C550 6-15
Specifying the account track settings
If the account track settings have been specified on this machine, you must
enter a department name and password.
2
Reminder
If a job is printed using a department name or password that is not a reg-
istered account on this machine, or if a job is printed without “Account
Track” selected, the operation is not authenticated by this machine and
the job is canceled.
When the account track settings are specified on this machine, the au-
thentication operation restriction function is in mode 2, and the authenti-
cation information is not entered correctly, the applicable account is
locked and cannot be accessed.
If the account track settings are not specified on the Configure tab, ac-
count track cannot be performed. If using the account track function, be
sure to specify the settings on the Configure tab. For details, refer to
“Specifying the Configure tab settings” on page 6-45.
1Click the Basic tab.
2Click the [Authentication/Account Track] button.
3Enter the department name and password.
4Click the [OK] button.

Setting up the PostScript driver (Windows) 6
C550 6-16
2
Note
Click the [Verify] button to communicate with this machine and to check
whether authentication can be performed with the user that was entered.
You cannot use this function if you are not connected to or able to com-
municate with this machine.
If printing is not allowed, printing cannot be performed even when used
by a registered account. For details on the account track function, con-
sult the administrator of this machine.
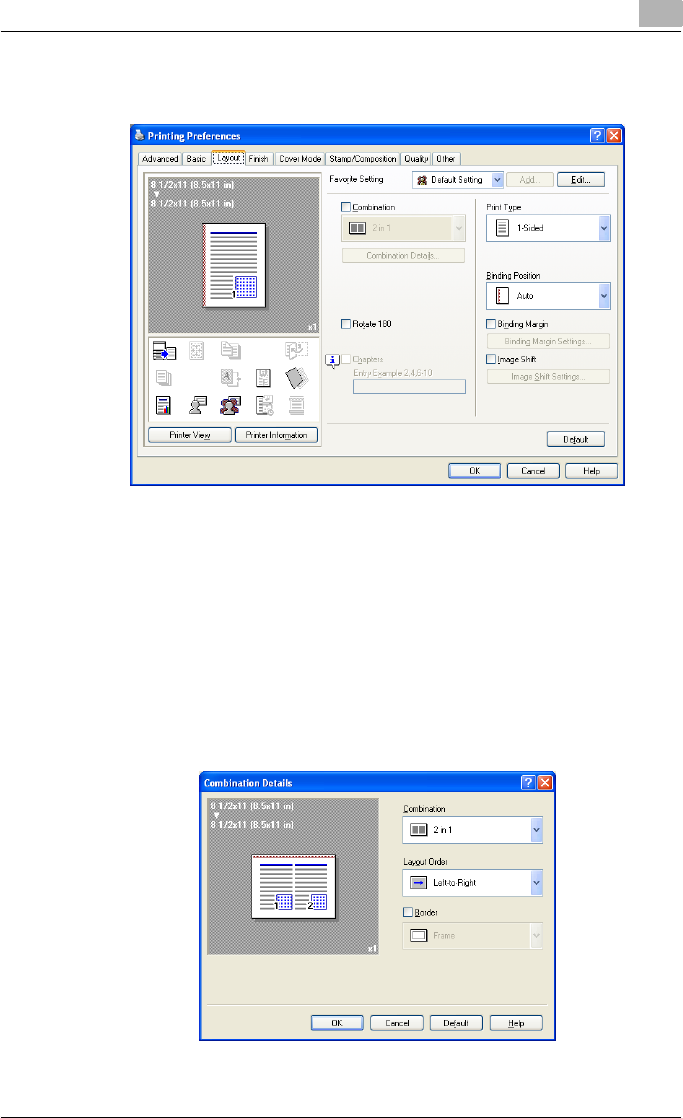
Setting up the PostScript driver (Windows) 6
C550 6-17
6.3 Specifying the Layout tab settings
Printing multiple pages on one page (N in 1)
You can specify to print multiple pages of text on one page with N in 1 print-
ing.
1Click the Layout tab.
2Select the “Combination” check box, and then specify the setting from
the drop-down list.
To change the “Border” settings, click the [Combination Details] button, and
then change the settings in the dialog box that appears.

Setting up the PostScript driver (Windows) 6
C550 6-18
2
Reminder
When printing a job that contains pages of different sizes and orienta-
tions, images may be missing or overlapping when the document is print-
ed.
Chapters
You can specify the page you want to print on the front side when duplex
printing or booklet printing.
Even if a specified page comes up to be printed on the back side in duplex
printing or booklet printing, the specified page is moved and printed on the
front side.
1Click the Layout tab.
2Select the “Chapters” check box.
3Enter the page number of the page you want to print on the front side.
2
Note
When entering multiple page numbers, separate the page numbers with
commas such as “2, 4, 6” or enter a page range using a hyphen such as
“6-10”.
The “Chapters” check box can only be selected when the duplex printing
or the booklet printing setting is enabled.
Specifying duplex/booklet printing
You can print a document onto both sides of a page or in a booklet format
(two facing pages). This comes in handy when you want to bind multiple-
page documents.
1Click the Layout tab.
2From the “Print Type” drop-down list, select “2-Sided” or “Booklet”.
2
Note
The binding position can be specified from the “Binding Position” drop-
down list.
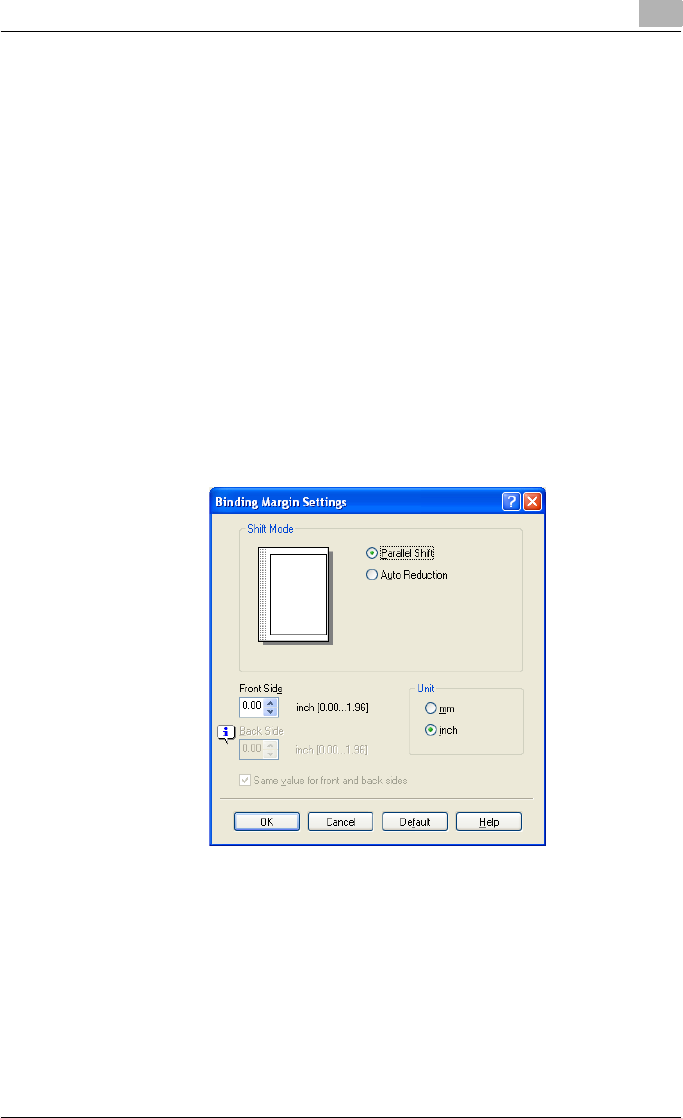
Setting up the PostScript driver (Windows) 6
C550 6-19
Setting the binding margin
Binding margins are added to the document before it is printed.
1Click the Layout tab.
2From the “Binding Position” drop-down list, select the binding position.
3Select the “Binding Margin” check box.
4To set the width of the binding margin, click the [Binding Margin Set-
tings] button, and then specify the desired settings in the Binding Mar-
gin Settings dialog box that appears.
– Shift Mode: To add a binding margin, select how the image is to be
shifted.
– Front Side/Back Side: Sets the binding margin values. By clearing
the “Same value for front and back sides” check box, you can
specify separate values for the front and back sides.
– Unit: Selects the measurement unit that specifies the size.
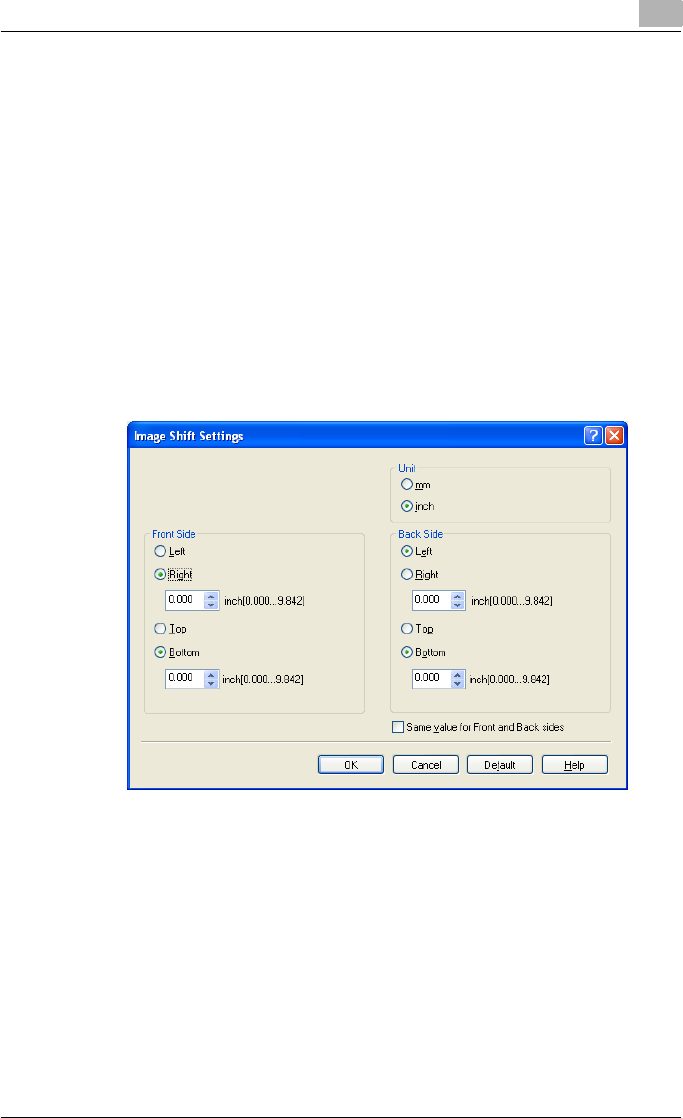
Setting up the PostScript driver (Windows) 6
C550 6-20
Shifting images
The entire print image of a document is shifted and then printed. You can use
this function when you want to adjust the print position.
1Click the Layout tab.
2Select the “Image Shift” check box.
3To set the image shift settings, click the [Image Shift Settings] button,
and then specify the desired settings in the Image Shift Settings dialog
box that appears.
– Unit: Selects the measurement unit that specifies the size.
– Front Side/Back Side: Specifies the shift direction and sets the val-
ues. By clearing the “Same value for Front and Back sides” check
box, you can set separate values for the front and back sides.
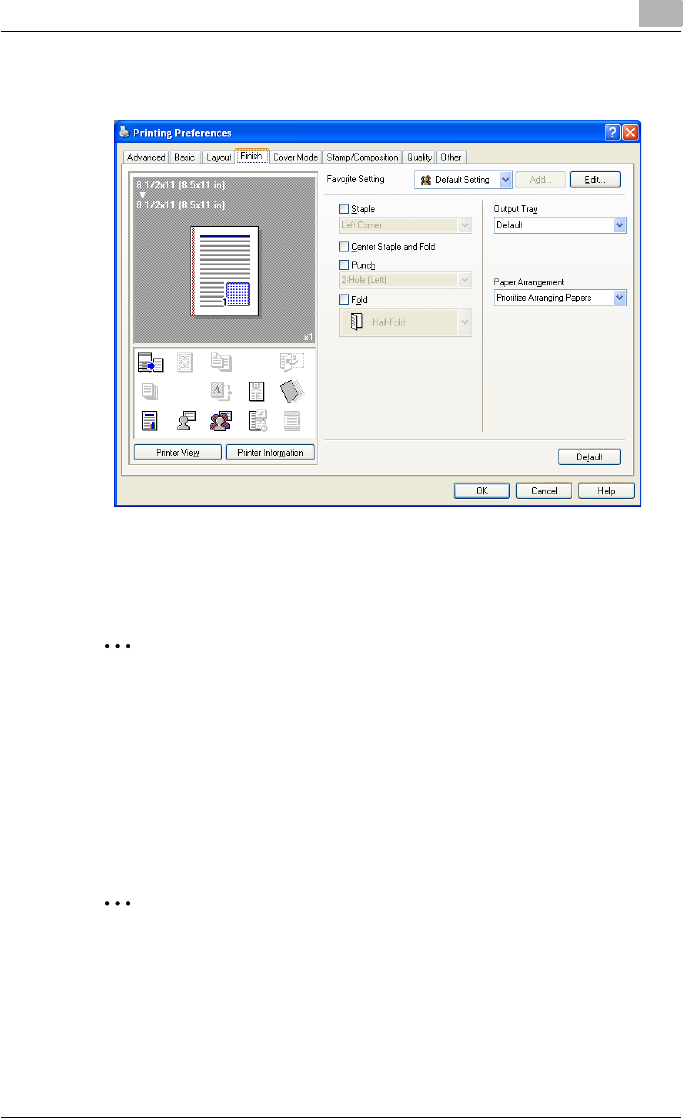
Setting up the PostScript driver (Windows) 6
C550 6-21
6.4 Specifying the Finish tab settings
Stapling
Multiple-page documents can be stapled.
2
Reminder
The staple function is available only when the optional finisher is installed.
1Click the Finish tab.
2Select the “Staple” check box.
3From the drop-down list, specify the number of staples and the sta-
pling position.
2
Note
Specify the staple position noting the binding position specified in “Bind-
ing Position”.

Setting up the PostScript driver (Windows) 6
C550 6-22
Specifying the center staple and fold setting
You can specify to center staple and fold a printed document. By specifying
the center staple and fold setting, printed documents can be folded in half
and stapled.
2
Reminder
The center staple and fold function is available only when optional finisher
FS-608 is installed.
1Click the Finish tab.
2Select the “Center Staple and Fold” check box.
2
Note
The center staple and fold function cannot be specified when the staple,
punch, or fold function is specified.
The center staple function and the thick paper function cannot be spec-
ified when finisher FS-608 is installed.
Hole punching
Holes can be punched into the printed document.
2
Reminder
The hole punch function is available only when the punch kit is installed
on the optional finisher.
1Click the Finish tab.
2Select the “Punch” check box.
3From the drop-down list, specify the number of punched holes.
2
Note
The hole-punch position changes according to the binding position spec-
ified from “Binding Position”.
The number of punch holes that can be selected may vary depending on
the punch kit that is installed.

Setting up the PostScript driver (Windows) 6
C550 6-23
Folding
You can specify to fold a printed document.
2
Reminder
The fold function is available only when optional finisher FS-608 is in-
stalled.
1Click the Finish tab.
2Select the “Fold” check box.
3From the drop-down list, specify the folding condition.
2
Note
The fold function cannot be specified when the staple, punch, or saddle
stitch function is specified.
Specifying the output tray
You can specify the tray to which the printed document is output.
1Click the Finish tab.
2From the “Output Tray” drop-down list, specify the output tray.
Specifying the procedure for adjusting the binding position
You can specify the procedure for adjusting the binding position for duplex
printing.
If “Prioritize Arranging Papers” is selected, all pages can be processed to a
suitable quality by this machine because the binding position is adjusted af-
ter all the print data is received. If “Prioritize Productivity” is selected, the
printing process is performed efficiently because the binding position is ad-
justed while the data is printed simultaneously as it is being received.
If you want to increase the print efficiency, select “Prioritize Productivity”. If
the desired binding position and width cannot be achieved, select “Prioritize
Arranging Papers”.
1Click the Finish tab.
2From the “Paper Arrangement” drop-down list, specify the processing
method.
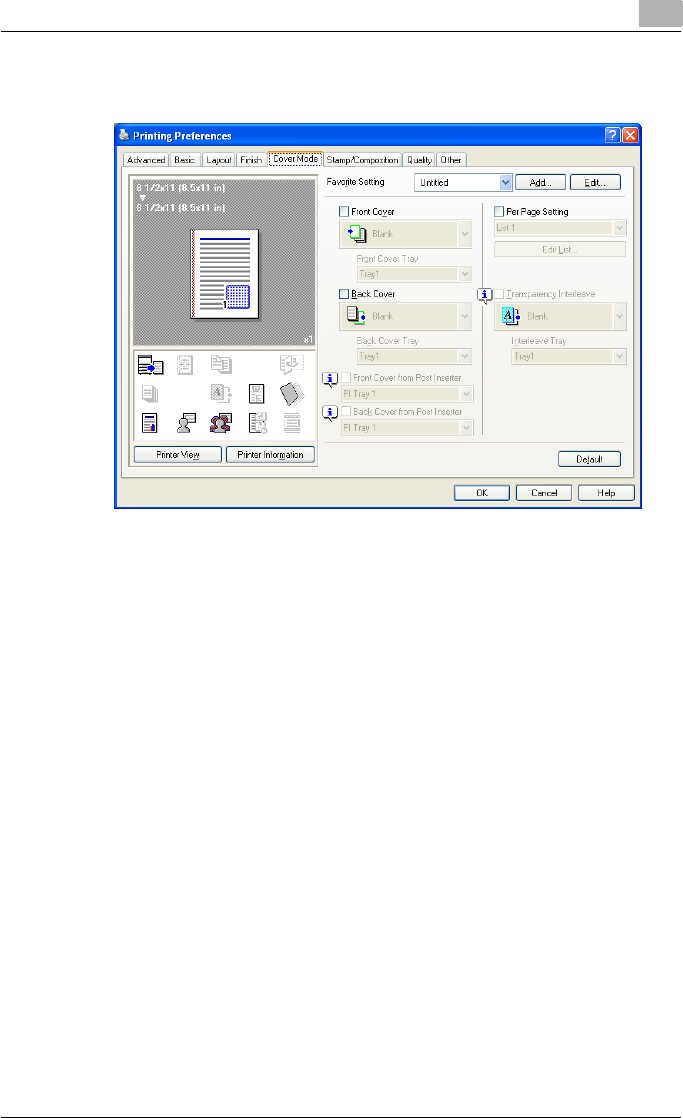
Setting up the PostScript driver (Windows) 6
C550 6-24
6.5 Specifying the Cover Mode tab settings
Printing documents with a front cover/back cover
1Click the Cover Mode tab.
2Select the “Front Cover” and “Back Cover” check boxes.
3From the “Front Cover” and “Back Cover” drop-down lists, select the
desired print settings.
To print on the front cover and back cover, select “Print”. To only add
a blank page, select “Blank”.
4Select the paper tray that contains the loaded paper for the front cover
and back cover.
Printing documents with a front cover/back cover from a post inserter
1Click the Cover Mode tab.
2Select the “Front Cover from Post Inserter” and the “Back Cover from
Post Inserter” check boxes.
3Select the PI tray that contains the loaded paper for the Front Cover
from Post Inserter function and the Back Cover from Post Inserter func-
tion.

Setting up the PostScript driver (Windows) 6
C550 6-25
2
Note
The Front Cover from Post Inserter function and the Back Cover from
Post Inserter function are available only when an optional post inserter is
installed.
The Front Cover from Post Inserter function and the Back Cover from
Post Inserter function cannot be specified when the Front Cover function
and the Back Cover function are specified.
Printing multiple pages
You can specify the print type and paper tray for each page. This comes in
handy when you want to change the paper tray during a print job when print-
ing multiple pages.
1Click the Cover Mode tab.
2Select the “Per Page Setting” check box.
3From the “Per Page Setting” drop-down list, select the desired list
name.
4Click the [Edit List] button.
The Per Page Settings – Edit List dialog box for specifying the print set-
tings appears.
5Click the [Add] button.

Setting up the PostScript driver (Windows) 6
C550 6-26
A new row for specifying the print settings is added to “Settings List”.
6Select the row that was added to the list, and then specify the print set-
tings in “Add/Edit”.
– Page Number: Enters the page number. When entering multiple
page numbers, separate the page numbers with commas such as
“2, 4, 6” or enter a page range using a hyphen such as “6-10”.
– Print Type: Specifies Print Insert, Insert Blank Sheet, Print (1-Sid-
ed), and Print (2-Sided).
– Paper Tray: Specifies the paper tray.
– Staple: Specifies the number of staples and the stapling position.
7Click the [OK] button.

Setting up the PostScript driver (Windows) 6
C550 6-27
2
Note
To change existing print settings, select the desired row and change the
settings. To delete existing print settings, select the desired row, and
then click the [Delete] button.
Click the [Up] button or the [Down] button to change the page number
starting with the smallest page number.
The list name can be changed by clicking the [Edit List Name] button.
Printing with transparency interleaves
If “Transparency” is selected as the paper type, you can select the “Trans-
parency Interleave” check box to enable the transparency interleave setting.
By selecting the “Transparency Interleave” check box, overhead projector
transparencies can be inserted between the printed pages.
1Click the Cover Mode tab.
2Select the “Transparency Interleave” check box.
3From the “Transparency Interleave” drop-down list, specify the printing
conditions.
4From the “Transparency Interleave” drop-down list, select the paper
tray that contains the paper to be used.
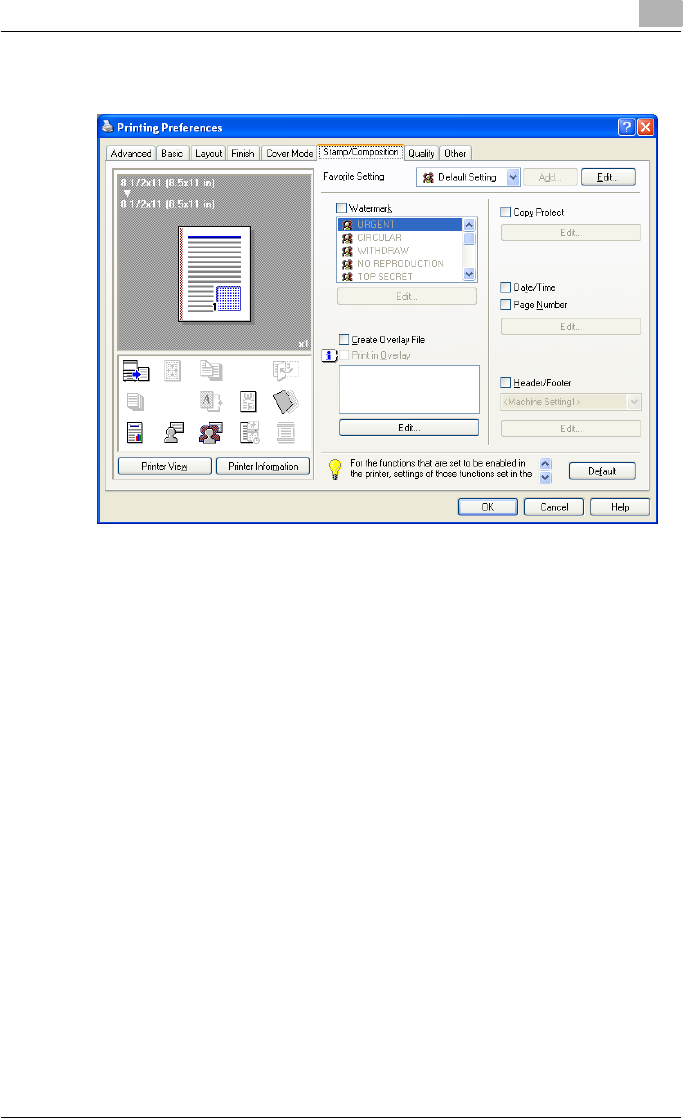
Setting up the PostScript driver (Windows) 6
C550 6-28
6.6 Specifying the Stamp/Composition tab settings
Printing a watermark
You can print specific text in the background as a watermark.
1Click the Stamp/Composition tab.
2Select the “Watermark” check box.
3From the list, select the watermark that you want to print.
!
Detail
For Windows Vista x64, the watermark function cannot be specified
when the following functions are specified at the same time.
User Authentication
Account Track
Per Page Setting
Verify Authentication settings before printing
Popup Authentication Dialog when printing
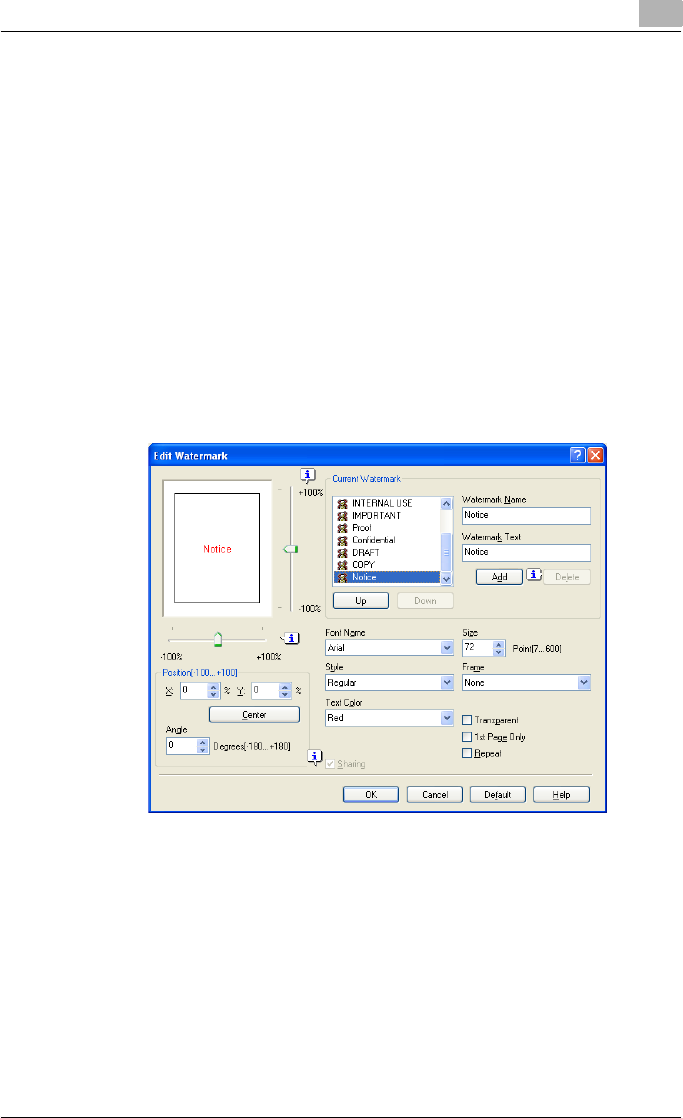
Setting up the PostScript driver (Windows) 6
C550 6-29
Editing a watermark
You can change the fonts and position of the watermark and you can register
a new one.
1Click the Stamp/Composition tab.
2Select the “Watermark” check box.
3Click the [Edit] button under “Watermark”.
The Edit Watermark dialog box appears.
4To create a watermark, click the [Add] button.
To change a watermark, select the watermark from the “Current Wa-
termark” list.
5Specify settings for the following:
– Watermark Name: Enters the name of the watermark.
– Watermark Text: Enters the text to be printed as a watermark.
– [Add]: Click to create a new watermark.
– [Delete]: Click to delete the selected watermark.
– Position: Specifies the vertical and horizontal positions. The water-
mark position can also be specified by using the horizontal and ver-
tical sliders in the dialog box.
– Text Angle: Specifies the watermark print angle.
– Font Name: Specifies the font.
– Size: Specifies the size.
– Style: Specifies the font style.

Setting up the PostScript driver (Windows) 6
C550 6-30
– Frame: Specifies the frame style.
– Text Color: Specifies the watermark text color.
– Sharing: Specifies whether to register the watermark as public or
private.
– Transparent: Prints the watermark as a transparent image.
– 1st Page Only: Prints the watermark on the first page only.
– Repeat: Prints several watermarks on a single page.
6Click the [OK] button.
2
Note
Up to 30 watermarks can be registered with the shared setting, and up to
20 watermarks can be registered with the private setting.
Only the administrator can select a setting under “Sharing”.
Printing different original documents together (overlay)
An original document can be printed on top of the overlay data that was cre-
ated separately. This function comes in handy when creating fax cover let-
ters or form letters.
2
Note
You must create and preregister the overlay file to be printed. For details,
refer to “Editing an overlay file” on page 6-32.
1Create the print data using any application.
2From the [File] menu, select “Print”.
3Select this machine in “Printer Name”, and then click the [Properties]
button or the [Preferences] button.
4Click the Stamp/Composition tab.
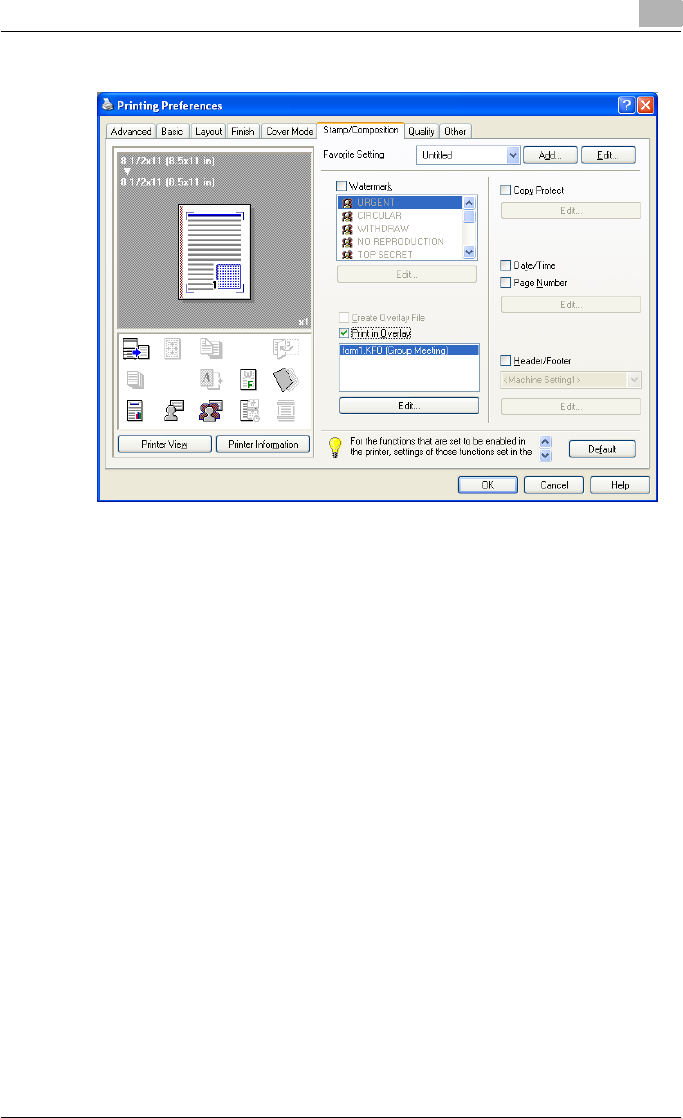
Setting up the PostScript driver (Windows) 6
C550 6-31
5Select the “Print in Overlay” check box.
6From the list, select the overlay that you want to print.
7Click the [Edit] button under “Print in Overlay”.
The Edit Print In Overlay dialog box appears.

Setting up the PostScript driver (Windows) 6
C550 6-32
8Specify the overlay printing method.
– Pages: Specifies the pages to print.
– Overwrite: Specifies the sequence for printing the overlay on top of
the original document.
9Click the [OK] button.
The Stamp/Composition tab appears again.
10 Click the [OK] button.
The Print dialog box appears again.
11 Click the [Print] button.
The printing of the overlay is performed.
Editing an overlay file
To use an overlay, an overlay file must be created and added to the overlay
file list. You can create and save a new overlay file by selecting the “Create
Overlay File” check box, specifying the document that you want to create as
an overlay file, then clicking the [Print] button on the Print dialog box. To add
an existing overlay file that was created to the list, specify the file.
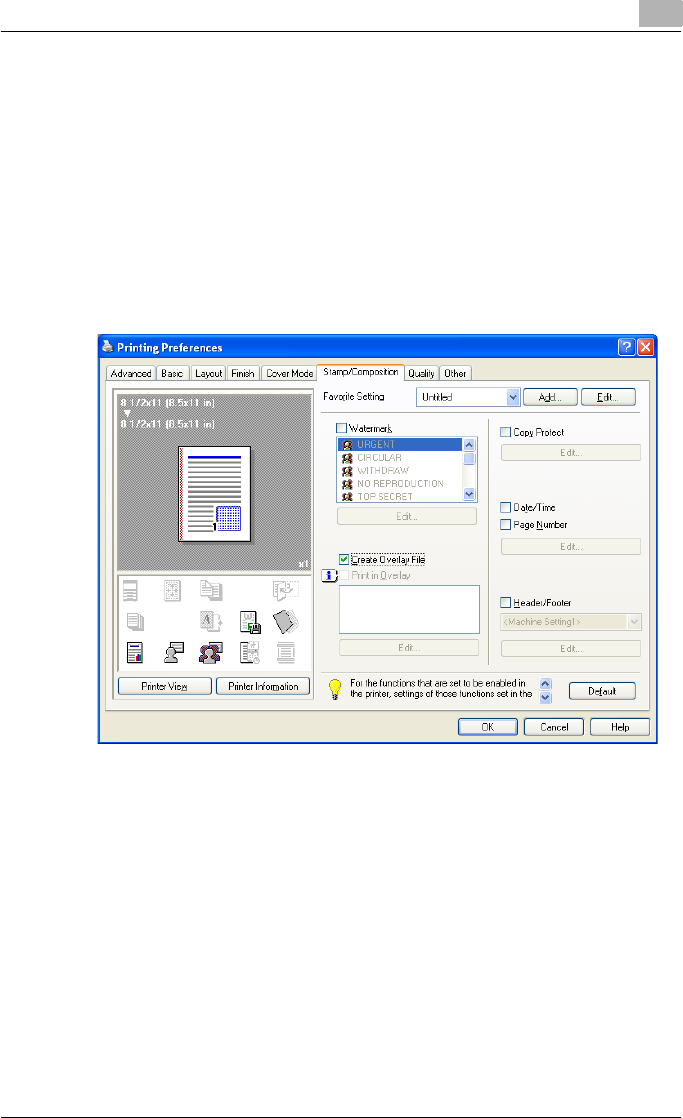
Setting up the PostScript driver (Windows) 6
C550 6-33
Creating an overlay file
1Create the overlay file data using any application.
2From the [File] menu, select “Print”.
3Select this machine in “Printer Name”, and then click the [Properties]
button or the [Preferences] button.
4Click the Stamp/Composition tab.
5Select the “Create Overlay File” check box.
6Click the [OK] button.
The Print dialog box appears again.
7Click the [Print] button.
The dialog box to save the overlay file appears.
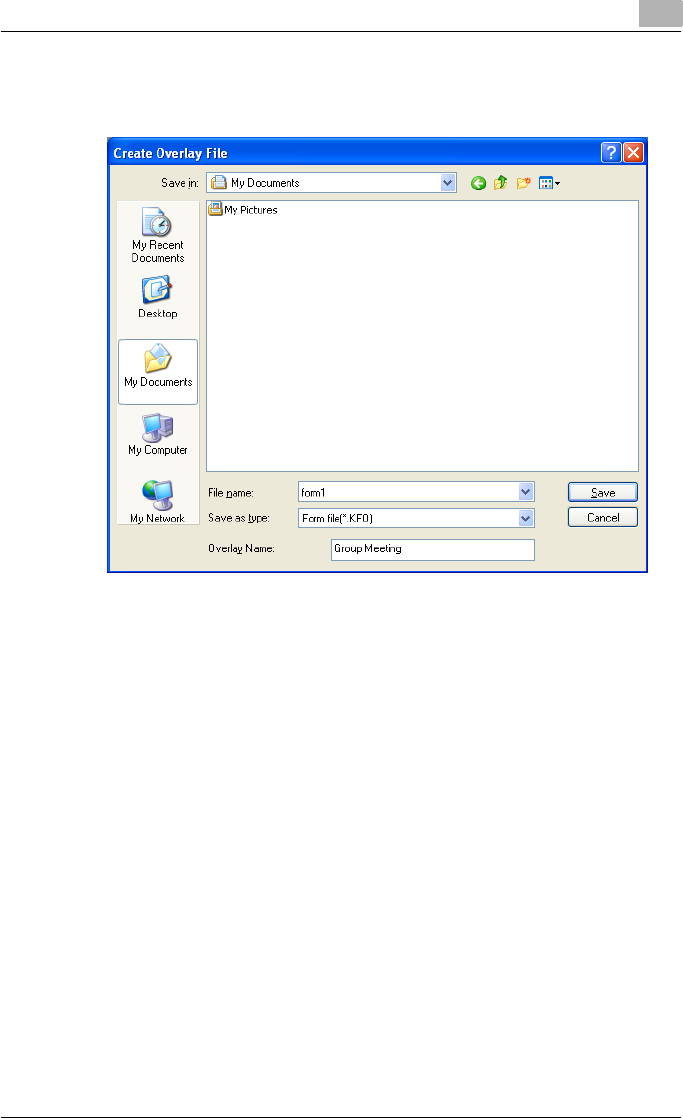
Setting up the PostScript driver (Windows) 6
C550 6-34
8Specify the storage location for the overlay file, enter the file name in
the “File Name” box, and then enter the overlay name or a comment in
the “Overlay Name” text box.
9Click the [Save] button.
Instead of executing a print, the overlay file is saved and is added to
the list to be used for the next operation. The file extension is “.KFO”.

Setting up the PostScript driver (Windows) 6
C550 6-35
Registering an overlay file
1Click the Stamp/Composition tab.
2Click the [Edit] button under “Print in Overlay”.
The Edit Print In Overlay dialog box appears.
3Click the [Browse Files] button to open the overlay file.
The overlay file is added to the “Select Overlay File” list.
2
Note
By clicking the [Delete] button in the Edit Print In Overlay dialog box, the
selected overlay file can be deleted from the overlay file list. The file itself
is not deleted.
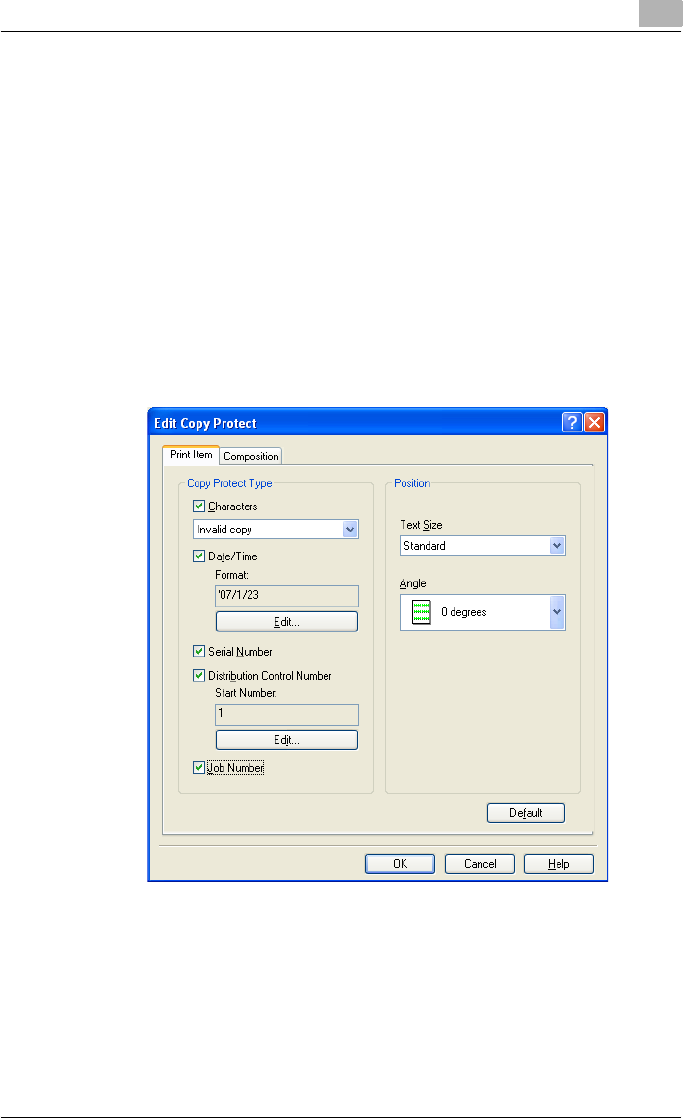
Setting up the PostScript driver (Windows) 6
C550 6-36
Printing with copy protection
You can print a special pattern on an entire page while printing.
When copying a printed page, the characters embedded in the pattern ap-
pear to prevent an illegal copy.
1Click the Stamp/Composition tab.
2Select the “Copy Protect” check box.
3Click the [Edit] button under “Copy Protect”.
The Edit Copy Protect dialog box appears.
4Specify the copy protection type and the position.
Multiple print items can be specified.
– Characters: Embeds the selected character string in a pattern. A
preregistered character string (common stamp) or a character
string registered on this machine (registered stamp) can be speci-
fied.
– Date/Time: Embeds the selected date and time in a pattern. By
clicking the [Edit] button under “Format”, you can specify the dis-
play type or the time format.
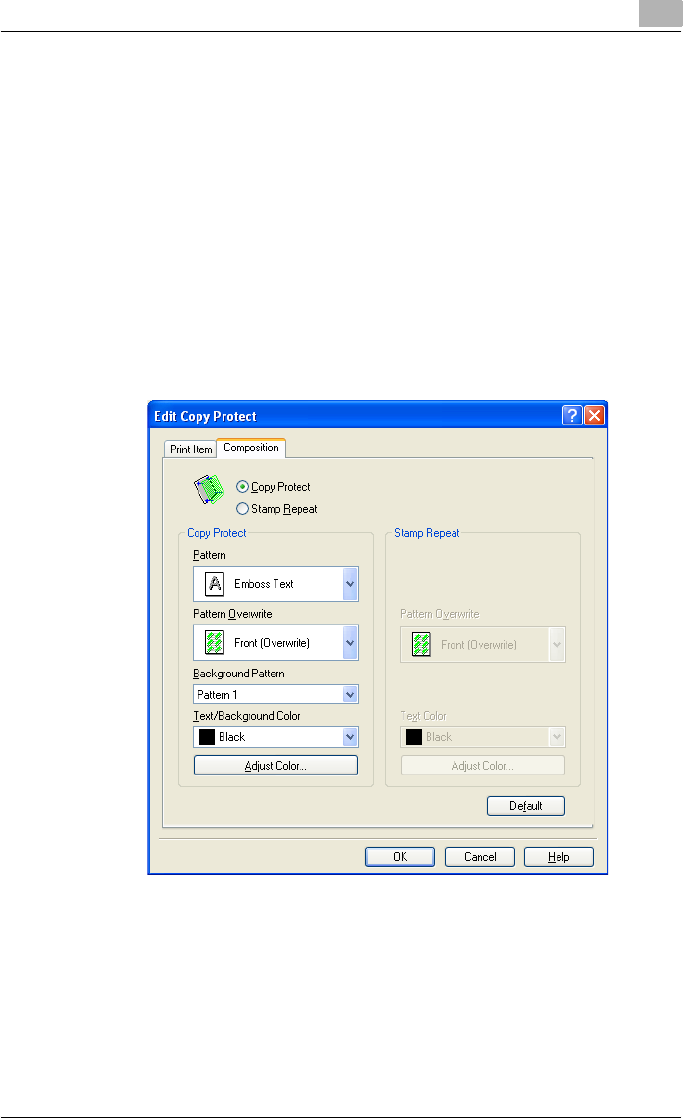
Setting up the PostScript driver (Windows) 6
C550 6-37
– Serial Number: Embeds the serial number of this machine in a pat-
tern.
– Distribution Control Number: Embeds the number of copies in a
pattern when printing multiple copies. By clicking the [Edit] button
under “Start Number”, you can specify the start number or the dis-
play type.
– Job Number: Embeds the print job number in a pattern for docu-
ments that are automatically paginated.
– Text Size: Specifies the text size of a pattern.
– Angle: Specifies the pattern angle.
5Select the composition method for copy protection.
Select “Copy Protect” to specify the desired results when copying, or
simply select “Stamp Repeat”. In addition, you can select the embed-
ding conditions.
– Pattern: Specifies the embedding method of a pattern.
– Pattern Overwrite: Specifies the order for printing a pattern on the
original document.
– Background Pattern: Specifies the pattern background.
– Text/Background Color: Specifies the pattern color. The density
and color contrast can be specified by clicking the [Adjust Color]
button.
6Click the [OK] button.
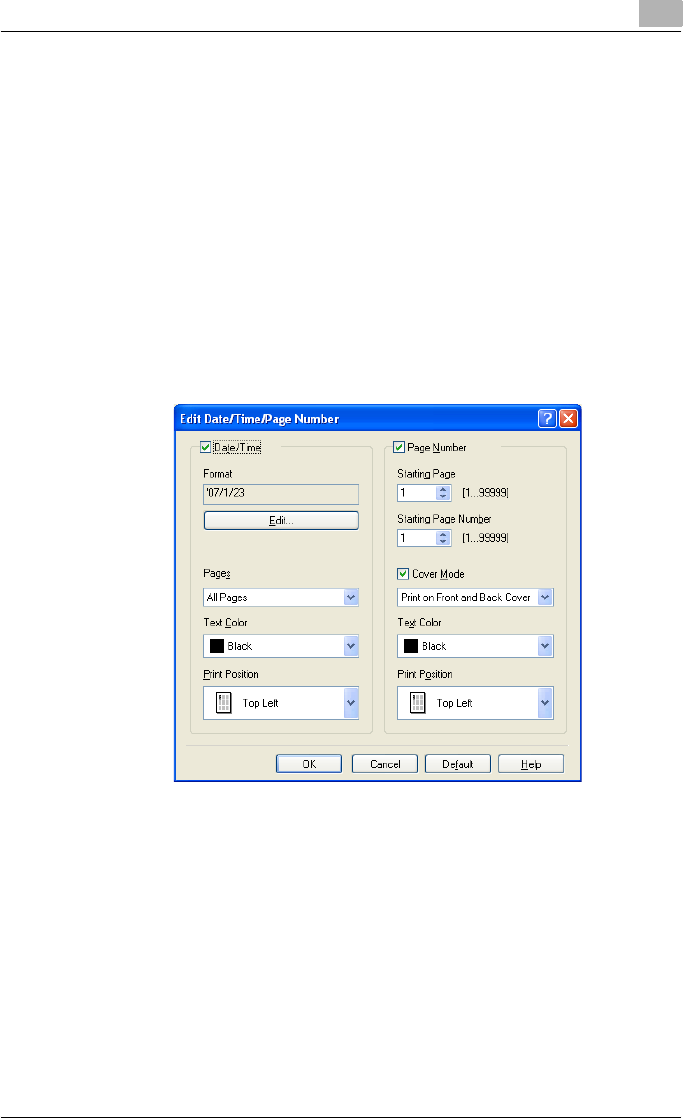
Setting up the PostScript driver (Windows) 6
C550 6-38
Printing the date and page numbers
You can print the date and page numbers on a document.
1Click the Stamp/Composition tab.
2Select the “Date/Time” or the “Page Number” check box.
The “Date/Time” and “Page Number” check boxes can be selected at
the same time.
3Click the [Edit] button under “Page Number”.
The Edit Date/Time/Page Number dialog box appears.
4Specify the format and print position for the date, time, and page
number.
– Format: Displays the format for the date and time to be printed. By
clicking the [Edit] button, you can specify the display type or the
time format.
– Pages: Specifies the pages to print the date and time.
– Text Color: Specifies the text color to print.
– Print Position: Specifies the print position.
– Starting Page: Specifies the page to start printing the page number.
– Starting Page Number: Specifies the start number for printing the
page number.
– Cover Mode: If cover pages are attached, specifies whether to print
the page number on the front cover page or the back cover page.
5Click the [OK] button.
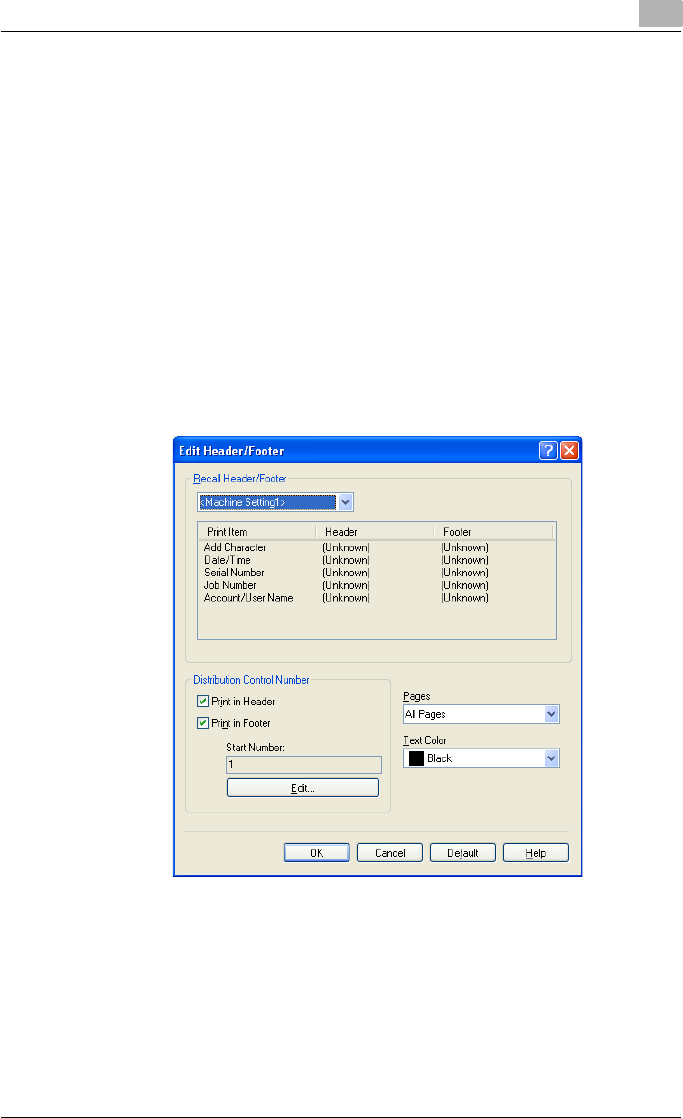
Setting up the PostScript driver (Windows) 6
C550 6-39
Printing a header and a footer
1Click the Stamp/Composition tab.
2Select the “Header/Footer” check box.
3From the drop-down list, select the Header/Footer setting.
– To specify the header and the footer details, continue with step 4.
4Click the [Edit] button under “Header/Footer”.
The Edit Header/Footer dialog box appears.
5Specify the print settings and pages for the header and the footer.
– The number of digits for the distribution control number can be
specified by clicking the [Edit] button.
6Click the [OK] button.

Setting up the PostScript driver (Windows) 6
C550 6-40
6.7 Specifying the Quality tab settings
Adjusting the color and quality
1Click the Quality tab.
2Specify settings for the following:
Select Color Specifies the color for printing.
Full Color: Prints in color.
Grayscale: Prints in grayscale.
Quality Adjustment Adjusts the image quality. Simple: Adjusts the entire docu-
ment. Detail : Specifies the color matching and the ICC pro-
file for the text, photos, and charts of each object in a
document.
Color Settings Specifies the contents of the original document. Prints with
a quality suitable for the original document. Document:
Prints with a quality suitable for documents with many
characters. Photo: Prints with a quality suitable for photos.
DTP: Prints with a quality suitable for documents produced
using DTP. Web: Prints with a quality suitable for Web page
printing. CAD: Prints with a quality suitable for CAD data
printing.
Resolution Displays the resolution. (The resolution cannot be changed
on this machine.)
Glossy Mode Prints using a gloss finish.
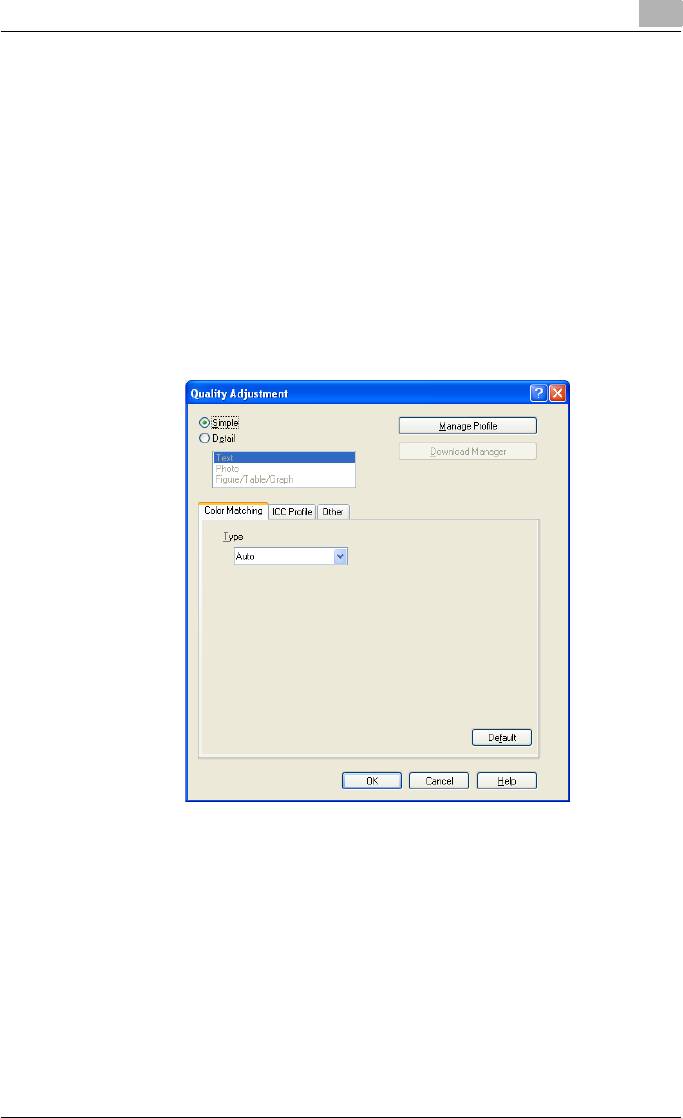
Setting up the PostScript driver (Windows) 6
C550 6-41
Controlling the color profile
You can add or delete the ICC profile that can be selected when adjusting
the details of the image.
1Click the Quality tab.
2Click the [Quality Adjustment] button.
The Quality Adjustment dialog box appears.
3Click the [Manage Profile] button.
The Color Profile Management dialog box appears.
The profile list that can be used and that was acquired from this ma-
chine appears.
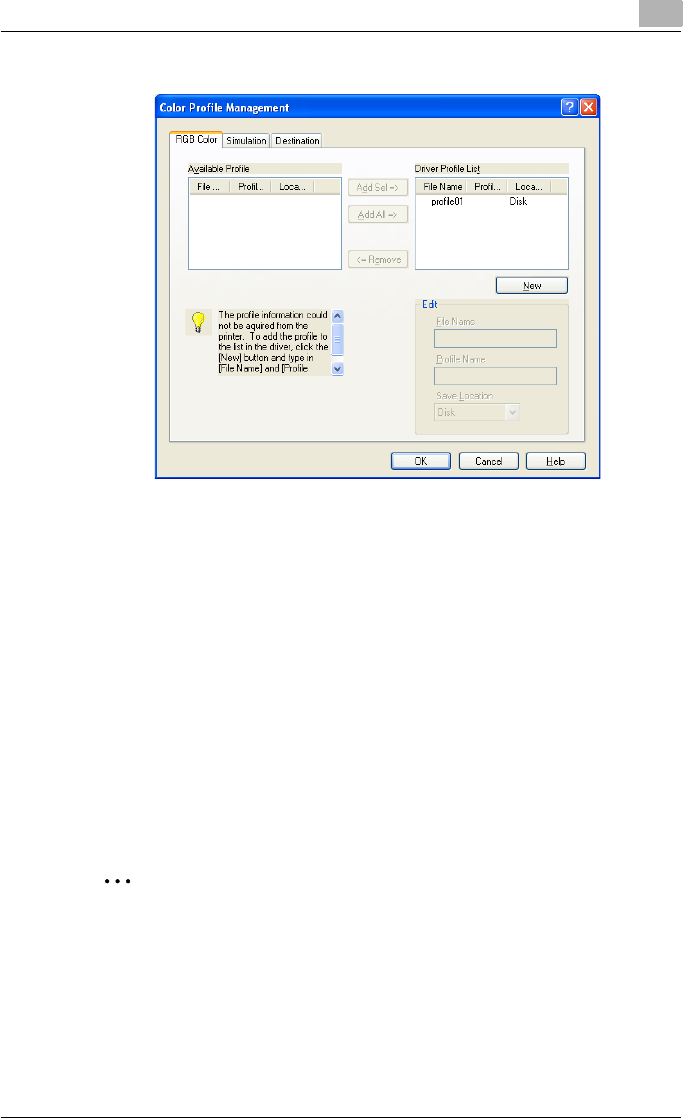
Setting up the PostScript driver (Windows) 6
C550 6-42
4Click the tab and select the color profile type.
5From the Available Profile list, select the profile to be used, and then
click the [Add] button.
– To add a profile to the current driver settings, click the [New] button,
and then enter the file name in the “File Name” text box and the pro-
file name in the “Profile Name” text box.
– The profile name can be changed in the “File Name” text box or the
“Profile Name” text box.
– To download the profile data to the printer, use a “DownloadMan-
ager (bizhub)” application. For details, refer to the user’s manual of
“DownloadManager (bizhub)”.
The selected profile is added to “Driver Profile List” and can be select-
ed from the ICC profile settings.
6Click the [OK] button.
2
Note
“Color Profile Management” communicates with this machine and reads
the profile that this machine can use. You cannot use this function if you
are not connected to or able to communicate with this machine.
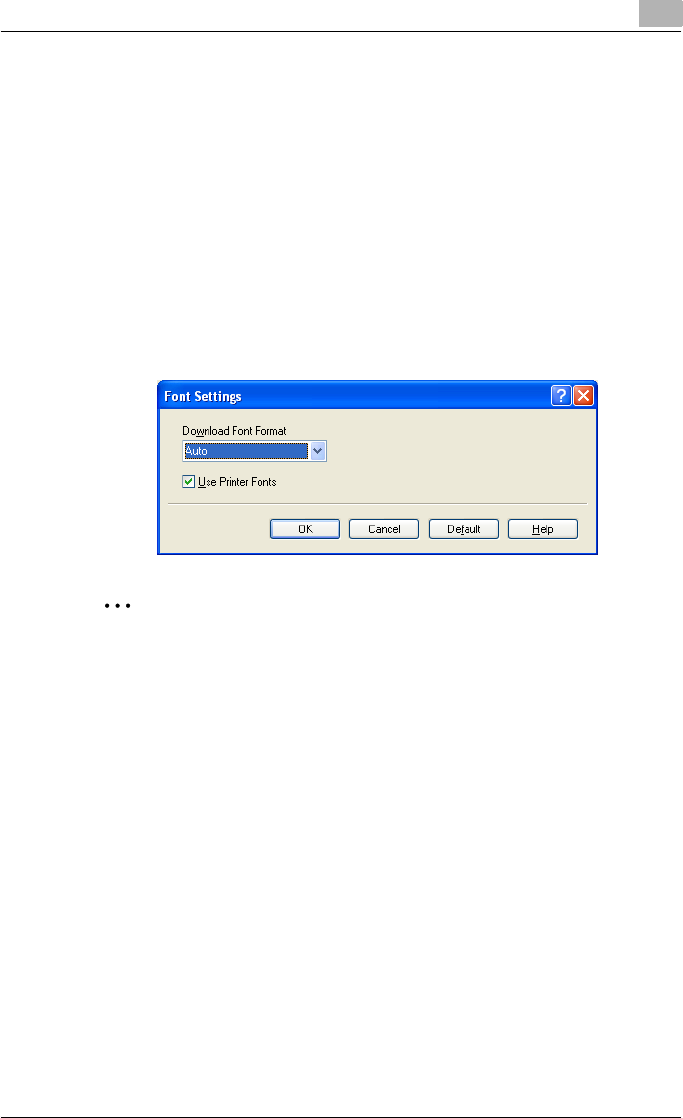
Setting up the PostScript driver (Windows) 6
C550 6-43
Font Settings
You can replace the TrueType fonts used in Windows with the printer fonts
of this machine.
1Click the Quality tab.
2Click the [Font Settings] button.
3Specify settings for the following:
– Download Font Format: Selects the TrueType font downloading
method.
– Use Printer Fonts: Replaces the TrueType fonts with the printer
fonts.
2
Note
Using the printer fonts will shorten the printing time, however, there may
be a difference in the screen display and the print results.
By selecting the TrueType font download method from the “Download
Font Format” drop-down list, you can select the TrueType font type to
download when downloading the TrueType fonts and not using the print-
er fonts. When using TrueType fonts, select the font type to be download-
ed to the printer.
Specify the font replacement list from the Device Settings tab.
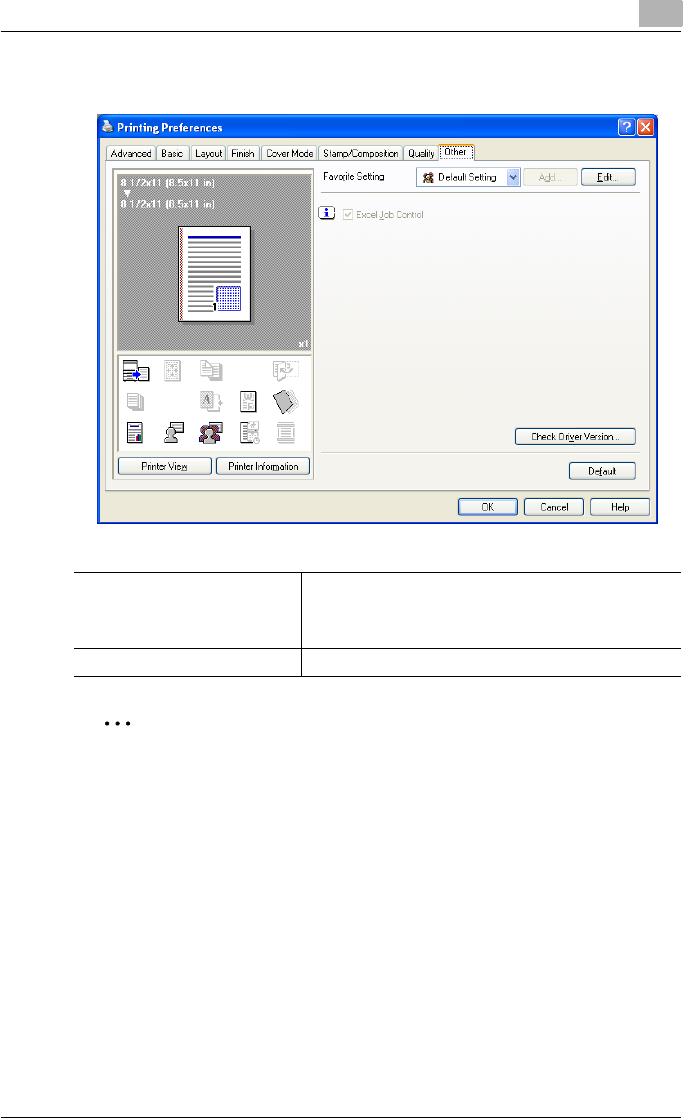
Setting up the PostScript driver (Windows) 6
C550 6-44
6.8 Specifying the Other tab settings
2
Note
The “Excel Job Control ”setting cannot be used with Windows XP Pro-
fessional x64 or Windows Server 2003 x64.
The “Excel Job Control” setting can only be changed when the printer
driver dialog box is displayed from the Printers window (for Windows XP/
Server 2003, Printers and Faxes window).
Excel Job Control When printing multiple sheets in Microsoft Excel that have
different page settings, the jobs may be separated by sheet
depending on the data. Select this function to control jobs
so that they are not separated.
Check Driver Version Displays the version information of the printer driver.
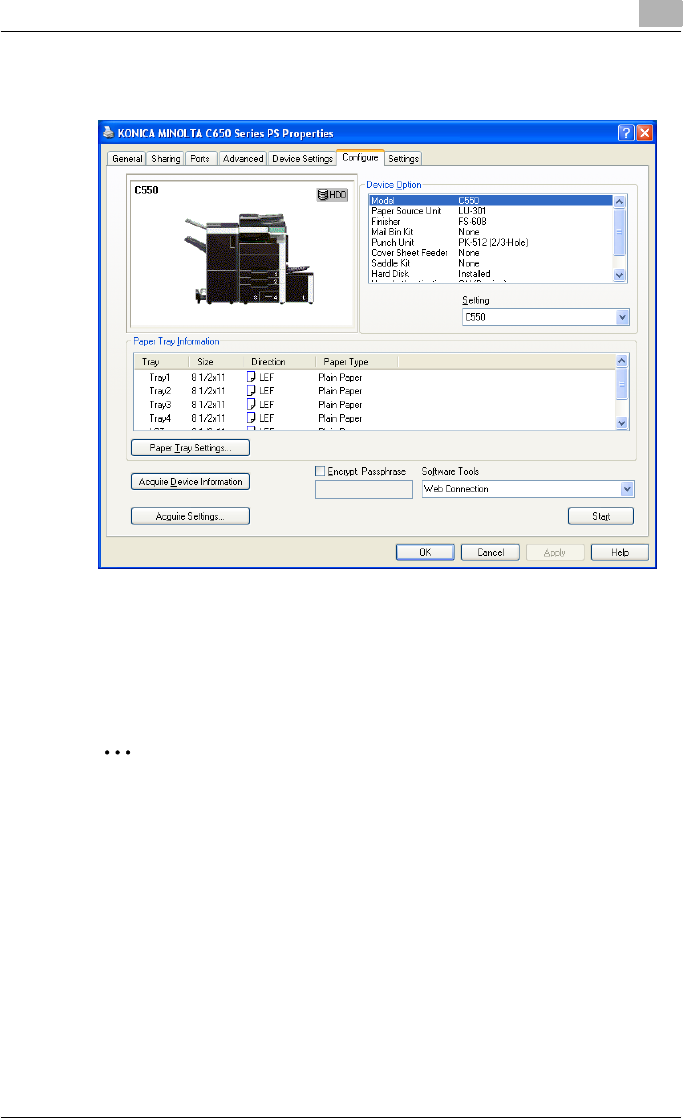
Setting up the PostScript driver (Windows) 6
C550 6-45
6.9 Specifying the Configure tab settings
Selecting a model name and an option
The functions of this machine can be used from the printer driver if the model
name, the installed options, and the user authentication and account track
functions are specified.
2
Reminder
If the installed options and the user authentication and account track
functions are not specified on the Configure tab, the option functions
cannot be used from the printer driver. When installing options or using
the authentication function, be sure to make the proper settings.
1For Windows 2000, click the [Start] button, point to “Settings”, and
then click “Printers”.
For Windows XP/Server 2003, click the [Start] button, and then click
“Printers and Faxes”.
For Windows Vista, click the [Start] button, and then click “Control pan-
el”, “Hardware and Sound”, and “Printers”.

Setting up the PostScript driver (Windows) 6
C550 6-46
– If “Printers and Faxes” does not appear in the Start menu in Win-
dows XP/Server 2003, open the Control Panel from the Start menu,
select “Printers and Other Hardware”, and then select “Printers and
Faxes”.
– For Windows Vista, if the control panel is in the classic view, dou-
ble-click “Printers”.
2Right-click the icon of the installed printer, and then click “Properties”.
3Click the Configure tab.
4From “Device Option”, select “Model”.
5Select the model to be used from the “Setting” drop-down list.
6Select the options to be specified under “Device Option”.
7Select the status of the option that is installed from the “Setting” drop-
down list.
2
Note
Click the [Acquire Device Information] button to communicate with this
machine and read the status of the settings specified on this machine.
You cannot use this function if you are not connected to or able to com-
municate with this machine. The connection can be specified by clicking
the [Acquire Settings] button.
Specifying the paper tray
You can register the paper size, paper orientation, and paper type for the pa-
per that is loaded in a paper tray.
2
Reminder
If the paper loaded in this machine and the paper specified from the print-
er driver are different, printing cannot be performed correctly. Be sure to
make the proper settings.
1Click the Configure tab.
2Click the [Paper Tray Settings] button.
The Paper Tray Settings dialog box appears.

Setting up the PostScript driver (Windows) 6
C550 6-47
3Select the desired tray in “Paper Tray Information”, and then specify
the paper size, paper orientation, and paper type.
4Click the [OK] button.
2
Note
The paper type for a paper tray can also be specified from the Basic tab.
For details, refer to “Specifying the Basic tab settings” on page 6-7.
Specify “Duplex Side 2” to print on the back side of a page.
Changing an encryption passphrase
You can specify an encryption passphrase when it is user defined by com-
municating with this machine.
The encryption key is automatically generated according to the entered char-
acters and it is used to communicate with this machine.
2
Reminder
Specify “Encrypt. Passphrase” according to the encryption passphrase
that was specified in “Driver Password Encryption Setting” of this ma-
chine. For details, refer to “Driver Password Encryption Setting” on
page 9-43.
1Click the Configure tab.

Setting up the PostScript driver (Windows) 6
C550 6-48
2Select the “Encrypt. Passphrase” check box.
3Enter the encryption passphrase in the “Encrypt. Passphrase” text box.
Starting up a software tool
You can start up tools such as PageScope Web Connection that can be used
by this machine.
1Click the Configure tab.
2From the “Software Tools” drop-down list, select the function.
3Click the [Start] button.
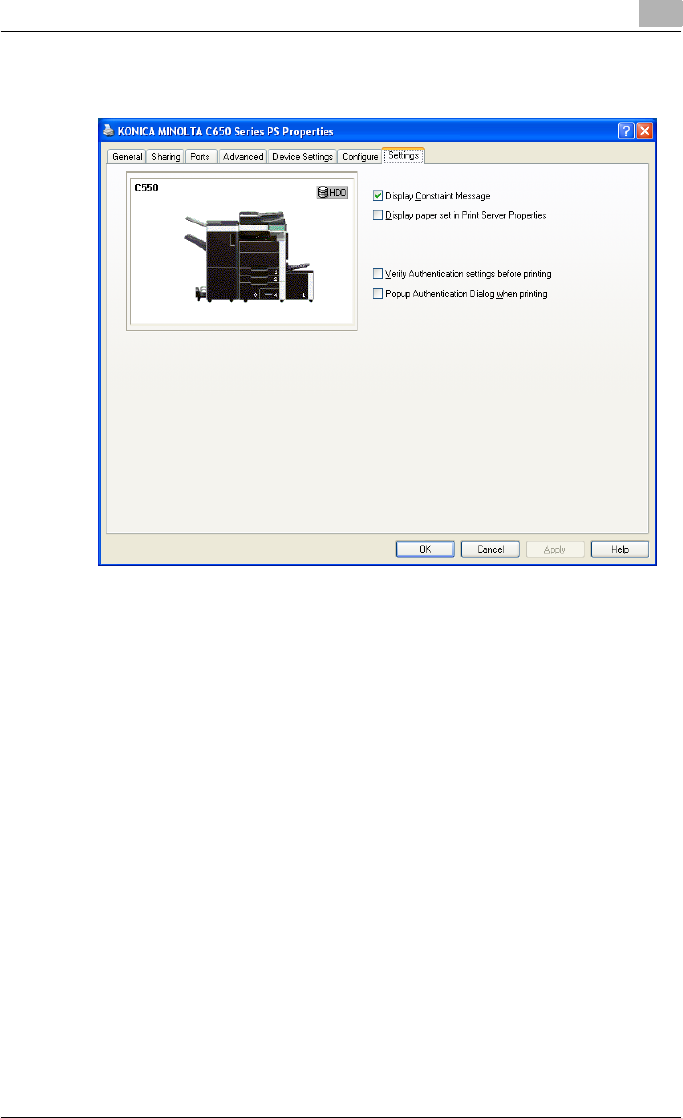
Setting up the PostScript driver (Windows) 6
C550 6-49
6.10 Specifying the Settings tab settings
Specifying the default settings
You can change the default settings for displaying the confirmation messag-
es or the dialog box for entering the authentication settings.
1For Windows 2000, click the [Start] button, point to “Settings”, and
then click “Printers”.
For Windows XP/Server 2003, click the [Start] button, and then click
“Printers and Faxes”.
For Windows Vista, click the [Start] button, and then click “Control pan-
el”, “Hardware and Sound”, and “Printers”.
– If “Printers and Faxes” does not appear in the Start menu in Win-
dows XP/Server 2003, open the Control Panel from the Start menu,
select “Printers and Other Hardware”, and then select “Printers and
Faxes”.
– For Windows Vista, if the control panel is in the classic view, dou-
ble-click “Printers”.
2Right-click the icon of the installed printer, and then click “Properties”.
3Click the Settings tab.

Setting up the PostScript driver (Windows) 6
C550 6-50
4Specify settings for the following:
– Display Constraint Message: Specifies whether to display a mes-
sage when functions that cannot be specified at the same time
were enabled from the printer driver.
– Display paper set in Print Server Properties: Specifies whether to
use the paper that was added in [Server Properties] of the printer
folder.
– Verify Authentication settings before printing: Specifies whether to
verify the authentication settings for this machine before printing. A
message appears if the results verified are not compatible.
– Popup Authentication Dialog when printing: Displays the User Au-
thentication/Account Track dialog box when a print job is specified
to enter a user name or a department name.
2
Note
If custom paper sizes are used regularly, add the paper size to [Server
Properties] of the printer folder. If the “Display paper set in Print Server
Properties” check box is selected, the paper size can be selected from
the paper size list.
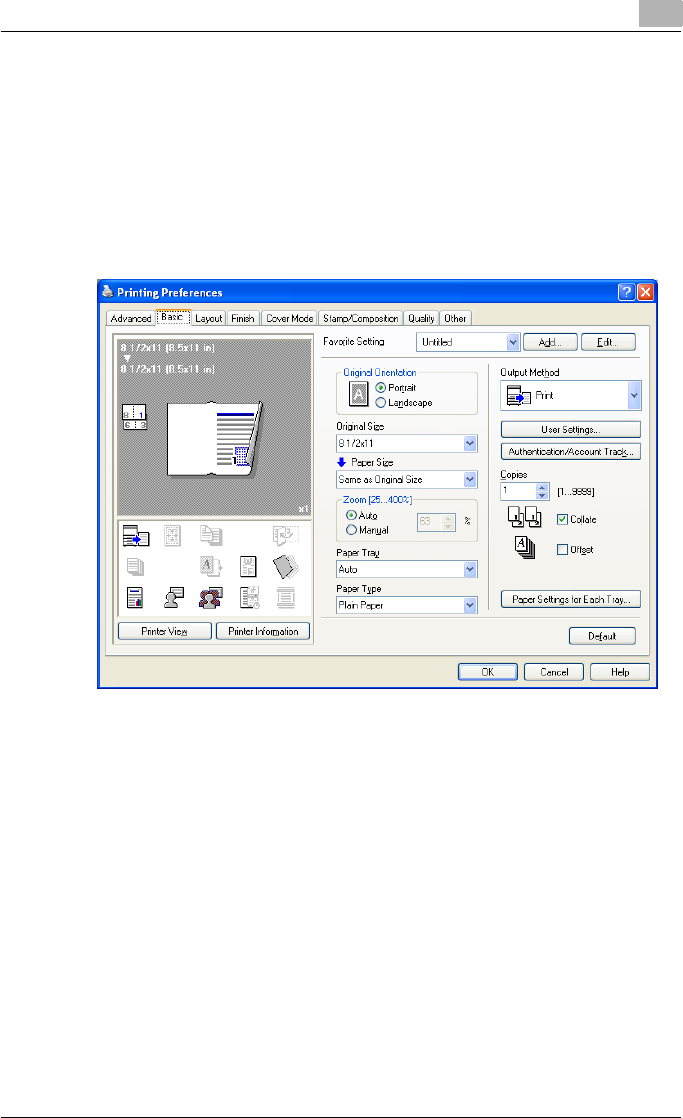
Setting up the PostScript driver (Windows) 6
C550 6-51
6.11 Saving the driver settings
You can save the setting values of the changed driver and recall them as
necessary.
Saving the driver settings
1Change the driver settings from the Basic tab and the Layout tab.
2Click the [Add] button next to the “Favorite Setting” drop-down list.
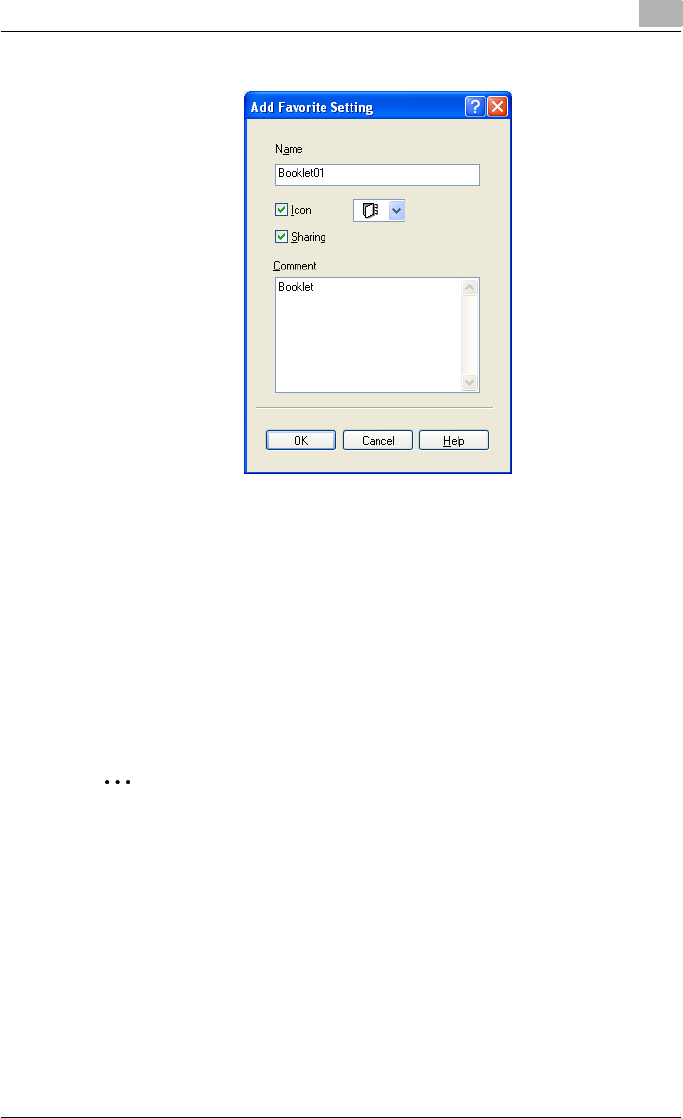
Setting up the PostScript driver (Windows) 6
C550 6-52
3Specify settings for the following:
– Name: Enters the specified registration name.
– Icon: Specifies the icon. The settings can be registered even if the
icon is not specified.
– Sharing: Specifies whether to register the specified file as public or
private.
– Comment: Enters the detailed description of the specified file, if
necessary.
4Click the [OK] button.
The specified settings are registered in the “Favorite Setting” drop-
down list.
2
Note
Up to 30 shared settings and up to 20 private settings can be registered.
Up to 30 characters can be entered in the “Name” text box. Up to 255
characters can be entered in the “Comment” text box.
Only the administrator can select a setting under “Sharing”.
The settings that were specified can also be saved (exported) to a file. For
details, refer to “Importing and exporting the driver settings” on
page 6-55.
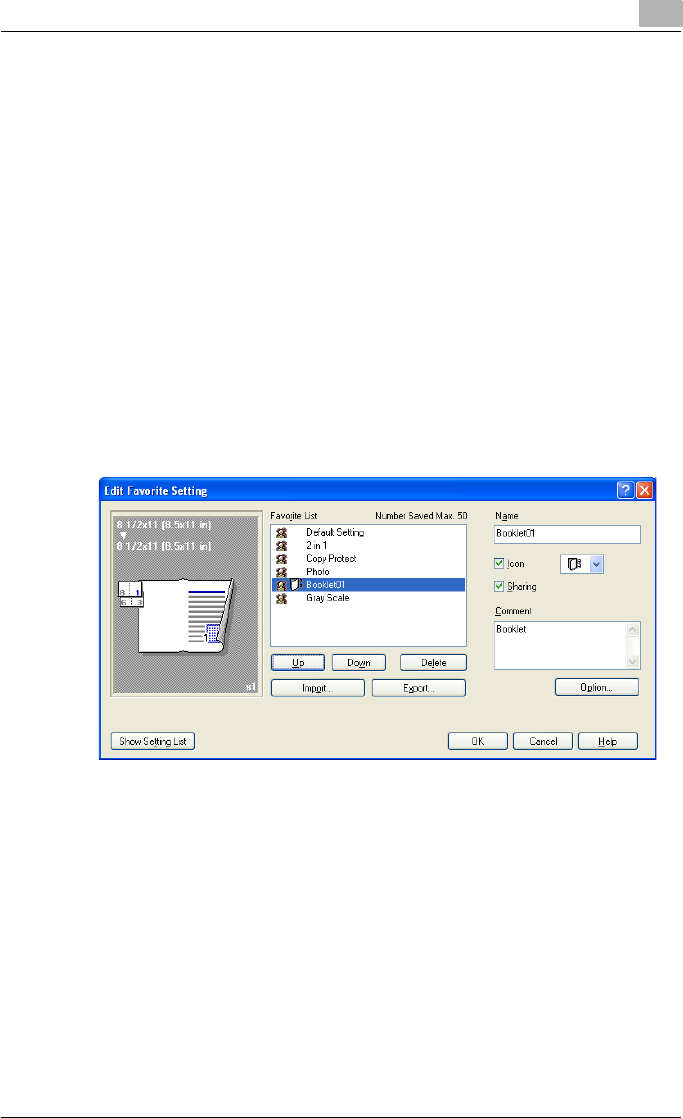
Setting up the PostScript driver (Windows) 6
C550 6-53
Recalling the settings
You can select the settings to recall from the “Favorite Setting” drop-down
list on the Printing Preferences dialog box.
The setting values are recalled, and the settings for the printer driver are
changed.
Editing the settings
You can edit the recalled function items such as the specified names and
comments.
1In the Printing Preferences dialog box, click the [Edit] button next to the
“Favorite Setting” drop-down list.
2From the list, select the specified name that you want to change, and
then change the setting. To delete a setting, click the [Delete] button.
To switch the order displayed, click the [Up] button or the [Down] but-
ton.
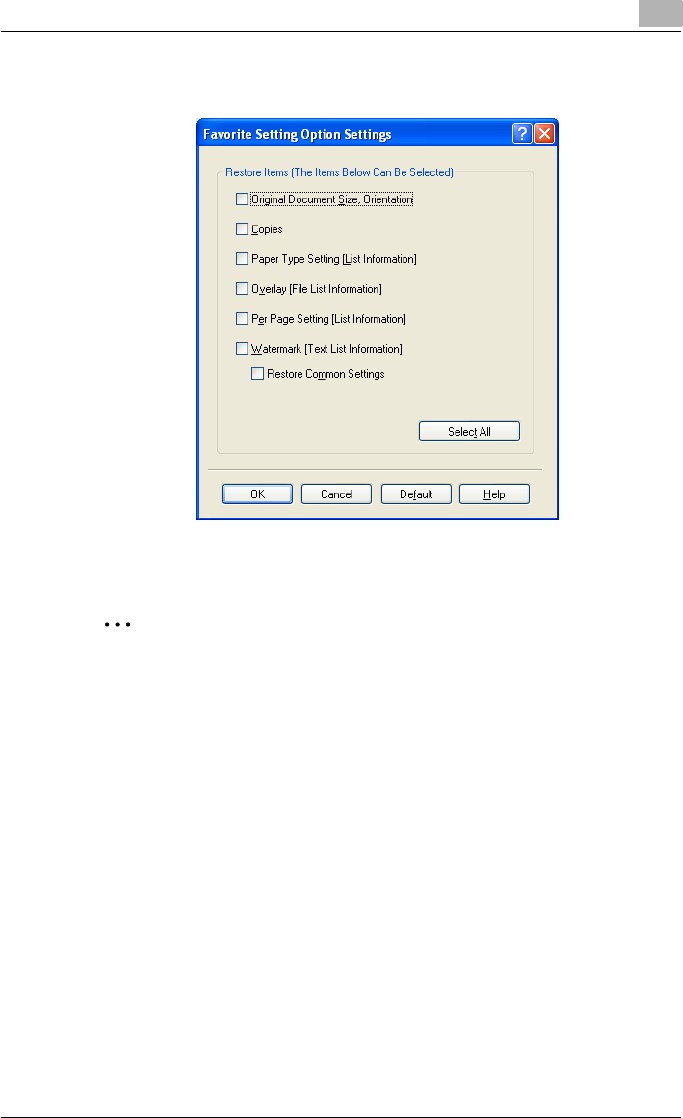
Setting up the PostScript driver (Windows) 6
C550 6-54
3Click the [Option] button, select the check box of the function that you
want to recall, and then click the [OK] button.
4Click the [OK] button.
2
Note
The specified settings of the driver functions cannot be changed.

Setting up the PostScript driver (Windows) 6
C550 6-55
Importing and exporting the driver settings
You can also save (export) or read (import) the settings that were specified
to a file. This comes in handy when you want to use the same settings on an-
other computer.
1In the Printing Preferences dialog box, click the [Edit] button next to the
“Favorite Setting” drop-down list.
2From the list, select the specified name that you want to export, and
then click the [Export] button.
The dialog box to save the specified file appears.
3Specify the location to save the file and enter the file name.
4Click the [Save] button.
The specified file is created. The file extension is “.KSF”.

Setting up the PostScript driver (Windows) 6
C550 6-56
2
Note
To read the specified file that was saved in the “Favorite Setting” drop-
down list, click the [Import] button and specify the file.
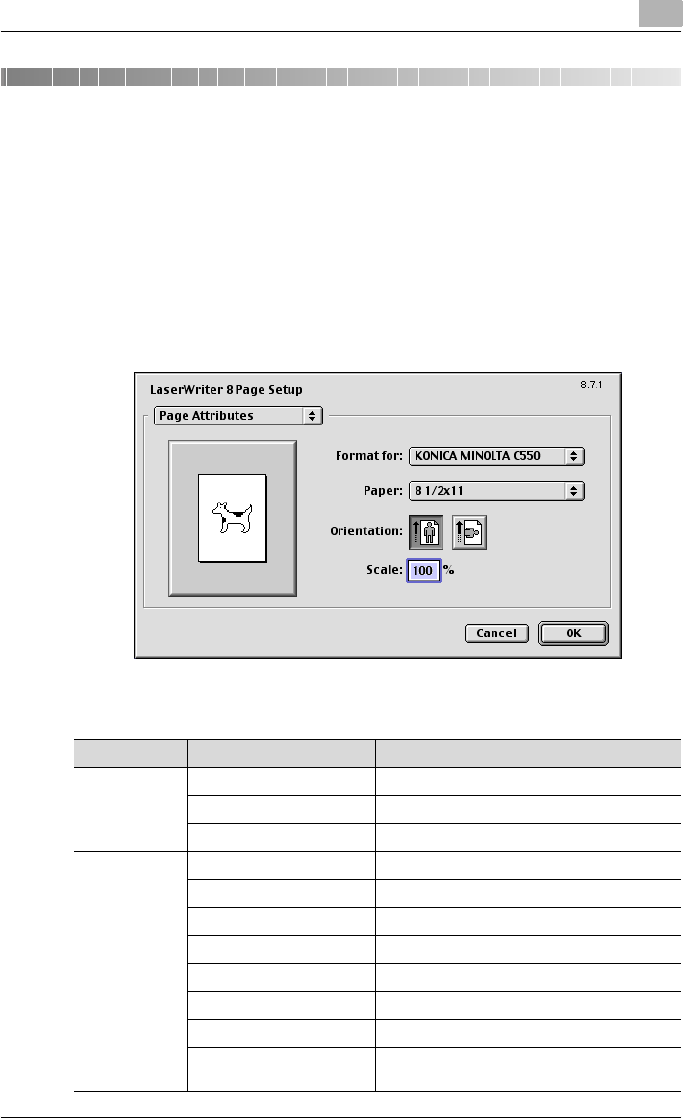
Setting up the PPD driver (Mac OS 9.2) 7
C550 7-1
7 Setting up the PPD driver (Mac OS 9.2)
7.1 Settings
The functions of this machine can be specified on the Page Setup and Print
dialog boxes displayed from an application.
The settings can only be applied while using the application. When the ap-
plication is exited, the settings return to their defaults.
Page Setup dialog box
Page Setup items
Menu Item Function
Page Attributes Paper Specifies the paper size.
Orientation Specifies the orientation.
Scale Specifies the enlargement and reduction ratio.
PostScript
Options
Flip Horizontal Prints the image flipped horizontally.
Flip Vertical Prints the image flipped vertically.
Invert Image Prints a negative image.
Substitute Fonts Replaces some fonts with printer fonts.
Smooth Text Smooths text data.
Smooth Graphics Smooths graphic data.
Precision Bitmap Alignment Corrects jagged graphic images.
Unlimited Downloadable
Fonts
Does not limit downloading screen fonts.
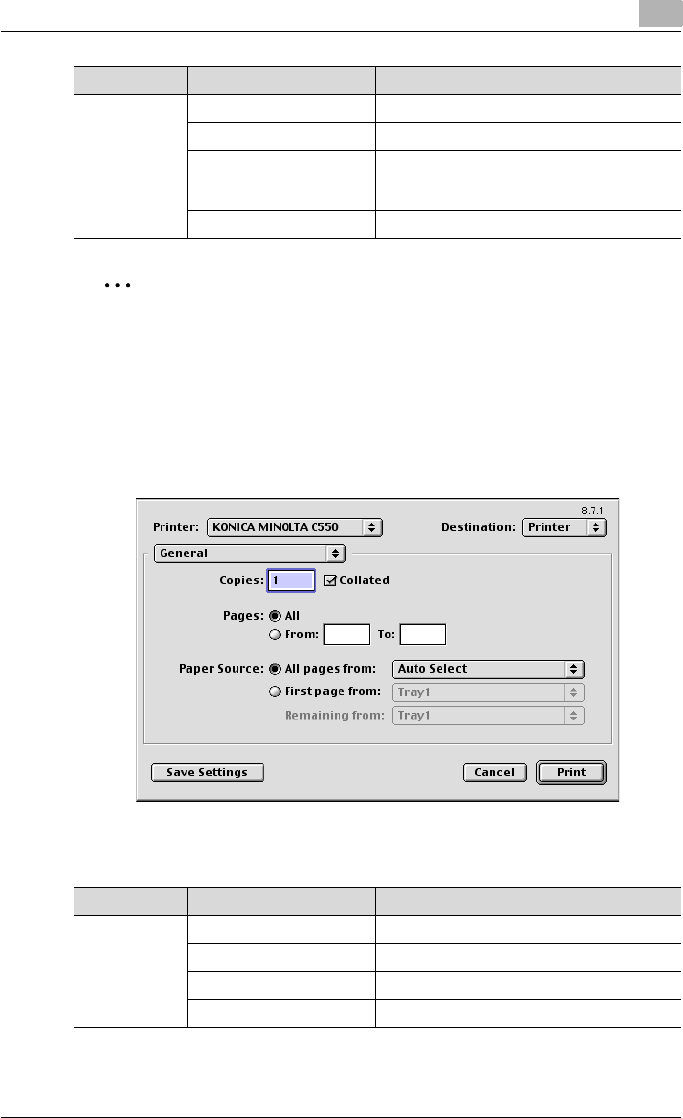
Setting up the PPD driver (Mac OS 9.2) 7
C550 7-2
2
Note
Depending on the application, “Page Setup” may be displayed as “Paper
Setup”. In addition, you may have to select “Paper Setup” – “Options”
from the “File” menu.
The dialog boxes differ depending on the application.
Print dialog box
Print items
Custom Page
Sizes
Paper Size Specifies any paper size.
Margins Specifies the paper margins.
Custom Page Size Name Enters the registered name for the specified
paper size and margin after the [OK] button is
clicked.
Units Selects the specified unit.
Menu Item Function
Menu Item Function
Page Attributes Copies Specifies the number of copies to print.
Collated Prints multiple copies in sets.
Pages Specifies the print range to print.
Paper Source Selects the paper tray.

Setting up the PPD driver (Mac OS 9.2) 7
C550 7-3
Color Matching Print Color Specifies the color for printing.
Intent Selects the matching method.
Printer Profile Specifies the color adjustment profile of the
output device.
Background
Printing
Print in Specifies background printing.
Print Time Specifies the priority level and print time.
Save as File Format Specifies the PostScript file output format.
PostScript Level Specifies the PostScript level.
Data Format Specifies the format to save a document.
Font Inclusion Specifies whether to include the font data on a
file.
Font Settings Font Documentation Adds information to the font key.
Font Downloading Specifies the conditions to download fonts.
Layout Pages per sheet Specifies the number of pages to print on one
page.
Layout direction Specifies the page order for printing multiple
pages on one page.
Border Specifies the borders around pages.
Job Logging If there is a PostScript error Specifies the PostScript error report condi-
tions.
Job Documentation Specifies the conditions for the operation
record to be saved.
Job Documentation Folder Specifies the folder to which the operation
record is to be saved.
Cover Page Print Cover Page Attaches a cover.
Cover Page Paper Source Selects the paper tray for the cover.
Finishing Op-
tions 1
Offset Specifies offset.
Output Tray Selects the output tray.
Binding Position Specifies the binding position.
Print Type Performs duplex printing.
Combination Performs booklet printing.
Staple Performs stapling.
Punch Performs hole punching.
Menu Item Function

Setting up the PPD driver (Mac OS 9.2) 7
C550 7-4
2
Note
The dialog boxes differ depending on the application.
Finishing Op-
tions 2
Fold Performs folding.
Front Cover Attaches a front cover page.
Front Cover Tray Selects the paper tray for the front cover.
Back Cover Attaches a back cover page.
Back Cover Tray Selects the paper tray for the back cover.
PI Front Cover Attaches a front cover from the post inserter.
PI Back Cover Attaches a back cover from the post inserter.
Finishing Op-
tions 3
Transparency Interleave Inserts interleaves between overhead projector
transparencies.
Interleave Tray Selects the paper tray for the transparency in-
terleaves.
Output Method Stops printing temporarily after part of the doc-
ument has been printed so that the proof print
can be checked.
Resolution Specifies the print resolution.
Select Color Specifies whether to print in color or grayscale.
Glossy Mode Prints using a gloss finish.
Color Settings Prints with a quality suitable for the original
document.
Finishing Op-
tions 4
Color Matching (Text) Adjusts the color quality of the text in a docu-
ment.
Pure Black (Text) Specifies whether to enable grayscale of the
text in a document.
Screen (Text) Specifies screening of the text in a document.
Color Matching (Photo) Adjusts the color quality of photos in a docu-
ment.
Pure Black (Photo) Specifies whether to enable grayscale of pho-
tos in a document.
Screen (Photo) Specifies screening of photos in a document.
Smoothing (Photo) Specifies smoothing of photos in a document.
Finishing Op-
tions 5
Color Settings (Graphic) Adjusts the color quality of a chart and graph in
a document to the text or photo settings.
Smoothing (Graphic) Adjusts the smoothing process of a chart and
graph in a document to the text or photo set-
tings.
Menu Item Function
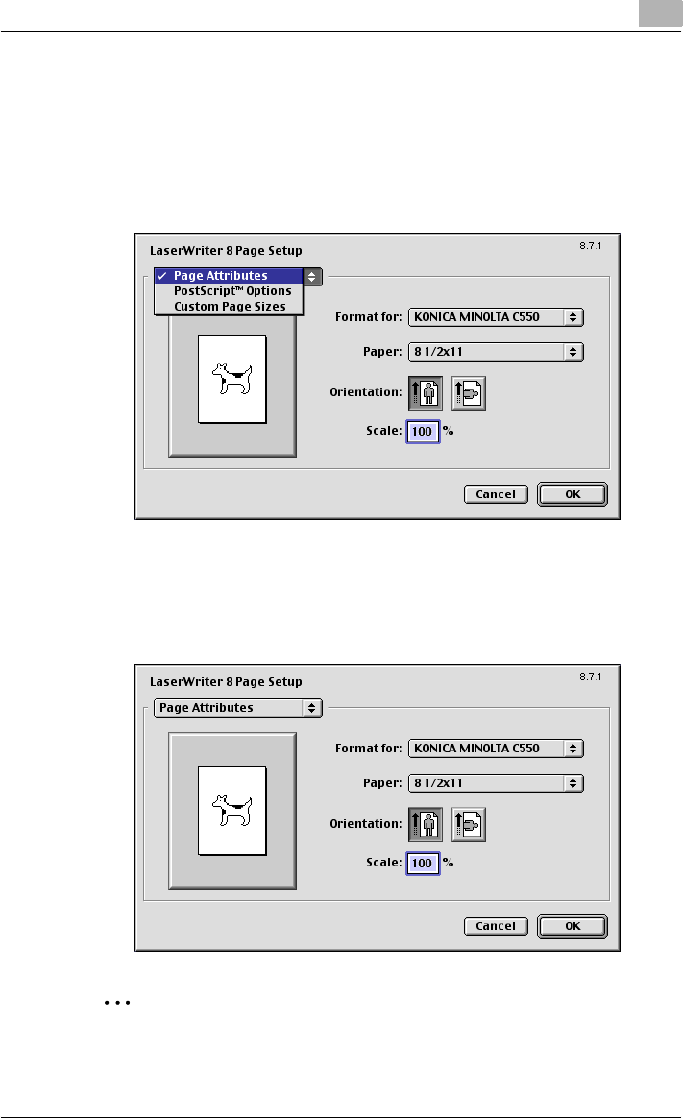
Setting up the PPD driver (Mac OS 9.2) 7
C550 7-5
7.2 Page Setup
Page Attributes (basic settings)
1Select “Page Setup” or “Paper Setup” from the [File] menu.
2Select “Page Attributes”.
3Specify settings for the following:
– Paper: Specifies the paper size.
– Orientation: Specifies the orientation.
– Scale: Specifies the enlargement and reduction ratio.
2
Note
The folding function can be selected from the screen that is displayed
when “Layout” is selected in the Print dialog box.
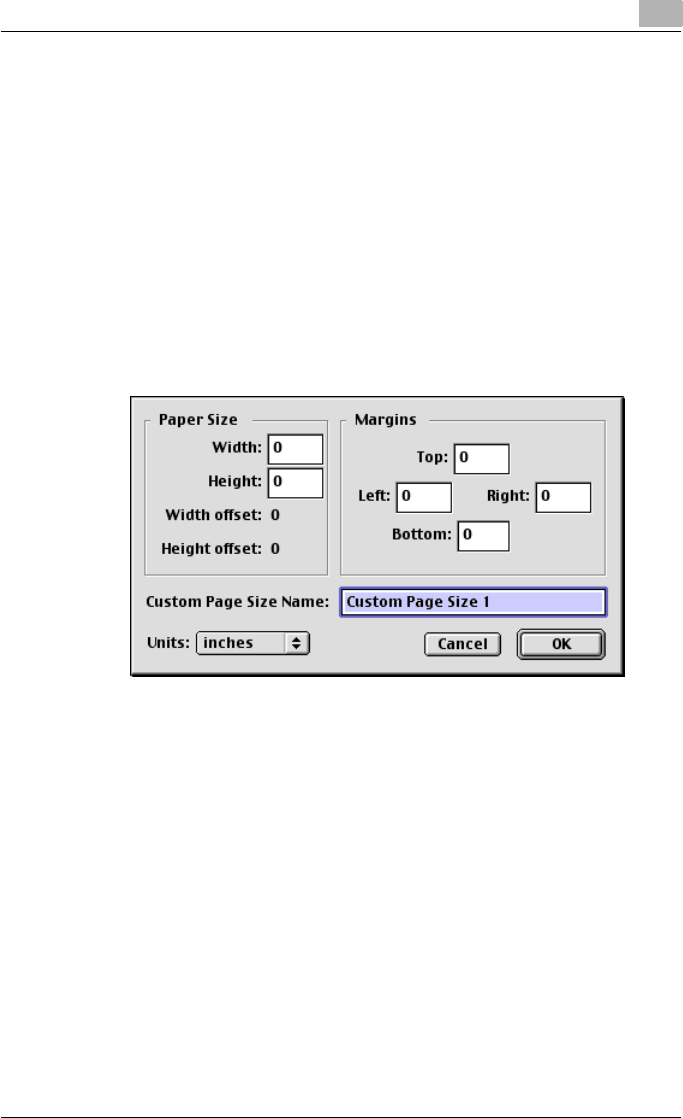
Setting up the PPD driver (Mac OS 9.2) 7
C550 7-6
Custom Page Sizes
1Select “Page Setup” or “Paper Setup” from the [File] menu.
2Select “Custom Page Sizes”.
3Click the [New] button.
4Specify settings for the following:
– Paper Size: Specifies the paper size.
– Margins: Specifies the paper margins.
– Custom Page Size Name: Enter the registered name for the speci-
fied paper size and margins, and then click the [OK] button.
– Units: Selects the specified unit.
5Click the [OK] button.
This saves the custom page size, which can be selected from the “Pa-
per” drop-down list when “Page Attributes” is selected.
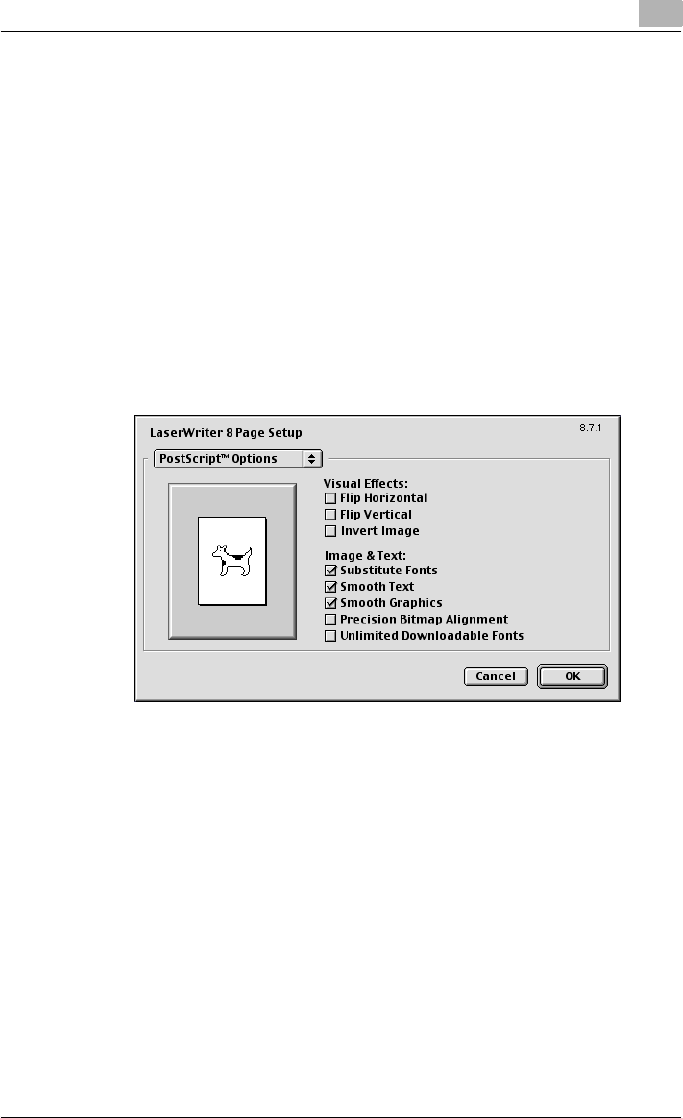
Setting up the PPD driver (Mac OS 9.2) 7
C550 7-7
PostScript Options
1Select “Page Setup” or “Paper Setup” from the [File] menu.
2Select “PostScript Options”.
3Specify settings for the following:
– Visual Effects: Provides “Flip Horizontal”, “Flip Vertical”, and “Invert
Image” (negative image).
– Substitute Fonts: Replaces some fonts with printer fonts.
– Smooth Text: Smooths text data.
– Smooth Graphics: Smooths graphic data.
– Precision Bitmap Alignment: Corrects jagged graphic images.
– Unlimited Downloadable Fonts: Does not limit downloading screen
fonts.
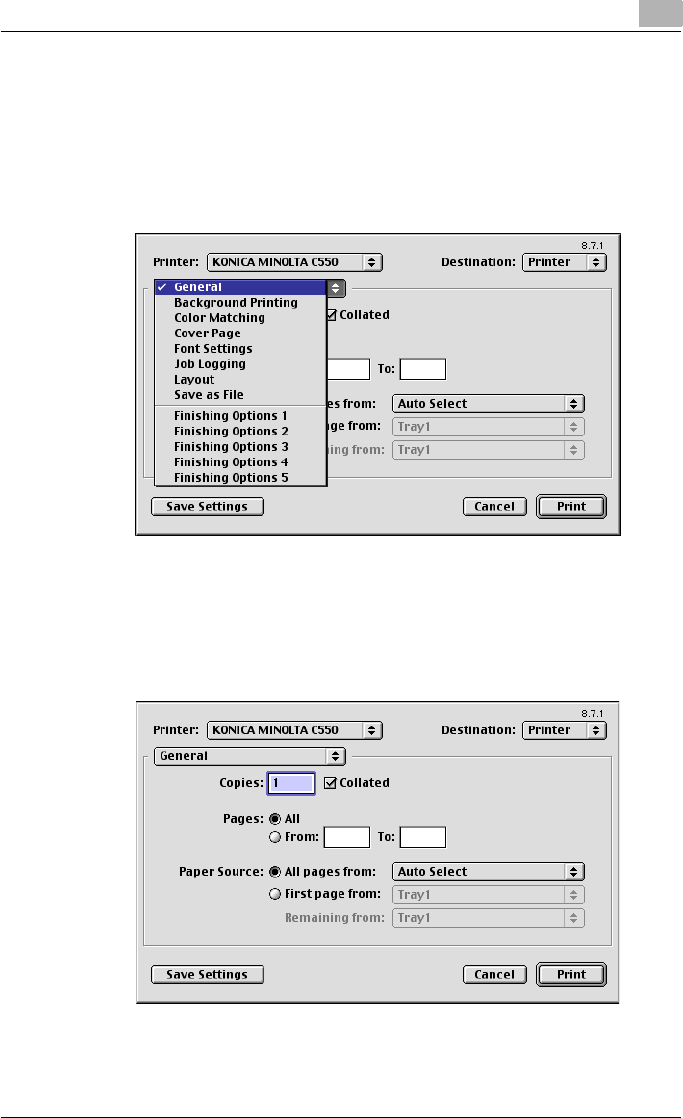
Setting up the PPD driver (Mac OS 9.2) 7
C550 7-8
7.3 Printing
General (basic settings)
1From the [File] menu, select “Print”.
2Select “General”.
3Specify settings for the following:
– Copies: Specifies the number of copies to print.
– Collated: Prints multiple copies in sets.
– Pages: Specifies the print range to print.
– Paper Source: Selects the paper tray.
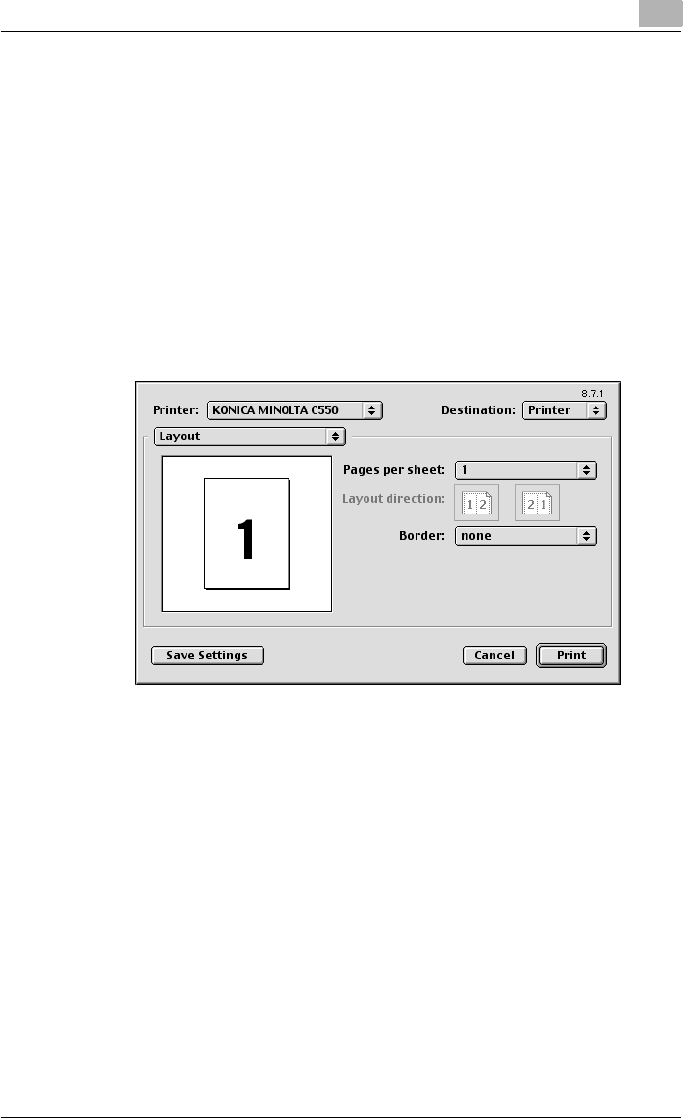
Setting up the PPD driver (Mac OS 9.2) 7
C550 7-9
Layout (printing multiple pages on one page)
You can specify to print multiple pages on one page.
1From the [File] menu, select “Print”.
2Select “Layout”.
3Specify settings for the following:
– Pages per sheet: Specifies the number of pages to print on one
page.
– Layout direction: Specifies the page order for printing multiple pag-
es on one page.
– Border: Specifies the borders around pages.

Setting up the PPD driver (Mac OS 9.2) 7
C550 7-10
Printer specific options (Finishing Options 1 to 5)
You can specify printer-specific options. You can specify these options
when using the staple or hole punch functions of this machine.
1From the [File] menu, select “Print”.
2Select “Finishing Options 1 to 5”.
3Specify settings for the following:
– Offset: Specifies offset.
– Output Tray: Selects the output tray.
– Binding Position: Specifies the binding position.
– Print Type: Performs duplex printing.
– Combination: Performs booklet printing.
– Staple: Performs stapling.
– Punch: Performs hole punching.
– Fold: Performs folding.
– Front Cover: Attaches a front cover page.
– Front Cover Tray: Selects the paper tray for the front cover.
– Back Cover: Attaches a back cover page.
– Back Cover Tray: Selects the paper tray for the back cover.
– PI Front Cover: Attaches a front cover from the post inserter.
– PI Back Cover: Attaches a back cover from the post inserter.
– Transparency Interleave: Inserts interleaves between overhead pro-
jector transparencies.
– Interleave Tray: Selects the paper tray for the transparency inter-
leaves.
– Output Method: Stops printing temporarily after part of the docu-
ment has been printed so that the proof print can be checked.
– Resolution: Specifies the resolution.
– Select Color: Specifies whether to print in color or grayscale.
– Glossy Mode: Prints using a gloss finish.
– Color Settings: Prints with a quality suitable for the original docu-
ment.
– Color Matching (Text): Adjusts the color quality of the text in a doc-
ument.
– Pure Black (Text): Specifies whether to enable grayscale of the text
in a document.
– Screen (Text): Specifies screening of the text in a document.
– Color Matching (Photo): Adjusts the color quality of photos in a
document.
– Pure Black (Photo): Specifies whether to enable grayscale of pho-
tos in a document.
– Screen (Photo): Specifies screening of photos in a document.
– Smoothing (Photo): Specifies screening of photos in a document.
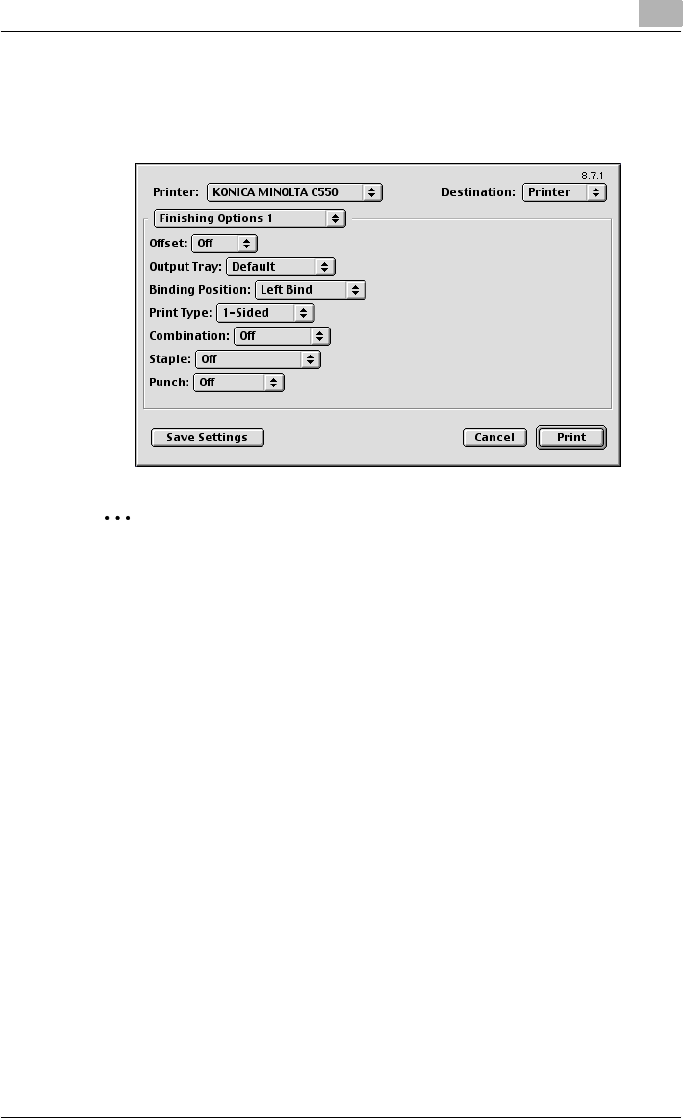
Setting up the PPD driver (Mac OS 9.2) 7
C550 7-11
– Color Settings (Graphic): Adjusts the color quality of a chart and
graph in a document to the text or photo settings.
– Smoothing (Graphic): Adjusts the smoothing process of a chart and
graph in a document to the text or photo settings.
2
Reminder
The staple function is available only when the optional finisher is installed.
The hole punch function is available only when the punch kit is installed
on the optional finisher.
The folding function is available only when optional finisher FS-608 is in-
stalled.
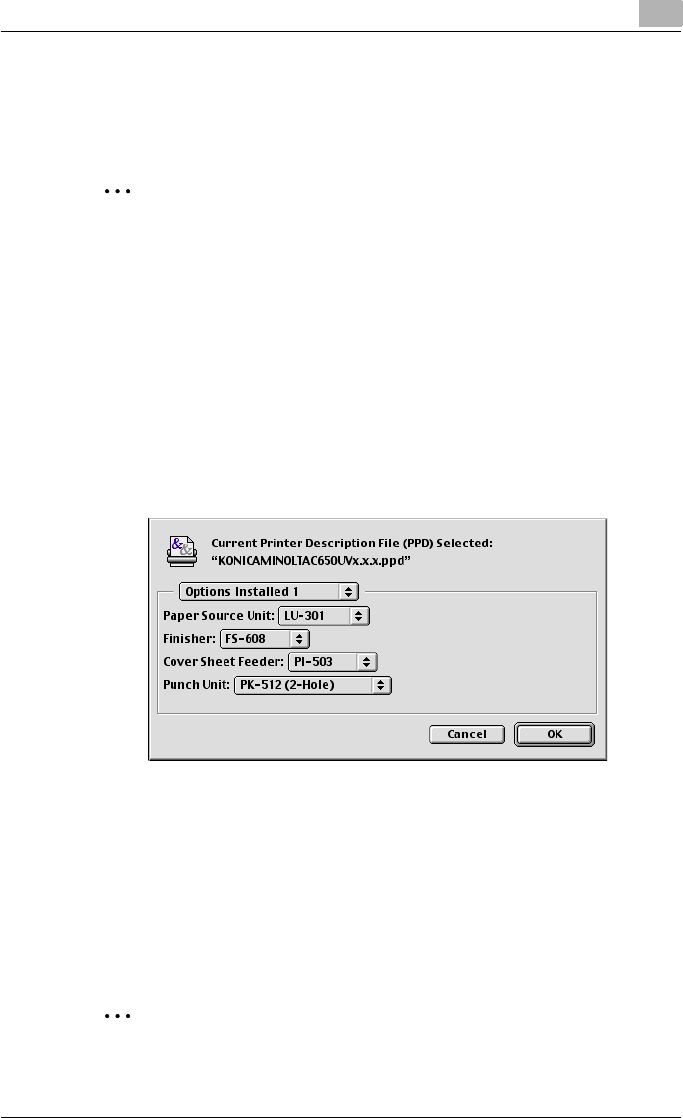
Setting up the PPD driver (Mac OS 9.2) 7
C550 7-12
7.4 Setting options
You can specify the options installed on this machine so that they can be
used from the printer driver.
2
Reminder
If the installed options on this machine are not set from “Installable Op-
tions”, the option function cannot be used with the printer driver. When
installing options, be sure to make the proper settings.
1On the Apple menu, click “Chooser”.
2Select the printer name.
3Click the [Create] button.
4Click the [Configure] button.
The setting screen for adding options appears.
5Select the options that are installed on this machine from the Options
Installed 1 dialog box and the Options Installed 2 dialog box.
6Click the [OK] button.
The Chooser window appears again.
7Close the Chooser window.
2
Note
The option settings are displayed automatically the first time the printer
driver is selected. For details, refer to “Selecting a printer” on page 2-25.
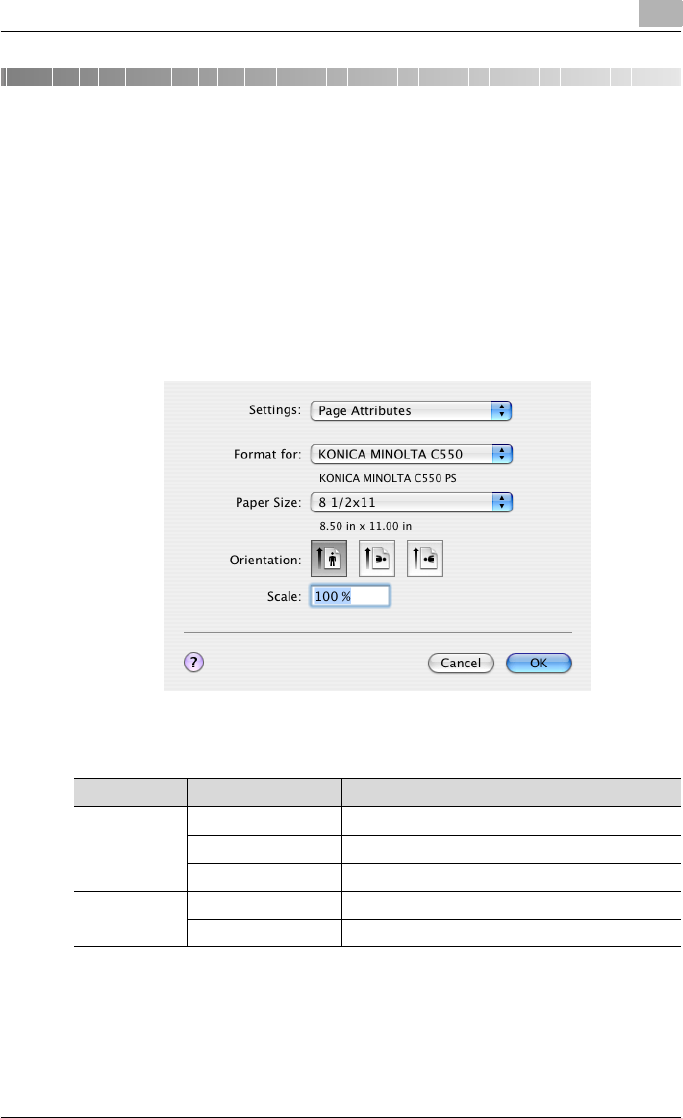
Setting up the PPD driver (Mac OS X) 8
C550 8-1
8 Setting up the PPD driver (Mac OS X)
8.1 Settings
The functions of this machine can be specified on the Page Setup and Print
dialog boxes recalled from the application.
The settings can only be applied while using the application. When the ap-
plication is quit, the settings return to their default settings.
Page Setup dialog box
Page Setup items
Menu Item Function
Page Attributes Paper Size Specifies the paper size.
Orientation Specifies the orientation.
Scale Specifies the enlargement and reduction ratio.
Custom Paper
Size*2 Paper Size (Page size) Specifies any paper size.
Printer Margins Specifies the paper margins.
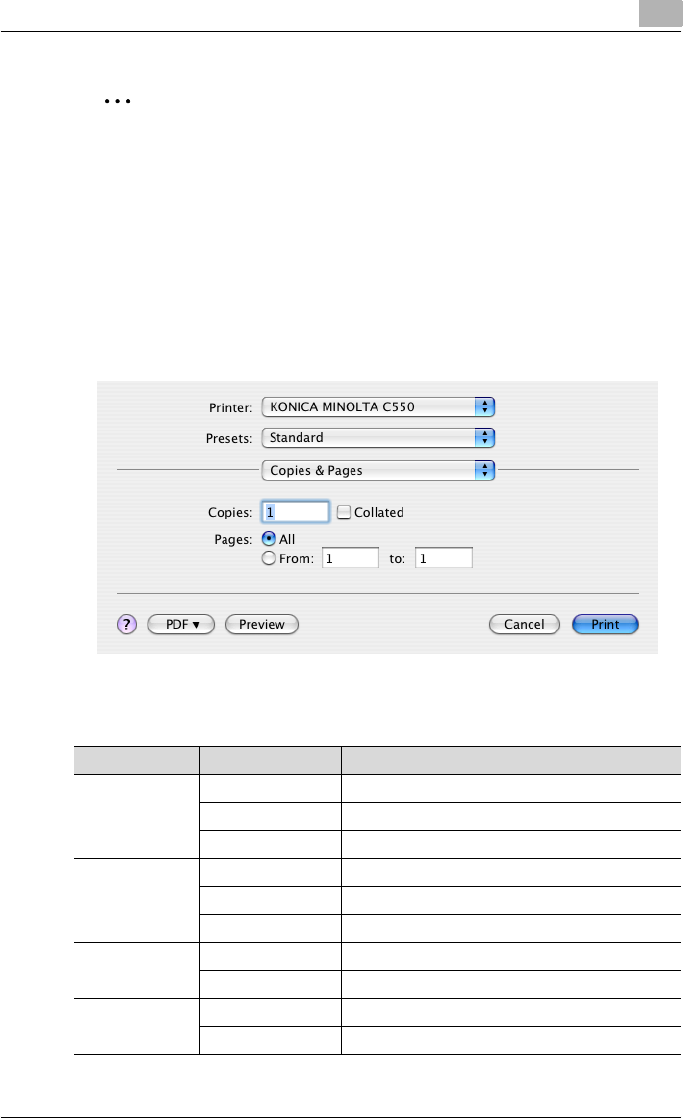
Setting up the PPD driver (Mac OS X) 8
C550 8-2
2
Note
Depending on the application, “Page Setup” may be displayed as “Paper
Setup”. In addition, you may have to select “Paper Setup” – “Options”
from the “File” menu.
The dialog boxes differ depending on the application.
The items indicated by *2 are displayed only in Mac OS 10.2 and Mac OS
10.3.
Print dialog box
Print items
Menu Item Function
Copies & Pages Copies Specifies the number of copies to print.
Collated Prints multiple copies in sets.
Pages Specifies the print range to print.
Layout Pages per Sheet Specifies the number of pages to print on one page.
Layout Direction Specifies the document page order.
Border Specifies the borders around pages.
Output Options*2 Save as File Saves data to a file.
Format Specifies the format for saving data to a file.
Scheduler*1 Print Document Specifies the print time.
Priority Specifies the priority level.

Setting up the PPD driver (Mac OS X) 8
C550 8-3
Paper Handling*1 Reverse Page Order
(Page Order)
Prints pages in the reverse order.
Print Selects the pages for printing.
Destination paper
size*3 Specifies the output paper size.
ColorSync*1 Color Conversion Specifies the color conversion method.
Quartz Filter Specifies the color for printing.
Cover Page*1 Print Cover Page Specifies whether to attach a cover page.
Cover Page Type Selects to print “Confidential” or other comments on
the cover page.
Billing Info Enters the user information used for billing.
Error Handling PostScript Errors Specifies whether to print an error report when a
PostScript error occurs.
Tray Switching Switches the paper source tray. (This function can-
not be selected on this machine.)
Output Method Collate Prints multiple copies in sets.
Offset Specifies offset.
Output Method Specifies output methods, such as “Secure Print”
and “Save in User Box”.
User Authentication Select to perform user authentication and specify the
user name and password.
Account Track Select to perform account track and specify the de-
partment name and password.
Layout/Finish Print Type Specifies duplex printing and booklet printing.
Binding Position Specifies the binding position.
Poster Mode Prints one sheet of an original document divided on
multiple pages.
Overlap width line Prints an overlap width line on split pages.
Rotate 180 Prints the image rotated 180°.
Image Shift Prints by shifting the entire print image.
Chapters Specifies the page to be printed on the front side.
Staple Specifies stapling.
Punch Specifies hole punching.
Fold & Staple Specifies to fold and saddle stitch a printed docu-
ment.
Paper Arrangement Specifies the method for adjusting the binding posi-
tion.
Menu Item Function

Setting up the PPD driver (Mac OS X) 8
C550 8-4
2
Note
The dialog boxes differ depending on the application.
The items indicated by *1 are displayed only in Mac OS 10.3 and Mac OS
10.4.
The items indicated by *2 are displayed only in Mac OS 10.3.
The items indicated by *3 are displayed only in Mac OS 10.4.
Paper Tray/Out-
put Tray
Paper Tray Selects the paper tray for printing.
Paper Type Selects the paper type for printing.
Paper Settings for
Each Tray
Specifies the paper type for each paper tray.
Output Tray Specifies the tray where to output the printed pages.
Cover Mode/
Transparency In-
terleave
Front Cover Attaches a front cover page.
Back Cover Attaches a back cover page.
PI Front Cover Attaches a front cover from the post inserter.
PI Back Cover Attaches a back cover from the post inserter.
Transparency Inter-
leave
Outputs and inserts interleaves when printing over-
head projector transparencies.
Per Page Setting Per Page Setting Inserts paper between pages and switches the pa-
per and tray for each page.
Stamp/Composi-
tion
Copy Protect Prints a special pattern to prevent copying.
Date/Time Prints the date and time.
Page Number Prints the page number.
Header/Footer Prints a header and a footer.
Quality Select Color Specifies the color for printing.
Glossy Mode Prints with a gloss.
Color Settings Prints with a quality suitable for the selected original
document.
Quality Adjustment Adjusts the image quality. You can select “Simple” to
adjust entire documents or “Detailed” to adjust the
text, photos, and charts in the document.
The profile can also be controlled.
Menu Item Function
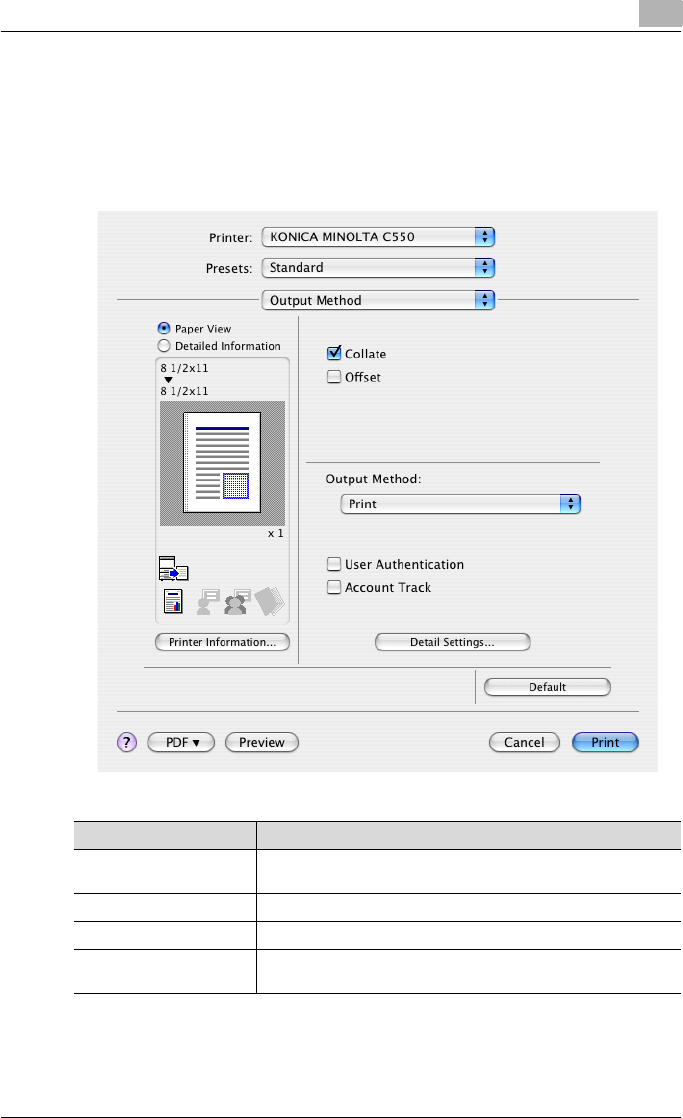
Setting up the PPD driver (Mac OS X) 8
C550 8-5
Common settings in the Print dialog box
The following describes the common settings that are displayed by the spe-
cific operations (Output Method, Layout/Finish, Paper Tray/Output Tray,
Cover Mode/Transparency Interleave, and Per Page Setting) for this ma-
chine.
Item Function
Paper View A preview of the page layout as specified in the current settings is
displayed and a preview image of the print job can be checked.
Detailed Information Shows the current settings with text.
Printer Information Displays the status of the installed options.
Default Click this button to return the settings to their defaults, which were
selected when the driver was installed.

Setting up the PPD driver (Mac OS X) 8
C550 8-6
2
Note
Click the [Acquire Device Information] button on the Printer Information
dialog box to communicate with this machine and read the status of the
settings specified on this machine. You cannot use this function if you are
not connected to or able to communicate with this machine.
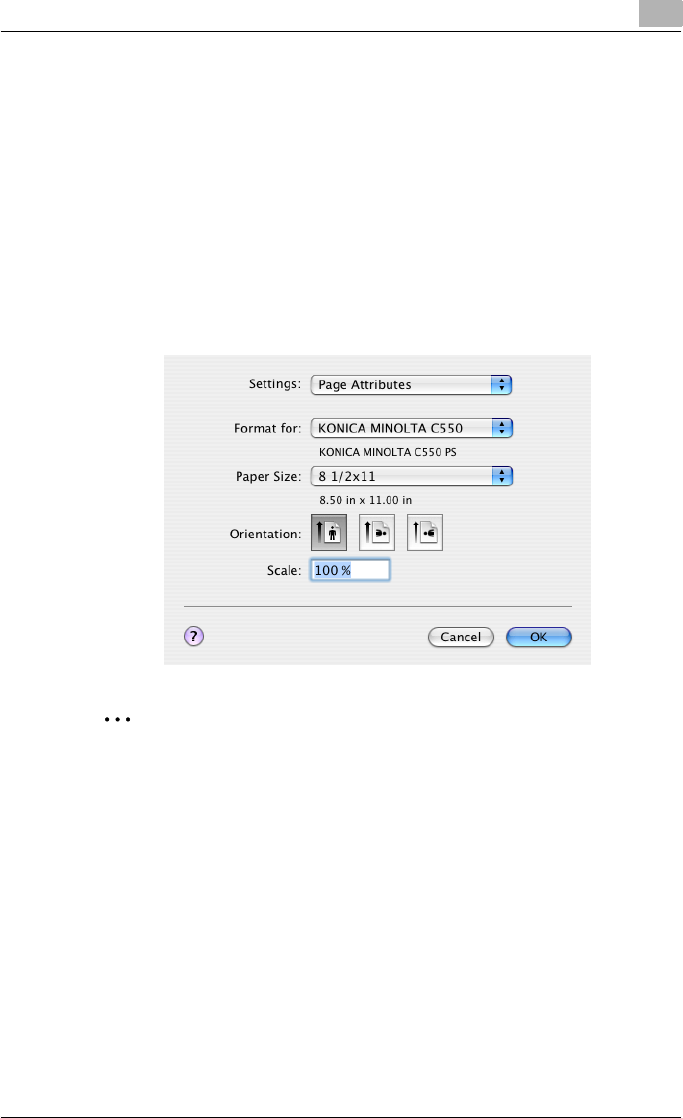
Setting up the PPD driver (Mac OS X) 8
C550 8-7
8.2 Page Setup
Page Attributes (basic settings)
1Select “Page Setup” or “Paper Setup” from the [File] menu.
2Select “Page Attributes”.
3Specify settings for the following:
– Paper Size: Specifies the paper size.
– Orientation: Specifies the orientation.
– Scale: Specifies the enlargement and reduction ratio.
2
Note
“12 × 18” paper size is one size larger than A3 paper size at 504.8 × 457.2
mm.
To print on paper sizes other than the standard sizes, be sure to set the
custom paper sizes in Custom Page Sizes first.
When “W” is selected for each standard paper size from the printer driv-
er, the data can be centered and printed.
For example, if A4 size data is created and you want to center and print
on A3 size paper, select “A4W” as the paper size and “Tray 1” or “Bypass
Tray” as the paper tray from the printer driver.
To print, load A3 size paper in the tray (“Tray 1” or “Bypass Tray”) of this
machine that is specified from the printer driver, and then specify the set-
tings described below from [Basic (Paper)] – [Change Tray Settings] –

Setting up the PPD driver (Mac OS X) 8
C550 8-8
[Wide Paper] in the control panel.
Select “A4W”.
Enter the A3 paper size (420.0 × 297.0) in [Change Size].
Custom Page Sizes
1Select “Page Setup” or “Paper Setup” from the [File] menu.
2For Mac OS 10.4, select “Manage Custom Sizes” from the “Paper Size”
drop-down list.
For Mac OS 10.2 and Mac OS 10.3, select “Custom Paper Size” from
“Settings”.
3Click the [New] (Mac OS 10.2/10.3) or the [+] (Mac OS 10.4) button.
4Enter the paper size name.
5Specify settings for the following:
– Page Size (Paper Size): Specifies any paper size.
– Printer Margins: Specifies the paper margins.
6For Mac OS X 10.4, continue with step 7.
For Mac OS 10.2 and Mac OS 10.3, click the [Save] button.
7Click the [OK] button.
This saves the custom paper size, which can be selected from the “Pa-
per Size” drop-down list that is displayed when “Page Attributes” is se-
lected.
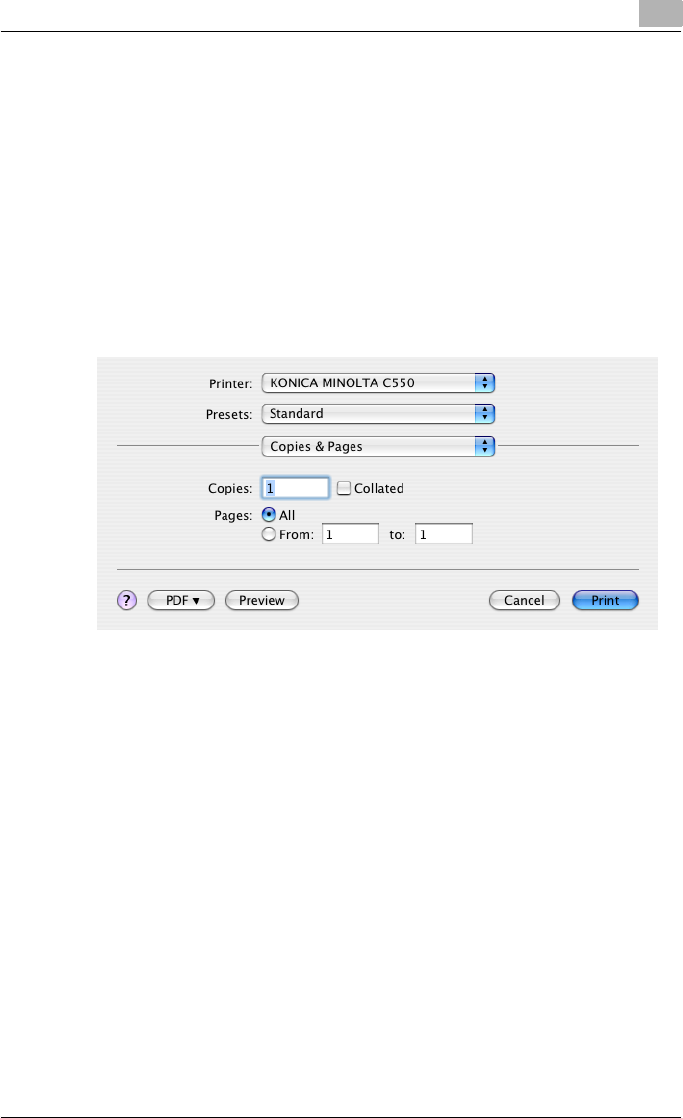
Setting up the PPD driver (Mac OS X) 8
C550 8-9
8.3 Printing
General settings
1From the [File] menu, select “Print”.
2Select “Copies & Pages”.
3Specify settings for the following:
– Copies: Specifies the number of copies to print.
– Collated: Prints multiple copies in sets.
– Pages: Specifies the print range to print.
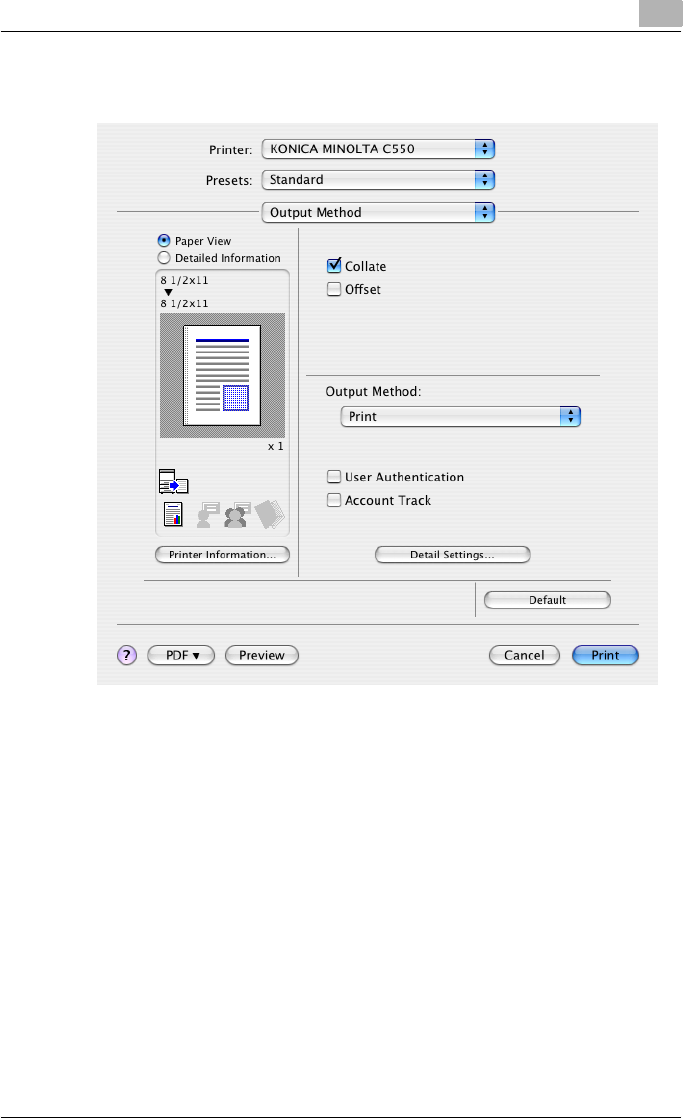
Setting up the PPD driver (Mac OS X) 8
C550 8-10
8.4 Output Method
Collate: Prints multiple copies in sets.
Offset: Specifies offset.
Output Method: Specifies the output method. For details, refer to “Selecting
the output method” on page 8-11.
User Authentication: Performs user authentication. For details, refer to
“Specifying the user authentication settings” on page 8-14.
Account Track: Performs account track. For details, refer to “Specifying the
account track settings” on page 8-15.
Detail Settings: Displays the functions for which the setting details have been
specified.
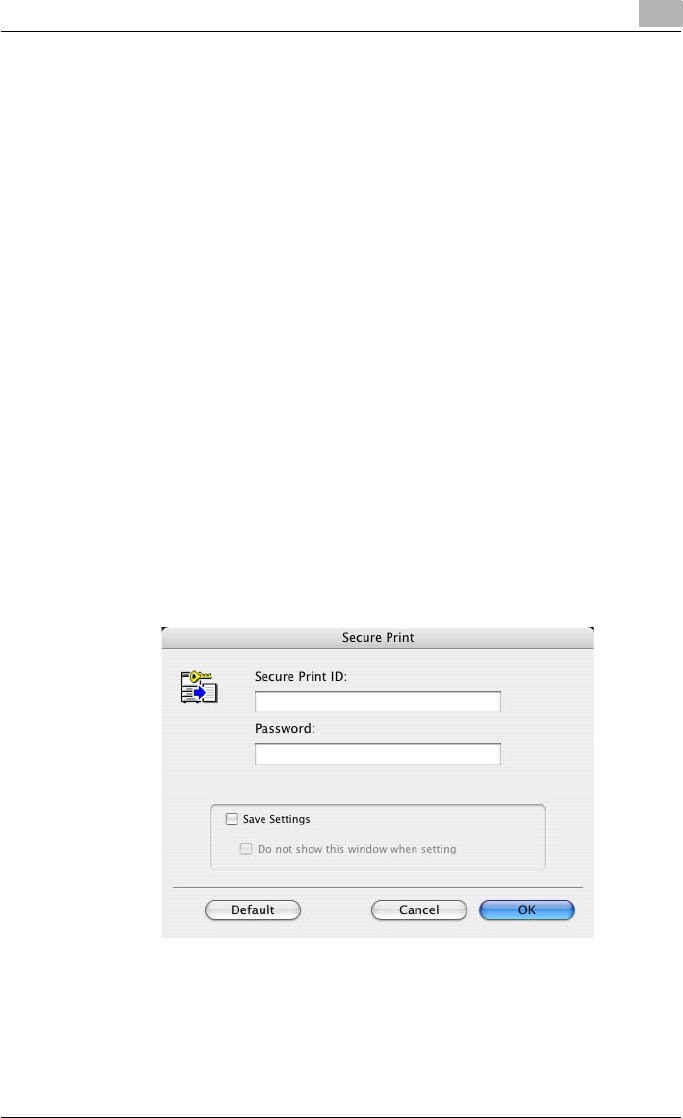
Setting up the PPD driver (Mac OS X) 8
C550 8-11
Selecting the output method
Not only can you print directly, but you can select “Secure Print”, which re-
quires a password to print, or “Save in User Box”, which saves data in the
boxes that were created on the HDD.
From the “Output Method” drop-down list, select the output method.
Print: Prints immediately.
Secure Print: Saves the document to be printed in “Secure Print User Box”
of this machine. When printing, you are required to enter the ID and pass-
word in this machine’s control panel. Select when printing highly confidential
documents.
Save in User Box: Saves the document to be printed in a box on this ma-
chine.
Save in User Box and Print: Saves the document in a box and prints at the
same time.
Proof Print: After a part of the document has been printed, this machine
stops printing temporarily. Select to avoid misprinting a large volume of print
jobs.
Secure Print
If “Secure Print” was selected, enter the ID and password in the dialog box
that appeared.
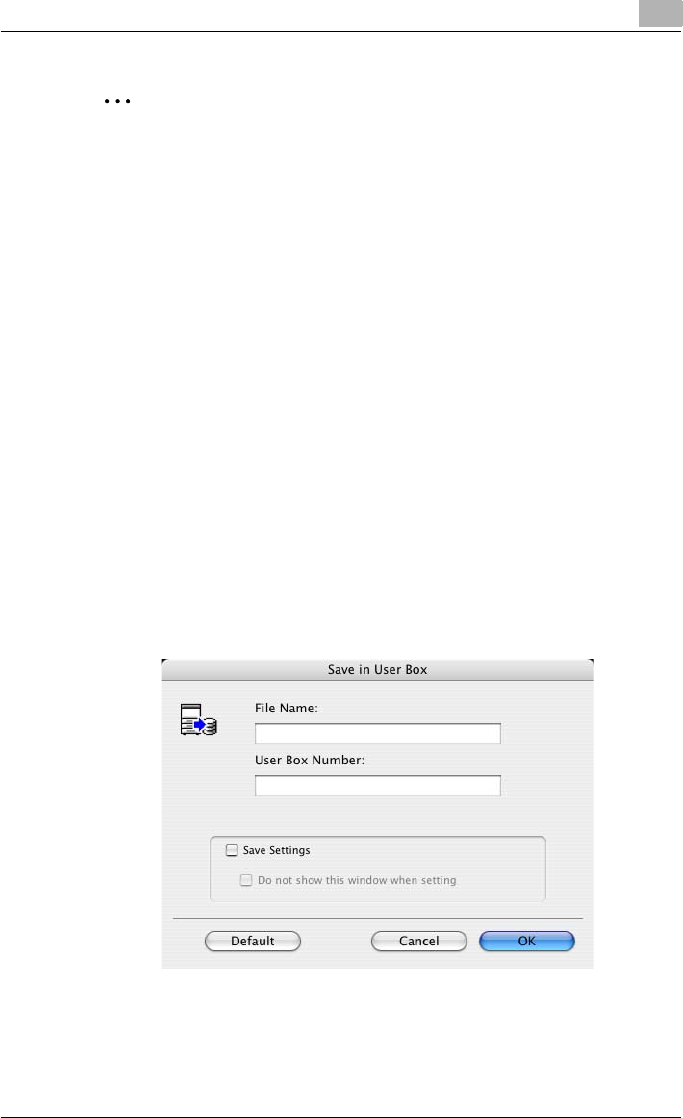
Setting up the PPD driver (Mac OS X) 8
C550 8-12
2
Note
By selecting the “Save Settings” check box, the specified settings are
saved. In addition, if the “Do not show this window when setting” check
box is selected, the dialog box does not appear when the function is
specified.
The dialog box can be displayed by clicking the [Detail Settings] button.
For details, refer to “Selecting the output method” on page 8-11.
To print, specify “Secure Print Document Box” from the Box mode in this
machine’s control panel, and then enter the ID and password. For details,
refer to “Print job management” on page 9-46. For details on the box
functions of this machine, refer to the User’s Guide [Box Operations].
When password rules are enabled on this machine, the passwords that
can be used for secured printing are limited and the jobs are deleted
when a password that does not comply with the password rule is en-
tered. For the password rules, refer to the User’s Guide [Copy Opera-
tions].
Save in User Box
When “Save in User Box” or “Save in User Box and Print” is selected, specify
the file name to be saved and the box number for the save location in the di-
alog box that appears for entering the file name and box number.

Setting up the PPD driver (Mac OS X) 8
C550 8-13
2
Note
By selecting the “Save Settings” check box, the specified settings are
saved. In addition, if the “Do not show this window when setting” check
box is selected, the dialog box does not appear when the function is
specified.
The dialog box can be displayed by clicking the [Detail Settings] button.
For details, refer to “Checking the Output Method setting details” on
page 8-16.
Be sure to create the box of the save location in advance with the box
function of this machine. For details on the box functions of this machine,
refer to the User’s Guide [Box Operations].
When password rules are enabled on this machine, specify the box that
was created on this machine.
Proof Print
When a print job is sent, this machine stops printing temporarily after part of
the document has been printed. The remaining print job is stored in this ma-
chine as a print job. When printing multiple copies, you can print the remain-
ing part of the print job after checking the print results.
2
Note
To print the document, release the held document from the Job mode in
this machine’s control panel. For details, refer to “Print job management”
on page 9-46.
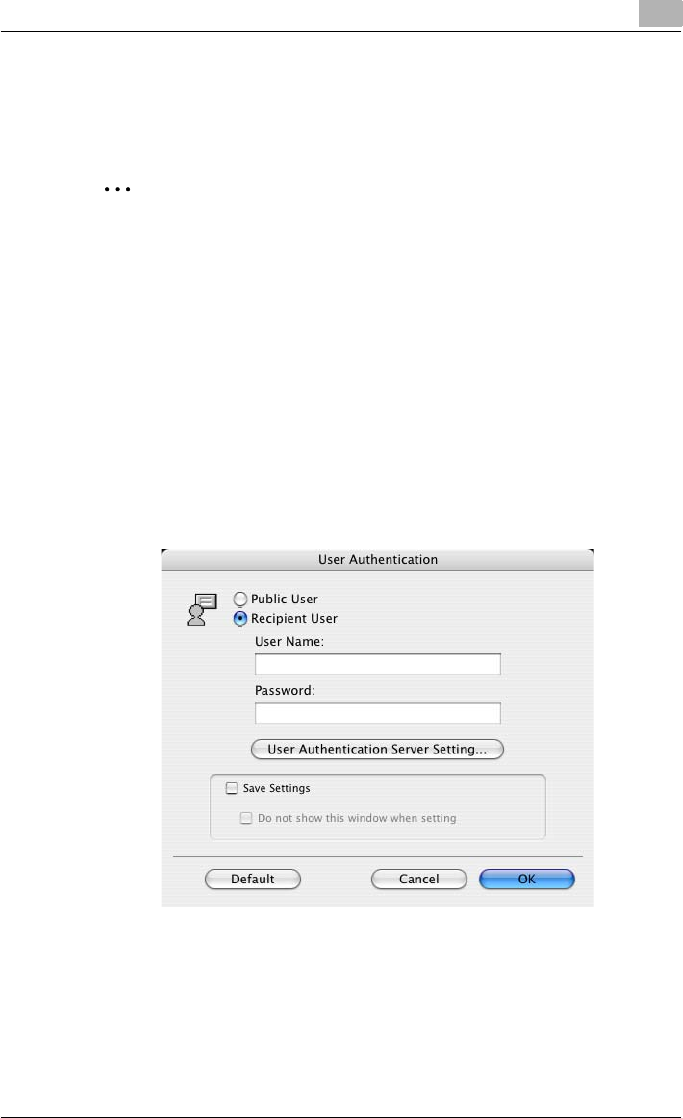
Setting up the PPD driver (Mac OS X) 8
C550 8-14
Specifying the user authentication settings
If the user authentication settings have been specified on this machine, you
must enter a user name and password.
2
Reminder
If a job is printed using a user name or password that is not a registered
account on this machine, or if a job is printed without selecting a user un-
der “User Authentication”, the operation is not authenticated by this ma-
chine and the job is canceled.
If the user authentication settings are specified on this machine and the
authentication operation restriction function is in mode 2, the applicable
user is locked and cannot be accessed if the authentication information
is not entered correctly.
1Select the “User Authentication” check box.
The User Authentication dialog box appears.
2Select “Recipient User”, and then enter the user name and password.
3Click the [OK] button.

Setting up the PPD driver (Mac OS X) 8
C550 8-15
2
Note
If this machine has been set to permit public users, the machine can be
used without a user name and password.
If performing user authentication on a server, the server settings must be
specified. Click the [User Authentication Server Setting] button to select
the server.
By selecting the “Save Settings” check box, the specified settings are
saved. In addition, if the “Do not show this window when setting” check
box is selected, the dialog box does not appear when the function is
specified.
The dialog box can be displayed by clicking the [Detail Settings] button.
For details, refer to “Checking the Output Method setting details” on
page 8-16.
If printing is not allowed, printing cannot be performed even when used
by a registered user. For details on the user authentication function, con-
sult the administrator of this machine.
If performing user authentication with an optional authentication unit, en-
ter the user name and password in step 2. For details, refer to the oper-
ation manual of the authentication unit.
Specifying the account track settings
If the account track settings have been specified on this machine, you must
enter a department name and password.
2
Reminder
If a job is printed using a department name or password that is not a reg-
istered account on this machine, or if a job is printed without “Account
Track” selected, the operation is not authenticated by this machine and
the job is canceled.
When the account track settings are specified on this machine, the au-
thentication operation restriction function is in mode 2, and the authenti-
cation information is not entered correctly, the applicable account is
locked and cannot be accessed.
1Select the “Account Track” check box.
The Account Track dialog box appears.
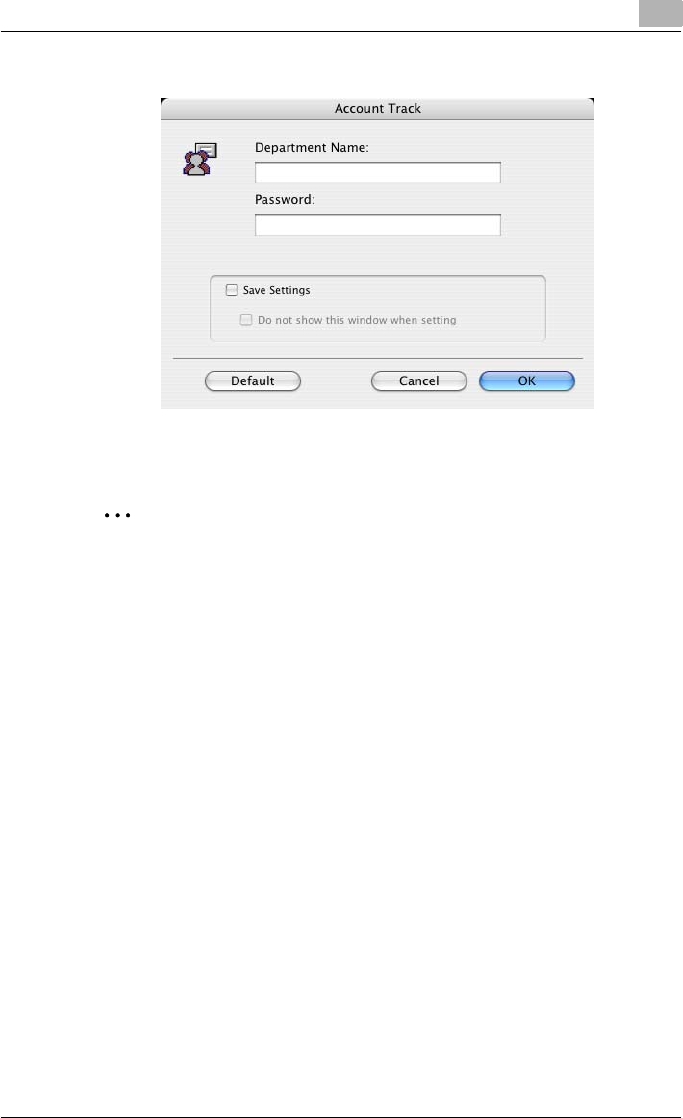
Setting up the PPD driver (Mac OS X) 8
C550 8-16
2Enter the department name and password.
3Click the [OK] button.
2
Note
By selecting the “Save Settings” check box, the specified settings are
saved. In addition, if the “Do not show this window when setting” check
box is selected, the dialog box does not appear when the function is
specified.
The dialog box can be displayed by clicking the [Detail Settings] button.
For details, refer to “Checking the Output Method setting details” on
page 8-16.
If printing is not allowed, printing cannot be performed even when used
by a registered account. For details on the account track function, con-
sult the administrator of this machine.
Checking the Output Method setting details
By clicking the [Detail Settings] button, the “Output Method” functions for
which detailed settings have been specified are shown.
The settings can be shown by clicking the [Expand All] button.
By selecting a function and clicking the [Settings] button, the dialog box for
specifying the detailed settings for the selected function appears.
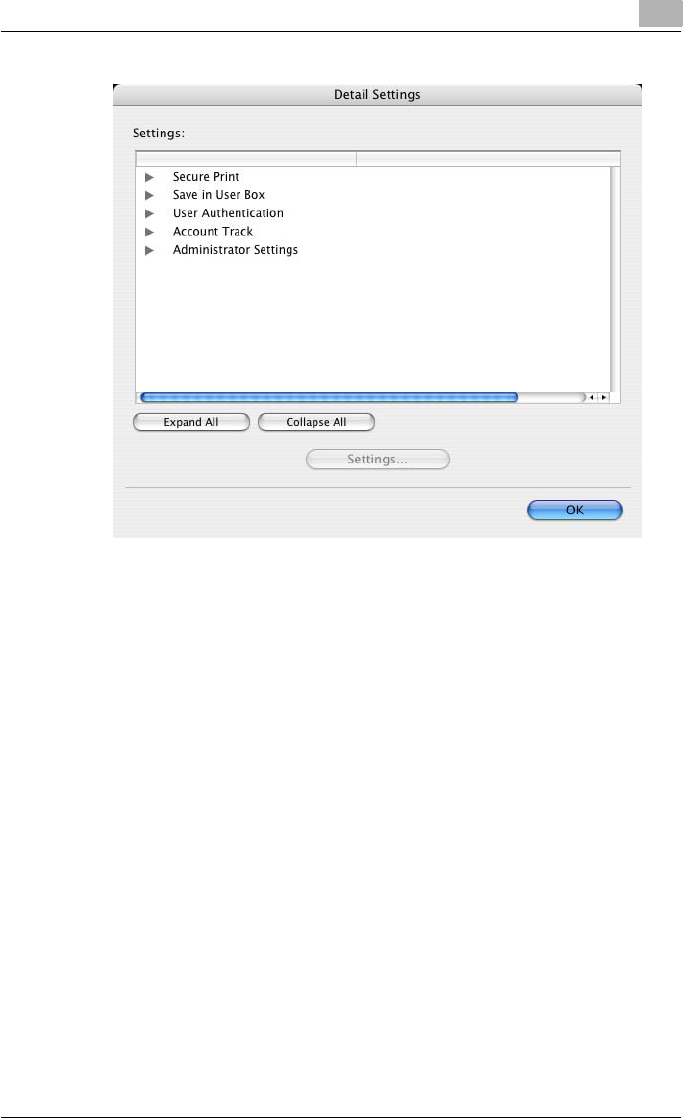
Setting up the PPD driver (Mac OS X) 8
C550 8-17
Secure Print: Displays the Secure Print dialog box for entering an ID and
password. This is the same dialog box that appears when “Secure Print” is
specified from the “Output Method” drop-down list.
Save in User Box: Displays the Save in User Box dialog box for entering a file
name and box number. This is the same dialog box that appears when “Save
in User Box” or “Save in User Box and Print” is specified from the “Output
Method” drop-down list.
User Authentication: Displays the User Authentication dialog box for entering
a user name and password. This is the same dialog box that appears when
the “User Authentication” check box is selected.
Account Track: Displays the Account Track dialog box for entering a depart-
ment name and password. This is the same dialog box that appears when
the “Account Track” check box is selected.
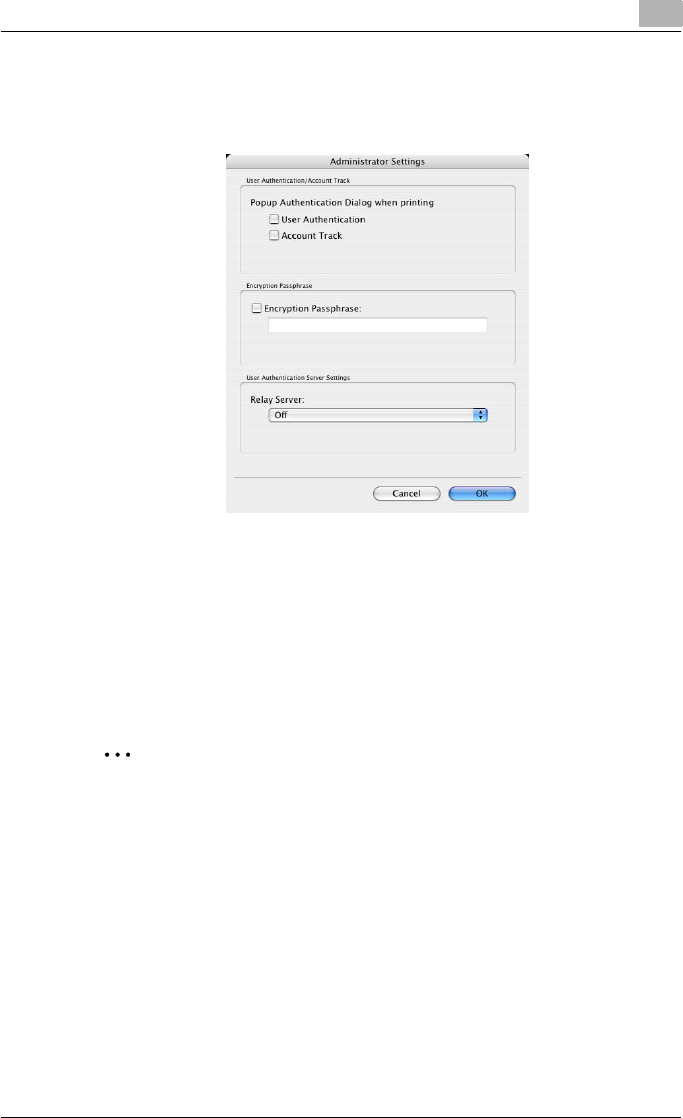
Setting up the PPD driver (Mac OS X) 8
C550 8-18
Administrator Settings: Displays the dialog box in which you can change
the display of the authentication setting dialog box or in which you can
change the encryption passphrase.
Popup Authentication Dialog when printing: Displays the User Authentication
dialog box or the Account Track dialog box when a print job is specified to
enter a user name or a department name.
Encryption Passphrase:Specifies an encryption passphrase when it is user
defined by communicating with this machine. The encryption key is automat-
ically generated according to the entered characters and it is used to com-
municate with this machine.
2
Reminder
Specify “Encryption Passphrase” according to the encryption pass-
phrase that was specified in “Driver Password Encryption Setting” of this
machine. For details, refer to “Driver Password Encryption Setting” on
page 9-43.
Setting up the PPD driver (Mac OS X) 8
C550 8-19
8.5 Layout/Finish
You can switch between the Layout dialog box and the Finish dialog box.

Setting up the PPD driver (Mac OS X) 8
C550 8-20
Print Type: Specifies duplex printing and booklet printing.
Binding Position: Specifies the binding position.
Poster Mode: Prints one page of an original document divided on multiple
pages.
Overlap width line: Prints an overlap width line on split pages. This setting
can be specified when “Poster Mode” is specified.
Rotated 180: Prints the image rotated 180°.
Image Shift: Prints by shifting the entire print image. For details, refer to
“Shifting images” on page 8-22.
Chapters: Specifies the page to be printed on the front side. For details, refer
to “Chapters” on page 8-23.
Staple: Specifies stapling. Select the “Staple” check box, and then specify
the number of staples and the stapling position from the drop-down list.
Punch: Specifies hole punching. Select the “Punch” check box, and then
specify the number of punched holes from the drop-down list.
Fold & Staple: Specifies to saddle stitch or fold a printed document.
Paper Arrangement: Specifies the method for adjusting the binding position.
If “Prioritize Arranging Papers” is selected, all pages can be processed to a
suitable quality by this machine because the binding position is adjusted af-
ter all the print data is received. If “Prioritize Productivity” is selected, the
printing process is performed efficiently because the binding position is ad-
justed while the data is printed simultaneously as it is being received.
Detail Settings: Displays the functions for which the setting details have been
specified.

Setting up the PPD driver (Mac OS X) 8
C550 8-21
2
Reminder
When printing a job that contains pages of different sizes and orientations
with the “Poster Mode” setting specified, images may be missing or over-
lapping when the document is printed.
The staple function is available only when the optional finisher is installed.
The hole punch function is available only when the punch kit is installed
on the optional finisher.
The fold & staple function are available only when optional finisher FS-
608 is installed.
2
Note
The staple and hole-punch position changes according to the binding
position specified from “Binding Position”.
The number of punch holes that can be selected may vary depending on
the punch kit that is installed.
The fold function cannot be specified when the staple, punch, or fold &
staple function is specified.
The center staple function and the thick paper function cannot be spec-
ified when finisher FS-608 is installed.
Setting up the PPD driver (Mac OS X) 8
C550 8-22
Shifting images
The entire print image of a document is shifted and then printed. You can use
this function when you want to adjust the print position.
1Select the “Image Shift” check box.
2Select the shift direction and set the values.
By clearing the “Same value for Front and Back sides” check box, you
can set separate values for the front and back sides.
2
Note
By selecting the “Save Settings” check box, the specified settings are
saved. In addition, if the “Do not show this window when setting” check
box is selected, the dialog box does not appear when the function is
specified.
The dialog box can be displayed by clicking the [Detail Settings] button.
For details, refer to “Checking the Layout/Finish setting details” on
page 8-24.
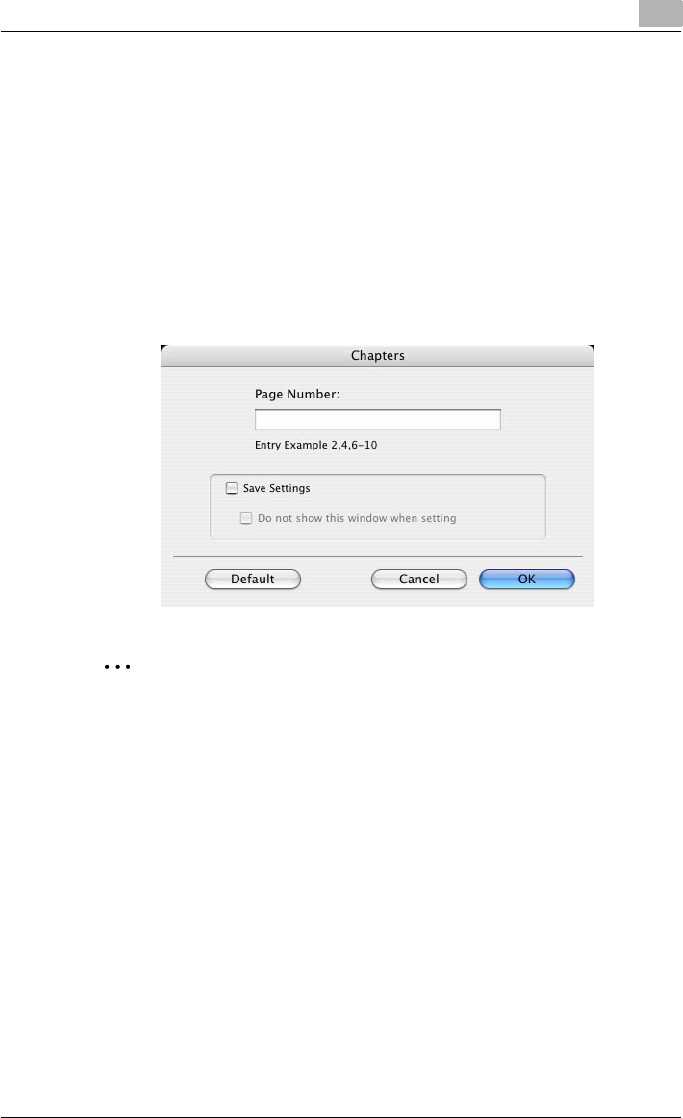
Setting up the PPD driver (Mac OS X) 8
C550 8-23
Chapters
You can specify the page you want to print on the front side when duplex
printing or booklet printing.
Even if a specified page comes up to be printed on the back side in duplex
printing or booklet printing, the specified page is moved and printed on the
front side.
1Select the “Chapters” check box.
The dialog box for setting the detailed settings appears.
2Enter the page number of the page you want to print on the front side.
2
Note
When entering multiple page numbers, separate the page numbers with
commas such as “2, 4, 6” or enter a page range using a hyphen such as
“6-10”.
The “Chapters” check box can only be selected when the duplex printing
or the booklet printing setting is enabled.
By selecting the “Save Settings” check box, the specified settings are
saved. In addition, if the “Do not show this window when setting” check
box is selected, the dialog box does not appear when the function is
specified.
The dialog box can be displayed by clicking the [Detail Settings] button.
For details, refer to “Checking the Layout/Finish setting details” on
page 8-24.
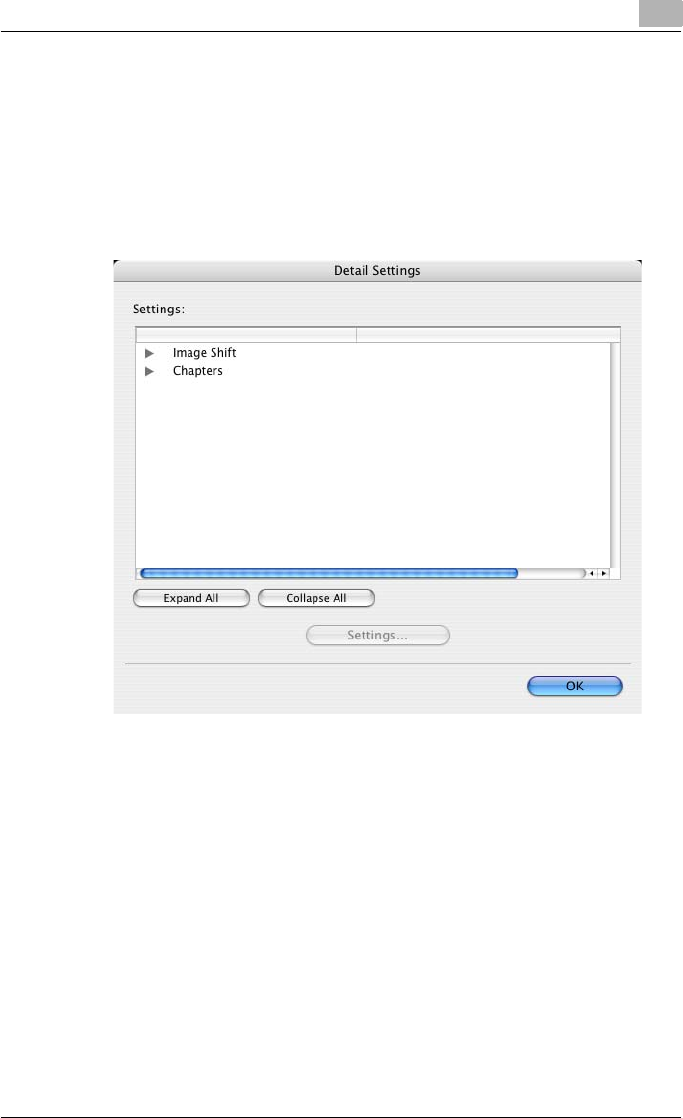
Setting up the PPD driver (Mac OS X) 8
C550 8-24
Checking the Layout/Finish setting details
By clicking the [Detail Settings] button, the “Layout/Finish” functions for
which detailed settings have been specified are shown.
The settings can be shown by clicking the [Expand All] button.
By selecting a function and clicking the [Settings] button, the dialog box for
specifying the detailed settings for the selected function appears.
Image Shift: Displays the Image Shift dialog box. This is the same dialog box
that appears when the “Image Shift” check box is selected.
Chapters: Displays the Chapters dialog box. This is the same dialog box that
appears when the “Chapters” check box is selected.
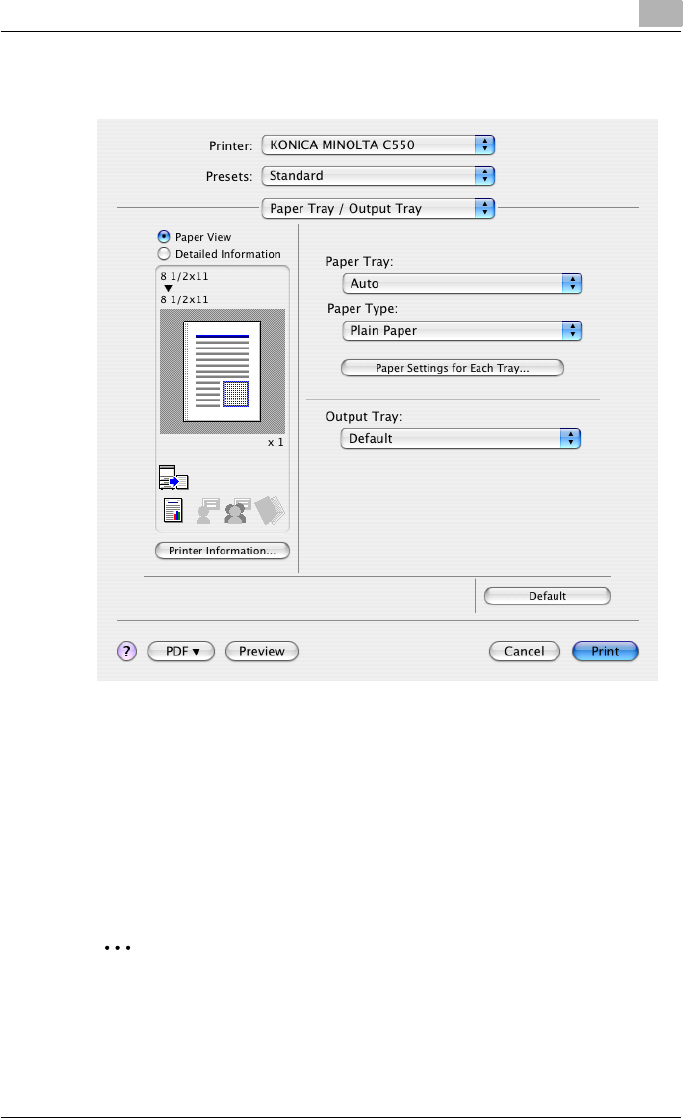
Setting up the PPD driver (Mac OS X) 8
C550 8-25
8.6 Paper Tray/Output Tray
Paper Tray: Selects the paper tray for printing.
Paper Type: Selects the paper type for printing. This setting can be specified
when the paper tray setting is set to “Auto”.
Paper Settings for Each Tray: Specifies the paper type for each paper tray.
For details, refer to “Specifying the paper type for a paper tray” on
page 8-26.
Output Tray: Specifies the tray where to output the printed pages.
2
Note
If “Auto” is specified as the paper tray, you can select the paper type. If
the paper tray setting is changed to a setting other than “Auto”, the paper
type is fixed to its preregistered setting. Specify a paper type by clicking
the [Paper Settings for Each Tray] button.

Setting up the PPD driver (Mac OS X) 8
C550 8-26
Specifying the paper type for a paper tray
You can specify the paper type for a paper tray.
1Click the [Paper Settings for Each Tray] button.
The dialog box for setting the detailed settings appears.
2Select the desired paper tray, and then select the paper type to be
specified from the “Paper Type” drop-down list.
2
Note
Click the [Restore Device Status] button to communicate with this ma-
chine and read the status of the settings specified on this machine. You
cannot use this function if you are not connected to or able to communi-
cate with this machine.
By selecting the “Save Settings” check box, the specified settings are
saved.
Specify “Duplex Side 2” to print on the back side of a page.
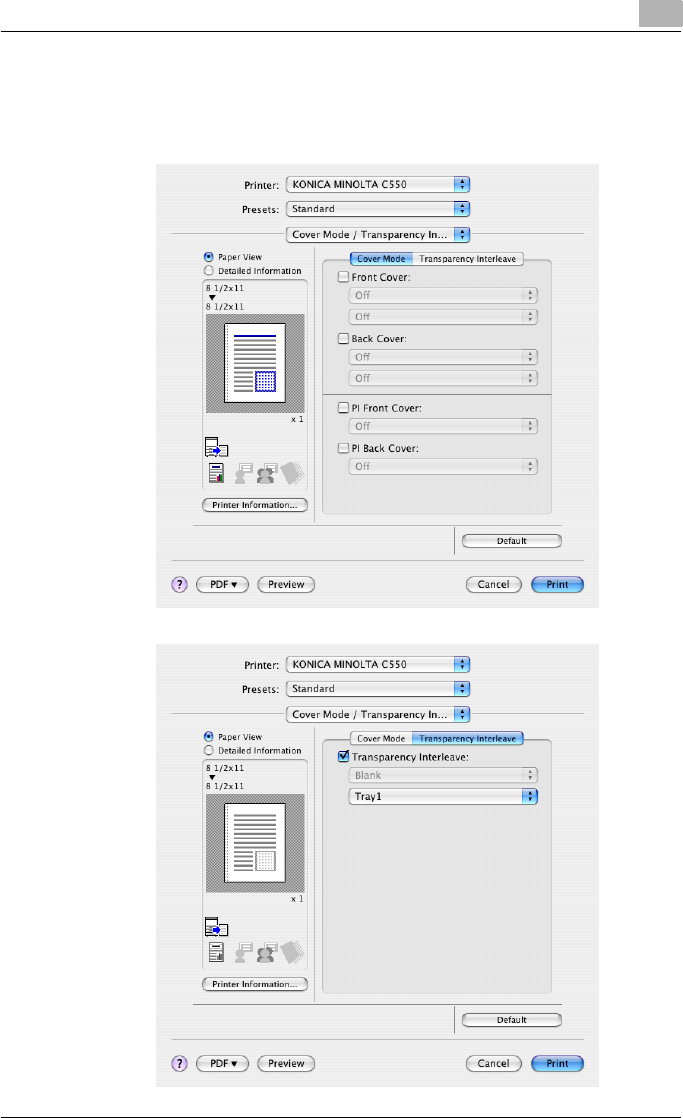
Setting up the PPD driver (Mac OS X) 8
C550 8-27
8.7 Cover Mode/Transparency Interleave
You can switch between the Cover Mode dialog box and the Transparency
Interleave dialog box.

Setting up the PPD driver (Mac OS X) 8
C550 8-28
Front Cover: Attaches a front cover page. Select this check box, and then se-
lect the print conditions from the upper drop-down list, and the paper tray
that contains the loaded paper to be used from the lower drop-down list.
Back Cover: Attaches a back cover page. Select this check box, and then
select the print conditions from the upper drop-down list, and the paper tray
that contains the loaded paper to be used from the lower drop-down list.
PI Front Cover:Attaches a front cover from the post inserter. Select this
check box, and then select the PI tray that contains the loaded paper to be
used from the drop-down list.
PI Back Cover: Attaches a back cover from the post inserter. Select this
check box, and then select the PI tray that contains the loaded paper to be
used from the drop-down list.
Transparency Interleave: Outputs and inserts interleaves when printing over-
head projector transparencies. Select this check box, and then select the pa-
per tray that contains the loaded paper to be used from the lower drop-down
list.
2
Note
To print on the front cover and back cover, select “Print”. To only add a
blank page, select “Blank”.
The PI Front Cover function and the PI Back Cover function are available
only when an optional post inserter is installed.
The PI Front Cover function and the PI Back Cover function cannot be
specified when the Front Cover function and the Back Cover function are
specified.
The “Transparency Interleave” setting can be specified if “Transparency”
is selected as the paper type.
Setting up the PPD driver (Mac OS X) 8
C550 8-29
8.8 Per Page Setting
You can specify the print type and paper tray for each page. This comes in
handy when you want to change the paper tray during a print job when print-
ing multiple pages. The settings are added to the per page setting list and
can be used as necessary.
Per Page Setting: Enables the per page setting function.
List: Displays the list of the settings that have been added to Per Page Set-
ting.
Add: Adds settings to Per Page Setting. For details, refer to “Adding and ed-
iting the settings in Per Page Setting” on page 8-30.
Edit: Edits the settings in Per Page Setting. For details, refer to “Adding and
editing the settings in Per Page Setting” on page 8-30.
Delete: Deletes the settings in Per Page Setting.
+/,: Changes the order of the per page setting list.
Setting up the PPD driver (Mac OS X) 8
C550 8-30
Adding and editing the settings in Per Page Setting
1Select the “Per Page Setting” check box.
2Click the [Add] button to add a new setting to the list.
To edit the list, select the desired name in the list, and then click the
[Edit] button.
The Per Page Settings dialog box for specifying the print settings ap-
pears.
3Click the [Add] button to add the setting to the list.
A new row for specifying the settings is added to the settings list.
4Select the row that was added to the list, and then specify the print set-
tings in “Add/Edit”.
– Page Number: Enters the page number. When entering multiple
page numbers, separate the page numbers with commas such as
“2, 4, 6” or enter a page range using a hyphen such as “6-10”.
– Print Type: Specifies Print Insert, Insert Blank Sheet, Print (1-Sid-
ed), and Print (2-Sided).
– Paper Tray: Specifies the paper tray.
– Staple: Specifies the number of staples and the stapling position.
5Click the [OK] button.

Setting up the PPD driver (Mac OS X) 8
C550 8-31
2
Note
To change existing print settings, select the desired row and change the
settings. To delete existing print settings, select the desired row, and
then click the [Delete] button.
Click the [+] button or the [,] button to change the page number starting
with the smallest page number.
The name of the list can be changed in the “List Name:” text box.
Setting up the PPD driver (Mac OS X) 8
C550 8-32
8.9 Stamp/Composition
Copy Protect: Prints a special pattern to prevent copying.
Date/Time: Prints the date and time.
Page Number: Prints the page number.
Header/Footer: Prints a header and a footer.
Printing with copy protection
You can print a special pattern on an entire page while printing.
When copying a printed page, the characters embedded in the pattern ap-
pear to prevent an illegal copy.
1Select the “Copy Protect” check box.
The Copy Protect dialog box appears.
Setting up the PPD driver (Mac OS X) 8
C550 8-33
2Specify the copy protection type and the position.
Multiple print items can be specified.
– Characters: Embeds the selected character string in a pattern. A
preregistered character string (common stamp) or a character
string registered on this machine (registered stamp) can be speci-
fied.
– Date/Time: Embeds the selected date and time in a pattern.
– Serial Number: Embeds the serial number of this machine in a pat-
tern.
– Distribution Control Number: Embeds the number of copies in a
pattern when printing multiple copies. The start number or the
number of digits that are displayed can be specified.
– Job Number: Embeds the print job number in a pattern for docu-
ments that are automatically paginated.
– Text Size: Specifies the text size of a pattern.
– Angle: Specifies the pattern angle.
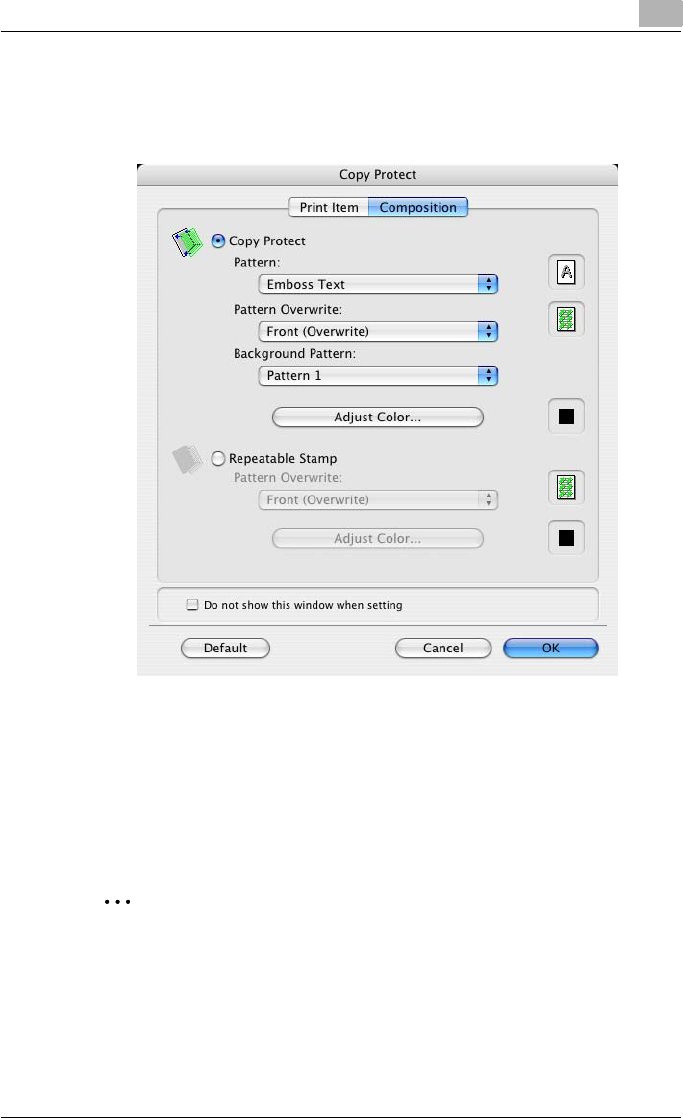
Setting up the PPD driver (Mac OS X) 8
C550 8-34
3Select the composition method for copy protection.
Select “Copy Protect” to specify the desired results when copying, or
simply select “Repeatable Stamp”. In addition, you can select the
embedding conditions.
– Pattern: Specifies the embedding method of a pattern.
– Pattern Overwrite: Specifies the order for printing a pattern on the
original document.
– Background Pattern: Specifies the pattern background.
– Adjust Color: Specifies the color of the pattern.
4Click the [OK] button.
2
Note
If the “Do not show this window when setting” check box is selected, the
dialog box does not appear when this function is specified. The dialog
box can be displayed by clicking the [Settings] button.
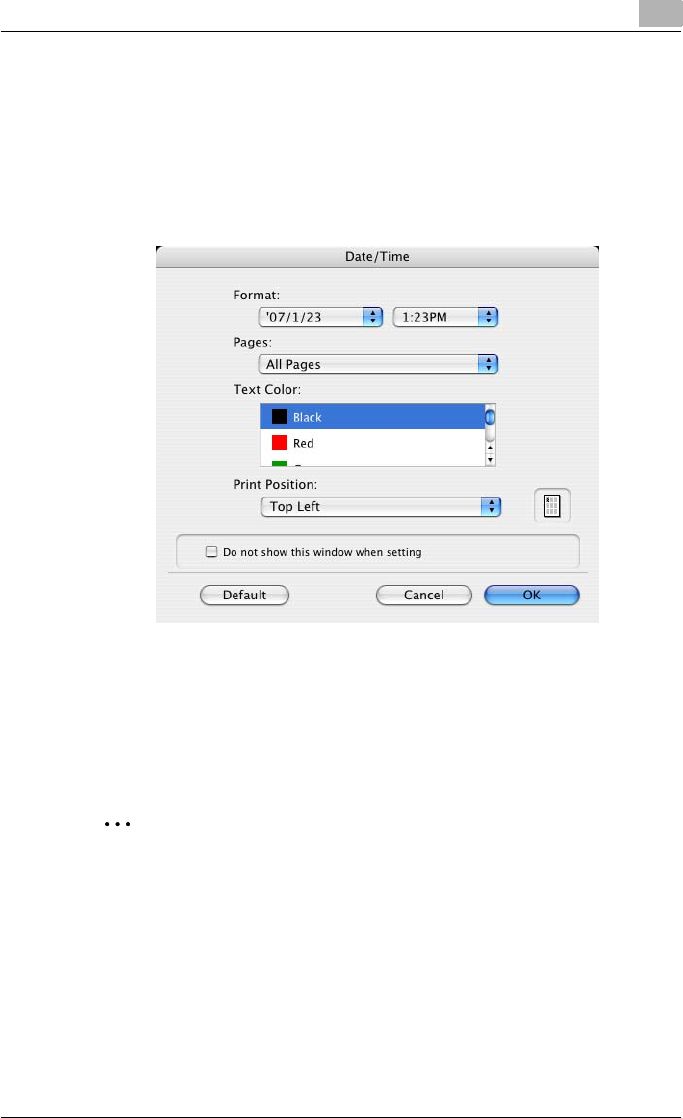
Setting up the PPD driver (Mac OS X) 8
C550 8-35
Printing the date and time
You can print the date and time on a document.
1Select the “Date/Time” check box.
The Date/Time dialog box appears.
2Specify the format and print position for the date and time.
– Format: Displays the format for the date and time to be printed.
– Pages: Specifies the pages to print the date and time.
– Text Color: Specifies the text color to print.
– Print Position: Specifies the print position.
3Click the [OK] button.
2
Note
If the “Do not show this window when setting” check box is selected, the
dialog box does not appear when this function is specified. The dialog
box can be displayed by clicking the [Settings] button.
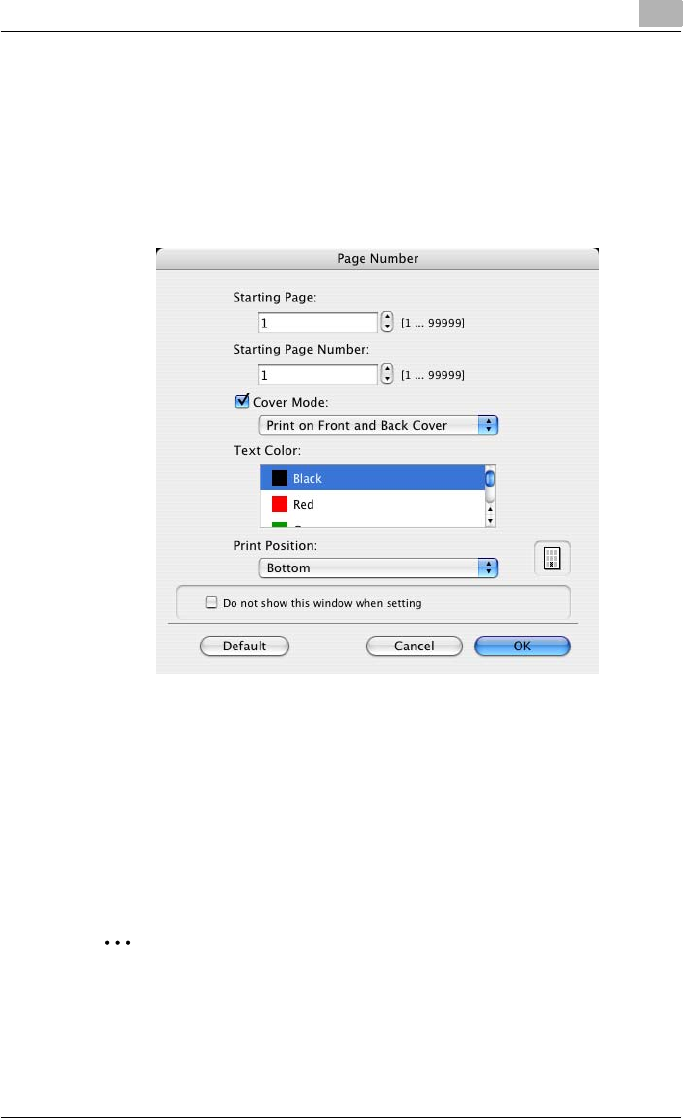
Setting up the PPD driver (Mac OS X) 8
C550 8-36
Printing the page numbers
You can print the page numbers on a document.
1Select the “Page Number” check box.
The Page Number dialog box appears.
2Specify the format and print position for the printing the page number.
– Starting Page: Specifies the page to start printing the page number.
– Starting Page Number: Specifies the start number for printing the
page number.
– Cover Mode: If cover pages are attached, specifies whether to print
the page number on the front cover page or the back cover page.
– Text Color: Specifies the text color to print.
– Print Position: Specifies the print position.
3Click the [OK] button.
2
Note
If the “Do not show this window when setting” check box is selected, the
dialog box does not appear when this function is specified. The dialog
box can be displayed by clicking the [Settings] button.
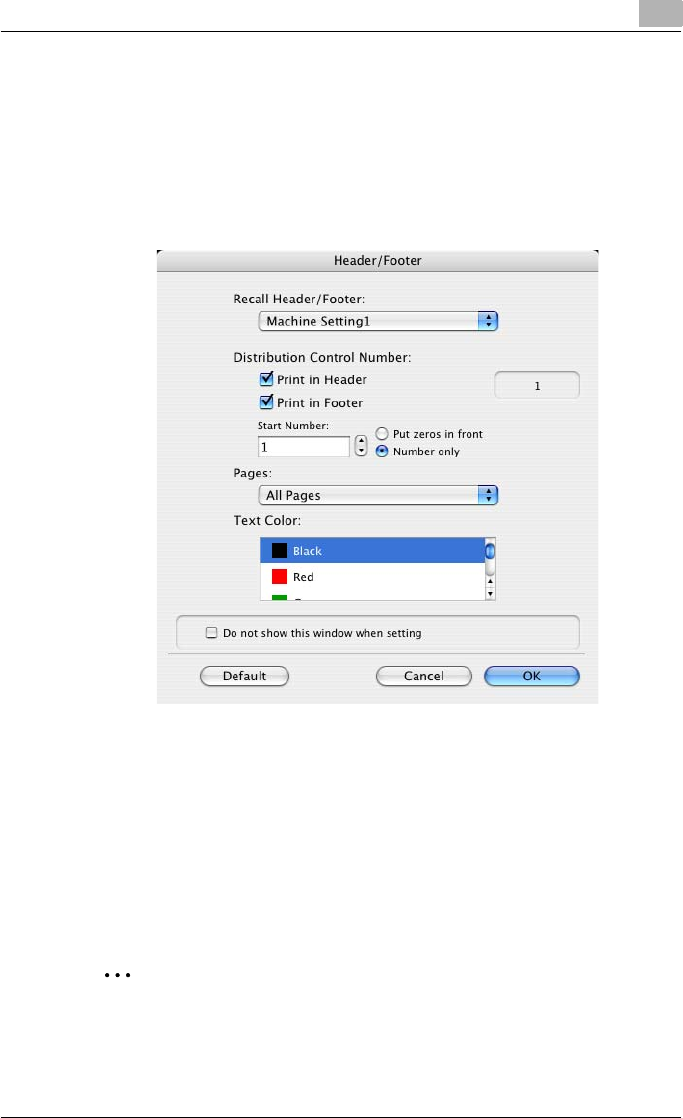
Setting up the PPD driver (Mac OS X) 8
C550 8-37
Printing a header and a footer
You can print a header and a footer on a document.
1Select the “Header/Footer” check box.
The Header/Footer dialog box appears.
2Specify the print settings and pages for the header and the footer.
– Recall Header/Footer:Select the header and the footer setting that
is registered in this machine.
– Distribution Control Number: Displays the number of the copy in
the header or the footer when printing multiple copies. The start
number or the number of digits that are displayed can be specified.
– Pages: Specifies the pages to print the header or the footer.
– Text Color: Specifies the color of the text for printing.
3Click the [OK] button.
2
Note
If the “Do not show this window when setting” check box is selected, the
dialog box does not appear when this function is specified. The dialog
box can be displayed by clicking the [Settings] button.
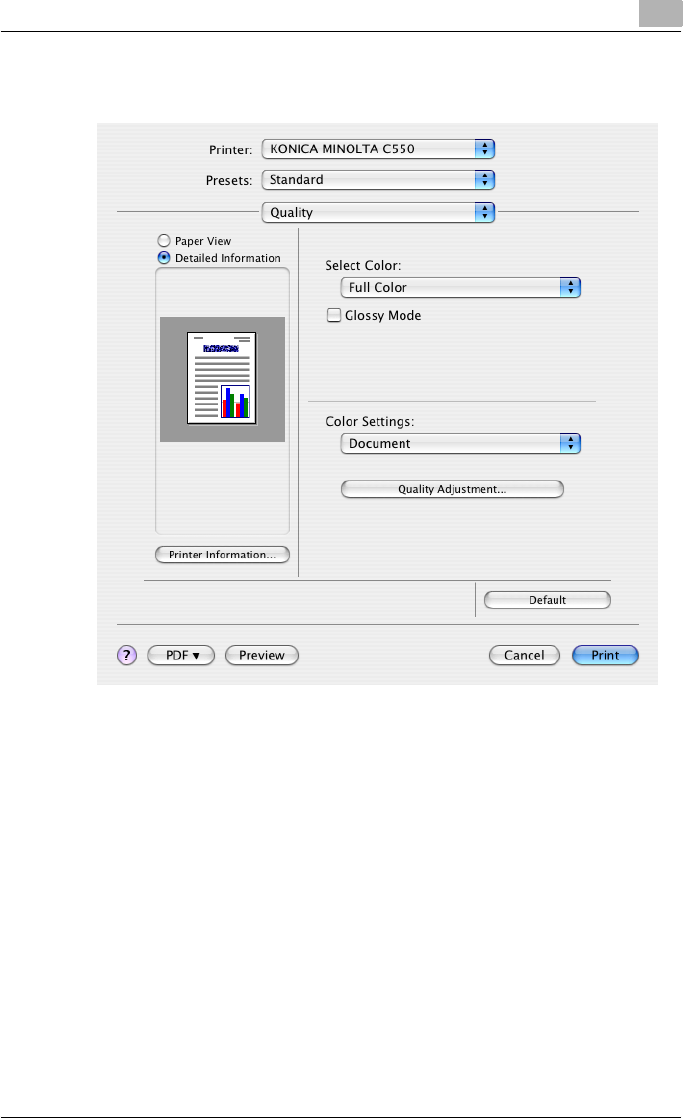
Setting up the PPD driver (Mac OS X) 8
C550 8-38
8.10 Quality
Select Color: Specifies whether to print in color or grayscale.
Glossy Mode: Prints with a gloss.
Color Settings: Prints with a quality suitable for the selected original docu-
ment.
Document: Prints with a quality suitable for documents with many charac-
ters.
Photo: Prints with a quality suitable for photos.
DTP: Prints with a quality suitable for documents produced using DTP.
Web: Prints with a quality suitable for Web page printing.
CAD: Prints with a quality suitable for CAD data printing.
Quality Adjustment: Adjusts the image quality. Specifies the color matching
and the profile for the text, photos, and charts of each object in a document.
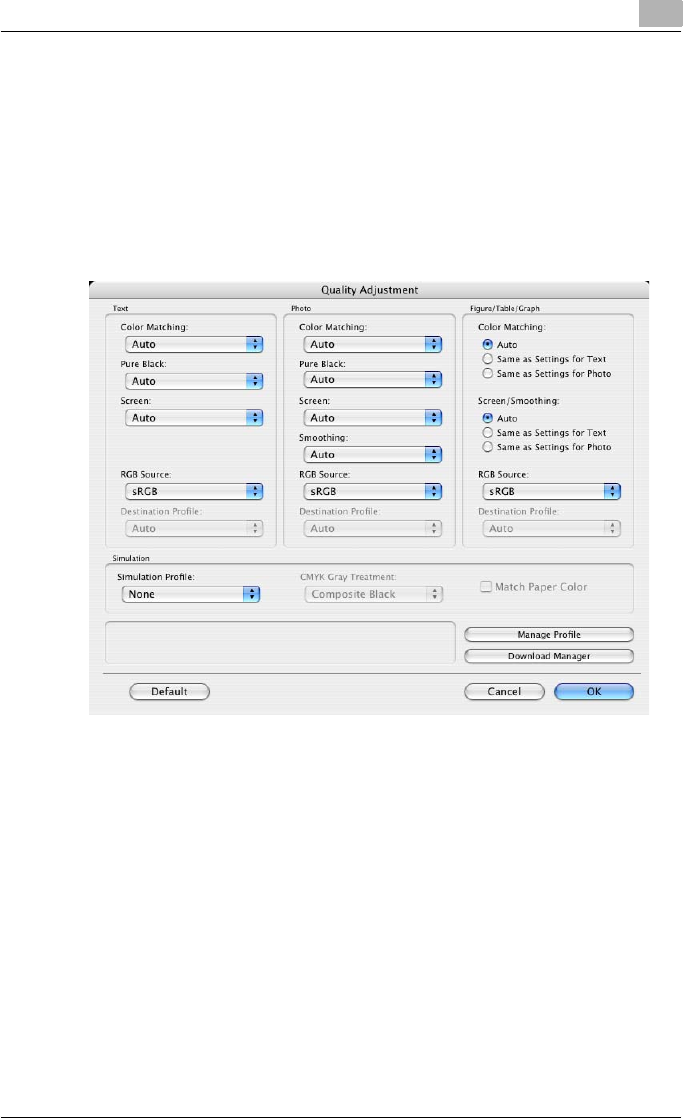
Setting up the PPD driver (Mac OS X) 8
C550 8-39
Controlling the color profile
You can add or delete the color profiles that can be selected from Quality Ad-
justment.
1Click the [Quality Adjustment] button.
The Quality Adjustment dialog box appears.
2Click the [Manage Profile] button.
The Color Profile Management dialog box appears.
The profile list that can be used and that was acquired from this ma-
chine appears.
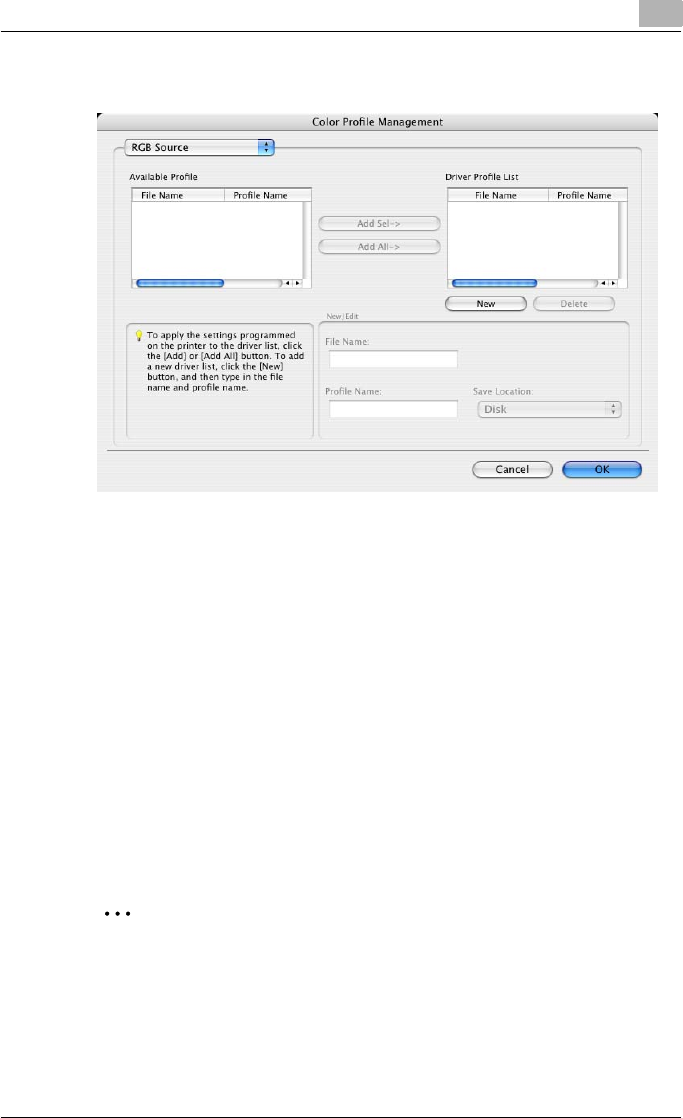
Setting up the PPD driver (Mac OS X) 8
C550 8-40
3Select the color profile type from the drop-down list.
4From the Available Profile list, select the profile to be used, and then
click the [Add] button.
– To add a profile to the current driver settings, click the [New] button,
and then enter the file name in the “File Name” text box and the pro-
file name in the “Profile Name” text box.
– The profile name can be changed in the “File Name” text box or the
“Profile Name” text box.
– To download the profile data to the printer, use “DownloadManager
(bizhub)” application. For details, refer to the user’s manual of
“DownloadManager (bizhub)”.
The selected profile is added to “Driver Profile List” and can be select-
ed from the profile settings.
5Click the [OK] button.
2
Note
“Color Profile Management” communicates with this machine and reads
the profile that this machine can use. You cannot use this function if you
are not connected to or able to communicate with this machine.
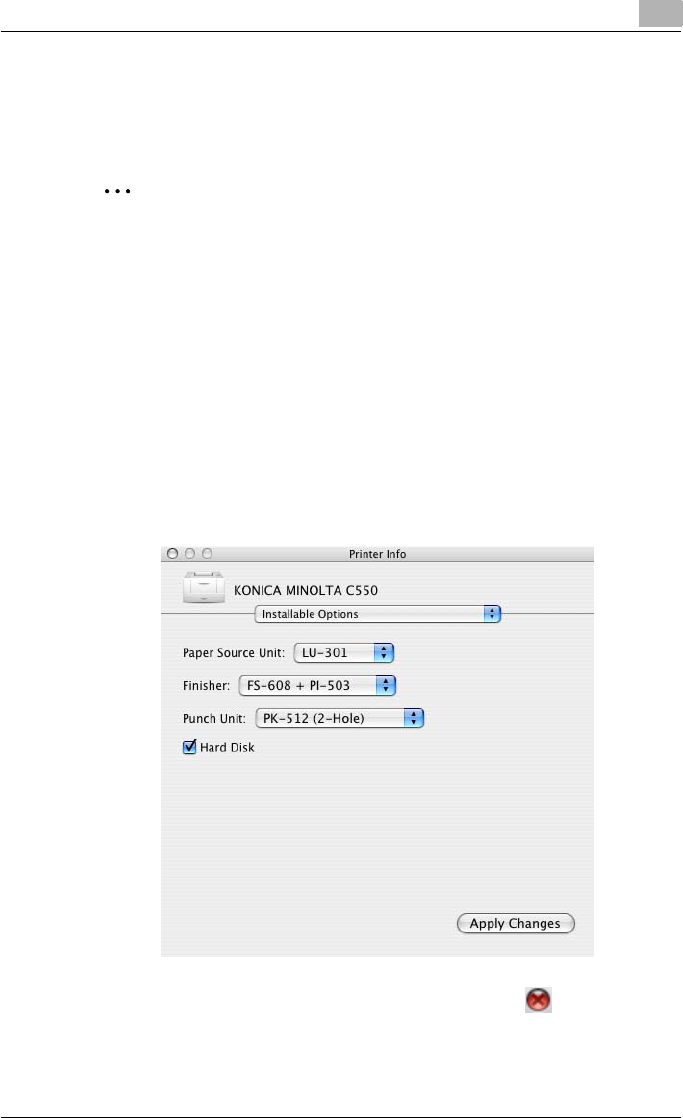
Setting up the PPD driver (Mac OS X) 8
C550 8-41
8.11 Setting options
You can specify the options installed on this machine so that they can be
used from the printer driver.
2
Reminder
If the installed options on this machine are not set from “Installable Op-
tions”, the option function cannot be used with the printer driver.
When installing options, be sure to make the proper settings.
1Open Printer Setup Utility or Print Center, located in “Applications” –
“Utilities” of “Hard Disk” and select this machine.
2From the [Printer] menu, select “Show Info”.
The Printer Info dialog box appears.
3Select “Installable Options”.
4Select the options that are installed on this machine.
5Click the [Apply Changes] button, and then click [ ] to close the
Printer Info dialog box.
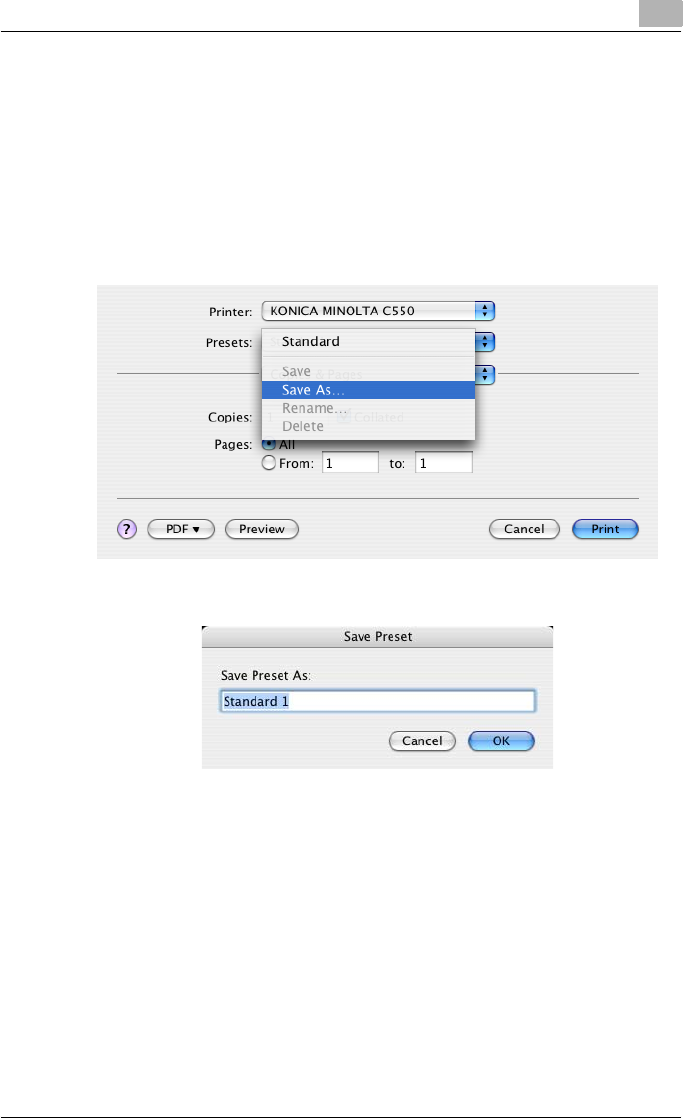
Setting up the PPD driver (Mac OS X) 8
C550 8-42
8.12 Saving the driver settings
For Mac OS X drivers, you can save the setting values of the changed driver
and recall them as necessary.
Saving the driver settings
1Change the driver settings in “Copies & Pages” and “Layout”.
2From “Presets”, click “Save as”.
3Enter the preset name in the “Save Preset As” text box.
4Click the [OK] button. The settings are added to the preset settings.
Recalling the settings
Select “Presets” from the Print dialog box to recall the settings.
The setting values are recalled, and the settings for the printer driver are
changed.

Setting up the PPD driver (Mac OS X) 8
C550 8-43
Changing the settings
1Select “Presets” from the Print dialog box to change the settings.
2Change the driver settings in “Copies & Pages” and “Layout”.
3From “Presets”, click “Save”.
To delete, click “Delete”. To change the name, click “Rename”.
The preset settings are changed.

Setting up the PPD driver (Mac OS X) 8
C550 8-44
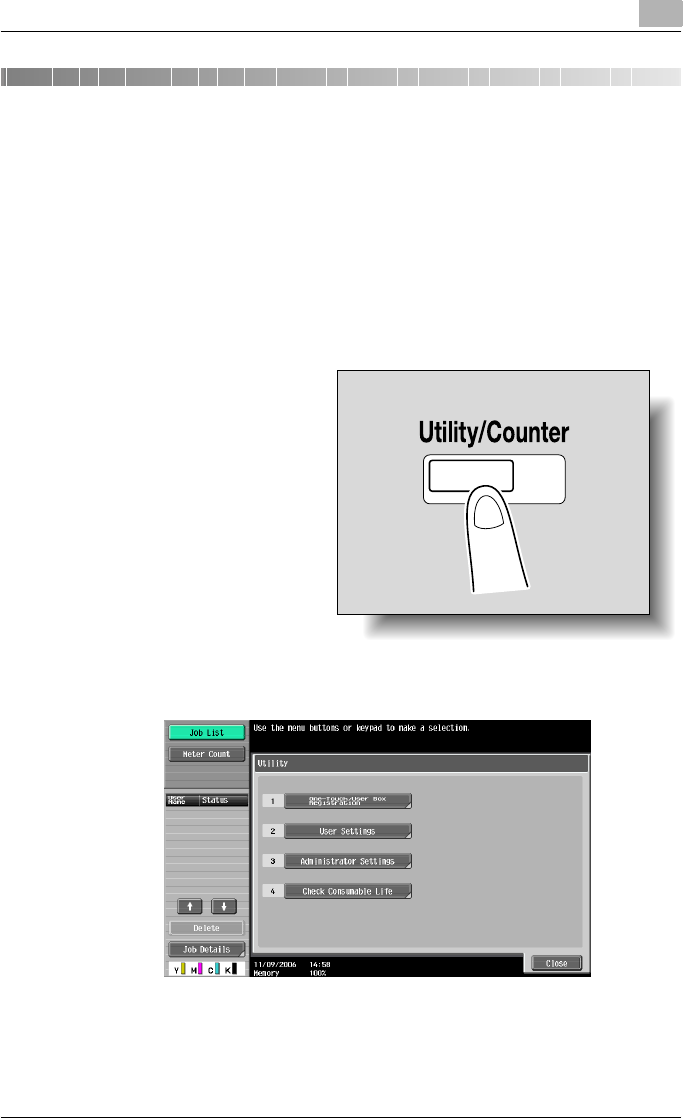
Various settings 9
C550 9-1
9 Various settings
9.1 Print settings in Utility mode
You can change the settings of the printer functions in this machine’s control
panel.
Default settings
To display the User Settings screen
1Press the [Utility/Coun-
ter] key.
2Touch [2 User Settings].

Various settings 9
C550 9-2
The User Settings screen appears.
2
Note
An item can also be selected by pressing the key in the keypad for the
number beside the desired button.
For [2 User Settings], press the [2] key in the keypad.
To quit specifying the Utility mode settings, press the [Utility/Counter]
key. Otherwise, cancel the Utility mode by touching [Close] in each
screen until the screen for the Copy, Fax/Scan, or Box mode appears.
To return to the Utility screen, touch [Close] until the desired screen ap-
pears. You can also touch the menus in the left panel to return to the Util-
ity screen.
PDL Setting
You can specify the PDL (Page Description Language) setting. (Default set-
ting: Auto)
Auto: Automatically switches between PCL and PS.
PCL: Only uses PCL.
PS: Only uses PS.
!
Detail
For details on displaying the User Settings screen, refer to “To display the
User Settings screen” on page 9-1.
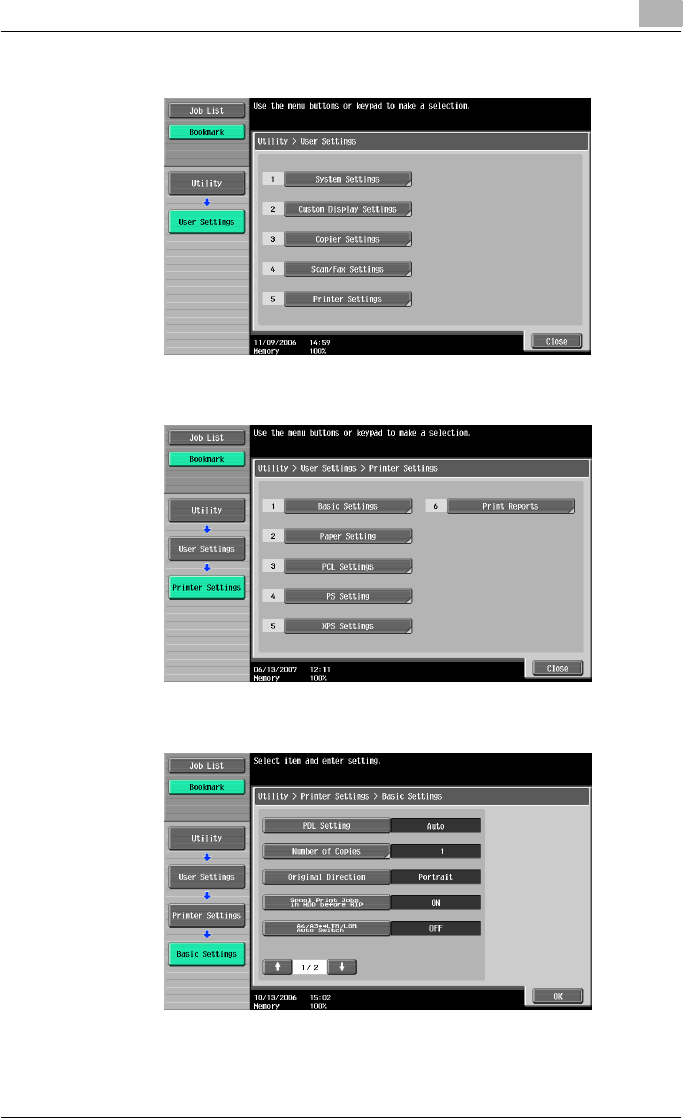
Various settings 9
C550 9-3
1In the User Settings screen, touch [5 Printer Settings].
2Touch [1 Basic Settings].
3Touch [PDL Setting].
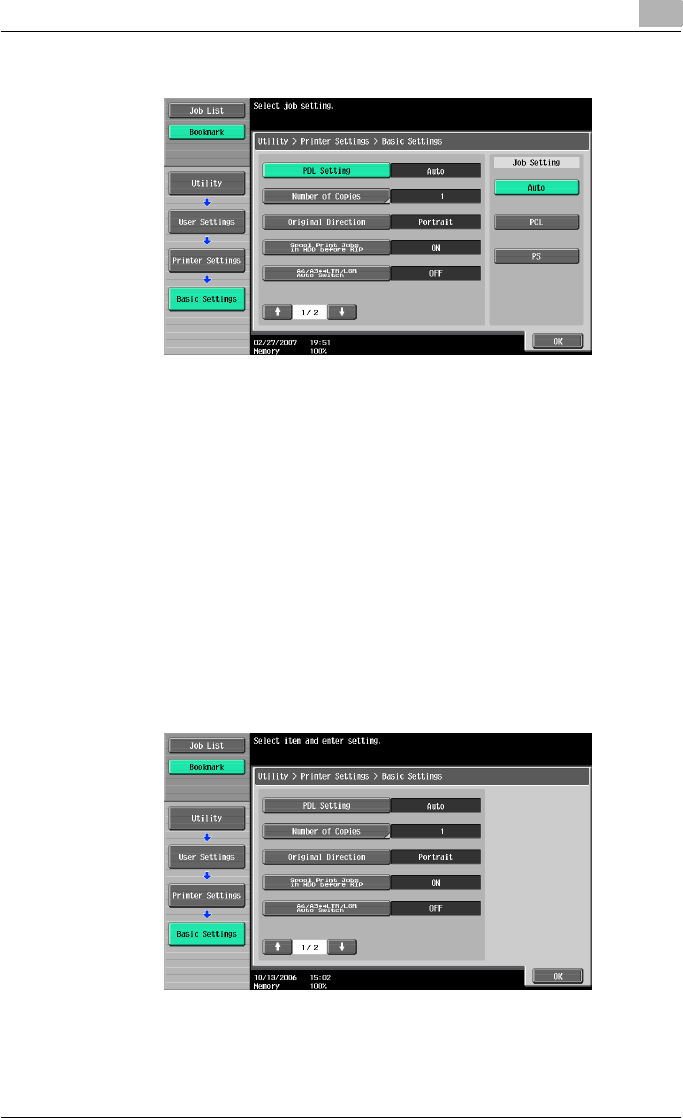
Various settings 9
C550 9-4
4Touch the button for the desired setting.
Number of Copies
You can specify the default number of copies when no setting has been
specified from the printer driver. (Default setting: 1)
!
Detail
For details on displaying the User Settings screen, refer to “To display the
User Settings screen” on page 9-1.
1In the User Settings screen, touch [5 Printer Settings].
2Touch [1 Basic Setting].
3Touch [Number of Copies].

Various settings 9
C550 9-5
4Press the [C] (clear) key to erase the value, and then use the keypad to
type in the default number of copies (between 1 and 9999 sets).
– If a value outside of the allowable range is specified, the message
“Input Error” appears. Type in a value within the allowable range.
5Touch [OK].
The default number of copies is set.
Original Direction
You can specify the default image orientation. (Default setting: Portrait)
Portrait: Prints the image vertically on the page.
Landscape: Prints the image horizontally on the page.
!
Detail
For details on displaying the User Settings screen, refer to “To display the
User Settings screen” on page 9-1.
1In the User Settings screen, touch [5 Printer Settings].
2Touch [1 Basic Setting].
Various settings 9
C550 9-6
3Touch [Original Direction].
4Touch the button for the desired setting.
Spool setting
You can specify whether or not a spool is used. (Default setting: ON)
ON: When the next job is received while processing a job, the print data is
stored in the HDD.
OFF: The print data is not stored in the HDD.
2
Reminder
Be sure not to change the setting to “OFF”. Printing may not be possible.
!
Detail
For details on displaying the User Settings screen, refer to “To display the
User Settings screen” on page 9-1.

Various settings 9
C550 9-7
1In the User Settings screen, touch [5 Printer Settings].
2Touch [1 Basic Setting].
3Touch [Spool Print Jobs in HDD before RIP].
4Touch the button for the desired setting.
Paper size change
You can specify whether similar paper sizes 8-1/2 × 11 and A4, and 11 × 17
and A3 are substituted for each other when there is no paper of the size
specified with the printer driver. (Default setting: OFF)
2
Reminder
The image may be defected since printing is forced.
Various settings 9
C550 9-8
!
Detail
For details on displaying the User Settings screen, refer to “To display the
User Settings screen” on page 9-1.
1In the User Settings screen, touch [5 Printer Settings].
2Touch [1 Basic Setting].
3Touch [A4/A3⇔LTR/LGR Auto Switch].
4Touch the button for the desired setting.
Banner Sheet Setting
You can specify whether to print banner pages (cover pages) with the sender
of the print job and title. (Default setting: OFF)
ON: Prints banner pages.
OFF: Does not print banner pages.
Various settings 9
C550 9-9
!
Detail
For details on displaying the User Settings screen, refer to “To display the
User Settings screen” on page 9-1.
1In the User Settings screen, touch [5 Printer Settings].
2Touch [1 Basic Setting].
3Touch [↑] or [↓], and then touch [Banner Sheet Setting].
4Touch the button for the desired setting.
Various settings 9
C550 9-10
Binding Direction Adjustment
You can specify whether to adjust the binding position for duplex printing.
(Default setting: Finishing Priority)
If you want to increase the print efficiency, select “Productivity Priority”. If the
desired binding position and width cannot be achieved, select “Finishing Pri-
ority”.
Finishing Priority: Adjusts the binding position to the most suitable position
after all of the print data is received by this machine.
Productivity Priority: Printing is performed efficiently because the data is
printed simultaneously as it is being received.
Control Adjustment: Follows the settings specified in the printer driver with-
out adjusting the binding position.
!
Detail
For details on displaying the User Settings screen, refer to “To display the
User Settings screen” on page 9-1.
1In the User Settings screen, touch [5 Printer Settings].
2Touch [1 Basic Setting].
3Touch [↑] or [↓], and then touch [Binding Direction Adjustment].

Various settings 9
C550 9-11
4Touch the button for the desired setting.
Line Width Adjustment
You can adjust the line width to make fine lines and small characters easy to
see. (Default setting: Thin)
-Thin: Prints sharp characters and lines. Elaborately reproduces the de-
tails of the characters and graphics.
-Normal: Prints the characters and lines at an intermediate thickness.
-Thick: Prints thick characters and lines. Clearly reproduces the charac-
ters and graphics.
!
Detail
For details on displaying the User Settings screen, refer to “To display the
User Settings screen” on page 9-1.
1In the User Settings screen, touch [5 Printer Settings].
2Touch [1 Basic Settings].
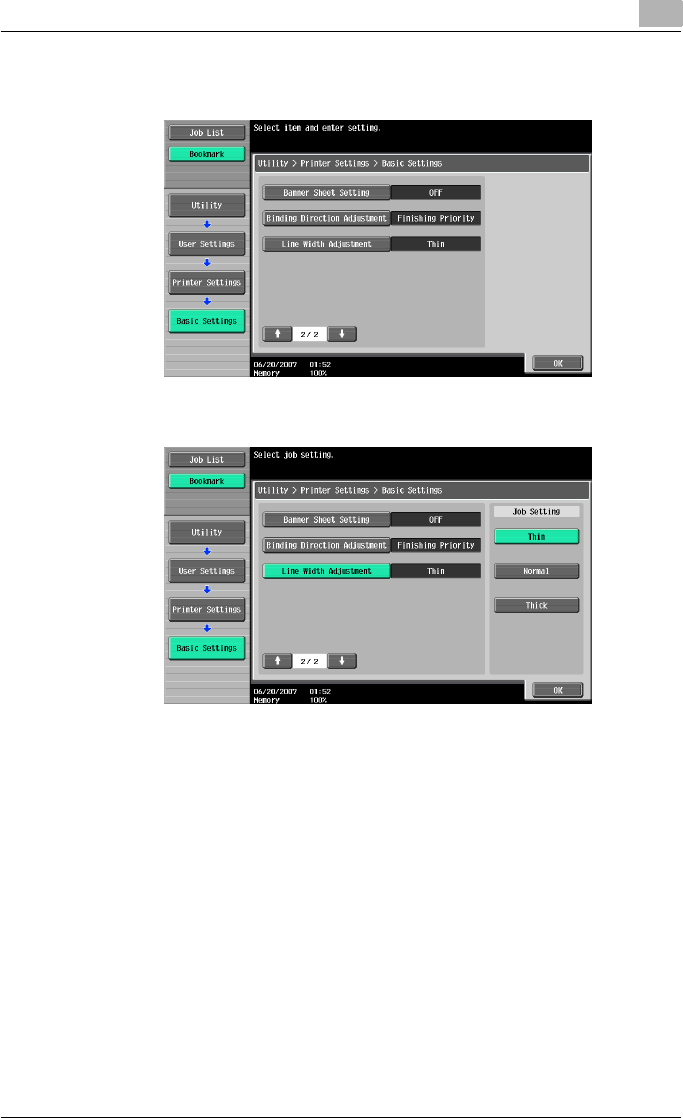
Various settings 9
C550 9-12
3Touch [↑] or [↓] to switch the page, and then touch [Line Width Adjust-
ment].
4Touch the button for the desired setting.
Paper Tray
You can specify the input tray to use when none has been specified from the
printer driver. (Default setting: Auto)
!
Detail
For details on displaying the User Settings screen, refer to “To display the
User Settings screen” on page 9-1.
1In the User Settings screen, touch [5 Printer Settings].
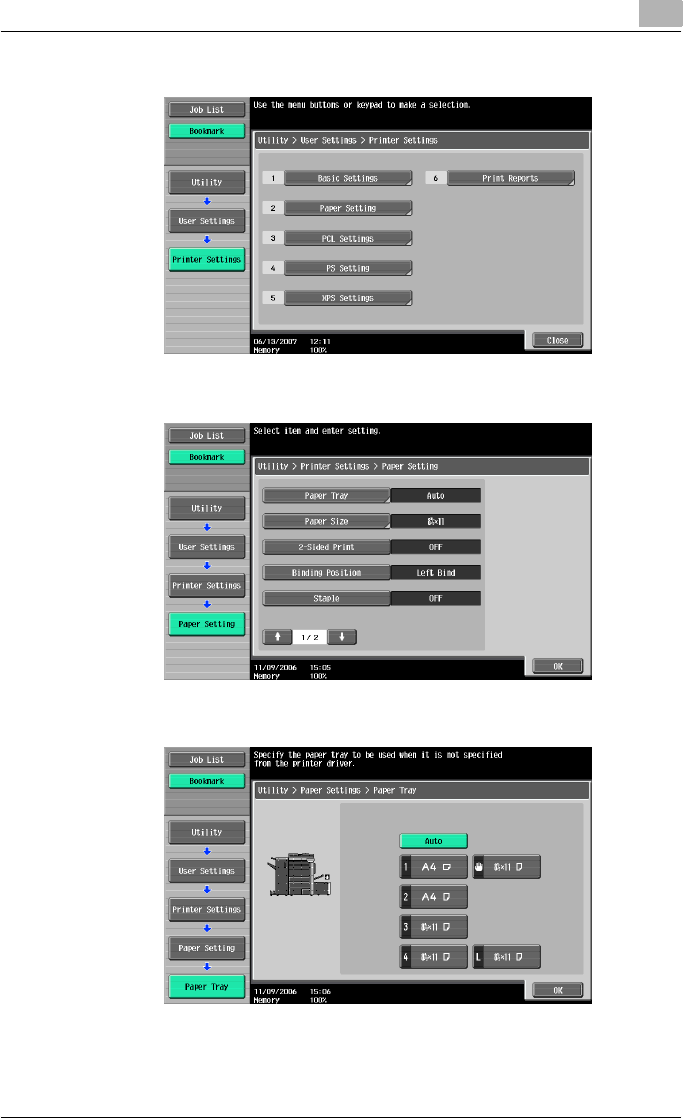
Various settings 9
C550 9-13
2Touch [2 Paper Setting].
3Touch [Paper Tray].
4Touch the button of the desired paper tray.
– To select the paper tray automatically, touch [Auto].
5Touch [OK].
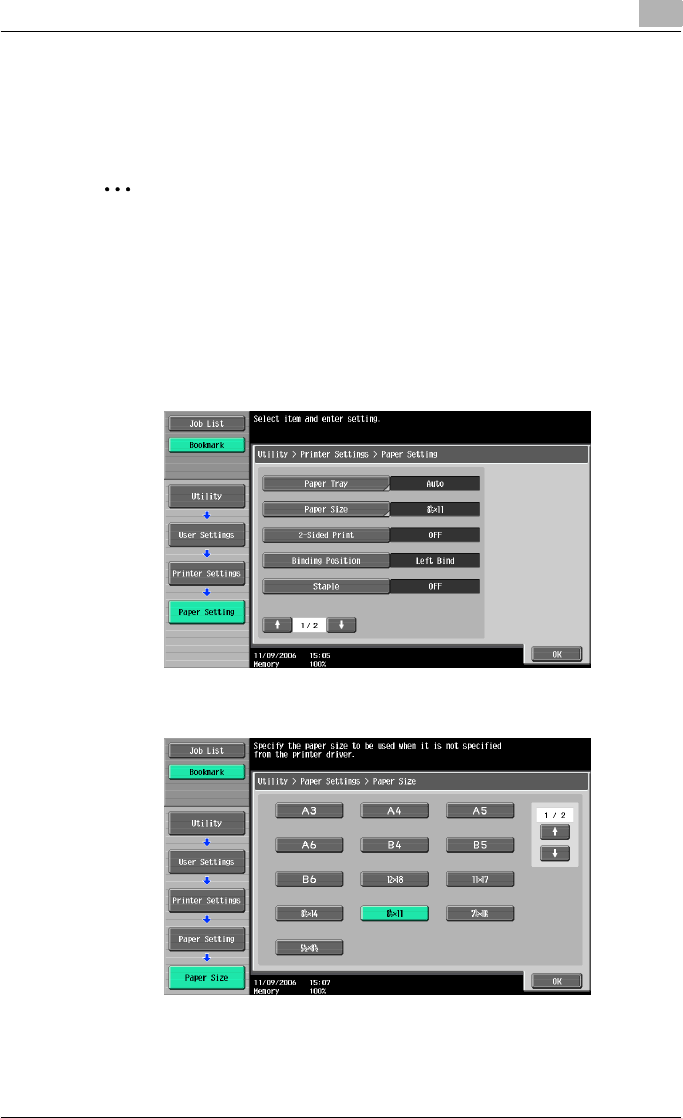
Various settings 9
C550 9-14
Paper Size
You can specify the paper size to use when no setting has been specified
from the printer driver. (Default setting: 8-1/2 × 11)
2
Note
For details on displaying the User Settings screen, refer to “To display the
User Settings screen” on page 9-1.
1In the User Settings screen, touch [5 Printer Settings].
2Touch [2 Paper Setting].
3Touch [Paper Size].
4Touch the button for the desired setting.
– To select other paper sizes, touch [↑] or [↓] to switch the pages.
5Touch [OK].
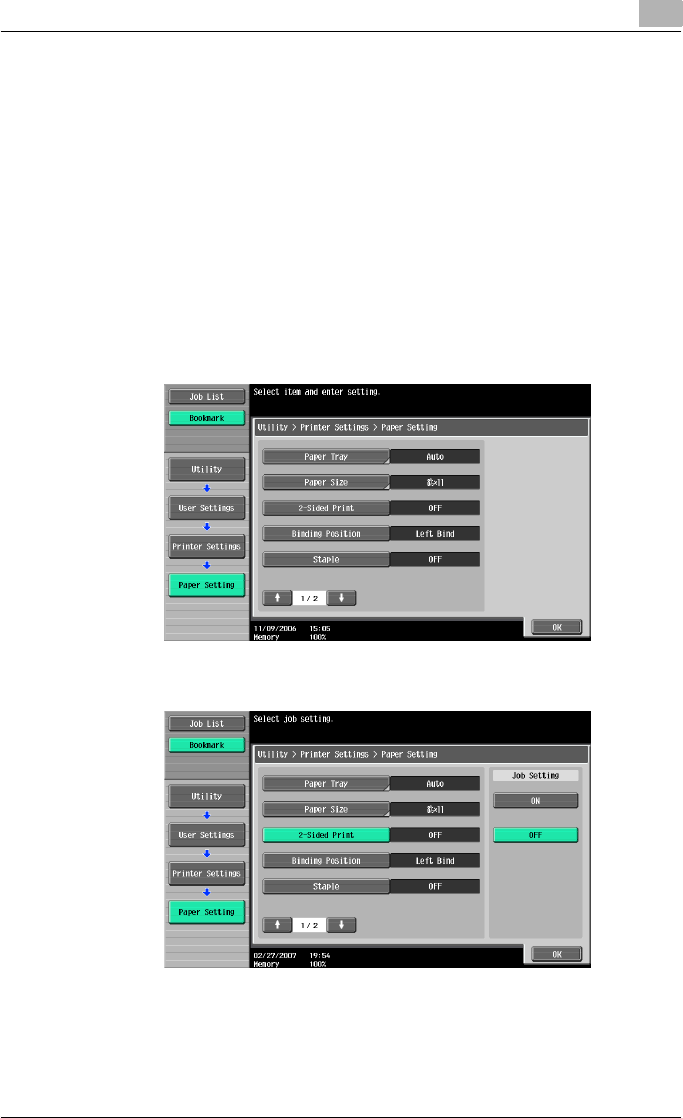
Various settings 9
C550 9-15
2-Sided Print
You can specify the default duplex printing setting. (Default setting: OFF)
!
Detail
For details on displaying the User Settings screen, refer to “To display the
User Settings screen” on page 9-1.
1In the User Settings screen, touch [5 Printer Settings].
2Touch [2 Paper Setting].
3Touch [2-Sided Print].
4Touch the button for the desired setting.
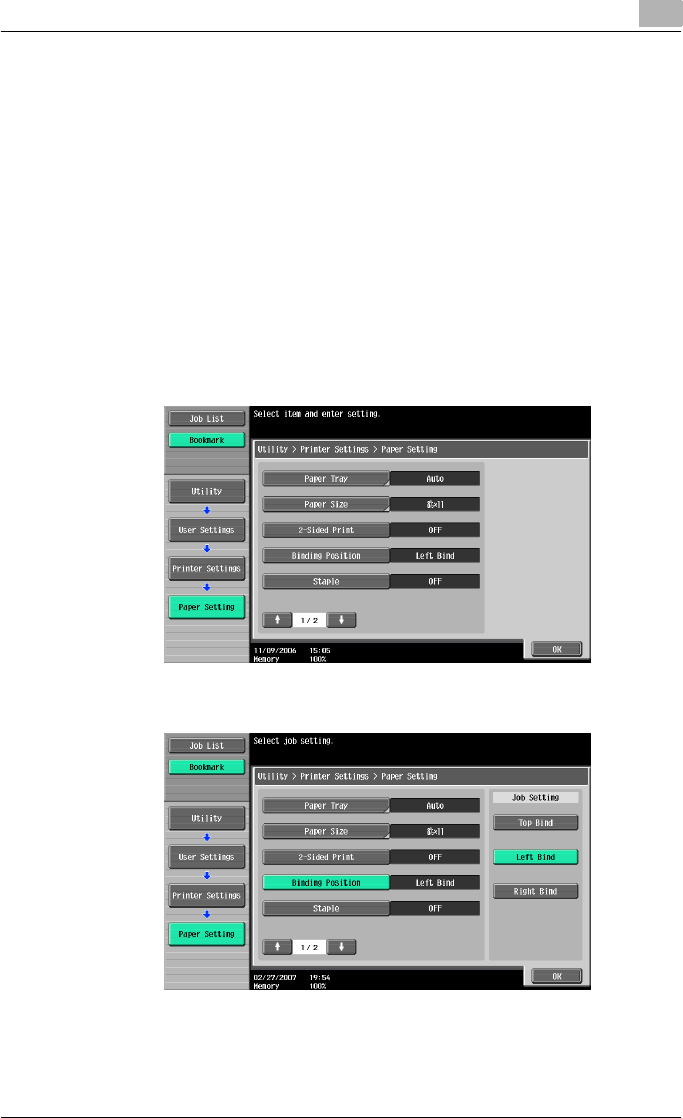
Various settings 9
C550 9-16
Binding Position
You can specify the default binding position for duplex printing. (Default set-
ting: Left Bind)
!
Detail
For details on displaying the User Settings screen, refer to “To display the
User Settings screen” on page 9-1.
1In the User Settings screen, touch [5 Printer Settings].
2Touch [2 Paper Setting].
3Touch [Binding Position].
4Touch the button for the desired setting.

Various settings 9
C550 9-17
Staple
You can specify the staple settings. (Default setting: OFF)
!
Detail
For details on displaying the User Settings screen, refer to “To display the
User Settings screen” on page 9-1.
1In the User Settings screen, touch [5 Printer Settings].
2Touch [2 Paper Setting].
3Touch [Staple].
4Touch the button for the desired setting.
2
Reminder
The staple function is available only when the optional finisher is installed.
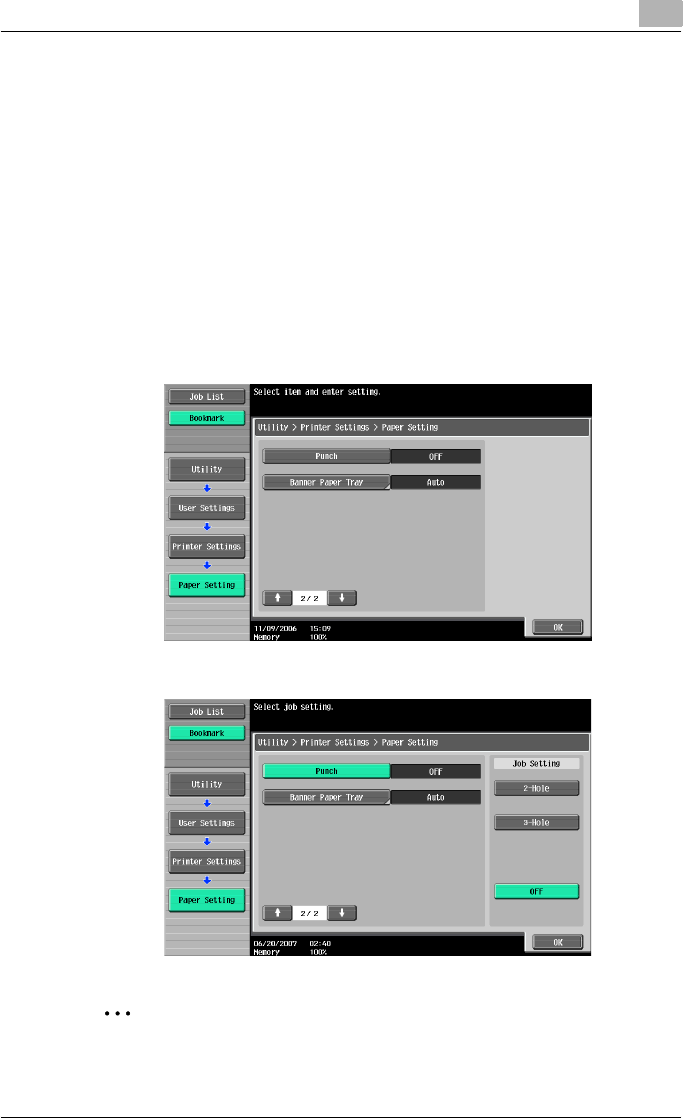
Various settings 9
C550 9-18
Punch
You can specify the hole punching settings. (Default setting: OFF)
!
Detail
For details on displaying the User Settings screen, refer to “To display the
User Settings screen” on page 9-1.
1In the User Settings screen, touch [5 Printer Settings].
2Touch [2 Paper Setting].
3Touch [↑] or [↓], and then touch [Punch].
4Touch the button for the desired setting.
2
Reminder
The hole punch function is available only when the punch kit is installed
on the optional finisher.
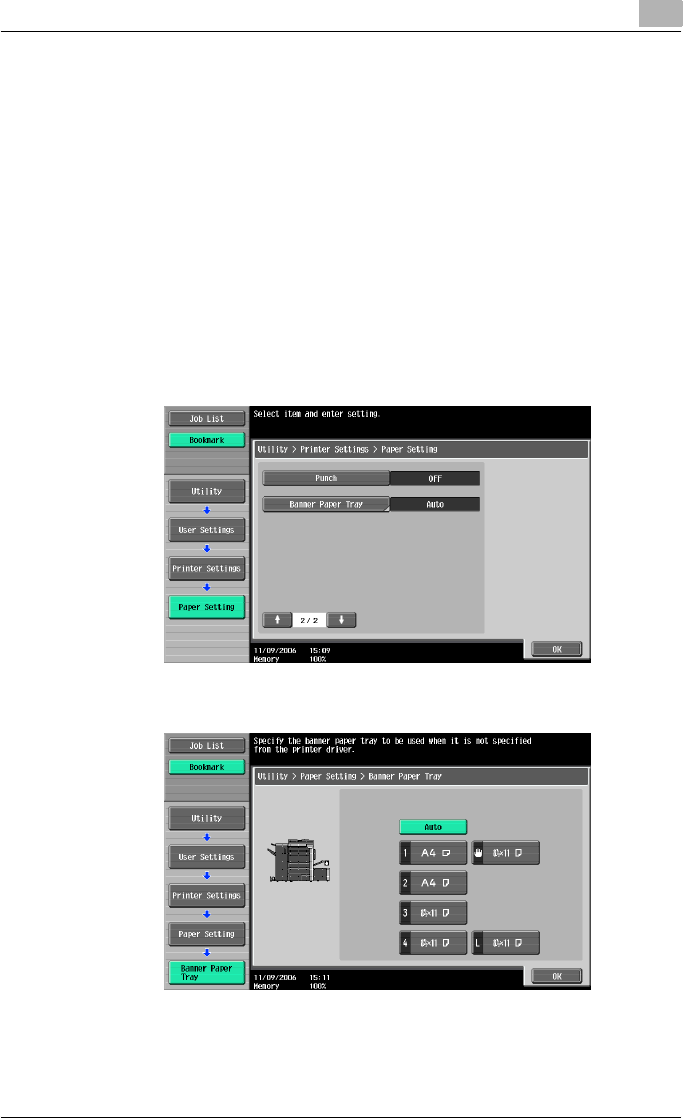
Various settings 9
C550 9-19
Banner Paper Tray
You can specify the paper tray to be used for banner page printing. (Default
setting: Auto)
!
Detail
For details on displaying the User Settings screen, refer to “To display the
User Settings screen” on page 9-1.
1In the User Settings screen, touch [5 Printer Settings].
2Touch [2 Paper Setting].
3Touch [↑] or [↓], and then touch [Banner Paper Tray].
4Touch the button for the desired setting.
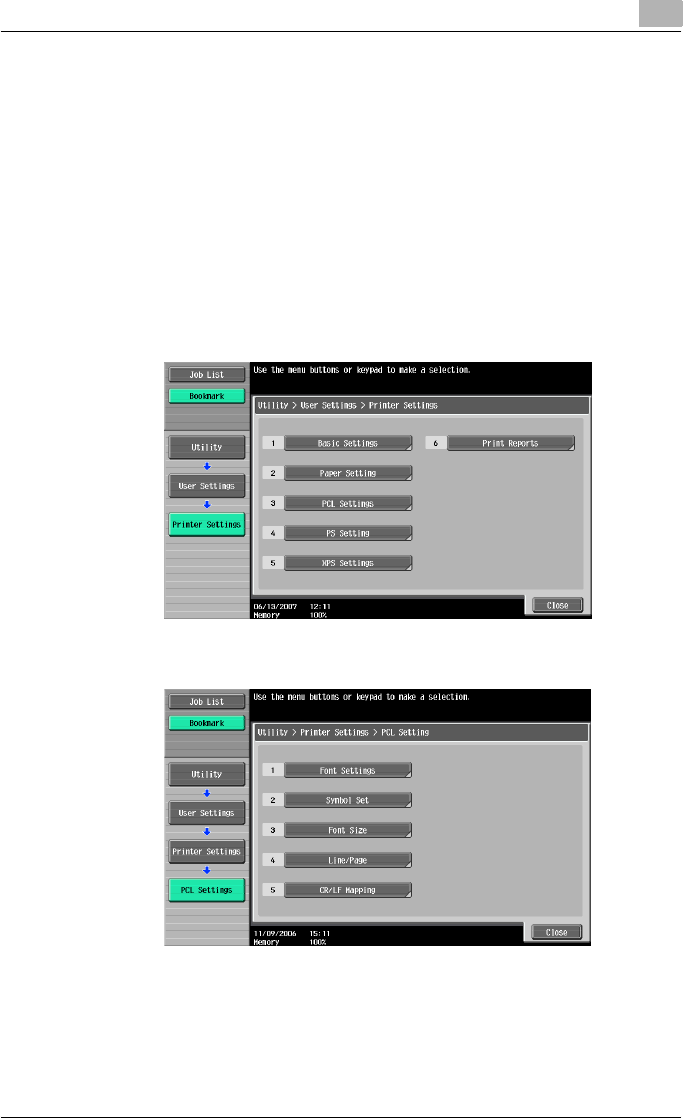
Various settings 9
C550 9-20
Font Settings
You can specify the font to use when no setting has been specified from the
printer driver. (Default setting: Courier)
!
Detail
For details on displaying the User Settings screen, refer to “To display the
User Settings screen” on page 9-1.
1In the User Settings screen, touch [5 Printer Settings].
2Touch [3 PCL Settings].
3Touch [1 Font Settings].
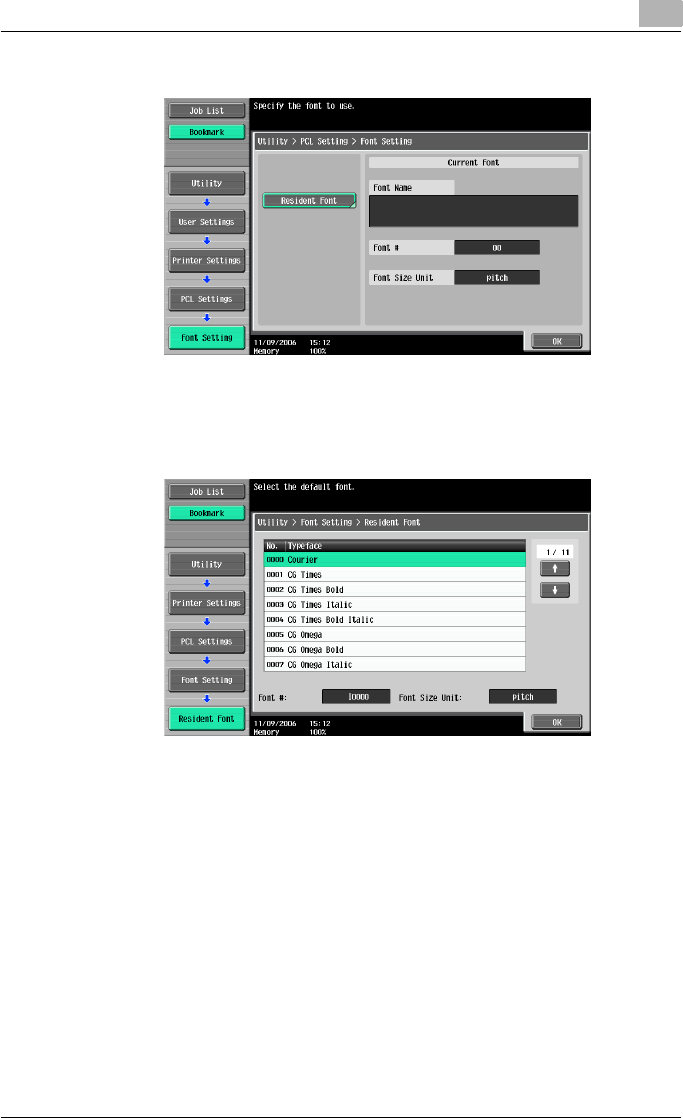
Various settings 9
C550 9-21
4Touch [Resident Font].
– If downloaded fonts are available, [Download Font] can also be se-
lected.
5Touch the button for the desired setting.
– Touch [↑] or [↓] to switch the pages, and then touch the button for
the desired setting.
– You can check the selected font number and font size units.
6Touch [OK].
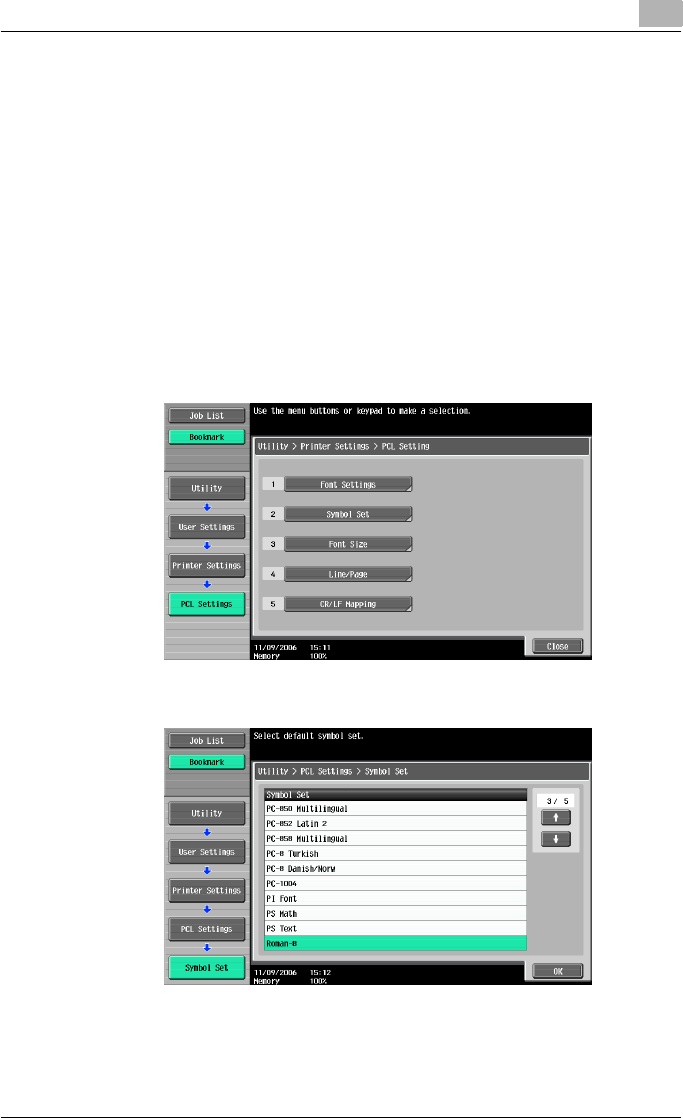
Various settings 9
C550 9-22
Symbol Set
You can specify the font symbol set to use when no setting has been spec-
ified from the printer driver. (Default setting: Depends on the location.)
!
Detail
For details on displaying the User Settings screen, refer to “To display the
User Settings screen” on page 9-1.
1In the User Settings screen, touch [5 Printer Settings].
2Touch [3 PCL Settings].
3Touch [2 Symbol Set].
4Touch the button for the desired setting.
– Touch [↑] or [↓] to switch the pages, and then touch the button for
the desired setting.
5Touch [OK].
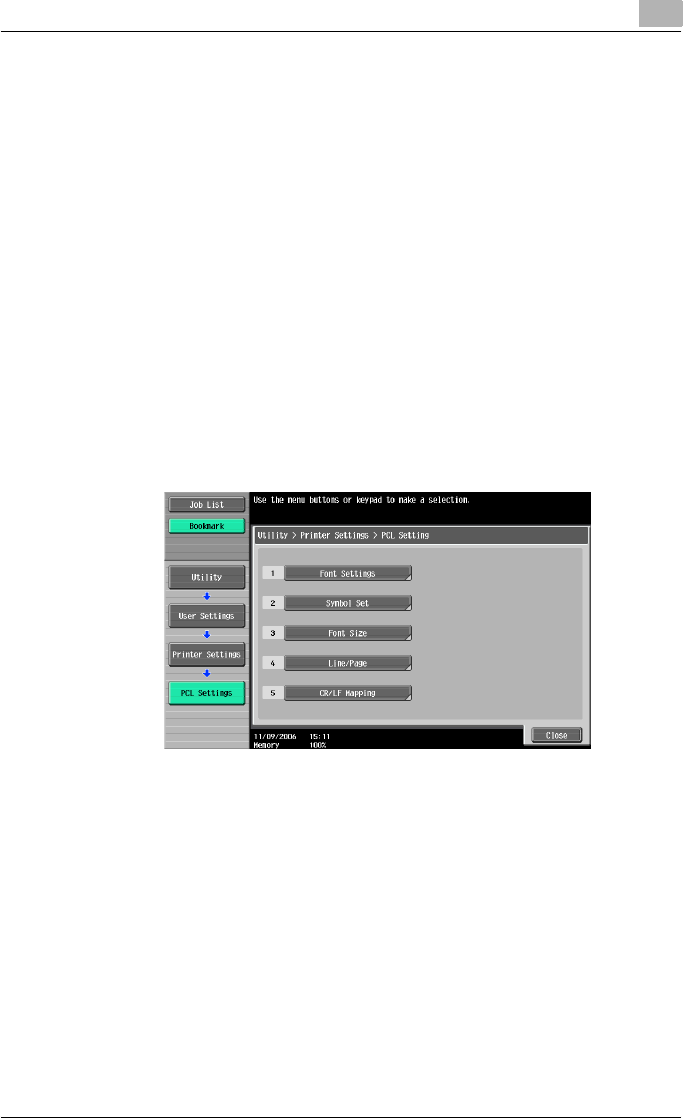
Various settings 9
C550 9-23
Font Size
You can specify the font size to use when no setting has been specified from
the printer driver. (Default settings: Scalable Font - 12.00 point; Bitmap Font
- 10.00 pitch)
Scalable Font: Specifies the font size in points.
Bitmap Font: Specifies the width of the fixed-width font in pitches.
!
Detail
For details on displaying the User Settings screen, refer to “To display the
User Settings screen” on page 9-1.
1In the User Settings screen, touch [5 Printer Settings].
2Touch [3 PCL Settings].
3Touch [3 Font Size].
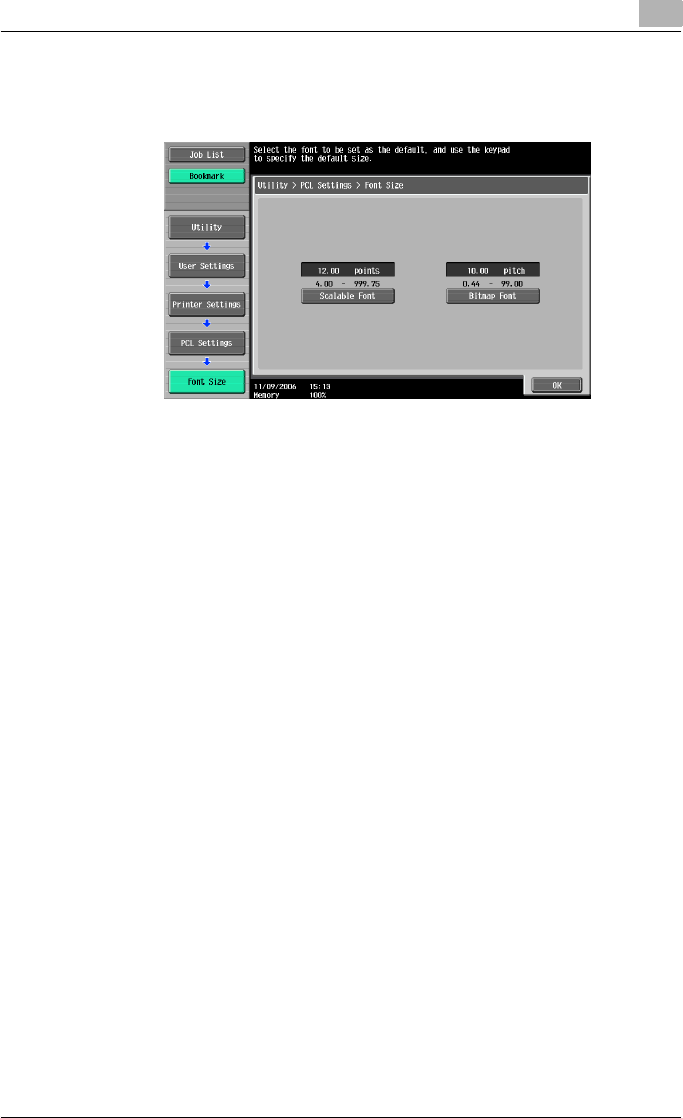
Various settings 9
C550 9-24
4Press the [C] (clear) key to erase the value, and then use the keypad to
type in the default font size (Scalable Font: between 4.00 and 999.75
points; Bitmap Font: between 0.44 and 99.00 pitches).
– If a value outside of the allowable range is specified, the message
“Input Error” appears. Type in a value within the allowable range.
5Touch [OK].
The font size is set.
Line/Page
You can specify the number of lines per page when printing text. (Default set-
ting: Depends on the location.)
!
Detail
For details on displaying the User Settings screen, refer to “To display the
User Settings screen” on page 9-1.
1In the User Settings screen, touch [5 Printer Settings].
2Touch [3 PCL Settings].

Various settings 9
C550 9-25
3Touch [4 Line/Page].
4Press the [C] (clear) key to erase the value, and then use the keypad to
type in the default number of lines (between 5 and 128).
– If a value outside of the allowable range is specified, the message
“Input Error” appears. Type in a value within the allowable range.
5Touch [OK].
The number of lines per page is set.
CR/LF Mapping
You can specify the data substitution method when printing text data. (De-
fault setting: OFF)
[Mode 1]: Substitutes CR for CR-LF.
[Mode 2]: Substitutes LF for CR-LF.
[Mode 3]: Substitutes to CR-LF.
[OFF]: Does not perform substitution.
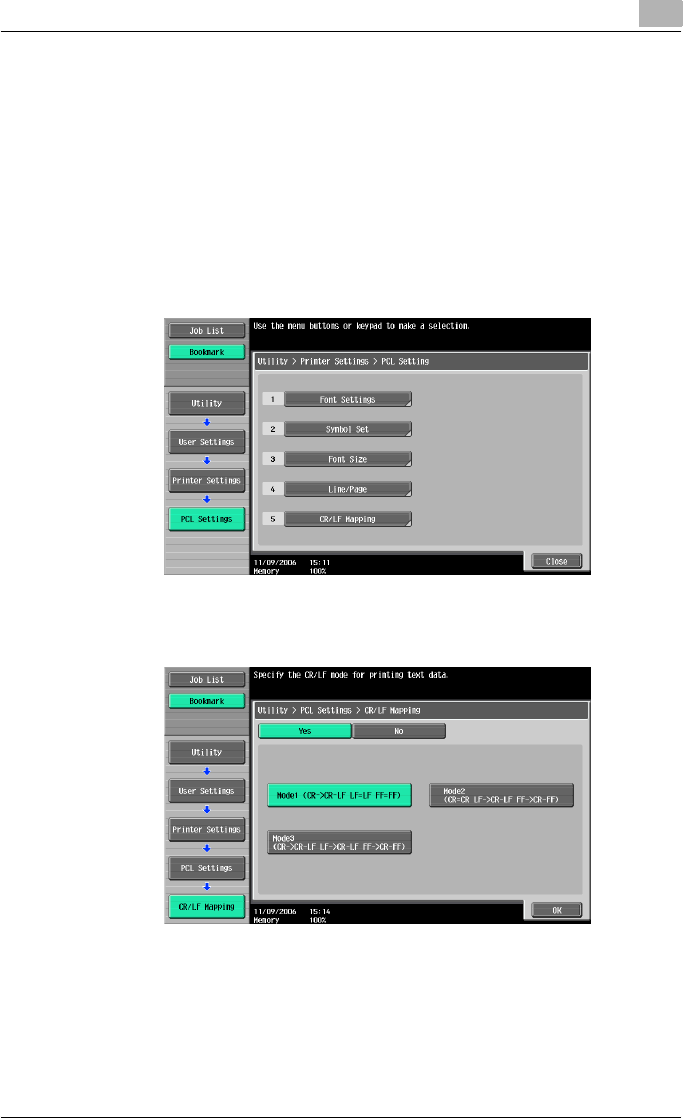
Various settings 9
C550 9-26
!
Detail
For details on displaying the User Settings screen, refer to “To display the
User Settings screen” on page 9-1.
1In the User Settings screen, touch [5 Printer Settings].
2Touch [3 PCL Settings].
3Touch [5 CR/LF Mapping].
4Select [Yes] or [No]. If [Yes] is selected, be sure to also touch the button
for the desired setting.
5Touch [OK].
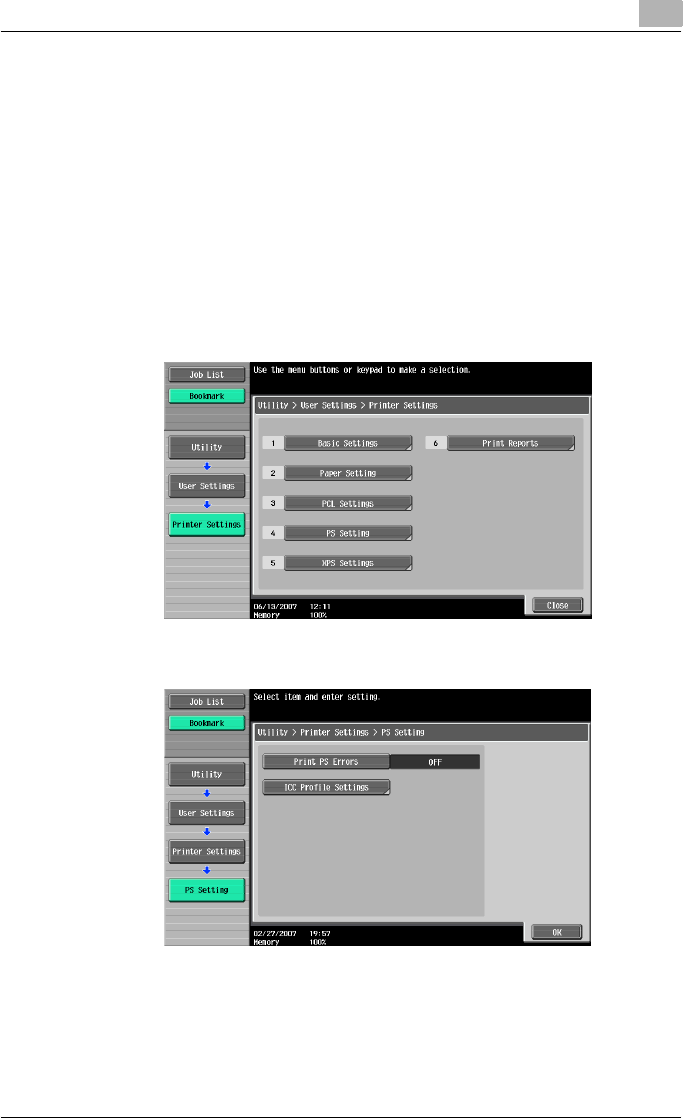
Various settings 9
C550 9-27
Print PS Errors
You can specify whether to print the error message when an error occurs
during PS rasterization. (Default setting: OFF)
!
Detail
For details on displaying the User Settings screen, refer to “To display the
User Settings screen” on page 9-1.
1In the User Settings screen, touch [5 Printer Settings].
2Touch [4 PS Setting].
3Touch [Print PS Errors].
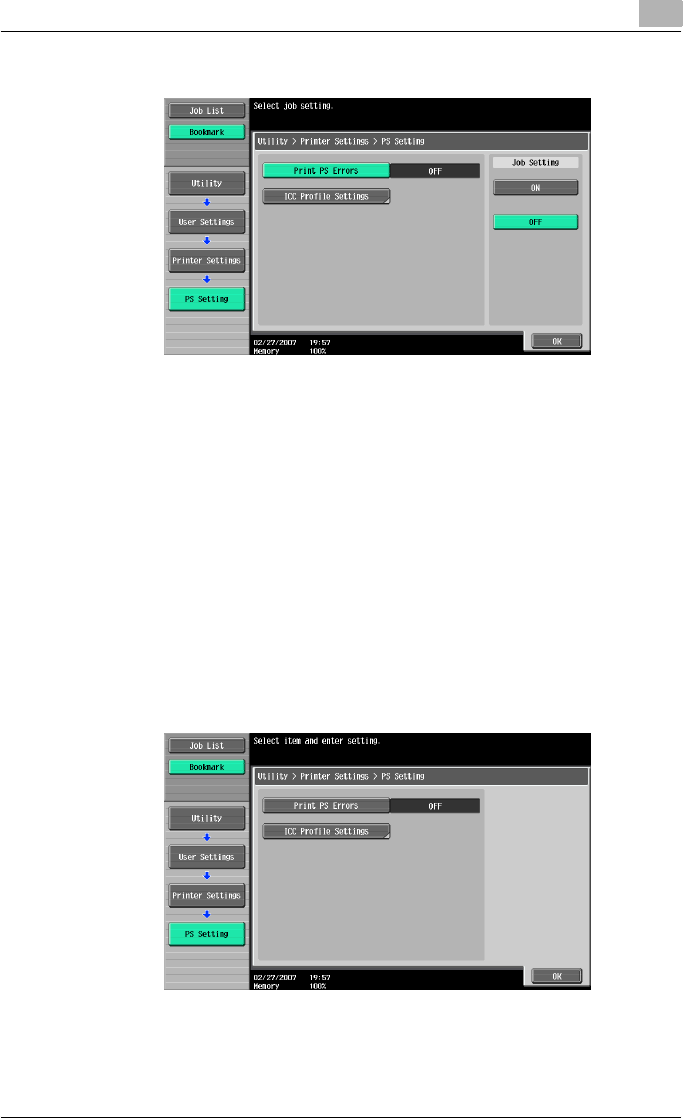
Various settings 9
C550 9-28
4Touch the button for the desired setting.
ICC Profile Settings
You can specify the profiles to use when no setting has been specified from
the printer driver.
!
Detail
For details on displaying the User Settings screen, refer to “To display the
User Settings screen” on page 9-1.
1In the User Setting screen, touch [5 Printer Settings].
2Touch [4 PS Setting].
3Touch [ICC Profile Settings].
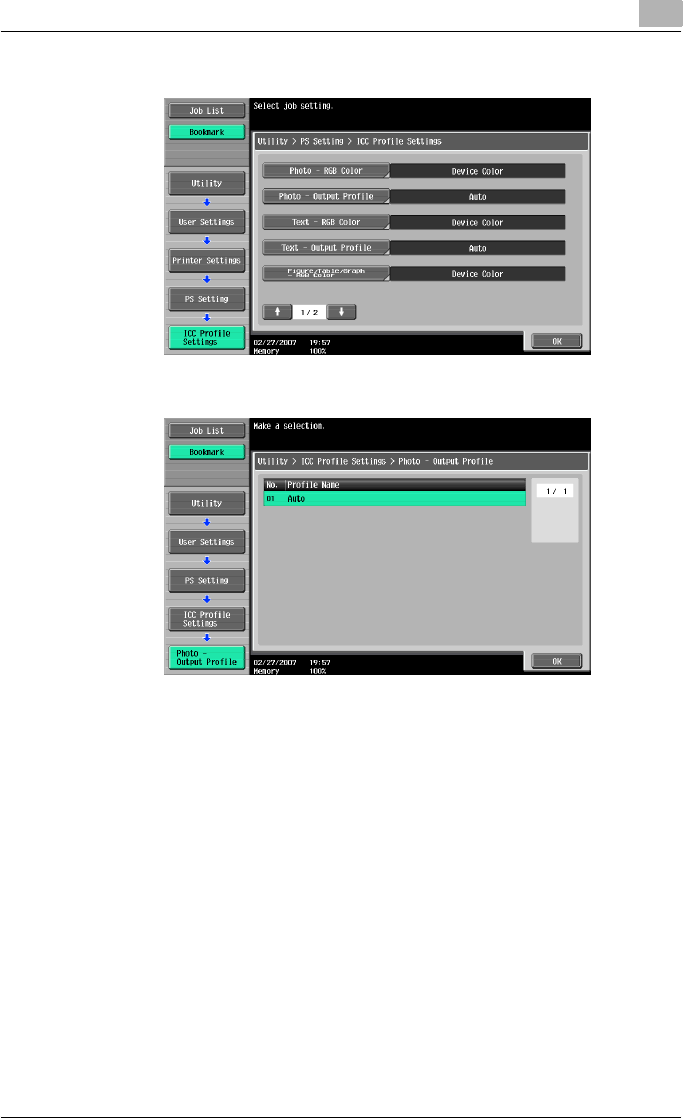
Various settings 9
C550 9-29
4Touch the desired setting.
5Touch the profile name for the desired setting.
Verify XPS Digital Signature
You can specify whether to verify a digital signature when XPS printing. If
verification is specified as “ON”, printing cannot be performed if the name is
invalid. (Default setting: OFF)
!
Detail
For details on displaying the User Settings screen, refer to “To display the
User Settings screen” on page 9-1.
1In the User Settings screen, touch [5 Printer Settings].

Various settings 9
C550 9-30
2Touch [5 XPS Settings].
3Touch [Verify XPS Digital Signature].
4Touch the button for the desired setting.
!
Detail
If an error in the verification of a signature occurs, and if the print infor-
mation setting is enabled under Print XPS Errors, the error information will
be printed. For details, refer to “Print XPS Errors” on page 9-41.
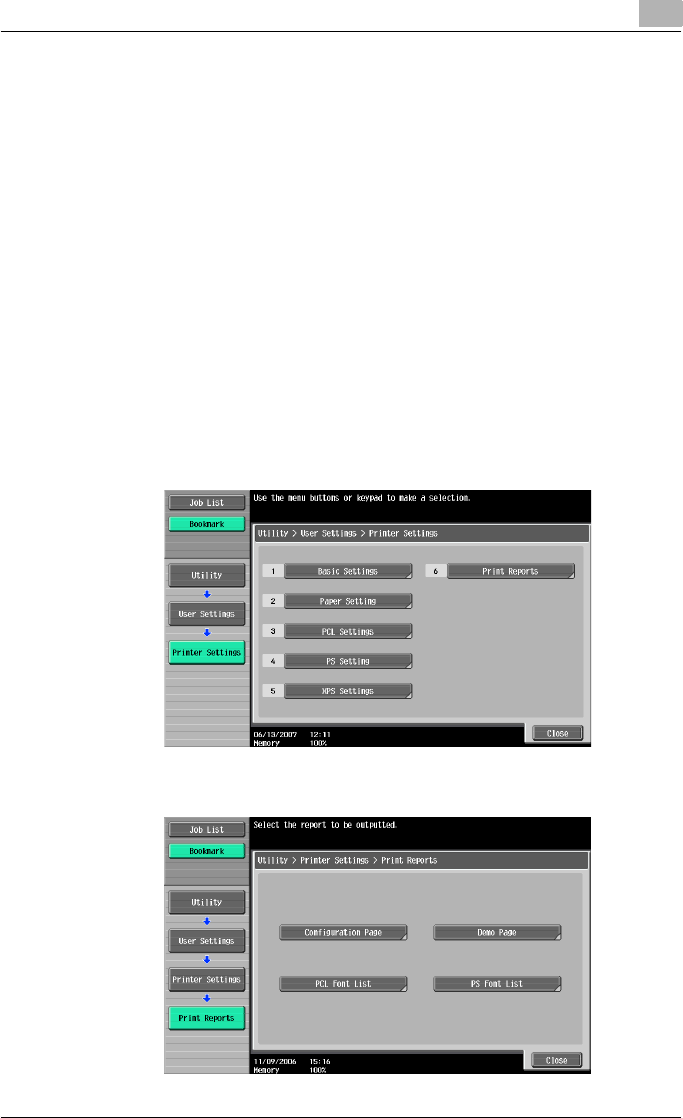
Various settings 9
C550 9-31
Print Reports
You can output the following four types of reports. The report output method
here is explained in the PCL font list.
Configuration Page: Outputs a list of this machine’s settings.
Demo Page: Outputs a test page.
PCL Font List: Outputs the PCL font list.
PS Font List: Outputs the PS font list.
!
Detail
For details on displaying the User Settings screen, refer to “To display the
User Settings screen” on page 9-1.
1In the User Settings screen, touch [5 Printer Settings].
2Touch [6 Print Reports].
3Touch the button for the desired setting.

Various settings 9
C550 9-32
4Touch the button for the desired paper tray and touch [1-Sided] or [2-
Sided].
5To print a report, touch [Start] or press the [Start] key.
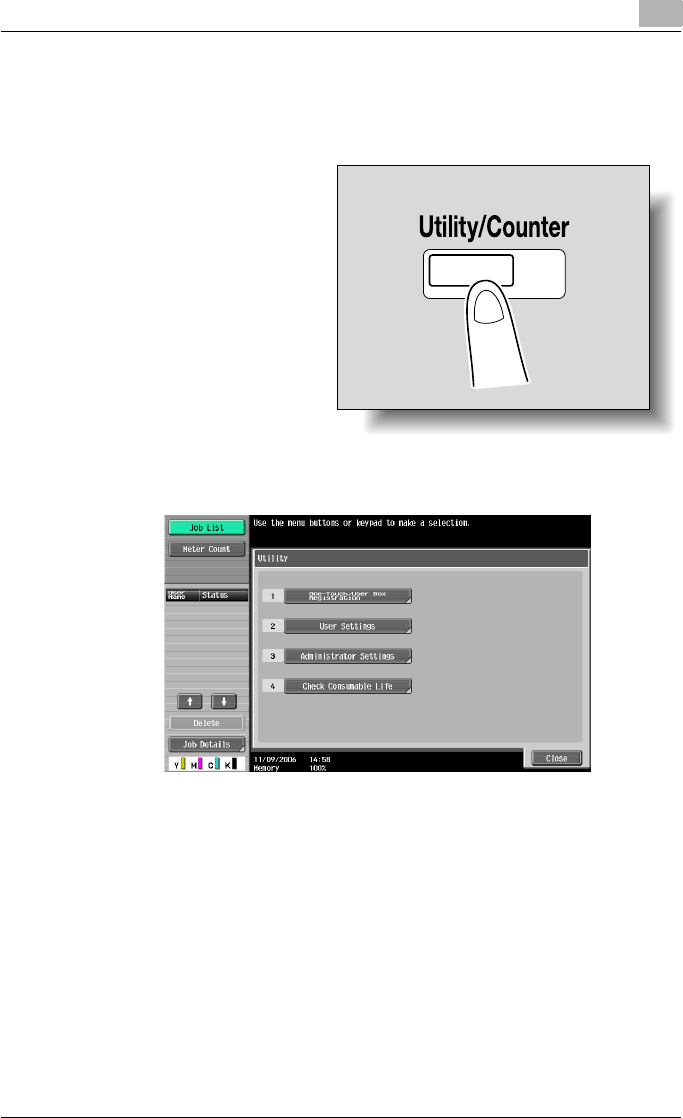
Various settings 9
C550 9-33
9.2 Print settings in Administrator mode
To display the Administrator Settings screen
1Press the [Utility/Coun-
ter] key.
2Touch [3 Administrator Settings].
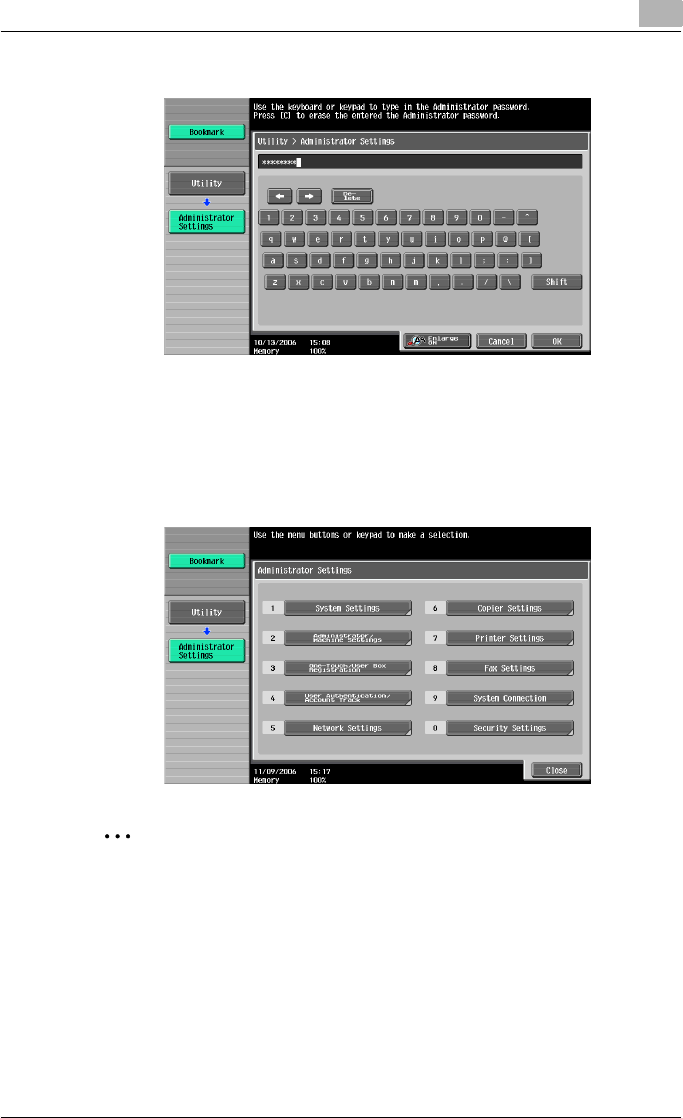
Various settings 9
C550 9-34
3Enter the password, and then touch [OK].
– In the Utility mode, an item can also be selected by pressing the key
in the keypad for the number beside the desired button. For [3 Ad-
ministrator Settings], press the [3] key in the keypad.
– For details on setting or changing the password, refer to the User’s
Guide [Copy Operations].
The Administrator Settings screen appears.
2
Note
To quit specifying the Utility mode settings, press the [Utility/Counter]
key. Otherwise, cancel the Utility mode by touching [Close] in each
screen until the screen for the Copy, Fax/Scan, or Box mode appears.
To return to the Utility screen, touch [Close] until the desired screen ap-
pears. You can also touch the menus in the left panel to return to the Util-
ity screen.
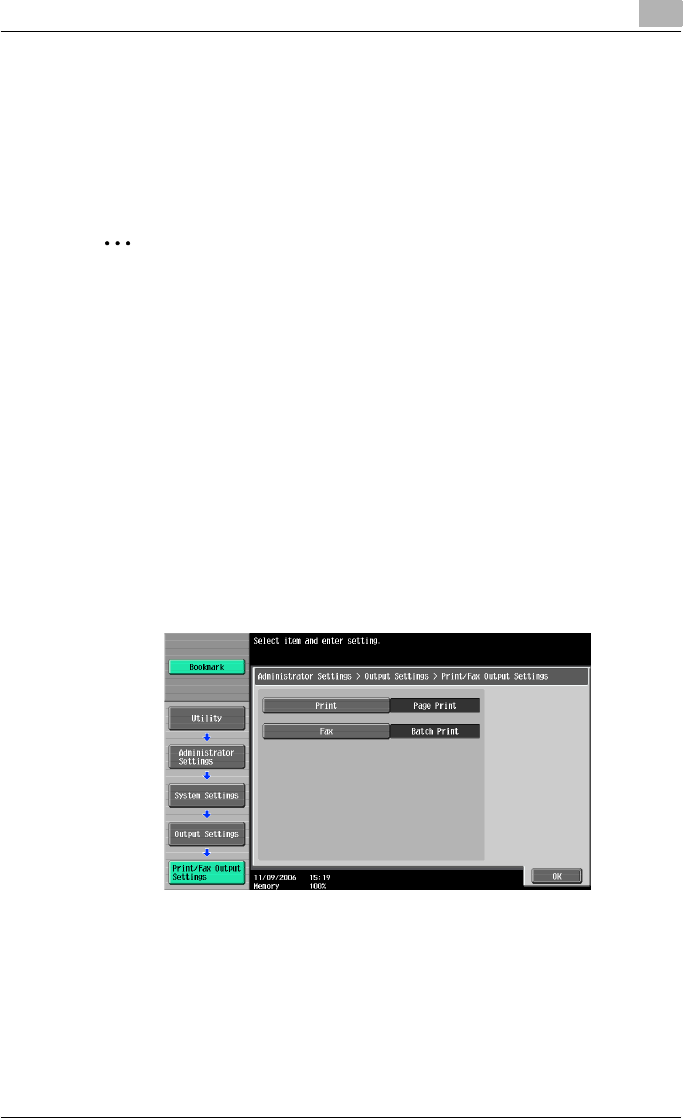
Various settings 9
C550 9-35
Print/Fax Output Setting
You can specify whether to print data after it is received or to print it simul-
taneously as it is being received.
You can specify this function for the printer and for faxing. (Default settings:
Printer - Page Print; Fax - Batch Print)
2
Reminder
To display the Administrator Settings screen, refer to “To display the Ad-
ministrator Settings screen” on page 9-33.
1In the Administrator Settings screen, touch [1 System Settings].
2In the Systems Settings screen, touch [2 Output Settings].
3In the Output Settings screen, touch [1 Print/Fax Output Settings].
– If the “Administrator Security Level” parameter is set to “Level 2”,
users can also specify this setting. Touch [User Settings], [System
Settings], [Output Settings], then [Print/Fax Output Settings] to dis-
play the Print/Fax Output Settings screen.
– For details on the user access levels, refer to the User’s Guide
[Copy Operations].
The Print/Fax Output Settings screen appears.
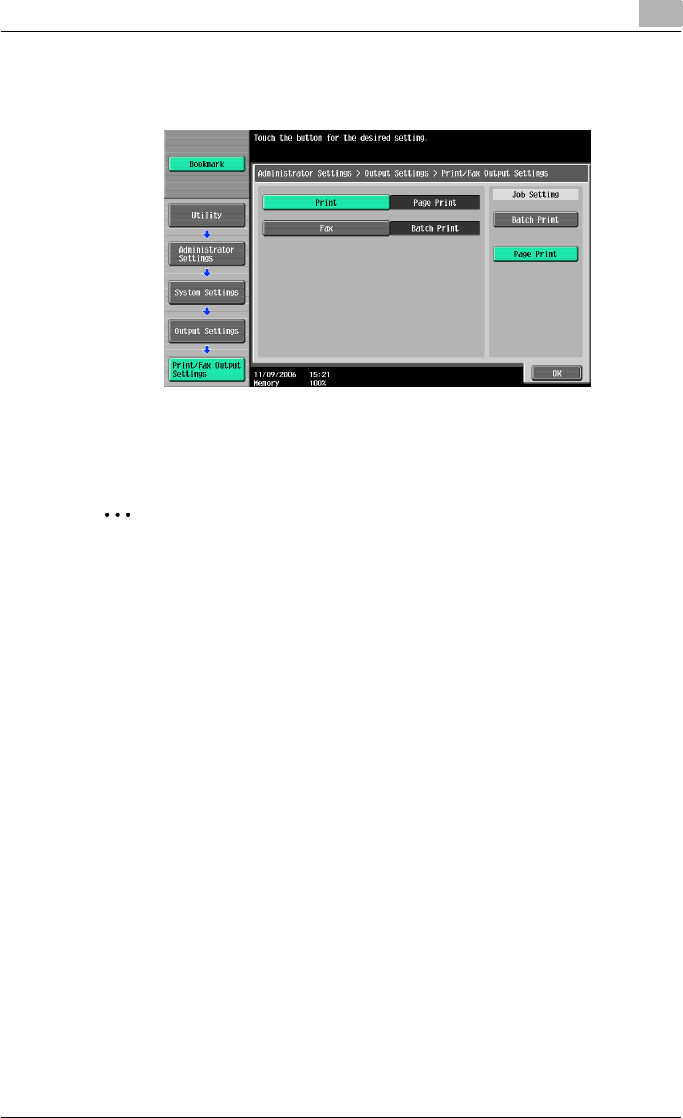
Various settings 9
C550 9-36
4Touch [Print] or [Fax].
The buttons for the available settings appear.
5Touch the button for the desired setting.
The timing the data is printed is set.
2
Note
If “Batch Print” is selected, printing starts when all the data is received
and the print job is queued. If “Page Print” is selected, printing starts
when the data for the first page is received and the print job is queued.
Output Tray Setting
You can specify the output tray to use when none has been specified from
the printer driver. (Default setting: Printer - Tray 1)
!
Detail
To display the Administrator Settings screen, refer to “To display the Ad-
ministrator Settings screen” on page 9-33.
1In the Administrator Settings screen, touch [1 System Settings].
2In the System Settings screen, touch [2 Output Settings].

Various settings 9
C550 9-37
3In the Output Settings screen, touch [2 Output Tray Settings].
The Output Tray Settings screen appears.
4Touch the button for the desired setting.
The output tray is set.
To delete secure print documents
All saved secure print documents can be deleted.
1In the Administrator Settings screen, touch [1 System Settings].
2In the Systems Settings screen, touch [0 User Box Settings].
3In the User Box Settings screen, touch [2 Delete Secure Print Docu-
ments].
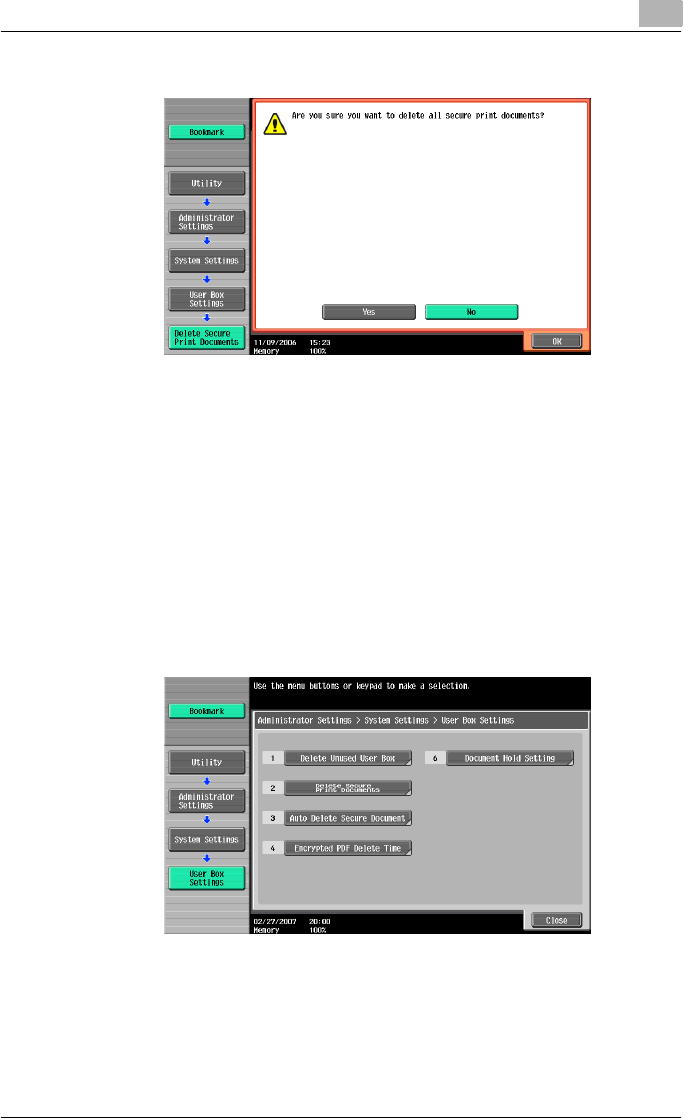
Various settings 9
C550 9-38
4To delete the secure print documents, touch [Yes].
5Touch [OK].
To specify the secure document delete time
The length of time for deleting a secure document after it is saved can be
specified.
1In the Administrator Settings screen, touch [1 System Settings].
2In the System Settings screen, touch [0 User Box Settings].
3In the User Box Settings screen, touch [3 Auto Delete Secure Docu-
ment].
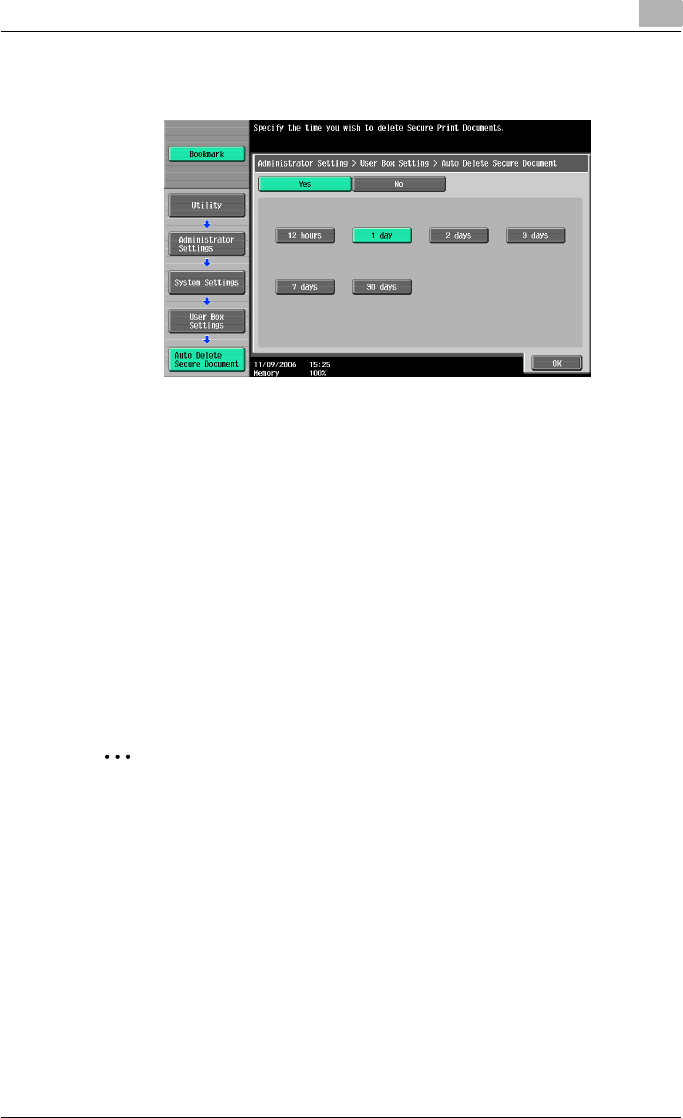
Various settings 9
C550 9-39
4Select [Yes] or [No]. If [Yes] is selected, be sure to also select the time
until the secure document is deleted.
5Touch [OK].
Printing without specifying the authentication setting
You can specify whether to allow print jobs without a specified user name or
password to be printed when this machine is performing User Authentication
or Account Track. (Default setting: Restrict)
Allow: Allows print jobs to be printed when a user name and password for
User Authentication, or a department name and password for Account Track
are not specified. The print job is counted as a public job.
Restrict: Restricts print jobs to be printed when a user name and password
for User Authentication, or a department name and password for Account
Track are not specified.
2
Reminder
If print jobs are allowed to be printed when authentication is not speci-
fied, printing is performed even if User Authentication or Account Track
is not specified in the printer driver and this machine is performing User
Authentication or Account Track. Select [Restrict] if you want control us-
age or for security reasons.
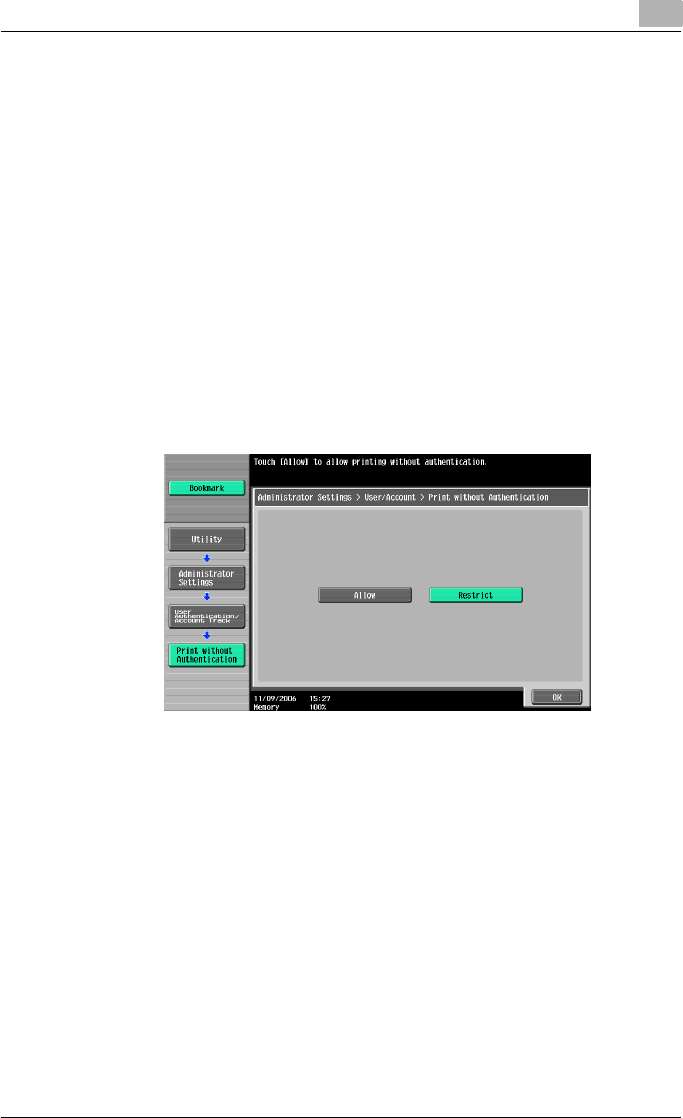
Various settings 9
C550 9-40
!
Detail
To display the Administrator Settings screen, refer to “To display the Ad-
ministrator Settings screen” on page 9-33.
Even if “Allow” or “Restrict” is specified, a job is not printed and it is can-
celed if the user name or password, or department name or password
that is specified to the job is incorrect.
1In the Administrator Settings screen, touch [4 User Authentication/Ac-
count Track].
2In the User/Account screen, touch [Print without Authentication].
3Touch the button for the desired setting.
The print without authentication setting is set.
I/F Timeout
You can set the time until a communication timeout occurs for the USB or
network interface. (Default setting: 60 sec.)
!
Detail
To display the Administrator Settings screen, refer to “To display the Ad-
ministrator Settings screen” on page 9-33.
1In the Administrator Settings screen, touch [7 Printer Settings].
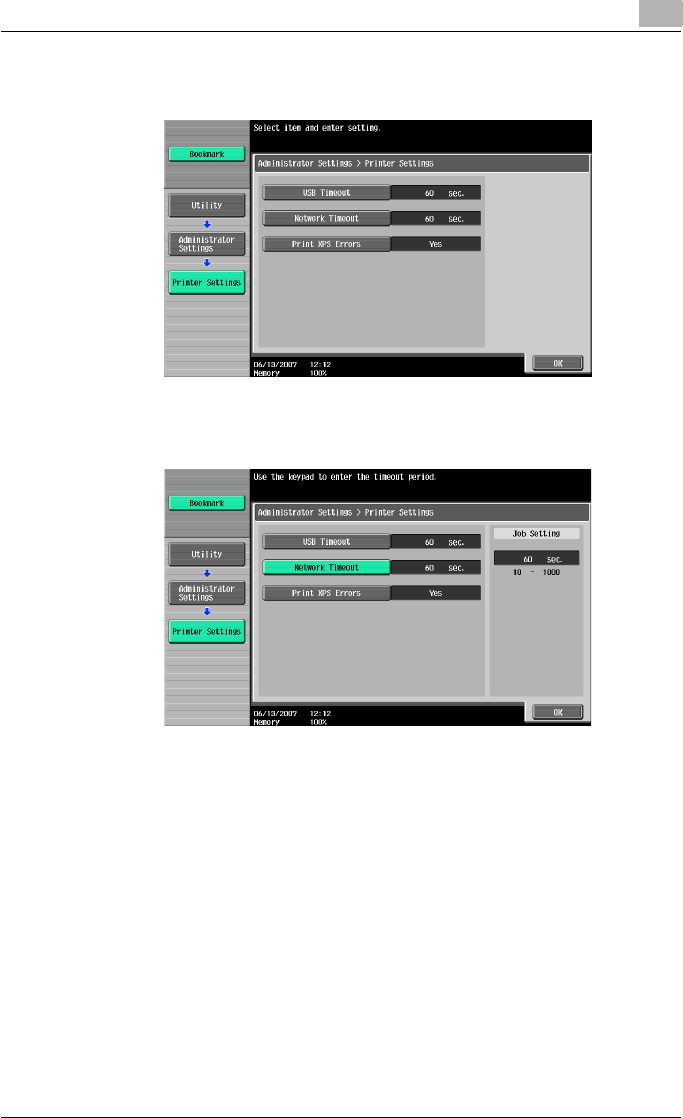
Various settings 9
C550 9-41
2In the Printer Settings screen, touch the button of the desired interface
setting.
3Press the [C] (clear) key to erase the value, and then use the keypad to
type in the default length of time (between 10 and 1000 seconds).
– If a value outside of the allowable range is specified, the message
“Input Error” appears. Type in a value within the allowable range.
4Touch [OK].
The time until a communication timeout occurs is set.
Print XPS Errors
You can specify whether to print an error message when an error occurs dur-
ing XPS printing. (Default setting: OFF)
!
Detail
To display the Administrator Settings screen, refer to “To display the Ad-
ministrator Settings screen” on page 9-33.
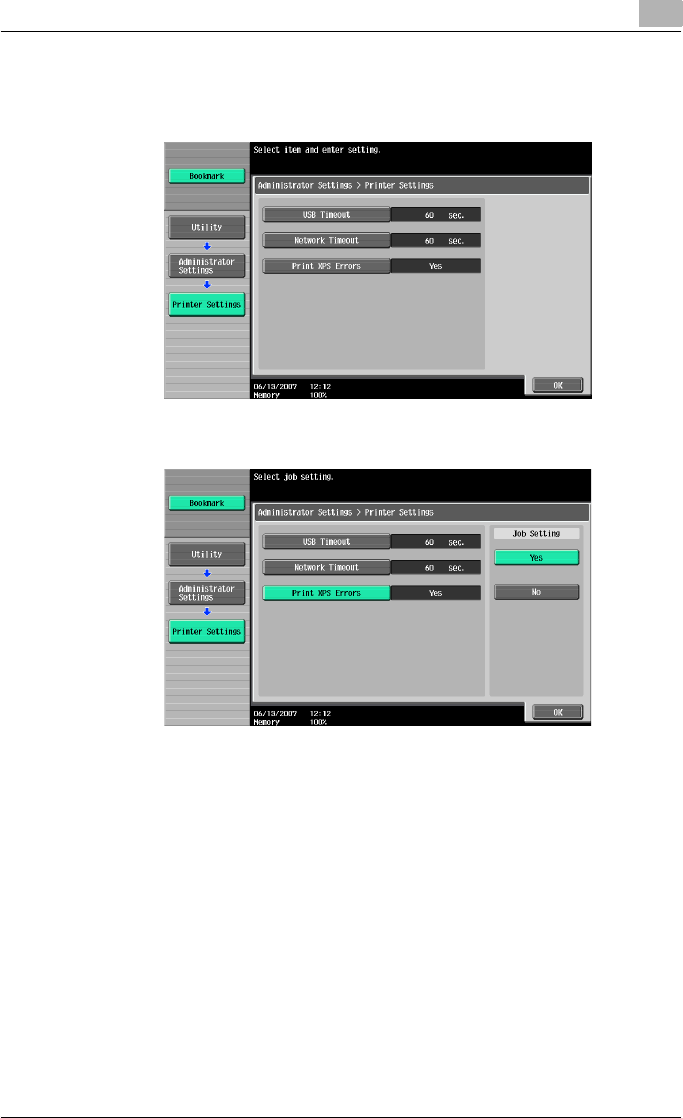
Various settings 9
C550 9-42
1In the Administrator Setting screen, touch [7 Printer Setting].
2Touch [Print XPS Errors].
3Touch the button for the desired setting.
4Touch [OK].
Print Data Capture
You can specify whether to allow or prohibit data capturing of a print job.
(Default setting: Allow)
!
Detail
To display the Administrator Settings screen, refer to “To display the Ad-
ministrator Settings screen” on page 9-33.
For details on capturing a print job, consult a service technician.
1In the Administrator Settings screen, touch [Security Settings].
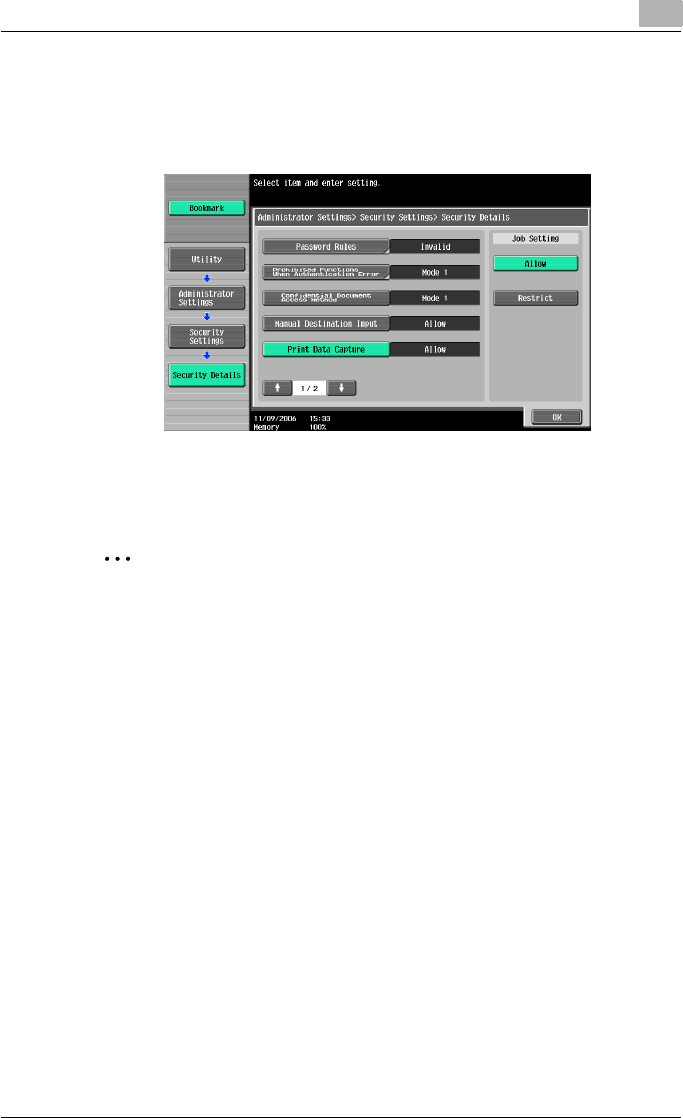
Various settings 9
C550 9-43
2In the Security Settings screen, touch [4 Security Details].
3In the Security Details screen, touch [Print Data Capture].
The buttons for the available settings appear.
4Touch the button for the desired setting.
The capturing of a print job is either allowed or prohibited.
2
Note
For details on capturing a print job, consult a service technician.
Driver Password Encryption Setting
For the encryption common key for the password that is added to a print job,
you can specify whether to use the encryption key that was specified at the
factory or change it to a user-defined encryption password. (Default setting:
User Factory Default)
-User-Defined: Specifies the encryption password. Enter an encryption
password of 20 characters.
-Use Factory Default: Uses the default encryption password (encryption
key [common key] that is already determined and that is not disclosed)
that was specified at the factory.
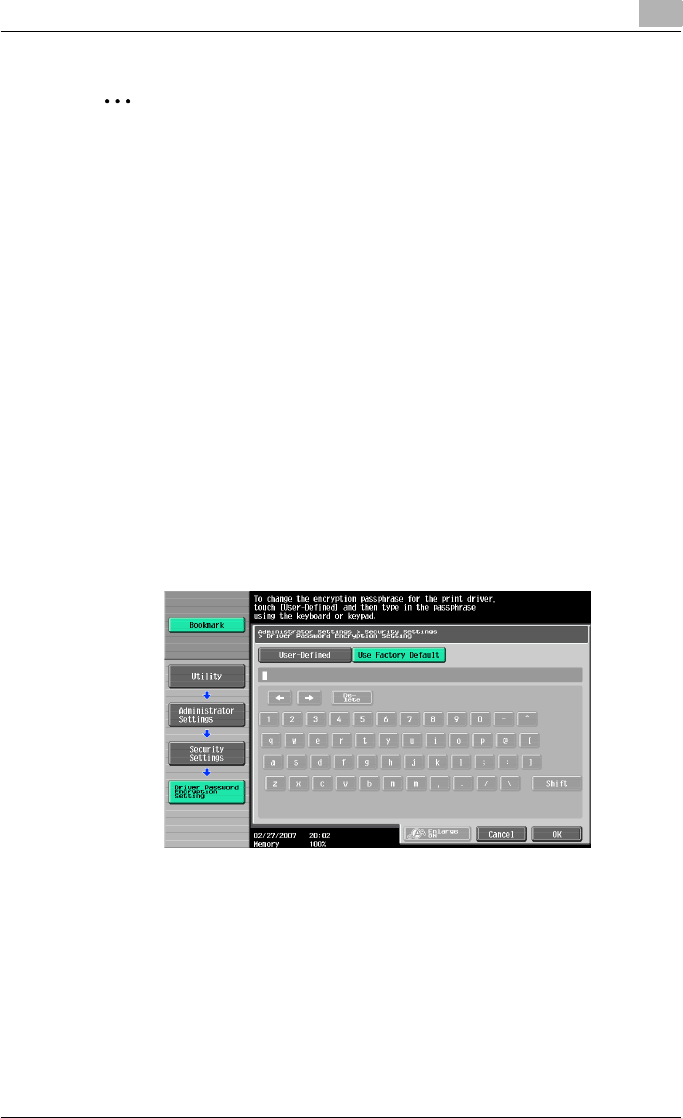
Various settings 9
C550 9-44
2
Note
To display the Administrator Settings screen, refer to “To display the Ad-
ministrator Settings screen” on page 9-33.
Encryption can be performed with an encryption common key, however,
the passwords that can be used are the user password, account pass-
word, and the secured document password.
When specifying the encryption password with “User-Defined”, be sure
to specify “Encryption Key” in the printer driver. If the encryption pass-
word for this machine and the encryption key for the printer driver are dif-
ferent, the passwords do not match and printing cannot be performed.
When using OpenAPI, the encryption common key can be acquired from
this machine.
1In the Administrator Settings screen, touch [Security Settings].
2In the Security Settings screen, touch [Driver Password Encryption
Setting].
3Touch the button for the desired setting.
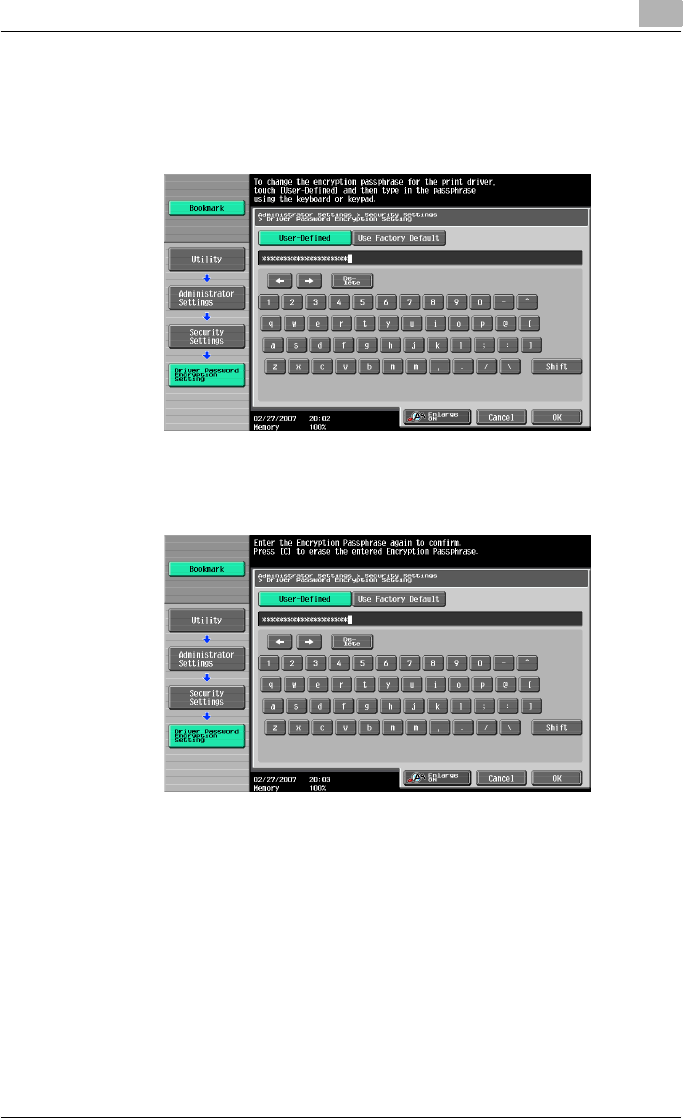
Various settings 9
C550 9-45
4If “User-Defined” was selected, enter 20 characters for the encryption
password, and then touch [OK].
– Consecutive encryption passwords with the same characters are
invalid.
5Reenter the encryption password, and then touch [OK].
The encryption password is specified.

Various settings 9
C550 9-46
9.3 Print job management
Specifying job operations
You can specify the job operations on this machine by setting a printer driver.
2
Note
The three printer drivers that can be set on this machine are as follows:
Konica Minolta PCL Printer Driver for Windows
Konica Minolta PostScript Printer Driver for Windows
Konica Minolta PostScript PPD Printer Driver for Mac OS X
Specifying settings (for Windows)
1Click the [Properties] button on the Print dialog box to open the printer
driver setup dialog box.
2Click the Basic tab.
3From the “Output Method” drop-down list, select the output method.
– Print: Prints immediately.
– Secure Print: Enters the ID and password in the dialog box that ap-
pears and saves the print document in “Secure Print User Box” on
this machine. When printing, you are required to enter the ID and
password in this machine’s control panel. Select when printing
highly confidential documents.
– Save in User Box: Enters the file name and box number in the dialog
box that appears, and saves the document to be printed in a box
on this machine.
– Save in User Box and Print: Saves the document in a box and prints
at the same time.
– Proof Print: After a part of the document has been printed, this ma-
chine stops printing temporarily. Select to avoid misprinting a large
volume of print jobs.

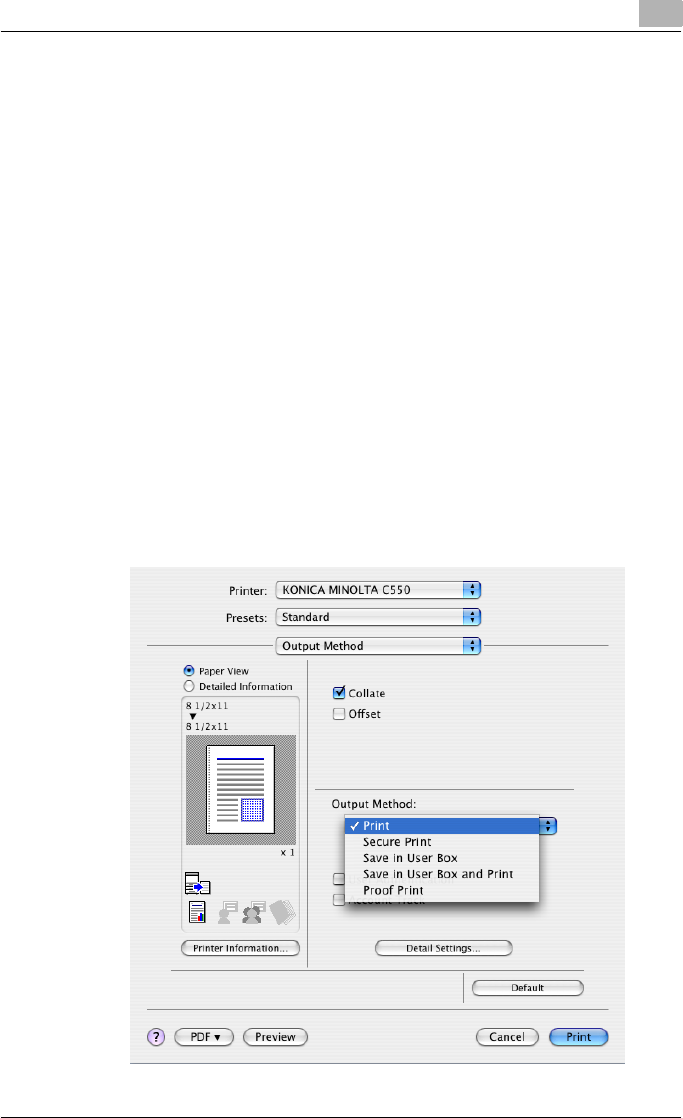
Various settings 9
C550 9-48
Specifying settings (for Mac OS X)
1From the [File] menu, select “Print”.
2Select “Output Method”.
3From the “Output Method” drop-down list, select the output method.
– Print: Prints immediately.
– Secure Print: Enters the ID and password in the dialog box that ap-
pears and saves the print document in “Secure Print User Box” on
this machine. When printing, you are required to enter the ID and
password in this machine’s control panel. Select when printing
highly confidential documents.
– Save in User Box: Enters the file name and box number in the dialog
box that appears, and saves the document to be printed in a box
on this machine.
– Save in User Box and Print: Saves the document in a box and prints
at the same time.
– Proof Print: After a part of the document has been printed, this ma-
chine stops printing temporarily. Select to avoid misprinting a large
volume of print jobs.
For details, refer to “Output Method” on page 8-10.
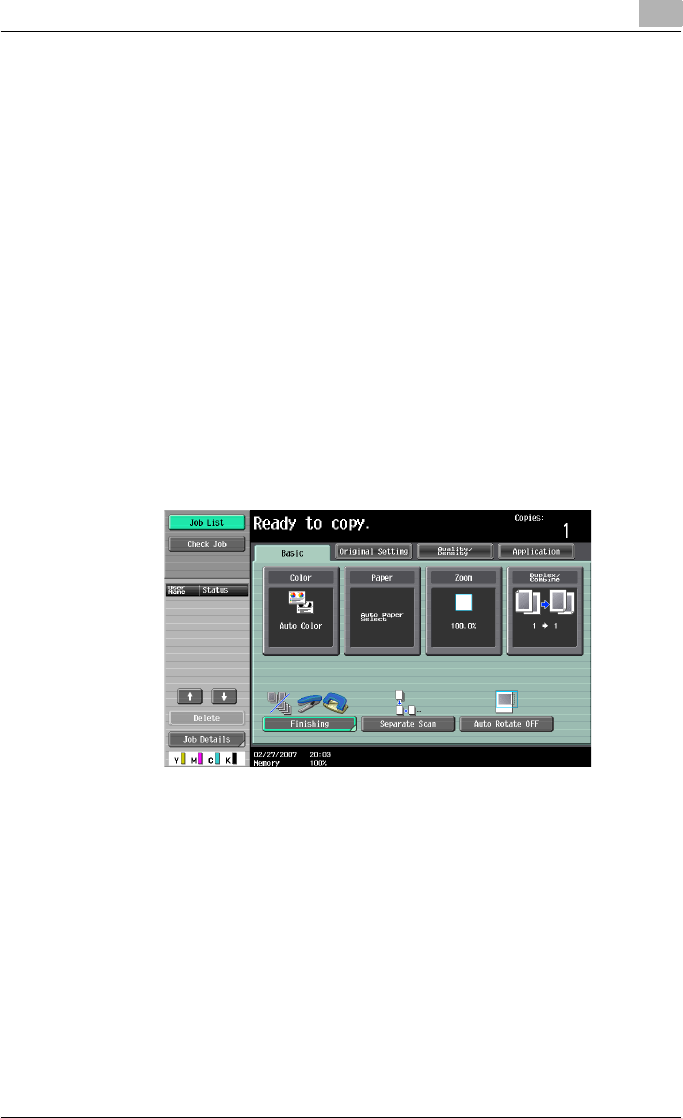
Various settings 9
C550 9-49
Job storage
When “Output Method” in the printer driver is selected, a print document can
be stored in this machine as a print job.
To print a stored job, you must recall the job using this machine’s control
panel.
Recalling jobs (Proof Print)
!
Detail
For details on using the keys in the control panel, refer to the User’s
Guide [Copy Operations].
For details on the box functions of this machine, refer to the User’s Guide
[Box Operations].
1Touch [Job List] in this machine’s control panel, then [Job Details].
The print screen appears.
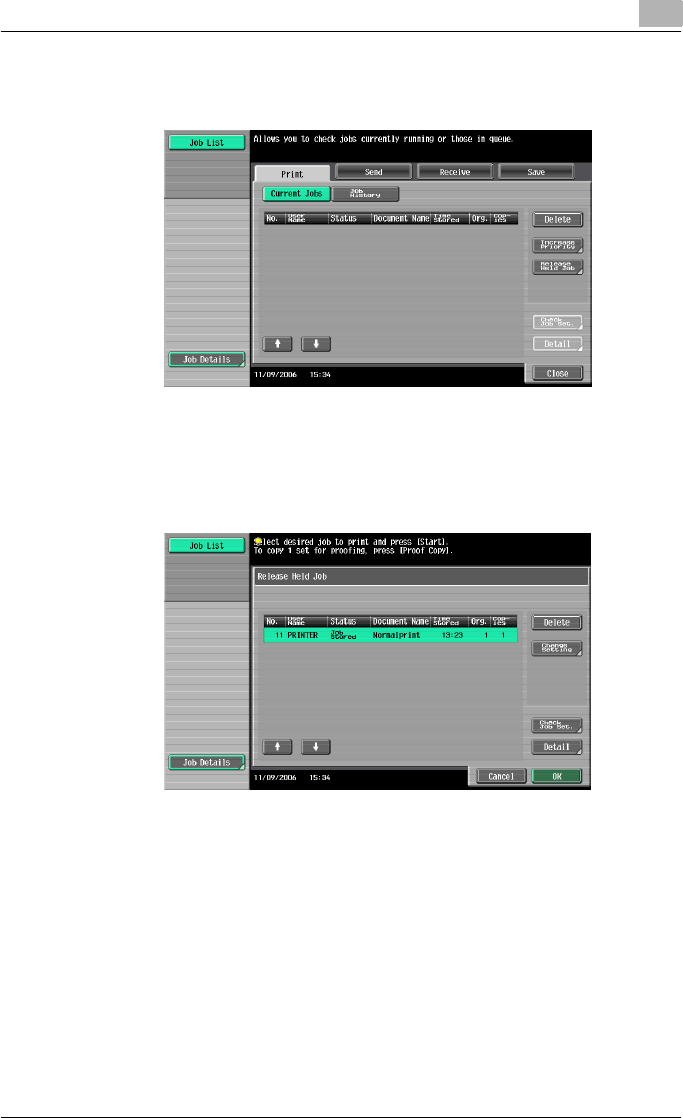
Various settings 9
C550 9-50
2With [Current Jobs] displayed, touch [Release Held Job].
The Release Held Job screen appears.
3From the job list, select the job you want to print.
– To print the remaining jobs, skip to step 7.
– To check the print results again, continue to step 4.
– To change the printing conditions, skip to step 5.
4To check the print results, select the job whose sample copy is to be
printed from the job list, and then press the [Proof Copy] key in the con-
trol panel.
– Check the print results on the printed pages.
5Touch [Change Setting].
– If the job to be removed from the Release Held Job list is not dis-
played, touch [↑] or [↓] until the desired job is displayed.
– If an incorrect job was selected, touch the button for the selected
job again to deselect it.
The Change Settings screen appears.

Various settings 9
C550 9-51
6Change the printing conditions on the Change Settings screen, and
then touch [OK].
The Release Held Job screen appears again.
7Touch [OK] or press the [Start] key in the control panel.
– To cancel printing the job, touch [Cancel].
The stored job is changed to an active job, then printed.
Recalling jobs (Secure Print)
“Secure Print” jobs are saved in “Secure Print User Box”. To print a secured
document, the ID and password that were specified in the printer driver are
required.
!
Detail
For details on using the keys in the control panel, refer to the User’s
Guide [Copy Operations].
For details on the box functions of this machine, refer to the User’s Guide
[Box Operations].
2
Note
Secured documents are automatically deleted after a set length of time
after they are registered. The default setting of this time is specified as 1
day, and the setting can be specified in the administrator mode. For de-
tails, refer to “To specify the secure document delete time” on page 9-38.
A secure document that was printed can be deleted manually in the Ad-
ministrator mode. For details, refer to “To delete secure print documents”
on page 9-37.
For details on specifying a setting for “Confidental Document Access
Method”, refer to the User’s Guide [Copy Operations].

Various settings 9
C550 9-52
When “Confidental Document Access Method” is set to “Mode 1”
1Press the [Box] key in this machine’s control panel, and then touch
[Use Document].
2Select [System User Box], then [Secure Print User Box], and then touch
[OK].
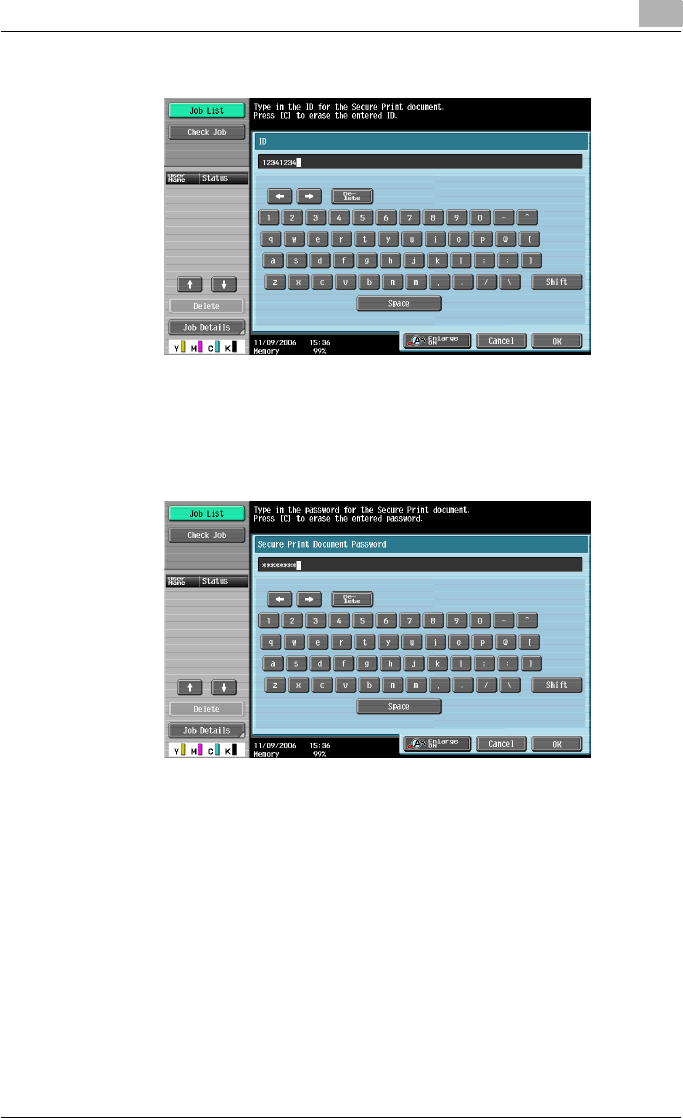
Various settings 9
C550 9-53
3Type in the ID for the secure print document, and then touch [OK].
4Type in the password for the secure print document, and then touch
[OK].
If the specified ID and password match, the secure print document list
appears.
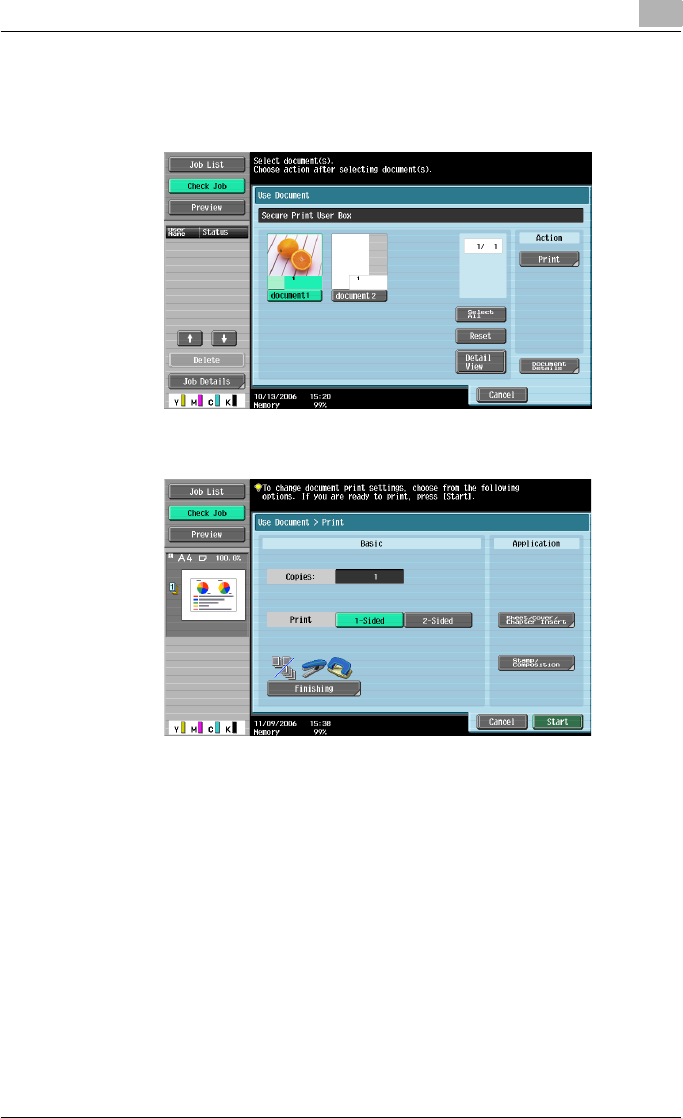
Various settings 9
C550 9-54
5Select the document to be printed, and then touch [Print].
– The contents and a preview of the document can be checked by
touching [Document Details].
6If necessary, change the print conditions.
7Touch [Start] or press the [Start] key in the control panel.
– To cancel printing the job, touch [Cancel].
The document is printed.
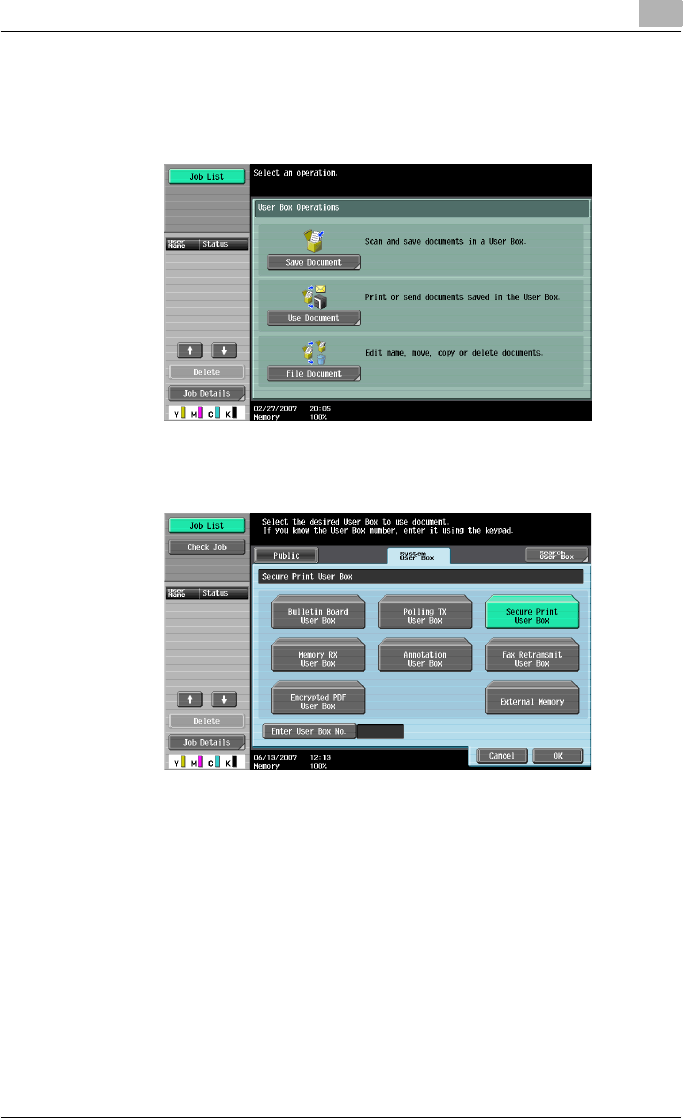
Various settings 9
C550 9-55
When “Confidental Document Access Method” is set to “Mode 2”
1Press the [Box] key in this machine’s control panel, and then touch
[Use Document].
2Select [System User Box], and touch [Secure Print User Box], and then
touch [OK].
3Type in the ID for the secure print document, and then touch [OK].
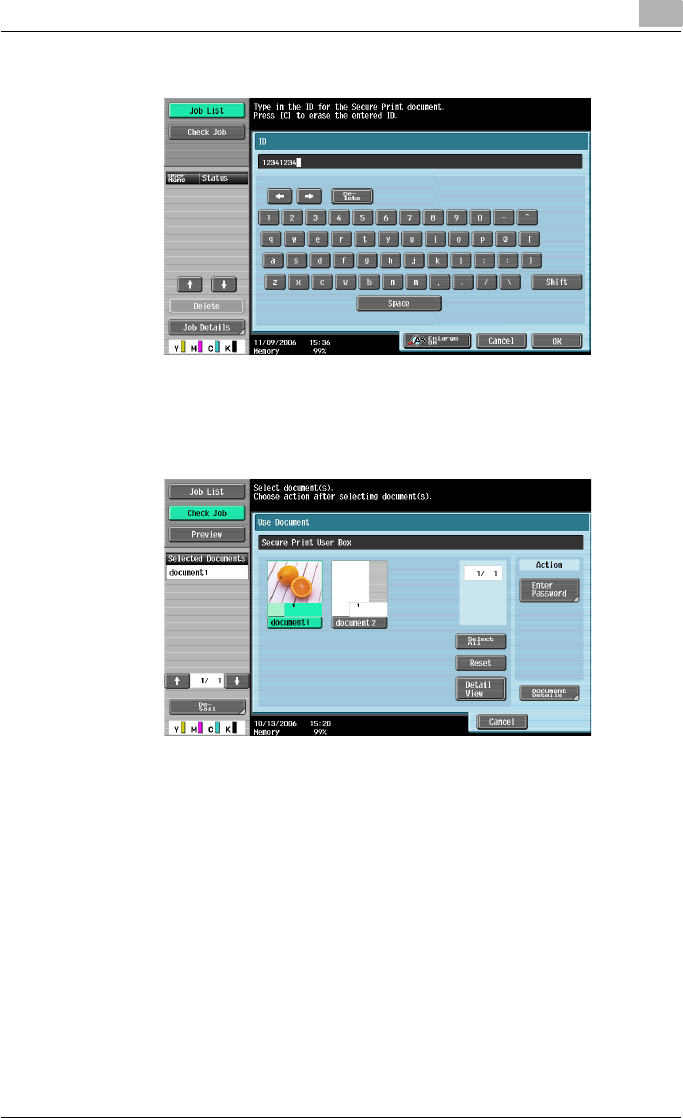
Various settings 9
C550 9-56
If the specified ID matches, the secure print document list appears.
4Select the document to be printed, and then touch [Enter Password].
– The contents and a preview of the document can be checked by
touching [Document Details].
5Type in the password for the secure print document, and then touch
[OK].
If the specified password matches, the security print document list ap-
pears.
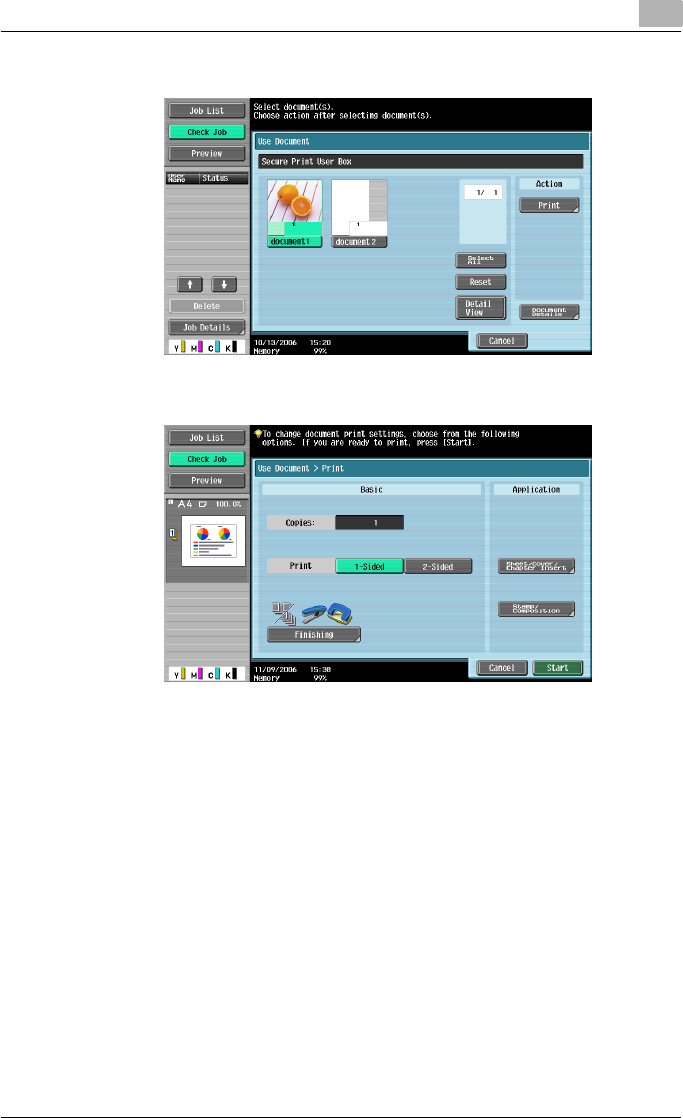
Various settings 9
C550 9-57
6Select the document to be printed, and then touch [Print].
7If necessary, change the print conditions.
– If “Prohibit Functions when Auth. Error” in Administrator mode is
set to “Mode 2” and an incorrect document password is entered
the specified number of times, the selected document is locked.
Contact the administrator to cancel operation restrictions.
8Touch [Start] or press the [Start] key in the control panel.
– To cancel printing the job, touch [Cancel].
The document is printed.
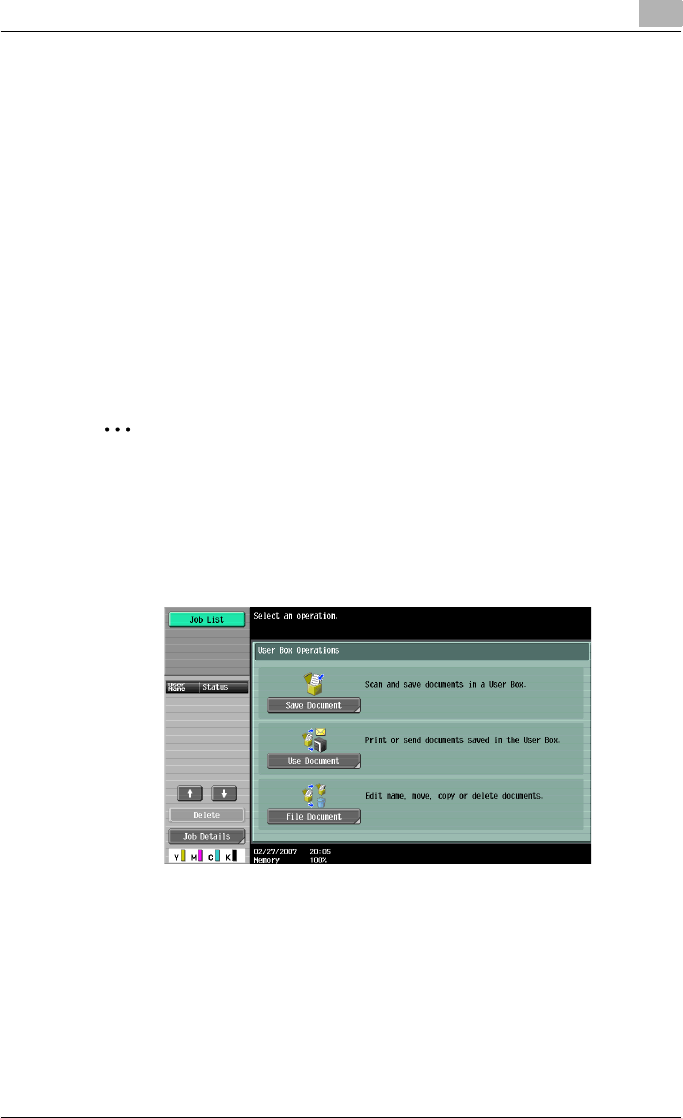
Various settings 9
C550 9-58
Recalling jobs (Save in User Box)
“Save in User Box” and “Save in User Box and Print” jobs are saved in a box
of the specified number.
To print a document saved in a box, open the specified box to remove the
document. If a password is specified to a box, the box password is required.
!
Detail
For details on using the keys in the control panel, refer to the User’s
Guide [Copy Operations].
For details on the box functions of this machine, refer to the User’s Guide
[Box Operations].
2
Note
Box documents are automatically deleted after a set length of time after
they are registered. The default setting of this time is specified as 1 day,
and the setting can be specified when creating the box.
1Press the [Box] key in this machine’s control panel, and then touch
[Use Document].
2Select the desired box number, and then touch [OK].
Boxes are classified as public, private, or group. Specify the desired
box from the classification of the saved box.
The box number can be specified manually.
– If a password is specified to a box, continue to step 3.
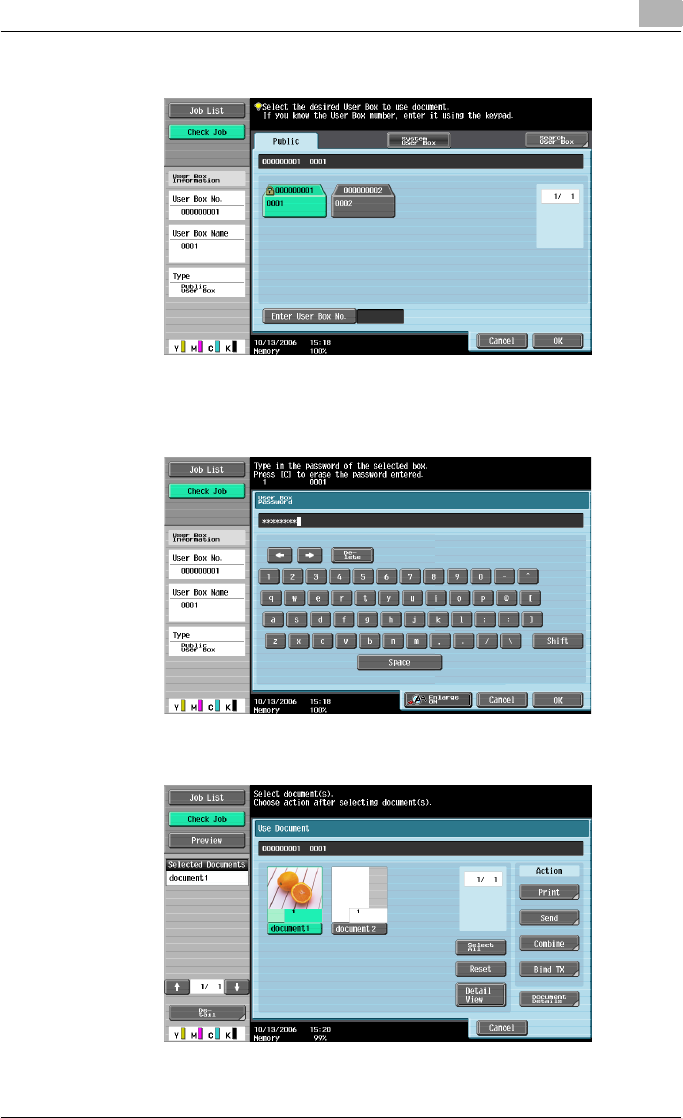
Various settings 9
C550 9-59
– If a password is not specified to a box, skip to step 4.
3Type in the password for the box, and then touch [OK].
The specified box document list appears.
4Select the document to be printed, and then touch [Print].
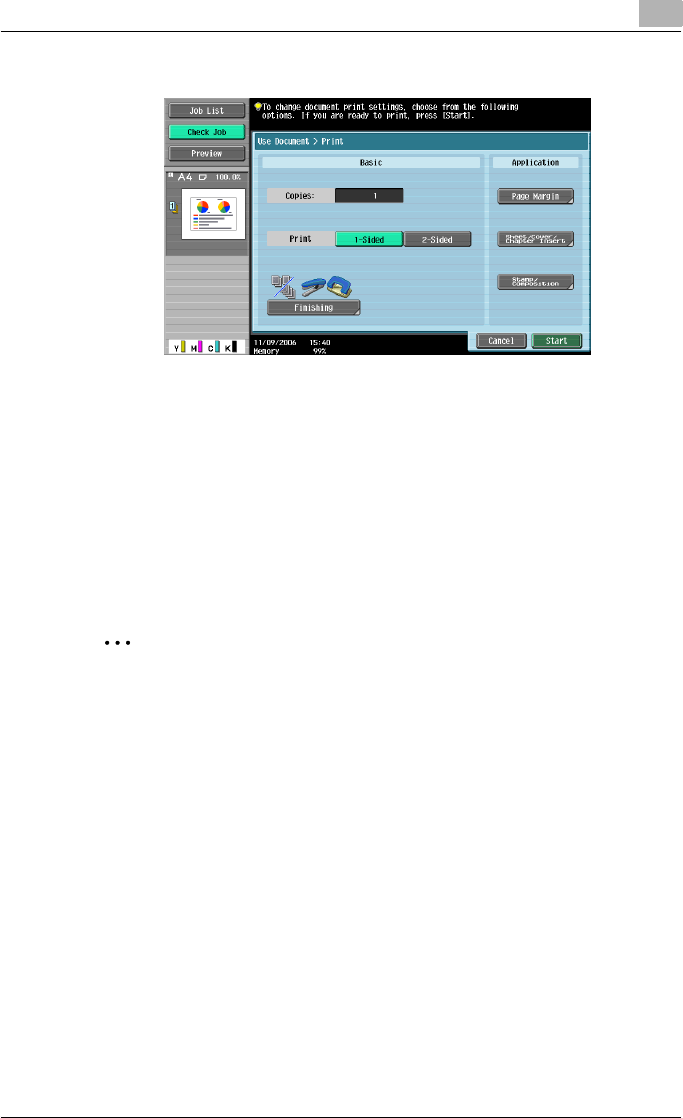
Various settings 9
C550 9-60
5If necessary, change the print conditions.
6Touch [Start] or press the [Start] key in the control panel.
– To cancel printing the job, touch [Cancel].
The document is printed.
Printing with this machine when user authentication settings have been
applied
When the user authentication function has been specified on this machine, a
user name and password must be entered when printing.
2
Reminder
If a print job is sent using a user name or password that is not a registered
account on this machine or if a job is sent without specifying “User Au-
thentication”, the operation is not authenticated by this machine and the
job is canceled.
When the user authentication settings are specified on this machine, the
authentication operation restriction function is in mode 2, and the authen-
tication information is not entered correctly, the applicable user is locked
and cannot be accessed.
The three printer drivers that can be set on this machine are as follows:
Konica Minolta PCL Printer Driver for Windows
Konica Minolta PostScript Printer Driver for Windows
Konica Minolta PostScript PPD Printer Driver for Mac OS X
Various settings 9
C550 9-61
2
Note
If printing is not allowed, printing cannot be performed even when used
by a registered user.
For the user authentication details, consult the administrator of this ma-
chine.
If performing user authentication with an optional authentication unit, en-
ter the user name and password. For details, refer to the operation man-
ual of the authentication unit.
Specifying settings (for Windows)
1Click the [Properties] button or the [Preferences] button on the Print di-
alog box to display the Printing Preferences dialog box.
2Click the Basic tab.
3Click the [Authentication/Account Track] button.
4Select “Recipient User”, and then enter the user name and password.
– If this machine has been set to permit public users, the machine can
be used without a user name and password.
– A default password can be registered and used rather than entering
a password for each job.
Various settings 9
C550 9-62
5After specifying the settings, click the [OK] button to begin printing.
– If the entered user name is a name registered on this machine, the
job is printed and counted as a job for the specified user.
Specifying settings (for Mac OS X)
1From the [File] menu, select “Print”.
2Select “Output Method”.
3Select the “User Authentication” check box.
4Select “Recipient User”, and then enter the user name and password.
Various settings 9
C550 9-63
– If this machine has been set to permit public users, the machine can
be used without a user name and password.
Printing with this machine when account track settings have been ap-
plied
When the account track settings have been specified on this machine, you
must enter a password when printing a job.
2
Reminder
If a print job is sent using a password that is not a registered account on
this machine or if a job is sent without specifying “Account Track”, the
operation is not authenticated by this machine and the job is canceled.
When the account track settings are specified on this machine, the au-
thentication operation restriction function is in mode 2, and the authenti-
cation information is not entered correctly, the applicable account is
locked and cannot be accessed.
The three printer drivers that can be set on this machine are as follows:
Konica Minolta PCL Printer Driver for Windows
Konica Minolta PostScript Printer Driver for Windows
Konica Minolta PostScript PPD Printer Driver for Mac OS X
2
Note
If printing is not allowed, printing cannot be performed even when used
by a registered account.
For the account track details, consult the administrator of this machine.
Various settings 9
C550 9-64
Specifying settings (for Windows)
1Click the [Properties] button or the [Preferences] button on the Print di-
alog box to display the Printing Preferences dialog box.
2Click the Basic tab.
3Click the [Authentication/Account Track] button.
4Enter the department name and password.
– A default password can be registered and used rather than entering
a password for each job.
5After specifying the settings, click the [OK] button to begin printing.
If the entered department name is a name registered on this machine,
the job is printed and counted as a job for the account.
Various settings 9
C550 9-65
Specifying settings (for Mac OS X)
1From the [File] menu, select “Print”.
2Select “Output Method”.
3Select the “Account Track” check box.
4Enter the department name and password.

Various settings 9
C550 9-66
Job operations on PageScope Web Connection
From PageScope Web Connection, you can also check the status of the job
being performed by this machine.
For details, refer to the User’s Guide [PageScope Web Connection Opera-
tions].

Troubleshooting 10
C550 10-1
10 Troubleshooting
10.1 Unable to Print
This chapter explains the troubleshooting procedures for possible malfunc-
tions.
Perform the troubleshooting procedures described below if this machine
does not print after you have sent a print job.
Symptom Probable cause Action
The message “No
printers are connect-
ed.” or “Print error”
appears.
The printer driver selected for
printing is not compatible with the
printer controller.
Check the printer name selected.
The network cable, or USB cable
is disconnected.
Check that the cable is connected
properly.
An error has occurred in this ma-
chine.
Check this machine’s control
panel.
Available memory space is not
sufficient.
Perform a test print to check
whether printing is possible.
A postscript error ap-
pears.
Available computer memory
space is not sufficient.
Perform a test print to check
whether printing is possible.
There is an error in the application
software settings.
Refer to the user’s manual of the
application software to check the
settings.
The file printing settings are incor-
rect.
Change the settings and try to
print again.

Troubleshooting 10
C550 10-2
If the problem persists after all of these procedures have been performed,
read the User’s Guide [Copy Operations].
The machine does not
start printing although
the print job was com-
pleted on the compu-
ter.
The printer driver selected for
printing is not compatible with the
printer controller.
Check the printer name selected.
The network cable, or USB cable
is disconnected.
Check that the cable is connected
properly.
An error has occurred in this ma-
chine.
Check this machine’s control
panel.
A print job is queued in this ma-
chine, delaying printing.
Check the job order on the Active
Jobs list of the machine’s control
panel.
“Save in User Box” was selected
for the print job.
Check if the print job is stored on
the Box screen of this machine’s
control panel.
“Secure Print” was selected for
the print job.
Check if the print job is held on the
Secure Print User Box screen of
this machine’s control panel.
If the account track settings have
been applied, an unregistered de-
partment name (or password)
may have been entered.
Enter the correct department
name (or password).
If the authentication settings have
been applied, an unregistered
user name (or password) may
have been entered.
Enter the correct user name (or
password).
Available computer memory
space is not sufficient.
Perform a test print to check
whether printing is possible.
The connection of this machine to
the network is not yet established
(while connecting to a network).
Consult with the network adminis-
trator.
The enhanced security mode may
be enabled on this machine.
Specify the authentication set-
tings in the enhanced security
mode. For details, consult with
the network administrator.
Symptom Probable cause Action

Troubleshooting 10
C550 10-3
10.2 Unable to specify desired settings or unable to print
as specified
Perform these troubleshooting procedures if you cannot specify the desired
settings in the printer driver, or if the print results do not represent the set-
tings that have been specified.
2
Note
Some of the printer driver functions cannot be combined with other func-
tions.
Symptom Probable cause Action
A printer driver setting
cannot be selected.
Some functions cannot be com-
bined.
Do not try to select settings that
are not available.
The “Conflicts” mes-
sage with “Unable to
Select” or “Function
Canceled” appears.
An incorrect combination of func-
tions has been specified.
Check the settings and specify
the functions correctly.
Printing is not per-
formed as specified.
Incorrect settings are specified. Check each setting in the printer
driver.
A combination of functions, al-
though possible in the printer driv-
er, is not possible with this
machine.
The paper size, orientation, and
other settings specified in the ap-
plication have priority over those
specified in the printer driver.
Enter the correct settings in the
application.
The watermark cannot
be printed.
The watermark is not correctly
set.
Check the watermark settings.
The watermark density is set to a
level that is too low.
Check the density settings.
Watermarks cannot be printed in
graphics applications.
No watermark can be printed in
this case.
The staple function
cannot be specified.
Stapling is not possible if “Paper
Type” is set to “Thick” or “Trans-
parency”.
Check each setting in the printer
driver.
The staple function requires op-
tional finisher.
Install the required optional finish-
er and enable it using the printer
driver.
Stapling cannot be
performed.
If are a large number of pages to
be printed, stapling cannot be
performed.
Change the number of pages to
be printed.
Stapling is not possible if the doc-
ument contains pages of different
sizes.
Check the document.

Troubleshooting 10
C550 10-4
The stapling position
is not as expected.
The orientation setting is not cor-
rect.
Check the stapling position in the
printer driver setup dialog box.
The hole punch func-
tion cannot be speci-
fied.
Hole punching cannot be speci-
fied if “Booklet”, “Transparency”,
“Thick2”, “Thick3”, or “Envelope”
is selected.
Check each setting in the printer
driver.
Optional finishers and punch kit
are required.
Install the required optional finish-
er and enable it using the printer
driver.
The pages are not
punched.
Printed pages may be fed out
without being punched if the pa-
per is loaded into the paper
source with an incorrect orienta-
tion.
Check the orientation setting.
The hole punch posi-
tion is not as expect-
ed.
The orientation setting is not cor-
rect.
Check the punch position in the
printer driver setup dialog box.
The overlay is not
printed properly.
Available computer memory
space is not sufficient.
Simplify the overlay to reduce the
data size.
The image is not print-
ed properly.
Available computer memory
space is not sufficient.
Simplify the image to reduce the
data size.
Paper is not fed from
the specified paper
source.
Paper will not be fed from the
specified paper source if that pa-
per source is loaded with paper of
a different size or orientation.
Load the paper source with paper
of the appropriate size and orien-
tation.
Symptom Probable cause Action

Troubleshooting 10
C550 10-5
10.3 Error message
Message Cause and remedy
Cannot connect to the
network.
A connection to the network could not be established.
Check if the network cable is correctly connected. In addition, check
that the Network Setting parameters on the Administrator Setting
screen have been correctly specified.

Troubleshooting 10
C550 10-6

Appendix 11
C550 11-1
11 Appendix
11.1 Specifications
Item Specifications
Model Built-in printer controller
Power supply Common with the main body
RAM 1024 MB
Hard disk 60 GB
Interface Standard: Ethernet (10Base-T/100Base-TX/1000Base-T)
USB 2.0
Frame type Ethernet 802.2
Ethernet 802.3
Ethernet II
Ethernet SNAP
Supported protocols TCP/IP
IPX/SPX
NetBEUI
AppleTalk (EtherTalk)
Print speed 45 pages/minute (color, 8-1/2 × 11 v paper, and simplex)
45 pages/minute (color, 8-1/2 × 11 v paper, and duplex)
Fast print time 6.5 seconds or less (color and A4 paper)
4.3 seconds or less (monochrome and A4 paper)
Printer language PCL5e/c Emulation
PCL6 (XL 3.0) Emulation
PostScript 3 Emulation (3016)
XPS ver.1.0
Operating environment condi-
tions
Temperature 10 to 30°C
Humidity 15 – 85% RH
Resolution Data processing 600 × 600 dpi (printing and fax operations)
400 × 400 dpi (fax operations)
200 × 200 dpi (fax operations)
Printing 1800 (equivalent) × 600 dpi
Supported paper sizes Maximum Standard Size
Printer fonts PCL Latin 80 Fonts
Postscript 3 Emulation Latin 137 Fonts
Compatible computers IBM PC or compatible, and Macintosh (PowerPC or Intel
Processor: Intel Processor for Mac OS X 10.4 only)

Appendix 11
C550 11-2
Printer driv-
er
Konica Minolta
PCL Driver (PCL
driver)
Windows NT Workstation/Server Version4.0(Service Pack 6
or later)
Windows 2000 Professional/Server(Service Pack 3 or later)
Windows XP Home Edition/Windows XP Professional, Win-
dows XP Professional x64 Edition
Windows Vista Home Basic/Home Premium /Ultimate /
Business /Enterprise, Windows Vista Home Basic /Home
Premium /Ultimate /Business /Enterprise x64 Edition
Windows Server 2003 Standard Edition, Windows Server
2003 x64 Edition
Konica Minolta
PostScript Driver
(PS driver)
Windows 2000 Professional/Server(Service Pack 3 or later)
Windows XP Home Edition/Windows XP Professional, Win-
dows XP Professional x64 Edition
Windows Vista Home Basic/Home Premium /Ultimate /
Business /Enterprise, Windows Vista Home Basic /Home
Premium /Ultimate /Business /Enterprise x64 Edition
Windows Server 2003 Standard Edition, Windows Server
2003 x64 Edition
PostScript PPD
driver (PS-PPD)
Macintosh OS 9.2 or later
Macintosh OS X 10.2.8/10.3/10.4
Fax driver Windows NT Workstation/Server Version4.0(Service Pack 6
or later)
Windows 2000 Professional/Server(Service Pack 3 or later)
Windows XP Home Edition/Windows XP Professional, Win-
dows XP Professional x64 Edition
Windows Vista Home Basic/Home Premium /Ultimate /
Business /Enterprise, Windows Vista Home Basic /Home
Premium /Ultimate /Business /Enterprise x64 Edition
Windows Server 2003 Standard Edition, Windows Server
2003 x64 Edition
Utility PageScope Web Connection
Web browsers:
Microsoft Internet Explorer 6 or later recommended (JavaS-
cript enabled, Cookies enabled)
Netscape Navigator 7.02 or later (JavaScript enabled,
Cookies enabled)
Mozilla Firefox 1.0 or later (JavaScript enabled, Cookies en-
abled)
Adobe® Flash® (If “Flash” is selected in View Mode, version
7.0 or later plugin is required.)
MetaFrame operating environ-
ment
This driver performs the confirmation of the operation only
in the following environments.
Server operating systems: Windows 2000 Advanced Serv-
er/Windows 2003 Enterprise Server
MetaFrame: Citrix® MetaFrame® Presentation Server 3.0/
Citrix® MetaFrame® Presentation Server 4.0
Client operating systems: Windows 2000/Windows XP
ICA Client: 32 bit
* For operating in an environment other than those de-
scribed above, consult the dealer.
Item Specifications
Appendix 11
C550 11-3
11.2 Configuration page
Appendix 11
C550 11-4
11.3 Font list
PCL font list
Appendix 11
C550 11-5
PS font list
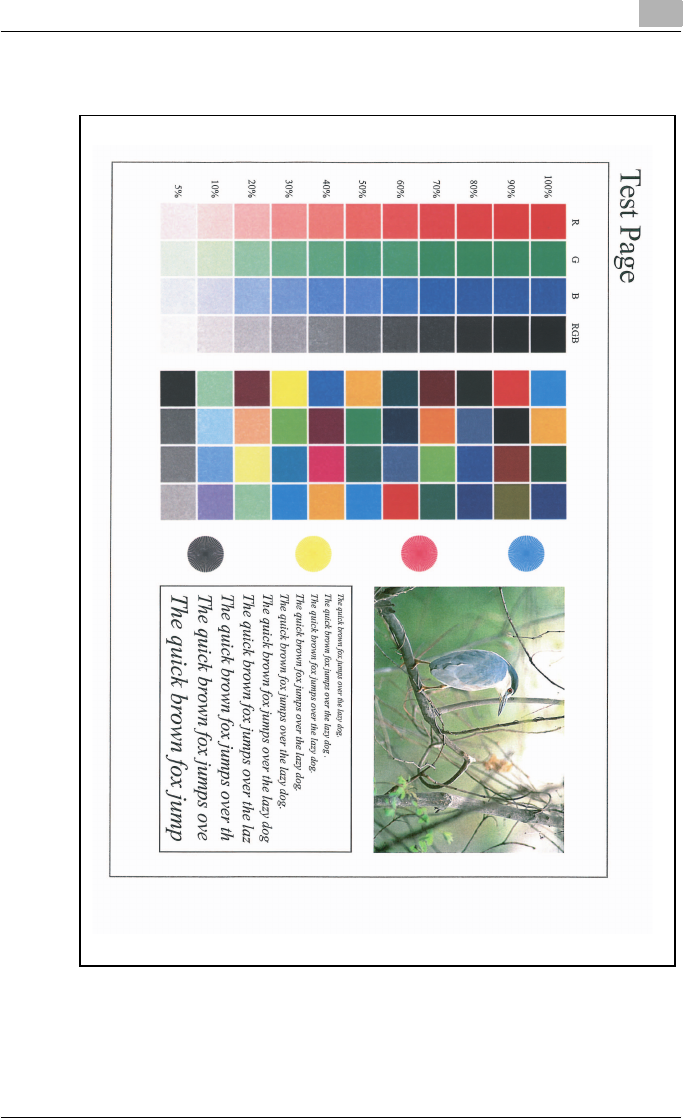
Appendix 11
C550 11-6
Demo page

Appendix 11
C550 11-7
11.4 PPD driver (Linux and applications)
PPD driver types
The PPD driver contains the PPD information for Mac OS 9, Linux, and ap-
plications.
-For Linux: Install the driver when using with Linux. (The PPD driver for
Linux and the PPD driver for OpenOffice are included.)
-For applications: Install the driver when using applications such as Adobe
PageMaker that require the PPD driver.
About the PPD driver for Linux
Operating environment
-Supported operating systems: Red Hat Linux 9/SuSe Linux 8.2
-Supported PostScript level: 3.0
-CUPS: 1.1.17
To register the PPD driver for Linux
1Copy the PPD file to the CUPS model directory. (/usr/share/cups/mod-
el when mainly Linux)
2In CUPS Printing System, click the [Add Printer] button, and then spec-
ify PPD to add this machine.
2
Note
For details on CUPS, click the [Help] button in the CUPS Web manage-
ment page.
To set up the PPD driver for Linux
Specify the functions by clicking the [Configure Printer] button in CUPS
Printing System.

Appendix 11
C550 11-8
To register the PPD driver for OpenOffice
1In CUPS Printing System, click the [Add Printer] button, and then spec-
ify PPD to add this machine.
2Open the OpenOffice Printer Administrator tool.
3Click the [New Printer] button.
4In the Choose a device type dialog box, select “Add a printer”, and then
click the [Next] button.
5In the Choose a driver dialog box, click the [Import] button.
6Select “KONICA MINOLTA C650 OpenOffice PPD”, and then click the
[OK] button.
7From the “Please Select a Suitable driver.” list, select “KONICAMINOL-
TA C650 OpenOffice PPD”, and then click the [Next] button.
8In the Choose a command line dialog box, select the printer that was
added to CUPS, and then click the [Next] button.
9Click the [Finish] button.
To print with OpenOffice
1From the [File] menu in OpenOffice, select “Print”.
2Select “KONICAMINOLTA C650 OpenOfficePPD” in “Printer name”.
3Click the [Properties] button.
4Select the desired setting from the “Page size” drop-down list, and
then click the [OK] button.
– To specify settings other than the page size, click the [Configure
Printer] button in CUPS Printing System.
5To print, click the [OK] button in the OpenOffice print dialog box.

Appendix 11
C550 11-9
About the PPD driver for applications
PPD registration destination (example: Adobe PageMaker)
-Adobe PageMaker 6.0
Copy the PPD file to RSR\CPPD4, which is under the folder to which
PageMaker is installed.
-Adobe PageMaker 6.5/7.0
Copy the PPD file to RSRC\<Language>\PPD4, which is under the folder
to which PageMaker is installed.
To print
1From the [File] menu, select “Print”.
2From the “PPD” box in the print dialog box, select this machine.
3Specify “Paper” or “Features” for the printer.
4To print, click the [Print] button.

Appendix 11
C550 11-10
11.5 Glossary
Term Definition
10Base-T/100Base-TX/
1000Base-T
An Ethernet standard, which is a cable consisting of twisted copper
wire pairs. The transmission speed of 10Base-T is 10 Mbps, of
100Base-TX is 100 Mbps, and of 1000Base-T is 1000 Mbps.
Adobe® Flash®Software developed by Adobe Systems, Inc. (formarly developed by
Macromedia, Inc.), and used to create data combining vector-graph-
ic animation and sound, and the format of this data file. The bidirec-
tional content can be manipulated using a keyboard and a mouse.
The files can be kept relatively compact, and they can be accessed
with the Web browser plug-in.
AppleTalk A generic name for the protocol suite developed by Apple Computer
for computer networking.
bit Abbreviation for Binary Digit. The smallest unit of information (data
quantity) on a computer or printer. Displays data using 0 or 1.
BMP Abbreviation for Bitmap. A file format for saving image data which
uses the .bmp extension. Commonly used on Windows platforms.
You can specify the color depth from monochrome (2 values) to full
color (16,777,216 colors). Images are not usually compressed when
saved.
Bonjour Macintosh network technology for automatically detecting devices
connected to the network and for specifying settings. Previously
called “Rendezvous”, the name was changed to “Bonjour” starting
with Mac OS X v10.4.
BOOTP Abbreviation for Bootstrap Protocol. A protocol in which a client
computer on a TCP/IP network automatically specifies the network
settings from the server. Currently, DHCP, which is an advanced
protocol based on BOOTP, is mainly used.
Brightness Brightness of a display screen
Byte Unit of information (data quantity) on a computer or printer. Config-
ured as 1 byte equals 8 bits.
Client A computer that uses the services provided by a server through a
network.
CMYK Abbreviation for Cyan, Magenta, Yellow, and Black. The colors in the
toner and ink used for color printing can all be represented by
changing the mixing ratio of the four colors of CMYK.
Color matching Technology for decreasing the difference in color among different
devices such as scanners, displays, and printers.
Default gateway A device, such as a computer or router, used as a “gateway” to ac-
cess computers not on the same LAN.
DHCP Abbreviation for Dynamic Host Configuration Protocol. A protocol in
which a client computer on a TCP/IP network automatically specifies
the network settings from the server. With collective management of
the IP address for DHCP clients on the DHCP server, you can avoid
duplication of an address and you can build a network easily.

Appendix 11
C550 11-11
DNS Abbreviation for Domain Name System. A system that acquires the
supported IP addresses from host names in a network environment.
DNS allows the user to access other computers over a network by
specifying host names, instead of difficult to memorize and under-
stand IP addresses.
DPI (dpi) Abbreviation for Dots Per Inch. A resolution unit used by printers and
scanners. Indicates how many dots per inch are represented in an
image. The higher the value, the higher the resolution.
Driver Software that works as a bridge between a computer and a periph-
eral device.
Ethernet LAN transmission line standard
Frame type Type of communication format used in a NetWare environment.
Communication is not possible if the same frame type is not used.
FTP Abbreviation for File Transfer Protocol. A protocol for transferring
files over the Internet or an intranet on the TCP/IP network.
Gateway Hardware and software used as the point where a network is con-
nected to a network. A gateway also changes data formats, ad-
dresses, and protocols according to the connected network.
Grayscale Monochrome image expressive form using the gradation information
from black to white
Hard disk Large capacity storage device for storing data. The data can be
stored even if the power is turned off.
Host name Displayed name of a device over a network.
HTTP Abbreviation for HyperText Transfer Protocol. A protocol used to
send and receive data between a Web server and a client (Web
browser). Documents containing images, recordings, and video clips
can be exchanged with the expressive form information.
Install To install hardware, operating systems, applications, printer drivers
on to a computer
IPP Abbreviation for Internet Printing Protocol. A protocol that sends and
receives print data and controls printers over the Internet on a TCP/
IP network. Data can also be sent to printers in remote areas to print
over the Internet.
IPX A protocol used with NetWare and works at the network layer of the
OSI reference model
IPX/SPX Abbreviation for Internetwork Packet Exchange/Sequenced Packet
Exchange. A protocol developed by Novel, Inc. that is commonly
used under a NetWare environment.
IP address A code (address) that is used to identify individual network devices
over the Internet. A maximum of three digits for four numbers are
displayed such as 192.168.1.10. IP addresses are assigned to devic-
es, including computers, which are connected to the Internet.
LAN Abbreviation for Local Area Network. A network which connects
computers on the same floor, in the same building, or in neighboring
buildings.
Local printer A printer connected to a parallel or USB port of a computer.
Term Definition

Appendix 11
C550 11-12
LPD Abbreviation for Line Printer Daemon. A printer protocol that uses
TCP/IP and is platform-independent. Originally developed for BSD
UNIX, it has become the standard printing protocol and can be used
with any general computer.
LPR/LPD Abbreviation for Line Printer Request/Line Printer Daemon. A print-
ing method over a network in a Windows NT system or UNIX system.
Using TCP/IP, you can output print data from Windows or Unix to a
printer over a network.
MAC address Abbreviation for Media Access Control address. With a special ID
number for each Ethernet card, data can be sent and received be-
tween the cards. A number consists of 48 bits. The first 24 bits con-
sist of a special number for each manufacture controlling and
assigning IEEE. The last 24 bits consist of a number that the manu-
facturer assigns uniquely to the card.
Memory Storage device for storing data temporally. When the power is
turned off the data may or may not be erased.
NDPS Abbreviation for Novell Distributed Print Services. Provides a highly
efficient printing solution in an NDS environment. By using the NDPS
as a printer server, you can output from the desired printer, automat-
ically download the printer driver of a newly installed printer, simplify
and automate complicated management environments related to
printer use, and integrate management related to the network print-
er.
NDS Abbreviation for Novell Directory Services. The servers and printers
on a network and the shared resources of the user’s information, as
well as the user’s access authority over these items can be consoli-
dated in the hierarchy structure.
NetBIOS Abbreviation for Network Basic Input Output System. A communica-
tion interface developed by IBM.
NetBEUI Abbreviation for NetBIOS Extended User Interface. A network proto-
col developed by IBM. By simply specifying the computer name, you
can build a small-scale network.
NetWare Network operating system developed by Novell. NetWare IPX/SPX
is used as the communication protocol.
Nprinter/Rprinter Remote printer support module for using a printer server under a
NetWare environment. Use NetWare 3.x with Rprinter, and NetWare
4.x with Nprinter.
OHP/OHT OHP (overhead projector) transparencies which are used for presen-
tations.
OS Abbreviation for Operating System. Basic software for controlling
the system of a computer.
Outline font A font using lines and curves to display an outline of a character.
Large-size characters can be displayed on a screen or printed with
no jagged edges.
PDF Abbreviation for Portable Document Format. An electronically for-
matted document which uses the .pdf extension. Based on the Post-
Script format, you can use the free Adobe Acrobat Reader software
to view documents.
PDL Abbreviation for Page Description Language. The language for spec-
ifying the print image per page to a printer when printing using a
page printer.
Term Definition

Appendix 11
C550 11-13
PostScript A typical page-descriptive language developed by Adobe and is
commonly used for high quality printing.
PPD Abbreviation for PostScript Printer Description. A file used to de-
scribe the resolution, usable paper size, and the PostScript printer
model special information.
Peer-to-peer A network format that allows connected devices to communicate
without using a dedicated server.
Plug-and-play Ability to automatically find and use the appropriate driver when a
peripheral device is connected to a computer.
Preview A function that allows you to view an image before processing a print
or scan job.
Printer buffer Memory domain temporarily used for data processing of a print job
Print Job Print request transmitted from a computer to a printing device.
Print queue A software system which queues the generated print job in the de-
vices.
Profile Color attribute file
The dedicated file that contains the summarized correlation of the in-
put and output of each primary color used so that the color input and
output devices can reproduce the color.
Property Attribute information
When using a printer driver, various functions can be specified in the
file properties.
In the file properties, you can check the attribute information of the
file.
Protocol The rules that allow computers to communicate with other comput-
ers or peripheral devices
Proxy server A server that is installed to act as an intermediary connection be-
tween each client and different servers to effectively ensure security
over the entire system for Internet connections.
PServer Print server module under a NetWare environment that monitors,
changes, pauses, restarts, or cancels a print job.
Queue name • Name specified to each device that allows printing when network
printing.
• Required logical printer name for LPD/LPR printing
Resolution Displays the ability to reproduce the details of images and print mat-
ter correctly.
RIP Abbreviation for Raster Image Processor. Process that develops pic-
ture images from described text data using the PostScript page de-
scription language. The processor is usually integrated in the printer.
RGB Abbreviation for Red, Green, and Blue. Represents all colors by
changing the brightness ratio of the RGB 3 colors using the primary
colors used by the color representation in a monitor.
Samba UNIX server software that uses SMB (Server Message Block) so that
UNIX system resources can be used from a Windows environment.
Screen font A font for displaying text and symbols on a CRT monitor.
Shared printer A printer setup that allows the printer to be used by multiple comput-
ers connected to a server over a network.
Term Definition

Appendix 11
C550 11-14
SLP Abbreviation for Service Location Protocol. A protocol capable of
finding services over a TCP/IP network and automatically specifying
a client.
SMB Abbreviation for Server Message Block. A protocol that shares files
and printers over a network and which is mainly used by Microsoft
Windows.
SMTP Abbreviation for Simple Mail Transfer Protocol. A protocol for send-
ing and forwarding e-mail.
SNMP Abbreviation for Simple Network Management Protocol. A manage-
ment protocol in a network environment using TCP/IP.
Spool Abbreviation for Simultaneous Peripheral Operation On-Line. For
printer output, data is not sent directly to the printer, it is temporarily
stored in another location, then sent to the printer collectively.
Subnet mask The unit used to divide a TCP/IP network into small networks (sub-
networks). It is used to identify the bits in a network address that are
higher than the IP address.
TCP/IP Abbreviation for Transmission Control Protocol/Internet Protocol.
The de facto standard protocol used by the Internet that uses IP ad-
dresses to identify each network device.
TrueType An outline font that was developed by Apple Computer and Micro-
soft. It is used as a standard by Macintosh and Microsoft Windows
and can be used both on a display and in print.
Touch & Print Function that allows you to print the job that was sent from the print-
er driver when performing user authentication by only positioning the
finger or IC card on the authentication unit that is connected to this
machine.
To use the Touch & Print function, an authentication unit must be in-
stalled on this machine, and the finger vein pattern or IC card IDs for
each user must be registered.
USB Abbreviation for Universal Serial Bus. A general interface standard
for connecting a mouse, printer, and other devices to a computer.
Uninstall To delete software installed on a computer
Web browser Software such as Internet Explorer and Netscape Navigator for view-
ing Web pages.
WINS Abbreviation for Windows Internet Naming Service. A service for re-
calling named servers for the conversion of computer names and IP
address in a Windows environment.
Term Definition

Index 12
C550 12-1
12 Index
12.1 Index
A
Account track
................ 4-12, 5-15, 6-15, 8-15, 9-63
Add printer wizard ............................2-7
Administrator mode ........................9-33
AppleTalk .............................2-25, 3-39
B
Back cover
................ 4-20, 5-24, 6-24, 7-10, 8-27
Banner paper tray ..........................9-19
Banner sheet setting ........................9-8
Basic tab ..................................5-7, 6-7
Bindery ...........................................3-21
Bindery emulation ................3-21, 3-24
Binding direction ............................9-10
Binding margin .....................5-19, 6-19
Binding position
................ 5-18, 6-18, 7-10, 8-19, 9-16
Bonjour .................................2-25, 3-40
Booklet ............ 4-16, 5-18, 6-18, 8-19
Border ..................................5-17, 6-17
C
Center Staple and Fold
.................................... 4-19, 5-22, 6-22
Changing paper sizes .......................9-7
Chapters .......... 4-15, 5-18, 6-18, 8-23
Collate ......................... 4-13, 7-8, 8-10
Color selection
.......................... 5-39, 6-40, 7-10, 8-38
Color settings
.......................... 5-39, 6-40, 7-10, 8-38
Combination ...... 4-14, 5-17, 6-17, 7-9
Configuration page .............. 9-31, 11-3
Configure tab ....................... 5-43, 6-45
Connecting ...................................... 1-5
Copies ............................. 7-8, 8-9, 9-4
Copies & Pages ............................... 8-9
Copy protection
.......................... 4-22, 5-35, 6-36, 8-32
Cover mode ......................... 4-20, 8-27
Cover Mode tab .................. 5-24, 6-24
CR/LF mapping ............................. 9-25
Custom page sizes
........................ 5-8, 5-48, 6-8, 7-6, 8-8
D
Date ........................... 5-37, 6-38, 8-35
Deleting secure print
documents .................................... 9-37
Demo page .......................... 9-31, 11-6
Driver settings ........... 5-50, 6-51, 8-42
Duplex ... 4-16, 5-18, 6-18, 7-10, 8-19
Duplex printing .............................. 9-15
E
Editing a watermark ............ 5-28, 6-29
Error message ............................... 10-5
Ethernet ........................................... 1-6
Exporting ............................. 5-53, 6-55
F
Fax driver ......................................... 2-1
Finish ............................................. 8-19
Finish tab ............................. 5-21, 6-21
Finishing ........................................ 7-10
Fold & Staple ................................. 8-19

Index 12
C550 12-2
Folding
................ 4-19, 5-23, 6-23, 7-10, 8-19
Font list ...........................................11-4
Font settings ............. 5-40, 6-43, 9-20
Font size .........................................9-23
Front cover
................ 4-20, 5-24, 6-24, 7-10, 8-27
G
General settings .......................7-8, 8-9
Glossy mode ... 5-39, 6-40, 7-10, 8-38
H
Hole punching
...... 4-18, 5-22, 6-22, 7-10, 8-19, 9-18
I
I/F timeout ......................................9-40
Image compression ........................5-39
Importing ..............................5-53, 6-55
Installer .............................................2-4
Installing ........................ 2-1, 2-5, 2-24
Interfaces ..........................................1-6
IP address ........................................3-4
IPP printing .....................................3-14
L
Layout ....................................7-9, 8-19
Layout tab ............................5-17, 6-17
Line/Page .......................................9-24
LPR printing ...................................3-10
M
Mac OS 9.2 ................. 2-24, 2-27, 7-1
Mac OS X ...............................2-24, 8-1
Macintosh .................... 1-5, 2-24, 3-39
N
N in 1 ......................... 4-14, 5-17, 6-17
NDPS ..............................................3-36
NDS ........................... 3-21, 3-28, 3-32
NetWare ................................ 3-2, 3-21
Network ........................................... 3-1
Network connection ................ 2-3, 3-3
Novell Distributed Print Service .... 3-36
Nprinter ......................................... 3-21
O
Offset ......................... 4-13, 7-10, 8-10
Operating environment .................... 1-5
Operating system .................... 1-5, 2-1
Options ............ 5-43, 6-45, 7-12, 8-41
Orientation ............................... 7-5, 8-7
Original direction ............................. 9-5
Original orientation .......................... 4-8
Original size ..................... 4-9, 5-7, 6-7
Output method
...... 4-12, 5-10, 6-10, 7-10, 8-10, 8-11
Output tray
................ 5-23, 6-23, 7-10, 8-25, 9-36
Overlap width line ................ 5-17, 8-19
Overlay ...................... 4-22, 5-29, 6-30
Overlay file ........................... 5-34, 6-33
P
Page attributes ........................ 7-5, 8-7
Page numbers
.......................... 4-23, 5-37, 6-38, 8-35
Page setup .............. 7-1, 7-5, 8-1, 8-7
Pages ...................................... 7-8, 8-9
PageScope Web Connection
................................................ 3-7, 9-66
Paper ............................................... 7-5
Paper arrangement
.......................... 4-20, 5-23, 6-23, 8-19
Paper size
................ 4-9, 5-7, 5-8, 6-7, 8-7, 9-14
Paper source ......................... 4-11, 7-8

Index 12
C550 12-3
Paper tray ........... 4-11, 5-8, 5-44, 6-8,
6-46, 8-25, 9-12
Paper type ............................4-11, 8-25
Pattern ............................................5-39
PCL driver ................................2-1, 5-1
PCL font list ....................................9-31
PDL setting .......................................9-2
Per page setting
.......................... 4-21, 5-25, 6-25, 8-29
Plug and play .................................2-18
Port 9100 printing ...........................3-12
Poster mode .........................4-14, 5-17
PostScript .........................................2-1
PostScript driver ......................2-1, 6-1
PostScript options ............................7-7
PPD driver ....................... 2-1, 7-1, 8-1
Print data capture ...........................9-42
Print jobs ........................................9-46
Print server mode .................3-24, 3-28
Print settings ....................................9-1
Print type
................ 4-16, 5-18, 6-18, 7-10, 8-19
Print/fax output setting ...................9-35
Printer controller ...............................1-1
Printer driver .....................................2-1
Printer fonts ....................................4-23
Printer specific options ..................7-10
Printing ............ 1-4, 7-2, 7-8, 8-2, 8-9
Printing methods ..............................4-1
Printing operations ...........................4-1
Printing reports ...............................9-31
Printing without specifying the
authentication setting .....................9-39
Proof print ....... 5-10, 6-10, 8-11, 9-49
PS errors ........................................9-27
PS font list ......................................9-31
PServer ...........................................3-21
Q
Quality ........................................... 8-38
Quality adjustment
.......................... 4-23, 5-39, 6-40, 8-38
Quality tab ........................... 5-39, 6-40
R
Recalling jobs ............ 9-49, 9-51, 9-58
Remote printer mode .......... 3-21, 3-28
Rendezvous ......................... 2-25, 3-40
Resolution ................. 5-39, 6-40, 7-10
S
Save in user box
.......................... 5-10, 6-10, 8-11, 9-58
Scale .............................. 4-10, 7-5, 8-7
Secure document delete time ....... 9-38
Secure print ..... 5-10, 6-10, 8-11, 9-51
Secure print user box .................... 9-51
Setting up the system ..................... 1-8
Settings tab ......................... 5-47, 6-49
Shifting images
.......................... 4-17, 5-20, 6-20, 8-22
Skipping blank pages .................... 4-15
SMB printing ................................... 3-8
Software tools ..................... 5-46, 6-48
Specifications ................................ 11-1
Spool setting ................................... 9-6
Stamp/Composition ...................... 8-32
Stamp/Composition tab ...... 5-27, 6-28
Stapling
...... 4-18, 5-21, 6-21, 7-10, 8-19, 9-17
Starting up a software tool
.............................................. 5-46, 6-48
Substitute fonts ............................. 4-23
Supported operating systems ......... 2-1
Symbol set .................................... 9-22

Index 12
C550 12-4
T
Test printing .....................................4-2
Time ................ 4-23, 5-37, 6-38, 8-35
Transparency interleave
................ 4-20, 5-26, 6-27, 7-10, 8-27
Troubleshooting .............................10-1
U
Unable to print ................................10-1
Unable to specify desired
settings ...........................................10-3
Uninstalling ...........................2-21, 2-29
USB ..................................................1-6
USB connection ...............................2-3
User authentication
................ 4-12, 5-13, 6-13, 8-14, 9-60
User settings ....................................9-1
User’s guides .................................x-29
Utility mode ......................................9-1
V
Various settings ................................9-1
W
Watermark ................. 4-21, 5-27, 6-28
Windows ...................................1-5, 2-3
Z
Zoom ............................. 4-10, 5-7, 6-7

Copyright
2006 2007. 7A00J-9648-22
http://konicaminolta.com
