Konka Telecommunications Technology I128 Mobile Phone User Manual W68
Shenzhen Konka Telecommunications Technology Co., Ltd. Mobile Phone W68
User manual

1
ALL RIGHTS RESERVED
©2014. All rights are reserved. No part of this document
can be reproduced without permission. All trademarks
and brand names mentioned in this publication are
property of their respective owners.
While all the efforts have been made to ensure the
accuracy of contents in this manual, we presume no
responsibility for errors or omissions or statements of any
kind, whether such errors are omissions or statements
resulting from negligence, accidents, or any other cause.
We operate a policy of continuous development and
reserve the right to make changes, modifications and
improvements to the device, device
features/specifications or any of its parts without prior
notice.
Your device may have preinstalled bookmarks and links
for third party internet sites and may allow you to access
third party sites. These are no affiliated with us, and we
do not endorse or assume liability for them. If you access
such sites, take precautions for security or content.
The limited warranty does not cover user manuals or any
third party software, settings, content, data or links,
whether included/downloaded in the product, whether
included during installment, assembly, shipping or any
other time in the delivery chain or otherwise and in any
way acquired by you. To the extent permitted by
applicable law(s), we do not warrant that any our
software will meet your requirements, will work in
combination with any hardware or software applications
provided by a third party, that the operations of the
software will be uninterrupted or error free or that any
defects in the software are correctable or will be
corrected.

2
User’s Manual is provided just to guide the
user about the functionality of the device. This
does not seem to be any certificate of technology.
Some functions may vary due to modifications
and up-gradations of software or due to printing
mistake.

3
SAFETY PRECAUTIONS
Please read the following safety guidelines before using
the device.
Do not use the phone while you are driving.
Do not place magnetic storage media near your
phone. Radiation from the phone may erase the
information stored on them.
Keep your phone and its accessories away from
children.
Mobile phones can interfere with the functioning of
medical devices such as hearing aids or
pacemakers. People having active medical
implants should keep their cell phone at least 15
cm away from the implant.
Permanent hearing loss may occur if you use
earphones or headphones at high volume.
Use a wireless hands-free system (headphone/
headset) with a low power Bluetooth emitter.
Make sure the cell phone has a low SAR.
Keep your calls short or send a text message (SMS)
instead. This advice applies specially to children
adolescents and pregnant women.
Use cell phone when the signal quality is good.
Notice:
Do not dismantle the device or accessories
otherwise, manufacturer is not liable to pay for
damages as the device and accessories are not
covered by warranty.
Use only original batteries and charging devices.
Please back up your important data timely and
keep them properly. The company is not liable for

4
any failure to call or loss of data due to
mis-operation, poor signal or power cut, etc.
All the screens in this manual are for reference only,
and some contents actually displayed may depend
upon the presetting of the service provider or the
network operator, or the SIM card. If any functions
referred to in this manual are different from those of
your device, please follow your device.
Do not put use it in a place with flammable gas
such as a petrol pumps. The temperature
recommended for using the device is 5-35℃. Do
not touch the charger, power cable or socket with
wet hands. This may cause an electric shock.
If your phone or any of its accessories do not
function normally, then please visit your nearest
authorized service facility. The qualified
personnel will assist you, and if necessary, will
arrange for the service.

5
TABLE OF CONTENTS
ALL RIGHTS RESERVED .................................. 1
SAFETY PRECAUTIONS ................................... 3
TABLE OF CONTENTS ..................................... 5
1. UNDERSTANDING YOUR DEVICE .................. 8
1.1 GENERAL INFO ............................................. 8
1.0 DEVICE OVERVIEW....................................... 9
2. GETTING STARTED ................................... 10
2.1 INSTALLING CARDS & BATTERY ................. 10
2.2 POWERING ON/OFF THE DEVICE ................ 11
3. BASIC OPERATIONS .................................. 13
3.1 CALLING ..................................................... 13
3.2 MESSAGING ............................................... 14
3.3 CONTACTS ................................................. 14
3.4 EMAIL ......................................................... 15
3.5 BROWSER .................................................. 15
4. HOME SCREEN ......................................... 16
4.1 STATUS BAR .............................................. 16
4.2 CUSTOMIZING SCREEN .............................. 16
5. MULTIMEDIA ............................................. 18
5.1 FILE EXPLORER ......................................... 18
5.2 MUSIC ........................................................ 18
5.3 CAMERA ..................................................... 18
6
5.4 SOUND RECORDER .................................... 18
5.5 GALLERY .................................................... 19
5.6 FM RADIO ................................................... 19
6. NETWORK ................................................ 20
6.1 WI-FI ........................................................... 20
6.2 3G .............................................................. 20
6.3 BLUETOOTH ............................................... 20
7. SETTINGS ................................................. 21
7.1 SIM MANAGEMENT ..................................... 21
7.2 WIRELESS & NETWOKS .............................. 21
7.3 AUDIO PROFILES ........................................ 21
7.4 DISPLAY ..................................................... 21
7.5 STORAGE ................................................... 21
7.6 BATTERY .................................................... 22
7.7 APPLICATIONS ........................................... 22
7.8 LOCATION ACCESS .................................... 22
7.9 SECURITY .................................................. 22
7.10 LANGUAGE AND INPUT ............................. 23
7.11 BACKUP & RESET ..................................... 23
7.12 ACCOUNTS ............................................... 23
7.13 DATE AND TIME ........................................ 23
7.14 SCHEDULE POWER ON/OFF ..................... 24
7.15 ACCESSIBILITY ......................................... 24
7.16 ABOUT PHONE ......................................... 24
7
8. APPLICATIONS AND UTILITIES ................... 25
8.1 CALCULATOR ............................................. 25
8.2 CLOCK ....................................................... 25
8.3 GMAIL......................................................... 25
8.4 LOCAL ........................................................ 25
8.5 PLAY STORE .............................................. 26
9. SPECIFICATIONS ...................................... 27
ENVIRONMENTAL CONCERN ......................... 28

8
1. UNDERSTANDING YOUR
DEVICE
1.1 GENERAL INFO
I128 is a multi SIM phone that encloses features, such as
Android version 4.2, Wi-Fi, 1.3 GHz Dual Core
Processor, 5 MP digital Camera, etc. This phone is
provided with two SIM slots for two different SIM cards.
The SIM card inserted in the slot1 is called SIM1, and the
other one in the slot2 is known as SIM2. You can select
to operate SIMs as per your personal and professional
needs.

9
1.2 DEVICE OVERVIEW
Position of Keys
1. USB port
2. Front camera lens
3. Volume control key
4. Touch Screen
5. Home Key
6. Menu Key
7. Back Key
8. Power Key
9. Earpiece
10. Earphone Jack
11. Speaker
12. Torch
13. Battery cover
14. Camera lens
10
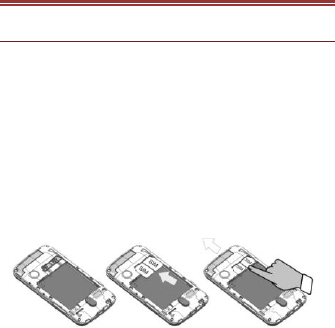
2. GETTING STARTED
2.1 INSTALLING CARDS & BATTERY
Please switch off your device before inserting or
removing the battery/ SIM card or memory card.
Installing SIM Card and Battery
Your device is provided with two SIM slots for two
different SIM cards. In order to install battery and SIM
card in the device, please follow the steps mentioned
below:
Remove the back cover of the device.
Hold the device with the front facing downwards
and pull the battery cover.
Insert the SIM cards in the device.
Attach the battery.
Push the battery cover until it clicks into place.
Installing Memory Card
Your device supports T-Flash card, which is a multimedia
memory card used to multiply the memory of the device.
The T-flash card is small and should be pulled out and
installed carefully and prudently in order to avoid any kind
of damage. Please follow the steps mentioned below to
install the memory card in the device:
Switch off your device.
Remove the battery cover.
Slot the T-Flash memory card into the slot.
Attach the battery.
Fix the battery cover until it mount properly into
place.
11
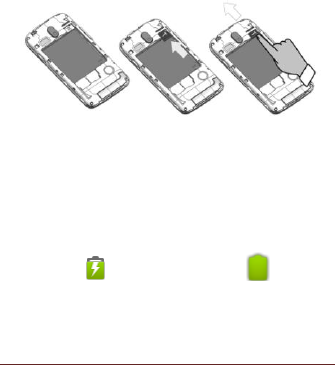
Charging the Battery
The device prompts a warning tone and message stating
insufficient battery when the battery power is low.
Please follow the instructions mentioned below to charge
your device:
Plug the connector of the charger into the jack of
the device.
Plug the charger into a standard AC wall outlet.
Charging……. Fully Charged…….
You should fully charge the battery before using the
device for the first time. It is recommended to charge the
battery for three hours before using the device for the first
time.
2.2 POWERING ON/OFF THE DEVICE
Turning On the Device
After installing the SIM cards and charging the battery,
you are now ready to turn on your device.
Long press and hold the Power Key to turn on the
device.
The first screen that appears is known as the
home/idle Screen.
Drag the lock icon sidewards to unlock the
screen.
If the screen turns off, then short press the Power
Key to turn on the display.
12
Turning Off the Device
Press and hold the Power Key for 3 seconds.
A pop-up window appears, select Power off.
Select OK to confirm.
13
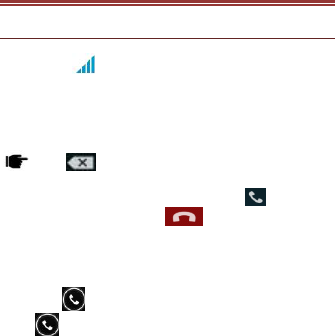
3. BASIC OPERATIONS
3.1 CALLING
To Make Calls
If the icon appears on the screen, then you can
make or receive calls.
To make a call, please follow the steps mentioned below:
Enter the Main Menu, select Phone.
Enter the phone number using the on-screen
keyboard.
Tap to delete a wrong number. Tap
and hold it to erase the entire number.
After entering phone number, tap .
To end the call, tap
Answer/Reject an Incoming Call
When you receive an incoming call, a notification
message appears on the screen. In order to accept the
call, drag towards right. If you wish to reject the call,
drag towards left.
Other Options during the call
To put a call on hold
If you are having a call conversation and there is another
incoming call, select hold to put the first call on hold. To
unhold the call, select unhold.
To set up conference calls
If you are already having a call conversation,
select Hold to put the call on hold.
Select Add Call to make another call. .
After connecting to the second call, select merge
calls to set up the conference call.

14
3.2 MESSAGING
Your device features, sending and receiving of SMS
(Short Message Service) and MMS (Multimedia Message
Service). Go to Main Menu and then select Messaging.
Creating a Message
Tap Compose new message.
In To field; enter the recipient’s phone number.
Type message in the Type to compose field.
Tap to Send.
Receiving and Managing Messages
When you send and receive messages to or from a
contact, these messages are grouped as a message
thread. A message thread looks like an exchanged
conversation.
MULTIMEDIA MESSAGE
A Multimedia message or MMS can contain letters, an
image, an audio or video file. To create and send a MMS,
please follow the steps mentioned below:
Enter the Main Menu, select Messaging.
Tap Compose new message.
Select Menu > Add subject.
In the To field, enter the recipient’s phone
number or email address and enter the Subject.
To insert a picture or video file, etc, tap .
To insert text, tap Type to Compose, and then
enter your message.
3.3 CONTACTS
Contacts refer to the phonebook that lets you store
names, phone numbers, e-mail addresses and other
information. You can save information such as name,
picture, phone numbers, e-mail addresses, etc for each

15
contact listed in your Contacts menu.
To add a Contact
Enter the Main Menu select Phone.
Enter number > Tap Menu > Add to contacts >
Create New contact.
Select the Storage location.
You can enter contact information such as name,
phone number, email address etc, if you select
storage as “Phone”.
Tap Done to save the contact.
Tip: Or enter the Main Menu and select People,
tap create New contact.
To import contacts
Enter the Main Menu select Phone.
Tap Menu > Import/Export.
Select copy contacts from Phone contact/ Phone
storage/ SIM card/ SD card.
Select Next.
Select copy contacts to SIM card/SD card/Phone
storage
Select Next.
Select “Selected” to import all contacts or mark
the required contacts.
Select OK.
3.4 EMAIL
Your device allows you to compose, read and send
emails.
3.5 BROWSER
Browser is a tool which enables you to access the
Internet.
16
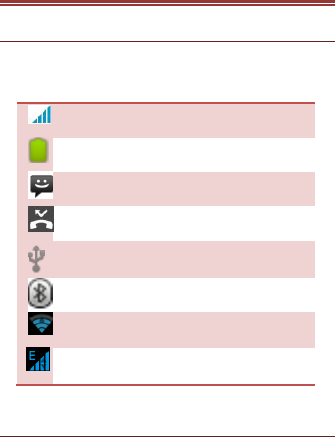
4. HOME SCREEN
4.1 STATUS BAR
The Status bar icons indicate different types of
information. The table below lists various icons that might
appear on the status bar of the device.
Network intensity of SIM card 1 or SIM
card 2
Battery level of the device
New short message
Missed call notification
USB connected
Bluetooth is activated
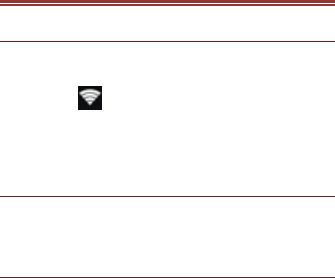
Wi-Fi is connected.
GPRS network is in use.
4.2 CUSTOMIZING SCREEN
The device features a touch screen with idle displays and
access to utilities at just one-touch. So swipe right or left
to navigate through various screens accessing your
favorite features without entering the main menu. Each
screen can be customized by adding various widgets,
shortcuts and folders.

17
Shortcuts
In order to add a shortcut on the screen: Long press on
the desired application to add on the screen.
Widgets
Save time with live updates right on Home screen and get
all of your personalized updates at one place.
Setting the wallpaper
You can customize the wallpaper of your Home screen
with default wallpaper or with pictures taken from your
device.
In the idle mode, tap Menu Key > Wallpaper.
Select your desired wallpaper from the various
options:
Home Screen
Lock Screen
Home and Lock Screen
Rotating Your Mobile Phone Screen
The orientation of most screens will change to
landscape or portrait view when you rotate your
phone sideways.
On the Home screen, tap > Settings >
Display > Auto-rotate screen to disable this
function.
18
5. MULTIMEDIA
5.1 FILE EXPLORER
You can browse, open and manage the data saved in the
Device and Memory card by accessing the File Manager
sub-menu. The device provides a certain space for users
to manage files and supports the T-Flash card. You can
use the file browser to conveniently manage various
directories and files on the T-Flash card.
5.2 MUSIC
Use the Music to play music files. The songs saved in
your SD Card can be played using the Music Player of
the device.
Tap select Application tab
Select Music
The songs are categorized by Artists, Albums and Songs.
You can make your favorite playlist by long pressing on a
song and selecting Add to Playlist.
5.3 CAMERA
Your device is equipped with camera and camcorder,
which enables you to capture photos and videos.
The rear camera is 2 megapixels.
5.4 SOUND RECORDER
You can use the sound recorder to record sounds and
also select to save the recordings in your phone. Tap
select Application tab > Sound Recorder. When in the
sound recorder interface, press menu key to select
recording mode.

19
5.5 GALLERY
You can view the captured images, recorded video clips,
and downloaded images in the Gallery.
The picture folder and video folder will be displayed.
Select to view the camera pictures or camera videos. The
images or videos will be displayed in thumbnails.
5.6 FM radio
You can use your phone to listen to FM radio stations
once the original Headset is plugged into the connector.
Please press the side key to adjust music volume.
Tap to exit FM radio function. Tap the ( ) to
search the channels.
20
6. NETWORK
6.1 WI-FI
Connect to a wireless network to browse Internet.
Enter Main Menu and tap Settings.
Tap ‘ON’ to activate Wi-Fi.
Tap Wi-Fi > Network notification to start
detecting networks. The available networks will
then be listed.
Tap Add Wi-Fi network to add a connection.
6.2 3G
The device supports WCDMA protocol. Please make
sure that you device is turned off, then insert or remove
the SIM card.
6.3 BLUETOOTH
You can transfer data, such as music to other device
using Bluetooth. Search the device and accept/transfer
data. The received data is automatically stored in the
directory.
Access Settings by entering the main menu
Check Bluetooth to turn on Bluetooth
To make your device discoverable, select
bluetooth settings and check discoverable.
21
7. SETTINGS
7.1 SIM MANAGEMENT
Your device supports two SIM cards, which can be
managed by accessing the SIM Management sub-menu.
You can view/change the roaming settings of the cards
using this menu.
7.2 WIRELESS & NETWOKS
Access this sub-menu to change/view the Wi-Fi,
Bluetooth, Mobile Networks, VPN settings, etc. Please
refer to network section for detailed information on Wi-Fi
and bluetooth.
7.3 AUDIO PROFILES
Your device provides four pre-defined user profiles that
allow the operations of the device to best suit the
environment you are in. The profiles are General, Silent,
Meeting and Outdoor. The Touch icon adds a new
profile; tap the icon to select Reset to restore the
default settings.
7.4 DISPLAY
With this function you can configure the display
characteristics of the device including brightness,
Auto-rotate screen, etc.
7.5 STORAGE
View and manage the data storage of your device:
Total Space and Available Space: Lists the amount of
space on the microSD card installed in your device and
the amount you have used to store photos, videos, music,
and other files.

22
Un-mount SD Card: Un-mounts the microSD card from
your device so that you can format the card or safely
remove it when the device is on.
Available Space: The amount of internal phone storage
used by the operating system, its components,
applications (including those you downloaded), and their
permanent and temporary data.
7.6 BATTERY
You can check the battery status of the device by
accessing this sub-menu.
7.7 APPLICATIONS
This sub-menu enables you to manage all the installed,
running and applications saved in the device memory and
SD card. You can remove and manage installed
applications, view and control running applications, allow
installation of non we build in market applications.
7.8 LOCATION ACCESS
Your device supports Global Positioning System.
7.9 SECURITY
You can protect your device from unauthorized users by
setting the PIN code or entering a password.
Enable or Disable SIM card PIN
When PIN code is enabled, you are required to enter the
PIN code before making a call.
Go to Application Drawer > Settings > Security.
On the SIM card lock tab, select Set up SIM card
lock.
Select a SIM card.
Tap Lock SIM card to use PIN. Check to enable,
uncheck to disable.
Enter the current PIN code.

23
To change the PIN code, select Change PIN.
Enter the old PIN code.
Enter the new PIN code and confirm.
Setup Screen Lock
You can set up a lock for your screen in form of Pattern,
PIN code or password.
Go to Settings > Security
Set up screen lock
Select a desired form (Slide,、Pattern、PIN、
password etc)
7.10 LANGUAGE AND INPUT
Use the Language & Keyboard settings to select the
language for the text on your device and for configuring
the onscreen keyboard, including words that you’ve
added to its dictionary.
7.11 BACKUP & RESET
You can use the Privacy settings to manage your
personal information, such as back up my data,
automatic restore and factory date reset.
7.12 ACCOUNTS
Use the Accounts to add, remove, and manage your
Google and other supported accounts. You also use
these settings to control how and whether all applications
send, receive, and sync data on their own schedules, and
whether all applications can synchronize user data
automatically.
7.13 DATE AND TIME
You can select to set date, time and time zone using this
sub-menu.
Use Automatic unless you need to override the network
values.

24
Use 24-hour format: Select to set 24-hour formats on or
off.
Choose Date format: Select from a variety of formats.
7.14 SCHEDULE POWER ON/OFF
You can set the time for auto power on /off. Do turn the
status on before using that function, and then the time.
7.15 ACCESSIBILITY
You can use the Accessibility settings to configure any
accessibility plug-ins you have installed on your device.
7.16 ABOUT PHONE
You can view system information Including System
updates, Status, Legal information, Model number,
Android version and so on.
25
8. APPLICATIONS AND
UTILITIES
8.1 CALCULATOR
Calculator helps you perform basic arithmetic functions,
such as addition, subtraction, multiplication and division.
8.2 CLOCK
This function gives you an access to the alarm clock.
Go to Clock
Tap > tap to add alarm.
8.3 GMAIL
Gmail is Google's web-based email service. Google Mail
is configured when you first set up your device.
Depending on your synchronization settings, Google Mail
on your device is automatically synchronized with your
Google Mail account on the web.
Go to Main Menu > Gmail.
Select Create or Existing your Google account.
Follow the on screen instructions to login or create your
Gmail username and password.
Once logged in, you can begin reading and sending
emails from your Gmail account.
8.4 LOCAL
Places helps you discover nearby places you'll love.
Quickly search for Restaurants, Cafes, Bars and other
places, while on the go. Places also makes it easy to
quickly rate the places you visit. By rating places you'll
get place recommendations based on the places you like
and recommendations from your friends.

26
8.5 PLAY STORE
Play store allows you to find and download applications
and fun games for your device.
Go to Main Menu > Play Store and setup your
Google account.
Select Create to create a new account or Existing
to sign in your existing account.
Once you are signed in you can begin searching and
downloading programs from the market. Tap Apps to
view the list of applications available and tap Games to
view the list of games available.
27
9. SPECIFICATIONS
Screen
4 inch (WVGA)
Battery
1500mAh
Dimensions
124x65x10.65 mm
Weight
120 g
Network
GSM: 850/900/1800/1900
MHz
WCDMA: 1900/850MHz
Standby Time
Up to 400 hours*
Maximum Talk
Time
Up to 7 hours*
Power Adapter
Input: 100-240V/1000mA
* The standby time and maximum talk time depend upon
the network signals and settings.

28
ENVIRONMENTAL
CONCERN
Help us save Our Environment…GO GREEN..!!
All our endeavors are directed towards providing
environment friendly products to you. The materials used
in our devices are recyclable and can be reused to make
new products. We strive to make products that are safe
for our consumers as well as the environment. Come join
hands with us and make world a better place to live.
Preserve natural resources for future generations by
recycling your phone. The phone contains some metals,
when recycled properly; these can be put back into
circulation, decreasing the need for new metal mining.
Recycling reduces the need for raw materials, saves
energy, helps mitigate Global Warming and reduces
pollution, reduces waste products in landfills; therefore
preserving natural resources for the future and saving the
planet.
Follow some simple steps and contribute towards saving
the planet.
DOs Recycle your handset and its accessories.
To protect natural resources and to promote
re-use of the material, kindly separate
batteries from other type of waste.
DONTs Do not dispose off your mobile and its
battery in fire.
Do not dispose your mobile with the regular
waste.
Do not over charge your handset. Remove
the charger when battery is full.
29
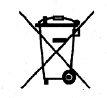
Don’t trash your phone, instead RECYCLE it
This logo signifies that this product and/or its
consitituents should not be disposed off with other
household waste.
Hazards of Improper handling, accidental breakage,
damage and /or improper recycling of hazardous
elements
If this product is improperly handled, broken or damaged
or carelessly recycled or disposed off in the fire, can
result in environmental and data security concerns,
including the following:
Affect nearly every system in the human body and
result in birth defects, brain, heart, liver,
kidney and skeletal system damage. They
will also significantly affect the nervous and
reproductive systems of the human body;
When burned, create cancer-producing dioxins
which are released into the air we breathe; If
thrown in landfills, may leach into
groundwater affecting your local community;
In warm climates, the oxidation of mercury in the
environment can be accelerated, leading to
the creation of oxidized Hg atoms that are
known to be associated with ozone depletion;
and Improper recycling additionally results in
data security issues, as private electronic
30
information remains on hard drive, if not
properly removed before disposal.
How to Recycle
Please get your electronics products recycled only
through authorized recyclers, approved by Pollution
Control Board. We provide facility of recycling of our
products. For details of our collection centers, please visit
our website or call our customer care. Help us to GO
GREEN.
Constitution of Hazardous Elements in your Device:
Your device does not contain the following hazardous
elements in a proportion higher than the limits provided
hereunder: maximum concentration value of 0.1% by
weight in homogenous materials for lead, mercury,
hexavalent chromium, polybrominated biphenyls and
polybrominated diphenyl ethers; and maximum
concentration value of 0.01% by weight in homogenous
materials for cadmium.

31
Symphony W66 Menu:
Features: You can get a brief list of the major features of
your handset here.
Contact Us: IF you face any problem please see the
address of your nearest service centre.
Also you can mail us for your inquiry at
customercare@symphony-mobile.com
Please visit our website:
www.symphony-mobile.com
FCC compliance statement
This device complies with part 15 of the FCC
Rules. Operation is subject to the following two
conditions:
(1) This device may not cause harmful
interference.
(2) This device must accept any interference
received, including interference that may cause
undesired operation.
Caution: Changes or modifications not expressly
approved by the party responsible for compliance
could void the user's authority to operate the
equipment.
This equipment has been tested and found to
comply with the limits for a Class B digital device,
pursuant to part 15 of the FCC Rules. These
limits are designed to provide reasonable
protection against harmful interference in a
residential installation. This equipment generates
uses and can radiate radio frequency energy and,
if not installed and used in accordance with the
instructions, may cause harmful interference
to radio communications. However, there is
no guarantee that interference will not occur in a
32
particular installation. If this equipment
does cause harmful interference to radio
or television reception, which can be determined
by turning the equipment off and on, the user is
encouraged to try to correct the interference by
one or more of the following measures:
—Reorient or relocate the receiving antenna.
—Increase the separation between the
equipment and receiver.
—Connect the equipment into an outlet on a
circuit different from
that to which the receiver is connected.
—Consult the dealer or an experienced radio/TV
technician for help.
SAR tests are conducted using
standard operating positions accepted by the
FCC with the Phone transmitting at its highest
certified power level in all tested frequency bands,
although the SAR is determined at the highest
certified power level, the actual SAR level of the
phone. While operating can be well below the
maximum value, in general, the closer you are to
a Wireless base station antenna, the lower the
power output. Before a new model phone is a
available for sale to the public, it must be tested
and certified to the FCC that it does not exceed
the exposure limit established by the FCC, Tests
for each phone are performed in positions and
locations (e.g. at the ear and worn on the body)as
required by the FCC.
For body worn operation, this model phone has
been tested and meets the FCC
RF exposure. Guidelines when used with
an accessory designated for this product or when
used with an accessory that Contains no metal
and that positions the handset a minimum of 1 cm
from the body.
Non-compliance with the above restrictions may
33
result in violation of RF exposure guidelines.