Konka Telecommunications Technology KK625 GSM DIGITAL MOBILE PHONE User Manual
Shenzhen Konka Telecommunications Technology Co., Ltd. GSM DIGITAL MOBILE PHONE User Manual
USERS MANUAL
PN:
KONKA MOBILE PHONE
C625
LET THE WORLD ENJOY THE VOICE FROM KONKA

Improvements and changes may be made to this manual without prior
notice.
- i -
KNOWING YOUR MOBILE PHONE .......................................................1
POSITIONS OF KEYS.......................................................................2
DISPLAY SCREEN............................................................................2
STATUS ICONS.................................................................................3
BACKLIGHT.......................................................................................3
1. GUIDELINE FOR SAFE AND EFFICIENT USE.............................4
1.1 CONDITIONS OF USE & SAFETY ...........................................4
1.2 FLIGHT ......................................................................................6
1.3 DRIVING....................................................................................6
1.4 DANGEROUS AREAS...............................................................6
1.5 HOSPITALS...............................................................................6
1.6 DISTURBANCE .........................................................................7
1.7 CHARGER.................................................................................7
1.8 ACCESSORIES.........................................................................8
1.9 BATTERY INFORMATION.........................................................8
1.10 EMERGENCY CALLS ...............................................................9
2 GETTING STARTED....................................................................10
2.1 FIRST CALL.............................................................................10
2.2 MOUNTING THE SIM CARD ..................................................10
2.3 BATTERY AND CHARGING....................................................12
2.4 SWITCHING ON/OFF YOUR PHONE ....................................15
2.5 USE OF PASSWORD..............................................................16
3 GENERAL FUNCTIONS .............................................................. 19
3.1 MAKING CALLS ......................................................................19
3.2 ADJUSTING THE SOUND VOLUME ......................................20
- ii -
3.3 ANSWERING CALLS ..............................................................21
3.4 OPTIONS DURING A CALL ....................................................21
4 GUIDE TO MENU OPERATIONS ................................................24
4.1 SMS.........................................................................................24
4.2 PHONE BOOK.........................................................................28
4.3 CALL HISTORY .......................................................................32
4.4 GAMES....................................................................................34
4.5 ORGANIZER ...........................................................................34
4.6 USER PROFILES....................................................................36
4.7 SETTINGS...............................................................................37
4.8 SHORTCUTS...........................................................................44
5 APPENDIX ...................................................................................46
5.1 APPENDIX A: GUIDANCE OF INPUT METHODS..................46
5.2 APPENDIX B: MAINTAIN AND TROUBLE SHOOTING..........48
5.3 APPENDIX C: INTRODUCTION OF AVAILABLE FITTINGS ..50
5.4 APPENDIX D: FUNCTION LIST..............................................50
-1-
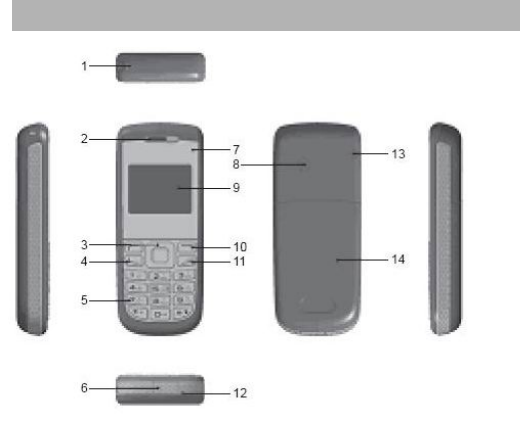
KNOWING YOUR MOBILE PHONE
1. Cord hole 8. RF Cover
2. Earpiece 9. Screen
3. Selection key 10. Soft key
4. Pick up key 11. Hang up key
5. Numeric key 12. Microphone
6. Charger and connector 13. Bolt Cover
7. Glass block 14. Battery Cover
-2-
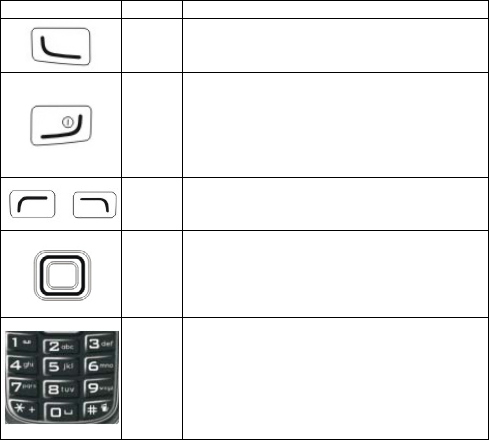
POSITIONS OF KEYS
Your mobile phone contains the following keys:
Key Name Description
Pick up
key
For dialing or receiving calls.
Press it in the standby mode to view call
records.
Hang
up key
For ending a call.
Press and hold this key to turn on or off
mobile phone.
Return to the standby mode or cancel the
current operation you entered from the
“Menu”.
Soft
keys
They include the left and right soft keys to
execute the operations shown at the bottom
of the screen.
Selecti
on key
For scrolling through the “Menu” or phone
book.
Press it to move the cursor in the edit status,
or enter the appointed function in the
standby mode.
Numbe
r keys
For entering numbers, letters, special
characters.
In the standby mode, press and hold # to
start the Mute mode.
In the edit window, press # to switch the
input method.
DISPLAY SCREEN
Your mobile phone has only one display that includes three parts:
- First line displays status icons, which indicate signal strength,
remaining power of the battery, etc.

-3-
- Middle lines display text and graphic, including numbers, text and
animated icons.
- Last line displays the functions currently assigned to the two soft
keys.
STATUS ICONS
Network signal
Divert all voice calls
Keypad lock
Alarm clock is activated
Battery status
Missed call
New message or messages full
Sound status
Ringing
Vibrate
Vibrate then Ring
Vibrate and Ring
BACKLIGHT
You can set up the backlight for the display and keypad through options
in the menu. If there is no key operation within a given period of time, it
will turn off automatically.

-4-
1. GUIDELINE FOR SAFE AND EFFICIENT
USE
We recommend you carefully read this chapter before using your
phone. The manufacturer disclaims any liability for damage, which may
result as a consequence of improper use or use contrary to the
instructions contained in this manual.
KONKA reserves the right to make changes and improvements to the
mobile phone described in this document without prior notice.
1.1 CONDITIONS OF USE & SAFETY
Conditions of use:
- Your phone is not water-resistant. Keep it dry.
- Do not use or store the phone in dusty, hot or cold areas.
- Do not use chemicals, solvents or detergents to clean the phone.
- Do not paint the phone.
- Minimum and maximum temperatures recommended by the
manufacturer are between -10°C and 55°C.
- In order to avoid erasing magnetic records, it is recommended not to
leave credit cards or other magnetic storage media in the long term
next to the phone.
- Respect privacy: Should your phone allow it, you must respect the
-5-
laws and regulations in force in your country regarding taking
photographs and recording sounds. It is the user's sole responsibility
to ensure that prior authorization is obtained, if necessary, in order to
record conversations or take a photograph. The manufacturer, the
seller or reseller of your mobile phone (including the operator)
disclaim any liability, which may result from improper use of the
mobile phone. Switch your phone off in any facility where posted
notices require it.
Safety:
- Do not switch on the phone when wireless phone is prohibited or
when it may cause interference or danger (hospitals, aero ports and
other prohibited areas).
- Do not use the phone at a refueling point, near fuel or chemicals.
- Do not use the phone where blasting is in progress.
- Do not expose your product to flames.
- Do not allow children to use the mobile phone without supervision.
- Keep the phone and all its parts and accessories out of the reach of
children.
- Do not throw, drop, knock, shake or try to bend the phone.
- Do not attempt to open the phone. Only qualified person may repair
the phone.

-6-
1.2 FLIGHT
Turn off your mobile phone before boarding any aircraft to prevent
interference with communication systems. It is illegal to use any mobile
phone in a plane.
1.3 DRIVING
- In relation to drivers, given to recent studies, use of mobile phones
(whether the phone is hand-held or hands-free) constitutes a real
risk. Drivers are requested to refrain from using either hand-held or
hands-free phones whilst on the move.
- Your phone emits electromagnetic waves when switched on. These
waves can interfere with a vehicle's electronic systems. Therefore,
do not place your phone on the dashboard or within an airbag
deployment area. Check with your dealer or car manufacturer to
make sure that the car electronics is well insulated.
1.4 DANGEROUS AREAS
Turn off your mobile phone in a gas station or any area with fuel,
chemicals or any other dangerous articles.
1.5 HOSPITALS
Observe the relevant rules and codes of the hospital in using your
mobile phone and turn it off near medical facilities. Any radio
transmission equipment, including mobile phones, may interfere and
affect the operation of medical facilities and other electronic devices.

-7-
For any question, please consult doctors or the medical facility supplier.
1.6 DISTURBANCE
Radio devices may disturb the mobile phones. They may affect your
mobile phone performance.
1.7 CHARGER
Do not use any accessories and batteries other than those approved by
the mobile phone vendor.
- Charger will operate in the temperature range of 0°C to 40°C.
- The charger designed for your mobile phone meets with the
standard for safety of information technology equipment and office
equipment use. It must be used for this purpose only.
- The manufacturer disclaims any liability for damage caused by the
use of other charger.
- Caution: Explosion if battery is replaced by an incorrect type
charging.
Technical specifications:
Adapter Input: AC 100-240 V / 50-60 Hz / 0.15A
Output: DC 5.0V / 500 mA
Caution: the network voltage is classified as a
hazard by the criteria of this standard.

-8-
1.8 ACCESSORIES
Use only accessories approved by the phone manufacturer for use with
this particular phone model. The use of any other types of accessories
may damage the product.
1.9 BATTERY INFORMATION
Your phone is powered by a rechargeable battery (DC 3.7V / 550 mAh)
which full performance is achieved after two or three complete charge
and discharge cycles. When the operating time (standby and talk time),
after hundreds of charge and discharge, is noticeably shorter than
normal, it is time to replace the battery.
- Use only batteries approved by the phone manufacturer for use with
this particular phone model. The use of any other types of battery
may damage the product, be dangerous and invalidate any approval
or warranty applying to the phone.
- The manufacturer disclaims any liability for damages caused by the
use of other battery.
- Always keep the battery between 15 °C and 25°C.
- Use the battery only for its intended purpose.
- Do not short-circuit the battery.
- Do not leave the battery connected to a charger too long, since

-9-
overcharging may shorten its lifetime.
- Do not dispose of battery in fire.
- Leaving the battery in hot or cold places will reduce the capacity and
lifetime of the battery.
- The batteries could split or leak if incorrectly inserted, opened or
exposed to heat.
- Used phone batteries must be disposed of in
compliance with current environmental protection
regulations.
1.10 EMERGENCY CALLS
Connections in all conditions cannot be guaranteed. Therefore, you
should never rely solely on the mobile phone for essential
communications such as emergencies. Emergency calls may not be
possible on all mobile phone networks or when certain network
services or phone features are in use. Check with your local service
provider. To make an emergency call: you must switch on the phone,
check for adequate signal strength; some networks may require that a
valid SIM card be properly inserted in the phone. Then, dial the official
emergency number.

-10-
2 GETTING STARTED
2.1 FIRST CALL
z Insert a SIM card (first switch off your phone and remove the
battery). For relevant detailed guidance on installation, please
refer to “2.2 Mounting the SIM Card”.
z Charging the battery. Please refer to “Section 2.3 Batteries and
Charging the Battery” for details.
z Input the area code and the phone number and press Pick up key.
Note: Before you get started, you must insert a valid SIM card in your
phone and charge the battery first.
2.2 MOUNTING THE SIM CARD
Your mobile phone number, PIN (Personal Identification Number), PIN2,
PUK (Personal Unlock Key), PUK2 (Personal Unlock Key2) and IMSI
(International Mobile Subscriber Identity) and network information,
phonebook data, SMS (short messages) and other data are stored in
your SIM card.
Note: Please do pay attention that: This model of phone supports the
SIM cards of 1.8V and 3V except the SIM card of 5V.
- At present, not all network operators provide PIN2 and PUK2.
Please pay attention that the functions that need the above
passwords in this phone may be unavailable.
- Please remove or insert the SIM card after you switch off the
phone for a few seconds.
-11-
- Please carefully handle the SIM card, scraping or bending the SIM
card may damage it easily.
- Please store your phone and the SIM card and other tiny
components of the accessories in a proper place and keep them
out of children’s reach.
Warning: Before you insert or remove the SIM card, please switch off
your phone. Otherwise it may damage the SIM card.
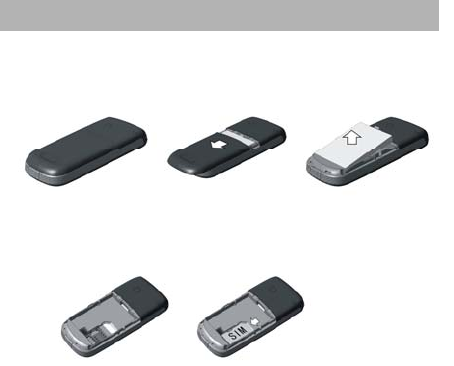
2.2.1 Mounting
① Press and hold the Hang up key to turn off your mobile phone
before removing the battery.
② Keep the SIM card facing the phone and align its dent with the dent
of the SIM card slot. Slide the SIM card into the slot carefully.
③ Re-attach the battery.
-12-
Note: If you insert the SIM card improperly or the SIM card is damaged,
“Insert SIM” will be displayed on the LCD after you switch on
your phone. Remove the SIM card and check the right way to
insert it, and then insert it in the phone again.
-If it displays that the SIM card is damaged, please send it to the
network operator for repair.
-If it displays that the SIM card is permanently locked, please
consult your network operator.
2.3 BATTERY AND CHARGING
2.3.1 Battery Status
Your phone can monitor and display relevant information on battery
level.
① Under normal condition, you can view remaining level of the
battery from the battery icon on the upper right corner of the LCD.
② When the battery level is low, “Low Battery” will be displayed on
the LCD. If you have selected Alert Tone – Warning Tone of any
profile in Profiles, the phone will sound alert tone.
③ While charging the battery, the battery icon repeatedly fills until
the battery is fully charged.
④ The phone is equipped with 550mAh (li-ion) battery, and the
expected standby time is 180~250 hours and the talk time is
2.0~2.5 hours.

-13-
Note: Actual standby time and talk time depend on the use condition of
the phone, local network environment, SIM card and actual
settings of the phone.
2.3.2 Tips on the Battery
Please don’t put your battery in the environment where the temperature
is too high or low; if so, it will affect the service life of the battery and
decrease standby time of the battery. The service life of the battery is
limited; after you use it for a period of time, it is suggested that you
should replace with KONKA’s original battery in time if you find that the
performance of the battery trends to decrease.
Note: Do not leave the battery on the battery charger being charged
too long time (less than 12 hours), and remove the battery as early as
possible after the battery is fully charged to prevent the battery from
getting damaged or dangerous situations from occurring.
2.3.3 Using the Travel Charger
You can use the travel adapter to charge the battery through the phone.
When you need to charge the battery, install the battery in the phone.
① Connect the connector of the travel adapter to the input/output
jack of the phone.
② Plug the travel adapter into a proper AC wall outlet.
③ While charging, the battery icon repeatedly fills until the battery is
fully charged.
④ When charging is finished, the battery icon stops changing. Pay
attention that you should press the snap fastener on both side of
the connector when disconnect the connector of the travel adapter
from the input/output jack of the phone.

-14-
Note: If the battery voltage is too low to power on the phone, the
battery icon will take longer time to change while charging.
-You can switch your phone on or off while it’s being charged.
Warning: You must ensure that the standard voltage and power of the
place where you are match the rated voltage and power of our travel
adapter.
2.3.4 Precautions on Using the Battery
− Before you remove the battery, please ensure that you switch off
your phone.
− Please carefully use the battery. If you use metallic objects (such as
coins, clips, etc.) to connect the anode (+) and cathode (-) of the
battery, it mighty causes short circuit and may damage the battery
and metallic objects. If you remove the battery from the phone and
put it in your bag, you should note that don’t let the metallic objects
(such as your key) contact the anode and cathode of the battery at
same time.
− Do not throw the battery into fire, nor use the battery in the place
where the temperature is extremely high.
− Do not dismantle or modify the battery.
− Dot not put the battery in the place where there is strong mechanical
shock, nor use hard object to strike the battery.
− You should keep the battery in cool and dry place; never put the
battery in the place at high temperature (over 60 centigrade) and you
should keep the battery away from direct sunshine.
− If you find any strange odor or the battery is overheated, you should
stop using it.
− If you find that the battery has any crack, deformation or other types

-15-
of damage, or the electrolyte leaks out, you should stop using the
battery immediately.
− If the electrolyte leaked out contacts your skin or clothes, you should
immediately use soap and clean water to clean it; if you inadvertently
let the electrolyte come into your eyes, you should thoroughly wash
your eyes with clean water and go to the hospital immediately.
− Only use KONKA approved batteries in charging to avoid hurt due to
incorrect charging.
− Never use the lithium battery when the temperature is very low; you
can't obtain maximum standby/talk time at low temperature.
− Do not clean the battery with water or organic solvent, nor dip it into
water.
− If you don’t use the battery for a long time, please fully charge the
battery before you store it.
− For used batteries, it is suggested that you should return them to
mobile phone manufactures or put them into the specified public
used batteries recycling area; never mix them with other rubbish or
discard them randomly.
2.4 SWITCHING ON/OFF YOUR PHONE
z Press and hold Hang up key for a few seconds to switch your phone
on. Startup animation appears on the LCD.
z If you are required to input phone password, input the password and
press “OK” soft key. Before the phone leaves factory, the phone
password is preset to 1234.
z If you are required to input PIN, input PIN and press “OK” soft key.
Your SIM card and PIN are supplied by your network operator.
z Enter idle screen.

-16-
z Press and hold Hang up key for a few seconds to switch your phone
off.
2.5 USE OF PASSWORD
Your mobile phone and SIM card have multiple passwords. These
passwords are helpful to prevent others from using your mobile phone
and SIM card without your permission. When you are required to input
any password referred below, first input correct password (displayed in
“*”), then press “OK” soft key. If you input wrong numbers, please first
press “Clear” soft key to delete wrong input, then input correct numbers.
You can change PIN, PIN2 and phone password with function list
“Settings->Security Settings->Change Password”.
2.5.1 Mobile Phone Code
The phone password is phone lock, mobile phone password, which is
used for preventing others from using your phone without your
permission. Generally, the mobile phone password is preset by the
manufacturer. The default phone password is 1234. If phone lock is
activated, you will be required to input phone password when you
switch on your phone.
2.5.2 PIN
PIN (Personal Identification Number, 4-digit to 8-digit) is used for
preventing your SIM card from unauthorized use. PIN is generally
supplied with the SIM card by your network operator. If the PIN Check
feature is activated, then you will be required to input PIN each time
you switch on your phone. If you input wrong PIN three times in
succession, the SIM card will be locked; please follow the operations
below to unlock it.
① Input correct PUK as prompt on the display to unlock the SIM
card.

-17-
② Then input new PIN and press “OK” soft key.
③ When you are required to input the new PIN again, input it and
press “OK” soft key.
④ If the PUK is correct, then the SIM card will be unlocked and the
PIN will be reset.
Warning: If you input wrong PIN three times in succession, the SIM
card will be locked and you need to use PUK to unlock it. PUK is
usually kept by the network operator.
2.5.3 PUK
PUK (Personal Unlock Key, 8-digit) is used for unlocking locked PIN.
Usually PUK is supplied with the SIM card by the manufacturer. If not,
please contact your network operator who offers you services. If you
input wrong PUK ten times in succession, the SIM card will be invalid
and you will need to contact your network operator for changing new
SIM card.
2.5.4 PIN2
PIN2 (4-digit to 8-digit) is supplied with the SIM card, which is used for
setting “Call Cost”, “Fixed Dial” and other functions. Please contact
your network operator to affirm whether your SIM card supports these
functions. If you input wrong PIN2 three times in succession, the PIN2
will be locked; only after you input correct PUK2, the PIN2 can be
unlocked. Please follow the operations below to unlock it.
① Input correct PUK2 as prompt on the display to unlock PIN2.
② Then input new PIN2 and press “OK” soft key.
③ When you are required to input the new PIN2 again, input it and
press “OK” soft key.

-18-
2.5.5 PUK2
PUK2 (Personal Unlock Key 2, 8-digit) is used for unlocking locked
PIN2. Usually PUK2 is supplied with the SIM card by the manufacturer.
If not, please contact your network operator who offers you services. If
you input wrong PUK2 ten times in succession, you will be unable to
apply the functions that need PIN2; if you want to apply these functions,
you need to contact your network operator to change a new SIM card.
2.5.6 Barring Code
To activate call barring, you need a barring code.
The code comes with your subscription of this network function and can
be obtained from your network operator.

-19-
3 GENERAL FUNCTIONS
3.1 MAKING CALLS
z In idle screen, input the area code and phone number and press
Pick up key to make a call.
z You can press Hang up key to end a call.
3.1.1 Making International Calls
Press“*”key twice. The " + " sign appears on the screen. Enter the
country code, area code and phone number, and then press the Pick
up key.
3.1.2 Making Calls to An Extension Number
After entering the main number, press “*”key three times to get “p”
or four times to get “w”, then enter the extension number and press the
Pick up key
3.1.3 Correcting Wrong Inputs
Press the Right Soft key to delete the last character on the screen.
Hold the Right Soft key to clear all.
3.1.4 Calling a Number from the Phone Book
Method 1:
① Scroll to the phone book by pressing the Right Soft key. To search
the entry you want, press the number keys to enter the first

-20-
character of the name, then press Up or Down of the Selection
key to find the name.
② Press the Pick up key to call the selected number.
Method 2:
① On the standby screen, press the left soft key to select the
phone book.
② Select ”Search Entry” to find the number you want and then press
the Pick up key to call the selected number.
3.1.5 Re-dialing a Last Called Number
z On the standby screen, press the Pick up key to display the call
records.
z Your phone will display the numbers of the received calls, dialed
calls and missed calls. Press Up or Down of the Selection key to
select a number.
z Press the Pick up key to call the selected number.
3.1.6 Speed Dialing
z In the dialing list of “Settings->Phone Setup->Speed Dial->Set
Number”, you can edit entries of speed dialing.
z After you set it to “On”, you can long press the Numeric key 2~9
corresponding to the numbers in speed dialing list to make calls.
3.2 ADJUSTING THE SOUND VOLUME
During a call, you can press the Up/Down Key of the Selection key to
adjust the earpiece volume.

-21-
3.3 ANSWERING CALLS
z When you receive a call, the phone rings or vibrates.
z Press the Pick up key or Left Soft key to answer the call.
z Press the Hang up key or Right Soft key to end the call.
Note: If the caller can be identified, the caller’s phone number will be
displayed (if the number has been stored in the phonebook of your
phone, the caller’s name and phone number will be displayed).). If the
caller can’t be identified, it only displays the caller’s number. When you
use the function list or phonebook, you can also answer a call.
3.4 OPTIONS DURING A CALL
Your phone provides a number of control functions that you can use
during a call.
3.4.1 Call Waiting
If your network supports the call waiting service and the service is
activated, you can hear the call waiting tone if you receive another all
during the conversation.
To answer another call during the conversation:
z Press the Pick up key or Left Soft key to answer the incoming call.
The first call (ongoing call) will be held automatically. See
“Hold/Switching”.
z Press the Hang up key or Right Soft key to reject the incoming call
and continue the current call.
z Press the Left Soft key to held the ongoing call and answer the
incoming call.

-22-
3.4.2 Hold/Switching
When you have a call on hold and another one in progress:
z Press the Left Soft key to select Swap to hold the ongoing call and
answer the held call.
z Press the Left Soft key to select End Single to disconnect or hold the
ongoing call. Press the Hang up key to end the ongoing call.
z Or you can press Left soft key to select End All to end both current
call and the call on hold.
3.4.3 Call Hold
If the network supports call holding, you can make another call at the
same time you have a call in progress:
Method 1:
z Directly input the phone number or press Left soft key to transfer the
phone number you want to call from the phonebook, or press Left
soft key to select New Call to input the phone number, then press
Pick up key to make the second call.
z And the first call (in progress) will be automatically put on hold.
Method 2:
z Press Left soft key to select mute to hold current call.
z And then start making another call.
After the call is answered, one call is in progress and the other one is
on hold; you can switch between the two calls, refer to “Hold/Switch” for
details.

-23-
3.4.4 Mute/Un-mute
With this function, you can turn off/on the microphone of the phone and
other microphones connected. “Mute” function can prevent others from
hearing your voice.
During a call, you can press Left soft key to enter “Option→Mute” to
enable or disable mute function.
3.4.5 Other Options during a Call
During a call, you can enter the Phone Book, SMS, and other functions;
please refer to Menu Guidance for details.

-24-
4 GUIDE TO MENU OPERATIONS
The functions available in this model of mobile phone are listed below
and it briefly describes each function. If you want to view these
functions, refer to “Appendix D: Function List”.
4.1 SMS
− In idle screen, press left soft key to enter the menu and scroll to
“SMS” by pressing Left/Right key or Up/Down key of the Selection
key.
− Press “select” soft key to enter this function.
Short Message Service (SMS) is a kind of network service which
provided by the network operator. If you want to send short messages,
you need the number of short message service center (you can get the
number from your network operator).
4.1.1 Write Message
Press“#” key to switch input methods when editing message.
z Input messages. You can press “*” key to insert the special symbol
in input mode.
z Press “Option” to select the following options:
Submit: Send messages.
Save and Send: Send and have the message saved in outbox.
Save: Have the message only saved to outbox.
Send By Group: Send messages to one group.
-25-
Use Template:You can use template messages.
Exit: Exit from option
4.1.2 Inbox
When receiving new short messages or short message box is full, the
screen will display status icon; if the short message box is full, you
will not be able to receive new messages, please delete some of the
messages.
z Select “Inbox”, the screen will display the message in the inbox, the
one with is the unread message.
z Press “OK” soft key to read the current message.
z Read messages, press “Option” to select the following options:
Delete: Delete the message.
Reply: Reply to sender.
Forward: Forward or edit the original text message.
GET Number: Extract all phone numbers and save them to SIM
card or phone or dial directly.
4.1.3 Outbox
z Select “Outbox”, the screen will display the message in the Outbox.
z Press “OK” soft key to browse the current messages.
z Read messages, press “Option” to select the following option:
Please refer to “Write Messages” for operation details.

-26-
4.1.4 Sent-Box
z Select “Sent-Box”, the screen will display the message in the
Sent-Box.
z Press “OK” soft key to browse the current messages.
z Read messages, press “Option” to select the following option:
Please refer to “Write Messages” for operation details.
4.1.5 Draftbox
z Select “Draftbox”, the screen will display the message in the
Draftbox.
z Press “OK” soft key to browse the current messages.
z Read messages, press “Option” to select the following option:
Please refer to “Write Messages” for operation details.
4.1.6 Report-Box
z Select “Report-Box”, the screen will display the message in the
Report-Box.
z Press “OK” soft key to browse the current messages.
z Read messages, press “Option” to select the following option:
Please refer to “Write Messages” for operation details.
4.1.7 Use Template
Ten template messages are saved in the phone and users can edit or

-27-
delete them. After deleting, the template section will become blank.
4.1.8 Message Settings
You can set the default information about SMS properties with the
function.
Delivered:You can set ON/Off
Preferred Storage: The default location for Message Saving is SIM
card.
Expire:You can set time of Expire.
SC Address:You can save or modify the Short Message Center
number required by message sending; the number can be obtained
from the network operator.
4.1.9 Delete message
Delete the message.
4.1.10 Memory Status
Check the percentage of short messages stored in SIM card in the total
capacity.
4.1.11 Voice Mail Server
Press Up/Down keys to select “Voice Mail Server” in the “Messages”
menu, press “OK” to enter.
Connect to Voice: You can hear messages in the voice mailbox with
the function.
Setting: Input or modify the number of voice mailbox.

-28-
Note: The service offered by the network resembles the message
machine which enables the caller to leave word when you can not or
not willing to answer the phone. Your phone number of the voice
mailbox is saved in the phone. Long press on the numeric key 1 to dial
the number of the voice mailbox in the idle mode after the voice
mailbox number is set. Please contact the network operator for details.
4.1.12 Broadcast Message
The network service enables you to receive various text messages,
such as weather or transportation. Few network provides such service
across the world, please refer to the network operator for details.
Read Message: Press Up/Down keys to select the message.
Receive Mode: Turn on or off the Cell Broadcast.
Channel Setting: Select the Broadcast Channel. You can selectively
receive the broadcast messages.
Show: You can Turn on or off.
Languages: Select the required language to display the broadcast
message.
Note: Whether language can support or nor depends on the network
operator.
4.2 PHONE BOOK
You can store up to 300 phone numbers in the memory of the mobile
phone; for SIM card, the number of phone numbers that can be stored
in the SIM Card depends on capacity of the SIM Card. The phone
numbers stored in the phone and SIM card can be taken as a uniform
phonebook when you search for phone numbers.

-29-
4.2.1 PhoneBook View
With this function, you can quickly locate the number of the person you
wish to speak to. You can enter the initial letter of the person’s name
and entries which begin with this letter will be displayed in the middle
lines of the LCD; you can press the Selection key Up or Down to
browse the entries, then you can press the Pick Up Key to make a
call.
4.2.2 Search Entry
You can find the phone number you need in the phone book by
applying this function. In idle screen, press “Menu” soft key to select
“Phone Book” and press Up/Down key of the Selection key to select
“Search Entry”, then you can operate as follows:
z In "Name" box, input all letters of the name or you can input the initial
letters of the name.
z Press “Option” soft key to select “Search”, and then press “OK” soft
key, all entries that meet the requirement will be listed. You can
press Up/Down key of the Selection key to browse all entries, then
you can press Pick up key to make a call.
z For each entry, you can perform following operations by pressing
“Option” soft key:
Edit: Edit this entry.
Send SMS: Send a short message to this number.
Delete: Delete this entry from the phonebook.
Copy: You can copy entries in the SIM card to the phone or entries in
the phone to the SIM card, i.e. Phone-SIM Copy.

-30-
Move: If this entry is saved in the SIM card, it will be moved to the
phone with this operation; on the contrary, it will be moved to the SIM
card.
IP Dial: If IP dial has been set, an IP prefix number will be added in
the front of the number and an IP call will be made (see “IP number”
in call setup); otherwise, a common call will be made.
4.2.3 Add New Entry
With this function, you can add new entries to the phonebook. You
can add them to the SIM card or the phone, specific operations are as
follows:
− Select “Add New Entry” in the phonebook menu, and then select “To
SIM” or “To Phone”.
− If you select “To SIM”, press “OK” soft key; after you edit names,
press “Done” and Up/Down key of the Selection key to input
“Number”, then select “Save”.
− Select “To Phone” and press “OK” soft key; First input the name, and
press “Edit” soft key; this mobile phone offers you Multitap ABC Input
Method (ABC), Multitap abc Input Method (abc), Numeric Input
Method (123), eZi Text ABC Input Method (eZi ABC), eZi Text abc
Input Method (eZi abc), etc. Refer to “Appendix A: Guidance of Input
Methods”; then press “Options” soft key and select “Done” soft key.
− Then press Up/Down key of Selection key to select the information
items you want to input the phone Number..
− If you input wrong characters, press “Clear” soft key to clear final
characters you input. If you want to delete all characters you input,
you can press and hold “Clear” soft key for a few seconds.
− Finally, press “Done” soft key to complete adding new entries.

-31-
Note: When editing E-mail address, press “#“ key to switch input
methods.
4.2.4 Copy
With this function, you can copy the phonebook entries between the
phone and SIM card.
Note: If the storage capacity for the phonebook in the phone is different
from that for the phonebook in the SIM card, the phonebook with
smaller storage capacity shall prevail during copying.
4.2.5 Move
With this function, you can move the phonebook entries between the
phone and SIM card.
Note: If the storage capacity for the phonebook in the phone is different
from that for the phonebook in the SIM card, the phonebook with
smaller storage capacity shall prevail during copying.
4.2.6 Delete
With this function, you can completely delete all contents in the
phonebook of the phone or the SIM card.
4.2.7 Caller Group
This function allows you to set group name, associate sound and
member list.

-32-
4.2.8 Memory Status
− Display the used space and total space of phonebook in the phone
and phonebook in the SIM card.
Note: After you switch on the phone and it find the network, you view
the phonebook immediately and “Processing” is displayed on the LCD,
it means that the phonebook is under initialization, please view the
phonebook after a few seconds.
4.3 CALL HISTORY
In the idle mode, press left soft key to enter the menu and select “Call
History”, or press to view Call Logs.
4.3.1 Missed Calls
You can view the latest missed calls with the function.
z Enter the function, press Up/Down keys to select one phone
number.
Press ”Option” conduct the follow operations:
Delete: Delete the item from the list of missed calls.
Save: Save the selected numbers to SIM card or the phone.
Edit: Edit the selected number and save it to SIM card or the phone.
Dial: Dial the selected phone number.
IP Dial: IP Dial the selected phone number.
Write message: Edit message and send it to the number.
Black List: Join the Black list

-33-
4.3.2 Received Calls
You can view the latest received calls with the function. You can delete,
save, dial or edit the received call selected by you after entering the
function, please refer to “Missed Calls” for details.
4.3.3 Dialed Calls
You can view the latest dialed calls with the function. You can delete,
save, dial or edit the selected call after entering the function, please
refer to “Missed Calls” for details.
4.3.4 Delete Call Log
You can remove all records of missed, dialed or received calls with the
function.
4.3.5 Call Time
With this function, you can view the call time for the last call, total sent
and total received calls and reset all time.
− Last call time: The last call time can be checked.
− Total Sent: Total call time can be checked.
− Total Received: Total time for received calls can be checked.
− Reset All Time: Reset the counters.
4.3.6 Call Cost
You can check Last Call Cost, Total Cost, Reset Cost, Max Cost and
set Price Per Unit.

-34-
− Last Call Cost: You can check last call charge.
− Total Cost: You can check the upper limit on call charge.
− Reset Cost: You can check and modify the call rates. PIN2 code is
required when modifying.
− Max Cost: You can check and modify total call charges. PIN2 code
is required when modifying.
− Price Per Unit: You can check and modify the upper limit on call
charge. PIN2 code is required when modifying.
Note: The function depends on SIM card, some SIM cards do not
support the function, PIN2 is provided by the network operator; please
contact the network operator for the PIN2.
4.4 GAMES
You can play the games.
Note: Game menu includes Start Game, Game Audio, Best Grades
and Game Help.
4.5 ORGANIZER
4.5.1 Alarm
This mobile phone supplies three alarms to you, you can set up them
as you required. If you did not start up the alarm, there will be no icon
ahead, a“ √” mark will be ahead after starting up. Choose the Edit
soft key, enter into the function of setting the alarm:
− Select On.
− Set the time of activating alarm.

-35-
− Choose the way of ringing you need: Once, Everyday, Days (this can
be finished by pressing the down key and then activating).
− Press the Done soft key.
Note: when an alarm is ringing, if you choose Snooze or don’t operate
to prevent ringing, the alarm will default that you did not hear the ring;
five minutes later, it will ring again; if you are still like before, every five
minutes it will ring to prompt you.
4.5.2 Calculator
This mobile phone provides you the function of calculator; you can plus,
minus, multiply and divide. The using steps as follows:
− Input the first number: when “0” appears on the screen, please input
the first number you want to count (press “#” key to input the decimal
point.
− Input operator: those up, down, left, right of the direction keys and
OK soft key correspond to the sign of +, -, *, /, = separately.
− Input the second number.
− Calculate the Result: Press OK soft key, the result will appear on the
screen.
− Count On: If you use the existing result to count, you should press
the left/right keys or up/down keys of the direction key to input the
operator, then input the second number.
− Clear: Press clear soft key. Clear according to the existing input
situation. If you have got the result, clear it to “0”. If you are inputting
the operand or operator, clear the current one only.
Quit this function: Press the return soft key. If there is no return key on
the screen, press the clear soft key to quit step by step.

-36-
4.5.3 Stopwatch
You can use the Stopwatch.
4.5.4 To Do List
Press the Left Soft key to add new memo.
− Set the date of activating the To Do List.
− Set the time of activating the To Do List.
− Input the note text of the To Do List.
− Start up the alarm ..
− Press the Done soft key.
Select a memo, you can View, Add, Edit Task, Delete Task and Delete
All as required.
4.5.5 STK Service
This service is provided according to the SIM card service which
provided by the network operator.
4.6 USER PROFILES
4.6.1 General
Activate
Tone Setup: Includes Incoming Call, Alarm, Power On, Power Off,
Message Tone, and Keypad Tone. You can choose the built-in ring
tones, or the tones composed by yourself.

-37-
Volume: Includes the volume setting of Ring Tone .
Alert Type:
− Ring: Just ringing, no vibration.
− Ascending: Select ascending.
− Vibration Only: Just vibrating, no ringing.
− Vibra and Ring: Vibrating and ringing.
− Vibra Then Ring: Ring after vibration.
4.6.2 Meeting
The detailed operation has been shown in the “General”.
4.6.3 Outdoor
The detailed operation has been shown in the “General”.
4.6.4 Indoor
The detailed operation has been shown in the “General”.
4.7 SETTINGS
Press “Menu” soft key in idle mode. Press Left /Right or Up/Down key
to select “Settings”. Press “OK” soft key to enter the function.
4.7.1 Phone Setup
Time and Date:
Set Time/Date: Set time and date.

-38-
Set Data Format: Set Time format and Date format.
Schedule Power On/Off: With this function, you can set the time for
automatically turning on or off your phone. To use this service, you
have to activate it first, and then set Power On or Off and set the time.
Note: please disable the Schedule Power On function before you
aboard the plane.
Language: Select language for display text.
Input Methods: Set the default input method for wording editing.
Greeting Text: When set to ON, greetings can be displayed when
Power ON.
Speed Dial: When set ON, 8 sets of numbers available for you to set
for quick dial (corresponding numeric key 2 ~numeric key 9 ) ,Long
press on the corresponding numeric key in the idle interface to dial the
corresponding phone number.
Dedicated Key: You can define the shortcut function of Up, Down, Left,
Right of direction key as you like, press the corresponding key to
enter the specified function in idle mode.
Shortcuts: Use this function you are allowed to set shortcuts, after
finished, return to the main menu to enter into the sub-menu of Settings,
set some one to be the function of Shortcuts during setting Dedicated
key (selection key) of Phone Setup. On the idle screen, you can press
the corresponding direction key to go to the function menu speedily.
4.7.2 Display Setup
Wallpaper: Set the Wallpaper.
Luminance Adjust: Set the Luminance of LCD.
Contrast: Adjust the contrast of LCD.

-39-
LCD Backlight: Set the time of Backlight.
4.7.3 Call Setup
Caller ID: You can select the system presetting provided by the
network operator to hide or send the number. The default setting by the
factory is Set By Network.
Note: It has something to do with network, so select “Hide ID” probably
causes the failure to dial. Please test it to ensure that everything is ok
with talk over the phone before use the function.
Call Waiting:
− On: When activating the function, the mobile phone will be
connected with network. After a while, the network will response by
sending the message to OK your operation. If you start Call Waiting,
you will receive the alarm from the network if someone calls you
when you are talking over the phone, and the phone number of the
caller will appear on the screen.
− Off: If you cancel the function, you will not receive the alarm from the
network if someone call you when you are talking over the phone.
− Query Status: You can inquiry with the network about the current
status with the function.
Call Divert: The network service allows the incoming call to transfer to
another phone defined by you. Enter Call Setting, select Call Divert and
press OK to enter the function.
− Divert All Voice Calls: When activate the function, all incoming calls
will be diverted to the defined number. Select Activate or Deactivate,
then the phone will connect the network, after a while, the network
will response and advise the operation result.
-40-
− Divert If unreachable: When activate the function, the incoming call
will be diverted to the defined number if not reachable. Select
Activate or Deactivate, then the phone will connect the network, after
a while, the network will response and advise the operation result.
− Divert If No Answer: When activate the function, the incoming call
will be diverted to the defined number if no answer within the
specified time. Select Activate or Deactivate, then the phone will
connect the network, after a while, the network will response and
advise the operation result.
− Divert If Busy: When activate the function, the incoming call will be
diverted to the defined number when busy. Select Activate or
Deactivate, then the phone will connect the network, after a while,
the network will response and advise the operation result.
Note: The fore-said four divert operations:
- Activate: Activate it after inputting the divert number.
- Deactivate: Cancel the function.
- Query Status: Inquire with the network about the current status
of some divert function. The phone will contact the network,
after a while, the network will response and inform you of the
result.
− Cancel All Divert: Cancel various divert with the function, i.e. set all
divert functions Deactivate. Select the function, then the phone will
connect the network, after a minute, the network will response and
advise the operation result.
Call Barring:
You can bar the calls with the function. The network bar password
provided by the network operator is required for you to set the function.
You will be advised if the password is not correct. After OK the option,
select Activate or Deactivate, you will be required to input the bar
-41-
password, then the phone will contact the network, after a while, the
network will response and informs you of the result.
− Outgoing Calls:
All Calls: When set it Activate, you cannot make phone call.
International Calls: When set it Activate, you can dial the
international long distance calls.
International Except Home: When set it Activate, you only can dial
the local call when you are abroad or dial the country where the
network provider is.
− Incoming Calls:
All Calls: When set it Activate, you can not receive any phone call.
When Roaming: When set it to Activate, you cannot receive the
incoming call when you are out of service.
Note: The fore-said five barring operations:
- Activate: Activate it after inputting the barring number.
- Deactivate: Cancel the barring function.
- Query Status: Inquire with the network about the current status
of some barring function. The phone will contact the network,
after a while, the network will response and inform you of the
result.
− Cancel All: Cancel the call barring, network barring password
provided by the network operator is required to cancel call barring.
− Change Barring PW: Modify the barring password with the function.
Input the original barring password when modifying.

-42-
Call Time Reminder:
The function enables you to duly end talk to save call cost by prompt.
The optional prompt types are "Off", "Single" or "Periodic"; No prompt
when set OFF; When set Periodic, you are required to select a
numerical value 45,50, and 55 seconds, the phone will automatically
ring one time at the time before every full minute.
Connect Tone: Set On/Off.
Auto Redial:
Start or close the auto redial function. When set ON, the phone will
automatically redial after a while if you fail to reach the receiver. The
auto redial can be done for 10 times at best, during which you can not
dial any other call, press Cancel to end the auto redial.
IP Dial:
Activate: Activate selected IP number.
Edit: Edit IP number.
Black List: Phone fire wall function, automate to refuse incoming calls,
not notification any message.
Status: The status of fire wall, there OFF and ON.
Black List Number: Entering your black number.
4.7.4 Network Setup
Please contact the network operator for the following network service.
You can set it at Automatic or Manual to select the network (Auto is
recommended). When selecting Automatic, the phone will make the
preferential selection according to the network in which SIM card
belongs to. When selecting Manual, you are required to select the

-43-
same network as the registered network with the network operator
by SIM card for your use.
4.7.5 Security Setup
Some related setup options to security use are provided.
z SIM Lock:
Enter PIN: Enter the right PIN. When set SIM Lock at ON, you are
required to enter PIN for each Power-On, PUK (Personal Unlock key)
is required when you fail to enter the right PIN for three times. PUK is
used to unlock and modify the locked PIN. Please contact the
network operator if you are not provided with PUK or lost PUK.
z Phone Lock:
You can lock or unlock the phone; enter the password to activate or
deactivate the phone lock; when the phone is locked, you will be
required to enter the phone password for each Power-On. 4-8
figures for the phone password.
z Auto Keypad Lock:
You can lock/unlock the phone keyboard.
z Fixed Dial
If your SIM is eligible for this function, you can fix the dials. If the
function is activated, the phone numbers in fixed dial list cannot be
dialed. PIN2 is required for the function. Network support is required.
Note: PIN2 is not required before the phone is switched off if you
enter PIN2 after the phone is switched on. Therefore, please switch
the phone off and switch it on again after your setting if you do not
expect others to change the status of fixed dial.
z Change Password:

-44-
You can change PIN, phone lock password with the function.
− Steps with PIN as follows:
The original PIN is required before changing PIN.
Enter the new PIN. 4-8 figures for PIN.
Enter a verified PIN
− Steps with PIN2 as follows:
The original PIN2 is required before changing PIN2.
Enter the new PIN2. 4-8 figures for PIN2.
Enter a verified PIN2.
− Steps with Phone Lock Password as follows:
The current phone password is required before changing the
phone password.
Enter the new phone password.
Enter a verified password.
4.7.6 Restore Factory Settings
Enter “Settings” to select “Restore Factory Settings”, enter the phone
password as prompted and press OK. All settings can be restored to
factory settings with the function.
Note: Default password is“1234”。
4.8 SHORTCUTS
You can set shortcuts with this function. After you have finished, return
-45-
to the main menu to enter into the sub-menu of Settings, set some one
to be the function of SHORTCUTS during setting Dedicated Key
(Selection key) of Phone Setup. On the idle screen, you can press the
corresponding direction key to go to the function menu speedily.

-46-
5 APPENDIX
5.1 APPENDIX A: GUIDANCE OF INPUT METHODS
This phone provides the input method of Multitap ABC Input Method
(ABC), Multitap abc Input Method (abc), Numeric Input Method (123),
eZi Text ABC Input Method (eZi ABC), eZi Text abc Input Method (eZi
abc), etc. which can be used in editing phonebook, short messages,
memos, greets, alarms and other text application.
5.1.1 The icons of input methods
After entering kinds of edit windows (including edit phonebook, short
messages. etc.), the icons of Numeric and English inputs are:
z The input method of Numeric appears as: “123”.
z The input method of Multitap ABC appears as: “ABC”.The input
method of Mulitap abc appears as: “abc”.
z The input method of eZiText®Smart ABC appears as: “eZi ABC”.
z The input method of eZiText® Smart abc appears as: “eZi abc”.
5.1.2 How to switch the input methods
z Press key to switch the input methods.
e.g.: If the current input is eZi ABC, the screen will show “eZi ABC”,
press key, enter into the input of eZi abc, the screen will
show “abc”.

-47-
5.1.3 Numeric、Multitap ABC and Multitap abc
Input Methods
z Numeric
When the icon of input method is “123”, press the number keys to
input the numbers directly.
z Multitap ABC and Multitap abc
When the icon is “ABC” or “abc”, repeatedly press the number keys
(2 ~ 9)on which show the letters you required, until the letters
appear in the text area. Press once the first letter on the number
keyboard can be inputted, twice the second appears, and press in
the same way.
Note: when in the way of Multitap and Numeric input, if blank is
required, please switch to the method of Multitap ABC and Multitap
abc first, then press “0” key to input blank.
5.1.4 How to Input Special Symbols
If you want to input special symbols, such as ", . ! ? = < >”, etc. When
editing, please refer to the following steps: Press left soft key to enter
option menu for the ”Insert Symbols” in “Input method” or press
to display symbols. Press the Up/Down, or Left/Right key of selection
key to move the cursor in the symbol table, and then press Left Soft
key to choose one symbol, or press Right Soft key to cancel the
symbols selection.

-48-
5.2 APPENDIX B: MAINTAIN AND TROUBLE
SHOOTING
5.2.1 Nurse and Maintain
Your phone is excellently designed and masterly-technics, so it should
be well nursed. The suggestion as follows will help your phone to
spend the guarantee safely and to be used for a long time.
z The mobile phone and all the parts and fittings should be kept out of
children’s reach.
z Keep it dry. Far away from rains, wetness, liquors and any other
substances that may erode the electronic circuit. Don’t use or
deposit your phone at the place full of dust to avoid damaging the
moving parts.
z Do not put the phone at the place of high temperature. High
temperature may decrease the life of electronic circuit, damage the
battery, and some plastic parts.
z Do not put the phone at the cold places. When in hot environments
(to the normal temperature), the phone inside will form humidity,
which may damage the electronic circuit.
z Do not use the corrosive chemicals, cleanser or heavy scour to clean
the phone. With soft towel dipping into little soap water to wipe it.
z If your phone or any fitting can not work normally, please send them
to the professional service department. There the workers will help
you, and maintain if necessary.
Please cherish our lives, hand the waste and old products to the
legal disposer to handle appropriately.

-49-
5.2.2 Troubleshooting
If you have abnormal feel when operating your phone, please recover
the reset settings first and refer to the following troubles and the
solutions. If you still can not solve them, please contact the service
center or seller.
Troubles Solutions
Can not answer or
dial call
Make sure that the phone flip has been opened
Make sure that the battery is still available.
Make sure the signal intensity is high enough.
Make sure the own number function in the call
setting is system preset or number sending.
Make sure the line switch in call setting is the
system preset line.
Make sure that whether you have set up call
barring or fixed dialing and any other safety
function.
Make sure whether you have set up call divert.
Make sure whether you have inserted the proper
SIM card correctly.
Low voice Make sure whether the volume has been set too
low.
No ring
Make sure whether you have set up the vibration.
Make sure whether the ring volume is too low
Leave noise place.
Make sure whether you have set up call divert.
LCD unclear Make sure whether the contrast has been set too
low.

-50-
5.3 APPENDIX C: INTRODUCTION OF AVAILABLE
FITTINGS
5.3.1 Travel Charger
Used in traveling when charge is required.
Note: Please use dedicated KONKA accessories.
5.4 APPENDIX D: FUNCTION LIST
1 SMS
1.1 Write Message
1.2 Inbox
1.3 Outbox
1.4 Sent-Box
1.5 Draftbox
1.6 Report-Box
1.7 Use Template
1.8 Message Settings
1.9 Delete message
1.10 Memory Status
-51-
1.11 Voice Mail Server
1.12 Broadcast Message
2 Phone Book
2.1 PhoneBook View
2.2 Search Entry
2.3 Add New Entry
2.4 Copy
2.5 Move
2.6 Delete
2.7 Caller Group
2.8 Memory Status
3 Call History
3.1 Missed Calls
3.2 Received Calls
3.3 Dialed Calls
3.4 Delete Call Log
3.5 Call Time
3.6 Call Cost
4 Games
5 Organizer
5.1 Alarm
5.2 Calculator
-52-
5.3 Stopwatch k
5.4 To Do List
5.5 STK Service
6 User Profiles
6.1 General
6.2 Meeting
6.3 Outdoor
6.4 Indoor
7 Settings
7.1 Phone Setup
7.1.1 Time and Date
7.1.2 Schedule Power On/Off
7.1.3 Language
7.1.4 Input Methods
7.1.5 Greeting Text
7.1.6 Speed Dial
7.1.7 Dedicated Key
7.1.8 Shortcuts
7.2 Display Setup
7.2.1 Wallpaper
7.2.2 Luminance Adj
-53-
7.2.3 Contrast
7.2.4 LCD Backlight
7.3 Call Setup
7.3.1 Caller ID
7.3.2 Call waiting
7.3.3 Call Divert
7.3.4 Call Barring
7.3.5 Call Time Reminder
7.3.6 Connect Tone
7.3.7 Auto Redial
7.3.8 IP Dial
7.3.9 Black List
7.4 Network Setup
7.5 Security Setup
7.5.1 SIM Lock:
7.5.2 Phone Lock:
7.5.3 Auto Keypad Lock:
7.5.4 Fixed Dial
7.5.5 Change Password:
7.6 Restore Factory Settings
8 SHORTCUTS

-54-
5.5 RF EXPOSURE INFORMATION AND
STATEMENT
The SAR limit of USA (FCC) is 1.6 W/kg averaged over one gram of
tissue. Device types C625 (FCC ID: UT3KK625) has also been tested
against this SAR limit. The highest SAR value reported under this
standard during product certification for use at the ear is 0.625 W/kg
and when properly worn on the body is 0.268 W/kg. This device was
tested for typical body-worn operations with the back of the handset
kept 1.5cm from the body. To maintain compliance with FCC RF
exposure requirements, use accessories that maintain a 1.5cm
separation distance between the user's body and the back of the
handset. The use of belt clips, holsters and similar accessories should
not contain metallic components in its assembly. The use of
accessories that do not satisfy these requirements may not comply with
FCC RF exposure requirements, and should be avoided.
This device complies with part 15 of the FCC rules. Operation is subject
to the following two conditions: (1) this device may not cause harmful
interference, and (2) this device must accept any interference received,
including interference that may cause undesired operation.
NOTE: The manufacturer is not responsible for any radio or TV
interference caused by unauthorized modifications to this equipment.
Such modifications could void the user’s authority to operate the
equipment.
NOTE: This equipment has been tested and found to comply with the
limits for a Class B digital device, pursuant to part 15 of the FCC Rules.
These limits are designed to provide reasonable protection against
harmful interference in a residential installation. This equipment
generates uses and can radiate radio frequency energy and, if not
installed and used in accordance with the instructions, may cause
harmful interference to radio communications. However, there is no
guarantee that interference will not occur in a particular installation. If
this equipment does cause harmful interference to radio or television
reception, which can be determined by turning the equipment off and
on, the user is encouraged to try to correct the interference by one or
-55-
more of the following measures:
- Reorient or relocate the receiving antenna.
- Increase the separation between the equipment and receiver.
-Connect the equipment into an outlet on a circuit different from that to
which the receiver is connected.
-Consult the dealer or an experienced radio/TV technician for help