Konka Telecommunications Technology KKTV9 GSM DUAL BAND GPRS DIGITAL MOBILE PHONE-BLUETOOTH PORTION User Manual
Shenzhen Konka Telecommunications Technology Co., Ltd. GSM DUAL BAND GPRS DIGITAL MOBILE PHONE-BLUETOOTH PORTION Users Manual
Users Manual


© 2010. All rights are reserved. No part of this document may be
reproduced without permission. All trademarks and brand names
mentioned in this publication are property of their respective owners.
While all efforts have been made to ensure the accuracy of all contents
in this manual, we assume no liability for errors or omissions or by
statements of any kind in this manual, whether such errors are
omissions or statements resulting from negligence, accidents, or any
other cause. The contents of this manual are subject to change without
notice.
Protect your environment! We strive to produce products in compliance
with global environmental standards. Please consult your local
authorities for proper disposal.
Note: User’s Manual is Just to guide the user about the functionality of
the phone. This dose not seems any certificate of technology. Some
functions may very due to modifications and up gradations of software
or due to print mistake.

SAFETY PRECAUTIONS
Before using your phone, please read the following important
information to eliminate or reduce any possibility of causing damage
and personal injury.
Do not use wireless phones while driving.
Switch off wireless devices in aircraft. The signal may cause
interference. Using them on aircraft is illegal.
Do not use mobile phones where blasting is in progress.
Follow any regulations and rules strictly.
Do not use mobile phones at a refueling point. Don’t use
near fuel or chemicals
Follow regulations or rules in hospital and health care
facilities. Switch phone off near medical equipment.
All wireless devices may get interference that could affect
performance.
Only qualified service personnel can install or repair this
device.
Use only approved accessories and batteries.
Use only in normal position. Do not expose your phone to
extreme high temperatures above +60℃(+140°F). Do not
use an
y
thin
g
static to clean
y
our
p
hone.

Ensure the phone is turned on and in service. Enter the
emergency number, then press Pick Up key. Give your
location. Do not end the call until told to do so.
Table of Content
GENERAL INFORMATION.................................................... 1
Antenna…………………………………………………………………...1
Network Service………………………………………………………….1
Accessories………………………………………………………………1
Privacy…………………………………………………………………….2
KNOW YOUR MOBILE PHONE ............................................ 3
Positions of Phone Keys………………………………………………..3
Functions of Keys………………………………………………………..4
Display Screen…………………………………………………………...6
Status Icons………………………………………………………………6
Back Light………………………………………………………………...7
GETTING STARTED............................................................... 8
First Call…………………………………………………………………..8
Mounting the SIM Card………………………………………………….8
Mounting the Memory Card…………………………………………...10
Charging the Battery…………………………………………………...10
Switching Your Phone On/Off…………………………………………11
Using the Personal Handsfree Handset……………………………...11
CALLING............................................................................... 12
Making Calls…………………………………………………………….12
Answering Calls………………………………………………………...13
Options in Call…………………………………………………………..13
GUIDE TO MENU OPERATIONS………….14
Services…………………………………………………………………14
Phone Book……………………………………………………………..29
Fun & Games…………………………………………………………...22
Call Center………………………………………………………………23
Messages Center………………………………………………………14
Multimedia………………………………………………………………29
Organizer……………………………………………………………… .43
Settings………………………………………………………………….36
User Profiles……………………………………………………………36
APPENDIX............................................................................ 46
Appendix A: Guidance on Entry Methods……………………………46
Appendix B: Troubleshooting…………………………………………48
Appendix C: Available Accessories…………………………………..50

1
GENERAL INFORMATION
Antenna
Use of other antenna devices could damage your mobile phone and
reduce performance. Your phone has a built-in antenna. Don’t touch the
antenna area unnecessarily when the phone is switched on. Contact
with the antenna affects call quality and may cause the phone to
operate at a higher power level than otherwise needed.
Network Service
A lot of features described in this manual are called network service.
They are special services provided by wireless service providers. You
should subscribe to these services from your home service provider
and learn instructions on uses before you select the network you want
to use.
Accessories
Li-Ion battery is the manufacturer-approved rechargeable battery
available for your phone. May be some batteries performs best after
several full charge/discharge cycles.
Use only batteries, chargers and accessories approved by the phone
manufacturer for use with this particular model. The use of any other
types will invalidate any approval or warranty applying to the phone,
and may be dangerous.
Please consult with your dealer for availability of approved accessories.
2
Privacy
The shoot or recording of photos, images or sounds privately may be
prohibited by law and/or subject to criminal prosecution. We
recommend you to be responsible and respectful of privacy laws when
you are taking photos, shooting videos, or doing records.
3
KNOW YOUR MOBILE PHONE
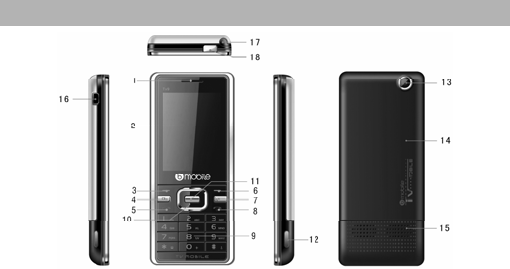
Positions of Phone Keys
1. Earpiece 10. Selection key
2. Screen 11. OK key
3. Left Soft key 12. Speaker
4. Camera shortcut key 13. Camera
5. Pick up key 14. Battery Cover
6. Right Soft key 15. Speaker
7. TV shortcut key 16. Charger and accessories connector
8. Hang up and Power key 17. Antenna
9. Number keys 18. Flashlight

4
Functions of Keys
Key Name Description
Pick Up
Key
Making or answering a call.
In the standby mode, press this key to access the
Call Logs.
Left Soft
Key
Use the left soft keys to execute to functions
indicated at the left of the prompt bar on the
screen.
TV
Shortcut
key
In the standby mode, press it to access TV
function.
Camera
shortcut
key
In the standby mode, press it to access
Camera function.
Hang Up
Key
End an ongoing call.
Press and hold this key to turn on or off the
mobile phone.
In the menu mode, press this key to return the
standby mode and cancel current operations.
Press this key to stop the alarm ringing once
the alarm rings.
Right Soft
Key
Use the right soft keys to execute to functions
indicated at the right of the prompt bar on the
screen.
5
Selection
Key/OK
Key
Scrolling options in the function list or the
phone book.
In the edit mode, it is used for moving the
cursor.
In the standby mode, press Selection Key to
activate a specified function; press OK to
switch to menu.
In the Camera mode, press the OK Key to take
a photo.
In the Video mode, press the OK key to
start/pause record.
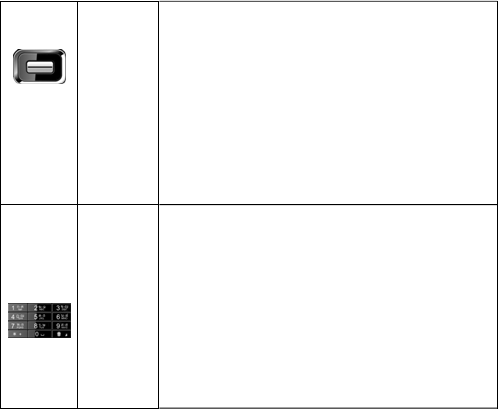
Numeric
Keys
Used to enter numbers, letters and some
special characters.
In the standby mode, long press the # key to
activate Silent mode; long press the number
key “0” to activate/ deactivate Flash Light.
In the edit mode, you can press the # key to
switch the input method.
In the Camera mode, press Numeric Keys to
switch to the corresponding function setting
quickly; press the number key “0” to start
shooting.

6
Display Screen
Your mobile phone has a single LCD display, which consists of three
main areas:
The First line displays status icons, which indicate the signal strength,
the remaining power of the battery, etc.
The Middle lines display text and graphics, including numbers, text,
animated icons and the information you enter.
The Last line displays the currently available operations assigned to the
left or right soft key.
Status Icons
Network Signal
Connecting GPRS and using GPRS
Connecting GPRS but no data alternating
Divert all Voice Calls
Auto Keypad Lock
Alarm Clock is activated
Battery Status
Missed Calls
New Message or Message Memory Full
MMS is busy
New MMS
Roaming Startup
WAP Message
Bluetooth

7
Sound Status
Ring
Vib. only
Vib. and Ring
Vib. then Ring
Back Light
You can set the Back Light for the display and keypad through options
in the menu. The backlight will be off automatically without any key
operation after a while.

8
GETTING STARTED
First Call
Insert a SIM card (Switch off your phone at first, and then remove the
battery). Enter the area code and the phone number and press Pick
Up Key.
Tip: Before you get started, you must insert a valid SIM card in your
phone and charge the battery first.
SIM Card: Please refer to “Mounting the SIM Card” for more
reference on installation.
Charging the battery: please refer to “Charging the Battery” for more
details.
Mounting the SIM Card
Your mobile phone number, PIN (Personal Identification Number), PIN2,
PUK (Personal Unlock Key), PUK2 (Personal Unlock Key2), IMSI
(International Mobile Subscriber Identity), the network information, the
phonebook data, SMS (short messages) and other data are stored in
your SIM card.
Note: This particular phone model only supports the SIM cards of 1.8V
and 3V.
Some network operators don’t offer PIN2 and PUK2, so functions
using those passwords will be unavailable.
The SIM card and its contacts can be damaged by scratches or
bending easily, so be careful while handling, inserting or removing
9
the card.
Keep all miniature SIM cards out of children’s reach.
Note: Always make sure the phone is switched off before you insert or
remove the SIM card, otherwise it may damage the SIM card.
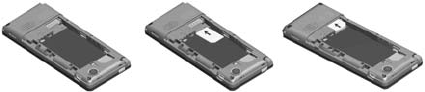
Mounting
1. Remove the battery cover by sliding it.
2. Insert the SIM card, with the notch at the lower right and the gold
contacts face down, into the card slot. Align the card to the arrow sign
as the following picture shows:
3. Replace the battery and close the cover tightly.
Note:
If the SIM Card is installed improperly or damaged, the prompt
words “Insert SIM” will display on the screen after you switch on your
phone. Remove the SIM Card and check the way that performs as
pictures show, and then mount it again.
If “Insert SIM” still appears on the screen after you have inserted the
SIM correctly, there may be something wrong with your SIM card.
Please ask the network operator to repair it.
If the screen displays that the SIM card is locked permanently,
please consult with your network operator.
10
Mounting the Memory Card
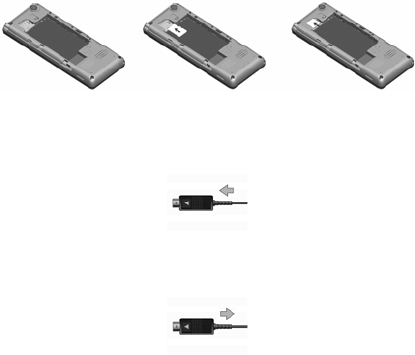
Please follow steps described as below:
Insert the Memory card, with the gold contacts face down, into the card
slot. Align the card to the arrow sign as the following picture shows:
Charging the Battery
Note: Please always keep your phone connector and charger dry.
1. Connect the connector of the travel adapter to the phone.
2. Plug the travel adapter into a proper AC wall outlet.
3. When your phone indicates that the battery is fully charged, please
pull the travel adapter out from the I/O socket of the phone.
Tip: 1. If the battery is totally empty or not enough, it may take a few
11
minutes before the charging indicator appears on the screen.
2. You can turn on/off, and use the phone while charging.
Warning: Make sure that the standard voltage/power of the place
where you charge the battery matches with the rated voltage/power of
our travel adapter.
Switching Your Phone On/Off
Press and hold Power Key for a few seconds to switch your phone
on.
If the phone ask for a phone lock code:
Enter the phone lock code, and press OK.
If the phone ask for a PIN code:
Enter the PIN code, and press OK. The PIN code is usually supplied
with the SIM card. Please consult your network operator for more
information.
Access the standby mode.
Press and hold Power Key for a few seconds to switch your phone
off.
Using the Personal Handsfree Handset
Connect the handsfree handset to your mobile phone, you can still
answer calls and use the microphone without holding the phone.

12
CALLING
Making Calls
1. Enter the phone number (with the area code)
2. Press Pick up Key to make a call.
3. Press Hang up Key to end a call.
Making International Calls
1. Press the * key twice for the international prefix symbol +.
2. Enter the country code, area code and phone number.
3. Press Pick up Key to make a call.
Making Extension Calls
1. Enter the host number, and press the * key three or four times for the
extension prefix symbol P or W.
2. Enter the extension number, and press Pick up Key to make a call.
Clear Wrong Enters
Press right soft key to delete the last character on the screen. Hold right
soft key will clear all you entered.
Making a call from the Phone Book
1. Press right soft key to access the Phonebook List. Scroll to search
the desired number. (Enter the first letter or more of the name and
press the selection key Up/Down to reach the desired name.)
2. Press Pick up Key to call the number.
Last Number Redial
13
1. In the standby mode, press Pick up Key to access the Call Logs.
2. Press the Up/Down key to reach the desired number or name and
press Pick up Key.
Adjusting the Sound Volume
During a call, you can press the Up/Down Key to adjust the earpiece
volume.
Answering Calls
1. To answer an incoming call, press Pick up Key.
2. To end or reject an incoming/ongoing call, press Hang up Key.
Tip:
If the caller can be identified, the caller’s name and phone number will
display. If the caller can’t be identified, the screen will only display the
caller’s number. When you use the function list or Phone Book, you can
also answer a call.
Options in Call
Your phone provides a number of functions that you can use during a
call.
During a call, you can access Hold/End single call, New Call, Phone
Book, Message center, Sound Recorder and other functions.

14
GUIDE TO MENU OPERATIONS
All function options about the mobile phone are listed as below with
brief descriptions.
Messages Center
Short Message Service (SMS) is a kind of network service. Your home
network may not support the service. Please consult your home
network operator for more information.
1. Enter the Menu, and select Message Center.
2. Press the left soft key to enter the function.
Write Message
1. Please press the # to switch input methods while editing a message.
You can enter letters and numbers, and insert pictures and rings.
(Support EMS service)
2. Edit your message, and press the * to insert special symbols.
3. Select Options, and then you can do: Done, Use Templates, Insert
Object and so on.
4. When you select Done, you can choose the way to send or save as
desired.
Inbox
The icon means an unread message or the message box is full.
You won't receive new messages once the message box is full. Please
delete unnecessary messages.
1. Select the unread message, and press the left soft key to read.

15
2. Select Options, and then you can do: reply, delete, edit and so on.
Drafts
In the Drafts, please select Options, and then you can send, edit or
select other operations.
Outbox
The screen will display the message list once you select the Outbox.
1. Select “OK” to read the current messages.
2. Select Options, and then you can send, edit or select other
operations.
MMS
Please consult your network operator to obtain the MMS services.
Write Message
While writing messages, you can select To, Cc, Bcc, Subject or Edit
content.
To: the phone number or E-mail address are both OK.
Cc: send the MMS to others at the same time. Phone numbers or
E-mail addresses are both OK
Bcc: send the MMS to others secretly at the same time. Phone
numbers or E-mail addresses are both OK.
Subject: edit the Subject of the MMS.
Edit content: enter the text or add picture, audio and so on.
Inbox
The phone saves the received MMS into the inbox.
All received Messages display in the inbox, and the icon means the
16
MMS is unread. Use the Down/Up key to scroll the cursor to check the
list, and the sender's name and number will display. If the MMS has
been read, the icon will change to the read icon. Please press the left
soft key to access Options, and then you can do: view, reply, delete
and so on.
Outbox
In the Outbox, please select Options, and then you can send, edit or
select other operations.
Drafts
In the Drafts, please select Options, and then you can send, edit or
select other operations.
Templates
User defined: you can save many MMS in it.
Default: You mobile phone saves many MMS in it.
And what you can do for those MMS are View, Write Message and
Properties.
MMS Settings
Please follow steps described as below:
Server Profile: You can select one profile to activate or edit.
Common settings:
1> Compose: You can configure Creation Mode, Picture Resizing,
Best page time, Auto Signature, and Signature.
2> Send: You can configure Validity period, Delivery Report, Read
Report, Priority, Slide Timing, and Delivery Time.
3> Retrieve: You can configure Home Network, Roaming, Read
17
Report, and Delivery Report.
4> Filter: You can configure Anonymous and Advertisement.
5> Memory Status: You can check the Usage, Used space and Free
space.
Email
This E-mail function can receive and send e-mails supported POP3,
IMAP4 E-mail servers. Please read the following related information
carefully before you use the function:
E-mail: Please log on some Internet web to apply an e-mail account.
That e-mail account is just the "E-mail" referred in your manual. It
belongs to the e-mail server computer system provided from the
network operator. E-mails you receive and send are transferred by that
e-mail server.
E-mail Server: is a computer that supplies the e-mail service from the
network operator. Please consult your network operator to obtain the
server name. POP3 and IMAP4 are commonly used.
1. POP3: is a client/server protocol in which e-mail is received and
held for you by your Internet server. Once you connect the web
and enable the e-mail, your phone will automatically download
the new e-mail from POP3 e-mail server to the phone's inbox, and
then delete those e-mails from the server. If you want to save
those e-mails, please select the "Leave a copy of messages on
server" option in "E-mail Setting".
2. IMAP4: (Internet Message Access Protocol) is a standard
protocol for accessing e-mail from your local server.

18
IMAP provides the user more capabilities for retaining e-mail on
the server and for organizing it in folders on the server. IMAP can
be thought of as a remote file server.
Note: Please consult your network operator to check the type of
your e-mail.
User Name: The name you enter when you applied the e- mail account.
When you log on the e-mail, the server should verify your identity.
Password: The code you enter when you applied the e-mail account.
The e-mail server will verify whether you are the only user for the e-mail
account or not according to the user name and password you input.
E-mail
This is the address used in Internet. According to the address, people
send e-mails to your mailbox. The address is assigned by the system
when you apply the e-mail, so you cannot modify the address.
Send and Receive
You can read sent and received e-mails.
Write E-mail
To: edit the receiver E-mail address.
CC: edit others E-mail address which used to send the E-mail to
others at the same time.
BCC: edit others E-mail address which used to send the E-mail to
others secretly at the same time.
Subject: edit the Subject of the E-mail.
Attachment: attach 3 files saved in the phone. The default mail
size is up to 40K.

19
Priority: you can select Low, High or Medium.
Content: enter the text and press “#” to switch input methods.
When you select Done, you can do the following operations:
− Send: to send the e-mail.
− Send and Save: to save the e-mail to Sent and send it out.
− Save to Drafts: to save the e-mail to Drafts without sending it
out
− Quit without saving: to exit the E-mail Option without saving
the e-mail.
Inbox
All received e-mails display in the inbox, and the icon means the
e-mail is unread. Use the Down/Up key to scroll the cursor to check the
list, the subject and time will display. If the e-mail has been read, the
icon will change to the read icon. Select Options, and then you can
View or select other operations.
Outbox
In the Outbox, Select Options, and then you can View or select other
operations.
Sent
After the e-mail is sent out successfully, you will be asked to save the
e-mail into the Sent or not.
Drafts
E-mails in Inbox, Sent or Unsent and the e-mail unfinished can all be
saved into the Drafts. Select Options, and then you can View or select
other operations.
20
Delete all folders
Use the function to delete e-mails in Inbox, Outbox, Sent, Drafts
respectively, or Delete all mailboxes drastically.
Delete all marks
Use the function to delete e-mails with the deleted mark in Inbox,
Outbox, Sent, Drafts respectively, or Delete all mailboxes drastically.
E-mail Accounts
Please select one mode from them. After you edited the mode, please
activate it to use the E-mail function.
1> E-Mail Address: user define
2> Display Name: user define
3> Username: user define
4> Password: user define
5> Outgoing Server: user define
6> Incoming Server: user define
7> Advanced Settings:
Account Setting:
1> Account Name: user define
2> Data Account: user define
3> Protocol: POP3
4> Check Interval: user define
5> E-mail notifications: user define
6> Download Size: user define( 102400, max)
7> Retrieve amount: user define( 50, max)
8> Reply to address: user define

21
Outgoing Server:
1> Outgoing Port: 25
2> Authentication: user define
Incoming Server:
1> Incoming port: 110
2> Download Options: user define
3> Copy on Server: user define
4> Del server mail: user define
Signature: You can set Auto Signature, Signature Image and
Signature Text.
Templates
You mobile phone saves many template in common use. What you can
do for those are Edit, Erase and Write E-mail.
Tip: The word “user define” may indicate what you enter or select, you
should consider the local network condition, please consult your
network operator and the local dealer for more information.
Broadcast Message
This network service enables you to receive all kinds of text messages,
such as weather reports or transportation information. Until now, there
are several networks afford the service in this world. Please consult
your network operator for more reference.
Broadcast message:
Receive Mode: Turn on or off the Cell Broadcast.
Read Message: Scroll the Up/Down Key to select the message.
22
Languages: Select the desired language to display the broadcast
message.
Note: Your network operator decides whether the language is
supported or not.
Channel Settings: You can choose Select, Add, Edit or Delete to
receive the Broadcast information.
Templates
You mobile phone saves many messages in common use. You can Use,
edit, or remove.
SMS Settings
You can set the default information about SMS properties.
Schedule SMS
Press the left soft key to access the Add or Options > Add, and then you
can set the date, time, message and Phone number. Press Done and
Save the message will sent out the message to the number as your
desire.
Fun & Games
Games
There are several interesting games in the phone. Please refer to
instructions from the game menu for more details.
23
STK
This service is offered as the SIM card service provided by the network
operator.
Call Center
Call History
In the standby mode, press the left soft key to access Menu > Call
Center > Call History.
Call History
All Calls: You can read all records of missed, dialed or received
calls with this function. Press the left soft key to enter Options, you
can View, Call, Send text message, Send multimedia message, and
so on.
Dialled Calls: With this function, you can check recent dialed calls.
Press the left soft key to enter Options, you can View, Call, Send
text message, Send multimedia message, and so on.
Received Calls: With this function, you can check recent received
calls. Press the left soft key to enter Options, you can View, Call,
Send text message, Send multimedia message, and so on.
Missed Calls: With this function, you can check recent missed
calls. Press the left soft key to enter Options, you can View, Call,
Send text message, Send multimedia message, and so on.
General call settings
1> Caller ID: You can select Set By Network, Hide ID or Send
24
ID. The default status is the Set by Network.
Note: This function is related with your network. Select Hide ID
may cause failure to dial. Please test the calling function is ok
before you enable Hide ID.
2> Call Waiting:
− Activate: The mobile phone will connect to the network when Call
Wait is enabled. After a while, the network will take a response by
sending messages to ensure your operation. If Call Wait is
enabled, the network will warn you. At the same time, another
coming call number will display on the screen when the first call is
ongoing and a new call is coming.
− Deactivate: If you cancel Call Waiting, the network won't warn
you when the first call is ongoing and a new call is coming.
− Query Status: With this function, you can inquire about the
current status from the network.
3> Call Divert: This function allows your phone divert coming calls to
another phone. In Settings, select Call center > General call
settings > call setting > Call Divert:
− Divert All Voice Calls: When this function is enabled, all coming
calls will be diverted to another phone. Set it On or Off, the phone
will connect to the network. After a while, the network will take a
response and tell you the result on operation.
− Divert If Unreachable: When this function is enabled, the coming
call will be diverted to another phone number if the phone is
unreachable.
25
− Divert If No Answer: When this function is enabled, the coming
call will be diverted to another phone number if there is no answer
in some time.
− Divert If Busy: When this function is enabled, the coming call will
be diverted to another phone number if the phone number you
dialed is busing.
− Divert All Data Calls: You can divert all data calls with the need
of your network operator's support.
− Cancel All Divert: Use to cancel all diverting functions.
4> Call Barring: This function makes use of Call Barring to limit some
selected calls. When you configure this function, you should
consult your network operator for the password. If the password is
wrong, the phone will prompt the fault message. After the desired
number is selected, please continue to select On or Off. After a
while, the network will take a response and tell you the result.
− Outgoing Calls:
z All Calls: When this option is enabled, you can’t make any
calls.
z International Calls: When this option is enabled, you can’t
make any international calls.
z International Calls Except to Home PLMN: When this option
is enabled, you can only make local calls when you are abroad
or dial to the country in which the network provider is.
− Incoming Calls:
26
z All Calls: When this option is enabled, you can’t make any
calls.
z When Roaming: When this option is enabled, you can’t receive
any incoming calls if you are out of reach of the network service.
− Activate All: When this option is enabled, you cannot receive any
incoming calls.
− Cancel All: Cancel the call barring. It also needs the Call baring
password provided by the network operator.
− Change Barring Password: Use to modify the Call baring
password. It needs to input the original password before you
modify.
5> Line Switching: Switch to Line 1 or Line 2, the default is Line 1.
Note: If Line 2 is selected, making calls from Line 2 depends on
the network operator.
6> Close User Group > On, this network service specifies the group
of people whom you can call and who can call you. For further
information contact your network operator or service provider.
7> More:
1> Black List: If on, you won’t receive the calls from the numbers
entered in the blacklist.
2> Auto Redial: You can set the Auto Redial function On or Off.
When set it ON, the phone will automatically redial the last
called number after a while if you fail to connect to the number.
The times for auto redial are up to 10 times. You can’t make any
other calls when the Auto Redial is ongoing. Press Cancel to
27
end Auto Redial. .
3> Background sound: You can set the background sound when
you are taking phone call as you need.
Select when make call: You can set on and off.
Playback setting: You can set the volume and the play mode
of the background sounds.
Effect list: There are ten kinds of effect sounds as default,
and you can also add other effects as you need.
4> Call Time Display: You can set Call Time Display On or Off.
The call time will display when set it on, .The call time won't
display when set it off.
5> Call Time Reminder: In order to save the call cost, this function
prompts you to end the call in time. You can select Off, Single, or
Periodic. There is no prompt when Off is selected. You should
enter a specific time between 1 and 3000 seconds when Single
is selected. The phone will ring once when the time is up. You
should enter a specific time between 30 and 60 seconds when
Periodic is selected. The phone will ring once automatically at
the specific time before the integral minute is up.
6> Auto quick end: You can set ON/ OFF, and set a time (1~9999s)
as your desire.
7> Reject by SMS: You can set on and off.
28
Services
STK Service
This service is offered as the SIM card service provided by the network
operator.
WAP
WAP enable you tour around the Internet world easily and pleasantly.
Please follow the steps described as below:
1. Homepage: The default Internet Web Address.
2. Book Marks: Save the Web address you often use.
3. Recent Pages: Records after you browse the Website.
4. Offline Pages: You can view the offline pages which you have
saved.
5. Enter Address: Press the left soft key to access Enter Address, and
then input the web address to go to the Internet.
6. Service Inbox: Messages sent to users from the Web site.
7. Settings: You can configure Profiles, Browser Options, Service
Message Settings, Clear Cache, Clear Cookies and Trusted
certificates.
29
Phone Book
You can save many phone numbers in your mobile phone. The capacity
of your SIM card decides how many phone numbers can be saved in.
You can access the Phone Book to search all records saved in this
mobile phone and your SIM card.
Multimedia
TV
Draw out the antenna in the top left corner of the phone. If this function
had been actives for the first time, it will prompt you to search channel.
Press the Up/Down key to switch channel, press “*” & “#” key to adjust
the volume. Press the OK key to esc the full screen mode, and then you
can press the Left/Right Key to switch channel and press the Up/Down
to adjust the volume.
In the full-screen mode, press the left soft key to access these option as
below:
1. Preset auto search: to choose your area/city
2. Manual choose: to get into the function of manual search
3. Channel list: to pick up a channel
4. Power off setting: you can choose None/10min/20min/30min/
40min/50min/60min.
Camera
CMOS camera is built in to your mobile phone. Digital zoom depends
30
on the picture’s size. You can press the Up/Down selection key to adjust
the focus.
Select Camera in Multimedia menu to activate the camera, press the
OK key/the number key 0 to take a photo. Press the left soft key to
access the following options:
Photos: With this function, you can view, browse style, forward,
rename, delete and do some other operations with these pictures.
Camera Settings: You can configure the basic settings of camera such
as shutter sound, EV, Contrast, banding and so on.
Image Settings: You can set the size and quality of these images.
White Balance: Adjust the color balance of the image. You can make
your photo appear warmer or cooler.
Scene Mode: You can set Auto or Night.
Effect Settings: You can add a distinct appeal to your pictures with the
following effects Normal, Grayscale, Sepia, Sepia Green, Sepia Blue,
Color Invert.
Storage: To set the default storage path.
Restore Default: Camera Parameters will be restored to factory
parameters with this function.
Tip: You can use the selection key repeatedly to select the desired
option.
Image Viewer
The Image Viewer provides you with a quick view of the picture
functions. Please refer to the Photos operations of the Camera for
more details.
31
Video Recorder
You can record videos of special moments with this function. Press the
OK key to start record. Press the left soft key to access Options:
CamCorder Settings: You can configure the basic settings of recorder
such as EV, night mode, banding.
Video settings:
− Video Quality: You can select from the following Video Quality
settings: Normal, Low or High. Higher Quality Videos takes up more
space.
White Balance: Adjust the color balance of the image. You can make
your videos appear warmer or cooler.
Effect Settings: You can add a unique appearance to your Videos with
several Effect Settings.
Storage: To set the default storage path.
Restore Default: Video Recorder Parameters will be restored to factory
parameters with this function.
Tip: Generally speaking, you can use the Left/Right or Up/Down
selection key to select the desired setting option according to your need.
Please refer the section “Camera” for more details.
Video Player
You can perform the following operations:
− Play: You can play the specified video.
− Use as: You can forward the video to Screen saver, Power on
display, Power off display, and Caller video.
32
− Send: You can forward the video to multimedia, Email, and
Bluetooth.
− Rename: You can rename the specified video.
− Delete: You can delete the specified video.
− Delete All Files: You can delete all videos.
− Sort by: You can sort all video files and display them in a new order;
you can choose to Sort By Name, By Type, By Time, By Size and
None.
− Storage: To set the default storage path.
Photo Editor
Photo Artist
Use this menu to edit your photos using various editing tools. Select the
desired photo to edit from the file manager.
Select from file:
Choose a picture to clip, select OK to perform the following options:
1. Auto Resize: Save as, Send, Add frame, Add icon, Add text, Mirror,
Rotate, Add defect, Redeye reduction, Expand canvas, Undo, Exit,
Help.
2. Main LCD Clip: The detailed operation is same as shown in the
“Auto Resize”.
3. Manual clip: You can manually clip pictures.
4. Clip help: Read information about Clip.
Resize image:
After chosen the picture, you can choose one of the ratios to resize to:
33
x0.25, x0.5, x0.75, x1.5, x2.
Image Tiles
Access this option to select 2, 4 or 9 image tiles to display pictures,
photos, or other images from your memory card.
Audio Player
The Play, Stop, Back, Forward functions correspond to the Up, Down,
Left and Right Key respectively. The available music formats include:
MP3, WAV, AMR, and so on. Select List to access the Play List, and
then select Options to perform the following functions: play, details,
add to rings, Refresh list, Settings.
Note: To enjoy non-stop music, please download music to the My
Music folder of the memory card recognized as a USB disk on your PC.
Warning: Make sure that the volume is appropriate for your hearing
while using the audio player.
Sound Recorder
The mobile phone supports three recording formats: WAV、AWB and
AMR. You can record conversations, which may be saved to the Audio
folder under File Manager. If there is a record, press the left soft key
you can do: Record, Play, Rename, Delete, Delete All, Forward and so
on.
Note: If a call is incoming while recording, the record will abort and the
data will be saved into the record folder automatically. AMR adopts
dynamic compression and provides a longer recording time than WAV‘s
while utilizing the same storage space. WAV file does not support
34
APPEND feature.
FM Radio
You can use your phone to listen to FM radio stations once the original
Headset is plugged into the accessories connector. Select FM Radio in
the Multimedia to access the radio controls.
1. Press the Down key to Power on/ off the FM radio.
2. Press the OK key to record the FM.
3. Press the Left/ right key to step down/up to the next frequency.
4. Press the * key and the # key to adjust radio volume.
5. Press Options to access the following options: channel list, manual
input and so on.
Schedule FM record
With this function, your phone can record the FM program as the
schedules. You can set the date and time, repeat style, channel settings
and record settings.
Melody Compose
The mobile phone enables you to compose your favorite music as the
tune of the incoming call, alarm or memo.
Note: The phone can save multiple tones edited by you according to
the volume of tones.
When the Tune Editing List is blank, you can edit your favorite tunes by
pressing “Add”. After you have finished editing, press Options to select
a music instrument or playing speed to play the editing tunes. You also
can save the editing tunes.
35
Select the edited music, and press Options to perform the following
operations: Play, edit, add rename and so on.
Note: A maximum of 150 notes can be edited with a piece of self-edit
tune.
In the window of Tone Editing, press Options to perform the following
operations: Play, adjust play speed and so on.
The rules by which the tone is composed as follows:
0: Insert one pause;
1: Insert Do;
2: Insert Re;
3: Insert Mi;
4: Insert Fa;
5: Insert So;
6: Insert La;
7: Insert Si;
8: Insert a vibration note;
9: Insert a backlight;
*: Modify the playing rhythm of the current tone;
#: Modify the current note with halftone;
↑: Modify the tone of current note (high, middle, low);
↓: Modify the tone of current note (high, middle, low.
File Manager
You can use the function to manage all types of files saved in the
memory card.
36
Memory card (Only for the card inserted)
There are all of files saved in your memory card. You can do Open,
Create Folder, Format and so on. With this function, you can perform
the permissible operations as your desire.
Slide Show
With this function, you can enjoy your images comfortably. Choose one
folder to play, and then the images will display on screen one by one.
Settings
In the standby mode, press the OK key to access Menu > Settings.
User Profiles
General
1. Activate
2. Customize
Tone Setup: Includes Incoming Call, Power on, Power off, Message
Tone and so on. You can select built-in ring tunes, or the tunes
composed by yourself.
Volume: Includes the volume setting of Ring Tone and Key Tone.
The volume degree is from 1 to 7.
Alert Type: You can choose Ring, Vib. Only, Vib. and Ring, Vib. then
Ring.
Ring Type:
− Single: Rings once when a call is coming.
37
− Repeat: Rings continuously when a call is coming.
− Ascending: Rings continuously and the volume increases
gradually.
Extra Tone:
− Warning: If necessary, you will be warned by the prompt tone.
− Error: You will be warned by a tone if you make a mistake.
− Camp On: A prompt tone will be heard after searching the
network successfully.
− Connect: A prompt tone will be heard after getting through to the
dialed number.
Answer Mode:
− Any Key: Press any key to answer a call (Except of Hang Up
Key and Right Soft Key)
Meeting
Please refer to “General” for more details.
Outdoor
Please refer to “General” for more details.
Indoor
Please refer to “General” for more details.
Headset
Insert the earphone and access the Headset mode automatically. This
mode has no Activate option. Please refer to “General” for more details.
Note: Press and hold the # key to enable or cancel the silent mode. In
the Silent mode you can’t hear any sounds except the vibration

38
indicates a call or a SMS/MMS is coming.
Bluetooth
You will enter into Bluetooth mode after you activate the Bluetooth
function. This mode has no Activate option; the detailed operation has
been shown in the “General”.
Phone Setup
Time and Date: You can set the home city, time / date and format.
Schedule Power On / Off: You can set the time for auto power on /off.
Do turn the status on before using that function, and then the time.
Note: Please disable the Schedule Power On function before you board
an airplane.
Language: Select the desired language for the display text.
Preferred Input Methods: Select the desired input method for the
default input method.
Display Characteristic: With this function you can configure the basic
status of display characteristics including Wallpaper, Screen saver,
Power on Display, Power off Display, Main menu style, Show date and
time, Show owner number.
Themes: You can choose one mode as your desire.
Greeting text: Set ON, input words as your greeting text once you
switch the phone on.
Shortcuts: You can set shortcuts for those functions you often use.
Dedicated key: You can configure short cut functions for the Up, Down,
Left and Right key respectively. In the standby mode, press any one of
them to access the appointed function.
39
Auto update of date and time: It can be set to ON or OFF.
UART setup: When using this phone as GPRS Modem.
Misc. settings:
LCD Backlight > According to various lighting conditions, you can select
different brightness and its light time.
Dazzle Ringtone: You like lot of songs and also like to set those all
songs to be a ring tone of your mobile phone? For this you have to
change ring tone every time with new song.
TV9 gives you the facility of Dazzle/Shuffle Ringtones. Where you can
set up to 10 songs in one time as your ring tone.
Now whenever a new call will come every time a new song will play as
your ring tone.
Keypad Light Set: You can select Open in flow time, don’t auto
open, auto open. When you select Open in flow time, you can set the
Start time and the End time of the keypad light brightening up.
Network Setup
Please contact the network operator for the following network service.
1. Network Selection
You can choose Automatic or Manual to select the network (Auto is
recommended). When you select Automatic, the phone will make the
preferential selection according to the network where the SIM card
belongs. When you select Manual, you are required to select the same
network as the registered network with the network operator by SIM
card for your use.
2. Preferred Networks
40
Select the Preferred Networks. The default network is the network
where the SIM card belongs. Select Options to perform: add from list,
create new, change priority and delete the current preferred network.
3. GPRS connection
You can choose Always or When needed to select the GPRS
connection..
Security Setup
SIM Lock:
It is asked to input the PIN. It can be configured if the PIN is correct. If
SIM card is set on, it needs to input the PIN every time you power on.
Three times wrong PIN input, it's asked to input PUK. PUK is used to
release and modify the locked PIN. If PUK isn't provided or missed,
please consult your network operator.
Phone Lock
You can lock or unlock the phone. Enter the password to activate or
deactivate the phone lock. When the phone is locked, you will be
required to enter the phone password. 4-8 numbers can be used for the
phone password. The default password is 1122.
Auto Keypad Lock
You can lock/unlock the phone keyboard and set the Key Lock Time to
None, 5 sec, 15 sec, 30 sec, 1 min.
Fixed Dial: If this function is enabled, only phone numbers in the Fixed
Dial List can be dialed. PIN2 is required for this function. Network
support is also required.
Note: If you enter PIN2 after the phone is switched on, PIN2 is not
41
required before the phone is switched off. Therefore, please switch the
phone off and switch it on again after configuration, if you do not want
others to change the status of the Fixed Dial.
Barred dial: If this function is activated, the phone numbers in the
barred dial list cannot be dialed. PIN2 is required for the function.
Network support is also required
Change Password: You can change PIN/ PIN2 password.
Change Password
1> Phone Password
− The current phone password is required before change the
phone password.
− Enter the new phone password.
− Enter the new phone password again to ensure the new
phone password.
Connectivity
Bluetooth
You can establish a wireless connection with other compatible devices
using Bluetooth technology. Such compatible devices include cell
phone, computer, earphone and vehicle parts. For the compatibility of
other devices please consult the manufacturer. You can use Bluetooth
to send pictures, videos, music, notes and voice segments; or establish
a wireless connection with compatible PC (to send files for example).
As the communication between two Bluetooth devices is just wireless,
so it’s not necessary to keep the mobile phone dead against the other
42
device. You shall ensure that the distance between two Bluetooth
devices is not more than 10 meters (about 32 feet). However, the
Bluetooth connection may be interfered by obstacles like wall or other
electronic devices.
In some circumstances, the application of Bluetooth may be restricted.
Please consult your local authorities or service providers.
Application of Bluetooth technology in your cell phone will accelerate
the consumption of electricity power and thus shorten the service life of
your battery.
Power: select to switch ‘on’ or ‘off’ Bluetooth.
Inquiry Audio Device: Searching for hand-free devices: After
confirmation, your phone will search for Bluetooth devices and a list of
available devices will be displayed in the screen. Select a Bluetooth
device and input a correct password to establish a security connection.
Note: The initial password of Bluetooth earphone is 0000 or 1122. For
details please contact your device provider.
Remote control: Controls other Bluetooth appliances through
cell-phone far away, based on Bluetooth Technology.
My Device: Search for new devices and show the list of all Bluetooth
devices within the scope of your phone. Select the available device,
press OK and then you have the following options:
− Connect: Enter into service record option after confirmation.
− Rename: Rename a device.
− Delete: Delete a device.
− Delete All: Delete all the devices.
43
− Service list: Press left soft key to Refresh HID profile, FTP
profile, OPP profile, DUN profile, SPP profile function.
Active Device: Show all devices already connected.
Setting: After selecting, you have the following options:
After select, you have the following options: Visibility, Change Device
name, Authentication, Audio path, Block list, FTP settings, Bip
setting.
About: Show detail the Bluetooth serviced provided by this phone.
Data Account
Press the left soft key to perform the following steps:
1. GSM Data: Edit the GSM account.
2. GPRS: Edit the GPRS account.
Restore Factory Settings
Access Settings to select Restore Factory Settings, and press OK.
All settings can be restored to factory settings with this function. The
default password is 1122.
Organizer
Calendar
You can view and edit the memo of a specified date with this function.
To Do List
You can View, Add, Edit, Delete, Delete overdue, Delete All and so on
as desired. Start up the Memo and press OK. Press Options > Add or
44
Add to access to add a new memo.
Alarm
The mobile phone provides 5 alarms and you can set them as your
need. If you have configured an alarm, an icon indicated that you have
configured the alarm will appear. No icon will show if you don’t set an
alarm. Select “Edit” to set an alarm.
Calculator
The calculator can add, subtract, multiply and divide. To use the
calculator:
1. Press the # key to enter the decimal point
2. Press the up, down, left and right key and OK key to select +, -, ×,
÷, = respectively.
3. Press Clear to delete the figure.
Currency Converter
You can make currency conversions. Press OK after enter the
exchange rate, and then enter the number of the currency, and press
OK to get the result.
World Clock
Scroll to browse every city’s time zones in the world map. The related
date and time will display at the bottom of the screen.
E-Book Reader
You can select this option to read text. This text reader only supports
TXT format. The default one is “txt format file” under the eBook folder in
45
the memory card.
Flash Light
You can turn On/ Off the flashlight function.
In the standby mode, long press the number key “0” to activate/
deactivate Flash Light.

46
APPENDIX
Appendix A: Guidance on Entry Methods
This phone provides several input methods which can be used in
editing the Phone Book, short messages, memos, greetings, alarms
and other text applications.
The Icons of Input Methods
After entering different kinds of edit windows (including edit phonebook,
short messages. etc.), the icons of input are as follows:
“123”: The Entry method of Numeric appears as: “123”
“ABC”: The entry method of Multitap ABC appears as: “ABC”
“abc”: The entry method of Mulitap abc appears as: “abc”
“eZi ABC”: The entry method of eZiText®Smart ABC appears as: “eZi
ABC”
“eZi abc”: The entry method of eZiText® Smart abc appears as: “eZi
abc”
“eZi ES”: The entry method of eZiText®Smart ES appears as: “eZi ES”
“eZi es”: The entry method of eZiText®Smart es appears as: “eZi es”
“ES”: The entry method of Multitap ES appears as: “ES”
“es”: The entry method of Mulitap es appears as: “es”
“eZi FR”: The entry method of eZiText®Smart FR appears as: “eZi FR”
“eZi fr”: The entry method of eZiText®Smart fr appears as: “eZi fr”
“FR”: The entry method of Multitap FR appears as: “FR”
“fr”: The entry method of Mulitap fr appears as: “fr”
47
How to Switch Between the Input Methods
Press the # key to switch the input methods.
e.g.: If the current input is Smart ABC the screen will show “eZi ABC”.
Press the # key, to go to Smart abc, and the screen will show “eZi abc”.
Numeric, Multitap ABC and Multitap abc Input Methods
Numeric
When the icon of the input method is “123”, press the number keys to
enter the numbers directly.
Multitap ABC and Multitap abc
When the icon is “ABC” or “abc”, press the number keys(2 to 9)
repeatedly until desired letters appear in the text area. Press the
number key once for the first letter. Press twice for the second letter. So,
press number keys to reach the desired letter in the same way.
Press 0 to enter a blank space or “0”.
Note: while using the Numeric entry, please switch to the method of
Multitap ABC and Multitap abc first if a blank space is required, and then
press 0 to enter a blank space.
How to Input Special Symbols
If you want to input special symbols, such as ". ! ? = < >”, Etc., please
following steps as below:
Press the * key to display the symbols. Press the Up/Down, or
Left/Right Key to move the cursor in the symbol table, and select one
symbol. Press the right soft key to cancel the symbols selection.

48
Appendix B: Troubleshooting
This section lists some problems that you might meet while using your
phone. If you feel that your phone do not operate normally, please reset
settings first, and then follow Troubleshooting Guide. If you are still
unable to solve problems, please contact the authorized service center
or the store from where you purchased the phone.
Problems Solutions
Can not
answer or
make a
call
Make sure that the phone has been switched on.
Make sure that the battery is charged.
Make sure that the signal intensity is high enough.
Make sure the own number function in the call setting
is system preset or number sending.
Make sure the line switch in call setting is the system
preset line. Check whether you have set up call
barring or fixed dialing or any other safety function.
Check whether you have set up call diverts. Check
whether you have inserted the proper SIM card
correctly.
Low voice Check if the volume has been set too low.

49
No ring
Check whether you have set up the” Vibrating Only”
option.
Check whether the ring volume is not too low
Move away from a noisy place to check if you can
hear the phone ringing.
Check whether you have set up call diverts.
LCD
unclear Check whether the contrast has been set too low.
50
Appendix C: Available Accessories
Dual Stereo Personal Hands Free Handset
The Dual Stereo Personal Hands Free Handset allows you listen to
music or to make conversations with hands free comfort.
Mini USB Cable
Connect the USB cable to the phone to save files and download
pictures. When the USB cable is in use, the charging function will be
activated. Drivers are not needed when you are using the USB cable
with Windows 2000/XP. If you are using the USB Cable with Windows
98/98SE, you can download and install the drivers from the Internet.
Travel Charger
You can charge the phone with the Travel Charger when you are on the
move.
Note: Please use approved your network operator to get the most out
of your phone.
FCC RF Exposure Information and Statement
The SAR limit of USA (FCC) is 1.6 W/kg averaged over one gram of tissue.
Device types TV9 (FCC ID: UTSKKTV9) has also been tested against this
SAR limit. The highest SAR value reported under this standard during product
certification for use at the ear is 0.859W/kg and when properly worn on the body
is 0.485W/kg. This device was tested for typical body-worn operations with the
back of the handset kept 1.5cm from the body. To maintain compliance with FCC
RF exposure requirements, use accessories that maintain a 1.5cm separation
distance between the user's body and the back of the handset. The use of belt
clips, holsters and similar accessories should not contain metallic components
in its assembly. The use of accessories that do not satisfy these requirements
may not comply with FCC RF exposure requirements, and should be avoided.
This device complies with part 15 of the FCC rules. Operation is subject to the
following two conditions: (1) this device may not cause harmful interference,
and (2) this device must accept any interference received, including
interference that may cause undesired operation.
NOTE: The manufacturer is not responsible for any radio or TV interference
caused by unauthorized modifications to this equipment. Such modifications
could void the user’s authority to operate the equipment.
NOTE: This equipment has been tested and found to comply with the limits for
a Class B digital device, pursuant to part 15 of the FCC Rules. These limits
are designed to provide reasonable protection against harmful interference in
a residential installation. This equipment generates uses and can radiate
radio frequency energy and, if not installed and used in accordance with the
instructions, may cause harmful interference to radio communications.
However, there is no guarantee that interference will not occur in a particular
installation.
If this equipment does cause harmful interference to radio or television
reception, which can be determined by turning the equipment off and on, the
user is encouraged to try to correct the interference by one or more of the
following measures:
- Reorient or relocate the receiving antenna.
- Increase the separation between the equipment and receiver.
-Connect the equipment into an outlet on a circuit different from that to which
the receiver is connected.
-Consult the dealer or an experienced radio/TV technician for help.