Korg Krome Music Workstasion 61Key Users Manual Operation Guide
73key to the manual 290d0a03-cbf4-4a01-95fa-3bf9e81731ea
2015-02-03
: Korg Korg-Krome-Music-Workstasion-61Key-Users-Manual-468815 korg-krome-music-workstasion-61key-users-manual-468815 korg pdf
Open the PDF directly: View PDF ![]() .
.
Page Count: 142 [warning: Documents this large are best viewed by clicking the View PDF Link!]
- About this manual
- Table of Contents
- Introduction to the KROME
- Setup
- Playing and editing Programs
- Playing Programs
- Easy Program editing
- Detailed Editing with Programs
- Before you start editing
- An overview of the edit pages
- Basic oscillator settings
- Creating time-varying changes (LFO and EG)
- Diverse modulation settings (AMS and AMS mixer)
- Controlling Pitch
- Using Filters
- Using the Amp section
- Making controller assignments
- Arpeggiator settings
- Drum Track settings
- Effects
- Automatically importing a Program into Sequence mode
- Playing and editing Combinations
- Creating songs (Sequencer mode)
- Using Effects
- Arpeggiator function
- Drum Track function
- Using Drum Kits
- Adjusting Global KROME setings
- Loading & saving data
- Appendices

4E
Operation Guide

ii
About this manual
The manuals and how to use them
TheKROMEcomeswiththefollowingmanuals.
•VideoManual(approximately60minutes)
•QuickStartGuide(printedandPDF)
•OperationGuide(PDF)
• ParameterGuide(PDF)
•VoiceNameList(PDF)
Allofthesemanualsareontheincludedaccessorydisc.
AprintedcopyisincludedonlyfortheQuickStart
Guide.
Video Manual
Thisvideoillustratesthemainfunctionalityofthe
KROME.
Quick Start Guide
ThisprovidesasimpleexplanationoftheKROME’s
functions.Tobegin,pleasewatchtheVideoManualand
readtheQuickStartGuide.
Operation Guide
Putsimply,theOperationGuideisdesignedtoanswer
thequestion,“HowdoIdothis?”
Itexplainsthenamesandfunctionsofeachpartofthe
KROME,basicoperation,anoverviewofeachmode,
howtoeditsounds,recordonthesequencer,andsoon.
Thisguidealsoexplainsthebasicsofeffects,the
Arpeggiator,DrumTrack,andDrumKits.
Finally,italsocontainsatroubleshootingguideaswellas
supplementalinformationsuchasalistofspecifications.
Parameter Guide
TheParameterGuideisdesignedtoanswerthequestion,
“Whatdoesthisdo?”
Organizedbymodeandpage,theParameterGuide
includesinformationoneachandeveryparameterinthe
KROME.
Voice Name List
TheVoiceNameListlistsallofthesoundsandsetups
thatareintheKROMEwhenitisshippedfromthe
factory,includingPrograms,Combinations,
Multisamples,Drumsamples,DrumKits,Arpeggio
Patterns,DrumTrackPatterns,TemplateSongs,and
EffectPresets.
PDF versions
TheKROMEPDFmanualsaredesignedforeasy
navigationandsearching.TheyincludeextensivePDF
contentsinformation,whichgenerallyappearsonthe
sideofthewindowinyourPDFreaderandletsyoujump
quicklytoaspecificsection.Allcross‐referencesare
hyper‐links,sothatclickingonthemautomaticallytakes
youtothesourceofthereference.
Conventions in this manual
References to the KROME
TheKROMEisavailablein88‐key,73‐key,and61‐key
models.Themanualsrefertoallmodelswithout
distinctionas“theKROME.”Thefrontpanelandrear
panelillustrationsinthemanualshowthe61‐keymodel,
buttheyapplyidenticallytotheothermodels.
Abbreviations for the manuals: QS, OG, PG,
VNL
Inthedocumentation,referencestothemanualsare
abbreviatedasfollows.
QS:QuickStartGuide
OG:OperationGuide
PG:ParameterGuide
VNL:TheVoiceNameList
Symbols , , Note, Tips
Thesesymbolsrespectivelyindicateacaution,aMIDI‐
relatedexplanation,asupplementarynote,oratip.
Example screen displays
Theparametervaluesshownintheexamplescreensof
thismanualareonlyforexplanatorypurposes,andmay
notnecessarymatchthevaluesthatappearintheDisplay
ofyourinstrument.
MIDI-related explanations
CC#isanabbreviationforControlChangeNumber.
InexplanationsofMIDImessages,numbersinsquare
brackets[]alwaysindicatehexadecimalnumbers.
What is REMs * ?
(ResonantstructureandElectroniccircuit
ModelingSystem)isKorg’sproprietarytechnologyfor
digitallyrecreatingthenumerousfactorsthatproduce
andinfluenceasound,rangingfromthesound‐
productionmechanismsofacousticinstrumentsand
electric/electronicmusicalinstruments,totheresonances
ofaninstrumentbodyorspeakercabinet,thesoundfield
inwhichtheinstrumentisplayed,thepropagationroute
ofthesound,theelectricalandacousticresponseofmics
andspeakers,andthechangesproducedbyvacuum
tubesandtransistors.
*Allproductnamesandcompanynamesarethe
trademarksorregisteredtrademarksoftheirrespective
owners.
ThankyouforpurchasingtheKorgKROMEMusicWorkstation.Tohelpyougetthemostoutofyournew
instrument,pleasereadthismanualcarefully.

iii
Table of Contents
About this manual . . . . . . . . . . . . . . . . . . . . . . . . . . . ii
Introduction to the KROME . . . . . . . . . . . . 1
Front and rear panels. . . . . . . . . . . . . . . . . . . . . . . . . 1
Front panel . . . . . . . . . . . . . . . . . . . . . . . . . . . . . . . . . . . . . . . 1
Rear panel . . . . . . . . . . . . . . . . . . . . . . . . . . . . . . . . . . . . . . . . 3
Objects in the display . . . . . . . . . . . . . . . . . . . . . . . . . . . . . 4
Basic Information . . . . . . . . . . . . . . . . . . . . . . . . . . . . 7
About the KROME’s modes . . . . . . . . . . . . . . . . . . . . . . . . 7
Basic operations . . . . . . . . . . . . . . . . . . . . . . . . . . . . . . . . . . 9
Setup . . . . . . . . . . . . . . . . . . . . . . . . . . . . . . .15
Turning the power on/off . . . . . . . . . . . . . . . . . . . . 15
Connecting the AC adapter. . . . . . . . . . . . . . . . . . . . . . .15
Turning the power on . . . . . . . . . . . . . . . . . . . . . . . . . . . .15
Turning the power off . . . . . . . . . . . . . . . . . . . . . . . . . . . .15
Connections . . . . . . . . . . . . . . . . . . . . . . . . . . . . . . . . 17
Audio connections . . . . . . . . . . . . . . . . . . . . . . . . . . . . . . .18
Connecting a damper pedal, foot switch, or
foot pedal . . . . . . . . . . . . . . . . . . . . . . . . . . . . . . . . . . . .18
Connecting the KROME to a computer. . . . . . . . . . . .20
Connecting MIDI devices . . . . . . . . . . . . . . . . . . . . . . . . .20
Playing and editing Programs . . . . . . . .21
Playing Programs . . . . . . . . . . . . . . . . . . . . . . . . . . . 21
Selecting Programs . . . . . . . . . . . . . . . . . . . . . . . . . . . . . .21
Program information. . . . . . . . . . . . . . . . . . . . . . . . . . . . .24
Using Controllers . . . . . . . . . . . . . . . . . . . . . . . . . . . . . . . .24
Performing with the arpeggiator or drum track . . .26
Easy Program editing. . . . . . . . . . . . . . . . . . . . . . . . 27
Adjusting the EQ. . . . . . . . . . . . . . . . . . . . . . . . . . . . . . . . .27
Adjusting the volume balance. . . . . . . . . . . . . . . . . . . .27
Using realtime controls to edit the sound or
effects. . . . . . . . . . . . . . . . . . . . . . . . . . . . . . . . . . . . . . . .28
Using Tone Adjust . . . . . . . . . . . . . . . . . . . . . . . . . . . . . . .29
Comparing the unedited sound . . . . . . . . . . . . . . . . . .30
Saving your edits. . . . . . . . . . . . . . . . . . . . . . . . . . . . . . . . .30
Detailed Editing with Programs . . . . . . . . . . . . . . 31
Before you start editing . . . . . . . . . . . . . . . . . . . . . . . . . .31
An overview of the edit pages . . . . . . . . . . . . . . . . . . . .32
Basic oscillator settings. . . . . . . . . . . . . . . . . . . . . . . . . . .32
Creating time-varying changes (LFO and EG). . . . . .35
Diverse modulation settings
(AMS and AMS mixer). . . . . . . . . . . . . . . . . . . . . . . . .36
Controlling Pitch . . . . . . . . . . . . . . . . . . . . . . . . . . . . . . . . .37
Using Filters . . . . . . . . . . . . . . . . . . . . . . . . . . . . . . . . . . . . .38
Using the Amp section . . . . . . . . . . . . . . . . . . . . . . . . . . .40
Making controller assignments . . . . . . . . . . . . . . . . . . .41
Arpeggiator settings . . . . . . . . . . . . . . . . . . . . . . . . . . . . .42
Drum Track settings. . . . . . . . . . . . . . . . . . . . . . . . . . . . . .42
Effects . . . . . . . . . . . . . . . . . . . . . . . . . . . . . . . . . . . . . . . . . . . 42
Automatically importing a Program
into Sequence mode . . . . . . . . . . . . . . . . . . . . . . . . . 42
Playing and editing Combinations . . . .43
Playing combinations . . . . . . . . . . . . . . . . . . . . . . . 43
Selecting Combinations. . . . . . . . . . . . . . . . . . . . . . . . . . 43
Using controllers to modify the sound . . . . . . . . . . . . 45
Performing with the arpeggiator or drum track . . . 45
Easy Combination editing. . . . . . . . . . . . . . . . . . . . 46
Changing the program of each timbre. . . . . . . . . . . . 46
Adjusting the mix . . . . . . . . . . . . . . . . . . . . . . . . . . . . . . . . 46
Simple editing using the knobs. . . . . . . . . . . . . . . . . . .47
Saving a Combination you’ve edited . . . . . . . . . . . . .47
Detailed Editing with Combinations . . . . . . . . . . 47
A suggested approach for editing . . . . . . . . . . . . . . . . 48
Restoring edited settings. . . . . . . . . . . . . . . . . . . . . . . . . 48
Layers, Splits, and Velocity Switches . . . . . . . . . . . . . . 48
MIDI settings . . . . . . . . . . . . . . . . . . . . . . . . . . . . . . . . . . . . 50
Altering Programs to fit within a Combination . . . . 51
Arpeggiator settings . . . . . . . . . . . . . . . . . . . . . . . . . . . . . 52
Drum Track settings . . . . . . . . . . . . . . . . . . . . . . . . . . . . . 52
Effects . . . . . . . . . . . . . . . . . . . . . . . . . . . . . . . . . . . . . . . . . . . 52
Automatically importing a Combination
into Sequencer mode. . . . . . . . . . . . . . . . . . . . . . . . . 52
Creating songs (Sequencer mode) . . . .53
Overview . . . . . . . . . . . . . . . . . . . . . . . . . . . . . . . . . . . 53
About the KROME’s Sequencer . . . . . . . . . . . . . . . . . . . 53
Sequencer mode structure . . . . . . . . . . . . . . . . . . . . . . . 53
Transport control . . . . . . . . . . . . . . . . . . . . . . . . . . . . . . . . 54
Playing Songs . . . . . . . . . . . . . . . . . . . . . . . . . . . . . . . 55
Playback. . . . . . . . . . . . . . . . . . . . . . . . . . . . . . . . . . . . . . . . . 55
Recording . . . . . . . . . . . . . . . . . . . . . . . . . . . . . . . . . . 57
Preparations for recording . . . . . . . . . . . . . . . . . . . . . . . 57
Recording MIDI in real time . . . . . . . . . . . . . . . . . . . . . . 60
Step recording. . . . . . . . . . . . . . . . . . . . . . . . . . . . . . . . . . . 61
Recording multiple tracks from an external
sequencer. . . . . . . . . . . . . . . . . . . . . . . . . . . . . . . . . . . . 63
Recording System Exclusive events. . . . . . . . . . . . . . . 64
Recording patterns . . . . . . . . . . . . . . . . . . . . . . . . . . . . . .65
Other way to record . . . . . . . . . . . . . . . . . . . . . . . . . . . . . 66
Song editing . . . . . . . . . . . . . . . . . . . . . . . . . . . . . . . . 67
Song . . . . . . . . . . . . . . . . . . . . . . . . . . . . . . . . . . . . . . . . . . . . 67
MIDI tracks . . . . . . . . . . . . . . . . . . . . . . . . . . . . . . . . . . . . . . 67
Track view edit . . . . . . . . . . . . . . . . . . . . . . . . . . . . . . . . . . 68
Piano Roll Editing . . . . . . . . . . . . . . . . . . . . . . . . . . . . . . . . 70

Table of Contents
iv
Creating an RPPR pattern. . . . . . . . . . . . . . . . . . . . 71
Creating RPPR data. . . . . . . . . . . . . . . . . . . . . . . . . . . . . . .71
RPPR playback . . . . . . . . . . . . . . . . . . . . . . . . . . . . . . . . . . .72
Realtime-recording an RPPR performance . . . . . . . .72
Creating and playing a Cue List . . . . . . . . . . . . . . 74
Creating a cue list . . . . . . . . . . . . . . . . . . . . . . . . . . . . . . . .74
Converting a cue list to a song. . . . . . . . . . . . . . . . . . . .75
Saving your song . . . . . . . . . . . . . . . . . . . . . . . . . . . 75
Using Effects . . . . . . . . . . . . . . . . . . . . . . . . 77
An overview of the KROME’s effects . . . . . . . . . . 77
Effect I/O . . . . . . . . . . . . . . . . . . . . . . . . . . . . . . . . . . . . . . . .77
Effects in each mode . . . . . . . . . . . . . . . . . . . . . . . . . . . . .78
Routing effect settings . . . . . . . . . . . . . . . . . . . . . . 79
Program Effects settings. . . . . . . . . . . . . . . . . . . . . . . . . .79
Using effects in Combinations and Songs . . . . . . . . .81
Dynamic modulation, Common FX LFO . . . . . . . 82
Dynamic modulation (Dmod). . . . . . . . . . . . . . . . . . . . .82
Common FX LFO . . . . . . . . . . . . . . . . . . . . . . . . . . . . . . . . .83
Arpeggiator function . . . . . . . . . . . . . . . . 85
Using the arpeggiator while you play . . . . . . . . 85
Using the arpeggiator in Program mode . . . . . . . . . .85
Using the arpeggiator in Combination mode. . . . . .88
Arpeggiator settings in Combination and
Sequencer modes . . . . . . . . . . . . . . . . . . . . . . . . . . . .89
Linking the arpeggiator to programs or
combinations. . . . . . . . . . . . . . . . . . . . . . . . . . . . . . . . .91
Creating a user arpeggio pattern . . . . . . . . . . . . . . . . .91
Regarding arpeggiator synchronization. . . . . . . . . . .96
Drum Track function . . . . . . . . . . . . . . . . 97
Performing with the Drum Track function . . . . 97
Using the Drum Track function in Program
mode . . . . . . . . . . . . . . . . . . . . . . . . . . . . . . . . . . . . . . . .97
Using the Drum Track function in Combination
mode . . . . . . . . . . . . . . . . . . . . . . . . . . . . . . . . . . . . . . . .98
Drum Track function settings . . . . . . . . . . . . . . . 100
Drum Track function settings in Program
mode . . . . . . . . . . . . . . . . . . . . . . . . . . . . . . . . . . . . . . 100
Drum Track function settings in Combination
mode . . . . . . . . . . . . . . . . . . . . . . . . . . . . . . . . . . . . . . 101
Drum Track function settings in Sequencer
mode . . . . . . . . . . . . . . . . . . . . . . . . . . . . . . . . . . . . . . 101
Synchronizing the Drum Track function. . . . . . . . . 102
Creating a Drum Track pattern. . . . . . . . . . . . . . . . . . 103
Using Drum Kits. . . . . . . . . . . . . . . . . . . . 105
Drum Kit Overview . . . . . . . . . . . . . . . . . . . . . . . . . . . . . 105
Before you start editing… . . . . . . . . . . . . . . . . . . . . . . 105
Editing a Drum Kit. . . . . . . . . . . . . . . . . . . . . . . . . . . . . . 106
Adjusting Global KROME setings . . . . 109
How Global mode is structured. . . . . . . . . . . . . . 109
Global settings. . . . . . . . . . . . . . . . . . . . . . . . . . . . . 109
Basic setup . . . . . . . . . . . . . . . . . . . . . . . . . . . . . . . . . . . . .109
MIDI Settings . . . . . . . . . . . . . . . . . . . . . . . . . . . . . . . . . . .111
Pedal and other controller settings . . . . . . . . . . . . . .111
Creating user scales. . . . . . . . . . . . . . . . . . . . . . . . . . . . .112
Setting Category Names . . . . . . . . . . . . . . . . . . . . . . . .112
Loading & saving data . . . . . . . . . . . . . . 113
Saving data . . . . . . . . . . . . . . . . . . . . . . . . . . . . . . . . 113
Saving data on the KROME . . . . . . . . . . . . . . . . . . . . . .113
Writing to internal memory . . . . . . . . . . . . . . . . . . . . .115
Editing names . . . . . . . . . . . . . . . . . . . . . . . . . . . . . . . . . .117
Saving to SD card (Media–Save) . . . . . . . . . . . . . . . . .118
Using the KROME as a data filer. . . . . . . . . . . . . . . . . .119
Loading data . . . . . . . . . . . . . . . . . . . . . . . . . . . . . . 120
Data that can be loaded. . . . . . . . . . . . . . . . . . . . . . . . .120
Loading data from SD card (Media–Load). . . . . . . .120
Media utility . . . . . . . . . . . . . . . . . . . . . . . . . . . . . . . 123
Formatting media . . . . . . . . . . . . . . . . . . . . . . . . . . . . . .123
Setting the current time. . . . . . . . . . . . . . . . . . . . . . . . .123
Appendices . . . . . . . . . . . . . . . . . . . . . . . . 125
Restoring the factory settings . . . . . . . . . . . . . . . 125
Loading the preloaded data . . . . . . . . . . . . . . . . . . . . .125
Initialization . . . . . . . . . . . . . . . . . . . . . . . . . . . . . . . . . . . .125
Troubleshooting . . . . . . . . . . . . . . . . . . . . . . . . . . . 126
Power supply . . . . . . . . . . . . . . . . . . . . . . . . . . . . . . . . . . .126
Display . . . . . . . . . . . . . . . . . . . . . . . . . . . . . . . . . . . . . . . . .126
Audio output . . . . . . . . . . . . . . . . . . . . . . . . . . . . . . . . . . .126
Programs and Combinations . . . . . . . . . . . . . . . . . . . .127
Songs . . . . . . . . . . . . . . . . . . . . . . . . . . . . . . . . . . . . . . . . . .128
Arpeggiator . . . . . . . . . . . . . . . . . . . . . . . . . . . . . . . . . . . .128
Drum Track function . . . . . . . . . . . . . . . . . . . . . . . . . . . .128
Drum Kits. . . . . . . . . . . . . . . . . . . . . . . . . . . . . . . . . . . . . . .128
Effects . . . . . . . . . . . . . . . . . . . . . . . . . . . . . . . . . . . . . . . . . .129
MIDI. . . . . . . . . . . . . . . . . . . . . . . . . . . . . . . . . . . . . . . . . . . .129
Damper pedal . . . . . . . . . . . . . . . . . . . . . . . . . . . . . . . . . .129
Media . . . . . . . . . . . . . . . . . . . . . . . . . . . . . . . . . . . . . . . . . .129
Connections with a computer . . . . . . . . . . . . . . . . . . .129
Error messages. . . . . . . . . . . . . . . . . . . . . . . . . . . . . 130
Error and confirmation messages. . . . . . . . . . . . . . . .130
Specifications. . . . . . . . . . . . . . . . . . . . . . . . . . . . . . 134
Operating requirements . . . . . . . . . . . . . . . . . . . . . . . .135
MIDI Implementation Chart . . . . . . . . . . . . . . . . . 136
1
Introduction to the KROME
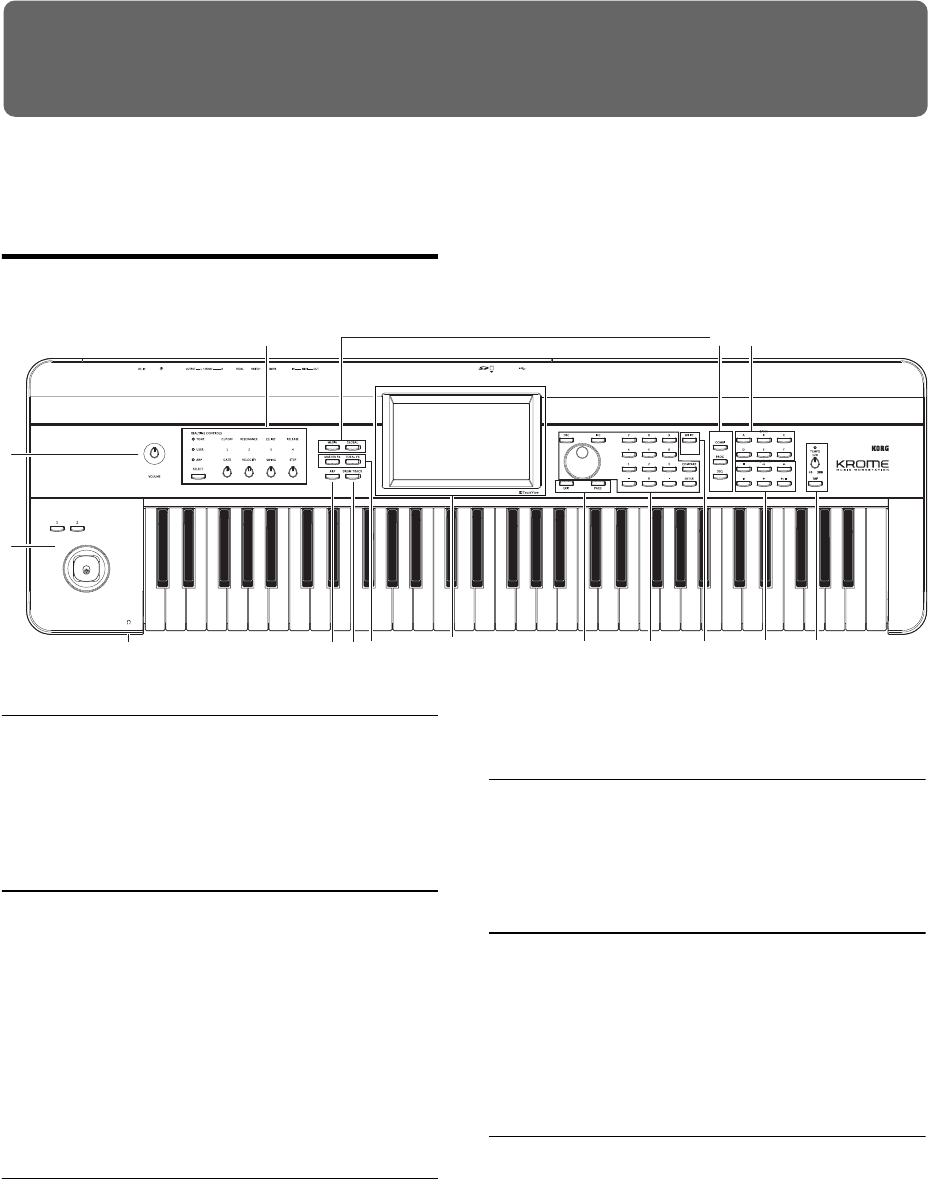
Front and rear panels
Front panel
1. Volume
VOLUME knob
ThisknobadjuststhevolumeoftheAUDIOOUTPUT
L/MONO,Routputs,aswellasthevolumeofthe
headphonejack.(Seepage 15)
2. SW1, 2 and Joystick
SW1 and SW2
Thesebuttonsareusedtocontroltheprogramsor
effectparameters,ortoturnthejoysticklockfunction
on/off.(Seepage 24)
Joystick
Youcancontrolsynthesisparametersoreffect
parametersbymovingthejoystickup/down/left/right.
(Seepage 24)
3. REALTIME CONTROLS
Theserealtimecontrollersconsistoffourknobsand
onebutton.Youcanusethemtodothefollowing
things.
• Controlthesoundandeffectsofprogramsand
combinations
• Controlthearpeggiator
SELECT button, knobs 1–4
UsetheSELECTbuttontoselectthefunctions
controlledbyknobs1–4.Byusingknobs1–4youcan
controlthesound,effects,andarpeggiator.
(Fordetails,pleasesee“Realtimecontrolknobs”on
page 25.)
(Fordetails,pleasesee“Usingrealtimecontrolstoedit
thesoundoreffects”onpage 28.)
4. Arpeggiator
ARP button
Thisbuttonturnsthearpeggiatoron/off.Thebutton
willbelitifthearpeggiatorison.(Seepage 85)
5. DRUM TRACK
DRUM TRACK button
ThisbuttonturnstheDrumTrackfunctiononoroff.
Thisbuttonalsoindicatestheoperatingstateofthe
drumtrack.(Unlit:off,Blinking:waitingfortrigger,
Lit:on.Seepage 97.)
6. Effect buttons
MASTER FX button
TOTAL FX button
Thesebuttonsturnthemastereffectandtotaleffecton/
off.Whenthebuttonison(LEDlit),theeffectsettings
oftheprogram,combination,orsongwillbeenabled.
Whenthebuttonisoff(LEDunlit),thecorresponding
effectwillbeoff.
Theon/offstatusofthesebuttonsisrememberedeven
whenyouswitchprograms,combinations,orsongs.
(Seepage 110)
2
3
7
8 9
4
15 511 10 13 14
6
1
12
* The diagram shown is for KROME-61
Introduction to the KROME
2
7. Display
Display
TheTouchViewdisplayfeaturessimpletouchcontrol
andselectionofnumerousfeaturesandparameters.
(Seepage 4)
8. Mode
COMBI, PROG, SEQ, GLOBAL, MEDIA buttons
KROMEhasfivedifferentmodes,eachoneis
optimizedforaspecificsetoffunctions.
Pressoneofthesebuttonstoenterthecorresponding
mode.
Formoredetails,pleasesee“Selectingmodes”on
page 9.
9. PROG/COMBI BANK
A, B, C, D, E, F buttons
ThesebuttonsselectprogrambanksA–Fand
combinationbanksA–D(seepage 21,andpage 44).
Youcanalsousethesebuttonstoselectthebankof
timbreprogramsinacombination,orthebankoftrack
programsinasong(seepage 46,andpage 57).
IfyouwanttoselectaGMbank,usethenumerickeys
(seepage 22)ortheBank/ProgramSelectmenu(see
page 22).
10. VALUE controllers
Usethesecontrollerstoedittheparameterthat’s
selectedinthedisplay.
INC and DEC buttons
VALUE dial
0–9, –, ., and ENTER buttons
Together,thesecontrolsspecifyandconfirmthevalue
oftheselectedparameter.(Seepage 10)
COMPARE button
Comparesyourcurrenteditedsoundtothesound
beforeitwasedited.
Formoredetails,pleasesee“Comparefunction”on
page 11.
11. PAGE SELECT, EXIT
PAGE button
Whenyoupressthisbutton,alistofthepageswithin
theselectedmodewillappearinthedisplay.Pressthe
buttonofthedesiredpage.(Seepage 9)
EXIT button
Pressthisbuttontoreturntothemainpageofthe
currentmode.(Seepage 9)
12. Save (Write)
WRITE button
Usethisbuttontosaveprograms,combinations,global
settings,drumkits,orarpeggiopatternstointernal
memory(seepage 9).
You’llalsousethisbuttontosavesongstomedia(see
page 75).
Whenyoupressthisbuttonintheappropriatemodeor
page,aWritedialogboxwillappear.Pressthebutton
onceagaintosavethedata.
13. Sequencer
Thebuttonsinthissectionareusedforoperationsin
Sequencermode,suchasrecordingandplayback(see
page 54).TheREC(●)buttonisalsousedtosavea
programorcombination,orwhenusingtheAutoSong
Setupfunction(seepage 59).
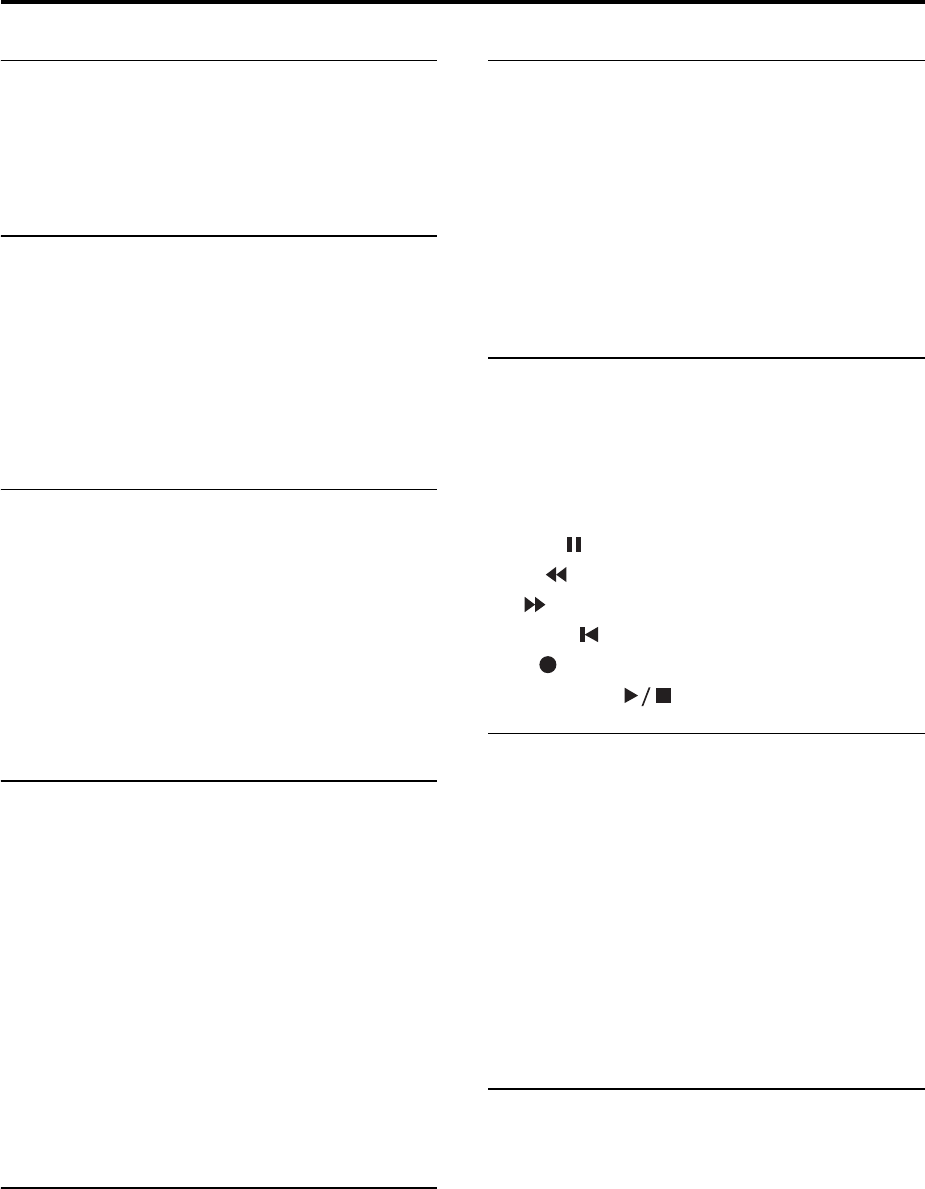
PAUSE ( ) button
REW ( ) button
FF ( ) button
LOCATE ( ) button
REC ( ) button
START/STOP ( ) button
14. TEMPO controls
TEMPO knob
Thisknobadjuststhetempoofthearpeggiator,drum
track,orinternalsequencer.
TEMPO LED
ThisLEDwillblinkatquarter‐noteintervalsofthe
currenttempo.
TAP button
Bypressing(ortapping)thisbuttononthebeat,you
canenterthetempousedbythearpeggiator,drum
track,orinternalsequencer(seepage 25).
15. Headphone
Headphone jack
Connectyourheadphoneshere.
ThisjackwilloutputthesamesignalastheAUDIO
OUTPUTL/MONOandRjacks.
TheheadphonevolumeiscontrolledbytheVOLUME
knob.
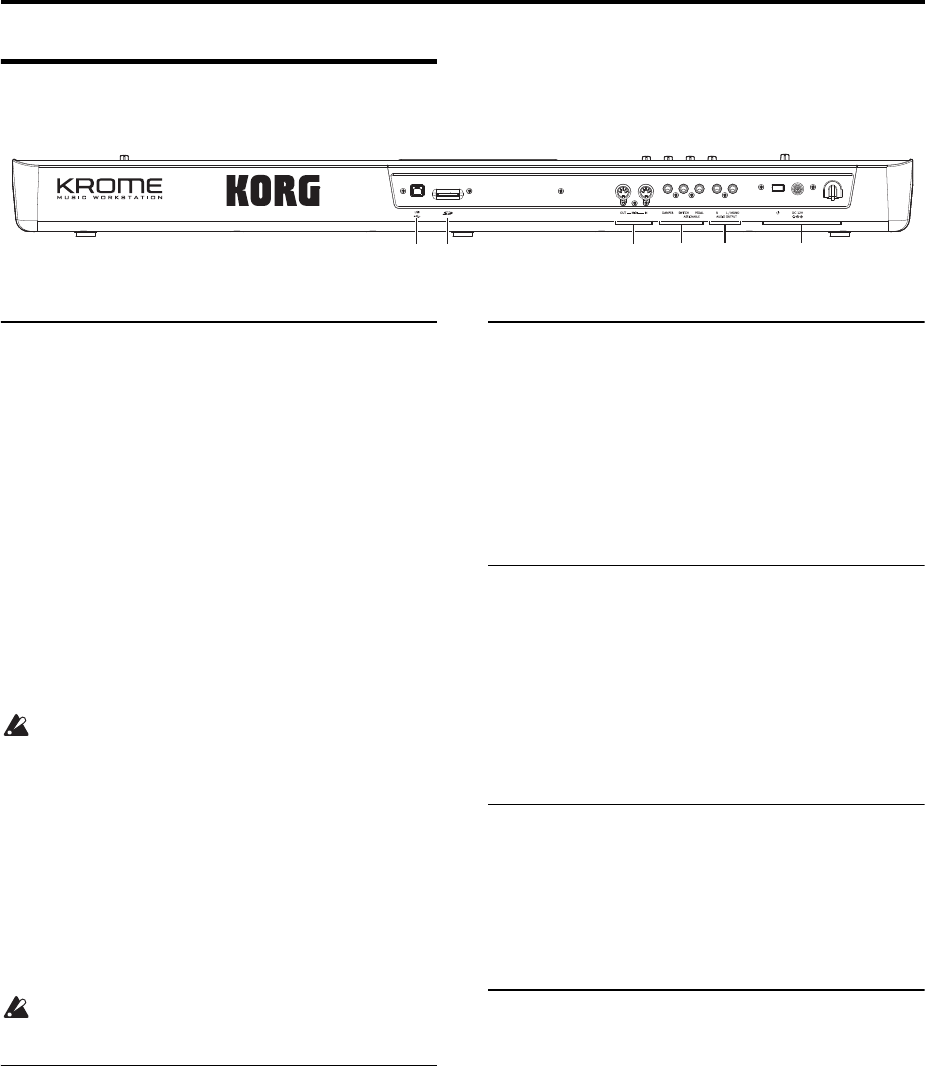
Front and rear panels Rear panel
3
Rear panel
1. Power supply
Besuretosee“Turningthepoweron”onpage 15and
followthecorrectproceduredescribedthere.
Note: TheKROMEhasanautopower‐offfunctionthat
automaticallyturnsoffthepowerwhenthekeyboard
orfrontpanelbuttonshavenotbeenusedforacertain
lengthoftime.Withthefactorysettings,thisissetto4
hours(see“A u t o power‐offfunction”onpage 16).
Power switch
Thisswitchturnsthepoweron/off.(Seepage 15)
AC adapter connector
TheincludedACadapterisconnectedhere.
(See page 15)
Connectionsmustbemadewiththepowerturned
off.Pleasebeawarethatcarelessoperationmay
damageyourspeakersystemorcause
malfunctions.
Cable hook
UsethistosecurethecableoftheincludedACadapter.
AfterconnectingtheACadapter,loopthecable
aroundthehooklocatedontheKROME’srearpanelso
thatthecablewon’tgetpulledoutinadvertently.Leave
enoughslackontheplugendsothatyoucan
disconnectitifyouwantto.(Seepage 15)
Becarefulnottobendthebaseoftheplugany
morethannecessary.
2. AUDIO OUTPUTS
AUDIO OUTPUT L/MONO & R jack
Thesearethestereoaudiooutputs.UsetheVOLUME
knobtoadjustthevolume.(Seepage 17)
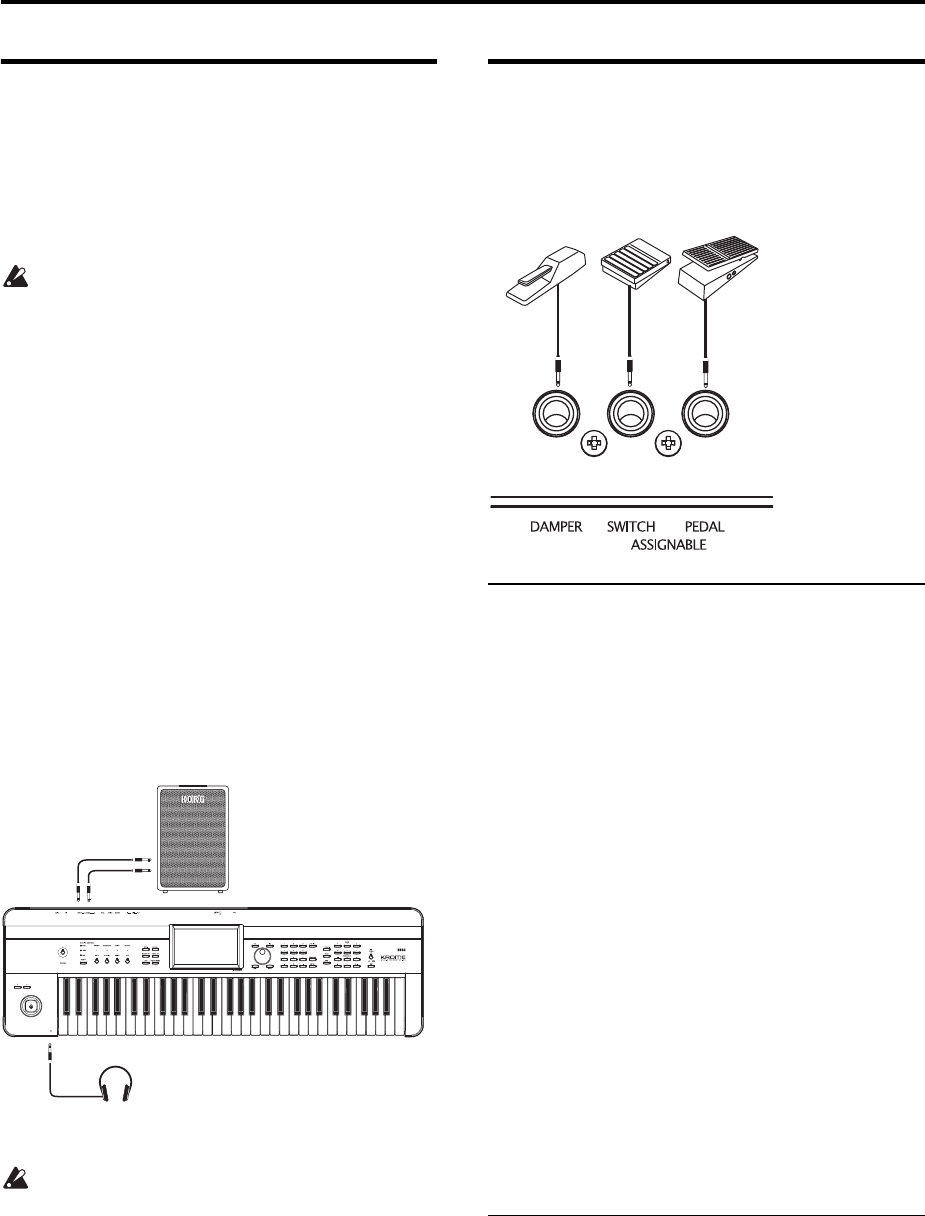
3. PEDALS
Youcanconnectadamperpedal,footswitch,andfoot
pedaltothesejacks.Thisgivesyouabroaderrangeof
functionsandeffectstocontrol.(Seepage 18)
ASSIGNABLE PEDAL jack
ASSIGNABLE SWITCH jack
DAMPER jack
4. MIDI
MIDIletsyouconnecttheKROMEtoacomputeror
otherMIDIdevices,forsendingandreceivingnotes,
controllergestures,soundsettings,andsoon.(See
page 20)
MIDI IN connector
MIDI OUT connector
5. SD
SD card slot
YoucaninsertanSDcardhere,anduseittosave/load
KROMEprograms,combinations,orsongdata.(See
page 118)
6. USB
USB connector
(for connecting to computer)
Youcanconnectyourcomputertothisconnector.
UsingasingleUSBcable,yourKROMEcansendand
receiveMIDIinformationdirectlytoandfroma
computer,withoutrequiringaMIDIinterface.(See
page 20)
Note: TheUSBconnectoroftheKROMEisonlyableto
transmitandreceiveMIDIdata.
1
2
456 3
Introduction to the KROME
4
Objects in the display
TheKROMEusesKorg’sTouchViewgraphicaluser
interface.
Bypressingordraggingobjectsshowninthedisplay,
youcanselectprogramsorcombinations,oredit
parametervalues.Herewe’llexplainthenamesand
functionsoftheseobjects.
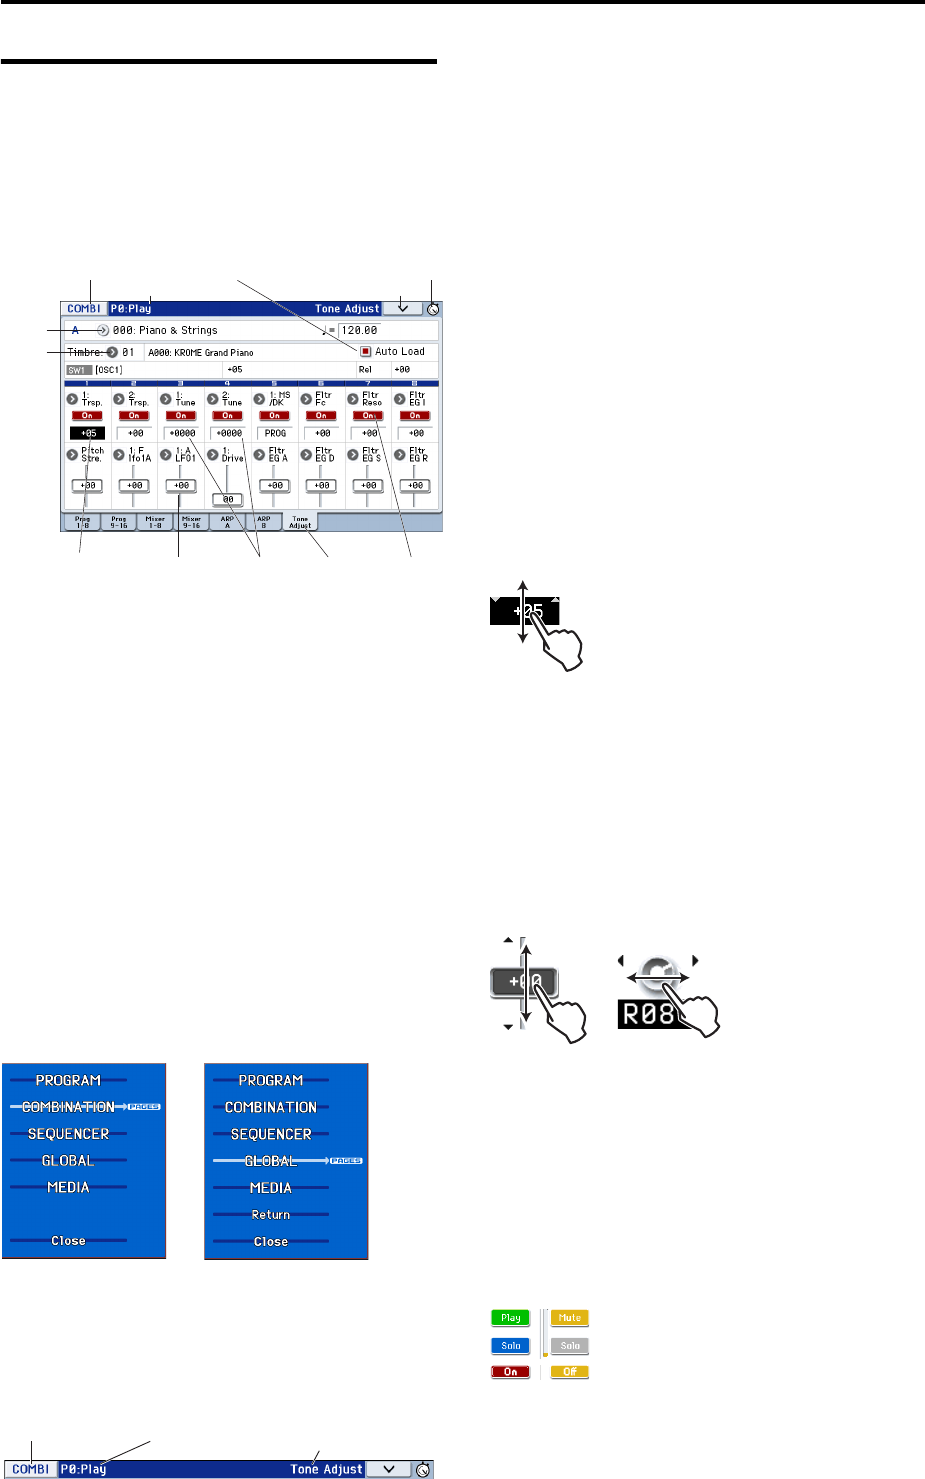
a: Mode button
Thisindicatesthemodethat’scurrentlyselected.
Whenyoupressthisbutton,theModemenuwill
appear.Inthemodemenu,pressthenameofthemode
thatyouwanttomove.Ifyouselectthecurrently
selectedmode,thePageSelectmenuforthatmodewill
appear.Eveninanothermode,pressingtherightside
ofthenamewilldisplaythePageSelectmenuforeach
mode.
Toclosethemenu,presstheClosebuttonortheEXIT
button.
IfyouaccessthismenufromGlobalorMediamode,it
willincludeanitemnamedReturn.Ifyoupress
Return,youwillreturntothemodewhereyouwere
beforeselectingGlobalorMediamode.
Mode menu
b: Current page
Thisindicatesthecurrentpagewithintheselected
mode.
Beginningontheleft,thisareashowsthemodebutton,
pagenumber:name,andtabname.
c: Tab
Mostpagesaredividedintotwoormoretabs.
d: Parameters
Theparametersforvarioussettingsareshowninthe
display.
e: Edit cell
Whenyoutouchaparameterinthedisplay,the
parameterorparametervaluewillusuallybe
highlighted(displayedinreversehighlighting).Thisis
calledtheeditcell,andthehighlighteditemwillbe
availableforediting.
UseavaluecontrollersuchastheVALUEdial(see
page 2)toeditthevalue.
Alternatively,youcaneditthevaluebypressingthe
editcellandusingyourfingertodraginthedirection
ofthetrianglesthatappear.(Theshadingofthe
triangleswillchangeinthreelevels;thisfunctionwill
becomeavailablewhenthedarkestshadingis
reached.)
Inaddition,youcandisplaytheeditpadbypressing
twiceinsuccessionontheeditcell,orbyholdingit
downforatimeandthenreleasingit(seepage 6).
f: Sliders and knobs
Toeditthevalueofanobjectshapedlikeaslideror
knob,pressittomovetheeditcell.Fordetailsonhow
toeditthevalue,pleasesee“e:Editcell,”above.
Theparameterwillbeactiveifitischecked,and
inactiveifitisunchecked.
g: Check boxes
Thepresenceorabsenceofacheckmarkintheseboxes
willenable/disableparametersorfunctions.Puttinga
checkmarkintheboxwillenabletheitem,and
clearingthecheckmarkwilldisableit.
h: Toggle buttons
Thistypeofbuttonwillchangeitsfunctionorswitch
on/offeachtimeitispressed.
Play/Rec/Mutebutton(Sequencermode)
SoloOn/Offbutton(Sequencermode)
On/OffbuttonforEffect
h: Toggle buttons
b: Current page
e: Edit cell
g: Check boxes
i: Popup
button (1)
j: Popup
button (2)
k: Menu command button
a: Mode button l: Stopwatch button
f: Sliders and knobs c: Tabd: Parameters
When selected in Program,
Combination, or
Sequencer mode
When selected in Global or
Media mode
Mode button Page number and name Tab name
Front and rear panels Objects in the display
5
i: Popup button (1)
Whenthisbuttonispressed,apopupmenuwill
appear,showingtheparametervaluesthatare
availableforselection.
Toentertheparametervalue,pressthedesiredvaluein
thepopupmenu.
* Popup menu
Pin
Thisswitchesthepopupmenu
displaybetweenlockedand
unlocked.
Whenlocked,thepinwillbeshown
closed,andthepopupmenuwill
remaindisplayedevenafteryou
pressaparametervalue.When
unlocked,thepinwillbeshown
opened,andthepopupmenuwill
closeimmediatelywhenyoupressa
parametervalue.
j: Popup button (2)
Whenyoupressthisbutton,atabbedmenuwill
appear.
Tocloseatabbedmenu,presstheOKbuttonorCancel
button.
Scroll bar
Usethiswhenyouneedtoseeparametervaluesthat
extendbeyondwhatcanbeshowninthedisplayat
onetime.
k: Menu command button
* Menu
Whenthisbuttonispressed,alistofmenucommands
willappear.
Themenucommandsthatappearwilldiffer
dependingontheselectedpage.
Youcanalsoselectuptotenmenucommandsby
holdingdowntheENTERbuttonandpressinga
numerickey0–9.Themenuwillclosewhenyoupress
thedisplayinalocationotherthanthemenu,orwhen
youpresstheEXITbutton.
* Dialog box
Whenyouselectamenucommand,you’llseeascreen
containingthesettingsneededtoexecutethe
command.Thisiscalledadialogbox.Thedialogbox
thatappearswilldependonthemenucommandthat
youselect.Somecommands,suchasExclusiveSolo,
donotdisplayadialogbox.
* Text edit button
Whenyoupressthisbutton,thetexteditdialogbox
appearsforchangingthenamesofPrograms,
Combinations,Songs,etc.Fordetails,pleasesee
“Editingnames”onpage 117.
* OK and Cancel buttons
Afterperformingotheroperationsinthedialogbox,
youcanexecutethecommandbypressingtheOK
button.Tocancelwithoutexecuting,presstheCancel
button.(Theoperationwilloccurwhenyoupressand
releasethebutton.)Thedialogboxwillclose.
TheEXITbuttoncorrespondstotheCancelbutton,
Donebutton,andExitbutton.
* Done, Copy, and Insert buttons
Therearebuttonswhichperformfunctionwhenthey
arepressedandreleased,suchasDone,Copy,and
Insert(similartotheOKandCancelbuttonsexplained
under“*Dialogbox,”above).
l: Stopwatch button
Whenyoupressthebuttonontheupperrightofthe
display,thetimeelapsedsincepower‐onwillbe
displayed.YoucanusetheSTART/STOPbuttonand
RESETbuttontomeasureelapsedtime.Thisis
Pin
Press here to scroll to left or right.
Press here and slide to left or
right to scroll to the desired
location.
Press here to scroll to the
corresponding location.
Menu command button
Menu button
Text edit button
Cancel button OK button
Character
buttons
Shift button
Switches
between
uppercase and
lowercase
characters.
Delete button
Deletes the
character to the
left of the cursor.
Cursor buttons
Move the cursor
to left or right.
Space button
Insert a space at
the cursor location.
Clear button
Delete all characters
of the text.
Cancel button, OK button
If you are satised with the text
that you input, press the OK
button. If you wish to discard
your input and exit the text edit
box, press the Cancel button.
Cursor
Character Set Selects
the type of character.
Text
Introduction to the KROME
6
convenientwhenyouwanttocheckthetimeduringa
liveperformanceorrehearsal,ortodeterminethe
approximateplaybacktimeofasong.
•START/STOP:Startsorstopsthestopwatch
• RESET:Returnsthetimeto000:00:00
m: Radio buttons
Pressaradiobuttontoselectonevaluefromtwoor
morechoices.
* Edit pad
Numericalinputpad/calculator
Ifyoupressaneditcell,slider,orknobtwiceinquick
succession,apadforinputtingnumbersorusinga
calculatorwillappear.Thevariousbuttonshavethe
followingfunctions.
• OPERATIONDIRECT/CALCULATE:Switches
betweennumericalinputpadandcalculator.
•CE(clearentry):Clearsthecurrently‐inputnumber.
•Ent:Entersthenumberfromthepadintothe
parameter,andclosesthepad.
• RECALL:Copiestheparametervalueintothepad.
•Close:Closesthepad.
Note: Someparameterscannotusethecalculator
function.
Bankandnumberselectpad
IfyoupresstwiceinsuccessiononProgramSelect,
CombinationSelect,orTimbreSelect,thebankand
numberselectpadwillappear.
Bankandnumberselectpad
•BANK:Selectstheprogramorcombinationbank.
•Forotherfunctions,see“Numericalinputpad.”
Val ue slider/Wheelpad
Whenyouholddownaneditcell,slider,orknobfora
whileandthenreleaseit,thewheel/valuesliderwill
appear.
Tochangethevalue,dragthewheel/sliderpad.
SLIDER
WHEEL
Note: Ifyoudon’twanttheeditpadtoappear,clearthe
“EnableEditPad”checkboxinthemenufoundin
GlobalP0:BasicSetup–SystemPreferences(see
page 111).
* EG, Velocity Split
YoucanchangethevaluesofaEGorvelocitysplit
objectbydragginginthedisplay.
* Realtime control popup
WhenyouuseaREALTIMECONTROLSknob,a
popupwillindicatethefunctionthat’sbeingcontrolled
anditsvalue.Acertainlengthoftimeafteryoustop
usingtheknob,thispopupwillcloseautomatically.If
youpressthepopupwhileit’sdisplayed,itwillstay
visible,allowingyoutoenterthevalueusingavalue
controllersuchasthenumerickeys.
Note: Ifyoudon’twanttherealtimecontrolpopupto
appear,clearthe“REALTIMECONTROLPop‐Up”
checkboxinthemenulocatedinGlobalP0:Basic
Setup–SystemPreferences.
m: Radio buttons
Numericalinputpad Calculator

Basic Information About the KROME’s modes
7
Basic Information
About the KROME’s modes
TheKROMEhasnumerousfunctionsthatletyouplay
andeditprogramsorcombinations,recordandplay
backsequencedata,andmanagemedia.These
functionsaregroupedinto“modes.”TheKROMEhas
fivemodes.
Program mode
ProgramsarethebasicsoundsofKROME.
InProgrammode,youcan:
•SelectandplayPrograms.
•Useonearpeggiatorinyourperformance.
•PlaybackDrumTrackpatternswhileyouperform
usingaProgram.
•EditPrograms
YoucanusetherealtimecontrolsandtheTone
Adjustfunctiontoeasilyedittheprogram.
Youcanadjusttheparametersandsettingsofthe
oscillators,filters,amps,EGs,LFOs,effects,arpeggi‐
ator,drumtrack,etc.
Youcanuseuptofiveinserteffects,twomaster
effects,andonetotaleffect.
Plus,youcancreatedrumprogramsusingdrum
kits(ascreatedinGlobalmode).
Combination mode
Combinationsaresetsofupto16programsthatcanbe
playedsimultaneously,lettingyoucreatesoundsthat
aremorecomplexthanasingleProgram.In
Combinationmode,youcan:
•SelectandplayCombinations.
•Usemultipletimbrestoplayarpeggiopatterns
generatedbytwoarpeggiators.
•Useoneormoretimbrestoplaybackthepatterns
inthedrumtrack.
•UsetheKROMEasa16‐trackmultitimbraltone
generator.
•Edi
tCombinations
Youcanusethetoneadjustfunctiontoeasilyedit
theprogramofeachtimbre.
YoucanassignProgramstoeachofthe16Timbres,
eachwithseparatevolume,pan,EQ,andkeyboard
andvelocityzones;makesettingsforeffects,arpeg‐
giator,drumtrack.
Plus,youcanuseuptofiveinserteffects,twomas‐
tereffects,andonetotaleffect.
Sequencer mode
Sequencermodeletsyourecord,playback,andedit
MIDItracks.Youcan:
•Usethesixteen‐trackMIDIsequencertorecordand
playbacksongs.
RecordasingleMIDItrackatatime,orrecordas
manyasallsixteentrackssimultaneously.Youcan
alsorecordexclusivemessages.
•Usemultipletrackstorecordandplayback
performancesgeneratedbytwoarpeggiators.
•Useoneormoretrackstoplaybackthepatternsin
thedrumtrack.
•Editsongs.
•UsetheKROMEasa16‐partmulti‐timbralsound
module.
•GM/GM2playbackisalsosupported.
•UsetheToneAdjustfunctiontoeasilyeditthe
programofeachtrack.
•Useuptofiveinserteffects,twomastereffects,and
onetotaleffect.
•Reco
rdpatternsandassignthemtoindividual
keys,usingRPPR(RealtimePatternPlay/
Recording).
• CreateaCueListthatwillplaybackmultiplesongs
intheorderthatyouspecify.
• CreateuserDrumTrackpatterns.
Global mode
Globalmodeletsyouadjustoverallsettingsforthe
entireKROME,andeditdrumkits,arpeggiopatterns.
InGlobalmode,youcan:
•AdjustsettingsthataffecttheentireKROME,such
asmastertuneandglobalMIDIchannel.
• Createuserscales.
• Createdrumkitsusingdrumsamples.
• Createuserarpeggiopatterns.
• Renameprogram,andcombinationcategories.
•S
etthefunctionoftheassignablepedalsand
assignablebuttons.
•Transm
itMIDISystemExclusivedatadumps.
Media mode
YoucansaveorloaddatausinganSDcard.InMedia
mode,youcan:
• SaveandloadPrograms,Combinations,Songs,and
Globalsetupdata.
•FormatSDcard,copyandrenamefiles,etc.
•Performfileoperationssuchascopyingdatatoor
frommedia.
•ExportandimportsequencestoandfromSMF
(StandardMIDIFiles).
•UsetheDataFilerfunctiontosaveorloadMIDI
SystemExclusivedata.
Introduction to the KROME
8
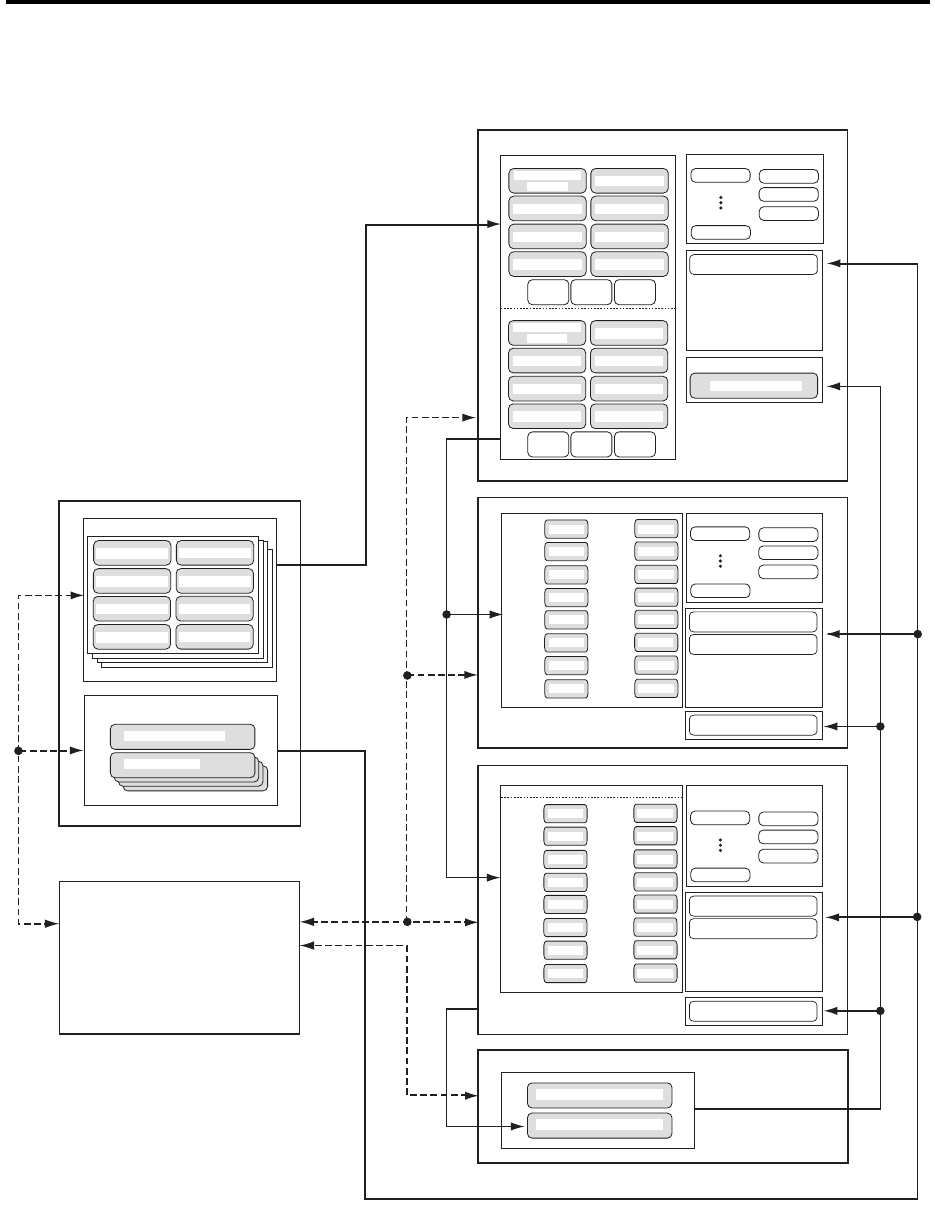
RelationaldiagramoftheKROME’smodes
IFX 1
IFX 5
MFX 1
MFX 2
TFX
Insert / Master / Total Eect
TRACK 1
TRACK 8
TRACK 2
TRACK 3
TRACK 4
TRACK 5
TRACK 6
TRACK 7
PROGRAM
PROGRAM
PROGRAM
PROGRAM
PROGRAM
PROGRAM
PROGRAM
PROGRAM
TRACK 9
TRACK 16
TRACK 10
TRACK 11
TRACK 12
TRACK 13
TRACK 14
TRACK 15
PROGRAM
PROGRAM
PROGRAM
PROGRAM
PROGRAM
PROGRAM
PROGRAM
PROGRAM
Arpeggiator B
Arpeggiator A
Drum Track
Drum Track
IFX 1
IFX 5
MFX 1
MFX 2
TFX
Insert / Master / Total Eect
TIMBRE 1
TIMBRE 8
TIMBRE 2
TIMBRE 3
TIMBRE 4
TIMBRE 5
TIMBRE 6
TIMBRE 7
PROGRAM
PROGRAM
PROGRAM
PROGRAM
PROGRAM
PROGRAM
PROGRAM
PROGRAM
TIMBRE 9
TIMBRE 16
TIMBRE 10
TIMBRE 11
TIMBRE 12
TIMBRE 13
TIMBRE 14
TIMBRE 15
PROGRAM
PROGRAM
PROGRAM
PROGRAM
PROGRAM
PROGRAM
PROGRAM
PROGRAM
Arpeggiator
Arpeggiator B
Arpeggiator A
IFX 1
IFX 5
MFX 1
MFX 2
TFX
Insert / Master / Total Eect
MIDI TRACK 1...16
PCG / SNG
PCG
PCG
DrumTrack
DRUMS PROGRAM
ARPEGGIO PATTERN
Preset Drum Track Pattern
User Drum Track Pattern
Preset Pattern: P0 - 4
User Pattern
OSC 1
PITCH1 FILTER1 AMP1/
DRIVER1
OSC 2
PITCH2 FILTER2 AMP2/
DRIVER2
Multisample 1
Drum Kit Multisample 5
Multisample 2 Multisample 6
Multisample 3 Multisample 7
Multisample 4 Multisample 8
Multisample 1
Drum Kit Multisample 5
Multisample 2 Multisample 6
Multisample 3 Multisample 7
Multisample 4 Multisample 8
Key Assign
DRUM KIT
Drumsample 1 Drumsample 5
Drumsample 2 Drumsample 6
Drumsample 3 Drumsample 7
Drumsample 4 Drumsample 8
GLOBAL MODE
PROGRAM
COMBINATION
SEQUENCER
DRUM KIT
MEDIA MODE
MEDIA MODE
ARPEGGIO PATTERN
Basic Information Basic operations
9
Basic operations
Afteryou’veturnedontheKROME,here’showto
performbasicoperations,suchasselectingmodesand
pages.
Selecting modes
InordertouseaparticularfunctionontheKROME,
youmustfirstselecttheappropriatemode.
•Pressoneofthefrontpanelmodebuttonstoenter
thecorrespondingmode.
•Alternatively,youcanpresstheModebutton
locatedintheupperleftofthedisplay,andselect
thedesiredmodefromamenu(seepage 4).
Forasummaryofeachmode,pleasesee“A b o u t the
KROME’smodes”onpage 7.
Note: Theselectedmodeisshownintheupperleftof
thedisplay,andalsoindicatedbythelitstatusofoneof
theabovemodebuttons.
Note: BypressingtheGLOBALorMEDIAbutton
twice,youcanselectthepreviously‐selectedmode
(Combination,Program,orSequencer).
Selecting page group and tabs
Eachmodehasalargenumberofparameters,which
aregroupedintopages.Thesepagesarefurther
subdividedbytabs;withuptotwelvetabsperpage.
•Makesurethatthedesiredmodeisselected.
Forthisexplanationwe’lluseCombinationmodeas
anexample.
Selecting a page group
Moving by selecting a page group
ThePageSelectscreenshowsalistofthepagegroups
withineachmode.Selectthedesiredpagegroupfrom
thislist.
1. PressthePAGEbutton.
Alternatively,youcanaccessthemodemenuandpress
themodebutton,andthenpresstherightsideofthe
menu(seepage 4).
Thepageselectmenuwillappear.
Thepagewhereyouwereimmediatelybeforepressing
thePAGEbuttonisshowninadarkercolorforyour
reference.
2. Pressthebuttonforthepagethatyouwantto
view.
P0:Playisthepageyou’llnormallyusewhen
performingontheKROME.(Thesameistruein
Programmode.)Editingisdoneinotherpages.
Asanexamplehere,tryselecting“P4Zone/Delay.”The
P4:Zone/Delay–KeyZT01–08pagewillappear.
Note: Thepagethatappearswillbeshowingthetab
thatyoumostrecentlyselected.
Using the PAGE button plus the numeric keys 0–9
to access different pages
•HolddownthePAGEbuttonandusethenumeric
keys0–9tospecifythepagenumberthatyouwant
toview.
Thespecifiedpagenumberwillappear.Thepage
thatappearswillbeshowingthetabthatyoumost
recentlyselected.
Note: InpagesconsistingofmultiplepagessuchasP5–
1,P5–2,P8–1,andP8–2,thefirstpage(P5–1,orP8–1)
willbeselected.
Using the EXIT button to move between pages
Ifyou’reinapageotherthanpage0(e.g.,ProgP0:
Play)ofeachmode,pressingthisbuttonwilltakeyou
topage0.
Thisbuttonmakesiteasytoreturntothemainpageof
thecurrentmode:
•Pressitoncetogotothepreviously‐selectedtabon
themainP0:Playpage(Play/RECpagein
Sequencermode).
•PressitagaintogotothefirsttabonthemainP0:
Playpage(suchasthemainProgramPlaypage).If
youhadpreviouslyselectedaparameteronthis
page,thatparameterwillbeselected.
•Pressitathirdtimetoselectthemainparameteron
theP0:Playpage,suchastheProgramnamein
Programmode.
COMBIbutton: Combinationmode
PROGbutton: Programmode
SEQbutton: Sequencermode
GLOBALbutton: Globalmode
MEDIAbutton: Mediamode
Introduction to the KROME
10
Whenadialogboxisopen,thisbuttoncancelsthe
settingsmadeinthedialogboxandclosesthedialog
box,justlikepressingtheCancelbutton.
Ifapopupmenuormenuisopen,pressingEXITcloses
themenu.
Selecting pages
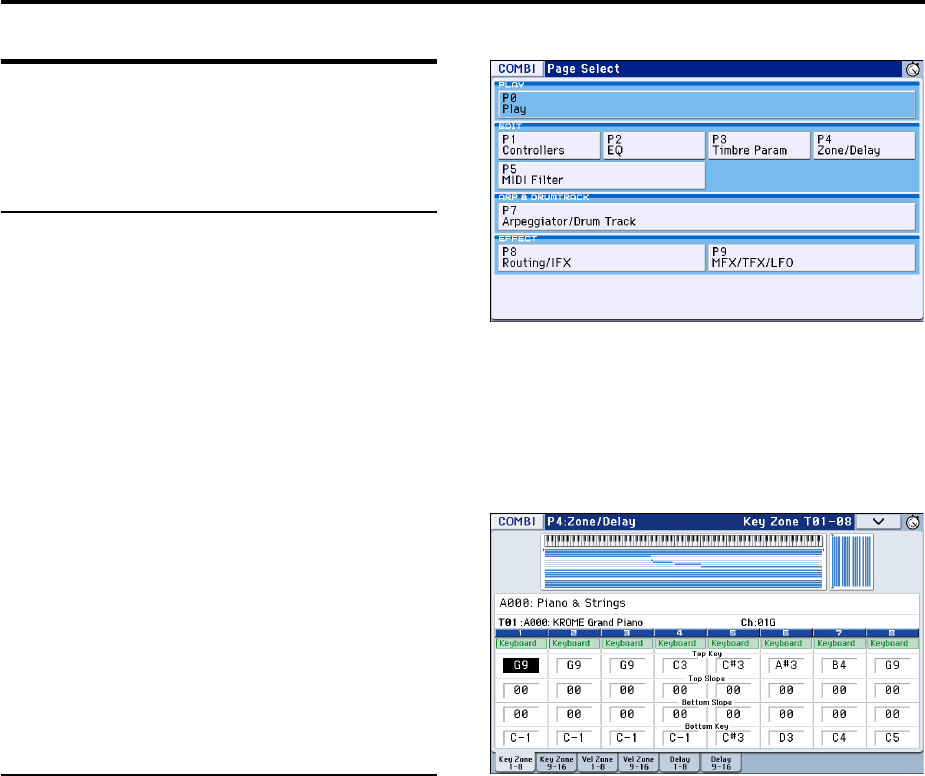
•Youcanaccesstabbedpagesbypressingthetabs
showninthebottomlineofthedisplay.
ThisexampleshowstheProgramT01–08page
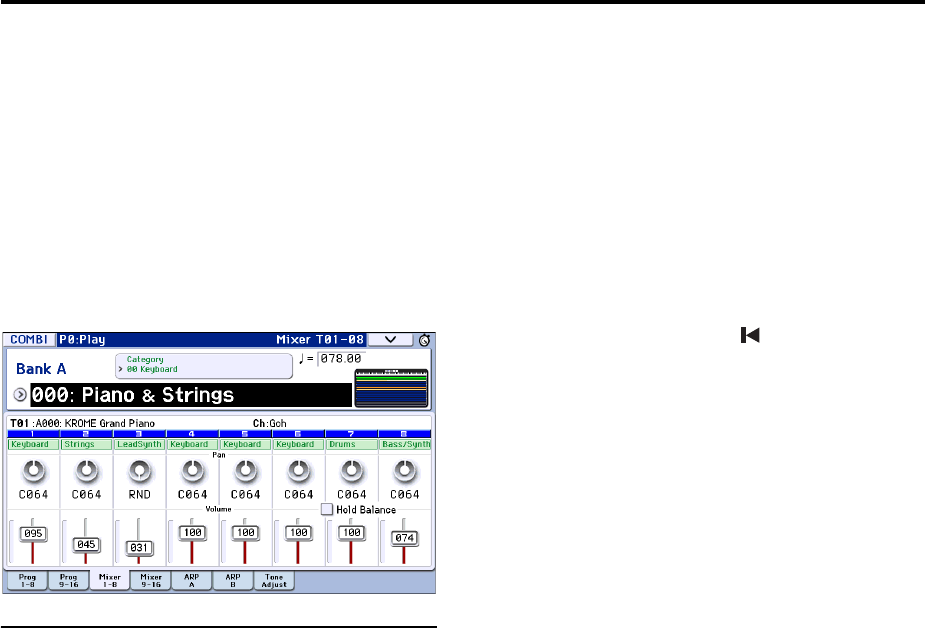
throughMixerT01–08pageofCombiP0:Play.
Selecting a parameter and editing the
value
1. Presstheparameterthatyouwanttoedit.
2. Ifyouselectaneditcell,thedisplaywillbe
highlighted.Editthevalue.
•Thewaythatthevaluewillchangedependsonthe
typeofparameterorobject.(See“Objectsinthe
display”onpage 4.)
Thevalueintheeditcellcanbeeditedbyusingthe
valuecontrollers(VALUEdial,INC/DECbuttons,
numerickeys0–9,–button,(.)button,ENTERbut‐
ton,etc.).
3. Youcanuseknobs1–4toeditparametersthatare
assignedtothecontrolsurface.
Note:
YoucanusetheCOMPAREbuttontocomparethe
soundyou’reeditingwiththeoriginaluneditedsound.
INC/DEC buttons
Usethesewhenyouwishtomakesmallchangesinthe
value.
VALUE dial
Usethisdialtoedittheselectedparameter’svalue.
Thiscontrolisconvenientwhenyouwanttoscroll
throughaverylonglistofselections.
Numeric keys 0–9, ENTER button, – button,
(.) button
Thesebuttonsareconvenientwhenyouknowthe
exactvaluethatyouwanttoenter.Usethe0–9,–,and
decimal(.)buttonstoenterthevalue,andthenpress
theENTERbuttontoconfirmtheentry.
The–buttoninvertsthesign(+/–)oftheparameter
value;thedecimal(.)buttoninsertsadecimal,for
enteringfractionalvalues.
Note: Whenselecting“ProgramSelect”(seepage 21),
youcanselectaGMbankbyholdingdownthe0
buttonandpressingthe(.),1–9,or–buttons.
Functions that use the ENTER button in conjunc-
tion with another button
ENTERhasafewspecialfunctionswhenitispressed
incombinationwithotherbuttons.
ByholdingdowntheENTERbuttonwhileyoupressa
numerickey(0–9),youcanselectuptotenmenu
commandsfromwithinthecurrentpage.
Whileadialogboxisdisplayed,theENTERbutton
correspondstotheOKbutton.(TheEXITbutton
correspondstotheCancelbutton.)
InSequencermode,youcanholddowntheENTER
buttonandpresstheLOCATE()buttontousethe
menucommandSetLocation.
Other
Specifying a program bank or combination bank
PROG BANK A, B, C, D, E, F/
COMBI BANK A, B, C, D buttons
Usethesebuttonstochangebankswhenselecting
ProgramsorCombinations.TheLEDsinthebuttons
lightuptoshowthecurrentbank.
InProgrammode,thesebuttonsselecttheProgram
bank.
InCombinationmode,thesebuttonshavetwo
functions:
•Whenyou’reselectingCombinations,theychoose
theCombinationbank.
•Whenyou’reassigningaProgramtoatimbre
withintheCombination,theyselecttheProgram
bank.
InSequencermode,whenatrack’sProgramnameis
selected,thesebuttonschangetheProgrambank.
Using the keyboard to enter a note number or
velocity value
Byplayingakeywhilepressingaparameterthat
specifiesanotenumber(suchasG4orC#2)ora
velocityvalue,youcandirectlyenterthatnotenumber
orvelocityvalue.(Thisisnotavailableinmenu
commanddialogboxes.)
Tempo input
TEMPO knob, TAP button
YoucansetthetempobyturningtheTEMPOknobor
byrepeatedlypressingtheTAPbutton.
COMPARE button
Youcanusethisbuttontoreturnthesettingsofan
editedprogram,combination,orsongtotheiroriginal
state.Refertothefollowingsection.

Basic Information Basic operations
11
Compare function
Program, Combination mode
Usethiswhenyouwishtocomparetheeditsyouhave
madetoaprogramorcombination’ssoundwiththe
un‐editedoriginal(i.e.,thesoundthatiswritteninto
memory).
Wheneditingaprogramorcombination,pressthis
button.TheLEDwilllightup,andthelast‐written
settingsforthatprogramorcombinationnumberwill
berecalled.WhenyoupresstheCOMPAREbutton
onceagain,theLEDwillgodarkandyouwillreturnto
thesettingsthatyouwereediting.
1. Wheneditingaprogramorcombination,press
thisbutton.
TheLEDwilllightup,andthelast‐writtensettingsfor
thatprogramnumberorcombinationnumberwillbe
recalled.
2. PresstheCOMPAREbuttononceagain.
Note: TheLEDwillgodarkandyouwillreturntothe
settingsthatyouwereediting.
Ifyoueditthesettingsthatarerecalledbypressingthe
COMPAREbutton(i.e.,thesettingsthatarewritten
intomemory),theLEDwillgodark,anditwillnotbe
possibletoreturntothepreviouseditsbypressingthe
COMPAREbuttonagain.
Sequencer mode
InSequencermode,youcanusetheCOMPAREbutton
tomake“beforeandafter”comparisonsimmediately
afterusingrealtimerecordingorsteprecordingto
recordasong,orafterperforminganeditonatrack.
Forexample,thiscanbeusedeffectivelywhen
realtime‐recordingaMIDItrackforasong.
1. Realtime‐recordaMIDItrack.(Take1)
2. Onceagain,realtime‐recordonthesametrack.
(Take2)
3. PresstheCOMPAREbutton.TheLEDwilllight
up,andtake1willberecalled.
4. PresstheCOMPAREbuttononceagain.TheLED
willgodark,andtake2willberecalled.
5. Ifatstep3youonceagainrealtime‐recordonthe
sametrack(take3),theComparefunctionwill
nowbereferencingtake1.
6. Ifatstep4youonceagainrealtime‐recordonthe
sametrack(take3),theComparefunctionwillbe
referencingtake2.
Inthisway,theComparefunctionletsyourecallthe
previousrecordingorthepreviousstateofevent
editing.
Note: IfyoucontinueeditingwhentheCOMPARE
buttonislit,thebuttonwillgodark.Thisnowbecomes
themusicaldatathatwillbeselectedwhenthe
COMPAREbuttonisdark.
Global mode
TheComparefunctionthatbringsbackthesettings
priortoeditingisnotavailableinGlobalmode.
Selecting and executing menu
commands
Theutilityfunctionsprovidecommandsthatare
specifictoeachpage,suchasWrite(save)orCopy.The
availableutilityfunctionswilldependontheselected
page.
Forexample,theutilityfunctionsinProgrammodelet
youwrite(save)thesettings,orletyouperform
convenienteditingoperationssuchascopyingsettings
betweenoscillatorsoreffects,oraSyncfunctionthat
letsyouedittwoEGstogether.
1. Ontheupperrightsideofthedisplay,pressthe
v
button.
Themenucommandwillappear.
2. Selectamenucommandbytouchingitwithyour
finger.
Adialogboxfortheselectedmenucommandwill
appear.
Check‐typecommandswillnotdisplayadialogbox;
theirstatuswillbeswitched,andthelistwillclose.
ByholdingdowntheENTERbuttonandpressinga
numerickey0–9youcanaccessthedialogboxforthe
firsttenutilityfunctionswithoutgoingthroughthe
menu.
•Ifyouwanttoclosethelistwithoutselectinga
command,pressthedisplaysomewhereotherthan
thelist,orpresstheEXITbutton.
3. Foraparameterinadialogbox,selectitby
pressingitwithyourfinger,andusetheVA L U E
controllers(e.g.,VAL UEdialorINC/DECbuttons)
toenteritsvalue.
Whenselectingaprogramorcombinationnumberina
dialogbox,youcanalsousetheBANKbuttontoenter
thebankasanalternativetousingtheVALUE
controllers.
4. Toexecute,presstheOKbuttonortheENTER
button.
Ifyoudecidenottoexecute,presstheCancelorthe
EXITbutton.
Thedialogboxwillclose.
Menu command button
Menu button

Introduction to the KROME
12
Writing/saving
Afterediting,youshouldwriteorsaveyourchangesas
necessary.
Forexampleifyou’veeditedaprogram,yourchanges
willbelostifyouselectanotherprogramorturnoff
thepower.Thesameappliestoacombination.
SettingsyoueditinGlobalmodeandsongswillbe
rememberedaslongasthepowerison,butyour
changeswillbelostwhenyouturnoffthepower,
unlessyouwritethesechangesintomemory.
•YoucanwriteorsavebypressingtheWRITE
buttontwice.
FormoredetailsontheWriteoperations,seethe
followingpages.
• Programs→p.30
• Combinations→p.47
•Effectpresets→PG p.67
•Globalsettings(pages0–4)→p.116
•Dru
mkits→p.116
•Userarpeggiopattern→p.116
•UserDrumTrackpatterns→p.103
Preset/userDrumTrackpatternsaresavedin
internalmemoryevenwhenthepoweristurned
off.PatternsthatyoucreateinSequencermodecan
beconvertedintouserDrumTrackpatternsand
savedininternalmemory.
•Usertemplatesongs→PG p.164
Preset/usertemplatesongsaresavedininternal
memoryevenwhenthepoweristurnedoff.Track
settingsandeffectsettingsofasongyoucreatecan
besavedininternalmemorybyusingthemenu
commandSaveTemplateSong.
•Fordetailsonwritingtointernalmemory→p.115
Refertothefollowingpagesformoreinformation
aboutsaving.
• Savingasong→p.75
• Savingtomedia(Media–Save)→p.118
Note: OntheKROME,theactionofwritingtointernal
memoryiscalled“Write,”andtheactionofsavingto
anSDcarddeviceiscalled“Save.”
Assigning a name (renaming)
Youcaneditthenameofaneditedprogram,
combination,song,drumkit,orarpeggiopattern.
Youcanalsochangethenamesoftheprogramand
combinationcategories.
Fordetails,pleasesee“Editingnames”onpage 117.
Shortcuts
Selecting a GM bank program
• BankGM:Holddownthe0numerickeyandpress
–.
•Banksg(1)–g(9):Holddownthe0numerickeyand
press1–9.
• Bankg(d):Holddownthenumerickey0andpress
(.).
Moving between pages within a mode
•ByholdingdownthePAGEbuttonandpressinga
numerickey0–9youcanjumptothe
correspondingpage.
Access the menu commands in each page (up
to ten items)
•ByholdingdowntheENTERbuttonandpressinga
numerickey0–9.
Input note number values or velocity values
•Whileholdingdowntheeditcellinthedisplay,
pressanoteonthekeyboard.
Alternatively,selecttheeditcellinthedisplay,and
thenholddowntheENTERbuttonandpressanote
onthekeyboard.
Note: YoucanalsouseaMIDInote‐onmessageinstead
ofthekeyboard.
Note: Whileadialogboxisdisplayed,theENTER
buttonwillperformthesamefunctionastheOK
button.Thismeansthatyoucan’tusethismethodto
enteranotenumberorvelocityvalueinadialogbox
thatcontainsanOKbutton.
Specifying the location in a song
InSequencermode,setsthecurrentlocationasthe
Location(equivalenttotheSetLocationmenu
command)
•HolddowntheENTERbuttonandpressthe
LOCATE()button.
ENTER button
•Whileadialogboxisdisplayed,thisbutton
performsthesamefunctionastheOKbutton.
EXIT button
Thisbuttonmakesiteasytoreturntothemainpageof
thecurrentmode:
1. Pressitoncetogotothepreviouslyselectedtabon
themainP0page.
2. PresstheEXITbutton.Youwillmovetothe
previouslyselectedparameteroftheP0toppage
(Prog:Main,Combi/Seq:ProgramT01–08).
3. PresstheEXITbutton.Youwillmovetothe
followingparameteroftheP0toppage.
Prog:ProgramSelect
Combi:CombinationSelect
Seq:SongSelect

Basic Information Basic operations
13
InanypageofProgramorCombinationmode,
pressingEXITamaximumoftwotimeswill
immediatelyallowyoutousethenumerickeysor
INC/DECbuttonstoselectprogramsorcombinations.
InSequencermode,pressingEXITamaximumofthree
timeswillallowyoutoselectasong.
EXIT button (in dialog boxes)
Whenadialogboxisdisplayed,thishasthesame
functionastheCancel,Done,orExitbutton.
Initialize the KROME
•Withthepoweroff,pressthepowerswitchwhile
holdingdowntheENTERbuttonandnumerickey
[0].
(Whiledataisbeingloaded,thedisplaywill
indicate“NowwritingintointernalMemory.”)
Theresultwillbethesameaswhenyou’ve
executedLoadPreload/DemoDataAll.
(Seepage 125)

Introduction to the KROME
14
15
Setup
Turning the power on/off
Connecting the AC adapter
1. MakesurethattheKROMEispowered‐off.
2. ConnecttheDCplugoftheincludedACadapter
tothepowersupplyjackontheKROME’srear
panel.
YoumustuseonlytheincludedACadapter.Using
anyotherACadaptermightcausemalfunctions.
3. ConnectthepowercordtotheACadapter.
4. PlugthepowercordintoanACoutlet.
BesuretouseanACoutletofthecorrectvoltage
foryouradapter.
5. UsetheKROME’scablehooktofastenthecableso
thattheDCplugdoesnotbecomeaccidentally
disconnected.
ACadapterconnections
Turning the power on
1. TurntheKROME’sVOLUMEknoballthewayto
theleftsothatthevolumeisdown.
Ifexternalequipmentsuchaspoweredmonitor
speakersareconnected,lowertheirvolumeaswell,
andthenturnofftheirpower.
2. PressthepowerswitchontheKROME’srear
paneltoturnthepoweron.
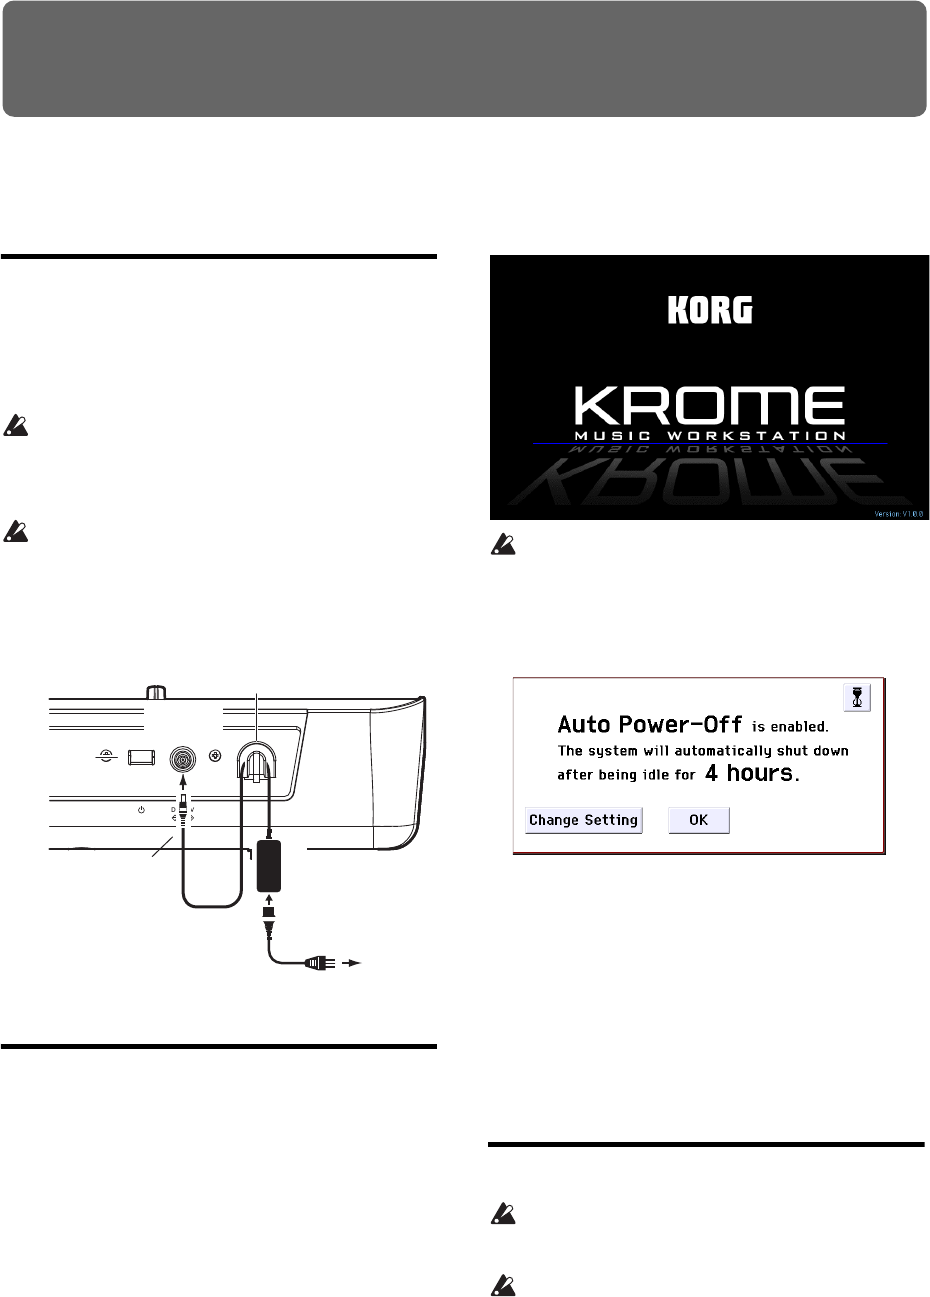
Thedisplaywillshowthemodelnameandsoftware
version.(Theillustrationshowsthescreenthatwill
appearwiththefactorysettings.Thismaychange
withoutnotice.)
Iftheautopower‐offfunctionisenabled,thetime
untilautopower‐offturnsoffthepowerwillbe
shownwhenthesystemstartsup.Ifthisdialog
boxdoesnotappear,theautopower‐offfunctionis
disabled;thepowerwillnotturnoffautomatically
(see“A u t o power‐offfunction”onpage 16).
3. Turnonthepoweroftheexternalequipmentthat’s
connectedtotheKROME’sAUDIOOUTPUTL/
MONOandRjacks,suchaspoweredmonitor
speakers.
4. UsetheKROME’sVOLUMEknobandthevolume
controlsofyourexternalequipmenttoadjustthe
volumetoasuitablelevel.
Note: Thepagethatappearswhenyouturnonthe
powerwilldependonthePower‐OnModesetting(see
page 110).
Turning the power off
Whenyouturnoffthepower,unsaveddatawillbe
lost.Besuretosaveanyimportantdatasuchas
editedsoundsorglobalsettings(seepage 12).
IftheKROME’sautopower‐offfunctionis
enabled,itspowerwillautomaticallyturnoffif
therehasbeennouserinputforacertainlengthof
time.Unsaveddatawillbelostevenifthepoweris
turnedoffbytheautopower‐offfunction.
1. TurntheKROME’sVOLUMEknoballthewayto
theleftsothatthevolumeislowered.
2. Ifexternalequipmentsuchaspoweredmonitor
speakersareconnected,lowertheirvolumeand
thenturnofftheirpower.
Power switch
4: Cable hook
AC adapter
When fastening the
cable to the cable
hook, take care not
to bend this portion
any more than
necessary.
3: Power cord for AC adapter
1: Power
supply jack
2: Plug into AC outlet.
Setup
16
3. PressthepowerswitchontheKROME’srear
paneltoturnthepoweroff.
TheKROME’sinternaldatamaybedamagedifthe
poweristurnedoffwhiledataisbeingwritteninto
internalmemory,suchasduringaSaveoperation.
Neverturnoffthepowerwhileprocessingisbeing
performed.
Thefollowingmessageisdisplayedwhiledatais
beingwrittenintointernalmemory.
“Nowwritingintointernalmemory”
Ifwritingtointernalmemorycouldnotbe
completedsuccessfully,theKROMEwill
automaticallyrepairtheinternalmemoryby
initializingitthenexttimeyouturnonthepower.
Thisisnotamalfunction.Ifthisoccurs,the
followingmessagewillappearinthedisplay;
presstheOKbutton.
Theinternalmemoryhasbeencorrupted,likely
duetoaninterruptionofpowerwhilethesystem
waswriting/savingdata.Thishasbeenrepaired
andtheaffectedBankhasbeeninitialized.
Asmallamountofelectricalpowerisusedeven
whenthepowerisoff(STANDBY).Ifyouwon’tbe
usingtheKROMEforanextendedperiod,turnoff
thepowerandunplugthepowercordfromthe
ACoutlet.
Auto power-off function
TheKROMEsupportsanautopower‐offfunctionthat
automaticallyturnsoffthepowerwhenthekeyboard
orfrontpanelbuttons(*)havenotbeenusedfora
certainlengthoftime.
*UsageoftheVOLUMEknobisnotincluded.
Note: Withthefactorysettings,thetimeuntil
automaticpower‐offwillbeapproximatelyfourhours.
Whenthepowerturnsoff,thesettingsyouhad
beeneditingwillbelost.Makesurethatyousave
importantsettingsbeforethisoccurs.
Changing the auto power-off setting
Ifyouwanttochangethesettingsothatthepower
doesnotturnoffautomatically,proceedasfollowsto
disabletheautopower‐offfunction.
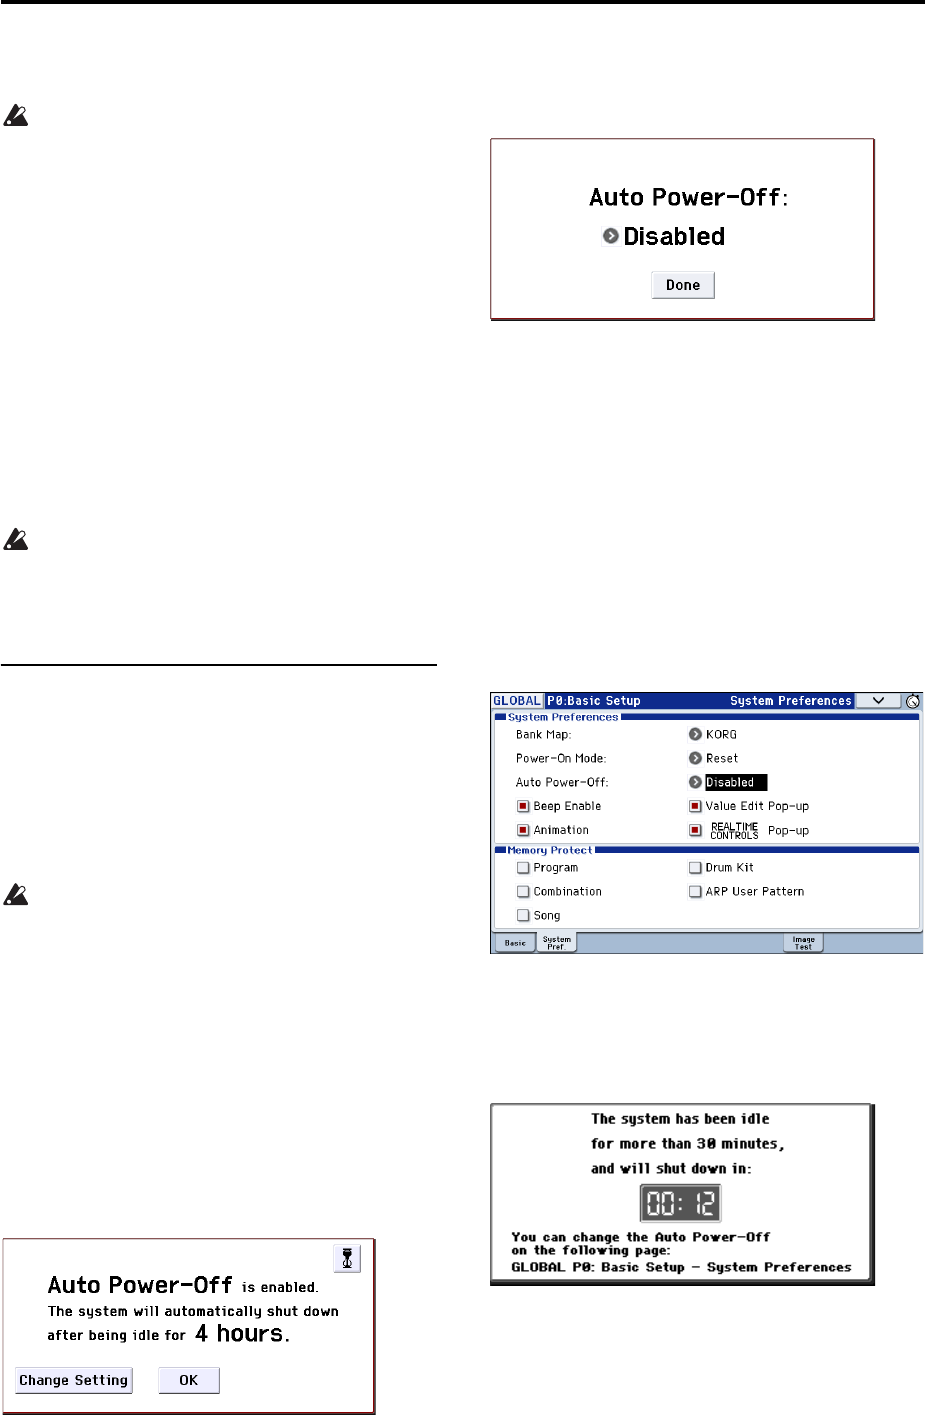
Making the change in the dialog box immediately
after start-up
Iftheautopower‐offfunctionisenabledsothatthe
powerwillturnoffautomatically,thedialogboxwill
appearimmediatelyafterstart‐up,indicatingthetime
untilautomaticpower‐offwilloccur.
1. Whilethismessageisdisplayed,presstheChange
Settingbuttoninthedialogbox.
Thefollowingdialogboxwillappear.
2. Pressthepopupbuttontoselectthelengthoftime
afterwhichthepowerwillturnoff.Ifyoudon’t
wantthepowertoturnoffautomatically,choose
theDisabledsetting.
Changing the setting during operation
1. PresstheGLOBALbutton.(Alternatively,press
themodebuttonandchooseGLOBAL.)
2. PresstheEXITbuttontoaccessP0:BasicSetup.
3. PresstheSystemPref.tabtoaccesstheSystem
Preferencespage.
4. In“AutoPower‐Off,”specifytheamountoftime
whenyouwantthepowertoturnoff.Ifyoudon’t
wanttheautopower‐offfunctiontoautomatically
turnoffthepower,choosetheDisabledsetting.
Auto power-off warning message
Whenthespecifiedlengthoftimehaselapsedwithout
anyuserinputontheKROME,amessagewillappear,
warningyouthattheautopower‐offfunctionisabout
toturnoffthepower.
Ifyouwanttocontinueusingthesystem,pressthe
keyboard,abutton,orthedisplay.TheAutopower‐off
functionwillbereset.Ifthesamespecifiedlengthof
timeelapseswithnouserinput,thesamemessagewill
appearagain.
Connections Turning the power off
17
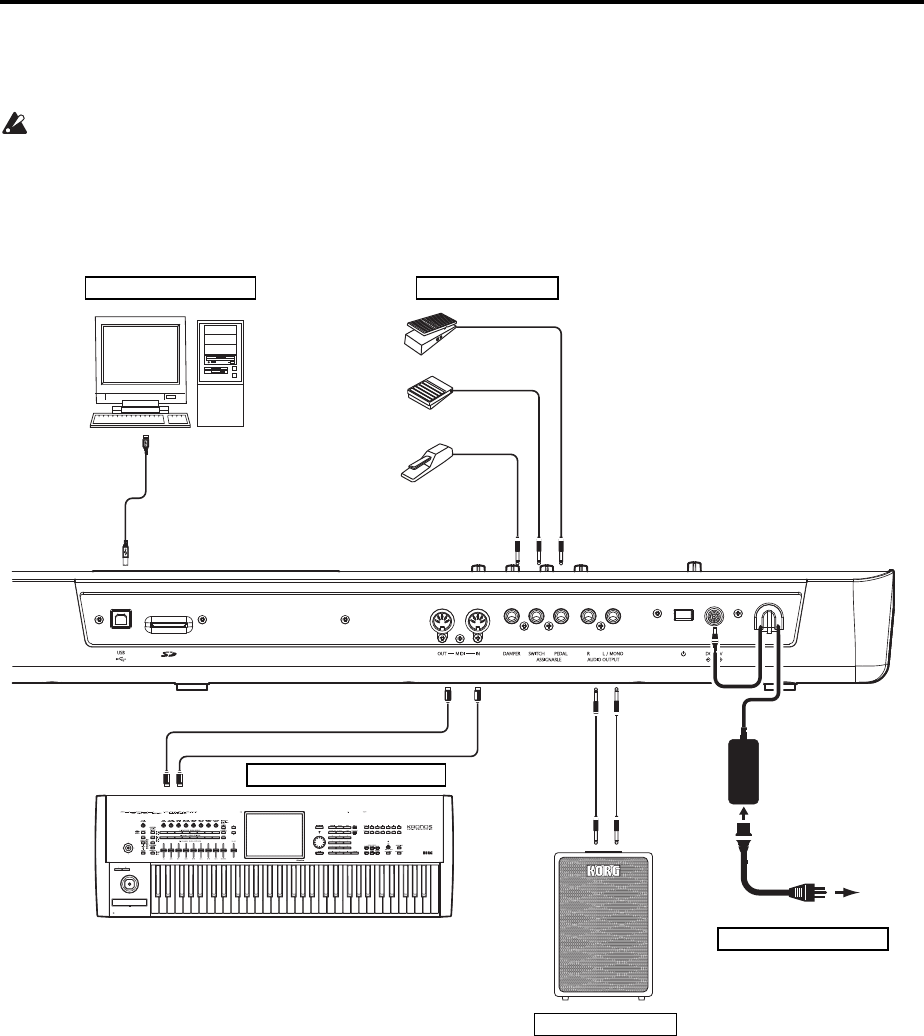
Connections
Connectionsmustbemadewiththepowerturned
off.Pleasebeawarethatcarelessusagemay
damageyourspeakersystemorcause
malfunctions.
USB
DAMPER
ASSIGNABLE PEDAL
ASSIGNABLE SWITCH
INPUT
MIDI IN
MIDI IN MIDI OUT
MIDI OUT
R L/MONO
AUDIO OUTPUT
Computer
Analog audio output
Powered
monitors, etc.
Connections to MIDI equipment
Pedal connections etc.
MIDI cable
AC adapter power
supply connector
Power cable
(Included)
to an AC outlet
Connecting the AC adapter
Connections to computers
MIDI keyboard
Setup
18
Audio connections
TheKROMEdoesnotcontainbuilt‐inspeakers.In
ordertohearthesoundofyourperformance,you’ll
needtoconnectaudioequipmentsuchaspowered
monitors,amixer,astereosetorheadphones.
Connecting audio equipment
TheKROME’saudiooutputisdesignedto
produceasignallevelthatishigherthanconsumer
audioequipmentsuchasCDplayers.Forthis
reason,performingathighavolumemaydamage
yourspeakersorequipment.Pleaseusecaution
whenadjustingthevolume.
1. Minimizethevolumeofallconnectedequipment,
andturnoffthepower.
2. ConnecttheKROME’sOUTPUTL/MONOandR
jackstotheinputjacksofyourpoweredmonitor
speakersormixer.
Note: IfyouconnectonlytheL/MONOjack,theLand
Rsoundwillbemixedformonauraloutput.Inorderto
takefulladvantageoftheKROME’scapabilities,we
recommendthatyoulisteninstereo.
Ifyou’replayingbackthroughyourstereoaudio
systemoracassette‐radiothathasexternalinput
connectors,connecttheKROMEtothejacksthatare
markedLINEIN,AUXIN,orexternalinput.(You
mightneedtoobtaintheappropriateadapterplugor
conversioncable.)
Connecting headphones
Usingheadphonesathighvolumeforanextended
timemaycausehearingdamage.Pleaseavoid
excessivelyhighvolumelevels.
1. Connectthestereomini‐plugofyourheadphones
totheKROME’sHeadphonejack.
2. UsetheVOLUMEknobtoadjusttheheadphone
volume.
TheKROME’sHeadphonejackwilloutputthesame
signalastheOUTPUTL/MONOandRjacks.
TheoutputfromtheOUTPUTjackisnotturnedoff
evenifheadphonesareconnectedtotheHeadphone
jack.
Connecting a damper pedal,
foot switch, or foot pedal
Ifyouconnectanoptionaldamperpedal,footswitch,
orfootpedaltotheKROME,you’llbeabletocontrol
theKROMEusingyourfeet.
Connecting a damper pedal
Whenyoupressthedamperpedal,thenotesyou’ve
pressedwillbesustainedsothattheywillcontinue
evenafteryoutakeyourhandsoffthekeyboard.This
isalsocalledasustainpedal;ithasthesamefunction
asthedamperpedalofanacousticpiano.
IftheoptionalKorgDS‐1Hdamperisconnected,you’ll
beabletotakeadvantageofthe“half‐damper”effect,
wherethedepththatyoupressthepedalwillvarythe
damperamount.Ifanyothertypeofpedalis
connected,itwillfunctionasadamperswitch.
InCombinationorSequencermode,youcanalsoselect
settingssothatthedamperwillapplytosomesounds
butnottoothersounds.
1. ConnectaKorgDS‐1Hdamperpedaltothe
ASSIGNABLEPEDAL/SW1/DAMPERjack.
2. Dependingonwhichassignablejackyouhave
connectedthepedalto,setthecontrollertype
(Type)toDamper,andsetthePolarityas
appropriate(seepage 202oftheParameterGuide).
Note: Thehalf‐dampersensitivityisadjustedtoa
standardvaluewhentheKROMEisshippedfromthe
factory.Ifthehalf‐damperpedalyou’reusingdoesnot
respondappropriately,pleaseadjustthesensitivity
(seepage 217oftheParameterGuide).
Connecting a foot switch
Thisletsyouuseasimplefootswitch,suchastheKorg
PS‐1orPS‐3,asanassignablecontroller.Thefoot
switchcanperformawidevarietyoffunctions,such
as:
•Anassignablesourceformodulatingsoundsand
effects
•Portamentoon/off
•Programselectupordown
• Sequencerstart/stoporpunchin/out
•TapTempo
R
L/MONO
INPUT
PHONES
Powered monitor speakers
Headphones

Connections Connecting a damper pedal, foot switch, or foot pedal
19
•Arpeggiatoron/off
•SwitchtheDrumTrackon/off
•UsevariousKROMEcontrols(realtimecontrol
knobs,joystick,SW1/SW2,etc.)
Thisbuttonwillalwaysfunctioninthesameway
regardlessoftheProgram,Combination,orSong
you’veselected.Youcanassignthefunctioninthe
Globalmode.
Using a foot switch to select Programs
Youcanselectprogramsbyusingafootswitch
connectedtotheASSIGNABLESWITCHjack.By
assigningtheappropriatefunction,youcanincrement
ordecrementtheprogramnumberinstepsofone.
ThisletsyouchangeProgramswithoutusingyour
hands–greatforquickProgramchangesinlive
performancesituations.
Therearetwowaysofdoingthis:byassigningthefoot
switchtoProgramUp/Down,ortoValueInc/Dec.Each
oftheseissuitedtoaparticularapplication,as
describedbelow.
•ProgUp/Down:WhenperforminginthenormalP0
screen
• VALUEInc/Dec:Whenperformingwhilealistsuch
astheCategory/ProgramSelectmenuisopen
Assigning the foot switch to Program Up/Down
AssigningthefootswitchtoProgramUporProgram
DownletsyoudirectlycontrolProgramchangesfrom
thefootswitch.Formostsituations,thisisthemore
straightforwardmethod.
Tosetthisup:
1. Connectafootswitchtotherear‐panel
ASSIGNABLESWITCHinput.
UseanoptionalPS‐1pedalswitch.
2. AccesstheGlobalP2:Controllers–Foot
Controllerspage.
Proceedasfollows.
PresstheGLOBALbuttontoenterGlobalmode.
PressthePAGEbuttontoaccesstheGLOBALPage
Select.PressP2Controllers,thenpresstheFoot
Controltabinthedisplay.
3. Set“FootSwitchAssign”toeitherProgramUpor
ProgramDown.
IfyouchooseProgramUp,thenextprogramnumber
upwillbeselectedeachtimeyoupressthefootswitch.
IfyouchooseProgramDown,thenextprogram
numberdownwillbeselectedeachtimeyoupressthe
footswitch.
4. Setthe“FootSwitchPolarity”tomatchthe
polarityofthepedalyou’veconnected.
Ifyou’veconnectedtheoptionalPS‐1orPS‐3pedal,
choose(–)KORGStandard.
Now,thefootswitchwillstepthroughthePrograms,
onebyone.
5. Ifyouwanttopreservethissettingevenwhenthe
poweristurnedoff,besuretoWritethedata.(See
page 116)
6. PressthePROGbuttontoenterProgP0:Play,and
pressthefootswitchtochangetheProgram.
Note:
ThissettingappliestoselectingCombinations,aswell.
Note: WiththeProgramUp/Downmethod,youwon’t
beabletoselectprogramswhiletheBank/Program
SelectorCategory/ProgramSelectmenusareopen.
Usethe“AssigningthefootswitchtoValueInc/Dec”
methoddescribedbelow.
Assigning the foot switch to Value Inc/Dec
ThisletsyouusetheAssignableFootSwitchtoduplicate
thefunctionsofthefront‐panelINCorDECbuttons.
Thismethodisconvenientifyouwanttoopenthe
Bank/ProgramSelectmenuortheCategory/Program
Selectmenuandswitchprogramswhileviewingthe
programorcombinationmenu.
1. Followsteps1–2under“Assigningthefootswitch
toProgramUp/Down,”above.
2. Atthetopofthepage,settheFootSwitchAssign
parametertoValu eInc(orVal ue Dec).
3. Now,thefootswitchwillactjustlikeyou’re
pressingthefront‐panelINCorDECbuttons.
Note: Thefootswitchwillworklikethisfortheentire
KROME–notjustwhentheBank/Programselectmenu
orCategory/ProgramSelectmenuisopen.
Connecting a foot pedal
IfyouconnectanoptionalEXP‐2footcontrolleror
XVP‐10expression/volumepedaltotheASSIGNABLE
PEDALjack,youcanuseittoapplymodulationto
soundsoreffects,ortoadjusttheoverallvolume.
Thispedalwillalwaysfunctioninthesameway
regardlessoftheProgram,Combination,orSong
you’veselected.Youcanassignthefunctioninthe
Globalmode.
LiketheAssignableFootSwitch,describedabove,the
FootPedalcanbeusedformanydifferentfunctions,
including:
• MasterVolume
•ChannelVolume,Pan,orExpression
•Assignablesoundmodulation,asseveraldifferent
AMSorDmodsources
•EffectsSendlevelcontrol
•UsevariousKROMEcontrols(realtimecontrol
knobs,Joystick,SW1/SW2,etc.)
1. ConnectanoptionalXVP‐10orEXP‐2tothe
ASSIGNABLEPEDALjacks.
2. Afterturningthepoweron,useGlobalP2:
Controllers–FootControllerspage“FootPedal
Assign”toassignthefunctioncontrolledbythe
footpedal.(Seepage 111,andpages202,350ofthe
ParameterGuide)
Setup
20
Connecting the KROME to
acomputer
USB connection
TheKROMEprovidesbothMIDIandUSBconnectors
asstandardequipment.ByconnectingtheKROMEto
yourcomputerviaUSB,youcanuseitasacontroller
andMIDIsoundmoduleforyourDAWsoftwarewith
singlecableconvenience;andwithouttheneedfora
MIDIinterface.
Byusingthededicatededitor,youcaneditsomeofthe
parametersoftheKROMEfromyourcomputeras
thoughitwereasoftwareplug‐in.
Note: TheUSBconnectoroftheKROMEisonlyableto
transmitandreceiveMIDIdata.
BeforeyouconnecttheKROMEtoyourcomputer
viaUSB,youmustinstalltheKORGUSB‐MIDI
driveronyourcomputer.
Connecting via the MIDI connectors
YoucanconnecttheKROMEtoyourcomputervia
MIDIbyusingacommerciallyavailableMIDI
interface.
Note: FormoreaboutMIDIinterfaces,refertothe
owner’smanualoftheMIDIinterfaceyou’reusing.
SomeUSB‐MIDIinterfacesmaybeunableto
transmitorreceivetheKROME’sMIDIexclusive
messages.
Connecting MIDI devices
ByconnectingtheKROME’sMIDIconnectorstoan
externalMIDIdeviceyoucantransfersoundsettings
andperformancedatasuchasnotemessagesbetween
yourexternalMIDIdeviceandtheKROME.
About MIDI
MIDIstandsforMusicalInstrumentDigitalInterface,
andisaworld‐widestandardforexchangingvarious
typesofmusicaldatabetweenelectronicmusical
instrumentsandcomputers.WhenMIDIcablesare
usedtoconnecttwoormoreMIDIdevices,
performancedatacanbeexchangedbetweenthe
devices,eveniftheyweremadebydifferent
manufacturers.
Controlling an external MIDI tone
generator from KROME
IfyouwanttousetheKROME’skeyboard,chord
triggerswitchesandothercontrollers,sequencer,and
arpeggiatortoplayorcontrolanexternalMIDIsound
module,useaMIDIcabletoconnecttheKROME’s
MIDIOUTconnectortotheMIDIINconnectorofyour
externalMIDIsoundmodule.
Controlling KROME’s tone generator
from an external MIDI device
WhenyouwishtoplayorcontroltheKROME’stone
generatorfromanexternalMIDIkeyboardor
sequenceretc.,useaMIDIcabletoconnecttheMIDI
OUTconnectoroftheexternalMIDIdevicetothe
MIDIINconnectorofKROME.
Controlling two or more external MIDI
tone generators from KROME
YoucanalsouseaMIDIpatchbaytocontrolmultiple
MIDIdevices.
KROME
MIDI IN
MIDI OUT
MIDI keyboard
KROME
MIDI IN MIDI OUT
MIDI keyboard
MIDI IN
MIDI OUT
MIDI IN
MIDI OUT
MIDI IN
MIDI OUT
KROME
MIDI keyboard
MIDI
patch bay
MIDI tone generator
21
Playing and editing Programs
About the KROME’s Programs
ProgramsarethebasicsoundsoftheKROME.
Youcanplaythembythemselves,layerthemtogether
inCombinations,orplayadifferentProgramoneach
ofthe16MIDItracks,eitherfromtheinternal
sequencerorfromexternalcomputer‐based
sequencers.
Thissectionofthemanualtakesaquicklookatplaying
Programs,includingtoursofthefront‐panel
controllersandbasiceditingtechniques.
Playing Programs
Selecting Programs
ThereareseveraldifferentwaystoselectPrograms.
Eachoneisconvenientinadifferentway:
•Using“ProgramSelect”andtheVALUE
controllers:
•UsingtheBank/ProgramSelectmenu:
•UsingtheCategory/ProgramSelectmenu:
•Find
•Usingafootswitch:page 19
•MIDIprogramchangemessagesletyouselect
Programsremotely,fromeitheraMIDIsequencer
oranexternalMIDIcontroller
Fordetails,pleaseseebelow.
Selecting a program using “Program
Select” and the VALUE controllers
1. PressthePROGbutton.(TheLEDwilllightup.)
(Refertotheillustrationbelowforthebuttons.)
Alternatively,youcanusethemodebutton(see
“Selectingmodes”onpage 9).
TheKROMEwillenterProgrammode.
2. AccesstheProgP0:Play–Mainpage.
Thisisshowninthetoplineofthedisplay.
Ifadifferentpageisshown,presstheEXITbuttona
fewtimestoreturntotheProgP0:Play–Mainpage.
3. Makesurethat“ProgramSelect”isselected.
Ifit’snotselected,press“ProgramSelect”inthe
displayorpresstheEXITbuttontohighlightthe
indication.
4. Selecttheprogramyouwanttoplay.
Youcanusethefollowingmethodstoselectaprogram.
•UsetheINCorDECbuttons.
•T
urntheVALUEdial.
•Usenumerickeys0–9toentertheprogramnumber,
andpresstheENTERbutton.
5. PressoneofthePROGBANKA–Fbuttonsto
selectabank.
WhenyouselectadifferentBank,thebutton’sLEDwill
lightup,andtheselectedbankwillappearontheleft
sideofthedisplay.
4: INC/DEC buttons
3: Program Select
2: PROG P0: Play
4: VALUE dial
1: ROG buttons4: Numeric keypads
ENTER button 5: BANK A–F buttons
Velocity meter
1: Mode name
(button)
Mode button Page number and name Tab name
Program Select
(Program number and name) Category Select popup button
(Category number and name)
Bank
number
Program Select popup button
Playing and editing Programs
22
Forexample,toselectbankB,pressthePROGBANKB
button.TheBbuttonwilllightup,andthenameBank
Bwillappearontheleftsideofthedisplay.
•ToselectaGMbank,you’llusethenumerickeys.
GM:Holddown0andpress–.
g(1)–g(9):Holddown0andpressthedesirednum‐
ber1–9.Forbanksthatdonothavevariation
sounds,thebasicGMsoundswillberecalled.(An
“*”willbeappendedtothebeginningofthepro‐
gramname.)
g(d):Holddown0andpress(.).
Auditioning the sound
Playthekeyboardtoauditiontheprogramyou’ve
selected.
Thevelocitymetershowsthenote‐onvelocity.
•Thisshowsthevelocityvalueofnote‐oneventsfor
theglobalMIDIchannel,suchasthekeyboard,
MIDIIN,andarpeggiator.(Ifmultiplenote‐on
eventsarereceivedsimultaneously,thehighest
velocityvalueisshown.)
•Sincethisshowsthenote‐onvelocityvalues,itwill
notbeaffectedbythesettingsofthevolumeknob
orbychangesintheaudiosignallevel.
Overview: Program Banks
Asprogrambanks,theKROMEprovidesthesixbanks
A–FandtheGMbanks(GM–g(d)).Withthefactory
settings,theKROMEhas640preloadprogramsin
banksA–E.BankFcontainsonlyinitializedprograms.
Programsyou’vecreatedshouldbestoredinthisbank.
WiththeexceptionoftheGM–g(d)banks,youarefree
tosavebyoverwritingtheseprogrammemoryareas.
YoucanalsosavetheseprogramsonanSDcard.
Programsareorganizedintosixbanksasshowninthe
followingtable.
Programbankcontents
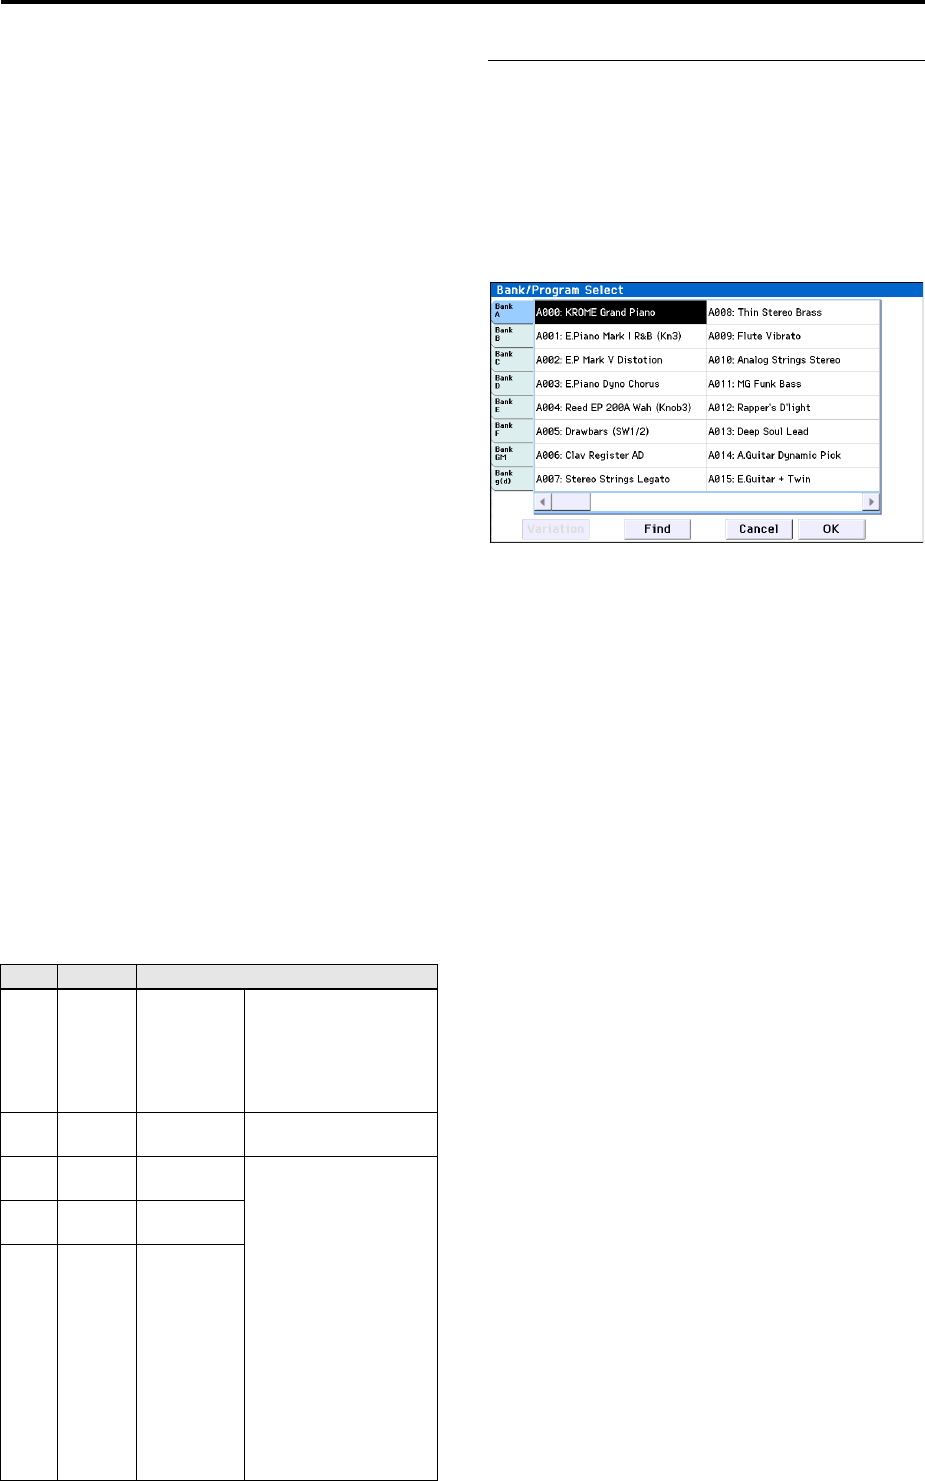
Selecting by Bank/Program Select
menu
YoucanselectProgramsfromamenuorganizedby
Programbank.
1. PresstheProgramSelectpopupbutton.
TheBank/ProgramSelectmenuappears.
Bank/ProgramSelectmenu
Inthisillustration,BankAisselected.Themenu
displaystheProgramscontainedinthatbank.
2. Pressthetabsontheleftsideofthedisplayto
selectbanks.
3. Pressoneoftheprogramnamesinthecenterarea
toselectaprogram.
Theselectedprogramwillbehighlighted,andthe
programwillchange.
Alternatively,youcanusetheINC/DECbuttonsto
switchprograms.
Playthekeyboardorpressthechordtriggerbuttonsto
heartheprogramyouselected.
4. IfyouselectedBankGM,theVariationbuttonis
shown.
ByrepeatedlypressingthisVariationbutton,youcan
successivelystepthroughthebanks,allowingyouto
recallaGM2soundset(see“ToselectaGMbank”on
page 22).
5. WhenyouaresatisfiedwiththeselectedProgram,
presstheOKbuttontoclosethemenu.
IfinsteadyoupresstheCancelbutton,theselection
youmadeherewillbediscarded,andyouwillreturn
totheprogramthathadbeenselectedbeforeyou
openedthemenu.
Bank Prog. No. Explanation
A…E 000…127 Factory
Programs.
With the factory settings,
these banks contain a wide
variety of preloaded
programs that use the
internal multisamples,
effects, and arpeggiator.
F 000…127 Initialized
Programs.
Use these to create a
program from scratch.
GM 001…128 GM2 main
programs.
These banks contain 256
GM programs and nine GM
drum programs that are
compatible with the GM2
sound map. The programs
of these banks are read-
only.
Bank GM contains the GM
programs. GM lets you
select 128 programs
numbered from 001–128,
and g(1)–g(d) lets you
select nine drum
programs.
You can’t write (save) data
to these banks.
g(1)…
g(9) 001…128 GM2 variation
programs.
g(d) 001…128 GM2 drum
programs.
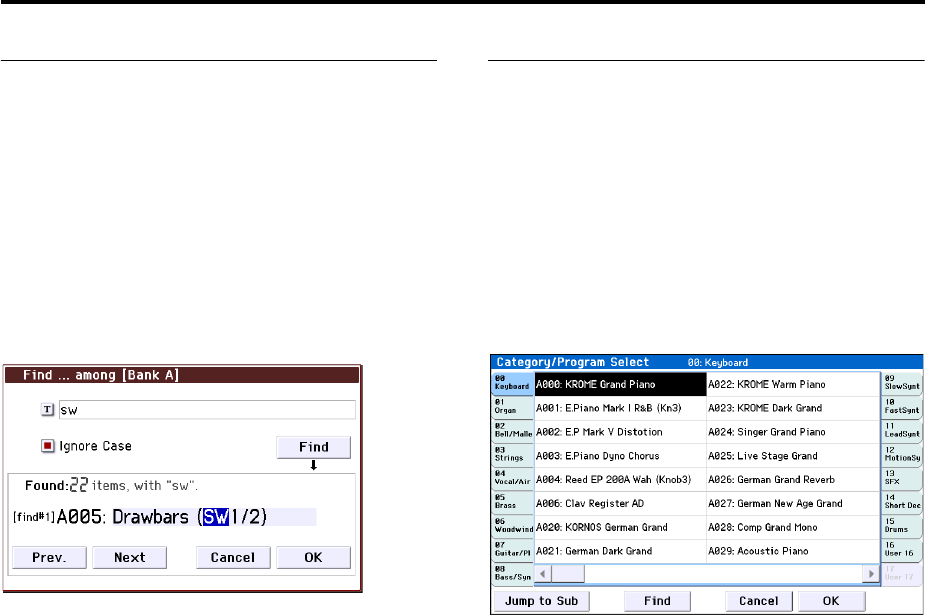
Playing Programs Selecting Programs
23
Find
Here’showtosearchforaprogrambyaportionofits
name.
1. AccesstheBank/ProgramSelectmenuorthe
Category/ProgramSelectmenu,etc.
2. Pressatabtoselectthebankorcategorythatyou
wanttosearch.
Note: Theprogramsincludedintheselectedtabwillbe
thesubjectofthesearch.
3. Onthelowerleftside,presstheFindbuttonto
accessthedialogbox.
4. Pressthe“T”buttontoaccessthetextdialogbox.
Enterthealphanumericcharactersthatyouwantto
find,andpresstheOKbutton.Forexampleifyouwant
tofindprogramsthattakeeffectiveadvantageofSW1
orSW2,enter“sw”.
5. Ifyouselectthe“IgnoreCase”checkbox,
uppercaseandlowercasecharacterswillnotbe
distinguishedinthesearch.
6. PresstheFindbuttontobeginsearching.
Searchresultsareshownin“Found.”
Ifoneormoreitemsarefound,thenumberofitems
andthefirstfoundprogramwillbedisplayed.
PressthePrev.buttonorNextbuttontofindthe
previousornextprogram.Thiswillcyclethroughthe
founditemswithinthetab.
Youcanplaythekeyboardtoauditiontheprogram
thatwasfound.
Ifnoitemsarefound,thedisplaywillindicate
“nothing.”
7. Ifyouaresatisfiedwiththeselectedprogram,
presstheOKbuttontoclosethemenu.
Theselectedprogramwillbeselectedinthemenuyou
selectedinstep1.Ifyouaresatisfiedwiththeselected
program,presstheOKbuttontoclosethemenu.
Ifyouwanttosearchforadifferentprogram,orifno
itemswerefound,presstheCancelbutton.
8. Pressthetabthatyouwanttoselectnext,and
searchasdescribedinsteps3–7.
IfyoupresstheCancelbutton,thisselectionwillbe
discarded,andyouwillreturntotheprogramthathad
beenselectedpriortoopeningthemenu.
Selecting by Category/Program Select
menu
YoucanselectProgramsfromwithinacategory,such
askeyboard,organ,bass,anddrums.
Whenshippedfromthefactory,thepreloaded
Programsareorganizedinto16categories,eachwith
severalsub‐categories.
1. PresstheCategorySelectpopupbutton.
TheCategory/ProgramSelectmenuappears.
Category/ProgramSelectmenu
Intheillustrationabove,theKeyboardcategoryis
selected.Themenuinthecentercolumnareashows
theProgramswhichbelongtothatcategory.
2. Pressthetabstotheleftandrightofthedisplayto
selectadifferentcategory.
Thenameoftheselectedcategorywillbedisplayedin
fullinthetopright‐handcorner.
3. Pressoneoftheprogramnamesinthecenterarea
toselectaprogram.
Theselectedprogramwillbehighlighted,andthe
programwillchange.
Alternatively,youcanusetheINC/DECbuttonsto
switchprograms.Touchthescrollribbonatthebottom
ofthescreentoseealloftheProgramsinthatcategory.
Playthekeyboardorpressachordtriggerbuttonto
heartheprogramyouselected.
4. Ifyouwanttoselectfromasub‐category,pressthe
JumptoSubbuttontoaccesstheSubCategory/
ProgSelectmenu.
Pressthelefttabstoselectasub‐category.
Note: Youcan’tselecttabsforasub‐categorythathas
noassociatedprograms.
Selectaprogramasdescribedinstep3above.
PresstheOKbuttontoconfirmyourselection,orpress
theCancelbuttontodiscardit.Youwillreturntothe
maincategory.
5. Whenyouaresatisfiedwiththeselectedprogram,
presstheOKbuttontoclosethemenu.
IfinsteadyoupresstheCancelbutton,yourselection
willbediscarded,andyouwillreturntotheprogram
thathadbeenselectedwhenyouopenedthepopup
menu.
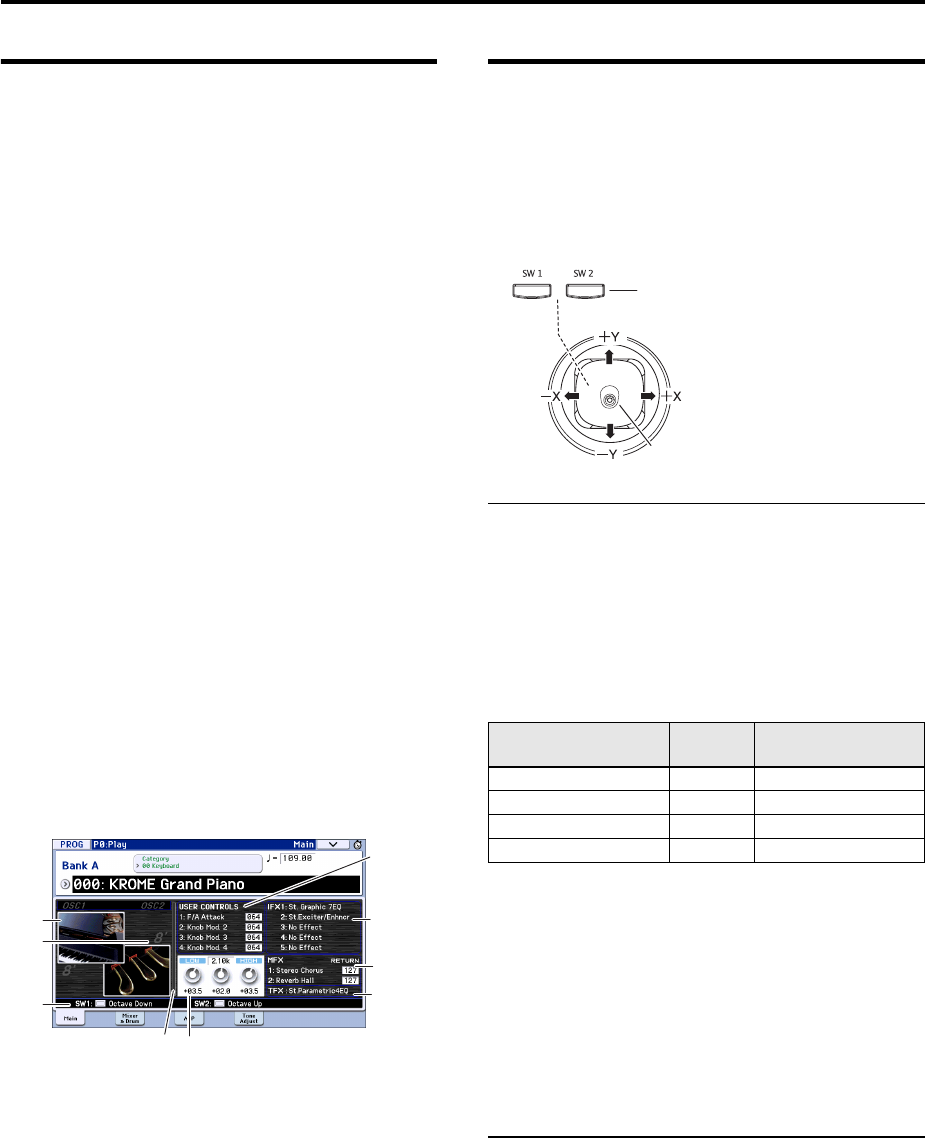
Playing and editing Programs
24
Program information
IntheProgP0:Play–Mainpageyoucanviewthe
followinginformationabouttheselectedprogram.
OSCPicture:Thisisagraphicthatrepresentsthe
program’soscillator.
OSCOct:Foradoubleoscillatorordoubledrums,this
indicates“Oct”(thebasicpitchoftheoscillator).
SW1,SW2:Thisindicatesthefunctionthat’sassigned
totheSW1/SW2buttons,andtheon/offstateofthe
buttons.
RealtimeControls–TONECONTROLS/USER
CONTROLS/ARPCONTROLS:
Thisshowsinformationaboutthefunctionsofthe
REALTIMECONTROLSknobthat’scurrentlyselected.
UsetheSELECTbuttontochoosethefunctionsthat
willbecontrolledbytheknobs.Formoreinformation
aboutthesefunctions,pleaseseepage 28.
EQ(Low,Mid[Hz],Mid,High):Thisshowsthe3‐band
EQsettings.Youcanusethevaluecontrollerstoedit
thevalues.
EffectControls–IFX,MFX,TFX:
Thisshowstheeffectsthatareassigned.TheKROME
providesinserteffects1–5,mastereffects1and2,anda
totaleffect.Forthemastereffects,youcaneditthe
returnlevels.
Vel oc ityMeter:
Thismetershowsthenote‐onvelocityvalue.
Themetershowsthenote‐onvelocityofthekeyboard,
MIDIIN,andarpeggiatoretc.(Ifmultiplenote‐on
messagesarereceivedsimultaneously,thehighest
velocityvalueisshown.)
Using Controllers
Inadditiontousingthekeyboard,theKROMEletsyou
controlthesoundbyusingthejoystick,SW1andSW2
buttons,knobs1–4,damperpedal,andfootswitchor
footpedal.
Thesecontrolsletyoumodifythetone,pitch,volume,
effects,etc.inrealtimeasyouplay.
Joystick
Thejoystickmovesinfourdirections:left,right,up
(awayfromyourself),anddown(towardsyourself).
Eachofthefourdirectionscanbeusedtocontrola
differentfunction,suchasmodulatingProgramor
effectsparameters.Theseassignmentscanbedifferent
foreveryProgram,butgenerally,theydothefollowing:
StandardJoystickfunctions
Fordetails,pleaseseepage 82.
Joystick Lock
Thisfunctionletsyoumaintaintheeffectthathadbeen
appliedpriortoreleasingyourhandfromthejoystick.
YoucanusetheSW1/SW2buttonsorafootswitch
connectedtotheKROMEtolockthecurrentposition
sothattheeffectwillcontinueevenafterthejoystick
returnstothecenterposition.Fordetails,pleasesee
“LockingtheJoystick”onpage 25.
SW1, SW2
Youcanusethesebuttonstocontrolprogram
parametersviaAMS(AlternateModulation),oreffect
parametersviaDmod(DynamicModulation).
Theycanalsotransposethekeyboardbyoctaves,turn
portamentoon/off,ortolockthepositionjoystick.
EachbuttoncanworkaseitheraToggleorMomentary
button.InTogglemode,theassignedfunctionis
switchedbetweenonandoffeachtimethebuttonis
pressed.InMomentarymode,theassignedfunctionis
activeononlyaslongasyouholddownthebutton.
InProgrammode,youcanchecktheassignmentsof
SW1andSW2ontheProgP0:Play–Mainpage.
Fordetails,pleasesee“Programinformation”on
page 24.
SW1,
SW2
OSC
Picture
OSC Oct
EQ
Realtime Controls
- Tone Controls
- User Controls
- Arp Controls
Eect Infomation
IFX 1-5
MFX 1, 2,
Send level
(On/O)
TFX (On/O )
Velocity Meter
Move the joystick… Controller
Name Normally controls…
Left JS–X Pitch bend down
Right JS+X Pitch bend up
Up (away from yourself) JS+Y Vibrato
Down (towards yourself) JS–Y Filter LFO (wah)
[SW1], [SW2]
(Lock
function)
Joystick
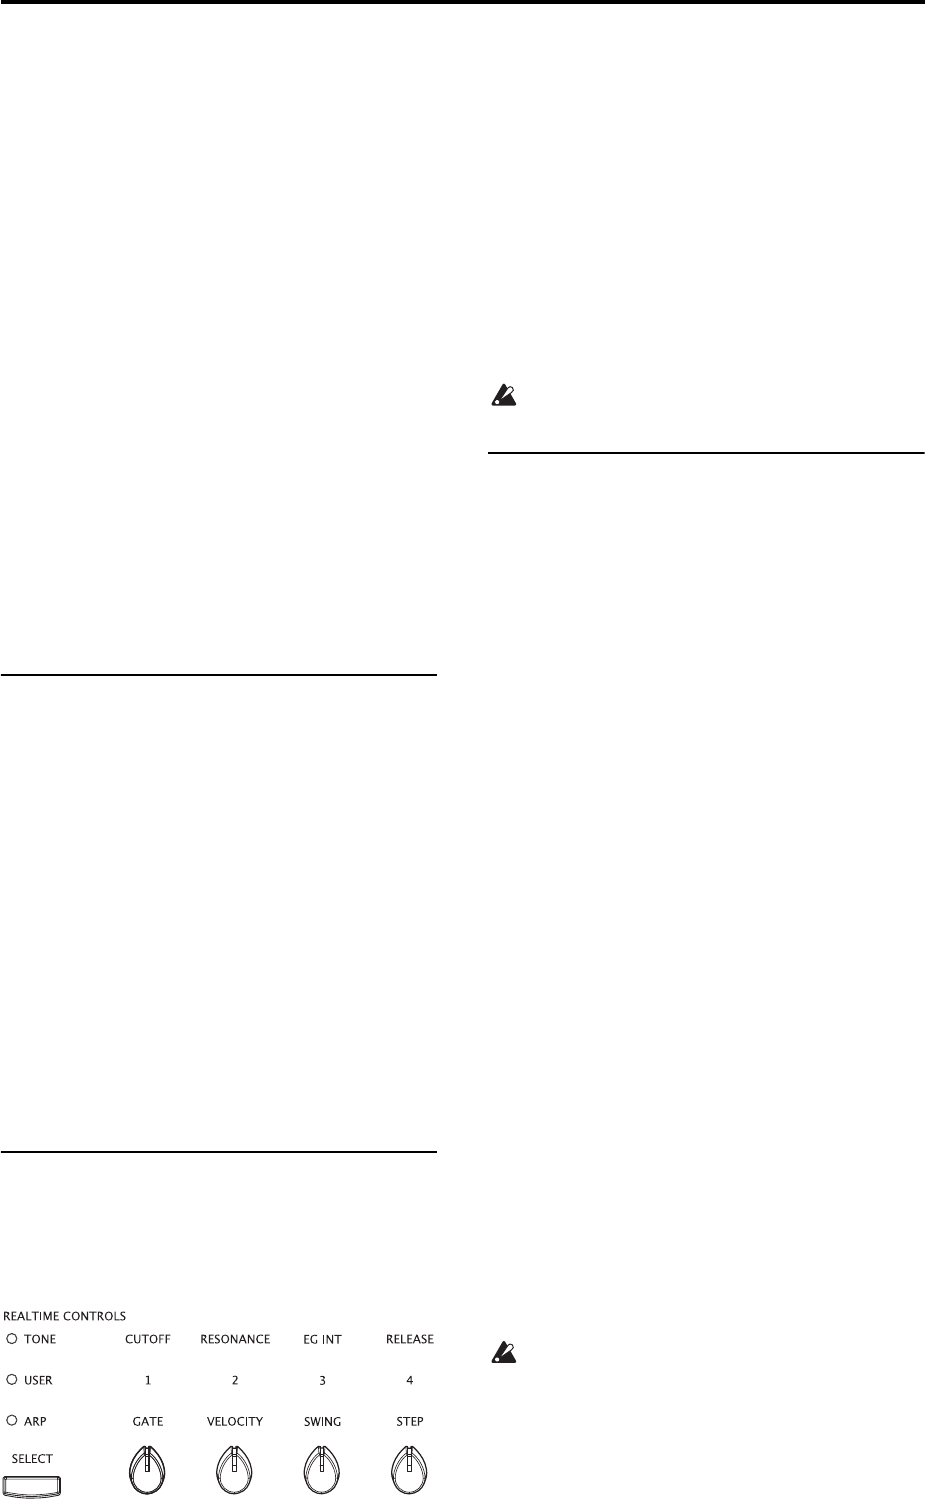
Playing Programs Using Controllers
25
WhenyouwriteaProgramorCombination,theon/off
statusoftheSW1andSW2buttonsissaved.
Fordetails,pleaseseepage 82.
Locking the Joystick
1. Usingthestandardfactorysounds,selectProgram
C027:SemiDistortionGuitar.
Toselectaprogram,makesurethatyouareinProgram
mode,andpressthePROGBANKCbutton,numeric
key2,7,andthentheENTERbutton.
2. Whileholdingdownakey,movethejoystickin
the–Ydirection(towardyourself).
Thetremoloeffectwilldeepen.
3. Whilekeepingthejoystickinthe–Ydirection
(towardyourself),presstheSW2button.(TheSW2
buttonLEDwilllightup.)
Whenyoupressthebutton,itsLEDwilllightup,and
themodulationeffectatthispointwillbemaintained.
4. Releasethejoystick,andplaythekeyboard.
ThemodulationwillstaythesameasitwaswhenSW2
waspressed.Evenifyoumovethejoysticktoward
yourself,thesoundwillnotchange.
5. PresstheSW2buttononceagaintoreleasethe
Lockfunction.
Keyboard
TheKROME’skeyboardprovidesthefollowingtwo
typesofcontrol.
Velocity
Velocityisameasureofhowhardyouplayanoteon
thekeyboard.Thiscanbeusedtomodulatemany
differentaspectsofthesound,suchasvolume,
brightness,orthecharacteroftheattack.
Note Number
Soundscanbeprogrammedtochangeincharacter
basedonthenotebeingplayed.
Asyouplayhigherorloweronthekeyboard,thenote
numbercanmodulatethetimbre‐suchasbecoming
brighterasyouplayhighernotes.Envelopesmayalso
becomefasterorslower;thevolumemaychange;and
soon.
Realtime control knobs
Therealtimecontrolsconsistoffourknobsandthe
SELECTbutton.Thesecontrolsfunctionasfollows.
•Youcanapplymodulationtosoundsoreditthem.
•Youcancontrolthearpeggiator.
1. PresstheSELECTbuttontoselecttherealtime
controlfunctionbetweenTONE,USER,orARP.
TONE,USER:Usetheknobstomodifythesoundor
effects(seepage 28).
ARP:Usetheknobstocontrolthearpeggiator(see
page 86).
Youcanfreelyswitchbetweenthesefunctionswithout
losingyourcurrentedits.
2. Useknobs1–4tocontroltheselectedfunctions.
Whenyouturnoneoftheseknobs,thatknob’sfunction
andvaluewillappearinapopup.
(Youcanpreventthispopupfromappearing.See
page 111.)
Therewillbeaslightamountofplaywhenturning
theknobnearitsminimumormaximumpositions.
TEMPO knob and TAP button
ThisadjuststhetempofortheKROMEasawhole,
including:
• Arpeggiator
•DrumTrack
•SongsinSequencermode
•Tempo‐syncedLFOs
•Tempo‐synced(“BPM”)delayeffects
TEMPO LED
TheLEDwillblinkatquarter‐noteintervalsofthe
currenttempo.
TEMPO knob
Thisknobadjuststhetempo.It’saconvenientwayto
makecontinuousadjustments.
Note: IftheGlobalP1:MIDI–MIDIBasicpageMIDI
ClockparameterissettoExternalMIDI,ExternalUSB,
orifitissettoAutoandaclockiscurrentlybeing
receivedviaMIDI,thenneithertheTEMPOknobnor
theTAPbuttonwillhaveanyeffect.
TAP button
YoucansetthetempooftheArpeggiatororDrum
TrackfunctioninProgram,Combination,and
Sequencermodesbylightlypressingortappingthe
TAPbuttonseveraltimesonthebeat.InSequencer
mode,youcancontrolthesongtempointhisway.
Toenterthetempo,useyourfingertogentlytapthe
TAPbutton.Thetempowillbeenteredwhenyoupress
thebuttontwice,butyoushouldtapseveraltimesin
ordertoincreasetheprecision.Theaverageofthelast
sixteentapswillbespecifiedasthetempo.
Duringplayback,lightlypresstheTAPbuttonseveral
timesatthedesiredtempo.Thetempowillfollowyour
tappinginrealtime.Thisisaconvenientwaytomatch
thetempoinrealtimetothebeatofadifferentsource.
Youcanusetaptempocontrolwheneverthe
TEMPOknobcanbeused.Forexamplein
Sequencermode,taptempocontrolwillnotbe
availableifyouareplayingasongwherethe
TempoModesettingissettoAuto.(Seepage 110
oftheParameterGuide)
Note: Youcanalsouseafootswitchconnectedtothe
ASSIGNABLEFOOTSWITCHjacktocontrolthetap

Playing and editing Programs
26
tempofunction(seepage 18,andpages202,349ofthe
ParameterGuide).
Damper pedal / Foot switch / Foot
pedal
Fordetailsonusingthedamperpedal,footswitch,or
pedaltocontrolthesound,pleasesee“Connectinga
damperpedal,footswitch,orfootpedal”onpage 18.
Performing with the
arpeggiator or drum track
Basedonnotedatathatitreceivesfromthekeyboard
orfromtheMIDIINconnector,thearpeggiatorcan
generateawiderangeofphrasesandpatterns
includingarpeggios,guitarorkeyboardbackingriffs,
bassphrases,ordrumpatterns.BysettingSELECTto
ARPandusingtheknobs,youcanvarytheduration
andstrengthofthearpeggiatednotes.
Formoreaboutthearpeggiator,pleaseseepage 85.
Thedrumtrackusesarichvarietyofdrumpatternsto
playtheKROME’shigh‐qualitydrumprograms.You
canselectanyprogramandplayalongwiththedrum
patterns.
Ofcourseyoucanalsosynchronizethearpeggiator
andthedrumtrackpatternsandusethemtogether.
Formoreaboutthedrumtrack,pleaseseepage 97.
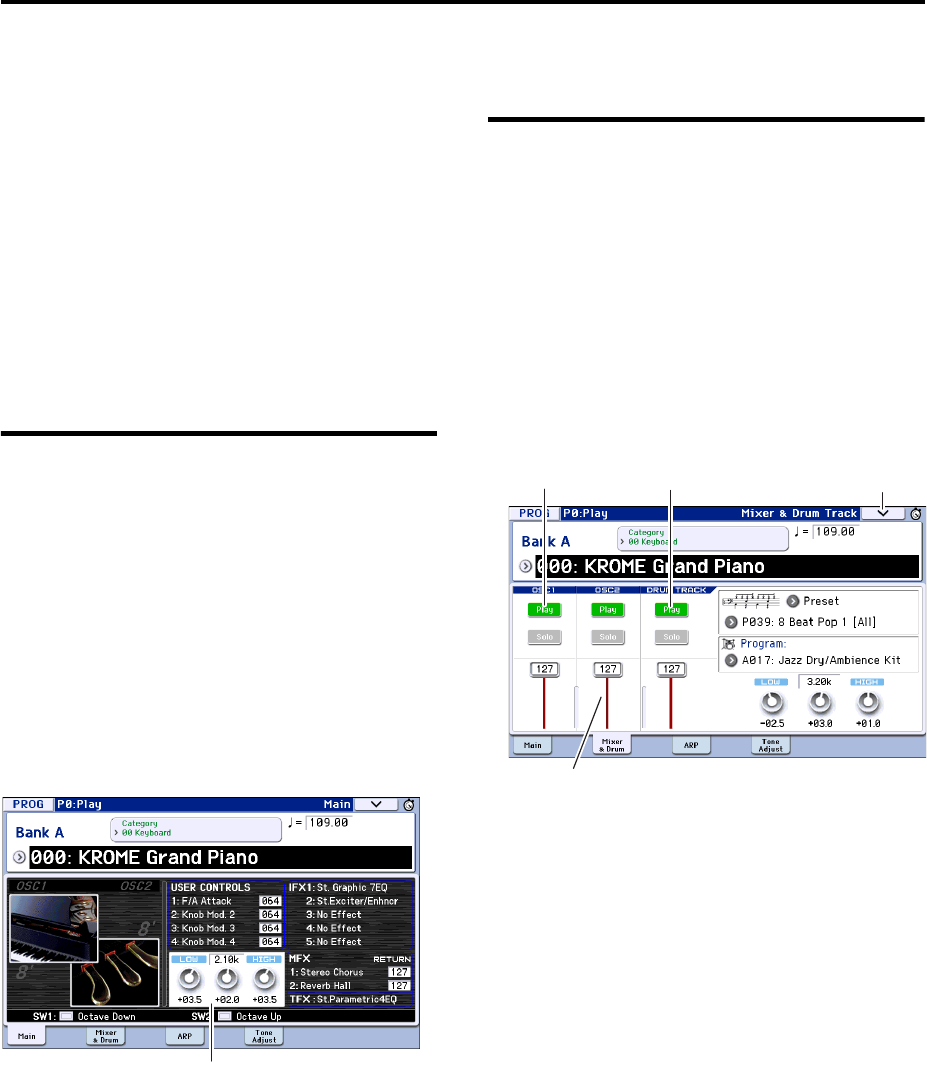
Easy Program editing Adjusting the EQ
27
Easy Program editing
Thefastestwaytocreatethesoundyouneedistostart
fromapreloadprogramthat’sclosetowhatyouhave
inmind,andeditthatprogram.
Simpleeditingcanbedonewithinthevariouspagesof
P0:Playwhereyouperform.YoucanadjusttheEQ
andvolumelevel,andintheToneAdjustpageyoucan
usetheslidersandbuttonstoperformvarioususeful
edits.Youcanalsousethefrontpanelrealtimecontrols
tointuitivelyadjustthecutoff,resonance,andrelease
time.
Ifyouwanttododetailedediting,usetheediting
pagesP1andfollowing.
Adjusting the EQ
Youcanadjustamid‐sweepablethree‐bandEQinthe
ProgP0:Play–Mainpage.
Note: ThisEQwillaffectbothoscillator1andoscillator
2.
1. AccesstheProgP0:Play–Mainpage.
2. Onthedisplay,selecttheEQgainknoborthe
centerfrequencyoftheMidsweepEQthatyou
wanttoedit.
3. UsetheVA L U E controllers(e.g.,VA L U E dial)to
editthevalue.
Youcanalsoeditthevaluebydraggingleftorrighton
aknoboreditcellinthedisplay.
Adjusting the volume balance
Aprogram’ssoundconsistsofuptotwo“oscillators”
whichareplayedmainlyfromthekeyboard,andone
“drumtrack”whichautomaticallyplaystherhythm
section.
Thevolumesoftheoscillatorsandthedrumtrackcan
beadjustedintheProgP0:Play‐Mixer&DrumTrack
page.
Note: There’salsoa“mutefunction”which
individuallysilencesthese,anda“solofunction”
whichmutesallsoundsotherthanthespecifiedone.
1. AccesstheProgP0:Play–Mixer&DrumTrack
page.
2. Selectasliderinthedisplay,andusetheVA L U E
dialetc.toadjustthevolumeofoscillators1and2
andthedrumtrack.
Foroscillatorsthatusetwodrumkits,youcanusethe
OSC1andOSC2sliderstoadjustthedirectsoundof
theclose‐miceddrumkitandtheambientsoundofthe
drumkitcapturedwithmorespace.
Note: Withsingle‐oscillatorprograms,youwon’tbe
abletocontroloscillator2.
3. YoucanpressthePlay/Mutebuttoninthedisplay
totogglethePlay/Mutestatusofoscillators1and2
andthedrumtrack.
4. YoucanpresstheSolobuttoninthedisplayto
toggletheSoloOn/Offstatusofoscillators1and2
andthedrumtrack.
ThefunctionoftheSolobuttonwillswitcheachtime
youselect“ExclusiveSolo”inthemenu(seepage 64of
theParameterGuide).
EQ
OSC Play/Mute Drum Track Play/Mute
Volume
Menu
Playing and editing Programs
28
Using realtime controls to edit
the sound or effects
Youcanusetherealtimecontrols(theSELECTbutton
andknobs1–4)tomodifythesoundandcontrolthe
arpeggiator.
1. PresstheREALTIMECONTROLSSELECTbutton
toswitchtherealtimecontrolfunctionbetween
TONE,USER,orARP.
Eachtimeyoupressthebutton,you’llcyclethroughA,
B,andCmodes,andthecorrespondingLEDwilllight
up.
Note: IfCC#70–79areassignedtoREALTIME
CONTROLSAmodeandBmode,thesoundthatyou
editusingknobs1–4willbesavedwhenyouwritethe
program.ArpeggiatorsettingsyouadjustinCmode
willalsobesaved.
2. Modifythesoundbyturningtheknobthatyou
wanttocontrol.Seebelowfordetails.
TONE controls
InTONEsectionyoucanturnknobs1–4tocontrolor
editthefollowingitems.
Note: Whenaknobisinthecenterposition
(12 o’clock),theparameterwillhavethevalue
specifiedbytheprogram.
Knob 1: CUTOFF
Thisadjuststhefilter’scutofffrequency.Adjustingthe
cutofffrequencywillmodifythebrightnessofthe
sound.
Knob 2: RESONANCE
Thisadjuststhefilter’sresonancelevel.
Adjustingthefilterresonancelevelwillboostthe
soundintheregionofthefrequency,givinga
distinctivecharactertothesound.
Knob 3: EG INT
ThisadjuststhefilterEGintensity(thedepthofhow
theEGaffectsthefilter).
Usingtheknobwillchangetheamountofhowthe
filterisaffectedbytheEG.Normally,turningtheknob
towardtheleftwillmakethefilterEGshallower,and
turningtheknobtowardtherightwillmakeitdeeper.
SincethefilterEGoperatesrelativetothefiltercutoff
frequency,bothknobs1and3willcontrolthetonal
changeproducedbythefilter.
Knob 4: RELEASE
ThisadjuststhefilterandampEGreleasetime,
changingthetimefromnote‐offuntilthesoundisno
longerheard.
Turningtheknobwillchangethereleasetimeofthe
filterEGandtheampEG.Normally,turningtheknob
towardtheleftwillshortenthereleasetime,and
turningtheknobtowardtherightwilllengthenit.
Example:
1. Selectprogram“Category:KEYBOARDA066:
DarkR&BPiano.
Thisisanelectricpianosound.Let’strymodifyingthe
soundalittle.
2. PresstheREALTIMECONTROLSSELECTbutton
toselectTONE(theLEDwilllight‐up).
3. Whileyouplay,slowlyturnknob1(filter
frequency)about3/4towardtheright.
Thepianosoundwillbecomemorelikeasynthsweep.
4. Next,turnknob2(filterresonance)about3/4
towardtherightaswell.
5. Leaveknob2initsposition,andtryturningknob
1totheleftandright.
Raisingtheresonancewillchangethesoundasthough
youwereplayingthroughawahpedal.
Level
Frequency
HighLow Cut off
frequency
Level
Time
Level
Time
note-on note-off
Sutart Level
Attack Time
Decay Time Slope Time
Attack Level
Break Level
Release Level
Sustain Level
Release
time
Easy Program editing Using Tone Adjust
29
USER controls
IntheUSERsectionyoucanturnknobs1–4tocontrol
variousaspectsofthesoundsuchasvolume,
portamentotime,
pan,filterandampEG,pitchLFO,andmastereffect
sendlevel.
InUSER,themostusefulfunctionsareassigned
individuallyforeachpreloadprogram.
Thetablebelowshowsthestandardassignmentsofthe
RealtimeControlsknobs:
Fordetails,pleaseseepage 16oftheParameterGuide.
ARP controls
IntheARPsectionyoucancontrolthearpeggiatorin
realtime.
Fordetailsonfunctionality,pleaseseepage 86.
Saving the edits you made by moving the
knobs
Therealtimecontrolknobsareanidealwaytomodify
thesoundwhileyouperform.Asneeded,pressthe
frontpanelWRITEbuttontoWritethePrograminto
memoryandsavethesoundyou’veedited.(See
“Savingyouredits”onpage 30.)
HoweverforRealtimeControlsUSERknobs1–4,
theeditedsettingscanbesavedonlyifyou’ve
assignedCC#70–79.
Internally,asingleknobusuallyaffectsseveral
differentparameters.WhenyouwriteaProgram,the
editsaresavedintotheindividualprogram
parameters,andnottotheknobitself.
AfterwritingtheProgram,you’llnoticethattheknobs
havereturnedtotheircenterpositions–sincetheold
“edited”valuesarenowthenew“saved”values.
Assigning Realtime Controls USER functions
to knobs 1–4
Youcanassignthefunctionsthatknobs1–4will
performwhenRealtimeControlsUSERisselected.
(Seepage 41)
Using Tone Adjust
TheToneAdjustfunctionletsyouedittheparameters
oftheprogram.Theprogramparametersthataremost
effectiveforeditingwillbeassignedtothecontrollers
inthedisplay.
1. AccesstheProgP0:Play–ToneAdjustpage.
Thispageshowsandreflectsdatageneratedbythe
toneadjustfunction,lettingyouviewtheparameter
assignmentsandtheirprecisevalues.
2. Toeditthesound,selectaslider(1–8)orbutton(1–
8)inthedisplay,andusetheVA L U E dialetc.to
useit.(Youcaneditthevalueofasliderby
draggingitinthedisplay.)
Note: Youcanassigntheprincipalprogram
parameterstothevariouscontrollersinthedisplay.For
details,pleaseseepage 7oftheParameterGuide.
For example:
1. SelectProgramA069,“DeluxeE.Piano.”
2. AccesstheP0:Play–ToneAdjustpage.
3. Lookattheassignmentsforsliders5,6,and8in
thedisplay.
Slider5isassignedtoF/AEGAttackTime;slider6is
assignedtoF/AEGDecayTime;andslider8is
assignedtoF/AEGReleaseTime.
4. Raiseeachofthethreesliderssothattheyare
about4/5ofthewaytothetop.
Thedisplayshouldshowtheirvaluesasbetween+60
and+70.ThismeansthatyouhaveeditedthefilterEG
andampEGattack,delay,andreleasetolongervalues.
5. Playafewnotes.
Noticethatthesoundhaschangedfromanelectric
pianointoasoftpad.Next,let’saddjustabitoffilter
modulation,tomakethesoundmorerich.
6. Noticetheassignmentofslider2inthedisplay.
Slider2isassignedto“[OSC1]FilterLFO1IntA”
(OSC1filterLFO1intensity).Itwilladjusttheamount
offiltermodulationproducedbyLFO1.
7. Lowerslider2slightlysothatthedisplayindicates
about–6.
8. Playafewmorenotes.
Thefiltermodulationhasaddedsomeshimmertothe
sound.Now,maybeitcoulduseabitmoreedge…
9. Lookattheassignmentsforswitches6and7inthe
display.
TheseareprogrammedtoraisetheFilterCutoffand
FilterResonance,respectively.Switchesarejuston/off,
butyoucansetaspecificvaluefortheOnposition;
noticethe+10and+40intheswitch’svalueboxes.
10. Presseachofthetwoswitchbuttons.
Thesoundnowhasamoreinterestingcharacter,due
tothefilters.Sinceit’sbrighter,we’vealsorestored
someoftheelectricpianocharacter.
Prettyeasy,huh?Note:dependingontheparameter,
youmayoccasionallyhearglitchesinthesoundasyou
movethecontrol.
Knob MIDI CC Normally controls…
TONE1 74 Filter Cutoff Frequency
TONE2 71 Filter Resonance
TONE3 79 Filter EG Intensity
TONE4 72 EG Release Time
USER1, 2 Varies for each Program
USER3 Often Chorus Depth - but can vary per Program
USER4 Often Reverb Depth - but can vary per Program

Playing and editing Programs
30
Changing parameter assignments
ThefactoryProgramsincludedefaultassignmentsof
ToneAdjustparameterstothesliders,andbuttonsin
thedisplay.Ifyoulike,youcanchangeanyofthe
assignments.Todoso:
1. AccesstheProgP0:Play–ToneAdjustpage.
2. Pressthepopupbuttonlocatedtotheleftofthe
assignedparameter.
Apopupwindowwillappear,withalongmenuof
parameters.Youcantellvariousthingsaboutthe
selections,justfromthewaytheyappearinthemenu:
ParameterswhichaffectonlyOSC1orOSC2are
prefixedwith[OSC1]and[OSC2],respectively.
ParameterswhichaffectbothOscillators,butwhichare
specifictoPrograms,areprefixedwith[OSC1&2].
Theothergroupofparametersatthebeginningofthe
list,are“Common.”Thatis,youcanusethemwith
mostPrograms.
ParameterscanonlybeassignedtooneToneAdjust
controlatatime.Ifaparameterisalreadyassigned,it’s
grayedout.
3. Selectaparameterfromthemenu.
Theparameterisnowassignedtothecontrol.Toclose
thelistwithoutmakinganychanges,pressalocation
inthedisplayoutsidethepopupwindow,orpressthe
EXITbutton.
Comparing the unedited
sound
Using COMPARE
Whenyou’reintheprocessofeditingasound,
pressingtheCOMPAREbuttonwillrecallthelast
savedversionofthesound,asitwasbeforeyoustarted
editing.
Fordetails,pleasesee“Comparefunction”onpage 11.
Saving your edits
Afteryou’veeditedaprogram,youmustsaveitifyou
wanttokeepthechangesyou’vemade.Ifyoure‐select
theprogramorturnoffthepowerafterediting,your
editswillbelost.
1. PresstheWRITEbutton.
TheWriteProgramdialogboxwillappear.Ifyouwant
tomodifythewriting‐destinationorname,youcando
so(seepage 117).
2. PresstheWRITEbuttononceagaintosave(write)
theprogram.
Fordetails,pleasesee“WritingaProgramor
Combination”onpage 115.
YoucanalsosaveprogramsonanSDcardasPCGfiles.
Fordetails,pleasesee“SavingtoSDcard(Media–
Save)”onpage 118.
Detailed Editing with Programs Before you start editing
31
Detailed Editing with Programs
Youcancreateoriginalsoundsbyeditingapreloaded
programorbyeditinganinitializedprogram.The
programsyoucreatecanbesavedinbanksA–F.
Fordetails,pleasesee“Savingyouredits”onpage 30.
Before you start editing
The three elements of sound: pitch,
tone, and volume
Soundismadeupofthreebasicelements:pitch,tone,
andvolume.
TheKROMEprovides“pitch,”“filter,”and“amp
(amplifier)”sectionsthatallowyoutocontrolthese
elements.
The“pitch”sectionmodifiesthepitch,the“filter”
sectionmodifiesthetone,andthe“amp”section
modifiesthevolume.
You’lledit“pitch”settingsinP2:OSC/Pitch(P2‐3)and
OSC2Pitch,“filter”settingsinP3:Filter(P3‐1–3),and
“amp”settingsinP4:Amp/EQ(P4‐1–2).
EG, LFO, AMS, and controllers
Inadditiontothethreeelementslistedabove,asound
canvaryaccordingtothepassageoftime,thepitch
rangeinwhichit’splayed,orbyperformance
expressions.
Suchaspectscanbecontrolledbymodulatorsand
controllerssuchastheEG(envelopegenerator),LFO
(lowfrequencyoscillator),andjoystick.These
modulatorsandcontrollersapplychangetothebasic
program.
Takealookattheillustration“Programstructure”
NoticethatthesignalflowisintheorderofOscillator/
Pitch,Filter,Amp.YoucanseehowtheEGsandLFOs
affecteachsection.
Asshownintheillustration,eachprogramconsistsof
sectionssuchasOSC1/2,effects,andthearpeggiator.
OSC (oscillator) 1/2
TheOSC(oscillator)generatesthewaveformthatisthe
basisofthesound.OntheKROME,theoscillator
consistsofmultiplesampledsoundssuchasa
multisampleoradrumkit(drumsamples).
TheKROMEprovidestwooscillators;OSC1and
OSC2.Youcancreatemorecomplexprogramsby
combiningthese.
TheOSC,whichisthebasisofthesound,canbe
controlledbymodulatingitspitch,filter,amp,EG,and
LFOtochangethesoundinawiderangeofways.
Note: PitchEGissharedbyOSC1andOSC2.
Effects
Aseffects,youcanusefiveinserteffects,twomaster
effects,andonetotaleffect.
TheoutputofOSC1/2issenttotheseeffectprocessors.
Bychoosingthedesiredeffectforeachprocessorand
editingitsparameters,youcanapplyawiderangeof
effectssuchasmodulation,distortion,and
reverberation.
Arpeggiator
Aprogramcanuseonearpeggiator.Youcanselectan
arpeggiopattern,specifytherangethatthepatternwill
bedevelopedwithin,andspecifytherangeofnotesor
velocitiesthatwilltriggerthearpeggiator.
OSC / Pitch Filter Amplier Eects
EQ
OSC1 Setup: P2–1,
OSC1 Velocity: P2–2
Amp1/Driver1: P4–1
Pitch EG : P2–10
Filter1 EG: P3–10 Amp1 EG: P4–3
OSC1 LFO1: P5–1
OSC 1
OSC 2
Filter1 Mod: P3–3
Filter Key Track: P3–2
Filter1 LFO Mod: P3
–4
OSC1 Pitch: P2–3
OSC1 LFO2: P5–2
Amp1 Mod: P4–2
Program Basic/Controllers: P1
AUDIO OUTPUT
L/MONO, R
Master
Eect
1, 2: P9
Total
Eect
: P9
Insert
Eect
1…5: P8
3Band EQ
: P4–10
Filter1(A/B): P3–1
OSC1 AMS Mix: P6–1/2
Common KeyTrack: P6–9/10
OSC1, 2
Insert Eects
Master Eects
FX Control Bus
Routing: P8–1
Common LFO: P5–10
Arpeggio: P7–1, 2
DrumTrk Pattern: P7–4, 5 Tone Adjust: P0–7
Controllers: P1–3
P1–1, P2–2, etc. indicate the on-screen pages and tabs used when editing on the KROME.
Programstructure
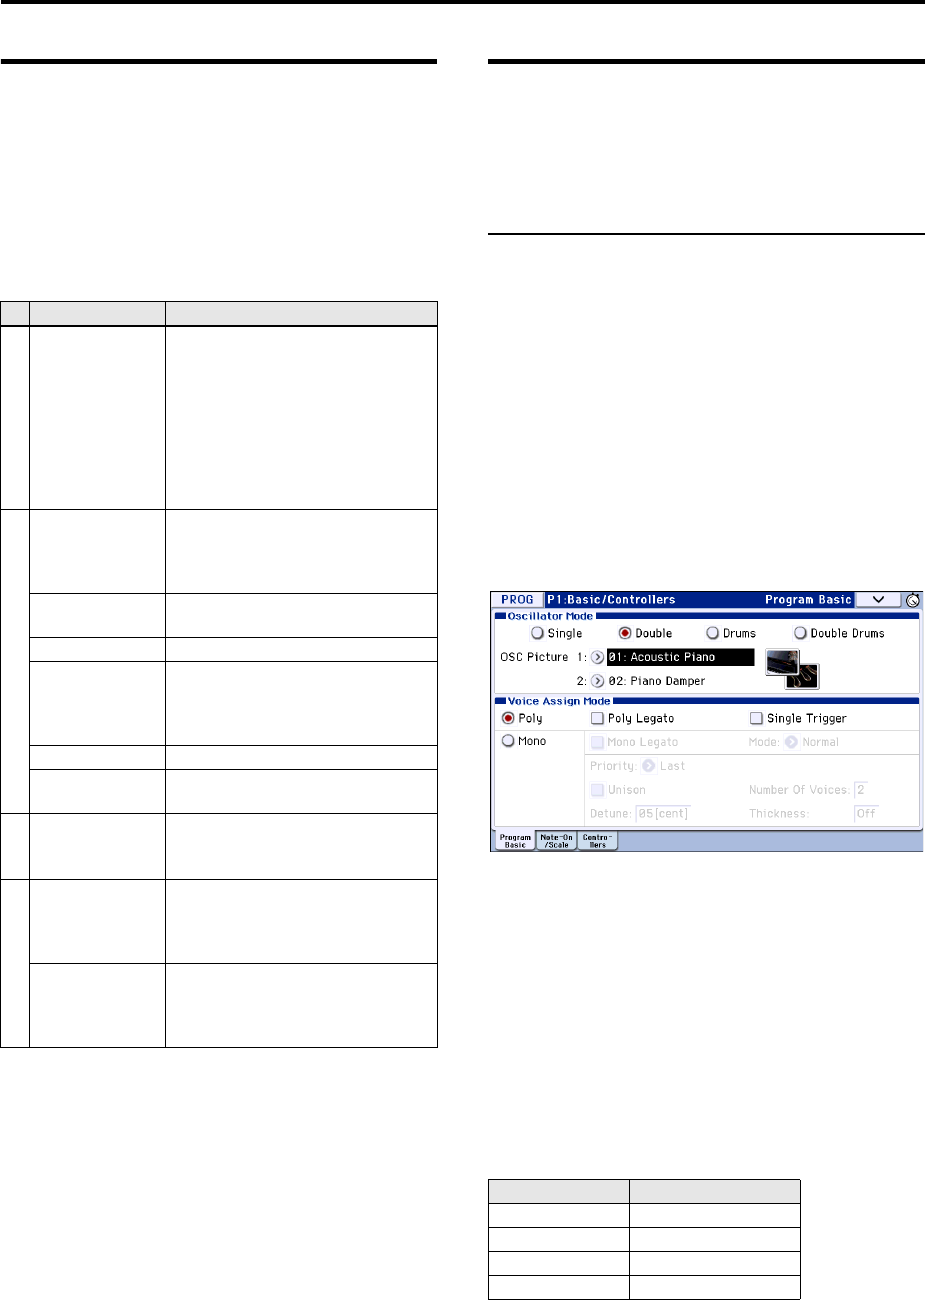
Playing and editing Programs
32
An overview of the edit pages
Inordertododetailedediting,you’llneedtoaccessthe
editpagesinthedisplay.
Theprecedingsection“EasyProgramediting”on
page 27explainedhowtousetheProgP0:Playpageto
dosimpleediting.Formoredetailedediting,you’lluse
theP1andfollowingeditpages.
Fordetailsonhowtoaccesseachmodeandpage,
pleasesee“Basicoperations”onpage 9.
Basic oscillator settings
Hereyoucanspecifythetypeofprogram,selectthe
basicwaveform(multisampleordrumkit),andspecify
whetheritwillplaypolyphonicallyormonophonically
(poly/mono).
Program type setting (single, double,
drum kit)
Hereyoucanspecifytheprogramtype.
Broadlyspeakingtheprogramtypewillbeeither“a
programthatusesamultisample”or“aprogramthat
usesadrumkit”(see“MultisamplesandDrumKits”
onpage 33).
ThischoiceismadebytheProgP1:Basic/Controllers–
ProgramBasic“OscillatorMode”setting,which
specifieswhichtypetheoscillatorswilluse.Uptotwo
canbeusedsimultaneouslyforeachtype.
•Multisample:Single,Double
•Drumkit:Drums,DoubleDrums
Single(singleprogram)usesoneoscillator,and
Double(doubleprogram)usestwooscillators.
Drums(drumprogram)issimilartoasingleprogram,
butusesadrumkit(createdinGlobalmode)insteadof
amultisample.DoubleDrums(doubledrum
program)usestwodrumkits.Byusinganambience‐
typekitastheseconddrumkit,youcangiveawider
senseofspacetothesound.
Polyphony
Polyphonyisthenumberofnotesthatcanbeplayed
simultaneously,suchasinachord.Thepolyphony
dependsontheprogramtype.
Note:
•DoubleProgramsandDoubleDrumsusetwiceas
manyvoicesasSinglePrograms.
•StereoMultisamplesusetwiceasmanyvoicesas
MonoMultisamples.
•Ifusingvelocitycrossfadeswitching,the
multisamplewillusetwiceasmanyvoicesasusual.
Page Main content
PLAY
P0: Play
Select and play programs. (see
page 21)
Oscillator and Drum track level
settings. (see page 27)
Simple drum track editing. (see
page 98)
Simple arpeggiator editing. (see
page 86)
Tone Adjust settings. (see page 29)
EDIT
P1: Basic/
Controllers
Basic program settings, such as
Oscillator mode. (see page 32)
SW1, 2, and knob settings. (see
page 41)
P2: OSC/Pitch Oscillator selection and pitch settings.
(see page 33)
P3: Filter Filter 1, 2 (tone) settings. (see page 38)
P4: Amp/EQ
Amp 1, 2 (volume) settings. (see
page 40)
Amp 1, 2 driver and pan settings.
3-band parametric EQ settings.
P5: LFO LFO settings. (see page 35)
P6: AMS/Common
KeyTrack
AMS Mixer settings. (see page 36)
Common keyboard tracking settings.
ARP/ DT
P7: Arpeggiator/
Drum Track
Arpeggiator settings. (see page 88)
Drum track settings. (see page 100)
EFFECT
P8: Routing/IFX
Oscillator output bus and master effect
send level settings. (see page 79)
Insert effect routing, selection, and
settings. (see page 79)
P9: MFX/TFX/LFO
Master effect routing, selection, and
settings. (see page 80)
Total effect selection and settings. (see
page 80)
Program type Polyphony
Single 120
Double 60
Drums 120
Double Drums 60
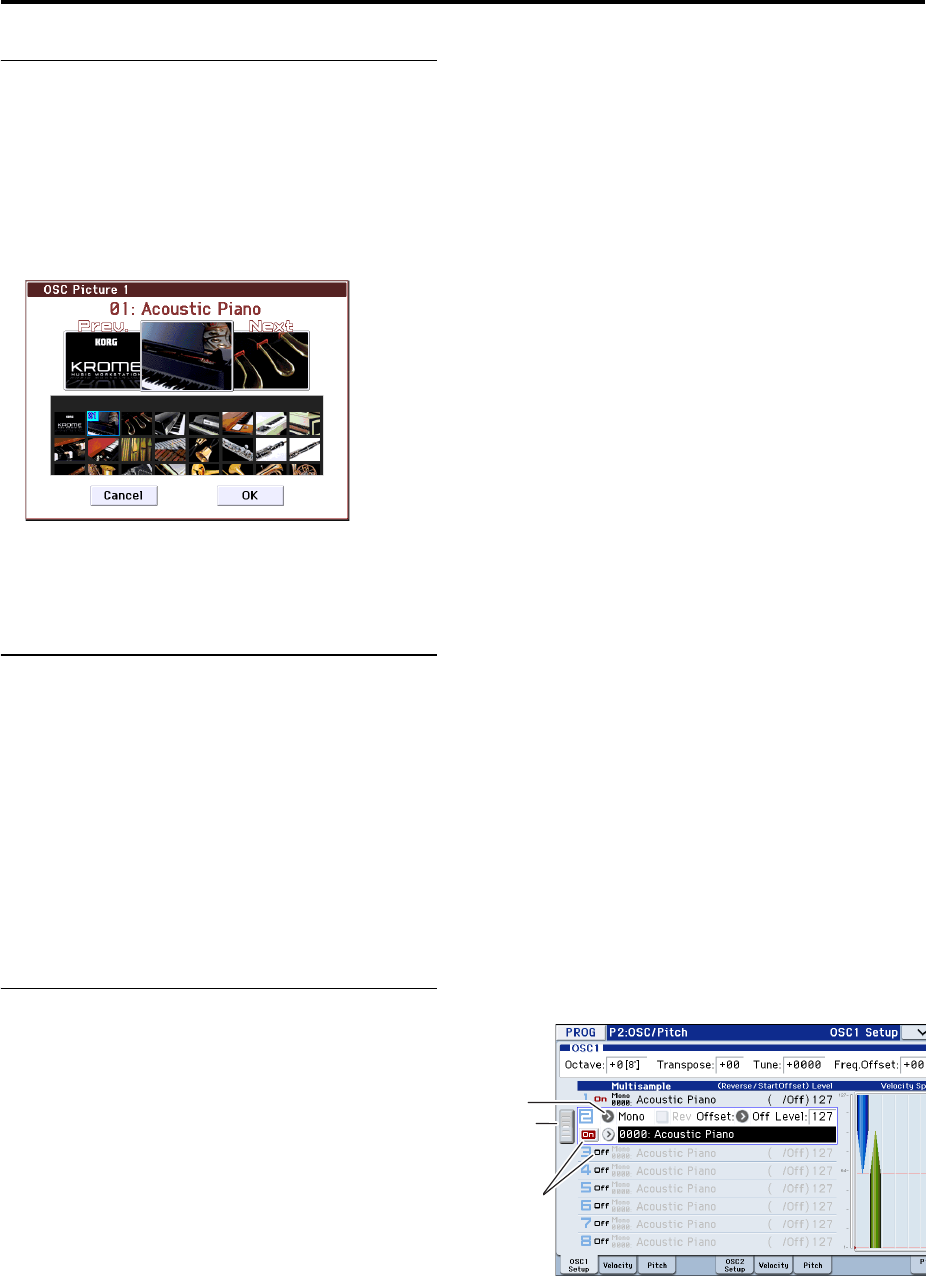
Detailed Editing with Programs Basic oscillator settings
33
Oscillator image setting
Youcanspecifytheprogramoscillatorimagethat’s
shownintheP0:Play–Mainpage.Adjustthissetting
inProgP1:Basic/Controllers–ProgramBasicOscillator
Mode“OSCPicture1”and“2.”
1. Pressthe“OSCPicture1”or“2”popupbutton(>)
ortheimageiconshownatright;thedialogbox
willappear.
2. Toselectanimage,pressanimageinthelistinthe
lowerpartofthescreen,orattheleftorrightinthe
upperpart.
3. PresstheOKbuttontoconfirmyourchoice.
Polyphonic/monophonic playing
TheVoiceAssignModeselectswhethertheProgram
willplaypolyphonically(Poly)ormonophonically
(Mono).
WhenthisissettoPoly,youcanplaybothchordsand
melodylines.WhenthisissettoMono,onlyonenote
willsoundevenifyouplayachord.
Normallyyou’llsetthistoPoly,butMonoisuseful
whenplayingsoundssuchassynthbasses,synth
leads,andothersoloinstruments.
TryswitchingbetweenPolyandMono,andlistento
theresults.
Working with Multisamples
What is a multisample?
Asampleisadigitalrecordingofaparticular
instrumentorwaveform(orothernaturalorartificially
processedsound)recordedataspecificpitch.A
multisampleisacollectionofsimilarlyvoicedsamples,
usedtocreatethesametypeofsound‐piano,bass,
guitar,strings,organ‐acrosstheentirekeyboard,as
thebasisofaprogram.Theoscillatorsofsingleand
doubleprogramsusemultisamples.Thereare583
multisamplesavailableinthisinstrument.
Youcanassignuptofourmultisamplestoeach
oscillatorandswitchbetweenthembyvelocity.
Multisamples and Drum Kits
MultisamplesandDrumKitsallowyoutoplay
samplesindifferentways.
•Multisampleslayoutoneormoresamplesacross
thekeyboard.Ifweusetheexampleofasimple
guitarmultisample,onesamplecouldbeassigned
foreachstring,sothatthemultisamplewould
consistofsixsamples.
•Asthenamesuggests,DrumKitsareoptimizedfor
playingdrumsamples.
Velocity splits, crossfades, and layers
Eachoscillatorprovideseightvelocityzones.Thislets
youswitchbetweenmultisamplesordrumsamples
accordingtothevelocity(speed)atwhichyouplaya
key.
Byspecifyingthethreshold(boundaryvalue)where
eachzonewillrespond,andtheamountofcrossfading
(theoverlapbetweenzones),youcanspecifyhowyour
keyboardplayingdynamicswillswitchorlayerthe
multisamplesordrumsamples.Youcanusethisto
makethefollowingtypesofsetups.
•Velocitysplits,wheremultisamples(or
drumsamples)arecleanlyswitchedatthethreshold
•Velocitycrossfades,wheremultisamples(or
drumsamples)aresmoothlycrossfadedovera
specifiedrangeoutsidethethreshold
•Velocitylayers,wheretwomultisamples(or
drumsamples)arelayeredwhenyouplaya
specifiedrangeoutsidethethreshold
Note: If“OscillatorMode”issettoDrumsorDouble
Drums,thevelocitysettingspre‐specifiedforthedrum
kitwillbeused,andthereforewillnotbeshowninthe
screen.Thevelocityzonesettingsofadrumkitcanbe
editedinGlobalP5:DrumKit(seepage 105).Youcan
jumpautomaticallytoGlobalP5bypressingtheJump
toDrumKitEditbuttonshownonthescreen.
Selecting Multisamples
Let’screateasimplevelocitycrossfadebetweentwo
Multisamples,usingjustOSC1.
1. AccesstheProgP2:OSC/Pitch–OSC1Setuppage.
2. SettheMultisampleOn/Offformultisample1and
multisample2toOn.
SettheMultisampleOn/Offformultisample3and
multisample4toOff.
Bydraggingtheslidertotheleft,youcanselecteach
multisampleandviewitssettings.
3. SelectStereoastheMultisampleBankfor
multisample1andmultisample2.
TherearetwomaintypesofMultisampleBanks:
Mono,andStereo.NotethatstereoMultisampleswill
requiretwiceasmanyvoicesasmonoMultisamples.
Multisamplesareorganizedbycategorysuchaspiano,
guitar,bell,etc.
Bank
Multi-
sample
On/Off
Slider
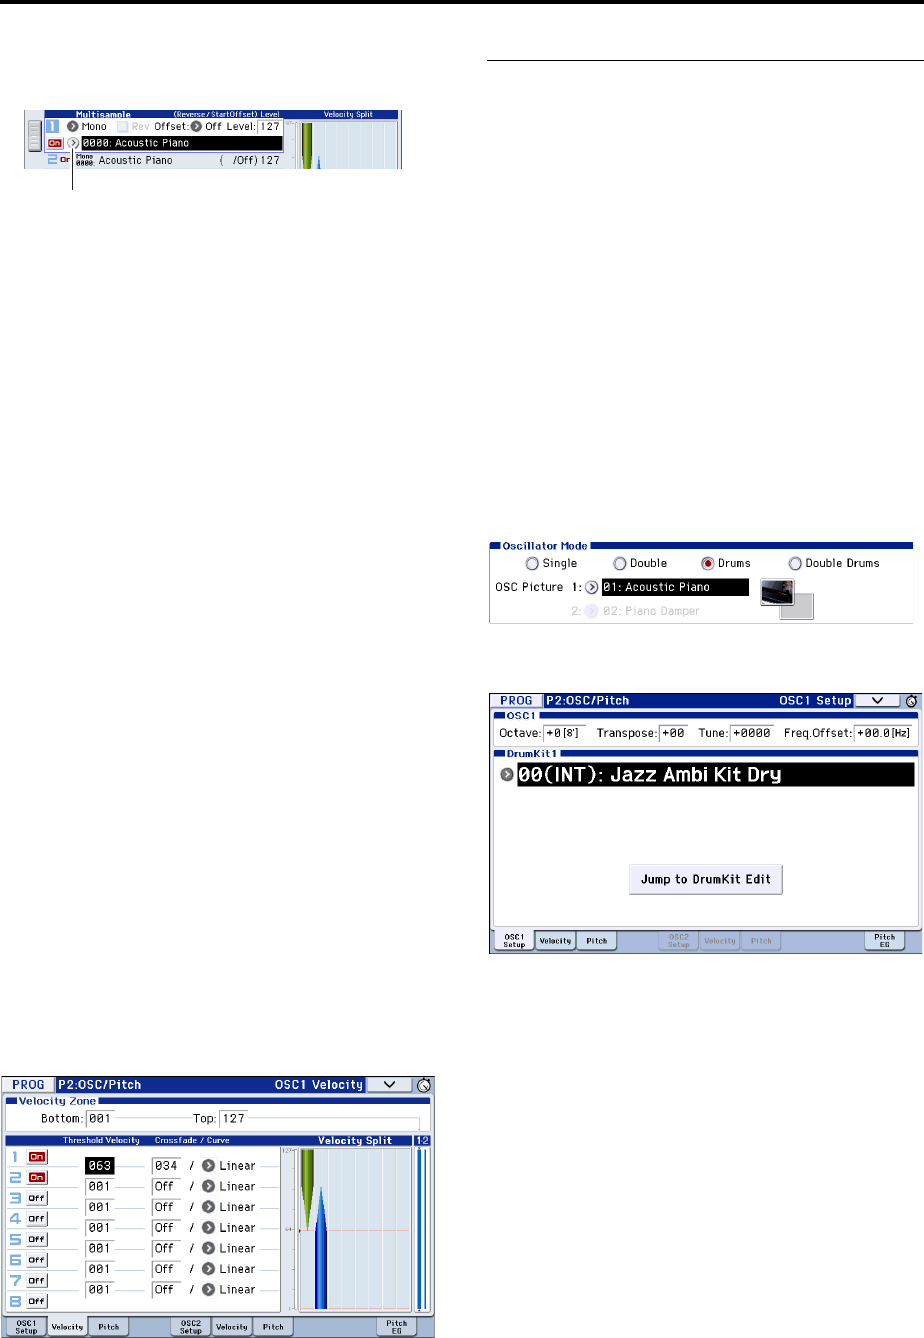
Playing and editing Programs
34
4. PresstheMultisamplepopupbuttonfor
multisample1.
ThisbringsupalistofMultisamples,organizedby
category.Usethetabsontheleftofthedisplayto
browsethroughthedifferentcategories.
5. SelectaMultisamplebytouchingitsnameinthe
list.YoucanalsouseFindtosearchfora
Multisample.
6. PresstheOKbuttontoconfirmyourselection.
7. Performthesamestepsformultisample2,
selectingadifferentMultisamplethanfor
multisample1.
Nowthatyou’veassignedMultisamplesto
multisample1andmultisample2,let’ssetupthe
velocityrangesandcrossfades.
Multisampleshavenowbeenassignedtomultisample
1and2.
8. Specifythevelocityrangeandcrossfaderange.
PresstheVelocitytabtoaccesstheOSC1Velocitypage.
Setthemultisample2“ThresholdVelocity”to001,and
turn“Crossfade”Off.
9. Setthemultisample1“ThresholdVelocity”to80.
Youcanalsoset“ThresholdVelocity”bydraggingthe
bottomedgeofthelinegraph.
Withthesesettings,Multisample2willsoundfornotes
playedwithavelocityof79orless,andMultisample1
willsoundfornotesplayedwithavelocityof80or
greater.
TheVelocitySplitmetershowstheoscillator’seight
multisamplesandthevelocityzonesofeachoscillator.
Themeterontheleftshowsthenote‐onvelocity.This
letsyouseewhichmultisampleandoscillatorwill
soundforthatspecificvelocity.
10. Setthemultisample1“Crossfade”to20,andits
“Curve”toLinear.
Thestateofthissplitisshownvisuallyinthescreen.
Thetwomultisampleswillfadeacrosstherangefrom
80to100,withmultisample2fading‐outwhile
multisample1fades‐in.Thisproducesasmooth
changewithoutanysuddenswitch.
11. Asnecessary,usetheProgP2:OSC/Pitch–OSC1
Setuppagetoadjustthe“Level”ofthetwo
multisamples.
Assigning a drum kit
What is a drum kit?
DrumkitsarecreatedoreditedinGlobalmode.For
eachnoteofthekeyboard,youcanassignuptoeight
druminstrumentsamples,anduselayering,
crossfading,orvelocityswitchingtoswitchbetween
them.Then,inProgrammode,youcanadjustfilter
andampsettings,andspecifyeffectsandroutingtothe
audiooutputjacks.(Seepage 105)
TouseadrumkitinaProgram,setOscillatorModeto
DrumsorDoubleDrums,andchooseoneofthe48
userdrumkitsorthenineGM2drumkits.
Selecting a drum kit
1. AccesstheProgP1:Basic/Controllers–Program
Basicpage.
2. Set“OscillatorMode”toDrumsorDouble
Drums.
3. SelectadrumkitintheProgP2:OSC/Pitch–OSC1
Setuppage.
4. Specifythebasicpitchoftheoscillator.Foradrum
kit,set“Octave”to+0[8ʹ].
Multisample popup button
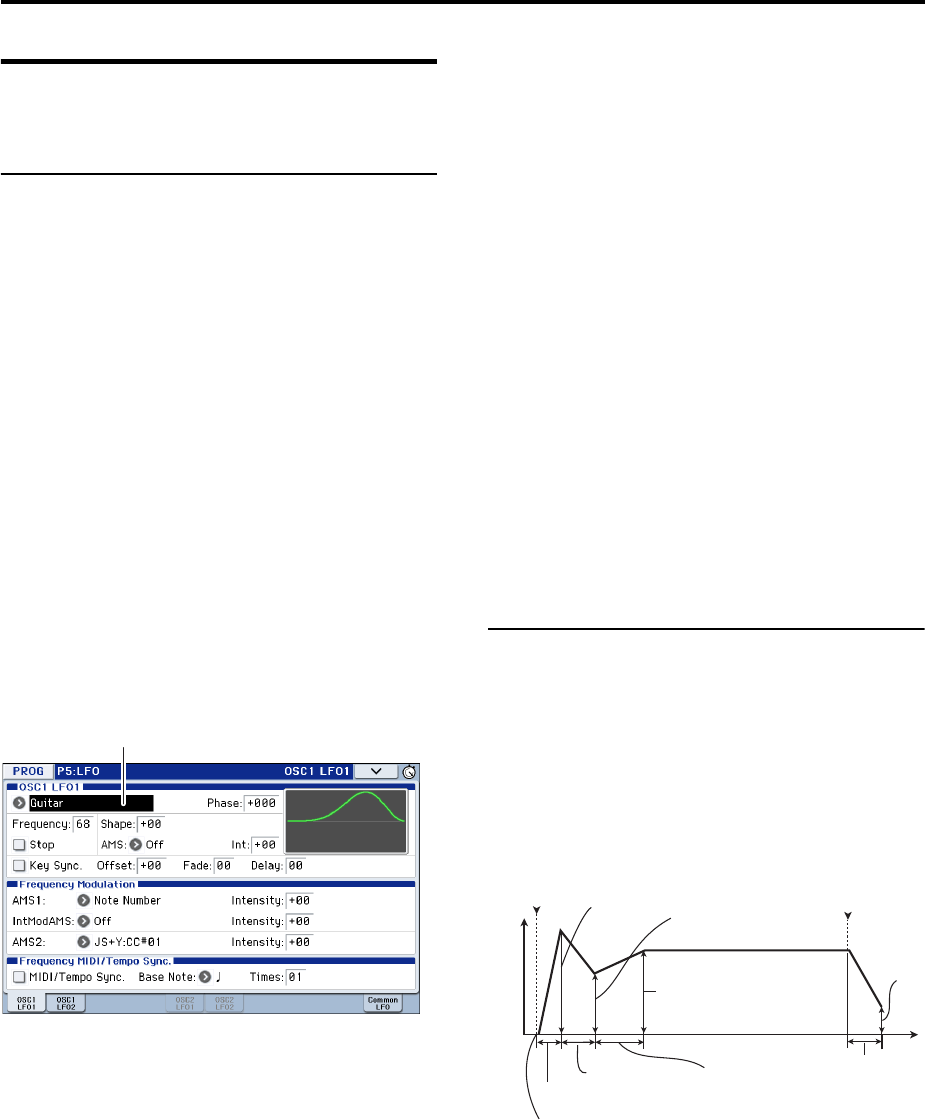
Detailed Editing with Programs Creating time-varying changes (LFO and EG)
35
Creating time-varying
changes (LFO and EG)
Using LFOs
YoucanusethecyclicchangeproducedbytheLFO
(LowFrequencyOscillator)tomodulatenumerous
aspectsofthesound.
EachProgramhastwoLFOs:LFO1andLFO2.Thereis
alsoasingleCommonLFO,sharedbybothOscillators.
WhileLFO1andLFO2areseparateforeachvoice,the
CommonLFOissharedbyallvoicesintheProgram.
Thismakesitusefulwhenyouwantallofthevoicesto
haveanidenticalLFOeffect.
YoucanusetheseLFOstomodulatemanydifferent
Programparameters,including:
•Pitch(forvibrato)
•Filters(forwaheffects)
•Volume(fortremolo)
•Pan(forauto‐panning)
TheLFOscanmodulatemanyotherparameters,in
additiontothoselistedabove.
Using the basic LFO
1. AccesstheProgP5:LFO–OSC1LFO1page.
2. SelecttheWaveformparameter.
UsetheINCandDECbuttonstoscrollthroughthe
differentwaveforms,andlookattheirshapesinthe
graphicdisplay.
Thereareanumberofwaveformstochoosefrom.Each
aresuitedtodifferentapplications:
TriangleandSinearetheclassicLFOshapesfor
vibrato,tremolo,panning,andfilterwaheffects.
Squareisusefulforgatedonandofffilterandamp
effects,andcancreatetrillswhenmodulatingpitch.
TheGuitarwaveformisdesignedespeciallyforguitar
vibrato;itbendsonlyupwardsfromthebasevalue.
SawandExponentialSawDownaregoodfor
rhythmicfilterandampeffects.
Random1(S/H)createstheclassicsample‐and‐hold
effect,whichisgreatformodulatingaresonantfilter.
3. Afterlookingatthedifferentwaveforms,select
Triangle.
4. SelecttheShapeparameter,andusetheVA L U E
dialtomovethroughitsdifferentsettings,from
–99to+99.
Noticehowtheshapeofthewaveformbecomesmore
curved,andhow–99emphasizesthelowerpartofthe
shape,and+99emphasizestheupperpart.
5. SelectthePhaseparameter,andusetheVALUE
dialtosweepthroughitsrangeofvalues.
Noticehowthewaveformshiftsfromsidetoside.
Amongotherthings,thisletsyouoffsettheLFOsfrom
oneanotherintime,whichcancreateinteresting
organiceffects.
6. UsetheFreq(Frequency)parametertosetthe
speedoftheLFO.
7. UsetheFadeandDelaysettingstocontroltheway
theLFOsoundsatthebeginningofthenote.
FormoreinformationonLFOs,pleaseseepage 42of
theParameterGuide.
AlloftheseparameterscontrolthewaythattheLFO
works.InorderfortheLFOtoactuallyaffectthe
sound,youcanusethededicatedLFOroutingsonthe
Filter,Pitch,andAmppages,orusetheLFOsasAMS
sourcesforawidevarietyofparameters.
Using EGs (Envelope Generators)
Anenvelopecreatesamodulationsignalbymoving
fromoneleveltoanotheroveraspecifiedtime,and
thenmovingtoanotherleveloveranotherperiodof
time,andsoon.
TheProgramincludesthreeEGs,forPitch,Filter,and
Amp.Theseproducetime‐varyingchangesinpitch,
tone,andvolumerespectively.Theycanalsobeusedto
modulateanumberofotherprogramparametersvia
AMS.
Note: TheparametersthatcanbemodulatedbyanEG
andtherangeofvalueswilldifferdependingonthe
EGsprovidedforeachsection.
Waveform
Level
Time
note-on note-off
Sutart Level
Attack Time
Decay Time Slope Time
Attack Level
Break Level
Release
Level
Sustain Level
Release Time

Playing and editing Programs
36
Diverse modulation settings
(AMS and AMS mixer)
Using AMS
AMS(AlternateModulationSource)letsyoumodulate
programparametersusingcontrollers,EG,orLFOas
themodulationsource.Extremelycreativetypesof
modulationarepossible;forexample,youcanusea
singlecontrollertosimultaneouslymodulatemultiple
parameters,oryoucanuseanEGtomodulatean
LFO’sfrequencyandthenusethatLFOtomodulatea
filter.
AMS(AlternateModulationSource)referstoanyof
theassignablemodulationsourcesinKROME,
including:
• ControllersoftheKROMEitself,suchasthe
joystick,SW1/2,andtherealtimeknobs
•IncomingMIDIcontrollers
• ModulatorssuchastheFilter,Pitch,andAmpEGs,
theLFOs,ortheAMSMixers
Intensityisaparameterthatsetsthedegree(speed,
depth,amountetc.)ofhowAMSwillcontrolthe
modulation.
Anumberoffrequently‐usedmodulationroutings,
suchasusingthejoysticktovarythepitch,are
providedasadditional,dedicatedroutings,separate
fromAMS.
NotethatnotallAMSsourcesmaybeavailablefor
somemodulationdestinations.
FordetailsonalternatemodulationandAMS,please
seebelow.
• “AlternateModulationSources(AMS)”onpage 339
oftheParameterGuide
•“CreatingVibrato”onpage 37
•“PitchEG”onpage 37
• “FilterEG”onpage 39
•“LFOmodulation”onpage 39
•“AMS(Pan)”onpage 36oftheParameterGuide
•“LFO1/2”onpage 40
Using the AMS Mixers
TheAMSMixerscombinetwoAMSsourcesintoone,
orprocessanAMSsourcetomakeitintosomething
new.
Forexample,thisletsyouuseanLFOtomodulatea
filter’sresonancewhilealsomodulatingitbyanEG.
AlthoughresonancehasonlyoneAMSinput,using
theAMSmixermakesthispossible.Youcouldalsodo
thingssuchasusingthefilterEGtocontroltheamount
ofLFO1.Thewidevarietyofotherpossibilitiesinclude
usingthejoysticktocontroltheamountofpitchEG,
allowingthejoysticktoapplybendonlytonotes
playedwhileyouholddownthefootswitch,or
changingtheresponseofarealtimecontroller.
TheAMSMixeroutputsappearinthelistofAMS
sources,justliketheLFOsandEGs.AnAMSmixer’s
outputsignalcanbeusedtomodulateavarietyof
parameters.
Thisalsomeansthattheoriginal,unmodifiedinputsto
theAMSMixersarestillavailableaswell.Forinstance,
ifyouuseLFO1asaninputtoanAMSMixer,youcan
usetheprocessedversionoftheLFOtocontrolone
AMSdestination,andtheoriginalversiontocontrol
another.
Finally,youcancascadethetwoAMSMixerstogether,
byusingAMSMixer1asaninputtoAMSMixer2.
Fordetails,pleasesee“6–1:OSC1AMSMix1”on
page 46oftheParameterGuide.
Tips for using AMS
Whenmakingsettingsforalternatemodulation,think
oftheeffectthatyouwishtoproduce,whattypeof
modulationwillbenecessarytoproducethateffect,
andwhatparameteroftheoscillator,filter,oramplifier
needstobecontrolled.
Next,selectasource(AMS)andsettheIntensity.If
youproceedlogicallyinthisway,youwillachievethe
desiredeffect.
Forexampleinaguitarsoundprogramwhereyou
wanttousethejoysticktocontrolthefeedback,you
wouldmakeassignmentssothatthejoystickcontrols
thefilterfrequencyandresonance.
Controller Setup page
Foreachprogram,thefunctionofRealtimeControl
knobs1‐B–4‐BandtheSW1andSW2buttonscanbe
assignedintheProgP1:Basic/Controllers–Controllers
Setuppage.
Fordetails,pleasesee“SettingthefunctionsofSW1
andSW2”onpage 41,and“Settingthefunctionsof
RealtimeControlsUSERknobs1–4”onpage 42.
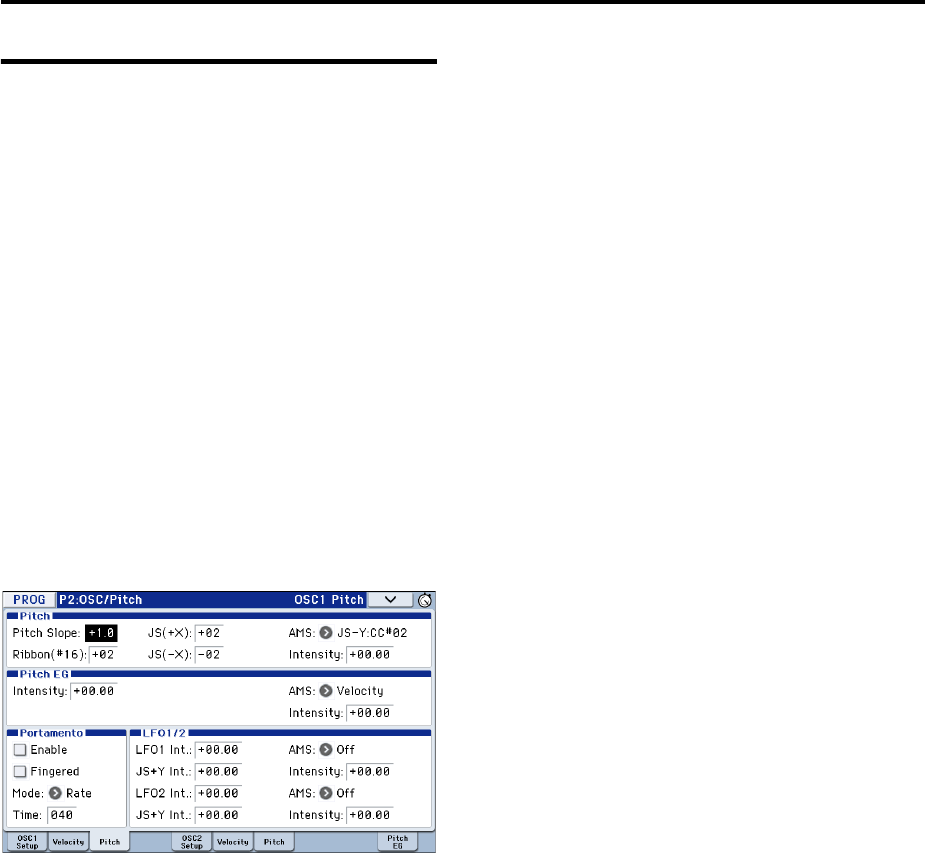
Detailed Editing with Programs Controlling Pitch
37
Controlling Pitch
Pitch bend
Pitchbendsmoothlychangesthepitchupwardor
downward,similartohowaguitaristcan“bend”
strings.OntheKROME,youwillnormallyusethe
joysticktocontrolpitchbendinrealtime.
TheJS(+X)andJS(–X)settingsspecifytheamountof
pitchchange(insemitones)thatwilloccurwhenMIDI
pitchbendmessagesarereceivedorwhenthejoystick
ismovedtoleftorright.Asettingof+12allowsthe
pitchtobecontrolledamaximumofoneoctave
upward;asettingof–12allowsthepitchtobe
controlledamaximumofoneoctavedownward.
Note: Youcanalsocontrolpitchbendusinga
controllerotherthanthejoystick,orviaMIDI.
Ribbon(#16)specifiestheamountofpitchchange(in
semitoneunits)thatwilloccurwhenMIDIcontrol
changemessage#16isreceived.Withasettingof+12,a
valueof127willraisethepitchoneoctave,andavalue
of0willlowerthepitchoneoctave.
Creating Vibrato
YoucanuseanLFOtocreatevibrato.
LFO1Int.orLFO2Int.setsthedepthofhowthe
selectedLFOwillaffectthepitch.Withasettingof
+12.00,vibratowillproduceamaximumof±1octaveof
pitchchange.
JS+YIntspecifiestheamountofvibratothattheLFO
willproducewhenthejoystickispushedawayfrom
you.
Intensity(AMSIntensity)specifiesthedepthof
vibratothatwillbeappliedbytheLFOwhen
modulatedbytheselectedAMS(AlternateModulation
Source).Forexample,ifthepanelswitchassignment
forSW1issettoSW1Mod.(CC#80)(Prog1–7a),and
yousetLFO1AMStoSW1:CC#80andspecifyan
appropriatevalueforIntensity,vibratowillbeapplied
whenyouturnSW1onorwhenMIDIcontrolchange
#80isreceived.
Pitch EG
WhentheIntensityvalueissetto+12.00,thepitchEG
specifiedinthePitchEGpagewillproducea
maximumof±1octaveofpitchchange.
Torealisticallysimulatetheslightchangeinpitchthat
occurswhenastringispluckedorattheattackofa
brassorvocalsound,youcanusetheEGtocreatea
subtlechangeinpitchattheattack.
Portamento
Portamentomakesthepitchchangesmoothlywhen
youplaythenextnotebeforereleasingtheprevious
note.
TheTimeparametercontrolshowlongitwilltakethe
pitchtochange.Asthisvalueisincreased,thepitch
willchangeoveralongertime.Withavalueof000,
therewillbenoportamento.
YoucanturnPortamentoonandoffviaSW1orSW2,
byassigningthemtoPorta.SWCC#65.
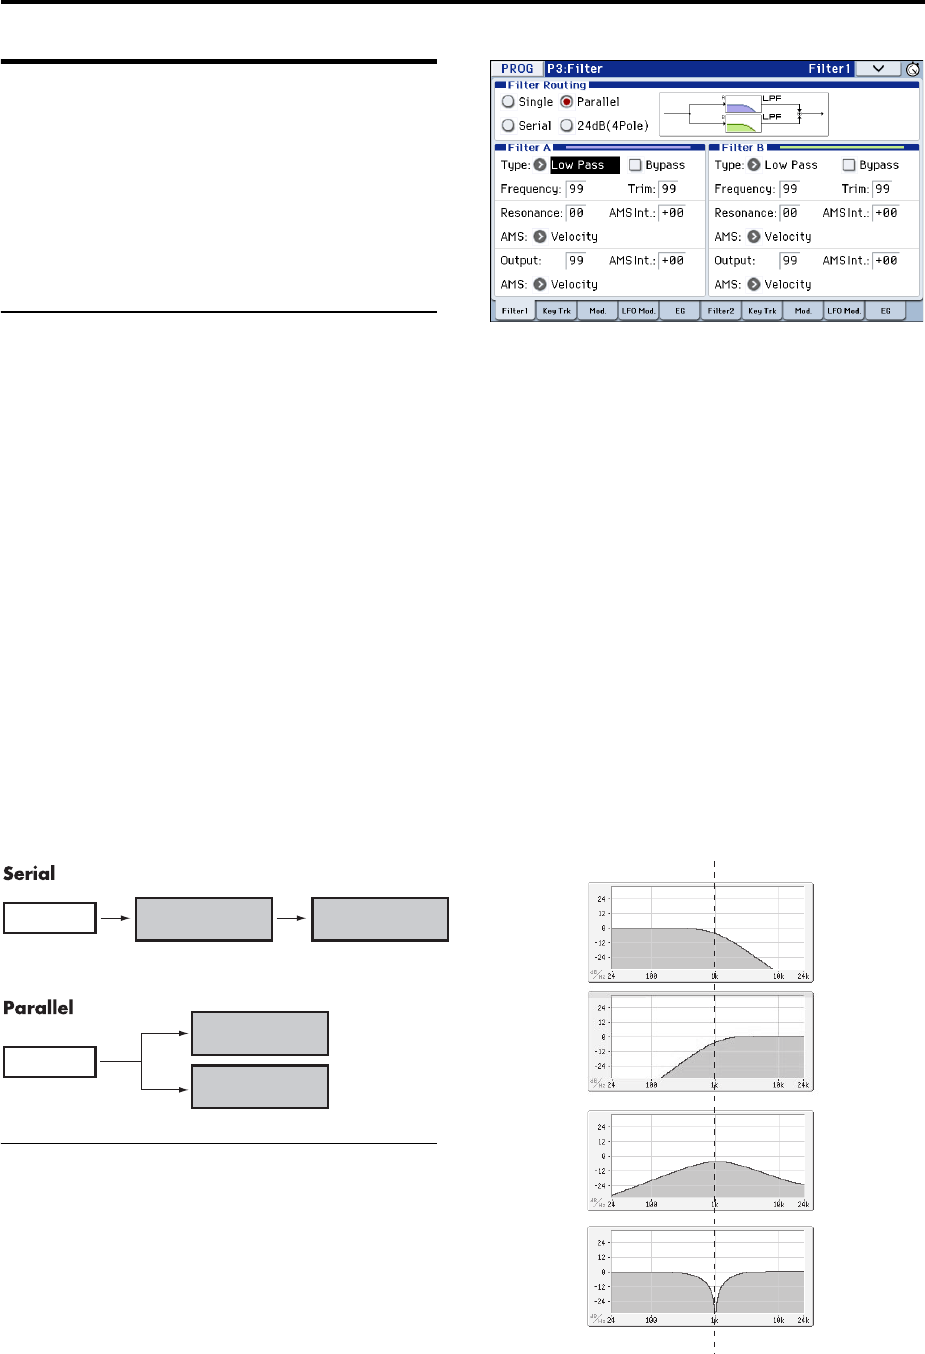
Playing and editing Programs
38
Using Filters
Thefiltersallowyoutodiminishoremphasize
specifiedfrequencyareasofthesound.
Thetoneofthesoundwilldependsignificantlyon
thefiltersettings.
Thebasicfiltersettings,includingtherouting,type,
cutofffrequency,andresonance,aresetontheP3–1:
Filterpage.
Filter Routing
Eachoscillatorhastwofilters,FilterAandFilterB.The
FilterRoutingparametercontrolswhetheroneorboth
ofthefiltersareused,andifbothareused,itcontrols
howtheyareconnectedtoeachother.
TheSingleroutingusesonlyFilterAasasingle2‐pole,
12dB/octavefilter(6dBforBandPassandBandReject).
TheSerialroutingusesbothFilterAandFilterB.The
oscillatorfirstgoesthroughFilterA,andthenthe
outputofFilterAisprocessedthroughFilterB.
ParallelalsousesbothFilterAandFilterB.The
oscillatorfeedsbothfiltersdirectly(andallow
independentsettingsforeach),andtheoutputsofthe
twofiltersarethensummedtogether.
The24dB(4Pole)routingmergesbothfilterstocreatea
single4‐pole,24dB/octavefilter(12dBforBandPass
andBandReject).IncomparisontoSingle,thisoption
producesasharperroll‐offoffrequenciesbeyondthe
cutofffrequency,aswellasaslightlymoredelicate
resonance.Manyclassicanalogsynthsusedthistype
offilter.
SerialandParallelRouting
Filter Types
Thisselectsthepartsofthesoundthatwillbeaffected
bythefilter,asdescribedbelow.WiththeSerialand
Parallelroutings,youcanindependentlysetthetypes
forFilterAandFilterB.
Thefilterswillproduceverydifferentresults
dependingontheselectedfiltertype.
LowPass:Thiscutsoutthepartsofthesoundthatare
higherthanthecutofffrequency.LowPassisthemost
commontypeoffilter,andisusedtomakebright
timbressounddarker.
HighPass:Thiscutsoutthepartsofthesoundthatare
lowerthanthecutofffrequency.Youcanusethisto
maketimbressoundthinnerormorebuzzy.
BandPass:Thiscutsoutallpartsofthesound,both
highsandlows,exceptfortheregionaroundthecutoff
frequency.Sincethisfiltercutsoutbothhighandlow
frequencies,itseffectcanchangedramatically
dependingonthecutoffsettingandtheoscillator’s
multisample.
Withlowresonancesettings,youcanusetheBand
Passfiltertocreatetelephoneorvintagephonograph
sounds.Withhigherresonancesettings,itcancreate
buzzyornasaltimbres.
BandReject:Thisfiltertype–alsocalledanotchfilter–
cutsonlythepartsofthesounddirectlyaroundthe
cutofffrequency.Trymodulatingthecutoffwithan
LFOtocreatephaser‐likeeffects.
FilterTypesandCutoffFrequency
Filter A (Low Pass)Oscillator
Oscillator
Filter B (High Pass)
Filter A (Low Pass)
Filter B (High Pass)
Low Pass
High Pass
Band Pass
Band Reject
Cutoff Frequency
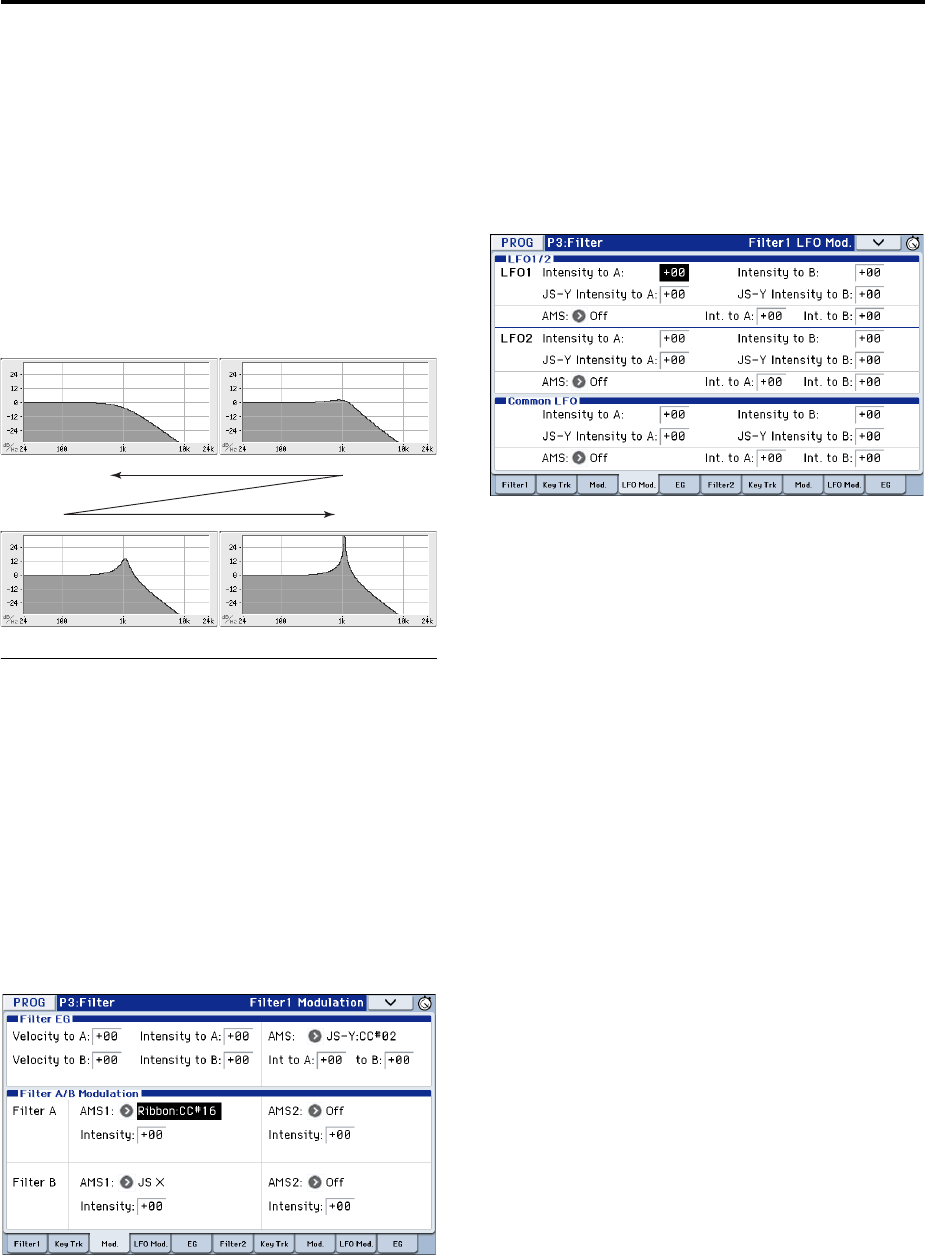
Detailed Editing with Programs Using Filters
39
Resonance
Resonanceemphasizesthefrequenciesaroundthe
cutofffrequency,asshowninthediagrambelow.
Whenthisissetto0,thereisnoemphasis,and
frequenciesbeyondthecutoffwillsimplydiminish
smoothly.
Atmediumsettings,theresonancewillalterthetimbre
ofthefilter,makingitsoundmorenasal,ormore
extreme.Atveryhighsettings,theresonancecanbe
heardasaseparate,whistlingpitch.
Tomaketheresonancetrackthekeyboardpitch,please
see“KeyFollow”onpage 29oftheParameterGuide.
Modulating the filters
Youcanmodulatethefiltercutofffrequencyusingthe
FilterEG,theLFOs,keyboardtracking,andother
built‐inandMIDIcontrollers.Thisisagreatwayto
addarichvarietyoftonalchangetothesound.
Filter EG
TheFilterEGisamulti‐stageenvelope,whichyoucan
usetomodulatethefilteraswellasotherProgram
parameters.TheEGitselfissetupontheEGtab;the
waythatitaffectsthefiltersiscontrolledbythe
parametersdescribedbelow,ontheFilter1/2–
Modulationpage:
TheIntensitytoAandIntensitytoBsettingscontrol
thebasicamountofEGmodulationforfilter
frequenciesAandB,respectively,beforeother
modulation.
TheVelocitytoAandVelocitytoBsettingsletyouuse
velocitytocontroltheamountofEGmodulation.
TheAMSsettingselectsanAMSmodulationsourceto
scaletheamountoftheFilterEGappliedtoFiltersA
andB.ThetwofiltersshareasingleAMSsource,with
separateintensityIntoAortoBsettings.
LFO modulation
YoucanmodulatethefilterviaLFO1,LFO2,andthe
CommonLFO.Amongotherapplications,LFO
modulationofthefiltercanproducetheclassic“auto‐
wah”effect.
TheFilter1/2–LFOMod.pageletsyousetupthe
followingparametersseparatelyforeachLFO:
IntensitytoAandIntensitytoBspecifyhowmuch
theLFOchangesthetone.
JS‐YIntensitytoAandJS‐YIntensitytoBspecifythe
depthofthewaheffectproducedbytheLFOwhenthe
joystickismovedtowardyourself,orwhenCC#2is
received.
TheAMSsettingselectsanAMSmodulationsourceto
scaletheamountoftheLFOappliedtoFiltersAandB.
ThetwofiltersshareasingleAMSsource,with
separateintensitysettings.
ForexampleifAMSissettoSW1:CC#80,turningSW1
onwillapplyanauto‐waheffect(seepage 37).
Keyboard Track
Mostacousticinstrumentsgetbrighterasyouplay
higherpitches.Atitsmostbasicapplication,keyboard
trackingre‐createsthiseffectbyincreasingthecutoff
frequencyofalowpassfilterasyouplayhigheronthe
keyboard.Usually,someamountofkeytrackingis
necessaryinordertomakethetimbreconsistentacross
theentirerange.
TheKROMEkeyboardtrackingcanalsobemuchmore
complex,sinceitallowsyoutocreatedifferentratesof
changeoveruptofourdifferentpartsofthekeyboard.
Forinstance,youcan:
• Makethefiltercutofffrequencyincreasevery
quicklyoverthemiddleofthekeyboard,andthen
openmoreslowly–ornotatall–inthehigher
octaves.
• Makethecutofffrequencyincreaseasyouplay
loweronthekeyboard.
• Createabruptchangesatcertainkeys,forsplit‐like
effects.
How Key Track works: Keys and Ramps
Thekeyboardtrackingworksbycreatingfourramps,
orslopes,betweenfivekeysonthekeyboard.
Fordetails,pleasesee“Howitworks:Keysand
Ramps”onpage 28oftheParameterGuide.
Low resonance
High resonance
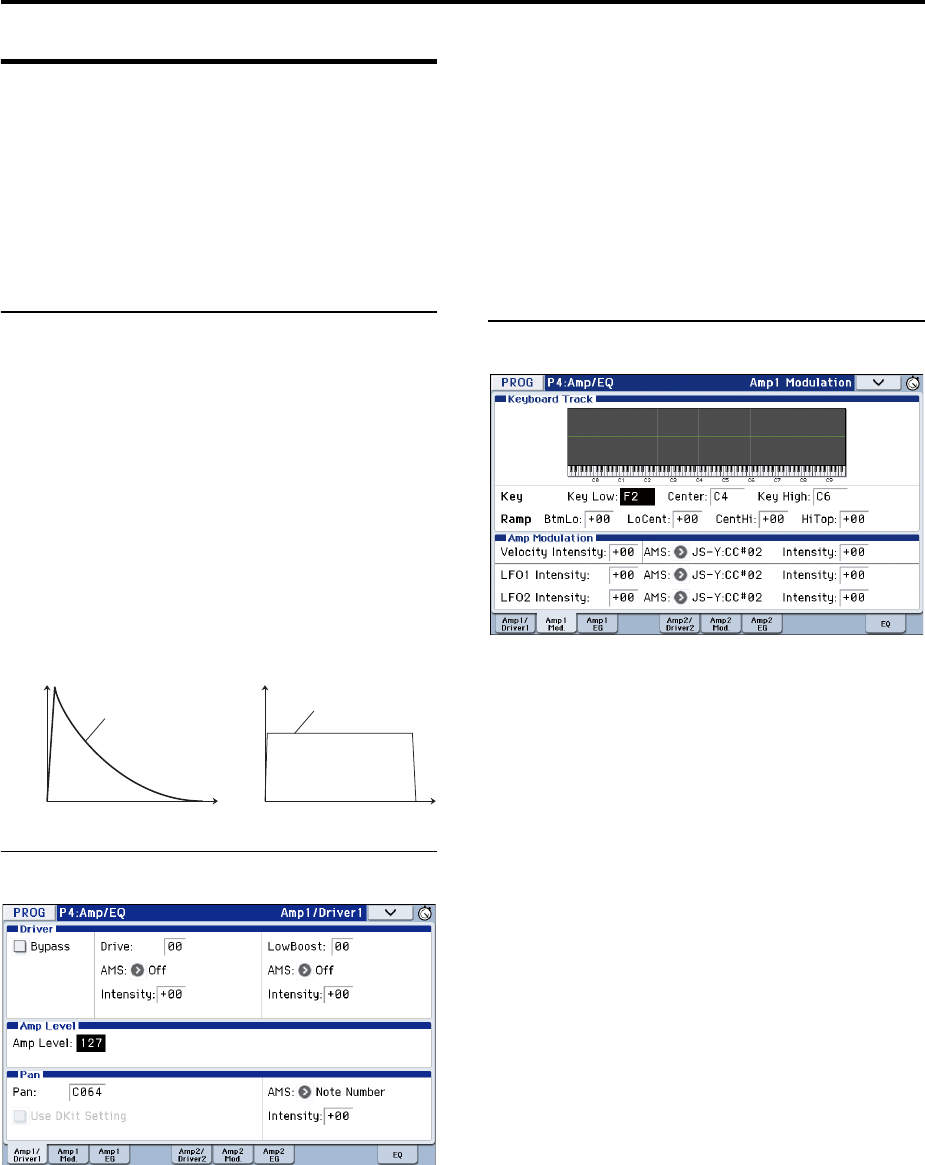
Playing and editing Programs
40
Using the Amp section
TheAmpsectionincludescontrolsforvolume,pan,
andthedrivercircuit.
YoucancontrolthevolumeusingtheAmpEG,LFO1/
2,KeyTrack,andvelocity,alongwithotherAMS
sources.
EachOscillatorhasitsownAmpsection:Amp1for
OSC1,andAmp2forOSC2.
Background - what does “Amp”
mean?
Differentsoundshavecharacteristicshapestotheir
volumelevels.
Forexample,thevolumeofapianonotebeginsata
highvolumetheinstantyouplaythenote,andthen
decreasesgradually.
Thevolumeofanorgannote,ontheotherhand,
remainsconstantaslongasyoucontinuepressingthe
key.
Thevolumeofanoteonaviolinorwindinstrument
canbevariedduringthenotebythemusician(i.e.,by
regulatingtheamountofpressureontheboworthe
forceofthebreath).
Pan
Pan
ThemainPanparametercontrolsthestereoposition
afterthesignalhaspassedthroughtheoscillator,filter,
andamp.
Normallyyou’llsetthistoC064,sothatthesoundis
centeredequallybetweentheleftandrightspeakers.
TocreateastereoeffectwhenOscillatorModeissetto
Double,settheAmp1/Driver1pagePantoL001,and
theAmp2/Driver2pagePanR127.Thiswillmake
OSC1gototheleftspeaker,andOSC2gototheright
speaker.
WithasettingofRandom,thepanwillchange
randomlyeachtimeyouplayanoteonKROME,
producinganinterestingeffect.
Pan - Use DKit Setting
UseDKitSettingapplieswhenOscillatorModeisset
toDrumsorDoubleDrums.
Ifthisischecked,theProgramcanuseadifferentpan
positionforeachdrumsound,asspecifiedbythe
DrumKit.Ifthisisunchecked,alldrumsoundswill
usetheProgram’spanposition.
ThefactorypresetsandGMdrumkitsuseindividual
panpositionsforthedifferentdrums,sonormallyit’s
besttoleavethischecked.
Amp modulation
ThebasicvolumelevelissetbytheAmpLevel
parameter.Youcanthenalterthisusingthe
modulationsourcesbelow:
Keyboard Track
Thisletsyouvarythevolumerelativetothenoteyou
play.
Fordetails,pleasesee“KeyboardTrack”onpage 39.
Amp Modulation
VelocityIntensityisusedbymostprogramsto
decreasethevolumeofsoftlyplayednotesand
increasethevolumeofstronglyplayednotes,andthe
AmpModulationparameteradjuststhedepthofthis
control.
NormallyyouwillsetAmpModulationtopositive(+)
values.Asthissettingisincreased,therewillbe
greatervolumedifferencebetweensoftlyplayedand
stronglyplayednotes.
LFO1/2
SpecifieshowtheLFO’swillproducecyclicchangesin
volume(tremoloeffect).
ThevolumewillbeaffectedbytheLFO(s)whereyou
setanLFO1Intensity,LFO2Intensityvalue.
Intensity(AMSIntensity)adjuststhedepthofhowthe
tremoloeffectproducedbytheLFOwillbeaffected
whenyouassignanAMS(LFO1AMS,LFO2AMS).
Forexample,ifyousetAMStoJS‐Y:CC#02,tremolo
willbeappliedwhenyoupushtheKROME’sjoystick
down(towardyourself),orwhenCC#02isreceived.
Volume
Time
Volume
Time
Piano Organ
Volume decays
gradually
Volume remains constant
until note is released
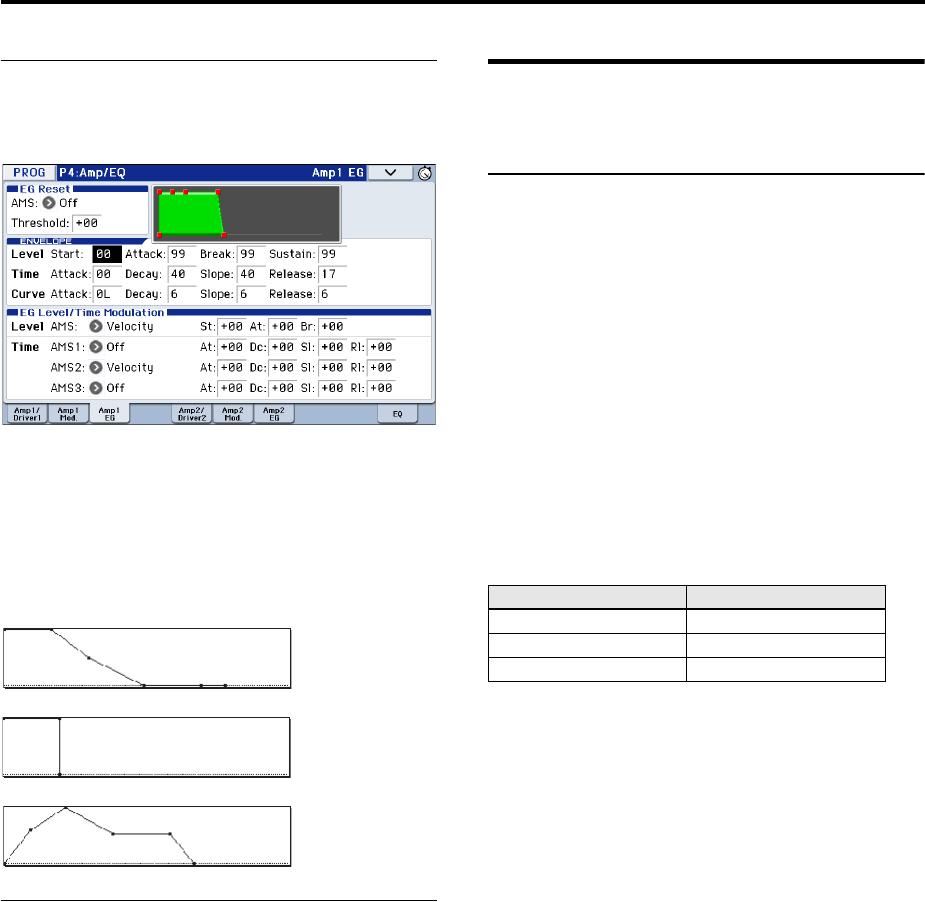
Detailed Editing with Programs Making controller assignments
41
Amp EG
TheAmpEGletsyoucontrolhowthevolumechanges
overthecourseofanote.
Everyinstrumenthasitsowncharacteristicvolume
envelope.Thisispartofwhatgiveseachinstrumentits
identifiablecharacter.
Conversely,bychangingthevolumecontour–for
instance,applyingastring‐likeAmpEGcurvetoan
organmultisample–youcanproduceinterestingand
unusualsounds.
Drive
TheDrivecircuitaddssaturationandoverdrivetothe
sound,foreverythingfromsubtlefatteningtodrastic
distortion.Unlikeanoverdriveeffect,Driveprocesses
eachvoiceindividually,sothetimbrestaysthesame
regardlessofhowmanyvoicesarebeingplayed.
Thetwomainparameters,DriveandLowBoost,work
togethertocreatetheoveralleffect.
Drivecontrolstheamountofedgeandbiteinthe
timbre.Lowsettingswillproducemildsaturation,and
highersettingscreatemoreobviousdistortion.
Often,it’susefultoincreasetheLowBoostalongwith
theDrive.
Note: evenwhentheDriveamountissetto0,the
Drivecircuitstillaffectsthetimbre.Ifyourgoalisa
completelypristinesound,usetheBypasscontrol
instead.
LowBoostisaspeciallow‐frequencyEQwhich
controlsthebodycharacterofthesound.Thespecific
EQfrequenciesaffectedwillchangewiththeDrive
setting.
Higheramountsincreasethebassboost,andwillalso
intensifytheeffectoftheDriveparameter.
Making controller
assignments
Setting the functions of SW1 and SW2
SW1andSW2arethetwobuttonsabovethejoystick.
Theseon/offbuttonscanperformanumberofdifferent
functions,suchasmodulatingsoundsoreffects,or
lockingthemodulationvaluesofthejoystick.
Also,eachonemayworkeitherasatoggle,orasa
momentaryswitch.InTogglemode,eachpress
alternatesbetweenonandoff;inMomentarymode,
theswitchonlychangesforaslongasyouholdit
down.
EachProgram,Combination,andSongstoresitsown
settingsforwhatthebuttonswilldo,andwhethereach
buttonisonoroff(basedontheircurrentstateswhen
thedataissaved).
YoucansetupPanelSwitchAssignontheControllers
Setuppage.
Note: Theon/offstatusoftheSW1andSW2buttons
willbepreservedwhenyouwritetheprogramor
combination.
Note: YoucanuseSW1/2asalternatemodulationor
effectdynamicmodulationsourcestocontrolprogram
parametersoreffectparameters.
Todoso,youwillnormallyassignSW1Mod.(CC#80)
andSW2Mod.(CC#81).
ForanexampleofassigningtheSW1buttonasan
effectdynamicmodulationsourceforaprogram,and
usingittocontrolaneffect,seepage 82.
Foracompletelistofthepossibleassignments,see
page 348oftheParameterGuide.
Note: Ifyouwanttokeepthesesettingsafterthepower
isturnedoff,youmustsavethem(seepage 116).
Piano
Organ
Strings
Mode Page
Programs Prog P1: Basic/Controllers
Combinations Combi P1: Controllers
Songs Seq P1: Controllers

Playing and editing Programs
42
Setting the functions of Realtime
Controls USER knobs 1–4
WhentheRealtimecontrolsissettoUSER,thefour
knobsontherightfunctionasRealtimeknobs1–4.
Thesecanperformanumberofdifferentfunctions,
suchasmodulatingsoundsoreffects,adjustingeffects
sendlevels,andsoon.
EachProgram,Combination,andSongstoresitsown
settingsforwhattheknobswilldo.
WhenusingtheslidersforAMSorDmod,it’s
importanttounderstandthatcreatinganassignmentis
atwo‐stepprocess.First,youassigntheknobtosenda
MIDIcontroller,suchasKnobMod.1(CC#17).Second,
youassignthatMIDIcontrollertomodulateoneor
moreProgramoreffectsparameters.
Forthefirstpartoftheabove,usethemode’s
ControllersSetuppage(See“Settingthefunctionsof
SW1andSW2,”above).
Thedefaultassignmentsforknobs1–4areKnobMod.1
(CC#17),KnobMod.2(CC#19),KnobMod.3(CC#20),
andKnobMod.4(CC#21),respectively.
Here’sanexampleofhowtosetupknob1tocontrola
Program’sfilterandampEGattacktime:
1. PresstheMODEPROGbuttontoenterProgram
mode.
2. AccesstheP1:Basic/Controllers–Controllers
Setuppage.
PressthePAGEbuttontoaccessPageSelect,and
choose“P1Basic/Controllers.”PresstheControllers
tab.
3. PresstheRealtimeControlsKnobAssign“Knob
1–B”popupbutton,andchooseF/AAttack
(CC#73).
4. PresstheCONTROLASSIGNREALTIME
CONTROLbuttontoselectUSER.(TheLED
USERwilllightup.)
5. Useknob1tocontroltheEGattackforthefilter
andamp.
Fordetails,pleaseseepage 348oftheParameter
Guide.
Note: Ifyouwishtokeepthesesettingsafterthepower
isturnedoff,youmustsavetheProgram,
Combination,orSong(seepage 116).
Arpeggiator settings
Accordingtothenotedatareceivedfromthekeyboard
orfromtheMIDIINconnector,thearpeggiatorwill
automaticallygenerateawiderangeofphrasesor
patternsincludingarpeggios,guitarorkeyboard
backingriffs,bassphrases,ordrumpatterns.Whenthe
realtimecontrolsARPisselected,youcanusethe
knobstovarythedurationanddynamicsofthe
arpeggiatednotes.
Formoreaboutthearpeggiator,pleaseseepage 85.
Drum Track settings
YoucanusetheKROME’srichvarietyofdrum
patternstoaccompanyyouwithhigh‐qualitydrum
programswhileyouperformusingaprogram.
PlayingalongwithDrumTrackpatternsisoftena
usefulwaytocomeupwithnewphrases.
FormoreabouttheDrumTrackfunction,pleasesee
page 97.
Effects
Fordetails,pleasesee“UsingEffects”onpage 77.
Automatically importing a
Program into Sequence mode
YoucanusetheAutoSongSetupfeature,which
automaticallycopiesthesettingsoftheprogramor
combinationandputstheKROMEinrecord‐standby
modewhenyousimplypresstheREC(●)button.
ThenyoucanpresstheSEQUENCERSTART/STOP
()buttontobeginrecording.
Fordetails,pleasesee“A u t o SongSetupfunction”on
page 59.
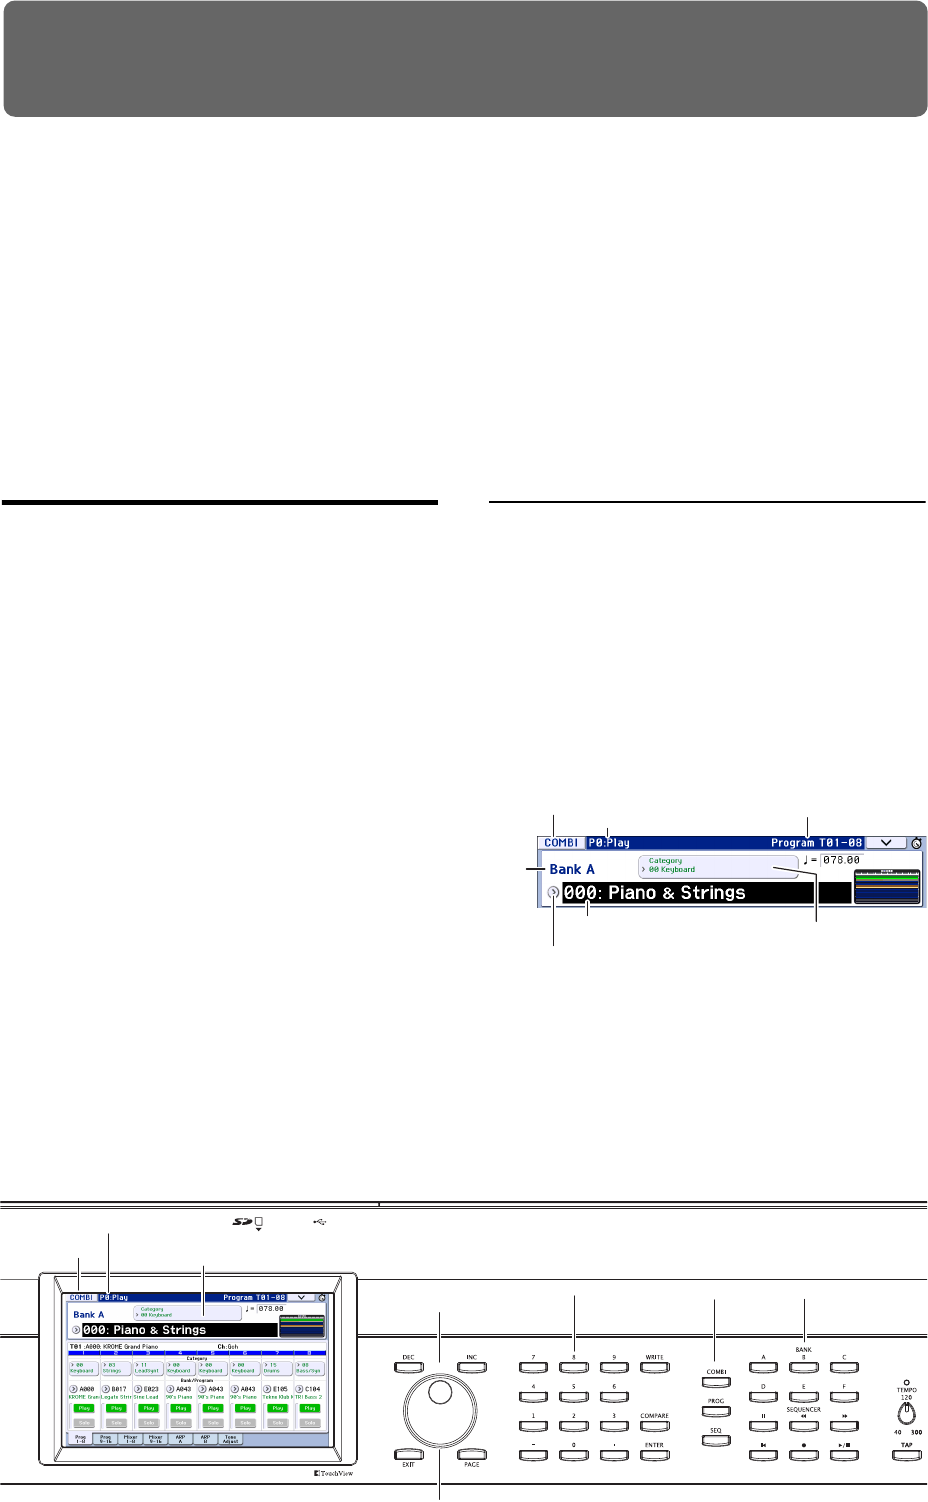
43
Playing and editing Combinations
About the KROME’s combinations
Combinationsletyousplitandlayerupto16Programs
atonce.
ACombinationismadeupof16Timbres(Notethat
youdon’thavetouseall16Timbres).EachTimbreis
assignedaProgram,alongwithparametersforkey
rangeandvelocityzones,mixersettings,MIDIchannel
andcontrollerfiltering,andsoon.
AswithPrograms,eachCombinationhasfiveinsert
effects,twomastereffects,andonetotaleffectfor
shapingandtransformingthesoundsoftheindividual
Timbres.
Thissectionofthemanualtakesaquicklookatplaying
Combinations,includingatourofthefront‐panel
controllersandbasiceditingtechniques.
Playing combinations
Selecting Combinations
Thereareseveraldifferentwaystoselect
Combinations.Eachoneisconvenientinadifferent
way:
•Using“CombinationSelect”andtheVALUE
controllers:
•UsingtheBank/CombinationSelectmenu:
•UsingtheCategory/ProgramSelectmenu:
•Find
•Usingafootswitch:page 19
•SendingMIDIprogramchangemessagestoselect
Programsremotely:
Fordetails,pleaseseebelow.
Selecting a program using
“Combination Select” and the VALUE
controllers
1. PresstheCOMBIbutton.(TheLEDwilllightup.)
(Refertotheillustrationbelowforthebuttons.)
Alternatively,youcanusethemodebutton(see
“Selectingmodes”onpage 9).
TheKROMEwillenterCombinationmode.
2. AccesstheCombiP0:Play–ProgramT01–08page.
Thisisshowninthetoplineofthedisplay.
Ifadifferentpageisshown,presstheEXITbutton
severaltimestomovetotheCombiP0:Play–Program
T01–08page.
3. Makesurethat“CombinationSelect”isselected.
Ifitisnot,press“CombinationSelect”inthedisplayto
highlightit.
4. Selectthecombinationyouwanttoplay.
Youcanusethefollowingmethodstoselectacombination.
4: INC/DEC buttons
3: Combination Select
2: COMBI P0: Play
4: VALUE dial
1: COMBI button
4: Numeric keypads
ENTER button
5: BANK SELECT
A–F buttons
1: Mode name
(button)
Mode button Mode, page number
and name
Tab name
Combination Select
(Combination number and name) Category Select popup button
(Category number and name)
Bank
number
Combination Select popup button
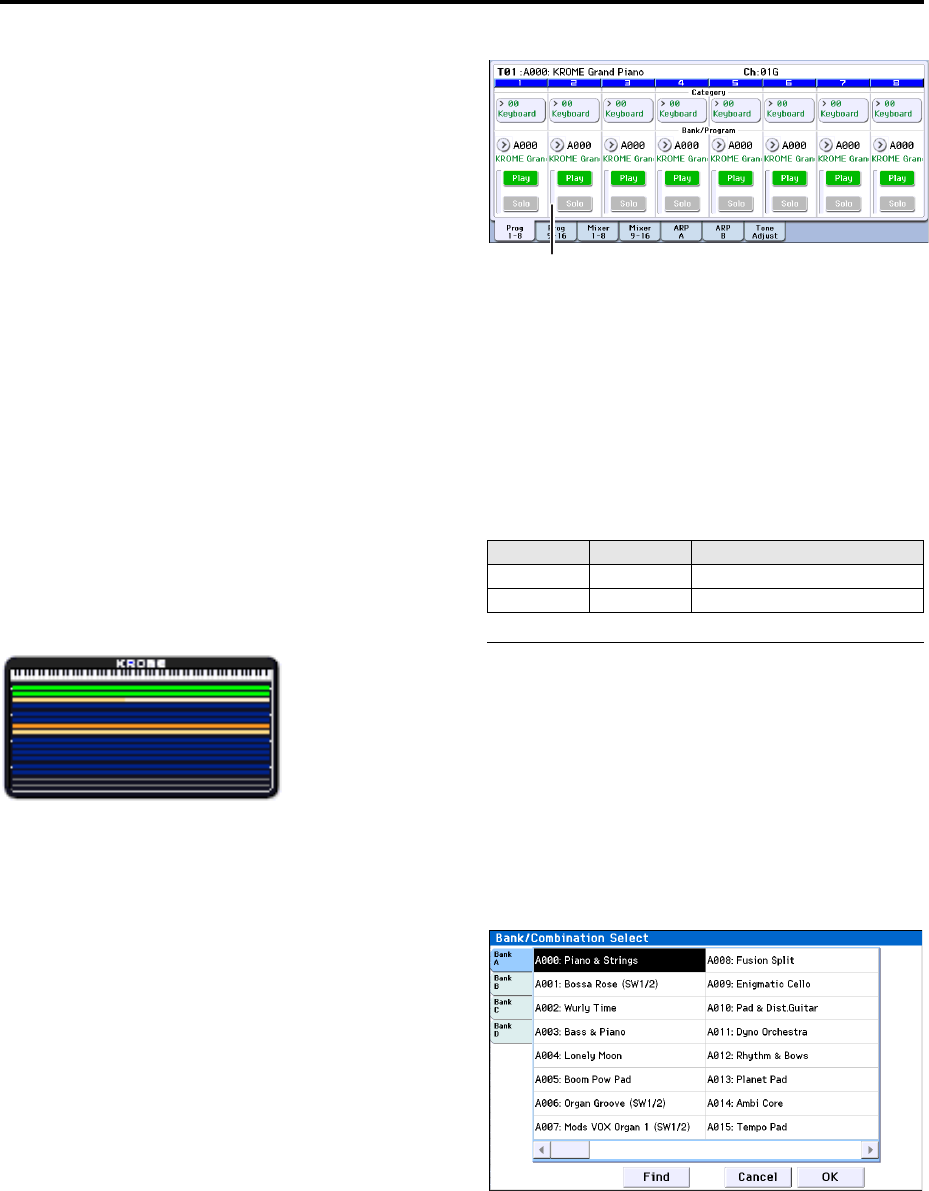
Playing and editing Combinations
44
•UsetheINCorDECbuttons.
•TurntheVALUEdial.
•Usenumerickeys0–9toenterthecombination
number,andpresstheENTERbutton.
5. PressaCOMBIBANKA–Dbuttontoswitch
banks.
WhenyouselectadifferentBank,thebutton’sLEDwill
lightup,andtheselectedbankwillappearontheleft
sideofthedisplay.
Forexample,toselectbankB,presstheCOMBIBANK
Bbutton.TheBbuttonwilllightup,andthename
BankBwillappearintheleftsideofthedisplay.
Auditioning the sound
PlaytheKROME’skeyboardtohearthecombination
you’veselected.
Keyzonepreviewallowsyoutocheckthetimbre’s
layerandsplitsettings,aswellashowthearpeggiator
isused.
•Thekeyboardareaindicatesthelast(single)note‐
onthatwasreceivedontheglobalMIDIchannel.
•Thekeyzoneareashowsthetimbresthatwill
soundatthekeyposition,differentiatedbyseveral
colorsaccordingtothesettingsofeachtimbre.
Green:TimbresthataresoundedontheglobalMIDI
channel,suchasbythekeyboard.
Yellow:Timbresthatwillsoundonlywhenthe
arpeggiatorison(seepage 90).
Orange:Timbresthatwillsoundonlywhenthedrum
trackison.
Blue:Timbreswhosetimbrechannelissetto
somethingotherthantheglobalchannel.Thesewill
notbesoundedbytheKROME’skeyboard,
arpeggiator,ordrumtrack,butwillsoundinresponse
toMIDInote‐onmessagesfromanexternaldevice.
Purple:Thesetimbresareusedtoplayanexternal
soundmodule.TheydonotsoundontheKROME.
None:Timbreswhosetimbrestatusisoff.Thesewill
notsound.
Thevelocitymetershowsthenote‐onvelocityvalue.
•Note‐onvelocitiesfromthekeyboard,MIDIIN,
arpeggiator,anddrumtrackareshownforeach
timbre/channel.(Ifmultiplenote‐oneventsoccur
simultaneously,thehighestvelocityvaluewillbe
shown.)
•Sincethisshowsthenote‐onvelocityvalues,itis
notaffectedbythesettingoftheVolumeslidernor
bychangesintheaudiosignallevel.Also,themeter
willrespondevenifkeyzonesettingsorvelocity
zonesettingsaresuchthatthenoteisnotsounded.
TimbreswhosePlay/MuteandSolosettingsallows
themtoplayareshowninadarkcolor,andtimbres
thataremutedareshowninalightcolor.
Overview: Combination Banks
Withthefactorysettings,theKROMEcontains384
preloadedcombinationsthatareGM2compatible.In
additiontothese,thereare128combinationstostore
soundsthatyoucreate,orstoreoptionalsound
libraries.
Combinationsareorganizedintofourbanksasshown
inthefollowingtable.
Combinationbankcontents
Selecting by Bank/Combination
Select menu
YoucanselectCombinationsfromalistorganizedby
Combinationbank.
•PresstheCombinationSelectpopupbuttonto
accessthemenuandmakeyourselection.
Theselectionmethodisthesameasin“Selectingby
Bank/ProgramSelectmenu”onpage 22;Refertothat
pagefordetails.
Bank/CombinationSelectmenu
Bank Combi. No. Explanation
A, B, C 000...127 Factory Combinations
D 000...127 Initialized Combinations
Velocity meter
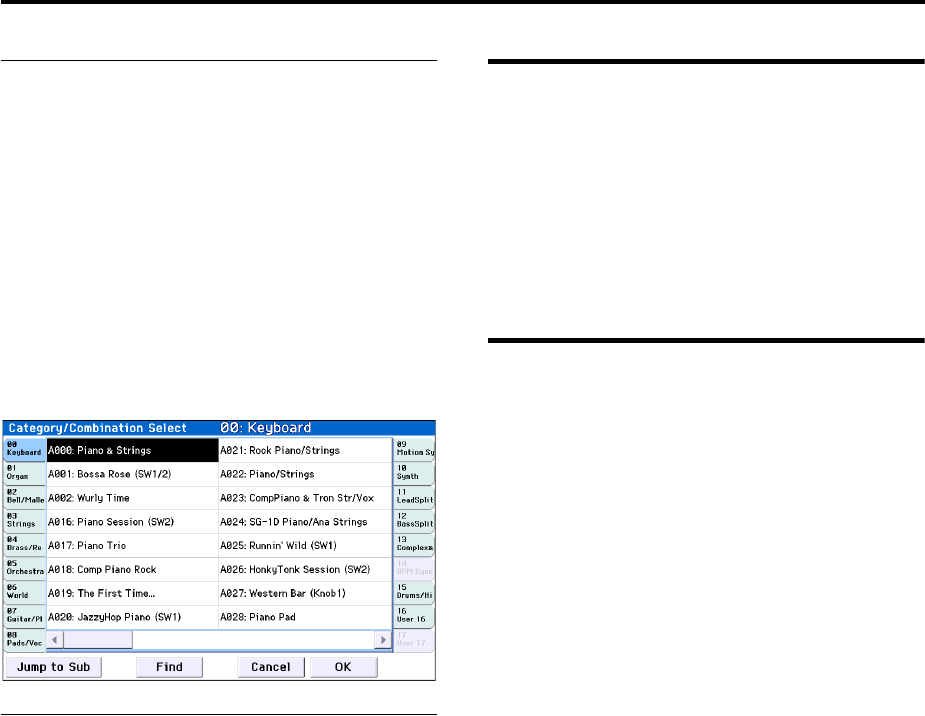
Playing combinations Using controllers to modify the sound
45
Selecting by Category/Combination
Select menu
YoucanselectCombinationsarrangedbycategory,
suchaskeyboard,organ,bass,anddrums.
Whenshippedfromthefactory,thepreloaded
Combinationsareorganizedinto16categories,each
withseveralsub‐categories.
•PresstheCategorySelectpopupbuttontoaccess
themenuandmakeyourselection.
Theselectionmethodisthesameasin“Selectingby
Category/ProgramSelectmenu”onpage 23;referto
thatpagefordetails.
Category/CombinationSelectmenu
Find
Youcansearchforacombinationbyaportionofits
name.
Theprocedureisthesameasexplainedin“Find”on
page 23.Pleaseseethatexplanationfordetails.
Using controllers to modify
the sound
TheKROMEprovidesavarietyofcontrollersthatyou
canusetovarythesound,suchasthejoystick,the
SW1,SW2buttons,andthecontrolsurfaceknobs.It
alsoprovideschordtriggerbuttons.
Fordetails,pleaseseethecorrespondingexplanation
forPrograms:“UsingControllers”onpage 24.
Performing with the
arpeggiator or drum track
Basedonnotedataitreceivesfromthekeyboardor
fromtheMIDIINconnector,thearpeggiatorcan
generateawiderangeofphrasesandpatterns
includingarpeggios,guitarorkeyboardbackingriffs,
bassphrases,ordrumpatterns.Whentherealtime
controlsARPisselected,youcanusetheknobstovary
thedurationanddynamicsofthearpeggiatednotes.
Formoreaboutthearpeggiator,pleaseseepage 85.
TheDrumTrackfunctionusesarichvarietyofdrum
patternstoplaytheKROME’shigh‐qualitydrum
programs.Youcanperformalongwiththedrum
patterns,orsynchronizeDrumTrackpatternswiththe
phrasesgeneratedbyarpeggiator.
FormoreabouttheDrumTrackfunction,pleasesee
page 97.
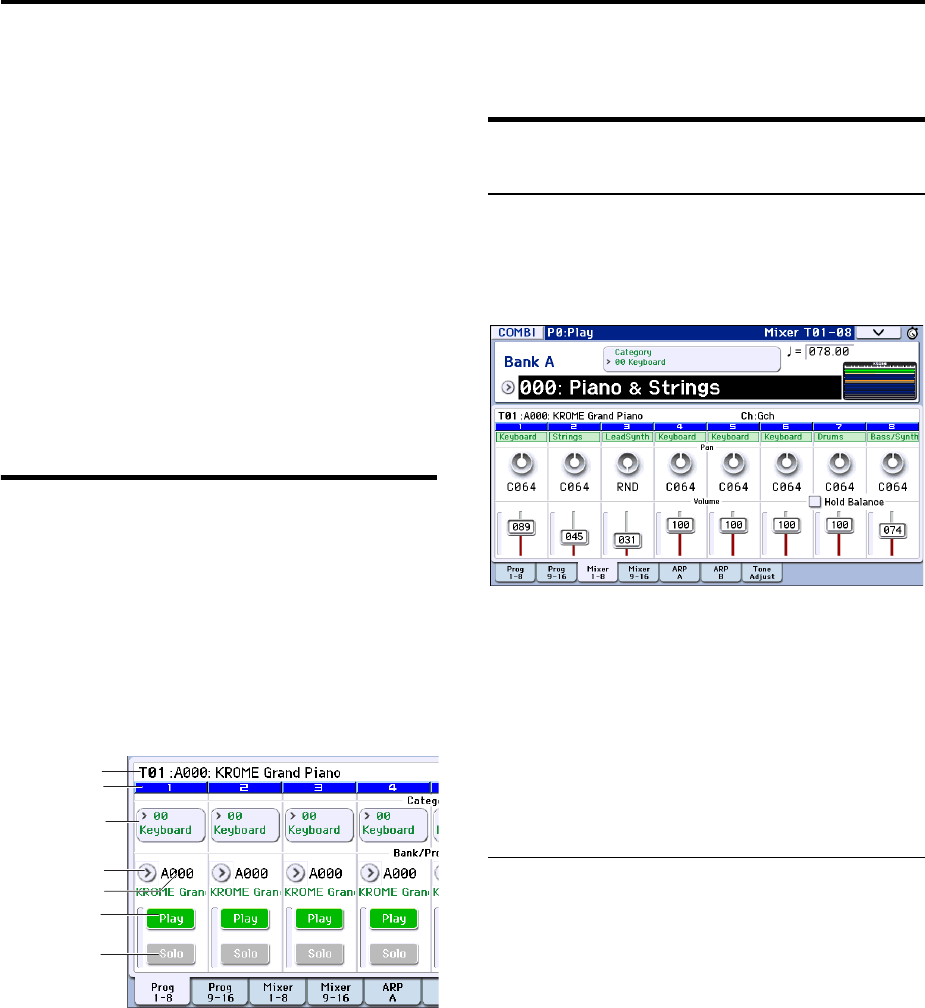
Playing and editing Combinations
46
Easy Combination editing
YoucaneditanyoftheCombinationsshippedwith
KROME.Youcancreateyourowncombinationsby
editingapreloadedcombination,orbystartingfrom
aninitializedcombination.
Acombinationhassixteentimbres;youcanassigna
programtoeachtimbreandspecifyitsvolumeand
pan,thekeyrangeinwhichtheprogramwillsound,
andhowitssoundwillberoutedtotheeffects.Youcan
createsimplesetupssuchasdetunedsounds,split,or
layers,orhighlycomplexorchestra‐likesetups.
Evenwithoutmovingtothevariouspagesfordetailed
editing,youcanmakedramaticchangesjustfrom
withintheCombiP0:Playpage.Youcanalsoedit
usingthecontrolsurface’sknobsonthefrontpanel.
Changing the program of each
timbre
ChangingtheProgramsassignedtotimbres(1–16)isa
quickwaytodramaticallyalterthesoundofthe
Combination.
1. AccesstheCombiP0:Play–ProgramT01–08/T09–
16page.
Inthispageyoucanviewtheprogramassignedtoeach
timbre1–16,andtheplay/muteandsolostatusofeach.
2. Useanyofthefollowingmethodstoselecta
Programforeachtimbre.
•ChooseProgramSelect,usenumerickeys0–9to
inputtheprogramnumber,andpresstheENTER
button.
•ChooseProgramSelectandturntheVALUEdialor
usetheINC/DECbuttons.
•IftheProgramSelectparameterisselected,the
PROGBANKA–Fbuttonswillswitchprogram
banks.(IfTimbreProgramSelectisselected,the
BANKbuttonLEDoftheprogrambankselectedfor
thattimbrewilllightup.)
•FromtheBank/ProgramSelectmenuyoucanview
andselectprogramsbybank.
•FromtheCategory/ProgramSelectmenuyoucan
viewandselectprogramsbycategory.
•YoucantransmitMIDIprogramchangesfroma
connectedexternalMIDIdevice.(Seepage 359of
theParameterGuide)
Note: ToselectthetimbreprogramviaMIDIprogram
changethetimbre’sstatusmustbesetto“INT.”
Adjusting the mix
Adjusting the volume of each timbre
1. AccesstheCombiP0:Play–MixerT01–08page.
Thispageshowsthevolume,pan,andProgram
assignmentsforall8Timbres.
2. Inthedisplay,pressthetimbre1volumeslider
andslideitupordowntoadjustthevolume.
Youcanalsohighlightthenumericalareaoftheslider
andusetheVALUEdialorthenumerickeystoadjust
thevalue.
IfyoucheckHoldBalance,movinganyoneofthe
volumesliders(volumevalues)willcausethevolume
oftheothertimbrestochangeaswell,maintainingthe
relativevolumebalancebetweentimbres1–16.Thisisa
convenientwaytoadjusttheoverallvolume.
Adjusting the panning of each timbre
1. AccesstheCombiP0:Play–MixerT01–08page.
2. Pressthetimbre1panknob,andslideitleft/right
toadjustthepanning.
Youcanalsohighlightthenumericalareaoftheknob
andusetheVALUEdialorthenumerickeystoadjust
thevalue.
Timbrepaninteractswiththepanstoredinthe
Program.AsettingofC064reproducestheProgram’s
oscillatorpansettings.AdjustingtheTimbrePanwill
movethesoundtoleftorrightwhilepreservingthe
panrelationshipbetweentheoscillators.Asettingof
L001isfarleft,andR127isfarright.
Selected
Timbre Info
Timbre No.
Category/Timbre
Program Select
Play/Mute
Solo On/O
Bank/Timbre
Program Select
Program Select
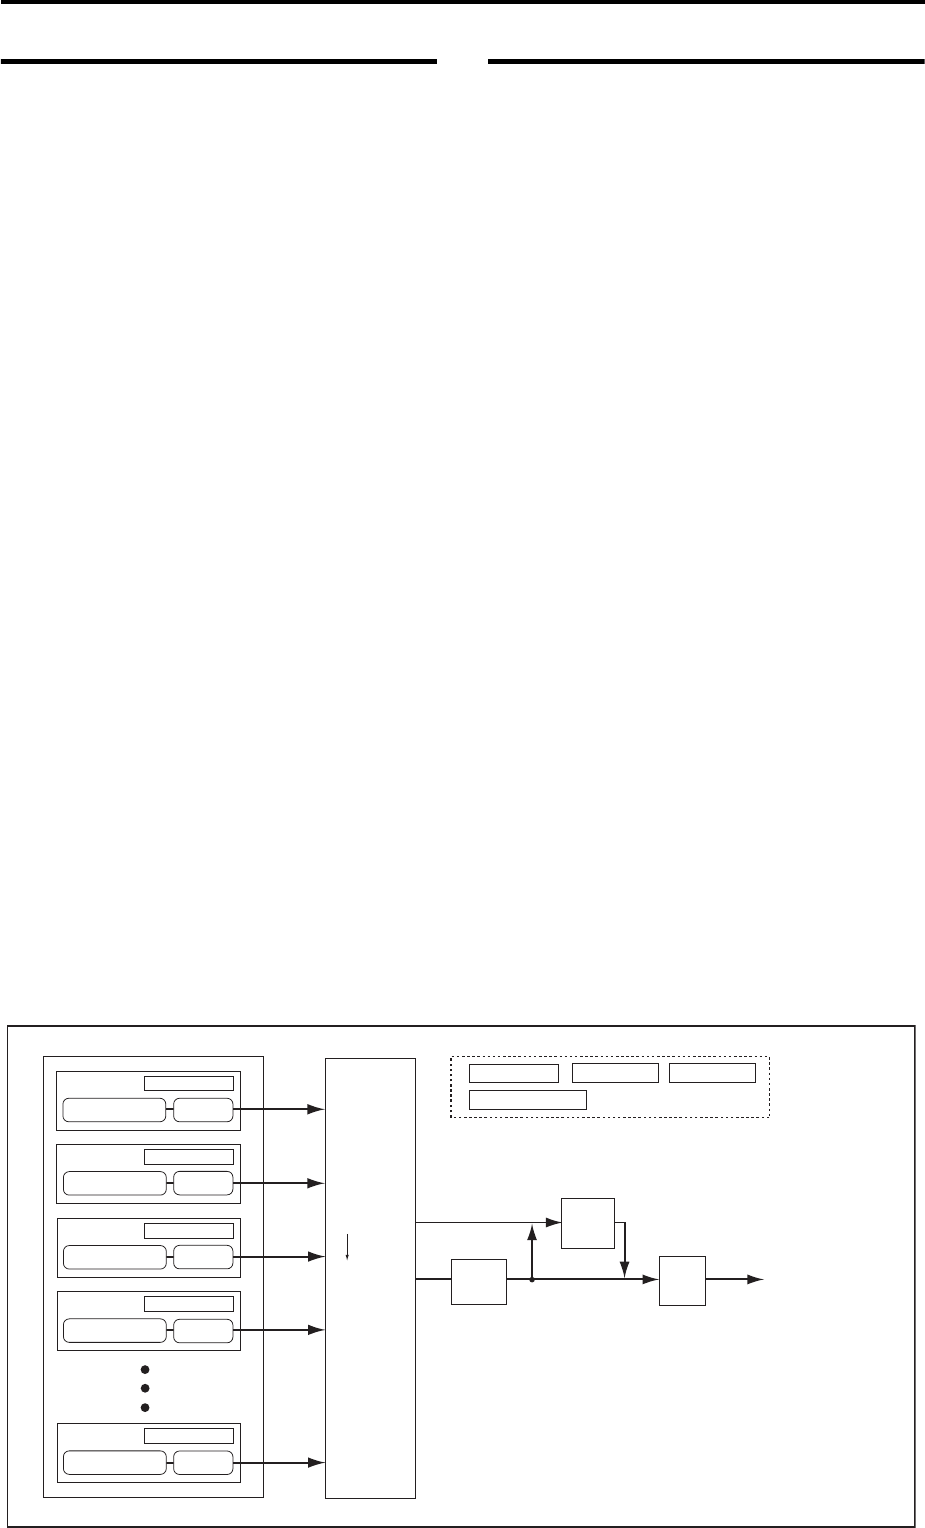
Detailed Editing with Combinations Simple editing using the knobs
47
Simple editing using the
knobs
YoucanusetheControlSurfacetoperformavarietyof
edits.
Forexample,youcanusethecontrolsurfacetoadjust
theFiltercutofforresonance.Youcanalsouseitto
varythedepthofaneffect,ortochangethewayin
whichthearpeggiatorgeneratesaphrase.
Fordetails,pleasesee“Realtimecontrolknobs”on
page 25.
Saving a Combination you’ve
edited
Afteryou’veeditedacombination,youmustsaveitif
youwanttokeepthechangesyou’vemade.Ifyoure‐
selectthecombinationorturnoffthepowerbefore
saving,youreditswillbelost.
1. PresstheWRITEbutton.
TheWriteCombinationdialogboxwillappear.Ifyou
wanttochangethewritingdestinationorthename,
maketheappropriatechanges(seepage 117).
2. PresstheWRITEbuttononceagaintosave(write)
thedata.
Fordetails,pleasesee“WritingaProgramor
Combination”onpage 115.
YoucanalsosavecombinationsonanSDcardasPCG
files.
Fordetails,pleasesee“SavingtoSDcard(Media–
Save)”onpage 118.
Detailed Editing with Combinations
Youcaneditthepreloadedcombinations(BanksA–C)
thattheKROMEisshippedwith,orstartwithan
initializedCombinationtocreateyourownoriginal
sounds.
YoucanusethefactoryProgramstocreatenew
Combinations,oruseyourowncustomPrograms.
Note: Ifyou’reintheprocessofeditingaProgramin
Programmode,andyouusethatProgramina
Combination,you’llheartheeditedversionin
Combinationmodeaswell.
About the edit pages
IntheCombiP0:Playpageyoucanselectandplay
combinations.Hereyoucanalsousethecontrol
surface’sknobsandthetone‐adjustfunctionforquick
editing,ortoeditthesettingsofthearpeggiatoror
drumtrack.Intheotherpagesyoucaneditthesound
ingreaterdetail.
Fordetailsoneachmodeandhowtoaccesseachpage,
pleasesee“Basicoperations”onpage 9.
Parameters
Parameters
Parameters
Parameters
Timbre2
Timbre3
Timbre16
Timbre4
Timbre1 Parameters
Program
Program
Program
Program
Program
AUDIO OUTPUT
L/MONO, R
Master
Eects
1, 2: P9
Total
Eects:
P9
Insert
Eects
1…5: P8
Arpeggio: P7–1, 2, 3, 4, 5
Timbre
Insert Eects
Master Eects
FX Control Bus
Routing: P8-1, 2
DrumTrack: P7–7 Tone Adjust: P0–7
3Band EQ
3Band EQ
3Band EQ
3Band EQ
3Band EQ
Controllers: P1–1
Combinationstructureandcorrespondingpages
P1–1, P2–2, etc. indicate the on-screen pages and tabs used when editing on the KROME.

Playing and editing Combinations
48
A suggested approach for
editing
First,selectaProgramforeachTimbre,ontheP0:
Play–ProgramT01–08orT09–16page.(Notethatyou
don’thavetouseall16Timbres)
Next,createanydesiredkeyboardorvelocitysplits,
layers,orcrossfadesbetweenthedifferentTimbres.
YoucandothisontheP4:Zone/Delay–Keyboard
Zonespage.
Afterthis,adjustthevolumesoftheTimbres(backon
theProgramSelect/Mixertab),andsetupanyother
Timbreparametersasdesired.
Toaddfinishingtouchestothesound,setuptheInsert,
Master,andTotalEffectasdesired(ontheP8:Routing/
IFXandP9:MFX/TFX/LFOpages,respectively.)These
effectscanbedifferentfromthoseassociatedwiththe
individualProgramsinProgrammode,ifdesired.
Inaddition,youcanmakearpeggiatoranddrumtrack
settings(ontheP7:ART/DTpage)andcontroller
settings(ontheP1:Controllerspage)tocreatethe
finishedCombination.
Soloing timbres
YoucanusetheControlSurface’sSolofunctiontohear
thesoundofeachtimbrebyitself.
Fordetails,pleasesee“SoloOn/Off”onpage 72ofthe
ParameterGuide.
Restoring edited settings
Using COMPARE
Whenyou’reintheprocessofeditingasound,
pressingtheCOMPAREbuttonwillrecallthesaved
versionofthesound,asitwasbeforeyoustarted
editing.
Fordetails,pleasesee“Comparefunction”onpage 11.
Layers, Splits, and Velocity
Switches
WithinaCombination,youcanusenoterangeand
velocityleveltodefinethe“zone”inwhichaspecific
timbrewillplay.
TheProgramsassignedtoeachTimbrecanbeplayed
inthreeways:aspartofalayer,asplit,oravelocity
switch.ACombinationcanbesettouseanyoneof
thesemethodsortousetwoormoreofthesemethods
simultaneously.
Layer
LayerscausetwoormoreProgramstoplay
simultaneouslywhenanoteisplayed.
Split
SplitscausedifferentProgramstorespondondifferent
areasofthekeyboard.
Velocity Switch
VelocitySwitchescausedifferentProgramstorespond
dependingonthevelocity(howhardyouplaythe
notes).
OntheKROME,youcanuseadifferentProgramfor
eachofuptosixteenTimbres,andcombinetwoor
moreoftheabovemethodstocreateevenmore
complexsetups.
Asanadditionalpossibility,youcansettheslopefora
keyzoneorvelocityzonesothatthevolume
diminishesgradually.Thisletsyouchangeasplitintoa
keyboardcrossfade,oravelocityswitchintoavelocity
crossfade.
Program B
Program A
Layer:
Two or more programs sound
simultaneously.
Program B
Program A
Split:
Dierent programs will sound in
dierent areas of the keyboard.
Program A
Program B Keyboard playing
dynamics
Strong
Soft
Velocity Switch:
Keyboard playing dynamics
(velocity) switches between
dierent programs.
Program C
Program D
Program B
Program A
Keyboard playing
dynamics
Strong
Soft
Example:
B and C/D are split. In the lower
keyboard range, A and B are
layered. In the higher keyboard
range, C and D are switched by
velocity and layered with A.
Program A Program B Keyboard X-Fade (keyboard
crossfade):
As you play from low notes to
high notes, the volume of A
will fade out, and the volume
of B will fade in.
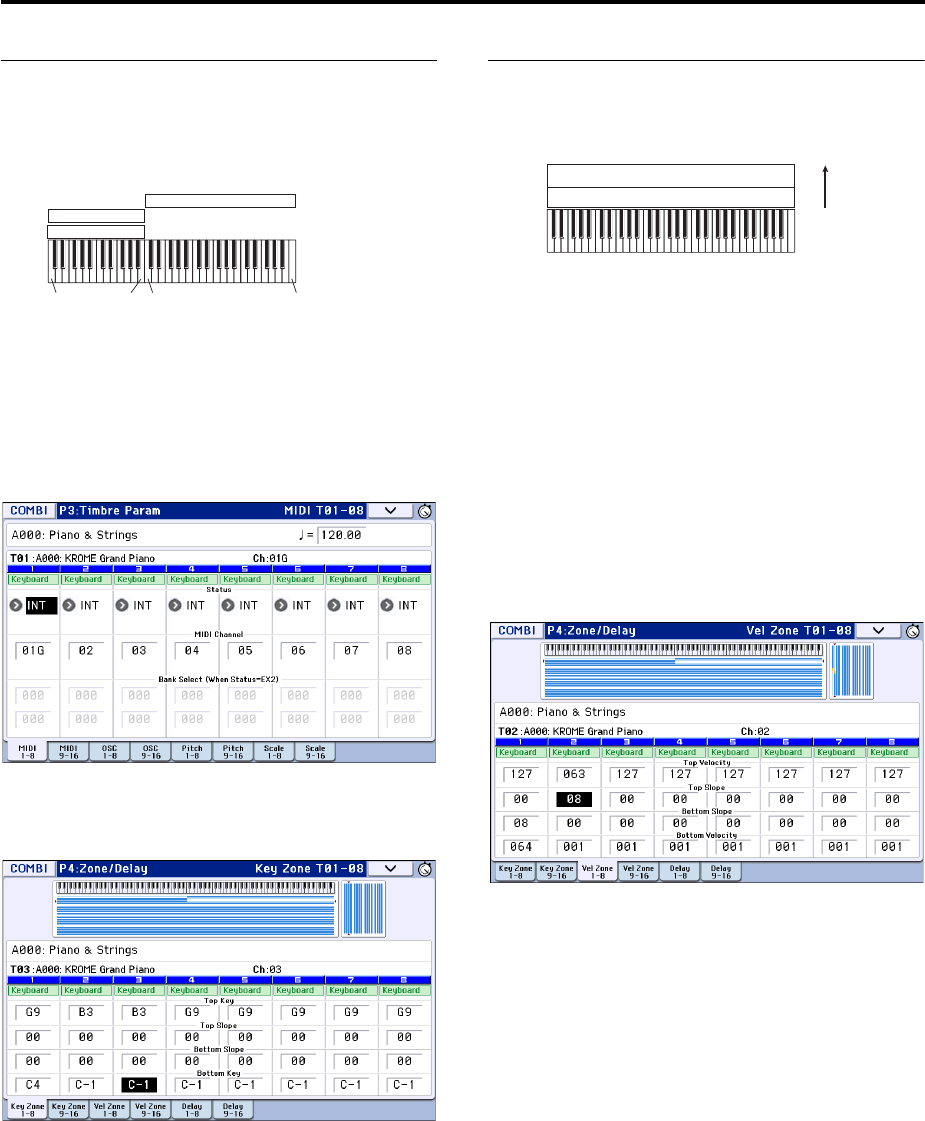
Detailed Editing with Combinations Layers, Splits, and Velocity Switches
49
Creating Key Splits and Layers
Splits and Layers
Let’screateaCombinationthatcombinesbothsplits
andlayers,likethediagrambelow:
1. AccesstheCombiP0:Play–ProgramT01–08page.
2. SelectapianosoundforTimbre1,abrasssound
forTimbre2,andastringssoundforTimbre3.
3. AccesstheP3:TimbreParameters–MIDIT01–08
page.
4. ForTimbres1–3,setStatustoINTandMIDI
ChanneltoGch(theGlobalChannel).
5. AccesstheP4:Zone/Delay–KeyZT01–08page.
6. SetTimbre1’sTopKeytoG9,anditsBottomKey
toC4.
Youcanalsoenteranotevaluebyselectingthe
parameterandthenplayingthedesirednoteonthe
keyboardwhileholdingdowntheENTERbutton.
7. SetTimbres2and3toaTopKeyofB3,anda
BottomKeyofC–1.
Key Zone Slope
Inadditionto“hard”splits,wherethesoundchanges
abruptly,youcanusetheSlopeparametersto
graduallyfadeasoundinoroutoverarangeofkeys.
Intheexampleabove,youcouldsettheBottomKeyof
timbre1toG3,andsettheTopKeyoftimbre2toG4,
sothatthesetwotimbresoverlap.
Next,ifyousettheBottomSlopeoftimbre1to12,and
settheTopSlopeoftimbre2to12,thesoundwill
changegraduallyinsteadofchangingsuddenly.
Creating Velocity Switches
Next,let’screateasimplevelocityswitched
Combination,likethediagrambelow:
1. AccesstheCombiP0:Play–ProgramT01–08page.
2. SelectabrasssoundforTimbre1,andastrings
soundforTimbre2.
3. AccesstheP3:TimbreParameters–MIDIT01–08
page.
4. ForTimbres1and2,setStatustoINTandMIDI
ChanneltoGch(theGlobalChannel).
5. AccesstheP4:Zone/Delay–VelZT01–08page.
6. SetTimbre1’sTopVelocityto127,anditsBottom
Velocityto64.
Youcanalsoenteravelocityvaluebyselectingthe
parameterandthenplayinganotewiththedesired
velocityonthekeyboardwhileholdingdownthe
ENTERbutton.
7. SetTimbre2toaTopVelocityof63,andaBottom
Velocityof1.
Velocity Zone Slope
SimilartoKeyZoneSlopes,asdescribedabove,these
letyoufadeinandfadeoutsoundsgraduallyovera
velocityrange,insteadofasimplehardswitch.
Inthecaseoftheexampleabove,youcouldsetthe
velocityzonesofthetwoTimbressothattheypartially
overlap.Then,settheTopSlopeandBottomSlopeso
thatthesoundchangesgradually,insteadofchanging
suddenlybetweenvelocityvaluesof63and64.
C–1 C4 G9B3
PianoTimbre 1
Brass
Timbre 2
Strings
Timbre 3
127
64
63
1
Strings
Velocity
switch
Timbre 1
Timbre 2
Brass
Playing and editing Combinations
50
MIDI settings
Timbre Parameters MIDI page
Status
ThiscontrolsthestatusofMIDIandtheinternaltone
generatorforeachTimbre.Normally,ifyou’replaying
aninternalProgram,thisshouldbesettoINT.
IfthestatusissettoOff,EXT,orEX2,thatTimbre’s
internalsoundswillnotbeplayed.Offsimplydisables
theTimbreentirely.TheEXTandEX2settingsallow
theTimbretocontrolanexternalMIDIdevice.
Fordetails,pleasesee“Status”onpage 81ofthe
ParameterGuide.
Bank Select (when status=EX2)
WhentheStatusissettoEX2,theseparametersallow
youtotransmitMIDIBankSelectmessagestoexternal
MIDIdevices.
MIDI Channel
TimbresthatyouwishtoplayfromtheKROME’s
keyboardmustbesettotheglobalMIDIchannel.Your
playingonthekeyboardistransmittedontheglobal
MIDIchannel,andwilltriggeranytimbrethatmatches
thischannel.NormallyyouwillsetthistoGch.When
thisissettoGch,theMIDIchannelofthetimbrewill
alwaysmatchtheglobalMIDIchannel,evenifyou
changetheglobalMIDIchannel.
OnsomepreloadedCombinations,Timbresused
bythearpeggiatormayhavetheirMIDIChannels
settosomethingotherthanGch.Thesewillbe
timbresthatplayonlywhenthearpeggiatorison,
whichisaveryusefultechniqueforcreating
“A p r e g g iatorbased”Combinations.
Fordetails,pleasesee“Arpeggiatorsettingsin
CombinationandSequencermodes”onpage 89.
Inparticular,notetherelationshipsbetween
arpeggiatorA/BassignmentsandMIDIChannel.
MIDI filter settings
ForeachMIDIFilteritem,youcanspecifywhetheror
notthecorrespondingMIDImessagewillbe
transmittedandreceived.Thecheckeditemswillbe
transmittedandreceived.
TheMIDIfiltersdon’tturnthefunctionsthemselveson
oroff.Instead,thefilterjustcontrolswhetherornot
thatMIDImessagewillbetransmittedandreceived.
Forexample,ifportamentoison,portamentowillbe
appliedtotheinternalKROMEsoundevenifEnable
PortamentoSWisunchecked.
Asanotherexample,let’ssaythatyou’veselecteda
bassProgramforTimbre1,andapianoProgramfor
Timbre2,withthegoalofcreatingabass/pianosplit.
Youcouldchoosethefollowingsettingssothat
pressingthedamperpedalaffectsonlyTimbre2’s
pianosound:
1. AccesstheP5–1:MIDIFilter<1>T01–08page.
2. Un‐checktheEnableDamperboxforTimbre1.
3. ChecktheEnableDamperboxforTimbre2.

Detailed Editing with Combinations Altering Programs to fit within a Combination
51
Altering Programs to fit
within a Combination
YoucanmakevariouschangestoProgramswithinthe
contextofaparticularCombinationtomakethemfit
betterwithotherPrograms,ortocreateparticular
soniceffects.Thesechangesdonotaffecttheoriginal
Programs,orhowthoseProgramssoundinother
Combinations(seepage 81oftheParameterGuide).
Timbre Parameters: OSC
Force OSC Mode
Ifyouwishtoforceapolyphonicprogramtosound
monophonically,setthiseithertoMN(Mono)orLGT
(Legato).Conversely,setthistoPolyifyouwishto
forceamonophonicprogramtoplaypolyphonically.
NormallythisshouldbesettoPRG,sothatthesound
willplayassetbytheoriginalProgram.
Fordetails,pleasesee“ForceOSCMode”onpage 82of
theParameterGuide.
OSC Select
IfthetimbreisusingaProgramwheretheOscillator
ModeisDoubleorDoubleDrums,andyouwantonly
OSC1orOSC2(notboth)tosound,setthistoOSC1
(onlyOSC1willsound)orOSC2(onlyOSC2will
sound).
Normally,thisshouldbesettoBTH(Both).
Portamento
IftheProgramusesportamento,butyou’dliketo
disablethisforthecurrentCombination,setthis
parametertoOff.
Conversely,ifyouwanttoforcetheportamentotobe
on,orjusttochangetheportamentotime,setthistoa
valueof001–127.Theportamentowillchangetouse
thenewlyspecifiedtime.
Normally,thisshouldbesettoPRG.
Timbre Parameters: Pitch
Transpose, Detune (BPM Adjust)
Theseparametersadjustthepitchofthetimbre.
•Inalayer‐typecombination,youcansettwoor
moretimbrestothesameprogram,andcreatea
richersoundbyusingTransposetoshifttheirpitch
apartbyanoctaveorbyusingDetunetocreatea
slightdifferenceinpitchbetweenthetwo.
•Insplit‐typecombinations,youcanuseTranspose
toshiftthepitch(insemitoneunits)ofthe
programsspecifiedforeachkeyzone.
Note: Ifyouwishtochangetheplaybackpitchofa
drumprogram,useDetune.Ifyouchangethe
Transposesetting,therelationshipbetweenthenotes
anddrumsoundswillchange.
Use Program’s Scale, Scale
Thisspecifiesthescaleforeachtimbre.
IfyoucheckUseProgram’sScale,thescalespecified
bytheprogramwillbeused.Timbreswherethis
parameterisnotcheckedwillusetheScalesetting.
Playing and editing Combinations
52
Delay
YoucansetsomeTimbressothattheydon’tsound
immediatelyatnote‐on.Thiscancreatecooleffects,
andmoredramaticlayers.
YoucanspecifythedelayforeachTimbreeitherin
milliseconds(ms),orinrhythmicvalueswhichsyncto
thesystemtempo.
IfyousettheDelaytoKeyOff,theTimbrewillsound
whenthenoteisreleased.
Editing Programs with Tone Adjust
UsingToneAdjust,youcancreatedetailededitsto
ProgramswithinthecontextoftheCombination.
TheseeditswillnotaffecttheoriginalProgram,orany
otherCombinationswhichusetheProgram.Toedita
ProgramwithToneAdjust:
SelectatimbreintheTimbrefieldoftheP0:Play–Tone
Adjustpage.Thenselecttheparameterthatyouwant
toadjust,andusetheVALUEcontrollerstoeditthe
sound.
Arpeggiator settings
Accordingtothenotedatareceivedfromthekeyboard
orfromtheMIDIINconnector,thearpeggiatorwill
automaticallygenerateawiderangeofphrasesor
patternsincludingarpeggios,guitarorkeyboard
backingriffs,bassphrases,ordrumpatterns.Ifthe
SELECTbuttonissettoARP,youcanusetheknobsto
varythedurationanddynamicsofthearpeggiated
notes.
Formoreaboutthearpeggiator,pleaseseepage 85.
Drum Track settings
Whileyouperformusingacombination,youcanuse
theKROME’srichvarietyofdrumpatternstoplay
high‐qualitydrumprograms.
PlayingalongwithDrumTrackpatternsisoftena
usefulwaytocomeupwithnewphrases.
FormoreabouttheDrumTrackfunction,pleasesee
page 97.
Effects
Fordetails,pleasesee“UsingEffects”onpage 77.
Automatically importing a
Combination
into Sequencer mode
TheAutoSongSetupfeatureautomaticallyappliesthe
settingsofthecurrentCombinationtoasong.
Fordetails,pleasesee“A u t o SongSetupfunction”on
page 59.

53
Creating songs (Sequencer mode)
Overview
About the KROME’s Sequencer
ThesequencerbringstogethertheKROME’snumerous
functionssuchasitsarpeggiator,RPPR,high‐
performanceeffects,andcontrollers,allowingyouto
takeadvantageoftheseinawiderangeofsituations.
Thissequencerisa16‐trackMIDIsequencerthatcan
storeupto128songsand210,000MIDIevents.Youcan
useittorecordandplaybacknotesfortheinternal
soundgeneratoraswellasforexternalMIDIsound
modules.
Whenyouturnoffthepower,thesettingscreated
inSequencermode,thesongdata,anyuser
patterndata,andCueListthatyourecordedwill
notbebackedup.Ifyouwishtokeepthisdata,
youmustsaveitonanSDcardbeforeturningoff
thepower,orperformaMIDIdatadumptosave
thedataonanexternaldatafileretc.
Ifyouwishtowritetheprograms,track
parameters,effects,andarpeggiatorsettingsetc.
selectedforasongasatemplatesong,usethe
menucommandSaveTemplateSong.
Immediatelyafterthepoweristurnedon,KROME
willnotcontainanysongdata,soifyouwishto
playasongonthesequencer,youmustfirstload
datafromSDcard,orreceiveaMIDIdatadump
fromaMIDIfiler.Fordetails,pleaseseepage 118,
andpage 219oftheParameterGuide.
Sequencer mode structure
Sequencermodeisstructuredasfollows.
Songs
Asongconsistsoftracks1–16,amastertrack,song
parameterssuchasthesongname,arpeggiator,Drum
Trackfunction,effectandRPPRparameters,and100
userpatterns.
Amaximumof128suchsongscanbecreatedon
KROME.
Tracks1–16consistofsetupparameters(suchaseach
track’sprogram,pan,andvolume)locatedatthestart
ofthesong,andthemusicaldataitself.Themaster
trackconsistsoftempoandtimesignaturedata(see
“Setupparameters&Musicaldata”onpage 106ofthe
ParameterGuide).
Song recording and editing
Songrecordingisperformedontracks.
Youcanrecordtracksineitheroftwoways;realtime
recordingorsteprecording.Forrealtimerecording
youcanchooseoneofsixrecordingmodes.
YoucanedittracksbyusingEventEditoperationsto
modifytherecordeddataorinsertnewdata,andby
usingTrackEditfunctionssuchasCreateControlData,
whichgeneratesandinsertspitchbend,aftertouch,or
controlchangedata.
Patterns
Therearetwotypesofpatterns:presetpatternsand
userpatterns.
Presetpatterns:Patternssuitablefordrumtracksare
presetininternalmemory,andcanbeselectedforany
song.
Userpatterns:Eachsongcanhaveupto100patterns.
Whenusingapatterninadifferentsong,usethe
UtilitymenucommandsCopyPatternorCopyFrom
Songetc.tocopythepattern.Thepatternlengthcanbe
specifiedinunitsofameasure.
Eachpatternconsistsofmusicaldataforonetrack.Itis
notpossibletocreatepatternsthatcontainmultiple
tracks.
Youcanusethesepatternsbyplacingtheminatrack
(PuttoTrackmenucommand)orbycopyingthem
(CopytoTrackmenucommand).Youcanalsouse
patternswiththeRPPRfunctionofasong(see
page 71).
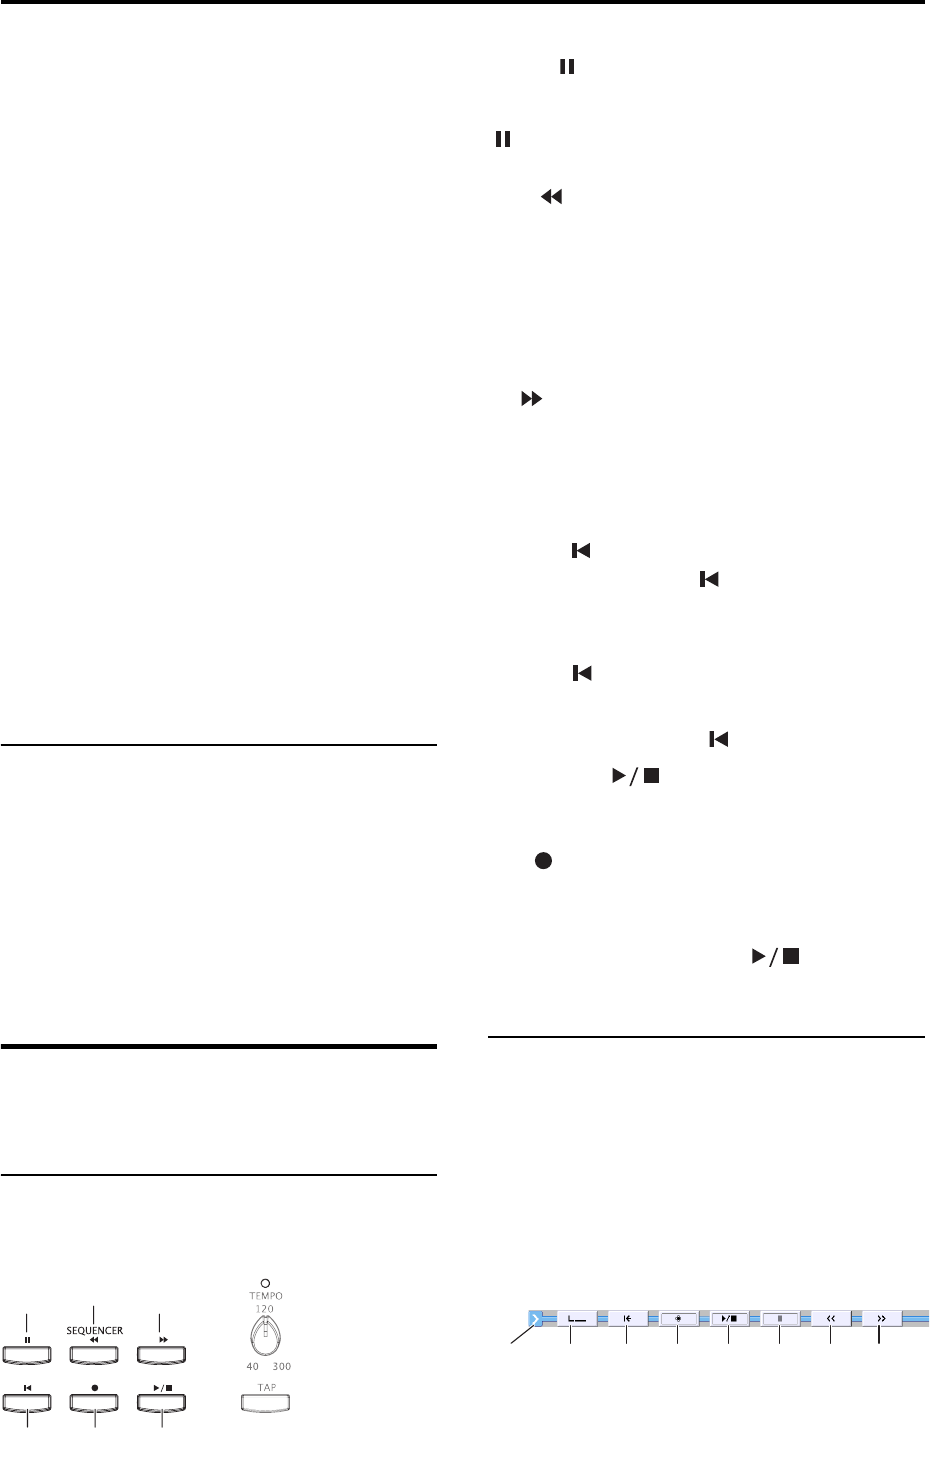
Creating songs (Sequencer mode)
54
Recording and editing a pattern
Youcanrecordapatternineitheroftwoways:realtime
recordingorsteprecording.However,unlikerealtime‐
recordingtoatrack,youcanselectonlyonerecording
type(looprecording)whenrealtime‐recordingtoa
pattern.
Youcaneditthepatterntocorrectmistakesinthe
recordeddata,oruseeventeditingtoinsertnewdata.
YoucanusetheGetFromTrackmenucommandto
obtainadesiredregionofperformancedatafroma
trackanduseitaspatterndata.Conversely,youcan
usethePuttoTrackorCopytoTrackmenu
commandstoplaceorcopyapattern’sperformance
dataintoatrack.
How Sequencer patterns are related to Drum
Track patterns
ThepatternsoftheDrumTrackfunctionyouusewith
aProgramorCombinationarerelatedtoSequencer
modepatternsasfollows.
Presetpatternsareacommonlibrarythatcanalsobe
usedbytheDrumTrackfunction.
UserpatternscannotbedirectlyusedbytheDrum
Trackfunction,buttheycanbeconvertedtouserDrum
TrackpatternsandusedwithaProgramor
Combination.Ifyouconvertauserpattern,itwillbe
storedininternalmemory,andthisdatawillnot
disappearevenwhenyouturnoffthepower.
Cue List
Thecuelistallowsyoutoplaybackmultiplesongsin
succession.TheKROMEletsyoucreatetwentycue
lists.Eachcuelistletsyouconnectupto99songsand
specifythenumberoftimesthateachsongwillrepeat.
ThemenucommandConverttoSongletsyouconvert
thesongsinacuelistintoasinglesong.
Forexampleyoucanuseacuelisttocreatethe
backing,convertthecuelisttoasong,andthenadd
solophrasesonunusedtracks.
Transport control
Thesecontrolsletyouplayback,record,fast‐forward,
orrewindthesequencer.
Front panel buttons
YoucanusethefrontpanelSEQUENCERbuttonsto
controlrecordingandplaybackonthesequencer.
PAUSE ( ) button
Thisbuttonpausestheplaybackofthesong.When
paused,thebutton’sLEDwilllightup.PressPAUSE
()onceagaintoresumeplayback,andtheLEDwill
turnoff.
REW ( ) button
WhentheSongisplayingorpaused,thisbuttonwill
rewindthesong.Whenyoupressandholdthisbutton,
itsLEDwilllightup,andtheplaybackwillrewind.
(Rewindisdisabledduringrecording,andwhilethe
Songisstopped.)
Note: YoucanusetheFF/REWSpeedmenucommand
tospecifythefast‐forwardandrewindspeed.
FF ( ) button
WhentheSongisplayingorpaused,thisbuttonwill
fast‐forwardthesong.Whenyoupressandholdthis
button,thebuttonwilllightup,andtheplaybackwill
fast‐forward.(Fast‐forwardisdisabledduring
recording,andwhiletheSongisstopped.)
LOCATE ( ) button
BypressingtheLOCATE()buttonyoucanmoveto
aspecifiedlocatepoint.Bydefault,you’llmoveto
001:01.000.
Tochangethelocatepointthat’sassignedtothe
LOCATE()button,usethemenucommandSet
Location.Alternatively,youcansetthelocatepoint
duringplaybackbyholdingdowntheENTERbutton
andpressingtheLOCATE()button.
START/STOP ( ) button
Thisstartsorstopsrecordingandplaybackin
Sequencermode.
REC ( ) button
Pressingthisbuttonwillenterrecord‐readymode.
Onceyou’reinrecord‐readymode(shownbythe
button’slitLED),youcanbeginrecordingbypressing
theSEQUENCERSTART/STOP()button.For
details,pleasesee“RecordingMIDIinrealtime”on
page 60.
Buttons in the display (the transport
bar)
Thetransportbuttonsinthebottomlineofthedisplay
canalsobeusedtocontrolsequencerrecordingand
playbackinthesamewayasthefrontpanel
SEQUENCERbuttons.
Thetransportbuttonswillappearwhenyoupressthe
“<”buttononthelowerrightsideofthedisplayand
dragittowardtheleft.Toclosethem,pressthe“>”
buttonanddragittowardtheright.
RECLOCATE START/
STOP
PAUSE REW FF
RECLOCATESET
LOCATE
<, >
popup
START/
STOP
PAUSE REW FF
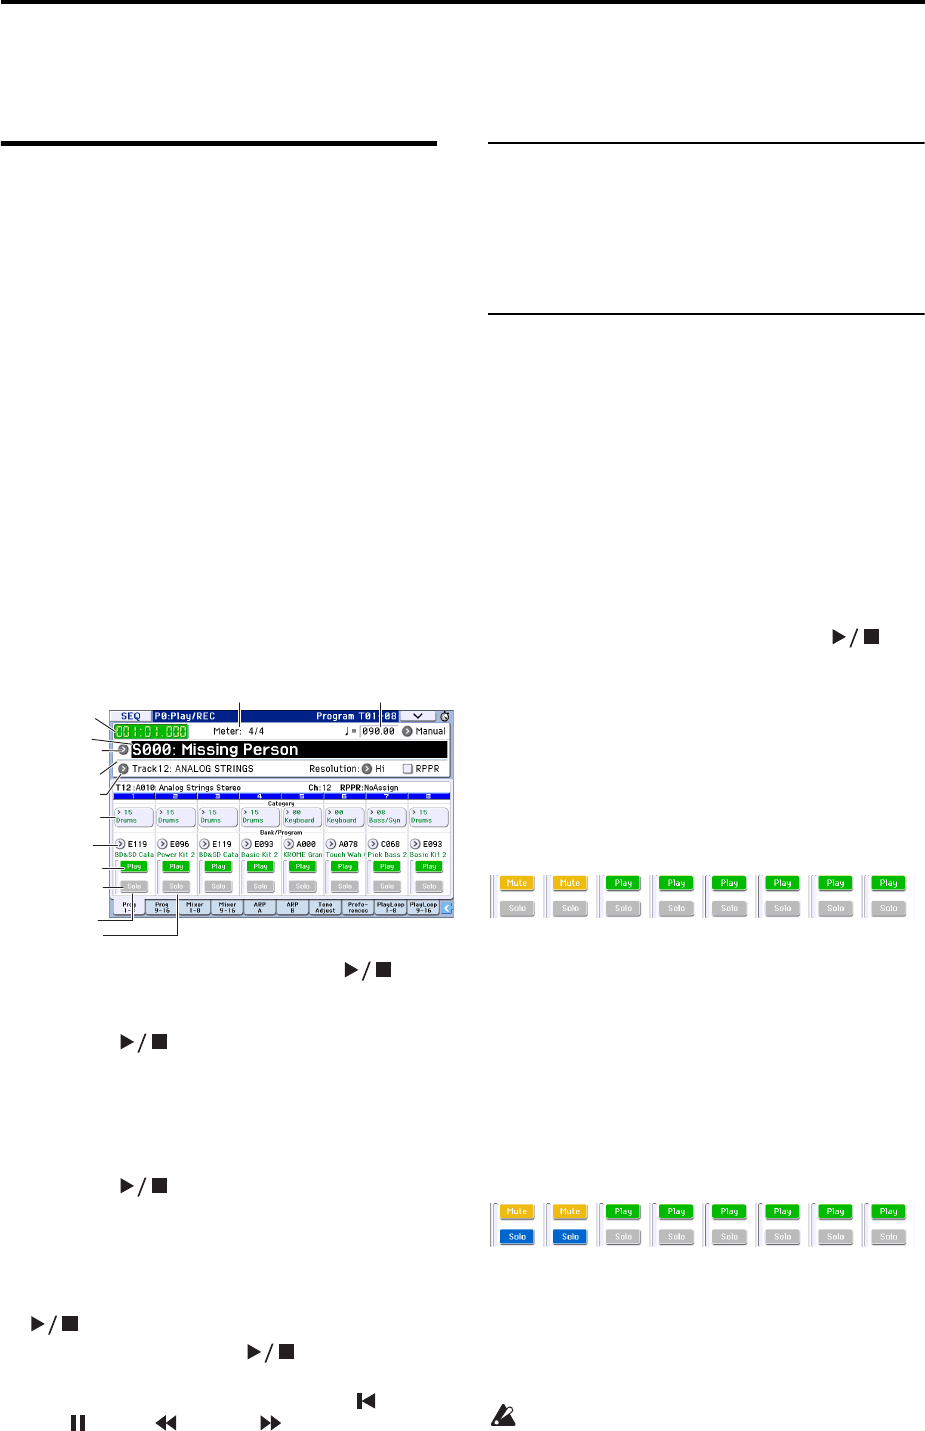
Playing Songs Playback
55
Playing Songs
Playback
Inordertoplaybacksongdatainthesequencer,you
mustfirstrecord,loadordumpsongdataintothe
KROME.
Let’sstartbyloadingandplayingthedemosongdata.
Fordetails,pleasesee“Listeningtothedemosongs”
onpage 21oftheQuickStartGuide.
1. PresstheSEQbuttonorMODEbuttontoenter
Sequencermode.
TheP0:Play/REC–ProgramT01–08orT09–16page
willappear.Ifthisisnotdisplayed,presstheEXIT
buttonaboutthreetimes.
2. Use“SongSelect”toselectthesongyouwantto
playback.
YoucanpresstheSongSelectpopupbuttonand
choosefromalist.Ifyouselectanemptylist,anew
songwillbecreated.
YoucanalsoselectasongbyusingtheINC/DEC
buttonorVALUEdial.Howeverifthereisnosong,
youcan’tmakeaselectionusingtheVALUE
controllers.
3. PresstheSEQUENCERSTART/STOP()
button.
Alternatively,pulloutthetransportbarandpressthe
START/STOP()button.Thetransportcontrol
functionalityintheprocedurebelowisdescribedas
buttonoperations,butyoucanalsoperformthesame
operationsusingtheon‐screentransportbuttons.
Thesongyouselectedinstep2willbeginplaying.
Note: Thesongwillbeginplayingifyoupressthe
START/STOP()buttoninapageotherthanP10:
Pattern/RPPR.Ifyoupressthisbuttonwhileyou’rein
P10:Pattern/RPPR,thecurrently‐selectedpatternwill
beginplaying.(InP11:CueList,thesongsofthecue
listwillbeplayed.)
4. Duringplayback,youcanpresstheSTART/STOP
()buttontostopplayback.
IfyoupresstheSTART/STOP()buttononce
again,playbackwillresumefromwhereyoustopped.
FordetailsonthefunctionsoftheLOCATE(),
PAUSE(),REW(),andFF()buttons,please
seepage 54.
YoucanusetheFF/REWSpeedmenucommandto
specifythefast‐forwardandrewindspeed.
Changing the volume, mute, and solo
settings of each track
IntheSEQP0:Play/REC–ProgT01–08,T09–16,Mixer
T01–08,andT09–16pagesyoucanchangethevolume,
mute,andsolosettingsofeachtrack.
Muting a specific track/Monitoring a
specific track (Mute/Solo functions)
TheKROMEprovidesaMutefunctionthatletsyou
silencespecifiedtracks1–16,andaSolofunctionthat
letsyouhearthespecifiedtrackorchannelbyitself.
Thesefunctionscanbeusedinvariousways.For
exampleyoucanintentionallymuteorsolospecific
tracks,orlistenonlytotherhythmsectionofthe
previously‐recordedtrackswhileyourecordnew
tracks.Let’stryouttheMuteandSolofunctions.
1. Use“SongSelect”toselectthesongthatyouwant
toplayback.
2. PresstheSEQUENCERSTART/STOP()
button.
3. Presstrack1Play/Rec/Mute.
ThedisplaywillchangefromPlaytoMute,andthe
playbackoftrack1willnolongerbeheard.Inthisway,
the“mute”functionallowsyoutosilenceaspecified
trackuntilthetrackisun‐muted.
Presstrack2Play/Rec/Mute.Thedisplaywillchange,
andtheplaybackoftrack2willalsobemuted.To
cancelmuting,pressPlay/Rec/Muteonceagain.
4. Presstrack1“SoloOn/Off.”
“Solo”willbehighlighted,andthistime,onlythe
performanceoftrack1willbeheard.Toplaybackonly
aspecifiedtrackbyitselfinthiswayisknownas
“soloing”thetrack(turningSoloon).
IfbothMuteandSoloareused,theSolofunctionwill
begivenpriority.
Presstrack2“SoloOn/Off.”
Thedisplaywillchange,andyouwillhearthe
playbackoftracks1and2.Youwon’thearthesoundof
tracks3–16.
5. ToswitchSolooff,pressSoloOn/Offonceagain.
PressSoloOn/Offforbothtracks1and2.
Thedisplaywillchange,andtheplaybackoftracks1
and2willbemuted.IftheSolofunctionisturnedoff
foralltracks,playbackwillbeaccordingtothePlay/
Rec/Mutesettings.
TheSOLOsettingisnotstoredwhenyousavethe
song.
Popup
Location
Song Position Bar
Track Select
Song Select
Meter Tempo
Program Select,
& Popup
Category
Track 2
Solo
Play/Mute/Rec
Track 1
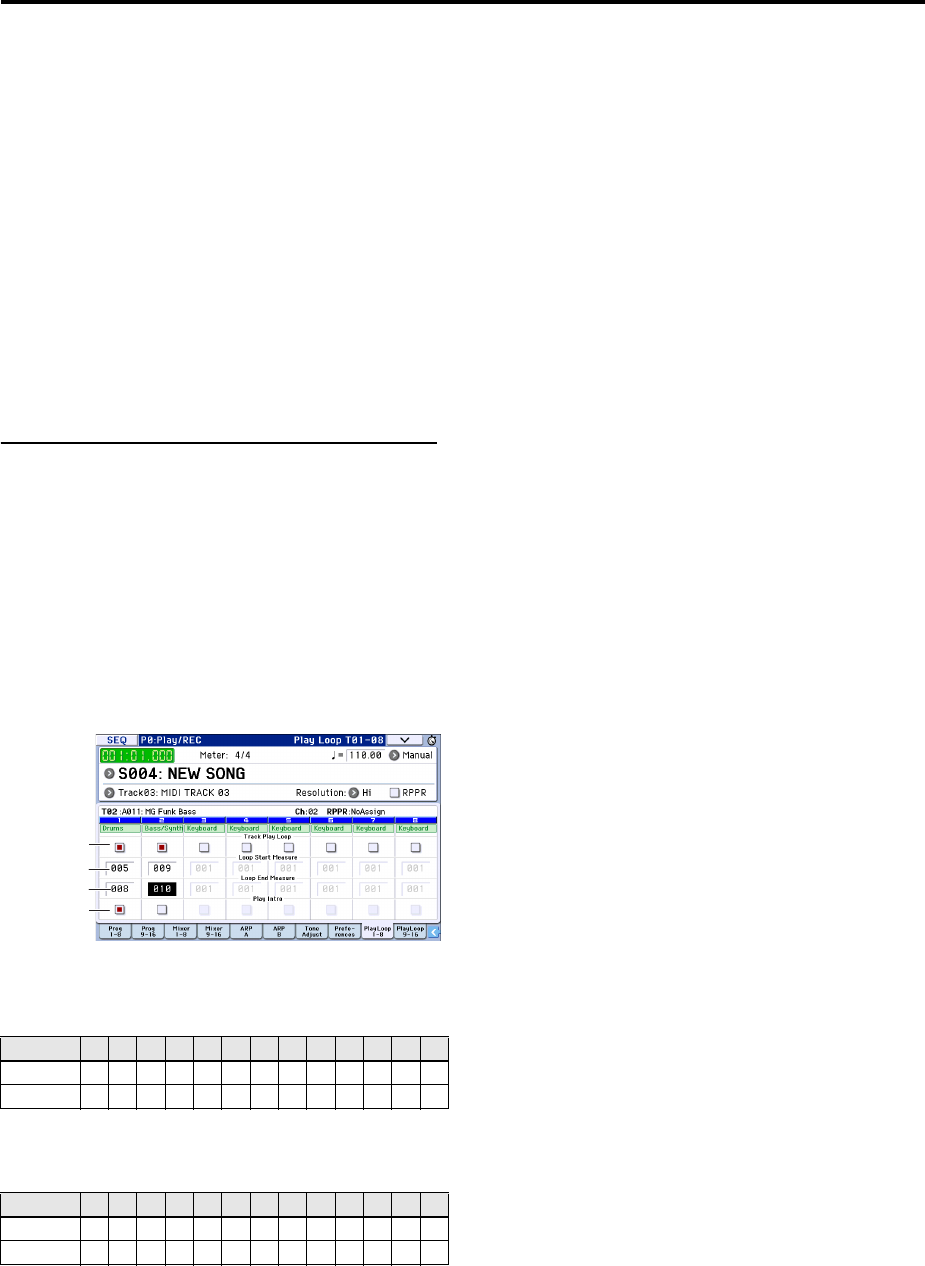
Creating songs (Sequencer mode)
56
Exclusive Solo
ExclusiveSoloisafunctionthatlimitstheSolo
function(describedabove)toasingletrackatatime.If
ExclusiveSoloison,onlythetrackforwhichSolowas
lastturnedonwillbeplayed;othertrackswillalways
besilent.
UsetheExclusiveSolomenucommandtospecifyhow
theSolofunctionwillfunction.
ExclusiveSolooff:Youwillbeabletosolomorethan
onetrackatatime.Thestatusofatrackwillchange
eachtimeyoupressitsSoloOn/Offbutton.
ExclusiveSoloon:WhenyoupressaSoloOn/Off
button,onlythattrackwillbesoloed.
Tip:YoucanturnExclusiveSoloon/offbyholding
downtheENTERbuttonandpressingnumerickey1.
Loop playback
Whenrecordingorplayingbackasong,youcanloop
individualtracksthatareplaying.
IntheP0–1:PlayLoopT01–08orT09–16page,check
TrackPlayLoopforthetracksyouwanttoloop,and
useLoopStartMeasureandLoopEndMeasureto
specifythestartingandendingmeasureoftheregion
thatwillplaybackasaloop.
IfyoucheckPlayIntro,themeasuresprecedingthe
loopwillbeplayedbackasanintroductionbeforethe
loopbegins.
Ifyouplaybackfromthefirstmeasurewiththe
settingsshowninthescreenshotabove,thespecified
regionofmeasureswillrepeatasfollows.
IfPlayIntroisunchecked,thespecifiedregionof
measureswillrepeatasfollows.
Measures 12345678910 11 12 13
Track 1 1234567856785
Track 2 9109109109109109109
Measures 12345678910 11 12 13
Track 1 5678567856785
Track 2 9109109109109109109
Loop Start
Measure
Play Intro
Track Play Loop
Loop End
Measure
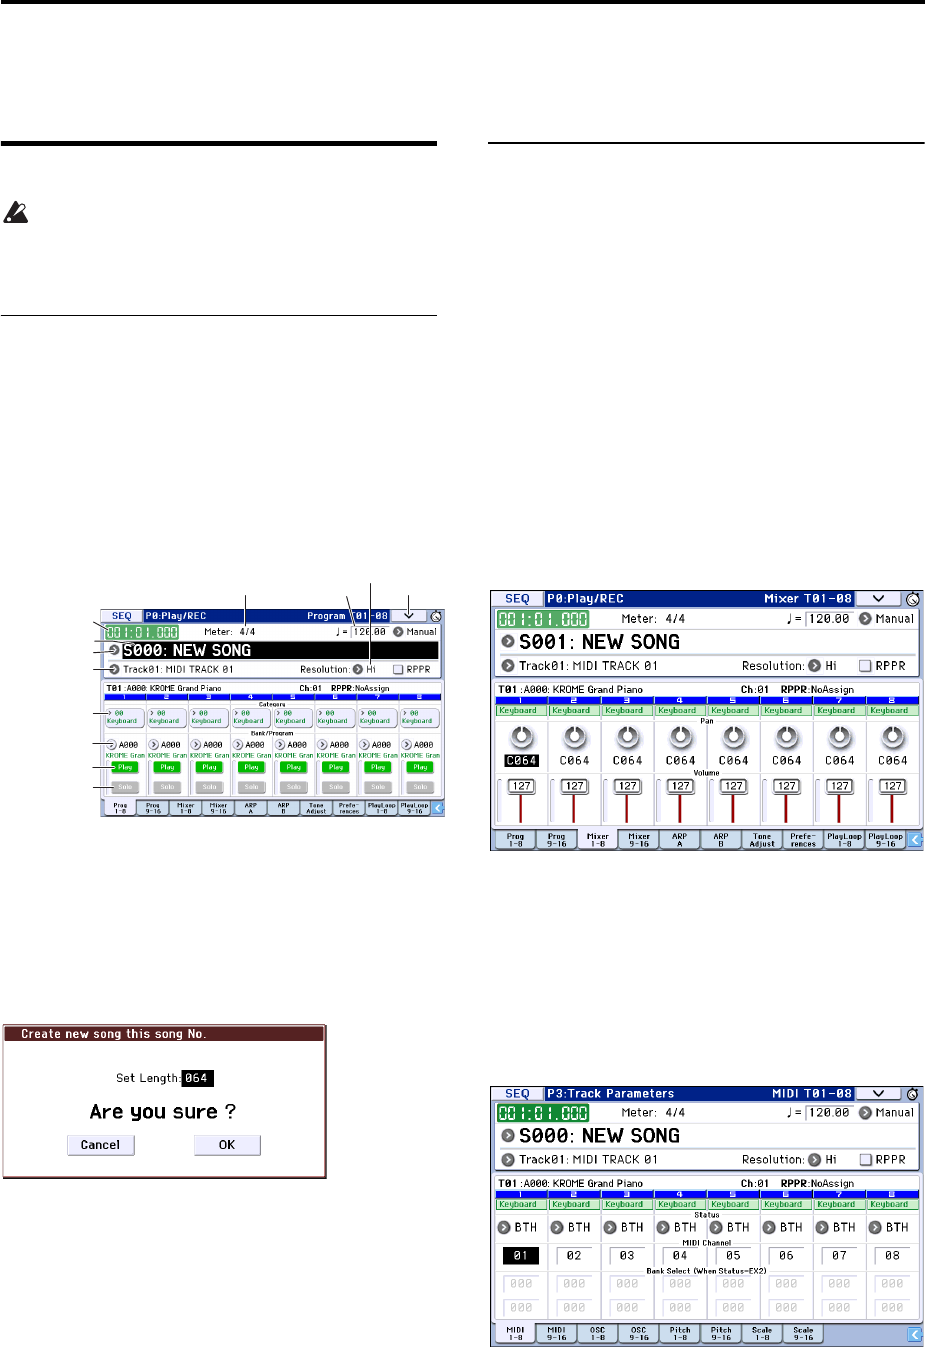
Recording Preparations for recording
57
Recording
Preparations for recording
Beforeyoubeginrecording,makesurethatthe
memoryprotectsettinginGlobalmodeisturned
off.Fordetails,pleasesee“Protectingthe
memory”onpage 110.
Creating a Song
Beforewecanbeginthisexample,weneedtoselectan
emptysongwherewecanrecord.
1. PresstheSEQbuttonorMODEbuttontoenter
Sequencermode.
2. Choose“SongSelect”(e.g.,intheP0:Play/REC–
ProgramT01–08page).
YoucanpresstheSongSelectpopupbutton,and
choosefromalist.
3. Usethenumerickeystoinputthenumberofthe
newsongthatyouwanttocreate,andpressthe
ENTERbutton.(Forexample,pressthe1switch
andthentheENTERbutton.)Adialogboxwill
appear.
IfyoupressedtheSongSelectpopuptoaccessthe
SongNo.dialogbox,pressthedesiredsongnumberto
openthedialogbox.
4. Use“SetLength”toinputthedesirednumberof
measuresandpresstheOKbutton.
Youcanchangethenumberofmeasureslaterif
desired.Fordetails,pleasesee“SetSongLength”on
page 176oftheParameterGuide.
5. PresstheOKbuttontocreatethesong.
Tip:YoucanusetheENTERbuttoninsteadoftheOK
button.
Track settings
Sincewe’regoingtorecordanewsonginthisexample,
wewillstartbyexplaininghowtoassignaprogramto
eachtrack,andadjustbasicsettingssuchasvolume.
1. Assignaprogramtoeachtrack.
Use“ProgramSelect”toassignaprogramtoeach
track.Themethodisthesameaswhenassigninga
programtoatimbreinacombination(seepage 46).
YoucancopyvarioussettingsfromProgramsor
Combinations.(Seepages166,167oftheParameter
Guide.)
2. Whenassigningaprogram,youcanuseTrack
Selecttochoosethetracktowhichyouwishto
assignaprogram,andauditionthesound.
3. Setthepanandvolumeofeachtrack.
PresstheMixer1–8tab(ortheMixer9–16tab)toaccess
theMixerT01–08page(MixerT09–16page).
•Pansetsthepanpositionofeachtrack,andVol um e
setsthevolumelevelofeachtrack.
4. SpecifythetonegeneratorandMIDIchannelthat
willbeplayedbyeachtrack.
PressthePAGEbuttontoaccessSEQPageSelect,and
press“P3TrackParameters”TheP3:TrackParameters
pagewillappear.PresstheMIDI1–8tab(ortheMIDI
9–16tab)toaccesstheMIDIT01–08page(MIDIT09–16
page).
•UseStatustospecifywhethereachtrackwillplay
theinternaland/orexternalsoundgenerator.
NormallywhenusingtheKROME,youwillselectINT
orBTH.
INT:Duringplayback,theKROME’sinternaltone
generatorwillplaytheMIDIdatarecordedonthat
track.WhenyouusetheKROME’skeyboardor
Popup
Track Select
Location
Song Select
Meter
REC Resolution
Tempo
Tempo
Mode
Program Select,
& Popup
Category
Solo
Play/Mute/Rec
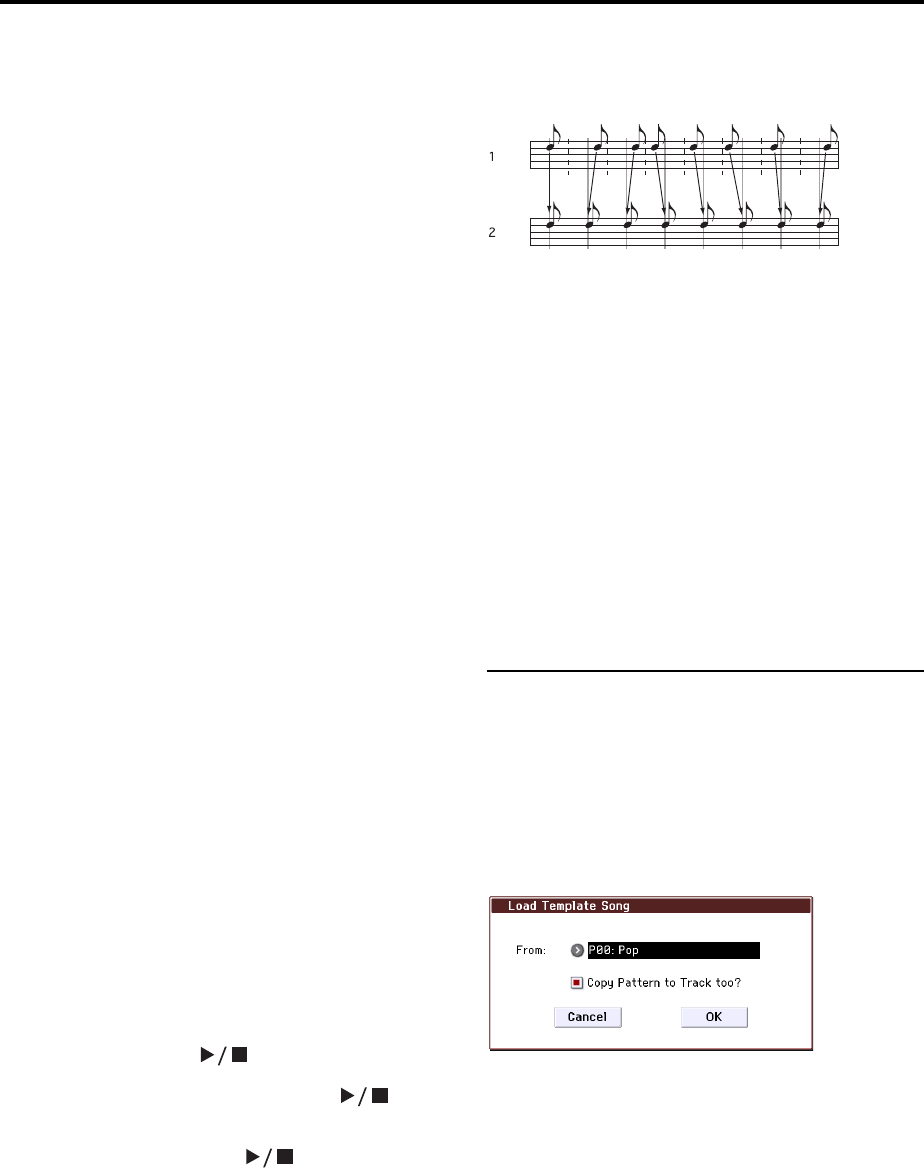
Creating songs (Sequencer mode)
58
controllers,youwillbeplayingandcontrollingthe
trackselectedbyTrackSelect.
EXT,EX2,BTH:Duringplayback,theMIDIdata
recordedonthattrackwillbetransmittedfromMIDI
OUTtoplayanexternalsoundmodule.Whenyouuse
theKROME’skeyboardorcontrollers,MIDIdatawill
betransmittedtoplayandcontroltheexternalsound
moduleselectedbyTrackSelect.(TheMIDIchannelof
theexternaltonegeneratormustbesettomatchthe
MIDIChannelofKROMEtracksthataresettoEXT,
EX2orBTH.)
IfStatusissettoBTH,boththeexternaltonegenerator
andinternaltonegeneratorwillbeplayedand
controlled.
•UseMIDIChanneltospecifytheMIDIchannelfor
eachtrack.
NormallyyouwillsettheMIDIChanneltoa
differentchannel:1–16foreachtrack.Tracksthat
aresettothesameMIDIchannelwillsound
simultaneouslywhenyourecordorplayback
eitherofthetracks.
5. Adjusttheeffectsettings.
AdjustsettingsforeacheffectinP8:Routing/IFXand
P9:MFX/TFX/LFO.
Fordetails,pleasesee“UsingeffectsinCombinations
andSongs”onpage 81.
6. Setthetempoandtimesignature.
•Tosetthetempo,youcanturntheTEMPOknobor
presstheTAPbuttonatthedesiredinterval.
Alternatively,youcanselect(Tempo)intheP0:
Play/REC–ProgramT01–08page(orsimilarpage),
andusetheVALUEcontrollerstosetthetempo.Set
TempoModetoManual.
•Nextyouwillsetthetimesignature.Inthis
example,we’llexplainhowtosetthetimesignature
usingthe“Meter”field.Normally,youspecifythe
timesignaturebeforerecordingthefirsttrack,and
thenbeginrecording.
a) PresstheSEQUENCERREC(●)button,andset“Meter”
to**/**.
b) Press**/**tohighlightit,andusetheVALU Econtrollers
tosetthetimesignature.
c) PresstheSTART/STOP()buttontobegin
recording.Whenthepre‐counthasendedandLocate
reaches001:01:000,presstheSTART/STOP()
buttontostoprecording.Thetimesignatureyou
specifiedhasnowbeenrecordedontheMastertrack.
IfyoupresstheSTART/STOP()buttonduringthe
pre‐count,thetimesignaturewon’tberecorded.
7. Setthe“RECResolution”ifnecessary.
Whenyourecordinrealtimeonatrack,thisparameter
specifieshowthetimingoftherecordedMIDIdata
willbecorrected.Thetimingwillalsobecorrected
whenyourecordautomationdatainrealtmeonan
audiotrack.(Datathatwasalreadyrecordedwillnot
becorrected.)
Forexample,let’ssupposethatyourecordedsome
eighthnotesinrealtime,butyourtimingwasnotquite
perfect,asshowninpart1oftheillustrationbelow.If
RECResolutionweresettowhenyourecorded,the
timingwouldautomaticallybecorrectedasshownin
part2oftheillustration.IfRECResolutionissettoHi,
thenoteswillberecordedwiththetimingatwhich
youplaythem.
8. Makeothersettingsasnecessary.
Youcanadjustthesettingsforthearpeggiator(P7:
ARP/DT),MIDIfiltering(P5:MIDIFilter),etc.(See
page 89)
YoumayalsowishtouseToneAdjusttotweakthe
sound.Whenyouarefinishedmakingthesesettings,
thebasicsetupiscomplete.
Saving your song parameter settings
Thesongparametersettingsyoucreateherecanbe
savedasatemplate.Ifyouusethesesettings
frequently,youcansimplyloadoneofthetemplates
you’vesaved.
Fordetails,pleasesee“SaveTemplateSong(Saveas
UserTemplateSong)”onpage 164oftheParameter
Guide.
Using template songs
Loadingatemplatesongisaneasywaytocreate
settingsappropriateforaparticularmusicalstyle.You
canalsoassignadrumpatterntoatrackatthesame
time.
1. IntheP0:Play/RECpage,pressthemenubutton
andchoose“LoadTemplateSong.”
Adialogboxwillappear.
2. Inthe“From”field,choosethetemplatesongyou
wanttoload.
3. Ifyoucheck“CopyPatterntoTracktoo?”,adialog
boxforcopyingapatternwillautomatically
appearafteryouexecutethe“LoadTemplate
Song”operation.
Ifyouexecutethecommandwithoutcheckingthis,
onlythetemplatesongyouselectedinstep2willbe
loaded.
4. PresstheOKbuttontoloadthetemplatesong,or
presstheCancelbuttonifyoudecidetocancel.
Whenyouperformthisoperation,songsettingsother
thantrackLoopandRPPRwillbecopied.
IfyouexecutedthisoperationwithCopyPatternto
Tracktoo?checkedinstep3,theCopyPatternTo
Trackdialogboxwillappear.
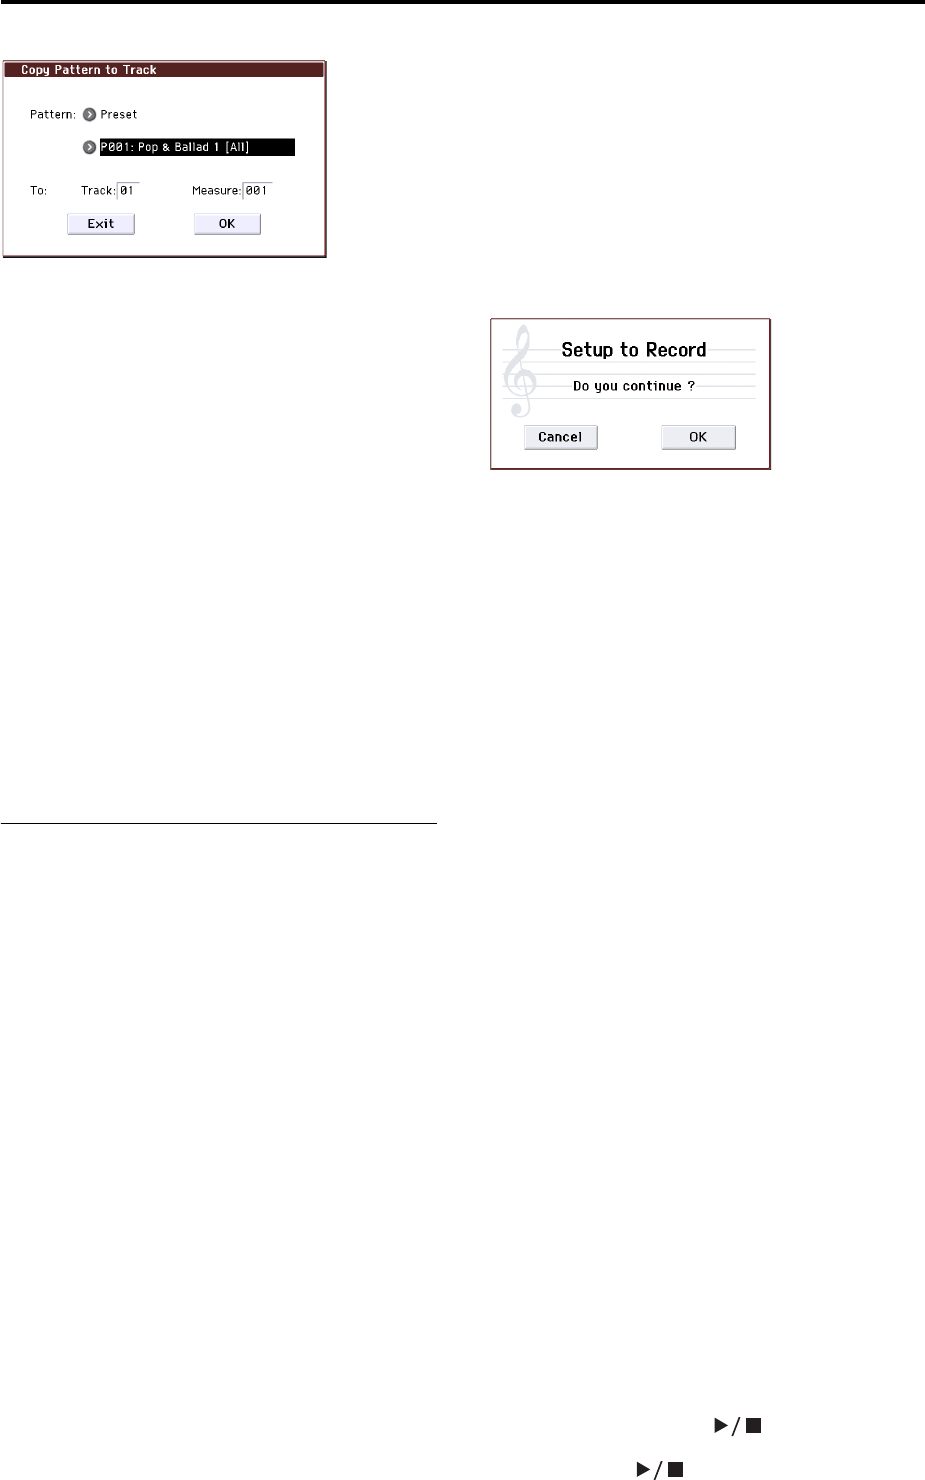
Recording Preparations for recording
59
Thisdialogboxisthesameastheonethatappearsfor
theCopyToTrack(P10:Pattern/RPPR–PatternEdit)
menucommand.
5. Inthe“Pattern”field,selectthepatternthatyou
wanttocopy.
IntheToTrackfield,selectthecopy‐destinationtrack.
IntheMeasurefield,specifythestartingmeasureof
thecopy‐destination.
Followingthepatternnameforeachofthe605preset
patterns,themusicalstyleandthenameofthemost
suitableDrumscategoryprogramarepartially
displayed.
Byloadingadrumstrackandthecorrespondingpreset
pattern,youcaninstantlysetupadrumtrack
appropriateforeachpresettemplatesong.
6. Toexecutethisoperation,presstheOKbutton.
Whenyouexecutethisprocedure,theMeasurefield
willcountupautomatically,showinghowmany
measuresoftheselectedpatternhavebeenplacedin
theselectedsong.Youcanthencopyanotherpatternif
desired,oraddmoremeasuresofthesamepattern.
Whenyou’refinished,presstheExitbutton.
Copying the settings of a combination
or program
Youcancopythesettingsofacombinationorprogram
intothesequencer.
Thiscanbedoneinthefollowingways.
•AutoSongSetup
AutoSongSetupisafunctionthatcopiesthe
settingsoftheselectedcombination(in
Combinationmode)orprogram(inProgrammode)
tothesonginSequencermode.
•MenucommandsCopyFromCombiorCopyFrom
Program.(Seepages166,167oftheParameter
Guide)
InSequencermode,youcanusethesepagemenu
commandstocopythedesiredsettings.
Auto Song Setup function
1. EnterCombinationmode.
2. InP0:Playpage,selectthedesiredcombination
andedittheArpeggiatoretc.asdesired.
Note: Ifyouwanttosavetheeditedstateofthe
combination,usetheWriteCombinationmenu
commands.
3. PresstheREC(●)button.Alternatively,selectthe
pagemenucommand“AutoSongSetup.”
TheSetuptoRecorddialogboxwillappear.
4. ToexecutetheAutoSongSetupfunction,pressthe
REC(●)buttonortheOKbutton.Ifyoudecide
nottoexecute,presstheCancelbutton.
YouwillautomaticallymovetoSequencermode,and
thesettingsofthecombinationwillbecopiedtothe
song.
Thefirstunusedsongwillbethecopy‐destination
song.
Contents automatically copied from a combi-
nation
Thecopiedcontentswillbethesameaswhenyou
executethemenucommandCopyFromCombiwith
thefollowingsettingsinthedialogbox.(Seepage 166
oftheParameterGuide)
•IFXs,MFXs,TFXchecked
•AutoAdjustArpsettingforMultiRECchecked
Contents automatically copied from a pro-
gram
Thecopiedcontentswillbethesameaswhenyou
executethemenucommandCopyFromProgramwith
thefollowingsettingsinthedialogbox.(Seepage 167
oftheParameterGuide)
•IFXs,MFXs,TFXchecked
•Arpchecked
•TosettoTrack01
•ArpsettoA
•withDrumTrackchecked
•To:DrumTracksettoTrack10
•CheckRecordingSetupMultiREC
•SetthePlay/Rec/MutesettingtoRECfortracks01
and10(seepage 101oftheParameterGuide).
5. TheKROMEwillautomaticallyenterrecord‐ready
mode,andthemetronomewillsoundaccordingto
theMetronomesetting(Seepage 119ofthe
ParameterGuide).
6. PresstheSTART/STOP()buttontobegin
realtimerecording.Tostoprecording,pressthe
START/STOP()buttononceagain.

Creating songs (Sequencer mode)
60
Recording MIDI in real time
Whenyou’vefinishedwith“Preparationsfor
recording,”youcanstartrecording.
Thisisamethodofrecordingwhatyou’replayingon
thekeyboardandyourcontrollerusage,inrealtime.
Thismethodofrecordingisnormallyusedonetrackat
atime,andiscalledsingletrackrecording.
Asanalternative,multitrackrecordingallowsyouto
simultaneouslyrecordmultiplechannelsofdataonto
multipletracks.Thisisthemethodyouwillusewhen
usingtheDrumTrackfunction,theRPPRfunction,and
thearpeggiatortorecordmultipletracksofmusical
dataatonce,orwhenyouplaybackexistingsequence
dataonanexternalsequencerandrecorditonto
KROME’ssequencerinrealtime.
Recording setup
InP0:Play/REC–PreferencespageRecordingSetup,
selecttherealtimerecordingmethodyouwanttouse.
Overwrite
Bydefault,thisrecordingmethodisselected.
Thiswillrecordyourperformancebyoverwritingany
previouslyrecordeddata.Alldatafollowingthe
measurewhereyoustartrecordingwillbeerased.
Normallyyouwillusethismethodtorecord,andthen
modifytheresultsbyusingothertypesofreal‐time
recordingorMIDIeventediting.
1. UseTrackSelecttochoosethetrackthatyouwant
torecord.
2. SettheRecordingSetuptoOverwrite.
3. In“Location,”specifythelocationwhereyouwish
tobeginrecording.
4. PresstheSEQUENCERREC(●)button,andthen
presstheSTART/STOP()button.
IftheMetronomeSetupisstillsettothedefault
settings,themetronomewillsoundforatwo‐measure
pre‐count,andthenrecordingwillbegin.
Playthekeyboardandmovecontrollerssuchasthe
joysticktorecordyourperformance.
5. Whenyoufinishplaying,presstheSTART/STOP
()button.
Recordingwillend,andthelocationwillreturntothe
pointwhereyoubeginrecording.
IfyoupressthePAUSE()buttoninsteadofthe
START/STOP()button,recordingwillpause.
WhenyoupressthePAUSE()buttononceagain,
recordingwillresumewhereyouleftoffbefore
pausing.Whenyouarefinished,presstheSTART/
STOP()buttontostoprecording.
Thefollowingrecordingsetupparametersarealso
available.
Overdub
Selectthismethodifyouwishtorecordadditional
performancedatabyoverdubbingitwithouterasing
thepreviously‐recordeddata.
Manual punch-in
Selectthismethodwhenyouwishtousethe
SEQUENCERREC(●)buttonorafootswitchtore‐
recordselectedportionsofapreviously‐recorded
track.
Auto punch-in
Selectthismethodwhenyouwishtoautomaticallyre‐
recordselectedportionsofapreviously‐recorded
track.
Then,recordingwilloccuronlyoverthespecifiedarea
(AutoPunchInStartMeasure–AutoPunchInEnd
Measure),rewritingitwiththenewlyrecordeddata.
Loop All Tracks
Selectthismethodwhenyouwishtorepeatedlyrecord
overaspecifiedareaofatrack,whilecontinuingtoadd
data.Thisissuitableforcreatingdrumpatterns,etc.
Fordetails,pleasesee“A n exampleofrealtime
recording”onpage 61.
Multi (multitrack recording)
UseMIDImulti‐trackrecordingifyouwantto
simultaneouslyrecordmultipletracksofdifferent
channels,suchaswhenrecordingtheoutputofthe
drumtrack,arpeggiatororRPPRfunctions,orwhen
recordingfromanexternalmulti‐tracksequencer.
Location
Recording Step recording
61
An example of realtime recording
Inthisexample,we’llassignadrumprogramtotrack
01andcreatethefollowingone‐measuredrumphrase.
1. Createanewsong,andspecifyadrumprogram
fortrack01.
UseTrackSelecttoselecttrack01,andverifythatyou
hearadrumprogram.(Seepage 57)
2. AccesstheP0:Play/REC–Preferencespage.In
RecordingSetup,specify“LoopAllTracks”and
setittoM001‐M001(seepage 117oftheParameter
Guide).
Withthissetting,measure1willberecorded
repeatedly.Thenewlyrecordeddatawillbeaddedat
eachpass.
3. Set“RECResolution”to.(Seepage 58)
4. PresstheSEQUENCERREC(●)button,andthen
theSTART/STOP()button.
Themetronomewillsoundatwo‐measurecount‐
down,andthenrecordingwillbegin.
5. Asshowninthemusicalexampleprintedabove,
startbyplayingtheC3noteofthekeyboardto
recordthebassdrumforonemeasure.
6. Next,playtheE3noteofthekeyboardtorecord
thesnareforonemeasure,andthentheF#3noteto
recordthehi‐hat.
7. PresstheSTART/STOP()buttontostop
recording.
8. Playbacktheresult,andlistentothedrum
performancethatyourecorded.
PresstheSTART/STOP()button.Whenyou’ve
finishedlistening,presstheSTART/STOP()
buttononceagaintostopplayback.
9. Ifyou’renotsatisfiedwiththeresult,pressthe
COMPAREbuttontoreturntothestatepriorto
recording,andthenre‐recordfromstep4.
Note: Whenyou’refinishedrecording,changethe
RecordingSetupbacktothenormally‐usedOverwrite
(P0:Play/REC–Preferencespage).
Inaddition,accesstheP0:Play/REC–PlayLoopT01–
08page,checkTrackPlayLoopfortrack01,andsetthe
LoopStartMeasureandLoopEndMeasureto001.
Whenyouplayback,track01willrepeatedlyplaythe
firstmeasure.
Step recording
Steprecordingistherecordingmethodwhereyou
specifythedurationandstrengthofeachnote,anduse
thekeyboardtospecifythepitchofeachMIDInote.
YoucanusetheRestbuttonandTiebuttonofthe
dialogboxtoinputrestsandties.
Steprecordingisusefulwhenyouwanttocreate
mechanicallyprecisebeats,orwhenyouneedto
recordaphrasethatwouldbedifficulttoplaybyhand
“inrealtime,”orwhenyoufinditdifficulttoplay
extremelycomplicatedorrapidpassages.
An example of step recording
Inthisexample,we’llassignabassprogramtotrack02
andstep‐recordthefollowingtwo‐measurebass
phrase.
1. Specifyabassprogramfortrack02.UseTrack
Selecttoselecttrack02,andverifythatyouheara
bassprogram.
2. AccesstheP6:TrackEdit–TrackEditpage.
Bass drum: C3
Snare: E3
Hi hat: F#3
Note
Step
Time:
Select
Step
Time:
. 3 -
Key, Button Measure/
Beat Tick
C3 . C3 key 001 / 01.000
G3 - G3 key 001 / 01.360
- Rest button 001 / 02.000
C4 - C4 key 001 / 02.240
- Rest button 001 / 02.360
C4 - C4 key 001 / 03.120
D3 - D3 key 001 / 03.240
Eb3 - Eb3 key 001 / 04.000
E3 - E3 key 001 / 04.240
F3 - F3 key 002 / 01.000
- Rest button 002 / 01.120
C3 - C3 key 002 / 01.360
- Rest button 002 / 02.000
F2 - F2 key 002 / 02.240
Tie - Tie button 002 / 03.000
F2 - F2 key 002 / 03.240
- Rest button 002 / 03.360
A2 - A2 key 002 / 04.000
A3 - A3 key 002 / 04.240
- Rest button 002 / 04.360
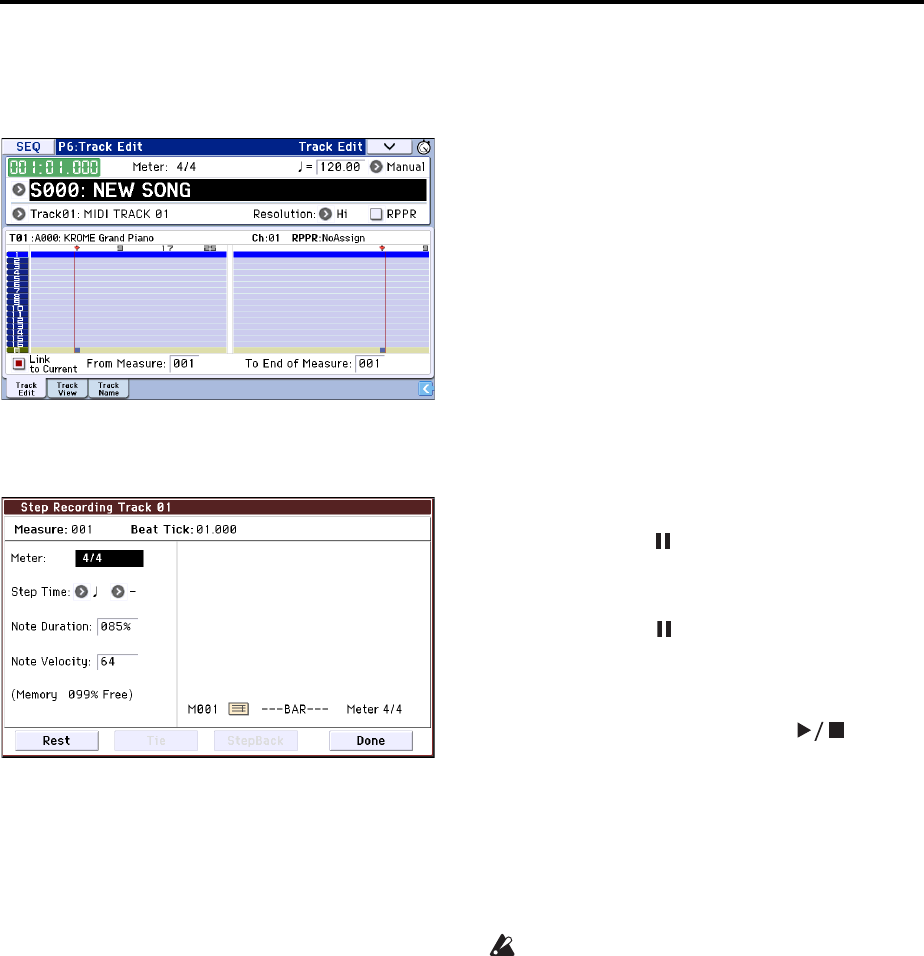
Creating songs (Sequencer mode)
62
3. Set“FromMeasure”to001.
Withthissetting,steprecordingwillbeginfrom
measure1.
4. Pressthemenubutton,andpressmenucommand
“StepRecording.”
Adialogboxwillappear.
5. In“StepTime,”use“Select”tospecifythebasic
timingvalue.
InputthefirstC3noteas.(dottedeighthnote).
Usethepopupbuttontothelefttoselect.
Youcanchooseanotevaluerangingfromawholenote
()toa32ndnote().
Inputadottednotebyselecting“.”withthepopup
buttonsatright.
Youcanspecify“3”toinputatriplet.Ifyouwanttouse
theunmodifiedlengthofthenotethat’sselectedatthe
left,choose“–”.
“NoteDuration”indicatesthelengththatthenote
itselfwillsound.Smallervalueswillproduceastaccato
note,andlargervalueswillproducealegatonote.For
thisexample,leavethissettingunchanged.
“NoteVelocity”isthevelocity(playingstrength),and
largervalueswillproducealoudervolume.Setthisto
Key.
IfyouselectKeyforthisparameter,thevelocityofhow
youactuallyplaythekeyboardwillbeinput.
6. Onthekeyboard,pressandthenreleasethefirst
C3notethatyouwanttoinput.
Thedatayouinputwillappearinthedisplayas
numericalvalues.Ontheupperrightside,Measure
001BeatTick01.000willchangetoMeasure001Beat
Tick01.360.Thenextnoteyouinputwillbeplacedat
thislocation.
7. Asdescribedinsteps5and6,inputthenotesand
reststhatfollowthefirstC3note.
Inadditiontothemethodsdescribedinsteps5and6,
youcanalsousethefollowinginputmethods.
•Toinputarest,presstheRestbutton.Thiswill
inputarestoftheselectedStepTimevalue.
•Toenteratie,sothattwoormorenotesofthesame
pitchwillbeplayedasasingleunbrokennote,
presstheTiebutton.WhenyoupresstheTie
button,thepreviously‐inputnotewillbeextended
bytheStepTimelength.
•Todeleteanoteorrestthatyouinput,pressthe
StepBackbutton.Thepreviously‐inputnotewillbe
deleted.
•Toinputachord,simultaneouslypressthenotesof
thedesiredchord.Evenifyoudonotpressthem
simultaneously,notesthatarepressedbeforeyou
fullyremoveyourhandfromallkeysonthe
keyboardwillbeinputatthesamelocation.
•Toauditionanotewithoutactuallyinputtingit,
pressthePAUSE()button.Nowwhenyouplaya
noteonthekeyboard,itwillsound,butthenote
willnotbeactuallyinput.Inthisstate,playinga
keywillproduceasound,butwillnotinputanote.
PressthePAUSE()buttononceagaintocancel
therecord‐pausestate,andresumeinputtingnotes.
8. Whenyouarefinishedrecording,presstheDone
button.
PresstheSEQUENCERSTART/STOP()button
toplayback.
AccesstheP0:Play/REC–PlayLoopT01–08page,
checkTrackPlayLoopfortrack02,setLoopStart
Measureto001,andLoopEndMeasureto002.track
02willplaymeasures1–2repeatedly.
9. Ifyou’renotsatisfiedwiththeresult,pressthe
COMPAREbuttontoreturntothestatepriorto
recording,andthenre‐recordfromstep4.
Whenyoubeginsteprecording,alldatainthe
trackthatfollowsthemeasurewhereyoubegan
recordingwillbeerased.Youneedtobeawareof
thisifyoubeginsteprecordingfromameasure
mid‐waythroughthesong.
Ifyouwanttocopydataintoameasurethat
alreadycontainsdata,performsteprecordingin
anemptytrack,andusetheMoveMeasureor
CopyMeasuremenucommands.(Seepage 179of
theParameterGuide)
Ifyouwanttoeditoraddtotherecordeddata,you
canusetheEventEditorPianoRollfunction.(See
pages 169,171oftheParameterGuide)
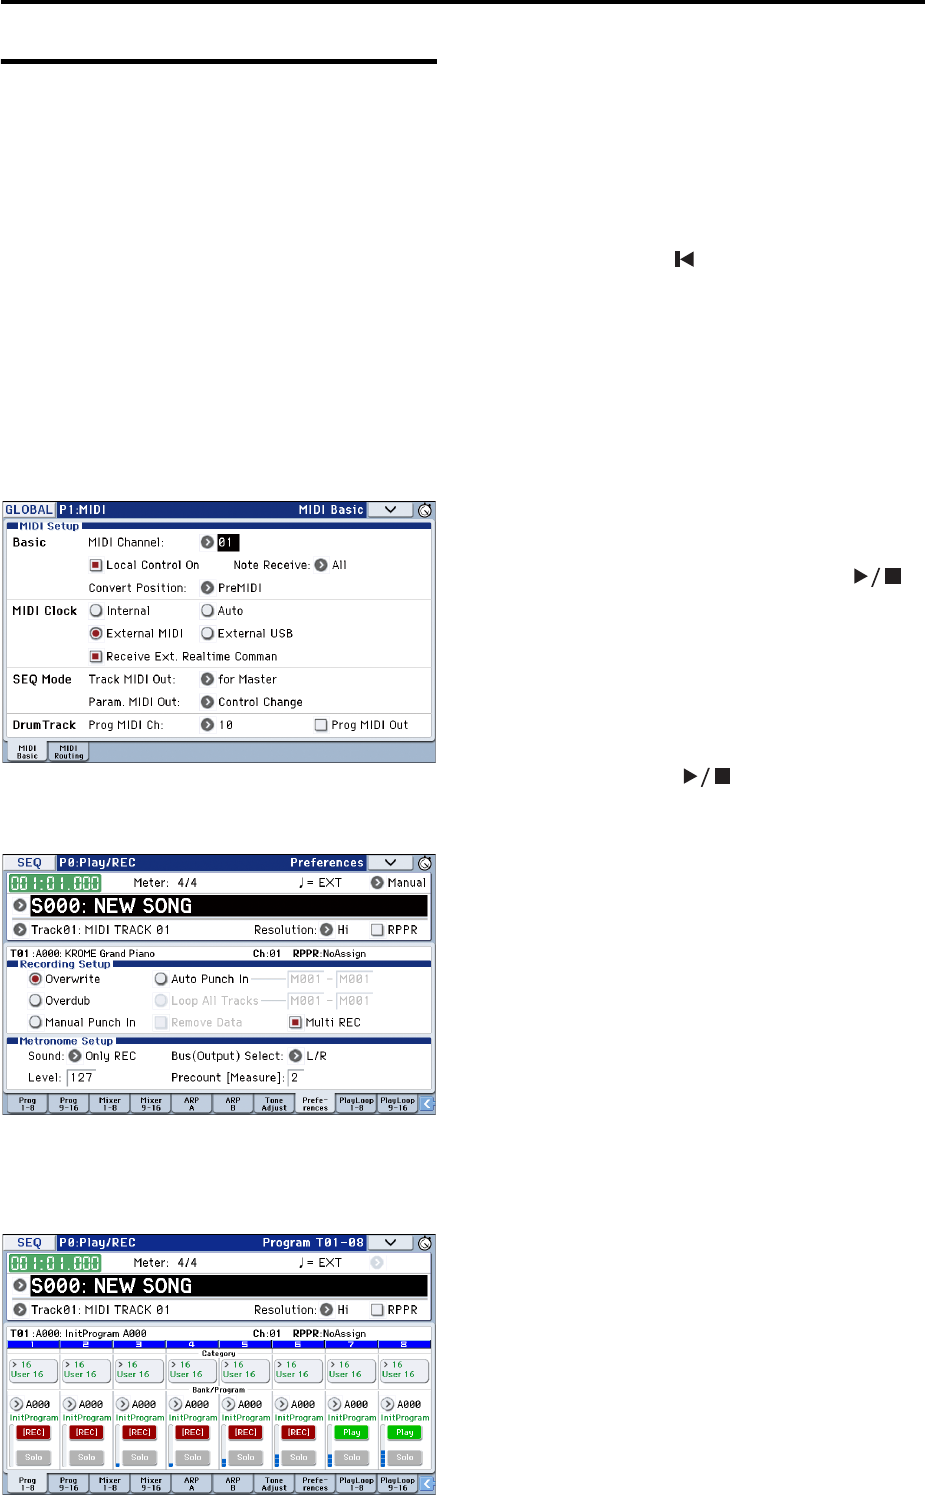
Recording Recording multiple tracks from an external sequencer
63
Recording multiple tracks
from an external sequencer
TheplaybackfromanexternalMIDIsequencer
connectedtotheKROMEcanberecorded
simultaneouslyusingmulti‐recording.
1. MakesurethattheMIDIOUTofyourexternal
sequencerisconnectedtotheMIDIINofthe
KROME.
Ifitisnotconnected,turnoffthepower,makethe
connection,andthenturnthepoweron.
2. IntheGlobalP1:MIDI–MIDIBasicpage,set
MIDIClocktoExternalMIDI.Withthissetting,
theKROMEwillsynchronizetoMIDIclock
messagesfromyourexternalsequencer.
MakesurethatReceiveExt.RealtimeCommandsis
checked.
3. CreateanewsonginSequencermode,andinthe
P0:Play/REC–Preferencespage,checktheMulti
RECcheckbox.SetRecordingSetuptoOverwrite.
4. PressPlay/Rec/Mutetoselect“REC”forthetracks
youwanttorecord.
Forthetracksyoudon’twanttorecord,selectPlayor
Mute.
5. IntheP3:TrackParameters–MIDIT01–08and
T09–16page,useMIDIChanneltospecifythe
MIDIchannelofeachtrack.
SettheMIDIchannelofeachKROMEtracktomatch
theMIDIchannelofeachexternalsequencertrack.
Datafromeachchannelwillberecordedonthe
correspondingKROMEtrack.
MakesurethatStatusissettoINTorBTH.
6. PresstheLOCATE()buttontosetthelocation
to001:01.000.
7. PresstheSEQUENCERREC(●)buttontoenter
record‐standbymode.
8. Startyourexternalsequencer.
TheKROME’ssequencerwillautomaticallybegin
recordingwhenitreceivestheMIDIStartmessage
transmittedbyyourexternalsequencer.
9. Whenplaybackhasended,stopyourexternal
sequencer.
TheKROME’ssequencerwillautomaticallystop
recordingwhenitreceivestheMIDIStopmessage
transmittedbytheexternalsequencer.Youcanalso
stoprecordingbypressingtheSTART/STOP()
buttonontheKROME.
Afterthis,youcanplaybackthenewlyrecorded
sequence:
10. IntheGlobalP1:MIDI–MIDIBasicpage,set
MIDIClocktoInternal.
SetTempoModetoAutointheSeqP0:Play/REC–
ProgramT01–08page.
PresstheSTART/STOP()buttontoplayback.
Note: Ifthecorrectsoundsarenotselectedwhenyou
startplayingback,youmaybeabletosolvethe
problembyusingthemenucommandEventEdit(P6:
TrackEdit)tore‐specifytheProgramChangedata.
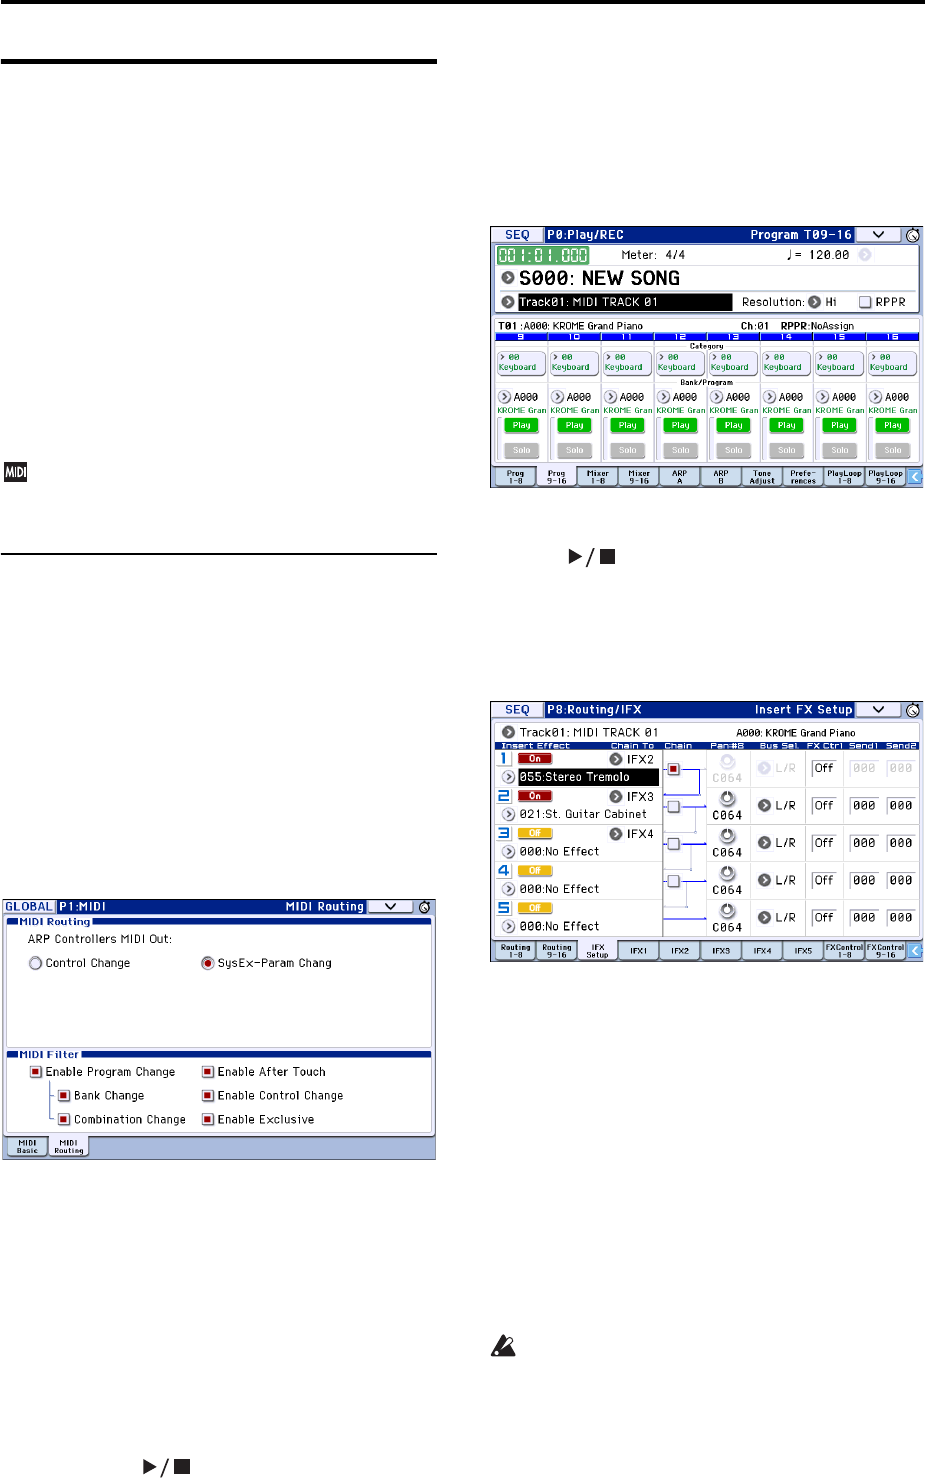
Creating songs (Sequencer mode)
64
Recording System Exclusive
events
ExclusivemessagesreceivedfromanexternalMIDI
deviceortheparameterchangesproducedwhenyou
editatrackparameteroreffectparametercanbe
recordedinrealtimeonanytrack.
Duringplayback,theexclusivemessagesyourecorded
willcontrolthetrackparametersandeffectparameters
ofthesong,andcanbesenttoexternalMIDIdevices.
Note: YoucanusethemenucommandPutEffect
SettingtoTracktoinsertanexclusiveeventcontaining
theparametersettingsforaninserteffect,mastereffect
ortotaleffectintothedesiredlocationofatrack,so
thatthesesettingswillautomaticallyswitchduring
playback.
GM,XG,andGSexclusivemessagescanbe
recordedonatrack,buttheKROME’stone
generatorwillnotrespondtothesemessages.
Recording internal parameter
changes
YoucanuseSysExforautomationofinternalKROME
effectsandProgramparameters.
Herewe’llexplainhowtorecordinternalparameter
changes.Asanexample,we’llexplainhowparameter
changesrecordedonadifferenttrackcanbeusedto
modifytheparametersoftheinserteffect(IFX1)
appliedtotheprogramoftrack1.
Note: Inordertorecordsystemexclusivemessages,
makesurethattheGlobalP1:MIDI–MIDIRouting
settingEnableExclusiveischecked.GotoGlobal
modeandverifythatthisischecked.
1. SelectthedesiredprogramforMIDItrack1,and
routeittoIFX1.Thenrecordaphraseofabout
sixteenmeasures.
•IntheP0:Play/REC–ProgramT01–08page,use
“ProgramSelect”toselectthedesiredprogramfor
MIDITrack01.
•IntheP8:Routing/IFX–RoutingT01–08page,route
theMIDITrack01Bus(IFX/Output)SelecttoIFX1.
ThenintheP8:Routing/IFX–InsertFXSetuppage,
selectthedesiredeffectforIFX1.
• SelectMIDITrack01inTrackSelect.Thenpress
theSEQUENCERREC(●)buttonandthenthe
START/STOP()button,andrecordaphrase
ofaboutsixteenmeasures.
2. SelectTrack09in“TrackSelect,”andrecord
parameterchangesasdesired.
Note: Forthisexample,selectanemptytrack.Ifyou
wanttorecordontoaMIDItrackthatalreadycontains
data,settheP0:Play/REC–Preferencespage
RecordingSetupto“Overdub,”asdescribedon
page 60.
• SelectTrack09inTrackSelect.Thenpressthe
SEQUENCERREC(●)buttonandthentheSTART/
STOP()button,andbeginrecording.
•A
ttheappropriatetimewhilerecording,adjustthe
parameter(s)thatyouwanttorealtime‐record.
IntheP8:Routing/IFX‐InsertFXSetuppage,select
anothereffectforIFX1,andmodifytheeffect
parametervalues.
Note: Inadditiontoeffectparameterchanges,youcan
alsorecordparameterssuchassoundparameters.For
detailsontheparametersthatcanberecorded,please
seepage 191oftheParameterGuide.
3. Stoprecording.
Note: Exclusivemessagesarealwaysrecordedonthe
currenttrackselectedbyTrackSelect.Inthisexample,
theyarerecordedonMIDItrack9.
Note: IntheMIDIeventeditpageyoucanviewthe
recordedexclusiveeventsandtheirlocation.Exclusive
eventsaredisplayedas“EXCL”.
Toviewtheseevents,gototheP6:TrackEdit–Track
Editpage,andselectthemenucommandMIDIEvent
Edit.ThenintheSetEventFiltersdialogbox,check
ExclusiveandpresstheOKbutton.
Exclusiveeventscannotbechangedtoadifferent
typeofevent.Norcanothereventsbechanged
intoexclusiveevents.
4. Ifyougotothepage(e.g.,P8:Routing/IFX)that
showstheparametersyouadjustedinrealtime,
youcanwatchtherecordedchangesbereproduced
whilethesongplaysback.
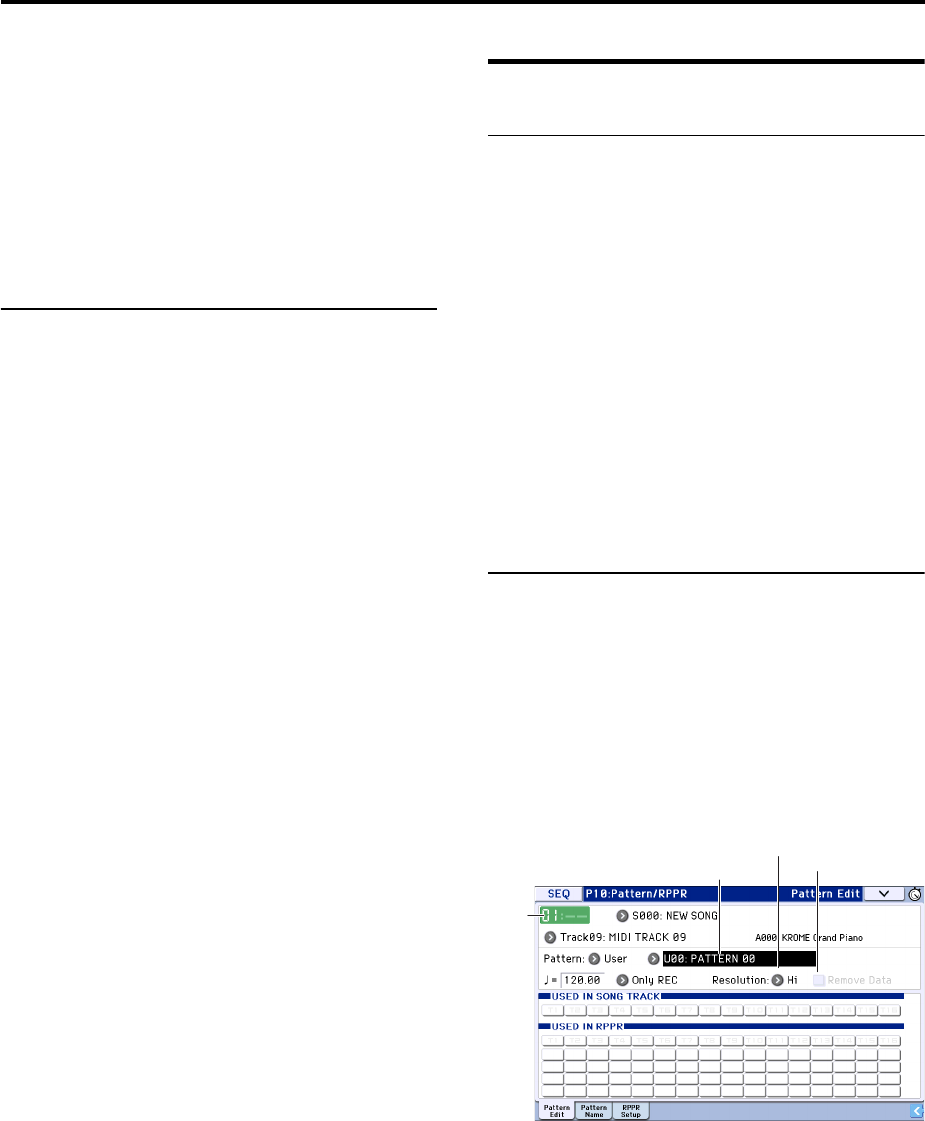
Recording Recording patterns
65
Exclusive messages that will be recorded dur-
ing realtime recording
Thefollowingexclusivemessageswillberecorded.
(Seepage 191oftheParameterGuide)
•ExclusivemessagesreceivedfromanexternalMIDI
device.
• ParameterchangesinSequencermode.
•MasterVolumeuniversalsystemexclusive
messagesassignedtoafootpedalorknob.
Using realtime controls to record
changes in a MIDI track’s pan, EQ,
volume, and tone adjust
Bycontrollingthepan,EQ,volume,andtoneadjust
parametersduringrealtimerecording,youcanrecord
thesechangessothattheywillbereflectedduring
playback.
Usemulti‐trackrecordingifyouwanttomodifythe
settingsofmultipletrackssimultaneously.
Note: Controllingtheseparameterswilltransmit
controlchangeorsystemexclusivemessages.Inorder
forthisdatatoberecorded,theGlobalP1:MIDI–MIDI
RoutingEnableControlChangeandEnableExclusive
settingsmustbechecked.GotoGlobalmodeand
verifythattheseitemsarechecked.
Note: UseParam.MIDIOutinGlobalP1:MIDIBasic
pagetospecifywhethercontrolchangemessagesor
systemexclusivemessageswillbetransmittedwhen
youeditthePan(CC#10),Volume(CC#7),orSend1/2
level(CC#93andCC#91)parameters.
Inthiscase,theGlobalP1:MIDI–MIDIRouting
settingsEnableControlChangeandEnableExclusive
mustbecheckedrespectively.
Recording patterns
Recording and editing patterns
Youcanrecordpatternsineitheroftwoways;realtime
recordingorsteprecording.However,patternrealtime
recordingdiffersfromsongrealtimerecordinginthat
youcanuseonlyLooptyperecording.
YoucaneditpatternsbyusingEventEditoperationsto
modifytherecordeddataorinsertnewdata.Youcan
alsousetheGetFromTrackmenucommandto
convertadesiredregionofperformancedatafroma
MIDItrackintoapattern.Conversely,youcanusethe
PuttoTrackorCopytoTrackmenucommandsto
placeorcopytheperformancedatafromapatterninto
aMIDItrack.
Inaddition,youcanusethe“ConverttoDrumTrack
Pattern”pagemenucommandtoconvertauser
patterntoadrumtrackpattern.(See“Convertingtoa
DrumTrackpattern”onpage 103)
Recording patterns in real time
Whenrealtime‐recordingapattern,apatternofthe
specifiednumberofmeasureswillplayback
repeatedly,allowingyoutocontinueaddingmusical
datatoit.
1. Createanewsong,andasdescribedin
“Preparationsforrecording”onpage 57,setthe
tracktotheprogramthatwillbeusedbythe
pattern.
2. AccesstheP10:Pattern/RPPR–PatternEditpage.
3. UseTrackSelecttochoosethetrackthatyouwill
usetorecordthepattern.
Thepatternwillplaybackwiththeprogramandother
settingsoftheselectedtrack.
4. Set“Pattern(PatternBank)”toUser,andset
“PatternSelect”toU00.
UserpatternsU00–U99canbecreatedforeachsong.
5. Selectthemenucommand“PatternParameter”.
Pattern Select
Track
Select
Remove Data
REC Resolution
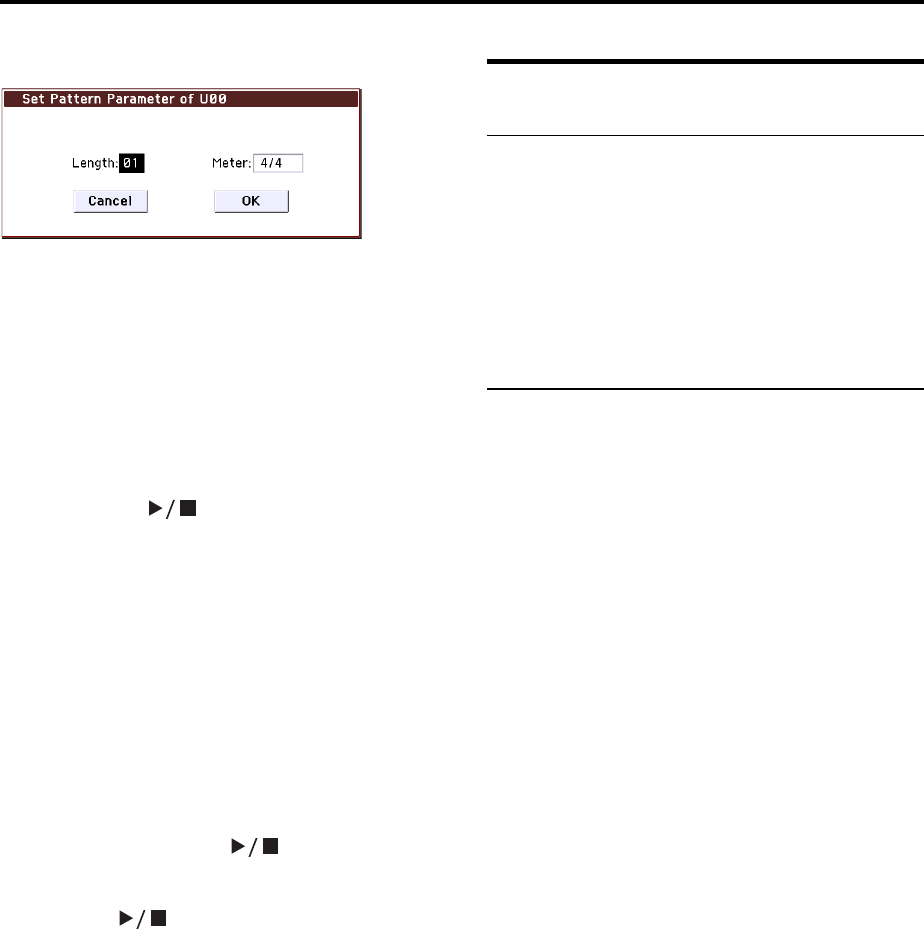
Creating songs (Sequencer mode)
66
Adialogboxwillappear.
6. Setthenumberofmeasuresinthepatterntoa
“Length”of04(fourmeasures),andset“Meter”to
atimesignatureof4/4.PresstheOKbutton.
7. Asnecessary,set“RECResolution”toapply
realtimequantization.
8. Beginrealtimerecording.
Youcanrecordinthesamewayasyoudidwhen
recordingtrackswithLoopAllTracks.(See“LoopAll
Tracks”onpage 60)
PresstheSEQUENCERREC(●)button,andthenpress
theSTART/STOP()button.
Afterthepre‐count,patternrecordingwillbegin.Play
thekeyboardandusethejoystickandothercontrollers
torecordyourperformance.
Whenyoureachtheendofthepattern,thesequencer
willreturntothebeginningofthepatternandcontinue
recording.Ifyoucontinuerecording,thenewly
recordeddatawillbeaddedtothepreviously‐
recordeddata.
9. Ifyouwanttodeletespecificdatawhileyou
continuepatternrecording,youcanpresstheREC
(●)buttonorcheckthe“RemoveData”checkbox.
Fordetailsrefertostep6of“LoopAllTracks”on
page 60.
10. PresstheSTART/STOP()buttontostop
recording.
Ifyoumadeamistakeordecidetore‐record,pressthe
START/STOP()buttontostoprecording,and
presstheCOMPAREbutton.Thenbeginthepattern
recordingprocedureagainasinstep8.
Other way to record
Using the Drum Track function and
the arpeggiator to record on multiple
tracks simultaneously
Youcanusemulti‐recordingtosimultaneouslyrecord
amulti‐trackperformanceusingtheDrumTrack
functionandarpeggiator.
Fordetails,pleasesee“RecordingMIDIinrealtime”
onpage 60.
Using the RPPR function to record on
multiple tracks simultaneously
Youcanusemulti‐recordingtosimultaneouslyrecord
amulti‐trackperformanceusingtheRPPRfunction.
Fordetails,pleasesee“CreatinganRPPRpattern”on
page 71.

Song editing Song
67
Song editing
Youcanapplyavarietyofeditingprocedurestoa
song.Theavailabletypesofeditingproceduresare
listedbelow.
Song
Load(Save)TemplateSong:Loadsasongtemplate
intothesong(orsavesasongasatemplate)(see
page 58).
CopyFromCombination/CopyFromProgram:
Copies
thesettingsofthespecifiedcombination/programtothe
settingsofthesongthat’scurrentlyselected.
CopyFromSong:Thiscommandcopiesallofthe
settingdataandmusicaldatafromthespecifiedsong
tothesongthat’scurrentlyselected.
Renamesong:Renamestheselectedsong.Youcan
enterupto24characters.
DeleteSong:Thiscommanddeletesthecurrently
selectedsong.
FF/REWSpeed:Thisallowsyoutosetthespeedat
whichfast‐forwardorrewindwilloccurwhenyou
presstheFF()buttonorREW()button.
GMInitialize:ThiscommandtransmitsaGMSystem
OnmessagetotheSequencermode,resettingallMIDI
trackstotheGMsettings.
SetSongLength:Thiscommandchangesthelengthof
thespecifiedsong.Whenitisexecuted,thelengthof
themastertrackwillchange,andthenumberof
measuresplayedwillchange.
MIDI tracks
Tracks
StepRecording:Thisallowsyoutospecifythelength
andvelocityofeachnotenumerically,andtoinput
MIDIdata,thepitches,fromthekeyboard.Youcanuse
theRestbuttonandTiebuttontoenterarestortie.
EventEdit:Hereyoucaneditindividualeventsof
MIDIdata.
PianoRoll:Allowsyoutoeditnotes,velocities,and
controlchangesinthepianorollscreen.Byselecting
anddraggingeventsinthescreen,youcanedittheir
pitchortiming,ordeleteoraddevents.
EraseTrack:Thiscommanderasesthedatafromthe
specifiedtrack.Itisnotpossibletoerasethemaster
trackbyitself.
CopyTrack:Thiscommandcopiesmusicaldatafrom
thecopysourcetracktothespecifiedtrack.
BounceTrack:Thiscommandcombinesthemusical
dataofthebouncesourceandbouncedestination
tracks,andplacesthecombineddatainthebounce
destination.Allmusicaldatainthebouncesourcewill
beerased.
EraseMeasure:Thiscommanderasesthespecified
type(s)ofmusicaldatafromthespecifiedrangeof
measures.TheEraseMeasurecommandcanalsobe
usedtoremoveonlyaspecifictypeofdata.Unlikethe
DeleteMeasurecommand,executingtheErase
Measurecommanddoesnotcausethesubsequent
measuresofmusicaldatatobemovedforward.
DeleteMeasure:Thiscommanddeletesthespecified
measures.WhentheDeleteMeasurecommandis
executed,themusicaldatafollowingthedeleted
measureswillbemovedtowardsthebeginningofthe
sequence.
InsertMeasure:Thiscommandinsertsthespecified
numberofmeasuresintothespecifiedtrack.Whenyou
executetheInsertMeasurecommand,themusicaldata
followingtheinsertlocationwillbemovedbackward.
RepeatMeasure:Thiscommandrepeatedlyinsertsthe
specifiedmeasuresforthespecifiednumberoftimes.
WhenyouexecutetheRepeatMeasurecommand,the
measureswillbeinsertedfollowingthemeasure
specifiedbyToEndofMeasure,andmusicaldata
followingtheinserteddatawillbemovedbackward.
CopyMeasure:Thiscommandcopiesthemeasuresof
musicaldataspecifiedasthe“From”sourcetothe
beginningofthemeasurespecifiedasthe“To”
location.WhenyouexecutetheCopyMeasure
command,theexistingtrackdataatthecopy
destinationwillberewritten.
MoveMeasure:Thiscommandmovesthespecified
measuresofperformancedatatoanothermeasure.
WhenyouexecutetheMoveMeasurecommand,the
performancedatafollowingthemove‐sourcemeasures
willmoveforwardbythecorrespondingnumberof
measures,andtheperformancedatafollowingthe
move‐destinationwillmovebackward(i.e.,laterinthe
song)bythesamenumberofmeasures.
CreateControlData:Thiscommandcreatescontrol
change,aftertouch,pitchbend,ortempodatainthe
specifiedregionofaMIDItrackorthemastertrack.
EraseControlData:Thiscommanderasesdatasuchas
controlchanges,aftertouch,pitchbend,ortempoin
thespecifiedrange.
Quantize:ThiscommandcorrectsthetimingofMIDI
dataofthetypeyouspecify(notedata,controlchange,
aftertouch,pitchbend,programchange,etc.)inthe
track.Youcanalsoadjustforswing.
Shift/EraseNote:Thiscommandshifts(moves)or
erasesthespecifiednotenumbersinaspecifiedMIDI
trackandrangeofmeasures.
ModifyVelocity:Thiscommandmodifiesthevelocity
valuesofnotesinthespecifiedareasothattheywill
changeovertimeaccordingtoaselectedcurve.
CreateExclusiveData:Thiscommandcreates
universalsystemexclusivemessagesorKROME
parameterchangemessagesinthespecifiedregionofa
MIDItrack.
EraseExclusiveData:Thiscommanderases(deletes)
universalsystemexclusivemessagesorKROME
parameterchangemessagesfromthespecifiedregion.
Todeletealltypesofsystemexclusivemessageother
thanthoselistedabove,settheEraseMeasure
command’s“Kind”fieldtoExclusive,andexecutethe
command.
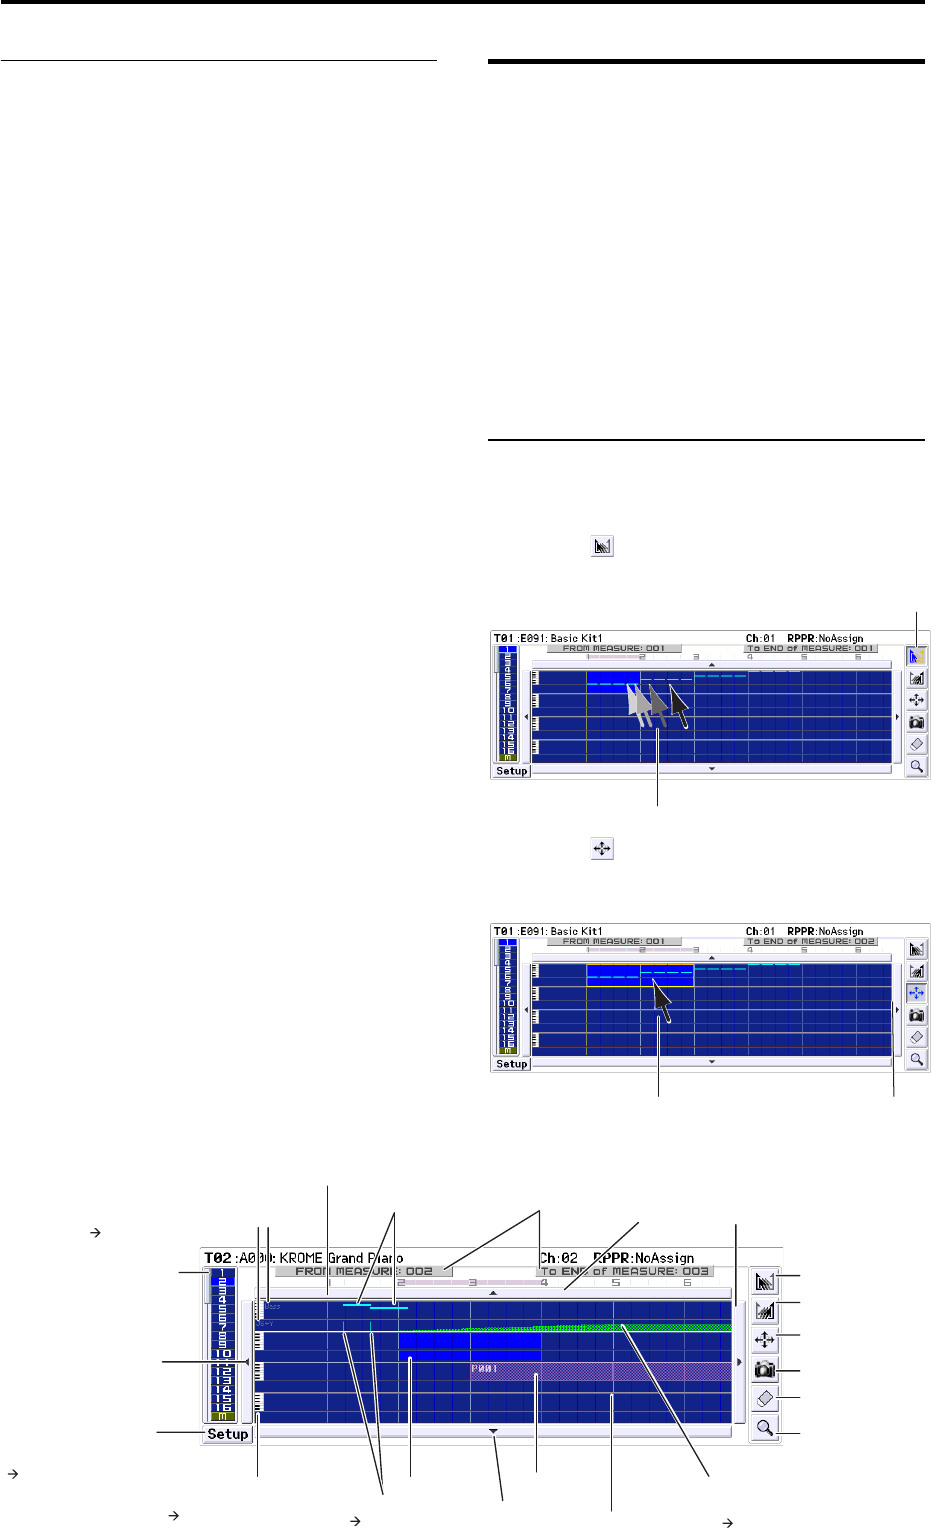
Creating songs (Sequencer mode)
68
Pattern
StepRecording(LoopType):Hereyoucanperform
steprecordingintoapattern.
EventEdit:Hereyoucaneditindividualeventsofthe
musicaldatainapattern.
PianoRoll:Youcaneditnotes,velocities,andcontrol
changesinthepianorollscreen.
PatternParameter:Thiscommandspecifiesthe
numberofmeasuresandthetimesignatureofthe
selectedpattern.
ErasePattern:Thiscommanderasesthedatafromthe
selectedpattern.
CopyPattern:Thiscommandcopiesthesettingsand
musicaldataoftheselectedpatterntoanotherpattern.
BouncePattern:Thiscommandcombinesthemusical
dataofthebouncesourcepatternandbounce
destinationpattern,andplacesthecombinedmusical
datainthebouncedestination.
GetFromTrack:Thiscommandtakesmusicaldata
fromaMIDItrackandloadsitintothespecified
pattern.
PutToTrack:Thiscommandplacesapatternintoa
MIDItrack.
CopyToTrack:Thiscommandcopiesthespecified
areaofmusicaldatafromthespecifiedpatterntoa
MIDItrackasmusicaldata.
ConverttoDrumTrackPattern:Thiscommand
convertsauserpatternintoauserdrumtrackpattern,
whichcanthenbeusedwiththeDrumTrackinany
mode.
LoadDrumTrackPattern:Thiscommandloadsauser
DrumTrackpatternintoauserpattern.
EraseDrumTrackPattern:Thiserasesthespecified
DrumTrackpattern.
Track view edit
Herewe’llexplaintrackviewediting.
Youcanvisuallyspecifyregionsofmeasuresinthe
display,andthenmove,copy,orerasethem.
Foreachtrack,eventdatasuchasnotes,velocities,and
controlchangesaredisplayed(seetheillustration
below).
Youreditingwillapplytothehighlightedmeasures.
TherangeisshowninFROMMEASUREandToEND
ofMEASUREintheupperline.
Youcanmove,copy,orerasedatainunitsofmeasures.
Note: Youcan’tspecifyaregionofmeasuresunlessa
toolisselectedinthetoolbox.
Examples of using the tools
Example)
Moving the events of measures 1–2 to measures 5–6
1. Pressthetool.
2. Dragovermeasures1–2tospecifytheeditregion.
3. Pressthetool.
4. Pressmeasure5(themove‐destinationmeasure).
Alternatively,dragtheeditregiontomeasure5.
Track View area select
The bar at left indicates the
four tracks shown in the track
view area (in this example,
tracks 1–4).
Setup
Press this button to open
the Track View Setup
dialog box.
Displays note events in a
one-octave range
Displays the values for the
control message name indicated
in the left of the screen
Indicate the selected region.
Linked with the identically-
named parameter of the
Track Edit page.
( Track View Setup)
Track name indication
Control message name indication
( Track View Setup)
Scroll button
Selected region
Velocity indication
( Track View Setup)
( Track View Setup)
( Track View Setup)
Scroll button
Scroll button
Note events
Location bar
Track view area
Pattern
Tool box
Jump to the piano roll.
Specify the starting
measure.
Specify the ending
measure.
Move the events of the
selected measure(s).
Copy the events of the
selected measure(s).
Erase the events of the
selected measure(s).
1
2
34
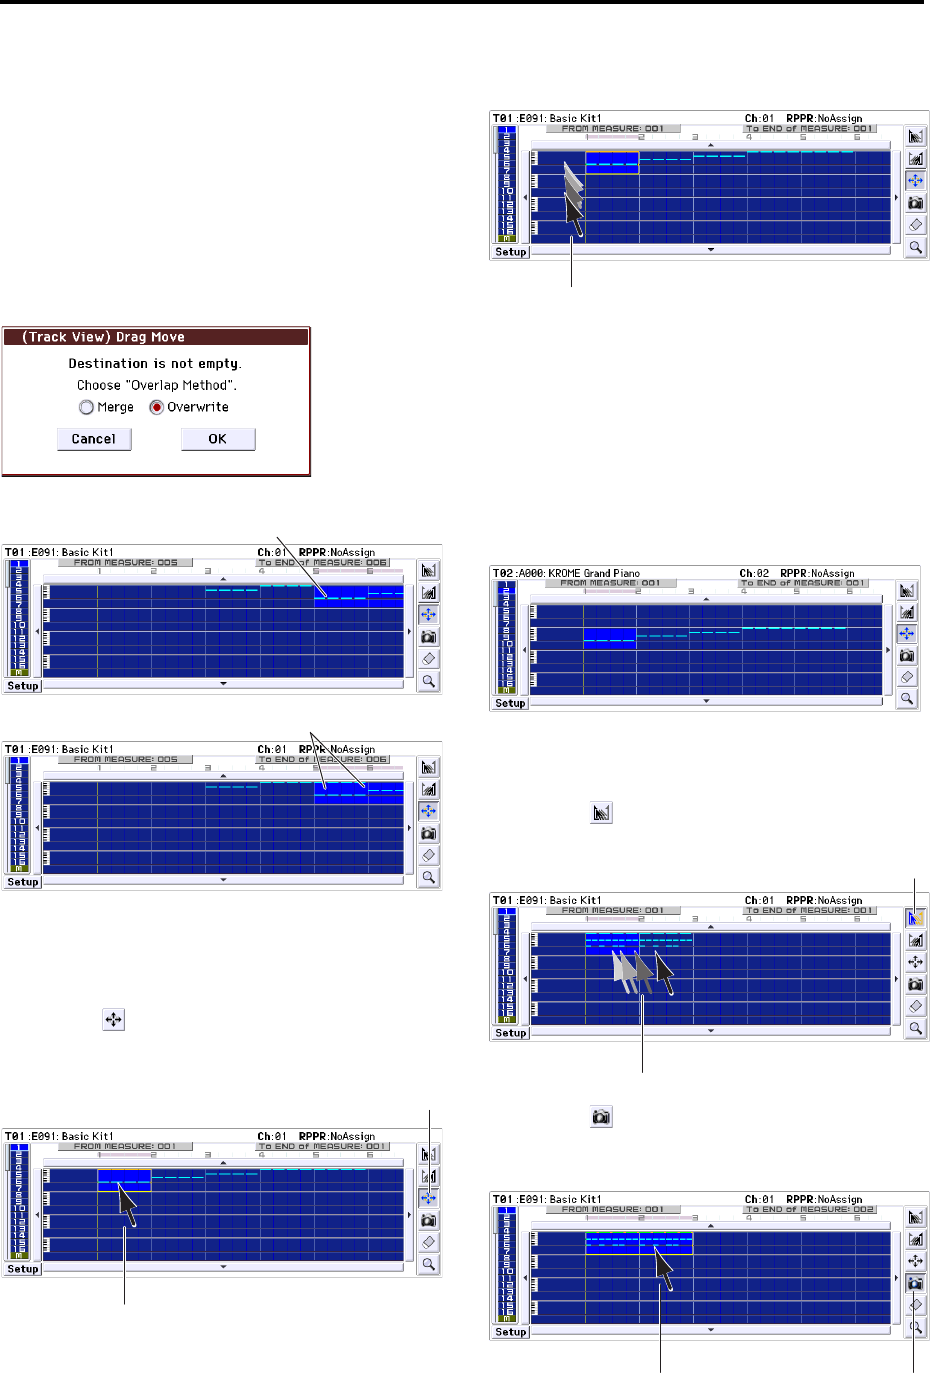
Song editing Track view edit
69
5. Inthisexample,aneventexistsinthemove‐
destinationmeasure,sotheDragMovedialogbox
willappear.
Overwritewilloverwritethesourcedataoverthe
destinationdata(replacingthedestinationdatawith
thesourcedata).Mergewillcombinethesourceand
destinationdata.
PresstheOKbuttontoexecutethemove.
Iftherearenoeventsinthemove‐destination
measures,thisdialogboxwillnotappear;themove
willoccurimmediately.
Example)
Moving the data of an entire track
1. Returnthelocationtothebeginning.
2. Pressthetool.
3. Presstheleftsideofmeasure1inthetrackyou
wanttomove.
4. Whilecontinuingtopress,dragtothemove‐
destinationtrack,andrelease.
Ifthemove‐destinationmeasurescontainevents,the
DragMovedialogboxwillappear.
Overwritewilloverwritethesourcedataoverthe
destinationdata(replacingthedestinationdatawith
thesourcedata).Mergewillcombinethesourceand
destinationdata.PresstheOKbuttontoexecutethe
move.
Iftherearenoeventsinthemove‐destination
measures,thisdialogboxwillnotappear;themove
willoccurimmediately.
Example)
Copying the events of measures 1–2 to measures 3–4
1. Pressthetool.
2. Dragovermeasures1–2tospecifytheeditregion.
3. Pressthetool.
4. Pressmeasure3(thecopy‐destinationmeasure).
Alternatively,dragtheeditregiontomeasure3.
The destination is overwritten
by the source data
If you choose Overwrite
The two sets of data are combinedIf you choose Merge
2
3
4
1
2
34
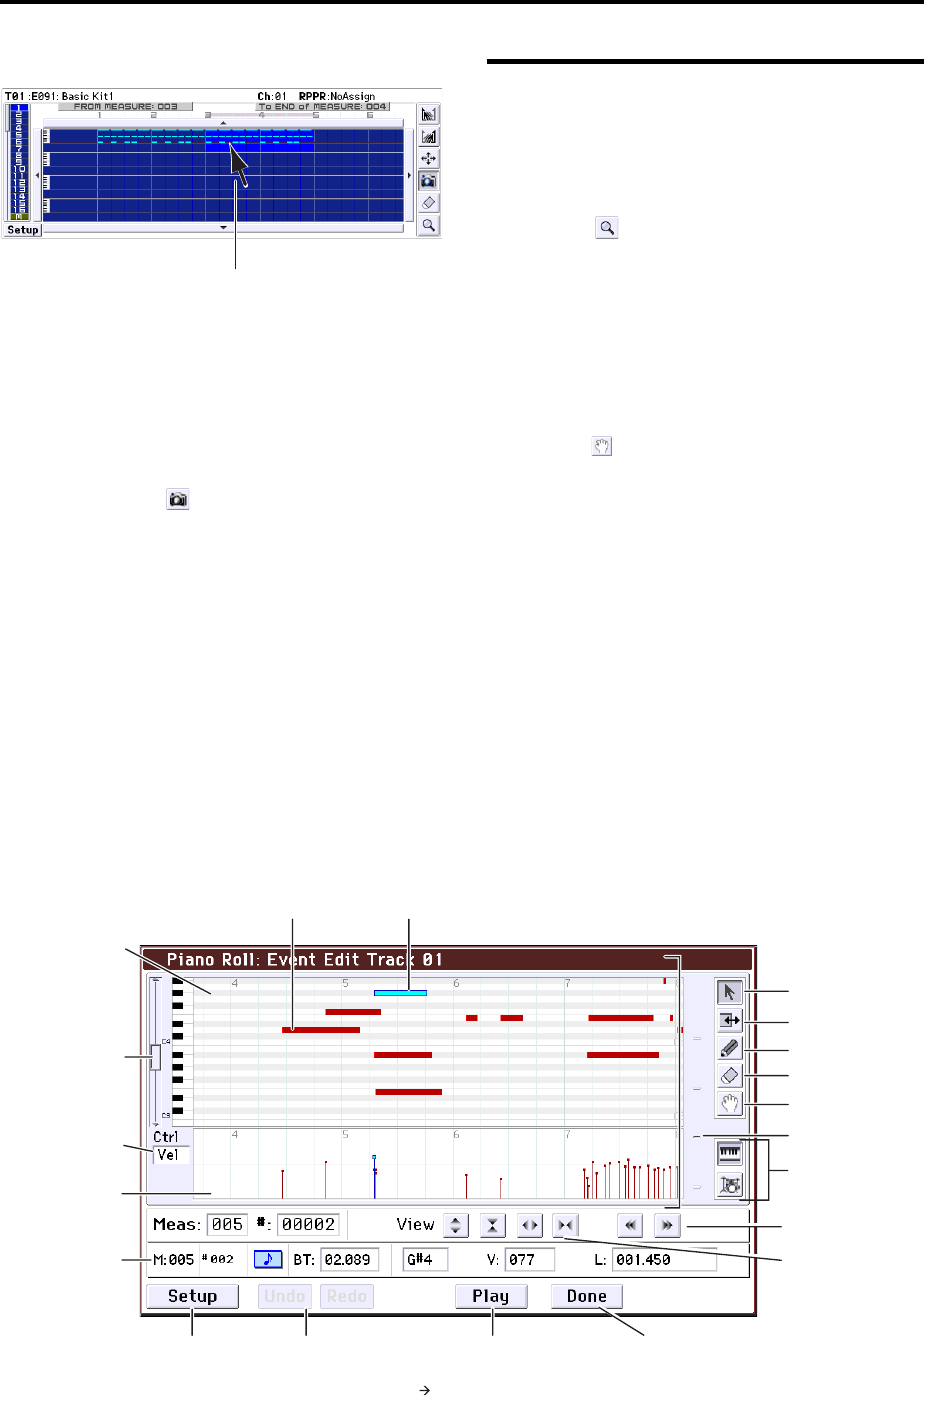
Creating songs (Sequencer mode)
70
Thecopywillbeexecuted.
5. Ifdesired,youcanpressanothercopy‐destination
tocopythedatarepeatedly.
Example) Copying the data of an entire track
Youcancopythedataofanentiretracktoanother
track.
Referto“Example)Movingthedataofanentiretrack.”
Instep2,choosethetool.
Piano Roll Editing
PianoRolleditingletsyouenter,edit,ordeleteevent
datasuchasnotes,velocities,andcontrolchanges.
1. IntheSeqP6:TrackEdit‐TrackViewpage,specify
thetrackandmeasurethatyouwanttoedit.
2. SelectthetoolintheTrackViewpageorselect
“PianoRoll”fromthemenucommandstoaccess
thePianoRollwindow.(Seeillustrationbelow)
3. Makesurethattheeventsyouwanttoeditare
displayedinthenoteviewareaattheupperpart
ofthewindoworinthecontrolviewareaatthe
lowerpartofthewindow.
•Pressthenoteviewareaselector,andusethevalue
controllers.
• Selectthetool,anddrag.
•Enter“Meas”or“#”intheeventlist.
•Usetheviewcontrolzoombuttonstozoom‐in/out.
•Switchtheviewareaheightselector.
4. Usethetoolboxtoselectatool,andeditthedata.
Note: Ifyouwanttoundoanedit,presstheUndo
button.
5. Toplaybacktheevents,pressthePlaybutton.A
dialogboxwillopen,andthesongwillstart
playing.Thisallowsyoutochecktheresultsof
yourediting.
6. Youcanchangesettingssuchasthenote
resolution.PresstheSetupbutton,andadjustthe
settingsinthePianoRollSetupdialogbox.
7. Whenyou’refinishedediting,presstheDone
button.
5
Control view area
Event list
Note view area
Note view area select
Note events
View area height select
Zoom
Scroll (view control)
The selected note event
Enter notes.
Delete notes.
Switch the note event
display
Ends piano roll editing
Move the note view
area that is displayed.
Select what will be
shown in the control
view area. (In this
example, velocity values
are shown.)
The Piano Roll Setup dialog
box will appear when you
press the Setup button
(->see Piano Roll Setup).
Undo cancels the
preceding edit. Redo
returns to the state prior
to Undo.
Plays back the song. The Piano Roll
Edit Play dialog box will appear
when you press this button
( Piano Roll Edit Play).
Toolbox:
Select or move a note.
Change the length of notes.
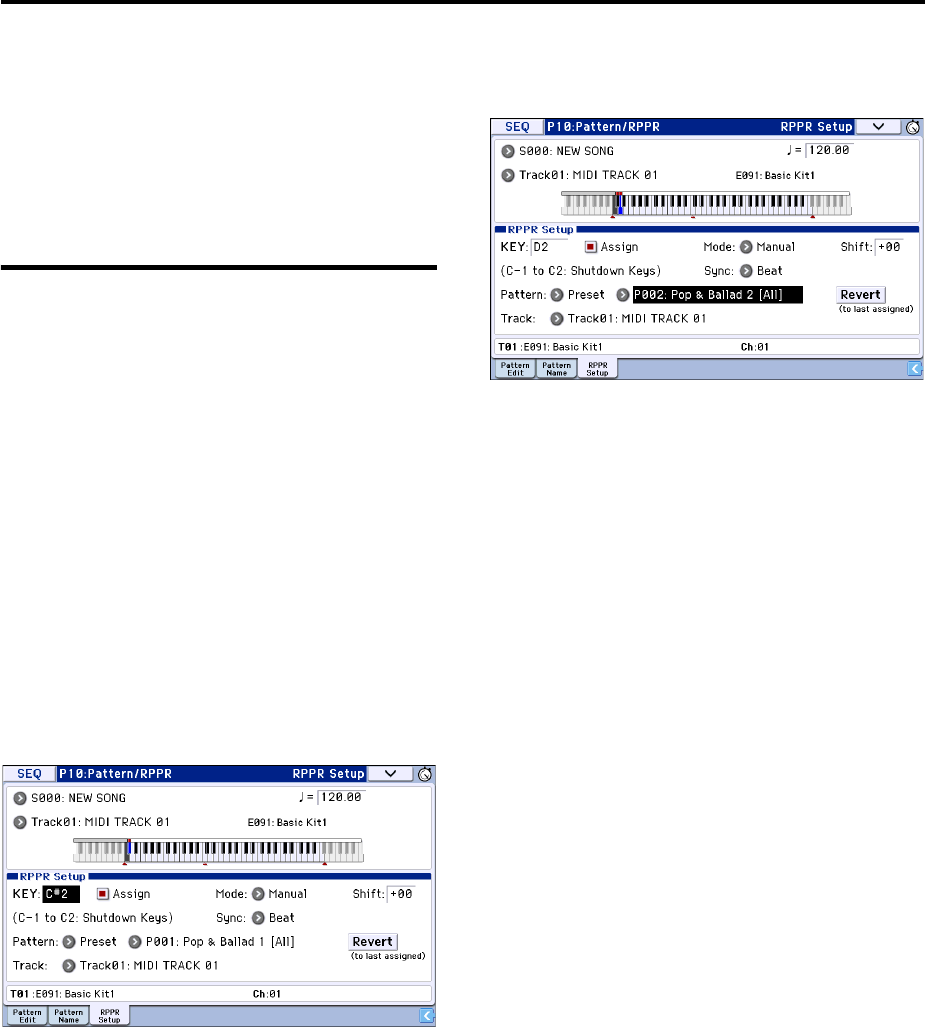
Creating an RPPR pattern Creating RPPR data
71
Creating an RPPR pattern
RPPRstandsforRealtimePatternPlay/Recording,and
isafunctionthatletsyouassignpatterndatatoeach
key,andthenplaybackthatpatternsimplybypressing
thekeywhereitisassigned.Youcanrealtime‐record
thisperformance.
Creating RPPR data
1. Createanewsong,andchooseadrumprogramfor
track1.
2. AccesstheP10:Pattern/RPPR–RPPRSetuppage.
Inthispage,theRPPRfunctionisautomatically
turnedon.
3. Selectthekeywherethepatternwillbeassigned.
4. SelectC#2.
Youcanalsochangethissettingbyholdingdownthe
KEYeditcellandplayinganoteonthekeyboard.
Note: C2andlowerkeysareusedtostopplayback,
andcannotbeassignedpatterns.
5. Check“Assign”forC#2.
6. Set“PatternBank”toPreset,andset“Pattern
Select”toP001.
7. Set“Track”toTrack01.
Theselectedpatternwillbeplayedaccordingtothe
settings(program,etc.)ofthetrackyouselecthere.
8. Assignpatternstootherkeys.
For“KEY,”presstheINCbuttontoselectD2.
9. PresstheRevertbutton.
TheAssign,PatternBank,PatternSelect,andTrack
settingswillbegiventhepreviously(steps5–7)
specifiedvalues.
10. Choose“PatternSelect,”andpresstheINC
buttontoselectP002.
ByusingRevertinthisway,youcanworkefficiently
whenassigningcontiguous(ornearby)pattern
numbersortracks.
•Asdescribedabove,assignseveralotherpatterns
suchasP003andhigher.
11. PresstheC#2key.
Theassignedpatternwillplay.
12. TakeyourfingerofftheC#2key,andpresstheD2
key.
Thepatternwillchange,andplaybackwillbegin.At
thistime,thepatternoperationwilldependonthe
SyncandModesetting.
13. SetKEYtoC#2,andsetSynctoMeasure.Make
thesamesettingforD2.
Nowpressthenotesconsecutively.Noticethatthe
patternsfunctioninadifferentway.
WiththeMeasuresetting,patternswillbehandledin
one‐measureunits.Thesecondandsubsequent
patternswillstartinsyncwiththeendofpatternthat
waspreviouslyplayed.
IfyouchangetheModesettingtoOnce,theentire
patternwillplaybacktotheendevenifyourelease
yourfingerfromthekeyboardimmediately.
•Tostopplayback,eitherpressthesamekeyonce
again,orpresstheC2orlowerkey.
FordetailsonSync,Mode,andShift,pleasesee
page 158oftheParameterGuide.
•Theassignedkeysarealsoshowninthekeyboard
graphicinthedisplay.
•Keyswherenopatternsareassignedcanbeplayed
normally.UseTrackSelecttoselectthetrackyou
wanttoplay.Forexampleyoucouldassignbacking
patternsfordrumsorbasstokeysC#2–B2anduse
thesekeystocontrolthepatternplayback,while
usingthekeysC3andabovetoplayasolo
performanceinrealtime.It’sagoodideatokeep
yourRPPRassignmentswithinaspecificrangeof
keys.
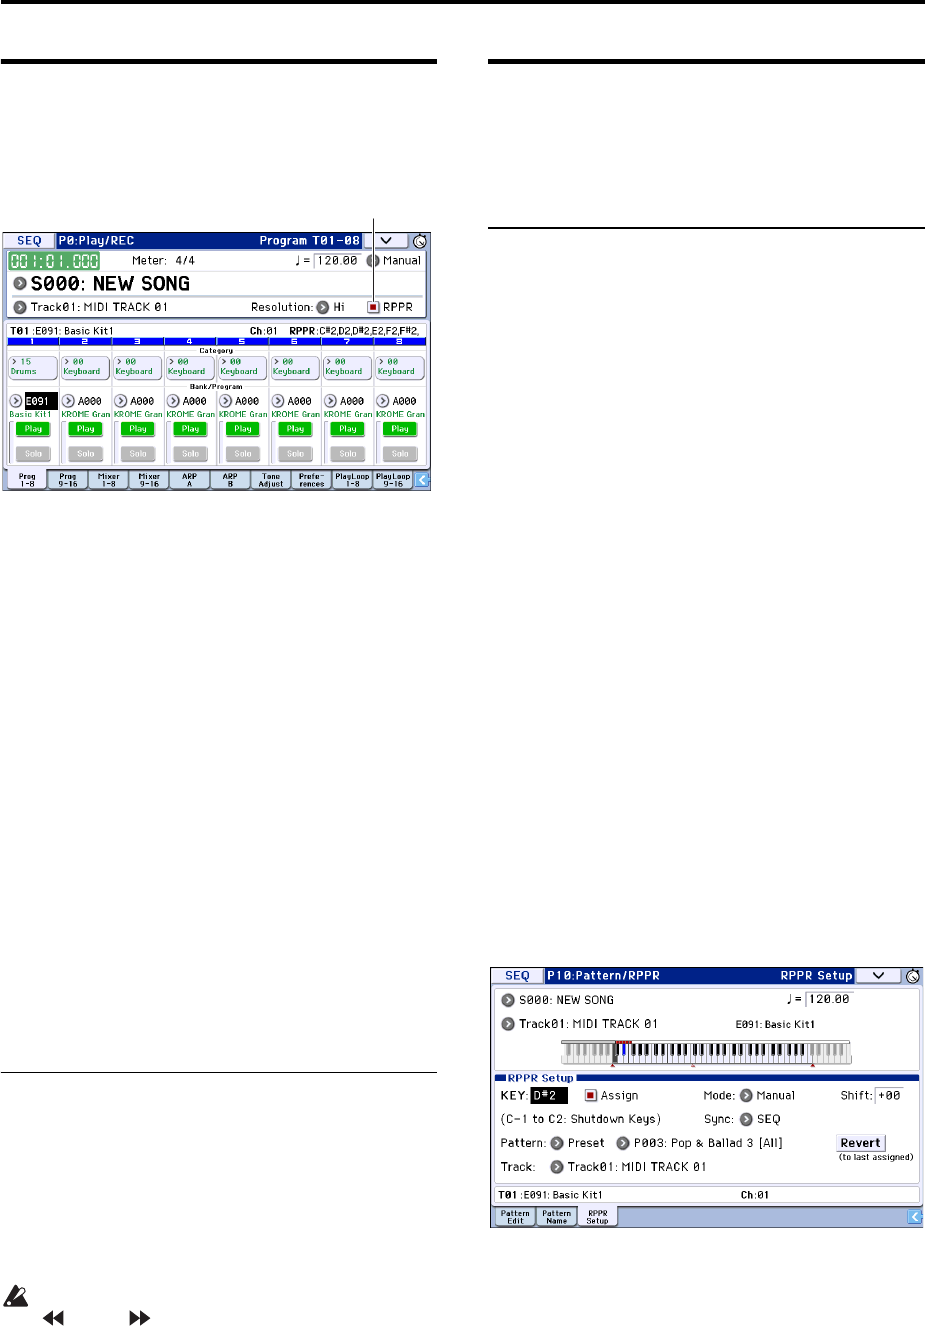
Creating songs (Sequencer mode)
72
RPPR playback
Let’susetheRPPRpatternthatyoucreatedtoperform
intheP0:Play/REC–ProgramT01–08page.
1. AccesstheP0:Play/REC–ProgramT01–08page.
2. Checkthe“RPPR”checkbox.
TheRPPRfunctionwillbeturnedon.SettheRPPRon/
offforeachsong.
3. Playthekeyboard,andpatternswillbeginplaying
accordingtotheRPPRsettings.
IfyouwanttoplayRPPRphrasesfromanexternal
MIDIdevice,youcancontrolthemontheMIDI
channelofthetrackthat’sselectedinTrackSelect.
•PatternplaybackforkeyswheretheSyncsettingis
BeatorMeasurewillsynchronizetothepattern
playbackoftheveryfirstkeyplayed.
•Ifyouareplayingthepatterninsynchronization
(whenSyncisBeat,Measure,orSEQ),thepattern
willstartaccuratelyifyouplaythenoteslightly
earlierthanthetimingofthebeatormeasure.Even
ifyouplaythenoteslightlylaterthanthebeator
measure(butnolaterthana32ndnote),itwillbe
consideredtohavestartedatthebeatormeasure,
andthebeginningofthepatternwillbe
compressedsothattheremainderoftheplayback
willbecorrect.
4. ToturnofftheRPPRfunction,unchecktheRPPR
checkbox.
Play RPPR while a song plays back
RPPRcanbeplayedinsynchronizationwiththe
playbackofasong.
PatternplaybackforakeywithaSyncsettingofSEQ
willsynchronizetotheplaybackofthesong.Startthe
songplayback,andthenpressthekey.Thepattern
playbackwillstartinsynchronizationwiththe
measuresofthesong.
SynchronizationwillbelostifyouusetheREW
()orFF()buttonswhileasongisplaying.
Note: IfyouwantRPPRpatternplaybacktobeginat
themomentthatsongplaybackbegins,itisagood
ideatoinsertanemptymeasurecontainingnomusical
databeforethesongplaybackbegins.
Note: Ifthesongisstopped,thepatternwill
synchronizetothetimingofthearpeggiator.
Realtime-recording an RPPR
performance
Youcanrecordtherealtimeperformancegeneratedby
RPPR.
Recording an RPPR performance
TheRPPRplaybackcanberecordedasperformance
dataonthetrack(s)assignedtoeachpattern.This
meansthatyou’lluseeithersingletrackrecordingor
multi‐trackrecording,asappropriateforthetrack
settingsorperformancestyleoftheRPPRyou’re
playing.
Ontheotherhand,evenifRPPRusesonlyonetrack,
usemulti‐trackrecordingifyouwillberecording
anothertrackatthesametime.
Youshouldalsoselectmulti‐trackrecordingifyou
specifiedtheRPPRdatausingmultipletracksrather
thanjustasingletrack,andwanttosimultaneously
recordtheperformanceofmultipletracks.
Here’showyoucanrecordanRPPRperformanceand
akeyboardperformanceatthesametime.Beforeyou
continue,usetheP0:Play/REC–ProgramT01–08page
toassignadrumprogramtoMIDItrack1,andabass
programtoMIDItrack2.
1. AssignseveralkeysstartingwithC#2topreset
patterns.
ChecktheC#2Assignsetting,andsetPatternBankto
PresetandPatternSelecttothedesiredpresetpattern.
ForTrack,selectMIDItrack1(Track01)towhichyou
assignedadrumprogram.
2. ForeachRPPRpattern,setSynctoSEQ.
WithasettingofSEQ,RPPRpatternstriggeredwhile
thesequencerisplayingorrecordingwillstartin
synchronizationwiththemeasuresofthesequencer.
(Seepage 158oftheParameterGuide.)
3. AccesstheP0:Play/REC–ProgramT01–08page.
4. Checkthe“RPPR”checkbox,andsetTrackSelect
toMIDITrack02.
IftheRPPRcheckboxisselected,theRPPRfunction
willbeturnedoneveninpagesandtabsotherthan
RPPRSetup,allowingyoutoperformwiththeRPPR
functionbypressingakeytowhichanRPPRis
assigned.
Note: InthenoterangeC#2andabove,keystowhich
nopatternhasbeenassignedcanbeplayedtosound
theprogramoftheMIDItrackselectedbyTrack
Select.
RPPR On
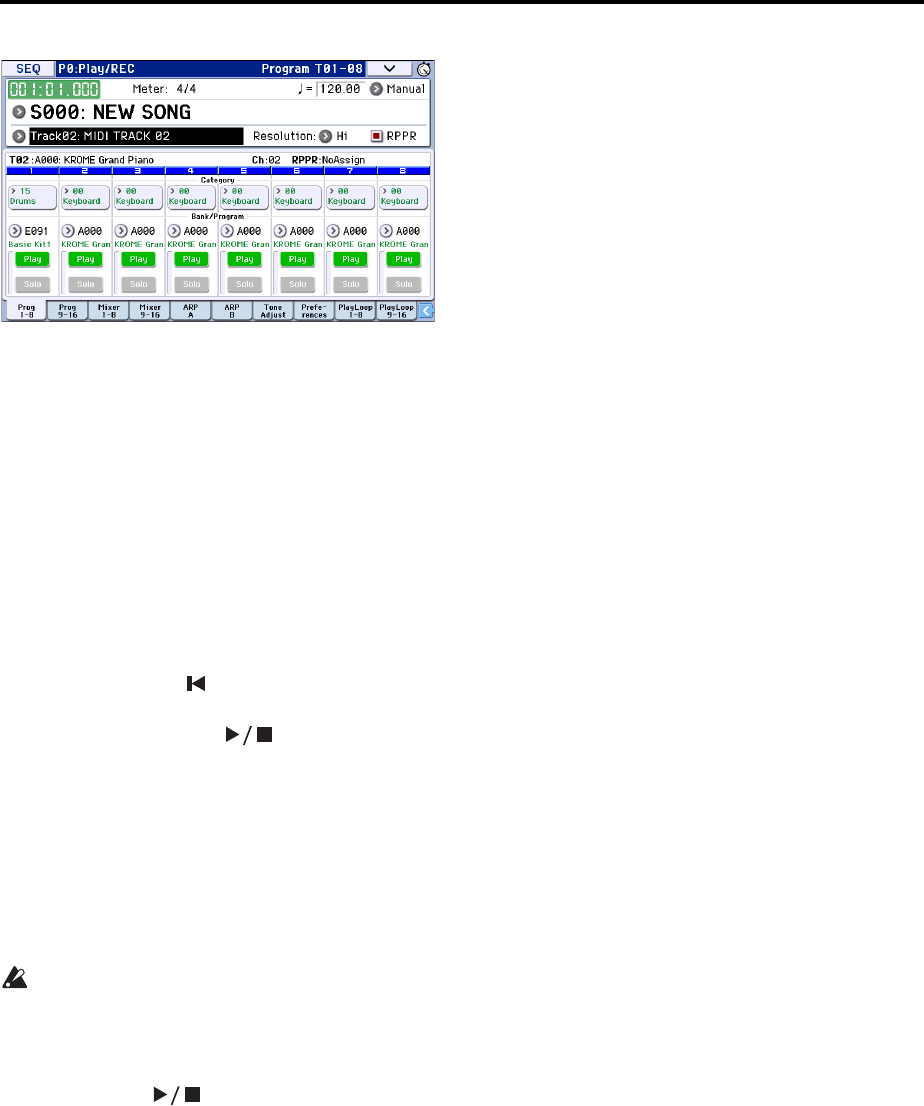
Creating an RPPR pattern Realtime-recording an RPPR performance
73
5. SinceyouwantthetracksyouplayviaRPPRand
thetrackyouplayfromthekeyboardtobe
recordedatthesametime,checktheMultiREC
checkbox.
Note: IfRecordingSetupissettoLoopAllTracks,it
willnotbepossibletoselectMultiREC.Setthe
RecordingSetuptoOverwrite(seepage 60).
6. PresstheSEQUENCERREC(●)buttontoenter
record‐readymode.
7. Forthetracksyouwillberecording(MIDITrack1,
2),pressPlay/Rec/Mutetomakethemindicate
REC.
Makesurethatthetracksyou’renotrecordingare
indicatedasPlayorMute.
8. PresstheLOCATE()buttontosetthelocation
to001:01.000.
9. PresstheSTART/STOP()button,andthen
pressakeythatplaysanRPPRpattern.
ThenpressthekeywheretheRPPRpatternplaybackis
assigned.
IfthekeywheretheRPPRisassignedispressed
duringthepre‐countbeforerecording,RPPRpattern
playbackwillstartthemomentthatrecordingbegins
afterthepre‐count.
RecordtheRPPRpatternplaybackandkeyboard
performance.
Whenrecordingtheplaybackofpatternstriggered
byRPPR,thetimingoftherecordedeventsmaybe
slightlyskewed.Ifthisoccurs,trysettingREC
ResolutiontoasettingotherthanHi.
10. Whenyouarefinishedperforming,pressthe
START/STOP()button.
Recordingwillend,andthesequencerwillreturnto
thelocationwhererecordingbegan.
Ifyoumadeamistakeduringyourperformanceor
wouldliketore‐record,youcanusetheCompare
function(presstheCOMPAREbutton)tore‐recordas
manytimesasyouwish.
11. Ifyouwanttorecordothertracks,un‐checkthe
MultiREC(Seestep5)or“RPPR”(Seestep4)
checkboxesasnecessary.
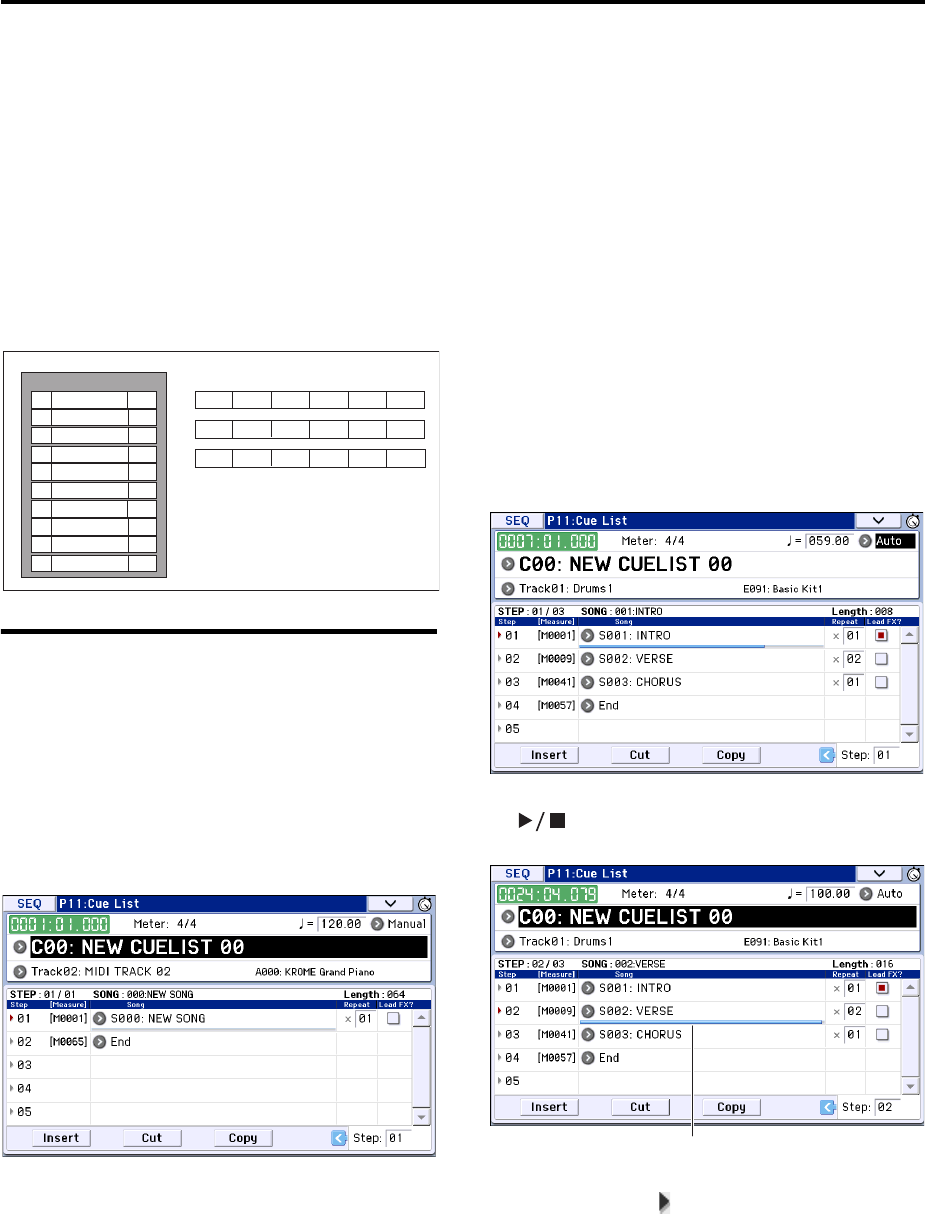
Creating songs (Sequencer mode)
74
Creating and playing a Cue List
Acuelistallowsyoutoplaymultiplesongsin
succession.Youcancreatetheindividualsectionsofa
song,suchastheintro,melodyA,melodyB,chorus,
andending,andthenuseaCueListtoassemblethese
sectionsintoasongbyspecifyingthedesiredorder
andthenumberofrepetitionsforeachsection.Youcan
theneditthecuelisttoefficientlytryoutdifferent
structuresforyoursong.
Youcanalsousethisasajukeboxfunctionthatwill
playbackcompletedsongsintheorderyouspecify.
Creating a cue list
Eachunitinacuelistiscalleda“step,”andeachstep
containsasongnumberandthenumberofrepeats.
Forexample,supposeyou’vecreatedthesongsS000:
INTRO,S001:VERSE,andS002:CHORUS.Let’susea
cuelisttoconnectthesesongstogether.
1. AccesstheSeqP11:CueListpage.
Withthedefaultsettings,songS000willbeselectedfor
“Step”01,andEndwillbeselectedfor“Step”02.
2. AddasongtotheSteparea.
Selectthe“Song”forStep02,andpresstheInsert
button.Asongwillbeaddedtostep02.Pressthe
popupbutton,andthenchooseS001:VERSEfromthe
list.
Inthesameway,selecttheStep03“Song,”andpress
theInsertbuttontoaddasongtoStep03.Setthisto
S002:CHORUS.
WhenyoupresstheCutbutton,theselectedstepwill
bedeletedandtemporarilysaved.Whenyoupressthe
Insertbutton,thesongthatwascutwillbeinsertatthe
selectedstep.
IfyoupresstheCopybutton,theselectedstepwillbe
copied.IfyoupresstheInsertbutton,thecopiedstep
willbeinserted.
3. SetthelaststeptoEnd.
IfyousetthistoContinuetoStep01,thecuelistwill
playbackrepeatedly.
4. In“Repeat,”specifythenumberoftimesthatthe
songforthatstepwillberepeated.Forthis
example,setStep02S001:VERSEto02.
5. Specifywhethereffectsettingswillalsobe
switchedwhenthesongateachstepisplayed
back.Ifyouwanteffectsettingstochange,check
the“LoadFX?”checkbox.
Forthisexample,checkthe“LoadFX?”checkboxfor
Step01,whichloadstheeffects.
6. Toplaybackatthetempothatwasspecifiedfor
eachsong,set“TempoMode”toAuto.
IfthisissettoManu(Manual),playbackwillusethe
tempospecifiedby“=”.
7. WhenyoupresstheSEQUENCERSTART/STOP
()buttonh,playbackwillbeginfromthe
stepthatisspecifiedasthe“CurrentStep.”
•Step:Thearrowwillindicatethestepthat’s
currentlyplaying.indicatesthecurrentlyselected
“Step.”TheSongPositionBarlocatedbelowthe
songnameshowstheprogressionofthesong
withinthestep.Whilestopped,youcanspecifythe
CurrentStepandthedisplaywillchange
accordingly.
•M****:Indicatesthestartingmeasureofthatstep.
•Meter:Indicatesthecurrently‐playingtime
signature.Thiscannotbechanged.
•Thenameofacuelistcanbespecifiedbythe
RenameCueListmenucommand.
•Whenyouplaythekeyboard,theprogramofthe
trackselectedbyTrackSelectwillsound.Ifa
differentprogramisselectedforeachsong,the
Step Song Repeat
S000: Intro
S001: A
S002: B
S003: Chorus
S001: A
01
02
03
04
05
06 S002: B
02
02
01
02
02
01
S003: Chorus
S001: A (Solo)
S003: Chorus
S004: Ending
07
08
09
10
02
01
03
02
Cue List
Intro Intro A A B Chorus
Chorus AAB Chorus Chorus
A(Solo) Chorus Chorus Chorus Ending Ending
Song Position Bar
Saving your song Converting a cue list to a song
75
programthat’sspecifiedforthesongthat’s
currentlyplayingwillplay.
Converting a cue list to a song
TheConverttoSongmenucommandletsyouconvert
acuelisttoasinglesong.
Fordetails,pleasesee“ConverttoSong(ConvertCue
ListtoSong)”onpage 189oftheParameterGuide.
Saving your song
Inordertoensurethatthedatayoucreateis
reproducedfaithfully,werecommendthatyousave
yourdatabyusingSaveAllsothattheprogramswill
alsobesaved.Howeverifyouhavenotchangedthe
programnumbersorsoundsusedinyoursong,saving
onlythesong‐relateddata(.SNG)willminimizethe
sizeofthedata.
Whenyouturnoffthepower,theSequencermode
settings,therecordedsongs,andtheuserpattern
datawillbelost.
1. InsertanSDcardintheSDcardslot.
Withthecardlabelfacingupward,inserttheconnector
endofthecardintotheSDcardslotandpressitin
untilyouhearaclick.
Makesurethatthecardisorientedcorrectlywhen
youinsertit.Forcingitinthewrongdirectionmay
damagetheslotorthecard,andthedatamaybe
lost.
2. PresstheWRITEbutton.
TheSaveSongsandCueListsDatadialogboxwill
appear.Ifyouwanttochangethename,adjustthe
appropriatesettings(seepage 117).
3. PresstheWRITEbuttononceagaintosave(write)
thedata.
Ifdataofthesamenamealreadyexists,asmessagewill
askwhetheryouwanttooverwritetheexistingdata.If
youwanttooverwritetheexistingdata,presstheOK
button.
Ifthesave‐destinationdirectoryissomething
otherthanaDOSdirectory(e.g.,ifyou’reina
directoryshownbyopeninga.PCGor.SNGfile),
amessagesuchas“File/pathnotfound”will
appear,andyouwon’tbeabletosavethedata.If
thisoccurs,movetoMediamode,selectthe
appropriatesave‐destination(i.e.,aDOS
directory),andthenexecute“SaveAll”or“Save
SEQ.”
Saving a template song
Ifyouwanttheprograms,trackparameters,effect
settings,andarpeggiatorsettingsetc.usedbyasongto
besavedasaTemplatesong,usetheSaveTemplate
Songmenucommandtosavethesesettings.

Creating songs (Sequencer mode)
76
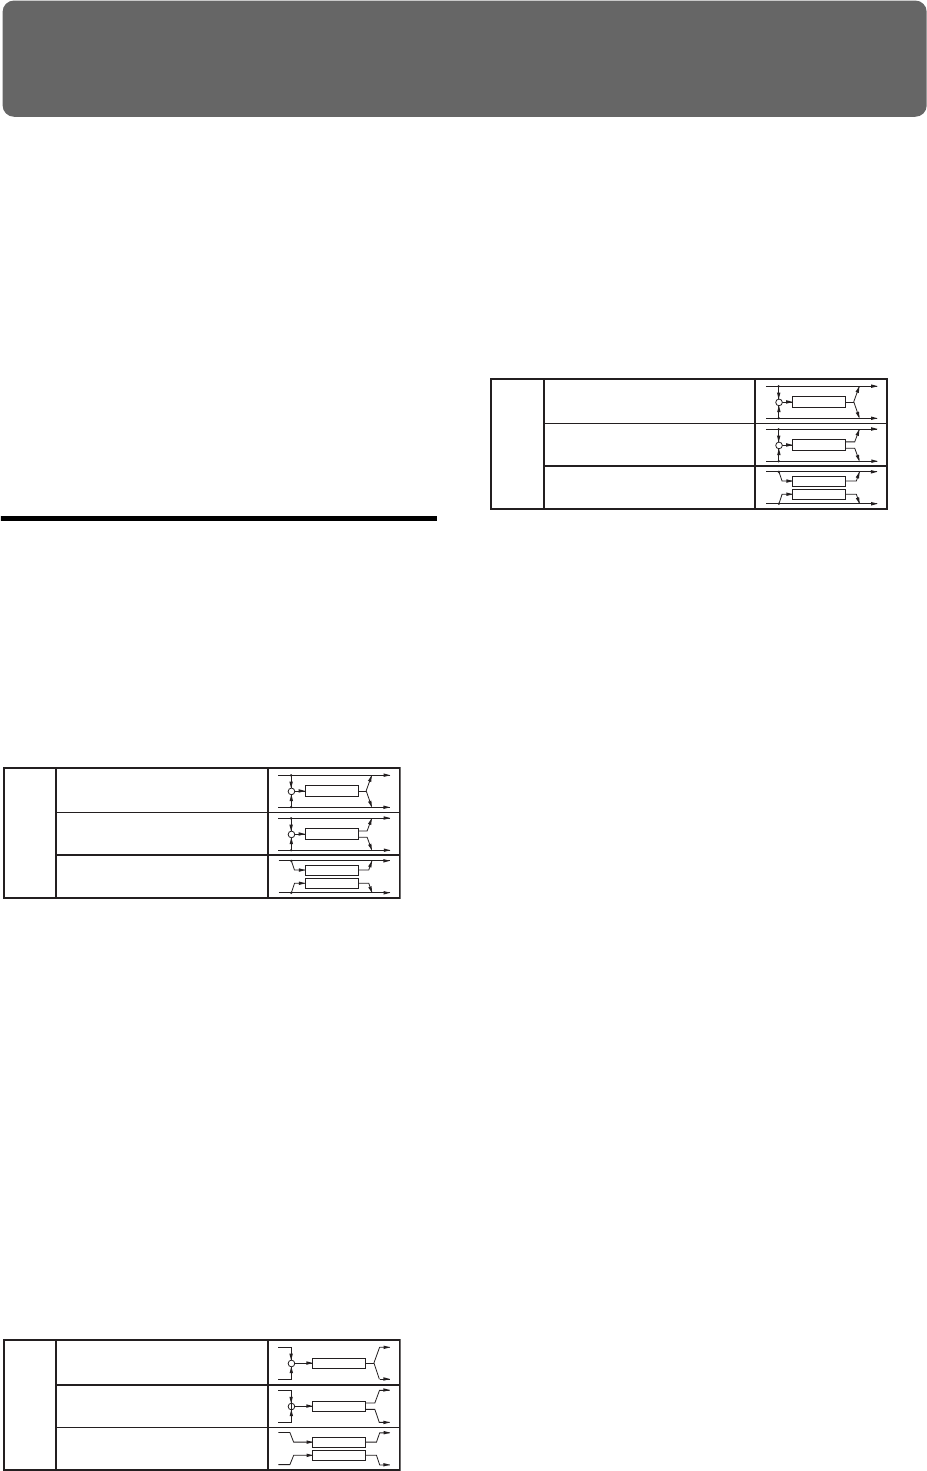
77
Using Effects
An overview of the KROME’s effects
Youcanchoosefrom193differenttypesofhigh‐
qualitydigitaleffects.TheKROMEprovidesfiveinsert
effects,twomastereffects,andonetotaleffect,together
withamixersectionthatcontrolstheroutingofthese
effects.Allofthesearestereoin/out.
Specificparametersoftheseeffectscanalsobe
controlledinrealtimefromtheKROME’scontrollers
orviaMIDImessagesusingDynamicModulation
(Dmod),byMIDI/TempoSync,orbyusingacommon
LFOtoapplysynchronizedchangestomultiple
modulationeffects.
Effect I/O
Insert Effects
InsertEffects(IFX1–5)arestereo‐in/stereo‐out.Ifyou
selectDry(unprocessed)fortheWet/Dryparameter,
thestereoinputsignalwillbeoutputinstereowithout
beingprocessedbytheeffect.IfyouselectWet(effect
applied),theprocessedsignalwillbeoutputinoneof
thefollowingways:
Master Effects
MasterEffectsMFX1andMFX2arestereo‐in/stereo‐
out.Send1andSend2determinethesendleveltothe
MasterEffects.
WithMastereffects,onlytheWet(processed)signal
willbeoutput.TheoutputsignalsfromtheMaster
EffectsareroutedtotheL/Rbuswiththeoutputlevel
specifiedbyReturn1andReturn2.Theseoutput
signalsaremixedwiththeoutputsignalsfromthebus
specifiedbyBus(IFX/Output)Select(P8–Routing
pageineachmode)L/R,orwiththeoutputsignals
fromthebusspecifiedbyBus(IFX/Output)Select(P8–
InsertFXSetuppageineachmode)L/R,thenroutedto
thetotaleffect.
Selecting“000:NoEffect”willmutetheoutput.The
processedsignalwillbeoutputinoneofthefollowing
ways,accordingtothetypeofeffects.
Total Effect
Thetotaleffect(TFX)isstereo‐in/stereo‐out.TheDry
(unprocessed)sideoftheWet/Dryparametersendsthe
stereoinputsounddirectlytothestereooutput.The
waythattheWet(processed)sideisoutputdependson
thetypeofeffect,asfollows.
Note: TheParameterGuideincludesblockdiagrams
foreachindividualeffect,whichincludetheeffect’s
input/outputstructure.(Seepage 251oftheParameter
Guide)
Stereo In - Stereo Out
Mono In - Mono Out
Mono In - Stereo Out
Eect
Eect
Eect
+
Eect
+
Wet
Stereo In - Stereo Out
Mono In - Mono Out
Mono In - Stereo Out
Eect
Eect
Eect
+
Eect
+
Wet
Stereo In - Stereo Out
Mono In - Mono Out
Mono In - Stereo Out
Eect
Eect
Eect
+
Eect
+
Wet
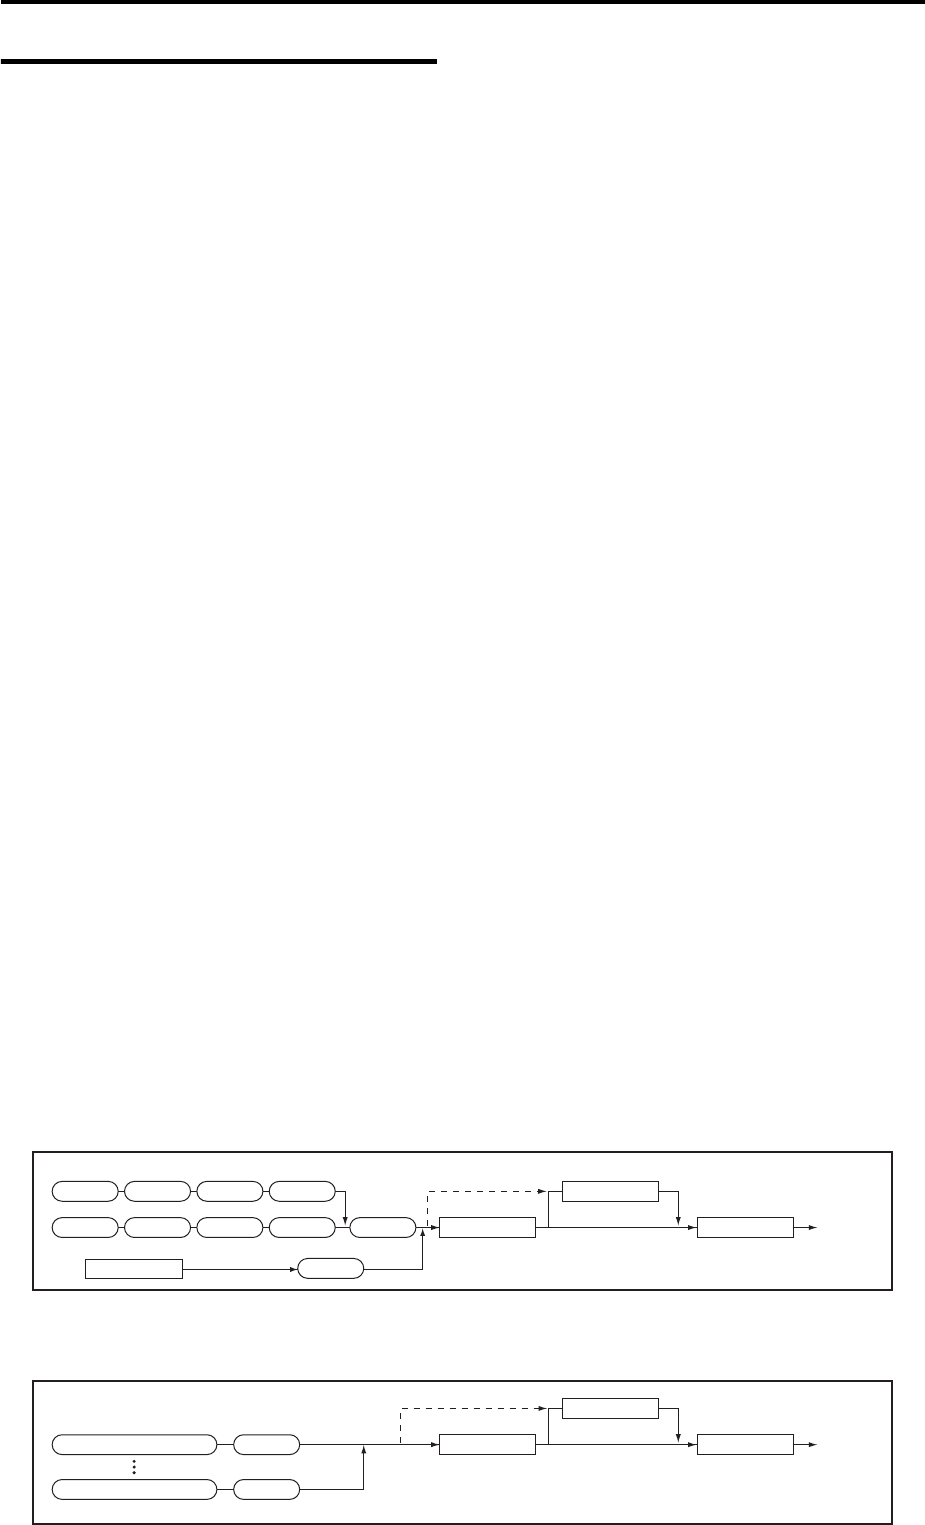
Using Effects
78
Effects in each mode
Program mode
Forprograms,youcanuseinserteffectstoprocessthe
finalsoundinthesamewaythatyouusetheFilter,
Driver,Amplifier,andEQ(equalizer)toprocessthe
soundfromtheoscillators(OSC1&2).Next,the
mastereffectsareusedtocreateoverallambiencesuch
asreverb,andyouusethetotaleffecttomakefinal
adjustments.Youcanapplyaneffectinthesameway
totheoutputofadrumtrackprogram.Allofthese
settingscanbemadeindependentlyforeachprogram.
Combination and Sequencer modes
InCombinationandSequencermodes,youcanusethe
trackEQandinserteffectstoprocessthesoundofeach
timbre/trackprogram.Thenyoucanusethemaster
effectstocreateoverallambience,andusethetotal
effecttomakefinaladjustments.
InCombinationmode,youcanadjustthesesettingsfor
eachcombination,andinSequencermodeyoucan
adjustthemforeachsong.
InSequencermode,youcanswitchbetweeneffectsor
modifytheeffectparametersandrecordthesechanges,
sothateffectswillswitchautomaticallyoreffect
parameterswillbemodifiedautomaticallyasthesong
playsback.
Programmode
Oscillator1 Filter1 Driver1 Amplier1
Oscillator2 Filter2 Driver2 Amplier2 EQ
EQ
Insert Eect 1–5
Drum Track
Total Eect
Master Eect 1, 2 Return
OUTPUT
L/MONO, R
Send
CombinationandSequencermodes
Timbre 1 /MIDI Track 1 EQ
Timbre 16 /MIDI Track 16 EQ
Insert Eect 1–5 Total Eect
Master Eect 1, 2 Return
OUTPUT
L/MONO, R
Send

Routing effect settings Program Effects settings
79
Routing effect settings
Theinserteffects,mastereffects,andtotaleffecthave
thesamestructureinallmodes,buttherouting
settingswilldeterminehowtheoscillatorsofa
programorthetimbresofacombinationortrackofa
songwillbesenttoeachinserteffect,mastereffector
totaleffect.Inthepagesthatfollow,wewillexplain
howyoucanadjustroutingsettingsandeffectsettings
ineachmode.
Program Effects settings
Routing
1. AccesstheProgP8:Routing/IFX–Routingpage.
2. UseBus(IFX/Output)Selecttospecifythebus
wheretheoscillatoroutputwillbesent.Ifyou
wanttheoscillatoroutputtobeinputtoinsert
effect1,chooseIFX1.
L/R:Theoutputwillnotbesenttothetotaleffect.After
bypassingthetotaleffect,thesoundwillbesentto
AUDIOOUTPUTL/MONOandR.
IFX1–5:TheoutputwillbesenttoinserteffectIFX1–5.
Off:Choosethisifyouwantthesignaltobeconnected
inseriestothemastereffectsatthesendlevels
specifiedbySend1(toMFX1)andSend2(toMFX2).
3. OSCMFXSendspecifiesthesendlevelfromeach
oscillatortothemastereffects.
ThiscanbesetonlywhenBus(IFX/Output)Selectis
eitherL/RorOff.
IfBus(IFX/Output)SelectissettoIFX1–5,thesend
leveltothemastereffectsissetbySend1andSend2
(InsertFXSetuppage)afterthesignalpassesthrough
theinserteffects.
4. FXControlBussendstheoutputofoscillator1and
2totheFXControlbus.Usethisifyouwantthe
audioinputtotheeffecttobecontrolledbya
differentsound.
YoucanusethetwoFXControlbusestocontroleffects
freely.Fordetails,pleasesee“FXControlBuses”on
page 238oftheParameterGuide.
Insert effects
5. AccesstheProgP8:Routing/IFX–InsertFXSetup
page.
6. Choosetheeffecttypethatyouwanttousefor
eachinserteffectIFX1–5.
Whenyoupressthepopupbutton,alleffectswillbe
displayed,organizedintotencategories.Usethepages
locatedtotheleftandrighttoselectacategory,and
chooseaneffectfromthedesiredcategoryonthe
display.
YoucanusetheCopyInsertEffectmenucommandto
copyeffectsettingsfromanotherprogrametc.Also,
youcanuseSwapInsertEffecttoexchange(for
example)IFX1andIFX5.
7. PresstheOn/Offbuttontoturnontheinsert
effect.
Eachtimeyoupressthisbutton,theinserteffectwill
toggleon/off.WhenOff,theresultwillbethesameas
when000:NoEffectisselected;thesoundwillbe
outputwithoutbeingprocessedbytheinserteffect.
8. MakeChainsettings.
IftheChaincheckboxischecked,theinserteffectwill
beconnectedinseries.Sincetheoutputoftheoscillator
isbeingsenttoIFX1instep2,adjustingsettingsas
showninthediagramabovestep6,wouldconnectall
fiveinsertioneffectsIFX1IFX2IFX3inseries,so
thattheseeffectswouldbeinsertedintotheoutputof
theoscillator.
9. AdjustsettingsforPan:#8,Bus(BusSelect),Send
1,Send2andFXCtrlforthesoundafterithas
passedthroughtheinserteffects.
Ifyou’vespecifiedachain,thesettingsthatfollowthe
lastIFXinthechainwillbevalid(exceptforFXCtrl).
Pan:#8:SetsthepanoftheIFXoutput.
Bus(BusSelect):Specifiestheoutputdestination.
NormallyyouwillsetthistoL/R.
Send1,Send2:Setsthesendlevelstothemaster
effects.Forthisexample,setthisto127.
FXControlBus:TheFXControlBusesletsyoucreate
effects“sidechains.”Sidechainsletyoucontrolan
effectwithoneaudiosignal(thesidechain),whilethe
effectprocessesacompletelydifferentaudiosignal.
Thisisconvenientforusewithvocoders,compressors
andlimiters,gates,etc.Fordetails,pleasesee“FX
ControlBuses”onpage 238oftheParameterGuide.
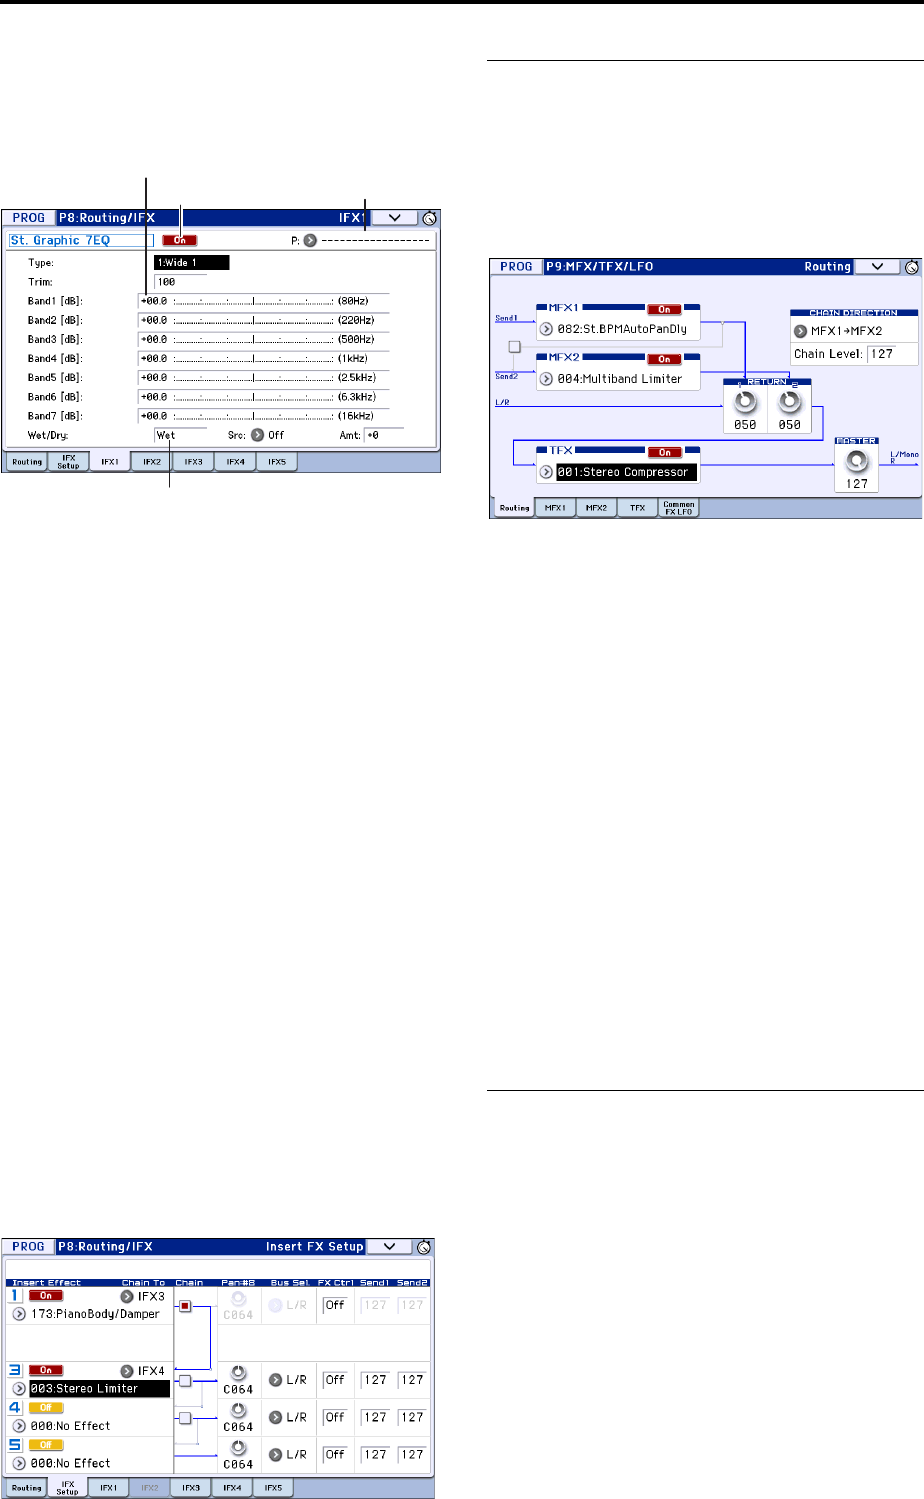
Using Effects
80
10. AccesstheP8:Routing/IFX–InsertFXSetuppage,
andedittheparametersoftheinserteffectyou
selected.
PresstheIFX1–5tabsandedittheparameters.
Effect1On/Off:Turnstheinserteffecton/off.Thisis
linkedwiththeon/offsettingontheInsertFXSetup
page.
P(EffectPreset):Selectsaneffectpreset.TheKROME’s
internalmemorycontains“effectpresets”whichare
parametersettingsforeacheffectfrom001:Stereo
Compressorthrough193:EarlyReflections.
Effectparametersyoueditaresavedaspartofeach
program,buteffectpresetsallowyoutosaveandrecall
yourfavoriteparametersettingsforeacheffect.If
you’vecomeupwithaneffectsettingyoulike,usethe
menucommandWriteFXPresettosaveitasapreset
sothatyoucaneasilyrecallitinadifferentprogramor
mode.
Fordetailsontheparametersofeacheffect,see
page 251andfollowingintheParameterGuide.
Double-size effects
Double‐sizeeffects(172:St.MltbandLimiter–193:
EarlyReflections)usetwiceasmuchspaceasother
effects.
Youcanusedouble‐sizeeffectsforinserteffectsIFX1–
IFX4andmastereffectMFX1.However,becauseit
takesuptwounitsofeffectspower,thenext‐numbered
effectwillbeunavailable.Forexample,ifyou’ve
selectedadouble‐sizeeffectforIFX1,youwon’tbeable
touseIFX2.Ifyou’veselectedadouble‐sizeeffectfor
MFX1,youwon’tbeabletouseMFX2.
Anexampleofwhenadouble‐sizeeffectisselectedforIFX1
andIFX4
Master effects
11. Theinputlevelstothemastereffectsaresetby
theSend1,2levels(step3or9).IfSend1,2are
zero,themastereffectswillnotapply.Send1
correspondstoMFX1,andSend2correspondsto
MFX2.
12. AccesstheProgP9:MFX/TFX/LFO–Routingpage.
13. InMFX1andMFX2,selectthetypeofeachmaster
effect.
Theprocedureisthesameaswhenselectinganinsert
effect(seestep6).
Note: Youcanonlyselectadouble‐sizeeffectfor
MFX1.Fordetails,pleasesee“Double‐sizeeffects,”
above.
14. PresstheOn/Offbuttontoturnonthemaster
effect.
Eachtimeyoupressthisbutton,themastereffectwill
toggleon/off.WhenOff,theoutputofthemastereffect
willbemuted.
15. UseReturn1andReturn2toadjusttheoutput
levelsofthemastereffects.
Note: Foreacheffect,theWetvalueoftheWet/Dry
parameteristheoutputleveloftheeffect.Thereturn
valueismultipliedwiththis(“Return”=127willbe
x1.0)todeterminetheactualoutputlevelofthemaster
effect.
16. SelecttheMFX1andMFX2pages,andsetthe
parametersforeachselectedeffect.
Fordetailsonthe“ProgramEffectssettings”step10.
Total Effect
17. IfyouuseBus(IFX/Output)SelecttochooseL/R
astheoscillatoroutput,orifyousetthepost‐IFX
BustoL/R,thesignalwillbeinputtothetotal
effect.
Theoutputfromthemastereffectisinputtothetotal
effectviatheReturn1andReturn2settingsoftheProg
P9:MFX/TFX/LFO–Routingpage.
Afterbeingprocessedthroughthetotaleffect,the
signalisoutputfromtheAUDIOOUTPUTL/MONO
andRoutputs.
18. AccesstheProgP9:MFX/TFX/LFO–Routingpage.
19. ChoosethedesiredtotaleffectforTFX.The
procedureisthesameaswhenselectinganinsert
effect.(Seestep6)
Youcan’tuseadouble‐sizeeffectasthetotaleffect.
Fordetails,pleasesee“Double‐sizeeffects,”above.
P (Eect Preset)
Eect Parameters
Eect On/O
Wet/Dry

Routing effect settings Using effects in Combinations and Songs
81
20. PresstheOn/Offbuttontoturnthetotaleffecton.
Thetotaleffectwilltoggleon/offeachtimeyoupress
thebutton.IfthisisOff,theresultwillbethesameasif
000:NoEffectisselected.Theinputsoundwillbe
outputwithoutbeingprocessedbythetotaleffect.
21. AccesstheTFXpage,andedittheparametersof
eacheffecttoadjustthefinalsoundasdesired.
Fordetailsonthe“ProgramEffectssettings”,seestep
10.
Using effects in Combinations
and Songs
InCombination,andSequencermodes,youcan
specifytheroutingofeachtimbre/tracktotheinsert
effects,mastereffectsandtotaleffect.Thesesettings
areadjustedinthesamewayineachofthesemodes.
WewillbeusingtheexampleofCombinationmodein
ourexplanationhere.
Routing
1. AccesstheCombiP8:Routing/IFX–RoutingT01–
08page.
2. Use“Bus(IFX/Output)Select”tospecifythebus
whereeachtimbrewillbeoutput.ChooseIFX1if
youwanttosendtheoutputofatimbretoinsert
effect1.
Therouting,inserteffects,andchainsettingsare
showngraphicallyontheupperpartofthepage.In
thisexample,T01(timbre1)usesIFX1and2.T02uses
IFX2,T03usesIFX3and4,T02andT05useIFX4,and
T06andT07useIFX5.
3. UseSend1andSend2tospecifythesendlevelof
eachtimbretothemastereffects.
ThiscanbesetonlyifBus(IFX/Output)Selectissetto
L/RorOff.
Note: Theactualsendlevelisdeterminedby
multiplyingthisbytheSend1orSend2settingsfor
oscillators1and2withintheprogramselectedbythe
timbre.IftheprogramparameterSend1orSend2is
setto0,theresultinglevelwillstillbe0evenifyou
raisethissendlevel.
IfBus(IFX/Output)SelectissettoIFX1–5,thesend
levelstothemastereffectsaresetbySend1andSend2
(InsertFXSetuppage)followingtheinserteffects.
4. PresstheFXControl1–8tabstoaccesstheFX
ControlT01–08pages.
Bus(IFX/Output)SelectisthesameasintheRouting
T01–08page.Youcansetitfromeitherpage.
FXControlBussendstheoutputofthetimbretoanFX
Controlbus.Usethiswhenyouwanttheaudioinput
toaneffecttobecontrolledbyanothersound.There
aretwoFXControlbuses,whichgivesyouagreatdeal
offreedomforcontrollingeffectsfreely.Fordetails,
pleasesee“FXControlBuses”onpage 238ofthe
ParameterGuide.
Insert effects
5. AccesstheCombiP8:Routing/IFX–InsertFX
Setuppage.
6. SelectaninserteffectinIFX1–5andeditthe
settings.
7. AccesstheIFX1–5pagestoedittheindividual
effectparameters.
Thesesettingscanbeadjustedinthesameway.(See
page 79.)
YoucanuseMIDItocontroldynamicmodulation
(Dmod)foreacheffect,thepost‐IFXpan(CC#8),
andSend1andSend2levels.
Anasterisk“*”isshownattherightofCh01–Ch16
forthechannelnumberoftracksroutedtoIFX.If
you’veroutedmultipletracksthathavedifferent
MIDIchannelsettings,thisspecifiesthechannel
onwhichtheywillbecontrolled.
Master effects and Total effect
Thesesettingscanbeadjustedinthesamewayason
page 80.
YoucancontroltheseeffectsviaMIDIonthe“Ctrl
Ch.”ThespecifiedMIDIchannelwillcontrol
dynamicmodulation(Dmod)fortheMasterand
TotalEffect.
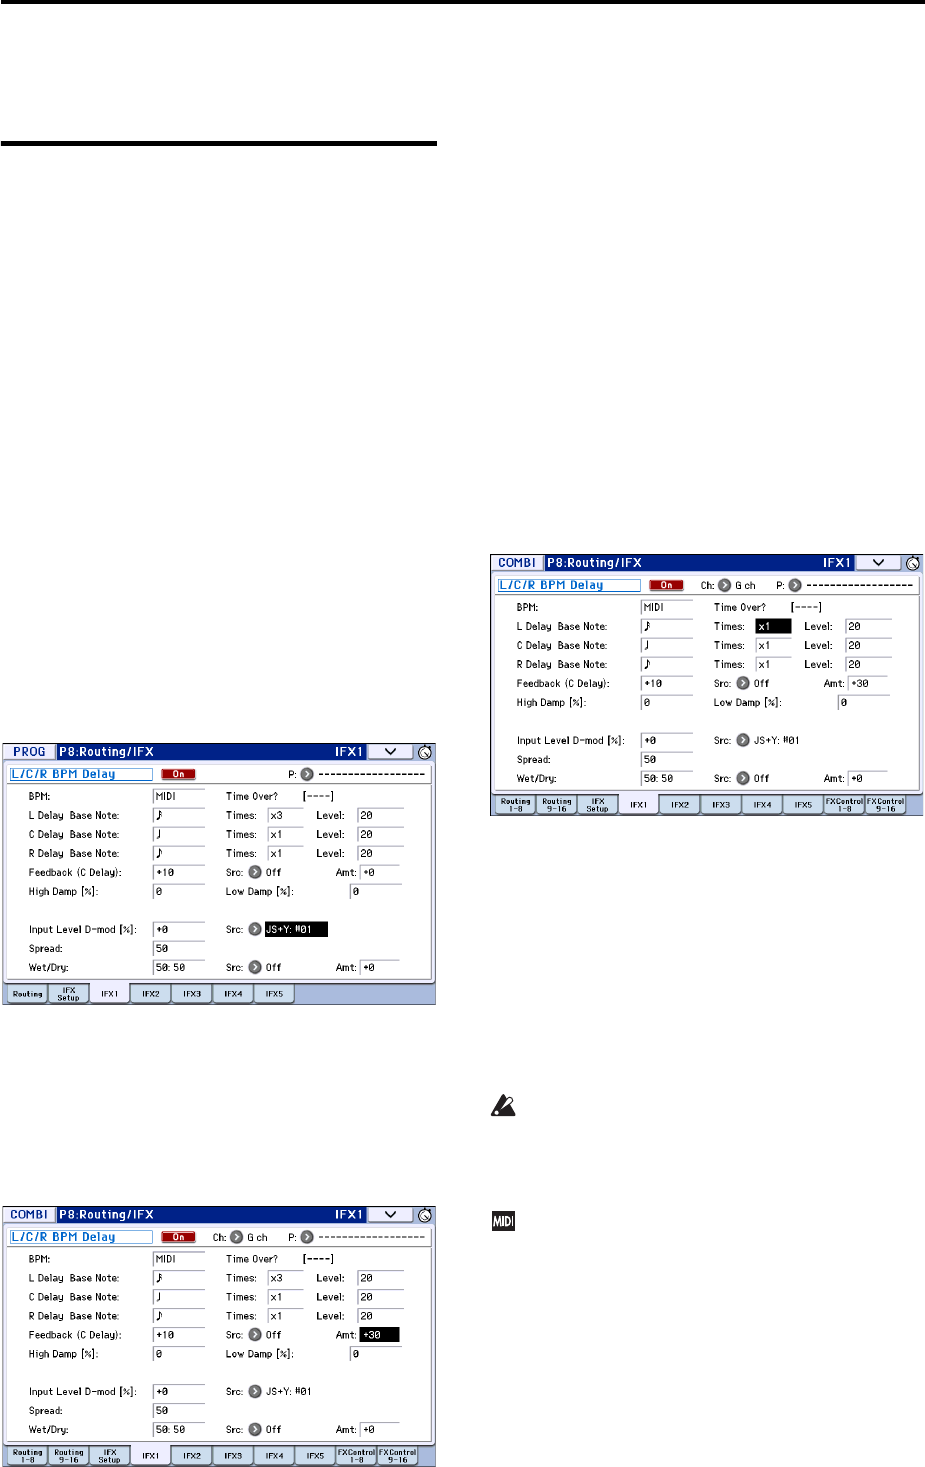
Using Effects
82
Dynamic modulation, Common FX LFO
Dynamic modulation (Dmod)
Dynamicmodulation(Dmod)letsyouuseMIDI
messagesortheKROME’scontrollerstomodulate
specificeffectparametersinreal‐time.
Dynamic modulation to control an effect pa-
rameter in realtime
Asanexample,let’ssetupdynamicmodulationto
controlaneffectparameterinrealtime.
1. Asdescribedintheprocedurefor“Program
Effectssettings”onpage 79,setIFX1to078:L/C/R
BPMDelay.Verif ythatyou’rehearingadelay
effect.
2. AccesstheProgP8:Routing/IFX–IFX1page.
Now, we can set the Dmod to change the delay
level via the Joystick
3. SetInputLevelD‐modto+100.
4. SetSourcetoJS+Y:#01.
Thedelaysoundwilldisappear.
Theinputleveltotheeffectcanbecontrolledbythe
joystick.Asyoumovethejoystickawayfromyourself,
thedelaysoundwillgraduallyincrease.
In addition, we can use Dmod to change the feed-
back level via SW1
5. IntheP1:Basic/Controllers–ControllersSetup
page,settheSW1functiontoSW1Mod.CC#80,
andtheModetoToggle.
ChooseP8:Routing/IFX–IFX1page.SettheFeedback
SrctoSW1:#80,andsetAmtto+30.
Whenyoumovethejoystickawayfromyourselfand
presstheSW1button,thefeedbacklevelwillincrease,
andthedelaysoundwillcontinueforalongertime.
TheAmtsettingspecifiesthefeedbacklevelthatwill
beineffectwhentheSW1buttonispressed.IfAmtis
setto–10,pressingtheSW1buttonwillreducethe
feedbacklevelto0.
Finally, we can use the MIDI/Tempo Sync
function to synchronize the delay time to the
arpeggiator tempo.
6. SetBPMtoMIDI.
7. ForL,C,andR,settheDelayBaseNoteandTimes
asdesired.
Forthisexample,setDelayBaseNoteto andTimes
tox1sothattheeffectwillbeeasilyunderstandable.
Thedelaytimewillrepeatatanintervalofa8thnote.
8. RotatetheTEMPOknob,andthedelaytimewill
change.
Whenyou(pushthejoystickawayfromyourselfand)
presstheSW1button,thefeedbacklevelwillrise,and
thedelayswillbecomelonger.
9. WhenyouturnontheARPbutton,arpeggiator
willbeginplaying.
Selectanydesiredarpeggiator.Whenyourotatethe
TEMPOknob,thedelaytimewillchangein
synchronizationwiththechangingtempoofthe
arpeggiator.
Dependingonthespecificdelayeffect,youmay
hearsomeunexpectednoiseifyouchangethe
tempowhilethedelayissounding.Thisisbecause
thedelaysoundbecomesdiscontinuous,andisnot
amalfunction.
Forsomeeffects,youcansynchronizetheLFO
frequencytothetempo.Settheeffectparameters
MIDISynctoOn,andBPMtoMIDI.Fordetails,
pleaseseepage 236oftheParameterGuide.
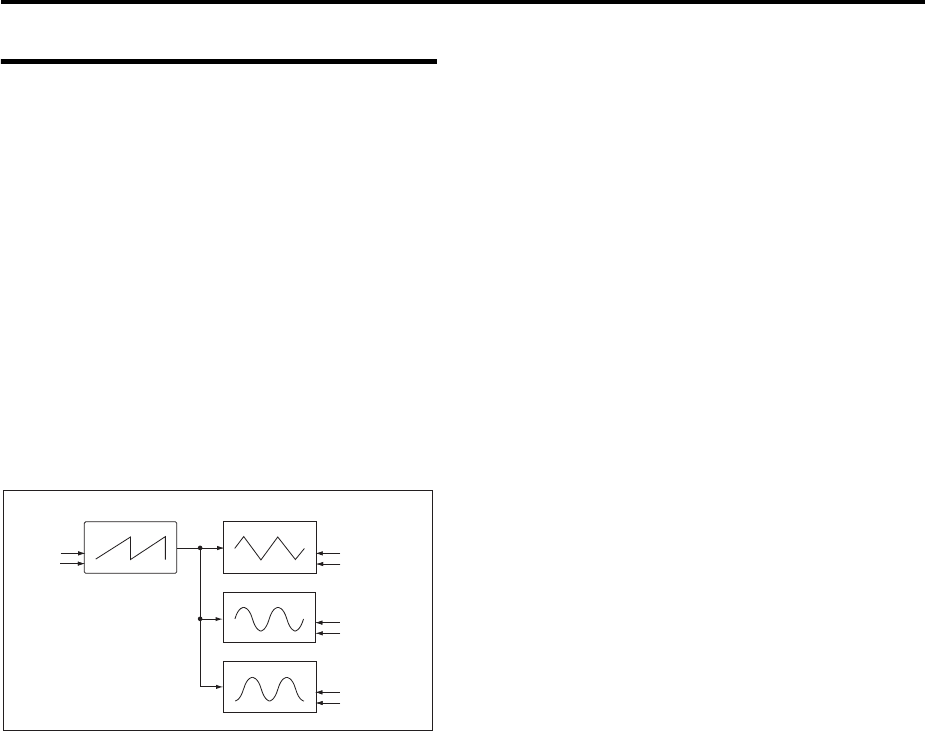
Dynamic modulation, Common FX LFO Common FX LFO
83
Common FX LFO
TwoCommonFXLFOsareavailableformodulation
effects,suchaschoruses,filters,phasers,etc.Normally,
thephaseoftheLFOsofmultiplemodulation‐type
effectswillnotbesynchronizedevenifyousetthemto
theidenticalFrequency,sincetheLFOsarebeing
generatedindependently.
However,ifyouselectCommon1orCommon2forthe
LFOTypeparameterofamodulation‐typeeffect,the
effectwillusetheoneofthecommonLFOsinsteadof
itsownindividualLFO.Thisallowsyoutouseasingle
CommonFXLFOtocontroltwoormoremodulation‐
typeeffectssuchasflanger,phaser,orauto‐panwith
thesamephase.Sinceyoucanmakeindependent
settingsforLFOwaveformandphaseoffsetforeach
effect,youarefreetocreatecomplexcombinationsof
effects.
Stereo Flanger
Common FX LFO1
Common FX LFO
Stereo Phaser
Stereo Auto Pan
Waveform = TriangleFrequency[Hz]
Reset Phase Oset = 0 [deg]
Waveform = Sine
Phase Oset = 0 [deg]
Waveform = Sine
Phase Oset = +90 [deg]
LFO Type = Common1
Generate original LFO waveform

Using Effects
84
85
Arpeggiator function
Using the arpeggiator while you play
Thearpeggiatorisafunctionthatautomatically
generatesarpeggios(patternsofindividualnotes
derivedfromachord).Mostarpeggiatorsproducean
arpeggiowhenyouplayachordonthekeyboard.
TheKROME’sarpeggiatorisalsopolyphonic,andcan
produceavarietyofchordaltransformationsor
phrasesbasedonthepitchortimingofthenotesyou
playonthekeyboard.Thesefunctionsletyouusethe
arpeggiatortoplayawiderangeofpatternsincluding
drumorbassphrases,andguitarorkeyboardbacking
riffs.Itisalsoeffectivetousethearpeggiatoraspartof
thesound‐designprocesswhencreatingsubtly‐
movingpads,synth‐sounds,orsoundeffects.
TheKROME’sDualArpeggiatorfeatureletsyouuse
twosimultaneousarpeggiopatternsinCombination
mode,andSequencermode.Youcantakeadvantageof
thisinmanyways,includingaseparatearpeggio
patternforadrumprogram,andanotherappliedtoa
bassprogram,orusingakeyboardsplitorvelocityto
switchbetweentwoarpeggiopatterns.
TheKROMEprovidesfivepresetarpeggiopatterns:
thestandardUP,DOWN,ALT1,ALT2,and
RANDOM.Youcanalsocreateandstore1,028ofyour
ownuserpatterns.Thefactorysettingscontainawide
varietyofarpeggiopatternsstoredintheseuser
locations(seepage 211oftheParameterGuide).
Using the arpeggiator in
Program mode
1. PressthePROGbuttontoenterProgrammode,
andselectaprogram.Fordetails,pleasesee
“SelectingPrograms”onpage 21.
2. PressARPbutton(theLEDwilllight)toturnon
thearpeggiator.Arpeggioswillbeginsounding
whenyouplaythekeyboard.
3. Asdescribedinthefollowingsections“Using
knobs1–4tocontrolthearpeggiator”and
“Selectinganarpeggiopatternandspecifyingits
function,”movethecontrollersormodifythe
parameterstochangethewaythatthearpeggios
areplayed.
Arpeggiator on/off
•EachtimeyoupresstheARPbutton,the
arpeggiatorwillbeswitchedon/off.
Whenthearpeggiatoristurnedon(theLEDwilllight
up)andtheselectedarpeggiopatternwillbeginwhen
youplaythekeyboard.
Note: Theon/offstatusissavedwhenyouwriteeach
program.
InCombinationandSongmodes,thearpeggios
maynotstartwhenyoupresstheARPbutton‐
dependingonthesavedsettings.Youmayneedto
playakeyboard(seepage 90).
Adjusting the arpeggiator tempo
• RotatetheTEMPOknoborTAPbutton
toadjustthetempo.
The“ =”displayintheupperrightof
theLCDwillchange.Thetempocanbe
adjustedoverarangeof40.00–300.00
bpm.TheLEDwillblinkintimewith
thespecifiedtempo.
AsanalternativetousingtheTEMPO
knoborTAPbutton,youcanalsosetthe
tempobyselecting“=”inthedisplay,
usingthenumerickeys0–9toenterthetempo,and
pressingtheENTERbutton.Youcanalsosetthe
tempobyusingtheVALUEcontrollers.TheLED
willblinkinsynchronizationwiththetempoyou
specify.
Note: Thetemposettingisalsosavedwhenyouwritea
program.
Note: Thearpeggioplaybackspeedisaffectedbythe
Resosetting(ProgP0:Play–Arpeggiatorpage),or
Resolution(P7:ARP/DT–ARPSetuppage).
IftheGlobalP1:MIDI–MIDIBasicpageMIDI
ClockparameterissettoExternalMIDI,External
USB,orsettoAutoandMIDIClockmessagesare
beingreceived,thedisplaywillindicate“=”EXT,
meaningthattheKROMEissynchronizedtoan
externalMIDIdevice.Inthiscase,youwon’tbe
abletochangethetempobyusingtheKROME.
The chord you played on
the keyboard is sounded as
an arpeggio (broken chord)
Arpeggiator function
86
Using knobs 1–4 to control the
arpeggiator
•Youcancontrolthearpeggiatorbypressingthe
SELECTbuttontoselectARPandthenturning
knobs1–4.
Adjusting the duration of the arpeggiated
notes
•Turnknob1toadjustthedurationofthe
arpeggiatednotes.
Rotatingtheknobtowardtheleftwillshortenthe
durationofthenotes,androtatingittowardthe
rightwilllengthenthedurationofthenotes.Atthe
centerposition(12o’clock),thenotelengthwillbe
asspecifiedbytheprogramparameter:Gate(Prog
P7:ARP/DT–ARPSetuppage).
Note: Theknobsettingissavedwhenyouwriteeach
program.
Note: ItiseffectivetousetheSELECTbuttontoselect
TONE,andthenadjustknob4(RELEASE).
Changing the dynamics of the arpeggiated
notes
•Turnknob2toadjustthedynamicsofthe
arpeggiatednotes.
Turningtheknobtowardtheleftwillmakethe
notessofter,andturningittowardtherightwill
makethenotesstronger.Whentheknobisinthe
centerposition(12o’clock),thevalueofthepro‐
gramparameterVelocity(ProgP7:ARP/DT–Arp
Setuppage)willbeused.
Note: Thestateoftheknobissavedwhenyouwrite
theprogram.
Note: ItiseffectivetousetheSELECTbuttontoselect
TONE,andthenadjustknobs1(CUTOFF),2
(RESONANCE),and3(EGINT).
Adding a shuffle feel to the arpeggio pattern
•Ifyouturnknob3,thetimingofthearpeggiated
notesoneven‐numberedbeatswillbeshifted
forwardorbackward.
Turningtheknobtowardtheleftwillspeedupthe
timingoftheeven‐numberedbeats.Whentheknob
isinthecenterposition(12o’clock),thetimingwill
beasspecifiedbytheprogramparameterSwing
(GlobalP6:ArpeggioPattern‐Setuppage).
Changing the number of steps in the
arpeggio pattern
•Byturningknob4(STEP),youcanchangethe
numberofstepsinthearpeggiopattern.
Turningtheknobtowardtheleftwillshortenthe
patternlength(“Length”)byhalf.Turningtheknob
towardtherightwillshortentheintervalofthe
arpeggiatednotes(“Resolution”)byhalf.Whenthe
knobisinthecenterposition(12o’clock),thepat‐
ternwillbeasspecifiedbytheparametersLength
andResolution(GlobalP6:ArpeggioPattern–
Setuppage).
Ifthearpeggiopatternselectedby“Pat(Pattern
Select)”isoneofthepresetarpeggiopatternsP0–
P4,turningtheknobswillnotproduceany
change.Theseadjustmentsareavailableonlyifa
userarpeggiopatternU0000(INT)–U1027(USER)
isselected.
Note: Thestateoftheknobsissavedwhenyouwrite
theprogram.
Note: Dependingontheprogramthat’sselected,using
knob4maynotproduceanyeffect.
Selecting an arpeggio pattern and
specifying its function
IntheProgP0:Play–Arpeggiatorpageyoucanselect
anarpeggiopatternandspecifyhowthearpeggiator
willfunction.
•InProgP0:Play,presstheARPtabtoaccessthe
ProgP0:Play–Arpeggiatorpage.
Selecting an arpeggio pattern
Anarpeggiopatterncanbeselectedfrompreset
arpeggiopatternsP0–P4anduserarpeggiopatterns
U0000(INT)–U1027(USER).Thefactorysettings
U0000(INT)–U0899(INT),U0900(USER)–U1027(USER)
containawidevarietyofpreloadeduserarpeggio
patterns.
•ChoosePattern,andusetheVALUEdial,INC/DEC
buttons,andpopupmenutoselectanarpeggio
pattern.
Userarpeggiopatternscanalsobeselectedbyusing
thenumerickeys0–9toinputthepatternnumber
andthenpressingtheENTERbutton.
P0: UP
UP
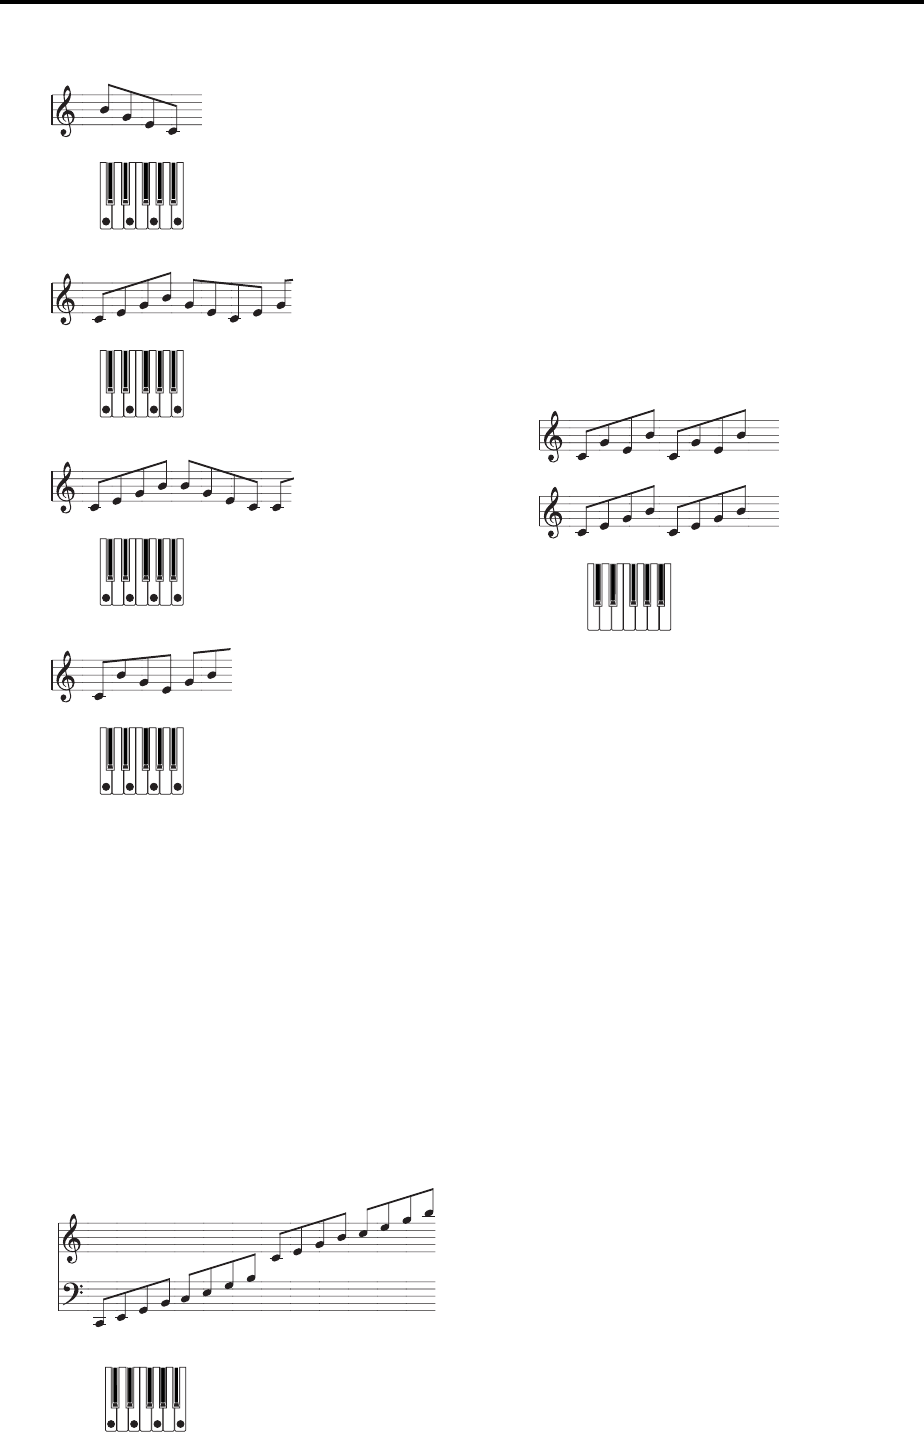
Using the arpeggiator while you play Using the arpeggiator in Program mode
87
P1: DOWN
P2: ALT1
P3: ALT2
P4: RANDOM
Changing the note value of the arpeggiated
notes
TheResolutionparameterletsyousetthenotevalue
ofthearpeggiatednotes,overarangefrom 3 –.
•PressResolution,andusetheVALUEdial,INC/
DECbuttons,orpopupmenutoselectthedesired
arpeggionotevalue.
Selecting the octave range where the
arpeggio is sounded
Usethe“Octave”radiobuttonstospecifytherangeof
octaveswherethearpeggiowillplay.
•Pressan“Octave”radiobuttontomakeyour
selection.
Sounding an arpeggio in the order of the
pitches in the chord you played
Youcanselectwhetherthenotesofthearpeggiowill
besoundedintheorderofthepitchesinthechordyou
played(regardlessoftheorderinwhichyouactually
playedthenotes),orintheorderinwhichyouplayed
thenotes.
•Pressthe“Sort”checkboxinthedisplaytomake
thissetting.
Checked:thearpeggiowillplayeachnoteinthe
orderofitspitch,regardlessoftheorderinwhich
youactuallyplayedthenotes.
Unchecked:thearpeggiowilltriggereachnotein
theorderinwhichyouactuallyplayedthenotes.
Setting the arpeggio to continue playing
even after you have taken your hand off the
keyboard
Youcanselectwhetherthearpeggiowillcontinue
playingwhenyoutakeyourhandoffthekeyboard,or
whetherthearpeggiowillstop.
•Pressthe“Latch”checkboxtomakethissetting.
Checked:Thearpeggiowillcontinueplayingeven
afteryouremoveyourhandfromthekeyboard.
Unchecked:Thearpeggiowillstopplayingwhen
youremoveyourhandfromthekeyboard.
Synchronizing the arpeggiator to your
keyboard timing
Youcanspecifywhetherthearpeggiowillbeginatthe
momentyouplaythekeyboard,orwhetheritwill
alwaysplayinsynchronizationtotheMIDIclock
tempo.
•Pressthe“KeySync.”checkboxtomakethis
setting.
Checked:Thearpeggiopatternwillstartfromthe
beginningwhenyoupressakey.Thissettingissuit‐
ablewhenyouwantthearpeggiotostartfromthe
beginningofthemeasureasyouareplayinginreal‐
time.
Unchecked:Thearpeggiatorwillsynchronizetothe
MIDIclocktiming.
Sounding both the arpeggio notes and the
notes you play
•Pressthe“Keyboard”checkboxtoadjustthis
setting.
Checked:Thenotesyouplayonthekeyboardand
thenotesplayedbythearpeggiatorwillbothbe
heard.
DOWN
ALT1
ALT2
RANDOM
Octave: 4
UP
ON, UP
Sort
OFF, UP
Sort
1324
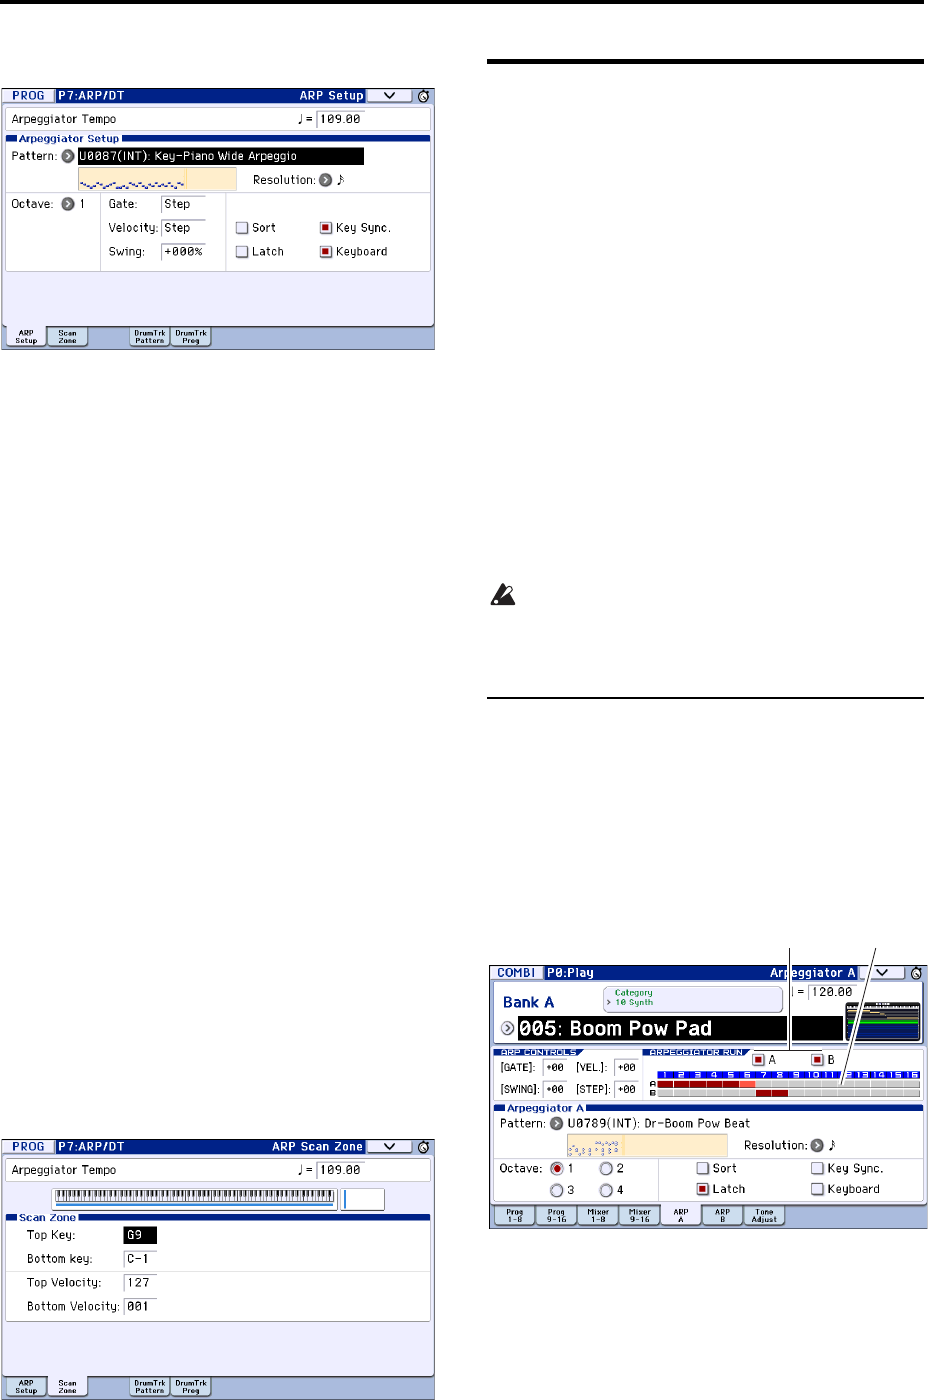
Arpeggiator function
88
Unchecked:Onlythearpeggiatednoteswillsound.
Changing the duration of the arpeggiated
notes
TheP7:ARP/DT–ARPSetupGateparameterspecifies
thedurationofthearpeggiatednotes.Withasettingof
000–100(%),thedurationwillalwaysbethespecified
gatetime.Stepisavailableifyou’veselected
U0000(INT)–U1027(USER)asthePattern;thegate
valuespecifiedforeachstepwillbeused.
Youcanalsocontrolthisbyusingthearpeggiocontrol
(ARP)GATEknob(seepage 86).
Specifying the arpeggio pattern’s velocity
and other settings
InP7:ARP/DT–ARPSetup,theVelocityparameter
specifiesthevelocityofthearpeggiatednotes.Ifyou
chooseavalueintherangeof001–127,thatvelocity
valuewillalwaysbeused.IfyouchooseKey,the
velocityvalueofhowyouplayedthekeywillbeused.
Stepisavailableif“Pattern”issettoU0000(INT)–
U1027(USER);thiscausesthevelocityvaluespecified
foreachsteptobeused.
“Swing”offsetsthetimingofarpeggiatednotesthat
areeven‐numbered(countingfromthebeginning).
“Velocity”and“Swing”canbecontrolledbyknobs2
and3respectivelywhenSELECTissettoARP.
Specifying the zone where the arpeggiator
will function
InP7:ARP/DT–ARPScanZoneyoucanspecifythe
rangeofnotes(keys)andvelocitieswherethe
arpeggiatorwillfunction.
Using the arpeggiator in
Combination mode
InCombinationmodetheKROMEprovidesdual
arpeggiators,allowingyoutoruntwoarpeggio
patternssimultaneously.
1. InCombinationmode,selectacombination(see
“SelectingCombinations”onpage 43).
Asyouselectvariouscombinations,you’llnoticethat
theARPbuttonLEDwilllightupforsome
combinations(see“Linkingthearpeggiatorto
programsorcombinations”onpage 91).
Whenyouplaythekeyboard,thearpeggiatorwill
start.Evenforothercombinations,youcanturnthe
arpeggiatoronbypressingtheARPbutton(theLED
willlightup).
2. Listentohowthearpeggiocanbemodifiedas
describedinthe“Usingknobs1–4tocontrolthe
arpeggiator”(above)and“Selectinganarpeggio
patternandspecifyingitsfunction”sections
(below).
TheARPbutton,TEMPOknob,TAPbutton,and
controlsurfaceARPwillapplytoboth
arpeggiatorsAandB.Theirstateissavedwhen
thecombinationiswritten.
Selecting an arpeggio pattern and
adjusting settings
IntheCombiP0:Play–Arpeggiatorpageyoucan
selectanarpeggiopatternandspecifyhowthe
arpeggiatorwillfunction.
•InCombiP0:Play,presstheARPAtabortheARP
BtabtoselecttheCombiP0:Play–ArpeggiatorA
orBpage.
Select the arpeggiator(s) that will run
UsetheArpeggiatorRuncheckboxestospecifythe
arpeggiator(s)thatyouwanttohaverunning.The
arpeggiator(s)thatarecheckedherewillrunwhenthe
ARPbuttonison.However,thearpeggiatorwillonly
playatimbreifthetablenexttothecheckboxes
assignsarpeggiatorAorBtoatimbre:T1–16.You
changethesesettingsinCombiP7:ARP/DT–ARP
SetupT01–08,T09–16pageArpeggiatorAssign(see
page 90).
Timbre AssignArpeggiator Run

Using the arpeggiator while you play Arpeggiator settings in Combination and Sequencer modes
89
Arpeggiator-A, Arpeggiator-B
ForeacharpeggiatorAandB,youcanadjustsettings
forPattern(Select),Resolution,Octave,Sort,Latch,
KeySync,andKeyboard(seepage 86).
Checking the structure of a user arpeggio
pattern
Let’sseehowthecombination“A005:BoomPowPad”
(category:LeadSplits)isconstructed.
•Selectcombination“A005:BoomPowPad”
(category:LeadSplits),andlookattheArpeggio
PlayApageandArpeggioPlayBpage.
•In“TimbreAssign”you’llseethatarpeggiatorAis
assignedtotimbres1–5,andarpeggiatorBis
assignedtotimbres6and7.
Whenyouplaythekeyboard,thedrumprogramsof
timbres1–4willbesoundedbythearpeggiopattern
ofarpeggiatorA.(Timbre5isadummyprogram
usedtoplaytimbres1–4.Seepage 91.)
ArpeggiatorBwillsoundtheprogramsoftimbres6
and7.
•IfyouuncheckArpeggiatorRunAorArpeggiator
RunB,itwillstop.
Ifyoucheckitonceagainandplaythekeyboard,
thatarpeggiatorwillbeginrunning.
•WhenyouaccesstheCombiP7:ARP/DT–ARP
ScanZonepage,you’llseethattheB“TopKey”
and“BottomKey”parametersaresetsothat
arpeggiatorBwillrunonlyforthenotesB3and
below.ArpeggiatorAissettorunforanykey.
•Thedrumprogramsoftimbres1–4usethesame
arpeggiatorApattern,butsincethenotessounded
byeachtimbrearedividedbykeyzone,eachwill
playonlyaportionofthearpeggiatorpattern.Goto
theP0:Play–ProgramT01–08pageandtrymuting
eachtimbre1–4toheartheresult.Youcanadd
varietybyusingdifferentcombinationsoftimbres.
Arpeggiator settings in
Combination and Sequencer
modes
InCombinationandSequencermodes,youcanuseuse
twoarpeggiopatternssimultaneously,thankstothe
KROME’sdualarpeggiatorfunctionality.Thesettings
ineachofthesemodesareadjustedinasimilarway.
Thefollowingexampleshowshowtoadjustsettingsin
Combinationmode.
Thedualarpeggiatorfunctionalityletsyoudothe
followingthings.
•Assignanarpeggiatorforeachtimbre.Choosefrom
Off,(arpeggiator)A,or(arpeggiator)B.☞step5
• IndependentlyspecifywhetherAandBwill
function.☞step6
•Selectanarpeggiopatternandsetparameters
independentlyforAandB.☞step7
• MakeScanZonepagesettingssothatyoucanuse
keyboardrangeorplayingvelocitytoswitch
betweennormalplayingandarpeggiatedplaying,
ortoswitchbetweenarpeggiatorsAandB.☞step8
• Makesettingsfortimbresthatwillbesilentwhen
thearpeggiatorisOff,andwillsoundonlywhen
thearpeggiatorisOn.☞step10
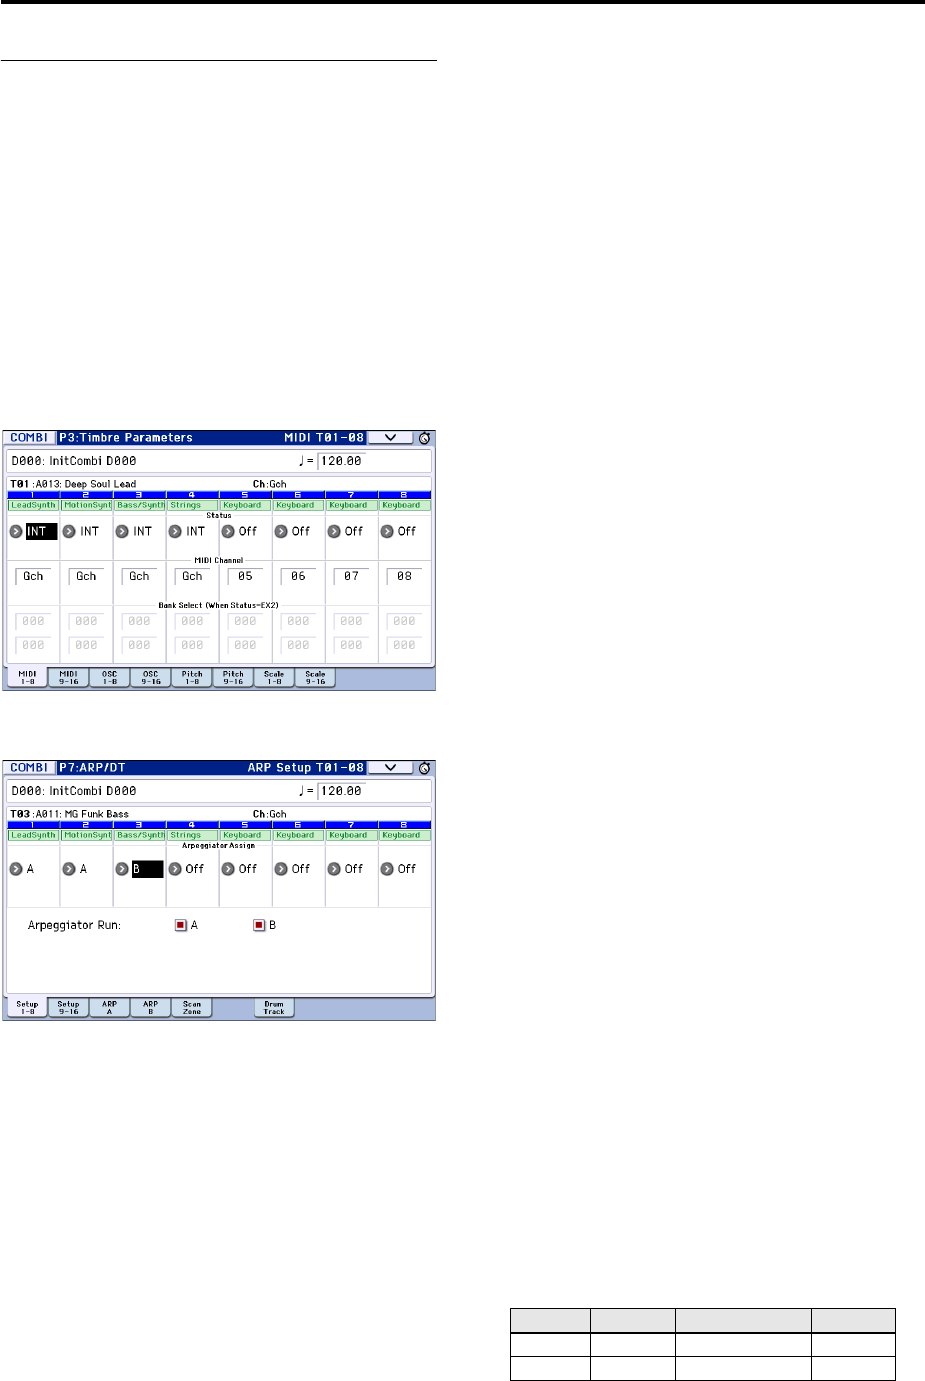
Arpeggiator function
90
Arpeggiator settings
1. SelectCombiP0:Play–ProgramT01–08page.
Selectprogramsforthetimbresthatyouwishtouse.
Forthisexample,selectanydesiredprogramfor
timbres1–4.
2. SelectCombiP3:TimbreParameters,MIDIT01–08
page.
Forthetimbresthatyouwillbeusing,setStatusto
INT,andsetMIDIChanneltoGchortotheglobal
MIDIchannel(setinGlobalP1:MIDIBasicMIDI
Channel).
Forthisexample,settimbres1–4toaStatusofINT,
andtimbres5–8toaStatusofOff.SettheMIDI
Channeloftimbres1–4toGch.
3. SelectCombiP7:ARP/DT–ARPSetupT01–08
page.
4. Set“(Temp)”tospecifythetempo.
Thisisthesameasforaprogram.However,thetempo
issharedbybotharpeggiatorsAandB.
5. Make“ArpeggiatorAssign”settings.
AssignarpeggiatorAorBtothedesiredtimbres.Each
timbrewillbeplayedbythearpeggiatorthathasbeen
assignedtoit.
6. Make“ArpeggiatorRun”settings.
Checkthearpeggiator(s)thatyouwanttorun.The
arpeggiator(s)checkedherewillrunwhentheARP
buttonisturnedon.
Withthesettingsshowninthedisplayforsteps2and
3,turningtheARPbuttononwillcausearpeggiatorA
torunfortimbres1and2,andarpeggiatorBtorunfor
timbre3.WhentheARPbuttonisturnedoff,timbres
1–4willsoundasalayer.
IfalltimbresAssignstatusaresettoOff,orif
ArpeggiatorRunAorBisunchecked,thearpeggiator
willnotfunction.
7. OntheArpeggiatorAandArpeggiatorBpages,set
theparametersforarpeggiatorsAandB.
TheparametersforAandBarethesameasfora
program(seepage 86).
8. IntheScanZoneA/Bpage,specifytherangein
whicharpeggiatorsAandBwillfunction.
TheparametersforAandBarethesameasfora
program.
Youcanusekeyboardrangesorvelocityrangestouse
oneorbothofthearpeggiators,ortoswitchbetween
arpeggiatorsAandB.ByusingtheCombiP4:Zone/
Delay–KeyZoneT01–08–T09–16page,andVelZone
T01–08–T09–16pagetosetkeyboardandvelocity
rangesinconjunctionwitheachother,youcancreate
evenmorevariations.
9. Ifyouwishtosavetheeditedcombination
settingsininternalmemory,turnoffmemory
protectinGlobalmode,andwritethecombination
(seepage 115andpage 117).
10. The“Status,”“MIDIChannel”and“Assign”
settingsshowninthedisplayofsteps2and3can
bemadesothatcertaintimbreswillsoundonly
whenthearpeggiatorisOn,andwillbesilent
whenthearpeggiatorisOff.
Combination A001: Bossa Rose (SW1/2)
(Category: Keyboard)
Althoughthisisasomewhatsophisticatedediting
technique,wewilldescribethesettingsofoneofthe
presetcombinationsasanexample.
Whenyouplayaspecificregionofthekeyboard,this
combinessettingsthatcausethearpeggiatortoplayan
arpeggiousingdifferentsoundsthanwhatʹsbeing
playedbythekeyboard,withothersettingsthatcause
thearpeggiatorsoundstoremaincompletelyunplayed
whenthearpeggiatorisoff.
Beforeyouplay,makesurethattheglobalMIDI
channel(GlobalP1:MIDIBasicMIDIChannel)isset
to01.
SelectcombinationA001:BossaRose(SW1/2),turnthe
ARPbuttonon,andplay.
• ArpeggiatorAisassignedtotimbre2and16.When
youplaythekeyboard,thebassriffarpeggio
patternwillsoundthetimbre2program.
•TheABottomKeyandTopKey(CombiP7:ARP/
DT–ARPScanZonepage)aresetsothat
arpeggiatorAwillfunctiononlyfornotesB3and
lower.
• ArpeggiatorAisalsoassignedtotimbre16,butthis
issothatthetimbre2programwillsoundonly
whenthearpeggiatorison.
Noticethetimbresettingsfortimbre2and16.
•Ifthearpeggiatorisoff,playingthekeyboardwill
soundthetimbre(s)thataresettoGchortothe
globalMIDIchannel(inthiscase,01).Sincethe
MIDIChanneloftimbre2issetto02,itwillnot
sound.Timbre16issettoGch,butsince“Status”is
Offitwillnotsound.
Timbre Status MIDI Channel Assign
2INT02 A
16 Off Gch A
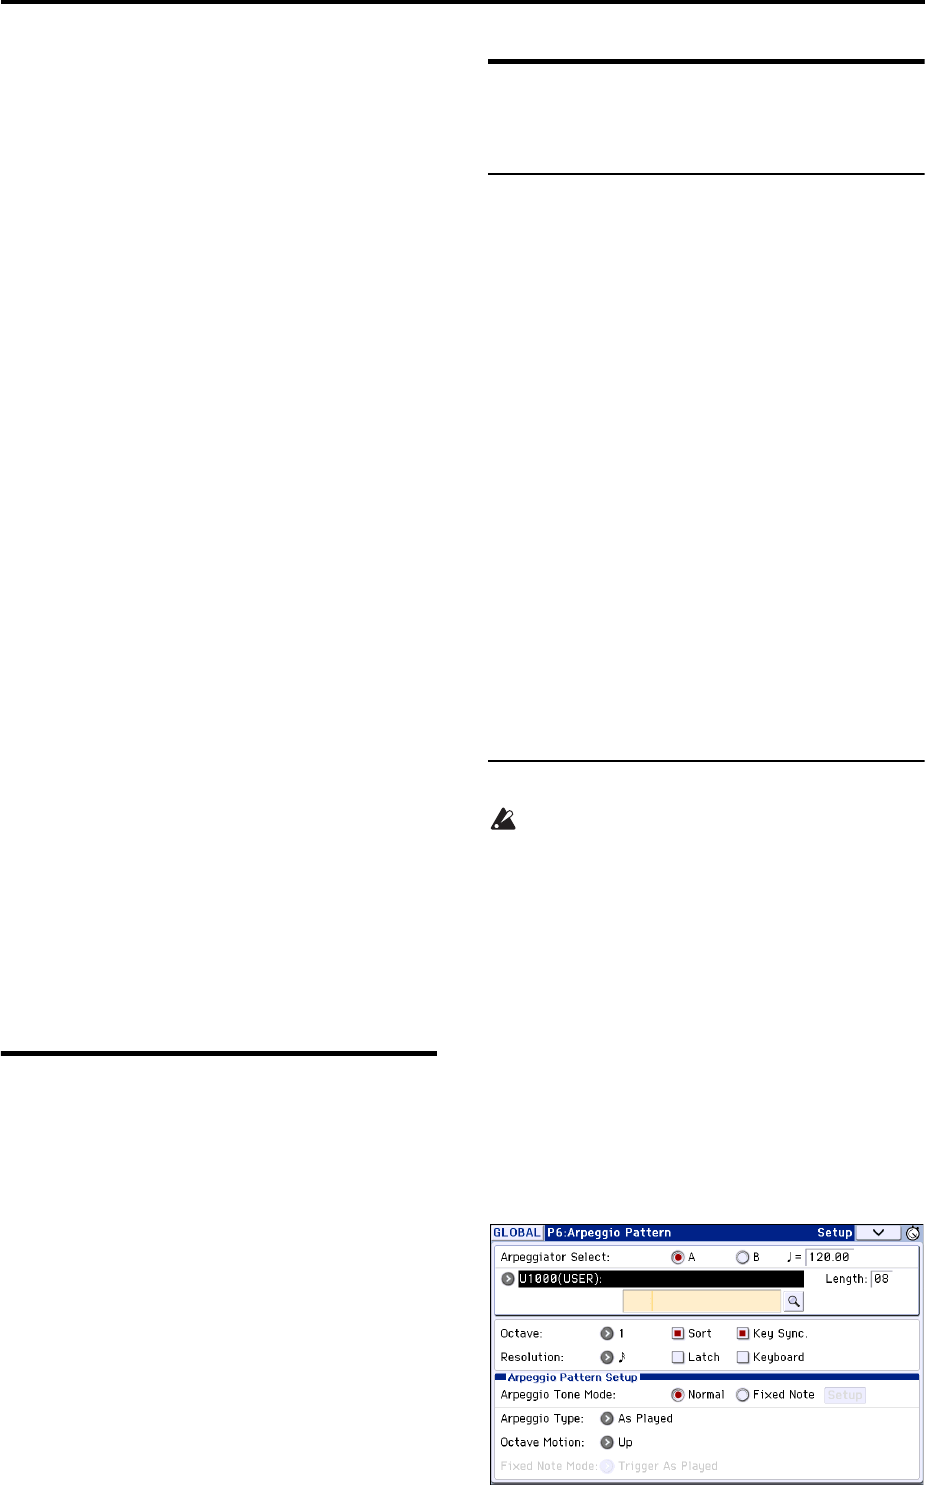
Using the arpeggiator while you play Linking the arpeggiator to programs or combinations
91
•NotesfromanyMIDIchannelthatisassignedtoa
timbrewilltriggerthearpeggiator.Inthiscase,
thesewillbeMIDIChannel02andGch(global
MIDIchannel).Whenthearpeggiatorison,playing
thekeyboardwilltriggerarpeggiatorA,whichis
assignedtotimbre16(Gch).Timbre2willbe
soundedbyarpeggiatorA.SincetheStatusof
timbre16isOff,itwillnotsound.
•SincetheStatusoftimbre16isOff,itwillnot
sound,regardlessofwhetherthearpeggiatorison
oroff.Itisadummytimbrethatcausestimbre2to
soundonlywhenthearpeggiatorison.
Combination A005: Boom Pow Pad
(Category: Synth)
Beforeyouplay,makesurethattheglobalMIDI
channel(GlobalP1:MIDIBasicMIDIChannel)isset
to01.
SelectcombinationA005:BoomPowPad,turntheARP
buttonon,andplay.
•ArpeggiatorAisassignedtotimbres1–5,and
arpeggiatorBisassignedtotimbres6and7.When
youpressanynoteoftheentirekeyboard,thedrum
programsoftimbres1–4willbesoundedbythe
arpeggiopatternofarpeggiatorA.Whenyouplay
theB3oralowernoteonthekeyboard,thesynth
programsoftimbres6and7willbesoundedbythe
backingarpeggiopattern.
•T
hearpeggiatorAparameters“BottomKey”and
“TopKey”(CombiP7:ARP/DT–ARPScanZone
page)aresetsothatarpeggiatorAwillrunforthe
entirekeyboard.
•TheBBottomKeyandTopKey(CombiP7:ARP/
DT–ARPScanZonepage)aresetsothat
arpeggiatorsBwillfunctiononlyforthenoteB3
andbelow.
•ArpeggiatorAisassignedtotimbre5aswell,but
thissettingissothatthetimbre1to4programwill
soundonlywhenthearpeggiatorison.Refertothe
precedingsection“CombinationBossaRose(SW1/
2).”
Linking the arpeggiator to
programs or combinations
Youcanspecifywhetherthearpeggiatorsettings
writtentoaprogramorcombinationwillberecalled
whenyouswitchprogramsorcombinations,or
whetherthecurrentarpeggiatorsettingswillbe
maintained.
Withthefactorysettings,theformerisselected.Use
thelatterwhenyouwanttokeepthesamearpeggio
patternrunning,andchangeonlytheprogramsound.
Thissettingismadein“LoadARPwhenchanging”
(GlobalP0:BasicSetup,Basicpage).(Seepage 110)
Creating a user arpeggio
pattern
About user arpeggio patterns
ThepatternsthatcanbeselectedontheKROME’s
arpeggiatorarecalled“arpeggiopatterns.”Thereare
twotypesofarpeggiopatterns:presetarpeggio
patternsanduserarpeggiopatterns.
Presetarpeggiopatterns:
Therearefivepatterns;UP,DOWN,ALT1,ALT2,and
RANDOM.
Thefunctionalityofthesepatternsisfixed,andcannot
beedited.
Userarpeggiopatterns:
Thereare1028patterns‐U0000(INT)–U1027(USER)‐
whichcandevelopchordsorphrasesinawidevariety
ofways,basedonthepitchesthatyouplayonthe
keyboardorthetimingwithwhichyouplaythem.
InGlobalP6:ArpeggioPattern,Setupyoucanmodify
theseuserarpeggiopatterns,orcreateanewuser
arpeggiopatternfromaninitializedcondition.Edited
userarpeggiopatternscanbewrittentointernal
memoryareasU0000(INT)–U1027(USER)(see
page 221oftheParameterGuide).
InMediamode,youcanalsosaveuserarpeggio
patternstomedia.
Editing a user arpeggio pattern
Ifyouwanttoeditauserarpeggiopattern,you
mustfirstmakesurethatmemoryprotectis
unchecked.(Seepage 197oftheParameterGuide)
IfyouenterthismodefromtheProgrammode,your
editingwillapplytothearpeggiopatternspecifiedfor
theselectedprogram.
1. InProgrammode,selectaprogramwhichusesthe
arpeggiopatternyouwishtoedit,oraprogram
thatyouwishtouseasabasisforeditingthe
arpeggiopattern.
2. PresstheARPbuttontoturnthearpeggiatoron
(thebuttonwilllightup).
EvenifyouenteredGlobalmodefromaprogramin
whichthearpeggiatorwasturnedoff,youcanusethe
ARPbuttontoturniton.
3. SelecttheGlobalP6:ArpeggioPattern–Setup
page(seepage 211oftheParameterGuide).
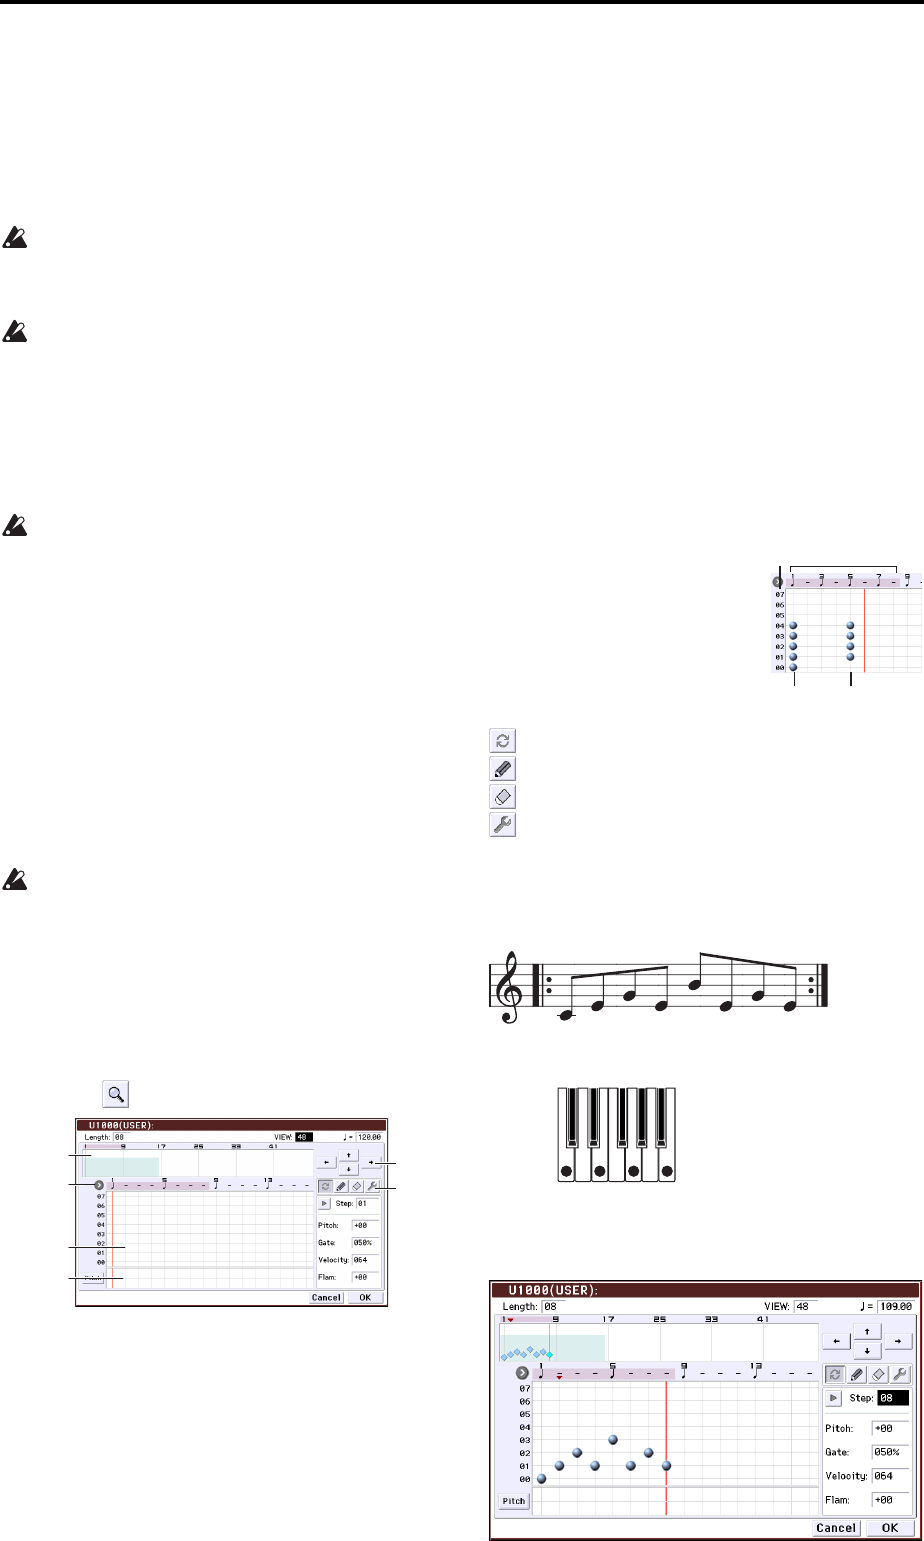
Arpeggiator function
92
4. “ArpeggiatorSelect”willautomaticallybesettoA
whenyounavigatetothispagefromProgram
mode.
5. In“Pattern,”selectthearpeggiopatternthatyou
wishtoedit.
Forthisexample,selectanemptyuserarpeggio
pattern.
Ifablankpatternisselected,playingthekeyboard
willnotstartanarpeggio.Althoughpreset
arpeggiopatternsP0–P4canbeselected,they
cannotbeedited.
Whenyoueditauserarpeggiopattern,the
changeswillhaveaneffectanytimethatthis
patternisusedinProgram,Combination,orSong.
6. In“Length,”specifythelengthofthepattern.
Afterthepatternhasplayedforthelengthspecified,it
willreturntothebeginning.Thissettingcanalsobe
changedduringorafterediting.Forthisexample,setit
to08.
Setknob4(STEP)tothecenterposition(12
o’clock)sothatthevaluesofthe“Length”and
“Resolution”parameters(GlobalP6:Arpeggio
Pattern‐Setuppage)willbeused.
Note: ForthepreloadarpeggiopatternsU0000(INT)–
U0899(INT),simplychangingthe“Length”can
significantlychangethecharacterofthepattern.Try
changingthelengthandlisteningtotheresult.(See
“Length(PatternLength)”onpage 211ofthe
ParameterGuide.)
7. Makesettingsforthe“ (Tempo),”“Resolution,”
“Octave,”“Sort,”“Latch,”“KeySync.,”and
“Keyboard”parameters.
Theseareprogramparameters,buttheycanbeset
fromhereaswell.
IfafteraccessingthispagefromProgrammode,
youmodifytheseparametersandwishtokeep
yourchanges,returntoProgrammodeandwrite
theprogram.Theseparametersarenotsavedby
“WriteArpeggioPattern.”
Forthisexample,makethesettingsshowndisplaystep
3.
8. InArpeggioPatternSetup,specifyhowthe
arpeggiowillbedeveloped.
9. PressthebuttontoselectEditdialog.
ApatternconsistsofStepsandTones.
•Step:Eachuserarpeggiopatternhasupto48steps.
Startingwiththefirststep,thearpeggiatorwillplay
notesatintervalsofthenotevaluespecifiedby
Resolution.Theverticallinesofthegridindicate
thesteps.
UseSteptoselectthestep;thenspecifyPitchOff‐
set,Gate,VelocityandFlamforeachstep.
YoucanalsoselectthestepbypressingtheStepline
intheparameterviewatthebottom.Youcanalso
editbydraggingintheparameterview.
Pressthebuttontotheleftoftheparameterviewto
switchbetweenPitch(PitchOffset)→Gate(Gate)
→Vel.(Velocity)→Flam(Flam).
•Tone:Eachstepcansoundachordofupto12tones
(ToneNo.00–11).Bytouchinganddraggingthe
overviewontherightpartofthescreenorbyusing
thezoomscrollbuttonsaboveit,selectthelocation
forenteringtonesinthezoomviewbelow.Press
thetouchgridtoentertones.
WhenStepisselected,youcanalsoentertonesby
usingthenumerickeys0–9andthe“–”and“.”but‐
tons.
Note: TheToneNo.correspondstothenumerickeys
0–9andthe“–”and“.”buttonsasshownbelow.Each
timeyoupressanumerickey0–9ora“–”or“.”button,
thecorrespondingtonewillturnonoroff.The
horizontallinesofthegridinthecenterofthedisplay
correspondtotones.
Tone00–09:0–9buttons
Tone10:–button
Tone11:.button
Entering tones
Alternate:Setorresetthetone.
Pen(setonly):Setthetone.
Erase(resetonly):Resetthetone.
Tool:Opensthetooltablet.Thetooltabletletsyou
usevariouscommandsinaregionyou’vespecifiedin
theoverview,ortocopyandpaste(see“ToolTablet”
onpage 214oftheParameterGuide).
Creating an example pattern
1. Pressthealternatebutton.
2. Entertonesinthetouchgridasshowninthe
illustrationbelow.
Overview
Resolution Tone Input
Touch Grid
Parameter
View
Zoom Scroll
T
one No.
01 Step No.
Length: 8
05
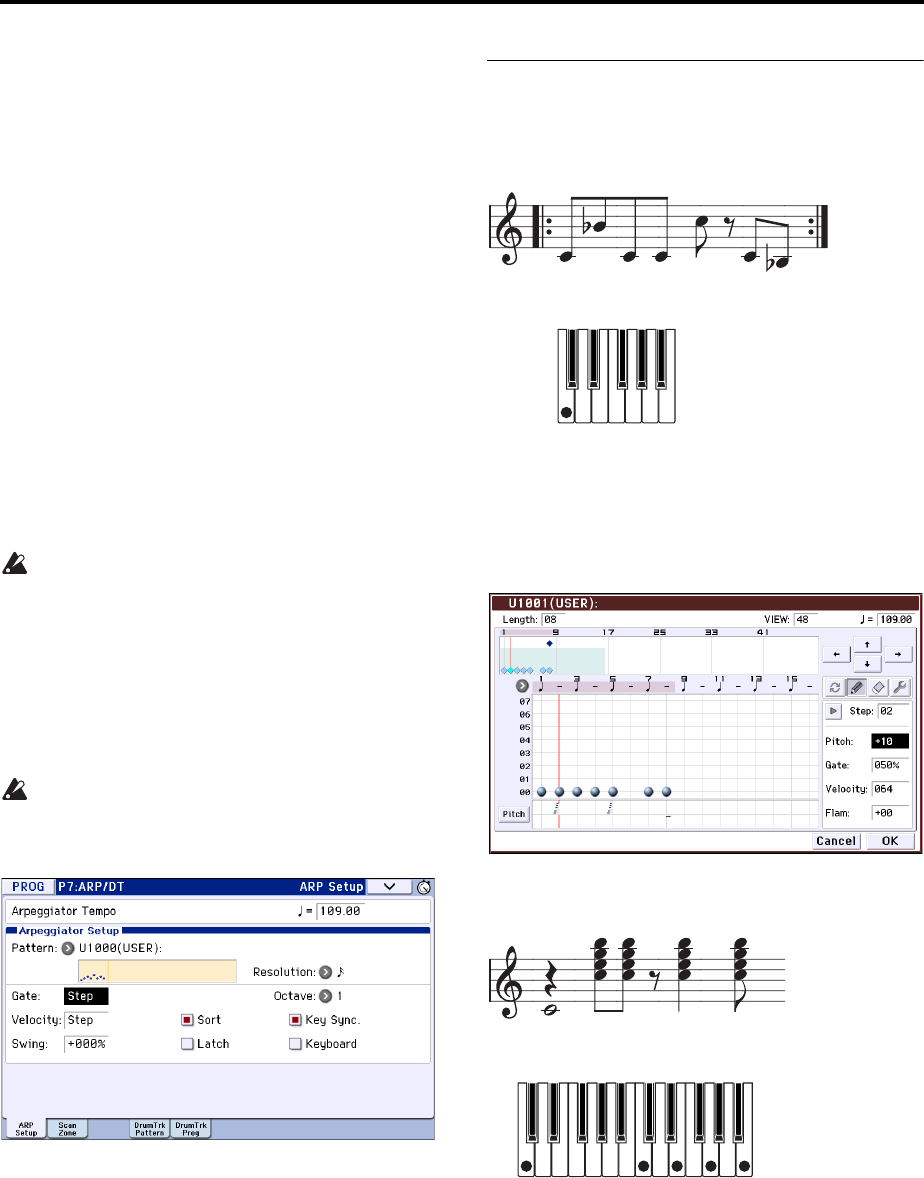
Using the arpeggiator while you play Creating a user arpeggio pattern
93
3. Whenyouplaythekeyboardasshowninthe
illustration,thearpeggiatorwillbeginplaying.
Tone0correspondstothepitchofthelowestkeyof
chordyouplayonthekeyboard.(IfSortisunchecked,
itwillcorrespondtothepitchofthefirstnoteyou
play.)
4. Forsteps01–08,makesettingsfor“PitchOffset,”
“Gate,”“Velocity,”and“Flam.”
PitchOffset:Thisoffsetsthepitchofthearpeggionote
insemitonesupordown.Youcaninputthesametone
foreachstep,andchangethePitchOffsetvaluefor
eachtocreateamelodyusingasingletone.(See
“Melodypattern”)
Gate:Specifiesthelengthofthearpeggionoteforeach
step.WithasettingofLegato,thenotewillcontinue
soundingeitheruntilthenextnoteofthesametoneor
untiltheendofthepattern.WithasettingofOff,the
notewillnotsound.
Velocity:Thisspecifiesthestrengthofthenote.Witha
settingofKey,thenotewillsoundatthestrengthof
howitwasactuallyplayed.
TheGateandVelocitysettingsyouselectherewill
bevalidiftheGateandVel oc ityparameters
(ProgramP7:ARP/DT–ARPSetuppage)ofthe
programselectedinProgrammodearesettoStep.
IftheseparametershaveasettingotherthanStep,
theGateandVelocitythatwerespecifiedforeach
individualstepwillbeignored,andallnotesofthe
arpeggiowillsoundaccordingtothesettingsin
ProgramP7:ARP/DT–ARPSetuppage.Besureto
verifythesettingsoftheprogram.
WheneditingGate,Velocity,andSwing,usethe
SELECTbuttontoselectARP,andsetknob1
(GATE)andknob2(VELOCITY)tothecenter
position(12o’clock).
5. Tochangetheuserarpeggiopatternname,usethe
“RenameArpeggioPattern”menucommand.(See
page 221oftheParameterGuide)
6. Ifyouwishtosavetheediteduserarpeggio
patterntointernalmemory,besuretoWritethe
userarpeggiopattern.(Seepage 221ofthe
ParameterGuide)
Ifyouturnoffthepowerwithoutwriting,theedited
contentswillbelost.
7. Ifyouwishtosavethestateoftheprogramatthe
sametime,returntoProgrammodeandwritethe
program.(Seepage 115)
Other examples of creating a user
arpeggio pattern
Melody pattern
1. Pressthealternatebutton.
2. Inthetouchgrid,settone0for“Step”01,02,03,04,
05,07,and08(i.e.,allbut06).
3. Specifythepitch.Setthe“Step”02“Pitch”to+10,
“Step”05“Pitch”to+12,andthe“Step”08“Pitch”
to–2.
4. Playasinglekey;thearpeggiowillbeginplaying.
Chordal pattern
1. Pressthealternatebutton.
2. Inthetouchgrid,settone00of“Step”01.
3. In“Step”03,04,06,and07,settones00–04.
4. Select“Step”01,andset“Gate”toLegato.
5. Select“Step”06,andset“Gate”toLegato.
Note: Tosimulatethetimingnuancesofastrummed
guitarchord,selectFlam.InProgrammode,selectan
acousticguitarprogram,andchoosetheuserarpeggio
patternthatyoucreatedhere.IntheArpeg.Program
P7:ARP/DT–ARPSetuppage,setGatetoStep.
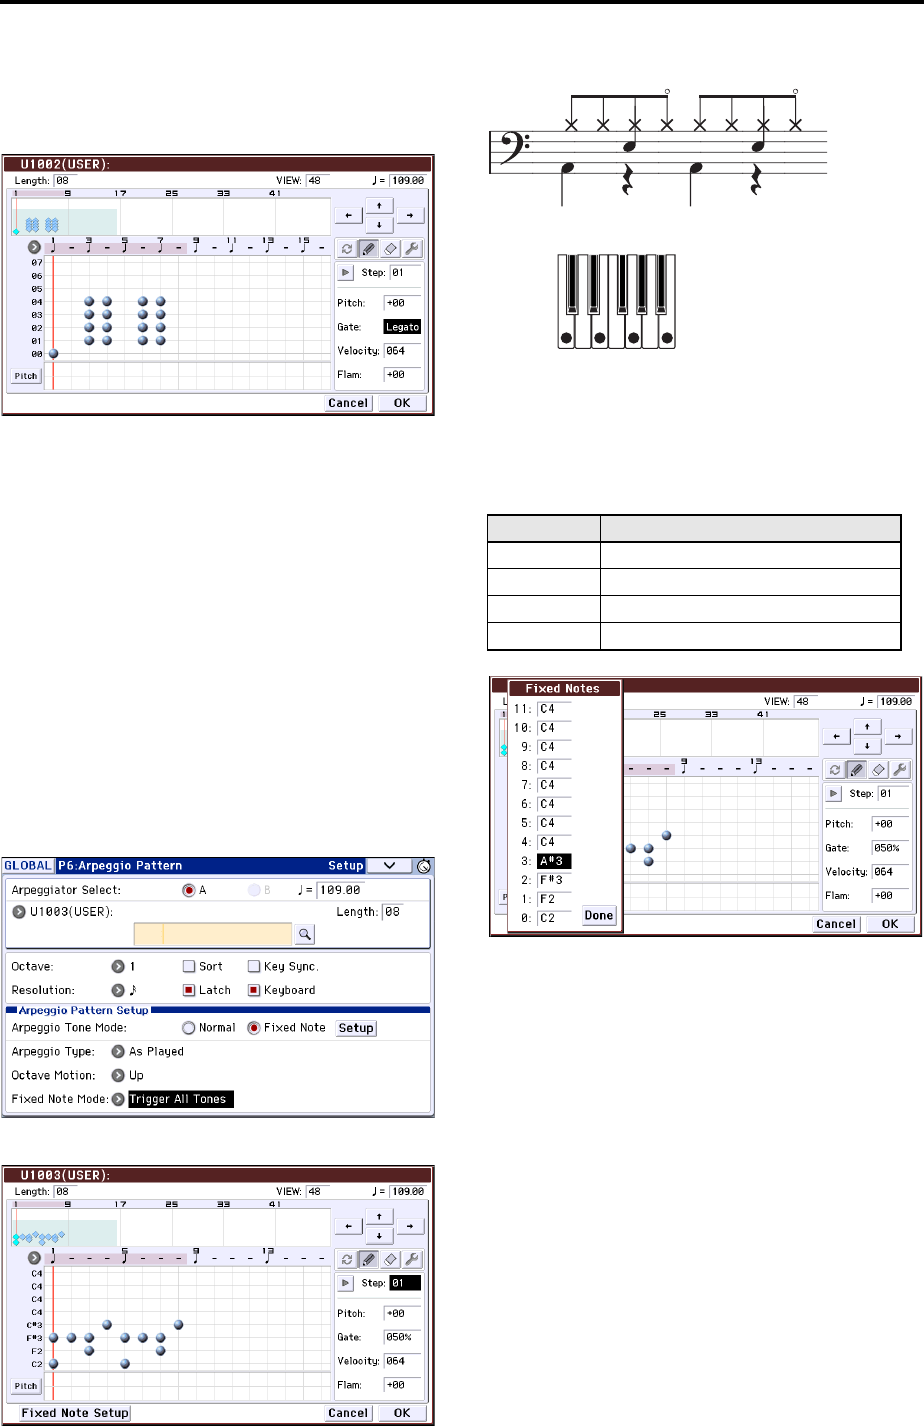
Arpeggiator function
94
ThenreturntotheGlobalP6:ArpeggioPattern–Setup
page.Forodd‐numberedsteps,setFlamtoapositive
(+)value.Foreven‐numberedsteps,setFlamtoa
negative(–)value.
Drum pattern
Youcanusethearpeggiatortoplayarhythmpattern
byusing“FixedNote”withadrumprogram.
1. InProgrammode,selectadrumkitprogram.
Forthisexample,selectthepresetprogramA017:Jazz
Dry/Amb1Kit(Category:Drums).
2. InGlobalP6:ArpeggioPattern,selecttheSetup
page,andparametersettings.
ArpeggioToneMode:SetthistoFixedNote.Thiswill
causethetonetoalwayssoundatthespecifiedpitch.
FixedNoteMode:IfyousetthistoTriggerAllTones,
playingasinglenoteonthekeyboardwillsoundall
tones.
IfyousetthistoTriggerAsPlayed,thetoneswillbe
soundedaccordingtothenotesyouplayonthe
keyboard(seepage 212oftheParameterGuide).
3. SelecttheEditpage.
Let’sinputthefollowingrhythmpattern.
4. Foreach“Tone,”specify“FixedNoteNo.”
UsetheFixedNoteSetupbuttontoopenthedialog
box.Hereyoucanassignadifferentdrumsample(note
number)ofthedrumkittoeachfixednote.
Forthisexample,setToneNo.andFixedNoteNo.as
follows.
Thedrumsamplecorrespondingtoeachnotenumber
willdifferdependingonthedrumkit.It’sbesttoplay
thekeyboardtofindthedrumsoundyouwant;then
holddownFixedNoteNo.andplaythatnotetoenter
thedesirednotenumber.
5. Pressthealternatebutton.
6. Enterthekick(Tone00).
Inthetouchgrid,settone00(C2)ofStep01and05.
7. Enterthesnare(Tone01).
Inthetouchgrid,settone01(F2)ofStep03and07.
8. Entertheclosedhi‐hat(Tone02).
Inthetouchgrid,settone02(F#3)ofStep01,02,03,05,
06,and07.
9. Entertheopenhi‐hat(Tone03).
Inthetouchgrid,settone03(A#3)forStep04.
10. IfFixedNoteModeissettoTriggerAsPlayed,
playingasinglenoteonthekeyboardwillcause
onlythekick(Tone00)toplay.
Playingtwonotesonthekeyboardwillcauseonlythe
kick(Tone00)andsnare(Tone01)toplay.Inthisway,
thenumberofkeysthatyouplaywillbeplayedbythe
samenumberoftones.
Tone No. Fixed Note No.
00 C2 (kick)
01 F2 (snare)
02 F#3 (closed hi-hat)
03 A#3 (open hi-hat)

Using the arpeggiator while you play Creating a user arpeggio pattern
95
11. Settheparametersforeachstep.
UseVelocityetc.toaddaccentstotherhythmpattern.
TheGateandVelocitysettingsyouselectherewill
bevalidiftheGateandVel oc ityparameters
(ProgramP7:ARP/DT–ARPSetuppage)ofthe
programselectedinProgrammodearesettoStep.
IftheseparametershaveasettingotherthanStep,
theGateandVelocitythatwerespecifiedforeach
individualstepwillbeignored,andthenotesof
thearpeggiowillbesoundedaccordingtothe
settingsoftheProgramP7:ARP/DT–ARPSetup
page.Checkthesettingsoftheprogram.
WhenspecifyingGateandVelocity,pressthe
controlsurfaceARPbutton,andsetknob1(GATE)
andknob2(VELOCITY)tothecenterposition(12
o’clock).
Dual arpeggiator editing
Herewewilluseacombinationasanexampleinour
explanation.
Thesameprocedureapplieswheneditinganarpeggio
patterninSequencermode.
IfyouhaveenteredthismodefromtheCombination
mode,thearpeggiopatternselectedbythe
combinationwillbeaffectedbyyourediting.
1. InCombinationmode,selectacombinationthat
usesthearpeggiopatternyouwishtoedit.
Forthisexample,selectacombinationwhereboth
arpeggiatorsAandBareassigned.
2. PresstheARPbuttontoturnonthearpeggiator
(thebuttonwilllightup).
Evenifthearpeggiatorhadbeenturnedoffwhenyou
movedhere,youcanusetheARPbuttontoturniton.
However,ifArpeggiatorRunAorBarenotchecked,
andifArpeggiatorAssign,issettooff,thenthe
arpeggiatorwillnotfunction.
3. SelecttheGlobalP6:ArpeggioPattern–Setup
page.
4. IfyouaccessedthispagefromCombinationmode,
usethe“ArpeggioSelect”AandBtoselectthe
arpeggiatorthatyouwishtoedit.
IfthisisA,youreditingwillapplytotheparameters
anduserarpeggiopatternofarpeggiatorA.
IfthisisB,youreditingwillapplytotheparameters
anduserarpeggiopatternofarpeggiatorB.
5. SwitchbetweenarpeggiatorsAandB,andedit
theirrespectiveuserarpeggiopatterns.
Ifyouwishtostoponeofthearpeggiators,returnto
Combinationmode,andinCombinationP0:Play–
ArpeggioAortheArpeggioBpageanduncheckthe
ArpeggiatorRuncheckbox.
6. Tomodifythenameofauserarpeggiopattern,use
theUtility“RenameArpeggioPattern.”(See
page 221oftheParameterGuide)
7. Ifyouwishtosavetheediteduserarpeggio
patternininternalmemory,youmustwritethe
userarpeggiopattern.
Inthiscase,bothuserarpeggiopatternswillbewritten
simultaneously.Ifyouturnoffthepowerwithout
writing,theeditedcontentswillbelost(seepage 221of
theParameterGuide).
8. Ifyouwishtosavethestateofthecombinationat
thesametime,returntoCombinationmodeand
writethecombination.(Seepage 115)
Note: Wheneditingauserarpeggiopattern,pay
attentiontotheglobalMIDIchannel,thechannelof
eachtrack,andthearpeggiatorassignments,andmake
surethatthearpeggiatoryouarehearingisthepattern
thatyouwishtoedit.

Arpeggiator function
96
Regarding arpeggiator
synchronization
“Key Sync.” parameter
Thetimingofthearpeggiatornotesdependsonthe
stateofthearpeggiatorKeySync.checkbox.
Ifthisboxischecked,thearpeggiatorwillstart
runningatthefirstnote‐onthatoccursafteryou’ve
takenyourhandscompletelyoffthekeyboard.
Ifthisboxisunchecked,thearpeggiatorwillrunin
synchronizationwiththeinternal/externalMIDIclock.
Below,wewillexplainhowsynchronizationoccurs
whentheKeySync.checkboxisnotchecked
(SynchronizationwithSongStartandwithMIDI
realtimeStartmessagesareexcluded).
Synchronization between arpeggiators
A and B
InCombinationandSequencermodes,thetwo
arpeggiatorscanrunsimultaneously.Inthiscase,ifone
arpeggiatorisalreadyrunning,andyouthenrunthe
otherarpeggiator(with“KeySync.”unchecked),the
secondarpeggiatorwillsynchronizetothe“(Tempo)”
basedonthefirstarpeggiator.
IfKeySync.ischecked,arpeggiatorsAandBwillrun
independently,eachattheirowntempo.
Synchronization with the drum track
Ifyouwantthearpeggiatortosynchronizetothedrum
trackpatternthat’scurrentlyplaying,unchecktheKey
Sync.setting.Inthiscase,thearpeggiatorwill
synchronizetothebeatofthedrumtrackpatternthat’s
currentlyplaying.
Ifyouwantthedrumtrackpatterntosynchronizeto
thearpeggiatorthat’scurrentlyrunning,turnonthe
“Sync”setting(theTriggerparameteroftheDrum
Trackpageofeachmode).
Synchronization between the arpeggiator
and sequencer in Sequencer mode
If song playback is stopped
•Thearpeggiatorwillsynchronizetothe“(Tempo)”
basedontheinternalMIDIclocktiming.
•IfanRPPRpatternisplayinginSequencermode,
thearpeggiatorwillsynchronizetothebeatbased
onthatpattern.
IfyouwanttheRPPRpatternplaybacktosynchronize
tothearpeggiatorthat’scurrentlyrunning,set“Sync”
toSEQ(SEQP10:Pattern/RPPR–RPPRSetuppage).
Patternplaybackwillsynchronizetothe“(Tempo)”
timingofthearpeggiator.
While playing back or recording a song
•Thearpeggiatorwillsynchronizetothebeatbased
onthetimingofthesong.
Synchronization with Song Start
•Ifthearpeggiatoristurnedon(ARPbuttonison)
andisrunning,itwillresettothebeginningofits
arpeggiopatternwhenaSongStartisreceived.
(ThisisunaffectedbytheKeySync.setting.)
•InSequencermodewhenKeySync.isunchecked
andtheARPbuttonison,ifyoustartthe
arpeggiatorbypressingakeyduringthepre‐count
beforerecordingbegins,thearpeggiatorwillstart
itspatternassoonasrecordingbegins,andwillbe
recorded.
Synchronization with external sequencer
playback
If“(Tempo)”isEXT(i.e.,ifGlobalP1:MIDIMIDI
ClockisExternalMIDIorExternalUSB)inProgram,
Combination,orSequencermodes,thearpeggiator
willsynchronizetotheMIDItimingClockandStart
messagesreceivedfromaconnectedMIDIdevice.
Note: Synchronizationwilloccurinthesamewayif
MIDItimingClockisAutoandMIDIrealtimeclock
messagesarebeingreceivedfromaconnectedMIDI
device.
Synchronization with external MIDI timing clock
Thearpeggiatorwillsynchronizetothe“(Tempo)”
timingoftheexternalMIDItimingclock.
Synchronization with MIDI realtime Start messages
Ifthearpeggiatoristurnedonandrunning,an
incomingMIDIrealtimeStartmessagewillresetthe
arpeggiatortothebeginningofitspattern(Thisis
unaffectedbytheKeySync.setting).
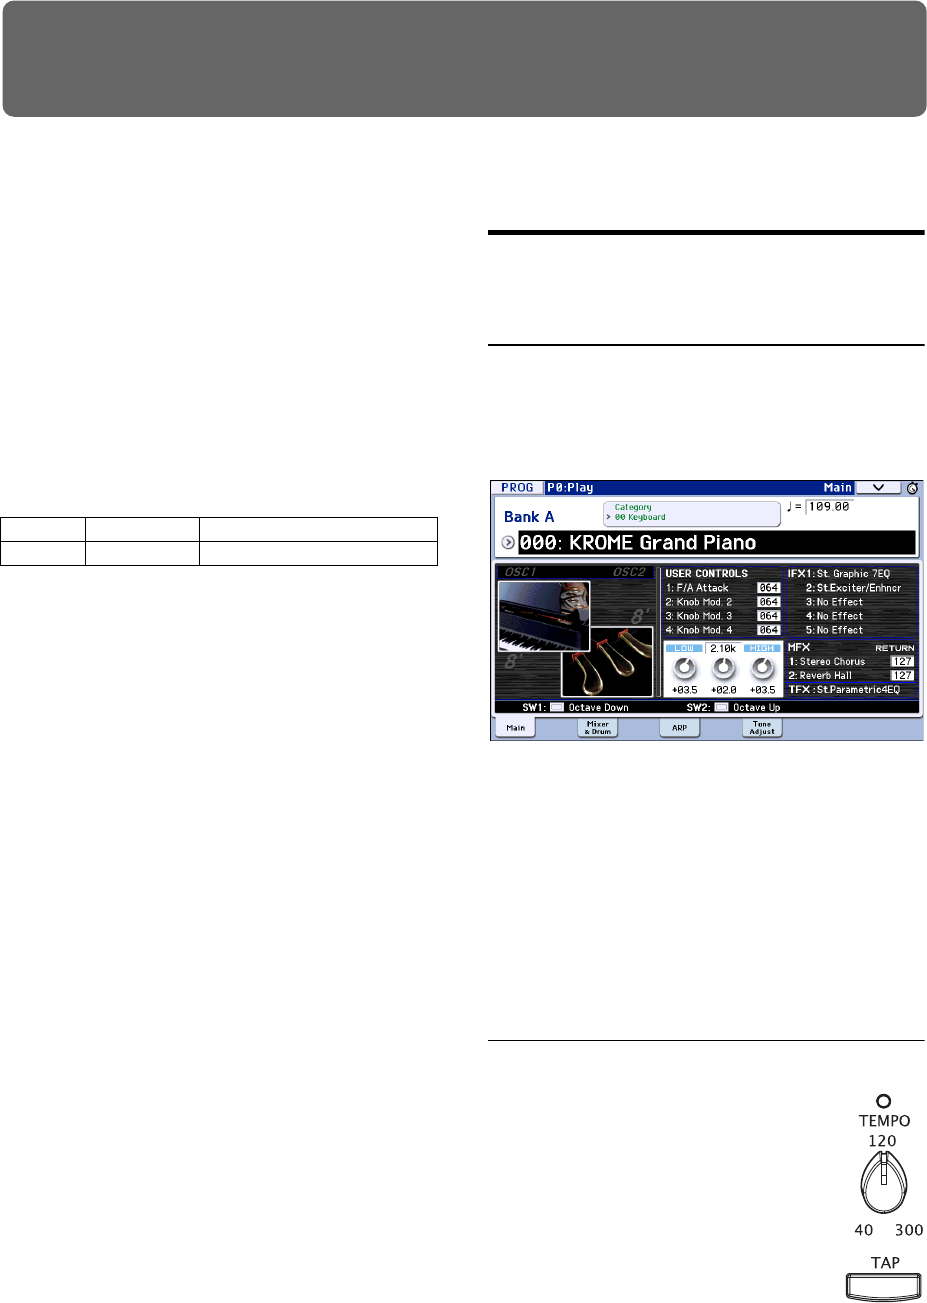
97
Drum Track function
Performing with the Drum Track function
TheDrumTrackfunctionmakesiteasytoplaythe
KROME’shigh‐qualitydrumprogramsusingawide
varietyofDrumTrackpatterns.
ItprovidesaconvenientwayforyoutohearDrum
Trackpatternswhileyoutryoutvariousphrasesona
programorcombination,orworkouttheoutlineof
yoursong.Then,whenyou’vecomeupwithsome
ideas,youcanusetheAutoSongSetupfunctionto
immediatelystartrecordinginSequencermode.
Youcanusepresetdrumpatternsthatcoverawide
rangeofmusicalstyles,aswellasuserpatternsthat
youyourselfcreated.
YoucanwriteyourownpatternsintoU000–U999.User
patternsyou’vecreatedinSequencermodecanbe
convertedintouserDrumTrackpatterns.
TheDrumTrackpatternwillstartimmediatelywhen
youpresstheDRUMTRACKbutton,orwhenyou
playthekeyboardafterpressingtheON/OFFbutton.If
you’restartingthepatternbyplayingthekeyboard,
youhavetheoptionofstartingitbyusingaspecific
rangeofnotesorvelocities.
InProgrammode,thedrumtrackhasadedicated
mixerchannel(includingEQ)andeffectrouting,
allowingyoutocontrolthedrumtrackindependently
fromthesoundoftheprogramitself.InCombination
andSequencermodes,thedrumtrackishandledasa
conventionaltimbreortrack,allowingyoutoselect
programs,editEQsettings,andspecifytheeffect
routinginthesamewayasforconventionaltimbresor
tracks.
Using the Drum Track function
in Program mode
Turning the Drum Track function on/
off
1. InProgrammode,selectaprogram(see“Selecting
Programs”onpage 21).
2. PresstheDRUMTRACKbutton.
TheON/OFFbuttonwilllightuporblink,depending
onthesetting(TriggerMode)oftheprogram.
Iflit:TheDrumTrackpatternwillstartaccordingto
theSyncsetting.Whenyouturnitoff,thepatternwill
stop.(ThiswilloccuriftheTriggerModeparameteris
settoStartImmediately.)
Ifblinking:TheDrumTrackpatternwillbereadyto
start.Itwillstartwhenyouplaythekeyboardorwhen
aMIDInote‐onisreceived.(Thiswilloccurifthe
TriggerModeparameterissettoWaitKBDTrigger.)
Adjusting the performance tempo
•YoucanusetheTEMPOknoborthe
TAPbuttontoadjusttheperformance
tempo.
Thiswillchangethe“=”valuelocated
ontheupperrightsideofthedisplay.
Youcanadjustthetempowitharange
of40.00–300.00bpm.TheLEDlocated
abovetheTAPbuttonwillblinkatinter‐
valsofaquarternote().
Youcanalsoadjustthetempobychoos‐
ing“=”inthedisplay.Usenumerickeys0–9to
enterthetempo,andthenpresstheENTERbutton.
YoucanalsousetheVALUEcontrollertosetthe
tempo.TheLEDwillblinkatthetempoyouspecify.
Note: Thetemposettingisalsosavedwhenyouwritea
program.
Preset P001...P605 Preset Drum Track patterns
User U000...U999 User Drum Track patterns
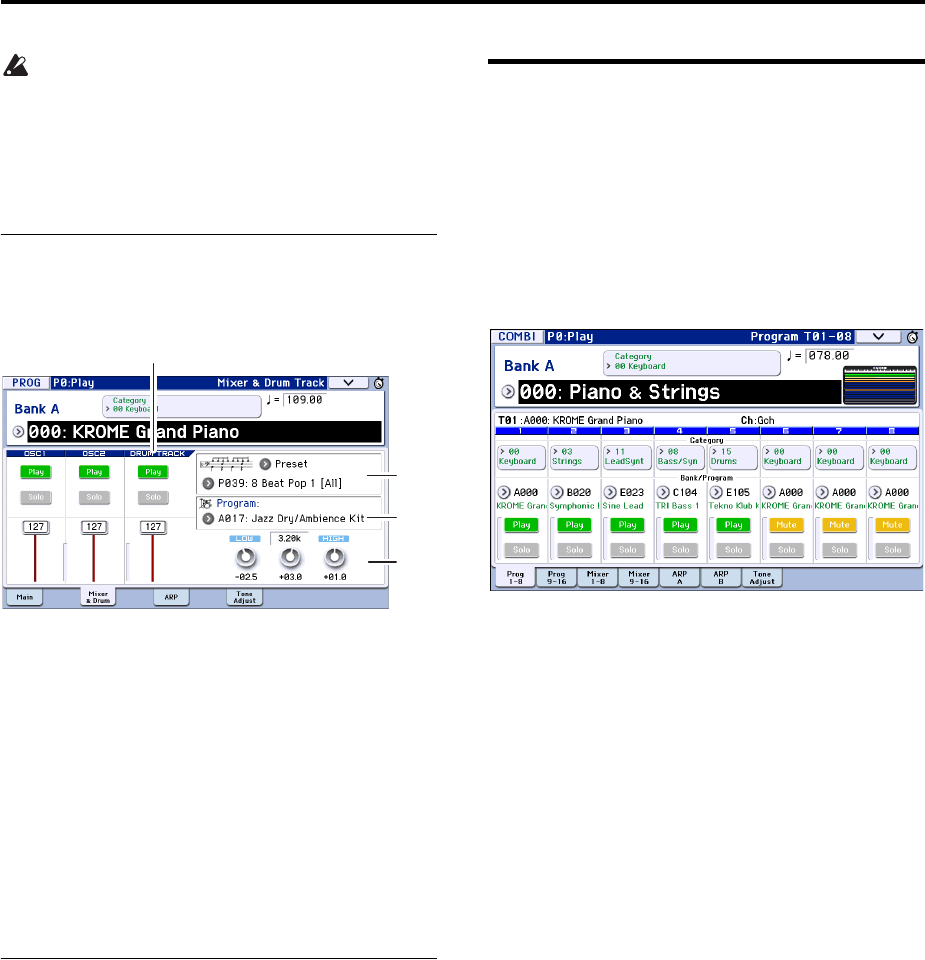
Drum Track function
98
IftheGlobalP1:MIDI–MIDIBasicpageMIDI
ClockparameterissettoExternalMIDI,External
USB,orsettoAutoandMIDIClockmessagesare
beingreceived,thedisplaywillindicate“=”EXT,
andtheKROMEwillbesynchronizedtoan
externalMIDIdevice.Inthiscase,youwon’tbe
abletochangethetempobyusingtheKROME.
Selecting a Drum Track pattern and
Drum Track program
1. AccesstheProgP0:Play–Mainpage.
2. SelectaDrumTrackpattern.Use“PatternBank”
toselectthepresetortheuserbank,anduse
“PatternNo.”toselectthepatternnumber.
3. Use“DrumTrackProgram”toselecttheprogram
thatwillplaytheDrumTrackpattern.
Note: Youcanonlyselectprogramsofcategory
number15(Drums).Ifyouwanttouseanoriginal
programyoucreatedastheDrumTrackprogram,save
itwith“Category”setto15(seepage 30).
Note: Ifyou’veselectedanemptypattern,theDRUM
TRACKbuttonwillnotfunction.
TheseparameterscanalsobesetfromP7:ARP/DT
page.
Setting the EQ, volume, mute, and
solo for the drum track pattern
IntheProgP0:Play–Mixer&DrumTrackpageyou
canusea3‐bandEQtoadjustthesoundofthedrum
trackprogram.Youcanalsoeditthevolume,mute,
andsolosettings.
Using the Drum Track function
in Combination mode
Selecting a combination and turning the
Drum Track function on/off
1. PresstheCOMBIbuttontoenterCombination
mode,andselectthedesiredcombination.For
details,pleasesee“SelectingCombinations”on
page 43.
2. PresstheDRUMTRACKbutton.
TheON/OFFbuttonwilllightuporblink,depending
onthesetting(TriggerMode)ofthecombination.
Iflit:TheDrumTrackpatternwillstartaccordingto
theSyncsetting.Whenyouturnitoff,thepatternwill
stop.(ThiswilloccuriftheTriggerModeparameteris
settoStartImmediately.)
Ifblinking:TheDrumTrackpatternwillbereadyto
start.Itwillstartwhenyouplaythekeyboardorwhen
aMIDInote‐onisreceived.(Thiswilloccurifthe
TriggerModeissettoWaitKBDTrigger.)
Adjusting the performance tempo
YoucanusetheTEMPOknobortheTAPbuttonto
adjusttheperformancetempo.
Selecting a Drum Track pattern and Drum
Track program
UnlikeitsfunctionalityinProgrammode,theDrum
TrackfunctioninCombinationmodedoesnothaveits
owndedicatedtrack(timbre).Theprogramthatplays
theDrumTrackpatternwillusethetimbrethatyou
specify.
1. IntheCombiP0:Play–ProgramT01–08pageor
T09–16page,selectthetimbrethatyouwanttouse
forthedrumtrack,andthenselecttheDrumTrack
program.
Pattern
Bank/No.
Drum Track
Program
Drum Track Play/Mute, Solo On/O, Volume
Drum Track
EQ

Performing with the Drum Track function Using the Drum Track function in Combination mode
99
Inthefollowingillustration,we’veselectedtimbre5
forusebythedrumtrack.
2. SpecifytheMIDIchannelofthedrumtrack
timbre.
BeawarethatifanothertimbreusesthesameMIDI
channel,thattimbrewillalsobeplayed.
3. AccesstheCombiP7:ARP/DT–DrumTrackpage.
Specifythedrumtrack’sMIDIchannelOutput.Setthis
tomatchtheMIDIChannelofthetimbreyou
specifiedinstep2.
4. SelectaDrumTrackpattern.Use“Pattern(Pattern
Bank)”toselectthepresetoruserbank,anduse
“PatternNo.”toselectthepatternnumber.
Note: Ifyouselectanemptypattern,theDRUM
TRACKbuttonwillnotfunction.
5. PresstheDRUMTRACKbuttontoverifythatthe
patternplayscorrectly.
ThemethodoftriggeringwilldependontheTrigger
settings.IftheTriggerModeparameterissettoStart
Immediately,theDrumTrackpatternwillstartwhen
youpresstheDRUMTRACKbutton.Fordetailsonthe
Triggersettings,pleasesee“7–4b:Trigger ”onpage 56
oftheParameterGuide.
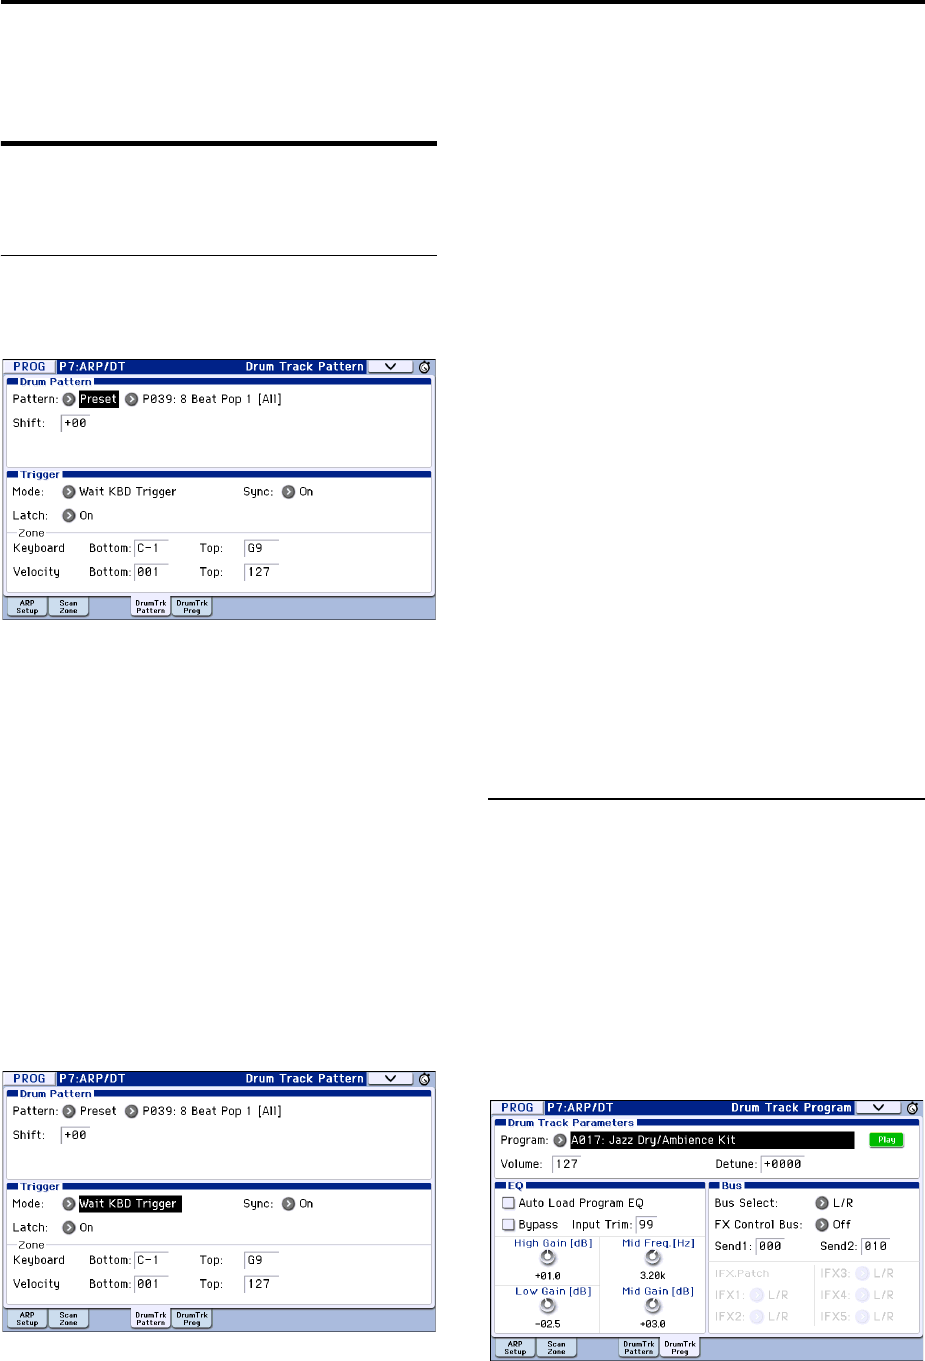
Drum Track function
100
Drum Track function settings
Drum Track function settings
in Program mode
Starting/stopping the drum track
1. AccesstheProgP7:ARP/DT–DrumTrackPattern
page.
2. “TriggerMode”specifieshowtheDrumTrack
patternwillbetriggered.
StartImmediately:WhenyoupresstheDRUM
TRACKbuttontoturniton,theLEDwilllightupand
theDrumTrackpatternwillstartaccordingtotheSync
setting.ItwillstopwhenyoupresstheDRUMTRACK
buttontoturnitoff.
WaitKBDTrigger:WhenyoupresstheDRUM
TRACKbuttontoturniton,theLEDwillblinkandthe
DrumTrackpatternwillwaittostart.Whenyouplay
thekeyboardorreceiveaMIDInote‐on,theDrum
TrackpatternwillstartaccordingtotheSyncsetting.
3. SpecifytheSyncsetting.
Off:TheDrumTrackpatternwillnotsynchronizeto
thearpeggiatorthat’scurrentlyrunning,butwillstart
immediately.
On:TheDrumTrackpatternwillsynchronizetothe
arpeggiatorthat’scurrentlyrunning.
4. If“TriggerMode”issettoWaitKBDTrigger,
specifythe“Latch”setting.“Latch”specifies
whethertheDrumTrackpatternwillcontinue
playingevenafteryoutakeyourhandoffthe
keyboard.
Off:IftheDRUMTRACKbuttonison(theLEDwill
blink),thepatternwillstartwhenyouplaythe
keyboard(note‐on).Thepatternwillstopwhenyou
releasethekeyboard(note‐off).
On:IftheDRUMTRACKbuttonison(theLEDwill
blink),thepatternwillstartwhenyouplaythe
keyboard(note‐on).Thepatternwillcontinuewhen
youreleasethekeyboard(note‐off).Thepatternwill
stopwhenyouturntheDRUMTRACKbuttonoff(the
LEDwillgodark).
5. If“TriggerMode”issettoWaitKBDTrigger,
specifytheKeyboardZoneandVelocityZone.
Thesesettingsspecifytherangeofkeysandvelocities
thatwilltriggertheDrumTrackpatternwhenyouplay
thekeyboard(orreceiveanote‐on).
Saving the on/off status
If“TriggerMode”issettoWaitKBDTrigger,thedrum
track’son/offstatuscanbesavedintheprogram.
If“TriggerMode”issettoStartImmediately,thedrum
track’son/offstatuswillalwaysbesavedas“off,”
regardlessofthestateoftheDRUMTRACKbutton.
EQ adjustments for the Drum Track
program
Youcanadjustathree‐bandEQfortheDrumTrack
program.
Ifyouturn“A u t o LoadProgramEQ”on(selected),the
three‐bandEQsettingsspecifiedfortheprogramwill
beautomaticallyloadedwhenyouswitchDrumTrack
programs.Normallyyouwillleavethisselected.
Youarefreetoadjustthethree‐bandEQsettingsthat
areloadedautomatically.Theseadjustmentsare
appliedrelativetotheoriginalsettingsoftheprogram.
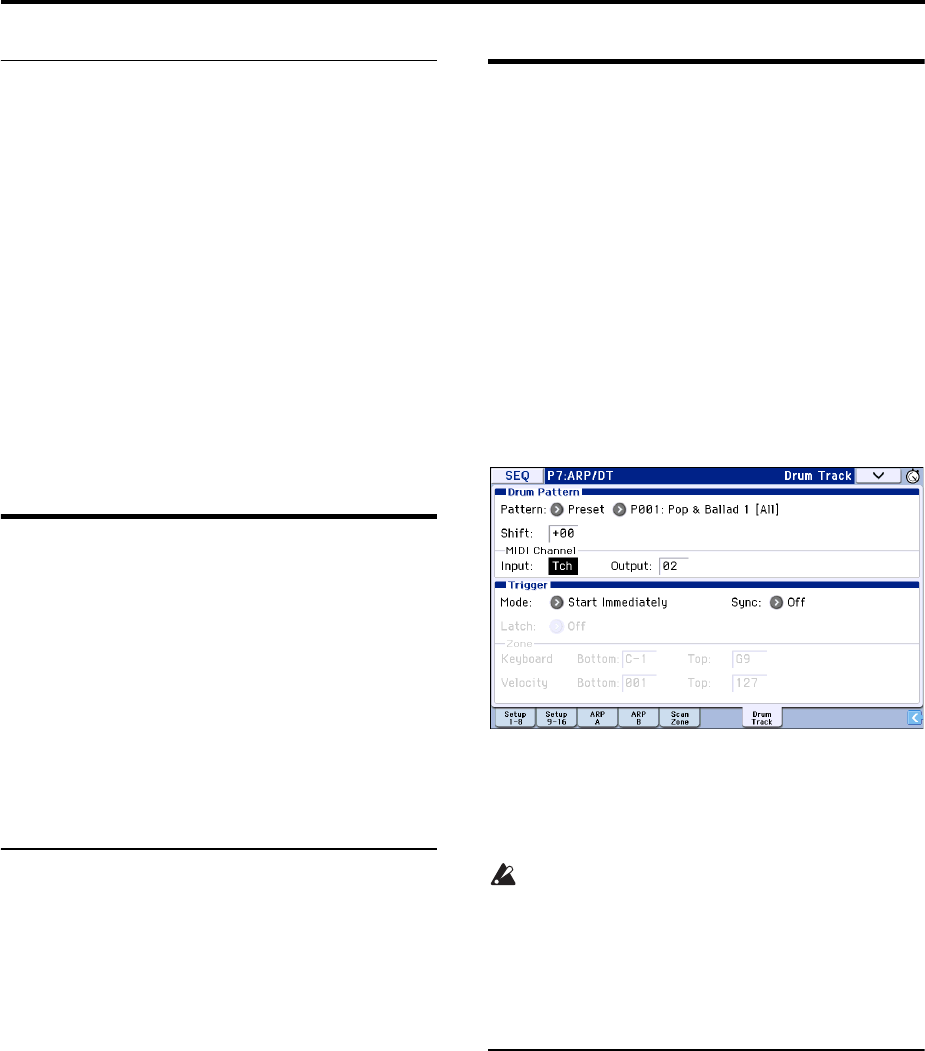
Drum Track function settings Drum Track function settings in Combination mode
101
MIDI transmission and reception for
the drum track
InProgrammode,theDrumTrackfunctiontransmits
andreceivesonthefollowingMIDIchannels.
Receive:Ifyou’recontrollingthetriggeringbyplaying
thekeyboard,thedrumtrackwillreceiveontheglobal
MIDIchannel.
Transmit:ThedrumtrackwilltransmitontheMIDI
channelspecifiedbyDrumTrackProgMIDICh
(default:channel10).(Notedataetc.oftheDrumTrack
programwillbetransmitted.)
Note: MIDItransmissionofthepatterndataisenabled
ifDrumTrackProgMIDIOutisselected.Thedefault
settingisoff(unselected).
TheDrumTrackprogramdoesnottransmitorreceive
programchanges.
Drum Track function settings
in Combination mode
UnlikeProgrammode,Combinationmodedoesnot
haveadedicatedtrackfortheDrumTrackfunction.
You’llneedtospecifyatimbre1–16astheoneforuse
bytheDrumTrackprogram.
Thensetthedrumtrack’soutputMIDIchannelOutput
tomatchthetimbre’sMIDIchannelMIDIChannelso
thattheDrumTrackprogramcanbeplayed.
Fordetails,pleasesee“SelectingaDrumTrackpattern
andDrumTrackprogram”onpage 98.
MIDI transmission and reception for
the drum track
InCombinationmode,theDrumTrackfunction
transmitsandreceivesonthefollowingMIDIchannels.
Receive:Ifyou’recontrollingthetriggeringbyplaying
thekeyboard,thedrumtrackwillreceiveontheglobal
MIDIchannel.
Transmit:ThedrumtrackwilltransmitontheMIDI
channelspecifiedbytheDrumPatternOutputsetting
ofeachcombination.
SetthistomatchtheMIDIchannelofthetimbreyou’ve
specifiedforthedrumprogram.
Ifthetimbre’sStatusisEXTorEX2,thenotedataetc.
oftheDrumTrackpatternwillbetransmitted.
Drum Track function settings
in Sequencer mode
TheparametersfortheDrumTrackfunctionare
structuredinthesamewayasinCombinationmode.
AssigntheDrumTrackprogramtothedesiredtrack1–
16.
However,whileacombinationtriggerstheDrum
TrackpatternontheglobalMIDIchannel,asong
triggerstheDrumTrackpatternontheMIDIchannel
specifiedbytheDrumPatternInput.Normallyyou’ll
setthistoTch.WiththeTchsetting,theMIDIchannel
ofthetrackselectedbyTrackSelectwillautomatically
beusedasthetriggerchannel.
Fordetails,pleasesee“SelectingaDrumTrackpattern
andDrumTrackprogram”onpage 98.
InSequencermodeyoucanusetheDrumTrack
functionwhilerealtime‐recordingasongtrackor
pattern.
Thenote‐on/offdatatransmittedbytheDrumTrack
patterncanberecordedaseventsinatrackorpattern.
Youcan’tusenotedatafromtheinternal
sequencerasatriggertostartpatternsforthe
DrumTrackfunction.
Whenyou’veusedtheDrumTrackfunctionwitha
programorcombinationtocomeupwithanideafora
song,youcanthenusetheAutoSongSetupfunctionto
immediatelystartrealtime‐recording(seepage 59).
MIDI transmission and reception for
the drum track
InSequencermode,theDrumTrackfunctiontransmits
andreceivesonthefollowingMIDIchannels.
Receive:ThedrumtrackwillreceiveontheMIDI
channelspecifiedbytheDrumPatternInputsettingof
eachsong.Normallyyou’llsetthistoTchandusethe
KROME’skeyboardtocontrolthetriggering.
Transmit:ThedrumtrackwilltransmitontheMIDI
channelspecifiedbytheDrumPatternOutputsetting
ofeachsong.SetthistomatchtheMIDIchannelofthe
MIDItrackwhereyou’veassignedthedrumprogram.
Ifthetrack’sStatusisBTH,EXT,orEX2,notedataetc.
oftheDrumTrackpatternwillbetransmitted.
Drum Track function
102
Synchronizing the Drum Track
function
The Trigger “Sync” parameter
Thetriggertimingofadrumtrackwilldependonthe
settingofitsTriggerSyncparameter.
On(checked):Thetriggertimingwillbequantizedto
thenearestbeatrelativetothebasetempo.
Off(unchecked):IfTriggerModeissettoStart
Immediately,triggeringwilloccuratthemomentyou
presstheDRUMTRACKbutton.IfthisissettoWait
KBDTrigger,triggeringwilloccuratthemomentyou
playthekeyboard.
Synchronizing the drum track with the KAR-
MA function, Sequencer mode songs, pat-
terns, and RPPR performance
IfyouwanttheDrumTrackpatterntoplayorbe
recordedinsynchronizationwiththearpeggiatorthat’s
currentlyrunning,acurrently‐playingsong,pattern,
orRPPRperformance,turnTriggerSyncon.
TriggerSyncOff:IftheTriggerModesettingisStart
Immediately,theDrumTrackpatternwillbetriggered
themomentyoupresstheDRUMTRACKbutton.If
thisissettoWaitKBDTrigger,theDrumTrackpattern
willbetriggeredthemomentyouplaythekeyboard.It
willnotsynchronizetothearpeggiatorthat’scurrently
runningortothesong,pattern,orRPPRthat’s
currentlyactive.
TriggerSyncOn:Triggeringwillsynchronizetothe
songthat’scurrentlyplaying,patternorRPPR
performanceinunitsofameasure.Triggeringwill
synchronizetothearpeggiatorthat’scurrentlyrunning
(inSequencermodeifthesongorpatternisstopped)
inunitsofabeat.
Note: Ifyouwanttosynchronizearpeggiatortothe
DrumTrackfunctionthat’scurrentlyrunning,setthe
Syncparameter(Prog/Combi/SeqP7:ARP/DT‐
DrumTrkPattern).
Note: IfyouwanttosynchronizetheRPPRpattern
performancetotheDrumTrackfunctionthat’s
currentlyrunning,settheSyncparameter(SeqP10:
Pattern/RPPR–RPPRSetuppage)toBeatorMeasure.
Synchronization with song stop
Synchronization with a song in Sequencer
mode
•WhenyoupresstheSEQUENCERSTART/STOP
()button,theDrumTrackfunctionwillstop
aswellasthesequencer.
•IfyouwanttheDrumTrackfunctiontostart
simultaneouslywiththestartofrecording,press
theDRUMTRACKbuttonduringthepre‐count
beforerecording(ifTriggerModeissettoStart
Immediately)orplaythekeyboard(ifTrigger
ModeisWaitKBDTrigger).TheDrumTrackswill
notbetriggeredimmediately,butwillbetriggered
insynchronizationwiththesequencerthemoment
recordingstarts.
Slave operation
ConnecttheKROME’sMIDIINtoyourexternalMIDI
device’sMIDIOUT,orconnecttheKROME’sUSBB
connectortoyourcomputer’sUSBport.
SetMIDIClock(seepage 111)toExternalMIDIor
ExternalUSB.
Note: IftheKROMEissettoMIDIClock=Auto,itwill
alsosynchronizetotheexternalMIDIdeviceinthe
samewayifMIDItimingclockmessagesarebeing
receivedfromtheexternaldevice.
Synchronization to MIDI clock
Thearpeggiatorfunctionwillsynchronizetoatempo
basedontheexternalMIDIclocktiming.
Synchronization with MIDI realtime commands
InSequencermode,SongStart,Continue,andStop
messagesthattheKROMEreceiveswillcontrolsong
playbackandrecordingjustaswhenyouusethefront
panelSTART/STOP()button.TheKARMA
functionalsowillbecontrolledinthesamewayas
whenyouusethefrontpanelSTART/STOP()
button.(See“Synchronizationwithsongstop”)
Sync: O
Sync: Beat
Sync: Measure
Key 1 on
Song
Key 2 on Key 1 o
Sync settings
Patterns 1 and 2 are set to
Mode=Manual, and have
identical Sync settings
Pattern 1
Pattern 2
Pattern 1
Pattern 2
Pattern 1
Pattern 2

Drum Track function settings Creating a Drum Track pattern
103
Master operation
IfyouwantanexternalMIDIdeviceorcomputerto
synchronizetotheKROME’sMIDItimingclockand
realtimecommands,connecttheKROME’sMIDIOUT
toyourexternalMIDIdevice’sMIDIIN,orconnectthe
KROME’sUSBporttoyourcomputer’sUSBport.
SetMIDIClocktoInternal.
Note: ThesameappliesifMIDIClock=AutoandMIDI
realtimeclockmessagesarebeingtransmitted(see
page 111).
Synchronization via MIDI clock
TheconnectedexternalMIDIdevicewillsynchronize
totheMIDIclockoftheKROME.
Creating a Drum Track pattern
Onceyou’veconvertedthepatterninthisway,you’ll
beabletouseitwiththedrumtrackineachmode.
TheseconvertedDrumTrackpatternsareheldin
internalmemoryevenafteryouturnoffthepower.
Thismeansyoucanmanagethemtogetherwiththe
programsandcombinations.
Preparing a user pattern
You’llfirstneedtopreparetheuserpatternthatyou
wanttoconverttoaDrumTrackpattern.
Tocreateauserpattern,youcanrealtime‐recordit(see
page 65)intheSeqP10:Pattern/RPPR–PatternEdit
page,orstep‐recordit(seepage 167oftheParameter
Guide).
Alternatively,performancedatafromatrackcanbe
importedintoapattern,meaningthatperformance
datayou’vecreatedinatrackorSMFdatayou’ve
loadedinMediamodecanbeusedasauserpattern.To
dothis,executetheGetFromTrackmenucommandin
theSeqP10:Pattern/RPPR–PatternEditpage(see
page 187oftheParameterGuide).
Converting to a Drum Track pattern
1. PresstheSEQbuttontoenterSequencermode.
2. AccesstheSeqP10:Patern/RPPR–PatternEdit
page.
3. Selecttheuserpatternthatyouwanttoconvertto
aDrumTrackpattern.
SetPatterntoUser,andusePatternSelecttoselectthe
desiredpattern.
4. ChoosethemenucommandConverttoDrumTrk
Patterntoaccessthedialogbox.
5. UsetheTo“DrumTrackPatternSelect”fieldto
specifytheuserDrumTrackpatternnumberthat
willholdtheconverteddata.Whenyouexecute
thecommand,thedatawillbeoverwrittenonto
thisnumber.
6. Ifyouselectthe“AllPatternsavailableinSong
***”option,allpatternsinthesongthatcontain
notedatawillbeconverted,startingwiththe
numberyouspecifiedinstep3.
7. Ifyouexecutethiscommandwith“NoteOnly”
selected,onlythenoteeventswillbeconverted.
8. PresstheOKbuttonortheENTERbuttonto
execute.Ifyoudecidenottoexecute,pressthe
CancelbuttonortheEXITbutton.
9. Asdescribedin“UsingtheDrumTrackfunction
inProgrammode”onpage 97,settheDrumTrack
“PatternBank”toUser,andset“PatternNo.”to
theuserDrumTrackpatternyouconverted.Then
playtheDrumTrackpattern.
Ifthedrumpatternmemoryisinsufficient,orif
therearenotenoughpatternslots,theerror
message“NotenoughDrumTrackpattern
memory”or“NotenoughDrumTrackpattern
locationsavailable”willappear,andthecommand
cannotbeexecuted.
Tip: It’sagoodideatoconvertdrumpatternsthatyou
usefrequently.Use“LoadDrumTrackPattern”toload
them.
Internal memory (saved inside the KROME)
Song
Drum Track
Track/RPPR
Program
/Combination
Drum Track
Convert to
Drum Track Pattern
100
User
Pattern
Preset
Pattern
User
Drum Track
Pattern
Sequencer memory
(Not saved internally;
save on external USB
media.)

Drum Track function
104

105
Using Drum Kits
Drum Kit Overview
What’s a Drum Kit?
Adrumkitisacollectionofdrumsamples(drumset
soundssuchasbassdrum,snare,orcymbals,aswellas
awidevarietyofotherpercussionsounds),witheach
sampleassignedtoanoteofthekeyboard.
• Eachkeycanplayadifferentsound
•Oneachkey,youcanuseuptoeightDrumsamples,
withvelocitycrossfades
• Eachkeyhasseparatesettingsforthemost
importantsoundparameters,includingvolume,
filtercutoffandresonance,envelopeattackand
decay,pitch,driveandlowboost,andgainforeach
bandoftheProgramEQ.
Forinstance,youcouldcombinehighdriveand
lowcutofffrequencytocreatealo‐fieffectononlya
fewsounds,whiletherestofthesoundsremained
clearandpristine.
• EachnotecanberoutedtodifferentInsertEffects,
orhaveseparateFXSendamounts.Forinstance,
youcansendasnaresoundthroughadedicated
compressor.
YoucanuseDrumKitsonlyinProgramswhose
OscillatorModeissettoSingleorDoubleDrums.
Drum Kit memory structure
TheKROMEhasover161DrumKits,dividedinto
Internal,User,andGM(GeneralMIDI)groupsas
shownbelow.Youcaneditorwriteintoanyofthe
locationsexceptfortheGMbank,whichcannotbe
erased.
DrumKitcontents
The9DrumKitsintheGMbankarecompatiblewith
theGM2soundmap.TheotherDrumKitsmayuse
differentmappings,whereappropriate.
Using a drum kit in a program
(Oscillator Mode)
IntheProgramP1:BasicCtrls–ProgramBasicpage,set
theOscillatorModeparametertoDrumsorDouble
Drums.Thenfortheoscillator,selectthedrumkitthat
youwanttouse.
Before you start editing…
Selecting a drum program
DrumKitsareeditedinGlobalMode.Whileyou’rein
GlobalMode,you’llplaythekitthatyou’reeditingasif
youwereplayingitfromwithintheProgram,Combi,
orSongwhichwasselectedbeforeyouenteredGlobal
mode.
So,beforeyouenterGlobalmode,it’sbesttoselecta
Programwhichisalreadysetupfordrums,withthe
appropriateEGsettings,effects,andsoon.Justusethe
ProgramCategoryselectpopup,andchooseadrum
Programsuchas“StudioStandardKit.”
Eveniftheprogram’soscillatorissettoDouble
Drums,thispagewillshowonlythesingledrum
kitthatisselectedbyDrumKitSelect.
Matching the key of the keyboard
with the drum kit
Inorderforthenotemappingstomatchthekeyboard,
theOscillator’sOctavesettingneedstobe+0[8ʹ].All
DrumKitProgramsshouldhavethissettingalready.If
you’reunsure,youcancheckthisyourself:
1. GototheOSC1SetuptaboftheOSC/Pitchpage.
Withasettingotherthan+0[8ʹ],therelationship
betweenthekeysandtheDrumKitsoundmapwillbe
incorrect.
2. SettheGlobalP0:BasicSetup–Basicparameter
“KeyTranspose”to+00.
Make sure that Memory Protect is
disabled
Beforeyoustartediting,gototheGlobalP0:Basic
Setup–SystemPreferencespage,andlookinthe
MemoryProtectsection.MakesurethatDrumKitis
notchecked–ifso,youwon’tbeabletomakeanyedits.
Drum Kits may be used by more than
one Program
WhenyoueditaDrumKit,allProgramsthatusethat
DrumKitwillbeaffected.Toavoidchangingthe
factoryvoicing,youmaywishtocopyDrumKitsto
emptylocationsintheUSERbanksbeforeediting.
Bank No. Contents
INT 00...31 Preload Drum Kits
User 32...47 User Drum Kits
GM 0 48...56 GM2 Drum Kits
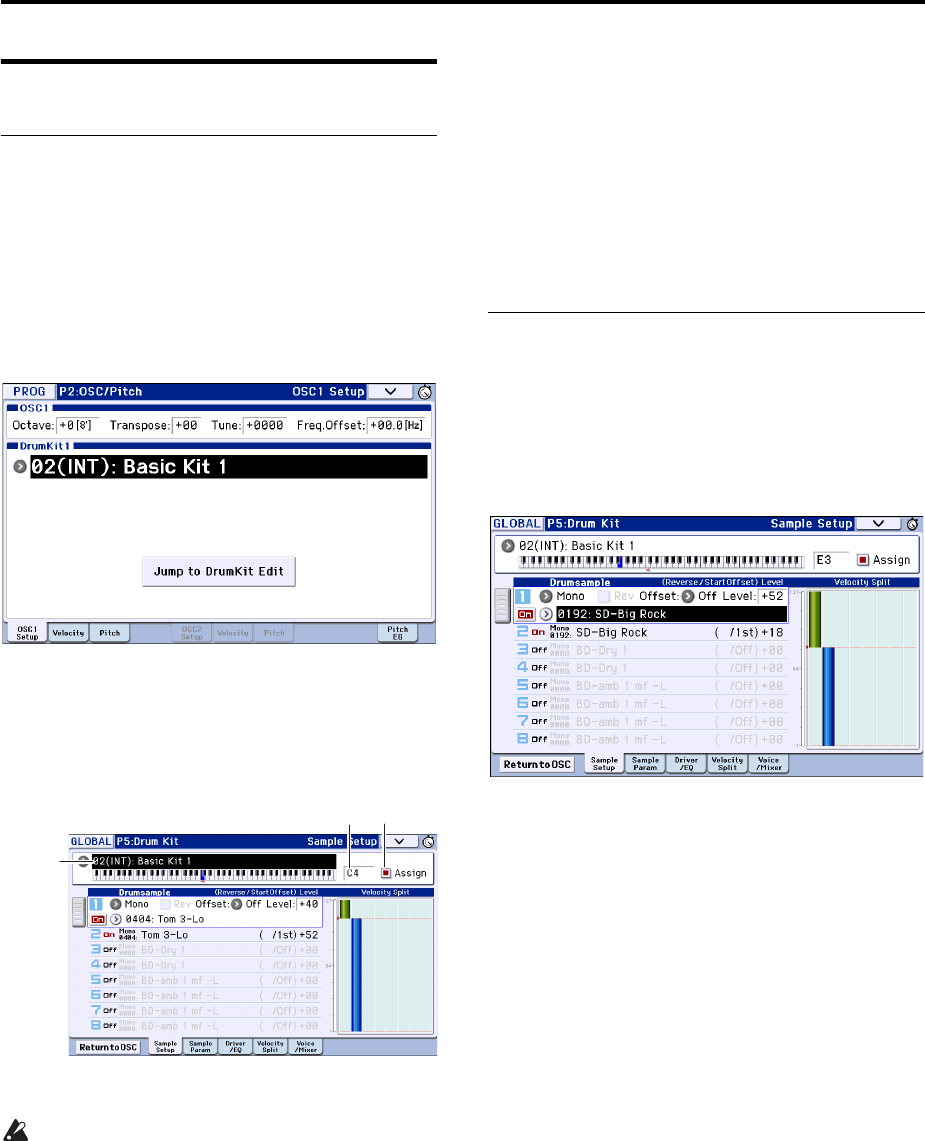
Using Drum Kits
106
Editing a Drum Kit
Basic Editing
1. SelecttheProgramthatyouwishtousewhile
editingtheDrumKit.
2. AccesstheP2:OSC/Pitch–OSC1Setuppageorthe
OSC2Setuppage(DoubleDrumsonly),andpress
theJumptoDrumKitEditbutton.
IfyouwanttoedittheOSC2drumkitofadouble
drumsprogram,presstheJumptoDrumKitEdit
buttonfromtheP2:OSC/Pitch–OSC2Setuppage.
You’lljumptotheGlobalmodeP5:DrumKit–Sample
Setuppage.
Note: IfyouenterGlobalmodebypressingthe
GLOBALbuttonorthemodebutton,andthenaccess
theP5:DrumKit–SampleSetuppage,theOSC1sound
settingswillbeused.
3. Inthetoplineofthedisplay,use“DrumKit
Select”toselectthedrumkitthatyouwanttoedit.
GMdrumkits48(GM)–56(GM)cannotbeselected
here.(ItisnotpossibletoeditorwriteaGMdrum
kit.)Ifyouwishtomodifythesettingsofoneofthe
drumkits48(GM)–56(GM),youcanuseCopy
DrumKittocopyitto00(INT)–47(USER),and
theneditthecopy.
4. UsetheKeyparametertoselectthenotethatyou
wishtoedit.
Toselectakey,youcanuseanyofthestandardVALUE
controllers(thedial,numerickeypadetc.).Asa
shortcut,youcanalsoholddowntheKeyandplaya
noteonthekeyboard.
ThisKeyselectionappliestoallfiveDrumKitediting
pages.
5. UsetheAssigncheckboxtospecifywhetherthe
keywillhaveitsownsettings,orusethesame
settingsasthenexthighernote.
IfAssignischecked,thekeywillhaveitsownsettings.
Thisisthedefault.
IfAssignisnotchecked,thekeywon’thaveitsown
settings.Instead,itwillusethesamesettingsasthe
nexthighernote–exceptthatthedrumsampleswillbe
playedatalowerpitch.Theamountofpitchchange
dependsonthePitchSlopeparameter,ontheProgP2:
OSC/Pitch–OSC1PitchorOSC2Pitchpage.
Usethissettingwhenyouwantonlytochangethe
pitch,suchaswithtomorcymbalsounds.
Velocity crossfade settings
Forthiskey,let’screateasimplevelocitycrossfade
betweentwostereodrumsamples.
1. Ontheleftsideofthepage,makesurethat
Drumsample1and2areturnedOn.
JustpresstheOn/Offbuttonstotogglethem,if
necessary.
2. Inthesameway,makesurethatDrumsamples3–8
areOff.
Whentheyareturnedoff,mostoftheirparameterswill
begrayedout.
3. SelectStereoastheBankforDrumsample1and
Drumsample2.
Drumsamplescomeinseveraltypes:Mono,Stereo,
VM.M,orVM.S.Monoaremonodrumsamples,and
Stereoarestereodrumsamples.Stereodrumsamples
usetwiceasmanyvoicesasmonodrumsamples.
VM.MandVM.Sarerespectivelymonoandstereo
versionsoflarge‐capacitydrumsamples.
Drumsamplesareorganizedintocategoriessuchas
bassdrumorsnare.
4. PresstheDrumsamplepopupforDrumsample1.
ThisbringsupalistofDrumsamples,organizedby
category.Usethetabsattheleftofthedisplayto
browsethroughthedifferentcategories.
ForalistoftheDrumsamplenames,pleaseseethe
VoiceNameList.
Drum Kit
Select
KEY Assign
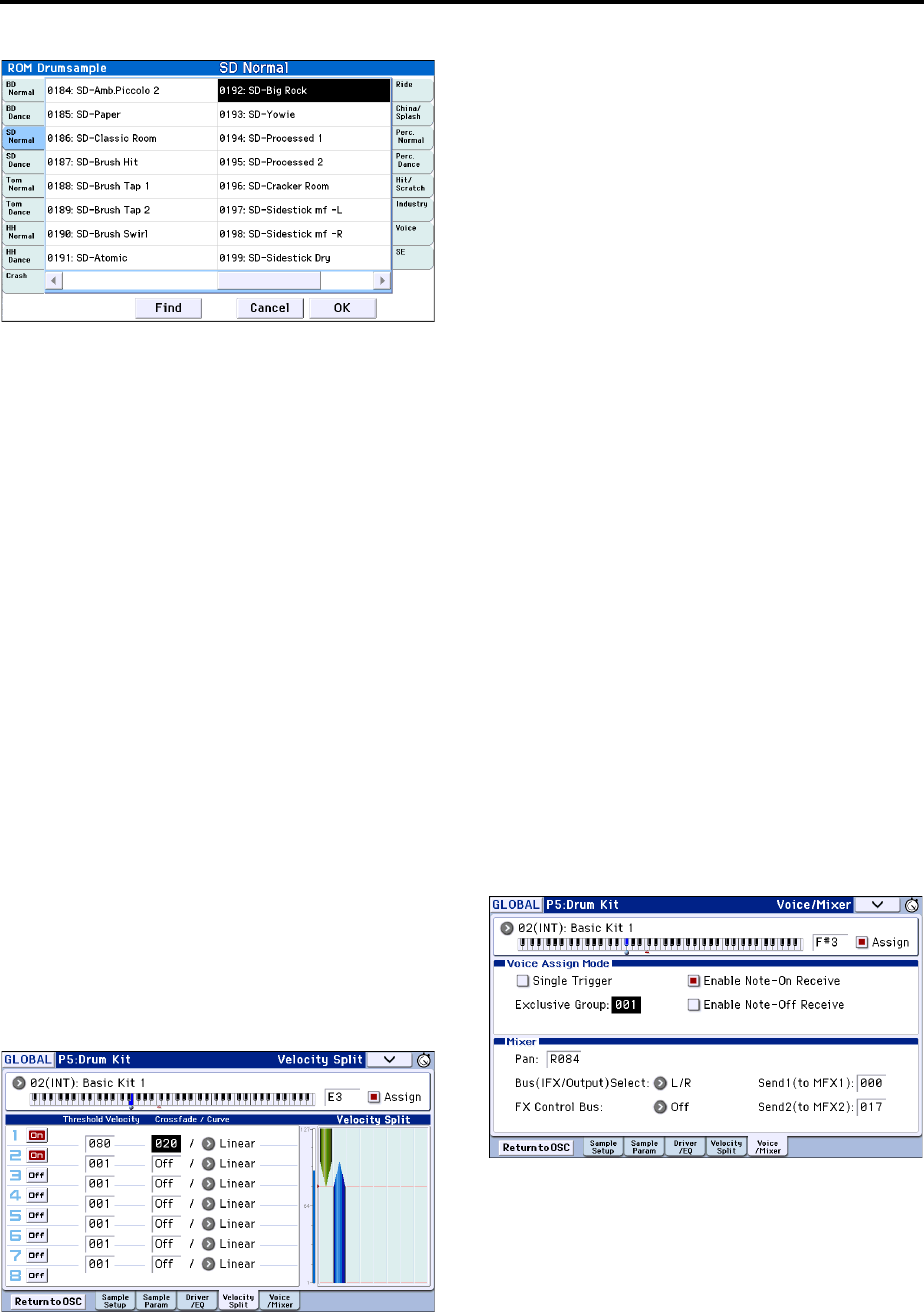
Editing a Drum Kit
107
5. SelectaDrumsamplebytouchingitsnameinthe
list.
6. PresstheOKbuttontoconfirmyourselection.
7. Switchtheslotto2,andmakesettingsfor
Drumsample2inthesameway.
Nowthatyou’veassignedDrumsamplesto
Drumsample1andDrumsample2,let’ssetupthe
velocityrangesandcrossfades.
8. AccesstheP5:DrumKit–VelocitySplitpage.
9. SetDrumsample2’sThresholdVelocityto1,and
itsCrossfadetoOff.
10. SetDrumsample1’sThresholdVelocityto80.
YoucanedittheThresholdVelocitysettingby
touchinganddraggingthegraphicontheright
(see“*EG,VelocitySplit”onpage 6).
Now,Drumsample2willsoundwhenyouplaysoftly,
atvelocitiesof79orless–andDrumsample1willsound
whenyouplayharder,withvelocitiesof80ormore.
ThemeterattheleftsideoftheVelocitySplitgraphic
indicatesthenote‐onvelocityvalue.Thisletsyou
verifythedrumsamplethatwillbesoundedbyagiven
velocity.
11. Next,setDrumsample1’sCrossfadeto20,andits
CurvetoLinear.
Noticethatthegraphicnowshowsthetworanges
taperingintooneanother.Between80and100,
Drumsample2willfadeout,andDrumsample1will
fadein,creatingagradualvelocitytransitioninsteadof
ahardsplit.
Fine-tuning the sound of each sample
1. Ifyoulike,adjusttheLevelsforthetwo
Drumsamples.
Thiscanbeveryusefulincreatingasmoothvelocity
splitorcrossfade.
2. Asnecessary,specifythetuning,EGparameters,
andfilter.
AccesstheP5:DrumKit–SampleParameterpage.
AdjustTune,Attack(AmpEGAttack),Decay(Amp
EGDecay),CutoffandResonanceforeach
drumsample.
3. Youcanalsoeditthedrive,boost,andEQforeach
drumsample.
AccesstheP5:DrumKit–Drive/EQpage.
AdjustDrive,LowBoost,and3BandEQGain[dB]
foreachdrumsample.
4. Repeat“BasicEditing,”onpage 106tosetupeach
keyoftheDrumKit.
5. Youcanalsocopysettingsfromonekeyto
another,usingtheCopyKeySetupmenu
command.
Using Exclusive Groups
1. AccesstheP5:DrumKit–Voice/Mixerpage.
2. UsetheExclusiveGroupstomakeonedrum
soundcutoffanotherdrumsound‐suchasclosed
andopenhi‐hats.
Forexample,let’ssaythatyou’veassignedanopenhi‐
hatandaclosedhi‐hattothesameexclusivegroup:
•Playtheopenhi‐hatsound.
•Whileit’sstillringing,playtheclosedhi‐hat.
•Th
eopenhi‐hatsoundwillbecutoff–simulating
theactionofaphysicalhi‐hat.

Using Drum Kits
108
Sustaining the sound even after the key is re-
leased (Hold)
UsetheHoldfunctionforinstrumentsthatshould
continuesustainingevenafterthekeyisreleased,such
asacrashcymbal.Thewaythisworkswilldependon
thesettingsoftheprogramanddrumkit.
SettheHoldfunctionasfollows.
1. AccesstheProgP1:Basic/Controllers–Note‐On/
Scalepage.
IfyoujumpedtotheGlobalP5:DrumKitpageby
pressingtheJumptoDrumkitEditbuttonfrom
Programmode,youcanreturntoProgrammodeby
pressingtheReturntoOSCbutton.
2. UnderKeyZone,makesurethattheHoldcheck‐
boxischecked.
Onceyou’veturnedonHoldfortheProgram,the
functioniscontrolledonanote‐by‐notebasis
accordingtosettingswithintheDrumKit.
3. AccesstheGlobalP5:DrumKit–Voice/Mixer
page.
4. Foreachkey,settheEnableNote‐OffReceive
parameterasdesired.
Ifthischeckboxisnotselected,noteswillbeheld,and
thesoundwillcontinueevenafterthekeyisreleased.
Ifitischecked,thekeywillnotbeheld.
IfyouturnoffHoldintheProgram,nokeyswillbe
held‐regardlessoftheirEnableNote‐OffReceive
setting.
Controlling effects for each key
DrumKitshavetheirown,built‐inmixers.Foreach
key,youcancontroltheInsertEffectsbussing,Master
Effectssends,andpan.
Touseseparatebussettingsforeachkey:
1. AccesstheProgP8:Routing/IFX–Routingpage.
2. MakesurethattheUseDKitSettingcheck‐boxis
checked.
WhenUseDKitSettingison,theProgramwillusethe
BusSelectandEffectsSendsettingsforeachkeyofthe
DrumKit.
WhenUseDKitSettingisoff,theProgramwillignore
theDrumKit’sBusSelectandEffectsSendsettings.
3. AccesstheGlobalP5:DrumKit–Voice/Mixer
page.
4. UsetheBus(IFX/Output)Selectparametertosend
drumsoundsthroughtheirownInserteffects,or
totheL/Routputs.
Ifyoulike,youcansendeachnotetoitsownInsert
effect,ortotheindividualaudiooutputs,inadditionto
theL/Routputs.
Forexample,youmightsendallsnaresoundstoIFX1,
allkicksoundstoIFX2,andtheremainingsoundstoL/
R.
Tip: Inmostpreloadeddrumkits,thedrum
instrumentshavethesameBus(IFX/Output)Select
settingsaccordingtotheirtype,asfollows.
SnaresIFX1
KicksIFX2
OtherIFX3
5. UseSend1(toMFX1)andSend2(toMFX2)toset
thesendlevelstothemastereffects.
Controlling pan for each key
Touseseparatepansettingsforeachkey:
1. AccesstheProgP4:Amp/EQ–Amp1/Driver1or
Amp2/Drive2page.
2. UnderPan,makesurethattheUseDKitSetting
check‐boxischecked.
WhenUseDKitSettingison,theProgramwillusethe
pansettingsforeachkeyoftheDrumKit.
3. AccesstheGlobalP5:DrumKit–Voice/Mixer
page.
4. Use“Pan”tospecifythepanningforeachkey.
Saving Drum Kits
Onceyou’vespentsometimeediting,you’llwantto
saveyourwork.
ThecontentsofyoureditinginGlobalmodeare
preservedaslongasthepowerison,butwillbe
lostwhenyouturnoffthepower.Ifyouwantto
keepyouredits,youmustexecutetheWriteDrum
Kitsfunction.
Thiswillsavealldrumkits.
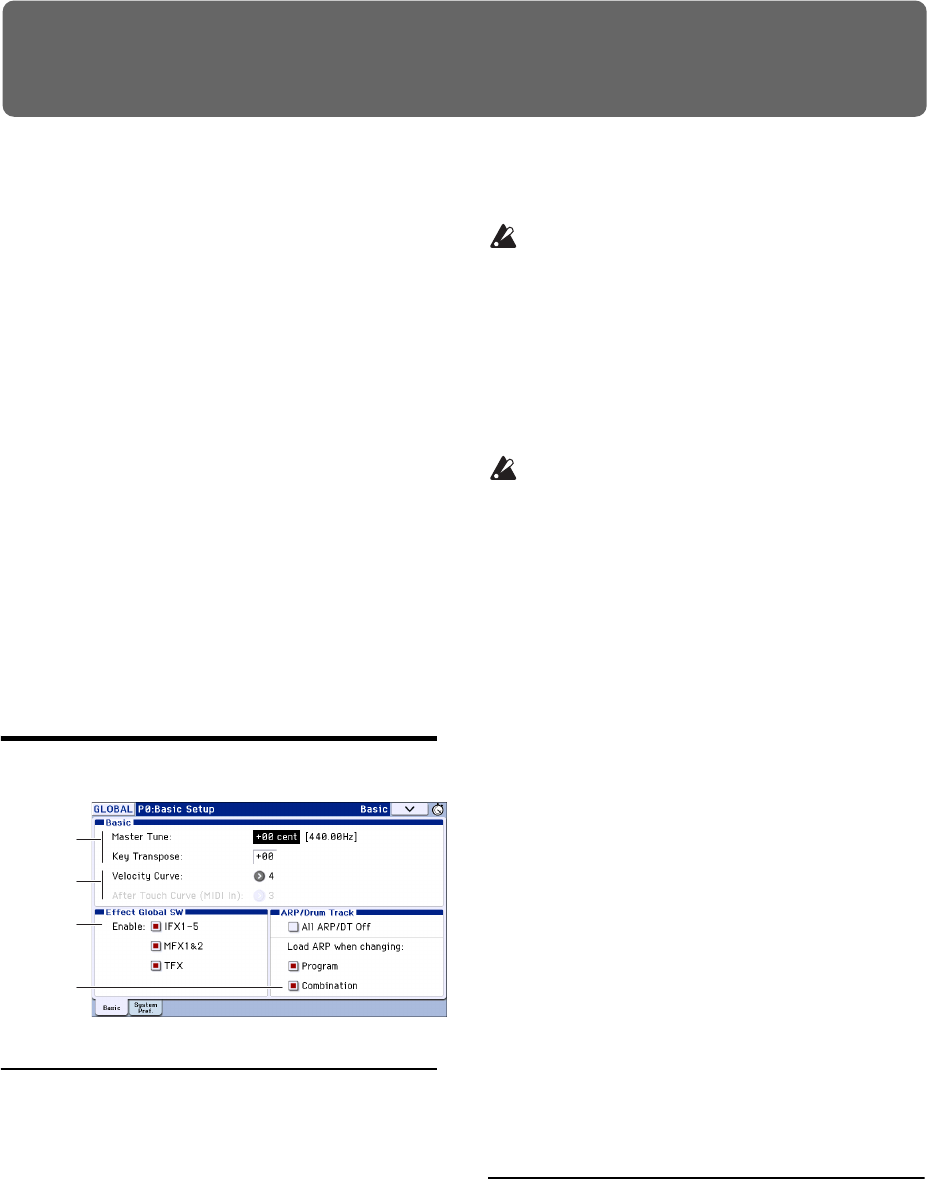
109
Adjusting Global KROME setings
How Global mode is structured
InGlobalmodeyoucanadjustoverallsettingsforthe
entireKROME.Theseconsistmainlyofthefollowing
settings.
•Mastertune
•Keytranspose
• Effectglobalbutton
•GlobalMIDIchannel
• Creatingscales
• Damperpedal,assignablefootswitch/pedal
• Categorynamesforprogramsandcombinations
• Creatinguserdrumkits
• Creatinguserarpeggiopatterns
Fordetailsonhowtoaccesseachpage,pleasesee
“Basicoperations”onpage 9.
ThreetypesofdataarehandledinGlobalmode:
userdrumkitsettings(GlobalP5),userarpeggio
patterns(GlobalP6),andotherglobalsettings
(GlobalP0–4).Eachofthesehasarespective
memoryareatostoreitsdata.Thisdatacanalsobe
savedtovarioustypesofSDcardinMediamode.
Fordetails,pleasesee“WritingGlobalsettings,
UserDrumKitsandUserArpeggioPatterns”on
page 116,and“SavingtoSDcard(Media–Save)”
onpage 118.
TheComparefunctionthatletsyoureturntothe
statepriortoyourediting(orundoedits)isnot
availableinGlobalmode.
Global settings
Basic setup
Tuning and Transposing
Tuning to another instrument
Toadjustthetuninginfineincrements,inorderto
matchotherinstrumentsorrecordedmusic:
1. InGlobalmode,gotoP0:BasicSetup–Basicpage.
2. AdjusttheMasterTunetothedesiredpitch.
TheMasterTuneisadjustableoverarangeof±50cents
(onesemitone=100cents).WhenMasterTuneisat0,
middleAistunedto440Hz.
Transposing the keyboard
Youcanalsotransposethekeyboardinsemitones,for
quickkey‐changes(forinstance,ifthebanddecidesto
playasonginFratherthanE).Todoso:
1. InGlobalmode,gotoP0:BasicSetup–Basicpage.
2. AdjusttheKeyTransposeasdesired.
Youcanadjustthetranspositionoverarangeof±1
octave.
3. UsetheGlobalmodeP1:MIDI–MIDIBasicpage
ConvertPositionparametertospecifytheposition
atwhichthetransposeandvelocitycurvesettings
willbeapplied.
PreMIDIisthenormalsetting.Withthissetting,the
TransposesettingdescribedaboveandtheVelocity
CurvedescribedbelowwillbeappliedtotheKROME’s
keyboardperformancedata,andwillaffectboththe
MIDIOUTandtheinternalsoundgenerator.Thisis
alsorequiredinordertorecordtheoutputofthe
curvesintotheinternalsequencer.
PostMIDIappliesthetranspositionandcurvesto
incomingMIDI,foradjustingtheKROMEresponseto
anexternalMIDIcontroller.
Whensimplyplayingtheinternalsoundsfromthe
KROMEkeyboard,bothsettingsworkthesame.
Adjusting the keyboard response
VelocitycurveletyouadjustthewaytheKROME
respondstohowyouplayonthekeyboard.The
defaultsettingshouldworkformostplayers,butthere
aremanyotherchoicestoletyoucustomizethe
responsetomatchyourownstyle.
Tosetthevelocityandaftertouchcurves:
1. InGlobalmode,gotoP0:BasicSetup–Basicpage.
2. SettheVelocityCurvetosuityourplayingstyle.
VelocityCurve4isthedefault,andshouldworkfor
mostplayers.
Tuning and
transpose
settings
Velocity/
curve settings
Effect bypass
settings
Link the
arpeggiator
Stop the
arpeggiator
and drum
track
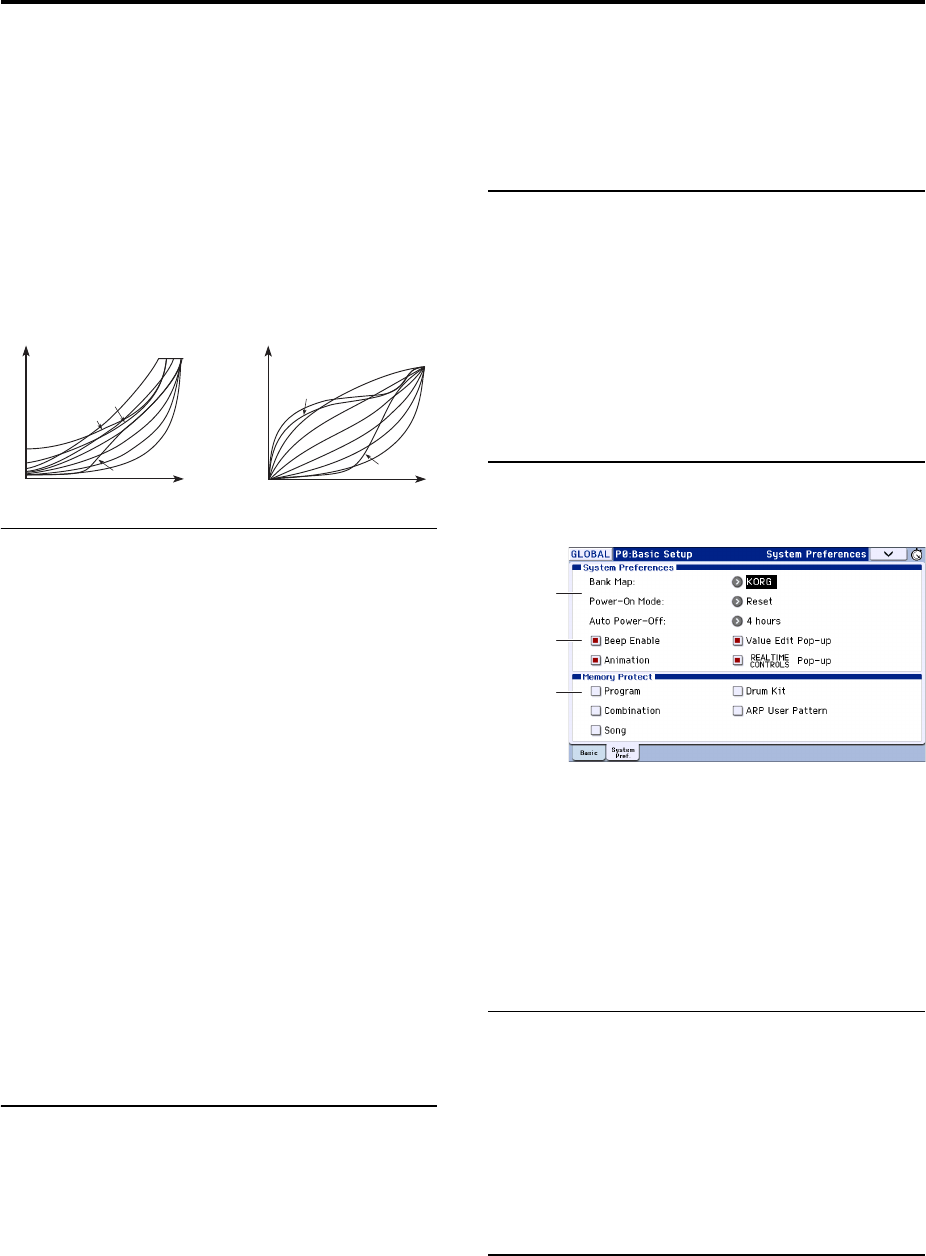
Adjusting Global KROME setings
110
Curve9isdesignedspecificallyforplayingpiano
soundsfromtheweightedNHkeyboardsinthe73‐
noteand88‐notemodels.
Fordetailsontheothercurves,seethegraphicbelow,
aswellasthe“VelocityCurve”sectiononpage 194of
theParameterGuide.
3. Specifythepositionwherethevelocitycurvewill
beapplied.Formoreabout“ConvertPosition,”
pleasesee“Transposingthekeyboard,”above.
Velocitycurves
Bypassing the effects
YoucanbypasstheKROME’sinserteffects,master
effects,andtotaleffects.Thesesettingswillbypassthe
effectsinallmodes.Ifyou’reusingeffectssuchas
reverborchorusprovidedbyanexternaleffect
processor,mixer,orDAW,youcanbypassthe
KROME’sowneffectssothattheywillnotbeused.
1. AccesstheGlobalmodeP0:BasicSetup–Basic
page.
2. UsethevariousEffectGlobalSWbuttonstoselect
theeffectsthatyouwanttobypass.Theeffectwill
bebypassedifthecheckboxiscleared.
Clearingthe“IFX1‐5”box:Bypassestheinserteffects
Clearingthe“MFX1&2”box:Bypassesthemaster
effects
Clearingthe“TFX1&2”box:Bypassesthetotaleffects
“MFX1&2”and“TFX”canalsobecontrolledbythe
frontpanelMASTERFXbuttonandTOTALFXbutton.
Thisisconvenientwhenyouwanttotemporarilyturn
offtheseeffectsduringaperformance.
Note: Theseparameterswillalwaysbeturnedonwhen
theKROMEstartsup.
Arpeggiator recall settings (Linking
the arpeggiator with programs or
combinations)
Youcanspecifywhetherthearpeggiatorsettings
writtenintoeachprogramorcombinationwillalsobe
selectedwhenyouselectthatprogramorcombination,
orwhetherthearpeggiatorwillstayinitscurrentstate
withoutchangingsettings.
Withthefactorysettings,theformerwilloccur.You
canchoosethelatterbehaviorifyouwanttoplay
phrasesandpatternswithcertainarpeggiatorsettings
whileyouswitchonlythesoundbetweendifferent
programsorcombinations.
1. AccesstheGlobalmodeP0:BasicSetup–Basic
page.
2. Inthe“LoadARPwhenchanging”area,ifthe
“Program”or“Combination”boxisselected,
switchingprogramsorcombinationsrespectively
willrecallthearpeggiatorsettingswritteninthat
programorcombination.
Disabling the arpeggiator and drum
track
1. AccesstheGlobalmodeP0:BasicSetup–Basic
page.
2. Ifthe“AllARP/DTOff”boxisselected,all
arpeggiatoranddrumtrackfunctionalitywillbe
turnedoff.
EveniftheARPorDRUMTRACKbuttonsareon,the
arpeggiatoranddrumtrackwillnotfunction.
Recalling the last-selected mode and
page at power-on
1. AccesstheGlobalmodeP0:BasicSetup–System
Preferencespage.
2. IfthePower‐OnModeissettoReset(factory
setting),KROMEwillautomaticallyselectthe
ProgrammodeP0:Play.
IfthePowerOnModeissettoMemorize,thelocation
(modeandpage)andtheprogramorcombination
numberthathadbeenselectedwhenyouturnedoff
thepowerwillberecalled.
Enabling a beep tone when the
display is pressed
1. AccesstheGlobalmodeP0:BasicSetup–System
Preferencespage.
2. Ifthe“BeepEnable”checkboxisselected,abeep
tonewillsoundwhenyoupressanobjectinthe
display.Clearthecheckboxifyoudon’twanta
beeptosound.
Protecting the memory
1. AccesstheGlobalmodeP0:BasicSetup–System
Preferencespage.
2. IfaMemoryProtectcheckboxisselected,the
correspondingwrite,dataload,orsongrecording
operationwillbedisabled,thusprotectingthe
contentsofmemory.
1
MAX
127
1
8
65
43
2
7
Soft
127
Strong
1
1
2
3
8
65
4
7
99
Velocity (MIDI In to sound engines)
Velocity (Keyboard to MIDI Out)
Convert Position = PostMIDIConvert Position = PreMIDI
Velocity
eect
Select the
mode that is
selected at
power-on
Beep setting
Memory
protect
settings
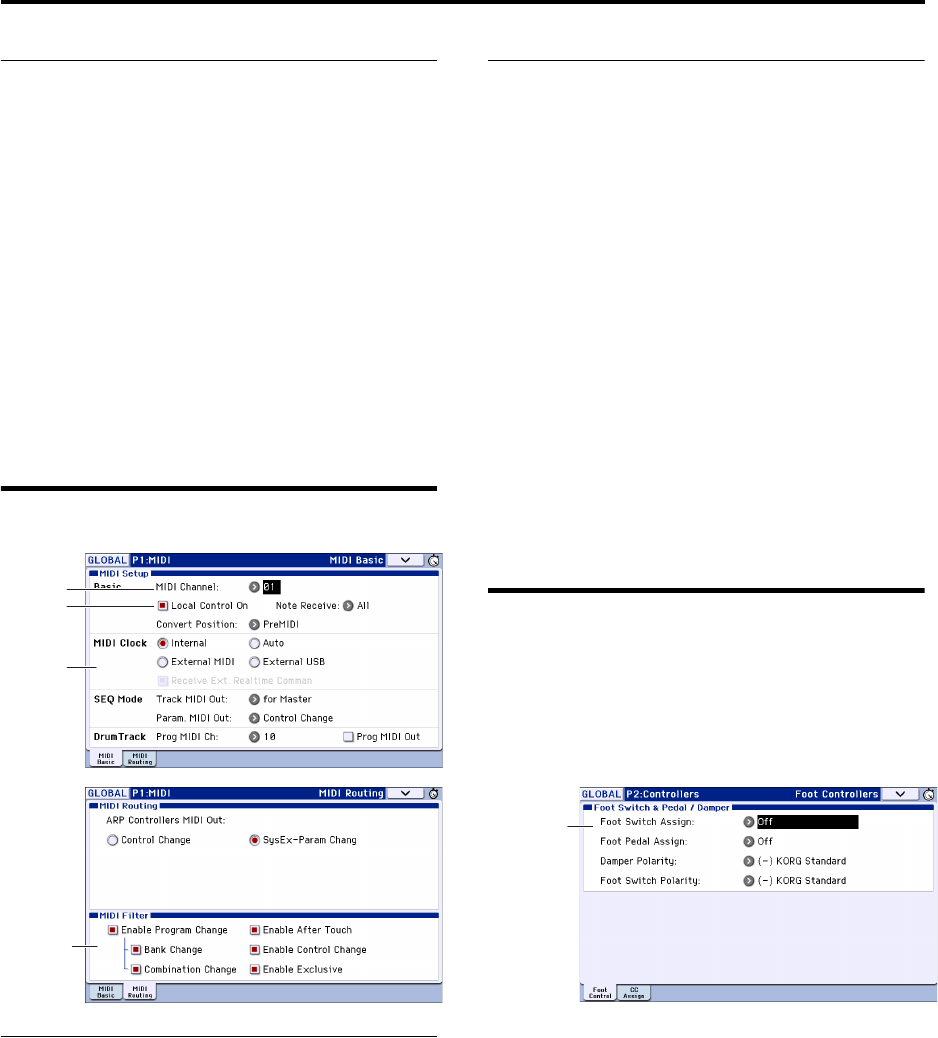
Global settings MIDI Settings
111
Other screen display settings (Edit
pad function and animation)
Youcankeeptheeditpad(seepage 4)orrealtime
controlpopup(seepage 6)fromappearing,and
disabletheanimationthatappearswhenapopupis
displayed.
1. AccesstheGlobalmodeP0:BasicSetup–System
Preferencespage.
2. Ifthe“ValueEditPop‐up,”“RealtimeControls
Pop‐up,”and“Animation”checkboxarecleared,
therespectivefunctionwillbedisabled.
Note: IftheKROMEisprocessinglargeamountsof
musicaldatasuchasfromthedrumtrackorsequencer,
therealtimecontrolpopupsoranimationeffectsmight
bedisabledautomaticallyinsomecases.
MIDI Settings
Global MIDI Channel
TheGlobalMIDIChannelisthemostimportantMIDI‐
relatedsettingintheKROME.Itdeterminesthemain
MIDIchannelusedforbothProgramandCombination
modes,forinstance.TosettheGlobalMIDIChannel:
1. GototheGlobalP1:MIDI–MIDIBasicpage.
2. IntheMIDISetupsection,settheMIDIChannel
asdesired.
MIDI Clock synchronization
TheKROMEcanuseitsowninternaltempo,or
synchronizetoexternalclocksfromeitherMIDIor
USB.
Thebestgeneral‐purposesettingisAuto.Thiscombine
thefunctionalityofInternalandExternalMIDI/USB,
sothatyoudon’thavetomanuallyswitchbetweenthe
two:
•Ifexternalclocksarebeingreceived,theycontrol
theKROMEtempo.
•Ifexternalclocksarenotbeingreceived,the
KROMEusesitsinternaltempoinstead.
Synchronizing to a USB-connected computer
IfyouwanttosynchronizetheKROME’stempotoa
computerconnectedviaUSB:
1. GototheGlobalP1:MIDI–MIDIBasicpage.
2. IntheMIDISetupsection,settheMIDIClockto
Auto.
Pedal and other controller
settings
IntheGlobalmodeP2:Controllers–FootControllers
pageyoucanassignthefunctionsoftheassignable
buttonsandassignablepedals.(See“Connectinga
damperpedal,footswitch,orfootpedal”onpage 18.)
Global MIDI
channel
Local
Control
on/off
MIDI clock
settings
Global MIDI
filter settings
Assignable
button and
Assignable
Pedal settings
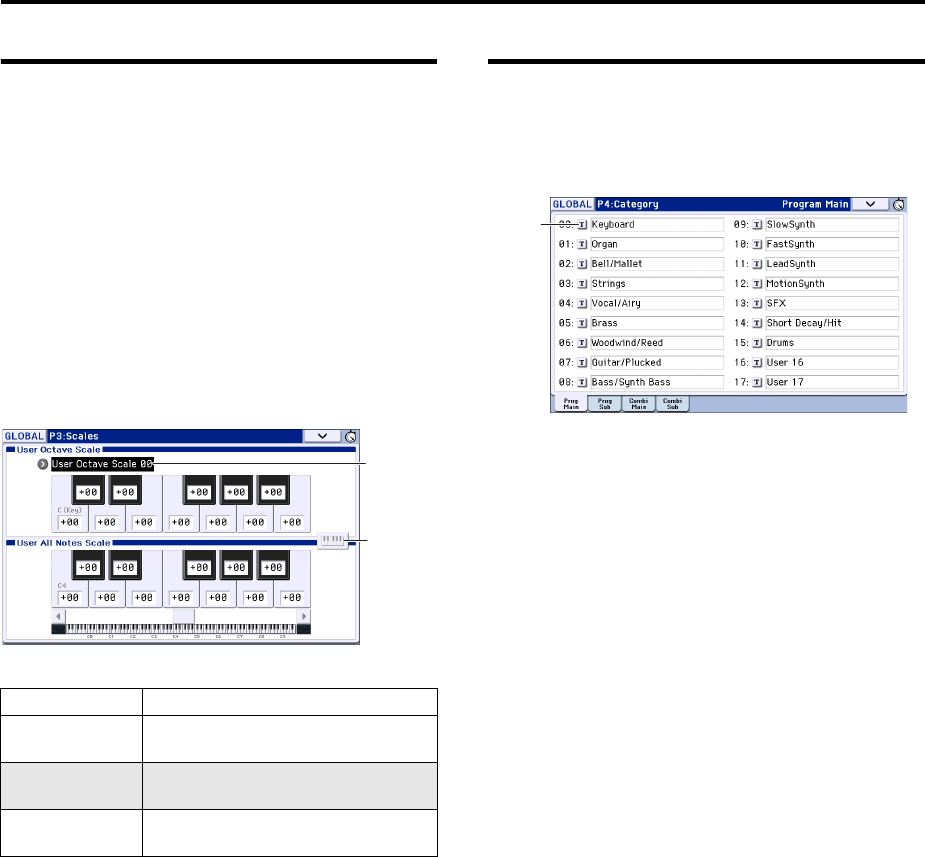
Adjusting Global KROME setings
112
Creating user scales
TheGlobalP3:Scalespageletsyoucreateyourown
originalscales.YoucancreatesixteenUserOctave
Scaleswhichallowyoutospecifythepitchofeachnote
inanoctave(whichwillthenbeappliedacrossall
octaves),andyoucancreateoneUserAllNoteScale
whichallowsyoutoindividuallyspecifythepitchfor
everyoneofthe128notes.
Byadjustingthepitchofeachkeyintherangeof±99
cents,youcanraiseorloweritbyapproximatelyone
semitonerelativetothenormalpitch.
Theuserscalesyoucreateherecanbeusedby
specifyingthescaleforaprogram,foreachtimbreofa
combination,orforeachtrackofasong.
Youcanchoosethesescalesfromthefollowingpages.
Hereishowtosetthescaletypeforeachtimbrein
Sequencermode.
1. Createauseroctavescaleorauserallnotesscale.
Selectakey,andusetheVALUEcontrollerstoadjust
thepitch.Therangeof±99raisesorlowersthepitch
approximatelyonesemitoneaboveorbelowthe
standardpitch.
Note: Youcanalsoselectthekeybyholdingdownthe
ENTERbuttonandplayinganoteonthekeyboard.
Alternatively,youcanturnonthekeylockbuttonand
thenplayanoteonthekeyboard.
Note: Youcancopyoneofthepresetscalesandeditit
tocreateanoriginalscale.Todoso,usethepagemenu
commandCopyScale.
2. AccesstheSequencermodeP3:TrackParameters–
OtherT01–08orT09–16page.
3. IfyouwanttheTracktousethescalesavedwith
itsindividualProgram,checkthetrack’s“Use
Program’sScale”checkbox.
Tracksthatarenotcheckedwillusethescalespecified
byScale“Type(Song’sScale).”
4. Set“Type(Song’sScale)”toselectthescaleforthe
currentlyselectedsong.
Setting Category Names
IntheGlobalP4:Categorypagesyoucanassignnames
tothecategoriesandsub‐categoriesofprogramsand
combinations.
EditingtheCategory/subcategorynamesisvery
simple:
1. PresstheT(Text)buttonnexttothenameyou’d
liketoedit.
Thetexteditingdialogwillappear.
2. Enterthenewname,andpressOK.
ToeditaSubCategoryname:
1. ChoosetheMainCategoryfromthepopupmenu.
2. EdittheSub‐Categorynamesasdescribedabove.
Mode Page
Program P1: Basic/Controllers– Note-On/Scale:
Scale
Combination P3: Timbre Parameters– Scale T01–08/
T09–16: Scale, Use Program’s Scale
Sequencer P3: Track Parameters– Scale T01–08/T09–
16: Scale, Use Program’s Scale
User Octave
Scales select
Key lock
button
Category
name
settings

113
Loading & saving data
Saving data
Saving data on the KROME
YoucansavetheKROME’svarioustypesofdatainthe
followingways.
•Writingtointernalmemory
•SavingtoanSDcard(commerciallyavailable)
•MIDIdatadump
Writing to internal memory
Thefollowingtypesofdatacanbewrittenintothe
internalmemory.
•Program
Programs000–127inbanksA–F
•Combination
Combinations000–127inbanksA–D
•Globalsettings
(GlobalP0:BasicSetup–P4:Category)
•Userdrumkits
00(INT)–47(USER)
•Userarpeggiopatterns
U0000(INT)–U1027(USER)
•UserDrumTrackpatterns
U000–U999
(Seepage 97)
•UsertemplatesongsU00–U15
Songsettingssuchasthesongnameandtempo,
tracksettings(seepage 106oftheParameter
Guide),arpeggiator,andeffectsettingscanbe
saved(written)tointernalmemory.However,the
musicaldataforsongtracksandpatternsarenot
savedtointernalmemory.Furthermore,settings
thatgovernhowthemusicaldataisplayedback
suchasMeter,Metronome,PLAY/MUTE,Track
PlayLoop(includingStart/Endmeasure),and
RPPRsettingswillnotbesavedeither.Usethe
SequencermodemenucommandSaveTemplate
Songtowritethisdata;fordetails,pleasesee
page 164oftheParameterGuide.
•Effectpresets
Foreacheffect,youcanwriteparametersettings
intointernalmemorybyusingthemenucommand
WriteFXPreset.
Themusicaldataandsetupdataofasongyou
createinSequencermodecannotbesavedinthe
KROME’sinternalmemory.You’llneedtosave
thisdatatoacommerciallyavailableSDcardorby
usingMIDIdatadump.
About preloaded data and preset data
“Preloadeddata”referstothedatathatisloadedinthe
KROMEwhenitisshippedfromthefactory.Youare
freetorewritethisdata,andwiththeexceptionofthe
demosongs,thedatawillbewrittentothelocationas
describedin“Writingtointernalmemory.”Thisdatais
storedintheKROME’ssystemarea.
Youcanreloadthefactorypreloaddataintointernal
memorybyusingtheGlobalmodemenucommand
LoadPreload/DemoData.
Presetdata,ontheotherhand,isdatathatcannotbe
overwrittenbytheWriteoperation.Thisincludesthe
followingdata.
•GMprogrambanksGM,g(1)–g(9),g(d)
•GMdrumkits48(GM)–56(GM)
•PresettemplatesongsP00–P15
•PresetpatternsP000–P605
Saving to SD card
ThefollowingdatacanbesavedtoanSDcard
(commerciallyavailable)insertedintheKROME’sSD
cardslot.
•.PCGfile:
Programs,Combinations,Drumkits,Global
settings,userDrumTrackpatterns,anduser
arpeggiopatterns(Thedatathatwascheckedinthe
checkboxesoftheSavedialogboxwillbesaved.)
•.SNGfile:
Songandcuelist.
•.EXLfile:
Systemexclusivedatafromanexternaldevicethat
wassavedontheKROME(ThisallowstheKROME
tobeusedasadatafiler.)
•.MIDfile:
SavesaSequencermodesonginStandardMIDI
File(SMF)format.
(Seetheillustrationonthefollowingpage.)
MIDI data dump
TheKROMEcantransmitthefollowingtypesofdata
asaMIDIdatadump;youcansavethisdataonan
externaldatafilerorotherdevice.
•Programs,combinations,drumkits,andglobal
settings
•Songandcuelist
•Userdrumkitpatterns
•Userarpeggiopattern
Fordetails,pleasesee“Dump:”onpage 218ofthe
ParameterGuide.
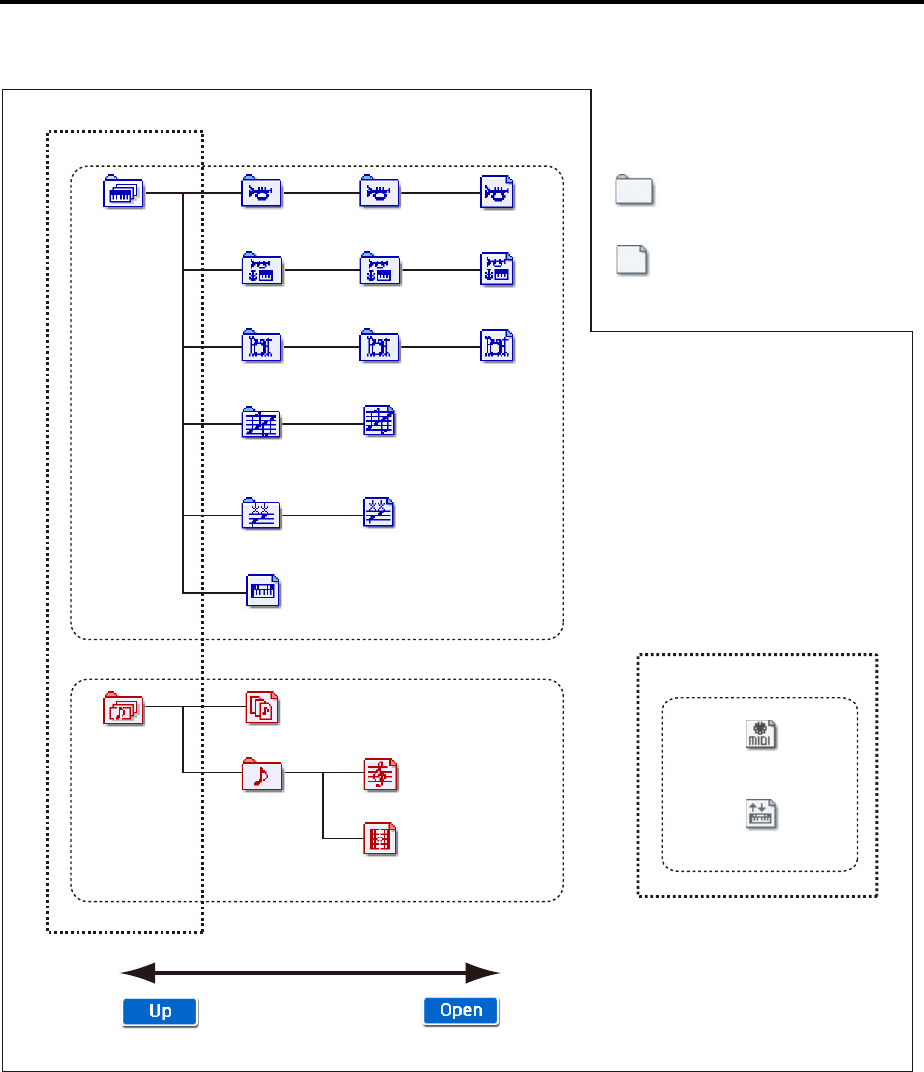
Loading & saving data
114
Supportedfiletypes
Undened DOS le
All user
arpeggio patterns
1 user
arpeggiopattern
bank INT, USER
.PCG le
DOS les
All programs 1 program
bank A...F
1 program
All combinations 1 combination
bank A...D
1 combination
1 drum kit
1 drum track
pattern
All track
All drum track
patterns
Global settings
All drum kits
User
1 drum kit
bank INT, USER
DOS directory
DOS les
.MID le
.EXL le
.SNG le
1 song
(S000-127)
1 user pattern
(U00–99)
Cue list
Saving data Writing to internal memory
115
Writing to internal memory
Writing a Program or Combination
About the Program and Combination edit
buffer
WhenyouselectaprograminProgP0:Playora
combinationinCombiP0:Play,theprogramor
combinationdataiscalledintotheKROME’sedit
buffer.
WhenyouthenusethevariousProgramor
Combinationpagestoedittheparameters,your
changeswillaffectthedataintheeditbuffer.
Ifyouwishtosavethismodifieddataintointernal
memory,youmustperformtheWriteoperation.
WhenyouperformtheWriteoperation,thedatainthe
editbufferiswrittentothespecifiedprogramor
combinationnumberofthespecifiedbank.
Ifyouselectanotherprogramorcombinationwithout
writingyouredits,thedataofthenewlyselected
programorcombinationwilloverwritetheediteddata
intheeditbuffer,andyourchangeswillbelost.
Note: WhenyoupresstheCOMPAREbuttonin
Programmode,orCombinationmode,thedatafrom
memory(i.e.,thecontentsthatwerewritteninto
memory)willbetemporarilycalledintotheeditbuffer.
Thisallowsyoutocomparethesettingsyouareediting
withtheoriginalun‐editedsettings.
Writing (saving) procedure
TheProgramandCombinationsettingsyou’vemade
inthevariouseditingpagescanbesavedtointernal
memory.Thisactionisreferredtoas“writinga
program”or“writingaCombination.”Ifyouwant
yourediteddatatobepreservedafterthepoweris
turnedoff,youmustperformaWriteoperation.
TherearetwowaystowriteaProgramor
Combination.
•UsetheWRITEbutton.
•UsetheWriteProgramorWriteCombination
menucommandsintheupperrightofthedisplay.
Beforeyoucanwritedataintomemory,youmust
turnoffthememoryprotectsettinginGlobal
mode.
Fordetails,pleasesee“Memoryprotect”on
page 117.
Acombinationdoesnotcontaintheactual
programdataforeachtimbre,butsimply
referencesthenumberoftheprogramusedby
eachtimbre.Ifyoueditaprogramthatisusedbya
combination,orexchangeitwithadifferent
programnumber,thesoundofthecombination
willalsochange,reflectingthealteredprogram.
1. Verifythattheprogramorcombinationyouwant
tosaveisselected.
2. PresstheWRITEbutton.
Alternatively,pressthepagemenubuttonintheupper
rightofthedisplay,andselectthemenucommand
“WriteProgram”or“WriteCombination.”
TheWriteProgramorWriteCombinationdialogbox
willappear.
ThisscreenshotisforProgrammode
3. Checktheprogram/combinationnamedisplayed
intheupperline(thewritingsource).
4. Ifyouwishtochangethenameoftheprogram/
combination,pressthetexteditbutton.
Thetextdialogboxwillappear.Enterthenameofthe
program/combination.Fordetails,pleasesee“Editing
names”onpage 117.
Afteryouhaveenteredthename,presstheOKbutton
toreturntotheWriteProgram/WriteCombination
dialogbox.
5. In“Category,”specifythecategoryoftheProgram/
Combination.
6. Selecta“SubCategory”aswell.
Forcombinations,thecategoryandsub‐categoryyou
specifyherecanbeselectedinthefollowingpages.
ProgP0:Play
“Category”
CombiP0:Play–ProgramT01–08,09–16
“Category”
SeqP0:Play/REC–ProgramT01–08,09–16
“Category”
ForPrograms,thecategory/sub‐categoryyouspecify
herecanbeselectedinthefollowingpages.
CombiP0:Play–ProgramT01–08,09–16
“Category”
7. Use“To”tospecifythebankandnumberofthe
writingdestinationprogram/combination.
UsetheVALUEcontrollersortheBANKbuttonsto
makeyourselection.
8. ToexecutetheWriteoperation,presstheWRITE
button.
Alternatively,presstheOKbuttonintheWritedialog
box.
Edit Buer
Write Select
Internal Memory
Edit
Program
A 0...127
Combination
A 0...127
When you write, the
program or combination
settings will be saved in
internal memory.
When you select a program
or combination, its data is
called from internal memory
into the edit buer.
Editing applies to the data in the edit
buer. Programs or combinations will
play according to the data in the edit
buer.
Loading & saving data
116
TocancelwithoutexecutingpresstheCancelbuttonor
EXITbutton.
About the Tone Adjust settings that are
saved
TherearethreetypesofToneAdjustparameters,as
listedbelow.Thewayinwhichsettingsarewrittenwill
dependonthetype.
•Absolute:ThistypeofToneAdjustparameter
controlsasingleprogramparameter.TheProgram
parameterandtheToneAdjustparameterreflect
eachotherexactly.Ifyoueditone,theother
parameterwillreflecttheidenticalchange.This
typeofToneAdjustparameter“absolutely”
controlstheprogramparameteritself.
•Relative:ThistypeofToneAdjustparameter
controlstwoormoreprogramparameters
simultaneously.Forexample,“Filter/AmpEG
AttackTime”controlsatotalofsixprogram
parameters.Thevalueofarelativeparameter
indicatestheamountofchangethatisappliedto
thevalueofeachprogramparameterit’saffecting.
Whenarelativeparameterisatzero(i.e.,whenits
sliderisinthecenterposition),theprogram
parametersitcontrolswillfunctionaccordingto
theiroriginalsettings.Raisingorloweringthevalue
ofarelativeparameterwillindirectlyraiseorlower
thevalueoftheseprogramparameters.
•Meta:ThistypeofToneAdjustparameteraffects
otherToneAdjustparameters.Itdoesnotaffect
programparametersdirectly.
Ifyou’veadjustedanabsoluteorarelativeToneAdjust
parameter,theresultofyouradjustmentwillbe
writtenasfollows.
Program mode:
•Thesettingsofrelative‐typeToneAdjust
parametersareautomaticallyapplieddirectlytothe
programparameterswhenyouwritetheprogram.
TheToneAdjustvalueswillberesettozero.
•Thesettingsofabsolute‐typeToneAdjust
parametersarewritten“asthemselves”(i.e.,asthe
newsettingsofthoseToneAdjustparameters).
Combination mode:
•Thesettingsofbothrelative‐typeandabsolute‐type
ToneAdjustparametersarewrittenandpreserved
astheToneAdjustsettingsforeachtimbre.
Fordetails,pleaseseepages7,75oftheParameter
Guide.
Writing Global settings, User Drum
Kits and User Arpeggio Patterns
Memory in Global mode
Whenthepoweristurnedon,theGlobalmodedatais
calledfrominternalmemoryintotheGlobalmode
memoryarea.Thenwhenyoumodifytheparameters
inGlobalmode,thedatainthememoryareawillbe
modified.Ifyouwishtosavethismodifieddatain
internalmemory,youmustWriteit.
Whenyouwritethisdata,thedatainthememoryarea
iswrittenintointernalmemory.
Ifyouturnoffthepowerwithoutwriting,themodified
datainthememoryareawillbelost.
Writing (saving) procedure
ThefollowingthreetypesofGlobalmodedatacanbe
savedbywritingitintotheKROME’smemory.
•Globalsettings(thesettingsinGlobalP0–P4)
•Drumkits(thesettingsinGlobalP5)
• Arpeggiopatterns(thesettingsinGlobalP6)
Changesyoumaketothisdatawillberememberedas
longasthepowerremainson,butwillbelostwhen
youturnoffthepower.Ifyouwanttokeepyour
changesevenafterturningthepoweroff,youmust
writethemintomemory.
Thefollowingareexceptions.
ParametersthatarenotsavedevenifyouWrite
• EffectGlobalSW
Parametersthataresavedevenifyoudon’tWrite
•AutoPower‐Off
1. Accessthepagethatcontainstheparametersor
settingsthatyouwanttosave.
ChooseoneoftheP0–P4pagesifyouwanttowrite
globalsettings,chooseP5ifyouwanttowritedrum
kits,orchooseP6ifyouwanttowritearpeggio
patterns.
2. PresstheWRITEbutton.
Alternatively,pressthepagemenubuttonintheupper
rightofthedisplay,andchoose“WriteGlobalSetting,”
“WriteDrumKits,”or“WriteArpeggioPatterns.”The
correspondingoneofthefollowingdialogboxeswill
appear.
WriteGlobalSettingdialogbox(P0–P4)
Memory Area
Write Power On
Internal Memory
Edit
Global Setting
P0...P4
Drum Kits
P5
Arpeggio Patterns
P6
Editing will aect the data that has
been called into the memory area.
When you Write, the
various Global mode
settings will be saved in
internal memory.
When the power is
turned on, the settings
are called into the
memory area.

Saving data Editing names
117
WriteDrumKitsdialogbox(P5)
WriteArpeggioPatternsdialogbox(P6)
3. ToexecutetheWritecommand,presstheWRITE
button.
Alternatively,presstheOKbuttonintheWritedialog
box.
Ifyoudecidenottoexecute,presstheEXITbuttonor
theCancelbutton.
Memory protect
TopreventPrograms,Combinations,Songs,Drum
Kits,andUserArpeggioPatternsfrombeing
overwrittenaccidentally,theKROMEprovidesa
MemoryProtectsettingthatprohibitswritingto
memory.
Beforeyousaveediteddataorloaddatafrommedia,
usethefollowingproceduretoturnthememory
protectoff(unchecktheappropriatecheckbox).
Youmustalsoturnmemoryprotectoffbeforeloading
theabovedatafrommediaorviaaMIDIdatadump,
orbeforerecordinginSequencermode.
1. PresstheGLOBALbuttontoenterGlobalmode.
2. AccesstheGlobalP0:BasicSetup–System
Preferencespage.
3. Pressthe“MemoryProtect”checkboxforthetype
ofdatayouwishtowritetointernalmemory,so
thattheboxisunchecked.
Editing names
Youcanmodifythenameofaneditedprogram,
combination,song,drumkit,oruserarpeggiopatterns
etc.
Youcanalsomodifythecategorynamesforprograms
andcombinations.
Theserenamingprocedurescanbeperformedinthe
followingpages.
1. Inthepageslistedabove,orafterselectingamenu
commandinthesepages,pressthetexteditbutton
toaccessthetexteditdialogbox.
Item Page
Program Prog P0…9 menu command:
Write Program
Combination Combi P0…9 menu command:
Write Combination
Song Seq P0…5 menu command:
Rename Song
Track Seq P6: Track Name
Pattern Seq P10: Pattern Name
Cue list Seq P11: menu command: Rename
Cue List
Program category/
sub category Global P4: Program Category
Combination category/
sub category Global P4: Combination Category
Drum Kit Global P5 menu command:
Rename Drum Kit
Arpeggio Pattern Global P6 menu command:
Rename Arpeggio Pattern
File
Media Save: Save All…Save Exclusive,
Media Utility menu command:
Rename, Create Directory, Format
Seq P0–P11:
Save Songs and Cue Lists Data
Effect preset Prog, Combi, Seq P8, 9 menu
command: Write FX Preset
Character
buttons
Shift button
Switches
between
uppercase and
lowercase
characters.
Delete button
Deletes the
character to the
left of the cursor.
Cursor buttons
Move the cursor
to left or right.
Space button
Insert a space at
the cursor location.
Clear button
Delete all characters
of the text.
Cancel button, OK button
If you are satised with the text
that you input, press the OK
button. If you wish to discard
your input and exit the text edit
box, press the Cancel button.
Cursor
Character Set Selects
the type of character.
Text
Loading & saving data
118
Saving to SD card (Media–
Save)
Fordetailsonthedatathatcanbesavedonstorage
media.Fordetails,pleasesee“Savingdata”on
page 113.
ThemusicaldataofasongyoucreateinSequencer
modecannotbesavedintheKROME’sinternal
memory.Youmustsavethisdataona
commerciallyavailableSDcard,orsaveitusing
MIDIdatadump.Whenyou’vecomeupwith
settingsyoulike,it’sagoodideatosavethem,so
thatevenifyousubsequentlyeditthosesettings,
you’llalwaysbeabletoreloadtheprevious
settingsifdesired.
Types of SD card you can use
SD card specifications
SDmemorycardsupto2GBandSDHCmemorycards
upto32GBaresupported.
SDXCmemorycardsarenotsupported.
MS‐DOSformatFAT16orFAT32aresupported.
Mediaisnotincluded.Youwillneedtopurchaseit
separately.
Inserting/removing a card in the SD
card slot
Ifyou’veplacedanSDcardintheSDcardslot,youcan
useittosaveorloadvarioustypesofProgram,
Combination,andSongdata.
About the write protect setting of an SD card
SDcardshaveawriteprotectswitchthatpreventsthe
datafrombeingoverwrittenaccidentallyandlost.If
yousetthecard’sLock(writeprotect)switchtothe
“protected”setting,itwillbeimpossibletowriteor
erasedataonthecard,ortoformatit.Ifyouneedto
saveediteddataonthecard,movetheswitchbackto
itsoriginal“unprotected”setting.
Inserting a card
•InsertanSDcardintheSDcardslot.
Withthecardlabelfacingupward,inserttheconnector
endofthecardintotheSDcardslotandpressitin
untilyouhearaclick.
Makesurethatthecardisorientedcorrectlywhen
youinsertit.Forcingitinthewrongdirectionmay
damagetheslotorthecard,andthedatamaybe
lost.
Removing a card
NeverremoveanSDcardfromtheslotwhile
loading,saving,orformattingisinprogress.
•RemovethecardfromtheSDcardslot.
Pressthecardinward;youwillhearaclick,andthe
cardwillpopoutpart‐way,allowingyoutopullit
completelyout.
Refertotheowner’smanualincludedwithyour
card,andobservetheguidelinesforhandlingand
use.
Formatting media
SomeconsumerelectronicsproductsthatuseSDcards
utilizetheirownproprietaryformat.Beforeusingan
SDcardwiththeKROME,youmustformatitonthe
KROME(seepage 123).
How to save data
Asanexamplehere,we’llexecuteSaveAlltosavethe
.PCGand.SNGfiles.
“SaveAll”savesallinternalmemoryPrograms,
Combinations,Globalsettings,DrumKits,User
ArpeggioPatterns,andDrumTrackUserPatternsto
mediaasa.PCGfile.Italsosavessongsandcuelistsas
a.SNGfile.
Thismethodisavailableonlyifthecurrentdirectoryis
aDOSdirectory.
Ifyousavethisdatatolow‐capacitymedia,you
mayneedmorethanonemedia.
1. Preparethemediaonwhichyouwanttosavethe
data.
2. PresstheMEDIAbuttontoenterMediamode.
3. AccesstheMedia–Savepage.PresstheSavetab.
4. Ifthemediacontainsdirectories,selectthe
directoryinwhichyouwanttosavethedata.
PresstheOpenbuttontomovetoalowerlevel,or
presstheUpbuttontomovetoanupperlevel.
Note: Ifyouaresavingdataonhigh‐capacitymedia,
werecommendthatyoucreatedirectoriestoorganize
themediaintosections.
Tocreateanewdirectory,movetothelevelatwhich
youwanttocreatethedirectory,andexecutetheUtility
menucommandCreateDirectory.
5. Pressthemenubuttontoaccessthemenu,and
pressSaveAll.
Adialogboxwillappear.Thecontents,settings,and
operationsforthedialogboxwilldependonthetype
ofdatathatyouaresaving.
SD card slot
SD card
Saving data Using the KROME as a data filer
119
6. Pressthetexteditbuttonandinputafilenamefor
thefileyouwanttosave.(Seepage 117.)
7. PresseachSelectionbuttontoaccessthedialog
box,andusethecheckboxestouncheckanyitems
thatyoudonotneedtosave.
Inordertoaccuratelyreproducethedatayoucreated,
werecommendthatyoucheckalloftheboxes.
Whenyou’vefinishedmakingsettings,presstheOK
buttontoclosethedialogbox.
8. PresstheOKbuttontoexecutetheSaveoperation.
•Ifthedatafitsononevolumeofmedia
Thedatawillbesavedonthespecifiedmedia,and
youwillreturntotheSavepage.
•Ifthedatadoesnotfitononevolumeofmedia
The“Nospaceavailableonmedia”dialogboxwill
appear.
PresstheOKbuttonandthefilewillbedividedand
savedtomultiplevolumesofmedia.Ifyoudon’twant
todividethefile,presstheCancelbutton,andre‐save
ittolarger‐capacitymedia.
Fordetails,pleasesee“Ifthedatabeingsaveddoesnot
fitononevolumeofmedia”onpage 231ofthe
ParameterGuide.
9. WhensavingendsandyoureturntotheSave
page,thedisplaywillshowthefilethatwassaved.
Thevarioustypesofdataaresavedasthefollowing
files.
•.PCGfile
•.SNGfile
Cautions when saving
If an identically named file exists on the media
Ifafilewiththesamenamealreadyexistsonthe
media,youwillbeaskedwhetheryouwantto
overwrite.Ifyouwishtooverwrite,presstheOK
button.Ifyouwanttosavewithoutoverwriting,press
theCancelbuttonandrenamethefilebeforeyousave
it.Fordetails,pleasesee“Editingnames”onpage 117.
Please note when saving
•WhenusingSaveAll(PCG&SNG),andSave
PCGtosavecombinations,youshouldalso
remembertosavetheprogramsusedbyeach
timbre(orthedrumkits,anduserarpeggio
patternsusedbytheprograms)atthesametime.
Similarlywhensavingprograms,youshouldalso
remembertosavethedrumkits,userdrumtrack
patternsanduserarpeggiopatternsusedbythe
programs.
Time required when saving data
•Thelengthoftimerequiredwilldependonthe
amountofdatabeingsaved.
Using the KROME as a data
filer
TheKROMEcanreceiveMIDISystemExclusivedata
sentbyanexternaldevice,andsavethisdatatomedia.
(Thisissometimesreferredtoasthe“DataFiler”
function.)Fordetails,pleasesee“SaveExclusive”on
page 232oftheParameterGuide.
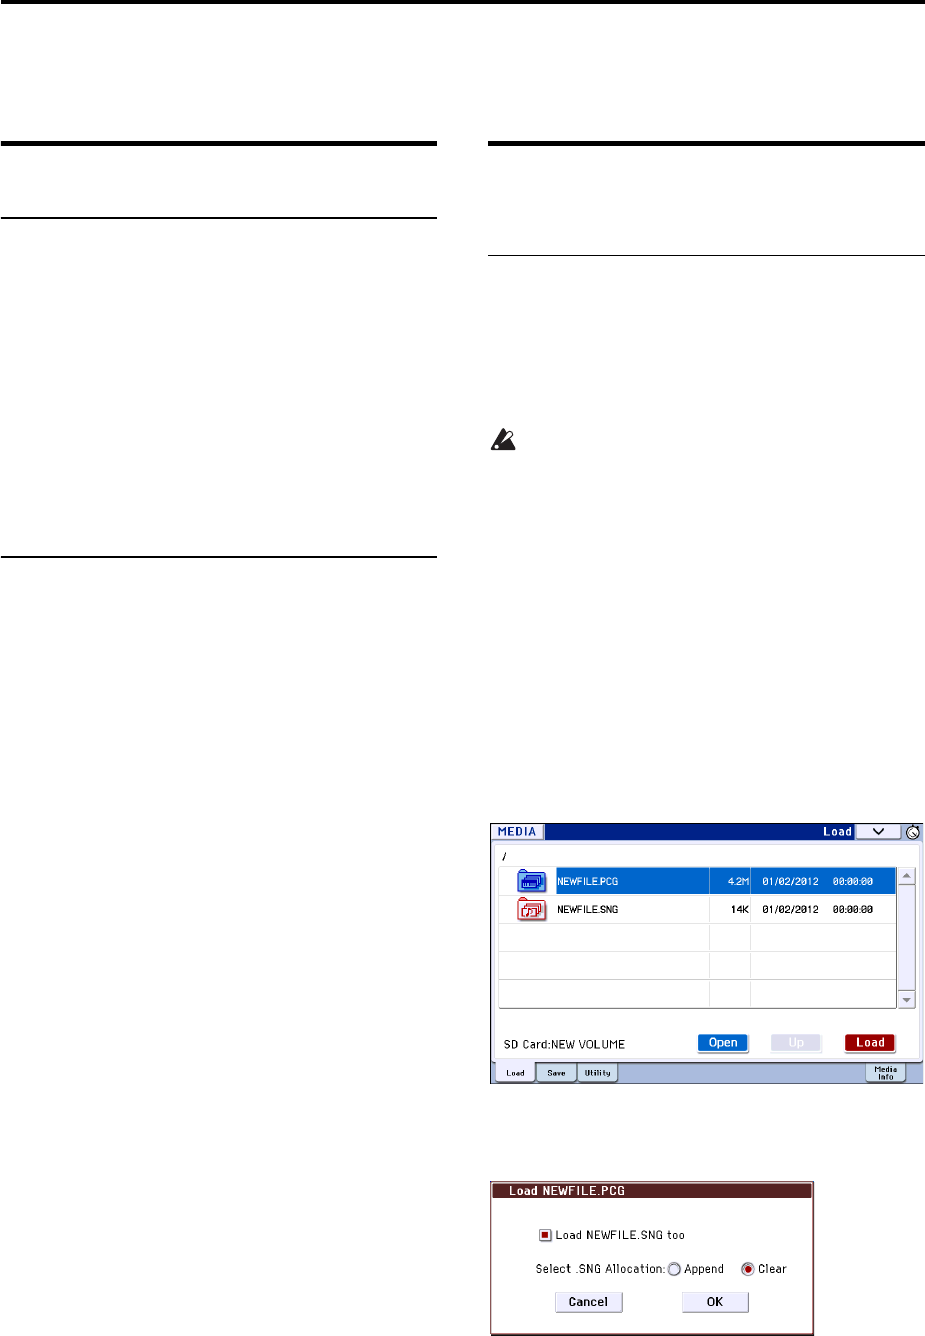
Loading & saving data
120
Loading data
Data that can be loaded
Loading from media
Youcanloadthefollowingdatafrommedia.
•.PCGfile:
Programs,Combinations,DrumKits,Global
settings,UserArpeggioPatterns,andUserDrum
Trackpatterns
•.SNGfile:
Songandcuelist.
•.MIDfile:
StandardMIDIfile(SMF)format
•.EXLfile:
MIDIexclusivedata
Loading the preloaded data and
demo songs to restore the factory
settings
Youcanloadthefactorysettingsanddemosongsback
intotheKROME’sinternalmemory.Fortheprocedure,
pleasesee“Loadingthepreloadeddata”onpage 125.
•Preloaddata:
Programs,Combinations,DrumKits,Global
settings,UserArpeggioPatterns
• Demosongdata
Loading data from SD card
(Media–Load)
Loading all Programs, Combinations,
Drum Kits and Arpeggio patterns
Herewe’llexplainhowtoloadalldatafroma.PCGfile
containingPrograms,Combinations,Drumkits,
Globalsettings,UserArpeggiopatterns,andDrum
Trackpatternsinasingleoperation.
WhenloadingPrograms,Combinations,Songs,or
DrumKits,youmustmakesurethattheGlobal
modememoryprotectsettingisunchecked.For
details,pleasesee“Memoryprotect”onpage 117.
Note: Pleaseseepage 117fordetailsontheSDcard
fromwhichyoucanloaddata.
1. Makesurethatthemediaisreadyforyoutoload
data.Fordetails,pleasesee“Inserting/removinga
cardintheSDcardslot”onpage 118.
2. AccesstheMedia–Loadpage.PresstheLoadtab.
3. Pressthe.PCGfilecontainingtheprogramand
combinationdatayouwanttoload,sothatthefile
ishighlighted.
•Iftherearedirectories,presstheOpenbuttonto
movetoalowerlevel,orpresstheUpbuttonto
movebacktothehigherlevel.
4. PresstheLoadbutton.Alternatively,choosethe
menucommand“LoadSelected.”
Adialogboxwillappear.
5. Ifyouwanttoloadsongdataatthesametime,
selectthe“Load********.SNGtoo”box.Whenyou
executetheloadoperation,the.SNGfilewillbe
loadedtogetherwiththe.PCGfile.
Use“Select.SNGAllocation”tospecifythedestination
towhichthesongdatawillbeloaded.
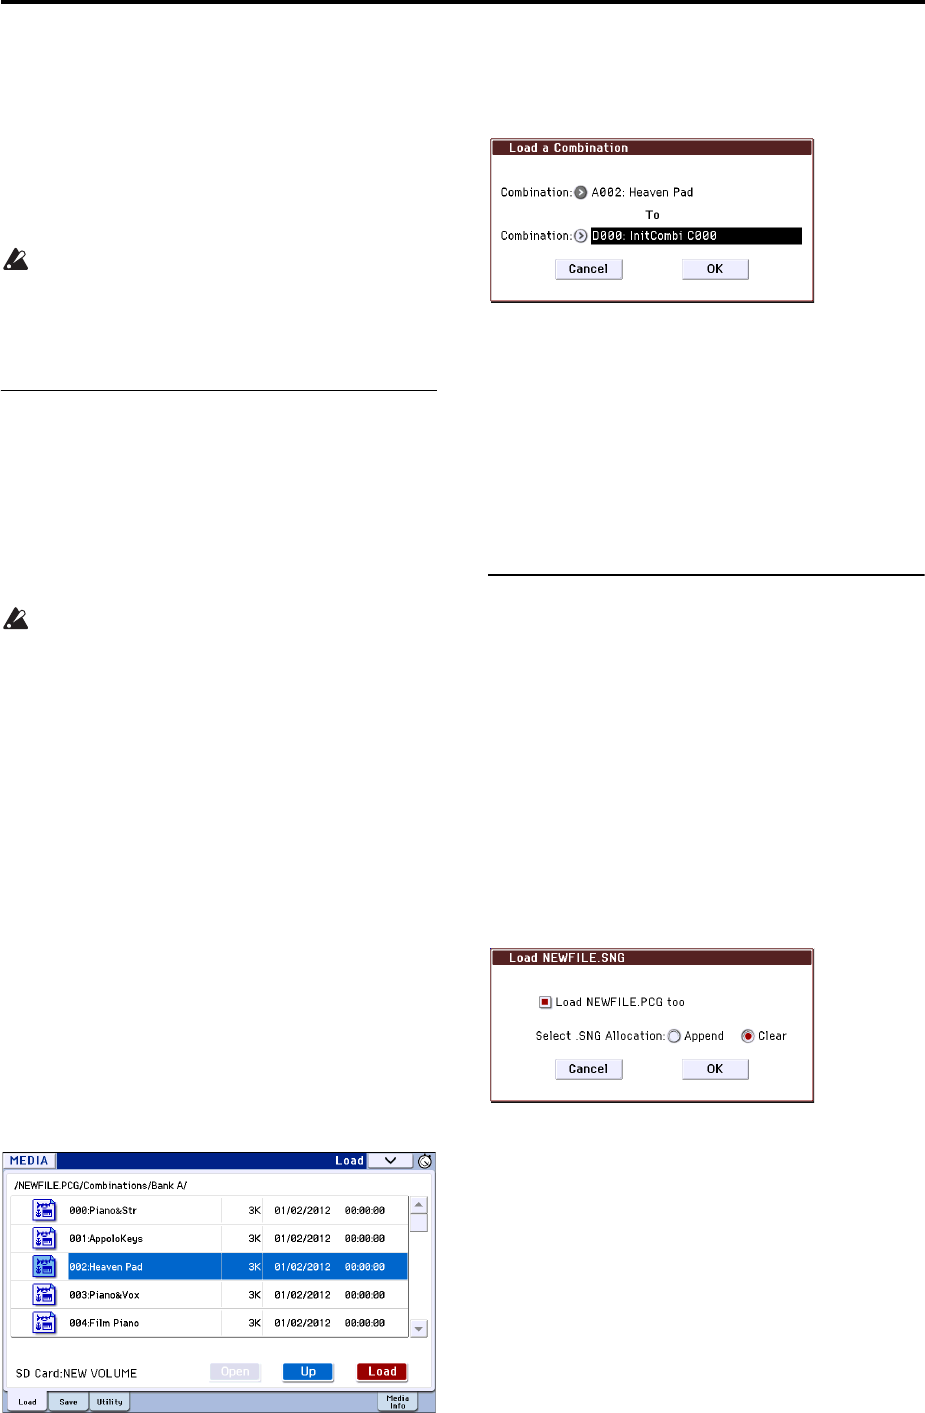
Loading data Loading data from SD card (Media–Load)
121
“A p p e n d ” willloadthesongintothesongnumberthat
followsthesong(s)currentlyexistingininternal
memory,withoutleavingavacantnumber.
“Clear”willeraseallsongsfrominternalmemory,and
loadthesongsintothenumbersfromwhichtheywere
saved.
6. PresstheOKbutton.Alldatafromthe.PCGfile
willbeloadedintotheKROME.
Neverremovethemediawhiledataisbeing
loaded.
Note: Youcanloadindividualbanksofprogramsor
combinations.Fordetails,pleaseseepage 228and
followingoftheParameterGuide.
Loading individual data from a .PCG
file
TheKROMEletsyouloadPrograms,Combinations,
Drumkits,userDrumKitpatterns,UserArpeggio
patternsindividuallyorbyindividualbanks.Thisisa
convenientwaytorearrangeCombinationsinthe
orderinwhichyouwillusethemduringalive
performance.
BeawarethatifyouchangetheorderofPrograms,
thesoundsplayedbyCombinationsmayalsobe
affected.
Asanexamplehere,wewillexplainhowa
combinationsavedinbankAcanbeloadedintoD000.
1. Movetothe“BankA”directory,andselectthe
Combinationthatyouwanttoload.(.PCGfile/
Combinations/BankA/)
Theprocedureisasfollows:
•Performsteps1–3under“LoadingallPrograms,
Combinations,DrumKitsandArpeggiopatterns”
onpage 120.Selectthe.PCGfilecontainingthedata
youwanttoload(itwillbehighlighted),andpress
theOpenbutton.
•Press“Combinations”tohighlightit,andpressthe
Openbutton.
•Press“BankA”tohighlightit,andpresstheOpen
button.
•PressthescrollbartofindtheCombinationyou
wanttoload,andhighlightit.
Alternatively,youcouldselectanyfile,sincethe
desiredfilecanbeselectedlaterfromthedialogbox.
Note: WhenyoupressthekeyboardoftheKROME,
youwillhearthecombinationyouhaveselected.
However,theinternalprogramswillbeusedasthe
programofeachtimbre.
2. PresstheLoadbutton.Alternatively,choosethe
menucommand“LoadSelected.”
Adialogboxwillappear.
3. Usethe“Combination”(upperline)toselectthe
load‐sourcecombination,anduse“(To)
Combination”(lowerline)tospecifythe
destinationcombination.Forthisexample,select
D000.
Youcanpressthepopupbuttonandselectfroma
menu,orusetheBANKbuttonsandnumerickeysto
makeaselection.
4. PresstheOKbuttontoexecuteloading;theloaded
combinationwillbeassignedtoD000.
Loading songs for use in Sequencer
mode (.SNG)
Asanexamplehere,wewillexplainhowtoloada
song.We’llassumethatthissongusesedited
programs,multisamplesyousampledandprograms
thatusedrumkitanduserarpeggiopatternsetc.In
suchcases,itisbesttoload“alldata.”
1. Performsteps1–3under“LoadingallPrograms,
Combinations,DrumKitsandArpeggiopatterns”
onpage 120.Selectthe.SNGfilecontainingthe
datayouwanttoload(itwillbehighlighted).
2. PresstheLoadbutton.Alternatively,choosethe
menucommandLoadSelected.
Adialogboxwillappear.
Note: Thecontentsandsettingsofthedialogboxwill
differdependingonthetypeoffilethatyouare
loading.
3. Checkthe“Load********.PCGtoo”checkbox.
Whenyouexecuteloading,the.PCGfilewillbeloaded
alongwiththe.SNGfile.
Use“Select.SNGAllocation”tospecifythedestination
towhichthesongdatawillbeloaded.
“Append”willloadthesongintothesongnumberthat
followsthesong(s)currentlyexistingininternal
memory,withoutleavingavacantnumber.
“Clear”willeraseallsongsfrominternalmemory,and
loadthesongsintothenumbersfromwhichtheywere
saved.

Loading & saving data
122
4. PresstheOKbuttontoexecuteloading.
Neverremovethemediawhiledataisbeing
loaded.
Loading KROME system update data
YoucanupdatetheKROME’ssystembydownloading
themostrecentversionofthesystemfilefromthe
Korgwebsite(http://www.korg.com)toyour
computer,andloadingitintotheKROME.Fordetails
ontheprocedure,pleaseseetheKorgwebsiteandto
“UpdateSystemSoftware”onpage 218ofthe
ParameterGuide.
UsetheGlobalmodemenucommandUpdateSystem
Softwaretoloadthesystemupdatedata.
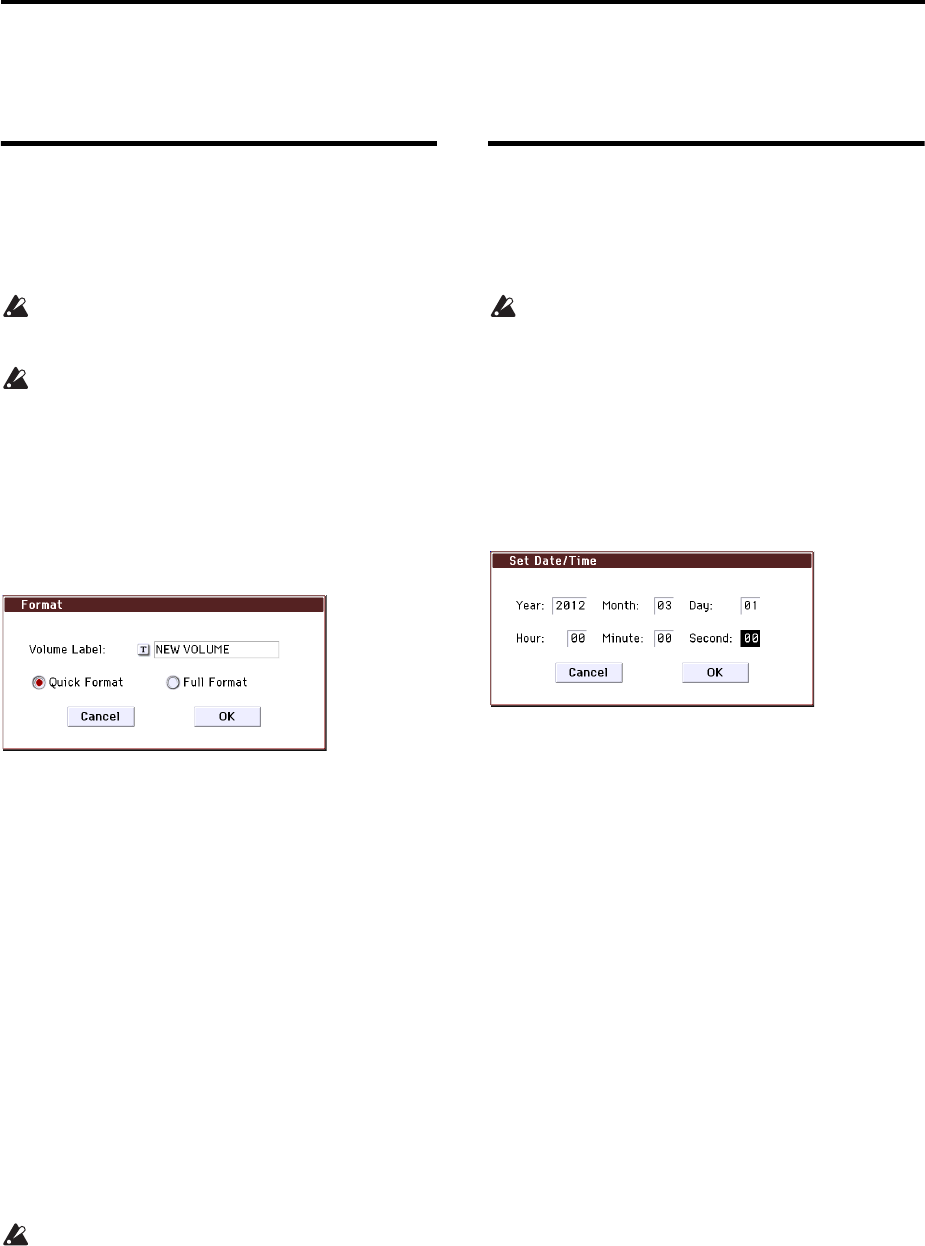
Media utility Formatting media
123
Media utility
Formatting media
Newlypurchasedmediaormediathathasbeenused
byanotherdevicecannotbeused“asis;”youmust
formatthemediabeforeyoucanuseitwiththe
KROME.
Whenyouformatmedia,alldatathathadbeen
savedonthatmediawillbeerased.Besureto
double‐checkmediafordatabeforeyouformat.
Afterformatting,itisnotpossibletopressthe
COMPAREbuttontoreturntothepreviousstate.
1. Makesurethatthemediayouwanttoformatis
inserted.Fordetails,pleasesee“Inserting/
removingacardintheSDcardslot”onpage 118.
2. AccesstheMedia–Utilitypage.PresstheUtility
tab.
3. Pressthemenubuttontoaccessthemenu,and
press“Format”toopenthedialogbox.
4. In“VolumeLabel,”usethetexteditbuttonto
accessthetexteditdialogbox,andspecifythe
volumelabel.
Thepreviously‐specifiedvolumelabelwillbe
displayed.Ifnovolumelabelhadbeenspecifiedforthe
media,orifanon‐DOSmediawasinserted,thiswill
indicate“NEWVOLUME.”
5. Specifytheinitializationformat.
QuickFormat:Thiserasesthefileinformationonthe
SDcard,allowingthecardtobeformattedquickly.
Normallyyou’llusethismethodofformatting.
FullFormat:Allblocksonthemediawillbeerased.
Normally,thereisnoneedtoapplyaFullFormat;you
shouldsimplyexecuteQuickFormat.
6. PresstheOKbuttontoformat,orpresstheCancel
buttonifyoudecidetocancel.
WhenyoupresstheOKbutton,amessagewillaskyou
forconfirmation.PresstheOKbuttononceagainto
executetheFormatoperation.
YoumustusetheKROMEtoformatthemedia.
TheKROMEwillnotcorrectlyrecognizemedia
thathasbeenformattedbyanotherdevice.
Setting the current time
Specifythedateandtime;thisisusedtorecordthe
correctdateandtimewhenyousavedata.Youcanset
thedateandtimebyusingtheMediaUtilitypage’sSet
Date/Timemenucommand.
TheKROMEdoesnotcontainaninternalcalendar
orclock,youmustusetheUtilitymenucommand
SetDate/Timetosetthedateandtimebefore
savingthefile.
1. PresstheMEDIAbuttontoenterMediamode.
2. AccesstheMedia–Utilitypage.PresstheUtility
tab.
3. Openthemenu,andselecttheSetDate/Time
command.
Thefollowingdialogboxwillappear.
4. UsetheVA L U E controllerstosetthecorrectyear,
month,day,hour,minute,andsecond.
5. PresstheOKbutton.

Loading & saving data
124

125
Appendices
Restoring the factory settings
Loading the preloaded data
TheoriginalpreloaddataisbackedupintheKROME,
soyoucanrestoreanyorallofthePrograms,
Combinations,DrumKits,UserArpeggioPatterns,
andGlobalsettingstotheiroriginalfactorysettings.
Note: Theoriginaldemosongscanbere‐loadedatany
time.Fordetails,pleasesee“A b o u t thedataloadedby
All(PreloadPCGandDemoSongs)”.
Userbanksanduserpatternsintowhichpreloaddata
hasnotbeenloadedwillremainunchanged.Ifyou
wanttoeraseuserbanksoruserpatterns,initializethe
KROMEandthenloadthepreloaddata.Formore
details,pleasesee“Initialization”onpage 125.
Neverturnoffthepowerwhilethedataisbeing
loaded.
Beforeyouloadthepreloaddata,gototheGlobal
modeP0:BasicSetup–SystemPreferencespage,
anduncheckthe“MemoryProtect”settingsforthe
datathatyouwanttoload.Ifyouexecutethis
procedurewiththesesettingschecked,thedata
willnotbeloaded.
Loadingthepreloadeddatawilloverwritethe
contentsoftheinternalmemory.Ifyouwantto
keeptheexistingdatathatisstoredininternal
memory,use“SaveAll(PCG&SNG)”or“Save
PCG”tosaveyourdatatoexternalmediabefore
youcontinue.
1. AccesstheGlobalmodeP0:BasicSetup–Basic
page.
EnterGlobalmodebypressingtheGLOBALbutton
orbyusingthemodebutton.
IftheGlobalP0:BasicSetup–Basicpageisnot
shown,presstheEXITbutton.
2. Pressthemenubutton,andchoose“LoadPreload/
DemoData.”
Adialogboxwillappear.
3. Inthe“Kind”field,selectAll(PreloadPCGand
DemoSongs).
4. PresstheOKbuttontoloadthepreloaddata.If
youdecidenottoloadthepreloaddata,pressthe
Cancelbutton.
WhenyoupresstheOKbutton,adialogboxwillask
youforconfirmation.PresstheOKbuttontoexecute
loading.
Note: Whenthedialogboxisdisplayed,theENTER
buttonperformsthesamefunctionastheOKbutton.
About the data loaded by All (Preload PCG
and Demo Songs)
WhenyouexecuteAllPreloadPCG,thefollowingdata
willbeloaded:
• Program:BankA,B,C,D,E
• Combination:BankA,B,C
•DrumKit:00(INT)–31(INT)
•UserArpeggioPattern:U0000(INT)–U899(INT)
•GlobalSetting
IfyouexecuteAll(PreloadPCGandDemoSongs),the
demosongswillbeloadedaswellastheabovedata.
•D
emoSong:S000–003
OnlywhenexecutingAll(PreloadPCGandDemo
Song)
Note: Aswiththeotherusersongs,theDemoSong
datawillnotremaininSequencermodewhenyouturn
offthepower.You’llneedtoloaditagainifnecessary.
Initialization
IfyourKROMEshouldbecomeunstable,youcan
initializeit.
•Turnoffthepower,andthen,whileholdingdown
theEXITbuttonandPAGEbutton,turnthepower
on.
TheKROMEwillbeinitialized.Whilethedatais
beingloaded,thedisplaywillindicate“Nowwrit‐
ingintointernalmemory.”
TheresultingstatewillbethesameaswhenLoad
Preload/DemoDataAllisexecuted(seepage 125).

Appendices
126
Troubleshooting
Ifyouexperienceproblems,pleaseseetherelevant
itemandtaketheappropriatemeasures.
Power supply
Power does not turn on
IstheACadapterconnectedtoanoutlet?→p.15
Power turns off
CouldtheAutoPower‐Offfunctionbeenabled?→p.16
Display
The power is turned on, but nothing is shown
on the display. The KROME functions normal-
ly when you play the keyboard or perform
other procedures.
AccesstheGlobalmodemenu“DisplaySetup”(Global
P0:BasicSetup),anduse“Brightness”toadjustthe
contrastofthedisplay.→PG p.216
The power is turned on, but the display does
not work normally, or an error message is dis-
played. There is no sound when you play the
keyboard, and the KROME does not function
normally.
Thistypeofproblemmayoccurifadatawriting
operationtointernalmemorywasnotcompleted
correctly,forexample,ifthepoweroftheKROMEwas
turnedoffwhileaprogramorotherdatawasbeing
written.Ifthisoccurs,usethefollowingprocedureto
initializetheKROME’sinternalmemory.
1. Turnoffthepower.
2. InitializetheKROME.Whileholdingdownthe
EXITbuttonandthePAGEbuttonlocatedbeside
it,turnonthepoweroftheKROME.
TheKROMEwillbeinitialized,anddatawillbe
writtenintointernalmemory.Whilethedatais
beingwritten,thedisplaywillindicate“Nowwrit‐
ingintointernalmemory.”
Afterinitialization,alluserdatawillbeempty,and
youwillneedtore‐loadthepreloaddata.Execute
theGlobalmodemenucommandLoadPreload/
DemoDatatoloadthedata.→p.125
Operations in the display don’t work, the po-
sition has drifted, the response is poor
OntheGlobalP0:BasicSetuppage,usetheTouch
PanelCalibrationmenucommandtoadjustthetouch
panelresponse.→PG p.217
Inordertoperformthecalibrationoptimally,usea
styluspentoaccuratelypressthecenterofthesymbol
(calibrationtarget)thatappearsinthecornerofthe
display.
Note: Ifyouareunabletoselectcommandsfromthe
menu,dothefollowing:
1. PresstheGLOBALbutton(lit).
2. PresstheEXITbuttonseveraltimes.
3. HolddowntheENTERbuttonandpress4onthe
numerickeypad.
TheTouchPanelCalibrationpagewillappear.Follow
theon‐screeninstructionstore‐calibratethetouch
panel.
Can’t switch modes or pages
Ifyou’redoinganyofthefollowing,youmaynotbe
abletochangemodesorswitchtoadifferentpage:
•Recordingorplayingbackasongorpattern.
Alternatively,couldtheKROMEbeinthepaused
PAUSE()orrecord‐readycondition?
CouldsomethingbepressingtheTouchViewdisplay?
Couldarealtimecontrolpopuporsimilarmessagebe
displayed?
• Disabling“Animation,”“ValueEditPop‐up,”
“REALTIMECONTROLSPop‐up”(GlobalP0:
BasicSetup–SystemPreferences)willimprovethe
responsetimeandperformance.
In Combination, or Sequencer modes, you
can’t edit the value of Timbre/Track parame-
ters such as MIDI Channel or Status
Someparameterscan’tbeeditedwhilenotesare
playing,eitherlocallyorfromMIDI.Ifthedamper
pedalishelddown,orifitscalibrationisincorrect,
notesmaybesustainingeveniftheyaren’taudible.
•Areyouusingadamperpedalwithapolaritythat
doesnotmatchtheDamperPolaritysetting(Global
P2:Controllers–FootControllers)?→p.18
•Insomecases,thisproblemcanbesolvedbe
executingthemenucommandHalfDamper
Calibration(GlobalP0:BasicSetup).→PG p.217
No beep sounds when you touch the display
ChecktheBeepEnablecheckbox(GlobalP0:Basic
Setup–SystemPreferences).→p.110
Audio output
No sound
Areconnectionsmadecorrectlytoyouramp,mixer,or
headphones?→p.17
Istheconnectedampormixerpowered‐on,andisits
volumeraised?
IsLocalControlturnedon?
•InGlobalP1:MIDI,checktheLocalControlOn
checkbox.→PG p.198
CouldtheVOLUMEknobbeturnedallthewaytothe
left?→p.1
IstheMasterVolumeassignedtoFootPedalAssign,
andisthatpedalvolumelowered?→p.19
Couldtheprogrambemuted?→p.27
Ifaspecifictimbredoesn’tsoundinCombination
mode,isitsPlay/MutebuttonsettoPlay?

Troubleshooting Programs and Combinations
127
Alternatively,areallSolobuttonsettingsturnedoff?
→p.46
Ifaspecifictrackdoesn’tsoundinSequencermode,is
itsPlay/Rec/MutebuttonsettoPlay?Alternatively,are
allSolobuttonsettingsturnedoff?→p.55
MakesurethattheStatusisINTorBTH.→p.50,p.57
AretheKeyZoneandVelocityZonesetsothatsound
willbeproducedwhenyouplay?→PG p.14,p.84,
p.129
IstheOscillator,DrumTrack,Timbre,orTracklevel
loweredinthecontrolsurfacemixer?→p.27,p.46,p.55
CouldtheleveloftheMasterVol um efollowingthe
totaleffecthavebeenlowered?→PG p.62,p.99,p.152
Couldthetotalpolyphonybeexceedingthemaximum
polyphonyof120voices?→p.32
Notes do not stop
InProgP1:Basic/Controllers–Note‐On/Scale,select
theProgramBasicpage,makesurethattheHoldcheck
boxisunchecked.→PG p.14
DidyouuseToneAdjusttoturnHoldon?→PG p.10
InGlobalP2:Controller,makesurethatDamper
PolarityorFootSwitchPolarityissetcorrectly.
→PG p.202
IftheDRUMTRACKorARPbuttonsareturnedon,
tryturningthemoff.
Notes are sounded in duplicate
IsLocalControlturnedOff?
•CleartheLocalControlOncheckbox(GlobalP1:
MIDI).→PG p.198
Noise or oscillation is heard
WhenusingtheMIDI/TempoSyncfunctiontocontrol
thedelaytimeofaneffect,noisemayoccurinthedelay
sound.Thisnoiseisduetodiscontinuitiesinthedelay
sound,andisnotamalfunction.
Someeffects,suchas019:StereoAnalogRecord,
generatenoiseintentionally.Itisalsopossibletocreate
oscillationusingafilterwithresonance.Thesearenot
malfunctions.
Notethatifyouusethefollowingeffectswiththe
routingdescribedbelow,afeedbackloopwillbe
created,possiblyproducingaloudnoise.Pleaseuse
caution.
Ifthesignalfromanoscillatorortimbre/trackoutput,
orthesignalafteraninserteffect,issenttotheFX
Controlbusandthatsignalisoutputdirectly,withthis
outputsenttotheFXControlbus,aloudnoisemaybe
output.(ItisalsopossiblethataDCcomponentwillbe
outputatthemaximumlevel,producingsilence.)
•Whenusingthe003:StereoLimiteror006:Stereo
Gate,andtheEnvelopeSourceoftheseeffectsisset
aseitherFXControl1orFXControl2,andTrigger
MonitorisOn.
•Whenusing174:Vocoder,withtheModulator
SourcesettoFXControl1orFXControl2,andthe
ModulatorHighMixsettootherthan0.
Can’t play chords
Couldtheprogram’sVoi ceAssignModebesetto
Mono?→p.33
Pitch is incorrect
•IntheGlobalP0:BasicSetuppage,aretheMaster
TuneandTransposesettingscorrect?→p.109
•IntheProgP2:OSC/Pitchpage,isthePitchSlope
setto+1.0?→PG p.20
•Inthecombinationorsong,aretheTransposeand
Detunesettingsofeachtimbre/trackset
appropriately?→PG p.82,p.127
•Inthetimbre/tracksettingsofeachprogram,
combination,orsong,couldyouhaveselecteda
non‐standardscaletypeotherthanEqual
Temperament?→PG p.15,p.83,p.128
Programs and Combinations
Settings for oscillator 2 are not displayed
MakesurethattheOscillatorMode(ProgP1:Basic/
Controllers)parameterissettoDoubleorDouble
Drums.→p.32
Program does not sound
Couldtheoscillatororamplevelbelowered?
→PG p.5,p.6,p.35
Couldtheprogrambemuted?
•UsethePlay/MutebuttonintheProgP0:Play–
Mixer&DrumTrackpagetomute/unmutea
program,orintheCombiP0:Play–ProgramT01–
08andT09–16pagestomute/unmutea
combination.
A combination does not play correctly after
you load data
Inthedialogboxwhenyousavedthedata,didyou
checktheitemsthatyouwantedtosave?→PG p.231
Arethebank/numbersoftheprogramsusedbythe
combinationthesameaswhenthecombinationwas
created?
•Ifyouhaveswitchedprogrambanks,youcanuse
theGlobalmodeChangeallbankreferencesmenu
commandtochangetheprogrambankforeach
timbreofacombination.→PG p.216
Can’t write a Program
IstheMemoryProtectProgramorCombination
checkbox(GlobalP0)cleared?→p.110,andPG p.197
Appendices
128
Songs
Song does not play correctly after being loaded
Inthedialogboxwhenyousavedthedata,didyou
checkalloftheitemsthatyouwantedtosave?
→PG p.231
Aretheprogramsusedbythesongthesameaswhen
thesongwascreated?
•Ifyouhaveswitchedprogrambanks,youcanuse
theGlobalmodeChangeallbankreferencesmenu
commandtochangetheprogrambankforeach
trackofasong.→PG p.216
•Whensavingthesong,itisbesttouseSaveAll
(PCG&SNG)sothattheprogramsaresaved
togetherwiththesong.Thenwhenloading,load
boththe.PCGandthe.SEQdata.→PG p.231
Playback does not start when you press the
SEQUENCER START/STOP ( ) button in
Sequencer mode
IstheMIDIClock(GlobalP1:MIDI)settoInternalor
Auto?→PG p.199
Can’t record in Sequencer mode
DidyouuseTrackSelecttoselecttheMIDItrackthat
youwanttorecord?→p.60
IstheMemoryProtectSongcheckbox(GlobalP0)
unchecked?→p.110,andPG p.197
IstheMIDIClock(GlobalP1:MIDI)settoInternalor
Auto?→PG p.199
A combination copied using “Copy From Com-
bi” doesn’t record via arpeggiator as it did
when you were playing it in Combination mode
IsMultiREC(SeqP0:Play/REC)checked?→p.60,and
PG p.118
ArethesettingsintheCopyfromCombinationdialog
boxcorrect?→PG p.166
•IntheCopyfromCombinationdialogbox,check
theAutoadjustArpsettingforMultiRECoption
beforeyouexecutethecopy.Thiswillcausethe
settingstobeadjustedautomatically.
Can’t record Tone Adjust data
ChangesyoumakeusingToneAdjustarerecordedas
systemexclusivedata.DidyouchecktheGlobalmode
MIDIFilterEnableExclusivecheckbox?→PG p.201
RPPR does not start
IstheSeqP0:Play/RECRPPRsettingchecked?→p.72
AreAssign,PatternSelect,andTracksetcorrectly?
→p.71
IstheMIDIClock(GlobalP1:MIDI)parametersetto
InternalorAuto?→PG p.199
SMF you loaded in Media mode won’t play
correctly
ExecutethemenucommandGMInitializetorestore
thesettings.→PG p.165
SetBankMaptoGM(2)andloadthedataagain.
→PG p.196
Arpeggiator
The Arpeggiator does not start
IstheARPbuttonturnedon(lit)?→p.85
Ifthearpeggiatordoesnotstartforacombinationor
song,makesurethatArpeggiatorRunischecked,and
thatanarpeggiatorisselectedforAssign.→p.88,and
PG p.74,p.92,p.114
IfthearpeggiatordoesnotrunintheGlobalP6:
ArpeggioPatternpage,couldyouhavenavigated
therefromCombinationorSequencermodewith
settingsthatdonotstartthearpeggiator?
IstheMIDIClock(GlobalP1:MIDI)parametersetto
Internal?→PG p.199
IntheGlobalP0:BasicSetuppage,isAllARP/DTOff
checked?→PG p.195
Drum Track function
The Drum Track does not start
IstheDRUMTRACKbuttonturnedon(lit)?→p.97
YoupressedtheDRUMTRACKbuttonbutthedrum
trackpatterndidnotstart.
•IstheDRUMTRACKbuttonblinking?Trigger
ModeissettoWaitKBDTrigger.Thedrumtrack
patternwillstartwhenyouplaythekeyboardor
receiveanote‐on.→PG p.56
•Didyouselectapatternthatdoesnotcontaindata?
•CouldP000:Offbeselectedasthepattern?
→PG p.55
IfthedrumtrackpatternfailstostartinCombination
mode,istheOutputsettingappropriate?
IfthedrumtrackpatternfailstostartinSequencer
mode,aretheInputandOutputsettingsappropriate?
→p.99,andPG p.146
IsMIDIClock(GlobalP1:MIDI)settoInternalor
Auto?→PG p.199
IntheGlobalP0:BasicSetuppage,isAllARP/DTOff
checked?→PG p.195
Drum Kits
The drumsample’s pitch does not change
YouhavelefttheAssigncheckboxunchecked,and
wanttoplaythedrumsampleattheadjacentrighta
semitonelower,butthepitchdoesnotchange.
•IfyouhaveselectedadrumprograminProgram
mode,andthenwanttoeditthedrumkitinGlobal
mode,gototheProgP2:OSC/Pitch–OSC1Pitch
pageandsetPitchSlopeto+1.0beforeyouenter
Globalmode.→PG p.20
Can’t edit the drum kit for Double Drums
OSC2
•AccesstheP2:OSC/Pitch–OSC2Setuppage,and
movetoGlobalmodebypressingtheJumpto
DrumKitEditbutton.

Troubleshooting Effects
129
Effects
Effects are not audible
Haveyouselectedeffectprogram000(NoEffect)?
•Selectaneffectotherthan000:NoEffectfor“IFX1–
5,”“MFX1,2”or“TFX.”
AretheEffectGlobalSWIFX1–5,MFX1&2,orTFX
(GlobalP0:BasicSetuppage)settingschecked?
→PG p.195
IfyouareinCombinationandSequencermode,and
mastereffectsarenotaudiblewhenyouraisethe
Send1orSend2ofthetimbre/track,doesReturn1or
Return2fromthemastereffectneedtoberaised?
→PG p.61,p.99,p.152
Alternatively,hasSend1orSend2foreachoscillator
oftheprogramusedbythetimbre/trackbeenlowered?
→PG p.96,p.148
Note: Theactualsendlevelisdeterminedby
multiplyingthesendsettingofeachoscillatorinthe
programwiththesendsettingofthetimbre/track.
Haveyouroutedtheoutputtoaninserteffect?
→PG p.57,p.58,p.96,p.98,p.148,p.149
MIDI
The KROME does not respond to incoming MIDI
data
AreallMIDIcablesorUSBcablesconnectedcorrectly?
→p.20
AretheKROME’sreceivesettings(suchastheglobal
MIDIchannelandthetimbre/track’sreceivechannel)
settomatchthechannelsofthetransmittingdevice?
→PG p.360
The KROME does not respond correctly to in-
coming MIDI data
AretheGlobalP1:MIDIsettingsMIDIFilterEnable
ProgramChange,EnableBankChange,Enable
ControlChange,EnableAfterTouch,andEnable
Exclusiveeachchecked?→PG p.200
DoestheKROMEsupportthetypesofmessagesthat
arebeingsenttoit?→PG p.360
Can’t recall programs of the desired bank
IstheBankMapsettingcorrect?→PG p.196
Damper pedal
Damper response is wrong
ExecutethemenucommandHalfDamperCalibration
(GlobalP0:BasicSetup)tocorrectlycalibratethehalf‐
damperpedalsensitivity.→PG p.217
Media
Can’t format the SD card
Doesthemediameettherequirementsforuseonthe
KROME?→p.118
Isthemediainsertedcorrectly?→p.118
Couldthemedia’sLock(writeprotect)switchbeon?
Can’t save/load data on the SD card
Isthemediainsertedcorrectly?→p.118
Hasthemediabeenformatted?→p.123
Couldthemedia’sLock(writeprotect)switchbeon?
The date of the data is wrong
Thefilesyousavedhavetheincorrectdate.
•TheKROMEdoesnotcontainaninternalcalendar.
UsethemenucommandSetDate/Time(Media–
Utilitypage)tospecifythecurrenttimeanddate
beforeyousavethedata.→p.123
Connections with a computer
The KROME does not respond to MIDI data
sent from outside
IstheUSBcableconnectedcorrectly?→p.20
The computer does not detect the KROME
AretheUSBcablesconnectedcorrectly?
An error occurs when you disconnect from
the computer
NeverdisconnecttheKROMEfromthecomputer
whileyourhostapplicationisinuse.
While connected, you are asked to install
software or a device driver
Doestheoperatingsystemorversionofyourcomputer
supporttheKROME?
When using USB, sound processing is slow, or
the tempo is unstable
IstheKORGUSB‐MIDIdriverinstalledcorrectly?
•YoumustinstallthededicatedKorgdriverinorder
tousetheKROMEviaUSBMIDI.
Ifyourcomputer’soperatingsystemisWindows,
you’llneedtoinstallthedriverforeachUSBport
whereyouconnecttheKROME.
IfyouconnecttheKROMEtoadifferentUSBport
thantheoneyouusedwheninstallingtheKORG
USB‐MIDIDriverforWindows,you’llneedtorein‐
stalltheKORGUSBMIDIdriver.

Appendices
130
Error messages
Error and confirmation
messages
A
Are you sure ?
Meaning:Thismessageasksyoutoconfirmexecution.
ToexecutepresstheOKbutton.Tocancel,pressthe
Cancelbutton.
C
Can’t calibrate
Meaning:Calibrationcouldnotbeperformed
correctly.
•Tryagain.
Can’t copy/swap double size effect
Meaning:Whencopyingorswappinganinsertion
effectormastereffect,youattemptedtoplacea
double‐sizeeffectinIFX5andMFX2.
•Modifyyoursettingssothatadouble‐sizeeffectis
notmovedtoIFX5orMFX2,andexecuteagain.
Can’t open pattern Continue?
Meaning:Whenyoufinishedrecording,therewasnot
enoughmemorytoopenthepatternthatwasputinto
thetrack(Whenitmustbeopenedautomatically).If
youpresstheOKbutton,thepatterndatawillbe
deleted,andtherecordedoreditedcontentwillbe
saved.IfyoupresstheCancelbutton,therecorded
contentwillbediscarded.
Completed
Meaning:Theprocessingexecutedbythecommand
hasbeencompleted.
Completed. Please turn the power off, and then
on again
Meaning:ExecutionofUpdateSystemSoftwarehas
beencompletedsuccessfully.Turnthepowerswitch
off,andthenonagaintocompletetheupdate.
D
Destination and source are identical
Meaning:Whencopyingorbouncing,thesamesong,
trackorpatternwasselectedforboththesourceand
destination.Tosolvethisproblem:
• Selectadifferentsong,track,orpatternforthe
sourceanddestination.
Destination from-measure within the limits of
source
Meaning:WhenexecutingtheMoveMeasure
commandforalltracksorwithinthesametrack,the
specifieddestinationmeasureiswithinthesource
range.Tosolvethisproblem:
•Setadestinationmeasurethatisoutsideofthe
sourcerange.
Destination is empty
Meaning:Whenediting,thetrackorpatternthatwas
specifiedasthedestinationcontainsnomusicaldata.
Tosolvethisproblem:
• Selectatrackorpatternthatcontainsmusicaldata.
Destination measure is empty
Meaning:Themeasurethatwasspecifiedasthe
destinationcontainsnodata.
•Specifyadestinationmeasurethatcontainsdata.
Destination song is empty
Meaning:Thesongthatwasspecifiedasthecopy
destinationorbouncedestinationdoesnotexist.
•ExecutetheCreateNewSongcommandinthe
dialogboxthatappearswhenanewsongis
selectedbeforecopyingorbouncing.(Seepage 57)
Directory is not empty Cleanup directory
Are you sure?
Meaning:Whendeletingadirectory,filesor
directoriesexistwithinthatdirectory.
•PresstheOKbuttontodeleteallfilesand/or
directorieswithinthatdirectory.
E
Error in formatting media
Meaning:Anerroroccurredwhileperforminga
physicalformat(fullformat)orhigh‐levelformat
(quickformat)ofthemedia.Tosolvethisproblem:
•Useothermedia.
Error in reading from media
Meaning:Anerroroccurredwhilereadingdatafrom
media.Thiserrormayalsoappearwhendataisbeing
writtentomediabyaSaveorCopyoperation.Tosolve
thisproblem:
•Executethereadingprocedureonceagain.Ifthe
sameerroroccurs,itispossiblethatthedataonthe
mediahasbeendamaged.
Error in writing to media
Meaning:Averificationerroroccurredwhilewriting
datatoamedia.Tosolvethisproblem:
•Itispossiblethatthemediahasbeenphysically
damaged.Tryanothermedia.Avoidusingthe
mediathatproducedtheerror.
F
File already exists
Meaning:WhenexecutingaCreateDirectoryorFile
Renameprocedure,adirectoryorfileofthesame
namealreadyexistsonthemedia.
Meaning:WhenexecutingtheMediamodeUtility
Copycommandwithoutusingwildcards,thecopy
destinationcontainedafileofthesamenameasthe
copysource.
•Eitherdeletetheexistingdirectoryorfile,orspecify
adifferentname.

Error messages Error and confirmation messages
131
File unavailable
Meaning:Youattemptedtoloadoropenafilewhose
formatwasincorrect.
File/path not found
Meaning:WhenexecutingtheDeletecommandinthe
MediamodeUtilitypage,thespecifiedfiledidnot
exist.
Meaning:WhenexecutingtheCopycommandinthe
MediamodeUtilitypage,andyouusedawildcardto
specifythecopyfilename,thespecifiedfilewasnot
found.Alternatively,thelengthofthecopysourcepath
nameexceeded76characters.
Meaning:InMediamodewhenyouusedtheOpen
buttontoopenadirectory,thepathlengthincluding
theselecteddirectorynameexceeded76characters.
•Checkthefileordirectory.
Meaning:WhenyoupressedtheWRITEbuttontosave
yourdatainSequencermode,themediawasnotina
statethatallowedsaving,orthepreviously‐opened
directorywasnotalocationwhereSNGfilescouldbe
saved.
•Ifthesave‐destinationdirectoryissomethingother
thantheDOSdirectoryfromwhichyouopeneda
.PCGor.SNGfile,amessagesuchas“File/pathnot
found”willappear,andthedatacannotbesaved.
Inthiscase,movetoMediamode,selectan
appropriatesave‐destination,andthenexecute
SaveAllorSaveSEQ.
I
Illegal file description
Meaning:Thefilenamethatyouspecifiedwhensaving
afileorcreatingadirectorycontainedinvalid
characters.Tosolvethisproblem:
• Changethefilenameyouarespecifying.Filenames
notpermittedbyMS‐DOScannotbeusedasa
filename.
Illegal SMF data
Meaning:Youattemptedtoloadafilethatwasnota
StandardMIDIFile.
Illegal SMF division
Meaning:YouattemptedtoloadaStandardMIDIFile
thatwastimecode‐based.
Illegal SMF format
Meaning:YouattemptedtoloadaStandardMIDIFile
ofaformatotherthan0or1.
M
Master Track can’t be recorded alone
Meaning:Whenrealtime‐recordingasingletrack,you
attemptedtobeginrecordingwiththemastertrackas
thecurrenttrack.
•SelectaMIDItrackforrecording,insteadofthe
MasterTrack.
Measure number over limit
Meaning:Theattemptededitprocedurewouldcause
thetracklengthtoexceed999measures.
• Deleteunnecessarymeasures.
Measure size over limit
Meaning:WhenloadingaStandardMIDIFile,the
numberofeventsinameasureexceededthemaximum
(approximately65,535events).
Meaning:Theattemptededitprocedurewouldcause
themaximumnumberofeventsinameasure
(approximately65,535)tobeexceeded.
Tosolveeitheroftheseproblems:
•Useeventeditingetc.todeleteunwanteddata.
Media changed
Meaning:WhenexecutingtheCopycommandinthe
MediamodeUtilitypage,themediawasexchangedor
ejected,anditwasnotpossibletocopybetween
separatemediaonthesamedrive.
Media unavailable
Meaning:Youselectedamediasourcethatdoesnot
allowwriting.
Media write protected
Meaning:Theotherwriting‐destinationmediais
write‐protected.
•Turnoffwriteprotectontheothermedia,and
executethecommandonceagain.
Memory full
Meaning:Wheneditingasong,trackorpatternin
Sequencermode,thetotaldataofallsongshasusedup
allofthesequencedatamemory,andfurthereditingis
notpossible.Tosolvethisproblem:
• Deleteothersongdataetc.toregainfreememory.
Meaning:WhilerealtimerecordinginSequencer
mode,thereisnomorefreememorytoaccommodate
therecordeddata,sorecordinghasbeenforcibly
halted.Tosolvethisproblem:
• Deleteothersongdataetc.toregaintheamountof
freememory.
Memory overflow
Meaning:WhilereceivingexclusivedatainMedia
modeSaveExclusive,allremaininginternalmemory
wasusedup.Tosolvethisproblem:
•Ifyouarereceivingtwoormoresetsofexclusive
data,transmitthemseparatelytotheKROME.
Memory Protected
Meaning:Theinternalprogram,combination,song,
drumkit,userarpeggiopatternisprotected.
•InGlobalmode,turnoffwrite‐protect,andexecute
thewriteorloadprocedureonceagain.
MIDI data receiving error
Meaning:WhilereceivingMIDISystemExclusive
data,theformatofthereceiveddatawasinvalid,for
example,becausethesizeofthedatawasincorrect.

Appendices
132
N
No data
Meaning:WhenloadingaStandardMIDIFile,thefile
containednoevents.
No media
Meaning:WhenexecutingacommandinMediamode,
nomediawasinsertedinthedrive.Tosolvethis
problem:
•Insertmedia,andnavigatetoanappropriate
directorythattheKROMEwillrecognize.→p.118
No recording track specified
Meaning:Whenperformingrealtimemulti‐track
recording,youattemptedtobeginrecordingwithno
trackssettoREC.Tosolvethisproblem:
•SetthedesiredtracksforrecordingtoREC.
No space available on media
Meaning:Whenyouattemptedtosaveorcopyafile,
ortocreateadirectory,therewasnotenoughfree
spaceontheothermedia.Tosolvethisproblem:
•Eitherdeleteanexistingfile,orreplacethemedia
withanotherthatcontainssufficientfreespace.
Not enough Drum Track pattern locations
available
Meaning:Whenconvertingasong’suserpatterntoa
userdrumtrackpattern,youhaveexceededthe
numberofuserdrumtrackpatternsavailableforuse.
•Asnecessary,executetheMediamodeSavePCG
commandtosaveyouruserdrumtrackpatterns.In
Sequencermode,executethemenucommandErase
DrumTrackPatterntoincreasethenumberof
availabledrumtrackuserpatterns.Thentrythe
conversionprocedureagain.
Not enough Drum Track pattern memory
Meaning:Whenconvertingasong’suserpatterntoa
userdrumtrackpattern,therewasnotenoughfree
memory.
•Asnecessary,executetheMediamodeSavePCG
commandtosaveyouruserdrumtrackpatterns.In
Sequencermode,executethemenucommandErase
DrumTrackPatterntoeraseotheruserdrumtrack
patternsandincreasetheamountoffreememory.
Thentrytheconversionprocedureagain.
Not enough memory
Meaning:Whenstartingrealtimerecordingin
Sequencermode,theminimumamountoffree
memory(suchasmemoryfortheBAReventsuptothe
recordingstartlocation)couldnotbeallocated.To
solvethisproblem:
• Deleteothersongdataetc.toregainfreememory.
Not enough memory to load
Meaning:Whenyouattemptedtoloada.SNGfileora
standardMIDIfileinMediamode,therewas
insufficientfreememoryinthesequencememory.To
solvethisproblem:
• Deleteothersongdataetc.toregainfreememory.
Not enough memory to open pattern
Meaning:Therewasinsufficientsequencermemoryto
openthepattern,soeditingisnotpossible.
•Eitherdeleteunwanteddatasuchasasong,track,
orpattern,ordonotopenthepattern.
Not enough pattern locations available
Meaning:WhenexecutingLoadDrumTrackPattern,
theattemptedloadprocedurewouldexceedthe
remainingnumberofuserpatternsintheselected
song.
• Createanewsong,andreloadthedataintotheuser
patternsofthatsong.Youcanloadupto100user
patternsintoeachsong.Ifyouhavemoredrum
trackpatternsthanthistoload,youcandivide
thembetweentwoormoresongs.
Not enough song locations available
Meaning:Whenloadinga.SNGfilewithAppend
specified,youattemptedtoloadmoresongsthancan
beloaded.
•InSequencermode,executeDeleteSongto
increasethenumberofsongsthatcanbeused,and
thenloadthesongagain.
P
Pattern conflicts with events
Meaning:ItwasnotpossibletoexecutetheBounce
procedurebecauseoneofthetrackscontaineda
pattern,andthesamemeasureoftheothertrack
containedeventsorapattern.
•Openthepattern.
Pattern exists across destination to-end-of-
measure or source from-measure
Meaning:Whenmovingameasure,theeditprocedure
couldnotbeexecutedbecauseapatternhadbeenput
inthedestination‐endmeasure,orthesource‐start
measure,andhadnotbeenopened.
•Openthepattern.
Pattern exists in destination or source track
Open pattern?
Meaning:Apatternhasbeenplacedinthetrackthat
youspecifiedasadestinationorsourceforediting.If
youwishtoopenthepatternandexecute(theeventsof
thepatternwillbecopied),presstheOKbutton.Ifyou
wishtoexecutewithoutopeningthepattern,pressthe
Cancelbutton.
Pattern used in song Continue ?
Meaning:Whenediting,thespecifiedpatternhasbeen
placedinatrack.Ifyouwishtoexecute,presstheOK
button.Ifyoudecidenottoexecute,presstheCancel
button.

Error messages Error and confirmation messages
133
R
Root directory is full
Meaning:Whenattemptingtocreateafileordirectory
attherootlevelofthemedia,youexceededthe
maximumnumberoffilesorfolderthatcouldbe
createdintherootdirectoryofthatmedia.
•Eitherdeleteanexistingfileordirectory,orOpena
directorytomovedownonelevelbeforecreatinga
fileordirectory.
S
Selected file/path is not correct
Meaning:Whenloadingadivided.PCGfile,you
attemptedtoloada.PCGfileofthesamenamethat
wasnotdividedorhaddifferingcontents.
•Loadthecorrect.PCGfile.
Source is empty
Meaning:Nodataexistsinthetrackorpatternthat
youspecifiedasthesource.
•Specifyatrackorpatternthatcontainsmusical
data.
Meaning:Thismessagewillappearwhenyouexecute
SwapInsertEffectifoneoftheeffectstobeswapped
(“Source1”or“Source2”)isadouble‐sizeeffect,andis
thereforeanunusableIFXnumber.
•IfyouwanttoexecutetheSwapprocedureona
double‐sizeeffect,specifyanIFXnumbertowhich
adouble‐sizeeffectisassigned.
T
The internal memory has been corrupted, likely
due to an interruption of power while the system
was writing/saving data. This has been repaired
and the affected Bank has been initialized. [OK]
Meaning:Amemorywriteproceduredidnotend
normally,perhapsbecausethepowerwasturnedoff
whileprocessingwasstillunderwayafteryouwrotea
programorotherdataintointernalmemory.
•TheKROMEwillautomaticallyinitializeitselfin
ordertorepairtheinternalmemory.Thismessage
willappearatthistime;pressOKtoclosethe
dialogbox.Insomecases,thepreloadbankdata
maybetemporarilyinitialized.Asnecessary,use
theGlobalmodeLoadPreload/DemoData
commandtoloadthepreloaddataintointernal
memory,orifyouhaveyourownbackupPCG,
loaditusingMediamode.
There is not readable data
Meaning:Eitherthefilesizeis0orthefiledoesnot
containdatathatcanbeaccessedbytheloadoropen
procedure.Alternatively,thedataisdamagedetc.,and
cannotbeloadedoraccessed.
This file is already loaded
Meaning:Whenloadingadivided.PCGfile,you
attemptedtoloadafilethathadalreadybeenloaded.
•Loadthe.PCGfilesthathavenotyetbeenloaded.
U
Unable to create directory
Meaning:Youattemptedtocreateadirectorythat
wouldexceedthemaximumpathnamelength(76
charactersforthefullpathname).
Unable to save file
Meaning:WhenexecutingtheMediamodeUtility
menucommandCopy,thecopydestinationpath
lengthexceeded76characters.
Meaning:WhensavingafileinMediamode,thesave
destinationpathexceeded76characters.
Meaning:WhenyouexecutedtheMediamodeUtility
menucommandCopy,thefilemanagementdata
exceededthesizeofthemanagementarea.
Y
You can’t undo this operation Are you sure?
Meaning:Onceyouentereventediting(evenifyou
leaveeventeditingwithoutactuallyeditinganevent),
itwillnolongerbepossibletoexecuteCompareto
listentothepreviousedit.Ifyouwishtoenterevent
editing,presstheOKbutton.Tocancel,pressthe
Cancelbutton.
You can’t undo last operation Are you sure?
Meaning:Whenyouexitrecordingoreventeditingin
Sequencermode,thememoryareaforUndo(Compare
function)isnotallocated.Ifyouwishtokeepthedata
thatwasjustrecordedoredited,presstheOKbutton.
Ifyouwishtoreturntothepreviousdata(i.e.,todelete
thedatathatwasjustrecordedoredited),pressthe
Cancelbutton.
Meaning:WheneditinginSequencermode,memory
areaforUndo(Comparefunction)cannotbeallocated.
Ifyouwishtoexecutetheedit,presstheOKbutton(It
willnotbepossibletoundoyouredit).Ifyoudecide
nottoexecutetheedit,presstheCancelbutton.
•InordertoallocatememoryareaforUndo
(Comparefunction),deleteunneededdatasuchas
songs,tracks,orpatterns.Werecommendthatyou
datatomediabeforeyouexecutetheedit
procedure.
Appendices
134
Specifications
Operating temperature 0 – +40 °C
Keyboard
61-note Semi-Weighted Keyboard (velocity sensitive, no aftertouch)
Normally C2–C7 (adjustable in the range [C1...C6]–[C3...C8])
73-note Semi-Weighted Keyboard (velocity sensitive, no aftertouch)
Normally C1–C7 (adjustable in the range [C0...C6]–[C2...C8])
88-note
NH (Natural weighted hammer action) Keyboard (no aftertouch)
* The NH Keyboard delivers a playing feel similar to that of an acoustic piano, with low
notes being heavier and high notes being lighter.
System EDS-X (Enhanced Definition Synthesis-eXpanded)
Sound Engine
Maximum Polyphony
120 voices max, single mode
60 voices max, double mode
* The actual maximum polyphony will vary depending on oscillator settings such as
stereo multisamples and velocity crossfading.
Preset PCM
3.8 Gbytes (when calculated as 48kHz 16-bit linear data)
583 multisamples (including twelve stereo),
2,080 drumsamples (including 474 stereo)
Programs
Oscillator OSC1 (Single), OSC1+2 (Double): Stereo multisamples are supported
8 velocity zones per oscillator, with switching, crossfades and layers.
Filters Four types of filter routing (single, serial, parallel, 24 dB)
Two multi-mode filters per voice (low pass, high pass, band pass, band reject)
Driver Per-voice nonlinear driver and low boost.
EQ Three bands, with sweepable mid.
Modulation
For each voice, two envelope generators (Filter & Amp), two LFOs, two key tracking
generators (Filter & Amp), and two AMS mixers
In addition, pitch EG, common LFO, and two common key tracking generators
Combinations
16 Timbres Up to sixteen timbres, keyboard and velocity split/layer/crossfade, and modifications
to the program setting via the Tone Adjust function
Master Keyboard
functionality These allow you to control external MIDI devices
Drum Kits Stereo and mono drumsamples.
8-way velocity switches with crossfades and adjustable crossfade shapes (Linear, Power, Layer).
The number of
…
-Combinations
-Programs
-Drum Kits
User Combinations 512 Combinations/384 Preload
User Programs 768 Programs/640 Preload
User Drum Kits 48 Drum Kits/32 Preload
Preset Programs 256 GM2 Programs + 9 GM2 Drum Programs
Effects
5 Insert Effects In-line processing; stereo in - stereo out.
2 Master Effects Two effects sends; stereo in - stereo out.
1 Total Effect For overall processing on the main outputs, such as compression, limiting, and EQ;
stereo in - stereo out.
3-band Track EQ High, low, and sweepable mid band. Per Program in Program Mode, per Timbre in
Combination mode (16 total), and per Track in Sequencer mode (16 total).
Effects types 193 types (Usable for insert, master, or total effects. However, double-size effects
cannot be used as the total effect.)
Modulation Dynamic Modulation, two common LFOs
Effects Control Bus Stereo side-chaining for limiter, gates, vocoders, etc.
Effects Presets Up to 32 per Effect
Dual polyphonic arpeggiators
Program mode: one arpeggiator available. Combination and Sequencer modes: two arpeggiators available.
5 preset arpeggio patterns
1028 user arpeggio patterns (900 preload)
Drum Track
Preset patterns 605 patterns (Held in common with sequencer preset patterns.)
User patterns 1,000 patterns. Patterns created in Sequencer mode can be converted to drum track
user patterns.
Trigger Mode / Sync / Zone settings can be specified
Sequencer
16 MIDI Tracks & 1 Master Track
128 Songs
Resolution: 480 ppq (parts per quarter-note)
Tempo: 40.00–300.00 bpm (1/100 bpm resolution)
Up to 210,000 MIDI events
16 preset/16 user template songs
Cue List function 20 cue lists. Songs can be arranged consecutively or repeatedly in up to 99 steps. A cue
list can be converted back into a song.
Patterns/RPPR 605 Presets /100 User Patterns (per Song)
RPPR (Realtime Pattern Play/Recording): 1 set per Song.
Format Korg (KROME) format, SMF (formats 0 and 1) supported
Media Load, Save, Utility
Data Filer functionality (Save and Load MIDI System Exclusive Data)
Specifications Operating requirements
135
Operating requirements
KORG USB-MIDI Driver
Windows
Operating system: Microsoft Windows XP Home/Professional SP3,
Windows Vista SP2 (including 64-bit),
Windows 7 SP1 (including 64-bit)
Computer: USB port required (a USB host controller made by Intel is recommended)
Macintosh
Operating system: Mac OS X 10.5 or later.
Computer: Apple Macintosh computer with an Intel processor that has a USB port and satisfies the requirements for
running Mac OS X.
*Appearanceandspecificationsaresubjecttochangewithoutnotice.
Controllers
Joystick, SW1, 2
Realtime controls
SELECT buttons REALTIME CONTROLS (TONE, USER), ARP
4 knobs REALTIME CONTROL: Realtime modulation
Arpeggio control
Drum Track Buttons = DRUMTRACK
Arpeggiator Buttons = ARP
Effect On/Off Buttons = MASTER FX, TOTAL FX
User Interface
Display TouchView graphical user interface, 7 inch TFT, WVGA (800x480 dots), adjustable
brightness.
MODE Buttons = COMBI, PROG SEQ, GLOBAL, MEDIA
Value Controllers VALUE Dial, INC/DEC buttons, 10-key numeric keypad, (–) button, (.) button, ENTER
button, COMPARE button
BANK Buttons = A…F (used for Combination A, B, C, D)
SEQUENCER Buttons = PAUSE ( ), REW ( ), FF ( ), LOCATE ( ), REC ( ), START/STOP ( )
TEMPO TEMPO Knob, TAP button
Other WRITE button, PAGE button, EXIT button, VOLUME knob
Audio Outputs Analog
AUDIO OUTPUT
L/MONO, R
1/4" TS (Mono), unbalanced, Volume knob controls
Output Impedance 1.1k stereo; 550 mono (L/Mono only)
Maximum Level +16.0 dBu
Load Impedance 10 k or greater
Headphone output
1/8" TRS (Stereo), Volume knob
Output Impedance 33
Maximum Level 60+ 60 mW @33
Control Inputs DAMPER (Supports piano-style half-damper pedals as well as standard foot switches)
ASSIGNABLE SWITCH, ASSIGNABLE PEDAL
MIDI IN, OUT
USB 1 USB (TYPE B), MIDI interface
SD-Card slot Capacity recognized: SD memory cards up to 2 Gigabytes (GB). SDHC memory cards up to 32 Gigabytes (GB).
SDXC memory cards are not supported.
Power AC adapter power supply connector (DC 12V, ), Power On/Off switch
Dimensions
(W D H)
KROME-61 1,027 x 313 x 93 (mm)/40.43" x 12.32" x 3.66"
KROME-73 1,191 x 313 x 93 (mm)/46.89" x 12.32" x 3.66"
KROME-88 1,448 x 383 x 131 (mm)/57.01" x 15.08" x 5.16"
Weight
KROME-61 61-note 7.2 kg/15.87 lbs
KROME-73 73-note 8.2 kg/18.08 lbs
KROME-88 88-note 14.7 kg/32.41 lbs
Power Consumption
KROME-61
13WKROME-73
KROME-88
Accessories AC adapter, Quick Start guide
Accessory Disc (KROME Parameter Guide (PDF), Operation guide (PDF), Video manual etc.)
Options
XVP-10 Expression/Volume Pedal
EXP-2 Foot Controller
DS-1H Damper Pedal
PS-1, PS-3 Pedal Switch
MIDI Implementation Chart
ConsultyourlocalKorgdistributorformoreinformationonMIDIIMPLEMENTATION.
MIDI Implementation Chart
Date : 2011. 10. 04
Ver.: 1.00
KROME
*C
*E, *4
When cue list is selected, corresponds to cue list.
*1
When cue list is selected, corresponds to cue list 0-19.
*1
*1
*1
*P
Memorized
[Music Workstation]
Polyphonic aftertouch and Channel aftertouch
*A (receive)
transmitted only as sequence data
*A (receive)
All note numbers 0–127 can be transmitted
by the Arpeggiator or as sequence data
Bank Select (MSB, LSB)
*P
Joystick (+Y, –Y), Knob1-4
*C
Pedal, Portamento Time, Volume, IFX pan, Pan
*C
Expression, Eect Control 1, 2
*C
Damper, Portamento Sw., Sostenuto, Soft
*C
Sound (Realtime Control TONE 1–4: 74, 71, 79, 72)
*C
Switch 1, 2, Foot Switch, Controller
*C
Send 1, 2, Eect ON/OFF (IFXs, MFXs, TFX)
*C
Arpeggiator Controllers
*C, *2
Data Entry (MSB, LSB)
*C
Data Increment, Decrement
*C
RPN (LSB, MSB)
*C, *3
Realtime Control USER 1−4, Seq. Data *C (Seq when received)
All Sound O, Reset All Controllers
*C
0, 32
1, 2, 17, 19, 20, 21
4, 5, 7, 8, 10
11, 12, 13
64, 65, 66, 67
70–79
80–83
91–95
14, 22–25
6, 38
96, 97
100, 101
0–119
120, 121
Notes *P, *A, *C, *E:
Transmitted/received when Global P1: MIDI Filter (Program Change, Aftertouch, Control Change, Exclusive) is Enable, respectively.
*1: When Global P1: MIDI Clock is Internal, transmitted but not received. The opposite for External MIDI.
*2: Valid if assigned as a MIDI control change in Global P2: Controllers. The number shown here is the CC default assignment.
*3: RPN (LSB,MSB)=00,00: Pitch bend range, 01,00: Fine tune, 02,00: Coarse tune
*4:
In addition to Korg exclusive messages, Inquiry, GM System On, Master Volume, Master Balance, Master Fine Tune, and Master Coarse
Tune are supported.
System
Real Time
Clock
Command
Aux
Messages
Local On/O
All Notes O
Active Sense
Reset
Function Transmitted Recognized Remarks
Basic
Channel
Default
Changed
Aftertouch
Pitch Bend
Polyphonic (Key)
Monophonic (Channel)
Program
Change Variable Range
System Exclusive
System
Common
Song Position
Song Select
Tune
Velocity Note On
Note O
Note
Number: True Voice
Mode Memorized
Messages
Altered
Control
Change
Mode 1: OMNI ON, POLY Mode 2: OMNI ON, MONO : Yes
Mode 3: OMNI OFF, POLY Mode 4: OMNI OFF, MONO : No
0 – 127
9n, V=1 – 127
0 – 127
1 – 16
1 – 16
0 – 127
0 – 127
9n, V=1 – 127
0 – 127
0 – 127
0 – 127 0 – 127
123 – 127
1 – 16
1 – 16
3

4015-2 Yanokuchi, Inagi-city, Tokyo 206-0812 Japan
© 2012 KORG INC.
IMPORTANT NOTICE TO CONSUMERS
Thisproducthasbeenmanufacturedaccordingtostrictspecificationsandvoltagerequirements
thatareapplicableinthecountryinwhichitisintendedthatthisproductshouldbeused.Ifyou
havepurchasedthisproductviatheinternet,throughmailorder,and/orviaatelephonesale,
youmustverifythatthisproductisintendedtobeusedinthecountryinwhichyoureside.
WARNING:Useofthisproductinanycountryotherthanthatforwhichitisintendedcouldbe
dangerousandcouldinvalidatethemanufacturer’sordistributor’swarranty.
Pleasealsoretainyourreceiptasproofofpurchaseotherwiseyourproductmaybedisqualified
fromthemanufacturer’sordistributor’swarranty.
