Kraemer Automotive Systems KR1-J6 CLASSIC INFOTAINMENT SYSTEM User Manual Jaguar Handbuch DE indd
Kraemer Automotive Systems GmbH CLASSIC INFOTAINMENT SYSTEM Jaguar Handbuch DE indd
User Manual

CLASSIC INFOTAINMENT
SYSTEM
EN | DE

CLASSIC INFOTAINMENT
SYSTEM
EN

2
3
Introduction
Introduction
IMPRINT
Jaguar Land Rover Limited,
Abbey Road,
Whitley,
Coventry
CV8 3LF
Great Britain
ABOUT THIS HANDBOOK
Please take the time to read all the user documentation delivered with your Classic
Infotainment System as quickly as possible.
The information contained in this publication was correct at the time of going to print.
Subsequent modifications/updates to the unit may mean that descriptions in the
handbook may no longer be entirely in accordance with the status of the unit.
In the interest of progress we reserve the right to change the specifications, the
design or the documentation at any time without notice and without any obligation.
This publication or parts of this publication are not allowed to be copied or translated
without our approval. Errors and omissions excepted.
SYMBOLS USED
Safety instructions either provide a procedure that must be followed exactly, or
information that should be considered with great care to prevent the possibility
of injury.
Precautionary measures either provide a procedure that must be followed exactly,
or information that should be considered with great care to prevent the possibility
of damage to your vehicle.
All rights reserved. Published by © Jaguar Land Rover Limited 2018.

2
3
Introduction
Introduction
UNIT PART NUMBER
BD11017, BD11018, BD11019, BD11020,
BD11021, BD11022, LR114720, LR115044,
LR117489, LR117490
STATUS
Status 08/2018, handbook version 1.0
SUPPORT
Contact number:
+44 (0) 2476-565708
Email:
Jaguar:
Jclassic@jaguarlandrover.com
Land Rover:
Lclassic@jaguarlandrover.com
Copyrights:
© JAGUAR LAND ROVER LIMITED 2018
Address:
Jaguar Land Rover Classic Works
DC1 Imperial Road
Prologis Park
Ryton-on-Dunsmore
Coventry CV8 3LF
Great Britain
website: www.jaguarclassicparts.com
SAFETY
The Classic Infotainment System is the
central control unit for the radio, media
functions, iPod, external audio sources,
sound settings, navigation and Bluetooth
telephony. To ensure you do not put
yourself or others at risk or cause yourself
or others harm while using your Classic
Infotainment System, you must pay
attention to the following points:
Risk of accident. Due to distraction,
you could lose control of the
vehicle. Only operate your Classic
Infotainment System if you can
control your vehicle safely and the
road trac situation permits. If in
doubt, stop and operate the Classic
Infotainment System with the
vehicle stationary. The navigation
system is only intended as an
aid for the driver and provides a
suggestion for the route. This aid
does not relieve you of your sole
responsibility to drive correctly to
suit the road trac, to comply with
the highway code as well as other
applicable provisions in relation
to how to act in road trac. As a
driver you must assess the current
trac situation. You remain solely
responsible for driving your vehicle
safely. Continue to pay attention to
the trac situation.
INTENDED USE
The Classic Infotainment System is used
for the reception of radio stations, for
playing back audio files on memory
cards and other data carriers, for making
telephone calls via Bluetooth® and for
navigation.
COPYRIGHT
All the programs and terms mentioned
in this document may be registered
marks or trademarks of the related
manufacturers and are not allowed to be
used commercially or for other purposes.
Without the express written permission
of the originator, no part of this
documentation is allowed to be copied or
transmitted for any purpose, independent
of the manner or the means, electronic
or mechanical, with which this action is
taken. All rights reserved.

4
5
Contents
Contents
Imprint ................................................................. . 2
About this handbook .................................... . 2
Symbols used ................................................... . 2
Unit part number ............................................ . 3
Status................................................................... . 3
Support ............................................................... . 3
Safety .................................................................. . 3
Intended use ..................................................... . 3
Copyright ........................................................... . 3
Controls .............................................................. . 7
Menu structure ................................................. . 8
Basic functions ................................................. . 8
Selecting operating mode ........................... . 8
Switching on and o the unit ..................... . 8
Volume control ................................................ . 8
Muting ................................................................. . 8
Touchscreen operation ................................. . 8
Tone ...................................................................... . 9
Equalizer ............................................................. . 9
Loudness ............................................................ . 9
Balance ............................................................... . 9
Fader .................................................................... . 9
Time format, date and time ........................ . 9
Time format ....................................................... . 9
Date ...................................................................... 10
Time ..................................................................... 10
Time synchronisation .................................... 10
Standby time .................................................... 10
Button sound .................................................... 10
AM tuner on/o ............................................... 10
Choose radiozone ........................................... .11
Day/night mode............................................... .11
Language ........................................................... .11
Volume of the audio sources ...................... .11
Version information ........................................ 12
Factory settings .............................................. 12
Restarting Classic Infotainment System 12
TUNER main menu ......................................... 13
Activating tuner ............................................... 13
Setting station .................................................. 13
Setting frequency band ................................ 13
Setting station manually .............................. 13
Setting station using station search ........ 13
Setting station via list of stations ............. 13
Setting station via saved stations............. 13
Saving stations ................................................. 14
Saving current station ................................... 14
Saving station from list of stations .......... 14
Alternative frequency (AF) on/o ........... 14
Trac messages (TA) on/o ...................... 14
MEDIA main menu .......................................... 15
Activating MEDIA ........................................... 15
Audio playback from
USB sticks and SD cards .............................. 15
Connecting USB stick.................................... 15
Inserting and removing SD card ............... 15
Inserting SD card ............................................ 15
Removing SD card .......................................... 15
Audio playback from a Bluetooth®
device (A2DP) .................................................. 16
Audio playback from iPod® or iPhone® ... 16
Audio playback via the AUX port ............. 16
File formats supported ................................. 17
Information on Bluetooth® ........................... 17
PHONE main menu ........................................ 17
Making telephone calls ................................. 17
Requirements for making
telephone calls ................................................. 17
Dropped calls while driving ........................ 17
Answering call .................................................. 18
Rejecting call .................................................... 18
Ending call ......................................................... 18
Making call ......................................................... 18
Re-dialling .......................................................... 18
Automatically accept call on/o .............. 18
Direct dialling ................................................... 18
Functions during a call ................................. 18
Changing microphone .................................. 18
List of contacts ................................................ 19
Transferring list of contacts ........................ 19
Sorting list of contacts ................................. 19
Calling contact ................................................. 19
Finding contact ............................................... 19
Deleting list of contacts ............................... 19
Call lists ............................................................... 19
Displaying call lists ......................................... 19
Calling telephone number
from a call list ................................................... 19
Bluetooth® settings ........................................ 19
Bluetooth® function on/o .......................... 19
Coupling Bluetooth® device ........................20
Coupling via Classic Infotainment
System ................................................................20
Coupling via mobile phone ........................20
Connecting coupled Bluetooth®
devices ...............................................................20
Manual connection ........................................20
Closing Bluetooth® connection .................20
Contents

4
5
Contents
Contents
Uncoupling mobile phone ..........................20
Changing pairing code ................................. 21
Changing Bluetooth® name ......................... 21
The navigation system .................................. 21
Switching on navigation ..............................22
Entering the destination..............................22
Possible ways of entering an address ....22
Entering address ............................................ 22
Choosing town/city centre
as destination ..................................................22
Information without complete
address...............................................................22
Destination from points of interest .........23
Destination from saved places .................23
Destination from history .............................23
Destination from saved routes ..................23
Destination via coordinates .......................23
Destination from all destination types ..23
Destination via map ......................................24
Saving destination ......................................... 24
Routes ................................................................24
Entering new route ........................................24
Saving route ..................................................... 24
Saving active route .......................................24
Renaming route ..............................................24
Changing route ...............................................24
Changing order of destinations................24
Deleting individual destination ................. 25
Adding interim point ....................................25
Avoiding specific sections on the
route ....................................................................25
Avoiding specific roads on a route .........25
Avoiding stretch of road ahead ................25
Restoring original route ...............................25
Displaying alternative routes .....................25
Interrupting navigation ................................25
Deleting next interim point ........................26
Deleting active route ....................................26
Deleting individual saved route ................26
Deleting all saved routes .............................26
Defining new starting point .......................26
Deleting new starting point .......................26
Starting route simulation ............................26
Jumping back to last turning ....................26
Jumping forward to next turning ............26
Interrupting simulation ................................26
Increasing simulation speed ......................27
Ending simulation .......................................... 27
During navigation ..........................................27
Repeating navigation announcements ..27
Display during navigation ...........................27
Turning ............................................................... 27
Lane recommendation .................................27
Trac messages on the map ....................28
Displaying useful information ...................28
Navigation settings .......................................28
Setting vehicle profile ..................................28
Adding new profile ........................................ 29
Setting route planning method ................29
Setting navigation mode ............................29
Setting road types ......................................... 29
Setting volume for sounds .........................29
Switching on or o sounds ....................... 30
Setting the level of detail of the voice
instructions ...................................................... 30
Reading out road names ............................ 30
Settings warnings for road speed
limits................................................................... 30
Settings warnings for warning points ..... 31
Types of warnings ........................................... 31
Settings zoom and angle of the map ...... 31
Settings map day/night view ..................... 31
Setting map colours .....................................32
Enabling or disabling the display of
3D objects on the map ................................32
Enabling or disabling route
recording ........................................................... 32
Enabling or disabling the display of point
of interest symbols on the map ...............32
Setting data fields on the map ................. 32
Displaying progress bar for the route .... 32
Providing motorway information .............33
Displaying points of interest close to
motorway journeys........................................33
Automatic overview ...................................... 33
Displaying road signs ...................................33
Displaying junction overview ....................33
Displaying tunnel view ................................. 33
Providing trac jam avoidance on
motorways ........................................................ 33
Providing real-time route alternatives ...33
Providing information on car parks
in the vicinity ................................................... 34
Providing suggestions on variations ......34
Map view and map alignment ...................34
Setting language for the user
interface............................................................. 34
Setting language for voice outputs ........34
Contents

6
7
Setting units and formats ...........................34
Setting time zone automatically .............. 35
Setting time zone manually .......................35
Setting summer time .................................... 35
Menu animation ..............................................35
Trac messages/real-time trac
messages (TMC).............................................35
Reception of trac messages ................. 35
Choosing data sources for real-time
trac messages .............................................35
Real-time trac messages .........................35
Displaying trac information ...................36
Displaying free flow of trac .................... 36
Setting time saving for route
recalculation ....................................................36
Prompting for route recalculation ........... 36
Journey overview ...........................................36
Starting configuration wizard ...................36
Updating digital map ...................................37
Important safety instructions on
installation ........................................................37
Installation ........................................................38
Fine adjustment of the installation
depth ..................................................................38
Removal .............................................................38
Connection of accessories .........................39
Installation of the hands-free
microphone ......................................................39
Installation of the GPS antenna ................39
Installation of the antenna signal
splitter ................................................................39
Connection diagram .................................... 40
Technical data .................................................. 41
System ................................................................. 41
Tuner/digital radio .......................................... 41
Bluetooth® .......................................................... 41
Navigation software ....................................... 41
Dimensions/weight ........................................ 41
Items supplied .................................................. 41
Contents
6
7
TUNER
MEDIA
PHONE
NAVI
MAP
BACK
Basic operation
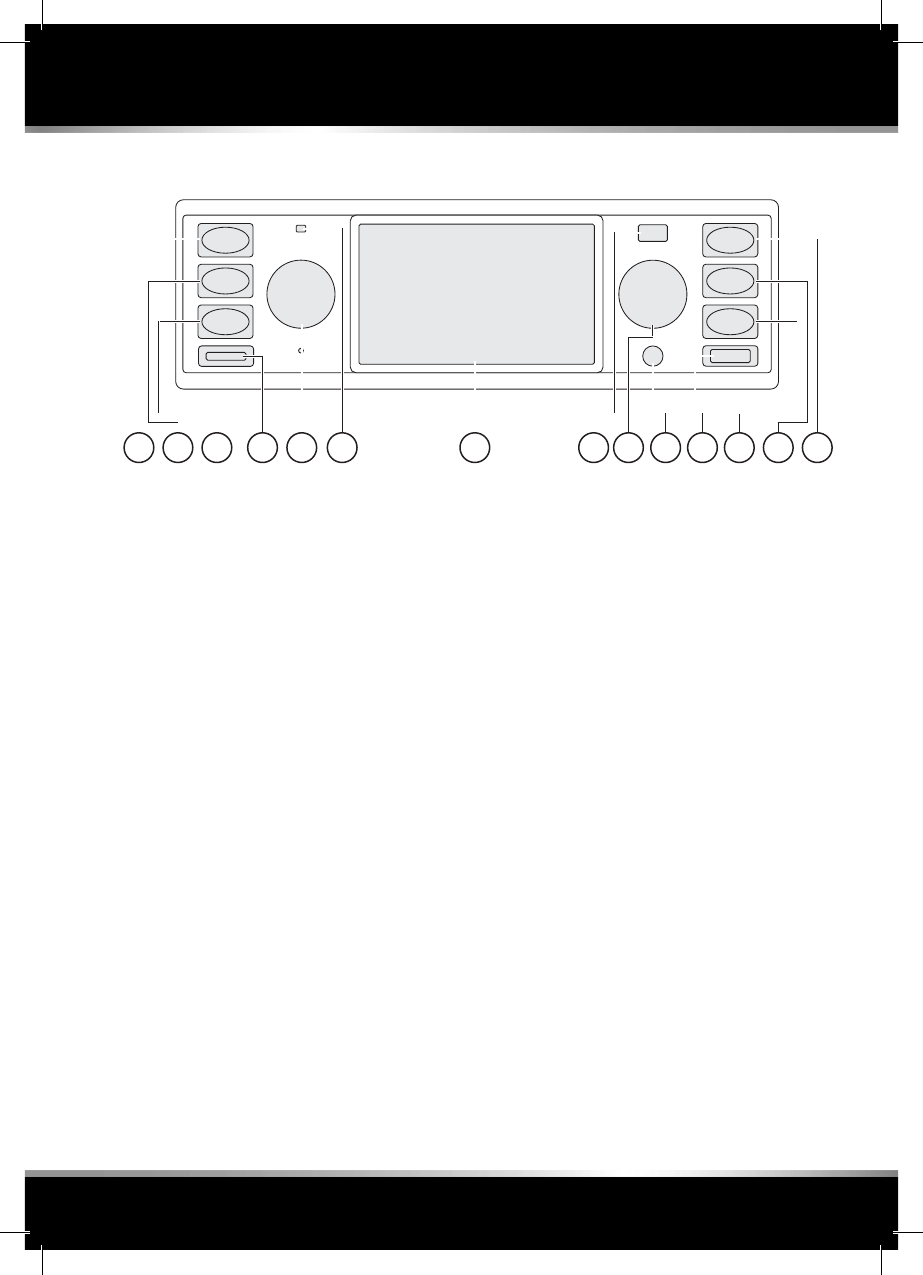
CONTROLS
1. Microphone for hands-free system
2. Light sensor for display brightness
NAVI (navigation mode)
MAP (map view) and repeat
last announcement
Back button
USB port
Aux in
Rotary knob/push button
Turn: change frequency/change value/
change menu command
Press: next station/save station/
choose menu command
Display with touchscreen function
On/O knob
Long press: switch on/o Classic
Infotainment System
Turn: adjust volume
Short press: mute on/o/interrupt
trac message
microSDHC card slot
PHONE/choose telephone
MEDIA/choose media source
iPod®/iPhone®
Play back from USB stick
Play back from microSDHC card
Play back from Bluetooth®
audio source
Aux in
TUNER/choose frequency band
(AM/FM/DAB+)
Note: The DAB+ function is only available
in Europe.
Note: The SD card function is only avail-
able for Land Rover devices.
13 4
10 9
1 5 36782
12 11
14
Contents
8
9
MENU STRUCTURE
1. Status bar
2. Main display
EQ/sound settings
System settings
Options for tuner
BASIC FUNCTIONS
Selecting operating mode
Press the TUNER, MEDIA, PHONE, NAVI
and MAP buttons to change between the
various operating modes of the Classic
Infotainment System.
Switching on and o the unit
The Classic Infotainment System is
switched on and o together with the
ignition. Alternatively, you can switch on
and o the Classic Infotainment System
manually. For this purpose press the On/
O knob for a few seconds.
Volume control
Turn the On/O knob to adjust the
volume. Depending on the operating
mode selected, you change the volume
for the active audio source, a tra c
message, a navigation announcement, the
telephone ring sound or the telephone
call.
To prevent distraction or startling
due to a sudden tra c message or
navigation announcement, ensure
the volume is always reasonable.
Muting
Press On/O knob briefl y. The sound is
switched on or o .
Note: Muting also interrupts the incoming
tra c messages.
Touchscreen operation
To operate the unit using the touchscreen
display, follow these steps:
1. Touch the touchscreen using your
fi nger.
2. Move your fi nger over the touchscreen
to the left/right/top/bottom with light
pressure.
The selection on the touchscreen display
moves depending on the direction.
In this way you can navigate through lists
or menus. To accept a selection, tap the
touchscreen display with your fi nger.
A menu is opened, an option is chosen or
a function is run.
Basic operation
1 2 34 5
8
9
System settings
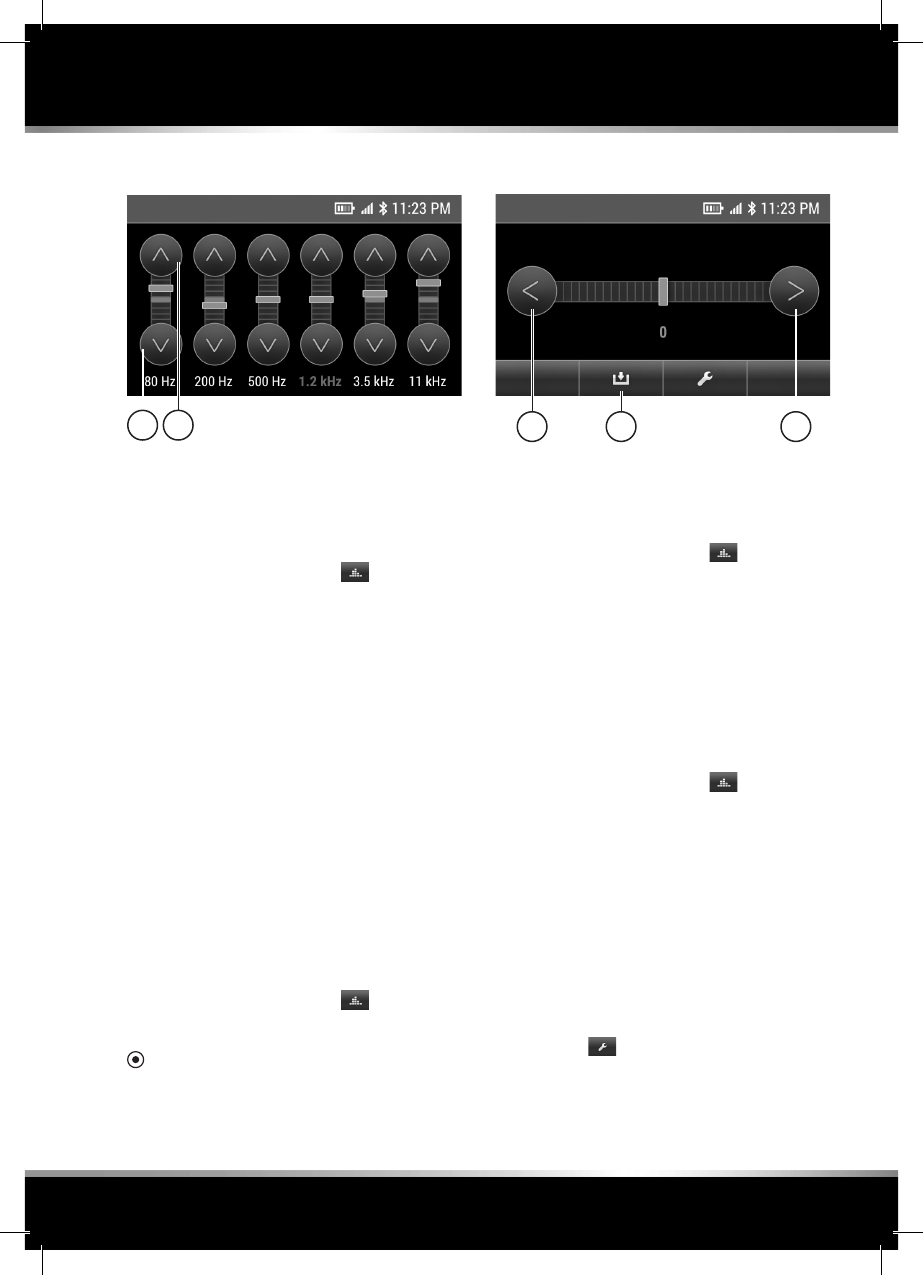
TONE
Equalizer
Using the Equalizer you can adjust the
treble, mid-range and bass. You can also
select pre-defined EQ presets. To set,
follow these steps:
1. Choose sound settings .
2. Choose Equalizer.
3. Choose required EQ preset:
• Pop
• Rock
• Classic
• Jazz
• Custom
Choose Custom to set your own personal
EQ settings.
Set the required values using the arrows
(1).
Loudness
High and low frequencies in the sound
spectrum are enhanced by activating the
Loudness function. To set, follow these
steps:
1. Choose sound settings .
2. Choose Loudness
The option field shows whether the
function is activated or deactivated.
Balance
Using the Balance you can move the
sound within the vehicle to the right or
left. To set, follow these steps:
1. Choose sound settings .
2. Choose Balance.
3. Set the required value using the
arrows (1).
4. Save the setting: choose (2).
Fader
Using the Fader you can move the sound
within the vehicle to the front or back. To
set, follow these steps:
1. Choose sound settings .
2. Choose Fader.
3. Set the required value using the
arrows (1).
4. Save the setting: choose (2).
TIME FORMAT, DATE AND TIME
To set the time format, date and time,
follow these steps:
Time format
1. Choose .
2. Choose Date/time.
3. Choose 12h mode or 24h mode.
Depending on the setting already
1 1 21 1

10
11
active, the setting changes to 24h
mode or 12h mode. The setting
displayed is activated.
Date
1. Choose .
2. Choose Date/time.
3. Choose Date.
4. Set the date using the arrows
Time
1. Choose .
2. Choose Date/time.
3. Choose Time.
4. Set the time using the arrows
TIME SYNCHRONISATION
The following options are available to
synchronise the time:
• RDS: if this function is activated, the
time is regularly synchronised with the
time in the RDS signal.
• GPS: if this function is activated, the
time is regularly synchronised with the
time signal in the GPS signal.
• Manually: if this function is activated,
the time you set manually is used.
To set the time synchronisation, follow
these steps:
1. Choose .
2. Choose Time synchronizing.
3. Choose required option.
The option fi eld shows whether the
function is activated or deactivated.
STANDBY TIME
If the standby time function is activated,
after switching o the ignition the
Classic Infotainment System remains
in the standby mode for the time you
have selected. If you switch back on the
ignition within the time set, the navigation
is active again immediately, for example.
To set the standby time, follow these
steps:
1. Choose .
2. Choose Standby.
3. Choose required setting 5 minutes, 15
minutes, 30 minutes or O .
The option fi eld indicates the function
activated.
BUTTON SOUND
To activate or deactivate the button
sound, follow these steps:
1. Choose .
2. Choose Key tone.
The option fi eld shows whether the
function is activated or deactivated.
AM TUNER ON/OFF
To select the AM frequency band, the AM
tuner must be activated in the system
settings. To activate the AM band, follow
these steps:
1. Activate/deactivate AM: choose .
2. Choose AM-Tuner.
The option fi eld shows whether the
function is activated or deactivated.
DAB+ ON/OFF
To select the digital radio function DAB+,
the DAB tuner must be activated in the
system settings. To set, follow these steps:
1. Activate/deactivate DAB+:
choose .
2. Choose DAB+.
The option fi eld shows whether the
function is activated or deactivated.
System settings

10
11
CHOOSE RADIOZONE
To select the european or american
frequency band, follow these steps:
1. Choose .
2. Choose Choose radiozone.
The option fi eld indicates the function
EU or US activated.
Note: When activating the US frequency
band, the DAB function is not available.
DAY/NIGHT MODE
The Classic Infotainment System can
adjust the brightness of the display
depending on the ambient light levels. To
set, follow these steps:
1. Choose .
2. Choose Day/night mode.
3. Choose between the automatic set-
ting Auto (light sensor) and Custom.
The option fi eld indicates the function
activated.
After you select Custom a scale for the
day mode is displayed.
1. Set the required value using the
arrows or .
2. To save, choose .
After you have saved the day mode, a
scale for the night mode is displayed.
3. Set the required value using the
arrows or .
4. To save, choose .
CONTROLLER SETTING
You can defi ne the function of the rotary-
pushbutton control using the Controller
setting menu command. The following
options are available:
• Zoom map
• Jump to the next or previous station
or track
To set, follow these steps:
1. Choose .
2. Choose Controller setting.
The option fi eld indicates the function
activated.
Note: If the Change station/title function
is active and navigation is running in the
background, it is only possible to zoom
the map using the touchscreen display.
LANGUAGE
To set the menu language, follow these
steps:
1. Choose .
2. Choose Language.
3. The available menu languages are
displayed.
4. Choose required language.
The option fi eld indicates the language
activated.
Note: If you change the menu language,
the navigation software will restart
to apply the language. In some
circumstances the navigation software
contains various other languages that are
not available on the device menu.
To select a separate language within the
navigation, change the language setting
on the menu for the navigation software.
VOLUME OF THE AUDIO
SOURCES
Using the Volume menu command you
can regulate separately the volume for
the individual media sources, e.g. tra c
messages, Aux input or navigation
announcements. To set the volume, follow
these steps:
1. Choose .
2. Choose Volume.
System settings

12
13
3. Choose the required audio source.
4. Set the required value using the
arrows or .
5. To save, choose .
To prevent distraction or startling
due to a sudden tra c message or
navigation announcement, ensure
the volume is always reasonable.
VERSION INFORMATION
Using the Version info menu command
you can retrieve the fi rmware version
states. To display the version information,
follow these steps:
1. Choose .
2. Choose Version info.
Note: To retrieve the version states for
the navigation software, change to the
separate menu for the navigation.
FACTORY SETTINGS
Using the Factory reset menu command
you can reset the Classic Infotainment
System to its state as delivered. All
settings you have made will be deleted.
To reset to the factory settings, follow
these steps:
1. Choose .
2. Choose Factory reset.
3. Choose YES. The Classic Infotainment
System is reset to the factory settings.
RESTARTING CLASSIC
INFOTAINMENT SYSTEM
In a few exceptional cases it may
be necessary to restart the Classic
Infotainment System:
• General malfunction of the Classic
Infotainment System
• Incorrect positioning on the map
To restart the Classic Infotainment
System, follow these steps:
1. Remove all the media sources
connected to the Classic Infotainment
System.
2. Press the On/O knob for fi ve
seconds until the system restarts.
Note: If the Classic Infotainment System
has a RESET button on the front, you can
also restart the unit using this button.
System settings
12
13
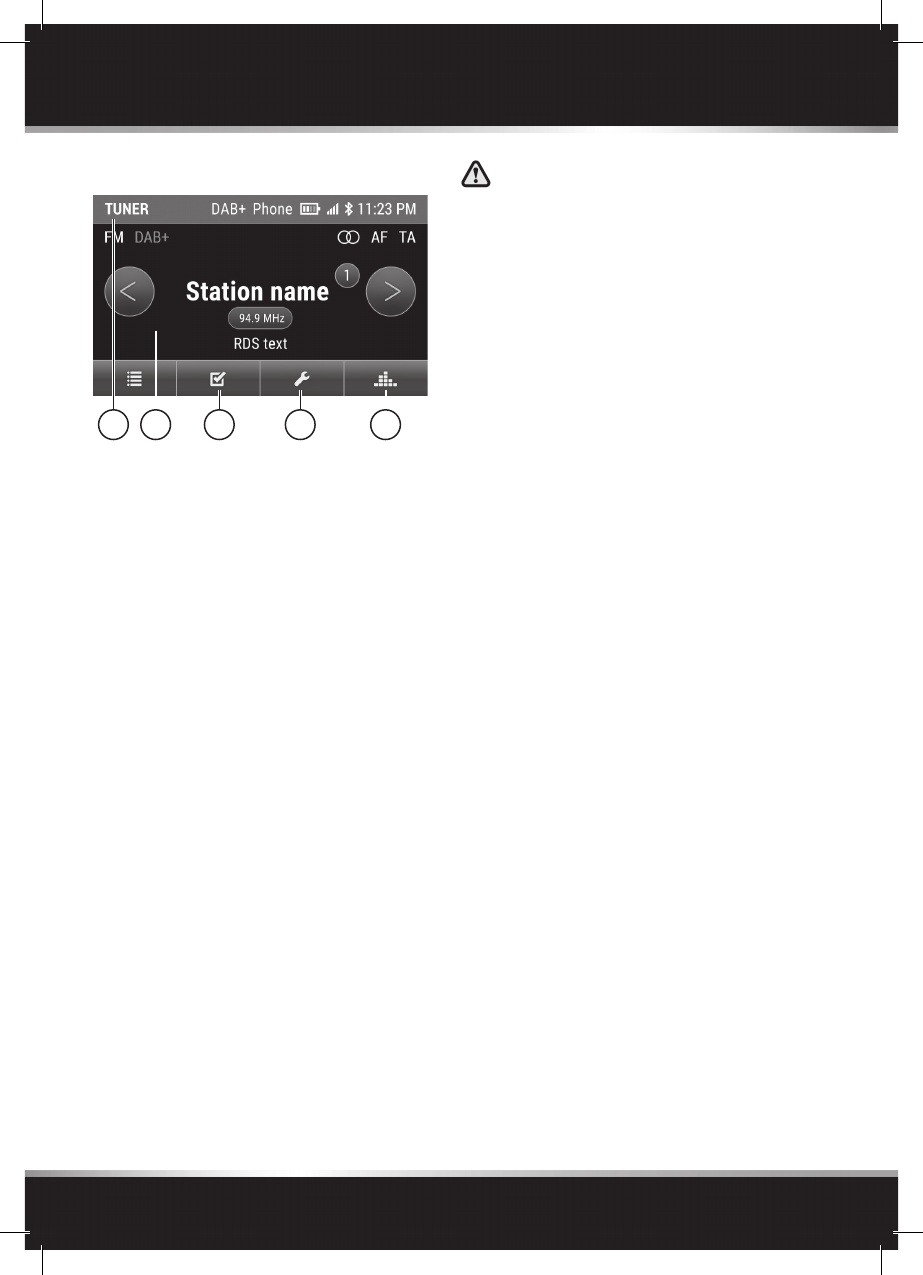
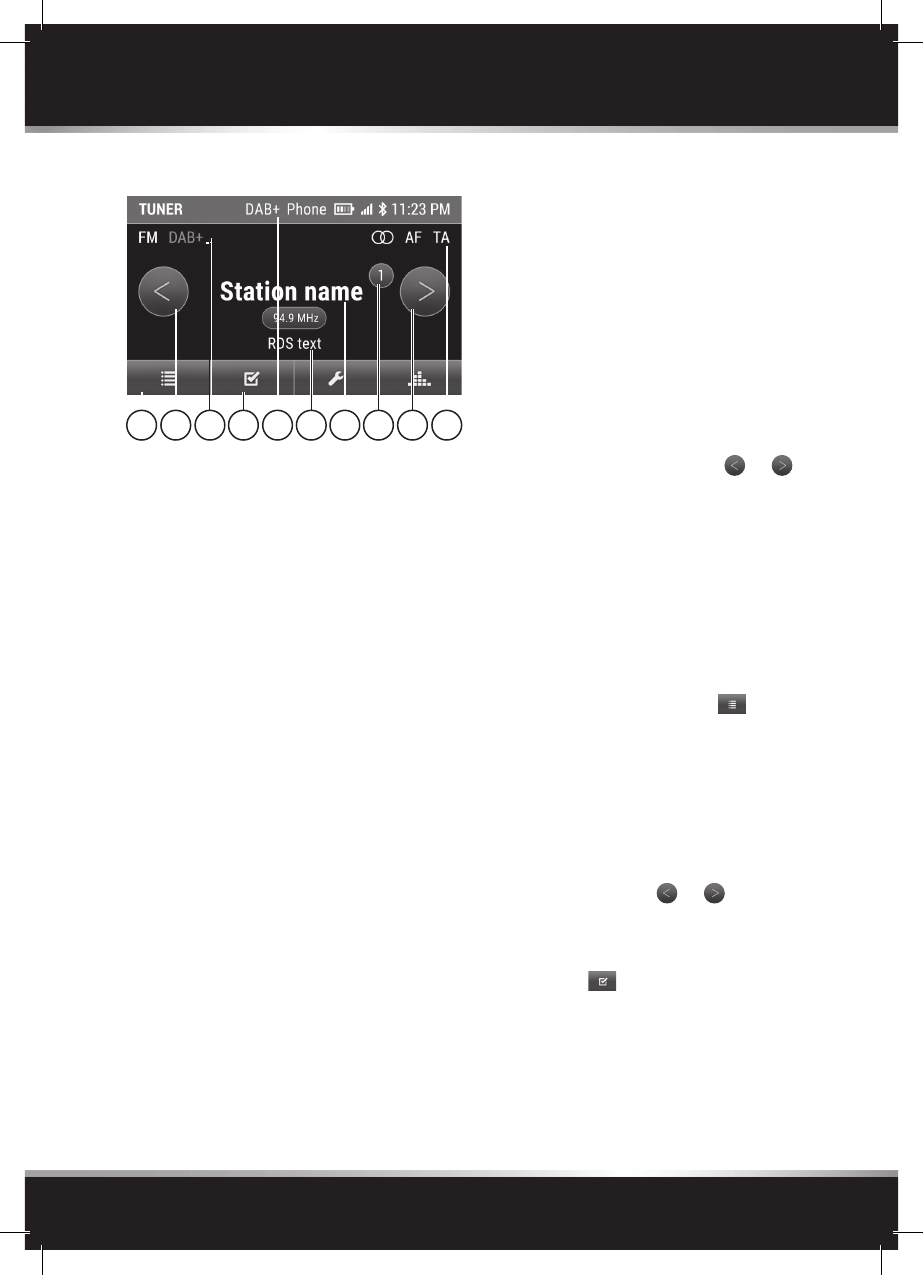
TUNER MAIN MENU
1. Frequency band (AM/FM/DAB)
2. DAB reception active
3. Stereo, AF and TA
4. Change between saved stations or
activate search with a long press
5. Preset
6. Radio text
7. Options
8. Station name
9. List of stations
ACTIVATING TUNER
To activate the radio function, follow
these steps: press the TUNER button.
The tuner mode is displayed. The last
station selected is played.
SETTING STATION
Setting frequency band
To set the required frequency band,
press the TUNER button several times
and choose between FM band, AM
band and DAB+.
Note: The DAB+ function is only available
in Europe.
Note: To be able to select the AM band
and DAB+, you must activate these
functions in the settings for the Classic
Infotainment System.
Setting station manually
To set, follow these steps:
1. Choose the frequency band using the
TUNER button.
2. Turn the right rotary knob counter
clockwise or clockwise and change
the station frequency in steps.
Setting station using station search
To set, follow these steps:
1. Choose the frequency band using the
TUNER button.
2. Press the right rotary knob or use a
long press on the arrows or to
search for the next station that can be
received.
Setting station via list of stations
The list of stations is generated
automatically by the tuner and shows all
the stations currently available. To open
the list of stations, follow these steps:
1. Choose the frequency band using the
TUNER button.
2. Open the list of stations .
3. Choose station from the list of
stations.
Setting station via saved stations
To set, follow these steps:
1. Choose the frequency band using the
TUNER button.
2. Press briefl y the or arrows to
choose a station already saved.
Alternatively:
2. Choose .
3. Choose Presets.
4. Choose station from the list of
stations saved.
Note: In both cases, there must be one or
more stations in the list of saved stations.
4 59 4 32 6 871
Tuner

14
15
Tuner
SAVING STATIONS
Saving current station
To save the station currently playing,
follow these steps:
1. Choose the frequency band using the
TUNER button.
2. Choose the required station.
3. Tap the station name in the middle of
the display. Alternatively use a long
press on the right rotary knob or
Presets.
4. Choose the preset using the touch-
screen or using the right rotary
knob and use a long press on the
touchscreen or rotary knob to save.
Note: The Classic Infotainment System
can save 30 stations in each of the FM/AM
frequency bands.
Saving station from list of stations
To save station from the list of stations,
follow these steps:
1. Choose the frequency band using the
TUNER button.
2. Open the list of stations .
3. Choose the required station.
4. Tap the station name in the middle of
the display. Alternatively use a long
press on the right rotary knob or
Presets.
5. Choose the preset using the touch-
screen or using the right rotary
knob and use a long press on the
touchscreen or rotary knob to save.
ALTERNATIVE FREQUENCY
(AF) ON/OFF
The AF function provides optimal
reception with the aid of alternative
frequencies. Regional programmes
are taken into account. The switching
behaviour is also aected by the local
reception conditions and can therefore
change. Poor reception conditions can
result in undesirable, irritating frequency
changes. In this situation, switch o the
AF function. To activate the AF function,
follow these steps:
1. Press the TUNER button.
2. Choose .
3. Choose AF (Alternative Frequency).
The option field shows whether the
function is activated or deactivated.
Note: The function is available in the
FM/DAB+ frequency band.
TRAFFIC MESSAGES (TA)
ON/OFF
The trac messages function (Trac
Announcement (TA)) provides trac
announcements while operating an audio
source. To activate the TA function, follow
these steps:
1. Press the TUNER button.
2. Choose .
3. Choose TA (Trac Announcement).
The option field shows whether the
function is activated or deactivated.
Note: The function is available in the
FM/DAB+ frequency band.
14
15
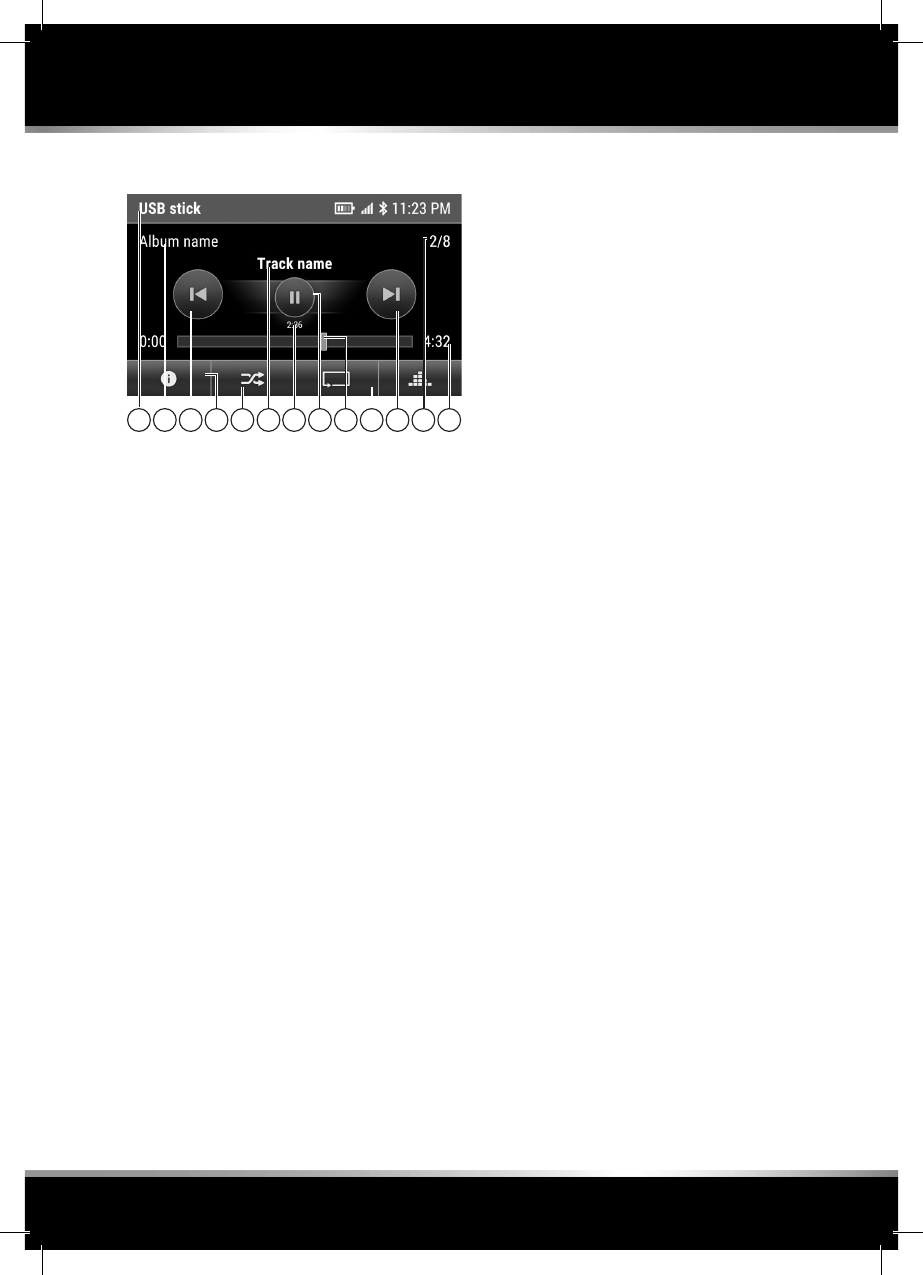
MEDIA MAIN MENU
1. Album
2. Track
3. Track number and total number of
tracks
4. Previous/next track
5. Elapsed time
6. Fast forward or rewind/
progress bar
7. Play/pause
8. Repeat (repeat all tracks or folder)
9. Random on/o
10. Info (album information)
11. Medium
12. Track total time
ACTIVATING MEDIA
To activate the media function, follow
these steps: press the MEDIA button.
The media mode is activated and the
list with the possible audio sources is
displayed: iPod/iPhone, USB stick, SD
card, Ext. BT audiostreaming, Aux-In.
Audio sources that are not connected
are displayed dimmed. To play back a
medium, connect it and select it on the
list displayed.
Note: The SD card function is only avail-
able for Land Rover devices.
AUDIO PLAYBACK FROM
USB STICKS AND SD CARDS
To play back music from USB sticks or SD
cards, follow these steps:
1. Press the MEDIA button.
2. Choose USB stick or SD card. The
folder structure on the selected audio
source is displayed.
3. Choose required folder.
4. Choose required track. The playback
of the audio file starts. The audio files
are played back in the order in which
they are saved on the data carrier.
CONNECTING USB STICK
Connect the USB stick, with the contacts
facing down, to the USB port. The USB
port is on the right side of the front of the
unit.
INSERTING AND REMOVING SD
CARD
Inserting SD card
Insert the SD card, with the contacts
facing forward and downward, in the SD
card slot. The SD card slot is on the left
side of the front of the unit.
Removing SD card
1. Press the SD card with the tip of your
finger.
2. Remove the SD card.
Note: The Classic Infotainment System
supports USB sticks and MicroSDHC cards
up to a maximum capacity of 32GB.
Note: The SD card function is only avail-
able for Land Rover devices.
Media
1
11 410 9 7 8 4 3 12
62 5
16
17
AUDIO PLAYBACK FROM A
BLUETOOTH® DEVICE (A2DP)
To play back music that is saved on a
mobile phone, the phone must be
coupled to the Classic Infotainment
System and connected. To play back,
follow these steps:
1. Establish Bluetooth® connection.
2. Press the MEDIA button.
3. Choose BT audiostreaming.
4. Choose to play back the audio
file.
AUDIO PLAYBACK FROM IPOD®
OR IPHONE®
To play back music that is saved on an
iPod® or iPhone®, the device must be
connected to the Classic Infotainment
System via the USB port. To play back,
follow these steps:
1. Establish USB connection.
2. Press the MEDIA button.
3. Choose iPod/iPhone.
4. Choose Music.
5. Choose category of the audio file
from Playlists, Artists, Songs, Albums,
Genres, Composers, Podcasts or
Audiobooks
6. Select the audio file to play back in
the category.
Note: iPod® and iPhone® are registered
trademarks of Apple Inc., Cupertino,
California, USA.
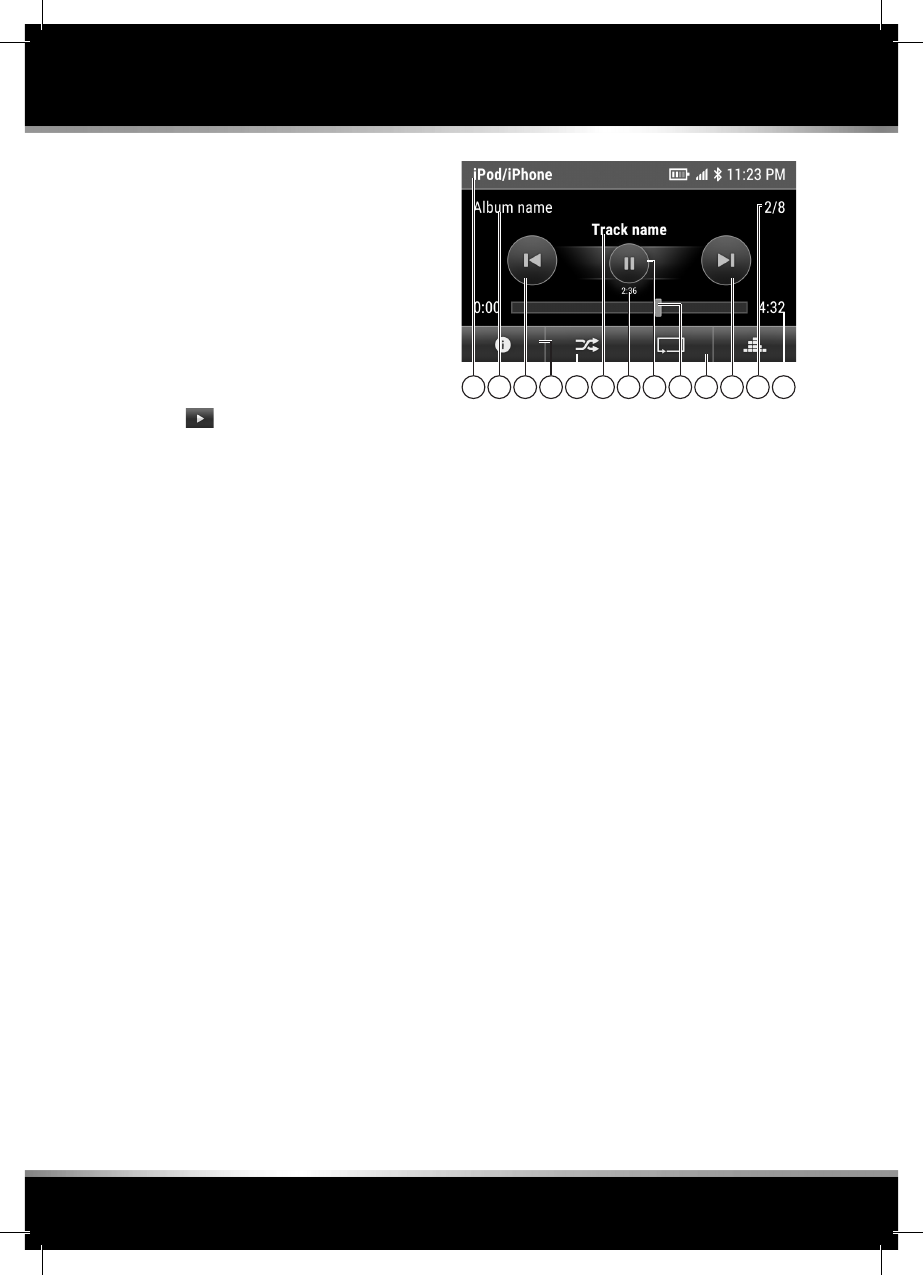
1. Album
2. Track
3. Track number and total number of
tracks
4. Previous/next track
5. Elapsed time
6. Fast forward or rewind/progress bar
7. Play/pause
8. Repeat (repeat track, folder or all
tracks)
9. Random on/o
10. Info (album information)
11. Medium
12. Track total time
AUDIO PLAYBACK VIA
THE AUX PORT
To play back music that is saved on a
device with an audio output, the device
must be connected to the Classic
Infotainment System via the AUX port.
1. Connect the external audio source to
the AUX port.
2. Press the MEDIA button.
3. Choose Aux-In to play back the audio
file.
Note: You cannot operate the external
audio device via the Classic Infotainment
System. For example, to select a track you
Media
1
11 410 9 7 8 4 3 12
62 5
16
17
must make the corresponding setting on
your external audio device.
FILE FORMATS SUPPORTED
The Classic Infotainment System supports
the following file formats:
• .flac
• .m4a
• .mp3
• .ogg
• .wav
• .wma
INFORMATION ON BLUETOOTH®
Bluetooth® is the name for a short-range
radio frequency (RF) technology that
permits electronic devices to
communicate with each other.
Note: The Bluetooth® word mark and
logos are owned by Bluetooth SIG, Inc
and every usage of such marks is licenced
by Jaguar LandRover Limited.
The Jaguar Bluetooth® radio technology
supports a profile for the usage of the
hands-free system (HFP) as well as a
profile for playing back music (A2DP)
Note: HFP and A2DP profiles can be
connected independently, that is a
telephone can be connected via one
profile, while a further medium is
connected via a second profile.
Note: Before using Bluetooth® radio
technology, the mobile device must be
connected to the Classic Infotainment
System. You will also find further infor-
mation on this aspect in the operating
instructions for your mobile phone.
It is recommended not to oper-
ate mobile devices while driving.
Distraction of the driver can result
in accidents and therefore serious
injuries or even death. Only operate
a mobile device if the vehicle is sta-
tionary. Follow the legal provisions
in the country you are currently in.
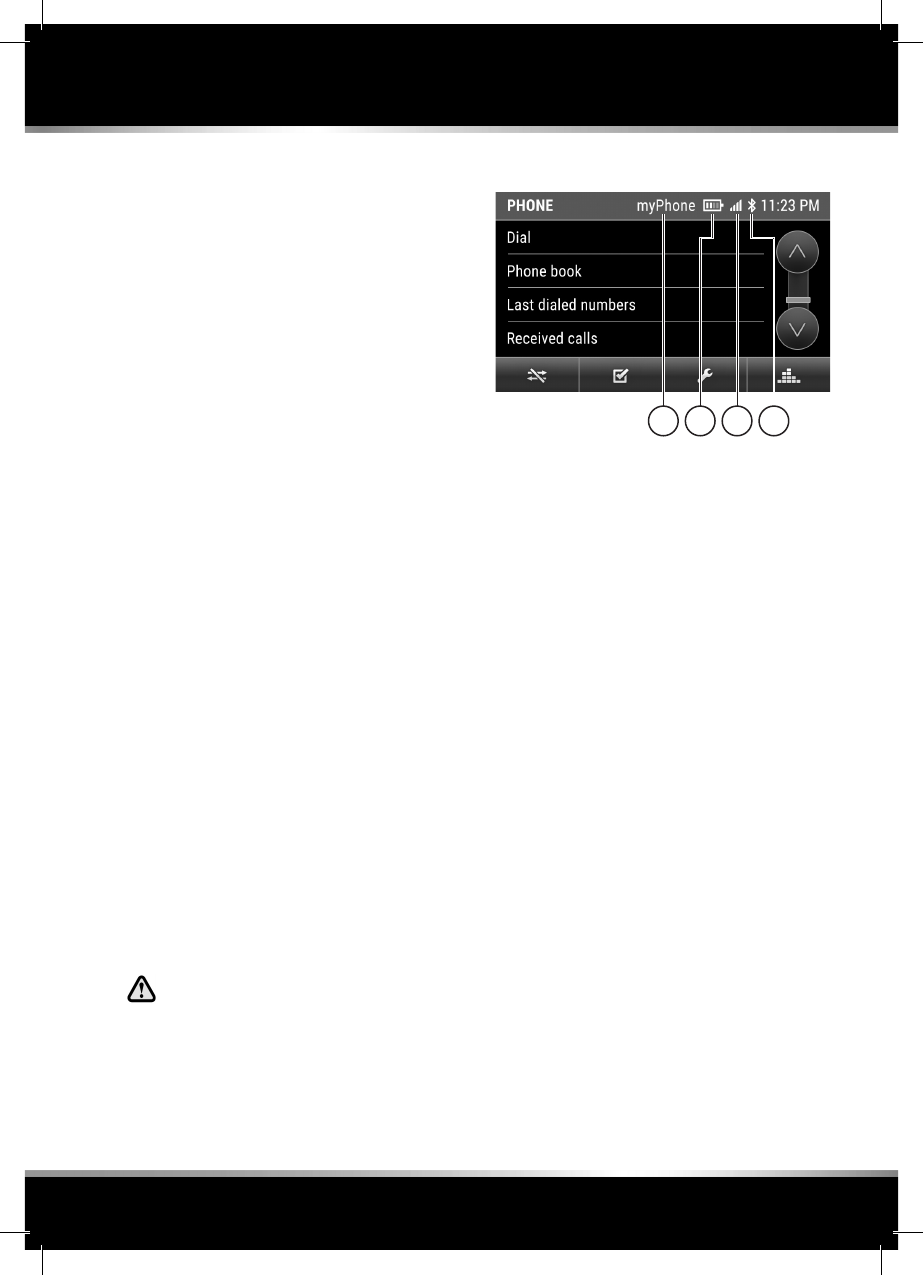
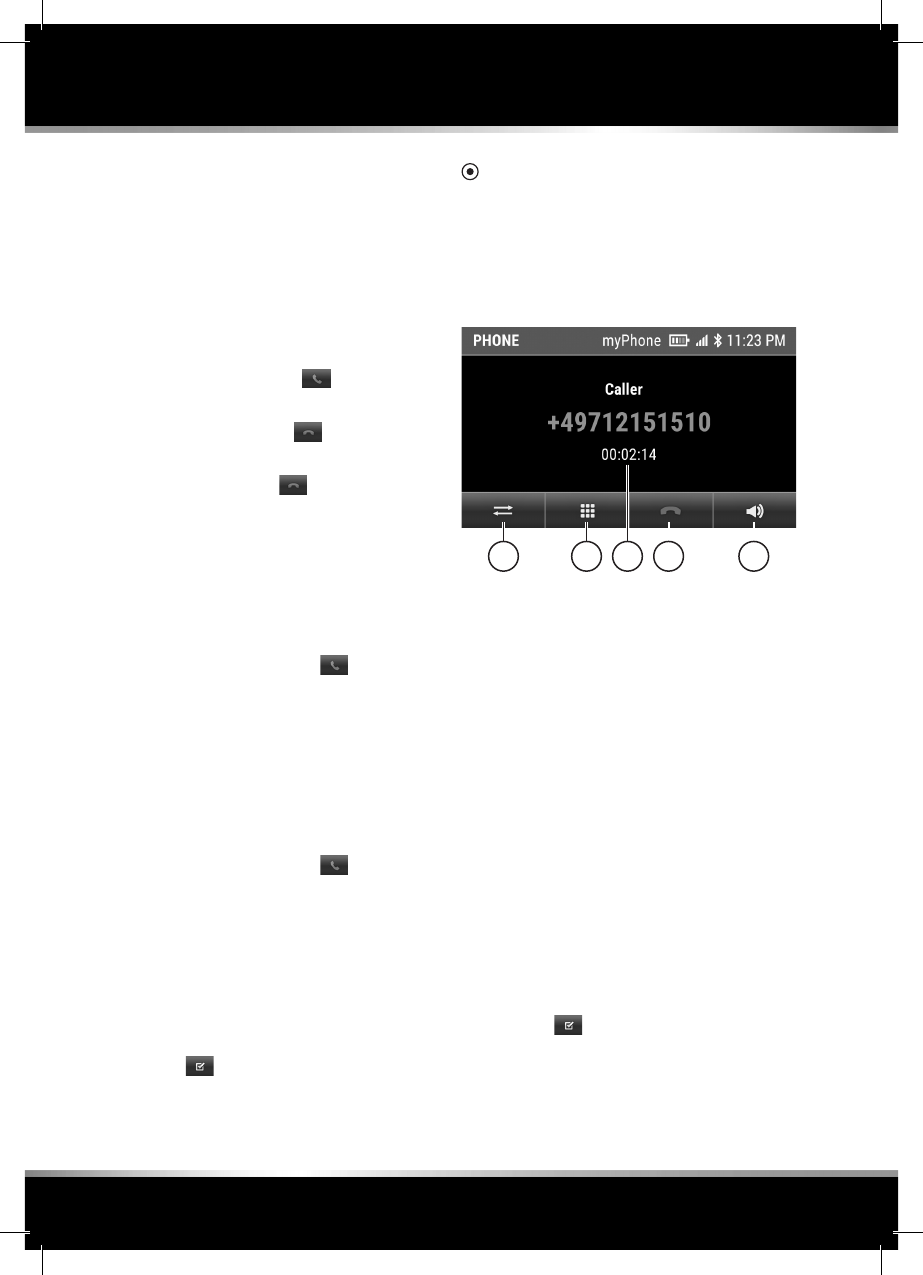
PHONE MAIN MENU
1. Name of the mobile phone connected
2. Charge state of the mobile phone
3. Field strength of the mobile network
4. Bluetooth® is active
MAKING TELEPHONE CALLS
Requirements for making telephone calls
To make telephone calls via the Classic
Infotainment System, the following
requirements must be met:
• The Bluetooth® function is enabled.
• The Bluetooth® function in the mobile
phone is enabled.
• The mobile phone is coupled and
connected to the Classic Infotainment
System.
DROPPED CALLS WHILE
DRIVING
Calls may be dropped while driving.
The reasons for this happening are:
• The GSM network coverage is
inadequate.
• In the GSM cell in which the vehicle is
located, all channels are busy.
• The SIM card used is not compatible
with the network.
• On the usage of a mobile phone with
dual SIM, the mobile phone is booked
into the network with the second SIM
card at the same time.
1 2 3 4
Phone
18
19
Phone
Answering call
If there is an incoming call, a ring tone
sounds on the vehicle's loudspeakers.
Audio sources that were active previously
are muted if there is an incoming call. If
the caller is saved in the list of contacts,
both the name of the contact and the
number are displayed. Only the number is
displayed for unknown calls, provided the
display of the number is not suppressed.
To accept the call, choose .
Rejecting call
To reject the call, choose .
Ending call
To end the call, choose .
Making call
To call a number, follow these steps:
1. Press the PHONE button.
2. Choose Dial.
3. Type the telephone number.
4. To make the call, choose .
Re-dialling
To call a number using the re-dial feature,
follow these steps:
1. Press the PHONE button
2. Choose Last dialed numbers.
3. Choose the entry.
4. To make the call, choose .
Automatically accept call on/o
With this function, telephone calls are
accepted automatically as soon as the
mobile phone is connected to the Classic
Infotainment System. To activate the
function, follow these steps:
1. Press the PHONE button
2. Choose .
3. Choose Auto answer.
The option field shows whether the
function is activated or deactivated.
Direct dialling
If a telephone number is displayed on a
menu and this number is selected, this
number is dialled directly.
Functions during a call
1. Active call
2. Microphone on/o
3. End call
4. Enter digits
5. Transfer call from the hands-free
system to the mobile phone
Changing microphone
On the front of the Classic Infotainment
System there is an internal microphone
for making telephone calls using the
hands-free system. If an additional
external microphone is connected,
you can change between the two
microphones. To change, follow these
steps:
1. Press the PHONE button.
2. Choose .
3. Choose Microphone.
4. Choose internal or external.
Note: The external microphone is an
optional accessory part.
1 23
45

18
19
LIST OF CONTACTS
Transferring list of contacts
After a Bluetooth® connection is estab-
lished, the Classic Infotainment System
attempts to transfer the list of contacts
from the mobile phone. If the list of
contacts is not transferred automatically,
you can start the transfer of the list of
contacts manually. To transfer manually,
follow these steps:
1. Press the PHONE button.
2. Choose .
3. Choose Phone book synchronisation.
4. Access to the list of contacts via
the mobile phone is enabled.
Note: A maximum of 15x 1250 contacts
can be transferred per mobile phone.
Sorting list of contacts
To sort the list of contacts by first name
or surname, follow these steps:
1. Press the PHONE button.
2. Choose .
3. Choose Sort phone book.
4. Choose required sort criterion First
name or Last name.
Calling contact
To call a contact from the list of contacts,
follow these steps:
1. Press the PHONE button.
2. Choose Phone book.
3. Choose the contact.
4. If several telephone numbers are
saved for the contact, choose the
required telephone number.
Finding contact
To find a contact in the list of contacts,
follow these steps:
1. Press the PHONE button.
2. Choose Phone book.
3. Choose .
4. Type the required contact.
5. Choose
6. Choose the contact.
7. If several telephone numbers are
saved for the contact, choose the
required telephone number.
Deleting list of contacts
To delete the list of contacts, follow these
steps:
1. Press the PHONE button.
2. Choose .
3. Choose Delete phone book.
4. Choose YES to delete.
CALL LISTS
Displaying call lists
To display the call lists, follow these steps:
1. Press the PHONE button.
2. Choose Last dialed numbers,
Received calls or Missed calls.
Calling telephone number from a call list
To call a contact from the call lists, follow
these steps:
1. Press the PHONE button.
2. Choose Last dialed numbers,
Received calls or Missed calls.
3. Choose the entry to make the call.
BLUETOOTH® SETTINGS
Bluetooth® function on/o
To use the Bluetooth® functions, you must
activate Bluetooth®. Follow these steps:
1. Press the PHONE button.
2. Choose .
3. Choose Bluetooth.
Phone
20
21
The option field shows whether the
function is activated or deactivated.
Coupling Bluetooth® device
When the mobile phone is connected to
the Classic Infotainment System for the
first time, it is necessary to first search for
the mobile phone and then couple it. It is
also necessary to enter the pairing code
via the mobile phone. You can undertake
coupling from the mobile phone or from
Classic Infotainment System.
Coupling via Classic Infotainment System
To couple from the Classic Infotainment
System, follow these steps:
1. Press the PHONE button.
2. Choose Add new device. The Classic
Infotainment System searches for
Bluetooth® devices that are available
and set to discoverable. The
Bluetooth® devices found are then
displayed.
3. Choose the required Bluetooth®
device.
4. Type the pairing code and the
coupling is completed.
Note: The default pairing code is "1234".
Coupling via mobile phone
To couple from the mobile phone, follow
these steps:
1. Press the PHONE button.
2. Start the search for the Classic Info-
tainment System on the Bluetooth®
menu on the mobile phone and couple.
Note: The default Bluetooth® name for
the Classic Infotainment System is "JLR".
Note: For further information on
coupling from the mobile phone, refer to
the related operating instructions from
the manufacturer.
Connecting coupled Bluetooth® devices
With the aid of the activated Auto
connect function, the mobile phone is
automatically connected to the Classic
Infotainment System, provided the two
devices are in close proximity. To activate
the function, follow these steps:
1. Press the PHONE button.
2. Choose .
3. Choose Auto. connect.
The option field shows whether the
function is activated or deactivated.
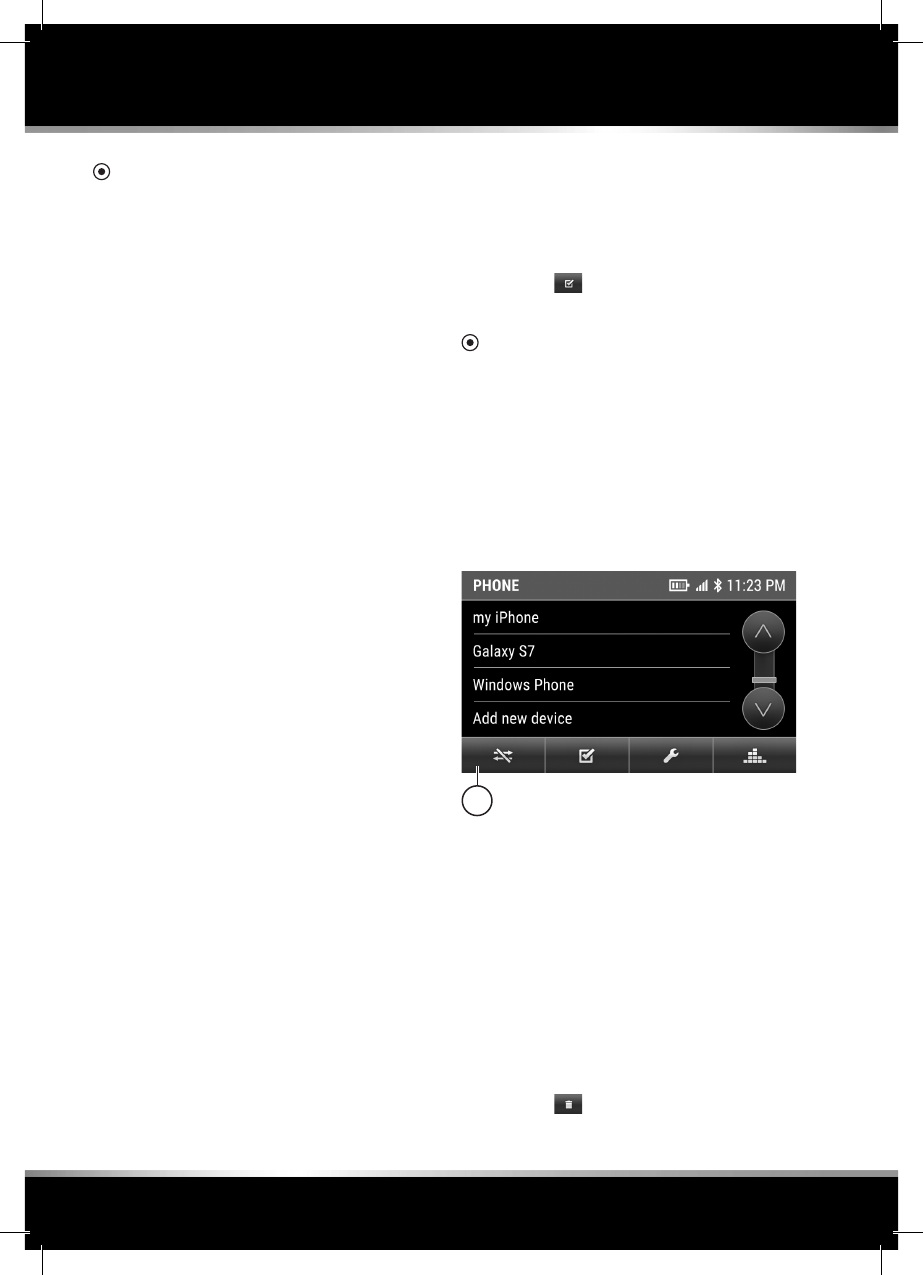
Manual connection
To connect the two devices manually,
follow these steps:
1. Press the PHONE button.
2. Choose the required mobile phone
and it is connected to the Classic
Infotainment System.
1
Closing Bluetooth® connection
To close a Bluetooth® connection,
follow these steps:
1. Press the PHONE button.
2. Choose (1).
Uncoupling mobile phone
To uncouple a mobile phone, follow these
steps:
1. Press the PHONE button.
2. Choose the required mobile phone
3. Choose .
4. Choose YES to delete.
Phone

20
21
Changing pairing code
The default pairing code is "1234". You
can define your own four-digit pairing
code. Follow these steps:
1. Press the PHONE button.
2. Choose .
3. Choose Pairing-Code.
4. Type the required pairing code.
5. Choose .
Changing Bluetooth® name
The default Bluetooth® name for the
Classic Infotainment System is "JLR
Bluetooth". You can define any name
you like. Follow these steps:
1. Press PHONE button.
2. Choose .
3. Choose BT-Name.
4. Type the required Bluetooth® name.
5. Choose OK.
Note: The change is only eective after
complete decoupling and recoupling.
THE NAVIGATION SYSTEM
In the interest of safety, only use or
make settings in the system if it is
safe to do so.
The navigation instructions are displayed
either by the map or by arrow navigation
on the touchscreen and are supplemented
with voice announcements. To position
the vehicle, the Classic Infotainment
System uses signals from the Global
Positioning System (GPS), combined with
the map +data saved on the data carrier
for the navigation. With the aid of this
combination of data sources, you can
plan and follow a route to the required
destination using the Classic Infotainment
System. The touchscreen is used to
control the navigation via menus and map
displays.
Note: Always pay attention to national
road trac requirements.
Road signs and trac regulations always
have priority. The navigation system is
only used as an aid and, in particular,
cannot be used as an orientation aid in
bad visibility. Due to physical barriers
GPS signals may occasionally be
interrupted, for example in tunnels or on
roads under motorway bridges. However,
navigation can be continued as soon
as the obstruction is left. In certain
conditions the position of the vehicle on
the map may be displayed incorrectly.
These may occur in the following
situations:
• Driving inside a building.
• Driving under bridges.
• Driving between high buildings.
• Driving in narrow valleys.
• Two roads are close together and
run parallel
The navigation system is no
substitute for safe driving with
due care and attention. The
driver should not assume that a
function of the navigation system
can correct an error on the part
of the driver while driving. It is
the responsibility of the driver to
remain alert, to drive safely and to
keep the vehicle under control at all
times in the prevalent conditions.
It is also the responsibility of the
driver to assess the safety of the
route suggested by the navigation
system. The navigation system
will not function exactly in all
circumstances.
It is recommended not to
operate the navigation system
while driving. Distraction of the
driver can result in accidents and
therefore serious injuries or even
death.
Phone
22
23
Note: The first time you use the
navigation system, familiarise yourself
with its operation before the journey.
Note: You can drag the map within the
map view in the direction of your choice.
Press the touchscreen with your finger
and drag the map in the related direction.
SWITCHING ON NAVIGATION
To switch on the navigation, press the
NAVI button. The main menu for the
navigation software is displayed.
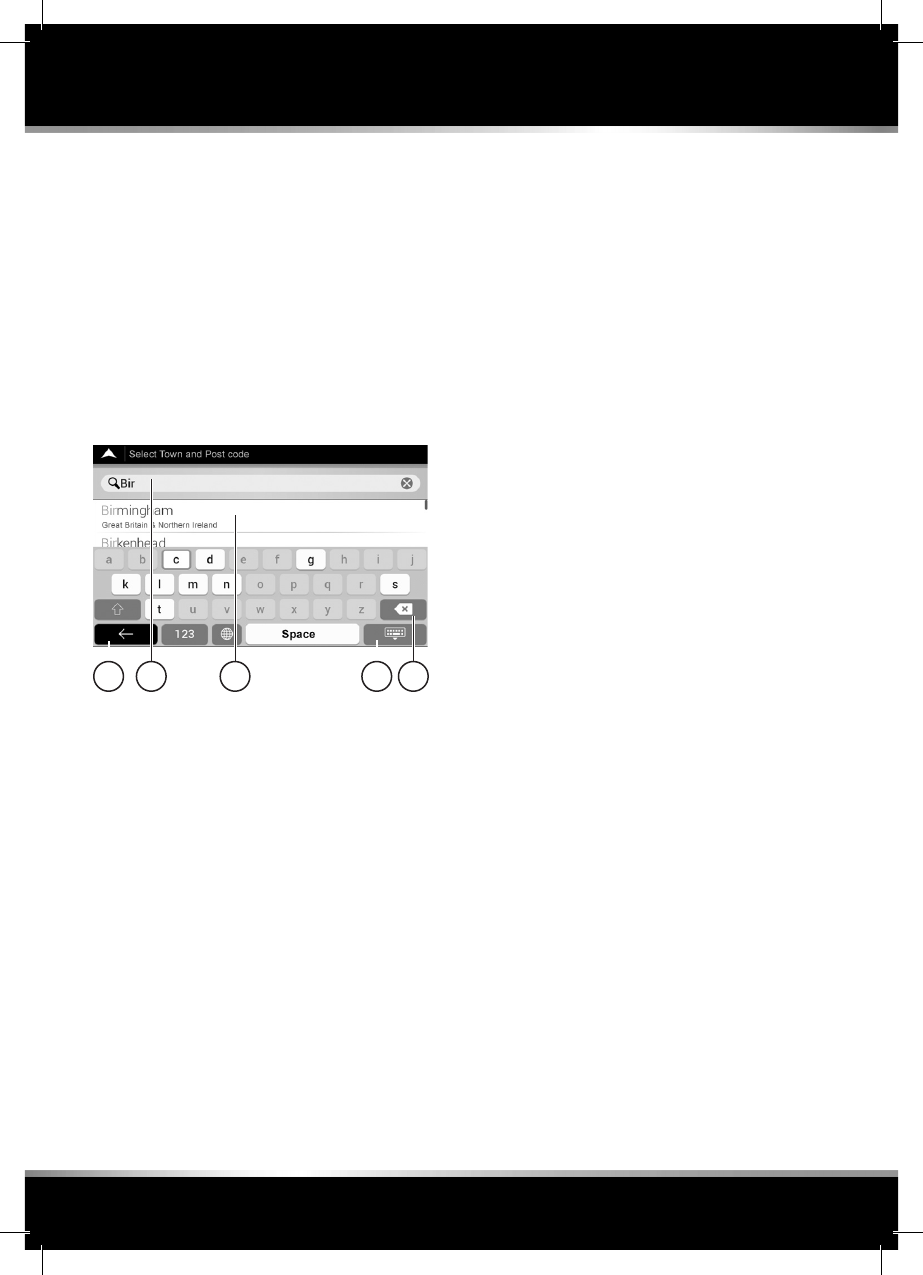
1. Entry
2. Hit list
3. Delete character
4. Hide keyboard
5. Cancel entry
ENTERING THE DESTINATION
Possible ways of entering an address
You can, e.g.
• Enter the place or postcode, road and
house number
• Enter the place or postcode and road
• Enter the place or postcode and centre
• Enter the place or postcode, road and
junction
Note: You can enter all places, roads,
postcodes etc. that are saved in the
digital map. However, postcodes are
not available for some countries. The
country and place are enough for the
navigation. You can enter either a place
or a postcode. Road and house number
complete the destination address.
Entering address
For a general address entry, follow these
steps:
1. Press the NAVI button.
2. Choose New Route.
3. Choose Address.
4. Choose Country.
5. Choose Town or Postcode.
6. Choose Street.
7. Choose House number or crossing
street.
8. Choose Select as Destination.
9. Choose Start Navigation.
Choosing town/city centre as destination
To enter the centre of a town/city as the
destination, follow these steps:
1. Press the NAVI button.
2. Choose New Route.
3. Choose Address.
4. Choose Country.
5. Choose Town or Postcode.
6. Choose Go to Town.
7. Choose Select as Destination.
8. Choose Start Navigation.
Information without complete address
You can also enter the destination
without complete address information.
Enter all the available information and
then follow these steps:
1. Choose Select as Destination.
2. Choose Start Navigation.
Navigation
1
5 2 34

22
23
The route is now calculated based on the
existing information.
Destination from points of interest
You can choose the destination from the
collection of existing points of interest
("POIs"), e.g. petrol stations, restaurants
or car parks. Follow these steps:
1. Press the NAVI button.
2. Choose New Route.
3. Choose Places.
4. Choose the required point of interest
via Search by Name or Category or
from a category.
5. Choose Select as Destination.
6. Choose Start Navigation.
Note: If you want to choose points of
interest at the destination or along the
route, use the along route and at my
destination functions.
Destination from saved places
You can choose a destination from
destinations already saved. Follow these
steps:
1. Press the NAVI button.
2. Choose New Route.
3. Choose Saved Location.
4. Choose Select as Destination.
5. Choose Start Navigation.
Note: Destinations can only be chosen
from saved places if places have already
been saved.
Destination from history
You can choose a destination from
destinations you have already used.
Follow these steps:
1. Press the NAVI button.
2. Choose New Route.
3. Choose History.
4. Choose the required destination.
5. Choose Select as Destination.
6. Choose Start Navigation.
Destination from saved routes
You can choose a destination from routes
already saved. Follow these steps:
1. Press the NAVI button.
2. Choose New Route.
3. Choose Saved routes.
4. Choose the required route.
5. Choose Calculate Route.
6. Choose Start Navigation.
Note: Destinations can only be chosen
from saved routes if routes have already
been saved.
Destination via coordinates
You can choose a destination by entering
coordinates. Follow these steps:
1. Press the NAVI button.
2. Choose New Route.
3. Choose Coordinates.
4. Type the required latitude.
5. Choose OK.
6. Type the required longitude.
7. Choose Go!.
8. Choose Select as Destination.
9. Choose Start Navigation.
Destination from all destination types
You can choose a destination from all
possible destination types. Follow these
steps:
1. Press the NAVI button.
2. Choose New Route.
3. Choose Search in All.
4. Type name, address or category for
the required destination.
5. Choose . A list of possible
destinations is shown. The search
Navigation

24
25
results appear in the column on the
right filtered by category, e.g. History.
6. Choose required destination.
The place is displayed on the map.
7. Choose Select as Destination.
8. Choose Start Navigation.
Destination via map
You can choose a destination directly
from the map view. Follow these steps:
1. Press the MAP button.
2. Choose the required point on the map.
3. Choose Select as Destination.
4. Choose Start Navigation.
Saving destination
To save destinations, follow these steps:
1. Enter the required destination.
2. Choose .
3. Choose Save Location.
4. Choose .
ROUTES
Entering new route
To plan a new route with interim points,
follow these steps:
1. Press the NAVI button.
2. Choose Multipoint Route.
3. Choose a final destination.
4. Choose Select as Destination.
5. Choose Add Waypoint.
6. Add a way point.
7. Choose Select as Waypoint.
8. Choose Calculate Route.
9. Choose Start Navigation.
Saving route
To save routes, follow these steps:
1. Enter a route.
2. Choose Calculate Route.
3. Choose .
4. Choose Save Route.
5. Choose .
Saving active route
To save the active route, follow these
steps:
1. Choose .
2. Choose Route Summary.
3. Choose .
4. Choose Save Route.
5. Choose .
Renaming route
To rename a route, follow these steps:
1. Press the NAVI button.
2. Choose New Route.
3. Choose Saved Routes.
4. Choose .
5. Choose Edit.
6. Choose the required route.
7. Choose Rename.
8. Choose the required name.
9. Choose .
Changing route
To change a route, follow these steps:
1. Press the NAVI button.
2. Choose New Route.
3. Choose Saved Routes.
4. Choose the required route and make
changes.
5. Choose Calculate Route
6. Choose Start Navigation.
Changing order of destinations
You can change the order of the way
Navigation

24
25
points on a planned route. Follow these
steps:
1. Press the NAVI button.
2. Choose Multipoint Route.
3. Choose .
4. Choose Move Up or Move Down.The
destination is moved up or down by
one position in the route list.
Deleting individual destination
To delete individual destinations from a
planned route, follow these steps:
1. Press the NAVI button.
2. Choose Multipoint Route.
3. Choose .
4. Choose Delete.
Adding interim point
To add interim points to an active route,
follow these steps:
1. Choose .
2. Choose Add Waypoint at the point
where you want to add the interim
point.
3. Enter the required destination.
4. Choose Select as Waypoint
Avoiding specific sections on the route
You can avoid specific sections on an
active route. Follow these steps:
1. Choose .
2. Choose Detours & Alternatives.
3. Choose Avoid Special Sections.
4. Choose the specific section required.
5. Choose Accept.
Avoiding specific roads on a route
You can avoid specific roads on an active
route. Follow these steps:
1. Choose .
2. Choose Detours & Alternatives.
3. Choose Avoid Specific Road.
4. Choose the required road.
5. Choose Accept.
Avoiding stretch of road ahead
You can avoid stretches of road ahead on
an active route. Follow these steps:
1. Choose .
2. Choose Detours & Alternatives.
3. Choose Avoid Route Ahead.
4. Using or , choose the stretch
of road ahead to be avoided.
5. Choose Avoid.
Restoring original route
To restore the original route, follow these
steps:
1. Choose .
2. Choose Detours & Alternatives.
3. Choose Restore Original Route.
4. Choose OK.
Displaying alternative routes
To display the alternative routes while
navigation is active, follow these steps:
1. .
2. Choose Detours & Alternatives.
3. Choose Alternative Routes.
4. Choose an alternative from the list on
the right.
5. Choose Select.
Note: The function is active if a route has
been calculated or navigation is active.
Interrupting navigation
To interrupt the active navigation, follow
these steps:
1. Press NAVI button.
2. Choose .
Navigation

26
27
Continuing navigation
To continue active navigation, choose
Continue Guidance.
Deleting next interim point
To delete an interim point, follow these
steps:
1. Choose .
2. Choose Delete Waypoint.
Deleting active route
To delete the active route, follow these
steps:
1. Choose .
2. Choose Delete Route.
Deleting individual saved route
To delete a saved route, follow these
steps:
1. Press the NAVI button.
2. Choose New Route.
3. Choose Saved Routes.
4. Choose.
5. Choose Edit.
6. Choose the required route.
7. Choose Delete.
Deleting all saved routes
To delete all saved routes, follow these
steps:
1. Press the NAVI button.
2. Choose New Route.
3. Choose Saved Routes.
4. Choose.
5. Choose Edit.
6. Choose.
7. Choose Delete All.
Defining new starting point
If a starting point that is dierent to the
actual GPS position is to be defined for a
route, follow these steps.
1. Press the NAVI button.
2. Choose Multipoint Route.
3. Choose Current GPS Position.
4. Choose Set Starting Point.
5. Choose OK.
6. Enter the required starting point.
7. Choose Set Starting Point.
8. Choose Calculate Route.
9. Choose Navigation View.
Deleting new starting point
If the actual GPS position is to be
restored as the starting point, follow
these steps.
1. Press the NAVI button.
2. Choose Multipoint Route.
3. Choose starting point.
4. Choose Delete Starting Point .
5. Choose OK.
Starting route simulation
A route simulation can be displayed using
this function.
1. Prepare a route.
2. Choose Calculate Route.
3. Choose .
4. Choose Simulation.
Jumping back to last turning
Choose.
Jumping forward to next turning
Choose .
Interrupting simulation
Choose .
Navigation
26
27
Increasing simulation speed
Choose 1 x. The simulation speed is
increased by four times, eight times or
sixteen times.
Ending simulation
Choose .
DURING NAVIGATION
Repeating navigation announcements
The navigation announcements from
the Classic Infotainment System will
help during navigation, while avoiding
distraction from the trac situation. To
repeat navigation announcements already
made, follow these steps: press the MAP
button twice.
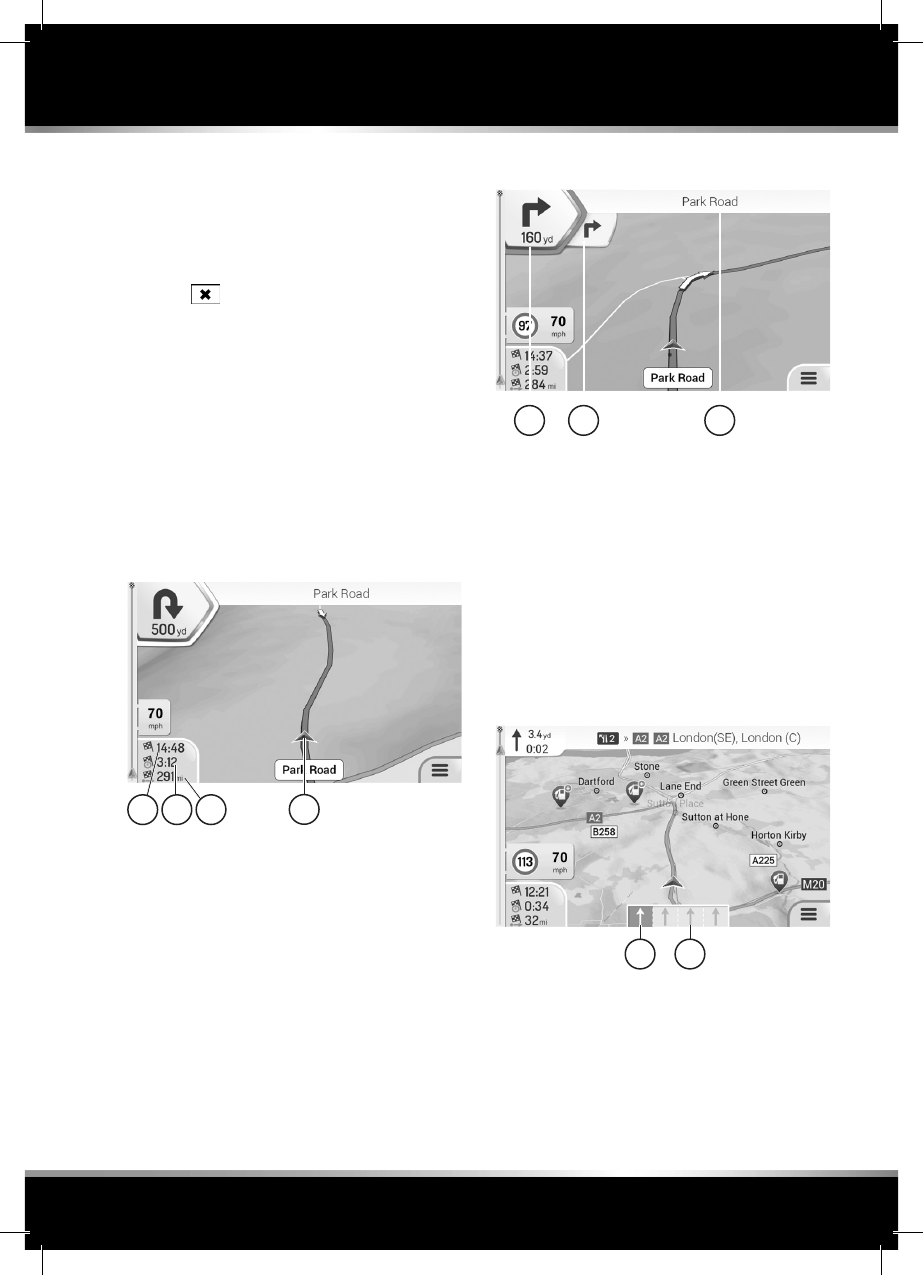
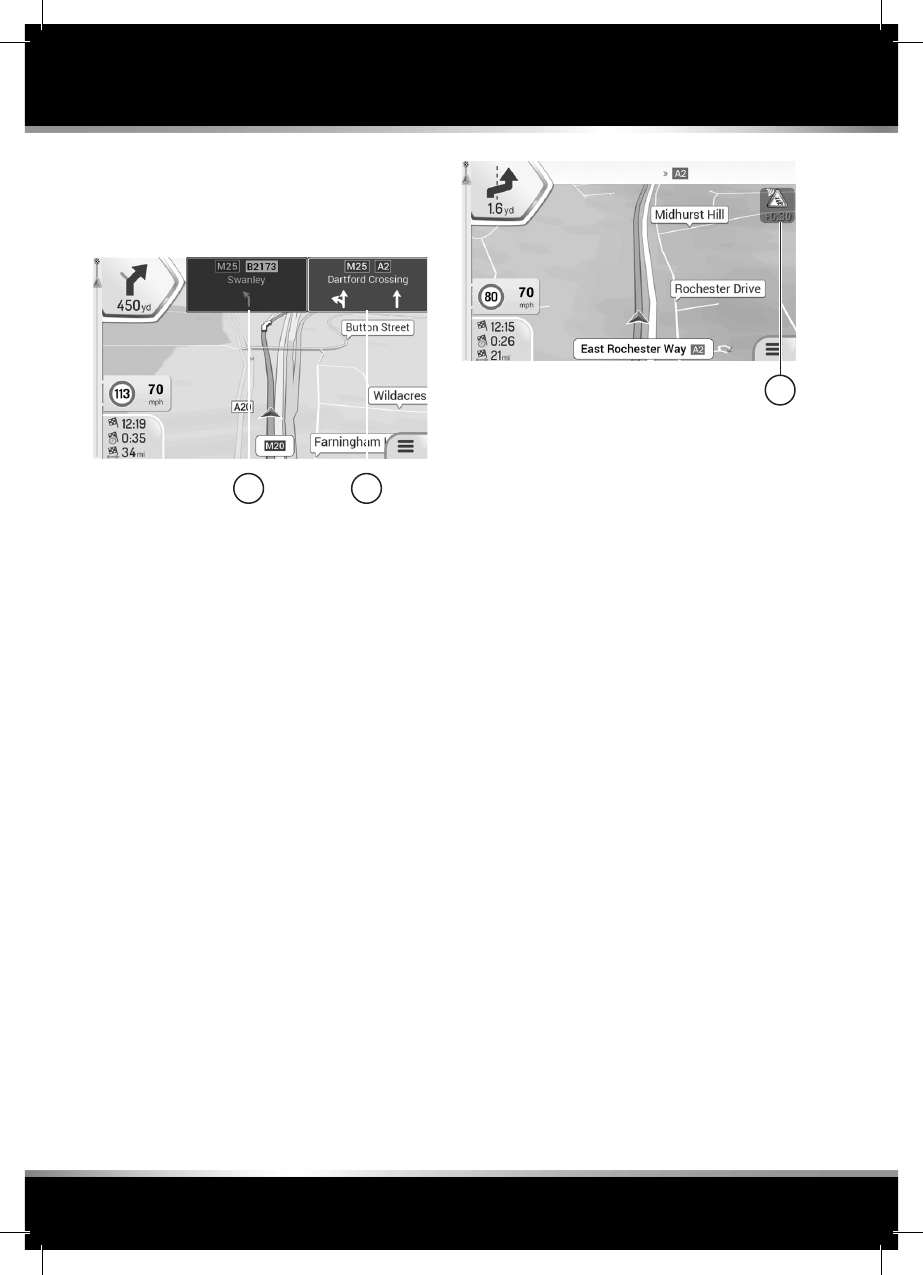
Display during navigation
1. The actual vehicle position
2. The actual distance to the destination
3. The actual driving time to the
destination
4. The expected arrival time
Turning
1. The next turning and the distance to
the turning
2. The turning after next
3. The next road or the next place
The symbol for the next turning (top left)
provides information on the turning, e.g.
turn right. A further turning that comes
immediately after is indicated by a smaller
symbol (to the right).
Lane recommendation
1. The recommended lane
2. The lanes not recommended
If the digital map contains the related
data, the Classic Infotainment System can
display lane recommendations for
imminent turnings on multilane roads.
Navigation
4 3 2 1
12 3
1 2
28
29
Lane recommendations are displayed
with small arrows at the bottom in
the map. The recommended lane is
highlighted.
1. The recommended lane
2. The lanes not recommended
If additional information is available, the
arrows are replaced with road signs.
The road signs show the possible
destinations and the number of the
road for the related lane. During
active navigation, the signs for the
recommended lane are highlighted.
Trac messages on the map
Sections of road aected by trac
messages are displayed on the map in
a dierent colour. The type of trac
message is indicated by a symbol.
1. Press the MAP button.
2. Press the symbol for the trac
messages
3. Choose the required trac message
from the list.
(1.) Symbol for the trac message
Displaying useful information
The navigation software provides a few
items of additional information, e.g.
country information. To retrieve this
information, follow these steps:
1. Press the NAVI button.
2. Choose Useful Information.
3. Choose from the following
information:
• Where Am I: displays the actual
vehicle position.
• Help Nearby: displays point of interest
categories, e.g. garages nearby.
• Country Information: displays
information on the selected country,
e.g. permissible maximum road
speeds.
• Trip Monitor: displays statistical data
on journeys, e.g. the average road
speed driven.
• Sunrise & Sunset: displays the time
for sunrise and sunset at the current
vehicle position.
• GPS Information: displays information
on the GPS signal strength and the
satellite positions.
NAVIGATION SETTINGS
Setting vehicle profile
To set the vehicle profile, e.g. car or lorry,
follow these steps:
Navigation
1
2 1

28
29
1. Press the NAVI button.
2. Choose Settings.
3. Choose Route Preferences.
4. Choose Vehicle.
Adding new profile
To add a new profile, follow these steps:
1. Choose Add Profile.
2. Choose vehicle type.
3. Set parameters.
4. Choose Save Profile.
Setting route planning method
To make the settings for route planning,
e.g. fast or short, follow these steps:
1. Press the NAVI button.
2. Choose Settings.
3. Choose Route Preferences.
4. Choose Route Planning Method.
5. Choose the required setting:
• Fast: the Classic Infotainment System
calculates a route with the shortest
possible journey time.
• Easy: the Classic Infotainment System
calculates the easiest possible route,
e.g. with as few turnings as possible.
• Short: the Classic Infotainment
System calculates a route that is as
short as possible.
• Green: the Classic Infotainment
System calculates a route that is as
economical as possible.
Setting navigation mode
For o-road navigation you can calculate
the route based on the line as the bird
flies. Follow these steps:
1. Press the NAVI button.
2. Choose Settings.
3. Choose Route Preferences.
4. Choose Navigation Mode.
5. Choose the required function.
Setting road types
You can take into account or exclude
dierent road types during the calculation
of the route. Follow these steps:
1. Press the NAVI button.
2. Choose Settings.
3. Choose Route Preferences.
4. Choose the required function:
• Motorways: if this function is enabled,
motorways are taken into account
during the route calculation.
• Road With Period Charge: if this
function is enabled, roads with a
time-dependent charge for usage are
taken into account during the route
calculation.
• Road With Per-use Toll: if this
function is enabled, roads with a
distant-dependent charge for usage
are taken into account during the
route calculation.
• Ferries: if this function is enabled,
ferries are taken into account during
the route calculation.
• Car Shuttle trains: if this function is
enabled, motorrail trains are taken into
account during the route calculation
• Unpaved Roads: if this function is
enabled, unmade roads are taken into
account during the route calculation.
Setting volume for sounds
To set the volume for sounds and voice
output, follow these steps:
1. Press the NAVI button.
2. Choose Settings.
3. Choose Sound.
4. Choose the required function and set
the volume:
• Master: set volume for all sounds.
• Voice: set volume for voice outputs.
• Alerts: set volume for acoustic
warnings.
Navigation

30
31
• Ding: set volume for attention sound.
The attention sound is output before
the navigation announcements.
• Keys: set volume for the button
sounds.
Switching on or o sounds
To activate or deactivate the sounds,
follow these steps:
1. Press the NAVI button.
2. Choose Settings.
3. Choose Sound.
4. Activate or deactivate the required
function:
• Voice Guidance: if this function is
enabled, voice instructions are output.
• Early Indication of Manoeuvres: if
this function is enabled, the Classic
Infotainment System reads aloud a
summary of the route during the route
search.
• Announce Route Summary: if this
function is enabled, the Classic
Infotainment System reads aloud
route summary.
• Announce Country Info: if this
function is enabled, the Classic
Infotainment System reads aloud
country information on reaching a
national border.
• Announce Trac Info: if this function
is enabled, the Classic Infotainment
System reads aloud trac messages
received.
• Announce System Messages: if this
function is enabled, the Classic Info-
tainment System reads aloud system
messages.
Setting the level of detail of the voice
instructions
To set the scope of the voice instructions,
follow these steps:
1. Press the NAVI button.
2. Choose Settings.
3. Choose Sound.
4. Choose Verbosity Level.
5. Choose the required function:
• Minimal: output voice instructions
once immediately before the next
turning.
• Medium: voice instructions are output
on approaching the next turning and
immediately before the turning.
• Verbose: voice instructions are output
relatively further away from the next
turning and immediately before the
turning.
Reading out road names
To output road names with the navigation
announcements, follow these steps:
1. Press the NAVI button.
2. Choose Settings.
3. Choose Sound.
4. Choose Say Road Names in Native
Language Area or Say Road Names in
Foreign Language Area.
5. Choose the required function.
Settings warnings for road speed limits
To set the road speed warnings, follow
these steps:
1. Press the NAVI button.
2. Choose Settings.
3. Choose Warnings.
4. Choose Speed Limit.
5. Make the required settings:
• Warn when speeding:
- Audio and Visual: if the vehicle
exceeds the maximum road speed
permitted, the Classic Infotainment
System outputs a visual warning.
- Visual: if the vehicle exceeds the
maximum road speed permitted,
the Classic Infotainment System
outputs a visual warning.
- Disabled: the Classic Infotainment
System does not output a warning.
• Speed Limit Always Visible: if this
Navigation

30
31
function is enabled, the maximum
road speed permitted is displayed in
the Classic Infotainment System.
• Outside Towns: X % of the Speed
Limit: if the vehicle reaches the
defined percentage of the maximum
road speed permitted, the Classic
Infotainment System outputs a
warning.
• Within Towns: X % of the Speed
Limit: if the vehicle reaches the
defined percentage of the maximum
road speed permitted, the Classic
Infotainment System outputs a
warning.
Note: This function is not available in all
countries and all regions.
Note: Deviations are possible between
map material and actual trac situation.
Settings warnings for warning points
A warning point is a place on the journey
that demands special attention, e.g. a
school. The Classic Infotainment System
outputs a warning when you approach
the place. To activate/deactivate the
function, follow these steps:
1. Press the NAVI button.
2. Choose Settings.
3. Choose Warnings.
4. Choose Alert Points.
5. Choose Alert Point Warnings On/O.
Note: This function is not allowed in all
countries and all regions. Follow the legal
provisions in the country you are in.
Types of warnings
To define the types of places where a
warning is to be given, follow these steps:
1. Press the NAVI button.
2. Choose Settings.
3. Choose Alerts.
4. Choose Alert Points.
5. Choose Alert Types.
6. Choose the required type of warning,
e.g. Railroad Crossing, Fire Station or
Toll Booth.
Setting warnings on map
If this function is enabled, warnings
appear on the map.
1. Press NAVI button.
2. Choose Settings.
3. Choose Warnings.
4. Choose Road Signs.
5. Choose On.
6. Choose the required road signs.
7. Choose Warning Type.
8. Make the required setting.
9. Choose Distance.
10. Set the required distance.
Settings zoom and angle of the map
To set the angle of the map, follow these
steps:
1. Press the NAVI button.
2. Choose Settings.
3. Choose Navigation View.
4. Choose Map Appearance.
5. Choose Viewpoint.
6. Choose the required setting:
• Far
• Normal
• Close
• Manual zoom
Settings map day/night view
To set the map day/night view, follow
these steps:
1. Press the NAVI button.
2. Choose Settings.
3. Choose Navigation View.
4. Choose Map Appearance.
Navigation

32
33
5. Choose Colour Mode.
6. Choose the required setting:
• Auto
• Day
• Night
Setting map colours
To set the map colours, follow these steps:
1. Press the NAVI button.
2. Choose Settings.
3. Choose Navigation View.
4. Choose Map Appearance.
5. Choose Day Map Colours or
Night Map Colours.
6. Choose the required map colour
using the arrows.
Enabling or disabling the display of 3D
objects on the map
To display 3D objects on the map, follow
these steps:
1. Press the NAVI button.
2. Choose Settings.
3. Choose Navigation View.
5. Choose Map Appearance.
6. Choose Landmarks, Building or 3D
Terrain.
You can select the following 3D objects:
• Landmarks: 3D display of notable or
known objects
• Building: 3D display of buildings in a
city
• 3D Terrain: 3D display of the
surrounding terrain
Enabling or disabling route recording
To record the route, follow these steps:
1. Press the NAVI button.
2. Choose Settings.
3. Choose Navigation View.
4. Choose Map Appearance.
5. Choose Track Logs.
Enabling or disabling the display of
point of interest symbols on the map
To display symbols for points of interest
on the map, follow these steps:
1. Press the NAVI button.
2. Choose Settings.
3. Choose Navigation View.
4. Choose Map Appearance.
5. Choose Place Markers.
6. Choose the required point of interest
category, e.g. Shopping, Leisure and
others.
Setting data fields on the map
You can specify the information displayed
in the map view. Follow these steps:
1. Press the NAVI button.
2. Choose Settings.
3. Choose Navigation View.
4. Choose Data Fields.
5. Choose First, Second, Third or
Without Route.
6. Choose the required setting, e.g. Time
of Arrival at Destination, Distance to
Destination or others.
Displaying progress bar for the route
For the simplified indication of the vehicle
position on the route, you can activate
the route progress bar. To activate/
deactivate the function, follow these
steps:
1. Press the NAVI button.
2. Choose Settings.
3. Choose Navigation View.
4. Choose Route Progress Bar On/O.
Navigation

32
33
Providing motorway information
With this function, information can be
retrieved during a motorway journey, e.g.
on service areas.
1. Press the NAVI button.
2. Choose Settings.
3. Choose Navigation View.
4. Choose Oer Motorway Services.
Displaying points of interest close to
motorway journeys
Using this function, you can specify which
point of interest categories close to
motorway journeys are displayed on the
map. Follow these steps:
1. Press the NAVI button.
2. Choose Settings.
3. Choose Navigation View.
4. Choose Services Displayed.
5. Choose point of interest category that
is to be changed.
6. Choose required point of interest
category.
7. Choose Select.
Automatic overview
This function makes it easier to
understand the next turning by changing
the map section and the viewing angle.
To activate/deactivate the function, follow
these steps:
1. Press the NAVI button.
2. Choose Settings.
3. Choose Navigation View.
4. Choose Automatic Overview On/O.
Displaying road signs
With this function, lanes are displayed
with the aid of road signs. To activate/
deactivate the function, follow these
steps:
1. Press the NAVI button.
2. Choose Settings.
3. Choose Navigation View.
4. Choose Signposts On/O.
Displaying junction overview
If the digital map contains corresponding
data, a 3D view is displayed on
approaching a motorway exit or a dicult
junction. To activate/deactivate the
function, follow these steps:
1. Press the NAVI button.
2. Choose Settings.
3. Choose Navigation View.
4. Choose Junction View On/O.
Displaying tunnel view
With the aid of this function, a tunnel
view is displayed on driving through
a tunnel. To activate/deactivate the
function, follow these steps:
1. Press the NAVI button.
2. Choose Settings.
3. Choose Navigation View.
4. C hoose Tunnel View On/O.
Providing trac jam avoidance on
motorways
With the aid of this function, the
Classic Infotainment System provides
an alternative route if there is a trac
jam. The Classic Infotainment System
calculates the alternative route from
the next motorway exit. To activate/
deactivate the function, follow these
steps:
1. Press the NAVI button.
2. Choose Settings.
3. Choose Navigation View.
4. Oer Congestion Detour On
HighwaysOn/O.
Providing real-time route alternatives
With the aid of this function, the Classic
Navigation

34
35
Infotainment System provides alternative
routes during journeys on normal roads.
The alternative route is displayed from
the next junction. To activate/deactivate
the function, follow these steps:
1. Press the NAVI button.
2. Choose Settings.
3. Choose Navigation View.
4. Choose Oer Real-time Alternative
Routes On/O.
Providing information on car parks in the
vicinity
With the aid of this function, the Classic
Infotainment System provides information
on car parks in the vicinity. To activate/
deactivate the function, follow these
steps:
1. Press the NAVI button.
2. Choose Settings.
3. Choose Navigation View.
4. Choose Oer Parking Around
Destination On/O.
Providing suggestions on variations
With the aid of this function, the Classic
Infotainment System provides points of
interest close to the motorway journey
or avoidable sections (e.g. toll roads),
if you leave the calculated route on the
motorway. To activate/deactivate the
function, follow these steps:
1. Press the NAVI button.
2. Choose Settings.
3. Choose Navigation View.
4. Choose Oer Hints Upon Detour.
Map view and map alignment
To set the map view and alignment,
follow these steps:
1. Press the NAVI button.
2. Depending on the current setting,
choose 3D, 2D or .The setting
changes, depending on the previous
setting to 3D, 2D or .
• 3D map: the map view is aligned with
the direction of travel.
• 2D map in direction of travel:
the map view is aligned with the
direction of travel. The direction of
travel is always up.
• 2D map aligned on north: the map
view is always aligned on north. North
is always up.
Setting language for the user interface
To change the language for the menu
commands, follow these steps:
1. Press the NAVI button.
2. Choose Settings.
3. Choose Regional.
4. Choose Language.
5. Choose required language.
The application restarts.
Setting language for voice outputs
To change the language for the voice
output, follow these steps:
1. Press the NAVI button.
2. Choose Settings.
3. Choose Regional.
4. Choose Voice Language.
5. Choose the required language and
speaker.
Setting units and formats
To change the units used in the
navigation, follow these steps:
1. Press the NAVI button.
2. Choose Settings.
3. Choose Regional.
4. Choose Units & Formats.
5. Choose the required unit/the
required format:
• Distance
Navigation
Navigation

34
35
• Fuel Consumption
• Weight
• Time Format
• Date Format
• Date Delimiter
• Coordinate Display Format
6. Make the required change.
Setting time zone automatically
To change the time zone automatically,
follow these steps:
1. Press the NAVI button.
2. Choose Settings.
3. Choose Regional.
4. Choose Time Zone.
5. Choose Automatic Time Zone.
Setting time zone manually
To change the time zone manually, follow
these steps:
1. Press the NAVI button.
2. Choose Settings.
3. Choose Regional.
4. Choose Time Zone.
5. Choose Manual Time Zone.
6. Choose Time Zone.
7. Set the required value.
Setting summer time
To activate/deactivate summer time,
follow these steps:
1. Press the NAVI button.
2. Choose Settings.
3. Choose Regional.
4. Choose Time Zone.
5. Choose Manual Time Zone.
6. Choose Daylight Saving Time On/O.
Menu animation
To activate/deactivate the menu
animation, follow these steps:
1. Press the NAVI button.
2. Choose Settings.
3. Choose Display.
4. Choose Menu Animations On/O.
Trac messages/real-time trac
messages (TMC)
The Trac Message Channel (TMC) can
provide trac messages in real-time. The
Classic Infotainment System can receive
TMC trac messages and take them into
account for trac-dependent navigation.
The trac messages are activated by
default. If trac messages occur on the
route, the Classic Infotainment System
outputs a message and recalculates the
route.
Note: TMC is not available in all countries
and regions.
Reception of trac messages
To activate/deactivate trac messages,
follow these steps:
1. Press the NAVI button.
2. Choose Settings.
3. Choose Trac On/O.
Choosing data sources for real-time
trac messages
This function is available if the TMC
receiver is activated.
1. Press NAVI button.
2. Choose Settings.
3. Choose Trac.
4. Choose Data Source.
5. Choose the required data source.
Real-time trac messages
To activate/deactivate the usage of real-
time trac messages, follow these steps:
1. Press the NAVI button.
2. Choose Settings.
3. Choose Trac.
Navigation

36
37
4. Choose Use Real-time Trac On/O.
Displaying trac information
To display trac information, follow these
steps:
1. Press the NAVI button.
2. Choose Settings.
3. Choose Trac.
4. Choose Show Trac Info.
5. Choose the required option O,
Colour or Colour and Icon.
Displaying free flow of trac
To activate/deactivate the display of the
free flow of trac, follow these steps:
1. Press the NAVI button.
2. Choose Settings.
3. Choose Trac.
4. Choose Show Free Trac Flow As
Well On/O.
Switching on or o usage of past trac
data
To activate/deactivate the function to use
past trac data, follow these steps:
1. Press the NAVI button.
2. Choose Settings.
3. Choose Trac.
4. Choose Use Historical Trac On/O.
Setting time saving for route
recalculation
With this function, you can specify the
time saving from which the Classic
Infotainment System calculates a new
route if there are trac messages for the
current route. To set, follow these steps:
1. Press the NAVI button.
2. Choose Settings.
3. Choose Trac.
4. Choose Oer detour if it saves at
least.
5. Set the required minimum value for
the time saving.
Prompting for route recalculation
If this function is activated, the Classic
Infotainment System prompts before
it calculates a new route. To activate/
deactivate the function, follow these
steps.
1. Press the NAVI button.
2. Choose Settings.
3. Choose Trac.
4. Choose Confirm Detours Manually
On/O.
Journey overview
To record the journeys, the Classic Info-
tainment System provides functions
for saving journey data. To activate/
deactivate the functions, follow these
steps:
1. Press the NAVI button.
2. Choose Settings.
3. Choose Trip Monitor.
4. Activate/deactivate the required
function:
• Enable auto-saving On/O: if this
function is enabled, the Classic
Infotainment System saves statistical
data on the journeys.
• Save Track Log On/O: if this
function is enabled, the Classic
Infotainment System saves route
recordings.
Starting configuration wizard
You can change the basic settings, e.g.
language, time format and other units to
suit your region using the configuration
wizard. To start the configuration wizard,
follow these steps:
1. Press the NAVI button.
2. Choose Settings.
3. Choose Start Configuration Wizard.
Navigation

36
37
The configuration wizard starts and
undertakes the configuration.
UPDATING DIGITAL MAP
You will only achieve optimal navigation
using the latest map data. You can
update the digital map. You will find
further information at: www.kraemer-
automotive.com/jaguarlandroverclassic/
update
Note: With the purchase of this product
you received one free of charge update
of map data. You will be eligible for the
first free of charge map data update for
30 days which starts from when the „PC
Tool“ has been used for the first time or
your vehicle done more than 20 km from
installing the unit. To update the map data
please visit www.kraemer-automotive.
com/jaguarlandroverclassic/update,
where you will find the exact instructions.
Please Note! You must perform the map
update within 30 days from using the „PC
Tool“ for the first time or completing 20
km from your starting point, otherwise
additional charges might occur.
INSTALLING AND REMOVING
THE CLASSIC INFOTAINMENT
SYSTEM
Important safety instructions on
installation
This Classic Infotainment System was
designed for usage in vehicles with a
12-volt battery and fits for negative
earth vehicles only. Before you install
the Classic Infotainment System in your
vehicle, make sure the battery voltage
corresponds to the Classic Infotainment
System. If not, use a voltage converter to
convert the supply voltage to 12 volts.
• Short circuit hazard and fire hazard
during work on the vehicle electrics.
Disconnect the battery during work
on the vehicle electrics.
• To prevent short circuits in the
wiring and damage to the Classic
Infotainment System, secure all cables
using cable ties or insulating tape.
Do not route cables past hot areas.
Also avoid areas with moving parts,
e.g. the gear lever, handbrake lever or
seat rails so that the insulation on the
cables is not damaged.
• Avoid short circuits and damage by
not routing connecting cables through
the engine compartment to connect
them to the battery.
• If the fuse is faulty, only replace the
fuse with a new 15-ampere fuse. Never
use a fuse dierent to that stated,
because otherwise there may be cable
fires or short circuits.
• Do not connect Classic Infotainment
Systems to the battery, because
otherwise the battery may overheat.
• Please make sure that all cable
connections to the loudspeakers are
correctly insulated to prevent short
circuits.
• Avoid connections from the earth
cable to the loudspeaker output,
because the internal output stage
could be damaged.
• The maximum load for the
loudspeakers used is 4 x 45 Watt.
• On connecting the loudspeakers, pay
attention to correct connection, be-
cause the navigation announcements
are only sent to the front loudspeakers.
• In principle a speedometer signal is
not required for the operation of the
Classic Infotainment System.
• Jaguar Land Rover recommend that
the installation must be carried out by
a competent technician or engineer.
• On vehicles with antenna amplifiers,
the connection must be made to the
ISO connector (black) PIN5 (blue).
Jaguar Land Rover recommend that
the installation must be carried out by
a competent technician or engineer.
Installation
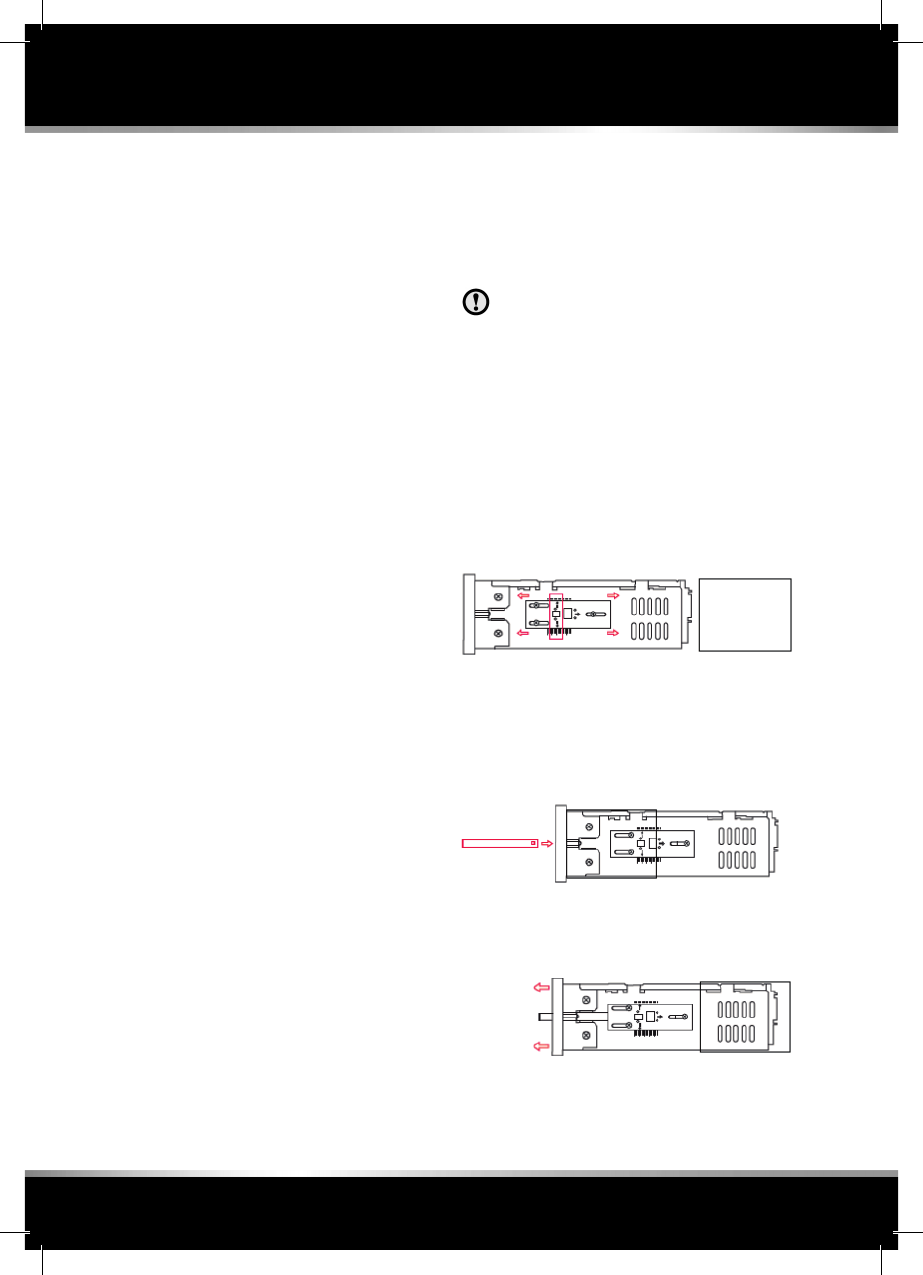
38
39
Installation
1. Before you start, it is imperative you
completely disconnect the battery
from the vehicle's electrical system.
2. Remove the installation mounting
from the Classic Infotainment System.
If the Classic Infotainment System
is engaged in the mounting, use the
unlocking key provided to unlock the
mounting.
3. Remove the old Classic Infotainment
System including installation
mounting.
4. Check whether it is possible to fit the
new installation mounting correctly
in your DIN slot. The installation
mounting is designed for installation
slots with the dimensions 183 x 52 mm
(width x height). Do not use force to
insert the installation mounting.
5. Bend up the locking tabs on the
installation mounting and in this
way ensure the Classic Infotainment
System is held securely and firmly in
the vehicle.
6. Position the Classic Infotainment
System in front of the installation slot.
Pull the connecting cables through
the installation mounting and then
connect the Classic Infotainment
System to the cables. During
this process, follow carefully the
connection diagram and make sure all
cables are correctly insulated.
7. In principle we recommend fitting
the spacer provided to the rear of
the Classic Infotainment System. The
spacer is used to protect the radio
connections and is screwed into the
thread provided. Then fit the rubber
cap provided.
8. Push the Classic Infotainment System
into the installation slot until it
engages in the installation mounting.
9. After the Classic Infotainment System
has been connected, reconnect the
battery. With the ignition switched on,
check whether it is possible to switch
on the Classic Infotainment System.
Jaguar Land Rover recommend that
the installation must be carried out by
a competent technician or engineer.
Damage to Classic Infotainment
System: Incorrect connection can
cause irreparable damage to the
Classic Infotainment System or to
the vehicle electronics.
Fine adjustment of the installation depth
To adjust the installation depth to the
related vehicle model, undo the screws
on the adjusting feature on both sides of
the Classic Infotainment System. Change
the adjustment as appropriate and then
re-tighten the screws.
Removal
1. Insert the two unlocking keys
provided into the openings provided
on the left and right end of the front
panel until they engage.
2. Carefully pull the Classic Infotainment
System out of the radio slot using the
two unlocking keys.
3. Disconnect all connectors on the rear.
4. Remove the installation mounting
from the radio slot.
Installation
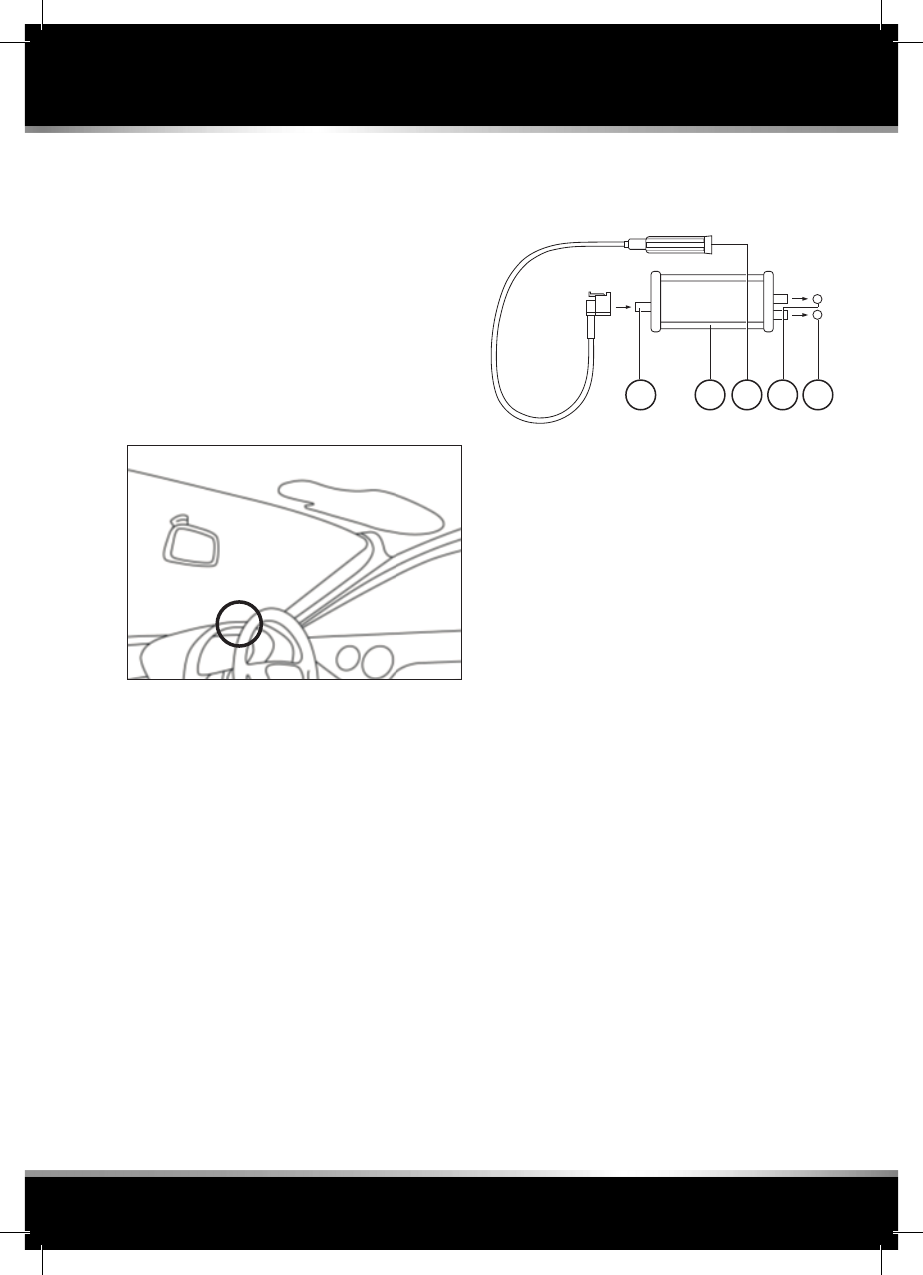
38
39
CONNECTION OF ACCESSORIES
Installation of the hands-free microphone
The Classic Infotainment System has
a microphone already installed in the
front panel for the usage of the internal
hands-free system. The separate external
microphone can also be connected.
This microphone can improve the voice
quality. For the optimal usage of the
microphone, we recommend installation
in the area behind the steering wheel.
For further information, refer to the
illustration on the connection diagram.
Information: The installation position
shown is only a recommendation. Because
the situations within vehicles can dier
in the specific case, Jaguar Land Rover
recommend that the installation must be
carried out by a competent technician or
engineer.
Installation of the GPS antenna
In principle we recommend the
installation of the GPS antenna inside the
vehicle. Avoid, if possible, all installations
of the GPS antenna in which reception
elements could be covered and reception
limited.
Note: Installation situations within
vehicles can dier in specific cases.
Installation of the antenna signal splitter
The antenna signal splitter included in the
delivery package divides the input signal
of your FM/AM antenna into an FM/AM
and a separate DAB signal. Connect the
distributor as follows:
1. DIN 150 Ohm adapter
2. FM/AM antenna input
Antenna signal splitter
DAB connector for the device
FM/AM connector for the device
Note: The antenna signal splitter is
included in the scope of delivery for
European market devices only.
Installation
32 1 54
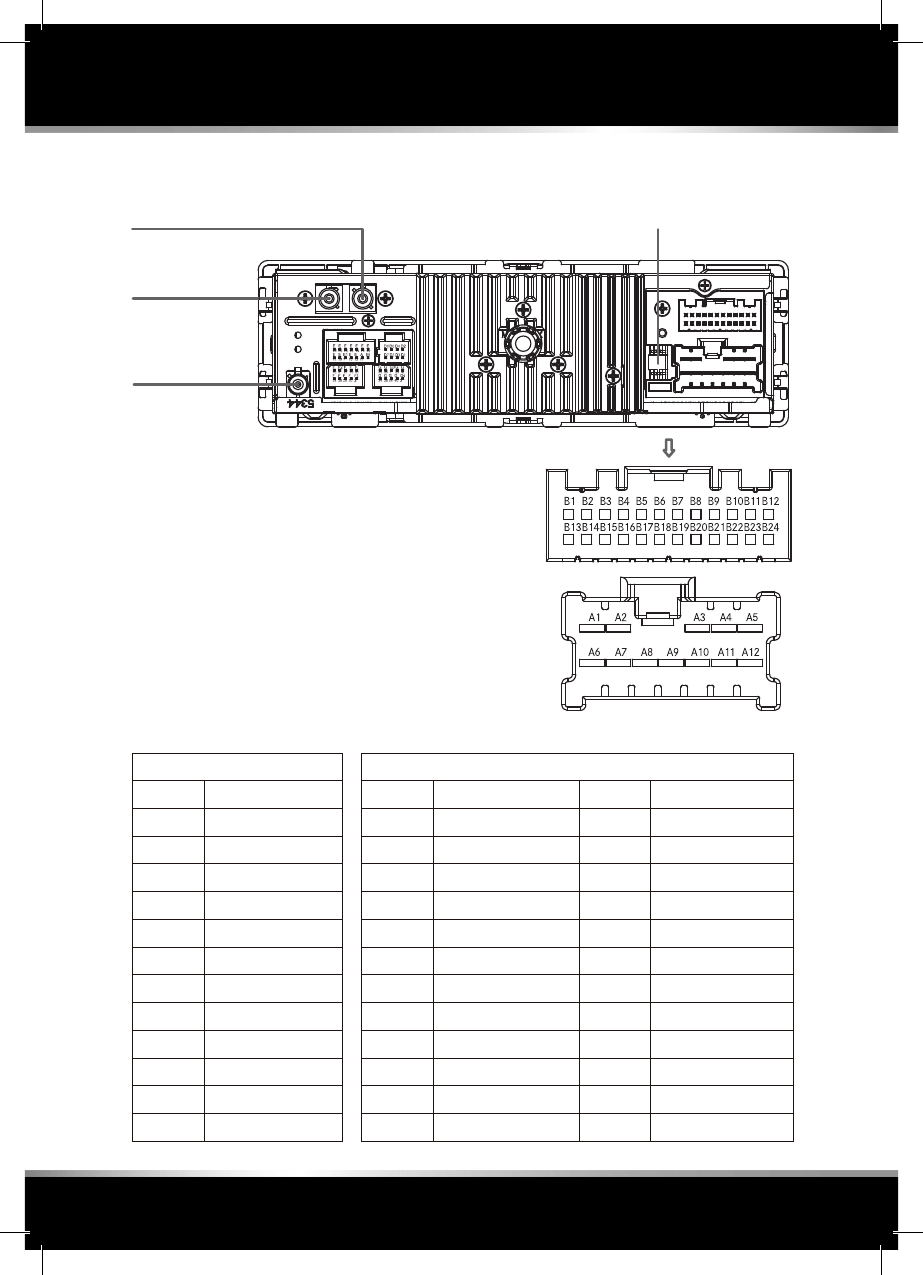
40
41
Installation
CONNECTION DIAGRAM
GPS FUSE 15A
DAB+
ANTENNA
ANTENNA
RADIO
ANTENNA
(Europe only)
No.
A1
A2
A3
A4
A5
A6
A7
A8
A9
A10
A11
A12
Pin definition
Battery +
NC
Front Right +
Front Left +
Rear Left +
Ground
NC
Rear Right -
Rear Right +
Front Right -
Front Left -
Rear Left -
No.
B1
B2
B3
B4
B5
B6
B7
B8
B9
B10
B11
B12
Pin definition
NC
NC
NC
NC
Mic. power
Mic. signal
NC
NC
NC
NC
ACC
Illumination
No.
B13
B14
B15
B16
B17
B18
B19
B20
B21
B22
B23
B24
Pin definition
NC
NC
NC
NC
NC
Mic. ground
NC
NC
NC
NC
NC
NC
TH 24NS 12
TH 24
NS 12

40
41
Technical data
TECHNICAL DATA
System
- 1-DIN Classic Infotainment System
- Processor: SiRF Prima II 1 GHz
- Operating system: Microsoft Windows
CE 6.0
- 512 MB RAM
- 256 MB ROM
- 8 GB iNAND
- Digital touchscreen display:
TFT LCD/8.89 cm (3.5“)
- Resolution: 800 x 480
- Light sensor for display brightness
control
- 1 x microSDHC card slot
- 1 x USB 2.0 socket
- GPS connection
- iPod/iPhone connection
- Aux-in
- Amplifier: 4 x 45 W
- Volume/balance/fader/treble/
mid-range/bass
- Mute
- MP3 music playback (with ID3 tags)
- Auto antenna control (for Jaguar
devices only)
Tuner/digital radio
- FM/AM dual tuner
- Frequency range, Europe, FM:
87.5-108 MHz
- Frequency range, Europe, AM:
522-1620 MHz
- FM/AM dual tuner
- Frequency range, USA, FM:
87.9-107.9 MHz
- Frequency range, USA, AM:
530-1710 MHz
- DAB+ dual tuner (Europe only)
- DAB frequency range (Europe only):
VHF band III 174.928-239.200 MHz
- RDS and RDS text (Europe)
- RBDS and RBDS text (USA)
- Storage: 30 stations (FM/AM)
- Storage: 10 stations (DAB+)
(Europe only)
- Auto station list
- Manual station search
- Manual store
Bluetooth®
- Bluetooth® handsfree set (Parrot
FC600TN)
- Frequency range: 2402-2480 MHz
- Max. transmit power: 2,5 mW
- 15 x 1250 contacts
- Phonebook and call history transfer
- A2DP feature (with ID3 tags)
- Internal microphone
- External microphone
Navigation software
- Classic- Navigation Software
- Map data: Europe (TomTom)
- Map data: USA/CAN (TomTom)
- GPS receiver: CSR G3000
- TMC module (Europe only)
Dimensions/weight
- 188 x 58 x 191 mm (WxHxD)
- 1.3 kg
Subject to technical change.
Items supplied
- Classic Infotainment System
- GPS antenna
- Antenna signal splitter (Europe only)
- Microphone for hands-free system
- Installation mounting and accessories
- Manual
We reserve the right to make changes to
the items supplied.
Note: The DAB+ function is only available
in Europe.
Note: The SD card function is only avail-
able for Land Rover devices.

42
43
Index
About this handbook .................................... . 2
Activating MEDIA ........................................... 15
Activating tuner ............................................... 13
Adding interim point ....................................25
Adding new profile ........................................ 29
Alternative frequency (AF) on/o ........... 14
AM tuner on/o ............................................... 10
Answering call .................................................. 18
Audio playback from a Bluetooth®
device (A2DP) .................................................. 16
Audio playback from iPod® or iPhone® ... 16
Audio playback from USB sticks and
SD cards ............................................................. 15
Audio playback via the AUX port ............. 16
Automatically accept call on/o .............. 18
Automatic overview ...................................... 33
Avoiding specific roads on a route .........25
Avoiding specific sections on the
route ....................................................................25
Avoiding stretch of road ahead ................25
Balance ............................................................... . 9
Basic functions ................................................. . 8
Bluetooth® .......................................................... 41
Bluetooth® function on/o .......................... 19
Bluetooth® settings ........................................ 19
Button sound .................................................... 10
Calling contact ................................................. 19
Calling telephone number from a
call list ................................................................. 19
Call lists ............................................................... 19
Changing Bluetooth® name ......................... 21
Changing microphone .................................. 18
Changing order of destinations................24
Changing pairing code ................................. 21
Changing route ...............................................24
Choose radiozone ........................................... .11
Choosing data sources for real-time
trac messages .............................................35
Choosing town/city centre as
destination ........................................................22
Closing Bluetooth® connection .................20
Connecting coupled Bluetooth®
devices ...............................................................20
Connecting USB stick.................................... 15
Connection diagram .................................... 40
Connection of accessories .........................39
Controls .............................................................. . 7
Copyright ........................................................... . 3
Coupling Bluetooth® device .......................20
Coupling via Classic Infotainment
System ................................................................20
Coupling via mobile phone ........................20
Date ...................................................................... 10
Day/night mode............................................... .11
Defining new starting point .......................26
Deleting active route ....................................26
Deleting all saved routes .............................26
Deleting individual destination ................. 25
Deleting individual saved route ................26
Deleting list of contacts ............................... 19
Deleting new starting point .......................26
Deleting next interim point ........................26
Destination from all destination
types ...................................................................23
Destination from history .............................23
Destination from points of interest .........23
Destination from saved places .................23
Destination from saved routes ..................23
Destination via coordinates .......................23
Destination via map ......................................24
Dimensions/weight ........................................ 41
Direct dialling ................................................... 18
Display during navigation ...........................27
Displaying alternative routes ...................... 25
Displaying call lists ......................................... 19
Displaying free flow of trac ...................36
Displaying junction overview ....................33
Displaying points of interest close
to motorway journeys ..................................33
Displaying progress bar for the route .... 32
Displaying road signs ...................................33
Displaying trac information ...................36
Displaying tunnel view ................................. 33
Displaying useful information ...................28
Dropped calls while driving ........................ 17
During navigation ..........................................27
Enabling or disabling route recording ... 32
Enabling or disabling the display of
3D objects on the map ................................32
Enabling or disabling the display of point
of interest symbols on the map ...............32
Ending call ......................................................... 18
Ending simulation .......................................... 27
Entering address ............................................ 22
Entering new route ........................................24
Entering the destination..............................22
Equalizer ............................................................. . 9
Factory settings .............................................. 12

42
43
Index
Fader .................................................................... . 9
File formats supported ................................. 17
Finding contact ............................................... 19
Fine adjustment of the installation
depth ..................................................................38
Functions during a call ................................. 18
Important safety instructions on
installation ........................................................37
Imprint ................................................................. . 2
Increasing simulation speed ......................27
Information on Bluetooth® ........................... 17
Information without complete
address...............................................................22
Inserting and removing SD card ............... 15
Inserting SD card ............................................ 15
Installation ........................................................38
Installation of the antenna signal
splitter ................................................................39
Installation of the GPS antenna ................39
Installation of the hands-free
microphone ......................................................39
Intended use ..................................................... . 3
Interrupting navigation ................................25
Interrupting simulation ................................26
Items supplied .................................................. 41
Journey overview ...........................................36
Jumping back to last turning ....................26
Jumping forward to next turning ............26
Lane recommendation .................................27
Language ........................................................... .11
List of contacts ................................................ 19
Loudness ............................................................ . 9
Making call ......................................................... 18
Making telephone calls ................................. 17
Manual connection ........................................20
Map view and map alignment ...................34
MEDIA main menu .......................................... 15
Menu animation ..............................................35
Menu structure ................................................. . 8
Muting ................................................................. . 8
Navigation settings .......................................28
Navigation software ....................................... 41
PHONE main menu ........................................ 17
Possible ways of entering an
address...............................................................22
Prompting for route recalculation ........... 36
Providing information on car parks in
the vicinity ........................................................34
Providing motorway information .............33
Providing real-time route alternatives ...33
Providing suggestions on variations ......34
Providing trac jam avoidance on
motorways ........................................................ 33
Reading out road names ............................ 30
Real-time trac messages .........................35
Reception of trac messages ................. 35
Re-dialling .......................................................... 18
Rejecting call .................................................... 18
Removal .............................................................38
Removing SD card .......................................... 15
Renaming route ..............................................24
Repeating navigation announcements ..27
Requirements for making telephone
calls ...................................................................... 17
Restarting Classic Infotainment
System ................................................................. 12
Restoring original route ...............................25
Routes ................................................................24
Safety .................................................................. . 3
Saving active route .......................................24
Saving current station ................................... 14
Saving destination ......................................... 24
Saving route ..................................................... 24
Saving station from list of stations .......... 14
Saving stations ................................................. 14
Selecting operating mode ........................... . 8
Setting data fields on the map ................. 32
Setting frequency band ................................ 13
Setting language for the user
interface .............................................................34
Setting language for voice outputs ........34
Setting map colours .....................................32
Setting navigation mode ............................29
Setting road types ......................................... 29
Setting route planning method ................29
Settings map day/night view ..................... 31
Setting station .................................................. 13
Setting station manually .............................. 13
Setting station using station search ........ 13
Setting station via list of stations ............. 13
Setting station via saved stations............. 13
Setting summer time .................................... 35
Settings warnings for road speed
limits................................................................... 30
Settings warnings for warning points ..... 31
Settings zoom and angle of the map ...... 31
Setting the level of detail of the voice
instructions ...................................................... 30

44
45
Index
Setting time saving for route
recalculation ....................................................36
Setting time zone automatically .............. 35
Setting time zone manually .......................35
Setting units and formats ...........................34
Setting vehicle profi le ..................................28
Setting volume for sounds .........................29
Sorting list of contacts ................................. 19
Standby time .................................................... 10
Starting confi guration wizard ...................36
Starting route simulation ............................26
Status................................................................... . 3
Support ............................................................... . 3
Switching on and o the unit ..................... . 8
Switching on navigation ..............................22
Switching on or o sounds ....................... 30
Symbols used ................................................... . 2
System ................................................................. 41
Technical data .................................................. 41
The navigation system .................................. 21
Time ..................................................................... 10
Time format ....................................................... . 9
Time format, date and time ........................ . 9
Time synchronisation .................................... 10
Tone ...................................................................... . 9
Touchscreen operation ................................. . 8
Tra c messages on the map ....................28
Tra c messages/real-time tra c
messages (TMC).............................................35
Tra c messages (TA) on/o ......................14
Transferring list of contacts ........................ 19
Tuner/digital radio .......................................... 41
TUNER main menu ......................................... 13
Turning ............................................................... 27
Types of warnings ........................................... 31
Uncoupling mobile phone ..........................20
Unit part number ............................................ . 3
Updating digital map ...................................37
Version information ........................................ 12
Volume control ................................................ . 8
Volume of the audio sources ...................... .11

44
45
DECLARATION OF CONFORMITY
Hereby, Krämer Automotive Sytems
GmbH declares that the radio is in
compliance with Directive 2014/53/EU.
The full text of the EU declaration of
conformity is available at the following
internet address:
www.kraemer-automotive.com/red
FCC Statement
1. This device complies with Part 15 of the
FCC Rules. Operation is subject to the fol-
lowing two conditions:
(1) This device may not cause harmful
interference.
(2) This device must accept any interfer-
ence received, including interference
that may cause undesired operation.
2. Changes or modifications not expressly
approved by the party responsible for
compliance could void the user’s author-
ity to operate the equipment.
Note: This equipment has been tested
and found to comply with the limits for
a Class B digital device, pursuant to Part
15 of the FCC Rules. These limits are
designed to provide reasonable protec-
tion against harmful interference in a
residential installation. This equipment
generates uses and can radiate radio
frequency energy and, if not installed and
used in accordance with the instructions,
may cause harmful interference to radio
communications. However, there is no
guarantee that interference will not occur
in a particular installation. If this equip-
ment does cause harmful interference to
radio or television reception, which can be
determined by turning the equipment o
and on, the user is encouraged to try to
correct the interference by one or more of
the following measures:
• Reorient or relocate the receiving
antenna.
• Increase the separation between the
equipment and receiver.
• Connect the equipment into an outlet
on a circuit dierent from that to
which the receiver is connected.
• Consult the dealer or an experienced
radio/TV technician for help.
FCC Radiation Exposure Statement
This equipment complies with FCC
radiation exposure limits set forth for an
uncontrolled environment. This equip-
ment should be installed and operated
with minimum distance 20cm between
the radiator & your body.
IC warning
This device complies with Industry Cana-
da’s licence-exempt RSSs. Operation is
subject to the following two conditions:
(1) This device may not cause interfer-
ence; and
(2) This device must accept any inter-
ference, including interference that
may causeundesired operation of the
device.
Le présent appareil est conforme aux
CNR d’Industrie Canada applicables aux
appareils radio exempts de licence.
L’exploitation est autorisée aux deux con-
ditions suivantes :
(1) l’appareil ne doit pas produire de
brouillage,
et
(2) l’utilisateur de l’appareil doit accepter
tout brouillage radioélectrique subi,
même si le brouillage est susceptible
d’en compromettre le fonctionnement.

Made for iPod/iphone
This unit supports only thefollowing
iPod/iPhone models:
- iPhone 5
- iPhone 4S
- iPhone 4
- iPod classic
- iPod touch (5th generation)
- iPod touch (4th generation)
- iPod nano (7th generation)
- iPod nano (6th generation)
- iPod nano (5th generation)
Use of the Made for Apple badge means
that an accessory has been designed
to connect specifi cally to the Apple
product(s) identifi ed in the badge, and has
been certifi ed by the developer to meet
Apple performance standards.
Apple is not responsible for the operation
of this device or its compliance with safety
and regulatory standards. iPhone and iPod
are trademarks of Apple Inc., registered in
the U.S. and other countries.