Kronos 8609K007 RFID READER 13.56 MHz IN TOUCH DATA COLLECTIVE DEVICE User Manual
Kronos, Inc. RFID READER 13.56 MHz IN TOUCH DATA COLLECTIVE DEVICE
Kronos >
User Manual
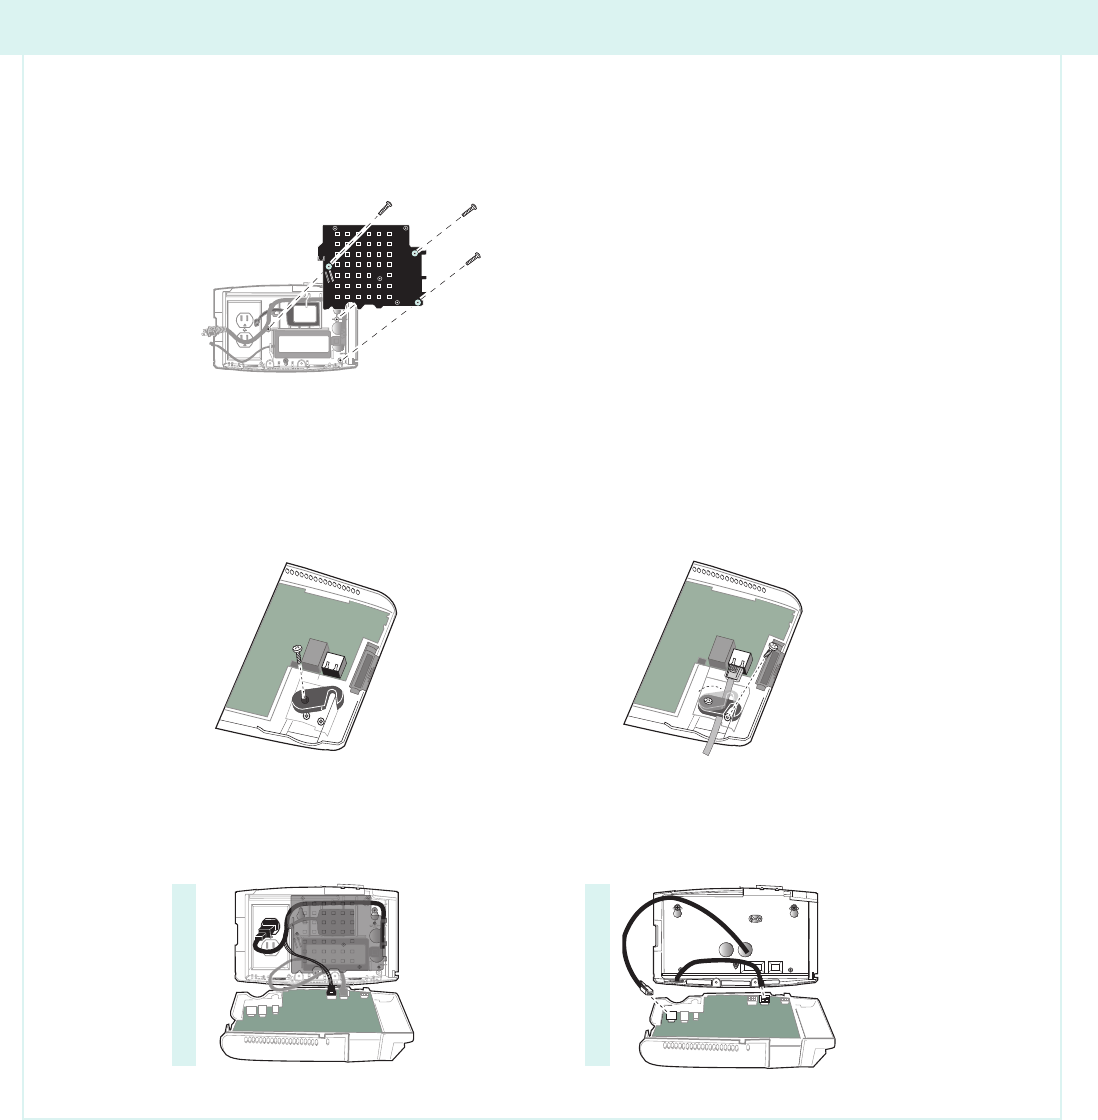
8. (Standard Model Only) If you ordered the optional backup battery, install it now (see the separate
backup battery installation guide). Then, use a number 1 or 2 Phillips screwdriver and the M3 X 6
screws to attach the plastic transformer holder to the base. Do not plug in the transformer or battery yet.
9. Install other options, including the nger scan device. See the installation guides for those kits.
10. Use the M3 X 10 screws to attach the Ethernet strain relief clip to the inside front cover.
Then connect the Ethernet cable to the main board.
Note: If using POE, the unit turns on when you plug in the Ethernet cable.
11. If not using POE, connect the power cable (and optional battery) to the main board. Ensure that the
locking clip snaps over the tab on the receptacle. Plug the transformer into the outlet.
Standard Model
a. b.
Slim Prole Model
Installation Instructions
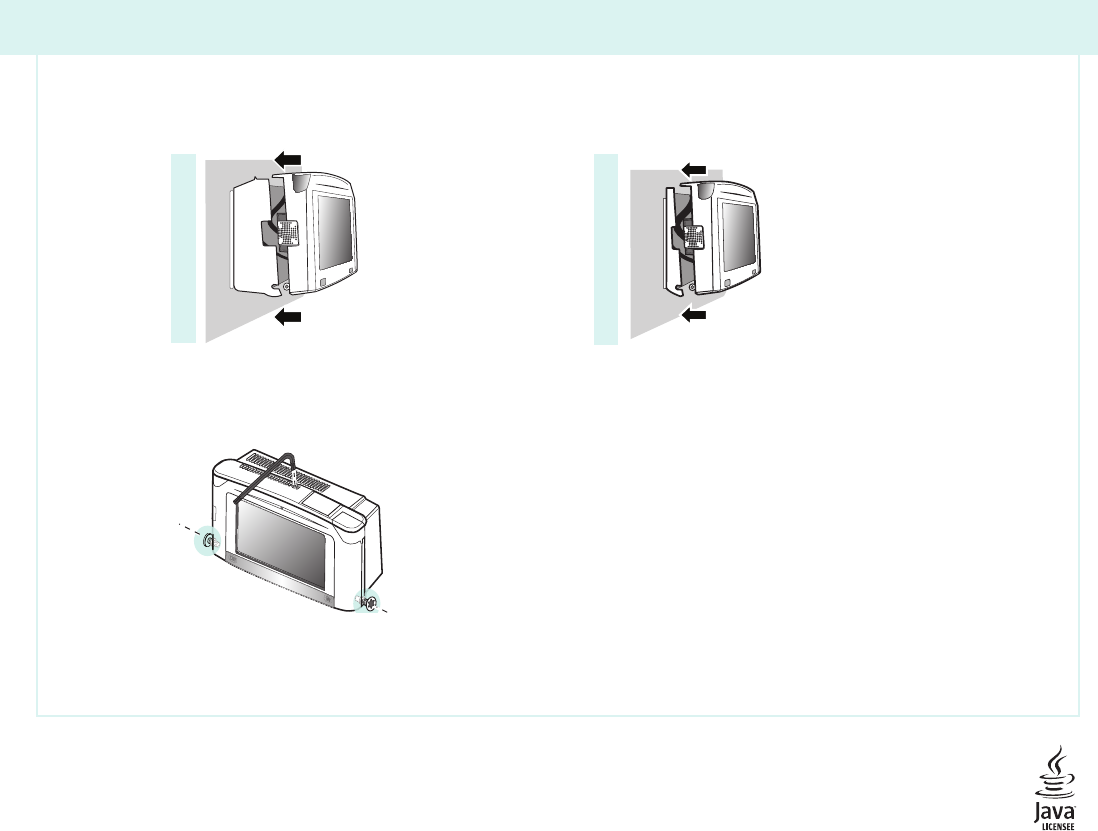
12. Verify that the unit is on. Then carefully close the cover.
13. Insert the M4 X 10 torx screw into the top of the cover. Use the security wrench to secure each
screw so that the t is snug, but not too tight.
14. After the unit powers up, complete the initial setup and conguration tasks that are described in the
Maintenance Mode chapter of the user guide. Congure other device settings on the host
application server as directed.
Standard Model
Slim Prole Model
The information in this document is subject to change without notice and should not be construed as a commitment by Kronos Incorporated. Kronos Incorporated assumes no responsibility for any errors that may appear
in this document. This document or any part thereof may not be reproduced in any form without the written permission of Kronos Incorporated. All rights reserved. Copyright 2013.
Kronos and Kronos InTouch are registered trademarks and Kronos 4500 is a trademark of Kronos Incorporated. All other trademarks or registered trademarks used herein are the property of their respective owners and are used
for identication purposes only. When using and applying the information generated by Kronos products, customers should ensure that they comply with the applicable requirements of federal and state law, such as the Fair
Labor Standards Act. Nothing in this Guide shall be construed as an assurance or guaranty that Kronos products comply with any such laws.
FCC Compliance - After testing, this equipment complies with the limits for a Class A digital device pursuant to Part 15 of FCC Rules. These limits provide reasonable protection against harmful interference when this equipment
is operated in a commercial environment. This equipment generates, uses, and can radiate radio frequency energy. If it is not installed and used in accordance with the instruction manual, it can cause harmful interference to
radio communications. Operation of this equipment in a residential area is likely to cause harmful interference, in which case, the user, and not Kronos Incorporated, is required to correct the interference. In order to maintain
compliance with FCC regulations, shielded cables must be used with this equipment. Operation with non-approved equipment or unshielded cables is likely to result in interference to radio and television reception. If this
equipment does cause harmful interference to radio or television reception, which can be determined by turning the equipment off and on, the user is encouraged to try to correct the interference by one or more of the following
measures: reorient or relocate the receiving antenna; increase the separation between the equipment and the receiver; connect the equipment into an outlet on a circuit different from that to which the receiver is connected; or consult the dealer or
an experienced radio/TV technician for help. You may also nd helpful the following booklet, prepared by the FCC: “How to Identify and Resolve Radio-TV Interference Problems.” This booklet is available from the U.S. Government Printing Ofce,
Washington D.C. 20402.
RADIO AND TELEVISION INTERFERENCE
NOTE: This equipment has been tested and found to comply with the limits for a Class A digital device, pursuant to Part 15 of the FCC rules. These limits are designed to provide reasonable protection against harmful
interference when the equipment is operated in a commercial environment. This equipment generates, uses and can radiate radio frequency energy and, if not installed and used in accordance with the instruction manual, may
cause harmful interference to radio communications. Operation of this equipment in a residential area is likely to cause harmful interference in which case the user will be required to correct the interference at his own expense.
FCC Notice (for U.S. Customers) - This device complies with Part 15 of the FCC Rules. Operation is subject to the following conditions:
1. This device may not cause harmful interference, and 2. This device must accept any interference received, including interference that may cause undesired operation.
Caution: Changes and Modications not expressly approved by the manufacturer or registrant of this equipment can void your authority to operate this equipment under Federal Communications Commission rules.
Canadian DOC Compliance - This digital apparatus does not exceed the Class A limits for radio noise emissions from digital apparatus set out in the Radio Interference Regulations of the Canadian Department of Communications. This device
complies with Industry Canada license-exempt RSS standard(s). Operation is subject to the following two conditions: (1) this device may not cause interference, and (2) this device must accept any interference, including interference that may
cause undesired operation of the device. Cet appareil numerique respecte les limites de rayonnement de bruits radio electriques applicables aux appareils numeriques de classe A, prevues au Reglement sur le materiel brouilleur du ministere des
Communications du Canada. Ce dispositif est conforme aux normes RSS sans licence d’Industrie Canada. Son utilisation est soumise aux deux conditions suivantes : (1) ce dispositif ne peut pas provoquer d’interférence et (2) ce dispositif doit
accepter toute interférence, y compris les interférences pouvant provoquer un mauvais fonctionnement du dispositif.
FCC ID:P5W-8609K003 IC:1416A-8609K003 is used with part numbers: 8609000-003, 8609000-013, 8609000-053, 8609000-063, 8609000-103, 8609000-113, 8609000-403, 8609000-413
FCC ID:P5W-8609K004 IC:1416A-8609K004 is used with part numbers: 8609000-004, 8609000-014, 8609000-054, 8609000-064, 8609000-114, 8609000-124, 8609000-424
FCC ID:P5W-8609K005 IC:1416A-8609K005 is used with part numbers: 8609000-005, 8609000-015, 8609000-016, 8609000-055, 8609000-065, 8609000-066, 8609000-116, 8609000-405, 8609000-415, 8609000-416
FCC ID:P5W-8609K007 IC:1416A-8609K007 is used with part numbers: 8609000-027, 8609000-077, 8609000-127, 8609000-427
EN 55022 (CISPR 22) - This product is a Class A product. In a domestic environment, it may cause radio interference in which case the user may be required to take adequate measures.
RoHS Directive - This equipment is designed in accordance with the European Union Restriction of the Use of Certain Hazardous Substances in Electrical and Electronic Equipment (“RoHS”) Directive (2002/95/EC), taking effect July 1, 2006. The
RoHS directive prohibits the sale of electronic equipment containing certain hazardous substances such as lead, cadmium, mercury, hexavalent chromium, polybrominated biphenyls (“PBB”) and polybrominated diphenylethers (“PBDE”) in the
European Union. A program is in place to address the requirements of the RoHS Directive in respect to the various categories of electronic products.
Installation Instructions
Kronos InTouch
®
QuickStart Guide
Document Part Number: 4704547-001
Document Revision: D

Important
The examples in this QuickStart guide show common installation
scenarios for the Standard and Slim Prole models of the
Kronos InTouch. For more complex installations, download the
comprehensive installation guide from the web site listed on this
page. If you do not have access to the documentation site, contact
your Kronos representative or dealer.
Wichtig
Die Beispiele in dieser Kurzanleitung zeigen häuge
Installationsszenarien für die Standard- und Flachprolmodelle des
Kronos InTouch. Laden Sie bei umfangreicheren Installationen das
vollständige Installationshandbuch von der auf dieser Seite aufgeführten
Website herunter. Wenn Sie nicht auf die Dokumentationswebsite
zugreifen können, wenden Sie sich an Ihren Kronos-Vertreter oder
-Händler.
Importante
Gli esempi riportati in questa guida di avvio rapido illustrano gli
scenari di installazione comuni per i modelli con prolo Standard e
Slim di Kronos InTouch. Per installazioni più complesse, scaricare
la guida di installazione completa dal sito Web indicato in questa
pagina. Se non si dispone dell’accesso al sito contenente la
documentazione, contattare il rappresentante o il rivenditore Kronos.
Ważne
Zawarte w niniejszym przewodniku Szybki start przykłady przedstawiają
scenariusze standardowej instalacji dla modeli Standard i Slim Prole
urządzenia Kronos InTouch. W przypadku bardziej zaawansowanych
instalacji należy pobrać odpowiedni podręcznik instalacji z witryny
internetowej wyszczególnionej na niniejszej stronie. W przypadku
braku dostępu do strony z dokumentacją należy skontaktować się z
przedstawicielem lub dostawcą rmy Kronos.
중요사항
이 QuickStart 설명서에서는 예제를 통해 Kronos InTouch의 표준 및 슬림
프로파일 모델에 대한 공통적인 설치 시나리오를 설명합니다. 복잡한
설치에 대한 설명이 필요한 경우 이 페이지에 표시된 웹 사이트에서 종합
설치 설명서를 다운로드하십시오. 이 문서 사이트에 액세스할 수 없는
경우 Kronos 담당자나 판매업체에 문의하십시오.
重要事項
這份快速上手指南中的範例,說明 Kronos InTouch 標準版和
窄版機型的共通安裝方式。 若要了解更複雜的安裝方式,請從
本網頁列出的網站下載完整版安裝說明。 若您無法連結說明文
件網站,請洽 Kronos 服務代表或經銷商。
重要事项
此快速入门指南中的示例对标准型和超薄型 Kronos InTouch 的常
见安装方法进行了说明。 对于较为复杂的安装,请从本页所列的网
站下载完整的安装指南。 如果您没有访问文档站点的权限,请联系
Kronos 的销售代表或经销商。
Important
Les exemples de ce guide de démarrage rapide illustrent des scénarios
d’installation courants des modèles Standard et Slim Prole de Kronos
InTouch. Pour des installations plus complexes, téléchargez le guide
d’installation complet à partir du site Web indiqué sur cette page. Si vous
n’avez pas accès au site de documentation, communiquez avec votre
représentant ou détaillant Kronos.
Importante
Os exemplos neste guia QuickStart mostram os cenários de
instalação comuns para os modelos padrão e de perl simples do
Kronos InTouch. Para instalações mais complexas, faça o download
do guia completo de instalação no site relacionado nesta página. Se
você não tiver acesso ao site de documentação, entre em contato
com um revendedor ou representante da Kronos.
Importante
Los ejemplos de la guía QuickStart muestran situaciones de
instalaciones comunes para los modelos Standard y Slim Prole de
Kronos InTouch. Para instalaciones más complejas, descargue la guía
completa de instalación desde el sitio web que gura en esta página.
Si no tiene acceso al sitio de documentación, comuníquese con el
representante o distribuidor de Kronos.
Belangrijk
De voorbeelden in deze handleiding Snel aan de slag hebben
betrekking op veel voorkomende installatiescenario’s voor de
modellen Standaard en Smal proel van de Kronos InTouch. Voor
complexere installaties kunt u de uitgebreide installatiehandleiding
downloaden van de op deze pagina genoemde website. Als u geen
toegang tot de documentatiesite hebt, neemt u contact op met uw
Kronos-accountmanager of Kronos-dealer.
http://customer.kronos.com/Support/Manuals.htm
Installation Instructions
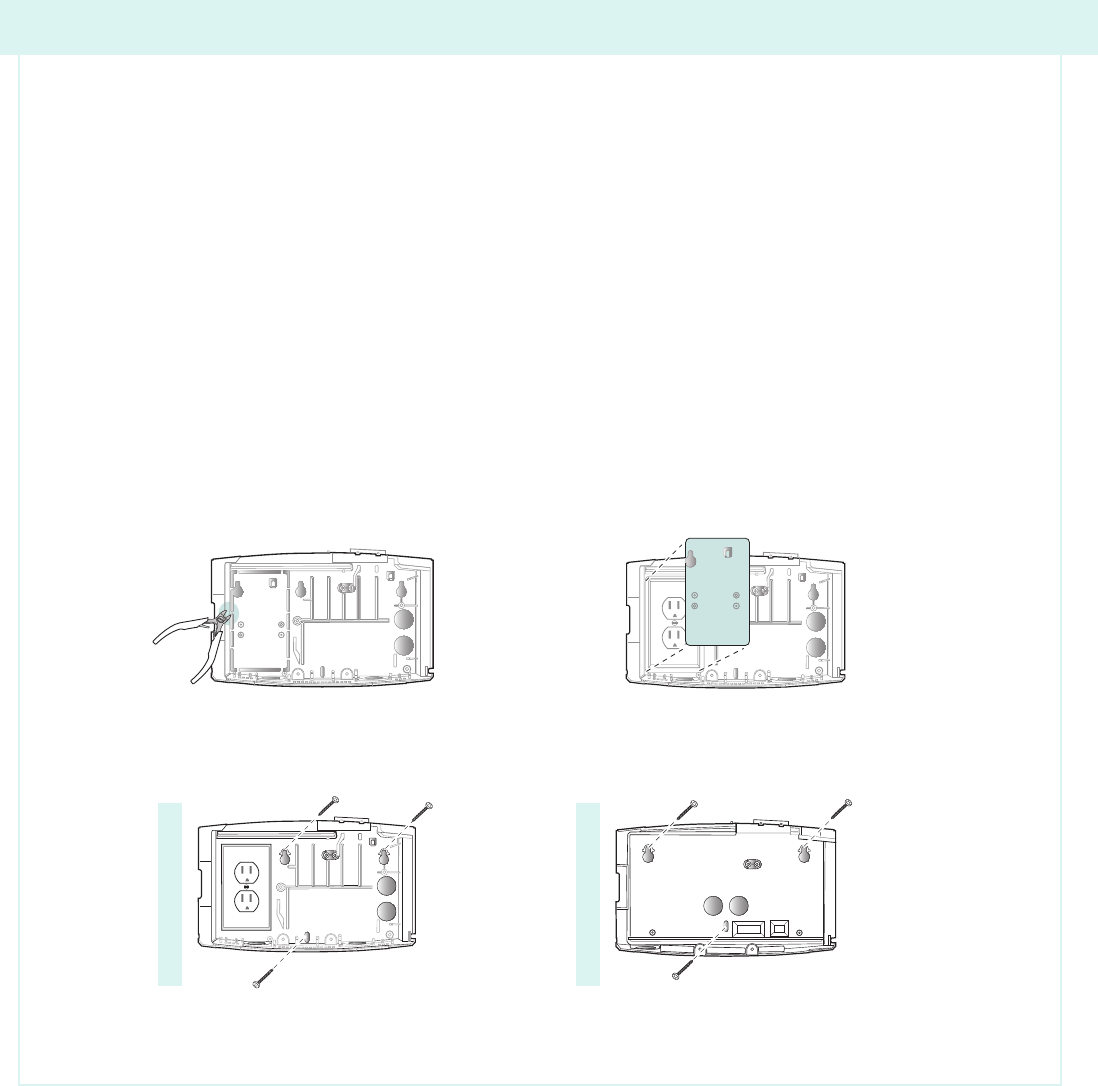
1. Verify the contents of the kit. Gather the following tools: security wrench (in kit), level, tape measure,
small wire cutter, drill, number 1 or 2 Phillips and slotted screwdrivers (magnetic tips).
Note: Do not remove the protective plastic tape afxed to the blank plate on top of the InTouch
cover until you complete the installation.
2. Use a level and a tape measure with the paper mounting template or the base of the unit itself to
mark the locations for screws, cable entry points, and the AC outlet (Standard model only). To en-
sure ADA compliance, be sure the top of the unit is 54 inches (1371 millimeters) from the oor.
Note: The examples in this guide show the Standard model mounted over an AC wall outlet and the
Slim Prole model mounted near an external AC outlet or with a power-over-Ethernet (POE) cable.
For other installation scenarios, such as using direct AC wiring or replacing a Kronos® 4500™ time-
clock, download and review the InTouch installation guide.
3. (Standard Model Only) Use a small wire cutter to remove the outlet cover plate from the base.
4. Mount the base on the wall. Use the 10 X 1-1/4 screws (and wall anchors, if necessary).
Standard Model
Slim Prole Model
Installation Instructions
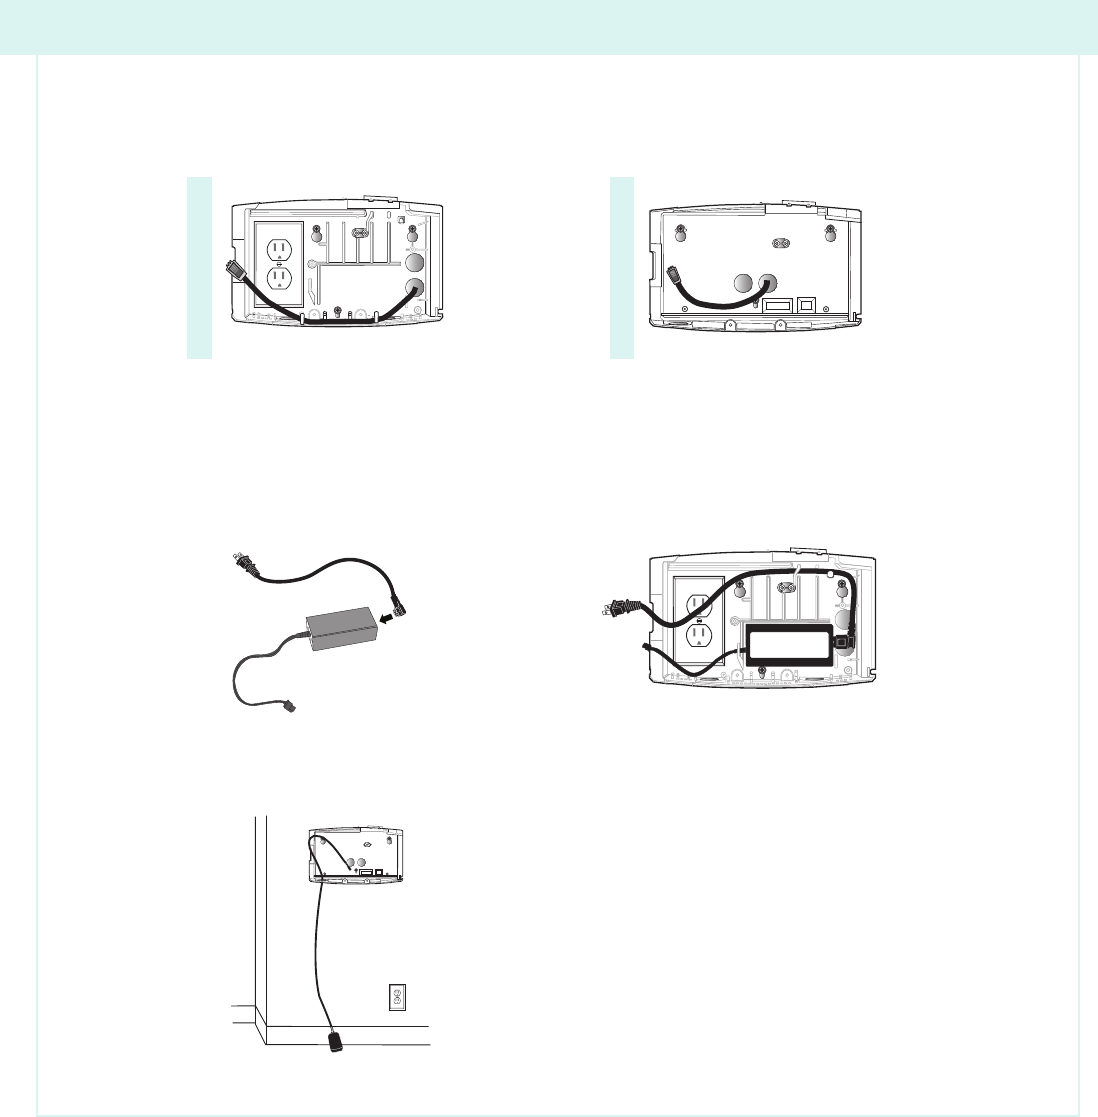
5. Route the Ethernet cable. (The cable can also be routed through either of the holes at the bottom of
the base.)
Warning: Do not plug in the power cable or backup battery cable until you are instructed to do so.
Avertissement : Ne branchez pas le câble d’alimentation ou le câble de batterie de rechange avant
qu’on vous demande de le faire.
6. (Standard Model Only) Install the transformer. Do not plug it in to the AC outlet yet.
7. (Slim Prole Model Only) If using the wall transformer for power, route that cable in to the base. Do
not plug the cable in to the AC outlet yet.
Continued on back
Standard Model
Slim Prole Model