Kurt T2005 Kinetic inRide 3.0 User Manual
Kurt Manufacturing Company Kinetic inRide 3.0
UserManual.wiki
>
Kurt
>
T2005 User Manual
User Manual
Navigation menu
Upload a User Manual
Namespaces
Wiki Guide
HTML
PDF
Info
Views
User Manual
Discussion / Help
Navigation
![12Kinetic inRide 3.0Installation[User Guide: T-2005]MADE IN CHINA kurtkinetic.com/inride/instructionsFeaturing certifi ed wireless ANT+™ connectivity.Vist www.thisisant.com/directory for compatible products.What’s in the box? Thank You!Thank you for purchasing the Kinetic inRide Power Sensor. The Power Sensor sends data to training apps running on Apple™ and Android™ devices using ANT-FEC and/or Bluetooth FTMS communication standards. Try our favorite apps:Scan QR code for Kinetic Fit App configuration and installation instructions and heart rate monitor usage directions or go online to: kurtkinetic.com/inride/instructionsiPhone and iPad are registered trademarks of Apple, IncCopyright 2018 Kinetic by Kurt. All rights reservedgrommetsensor podmagnettrainerroad.comTrainerRoadfulgaz.comFulGazrouvy.comRouvykinomap.comKinomapkinetic.fitKinetic Fit Zwi zwi .com](https://usermanual.wiki/Kurt/T2005/User-Guide-3836760-Page-1.png)
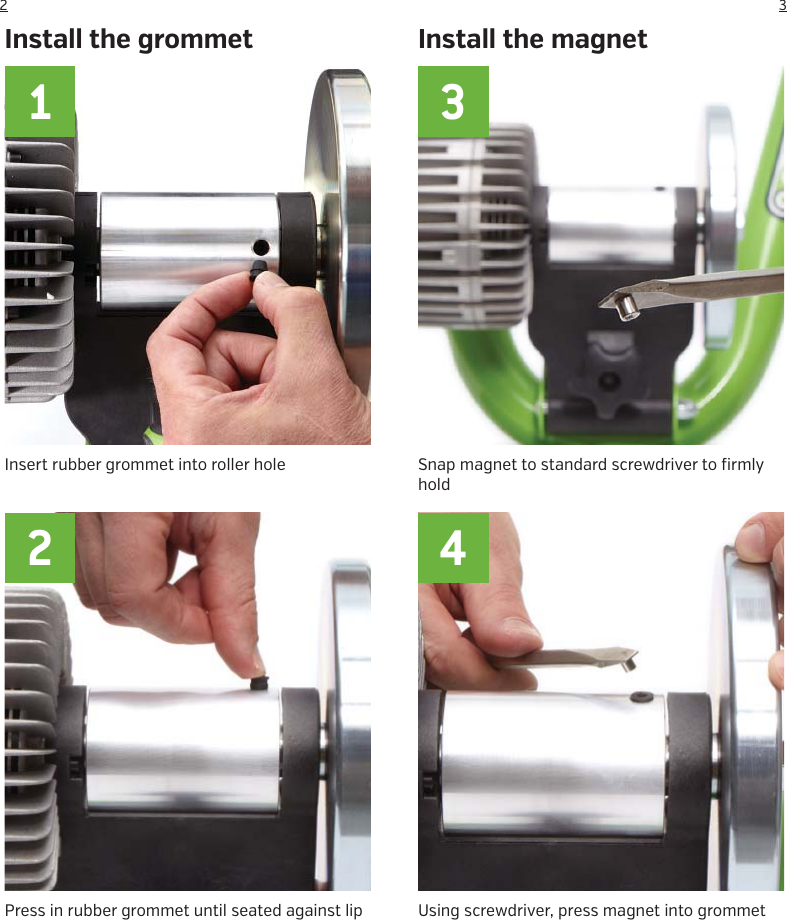
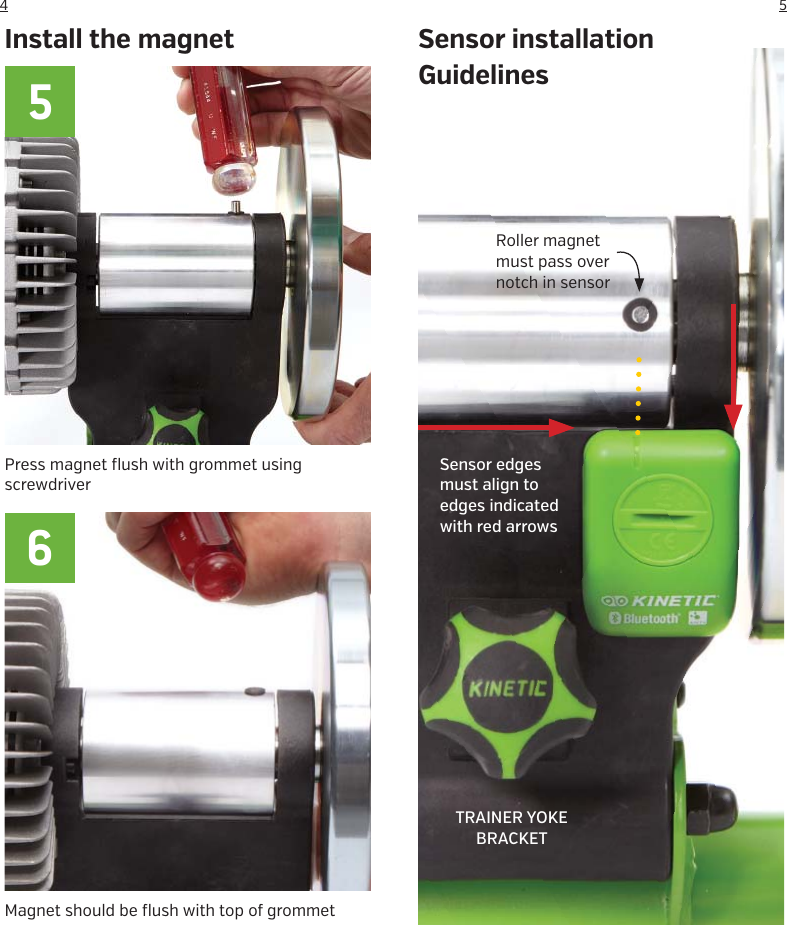
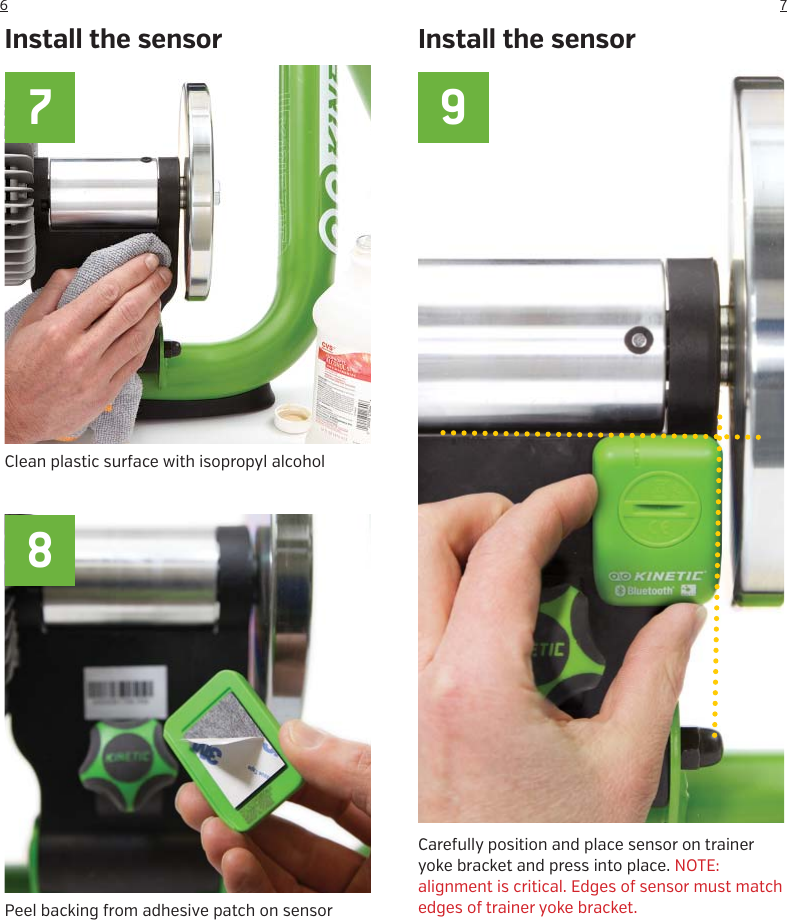
![98[DE translation]Installation der Gummitülle1. Stecken Sie die Gummitülle in das Loch in der Lau äche2. Pressen Sie die Gummitülle so tief hinein, bis sie mit den Gummilippen anliegtInstallation des Magneten3. Legen Sie den Magneten auf die flache Fläche eines Schraubenziehers (er hält dort von alleine)4. Pressen Sie mit dem Schraubenzieher den Magneten in die Gummitülle5. Drücken Sie den Magneten so tief hinein, bis er mit der Gummitülle bündig abschließt. Nutzen Sie den Schraubenzieher dazu6. Überprüfen Sie nochmals das bündige Abschließen mit dem SchraubenzieherSensor Installations-RichtlinienDer Magnet muss über der Kerbe des Sensors sitzen (in einer Linie)Die Sensor-Kanten müssen an den roten Pfeilspitzen anliegenInstallation des Sensors7. Reinigen Sie die Plastikoberfläche, so dass sie schmutz- und fettfrei ist8. Ziehen Sie die Folie von der Klebefläche auf der Rückseite des Sensors ab9. Positionieren Sie vorsichtig den Sensor auf dem Verbindungsbügel und pressen ihn fest. HINWEIS: Die richtige Ausrichtung ist wichtig. Sensorkanten müssen an den Kanten des Verbindungsbügels anliegen.BEFORE YOU START: Kinetic T-2005 inRide Power Sensors pair with apps using the Bluetooth Smart communication protocol (a.k.a. Bluetooth 4.0, Bluetooth LE or BLE) found in most mobile devices manufactured within the past 5 years or with Garmin computers and watches using the ANT+ communication protocol.PAIRING BEST PRACTICES USING BLUETOOTH AND MOBILE DEVICESinRide sensors and heart rate monitors pair directly with training apps and NOT within the device settings like wireless headphones or an earpiece. Do not pair your trainer or heart rate monitor in your device settings, even if the device will let you as some Android devices will. In your device SETTINGS > BLUETOOTH, if you see your sensor listed please delete it and follow the directions below.• Download and install the so ware you’d like to use. We recommend that all customers start with the Kinetic Fit app. • Open the Kinetic Fit app and create an account. • SELECT PROFILE from the menu in the lower le corner of the app and configure your profile• With inRide sensor installed and bike mounted on trainer, wake up your inRide sensor by pedaling your bike for a few turns. • Pair to the Fit app: Open the Fit app and select SENSORS from the menu on the bottom le of the app screen. Your inRide sensor should show on the SENSORS screen. Select the CHAIN LINK ICON. It will turn green when paired. (All training apps will have a similar process for pairing. Just make sure the trainer or sensor is active before trying to pair to any 3rd-party app.• On the Kinetic Fit app home screen, select WORKOUT button on bottom of screen and choose a workout.• Select a WARMUP and start riding. Each Kinetic Fit workout includes a 10-minute warmup followed by a spindown calibration. Once calibration is complete, actual workout begins.For additional information: https://support.kurtkinetic.com/hc/en-us/categories/200442600-Kinetic-Fit-Apphttps://www.kurtkinetic.com/training-blog-feed/getting-started-with-zwi Connect with Training Apps COMMON PAIRING ISSUES (sensors not showing in app)• Dead battery in inRide or HR sensor - replace battery.• Sensor has been paired to Bluetooth in device settings instead of the chosen training app - delete sensor in device settings and re-pair through Kinetic Fit app.RESETTING INRIDE SENSOR• Hard quit the Fit app by double tapping the home button and upswiping the app if it’s on. (varies with device type)• In your device settings, turn o Bluetooth.• Power o your device.• Pull battery from sensor and install it upside down.• While your sensor battery is flipped, power up your device, turn on bluetooth again in settings, open the Fit app, and open the Sensors screen.• Flip the battery back to positive side up in the sensor and reinstall battery cap. If this doesn’t work, try it again with a fresh battery. (a magnet helps with battery removal)](https://usermanual.wiki/Kurt/T2005/User-Guide-3836760-Page-5.png)
![1110[IT translation]Installare la gomma stabilizzatrice1. Inserire la gomma nel foro del rullo2. Premere bene la gomma fino in fondoInstallare il magnete3. Attacca il magnete a un cacciavite standard4. Uusando il cacciavite, spingi il magnete dentro la gomma stabilizzatrice5. Spingi a filo il magnete nella gomma con l’aiuto di un cacciavite6. Il magnete deve esser a filo con la gommaLinea guida per l’installazione del sensoreIl magnete del rullo deve passare sopra l’intaglio per il sensoreLe estremità del sensore devono essere allineate con le estremità indicate dalle frecce rosseInstallazione del sensore7. Pulire la superficie di plastica con alcol isopropilico8. Togliere la pellicola adesiva dal sensore9. Posizionare delicatamente sul regolatore di pressione e premere. NOTA: l’allineamento è fondamentale. Le estremità del sensore devono essere a livello delle estremità del regolatore di pressione[NL translation]Installatie van het rubbertje1. Plaats het rubbertje in het gat in de rol2. Druk het rubbertje geheel in de rol tot aan het lipjeInstallatie van de magneet3. Plak de magneet op een platte schroevendraaier voor een goede grip4. Druk nu met de schroevendraaier de magneet in het rubbertje5. Druk de magneet met de schroevendraaier in het rubbertje tot hij gelijk zit met de bovenkant6. De magneet moet gelijk zitten met de bovenkant van het rubbertjeInstallatie van de sensorDe magneet in de rol moet precies over de inkeping in de sensor komenDe randen van de sensor moeten gelijk zijn met de randen aangegeven met de rode pijlen7. Reinig het oppervlak grondig met aclohol8. Verwijder achterzijde van het plakkertje9. Plaats voorzichtig de sensor in de juiste positie en druk hem aan. LET OP: de plaatsing is erg nauwkeurig. De randen van de sensor moeten gelijk zitten met de randen van de bracket.[ES translation]Instalar la funda de goma1. Insertar la funda de goma en el agujero del rodillo2. Presionar la funda hasta que entre hasta el fondoInstalar el imán3. Colocar el imán en el extremo de un destornillador4. Usando el destornillador, insertar el imán en la funda de goma5. Presionar el imán con el destornillador para insertarlo6. El imán debe estar alineado con la parte superior de la funda de gomaConsejos para instalar el sensorEl imán del cilindro debe estar alineado con la muesca del sensorLos bordes del sensor deben estar alineados con los bordes señalados con las flechas rojasInstalar el sensor7. Limpiar la superficie plástica con alcohol isopropilo8. Retirar el protector del parche adhesivo del sensor9. Posicionar cuidadosamente el sensor del soporte del yugo y apretar para que quede pegado. NOTA: el alineamiento es crítico. Los bordes del sensor deben coincidir con los bordes del soporte del yugo[FR translation]Installer l’oeillet1. Insérer l’œillet en caoutchouc dans le trou du cylindre.2. Appuyer sur l’œillet caoutchouc pour qu’il soit complètement enfoncé.Installer l’aimant3. Placer l’aimant sur un tournevis standard4. A l’aide du tournevis, pousser l’aimant dans l’oeillet5. Enfoncer l’aimant solidaire de l’oeillet en utilisant un tournevis6. L’aimant doit a eurer la partie supérieure de l’œilletDirectives d’installation du capteurL’aimant doit passer au-dessus de l’encoche du capteurLes côtés du capteur doivent être alignés avec la limite indiquée par des flèches rouges.Installer le capteur7. Nettoyer la surface plastique avec de l’alcool isopropylique8. Enlever la protection de la partie adhésive à l’arrière du capteur9. Délicatement positionner et maintenir le capteur sur le support. Note : l’alignement est primordial. Les côtés du capteur doivent bien correspondre avec les bords du support.](https://usermanual.wiki/Kurt/T2005/User-Guide-3836760-Page-6.png)