Kustom Signals VANTAGE1 Bodyworn Camera User Manual Manual
Kustom Signals Inc Bodyworn Camera Manual
Manual

Covert Mode
To toggle Covert Mode on or off, press and hold the Bookmark button for 5 seconds**.
Covert mode can be toggled during recording or standby, but not during sleep mode.
When Covert mode is activated, all of the status LEDs will be off, and beeps will be
suppressed. When Covert mode is deactivated, the status LEDs will illuminate and beeps will
no longer be suppressed*.
Checking Status during Covert operation
A quick press of the Mute button while in Covert mode, allows you to view Record,
Battery and Storage Status. Battery status will be shown for 1 second, then Storage
Used for 1 second. This procedure may also be used when Vantage is not in Covert
mode to view Storage Used.
*Note: Vantage’s status is indicated using LEDs, beep, and vibrate, subject to your
configuration. Note that regardless of the configuration, if Covert Mode is enabled, the LEDs
and beep indications will be suppressed.
**Note: Mute and Bookmark are user functions that can be disabled by an administrator,
making them unavailable to the user.
Vantage Default Configuration:
Feature
Default
Options
1 Resolution
720P/30fps
1080P/720P60/720P30/480P
2 Pre-event recording
Off
Off/On:5/15/30sec
3
Mute Switch
Enabled – user controlled
Enable/Disable
4 Bookmark Switch
Enabled – user controlled
Enable/Disable
5 GPS
On
Off/On
6 Day/Night Mode
On – auto switches
Off/On/Auto
7
IR LEDs
Off
Off/Auto
8
Beep Tone Volume
3 (loudest)
Off/1/2/3
9
LED Illumination
1 (most dim)
Off/1/2/3
10
System Clock
Sync to GPS clock
GPS/PC/EyeHD
11
Time/Date Display
Not overlaid on video
No overlay/Overlay
12 Daylight Savings
On
On/Off
13
Officer Name
None
Officer Name
14
Officer Badge #
None
Officer Badge #
15 Sleep Mode
On
Off/On
For support on your Vantage camera, please contact Kustom Signals’ Technical Support
Services at 1-800-835-0156 or 1-620-431-2700.
KSI PN: 006-1221-00 – Rev 1.4
Vantage Quick-Reference Guide
Congratulations, and thank you for purchasing
the Eyewitness Vantage Officer-Worn Camera
from Kustom Signals. While Vantage offers a
number of configurable features, actual
operation is very simple. Once powered on,
there are only three controls available, and just
one, the prominent Record start/stop switch,
that will be used frequently. This guide should
provide everything you need to know to start
using the camera.
Note that two options for configuring the
cameras are available:
1) The camera has been shipped to you with the default configuration. (Defaults
are listed on page 4). Check with your administrator for making changes to the
configuration.
2) The second configuration option involves your agency pre-selecting the
desired configuration. If this was done, your Vantage will have shipped pre-
configured to your requirements.
Getting Started
1) Please charge your camera before the first use. A fully depleted standard
battery requires 2 ½ hours to fully charge and will provide 4 ½ -5 hours of
record time. The extended battery option requires 4 hours to charge and
provides up to 9 hours of record time.
2) Familiarize yourself with the controls and indicators detailed in this guide.
3) Please refer to your Agency’s Administrator for the process you will use to
download files into your database and for information on the configuration
options.

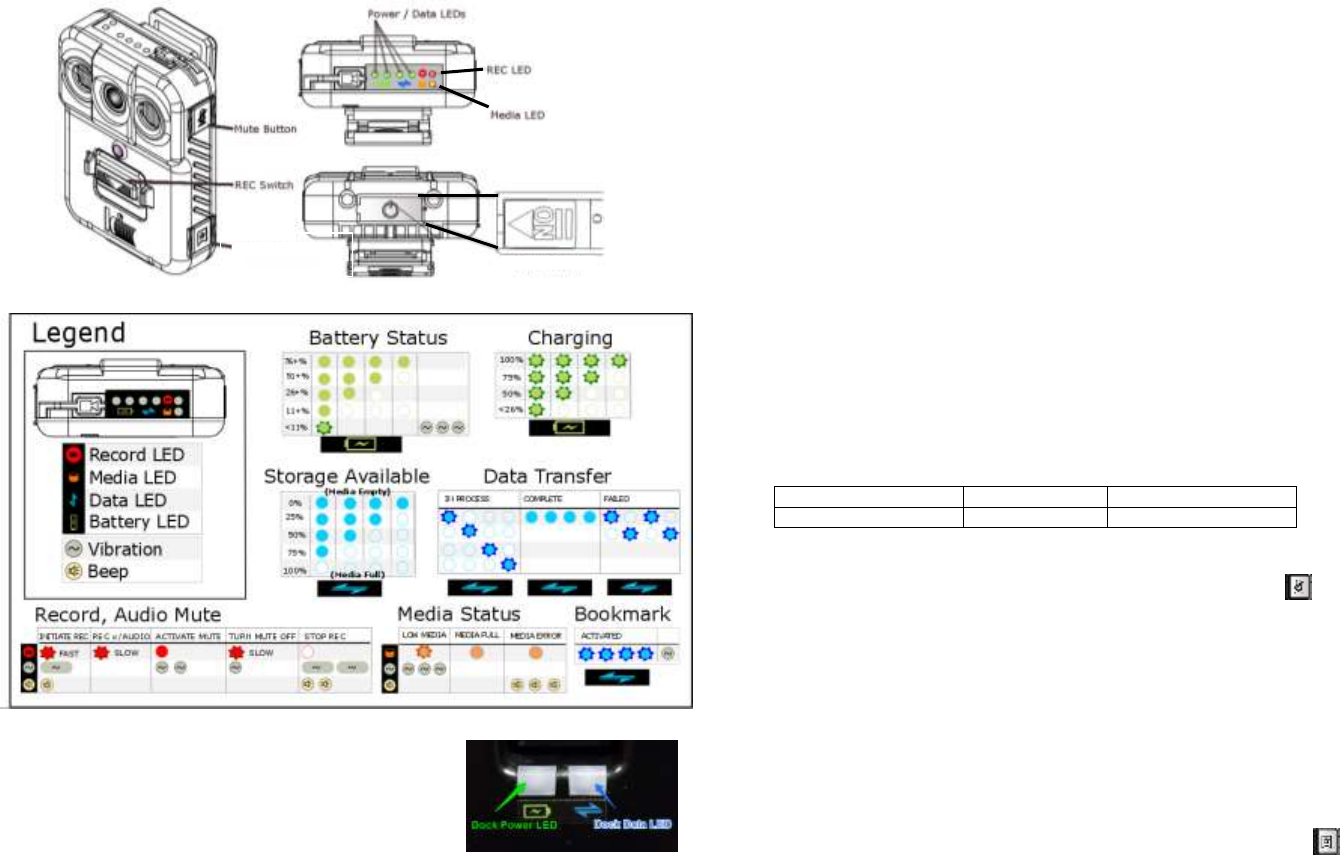
Vantage LED indicators
Charging
Place the Vantage in the dock to start charging. The Power
LED will be RED while charging, and then change to GREEN
when the battery is fully charged. It will also be green if power
is connected and no camera is present.
The Vantage battery-LEDs will flash in sequence one at a time as the battery achieves
25%/50%/75%/100% capacity. All four LEDs will continue to flash when the battery is fully
charged. A fully depleted battery will require 2 ½ hours to charge.
Recording
In order to start a recording, the unit must be powered on (power switch is on the bottom of
the camera), with sufficient battery power and media space available. To Start a recording,
slide the REC Switch down momentarily and release. Vantage will beep and vibrate once*,
indicating recording has started. The REC LED will then continuously flash red*, indicating
that video and audio are being recorded.
To Stop a recording, slide and hold the REC switch down for 2 seconds, then release.
Vantage will beep and vibrate twice*, to indicate the recording has stopped. The REC LED
will no longer be illuminated.
Sleep Mode
Vantage includes a “Sleep” Mode that conserves battery power. When sleeping, all LEDs are
off. Pressing the record switch will wake the camera: in 2 seconds you will see the camera’s
LEDs illuminate, then start recording within 3 more seconds. You can also wake the camera
momentarily with a quick press of the Bookmark button, which will briefly display battery
status, or with a quick press of the Mute button – which will cause the media LED to briefly
flash blue. The camera will return to sleep mode after 30 seconds of inactivity (e.g. after a
recording is stopped). While the camera is awake, (including when Sleep Mode is disabled)
recordings will start in ½ second of pressing the record switch.
Battery Capacity
Sleep Mode Off
Sleep Mode On
Standard Battery
4 ½ – 5 hours
Up to 48 hours
Mute
To toggle the Mute function on/off, press and hold the Mute button for 2 seconds
during a recording**. When Mute function is toggled ON (audio record disabled), Vantage
will vibrate twice to indicate that Mute has been activated, and the REC LED will change from
flashing to solid red.
Unless configured otherwise, Vantage will start each recording with Mute deactivated (audio
record enabled).
When Mute function is toggled OFF (audio record enabled), Vantage will vibrate once to
indicate that Mute has been deactivated, and the REC LED will change from solid to flashing
red.
Bookmark
To add a bookmark to a recording, momentarily press the bookmark button during the
recording**. All 4 power/media LEDs will flash blue once, to indicate that a bookmark has
been recorded.
Bookmark Button
Covert Mode On/Off
Power Switch
under protective cover

to which the receiver is connected.
- Consult the dealer or an experienced radio/TV technician for help.
- Connect the equipment into an outlet on a circuit different from that
- Increase the separation between the equipment and receiver.
- Reorient or relocate the receiving antenna.
Homologation
FCC Compliance Statement.
This device complies with part 15 of the FCC Rules. Operation is subject to the
following two conditions :
(1) This device may not cause harmful interference, and
(2) This device must accept any interference received, including interferencethat may
cause undesired operation.
Do Not
Any changes or modifications to the equipment not expressly approved by
the party responsible for compliance could void
user’s authority to operate the equipment.
IC Compliance Statement.
This device complies with Industry Canada licence-exempt RSS standard(s).
Operation is subject to the following two conditions:
(1) this device may not cause interference, and
(2) this device must accept any interference, including interference that may cause
undesired operation of the device.
Le present appareil est conforme aux CNR d’Industrie Canada applicables aux appareils radio
exempts de licence. L’exploitation est autorisee aux deux conditions suivantes :
(1) l’appareil ne doit pas produire de brouillage, et
(2) l’utilisateur de l’appareil doit accepter tout brouillage radioelectrique subi, meme si le
brouillage est susceptible d’en compromettre le fonctionnement.
This equipment has been tested and found to comply with the limits for a Class
B digital device, pursuant to part 15 of the FCC Rules. These limits are
designed to provide reasonable protection against harmful interference in a
residential installation.
This equipment generates uses and can radiate radio frequency energy and,
if not installed and used in accordance with the instructions, may cause
harmful interference to radio communications. However, there is no guarantee
that interference will not occur in a particular installation. If this equipment
does cause harmful interference to radio or television reception, which can be
determined by turning the equipment off and on, the user is encouraged to try
to correct the interference by one or more of the following measures:
To comply with FCC RF exposure compliance requirements, please use the supplied
belt clips provided by the manufacturer. This device must not be co-located or operation
in conjunction with any other antenna or transmitter except complying with FCC
multi-transmitter requirements.