Kyocera C6743 preface User Manual 1
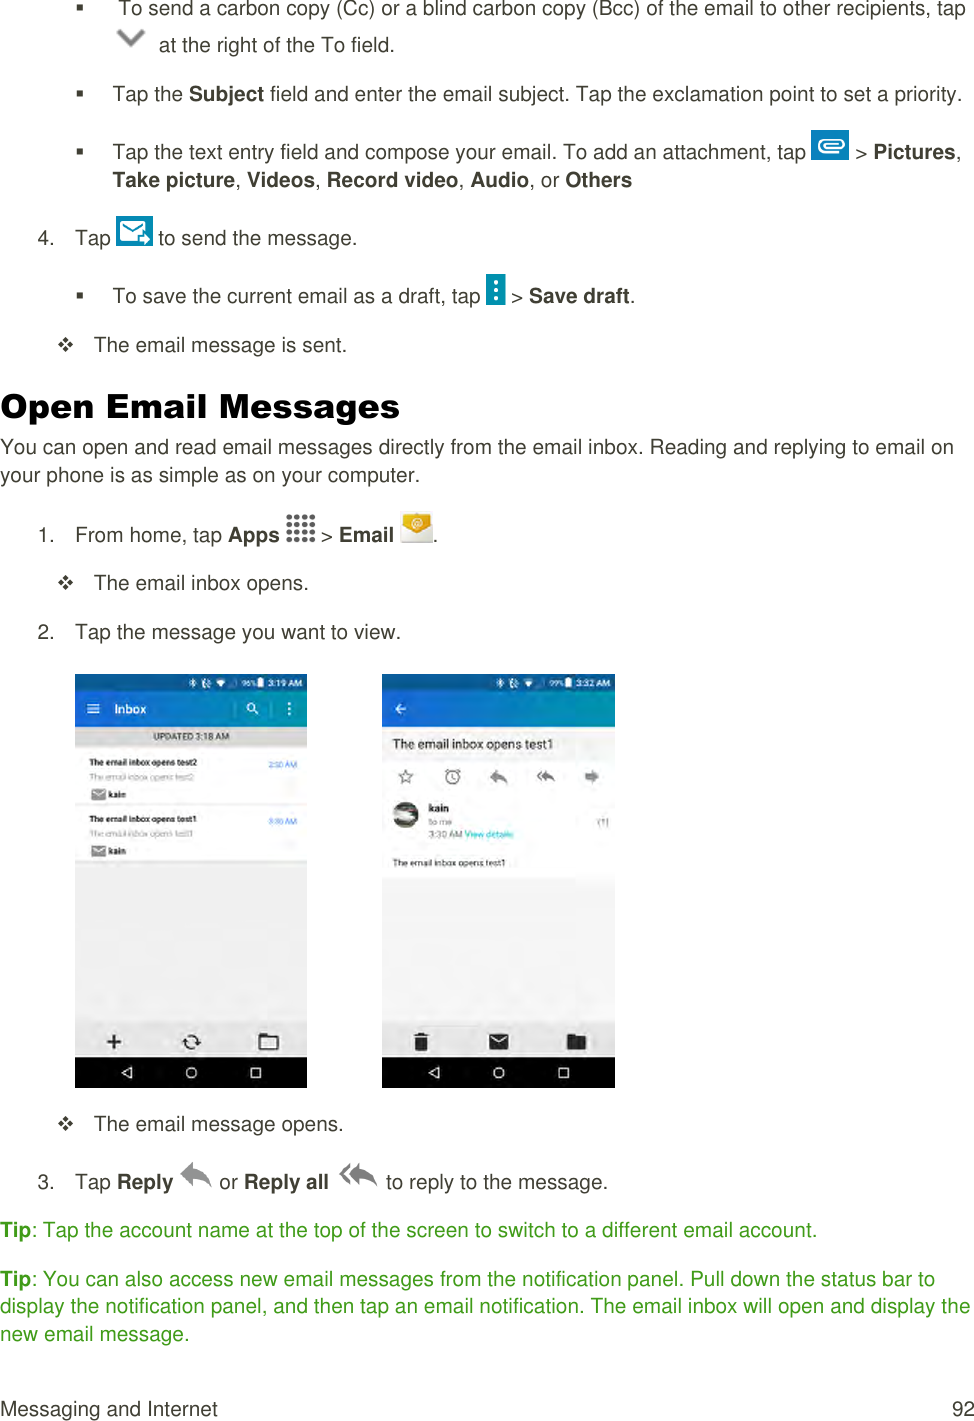
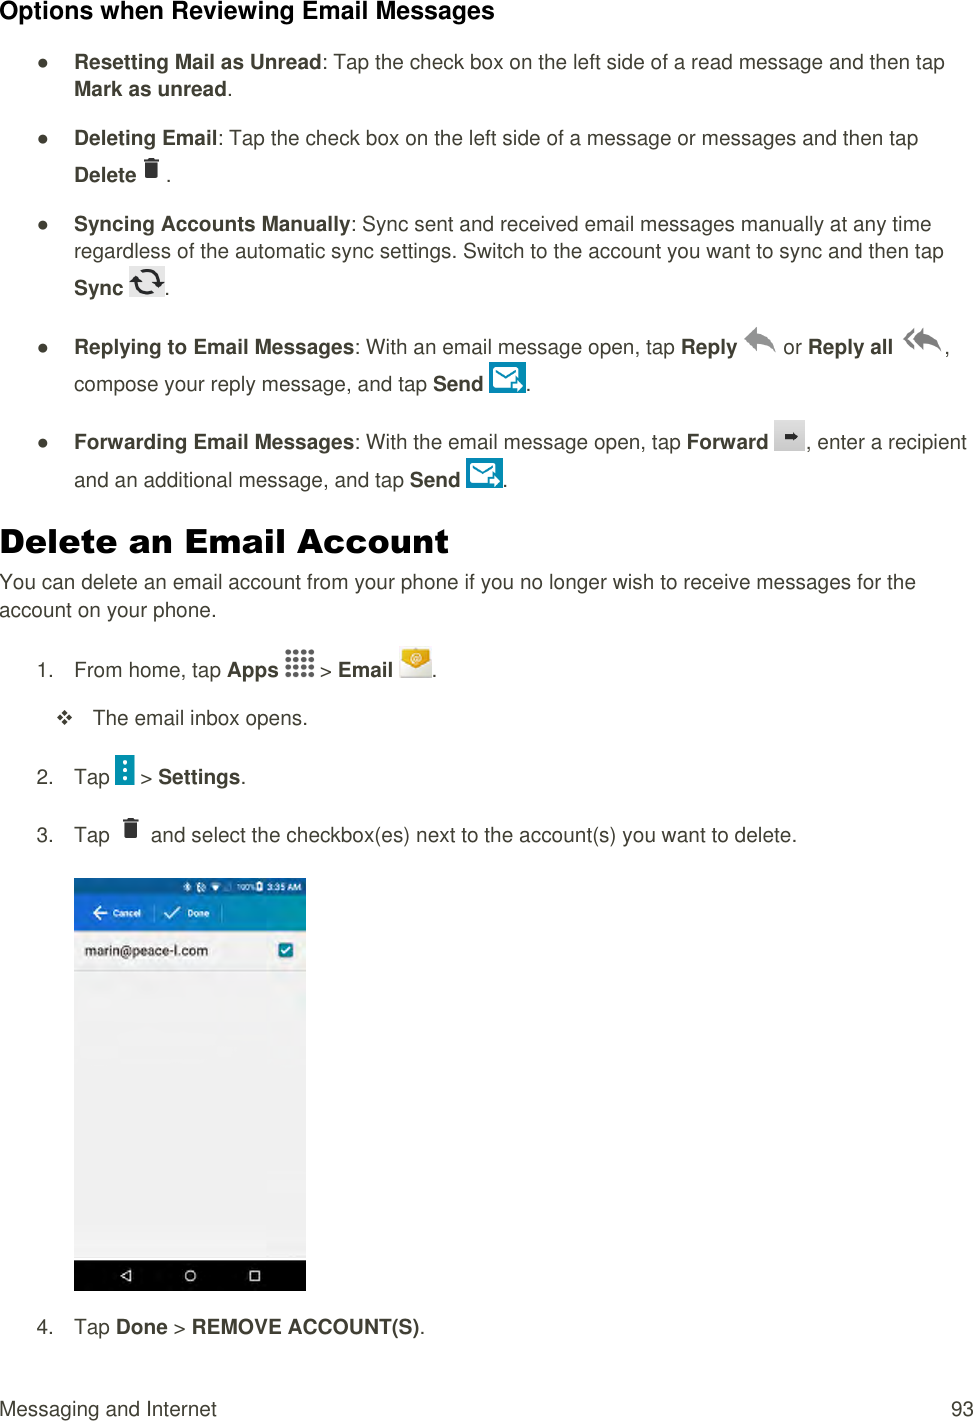
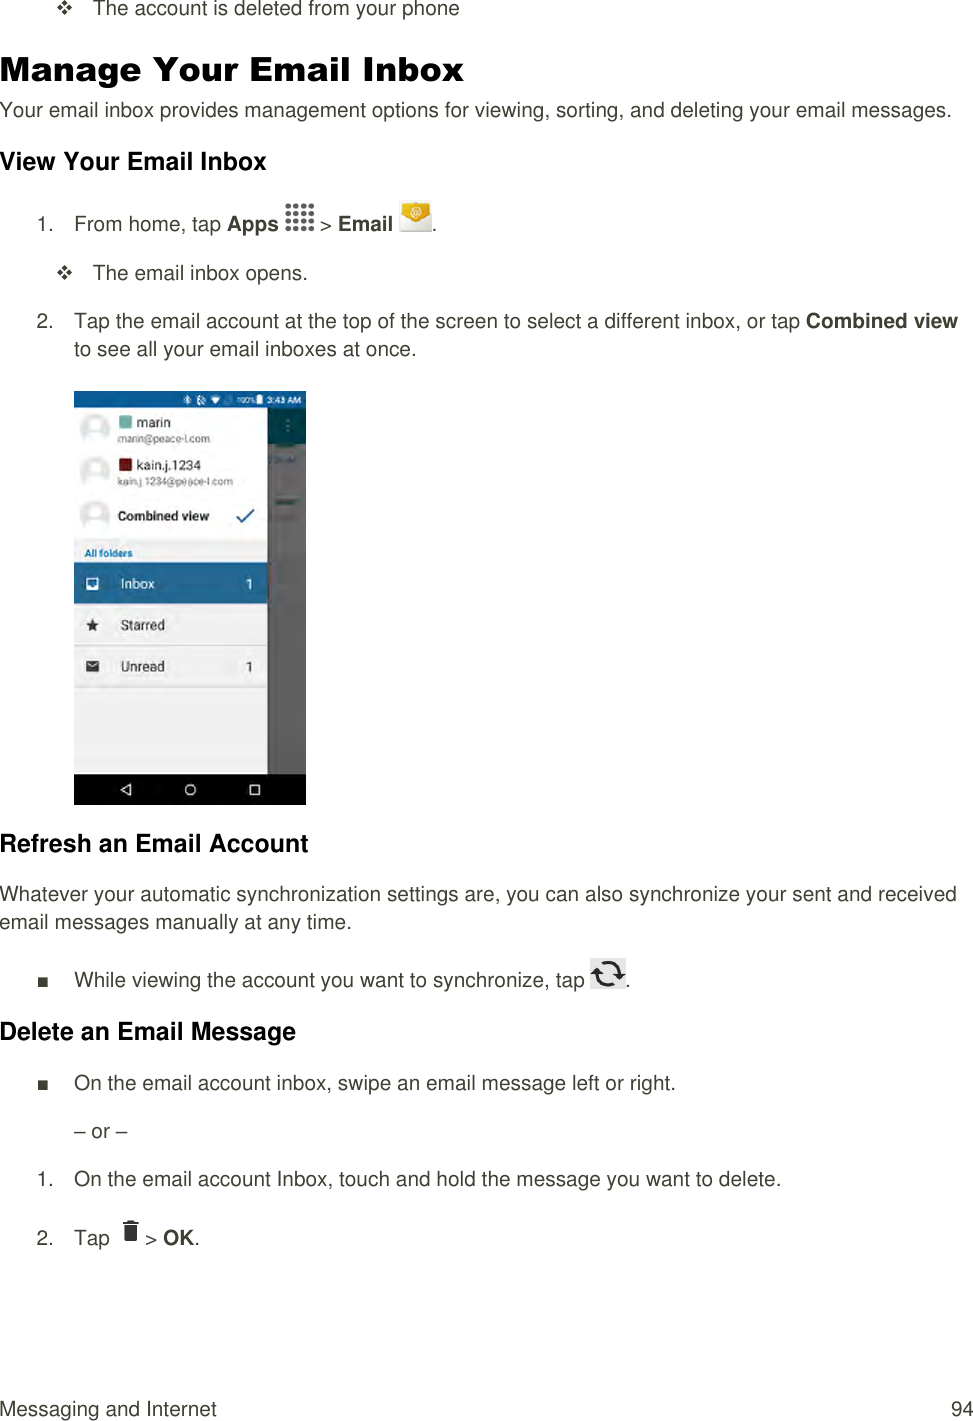
Kyocera Corporation preface 1
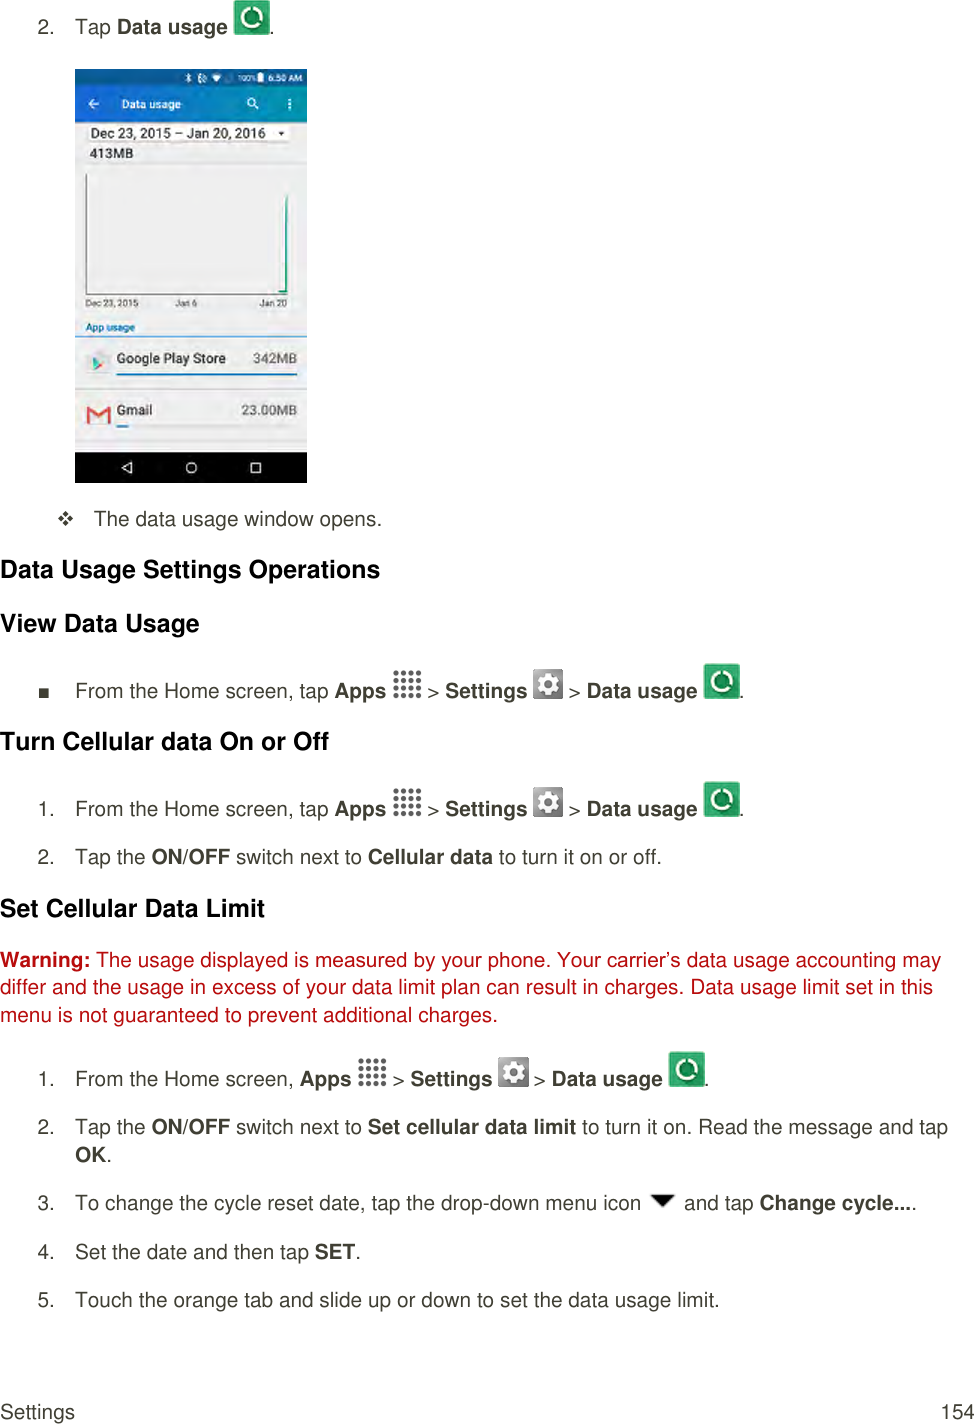
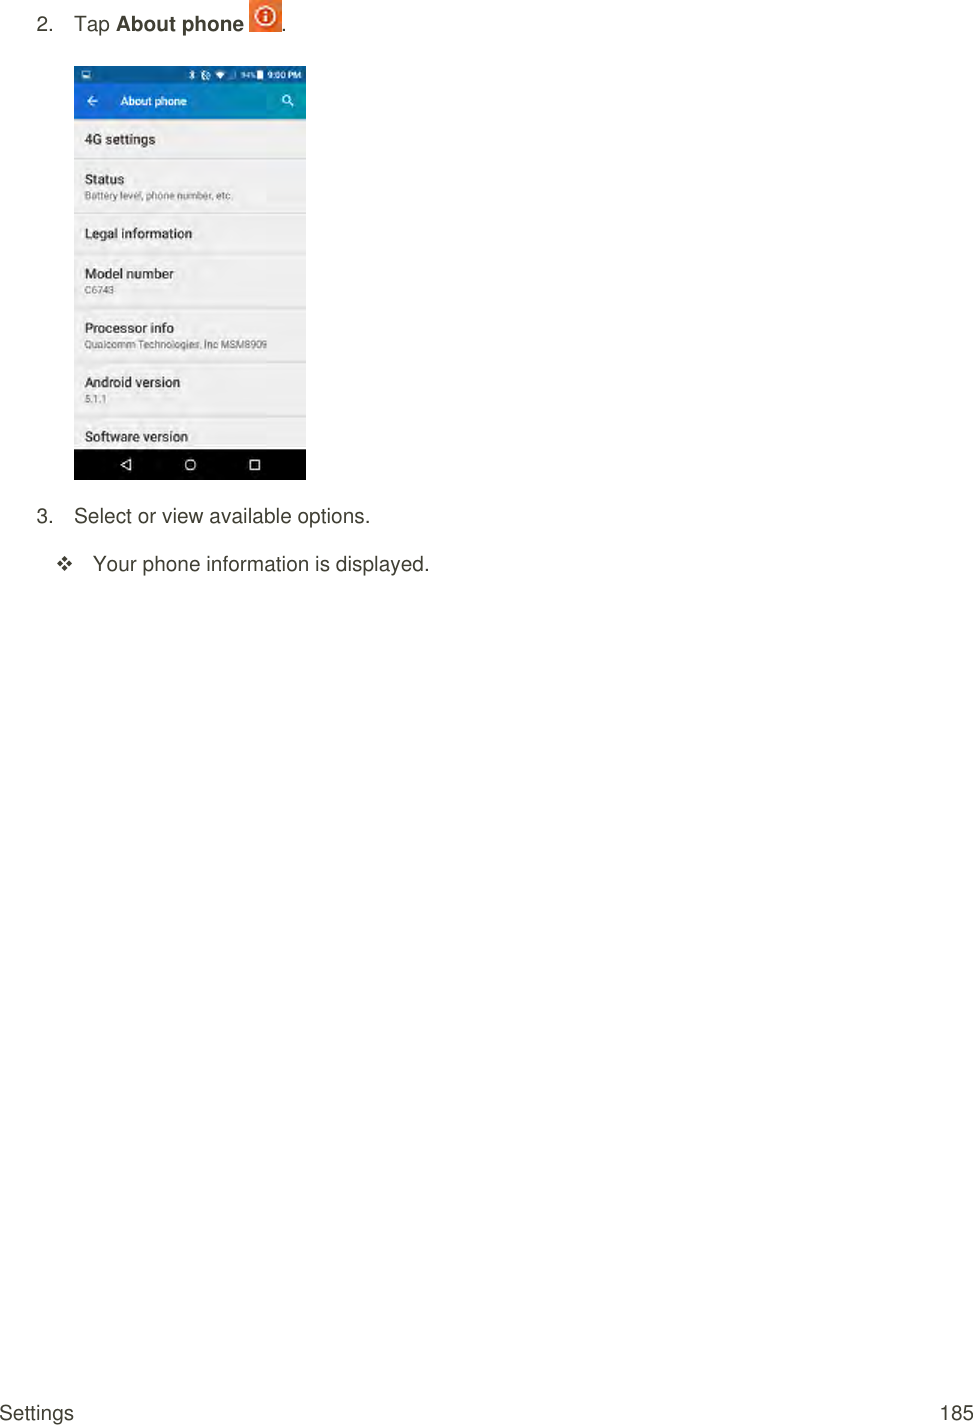
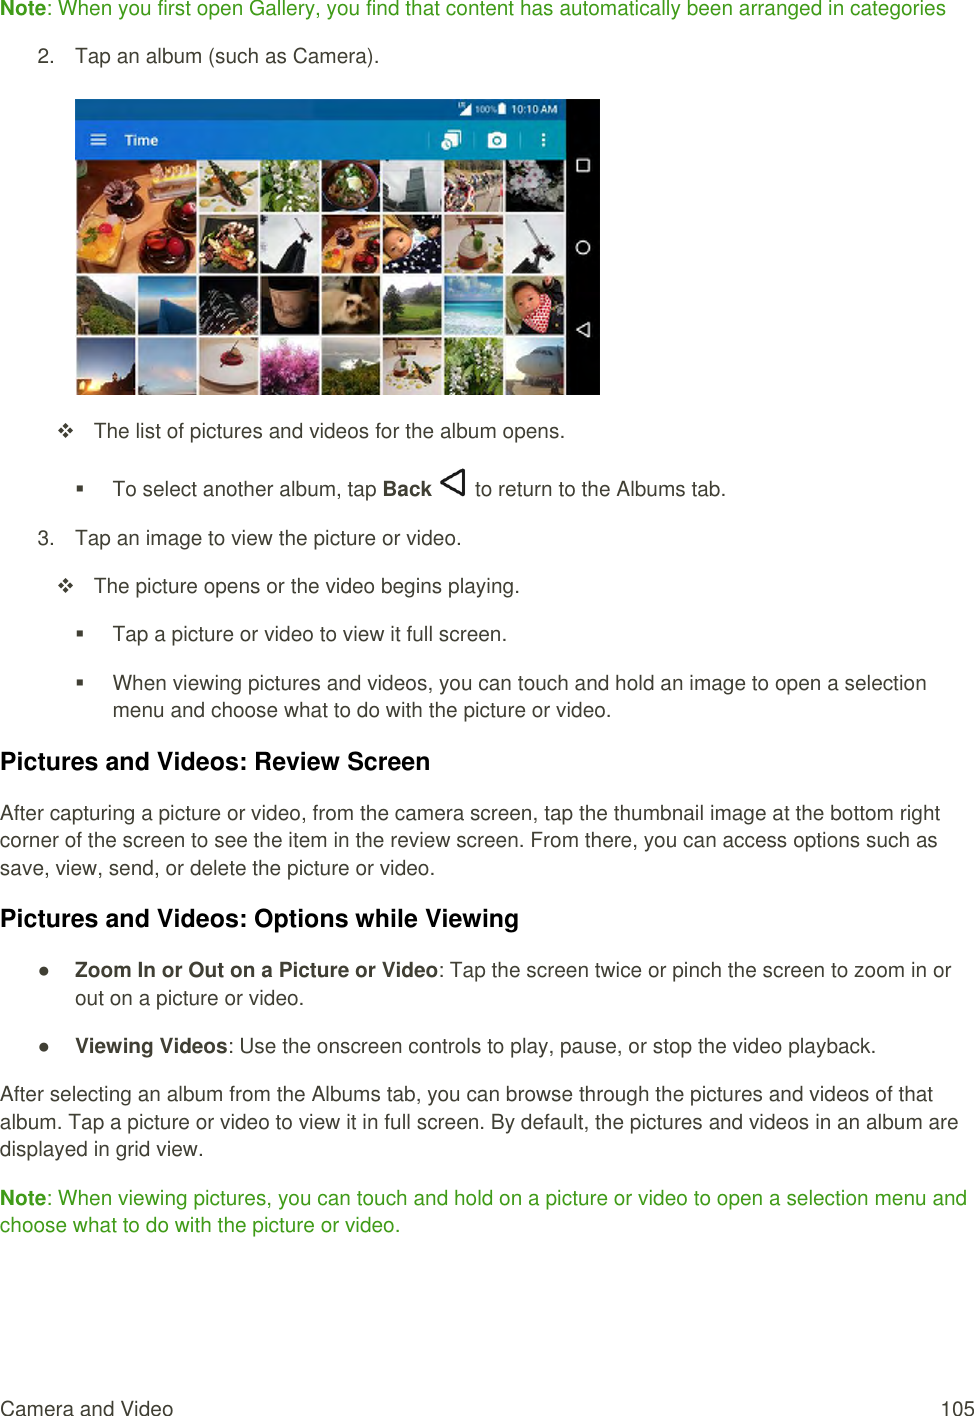
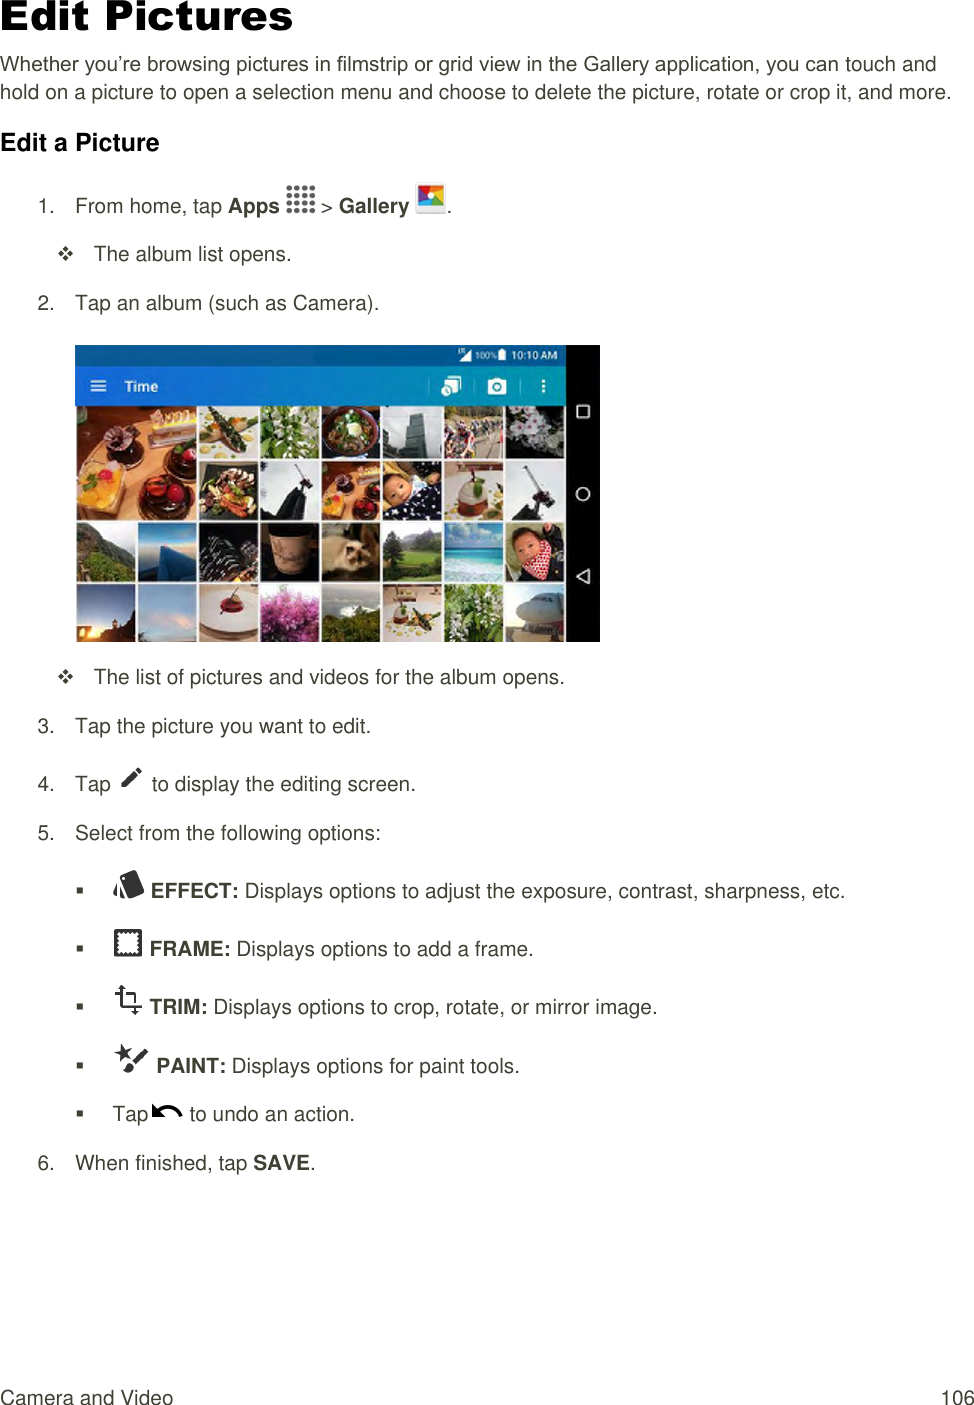
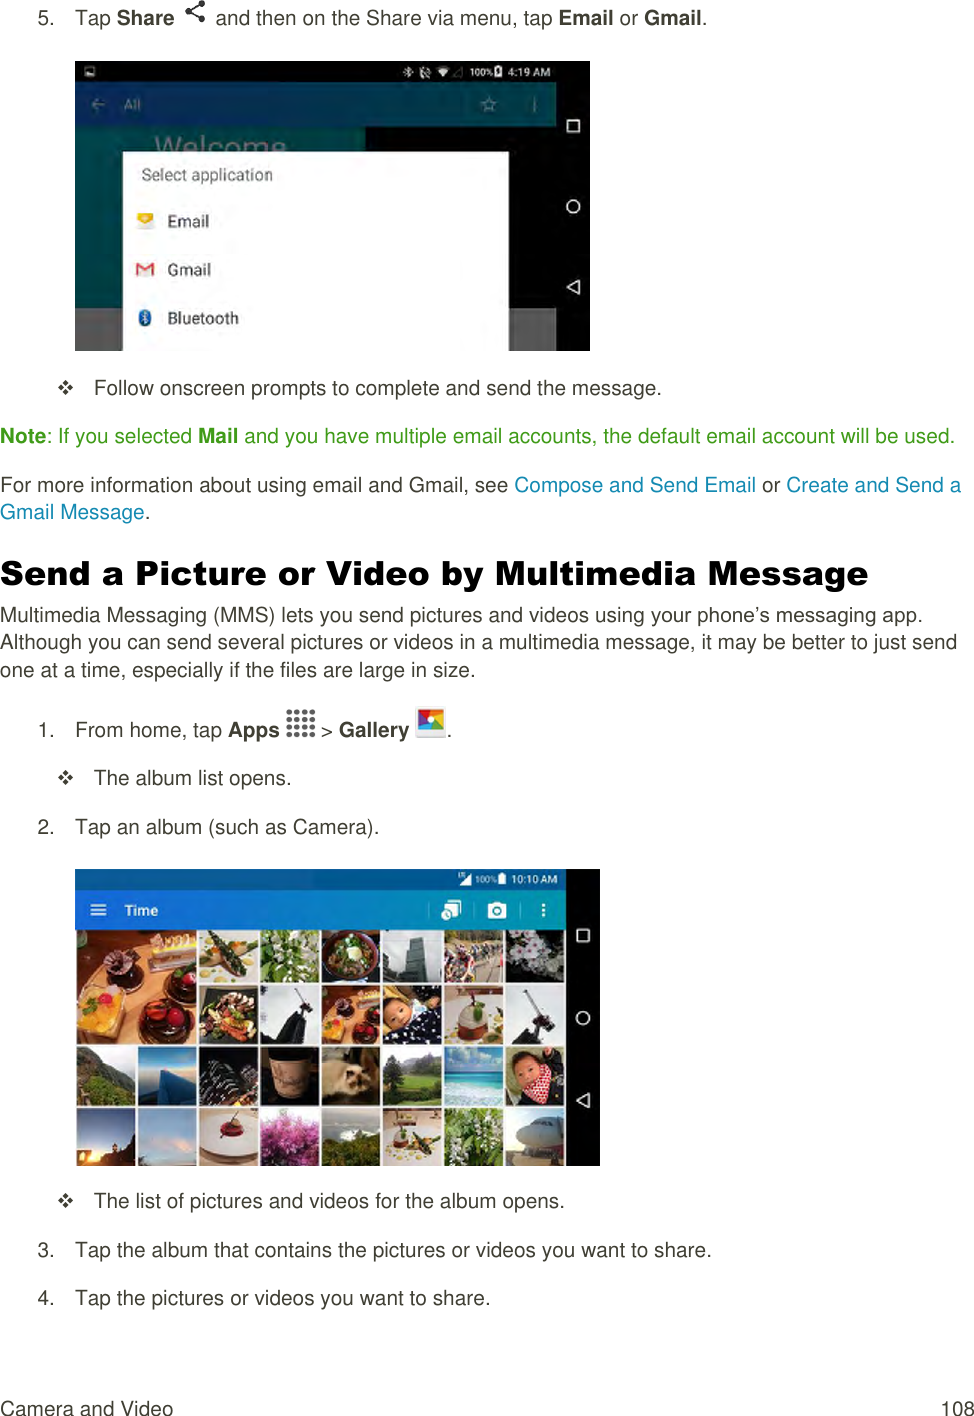
UserManual.wiki
>
Kyocera
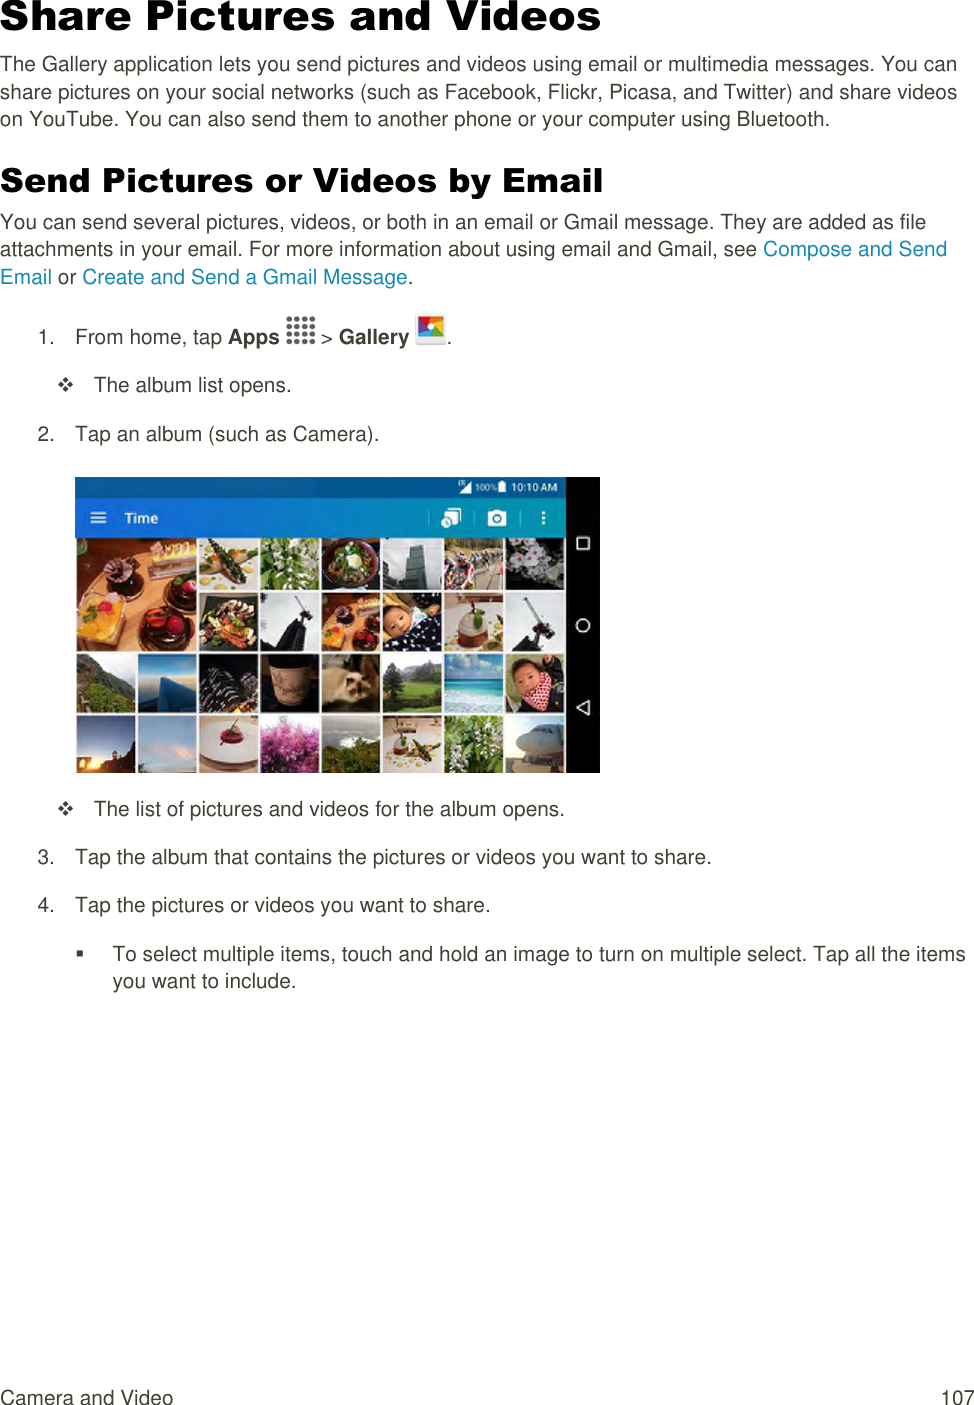
>
C6743 User Manual
>
User manual 1
Contents
1.
User manual 1
2.
User manual 2
User manual 1
Navigation menu
Upload a User Manual
Namespaces
Wiki Guide
HTML
PDF
Info
Views
User Manual
Discussion / Help
Navigation
![Hydro REACH User Guide [UG template version 15b_rev080815] [boost_Kyocera_Hydro REACH_ug_en_160126_d2]](https://usermanual.wiki/Kyocera/C6743.User-manual-1/User-Guide-2919331-Page-1.png)


![Basic Operations 30 Update Your Phone From time to time, updates may become available for your phone. You can download and apply updates through the Apps > Settings > System update menu. Software Update Cautions During update: The phone cannot be used until the software update is complete. It may take time to update your phone’s software. Signal during update: Update your phone where signal reception is good, and do not change location during the update process. Make sure the battery is adequately charged before beginning an update. A weak signal or low battery during an update may cause the update to fail. An update failure may disable the phone. Other functions during update: Other phone functions cannot be used during a software update. Update Your Phone Software You can update your phone's software using the System update option. Before Updating Your Phone Updating your phone may result in a loss of saved data depending on the condition of your phone (malfunctioning, damaged, water seepage, etc.). You must back up all critical information before updating your phone firmware. Back Up All Data Prior to Update To back up your Gmail information: 1. From home, tap Apps > Settings > Accounts > Google > [your account]. 2. Tap the ON/OFF switch to enable backup of each item. If the Auto-sync option is on, email, Calendar and Contacts automatically synchronize whenever a change is made. If the Auto-sync option is off, tap the sync icon within the account field to reveal the account’s synchronization settings screen. 3. Tap > Sync now to sync your Google Account information. To back up your Exchange Mail information: 1. From home, tap Apps > Settings > Accounts > Microsoft Exchange ActiveSync. 2. Tap the sync icon within the Corporate account field to reveal the account’s synchronization settings screen.](https://usermanual.wiki/Kyocera/C6743.User-manual-1/User-Guide-2919331-Page-38.png)


![Phone App 53 1. From home, tap Apps > Visual Voicemail. You will see the voicemail inbox. 2. Tap the voicemail that you would like to view or listen to. Tip: There are several icons at the bottom of the review screen for maintenance, storage, messaging, and other options. For an explanation of all your options, tap Menu > Help > Visual Voicemail Menu > Visual Voicemail Menu. Listen to Multiple Voicemail Messages When you are done listening to a voicemail message you can easily access other voicemail messages without returning to the main voicemail screen. 1. Listen to the current voicemail message. 2. Swipe your finger left or right to display the next or previous message. The next or previous message will begin playing automatically. You can navigate through voicemail messages as frequently as you'd like. You can even move to the next or previous message before you're finished listening to the current one. Visual Voicemail Options Your visual voicemail options appear as icons at the bottom of the voicemail review screen. 1. From home, tap Apps > Visual Voicemail. 2. Tap a message to review it. The following options are available while reviewing a voicemail message: [icon] Subscribe to subscribe to the premium Voice-to-Text transcription service. (Requires an additional monthly charge.)](https://usermanual.wiki/Kyocera/C6743.User-manual-1/User-Guide-2919331-Page-61.png)
![Phone App 54 [icon] Delete to delete selected messages from your current list of available voicemail messages. [icon] Call to call the number the message came from. [icon] Share to send the message via [available methods]. [icon] Reply to reply to the message via text or voice message. [icon] Move to SD to move one or more messages to your phone’s installed microSD card. Note: Not all options are available for all messages. Configure Visual Voicemail Settings The Visual Voicemail settings menu lets you access settings for notifications, pictures, greetings, and more. 1. From home, tap Apps > Visual Voicemail. 2. Tap Menu > Settings. You will see the voicemail settings menu. 3. Select an option to change its settings. Manage subscription to verify your Voicemail-to-Text account information. Auto forward to email to send a copy of new messages to an email address of your choice. Personalize voicemail to change your voicemail greeting for incoming calls and update password. See Change Your Main Greeting via the Voicemail Menu. Notifications to determine how you are notified of new voicemails. Delete messages to set the timing to permanently delete the messages in the trash folder. Display name to enter a name that is attached to your outgoing voicemails as part of an identification string. See Edit the Display Name via the Voicemail Menu. Speakerphone to set the speakerphone setting. Transcriptions displayed Themes to select a theme for the Visual Voicemail. View quick tips tutorial to display some quick tips for using Visual Voicemail. Help to go to the help page of Visual Voicemail. Send feedback to send your feedback on the Visual Voicemail. Updates to search for an update to your Visual message software.](https://usermanual.wiki/Kyocera/C6743.User-manual-1/User-Guide-2919331-Page-62.png)


![Camera and Video 101 Camera and Video You can use the camera or video camera to take and share pictures and videos. Your phone comes with a [xx] megapixel camera with an autofocus feature that lets you capture sharp pictures and videos. Camera Overview The camera's viewfinder screen lets you view your subject and access camera controls and options. ● Settings button: Opens the camera settings menu and lets you change additional camera settings. See Camera Settings. ● Shooting/Recording Mode: Opens the navigation drawer to switch the shooting/recording mode. ● Quick Settings Panel: Displays the settings you use most frequently. ● Thumbnail: Displays the thumbnail of the latest image. ● Shutter Button: Takes a picture. ● Record Button: Records a video. Note: You can customize the onscreen shortcuts on the left side of the screen. Touch and hold an icon to display the available options and then drag an available icon to the option you want to replace. Additional options may include Focus mode, Scene mode, Exposure value, Timer, Resolution, White balance, ICO, Metering, Auto contrast, Outdoor visibility, and Guidelines.](https://usermanual.wiki/Kyocera/C6743.User-manual-1/User-Guide-2919331-Page-109.png)

![Connectivity 140 Note: Turning on Hotspot on will disable your phone's connection to other Wi-Fi networks. Set Up Hotspot 1. From home, tap Apps > Settings > More . 2. Tap Tethering & Hotspot. The Hotspot window opens. 3. Tap the ON/OFF switch next to USB tethering to turn Mobile Hotspot on , if it is not enabled. Hotspot is enabled. If your phone's mobile data access is not enabled, you will be prompted to turn it on. Follow the onscreen instructions To disable Hotspot, tap the switch again . Note: The best way to keep using the phone as a hotspot is to have it connected to a power supply. Important: Write down the passkey (password) for this communication (shown onscreen). Connect to Mobile Hotspot 1. Enable Wi-Fi (wireless) functionality on your target device (laptop, media device, etc.). 2. Scan for Wi-Fi networks from the device and select your phone hotspot from the network list. The default name for your phone hotspot is [DEVICE]XXX. You can change the name by tapping Hotpot Settings > Router name from the Hotspot screen. 3. Select this phone and follow your onscreen instructions to enter the passkey (provided on the Mobile Hotspot page). The device is connected via your phone’s Mobile Hotspot. 4. Launch your Web browser to confirm you have an Internet connection. Tethering Use Tethering to share your device’s Internet connection with a computer that connects to your device via USB cable, or by Bluetooth. Important: Use of the Tethering feature requires an additional subscription. Sign in to your account on boostmobile.com to learn more. 1. From home, tap Apps > Settings > More . 2. Tap Tethering & Hotspot.](https://usermanual.wiki/Kyocera/C6743.User-manual-1/User-Guide-2919331-Page-148.png)