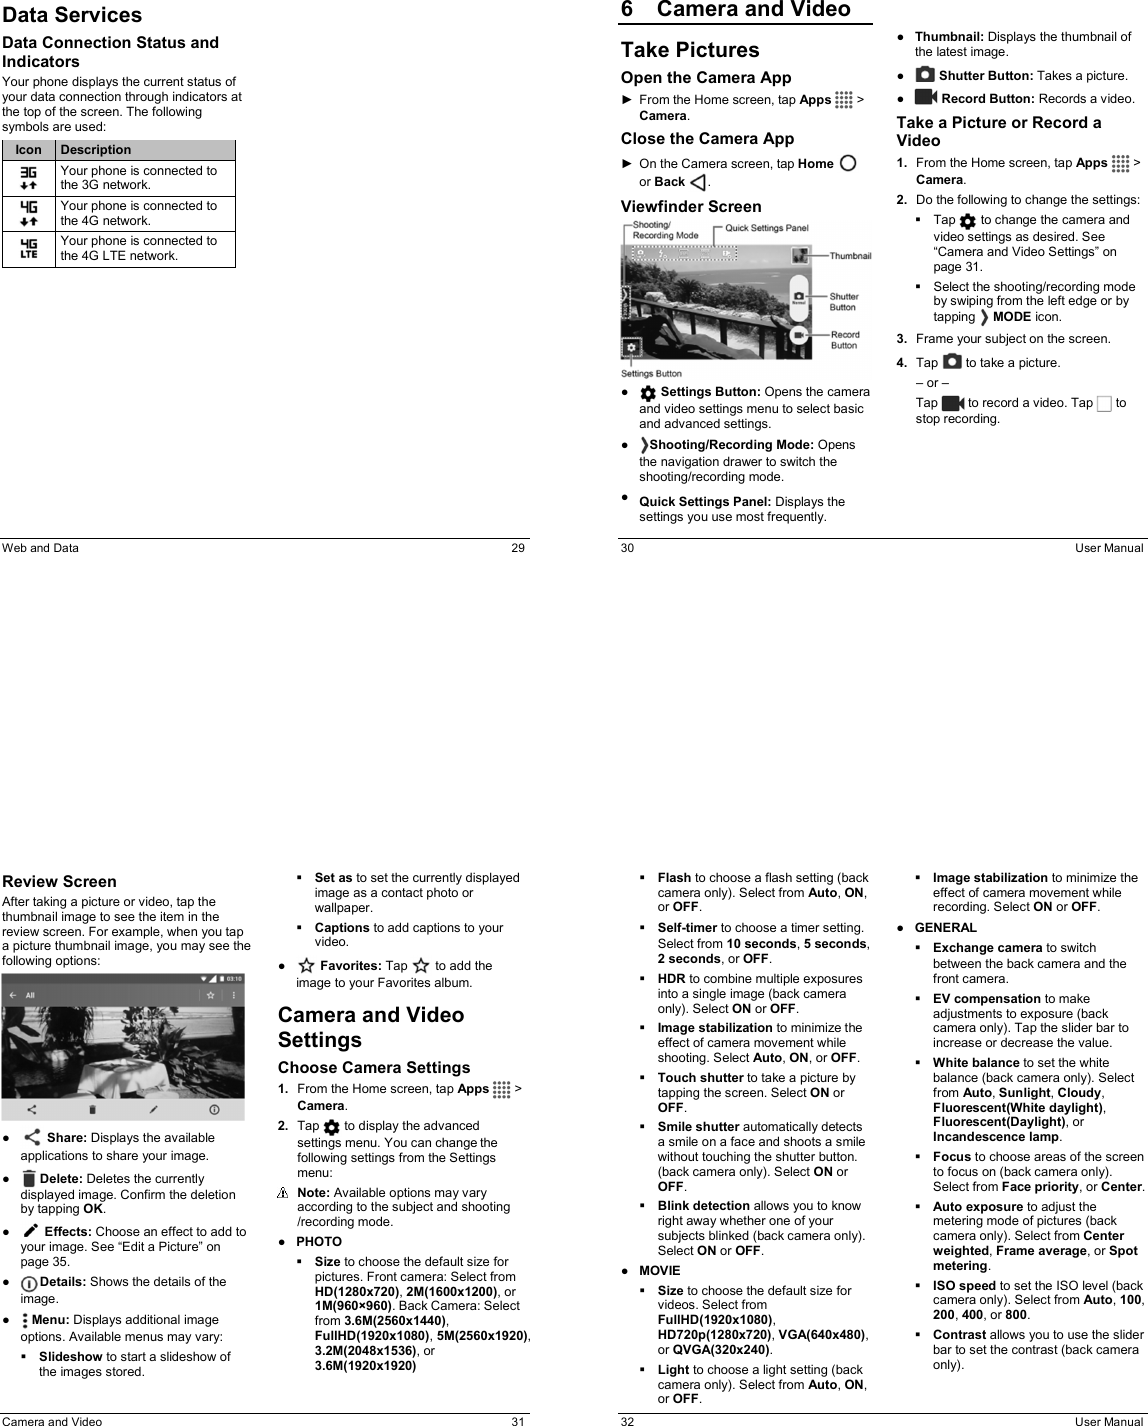
Kyocera CD8100 Multi-Band CDMA/LTE Phone with WLAN, Bluetooth and Nordic Transmitter User Manual KYOCERA I 75 Manualx

Kyocera Corporation Multi-Band CDMA/LTE Phone with WLAN, Bluetooth and Nordic Transmitter KYOCERA I 75 Manualx
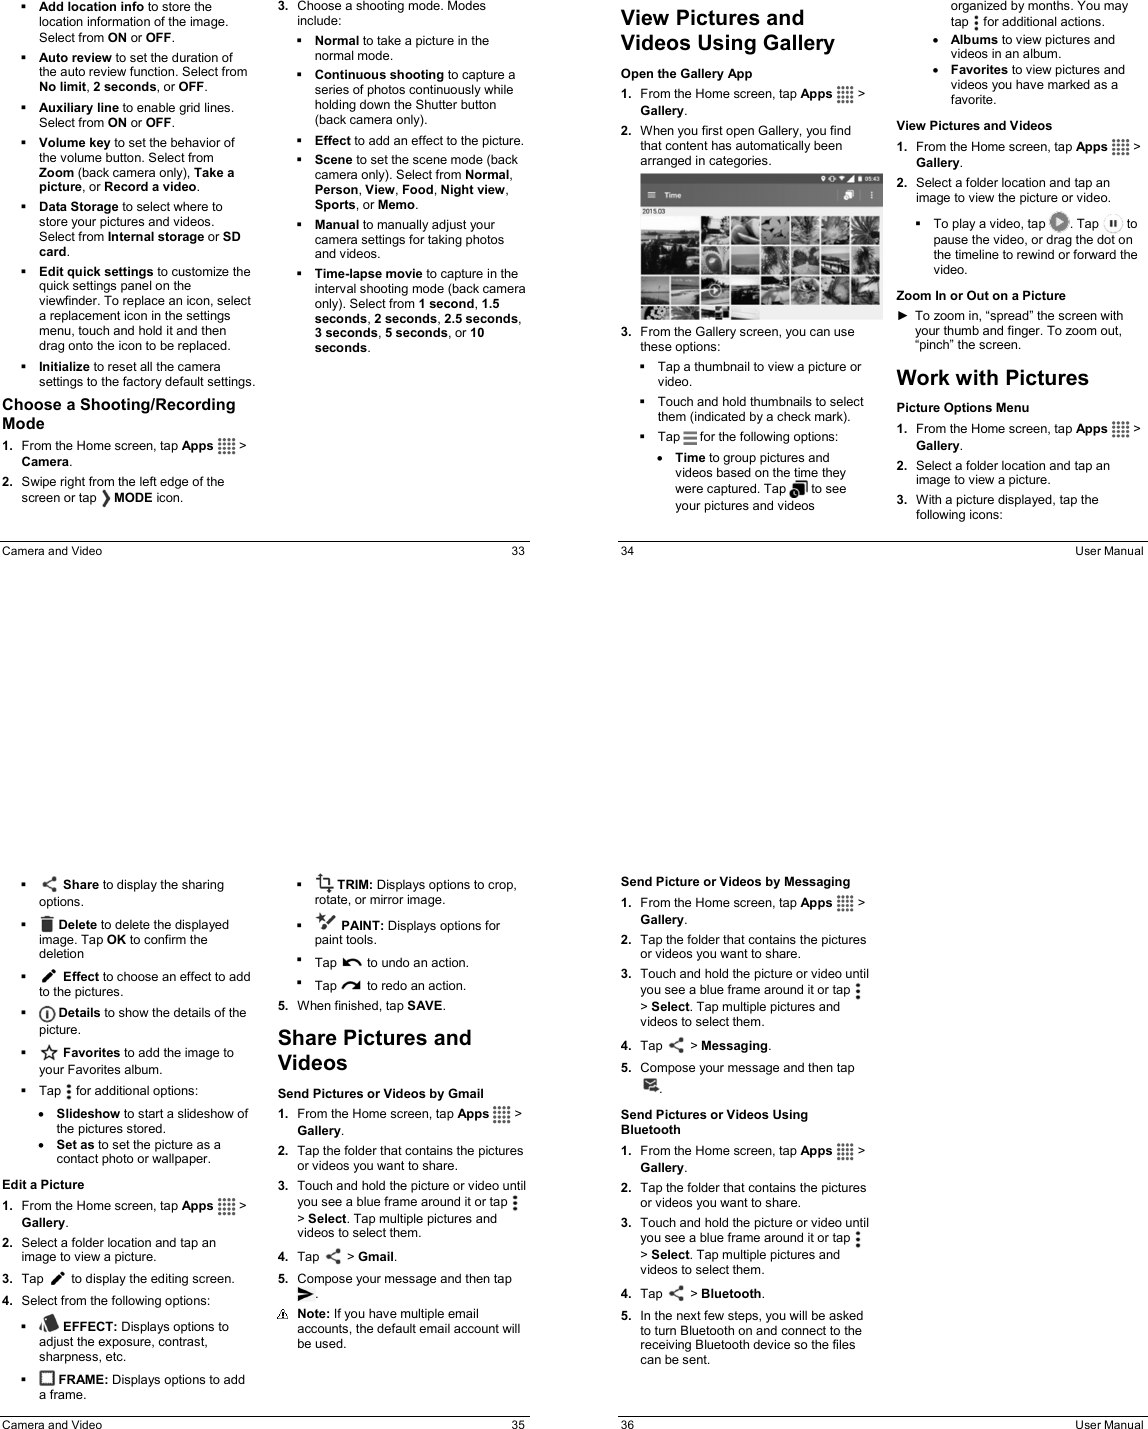
Users Manual

       CD8100   User Manual  2  User Manual Table of Contents1 Phone Basics .................................. 5 Phone Overview ..................................... 5 Key Functions ...................................... 6 Get the Phone Ready ............................. 7 Charge the Battery .............................. 7 Insert the SIM Card.............................. 7 Optional: Insert the MicroSD Card ....... 8 Turn the Phone On and Off .................... 8 Turn the Phone On .............................. 8 Turn the Phone Off .............................. 8 Turn the Screen On and Off ................... 9 Turn the Screen On and Start .............. 9 Turn the Screen Off When Not in Use...................................................... 9 Touchscreen Navigation ......................... 9 Function Buttons .................................. 11 Home Screen ....................................... 12 Home Screen Overview ..................... 12 Status Bar ............................................ 12 2 Text Entry ...................................... 13 Touchscreen Keyboard .......................... 13 Tips for Editing Text.............................. 13 3 Phone Calls ................................... 14 Make Phone Calls ................................ 14 Call Using the Phone Dialpad ............ 14 Call from Recent Calls ....................... 14 Call from Contacts ............................. 14 Call an Emergency Number ............... 14 Enhanced 9-1-1 (E911) Information ... 15 Call a Number with Pauses ................ 15 Call Using a Speed Dial Number........ 15 Call Using the Plus (+) Code Dialing .. 15 Receive Phone Calls ............................ 16 Answer an Incoming Call ................... 16 Mute the Ringtone ............................. 16 Send an Incoming Call to Voicemail ... 16 Reject a Call and Send a Text Message ............................................ 16 Voicemail .............................................. 16 Set Up Voicemail ............................... 16 Voicemail Notification ......................... 16 Retrieve Your Voicemail Messages .... 17 Phone Call Options ............................... 17 In-Call Options ................................... 17 Call Waiting ....................................... 17 Conference Calling ............................ 17 Call Settings ......................................... 19 Phone Ringtone ................................. 19 Dial Pad Touch Tones ....................... 19 Vibrate When Ringing ........................ 19 Voicemail Settings ............................. 19 Quick Responses ............................... 19 Fixed Dialing Numbers (FDN) ............ 19 Call Forwarding .................................. 20 Additional Settings ............................. 20 Caller ID ............................................ 20 Call Barring ........................................ 20 Auto Answer ...................................... 20 Call Timer and Call Duration .............. 20 Recent Calls ......................................... 21 View Recent Calls .............................. 21 Recent Calls Options ......................... 21 Filter Recent Calls ............................. 21 Clear Recent Calls ............................. 21 4 Contacts ........................................ 22 Display Contacts ................................... 22 Add a Contact ....................................... 23 Table of Contents  3 Save a Phone Number ......................... 23 Edit a Contact ....................................... 24 Add a Group Contact ............................ 25 Edit a Group Contact ............................ 26 ICE (In Case of Emergency) ................. 26 Synchronize Contacts ........................... 27 Share a Contact ................................... 27 5 Web and Data ................................ 28 Wi-Fi .................................................... 28 Turn Wi-Fi On and Connect to a Wireless Network ............................... 28 Check the Wireless Network Status ... 28 Connect to a Different Wi-Fi Network ............................................. 28 Data Services ....................................... 29 Data Connection Status and Indicators ........................................... 29 6 Camera and Video ........................ 30 Take Pictures ....................................... 30 Open the Camera App ....................... 30 Close the Camera App ...................... 30 Viewfinder Screen ............................. 30 Take a Picture or Record a Video ...... 30 Review Screen .................................. 31 Camera and Video Settings .................. 31 Choose Camera Settings ................... 31 Choose a Shooting/Recording Mode ................................................. 33 View Pictures and Videos Using Gallery ................................................. 34 Work with Pictures ................................ 34 Share Pictures and Videos ................... 35 7 Tools and Calendar ...................... 37 Calendar .............................................. 37 Add an Event to the Calendar ............ 37 Calendar Event Alerts ........................ 37 Edit Calendar Events ......................... 38 Erase Calendar Events ...................... 38 Clock .................................................... 38 Desk Clock ........................................ 38 Alarm ................................................. 39 Stopwatch .......................................... 39 Timer ................................................. 40 World Clock ....................................... 40 Calculator ............................................. 40 Bluetooth .............................................. 40 Turn Bluetooth On or Off .................... 40 The Bluetooth Settings Menu ............. 40 Disconnect a Bluetooth Device .......... 41 Send Information from Your Phone to Another Device .............................. 41 Receive Information from Another Device ............................................... 42 microSD Card ....................................... 42 Insert a microSD Card ....................... 42 Remove a microSD Card ................... 43 View the microSD Card Memory ........ 43 Unmount the microSD Card ............... 43 Format the microSD Card .................. 43 Use the Phone’s microSD Card as a Media Device ..................................... 43 8 Settings .......................................... 44 Access to Phone’s Settings Menu ......... 44 Wireless & Networks Settings ............ 44 Wi-Fi .................................................. 44 Bluetooth ........................................... 44 Data Usage ........................................ 44 Airplane Mode ................................... 45 Auto-Reply Mode ............................... 45 Cellular Networks Settings ................. 45 Wireless Emergency Alerts ................ 46 Device Settings..................................... 47 Change Home ................................... 47 4  User Manual Display Settings ................................. 47 Sound & Notification Settings ............. 48 Storage Settings ................................ 50 Battery Settings ................................. 50 Connectivity Settings ......................... 51 Apps Settings .................................... 51 Personal Settings ................................. 51 Location Settings ............................... 51 Start Screen Settings ......................... 51 Security Settings ................................ 53 Accounts Settings .............................. 54 Language & Input Settings ................. 54 Backup & Reset Settings ................... 55 System Settings ................................... 56 Date & Time Settings ......................... 56 Accessibility Settings ......................... 56 Printing .............................................. 59 About Phone ...................................... 59 9 Get Help ......................................... 60 Customer Support ................................ 60 Qualified Service .................................. 60 10 Notes .............................................. 61 Important Safety Information ........... 62 General Precautions ............................. 62 Maintaining Safe Use of and Access to Your Phone ...................................... 62 Do Not Rely on Your Phone for Emergency Calls ............................... 62 Using Your Phone While Driving ........ 62 Following Safety Guidelines ............... 62 Medical Devices ................................ 63 Using Your Phone Near Other Electronic Devices ............................. 63 Using Your Phone On Airplanes ........ 63 Turning Off Your Phone in Dangerous Areas ............................... 63 Restricting Children’s Access to Your Phone ........................................ 64 Waterproof Capability ........................... 64 Charging ............................................ 65 Using Your Phone With a Hearing Aid Device .................................................. 65 Getting the Best Hearing Device Experience With Your Phone ............. 66 Caring for the Battery ............................ 66 Charging ............................................ 67 Storing ............................................... 67 Common Causes of Battery Drain ...... 67 Disposal of Lithium Ion (Li-Ion) Battery Installed in Your Phone .......... 67 Radio Frequency (RF) Energy .............. 67 Understanding How Your Phone Operates ............................................ 67 Knowing Radio Frequency Safety ...... 68 Body-Worn Operation ........................ 68 Specific Absorption Rates (SAR) for Wireless Phones ................................ 68 FCC Radio Frequency Emission ........ 69 FCC Notice ........................................ 69 Owner’s Record .................................... 70 Manufacturer’s Warranty .................. 71 Index .................................................... 74 Copyright Information ....................... 77
Phone Basics  5 1  Phone Basics Phone Overview  6  User Manual Key Functions   CAUTION! Inserting an accessory into the incorrect jack may damage the phone. ●  Front Camera takes pictures and records videos while facing the screen, and allows you to video conference. ●  Proximity Sensor/Light Sensor detects how close an object is to the surface of the screen. This is typically used to detect when your face is pressed up against the screen, such as during a phone call. ●  Touchscreen displays all the information needed to operate your phone. Use finger gestures to navigate and interact with items on the screen. ●  Secondary Microphone suppresses background noise improving audio quality for the other party during voice calls except in speakerphone mode. ●  Power Button lets you turn the phone on/off, turn the screen on/off, or switch your phone to silent mode, vibration mode, or airplane mode. Press and hold for more than 10 seconds to restart the phone.  ●  Charger/USB Port allows you to connect the micro-USB cable (included) to charge the battery or to transfer files to and from a computer. ●  Primary Microphone transmits your voice and ambient sound during voice calls, voice recordings and videos.  Note: Do not cover the microphones during a call as it may compromise the hearing quality. ●  Camera Flash helps illuminate subjects in low-light environments when taking a picture or recording a video. ●  Back Camera lets you take pictures and videos. ●  SIM Card Holder (Internal) holds the nano SIM card. ●  microSD Card Holder (Internal) holds an optional microSD card to provide external memory. ●  Speaker lets you hear the different ringtones and sounds. The speaker also lets you hear the caller’s voice in speakerphone mode. ●  Internal Antennas facilitate reception and transmission. To maximize performance, do not obstruct while using the phone. ●  Volume Button allows you to adjust the ringtone or media volume when you are not on a call, or adjust the voice volume during a call.    Phone Basics  7 Get the Phone Ready You need to insert a SIM card into your phone and charge the battery to begin setting up your phone. Charge the Battery 1. Plug the smaller end of the micro-USB cable into the phone’s charger/USB port.    2. Plug the other end of the USB cable into the charger and then plug the charger into an electrical outlet.  Note: Your phone’s battery should have enough charge for the phone to turn on and find a signal, set up voicemail, and make a call. You should fully charge the battery as soon as possible.  Insert the SIM Card   Warning: Use only a nano SIM card in this phone. 1. Insert your fingernail into the slit at the bottom of the back cover and lift the cover up gently 2. Open the SIM/microSD card holder cover, located on the upper right side of the phone.    3. Slide the flap of the SIM card holder in the direction of the arrow to unlock it  ( ) and lift the flap ( ).   4. Insert the nano SIM card into the flap of the SIM card holder, making sure the cut-off corner is at the top right ( ) and then lower the flap of the SIM card holder ( ).  5. Slide the flap in the direction of the arrow to lock it ( ). 8  User Manual    Note: Make sure you insert your nano SIM card in the correct orientation. 6.  Close the SIM/microSD card holder cover and replace the back cover.  Warning: To ensure that your phone is waterproof, make sure the SIM/microSD card holder cover is properly sealed. Optional: Insert the MicroSD Card  Note: The microSD card is optional.  1.  Remove the back cover and open the SIM/microSD card holder cover 2.  Insert the microSD card into the microSD card holder with the gold contacts facing down. Gently push the card in until it snaps into place.    3.  Close the SIM/microSD card holder cover and replace the back cover.  Warning: To ensure that your phone is waterproof, make sure the SIM/microSD card holder cover is properly sealed. Turn the Phone On and Off Turn the Phone On ►  Press and hold the Power Button  . Turn the Phone Off ►  Press and hold the Power Button and tap Power off > OK.
Phone Basics  9 Turn the Screen On and Off Turn the Screen On and Start 1.  Press the Power Button  . 2.  From the Start screen:   ( ) Swipe up anywhere on the screen to access the Home screen.   ( ) Swipe right to launch the Phone app.   ( ) Swipe left to launch the Camera app.  Tip: To set up a screen lock for security, see “Start Screen Settings” on page 51. Turn the Screen Off When Not in Use ►  Press the Power Button  . To save battery power, the phone automatically turns off the screen after a certain period of time when you leave it idle. You will still be able to receive messages and calls while the phone’s screen is off. For information on how to adjust the time before the screen turns off, see “Sleep” on page 47.  Touchscreen Navigation  Your phone’s touchscreen lets you control actions through a variety of tap gestures.   Warning: Do not touch with a pen or stylus. It may damage the touchscreen.  Tap Tap the screen with your finger to select or launch a menu, option, or application. A light tap works best.    Touch and Hold To open the available options for an item (for example, a keyboard), touch and hold the item.   10  User Manual    Drag Touch and hold your finger before you start to move it. Do not release your finger until you have reached the target position.    Swipe or Slide To swipe or slide means to quickly drag your finger vertically or horizontally across the screen.    Flick Flicking the screen is similar to swiping, except that you need to swipe your finger in light, quick strokes.     Pinch and Spread Pinch the screen using your thumb and forefinger to zoom out or spread the screen Phone Basics  11 to zoom in when viewing a picture or a Web page. (Move fingers inward to zoom out and outward to zoom in.)    Rotate For most screens, you can automatically change the screen orientation from portrait to landscape by turning the phone sideways. When entering text, you can turn the phone sideways to bring up a bigger keyboard.     Note: The Auto-rotate feature needs to be turned on for the screen orientation to automatically change. To turn this on or off, from the Home screen, tap Apps  > Settings > Accessibility > Auto-rotate screen.  Function Buttons At the bottom of touchscreen, you will find a row of three buttons that let you perform specific functions. ●  Back ( ) - Tap to return to the previous screen, or close a dialog box, options menu, the Notifications panel, or onscreen keyboard. ●  Home ( ) - Tap to open the Home screen.  ●  Overview ( ) - Tap to open a list of thumbnail images of screens you have worked with recently. To open one, tap it. To remove a screen from the list, swipe it left or right or tap on the X.    12  User Manual Home Screen The Home screen is the starting point for your phone’s applications, functions, and menus. You can customize your Home screen by adding application icons, shortcuts, folders, widgets, and more.  Home Screen Overview There are two different options for the Home screen on your phone, Standard Home and Core Home. By default, your phone is set to Standard Home.  Status Bar The status bar at the top of the screen provides phone and service status information on the right side and notification alerts on the left.   Note: All icons are simulated. Actual images may vary.   Status Icons Icon Description  Bluetooth® enabled  Wi-Fi® active (full signal)  Vibrate  Silent  Network (full signal)  Network (no signal) Icon Description  3G (data service)  4G (data service)  4G LTE (data service)  Airplane mode  Battery (charging)  Battery (full charge)  Battery (discharged) Notification Icons Icon Description  Missed call  Event  Music application is running background  Alarm set  GPS is active  Downloading / Music is playing/Music is paused
Text Entry  13 2  Text EntryTouchscreen Keyboard The touchscreen keyboard lets you enter text directly onscreen. Your phone provides convenient ways to enter letters, numbers, and symbols whenever you are prompted to enter text. The keyboard appears automatically onscreen when you tap a text entry field and can be used in either portrait or landscape mode.  Text Mode ►  Tap   to select ABC mode. Tap   to select Number & Symbol mode.   In ABC mode, tap   to alter the capitalization.   You can select the caps lock by double-touching or touching and holding   to make all letters in a word uppercase.   In Number & Symbol mode, tap   to display more symbols.   Some keys have alternate characters. In either mode, if a key displays an extra character at the upper right corner, touch and hold the key to enter the character. Or, touch and long hold a key to call up a list of all the characters available on that key.  Tips for Editing Text To copy and paste the text: 1.  In a text entry field, touch and hold the text body. 2.  Selection tabs appear and the currently selected words or characters are highlighted. Drag the tabs to expand or reduce the range of the selected text. 3.  Tap an onscreen option from the edit menu bar. Available options may vary:    Select all: Highlights and selects all the text in the field.     Cut: Removes the selected text and saves it to the clipboard.      Copy: Copies the selected text to the clipboard.   Paste: Inserts the last copied or cut text into the current field.     14  User Manual 3  Phone CallsMake Phone Calls Call Using the Phone Dialpad 1.  From the Home screen, tap Apps   > Phone > DIALPAD tab to display the phone dialpad. 2.  Tap the number keys on the dialpad to enter the phone number.  3.  Tap   to call the number. 4.  To end the call, tap  . Call from Recent Calls 1.  From the Home screen, tap Apps   > Phone to display the phone app. 2.  Tap the RECENT CALLS tab to display the recent calls list. 3.  Tap the Phone icon   next to the name or number you want to place a call. Call from Contacts 1.  From the Home screen, tap Apps   > Phone to display the phone app. 2.  Tap   to display the Contacts list.    Tap   to search for your contact. 3.  Tap the contact and tap  .   For additional information on contacts, see “Contacts” on page 22. Call an Emergency Number You can place calls to 9-1-1 even if the phone’s screen is locked or your account is restricted.  To call the 9-1-1 emergency number: 1.  From the Home screen, tap Apps   > Phone > DIALPAD. 2.  Enter 911 and tap  . To call the 911 emergency number when the screen is locked: 1.  Tap EMERGENCY CALL on the screen. 2.  Enter 911 and tap  .  Phone Calls  15 Enhanced 9-1-1 (E911) Information This phone features an embedded Global Positioning System (GPS) chip necessary for utilizing E911 emergency location services where available. When you place an emergency 9-1-1 call, the GPS feature of your phone seeks information to calculate your approximate location. Depending on several variables, including availability and access to satellite signals, it may take up to 30 seconds or more to determine and report your approximate location.  Important: Always report your location to the 9-1-1 operator when placing an emergency call. Some designated emergency call takers, known as Public Safety Answering Points (PSAPs), may not be equipped to receive GPS location information from your phone. Call a Number with Pauses 1.  From the Home screen, tap Apps   > Phone > DIALPAD. 2.  Enter all or part of a number. 3.  Tap   > Add 2-sec pause or Add wait. 4.  Enter additional numbers. 5.  Tap   to dial the number. Call Using a Speed Dial Number 1.  From the Home screen, tap Apps   > Phone > DIALPAD. 2.  For speed dial numbers 2-9, touch and hold the number on the dialpad. – or – For speed dial numbers 10-99, tap the first digit and then touch and hold the second digit on the dialpad. Set Up Speed Dialing 1.  From the Home screen, tap Apps   > Phone > DIALPAD. 2.  Tap   > Speed dial setup. 3.  Tap Add speed dial next to the location number you want to assign a number to. 4.  Select a contact and, if the contact has more than one number, select a number. To remove a number from a speed dial location: 1.  From the Home screen, tap Apps   > Phone > DIALPAD. 2.  Tap   > Speed dial setup. 3.  Tap the assigned contact you want to remove and tap Remove > OK. Call Using the Plus (+) Code Dialing 1.  From the Home screen, tap Apps   > Phone > DIALPAD. 2.  Touch and hold 0 until you see a “+” on the display screen. 3.  Enter the country code and phone number and then tap  . The 16  User Manual phone automatically prepends the access code for international dialing, followed by the country code and phone number. Receive Phone Calls Answer an Incoming Call ►  On the Incoming call screen, swipe  . Mute the Ringtone ►  Press the Volume Button down. Send an Incoming Call to Voicemail ►  On the Incoming call screen, swipe to send the call to your voicemail inbox. Reject a Call and Send a Text Message ►  On the Incoming call screen, swipe   to ignore the call and send a message to the caller.  Note: If your phone is turned off, all calls automatically go to voicemail. Voicemail Set Up Voicemail 1.  From the Home screen, tap Apps   > Phone > DIALPAD. 2.  Touch and hold   to dial your voicemail number. 3.  Follow the system prompts to:   Create your password.   Record your name announcement.   Record your greeting.  Important: Voicemail Password –  It is strongly recommended that you create a password when setting up your voicemail to protect against unauthorized access. Without a password, anyone who has access to your phone is able to access your voicemail messages. Voicemail Notification There are several ways your phone alerts you to a new voicemail message. ●  By sounding the assigned notification sound. ●  By vibrating the phone when the vibrate setting is on. ●  By displaying   in the notifications area of the status bar when new unheard voicemail message(s) is received.   Note: Your phone accepts messages even when it is turned off. However, your phone notifies you of new messages only when it is turned on and you are in the service area.
 Phone Calls  17 Retrieve Your Voicemail Messages Use Your Phone to Access Messages 1.  From the Home screen, tap Apps   > Phone > DIALPAD. 2.  Touch and hold  . If prompted, enter your voicemail password. 3.  Follow the voice prompts to listen to and manage your voicemail messages.  Note: Depending on your plan, you may be charged when you are accessing your voicemail from your wireless phone. Use Another Phone to Access Messages 1.  Dial your wireless phone number. 2.  When your voicemail answers, press the asterisk key (*) on the phone. 3.  Enter your password. Phone Call Options In-Call Options ●   Hold: Tap to hold the current call. ●   End call: End the current call. ●   Add call: Tap to initiate a conference call. ●   Mute: Mute or unmute the microphone during an active call. ●     Speaker: Turn the speaker on or off. ●     Bluetooth: Route the phone’s audio through a connected Bluetooth headset or through the speaker. ●  /  Dialpad/Hide: Toggle the appearance of the onscreen dialpad to enter additional numbers, for example, an extension or access code. Call Waiting To enable Call waiting: 1.  From the Home screen, tap Apps   > Phone > DIALPAD. 2.  Tap   > Call settings > Additional settings. 3.  Select the Call waiting check box. To respond to an incoming call while you are on a call: ►  On the Incoming call screen, swipe  . To switch back to the first caller: ►   Tap   Swap calls. To create a conference call between your existing call: ►  Tap   Merge calls. Conference Calling 1.  On the Phone screen, enter a number and tap  . 2.  Once you have established the connection, tap   Add call, and dial the second number. (This puts the first 18  User Manual caller on hold and dials the second number.) 3.  When you are connected to the second party, tap   Merge calls. 4.  If you want to add another call to the existing conference, repeat steps 2 and 3. If one of the people you called hangs up during your call, you and the remaining caller stay connected. If you initiated the call and are the first to hang up, all callers are disconnected. ►  To end the conference call, tap  .  Phone Calls  19 Call Settings Phone Ringtone 1.  From the Home screen, tap Apps   > Phone. 2.  Tap   > Call settings > Phone ringtone 3.  If prompted, select an app to use and make your desired selection. 4.  Select the file or tap OK to assign the ringtone. Dial Pad Touch Tones 1.  From the Home screen, tap Apps   > Phone. 2.  Tap   > Call settings, and select the Dial pad touch tones check box to enable or disable the option. Vibrate When Ringing 1.  From the Home screen, tap Apps   > Phone. 2.  Tap   > Call settings, and select the Vibrate when ringing check box to enable or disable the option. Voicemail Settings 1.  From the Home screen, tap Apps   > Phone. 2.  Tap   > Call settings > Voicemail. 3.  Configure the following settings:  Service to select the voicemail service provider.  Setup to configure the voicemail number if necessary.  Sound to select the sound to ring for a new voicemail message.  Vibrate to select whether the phone responds with vibration to a new voicemail message.  Note: This Voicemail settings do not affect settings for Visual Voicemail. Quick Responses 1.  From the Home screen, tap Apps   > Phone. 2.  Tap   > Call settings > Quick responses. 3.  Create and edit text phrases that you can add to messages. Fixed Dialing Numbers (FDN)  1.  From the Home screen, tap Apps   > Phone. 2.  Tap   > Call settings > Fixed Dialing Numbers. 3.  Tap Enable FDN, Change PIN2 or FDN list.  Note: To use this feature you will have to enter your PIN2 number, which is associated with your SIM card. If you do not know your number, please contact your carrier to obtain it. 20  User Manual Call Forwarding 1.  From the Home screen, tap Apps   > Phone. 2.  Tap   > Call settings > Call forwarding. 3.  Select Always forward, When busy, When unanswered, or When unreachable.  Note: You are charged a higher rate for calls you have forwarded. Additional Settings Caller ID 1.  From the Home screen, tap Apps   > Phone. 2.  Tap   > Call settings > Additional settings > Caller ID. 3.  Select Network default, Hide number, or Show number. Call Barring 1.  From the Home screen, tap Apps   > Phone. 2.  Tap    > Call settings > Additional settings > Call barring. 3.  Select from All outgoing calls, International calls, INT’L calls except home, All incoming calls, or Incoming when roaming.   Auto Answer 1.  From the Home screen, tap Apps   > Phone. 2.  Tap   > Call settings > Auto answer. 3.  Select Hands free or Speakerphone. 4.  Select the delay time to automatically answer the phone. Call Timer and Call Duration To view the call timer and call duration: 1.  From the Home screen, tap Apps   > Phone. 2.  Tap   > Call settings > View call timer/call duration. To reset the call timer and call duration: 1.  From the Home screen, tap Apps   > Phone. 2.  Tap   > Call settings > View call timer/call duration. 3.  Touch and hold the item you want to reset and tap OK.
 Phone Calls  21 Recent Calls View Recent Calls 1.  From the Home screen, tap Apps   > Phone. 2.  Tap the RECENT CALLS tab to display the recent calls list.    = Incoming calls (blue arrows)  = Outgoing calls (green arrows)  = Missed calls (red arrows)  Recent Calls Options 1.  From the Home screen, tap Apps   > Phone > RECENT CALLS tab to display the recent calls list. 2.  Tap an entry to view the contact.   Tap   to call the number.   Tap   to send a text message.   If applicable, tap   to add the number to Contacts.   Tap   > Remove from call log to remove the log.   Tap   > Edit number before call to edit the number before calling. Filter Recent Calls 1.  From the Home screen, tap Apps   > Phone. 2.  Tap the RECENT CALLS tab to display the recent calls list. 3.  Tap   > Filter by. 4.  Select All calls, Missed calls, Outgoing calls, or Incoming calls. Clear Recent Calls 1.  From the Home screen, tap Apps   > Phone. 2.  Tap the RECENT CALLS tab to display the recent calls list. 3.  Tap   > Clear call log > OK.  22  User Manual 4  ContactsDisplay Contacts ►  From the Home screen, tap Apps   > Contacts. You will see the Contacts list. Contacts List ●   FAVORITES: Tap to display your favorite contacts.   Add new favorite: Tap to add a new favorite contact.  See “Add a Contact to Favorites” on page 25. ●   CONTACTS: Tap to display all the contacts you save.   Add new contact: Tap to add a new contact. See “Add a Contact” on page 23. ●     GROUPS: Tap to display the group contacts.      Add new group: Tap to add a new group contact. See “Add a Group Contact” on page 25. ●     Search: Tap to search a contact. ●  Tap   :  Delete: Allows you to select contact(s) you want to delete.  Contacts to display: Selects contacts to be displayed on Contacts.   Import/export: Imports/exports your contacts from/to the microSD card, SIM card and phone or shares your visible contacts.  Settings: Opens the display settings screen.  Display Options 1.  From the Home screen, tap Apps   > Contacts. 2.  Tap   > Contacts to display. 3.  Select one of the following options:  All contacts to display all the contacts you save.  Phone to display all the contacts saved in your phone.  SIM to display all the contacts saved in your SIM card.   An account (for example, Google) to display only its contacts.  Customize to select whether to display all the contacts saved in your phone or SIM card and to select contact types for each account. Tap Phone, SIM or an account name, make your selection and then tap OK. You can also select how your contacts are displayed. 1.  From the Home screen, tap Apps   > Contacts. 2.  Tap   > Settings.  Contacts  23 3.  Set the following options:  Position of index tab to choose were to place the index tab.  Sort by to choose how your contacts are sorted.  Name format to choose how your contacts names are displayed.  Accounts to open the account settings. Add a Contact 1.  From the Home screen, tap Apps   > Contacts > CONTACTS tab. 2.  Tap  .   If prompted, select the location where you want to save the contact, such as Phone, SIM, and an account (for example, Google). If you want to change the location later, tap the location name, and select the desired location. 3.  Use the keyboard to enter as much information as you want.    (Contacts icon): Tap the picture icon to assign a picture to the contact.  Name  Phonetic name  Add organization  Phone  Email  Address  Incoming settings  ADD ANOTHER FIELD: Tap to include additional information such as IM, Notes, Nickname, Website, SIP, etc.  Note: To select a type (label) for a phone number, email address, or postal address (such as MOBILE, HOME, WORK, etc.), tap the box to the left of the field and select the appropriate type.  Note: To add more phone numbers, email addresses, etc., tap Add new under the current numbers or addresses. 4.  When you have finished adding information, tap SAVE. Save a Phone Number 1.  From the Home screen, tap Apps   > Phone > DIALPAD tab to display the phone dialpad. 2.  Enter a phone number and tap ADD TO CONTACTS. 3.  To add the number to an existing entry, tap the contact, select a number type  for the new number and then tap OK. – or – To add the number to a new entry, tap Create new contact and select an account to use. Then, enter the name and any additional information and tap SAVE.   24  User Manual Edit a Contact Add or Change Information for a Contact 1.  From the Home screen, tap Apps   > Contacts > CONTACTS tab. 2.  Tap a contact to display it, and tap  . 3.  Tap any field you want to add or change.  4.  Add or change the information and then tap SAVE. Assign a Picture to a Contact 1.  From the Home screen, tap Apps   > Contacts > CONTACTS tab. 2.  Tap a contact to display it, and tap  . 3.  Tap the contact icon to the right of the name. 4.  To assign a stored picture, tap Choose photo, select the app to use, and locate and select a picture. – or – To assign a new picture, tap Take photo and take a picture. 5.  You may be prompted to size the picture for use with entries. Tap and drag the square to frame the portion of the picture to use. Tap and drag the side of the square to resize the square and tap DONE or OK. 6.  Tap SAVE to save the entry. Copy a Contact 1.  From the Home screen, tap Apps   > Contacts > CONTACTS tab. 2.  Tap a contact to display it, and tap   > Copy contact. 3.  If you have joined contacts, select a contact from the available list. 4.  Tap a copy destination from the available list. If you selected your SIM card as the copy destination, read the message displayed and tap OK. Assign a Ringtone to a Contact 1.  From the Home screen, tap Apps   > Contacts > CONTACTS tab. 2.  Tap a contact to display it, and tap  . 3.  Tap Incoming settings > Ringtone. 4.  Select a ringtone. 5.  Tap OK to save the settings. Assign a Vibration Pattern to a Contact 1.  From the Home screen, tap Apps   > Contacts > CONTACTS tab. 2.  Tap a contact to display it, and tap  . 3.  Tap Incoming settings > Vibration pattern. 4.  Select a vibration pattern. 5.  Tap OK to save the settings.
 Contacts  25 Add a Contact to Favorites 1.  From the Home screen, tap Apps   > Contacts > CONTACTS tab. 2.  Select a contact to display it. 3.  Tap  . The icon changes to   when the contact is added to Favorites. – or – 1.  From the Home screen, tap Apps   > Contacts > FAVORITES tab. 2.  Tap  and select the check box next to the contact(s) that you want to add to your Favorites list. 3.  Tap DONE. Send a Contact’s Call to Voicemail 1.  From the Home screen, tap Apps   > Contacts > CONTACTS tab. 2.  Tap a contact to display it, and  tap  . 3.  Select the All calls to voicemail check box. Add a Contact Widget to the Home Screen 1.  From the Home screen, tap Apps   > Contacts > CONTACTS tab. 2.  Tap a contact to display it and then tap   > Place on Home screen. The contact widget is added to your home screen. Delete Single or Multiple Contacts 1.  From the Home screen, tap Apps   > Contacts > CONTACTS tab. 2.  Tap   > Delete, select the check box next to the contact(s) you want to delete, or tap SELECT ALL. 3.  Tap DONE and then tap OK to confirm the deletion. – or – Tap a contact to display it, and tap   > Delete > OK. Join Contacts 1.  From the Home screen, tap Apps   > Contacts > CONTACTS tab. 2.  Select the contact you want to appear as the primary listing. 3.  Tap   > Join. 4.  Choose the contact you wish to join with the primary listing. Add a Group Contact 1.  From the Home screen, tap Apps   > Contacts > GROUPS tab. 2.  Tap  . 3.  Select the account in which you want to create a group contact. 4.  Enter the group’s name.  26  User Manual 5.  Tap Add/remove contacts and check the entries that you want to add to the group contact. 6.  Tap DONE > SAVE. Edit a Group Contact Add or Remove a Group Contact Entry, or Rename a Group 1.  From the Home screen, tap Apps   > Contacts > GROUPS tab. 2.  Tap a group contact, and tap   > Edit. 3.  The following options are available:   Tap the group’s name to rename it.   Tap Add/remove contacts to add or remove entries. 4.  Tap SAVE. Assign a Ringtone to a Group Contact 1.  From the Home screen, tap Apps   > Contacts > GROUPS tab. 2.  Tap a group contact, and tap   > Edit. 3.  Tap Ringtone and select a ringtone.  4.  Tap OK to save the settings. Assign a Vibration Pattern to a Group Contact 1.  From the Home screen, tap Apps   > Contacts > GROUPS tab. 2.  Tap a group contact, and tap   > Edit. 3.  Tap Vibration Pattern and select a vibration pattern. 4.  Tap OK to save the settings. Delete a Group Contact 1.  From the Home screen, tap Apps   > Contacts > GROUPS tab. 2.  Tap a group contact that you have created, and tap   > Delete > OK. ICE (In Case of Emergency) Registering ICE information might help rescue workers, such as paramedics, police and hospital personnel identify your primary contact. You can register up to five contacts.  ICE Contacts To add an ICE contact: 1.  From the Home screen, tap Apps   > Contacts > CONTACTS tab and then tap ICE- In Case of Emergency. 2.  Tap  .   Note: You will be prompted to enable the Location access settings if they are disabled. Read the onscreen information and follow the instructions. 3.  Tap the entry to register. To change or remove an ICE contact: 1.  From the Home screen, tap Apps   > Contacts > Contacts tab and then tap ICE- In Case of Emergency.  Contacts  27 2.  Tap   and tap the contact to remove. 3.  Tap OK. Personal Information 1.  From the Home screen, tap Apps   > Contacts > CONTACTS tab and then tap ICE- In Case of Emergency. 2.  Tap My emergency information > . 3.  Enter or edit the necessary information and tap SAVE. Synchronize Contacts 1.  From the Home screen, tap Apps   > Contacts. 2.  Tap  > Settings > Accounts. 3.  Select the account type and tap the account you want to sync your contacts with. 4.  Tap the ON/OFF switch next to Contacts to turn contacts sync on or off. Share a Contact 1.  From the Home screen, tap Apps   > Contacts > CONTACTS tab. 2.  Tap an entry, and tap   > Share. 3.  In the Share contact via menu, select a method.  28  User Manual 5  Web and DataWi-Fi Turn Wi-Fi On and Connect to a Wireless Network 1.  From the Home screen, tap Apps   > Settings > Wi-Fi. 2.  Tap the ON/OFF switch to turn Wi-Fi on. The network names of detected Wi-Fi networks are displayed. 3.  Tap a Wi-Fi network to connect. If you selected an open network, you will be automatically connected to the network. If you selected a network that is secured with a password, enter the password and then tap CONNECT. When your phone is connected to a wireless network, the Wi-Fi icon ( ) appears in the status bar and tells you the approximate signal strength.  If Network notification in Advanced Wi-Fi settings is enabled, the open network icon ( ) appears in the status bar whenever the phone detects an available open wireless network within range. Check the Wireless Network Status 1.  From the Home screen, tap Apps   > Settings > Wi-Fi. 2.  Tap the wireless network that the phone is currently connected to. You will see a message box showing the Wi-Fi network name, status, signal strength, speed, and other details.  Note: If you want to remove the wireless network settings, tap FORGET on this window. You need to enter the settings again if you want to connect to this wireless network. Connect to a Different Wi-Fi Network 1.  From the Home screen, tap Apps   > Settings > Wi-Fi. Detected Wi-Fi networks are displayed in the Wi-Fi networks section.    To manually scan for available Wi-Fi networks tap   > Refresh. 2.  Tap another Wi-Fi network to connect to it.  Note: If the wireless network you want to connect to is not in the list of detected networks, tap   > Add network. Enter the wireless network settings and tap
  Web and Data  29 Data Services Data Connection Status and Indicators Your phone displays the current status of your data connection through indicators at the top of the screen. The following symbols are used: Icon Description   Your phone is connected to the 3G network.   Your phone is connected to the 4G network.  Your phone is connected to the 4G LTE network.   30  User Manual 6  Camera and VideoTake Pictures Open the Camera App ►  From the Home screen, tap Apps   > Camera. Close the Camera App ►  On the Camera screen, tap Home    or Back  . Viewfinder Screen  ●   Settings Button: Opens the camera and video settings menu to select basic and advanced settings. ●  Shooting/Recording Mode: Opens the navigation drawer to switch the shooting/recording mode. ●  Quick Settings Panel: Displays the settings you use most frequently. ●  Thumbnail: Displays the thumbnail of the latest image. ●   Shutter Button: Takes a picture. ●   Record Button: Records a video. Take a Picture or Record a Video 1.  From the Home screen, tap Apps   > Camera. 2.  Do the following to change the settings:   Tap   to change the camera and video settings as desired. See “Camera and Video Settings” on page 31.    Select the shooting/recording mode by swiping from the left edge or by tapping   MODE icon. 3.  Frame your subject on the screen. 4.  Tap   to take a picture. – or – Tap   to record a video. Tap   to stop recording.   Camera and Video  31 Review Screen After taking a picture or video, tap the thumbnail image to see the item in the review screen. For example, when you tap a picture thumbnail image, you may see the following options:  ●   Share: Displays the available applications to share your image. ●   Delete: Deletes the currently displayed image. Confirm the deletion by tapping OK. ●   Effects: Choose an effect to add to your image. See “Edit a Picture” on page 35.  ●   Details: Shows the details of the image. ●   Menu: Displays additional image options. Available menus may vary:  Slideshow to start a slideshow of the images stored.  Set as to set the currently displayed image as a contact photo or wallpaper.  Captions to add captions to your video. ●   Favorites: Tap   to add the image to your Favorites album. Camera and Video Settings Choose Camera Settings  1.  From the Home screen, tap Apps   > Camera.  2.  Tap   to display the advanced settings menu. You can change the following settings from the Settings menu:   Note: Available options may vary according to the subject and shooting /recording mode. ●  PHOTO  Size to choose the default size for pictures. Front camera: Select from HD(1280x720), 2M(1600x1200), or 1M(960×960). Back Camera: Select from 3.6M(2560x1440), FullHD(1920x1080), 5M(2560x1920), 3.2M(2048x1536), or 3.6M(1920x1920)   32  User Manual  Flash to choose a flash setting (back camera only). Select from Auto, ON, or OFF.  Self-timer to choose a timer setting. Select from 10 seconds, 5 seconds, 2 seconds, or OFF.  HDR to combine multiple exposures into a single image (back camera only). Select ON or OFF.  Image stabilization to minimize the effect of camera movement while shooting. Select Auto, ON, or OFF.  Touch shutter to take a picture by tapping the screen. Select ON or OFF.  Smile shutter automatically detects a smile on a face and shoots a smile without touching the shutter button. (back camera only). Select ON or OFF.   Blink detection allows you to know right away whether one of your subjects blinked (back camera only). Select ON or OFF. ●  MOVIE  Size to choose the default size for videos. Select from FullHD(1920x1080), HD720p(1280x720), VGA(640x480), or QVGA(320x240).  Light to choose a light setting (back camera only). Select from Auto, ON, or OFF.  Image stabilization to minimize the effect of camera movement while recording. Select ON or OFF. ●  GENERAL  Exchange camera to switch between the back camera and the front camera.  EV compensation to make adjustments to exposure (back camera only). Tap the slider bar to increase or decrease the value.  White balance to set the white balance (back camera only). Select from Auto, Sunlight, Cloudy, Fluorescent(White daylight), Fluorescent(Daylight), or Incandescence lamp.  Focus to choose areas of the screen to focus on (back camera only). Select from Face priority, or Center.  Auto exposure to adjust the metering mode of pictures (back camera only). Select from Center weighted, Frame average, or Spot metering.  ISO speed to set the ISO level (back camera only). Select from Auto, 100, 200, 400, or 800.  Contrast allows you to use the slider bar to set the contrast (back camera only).
  Camera and Video  33  Add location info to store the location information of the image. Select from ON or OFF.   Auto review to set the duration of the auto review function. Select from No limit, 2 seconds, or OFF.  Auxiliary line to enable grid lines. Select from ON or OFF.  Volume key to set the behavior of the volume button. Select from Zoom (back camera only), Take a picture, or Record a video.   Data Storage to select where to store your pictures and videos. Select from Internal storage or SD card.  Edit quick settings to customize the quick settings panel on the viewfinder. To replace an icon, select a replacement icon in the settings menu, touch and hold it and then drag onto the icon to be replaced.    Initialize to reset all the camera settings to the factory default settings.  Choose a Shooting/Recording Mode 1.  From the Home screen, tap Apps   > Camera.  2.  Swipe right from the left edge of the screen or tap   MODE icon. 3.  Choose a shooting mode. Modes include:  Normal to take a picture in the normal mode.  Continuous shooting to capture a series of photos continuously while holding down the Shutter button (back camera only).  Effect to add an effect to the picture.  Scene to set the scene mode (back camera only). Select from Normal, Person, View, Food, Night view, Sports, or Memo.  Manual to manually adjust your camera settings for taking photos and videos.  Time-lapse movie to capture in the interval shooting mode (back camera only). Select from 1 second, 1.5 seconds, 2 seconds, 2.5 seconds, 3 seconds, 5 seconds, or 10 seconds.    34  User Manual View Pictures and Videos Using Gallery Open the Gallery App 1.  From the Home screen, tap Apps   > Gallery. 2.  When you first open Gallery, you find that content has automatically been arranged in categories.  3.  From the Gallery screen, you can use these options:   Tap a thumbnail to view a picture or video.    Touch and hold thumbnails to select them (indicated by a check mark).   Tap   for the following options: • Time to group pictures and videos based on the time they were captured. Tap   to see your pictures and videos organized by months. You may tap   for additional actions. • Albums to view pictures and videos in an album. • Favorites to view pictures and videos you have marked as a favorite.  View Pictures and Videos 1.  From the Home screen, tap Apps   > Gallery.  2.  Select a folder location and tap an image to view the picture or video.   To play a video, tap  . Tap   to pause the video, or drag the dot on the timeline to rewind or forward the video. Zoom In or Out on a Picture ►  To zoom in, “spread” the screen with your thumb and finger. To zoom out, “pinch” the screen. Work with Pictures Picture Options Menu 1.  From the Home screen, tap Apps   > Gallery. 2.  Select a folder location and tap an image to view a picture. 3.  With a picture displayed, tap the following icons:    Camera and Video  35    Share to display the sharing options.    Delete to delete the displayed image. Tap OK to confirm the deletion    Effect to choose an effect to add to the pictures.    Details to show the details of the picture.   Favorites to add the image to your Favorites album.   Tap   for additional options: • Slideshow to start a slideshow of the pictures stored. • Set as to set the picture as a contact photo or wallpaper. Edit a Picture 1.  From the Home screen, tap Apps   > Gallery. 2.  Select a folder location and tap an image to view a picture. 3.  Tap   to display the editing screen.  4.  Select from the following options:   EFFECT: Displays options to adjust the exposure, contrast, sharpness, etc.   FRAME: Displays options to add a frame.   TRIM: Displays options to crop, rotate, or mirror image.   PAINT: Displays options for paint tools.  Tap   to undo an action.  Tap   to redo an action. 5.  When finished, tap SAVE. Share Pictures and Videos Send Pictures or Videos by Gmail 1.  From the Home screen, tap Apps   > Gallery. 2.  Tap the folder that contains the pictures or videos you want to share. 3.  Touch and hold the picture or video until you see a blue frame around it or tap   > Select. Tap multiple pictures and videos to select them. 4.  Tap   > Gmail.  5.  Compose your message and then tap .  Note: If you have multiple email accounts, the default email account will be used.   36  User Manual Send Picture or Videos by Messaging 1.  From the Home screen, tap Apps   > Gallery. 2.  Tap the folder that contains the pictures or videos you want to share. 3.  Touch and hold the picture or video until you see a blue frame around it or tap   > Select. Tap multiple pictures and videos to select them. 4.  Tap   > Messaging.  5.  Compose your message and then tap . Send Pictures or Videos Using Bluetooth 1.  From the Home screen, tap Apps   > Gallery. 2.  Tap the folder that contains the pictures or videos you want to share. 3.  Touch and hold the picture or video until you see a blue frame around it or tap   > Select. Tap multiple pictures and videos to select them. 4.  Tap   > Bluetooth. 5.  In the next few steps, you will be asked to turn Bluetooth on and connect to the receiving Bluetooth device so the files can be sent.
 Tools and Calendar  37 7  Tools and CalendarCalendar  Note: If you have not added an account to sync with on your phone, you need  to set one up. From the Home screen, tap Apps   > Settings > Accounts > Add account. Add an Event to the Calendar 1.  From the Home screen, tap Apps  > Calendar. 2.  Tap  . 3.  Enter a name for the event. 4.  To specify the date and time of the event, do one of the following:   If there is a time frame for the event, tap the first line of dates and times to set them for the beginning of the event and the second line for the end of it.   If the event is a special occasion such as a birthday or an all-day event, tap All-day and set the dates. 5.  If the event occurs on a regular basis, tap more options and tap Does not repeat to choose how often the event occurs. 6.  Enter the event location. 7.  Set the event reminder time and select how you are notified. Tap the default option to change or tap Add another notification to add another reminder. 8.  Enter email addresses to invite guests to your event. 9.  Select a color for the event. 10. Tap Add note to add event descriptions. 11. Tap SAVE. Calendar Event Alerts There are several ways your phone alerts you to scheduled events: ●  By playing the assigned ringtone or vibration. ●  By showing the event icon   on the status bar. ●  By showing the Alert pop-up screen. Event Reminders If you have received an alert for an event, the upcoming event icon   will appear in the notifications area of the status bar to remind you. To view or postpone the reminder: 1.  Swipe down from the top of the screen to open the Notifications panel. 2.  Tap the event name to access the event. 3.  Tap   to edit the event. The following options are available.   38  User Manual   Tap the type of notification to change the reminder settings.   Tap DELETE to delete the event. To set default reminder settings: ►  On any Calendar view, tap   > Settings > Events, and set the items under Default notifications and Default notifications for all-day events. View Calendar Events When you open the Calendar, you'll see a list of your upcoming events. To change the Calendar view, tap   and choose Schedule, Day or 5 Day. You can also tap the month name at the top of your calendar screen to choose a date to view. Edit Calendar Events 1.  From the Home screen, tap Apps  > Calendar. 2.  Open the calendar event details.   In Schedule, Day, and 5 Day views, tap the calendar event you want to edit.   In Month view, tap the date where the calendar event occurs, and tap the calendar event. 3.  Tap  . 4.  Modify the event and tap SAVE. 5.  If it is a recurring event, select Change only this event or Change this and all future events. Erase Calendar Events 1.  From the Home screen, tap Apps  > Calendar. 2.  Open the calendar event details.   In Schedule, Day, and 5 Day views, tap the calendar event you want to delete.   In Month view, tap the date where the calendar event occurs, and tap the calendar event. 3.  Tap  . 4.  Tap DELETE and tap OK. – or – If the calendar event is recurring, select This event or All following events, and tap OK.  Clock Desk Clock ►  From the Home screen, tap Apps  > Clock > WORLD CLOCK tab.   Touch and hold the screen to turn the night mode on.  Tip: When enabled, you can easily turn off night mode by touching the screen.  Tools and Calendar  39 Change Clock Settings 1.  From the Home screen, tap Apps  > Clock > WORLD CLOCK tab. 2.  Tap   and choose from the following options:  Style: Select to change the clock style. Choose from Analog or Digital.  Automatic home clock: Check if you want to add a clock for home while traveling.  Home time zone: Select to set your home time zone.  Silence after: Select to set how long the alarm sounds.  Snooze length: Select to change the snooze interval.  Alarm volume: Select to set the alarm volume.  Volume button behavior: Select to set the behavior of the volume button when pressed while the alarm sounds. Choose from: Silent, Snooze, Dismiss, or Do nothing. Alarm Set an Alarm 1.  From the Home screen, tap Apps  > Clock > ALARM tab.  Note: When you first open the tab, two alarms are set up by default and ready for you to customize. These alarms are turned off by default. 2.  Tap   to add a new one and set the alarm time. 3.  Set the hours and minutes you want and tap OK. 4.  Tap Add label to enter a name for the alarm. 5.  Select the Repeat check box and choose the days of the week you want the alarm to repeat. 6.  Tap   to select a ringtone that will play as an alarm. 7.  Select the Vibrate check box to add a vibration feature to the alarm. Delete an Alarm 1.  From the Home screen, tap Apps  > Clock > ALARM tab. 2.  Tap   on the alarm you want to delete. 3.  Tap . Stopwatch  1.  From the Home screen, tap Apps  > Clock > STOPWATCH tab. 2.  Tap START to start the stopwatch. 3.  Do any of the following:   Tap STOP to stop timing.   Tap LAP to record the time.   Tap RESET to reset the stopwatch to zero.   40  User Manual   Tap SHARE to share your results via Keep, Bluetooth,  Messaging, and more. Timer 1.  From the Home screen, tap Apps  > Clock. 2.  Tap the TIMER tab to display the Timer screen, if necessary. 3.  Set the countdown time and tap START to start the countdown. 4.  Do any of the following:   Tap STOP to pause the timer.   Tap Add label to add a label to a timer.   Tap RESET to reset the timer.   Tap +1 MIN to add an additional minute to the timer.   Tap -1 MIN to subtract a minute from the timer.   Tap   to delete the timer.   Tap   to add a new timer. World Clock 1.  From the Home screen, tap Apps  > Clock > WORLD CLOCK tab. 2.  Tap   to display the world clock list. 3.  Tap the check box next to the city you want to display on the world clock screen. 4.  Tap Back   to confirm. (You will see the clocks you selected and what time it is in those locations.) Calculator 1.  From the Home screen, tap Apps  > Calculator. 2.  Enter numbers by taping the onscreen keys. 3.  Tap DEL to clear a number. Touch and hold to clear an entire number.   To access more advanced features, flick the screen left. 4.  Tap Back   to close the calculator. Bluetooth Turn Bluetooth On or Off 1.  From the Home screen, tap Apps  > Settings > Bluetooth. 2.  Tap the ON/OFF switch to turn Bluetooth on or off.   Note: Turn off Bluetooth when not in use to conserve battery power, or in places where using a wireless phone is prohibited. The Bluetooth Settings Menu ►  From the Home screen, tap Apps  > Settings > Bluetooth.
 Tools and Calendar  41   Turn Bluetooth on to search for other visible in-range Bluetooth devices.   Tap   and choose from the following options. • Refresh to update the Available devices list. • Rename this device to rename your phone for Bluetooth access. • Show received files to view all files you have received via Bluetooth. • Save to to select the location to store the files to be received via Bluetooth.   Note: Your phone is visible to nearby devices while Bluetooth settings is open. Disconnect a Bluetooth Device 1.  From the Home screen, tap Apps  > Settings > Bluetooth. 2.  On the Paired devices list, tap   next to the device you want to disconnect. 3.  Tap FORGET. Send Information from Your Phone to Another Device You can send the following types of information, depending on the device you are sending to. ●  Images and videos ●  Contacts 1.  Set the receiving device to discoverable mode. You may also need to set it to “Receive Beams” or “Receive Files.” Refer to the device’s documentation for instructions on receiving information over Bluetooth. 2.  On the phone, open the application that contains the information or file you want to send.  3.  Follow the steps for the type of item you want to send:   Picture or video (in Camera): After capturing a picture or video, tap the thumbnail and then tap   > Bluetooth.   Pictures and videos (in Gallery): On the Albums tab, tap an album, tap the items you want to share and then tap   > Bluetooth.   Contacts: Display a contact and tap  > Share > Bluetooth. 4.  If you are prompted to turn on Bluetooth, tap TURN ON. 5.  Tap the name of the receiving device. 6.  If prompted, accept the connection on the receiving device, and enter the same passcode on both your phone and the device, or confirm the auto-generated passcode. 7.  On the receiving device, accept the file.   42  User Manual Receive Information from Another Device 1.  From the Home screen, tap Apps  > Settings > Bluetooth. 2.  Tap the ON/OFF switch to turn Bluetooth on. 3.  Keep this screen open to make your phone visible to unpaired devices. 4.  On the sending device, send one or more files to your phone. Refer to the device’s documentation for instructions on sending information over Bluetooth. 5.  If prompted, enter the same passcode on both your phone and the device, or confirm the auto-generated passcode. A Bluetooth authorization request is displayed on your phone. 6.  Tap OK. 7.  When your phone receives a file transfer request notification, slide down the Notifications panel and tap ACCEPT. 8.  When a file is transferred, a notification is displayed. To open the file immediately, slide down the Notifications panel and tap the relevant notification. microSD Card A microSD™ card is an optional accessory that allows you to store images, videos, music, documents, and voice data on your phone. Your phone supports a microSD card up to 32GB.  Note: The microSD card is sold separately.   Note: You can easily damage the microSD card by improper operation. Please be careful when inserting, removing, or handling it. Insert a microSD Card 1.  Remove the back cover and open the SIM/microSD card holder cover. 2.  Insert the microSD card into the microSD card holder with the gold contacts facing down. Gently push the card in until it snaps into place.    3.  Close the SIM/microSD card holder cover and replace the back cover.  Tools and Calendar  43  Warning: To ensure that your phone is waterproof, make sure the SIM/microSD card holder cover is properly sealed. Remove a microSD Card 1.  From the Home screen, tap Apps   > Settings > Storage > Unmount SD card. 2.  Read the disclaimer and tap OK to continue. Wait for the SD card removed icon   to appear in the Status bar. 3.  Turn the phone off and remove the back cover. 4.  Open the SIM/microSD card holder cover. 5.  Gently pull the microSD card out from the holder. 6.  Close the SIM/microSD card holder cover and replace the back cover. View the microSD Card Memory 1.  With the microSD card inserted, from the Home screen, tap Apps   > Settings > Storage. 2.  Scroll down the screen to see the information under SD card. Unmount the microSD Card 1.  From the Home screen, tap Apps  > Settings > Storage. 2.  Tap Unmount SD card > OK. Format the microSD Card 1.  From the Home screen, tap Apps  > Settings > Storage. 2.  Scroll down the screen, and tap Erase SD card > ERASE SD CARD > ERASE EVERYTHING.  Note: The formatting procedure erases all the data on the microSD card, after which the files CANNOT be retrieved. To prevent the loss of important data, please check the contents before you format the card. Use the Phone’s microSD Card as a Media Device 1.  Connect the phone to your computer using the supplied USB cable. 2.  Swipe down from the top of the screen to open the Notifications panel and tap  the USB connection notification.  3.  Tap Media device (MTP). On your computer, the connected phone is recognized as a portable media device. See “Connectivity Settings” on page 51. 4.  Navigate to the device and select SD card. 5.  Manage the data as you wish, unmount the phone as required by your computer's operating system to safely remove your phone, and disconnect the phone from the computer.   44  User Manual 8  SettingsAccess to Phone’s Settings Menu ►  From the Home screen, tap Apps   > Settings. – or – Swipe down from the top of any screen and  tap the settings icon   in the top right. Wireless & Networks Settings Wi-Fi Turn Wi-Fi On or Off 1.  From the Home screen, tap Apps   > Settings > Wi-Fi. 2.  Tap the ON/OFF switch to turn Wi-Fi on or off. Access the Wi-Fi Settings Menu 1.  From the Home screen, tap Apps   > Settings > Wi-Fi. 2.  If necessary, tap the ON/OFF switch to turn Wi-Fi on. 3.  Tap   for the following menus:  Add network to add a new Wi-Fi network.   Saved networks to display your saved wireless networks.  Refresh to reload the list of networks.  Wi-Fi Direct to use a peer-to-peer Wi-Fi connection.   Advanced to configure advanced Wi-Fi settings. Bluetooth Turn Bluetooth On or Off 1.  From the Home screen, tap Apps   > Settings > Bluetooth. 2.  Tap the ON/OFF switch to turn Bluetooth on or off. Data Usage View Data Usage ►  From the Home screen, tap Apps   > Settings > Data usage. Turn Cellular data On or Off 1.  From the Home screen, tap Apps   > Settings > Data usage. 2.  Tap the ON/OFF switch next to Cellular data to turn it on or off. Set Cellular Data Limit  Warning: The usage displayed is measured by your phone. Your carrier’s
 Settings  45 data usage accounting may differ and the usage in excess of your data limit plan can result in charges. Data usage limit set in this menu is not guaranteed to prevent additional charges. 1.  From the Home screen, tap Apps   > Settings > Data usage. 2.  Tap the ON/OFF switch next to Set cellular data limit to turn it on. Read the message and tap OK. 3.  To change the cycle reset date, tap the drop-down menu icon   and tap Change cycle.... 4.  Set the date and then tap SET. 5.  Touch the orange tab and slide up or down to set the data usage limit. Alert About Data Usage 1.  From the Home screen, tap Apps   > Settings > Data usage. 2.  Tap the ON/OFF switch next to Alert me about data usage to turn it on. Read the message and tap OK. 3.  Touch the black tab and slide up or down set the data usage warning limit.  Data Usage Options 1.  From the Home screen, tap Apps   > Settings > Data usage. 2.  Tap   for the following options:  Restrict background data to restrict the background data usage.  Show/Hide Wi-Fi to display or hide Wi-Fi usage.  Network restrictions to set a Wi-Fi network as a metered connection.  Cellular networks to configure cellular network settings. Airplane Mode 1.  From the Home screen, tap Apps   > Settings > More. 2.  Tap the ON/OFF switch next to Airplane mode to turn it on or off. Auto-Reply Mode 1.  From the Home screen, tap Apps   > Settings > More > Auto-reply mode. 2.  Tap the ON/OFF switch to turn Auto-reply mode on or off. 3.  Select an option:  Reply to: Sets the desired options.  Reply to only registered contacts: Turn this on if you only want to automatically reply to registered contacts.  Auto-reply message: Allows you to edit your Auto Reply message. Cellular Networks Settings Data Roaming  1.  From the Home screen, tap Apps   > Settings > More > Cellular networks.   46  User Manual 2.  Tap the ON/OFF switch next to Data roaming to turn it off. Preferred Network Type 1.  From the Home screen, tap Apps   > Settings > More > Cellular networks. 2.  Tap Preferred network type and make your desired selection. Access Point Names To add a new access point: 1.  From the Home screen, tap Apps   > Settings > More > Cellular networks > Access Point Names. 2.  Tap   and enter the necessary information. 3.  Tap   > Save. To restore the default settings: 1.  From the Home screen, tap Apps   > Settings > More > Cellular networks > Access Point Names. 2.  Tap   > Reset to default. Network Operators 1.  From the Home screen, tap Apps   > Settings > More > Cellular networks > Network operators. 2.  Select an option:   Tap Choose automatically to select a preferred network automatically.   Tap SEARCH NETWORKS to search available networks. Wireless Emergency Alerts Your phone is compatible with the federally supervised cell phone alert services to send out broadcast SMS messages for public warning. 1.  From the Home screen, tap Apps   > Settings > More > Wireless Emergency Alerts. 2.  The following options are available:  Presidential: Receives an emergency presidential alert. (Presidential is always displayed.)  Imminent Threat - Extreme: Select the check box to display alerts for extreme threats to life or property.  Imminent Threat - Severe: Select the check box to display alerts for severe threats to life or property.  Amber: Select the check box to display child abduction emergency alerts (AMBER alerts).  Help: Displays the Help information for Emergency Alerts.  Cellbroadcast Message: Select the check box to enable receipt of cell broadcast messages.  Notifications: Select the check box to set your phone to display a notification when an alert is received.  Settings  47  Sound: Select the check box to set a notification sound to play when an emergency alert is received.  Vibrate: Select the check box to set your phone to vibrate when an emergency alert is received.   Alert reminder: Sets how often your phone alerts you.  Emergency notification preview: Select this option to play a sample emergency alert tone.  Speak alert message: Select the check box to use the text-to-speech feature on your phone to read the emergency alert out when it is received. Device Settings Change Home 1.  From the Home screen, tap Apps   > Settings > Change home. 2.  Select from the following:  Standard Home: Provides a standard experience for users who are familiar with Android.  Core Home: Provides a simplified and easier experience for the first time smartphone user. 3.  Tap OK. Display Settings Brightness Level 1.  From the Home screen, tap Apps   > Settings > Display > Brightness level. 2.  Drag the brightness slider   left or right to adjust the screen brightness. Adaptive Brightness 1.  From the Home screen, tap Apps   > Settings > Display. 2.  Tap the ON/OFF switch next to Adaptive brightness to turn it on or off. Wallpaper 1.  From the Home screen, tap Apps   > Settings > Display > Wallpaper. 2.  Select the wallpaper you want to display on the screen. Sleep 1.  From the Home screen, tap Apps   > Settings > Display > Sleep. 2.  Select a delay time. Daydream To select what is displayed: 1.  From the Home screen, tap Apps   > Settings > Display > Daydream. 2.  Tap the ON/OFF switch to turn Daydream on. 3.  Choose from the following options:   48  User Manual  Clock to display the phone's analog or digital clock. Tap   next to it and select the clock style or select the Night mode option.  Colors to display changing colors.  Gallery to display the images from Gallery as a slide show. Tap   next to it and select the images to display.  Photo Table to scatter the images one by one across the screen to make a collage. Tap   next to it and select the images to display.   Tap   > Start now to see a preview of your selection. Font Size 1.  From the Home screen, tap Apps   > Settings > Display > Font size. 2.  Make your desired selection. When Device Is Rotated 1.  From the Home screen, tap Apps   > Settings > Display > When device is rotated. 2.  Make your desired selection. Display Battery Percentage 1.  From the Home screen, tap Apps   > Settings > Display. 2.  Tap the ON/OFF switch next to Display battery percentage to turn it on or off. Sound & Notification Settings Sound Settings  1.  From the Home screen, tap Apps   > Settings > Sound & notification. 2.  Drag the onscreen sliders to adjust the volume level settings for Media volume, Alarm volume, Ring volume, or System volume. Enable or Disable Call Vibrations 1.  From the Home screen, tap Apps   > Settings > Sound & notification.  2.  Tap the ON/OFF switch next to Also vibrate for calls to enable or disable it. Phone Ringtone 1.  From the Home screen, tap Apps   > Settings > Sound & notification > Phone ringtone.  2.  If prompted, select an app to use and make your desired selection. 3.  Select the file or tap OK to assign the ringtone. Vibration Pattern 1.  From the Home screen, tap Apps   > Settings > Sound & notification.  2.  Tap Vibration pattern, and make your desired selection. 3.  Tap OK to assign the vibration.
 Settings  49 Default Notification Ringtone 1.  From the Home screen, tap Apps   > Settings > Sound & notification > Default notification ringtone. 2.  If prompted, select an app to use and make your desired selection. 3.  Tap OK to assign the ringtone. Other Sounds Settings 1.  From the Home screen, tap Apps   > Settings > Sound & notification. 2.  Tap Other sounds, and make your desired selection. Notification Settings Persistent Alerts 1.  From the Home screen, tap Apps   > Settings > Sound & notification > Persistent alerts. 2.  Tap the ON/OFF switch to turn Persistent alerts on or off. 3.  The following options are available:  Audible tone: Select the check box to beep when notification is on the notification bar.  Vibrate: Select the check box to vibrate when notification is on the notification bar.  Repeat interval: Sets the reminder interval.  App notifications: Sets the notification settings individually for apps. When Device Is Locked 1.  From the Home screen, tap Apps   > Settings > Sound & notification > When device is locked. 2.  Select Show all notification content, Hide sensitive notification content or Don’t show notifications at all. Interruptions Settings To manage when calls and notifications arrive: 1.  From the Home screen, tap Apps   > Settings > Sound & notification > Interruptions. 2.  Tap When calls and notifications arrive and select from the following:  Always interrupt: Allows you to always allow interruptions.  Allow only priority interruptions: Allows you to only allow priority interruptions. When you select this setting, a star icon   will appear in your status bar.  Don't interrupt: Allows you to not allow any sort of interruptions. To set app notifications: 1.  From the Home screen, tap Apps   > Settings > Sound & notification > Interruptions.   50  User Manual 2.  Tap App notifications and tap the desired app for which you want to manage the alert style. 3.  Make your desired selection. To set downtime: 1.  From the Home screen, tap Apps   > Settings > Sound & notification > Interruptions. 2.  Under the "Downtime (priority interruptions only)," set the following options:   Days: Select the days of the week you wish to allow priority notifications only.  Start time: Adjust the time you want downtime to begin.  End time: Adjust the time you want downtime to end.  Interruptions allowed: Select the type of interruptions allowed. Select from Priority only or None. Notification Access 1.  From the Home screen, tap Apps   > Settings > Sound & notification > Notification access. 2.  You will see a list of apps that can access your notifications. Storage Settings  View Memory Information ►  From the Home screen, tap Apps   > Settings > Storage.  Internal storage: View the total space, available space and space used by specific features on your phone's internal storage.  SD card: View total space and available space memory usage on an optional installed memory card. • Mount SD card: Prepare an optional installed memory card for use as storage in the phone. This option is only available if an optional memory card is installed.  • Unmount SD card: Prepare an optional installed memory card for safe removal. • Erase SD card: Permanently remove all content from an optional installed memory card. The deleted data CANNOT be retrieved. Battery Settings  1.  From the Home screen, tap Apps   > Settings > Battery. 2.  For additional details and settings options, tap a usage category.  Settings  51 Connectivity Settings 1.  From the Home screen, tap Apps   > Settings > Connectivity. 2.  Select an option:  Media device (MTP): Connects the phone as a media device and transfers media files on Windows, or using Android File Transfer on Mac (see www.android.com/filetransfer).  Camera (PTP): Connects the phone as a camera and transfers pictures using a camera software, and also transfers any files on the computer that do not support MTP.  Charge only: Charges the battery. Apps Settings 1.  From the Home screen, tap Apps   > Settings > Apps. 2.   Swipe the screen to the left to access settings by category (DOWNLOADED, ON SD CARD, RUNNING, or ALL).  3.  Tap an application to access the details and manage it. Personal Settings Location Settings 1.  From the Home screen, tap Apps   > Settings > Location. 2.  Tap the ON/OFF switch to turn location on or off. 3.  The following options are available:  Mode to select the method your phone uses to determine your location.  • High accuracy: Uses GPS, Wi-Fi, and cellular networks to determine your location. • Battery saving: Uses only Wi-Fi and cellular networks to determine your location. • Device only: Uses only the GPS network determine your location. Start Screen Settings Security Type 1.  From the Home screen, tap Apps   > Settings > Start screen > Security type. 2.  Choose the security type:  None: Turn off the screen lock.  Swipe: Tap and swipe up.  Pattern: Draw a pattern to unlock.  PIN: Enter four to seventeen digits PIN code to unlock.  Password: Enter four to seventeen letters, digits, or symbols to unlock. Use Swipe 1.  From the Home screen, tap Apps   > Settings > Start screen > Security type. 2.  Tap Swipe to save the setting.   52  User Manual Use Pattern  1.  From the Home screen, tap Apps   > Settings > Start screen > Security type > Pattern. 2.  Draw the screen unlock pattern by connecting at least four dots in a vertical, horizontal, or diagonal direction. Lift your finger from the screen when finished. The phone records the pattern. 3.  Tap CONTINUE. 4.  When prompted, draw the screen unlock pattern again, and then tap CONFIRM. 5.  Enter your backup PIN and tap CONTINUE. 6.  Enter your backup PIN again and tap OK to confirm it. 7.  Choose how you want notifications displayed when your phone is locked and tap DONE. Use PIN 1.  From the Home screen, tap Apps   > Settings > Start screen > Security type > PIN. 2.  Enter your PIN and tap CONTINUE. 3.  Enter your PIN again and tap OK to confirm it. Use Password 1.  From the Home screen, tap Apps   > Settings > Start screen > Security type > Password. 2.  Enter a password and tap CONTINUE. 3.  Enter your password again and tap OK to confirm it. Make Pattern Visible 1.  From the Home screen, tap Apps   > Settings > Start screen. 2.  Tap the ON/OFF switch next to Make pattern visible to turn it on or off. Screen Lock Time 1.  From the Home screen, tap Apps   > Settings > Start screen > Screen lock time. 2.  Select the delay time to lock the screen. Power Button Instantly Locks 1.  From the Home screen, tap Apps   > Settings > Start screen. 2.  Tap the ON/OFF switch next to Power button instantly locks to turn it on or off. Owner Info 1.  You can add a message on the start screen in case you lose your phone. 2.  From the Home screen, tap Apps   > Settings > Start Screen > Owner info.
 Settings  53 3.  Check the box next to "Show owner info on start screen" and then enter your information. Start Screen Background 1.  From the Home screen, tap Apps   > Settings > Start screen. 2.  Tap Start screen background > Use wallpaper image or Use another image. Smart Lock 1.  From the Home screen, tap Apps   > Settings > Start screen > Smart Lock. 2.  The following options are available:  Trusted devices: Allows you to add a trusted device to keep this device unlocked when connected.  Trusted places: Allows you to add a trusted place to keep this device unlocked when you stay in there.  Trusted face: Allows you to set up Face matching as an option to unlock this device.  Trusted voice: Allows you to have your phone unlock when you do a search with "Ok Google."  On-body detection: Allows you to keep your phone unlocked while it's on you.  Note: The settings available may vary depending on your phone and version of Android. Security Settings 1.  From the Home screen, tap Apps   > Settings > Security. 2.  The following settings are available:  Encrypt & Decrypt data: Encrypt the data in your phone and an optional SD card installed in your phone.  Set up SIM card lock: Set up a PIN to lock your phone's SIM card (may not be available on your device).  Make passwords visible: Allows you to see the password as you type.  Device administrators: View or deactivate device administrators.  Unknown sources: Allow installation of apps from unknown sources.  Storage type: Allows you to see the supported credentials storage type.  Trusted credentials: Allows you to see the trusted credentials on your phone’s system.  Install from SD card: Allows you to install encrypted certificates from the SD card.  Clear credentials: Clear all the credentials on your phone.  Trust agents: Manage trust agents for features like Smart Lock.  Screen pinning: Turn on to keep your current screen in view on your   54  User Manual phone. Learn how to use screen pinning.  Apps with usage access: Manage what apps have access to app-usage data on your device. Screen Pinning 1.  From the Home screen, tap Apps   > Settings > Security > Screen pinning. 2.  Set the switch to on. 3.  Open an app and go to the screen you want to pin. 4.  Tap Overview   on your phone. Swipe up to reveal the pin icon on the bottom right corner of your selected screen. 5.  Tap the pin icon  .  6.  To exit from the pinned screen, touch and hold Back   and Overview   at the same time. The screen will be unpinned. Accounts Settings Set up a New Account 1.  From the Home screen, tap Apps   > Settings > Accounts > Add account. 2.  Tap an account type. 3.  Follow the onscreen instructions to add your additional account. Manage Existing Accounts 1.  From the Home screen, tap Apps   > Settings > Accounts. 2.  Select an account type. 3.  Manage the settings or select an account and tap for additional options. Language & Input Settings Language 1.  From the Home screen, tap Apps   > Settings > Language & input > Language. 2.  Select an available language. Spell Checker 1.  From the Home screen, tap Apps   > Settings > Language & input > Spell checker. 2.  Set the switch to on. 3.  Tap Language and choose which language to use for spell-checking.  4.  Tap Settings icon to configure the settings. Personal Dictionary  1.  From the Home screen, tap Apps   > Settings > Language & input > Personal dictionary. 2.  Select a language and tap  . 3.  Type the word you want to add.  Settings  55 4.  Type the shortcut to bring up the typed word, if you want. 5.  Tap Back  . (A list of words you have added to the dictionary is displayed.)   Tap a word to edit it.   Tap a word and then tap   to delete it. Keyboard and Input Method Settings Current Keyboard 1.  From the Home screen, tap Apps   > Settings > Language & input > Current Keyboard. 2.  Tap CHOOSE KEYBOARDS. 3.  Adjust the switches to enable or disable the keyboards. Voice Input 1.  From the Home screen, tap Apps   > Settings > Language & input > Voice input. 2.  Select the voice input service you want to use. Tap  to configure its settings. Text-to-Speech 1.  From the Home screen, tap Apps   > Settings > Language & input > Text-to-speech output.  2.  The following options are available:  Preferred engine: Select your preferred engine. Tap   to configure its settings.  Speech rate: Choose a comfortable speed of the spoken text.  Speech pitch: Choose a comfortable tone of the spoken text.  Listen to an example: Play a short demonstration of the set speech synthesis.  Default language status: Shows the status of language support for voice recognition. Pointer Speed 1.  From the Home screen, tap Apps   > Settings > Language & input > Pointer speed. 2.  Use the slider to set the speed and tap OK. Backup & Reset Settings Backup & Restore 1.  From the Home screen, tap Apps   > Settings > Backup & reset. 2.  Select your backup and restore options.  Back up my data: When enabled, your can back up your app data, Wi-Fi passwords, and other settings to Google servers.   56  User Manual  Backup account: Allows you to set a Google Account for your phone backup.  Automatic restore: When enabled, you can restore backed up settings and data when reinstalling an application after a factory data reset. Factory Data Reset 1.  From the Home screen, tap Apps   > Settings > Backup & reset. 2.  Tap Factory data reset. 3.  Read the factory data reset information, select the Erase SD card check box if necessary, and tap RESET PHONE. 4.  Tap ERASE EVERYTHING.  Note: The deleted data CANNOT be retrieved. System Settings  Date & Time Settings Your phone obtains date and time information from the network. These values also can be manually set. 1.  From the Home screen, tap Apps   > Settings > Date & time. 2.  Turn the Automatic date and time option to OFF.   If set to ON, you cannot set the date or time values manually. 3.  Tap Set date. Adjust the month, date, and year by scrolling each value. Tap OK when finished. 4.  Tap Set time. Adjust the hour and minute and select AM or PM by scrolling each value. Tap OK when finished. 5.  Turn the Automatic time zone option to OFF.   If set to ON, you cannot set the time zone values manually. 6.  Tap Select time zone and then select a time zone from the onscreen list. Scroll down the list to view additional time zones. 7.  Tap the Use 24-hour format option to switch between 24-hour format and 12-hour format. Accessibility Settings Services TalkBack TalkBack provides spoken feedback to help visually impaired users. 1.  From the Home screen, tap Apps   > Settings > Accessibility > TalkBack. 2.  Tap the ON/OFF switch to turn TalkBack on. 3.  Read the confirmation message and then tap OK. 4.  Tap SETTINGS to configure its settings.
 Settings  57  Note: When TalkBack is turned on, you need to double tap or slide with two fingers, instead of single tap or slide with one finger, to operate the touchscreen. Switch Access This feature allows you to configure hard buttons to perform certain tasks to enable better navigation for the visually impaired users.  1.  From the Home screen, tap Apps   > Settings > Accessibility > Switch Access. 2.  Tap the ON/OFF switch to turn Switch Access on. 3.  Read the confirmation message and then tap OK. 4.  Tap SETTINGS to configure its settings. Vision Magnification Gestures 1.  From the Home screen, tap Apps   > Settings > Accessibility > Magnification gestures. 2.  Set the switch to the on or off position. Large Text 1.  From the Home screen, tap Apps   > Settings > Accessibility. 2.  Tap the ON/OFF switch next to Large text to turn it on or off. High Contrast Text 1.  From the Home screen, tap Apps   > Settings > Accessibility. 2.  Tap the ON/OFF switch next to High contrast text to turn it on or off. Auto-Rotate Screen 1.  From the Home screen, tap Apps   > Settings > Accessibility. 2.  Tap the ON/OFF switch next to Auto-rotate screen to turn it on or off. Speak Passwords 1.  From the Home screen, tap Apps   > Settings > Accessibility. 2.  Tap the ON/OFF switch next to Speak passwords to turn it on or off. Text-to-speech Output See “Text-to-Speech” on page 55.   Persistent Alerts 1.  From the Home screen, tap Apps   > Settings > Accessibility > Persistent alerts. 2.  The following options are available:  Audible tone: Select the check box to beep when notification is on the notification bar.  Vibrate: Select the check box to vibrate when notification is on the notification bar.  Repeat interval: Sets the reminder interval.   58  User Manual  App notifications: Modifies the notification settings individually for apps. Display Color Inversion 1.  From the Home screen, tap Apps   > Settings > Accessibility. 2.  Tap the Color inversion switch to turn on or off. Color Correction 1.  From the Home screen, tap Apps   > Settings > Accessibility > Color correction.  2.  Set the switch to the on or off position. 3.  To change the color correction mode, select Correction mode, then make your desired selection. Hearing Captions 1.  From the Home screen, tap Apps   > Settings > Accessibility > Captions.  2.  Set the switch to the on or off position. 3.  When captions are enabled, you can configure the following settings:  Language: Select the language in which you want captions to appear.  Text size: Select the size for your caption text.  Caption style: Select the style and color for your caption text and background. If you select Custom, you can then select additional options. Mono Audio 1.  From the Home screen, tap Apps   > Settings > Accessibility. 2.  Tap the ON/OFF switch next to Mono audio to turn it on or off. Sound Balance 1.  From the Home screen, tap Apps   > Settings > Accessibility > Sound balance. 2.  Use the slider to adjust the balance. A sound clip will play when you tap on the slider to adjust the balance. 3.  Tap OK. Mobility Touch & Hold Delay 1.  From the Home screen, tap Apps   > Settings > Accessibility > Touch & hold delay. 2.  Select Short, Medium, or Long. Others Power Button Ends Call 1.  From the Home screen, tap Apps   > Settings > Accessibility.  Settings  59 2.  Tap the ON/OFF switch next to Power button ends call to turn it on or off. Accessibility Shortcut 1.  From the Home screen, tap Apps   > Settings > Accessibility > Accessibility shortcut. 2.  Read the information and tap the switch to enable the feature. Phone Options Shortcut 1.  From the Home screen, tap Apps   > Settings > Accessibility > Phone options shortcut. 2.  Select the Screenshot and/or Accessibility check box. Printing 1.  From the Home screen, tap Apps   > Settings > Printing. 2.  Select an available print service and follow the online instructions. 3.  Tap the ON/OFF switch to turn the service on or off. The service must be ON to configure settings or print.   Tap   for more options, including adding a printer and print settings. 4.  Follow the onscreen instructions to proceed. About Phone ►  From the Home screen, tap Apps   > Settings > About phone. System updates ►  From the Home screen, tap Apps   > Settings > About phone > System updates.   60  User Manual 9  Get HelpCustomer Support Contact the Kyocera Communications Inc. Customer Care Center in any of the  following ways: ●  Web site: www.kyoceramobile.com. ●  Email: phone-help@kyocerawireless. com. ●  Phone: 1-800-349-4478 (U.S. and Canada) or 1-858-882-1401. Before requesting support, please try to reproduce and isolate the problem. When you contact the Customer Care Center, be ready to provide the following information: ●  The actual error message or problem you are experiencing. ●  The steps you took to reproduce the problem. ●  The phone's international mobile equipment ID (IMEI). To locate the IMEI, from the Home screen, tap Apps   > Settings > About phone > Status and scroll down. Qualified Service If the problem with your phone persists, return the phone with all accessories and packaging to the dealer for qualified service.
 Notes  61 10  Notes●  Instructions to perform tasks in this guide may change depending on the version of software or application on your phone. ●  All screens and icon images in this guide are simulated. Actual displays may vary. ●  Certain features, services and applications are network dependent and may not be available in all areas; additional terms, conditions and/or charges may apply. Contact your service provider about feature availability and functionality. ●  All features, functionality and other specifications, as well as the information contained in this guide are based upon the latest available information and are believed to be accurate at the time of issuing. Kyocera Communications, Inc. reserves the right to change or modify any information or specifications without notice or obligation.  62  User Manual Important Safety InformationThis section contains important operational and safety information that will help you safely use your phone. Failure to read and follow the information provided in this section may result in serious bodily injury, death, or property damage. General Precautions There are several simple guidelines to operating your phone properly and maintaining safe, satisfactory service. ●  To maximize performance, do not touch the portions of your phone where the internal antennas are located while using the phone. ●  Speak directly into the mouthpiece. ●  Do not expose your phone to direct sunlight for extended periods of time (such as on the dashboard of a car). ●  Although your phone is quite sturdy, it is a complex piece of equipment and can be broken. Avoid dropping, hitting, bending, or sitting on it.  ●  Any changes or modifications to your phone not expressly approved in this document could void your warranty for this equipment and void your authority to operate this equipment.  Note: For the best care of your phone, only Kyocera-authorized personnel should service your phone and accessories. Failure to do so may be dangerous and void your warranty. Maintaining Safe Use of and Access to Your Phone Do Not Rely on Your Phone for Emergency Calls  Mobile phones operate using radio signals, which cannot guarantee connection in all conditions. Therefore you should never rely solely upon any mobile phone for essential communication (e.g., medical emergencies). Emergency calls may not be possible on all cellular networks or when certain network services or mobile phone features are in use. Check with your local service provider for details. Using Your Phone While Driving Talking on your phone while driving (or operating the phone without a hands-free device) is prohibited in some jurisdictions. Laws vary as to specific restrictions. Remember that safety always comes first. Following Safety Guidelines To operate your phone safely and efficiently, always follow any special regulations in a  Important Safety Information  63 given area. Turn your phone off in areas where use is forbidden or when it may cause interference or danger. Medical Devices If you have a medical device, including an implantable medical device such as a pacemaker or defibrillator, consult your healthcare provider and the device manufacturer’s directions before using this mobile phone. Persons with implantable medical devices: ●  Should always keep the mobile phone more than six (6) inches from the implantable medical device when the mobile phone is turned ON. ●  Should not carry the mobile phone in the breast pocket. ●  Should use the ear opposite the implantable medical device to minimize the potential for interference. ●  Should turn OFF the mobile phone immediately if you have any reason to suspect that interference is taking place. Using Your Phone Near Other Electronic Devices Most modern electronic equipment is shielded from radio frequency (RF) signals. However, RF signals from wireless phones may affect inadequately shielded electronic equipment. RF signals may affect improperly installed or inadequately shielded electronic operating systems or entertainment systems in motor vehicles. Check with the manufacturer or their representative to determine if these systems are adequately shielded from external RF signals. Also check with the manufacturer regarding any equipment that has been added to your vehicle. Consult the manufacturer of any personal medical devices, such as pacemakers and hearing aids, to determine if they are adequately shielded from external RF signals.  Note: Always turn off the phone in healthcare facilities, and request permission before using the phone near medical equipment. Using Your Phone On Airplanes On airplanes, follow applicable airline regulations and always follow the flight crew’s instructions concerning the use of your phone. Turning Off Your Phone in Dangerous Areas To avoid interfering with blasting operations, turn your phone off when in a blasting area or in other areas with signs indicating two-way radios should be turned off. Construction crews often use remote-control RF devices to set off explosives. Turn your phone off when you are in any area that has a potentially explosive atmosphere. Although it’s rare, your phone   64  User Manual and accessories could generate sparks. Sparks can cause an explosion or fire, resulting in bodily injury or even death. These areas are often, but not always, clearly marked. They include: ●  Fueling areas such as gas stations. ●  Below deck on boats. ●  Fuel or chemical transfer or storage facilities. ●  Areas where the air contains chemicals or particles such as grain, dust, or metal powders. ●  Any other area where you would normally be advised to turn off your vehicle’s engine.  Note: Never transport or store flammable gas, flammable liquids, or explosives in the compartment of your vehicle that contains your phone or accessories. Restricting Children’s Access to Your Phone Your phone is not a toy. Do not allow children to play with it as they could hurt themselves and others, damage the phone or could potentially cost you money. Waterproof Capability Your CD8100 is waterproof and meets IPX5 and IPX7 standards, immersible for up to 30 minutes at a depth not exceeding one meter (about 3.28 feet). Exposing your phone to water outside these limits or not following the precautions can result in water damage. To ensure that your phone maintains waterproof capability, the following precautions must be observed. ●  Make sure the SIM/microSD card holder cover and back cover are properly sealed by squeezing around the edges of the cover. The charger/USB port does not have covers because they are waterproof. ●  Do not spray or immerse your phone in liquids other than fresh water or tap water. ●  Do not expose your phone to water heated in excess of 104°F (40°C), or to liquids other than water, such as detergent, beverages, or chlorinated or treated water. Should your phone be accidentally exposed to other liquids, rinse the phone gently in clean fresh water. ●  Your phone is inoperable under water and should be dried as quickly as possible when wet. ●  Do not use the charger/USB port for charging, data transmission, etc. until the phone is completely dry. If your phone gets wet: Water in the microphone port may affect outbound audio quality. These are
 Important Safety Information  65 temporary conditions and will subside once the phone is dry. 1.  Do not open the SIM/microSD card holder cover as this may allow water to get inside the sealed portion of the phone. 2.  Wipe the phone surfaces with a dry clean cloth. 3.  Water in the phone’s open ports may affect sound quality and should be removed with puffs of air directly into the ports. Phone audio may not operate properly until ports are dry. Apply a dry clean cloth to the open areas and crevices to remove the moisture left on the phone: microphones; speakers; power button; volume button; and charger/USB port. 4.  Repeat the process until the phone is completely dry. Charging ●  Dry your phone with a clean cloth before charging. ●  Do not touch the charger, charging cable, or charger/USB port with wet hands. Doing so may cause electric shock, injury, or product failure. ●  Do not charge your phone in a wet or damp place, such as in a bathroom or near a kitchen sink. Using Your Phone With a Hearing Aid Device When some wireless phones are used with certain hearing devices (including hearing aids and cochlear implants), users may detect a noise which can interfere with the effectiveness of the hearing device. Some hearing devices are more immune than others to this interference noise, and phones also vary in the amount of interference noise they may generate. ANSI standard C63.19 was developed to provide a standardized means of measuring both wireless phone and hearing devices to determine usability rating categories for both. Ratings have been developed for mobile phones to assist hearing device users in finding phones that may be compatible with their hearing device. Not all phones have been rated for compatibility with hearing devices. Phones that have been rated have a label located on the box. Your CD8100 has an M4 and a T4 rating. These ratings are not guarantees. Results will vary depending on the user’s hearing device and the individual’s type and degree of hearing loss. If a hearing device is particularly vulnerable to interference noise; even a phone with a higher rating may still cause unacceptable noise levels in the hearing device. Trying out the phone with your hearing device is the best way to evaluate it for your personal needs.   66  User Manual M-Ratings: Phones rated M3 or M4 meet FCC requirements for hearing aid compatibility and are likely to generate less interference to hearing devices than unrated phones. (M4 is the better/higher of the two ratings.) T-Ratings: Phones rated T3 or T4 meet FCC requirements and are likely to be more usable with a hearing device’s telecoil (“T Switch” or “Telephone Switch”) than unrated phones. (T4 is the better/higher of the two ratings. Note that not all hearing devices have telecoils in them.)  Note: This phone has been tested and rated for use with hearing aids for some of the wireless technologies that it uses. However, there may be some newer wireless technologies used in this phone that have not been tested yet for use with hearing aids. It is important to try the different features of this phone thoroughly and in different locations, using your hearing aid or cochlear implant, to determine if you hear any interfering noise. Consult your service provider or the manufacturer of this phone for information on hearing aid compatibility. If you have questions about return or exchange policies, consult your service provider or phone retailer. Hearing aid devices may also be measured for immunity to interference noise from wireless phones and should have ratings similar to phones. Ask your hearing healthcare professional for the rating of your hearing aid. Add the rating of your hearing aid and your phone to determine probable usability: ●  Any combined rating equal to or greater than six offers excellent use. ●  Any combined rating equal to five is considered normal use. ●  Any combined rating equal to four is considered usable. Thus, if you pair an M3 hearing aid with an M3 phone, you will have a combined rating of six for “excellent use.” This is synonymous for T ratings. More information about hearing aid compatibility may be found at: www.fcc.gov, www.fda.gov, and www.accesswireless.org. Getting the Best Hearing Device Experience With Your Phone To further minimize interference, move the phone around to find the point with least interference. Caring for the Battery  Note: The battery cannot be removed from the phone. For replacing or disposing the battery, contact a KYOCERA authorized service center. Your CD8100 is installed with a lithium ion (Li-Ion) battery. The guidelines listed below help you get the most out of your battery’s performance.  Important Safety Information  67 Charging ●  Only use the battery with a qualified charger. Use of an unqualified battery charger may present a risk of fire, explosion, leakage, or other hazard. If you are unsure about whether a charger is qualified, contact customer support. ●  In order to avoid damage, charge the battery only in temperatures that range from 32° F to 113°(0° C to 45° C). ●  Don’t use the battery charger in direct sunlight or in high humidity areas, such as the bathroom. ●  The battery may need recharging if it has not been used for a long period of time. ●  It’s best to replace the battery when it no longer provides acceptable performance. It can be recharged hundreds of times before it needs replacing. The battery cannot be removed from the phone. Contact a KYOCERA authorized service center for replacing the battery. Storing ●  Don’t store the phone in high temperature areas for long periods of time. It’s best to follow these storage rules:   Less than one month: -4° F to 140° F (-20° C to 60° C)   More than one month: -4° F to 113° F (-20° C to 45° C) Common Causes of Battery Drain ●  Playing games or using the Web. ●  Keeping backlighting on. ●  Operating the phone far away from a base station or cell site. ●  Using data cables or accessories. ●  Operating the phone when no service is available, or service is available intermittently. ●  High volume settings. ●  Repeating sound, vibration, or lighted alerts. Disposal of Lithium Ion (Li-Ion) Battery Installed in Your Phone ●  The battery cannot be removed from the phone. For safe disposal options of your Li-Ion battery, contact your nearest KYOCERA authorized service center. Radio Frequency (RF) Energy Understanding How Your Phone Operates Your phone is a radio transmitter and receiver. When it’s turned on, it receives and transmits radio frequency (RF) signals. Your phone is designed to transmit just enough RF power to reach the network. The system handling your call controls the   68  User Manual RF power level. Depending on network conditions, your phone may operate at an actual SAR level below the maximum value specified. Your phone is designed not to exceed the recommended international guidelines for limits on RF exposure. Knowing Radio Frequency Safety The design of your phone complies with updated NCRP standards described below. In 1991–92, the Institute of Electrical and Electronics Engineers (IEEE) and the American National Standards Institute (ANSI) joined in updating ANSI’s 1982 standard for safety levels with respect to human exposure to RF signals. More than 120 scientists, engineers and physicians from universities, government health agencies and industries developed this updated standard after reviewing the available body of research. In 1993, the Federal Communications Commission (FCC) adopted this updated standard in a regulation. In August 1996, the FCC adopted hybrid standard consisting of the existing ANSI/IEEE standard and the guidelines published by the National Council of Radiation Protection and Measurements (NCRP). Body-Worn Operation To maintain compliance with FCC RF exposure guidelines, always use an appropriate accessory if using the phone for body worn operations. Accessories used with this phone for body-worn operations must not contain any metallic components and must provide at least 0.59 inches (1.5 centimeter) separation distance between the user’s body and the phone, including antennas. Body worn accessories that do not meet these requirements may not comply with FCC RF exposure requirements and should be avoided. For more information about RF exposure, visit the FCC website at www.fcc.gov. Specific Absorption Rates (SAR) for Wireless Phones The SAR value corresponds to the relative amount of RF energy absorbed into the head of a user of a wireless handset. The SAR value of a phone is the result of an extensive testing, measuring and calculation process. It does not represent how much RF the phone emits. All phone models are tested at their highest value in strict laboratory settings. But when in operation, the SAR of a phone can be substantially less than the level reported to the FCC. This is because of a variety of factors including its proximity to a base station antenna, phone design and other factors. What is important to remember is
 Important Safety Information  69 that each phone meets strict federal guidelines. Variations in SARs do not represent a variation in safety. All phones must meet the federal standard, which incorporates a substantial margin of safety. As stated above, variations in SAR values between different model phones do not mean variations in safety. SAR values at or below the federal standard of 1.6 W/kg are considered safe for use by the public. The highest reported SAR values of the CD8100 are: Head: 0.68 W/kg Body-worn: 0.79 W/kg Hotspot: 1.20 W/kg Phone models may have different versions and more than one value. Changes in design or components may occur over time and some changes could affect SAR values. More information on the phone’s SAR can be found on the following FCC website: http://www.fcc.gov/oet/ea/. FCC Radio Frequency Emission This phone meets the FCC Radio Frequency Emission Guidelines. FCC ID number: V65CD8100 The FCC ID number can be found printed on the label under the back cover. To find the FCC ID number, remove the back cover.     You can also find the FCC ID number through the Settings menu. From the Home screen, tap Apps > Settings > About phone > Compliance information. The FCC ID number is displayed on the screen. FCC Notice This device complies with Part 15 of the FCC Rules. Operation is subject to the following two conditions: (1) this device may not cause harmful interference, and (2) this device must accept any interference received, including interference that may cause undesired operation. Changes or modifications not expressly approved by the party responsible for   70  User Manual compliance could void the user’s authority to operate the equipment.  Note: This equipment has been tested and found to comply with the limits for a Class B digital device, pursuant to Part 15 of the FCC Rules. These limits are designed to provide reasonable protection against harmful interference in a residential installation. This equipment generates, uses and can radiate radio frequency energy and, if not installed and used in accordance with the instructions, may cause harmful interference to radio communications. However, there is no guarantee that interference will not occur in a particular installation. If this equipment does cause harmful interference to radio or television reception, which can be determined by turning the equipment off and on, the user is encouraged to try to correct the interference by one or more of the following measures: ●  Reorient the direction of the internal antennas. ●  Increase the separation between the equipment and receiver. ●  Connect the equipment into an outlet on a circuit different from that to which the receiver is connected. ●  Consult the dealer or an experienced radio/TV technician for help. Owner’s Record The model number, regulatory number, and serial number are located on the label under the back cover. Record the serial number in the space provided below. This will be helpful if you need to contact us about your phone in the future. Model: CD8100 Serial No.:                 Important: Carefully read our End User License Agreement at our website www.kyoceramobile.com/support/phone/ before using or otherwise accessing the software or services provided with your Kyocera device.  Manufacturer’s Warranty  71 Manufacturer’s WarrantyKyocera Communications Inc. (“KYOCERA”) offers you a limited warranty that the enclosed product or products (the“Product”) will be free from defects in material and workmanship for a period that expires one year from the date of sale of the Product to you, provided that you are the original end-user purchaser of the Product and provided that your purchase was made from an authorized supplier. Transfer or resale of a Product will automatically terminate warranty coverage with respect to that Product. This limited warranty is not transferable to any third party, including but not limited to any subsequent purchaser or owner of the Product. KYOCERA shall, at its sole and absolute discretion, either repair or replace a Product (which unit may use refurbished parts of similar quality and functionality) if found by KYOCERA to be defective in material or workmanship, or if KYOCERA determines that it is unable to repair or replace such Product, KYOCERA shall refund the purchase price for such Product, provided that the subject Product (i) is returned, with transportation prepaid, to a KYOCERA authorized service center within the one year warranty period, and (ii) is accompanied by a proof of purchase in the form of a bill of sale or receipted invoice which evidences that the subject Product is within the one year warranty period (“Proof of Purchase”). After the one year warranty period, you must pay all shipping, parts and labor charges. This limited warranty does not cover and is void with respect to the following: (i) Products which have been improperly installed, repaired, maintained or modified (including the antenna); (ii) Products which have been subjected to misuse (including Products used in conjunction with hardware electrically or mechanically incompatible or Products used with software, accessories, goods or ancillary or peripheral equipment not supplied or expressly authorized by KYOCERA for use), abuse, accident, physical damage, abnormal use or operation, improper handling or storage, neglect, exposure to fire, water (except for product certified for protection against water; see the Kyocera product website for details on your Product) or excessive moisture or dampness or extreme changes in climate or temperature; (iii) Products operated outside published maximum ratings; (iv) cosmetic damage; (v) Products on which warranty stickers or Product serial numbers have been removed, altered, or rendered illegible; (vi) customer instruction; (vii) cost of installation, set up, removal or reinstallation; (viii) signal reception problems (unless caused by defect in material or workmanship); (ix) damage the result of fire, flood, acts of God or other acts which are not the fault of   72  User Manual KYOCERA and which the Product is not specified to tolerate, including damage caused by mishandling and blown fuses; (x) consumables (such as memory cards, fuses, etc.); (xi) third party software or applications, data and equipment not originally supplied with the Product; (xii) any Product in which the software has not been updated to the current version; (xiii) any Product in which the operating system has been unlocked (allowing installation of a third party operating system); or (xiv) any Products which have been opened, repaired, modified or altered by anyone other than KYOCERA or a KYOCERA authorized service center. Before returning any Product for service, be sure to back up data and remove any confidential, proprietary, or personal information from the Product. KYOCERA is not responsible for damage to or loss of any software, applications, data or removable storage media.  USE ONLY KYOCERA APPROVED ACCESSORIES WITH KYOCERA PHONES. USE OF ANY UNAUTHORIZED ACCESSORIES MAY BE DANGEROUS AND WILL INVALIDATE THE PHONE WARRANTY IF SAID ACCESSORIES CAUSE DAMAGE OR A DEFECT TO THE PHONE.  KYOCERA SPECIFICALLY DISCLAIMS LIABILITY FOR ANY AND ALL DIRECT, INDIRECT, SPECIAL, GENERAL, PUNITIVE, EXEMPLARY, AGGRAVATED, INCIDENTAL OR CONSEQUENTIAL DAMAGES, EVEN IF ADVISED OF THE POSSIBILITY THEREOF, WHETHER FORESEEABLE OR UNFORESEEABLE OF ANY KIND WHATSOEVER, INCLUDING BUT NOT LIMITED TO LOSS OF PROFITS, UNANTICIPATED BENEFITS OR REVENUE, ANTICIPATED PROFITS ARISING OUT OF USE OF OR INABILITY TO USE ANY PRODUCT (FOR EXAMPLE, WASTED AIRTIME CHARGES DUE TO THE MALFUNCTION OF A PRODUCT) OR CONTRIBUTION OR INDEMNITY IN RESPECT OF ANY CLAIM RELATED TO A PRODUCT. REPAIR OR REPLACEMENT OF A DEFECTIVE PRODUCT OR REFUND OF THE PURCHASE PRICE RELATING TO A DEFECTIVE PRODUCT, AS PROVIDED UNDER THIS WARRANTY, ARE YOUR SOLE AND EXCLUSIVE REMEDIES FOR BREACH OF THE LIMITED WARRANTY, AND SUBJECT TO THIS WARRANTY, THE PRODUCTS ARE APPROVED AND ACCEPTED BY YOU “AS IS”. KYOCERA MAKES NO OTHER WARRANTIES, REPRESENTATIONS OR CONDITIONS OF ANY KIND, ORAL OR VERBAL, EXPRESS OR IMPLIED, STATUTORY OR OTHERWISE, WITH RESPECT TO THE PRODUCTS, INCLUDING BUT NOT LIMITED TO ANY IMPLIED WARRANTY OR CONDITION
 Manufacturer’s Warranty  73 OF MERCHANTABILITY OR FITNESS FOR A PARTICULAR PURPOSE OR AGAINST INFRINGEMENT OR ANY IMPLIED WARRANTY OR CONDITION ARISING OUT OF TRADE USAGE OR OUT OF A COURSE OF DEALING OR COURSE OF PERFORMANCE. NO DEALER, DISTRIBUTOR, AGENT OR EMPLOYEE IS AUTHORIZED TO MAKE ANY MODIFICATION OR ADDITION TO THIS WARRANTY. Some jurisdictions do not allow the exclusion or limitation of incidental or consequential damages, or allow limitations on how long an implied warranty lasts, so the above limitations or exclusions may not apply to you. This limited warranty gives you specific legal rights, and you may also have other rights which vary from jurisdiction to jurisdiction. For warranty service information, please call the following telephone number from anywhere in the continental United States and Canada: 1-800-349-4478 or 858-882-1401.   74  User Manual Index                                 A Accessibility Display, 58 Hearing, 58 Mobility, 58 Switch access, 57 TalkBack, 56 Vision, 57 Accessibility Settings, 56 Accounts settings, 54 Airplane Mode, 45 Alarm, 39 Delete, 39 Answer a Call, 16 Apps Settings, 51 B Backup & Reset Settings Factory data reset, 56 Battery Charge, 7 Battery Settings, 50 Bluetooth, 40 Settings menu, 40 Turn on or off, 40 C Calculator, 40 Calendar, 37 Edit events, 38 Erase events, 38 Event alerts, 37 View events, 38 Call Settings Auto answer, 20 Call Forwarding, 20 Call timer and call duration, 20 Call waiting, 17 Caller ID, 20 Fixed Dialing Numbers (FDN), 19 Voicemail, 19 Camera Open, 30 Record a video, 30 Review screen, 31 Take a picture, 30 Camera and Video Settings, 31 Change Home Mode, 47 Charger/USB Port, 6 Clock, 38 Change settings, 39 Conference calling, 17 Connectivity Settings, 51 Contacts, 22 Add a contact, 23 Add a group contact, 25 Delete single or multiple contacts, 25 Display, 22 Edit a contact, 24 ICE (In case of emergency), 26 Save a phone number, 23 Share a contact, 27 Synchronize contacts, 27 D Data Connection    75 Status and indicator, 29 Data Services, 29 Data Usage, 45 Device Settings, 47 Display Settings, 47 E Emergency Call, 14 Enhanced 911 (E911), 15 F Factory Data Reset, 56 Flash, 6 Function Buttons, 11 G Gallery, 34 View, 34 Zoom, 34 H Help Customer support, 60 Home Screen, 12 I ICE (In case of emergency), 26 Important Safety Information, 62 In-Call Options, 17 Incoming Calls Answer, 16 Mute the ringtone, 16 Reject, 16 Reject and send a text message, 16 M Manufacturer’s Warranty, 71 Microphone, 6 microSD Card, 42 Insert, 8, 42 Remove, 43 Unmount, 43 Use as a media device, 43 N Notification Settings, 49 Notifications, 12 Notification icons, 12 P Personal Settings, 51 Accounts, 54 Backup & Reset, 55 Language & input, 54 Location, 51 Security, 53 Start screen, 51 Phone Overview, 5 Turn off, 8 Turn on, 8 Phone Call Emergency call, 14 From Contacts, 14 From Recent Calls, 14 Make calls, 14 Plus code dialing, 15 Receive, 16 Speed dialing, 15 Setup, 15 Using the phone dialpad, 14   76  User Manual With pauses, 15 Pictures Edit, 35 Options menu, 34 Share, 35 Take, 30 Power Button, 6 Printing, 59 R Recent Calls, 21 Options, 21 View, 21 Ringtone Mute, 16 S Security Settings, 53 Settings, 44 Share Pictures and Videos, 35 SIM Card Insert, 7 Sound Settings, 48 Speaker, 6 Start Screen, 51 Status Bar, 12 Status icons, 12 Stopwatch, 39 Storage Settings, 50 System Settings, 56 Accessibility, 56 Date & Time, 56 T Text Entry, 13, 14 Editing, 13 Text mode, 13 Timer, 40 Touchscreen Keyboard, 13 Navigation, 9, 11 Turn off, 9 Turn on, 9 U USB port, 6 V Videos Share, 35 Voicemail, 16 Notification, 16 Retrieve messages, 17 Set up, 16 Volume Button, 6 W Web, 28 Wi-Fi, 28 Connect to a different network, 28 Settings, 44 Status, 28 Turn on and connect to a network, 28 Wireless Emergency Alerts, 46 World Clock, 40
 Copyright Information  77 Copyright Information © 2015 Kyocera Corporation. All rights reserved. KYOCERA is a registered trademark of Kyocera Corporation. All other trademarks are the property of their respective owners. Android and other marks are trademarks of Google Inc.  The Bluetooth® word mark and logos are registered trademarks owned by Bluetooth SIG, Inc. and any use of such marks by Kyocera Corporation is under license. Other trademarks and trade names are those of their respective owners. PhotoSolid®, the image stabilization technology product, is a product of Morpho, Inc. "PhotoSolid®" is a registered trademark of Morpho, Inc. "MovieSolid®", the motion video stabilizing technology product, is a product of Morpho, Inc. "MovieSolid®" is a registered trademark of Morpho, Inc. "Morpho HDR"™, the high dynamic range technology product, is a product of Morpho, Inc. "Morpho HDR"™ is a trademark of Morpho,Inc. "Morpho Rapid Effect"™, a visual effect technology product, is a product of Morpho, Inc. "Morpho Rapid Effect"™ is a trademark of Morpho, Inc.       microSD and microSDHC Logos are trademarks of SD-3C, LLC.

Navigation menu