Kyocera IUD19AB iBurst User Terminal User Manual 1 of 2
Kyocera Corporation iBurst User Terminal 1 of 2
Kyocera >
Contents
- 1. User Manual 1 of 2
- 2. User Manual 2 of 2
User Manual 1 of 2

iBurst Terminal, Desktop Model (UTD) / USB Model (UTU), Manual
iBurst Terminal, Desktop Model (UTD) / USB Model (UTU), Manual iBurst Terminal, Desktop Model (UTD) / USB Model (UTU), Manual
iBurst Terminal, Desktop Model (UTD) / USB Model (UTU), Manual
Kyocera Corporation Revision 1.01 --- June.08.2006
- 1 -
Hirao Yamamoto
Koyama
Designed
Checked
Approved
June
.
08
.2006
Date:
1
.01
Revision:
Q
38
T
-
EE
-
00
1
Reference:

iBurst Terminal, Desktop Model (UTD) / USB Model (UTU), Manual
iBurst Terminal, Desktop Model (UTD) / USB Model (UTU), Manual iBurst Terminal, Desktop Model (UTD) / USB Model (UTU), Manual
iBurst Terminal, Desktop Model (UTD) / USB Model (UTU), Manual
Kyocera Corporation Revision 1.01 --- June.08.2006
- 2 -
Revision Record
Revision
Author Date Detail
1.00 Hirao May.10.2006 First Release
1.01 Miyasaka June.08.2006 Correct some writings

iBurst Terminal, Desktop Model (UTD) / USB Model (UTU), Manual
iBurst Terminal, Desktop Model (UTD) / USB Model (UTU), Manual iBurst Terminal, Desktop Model (UTD) / USB Model (UTU), Manual
iBurst Terminal, Desktop Model (UTD) / USB Model (UTU), Manual
Kyocera Corporation Revision 1.01 --- June.08.2006
- 3 -
CONTENTS
CONTENTS CONTENTS
CONTENTS
Safety Precautions on iBurst Terminal
Safety Precautions on iBurst TerminalSafety Precautions on iBurst Terminal
Safety Precautions on iBurst Terminal................................
................................................................
................................................................
................................................................
..........................................
....................
.......... 4
44
4
Chapter 1 Introduction
Chapter 1 IntroductionChapter 1 Introduction
Chapter 1 Introduction ................................
................................................................
................................................................
................................................................
................................................................
................................................................
..................................
....
.. 8
88
8
Components List
Components ListComponents List
Components List ................................
................................................................
................................................................
................................................................
................................................................
................................................................
................................................................
................................................................
................................................
................................
................ 9
99
9
Pictures of Accessories
Pictures of AccessoriesPictures of Accessories
Pictures of Accessories ................................
................................................................
................................................................
................................................................
................................................................
................................................................
................................................................
................................................................
.......................................
..............
....... 9
99
9
Outlook of iBurst Terminal
Outlook of iBurst TerminalOutlook of iBurst Terminal
Outlook of iBurst Terminal ................................
................................................................
................................................................
................................................................
................................................................
................................................................
..............................................................
............................................................
.............................. 10
1010
10
Indicators
IndicatorsIndicators
Indicators ................................
................................................................
................................................................
................................................................
................................................................
................................................................
................................................................
................................................................
..........................................................
....................................................
..........................11
1111
11
Requirements on your PC
Requirements on your PCRequirements on your PC
Requirements on your PC ................................
................................................................
................................................................
................................................................
................................................................
................................................................
................................................................
................................................................
................................ 12
1212
12
Outlook to use the iBurst Terminal
Outlook to use the iBurst TerminalOutlook to use the iBurst Terminal
Outlook to use the iBurst Terminal................................
................................................................
................................................................
................................................................
................................................................
................................................................
..................................................
....................................
.................. 12
1212
12
Chapter 2 Setup Procedure
Chapter 2 Setup ProcedureChapter 2 Setup Procedure
Chapter 2 Setup Procedure................................
................................................................
................................................................
................................................................
..........................................................
....................................................
.......................... 13
1313
13
iBurst Software Installation
iBurst Software InstallationiBurst Software Installation
iBurst Software Installation .............................................................................................................. 14
Installation for Windows XP
Installation for Windows XPInstallation for Windows XP
Installation for Windows XP ................................
................................................................
................................................................
................................................................
................................................................
................................................................
............................................................
........................................................
............................ 14
1414
14
I
II
Installation for Windows 2000
nstallation for Windows 2000nstallation for Windows 2000
nstallation for Windows 2000 ................................
................................................................
................................................................
................................................................
................................................................
................................................................
.........................................................
..................................................
......................... 17
1717
17
Installation for Windows Me
Installation for Windows MeInstallation for Windows Me
Installation for Windows Me ................................
................................................................
................................................................
................................................................
................................................................
................................................................
............................................................
........................................................
............................ 20
2020
20
Installation for Windows 98SE
Installation for Windows 98SEInstallation for Windows 98SE
Installation for Windows 98SE................................
................................................................
................................................................
................................................................
................................................................
................................................................
.........................................................
..................................................
......................... 39
3939
39
Installation for Mac OS X
Installation for Mac OS XInstallation for Mac OS X
Installation for Mac OS X................................
................................................................
................................................................
................................................................
................................................................
................................................................
................................................................
................................................................
.................................
..
. 59
5959
59
Connection Establishment
Connection EstablishmentConnection Establishment
Connection Establishment ................................................................................................................. 63
Connection Establishment for Windows XP
Connection Establishment for Windows XPConnection Establishment for Windows XP
Connection Establishment for Windows XP ................................
................................................................
................................................................
................................................................
................................................................
................................................................
.....................................
..........
..... 63
6363
63
Connection Establishment for Windows 2000/Me/98SE
Connection Establishment for Windows 2000/Me/98SEConnection Establishment for Windows 2000/Me/98SE
Connection Establishment for Windows 2000/Me/98SE ................................
................................................................
................................................................
................................................................
...................................................
......................................
................... 68
6868
68
Connection Establishment for Mac OS X
Connection Establishment for Mac OS XConnection Establishment for Mac OS X
Connection Establishment for Mac OS X ................................
................................................................
................................................................
................................................................
................................................................
................................................................
.........................................
..................
......... 70
7070
70
Chapter 3 Utility Software
Chapter 3 Utility SoftwareChapter 3 Utility Software
Chapter 3 Utility Software ................................
................................................................
................................................................
................................................................
..........................................................
....................................................
.......................... 74
7474
74
Using Utility Software
Using Utility SoftwareUsing Utility Software
Using Utility Software........................................................................................................................ 75
Using Utility Software for Windows
Using Utility Software for WindowsUsing Utility Software for Windows
Using Utility Software for Windows................................
................................................................
................................................................
................................................................
................................................................
................................................................
.................................................
..................................
................. 75
7575
75
Using Utility Software for Mac OS X
Using Utility Software for Mac OS XUsing Utility Software for Mac OS X
Using Utility Software for Mac OS X ................................
................................................................
................................................................
................................................................
................................................................
................................................................
...............................................
..............................
............... 81
8181
81
Status Indication over Ethernet
Status Indication over EthernetStatus Indication over Ethernet
Status Indication over Ethernet ........................................................................................................ 88
Chapter 4 MTU Optimizer Software & Network Property
Chapter 4 MTU Optimizer Software & Network PropertyChapter 4 MTU Optimizer Software & Network Property
Chapter 4 MTU Optimizer Software & Network Property ................................
................................................................
..........................................
....................
.......... 93
9393
93
MTU Optimizer Software & Network Property
MTU Optimizer Software & Network PropertyMTU Optimizer Software & Network Property
MTU Optimizer Software & Network Property................................................................................ 94
Chapter 5 Uninstal
Chapter 5 UninstalChapter 5 Uninstal
Chapter 5 Uninstallation
lationlation
lation................................
................................................................
................................................................
................................................................
.............................................................
..........................................................
............................. 97
9797
97
iBusrt Software Uninstallation
iBusrt Software UninstallationiBusrt Software Uninstallation
iBusrt Software Uninstallation.......................................................................................................... 98
Uninstallation for Windows XP/2000
Uninstallation for Windows XP/2000Uninstallation for Windows XP/2000
Uninstallation for Windows XP/2000 ................................
................................................................
................................................................
................................................................
................................................................
................................................................
...............................................
..............................
............... 98
9898
98
Uninstallation for Windows Me/98SE
Uninstallation for Windows Me/98SEUninstallation for Windows Me/98SE
Uninstallation for Windows Me/98SE ................................
................................................................
................................................................
................................................................
................................................................
................................................................
.............................................
..........................
.............101
101101
101
Uninstallation for Mac OS X
Uninstallation for Mac OS XUninstallation for Mac OS X
Uninstallation for Mac OS X ................................
................................................................
................................................................
................................................................
................................................................
................................................................
...........................................................
......................................................
...........................108
108108
108
Chapter 6 Trouble shooting
Chapter 6 Trouble shootingChapter 6 Trouble shooting
Chapter 6 Trouble shooting................................
................................................................
................................................................
................................................................
.........................................................
..................................................
.........................110
110110
110
Windows
WindowsWindows
Windows..............................................................................................................................................111
USB connection with Windows Me/98SE
USB connection with Windows Me/98SEUSB connection with Windows Me/98SE
USB connection with Windows Me/98SE ................................
................................................................
................................................................
................................................................
................................................................
................................................................
........................................
................
........ 111
111111
111
Illegal hang
Illegal hangIllegal hang
Illegal hang-
--
-up when
up whenup when
up when install iBurst Terminal.
install iBurst Terminal. install iBurst Terminal.
install iBurst Terminal. ................................
................................................................
................................................................
................................................................
................................................................
................................................................
................................114
114114
114
Illegal hang
Illegal hangIllegal hang
Illegal hang-
--
-up when set up dialer
up when set up dialerup when set up dialer
up when set up dialer................................
................................................................
................................................................
................................................................
................................................................
................................................................
..................................................
....................................
.................. 116
116116
116
PC hang
PC hangPC hang
PC hang-
--
-up when eject iBurst Terminal from Win98 USB port.
up when eject iBurst Terminal from Win98 USB port.up when eject iBurst Terminal from Win98 USB port.
up when eject iBurst Terminal from Win98 USB port. ................................
................................................................
................................................................
................................................................
.....................................
..........
.....118
118118
118
Mac
MacMac
Mac ..................................................................................................................................................... 119
Data rate
Data rateData rate
Data rate ................................
................................................................
................................................................
................................................................
................................................................
................................................................
................................................................
................................................................
.........................................................
..................................................
......................... 119
119119
119
Chapter 7 Information
Chapter 7 InformationChapter 7 Information
Chapter 7 Information ................................
................................................................
................................................................
................................................................
...............................................................
..............................................................
............................... 120
120120
120
FCC Compliance Statement
FCC Compliance StatementFCC Compliance Statement
FCC Compliance Statement............................................................................................................. 121
FCC RF Radiation Exposure Statement
FCC RF Radiation Exposure StatementFCC RF Radiation Exposure Statement
FCC RF Radiation Exposure Statement ......................................................................................... 121

iBurst Terminal, Desktop Model (UTD) / USB Model (UTU), Manual
iBurst Terminal, Desktop Model (UTD) / USB Model (UTU), Manual iBurst Terminal, Desktop Model (UTD) / USB Model (UTU), Manual
iBurst Terminal, Desktop Model (UTD) / USB Model (UTU), Manual
Kyocera Corporation Revision 1.01 --- June.08.2006
- 4 -
Safety Precautions on iBurst Terminal
Safety Precautions on iBurst TerminalSafety Precautions on iBurst Terminal
Safety Precautions on iBurst Terminal
• Things you must know
• When using the product, use it correctly according to the safety precautions.
• The product uses particular radio frequency band tuned for the network operator.
• The safety precautions, hardware, software, and the design of the product may be changed
in the future without any announcement to the customers.
• About use restriction
• The product is designed as an OA apparatus for home use. Please use it neither in the
medical apparatus directly to affect a human life, nor the system of which very high
reliability is required.
• Do not use the product in the zone where the wireless machines are forbidden, such as an
airplane and a hospital. An electric device and medical apparatus are affected and it
becomes the cause of the accident.
• About Qualification
• Our company does not take any responsibility about the damage produced by use under
the conditions such as natural disasters, earthquake, flood, fires, misuse by intent or
carelessness or other than the responsibility of our company.
• Our company does not take any responsibility about the damage produced by external
factor, failure, malfunction, and fault of product, such as loss of enterprise profits,
enterprise discontinuation, change and disappearance of the contents of memory etc.
• Our company takes no responsibility about the damage produced by not keeping the
written contents of an owner's manual.
• Our company takes no responsibility about the damage produced from incorrect operation
in combination with the connection apparatus and software in which our company is not
participating etc.
• iBurst ™ is a registered trademark of ArrayComm, Inc.
• Mac OS X is a registered trademark of Apple Computer, Inc.
• Windows is a registered trademark of Microsoft Corporation.
• In addition, the name of the software carried in this document and peripheral equipment is
each company’s trademark, or a registered trademark.

iBurst Terminal, Desktop Model (UTD) / USB Model (UTU), Manual
iBurst Terminal, Desktop Model (UTD) / USB Model (UTU), Manual iBurst Terminal, Desktop Model (UTD) / USB Model (UTU), Manual
iBurst Terminal, Desktop Model (UTD) / USB Model (UTU), Manual
Kyocera Corporation Revision 1.01 --- June.08.2006
- 5 -
• For your safety
-------- Danger
Danger Danger
Danger --------
----------------
--------
( If used improperly, may cause death or serious injury. )
• Do not use with an abnormal condition, such as with emission of smoke or odor. It may
cause fire or electric shock.
• Do not insert metal or flammable materials into the product interior through the air vents.
Pull out power plug from the outlet in case that foreign material into the product interior.
It may cause fire or electric shock.
• Do not disassemble or remodel the product. It may cause fire or electrical shock.
• Do not use or place the product at places with high humidity such as in the bath room or
near the humidifier. It may cause fire or electric shock. And do not touch the product with
wet hands.
• Do not use the product with power supply other than AC100 to 240V. It may cause fire or
electric shock.
• Do not plug too many leads into a single socket with extensions such as table taps, divided
outlets, and divided sockets. It may cause fire or electric shock. Moreover, make sure that
the total current does not exceed the capacity of the power supply. Otherwise, may cause
fire or electrical shock.
• Do not damage, break, modify, bend, pull, twist, or bundle the AC cord. In addition, if a
heavy material is placed onto the cord or it is heated, the cord may break and cause fire or
electric shock.
• Securely insert the plug into the outlet. If a metal object edges the teeth of the plug, it may
cause fire or electric shock. When pulling out the plug from the outlet, be sure to hold onto
its head. Pulling the cord can damage itself.
• When you change the installation place of the product, pull out the plug from the outlet
and confirm that PC is completely separated from it. Otherwise, the cord may be damaged
and cause electric shock or fire.
• Before inserting the plug into the outlet, check that there is no dust on its edge and head.
As dusts can easily enter between the plug and the outlet, they may cause fire or electric
shock. Pull out the plug from the outlet, at least once in a half year or a year, and
clean/maintenance.
• Use the AC/DC adapter enclosed with the product. Usage of other AC/DC adapters may
cause fire or electric shock.
• Do not place things or put cloth on the top of the plug. It may heat and break the plastic
and/or the rubber, causing fire or electric shock.

iBurst Terminal, Desktop Model (UTD) / USB Model (UTU), Manual
iBurst Terminal, Desktop Model (UTD) / USB Model (UTU), Manual iBurst Terminal, Desktop Model (UTD) / USB Model (UTU), Manual
iBurst Terminal, Desktop Model (UTD) / USB Model (UTU), Manual
Kyocera Corporation Revision 1.01 --- June.08.2006
- 6 -
------- Warning
Warning Warning
Warning --------
----------------
--------
( If used improperly, may cause disability or physical damage. )
• Do not give a shock strong against the product, such as dropping and throwing. It becomes
the cause of failure. Moreover, do not ride on the product. It may become the cause of an
injury.
• Do not put the product under direct sunshine or near equipment with high temperature
such as a stove and a heater. It may raise the temperature of the interior and cause fire.
• Do not put the product at places with an extreme fluctuation of temperature, such as near
the air conditioner or a heater. The dew condensation may occur in the interior and cause
fire, electrical shock, and malfunction.
• Do not put the product at places with oil and steams such as in the kitchen. In addition, do
not put it at dusty places and places where metal powder and toxic gas occur. It may cause
fire or electric shock.
• Do not place the product on unstable places such as on an unsteady desk or slanted
surfaces. In addition, do not put any object on the product. It may loose balance and
tumble, or fall and cause injury.
• When the thunder occurs in near, do not use the product and its peripheral equipment. It
may become the cause of an electric shock.
• If the air vents are blocked, the interior may be heated and cause malfunction. Please do
not use the products in the following manners;
Put on carpet or bedclothes.
Cover with tablecloths.
Put at places with bad ventilation, such as on a book shelf, in the drawer, or in the
closet.
• If suspending the use for a long time, pull out the plug from the outlet.
• Do not use the AC cord with an extension cord. It may cause fire.
• For maintenance, pull out the AC plug from the outlet for safety. Do not wipe the product
with benzene, thinner, or alcohol. It may cause the product to decolorize or deform. If the
product be stained, put some neutral detergent on a dry cloth and wipe gently.
• Do not connect electricity supplied LAN cable to the product. It may cause smoke or fire.
• Do not touch the connector pins directly with your hands. Static electricity may affect the
components. As static electricity is created from both the cloth and the human body, before
putting or removing the product, release static electricity by touching a metal object such
as a small cabinet.
• Do not use it in the intense place of vibration. It becomes the cause of failure.
iBurst Terminal, Desktop Model (UTD) / USB Model (UTU), Manual
iBurst Terminal, Desktop Model (UTD) / USB Model (UTU), Manual iBurst Terminal, Desktop Model (UTD) / USB Model (UTU), Manual
iBurst Terminal, Desktop Model (UTD) / USB Model (UTU), Manual
Kyocera Corporation Revision 1.01 --- June.08.2006
- 7 -
-------- Caution
CautionCaution
Caution --------
( If treated improperly, the equipment may not perform or work properly. )
• Do not put the product at low temperature. The product may not function properly.
• Do not put the product on the top of magnetic objects and places where electromagnetic
waves occur. This includes electrical appliances, AV, and OA (microwave oven, speaker, TV,
radio, fluorescent light, inverter air conditioner, and electric kitchen appliances). The
product will not be able to make communication properly if effected by magnetism or
electronic noise. Putting the product near TV or radio may cause RF receive error.
• The product lifetime may shorten if used at places with hydrogen sulfide such as at a hot
spring.
• Data communication will be disabled or a data file may corrupt if the PC is turned off or
the product is separated from the PC during the communication. Important data must be
verified against the original data.
• For fixing the product, use the enclosed fixture.
• When connecting the product onto PC, use the enclosed USB cable or LAN cable.
• Both a USB and an Ethernet interface cannot be used simultaneously in case a UTD
model.
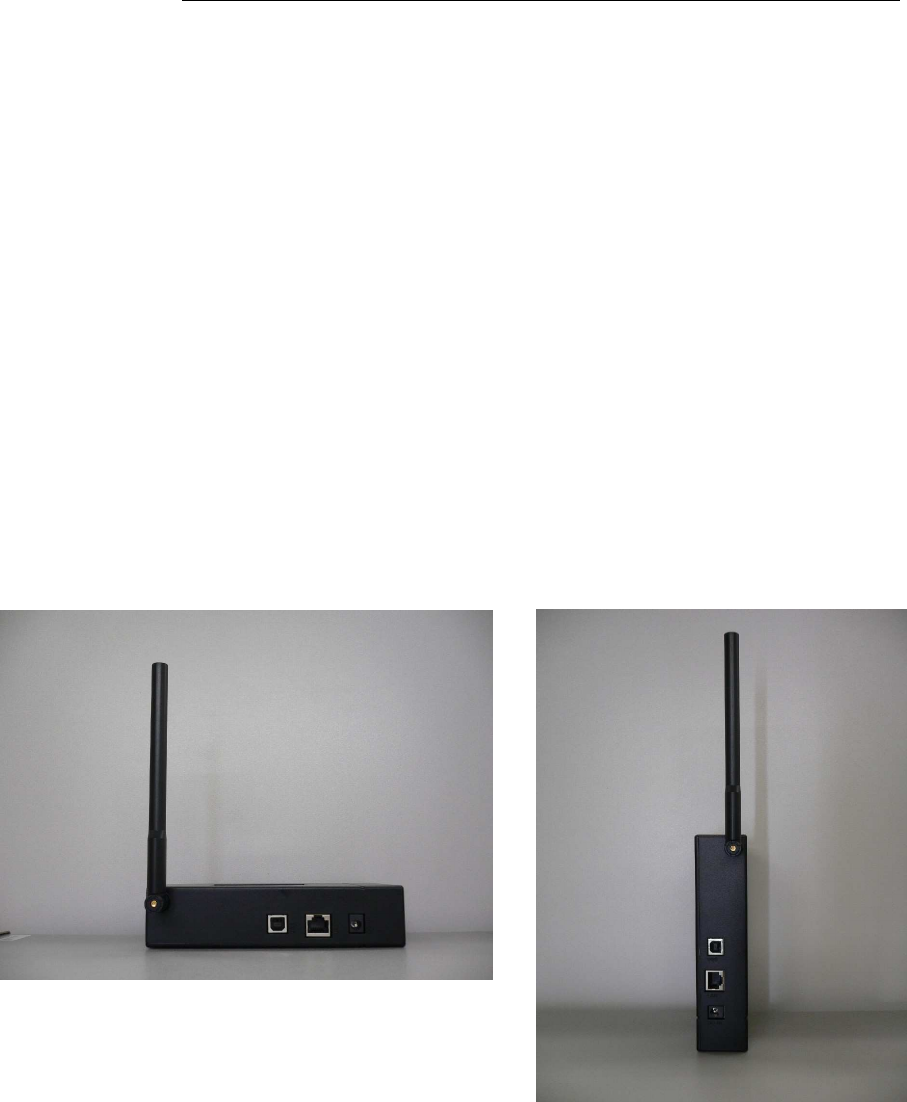
• When using UTD model, Please put the antenna at vertical position as shown in the below
diagrams so that the unit could acquire proper antenna characteristics.

iBurst Terminal, Desktop Model (UTD) / USB Model (UTU), Manual
iBurst Terminal, Desktop Model (UTD) / USB Model (UTU), Manual iBurst Terminal, Desktop Model (UTD) / USB Model (UTU), Manual
iBurst Terminal, Desktop Model (UTD) / USB Model (UTU), Manual
Kyocera Corporation Revision 1.01 --- June.08.2006
- 8 -
Chapter 1 Introduction
Chapter 1 IntroductionChapter 1 Introduction
Chapter 1 Introduction
7
This chapter
This chapter This chapter
This chapter describes what shoul
describes what shouldescribes what shoul
describes what should be confirmed
d be confirmed d be confirmed
d be confirmed before
before before
before
using iBurst
using iBurst using iBurst
using iBurst Terminal
TerminalTerminal
Terminal.
..
.
iBurst Terminal, Desktop Model (UTD) / USB Model (UTU), Manual
iBurst Terminal, Desktop Model (UTD) / USB Model (UTU), Manual iBurst Terminal, Desktop Model (UTD) / USB Model (UTU), Manual
iBurst Terminal, Desktop Model (UTD) / USB Model (UTU), Manual
Kyocera Corporation Revision 1.01 --- June.08.2006
- 9 -
Components List
Components List Components List
Components List
The table below shows the list of components. Please confirm items in the package.
UTD model
Component
ComponentComponent
Component
Notes
NotesNotes
Notes
Q’
Q’Q’
Q’ty
tyty
ty
iBurst Terminal Unit of UTD model
Refer to the pictures shown in next page.
1
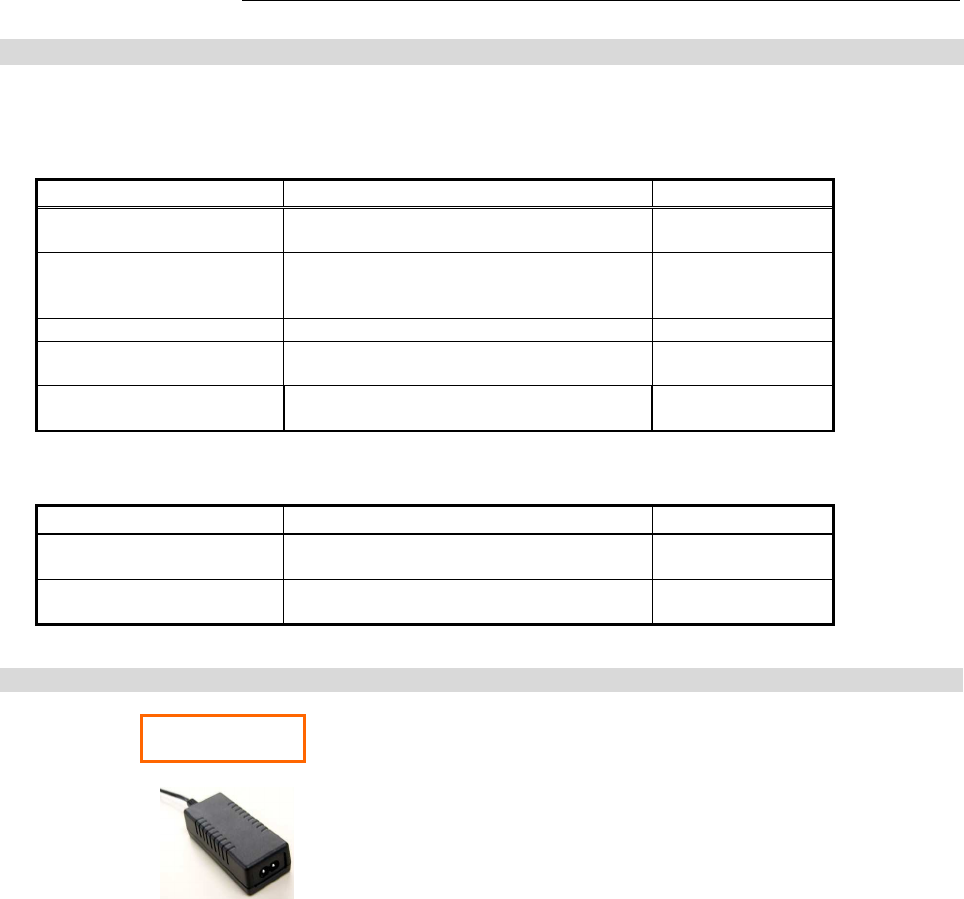
AC/DC Adapter Input: 100 - 240V AC/ 50 - 60Hz/ 300mA
Output: 9V DC/ 1.2A
Cable Length of output side: 2m
1
Power Cable Length: 2m 1
USB Cable Type: USB1.1
Length: 1m
1
10-Base-T Ethernet Cable Type: Straight through/ Category 5
Length: 2m
1
UTU model
Component
ComponentComponent
Component
Notes
NotesNotes
Notes
Q’
Q’Q’
Q’ty
tyty
ty
iBurst Terminal Unit of UTU model
Refer to the pictures shown in next page.
1
USB Cable Type: USB1.1 (Mini B for UTU side)
Length: 1m
1
Pictures of Accessories
AC/DC Adapter
iBurst Terminal, Desktop Model (UTD) / USB Model (UTU), Manual
iBurst Terminal, Desktop Model (UTD) / USB Model (UTU), Manual iBurst Terminal, Desktop Model (UTD) / USB Model (UTU), Manual
iBurst Terminal, Desktop Model (UTD) / USB Model (UTU), Manual
Kyocera Corporation Revision 1.01 --- June.08.2006
- 10 -
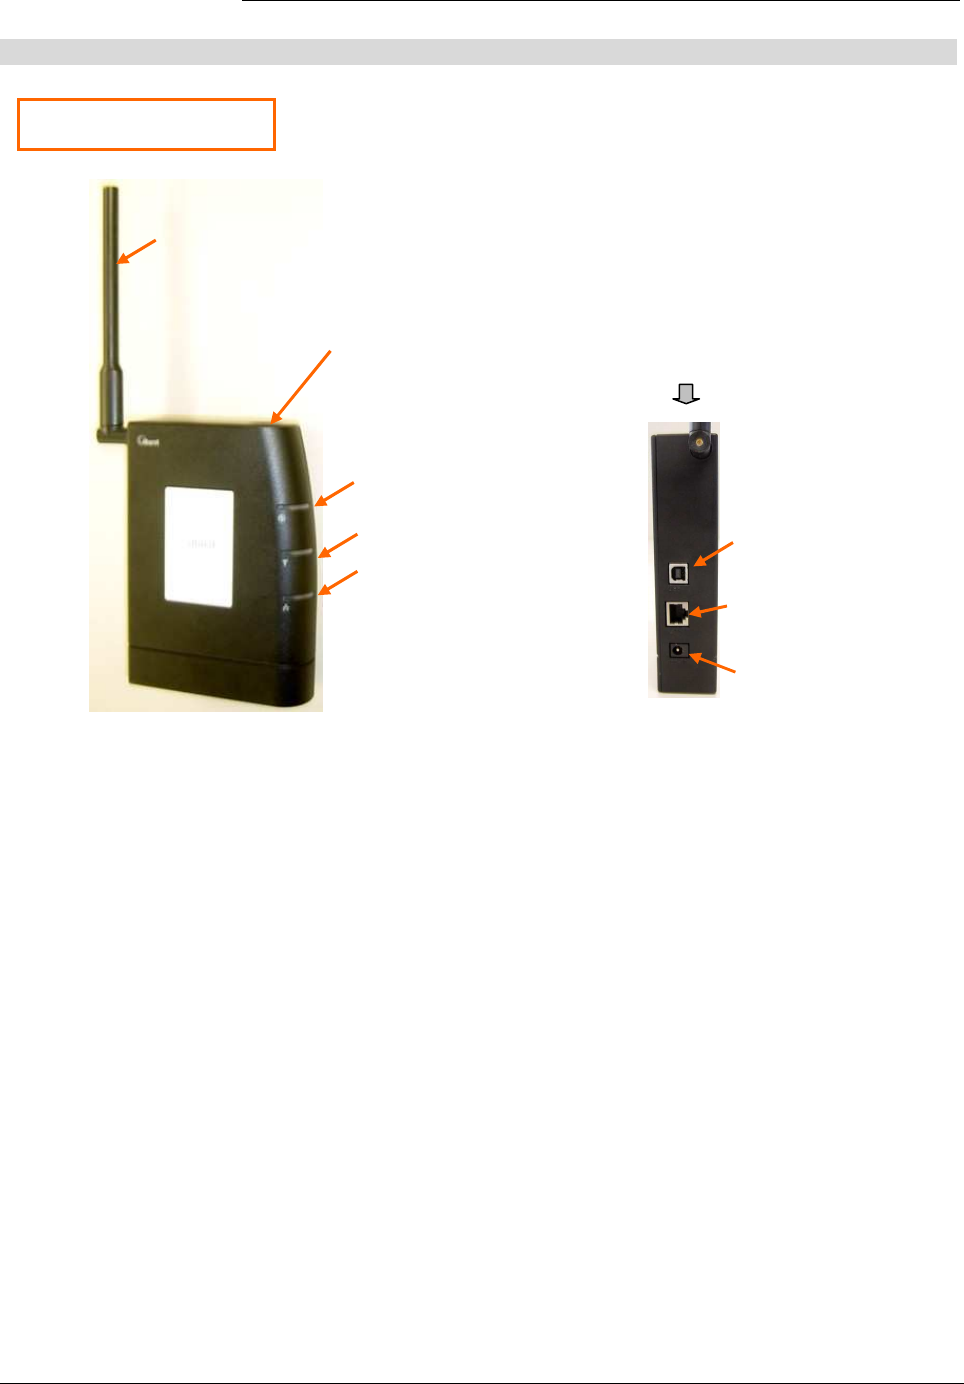
Outlook of iBurst Terminal
Outlook of iBurst Terminal Outlook of iBurst Terminal
Outlook of iBurst Terminal
UTD model
USB port
10Base-T port
only on UTD model
Back side view
Antenna
Power Indicator
Link/Communication Indicator
PC Connection Indicator
DC Power Input
Power switch
iBurst Terminal, Desktop Model (UTD) / USB Model (UTU), Manual
iBurst Terminal, Desktop Model (UTD) / USB Model (UTU), Manual iBurst Terminal, Desktop Model (UTD) / USB Model (UTU), Manual
iBurst Terminal, Desktop Model (UTD) / USB Model (UTU), Manual
Kyocera Corporation Revision 1.01 --- June.08.2006
- 11 -
Indicator
IndicatorIndicator
Indicators
s s
s
The table below describes meaning of each indicator.
Indicator State Meaning
Power Indicator OFF Turned OFF
Blue Turned ON
Blinking
Fault
Link/Communication Indicator OFF Turned OFF
Amber No signal receiving
Yellow Weak signal receiving
Blinking when communicating.
Green Strong signal receiving
Blinking when communicating.
PC Connection Indicator OFF Any port not active
(Only on UTD model) Amber USB port
Green 10Base-T port
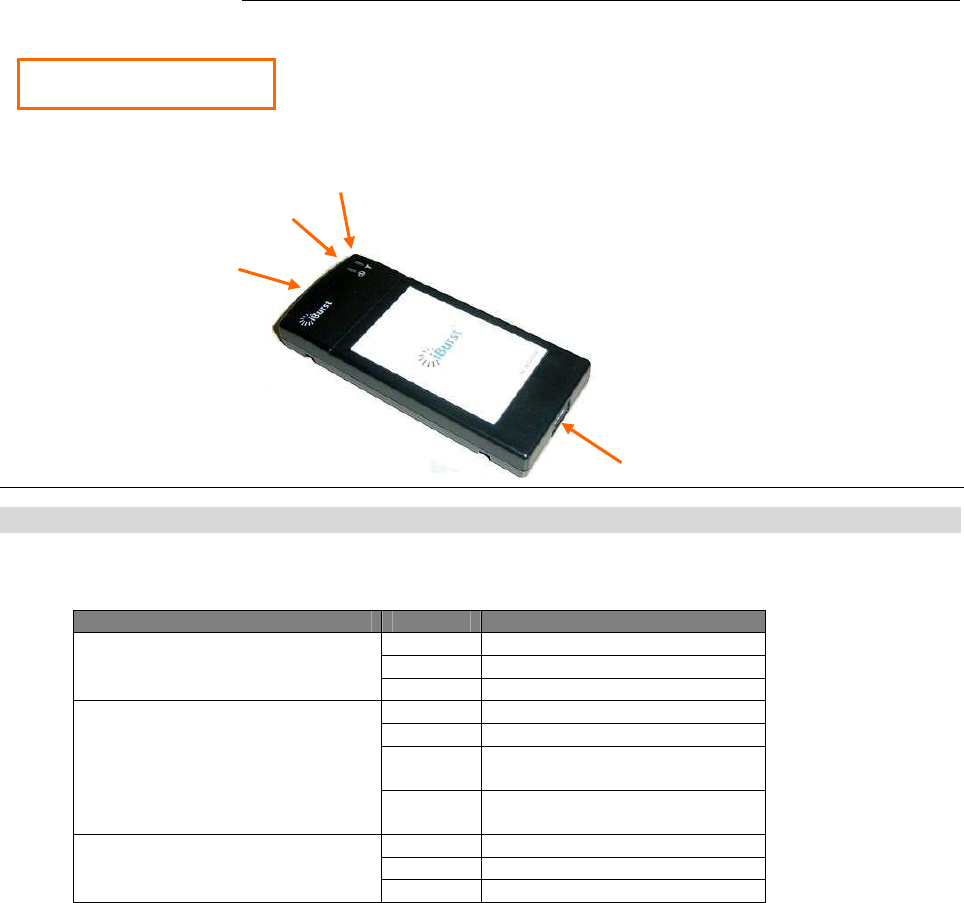
UTU model
USB port
External antenna port
Power Indicator
Link/Communication Indicator
iBurst Terminal, Desktop Model (UTD) / USB Model (UTU), Manual
iBurst Terminal, Desktop Model (UTD) / USB Model (UTU), Manual iBurst Terminal, Desktop Model (UTD) / USB Model (UTU), Manual
iBurst Terminal, Desktop Model (UTD) / USB Model (UTU), Manual
Kyocera Corporation Revision 1.01 --- June.08.2006
- 12 -
Requirements on your PC
Requirements on your PCRequirements on your PC
Requirements on your PC
• PC/AT Compatible PC with WindowsXP/2000/Me/98SE; or
version 10.1.5 or later version of Mac OS X except Mac Intel model.
• 1 USB1.1 port or a later version of USB port.
NOTE: In case of using USB connection.
• 1 10Base-T Ethernet port or compatible.
NOTE: In case of using 10Base-T Ethernet connection with a UTD model.
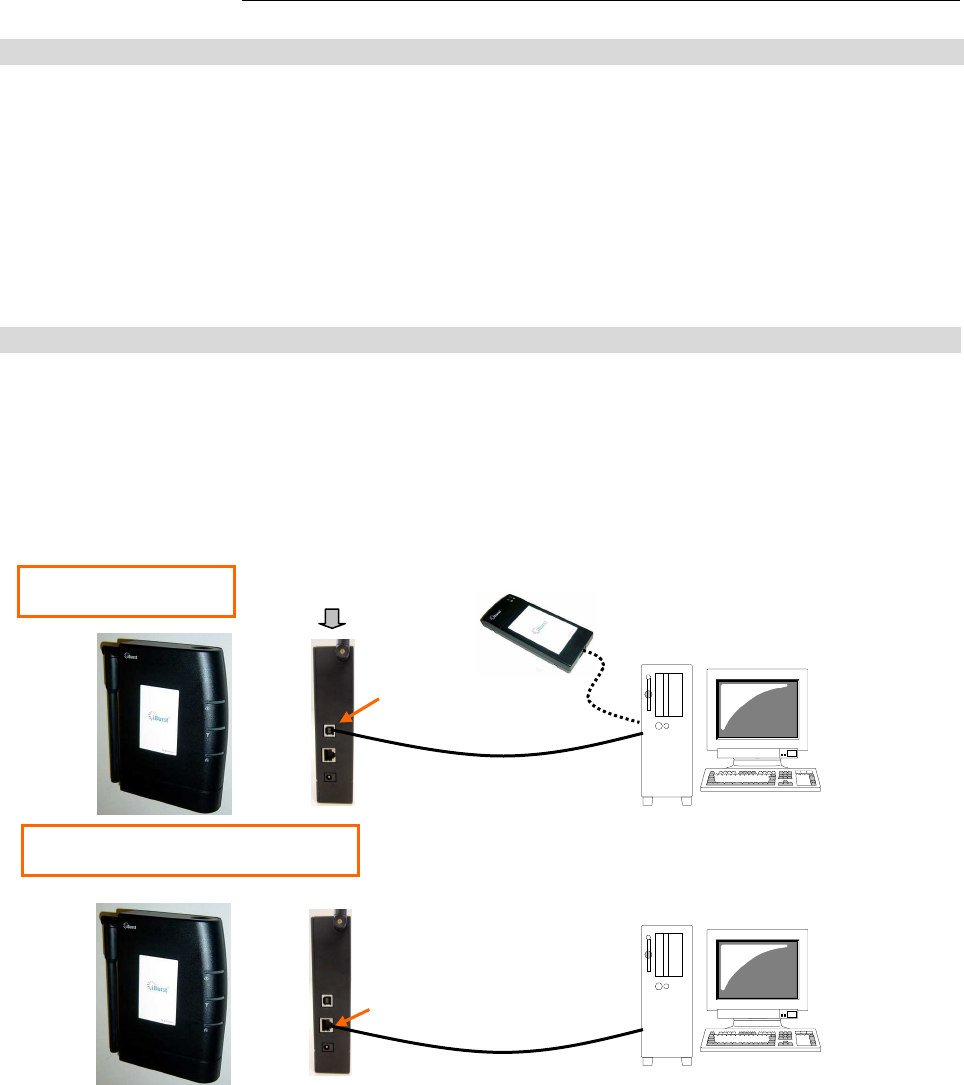
Outlook to use the iBurst Terminal
Outlook to use the iBurst Terminal Outlook to use the iBurst Terminal
Outlook to use the iBurst Terminal
A UTD model has 1 USB port and 1 10Base-T Ethernet port and a UTU model has only 1 USB port.
The USB port, or 10Base-T Ethernet port, shall be connected with your PC. Before connecting the
USB interface, you have to install iBurst software which includes device drivers. If you want to
utilize 10Base-T connection, you don’t have to install the software in case Windows XP or Mac OS
X. Please read through every sections related with the operating system for details.
USB Connection
10Base-T Ethernet Connection
USB port
Back side of UTD
10Base
-
T port
USB Cable
Category 5 Cable
(Straight cable)
UTU
iBurst Terminal, Desktop Model (UTD) / USB Model (UTU), Manual
iBurst Terminal, Desktop Model (UTD) / USB Model (UTU), Manual iBurst Terminal, Desktop Model (UTD) / USB Model (UTU), Manual
iBurst Terminal, Desktop Model (UTD) / USB Model (UTU), Manual
Kyocera Corporation Revision 1.01 --- June.08.2006
- 13 -
Chapter 2 Setup Procedure
Chapter 2 Setup ProcedureChapter 2 Setup Procedure
Chapter 2 Setup Procedure
Thi
ThiThi
This chapter describes how to install
s chapter describes how to install s chapter describes how to install
s chapter describes how to install iBurst software,
iBurst software,iBurst software,
iBurst software, then
then then
then
guides you how to make a network connection so as to use
guides you how to make a network connection so as to use guides you how to make a network connection so as to use
guides you how to make a network connection so as to use
data communication service.
data communication service.data communication service.
data communication service.
iBurst Terminal, Desktop Model (UTD) / USB Model (UTU), Manual
iBurst Terminal, Desktop Model (UTD) / USB Model (UTU), Manual iBurst Terminal, Desktop Model (UTD) / USB Model (UTU), Manual
iBurst Terminal, Desktop Model (UTD) / USB Model (UTU), Manual
Kyocera Corporation Revision 1.01 --- June.08.2006
- 14 -
iBurst Software Installatio
iBurst Software InstallatioiBurst Software Installatio
iBurst Software Installation
n n
n
This section shows the procedure to install iBurst software on your PC for utilizing iBurst
Terminal. The procedure shall be done once before using it.
Installati
InstallatiInstallati
Installation for Windows XP
on for Windows XPon for Windows XP
on for Windows XP
NOTE:
If you are going to connect the iBurst Terminal with your PC only through an Ethernet cable, not
through a USB cable, you don’t need to install/uninstall any iBurst software. In such case, you
can skip this section and you need only to create a dial-up connection setting described at from
page 62. You can see indications of the iBurst Terminal over Ethernet. See page 87 for the
method.
1. Make sure to disconnect the iBurst Terminal with your PC.
ATTENTION:
Don
DonDon
Don’
’’
’t connect the iBurst Terminal with your PC through a USB cable until completion of
t connect the iBurst Terminal with your PC through a USB cable until completion of t connect the iBurst Terminal with your PC through a USB cable until completion of
t connect the iBurst Terminal with your PC through a USB cable until completion of
installation.
installation.installation.
installation.
2. Turn your PC on.
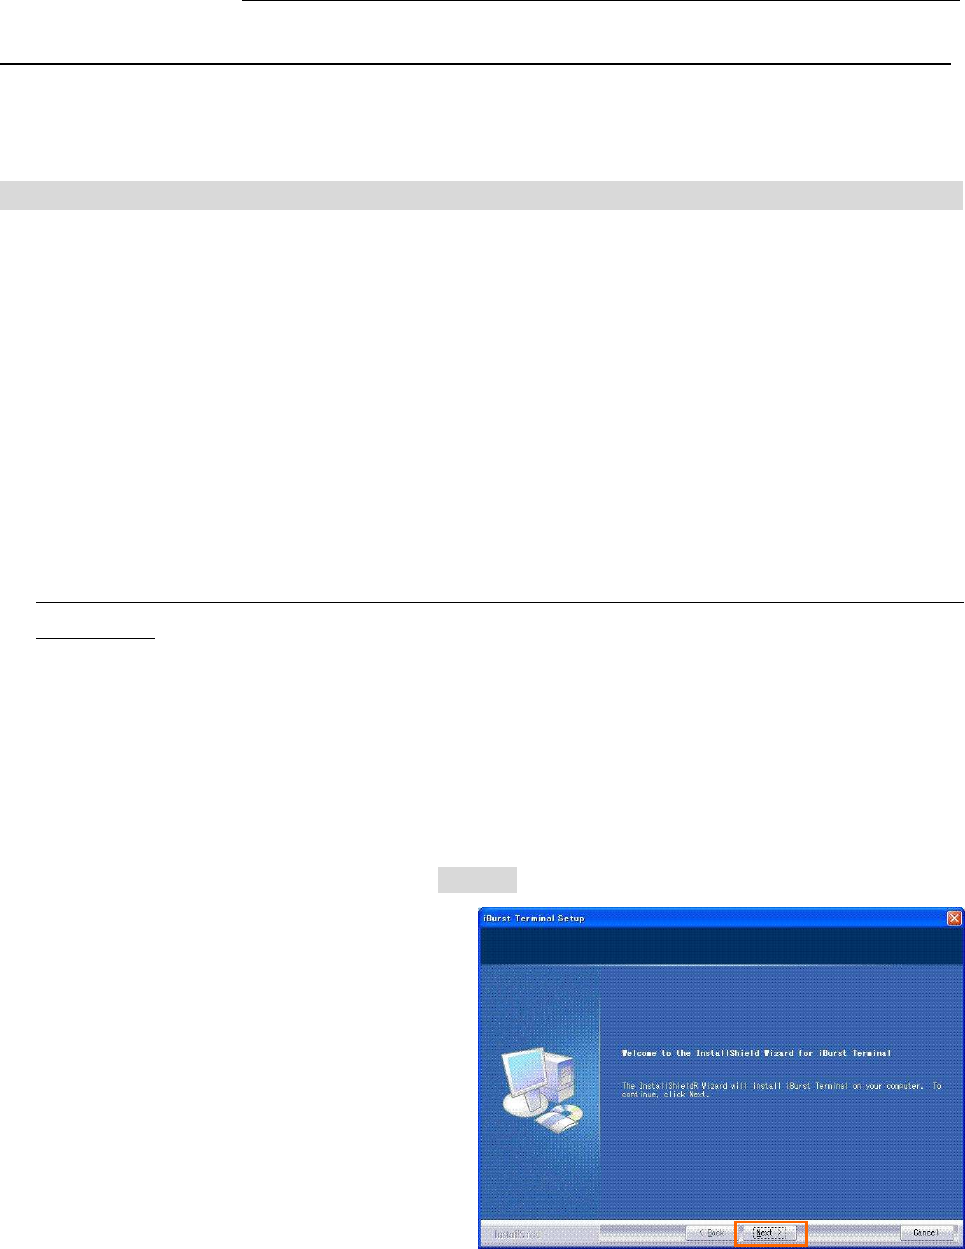
3. Insert the Software Utility CD provided by the network operator into your CD-ROM drive; or
execute the appropriate installation software.
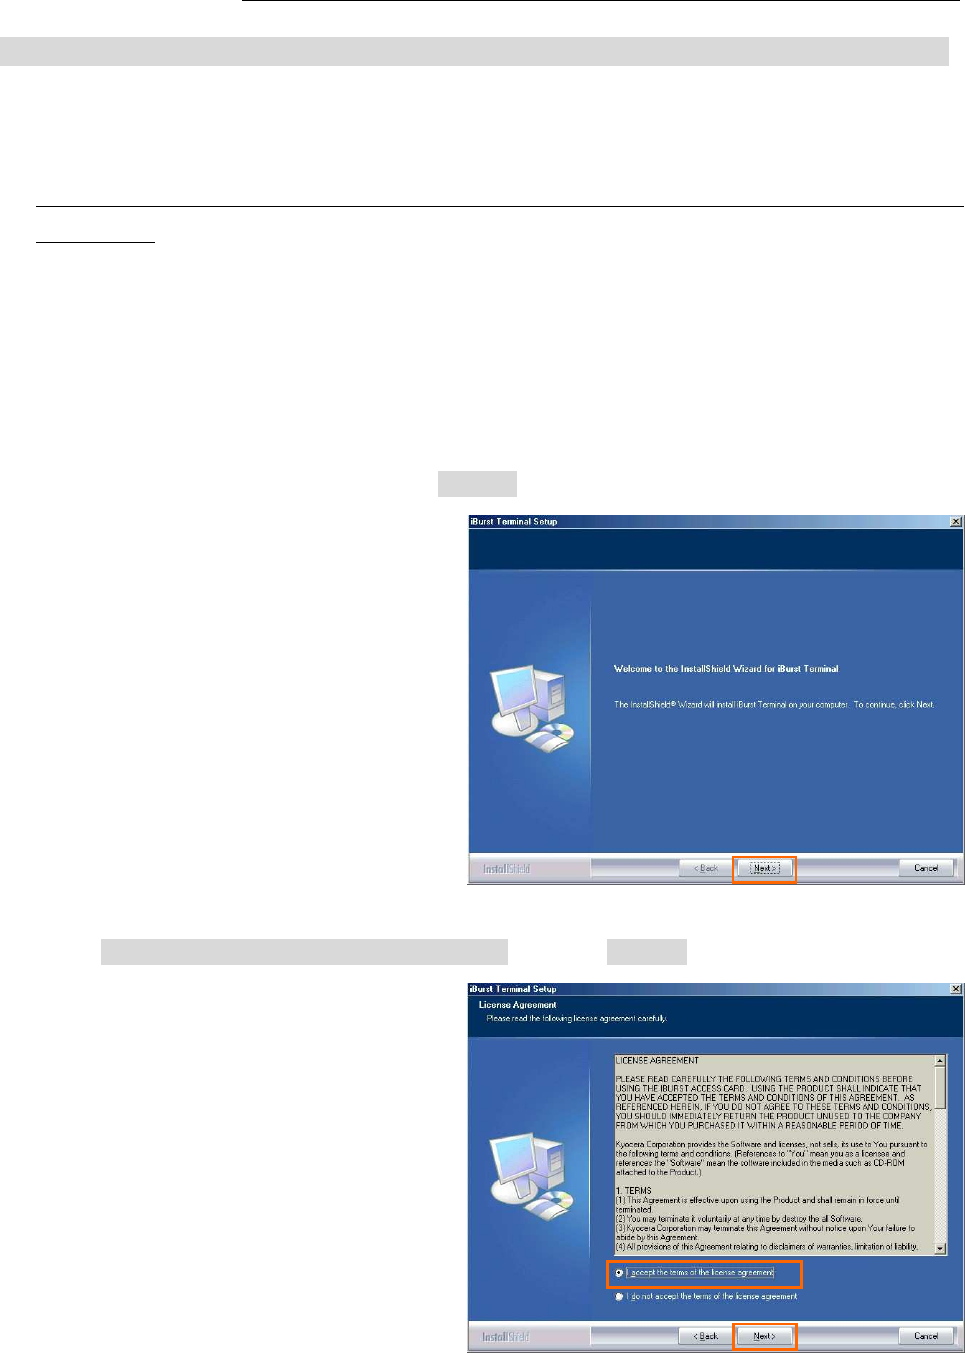
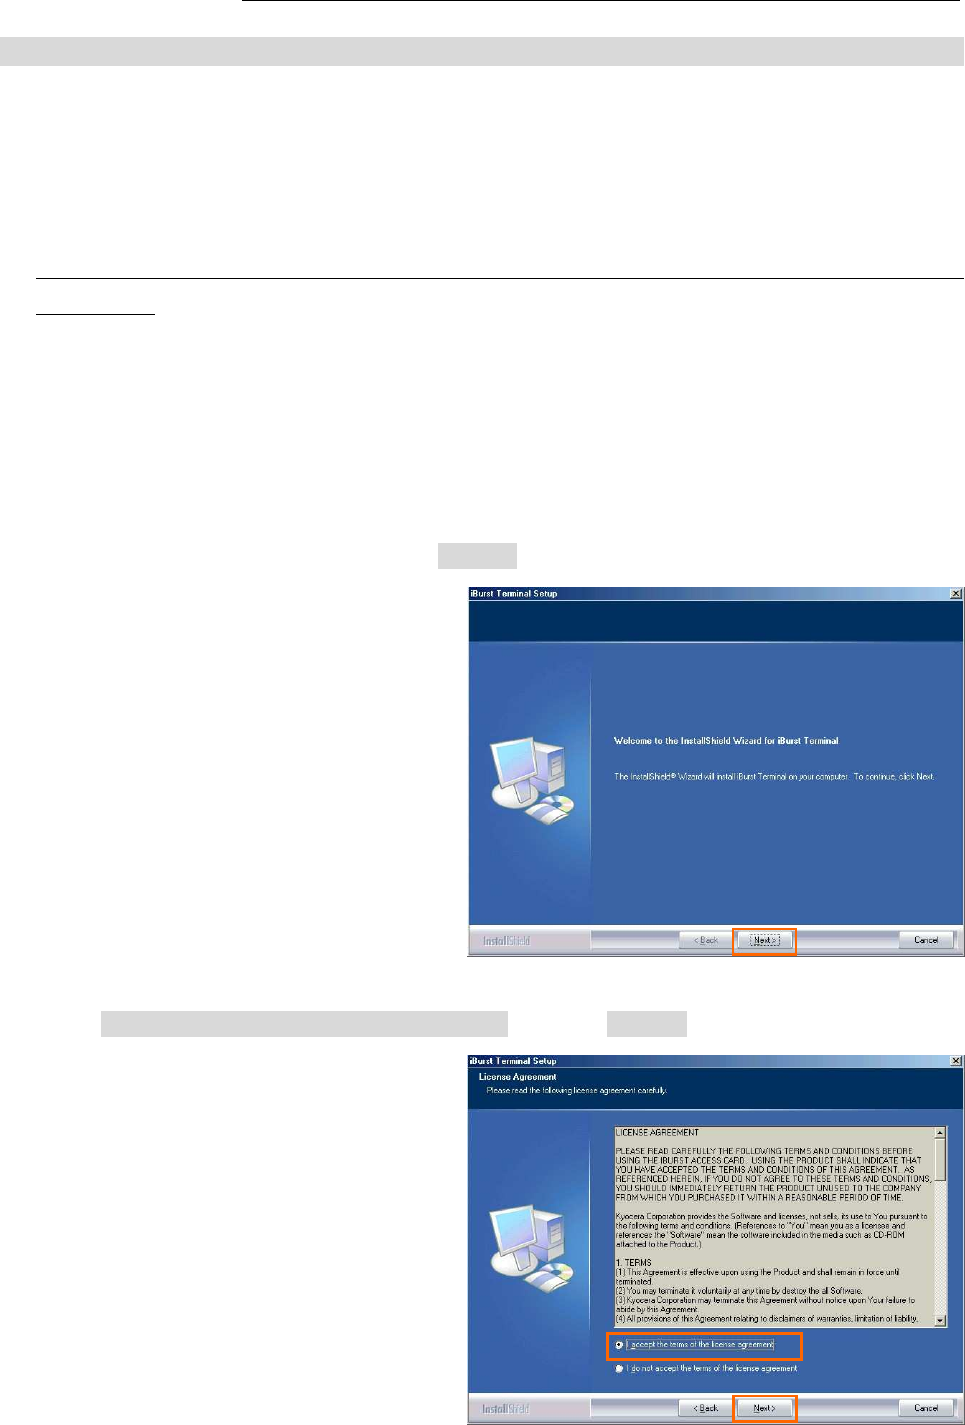
4. iBurst Terminal Setup starts. Click the [Next >] button.
iBurst Terminal, Desktop Model (UTD) / USB Model (UTU), Manual
iBurst Terminal, Desktop Model (UTD) / USB Model (UTU), Manual iBurst Terminal, Desktop Model (UTD) / USB Model (UTU), Manual
iBurst Terminal, Desktop Model (UTD) / USB Model (UTU), Manual
Kyocera Corporation Revision 1.01 --- June.08.2006
- 15 -
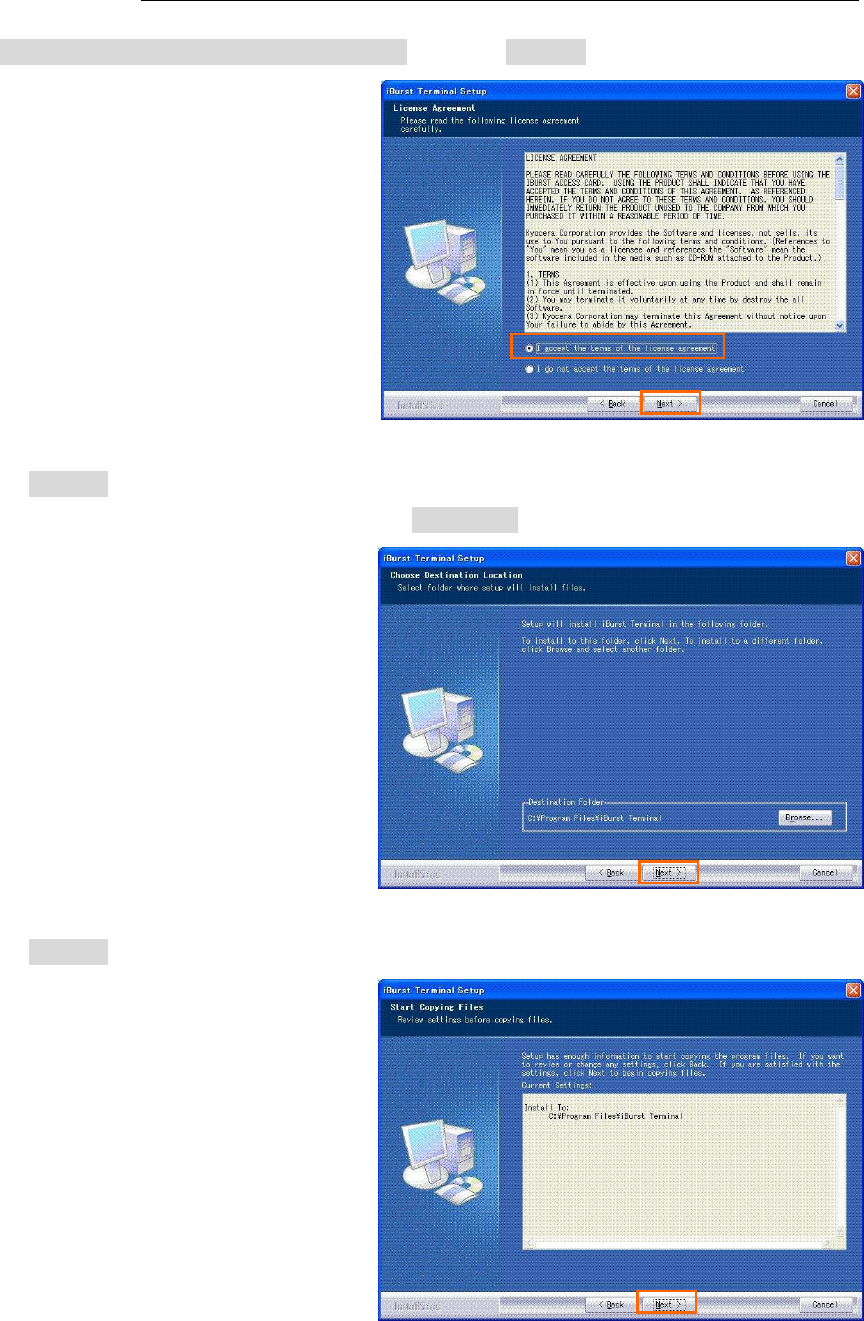
5. Select [I accept the terms the license agreement], click the [Next >] button.
6. Click the [Next >] button after appearing dialog window as shown below.
NOTE: To install to a different folder, click [Browse…] and specify another folder.
7. Click the [Next >] button.
iBurst Terminal, Desktop Model (UTD) / USB Model (UTU), Manual
iBurst Terminal, Desktop Model (UTD) / USB Model (UTU), Manual iBurst Terminal, Desktop Model (UTD) / USB Model (UTU), Manual
iBurst Terminal, Desktop Model (UTD) / USB Model (UTU), Manual
Kyocera Corporation Revision 1.01 --- June.08.2006
- 16 -
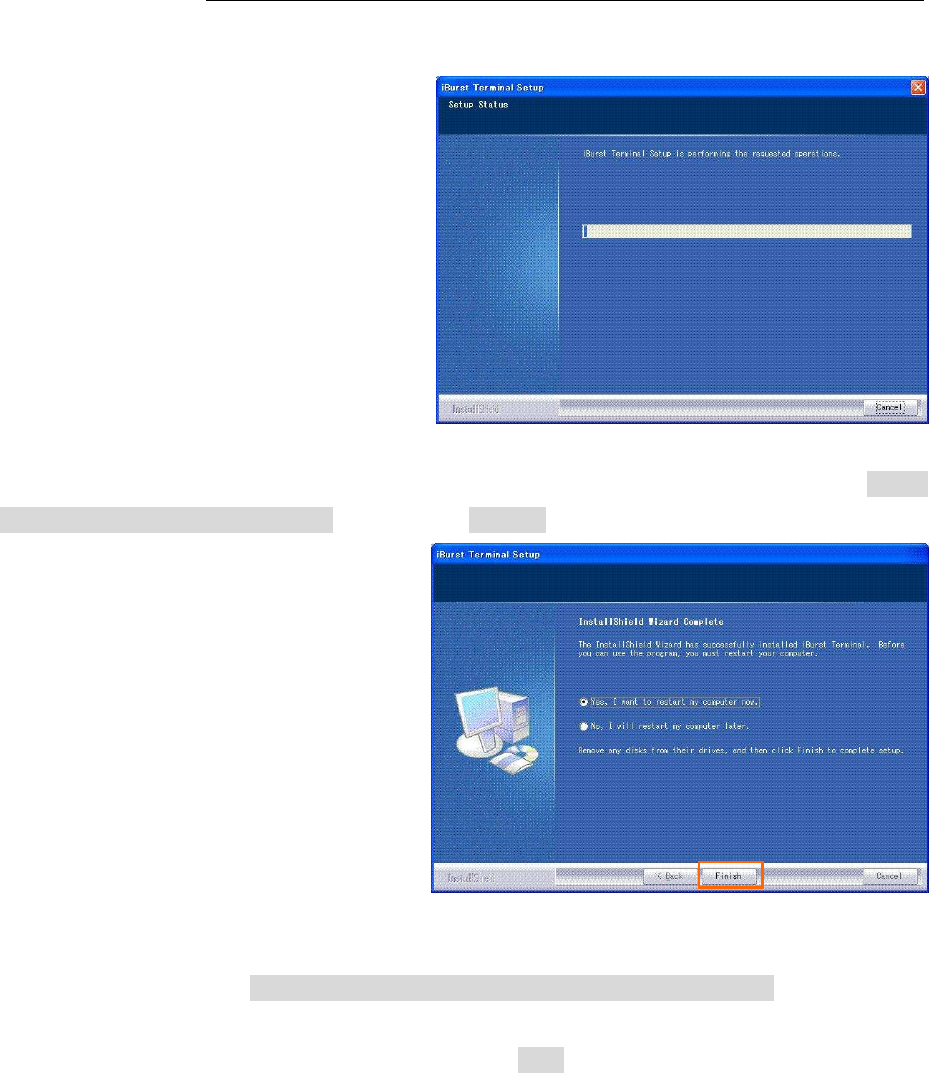
8. The following dialog window will appear, and installation of software begins.
9. When the installing process finishes, the dialog window shown below will appear. Select “Yes, I
want to restart my computer now” and click the [Finish] button in the dialog window.
10. After finish of restarting, connect the iBurst Terminal with your PC’s USB port.
The iBurst Terminal will be recognized and will be ready to use automatically.
NOTE: If the PC request to restart again, click [Yes] to restart the PC.
NOTE: To connect to the Internet, refer to page 62.
iBurst Terminal, Desktop Model (UTD) / USB Model (UTU), Manual
iBurst Terminal, Desktop Model (UTD) / USB Model (UTU), Manual iBurst Terminal, Desktop Model (UTD) / USB Model (UTU), Manual
iBurst Terminal, Desktop Model (UTD) / USB Model (UTU), Manual
Kyocera Corporation Revision 1.01 --- June.08.2006
- 17 -
Installation for Windows 2000
Installation for Windows 2000Installation for Windows 2000
Installation for Windows 2000
1. Make sure to disconnect the iBurst Terminal with your PC.
ATTENTION:
Don
DonDon
Don’
’’
’t connect the iBurst Terminal with your PC through a USB cable until completion of
t connect the iBurst Terminal with your PC through a USB cable until completion of t connect the iBurst Terminal with your PC through a USB cable until completion of
t connect the iBurst Terminal with your PC through a USB cable until completion of
installation.
installation.installation.
installation.
2. Turn your PC on.
3. Insert the Software Utility CD provided by the network operator into your CD-ROM drive; or
execute the appropriate installation software.
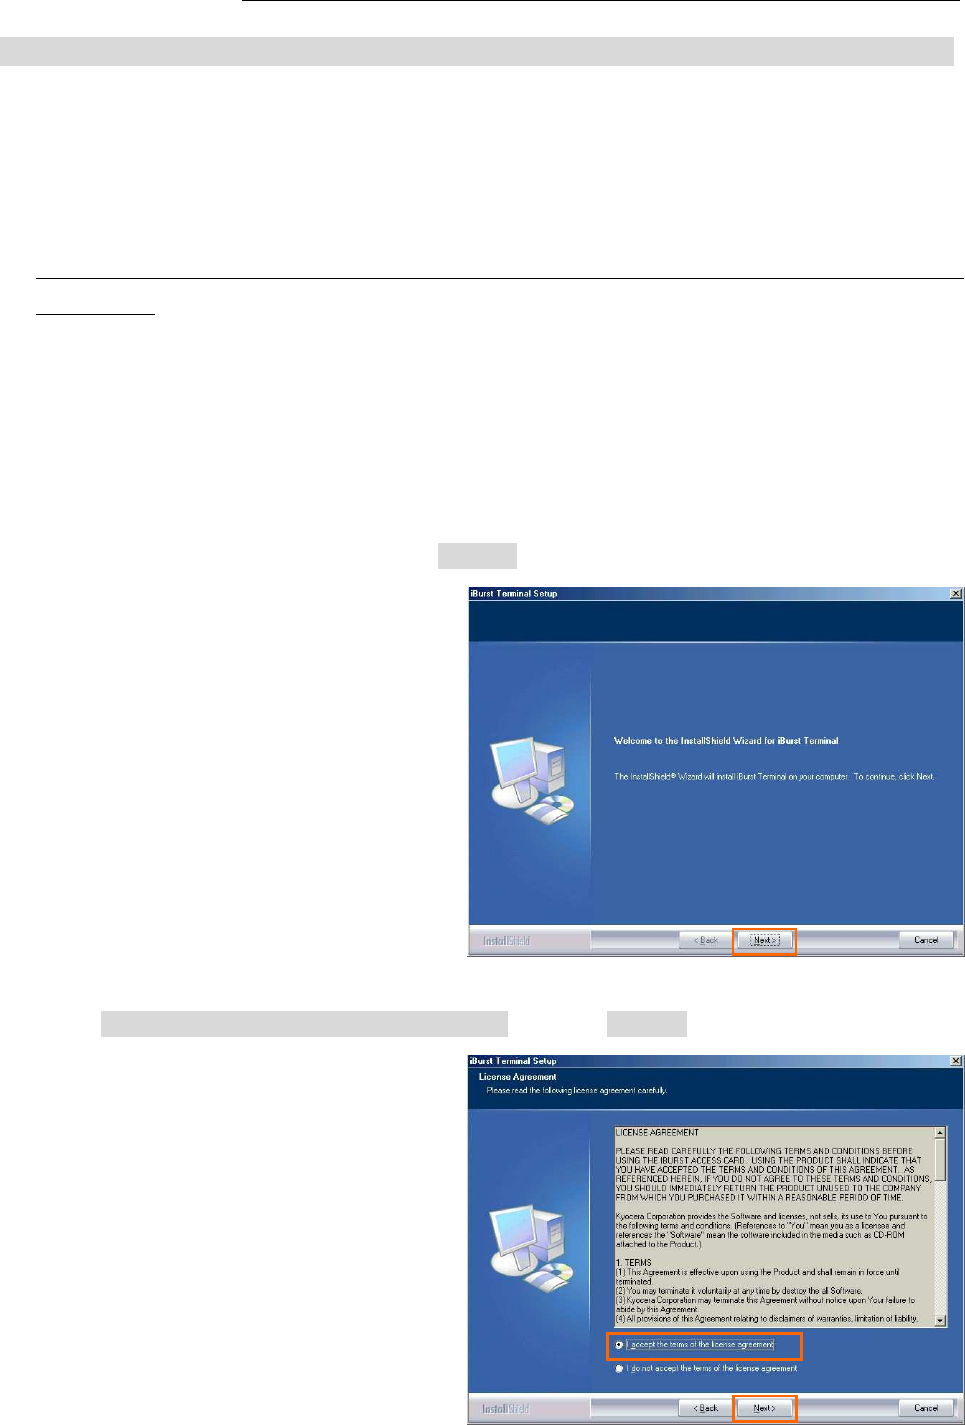
4. iBurst Terminal Setup starts. Click the [Next >] button.
5. Select [I accept the terms the license agreement], click the [Next >] button.

iBurst Terminal, Desktop Model (UTD) / USB Model (UTU), Manual
iBurst Terminal, Desktop Model (UTD) / USB Model (UTU), Manual iBurst Terminal, Desktop Model (UTD) / USB Model (UTU), Manual
iBurst Terminal, Desktop Model (UTD) / USB Model (UTU), Manual
Kyocera Corporation Revision 1.01 --- June.08.2006
- 18 -
6. Click the [Next >] button after appearing dialog window as shown below.
NOTE: To install to a different folder, click [Browse…] and specify another folder.
7. Click the [Next >] button.
8. The following dialog window will appear, and installation of software begins.

iBurst Terminal, Desktop Model (UTD) / USB Model (UTU), Manual
iBurst Terminal, Desktop Model (UTD) / USB Model (UTU), Manual iBurst Terminal, Desktop Model (UTD) / USB Model (UTU), Manual
iBurst Terminal, Desktop Model (UTD) / USB Model (UTU), Manual
Kyocera Corporation Revision 1.01 --- June.08.2006
- 19 -
9. When the installing process finishes, the dialog window shown below will appear. Select [Yes, I
want to restart my computer now] and click the [Finish] button in the dialog window.
10. After finish of restarting, connect the iBurst Terminal with your PC’s USB port.
The iBurst Terminal will be recognized and will be ready to use automatically.
NOTE: If the PC request to restart again, click [Yes] to restart the PC.
NOTE: To connect to the Internet, refer to page 67.
iBurst Terminal, Desktop Model (UTD) / USB Model (UTU), Manual
iBurst Terminal, Desktop Model (UTD) / USB Model (UTU), Manual iBurst Terminal, Desktop Model (UTD) / USB Model (UTU), Manual
iBurst Terminal, Desktop Model (UTD) / USB Model (UTU), Manual
Kyocera Corporation Revision 1.01 --- June.08.2006
- 20 -
Installation for Windows M
Installation for Windows MInstallation for Windows M
Installation for Windows Me
e e
e
Since t
Since tSince t
Since the installation disk of
he installation disk of he installation disk of
he installation disk of Windows Me
Windows MeWindows Me
Windows Me
may
maymay
may b
b b
be
e e
e required while
required while required while
required while driver installation, please
driver installation, please driver installation, please
driver installation, please
prepare
prepare prepare
prepare the CD or copy the
the CD or copy the the CD or copy the
the CD or copy the CD
CDCD
CD
into
intointo
into a hard disk in your PC
a hard disk in your PC a hard disk in your PC
a hard disk in your PC for it.
for it.for it.
for it.
1. Make sure to disconnect the iBurst Terminal with your PC.
ATTENTION:
Don
DonDon
Don’
’’
’t connect the iBurs
t connect the iBurst connect the iBurs
t connect the iBurst Terminal with your PC through a USB cable until completion of
t Terminal with your PC through a USB cable until completion of t Terminal with your PC through a USB cable until completion of
t Terminal with your PC through a USB cable until completion of
installation.
installation.installation.
installation.
2. Turn your PC on.
3. Insert the Software Utility CD provided by the network operator into your CD-ROM drive; or
execute the appropriate installation software.
4. iBurst Terminal Setup starts. Click the [Next >] button.
5. Select [I accept the terms the license agreement], click the [Next >] button.

iBurst Terminal, Desktop Model (UTD) / USB Model (UTU), Manual
iBurst Terminal, Desktop Model (UTD) / USB Model (UTU), Manual iBurst Terminal, Desktop Model (UTD) / USB Model (UTU), Manual
iBurst Terminal, Desktop Model (UTD) / USB Model (UTU), Manual
Kyocera Corporation Revision 1.01 --- June.08.2006
- 21 -
6. Click the [Next >] button after appearing dialog window as shown below.
NOTE: To install to a different folder, click [Browse…] and specify another folder.
7. Click the [Next >] button.
8. The following dialog window will appear, and installation of software begins.
iBurst Terminal, Desktop Model (UTD) / USB Model (UTU), Manual
iBurst Terminal, Desktop Model (UTD) / USB Model (UTU), Manual iBurst Terminal, Desktop Model (UTD) / USB Model (UTU), Manual
iBurst Terminal, Desktop Model (UTD) / USB Model (UTU), Manual
Kyocera Corporation Revision 1.01 --- June.08.2006
- 22 -
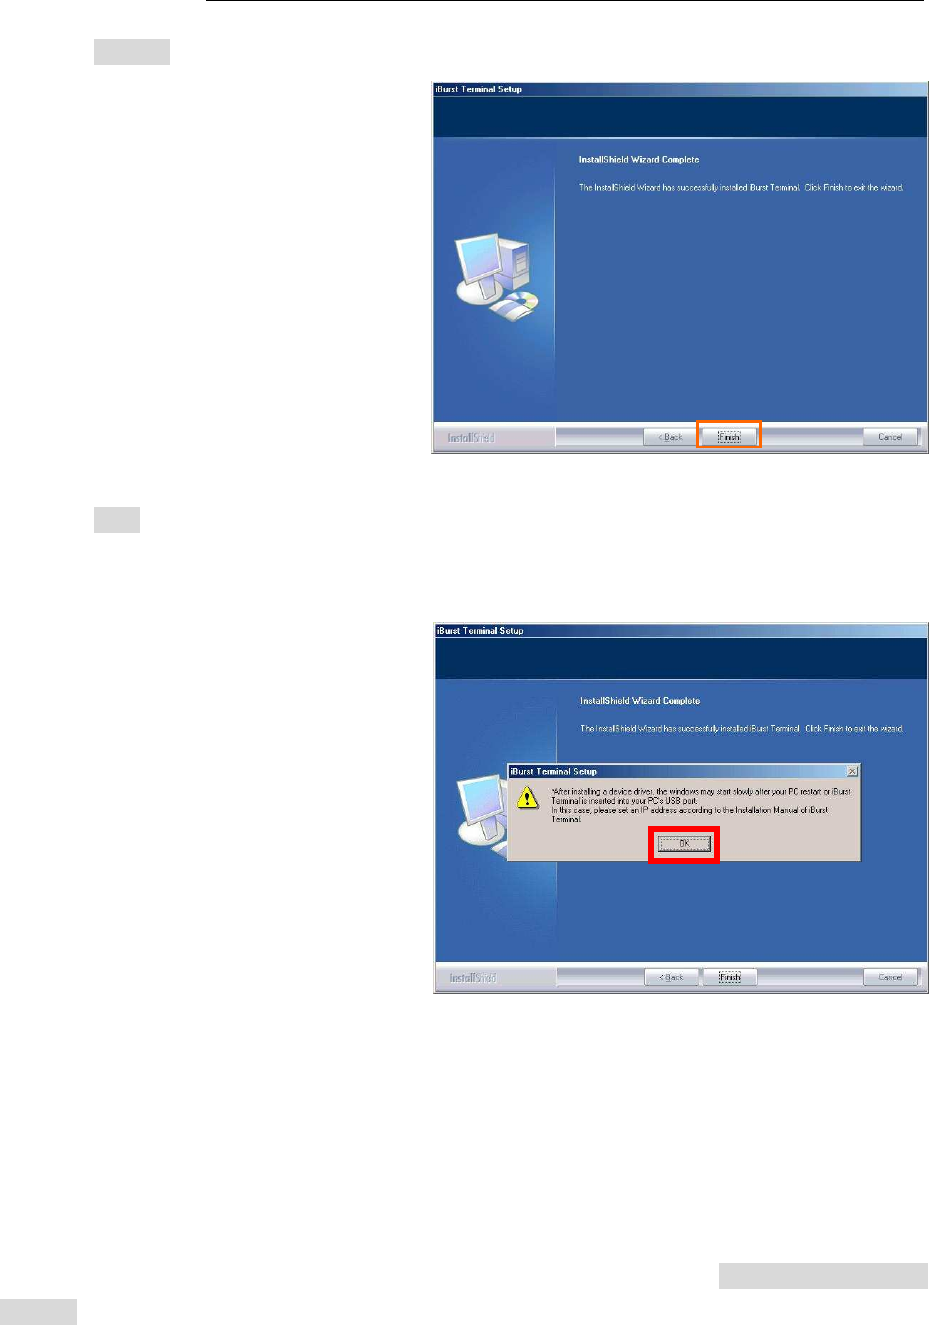
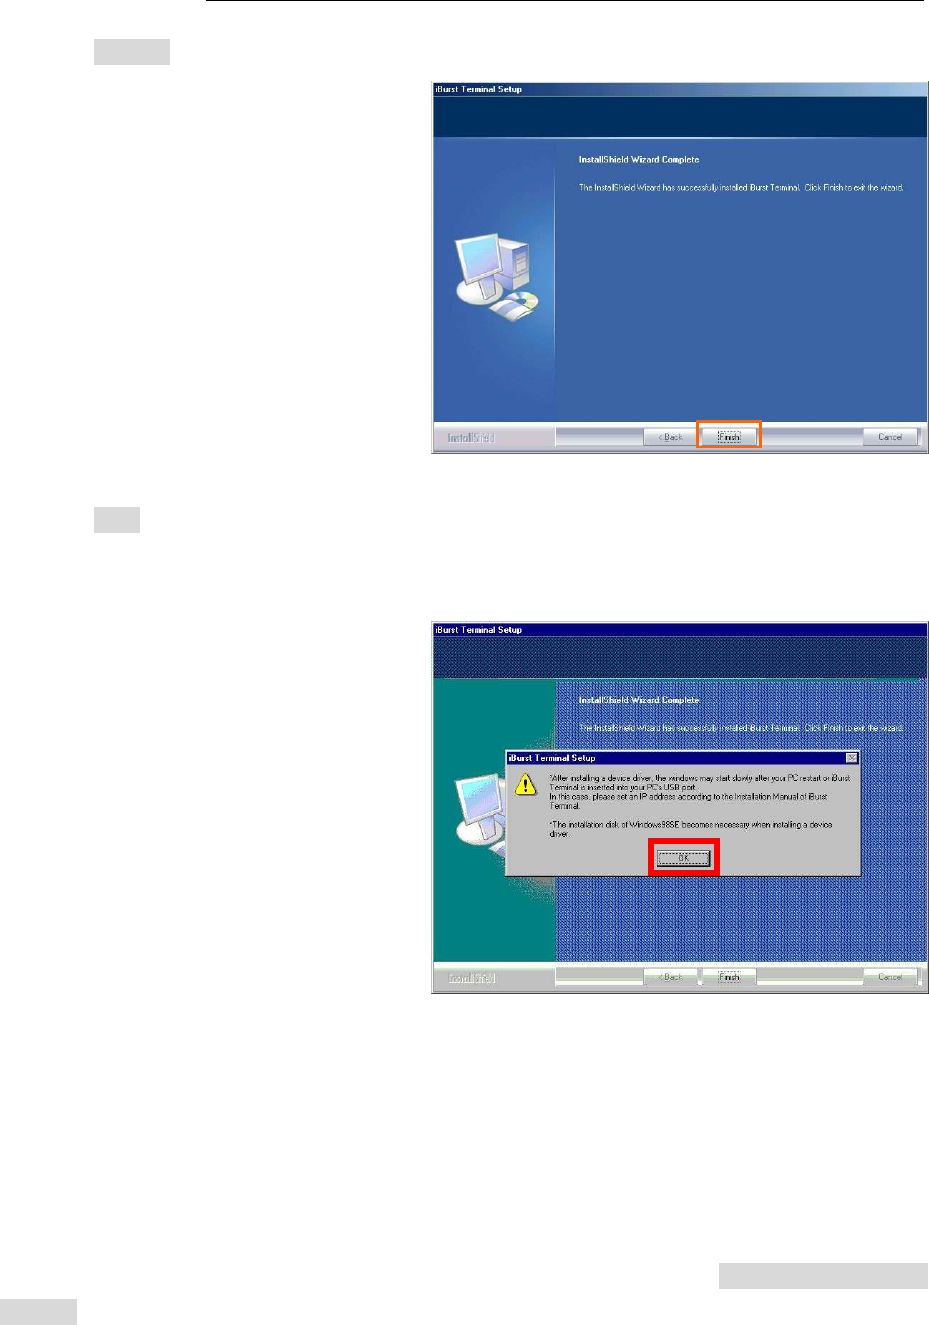
9. Click the [Finish] button.
10. Click the [OK] button.
NOTE: Refer to the 1st article in chapter 6, if you face such symptom described in the
attention message.
NOTE:
If you are going to connect the iBurst Terminal with your PC only through an Ethernet cable, not
through a USB cable, you can skip from hear to step 18 and continue from step 19 in this section.
You can see indications of the iBurst Terminal over Ethernet. See page 87 for the method.
11. Connect the iBurst Terminal with your PC through a USB cable.
Windows will detect the iBurst Terminal as a new hardware so that [Add New Hardware
Wizard] will begin.
iBurst Terminal, Desktop Model (UTD) / USB Model (UTU), Manual
iBurst Terminal, Desktop Model (UTD) / USB Model (UTU), Manual iBurst Terminal, Desktop Model (UTD) / USB Model (UTU), Manual
iBurst Terminal, Desktop Model (UTD) / USB Model (UTU), Manual
Kyocera Corporation Revision 1.01 --- June.08.2006
- 23 -
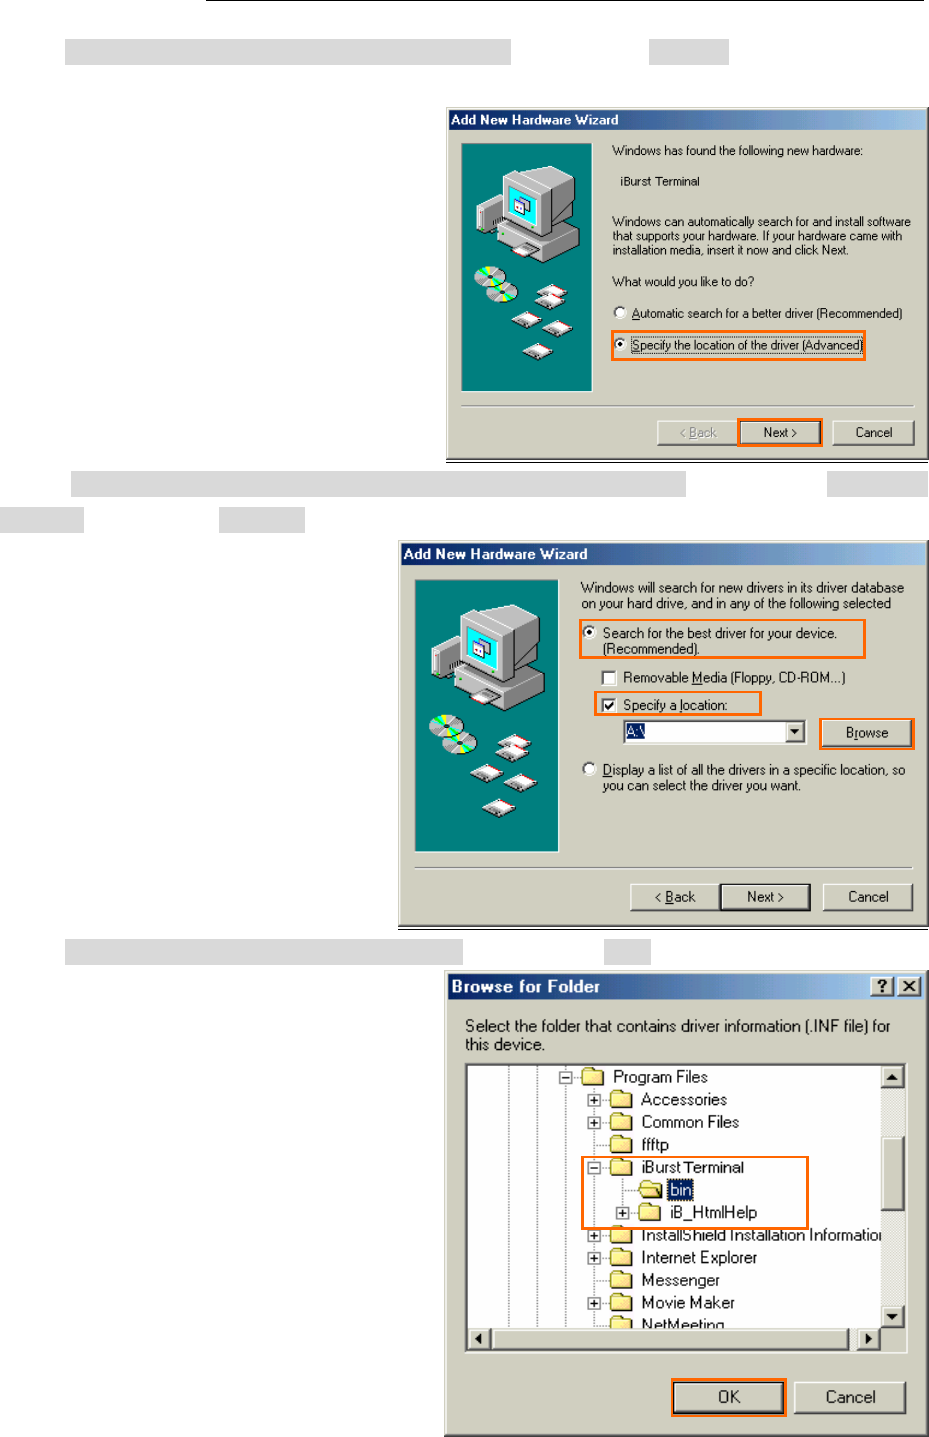
12. Select [Specify the location of the driver (Advanced)] and click the [Next >] button in the dialog
window.
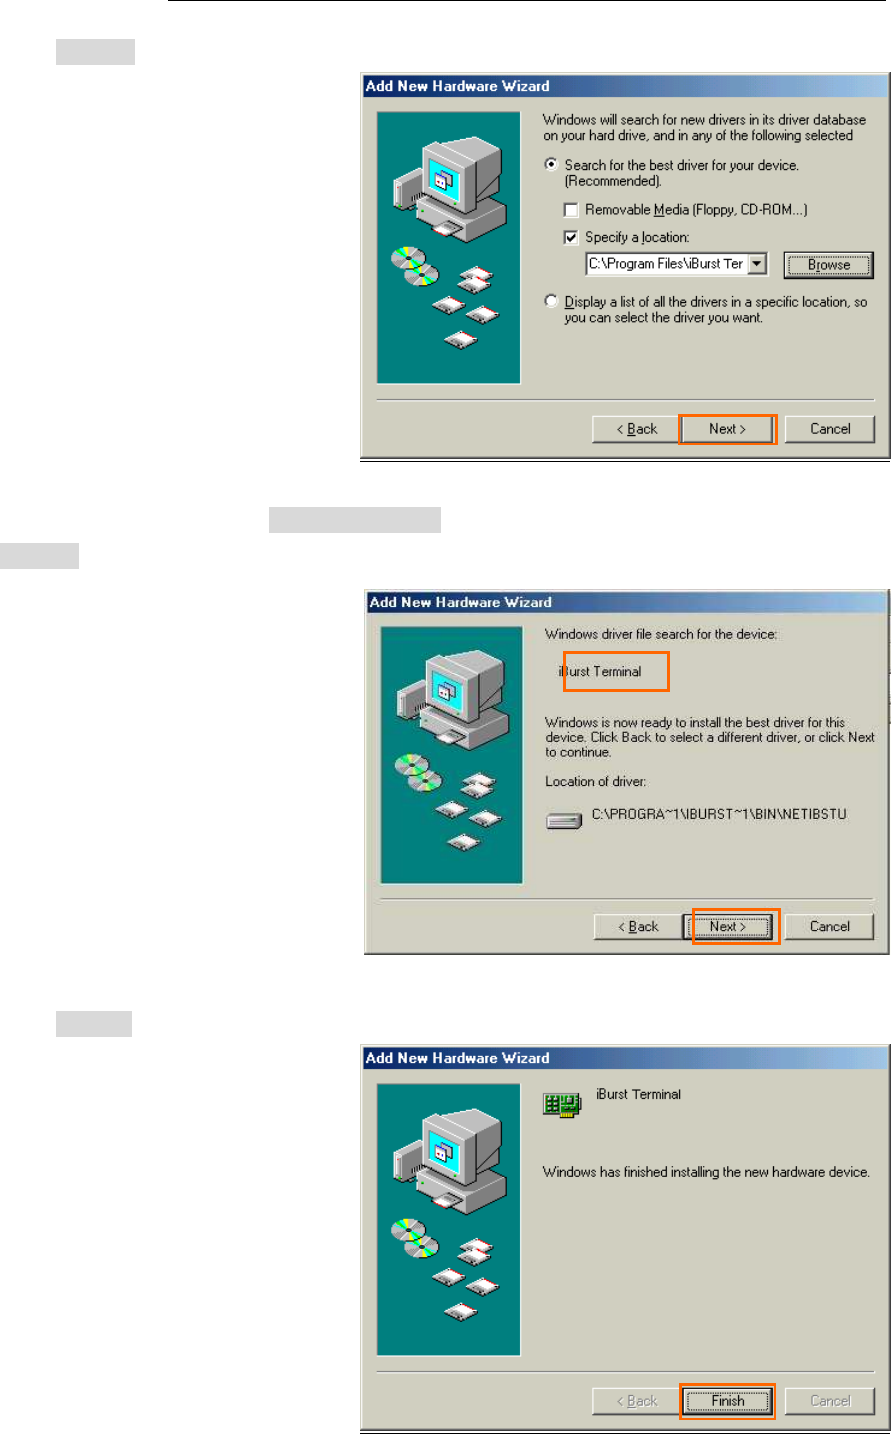
13. Select [Search for the best driver for your device.(Recommended)], then check [Specify a
location] and click the [Browse] button.
14. Select [C:\Program Files\iBurst Terminal\bin], and click the [OK] button.
iBurst Terminal, Desktop Model (UTD) / USB Model (UTU), Manual
iBurst Terminal, Desktop Model (UTD) / USB Model (UTU), Manual iBurst Terminal, Desktop Model (UTD) / USB Model (UTU), Manual
iBurst Terminal, Desktop Model (UTD) / USB Model (UTU), Manual
Kyocera Corporation Revision 1.01 --- June.08.2006
- 24 -
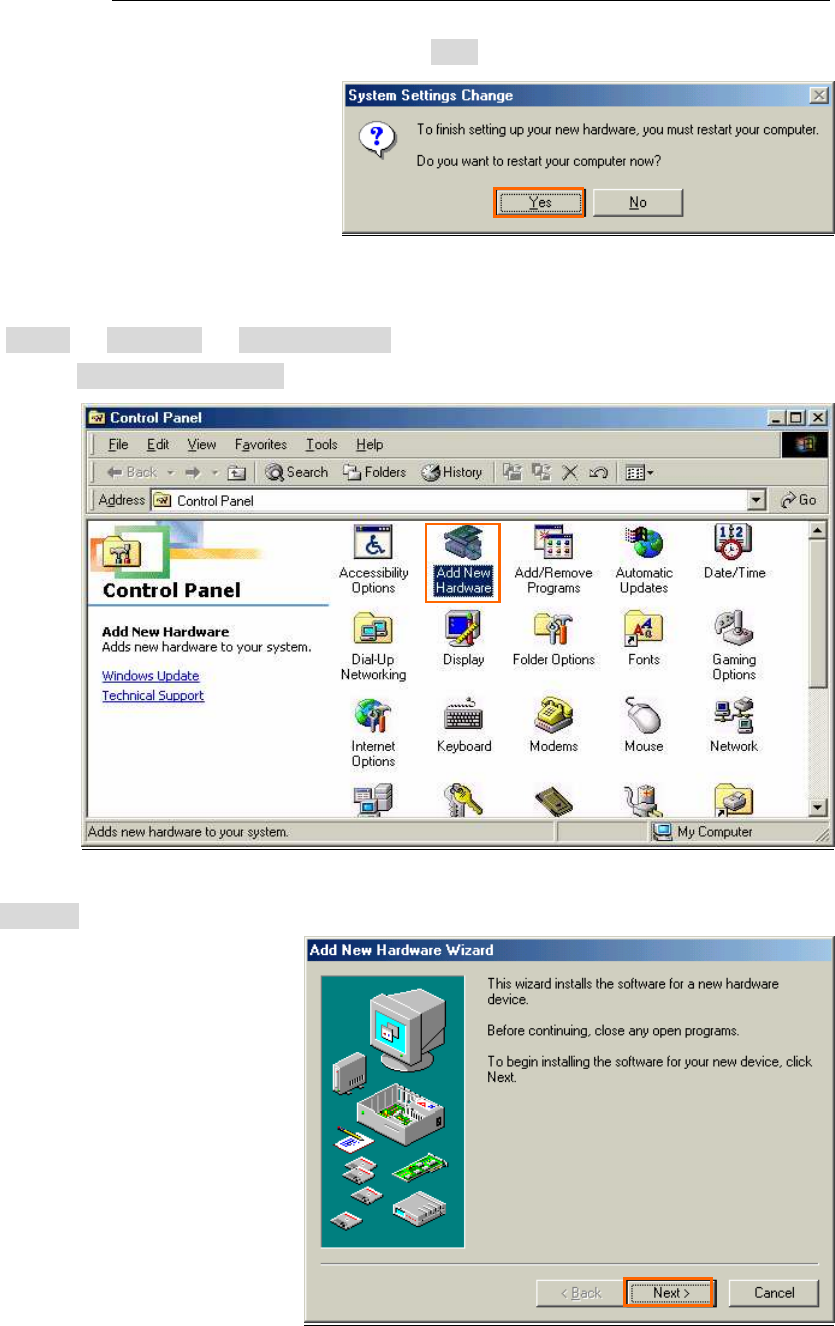
15. Click the [Next >] button.
16. Confirm that the device name [iBurst Terminal] is displayed in the dialog window, then click
the [Next >] button.
17. Click the [Finish] button.
iBurst Terminal, Desktop Model (UTD) / USB Model (UTU), Manual
iBurst Terminal, Desktop Model (UTD) / USB Model (UTU), Manual iBurst Terminal, Desktop Model (UTD) / USB Model (UTU), Manual
iBurst Terminal, Desktop Model (UTD) / USB Model (UTU), Manual
Kyocera Corporation Revision 1.01 --- June.08.2006
- 25 -
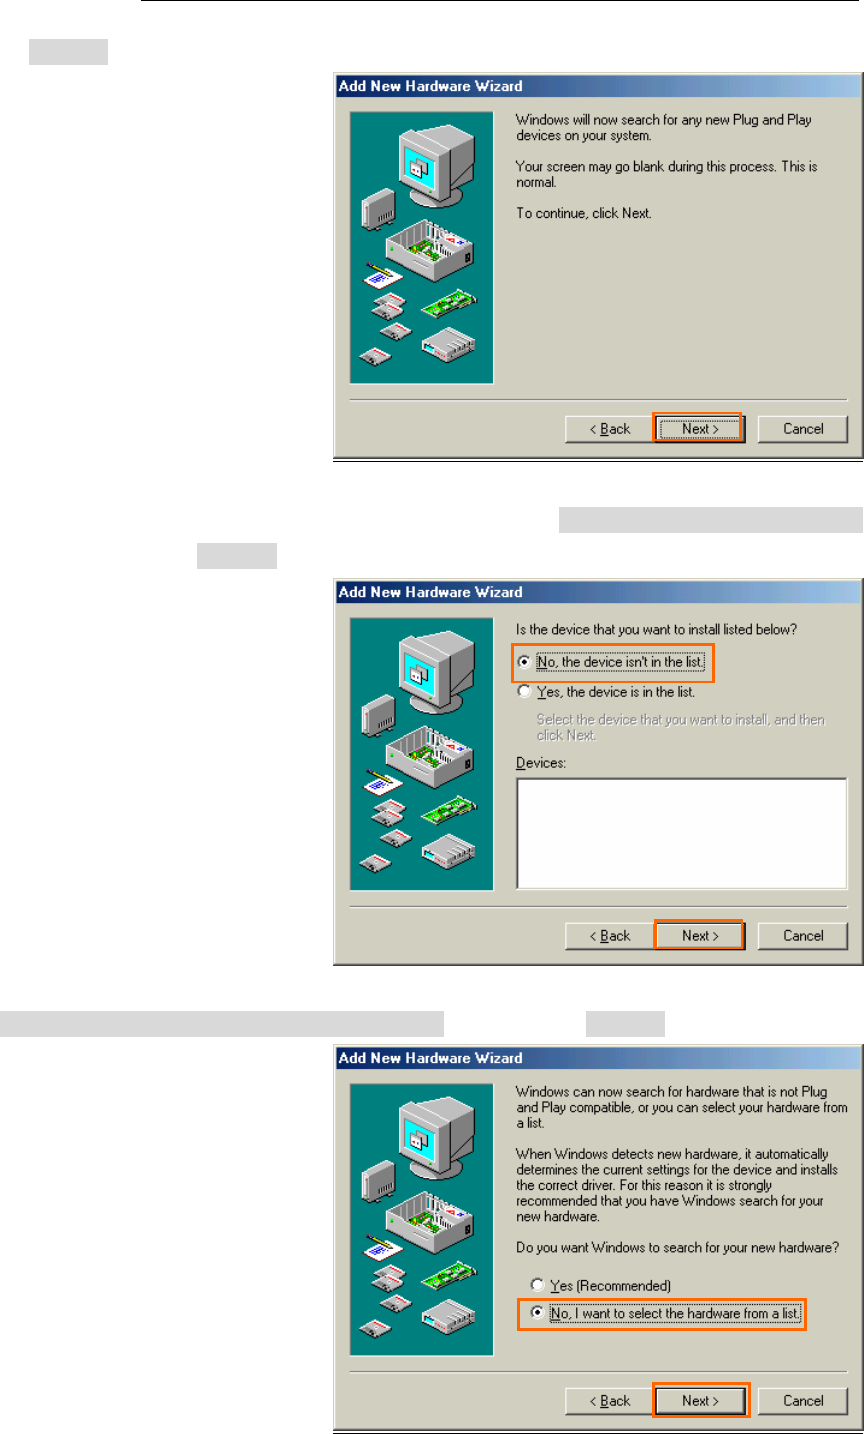
18. The dialog window shown below will appear, click the [Yes] button, and restart your PC.
NOTE: If the PC doesn’t shutdown itself, try to press Alt+Ctrl+Del keys several times.
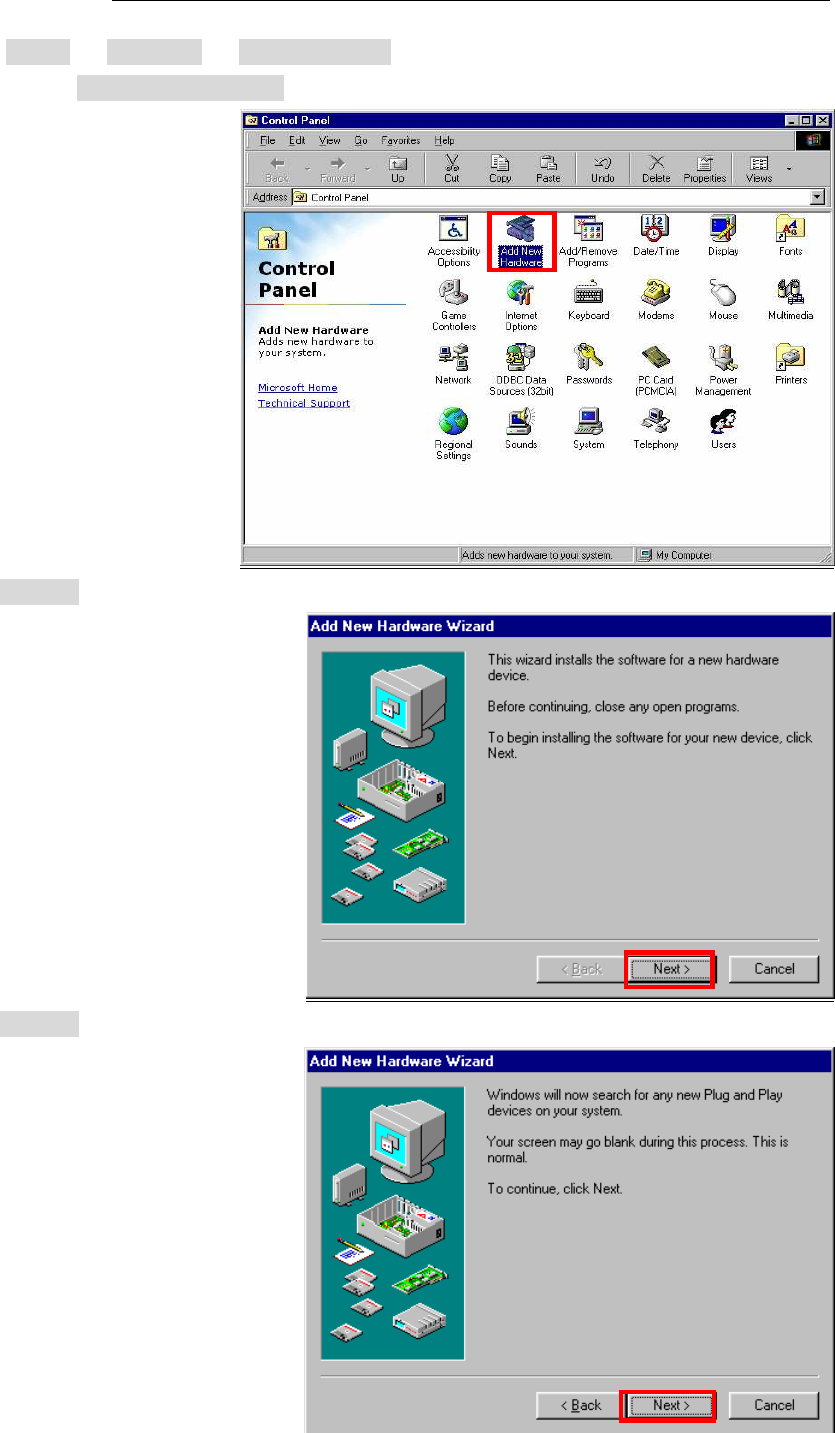
19. Click the [Start] -> [Settings] -> [Control Panel] to open Control Panel as shown below, and
then double click [Add New Hardware].
20. Click the [Next >] button.
iBurst Terminal, Desktop Model (UTD) / USB Model (UTU), Manual
iBurst Terminal, Desktop Model (UTD) / USB Model (UTU), Manual iBurst Terminal, Desktop Model (UTD) / USB Model (UTU), Manual
iBurst Terminal, Desktop Model (UTD) / USB Model (UTU), Manual
Kyocera Corporation Revision 1.01 --- June.08.2006
- 26 -
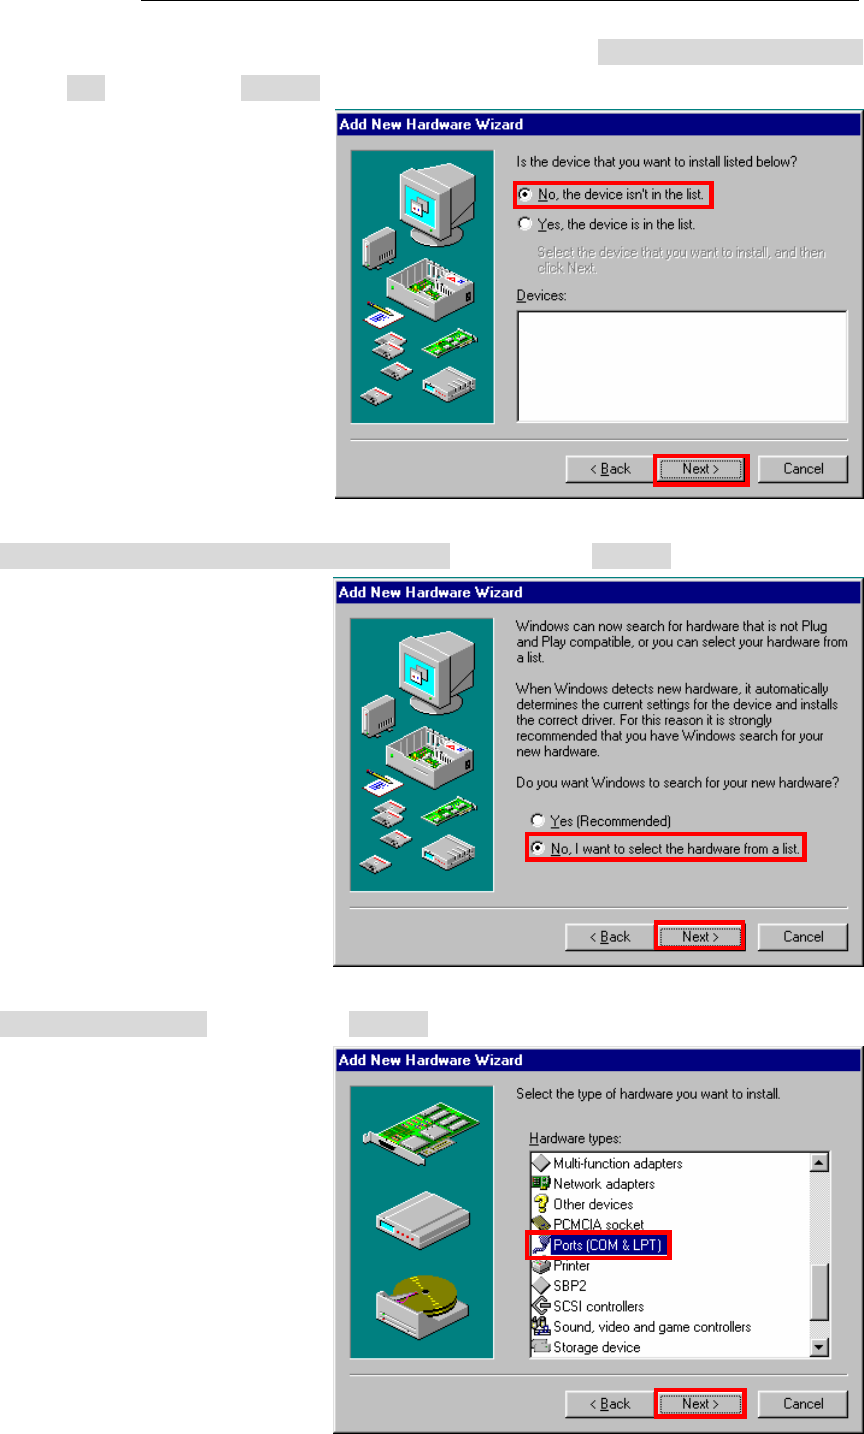
21. Click the [Next >] button.
NOTE: If the dialog window shown below appears, select [No, the device isn’t in the list]
and click the [Next >] button.
22. Select [No, I want to select the hardware from a list], and click the [Next >] button.
iBurst Terminal, Desktop Model (UTD) / USB Model (UTU), Manual
iBurst Terminal, Desktop Model (UTD) / USB Model (UTU), Manual iBurst Terminal, Desktop Model (UTD) / USB Model (UTU), Manual
iBurst Terminal, Desktop Model (UTD) / USB Model (UTU), Manual
Kyocera Corporation Revision 1.01 --- June.08.2006
- 27 -
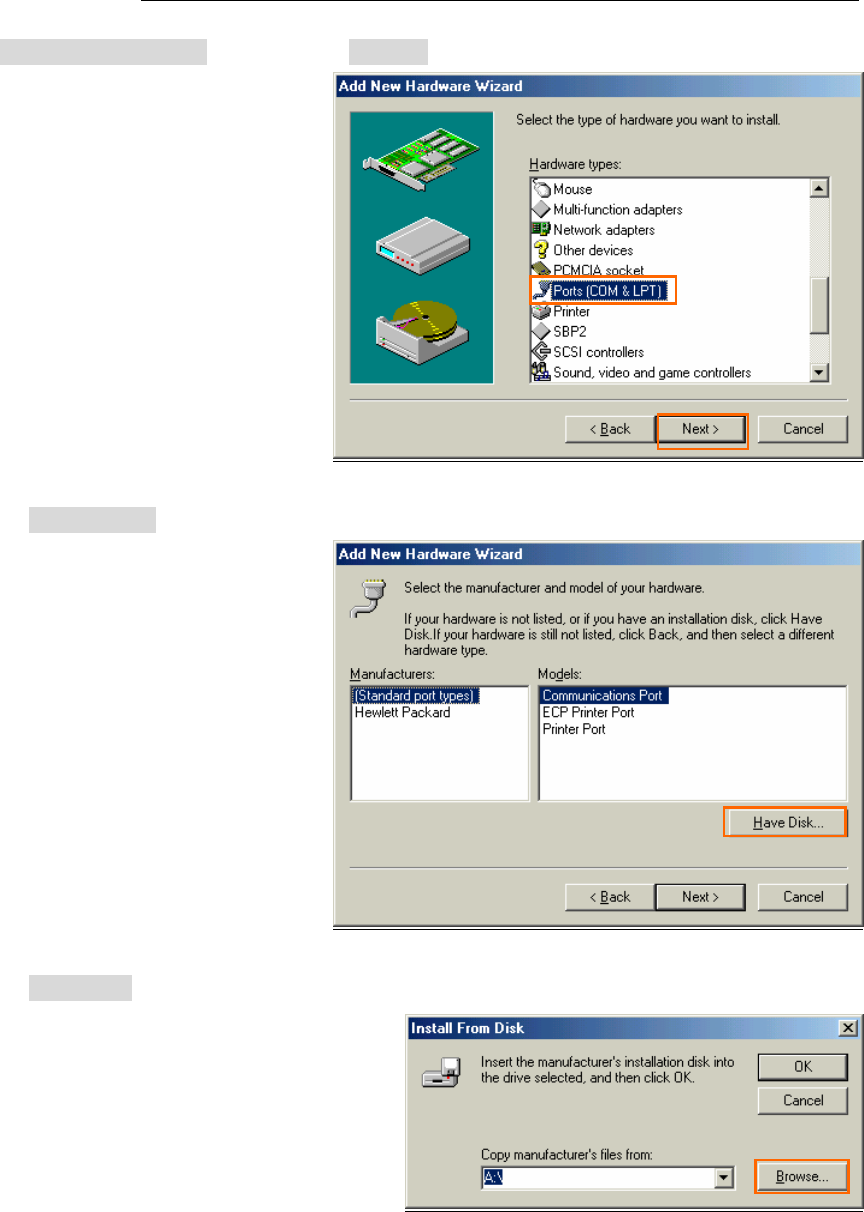
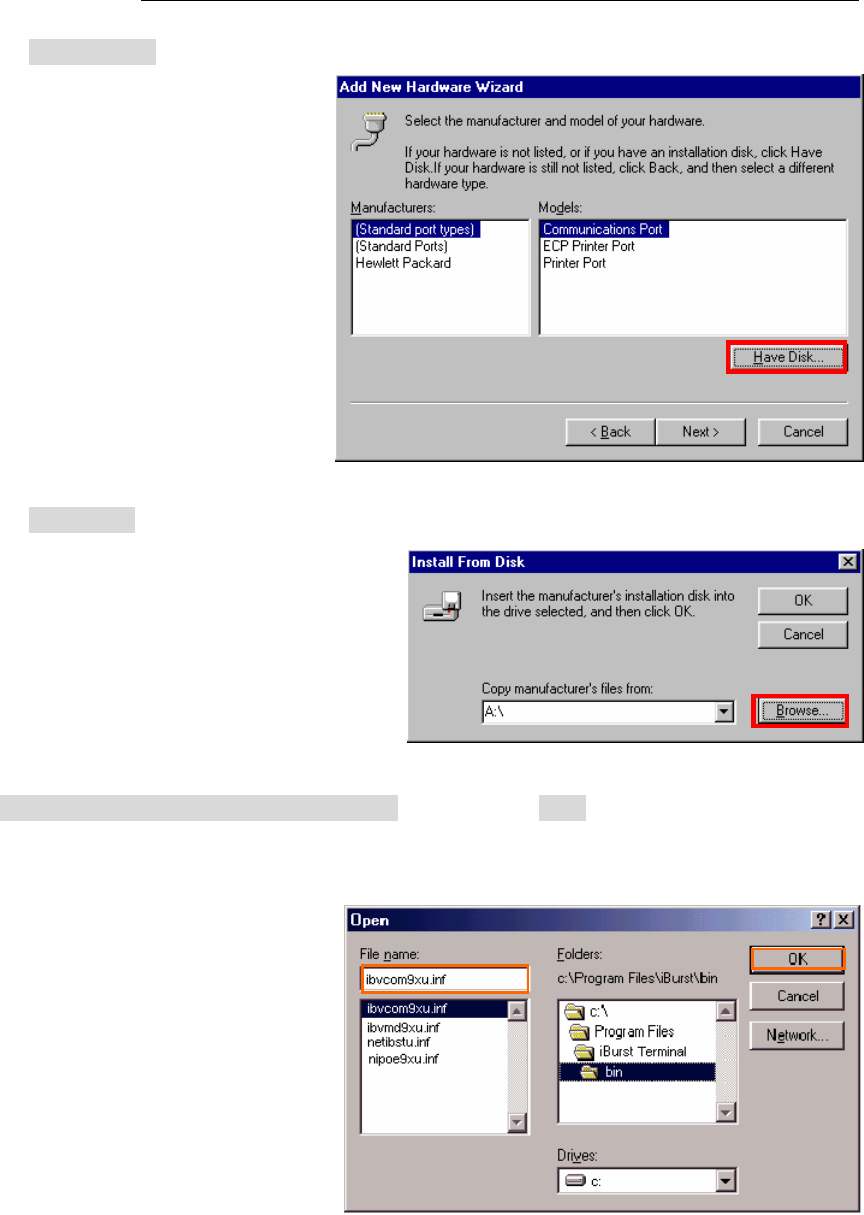
23. Select [Ports (COM & LPT)], and click the [Next >] button.
24. Click the [Have Disk..] button.
25. Click the [Browse...] button.
iBurst Terminal, Desktop Model (UTD) / USB Model (UTU), Manual
iBurst Terminal, Desktop Model (UTD) / USB Model (UTU), Manual iBurst Terminal, Desktop Model (UTD) / USB Model (UTU), Manual
iBurst Terminal, Desktop Model (UTD) / USB Model (UTU), Manual
Kyocera Corporation Revision 1.01 --- June.08.2006
- 28 -
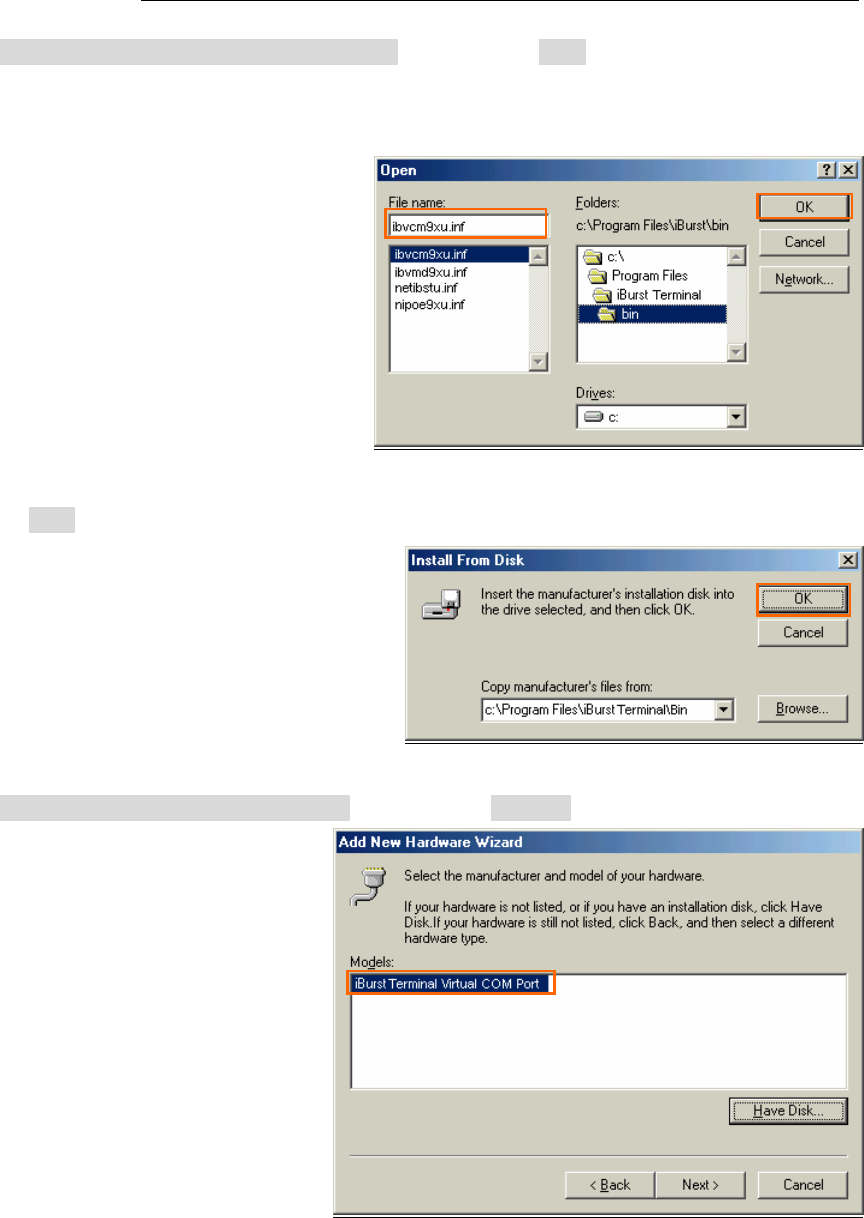
26. Select [C:\Program Files\iBurst Terminal\bin], and click the [OK] button.
NOTE: You don’t have to select a file name. Windows will find an appropriate file
automatically.
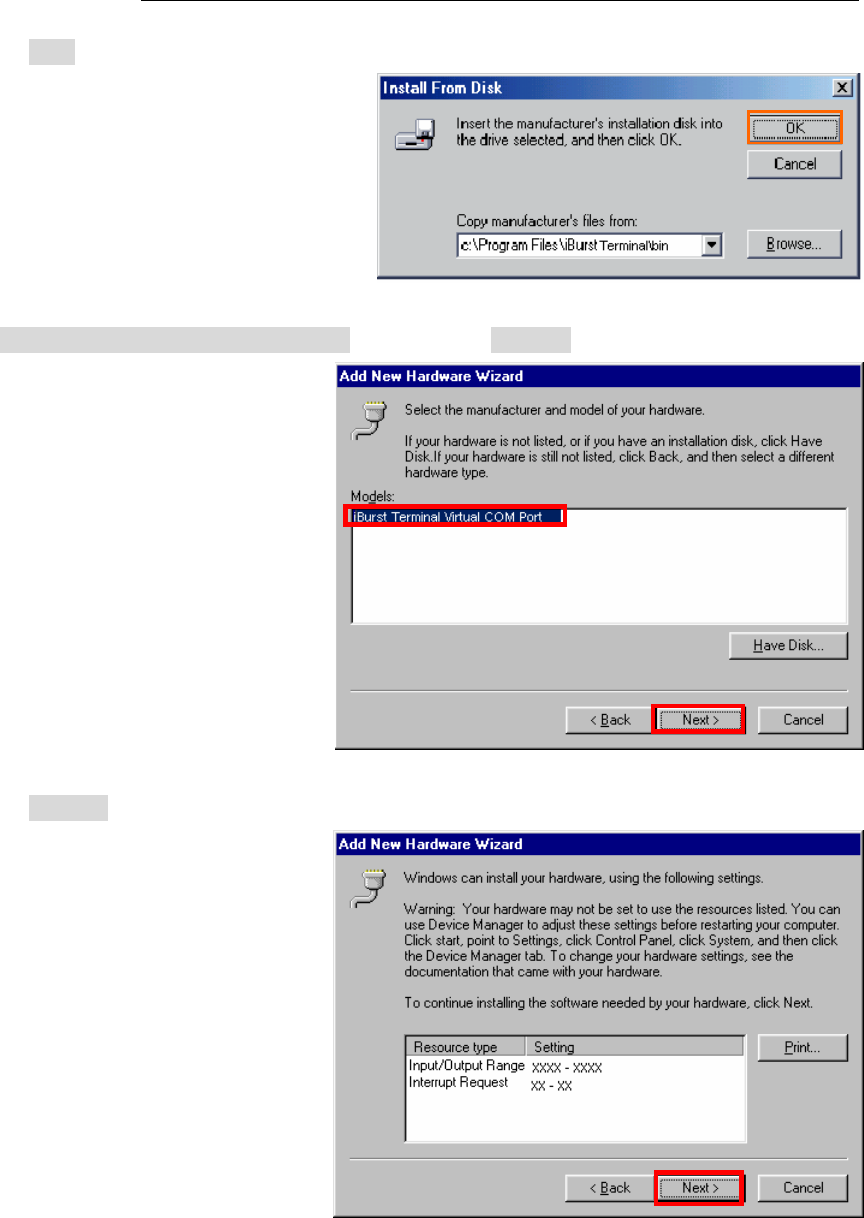
27. Click the [OK] button.
28. Select [iBurst Terminal Virtual COM Port], and click the [Next >] button.
iBurst Terminal, Desktop Model (UTD) / USB Model (UTU), Manual
iBurst Terminal, Desktop Model (UTD) / USB Model (UTU), Manual iBurst Terminal, Desktop Model (UTD) / USB Model (UTU), Manual
iBurst Terminal, Desktop Model (UTD) / USB Model (UTU), Manual
Kyocera Corporation Revision 1.01 --- June.08.2006
- 29 -
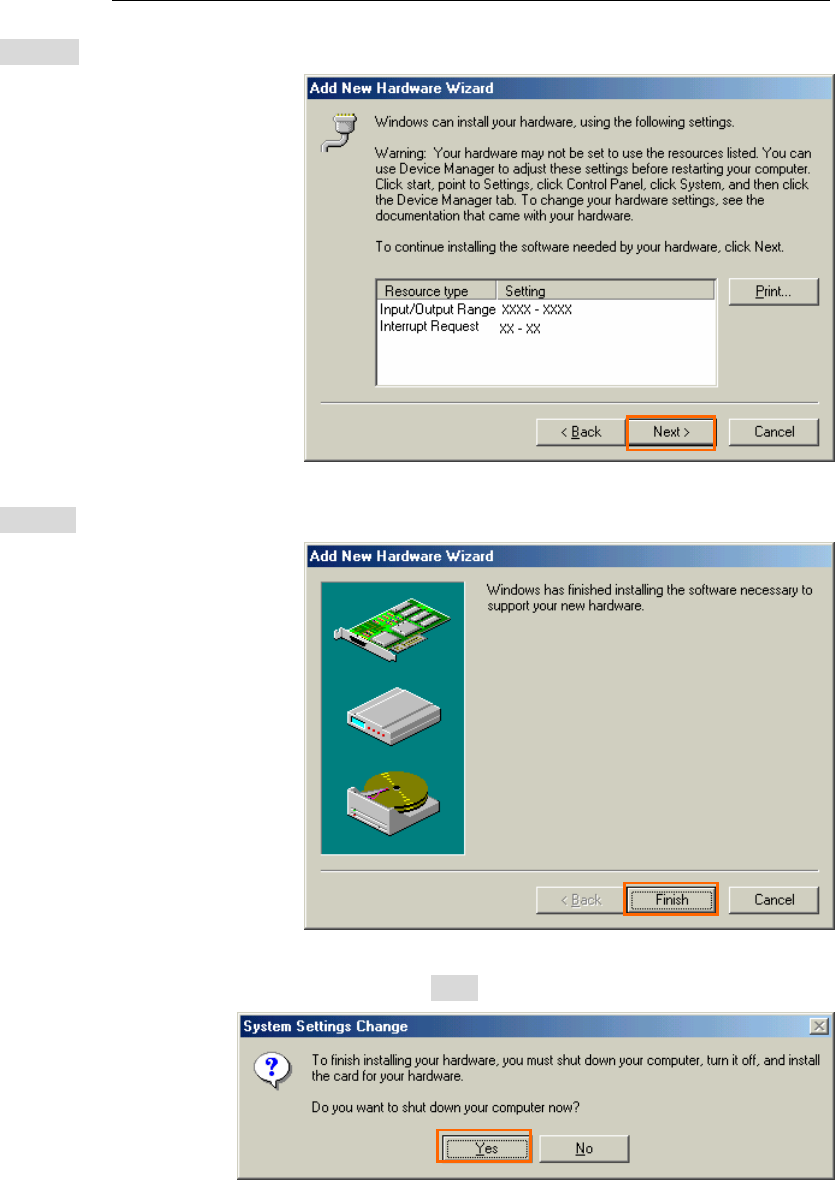
29. Click the [Next >] button.
30. Click the [Finish] button.
31. The dialog window shown below will appear, click the [Yes] button to SHUTDOWN
SHUTDOWNSHUTDOWN
SHUTDOWN your PC.
NOTE: If the PC doesn’t shutdown itself, try to press Alt+Ctrl+Del keys several times.
32. Turn your PC on again.
iBurst Terminal, Desktop Model (UTD) / USB Model (UTU), Manual
iBurst Terminal, Desktop Model (UTD) / USB Model (UTU), Manual iBurst Terminal, Desktop Model (UTD) / USB Model (UTU), Manual
iBurst Terminal, Desktop Model (UTD) / USB Model (UTU), Manual
Kyocera Corporation Revision 1.01 --- June.08.2006
- 30 -
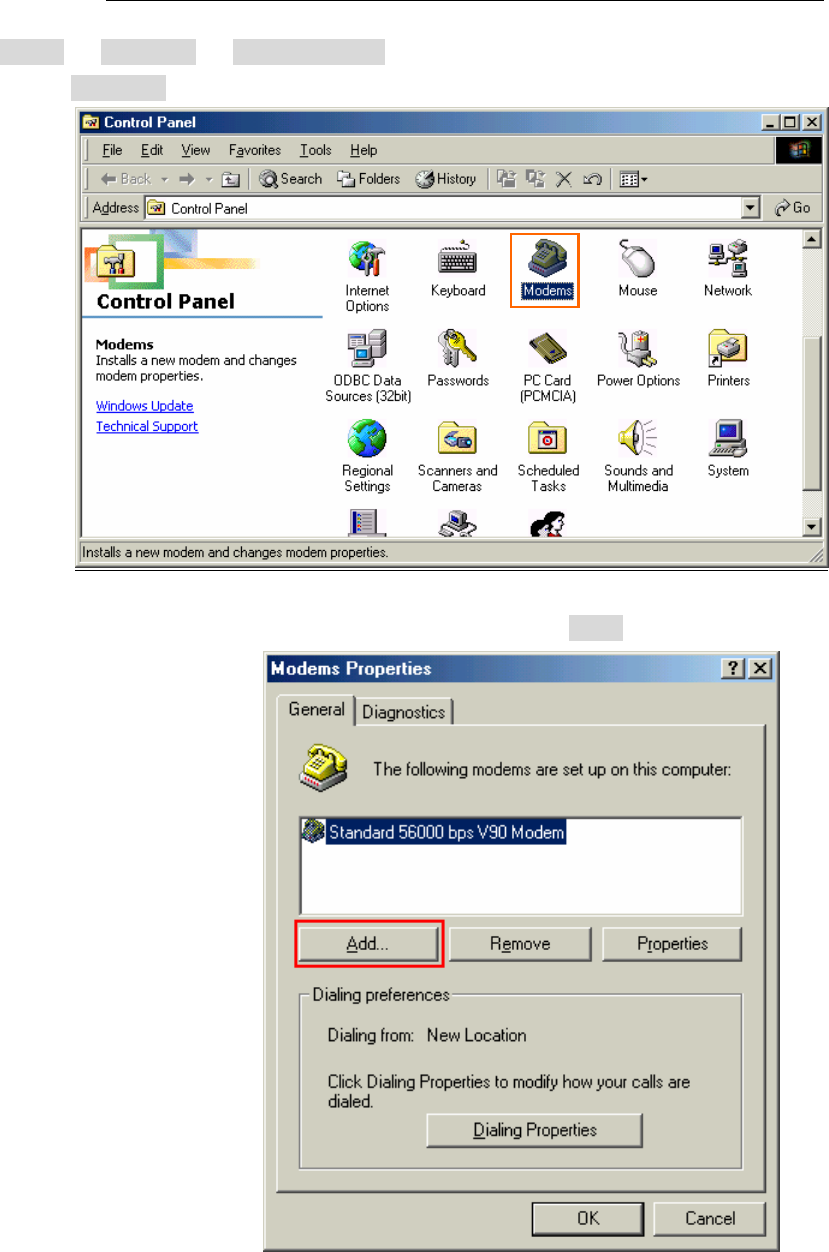
33. Click the [Start] -> [Settings] -> [Control Panel] to open Control Panel as shown below, and
then double click [Modems].
NOTE: If the dialog window as shown below appears, click the [Add] button.
iBurst Terminal, Desktop Model (UTD) / USB Model (UTU), Manual
iBurst Terminal, Desktop Model (UTD) / USB Model (UTU), Manual iBurst Terminal, Desktop Model (UTD) / USB Model (UTU), Manual
iBurst Terminal, Desktop Model (UTD) / USB Model (UTU), Manual
Kyocera Corporation Revision 1.01 --- June.08.2006
- 31 -
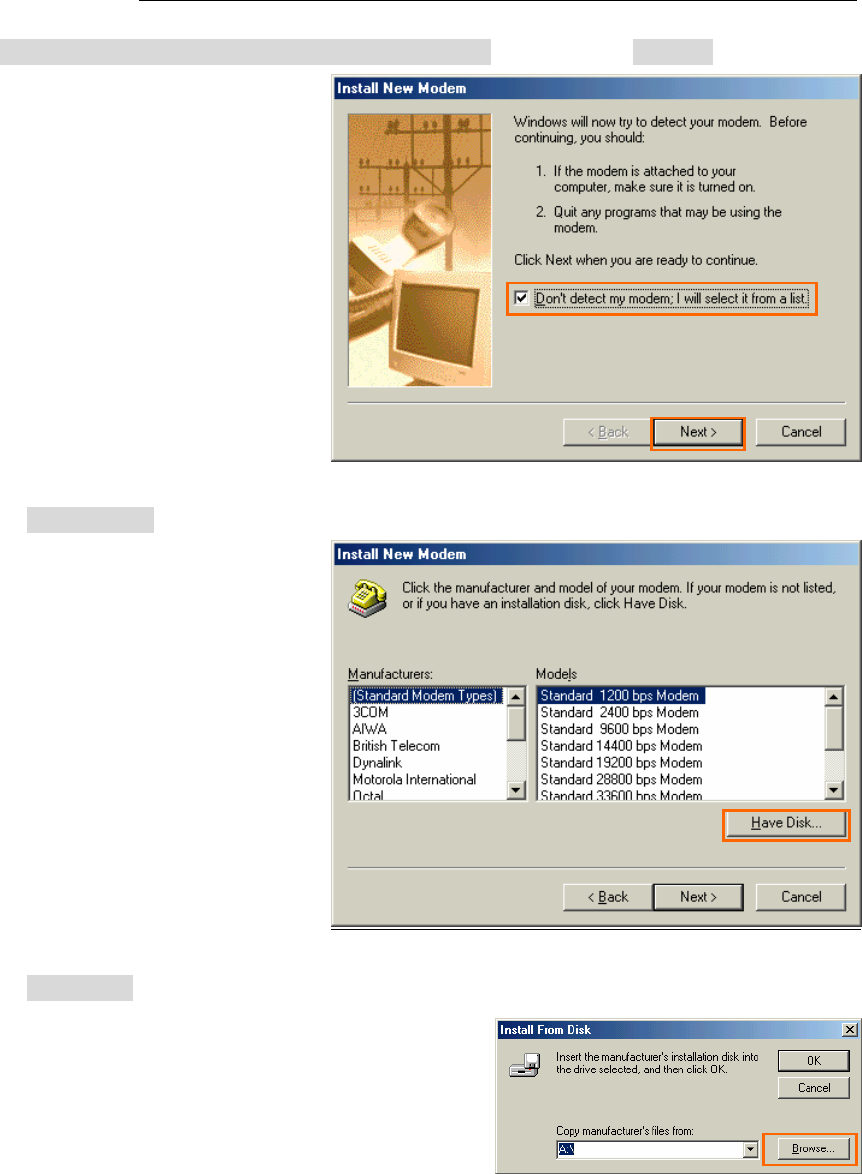
34. Check [Don’t detect my modem; I will select it from a list], and click the [Next >] button.
35. Click the [Have Disk..] button.
36. Click the [Browse…] button.
iBurst Terminal, Desktop Model (UTD) / USB Model (UTU), Manual
iBurst Terminal, Desktop Model (UTD) / USB Model (UTU), Manual iBurst Terminal, Desktop Model (UTD) / USB Model (UTU), Manual
iBurst Terminal, Desktop Model (UTD) / USB Model (UTU), Manual
Kyocera Corporation Revision 1.01 --- June.08.2006
- 32 -
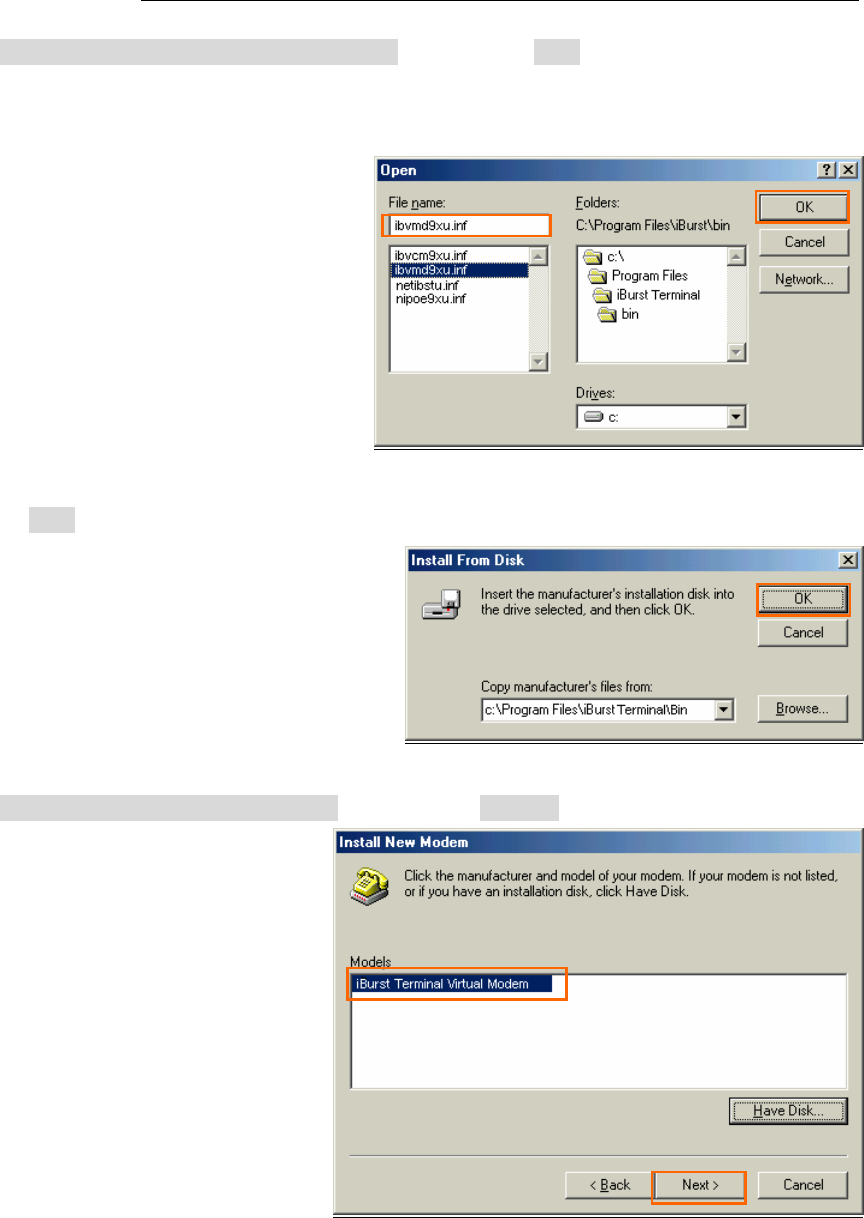
37. Select [C:\Program Files\iBurst Terminal\bin],and click the [OK] button.
NOTE: You don’t have to select a file name. Windows will find an appropriate file
automatically.
38. Click the [OK] button.
39. Select [iBurst Terminal Virtual MODEM], and click the [Next >] button.

iBurst Terminal, Desktop Model (UTD) / USB Model (UTU), Manual
iBurst Terminal, Desktop Model (UTD) / USB Model (UTU), Manual iBurst Terminal, Desktop Model (UTD) / USB Model (UTU), Manual
iBurst Terminal, Desktop Model (UTD) / USB Model (UTU), Manual
Kyocera Corporation Revision 1.01 --- June.08.2006
- 33 -
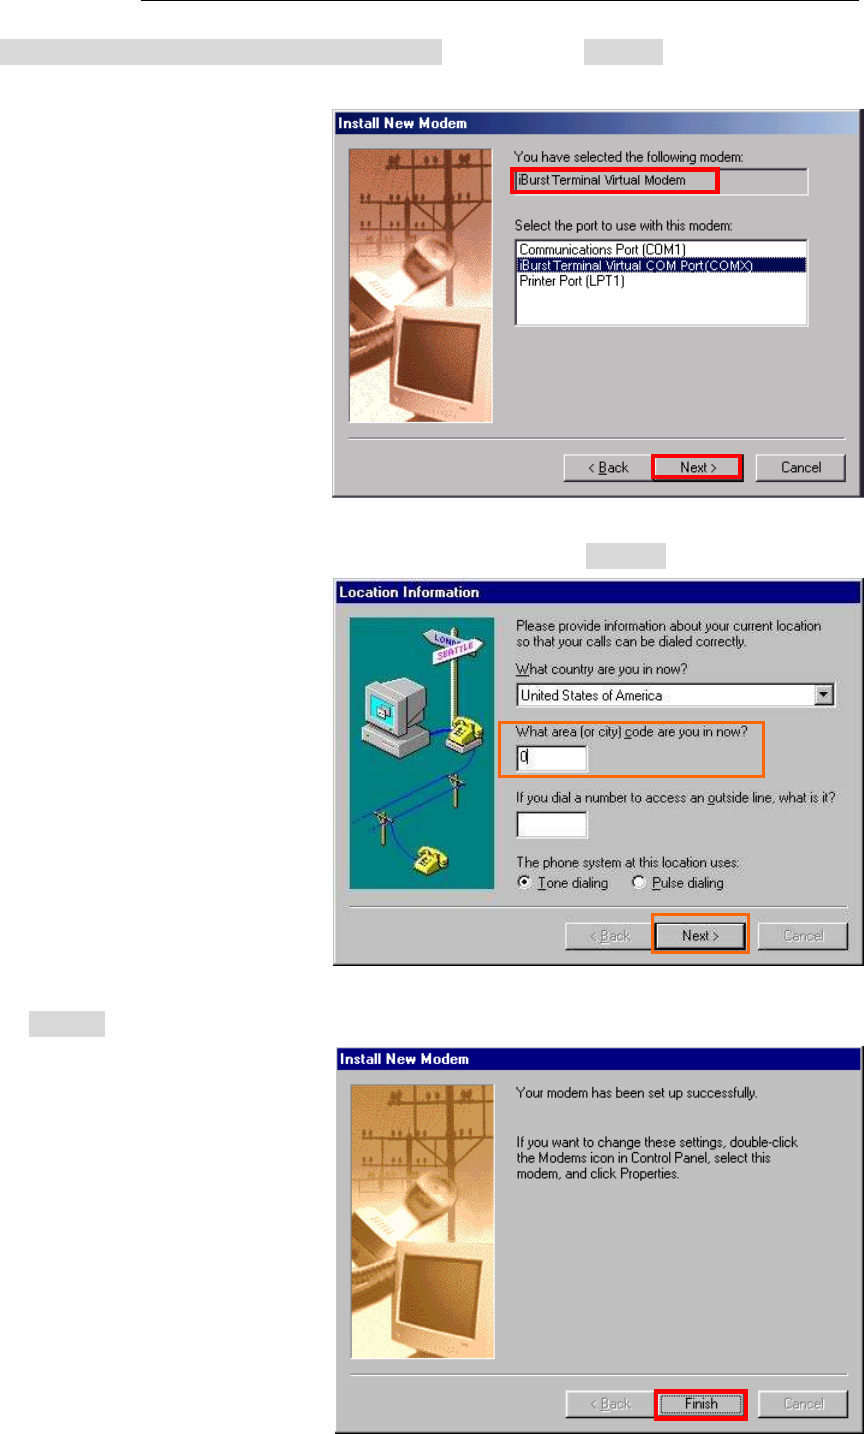
40. Select [iBurst Terminal Virtual COM Port (COM X)], and click the [Next >] button.
NOTE: The ‘X’ in “COM X” above is a COM port number assigned automatically.
NOTE: If the dialog window as shown below appears, type a dummy number in “What
are (or city) code are you in now ?” and then click the [Next >] button.
41. Click the [Finish] button.
iBurst Terminal, Desktop Model (UTD) / USB Model (UTU), Manual
iBurst Terminal, Desktop Model (UTD) / USB Model (UTU), Manual iBurst Terminal, Desktop Model (UTD) / USB Model (UTU), Manual
iBurst Terminal, Desktop Model (UTD) / USB Model (UTU), Manual
Kyocera Corporation Revision 1.01 --- June.08.2006
- 34 -
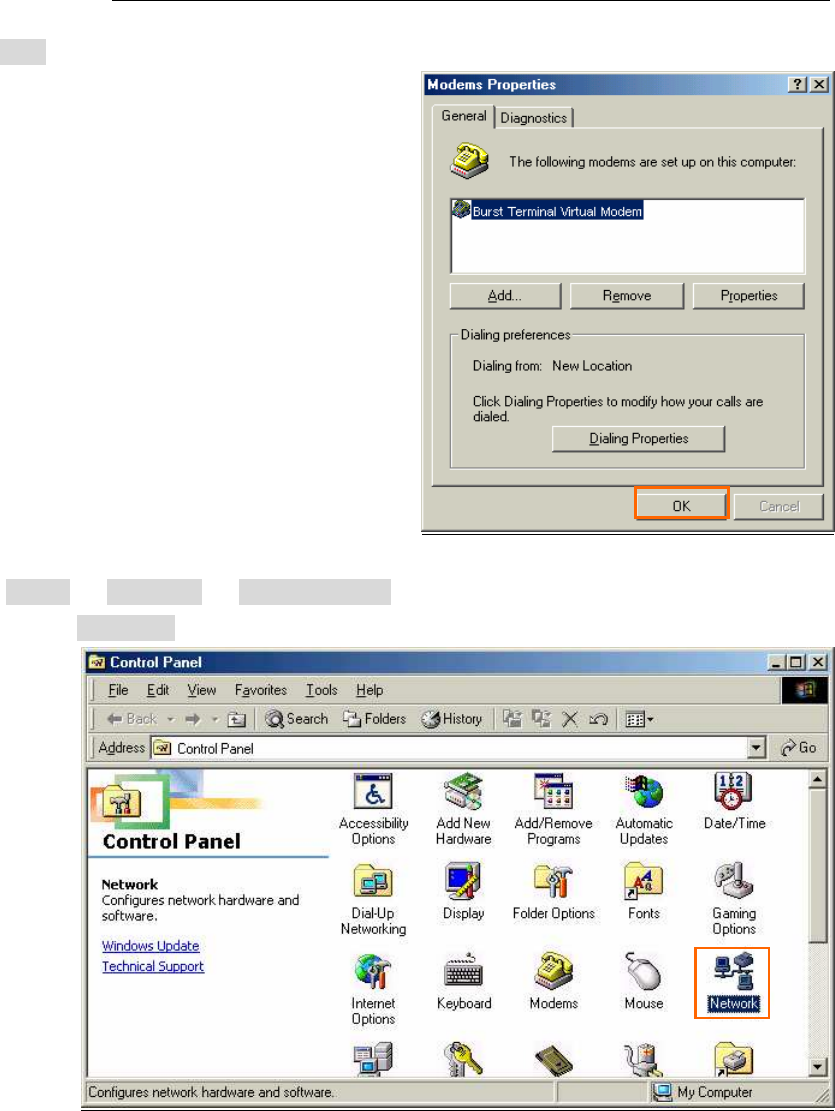
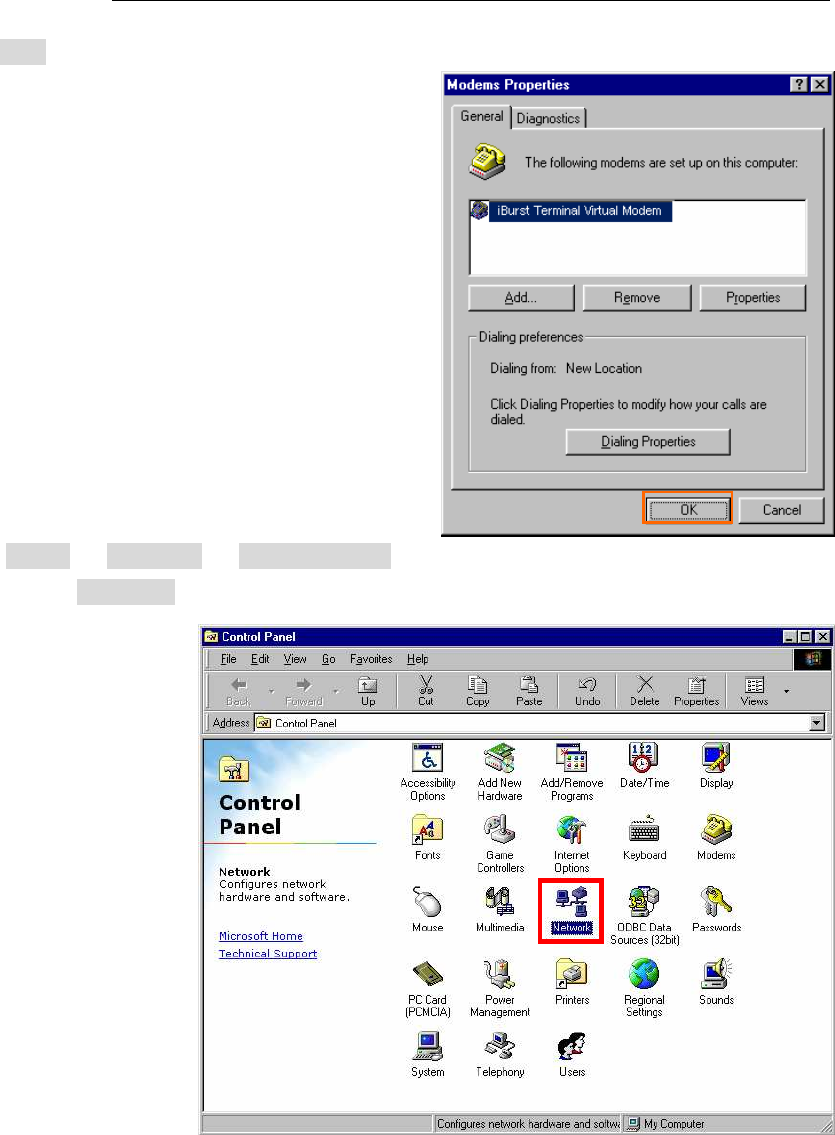
42. Click the [OK] button.
43. Click the [Start] -> [Settings] -> [Control Panel] to open Control Panel as shown below, and
then double click [Network].
iBurst Terminal, Desktop Model (UTD) / USB Model (UTU), Manual
iBurst Terminal, Desktop Model (UTD) / USB Model (UTU), Manual iBurst Terminal, Desktop Model (UTD) / USB Model (UTU), Manual
iBurst Terminal, Desktop Model (UTD) / USB Model (UTU), Manual
Kyocera Corporation Revision 1.01 --- June.08.2006
- 35 -
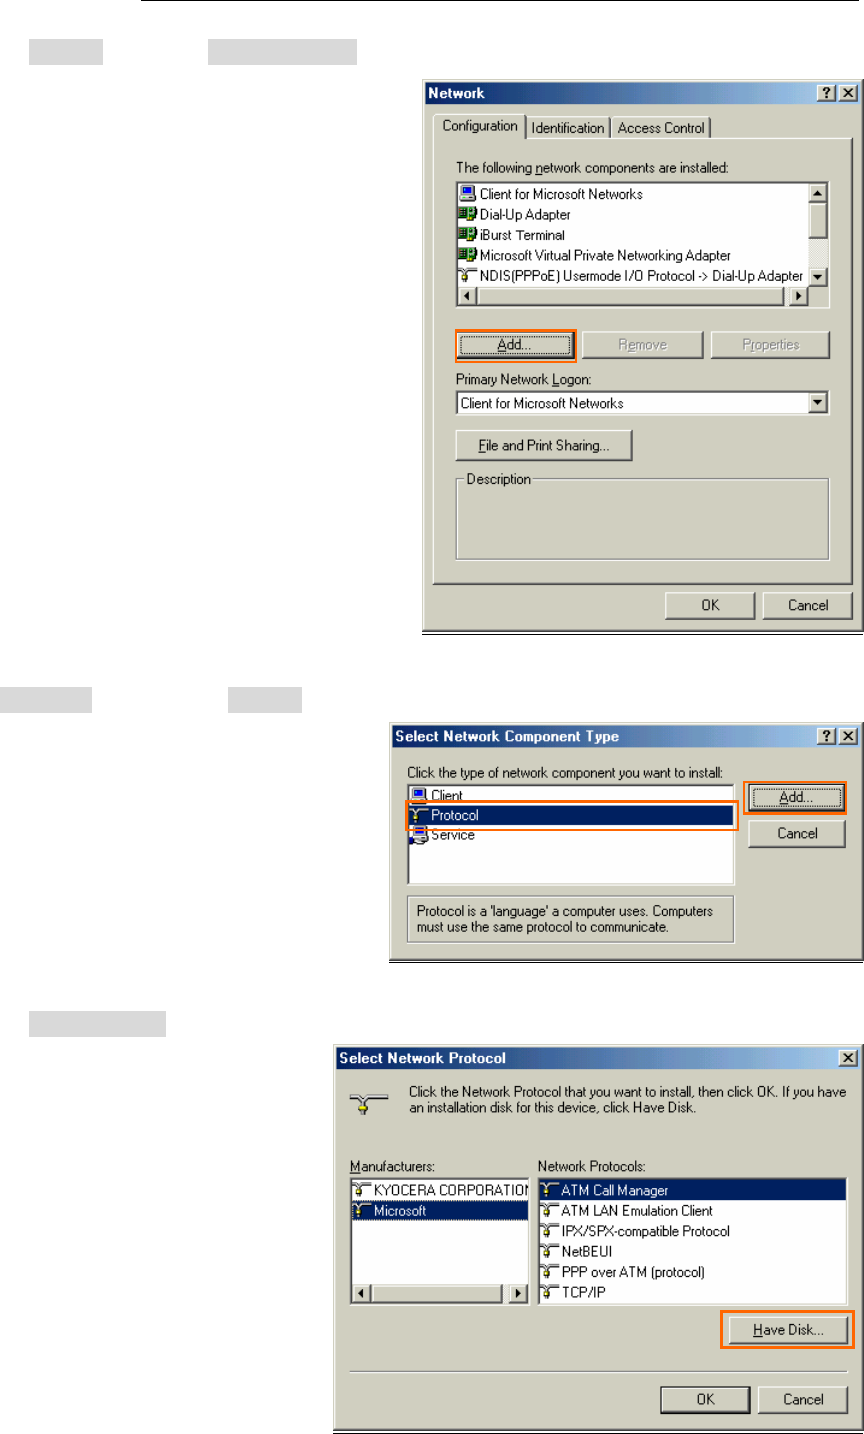
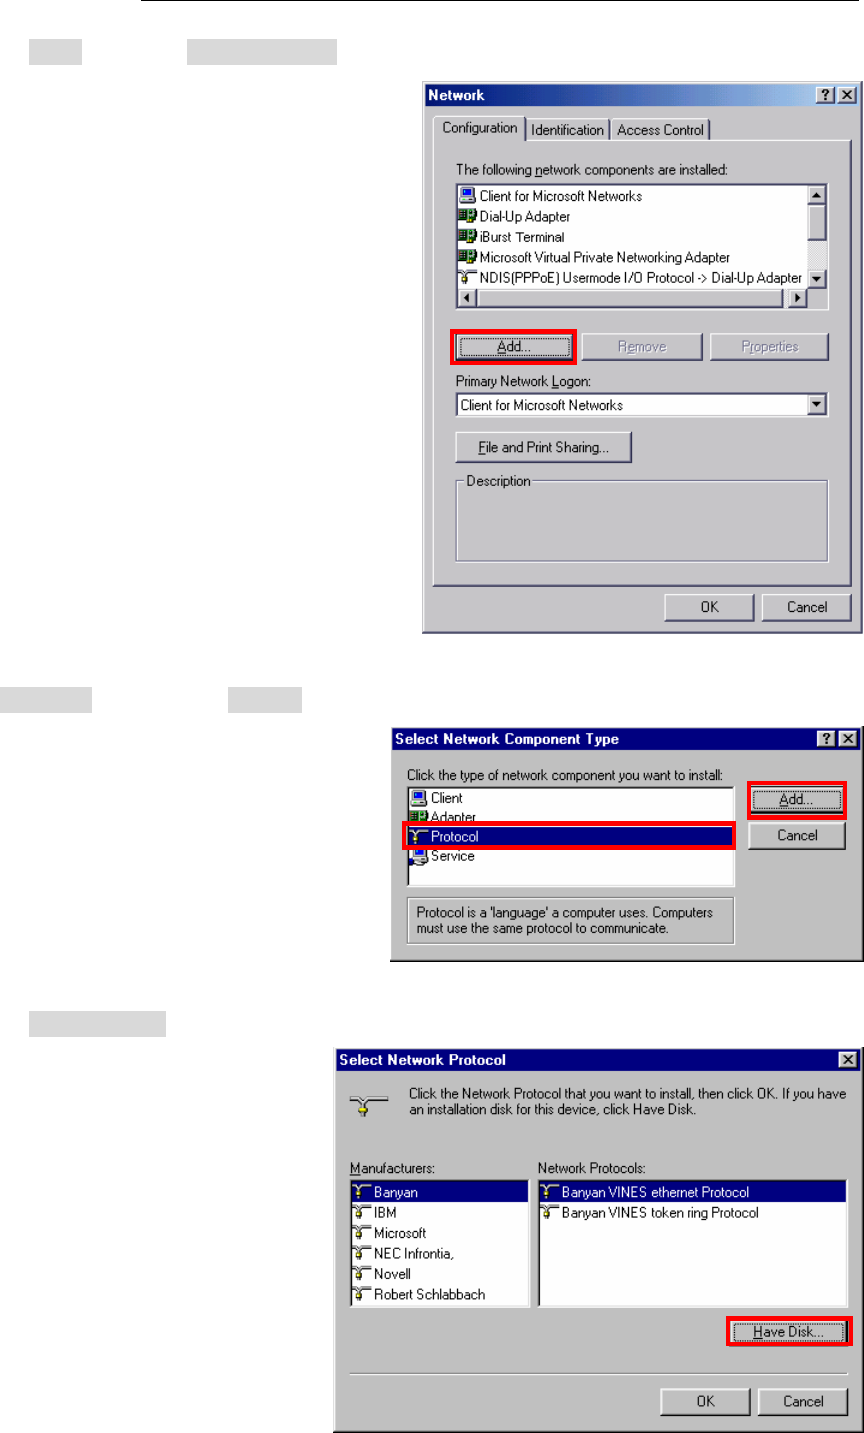
44. Click the [Add…] button on [Configuration] tab.
45. Select [Protocol] and click the [Add…] button.
46. Click the [Have Disk…] button.
iBurst Terminal, Desktop Model (UTD) / USB Model (UTU), Manual
iBurst Terminal, Desktop Model (UTD) / USB Model (UTU), Manual iBurst Terminal, Desktop Model (UTD) / USB Model (UTU), Manual
iBurst Terminal, Desktop Model (UTD) / USB Model (UTU), Manual
Kyocera Corporation Revision 1.01 --- June.08.2006
- 36 -
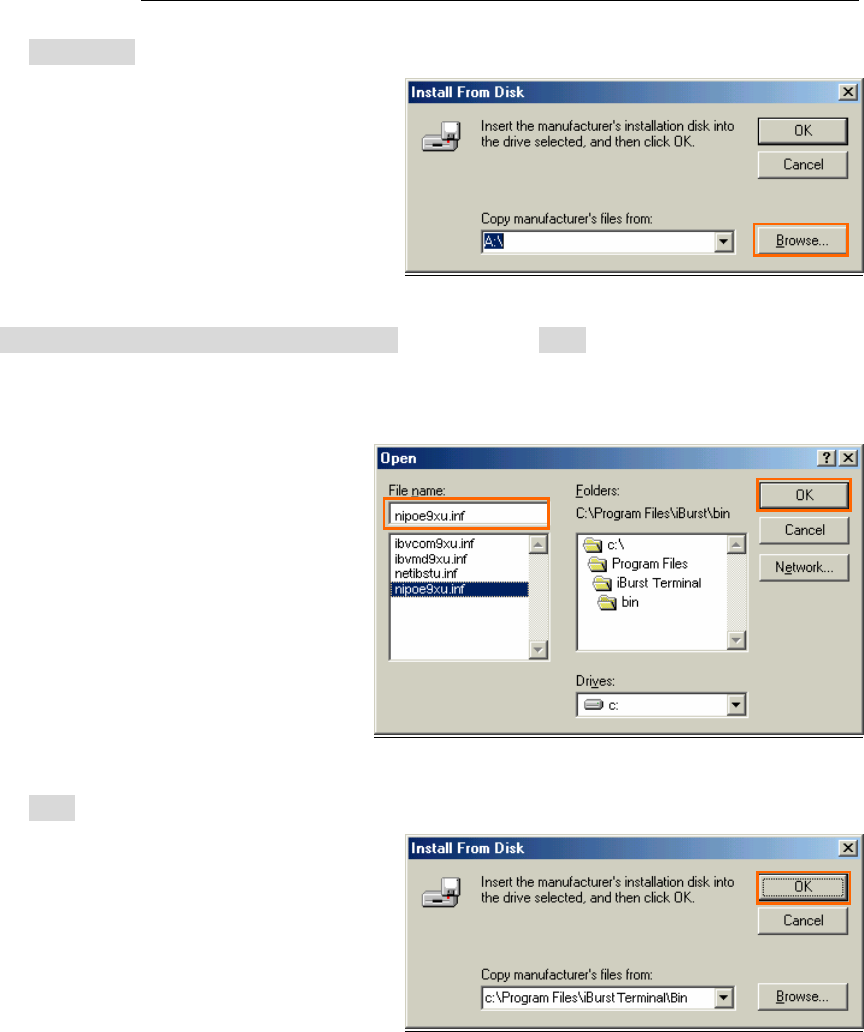
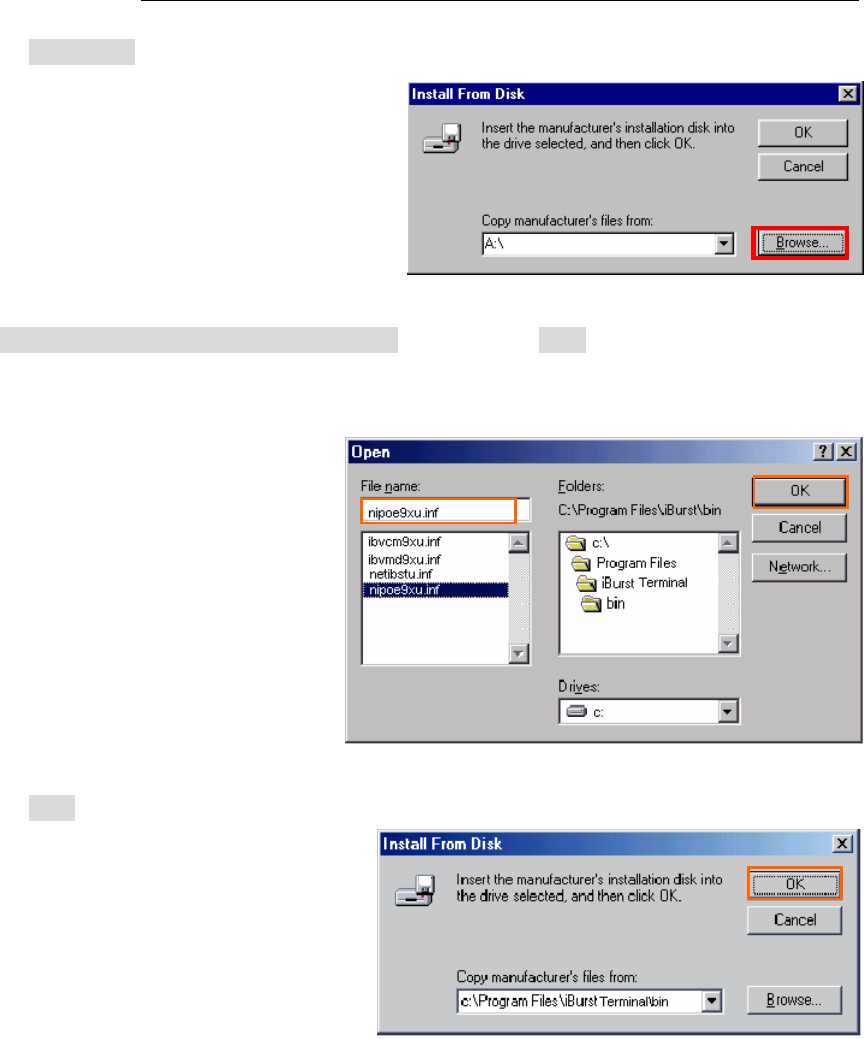
47. Click the [Browse…] button.
48. Select [C:\Program Files\iBurst Terminal\bin], and click the [OK] button.
NOTE: You don’t have to select a file name. Windows will find an appropriate file
automatically.
49. Click the [OK] button.
iBurst Terminal, Desktop Model (UTD) / USB Model (UTU), Manual
iBurst Terminal, Desktop Model (UTD) / USB Model (UTU), Manual iBurst Terminal, Desktop Model (UTD) / USB Model (UTU), Manual
iBurst Terminal, Desktop Model (UTD) / USB Model (UTU), Manual
Kyocera Corporation Revision 1.01 --- June.08.2006
- 37 -
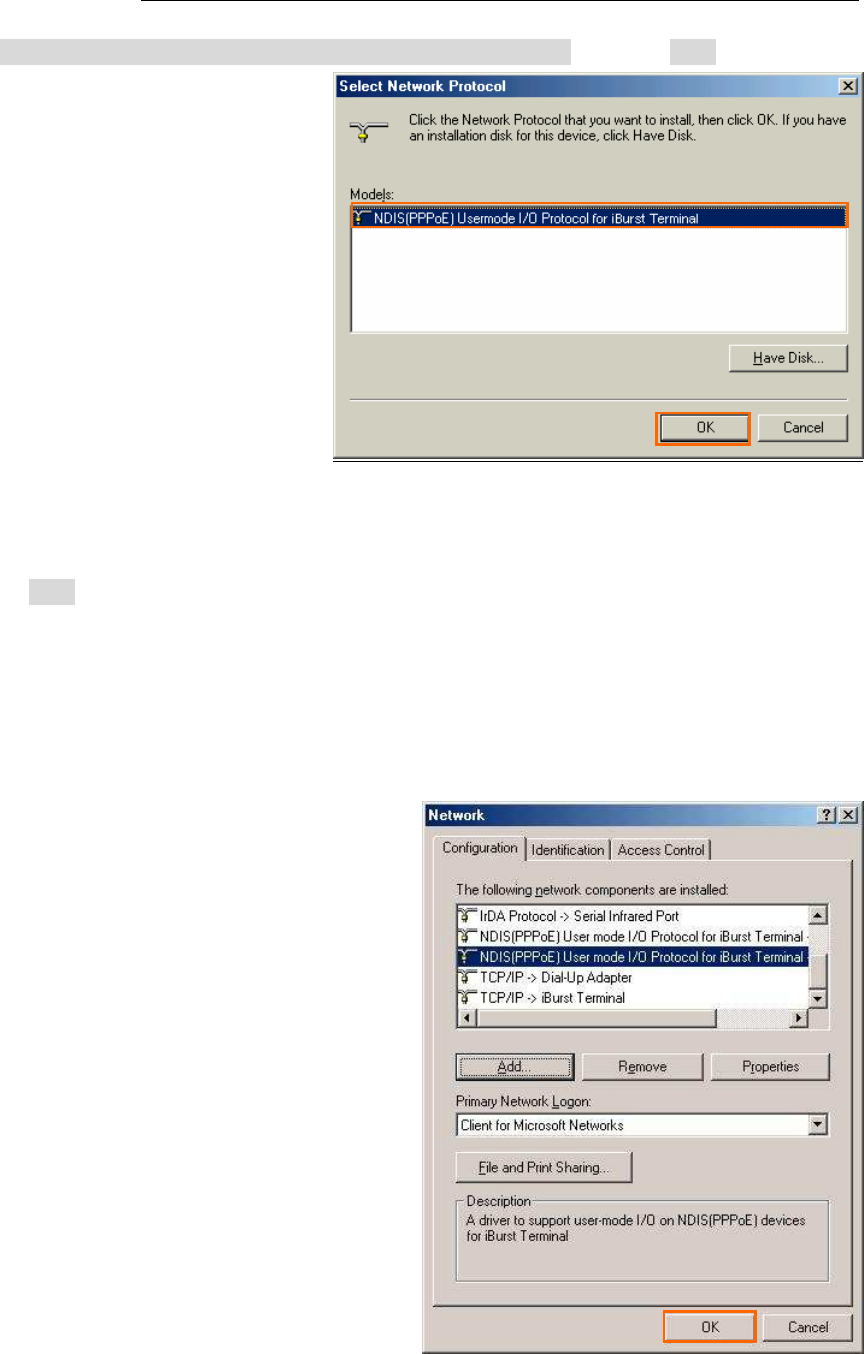
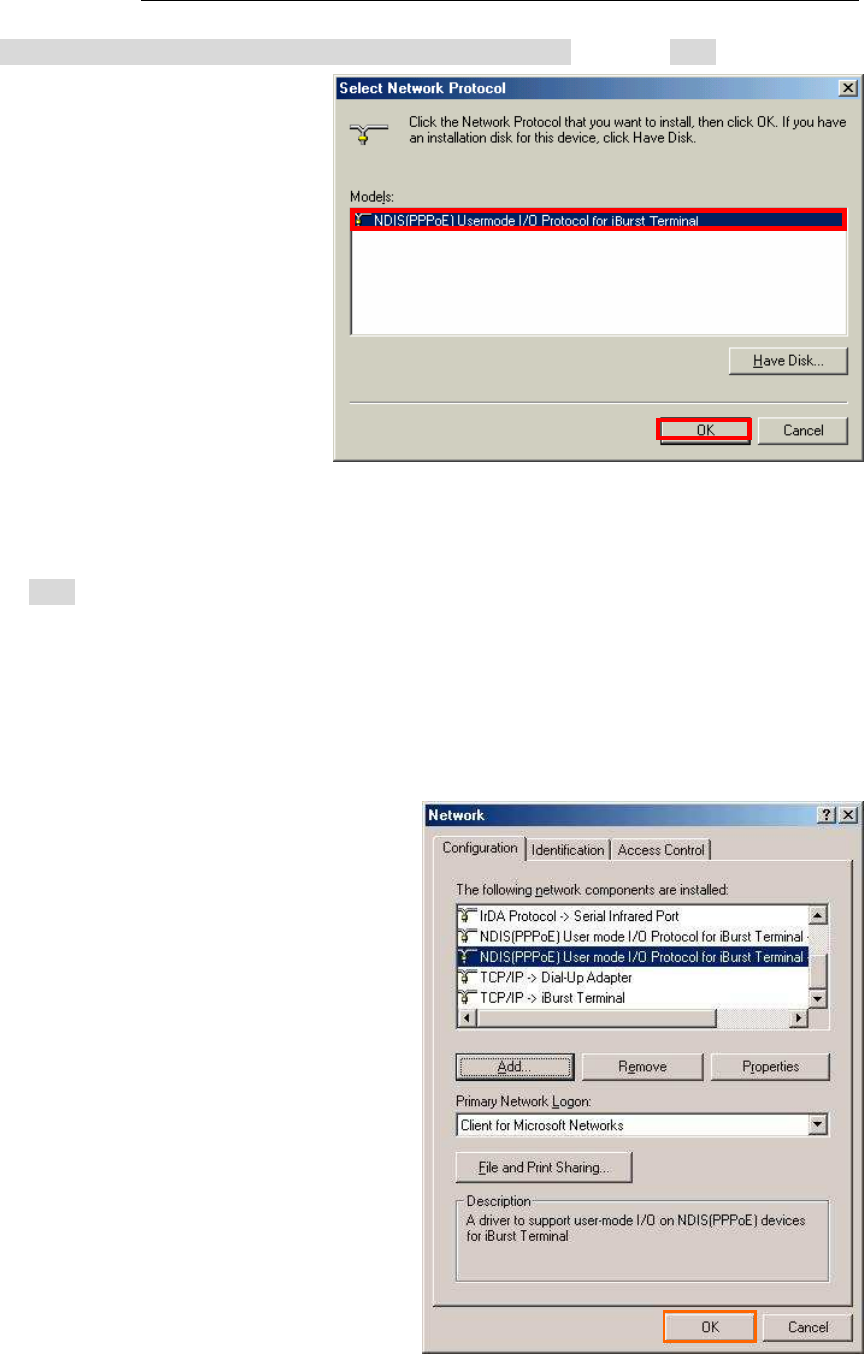
50. Select [NDIS(PPPoE) Usermode I/O Protocol for iBurst Terminal], click the [OK] button.
NOTE: If the same dialog at step 46 is popped up again, cancel once and repeat from step
44.
51. Click the [OK] button.
NOTE: For USB connection with iBurst Terminal, “NDIS(PPPoE) User mode I/O Protocol
for iBurst Terminal -> iBurst Terminal” must be added automatically.
For Ethernet connection with iBurst Terminal, “NDIS(PPPoE) User mode I/O
Protocol for iBurst Terminal -> The name of the Ethernet Network Interface Card
or Port” shall be added automatically.
iBurst Terminal, Desktop Model (UTD) / USB Model (UTU), Manual
iBurst Terminal, Desktop Model (UTD) / USB Model (UTU), Manual iBurst Terminal, Desktop Model (UTD) / USB Model (UTU), Manual
iBurst Terminal, Desktop Model (UTD) / USB Model (UTU), Manual
Kyocera Corporation Revision 1.01 --- June.08.2006
- 38 -
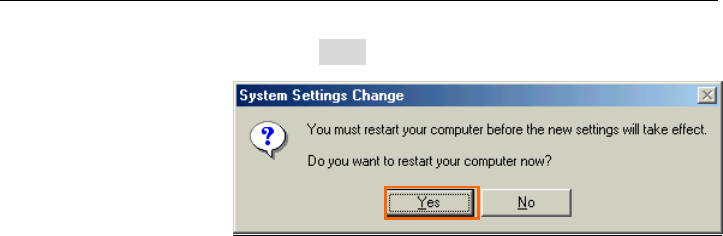
52. The dialog window shown below will appear, click the [Yes] button, and restart your PC.
NOTE: If the PC doesn’t shutdown itself, try to press Alt+Ctrl+Del keys several times.
NOTE: To connect to the Internet, refer to page 67.
iBurst Terminal, Desktop Model (UTD) / USB Model (UTU), Manual
iBurst Terminal, Desktop Model (UTD) / USB Model (UTU), Manual iBurst Terminal, Desktop Model (UTD) / USB Model (UTU), Manual
iBurst Terminal, Desktop Model (UTD) / USB Model (UTU), Manual
Kyocera Corporation Revision 1.01 --- June.08.2006
- 39 -
Installation for Windows 98SE
Installation for Windows 98SEInstallation for Windows 98SE
Installation for Windows 98SE
Since t
Since tSince t
Since the installation disk of WINDOWS 98SE
he installation disk of WINDOWS 98SE he installation disk of WINDOWS 98SE
he installation disk of WINDOWS 98SE may
may may
may b
bb
be
e e
e required while
required while required while
required while driver installation, please
driver installation, please driver installation, please
driver installation, please
prepare
prepare prepare
prepare the CD or copy the
the CD or copy the the CD or copy the
the CD or copy the CD
CDCD
CD
into
into into
into a hard disk in your PC
a hard disk in your PC a hard disk in your PC
a hard disk in your PC for it.
for it.for it.
for it.
1. Make sure to disconnect the iBurst Terminal with your PC.
ATTENTION:
Don
DonDon
Don’
’’
’t connect the iBurst Terminal with your PC through a USB cable until completion of
t connect the iBurst Terminal with your PC through a USB cable until completion of t connect the iBurst Terminal with your PC through a USB cable until completion of
t connect the iBurst Terminal with your PC through a USB cable until completion of
installation.
installation.installation.
installation.
2. Turn your PC on.
3. Insert the Software Utility CD provided by the network operator into your CD-ROM drive; or
execute the appropriate installation software.
4. iBurst Terminal Setup starts. Click the [Next >] button.
5. Select [I accept the terms the license agreement], click the [Next >] button.

iBurst Terminal, Desktop Model (UTD) / USB Model (UTU), Manual
iBurst Terminal, Desktop Model (UTD) / USB Model (UTU), Manual iBurst Terminal, Desktop Model (UTD) / USB Model (UTU), Manual
iBurst Terminal, Desktop Model (UTD) / USB Model (UTU), Manual
Kyocera Corporation Revision 1.01 --- June.08.2006
- 40 -
6. Click the [Next >] button after appearing dialog window as shown below.
NOTE: To install to a different folder, click [Browse…] and specify another folder.
7. Click the [Next >] button.
8. The following dialog window will appear, and installation of software begins.
iBurst Terminal, Desktop Model (UTD) / USB Model (UTU), Manual
iBurst Terminal, Desktop Model (UTD) / USB Model (UTU), Manual iBurst Terminal, Desktop Model (UTD) / USB Model (UTU), Manual
iBurst Terminal, Desktop Model (UTD) / USB Model (UTU), Manual
Kyocera Corporation Revision 1.01 --- June.08.2006
- 41 -
9. Click the [Finish] button.
10. Click the [OK] button.
NOTE: Refer to the 1st article in chapter 6, if you face such symptom described in the
attention message.
NOTE:
If you are going to connect the iBurst Terminal with your PC only through an Ethernet cable, not
through a USB cable, you can skip from hear to step 19 and continue from step 20 in this section.
You can see indications of the iBurst Terminal over Ethernet. See page 87 for the method.
11. Connect the iBurst Terminal with your PC through a USB cable.
Windows will detect the iBurst Terminal as a new hardware so that [Add New Hardware
Wizard] will begin.
iBurst Terminal, Desktop Model (UTD) / USB Model (UTU), Manual
iBurst Terminal, Desktop Model (UTD) / USB Model (UTU), Manual iBurst Terminal, Desktop Model (UTD) / USB Model (UTU), Manual
iBurst Terminal, Desktop Model (UTD) / USB Model (UTU), Manual
Kyocera Corporation Revision 1.01 --- June.08.2006
- 42 -
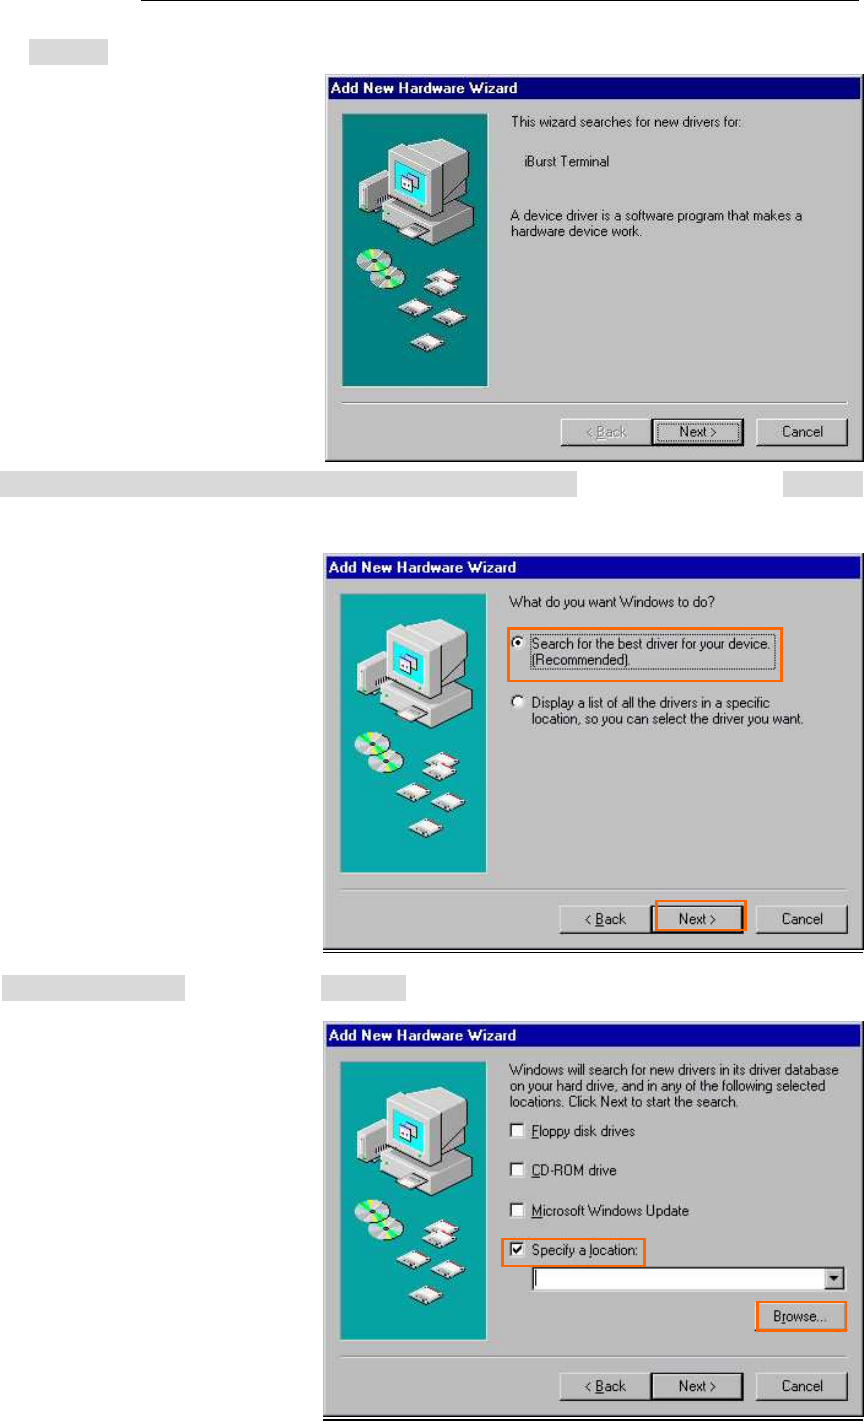
12. Click the [Next >] button in the dialog window.
13. Select [Search for the best driver for your device.(Recommended)], and then check the [Next >]
button.
14. Check [Specify a location] and click the [Browse] button.
iBurst Terminal, Desktop Model (UTD) / USB Model (UTU), Manual
iBurst Terminal, Desktop Model (UTD) / USB Model (UTU), Manual iBurst Terminal, Desktop Model (UTD) / USB Model (UTU), Manual
iBurst Terminal, Desktop Model (UTD) / USB Model (UTU), Manual
Kyocera Corporation Revision 1.01 --- June.08.2006
- 43 -
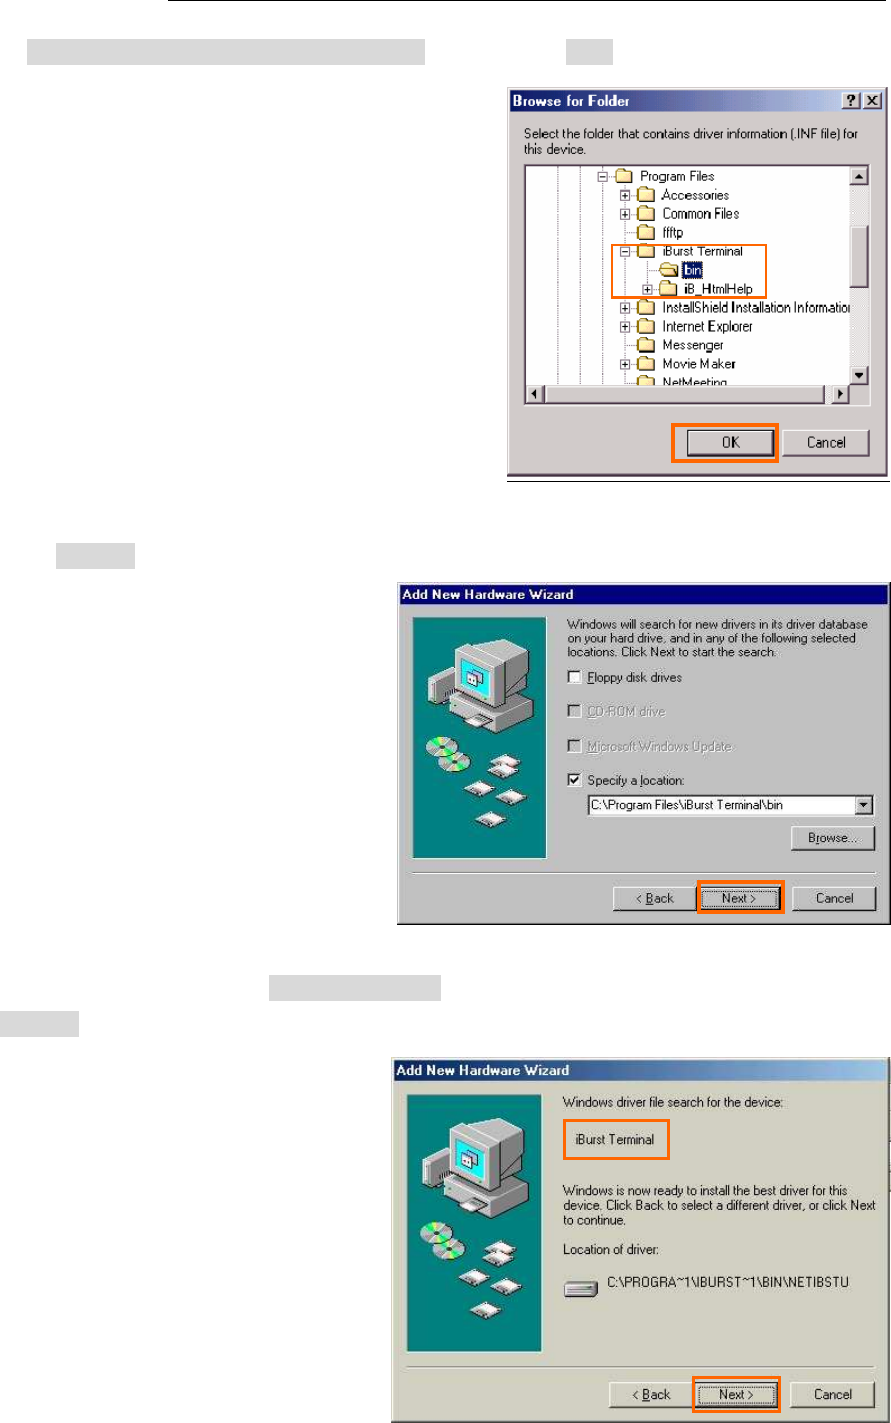
15. Select [C:\Program Files\iBurst Terminal\bin], and click the [OK] button.
16. Click the [Next >] button.
17. Confirm that the device name [iBurst Terminal] is displayed in the dialog window, then click
the [Next >] button.
iBurst Terminal, Desktop Model (UTD) / USB Model (UTU), Manual
iBurst Terminal, Desktop Model (UTD) / USB Model (UTU), Manual iBurst Terminal, Desktop Model (UTD) / USB Model (UTU), Manual
iBurst Terminal, Desktop Model (UTD) / USB Model (UTU), Manual
Kyocera Corporation Revision 1.01 --- June.08.2006
- 44 -
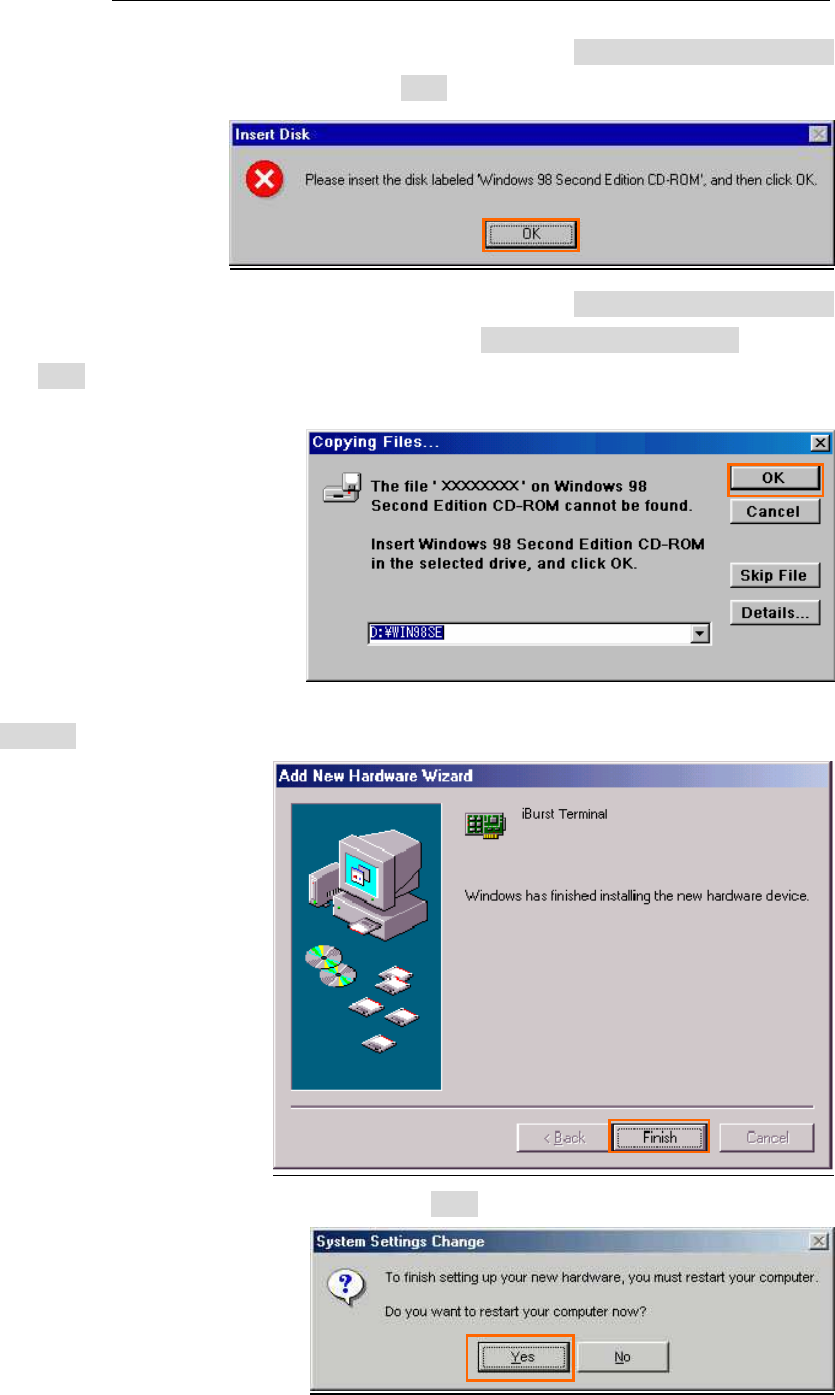
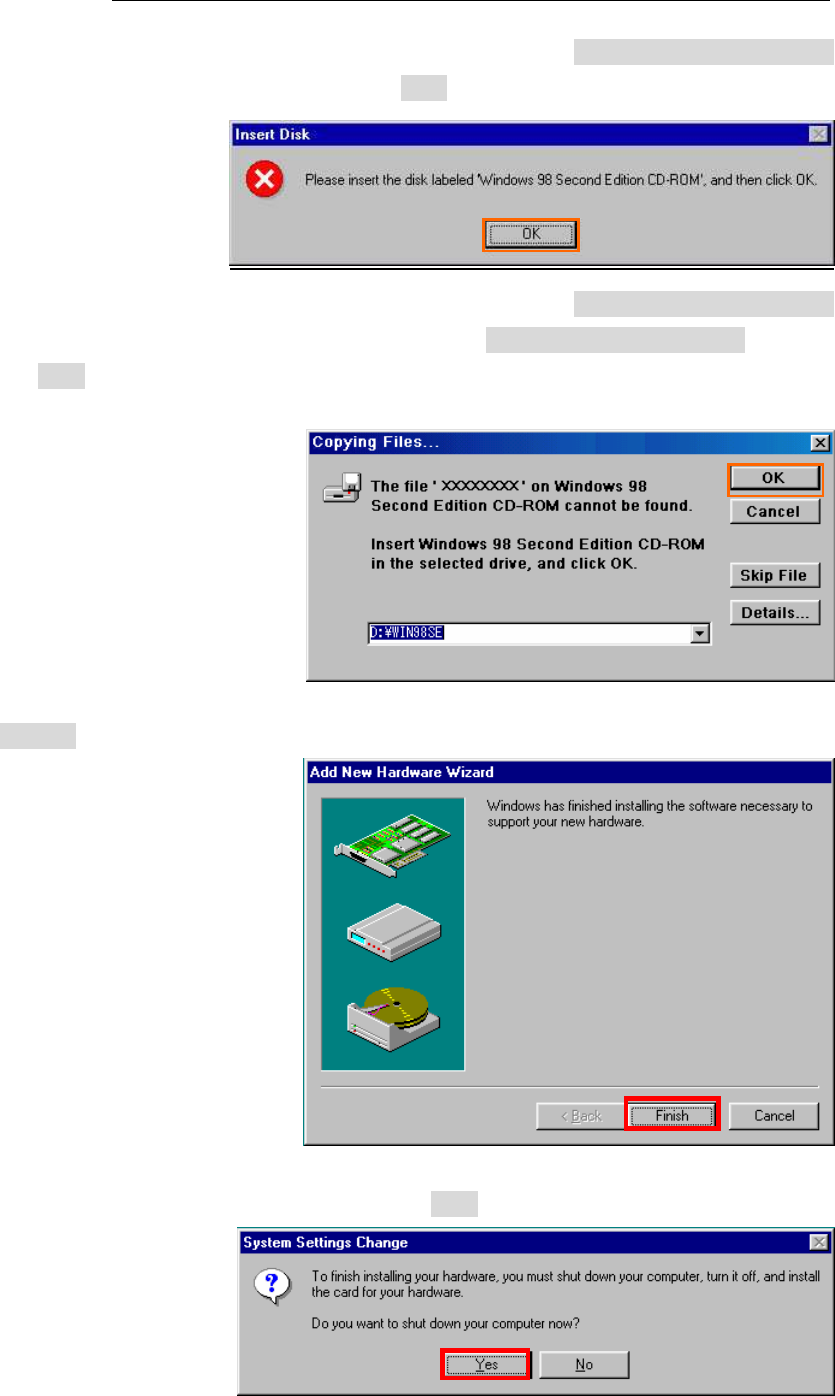
NOTE: If the dialog window as shown below appears, insert [Windows 98SE CD-ROM]
into the CD-ROM drive and click the [OK] button.
NOTE: If the dialog window as shown below appears, insert [Windows 98SE CD-ROM]
into your PC and enter the directory of your [Windows 98SE CD-ROM], click the
[OK] button. “xxxxxxxx“ in the picture below is a file name that can not be
found.
18. Click the [Finish] button.
19. The dialog window shown below will appear, click the [Yes] button, and restart your PC.
NOTE: If the PC doesn’t shutdown itself, try to press Alt+Ctrl+Del keys several times.
iBurst Terminal, Desktop Model (UTD) / USB Model (UTU), Manual
iBurst Terminal, Desktop Model (UTD) / USB Model (UTU), Manual iBurst Terminal, Desktop Model (UTD) / USB Model (UTU), Manual
iBurst Terminal, Desktop Model (UTD) / USB Model (UTU), Manual
Kyocera Corporation Revision 1.01 --- June.08.2006
- 45 -
20. Click the [Start] -> [Settings] -> [Control Panel] to open Control Panel as shown below, and
then double click [Add New Hardware].
21. Click the [Next >] button.
22. Click the [Next >] button.
iBurst Terminal, Desktop Model (UTD) / USB Model (UTU), Manual
iBurst Terminal, Desktop Model (UTD) / USB Model (UTU), Manual iBurst Terminal, Desktop Model (UTD) / USB Model (UTU), Manual
iBurst Terminal, Desktop Model (UTD) / USB Model (UTU), Manual
Kyocera Corporation Revision 1.01 --- June.08.2006
- 46 -
NOTE: If the dialog window as shown below appears, select [No, the device isn’t in the
list] and click the [Next >] button.
23. Select [No, I want to select the hardware from a list.], and click the [Next >] button.
24. Select [Ports (COM & LPT]], and click the [Next >] button.
iBurst Terminal, Desktop Model (UTD) / USB Model (UTU), Manual
iBurst Terminal, Desktop Model (UTD) / USB Model (UTU), Manual iBurst Terminal, Desktop Model (UTD) / USB Model (UTU), Manual
iBurst Terminal, Desktop Model (UTD) / USB Model (UTU), Manual
Kyocera Corporation Revision 1.01 --- June.08.2006
- 47 -
25. Click the [Have Disk..] button.
26. Click the [Browse…] button.
27. Select [C:\Program Files\iBurst Terminal\bin], and click the [OK] button.
NOTE: You don’t have to select a file name. Windows will find an appropriate file
automatically.
iBurst Terminal, Desktop Model (UTD) / USB Model (UTU), Manual
iBurst Terminal, Desktop Model (UTD) / USB Model (UTU), Manual iBurst Terminal, Desktop Model (UTD) / USB Model (UTU), Manual
iBurst Terminal, Desktop Model (UTD) / USB Model (UTU), Manual
Kyocera Corporation Revision 1.01 --- June.08.2006
- 48 -
28. Click the [OK] button.
29. Select [iBurst Terminal Virtual COM Port], and click the [Next >] button.
30. Click the [Next >] button.
iBurst Terminal, Desktop Model (UTD) / USB Model (UTU), Manual
iBurst Terminal, Desktop Model (UTD) / USB Model (UTU), Manual iBurst Terminal, Desktop Model (UTD) / USB Model (UTU), Manual
iBurst Terminal, Desktop Model (UTD) / USB Model (UTU), Manual
Kyocera Corporation Revision 1.01 --- June.08.2006
- 49 -
NOTE: If the dialog window as shown below appears, insert [Windows 98SE CD-ROM]
into the CD-ROM drive and click the [OK] button.
NOTE: If the dialog window as shown below appears, insert [Windows 98SE CD-ROM]
into your PC and enter the directory of your [Windows 98SE CD-ROM],click the
[OK] button. “xxxxxxxx“ in the picture below is a file name that can not be
found.
31. Click the [Finish] button.
32. The dialog window shown below will appear, click the [Yes] button to SHUTDOWN
SHUTDOWNSHUTDOWN
SHUTDOWN your PC.
NOTE: If the PC doesn’t shutdown itself, try to press Alt+Ctrl+Del keys several times.
iBurst Terminal, Desktop Model (UTD) / USB Model (UTU), Manual
iBurst Terminal, Desktop Model (UTD) / USB Model (UTU), Manual iBurst Terminal, Desktop Model (UTD) / USB Model (UTU), Manual
iBurst Terminal, Desktop Model (UTD) / USB Model (UTU), Manual
Kyocera Corporation Revision 1.01 --- June.08.2006
- 50 -
33. Turn your PC on again.
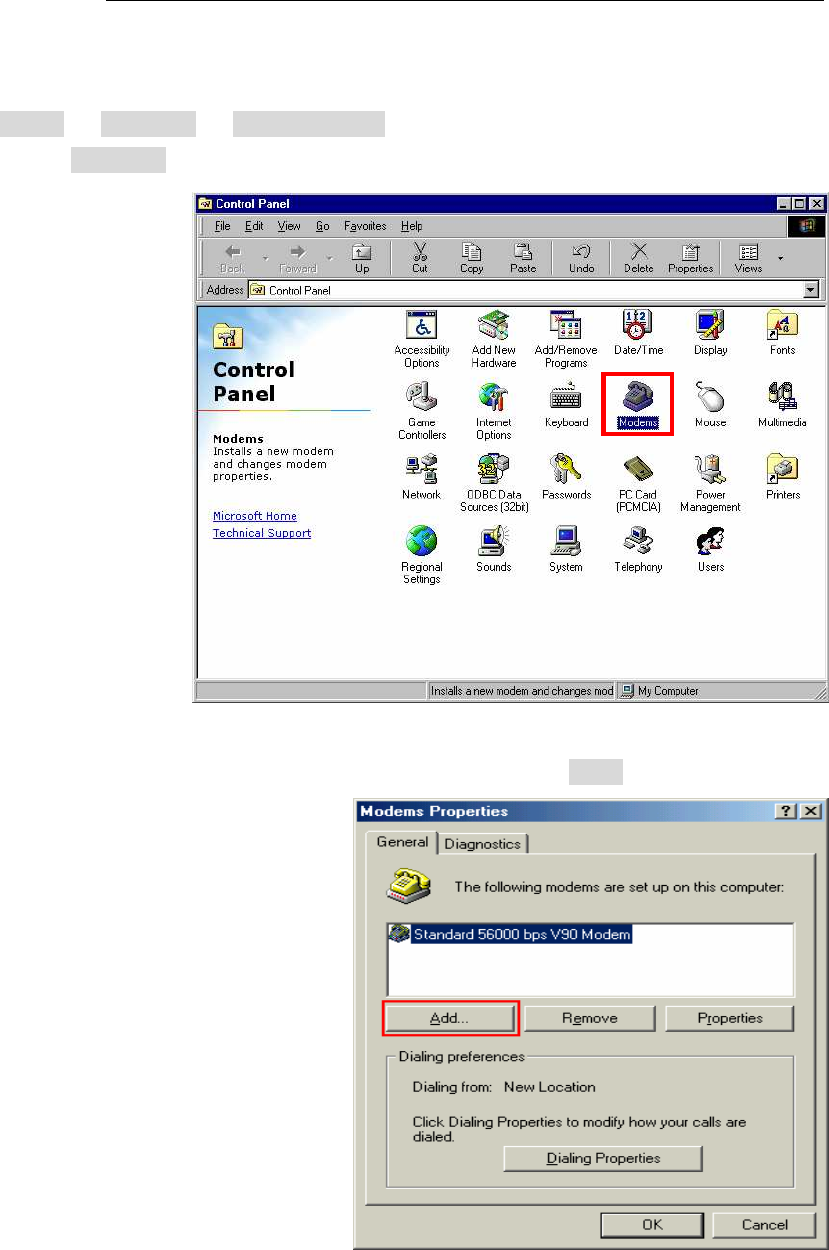
34. Click the [Start] -> [Settings] -> [Control Panel] to open Control Panel as shown below, and
then double click [Modems].
NOTE: If the dialog window as shown below appears, click the [Add] button.
iBurst Terminal, Desktop Model (UTD) / USB Model (UTU), Manual
iBurst Terminal, Desktop Model (UTD) / USB Model (UTU), Manual iBurst Terminal, Desktop Model (UTD) / USB Model (UTU), Manual
iBurst Terminal, Desktop Model (UTD) / USB Model (UTU), Manual
Kyocera Corporation Revision 1.01 --- June.08.2006
- 51 -
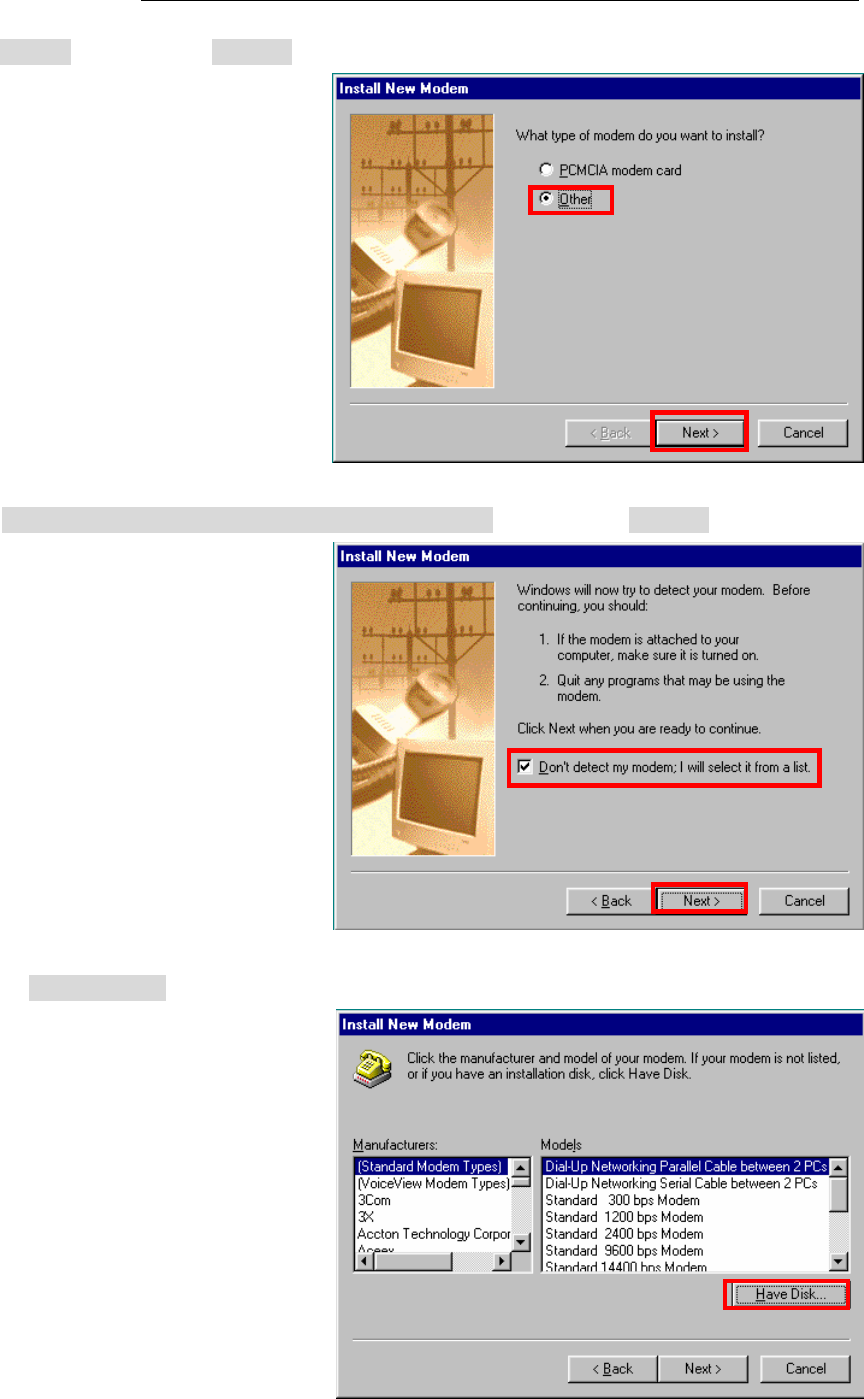
35. Select [Other], and click the [Next >] button.
36. Check [Don’t detect my modem, I will select it from a list] and click the [Next >] button.
37. Click the [Have Disk…] button.
iBurst Terminal, Desktop Model (UTD) / USB Model (UTU), Manual
iBurst Terminal, Desktop Model (UTD) / USB Model (UTU), Manual iBurst Terminal, Desktop Model (UTD) / USB Model (UTU), Manual
iBurst Terminal, Desktop Model (UTD) / USB Model (UTU), Manual
Kyocera Corporation Revision 1.01 --- June.08.2006
- 52 -
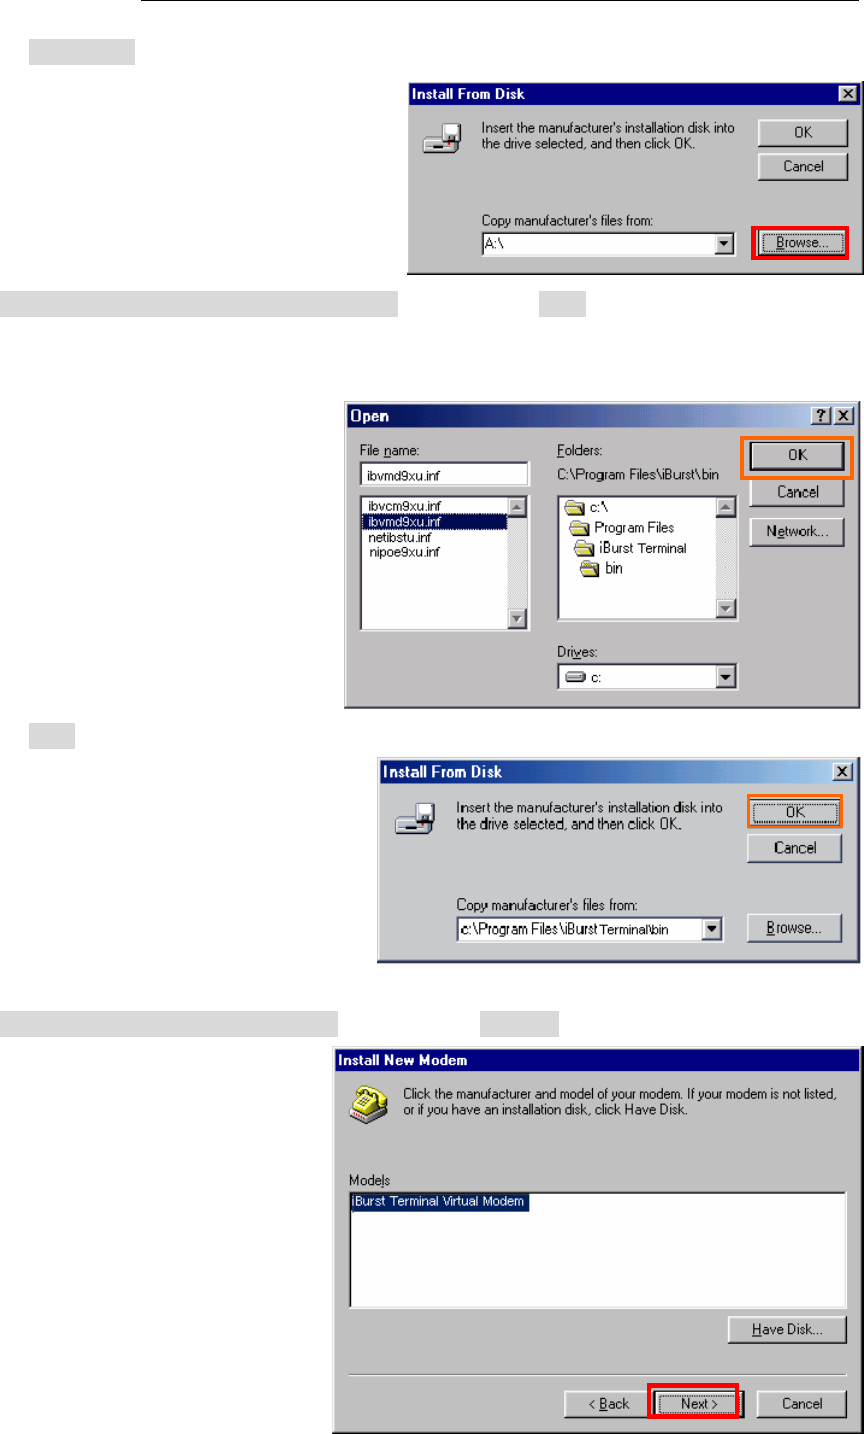
38. Click the [Browse…] button.
39. Select [C:\Program Files\iBurst Terminal\bin], and click the [OK] button.
NOTE: You don’t have to select a file name. Windows will find an appropriate file
automatically.
40. Click the [OK] button.
41. Select [iBurst Terminal Virtual MODEM], and click the [Next >] button.
iBurst Terminal, Desktop Model (UTD) / USB Model (UTU), Manual
iBurst Terminal, Desktop Model (UTD) / USB Model (UTU), Manual iBurst Terminal, Desktop Model (UTD) / USB Model (UTU), Manual
iBurst Terminal, Desktop Model (UTD) / USB Model (UTU), Manual
Kyocera Corporation Revision 1.01 --- June.08.2006
- 53 -
42. Select [iBurst Terminal Virtual COM Port (COM X)], and click the [Next >] button.
NOTE: The ‘X’ in “COM X” above is a COM port number assigned automatically.
NOTE: If the dialog window as shown below appears, type a dummy number in “What
are (or city) code are you in now ?” and then click the [Next >] button.
43. Click the [Finish] button.
iBurst Terminal, Desktop Model (UTD) / USB Model (UTU), Manual
iBurst Terminal, Desktop Model (UTD) / USB Model (UTU), Manual iBurst Terminal, Desktop Model (UTD) / USB Model (UTU), Manual
iBurst Terminal, Desktop Model (UTD) / USB Model (UTU), Manual
Kyocera Corporation Revision 1.01 --- June.08.2006
- 54 -
44. Click the [OK] button.
45. Click the [Start] -> [Settings] -> [Control Panel] to open Control Panel as shown below, and
then double click [Network].
iBurst Terminal, Desktop Model (UTD) / USB Model (UTU), Manual
iBurst Terminal, Desktop Model (UTD) / USB Model (UTU), Manual iBurst Terminal, Desktop Model (UTD) / USB Model (UTU), Manual
iBurst Terminal, Desktop Model (UTD) / USB Model (UTU), Manual
Kyocera Corporation Revision 1.01 --- June.08.2006
- 55 -
46. Click the [Add] button on [Configuration] tab.
47. Select [Protocol] and click the [Add…] button.
48. Click the [Have Disk…] button.
iBurst Terminal, Desktop Model (UTD) / USB Model (UTU), Manual
iBurst Terminal, Desktop Model (UTD) / USB Model (UTU), Manual iBurst Terminal, Desktop Model (UTD) / USB Model (UTU), Manual
iBurst Terminal, Desktop Model (UTD) / USB Model (UTU), Manual
Kyocera Corporation Revision 1.01 --- June.08.2006
- 56 -
49. Click the [Browse…] button.
50. Select [C:\Program Files\iBurst Terminal\bin], and click the [OK] button.
NOTE: You don’t have to select a file name. Windows will find an appropriate file
automatically.
51. Click the [OK] button.
iBurst Terminal, Desktop Model (UTD) / USB Model (UTU), Manual
iBurst Terminal, Desktop Model (UTD) / USB Model (UTU), Manual iBurst Terminal, Desktop Model (UTD) / USB Model (UTU), Manual
iBurst Terminal, Desktop Model (UTD) / USB Model (UTU), Manual
Kyocera Corporation Revision 1.01 --- June.08.2006
- 57 -
52. Select [NDIS(PPPoE) Usermode I/O Protocol for iBurst Terminal], click the [OK] button.
NOTE: If the same dialog at step 47 is popped up again, cancel once and repeat from step
45.
53. Click the [OK] button.
NOTE: For USB connection with iBurst Terminal, “NDIS(PPPoE) User mode I/O Protocol
for iBurst Terminal -> iBurst Terminal” must be added in this stage.
For Ethernet connection with iBurst Terminal, “NDIS(PPPoE) User mode I/O
Protocol for iBurst Terminal -> The name of the Ethernet Network Interface Card
or Port” shall be added in this stage.
iBurst Terminal, Desktop Model (UTD) / USB Model (UTU), Manual
iBurst Terminal, Desktop Model (UTD) / USB Model (UTU), Manual iBurst Terminal, Desktop Model (UTD) / USB Model (UTU), Manual
iBurst Terminal, Desktop Model (UTD) / USB Model (UTU), Manual
Kyocera Corporation Revision 1.01 --- June.08.2006
- 58 -
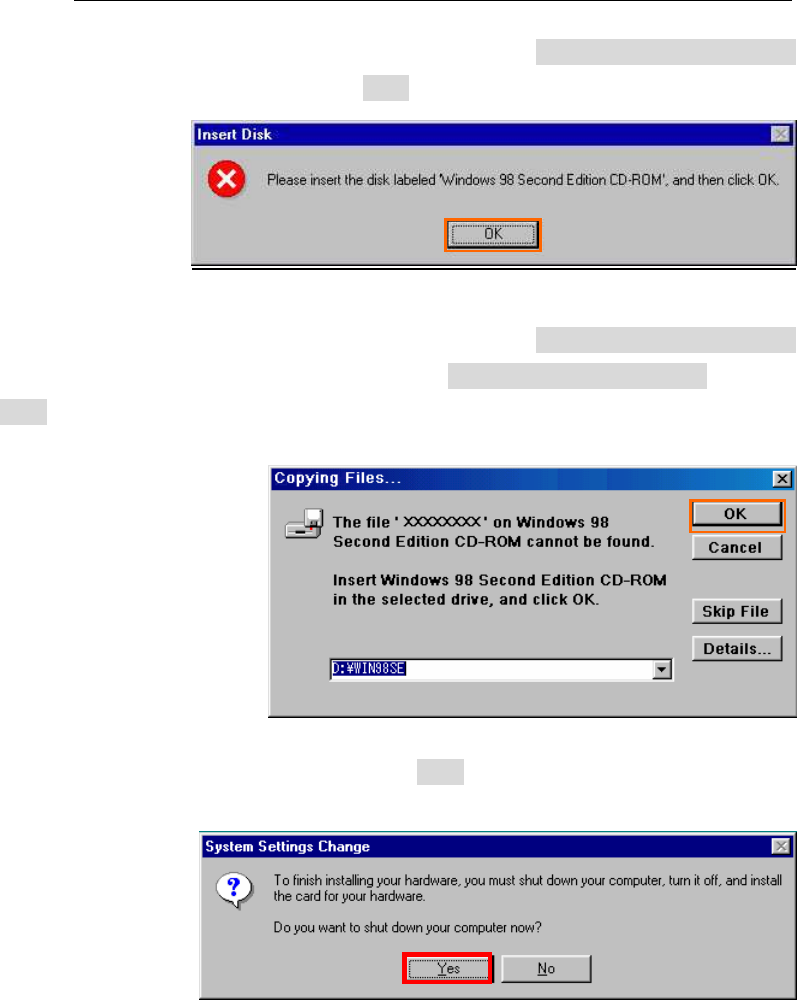
NOTE: If the dialog window as shown below appears, insert [Windows 98SE CD-ROM]
into the CD-ROM drive and click the [OK] button.
NOTE: If the dialog window as shown below appears, insert [Windows 98SE CD-ROM]
into your PC and enter the directory of your [Windows 98SE CD-ROM],click the
[OK] button. “xxxxxxxx“ in the picture below is a file name that can not be
found.
54. The dialog window shown below will appear, click the [Yes] button, and shut down your PC,
then turn on your PC again.
NOTE: If the PC doesn’t shutdown itself, try to press Alt+Ctrl+Del keys several times.
NOTE: To connect to the Internet, refer to page 67.
iBurst Terminal, Desktop Model (UTD) / USB Model (UTU), Manual
iBurst Terminal, Desktop Model (UTD) / USB Model (UTU), Manual iBurst Terminal, Desktop Model (UTD) / USB Model (UTU), Manual
iBurst Terminal, Desktop Model (UTD) / USB Model (UTU), Manual
Kyocera Corporation Revision 1.01 --- June.08.2006
- 59 -
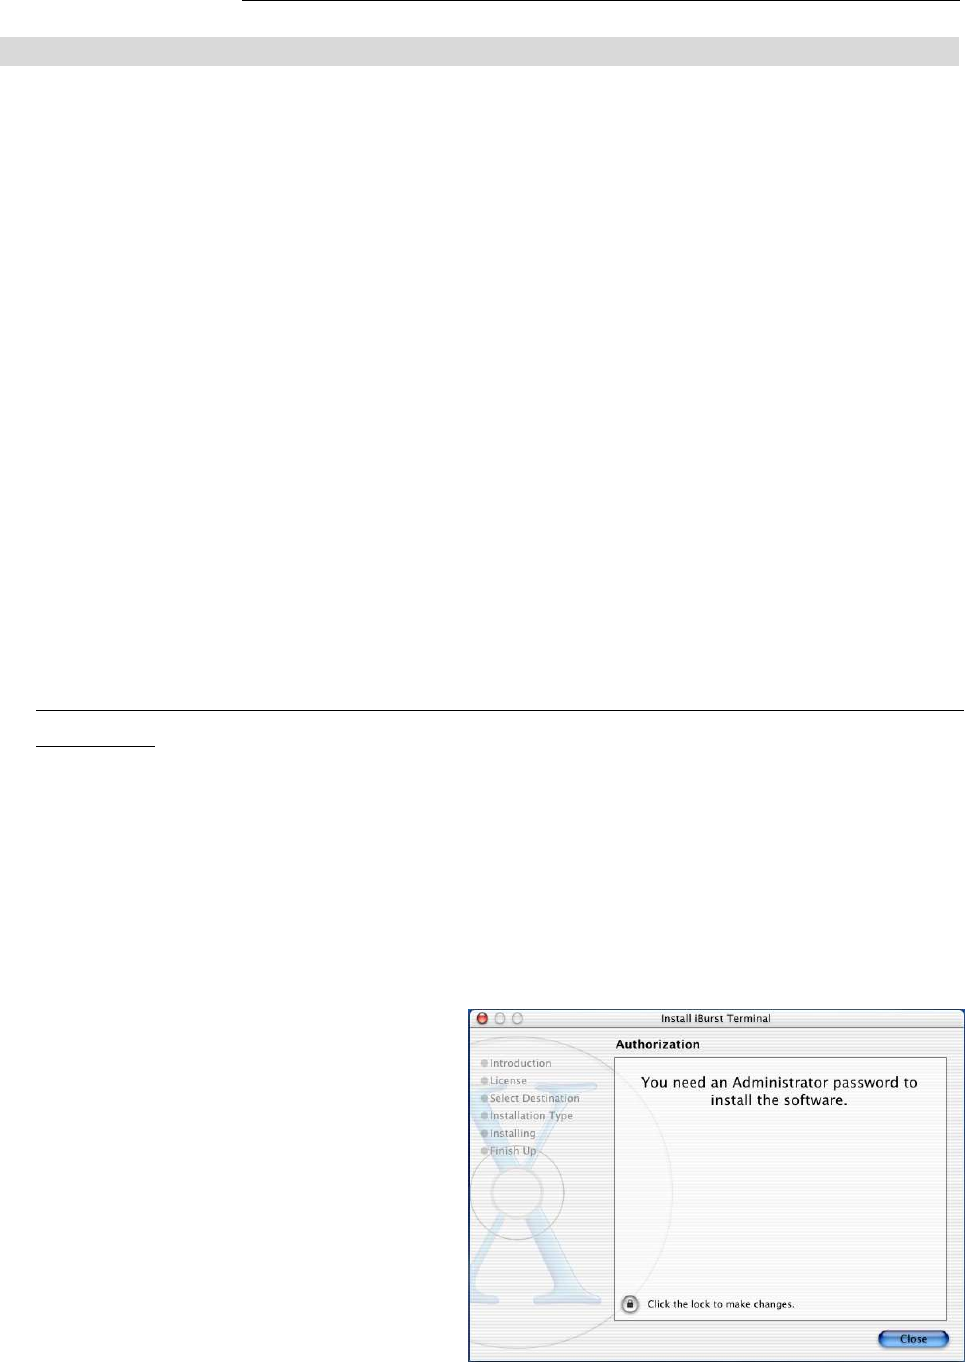
Installation for Mac OS X
Installation for Mac OS XInstallation for Mac OS X
Installation for Mac OS X
NOTE:
If you are going to connect the iBurst Terminal with your PC only through an Ethernet cable, not
through a USB cable, you don’t need to install/uninstall any iBurst software. In such case, you
can skip this section and you need only to create a dial-up connection setting described at from
page 69. Please note that you cannot utilize the iBurst utility software described in chapter 3.
NOTE:
The installation software are applied to Mac OS X 10.1.5/10.2/10.3/10.4 except Mac Intel models.
Make sure OS version on your PC and a corresponding installation software package for iBurst
Terminal.
NOTE:
All screen copies in this section are based on Mac OS X 10.1.5.
1. Make sure to disconnect the iBurst Terminal with your PC.
ATTENTION:
Don
DonDon
Don’
’’
’t connect the iBurst Terminal with your PC through a USB cable until completion of
t connect the iBurst Terminal with your PC through a USB cable until completion of t connect the iBurst Terminal with your PC through a USB cable until completion of
t connect the iBurst Terminal with your PC through a USB cable until completion of
installation.
installation.installation.
installation.
2. Turn your PC on and login as an administrative user.
3. Insert the Software Utility CD provided by the network operator into your CD-ROM drive; or
execute the appropriate installation software.
NOTE: If the window shown below appears, click “Click the lock to make changes”.
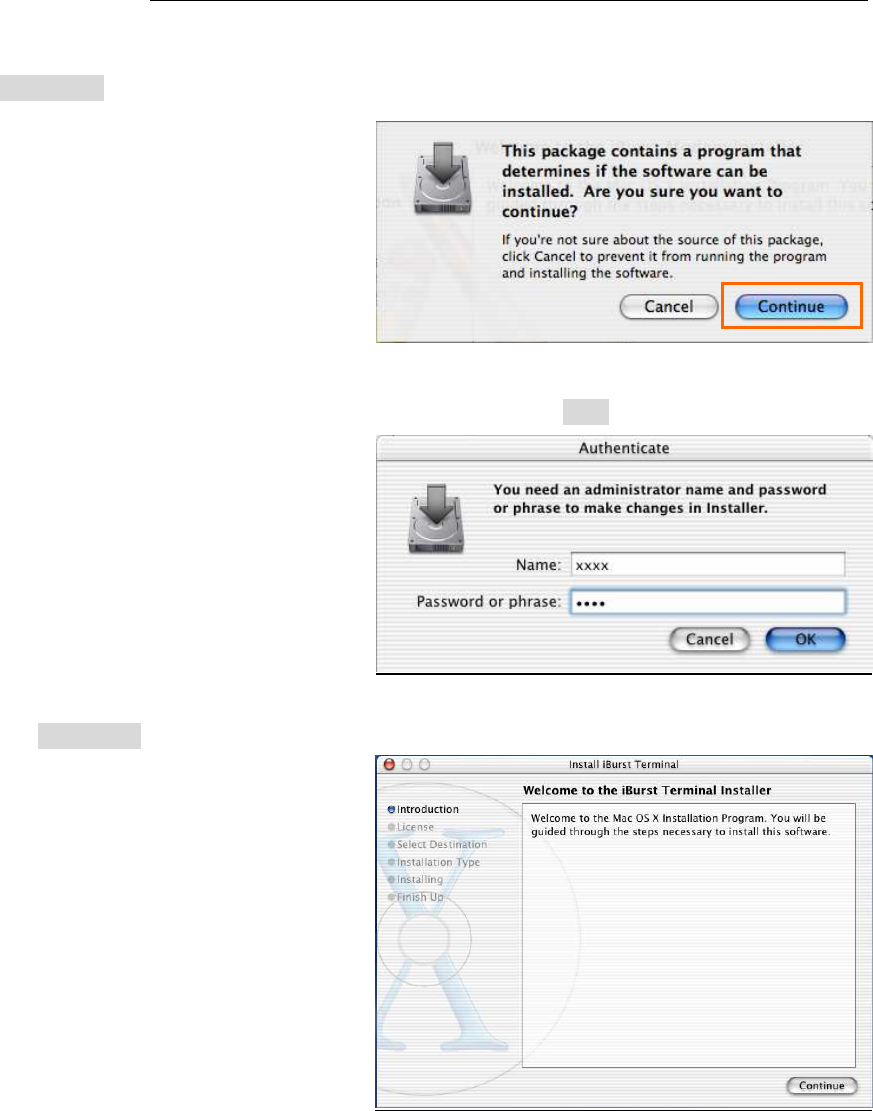
iBurst Terminal, Desktop Model (UTD) / USB Model (UTU), Manual
iBurst Terminal, Desktop Model (UTD) / USB Model (UTU), Manual iBurst Terminal, Desktop Model (UTD) / USB Model (UTU), Manual
iBurst Terminal, Desktop Model (UTD) / USB Model (UTU), Manual
Kyocera Corporation Revision 1.01 --- June.08.2006
- 60 -
4. In case of version 10.3 or later, the confirmation message shown below will appear.
Click [Continue] button.
5. In case of version 10.2 or older, “Authenticate” dialog will appear.
Enter an administrator name and password, and then click the [OK] button.
6. Click the [Continue] button.