Kyocera KWC-KX444 Trimode phone User Manual 82 K5713 1EN X2
Kyocera Communications, Inc Trimode phone 82 K5713 1EN X2
UserManual.wiki
>
Kyocera
>
KWC KX444 User Manual
user guide
Navigation menu
Upload a User Manual
Namespaces
Wiki Guide
HTML
PDF
Info
Views
User Manual
Discussion / Help
Navigation

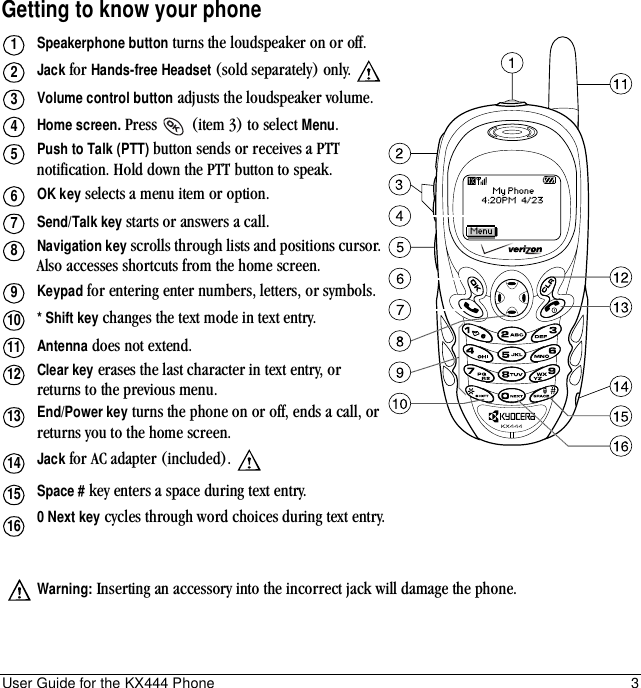


![16 Making and Answering CallsDraftto voicemail, even if your phone is in use or turned off.1. From the home screen, enter .2. Press to interrupt the notification.3. Follow the system prompts to create a password and record a greeting.Note: If you are having trouble accessing your voicemail, contact your service provider.Checking voicemail messagesWhen a voice message is received, your screen will display a notification: “New Message [x] Voicemail.” This text will remain for about five minutes. After that, look for the symbol at the top of your screen. The symbol flashes if the message is urgent. If you see “New Message” on your screen1. Press to select Call. This initiates a call to your voicemail number.2. Follow the prompts to retrieve the message.If you see the symbol1. Press to initiate a call to your voicemail number.2. Follow the prompts to retrieve the message.Note: You can set the phone to beep, light up, or play a tune every five minutes to remind you that you have voicemail.Locking the keypadThe Keyguard locks your keypad to prevent accidental keypresses when the phone is turned on and a call is not in progress. You can still answer or silence an incoming call.•To lock the keypad, select Menu → Settings → Keyguard → Guard now.•To unlock the keypad, press in this order.Changing the keyguard setting1. Select Menu → Settings → Keyguard.2. Highlight an option. You can set the phone to lock the keypad immediately, or automatically if no key is pressed after 30 seconds, 1 minute, or 5 minutes.3. Press to save.Tracking callsYou can track the number and duration of calls made and received on your phone.1. Select Menu → Settings → Call Information.2. Select a timer:–Recent Calls—Tracks all calls made and received by your phone since this timer was last reset. To reset this timer, highlight Reset and press .–All Calls Timer—Tracks all calls made and received by your phone. This timer cannot be reset.](https://usermanual.wiki/Kyocera/KWC-KX444/User-Guide-375843-Page-24.png)