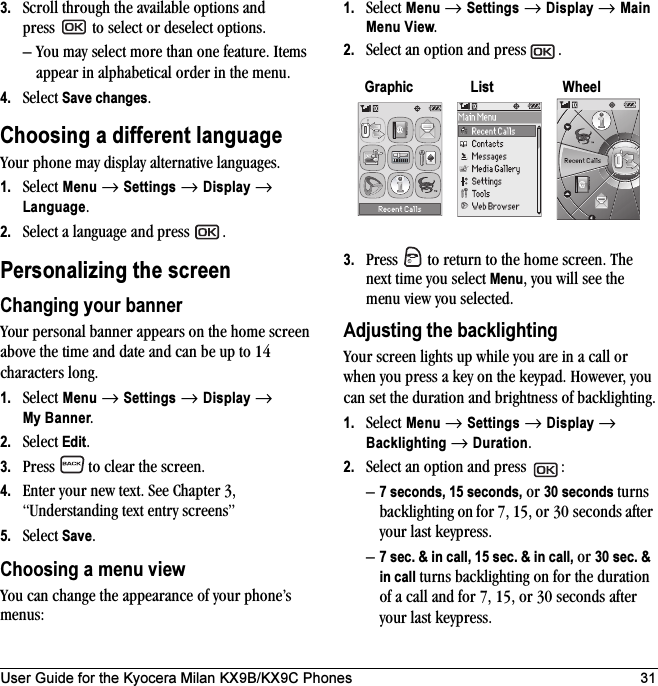
Kyocera KWC-KX9 Dual-Band Tri-Mode Cellular Phone User Manual 82 K5867 1EN

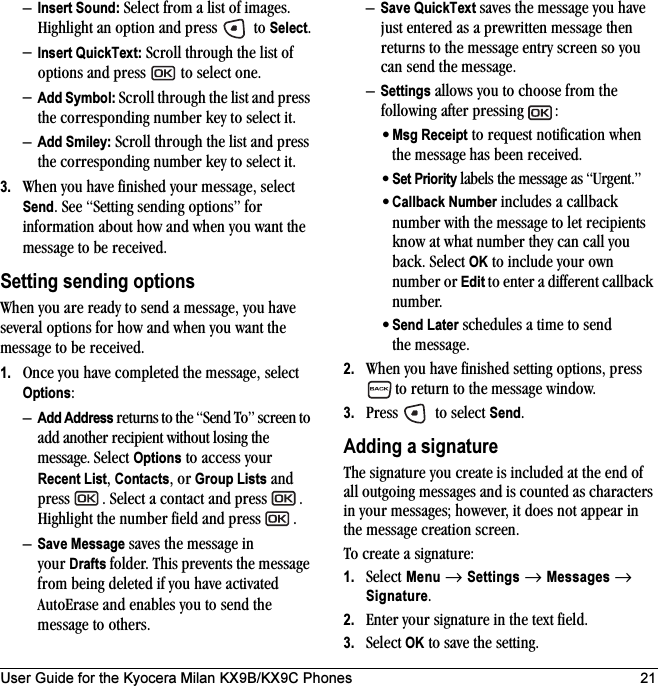
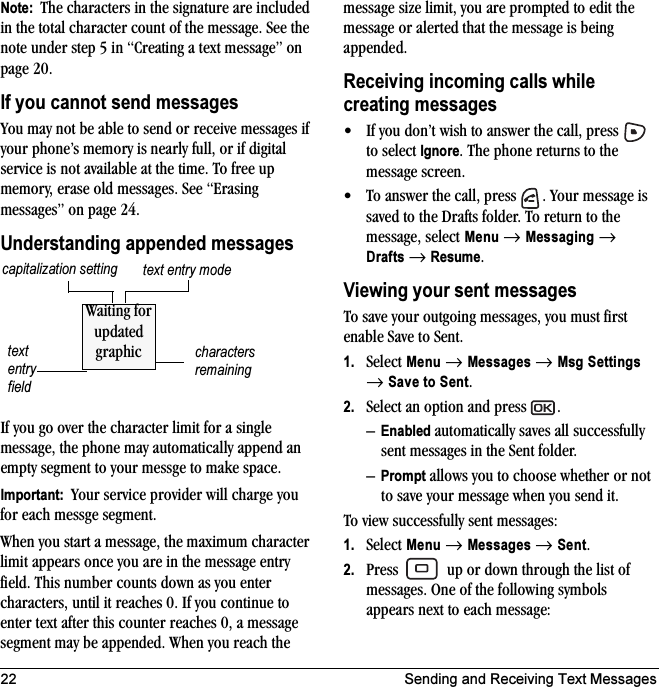
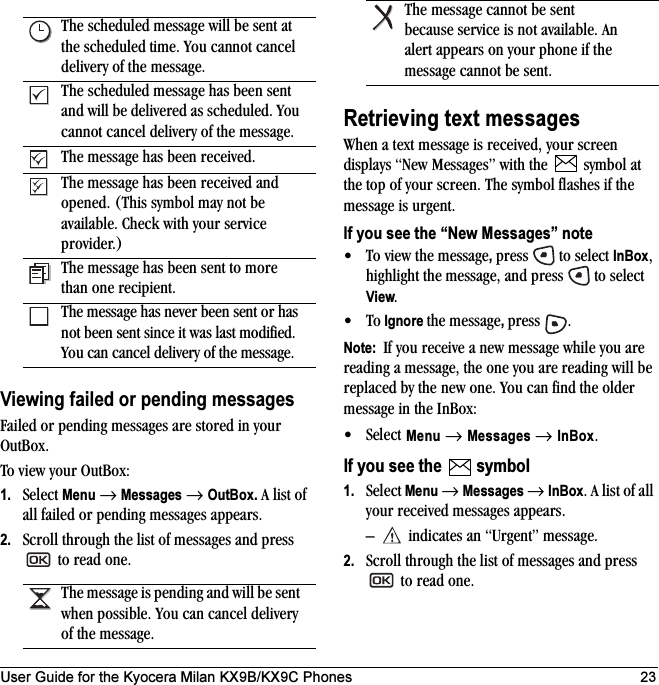
Kyocera Communications, Inc Dual-Band Tri-Mode Cellular Phone 82 K5867 1EN

User Manual

OynxPhone image not final. notOynxDraft Version OnlyThe software features of this handset are subject to modifications and may have changed since the printing of this guide.
iiUser Guide for the Kyocera Milan KX9B/KX9C PhonesThis manual is based on the production version of the Kyocera KX9 phone. Software changes may have occurred after this printing. Kyocera reserves the right to make changes in technical and product specifications without prior notice. The products and equipment described in this documentation are manufactured under license from QUALCOMM Incorporated under one or more of the following U.S. patents:4,901,307 5,056,109 5,101,501 5,109,390 5,228,0545,267,261 5,267,262 5,337,338 5,414,796 5,416,7975,490,165 5,504,773 5,506,865 5,511,073 5,535,2395,544,196 5,568,483 5,600,754 5,657,420 5,659,5695,710,784 5,778,7338Other patents pending.The Kyocera Wireless Corp. ("KWC") products described in this manual may include copyrighted KWC and third party software stored in semiconductor memories or other media. Laws in the United States and other countries preserve for KWC and third party software providers certain exclusive rights for copyrighted software, such as the exclusive rights to distribute or reproduce the copyrighted software. Accordingly, any copyrighted software contained in the KWC products may not be modified, reverse engineered, distributed or reproduced in any manner not permitted by law. Furthermore, the purchase of the KWC products shall not be deemed to grant either directly or by implication, estoppel, or otherwise, any license under the copyrights, patents or patent applications of KWC or any third party software provider, except for the normal, non-exclusive royalty-free license to use that arises by operation of law in the sale of a product.Kyocera is a registered trademark of Kyocera Corporation. Brick Attack, Doodler, and Race 21 are trademarks of Kyocera Wireless Corp. QUALCOMM is a registered trademark, and BREW and BREW shop are trademarks of QUALCOMM, Inc. Openwave is a trademark of Openwave Systems Incorporated. eZiText is a registered trademark of Zi Corporation. Java is a trademark of Sun Microsystems, Inc. All other trademarks are the property of their respective owners.Copyright © 2005 Kyocera Wireless Corp. All rights reserved. Ringer Tones Copyright © 2000-2002 Kyocera Wireless Corp.82-N8274-1EN, Rev. 001BFCC/IC NoticeThis device complies with part 15 of the FCC rules. Operation is subject to the following two conditions: (1) This device may not cause harmful interference, and (2) this device must accept any interference received, including interference that may cause undesired operation. To maintain compliance with FCC RF exposure guidelines, if you wear a handset on your body, use the Kyocera Wireless Corp. (KWC) supplied and approved holster CV90-K0100.Other accessories used with this device for body-worn operations must not contain any metallic components and must provide at least 22.5 mm separation distance including the antenna and the user’s body.THIS MODEL PHONE MEETS THE GOVERNMENT’S REQUIREMENTS FOR EXPOSURE TO RADIO WAVES.Your wireless phone is a radio transmitter and receiver. It is designed and manufactured not to exceed the emission limits for exposure to radio frequency (RF) energy set by the Federal Communications Commission of the U.S. Government. These limits are part of comprehensive guidelines and establish permitted levels of RF energy for the general population. The guidelines are based on standards that were developed by independent scientific organizations through periodic and thorough evaluation of scientific studies. The standards include a substantial safety margin designed to assure the safety of all persons, regardless of age and health.The exposure standard for wireless mobile phones employs a unit of measurement known as the Specific Absorption Rate, or SAR. The SAR limit set by the
User Guide for the Kyocera Milan KX9B/KX9C Phones iiiFCC is 1.6 W/kg.* Tests for SAR are conducted using standard operating positions specified by the FCC with the phone transmitting at its highest certified power level in all tested frequency bands.Although the SAR is determined at the highest certified power level, the actual SAR level of the phone while operating can be well below the maximum value. This is because the phone is designed to operate at multiple power levels so as to use only the power required to reach the network. In general, the closer you are to a wireless base station antenna, the lower the power output.Before a phone model is available for sale to the public, it must be tested and certified to the FCC that it does not exceed the limit established by the government-adopted requirement for safe exposure. The tests are performed in positions and locations (e.g., at the ear and worn on the body) as required by the FCC for each model. The body-worn SAR values were obtained by using Kyocera Wireless Corp. [KWC] supplied and approved holster CV90-K0100.Body-worn measurements differ among phone models, depending upon availability of accessories and FCC requirements. While there may be differences between the SAR levels of various phones and at various positions, they all meet the government requirement for safe exposure.The FCC has granted an Equipment Authorization for this model phone with all reported SAR levels evaluated as in compliance with the FCC RF emission guidelines. SAR information on this model phone is on file with the FCC and can be found under the Display Grant section http://www.fcc.gov/oet/fccid after searching on the FCC ID: OVFKWC-KX9.Additional information on SAR can be found on the Cellular Telecommunications and Internet Association (CTIA) web-site at http://www.wow-com.com.* In the United States and Canada, the SAR limit for mobile phones used by the public is 1.6 watts/kg (W/kg) averaged over one gram of tissue. The standard incorporates a substantial margin of safety to give additional protection for the public and to account for any variations in measurements.CautionThe user is cautioned that changes or modifications not expressly approved by the party responsible for compliance could void the warranty and user’s authority to operate the equipment.Optimize your phone’s performanceUse the guidelines on page 2 to learn how to optimize the performance and life of your phone and battery.Air bagsIf you have an air bag, DO NOT place installed or portable phone equipment or other objects over the air bag or in the air bag deployment area. If equipment is not properly installed, you and your passengers risk serious injury.Medical devicesPacemakers—Warning to pacemaker wearers: Wireless phones, when in the ‘on’ position, have been shown to interfere with pacemakers. The phone should be kept at least six (6) inches away from the pacemaker to reduce risk.The Health Industry Manufacturers Association and the wireless technology research community recommend that you follow these guidelines to minimize the potential for interference.• Always keep the phone at least six inches (15 centimeters) away from your pacemaker when the phone is turned on.• Do not carry your phone near your heart.• Use the ear opposite the pacemaker.• If you have any reason to suspect that interference is taking place, turn off your phone immediately.Hearing aids—Some digital wireless phones may interfere with hearing aids. In the event of such interference, you may want to consult your service
ivHearing aids—Some digital wireless phones may interfere with hearing aids. In the event of such interference, you may want to consult your service provider or call the customer service line to discuss alternatives.Other medical devices—If you use any other personal medical device, consult the manufacturer of the device to determine if it is adequately shielded from external RF energy. Your physician may be able to help you obtain this information.In health care facilities—Turn your phone off in health care facilities when instructed. Hospitals and health care facilities may be using equipment that is sensitive to external RF energy.Potentially unsafe areasPosted facilities—Turn your phone off in any facility when posted notices require you to do so.Aircraft—FCC regulations prohibit using your phone on a plane that is in the air. Turn your phone off or switch it to Airplane Mode before boarding aircraft.Vehicles—RF signals may affect improperly installed or inadequately shielded electronic systems in motor vehicles. Check with the manufacturer of the device to determine if it is adequately shielded from external RF energy. Your physician may be able to help you obtain this information.Blasting areas—Turn off your phone where blasting is in progress. Observe restrictions, and follow any regulations or rules.Potentially explosive atmospheres—Turn off your phone when you are in any area with a potentially explosive atmosphere. Obey all signs and instructions. Sparks in such areas could cause an explosion or fire, resulting in bodily injury or death.Areas with a potentially explosive atmosphere are often, but not always, clearly marked. They include:• fueling areas such as gas stations• below deck on boats• transfer or storage facilities for fuel or chemicals• vehicles using liquefied petroleum gas, such as propane or butane• areas where the air contains chemicals or particles such as grain, dust, or metal powders• any other area where you would normally be advised to turn off your vehicle engineUse with careUse only in normal position (to ear). Avoid dropping, hitting, bending, or sitting on the phone.Keep phone dryIf the phone gets wet, turn the power off immediately and contact your dealer. Water damage may not be covered under warranty.Resetting the phoneIf the screen seems frozen and the keypad does not respond to keypresses, reset the phone by completing the following steps:1. Remove the battery door.2. Remove and replace the battery.If the problem persists, return the phone to the dealer for service.AccessoriesUse only Kyocera-approved accessories with Kyocera phones. Use of any unauthorized accessories may be dangerous and will invalidate the phone warranty if said accessories cause damage or a defect to the phone.To shop online for phone accessories, visit www.kyocera-wireless.com/store.To order by phone, call 800-349-4188 (U.S.A. only) or 858-882-1410.Radio Frequency (RF) energyYour telephone is a radio transmitter and receiver. When it is on, it receives and sends out RF energy. Your service provider’s network controls the power of the RF signal. This power level can range from 0.006 to 0.6 watts.
User Guide for the Kyocera Milan KX9B/KX9C Phones vIn August 1996, the U.S. Federal Communications Commission (FCC) adopted RF exposure guidelines with safety levels for hand-held wireless phones. These guidelines are consistent with the safety standards previously set by both U.S. and international standards bodies in the following reports:• ANSI C95.1 (American National Standards Institute, 1992)• NCRP Report 86 (National Council on Radiation Protection and Measurements, 1986)• ICNIRP (International Commission on Non-Ionizing Radiation Protection, 1996)Your phone complies with the standards set by these reports and the FCC guidelines.E911 mandatesWhere service is available, this handset complies with the Phase I and Phase II E911 Mandates issued by the FCC.Battery and charger specifications  093 453 037Kyocera Wireless Corp.10300 Campus Point Drive, San Diego, CA 92121 U.S.A.Visit us at www.kyocera-wireless.comTo purchase accessories, visit www.kyocera-wireless.com/storeCharger Input OutputCV90-G2926 100-240 VAC / 50 / 60 Hz 4.5 V 1.2 ACV90-60859-01 120 VAC / 60Hz 5.2 V 400 mAStandard BatteryCV90-M6310-01, 3.7V / 850mAhExtended BatteryCV90-M3145-11, 3.7V / 1350mAh
vi Table of ContentsTABLE OF CONTENTS1 Getting Started. . . . . . . . . . . . . . . . . . . . . . 1Installing the battery . . . . . . . . . . . . . . . . . . . . . . 1Getting to know your phone . . . . . . . . . . . . . . . . 32 Making and Answering Calls  . . . . . . . . . . 6Making a call  . . . . . . . . . . . . . . . . . . . . . . . . . . . 6Using the speakerphone . . . . . . . . . . . . . . . . . . . 7Speed dialing  . . . . . . . . . . . . . . . . . . . . . . . . . . . 8Setting up voicemail . . . . . . . . . . . . . . . . . . . . . . 9Calling emergency services . . . . . . . . . . . . . . . . 10Understanding roaming. . . . . . . . . . . . . . . . . . . 113 Entering Letters, Numbers, and Symbols  . . . . . . . . . . . . . . . . . . . . . . 134 Storing Contacts . . . . . . . . . . . . . . . . . . . 16Creating a new contact . . . . . . . . . . . . . . . . . . . 16Adding a code or extension. . . . . . . . . . . . . . . . 16Customizing your contacts. . . . . . . . . . . . . . . . . 16Editing a contact . . . . . . . . . . . . . . . . . . . . . . . . 17Erasing a contact. . . . . . . . . . . . . . . . . . . . . . . . 18Sending a vCard  . . . . . . . . . . . . . . . . . . . . . . . . 18Editing a phone number . . . . . . . . . . . . . . . . . . 18Finding contact information . . . . . . . . . . . . . . . 185 Sending and Receiving Text Messages. 20Sending text messages. . . . . . . . . . . . . . . . . . . . 20Retrieving text messages . . . . . . . . . . . . . . . . . . 23Customizing message settings . . . . . . . . . . . . . . 256 Customizing Your Phone  . . . . . . . . . . . . 27Silencing all sounds  . . . . . . . . . . . . . . . . . . . . . 28Choosing ringers. . . . . . . . . . . . . . . . . . . . . . . . 28Setting sounds for your phone. . . . . . . . . . . . . . 29Adjusting volume. . . . . . . . . . . . . . . . . . . . . . . . 29Setting message alerts . . . . . . . . . . . . . . . . . . . . 30Using shortcuts . . . . . . . . . . . . . . . . . . . . . . . . . 30Personalizing the screen . . . . . . . . . . . . . . . . . . 31Creating a secure environment . . . . . . . . . . . . . 33Network settings . . . . . . . . . . . . . . . . . . . . . . . .  34Data Settings. . . . . . . . . . . . . . . . . . . . . . . . . . .  34Setting position location . . . . . . . . . . . . . . . . . .  357 Using Voice Recognition  . . . . . . . . . . . . 37Setting up voice dialing. . . . . . . . . . . . . . . . . . .  37Calling using voice tags. . . . . . . . . . . . . . . . . . .  37Calling using digit dialing . . . . . . . . . . . . . . . . .  38Training voice recognition . . . . . . . . . . . . . . . .  398 Using Media Gallery  . . . . . . . . . . . . . . . . 41Accessing files  . . . . . . . . . . . . . . . . . . . . . . . . .  41Creating free space . . . . . . . . . . . . . . . . . . . . . .  429 Using Tools and Games . . . . . . . . . . . . . 43Voice Memo . . . . . . . . . . . . . . . . . . . . . . . . . . .  43Scheduler . . . . . . . . . . . . . . . . . . . . . . . . . . . . .  43Alarm Clock . . . . . . . . . . . . . . . . . . . . . . . . . . .  44Tip Calculator. . . . . . . . . . . . . . . . . . . . . . . . . .  45Calculator. . . . . . . . . . . . . . . . . . . . . . . . . . . . .  45Timer . . . . . . . . . . . . . . . . . . . . . . . . . . . . . . . .  46Stopwatch. . . . . . . . . . . . . . . . . . . . . . . . . . . . .  46Games  . . . . . . . . . . . . . . . . . . . . . . . . . . . . . . .  46Brick Attack . . . . . . . . . . . . . . . . . . . . . . . . . . .  4610 Connecting to the Internet  . . . . . . . . . . . 49Using the Mobile Web. . . . . . . . . . . . . . . . . . . .  4911 Getting Help . . . . . . . . . . . . . . . . . . . . . . . 51Index . . . . . . . . . . . . . . . . . . . . . . . . . . . . . . . . . 53
User Guide for the Kyocera Milan KX9B/KX9C Phones 11GETTING STARTEDInstalling the batteryYour Kyocera Milan KX9B/KX9C phone comes with a removable lithium ion (LiIon) battery. Fully charge the battery before using the phone.To install the battery:1. Hold the phone face down.2. Toward the bottom of the phone there is a recess to aid you in opening the battery door.  Use your fingernail to pull the battery door away. 3. Place the battery in the phone casing with the metal contacts toward the bottom of the phone.4. Place the battery door tabs in the openings near the top of the phone.5. Press the battery door until it clicks into place.Note:  Before you remove the battery, make sure the phone is powered off.Charging the batteryYou must have at least a partial charge in the battery to make or receive calls. To charge the battery:1. Connect the AC adapter to the jack on the bottom of the phone.2. Plug the adapter into a wall outlet.The battery icon in the upper-right corner of the screen tells you whether the phone is:• Charging (the icon is animated)• Partially charged • Fully charged Note:  The battery will not charge if you use the phone while it is connected to an AC adapter.Recharging the batteryYou can safely recharge the battery at any time, even if it has a partial charge.
2 Getting StartedCaring for the batteryGeneral safety guidelines• Do not take apart, puncture, or short-circuit the battery.• If you have not used the battery for more than a month, recharge it before using your phone.• Avoid exposing the battery to extreme temperatures, direct sunlight, or high humidity.• Never dispose of any battery in or near a fire. It could explode.Common causes of battery drain• Playing games or using the Web.• Keeping backlighting on.• Operating in analog ( ) mode. Your phone switches between modes to find the best signal. To set your phone to operate in a single mode, select Menu → Settings → Network → Digital/Analog.• Operating in digital mode when far away from a base station or cell site.• Using data cables or accessories.• Operating when no service is available, or service is available intermittently.• High earpiece and ringer volume settings.• Repeating sound, vibration, or lighted alerts.Performing basic functionsTurn the phone on and off: Press and hold   until the phone beeps or plays a tone.Make a call: Enter the number and press  .End a call: Press  .Answer a call: Open the flip and press  .Access voicemail: Press and hold   and follow the system prompts.Verify your phone number: Select Menu → Phone Info. Silence the ringer on an incoming call: Press   then   to answer.-or-Press the side volume key   up or down then  to answer.-or-Press .Record a voice memo: Press and hold   right.Access Recent Calls list: Press and   hold down.Launch the browser (Milan KX9C only): Press and hold  left.Access your custom menu: Press and hold   up. (see “Creating and updating your custom menu” on page 30 for instructions on setting up your custom menu).
User Guide for the Kyocera Milan KX9B/KX9C Phones 3Getting to know your phoneHome screen.Left softkey accesses menus and functions.Volume key to raise or lower speaker volume.Send/Talk key starts or answers calls. Press once to activate voice dialing, twice to display the Recent Calls list, and three times to redial the last dialed number.Speakerphone key activates the speakerphone and answers incoming calls.Keypad for entering numbers, letters, or symbols.* Shift key changes the text mode in text entry.0 Next key cycles through word choices during text entry.Jacks for AC adapter (included) .AntennaNavigation key scrolls through lists and text entry field and accesses shortcuts from the home screen. OK key selects a menu item or option. Right softkey accesses the Contacts directory and other menu options.End/Power key turns the phone on and off, ends a call or browser session, and returns you to the home screen from other menus.Back key erases characters in text entry and returns to the previous screen.# Space key enters a space during text entry. Activates Silent mode.Jack=for hands-free headset and data cable (sold separately) . (waiting for new graphic to include 17)Warning: Inserting an accessory into the incorrect jack will damage the phone.1234567891011121314151617
4 Getting StartedUsing menusNavigating through menus• Press   to select Menu.• Press   left, right, up, or down to view menus and options. • Press   to select a menu item.• Press   to back up a menu level.• Press  to return to the home screen.In this guide, an arrow → tells you to select an option from a menu. For example, Menu → Settings means select Menu then select the Settings option.Note:  To change the way the menus appear, see “Choosing a menu view” on page 31 for details.The contents of the main menu are as follows:Recent CallsAll CallsIncoming CallsOutgoing CallsMissed CallsErase Call ListsRecent Calls TimerAll Calls TimerHome Calls TimerRoam Calls TimerContactsView AllAdd NewFind NameSpeed Dial ListVoice Dial List*Messaging GroupsBusiness ListPersonal ListInformationMessagesNew Text MsgVoicemailInBoxBrowser Alerts*OutBoxSent*SavedDraftsMsg SettingsGroup ListsErase MessagesMedia GalleryImagesSoundsSettingsSilent ModeSoundsDisplayConvenienceVoice Features*MessagingSecurityNetworkAccessoriesTools & GamesBrick AttackTM*Race 21TM*DoodlerTM*Voice MemoSchedulerAlarm ClockTip CalculatorCalculatorTimerStopwatchWeb Browser*Connects to InternetPhone InfoPlatformYour NumberSW VersionPRL VersionFactory ConfigESNTechnologySIDBrowser InfoIcon KeyBREW Apps*Mobile ShopSettingsHelp*Not available on all phones.
User Guide for the Kyocera Milan KX9B/KX9C Phones 5Understanding screen iconsThese icons may appear on your phone’s home screen and the external LCD.The phone is operating in IS2000 (1X) digital mode.The phone is operating in IS95 digital mode.The phone is operating in Analog (FM) mode.The phone is receiving a signal. You can make and receive calls. Fewer bars indicate a weaker signal.A call is in progress.The phone is not receiving a signal. You cannot make or receive calls.The phone is roaming outside of its home service area.You have a voice message.The battery is fully charged. The more black bars, the greater the charge.The alarm clock is set.The phone is in privacy mode or is accessing a secure Web site.High-speed (3G) data service is available and active on your phone. Check with your service provider for availability.(blinking) The phone is sending high-speed data.(blinking) The phone is receiving high-speed data.High-speed data service is available, but the phone is dormant.The phone is at the home screen. To access Menu, press  .The phone is at the home screen. To access Contacts, press  .The phone is set to light up instead of ring.The phone is set to vibrate or to vibrate and then ring.Position location is set to your service provider and to emergency services.Position location is set to emergency services only.
6 Making and Answering Calls2MAKING AND ANSWERING CALLSMaking a callMake sure you are in an area where a signal can be received. Look for   on the home screen.Note: The more bars you see in this symbol, the stronger the signal. If there are no bars, move to where the signal strength is better.1. Open the flip.2. Enter the phone number and press  .3. Press   to end the call or close the flip.Redialing a number• Press   three times to redial the last number called.Calling a saved numberUse your Contacts directory to quickly find a saved number.1. Press  to select Contacts.2. Scroll down the list to find the contact you want to call.3. Highlight the name and press   to dial the number.Answering a callWhen a call comes in, the phone rings, vibrates, or lights up, depending on your settings. The phone number of the caller appears on the external screen if the flip is closed, or home screen if the flip is open. If the number is stored in your Contacts directory, the contact name also appears.1. Open the flip.2. Press   to answer the incoming call.-or-Press   to answer the incoming call and turn on the speakerphone simultaneously.Setting Open to AnswerThe default setting of your phone requires you to press   to answer an incoming call. You can set the phone to answer immediately when you open the flip. •Select Menu → Settings → Convenience → Open to Answer → Enabled.–Select Disabled to have the phone continue ringing when you open the flip.Silencing an incoming call • Press   or   or   to silence the call. Note:  In the absence of voicemail, this feature drops the call.- or -• Press   to silence the call then press   to answer it.Either action silences only the current call. The next call will ring according to your settings.
User Guide for the Kyocera Milan KX9B/KX9C Phones 7Adjusting the volume during a call• To adjust the earpiece volume during a call, press   or   up or down.Using the speakerphoneYour Kyocera Milan KX9B/KX9C phone has a built-in speakerphone that you can use during a call when the flip is open. Note:  This function works only for the current call. Once the call is ended, the speakerphone turns off and the earpiece volume returns to normal.1. Open the flip.2. Press   to answer the call and turn on the speakerphone simultaneously. “  Speaker is ON” displays on the screen.- or -Press   to turn on the speakerphone at any time during a call.To turn off thespeakerphone, press  . The message “  Speaker is OFF” appears.Setting the phone to hold callsThe Hold Call feature allows you to place incoming calls on hold until you are ready to answer them.Note:  This feature will not work if “Open to Answer” is enabled. See “Setting Open to Answer” on page 6.1. Select Menu → Settings → Convenience → Hold Call→ Enabled.– If you have not recorded a hold message, you will be prompted to record one, such as “Please hold. I’ll answer in a minute.”2. Record the message twice, as prompted.3. Select Save or Options (Play, Re-Record,or Exit).The next time a call comes in, you will have the option of placing it on hold.Placing a call on holdYou can place a call on hold once you have enabled this feature.Note:  If you are already on a call and you receive another call, you cannot place the incoming call on hold. It will go to voicemail.1. When a call comes in, press   to select Hold Call. The caller will be placed on hold and will hear your recorded hold message.2. To speak to the caller, select Answer.- or -To hang up without speaking to the caller, select End Call.Changing the hold message1. Select Menu → Settings → Convenience → Hold Call → Re-Record Msg and follow the prompts.2. Record the message twice.3. Select Save or Options (Play, Re-Record,or Exit).
8 Making and Answering CallsDealing with missed callsWhen you have missed a call, “Missed Call” appears on your screen unless the caller leaves a voicemail. • To clear the screen, open the flip and press   to select OK.• To view details of the call, press   to select Calls. Highlight the missed call number and press   to select Details.• To return the call, highlight the number and press .Setting missed call alertsYou can set an alert to beep every five minutes after you have missed a call.•Select Menu → Settings → Sounds → Alerts → Missed Call Alert → Enabled.Viewing recent call detailsDetails on the last 30 calls you made, received, or missed are stored in the Recent Calls list and are identified by the following icons:Viewing recent calls1. Select Menu → Recent Calls.2. Select a list: All Calls, Incoming Calls, Outgoing Calls, or Missed Calls.3. Highlight a recent call and press   to select Options.–Save adds the phone number to the Contacts list.–Send Msg allows you to send a text message to the phone number.–Erase erases the selected call record.Note:  If the phone number has been classified as “secret,” you must enter your four-digit lock code to view or edit it. For information on the lock code, see “Changing your lock code” on page 33. To classify a phone number as secret, see “Creating a new contact” on page 16.Calling recent calls1. Open the flip.2. Press and hold   down.3. Highlight a number to call and press  .Erasing recent calls1. Select Menu → Recent Calls → Erase Call Lists.2. Select an option: All Calls, Incoming Calls, Outgoing Calls, or Missed Calls.3. Press   to select Yes.Speed dialingBefore you can use speed dialing, you must save a phone number as a contact and assign a speed dial location to it. Outgoing call Incoming callMissed call (flashing)
User Guide for the Kyocera Milan KX9B/KX9C Phones 9• To add a speed dial location to a saved or new contact, see “Editing a phone number” on page 18.Using speed dialingTo call a contact that has a speed dial location:• From the home screen, enter the one- or two-digit speed dialing location and press  .1-Touch dialing1-Touch dialing is the fastest way to call a saved contact.Note:  You must (1) enable 1-Touch dialing on your phone and (2) have a speed dial location assigned to a contact.Enabling 1-Touch dialing•Select Menu → Settings → Convenience → 1-Touch Dialing → Enabled.Using 1-Touch dialingTo call a contact that has a speed dial location:• From the home screen, press and hold the speed dialing number. If it is a two-digit number, press the first digit briefly, then press and hold the second digit. For example, if the speed dialing location is 15, press   briefly then press and hold .Setting up voicemailBefore your phone can receive voicemail messages, you must set up a password and record a personal greeting with your service provider. All unanswered calls to your phone are then automatically transferred to voicemail, even if your phone is in use or turned off.1. From the home screen, press and hold  .2. Follow the system prompts to create a password and record a greeting.Note:  If you are having trouble accessing your voicemail, contact your service provider.Checking voicemail messagesWhen a voice message is received, your screen displays “New Messages” along with the   symbol at the top of your screen. The symbol flashes if the message is urgent. If you see “New Messages” on your screen1. Press   to select Call and call your voicemail number.2. Press   when you hear your greeting.3. Follow the prompts to retrieve the message.To clear the screen without checking messages:• Press  to select Ignore.If you see only the   symbol1. Press and hold   to call to your voicemail number.2. Follow the prompts to retrieve the message.
10 Making and Answering CallsNote:  You can set the phone to beep or vibrate every five minutes to remind you that you have a voicemail message. See “Setting message alerts” on page 30.Calling emergency servicesRegardless of your 3-digit emergency code (911, 111, 999, 000, etc.), your phone operates as described below.• Dial  your 3-digit emergency code and press .You can call the code even if your phone is locked, has no balance, or your account is restricted. When you call, your phone enters Emergency mode. This enables the emergency service exclusive access to your phone to call you back, if necessary. To make or receive regular calls after dialing the code, you must exit this mode.To exit Emergency modeWhen you have completed the emergency call:1. Press  to select Exit.2. Press   again to confirm your choice.Note:  To determine who has access to your location, see “Setting position location” on page 35.Using your phone in an airplaneWhile in an airplane, it is normally required that you turn off your mobile phone because it emits RF signals that interfere with air traffic control.In Airplane mode, however, your phone will not emit RF signals. You cannot make or receive calls, send text messages, or use the Web, but you can play games, use the Scheduler, set the clock, and make emergency calls to designated emergency numbers.Note:  Please check with uniformed personnel before operating your phone in Airplane mode.Setting Airplane mode1. Select Menu → Settings → Convenience → Airplane Mode.2. Press   to select OK after reading the message.3. Select Enabled or Disabled.Tracking callsYou can track the number and duration of calls made and received on your phone.1. Select Menu → Recent Calls.2. Select a timer:–Recent Calls Timer tracks all calls you have made and received since you last reset this timer. To reset this timer, press   to select Reset.
User Guide for the Kyocera Milan KX9B/KX9C Phones 11–All Calls Timer tracks all calls you have made and received. This timer cannot be reset.–Home Calls Timer tracks all calls you have made while your phone is not roaming. To reset this timer, press   to select Reset. This will reset both the Home Calls and the Roam Calls Timer.–Roam Calls Timer tracks all the roam calls you have made. To reset this timer, press  to select Reset. This will reset both the Home Calls and the Roam Calls Timer.Timing your callsYou can set your phone to beep 10 seconds before each minute passes when you are on a call.•Select Menu → Settings → Sounds → Minute Alert → Enabled.Understanding roamingSetting an alert for roamingThe phone can alert you when you roam outside of your home service area.1. Select Menu → Settings → Network → Roam/Svc Alert.2. Select an option and press  .–When no svc alerts you with three tones decreasing in pitch when service is lost and three tones increasing in pitch when service is acquired again.–On roam change alerts you with two decreasing tones when roaming service is acquired and three increasing tones when home area service is acquired again. –On any change alerts you with three increasing tones if there is a change in roaming service or three decreasing tones if the phone loses service. Setting the roam ringerYou can set a ringer to indicate when an incoming call will be subject to roaming charges.•Select Menu → Settings → Sounds → Roam Ringer → Enabled. You will hear the ringer.Setting Call Guard You can set the phone to warn you before you answer or place a call while roaming.•Select Menu → Settings → Convenience → Call Guard → Call Prompt. – The phone now emits a distinctive roam ring to indicate when you are roaming during calls.– To accept or place a call while roaming, you must press  .Note:  Call Prompt is disabled when the phone is in emergency mode.
12 Making and Answering CallsSetting digital or analog modeDepending on services available from your service provider, you may set the phone to either digital or analog mode. This is useful if you are in an area that borders on digital service and the automatic feature is causing the phone to keep switching between modes.1. Select Menu → Settings → Network → Digital/Analog.2. Select an option and press  .–Automatic automatically switches the phone between digital and analog.–Analog only sets the phone to work in analog mode only.–Analog call forces a call into analog mode for the duration of the next call.–Digital only sets the phone to work in digital mode only.Turning roaming on or offThis setting allows you to control the phone’s roaming feature by specifying which signals the phone will accept.1. Select Menu → Settings → Network → Roam Option.2. Select an option and press  .–Automatic (recommended setting) accepts any system the phone service provides.–No roaming prevents you from making or receiving calls outside of your home service area.Note:  If your phone has more than one setting for Automatic, contact you service provider to determine which one to use.
User Guide for the Kyocera Milan KX9B/KX9C Phones 133ENTERING LETTERS, NUMBERS, AND SYMBOLSYou can enter letters, numbers, and symbols in contacts, text messages, and your banner.Understanding text entry screensThe current text entry mode (and capitalization setting, when applicable) are indicated by icons.Text entry modesThere are five text entry modes:Case changeNumbers onlyNormal alpha Rapid EntryAdd SymbolAdd SmileyNote:  The mode you start in depends on the task you are doing. For example, when entering a phone number, you’re in number mode. When entering a name for a contact, you’re in normal text mode. See “Changing modes” on page 14.Entering numbers• To enter a number while in   mode, press a number key once.• To enter a number while in   or   mode, press and hold a number key until the number appears on the screen.Entering words letter by letter1. Press a key once for the first letter, twice for the second letter, and so on. If your phone is set to Spanish, French, or Portuguese, accented letters are available.2. Wait for the cursor to move right and enter the next letter. Note:  To enter a space, press  .Entering words quicklyWhen you press a series of keys using   mode,  checks its dictionary of common words and guesses at the word you are trying to spell.1. For each letter of the word you want, press the key once. For example, to enter the word “any” press  →  → .2. If the word doesn’t match what you want, press  to look at other word matches.3. When you see the word you want, press  .text entry fieldtext entry modecapitalization settingcharacters remainingWaiting for updated graphic
14 Entering Letters, Numbers, and Symbols Entering symbolsWhile entering text, you can enter symbols by pressing   until you see the symbol you want. Using this method, you have access to the following symbols:To access the full set of symbols:1. From the text entry screen, select Options.2. Select   Add Symbol.3. Press   down to view the list of symbols.4. Press the number key corresponding to the symbol you want. Entering smileys1. From the text entry screen, select Options.2. Select   Add Smiley.3. Press   down to view the list of smileys.4. Press the number key corresponding to the smiley you want.Switching default text entry modesYou can change the default text entry mode when creating a text message. This setting applies only to the message body screen, not the “To” screen. 1. Select Menu → Messages → Msg Settings → Default Text.2. Select Normal Alpha or Rapid Mode.Changing modesSometimes you need to change modes. For example, to enter numbers in an email address while in  mode, you must change to mode, enter the numbers, and then change back to  mode to complete the address.To change text entry modes:• Press and hold   until the icon for the mode you want appears.-or-•Select Options then select a different mode.Capitalization settingsYou can change capitalization at any time while entering text. Simply press   to choose upper or lower case while in  Normal Alpha mode..@?!-,&:‘1
User Guide for the Kyocera Milan KX9B/KX9C Phones 15Quick reference to text entryThis table gives general instructions for entering letters, numbers, and symbols.To... Do this...Enter a letter Use   mode and press a key until you see the letter you want. For more information, see page 13.Enter a number Use   mode and press a key once to enter its number. For more options, see page 13.Enter a symbol Press   until you find the symbol you want. See page 14.Enter a smiley Use   mode and press a key once to enter its number. For more options, see page 14.Enter a space Press .Erase a character Press .Erase all characters Press and hold  .Move the cursor right or left Press   right or left.Move the cursor up or down Press   up or down.Change text entry modes Press and hold  .Capitalize any letter In   mode, press  . Choose  .Lowercase any letter In   mode, press  . Choose  .Select soft options on the screen Press the appropriate key,   or  .Highlight an option at the bottom of the screen Press   right or left.
16 Storing Contacts4STORING CONTACTSUse your phone’s Contacts directory to store information about a person or company. Each contact entry can have up to six phone numbers, two email addresses , two web addresses, two street addresses, and a space for notes.Creating a new contact1. From the home screen, enter the phone number you want to save, including the area code.2. Press   to select Save.3. Select Save New Contact.4. Enter a name for the contact. – If you need to learn how to enter letters, see “Understanding text entry screens” on page 13.– To add a symbol or smiley to the contact name, or to change the text entry mode, press   to select Options.5. Either save now or add more contact information.– To save now, press   to select Save.– To enter additional phone numbers, email and web addresses, or notes, press   down repeatedly. For help switching between numbers and letters for email or web addresses, see “Changing modes” on page 14.Adding a code or extensionWhen you save the phone number of an automated service, you may include a pause to stop dialing, for example, where you would wait to dial an extension.1. From the home screen, enter the first portion of the phone number.2. Press   to select Options.3. Select a type of pause:– Time Pause– Hard Pause4. Enter the remaining numbers.5. Press   to select Save.Customizing your contactsYou can customize each contact in your Contacts directory by assigning ringers, pictures, and number types, or by classifying your contacts as Business or Personal.Assigning ringers1. Press   to select Contacts.2. Highlight a contact and press  .3. Highlight the contact name and press   to select Options.4. Select Ringer → Assign Ringer.X
User Guide for the Kyocera Milan KX9B/KX9C Phones 175. Scroll down the list to hear the different ringers and press   to select one.Assigning pictures1. Press   to select Contacts.2. Highlight a contact and press  .3. Highlight the contact name and press   to select Options.4. Select Picture → Assign Picture → Images.5. Select Saved Images or Caller IDs.Note:  With mobile PhoneTools for Kyocera, you can transfer digital pictures to your phone. To purchase MPT or other accessories, visit www.kyocera-wireless.com/store.6. Scroll through the list to view your options and press   to assign it to your contact.Classifying contacts as Business or Personal1. Press   to select Contacts.2. Highlight a contact and press  .3. Highlight the contact name and press   to select Options.4. Select Classify.5. Select Personal or Business and press  .Note:  To assign Personal or Business ringers, see “Assigning business and personal ringers” on page 28.Assigning number typesWhen you assign a number type, an icon is placed in front of a contact number to specify the type of number, such as work, home, or mobile.1. Press   to select Contacts.2. Highlight a contact and press  .3. Highlight the contact number and press   to select Edit.4. Press   down once to move to the number type field and press   to select Options.5. Highlight an option to designate the number as General, Work, Home, Mobile, Pager, or Fax and press . The associated icon will appear next to the number in your Contacts directory and Recent Calls list.Viewing contactsThe following icons may appear next to information in your Contact entries. Editing a contact1. Press   to select Contacts.work email addresshome street addressmobile Web page URLpager notefax
18 Storing Contacts2. Highlight a contact and press  .3. Highlight the contact name or number and press   to select Edit.4. Enter your changes and press   to select Save.Erasing a contact1. Press   to select Contacts. 2. Highlight the contact to erase and press  .3. Select Options.4. Highlight Erase Contact and press  .Sending a vCard1. Press   to select Contacts. 2. Highlight the contact to send as a vCard and press .3. Select Options.4. Highlight Send as vCard and press  .5. Enter a recipient’s phone number and press  to select Send.Editing a phone number1. Press   to select Contacts. 2. Highlight the contact to edit and press  .3. Press   down to highlight the phone number you want to edit.4. Select Options.5. Highlight an option and press  :–Call to call the contact.–Send Text Msg brings you to the text messaging screen.–Add to Speed Dial assigns or removes the speed dial location.–View Number to see the selected phone number.–Erase Number erases the number from the contact.–Secret makes the number secret so that it will not appear on the screen until the lock code is entered. Secret numbers can be called without a lock code. (For more information, see “Limiting calls” on page 34.)–Primary Number makes this number the first one that shows up when you open the contact.–Add Voice Dial* to record a voice tag so you can call a contact using voice recognition (VR). For more information, see page 37.–Erase Voice Dial* erases the voice tag associated with the number.–Edit Voice Dial* records a new voice tag.6. Enter the new information and follow the prompts.7. Select Save, if necessary.* Applies to Milan KX9C only.Finding contact informationTo find a phone number or contact, you can (1) check the Frequent list, (2) search the Contacts directory, or (3) use Fast Find.
User Guide for the Kyocera Milan KX9B/KX9C Phones 19Checking the Frequent ListFrom the home screen, select Contacts. The last 15 of your most frequently called contacts appear when the Frequent List is enabled. Scroll past the double line to view the All Contacts list.To enable the Frequent List setting•Select Menu → Settings → Convenience → Frequent List → Enabled.Searching the Contacts directory1. Select Contacts for a list of all contacts. To quickly get down the list, enter the first letter of the contact. The menu skips to that letter of the alphabet.- or -Select Menu → Contacts.2. Select a search method:–View All lists all saved contacts.–Find Name locates a specific name. Enter part of the contact name then select Find.–Speed Dial List, Voice Dial List*, Messaging Groups, Business List, or Personal List selects a contact from the specified list.3. Highlight a contact and press  .– To call the contact, highlight the number and press  .* Applies to Milan KX9C only.Setting Fast FindWith Fast Find, you press one or two keys to view close matches of the number you are looking for.•Select Menu → Settings → Convenience → Fast Find → Enabled.Using Fast Find1. From the home screen, press the keys corresponding to the letters of the name you want to find. A matching contact or speed dial entry appears. 2. Press   down to scroll through matching entries.3. Highlight the name you want then press   to call the number.
20 Sending and Receiving Text Messages5SENDING AND RECEIVING TEXT MESSAGESThis chapter describes how to send, receive, and erase text messages from your phone. For information on voicemail messages, see “Setting up voicemail” on page 9.Important:  The features and menus described in this chapter may vary depending on services available in your area. Check with your service provider for details and possible usage charges.Sending text messagesYou can only send text messages to phones that are capable of receiving them or to email addresses. Creating a text message1. Select Menu → Messages → New Text Msg.2. Enter a recipient’s phone number or email address:–Select Options to access your Recent List, Contacts, or Group Lists and press  . Select a contact and press  . Highlight the number field and press  . For more about group lists, see “Creating group lists” on page 25.- or -– Enter a New Address manually. (To learn how to enter text, see Chapter 3, “Understanding text entry screens” .)3. Add another recipient if desired:– Press   to select Options then select Recent List, Contacts, or Group Lists.- or -– Enter a space or comma after the first number then enter another recipient manually.Note:  You can send a message to up to 10 contacts at once. The messages will be sent one at a time, once to each addressee.4. When you are done entering addresses, press   twice.5. Enter the message. To learn how to enter text, see “Understanding text entry screens” on page 13.- or -Add QuickText, symbols, or emoticons in your message. See “Including prewritten text and symbols” for information.6. Press   to select Send. See “Setting sending options” for information about how and when you want the message to be received.Including prewritten text and symbolsDuring text entry, you can add QuickText, symbols, or emoticons in your message.1. From the text entry screen, select Options.2. Select an option and press  . –Insert Picture: Select from a list of images. Highlight an option and press   to Select.
User Guide for the Kyocera Milan KX9B/KX9C Phones 21–Insert Sound: Select from a list of images. Highlight an option and press   to Select.–Insert QuickText: Scroll through the list of options and press   to select one.–Add Symbol: Scroll through the list and press the corresponding number key to select it.–Add Smiley: Scroll through the list and press the corresponding number key to select it.3. When you have finished your message, select Send. See “Setting sending options” for information about how and when you want the message to be received.Setting sending optionsWhen you are ready to send a message, you have several options for how and when you want the message to be received.1. Once you have completed the message, select Options: –Add Address returns to the “Send To” screen to add another recipient without losing the message. Select Options to access your Recent List, Contacts, or Group Lists and press  . Select a contact and press  . Highlight the number field and press  .–Save Message saves the message in your Drafts folder. This prevents the message from being deleted if you have activated AutoErase and enables you to send the message to others.–Save QuickText saves the message you have just entered as a prewritten message then returns to the message entry screen so you can send the message.–Settings allows you to choose from the following after pressing  :•Msg Receipt to request notification when the message has been received.•Set Priority labels the message as “Urgent.”•Callback Number includes a callback number with the message to let recipients know at what number they can call you back. Select OK to include your own number or Edit to enter a different callback number.•Send Later schedules a time to send the message.2. When you have finished setting options, press  to return to the message window.3. Press   to select Send.Adding a signatureThe signature you create is included at the end of all outgoing messages and is counted as characters in your messages; however, it does not appear in the message creation screen. To create a signature:1. Select Menu → Settings → Messages → Signature.2. Enter your signature in the text field.3. Select OK to save the setting.
22 Sending and Receiving Text MessagesNote:  The characters in the signature are included in the total character count of the message. See the note under step 5 in “Creating a text message” on page 20.If you cannot send messagesYou may not be able to send or receive messages if your phone’s memory is nearly full, or if digital service is not available at the time. To free up memory, erase old messages. See “Erasing messages” on page 24.Understanding appended messagesIf you go over the character limit for a single message, the phone may automatically append an empty segment to your messge to make space.Important:  Your service provider will charge you for each messge segment.When you start a message, the maximum character limit appears once you are in the message entry field. This number counts down as you enter characters, until it reaches 0. If you continue to enter text after this counter reaches 0, a message segment may be appended. When you reach the message size limit, you are prompted to edit the message or alerted that the message is being appended.Receiving incoming calls while creating messages• If you don’t wish to answer the call, press   to select Ignore. The phone returns to the message screen.• To answer the call, press  . Your message is saved to the Drafts folder. To return to the message, select Menu → Messaging → Drafts → Resume.Viewing your sent messagesTo save your outgoing messages, you must first enable Save to Sent.1. Select Menu → Messages → Msg Settings → Save to Sent.2. Select an option and press  .–Enabled automatically saves all successfully sent messages in the Sent folder.–Prompt allows you to choose whether or not to save your message when you send it.To view successfully sent messages:1. Select Menu → Messages → Sent.2. Press   up or down through the list of messages. One of the following symbols appears next to each message:text entry fieldtext entry modecapitalization settingcharacters remainingWaiting for updated graphic
User Guide for the Kyocera Milan KX9B/KX9C Phones 23Viewing failed or pending messagesFailed or pending messages are stored in your OutBox.To view your OutBox:1. Select Menu → Messages → OutBox. A list of all failed or pending messages appears.2. Scroll through the list of messages and press  to read one.Retrieving text messagesWhen a text message is received, your screen displays “New Messages” with the   symbol at the top of your screen. The symbol flashes if the message is urgent.If you see the “New Messages” note• To view the message, press   to select InBox, highlight the message, and press   to select View.•To Ignore the message, press .Note:  If you receive a new message while you are reading a message, the one you are reading will be replaced by the new one. You can find the older message in the InBox: • Select Menu → Messages → InBox.If you see the   symbol1. Select Menu → Messages → InBox. A list of all your received messages appears.–  indicates an “Urgent” message.2. Scroll through the list of messages and press  to read one.The scheduled message will be sent at the scheduled time. You cannot cancel delivery of the message.The scheduled message has been sent and will be delivered as scheduled. You cannot cancel delivery of the message.The message has been received.The message has been received and opened. (This symbol may not be available. Check with your service provider.)The message has been sent to more than one recipient.The message has never been sent or has not been sent since it was last modified. You can cancel delivery of the message.The message is pending and will be sent when possible. You can cancel delivery of the message.The message cannot be sent because service is not available. An alert appears on your phone if the message cannot be sent.
24 Sending and Receiving Text MessagesReading the messageThe options available to you may vary. Check with your service provider.Note:  Sounds embedded in text messages will not play if the phone is set to Silence All mode.1. If the text message is long, press   down to view the entire message.2. When you are finished, you can Reply to the sender, Play the sound embedded in the message, Erase the message, Save the message to your Saved folder, or set additional Options for the message:–Erase the message.–Lock Msg to protect the message from being accidentally deleted.–Forward the message.–Reply with Copy to reply to the message with a copy of the original attached.–Save Message to save the message.–Save as QuickText to save the text from the message as QuickText, which you can insert into other messages. Graphics and sound are not saved as part of QuickText.(For more about QuickText, see page 25.)–View Sender information.3. Select Done.Note:  The   symbol indicates that a graphic did not come through. It may be too large or incorrectly formatted.Setting message alertsYou can set your phone to alert you of incoming text messages or pages. For more information, see “Setting message alerts” on page 30.Erasing messagesIt is a good idea to erase old messages to free up memory in your phone.You have the option of erasing text messages and pages as you send or read them, erasing them one at a time from the list in the OutBox or InBox, or erasing them all at once.Erasing single messages1. Select Menu → Messages.2. Select the type of text message you want to erase and press  : InBox, OutBox, Sent, or Saved.3. Highlight the message to erase and press  .4. Select Options.5. Select Erase to erase the message. A notification appears: “Erase this message?”6. Select Yes to erase the message.Note:  You can erase a scheduled message from the OutBox, but you cannot cancel delivery of the message.Erasing all messages1. Select Menu → Messages → Erase Messages.
User Guide for the Kyocera Milan KX9B/KX9C Phones 252. Select a folder from which to erase all messages: InBox, OutBox, Sent, Saved Folder, Drafts Folder, or All Messages. To erase messages from all folders, select All Messages.3. A message appears: “Erase all messages?” Select Yes to erase messages or No to cancel.Erasing messages automaticallyUse this setting to have old messages automatically erased from the InBox when memory is low.•Select Menu → Messages → Msg Settings → Auto-Erase → Old InBox Msgs. Older messages will be erased as new messages are received.Customizing message settingsTo make messaging easier, you can customize settings for sending and receiving messages.Creating group listsYou can create and save a list of multiple recipients. Your Kyocera Milan KX9B or KX9C phone stores five group lists with up to 10 recipients per list.1. Select Menu → Messages → Group Lists → Create New.2. Enter a name for the list. For help entering text, see page 13.3. Select Next.4. To enter the first phone number or email address, select an option:–Recent List to select numbers from your Recent List.–New Address to enter the phone number or email address manually.–Contacts List to select numbers from your phone book. 5. Locate the contact number and press  .6. Select Options → Recent List or Contacts.7. Locate the contact number and press  .8. When finished, select Done.9. To send a message to your new group, see “Sending text messages” on page 20.Creating and editing prewritten messages (QuickText)Your phone comes with prewritten (QuickText) messages, such as “Please call me,” which you can insert into the body of a text message. You can edit these messages and create new ones. Your phone will store up to 40 QuickText messages, with up to 100 characters per message.1. Select Menu → Messages → Msg Settings → Edit QuickText.2. To create a new pre-written message, select New Msg.-or-To edit an existing pre-written message, highlight the message and select Edit.
26 Sending and Receiving Text Messages3. Enter or edit the text and press   to select Done. For help entering text, see Chapter 3, “Understanding text entry screens” .Note:  You can also save a message you have written or received as QuickText. See “Setting sending options” on page 21 or “Reading the message” on page 24.
User Guide for the Kyocera Milan KX9B/KX9C Phones 276CUSTOMIZING YOUR PHONEThe contents of the Settings menu are as follows.Silent ModeVibrate OnlyVibe then RingLights OnlyNormal SoundsSoundsRinger VolumeRinger TypeBusiness RingerPersonal RingerRoam RingerFlip OpenFlip ClosedPwr On/Off SoundKey VolumeKey LengthKey SoundAlertsSmart SoundMinute AlertEarpiece VolumeSpkrphone VolumeDisplayMy BannerMain Menu ViewColor ThemesWallpaperScreen SaverBacklightingAuto-HyphenLanguageTime/Date FormatContrastConvenienceAirplane ModeOpen to AnswerFast FindFrequent ListHold Call1-Touch DialingWeb PromptCall GuardVoice Features*Add Voice DialErase Voice DialVoice TrainingVoice Wake-UpVoice AnswerExpert ModeMessagingAlertsSignatureEdit QuickTextCallback NumberText Msg ReceiptSave to SentAuto-EraseDefault TextVoicemail NumberSecurityLock PhoneLimit CallsNew Lock CodeErase ContactsEmergency NumbersNetworkData/Fax Calls*Privacy Alert*Set Phone Line*Roam/Svc AlertRoam Option*Digital/Analog*LocationAccessoriesPwr BacklightingHeadset SoundsAuto-AnswerCom Port Speed*TTY Device*Not available on all phones. Check with your service provider.
28 Customizing Your PhoneSilencing all soundsYour phone is set to make sounds when you receive calls, press keys, navigate through menus, and receive alerts (such as new messages).You can silence all sounds and set the phone to vibrate or light up when you receive calls and alerts.Setting the phone to vibrate or light up 1. Select Menu → Settings → Silent Mode.2. Choose an option and press  :–Vibrate Only: The phone vibrates for the duration of the incoming call or other alert. appears on the home screen. –Vibe then Ring: The phone vibrates for the first 10 seconds and then rings for the remainder of the incoming call alert. appears on the home screen.–Lights Only: The phone lights up for the duration of the incoming call or other alert. appears on the home screen.–Normal Sounds: The phone rings for the incoming call or alert (in effect, returns phone to a non-silent mode).Note:  The phone will ring when it is attached to an external power source (such as a charger), even if all sounds have been silenced.Shortcut to Vibrate Only mode• Press and hold  .Turning sounds back on•Select Menu → Settings → Silent Mode→ Normal Sounds.- or -Press and hold  .Choosing ringersYour Kyocera Milan KX9B/KX9C phone has pre-programmed ringers you can choose to use for incoming calls. 1. Select Menu → Settings → Sounds → Ringer Type.2. Scroll down the list to hear the different ringers and press   to select one.Note:  Downloaded ringers are added to the end of the standard list of ringers.Assigning business and personal ringersYou can assign ringers to contacts classified as business or personal in your Contacts directory.Note:  To classify a contact as Business or Personal, see “Classifying contacts as Business or Personal” on page 17.1. Select Menu → Settings → Sounds.2. Ηighlight Business Ringer or Personal Ringer and press  .3. Select a ringer and press  .
User Guide for the Kyocera Milan KX9B/KX9C Phones 29Importing ringersYou can download additional ringers to your phone using the Mobile Phone Tools for Kyocera software, if available (sold separately). To purchase this software and other accessories, visit www.kyocera-wireless.com/store.Setting sounds for your phoneYou can set your phone to sound tones when you open and close the flip and when you turn the phone on and off. Sounds will not occur during an incoming call, if you are on a call, or if a headset or car kit is attached to your phone.Set sound when flip opens1. Select Menu → Settings → Sounds → Flip Open.2. Scroll through the list to hear the sounds and press   to select one.Set sound when flip closes1. Select Menu → Settings → Sounds → Flip Closed.2. Scroll through the list to hear the sounds and press   to select one.Set sound when phone powers on or off•Select Menu → Settings → Sounds → Pwr On/Off Sound → Enabled. – To deselect this sound, select Disabled.Adjusting volumeYou can adjust the earpiece, speakerphone, and ringer volume as well as key tones.Adjusting the earpiece volumeTo adjust the earpiece volume manually during a call, press the   key up or down.To set the earpiece volume:1. Select Menu → Settings → Sounds → Earpiece Volume.2. Press   right to increase the volume or left to decrease the volume and select Save.Using smart soundYou can set a baseline volume that the phone uses to automatically adjust the earpiece volume when there is a change in the amount of noise around you or the caller’s voice.1. Select Menu → Settings → Sounds → Smart Sound→ Enabled.Adjusting the ringer volume1. Select Menu → Settings → Sounds → Ringer Volume.2. Press   right to increase the volume or left to decrease the volume and select Save.Adjusting speakerphone volume1. Select Menu → Settings → Sounds → Spkrphone Volume.
30 Customizing Your Phone2. Press   right to increase the volume or left to decrease the volume and select Save.Adjusting key tone volumeYou can change the volume of the tones the phone makes when you press the keys. 1. Select Menu → Settings → Sounds → Key Volume. 2. Press   right to increase the volume, or left to decrease the volume and select Save.Setting key lengthYou can change duration of the tones the phone makes when you press the keys. 1. Select Menu → Settings → Sounds → Key Length.2. Choose Normal or Long and press  .Setting key soundYou can choose the sound the phone makes when you press the keys. 1. Select Menu → Settings → Sounds → Key Sound.2. Choose Tone, Click, or Off and press  .Setting message alertsYou can choose how you want be alerted of incoming voicemail, pages, or text messages.1. Select Menu → Settings → Messaging → Alerts.2. Select the type of alert and press  : Message Alert, Page Alert, or Voicemail Alert.3. Select an option:–Vibrate, Beep, Freeway!, Game!, Bloop, Winner!, and Zilofon! sets the phone to vibrate, beep, or play a tune once when a new message is received.– Options with Remind set the phone to notify you once when a new message is received and then notify you again every five minutes. To stop a reminder alert, press   to select Ignore. –Disabled turns off message alerts.Using shortcutsFrom the home screen, press   in one of four directions to access three shortcuts and one custom menu.Up: Access your Custom MenuDown: Access Recent CallsLeft: Launch Web browser (Milan KX9C only)Right: Record voice memoCreating and updating your custom menuYou can create a custom menu that contains your favorite features. After you set up your menu, simply press and hold   up to access it.1. Press and hold   up to launch Custom Menu.2. Select Manage List.
User Guide for the Kyocera Milan KX9B/KX9C Phones 313. Scroll through the available options and press   to select or deselect options. – You may select more than one feature. Items appear in alphabetical order in the menu. 4. Select Save changes.Choosing a different languageYour phone may display alternative languages. 1. Select Menu → Settings → Display → Language. 2. Select a language and press  .Personalizing the screenChanging your bannerYour personal banner appears on the home screen above the time and date and can be up to 14 characters long.1. Select Menu → Settings → Display → My Banner.2. Select Edit.3. Press   to clear the screen.4. Enter your new text. See Chapter 3, “Understanding text entry screens” 5. Select Save.Choosing a menu view You can change the appearance of your phone’s menus: 1. Select Menu → Settings → Display → Main Menu View. 2. Select an option and press  .3. Press   to return to the home screen. The next time you select Menu, you will see the menu view you selected.Adjusting the backlightingYour screen lights up while you are in a call or when you press a key on the keypad. However, you can set the duration and brightness of backlighting.1. Select Menu → Settings → Display → Backlighting → Duration.2. Select an option and press  :–7 seconds, 15 seconds, or 30 seconds turns backlighting on for 7, 15, or 30 seconds after your last keypress.–7 sec. & in call, 15 sec. & in call, or 30 sec. & in call turns backlighting on for the duration of a call and for 7, 15, or 30 seconds after your last keypress.Graphic List Wheel
32 Customizing Your PhoneNote:  The “in call” settings drain the battery more quickly.Using Power Save ModeYou can conserve battery life by activating Power Save mode. The backlighting appears for the selected duration, but is less bright than with Power Save off.•Select Menu → Settings → Display → Backlighting → Pwr Save Mode → On.Setting power backlightingYou can set backlighting to remain on when an external power source, such as the AC adapter, is used with the phone.Note:  Power backlighting may not be available with the optional desktop charger or other accessories.•Select Menu → Settings → Accessories → Pwr Backlighting → Always On.– To disable this feature, select Normal.Note:  The battery charges more slowly when power backlighting is on.Changing the display contrast1. Select Menu → Settings → Display → Contrast.2. Press   left or right to adjust the contrast and select Save.Setting numbers to auto-hyphenateAuto-hyphenation, when enabled, automatically inserts hyphens into your phone numbers to be consistent with the U.S. dialing plan. For example, 1-222-333-4444.•Select Menu → Settings → Display → Auto-Hyphen → Enabled.Selecting a screen saverScreen savers appear on the home screen when the flip is open and are activated 10 seconds after the last keypress. Incoming calls and alerts override screen savers. 1. Select Menu → Settings → Display → Screen Saver.2. Highlight a screen saver and press  . The image appears.3. Press   to assign the screen saver.4. Press   to return to the home screen and wait 10 seconds to view the selected screen saver.Note:  Downloaded screen savers are added to the end of the list. Selecting wallpaperWallpaper appears as background on the home screen. 1. Select Menu → Settings → Display → Wallpaper.2. Highlight a wallpaper design and press  .3. Select Assign to save your selection.
User Guide for the Kyocera Milan KX9B/KX9C Phones 33Selecting a color themeYou can select a color theme for the display background of your phone.1. Select Menu → Settings → Display → Color Themes.2. Scroll through the options to view the color themes and press  to select one.Choosing a different time/date format1. Select Menu → Settings → Display → Time/Date Format.2. Highlight an option press  .Creating a secure environmentThis section describes all the features involved in securing your phone and preventing access to personal information. All security features are shielded by a four-digit lock code. Changing your lock codeThe lock code is typically 0000 or the last 4 digits of your phone number.1. Select Menu → Settings → Security.2. Enter your four-digit lock code.3. Select New Lock Code. A message appears: “Change Code?” 4. Select Yes and enter a new four-digit code.5. Enter your new lock code again.Locking your phoneWhen your phone is locked, you can call only emergency numbers or your service provider’s number. You can still receive incoming calls.1. Select Menu → Settings → Security.2. Enter your four-digit lock code.3. Select Lock Phone.4. Highlight an option and press  :–Never does not lock the phone.–On power up locks the phone every time you turn it on.–Now locks the phone immediately.Unlocking the phone1. From the home screen, press   to select Unlock.2. Enter your four-digit lock code. Designating emergency numbersThe emergency numbers feature allows you to specify three personal phone numbers that can be called when the phone is locked.1. Select Menu → Settings → Security.2. Enter your four-digit lock code.3. Select Emergency Numbers.4. Select an Unassigned slot.5. Enter the phone number, including the area code. Do not enter 1 before the area code.6. Select Done.
34 Customizing Your PhoneNotes:• You can view these numbers only when they’re being entered for the first time.• To make a call to an emergency number from a locked phone, you must dial the number (including area code) exactly as it was stored in Emergency Numbers.Limiting callsYou can limit the calls that can be made from your phone to emergency numbers, your contacts, and service provider numbers.1. Select Menu → Settings → Security.2. Enter your four-digit lock code.3. Select Limit Calls.4. Choose an option and press  :–No Limit limits no calls.–Limit Outgoing calls only. Incoming calls can still be received and answered.–Limit All limits both incoming and outgoing calls.Erasing all contactsYou can erase all entries in your Contacts directory.1. Select Menu → Settings → Security.2. Enter your four-digit lock code.3. Select Erase Contacts.4. Select Yes to erase all contacts. A message appears: “Erase ALL Contacts?”5. Select Yes again to erase all contacts.Network settingsSwitching between phone linesYour phone can have two service accounts, or phone lines, associated with it. Each phone line has its own phone number.When you are using one line, you cannot receive calls from the other. It would be as if the phone were “off” for that number. Your voicemail, however, will still take messages. All contacts and settings are shared for both lines. Note:  You must first establish a second phone line with your service provider. Once established, a second phone number becomes available in the menu for selection.1. Select Menu → Settings → Network → Set Phone Line.2. Select one of the two lines and press  .Data SettingsNote:  Data features apply to Milan KX9C only and are supported only when the flip is closed.Setting Com port speedThe Com Speed sets the data rate at which your phone connects to a laptop or personal computer or at which it sends and receives over-the-air text messages.
User Guide for the Kyocera Milan KX9B/KX9C Phones 351. Select Menu → Settings → Accessories → Com Port Speed.2. Select the speed: 19.2 kbps, 115.2 kbps (default), or 230.4 kbps.Note:  There may be a higher charge for making calls using high-speed data in areas where 1X service is available. Check with your service provider for details.Setting the phone to receive data or faxesYour phone may be able to receive certain data or faxes, depending on the system sending the information. You cannot receive voice calls while the phone is in data/fax mode. To receive data or faxes, you must connect the phone to a laptop or PC and switch the phone from voice mode to data/fax mode.Note:  To purchase a data cable call 800-349-4188 (U.S.A. only), 858-882-1410, or visit www.kyocera-wireless.com/store.1. Connect the phone to the laptop or PC. 2. Set the Com Port speed.3. Select Menu → Settings → Network → Data/Fax Calls.4. Select an option and press  :–Voice only allows only voice calls.–Fax, next call or Data, next call sets the phone to fax mode or data mode for the next incoming call or the next 10 minutes. –Fax, until off or Data, until off forces the phone into fax or data mode until the phone is turned off.Note:  You cannot receive voice calls while the phone is in data/fax mode.Connecting to a TTY/TDD deviceYou can connect the phone to a TTY device for the hearing impaired. Note:  Enable TTY only when using the phone with a TTY device.1. Connect the TTY device to the phone.2. Enter         from your keypad.3. Select the TTY option.4. Press   to clear the message.5. Highlight an option and press  .Note:  TTY/TDD service may not be available. Check with your service provider for more information.Setting position locationThis setting allows you to share your location information with network services other than emergency services (911, 111, 999, 000, etc.) in markets where service has been implemented.Note:  This feature works only when your phone is in digital mode. You do not have the option of turning off the locator to emergency services.
36 Customizing Your Phone1. Select Menu → Settings → Network → Location.2. Select 911 Only or Location On.–911 Only (default) shares your position information only with emergency services when you call your 3-digit emergency code (911, 000, 111, etc.).–Location On shares your position information with your service provider’s network in addition to emergency services.
User Guide for the Kyocera Milan KX9B/KX9C Phones 377USING VOICE RECOGNITIONVoice recognition allows you to make and answer calls by speaking commands into the phone. Voice Recognition features are available for Milan KX9C only.Note:  You cannot use voice recognition to end a call; you must press   or close the flip. Setting up voice dialingTo make or receive calls using voice dialing, contacts must be saved with associated voice tags.Creating a voice tag for a contact1. Select Menu → Settings → Voice Features → Add Voice Dial.2. Follow the voice prompts to record a name for the contact.3. Highlight an option and press  :–Add New saves a new contact to go with the voice tag. –Add to existing adds the voice tag to a saved contact. Select the contact, highlight the phone number, and press   to Select.Viewing entries with voice tags•Select Menu → Contacts → Voice Dial List. A list of all contacts with assigned voice tags appears.Editing a voice tag1. Select Menu → Contacts → Voice Dial List.2. Highlight the contact you want to edit and press .3.Highlight the phone number and select Options.4. Select Add Voice Dial, Erase Voice Dial, or Edit Voice Dial.5. Follow the prompts.Calling using voice tags1. If you haven’t already done so, record a voice tag for the person you wish to call.2. From the home screen, press  . The phone responds: “Say a name” or “Say ‘dial.’”3. Say the name of the person you want to call.4. If the name you said matches a contact in the Voice Dial List, the phone responds: “Calling (Name).” Remain silent to make the call, or say No to cancel.5. If the phone finds multiple voice tags that sound like the name you said, you will be asked to verify which name you want to call. Say Yes when you hear the correct name. Say No when you hear an incorrect name.6. When you are finished with the call, press  . You cannot end the call with a voice command.
38 Using Voice RecognitionErasing all voice tags1. Select Menu → Settings → Voice Features → Erase Voice Dial.2. Select Yes.3. Select Yes again at the confirmation.Calling using digit dialingYou can speak the digits of a phone number to dial it.Note:  You cannot speak a string of digits. You must speak one digit at a time and wait for the prompt.1. From the home screen, press  . The phone responds: “Say a name or say Dial.”2. Say “Dial.” The phone responds: “Speak a digit.”3. Speak the first digit of the phone number you want to call. Once the phone repeats the digit, you can speak the next digit.If you pause, the phone prompts you with the following five options. After the prompt, speak an option.–Say “Clear” to erase the last digit entered. The phone responds: “Digit cleared.”To clear the entire phone number, say “Clear” again. When the phone prompts you with “Clear entire phone number?”, say “Yes” to clear or “No” to cancel.–Say “Call” to dial the number.–Say “Verify“ to hear the set of spoken digits.–Say “Cancel” to exit voice recognizer and return to the home screen.–Speak a digit to enter the next digit. Once the phone repeats the digit, you can speak the next digit or pause to hear the prompt.Using voice features with hands-free car kitsYou can use voice commands to make a phone call or to answer the phone only if your phone is connected to a professionally installed Kyocera hands-free car kit (sold separately).Note:  The following features apply only to professionally installed Kyocera hands-free car kits unless noted.To shop for these accessories, visit www.kyocera-wireless.com/store or call 800-349-4188 (U.S.A. only) or 858-882-1410.Waking up the phoneIf your phone is connected to a professionally installed Kyocera hands-free car kit, you can use a voice command to activate the phone to make a call.Note:  Voice Wake-up does not work with Keygaurd active. To disable Keygaurd, see “Locking your phone” on page 33.To activate the Voice Wake-up setting:
User Guide for the Kyocera Milan KX9B/KX9C Phones 39•Select Menu → Settings → Voice Features → Voice Wake-Up → With accessory.To wake up the phone:1. Say Wake Up and listen for a tone. 2. Say Wake Up again until you hear two tones.If the phone does not recognize your “Wake up” command, see “Training voice recognition” on page 39.Answering the phoneYou can set the professionally installed Kyocera hands-free car kit to either (1) answer automatically or (2) answer using a voice command.Answering automatically• Select Menu → Settings → Accessories → Auto-Answer → After 5 seconds.Note:  This setting also works with the portable hands-free car kit.Answering using voice commandsIf Auto-Answer is turned off, you can use a voice command to answer an incoming call using the installed Kyocera hands-free car kit.To turn off Auto-Answer:•Select Menu → Settings → Accessories → Auto-Answer → Disabled.To activate the Voice Answer setting:1. Select Menu → Settings → Voice Features → Voice Answer → Enabled.2. Select Menu → Settings → Silent Mode → Normal Sounds.To answer a call:When you receive an incoming call, the phone responds: “Incoming call, answer?” or “Incoming roam call, answer?” If the caller is recognized as a saved contact entry, then the phone says “Incoming call from (Name), answer?”•Say Yes or press any key except  .Ignoring an incoming callTo ignore an incoming call, do one of the following:•Say No and press   to silence the alert.• Remain silent. The voice alert repeats twice and the phone rings once, then returns to the home screen.Using Expert ModeExpert Mode allows you to use voice recognition at a faster pace by reducing the number of voice instructions and replacing them with tones. Simply speak a command after the tone.•Select Menu → Settings → Voice Features→ Expert Mode → Expert.Training voice recognitionIf your phone is having trouble recognizing your voice, you can train it with commands, such as Yes, No, and Wake up.1. Select Menu → Settings →Voice Features.
40 Using Voice Recognition2. Select Voice Training.3. Read the message and select OK to continue or Cancel to return to the previous screen.4. Select Train All or the item you want to train.5. Follow the prompts for each word until training is complete.
User Guide for the Kyocera Milan KX9B/KX9C Phones 418USING MEDIA GALLERYThe media gallery stores and displays all the image and sound files in the phone.Accessing files1. Select Menu → Media Gallery.2. Highlight an option and press  :–Images displays a list of categories that contain preloaded, downloaded, saved, or created files, such as wallpapers, screen savers, or caller IDs.–Sounds displays a list of categories that contain saved or downloaded sounds, such as ringers and voice memos.Browsing imagesThe Images menu allows you to assign your files to various applications.1. Select Menu → Media Gallery → Images.2. Highlight an option and press  :–Saved Images displays available images.–Wallpapers displays wallpaper selections.–Screen Savers displays available screen savers.–Caller IDs displays pictures and images that can be assigned to saved contacts.–Doodles displays files created with Doodler (available for KX9C only).3. Highlight an image and select Options. Note: Options vary according to menu selection. 4. Highlight an option and press  :–Erase the image (image must not be locked).–Set As Default sets as default setting.–Assign an image as a caller ID, wallpaper, or screen saver.–Rename an image.–Details gives you the file size of the image.–Erase All erases all stored images (images must not be locked).5. Select   or   when done.Browsing soundsThe Sounds menu allows you to view and listen to all sound files stored on your phone.1. Select Menu → Media Gallery → Sounds.2. Highlight an option and press  :–Saved Sounds contains sounds saved on your phone.–Ringers contains ringers saved on your phone.–Voice Memos contains recorded voice memos.3. Highlight a sound file and select Options. 4. Highlight an option and press  :
42 Using Media Gallery–Erase the sound.–Assign a sound as a ringer.–Rename a ringer.–Details gives you the file size of the sound.–Erase All stored sounds.5. Select   or   when done.Creating free spaceIf your phone does not have enough memory to store a file, a dialog appears and asks you if you want to create space. •Select Yes to display the file browser (categories) with the memory needed and available memory.•Select No to return to the previous screen. No files are saved or downloaded.The actions are limited to the following:–Erase the selected file (you cannot erase locked files).–Done re-attempts the download or save.
User Guide for the Kyocera Milan KX9B/KX9C Phones 439USING TOOLS AND GAMESVoice MemoThe Voice Memo tool allows you to record and play back audio memos.Recording a voice memo1. Select Menu → Tools & Games → Voice Memo → Record New.-or- Press and hold   right. 2. Say your memo and press to   select Stop.3. Select Save to save your memo.Note:  If an incoming call is received while you’re recording a memo, the memo is saved and the incoming call screen appears.Playing or reviewing a voice memo1. Select Menu → Tools & Games → Voice Memo → Recorded Memos.2. Highlight the voice memo to review and select Play.3. Press   right and left to select a function and press   to perform it:Naming a saved voice memo1. Select Menu → Tools & Games → Voice Memo → Recorded Memos.2. Highlight the memo and select Options.3. Select Rename. 4. Press and hold   to clear the default name.5. Use the keypad to enter a name for the memo.6. Select Save.Erasing a saved voice memo1. Select Menu → Tools & Games → Voice Memo → Recorded Memos.2. Highlight the memo and select Options.3. Select Erase. The prompt “Erase file?” appears.4. Select Yes or No.SchedulerThe Scheduler allows you to schedule events and set reminder alerts. Creating an event1. Select Menu → Tools & Games → Scheduler → Add New Event.2. Enter a name for the event and press   down. For help entering text, see page 13.Play=Stop=Pause=
44 Using Tools and Games3. Select Options and classify the type of event and press : Meeting, Phone Call, Birthday, Anniversary, Vacation, Medical, or Other.4. Press   to change the date of the event (the current date is the default date of the event).– Press   left or right to move between the month, day, and year fields.– Press   up or down to change the month, day, or year.– Press   to save your changes.5. Press   to set the time of the event.– Press   left or right to move between the hour, minute, and AM/PM fields.– Press   up or down to change the hour, minute, or AM/PM.– Press   to save your changes.6. Press   to set the duration of the event. – Press   left or right to move between the hour and minute fields.– Press   up or down to change the hour and minute.– Press   to save your changes.7. Press   to set a reminder of the event. – Select an option and press  . 8. Press   to set the reminder sound. – Select an option and press  . 9. Press   to select a Silent Mode setting–Select No or During Event and press  .10. Press   to select whether or not this is a recurring event.– Select an option and press  : No, Daily, Weekly, Monthly, or Annually.11. Select Save.Editing, erasing, or sending an event1. Select Menu → Tools & Games → Scheduler → View Month.2. Press   up, down, left or right to highlight the day with the event to view, edit, or erase.3. Press   up or down to highlight the event and press  .4. Press   to select Options. 5. Select Edit, Erase, or Send and press  . – For more information about editing the event, see “Scheduler” on page 43.– To erase the event, highlight Erase and press  . Press   to confirm.– For more information about sending the event, see “Sending and Receiving Text Messages” on page 20.Alarm ClockYou can set up to four alerts with your phone’s three alarm clocks and one quick alarm. Note:  The alert occurs only if the phone is on.
User Guide for the Kyocera Milan KX9B/KX9C Phones 45Setting an alarm clock1. Select Menu → Tools & Games → Alarm Clock. 2. Highlight one of the alarms and select Set.3. Use the phone keypad to enter numbers and  to switch between AM and PM.– Press   left or right to move between hours, minutes, and AM/PM fields. – Press   up or down to change the hours, minutes, and AM/PM options.4. Press   to set the time of the alarm.5. Select Options to set the alarm sound.6. Highlight an option and press  .7. Select Options to set the recurring time.8. Highlight an option and press  .9. Enter a note for the alarm and press  . 10. Press   to select Save and set the alarm(s).11. When the alarm rings, select Off to turn off the alarm or Snooze to silence the alarm for 10 minutes.Note:  Opening the flip turns off the alarm.Setting the QuickAlarm1. Select Menu → Tools & Games → Alarm Clock. 2. Highlight QuickAlarm and select Set.3. Select an option and press  : 5 minutes, 15 minutes (default), 30 minutes, or 60 minutes. A message appears telling you the QuickAlarm is On.4. When the alarm rings, select Off to turn off the alarm or Reset to set the QuickAlarm again.Tip CalculatorThe Tip Calculator helps you calculate how much tip to include with a bill. 1. Select Menu → Tools & Games → Tip Calculator.2. Enter the amount of your bill.3. Select Next.4. Select the amount you want to include as a tip (10%, 15%, 18%, 20%, Other) and press . Your total bill appears, including tip.5. To split the bill, press   to select Split.6. Press   to clear the default of 2 guests.7. Enter the number of guests and press   to select Next. The amount each guest pays is calculated.8. Select Done.CalculatorUse the calculator for basic mathematical equations.1. Select Menu → Tools & Games → Calculator.2. Use the keypad to enter numbers.3. Use   to select mathematical operations:Left x (multiply) Up + (add)Right ÷ (divide) Down - (subtract)
46 Using Tools and Games4. Press   to calculate the result. Example: Enter 5, press   left to select X, enter 2, then press   to obtain the result of 10.5. Press   to return to the home screen.- or - Press   to clear the screen.TimerThis timer counts down for a specified amount of time. It beeps when that amount of time has elapsed.1. Select Menu → Tools & Games → Timer.2. Select Set.– Press   to move the cursor left or right.– Press   up or down to set the hours, minutes, and seconds. 3. Select Start to begin the countdown.Select Stop to pause the countdown.Select Reset to clear the timer.4. Select Sound to set the alarm sound and press .5. Press  or   to silence the alarm.Stopwatch1. Select Menu → Tools & Games → Stopwatch.2. Select Start to begin counting. Select Stop to stop counting.Select Reset to clear the counter.GamesThe games in this section may not be available on your phone. Check with your service provider for availability.If you receive an incoming call alert while you are playing a game, the game is paused and exited. You can return to play once the call alert ends. Games do not remain paused if the phone is turned off or loses power.Brick AttackThe goal of this game is to eliminate bricks arranged in levels. You send a moving ball upward using a paddle at the bottom of the screen.1. Select Menu → Tools & Games → Brick Attack.2. Press  to select Yes at the prompt, “Turn off backlight to conserve battery?” 3. Press   to select New.– To pause the game, press  , then press  to Resume.– To move the paddle, press   left or right.OptionsM+ Adds displayed digit to the value stored in memory.MR Displays currently stored value on screen.MC Clears value currently stored in memory.
User Guide for the Kyocera Milan KX9B/KX9C Phones 47– To exit the game, highlight Exit and press .Race 21This game is a timed variation of Black Jack. Each game comprises three 90-second rounds. To score points, add cards in each of the four columns, trying to reach but not exceed 21 in each column within during the course of the game.1. Select Menu → Tools & Games → Race 21. 2. Press  to select Yes at the prompt, “Turn off backlight to conserve battery?”3. Select New Game. The first card to be placed is shown at the top left of the screen. Press a key to add a card to the row as follows:4. Continue placing cards until you are satisfied with your selections. – You can pause or end the game at any time by pressing  .– You lose points each time you exceed 21 in a column.–Select Skip to skip one card per round.5. Press   to select   to get your score and advance to the next round. 6. Select an option and press   to select it.–New Game initiates game play. To pause the game, press  . From here you can choose Resume, New or Quit.–Resume Game returns you to the game you were last playing.–Scoreboard provides you with the top five scores.–Music plays music with this game. Select from Music Always, Sound Effects, Instructions, Credits, During Title, or No Music.7. Press   to end all games. DoodlerYou can create and save graphics on your phone.1. Select Menu → Tools & Games → Doodler.2. Press  to select Yes at the prompt, “Turn off backlight to conserve battery?”3. Select New Doodle to open the drawing screen The cursor is located in the middle of the screen.4. Select Options to choose the Colors, Tools, Lines, or Shape you want to use.Add cards to the first row Add cards to the second rowAdd cards to the third rowAdd cards to the fourth rowShortcut: Press   left or right to choose arrows at the bottom of the screen then press  to add cards to corresponding rows.Note: Each time you place a card, a new card appears for placement.
48 Using Tools and Games5. Use keys 1–9 or   to move the cursor around the screen as indicated.6. When finished, select Options → Save. The image is saved to Media Gallery.To move the cursor away from the drawing:1. Select Options → Colors and Tools. 2. Select  then Done.3. Press a number key to move the cursor.To erase part of a drawing:1. Select Options → Colors and Tools. 2. Select  then Done. 3. Press a number key to move the eraser.To Navigate: Use the following keys to doodle.Saving a doodleIt is a good idea to save the doodle while you are working on it. If you receive a call while creating an unsaved doodle, it will be lost.•Select Options → Save. The image will be saved in Menu → Media Gallery → Images → Doodles.Resuming a doodleTo return to another saved doodle:•Select Menu → Tools & Games → Doodler → Resume Doodle.- or -Select Menu→ Media Gallery → Images → Doodles.To: Use:Select OptionsClear screenShortcut to ToolsDraw, erase, or move cursor/shape UP  upDraw, erase, or move cursor/shape DOWN  downDraw, erase, or move cursor/shape LEFT  leftDraw, erase, or move cursor/shape RIGHT  rightReturn cursor to centerPrevious screen
User Guide for the Kyocera Milan KX9B/KX9C Phones 4910 CONNECTING TO THE INTERNETAvailable for Milan KX9C only.Using the Mobile WebYou can use your Milan KX9C phone to browse the Internet if you have obtained phone Internet services from your service provider and if over-the-air Internet access is available in your area. Note:  You cannot receive incoming calls while you are using the Web Browser. Starting the Web Browser1. Select Menu → Web Browser.-or-Press and hold   left to launch the browser.Note:  A message about airtime fees appears every time you start the browser. To cancel the message, see “Changing the Web prompt” on page 50. For more information about how airtime is charged, contact your service provider.2. Press   to continue.If this is the first time you have connected to the Internet, a message informs you that security is not yet enabled for your Web Browser.3. Press   to select Yes to enable security.When you are connected, a browser home page appears. It has a list of bookmarks and some Web menu options at the bottom of the screen.– A   appears in a secure session.– An underline and an arrow indicate that there is more text. Press   down to view more text. Press  to return to the previous screen.– To choose a site, highlight it and press   to select Go.4. When you have finished using the Internet, press   to exit the browser.Using the Web menu optionsThe following options may appear on your screen:•Home returns you to the main Web Browser window or home page.•Mark Site saves the current location as a bookmark for easy access.•Bookmarks displays a list of your saved Web sites.•Setup gives you options for changing how information is displayed.–Show URL displays the entire URL.–About Openwave displays information about your Web Browser version.–Encryption should not be used unless you are instructed to do so by your service provider.
50 Connecting to the Internet–UP.Link selects a different browser server. You can use this option if you have more than one Web Browser account.–Restart restarts the Web Browser.Searching for a Web siteHow you search for a Web site depends on your service provider. For more information, contact your service provider.Going to a bookmarked site1. Select Menu → Web Browser. If you see a message prompt, press   to continue.2. From your Web home page, select Bookmarks. A list of bookmarks appears.3. Enter the number corresponding to the bookmark you want and press  .Checking Browser alertsAlerts received from a Web site are sent to your Browser Alerts inbox. 1. Select Menu → Messages → Browser Alerts. This action launches the browser inbox.2. Press   to accept browser fees.3. Select an alert and follow the prompts.Changing the Web prompt1. Select Menu → Settings → Convenience → Web Prompt.2. Highlight an option and press  :–At Start confirms that airtime fees will be applied when you use the browser.–At End verifies you want to exit the browser.–Both prompts you when you start and exit the browser.–No Prompts does not use any prompts.
User Guide for the Kyocera Milan KX9B/KX9C Phones 5111 GETTING HELPCustomer supportYour service provider’s customer support department may be accessible directly from your phone when you dial a number such as *611 (check with your service provider). They can answer questions about your phone, phone bill, call coverage area, and specific features available to you, such as call forwarding or voicemail.For questions about the phone features, refer to the materials provided with your phone, or visit www.kyocera-wireless.com.For additional questions, you may contact the Kyocera Wireless Corp. Customer Care Center in any of the following ways:• Web site: www.kyocera-wireless.com• Email: phone-help@kyocera-wireless.com • Phone: 1-800-349-4478 (U.S. and Canada) or 1-858-882-1401. Customer support phone numbers are also available in the following countries.Before requesting support, please try to reproduce and isolate the problem. When you contact the Customer Care Center, be ready to provide the following information:• The name of your service provider. • The actual error message or problem you are experiencing. • The steps you took to reproduce the problem. • The phone’s electronic serial number (ESN).– To locate the ESN select Menu → Phone Info and scroll down to ESN: for the 11-digit number.Argentina: 0-800-666-0052Australia: 1-800-507-000Brazil: 0-800-55-2362Chile: 800-43-1212Colombia: 01-800-700-1546India: Toll free:1-600-121214Toll: 0124-284-5000Mexico: 001-866-650-5103New Zealand: 0-800-990-100Panama: 001-800-201-1984Peru: 0-800-51-934Puerto Rico: 1-866-664-6443Venezuela: 0-800-100-2640
52 Getting HelpQualified serviceIf the problem with your phone persists, return the phone with all accessories and packaging to the dealer for qualified service.Phone accessoriesTo shop for KX9B/KX9C phone accessories, visit www.kyocera-wireless.com/store. You may also call us at 800-349-4188 (U.S.A. only) or 858-882-1410.Become a product evaluatorTo participate in the testing and evaluation of Kyocera Wireless Corp. products, including cellular or PCS phones, visit beta.kyocera-wireless.com.
User Guide for the Kyocera Milan KX9B/KX9C Phones 53INDEXNumerics1-touch dialing, 9Aaccessories, iv, 52alarm clock, 5, 44alertsbrowser, 50for messages, 30for missed calls, 8minute alert, 11roaming, 11analog mode, 5, 12auto-hyphenation, 32Bbanner, 31battery, 1blocking outgoing calls, 34Brick Attack, 46browser, 2, 49Ccalculator, 45callback number, 21calls answering, 6ending, 6missed, 8tracking, 10Choosing, 28color themes, 33com port speed, 34contacts directory, 16contrast, 32countdown timer, 46custom menu, 30updating, 30Ddata/fax setup, 35digital mode, 5, 12display contrast, 32Doodler, 47Eemergencycalls, 10emergency mode, 10exit emergency mode, 10position location, 5, 35erasingall contacts, 34contact entries, 18phone numbers, 18text messages, 24expert mode, 39Ffast find, 19fax mode, 35finding contact information, 18frequent contacts, 19GgamesBrick Attack, 46Doodler, 47Race 21, 47Hhands-free car kitanswering using voice, 39purchasing, iv, 52hands-free headsetpurchasing, iv, 52hard pause, 16Iicons, 5contacts, 17messages, 23recent calls, 8InBox, 23Internet, 49Llanguage, 31lightslights-only mode, 5, 28limiting calls, 34lock code, 33lockingphone, 33Mmemorycreating free space, 42saving, 24menu view, 31NNetwork settings, 12Digital/Analog, 12number mode, 13OOutBox, 23Pphone numbers
54 Indexerasing, 18verifying your own, 2phone, unlocking, 33position location, 5, 35QQuickAlarm, 45QuickText, 21, 25RRace 21, 47resetting the phone, ivringersbusiness and personal, 28for contacts, 16for roaming calls, 11general, 28silencing, 2volume, 29roaming, 5, 11alerts, 11ringer, 11Sscheduler, 43screen contrast, 32screen icons, 5, 13, 22, 23, 28screen savers, 32, 41secret contacts, 8, 18security, 33sent messages, 22shortcuts, 30silent mode, 5, 28smart sound, 29smiley mode, 14speakerphone, 7speed dialing, 8, 18stopwatch, 46symbol mode, 14Ttechnical support, 51text entry, 13quick reference, 15text messages, 20time format, 33timer, 46timing calls, 10tip calculator, 45TTY/TDD, 35Uunlocking the phone, 33VvCard, 18vibrate, 5, 28voice answer, 39voice dialing, 37voice memo, 41erasing, 43naming, 43recording, 2, 43voicemail, 9setting up, 2volumeearpiece, 7, 29key beep, 30ringer, 29Wwallpaper, 32, 41web browser, 49

Navigation menu