Kyocera KYO701 Mobile phone User Manual
Kyocera Corporation Mobile phone
UserManual.wiki
>
Kyocera
>
KYO701 User Manual
User manual
Navigation menu
Upload a User Manual
Namespaces
Wiki Guide
HTML
PDF
Info
Views
User Manual
Discussion / Help
Navigation
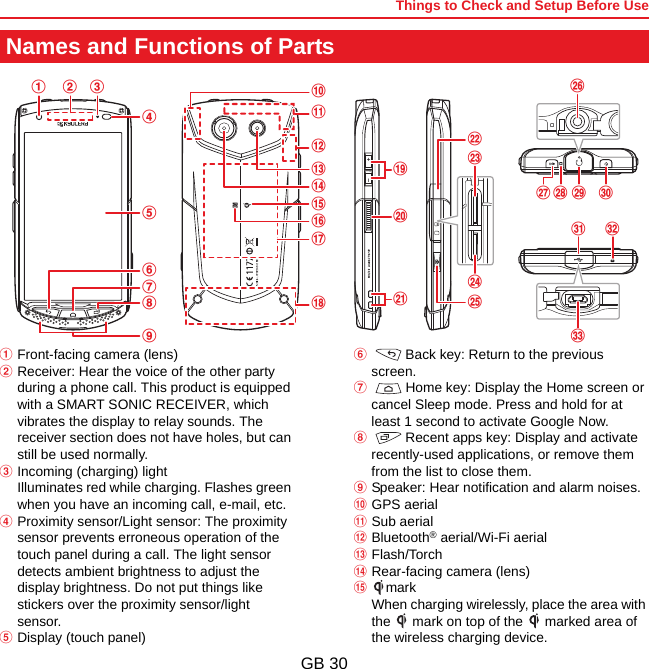
![GB 1Getting StartedThank you for purchasing a KYOCERA smartphone.Before use, please read the User Guide and the supplied Quick Reference Guide for proper usage.Choose the model you are using from the list at the URL below to view the USB driver.http://global.kyocera.com/ruggedphone/•KC-S701 main unit•Power adapter•Micro USB cable•Headset with microphone•Warranty•Quick Reference Guide✎Notes•The battery is built into the product.•MicroSD card and wireless charger are not included.In this document, the symbols , , , , , , , and are used to represent key operation. Also, the notations used for selecting icons and items visible on the display are as follows.Example : On the Home screen tap ► ► [About phone].Explanation : Tap the icon at the bottom of the Home screen. On the Apps list that is displayed, swipe right or left and tap . Then swipe up and down on the Settings menu screen that is displayed, and tap [About phone].✎Notes•This manual describes operations from the Home screen at factory settings. It you change things like the settings, then operation procedures, icons, etc. may differ from those described. Also, operations are described based on a vertical display. If using a horizontal display, things like menu items may differ.•The screens and illustrations used in this manual are representations and may differ from the actual product and screens. In addition, a portion of the screen may be omitted.List of Packaged ItemsNotations Used in This Document](https://usermanual.wiki/Kyocera/KYO701/User-Guide-2518479-Page-2.png)


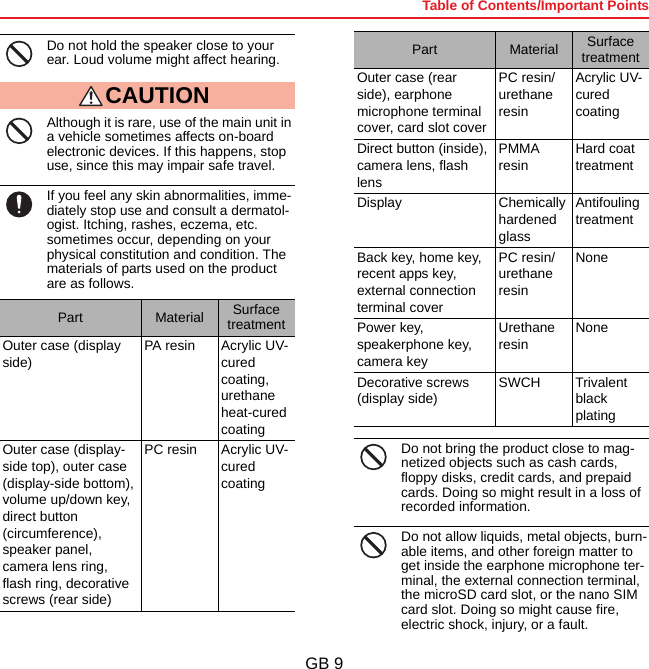

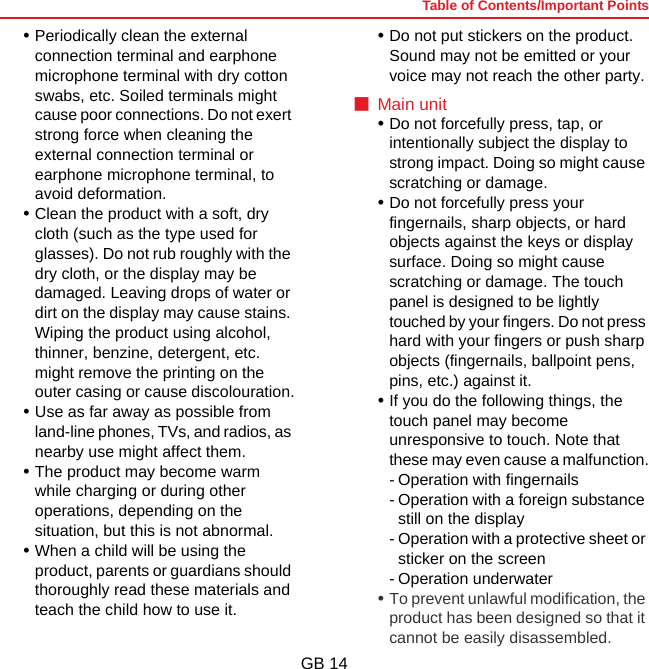
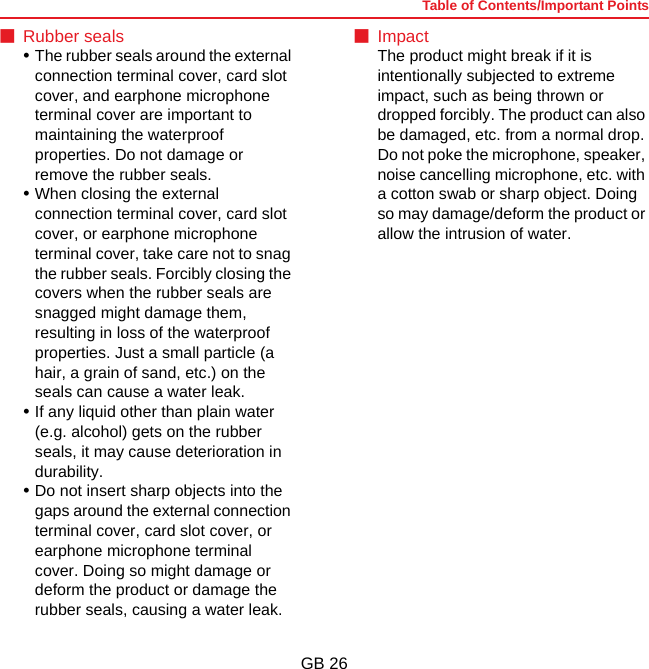

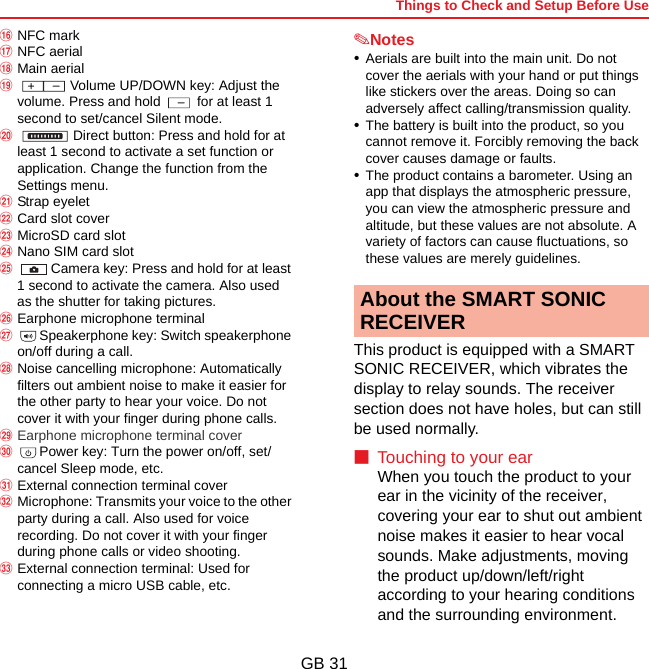

![Things to Check and Setup Before UseGB 341Open the card slot cover.2Check the alignment of the microSD card, and slowly insert it straight until you hear it click.When inserting, make sure there is a click to signify it locking. If you remove your finger before the microSD card is locked in place, it may come flying out.•The nano SIM card slot is on the left side, while the microSD card slot is on the right, as illustrated below.3Close the card slot cover.✎Note•The front/back and top/bottom of a microSD card are distinct. Forcing the card into the slot can cause an inability to remove the card or damage to the data.1On the Home screen tap ► ► [Storage] ► [Unmount SD card] ► [OK].2Open the card slot cover.3Slowly press in the microSD card until it clicks.Once it clicks, pull your finger back slightly, along with the microSD card. If you release your finger after pushing hard, the card may come flying out.4Slowly pull the microSD card straight out.Some microSD cards cannot be unlocked and do not eject. In this case, remove the card by pulling lightly with your fingers.5Close the card slot cover.Inserting a microSD card Removing a microSD card](https://usermanual.wiki/Kyocera/KYO701/User-Guide-2518479-Page-35.png)
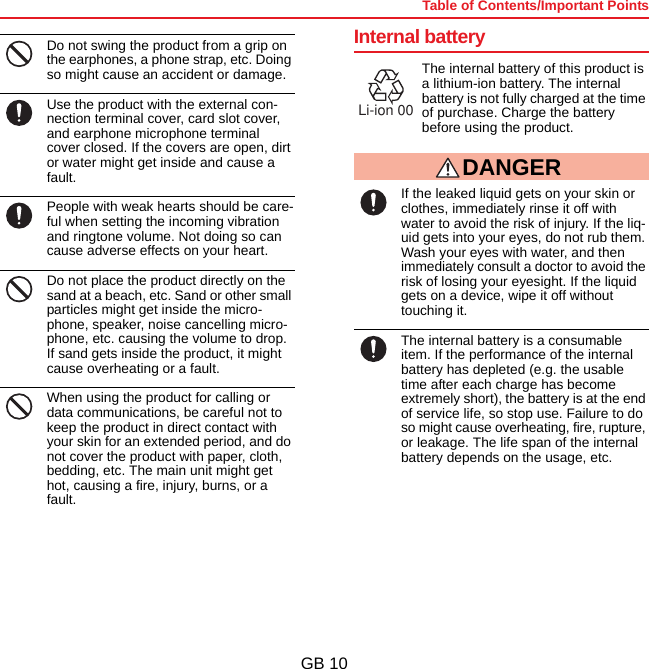
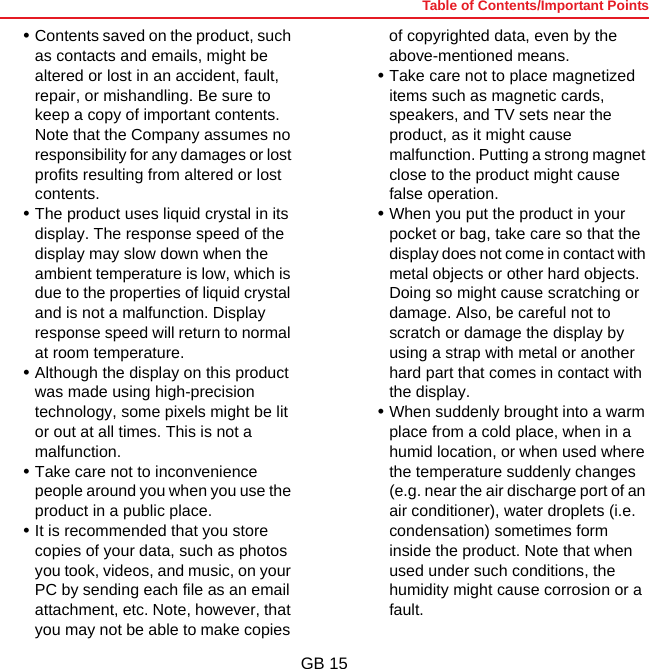
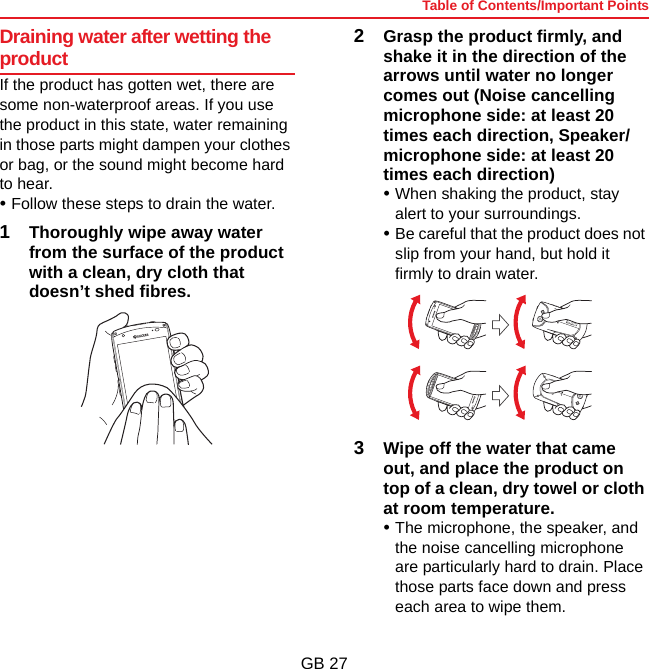
![Things to Check and Setup Before UseGB 37✎Note•While the various logos are being displayed after turning on the power, do not touch the screen, because the touch panel’s initial settings are being processed. If you do, the touch panel may not function normally.■ Start screenSwipe right and left to switch between the Compass, Barometer, and other widgets that are displayed on the Start screen.•Change the Start screen from the Settings menu.aWidgetbIndicatorTap to switch widgets, and tap to add widgets from a list.■ Sleep modeIf the product is not operated for a set amount of time, the screen darkens to curb battery consumption, and the product enters Sleep mode.•Press to enter Sleep mode.•Press or to cancel Sleep mode.•The time it takes to enter Sleep mode can be changed in the Settings menu.✎Note•While in Sleep mode, when you press or to display the screen, do not touch the screen. If you do, the touch panel may not function normally.1Hold down for at least 1 second.2[Power off] ► [OK]✎Note•If the screen is not responding and you cannot turn off the power, hold down for at least 11 seconds to force the product to turn off and restart. If you force the product to restart, unsaved data will be lost. Do not do so unless the product is inoperable.abTurning off the power](https://usermanual.wiki/Kyocera/KYO701/User-Guide-2518479-Page-38.png)
![ApplicationsGB 431When a call is arriving, drag to on the right.2When you’ve finished a call tap .✎Notes•To turn off the ringtone and vibration when receiving a call, press .•Tap while receiving a call to end the call with a message or reject the call.1On the Home screen tap ► ► [About phone].2[Status] ► [My phone number] ✎Note•You can also check your phone number from your profile in the People app.People displays various information for each of your contacts.✎Note•The names, numbers, etc. that are registered in People can disappear due to an accident or fault. We recommend making copies of phone numbers, etc. Note that the Company assumes no responsibility for any damages or lost profits resulting from altered or lost contacts caused by an accident or failure.1On the Home screen tap ► .Displays your contacts list.1On the Home screen tap ► .2Tap .•If the account selection screen is displayed, follow the on-screen instructions.3Enter the necessary items.Receiving a callDisplaying your own phone numberPeopleDisplaying contactsRegistering contacts](https://usermanual.wiki/Kyocera/KYO701/User-Guide-2518479-Page-44.png)
![ApplicationsGB 444[DONE]•If you tap a registered contact, the details are displayed, and you can check the registered content.✎Notes•If your contacts are not registered at step 1, a selection screen for creating a new contact, setting up an account, or importing contacts is displayed.•You can manage your own profile from the contacts list.•After setting up an account, on the contacts list tap to create and manage groups. Also, contacts that are saved on the server can be synced with those in People on the product. To set up an account, something like Wi-Fi or a nano SIM card that can connect to the network is necessary.•You can import and export contacts from the internal storage, a microSD card, etc.1On the Home screen tap ► ► choose a contact.2 ► [Edit]3Choose and edit items.4[DONE]✎Note•After tapping in step 2, you can delete a contact, share it via another application, etc.A nano SIM card that can connect to the network is necessary.•The number of characters and amount of data that you can send varies depending on the transmission method. Depending on your service provider, you might not be able to use this feature.1On the Home screen tap ► .2Enter the recipient’s phone number or e-mail address.3Enter the main text.4Tap / .✎Note•Depending on your contract and service provider, you can tap while creating a message to attach and send files.Editing contactsMessagingSending a message.](https://usermanual.wiki/Kyocera/KYO701/User-Guide-2518479-Page-45.png)
![ApplicationsGB 45Received messages are displayed by their participants.1On the Home screen tap .2Choose the message you want to check.✎Notes•To reply, enter a message into the message field and send.•Touch and hold a message to do things like forward or delete it.Something like Wi-Fi or a nano SIM card that can connect to the network is necessary. You can send and receive emails as if on a computer.•To use Email it is necessary to set up an email account beforehand (P. 57). You can even set up multiple email accounts.1On the Home screen tap ► ► .2Enter the recipient’s email address.3Input the subject and body.4Tap .✎Note•Tap while creating an email to attach a file, add an address, etc.1On the Home screen tap ► .•If multiple email accounts are set up, tap an account at the top of the screen to choose which email account is displayed.2On the Inbox or other screen tap ► [Refresh] .3Tap an email.✎Notes•Tap to reply, or tap to forward or reply all. Then create an email and send.•To delete an email, in the Inbox or individual folder screen touch and hold the email and tap , or choose the email and then tap .Reading a messageEmailCreating and sending an emailReceiving and reading an email](https://usermanual.wiki/Kyocera/KYO701/User-Guide-2518479-Page-46.png)
![ApplicationsGB 46Something like Wi-Fi or a nano SIM card that can connect to the network is necessary. You can check, send, and receive Gmail messages from this product.•To use Gmail it is necessary to set up a Google account beforehand (P. 57). You can even set up multiple Google accounts.✎Note•For more details on things like usage, please refer to the Google home page.1On the Home screen tap ► ► .2Enter the recipient’s email address.3Input the subject and body.4Tap .✎Note•Tap while creating a Gmail to attach a file, add an address, etc.1On the Home screen tap ► .•If multiple Google accounts are set up, tap an account at the top of the screen to choose which Google account is displayed.2On the Inbox or other screen tap ► [Refresh] .3Tap Gmail.✎Notes•Tap to reply, or tap to forward or reply all. Then create a Gmail and send.•To delete a Gmail, in the Inbox or individual folder screen touch and hold the Gmail and tap , or choose the Gmail and then tap .GmailCreating and sending a GmailReceiving and reading a Gmail](https://usermanual.wiki/Kyocera/KYO701/User-Guide-2518479-Page-47.png)
![ApplicationsGB 47Something like Wi-Fi or a nano SIM card that can connect to the network is necessary.•If the Google Chrome Terms of Service are displayed, confirm the contents, and follow the on-screen instructions.1On the Home screen tap .2Enter search terms or a URL in the URL entry field at the top of the screen.3Tap one of the search suggestions or .✎Note•If you touch and hold a link or image, a menu is displayed, from which you can save, copy, etc.You can register frequently viewed web pages as bookmarks, so they’re easy to display.1On the Home screen tap .2Display a web page you want to register.3Tap ► .4Set the name and save folder ► [Save].✎Note•On a web page tap to display your registered bookmarks and history, change your Chrome settings, etc.ChromeConnecting to the InternetRegistering a bookmark](https://usermanual.wiki/Kyocera/KYO701/User-Guide-2518479-Page-48.png)
![ApplicationsGB 50To install an app from Google Play, something like Wi-Fi or a nano SIM card that can connect to the network is necessary.•Setting up a Google account is necessary to use Google Play.1On the Home screen tap .2Search for the app ► choose the app.•After looking over the displayed content, follow the on-screen instructions.✎Notes•For paid apps, follow the purchasing procedure before downloading.•You can remove apps that were installed via Google Play, as well as reference the help page.•Depending on the app, it may perform automatic updates.•Operational procedures and the on-screen appearance of apps are subject to change without notice as a result of version upgrades. Be aware that they may differ from the descriptions in this manual.Battery consumption is reduced by changing the screen’s Sleep time or brightness and by disabling the Wi-Fi and Bluetooth functions.1On the Home screen tap ► .2Tap [ECO MODE].3[On]/[Auto On] 4Set each item.✎Notes•When setting Eco Mode to Auto On, set the battery level where the product switches into Eco Mode.•You can also set restrictions on background mobile data transmissions.Play Store Eco Mode](https://usermanual.wiki/Kyocera/KYO701/User-Guide-2518479-Page-51.png)
![Product settingsGB 51Product settingsChange various settings from the Settings menu.1On the Home screen tap ► .1On the Home screen tap ► .2Choose item operation.[Aeroplane mode] : Set Aeroplane mode.[Wi-Fi] : Set Wi-Fi function.[Bluetooth] : Set Bluetooth function.[Data usage] : Set whether mobile data transmissions are enabled/disabled, and set an upper limit on data usage.[More...] : Tap to display the following items.[Default SMS app] : Set up the message application used on the product.[NFC] : Enable/disable NFC function.[Android Beam] : Use the Android Beam function to exchange data with cellular phones and other devices equipped with an NFC function.[Tethering & portable hotspot] : Use the product as a modem and connect other USB-compatible devices, Wi-Fi devices, and Bluetooth devices to the Internet.[VPN] : Use a virtual private network for outside connection to information that is saved within the local network of a business, school, etc.[Mobile networks] : Set whether mobile data transmissions are enabled/disabled, and setup an access point for connecting to the Internet.[Mobile broadcasts] : Control settings related to emergency alerts.Calling, Internet connections, email correspondence, and all other functions that transmit radio waves are disabled.1On the Home screen tap ► .Displaying the Settings MenuWIRELESS & NETWORKSSetting Aeroplane mode](https://usermanual.wiki/Kyocera/KYO701/User-Guide-2518479-Page-52.png)
![Product settingsGB 522Tap for Aeroplane mode or drag it to the right.•When on, is displayed in the status bar.✎Note•You can also hold down for at least 1 second to set Aeroplane mode.You can use Wi-Fi to connect to home networks, work networks, public wireless LAN services, and other wireless access points.•You can still use the mobile network when the Wi-Fi function is turned on. However, the Wi-Fi function gets priority when connected to a Wi-Fi network.Connecting to a Wi-Fi network1On the Home screen tap ► .2Tap for Wi-Fi or drag it to the right.3[Wi-Fi]•A list of available Wi-Fi networks is displayed.4Choose a Wi-Fi network.•If you are connecting to a Wi-Fi network with security protection, password entry is necessary.✎Note•To disconnect from a Wi-Fi network, select the Wi-Fi network you are currently connected to.Easily setting up a Wi-Fi networkYou can easily connect using WPS features.•Turn on the Wi-Fi function before starting.1On the Home screen tap ► ► [Wi-Fi].2Manipulate as intended.•If connecting by the WPS button method, operate from . If connecting by the WPS PIN entry method, operate from . Follow the onscreen instructions to operate.Wi-Fi](https://usermanual.wiki/Kyocera/KYO701/User-Guide-2518479-Page-53.png)
![Product settingsGB 53Connect the product to a Bluetooth device to do things like wireless transmissions and music playback.•We do not guarantee a wireless connection with all Bluetooth devices.•Connect with other Bluetooth devices within about a 10 m radius, unobstructed. Depending on if there are any obstacles between the product and a Bluetooth device, the general surroundings (walls, furniture, etc.), and the structure of the building, the connection range may be shorter.•The supported profiles and features*1 are as follows:- SPP: Serial Port Profile- A2DP: Advanced Audio Distribution Profile- AVRCP: Audio/Video Remote Control Profile- HSP: Headset Profile- HFP: Hands-Free Profile- OPP: Object Push Profile- PBAP: Phone Book Access Profile- HID: Human Interface Device Profile- PAN: Personal Area Networking Profile- PAN NAP: Personal Area Networking-Network Access Point- PAN USER: Personal Area Networking-User- HOGP: HID over GATT Profile- MAP: Message Access Profile- DUN: Dial-Up Networking Profile*2*1 Specifications provided in Bluetooth standards for communications between Bluetooth-compatible devices in accordance with their intended use.*2 Compatible with only a portion of car navigation systems.Registering and connecting to a Bluetooth device•While registering a device, it may be necessary to enter a PIN. The product’s PIN is “0000”. If product registration does not work when you enter “0000”, refer to the Bluetooth device’s operating instructions.1On the Home screen tap ► .2Tap for Bluetooth or drag it to the right.•When on, is displayed in the status bar.3Tap [Bluetooth] ► the name of the product.Bluetooth Function](https://usermanual.wiki/Kyocera/KYO701/User-Guide-2518479-Page-54.png)
![Product settingsGB 544[SEARCH FOR DEVICES]5Choose a Bluetooth device.6Follow the on-screen instructions.■ If receiving a connection request from another Bluetooth device1Confirm the pass code on the Pair settings request screen ► [Pair].You can set up an access point for connecting to the Internet. They can be added and changed as needed.•Contact your service provider regarding the information necessary to set up an access point.1On the Home screen tap ► ► [More...] ► [Mobile networks] ► [Access Point Names].2Tap .3[Name] ► enter name ► [OK].4[APN] ► enter access point name ► [OK].5Set the items required by your service provider.6 ► [Save]1On the Home screen tap ► .2Choose item operation.[Sound/Vibration/LED] : Set Silent mode or Vibrate, ringtones, notification sounds, operation sounds, and other things related to the sound and Incoming light.[Display] : Set screen brightness, wallpaper, auto-rotate screen, Sleep mode, font size, and other things related to the screen display.[Direct button] : Choose which function or application activates with you hold down for 1 second or more.[Storage] : Confirm the capacity of the product or a microSD card, or initialize a microSD card.[Battery] : Check the remaining battery level, charging status, battery usage time, and the battery use of each function.[Apps] : Manage and delete applications that you installed, view their memory usage, change the settings, etc.Setting up an access pointDEVICE](https://usermanual.wiki/Kyocera/KYO701/User-Guide-2518479-Page-55.png)
![Product settingsGB 55Set the product to not release ringtones and notification sounds from the speaker.1On the Home screen tap ► ► [Sound/Vibration/LED].2Put a tick by [Silent mode].3[OK]✎Note•You can also hold down for at least 1 second to set Silent mode.Changing the Silent mode type1On the Home screen tap ► ► [Sound/Vibration/LED] ► [Silent mode type].2[Vibrate]/[Silent]✎Note•Hold down for at least one second, and then tap / to switch between Silent/Vibrate. Tap to turn off Silent mode.1On the Home screen tap ► ► [Sound/Vibration/LED] ► [Phone ringtone].2Choose a ringtone ► [OK].1On the Home screen tap ► ► [Display] ► [Wallpaper].2Choose an item.3Follow the on-screen instructions.Set the screen to automatically switch between a vertical display and a horizontal display, depending on how the product is oriented.1On the Home screen tap ► ► [Display].2Put a tick by [Auto-rotate screen].After a set amount of time passes, the screen automatically goes dark and enters Sleep mode.1On the Home screen tap ► ► [Display] ► [Sleep].2Choose a time.Setting Silent modeSetting a ringtoneSetting a wallpaperAutomatically switching between a vertical and horizontal screen displaySetting a screen off time](https://usermanual.wiki/Kyocera/KYO701/User-Guide-2518479-Page-56.png)
![Product settingsGB 561On the Home screen tap ► .2Choose item operation.[Location] : Control settings related to location information from using the Wi-Fi function, GPS, etc.[Start screen] : Control settings related to the Start screen.[Security] : Control settings related to security.[Language & input] : Set the display language and things related to character input.[Backup & reset] : Back up data, restore settings, or reset the product.1On the Home screen tap ► ► [Start screen] ► [Security type].2[None]/[Swipe]/[Face Unlock]/[Pattern]/[PIN]/[Password]3Follow the on-screen instructions.✎Note•If you set a password or other release method, be careful not to forget it.When you reset the product, all of the data and applications stored on the product are erased.•Be sure to backup your data before resetting.1On the Home screen tap ► ► [Backup & reset] ► [Factory data reset] ► [Reset phone].•Depending on the security release method you have set for the Start screen, it may be necessary to unlock it.2[Erase everything]PERSONALSetting the security release method for the Start screenResetting the product](https://usermanual.wiki/Kyocera/KYO701/User-Guide-2518479-Page-57.png)
![Product settingsGB 571On the Home screen tap ► ► [Add account].2Choose an account type.3Follow the on-screen instructions.✎Note•Even if you do not have a Google account, you can use the product, but you cannot use Google services like Gmail, Google Play, etc.1On the Home screen tap ► .2Choose item operation.[Date & time] : Control settings related to date and time.[Accessibility] : Control settings related to accessibility.[Printing] : Control settings for a printer using Google Cloud print.[About phone] : Check information such as your phone number and remaining battery life.1On the Home screen tap ► ► [Date & time].2Set each item.[Automatic date & time] : Automatically use network information to revise the date and time.•Remove the tick to manually set the date and time.[Automatic time zone] : Automatically use network information to revise the time zone.•Remove the tick to manually set the time zone.[Set date] : Manually set the date.[Set time] : Manually set the time.[Select time zone] : Manually set the time zone.[Use 24-hour format] : Enter a tick to display the time in 24-hour format. Remove the tick for 12-hour format.[Choose date format] : Choose a format for displaying the date.ACCOUNTSAdding an accountSYSTEMSetting the date and time](https://usermanual.wiki/Kyocera/KYO701/User-Guide-2518479-Page-58.png)
![AppendixGB 60[OpenSSL License]Copyright © 1998-2011 The OpenSSL Project. All rights reserved.This product includes software developed by the OpenSSL Project for use in the OpenSSL Toolkit. (http://www.openssl.org/)THIS SOFTWARE IS PROVIDED BY THE OpenSSL PROJECT “AS IS” AND ANY EXPRESSED OR IMPLIED WARRANTIES, INCLUDING, BUT NOT LIMITED TO, THE IMPLIED WARRANTIES OF MERCHANTABILITY AND FITNESS FOR A PARTICULAR PURPOSE ARE DISCLAIMED. IN NO EVENT SHALL THE OpenSSL PROJECT OR ITS CONTRIBUTORS BE LIABLE FOR ANY DIRECT, INDIRECT, INCIDENTAL, SPECIAL, EXEMPLARY, OR CONSEQUENTIAL DAMAGES (INCLUDING, BUT NOT LIMITED TO, PROCUREMENT OF SUBSTITUTE GOODS OR SERVICES;LOSS OF USE, DATA, OR PROFITS; OR BUSINESS INTERRUPTION) HOWEVER CAUSED AND ON ANY THEORY OF LIABILITY, WHETHER IN CONTRACT, STRICT LIABILITY, OR TORT (INCLUDING NEGLIGENCE OR OTHERWISE) ARISING IN ANY WAY OUT OF THE USE OF THIS SOFTWARE, EVEN IF ADVISED OF THE POSSIBILITY OF SUCH DAMAGE.[Original SSLeay License]Copyright © 1995-1998 Eric Young (eay@cryptsoft.com) All rights reserved.This product includes cryptographic software written by Eric Young (eay@cryptsoft.com)THIS SOFTWARE IS PROVIDED BY ERIC YOUNG “AS IS” AND ANY EXPRESS OR IMPLIED WARRANTIES, INCLUDING, BUT NOT LIMITED TO, THE IMPLIED WARRANTIES OF MERCHANTABILITY AND FITNESS FOR A PARTICULAR PURPOSE ARE DISCLAIMED. IN NO EVENT SHALL THE AUTHOR OR CONTRIBUTORS BE LIABLE FOR ANY DIRECT, INDIRECT, INCIDENTAL, SPECIAL, EXEMPLARY, OR CONSEQUENTIAL DAMAGES (INCLUDING, BUT NOT LIMITED TO, PROCUREMENT OF SUBSTITUTE GOODS OR SERVICES; LOSS OF USE, OpenSSL License](https://usermanual.wiki/Kyocera/KYO701/User-Guide-2518479-Page-61.png)