Kyocera M9300 DUALBAND CDMA PHONE WITH BLUETOOTH + EDR AND WIFI User Manual Users manual
Kyocera Corporation DUALBAND CDMA PHONE WITH BLUETOOTH + EDR AND WIFI Users manual
Kyocera >
Contents
- 1. Users manual
- 2. Users Manual
Users manual


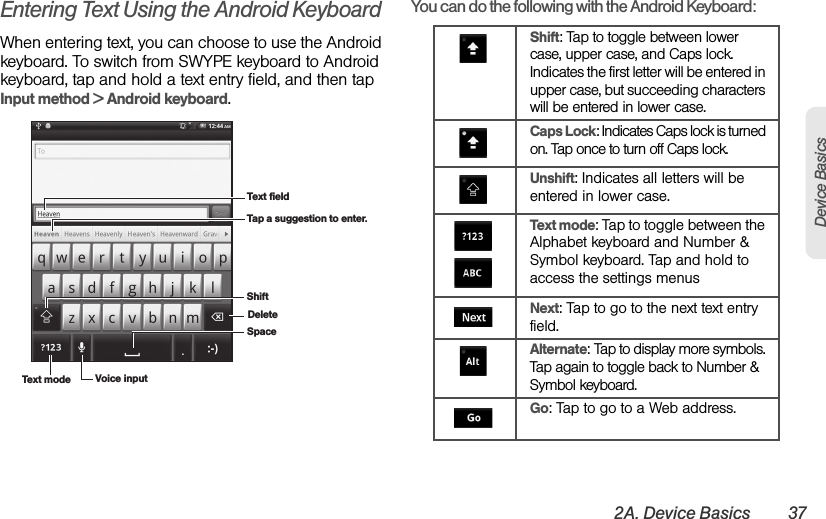
![34 2A. Device BasicsDialing From the Contacts List1. Press Home > > Contacts .– or –On the Phone screen, tap the Contacts tab.2. Scroll through the list and tap the entry you want to call. 3. Tap Call [Type of Number]. (For example, Call mobile.)Dialing From the Favorites ListYou can quickly dial contacts you call frequently by adding them to your Favorites list. See “Adding Entries to Your Favorites” on page 62.1. Press Home > > Contacts , and then tap the Favorites tab.– or –On the Phone screen, tap the Favorites tab.2. Scroll through the list and tap .ⅢIf the Favorite has multiple phone numbers registered, tap the number you want to dial to make a call.Plus (+) Code DialingWhen placing international calls, Plus Code Dialing automatically enters the international access code for your location (for example, 011 for international calls made from the U.S.). You can also change the international access code from the Settings menu. See “Changing the International Dialing Code” on page 49 for details.1. Press Home > . (If necessary, first tap the Phone tab. )2. Tap and hold until you see a “+” on the display screen.3. Enter the country code and phone number, and then tap . (The device automatically prepends the access code for international dialing, followed by the country code and phone number.)](https://usermanual.wiki/Kyocera/M9300.Users-manual/User-Guide-1429120-Page-46.png)

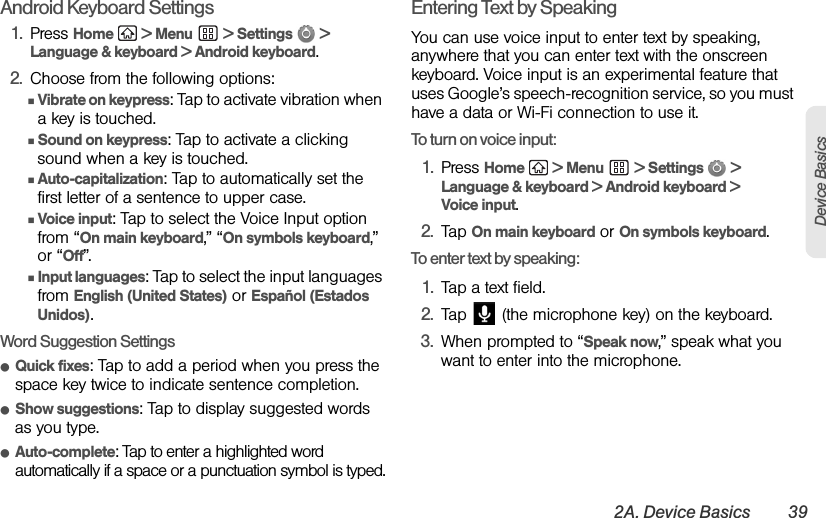

![2C. Call Log 57Call LogCall Log OptionsᮣTap a call log entry to open the overview page where the call details are displayed at the top and any available options are listed underneath:ⅢCall [contact] to return the phone call.ⅢSend text message to send a text message to the entry.ⅢView contact/Add to contacts to display the entry’s information or save the number to Contacts. ᮣTap and hold an entry to display the options menu:ⅢCall [number] to return the phone call.ⅢView contact/Add to contacts to display the entry’s information or save the number to Contacts.ⅢEdit number before call to edit the number and then call the number.ⅢSend text message to send a text message to the entry.ⅢRemove from call log to delete the call information from call log.ᮣPress Menu > Clear call log to delete all call log entries.Making a Call From the Call Log ᮣFrom the Call log, tap adjacent to the entry you would like to call.Saving a Number From the Call Log1. From the Call log, tap an entry.2. Tap Add to contacts.3. Tap Create new contact to store the number in a new Contacts entry, or tap an existing Contact entry name to save the number to an existing entry.4. Tap any field to enter the details.5. Enter all the necessary details and tap Done to save.Once you have saved the number, the call log list reflects the newly saved data.Note: You cannot save phone numbers from calls identified as Unknown, No Caller ID, Restricted orPrivate number.](https://usermanual.wiki/Kyocera/M9300.Users-manual/User-Guide-1429120-Page-69.png)
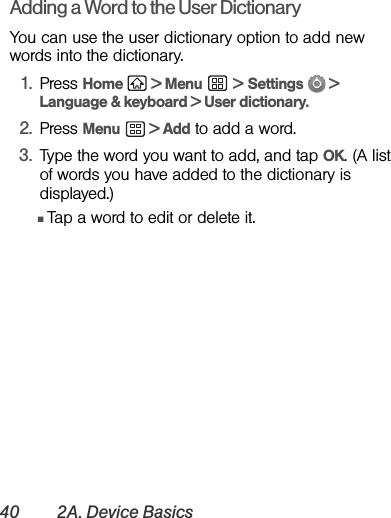
![2F. Voice Services 69Voice ServicesࡗAutomatic Speech Recognition (ASR) (page 69)ࡗVoice Search (page 70)Automatic Speech Recognition (ASR)You can use your device’s built-in automatic speech recognition (ASR) software (Voice Dialer) to dial a phone number in your Contacts or to launch device functions. All you have to do is talk into the device, and ASR will recognize your voice and complete tasks by itself.Activating the Voice DialerᮣPress Home > > Voice Dialer .The device prompts you to say a command from the list displayed onscreen. To complete your task, simply follow the onscreen prompts or tap an onscreen option.If the application does not recognize the number, name, or application name, it will find the most likely matches and display a list. Tap a selection or tap Cancel to exit the Voice Dialer.Making a Voice Call With the Voice Dialer1. Press Home > > Voice Dialer .2. When prompted to speak, say “Call [contact]” or “Dial [number].”ⅢFor example, say “Call John Smith on mobile,” to call John Smith’s mobile phone. Your device dials the number stored for the contact “John Smith” with the label “Mobile.”Opening an Application With the Voice Dialer1. Press Home > > Voice Dialer .2. When prompted to speak, say “Open [application name].” ⅢFor example, say “Open Calendar,” to open the Calendar. The application screen is displayed.2F. Voice ServicesTip: Use ASR in a quiet environment so it can accurately recognize your commands.](https://usermanual.wiki/Kyocera/M9300.Users-manual/User-Guide-1429120-Page-81.png)
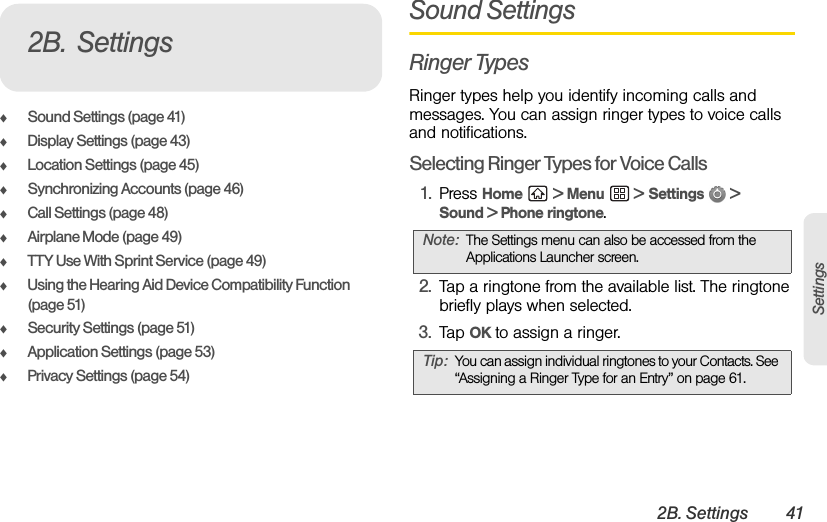
![70 2F. Voice ServicesOpening a Settings Menu With the Voice Dialer1. Press Home > > Voice Dialer .2. When prompted to speak, say “Open [settings menu name].”ⅢFor example, say “Open Calendar.” The settings menu screen is displayed.Voice SearchVoice Search allows you to find information on the web as well as items and information on your device by speaking your search terms.1. Press Home > > Voice Search .2.Speak clearly into the device’s microphone. If an error occurs, tap Speak again.3. Tap a matching item from the onscreen list.](https://usermanual.wiki/Kyocera/M9300.Users-manual/User-Guide-1429120-Page-82.png)