Kyocera QCP-6035 Portable Cellular Phone User Manual
Kyocera Communications, Inc Portable Cellular Phone
Kyocera >
users Guide
KYOCERA WIRELESS CORP.
10300 CAMPUS POINT DRIVE
SAN DIEGO, CALIFORNIA 92121 U.S.A.
Visit us at www.kyocera-wireless.com
For accessories, visit www.kyocera-wireless.com/store
80-B6595-1EN, Rev. X3
pdQ2™ User’s Guide
PRELIMINARY
Subject to Change
pdq2_QuickStart.book Page i Friday, July 28, 2000 6:37 PM

This manual is based on the production versions of the pdQ2 smartphone. Software changes
may have occurred after this printing. Kyocera reserves the right to make changes in technical
and product specifications without prior notice. The products and equipment described in this
documentation are manufactured under license from QUALCOMM Incorporated under one or
more of the following U.S. Patents:
Other patents pending.
4,901,307 5,056,109 5,099,204 5,101,501 5,103,459 5,107,225 5,109,390 5,193,094
5,228,054 5,257,283 5,265,119 5,267,261 5,267,262 5,280,472 5,283,536 5,289,527
5,307,405 5,309,474 5,337,338 5,339,046 5,341,456 5,383,219 5,392,287 5,396,516
D356,560 5,408,697 5,414,728 5,414,796 5,416,797 5,426,392 5,437,055 D361,065
5,442,322 5,442,627 5,452,473 5,461,639 5,469,115 5,469,471 5,471,497 5,475,870
5,479,475 5,483,696 5,485,486 5,487,175 5,490,165 5,497,395 5,499,280 5,504,773
5,506,865 5,509,015 5,509,035 5,511,067 5,511,073 5,513,176 5,515,177 5,517,323
5,519,761 5,528,593 5,530,928 5,533,011 5,535,239 5,539,531 5,544,196 5,544,223
5,546,459 5,548,812 5,559,881 5,559,865 5,561,618 5,564,083 5,566,000 5,566,206
5,566,357 5,568,483 5,574,773 5,574,987 D375,740 5,576,662 5,577,022 5,577,265
D375,937 5,588,043 D376,804 5,589,756 5,590,069 5,590,406 5,590,408 5,592,548
5,594,718 5,596,570 5,600,754 5,602,834 5,602,833 5,603,096 5,604,459 5,604,730
5,608,722 5,614,806 5,617,060 5,621,752 5,621,784 5,621,853 5,625,876 5,627,857
5,629,955 5,629,975 5,638,412 5,640,414 5,642,398 5,644,591 5,644,596 5,646,991
5,652,814 5,654,979 5,655,220 5,657,420 5,659,569 5,663,807 5,666,122 5,673,259
5,675,581 5,675,644 5,680,395 5,687,229 D386,186 5,689,557 5,691,974 5,692,006
5,696,468 5,697,055 5,703,902 5,704,001 5,708,448 5,710,521 5,710,758 5,710,768
5,710,784 5,715,236 5,715,526 5,722,044 5,722,053 5,722,061 5,722,063 5,724,385
5,727,123 5,729,540 5,732,134 5,732,341 5,734,716 5,737,687 5,737,708 5,742,734
D393,856 5,748,104 5,751,725 5,751,761 5,751,901 5,754,533 5,754,542 5,754,733
5,757,767 5,757,858 5,758,266 5,761,204 5,764,687 5,774,496 5,777,990 5,778,024
5,778,338 5,781,543 5,781,856 5,781,867 5,784,406 5,784,532 5,790,589 5,790,632
5,793,338 D397,110 5,799,005 5,799,254 5,802,105 5,805,648 5,805,843 5,812,036
5,812,094 5,812,097 5,812,538 5,812,607 5,812,651 5,812,938 5,818,871 5,822,318
5,825,253 5,828,348 5,828,661 5,835,065 5,835,847 5,839,052 5,841,806 5,842,124
5,844,784 5,844,885 5,844,899 5,844,985 5,848,063 5,848,099 5,850,612 5,852,421
5,854,565 5,854,786 5,857,147 5,859,612 5,859,838 5,859,840 5,861,844 5,862,471
5,862,474 5,864,760 5,864,763 5,867,527 5,867,763 5,870,427 5,870,431 5,870,674
5,872,481 5,872,774 5,872,775 5,872,823 5,877,942 5,878,036 5,870,631 5,881,053
5,881,368 5,884,157 5,884,193 5,884,196 5,892,178 5,892,758 5,892,774 5,892,816
5,892,916 5,893,035 D407,701 5,898,920 5,903,554 5,903,862 D409,561 5,907,167
5,909,434 5,910,752 5,911,128 5,912,882 D410,893 5,914,950 5,915,235 5,917,708
5,917,811 5,917,812 5,917,837 5,920,284 5,920,834 D411,823 5,923,650 5,923,705
5,926,143 5,926,470 5,926,500 5,926,786 5,926,786 5,930,230 5,930,692
pdq2_QuickStart.book Page ii Friday, July 28, 2000 6:37 PM

FCC/IC Notice
This device complies with part 15 of the FCC rules. Operation is subject to the following two
conditions: (1) This device may not cause harmful interference, and (2) this device must
accept any interference received, including interference that may cause undesired operation.
To comply with FCC radiation exposure requirements, use of this device for body-worn
operational configurations is limited to accessories tested and approved by Kyocera Wireless
Corp. Other accessories used with this device for body-worn operations must not contain any
metallic components and must provide at least 22.75mm separation distance including the
antenna and the user’s body.
Caution
The user is cautioned that changes or modifications not expressly approved by the party
responsible for compliance could void the warranty and user’s authority to operate the
equipment.
Warning
Use only Kyocera Wireless Corp. approved accessories with Kyocera Wireless Corp. phones.
Use of any unauthorized accessories may be dangerous and will invalidate the phone
warranty if said accessories cause damage or a defect to the phone.
Kyocera is a registered trademark of Kyocera Corporation. QCP and pdQ are trademarks of
Kyocera Wireless Corp. QUALCOMM is a registered trademark of QUALCOMM Incorporated.
Eudora is a registered trademark of QUALCOMM Incorporated. Graffiti and HotSync are
registered trademarks and the Palm Computing platform logo is a trademark of Palm Inc.,
3Com Corporation, or its subsidiaries. Other product and brand names may be trademarks or
registered trademarks of their respective owners.
Copyright © 2000 Kyocera Wireless Corp. All rights reserved. Printed in the United States of
America.
Portions of this document are Copyright © 1998 3Com Corporation or its subsidiaries.
Reprinted with permission.
80-B6595-1EN, Rev. X3
ACN 003 852 444
pdq2_QuickStart.book Page iii Friday, July 28, 2000 6:37 PM

iv pdQ2 User’s Guide
Contents
Welcome . . . . . . . . . . . . . . . . . . . . . . . . . . . . . . . . . . . . . . . . . . . . . . . . . . . 1
What to do first. . . . . . . . . . . . . . . . . . . . . . . . . . . . . . . . . . . . . . . . . . . . . . . 2
Introducing the pdQ2 . . . . . . . . . . . . . . . . . . . . . . . . . . . . . . . . . . . . . . . . . . 4
Making calls . . . . . . . . . . . . . . . . . . . . . . . . . . . . . . . . . . . . . . . . . . . . . . . . 12
Receiving calls . . . . . . . . . . . . . . . . . . . . . . . . . . . . . . . . . . . . . . . . . . . . . . 16
Using the flip-closed menus. . . . . . . . . . . . . . . . . . . . . . . . . . . . . . . . . . . . 17
Entering information. . . . . . . . . . . . . . . . . . . . . . . . . . . . . . . . . . . . . . . . . . 19
Using the Applications Launcher . . . . . . . . . . . . . . . . . . . . . . . . . . . . . . . . 21
Using the Address Book . . . . . . . . . . . . . . . . . . . . . . . . . . . . . . . . . . . . . . 22
Using Call History . . . . . . . . . . . . . . . . . . . . . . . . . . . . . . . . . . . . . . . . . . . 23
Using the Date Book . . . . . . . . . . . . . . . . . . . . . . . . . . . . . . . . . . . . . . . . . 24
Using the Memo Pad . . . . . . . . . . . . . . . . . . . . . . . . . . . . . . . . . . . . . . . . . 25
Using Speed Dial . . . . . . . . . . . . . . . . . . . . . . . . . . . . . . . . . . . . . . . . . . . . 26
Using the To Do List . . . . . . . . . . . . . . . . . . . . . . . . . . . . . . . . . . . . . . . . . 29
Receiving messages and voice mail . . . . . . . . . . . . . . . . . . . . . . . . . . . . . 30
Using Voice Dial. . . . . . . . . . . . . . . . . . . . . . . . . . . . . . . . . . . . . . . . . . . . . 31
Creating voice memos . . . . . . . . . . . . . . . . . . . . . . . . . . . . . . . . . . . . . . . . 32
Adjusting sounds . . . . . . . . . . . . . . . . . . . . . . . . . . . . . . . . . . . . . . . . . . . . 33
Setting up preferences. . . . . . . . . . . . . . . . . . . . . . . . . . . . . . . . . . . . . . . . 35
Network connections . . . . . . . . . . . . . . . . . . . . . . . . . . . . . . . . . . . . . . . . . 37
Resetting the phone. . . . . . . . . . . . . . . . . . . . . . . . . . . . . . . . . . . . . . . . . . 40
Synchronizing your pdQ2 with a computer. . . . . . . . . . . . . . . . . . . . . . . . . 42
Phone care. . . . . . . . . . . . . . . . . . . . . . . . . . . . . . . . . . . . . . . . . . . . . . . . . 46
Phone safety . . . . . . . . . . . . . . . . . . . . . . . . . . . . . . . . . . . . . . . . . . . . . . . 52
Index . . . . . . . . . . . . . . . . . . . . . . . . . . . . . . . . . . . . . . . . . . . . . . . . . . . . . 57
pdq2_QuickStart.book Page iv Friday, July 28, 2000 6:37 PM

Welcome 1
DRAFT
Welcome
Congratulations on your purchase of the pdQ™2 wireless Internet phone
and connected organizer. In one device, your pdQ2 gives you the
integrated features of a CDMA digital telephone and a Personal Digital
Assistant (PDA).
Use this guide to get up and running quickly.It provides a brief overview
of the many features of your phone. For detailed information, refer to the
pdQ2 Reference Guide on the CD-ROM.
In your phone package
Your phone package contains the following:
■pdQ2, cradle, and battery
■CD-ROM containing the Palm Desktop for the pdQ2 and complete
reference documentation
■two styluses
■a Graffiti® sticker you can attach to the phone or carry in your wallet
■information on warranties, accessories, and services
■this user’s guide
Important: Before using your phone, become familiar with the phone care and
safety considerations starting on page 46.
pdq2_QuickStart.book Page 1 Friday, July 28, 2000 6:37 PM
2 pdQ2 User’s Guide
DRAFT
What to do first
Installing and charging the battery
The battery in your new pdQ2 is delivered
partially charged. Before first use, install the
battery and charge it completely.
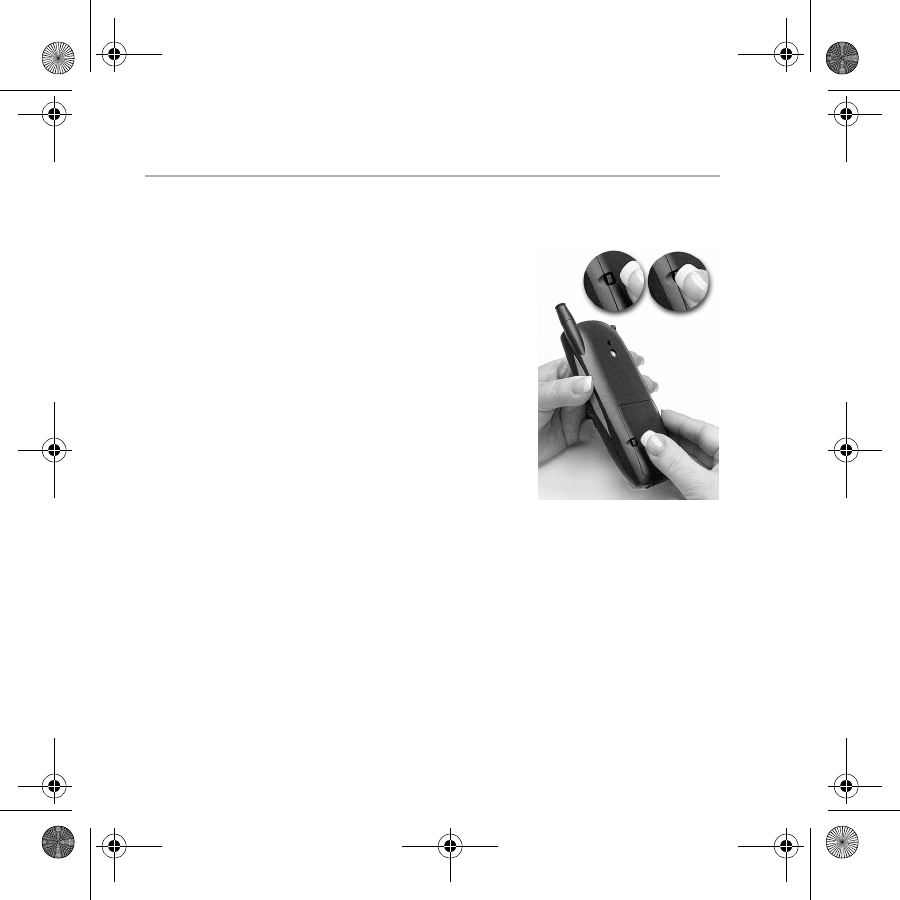
1. Turn the phone over. Use the stylus or
your finger to open the cover of the battery
compartment on the back of the phone.
2. Lift off the battery door.
3. Slide the battery into the compartment
with the QUALCOMM label facing you.
The end of the battery with four
copper-colored rectangular depressions
goes toward the top of the phone.
4. Apply gentle pressure until the battery snaps into place.
5. Replace the battery cover.
6. Plug the small round end of the power cord into the round port on the
base of the phone. Plug the other end into a power outlet.
The message “Phone is charging” appears on the screen. If the battery
is completely drained, it may take 6–8 hours to charge completely.
pdq2_QuickStart.book Page 2 Friday, July 28, 2000 6:37 PM

What to do first 3
DRAFT
7. Wait until the message “Charging is complete” appears. Then unplug
the pdQ2 from the power cable.
Turning your phone on for the first time
Wait until the battery is fully charged before using your phone for the
first time.
1. With the flip closed, press and hold for a few seconds. You see
the message “Powering on” on the screen.
2. Open the flip. Follow the procedures in the welcome screens to
calibrate the pdQ2. Use the stylus to tap the screen when you are
instructed to do so. To prevent scratches, never use a pen, pencil, or
other sharp object to tap or write on the screen.
The pdQ2 is now ready to use.
NOTE: If the pdQ2 does not power on correctly, refer to Chapter 20—
Troubleshooting in the
pdQ
2
Reference Guide
on the CD-ROM, or see “Where to
find help” on page 50.
pdq2_QuickStart.book Page 3 Friday, July 28, 2000 6:37 PM
4 pdQ2 User’s Guide
DRAFT
Introducing the pdQ
2
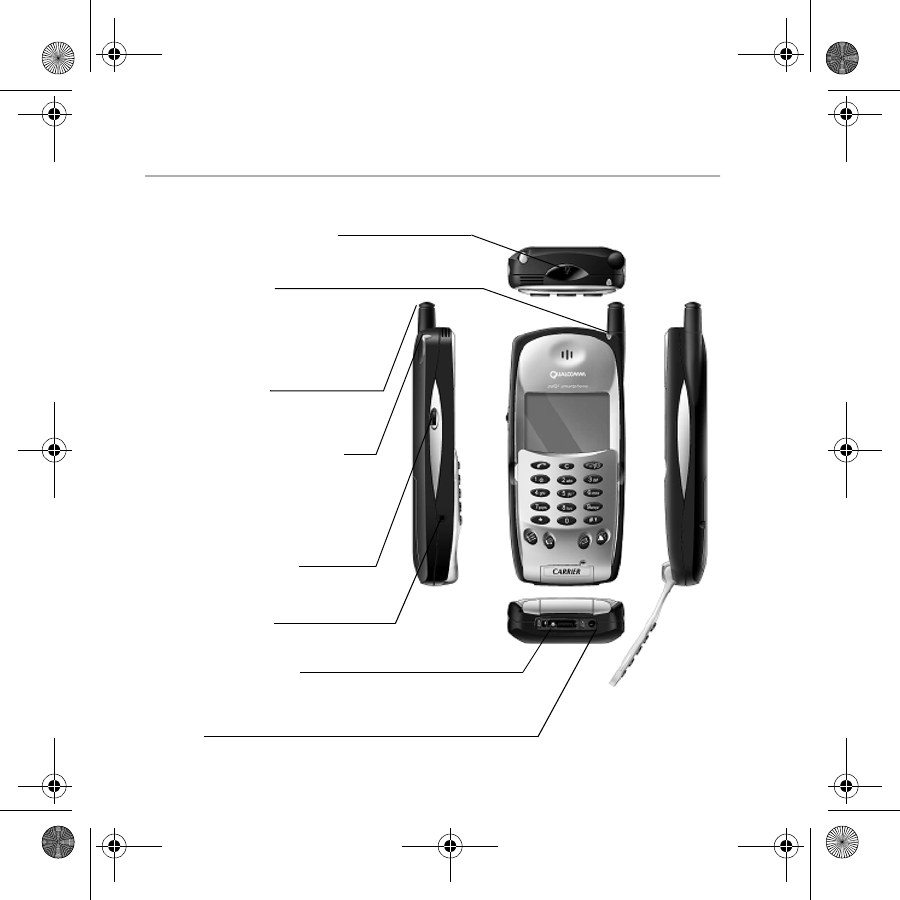
Antenna—Extend for the best
signal reception.
Backlight button—Tap to
turn the screen on and off.
Press and hold to turn the
backlight on and off.
Stylus—Slide the stylus out of
its slot. Hold it like a pen to
write directly on the screen.
Shuttle—Roll the shuttle up or
down to scroll through menus.
Press it in to make selections.
During a call, roll it up or down
to adjust the volume.
Headset jack—Plug the head
set cable in here.
Data port—To use a data
cable, plug it in here.
Power port—Plug the power
cable in here to recharge the
battery.
LED status light
Green = Home area
Amber = Roaming
Red = No signal or low power
pdq2_QuickStart.book Page 4 Friday, July 28, 2000 6:37 PM
Introducing the pdQ25
DRAFT
The keypad
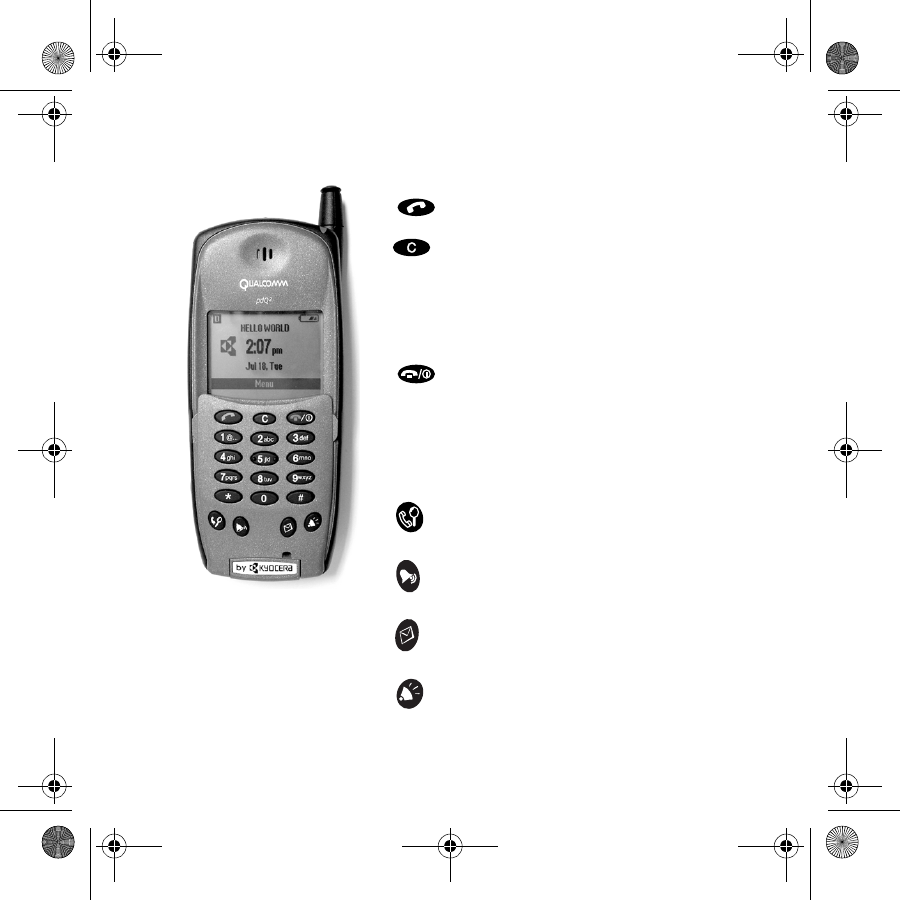
Talk/Send—Make or answer a call.
Clear—
In menus, press Clear once to move back
to the previous menu level. Press and
hold to return to the home screen.
When dialing or entering text, press Clear
once to erase the last digit or character.
Press and hold to erase all.
End/Power—Press once to end a call. In
menus, press once to exit all menus
and return to the home screen.
Press and hold for about two seconds to
turn the phone on or off.
0–9 Press keys on the keypad to enter
numbers or letters.
Find Name— Search for names in your
Address Book.
Sounds Shortcut—Turn off all sounds
or adjust the ringer volume.
Messages—Check your voicemail or
text messages.
Speakerphone—Put the phone in
speakerphone mode.
pdq2_QuickStart.book Page 5 Friday, July 28, 2000 6:37 PM
6 pdQ2 User’s Guide
DRAFT
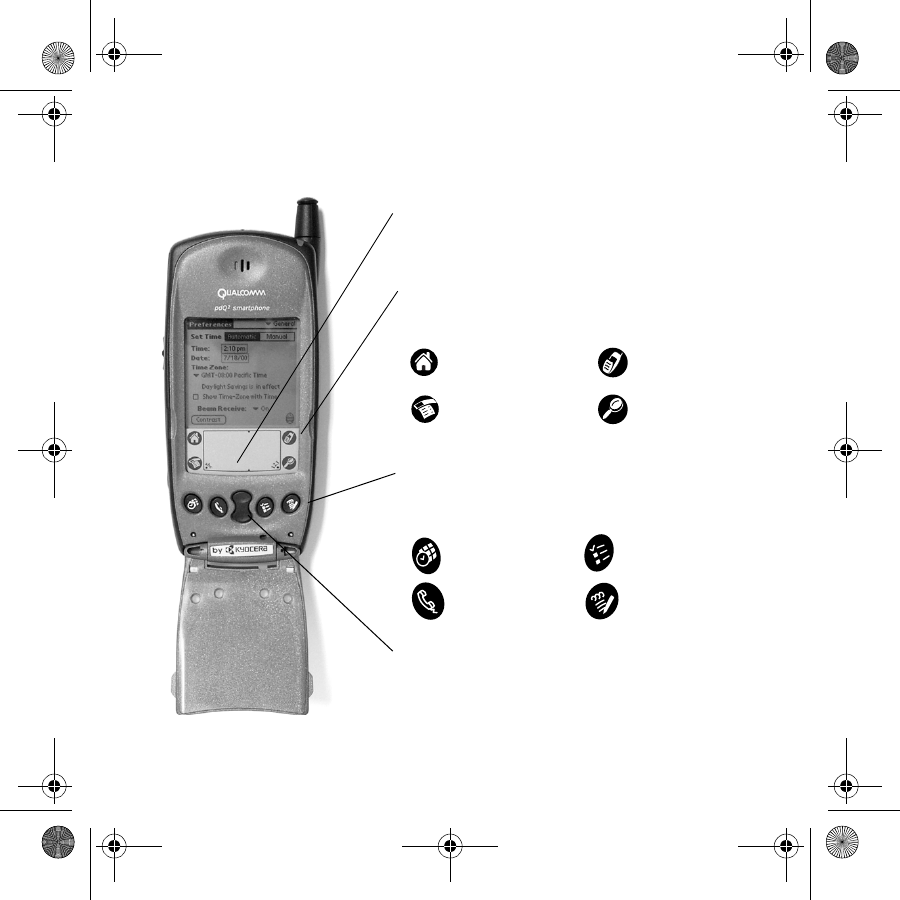
When the flip is open
Icons
Tap the icons in the area below the screen
to open the following:
Applications
Launcher
Menus
Dialer
Find
Application keys
Press these keys to open the following
Palm applications:
Date Book
Address Book
To Do List
Memo Pad
Graffiti writing area
Write here with the stylus. Write letters on
the left and numbers on the right.
Up and Down Keys
Press these keys to scroll up and down.
pdq2_QuickStart.book Page 6 Friday, July 28, 2000 6:37 PM

Introducing the pdQ27
DRAFT
Turning the phone on and off
To turn your phone on or off, just press and hold for a few seconds
until “Powering On” or “Powering Off” appears on the screen.
The pdQ2 is designed to conserve battery power. When you are not
actively using it, the screen “goes to sleep” (both when the flip is open
and when it is closed). If you aren’t sure whether the phone is on, press
once briefly or check the LED. The LED flashes slowly when the
phone is on.
What you see when the flip is closed
If the phone
is off The screen is blank. The LED is not flashing. Keyguard
protects against accidental key presses. Only and
the backlight key are active.
If the phone
is on When the screen is “awake”: The status icons appear at the
top of the screen; the menu bar appears at the bottom. The
LED flashes slowly. All keys are responsive.
When the screen is “asleep”: Keyguard protects against
accidental key presses. Only and the backlight key
are active. The LED flashes slowly.
To activate the screen, do any of the following:
■Press the backlight key.
■Press , followed by the digits 1, 2, 3.
■Open and close the flip.
pdq2_QuickStart.book Page 7 Friday, July 28, 2000 6:37 PM

8 pdQ2 User’s Guide
DRAFT
What you see when the flip is open
Whether the phone is on or off, the PDA “wakes up” when you open the
flip. It displays the last application you used.
If you aren’t sure whether the phone is on, roll the shuttle up. The status
bar appears at the top of the screen. Also, when the phone is on, the LED
flashes slowly.
After a few minutes of nonuse, the screen goes blank to save power. To
activate the screen, tap any button or close and open the flip.
Using the shuttle
The shuttle can be pressed in three ways: up, down, and in.
To use the shuttle (with the flip closed)
■Roll the shuttle up or down to scroll through menu items.
■Press the shuttle in to select a highlighted item.
■Roll the shuttle up or down to adjust the earpiece volume during a
call.
To use the shuttle (with the flip open)
■Roll the shuttle up or down to see phone and battery status at the top
of the screen.
■Press the shuttle in to open the full-keypad Dialer.
pdq2_QuickStart.book Page 8 Friday, July 28, 2000 6:37 PM
Introducing the pdQ29
DRAFT
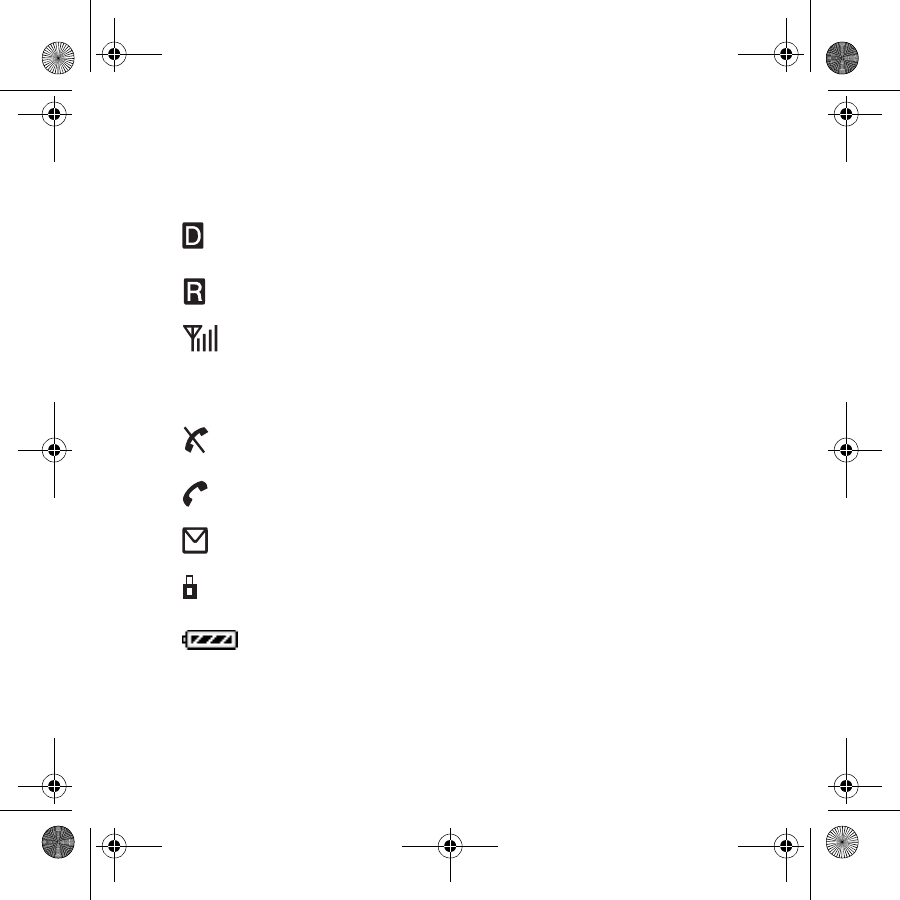
Checking status—the status bar
The status bar provides the following information when the phone is on.
The phone is operating in CDMA digital mode. If this icon isn’t
present, the phone is either in analog mode or there is no service.
The phone is outside of its home area (roaming).
This icon shows the current signal strength. The more lines you
see, the stronger the signal. When this icon appears, you can
make and receive calls. If the signal strength is very low, you
may not be able to complete a call.
The phone is not receiving a signal. You cannot make or receive
calls. Wait a little longer or move to an open area.
A call is in progress.
You have a text message, voice mail, or page.
When in conversation, your phone is operating with enhanced
CDMA voice privacy (if available from your service provider).
This icon shows how much power remains in the battery. The
more black bars you see, the greater the charge.
pdq2_QuickStart.book Page 9 Friday, July 28, 2000 6:37 PM

10 pdQ2 User’s Guide
DRAFT
To check status while the flip is open, roll the shuttle up. If the phone is
on, the status icons appear at the top of the screen. If the phone is not on,
“Phone off” and the battery charge icon appear instead.
Checking status—the LED light
The LED light indicates the following states:
■Green—Home. The phone is on and in its home area. The light flashes
slowly when you are not making a call, it flashes three times per ring
when you receive a call, and it becomes solid during a call.
■Amber—Roaming. The phone is on and in roaming mode. The light
flashes slowly when you are not making a call, it flashes three times
per ring when you receive a roaming call, and it becomes solid during
a call.
■Red—No signal or low battery. The phone is on and searching for a
signal. The light flashes slowly if there is no service or the battery is
low.
■Five fast red flashes—You have an incoming message or voice mail.
■No light—The phone is off.
Using the screen
Be aware that the screen is touch-sensitive only when the flip is open. You
can use the stylus to open applications and make selections.
When the flip is closed, the screen is not touch-sensitive. You open menus
and make selections using the shuttle, not the stylus.
pdq2_QuickStart.book Page 10 Friday, July 28, 2000 6:37 PM
Introducing the pdQ211
DRAFT
Using Keyguard
Keyguard protects your pdQ2 from accidental key presses. When the
phone power is on but you are not on a call, Keyguard engages
automatically. It remains on until you either turn it off or answer a call.
To turn on Keyguard manually
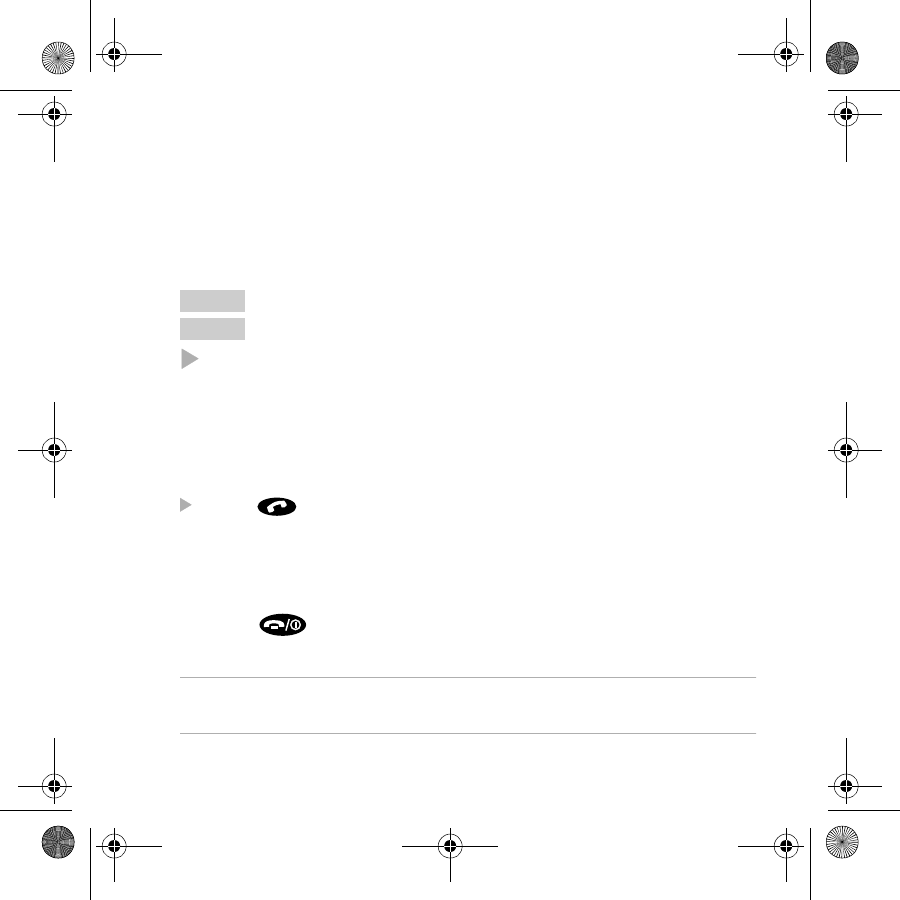
Press the backlight button on the top of the phone.
The phone enters Power Save mode. The phone is on, but the screen
is blank and the keypad is locked. You can also turn on Keyguard
from the flip-closed menus. Select Settings, then Keyguard.
If you receive a call while Keyguard is turned on
Press to answer the call. Keyguard is turned off.
To turn Keyguard off
You can turn Keyguard off using any of these methods.
■Press the backlight button on the top of the phone.
■Press , followed by the digits 1, 2, 3.
■Open and close the flip.
For more information, see “Using Keyguard” in the
pdQ
2
Reference Guide
on the
CD-ROM.
Phone On
Flip Closed
pdq2_QuickStart.book Page 11 Friday, July 28, 2000 6:37 PM
12 pdQ2 User’s Guide
DRAFT
Making calls
Because the applications on your pdQ2 are integrated with the phone
features, there are many ways to place calls. Here are just a few of them.
See the pdQ2 Reference Guide on the CD-ROM for detailed information.
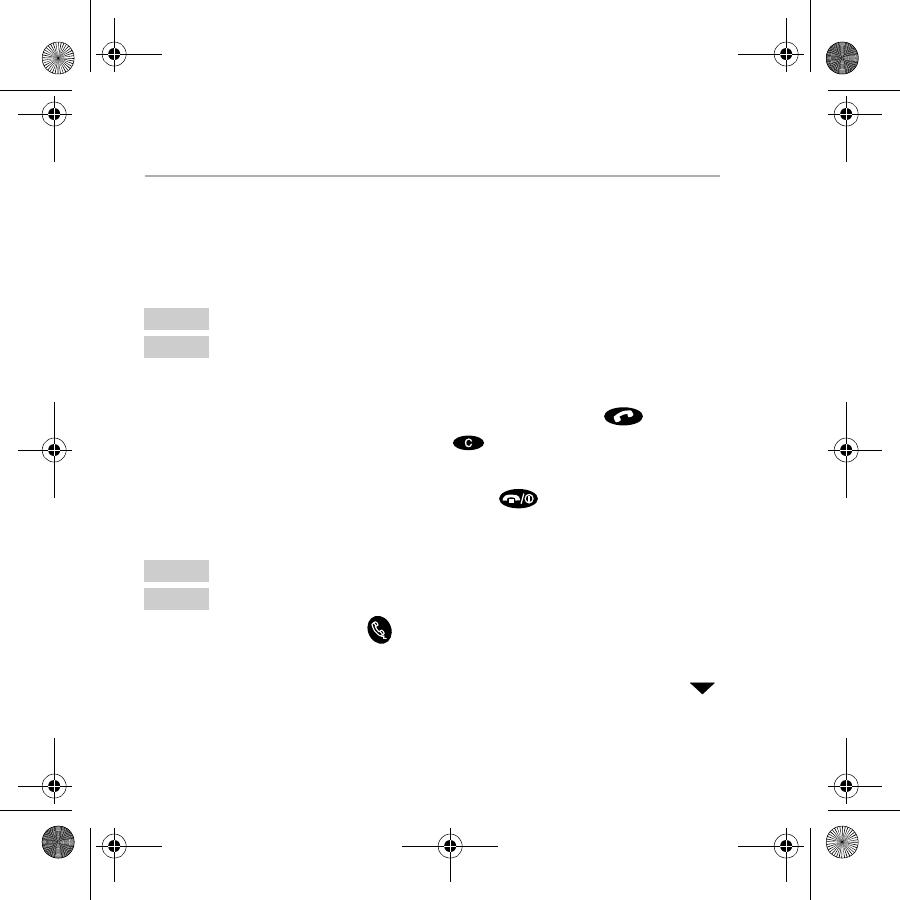
To dial a call on the keypad
1. Extend the antenna. Check the signal strength icon.
2. Press the keys to enter the phone number. Then press .
If you make a mistake, press Clear to remove the last digit you
pressed. Hold the key down to clear all digits.
3. When you have finished your call, press .
To make a call from the Address Book (with the flip open)
1. Press the Address Book key to open the Address List.
2. Tap the number you want to call. (Tap the phone number, not the
person’s name.) If there are more numbers for this person, tap the
beside the phone number to see them all.
Phone On
Flip Closed
Phone On
Flip Open
pdq2_QuickStart.book Page 12 Friday, July 28, 2000 6:37 PM
Making calls 13
DRAFT
To make a call from the Address Book (with the flip closed)
1. Press the Find Name key.
2. Using the keypad, press the first letter of the name you are searching
for. For example, the 2 key is equivalent to A, B, or C. If you press the
2 key once, the letter A appears in the Find window. If you press the
2 key twice, the letter B appears.
3. Wait a moment. The cursor moves one position to the right.
4. Press the key for the second letter of the name you are searching for.
Enter as many letters as you wish.
5. Press the shuttle in. Your Address Book contacts beginning with these
letters appear. Roll the shuttle up or down to scroll through them.
6. When the contact you want to call is highlighted, press the shuttle in.
If there are multiple numbers for this person, roll the shuttle up or
down to highlight the one you want to call.
7. Press .
8. When you have finished your call, press .
NOTE: If you prefer to look through all of your contacts, you can select View All
from the Contacts menu. See “Using the flip-closed menus” on page 17.
Phone On
Flip Closed
pdq2_QuickStart.book Page 13 Friday, July 28, 2000 6:37 PM
14 pdQ2 User’s Guide
DRAFT
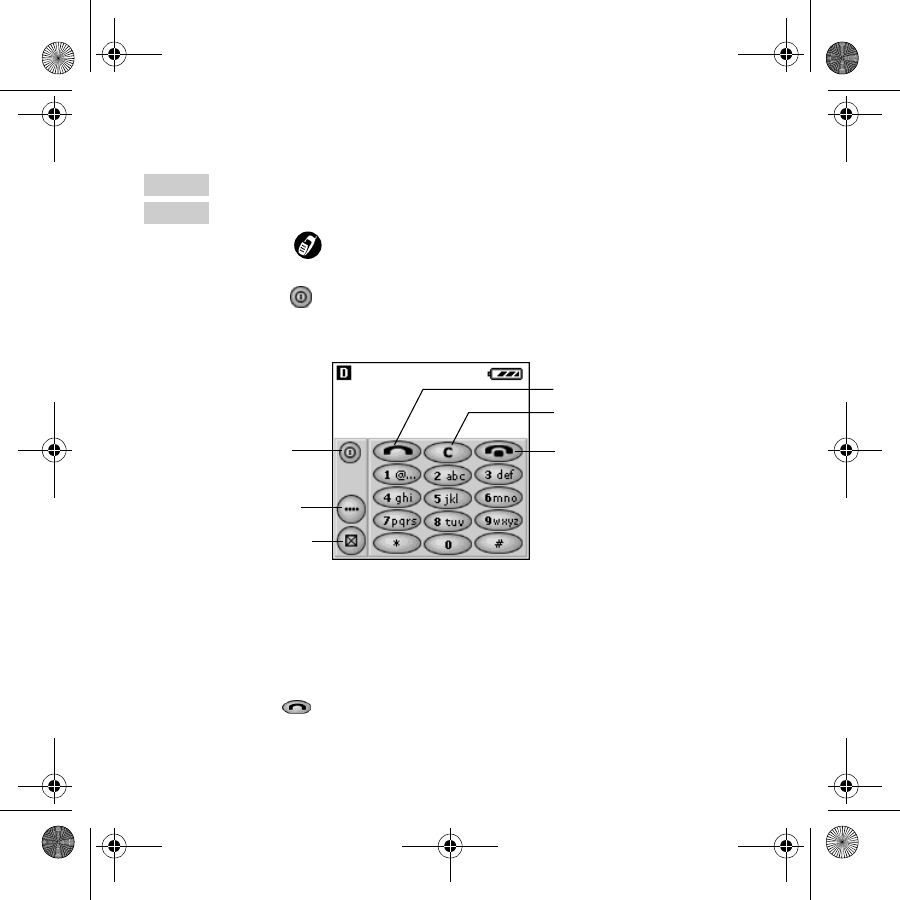
To make a call from the Dialer
1. Tap the Dialer icon.
If the phone is on, the full-keypad Dialer appears. If the phone is off,
tap the Power icon to turn it on.
The full-keypad Dialer
1. Tap the digits with the stylus.
If you prefer, you can write the numbers to dial in the Graffiti writing
area. If the phone number is in a memo or note, you can copy it and
paste it into the dialer.
2. Tap the Talk icon.
Phone On
Flip Open
Turn phone
power on or off.
Make a call.
Switch to the
minimized Dialer.
Return to previous
application.
Erase a number or
clear an error.
End a call.
pdq2_QuickStart.book Page 14 Friday, July 28, 2000 6:37 PM
Making calls 15
DRAFT
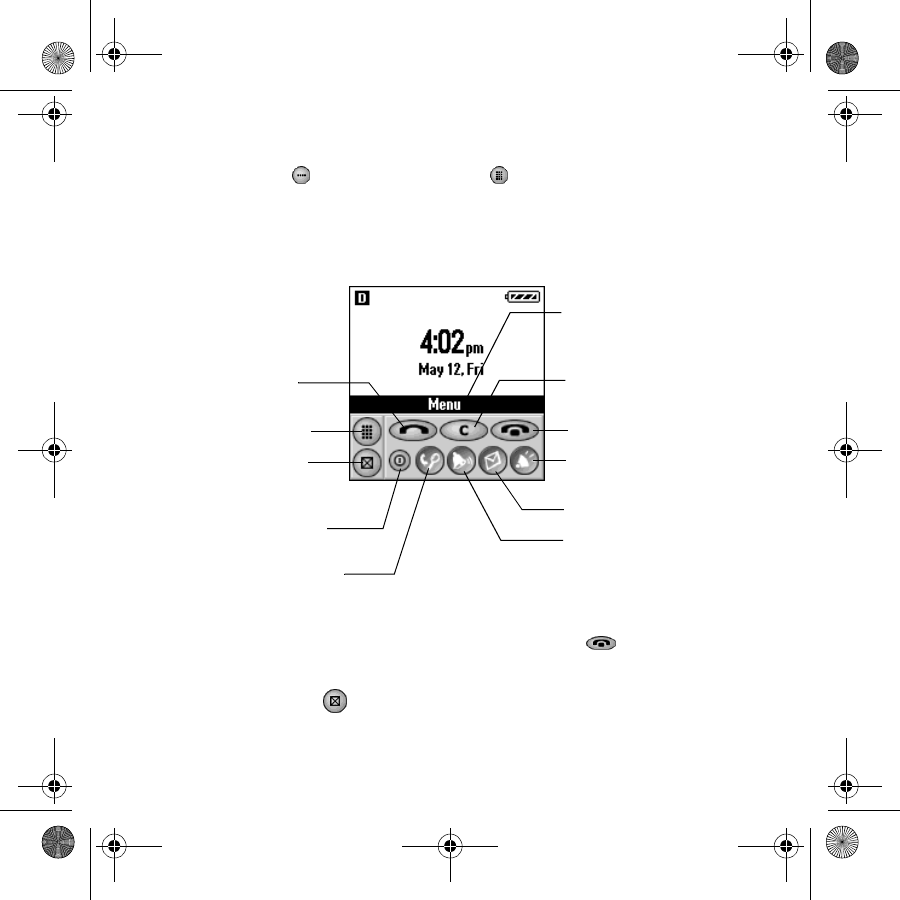
3. To toggle between minimized mode and full-keypad mode, tap the
Minimize icon or the Maximize icon.
The minimized Dialer
In the minimized Dialer, there is more room for caller information in
the top half of the screen.
1. When you have finished your call, tap the End icon.
2. To close the Dialer and return to the application you were previously
using, tap the icon in the lower left of the screen.
Use the shuttle to open
these menus, just as if the
flip were closed.
Erase a number or clear
an error.
End a call.
Toggle speakerphone
mode.
Check messages.
Silence the phone.
Make a call.
Switch to the full
keypad Dialer.
Return to the
previous
application.
Turn the phone
power on or off.
Find names from
the Address Book.
pdq2_QuickStart.book Page 15 Friday, July 28, 2000 6:37 PM
16 pdQ2 User’s Guide
DRAFT
Receiving calls
You can answer a call with the flip open or closed. If you are working
with an application (for example, entering addresses), your entries are
automatically saved; nothing is lost when you answer the phone.
To answer a call (with the flip closed)
Press or .
Pressing always answers the call, even if the keypad is locked.
Pressing puts the call directly into speakerphone mode.
If you have Any-key answer enabled, you can answer the call by
pressing any key except the backlight key, the shuttle, or .
Opening or closing the flip does not have any effect on the call.
To answer a call (with the flip open)
If the flip is open when a call arrives, the minimized Dialer
automatically appears on the screen.
Tap .
Phone On
Flip Closed
Phone On
Flip Open
pdq2_QuickStart.book Page 16 Friday, July 28, 2000 6:37 PM
Using the flip-closed menus 17
DRAFT
Using the flip-closed menus
To use the flip-closed menus when you are not on a call
1. From the home screen, press the shuttle in to see the menu. The menu
includes the following options:
2. When the option you want to select is highlighted, press the shuttle in.
3. Roll the shuttle up or down to move through an additional menu
options. Press the shuttle in to select a highlighted option.
4. To exit from an option or move up one menu level, press .
Phone On
Flip Closed
Phone Info Check your phone number and current service status
Contacts View your Address Book, Speed Dial list, or Voice Dial list
Recent Calls See your recent incoming, outgoing, and missed calls
Settings Adjust sounds; make many other adjustments
Voice Memo Record, edit, or play voice memos
Messages Check your voice mail
pdq2_QuickStart.book Page 17 Friday, July 28, 2000 6:37 PM
18 pdQ2 User’s Guide
DRAFT
To use the flip-closed menus during a call
During a call, the menu bar displays the word Options.
Press the shuttle in to see the following options:
Phone On
Flip Closed
Phone Info Check your phone number and current service status
(roaming, at home, or no service)
Volume Roll the shuttle up or down to adjust the volume during
a call.
Mute or Unmute Mute the sound so the caller cannot hear you.
pdq2_QuickStart.book Page 18 Friday, July 28, 2000 6:37 PM
Entering information 19
DRAFT
Entering information
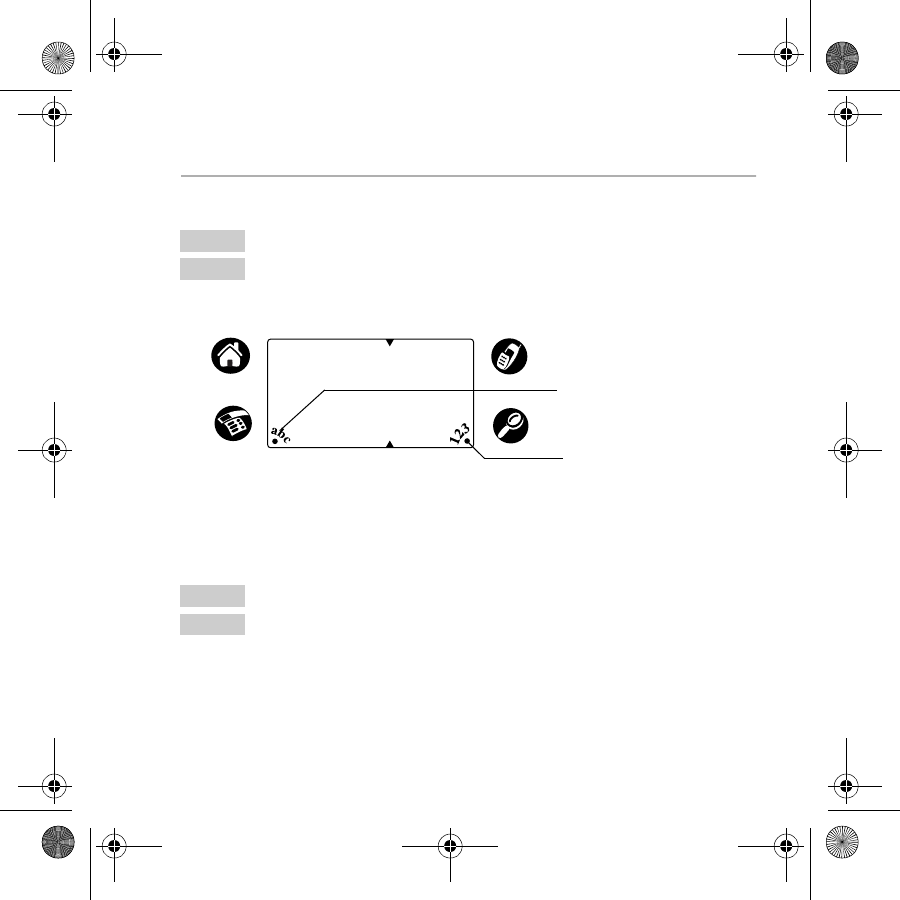
To use the on-screen keyboard
1. Tap abc or 123 to open the alphabetic or numeric keyboards.
2. Tap the characters of the onscreen keyboard. When you have finished,
tap Done to close the on-screen keyboard.
To write with the stylus
1. Place the stylus on the left side of the Graffiti writing area for letters
and on the right side for numbers.
Phone May be either on or off
Flip Open
Phone May be either on or off
Flip Open
Tap here for the numbers
keyboard.
Tap here for the letters
keyboard.
Graffiti writing area (letters
on left; numbers on right)
pdq2_QuickStart.book Page 19 Friday, July 28, 2000 6:37 PM
20 pdQ2 User’s Guide
DRAFT
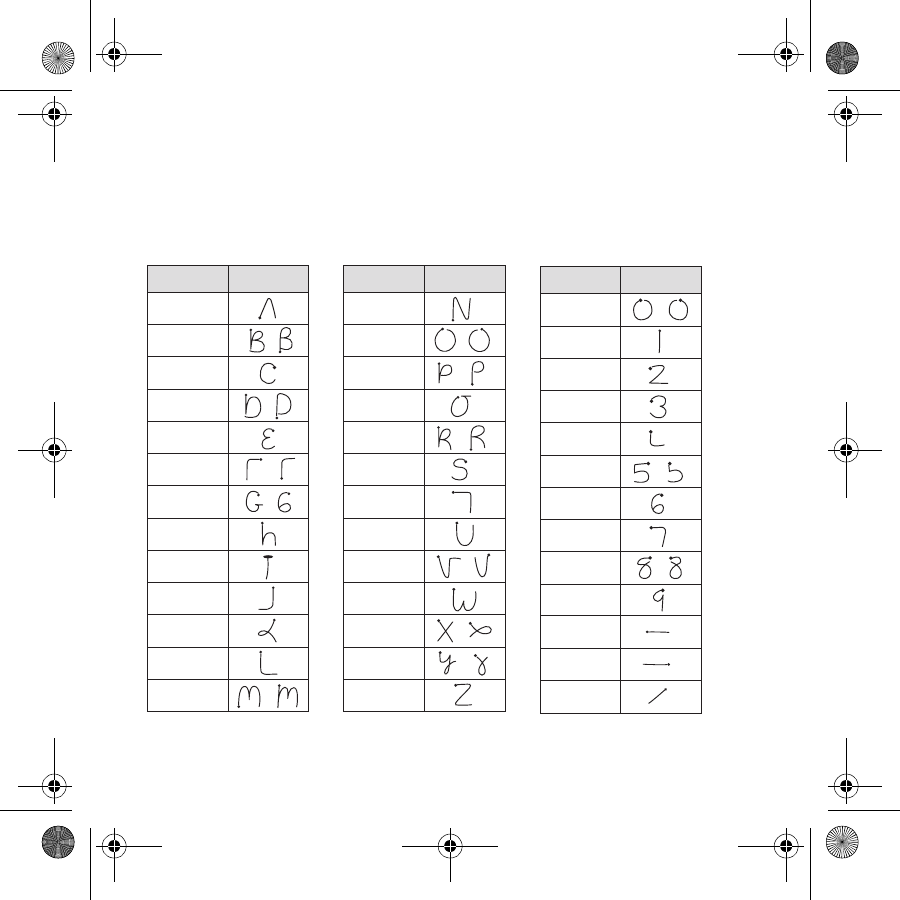
2. Draw the shape as it appears in the table, starting at the dot. (Don’t
draw the dot itself.) Lift the stylus at the end of the stroke. The letter
appears at the insertion point. Begin the stroke for the next character.
Graffiti characters
To enter... Draw To enter... Draw
A
B
C
D
E
F
G
H
I
J
K
L
M
N
O
P
Q
R
S
T
U
V
W
X
Y
Z
0
1
2
3
4
5
6
7
8
9
Space
Next Line
Back Space
To enter... Draw
pdq2_QuickStart.book Page 20 Friday, July 28, 2000 6:37 PM
Using the Applications Launcher 21
DRAFT
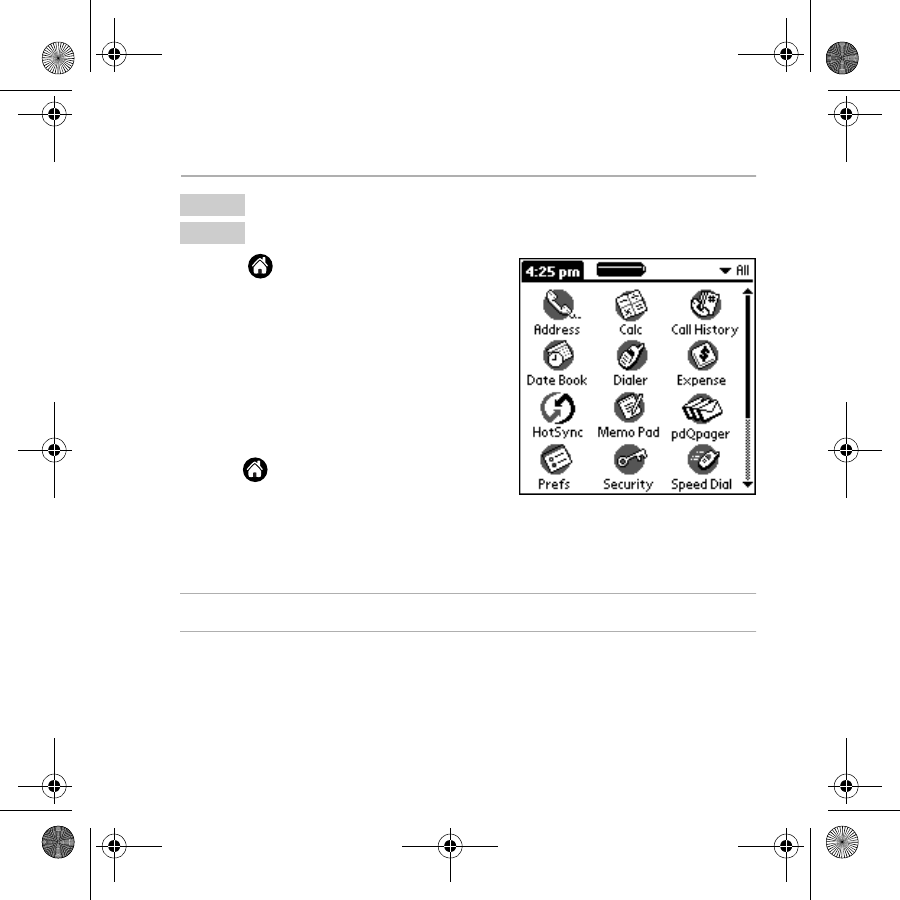
Using the Applications Launcher
1. Tap to view the Applications
Launcher.
2. Tap the icon for the application you
want to launch.
If the icon doesn’t appear on the
screen, tap the scroll bar or press the
Down button to see more.
3. When working in any application,
tap or press a key to switch to
another application.
The pdQ2 automatically saves your work when you change from one
application to another, so you don’t need to worry about losing
information.
For details, see Chapter 4—Working with the PDA in the
pdQ
2
Reference Guide
.
Phone May be either on or off
Flip Open
pdq2_QuickStart.book Page 21 Friday, July 28, 2000 6:37 PM
22 pdQ2 User’s Guide
DRAFT
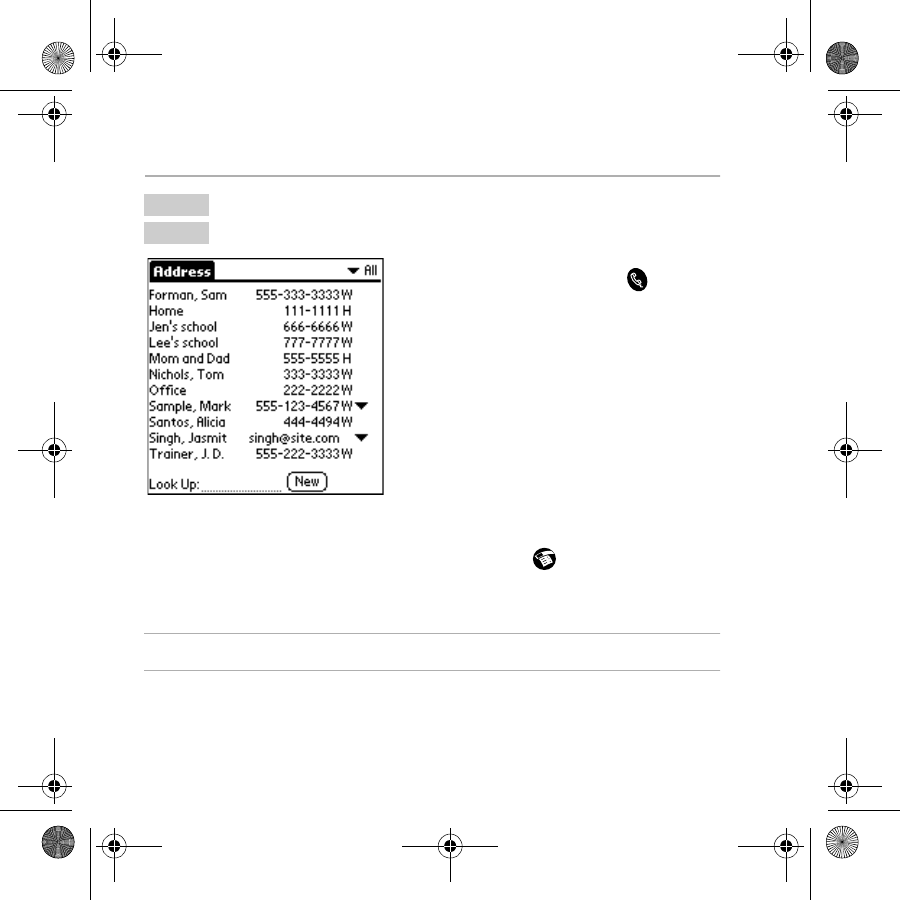
Using the Address Book
1. Press the Address Book key.
2. To call a number in the list, tap the
number.
3. To see other numbers for this
person, tap the arrow to the right of
the number. Tap the number you
want to call.
4. When you have finished your call,
tap End.
5. To enter new information in the Address Book, tap New.
6. To add a number to your Speed Dial list, tap to open the menus.
From the Options menu, tap Launch Speed Dial. Tap Add, then tap
Lookup. Select the number you want to put on the Speed Dial list.
For details, see Chapter 6—Address Book in the
pdQ
2
Reference Guide
.
Phone On to make a call; either on or off for viewing or editing
Flip Open
pdq2_QuickStart.book Page 22 Friday, July 28, 2000 6:37 PM
Using Call History 23
DRAFT
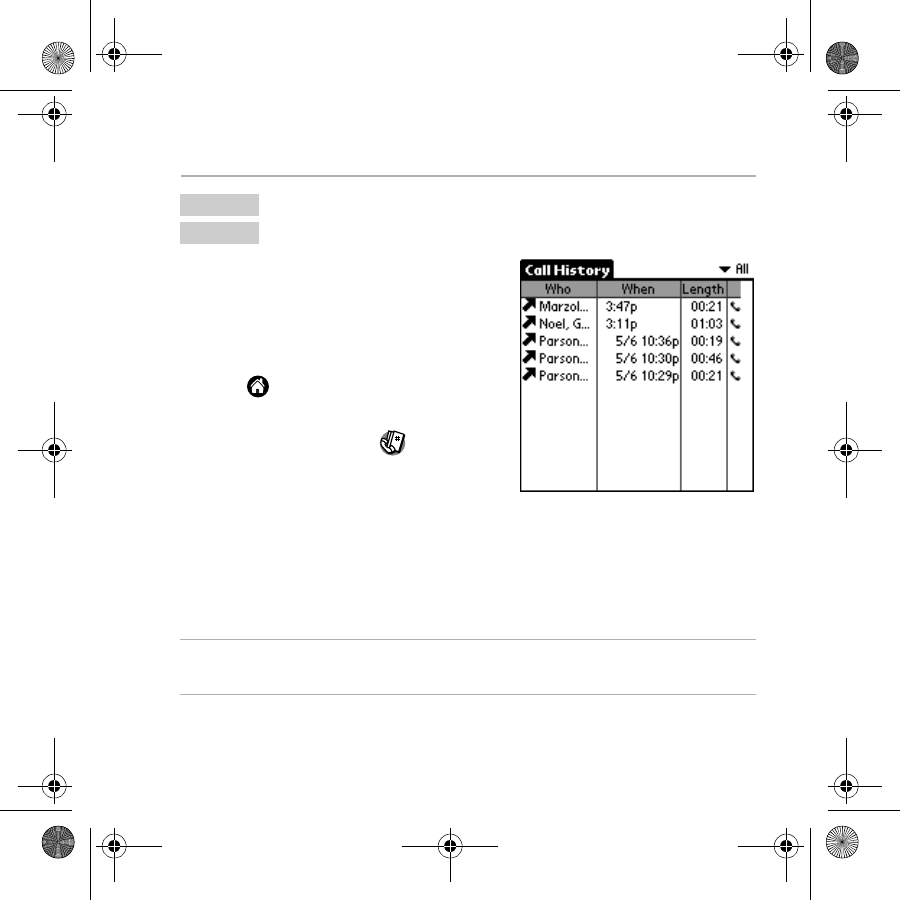
Using Call History
Call History records the last 99 phone
numbers you either called or received
calls from. It identifies callers, the day
and time they called, and the length of
the call.
1. Tap to view the Applications
Launcher.
2. Tap the Call History icon.
3. Tap the pick list in the upper-right
corner. From the list, tap All,
Incoming, Outgoing, or Missed.
4. To make a call from Call History, just turn on the phone and tap the
icon to the right of the number you want to call.
5. When you have finished your call, tap End.
For details, see Chapter 7—Call History and the Recent Calls List in the
pdQ
2
Reference Guide
.
Phone May be either on or off
Flip Open
pdq2_QuickStart.book Page 23 Friday, July 28, 2000 6:37 PM
24 pdQ2 User’s Guide
DRAFT
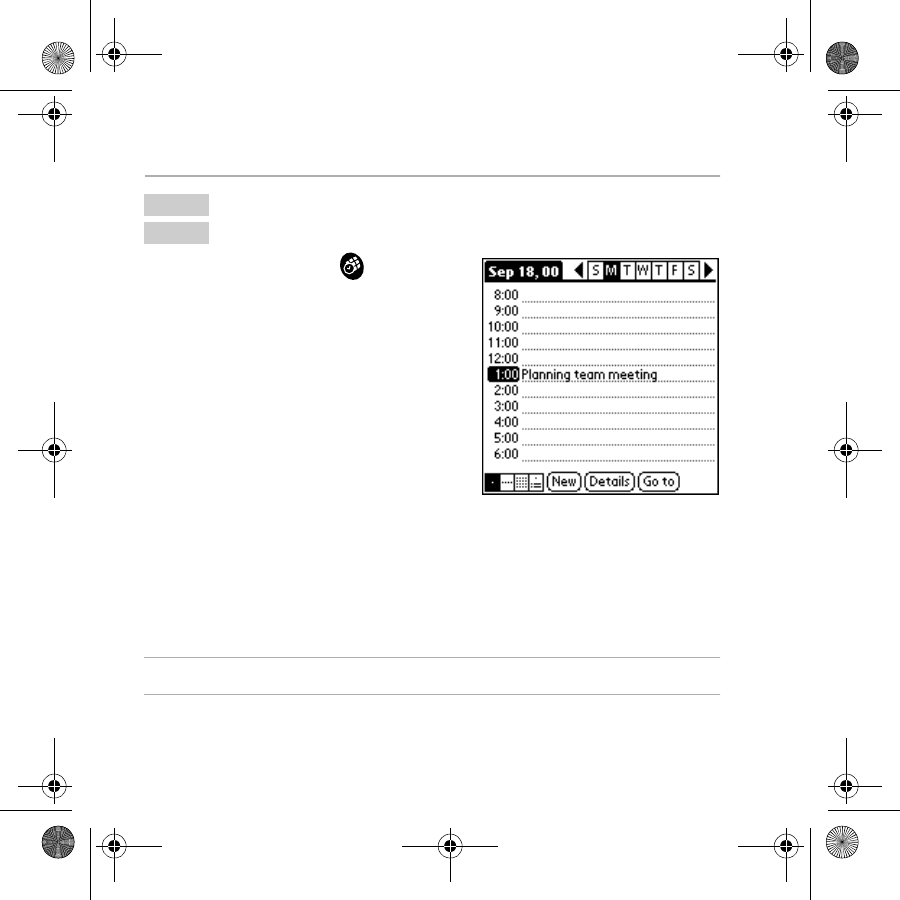
Using the Date Book
1. Press the Date Book key.
2. Tap the time line when the event
will begin.
3. Enter information about the event.
4. If your appointment is longer or
shorter than one hour, tap the time
of the event to open the Set Time
dialog.
If your appointment is exactly one
hour long, skip to step 7.
5. Tap the appropriate hour and minute in the time columns on the right
side of the dialog to set the Start Time.
6. Tap the End Time box. Tap the hour and minute in the time columns.
7. Tap OK when you have finished.
For details, see Chapter 8—Date Book in the
pdQ
2
Reference Guide
.
Phone May be either on or off
Flip Open
pdq2_QuickStart.book Page 24 Friday, July 28, 2000 6:37 PM
Using the Memo Pad 25
DRAFT
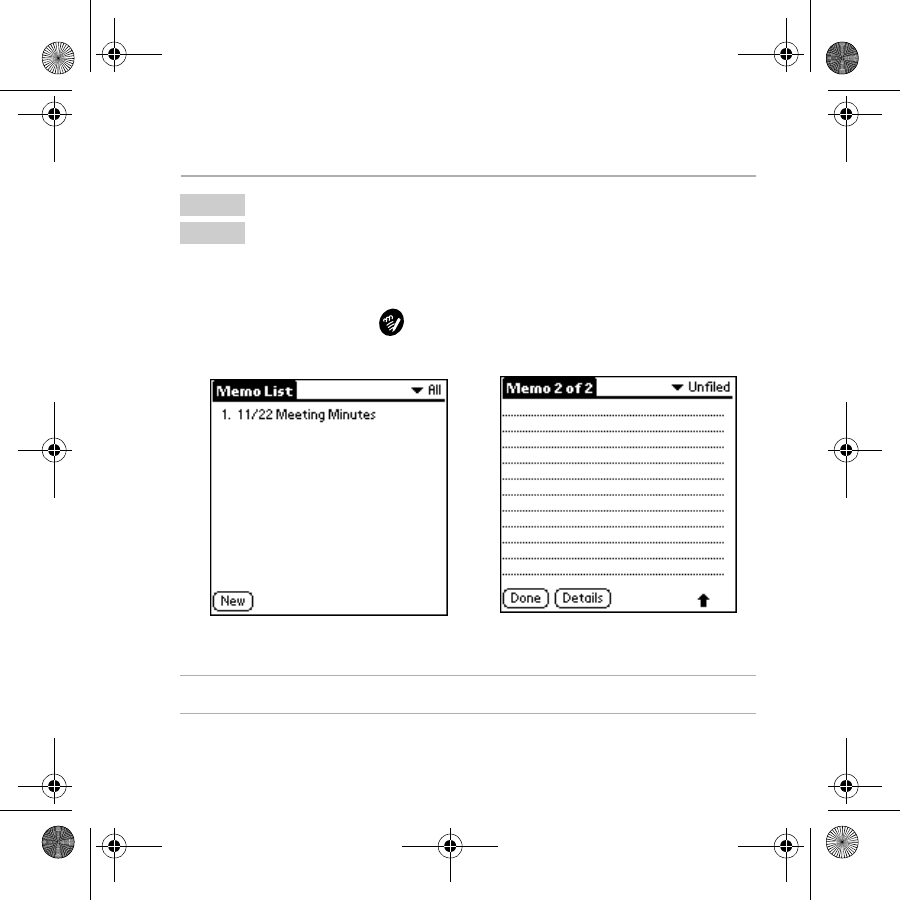
Using the Memo Pad
A memo can contain up to 4,000 characters; the number of memos you
can store is dependent only on how much free memory you have.
1. Press the Memo Pad key.
2. Tap any existing memo to open it or tap New to create a new memo.
3. Enter the memo text. When you have finished, tap Done.
For details, see Chapter 9—Memo Pad in the
pdQ
2
Reference Guide
.
Phone May be either on or off
Flip Open
pdq2_QuickStart.book Page 25 Friday, July 28, 2000 6:37 PM
26 pdQ2 User’s Guide
DRAFT
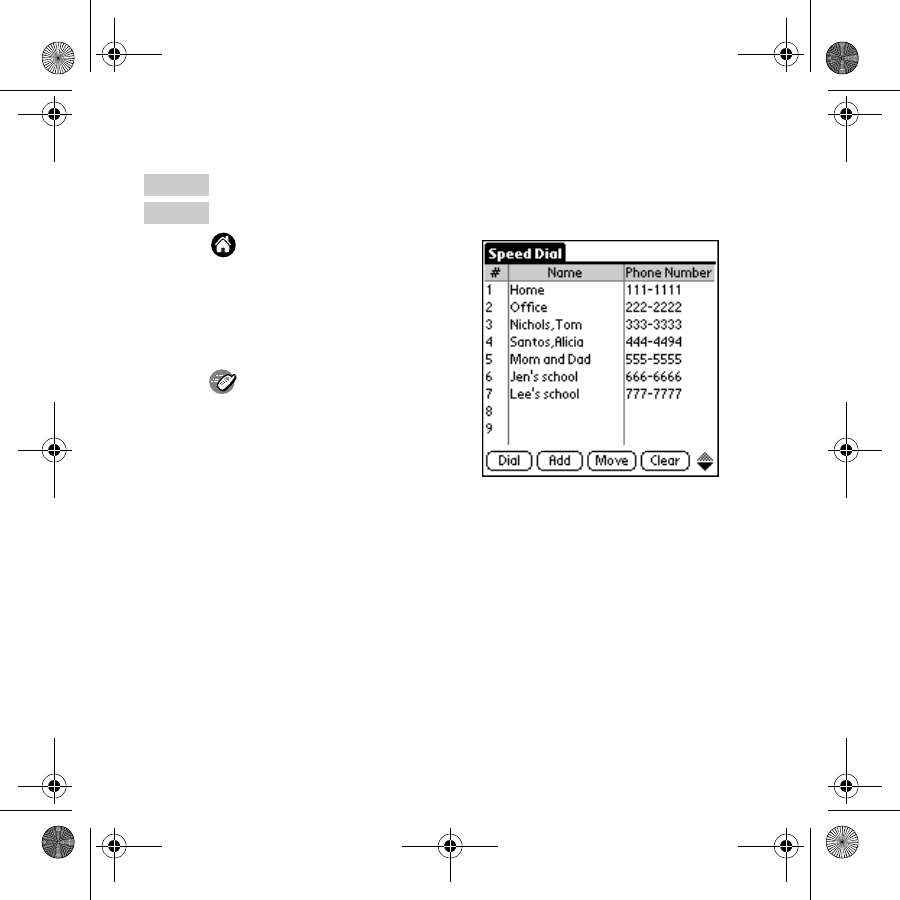
Using Speed Dial
You can designate up to 199 phone numbers from your Address Book to
be on your Speed Dial list. You can then call these phone numbers just by
pressing the one, two, or three digit Speed Dial number (1 through 199).
Because Speed Dial is linked to the Address Book, when you change a
phone number in the Address Book, it is automatically updated in the
Speed Dial list.
To add numbers to your Speed Dial list
1. Tap to view the Applications Launcher.
2. Tap the Down key or the scroll bar to move through the applications.
Tap to open Speed Dial.
3. Tap Add.
4. Tap Lookup.
5. Tap the entry you want to add to the Speed Dial list. Then tap Add.
The entry is added to the next available Speed Dial number.
For details, see Chapter 6—Address Book in the
pdQ
2
Reference Guide
.
Phone May be either on or off
Flip Open
pdq2_QuickStart.book Page 26 Friday, July 28, 2000 6:37 PM
Using Speed Dial 27
DRAFT
To make a call from Speed Dial (with the flip closed)
If you know the Speed Dial number
Press the Speed Dial number on the keypad and press .
NOTE: If you have One-Touch Dialing enabled, press the Speed Dial number
on the keypad and hold down the final digit for a few seconds to place the call.
(To enable One-Touch Dialing, see “Setting up preferences” on page 35.)
If you need to look up the Speed Dial number
1. Press the shuttle in to open the menus. Roll the shuttle up or down
until Contacts is highlighted. Then press the shuttle in.
2. Roll the shuttle up or down until Speed Dial List is highlighted. Then
press the shuttle in.
3. Roll the shuttle up or down to scroll through the Speed Dial list. When
the person you want to call is highlighted, press .
4. When you have finished your call, press .
Phone On
Flip Closed
pdq2_QuickStart.book Page 27 Friday, July 28, 2000 6:37 PM
28 pdQ2 User’s Guide
DRAFT
To make a call from Speed Dial (with the flip open)
1. Tap to view the Applications
Launcher.
2. Tap the Down key or the scroll bar on
the right to move through the
applications.
3. Tap to open Speed Dial.
4. Tap the number you want to call.
Then tap the phone icon to place the
call.
5. Tap Dial.
6. When you have finished the call, tap End.
Phone On
Flip Open
pdq2_QuickStart.book Page 28 Friday, July 28, 2000 6:37 PM
Using the To Do List 29
DRAFT
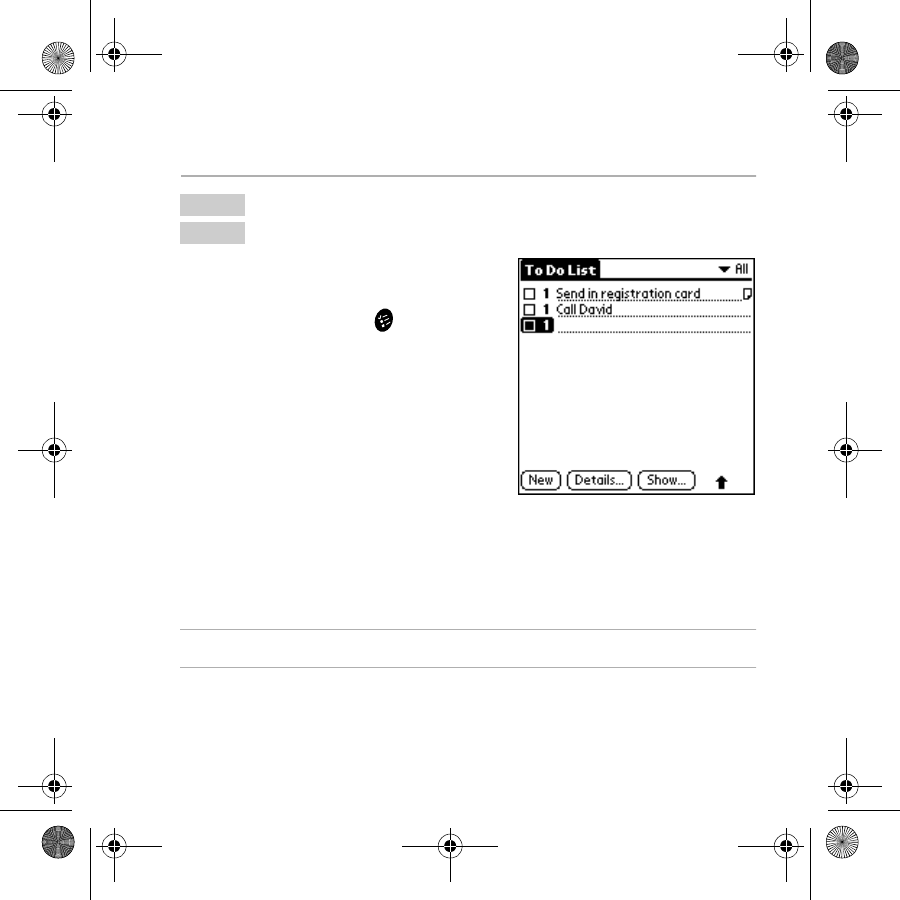
Using the To Do List
Use the To Do List to keep track of things
you need to accomplish.
1. Press the To Do List key.
2. Tap New to add an item to the list.
3. Enter the text for the item. The text
can be longer than one line.
4. Tap Details to set a priority, put the
item in a category, assign a due date,
or mark the item as private. You can
also attach a note to it.
5. Tap Show to set your preferences for displaying the To Do List. For
example, you can sort items by priority, due date, or category.
6. Tap Done when you have finished.
For details, see Chapter 11—To Do List in the
pdQ
2
Reference Guide
.
Phone May be either on or off
Flip Open
pdq2_QuickStart.book Page 29 Friday, July 28, 2000 6:37 PM
30 pdQ2 User’s Guide
DRAFT
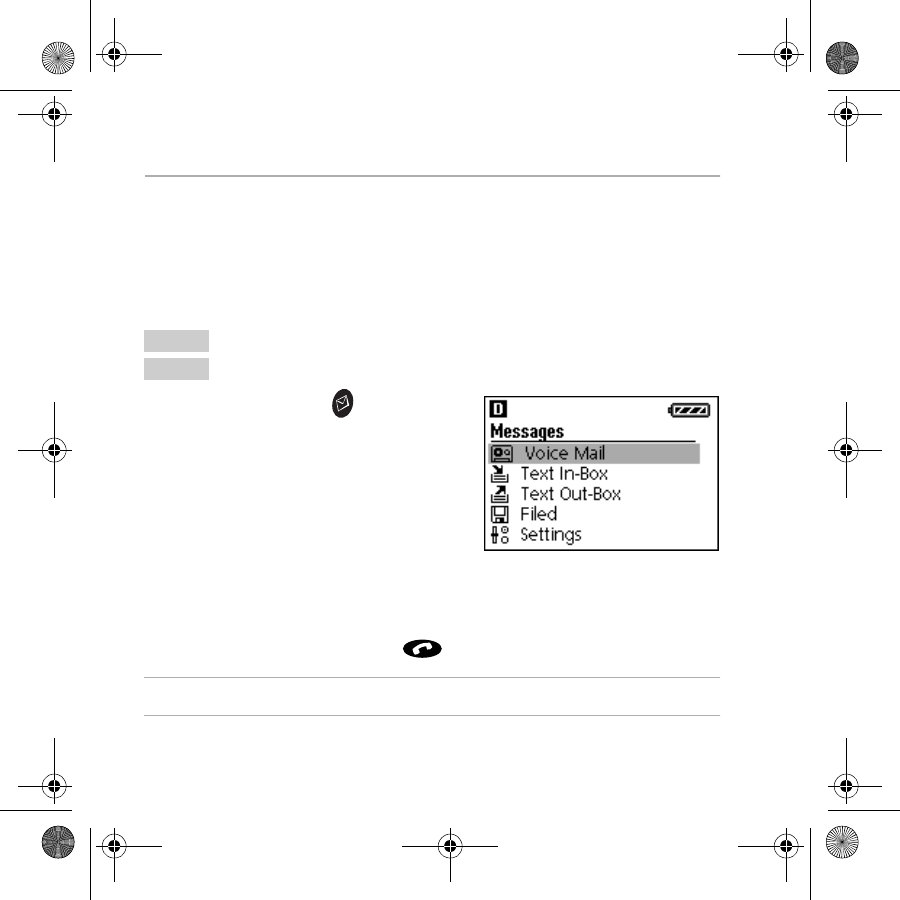
Receiving messages and voice mail
When you receive a page or voice mail message, the light on the front of
the pdQ2 flashes red five times, the backlight turns on, and the envelope
icon appears on the screen. You can check your messages with the flip
open or closed. However, to respond to messages, the flip must be open.
To check pages and voice mail
1. Press the Messages key.
2. To check voice mail, press the
shuttle in when Voice Mail is
highlighted.
3. To check text messages, roll the
shuttle down to highlight Text
In-Box. Then press the shuttle in.
4. Roll the shuttle up or down to scroll
through your messages.
5. To reply to a message, press when the message is highlighted.
For details, see Chapter 16—Messages in the
pdQ
2
Reference Guide
Phone On
Flip Closed
pdq2_QuickStart.book Page 30 Friday, July 28, 2000 6:37 PM
Using Voice Dial 31
DRAFT
Using Voice Dial
To train the phone
1. From the Applications Launcher, tap Voice Dial.
2. Tap New. A list of all the names in your Address Book appears.
3. Select a person and tap Add. If there is more than one phone number,
select the one you want to use and tap Add.
4. When you hear “Name Please,” speak the name. Repeat the name
when you are instructed to do so.
To make a call using voice commands
1. Press .
2. Speak the name of the person you want to call.
For details, see the
pdQ
2
Reference Guide
on the CD-ROM.
Phone On
Flip Open
Phone On
Flip Closed
pdq2_QuickStart.book Page 31 Friday, July 28, 2000 6:37 PM
32 pdQ2 User’s Guide
DRAFT
Creating voice memos
To record and play back voice memos
You can record at least 60 seconds of memos (the number is limited to the
available memory on the pdQ2). You’ll hear a beep 5 seconds before you
run out of memory.
1. Press and hold the shuttle in. After a few seconds, you hear a beep. Do
not release the shuttle.
2. Still holding in the shuttle, record your memo.
3. Release the shuttle to stop recording the memo.
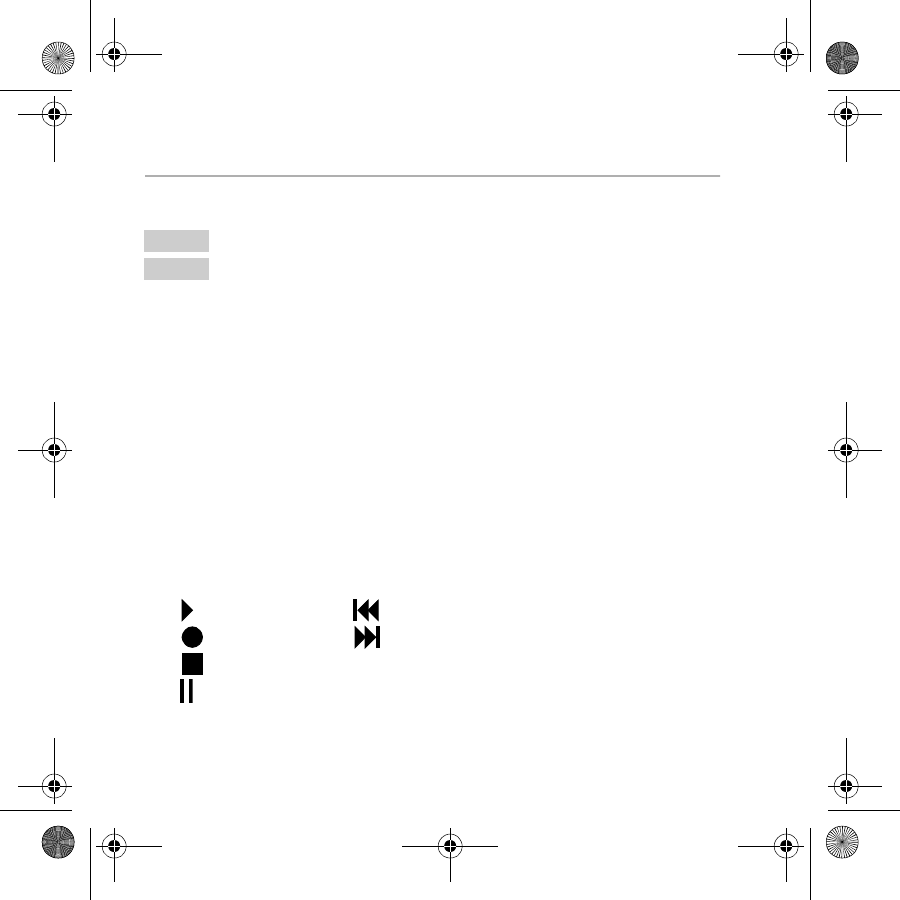
4. To replay a memo, select Voice Memo from the flip-closed menus.
5. Select the memo you want to replay. Roll the shuttle up or down to
select any of the following options. When the correct option is
highlighted, press the shuttle in.
Phone On
Flip Closed
Play Rewind (Hold the shuttle in.)
Record Fast forward (Hold the shuttle in.)
Stop Erase Erase a memo
Pause
pdq2_QuickStart.book Page 32 Friday, July 28, 2000 6:37 PM
Adjusting sounds 33
DRAFT
Adjusting sounds
To adjust the speaker volume
Roll the shuttle up or down.
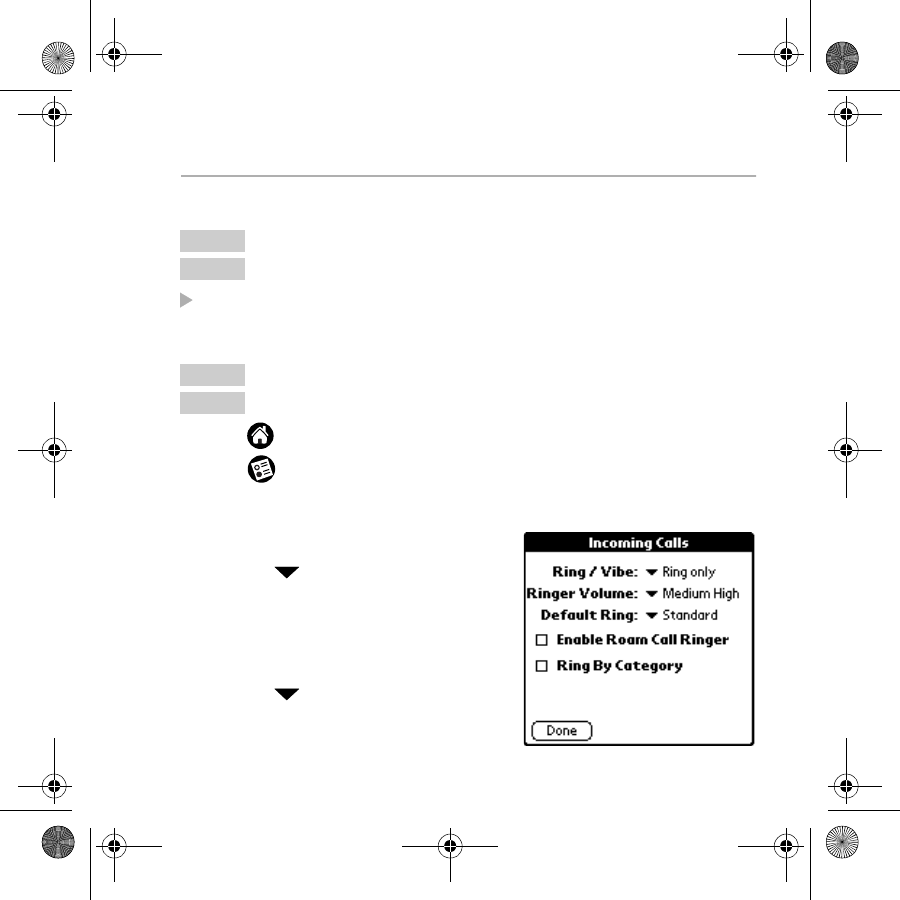
To select a ringer sound and adjust ringer volume
1. Tap to view the Applications Launcher.
2. Tap to open the last Preferences screen you used.
3. Tap the pick list in the upper-right corner and select Sounds.
4. Tap Incoming Calls.
5. Tap the beside Ringer Volume.
Select a volume level between Low
and High. If you want the ringer
volume to increase with each ring,
select Escalate.
6. Tap the beside Default Ring to
select a ringer sound. When you select
a sound, you hear a sample of it.
Phone On, with a call in progress
Flip Closed
Phone May be on or off
Flip Open
pdq2_QuickStart.book Page 33 Friday, July 28, 2000 6:37 PM
34 pdQ2 User’s Guide
DRAFT
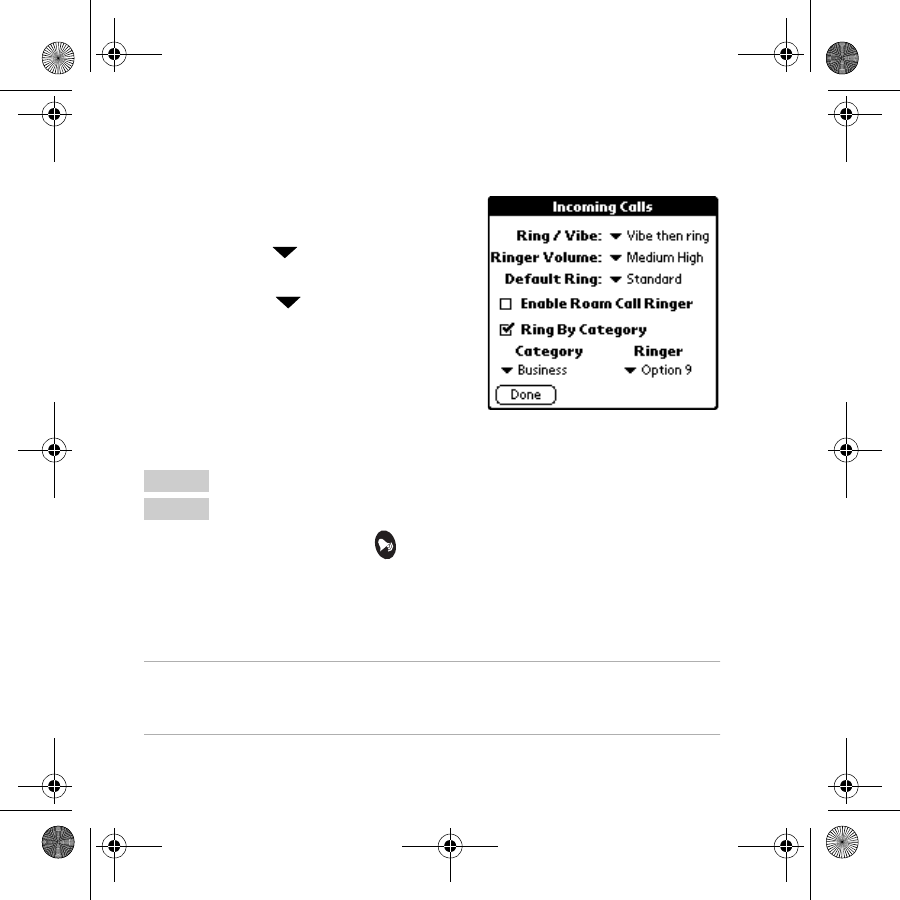
7. To select different ringer sounds for different categories of calls, do
the following:
a. Put a check mark in the Ring by
Category check box.
b. Tap the under Category. Select
a category of calls.
c. Tap the under Ringer. Select
the sound for that category of calls.
d. Repeat steps b–c for each category
you want to set up.
8. When you have finished, tap Done.
To silence all sounds
1. Press the Silence Sounds key.
2. Press the shuttle in to select Silence All.
3. Roll the shuttle up or down to scroll through the choices. When the
mode you want is highlighted, press the shuttle in.
NOTE: You can make many other adjustments to the sounds. When the flip is
closed, navigate to the Settings menu and select Sounds. When the flip is open,
tap the Prefs icon on the Application Launcher. Select Sounds from the pick list.
Phone On
Flip Closed
pdq2_QuickStart.book Page 34 Friday, July 28, 2000 6:37 PM
Setting up preferences 35
DRAFT
Setting up preferences
Using the preferences screens, you can turn on such features as Auto-
Answer, one-touch dialing, and beaming. You can also make adjustments
to sound, power usage, and other settings. This section explains how to
adjust a few of the preferences. For more information, see Chapter 17—
Setting Preferences in the pdQ2 Reference Guide on the CD-ROM.
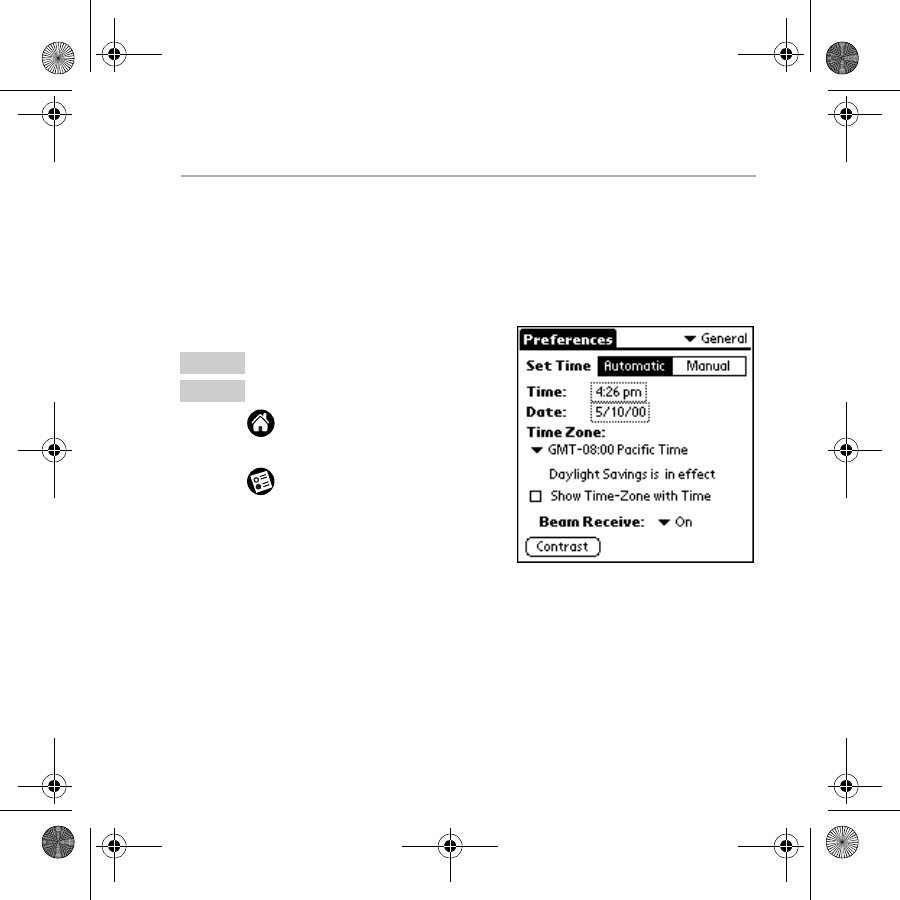
To set General preferences
1. Tap to view the Applications
Launcher.
2. Tap to open Preferences.
3. Tap the pick list in the upper-right
corner and select General.
4. Tap Automatic if you want your
phone to set the date and time
automatically. Tap Manual to adjust these settings yourself.
5. To activate beaming, tap On in the Beam Receive line.
6. Tap Contrast to adjust the contrast level of the screen.
7. Tap Done.
Phone May be either on or off
Flip Open
pdq2_QuickStart.book Page 35 Friday, July 28, 2000 6:37 PM
36 pdQ2 User’s Guide
DRAFT
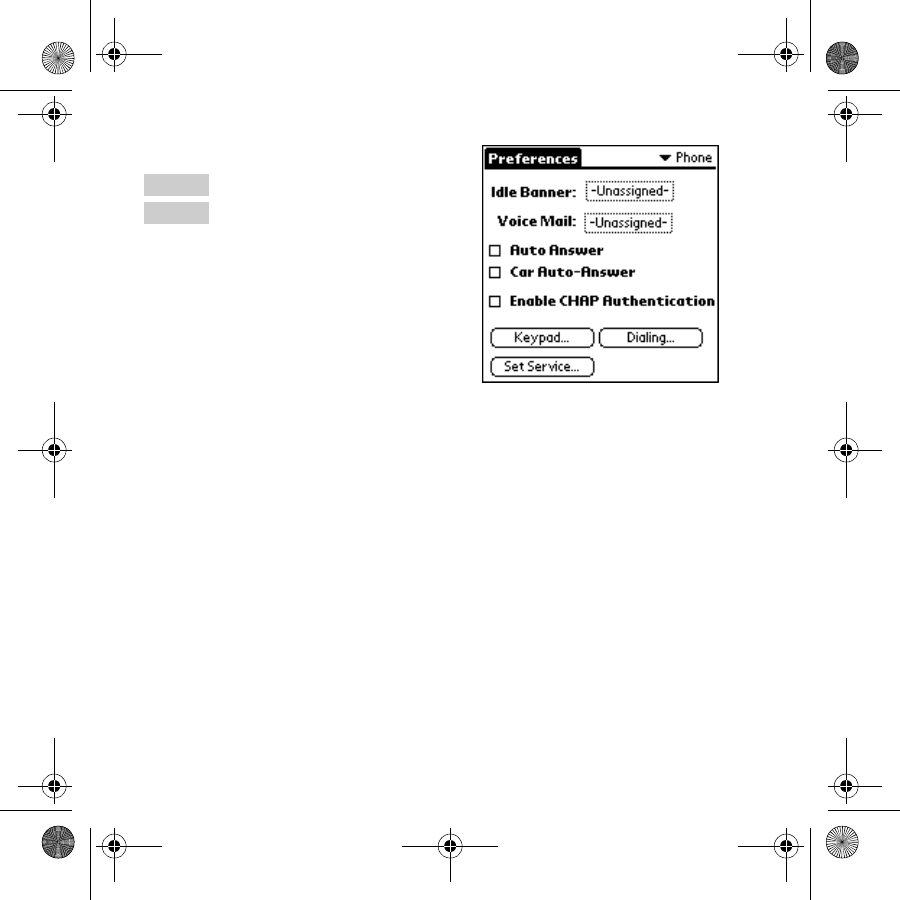
To set Phone preferences
1. Tap the Idle Banner line. Write
your name or other text you want
to appear on the screen.
2. Tap the Voice Mail line. If your
Voice Mail number has not been
entered by your service provider,
write it here.
3. To adjust the automatic answering features of the phone, tap Keypad.
4. Turn Auto Answer or Car Auto-Answer on or off. When these
settings are on, incoming calls are answered after two rings.
5. Turn Any-Key Answer on or off. When Any-Key Answer is on, you
can answer an incoming call by pressing any key on the keypad.
6. When you have finished, tap Done.
7. On the Phone Preferences screen, tap Dialing.
8. Turn One-touch dialing on or off. When One-touch dialing is on, you
can place calls by entering the Speed Dial number and holding the last
digit down for a few seconds.
9. Tap Done when you have finished.
Phone May be either on or off
Flip Open
pdq2_QuickStart.book Page 36 Friday, July 28, 2000 6:37 PM
Network connections 37
DRAFT
Network connections
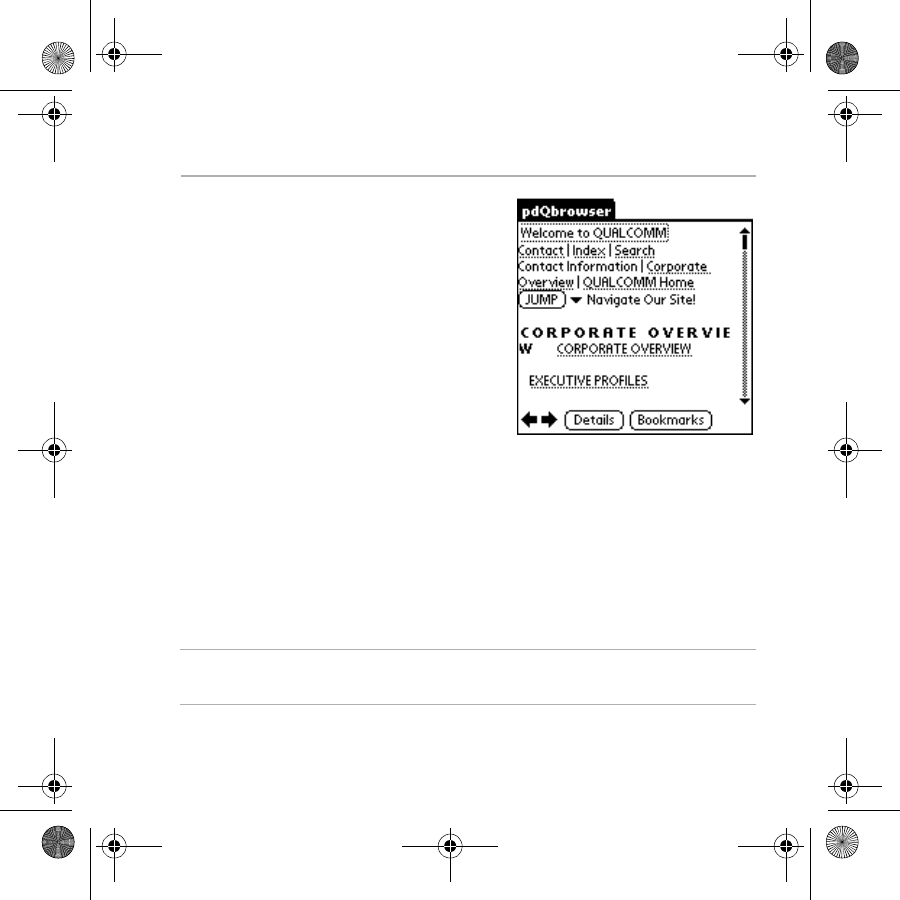
Your pdQ2 is capable of connecting
wirelessly to network services for
email and Internet access. To make
these connections, your service
provider must offer over-the-air
digital data coverage in your area.
(Note that data coverage is not the
same as voice coverage, but both are
offered by your wireless service
provider.)
Among the many network
applications you can use on your pdQ2
are the following:
■Eudora® for the Palm Computing Platform (email)
■Palm Mail (email)
■EudoraWeb (Internet browser)
Check with your phone service provider or Internet service provider
(ISP) to collect the information necessary to set up these applications on
your pdQ2.
For detailed information about making network connections and using these
applications, see the
pdQ
2
Reference Guide
on the CD-ROM.
pdq2_QuickStart.book Page 37 Friday, July 28, 2000 6:37 PM
38 pdQ2 User’s Guide
DRAFT
Data/Fax mode
You can use the built-in wireless modem in your pdQ2 just like a standard
external modem to your PC or laptop. You can also use it to send or
receive faxes from the PC. Notice, however, that you cannot make or
receive voice calls or use any other applications while the modem is in
Data/Fax mode. Incoming phone calls receive a busy signal. Opening
any other application terminates the modem call.
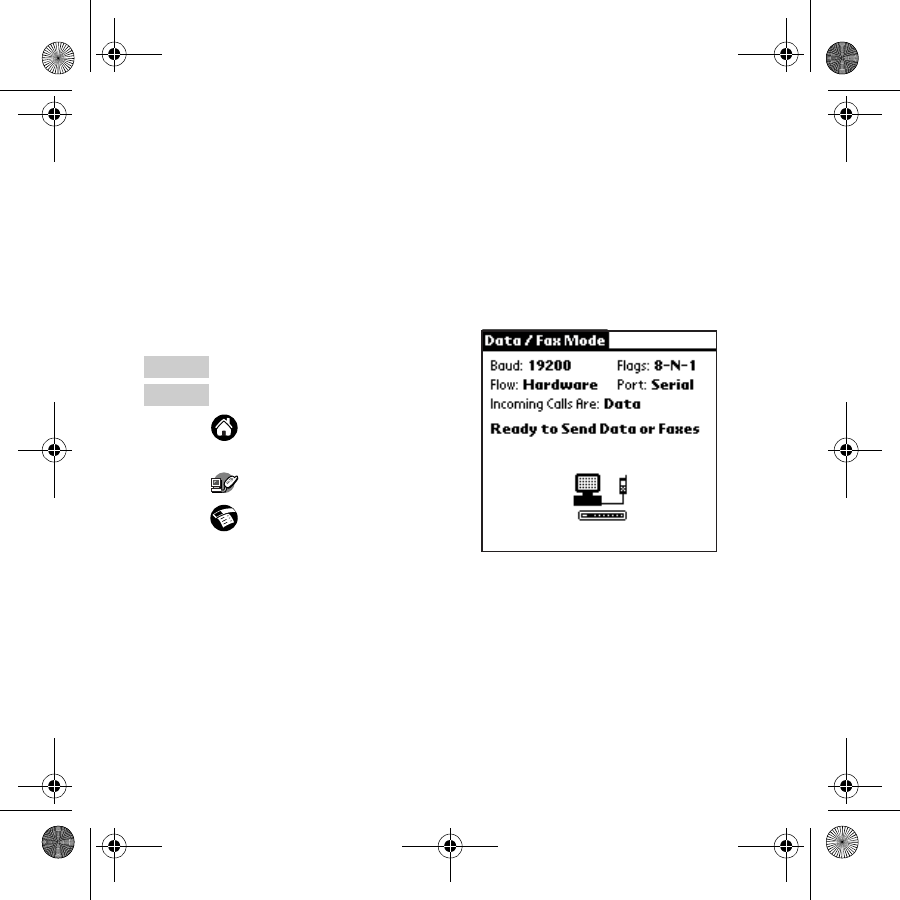
To set up Data/Fax mode
1. Tap to view the Applications
Launcher.
2. Tap to open Data/Fax mode.
3. Tap to open the menu.
4. From the Options menu, tap
Settings.
These settings identify the serial
communications settings between your computer and the pdQ2.
5. Match your computer’s settings to these values. You can change these
settings if necessary. Refer to your computer user guide.
6. Tap Done.
Phone On
Flip Open
pdq2_QuickStart.book Page 38 Friday, July 28, 2000 6:37 PM
Network connections 39
DRAFT
To use Data/Fax mode
1. Slide the pdQ2 into the cradle. If the cradle is attached to the port you
use for HotSync operations, turn off HotSync on your computer. If
you are using a data cable and/or a different port than the one you
use for HotSync operations, it is not necessary to turn off HotSync.
2. Tap to display the Applications Launcher.
3. Tap to open Data/Fax mode.
You see status information beginning with “Initializing Modem” and
continuing to “Modem Ready.”
4. From the computer, make the connection you want to initiate.
5. When you have finished the data or fax call, tap End or tap the
Applications Launcher and select a different application. The session
terminates automatically.
You can also Data/Fax mode on or off with the flip closed by selecting Network
from the Settings menu. For more information, see “Using Data/Fax mode” in the
pdQ
2
Reference Guide
.
Phone On
Flip Open
pdq2_QuickStart.book Page 39 Friday, July 28, 2000 6:37 PM
40 pdQ2 User’s Guide
DRAFT
Resetting the phone
If the phone does not respond to taps or key presses with the flip either
open or closed, you may need to perform a reset. There are two types of
resets—a soft reset and a hard reset.
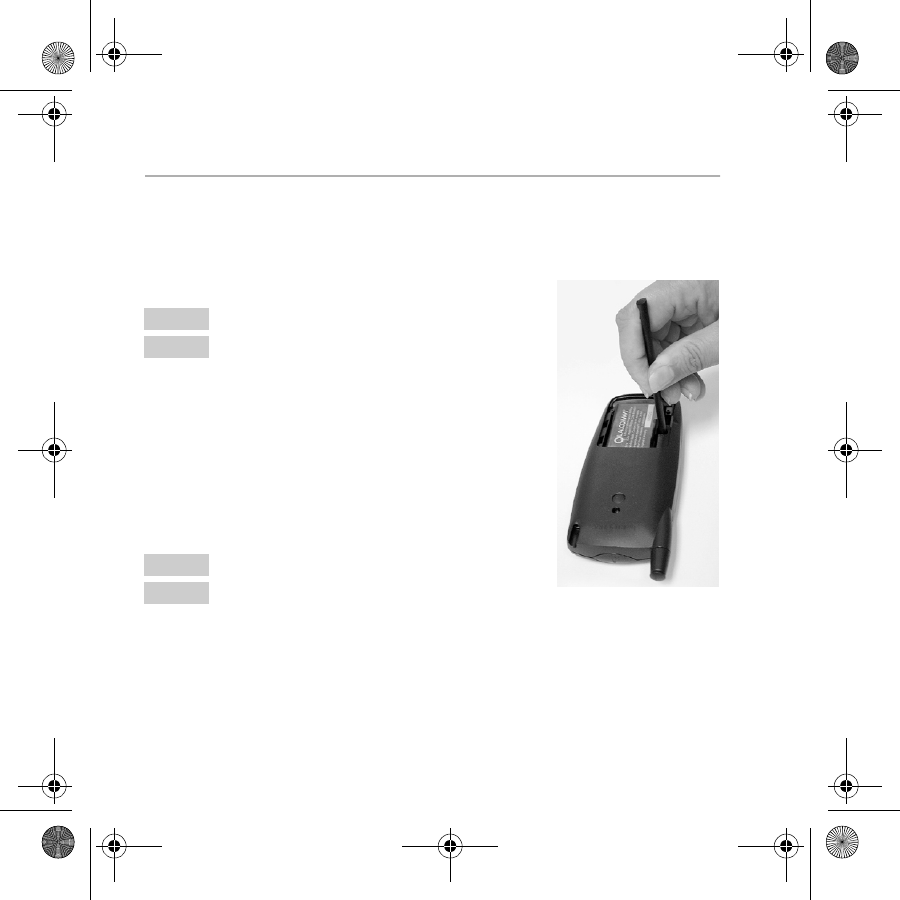
To perform a soft reset
In a soft reset, all records and entries are
retained.
1. Turn the pdQ2 over. Open the battery door
on the back of the phone.
2. Press the reset button with the stylus.
To perform a hard reset
With a hard reset, all entries stored in the pdQ2 are erased. You can
restore previously synchronized data using a HotSync operation.
1. With the flip open, turn the pdQ2 over. Open the battery door on the
back of the phone.
2. Press and hold down the backlight key on the top of the phone.
Phone Off
Flip Open
Phone Off
Flip Open
pdq2_QuickStart.book Page 40 Friday, July 28, 2000 6:37 PM
Resetting the phone 41
DRAFT
3. Keep holding down the backlight key as you do one of the following:
■Use the stylus to press the reset pin.
■Remove and reinsert the battery.
4. When the Palm logo appears, release the backlight key.
The following message appears:
5. Press the Up button below the screen to complete the hard reset and
delete your data. Press any other button to cancel the hard reset and
keep your data.
Erase all data?
YES - “up” button
NO - any other button
pdq2_QuickStart.book Page 41 Friday, July 28, 2000 6:37 PM
42 pdQ2 User’s Guide
DRAFT
Synchronizing your pdQ
2
with a computer
To synchronize your pdQ2 with your computer, install the Palm Desktop
software on the computer. You’ll find this software on the CD-ROM in
your phone package.
Installing Palm Desktop software
Requirements for a Windows system
Note
If you already use a Palm device and have already installed the Palm
Desktop on your computer, it is not necessary to install it again.
If you need to install using diskettes, you can order the Palm Desktop
installation diskettes from Palm Computing.
To install this software on a Macintosh® computer, you must purchase a
Palm™ MacPac connection kit. Contact Palm Computing at 800-881-7256
(USA), 800-891-6342 (Canada), or 801-431-1536 (worldwide). You can also
visit the Palm Connected Organizers web site at http://www.palm.com.
■Windows™ 95, Windows 98,
or Windows NT® 4.0
■IBM-compatible 486 computer or
higher
■8 MB RAM (memory) minimum;
16 MB recommended
■12 MB available hard disk space
■VGA monitor or better
■CD-ROM drive
■Mouse
■One available serial port
■Window’s compatible
printer (optional)
pdq2_QuickStart.book Page 42 Friday, July 28, 2000 6:37 PM

Synchronizing your pdQ2 with a computer 43
DRAFT
To install the Palm Desktop Software
Do not simply copy the Palm Desktop files to your hard drive. The
installer decompresses the files and places them in their proper locations.
Before you begin, exit all programs. Do not attach the pdQ2 to the
computer during installation.
1. Insert the Palm Desktop CD into the computer’s CD-ROM drive.
2. If the introduction screen does not appear automatically, open the
Start menu and choose Run. Type the letter of your CD-ROM drive,
followed by a colon and the word setup. For example, if your
CD-ROM drive is drive D, type D:setup.
3. Click the Install button. Follow the instructions on the screen.
4. After you have installed the software, refer to the Help menu for
complete information about how to use Palm Desktop.
Connecting the cradle
If you plan to synchronize pdQ2 data with your computer, connect the
cradle to the computer. If you don’t plan to synchronize data, there is no
need to attach the cradle to the computer. You can use it to store and
recharge the pdQ2 by plugging in the power cable.
1. Turn off the computer.
2. Plug the serial cable from the cradle into the serial communications
(COM) port on your computer. Your pdQ2 requires a dedicated port.
It cannot share a port with an internal modem or other device.
pdq2_QuickStart.book Page 43 Friday, July 28, 2000 6:37 PM

44 pdQ2 User’s Guide
DRAFT
3. Plug the power cable into the cradle and into a power outlet.
4. Turn on the computer.
Performing HotSync operations
The first time you synchronize data, you need to enter user information
on both the phone and the Palm Desktop. Once you enter this information
and synchronize, the HotSync Manager recognizes your phone and
doesn’t ask for this information again. You must perform your first
HotSync operation using the cradle, rather than using a modem.
Important considerations
■If you are a system administrator preparing several pdQ2s for a
group of users, see “Creating a user profile” on page 67 in the pdQ2
Reference Guide before you continue. Use a unique name for each
phone.
■If you are an existing Palm organizer user, back up your current files
to your computer before you perform a HotSync operation to the
pdQ2. Give your pdQ2 a different user name than your Palm
organizer. If problems occur with some applications, you may need to
delete the old files and reinstall them. See Chapter 5—Transferring
Information in the pdQ2 Reference Guide.
To perform your first HotSync operation
1. On your computer, double-click the Palm Desktop icon (or select
Palm Desktop from the Start menu).
pdq2_QuickStart.book Page 44 Friday, July 28, 2000 6:37 PM
Synchronizing your pdQ2 with a computer 45
DRAFT
2. Click in the Windows system tray to open the HotSync Manager
menu. From the menu, make sure Local is checked.
3. Turn on the pdQ2 and slide it into the cradle.
4. Tap the HotSync button on the cradle. During your first HotSync
operation, a dialog asks for your user name.
5. On the computer, enter a user name for your pdQ2. Click OK.
Every Palm device must have a unique name. Problems may occur if
you try to synchronize more than one device with the same name.
A message indicates when the HotSync operation is complete.
Important: Do
not
turn the phone on or off during a HotSync operation.
pdq2_QuickStart.book Page 45 Friday, July 28, 2000 6:37 PM

46 pdQ2 User’s Guide
DRAFT
Phone care
Use these guidelines to optimize the performance and life of your phone,
antenna, and battery.
Phone
❑Do not let unauthorized personnel install or service your phone or
accessories. Faulty installation or service may be dangerous and will
invalidate your warranty.
❑Only use approved accessories. Use of any unauthorized accessories
may be dangerous and will invalidate your phone warranty if the
accessories cause damage or a defect to the phone. See “Accessories”
on page 50.
❑Keep the phone dry. If the phone gets wet, turn the power off
immediately. Let it dry before you use it again. In general, treat the
pdQ2 as you would a pocket calculator or other small electronic
instrument.
❑To avoid scratching the screen, always use the stylus or other plastic-
tipped pen intended for a touch-sensitive screen. Never use a pen,
pencil, or other sharp object on the surface of the screen.
❑Treat the phone gently. The touch-sensitive screen contains a glass
element. Do not drop the phone or subject it to any strong impact. Do
not carry your pdQ2 in your back pocket. If you sit on it, the glass
may break.
pdq2_QuickStart.book Page 46 Friday, July 28, 2000 6:37 PM

Phone care 47
DRAFT
❑Protect the pdQ2 from temperature extremes. Do not leave it on the
dashboard of a car on a hot day, and keep it away from heaters and
other heat sources. Store it out of direct sunlight.
❑Do not store or use the pdQ2 in any location that is extremely dusty,
damp, or wet.
❑Use a soft, damp cloth to clean the phone. Clean the screen with a soft
cloth moistened with a diluted window-cleaning solution.
❑Avoid using suntan lotion around the phone. Chemicals in suntan
lotions can damage your phone.
Antenna
Follow these guidelines to get the best reception.
❑Fully extend the antenna when you place or receive a call.
❑Do not touch the antenna while you are on a call. Do not bend or
twist the antenna.
❑When using the headset, keep the headset wire away from the
antenna.
❑When using the phone to connect to the Internet or send and receive
email, make sure the extended antenna is at least 20 centimeters (8
inches) away from other people and is pointed away from them.
Battery
Your pdQ2 has a rechargeable lithium ion battery. To charge the battery,
either plug the power cable directly into the phone or plug the power
cable into the cradle and place the phone in the cradle. You can purchase
pdq2_QuickStart.book Page 47 Friday, July 28, 2000 6:37 PM

48 pdQ2 User’s Guide
DRAFT
an additional battery, if you wish, and charge it in the cradle along with
the phone.
Tips for improving battery performance
❑Select a shorter “Auto-off after” time on the General Preferences
screen. This feature turns off the PDA after a set number of minutes
of non-use. The shorter a time you select, the more energy is saved.
See “Entering information” on page 19.
❑Minimize the use of the backlight.
❑If you don’t use the Beaming feature to receive data from other
devices, leave the Beam Receive setting at Off. See “Entering
information” on page 19.
❑If you don’t plan to make or receive calls, you can use the PDA
without turning on the phone.
❑Do not disassemble or short-circuit the battery.
❑Keep the metal contacts at the base of the battery clean.
❑If you have not used an internal or external battery for more than a
month, recharge it before using it.
❑Do not charge any battery if the temperature is below 32ºF (0ºC) or
above 122ºF (50ºC).
❑Do not store any battery in hot areas for long periods of time. Use
these storage guidelines:
under 1 month: -4º to 140ºF (-20º to 60ºC)
over 1 month: -4ºF to 113ºF (-20º to 45ºC)
pdq2_QuickStart.book Page 48 Friday, July 28, 2000 6:37 PM

Phone care 49
DRAFT
Replacing the battery
If you have to replace the battery in your pdQ2, be aware of the following
considerations.
❑If the battery becomes low, an alert appears on the screen. Before you
replace the battery, perform a HotSync operation to back up your
data. This helps prevent accidental data loss.
❑If the pdQ2 does not turn on when you press the End/Power key on
the keypad, recharge the battery immediately.
❑Before replacing the battery, turn the phone off. Never remove the
battery while the telephone features are active. To verify that the
phone is turned off, open and then close the flip. The words “Phone
is off” appear on the screen. Then the screen becomes blank.
❑Only remove the battery to replace it with another battery. Don’t
leave the battery out of the pdQ2. For example, if your battery
becomes drained while you are traveling and you don’t have a
second battery or a cradle to recharge it, it is better to leave the
drained battery in the pdQ2 than to remove it.
❑If the battery drains completely, the pdQ2 no longer operates.
However, the built-in backup battery stores your clock settings for
about two days and your data for about seven days. There is enough
residual energy in the battery to store the data, but not enough to
turn on the pdQ2.
❑If you leave a drained battery in the pdQ2 for an extended period of
time (more than seven days), you can lose all of the stored data. If this
happens, replace the battery and reset the pdQ2. Then perform a
HotSync operation to restore data from your computer.
pdq2_QuickStart.book Page 49 Friday, July 28, 2000 6:37 PM

50 pdQ2 User’s Guide
DRAFT
❑Never dispose of any battery in or near a fire. It could explode.
❑When you remove the battery and reinsert it, the pdQ2 does a soft
reset. No information is deleted in a soft reset; all records and entries
are retained. For details, see “Resetting the pdQ2” on page 292 of the
pdQ2 Reference Guide.
❑After you have replaced the battery, always check the clock settings.
Accessories
Accessories for your phone may include additional batteries, hands-free
headsets, travel chargers, data cables, and more.
To purchase accessories, visit www.kyocera-wireless.com/store. You
may also call (800) 211-1537 (U.S.A. only) or (510) 683-4004.
Where to find help
Your service provider—For questions about your phone and phone
service, contact your service provider. Your service provider’s customer
support department can answer questions about your phone, phone bill,
call coverage area, and specific features (such as call forwarding or voice
mail) available to you.
Your phone documentation—If you have questions about the features of
the phone, refer to this guide or the pdQ2 Reference Guide (on the CD-ROM
in your phone package.) To view or download the most current version
of these guides, visit us at www.kyocera-wireless.com.
pdq2_QuickStart.book Page 50 Friday, July 28, 2000 6:37 PM

Phone care 51
DRAFT
Kyocera technical support—If you have additional questions, contact the
Kyocera Wireless Corp. Customer Care Center in any of these ways:
■Web site: www.kyocera-wireless.com
■Telephone: (800) 349-4478 (U.S.A and Canada only) or (858) 882-1401
■Email: phone-help@kyocera-wireless.com
Before requesting support, please try to reproduce and isolate the
problem. When you contact the Customer Care Center, be ready to
provide the following information:
■The name of your service provider
■The actual error message or problem you are experiencing
■The steps you take to reproduce the problem
■The phone’s electronic serial number (ESN) and part number (MCN).
The ESN usually starts with a “B” and the MCN usually starts with
“61.” You will find these numbers on the label on the lower back of
your phone.
pdq2_QuickStart.book Page 51 Friday, July 28, 2000 6:37 PM

52 pdQ2 User’s Guide
DRAFT
Phone safety
Radio frequency (RF) energy
Your pdQ2 is a radio transmitter and receiver. When it is on, it receives
and also sends out RF energy. Your service provider’s phone network
controls the power level of the RF signal. This power level can range from
0.006 watts to 0.6 watts.
There are situations in which wireless phones must be turned off for
reasons of safety. You can quickly turn off the pdQ2 simply by holding
down the End/Power key on the keypad for a few seconds.
Exposure to RF energy
In August 1996, the U.S. Federal Communications Commission (FCC)
adopted RF exposure guidelines with safety levels for hand-held wireless
phones. These guidelines are consistent with the safety standards
previously set by both U.S. and international standards bodies in the
following reports:
■ANSI C95.1 (American National Standards Institute, 1992)
■NCRP Report 86 (National Council on Radiation Protection and
Measurements, 1986)
■ICNIRP (International Commission on Non-Ionizing Radiation
Protection, 1996)
pdq2_QuickStart.book Page 52 Friday, July 28, 2000 6:37 PM

Phone safety 53
DRAFT
Medical devices
Pacemakers—If your portable wireless phone is too close to a pacemaker,
the phone’s RF energy may interfere with the pacemaker’s operation. The
Health Industry Manufacturers Association and the wireless technology
research community recommend that you follow these guidelines to
minimize the potential for interference.
■Always keep the phone at least six inches (15 centimeters) away from
your pacemaker when the phone is turned on.
■Do not carry your phone near your heart.
■Use the ear opposite the pacemaker.
■If you have any reason to suspect that interference is taking place,
turn off your phone immediately.
Hearing aids—Some digital wireless phones may interfere with hearing
aids. In the event of such interference, you may want to consult your
service provider or call the customer service line to discuss alternatives.
Other medical devices—If you use any other personal medical device,
consult the manufacturer of the device to determine if it is adequately
shielded from external RF energy. Your physician may be able to help
you obtain this information.
In health care facilities—Turn your phone off in health care facilities
when instructed. Hospitals and health care facilities may be using
equipment that is sensitive to external RF energy.
pdq2_QuickStart.book Page 53 Friday, July 28, 2000 6:37 PM

54 pdQ2 User’s Guide
DRAFT
Avoiding potentially unsafe areas
Posted facilities—Turn your phone off in any facility when posted
notices require you to do so.
Aircraft—FCC regulations prohibit using your phone on a plane that is in
the air. Turn your phone off before boarding aircraft.
Vehicles—RF signals may affect improperly installed or inadequately
shielded electronic systems in motor vehicles. Check with the
manufacturer or its representative regarding your vehicle. You should
also consult the manufacturer of any equipment that has been added to
your vehicle.
Blasting areas—To avoid interfering with blasting operations, turn your
phone off when you are in a blasting area or in areas posted “Turn off
two-way radio.” Obey all signs and instructions.
Potentially explosive atmospheres—Turn your phone off when you are
in any area with a potentially explosive atmosphere. Obey all signs and
instructions. Sparks in such areas could cause an explosion or fire
resulting in bodily injury or even death.
Areas with a potentially explosive atmosphere are often, but not always,
clearly marked. They include
■Fueling areas such as gas stations
■Below deck on boats
■Transfer or storage facilities for fuel or chemicals
■Vehicles using liquefied petroleum gas, such as propane or butane
pdq2_QuickStart.book Page 54 Friday, July 28, 2000 6:37 PM

Phone safety 55
DRAFT
■Areas where the air contains chemicals or particles such as grain,
dust, or metal powders
■Any other area where you would normally be advised to turn off your
vehicle engine
Driving safely
Before you use your pdQ2 while driving, check the local laws and
regulations on the use of portable wireless phones in vehicles. Always
obey them, and exercise caution while driving.
The following guidelines are based on recommendations of the Cellular
Telecommunications Industry Association (CTIA).
1. Get to know your wireless phone and its features such as speed dial
and redial.
2. Use a hands-free device such as the Hands-free Headset. For ordering
information, see “Accessories” on page 50.
3. Position your wireless phone within easy reach. If you get a call at an
inconvenient time, let your voice mail answer it for you.
4. Let the person with whom you are speaking know you are driving.
5. Do not use any of the Palm applications while driving.
6. Dial sensibly. If possible, place calls when you are not moving or
before pulling into traffic.
7. Do not engage in stressful or emotional conversations.
pdq2_QuickStart.book Page 55 Friday, July 28, 2000 6:37 PM

56 pdQ2 User’s Guide
DRAFT
8. Use your wireless phone to call for help. Remember, 9-1-1 is a free call
(U.S.A. only) on your wireless phone!
9. Use your wireless phone to help others in emergencies. Call roadside
assistance or other non-emergency wireless assistance numbers when
necessary.
For more information, call (888) 901-SAFE (in the U.S.A.) or visit CTIA’s
Web site at www.wow-com.com.
Failure to follow these instructions may lead to serious personal injury and
possible property damage.
Air bags
If you have an air bag, DO NOT place installed or portable phone
equipment or other objects over the air bag or in the air bag deployment
area. Air bags inflate with great force. If equipment is not properly
installed, you and your passengers risk serious injury.
pdq2_QuickStart.book Page 56 Friday, July 28, 2000 6:37 PM

Index 57
Index
A
accessories, 50
Address Book
calling from, 12
using, 22
with keypad closed, 13
adjusting
speaker volume, 33
aircraft safety, 54
answering calls, 16
antenna, 47
Any-Key Answer, 36
applications
opening, 21
Applications Launcher, 21
Auto-Answer, 36
B
banner, 36
battery
back-up battery, 49
charge icon, 9
improving performance, 48
installing and charging, 2
low battery signal, 10
removing, 50
replacing, 49
baud rate, 39
blasting areas, 54
C
Call History, 23
calls from Address Book, 12
receiving, 16
using keypad, 12
using the Dialer, 14, 26, 27, 28
care and safety, 46
CDMA digital mode, 9
CDMA voice privacy, 9
changing
speaker volume, 33
Clear key, 5
communications port, 43
computer, required hardware, 42
cradle, connecting, 43
D
Date Book, 24
Dialer, 14, 15
digital mode, 9
driving safety, 54, 55
E
entering text, 19
envelope icon, 9
erasing numbers or letters, 5
explosive areas, 54
F
flip-closed overview, 4
pdq2_QuickStart.book Page 57 Friday, July 28, 2000 6:37 PM

58 pdQ2 User’s Guide
flip-open overview, 6
G
Graffiti, 20
H
hearing aid, using phone with, 53
help, 50
home area indicator, 10
HotSync
communications port, 43
first time, 44
installing Desktop software, 42
I
icons, 9
idle banner, 36
installing Palm Desktop, 42
K
keyguard
padlock icon, 9
turning on and off, 11
keypad
flip-closed, 5
flip-open Dialer, 14
keys, 4
L
LED status light, 10
locking keypad, 11
M
making calls
from Address Book, 12
using keypad, 12
using the Dialer, 14, 26, 27, 28
medical devices, using phone near, 53
memo
Memo Pad, 25
voice memo, 32
menus
backing up, 5
flip-closed, 17
message
envelope icon, 9
modem
opening Modem Emulation, 39
modes, 9
N
no signal indicator, 9, 10
O
on call icon, 9
on-screen keyboard, 19
P
padlock icon, 9
pages
envelope icon, 9
Palm Desktop, 42
pdq2_QuickStart.book Page 58 Friday, July 28, 2000 6:37 PM

Index 59
phone calls
from Address Book, 12
using keypad, 12
using the Dialer, 14, 26, 27, 28
ways of making, 12
phone preferences, 35, 36
port, for cradle, 43
preferences, 35
privacy, 9
R
radio frequency energy, 52
receiving calls, 16
messages, 9
removing battery, 49
resetting pdQ smartphone, 50
RF energy
exposure, 52
unsafe areas, 54
ringer, 33
roaming indicator, 9, 10
S
safety
driving guidelines, 55
pacemaker, 53
RF energy, 52
unsafe areas, 54
screen
care of, 46
icons, 9
serial port, 43
service area, roaming, 9
shuttle, 8
signal strength, 9
silence all, 34
soft reset, 50
sound
silence all, 34
sound, adjusting, 33
speaker
adjusting volume, 33
standby time
battery charge icon, 9
status icons, 9
stylus
Graffiti, 19
synchronizing phone to computer, 42
T
talk time
battery charge icon, 9
To Do List, 29
V
voice mail
indicator, 9
setting up, 36
voice memo, 32
VoiceDial, 31
volume
adjusting, 8
adjusting speaker, 33
pdq2_QuickStart.book Page 59 Friday, July 28, 2000 6:37 PM