Kyocera SCP-3820 Dual-Band CDMA Phone User Manual
Kyocera Corporation Dual-Band CDMA Phone Users Manual
UserManual.wiki
>
Kyocera
>
SCP 3820 User Manual
Users Manual
Navigation menu
Upload a User Manual
Namespaces
Wiki Guide
HTML
PDF
Info
Views
User Manual
Discussion / Help
Navigation
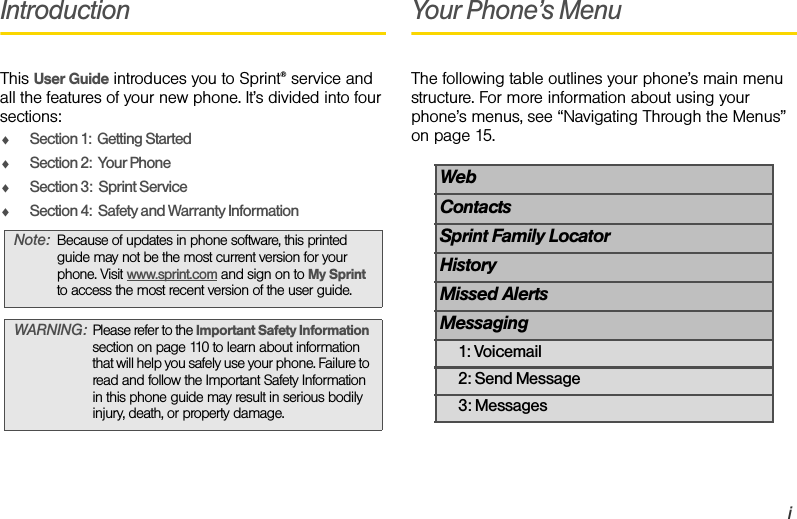

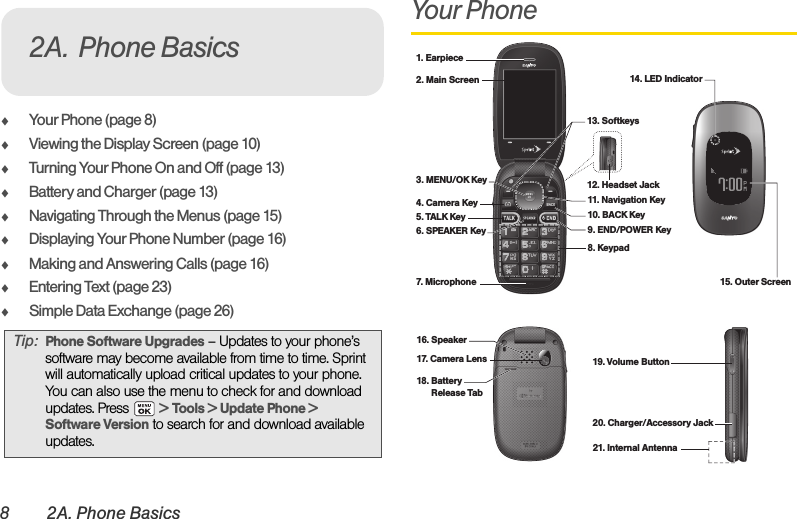
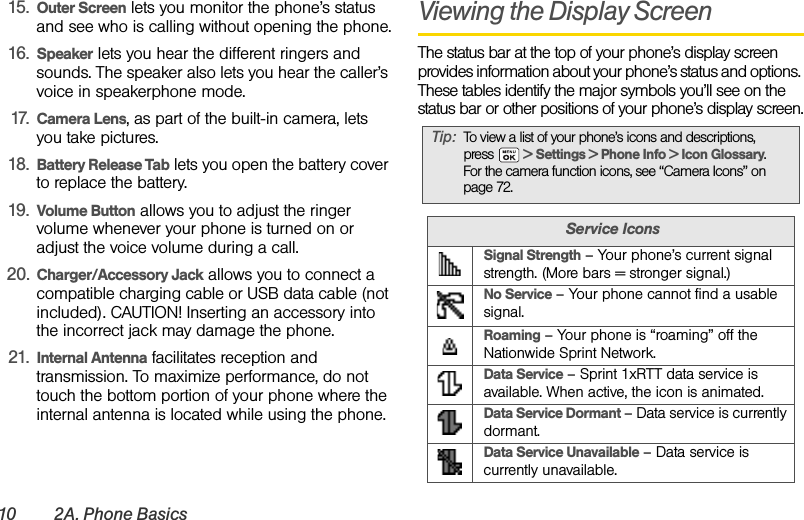
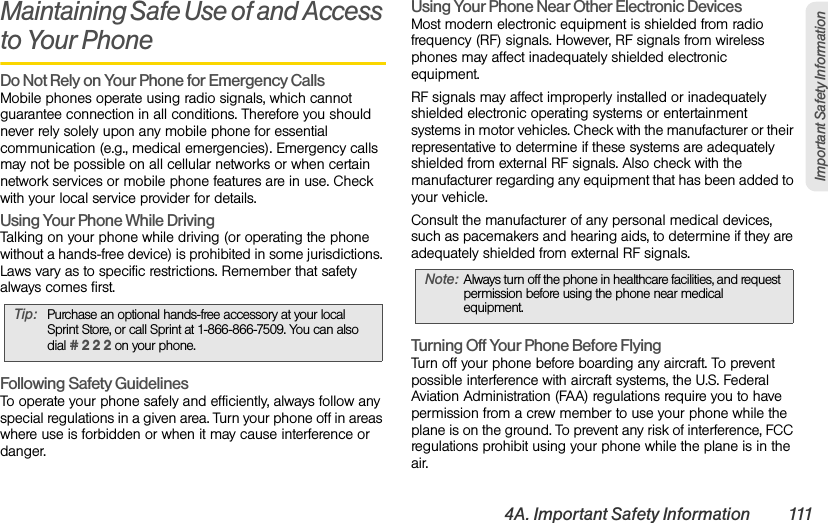
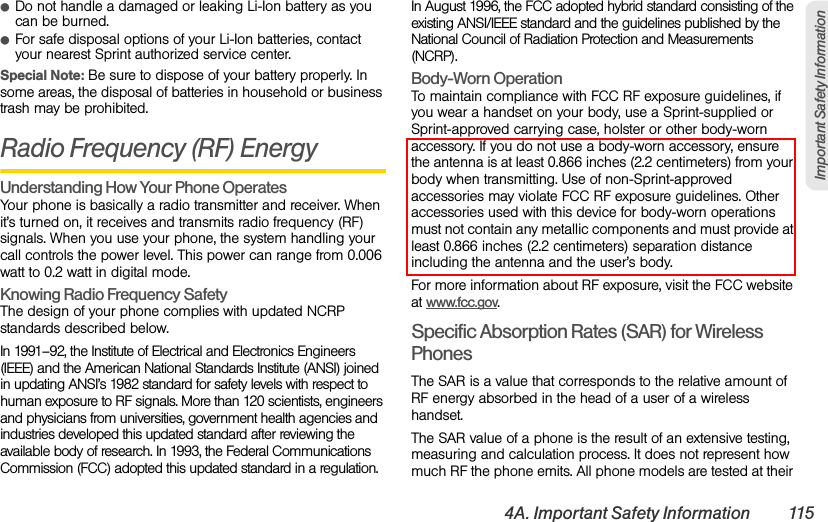
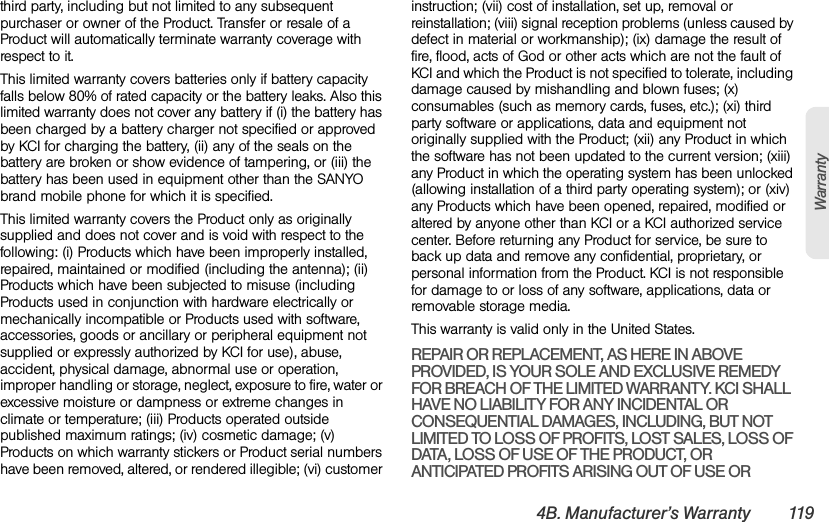
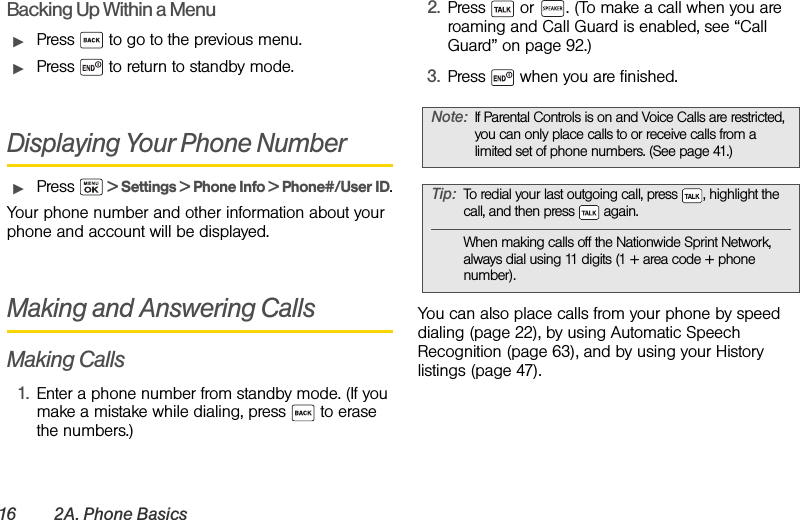
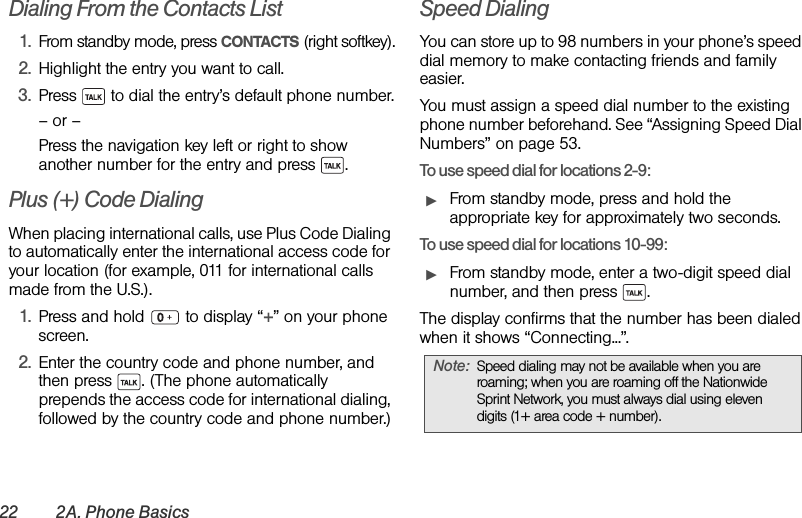
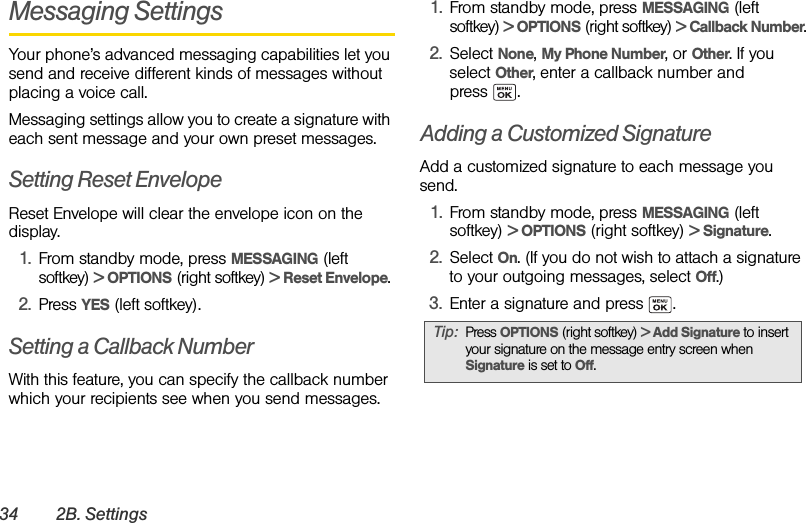
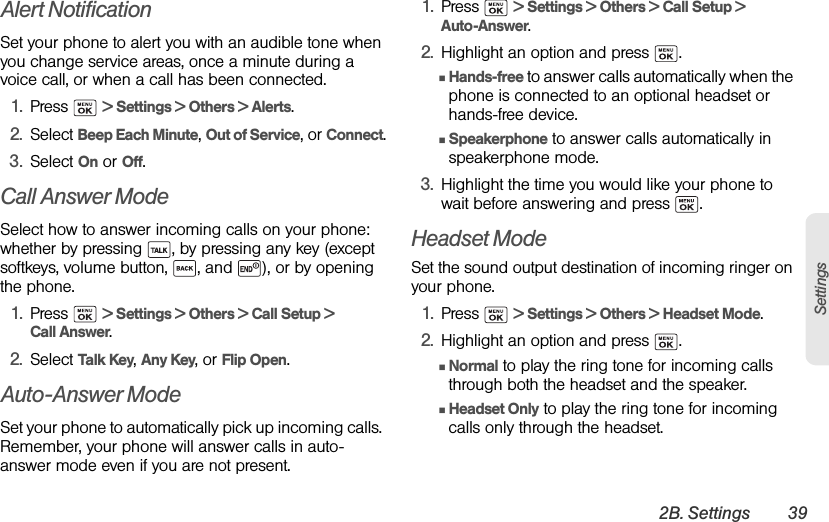
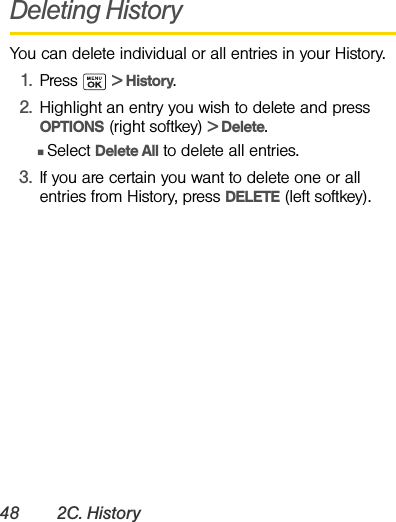
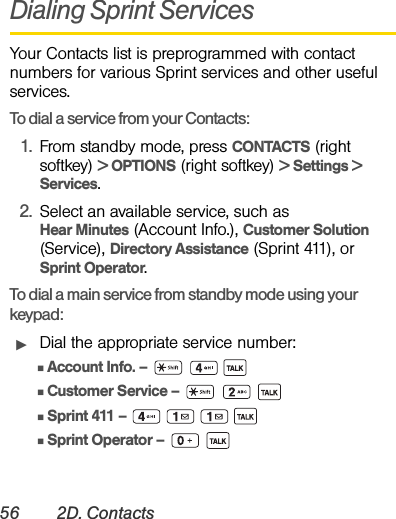
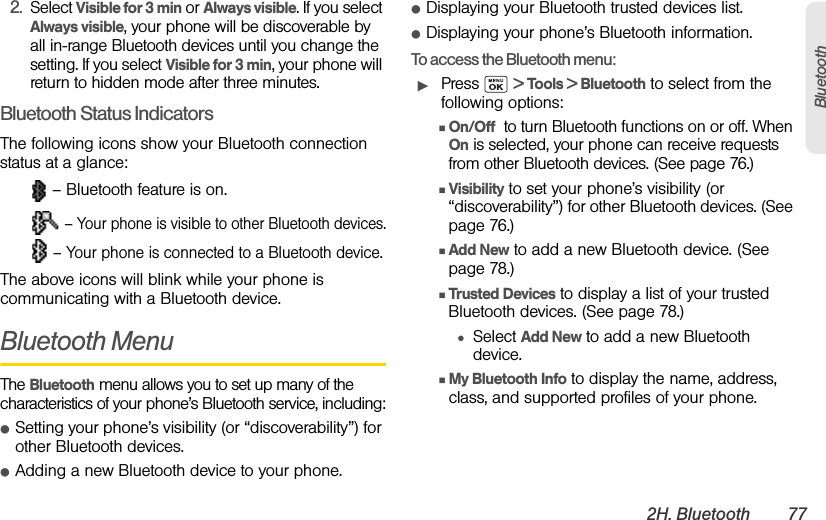
![2A. Phone Basics 11Phone BasicsStatus IconsBattery – Your phone’s current battery charge level. (The icon to the left shows the battery is fully charged.) The icon is animated while the battery is charging.Location On – Your phone’s location feature is on and available for location-based services such as GPS Navigation.Location Off – Your phone’s location feature is off. Your location is available only for 911.Silence All – Your phone’s sound is turned off.Vibrate All – Your phone’s sound is turned off but vibrate is turned on.Ringer Off – Your phone’s ringer is turned off. 1 Beep – A beep sounds when you receive an incoming call, a message, etc.1 Beep and Vibrate – 1 Beep and vibrate are set.Ringer and Vibrate – The volume level is set to between 1 and 8 and vibrate is turned on.Speaker Mode – Your phone is in speaker mode.Messaging and Alert IconsNew Messages – You have one or more new messages waiting.New Voicemail – You have one or more new voicemail messages waiting.Urgent Messages – You have one or more new urgent messages (including Commercial Mobile Alert System [CMAS] alert message) waiting.Multiple Alerts - You have different kinds of alerts waiting.Urgent Multiple Alerts - You have different kinds of alerts (including urgent message) waiting.Application Alerts - You have alert messages from Java applications activated in the background.](https://usermanual.wiki/Kyocera/SCP-3820/User-Guide-1331072-Page-21.png)


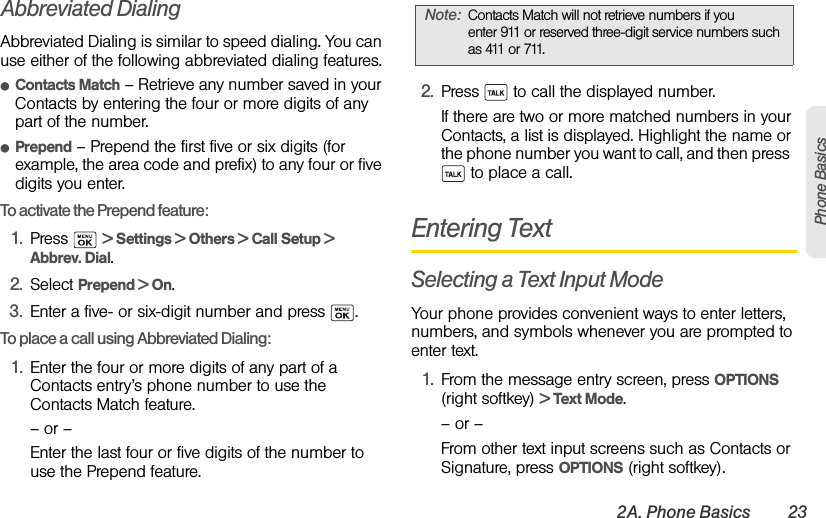
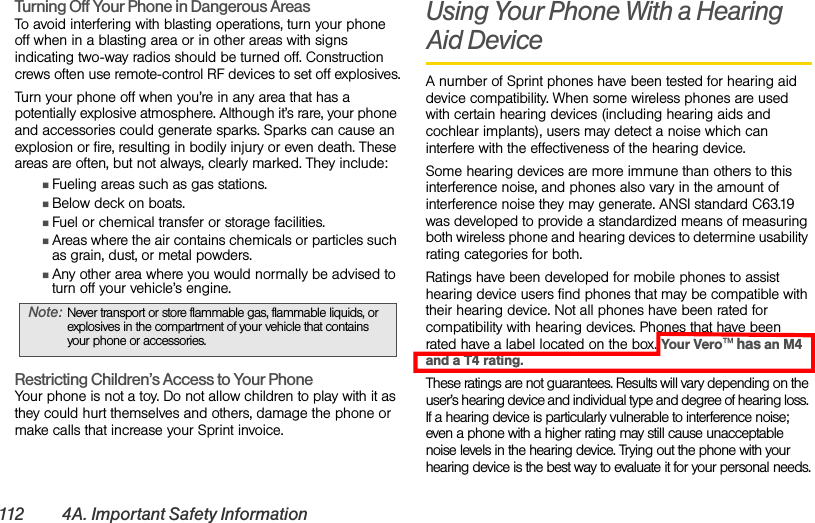
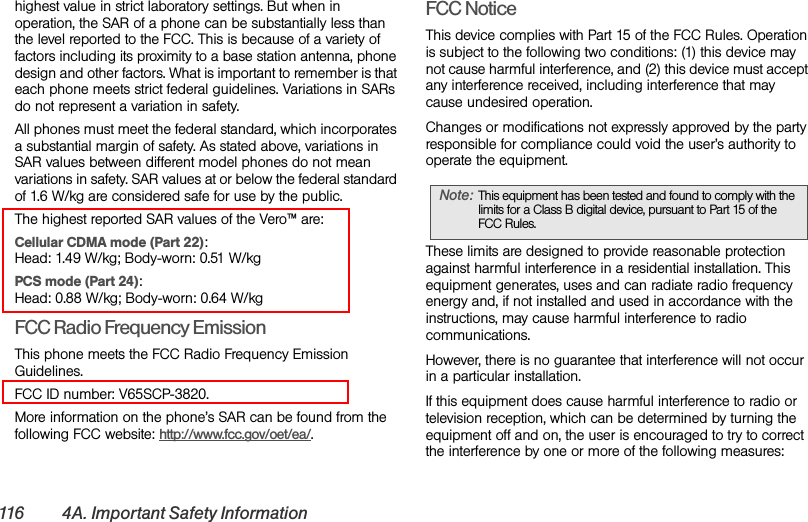
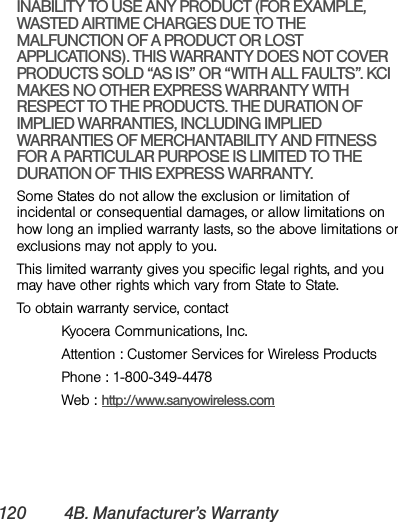
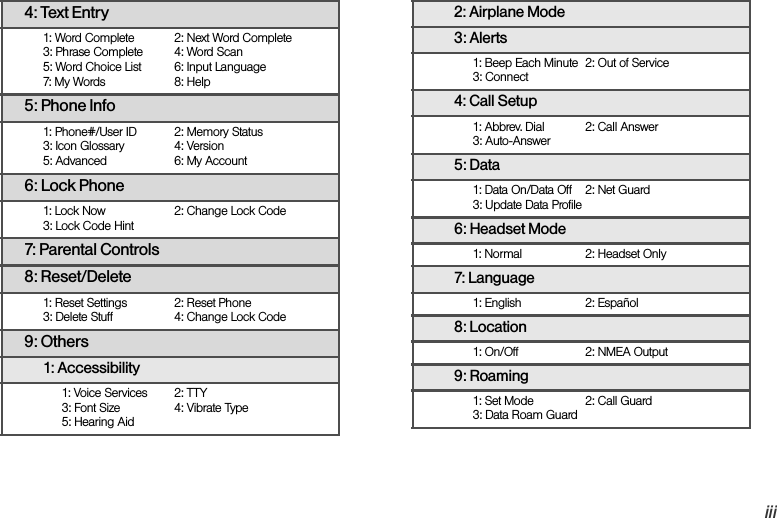
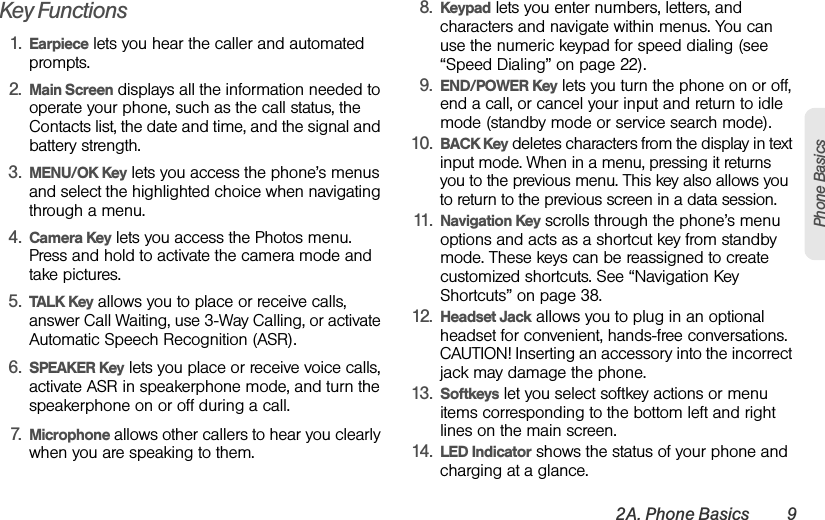
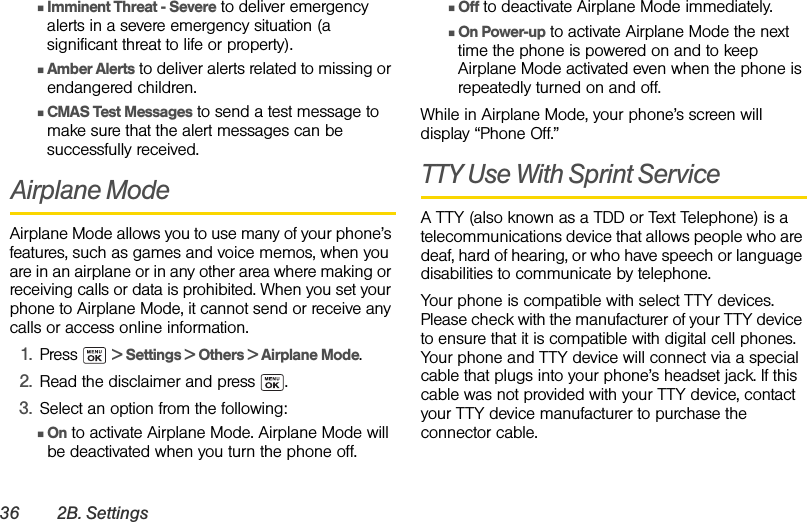
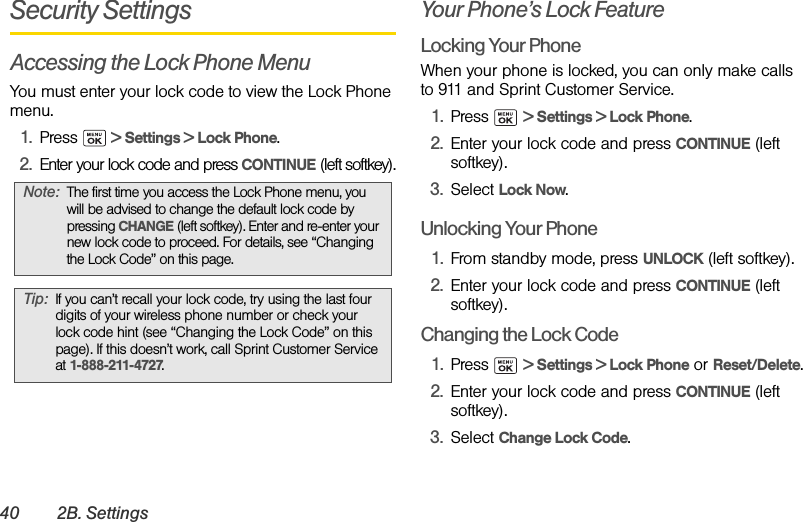
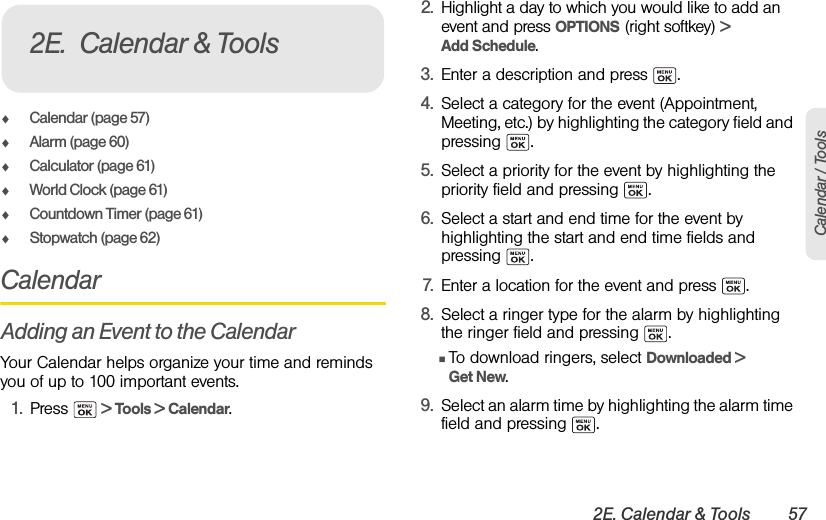
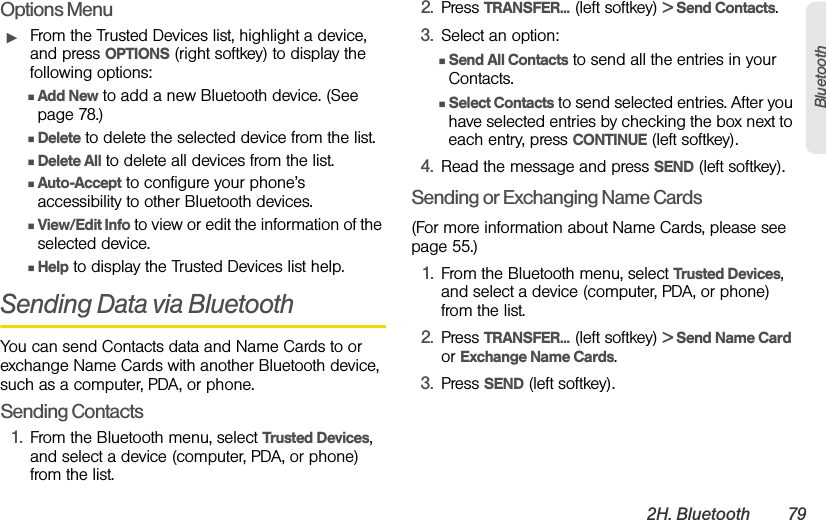
![2B. Settings 35SettingsManaging Preset MessagesYour phone is loaded with 20 preset messages to help make sending messages easier. Customize or delete these messages, such as “Where are you?,” “Let’s get lunch,” and “Meet me at” to suit your needs, or add your own messages to the list.To edit, delete, or reset preset messages:1. From standby mode, press MESSAGING (left softkey) > OPTIONS (right softkey) > Preset Messages. The list of preset messages will be displayed.2. To edit or delete a message, or reset all messages to the original text, highlight a message and press OPTIONS (right softkey). 3. Select Edit, edit the message, and press .– or –Select Delete > YES (left softkey) to delete the message.– or –Select Reset all messages > YES (left softkey) to reset all messages.To change the language of the preset messages:1. From standby mode, press MESSAGING (left softkey) > OPTIONS (right softkey) > Preset Messages. 2. Press OPTIONS (right softkey) > Select Language.3. Select English or Spanish.Setting CMAS AlertsThis phone features an embedded Commercial Mobile Alert System (CMAS), which is a federally supervised cell phone alert service to send out broadcast SMS messages for public warning.1. From standby mode, press MESSAGING (left softkey) > OPTIONS (right softkey) > CMAS Alerts.2. Check the box next to the options you wish to select:ⅢPresidential Alerts to deliver a national Presidential alert. (Presidential Alerts is always grayed out [not selectable] and cannot be excluded.)ⅢImminent Threat - Extreme to deliver emergency alerts in an extreme emergency situation (an extraordinary threat to life or property).](https://usermanual.wiki/Kyocera/SCP-3820/User-Guide-1331072-Page-45.png)
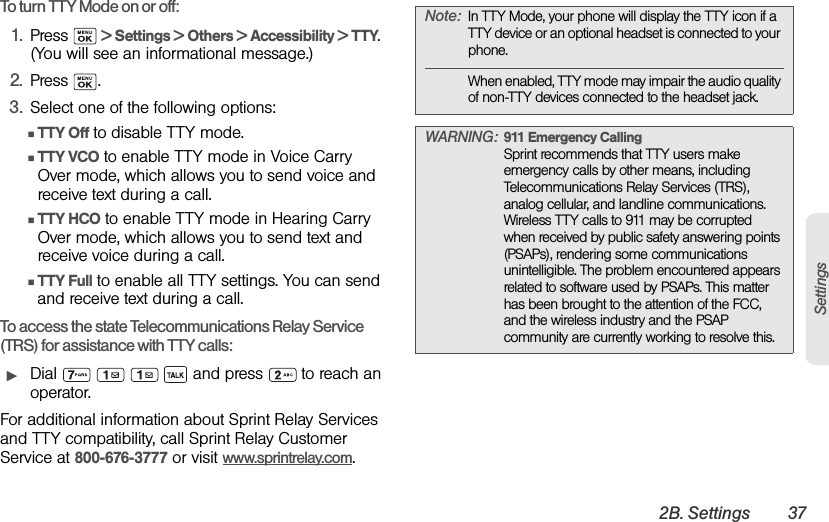

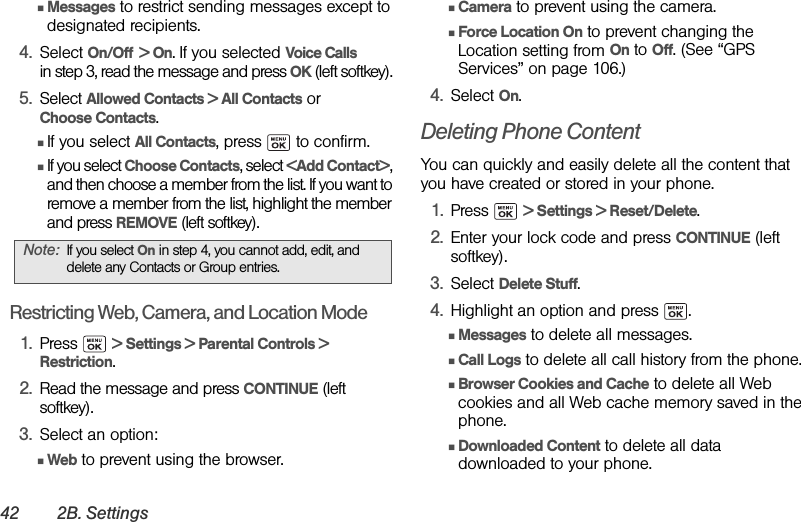
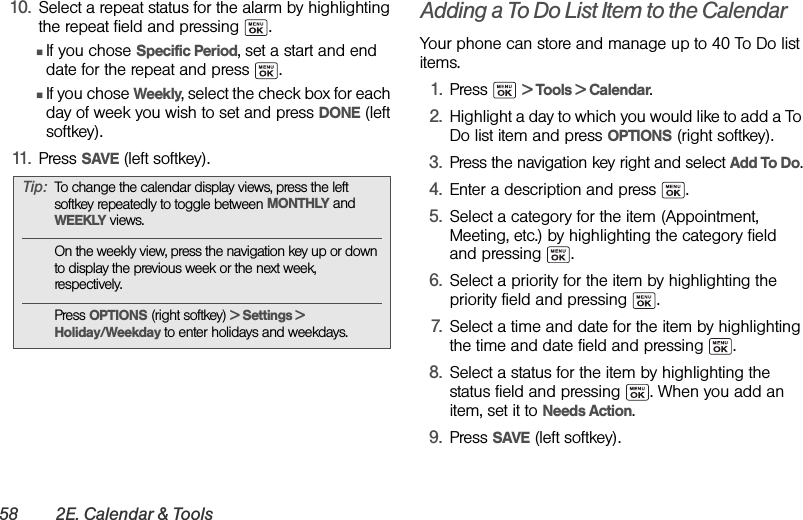


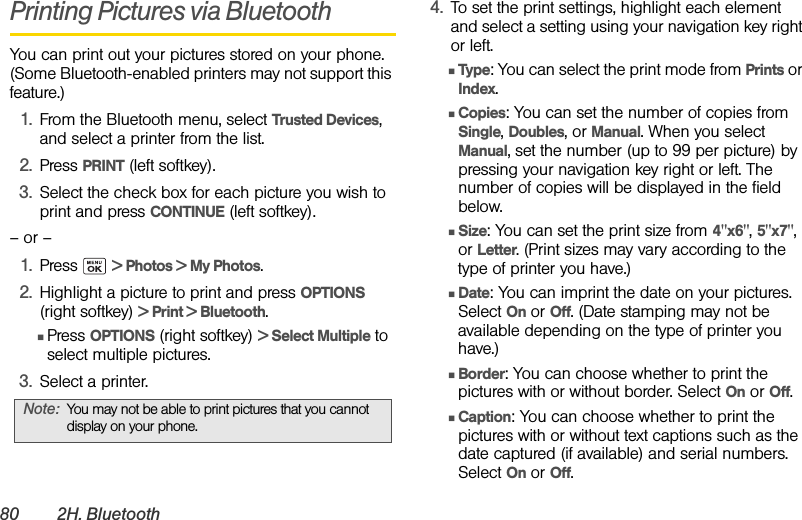
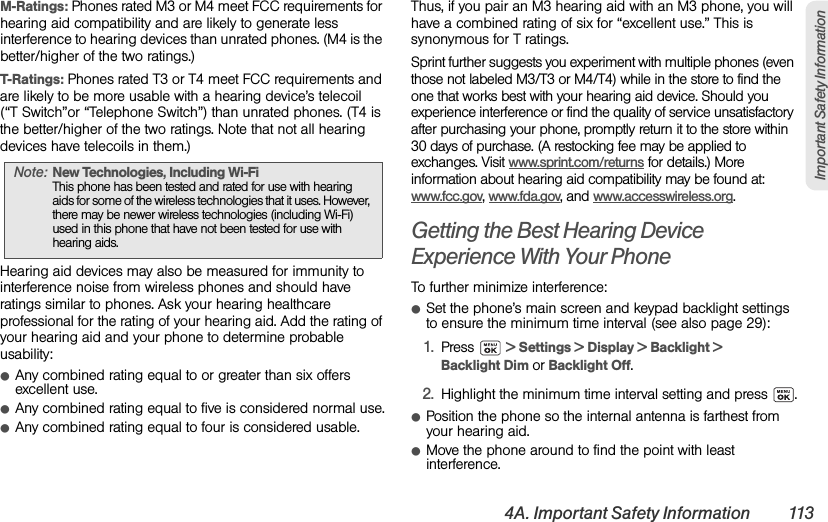
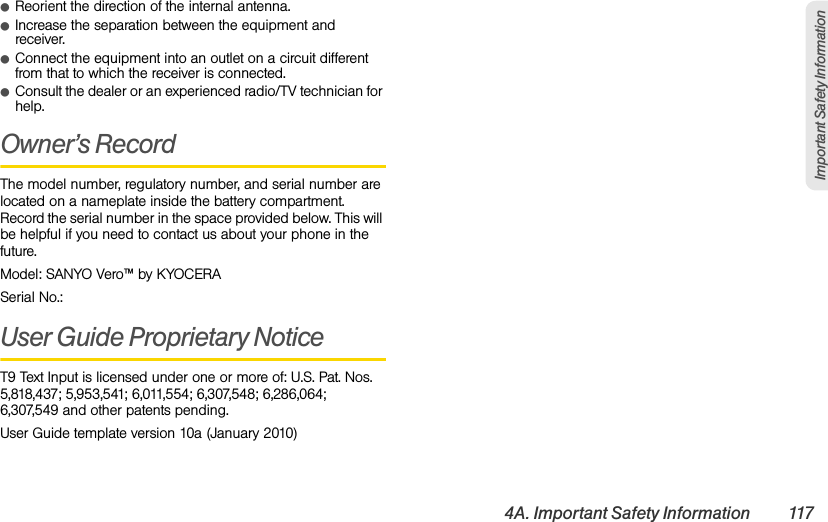
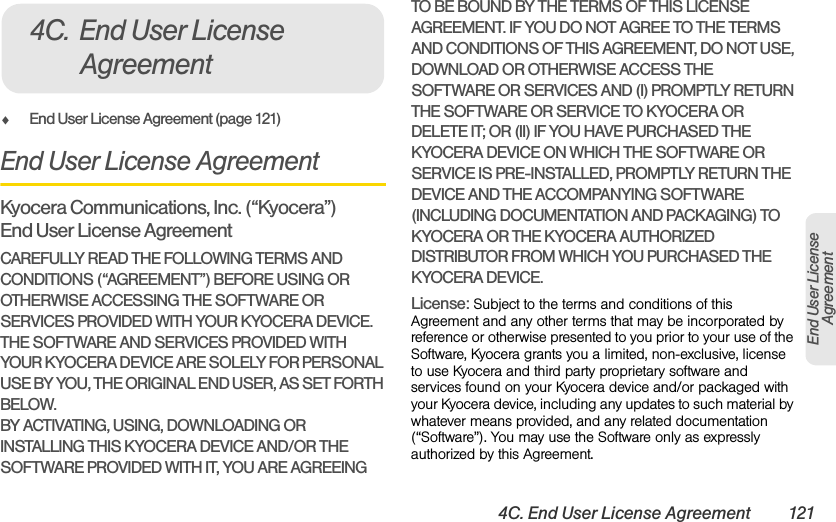
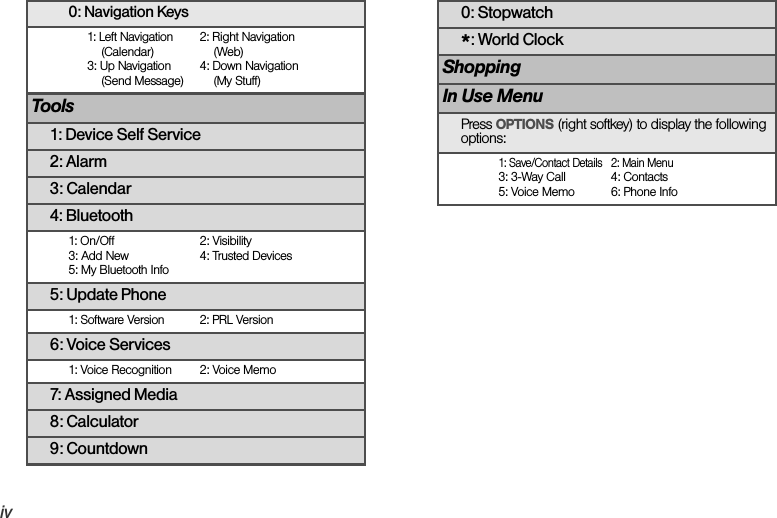
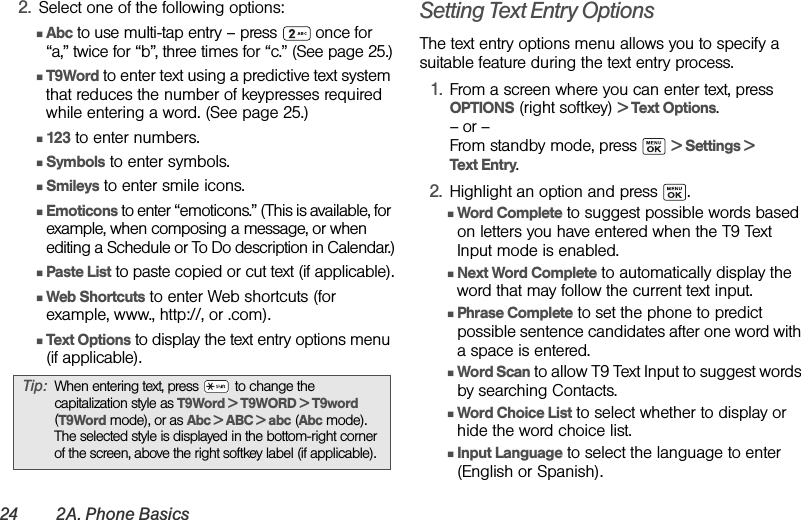
![96 3B. Web and Data ServicesNavigating the WebNavigating through menus and websites during a data session is easy once you’ve learned a few basics. Here are some tips for getting around.SoftkeysDuring a data session, the bottom line of your phone’s display screen contains one or more softkeys. These keys are shortcut controls for navigating around the Web, and they correspond to the softkeys directly below the phone’s display screen.To use softkeys:ᮣPress a softkey. (If an additional pop-up menu is displayed when you press the softkey, select the menu items using your keypad [if they’re numbered], or by highlighting the option and pressing .)ScrollingAs with other parts of your phone’s menu, you’ll have to scroll up and down to see everything on some websites.To scroll line by line through websites:ᮣPress the navigation key up or down.SelectingOnce you’ve learned how to use softkeys and scroll, you can start navigating the Web.To select onscreen items:ᮣUse the navigation key to highlight an item, and then press the left softkey (or press ).Links, which are displayed as underlined text, allow you to jump to Web pages, select special functions, or even place phone calls.To select links:ᮣHighlight the link and press the appropriate softkey. Tip: Depending on which websites you visit, the labels on the softkeys may change to indicate their function.Tip: You’ll find that the left softkey is used primarily for selecting items. This softkey is often labeled “GO.”If the items on a page are numbered, you can use your keypad (number keys) to select an item.](https://usermanual.wiki/Kyocera/SCP-3820/User-Guide-1331072-Page-106.png)
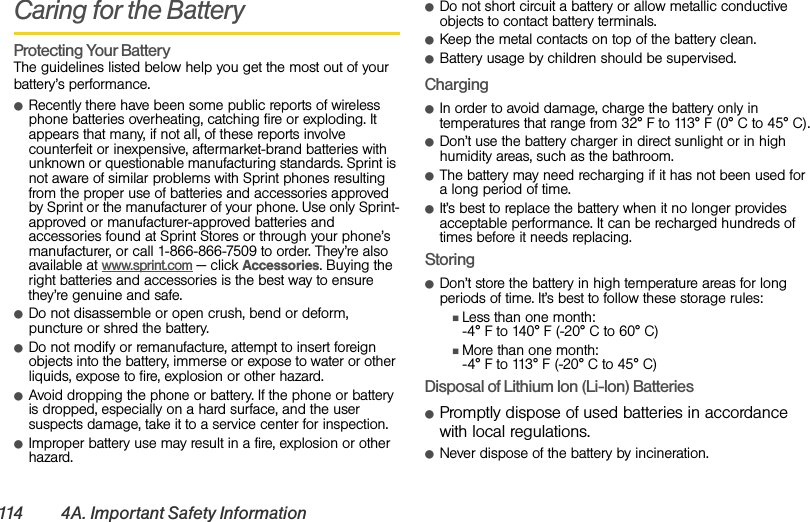
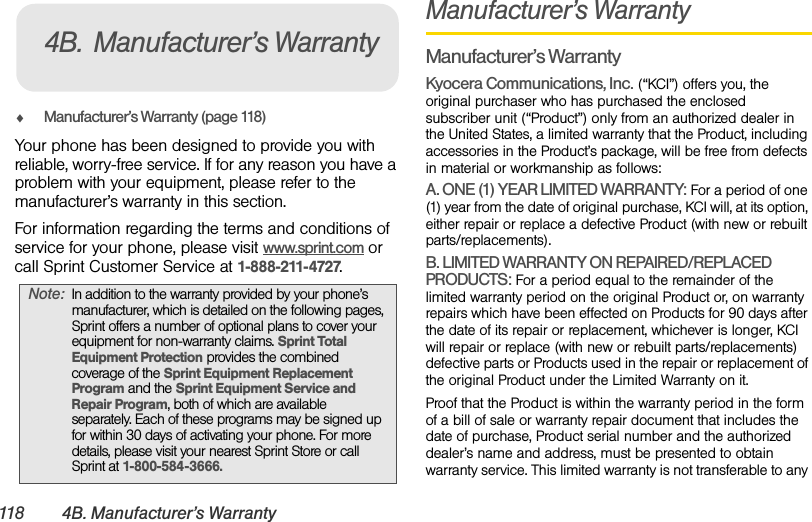
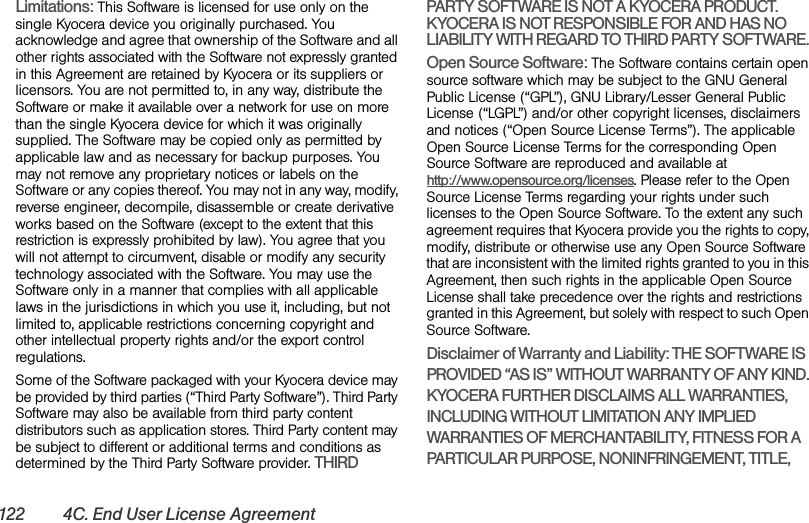
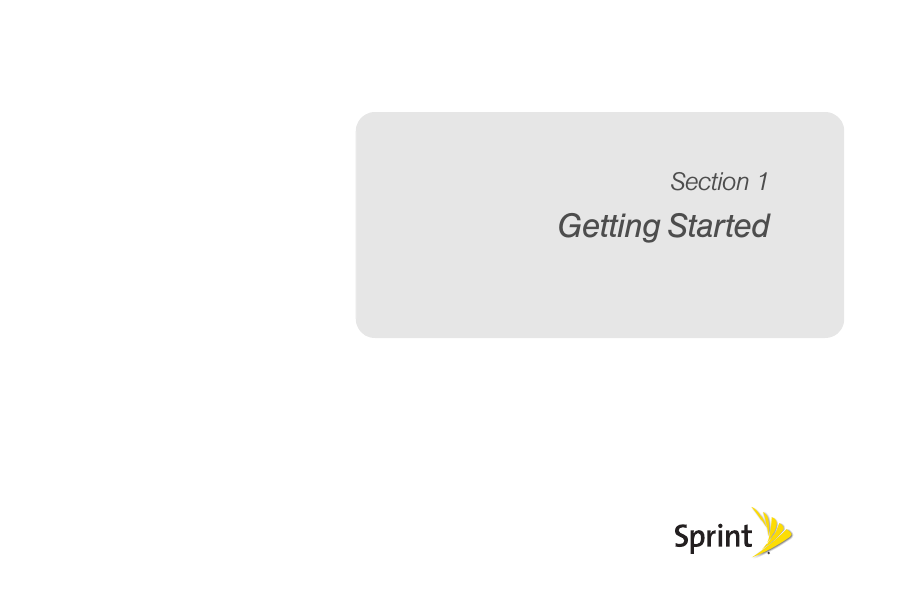
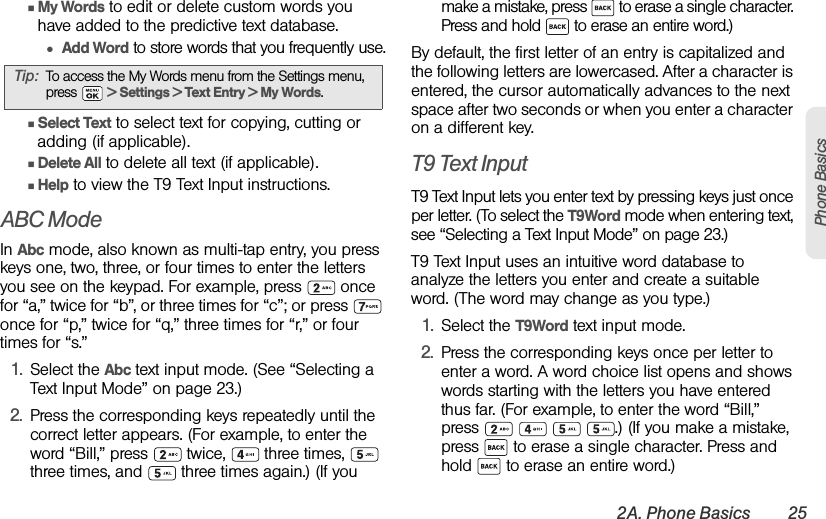
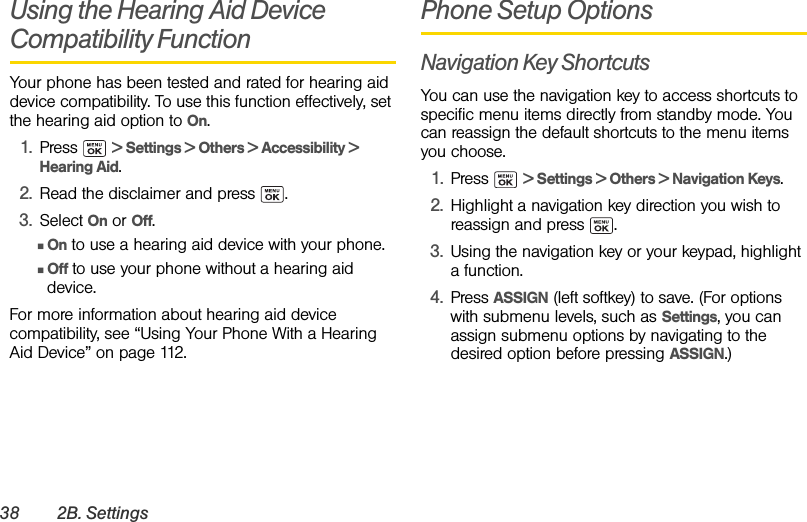
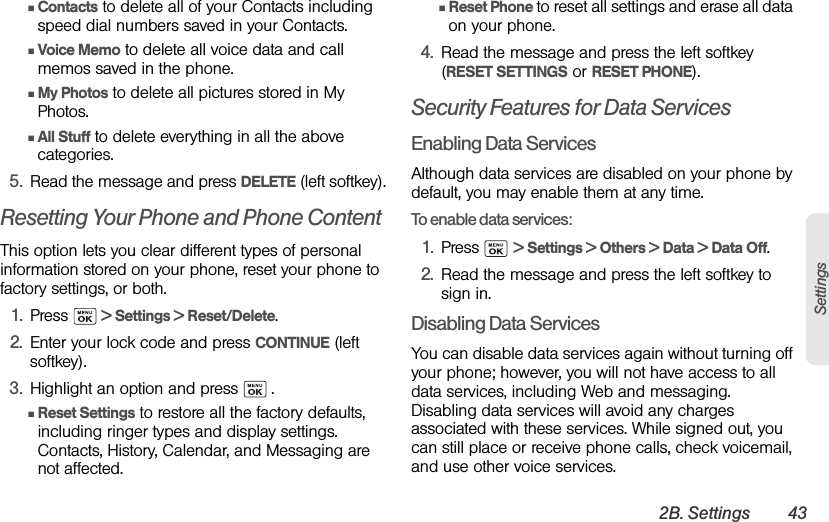
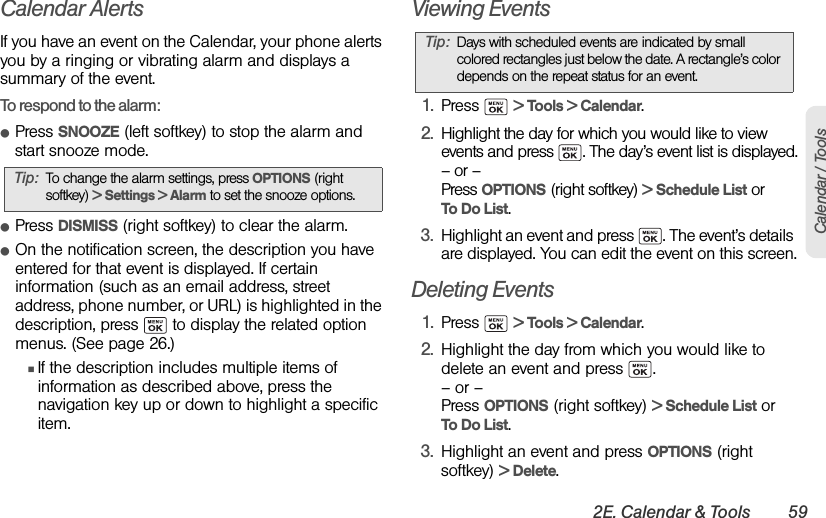
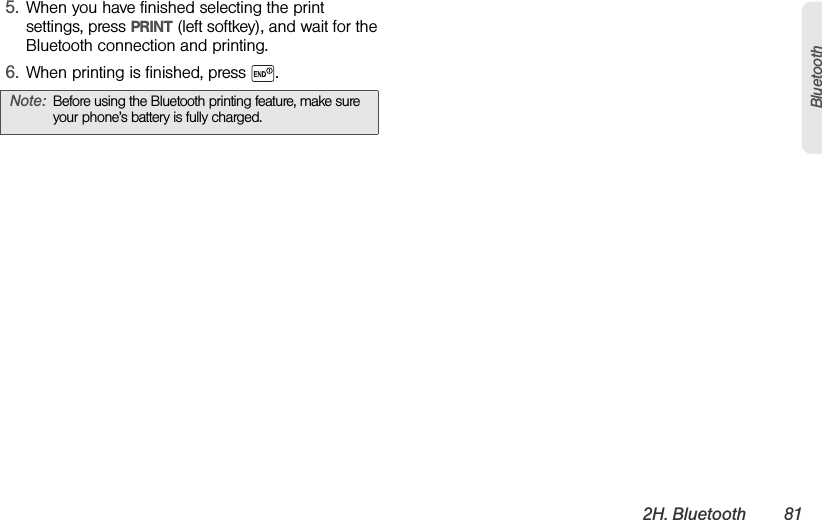
![3B. Web and Data Services 101Web and DataTo download purchased content from My Content Manager:1. From the My Content Manager display, highlight the item you wish to download, and press . (You will see the information page for the selected item.)2. Highlight Download and press . (The item will download automatically. When you see the New Download screen, you have successfully downloaded the item to your phone.)3. Select an option to continue:ⅢSelect a menu such as Run/Open/Listen/View/Play to start the downloaded item. Your data session will end, and your phone will redirect you to the appropriate phone menu screen.ⅢSelect Assign to assign a ringer or screen saver to a phone function.ⅢSelect Settings to configure downloaded games or applications.ⅢSelect Shop to browse for other items to download.ⅢPress to quit the browser and return to standby mode.For complete information and instructions on downloading Games, Ringers, Screen Savers, and Applications, visit the Digital Lounge at www.sprint.com.ApplicationsYou can access a wide variety of applications in many different categories with your phone and data service. Your phone comes preloaded with link to the following application:ⅷScanLifeTo get started with the application:1. Press > My Stuff > Applications > ScanLife.(The application will launch.)2. Accept the terms and conditions if asked.3. Press Menu (left softkey) to explore your options.Tip: You can also access My Content Manager through the phone’s main menu. Press > My Stuff > [Games, Ringers, Screen Savers, or Applications] > My Content Manager. The browser will open and take you to the corresponding content.When an application is running in the background, press APP. MGR. (left softkey) to go to the application screen.](https://usermanual.wiki/Kyocera/SCP-3820/User-Guide-1331072-Page-111.png)