L1 Identity Solutions 0B4000C RFID Transceiver User Manual iAAdminGd41
L1 Identity Solutions, Inc. RFID Transceiver iAAdminGd41
Exhibit D Users Manual per 2 1033 b3
Viisage iA-thenticate
®
4.1
Administrator’s Guide
i
Viisage iA-thenticate 4.1
Administrator’s Guide

ii
Copyright 2005 by Viisage Technology, Inc.
296 Concord Road, Billerica, MA 01821 USA
Phone 978-932-2200, fax 978-932-2225, web www.viisage.com
All rights reserved.
Unpublished rights reserved under the copyright laws of the United States.
Viisage, the Viisage logo, iA-thenticate, BorderGuard, iA-Passport, iA-DataPort, iA-Examiner, iA-License, TextWatch, and
iA-Administrator are trademarks or registered trademarks of Viisage Technology, Inc. All other brand and product names
are trademarks or registered trademarks of their respective companies or organizations.
Covered by one or more U.S. and foreign patents including U.S. Patent No. 6,269,169.
This equipment has been tested and found to comply with the limits for a Class A digital device, pursuant to Part 15 of
the FCC Rules. These limits are designed to provide reasonable protection against harmful interference when the
equipment is operated in a commercial environment. This equipment generates, uses, and can radiate radio frequency
energy and, if not installed and used in accordance with the instruction manual, may cause harmful interference to radio
communications. Operation of this equipment in a residential area is likely to cause harmful interference in which the
user will be required to correct the interference at his own expense. Changes or modifications not expressly approved by
Viisage for compliance could void the user’s authority to operate the device.
Safety Guidelines: Follow these safety guidelines to protect your iA-thenticate system from damage and to ensure your
own safety.
WARNING: Do not attempt to disassemble the iA-thenticate unit or to operate it with any parts removed. The unit
contains no user-serviceable parts.
Operate iA-thenticate only in an area where the temperature is between 50° F and 105° F (between 10° C and 40° C).
Do not spill food or liquids on the iA-thenticate unit. If the unit gets wet, immediately shut down the system and contact
Viisage. Do not attempt to open the unit. Only a qualified iA-thenticate technician should perform service and repair
work.
Do not set anything on top of the iA-thenticate unit or cables. Route all cables so that people will not step or trip on
them.
Use a surge-protection power strip to protect iA-thenticate against electrical damage, as you would with any computer.
The information contained in this document is subject to change without notice. Viisage assumes no responsibility for
technical or editorial errors or omissions, or for the use of this material. Nor does Viisage make any commitment to
update the information contained in this document. This document contains proprietary information that is protected by
copyright. All rights reserved. No part of this document may be photocopied or reproduced in any form without the prior
written consent of Viisage.
Edition: IA-ADMIN-4.1, 12/05
Publication number: PUB-00052-A-11
iii
Table of Contents
Part One
Setting Up a New iA-thenticate Unit
1 Introduction to iA-thenticate .............................................. 1-1
Hardware Configurations ......................................................................................1-1
Basic Setup Options ................................................................................................1-2
Full-Featured Document Security Workstation .....................................1-2
Compact, Self-Contained Unit ....................................................................1-2
Setting Up iA-thenticate .......................................................................................1-3
2 Setting Up Standard Monochrome iA-thenticate .............. 2-1
PC System Requirements for a Monochrome Unit ........................................2-1
Installing Software ..................................................................................................2-2
Setting the PC’s Taskbar and Display Properties ....................................2-2
Installing the iA-thenticate Security Software ......................................2-3
Installing iA-Administrator ..........................................................................2-3
Installing iA-Examiner ...................................................................................2-3
Installing the Custom Calibration File ......................................................2-4
Installing Optional Software .......................................................................2-4
Installing Hardware ................................................................................................2-4
Installing the PCI Card ..................................................................................2-4
Connecting the iA-thenticate Cables .......................................................2-5
Finishing Installation ..............................................................................................2-6
Starting Up and Checking Installation .....................................................2-6
Configuring Internet Explorer .....................................................................2-7
Configuring a French Version of Windows ..............................................2-7
Controlling Access ...................................................................................................2-8
Creating Local User Groups and Users ......................................................2-8
Assigning File and Folder Permissions ......................................................2-9
Installing a Bar Code and Magstripe Reader ................................................ 2-10
What’s Next? .......................................................................................................... 2-10
iv
3 Setting Up Standard Color iA-thenticate ........................... 3-1
PC System Requirements for a Color Unit .......................................................3-1
Software Installation ..............................................................................................3-2
Setting the PC’s Taskbar and Display Properties ....................................3-2
Installing DirectX ............................................................................................3-3
Installing the iA-thenticate Security Software ......................................3-3
Installing iA-Administrator ..........................................................................3-3
Installing iA-Examiner ..................................................................................3-4
Installing the Custom Calibration File ......................................................3-4
Installing Optional Software .......................................................................3-4
Hardware Installation ............................................................................................3-5
Connecting the iA-thenticate Unit ...........................................................3-5
Finishing Installation ..............................................................................................3-5
Starting Up and Installing Drivers .............................................................3-5
Checking the Camera Driver ........................................................................3-6
Configuring the Camera Port ......................................................................3-7
Configuring a Smart-Card Unit ..................................................................3-8
Configuring Internet Explorer .....................................................................3-8
Configuring a French Version of Windows ..............................................3-8
Controlling Access ...................................................................................................3-9
Creating Local User Groups and Users .....................................................3-9
Assigning File and Folder Permissions ....................................................3-10
Installing a Bar Code and Magstripe Reader .................................................3-11
What’s Next? ..........................................................................................................3-11
4 Setting Up Monochrome iA-thenticate Plus ...................... 4-1
Connecting Cables ..................................................................................................4-1
Starting Up and Logging On .................................................................................4-3
Installing Optional Software ................................................................................4-3
Controlling Access ...................................................................................................4-3
Users and Groups ............................................................................................4-3
Full-Featured Document Security Workstation .....................................4-4
Compact, Self-Contained Unit ....................................................................4-4
Installing a Bar Code and Magstripe Reader ...................................................4-5
What’s Next? ............................................................................................................4-5
5 Installing a Bar Code and Magstripe Reader ...................... 5-1
Installing the E-Seek Intelli-Check Serial Reader ..........................................5-1
Installing the E-Seek Intelli-Check USB Reader .............................................5-2
Connecting the Reader .................................................................................5-2
Installing the Drivers .....................................................................................5-3
Finding Driver Files .........................................................................................5-3
Configuring iA-Examiner ..............................................................................5-3
v
Part Two
Configuring and Managing iA-thenticate
6 Using the Administration Tools ........................................... 6-1
iA-Administrator ......................................................................................................6-2
iA-Examiner ..............................................................................................................6-3
What’s Next? .............................................................................................................6-5
7 Configuring iA-thenticate ................................................... 7-1
Viewing Unit Information .....................................................................................7-2
Setting Options for Basic Operation ..................................................................7-3
ICAO Expiration Test ......................................................................................7-3
Signals and Alerts ...........................................................................................7-4
Startup ...............................................................................................................7-4
Hardware ...........................................................................................................7-5
Advanced ...........................................................................................................7-6
Setting Options for Saving Images and Logs ...................................................7-8
Two Ways to Save Images and Logs ..........................................................7-8
Captured Images .......................................................................................... 7-10
Document Results Log ................................................................................ 7-10
Saving Based on Test Results ....................................................................7-11
JPEG Image Quality ......................................................................................7-11
Temporary Images and Logs ..................................................................... 7-12
8 Configuring iA-Examiner ..................................................... 8-1
System Configuration Screens .............................................................................8-1
Configuring Peripherals .........................................................................................8-2
Configuring Driver’s License Processing ............................................................8-3
Configuring Printing ...............................................................................................8-4
Configuring Data Saving .......................................................................................8-5
Data Saving Options ......................................................................................8-5
Using a Networked Database ......................................................................8-8
Configuring Tests .................................................................................................. 8-10
Configuring Document Processing .................................................................. 8-12
Configuring Verification Databases ................................................................. 8-14
About VerifyME ............................................................................................ 8-14
Configuring VerifyME ................................................................................. 8-15
Configuring Data Entry ....................................................................................... 8-16
Configuring a Custom ID Type .......................................................................... 8-17
Configuring Static Database Information ..................................................... 8-17
Configuring Debugging ....................................................................................... 8-18
Configuring Processing of Unidentified Documents .................................. 8-18
Configuring Display Options .............................................................................. 8-20
vi
Configuring Smart Card Options ...................................................................... 8-23
About Basic Access Control ...................................................................... 8-23
Smart Card Options ..................................................................................... 8-23
Configuring Examiner Doc Log Options ......................................................... 8-24
Configuring System Directories ........................................................................ 8-25
Configuring Other Options ................................................................................ 8-26
Configuring Test Suppression ........................................................................... 8-27
Configuring Test Override Options .................................................................. 8-27
Configuring Data Transmission Options ........................................................ 8-28
Configuring Credit Card Options ...................................................................... 8-29
9 Managing iA-Examiner ........................................................ 9-1
The System Management Screen ........................................................................9-1
Purging Saved Data ................................................................................................9-2
Backing Up Saved Data ..........................................................................................9-3
Temporarily Disabling Verification Databases .................................................9-4
Part Three
Using Optional Features
10 Using iA-DataPort ............................................................10-1
Preparing to Use iA-DataPort ............................................................................10-2
Choosing Where to Send Data ..................................................................10-2
Using the Optional Keyboard Filter .........................................................10-3
Starting iA-DataPort .............................................................................................10-4
Starting the iA-DataPort Utility ...............................................................10-4
Running the Utility Minimized .................................................................10-4
Viewing Captured Data ........................................................................................10-5
Configuring Settings .............................................................................................10-6
Configuring General Settings ....................................................................10-6
Configuring Communication Port Settings ...........................................10-8
Configuring Data Format Settings ...........................................................10-8
Configuring MRZ Data Format Settings ............................................. 10-10
Configuring Data Transmit Settings ..................................................... 10-12
Configuring Display Settings .................................................................. 10-12
Configuring Startup Settings ................................................................. 10-14
Checking the Capture Devices ........................................................................ 10-14
vii
Appendixes
A Resetting the E-Seek Reader ............................................... A-1
B Periodic Maintenance ........................................................... B-1
Cleaning the Glass Platform .................................................................................B-1
Cleaning the Sensor Switch ..................................................................................B-2
Defragmenting the Hard Drive ............................................................................B-2
viii
Part One
Setting Up a New
iA-thenticate Unit

1-1
1
Introduction to
iA-thenticate
iA-thenticate® is a hardware and software system for testing the authenticity of travel
and ID documents and for checking the identity of document owners.
Basic document testing includes verifying the checksum digits in a document’s machine-
readable zone (MRZ), checking its expiration date, and confirming the proper use of
IR-absorbent (B900) ink.
With optional software and hardware, iA-thenticate can test documents in additional
ways and also check a document owner’s identity. For example:
❑With iA-Passport® software, iA-thenticate can verify additional features such as UV
patterns and security laminate.
❑With iA-License™ and DL-Alert™ software and a magnetic stripe and bar code
reader, iA-thenticate can read and verify driver’s licenses and nondriver IDs.
❑With TextWatch® software, iA-thenticate can compare information read from the
document against a custom database of names, stolen document numbers, or other
important data.
❑With an integrated smart card reader, iA-thenticate can read, verify, and cross-check
information from an embedded smart chip.
Hardware Configurations
iA-thenticate is available in several hardware configurations:
❑With a monochrome or a color camera
•A monochrome unit captures and displays grayscale images. The captured
images are 768×576 pixels, 8 bits.
•A color unit captures and displays full-color images. The captured images are
1280×1024 pixels, 24 bits. A color unit needs more processing power, memory,
and disk space than a monochrome unit due to the larger images.
Note
Not all combinations of
these configuration options
are available.

Introduction to iA-thenticate
1-2
❑With or without an integrated PC
•An iA-thenticate Plus unit includes an integrated Windows® PC for running the
iA-thenticate software and other Windows programs. It can also operate as a
compact, self-contained unit without a keyboard, mouse, or monitor.
•A standard iA-thenticate unit has no built-in processor but attaches to a host PC
that runs the software. A monochrome unit connects through a PCI card, and a
color unit connects through a USB port.
❑With or without an integrated smart-card reader
A smart-card unit has an extended document platform and one or two antennas for
reading chips embedded in the front and back pages (covers) of documents.
•A dual-page reader has two antennas for reading both front-page and back-page
chips when you place documents in the usual way.
•A single-page reader has one antenna for reading either front-page or back-page
chips, depending on the antenna location. It can also read a chip in the opposite
page if you reposition the document during processing.
Basic Setup Options
You can set up each iA-thenticate or iA-thenticate Plus unit as a full-featured document
security workstation. You can also set up iA-thenticate Plus as a compact, self-contained
unit with no monitor, keyboard, or mouse.
Full-Featured Document Security Workstation
In a full-featured setup:
❑You use a standard monitor, keyboard, and mouse (or touch screen) for interacting
with the iA-thenticate software.
❑Users log on just as they do with any Windows PC, with access privileges controlled
by their accounts.
❑You can use the workstation as a PC for running other Windows software in addi-
tion to iA-thenticate.
Compact, Self-Contained Unit
In a self-contained iA-thenticate Plus setup:
❑You attach no monitor, keyboard, or mouse. Test results appear on the built-in text
panel. (You do need a monitor, keyboard, and mouse for setup and configuration.)
❑The unit starts up without requiring logon and automatically runs the iA-thenticate
software.
1-3
Setting Up iA-thenticate
Setting Up iA-thenticate
The next three chapters explain how to set up your iA-thenticate unit—installing soft-
ware and hardware, connecting cables, logging on, and controlling access using Win-
dows security features.
The remaining chapters explain how to configure all the details of your system’s opera-
tion.
To set up: Go to:
Standard iA-thenticate,
monochrome camera
Chapter 2,
“Setting Up Standard Monochrome iA-thenticate”
Standard iA-thenticate,
color camera
Chapter 3,
“Setting Up Standard Color iA-thenticate”
iA-thenticate Plus,
monochrome camera
Chapter 4,
“Setting Up Monochrome iA-thenticate Plus”
Note
iA-thenticate Plus is not cur-
rently available with a color
camera.
Introduction to iA-thenticate
1-4

2-1
2
Setting Up Standard
Monochrome iA-thenticate
This chapter explains how to install software and hardware, connect cables, and control
access to your standard iA-thenticate unit with monochrome camera. Other chapters
explain how to set up other kinds of units.
Before you proceed with installation, check the Release Notes for new information.
If you are upgrading from a previous version, you may need to follow additional steps.
PC System Requirements for a Monochrome Unit
The standard iA-thenticate monochrome unit attaches to your Windows PC through a
plug-in PCI interface card. You install the iA-thenticate software on your PC, and
iA-thenticate then operates as a peripheral device. The result is a full-featured document
security workstation that still has all the capabilities of the desktop PC.
To work properly with iA-thenticate, your PC must meet these requirements:
Hardware
❑Processor: 800 MHz Pentium 4 or better recommended
❑RAM: 256 MB minimum
❑Free disk space: 300 MB minimum; 1 GB or more recommended when saving
captured images and data
❑Video display: 1024x768 resolution, 65536 colors, or better
❑An available PCI-bus master slot, 2.0-compliant, capable of supplying 1.2 A at
12 VDC
IMPORTANT
Setting up iA-thenticate requires the same skills as setting up a standard PC in a
networked environment. If you are not an experienced installer and system admin-
istrator, you should not attempt to do the setup yourself.
Although setting up iA-thenticate is similar to setting up a PC, there are important
differences. If you don’t follow the instructions in this chapter carefully, your sys-
tem may not work properly.

Setting Up Standard Monochrome iA-thenticate
2-2
Configuration
❑Swap file: Recommended 768 MB minimum and 1024 MB maximum for drive C
and for the data drive (where you store captured images)
Supported operating systems
❑Windows 2000 Service Pack 4 or higher with updates 823980 (Microsoft Security
Bulletin MS03-026) and 828028 (Bulletin MS04-007)
❑Windows XP Professional Service Pack 2
Other software requirements
❑Internet Explorer 6.0 Service Pack 1 or higher with update 832894 (Microsoft
Security Bulletin MS04-004)
Installing Software
Be sure to install the software before you install the PCI card and connect the
iA-thenticate hardware.
Setting the PC’s Taskbar and Display Properties
Windows 2000 Windows XP
1. Start the PC, log on as an administra-
tor, and exit from all programs.
2. Right-click the taskbar and choose
Properties.
3. On the Taskbar Properties screen,
deselect Always on top and click OK.
4. Right-click the Windows desktop and
choose Properties.
5. On the Settings tab, click Advanced.
6. In the Font Size drop-down list, select
Small Fonts if it is not already
selected.
7. Follow any further on-screen instruc-
tions for confirming your choice and
installing fonts. You do not need to
restart the system at this point unless
Windows requires you to do so.
1. Start the PC, log on as an administra-
tor, and exit from all programs.
2. Right-click the taskbar and choose
Properties.
3. On the Taskbar Properties screen,
deselect Keep the taskbar on top of other
windows and click OK.
4. Right-click the Windows desktop and
choose Properties.
5. On the Appearance tab, in the Font
Size drop-down list, select Normal if it
is not already selected.
6. Follow any further on-screen instruc-
tions for confirming your choice and
installing fonts. You do not need to
restart the system at this point unless
Windows requires you to do so.

2-3
Installing Software
Installing the iA-thenticate Security Software
Installing iA-Administrator
Installing iA-Examiner
Windows 2000 and XP
1. Mount the iA-thenticate CD.
2. On the CD, in folder 1_iA-thenticate, run Setup.exe.
3. On the first screen, click Next.
4. On the License Agreement screen, read the license and click Ye s to agree.
5. On the Setup Type screen, select iA-thenticate 4.1 for monochrome units and click
Next.
6. On the iA-thenticate 4.1 Data Drive screen, if you do not have a separate E drive
for storing data, change the Destination Folder by clicking Browse and choosing
drive C (or a different drive reserved for data). Then click Next.
7. On the Current Settings screen, click Next.
8. On the Installation Complete screen, select No, I will restart my computer later and
click Finish.
Windows 2000 and XP
1. On the CD, in folder 2_iA-Administrator, run Setup.exe.
2. Proceed through the installer screens by clicking Next twice.
3. On the Installation Complete screen, select No, I will restart my computer later and
click Finish.
Windows 2000 and XP
1. On the CD, in folder 3_iA-Examiner, run Setup.exe.
2. On the first installer screen, click Next.
3. On the iA-Examiner Data Drive screen, accept the Destination Folder you chose
earlier—or change it if you want to use a different location for data and images
saved by iA-Examiner.
4. On the InstallShield Wizard Complete screen, click Finish.
Note
If you are upgrading, you
may see somewhat different
screens.

Setting Up Standard Monochrome iA-thenticate
2-4
Installing the Custom Calibration File
Each standard iA-thenticate unit comes with a matching SampleScan diskette containing
a calibration file. You should not use this file with any other iA-thenticate unit.
Installing Optional Software
1. If you have the optional DL-Alert™ feature, install it from the iA-thenticate CD:
a. In folder 4_DL-AlertIC, run DL-AlertIntelli-Check.exe.
b. Click Next and then Finish.
2. If you have other optional software such as iA-Passport or iA-License, install it
now. Follow the instructions included with the optional software.
Installing Hardware
Install the software as described in the previous section before you install the hardware.
Use proper antistatic procedures for the following steps, grounding yourself with a wrist
strap or carefully discharging static by touching the metal case of the power supply.
Installing the PCI Card
To install the PCI card into your PC:
1. Shut down the PC and disconnect the power and other cables.
2. Remove the PC’s case to gain access to the PCI slots, following the instructions sup-
plied by the PC manufacturer.
3. Remove the slot cover from an available PCI master slot.
4. Carefully align and insert the iA-thenticate PCI card into the slot, applying just
enough pressure to seat it fully.
5. Replace the screw from the removed slot cover to secure the PCI card.
6. Replace the PC’s case and reattach its cables. Do not start the PC until you connect
the iA-thenticate cables as explained next.
Windows 2000 and XP
1. Make sure the serial number printed on the SampleScan diskette matches the
serial number on the iA-thenticate unit.
2. Insert the SampleScan diskette, and copy the SampleScan.cfg file from the diskette
to directory C:\BorderGuard\Config\.
3. Eject the diskette.
Note
This release requires
version 2.0 or later of
iA-Passport and iA-License.
2-5
Installing Hardware
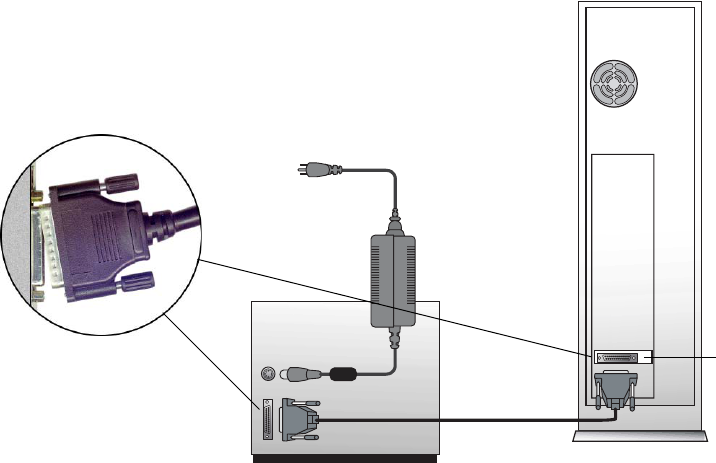
Connecting the iA-thenticate Cables
iA-thenticate comes with a cable for connecting it to the PCI card you installed in your
PC. It also comes with its own power supply and cord.
To connect the iA-thenticate cables:
1. Plug one end of the iA-thenticate cable into the connector on the PCI card you
installed in your PC.
2. Plug the other end of this cable into the matching connector on the back of the
iA-thenticate unit.
3. Make sure the power switch on the iA-thenticate unit is off.
4. Plug the cable from the iA-thenticate power supply into the power connector on the
back of the iA-thenticate unit.
5. Plug the line cord from the power supply into a surge-protected power source that
can supply 170 W at 100–240 VAC, 47–63 Hz.
PC
iA-thenticate
iA-thenticate
power supply
iA-thenticate
PCI connector
iA-thenticate
cable
CAUTION
To avoid damaging the
coaxial connectors, begin
inserting the plug at a
slight sideways angle.
Then push slowly, gently,
straight into the socket.
Note
The included power supply
might not have a power
cord suitable for your coun-
try. In this case you must
obtain and use a 3-conduc-
tor grounded supply cord
with a plug cap suitable for
your country. It must have a
minimum internal conduc-
tor area of 0.75 mm2 and
have a standard IEC 320
female connector.

Setting Up Standard Monochrome iA-thenticate
2-6
Finishing Installation
Starting Up and Checking Installation
1. Turn on the iA-thenticate unit using its power switch.
2. Start the PC and log in as an administrator. You will see a message saying that the
system has found new hardware.
3. When you see a message about the digital signature (Windows 2000) or Windows
Logo testing (XP), click Yes or Continue Anyway.
4. Double-click the iA-Examiner icon on your desktop. After an initialization process,
you should see the iA-Examiner screen.
If you see an error message instead, see below.
5. Exit by clicking the close button or selecting File→ Exit.
If you see an error message:
If the driver for the PCI card was not properly installed for some reason, you see one of
these error messages when you try to start iA-Examiner:
IACOM0: The system cannot find the file specified.
IACOM0: The port does not exist. Please check for its availability.
In this case you must follow these steps to reinstall the driver:
Now try starting iA-Examiner again. If you still get an error message, contact Viisage
Customer Support.
Windows 2000 Windows XP
1. Open the System control panel.
On the Hardware tab, click Device
Manager.
2. Under Imaging Devices (or possibly
Other Devices) find the item named
Multimedia Controller, displayed with
an exclamation point. Right-click it
and select Properties.
3. On the Driver tab, click Update Driver.
4. On the first screen of the wizard,
click Next.
5. On the next screen, select Search for a
suitable driver... and click Next.
6. On the next screen, deselect all the
checkboxes and click Next.
7. On the next screen, click Next.
8. On the Digital Signature Not Found
screen, click Ye s .
9. On the final screen, click Finish.
1. Open the System control panel.
On the Hardware tab, click Device
Manager.
2. Under Imaging Devices (or possibly
Other Devices) find the item named
Multimedia Controller, displayed with
an exclamation point. Right-click it
and select Properties.
3. On the Driver tab, click Update Driver.
4. On the first screen of the wizard,
select Install the software automatically...
and click Next.
5. When you see a message about Win-
dows Logo testing, click Continue Any-
way.
6. On the final screen, click Finish.
2-7
Finishing Installation
Configuring Internet Explorer
If you use the VerifyMe verification database, follow these steps to configure Internet
Explorer. Otherwise you can skip these steps.
1. Start Internet Explorer.
2. Select Tools→ Internet Options.
3. On the Advanced tab, under the Security heading, deselect Warn if changing between
secure and not secure mode.
Configuring a French Version of Windows
If you install this software on a unit running a French version of Windows, you must
follow these additional steps:
1. Select Start→ Run, type DCOMCNFG, and click OK.
2. On the Default Security tab, under Default Access Permissions, click Edit Default.
3. If the list does not include both INTERACTIF and SYSTEM, follow these steps to add
the missing name or names:
a. Click Add.
b. In the drop-down List Frames From list, select the name of your unit.
c. In the Names list, select the missing name or names (INTERACTIF, SYSTEM) and
click Add.
d. Click OK several times to accept the changes.

Setting Up Standard Monochrome iA-thenticate
2-8
Controlling Access
This section explains how to create local user groups and set file permissions for your
iA-thenticate unit so that different users have just the access they need. (This security
setup matches the way iA-thenticate Plus units are shipped from the factory.)
Creating Local User Groups and Users
First, create two local user groups and assign users to these groups as needed.
1. Create these two local user groups:
iA-thenticate Users
iA-thenticate Administrators
2. Create as many users as you need for the people who will use the system, and make
each one a member of the appropriate user group:
Local User Group Users Who Should Belong to This Group Access Allowed
iA-thenticate
Users Personnel who use iA-Examiner to
test and examine documents
iA-Examiner: user functions
iA-thenticate
Administrators Technical administrators, security
managers, and operations managers
iA-Examiner: user and man-
agement functions
iA-Administrator
All Users startup folder
(C:\Documents and Settings\
All Users\Start Menu\
Programs\Startup)

2-9
Controlling Access
Assigning File and Folder Permissions
Assigning file and folder permissions ensures that each group of users can run the
appropriate iA-thenticate programs.
To assign file and folder permissions:
1. Follow steps a–c for each file in the table below:
a. Right-click the file and choose Properties.
b. Select the Security tab.
c. In the Name list, remove the entries for Everyone and Users (if listed). Then add
Read & Execute permissions for user groups as indicated in the table.
2. iA-thenticate Administrators must be able to change startup settings for All Users.
Follow these steps to assign the needed permissions to C:\Documents and Settings\
All Users\Start Menu\Programs\Startup:
a. Right-click folder C:\Documents and Settings and choose Properties.
b. Select the Security tab.
c. Add Full Control permissions for the iA-thenticate Administrators group.
d. Repeat steps a–c for each successive folder in the path:
All Users (inside Documents and Settings)
Start Menu (inside All Users)
Programs (inside Start Menu)
Startup (inside Programs)
For this file in C:\BorderGuard\Bin\
Assign Read & Execute
permissions for these groups
iA-Administrator.exe
(iA-Administrator)
iA-thenticate Administrators
BGDataPort.exe
(iA-DataPort)
iA-thenticate Users
iA-thenticate Administrators
BGExaminer.exe
(iA-Examiner)
iA-thenticate Users
iA-thenticate Administrators
BGServer.exe
(iA-Server)
iA-thenticate Users
iA-thenticate Administrators
ExaminerConfiguration
(iA-Examiner configuration)
iA-thenticate Administrators
ExaminerManager
(iA-Examiner management)
iA-thenticate Administrators
ExaminerReport
(iA-Examiner reporting)
iA-thenticate Administrators
ExaminerViewer
(iA-Examiner document review)
iA-thenticate Administrators
iA-SecondaryStation.exe
(Secondary Station)
iA-thenticate Users
iA-thenticate Administrators

Setting Up Standard Monochrome iA-thenticate
2-10
3. If you use Windows security to limit users’ access to various folders on your system,
all iA-thenticate users must have these permissions:
•Read and execute access to C:\, C:\BorderGuard, and C:\BorderGuard\Bin
•Read, write, and execute access to:
–The work folder, normally C:\BorderGuard\Working
–The folder for storing captured images—for example, E:\BorderGuard\Images
–The folder containing the iA-Examiner database BGExaminer.mdb, normally
C:\BorderGuard\Bin
–If you use TextWatch, the folder containing the TextWatch database iAT.sys,
normally C:\BorderGuard\Bin
In addition, iA-thenticate administrators must have these permissions:
•Write access to:
–The folder containing the iA-Administrator database Administrator.mdb,
normally C:\BorderGuard\Bin
–The Windows registry
Installing a Bar Code and Magstripe Reader
If your system includes a bar code and magstripe reader, install it now by following the
instructions in chapter 5.
What’s Next?
Your iA-thenticate unit is now set up to work using factory-default settings. Probably
you will want to change some of those settings. Part Two of this guide explains how:
Part Two: Configuring and Managing iA-thenticate
Chapter 6, “Using the Administration Tools”
Chapter 7, “Configuring iA-thenticate”
Chapter 8, “Configuring iA-Examiner”
Chapter 9, “Managing iA-Examiner”

3-1
3
Setting Up Standard
Color iA-thenticate
This chapter explains how to install software and hardware, connect cables, and control
access to your standard iA-thenticate unit with color camera. Other chapters explain
how to set up other kinds of units.
Before you proceed with installation, check the Release Notes for new information.
If you are upgrading from a previous version, you may need to follow additional steps.
PC System Requirements for a Color Unit
The standard iA-thenticate color unit attaches to your Windows PC through a USB port
and, for some configurations, a standard serial port. You install the iA-thenticate soft-
ware on your PC, and iA-thenticate then operates as a peripheral device. The result is a
full-featured document security workstation that still has all the capabilities of the desk-
top PC.
To work properly with iA-thenticate, your PC must meet these requirements:
Hardware
❑Processor: 1.6 GHz Pentium 4 or better recommended; 2.8 GHz or better for a
smart-card unit
❑RAM: 256 MB minimum; 512 MB minimum for a smart-card unit
❑Free disk space: 300 MB minimum; 1 GB or more recommended when saving
captured images and data
❑Video display: 1024x768 resolution, 65536 colors, or better
❑An available USB 2.0 port (high speed, 480 Mbps)
❑An available standard serial port (for units that require it)
IMPORTANT
Setting up iA-thenticate requires the same skills as setting up a standard PC in a
networked environment. If you are not an experienced installer and system admin-
istrator, you should not attempt to do the setup yourself.
Although setting up iA-thenticate is similar to setting up a PC, there are important
differences. If you don’t follow the instructions in this chapter carefully, your sys-
tem may not work properly.

Setting Up Standard Color iA-thenticate
3-2
Configuration
❑Swap file: Recommended 768 MB minimum and 1024 MB maximum for drive C
and for the data drive (where you store captured images)
Supported operating systems
❑Windows 2000 Service Pack 4 or higher with updates 823980 (Microsoft Security
Bulletin MS03-026) and 828028 (Bulletin MS04-007)
❑Windows XP Professional Service Pack 2
Other software requirements
❑Internet Explorer 6.0 Service Pack 1 or higher with update 832894 (Microsoft
Security Bulletin MS04-004)
❑Current Microsoft USB driver recommended; third-party USB drivers may also
perform well
Software Installation
Be sure to install the software before you connect the iA-thenticate hardware.
Setting the PC’s Taskbar and Display Properties
Windows 2000 Windows XP
1. Start the PC, log on as an administra-
tor, and exit from all programs.
2. Right-click the taskbar and choose
Properties.
3. On the Taskbar Properties screen,
deselect Always on top and click OK.
4. Right-click the Windows desktop and
choose Properties.
5. On the Settings tab, click Advanced.
6. In the Font Size drop-down list, select
Small Fonts if it is not already
selected.
7. Follow any further on-screen instruc-
tions for confirming your choice and
installing fonts. You do not need to
restart the system at this point unless
Windows requires you to do so.
1. Start the PC, log on as an administra-
tor, and exit from all programs.
2. Right-click the taskbar and choose
Properties.
3. On the Taskbar Properties screen,
deselect Keep the taskbar on top of
other windows and click OK.
4. Right-click the Windows desktop and
choose Properties.
5. On the Appearance tab, in the Font
Size drop-down list, select Normal if it
is not already selected.
6. Follow any further on-screen instruc-
tions for confirming your choice and
installing fonts. You do not need to
restart the system at this point unless
Windows requires you to do so.

3-3
Software Installation
Installing DirectX
This software requires that DirectX 9.0 End-User Runtime be installed on your PC. To
find out whether you already have this software installed:
1. Select Start→ Run, type dxdiag, and click OK.
2. Find the DirectX version listed under System Information on the System tab.
If the version is not 9.0, follow these steps to install DirectX 9.0:
Installing the iA-thenticate Security Software
Installing iA-Administrator
Windows 2000 and XP
1. Insert the iA-thenticate CD into your CD drive.
2. On the CD, open folder DirectX and run the installer program,
dx90update_redist.exe.
3. Follow the on-screen instructions to install the DirectX software.
Windows 2000 and XP
1. Mount the iA-thenticate CD.
2. On the CD, in folder 1_iA-thenticate, run Setup.exe.
3. On the first screen, click Next.
4. On the License Agreement screen, read the license and click Ye s to agree.
5. On the Setup Type screen, select iA-thenticate 4.1.0 for color units and click Next.
6. On the Data Drive screen, if you do not have a separate E drive for storing data,
change the Destination Folder by clicking Browse and choosing drive C (or a differ-
ent drive reserved for data). Then click Next.
7. On the Choose COM Port screen, select the COM port where you will connect
the serial cable from the iA-thenticate unit. For a unit without a serial cable con-
nection, accept the default (COM 1).
8. On the Current Settings screen, click Next.
9. On the Installation Complete screen, select No, I will restart my computer later and
click Finish.
Windows 2000 and XP
1. On the CD, in folder 2_iA-Administrator, run Setup.exe.
2. Proceed through the installer screens by clicking Next twice.
3. On the Installation Complete screen, select No, I will restart my computer later and
click Finish.
Note
This release has been
tested with DirectX 9.0. If
you have a later version
already installed, we expect
iA-thenticate will run with no
problems.
Note
If you are upgrading, you
may see somewhat different
screens.

Setting Up Standard Color iA-thenticate
3-4
Installing iA-Examiner
Installing the Custom Calibration File
Each standard iA-thenticate unit comes with a matching SampleScan diskette containing
a calibration file. You should not use this file with any other iA-thenticate unit.
Installing Optional Software
1. If you have the optional DL-Alert™ feature, install it from the iA-thenticate CD:
a. In folder 4_DL-AlertIC, run DL-AlertIntelli-Check.exe.
b. Click Next and then Finish.
2. If you have other optional software such as iA-Passport or iA-License, install it
now. Follow the instructions included with the optional software.
Windows 2000 and XP
1. On the CD, in folder 3_iA-Examiner, run Setup.exe.
2. On the first installer screen, click Next.
3. On the Data Drive screen, accept the Destination Folder you chose earlier—or
change it if you want to use a different location for data and images saved by
iA-Examiner.
4. On the InstallShield Wizard Complete screen, click Finish.
Windows 2000 and XP
1. Make sure the serial number printed on the SampleScan diskette matches the
serial number on the iA-thenticate unit.
2. Insert the SampleScan diskette, and copy the SampleScan.cfg file from the diskette
to this directory:
C:\BorderGuard\Config\
3. Eject the diskette.
Note
This release requires
version 2.0 or later of
iA-Passport and iA-License.
Color units require the color
version of iA-Passport.

3-5
Hardware Installation
Hardware Installation
Install the software as described in the previous section before you install the hardware.
Before connecting any cables, be sure your PC and the iA-thenticate unit are fully
powered off.
Connecting the iA-thenticate Unit
Each iA-thenticate unit ships with:
❑A USB cable
❑A standard serial cable (some configurations)
❑A power supply and cord
To connect the iA-thenticate cables:
1. Connect the provided USB cable between the USB port on the back of the iA-thenti-
cate unit and an available USB 2.0 port (high-speed, 480 Mbps) on your PC.
2. If your unit includes a serial cable, connect the provided cable between the serial
port on the back of the unit and the appropriate COM port on your PC (selected
during installation, page 3-3).
3. Make sure the power switch on the iA-thenticate unit is off.
4. Plug the cable from the iA-thenticate power supply into the power connector on the
back of the iA-thenticate unit.
5. Plug the line cord from the power supply into a surge-protected power source that
can supply 170 W at 100–240 VAC, 47–63 Hz.
Finishing Installation
When you start your system after installing the hardware, you must help Windows
install drivers and confirm that they have been properly installed. You may also need to
set some configuration options.
Starting Up and Installing Drivers
When you start up for the first time, Windows tries to install drivers and may need your
help locating some. The steps vary with your hardware configuration and your version
of Windows.
To start the system:
1. Turn on the iA-thenticate unit using its power switch.
2. Start the PC and log in as an administrator.
3. Wait for the New Hardware wizard to run.
Note
The included power supply
might not have a power
cord suitable for your coun-
try. In this case you must
obtain and use a 3-conduc-
tor grounded supply cord
with a plug cap suitable for
your country. It must have a
minimum internal conduc-
tor area of 0.75 mm2 and
have a standard IEC 320
female connector.
Setting Up Standard Color iA-thenticate
3-6
To install each device driver (repeat as needed):
Driver files and locations:
If the wizard tries to install additional drivers, repeat these steps. For a dual-page smart-
card unit, you may need to install each of the SCR331-DI drivers twice.
Checking the Camera Driver
Follow these steps to make sure the camera driver is properly installed.
1. Open the System control panel. On the Hardware tab, click Device Manager.
2. Under Imaging Devices, find the item named OmniVision SuperCAM. Right-click it
and select Properties.
Windows 2000 Windows XP
1. Make sure you can see the small win-
dow that shows the name of the hard-
ware device; this is sometimes hidden
behind the wizard.
2. On the first wizard screen, click Next.
3. Select Search for a suitable driver for my
device (Recommended) and click Next.
4. Select Specify a location and click Next.
5. Click Browse and select the file shown
in the table below. Then click OK.
6. When the wizard displays the driver,
click Next.
7. If you see a message about the digital
signature, click Yes to continue.
8. Click Finish.
1. Make sure you can see the small win-
dow that shows the name of the hard-
ware device; this is sometimes hidden
behind the wizard.
2. On the first wizard screen, select
Install from a list or specific location
(Advanced) and click Next.
3. Select Include this location in the search
and browse to the folder shown in the
table below. Then click Next.
4. If you see a message about Windows
logo testing, click Continue Anyway.
5. Click Finish.
For this hardware device: Browse to this file:
USB 2.0 PC Camera
(May install without your help)
C:\Borderguard\Tools\Electrim\OVUSB2.inf
USB Fast Serial Adapter Install CD: US232B Drivers\ftdibus.inf
USB Serial Port Install CD: US232B Drivers\FTDIPORT.INF
SCR331-DI USB Smart Card Reader Install CD: SmartCard Drivers\S331DI2K.INF
SCR331-DI Contactless Reader Install CD: SmartCard Drivers\S331DICL.INF
Note
During driver installation,
you may also be asked to
locate the file ftser2k.sys. If
so, browse to the
US232B
Drivers
directory on the
install CD.
Note
If the Device Manager lists
no Imaging Devices:
Unplug the USB cable from
the iA-thenticate unit. Wait
at least 10 seconds, then
plug the USB cable back in.
If the problem persists:
Power down the PC and the
iA-thenticate unit. Wait at
least 30 seconds, then turn
on the iA-thenticate unit.
Finally, turn on the PC.

3-7
Finishing Installation
3. Compare the properties on the screen to the ones in this table:
4. If you have the wrong driver, continue with these steps to install the right one:
Configuring the Camera Port
(Units with no serial cable)
If your unit has no serial cable connecting it to the PC, follow these steps to configure
the camera port:
1. Open the Device Manager. (Right-click My Computer, choose Manage, and click
Device Manager.)
2. Expand the Ports (COM & LPT) item and find the USB serial port listing. Note the
COM port number assigned to the entry. For example, it might be listed as
USB Serial Port (COM3).
3. Run iA-Administrator by choosing Start→ Programs→ iA-thenticate→ iA-Administrator.
4. On the Configuration tab, under Advanced, select the number for Color camera
COM port that matches the one you found in Device Manager.
5. Click Apply, then exit iA-Administrator.
Right driver Wrong driver
OmniVision SuperCAM [or Super Cam]
Driver Provider = OmniVision
Driver Date = 2002-04-05 [or N/A]
Driver Version = 2.1.0.1
Digital Signer = Not digitally signed
OmniVision SuperCAM
Driver Provider = OmniVision
Driver Date = 2002-04-11
Driver Version = 5.2.2600.1
Digital Signer = Microsoft Windows
Hardware Compatibility
Windows 2000 Windows XP
1. In the Properties window, go to
the Driver tab and click Update
Driver.
2. On the first screen of the wizard,
click Next.
3. On the next screen, select Search
for a suitable driver... and click
Next.
4. On the next screen, select only
Specify a location and click Next.
5. On the next screen, click Browse.
Then browse to
C:\BorderBuard\Tools\Electrim
and select OVUSB2.INF. Click OK.
6. On the Digital Signature Not
Found screen, click Ye s.
7. On the final screen, click Finish.
1. In the Properties window, go to
the Driver tab and click Update
Driver.
2. On the first screen of the wizard,
select Install from a list or specific
location (Advanced) and click Next.
3. On the next screen, select Don't
search. I will choose the driver to
install. Then browse to
C:\BorderBuard\Tools\Electrim
and select OVUSB2.INF.
4. When you see a message about
Windows Logo testing, click Con-
tinue Anyway.
5. On the final screen, click Finish.
Setting Up Standard Color iA-thenticate
3-8
Configuring a Smart-Card Unit
If you are installing a smart-card unit, follow these steps to configure it:
1. Run iA-Administrator by choosing Start→ Programs→ iA-thenticate→ iA-Administrator.
2. On the Configuration tab, under Signals and Alerts, deselect both of the Beep
when... options. (These are currently incompatible with smart-card processing.)
3. Under Hardware, select either Dual page or Single page to match the type of reader
you have.
4. Click Apply, then exit iA-Administrator.
5. Run iA-Examiner using the desktop shortcut or by choosing Start→ Programs→
iA-thenticate→ iA-Examiner.
6. Click Mgmt Functions and then System Config.
7. On System Configuration Page 1, select Smart Card Reader.
8. Click Apply and Done, then exit iA-Examiner.
Configuring Internet Explorer
If you use the VerifyMe verification database, follow these steps to configure Internet
Explorer:
1. Start Internet Explorer.
2. Select Tools→ Internet Options.
3. On the Advanced tab, under the Security heading, deselect Warn if changing between
secure and not secure mode.
Configuring a French Version of Windows
If you install this software on a unit running a French version of Windows, you must
follow these additional steps:
1. Select Start→ Run, type DCOMCNFG, and click OK.
2. On the Default Security tab, under Default Access Permissions, click Edit Default.
3. If the list does not include both INTERACTIF and SYSTEM, follow these steps to add
the missing name or names:
a. Click Add.
b. In the drop-down List Frames From list, select the name of your unit.
c. In the Names list, select the missing name or names (INTERACTIF, SYSTEM) and
click Add.
d. Click OK several times to accept the changes.

3-9
Controlling Access
Controlling Access
This section explains how to create local user groups and set file permissions for your
iA-thenticate unit so that different users have just the access they need. (This security
setup matches the way iA-thenticate Plus units are shipped from the factory.)
Creating Local User Groups and Users
First, create two local user groups and assign users to these groups as needed.
1. Create these two local user groups:
iA-thenticate Users
iA-thenticate Administrators
2. Create as many users as you need for the people who will use the system, and make
each one a member of the appropriate user group:
Local User Group Users Who Should Belong to This Group Access Allowed
iA-thenticate
Users Personnel who use iA-Examiner to
test and examine documents
iA-Examiner: user functions
iA-thenticate
Administrators Technical administrators, security
managers, and operations managers
iA-Examiner: user and man-
agement functions
iA-Administrator
All Users startup folder
(C:\Documents and Settings\
All Users\Start Menu\
Programs\Startup)

Setting Up Standard Color iA-thenticate
3-10
Assigning File and Folder Permissions
Assigning file and folder permissions ensures that each group of users can run the
appropriate iA-thenticate programs.
To assign file and folder permissions:
1. Follow steps a–c for each file in the table below:
a. Right-click the file and choose Properties.
b. Select the Security tab.
c. In the Name list, remove the entries for Everyone and Users (if listed). Then add
Read & Execute permissions for user groups as indicated in the table.
2. iA-thenticate Administrators must be able to change startup settings for All Users.
Follow these steps to assign the needed permissions to C:\Documents and Settings\
All Users\Start Menu\Programs\Startup:
a. Right-click folder C:\Documents and Settings and choose Properties.
b. Select the Security tab.
c. Add Full Control permissions for the iA-thenticate Administrators group.
d. Repeat steps a–c for each successive folder in the path:
All Users (inside Documents and Settings)
Start Menu (inside All Users)
Programs (inside Start Menu)
Startup (inside Programs)
For this file in C:\BorderGuard\Bin\
Assign Read & Execute
permissions for these groups
iA-Administrator.exe
(iA-Administrator)
iA-thenticate Administrators
BGDataPort.exe
(iA-DataPort)
iA-thenticate Users
iA-thenticate Administrators
BGExaminer.exe
(iA-Examiner)
iA-thenticate Users
iA-thenticate Administrators
BGServer.exe
(iA-Server)
iA-thenticate Users
iA-thenticate Administrators
ExaminerConfiguration
(iA-Examiner configuration)
iA-thenticate Administrators
ExaminerManager
(iA-Examiner management)
iA-thenticate Administrators
ExaminerReport
(iA-Examiner reporting)
iA-thenticate Administrators
ExaminerViewer
(iA-Examiner document review)
iA-thenticate Administrators
iA-SecondaryStation.exe
(Secondary Station)
iA-thenticate Users
iA-thenticate Administrators

3-11
Installing a Bar Code and Magstripe Reader
3. If you use Windows security to limit users’ access to various folders on your system,
all iA-thenticate users must have these permissions:
•Read and execute access to C:\, C:\BorderGuard, and C:\BorderGuard\Bin
•Read, write, and execute access to:
–The work folder, normally C:\BorderGuard\Working
–The folder for storing captured images—for example, E:\BorderGuard\Images
–The folder containing the iA-Examiner database BGExaminer.mdb, normally
C:\BorderGuard\Bin
–If you use TextWatch, the folder containing the TextWatch database iAT.sys,
normally C:\BorderGuard\Bin
In addition, iA-thenticate administrators must have these permissions:
•Write access to:
–The folder containing the iA-Administrator database Administrator.mdb,
normally C:\BorderGuard\Bin
–The Windows registry
Installing a Bar Code and Magstripe Reader
If your system includes a bar code and magstripe reader, install it now by following the
instructions in chapter 5.
What’s Next?
Your iA-thenticate unit is now set up to work using factory-default settings. Probably
you will want to change some of those settings. Part Two of this guide explains how:
Part Two: Configuring and Managing iA-thenticate
Chapter 6, “Using the Administration Tools”
Chapter 7, “Configuring iA-thenticate”
Chapter 8, “Configuring iA-Examiner”
Chapter 9, “Managing iA-Examiner”
Setting Up Standard Color iA-thenticate
3-12

4-1
4
Setting Up Monochrome
iA-thenticate Plus
This chapter explains how to connect cables, install optional hardware and software,
log on, and control access to your iA-thenticate Plus unit (with built-in PC) with mono-
chrome camera. Other chapters explain how to set up other kinds of units.
Before you proceed with installation, check the Release Notes for new information.
If you are upgrading from a previous version, you may need to follow additional steps.
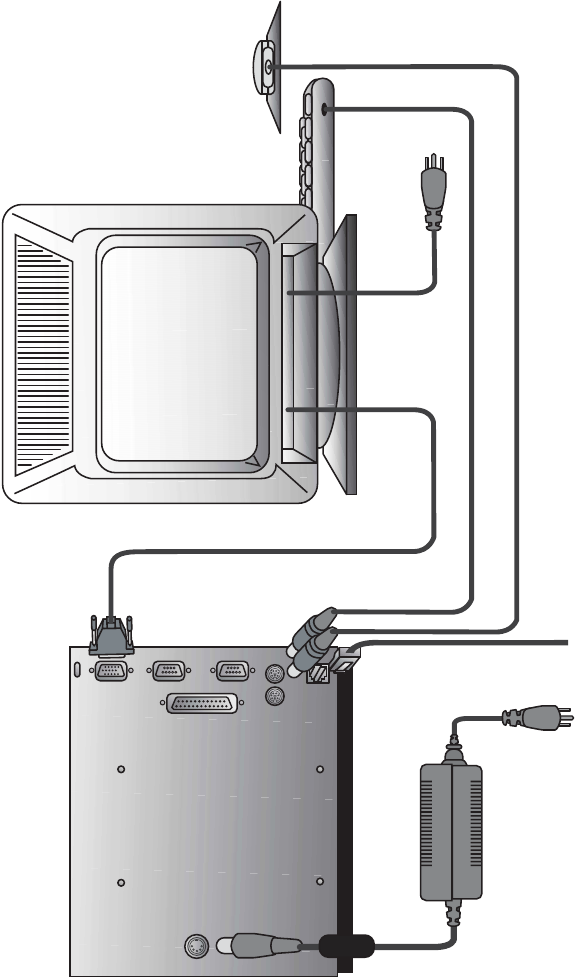
Connecting Cables
Referring to the diagram on the next page, make the appropriate connections to the
marked connectors on the back of the iA-thenticate Plus unit. (You must connect a mon-
itor, keyboard, and mouse for initial setup, even if you plan to use the unit later without
these peripherals.)
To connect a monochrome iA-thenticate Plus unit:
1. Plug a standard monitor into the monitor connector on the unit, and plug the mon-
itor’s power cord into an appropriate power source.
2. Plug a standard keyboard and mouse into the matching PS/2 connectors on the unit.
3. Optionally, plug an Ethernet cable into the 10/100BASE-T connector on the unit.
4. Make sure the power switch on the iA-thenticate unit is off.
5. Plug the cable from the power supply into the power connector on the unit.
6. Plug the line cord from the power supply into a surge-protected power source that
can supply 170 W at 100–240 VAC, 47–63 Hz.
IMPORTANT
Setting up iA-thenticate requires the same skills as setting up a standard PC in a
networked environment. If you are not an experienced installer and system admin-
istrator, you should not attempt to do the setup yourself.
Although setting up iA-thenticate is similar to setting up a PC, there are important
differences. If you don’t follow the instructions in this chapter carefully, your sys-
tem may not work properly.
Note
The included power supply
might not have a power
cord suitable for your coun-
try. In this case you must
obtain and use a 3-conduc-
tor grounded supply cord
with a plug cap suitable for
your country. It must have a
minimum internal conduc-
tor area of 0.75 mm2 and
have a standard IEC 320
female connector.
Setting Up Monochrome iA-thenticate Plus
4-2
Connecting Monochrome iA-thenticate Plus
Power supply
Use surge-protected
power source,
100–240 V AC,
47–63 Hz, 170 W.
Monochrome iA-thenticate Plus
Mouse
Ethernet
COM 2
COM 1
Keyboard
Monitor
Monitor
Mouse
10/100BASE-T
Ethernet
4-3
Starting Up and Logging On
Starting Up and Logging On
If your iA-thenticate unit is powered off, follow these steps to start up and log on:
1. Start the iA-thenticate unit by turning on its switch.
2. Log on with an administrator username.
For a new iA-thenticate Plus unit, log on as administrator, with password iai. As soon
as you log on, assign a secure password to
administrator
.
Installing Optional Software
If you have other optional software such as iA-Passport or iA-License, install it now.
Follow the instructions included with the optional software.
Controlling Access
This section explains how to control access to your iA-thenticate Plus unit, whether
you’re setting it up as a full-featured document security workstation or as a compact,
self-contained unit. (See “Basic Setup Options” on page 1-2.)
Users and Groups
iA-thenticate Plus units are preconfigured with local user groups that let you give differ-
ent users the kind of access they need:
Note
This release requires
version 2.0 or later of
iA-Passport and iA-License.
Local
User Group
Users Who Should Belong to
This Group Access Allowed
iA-thenticate
Users Personnel who use iA-Exam-
iner or Secondary Station to
test and examine documents
iA-Examiner: user functions
Secondary Station
iA-thenticate
Administrators Technical administrators,
security managers, and oper-
ations managers
iA-Examiner: user and man-
agement functions
Secondary Station
iA-Administrator
All Users startup folder,
C:\Documents and Settings\
All Users\Start Menu\
Programs\Startup\
Setting Up Monochrome iA-thenticate Plus
4-4
In addition, the units are preconfigured with these users:
Full-Featured Document Security Workstation
If you’re setting up your unit as a full-featured document security workstation with
monitor, keyboard, and mouse, you control access by creating users and making each
one a member of the appropriate group.
To control access to a full-featured workstation:
1. Log on to the iA-thenticate unit with an administrator username.
2. Create as many local users as you need for the people who will use the system, and
make each one a member of the appropriate user group—either iA-thenticate Users
or iA-thenticate Administrators, as described above.
Compact, Self-Contained Unit
With a compact, self-contained unit, the operator can’t log on because the unit has
no keyboard. So iA-thenticate includes an auto-logon feature that can bypass the
logon dialog box and automatically log on with the username autologon and pass-
word autologon.
To control access to a self-contained unit:
1. Optional: Create one or more users as members of the iA-thenticate Administrators
group, as just described under “Full-Featured Document Security Workstation.”
This lets an administrator attach a monitor and keyboard and log on when neces-
sary. (If you don’t create any such users, an administrator can still log on as adminis-
trator.)
2. Enable the auto-logon feature and set appropriate options as explained under “Set-
ting Startup Options” on page 4-7. This section also explains how to bypass or dis-
able auto-logon when needed.
3. After setting up auto-logon, be sure to control physical access to the unit as needed,
since anyone can attach a monitor and keyboard and use the unit without logging
on.
Username Password Description
administrator iai
(Change the first
time you log on.)
For initial iA-thenticate setup and continu-
ing master administrator access.
autologon autologon
(Do not change.)
For use with the auto-logon feature, which
allows you to set up an iA-thenticate unit
with no keyboard or mouse.

4-5
Installing a Bar Code and Magstripe Reader
Installing a Bar Code and Magstripe Reader
If your system includes a bar code and magstripe reader, install it now by following the
instructions in chapter 5.
What’s Next?
Your iA-thenticate Plus unit is now set up to work using factory-default settings. Proba-
bly you will want to change some of those settings. Part Two of this guide explains how:
Part Two: Configuring and Managing iA-thenticate
Chapter 6, “Using the Administration Tools”
Chapter 7, “Configuring iA-thenticate”
Chapter 8, “Configuring iA-Examiner”
Chapter 9, “Managing iA-Examiner”
Setting Up Monochrome iA-thenticate Plus
4-6

5-1
5
Installing a Bar Code
and Magstripe Reader
This release supports both the serial and USB models of the E-Seek Intelli-Check combi-
nation bar code and magstripe reader.
The reader is preconfigured with the correct settings to work with your iA-thenticate
unit. However, if it should lose its settings, you can restore them as explained in appen-
dix A, “Resetting the E-Seek Reader.”
Installing the E-Seek Intelli-Check Serial Reader
Follow these instructions if you have an E-Seek Intelli-Check serial reader. If you have
an E-Seek Intelli-Check USB reader, skip to the next section instead.
1. Locate the longer serial cable supplied with the reader.
2. Plug in the cable’s 9-pin D connector:
•For a standard iA-thenticate unit, plug the cable into your PC’s COM 2 serial
port.
•For a monochrome iA-thenticate Plus unit, plug the cable into the unit’s COM 2
(upper) serial port.
3. Plug the other end of the cable into the E-Seek Intelli-Check reader.
4. Plug the cable from the supplied power adapter into the reader.
5. Plug the power adapter into a surge-protected power source that meets the require-
ments printed on the adapter. The reader should beep three times when you connect
the power.
This completes the installation of the serial reader.
Note
You can also use a “key-
board wedge” magstripe
reader connected between
your keyboard and PC. This
reader is no longer provided
by Viisage but is supported
as a legacy device. We do
not
recommend this reader
for processing credit cards.
Note
If needed, you can use a
port other than COM 2. If
you do, you must change
the port settings in Exam-
iner (page 8-2) or DataPort
(page 10-8) to match.
Installing a Bar Code and Magstripe Reader
5-2
Installing the E-Seek Intelli-Check USB Reader
Follow these instructions if you have an E-Seek Intelli-Check USB reader. If you have an
E-Seek Intelli-Check Serial reader, see the previous section instead.
Note that:
❑Your exact installation steps depend on which version of Windows you have and
which USB drivers you already have installed.
❑You may need the driver CD supplied with the reader. If you are installing on a unit
with no CD drive, you can mount the CD on a network-accessible drive or copy its
contents to a network-accessible folder.
Connecting the Reader
✦With the system running, plug the reader’s USB cable into an available USB port.
Your next step depends on how the system responds:
If your system does this: Then do this:
Finds neither USB driver and starts the New Hardware
wizard (most likely with Windows 2000 when the system
has never used a USB-serial converter)
Continue with
“Installing the Drivers”
Finds one driver but not the other and asks you to locate
needed files (most likely with Windows 2000 when the
system has previously used a USB-serial converter)
Skip to
“Finding Driver Files”
Finds and installs both USB drivers on its own, and then
tells you it has done so (most likely with Windows XP)
Skip to
“Configuring iA-Examiner”

5-3
Installing the E-Seek Intelli-Check USB Reader
Installing the Drivers
Follow these steps if the New Hardware wizard runs.
Driver files and locations:
Next, skip to “Configuring iA-Examiner.”
Finding Driver Files
Follow these steps if the system doesn’t run the New Hardware wizard but asks you to
locate needed files.
1. In the Files Needed window, browse to the folder named DCM_USB_driver on the
driver CD and click OK.
2. When the Files Needed window appears a second time, repeat step 1.
Next, proceed to “Configuring iA-Examiner.”
Configuring iA-Examiner
After the USB drivers are installed, follow these steps to configure iA-Examiner to use
the reader.
1. Open the Device Manager. (Right-click My Computer, choose Manage, and click
Device Manager.)
Windows 2000 Windows XP
1. Make sure you can see the small win-
dow that shows the name of the hard-
ware device; this is sometimes hidden
behind the wizard.
2. On the first wizard screen, click Next.
3. Select Search for a suitable driver for my
device (Recommended) and click Next.
4. Select Specify a location and click Next.
5. Click Browse and select the file shown
in the table below. Then click OK.
6. When the wizard displays the driver,
click Next.
7. If you see a message about the digital
signature, click Yes to continue.
8. Click Finish.
1. Make sure you can see the small win-
dow that shows the name of the hard-
ware device; this is sometimes hidden
behind the wizard.
2. On the first wizard screen, select
Install from a list or specific location
(Advanced) and click Next.
3. Select Include this location in the search
and browse to the folder shown in the
table below. Then click Next.
4. If you see a message about Windows
logo testing, click Continue Anyway.
5. Click Finish.
For this hardware device: Browse to this file:
USB <-> Serial Driver CD: DCM_USB_driver\FTDIBUS.INF
USB Serial Port Driver CD: DCM_USB_driver\FTDIPORT.INF

Installing a Bar Code and Magstripe Reader
5-4
2. Expand the Ports (COM & LPT) item and find any USB Serial Port entries. Assuming
your PC has no additional USB serial devices attached, you should see either one
entry (if your unit has a serial cable) or two (if it has no serial cable).
On a unit with no serial cable, one entry is for the camera. This is the one you found
earlier and matched to the Color camera COM port number listed in iA-Administrator
(page 3-7). You are now interested in the other entry.
Note the COM port number assigned to the entry. For example, it might be listed as
USB Serial Port (COM4).
3. Start iA-Examiner by double-clicking its icon on the desktop or by selecting Start→
Programs→ iA-thenticate→ iA-Examiner.
If you see an error message about serial port initialization, click OK to continue.
4. In iA-Examiner, click Mgmt Functions and then System Config.
5. On System Configuration Page 1, under Peripherals:
a. Select E-Seek Reader.
b. For Comm. Port, select the number you found in step 2.
6. Click Apply and then Done.
This completes the installation of the USB reader.
Note: If you unplug the reader and plug it into a different USB port, your system
may want to reinstall USB drivers and assign a different COM port number. In this
case you must reconfigure iA-Examiner for the new port number as explained
above.
Part Two
Configuring and
Managing iA-thenticate
6-1
6
Using the
Administration Tools
You use two administration tools to configure iA-thenticate:
❑iA-Administrator
❑iA-Examiner (Management Functions)
This chapter introduces these tools, and the following chapters explain how to use them
to configure an iA-thenticate unit.
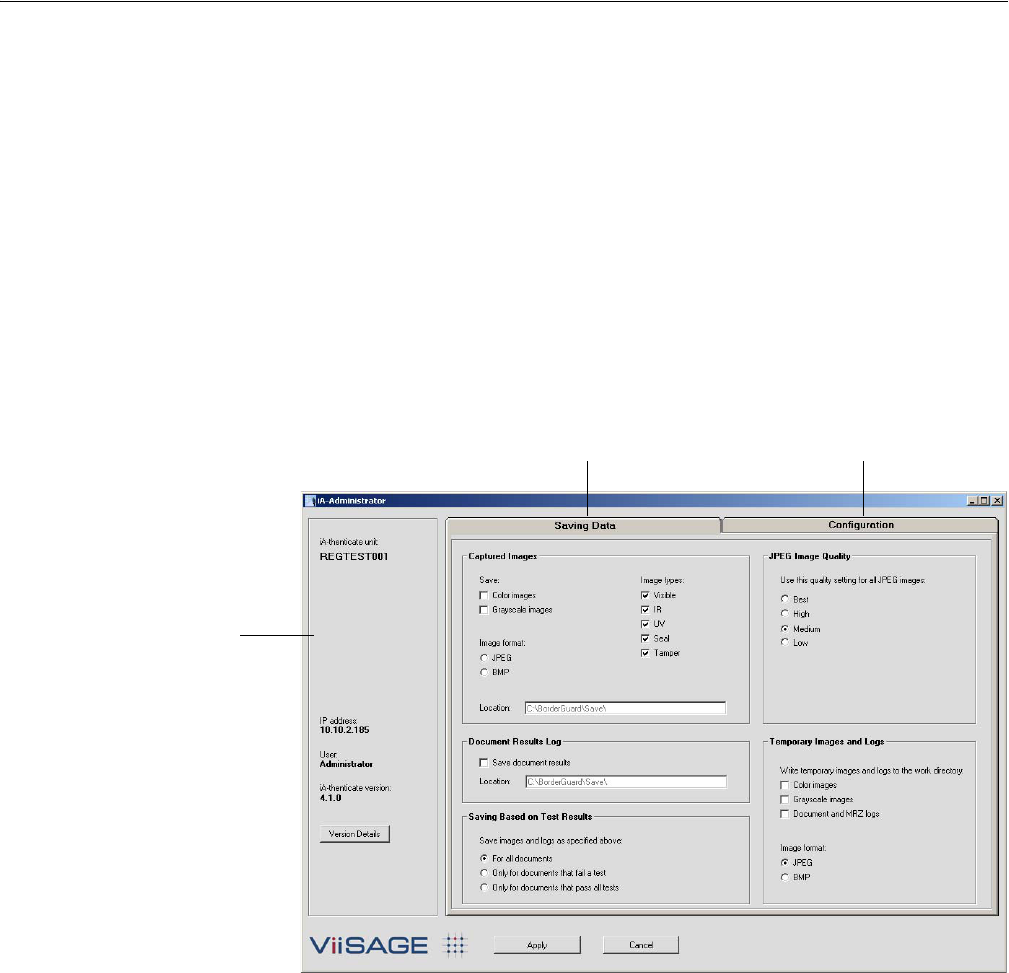
Using the Administration Tools
6-2
iA-Administrator
You use iA-Administrator to:
❑View information about the iA-thenticate unit
❑Set options for basic system operation
❑Set options for saving captured images and document logs—if you do not use
iA-Examiner to save images and logs
To run iA-Administrator:
1. Log on as a local administrator or member of the iA-thenticate Administrators user
group.
2. Select Start→ Programs→ iA-thenticate→ iA-Administrator.
The iA-Administrator screen looks like this:
Configuration tab:
Options for basic
system operation
Saving Data tab:
Options for saving captured
images and document logs.
Information
about this unit
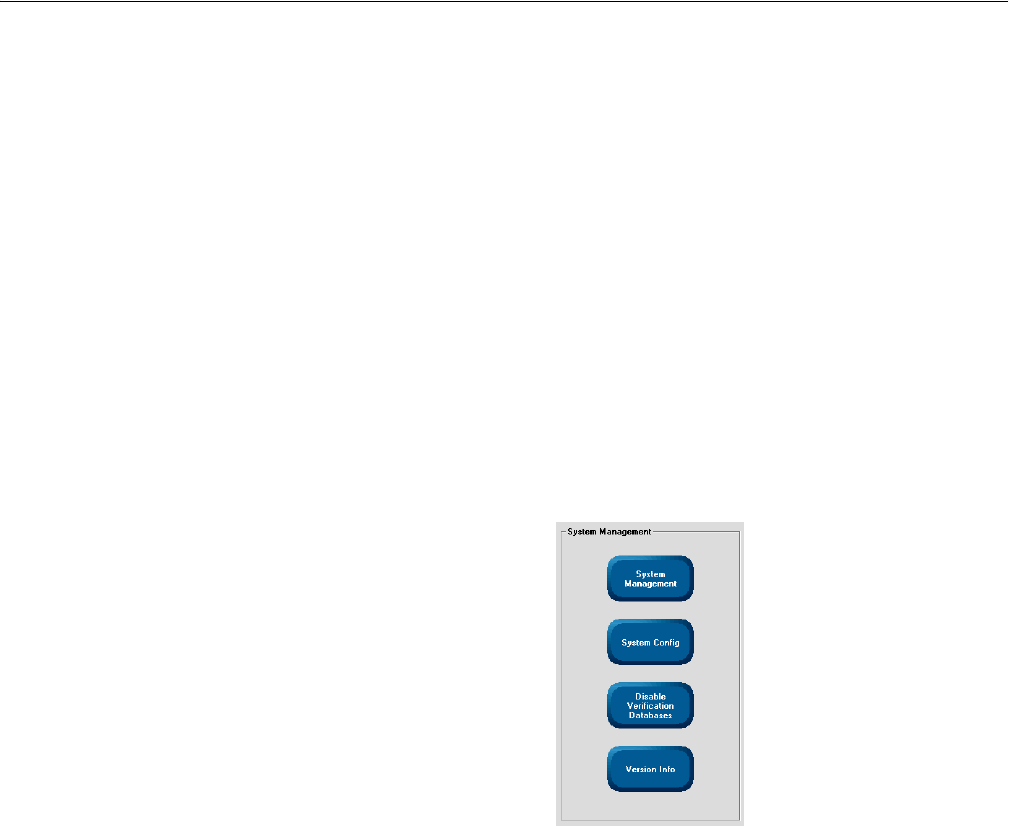
6-3
iA-Examiner
iA-Examiner
iA-Examiner is the primary program that operators use for processing documents. In
addition to its operator screens, it has a section of Management Functions screens that
let you set options beyond those you set with iA-Administrator.
You use the iA-Examiner management screens to:
❑Set options for saving captured images and document logs
❑Control details of iA-Examiner appearance and behavior
❑Choose document testing options
❑Enable optional iA-Examiner features
❑Configure a magstripe and bar code reader and a printer
To use iA-Examiner’s management functions:
1. Log on as a local administrator or member of the iA-thenticate Administrators user
group.
2. Run iA-Examiner by double-clicking the iA-Examiner icon on your desktop or by
selecting Start→ Programs→ iA-thenticate→ iA-Examiner.
3. On the main iA-Examiner screen, click Mgmt Functions.
You can then click System Management or System Config to accomplish various man-
agement and configuration tasks.
Note
Access to the management
screens is restricted when
you use the recommended
security setup described on
page 3-9.
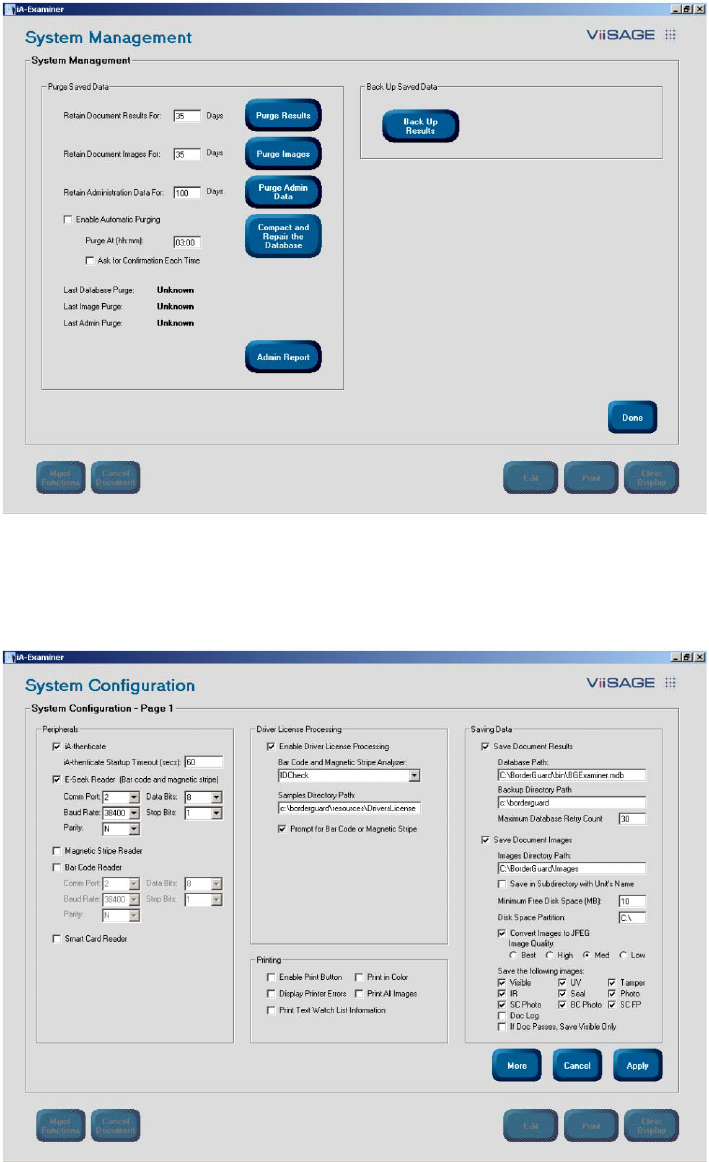
Using the Administration Tools
6-4
The System Management screen mostly lets you manage saved data:
The System Configuration screen lets you set a variety of options (on several pages) for
peripheral configurations, driver’s license and ID processing, printing, data saving, doc-
ument testing, screen display, and other features:

6-5
What’s Next?
What’s Next?
Use the following chapters to learn how to use iA-Administrator and iA-Examiner to
configure your unit’s operation:
❑Chapter 7, “Configuring iA-thenticate”
(using iA-Administrator)
❑Chapter 8, “Configuring iA-Examiner”
(using the iA-Examiner configuration screens)
❑Chapter 9, “Managing iA-Examiner”
(using iA-Examiner management functions)
Using the Administration Tools
6-6
7-1
7
Configuring
iA-thenticate
This chapter explains how you use iA-Administrator to:
❑View information about the iA-thenticate unit
❑Set options for basic system operation
❑Set options for saving captured images and document logs—if you do not use
iA-Examiner to save images and logs
Chapter 6, “Using the Administration Tools,” introduces iA-Administrator, tells how to
start it, and gives an overview of its screen.
Chapter 8, “Configuring iA-Examiner,” describes additional ways to control and con-
figure your system using iA-Examiner.
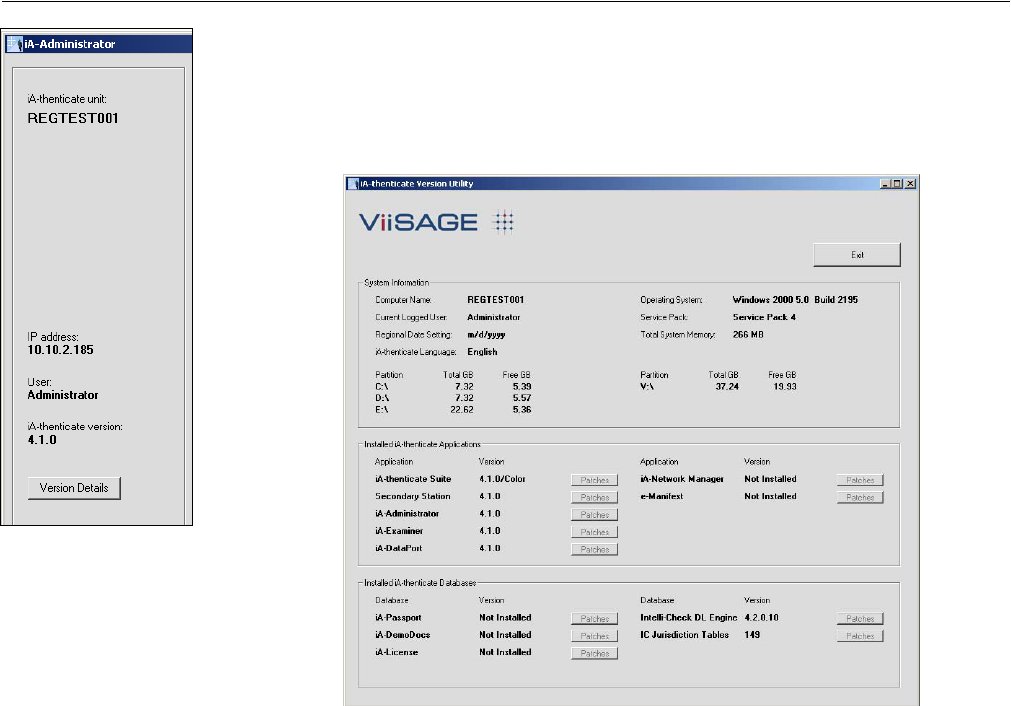
Configuring iA-thenticate
7-2
Viewing Unit Information
The left side of the Administrator screen shows the computer name of the iA-thenticate
unit, its IP address, the name of the logged-on user, and the iA-thenticate software ver-
sion. It also includes a button for viewing detailed version information.
Clicking Version Details runs the iA-thenticate Version Utility, which shows detailed
information about the installed software:
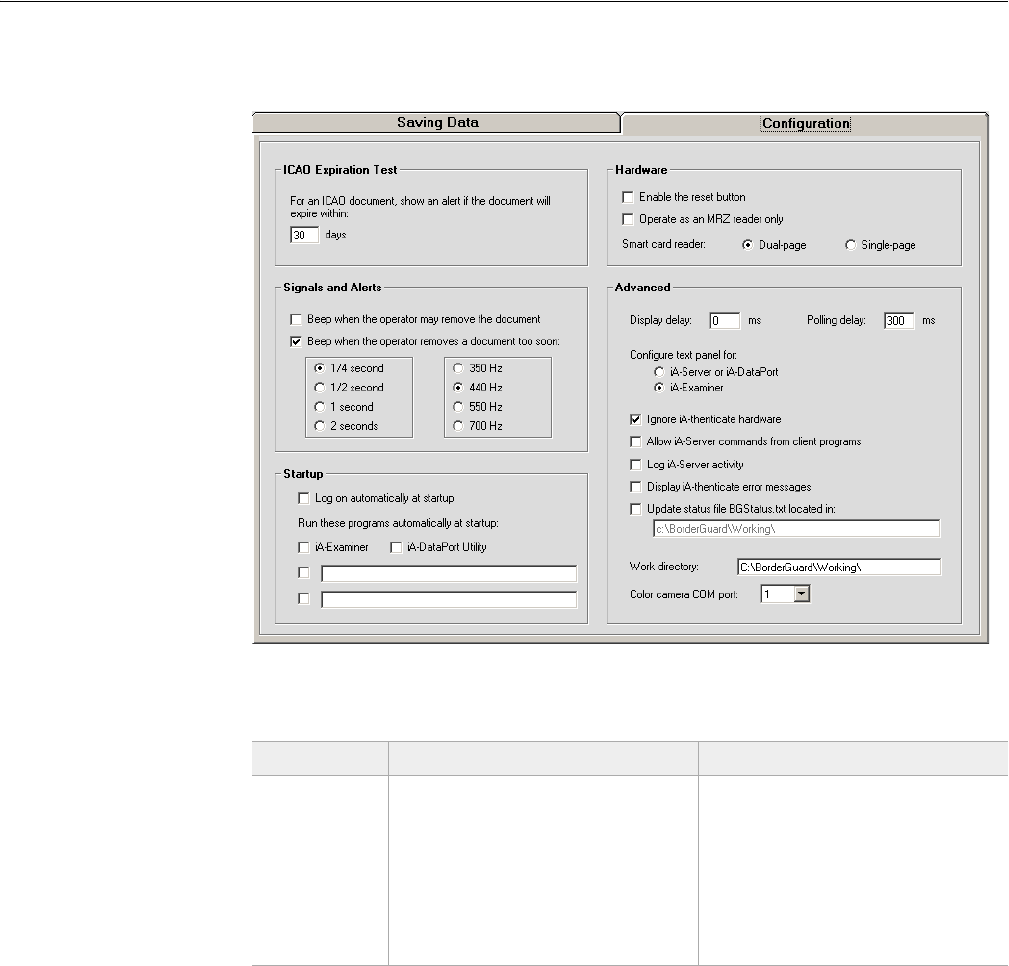
7-3
Setting Options for Basic Operation
Setting Options for Basic Operation
To set options for basic operation, run iA-Administrator (Start→ Programs→
iA-thenticate→ iA-Administrator) and click the Configuration tab. In each section of the
screen, set the options according to the following descriptions and recommendations.
ICAO Expiration Test
Option Description Recommendations
For an ICAO
document,
show an alert if
the document
will expire
within __ days
Tells iA-thenticate to display an alert
for an ICAO document if it expires
within this number of days. (When
Examiner tests the expiration date of
a non-ICAO license or ID by read-
ing the magstripe or bar code, it dis-
plays an alert only if the document
has already expired.)
Use the default value of 30 days
unless you want the alert displayed
farther in advance or not as far.

Configuring iA-thenticate
7-4
Signals and Alerts
You can use audio signals and alerts with an iA-thenticate Plus unit (which has a small
built-in speaker) and with a standard iA-thenticate unit attached to a PC with a sound
card and speaker.
Startup
If you want to use an iA-thenticate Plus unit as a compact, self-contained unit without
monitor or keyboard (see page 1-2), you must set it up to log on automatically and to
run any necessary programs. You can also set up a standard iA-thenticate unit to run
programs automatically at startup for convenience.
Option Description Recommendations
Beep when the
operator may
remove the
document
Beeps (using the standard system
beep) when testing is complete and
the operator may safely remove the
document.
Deselect this if you are using a smart
card reader.
Otherwise, select it if you want the
operator to hear a beep when the
document may be removed.
Beep when
the operator
removes a
document too
soon
Beeps at the selected frequency and
for the selected time when the opera-
tor removes a document before test-
ing is complete.
Deselect this if you are using a smart
card reader.
Otherwise, select it if you want the
operator to hear a beep when the
document is removed too soon. If
several units are located near each
other, you can choose different beep
frequencies to make them distinctive.
Option Description Recommendations
Log on
automatically
at startup
Bypasses the Windows logon screen
at startup and logs on as user
autologon.
This setting is only available if your
user account allows you to edit the
Windows registry. You may need to
log on as an administrator to change
it.
Select this if you are setting up a
compact, self-contained unit for use
without an attached monitor or key-
board (page 1-2).
We do not recommend using this
option for a full-featured unit with
keyboard and monitor, because it
bypasses normal Windows logon
security.
Run these
programs
automatically
at startup
After Windows starts, runs the
selected programs automatically. To
add a program, type its full path-
name.
Selected programs are added to the
Startup program group for All Users:
C:\Documents and Settings\All Users\
Start Menu\Programs\Startup\
Select the programs you want to run
at startup.
If you select more than one program,
one may hide another after startup.
If you select no programs, the Win-
dows desktop appears after startup.

7-5
Setting Options for Basic Operation
Restoring Normal Logon
If you select Log on automatically at startup, Windows never displays the logon screen. To
bypass automatic logon temporarily and to disable automatic logon, you must follow
special procedures.
To bypass automatic logon temporarily:
1. While starting or restarting the unit, press and hold the Shift key until the Logon
dialog box appears.
2. Log on in the usual way.
To disable automatic logon:
1. Log on as a local administrator or using another account that allows you to edit the
Windows registry.
2. Run iA-Administrator.
3. Deselect Log on automatically at startup and click Apply.
Hardware
Option Description Recommendations
Enable the
reset button Activates the reset button on the
back of the iA-thenticate unit, so
that pressing it shuts down the unit.
This works only when iA-thenticate
is running.
Select this only if you are setting up
a compact, self-contained unit with-
out an attached monitor or key-
board (page 1-2), so that you can
shut down the unit properly.
Operate as an
MRZ reader
only
Tells iA-thenticate to capture and
test only visible and IR images and
to skip all pattern and brightness
tests.
Select this only if you need maxi-
mum processing speed and you do
not need the excluded images and
test results.
Smart card
reader Selects the appropriate type of
smart-card reader (if you have one).
A dual-page reader has two anten-
nas; a single-page reader has one.
Select either Dual-page or Single-page
to match your smart-card reader. If
you have no reader, the setting
makes no difference.
You must have write access to the
Windows registry to change this set-
ting. If you don’t, the options may
be grayed out, or they may be select-
able but not actually have any effect.

Configuring iA-thenticate
7-6
Advanced
You will probably never need to change any of the following advanced options. You
should leave them alone unless you have a specific reason to change them.
Option Description Recommendations
Display delay Tells iA-thenticate how many milli-
seconds to display the test results
from the last document processed
before it starts looking for a new
document to process. After it starts
looking, it keeps polling according
the Polling delay value (next).
Use the default value of 0 ms.
Polling delay Tells iA-thenticate how many milli-
seconds to wait between checks to
see if a new document has been
placed on the document platform.
Use the default value of 300 ms.
Configure text
panel for Selects which program controls the
messages on the built-in text display.
If you use iA-Examiner as your pri-
mary application, select iA-Examiner.
If you use iA-DataPort as your pri-
mary application, select iA-Server or
iA-DataPort.
If you use a custom program as your
primary application, select iA-Exam-
iner only if your program is designed
to write information to the text dis-
play. Otherwise select iA-Server or iA-
DataPort.
Ignore
iA-thenticate
hardware
Tells the iA-thenticate software to
operate as if the hardware compo-
nents (camera, lights, and so on) are
not connected.
Do not select this except for testing
purposes.
Allow iA-Server
commands
from client
programs
Not currently used. Leave this deselected.
Log iA-Server
activity Records iA-Server activity in a log
file named iaT_Log.txt. This file is
saved in the work directory (see
below).
Do not select this unless you have a
reason to record iA-Server activity,
such as for troubleshooting pur-
poses.
Display
iA-thenticate
error messages
Displays extra error messages that
do not normally affect operation and
are not normally displayed.
Do not select this except for trouble-
shooting purposes.
Update
status file
BGStatus.txt
located in
Constantly updates a file named
BGStatus.txt in the specified directory
with iA-thenticate’s current status.
Other programs can then monitor
the status by reading this file.
Do not select this unless you are run-
ning a custom program that needs to
read this file.
7-7
Setting Options for Basic Operation
Work directory The directory iA-thenticate uses for
storing various work files.
Use the default directory
(C:\BorderGuard\Working\) unless you
have a reason to change it.
Color camera
COM port The COM port where the color cam-
era is connected, set during installa-
tion. Appears only on color systems.
For further information, see
pages 3-3 and 3-7.
Option Description Recommendations

Configuring iA-thenticate
7-8
Setting Options for Saving Images and Logs
You can configure iA-thenticate to save captured document images as well as text logs
containing document information and test results. You may want to save these files for
various reasons related to security, operations, and record-keeping.
Two Ways to Save Images and Logs
You can set options for saving images and logs here in Administrator or in Examiner.
The two ways are independent of each other, and you can use either one.
❑If you use Examiner to process documents, it’s generally easiest to use Examiner to
save images and logs as well. And it offers more options than Administrator.
❑Unless you have a special reason to do so, you should not save images and logs
using both Administrator and Examiner.
This table compares the two ways.
Using Administrator... Using Examiner...
You can save images in JPEG (.jpg) format
with several levels of compression, or in
uncompressed Bitmap (.bmp) format.
The same.
You can select the image types you want to
save—any combination of visible, IR, UV,
seal, and tamper.
In addition to the visible, IR, UV, seal, and
tamper images, you can save the ID photo
from the visible image, the ID photo from a
2D bar code, and the ID photo and finger-
print image from a smart card.
On monochrome systems you can save gray-
scale images. On color systems you can save
color images, grayscale images, or both.
On monochrome systems you can save gray-
scale images. On color systems you can save
only color images.
You can save the selected images and logs for
all documents, or only for those that pass all
tests, or only for those that fail a test.
You can save the selected images and data for
all documents. Or, for documents that pass
all tests, you can save the visible image alone.
You save document results in an individual
plain-text (.txt) log file for each document.
You save document results in a single data-
base (.mdb) file for all documents. You can
also save individual plain-text or XML log
files for custom processing.
The document results lack some of the infor-
mation that iA-Examiner is able to record.
The document results contain additional
information, including details about licenses
and IDs, data retrieved from verification
databases, data the operator enters manu-
ally, data from smart cards, and more.
Administrator includes no facility for viewing
previously captured images and linking them
to saved document information and test
results.
You can use the Viewer feature in Examiner
to view prior documents processed by the
unit and see their captured images, extracted
information, and test results, as explained in
the Viisage iA-Examiner User’s Guide.
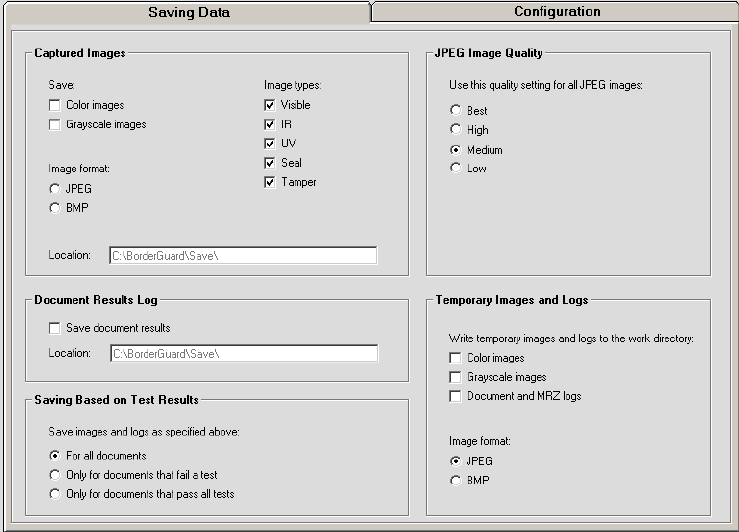
7-9
Setting Options for Saving Images and Logs
To set data-saving options here in Administrator, click the Saving Data tab, and use the
descriptions and recommendations in the following tables. Or, to set data-saving
options in Examiner, see “Configuring Data Saving” on page 8-5.

Configuring iA-thenticate
7-10
Captured Images
Document Results Log
Option Description Recommendations
Save Saves color or grayscale images, or
both, to the location specified.
Color images (color units only) are
1280×1024 pixels, 24-bit color.
Grayscale images (all units) are
768×576 pixels, 8-bit grayscale.
Names each file using the document
type and number (if known), date
and time processed (if needed to
make the name unique), and image
type. For example, for a typical
ICAO document:
USA_P_12345678_VC.jpg
where USA is the country code, P is
the ICAO document type, 12345678
is the document number, and VC is
the image type (can be I, S, T, U, or V,
plus C if the image is color).
Set these options to suit your needs.
Be sure the location you use for sav-
ing images has enough disk space. If
the disk fills up, iA-thenticate will no
longer operate properly.
To reduce file sizes, use the JPEG
format rather than BMP. See JPEG
Image Quality, below, for more infor-
mation.
Image format The graphics file format for saving
images, JPEG or BMP. JPEG files are
compressed according to the JPEG
Image Quality setting (below).
Location The full pathname of the directory
for saving images, on a local drive or
mapped network drive.
Image types The types of images to save—Visible
(white light), IR, UV, Seal, Tamper.
Option Description Recommendations
Save document
results Saves an individual text file of test
results for each document processed.
Select this if you want a record of
document information and test
results for each document.
Location The full pathname of the directory
for saving the logs, on a local drive
or mapped network drive.
Usually it’s most convenient to use
the same directory you use for sav-
ing images (above).

7-11
Setting Options for Saving Images and Logs
Saving Based on Test Results
JPEG Image Quality
Option Description Recommendations
Save images
and logs as
specified above
Selects which images and logs to
save, depending on whether they
pass or fail these tests only: check-
sum, expiration, B900 ink, patterns
(visible, IR, UV, seal), brightness (IR,
UV), and tamper.
For all documents: Saves all images
and logs regardless of test results.
Only for documents that fail a test:
Saves images and logs only for docu-
ments that fail one of these tests.
Only for documents that pass all tests:
Saves images and logs only for docu-
ments that pass all these tests.
Select the option that meets your
needs.
Note: You must also select the kinds
of images you want to save (above):
Color images, Grayscale images, or
both.
Option Description Recommendations
Use this quality
setting for all
JPEG images
The quality setting to use when sav-
ing JPEG images, from Best (highest
image quality, largest file) to Low
(lowest image quality, smallest file).
This list shows the approximate file
size of a single saved image. (JPEG
sizes vary with the document and
image type.)
Format Grayscale Color
BMP 430 KB 3800 KB
JPEG Best 170 KB 460 KB
JPEG High 110 KB 220 KB
JPEG Medium 50 KB 100 KB
JPEG Low 15 KB 30 KB
Use Medium for decent quality and
relatively small files. For better qual-
ity, use High or Best.
Do not use Low if you want to be
able to analyze images later for
authenticity.

Configuring iA-thenticate
7-12
Temporary Images and Logs
As iA-thenticate captures images and creates logs, it holds them in memory while it pro-
cesses the document. As explained above, you can have iA-thenticate preserve these
images and logs by saving them to a disk directory; otherwise they are discarded.
In addition, you can have iA-thenticate write the images and logs from memory to the
work directory, where they stay only until the next document is processed. Because this
takes extra time, you should not use this option unless you have a reason to do so.
Option Description Recommendations
Write
temporary
images and
logs to the work
directory
Writes the selected images and logs
from the system’s memory to the
work directory (page 7-7).
The images and logs from each doc-
ument overwrite those from the pre-
vious document.
Do not select any of these except for
a specific purpose, such as collecting
the images and logs using a custom
program.
Note: If you want to use the Doc Log
option described on page 8-7, you
must select Document and MRZ Logs
here.
Image format The graphics file format for saving
the temporary images, JPEG or BMP.
JPEG files are compressed according
to the JPEG Image Quality setting
(above).
Select the format you want to use.

8-1
8
Configuring iA-Examiner
iA-Examiner is the primary software interface an operator uses for viewing and analyz-
ing the results of iA-thenticate’s document testing.
Examiner has a number of options you can configure and several system management
functions you can perform. This chapter explains the configuration options, and the
next chapter explains the management functions.
To configure the basic operation of an iA-thenticate unit using the iA-Administrator
program, see chapter 7, Configuring iA-thenticate. You should do that basic configura-
tion before you set the additional options explained in this chapter.
System Configuration Screens
You set configuration options for Examiner from several System Configuration screens.
To display the System Configuration screens:
1. Run iA-Examiner (Start→ Programs→ iA-thenticate→ iA-Examiner).
2. On the iA-Examiner screen, click Mgmt Functions.
3. On the Management Functions screen, click System Config.
4. To display additional System Configuration pages, click More (and Back, when
appropriate).
This chapter describes the options on these screens and recommends appropriate set-
tings.
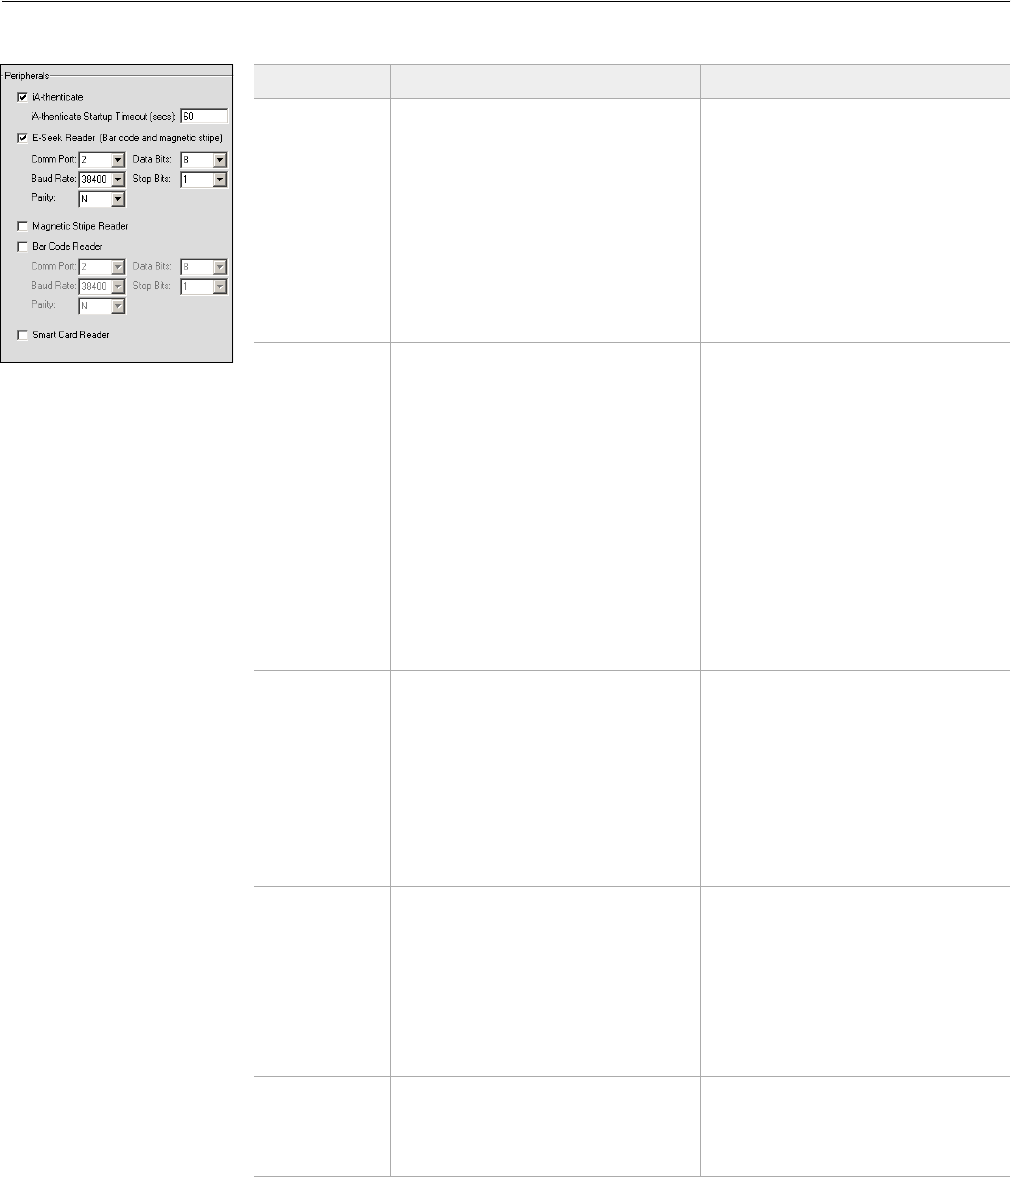
Configuring iA-Examiner
8-2
Configuring Peripherals
(System Configuration Page 1: Peripherals)
Option Description Recommendations
iA-thenticate Automatically starts the iA-thenti-
cate system software when Examiner
starts.
Leave this selected for normal opera-
tion. (If you want to use the unit
only to view prior documents and
reports using the Viewer and Reports
buttons on the Management Func-
tions screen, you can deselect this for
faster startup.)
iA-thenticate
Startup Time-
out
The time allowed for iA-thenticate
startup and hardware calibration
when starting Examiner.
Leave this set at its default value of
60 seconds.
E-Seek Reader
(Bar code and
magnetic stripe)
Enables the E-Seek Intelli-Check
combination bar code and magstripe
reader (either serial or USB).
Select this if you use one of these
readers. Otherwise deselect it. (See
note at left.)
If you select this and you also use
iA-DataPort, you must deselect both
Mag Stripe Reader and Keyboard Filter
in iA-DataPort (page 10-7). Other-
wise Examiner will not receive mag-
stripe data.
Comm. Port
Baud Rate
Parity
Data Bits
Stop Bits
Details of the communication proto-
col between iA-thenticate and the
E-Seek bar code reader.
Leave these set at their default val-
ues: 2, 38400, N, 8, 1
Magnetic Stripe
Reader Enables an optional magstripe
reader other than an E-Seek reader.
Select this if you are using a mag-
stripe reader other than E-Seek; oth-
erwise deselect it.
If you select this and you also use
iA-DataPort, you must deselect both
Mag Stripe Reader and Keyboard Filter
in iA-DataPort (page 10-7). Other-
wise Examiner will not receive mag-
stripe data.
Bar Code
Reader Enables an optional 2D bar code
reader other than an E-Seek reader.
Select this if you are using a bar code
reader other than E-Seek; otherwise
deselect it. (See note at left.)
Comm. Port
Baud Rate
Parity
Data Bits
Stop Bits
Details of the communication proto-
col between iA-thenticate and the
bar code reader.
Leave these set at their default values
(2, 38400, N, 8, 1) unless your reader
requires different settings.
Smart Card
Reader Enables an optional smart card
reader (for reading embedded chips).
Select this if your unit has a smart
card reader (and select the reader
type as explained on page 7-5).
Otherwise deselect it.
Note
Examiner and iA-DataPort
cannot both use the same
reader at the same time.
If you use iA-DataPort and
you select a reader here,
you must deselect it in
iA-DataPort (page 10-6).
8-3
Configuring Driver’s License Processing
Configuring Driver’s License Processing
(System Configuration Page 1: Driver License Processing)
Option Description Recommendations
Enable Driver
License
Processing
Enables or disables driver’s license
processing according to the options
selected below.
Select this if your system has driver’s
license processing capabilities.
Bar Code and
Magnetic Stripe
Analyzer
Enables validation of the magstripe
or bar code on a license or ID card.
Select IDCheck if you have this
optional feature. Otherwise select
None.
Samples
Directory Path The folder containing images of
sample driver’s licenses and other
IDs that iA-License displays on the
screen to help you select the correct
document type.
Use the default path:
C:\BorderGuard\Resources\
DriversLicenseSamples
Prompt for
Bar Code or
Magnetic Stripe
If the operator captures a license or
ID without first scanning its bar
code or magstripe, the system asks
the operator to either do the scan or
click the Skip Scan button. The
prompt appears only when the docu-
ment has a bar code or magstripe.
Select this if you want to give the
operator a second chance to scan a
document’s bar code or magstripe.
Note
The iA-License installer
sets the Driver License Pro-
cessing options appropri-
ately. Normally you do not
need to change any of
these settings.
Configuring iA-Examiner
8-4
Configuring Printing
(System Configuration Page 1: Printing)
You can configure Examiner so the operator
can print document results to the system’s
default printer.
Before this feature will work, you must set up
your default printer in the usual way using
the Printers control panel (Start→ Settings→
Printers).
Option Description Recommendations
Enable Print
Button Activates the Print button on the
Examiner screen.
Select this if you want operators to
be able to print document results.
Print in Color Sends color information when print-
ing, including green and red text to
mark passed and failed tests. On a
color unit, document images print in
color.
Select this if you are using a color
printer and want the printout in
color.
Display Printer
Errors Displays any printer error messages
on the Examiner screen.
Select this if you want the operator
to see printer error messages.
Print All Images Prints all captured images on a sec-
ond page (in addition to the visible
image on the main page).
Select this if you want all the images
included in the printout.
Print Text
Watch List
Information
Prints the detailed results of the
TextWatch test.
Select this if you have the optional
TextWatch feature and want the
detailed results included in the print-
out.
8-5
Configuring Data Saving
Configuring Data Saving
(System Configuration Page 1: Saving Data)
You can set data-saving options here in Examiner or in Administrator. See “Two Ways
to Save Images and Logs” on page 7-8 to compare the two methods and decide which
options you want to use.
Data Saving Options
Option Description Recommendations
Save Document
Results Saves information and test results
for each processed document in the
document-results database (.mdb)
file you specify.
Select this if you want a text record
of each document you process.
Database Path The full pathname of the database
file, on a local or mapped network
drive. This file, BGExaminer.mdb, is
in BorderGuard\Bin\ on the drive des-
ignated for storing data—typically
C, D, or E.
Use the default directory or one that
suits your needs.
If you use a directory other than the
default, copy the BGExaminer.mdb
file from the BorderGuard\Bin direc-
tory on the data drive to the direc-
tory you specify. Examiner will not
create a new file from scratch.
You can also specify the same file for
several networked units, as
explained on page 8-8.
Backup
Directory Path The full pathname of the directory
for saving a backup copy of the cur-
rent database, on a local drive or
mapped network drive.
Specify the directory you want to use
for backing up the database, as
explained on page 9-3.
Maximum
Database Retry
Count
If the database is on a network drive,
a network or server problem could
break your connection to it. The
Retry Count tells the system how
many times to try reconnecting when
this happens. For more information,
see page 8-8.
Depending on your network and the
type of problem, the default 30 tries
could take from 15 seconds to sev-
eral minutes. You may want to
experiment by disconnecting the net-
work cable or shutting down the file
server, and then adjust the number
for a reasonable delay under those
conditions.

Configuring iA-Examiner
8-6
Save Document
Images Saves the images you specify for each
document you process, in either
Windows Bitmap (.bmp) or JPEG
(.jpg) format.
Gives each file a unique name based
on the document type and number
(if known), date and time processed,
and image type. For example:
Utopia passport #12345678, pro-
cessed 2004-May-18 at 11:55:22,
visible image:
UTO_P_12345678_
040518115522_V.bmp
Maine type-1 driver’s license
#987654321, processed 2004-May-
18 at 11:55:33, IR image:
USA_ME_DL01_987654321_
040518115533_I.jpg
Unidentified document processed
2004-May-18 at 11:55:44, UV
image:
Unknown_040518115544_U.jpg
On a color unit, the image types
include a C: VC, IC, and so on.
Select this if you want to save some
or all of the images for later refer-
ence.
Color images take a lot of disk stor-
age space. To avoid problems, your
drive should have plenty of free
space.
To reduce file sizes (but also reduce
image quality), use JPEG compres-
sion (below).
To avoid saving unnecessary images,
select only the types you want using
Save the following images, below.
Images
Directory Path The full pathname of the directory
for saving images, on a local drive or
mapped network drive.
If you specify the same directory for
several networked units, you can
then view reports that include all the
units, as explained on page 8-8.
If you set data-saving options in
Administrator as well as here—not
recommended—be sure to specify
different directory paths to avoid file
naming conflicts.
Also see the next item, Save in Subdi-
rectory with Unit’s Name.
Save in Subdi-
rectory with
Unit’s Name
Saves each unit’s images in a subdi-
rectory of the images directory (pre-
vious item) rather than in the images
directory itself. The subdirectory’s
name is the unit’s computer name.
Select this if you want to keep the
saved images from different units
separate.
Important: Do not select this if you
want to be able to review prior doc-
uments as described in the Viisage
iA-Examiner User’s Guide. That fea-
ture does not work with images
saved in separate directories.
Minimum Free
Disk Space The amount of disk space (on the
specified drive partition) that must
be available for Examiner to con-
tinue saving images. If the space falls
below this amount, Examiner dis-
plays a message and stops saving
images.
The default value of 10 MB is an
absolute minimum.
If you are saving images on your C:
drive, you should increase this to
100 MB or more to avoid problems
with the operating system.
Disk Space
Partition The drive partition to monitor for
free disk space.
Set this to the same drive you use for
the Images Directory Path, typically
C:\, D:\, or E:\.
Option Description Recommendations

8-7
Configuring Data Saving
Convert Images
to JPEG Saves the images in JPEG (.jpg) for-
mat rather than Windows Bitmap
(.bmp) using the Image Quality setting
you specify (below).
Select this if you want to reduce file
sizes at the cost of some image qual-
ity.
Image Quality The quality setting to use when sav-
ing JPEG images, from Best (highest
image quality, largest file) to Low
(lowest image quality, smallest file).
This list shows the approximate file
size of a single saved image. (JPEG
sizes vary with the document and
image type.)
FormatGrayscale Color
BMP430 KB 3800 KB
JPEG Best170 KB460 KB
JPEG High110 KB220 KB
JPEG Medium50 KB100 KB
JPEG Low15 KB 30 KB
Use Medium for decent quality and
relatively small files. For better qual-
ity, use High or Best.
Do not use Low if you want to be
able to analyze images later for
authenticity.
Save the
following
images
The types of images and logs to save.
In addition to Visible (white light),
IR, UV, Seal, and Tamper images, you
can also save:
Photo: ID photo from visible image
SC Photo: ID photo from smart card
BC Photo: ID photo from bar code
SC FP: Fingerprint from smart card
Doc Log: Log detailing how iA-then-
ticate initially read and analyzed the
document—the same as the Extended
Doc Log Data listed on System Con-
figuration Page 5 (page 8-24).
Select each image type you want to
save.
To save the document log:
1. Select Doc Log here.
2. Also select Document and MRZ
Logs using iA-Administrator, as
described on page 7-12.
Also see the next item.
If Doc Passes,
Save Visible
Only
For documents that pass all tests,
save only the visible image. For doc-
uments that fail any test, save all the
selected images.
This does not affect saving the docu-
ment results log.
Select this if you need only a simple
“photocopy” of documents that pass
all tests. This lets you save disk space
while keeping important forensic
information about documents that
cause alerts.
Option Description Recommendations
Configuring iA-Examiner
8-8
Using a Networked Database
Examiner saves document data and test results in the BGExaminer.mdb database, located
by default in directory \BorderGuard\Bin on the drive designated for storing data.
If you have several networked iA-thenticate units, you can save their data in a single
database on a mapped network drive. You can then review the combined data and gen-
erate reports from it, as explained in chapters 3 and 4 of the Viisage iA-Examiner 4.1
User’s Guide.
If you want to review captured images along with the combined data, you can also save
the images from all the units to a common network location.
Performance and Reliability
Before you decide to use a networked database, you should consider performance and
reliability.
❑Saving data on a network takes longer than on a local disk, especially if you save
images as well. Be sure your network is fast enough for your application. Instead of
saving uncompressed Bitmap images, use JPEG compression to reduce file size.
❑A problem with the network or the file server can disrupt your operations.
If a unit loses its connection to
the database, it tries several
times to reconnect, as speci-
fied by the Maximum Database
Retry Count (page 8-5). During
this time it displays a progress
bar and prevents any operator actions.
If it cannot reconnect, it lets you proceed but displays in red.
As long as this message appears, the system is not working normally. You should
not continue using it for production work until the connection is restored.
When the network or server problem is resolved, the unit reconnects automatically
within 10 seconds, the red message disappears, and normal operation resumes.
Setting Up a Networked Database
To set up a networked database:
1. Copy BGExaminer.mdb from its default location on one of your iA-thenticate units
to a network-accessible folder.
2. On each iA-thenticate unit:
a. Map the database folder or its drive as a network drive.
b. Run Examiner. Click Mgmt Functions, then System Config.
c. On System Configuration Page 1, under Saving Data, select Save Document
Results.
d. In the Database Path field, fill in the complete pathname of the networked data-
base—for example, G:\Data\BGExaminer.mdb.
e. Specify the Maximum Database Retry Count as explained on page 8-5.
No database connection
8-9
Configuring Data Saving
f. To save images to the network folder as well:
–Select Save Document Images.
–In the Images Directory Path field, fill in the pathname of a network folder—
for example, G:\Data.
–To keep images from different units in different subfolders, select Save in Sub-
directory with Unit’s Name.
–To make image saving faster, select Convert Images to JPEG and select only
the image types you need to save. To review document data and images, you
must select at least the Visible image.
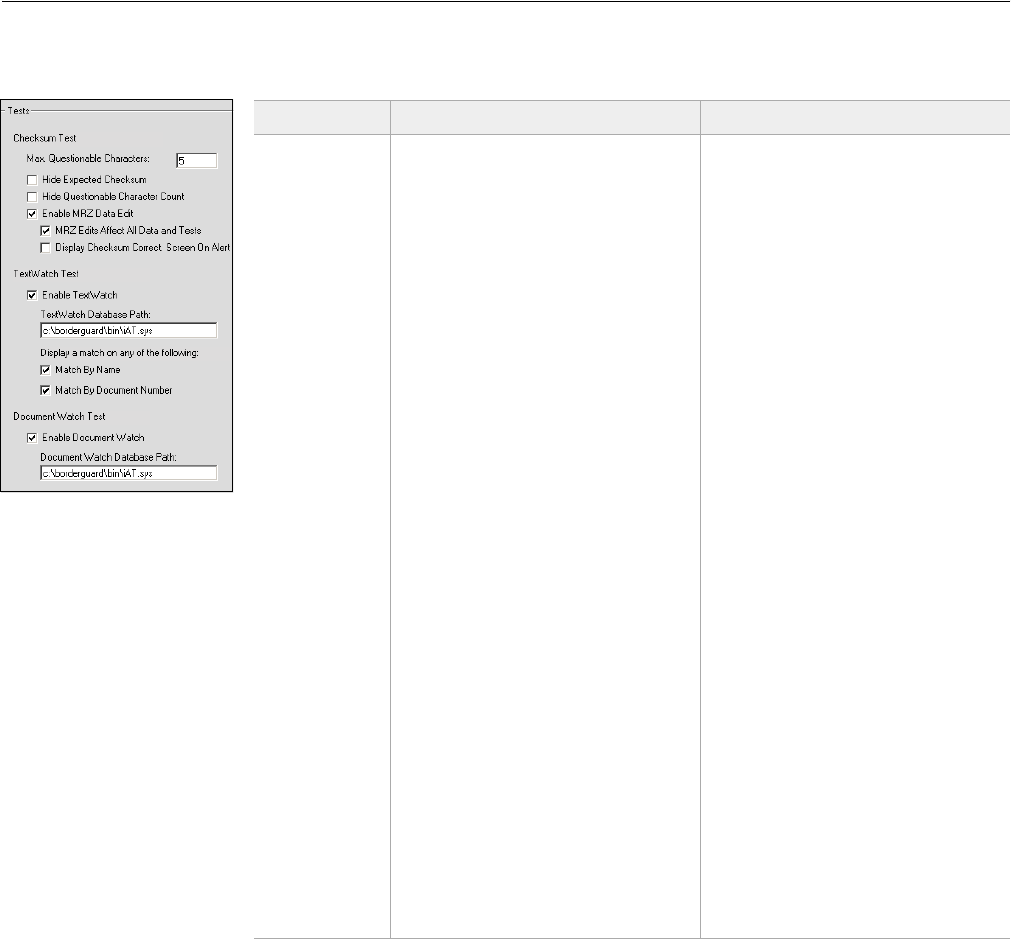
Configuring iA-Examiner
8-10
Configuring Tests
(System Configuration Page 2: Tests)
Note: The Viisage iA-Examiner User’s Guide has more information about each test.
Option Description Recommendations
Checksum
Test
Max.
Questionable
Characters
When a document fails the check-
sum test, Examiner shows the MRZ
and highlights any characters it had
trouble reading. But if there are
more questionable characters than
the number you specify here, Exam-
iner won’t highlight any at all.
Use the default value of 5 to avoid
overwhelming the operator with too
much information when many of the
MRZ characters are questionable.
Hide Expected
Checksum Suppresses display of the checksum
that the system expected to find.
Select this if you do not want the
operator to have access to the
expected checksum.
Hide
Questionable
Character
Count
Suppresses display of the total num-
ber of questionable characters.
Select this if you think displaying the
number would not help the operator.
Enable MRZ
Data Edit Allows the operator to change the
captured MRZ data onscreen to cor-
rect reading errors.
Select this option only if your opera-
tors are equipped to do such detailed
analysis of test results.
MRZ Edits
Affect All Data
and Tests
Accepts the operator’s MRZ edits as
permanent corrections, and changes
the results of any affected tests. Oth-
erwise the original data and test
results are retained.
Note: If the operator changes MRZ
characters to remedy a smart card
BAC failure (see page 8-23), those
changes are never permanent and do
not affect other tests.
Select this if you want the operator’s
edits to become permanent, overrid-
ing the captured data.
Display
Checksum
Correct. Screen
on Alert
Automatically displays the MRZ
editing screen when there is a prob-
lem with the checksum.
Select this if you want the editing
screen displayed automatically.
Otherwise the operator must click
Edit MRZ to display it.
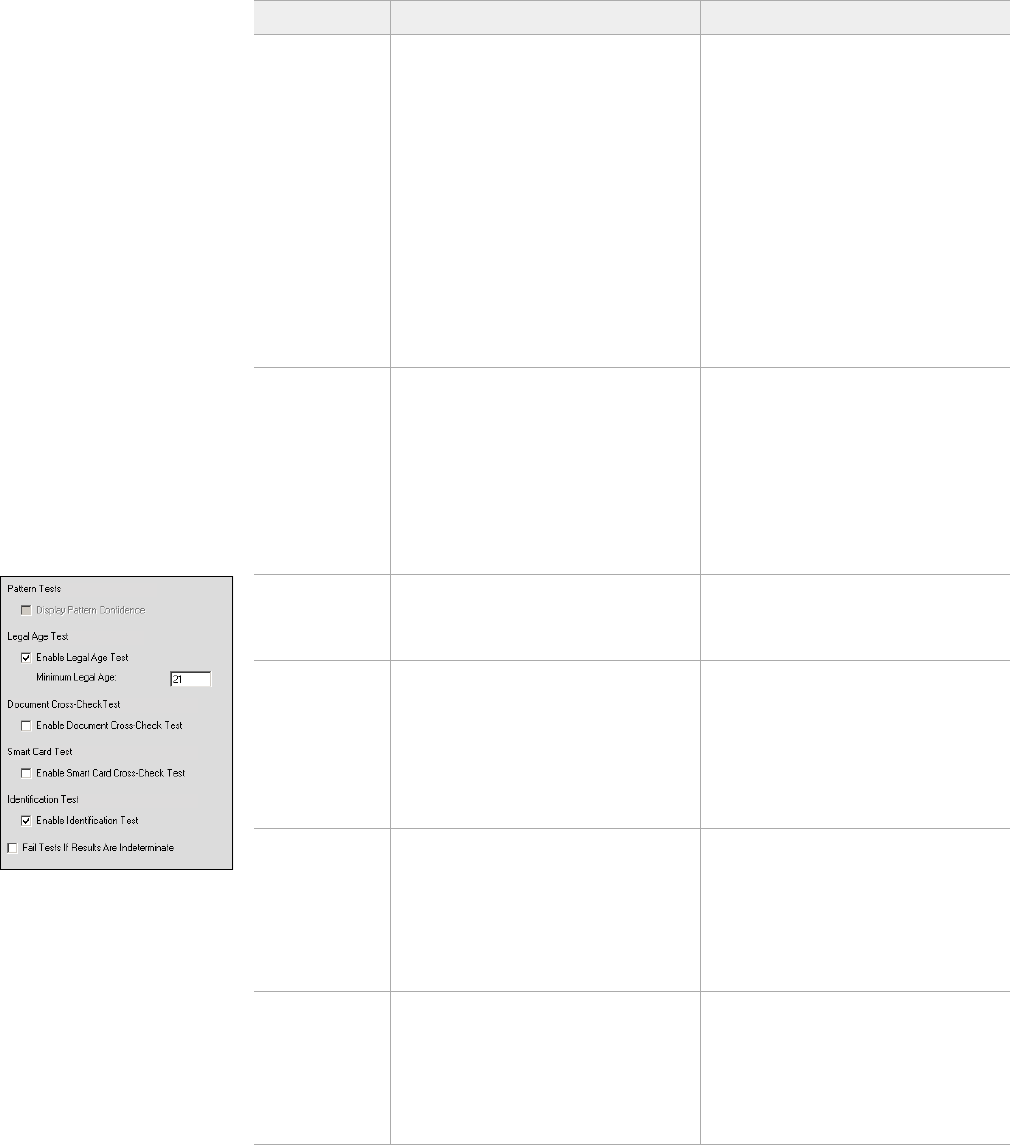
8-11
Configuring Tests
TextWatch
Test
Enable
TextWatch Activates the TextWatch test, which
checks a watch list for matching
names and document numbers.
Select this if you have the optional
TextWatch feature and want to use
it.
TextWa tch
Database Path The full pathname of the TextWatch
database. The default is
C:\BorderGuard\Bin\iAT.sys.
Use the default pathname, or a dif-
ferent one if you have customized it.
Match By
Name Searches the watch list for a match-
ing name.
Select the matching options you
want to use. If you select both Match
By Name and Match By Document
Number, you will see an alert if either
one matches.
Match By
Document
Number
Searches the watch list for a matching
document number.
Document
Watch Test
Enable
Document
Watch
Activates the Document Watch test,
which checks to see if the document
number falls within specified ranges.
Select this if you have the optional
TextWatch and want to use its Docu-
ment Watch feature.
Document
Watch
Database Path
The full pathname of the Document
Watch database. The default is
C:\BorderGuard\Bin\iAT.sys.
Use the default pathname, or a dif-
ferent one if you have customized it.
Pattern Tests
Display Pattern
Confidence Reserved for future use —
Legal Age Test
Enable Legal
Age Test Activates the legal age test, which
checks to make sure the document
owner is at least a certain age.
Select this if you want to test for
legal age.
Minimum Legal
Age Defines the legal age you are testing
for.
Set this to the legal age you want to
test for, such as 21.
Document
Cross-Check
Test
Enable
Document
Cross-Check
Test
Activates the document cross-check
test, which compares information
across the documents in a set.
Select this if you have enabled docu-
ment sets (page 8-13) and want to
use this cross-check test.
Smart Card
Test
Enable Smart
Card Cross-
Check Test
Activates the smart card cross-check
test, which compares MRZ informa-
tion read from the smart chip and
the document image.
Select this if you have a smart card
reader and want to use this cross-
check test.
Option Description Recommendations
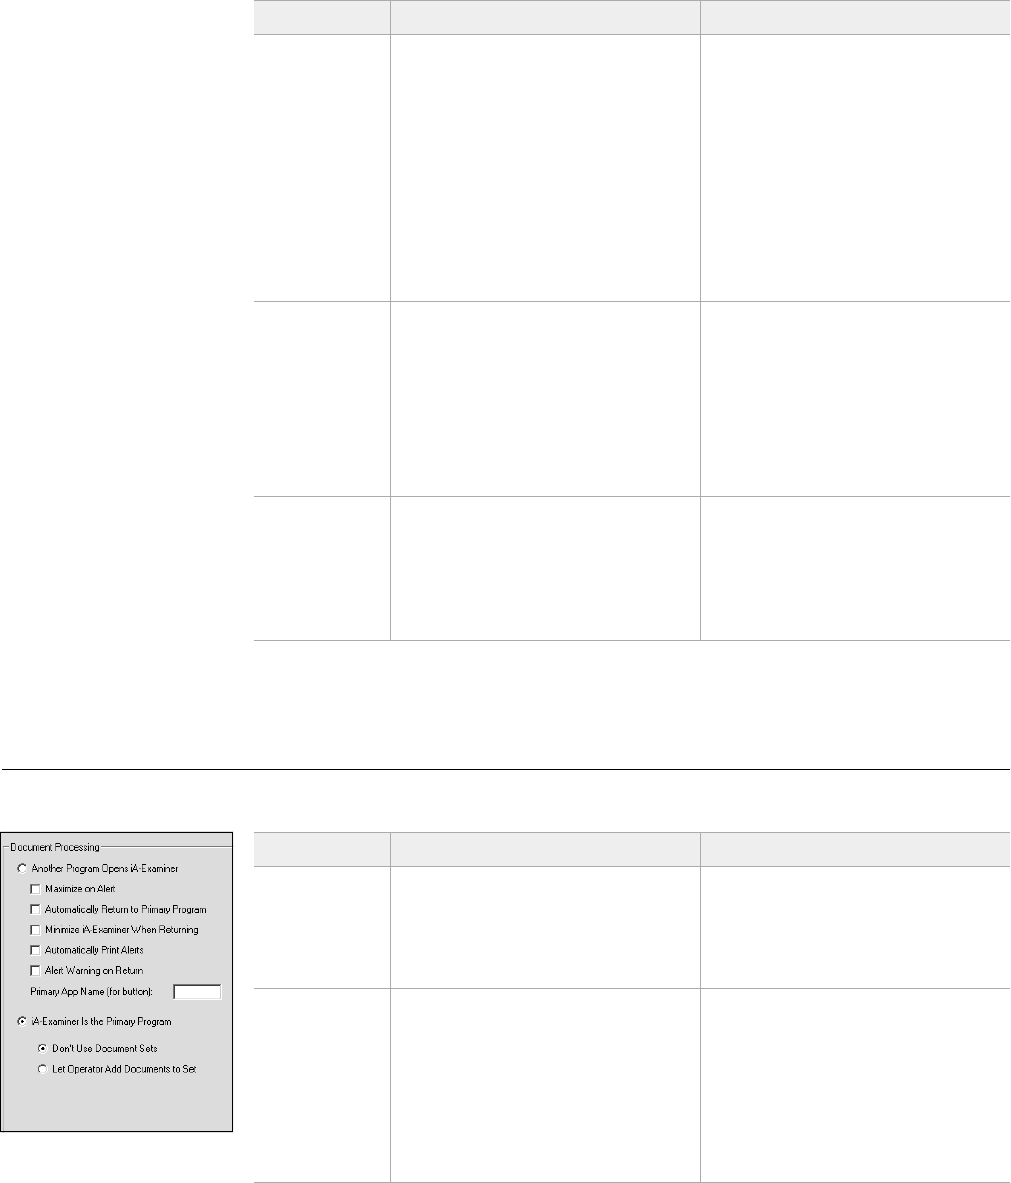
Configuring iA-Examiner
8-12
Configuring Document Processing
(System Configuration Page 3: Document Processing)
Identification
Test
Enable
Identification
Test
Tells the system to report, along with
the other test results, whether it was
able to automatically identify the
document.
Note: The system always tries to
identify the document automati-
cally. This option only affects
whether Identification is listed as a
separate test.
Keep this selected unless you do not
want to display Identification as a sep-
arate test.
Fail Tests If
Results Are
Indeterminate
Some tests can show an indetermi-
nate result if their results are incom-
plete or inconclusive. These include
Verification Database, DL Alert 2D,
DL Alert MSR, and custom tests.
This option tells the system to treat
such a result as a failure so that it
causes an alert.
Select this if you want indeterminate
results to cause an alert.
Custom Tests Controls additional tests designed
for custom applications. For further
information, contact Viisage Cus-
tomer Support and request the Tech
Note titled Information for iA-then-
ticate Integrators.
Leave all the Enable Custom Test
options deselected unless you know
they apply to your application.
Option Description Recommendations
Option Description Recommendations
Another
Program Opens
iA-Examiner
Used when the operator works pri-
marily with a program other than
Examiner, and works with Examiner
only as a supplement to the primary
program.
Select the appropriate option for
your work environment—either this
one or iA-Examiner is the Primary Pro-
gram (below).
Maximize on
Alert Causes the Examiner screen to come
to the front automatically whenever
a document requires review.
Note: Examiner always maximizes if
it requires some action by the opera-
tor. It then minimizes automatically
if Minimize iA-Examiner When Return-
ing is selected (below).
If you want Examiner to appear
automatically, select this. If you
want the operator to see Examiner
only after manually selecting it from
the primary program, deselect this.

8-13
Configuring Document Processing
Automatically
Return to Pri-
mary Program
Causes the primary program to
come to the front automatically
when the operator finishes reviewing
a document.
If you want to return to the primary
program automatically without hav-
ing to click Clear, Cancel, or the pro-
gram’s button (below), select this.
Minimize
iA-Examiner
When Return-
ing
Causes the Examiner screen to be
minimized (rather than simply hid-
den behind the primary program
screen) when returning to the pri-
mary program.
Select this if you want the Examiner
screen out of the way when it isn’t in
use.
Automatically
Print Alerts Automatically sends a report to the
default printer when the operator
leaves one or more problems unre-
solved during a review.
Select this if you want a paper record
of unresolved document problems.
Alert Warning
on Return Tells the primary program to display
an alert if any of the document’s pos-
sible problems have not been
resolved during the Examiner
review.
Select this if you want an extra
warning for the operator that the
document has unresolved problems.
Primary App
Name (for but-
ton)
The program name to display on the
Return to button that takes the opera-
tor back to the primary program.
For example, if you type Master here,
the button will say Return to Master.
Specify the program name for the
button.
iA-Examiner Is
the Primary
Program
Used when the operator works pri-
marily with Examiner (rather than
with another program).
Select the appropriate option for
your work environment—either this
one or Another Program Opens
iA-Examiner (above).
Don’t Use Doc-
ument Sets Store each document’s results inde-
pendently of other documents.
If you want to be able to group sev-
eral related documents together in a
set, select Let Operator Add Documents
to Set. In addition, on System Con-
figuration Page 1, you must:
• Select Save Document Results.
• Select Save Document Images, and
select at least the Visible image.
If you don’t want to group docu-
ments in sets, select Don’t Use Docu-
ment Sets.
Let Operator
Add Docu-
ments to Set
Let the operator group 2–4 docu-
ments together in a set so their
results are linked and can be com-
pared.
Option Description Recommendations

Configuring iA-Examiner
8-14
Configuring Verification Databases
(System Configuration Page 3: Verification Databases)
A verification database is an external database that iA-thenticate can reach through an
Internet connection to verify certain information about documents and their owners. To
use a verification database, you must be a registered subscriber.
Currently iA-thenticate supports the VerifyME™ verification database.
About VerifyME
The VerifyME database includes information from U.S. states and Canadian provinces
for verifying driver’s licenses and nondriver IDs. It also includes information from coun-
tries worldwide for verifying the format of passport numbers.
U.S. and Canadian Driver’s Licenses and IDs
When you process a U.S. or Canadian driver’s license or nondriver ID, iA-thenticate typ-
ically reads information from its 2D bar code or magstripe. (Information can also come
from other sources such as operator entry.) iA-thenticate uses this information to con-
sult the VerifyME database. It can then display information retrieved from the database
and point out certain kinds of discrepancies.
U.S. and Canadian information comes from departments of motor vehicles (DMVs) and
voter registration offices. The sources vary by state and province. In general, DMV data
tends to be more detailed and helpful for verifying documents and identifying their own-
ers.
Examiner lets you specify, for each state and province, whether you want to consult the
VerifyME database. If you find that you rarely get useful information from a certain
jurisdiction, you can turn off database lookups for documents issued by that jurisdic-
tion. This saves you the processing time needed for the lookup, any fee associated with
it, and the bother of retrieving and possibly correcting unhelpful data.
When Examiner shows you the results of a database lookup, it lists the source of the
data as either DMV or Voter. This information can help you make decisions about which
jurisdictions to include in your database lookups.
Passport Number Format
When you process a passport, iA-thenticate typically reads information from its MRZ.
(As with driver’s licenses and IDs, the information can also come from other sources.)
iA-thenticate then checks the format of the document number against the VerifyME
database and reports any problems.
This test is more limited than with driver’s licenses and IDs but does help detect forged
or altered document numbers.
Note
You can find a current list of
j
urisdictions supported by
VerifyME in the Support
area of the Viisage web
site:
www.viisage.com
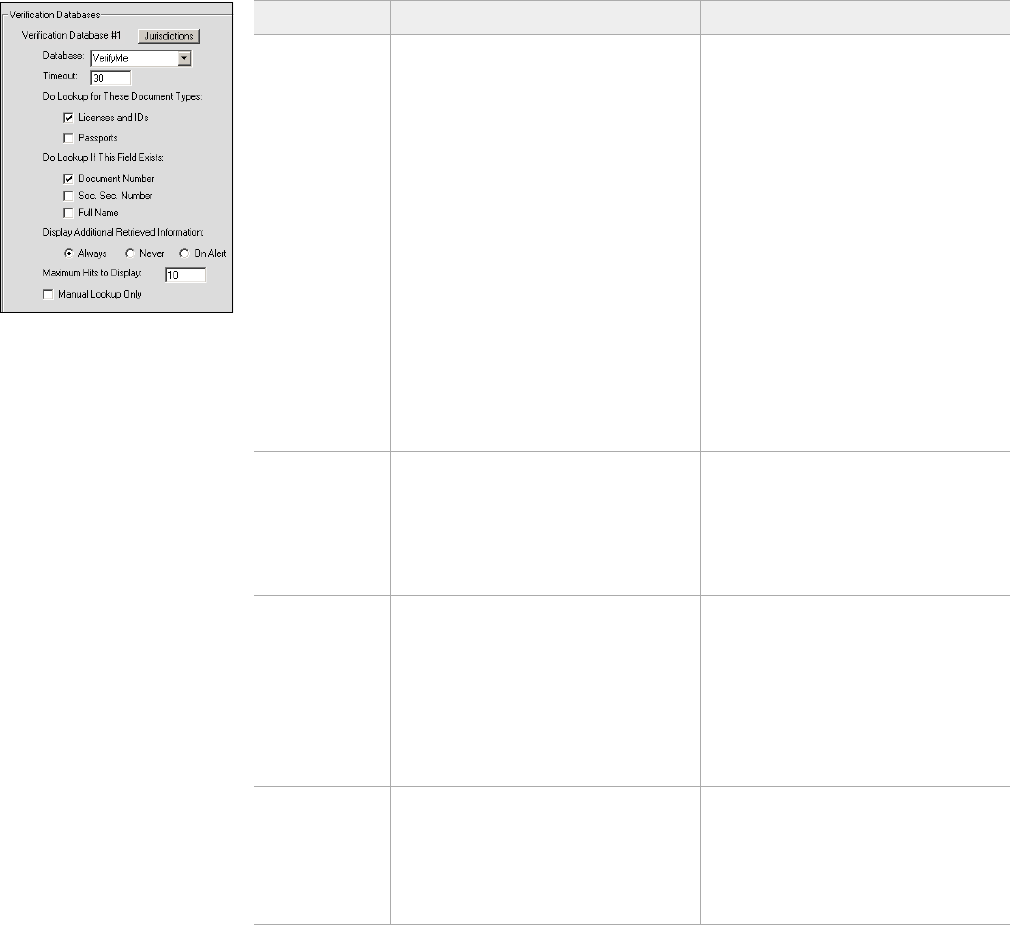
8-15
Configuring Verification Databases
Configuring VerifyME
Set these options on System Configuration Page 3:
Option Description Recommendations
Verification
Database #1
Jurisdictions The jurisdictions for which you want
to consult this database when pro-
cessing U.S. and Canadian driver’s
licenses and IDs. Select Jurisdictions
to see the list, and then select or
deselect individual jurisdictions.
Start with the default selections,
which are all the jurisdictions cov-
ered by this database. If experience
proves some to be unhelpful, dese-
lect them.
Database The name of the verification data-
base you subscribe to.
Select VerifyMe.
Timeout The maximum time you are willing
to wait for a response from this
database before Examiner cancels
the lookup request (in seconds).
Use the default value of 30 seconds
unless this is unacceptably long in
your work environment or you are
willing to wait longer for results.
The operator cannot proceed with
document processing until the
lookup either succeeds or times out.
Do Lookup For
These Docu-
ment Types:
Licenses and
IDs
Passports
The types of documents for which
you want to do lookups.
Select the types you want to be able
to look up using VerifyME.
Do Lookup If
This Field
Exists:
Document
Number
Soc. Sec.
Number
Full Name
Tells iA-thenticate what information
is required before it can do a lookup.
For example, if you select Document
Number, iA-thenticate requires the
document number before it does a
lookup. If you select more than one,
iA-thenticate can do a lookup when-
ever it knows any of them.
For the VerifyME database, select
Document Number and Full Name. Do
not select Soc. Sec. Number.
Display Addi-
tional Retrieved
Information:
Always
Never
On Alert
Tells Examiner when to display
additional information after a
lookup, which can include phone
number, Social Security number, cur-
rent address, and previous addresses.
Select one of the options.
Configuring iA-Examiner
8-16
In addition, you must set up data entry fields so that iA-thenticate can prompt the oper-
ator for any missing information that is required for the lookup.
✦On System Configuration Page 4, under Data Entry, select these for four of the
listed fields: First Name, Last Name, Document Number, and Postal Code. You can
leave the Required checkboxes deselected unless you have a reason to select them.
For general information about configuring data entry, see the next section.
Configuring Data Entry
(System Configuration Page 4: Data Entry)
Maximum Hits
to Display Not used for VerifyME. —
Manual Lookup
Only Disables automatic database look-
ups, so that the operator must click
the Issuer DB button to do a lookup.
Leave this deselected if you want
iA-thenticate to do a lookup auto-
matically for any document that
meets the requirements set up for
this database.
Select this if you want no automatic
lookups. The operator must then
click Issuer DB to do a lookup.
Option Description Recommendations
Option Description Recommendations
Field #1
...
Field #9
A list of fields for the data entry
screen, which allows the operator to
enter any missing information. The
data entry fields appear in the same
order you select here.
If you mark a field as Required, then
the system automatically displays the
data entry screen whenever it can’t
find the required information.
From the drop-down lists, select
each field you want to appear on the
data entry screen. If you want the
data entry screen to appear automat-
ically when the system can’t find the
information for a certain field, select
Required.
To include a custom field, select User
Field #1, #2, or #3 and see “Configur-
ing Static Database Information” on
page 8-17. If you select Required for
one of these fields, the system will
always display the data entry screen.
Note: To also let the operator dis-
play the data entry screen manually,
select Enable Edit Button (page 8-20).
Comment Specifies whether the data entry
screen includes a Comment field
where the operator can type addi-
tional information.
Select Ye s or No to include the Com-
ment field or not.
To include the Comment field and
always display the data entry screen,
select both Yes and Required.
8-17
Configuring a Custom ID Type
Configuring a Custom ID Type
(System Configuration Page 4: Custom ID Type)
Configuring Static Database Information
(System Configuration Page 4: Static Database Information)
Option Description Recommendations
Enable Custom
ID Button Displays an additional button on the
jurisdiction selection screen for pro-
cessing a custom type of ID—or any
other kind of document, such as a
ticket or boarding pass.
Select this if you want the operator
to be able to use this button.
Custom ID Type The name to display on the button. Use a name no more than about 30
characters long. After you configure
the custom ID button, check the
jurisdiction selection screen to make
sure the text fits on the button.
Default Image
Display The image to display by default on
the test results screen, either Visible
or IR.
Select the image that shows the most
relevant information for the opera-
tor. The operator can also display
the other images as usual.
Don’t Save
Custom ID
Images
Tells Examiner not to save document
images whenever the operator uses
the custom ID button.
This prevents saving images if you
have selected Save Document Images
in Examiner (page 8-5). However, it
does not prevent saving images if
you have enabled image saving using
iA-Administrator (page 7-10).
Select this if you don’t want the
images of this custom document type
saved for any reason, such as privacy
or security.
Note the important condition in the
description.
Option Description Recommendations
Customer
Name
Site Name
Names stored in the document
results database (page 8-5), intended
for use in custom reports that you
might generate from the database.
Fill in any suitable names.
User Field #1
User Field #2
User Field #3
Names for custom fields, to hold any
kind of information you want col-
lected along with the documents you
process.
For example, you might name two
fields Spouse’s Name and Child’s
Name so the operator can enter this
information as needed.
Assign suitable names for up to three
custom fields.
To make these fields appear on the
data entry screen so the operator can
fill them in, see the earlier section
“Configuring Data Entry.”
To fit more characters into the name,
avoid using lots of capital letters.
Configuring iA-Examiner
8-18
Configuring Debugging
(System Configuration Page 4: Debugging)
Configuring Processing of Unidentified Documents
(System Configuration Page 4: Processing Unidentified Documents)
iA-thenticate can automatically identify documents that conform to ICAO standards for
machine-readability. With the optional iA-License feature, it can also automatically
identify many nonstandard (non-ICAO) documents such as driver’s licenses and non-
driver IDs.
But what should happen if the operator processes a document that iA-thenticate cannot
automatically identify? If you have iA-License or a custom document database, Exam-
iner can display selection screens that let the operator manually identify the document.
Or, Examiner can process every unidentified document in a predetermined way.
The following table explains the five available options. In most cases, either the first or
last option is most suitable:
❑If you have iA-License or a custom document database:
•Use the first option (Go to the jurisdiction selection screen) for the most flexibility
in identifying and testing documents.
•Use the last option (Process as a nonstandard document) if you usually want to
simply capture unidentified documents without trying to identify or test them.
❑If you do not have iA-License or a custom database, always use the last option
(Process as a nonstandard document).
Option Description Recommendations
Log Debugging
Information Creates a log of information useful
for diagnosing problems.
Do not select this unless Viisage Cus-
tomer Support asks you to do so for
troubleshooting purposes.
Note
For information about creat-
ing and using a custom
database of nonstandard
documents, contact Viis-
age Customer Support.
8-19
Configuring Processing of Unidentified Documents
Option Description Recommendations
Go to the
jurisdiction
selection
screen
For an unidentified document, dis-
play the appropriate screen or
screens for selecting its issuing juris-
diction and document type.
If you have iA-License or a custom
document database, this is the most
flexible option.
Go to the
following
jurisdiction
screen
For an unidentified document, dis-
play a jurisdiction-selection screen
other than the top-level one—for
example, the one that shows all
jurisdiction names starting with D.
Consider this option if:
• You have a custom document
database for a certain jurisdic-
tion, and the database does not
include automatic document
identification.
• You have iA-License, but you
regularly process documents that
the system doesn’t identify, all
from a certain jurisdiction.
The operator can still display juris-
diction screens other than the one
you specify here.
Process as
category Always process an unidentified doc-
ument as a certain type—for exam-
ple, a Delaware Nondriver ID.
Consider this option if most of the
unidentified documents you process
are of the same type.
You must fill in the country code,
and you may optionally fill in the
jurisdiction name.
The operator can still use the Retest
button (if enabled) to retest a docu-
ment as a different type.
Country Code The ICAO country code associated
with this document type—for exam-
ple, USA.
Jurisdiction The name of the issuing jurisdic-
tion—for example, Delaware. May
be blank.
Display the
following
document
choices
For an unidentified document, dis-
play a list of up to six document
types to choose from.
Consider this option if most of the
unidentified documents you process
are of just a few types (six or less)
issued by two or more jurisdictions.
If you routinely process less than six
types but occasionally process oth-
ers, list the routine types and also
select Display the most recently used
documents as the remaining choices.
The operator can always choose a
different document type using the
Select Jurisdiction button.
Display the
most recently
used
documents as
the remaining
choices
If the list includes less than six types,
then also display the most-recently-
chosen document types as other
options to choose.
Process as a
nonstandard
document
For an unidentified document, don’t
display any special screens for select-
ing its type or issuing jurisdiction.
Simply display the document’s image
without testing it.
Use this option if you don’t have
iA-License or a custom document
database. Also consider it if you
want the system to simply capture
unidentified documents without test-
ing them, or you only occasionally
want to test unidentified documents
(using the Retest button).
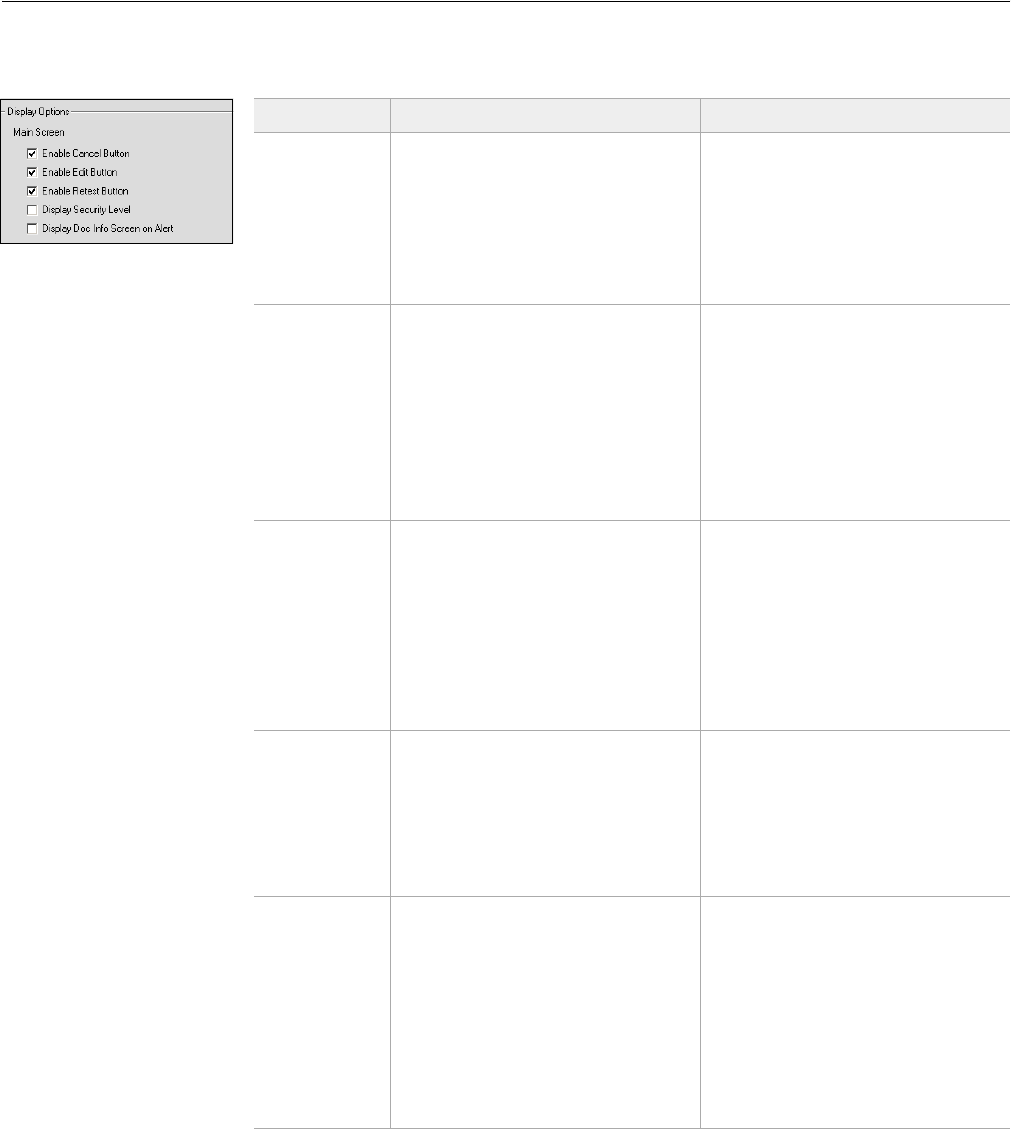
Configuring iA-Examiner
8-20
Configuring Display Options
(System Configuration Page 5: Display Options)
Main Screen
Option Description Recommendations
Enable Cancel
Button Adds a Cancel Document button that
lets the operator cancel evaluation of
a document after capturing it.
This button does not delete any
saved test results or captured images,
but it does exclude the canceled doc-
ument from reports.
Select this if you want the operator
to be able to cancel evaluation of
documents.
Enable Edit
Button Adds an Edit button that lets the
operator display the data entry
screen for manually entering infor-
mation.
This option applies only if you have
selected fields to appear on the data
entry screen as described under
“Configuring Data Entry,”
page 8-16.
Select this if you want the operator
to be able to display the data entry
screen even when the system doesn’t
display it automatically.
Enable Retest
Button Adds a Retest button that lets the
operator retest the document (usu-
ally without having to recapture it)
as a different type of document. This
is used when the system doesn’t
identify the document type correctly
the first time. It requires the optional
iA-License feature or a custom docu-
ment database.
Select this if you have iA-License or
a custom document database and
want to enable this feature.
See “Configuring Processing of Uni-
dentified Documents,” page 8-18,
for more information.
Display
Security Level Used with iA-Passport, displays a
number after the word REVIEW indi-
cating the level of security testing
done—for example, REVIEW 2. See
the iA-Passport Database Reference
(on the iA-Passport CD) for security
level information.
Select this if you have iA-Passport
and you want the operator to see
and consider this information.
Display Doc
Info Screen on
Alert
When a document causes an alert,
Examiner normally displays infor-
mation about the first alert. Selecting
this option causes Examiner to dis-
play general document information
instead—as it does when a document
passes all tests. The screen still lists
all passed and failed tests, and the
operator can click any one for more
information.
Select the behavior you prefer.

8-21
Configuring Display Options
Additional Information Display
When the Examiner screen
is not displaying the results
of a selected test, it displays
Identification Data—gen-
eral document information
including ID type, last and
first names, document num-
ber, and so on. The opera-
tor sees this information:
❑When a document
passes all tests
❑When a document
causes an alert and the
Display Doc Info Screen
on Alert option (above)
is selected
❑By clicking Doc Info
anytime
You can use the following options to let the operator see several kinds of additional
information. The Doc Info button then becomes More Doc Info, and clicking it displays
each kind of information in turn.
You can also tell Examiner which kind of additional information to display first.
Option Description Recommendations
Display
Reference
Image
Show the sample or reference image
for the processed document, if there
is one.
Select each kind of information you
want to let the operator see.
If you always want one kind to
appear first, select the radio button
next to it, under Primary.
(To clear the radio-button selection,
deselect the corresponding check-
box. Then you can re-select the
checkbox if you want to.)
Display Raw
MRZ Data Show the captured MRZ and the
system’s reading of it (ICAO docu-
ments only)
Display Docu-
ment Images
Img 1
Img 2
Show two of the captured document
images side-by-side for comparison.
You select the two images from the
Img1 and Img2 lists.
Identification Data
(general document information)
Space for additional information
Doc Info
/
More Doc Info
button
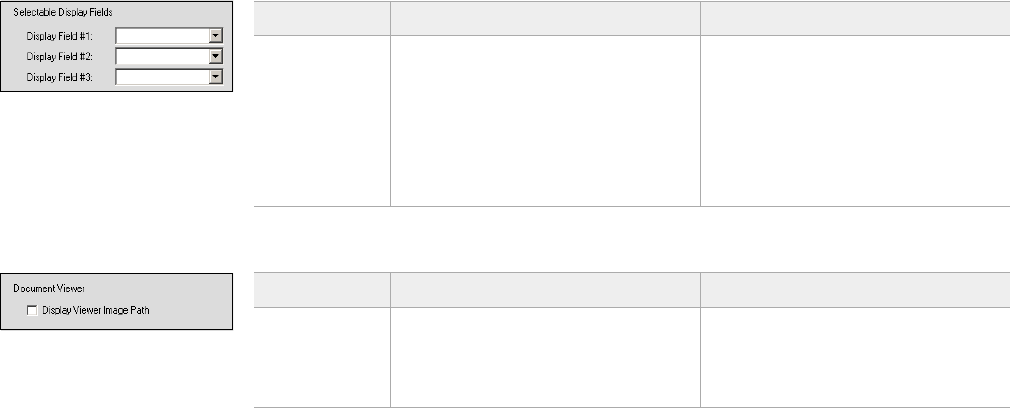
Configuring iA-Examiner
8-22
Selectable Display Fields
By default, Examiner displays this information under Identification Data:
ID Type Expiration Date
Last Name Sex
First Name * Age
Doc Number * Postal Code
Nationality *
(blank field)
You can customize the last three fields. For each one you can choose Age, Postal Code,
SSN (Social Security Number), or one of threee custom fields.
Document Viewer
Option Description Recommendations
Display Field #1
Display Field #2
Display Field #3
The last three fields to display under
Identification Data (shown when the
operator clicks Doc Info).
UserField1, UserField2, and UserField3
correspond to the matching entries
for Static Database Information
(page 8-17).
Choose the information you want
displayed.
Option Description Recommendations
Display Viewer
Image Path When using the document viewer
(Mgmt Functions→ Viewer), show the
full pathname of the displayed docu-
ment image.
Select this if you want to be able to
easily locate the saved image file
while using the document viewer.
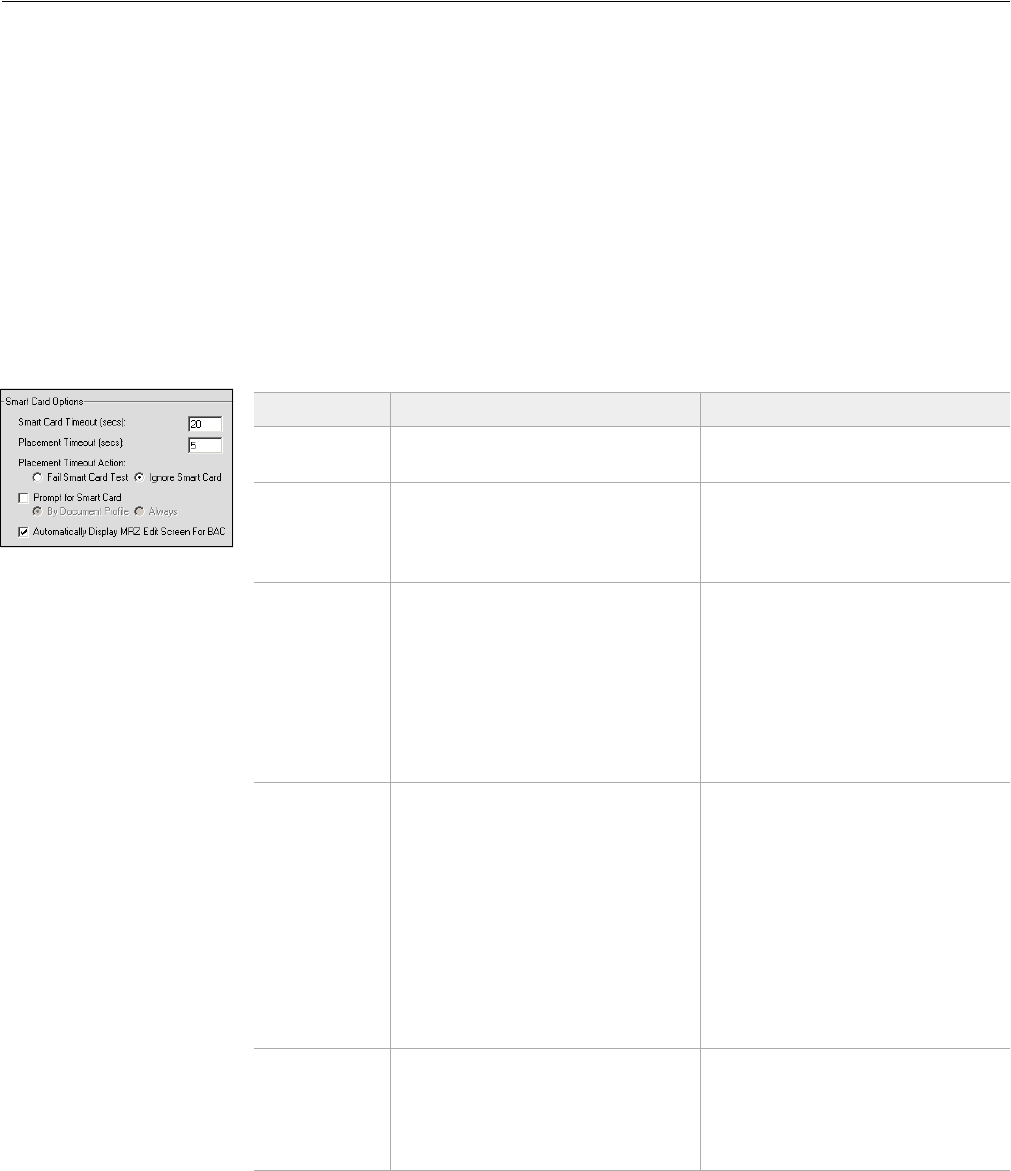
8-23
Configuring Smart Card Options
Configuring Smart Card Options
(System Configuration Page 5: Smart Card Options)
If your unit has a smart card reader, you can use the options in this section to adjust the
way it operates.
About Basic Access Control
Some smart cards use Basic Access Control (BAC). To read information from the chip,
the system must supply codes based on information it has already read from the docu-
ment’s printed MRZ. If iA-thenticate misreads the MRZ, access to the chip may be
blocked. In this case the operator must correct the information manually before the chip
can be read.
Smart Card Options
Option Description Recommendations
Smart Card
Timeout (sec) The amount of time allowed to read
the information from the smart card.
Use the default value of 20 seconds.
Placement
Timeout (sec) The amount of time allowed to
detect a smart card after the system
prompts the operator to place the
document on the platform.
Use the default value of 5 seconds—
long enough to let the operator place
the document but short enough to
time out quickly if no chip is present.
Placement
Timeout Action The test result to record if the system
does not detect a smart card before
the Placement Timeout expires.
Fail Smart Card Test: Record the
smart card test as failed
Ignore Smart Card: Record no result
for the smart card test, just as if the
document had no smart card
Prompt for
Smart Card If the operator captures a document
but does not scan its chip, the system
prompts the operator to scan it (and
waits for the scan until the Placement
Timeout expires).
Select this if you want to give the
operator a second chance to scan a
document’s chip with the embedded
reader.
By Document
Profile
Always
By Document Profile means the
prompt appears only if the docu-
ment profile database indicates that
this document has a smart chip.
Always means the prompt appears
for all documents.
Select the option you prefer.
Automatically
Display MRZ
Edit Screen for
BAC
If access to the card is blocked
because the system has misread the
MRZ, automatically display the
screen that lets the operator correct
misread MRZ characters.
Select this to display the edit screen
automatically as needed. Otherwise
the operator must click Retry to dis-
play the edit screen when needed.
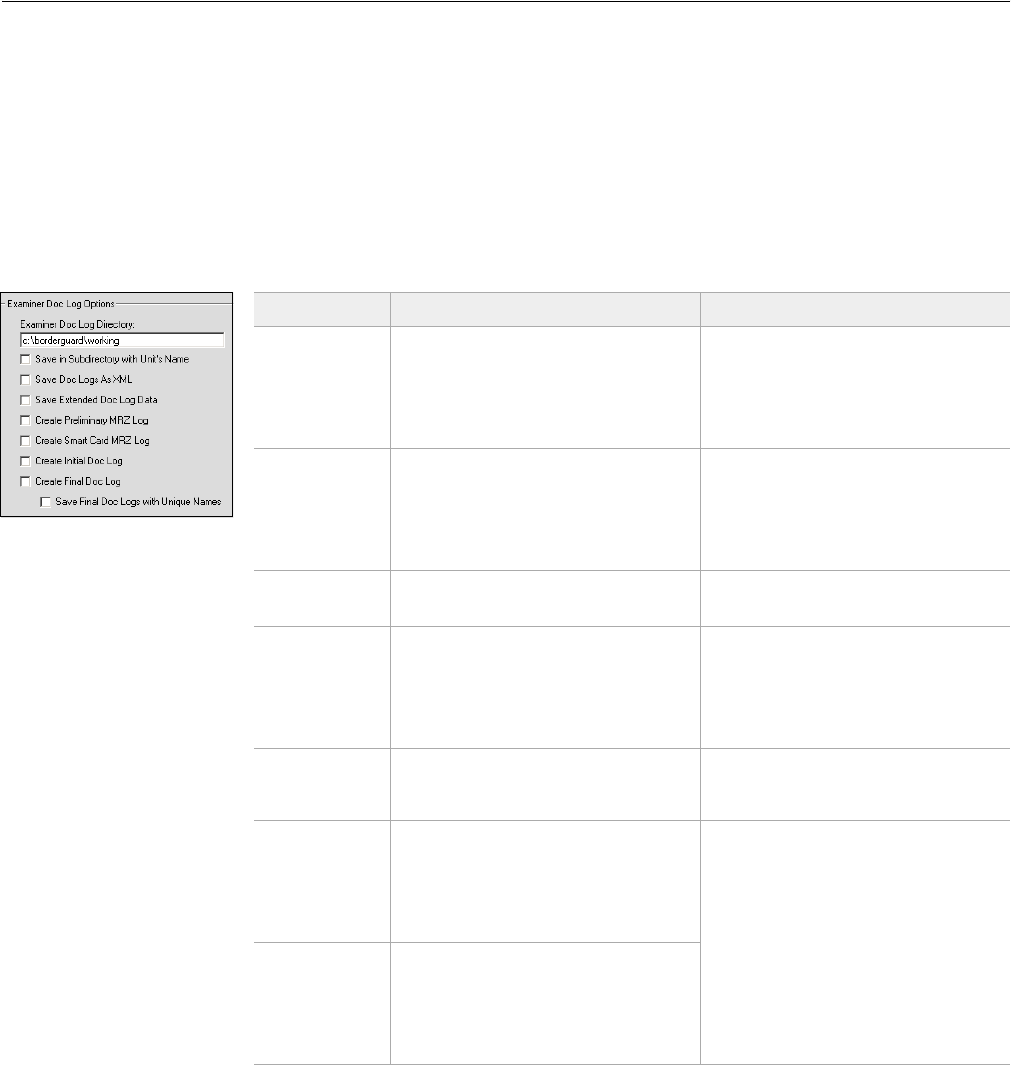
Configuring iA-Examiner
8-24
Configuring Examiner Doc Log Options
(System Configuration Page 5: Examiner Doc Log Options)
As explained under Configuring Data Saving (page 8-5), Examiner can save document
information and test results in the document-results database.
In addition, Examiner can create plain-text or XML log files containing document
information and test results. In general, these log files are useful only if you have custom
software that reads information from them as they are created. If you have no specific
use for such files, you should leave all of the following Doc Log options deselected.
You can preserve the final document logs if you like. All the others are temporary files,
overwritten with each new document.
Option Description Recommendations
Examiner Doc
Log Directory The directory for creating Examiner
document logs.
Use C:\BorderGuard\Working unless
you have a reason to use a different
directory. You might want to use a
network directory accessible to a
number of iA-thenticate units.
Save in
Subdirectory
with Unit’s
Name
Creates each unit’s logs in a subdi-
rectory of the log directory rather
than in the log directory itself. The
subdirectory’s name is the unit’s
computer name.
Select this if you want to create the
logs from different units in a com-
mon location but in separate subdi-
rectories.
Save Doc Logs
as XML Creates all the logs in XML rather
than plain-text format.
Select this if you want XML logs.
Save Extended
Doc Log Data Includes additional information in
the initial and final document logs
detailing how iA-thenticate read and
analyzed the document.
Do not select this unless you need
the additional details. If you select it,
you must also select Document and
MRZ Logs using iA-Administrator, as
described on page 7-12.
Create
Preliminary
MRZ Log
Reserved for future use. Do not select this option.
Create Smart
Card MRZ Log Creates a file containing MRZ infor-
mation from the smart card:
ExaminerSmartCardMRZLog.txt (.xml)
This same information is included in
the initial and final document logs.
Select these options only if you use
software that reads and processes
this information.
Create Initial
Doc Log Creates a file containing initial docu-
ment information and test results—
before the operator takes any actions
to correct or override test results:
ExaminerInitialDocLog.txt (.xml)
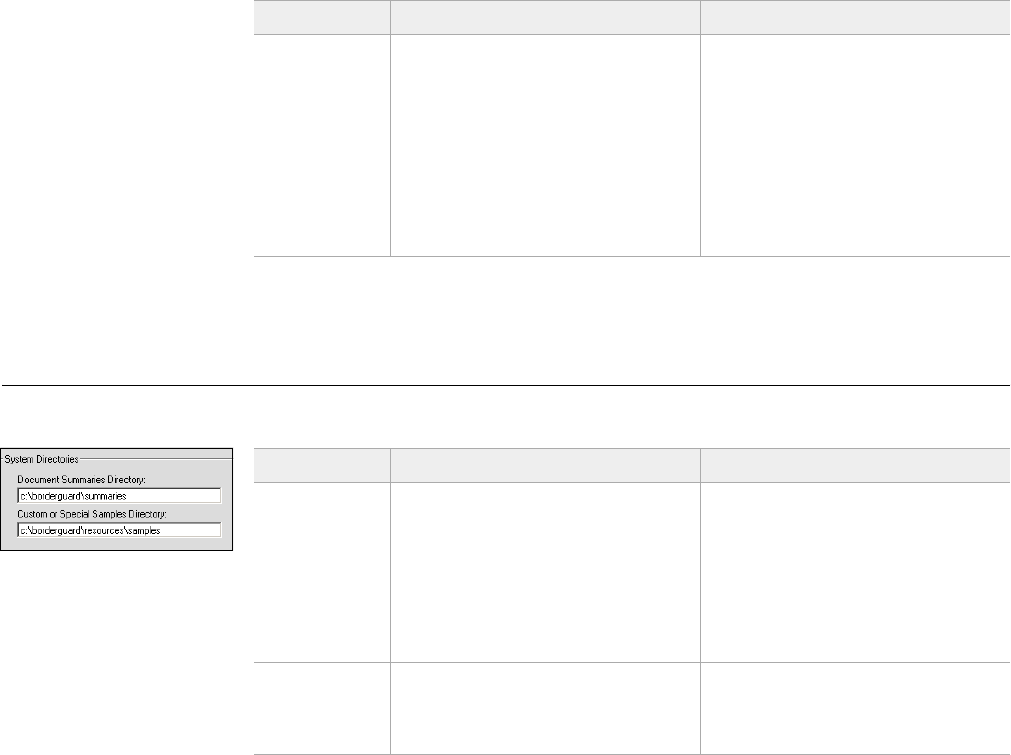
8-25
Configuring System Directories
Configuring System Directories
(System Configuration Page 5: System Directories)
Create Final
Doc Log Creates a file containing final docu-
ment information and test results—
after the operator has finished with
the document:
ExaminerFinalDocLog.txt (.xml),
unless you select the next option.
Select this if you use software that
reads and processes the information,
or if you want to preserve the final
logs for later use.
Save Final Doc
Logs with
Unique Names
Gives the final document log a
unique name rather than overwriting
it with each new document.
Select this if you want to preserve a
copy of each final document log.
Option Description Recommendations
Option Description Recommendations
Document
Summaries
Directory
The directory used for:
• The results of searches you per-
form using the Document Viewer
(Viisage iA-Examiner User’s
Guide, chapter 3)
• Temporary files for the data
transmission feature (page 8-28).
Use the default pathname:
C:\BorderGuard\Summaries
Custom or
Special
Samples
Directory
The directory for storing sample
images for custom configurations.
Use the default pathname:
C:\BorderGuard\Resources\Samples
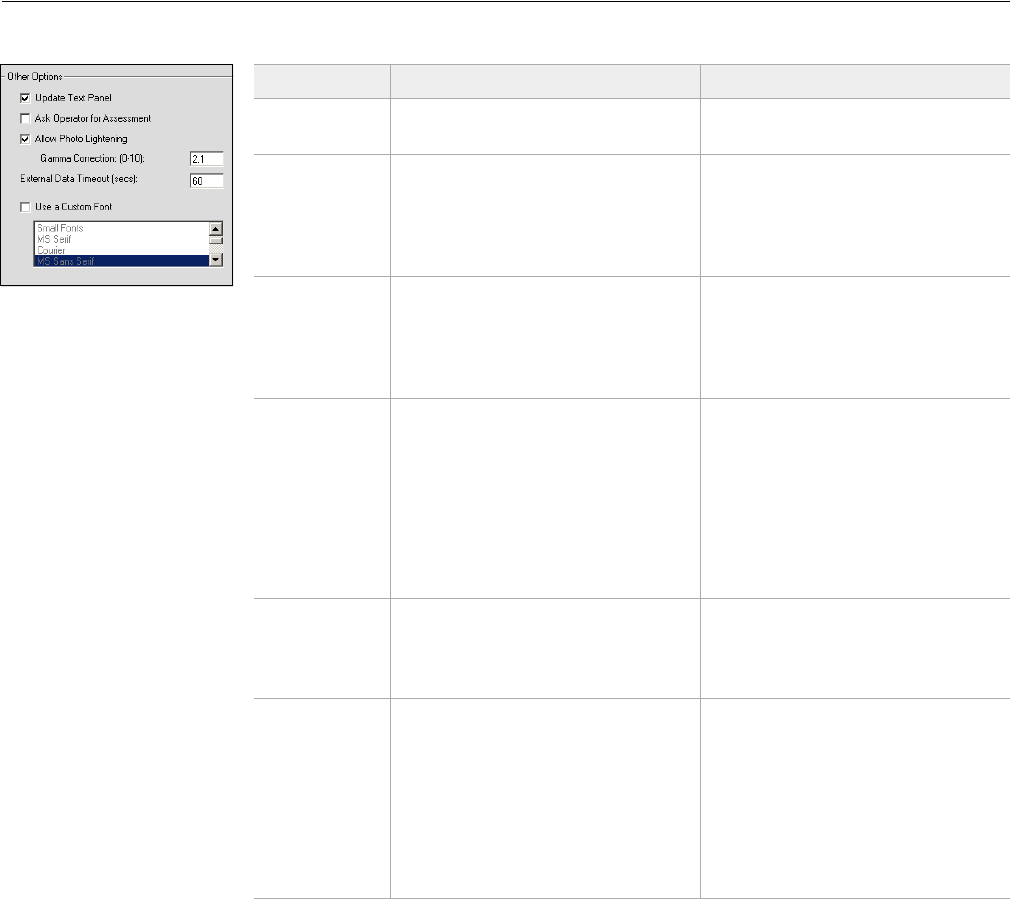
Configuring iA-Examiner
8-26
Configuring Other Options
(System Configuration Page 5: Other Options)
Option Description Recommendations
Update Text
Panel Displays document information on
iA-thenticate’s built-in text panel.
Leave this selected.
Ask Operator
for Assessment Each time a document is captured,
displays a screen requiring the oper-
ator to judge the document’s authen-
ticity before seeing the iA-thenticate
test results.
Leave this deselected unless you
want operators to prejudge the
authenticity of each document.
Allow Photo
Lightening Adds Lighten and Restore buttons to
let the operator adjust the appear-
ance of the document’s ID photo. If
you are saving the photo image, it is
saved as displayed on the screen.
Select this if you notice that ID pho-
tos tend to be too dark on the screen
and when saved as images.
Gamma
Correction The amount of lightening to apply to
the displayed ID photo when the
operator uses the Lighten button,
from 1 to 10:
1: No lightening at all
10: Extreme lightening
(Values between 0 and 1 actually
darken the image.)
Try the default value of 2.1. If the
lightened photo is still too dark, try
a slightly higher value such as 2.5 or
3.0. If it’s too light, try a slightly
lower value such as 1.8 or 1.5.
External Data
Timeout (secs) The maximum total time you are
willing to wait for responses from all
external databases.
Use the default value of 60 seconds
unless this is unacceptably long in
your work environment or you are
willing to wait longer for results.
Use a Custom
Font Display screen text using the font
you select from the list.
Leave this deselected unless you have
a special reason to use it. Changing
the font can make the screen hard to
read or even unusable.
To restore the default font, deselect
this option.
Restart iA-Examiner after making
any font change.
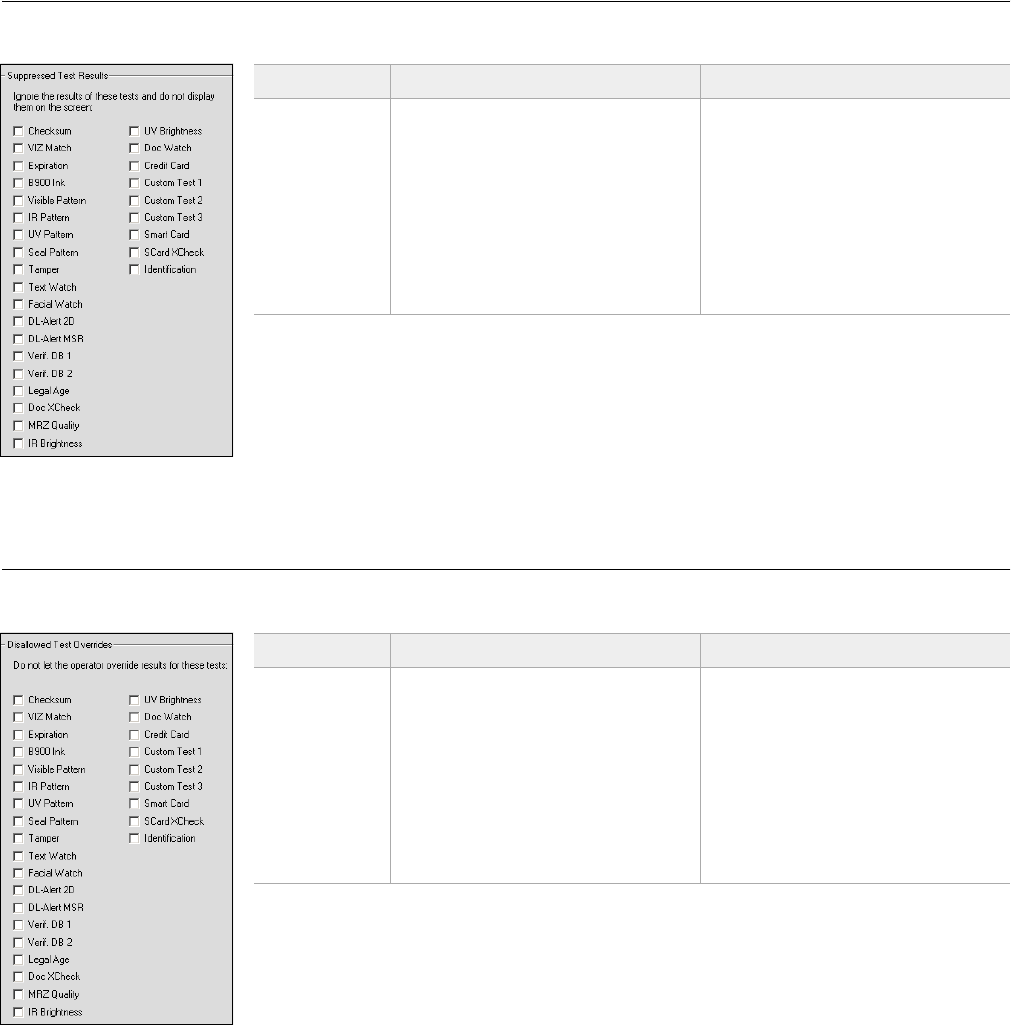
8-27
Configuring Test Suppression
Configuring Test Suppression
(System Configuration Page 6: Suppressed Test Results)
Configuring Test Override Options
(System Configuration Page 6: Disallowed Test Overrides)
Option Description Recommendations
Checksum
VIZ Match
Expiration
...
Tells the system to ignore the
selected test when evaluating a docu-
ment for problems and not display
its results for the operator.
However, if the test is included in the
document profile, the system still
performs the test and records its
results in the document-results data-
base as usual.
Leave all the tests deselected so they
are not suppressed.
Do not select any tests to suppress
except for troubleshooting or other
special purposes.
Option Description Recommendations
Checksum
VIZ Match
Expiration
...
Prevents the operator from overrid-
ing the results of the selected type of
test.
Select any tests the operator is not
allowed to override because of secu-
rity or operational policies.
Note: Even if you select Checksum
here, the operator may still be able
to change the results of the check-
sum test. To prevent that, you must
deselect Enable MRZ Data Edit, as
explained on page 8-10.
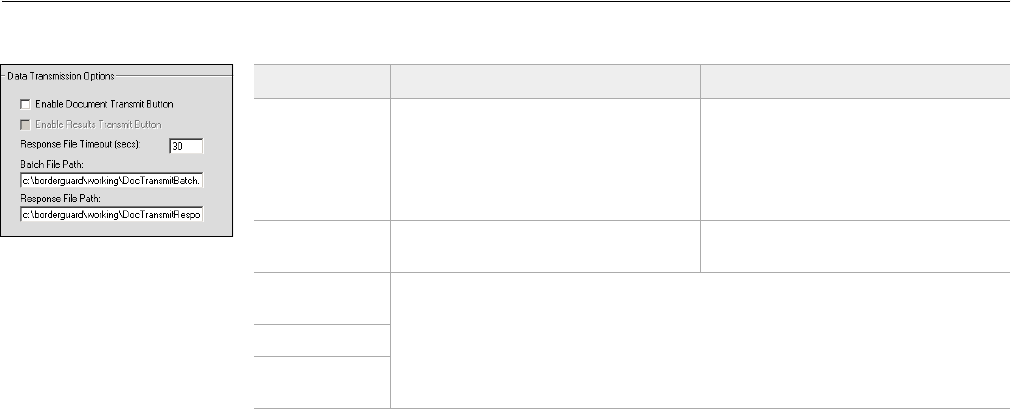
Configuring iA-Examiner
8-28
Configuring Data Transmission Options
(System Configuration Page 6: Data Transmission Options)
Option Description Recommendations
Enable
Document
Transmit Button
Activates the Send Current Document
button on the Management Func-
tions screen.
Select this if you want to be able to
transmit document images and test
results to another computer on your
network for archiving or further
analysis.
Enable Results
Transmit Button Reserved for future use. —
Response File
Timeout For information about using the data transmission feature, contact Viisage
Customer Support.
Batch File Path
Response File
Path

8-29
Configuring Credit Card Options
Configuring Credit Card Options
(System Configuration Page 6: Credit Card Options)
Option Description Recommendations
Display the
Card Number
As
Tells Examiner how much of a credit
card number (read from the mag-
stripe) to display on the screen. This
also affects the number saved when
you use the Create Results button
(Mgmt Functions→ Viewer→ Create
Results).
If the operator needs to see the full
number, select Full Number. Other-
wise select Last 4 Digits.
Save the Card
Number in the
Database As
Tells the system how much of the
credit card number to save in the
document results database and in the
Examiner Doc Logs (page 8-24).
If you need to save the full number,
select Full Number. Otherwise select
Last 4 Digits.
Default Image
Display for
Credit Cards
The image to display by default on
the test results screen, either Visible
or IR.
Select the image that shows the most
relevant information for the opera-
tor. The operator can also display
the other images as usual.
Don’t Save
Credit Card
Images
Tells Examiner not to save document
images for credit cards.
This prevents saving images if you
have selected Save Document Images
in Examiner (page 8-5). However, it
does not prevent saving images if
you have enabled image saving using
iA-Administrator (page 7-10).
Select this if you don’t want credit
card images saved for any reason,
such as privacy or security.
Note the important condition in the
description.
Configuring iA-Examiner
8-30

9-1
9
Managing iA-Examiner
iA-Examiner includes management functions for purging saved data, backing up saved
data, and temporarily disabling verification databases. This chapter explains these func-
tions.
The System Management Screen
You manage Examiner from the System Management screen.
To display the System Management screen:
1. On the iA-Examiner screen, click Mgmt Functions.
2. On the Management Functions screen, click System Management.

Managing iA-Examiner
9-2
Purging Saved Data
(System Management: Purge Saved Data)
Option Description Recommendations
Retain
Document
Results For
How many days’ worth of document
results to keep in the database when
using either manual or automatic
purging. For example:
0: Purge everything
1: Keep only today’s data
2: Keep yesterday’s too
Set to suit your needs.
Purge Results Purges document results now, retain-
ing recent results as specified.
Use this for manual purging, or set
up automatic purging (below).
Retain
Document
Images For
How many days’ worth of document
images to keep in the saved-images
folder when purging.
Set to suit your needs.
Purge Images Purges images now, retaining recent
images as specified.
Use this for manual purging, or set
up automatic purging (below).
Retain
Administration
Data For
How many days’ worth of actions to
keep in the administration report
when purging.
(See Admin Report, below.)
Set to suit your needs.
Purge Admin
Data Purges the administration report
now, retaining recent actions as spec-
ified.
Use this for manual purging, or set
up automatic purging (below).
Enable
Automatic
Purging
Tells the system to purge document
results, images, and administration
data automatically each day, retain-
ing recent results, images, and data
as specified.
Use this if you want to purge data
automatically.
The system does not back up files
automatically, so be sure to do regu-
lar backups (page 9-3) if you need to
keep files and data beyond the reten-
tion period you set.
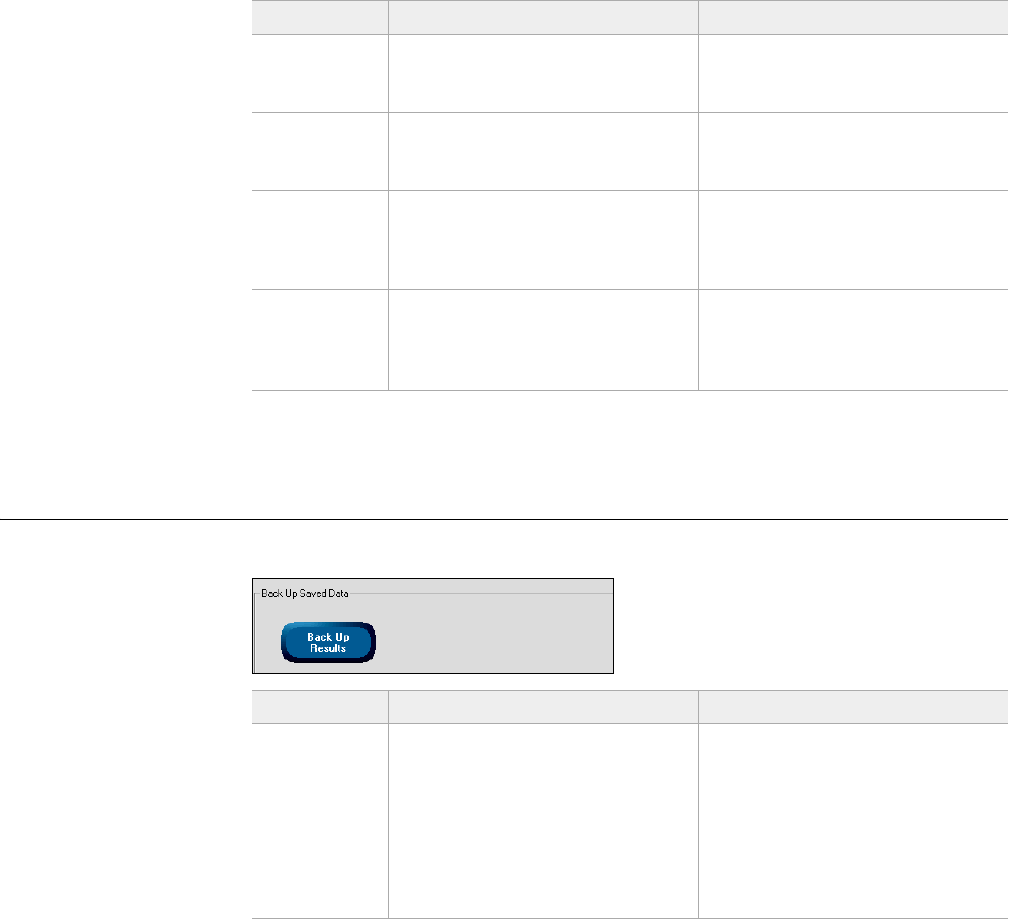
9-3
Backing Up Saved Data
Backing Up Saved Data
(System Management: Back Up Saved Data)
Purge At
(hh:mm) Sets the time of day for automatic
purging, using 24-hour time (0:00–
23:59).
Specify a time when the system is
running but not in heavy use.
Ask for
Confirmation
Each Time
Requires the operator to confirm
each automatic purge before it hap-
pens.
Select or deselect this to suit your
needs.
Compact and
Repair the
Database
Runs the Compact and Repair Data-
base utility within Microsoft Access,
which optimizes performance and
repairs damage.
Periodically use this option to
improve performance and prevent
problems.
Admin Report Displays a report of administration
actions, including manual and auto-
matic purges and database mainte-
nance.
Use this to see the report anytime.
Option Description Recommendations
Option Description Recommendations
Back Up
Results Copies the document results data-
base from the database directory to
the backup directory. You specify
these directories on System Configu-
ration Page 1, as explained in the
table on page 8-5.
Note: Each backup copy overwrites
the previous backup copy.
Periodically use this option to pre-
serve a backup copy of the database
in a safe location.

Managing iA-Examiner
9-4
Temporarily Disabling Verification Databases
(Management Functions)
Option Description Recommendations
Disable
Verification
Databases
Disables database lookups entirely
until you re-enable them or until you
exit and restart Examiner.
Select this to disable lookups tempo-
rarily for any reason, such as a prob-
lem with your Internet connection.
Part Three
Using Optional Features
10-1
10
Using iA-DataPort
iA-thenticate includes a data transmission feature called iA-DataPort™. It can route data
captured from a document’s MRZ, magstripe, and 2D bar code to:
❑A program running on the iA-thenticate unit
❑Another PC through a standard serial port
❑A virtual serial port (using third-party software)
Your own software can then process and store the data to meet your needs.

Using iA-DataPort
10-2
Preparing to Use iA-DataPort
Choosing Where to Send Data
DataPort can send captured data to a program, a standard serial port, or a virtual port.
Sending Data to a Program
If you want to send data to a program running on the iA-thenticate unit, select the Sim-
ulated Keyboard option and choose related options as explained on page 10-7.
Sending Data Through a Serial Port
If you want to send data to another PC through a standard serial port, you need:
❑An available serial port on your iA-thenticate unit (either on the back of a Plus unit
or on the PC that a standard unit is attached to)
❑An available serial port on the other PC
❑A null-modem serial cable
To use the serial port connection:
1. Attach the null-modem cable between the serial ports on the iA-thenticate unit and
the other PC.
By default, iA-DataPort sends data through the COM 1 port. (On a Plus unit, this is
the lower serial connector.) If you use a different port number, you must change the
communication port settings to match, as described on page 10-8.
2. Select the Communications Port option as explained on page 10-7.
Sending Data Through a Virtual Port
Sending data through a virtual serial port allows another program running on the
iA-thenticate unit to receive and process the data as if it were coming in through a stan-
dard serial port.
To use a virtual serial port:
✧Install and configure appropriate third-party software for setting up a virtual serial
port on your iA-thenticate unit.
✧Select the Communications Port option as explained on page 10-7.
Note
A standard color iA-thenti-
cate unit attaches to its host
PC through COM 1 by
default. If your unit is set up
this way, you must change
the port that iA-DataPort
uses.

10-3
Preparing to Use iA-DataPort
Using the Optional Keyboard Filter
If you want to transmit data from a magstripe reader other than the E-Seek Intelli-
Check combined magstripe and bar code reader, you may want to install and use the
optional keyboard filter provided with iA-DataPort.
A magstripe reader sends data as if it were typed on a keyboard. Depending on how you
use your unit, magstripe and keyboard data can sometimes be sent to the wrong pro-
gram. The keyboard filter can prevent this problem by recognizing magstripe data and
sending it to iA-DataPort, no matter which other programs are running.
After installing the filter, you can enable or disable it anytime as explained on page 10-7.
To install the optional keyboard filter:
Windows 2000 Windows XP
1. Open the System control panel. On the
Hardware tab, click Device Manager.
2. In the Device Manager window, expand
the Keyboards item. Then right-click the
current keyboard and select Properties.
3. On the Driver tab, click Update Driver.
4. On the Welcome to the Upgrade Device
Driver Wizard screen, click Next.
5. On the Install Hardware Device Drivers
screen, select Display a list of the known driv-
ers for this device so that I can choose a spe-
cific driver, and click Next.
6. On the Select a Device Driver screen, click
Have Disk.
7. On the Install from Disk screen, click
Browse and select the file
C:\BorderGuard\Tools\MagStripeFilter\
IAMSFilter.inf
8. On the Install from Disk screen, click OK.
9. On the Select a Device Driver screen, click
Next.
10.On the Upgrade Driver Warning screen,
click Yes.
11.On the Start Device Driver Installation
screen, click Next.
12.On the Digital Signature Not Found
screen, click Yes.
13.On the Completing the Upgrade Device
Driver Wizard screen, click Finish.
14.Close the IAI Magstripe Filter Driver
Properties window. In the System Settings
Change window, click Yes to restart.
1. Open the System control panel. On the
Hardware tab, click Device Manager.
2. In the Device Manager window, expand
the Keyboards item. Then right-click the
current keyboard and select Properties.
3. On the Driver tab, click Update Driver.
4. On the Welcome to the Hardware Update
Wizard screen, select Install from a list or
specific location and click Next.
5. On the next screen, select Don't search. I
will choose the driver to install. Then click
Next.
6. On the next screen, click Have Disk.
7. On the Install from Disk screen, click
Browse and select the file
C:\BorderGuard\Tools\MagStripeFilter\
IAMSFilter.inf
8. On the Install from Disk screen, click OK.
9. On the next screen, when you see the
message This driver is not digitally signed,
click Next.
10.On the Upgrade Driver Warning screen,
click Yes.
11.On the next warning screen, click Con-
tinue Anyway.
12.On the Completing the Hardware Update
Wizard screen, click Finish.
13.Close the IAI Magstripe Filter Driver
Properties window. In the System Settings
Change window, click Yes to restart.
Note
If you use the E-Seek Intelli-
Check reader, you do
not
need this filter.

Using iA-DataPort
10-4
Starting iA-DataPort
You start iA-DataPort by running the iA-DataPort Utility. As explained in the rest of
this chapter, the utility lets you:
❑View data as it is captured from the MRZ, magstripe, and 2D bar code
❑Configure various settings for capturing, displaying, formatting, and transmitting
the captured data
❑Test the operation of each information-capture device
Starting the iA-DataPort Utility
To run the iA-DataPort Utility and start iA-DataPort:
✧Double-click the iA-DataPort Utility icon on your desktop.
Or, select Start→ Programs→ iA-thenticate→ iA-DataPort.
Running the Utility Minimized
In most cases you can run the iA-DataPort Utility minimized (if you want to do so)
while you process documents.
However, you cannot run it minimized if you are using a “keyboard wedge” magstripe
reader without using the optional keyboard filter described on page 10-3.
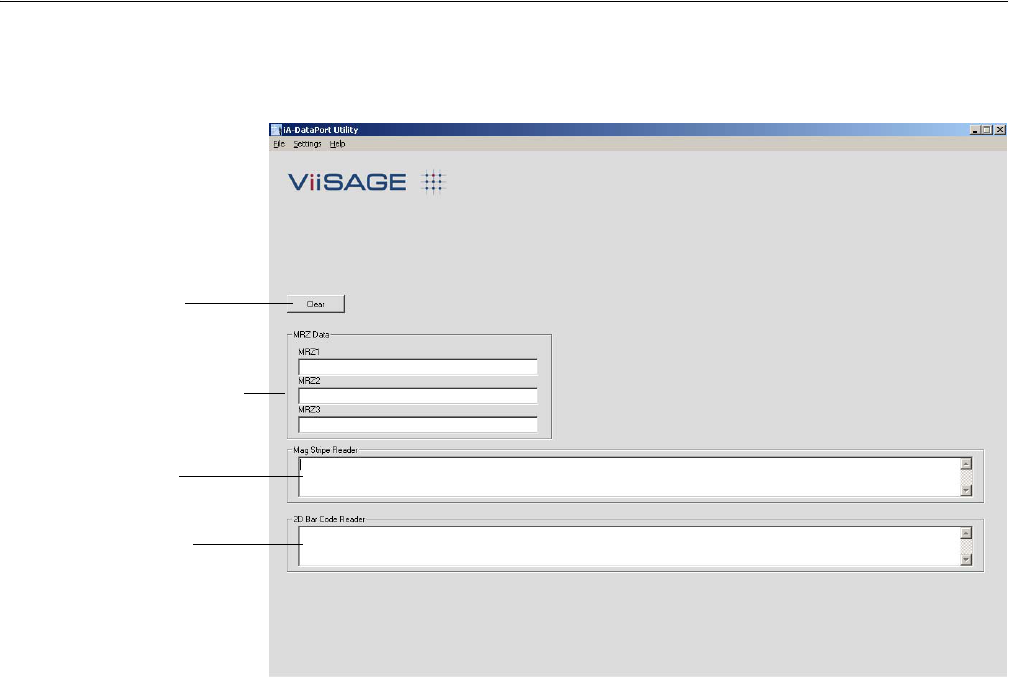
10-5
Viewing Captured Data
Viewing Captured Data
The iA-DataPort Utility window shows the data captured from the MRZ lines,
magstripe, and 2D bar code, highlighted in yellow. You can clear the displayed data by
clicking Clear.
Data from the
magstripe
Data from the
2D bar code
Button for clearing
the display
Data from the MRZ
lines (maximum 40
characters per line)
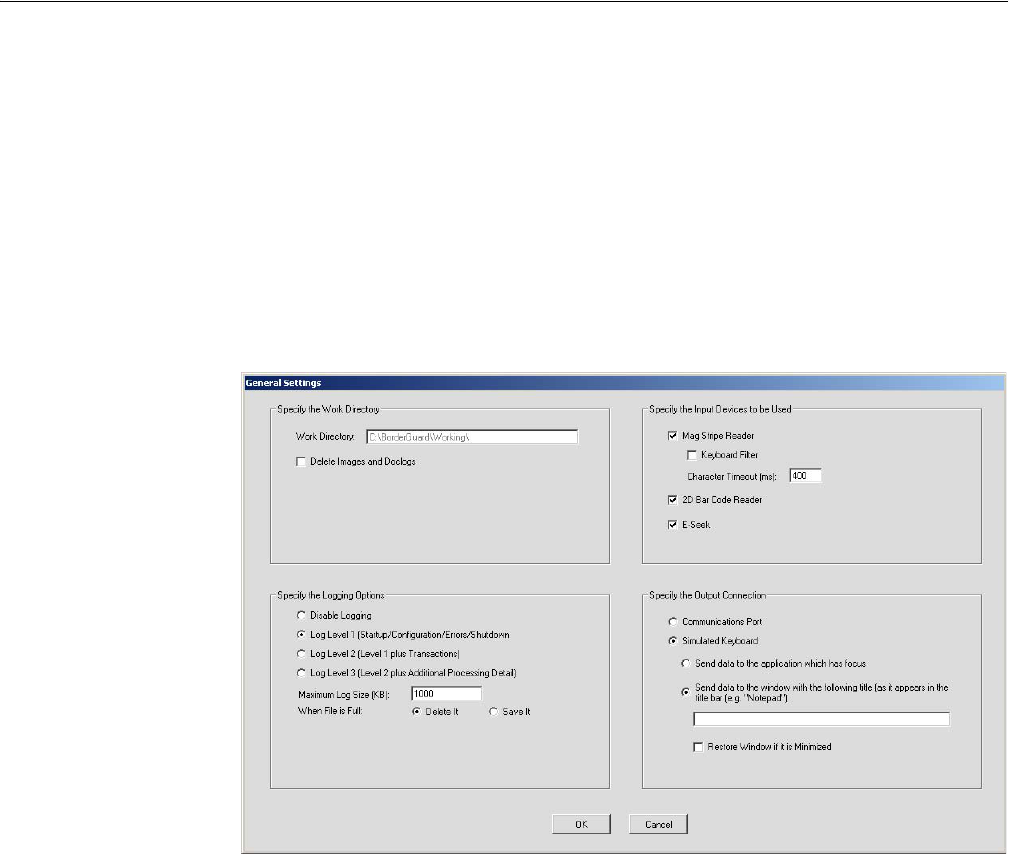
Using iA-DataPort
10-6
Configuring Settings
Using the Settings menu, you can configure:
General settings Data transmit settings
Communication port settings Display settings
Data format settings Startup settings
MRZ data format settings
Configuring General Settings
General settings let you configure your input devices, specify how you want
iA-DataPort to handle the data they capture, and set up logging.
To configure general settings:
1. Select Settings→ General Settings.
2. If you want iA-DataPort to delete images and document logs from the work direc-
tory after processing each document, select Delete Images and Doclogs. (You set the
location of the work directory using Administrator, as explained on page 7-7.)
3. Specify the logging options you want to use:
•Select one of the options for logging iA-DataPort activity: Disable Logging or
Logging Level 1, 2, or 3, as described on the screen.
•If you enable logging, specify the maximum size for the log file and what you
want done with the file when it reaches that size:
–To discard the existing file and start a new one, select Delete It.
–To retain the existing file and start a new one, select Save It.
10-7
Configuring Settings
4. Select each input device you are using:
•If you are using a magstripe reader (see note at left):
–Select Mag Stripe Reader.
–To use the optional keyboard filter to route magstripe data to iA-DataPort,
select Keyboard Filter. See page 10-3 for installation instructions and more
information about the filter.
Important: If you want magstripe data routed to a different program, such as
iA-Examiner, be sure to deselect both Keyboard Filter and Mag Stripe Reader.
–For Character Timeout, use the default value of 400 ms.
•If you are using a 2D bar code reader, select 2D Bar Code Reader. (See note at
left.)
•If you are using the E-Seek Intelli-Check combined magstripe and bar code
reader, select E-Seek.
5. Select one of the output connections:
•To send output to a serial communications port, select Communications Port.
•To send output to an application, as if the data were being typed using an ordi-
nary keyboard, select Simulated Keyboard and choose the options you want to
use:
–To send the output to the front program window, select Send data to the appli-
cation which has focus.
–To send the output to a specific program window, select Send data to the
window with the following title. Enter the window’s full title (exactly as it
appears in the title bar), or enter enough characters from the beginning or
end of the window’s title to identify it uniquely. For example, if the window’s
title is Log0001.txt - Notepad, you might enter either Log or Notepad.
–To restore the specified program window after each read (if it’s minimized),
select Restore Window if it is Minimized.
Note
iA-DataPort and Examiner
cannot both use the same
reader at the same time. If
you select the magstripe
reader or the bar code
reader here, you must
deselect that reader in
Examiner (page 8-2).
Do not select a reader if you
don’t have the device
attached.
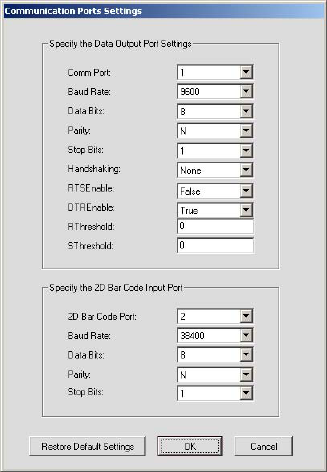
Using iA-DataPort
10-8
Configuring Communication Port Settings
You must configure iA-thenticate’s port settings so that they match those of your
iA-thenticate unit and your bar code reader.
To configure communication port settings:
1. Select Settings→ Comm Ports Settings.
2. If you want to send data to another PC through the iA-thenticate unit’s serial port
as described on page 10-2, select the appropriate values under Data Output Port
Settings. The Comm Port number must match the port to which the null modem
cable is attached.
3. For the 2D Bar Code Input Port settings, select values that match those set for your
bar code reader. The default values for the E-Seek Intelli-Check reader are 2, 38400,
8, N, 1.
4. Click OK.
Configuring Data Format Settings
You can format the data that iA-thenticate sends to your application by specifying the
characters used for starting, ending, and delineating each group of data.
For MRZ data, you can specify as many as three characters to start the block of data,
three characters to end the block of data, and three characters to insert after each line of
the MRZ within the block of data, as well as a calculated check digit. Similarly, you can
specify starting, ending, delineating, and check digit characters separately for magstripe
data and 2D bar code data.
Note
To restore the factory-set
values, click Restore
Default Settings.
10-9
Configuring Settings
To configure data format settings:
1. Select Settings→ Data Format Settings.
2. Under MRZ Format Options:
a. Specify as many as three characters to send at the start of the MRZ data. To
specify a character, you can:
–Select it from the drop-down list of special characters, including NUL, STX,
ETX, EOT, ENQ, ACK, HT, LF, VT, FF, CR, and ESC.
–Or, select Other from the drop-down list and type the character’s decimal
ASCII value in the box to the right of the list
b. Specify as many as three characters to insert at the end of the first line of MRZ
data. Do the same for the second line and third line of MRZ data.
c. Specify as many as three characters to send at the end of the entire block of
MRZ data.
d. Specify that a check digit be sent at the end of the data, calculated using the
CRC16-ARINC algorithm.
3. Similarly, specify starting, delineating, and ending characters under Mag Stripe For-
mat Options and 2D Bar Code Format Options. You can also select the check digit
option for each.
4. Click OK.
Note
To restore the default set-
tings for one of the kinds of
data, click the matching
Restore Defaults button.
Using iA-DataPort
10-10
Configuring MRZ Data Format Settings
In addition to the MRZ formatting options you set on the Data Format Settings screen,
you can also format the MRZ data in other ways.
To configure MRZ data format settings:
1. Select Settings→ MRZ Format Settings.
2. To make the data length the same for each MRZ line in a document, filling out
shorter lines with extra characters to be the same length as the longest line, select
Pad Shorter MRZ Lines. Specify the pad character you want to use.
3. To replace any character that iA-thenticate has trouble reading with a different
character:
a. Select Replace Low Confidence Characters.
b. For Minimum Confidence, specify how low the system’s confidence must be before
it replaces a character. The range is 0.0 to 1.0, and the default is 0.8.
–Lowering the value tells the system to allow lower confidence in its readings,
so it replaces fewer characters.
–Raising the value tells the system to require higher confidence in its readings,
so it replaces more characters.
10-11
Configuring Settings
c. For Replacement Character, specify which character you want substituted for
each doubtful character. For example, you might want to use a question mark
(?) or underscore (_).
4. To send a notation or other text when iA-thenticate is unable to automatically iden-
tify the document as a specific type (whether ICAO or non-ICAO), select MRZ1 Non-
standard Output and enter the text you want to send. For example, you might want
to send a notation such as [Unknown document].
5. Leave Custom MRZ Format deselected unless you have created a custom MRZ-pro-
cessing application in consultation with Viisage Customer Support.
6. To process the captured MRZ data and send it in a different format, select Reformat
MRZ Data and then choose how you want to format each field, in order. For each
field:
a. Under Field, select the name of the field—for example, Surname.
b. If you want the field to be no longer than a certain length when DataPort sends
it, specify that length under Max Len. DataPort then truncates longer fields to
this length. If you don’t want a long field truncated, leave Max Len blank.
c. If you want the field to be at least a certain length when DataPort sends it:
–Under Min Len, specify the minimum number of characters the field should
contain.
–Under Pad Character, type the character you want to use to fill out a short
field to the minimum length. The default is a space.
If you don’t want the field padded to any minimum length, leave Min Len blank
or enter 0 (zero).
d. If you want all spaces in the field removed, select Delete Spaces. For example,
VAN LIND would become VANLIND.
e. Under Termination Char, specify the character to insert immediately after a vari-
able-length field to mark its end. You can select various untypeable characters
(such as NUL) from the drop-down list, or you can enter any typeable character
(such as >) in the second box.
Finally, specify the Date Format you want to use for sending dates. This determines
the day-month-year order, the punctuation used between elements, the month for-
mat (number or abbreviation), and the year format (2 or 4 digits). For example, for
August 14, 2003:
7. Click OK.
This date format... Sends this data...
mm/dd/yy 08/14/03
yyyy-mm-dd 2003-08-14
dd mmm yyyy 14 Aug 2003
Notes
• One field you can select is
Pass/Fail
. This is not MRZ
data but an extra field for
sending overall test results.
Select
Pass/Fail
if you want
to send P when a document
passes all tests, or F when
a document fails any test.
• Setting Max Len and Min
Len to the same number
results in a fixed-length
field.
• If you select Delete
Spaces, DataPort removes
the embedded spaces
before adjusting the field’s
length using the Max Len
and Min Len settings.
Using iA-DataPort
10-12
Configuring Data Transmit Settings
You can select which kinds of data you want iA-thenticate to transmit—any combina-
tion of MRZ data, magstripe data, and 2D bar code data.
To configure data transmit settings:
1. Select Settings→ Data Transmit Settings.
2. Select all the kinds of data you want iA-thenticate to transmit to your application.
3. If you select MRZ Data, you can also select either or both of these options, to prevent
transmission of faulty or questionable data:
•Don’t transmit if MRZ length is incorrect
•Don’t transmit if MRZ has a checksum error
Configuring Display Settings
You can make several choices about:
❑What kinds of information the iA-DataPort Utility displays on its main screen
❑What kinds of information the iA-thenticate unit itself displays during operation
(apart from the iA-DataPort Utility)
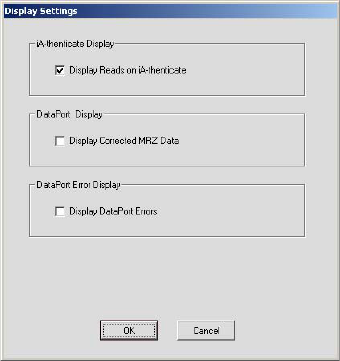
10-13
Configuring Settings
To configure display settings:
1. Select Settings→ Display Settings.
2. Under iA-thenticate Display:
•If you want the iA-thenticate unit to show the captured information to the oper-
ator, select Display Reads on iA-thenticate. This causes iA-thenticate to display the
results in a message box for the operator each time the unit reads an MRZ, mag-
stripe, or bar code.
•If you want the iA-thenticate unit to read information without displaying the
results for the operator, deselect this option.
3. Under DataPort Display:
•If you select Replace Low Confidence Characters (page 10-10) and you want the
displayed MRZ to show the replacement characters (rather than the original,
doubtful ones), select Display Corrected MRZ Data.
4. Under DataPort Error Display:
•If you want data port error messages to appear onscreen and on the built-in text
panel whenever they occur, select Display DataPort Errors. You may want to do
this when you first set up DataPort and to troubleshoot any problems.
•To suppress such error messages so that the operator does not see them, deselect
this option.
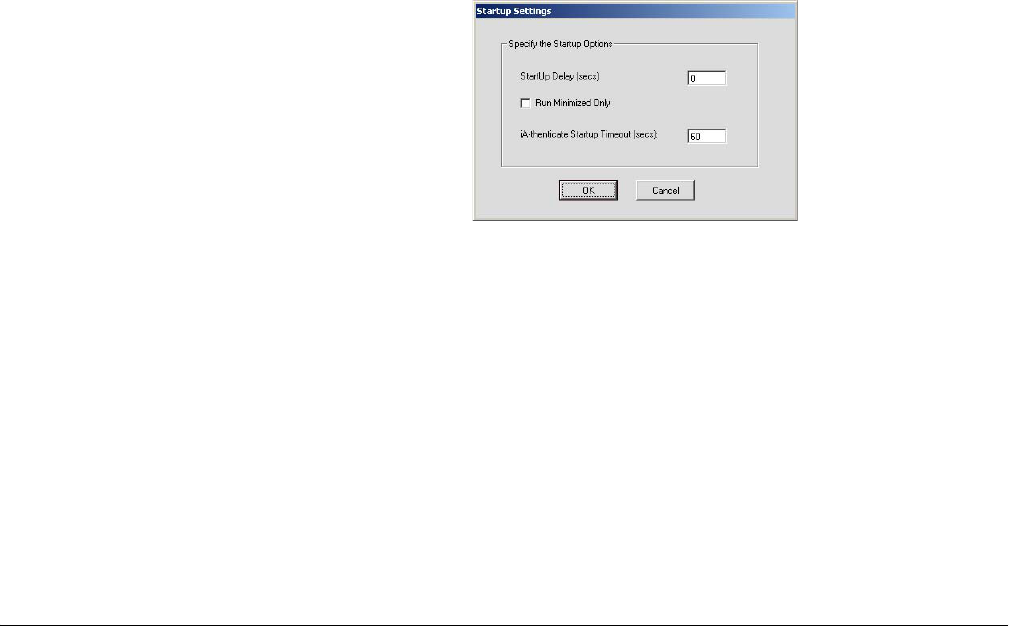
Using iA-DataPort
10-14
Configuring Startup Settings
iA-DataPort includes settings to set startup delays and to run the utility minimized so
the operator doesn’t see its screen.
To configure startup settings:
1. Select Settings→ Startup Settings.
2. For Startup Delay, use the default value of 0 seconds. But if your unit is set up to run
iA-DataPort automatically at startup, and you see error messages during startup,
try increasing this value.
3. If you want the iA-DataPort utility to run minimized each time you start it, select
Run Minimized Only. Do not select this option unless you have determined that you
can run the utility minimized, as explained under “Running the Utility Minimized”
on page 10-4.
4. For iA-thenticate Startup Timeout, use the default value of 60 seconds.
5. Click OK.
Checking the Capture Devices
You can use the iA-DataPort Utility to confirm that each of your iA-thenticate capture
devices is working properly. With the Utility running, try capturing each kind of data
and check to make sure it appears on the screen.
To check MRZ capture:
1. On the iA-thenticate unit, lower the hinged light shield over the glass platform.
2. Place an ICAO document (with a standard MRZ) facedown on the platform, hold-
ing it flat against the glass, and slide it back and to the left until it stops against the
edges of the platform.
3. Hold the document still for a few seconds, until the text panel displays Remove Doc-
ument or the iA-DataPort Utility displays the resulting data on the screen. Then
remove the document.
4. Confirm that the correct MRZ data appears on the screen.
10-15
Checking the Capture Devices
To check the magstripe reader:
1. Briskly swipe a magstripe card through the reader’s slot in either direction, follow-
ing the orientation diagram on the reader.
2. Confirm that the correct data appears on the screen in the Mag Stripe Reader field.
To check the bar code reader:
1. Insert a document with a 2D bar code into the slot in the reader, following the ori-
entation diagram on the reader, and then remove it.
2. Confirm that the correct data appears on the screen in the 2D Bar Code field.
Using iA-DataPort
10-16
Appendixes
A-1
A
Resetting the
E-Seek Reader
If you have the E-Seek Intelli-Check magstripe and bar code reader, and iA-Examiner or
iA-DataPort keeps displaying an error message when you scan a magstripe or bar code,
the reader may have lost its correct settings. Typical error messages:
❑iA-Examiner: E-Seek identifier code not found
❑iA-DataPort: E-Seek header is not enabled or an extra beep after reading a document
To reset the E-Seek Intelli-Check reader to its correct settings:
❑Find the iA-thenticate Setup card supplied with the reader.
If you can’t find the supplied card, make a clean photocopy of this page on heavy,
stiff paper, and cut out the card. (Or use ordinary paper and tape the photocopied
bar code onto a blank ID card.)
❑With the E-Seek Intelli-Check reader powered on, scan the bar code by briskly
inserting and removing the card. The reader should respond with a warbling beep
indicating that the settings have been accepted.
Note
iA-DataPort displays errors
only if
Display DataPort
Errors
is selected as
described on page 10-13).
E-Seek Reader
Default Settings
(38400, PRECID)
Resetting the E-Seek Reader
A-2

B-1
B
Periodic Maintenance
Follow these procedures to keep your iA-thenticate unit working accurately and
efficiently.
Cleaning the Glass Platform
During normal use, the glass document platform becomes dusty and smudged with fin-
gerprints. It can also become sticky with adhesives from the documents you process.
To keep the unit working properly, you must keep the glass clean. You should clean the
glass routinely at least once a week, and immediately if it becomes sticky.
We strongly recommend using pre-moistened optical wipes to clean the glass. They are
effective, safe, convenient, and inexpensive.
Warnings:
❑Never spray liquid onto the glass or any other part of the unit.
❑Never use an abrasive cleaner or pad of any kind.
❑Use only wipes that are specifically for cleaning optical surfaces.
To clean the glass platform:
✧Gently wipe the glass with a pre-moistened optical wipe.
As an alternative, you can use a clean, soft, lint-free cloth slightly moistened with
denatured alcohol or a nonabrasive glass cleaner.

Periodic Maintenance
B-2
Cleaning the Sensor Switch
Sometimes dirt and bits of paper can slip underneath the document sensor switch. If
these build up, they can interfere with the switch, so that the unit doesn’t always
respond when you place a document on the platform.
About once a month, or whenever a unit has problems responding to a document, you
should check and clean the sensor switch.
To clean the sensor switch:
1. Raise the light shield and locate the sensor switch lever, at the back left corner of the
platform.
2. Gently vacuum the switch area, being careful not to mar the glass.
3. Carefully remove any bits of paper stuck under the lever.
Defragmenting the Hard Drive
During normal use, the files and free space on your unit’s hard drive become frag-
mented. As fragmentation becomes worse, your system runs less efficiently.
About once a month, you should use Disk Defragmenter to check your hard drive for
fragmentation and to defragment it as necessary. The check takes just a few moments;
defragmentation can take 15 minutes or more.
To check and defragment the hard drive:
1. Log on as an administrator.
2. Run Disk Defragmenter (Start→ Programs→ Accessories→ System Tools→ Disk
Defragmenter).
3. Select the C drive and click Analyze.
4. If Disk Analyzer reports that the volume needs defragmenting, click Defragment to
proceed.
Note: Even if Disk Analyzer reports that the volume does not need defragmenting,
you can defragment it as a preventive measure.
5. If your system has additional drives, check and defragment them in the same way.

Viisage Technology, Inc.
296 Concord Road, Billerica, MA 01821 USA
T 978.932.2200 F 978.932.2225
www.viisage.com
PUB-00052-A-11