L1 Identity Solutions 0B5000A BORDERGUARD WITH SMART CHIP, SCANNER MODE User Manual USERS MANUAL
L1 Identity Solutions, Inc. BORDERGUARD WITH SMART CHIP, DOCUMENT SCANNER MODE USERS MANUAL
UserManual.wiki
>
L1 Identity Solutions
>
0B5000A User Manual
USERS MANUAL
Navigation menu
Upload a User Manual
Namespaces
Wiki Guide
HTML
PDF
Info
Views
User Manual
Discussion / Help
Navigation

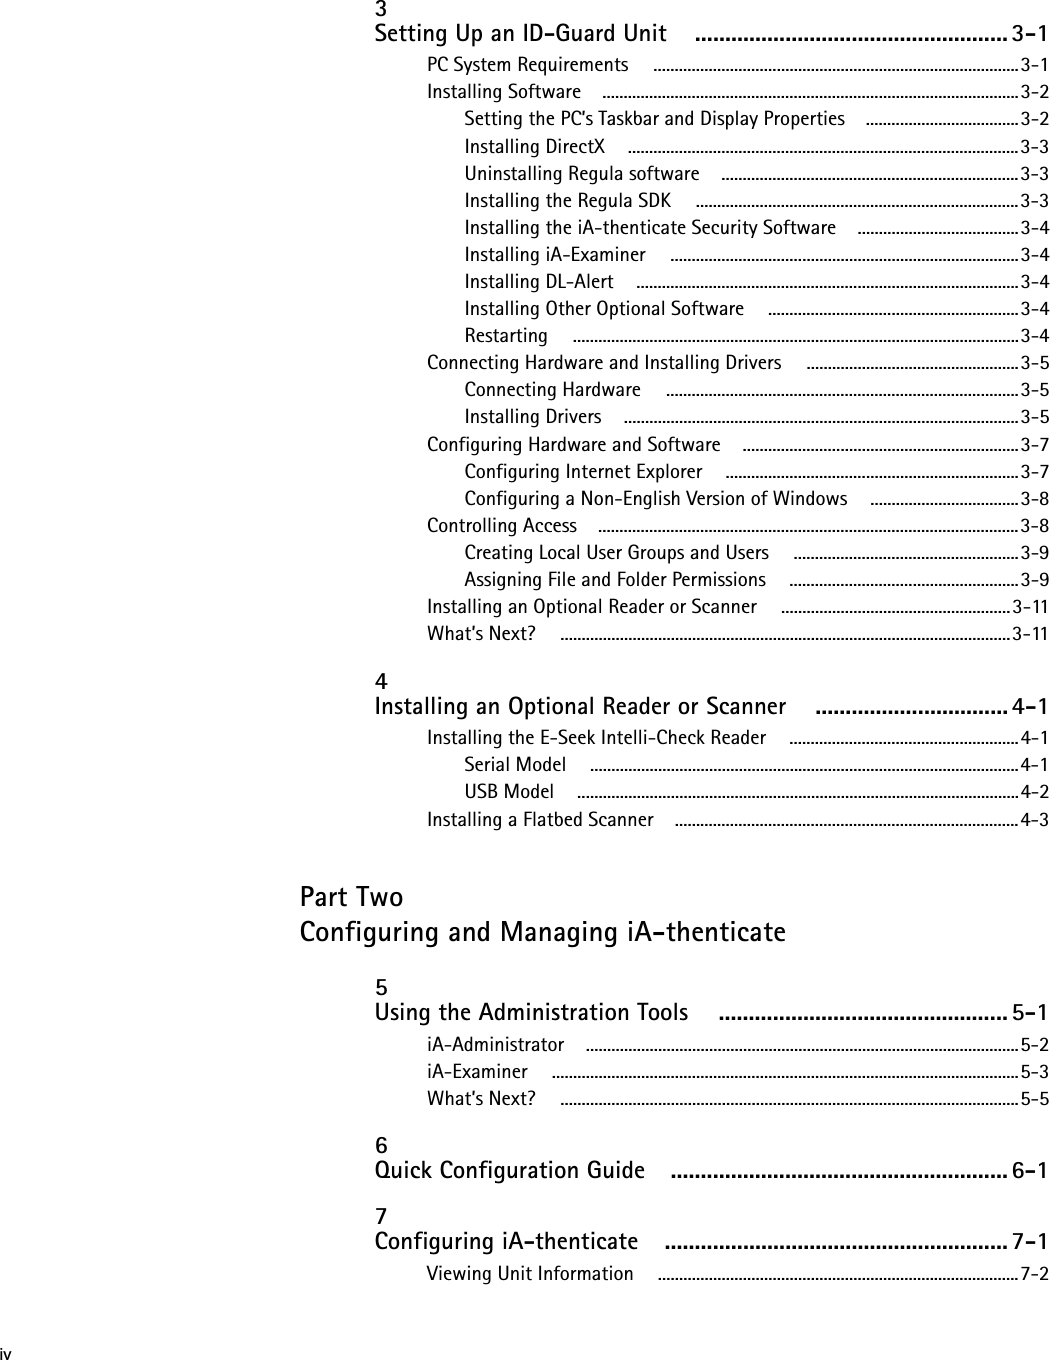


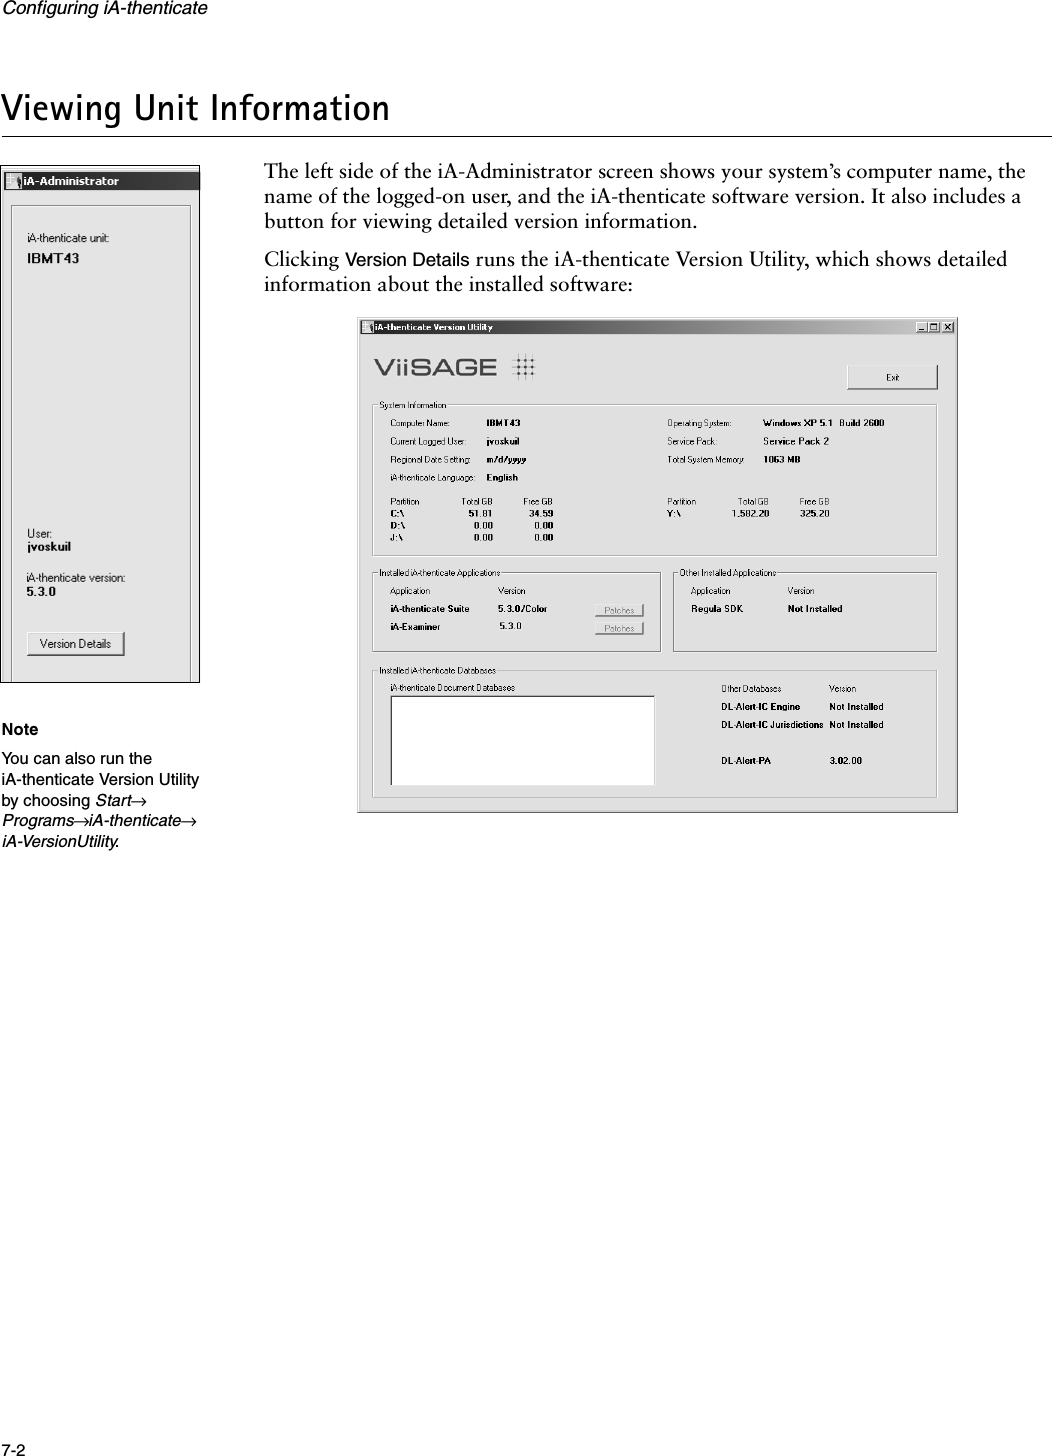
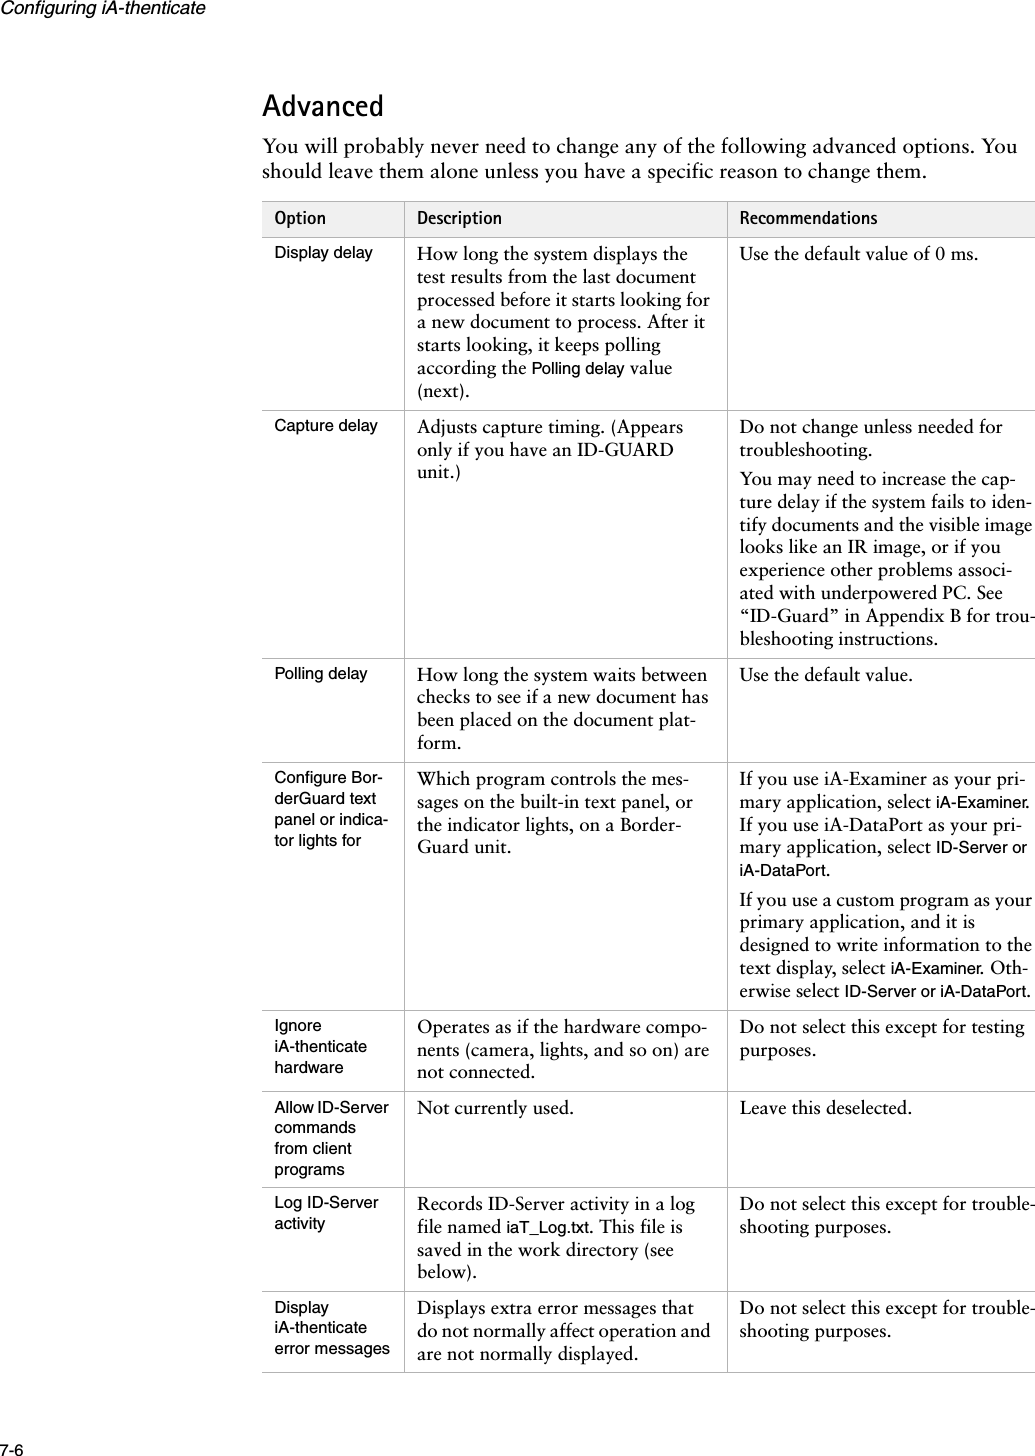

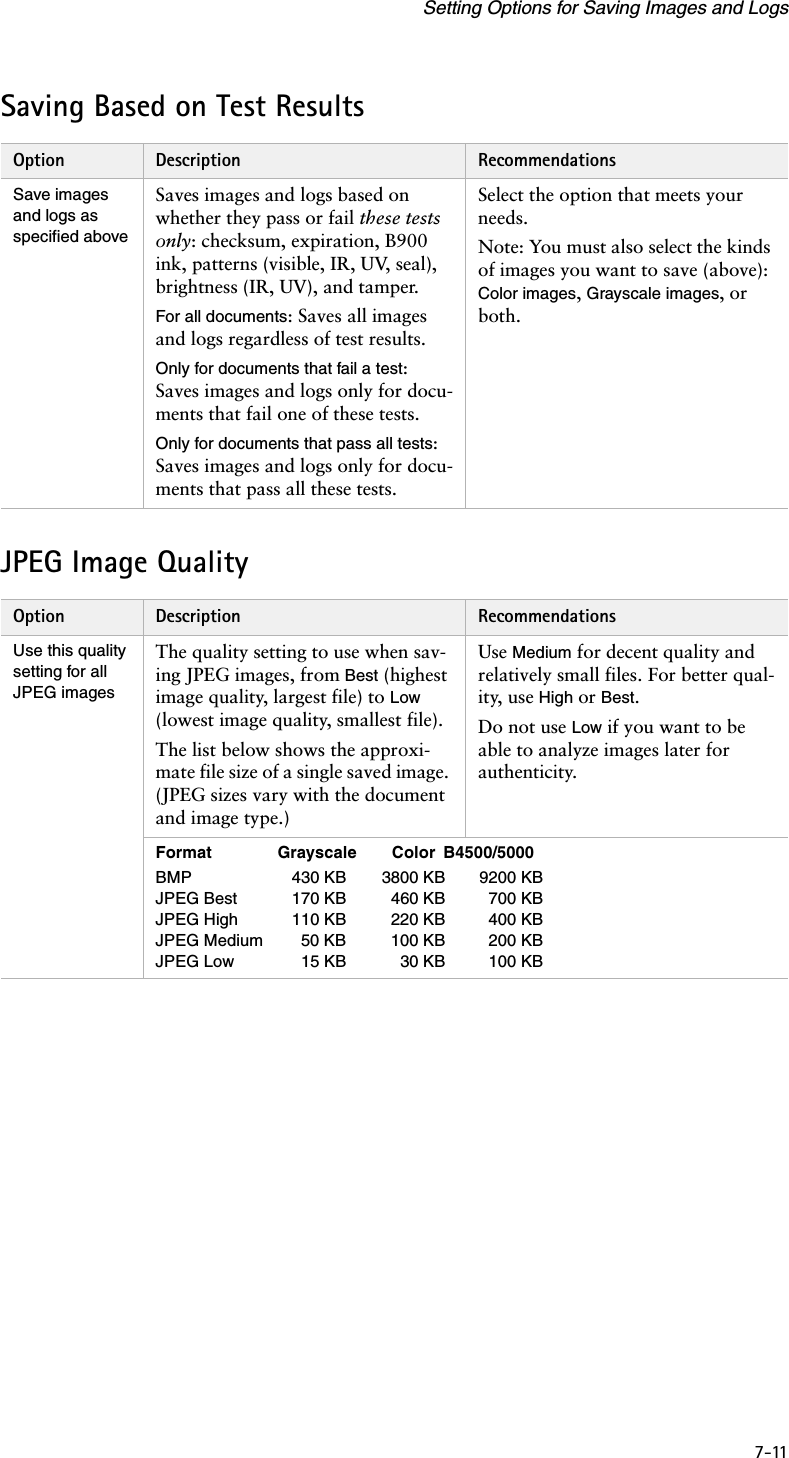
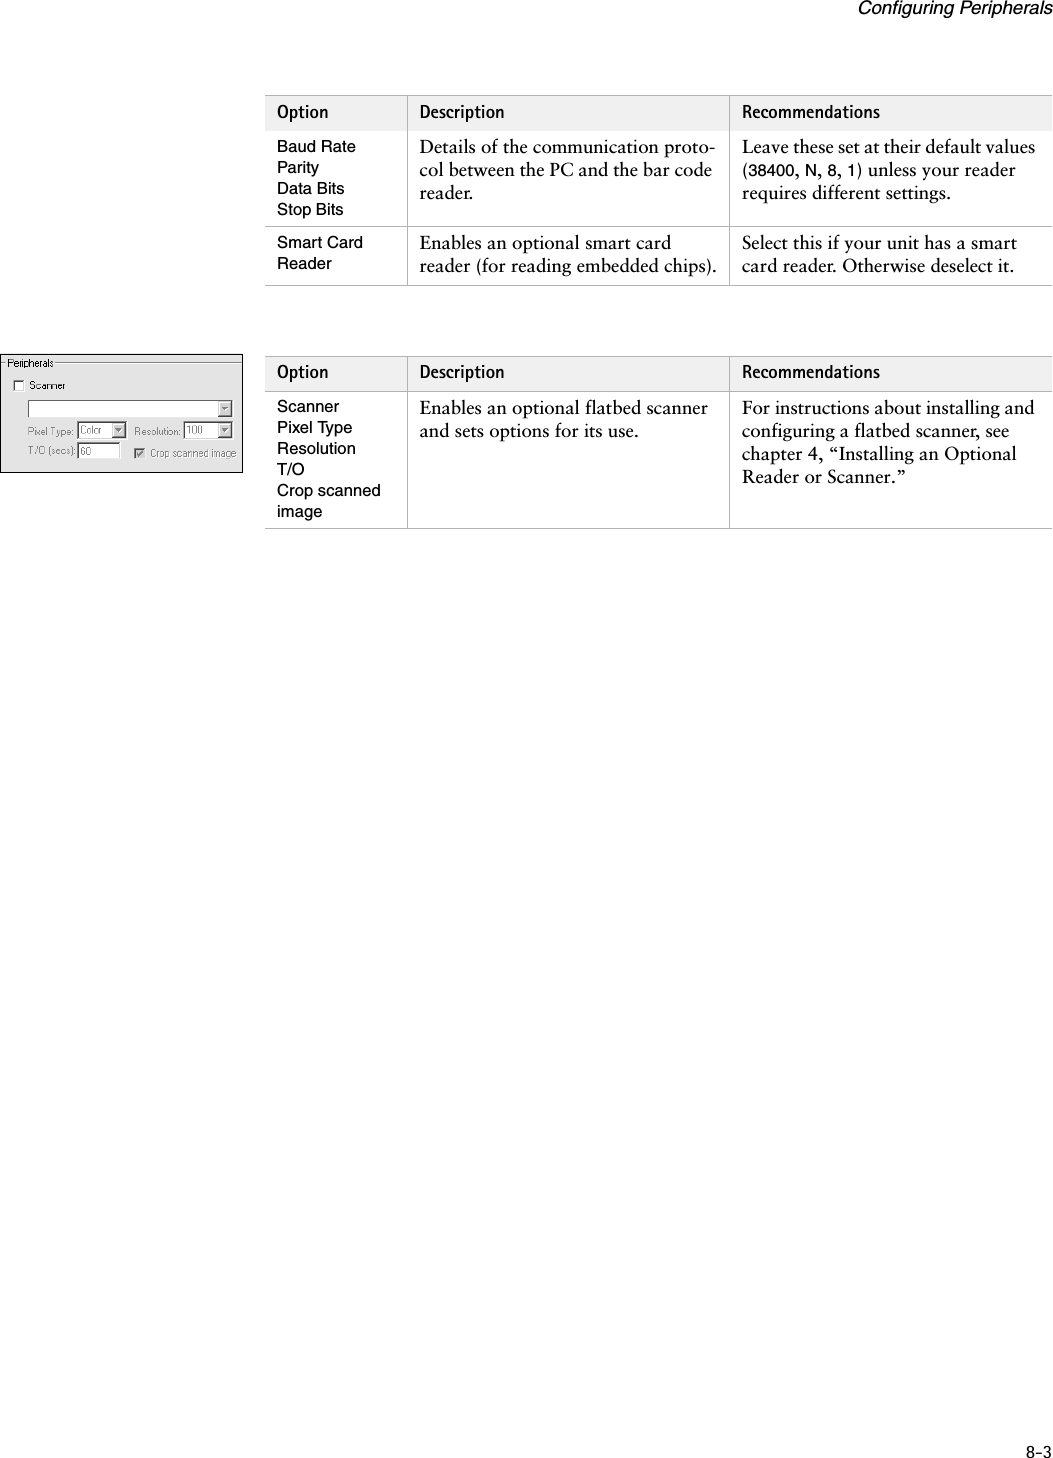
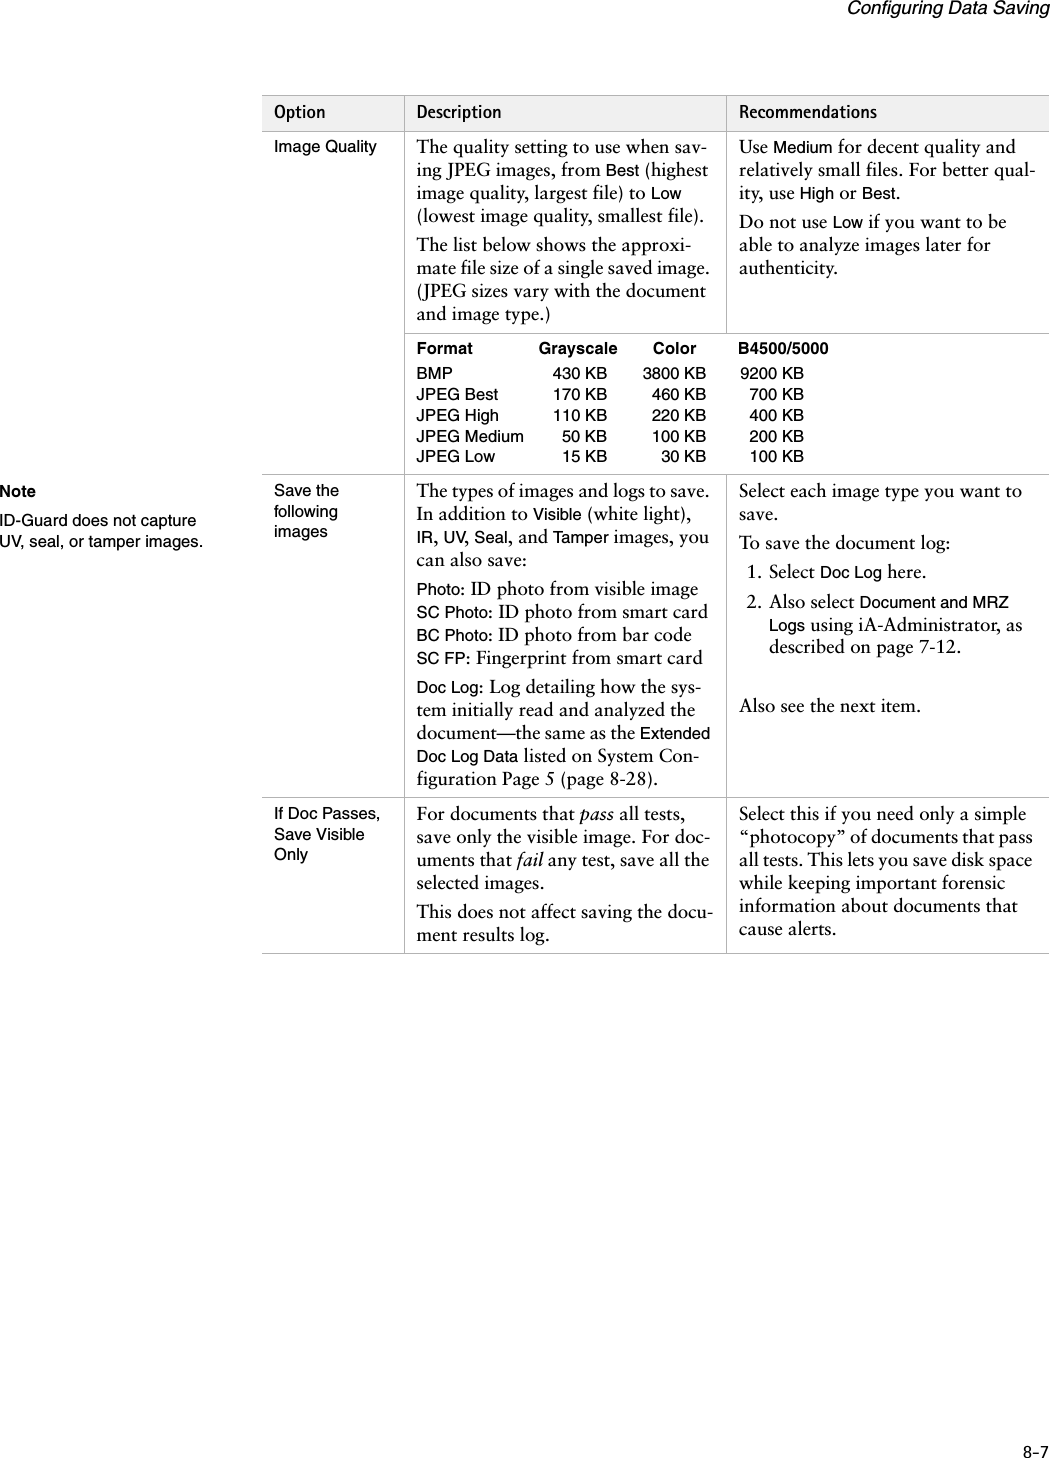
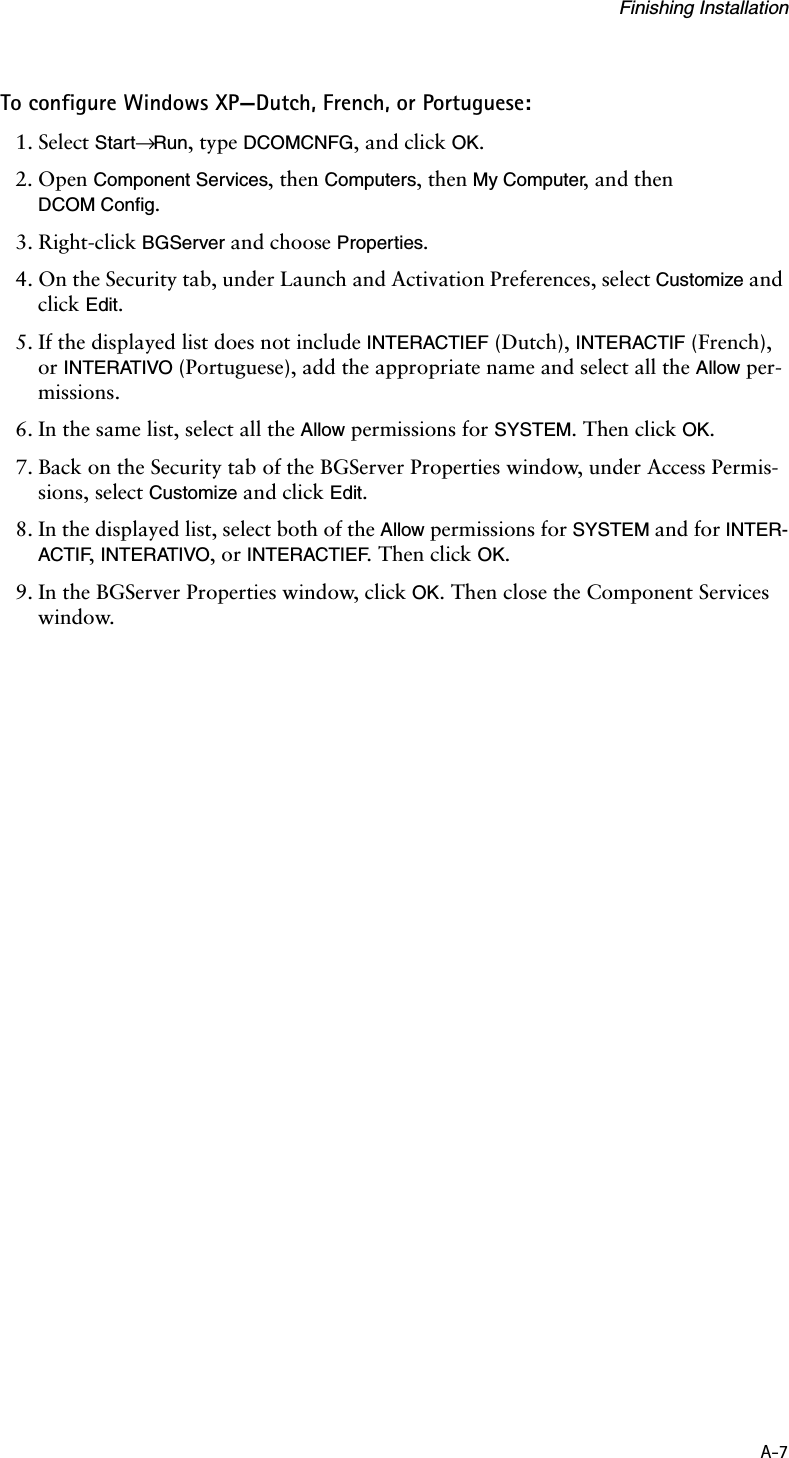
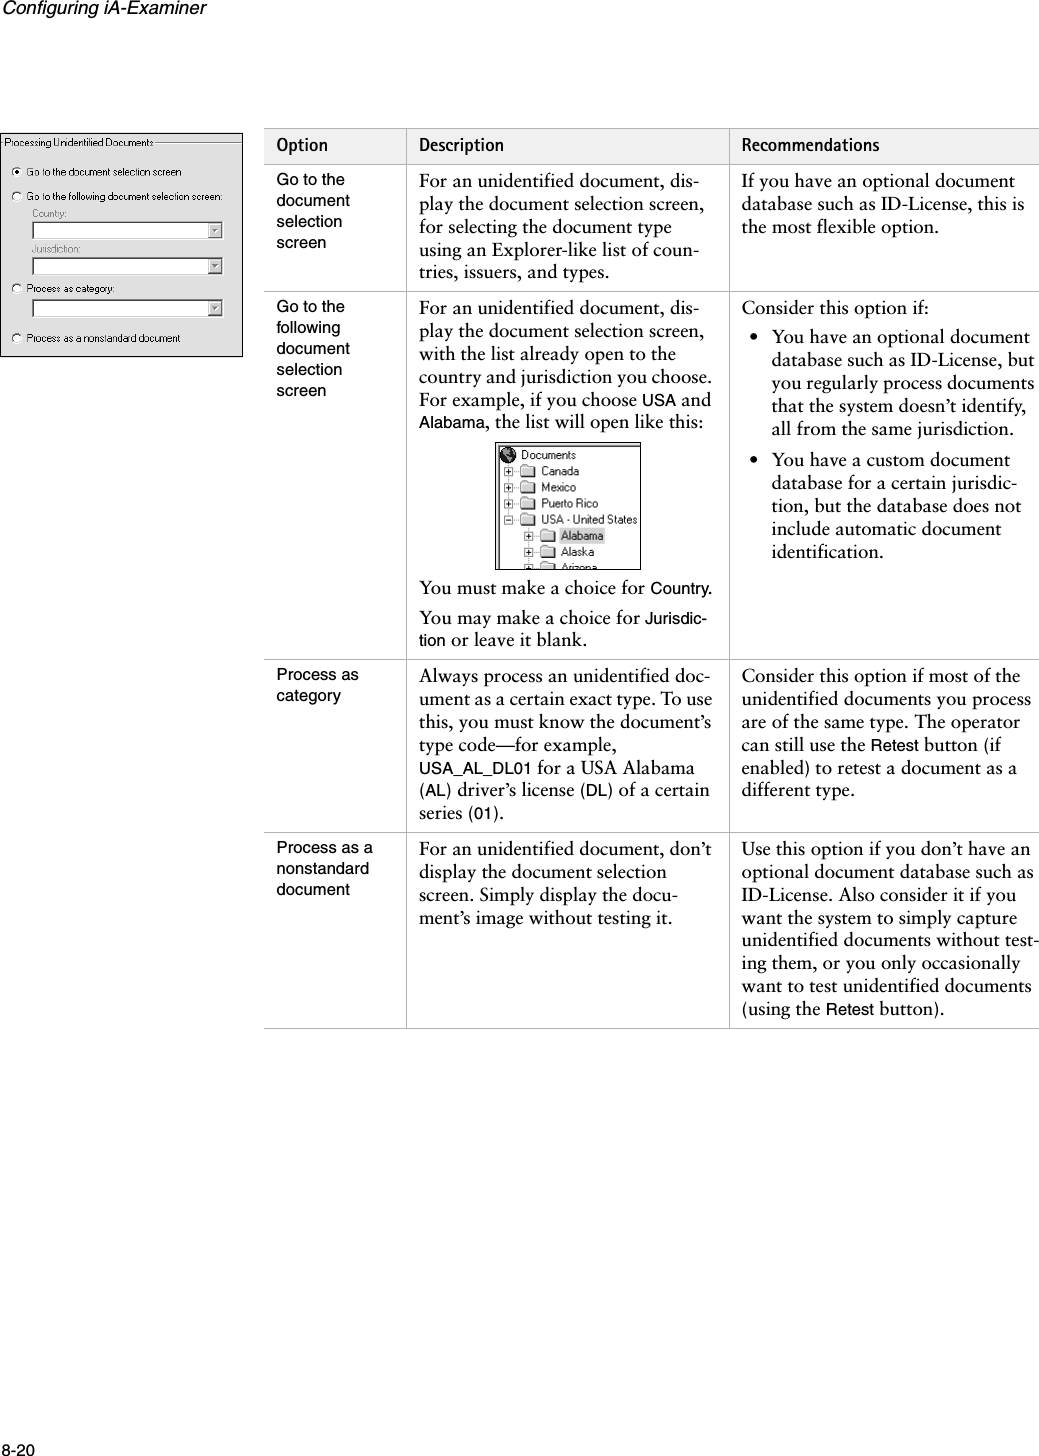
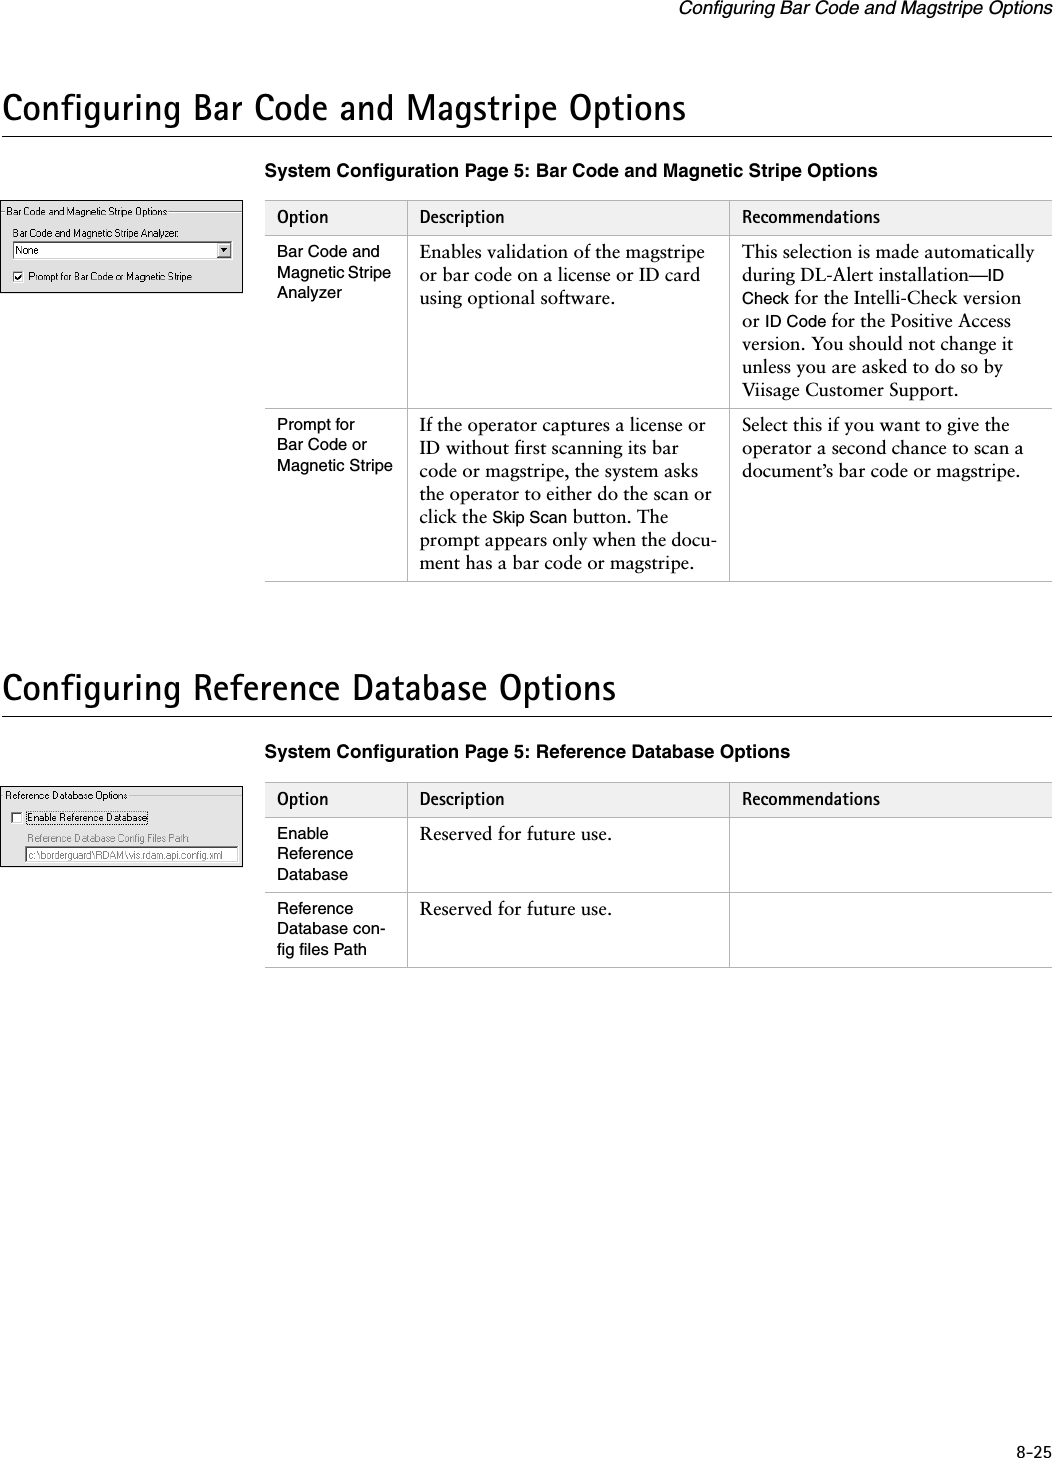
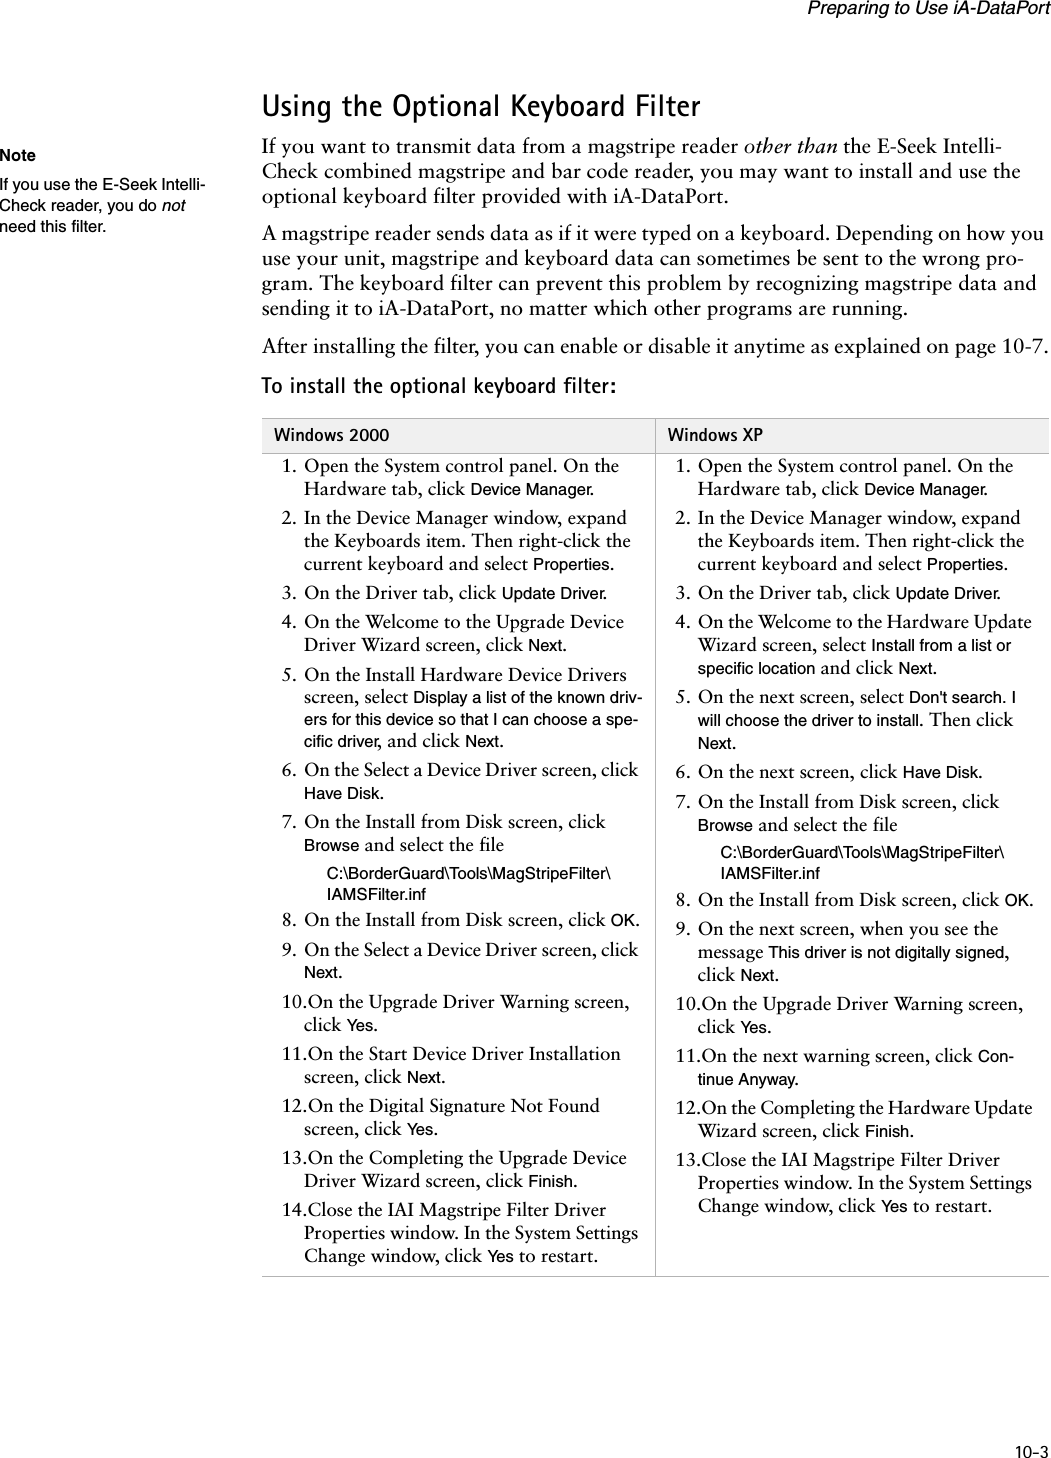
![8-13Configuring Document ProcessingAutomatically Print AlertsAutomatically sends a report to the default printer when the operator leaves one or more problems unre-solved during a review.Select this if you want a paper record of unresolved document problems.Alert Warning on ReturnWhen the operator returns from the primary program, iA-Examiner dis-plays an alert if any of the docu-ment’s possible problems were not resolved during the iA-Examiner review.Select this if you want an extra warning for the operator that the document has unresolved problems.Supervisor Finish OnlyA special-purpose option that works only with the settings shown at left.Select this only in consultation with Viisage Customer Support.Send User MessagesSends to the primary program the messages iA-Examiner displays on its screen about what is happening and what the operator should do next.Select this only if your primary pro-gram is set up to process these mes-sages.Send Exam-iner StatusSends to the primary program cer-tain indicators about iA-Examiner’s status, such as “document inserted” and “document removed too soon.”Select this only if your primary pro-gram is set up to process these status indicators.Primary App Window NameThe name that appears in the title bar of the primary program. Specify-ing this name ensures that iA-Exam-iner properly returns control to the primary program.Enter the name exactly as it appears in the program’s title bar.Primary App Name (for button)The program name to display on the Return to button that takes the opera-tor back to the primary program.For example, if you type Master here, the button will say Return to Master.Specify the program name for the button. (This does not need to match the name in the program’s title bar.)iA-Examiner Is the Primary ProgramUsed when the operator works pri-marily with iA-Examiner (rather than with another program).Select the appropriate option for your work environment—either this one or Another Program Opens iA-Examiner (above).Option Description Recommendations[Required][Req’d][All selected]Required settings for Supervisor Finish Only:](https://usermanual.wiki/L1-Identity-Solutions/0B5000A/User-Guide-886516-Page-81.png)
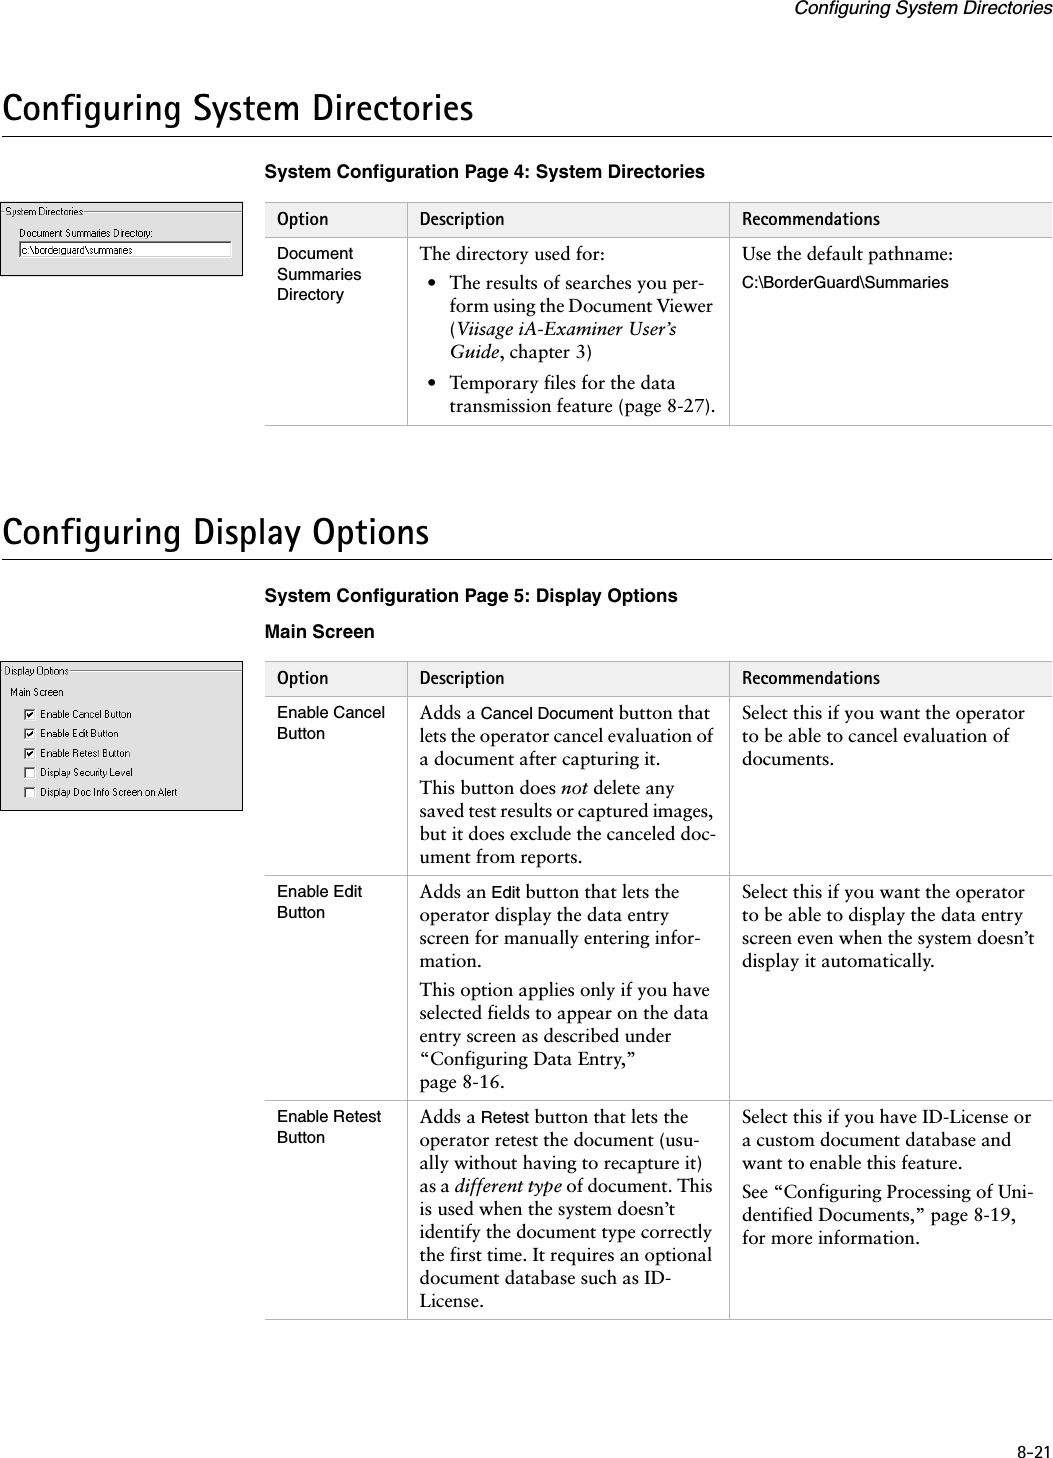

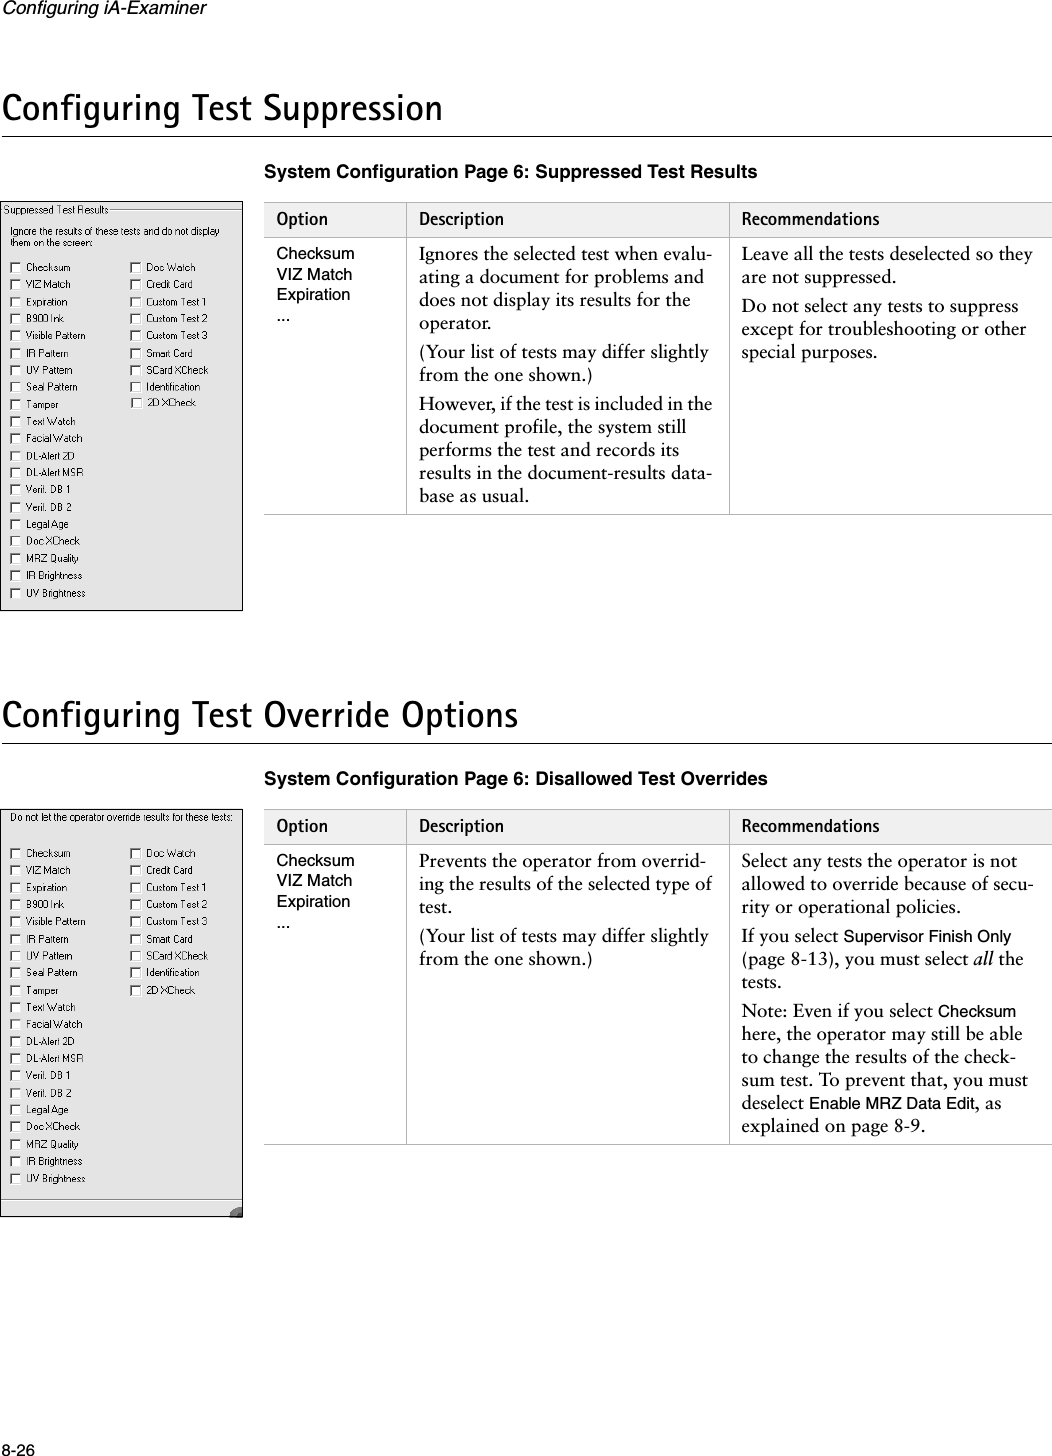

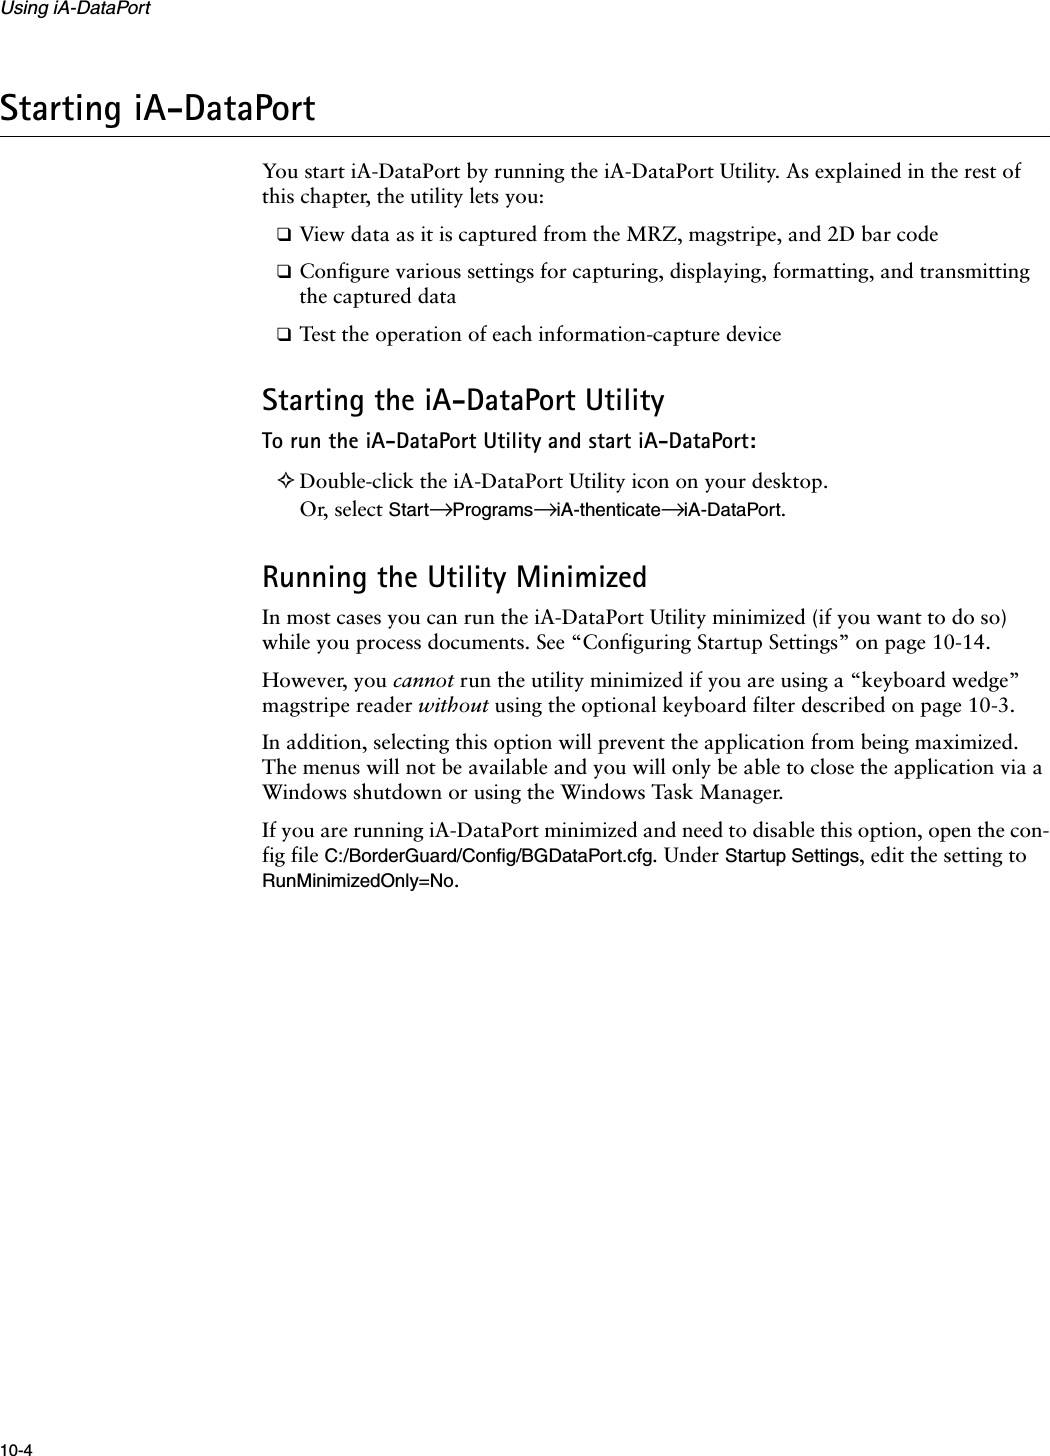

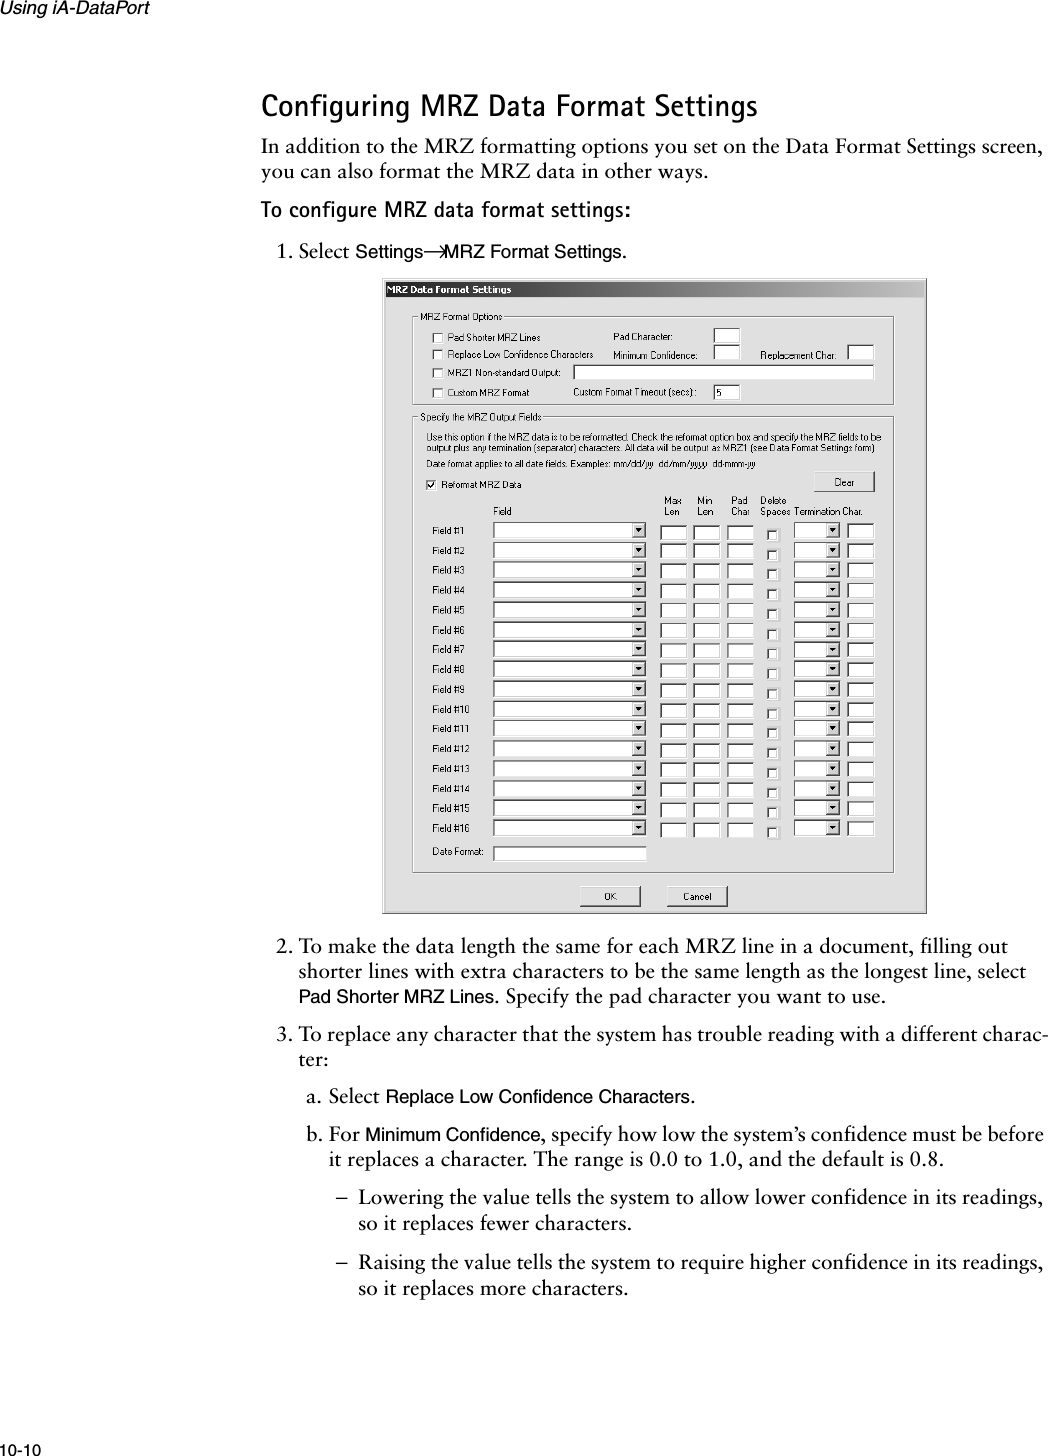
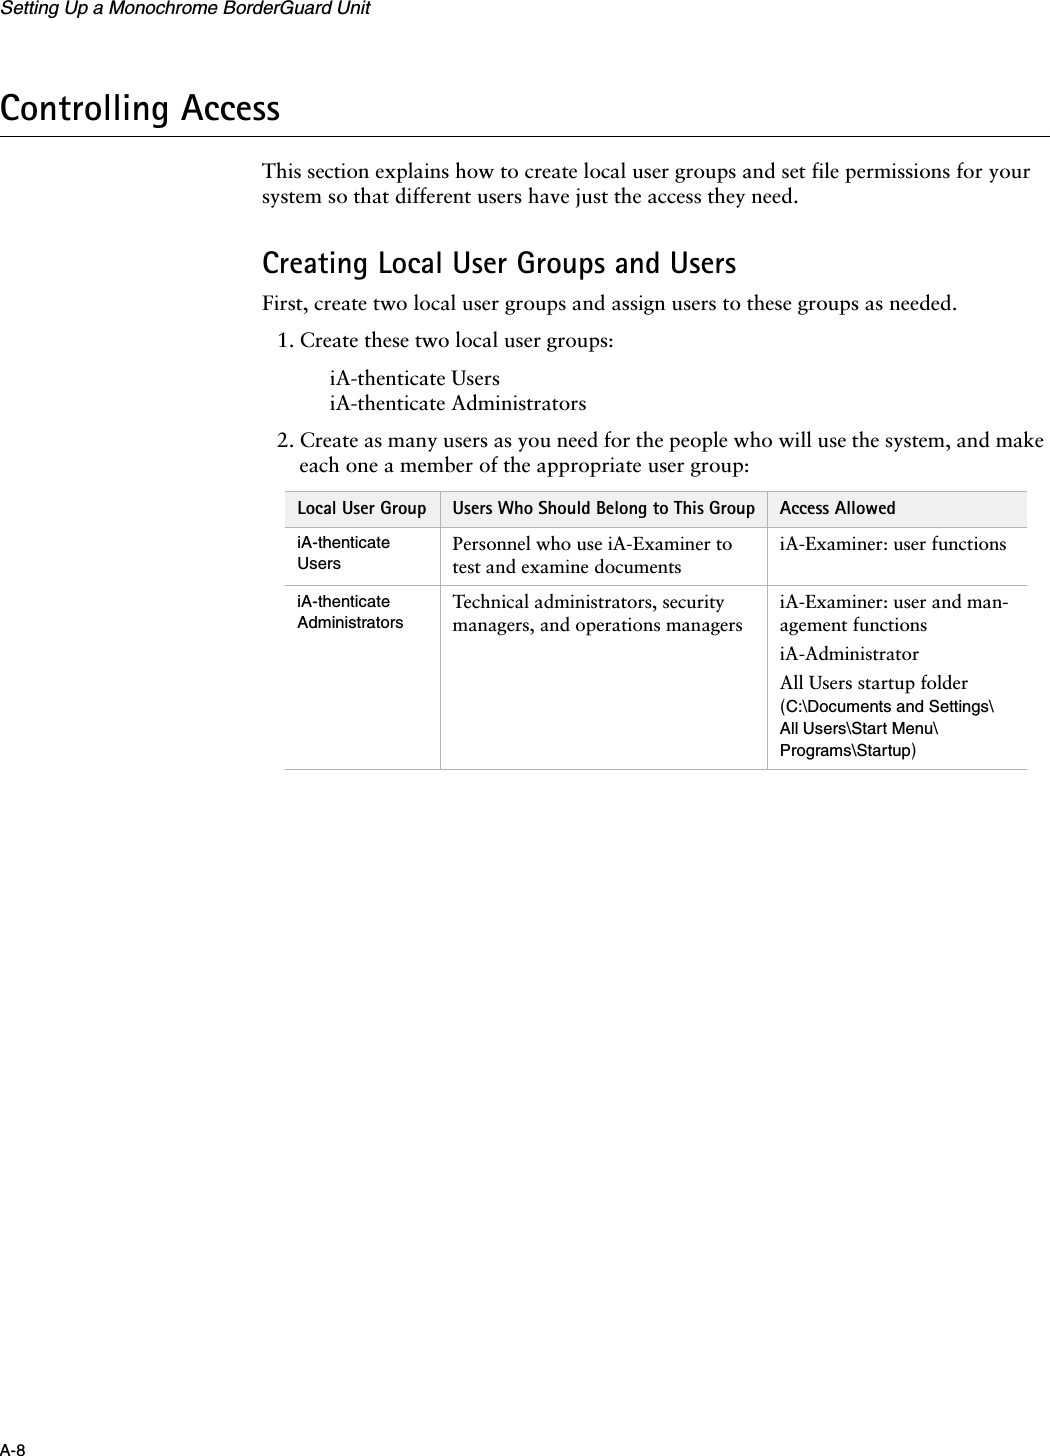
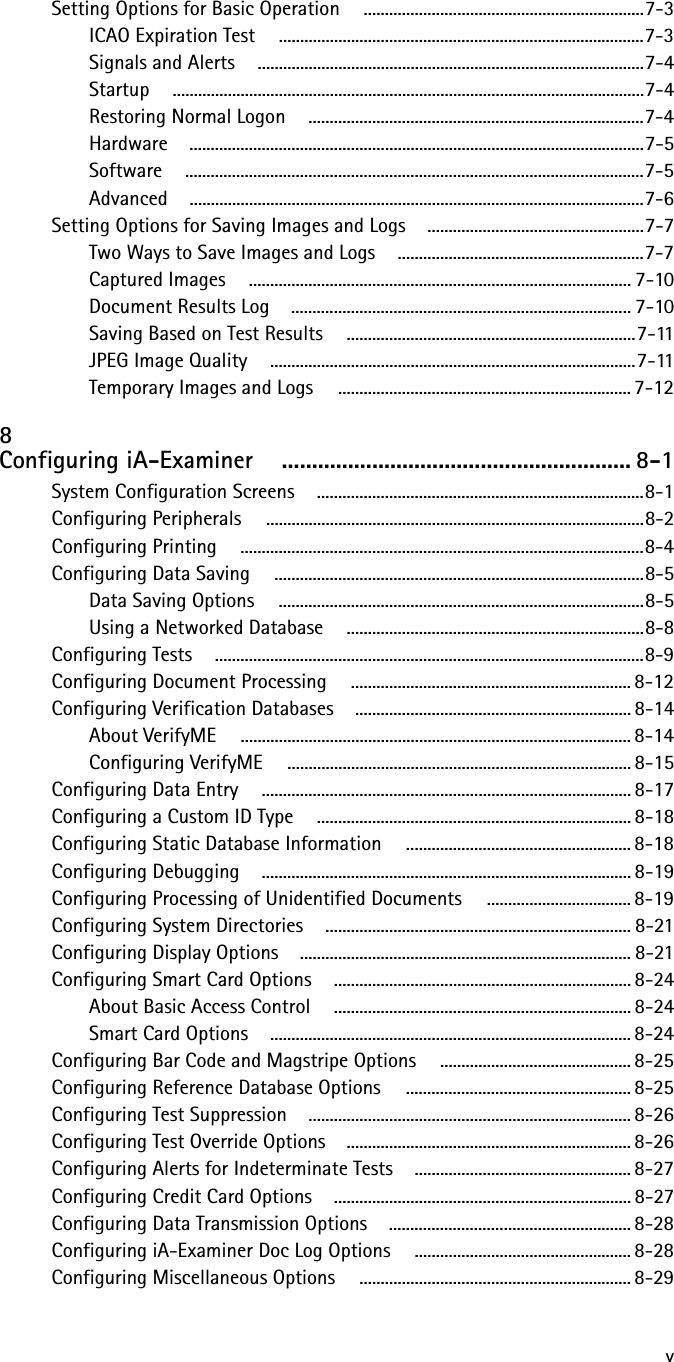
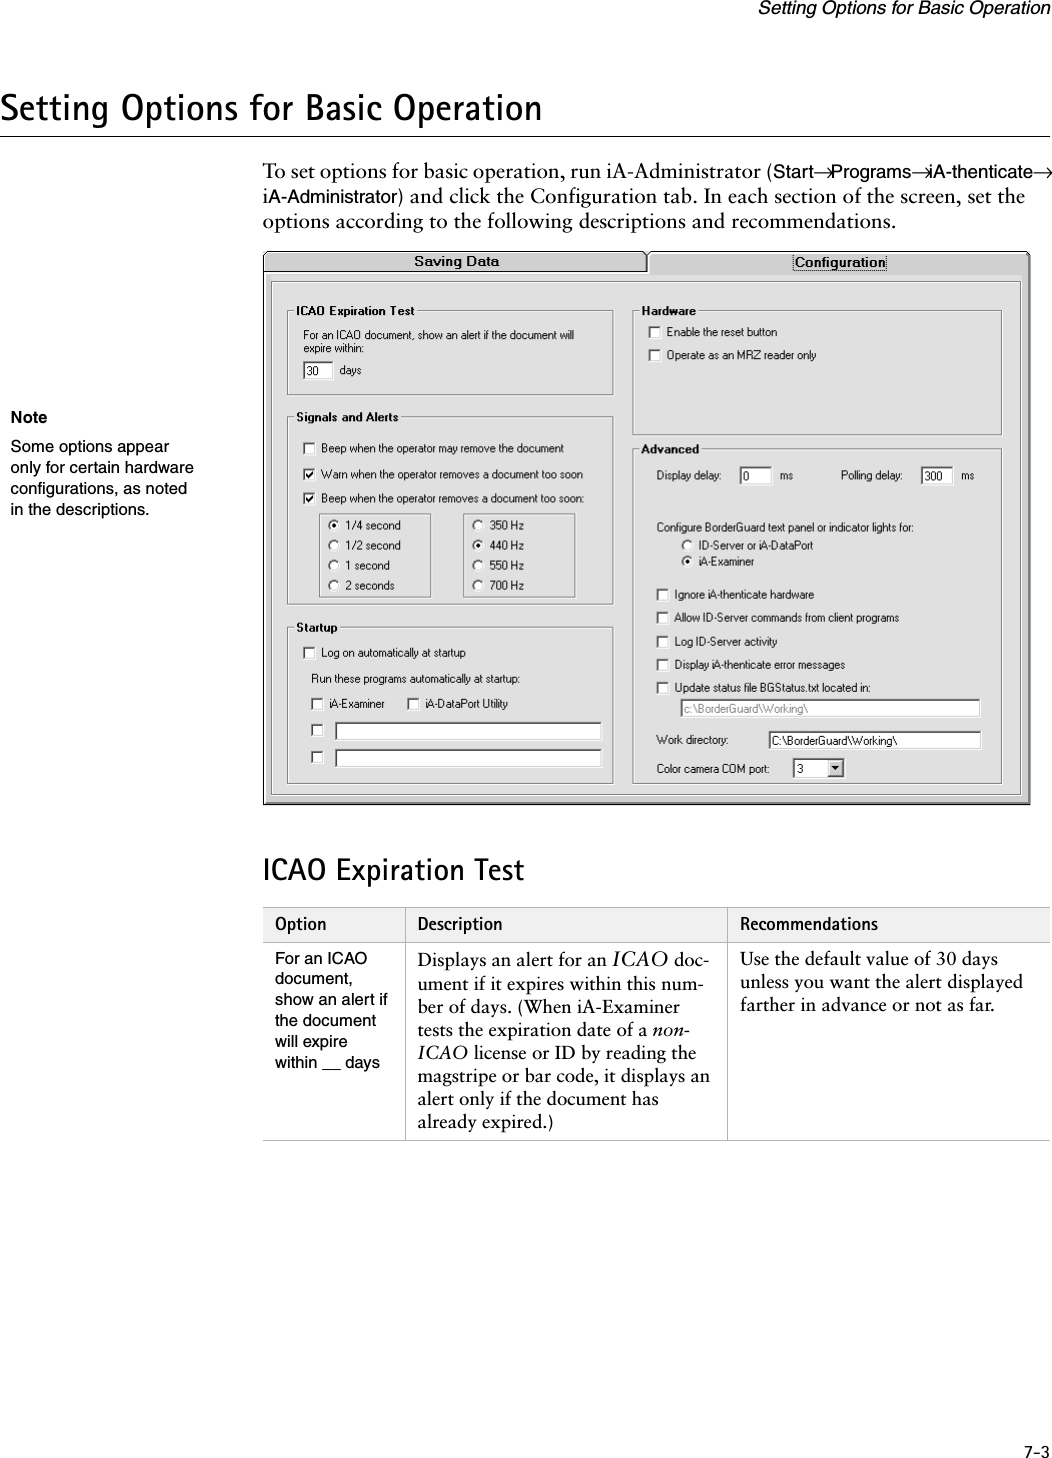
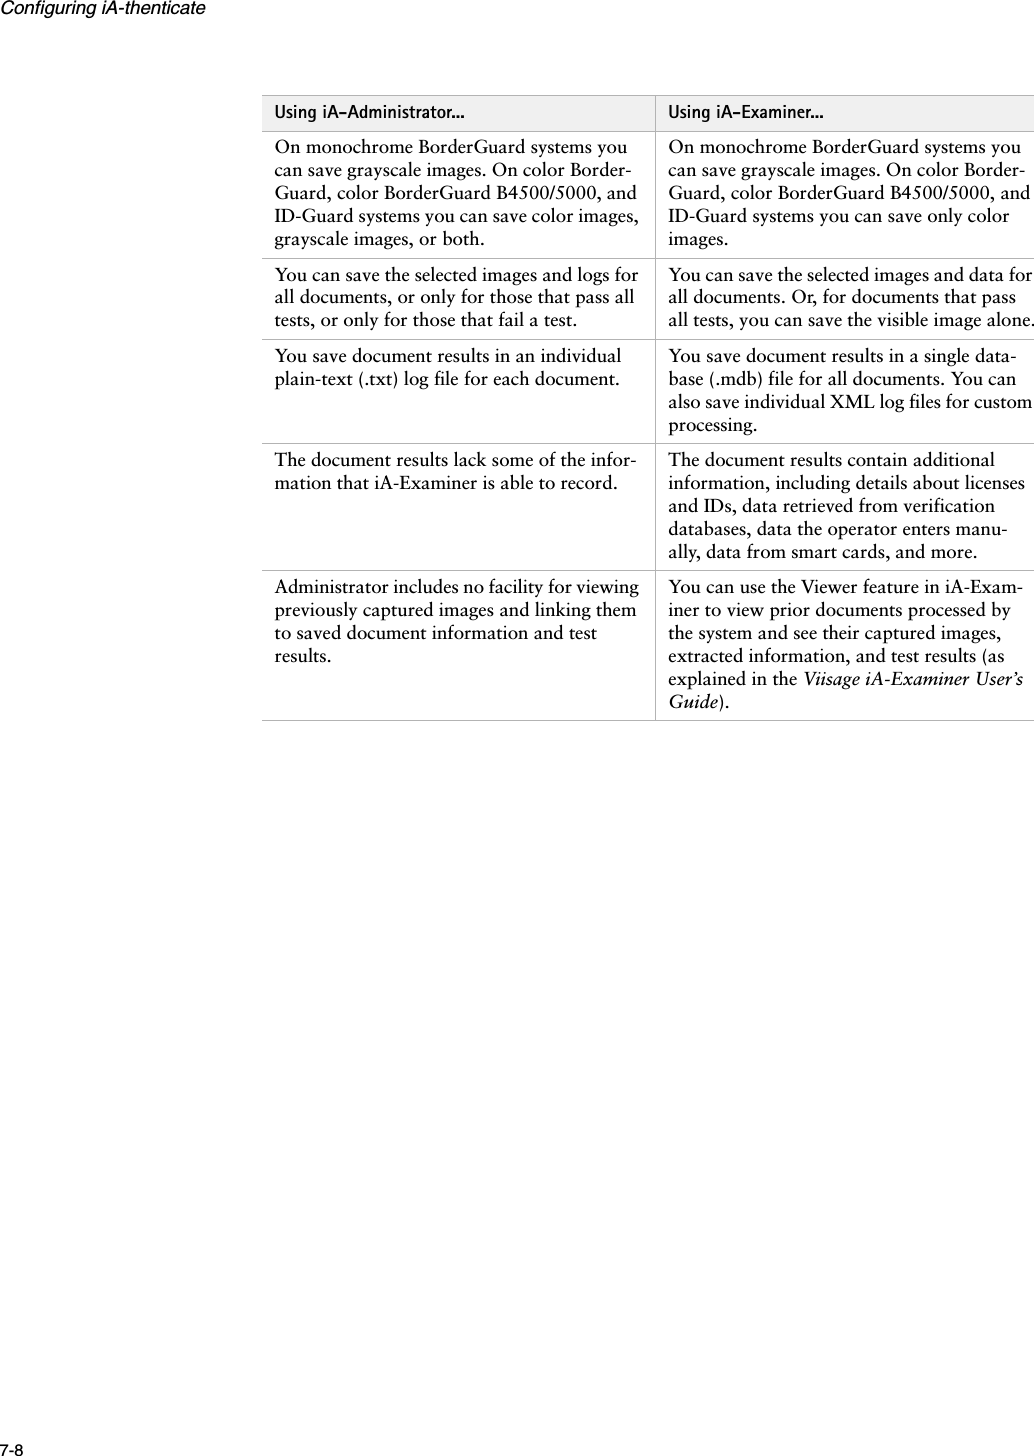
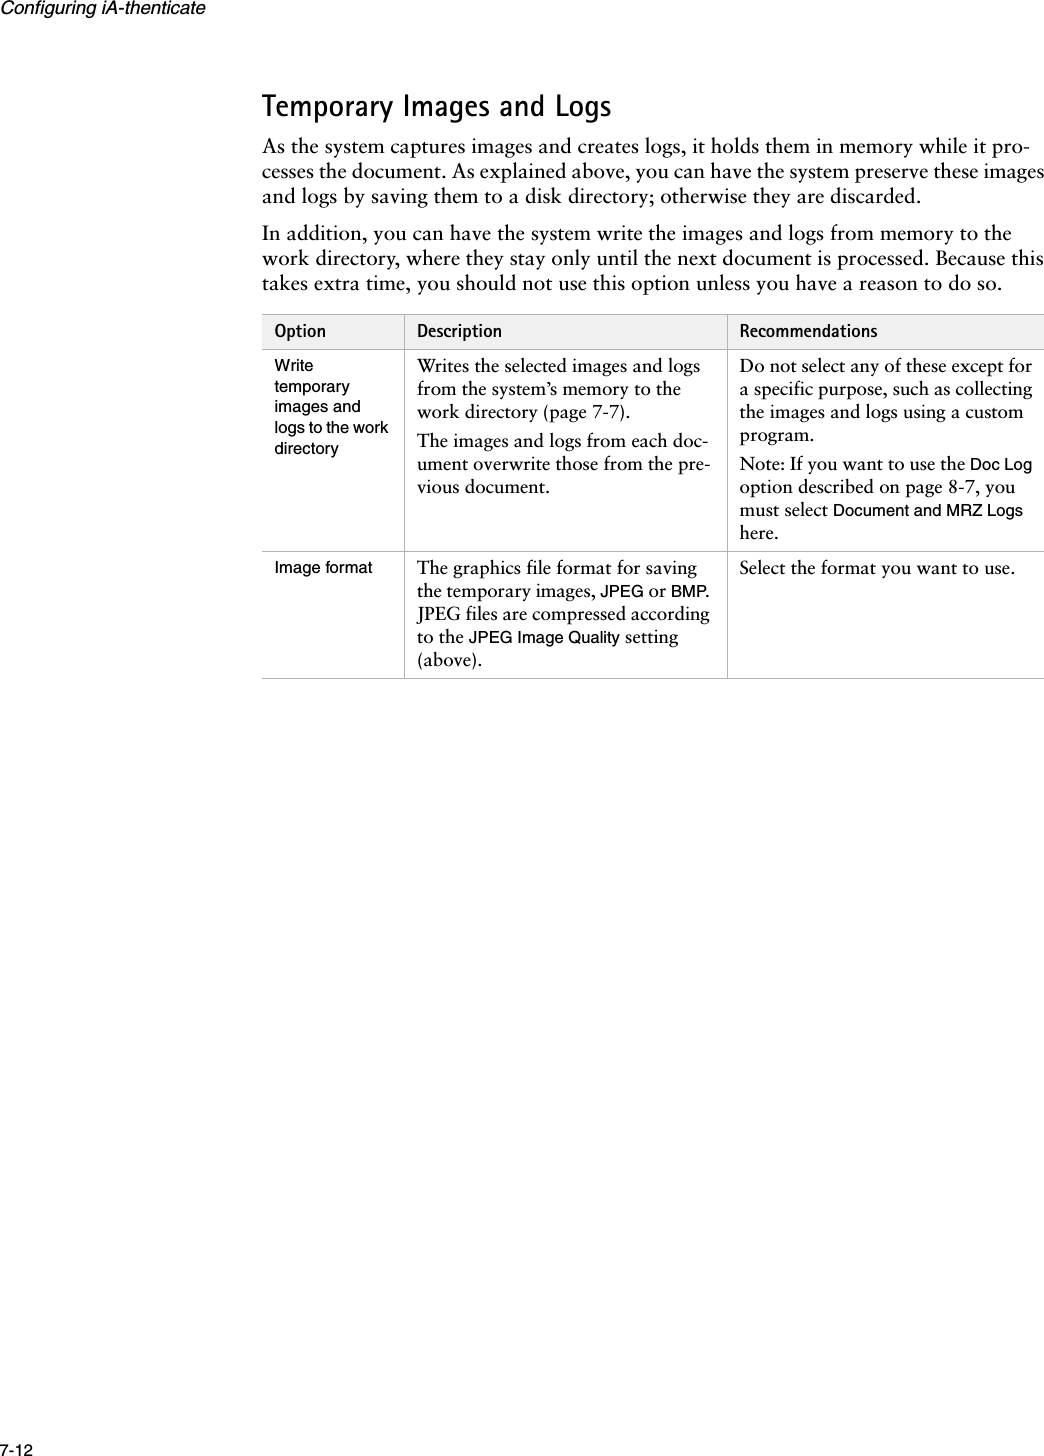
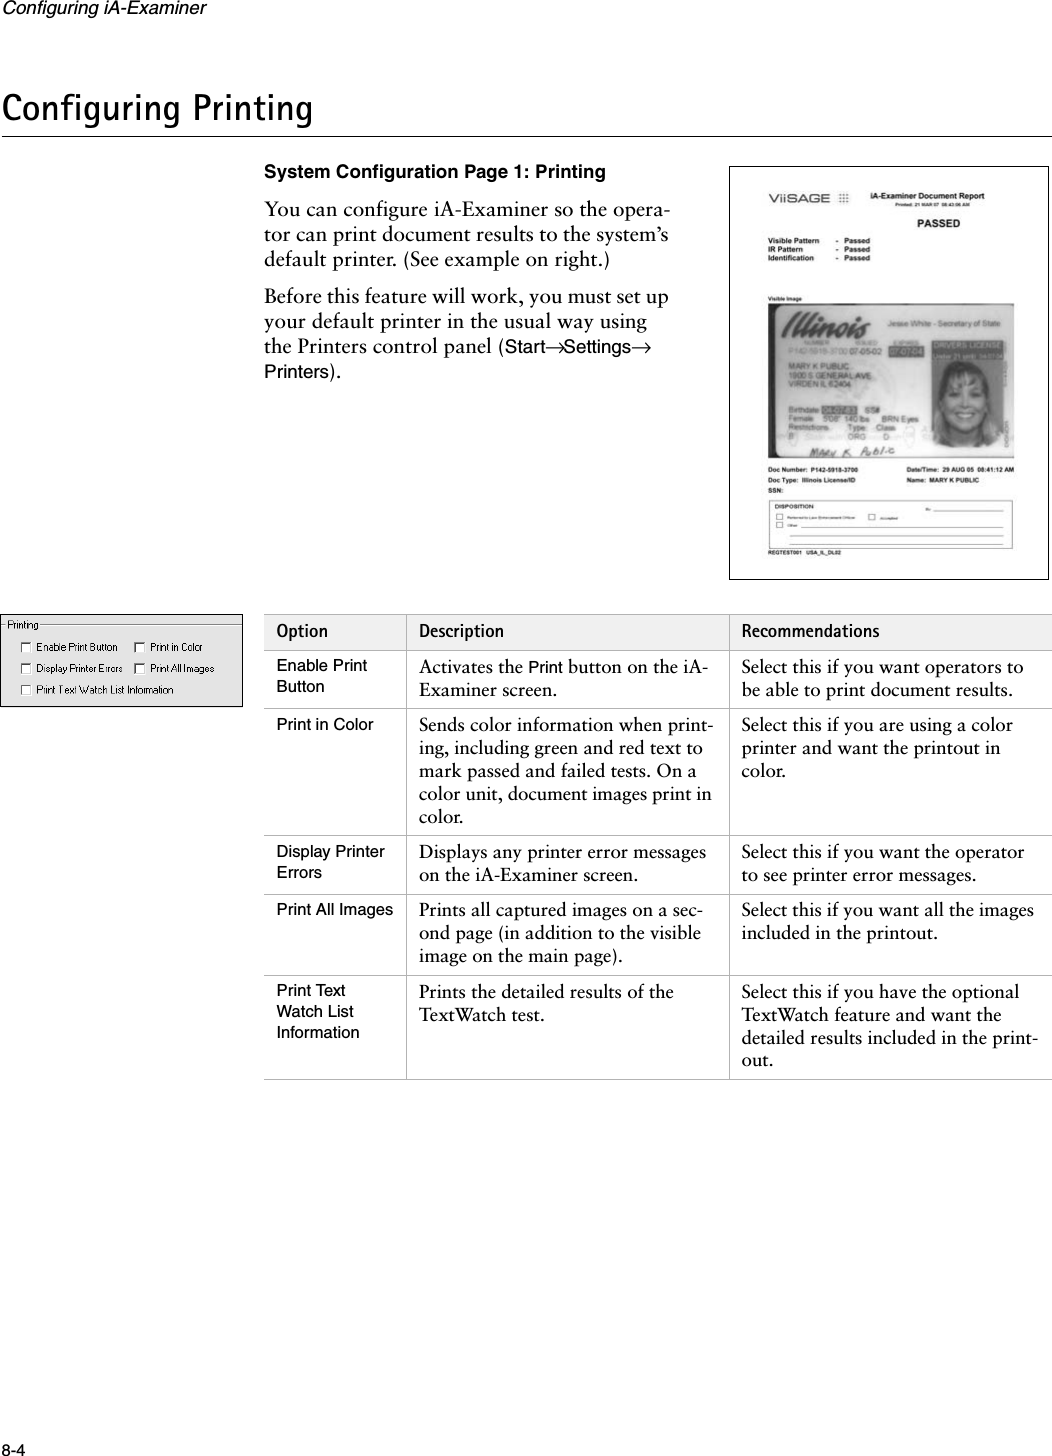
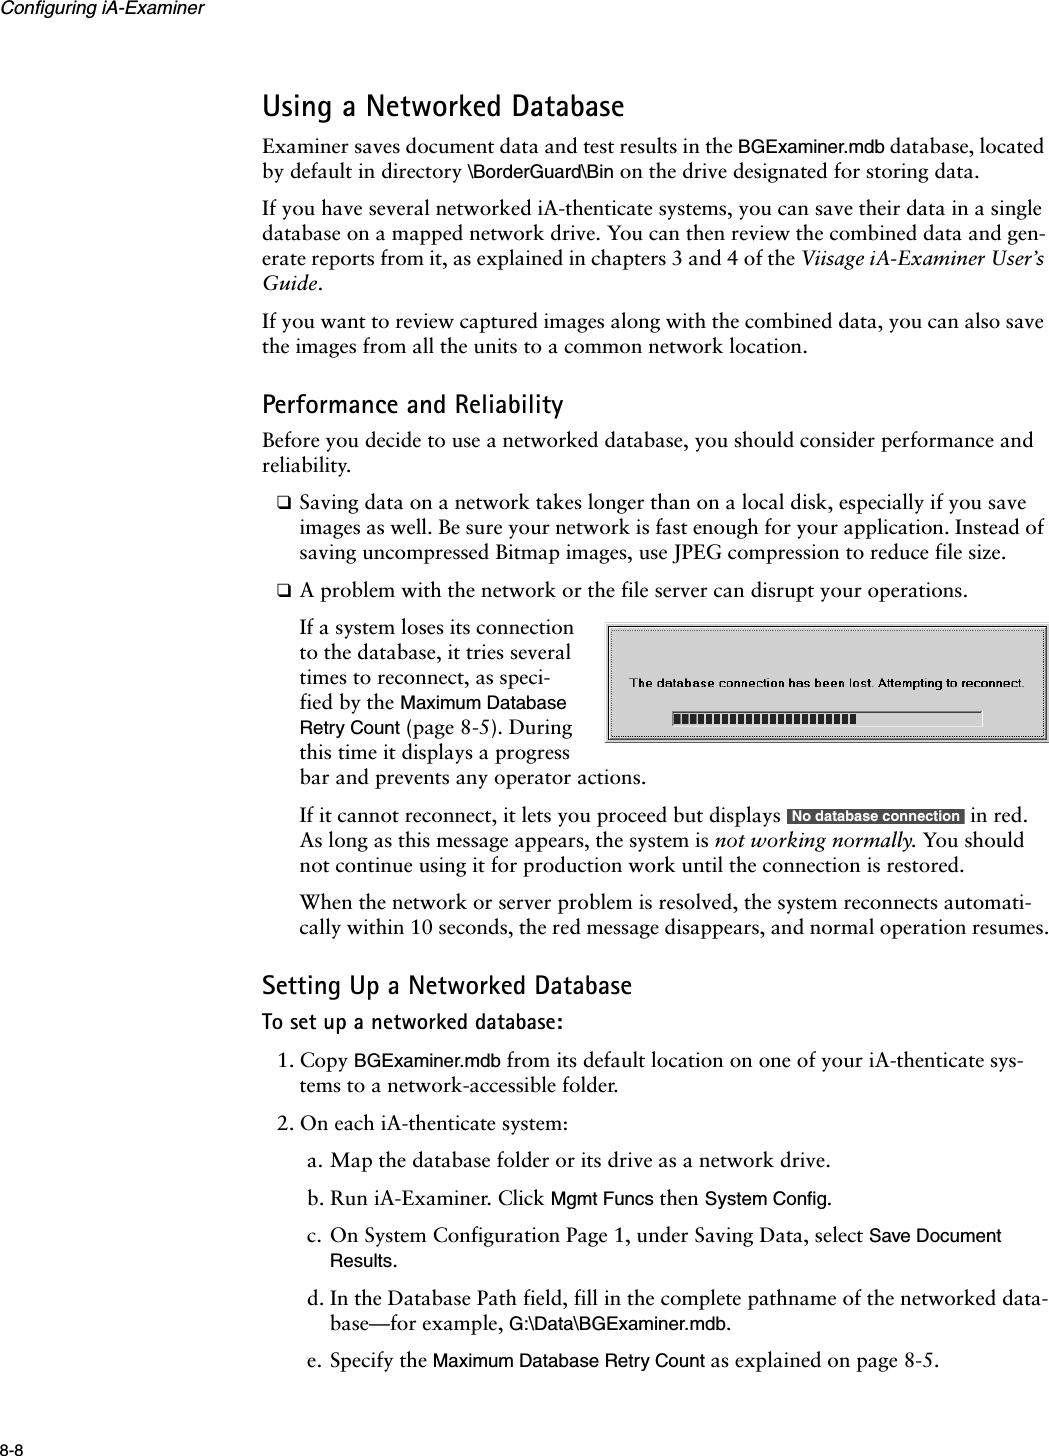
![10-11Configuring Settingsc. For Replacement Character, specify which character you want substituted for each doubtful character. For example, you might want to use a question mark (?) or underscore (_).4. To send a notation or other text when the system is unable to automatically identify the document as a specific type (whether ICAO or non-ICAO), select MRZ1 Non-standard Output and enter the text you want to send. For example, you might want to send a notation such as [Unknown document].5. Leave Custom MRZ Format deselected unless you have created a custom MRZ-pro-cessing application in consultation with Viisage Customer Support.6. To process the captured MRZ data and send it in a different format, select Reformat MRZ Data and then choose how you want to format each field, in order. For each field:a. Under Field, select the name of the field—for example, Surname.b. If you want the field to be no longer than a certain length when iA-DataPort sends it, specify that length under Max Len. iA-DataPort then truncates longer fields to this length. If you don’t want a long field truncated, leave Max Len blank.c. If you want the field to be at least a certain length when iA-DataPort sends it:–Under Min Len, specify the minimum number of characters the field should contain.–Under Pad Character, type the character you want to use to fill out a short field to the minimum length. The default is a space.If you don’t want the field padded to any minimum length, leave Min Len blank or enter 0 (zero).d. If you want all spaces in the field removed, select Delete Spaces. For example, VAN LIND would become VANLIND.e. Under Termination Char, specify the character to insert immediately after a vari-able-length field to mark its end. You can select various untypeable characters (such as NUL) from the drop-down list, or you can enter any typeable character (such as >) in the second box.Finally, specify the Date Format you want to use for sending dates. This determines the day-month-year order, the punctuation used between elements, the month for-mat (number or abbreviation), and the year format (2 or 4 digits). For example, for August 14, 2003:7. Click OK.This date format... Sends this data...mm/dd/yy 08/14/03yyyy-mm-dd 2003-08-14dd mmm yyyy 14 Aug 2003Notes• One field you can select is Pass/Fail. This is not MRZ data but an extra field for sending overall test results. Select this to send P when a document passes all tests, E when it fails only the expiration test, or F when it fails any other test.• Setting Max Len and Min Len to the same number results in a fixed-length field.• If you select Delete Spaces, iA-DataPort removes the embedded spaces before adjusting the field’s length using the Max Len and Min Len settings.](https://usermanual.wiki/L1-Identity-Solutions/0B5000A/User-Guide-886516-Page-115.png)