LB Technology JM83310-H3V IP Camera User Manual
LB Technology Co., Ltd. IP Camera
User manual
IP Camera Quick Guide
2
1. Important Safeguards and Warnings
• Avoid dropping or striking the IP camera.
• Keep the IP Camera in a normal room environment, between -10oC ~ +40oC, away from any direct heat source like
direct sun light. Please do not install the IP Camera in a damp, smoky, or dusty environment. Do not let solids or
liquids fall into or infiltrate the IP camera.
• Use within the power and surge protection rating.
• Don’t disassemble or try to repair the IP Camera by yourself. Attempts to do so will void manufacturer’s warranty!
2. Package Contents
Your IP Camera package should come with the following items:
• IP Camera
• Power Adapter
• Installation CD (with full manual and IPC software)
• This Quick Guide
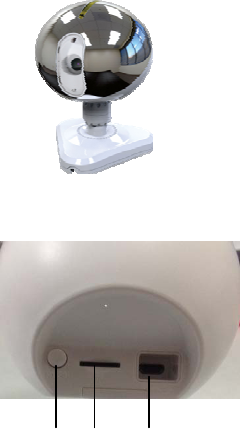
3. DescriptionOnTheIpcam(Pleasetakeactualmodelasquasi)
A. Appearance
B. Back interface
123
1. EnterAPmodebutton
2. SDcardsocket
3. DC5V
3
C.front interface
1234
1. Cameralens
2. Microphone
3. Photosensitiveresistance
4. IR
3. Device Connect
1). Connect the power adapter to the electrical outlet of the IP camera and power on.
2). With the mobile phone will establish a connection between IPcam and wireless router。(Please refer to 7 “mobile
phone support” )
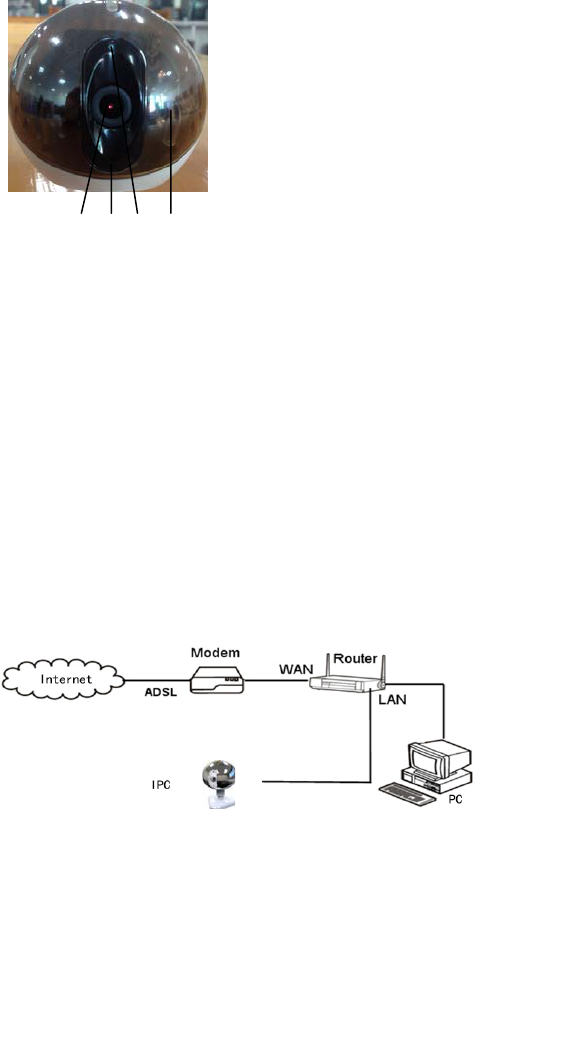
4. Network connection and port forwarding
A. Network connection diagram as below:
WIFI
4
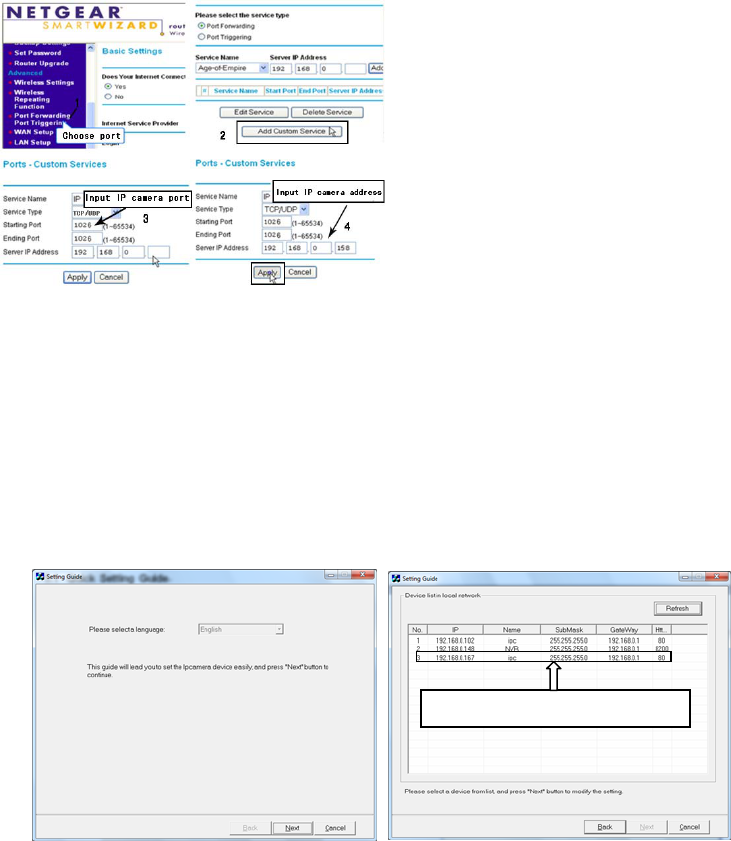
z Port forwarding
If visit IP Camera through IE browser or CMS client
from WAN, you must do port forwarding on the router.
Take NETGEAR router for example.
Operation Steps:
① After login the interface of the router, choose
“Port Forwarding”;
② Choose “Add custom Service”;
③ Input IP camera port;
④ Input IP camera IP address, click “Apply”(the
http port and IP address should be the same as
figure 4 which set by your own).
Note: Different router has different settings for port
forwarding; please kindly follow your router guide
to do the port forwarding.
After the port-forwarding is done, you could view the IP Camera from WAN now.
5. Quick setting guide
1) Connect the IP Camera to network (or PC), and then to the IP Camera electric start.
Note: if an IP Camera and a PC connected directly, PC IP address to use manual distribution methods, and the IP
address of the PC network segment and the IP Camera should keep the same segment.
2) Copy the quick setting guide program “HiCamSearcher_v1.1.exe” from the CD to user’s PC, and run it on PC.
3) Press "Next" button, pop-up as below interface. Click “Refresh” button and online devices on LAN will be shown on
the list.
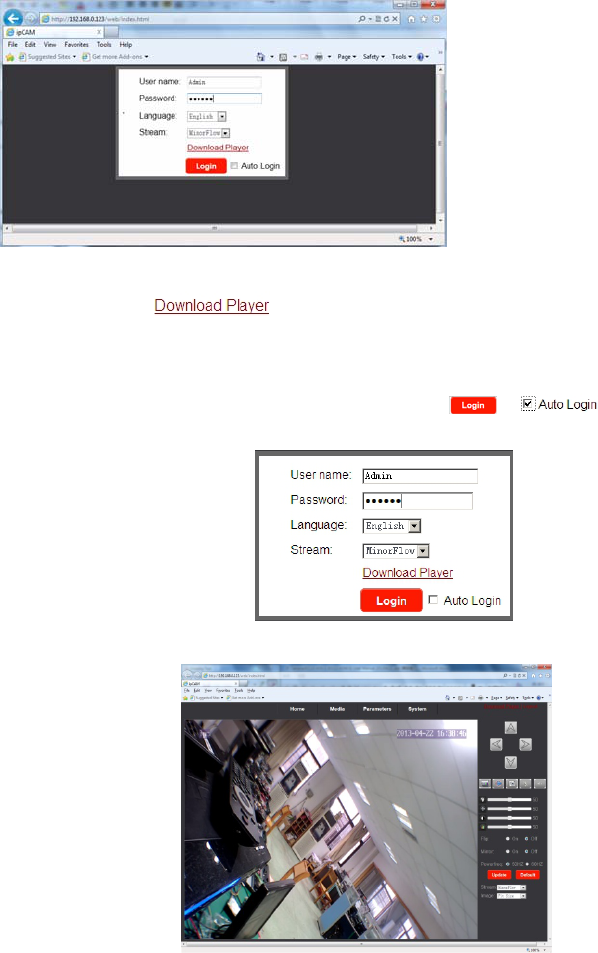
6. System Login
1) Open the web page, enter IP address “http://X.X.X.X”. If the http port of IPC has been changed (if it is not “80”), it
will be necessary to add a “:” followed by a port number. For example, assuming that the current port number is “P”, enter
“http://192.168.0.X:P”, to correct the problem.
Note: If the device is connected to the WAN, the IP address should be a public IP address.
The system will automatically enter the GUI as follows.
Doubleclickonetoaccessthecamera.
5
2) First users must click “ ” and it will download the file “IPCamera_OCX_Setup.zip” to the PC. Open
the zip file to run the file “IPCamera_OCX_Setup.exe” and it will install IPC’s OCX on the PC.
3) After installing player on the PC, input the authorized user name and password, the default user name of the
administrator is “Admin” and the default password of administrator is “888888”. Select language “English” or “Chinese”,
choose network stream “Main Flow” or “Minor Flow”, and then click “ ”. “ ” indicates that it will
enter into “Home” interface automatically when the device will be connected to the web browser again on the same PC.
4) After login, it will enter into “Home” interface of the live view as follows.
6
7. Soft AP function and wireless network
The ipcam can be worked in AP mode. If user doesn’t want to connect a wired cable to the indoor device, and user need
prepare a wireless router and a smart-phone or a pad with IOS or Android system.
Step 1. First user must install a mobile operating system specific program into his mobile or pad. and the iPhone and
android program should be downloaded via “APP Store” and “Play Store”. In “Play Store” or “APP Store”, please search
for “MobileEyeDoor+” and install it onto user’s mobile or Pad. Please see the instruction manual for user’s mobile to
install the program.
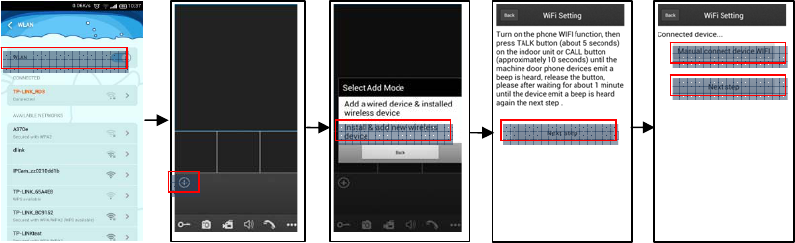
Step2. Turn on user’s phone WLAN function, then click the “MobileEyeDoor+” icon to run the program, click
“ + ” to select add mode, here must select “ Install & add new wireless device ” to the next interface to add
wireless device.
Step3. Then make the ipcam into standby mode, and long-press the “WIFI/ETH” button on the bottom panel, don’t loosen
the button until the blue light started flashing , this means the device will reboot automatically and go into AP mode.
Step4. On “WIFI setting” interface, wait for a moment and phone with android system can be connected to the device
WIFI successfully automatically. For the phone with IOS system user need to connect device WIFI function
manually. Click “Manual connect device WIFI ” to enter WLAN interface of user’s phone to see available networks,
and UID number of the ipcam device(the UID is attached to the machine) will be shown on the available networks
list. Select it and connected successfully means the mobile will be connected to the ipcam unit directly (shown as
follows).
Step5. Return to the “WIFI setting” interface and go to the next step. On this interface, available wireless devices will
be shown on the list. Choose one and click it, if the wireless password of the wireless router is enabled, it will
pop-up a window to enter the password of the wireless router, input the correct password and setting ok, the
ipcam device will reboot automatically, it will be connected to the wireless router after starting
Step6. Click “Next Step” to add ipcam device, input the correct password of the device, default as “888888", and then
save.
Step7. Return to the WLAN settings on the mobile and choose the wireless router which the ipcam has been
connected to. Now the wireless function of the ipcam device has been activation and works normally (Shown as
follows).
Step8. Now user can surveillance, communication, capture and recording on his phone/pad about the remote device via
the program “MobileEyeDoor+”
In the following diagram, we use a smart-phone with android system to a ipcam. The usage of an iPhone/iPad with
IOS system is similar.

7
8. FAQ
1). Forget password?
Solution:There is a "Reset" button on the device interface, press it for 3 seconds or more to restore all default parameters
except IP address (Factory settings), user name and password of administrator are "Admin" and “888888”.
2). NO video Image displayed in IE browser?
Possible reason: Player (ActiveX) not installed.
Solution: Player (ActiveX) must be installed when visiting IP camera for the first time via internet Explore.
How to install: Visit IP camera, first users must click “ ” and it will download the file
“IPCamera_OCX_Setup.zip” to the PC. Open the zip file to run the file “IPCamera_OCX_Setup.exe” and it will install
IPC’s OCX on the PC.
3). Fail to visit IP camera via IE browser?
Possible Reason 1: Network is disconnected.
Solution: Connect your PC to network, checking whether it works properly or not. Check whether there is cable failure or

8
network failure caused by pc virus, until PC can be connected with the command of ping.
Possible reason 2: IP Address has been occupied by other devices.
Solution: Stop the connection between IP camera and Network, hook up IP camera to PC separately, reset IP address
according to the proper operations recommended.
Possible reason 3: IP addresses are in different subnets.
Solution: Check IP address, subnet masking address of the IPC and the settings of Gateway.
Possible reason 4: Physical address of network conflict with IP camera.
Solution: Modify the physical address of IP camera.
Possible Reason 5: Web port has been modified.
Solution: Contact Network Administrator to obtain related information.
Federal Communications Commission (FCC) Statement
This device complies with part 15 of the FCC Rules. Operation is subject to the following two conditions: (1) This device
may not cause harmful interference, and (2) this device must accept any interference received, including interference that
may cause undesired operation.
Note: This equipment has been tested and found to comply with the limits for a Class B digital device, pursuant to part 15
of the FCC Rules. These limits are designed to provide reasonable protection against harmful interference in a residential
installation. This equipment generates, uses and can radiate radio frequency energy and, if not installed and used in
accordance with the instructions, may cause harmful interference to radio communications. However, there is no
guarantee that interference will not occur in a particular installation. If this equipment does cause harmful interference to
radio or television reception, which can be determined by turning the equipment off and on, the user is encouraged to try
to correct the interference by one or more of the following measures:
●Reorient or relocate the receiving antenna.
●Increase the separation between the equipment and receiver.
●Connect the equipment into an outlet on a circuit different from that to which the receiver is connected.
●Consult the dealer or an experienced radio/TV technician for help.
Warning: Changes or modifications made to this device not expressly approved by LB Technology Co.,Ltd may void the
FCC authorization to operate this device.
Note: The manufacturer is not responsible for any radio or tv interference caused by unauthorized modifications to this
equipment. Such modifications could void the user’s authority to operate the equipment.
This equipment should be installed and operated with a minimum distance of 20cm between the radiator and any part
of your body.
★Ifthereisanydoubtordisputabilityregardinginformationinthismanual,youcancallour
companyforclarification.
★ In all cases, for more details, please refer to the electronic user’s manual on the CD. Thank you!