LG ELECTRONICS GT-8320C Cordless Telephone User Manual
LG Electronics, Inc. Cordless Telephone
user manual

900MHz DSST PHONE with CALLER ID, SPK PHONE and ANSWERING SYSTEM.
OPERATION DESCRIPTION
( MODEL : GT- 8320C )
SK : TCTU0001801-MG DESCRIPTION : OPERATION DESCRIPTION OF GT-8320C
DATE Iss. SHEETS NOTICE NO. DESIGNER CHECKER
’00. 07. 24 1 28 K961/26/8903 Y. H. Ji J. H. Lee

900MHz DSST PHONE with CALLER ID, SPK PHONE and ANSWERING SYSTEM.
GT-8320C (900MHz DSST WITH CALLER ID , CALLWAITING ID, SPEAKER PHONE
and ANSWERING SYSTEM) MANUAL
This equipment has tested and found to comply with the limits for a class B digital device, pursuant to Part 15 of the FCC Rules,
These limits are designed to provide reasonable protection against harmful interference in a residential installation. This
equipment generates, uses, and can radiate radio frequency energy, and if not installed and used in accordance with the
installation.
If this equipment does cause harmful interference to radio or television reception, which can be determined by turning the
equipment off and on, the user is encouraged to try to correct the interference by one or more of the following measurements:
❏ Reorient or relocate the receiving antenna.
❏ Increase the separation between the equipment and receiver.
❏ Connect the equipment into an outlet on a circuit different from that to which the receiver is connected.
❏ Consult the dealer or an experienced radio/TV technician for help.
! CAUTION
Changes or modification to device not expressly approved by LGE could void the user’s authority to operate
this equipment. Copyright 2000 by LGE. All rights reserved.
! Warning
This equipment will be inoperable when mains power fails.
! Important Notice
Since this equipment has very low output power ( EIRP <10 mW), it complies with the FCC RF
Exposure Limit.
MODEL GT-8320C
1999 LGIC. No part of this publication may reproduced, transcribed, stored in a retrieval system,
or translated into any language in any form, by any means, without the written permission of LGIC.

900MHz DSST PHONE with CALLER ID, SPK PHONE and ANSWERING SYSTEM.
GETTING TO KNOW YOUR NEW PHONE
Your new GT-8320C telephone gives you the ultimate in cordless telephone sound quality with the luxury of
Caller ID and Call Waiting ID
If this is your first cordless telephone, you'11 soon discover that your cordless is similar to regular telephone,
except without the cord. If you've owned a cordless in the past, you'll discover that the GT8320C telephone is the
most powerful and full-functioned Call Waiting ID cordless telephone on the market.
Some key features are:
❍ 60 name and number Caller ID/Call Waiting ID memor y
❍ 20 name and number programmable memory
❍ Hearing-aid compatibility
❍ High quality digital security communication
❍ Dual mode voice mail serviceable (FSK , STUTTER)
Unlike regular telephones, your cordless does not work during power failures.
Because of this restriction, we do not recommend you have only cordless telephone in your residence.
UNPACKING YOUR PHONE
In addition to this handbook, check that you have:
7 Foot Line Cord for Wall Mounting
D-AA600 x 3 3.6V 600mA Battery
(This might not be pre-installed in your handset) AC Adapter

900MHz DSST PHONE with CALLER ID, SPK PHONE and ANSWERING SYSTEM.
LOCATING KEYS, LIGHT, AND SWITCHES
ON THE BASE
① The PAGE key - is a homing system for finding the handset.
If you press the PAGE key once, the handset beeps for 15seconds.
② IN USE light - becomes lit when the GT-8320C is being used.
③ CHARGE light - comes on solid when the handset is in the base.
④ VOICE MAIL light – flashes slowly to alert you when you receive new messages in
your Voice mail messages mail box. MESSAGE WAITING appears on the display.
NEWCALL light – flashes more slowly when you receive new calls.
This light continues to flash until you review the newcalls
OO
uu
S
SP
P
K
K
1
2
3
4
5
6
7
8
9
*
P
P
r
ro
og
gr
ra
aR
R
e
ec
co
or
r
d
d
M
M
e
em
mo
or
r
•/ •P
P
a
ag
g
M
M
e
em
m
Ne
w•
• Volume •
Fl
as
h
R
e
di
a
l
/
P
.
Ti
m.
Al
ar
.
Ri
n
C
on
fi
r
••
••
E
ras
900MHz DSST PHONE with CALLER ID, SPK PHONE and ANSWERING SYSTEM.
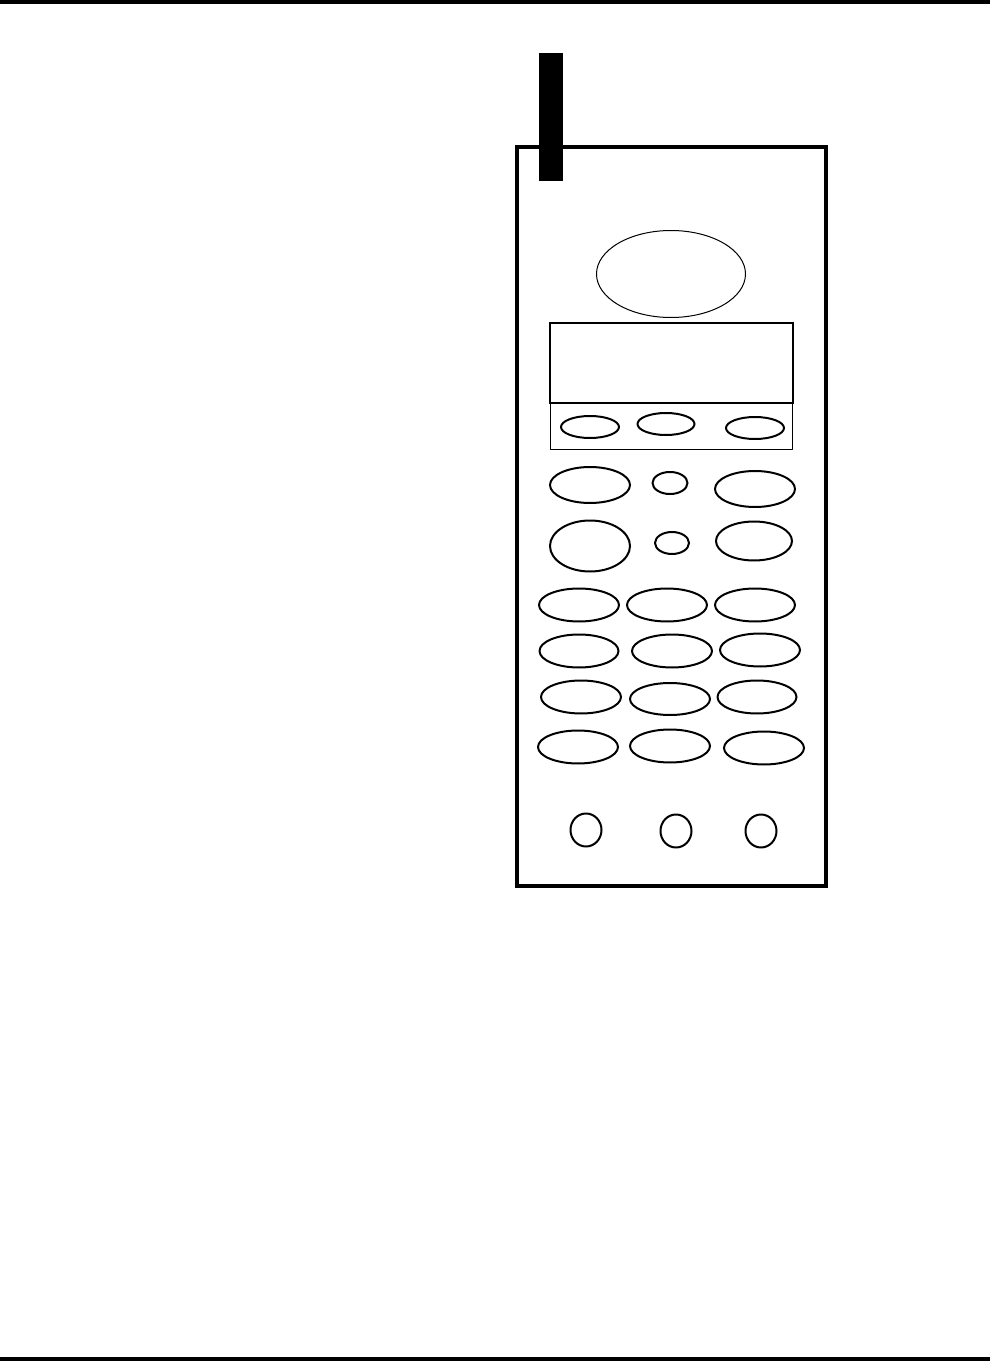
Keys
TALK key-Turns the
phone on or off so you
can dial or talk.
Voice mail key-
. Directly access your
V.Mail service
Dialing keys-Control
manual dialing.
Scroll keys
" #
Scrolls through your
Callers log
Redial key-
Redials your last out-
bound call or inserts a
pause in a number
when entering
numbers into memory.
ON THE HANDSET
DELETE Key- Removes records from the Callers log or from memory dialing.
MEM key-Allows you to store frequently dialed numbers and to dial directly from the speed dialing list.
FLASH key- Allows you to switch between a call and a Call Waiting call.
PGM key-Allows you to program your setting up your function or to edit a name and number in memory.
VOLUME UP/DOWN KEY- Allows you to adjust the loudness of the handset earpiece, or the ringer
or allows you to edit the character at Memory mode.
VOLUME
▲
▲▲
▲
12 : 22 PM 12 / 01 CALL 01 ✉
✉✉
✉
1- 555 – 123 - 4567
SMITH JOHN
DEL
VM
▼
▼▼
▼
TALK
2 ABC 3 DEF
4 GHI 5 JKL 6 MNO
7 PQRS 8 TUV 9 WXYZ
*
7
0 OPER
10
#
+1
MUTE FLASH MEM
!"
PGM
1
RE/PA
900MHz DSST PHONE with CALLER ID, SPK PHONE and ANSWERING SYSTEM.
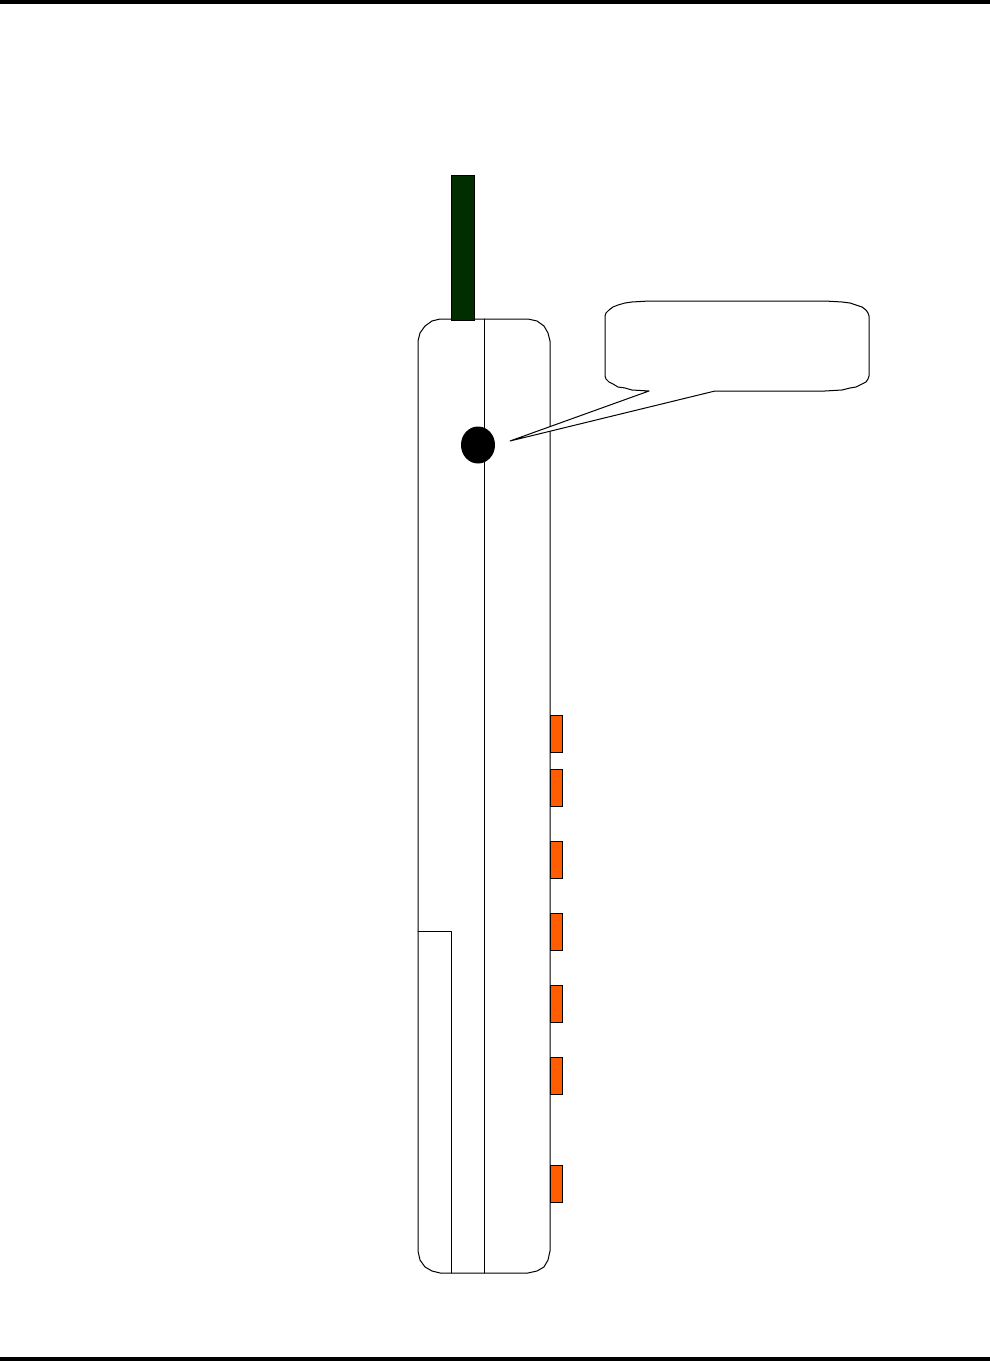
HEADSET Jack
Allows you to add a headset to the handset (not included, but available by order.)
HEADSET JACK

900MHz DSST PHONE with CALLER ID, SPK PHONE and ANSWERING SYSTEM.
SETTING UP YOUR PHONE
Now that you've checked the contents of the carton, it only takes a few steps
to set up your phone.
STEP 1. CHOOSE A CENTRAL LOCATION FOR THE BASE UNIT
The base should be away from all other electronic equipment such as a personal computer,
microwave, stereo ,or television. It is also a good idea to place the unit away from
noisy areas, or from heat sources such as a radiator or direct sunlight.
STEP 2. PLUG IN CORDS
You can set your GT-8320C telephone on a tabletop or you can mount the phone on a wall.
When on a tabletop, you can place the handset with either the keys facing downward or upward.
If you decide to use the wall mount position, you can also place the handset with the same-ward.
To use on a tabletop or desk:
1.Take the long telephone line cord that comes with the phone and plug one end into the
labeled TEL-LINE
2.Thread the long line cord through the channel in the housing to secure the cord.
3.Take the remaining end and plug it into the wall jack.
4.Plug the adapter tips into the adapter jack. Be sure that the tip is all the way into the jack.
5.Thread the adapter cord through the channel on the left-hand side of the bracket.
To mount on a wall:
1.Locate the handset hook. It is a small
square plastic piece located at the
bottom of the handset receiver well.
2. Slide the handset hook up and turn it
around so that the tab is the top.
3.Remove the mounting bracket from the
bottom of the phone by pressing down
on the two clips near the top.

900MHz DSST PHONE with CALLER ID, SPK PHONE and ANSWERING SYSTEM.
4. Turn the mounting bracket around so that the larger part the wedge is set the bottom of the phone
5. Use the same method to replace the bracket.
6. Insert the 8 inch line cord into phone jack marked TEL Line.
7. Thread the line cord through the channel on the right-hand side of the bracket to secure the cord.
8. Plug the adapter tip into the adapter jack.
Be sure that the tip is all the way into the jack.
9. Thread the adapter cord through the channel on the left-hand side of the bracket.
10. Insert the other end of the line cord into the wall jack.
11. Align the holes in the bracket over the wall-plate posts.
12. Slide the phone down until the phone is secure.
STEP 3. PLUG IN THE ADAPTER
Plug the adapter into an electrical outlet. Without AC power, your phone does not operate.
STEP 4. ADD THE BATTERY TO THE HANDSET
Use this procedure to install or to replace a "dead" battery.
!
!!
! CAUTION
Use only nickel-cadium(Ni-Cad)battery in the phone.

900MHz DSST PHONE with CALLER ID, SPK PHONE and ANSWERING SYSTEM.
5. Replace the battery door.
STEP 5. TURN THE HANDSET ON
You MUST install the battery on the handset to turn on and use your phone.
1. Check the power is on and appears on the display
2. You'll hear the handset's ready tones
and the 'READY' message appears on the display.
STEP 6. CHARGE THE HANDSET
Before you use the phone for the first time, you need to charge the battery
for at least 6 hours.
Place the handset in the base of the phone. The charge light the base then comes on.
Whenever you need to charge your handset, you hear short beeps and see the 'LOW BATTERY'
message. Press TALK and listen for dial tone to test for a fully charged handset.
STEP 7. Beginning the programming Sequence
Most of the programming options appear in one screens.
Press PGM key, SETUP PROGRAM appears on the screen.
1. Press down on the battery cover and slide
the battery cover down to expose the
battery well.
2. Locate the battery connectors inside the
battery well.
If you are replacing a dead battery, remove
the old battery by pulling firmly on the
battery cords.
3. Insert the battery plug into the connector.
It is polarized and only insert in one
direction.
4. Place the battery in the battery well.
READY
SETUP PROGRAM

900MHz DSST PHONE with CALLER ID, SPK PHONE and ANSWERING SYSTEM.
When you make a selection, the check mark, “✓
✓✓
✓” moves to the selection you have made to use ▲ or ▼ key.
After making a selection, the next programming screens appear. If you make a mistake, press ←
←←
← (review) key to
go back to the previous prompt or start the programming sequence again.
When you do not want to go on programming sequence, press PGM to save the previous items and you will
exit the programming mode.
To begin the programming sequence, press PGM keys and SETUP PROGRAM appears on the screen.
STEP 8. Setting area code
Many regions are changing how customers use their area codes. In order to dial from
your call records and directory records, the GT8110C needs to distinguish between local and long distance numbers.
€ If your region has seven digit dialing (you don't need to dial your area code when
making a local call), enter your local area code as described in to set your local
area code below.
€ If your region requires that you always dial ten digits when making local calls,
also follow the procedure under to set other local area codes.
If you are unsure on how your region works, please contact your local telephone co.
TO ENTER AN AREA CODE, use the keypad. If you make a mistake, retype the area code.
8-1 To set your local area code
If you set your area code, the GT-8110C telephone removes the area code from a call
record within your own area. You need to program the code in order to dial with call records.
1. Press " PGM " key
2. Press →
→→
→ (REVIEW) key.
The my area code screen display.
3. Press ▲ or ▼ key to enter your area code.
The numbers appear on the display as you press the dial keys.
If you make a mistake, press "DEL"key, and reenter the area code.
STEP 9. SET LOCAL CODE (1~6)
If your region requires that you dial ten digits when making local calls,
follow the procedure under to set other local area codes.
1. Press →
→→
→ (REVIEW) key
2. Press ▲ or ▼ key to enter your area code.
The numbers appear on the display as you press the dial keys.
If you make a mistake, press "DEL"key, and reenter the local code.
3. Press →
→→
→ (REVIEW) key
4. enter 2nd local code
GT-8110C has 6 local codes. Repeate 1~4 commands to enter other local codes.
MY AREA CODE
_
LOCAL CODE 1
_

900MHz DSST PHONE with CALLER ID, SPK PHONE and ANSWERING SYSTEM.
STEP 10. SELECTING YOUR LANGUAGE
You can choose between two different languages, English or Spanish.
The screen SELECT LANGUAGE appears
1. Press →
→→
→ (REVIEW) key
2. Press ▲ or ▼ key to set SELECT LANGUAGE
to ENG or ESP or FRE .
STEP 11. Adding More units
If you subscribe to call waiting ID and this is first call waiting ID unit (the display appears as 1’ST CWID UNIT?)
you must select "YES" However, if you already have a call waiting ID unit, you must select "NO".
If you do not program this option correctly, you might not receive call waiting ID records consistently.
1. Press →
→→
→ (REVIEW) key
2. Press ▲ or ▼ key to set 1’ST CWID UNIT to YES or NO.
STEP 12. Turning on Callwaiting ID
If you subscribe to CALL WAITING ID, turn this position ON
1. Press →
→→
→ (REVIEW) key
2. Press ▲ or ▼ key to set CALL WAITING ID to ON or OFF.
Setting this feature does not subscribe or cancel CALL WAITING ID service. You must contact your local
telephone company to request a change in services.
STEP 13. ANSWER PHONE WHEN PICKED UP
There are two ways that the GT8110C can answer a call. The GT8110C can instantly answer incoming calls
when you remove it from the cradle, or the phone can be set to answer after pressing the TALK key.
.
1. Press →
→→
→ (REVIEW) key
2. Press ▲ or ▼ key to set AUOT ANSWER to ON or OFF.
CALL WAITING ID
✓
✓✓
✓ON OFF
AUTO ANSWER
✓
✓✓
✓ON OFF
SELECT LANGUAGE
✓
✓✓
✓ENG ESP FRE
1ST CWID UNIT?
✓
✓✓
✓YES NO
900MHz DSST PHONE with CALLER ID, SPK PHONE and ANSWERING SYSTEM.
If you set AUTO ANSWER to ON, GT8110C automatically answer incoming calls when removed from the
cradle and also you could press any key to connect after incoming calls
If you set AUTO ANSWER to OFF, press only TALK key before answering incoming calls.
STEP 14. SET RING ON or OFF
If you don't need to hear the ring sound and select RING ON or OFF
.
1. Press →
→→
→ (REVIEW) key
3. Press ▲ or ▼ key to set RING to ON or OFF.
STEP 15. ADJUSTING THE CONTRAST
1. Press →
→→
→ (REVIEW) key
2. To lighten the display, press ▲ key while also pressing
▲ key repeatedly until you get the desired results.
To darken the display, press ▼ key while also pressing ▼ key repeatedly until you get the desired results.
STEP 16. COMPLETED SETUP
Once you have finished installing your GT8110C,
Your phone appears “READY” on the screen
STEP 17. SELECTING TONE/PUSE (T/P SWITCH) DIALING
☛ If your home is equipped with touch-tone dialing service, set the T/P switch T(TONE) on the base.
☛ If you only have rotary(pulse) dialing service, set the T/P switch P(PULSE) on the base.
RING
✓
✓✓
✓ON OFF
CONTRAST
SETUP COMPLETE

900MHz DSST PHONE with CALLER ID, SPK PHONE and ANSWERING SYSTEM.
USING YOUR PHONE
You can make calls many different ways with the GT8320C.
DIALING (HAND SET)
1. Press TALK key on the handset.
2. Use the number pad to dial the phone number.
The phone number appears on the display as you enter the number.
You also hear beeps for each digit as you dial.
3. Listen for a connection.
4. Press TALK to end your call.
DIALING (BASE SET)
1. Press SPK key on the baseset.
2. Use the number pad to dial the phone number.
The phone number digit appears on the LED as you enter the number.
You also hear beeps for each digit as you dial.
3. Listen for a connection.
4. Press SPK key to end your call.
REDIALING
Redial is a really fast method of calling your last number. Redial dials the last number
you called whether you dialed it manually, or it was from a Call Record or the memory list.
For more information on dialing from call records, See Dialing From Call Records.
Redial is two-ways with the GT8320C
USING HANDSET
☛ 1’ST method: Press TALK and press RE/PA
☛ 2’nd method: Press RE/PA key, your phone is automatically connected and redialed
USING BASESET
Press SPK and Press REDIAL/PAUSE
USING SPEED DIALING(H/S)
Another short cut for dialing is using speed dialing. First, create a speed dial list,
as described in Creating Speed Dialing List . Then:
1. Press MEMO key. It displays " DIRECTORY "
2. Press ←
←←
← or →
→→
→ key DIRECTORY

900MHz DSST PHONE with CALLER ID, SPK PHONE and ANSWERING SYSTEM.
and it displays " NAME and NUMBER " in MEMEORY
4. Press TALK to dial
The phone automatically dials out whatever is shown on the display.
USING SPEED DIALING(B/S)
1. Press SPK key
2. Press MEMORY key. LED displays “ A- “.
3. Press a number key that is stored phone numbers.
USING FLASH
To access your custom calling services, like Call Waiting, while you are on the telephone,
press FLASH key.
USING PAUSE
If you want to add a three-second pause to number in your speed dialing list, press RE/PA key while creating the
speed dial entry. For example, if you had a memory location dedicated to your voice mailbox, you might want
add a pause in a dialing string for your PIN number. For more information about programming speed dialing
numbers, see Creating a speed Dialing List .
FINDING CLEAR RECEPTION
Your GT8320C automatically selects 1 of 20 channels at the beginning of the call for the best reception.
REACHING MAXIMUM RANGE
The GT8320C handset and base communicate up to a certain maximum range.
Weather, power lines, or other cordless telephones can affect this distance.
The GT8320C beeps whenever you are on the phone and the handset moves out of range from the base.
If you do not move back within range in 30 seconds, you lose your connection.
CREATING A SPEED DIALING LIST(H/S)
In addition to your Call Records, you can store up to 20 speed dial names and numbers in memory.
You can either enter name and number, or you can transfer a Call Record into your speed-dialing list.
MANUAL METHOD
1. Press “ MEMO “ KEY at the 'READY' message.
2. Press " PGM " key to edit a character and number.
3. It displays like this.
The cursor is blinking on the name field.
4. Enter the name, character by character. You can have up to 21 characters in the name field,(The 3'rd Line)
01
5556667777
SMITH JOHN
DIRECTORY
900MHz DSST PHONE with CALLER ID, SPK PHONE and ANSWERING SYSTEM.
DIRECTORY ADRESS
NUMBER FIELD
NAME FIELD
a. Locate the character on the dialing keys 2 through 9.
b. Press once to enter the first character, twice for the second character, etc. For example, to choose a P,
press PQRS7 once, but to select an S, press PQRS7 four times.
c. Use the ←
←←
← or →
→→
→ (REVIEW) Keys to move back and forth through the name.
Use the $ or % keys to move up and down.
d. Create a space between names or words, by pressing the →
→→
→ (REVIEW) key twice after the last character.
e. Special Symbols
You can also use the 1 key to get the following symbols in the name field:
& ➯
➯➯
➯ ’ ➯
➯➯
➯ ( ➯
➯➯
➯ ) ➯
➯➯
➯ . ➯
➯➯
➯ 1
5. Enter the telephone number, area code first, using the dialing key pad. (2'nd Line number field)
You can have up to 32 digits in the number field,
If you make a mistake entering the telephone number, you must:
a. Press PGM key to leave speed dialing list.
b. Press PGM key to enter the speed dialing list again.
c. Or, Use the ←
←←
← or →
→→
→ (REVIEW) keys to find the digit and press DEL key
and re-enter the telephone number and the name.
6. Press MEMO key to store the complete record. The phone gives you a
confirmation tone to let you know that the record is stored.
CALLER ID METHOD
A quick way to add to your speed dial list is to copy a Caller ID Call Record.
At THE 'READY' screen:
1. Locate the Call Record that you want to copy
using ←
←←
← or →
→→
→ (REVIEW) keys.
2. Press MEMO key . You now see some of the
information from the Call Record
and displays "NUMBER STORED"
and displays call record again.
3. The number of the memory location automatically is entered.
CREATING A SPEED DIALING LIST(B/S)
1. Press PROGRAM key
2. Press MEMORY key.
01
5 5 5 – 5 5 5 5
SMITH JOHN
NUMBER STORED
10 : 35 PM 10 / 25 CALL 25
5 5 5 – 5 5 5 5
SMITH JOHN
NUMBER STORED

900MHz DSST PHONE with CALLER ID, SPK PHONE and ANSWERING SYSTEM.
3. Press the address number key.
4. Press phome numbers
5. Press PROGRAM key.
DELETING SPEED DIALING NUMBERS
You can erase unwanted speed dial numbers one-at-a-time.
IN HANDSET
1. Press MEMO key to see your speed dial list.
2. Use ←
←←
← or →
→→
→ key to find the memory location you want.
3. Press DEL key once, and the GT-8320C asks if you want to delete this entry.
4. Press DEL key again to delete the speed dial number.
The GT-8320C clears the number, gives you a confirmation beep
If you do not wish to delete the number, press MEMO key to cancel.
IN BASESET
1. Press PROGRAM key
2. Press MEMORY key.
3. Press the address number key.
4. Press PROGRAM key.
Only phone number is stored in the baseset.
ADJUSTING THE HANDSET VOLUME
1. Press TALK key
2. Press the ▲ or ▼ key to increase or decrease the VOLUME.
The handset sounds an error tone when it reaches the upper or lower limits.
ADJUSTING HANDSET RINGER VOLUME
Press the ▲ or ▼ key on the handset while the phone is not in-use.
You hear the sound of the ringer as you adjust the volume between the two levels.
ADJUSTING THE BASESET VOLUME
3. Press SPK key
4. Press the ▲ or ▼ key to increase or decrease the VOLUME.
ADJUSTING BASESET RINGER VOLUME
Press the ▲ or ▼ key on the baseset while the phone is not in-use.
You hear the sound of the ringer as you adjust the volume
USER SLECTABLE RINGER TONES(H/S)
05
1 8 8 8 6 6 6 5 5 5 5
DELETE ?

900MHz DSST PHONE with CALLER ID, SPK PHONE and ANSWERING SYSTEM.
There are four user-selectable ringer tones available for this handset.
1. While in the Stand-by mode, press the FLASH button
2. Press a key (1 to 4) to select a ringer tone mode.
USER SLECTABLE RINGER TONES(B/S)
There are five user-selectable ringer tones available for this baseset.
1. While in the Stand-by mode, press the RING( 0 digit) button.
2. Press the RING button (continuously) to select a ringer tone mode.
THE INTEGRATED ANSWERING DEVICE

900MHz DSST PHONE with CALLER ID, SPK PHONE and ANSWERING SYSTEM.
TURING THE ANSWERING SYSTEM ON/OFF
1. To turn the answering system on, Press OUT DOOR. A tone sounds. Then, the OUT DOOR button is lighted.
2. To turn the answering system off, Press OUT DOOR again, Then, light turns off.
SETTING THE CLOCK
To set the correct time:
1. Press PROGRAM button.
2. Press TIME(7 digit) button
3. Press number key to input day.
1 : Sunday
2 : Monday
3 : Tuesday
4 : Wednesday
5 : Thursday
6 : Friday
7 : Saturday
4. Press number keys to input current hour.(0 ~ 23)
5. Press number keys to input current minute.(0 ~ 59)
Then, the GT-8320C Answering System announces the correct time.
To listen to current time, press TIME button or press CONFIRM button and TIME button.
Then, answering system announces the current time.
SETTING ALARM TIME
If you set alarm time, GT-8320C sounds a alarm at your setting time in everyday.
1. Press PROGRAM button.
2. Press ALARM(9) button.
3. Press number keys to input hour(0 ~ 23).
4. Press number keys to input minute(0~59).
The system announces your setting time.
If you want alarm function to set, press ALARM button in stand-by mode. Alarm LED is lighted in baseset.
If you want alarm function to release, press ALARM button again. Alarm LED is OFF.
To review alarm time, press CONFIRM button and press ALARM button.
RECORDING YOUR OUTGOING MESSAGE
When you receive a call, the answering system automatically plays either a preset greeting, or your own personal greeting.
Preset Message
The following message is pre-recorded

900MHz DSST PHONE with CALLER ID, SPK PHONE and ANSWERING SYSTEM.
“Hello, I cannot receive your call, Please leave your message after a beep. Thank you.”
Recording your personal Outgoing Message(OGM)
1. Press RECORD key in stand-by mode.
The answering system announces explanation and LED counts recording time.
Record your message. (MAX 20 sec)
3. When you finish recording your message, Press •/•(play/stop) button.
A tone sounds. Your message plays back for your review.
CHOICE BETWEEN THE PRE-RECORDED GREETING AND YOUR PERSONAL GREETING
1. Press OUT DOOR button. The answering system announce choosing OGM.
2. To choose your personal outgoing message, press 1 button.
To choose pre-recorded outgoing message, press 3 button
The answering system announces your selecting OGM.
SETTING THE RING TIME
1. Press PROGRAM button
2. Press RECORD button
3. Press number button.(2~9)
TOLL SAVE
In the TOLL SAVE is ON, if you have new messages, the answering system answers after one ring.
If there are no new messages, the system answers after four rings. This way, when you call long distance to check your
messages, and have no message, you can hang up after the second ring to save a charge.
SETTING A PIN CODE
To listen to your messages from a remote location, you will need to enter a four digit Personal Identification Number(PIN)
code(0000 ~ 9999).
1. Press PROGRAM button.
2. Press OUT DOOR button.
3. Press PIN code(4 digit)
Your PIN code plays back for your review.
To review your PIN code, press CONFIRM button and press OUT DOOR button.
PLAYING YOUR MESSAGES
The base 7-segment LED displays the total number of messages.
1.press •/•(play/stop)
The system announces messages.
2. After reviewing our new messages, you can review your old messages.
Press •/•(play/stop) and |•• or ••| to review old messages.
SKIPPING A MESSAGE
1. Press •/•(play/stop) to review your messages.

900MHz DSST PHONE with CALLER ID, SPK PHONE and ANSWERING SYSTEM.
2. Press ••| at anytime to skip to the next message.
3. Press •/•(play/stop) at any time to stop reviewing your messages and return to stand-by mode.
DELETING MESSAGES
1. Press •/•(play/stop) to review your messages.
2. If you decide to delete a message, press ERASE(2) button. The system goes to the next message.
To delete all your messages, press ERASE button and press CONFIRM(#) button in stand-by mode.
RECORDING A VOUCE MEMO
The Voice Memo function allows the user to record a message on the base for others who use your phone.
1. Press MEMO button. System announces how to use. Record your message.
2. When you have finished your message, press •/•(play/stop). The system returns to stand-by mode.
REMOTE ACCESS AWAY FROM HOME
You can access functions such as checking recorded messages, playing or deleting messages, and room monitoring remotely
using a touch-tone phone.
1. Call your telephone number.
2. While the outgoing message is playing, press # button, and press your PIN code.
3. You select a command from the following chart :.
Delete all messages 0 then 0 (confirm)
then 5 (cancel)
Play 2
Room Monitor 4
Stop 5
Delete (while announcing) 0
Remote control off 9
When you select Room Monitor, it is continuous about 10 second.
When you are finished, The answering system automatically returns to stand-by mode.
USING CALLER ID AND CALL WAITING ID

900MHz DSST PHONE with CALLER ID, SPK PHONE and ANSWERING SYSTEM.
One of the best features of your phone is Caller ID, which allows you to see information about an incoming call
before you pick up the phone. With Caller ID service from your local telephone company,
the GT-8320C telephone displays and records information about the call in a log.
Possibly even better than Caller ID is Call Waiting ID. In addition to providing normal Caller ID information,
Call Waiting ID allows you to see caller information while you are on a call.
Now you can have the information you need to choose whether or not to answer a waiting call.
Before you use these features on your GT-8320C telephone, you must first subscribe to the services through
your local telephone company, and set "CALL WAITING ID ON or OFF" correctly during the
SETTING UP YOUR PHONE procedure.
For more details on CALLWAITING ID ON/OFF, see STEP 10. Turning on Callwaiting ID on page 11.
RECEIVING NEW CALLS
When you receive a new call, the information is stored under CALLER area.
When you press ←
←←
← or →
→→
→ (REVIEW) key , it tells you:
❍ How many total calls you have.
❍ How many new calls you have since you
last reviewed your calls.
When you receive a call, the GT-8320C displays the caller information sent by the Telephone Company,
called a Call Record.
The call record consists of the following information:
❍
❍❍
❍ The caller's name( If available )
❍
❍❍
❍ The caller's telephone number
❍ The time and date of the call
❍ A call record number
❍ NEW CALL LCD display
❍ MESSAGE WAITING (VOICE MAIL) indicator
REVIEWING CALL RECORDS
To review a call Record:
10 : 35 PM 10 / 25 25
5 5 5 – 5 5 5 5
SMITH JOHN
NEW
CALL
ALL : 23 NEW : 03
✉
✉✉
✉
MESSAGE WAITING

900MHz DSST PHONE with CALLER ID, SPK PHONE and ANSWERING SYSTEM.
1. Press ←
←←
← or →
→→
→ (REVIEW) to see how many new calls you have.
2. Use ←
←←
← or →
→→
→ (REVIEW) key to move though the Call Record list.
☛ Press →
→→
→ (REVIEW) key to see the most recent call record.
☛ Press ←
←←
← (REVIEW) key to see earlier calls.
When you reach either end of the Call Record
list, you see an 'END OF LIST' message. If you
continue to press ←
←←
← or →
→→
→ (REVIEW) key,
you scroll through the list again.
DIALING FROM CALL RECORDS
You can use your Call Records as a short-cut method of dialing.
1. Press ←
←←
← or →
→→
→ (REVIEW) key to see your Call Records.
2. Use ←
←←
← or →
→→
→ (REVIEW) key to find the desired Call Record.
3. Press TALK key
The phone dials whatever is shown on the display.
SAVING CALL RECORDS
Your phone stores up to 60 Call Records before the memory becomes full.
When the next call comes in, the oldest record drops off and makes room for the new Call Records.
To save specific calls, delete old and unnecessary call records to keep from filling your phone's memory.
DELETING CALL RECORDS
You can either delete a single record or you can delete all Call Records at one time.
To delete a single record:
1. Press to ←
←←
← or →
→→
→ (REVIEW) key to see your Call Records.
2. Use ←
←←
← or →
→→
→ (REVIEW) key to find the desired Call Record.
3. Press DEL key once, and the GT-8320C asks if you want to erase this Call Record.
4. Press DEL key again to erase the Call Record.
The GT-8320C deletes the Call Record, gives you
a confirmation beep,
If you do not wish to delete the Call Record, press ←
←←
← or →
→→
→ (REVIEW) key to cancel.
To delete all Call Records:
1. Press ←
←←
← or →
→→
→ (REVIEW) key.
The display shows you how
END OF LIST
10 : 35 PM 10 / 25 CALL 25
5 5 5 – 5 5 5 5
DELETE ?
ALL : 23 NEW : 03

900MHz DSST PHONE with CALLER ID, SPK PHONE and ANSWERING SYSTEM.
many call records you have.
2. Press DEL key and the GT-8320C asks if
you want to delete all Call Records.
3. Press DEL key again and the GT-8320C clears
all Call Records,
gives you a confirmation beep.
SEEING LONG RECORDS
If you receive long records on caller ID information, you could see that to use the ▲ or ▼ key.
the ▲ or ▼ key allows you to scroll back and forth to see long records.
1. Press ←
←←
← or →
→→
→ (REVIEW) key.
The display shows you long records
2. Press ▲ or ▼ key to see remain numbers
DELETE A LL ?
10 : 35 PM 10 / 25 CALL 25
⇐
⇐⇐
⇐
55566677778902
SMITH JOHN
10 : 35 PM 10 / 25 CALL 25
44455566677778
⇔
⇔⇔
⇔
SMITH JOHN
900MHz DSST PHONE with CALLER ID, SPK PHONE and ANSWERING SYSTEM.
VOICE MAIL
VOICE MAIL
VOICE MAIL
Voice Mail Service your calls when you are away from your phone or even while you are on the phone.
The indicator Light flashes whenever you have message in your mailbox. And once you have programmed
your Voice Mail key with your personal access codes, you can get your message at the touch of a button.
You must subscribe to Voice Mail Service in order for this feature on your phone.
To Program the Voice Mail Key.
Using this method, you can store up to 32 digits per key-You can program digits,
flash, pause, * or # , such as your mailbox number, your PIN, and any other additional codes that you need.
1. press MEMO key
2. press VOICEMAIL key
3. press PGM key
and then you will see the following display, The 2’nd line cursor(Number field) is blinking.
4. You can store digits, # , * , Flash , Pause up to 32 digits
5. press PGM key to cancel
6. Press MEMO key to store
To Use Voice Mail
Once you have programmed your Voice Mail key,
you can access your mail box by pressing
#
VOICE MAIL key
Not to use Voice Mail
If you are not subscribing to a voice mail service from your local
telephone company and you set VOICEMAIL to
OFF in Set up Program mode, The GT-8320C automatically
change your voice mail key into Speed dial key.
To Program the SPEED DIAL Key.
Using this method, you can store up to 32 digits per key-You can program digits,
flash, pause, * or # , such as your mailbox number, your PIN, and any other additional codes that you need.
1. press MEMO key
2. press VOICEMAIL key
3. press PGM key
and then, you will see the following display, The 2’nd line cursor(Number field) is blinking.
You can store digits, # , * , Flash , Pause up to 32 digits
4. press PGM key to cancel
5. Press MEMO key to store
To Use SPEED DIAL
Once you have programmed your SPEED DIAL key, you can access by pressing
#
VOICE MAIL key
READING DISPLAY MESSAGES
VOICE MAIL
ON ✓
✓✓
✓OFF
900MHz DSST PHONE with CALLER ID, SPK PHONE and ANSWERING SYSTEM.
The GT-8320C informs you of status by displaying the following messages :
Message Display
ALL CALLS & NEW CALLS: This message lets you know
how many call records you have, and how many of those call
records are new, In this example, you have 23 call records,
and 3 new calls.
CHARGING: The handset BATTERY is getting
low.
Place the handset in the base in order to recharge.
DELETE ALL?: You pressed the DEL key
after pressing the ←
←←
← or →
→→
→ (REVIEW) key
DELETE ? : To delete a single record, You pressed DEL key
after pressing the ←
←←
← or →
→→
→ (REVIEW) key.
END OF LIST: You have reached the end of the call records.
Press either ←
←←
← or →
→→
→ (REVIEW) key to see other records.
INCOMPLETE DATA : The message sent is
incomplete data
This message usually indicates temporary interference.
There is no problem with the phone.
MESSAGE WAITING : The GT-8320C (base LED) flashes
slowly to alert you and appears on the display
“ Message waiting “ When you receive new messages
in your mail box.
NO CALLS:
There are no call records in the caller ID memory.
Message Display
ALL : 23 NEW : 03
CHARGING
DELETE ALL ?
END OF LIST
INCOMPLETE DATA
✉
✉✉
✉
MESSAGE WAITING
10 : 35 PM 10 / 25 CALL 25
5 5 5 – 5 5 5 5
DELETE ?
NO CALLS
900MHz DSST PHONE with CALLER ID, SPK PHONE and ANSWERING SYSTEM.
NUMBER ONLY:
Either name service is not available in your area,
or you are subscribing to a number-only service.
PRIVATE: The caller has purposely chosen to
block his/her phone number.
TALK:
The handset is on and ready for you to dial.
PAGING :
The Base is calling the handset.
UNAVAILABLE: The Caller ID information, such
as the name,
or both the name and number, might not be available from the
caller’s area.
LONG DISTANCE : The message sent is a long distance call.
You might see this message alternate with other messages.
LOW BATTERY :
The handset is needed to replace the cradle.
Message Display
10 : 35 PM 10 / 25 CALL 25
5 5 5 – 5 5 5 5
10 : 35 PM 10 / 25 CALL 25
P R I V A T E
T A L K
PAGING
10 : 35 PM 10 / 25 CALL 25
5 5 5 – 5 5 5 5
UNAVAILABLE
10 : 35 PM 10 / 25 CALL 25
UNAVAILABLE
10 : 35 PM 10 / 25 CALL 25
5 5 5 – 5 5 5 5
SMITH JOHN
10 : 35 PM 10 / 25 CALL 25
5 5 5 – 5 5 5 5
LONG DISTANCE
LOW BATTERY
900MHz DSST PHONE with CALLER ID, SPK PHONE and ANSWERING SYSTEM.
OUT OF RANGE:
If you use the handset too far away from the base unit
during a call, the handset will alert you by audio warning beeps
(when using talk) and OUT OF RANGE appears on the display.
NUMBER STORED : When you save the call records in the
directory or create a speed dialing list, you will see the display
like this.
Forwarded CALLS : The message sent is a forwarded calls.
You might see the 3 type messages alternate with other
messages.
NEW CALL: This message lets you know that you have a
New messages
TROUBLESHOOTING
OUT OF RANGE
NUMBER STORED
10 : 35 PM 10 / 25 CALL 25
5 5 5 – 5 5 5 5
SMITH JOHN
10 : 35 PM 10 / 25 CALL 25
5 5 5 – 5 5 5 5
CFW. UNIVERSAL
10 : 35 PM 10 / 25 CALL 25
5 5 5 – 5 5 5 5
CFW. BUSY
10 : 35 PM 10 / 25 CALL 25
5 5 5 – 5 5 5 5
CFW. NO ANSWER
NEW
READY

900MHz DSST PHONE with CALLER ID, SPK PHONE and ANSWERING SYSTEM.
Are you having trouble with your phone?
Here are some of the most common problem areas and solutions.
SYMPTOM CORRECTIVE ACTION
No dial tone ☛ Verify that the line cord is connected and secure.
☛ Check to see that you are not out of range to the base.
☛ Check that the AC adapter is plugged into the outlet.
☛ Check that the handset is fully charged.
☛ Check to see that the Battery is connected inside the battery compartment.
Phone doesn’t ☛ Verify that the LINE CORD and AC adapter are plugged in correctly.
ring ☛ Check that the RING ON/OFF in your set up program mode.
☛ Determine if you have too many communication devices hooked to a single line.
A communication device can be a phone, modem, or facsimile (FAX) machine.
Contact your local phone company business office for help calculating the limit for your
residence or business.
☛ Move the handset closer the base
The phone has ☛ Check to see that you are not out of range to the base.
Static or fades ☛ Check that the handset is fully charged.
In and out
Caller ID / ☛ Verify that the CALLWAITING ID function is set correctly
Call Waiting ID See Step Turning CALLWAITNG ID ON or OFF on SETUP program
doesn’t work ☛ Check your service. Call your local phone company’s Business Office to ensure that
properly your services are active.
☛
☛☛
☛ Check for a power outage in your home area
☛
☛☛
☛ Check the AC adapter
☛
☛☛
☛ Check that the extension phone is being used.
Charge Light ☛
☛☛
☛ Check whether the handset is making contact in the cradle.
does Not work ☛
☛☛
☛ Check the AC adapter
Be sure that the adapter is not damaged and that it is securely plugged into
a working outlet. Also check that the wall plug is not controlled by a wall switch.
Phone does not ☛
☛☛
☛ You might not have programmed your area code correctly.
dial out correctly Please see Set up program my Area Code
when using call
records
Blank or faint ☛
☛☛
☛ Check the contrast control for the display
screen see set up your program
☛
☛☛
☛ Check the AC adopter
Be sure that the adapter is not damaged and that it is securely plugged into a working
Outlet and the phone jack. Also check that the wall plug is not controlled by a wall
switch or a power strip.
☛
☛☛
☛ You might not have received your first call record.
SYMPTOM CORRECTIVE ACTION

900MHz DSST PHONE with CALLER ID, SPK PHONE and ANSWERING SYSTEM.
NO DATA ☛
☛☛
☛ Check your service. Call your local phone company to ensure that you have
Caller ID or Call Waiting ID service.
☛
☛☛
☛ Check the answering machine. Ensure that your answering machine is set to
answer after two rings.
☛
☛☛
☛ You answered the call before two rings.
☛
☛☛
☛ Check call Forwarding. Ensure that Call Forwarding is turned off.
☛
☛☛
☛ Contact your local phone company’s Service Department
If the problem continues for more than 24 hours.
Your local phone company central office may be
temporarily experiencing an overload.
INCOMPLETE DATA ☛
☛☛
☛ Call information was distorted before reaching the unit.
Normal static on the telephone line can cause a line error and an
INCOMPLETE DATA message. If this condition persists, check with your local
telephone company to ensure that there is not a problem with your phone line.
Handset does not ☛
☛☛
☛ Check that the AC adapter is plugged in and operating correctly.
Charge. ☛
☛☛
☛ Check whether the handset is making contact in the cradle.
PAGE key does ☛
☛☛
☛ The handset is not communicating with the base.
not page The handset is either turned off, out of range, or the battery needs recharging.
the handset
Handset does not ☛
☛☛
☛ Check the AC adapter. Be sure that the adapter is not damaged and that
work it is securely plugged into a working Outlet and the phone jack.
Also check that the wall plug is not controlled by a wall switch or a power strip.
☛
☛☛
☛ Verify that the handset is turned on
☛
☛☛
☛ place the in the cradle for several seconds.
Ensure the handset is making contact in the cradle.
☛
☛☛
☛ Recharge the battery.