LG Electronics USA 15LW1R Wireless TV User Manual 3828TUL297C sunny
LG Electronics USA Wireless TV 3828TUL297C sunny
UserManual.wiki
>
LG Electronics USA
>
15LW1R User Manual
>
Users Manual 1
Contents
1.
Users Manual 1
2.
Users Manual 2
Users Manual 1
Navigation menu
Upload a User Manual
Namespaces
Wiki Guide
HTML
PDF
Info
Views
User Manual
Discussion / Help
Navigation


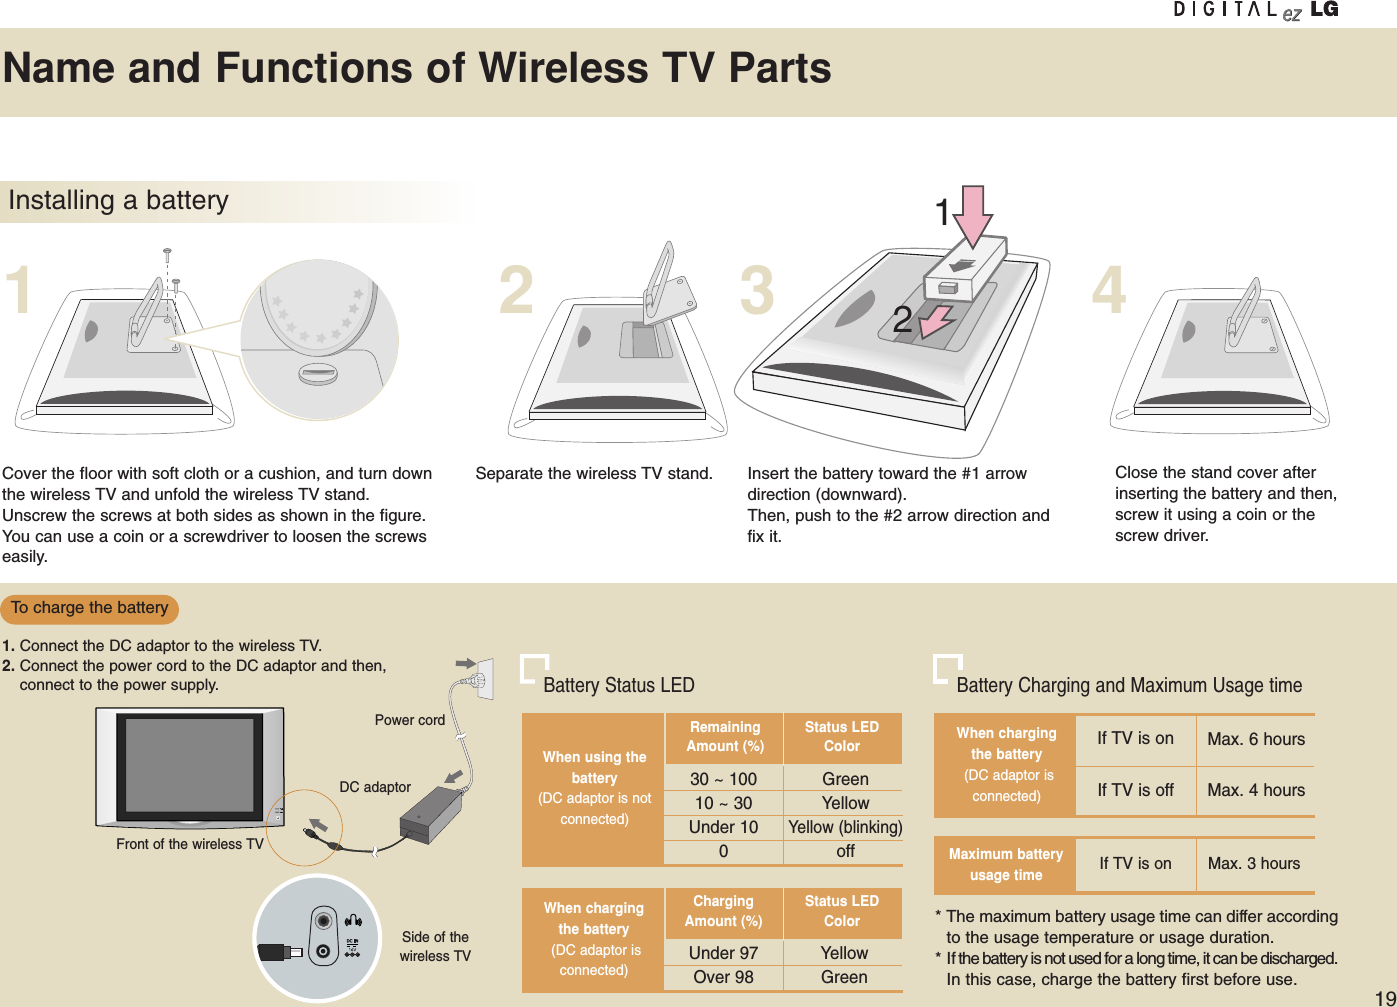
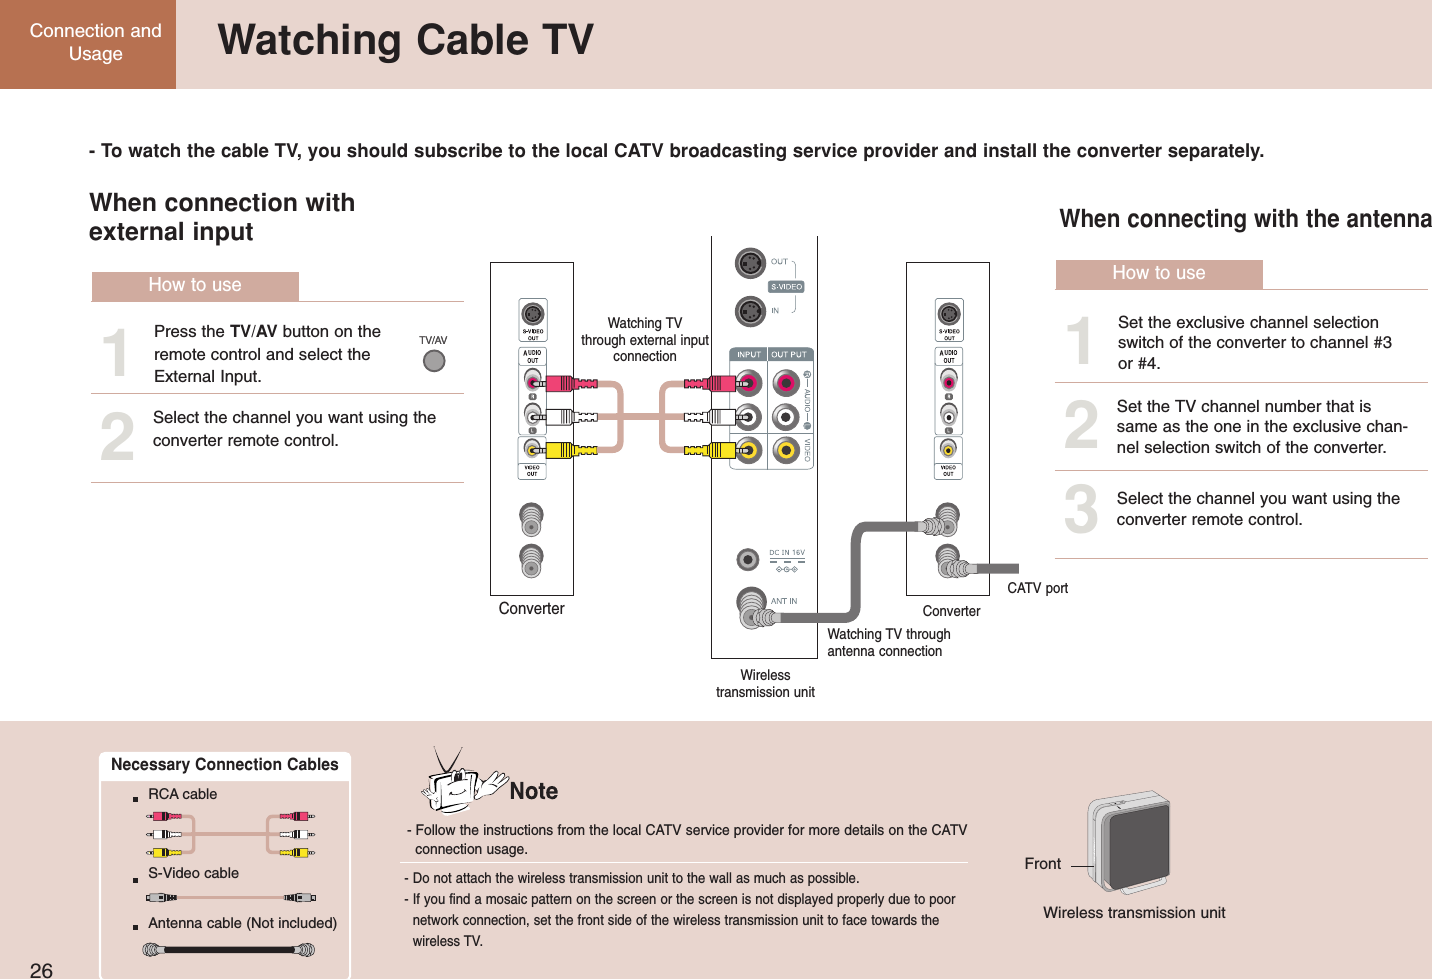
![29Setting the ChannelMove to [Channel].Run [Ez Scan].Select [Ez Scan].Memorize the channels shen you moe or the wireless transmission is moved.• Scan the channel during the TV broadcasting service hours after connecting the antenna.• When you run [Ez Scan], all broadcasting station channel will be memorized regardless of its type – publicTV or CATV.• If the CATV channel is duplicated with the public TV, the CATV channel will be selected. Each time youpress the number button (0 ~ 9) for channel selection, CATV-public channel selection will be toggled.• Press the or Exit button while running [Ez Scan] to stop channel setting. Then, the channel(s) scannedat that time point will be memorized.Select [Channel]. Move to [Channel].Change thechannel.Press the EXIT button to hide the menu screen.Press the MENU button to move to the previous menu screen.Memorize or clearthe selectedchannel.Press the button.Select [Channel]. Move to[Manual Prog.].Move to [Ez Scan].132Memorizing all broadcasting channels Memorizing or clearing the specific channel312](https://usermanual.wiki/LG-Electronics-USA/15LW1R.Users-Manual-1/User-Guide-504100-Page-29.png)
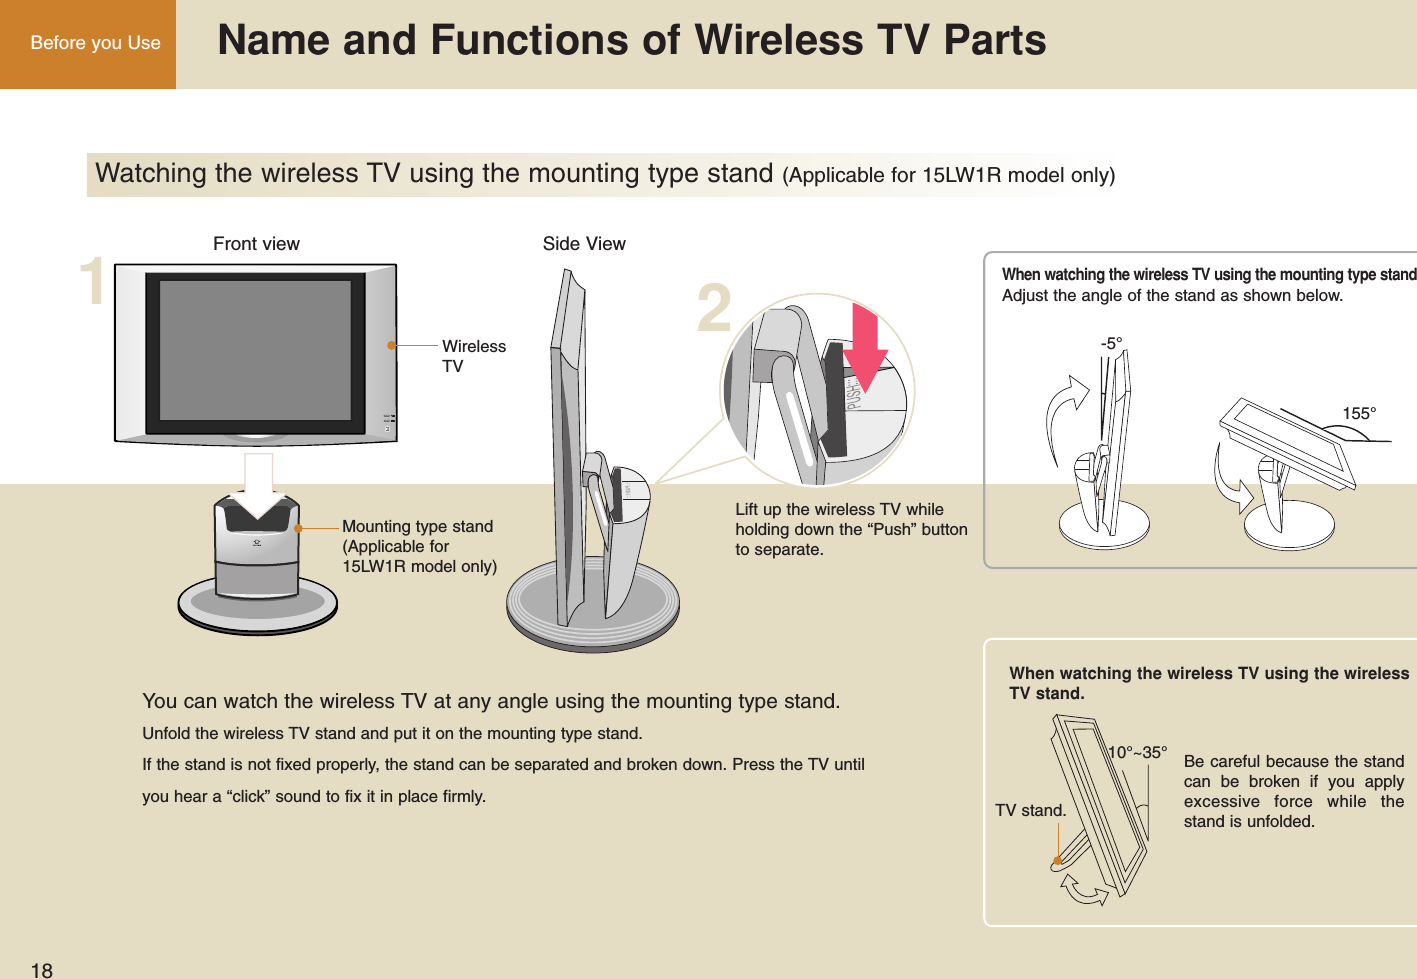
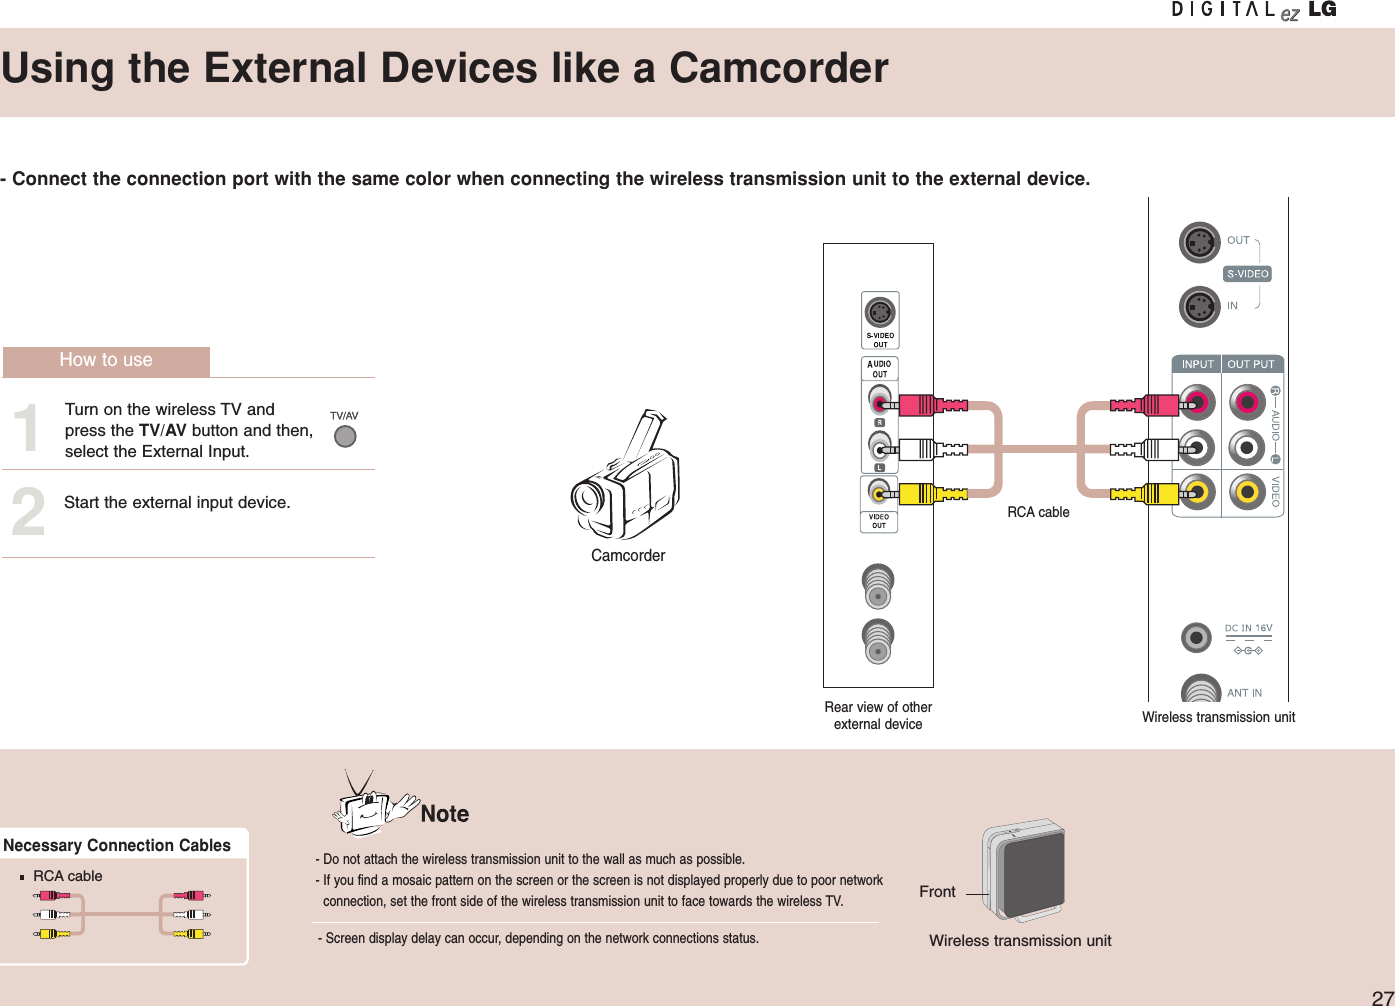
![30Adjustment when Usingthe Wireless TV Setting the ChannelWatching the selected channel only.Move to [Channel].Set the channel.Press the button.Select the channel you want.* Set other channels using the same method.Select [Channel]. Move to[Favorite Ch.]Press the button.Use the Favorite Ch. function to create your favorite channellist.• You can set up to 6 channels that you prefer.• If you add more than 6 channels, the previous channel willbe automatically removed.132Press the EXIT button to hide the menu screen.Press the MENU button to move to the previous menu screen.If you want to watch your favorite channelsonly, press the SURF button.• Each time you press the button, the selectedfavorite channel will be displayed sequentially.](https://usermanual.wiki/LG-Electronics-USA/15LW1R.Users-Manual-1/User-Guide-504100-Page-30.png)
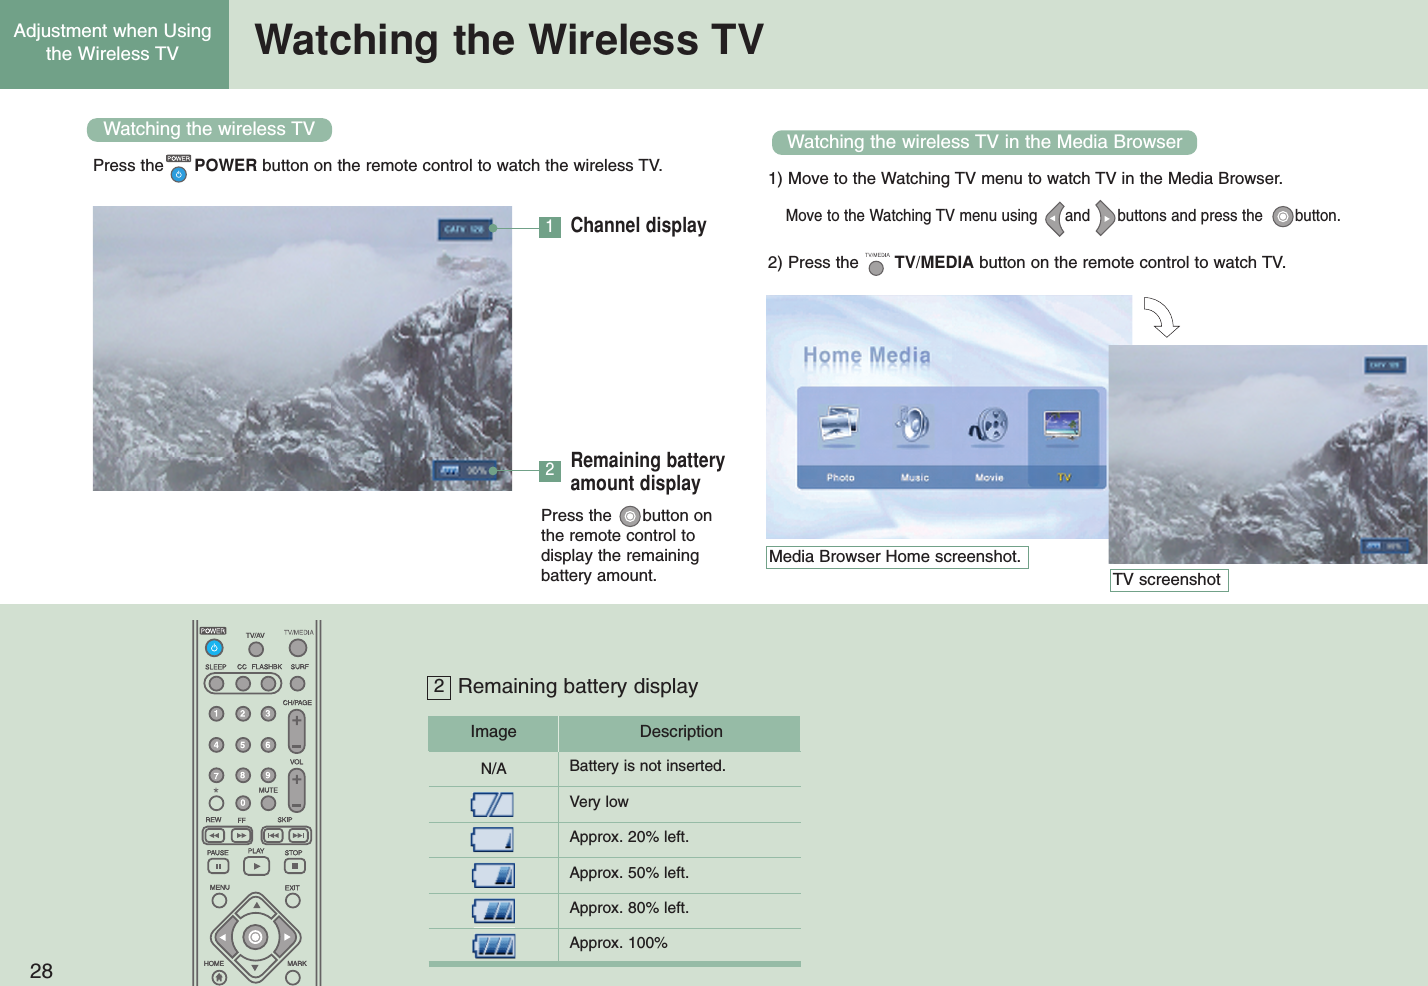
![31Adjusting the PictureAdjusting the picture automatically Adjusting contrastThis function automatically adjusts the picture so that you can enjoy theoptimal picture quality depending on the TV usage environment.Move to [Picture].Press the button.Select the stateyou want.• User: Select this option to watch the TV with the picture setting that you or others have adjusted.• Night: Suitable for dark area.• Optimum: Most natural picture setting.• Clear: Provides clear picture.• Soft: Provides soft picture.Select [Picture]. Move to [Picture].Adjust contrastyou want.Press the EXIT button to hide the menu screen.Press the MENU button to move to the previous menu screen.Press the button.Select [Picture]. Move to[Contrast].Move to [Ez Video].132312Press the EZ VIDEO button.•Press the EZ VIDEO buttonto adjust the screen to yourpreference.](https://usermanual.wiki/LG-Electronics-USA/15LW1R.Users-Manual-1/User-Guide-504100-Page-31.png)
![32Adjustment when Usingthe Wireless TV Adjusting the PictureAdjusting brightness Adjusting depth of colorMove to [Picture].Press the button.Adjust brightnessyou want.Select [Picture]. Move to [Picture].Adjust coloryou want.Press the EXITbutton to hide the menu screen.Press the MENU button to move to the previous menu screen.Press the button.Select [Picture]. Move to [Color].Move to[Brightness].132312](https://usermanual.wiki/LG-Electronics-USA/15LW1R.Users-Manual-1/User-Guide-504100-Page-32.png)
![33Adjusting the PictureAdjusting sharpness Adjusting tintMove to [Picture].Press the button.Adjust brightnessyou want.Select [Picture]. Move to [Picture].Adjust tint you want.Press the EXIT button to hide the menu screen.Press the MENU button to move to the previous menu screen.Press the button.Select [Picture]. Move to [Tint].Move to[Sharpness].132312](https://usermanual.wiki/LG-Electronics-USA/15LW1R.Users-Manual-1/User-Guide-504100-Page-33.png)
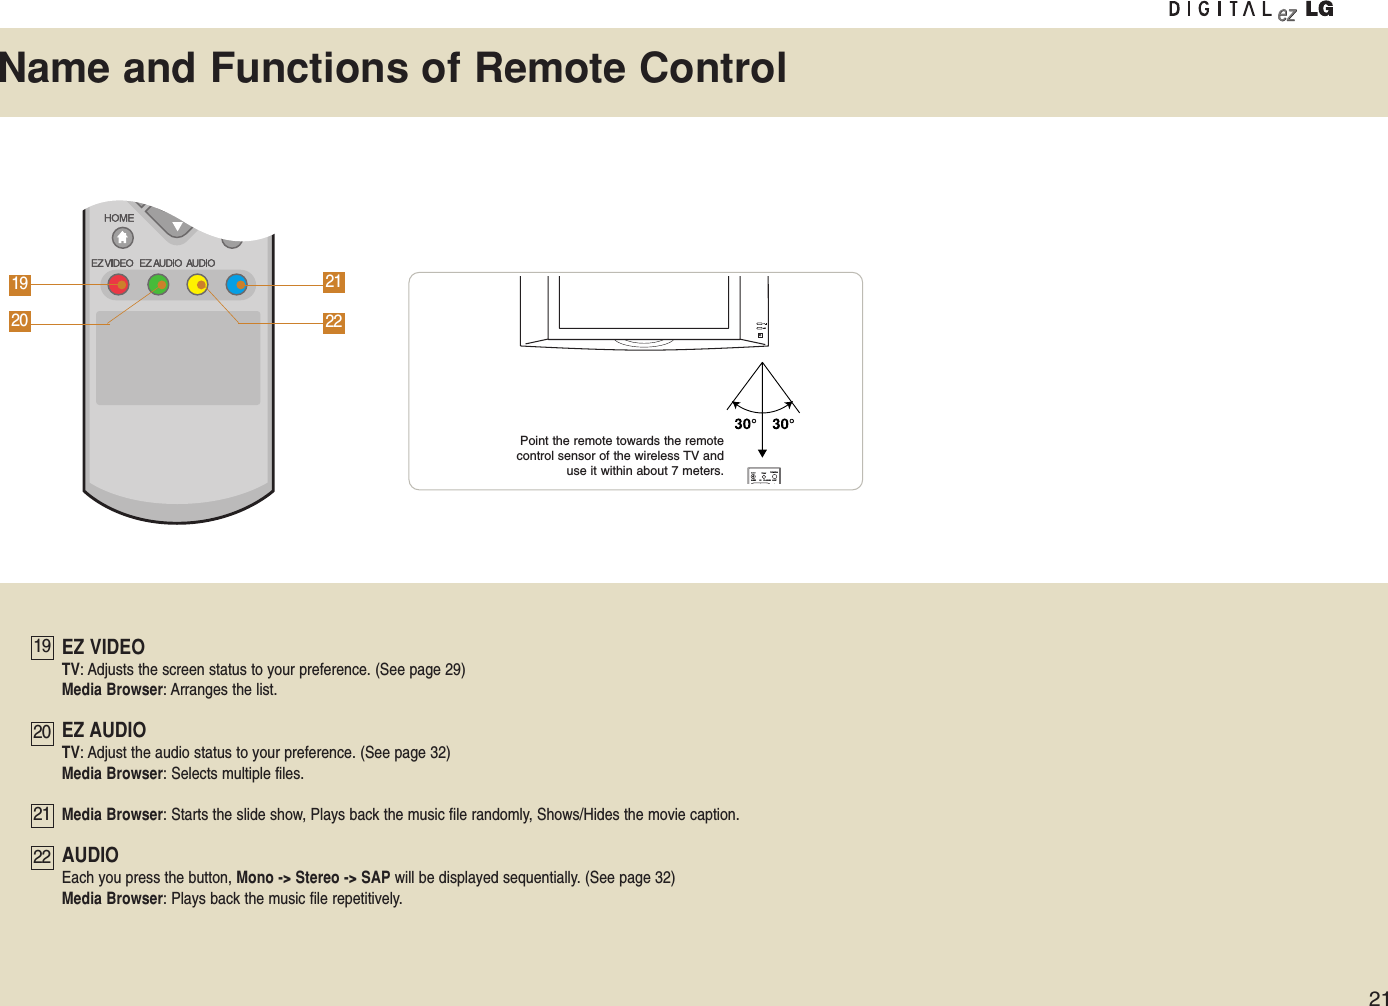
![34Adjustment whenUsing the Wireless TV Adjusting SoundAdjusting best sound automaticallyUsing the SAP (Secondary Audio Program) functionThis function automatically adjusts sound according to the type of the picture you’re watching so that you can enjoy the best sound quality.Move to [Sound].Press the button.Select the soundstate you want• User: Select this option to use the user-defined sound settings. • Flat: Most natural sound settings. • Movie: You can enjoy the magnificent sound.• Music: You can enjoy the live original sound without change. • Sports: Select this option when watching the sports program.• The TV can receive MTS stereo programs and any SAP (Secondary Audio Program) thataccompanies the stereo program, if the broadcaster transmits an additional sound signal as wellas the original one. • Mono: The primary language is heard from left and right speakers. Signal mode is mono. • Stereo: The primary language is heard from left and right speakers. Signal mode is stereo. • SAP: The secondary audio program is heard from left and right speakers. Select [Sound]. Move to [Sound].Select the soundstate you wantPress the button.Select [Sound]. Move to[Stereo Mode].Move to [Ez Audio].132312Press the EZ AUDIO button.• Press the EZ AUDIO buttonto select the sound state toyour preference.Press the AUDIO button.• Each time you press theAUDIO button, Mono->Stereo-> SAP will be dis-played sequentially.](https://usermanual.wiki/LG-Electronics-USA/15LW1R.Users-Manual-1/User-Guide-504100-Page-34.png)
![35Adjusting SoundAdjusting the volume automatically Adjusting sound balance.If you select this option, TV will automatically adjust the volume. Adjust the sound balance you want.Move to [Sound].Press the button.Select [On] or [Off]• TV will automatically set the proper volume level for each broadcasting service providerso that you can easily watch the TV program whenever you change the channel.Select [Sound]. Move to [Sound].Adjust the soundbalance you want.Press the button.Select [Sound]. Move to[Balance].Move to [AVL].132312Press the EXIT button to hide the menu screen.Press the MENU button to move to the previous menu screen.](https://usermanual.wiki/LG-Electronics-USA/15LW1R.Users-Manual-1/User-Guide-504100-Page-35.png)
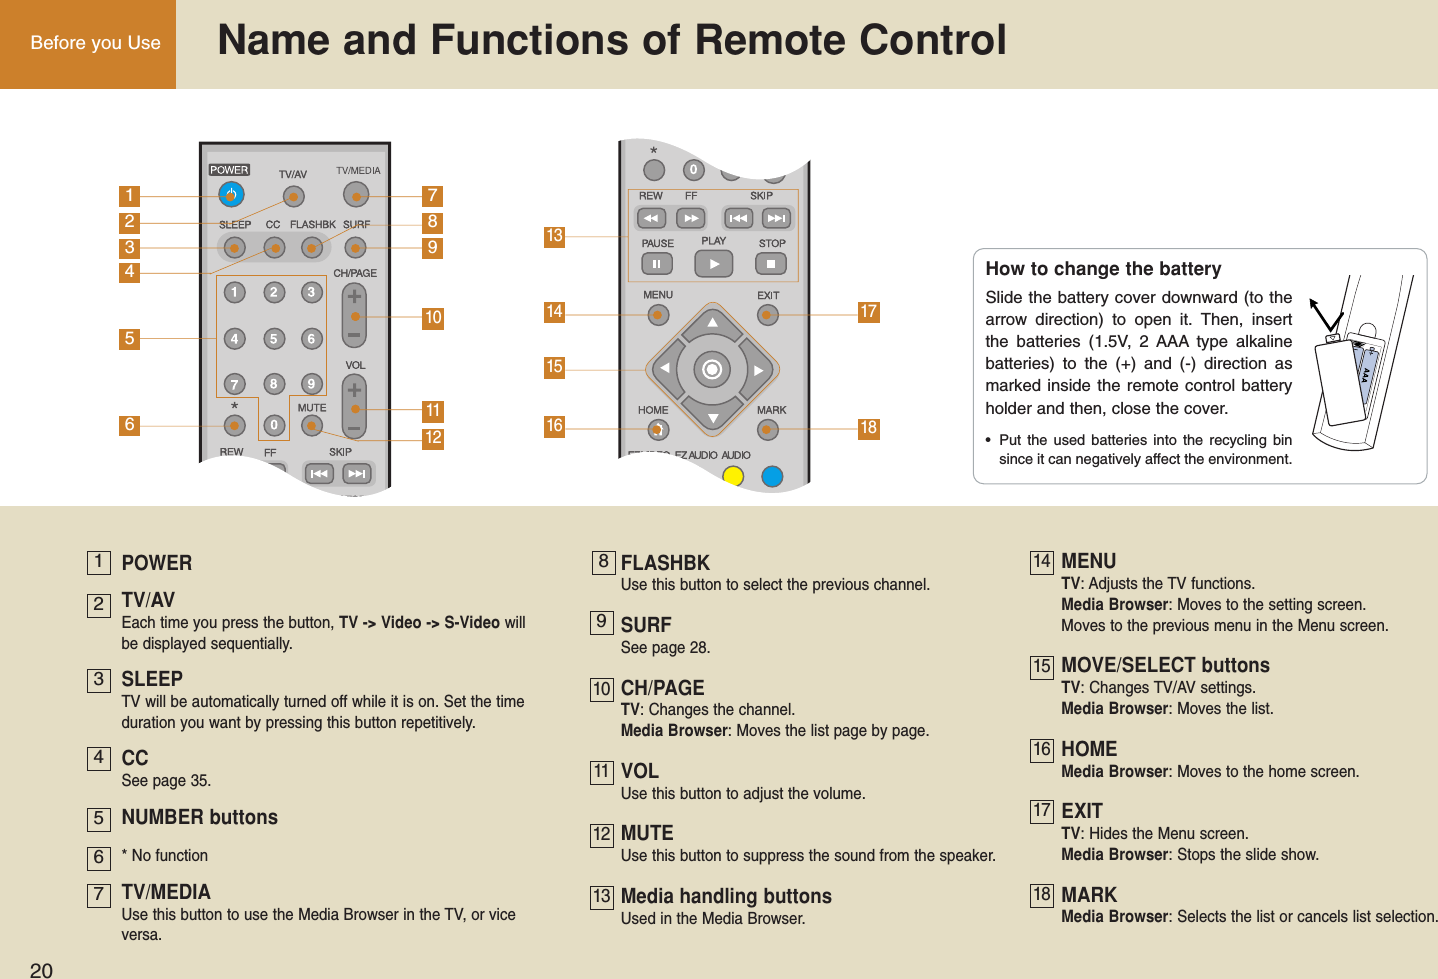
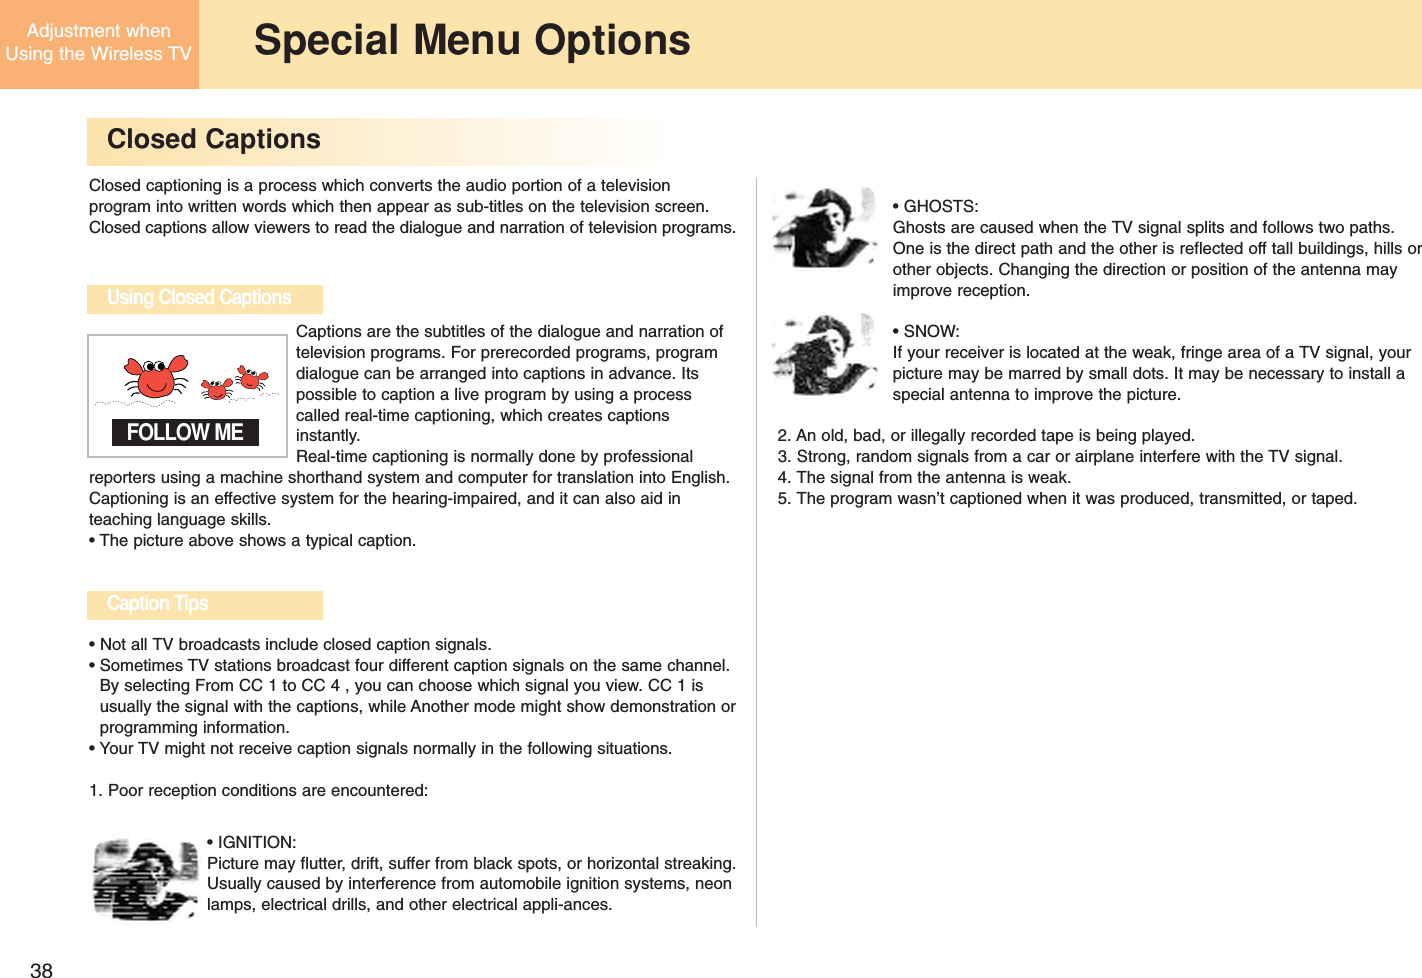
![36Adjustment whenUsing the Wireless TV Setting the SpecialSelecting the Input Signal Watching the Program with Caption TextMove to [Special].Press the button.Select the inputsignal you want.Select [Special]. Move to [Special].Select the functionyou want.Press the button.Select [Special]. Move to[Caption/Text].Move to [Input].132312• CAPTIONThe term for the words that scroll across the bottom of the TV screen;usually the audio portion of the program provided for the hearing impaired.• TEXTThe term for the words that appear in a large black frame and almost cover theentire screen; usually messages provided by the broadcaster.Press the EXIT button to hide the menu screen.Press the MENU button to move to the previous menu screen.Press the TV/AV button. • Each time you press theTV/AV button, the input sig-nal will be changed sequen-tially.](https://usermanual.wiki/LG-Electronics-USA/15LW1R.Users-Manual-1/User-Guide-504100-Page-36.png)
![37Setting the SpecialSetting the CaptionsMove to [Special].Select the optionyou want. Press the button.Select [Special]. Move to[Captions].132Press the EXIT button to hide the menu screen.Press the MENU button to move to the previous menu screen.Press the CC button • Use the CC button repeatedly to selectCaption Off, Mute or On. • Mute shows the selected captions option (if available on program)when the TV sound is muted.](https://usermanual.wiki/LG-Electronics-USA/15LW1R.Users-Manual-1/User-Guide-504100-Page-37.png)
![39Setting the SpecialSetting the sleep timerMove to [Special].Press the button.Set the sleep reservation time you want.Select [Special]. Move to [Special].Select [On] or [Off].Press the button.Select [Special]. Move to [Key Lock].Move to [Sleep Timer].132312• If you don’t press the SLEEP button and wait for a while when the Sleep Timer is displayed on the screen,the Sleep Timer display will disappear and the sleep reservation time will be set.• To check the remaining sleep reservation time after setting the Sleep Timer, press the SLEEP button onceonly.• If you turn off the TV after setting the Sleep Timer, it will be cleared. You need to set the Sleep Timer again.• This function will be disabled in the Media Browser.Press the EXIT button to hide the menu screen.Press the MENU button to move to the previous menu screen.Press the SLEEP button.• Each time you press theSLEEP button, the settingtime will be changed.Menu can be different according to the selected input signal.The TV will be automatically turned off after the setting period of time.Setting the key lockIf you select this function, key input will be disabled, which is designedto prevent wrong key input by the children.](https://usermanual.wiki/LG-Electronics-USA/15LW1R.Users-Manual-1/User-Guide-504100-Page-39.png)
![40Adjustment whenUsing the Wireless TV Setting the LockSetting the lock function Changing the password settingLockSet PasswordMPAATV RatingAux. BlockCanadianOnOffLockCodeLockMove to [Lock].Select [On] or [Off].Press the button.Move to [Lock].Select [Lock]. Move to [Lock].Move to [Set Password].Input new password.Input the passwordagain for confirmation.Select [Lock]. Input the password.Input the password.1342312• If Lock is already set, enter the password requested. • The TV is set with the initial password "0-0-0-0". • MPAA: Select the ratings defined by the Motion Picture Association of America.• TV Rating- Age Block: Select the age rating.- Content Block: Select the content rating• Aux. Block: Set locking on the input source of the external devices connected to the TV set.• Canadian: Select the ratings defined by the Canadian rating regulation.You can set the locking status for the program audience ratingsreceived from the broadcasting service provider.LockSet PasswordMPAATV RatingAux. BlockCanadianLockNewConfirm](https://usermanual.wiki/LG-Electronics-USA/15LW1R.Users-Manual-1/User-Guide-504100-Page-40.png)