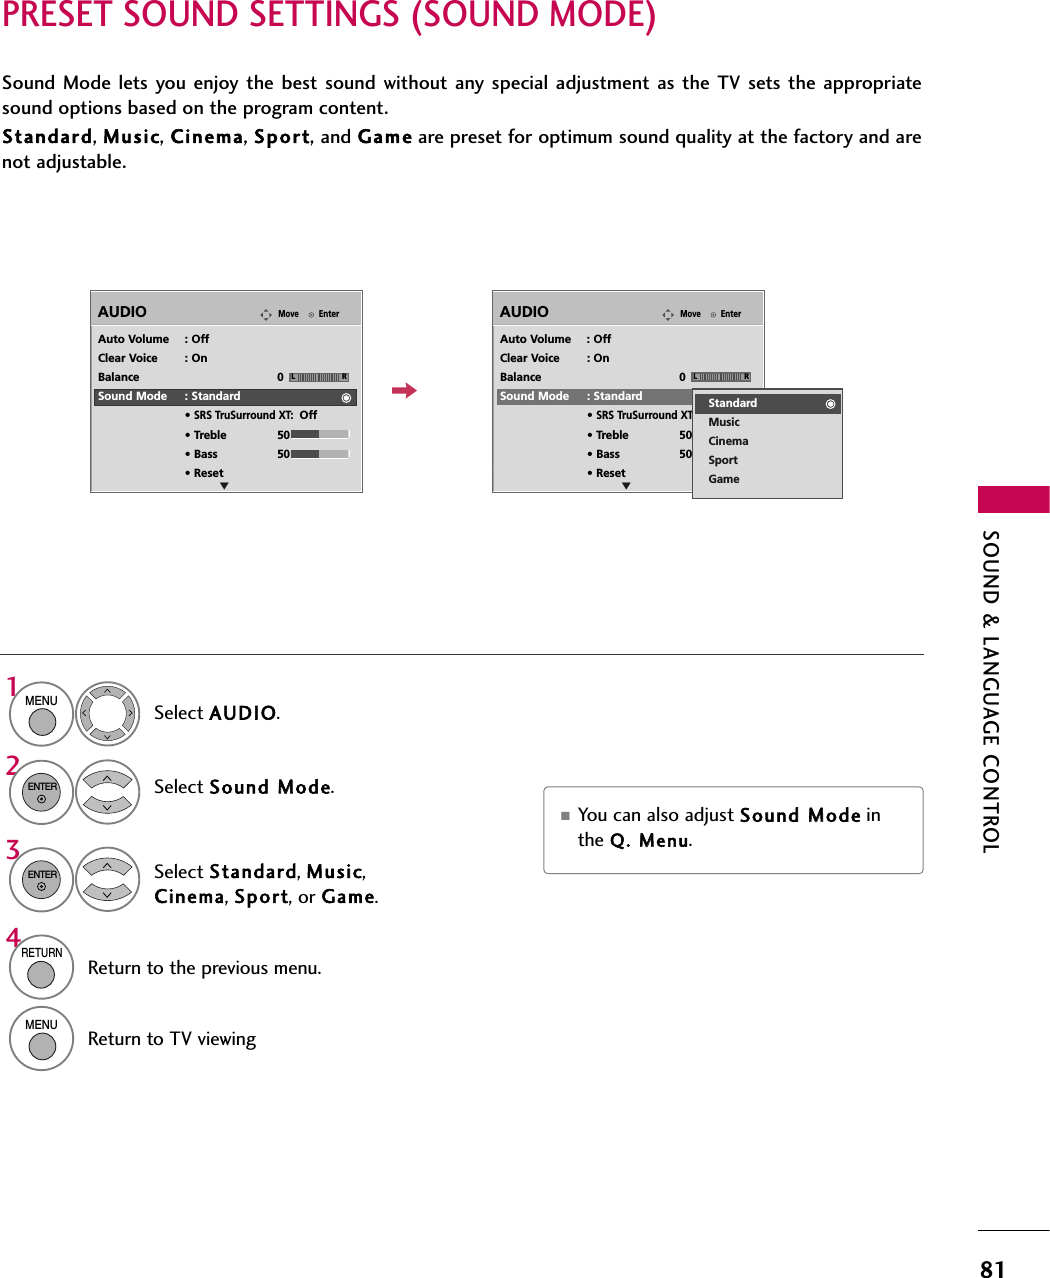
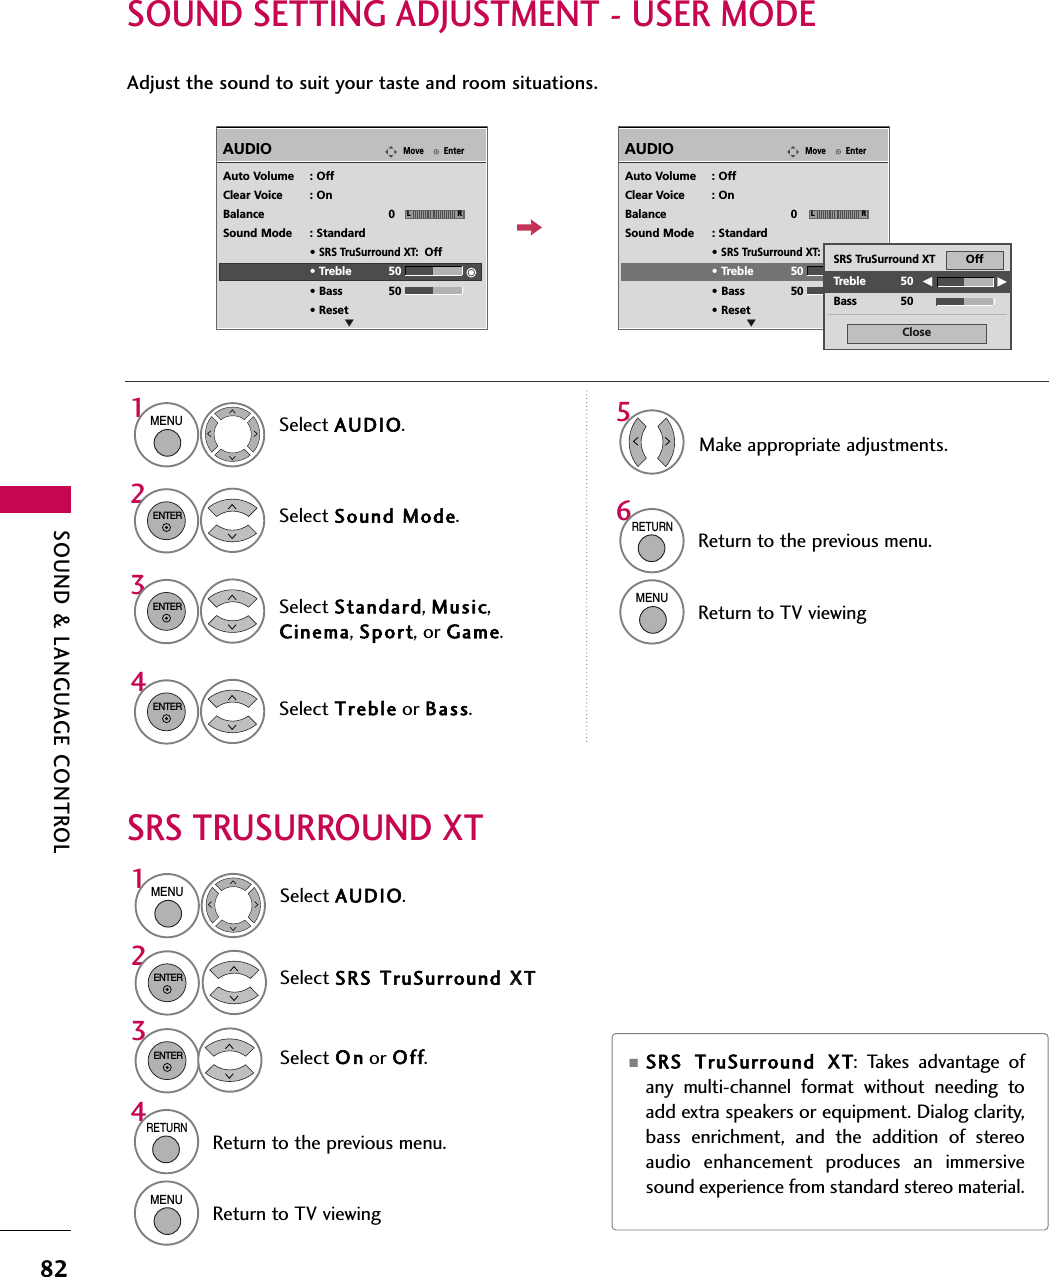
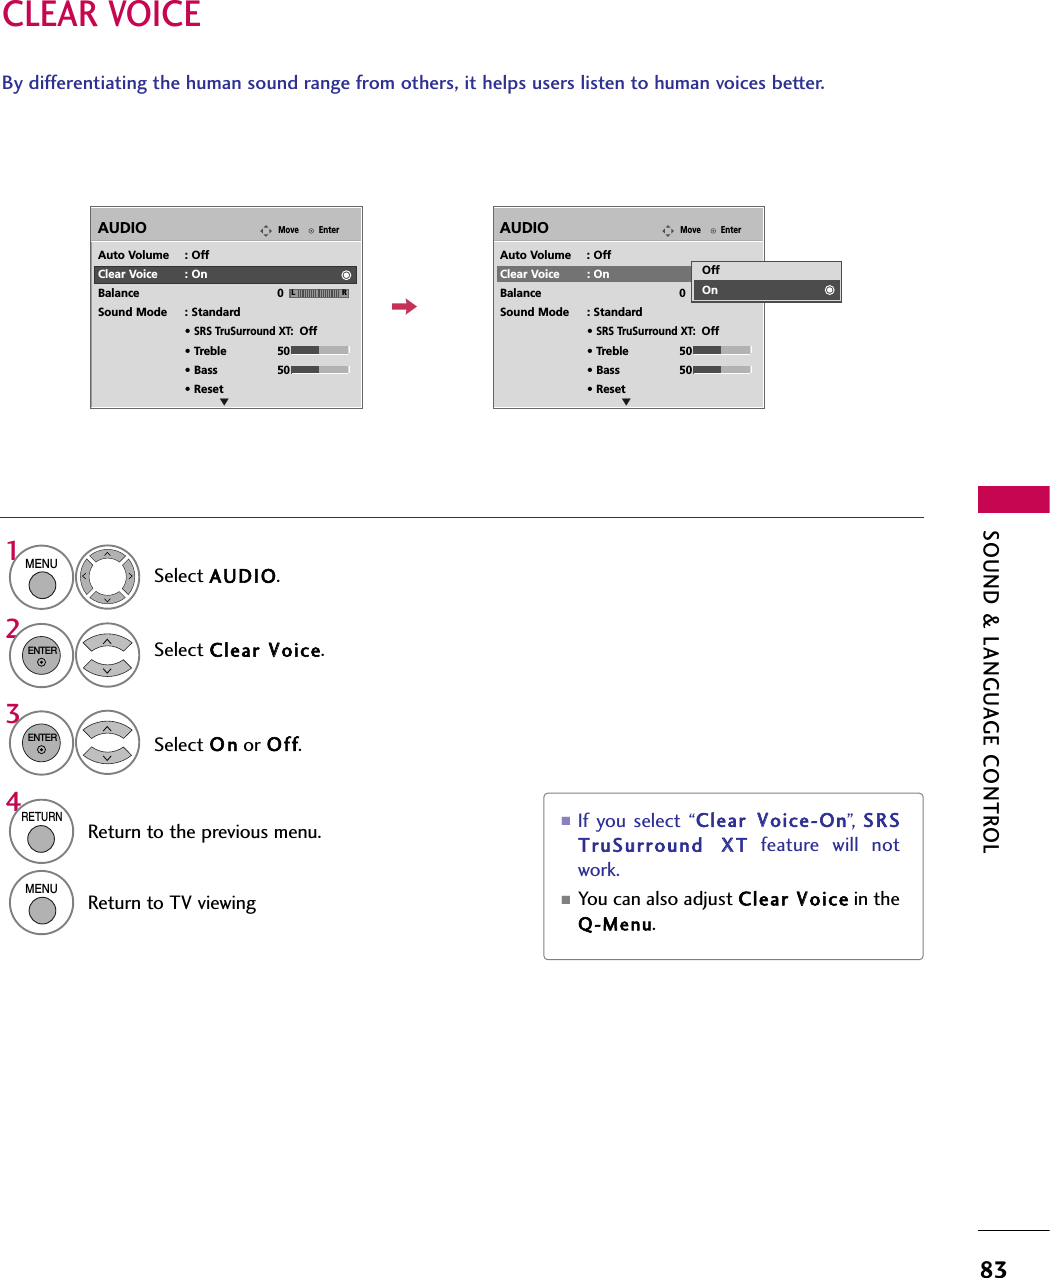
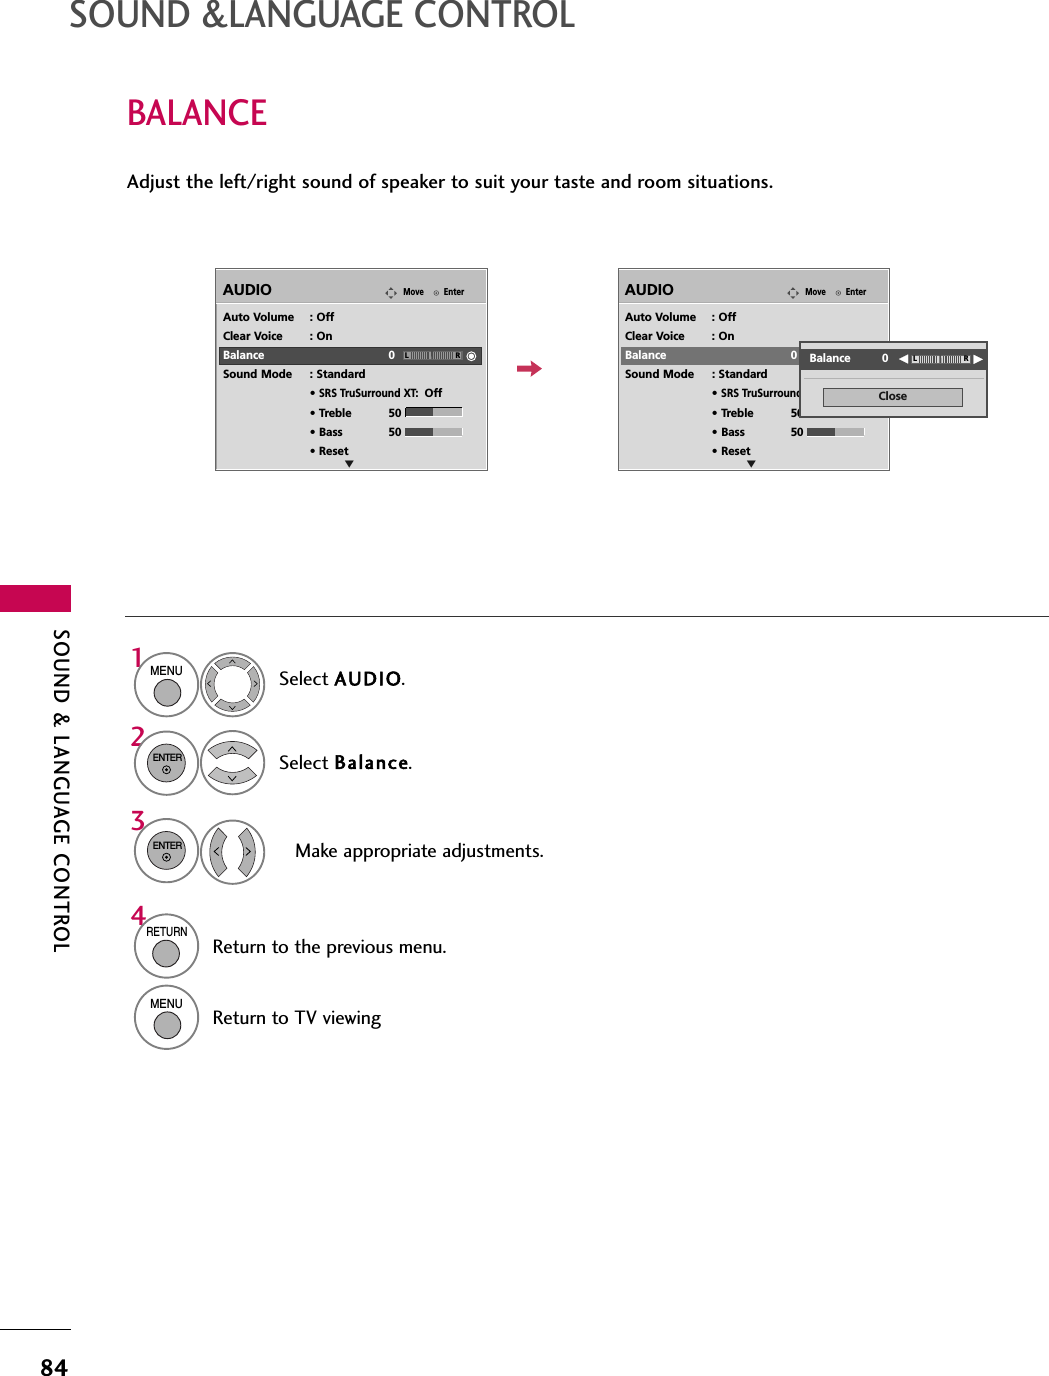
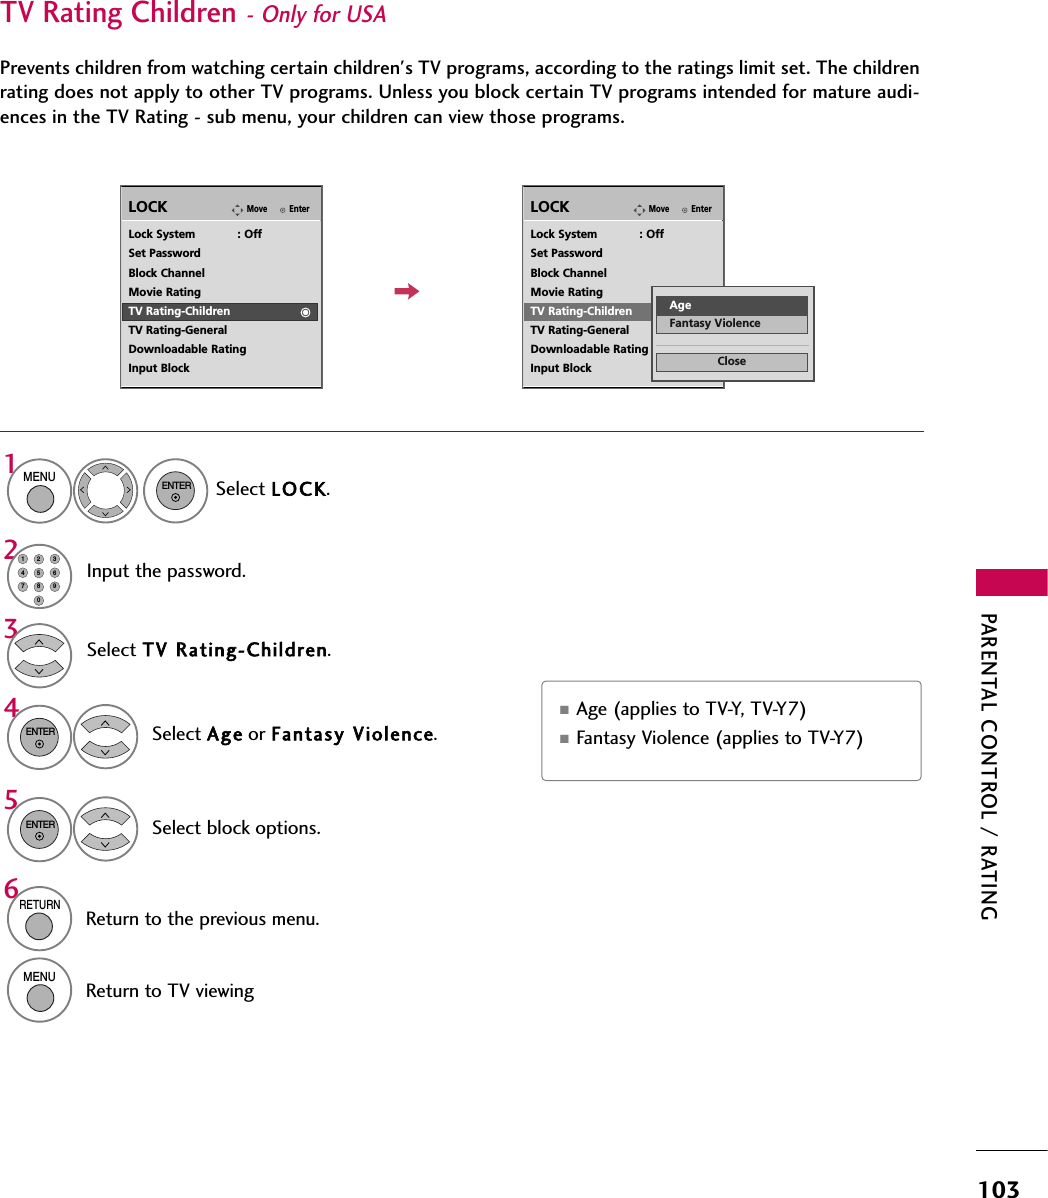
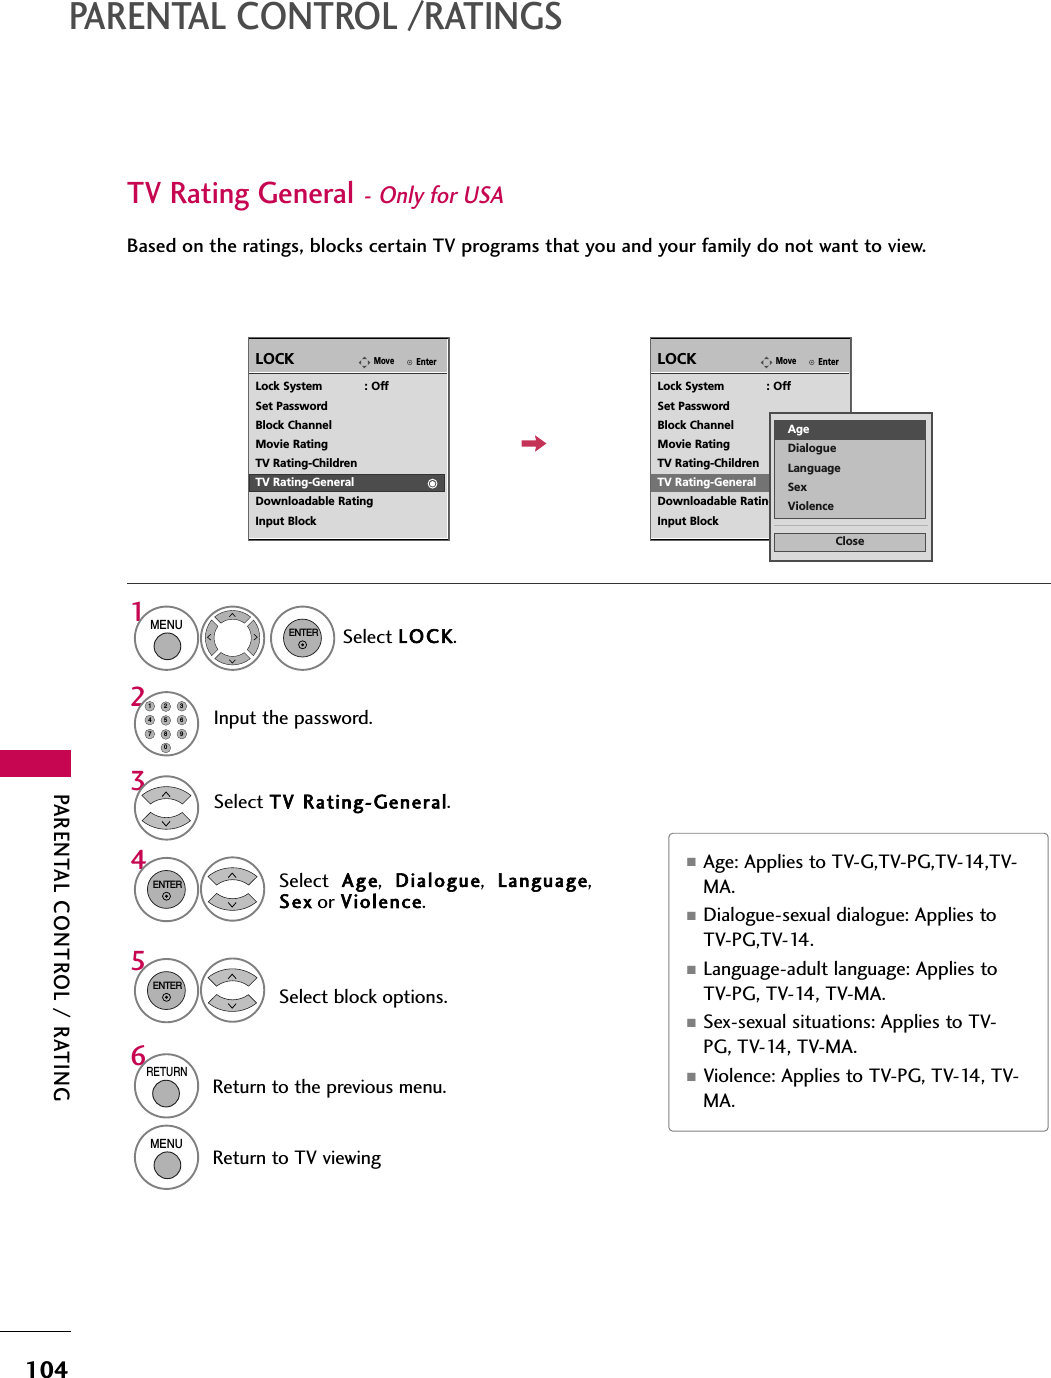
LG Electronics USA 32LG30UA LCD TV/MONITOR User Manual manual 2
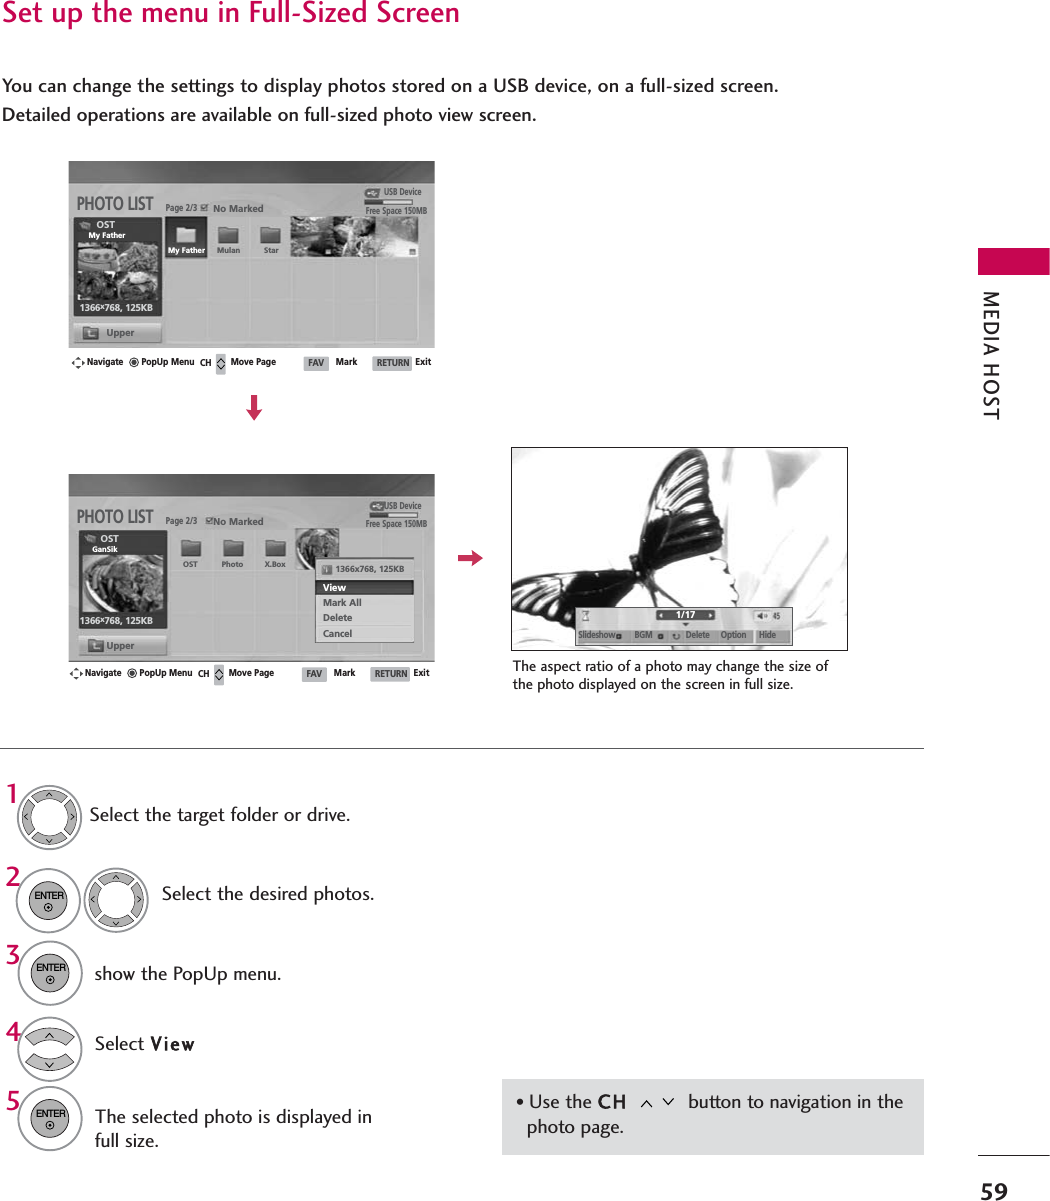
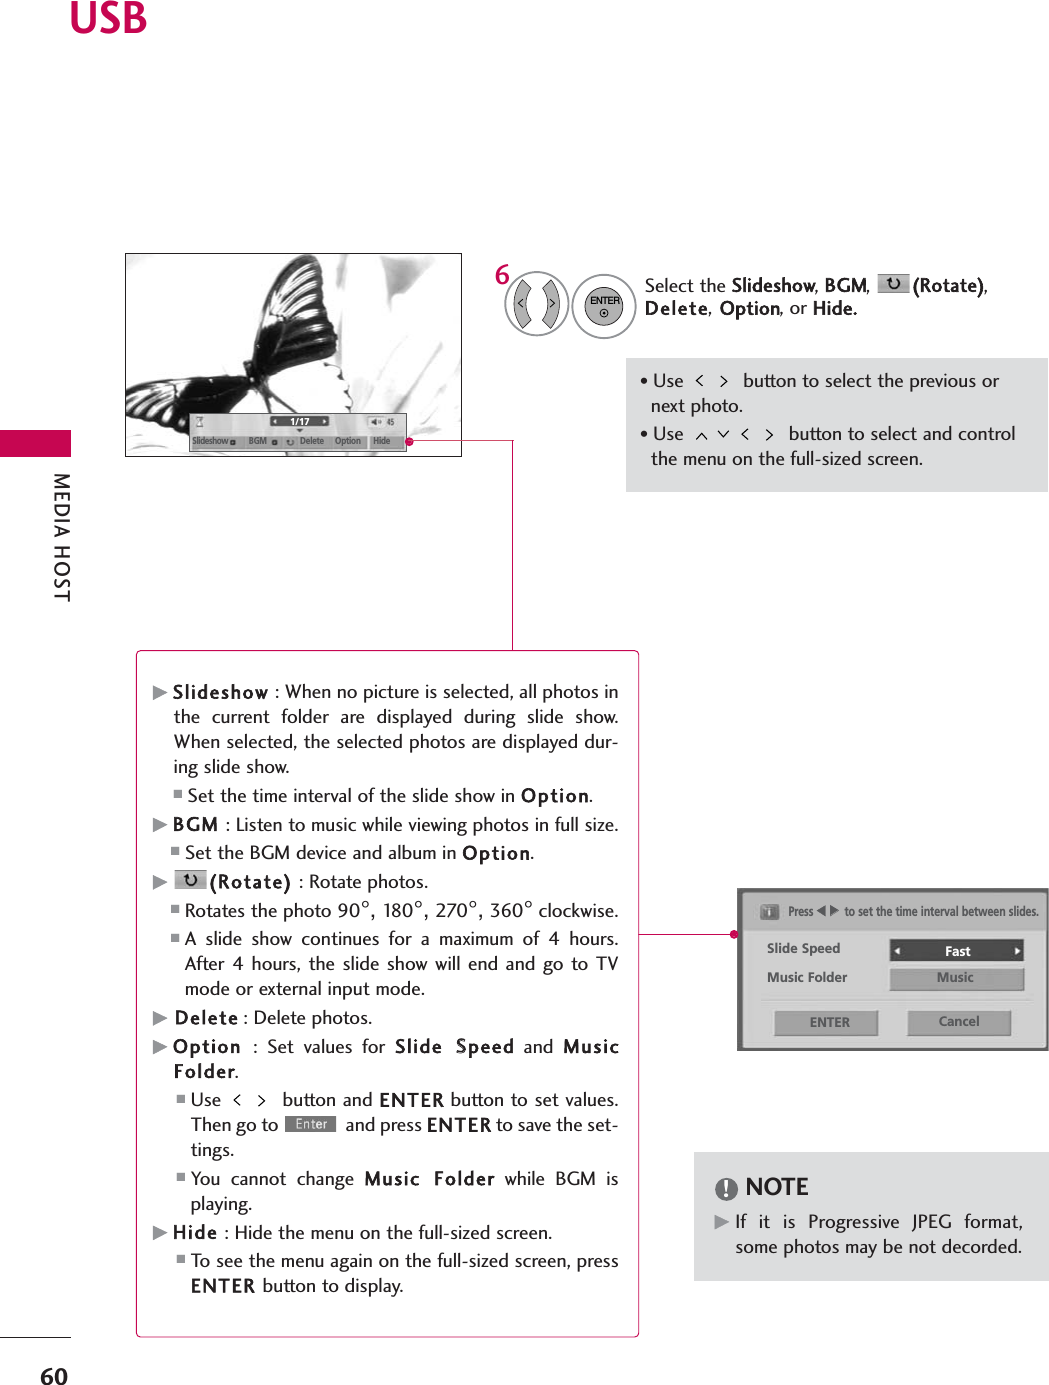
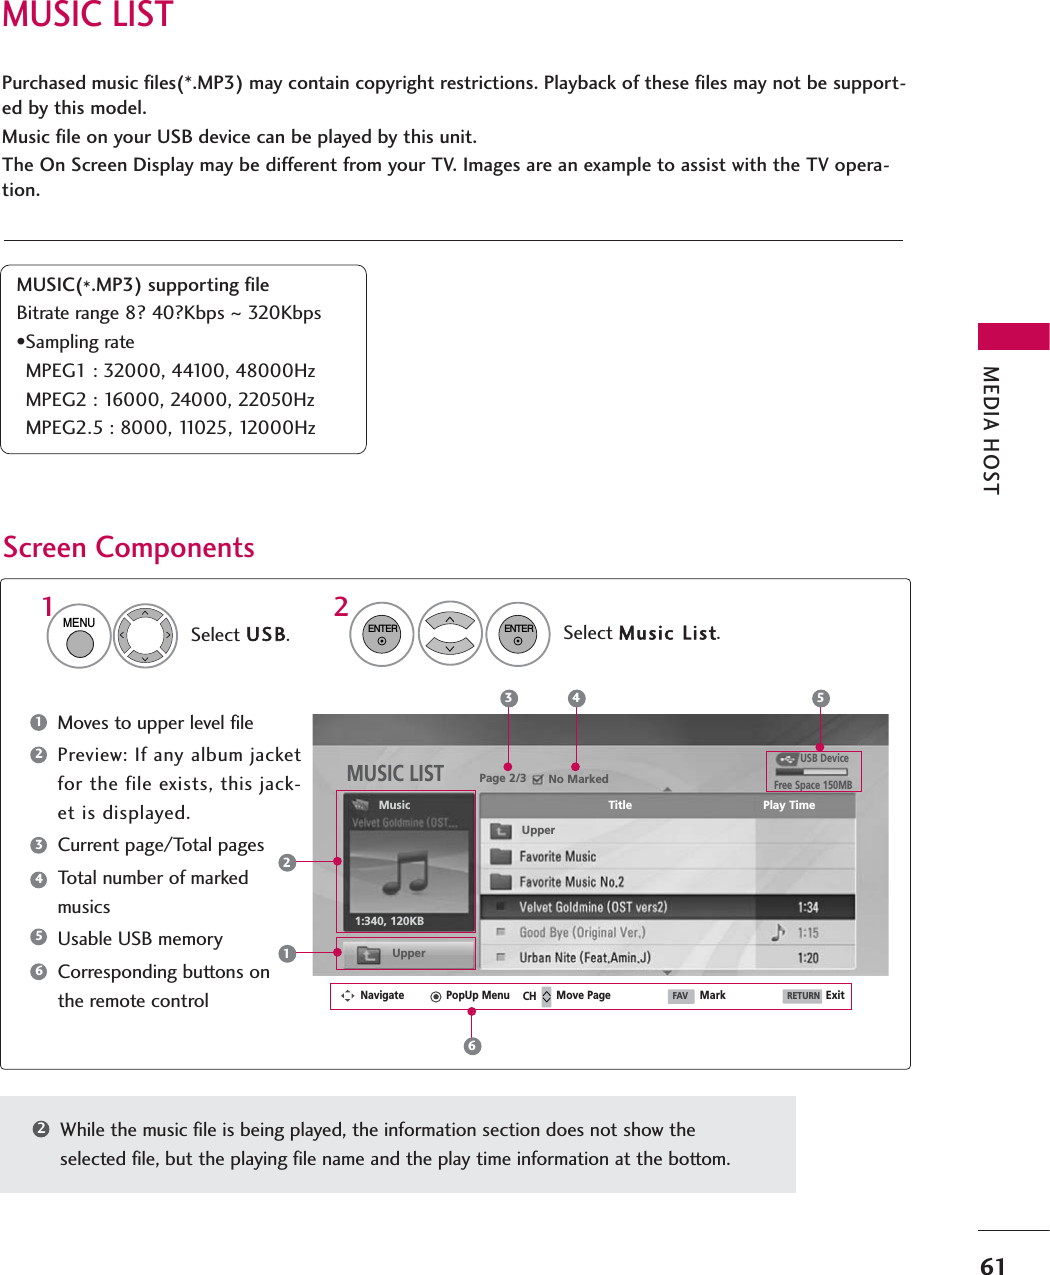
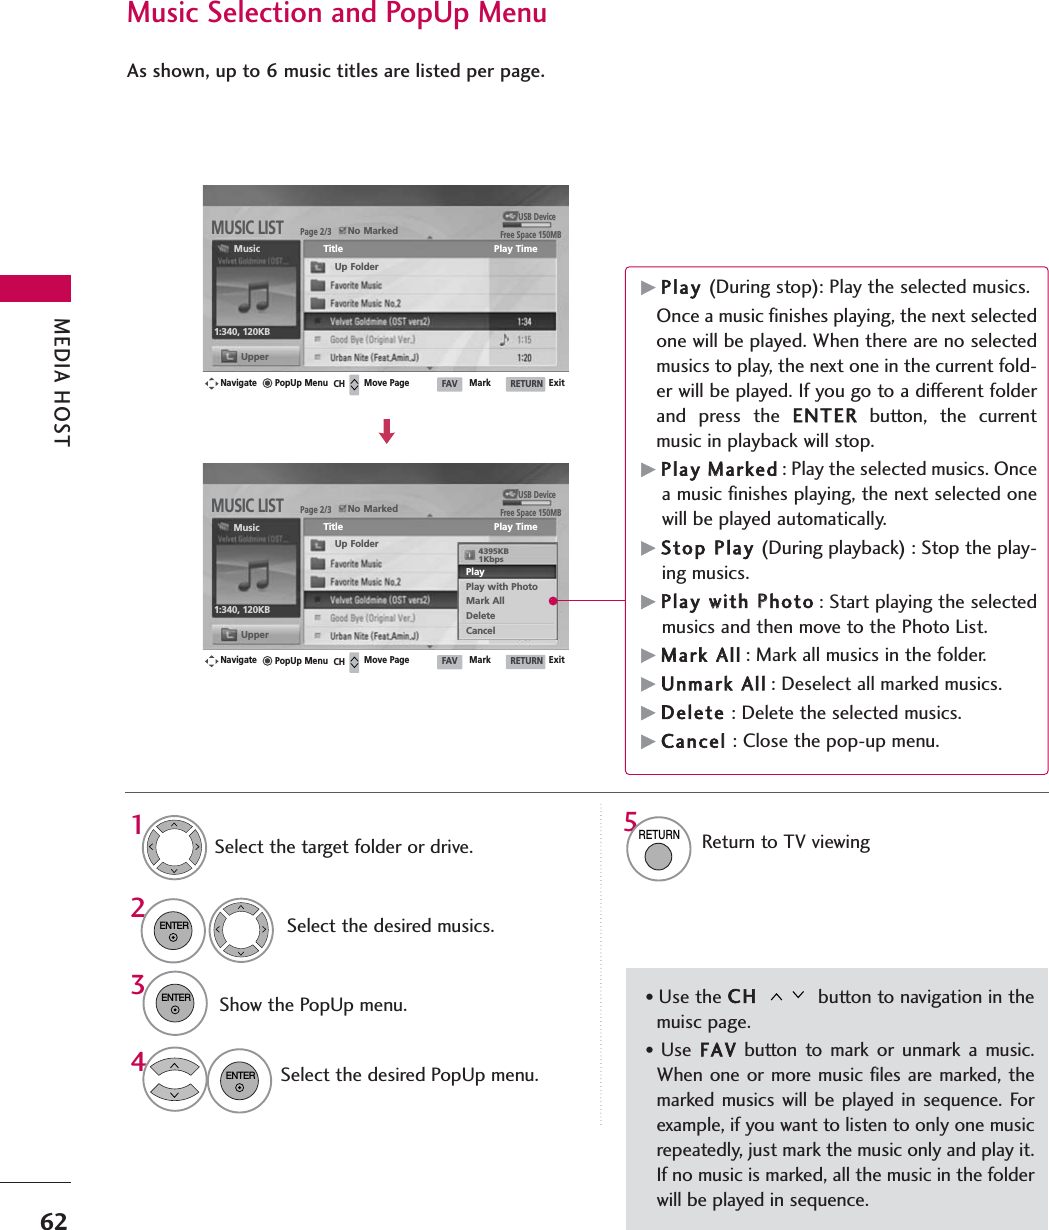
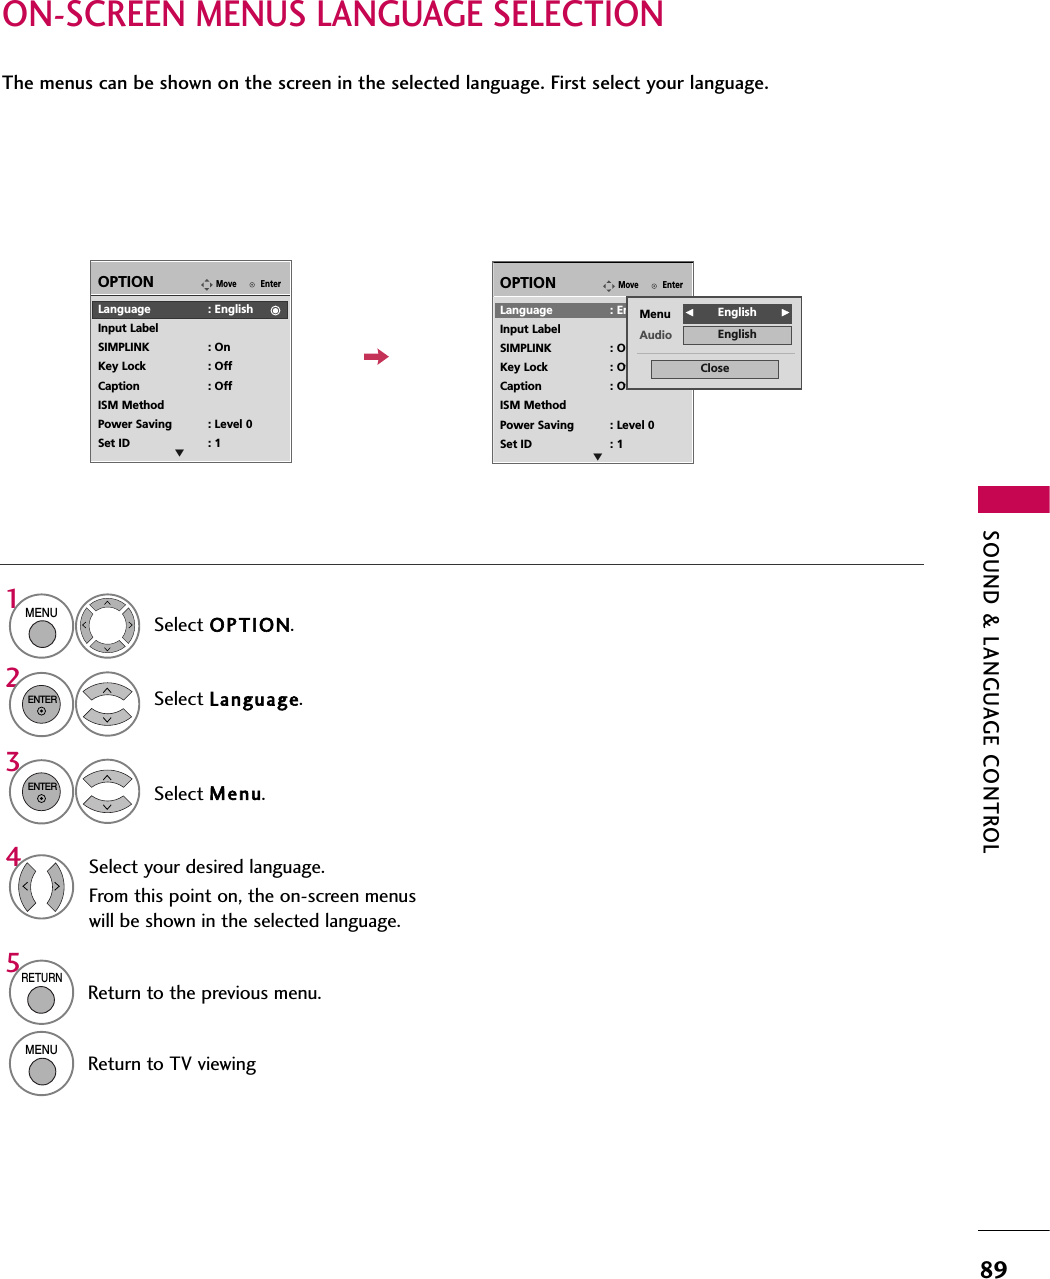
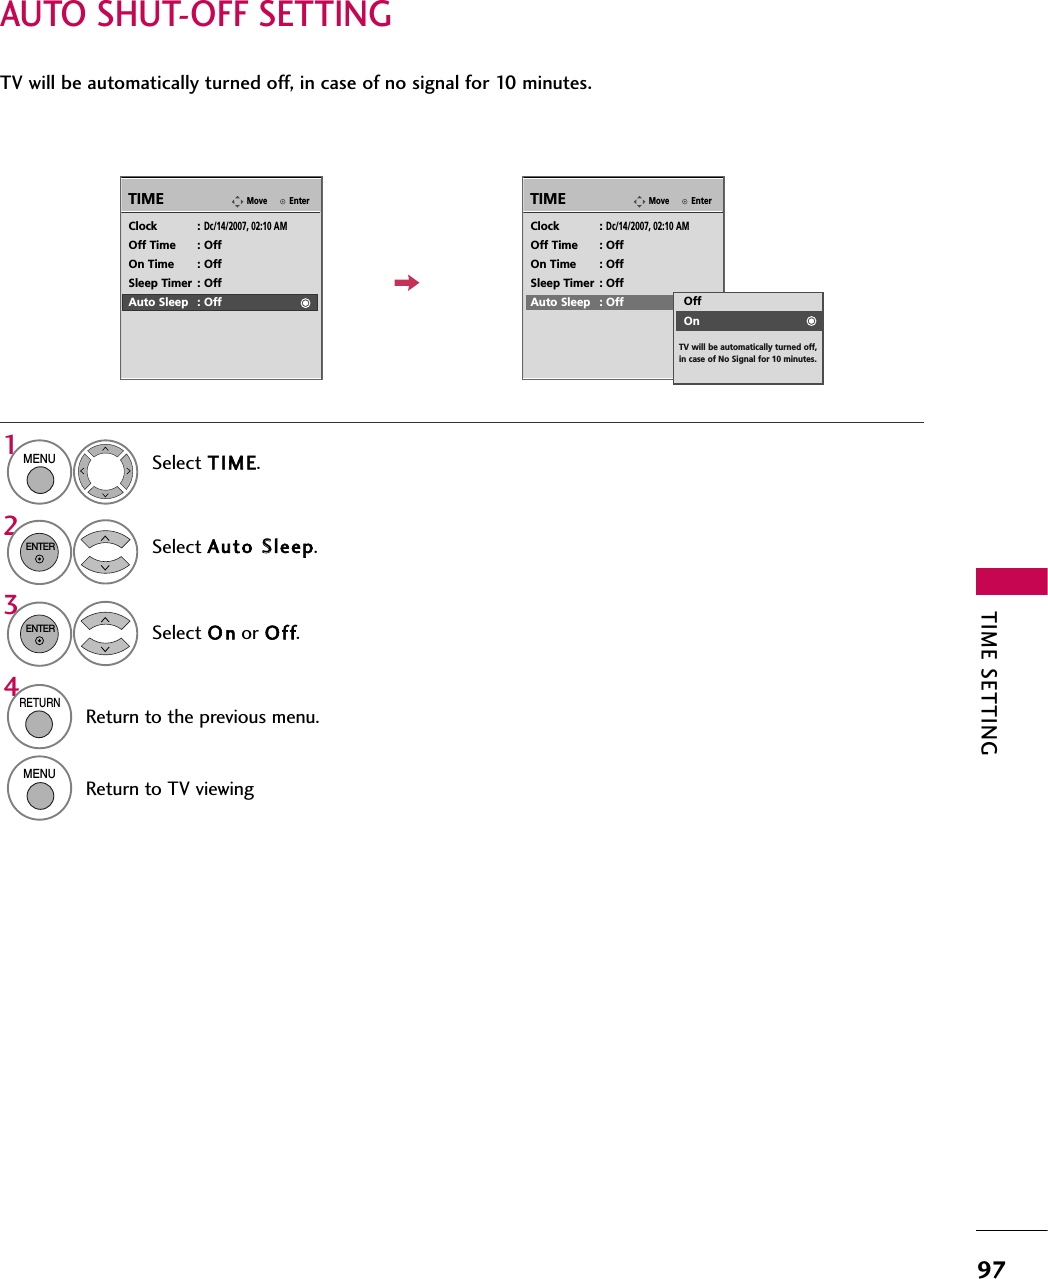
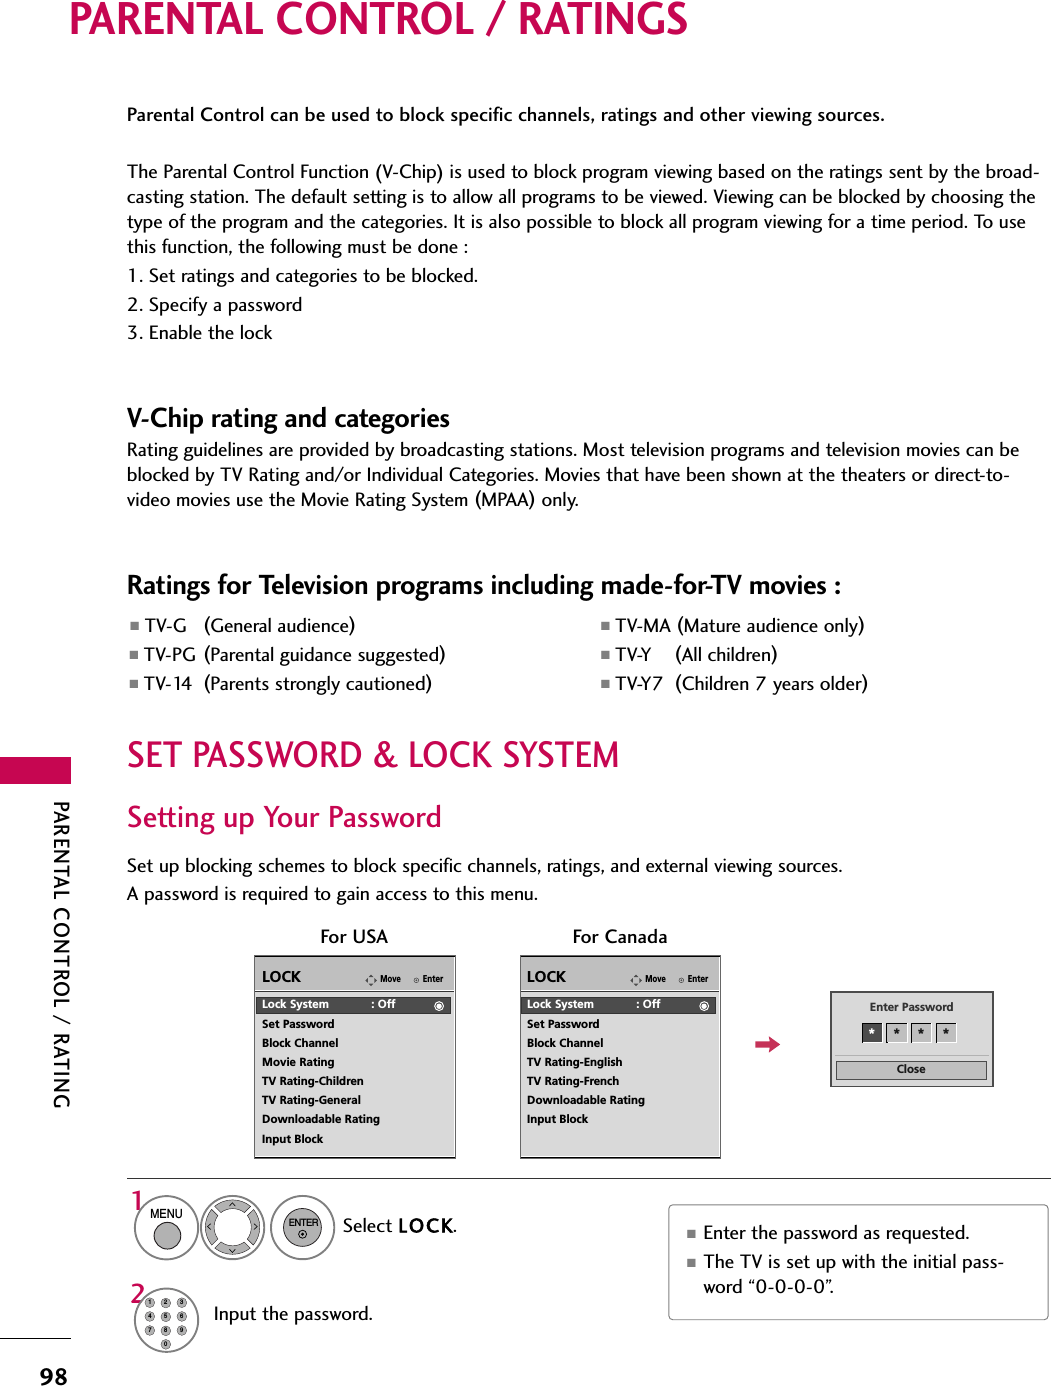
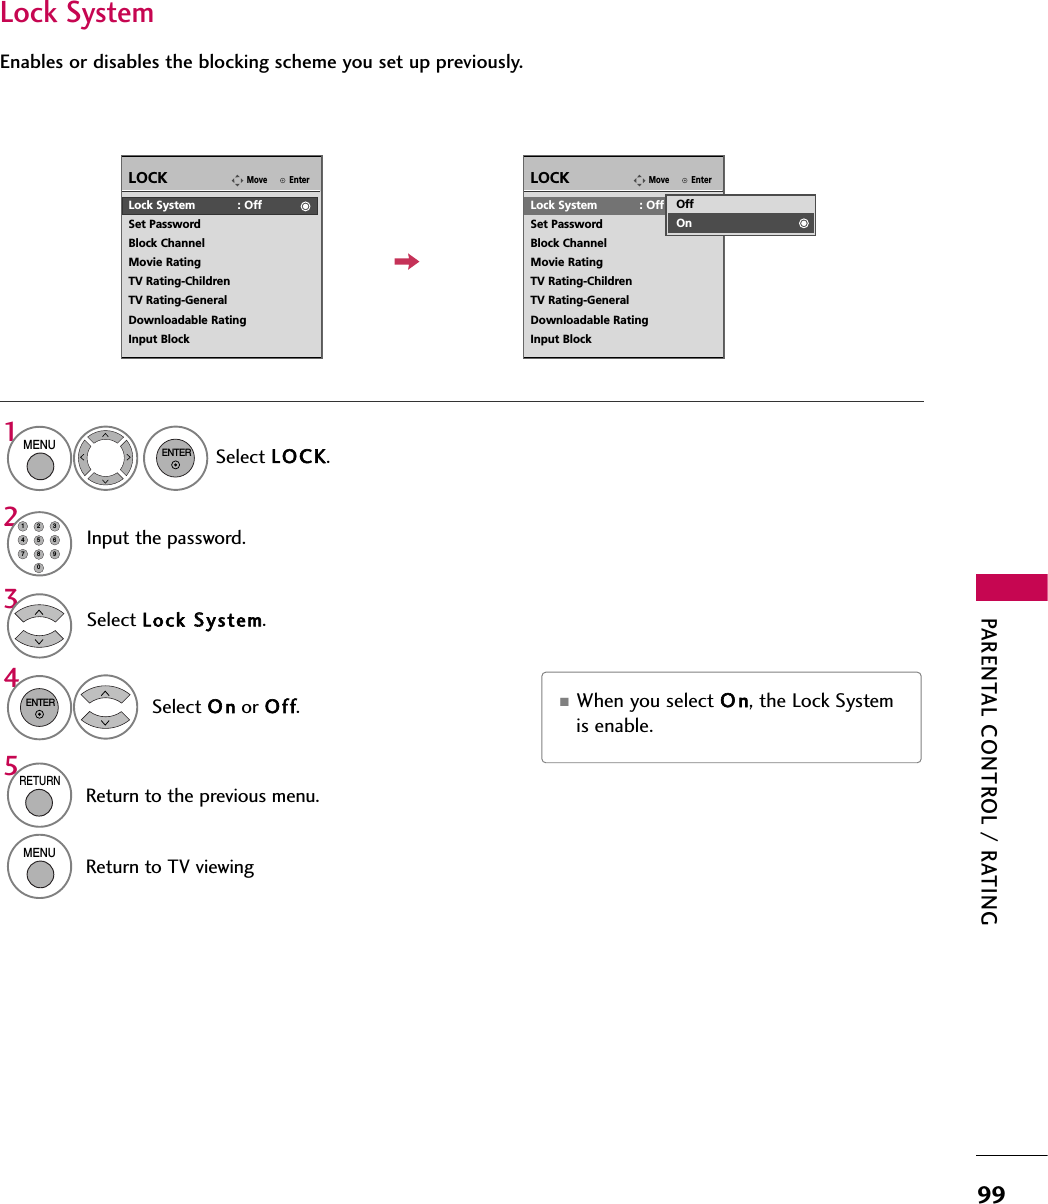
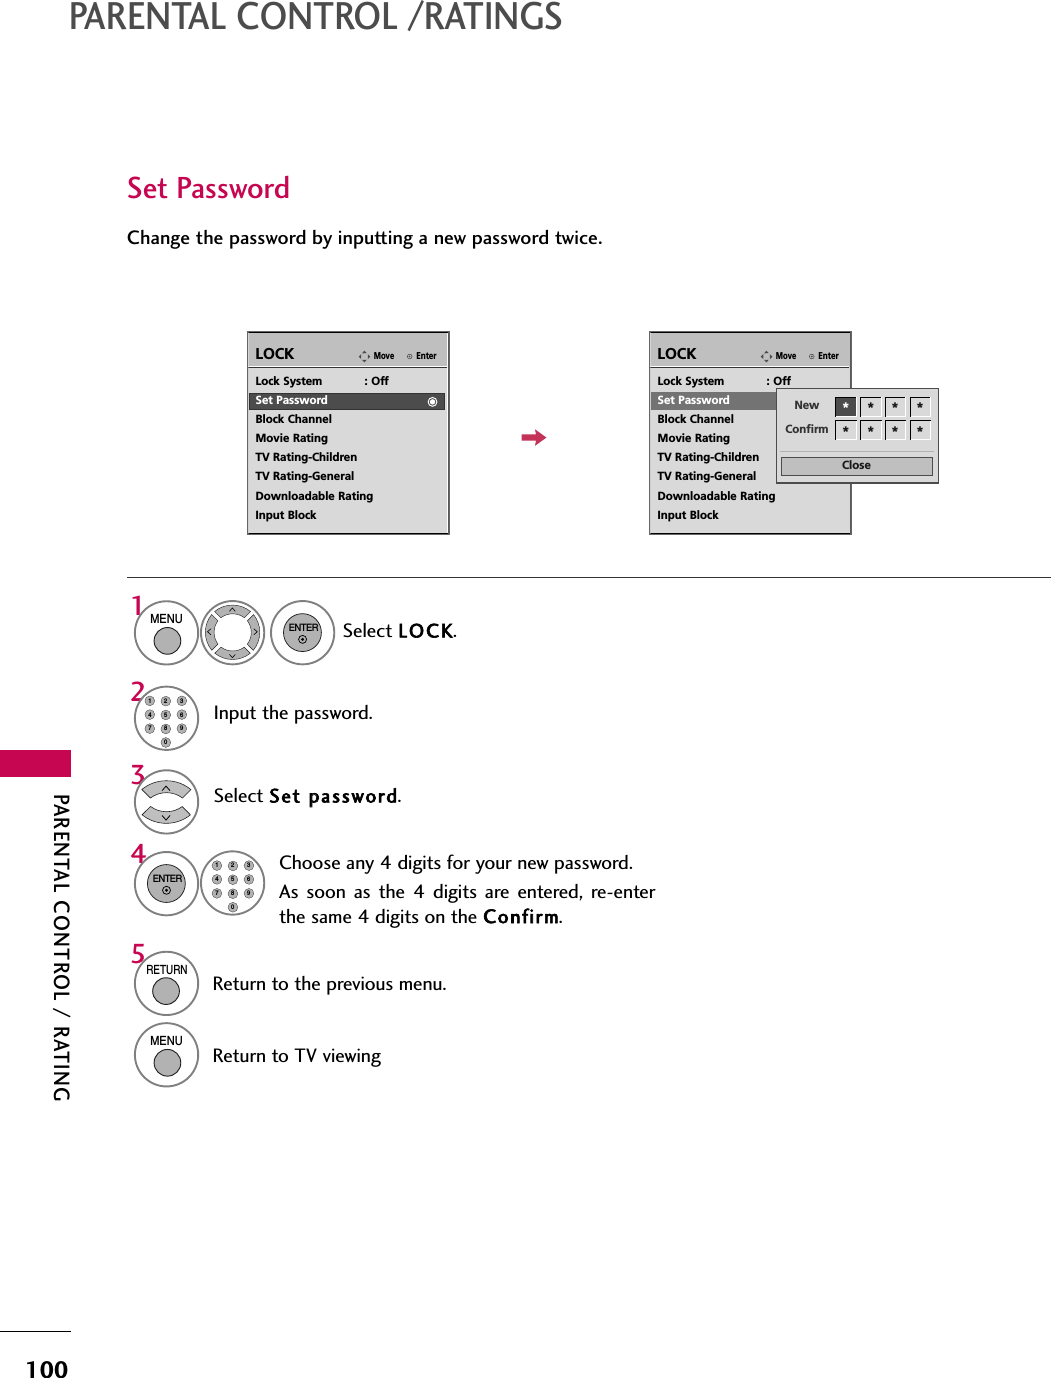
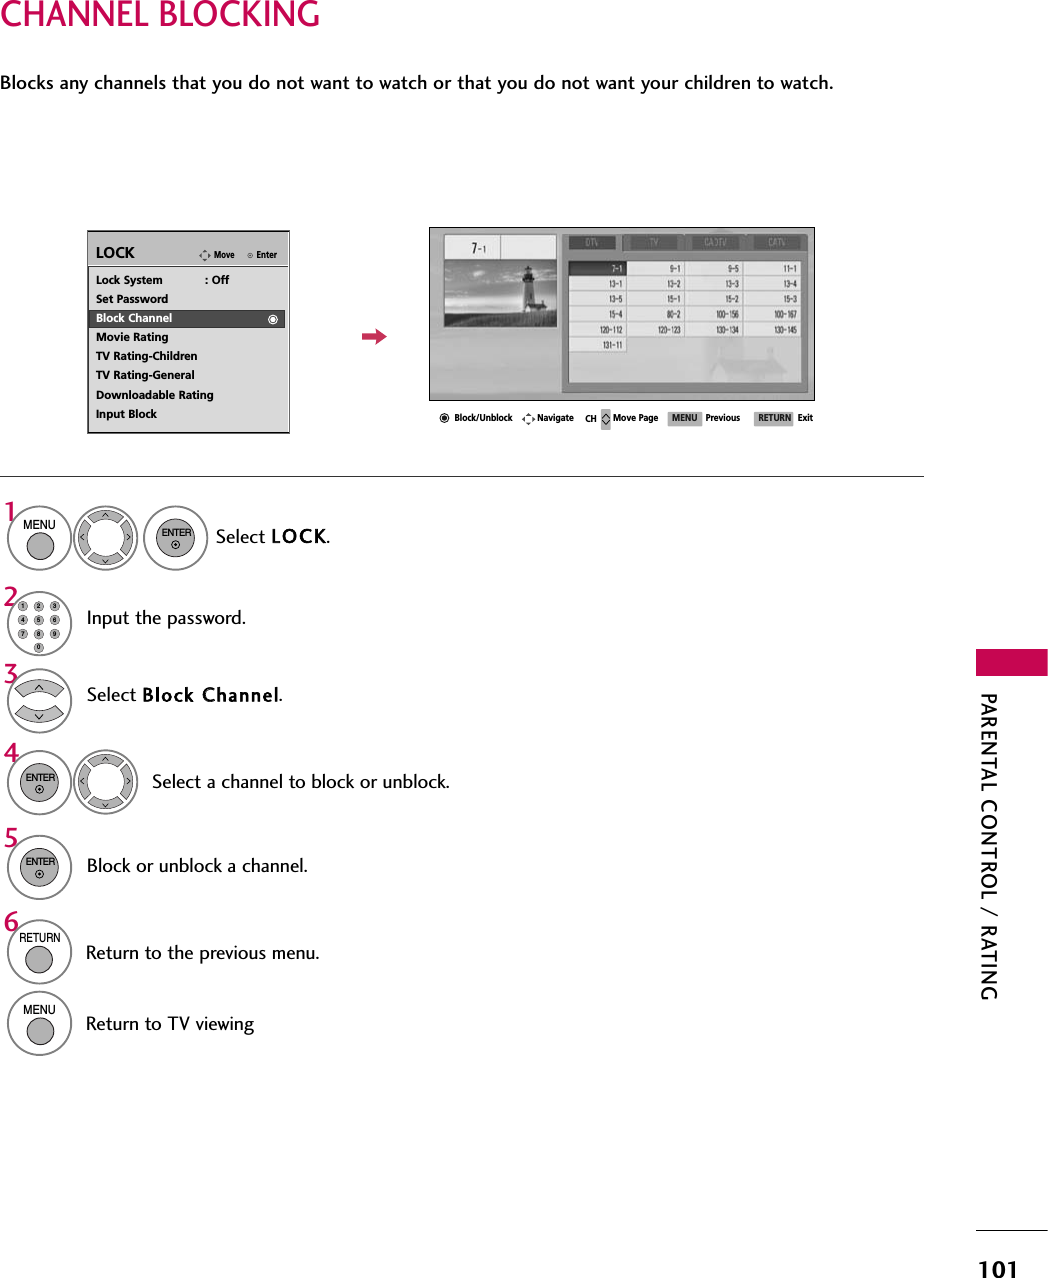
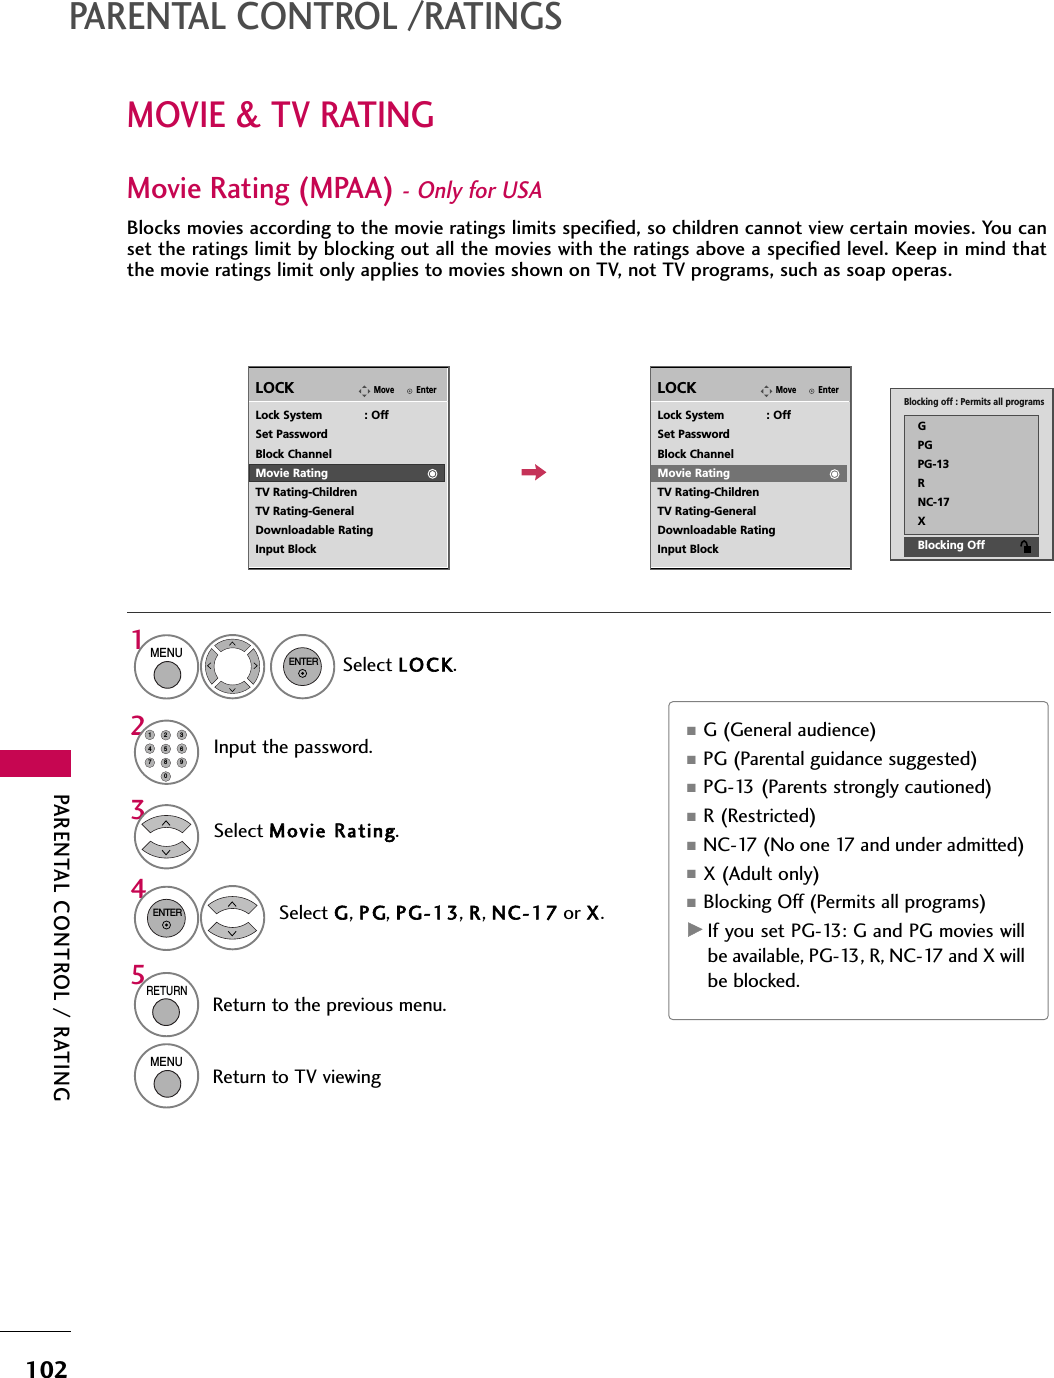
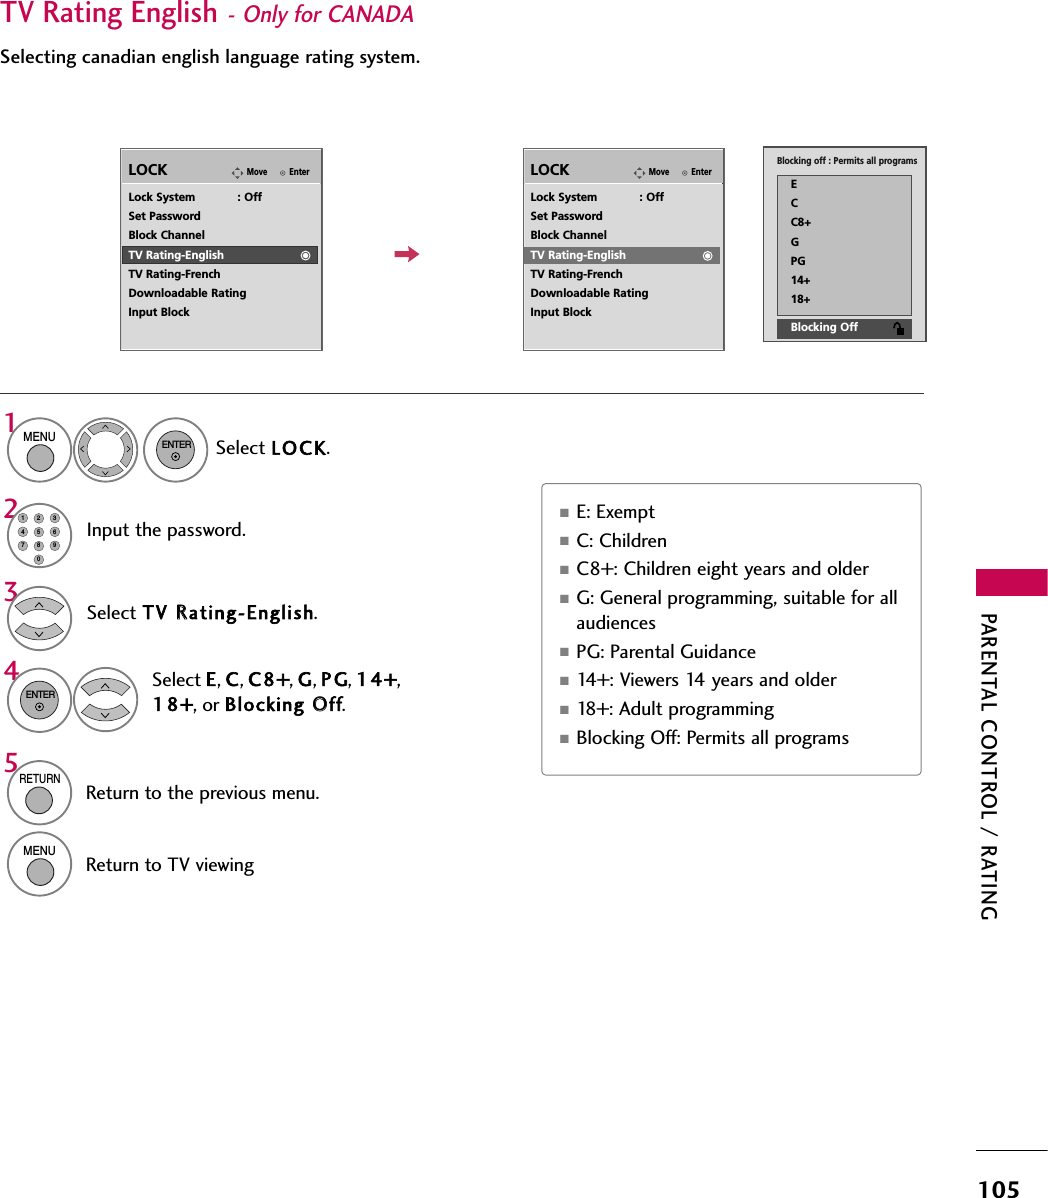
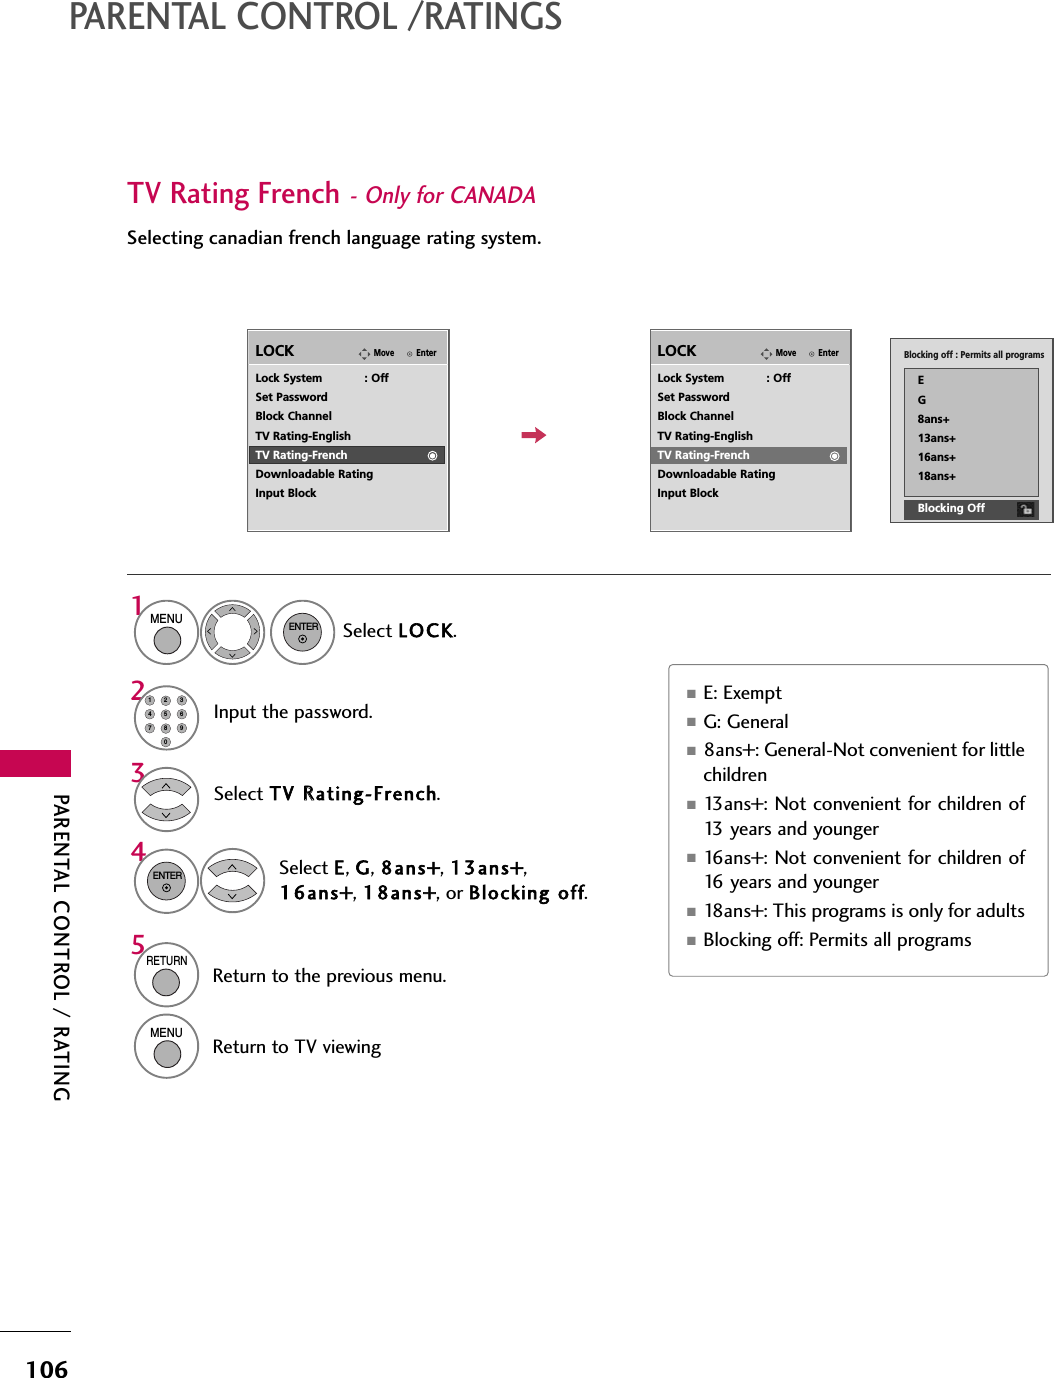
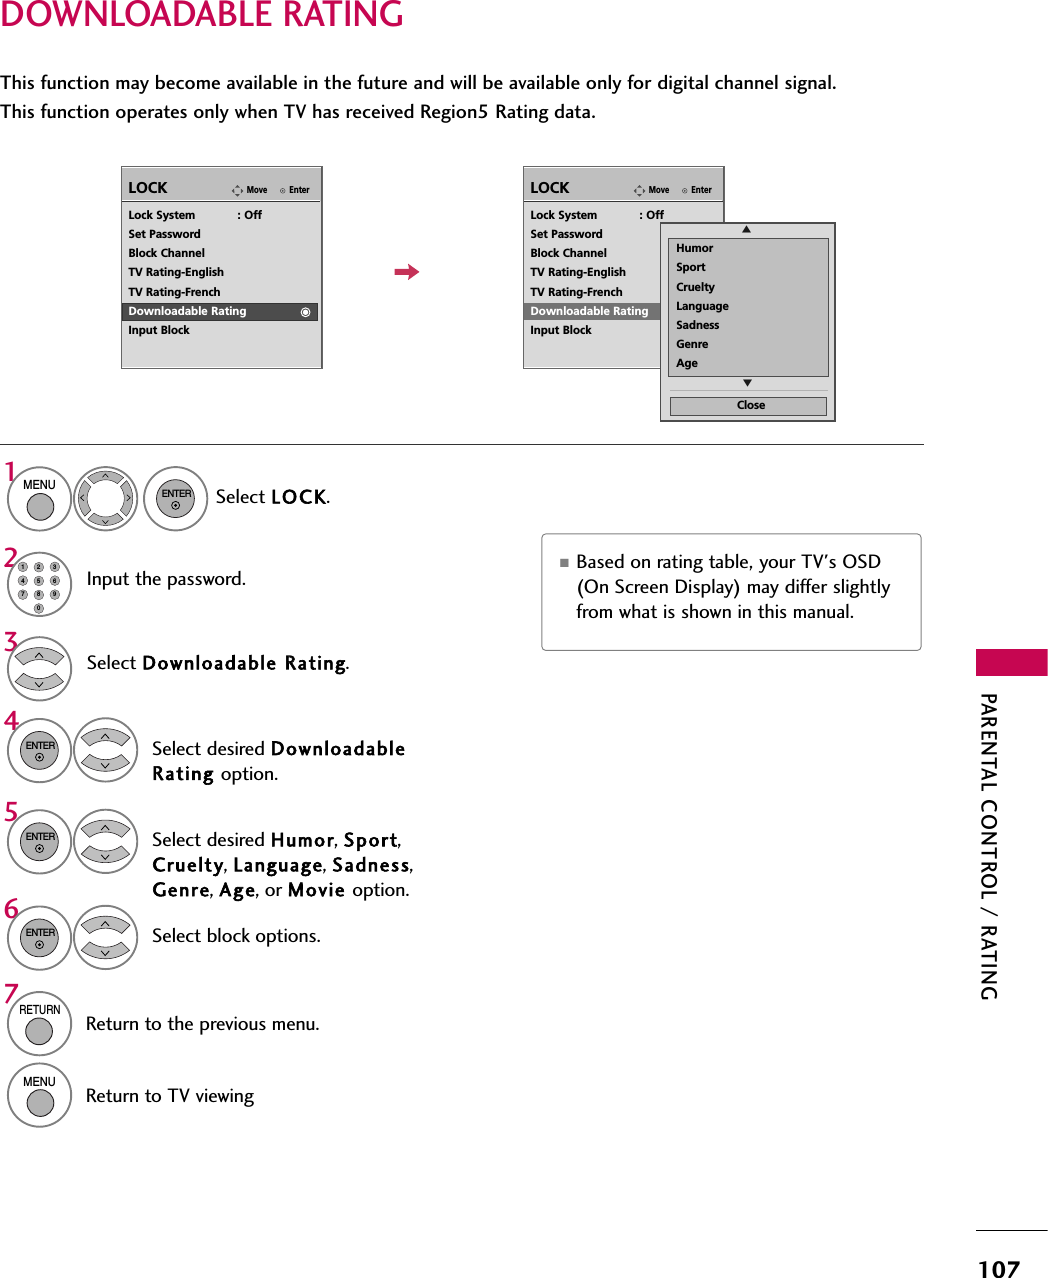
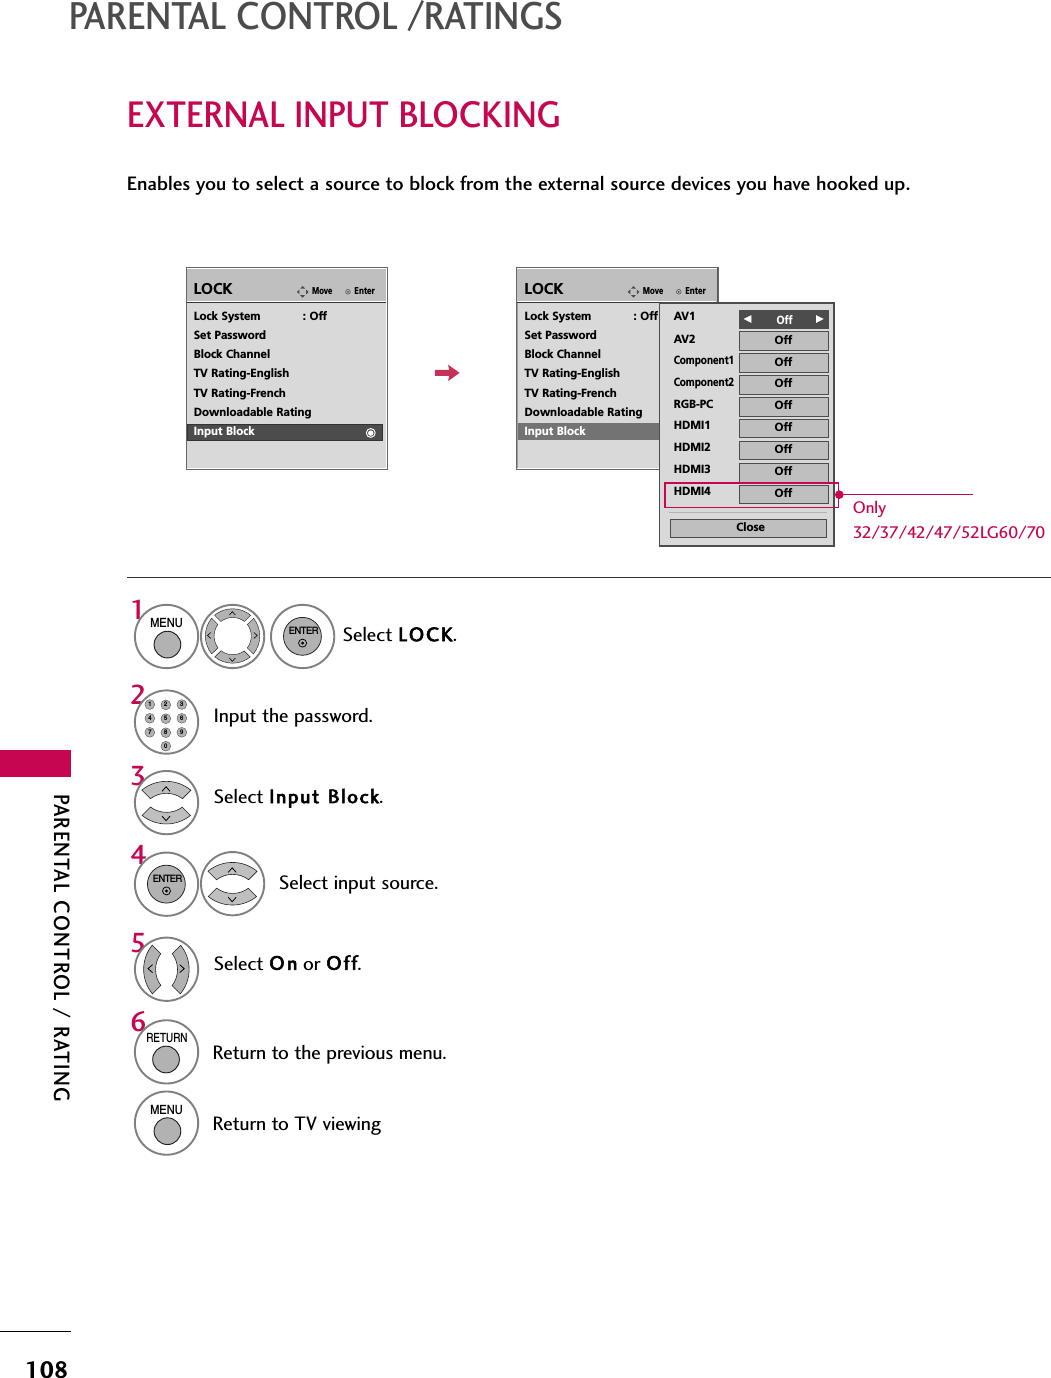
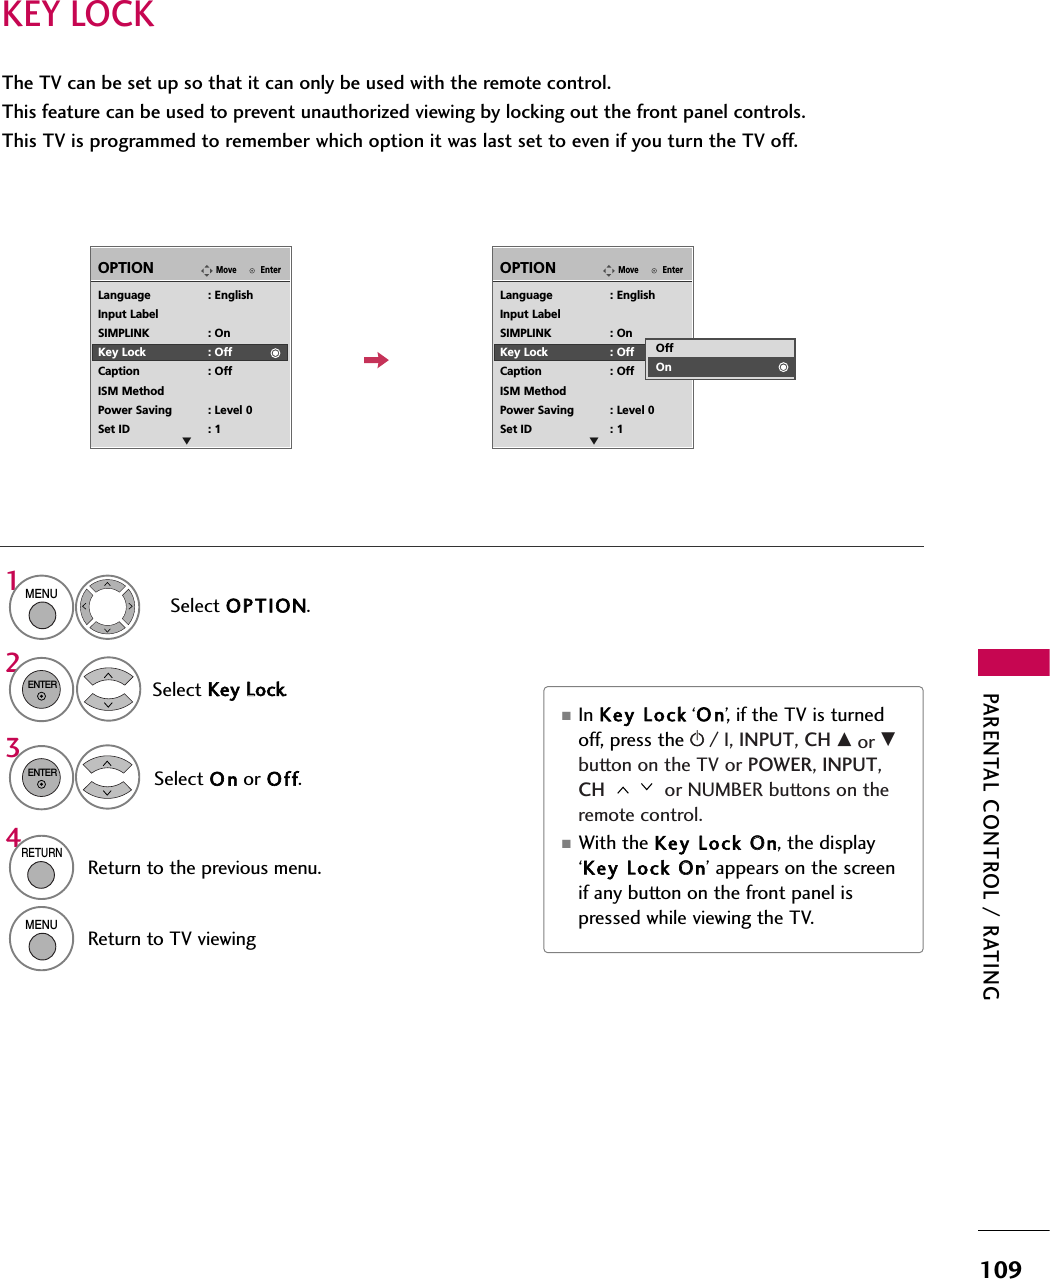
LG Electronics USA LCD TV/MONITOR manual 2
UserManual.wiki
>
LG Electronics USA
>
32LG30UA User Manual
>
User manual 2 of 2
Contents
1.
User manual 1 of 2
2.
User manual 2 of 2
User manual 2 of 2
Navigation menu
Upload a User Manual
Namespaces
Wiki Guide
HTML
PDF
Info
Views
User Manual
Discussion / Help
Navigation
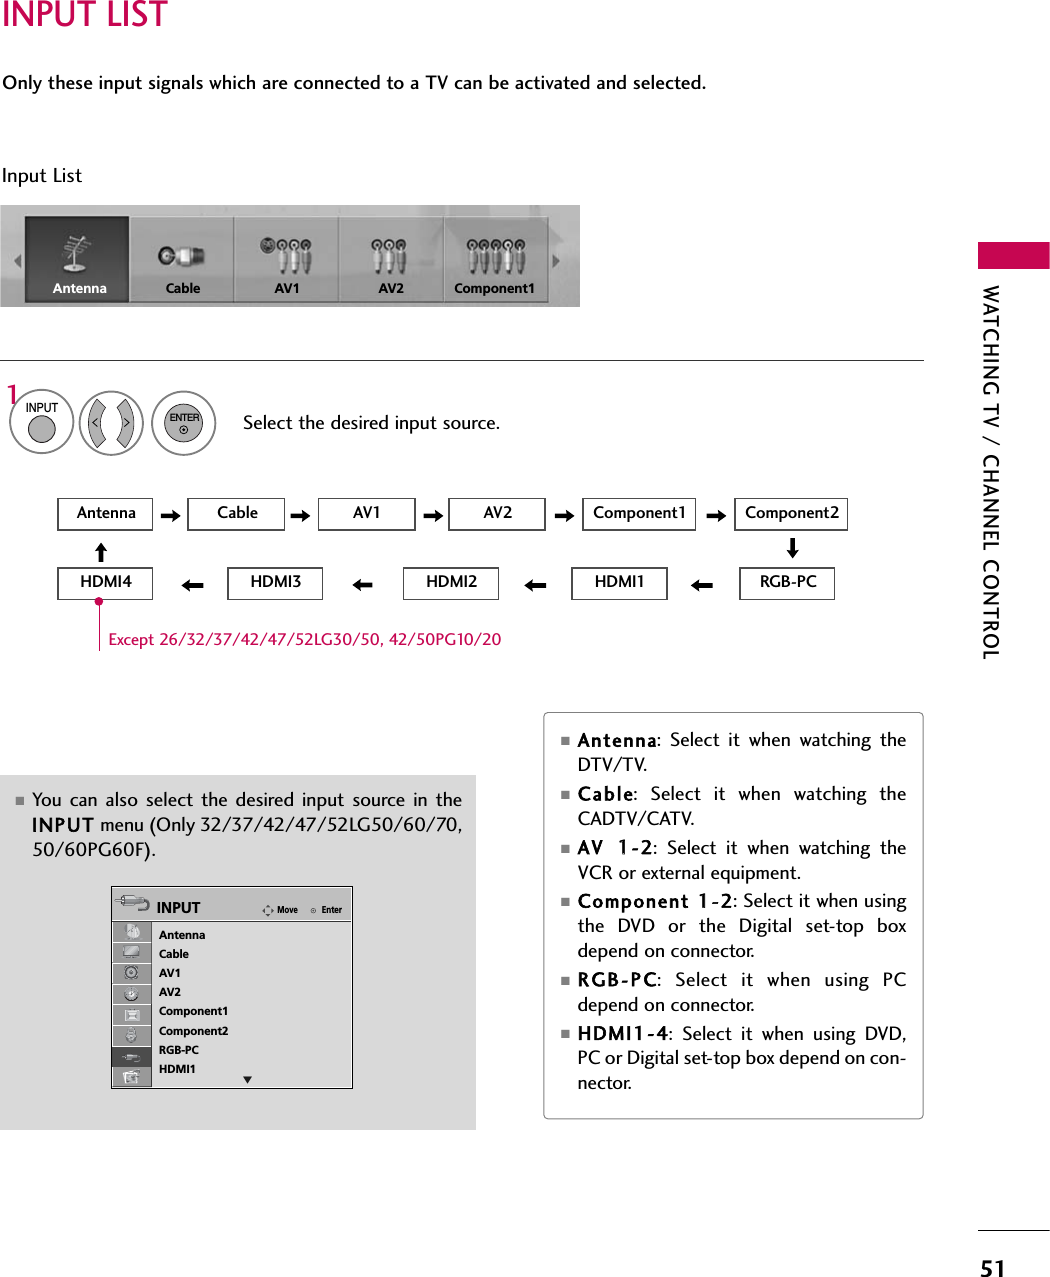
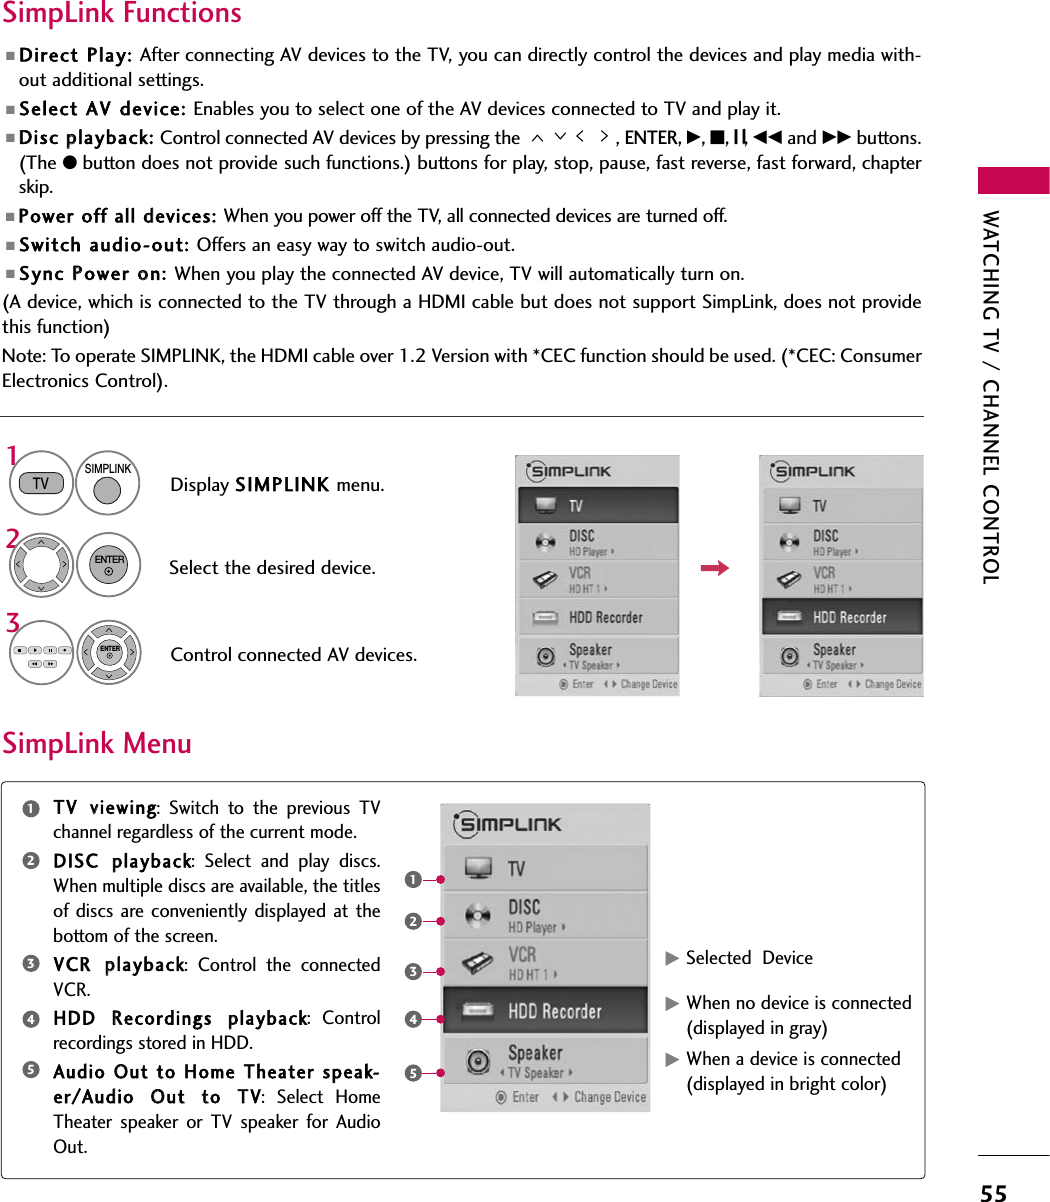


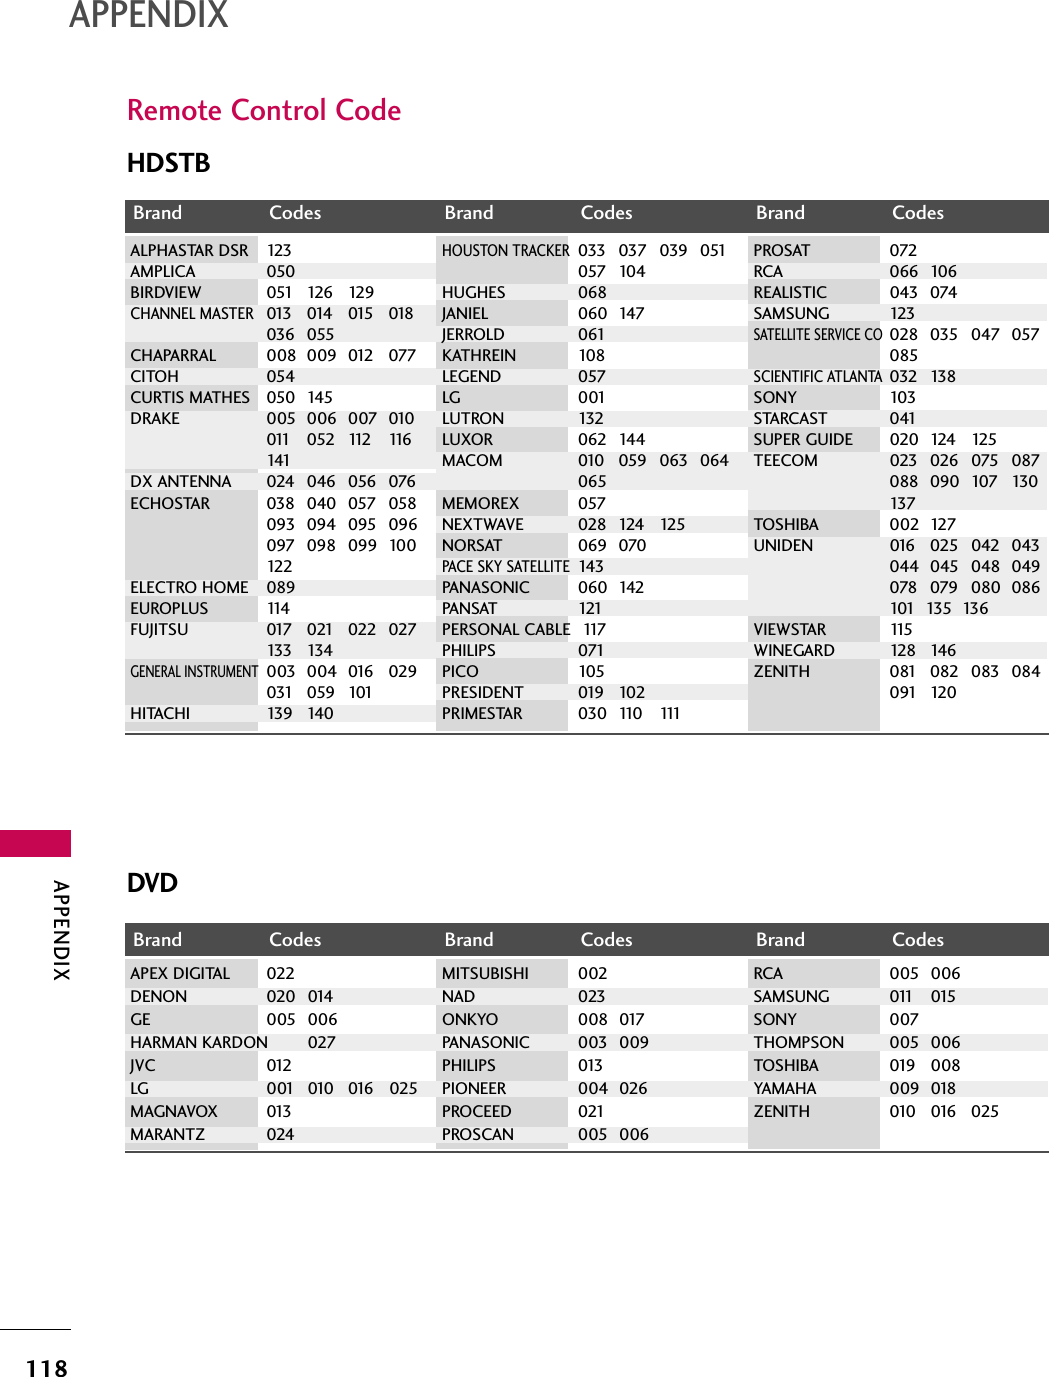
![APPENDIX123Command Reference ListCOMMAND1 COMMAND224. Channel TuningDATA(Hexadecimal)COMMAND1 COMMAND2DATA(Hexadecimal)COMMAND1 COMMAND2DATA0(Hexadecimal)DATA1(Hexadecimal)DATA2(Hexadecimal)DATA3(Hexadecimal)DATA4(Hexadecimal)DATA5(Hexadecimal)physical major major low minor high minor low attributeprogram high program lowma01. Power k a 0 ~102. Input Select k b (Gp.124)03. Input Select x b (Gp.124)04. Aspect Ratio k c (Gp.124)05. Screen Mute k d 0 ~106. Volume Mute k e 0 ~107. Volume Control k f 0 ~6408. Contrast k g 0 ~6409. Brightness k h 0 ~6410. Color k i 0 ~6411. Tint k j 0 ~6412. Sharpness k k 0 ~6413. OSD Select k l 0 ~114. Remote ControlLock ModeTransmission / Receiving ProtocolTransmission[Command 1] : First command to control the set.(j, k, m or x)[Command 2] : Second command to control the set.[Set ID] : You can adjust the set ID to choose desired TV IDnumber in Setup menu. Adjustment range is 1~99.When selecting Set ID ‘0’, every connected the TV iscontrolled. Set ID is indicated as decimal (1~99)onmenu and as Hexa decimal (0x0~0x63)on transmission/receiving protocol.[DATA] : To transmit the command data.Transmit the ‘FF’ data to read status of command.[Cr] : Carriage ReturnASCII code ‘0x0D’[ ] : ASCII code ‘space (0x20)’* In this model, TV will not send the status during the standby mode.OK AAcknowledgementThe TV transmits ACK (acknowledgement) based on this for-mat when receiving normal data. At this time, if the data isdata read mode, it indicates present status data. If the data isdata write mode, it returns the data of the PC computer.* In this model, TV will not send the status during the standby mode.* Data Format[Command 2] : Use as command.[Set ID] : Use the small character, if set ID is 10, it will send the ‘0’, ‘a’.[DATA] : Use the small character, if data is 0 x ab, it will send the ‘a’, ‘b’.[OK] : Use the large character.Error AAcknowledgementThe TV transmits ACK (acknowledgement) based on this for-mat when receiving abnormal data from non-viable functionsor communication errors.Data1: Illegal CodeData2: Not supported functionData3: Wait more time* In this model, TV will not send the status during the standby mode.* Data Format[Command 2] : Use as command.[Set ID] : Use the small character, if set ID is 10, it will send the ‘0’, ‘a’.[DATA] : Use the small character, if data is 0 x ab, it will send the ‘a’, ‘b’.[NG] : Use the large character[Command1][Command2][ ]][Set IID][ ]][Data][Cr][Command2][ ]][Set IID][ ]][OK][Data][x][Command2][ ]][Set IID][ ]][NG][Data][x]15. Treble k r 0 ~6416. Bass k s 0 ~6417. Balance k t 0 ~6418 .Color Temperaturek u 0 ~319. Red Adjustment k v 0 ~C820. Green Adjustment k w 0 ~C821. Blue Adjustment k $ 0 ~C822. ISM Method j p (Gp.126)23. Low Power j q 0 ~125. Channel Add/Del m b 0 ~126. Key m c (Gp.127)27. Back Light m g 0 ~640 ~1k m Only Plasma TV ModelOnly LCD TV Model](https://usermanual.wiki/LG-Electronics-USA/32LG30UA.User-manual-2-of-2/User-Guide-883821-Page-73.png)
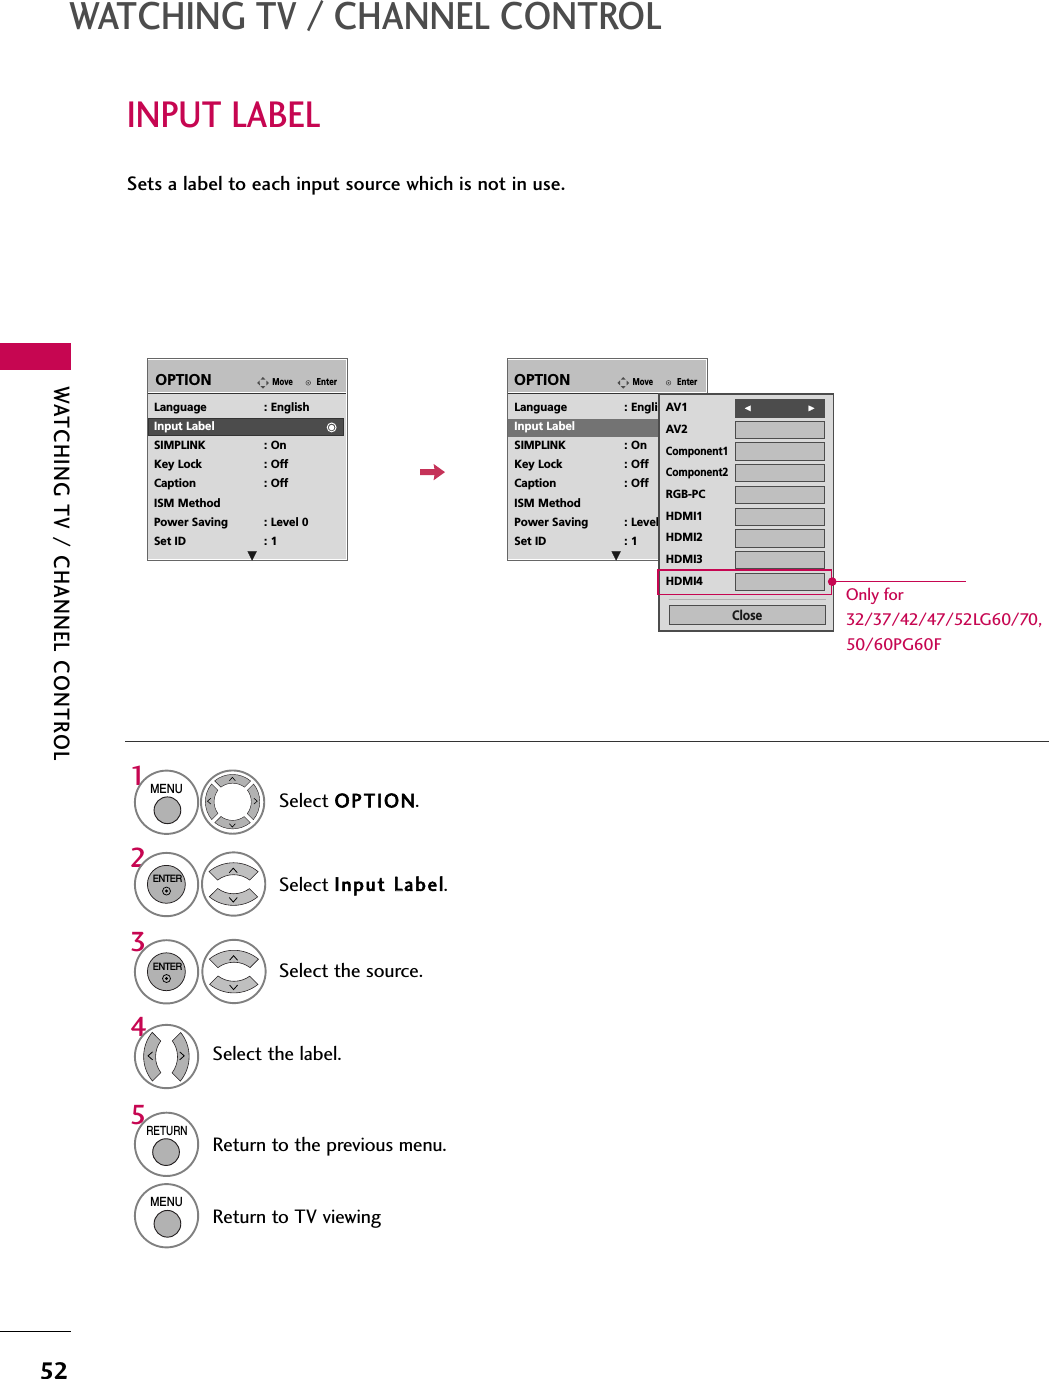
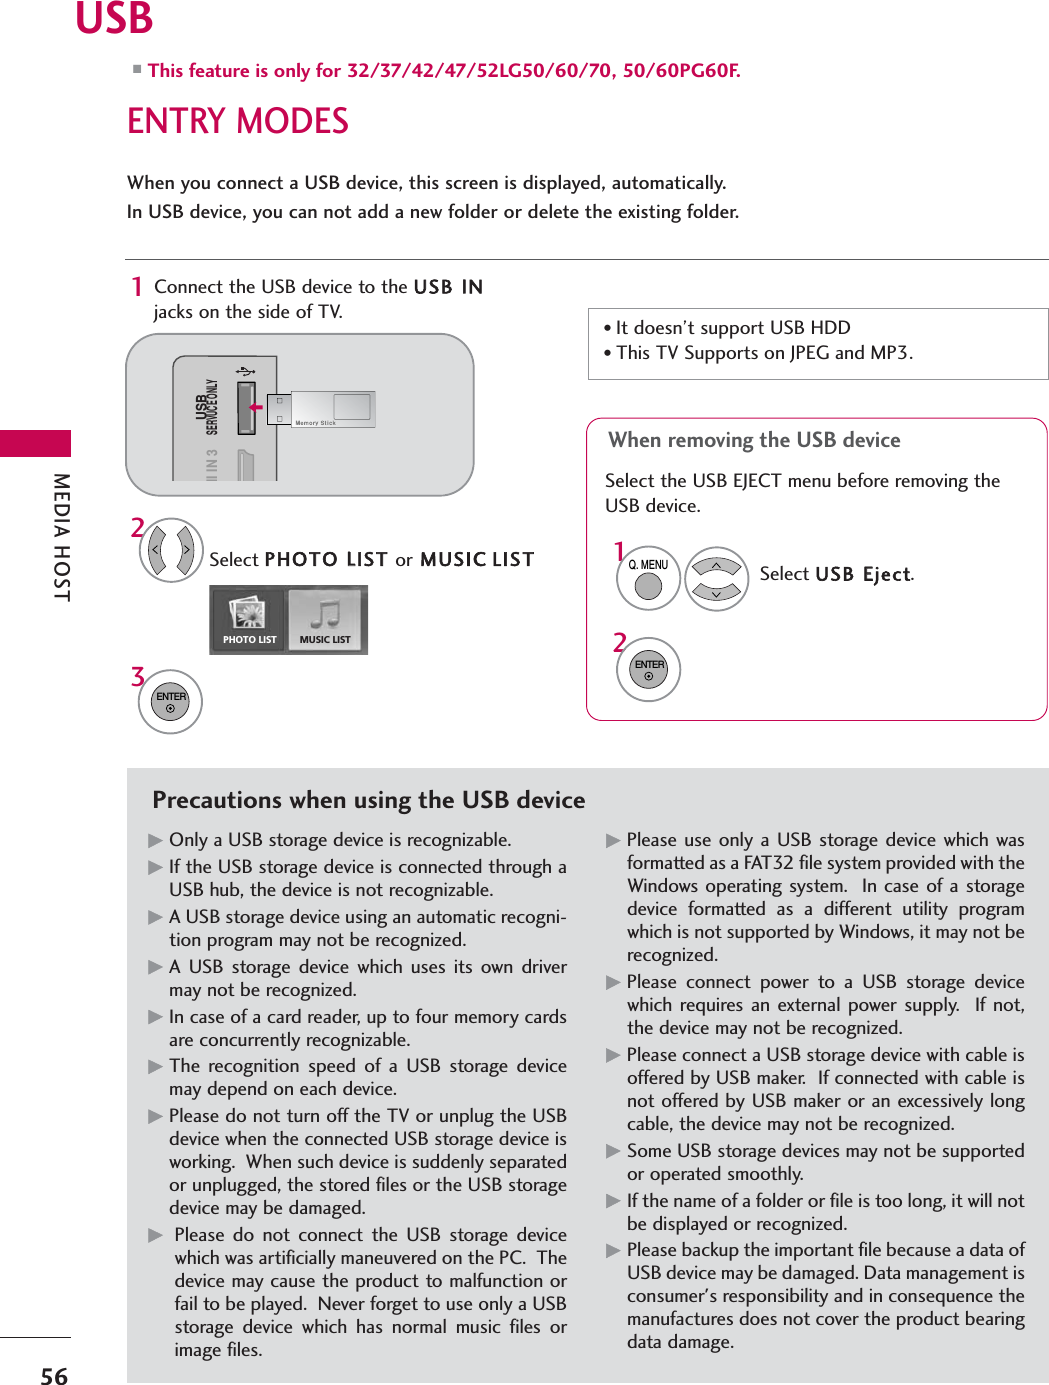
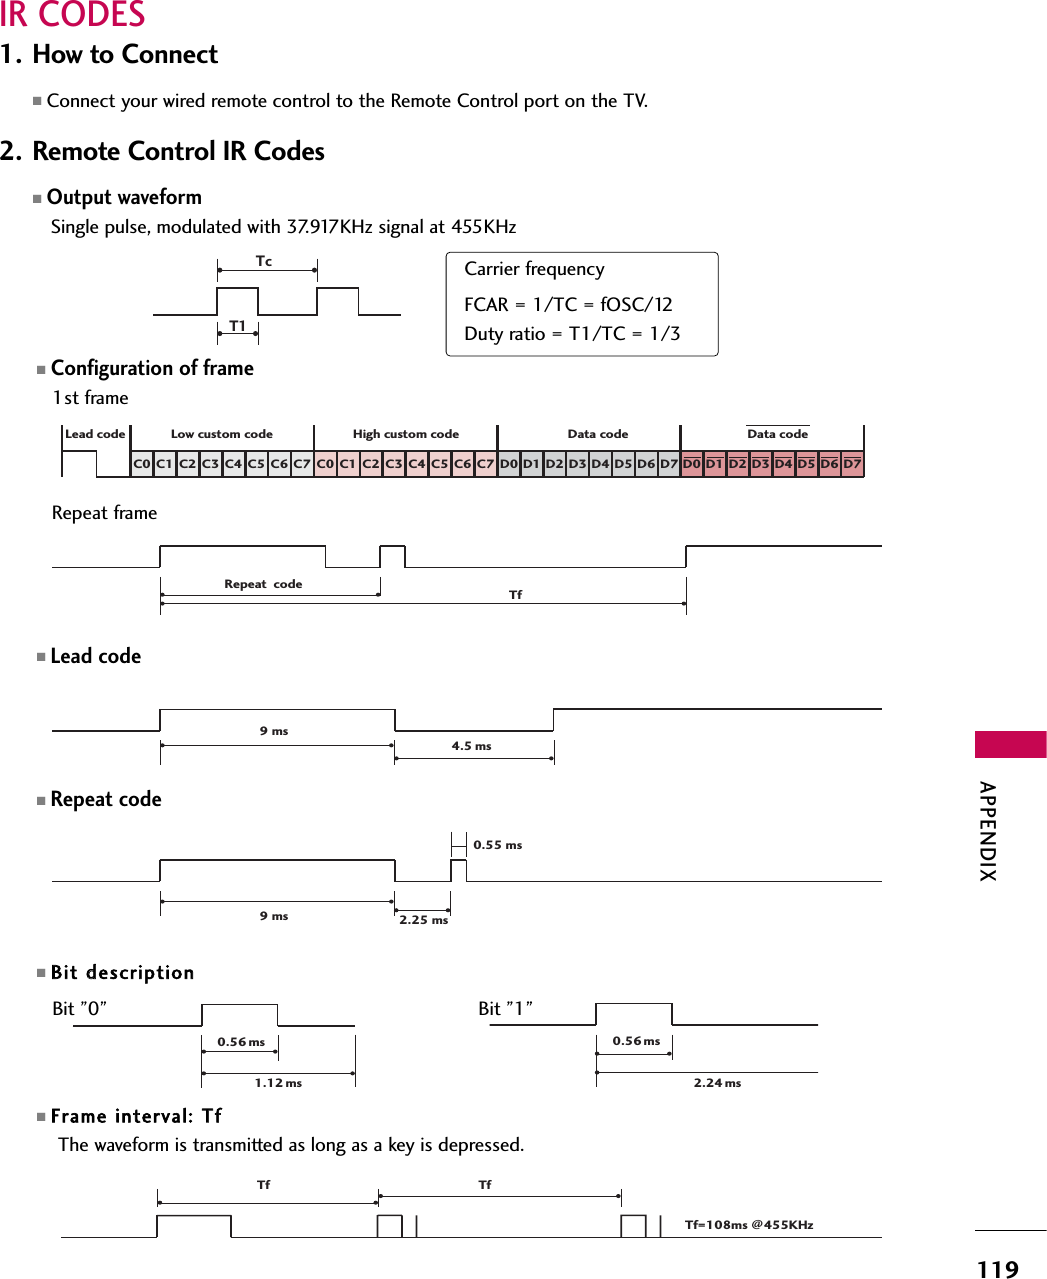
![APPENDIX124APPENDIX01. Power ((Command: kk aa)To control Power On/Off of the TV.Transmission [k][a][ ][Set ID][ ][Data][Cr]Data 0: Power Off Data 1: Power OnAcknowledgement [a][ ][Set ID][ ][OK/NG][Data][x]* In a like manner, if other functions transmit ‘FF’ databased on this format, Acknowledgement data feedbackpresents status about each function.* Note: In this model, TV will send the Acknowledgeafter power on processing completion.There might be a time delay between command andacknowledge.02. IInput SSelect ((Command: kk bb)To select input source for the TV.Transmission [k][b][ ][Set ID][ ][Data][Cr]Data 0: DTV Data 1: AnalogData 2: AV1 Data 3: AV2Data 4: Component 1 Data 5: Component 2Data 7: RGB-PC Data 8: HDMI1Data 9: HDMI2Acknowledgement [b][ ][Set ID][ ][OK/NG][Data][x]* You can select HDMI3 using “command xx bb”. * If you select input source, we recommend “command xx bb”.03. IInput SSelect ((Command: xx bb)To select input source for TV. Transmission [x][b][ ][Set ID][ ][Data][Cr]Data 00: DTV (Antenna) Data 01: DTV (Cable)Data 10: Analog (Antenna) Data 11: Analog (Cable)Data 20: AV1 Data 21: AV2Data 40: Component 1 Data 41: Component 2Data 60: RGB-PC Data 90: HDMI1Data 91: HDMI2 Data 92: HDMI3Acknowledgement [b][ ][Set ID][ ][OK/NG][Data][x]04. AAspect RRatio ((Command: kk cc)To adjust the screen format.You can also adjust the screen format using the RATIObutton on remote control or in the Picture menu.Transmission [k][c][ ][Set ID][ ][Data][Cr]Data 1: 4:3 5: Zoom 22: 16:9 6: Set by program4: Zoom 1 9: Just scanReservedAcknowledgement [c][ ][Set ID][ ][OK/NG][Data][x]05. Screen MMute ((Command: kk dd)To select screen mute on/off.Transmission [k][d][ ][Set ID][ ][Data][Cr]Data 0: Screen mute off (Picture on)Data 1: Screen mute on (Picture off)Acknowledgement [d][ ][Set ID][ ][OK/NG][Data][x]06. VVolume MMute ((Command: kk ee)To control volume mute on/off.You can also adjust mute using the MUTE button onremote control.Transmission [k][e][ ][Set ID][ ][Data][Cr]Data 0 : Volume mute on (Volume off)Data 1 : Volume mute off (Volume on)Acknowledgement [e][ ][Set ID][ ][OK/NG][Data][x]07. VVolume CControl ((Command: kk ff)To adjust volume.You can also adjust volume with the volume buttons onremote control.Transmission [k][f][ ][Set ID][ ][Data][Cr]Data Min : 0 ~Max : 64 (*transmit by Hexadecimal code)*Refer to ‘Real data mapping 1’. See page 125.Acknowledgement [f][ ][Set ID][ ][OK/NG][Data][x]08. CContrast ((Command: kk gg)To adjust screen contrast. You can also adjust contrast in the Picture menu.Transmission [k][g][ ][Set ID][ ][Data][Cr]Data Min : 0 ~Max : 64 (*transmit by Hexadecimal code)*Refer to ‘Real data mapping 1’. See page 125.Acknowledgement [g][ ][Set ID][ ][OK/NG][Data][x]09. BBrightness ((Command: kk hh)To adjust screen brightness.You can also adjust brightness in the Picture menu.Transmission [k][h][ ][Set ID][ ][Data][Cr]Data Min : 0 ~Max : 64 (*transmit by Hexadecimal code)*Refer to ‘Real data mapping 1’. See page 125.Acknowledgement [h][ ][Set ID][ ][OK/NG][Data][x]](https://usermanual.wiki/LG-Electronics-USA/32LG30UA.User-manual-2-of-2/User-Guide-883821-Page-74.png)
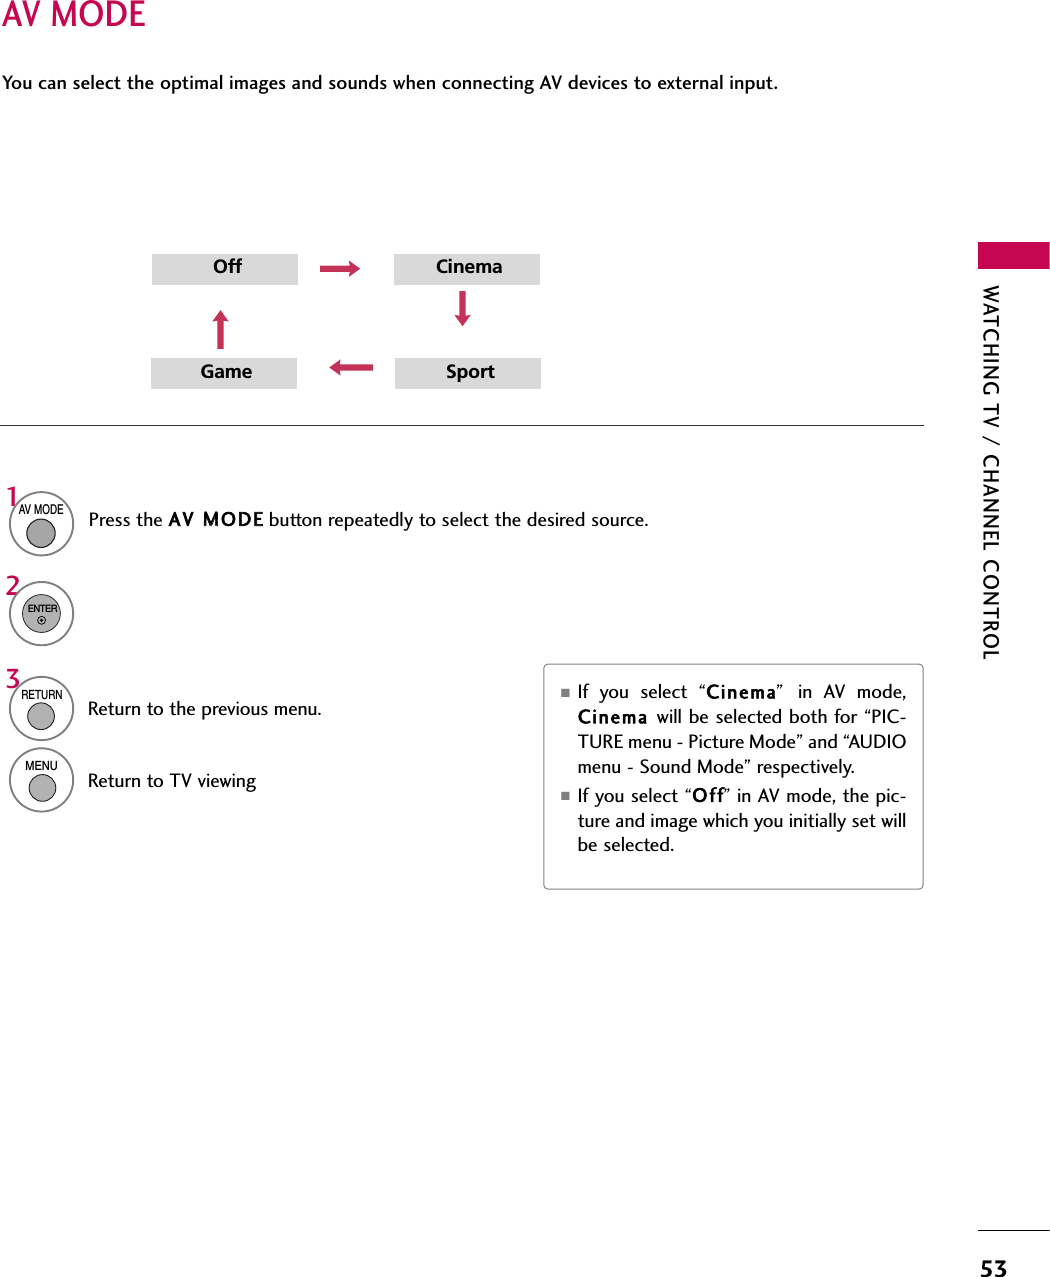
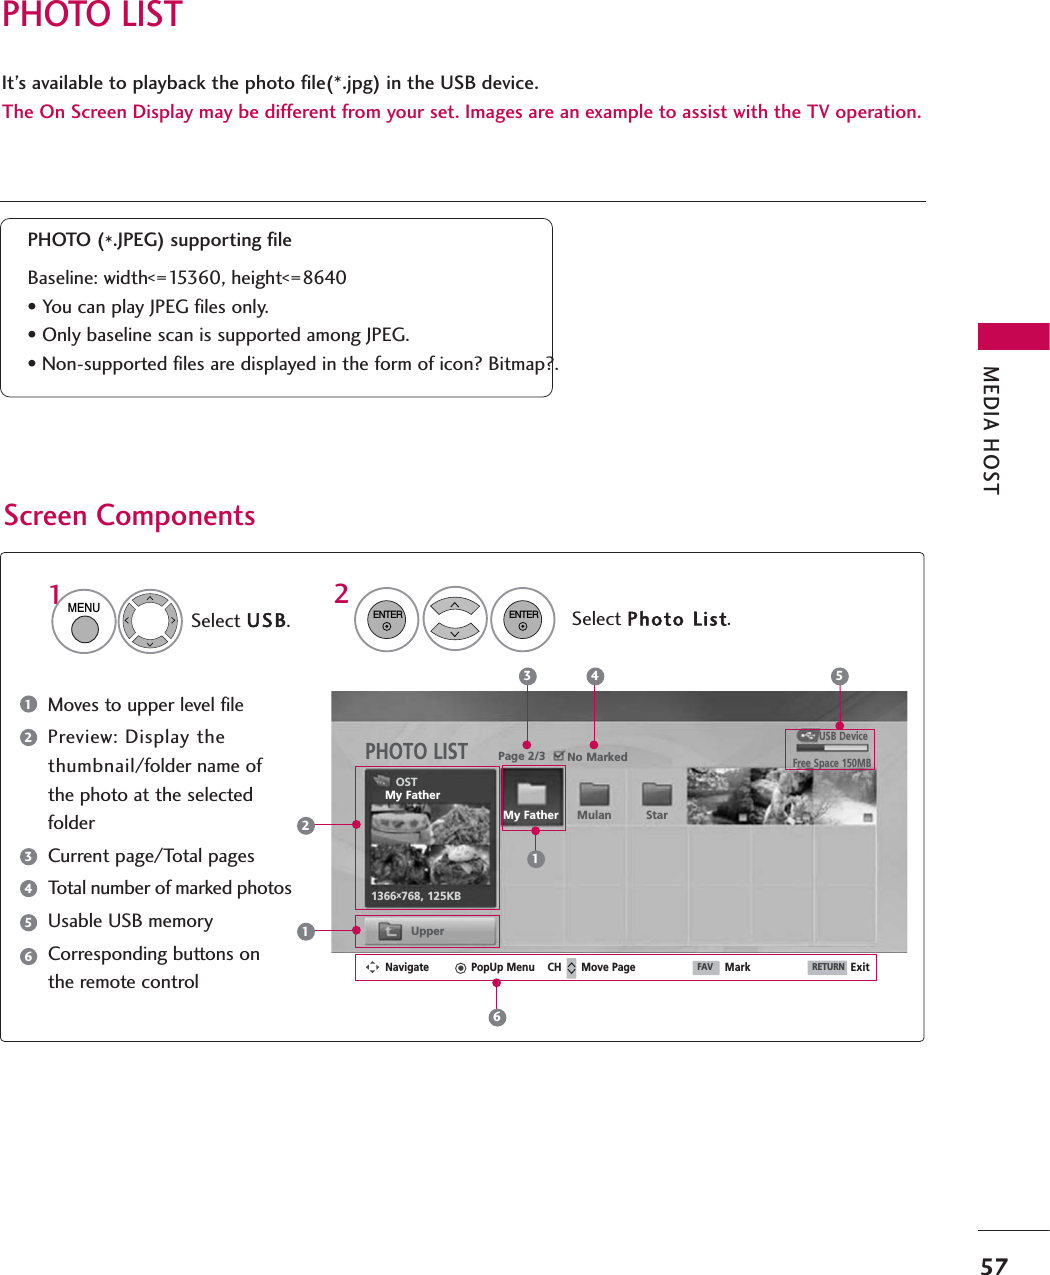
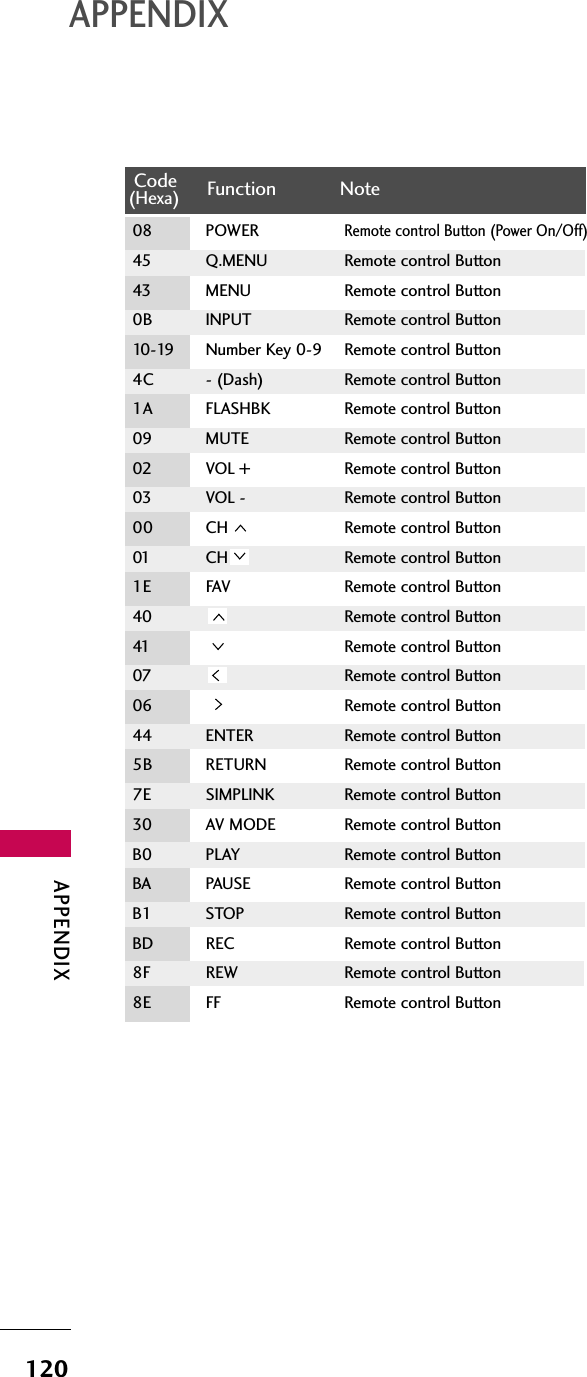
![APPENDIX12510. CColor ((Command: kk ii)To adjust screen color.You can also adjust color in the Picture menu.Transmission [k][i][ ][Set ID][ ][Data][Cr]Data Min : 0 ~Max : 64 (*transmit by Hexadecimal code)*Refer to ‘Real data mapping 1’ as shown below.Acknowledgement [i][ ][Set ID][ ][OK/NG][Data][x]11. TTint ((Command: kk jj)To adjust screen tint.You can also adjust tint in the Picture menu.Transmission [k][j][ ][Set ID][ ][Data][Cr]Data Red: 0 ~Green: 64 (*transmit by Hexadecimal code)*Refer to ‘Real data mapping 1’ as shown below.Acknowledgement [ j ][ ][Set ID][ ][OK/NG][Data][x]12. SSharpness ((Command: kk kk)To adjust screen sharpness.You can also adjust sharpness in the Picture menu.Transmission [k][k][ ][Set ID][ ][Data][Cr]Data Min : 0 ~Max : 64 (*transmit by Hexadecimal code)*Refer to ‘Real data mapping 1’ as shown below.Acknowledgement [k][ ][Set ID][ ][OK/NG][Data][x]13. OOSD SSelect ((Command: kk ll)To select OSD (On Screen Display) on/off.Transmission [k][l][ ][Set ID][ ][Data][Cr]Data 0: OSD off Data 1: OSD onAcknowledgement [l][ ][Set ID][ ][OK/NG][Data][x]14. RRemote CControl LLock MMode ((Command: kk mm)To lock the remote control and the front panel controlson the set.Transmission [k][m][ ][Set ID][ ][Data][Cr]Data 0: Lock off Data 1: Lock onAcknowledgement [m][ ][Set ID][ ][OK/NG][Data][x]If you’re not using the remote control and front panelcontrols on the TV, use this mode. When main power ison/off, remote control lock is released.15. TTreble ((Command: kk rr)To adjust treble. You can also adjust treble in the Audio menu.Transmission [k][r][ ][Set ID][ ][Data][Cr]Data Min: 0 ~Max: 64 (*transmit by Hexadecimal code)*Refer to ‘Real data mapping 1’ as shown.Acknowledgement [r][ ][Set ID][ ][OK/NG][Data][x]16. Bass ((Command: kk ss)To adjust bass.You can also adjust bass in the Audio menu.Transmission [k][s][ ][Set ID][ ][Data][Cr]Data Min: 0 ~Max: 64 (*transmit by Hexadecimal code)*Refer to ‘Real data mapping 1’ as shown below.Acknowledgement [s][ ][Set ID][ ][OK/NG][Data][x]17. BBalance ((Command: kk tt)To adjust balance.You can also adjust balance in the Audio menu.Transmission [k][t][ ][Set ID][ ][Data][Cr]Data Min: 0 ~Max: 64 (*transmit by Hexadecimal code)*Refer to ‘Real data mapping 1’ as shown below.Acknowledgement [t][ ][Set ID][ ][OK/NG][Data][x]18. CColor TTemperature ((Command: kk uu)To adjust color temperature.You can also adjust color temperature in the Picture menu.Transmission [k][u][ ][Set ID][ ][Data][Cr]Data 0: Medium 1: Cool 2: Warm 3: UserAcknowledgement [u][ ][Set ID][ ][OK/NG][Data][x]19. RRed AAdjustment ((Command: kk vv)To adjust red in color temperature Transmission [k][v][ ][Set ID][ ][Data][Cr]Data Min: 0 ~Max: C8*Refer to ‘Real data mapping 2’ as shown below.Acknowledgement [v][ ][Set ID][ ][OK/NG][Data][x]20. GGreen AAdjustment ((Command: kk ww)To adjust green in color temperature.Transmission [k][w][ ][Set ID][ ][Data][Cr]Data Min: 0 ~Max: C8*Refer to ‘Real data mapping 2’ as shown below.Acknowledgement [w][ ][Set ID][ ][OK/NG][Data][x]*Real data mapping 10 : Step 0A : Step 10 (SET ID 10)F : Step 15 (SET ID 15)10 : Step 16 (SET ID 16)63 : Step 99 (SET ID 99)64 : Step 100*Real data mapping 20 : -205 : -19A : -185F: -164: 069: +1C3 : +19C8 : +20](https://usermanual.wiki/LG-Electronics-USA/32LG30UA.User-manual-2-of-2/User-Guide-883821-Page-75.png)
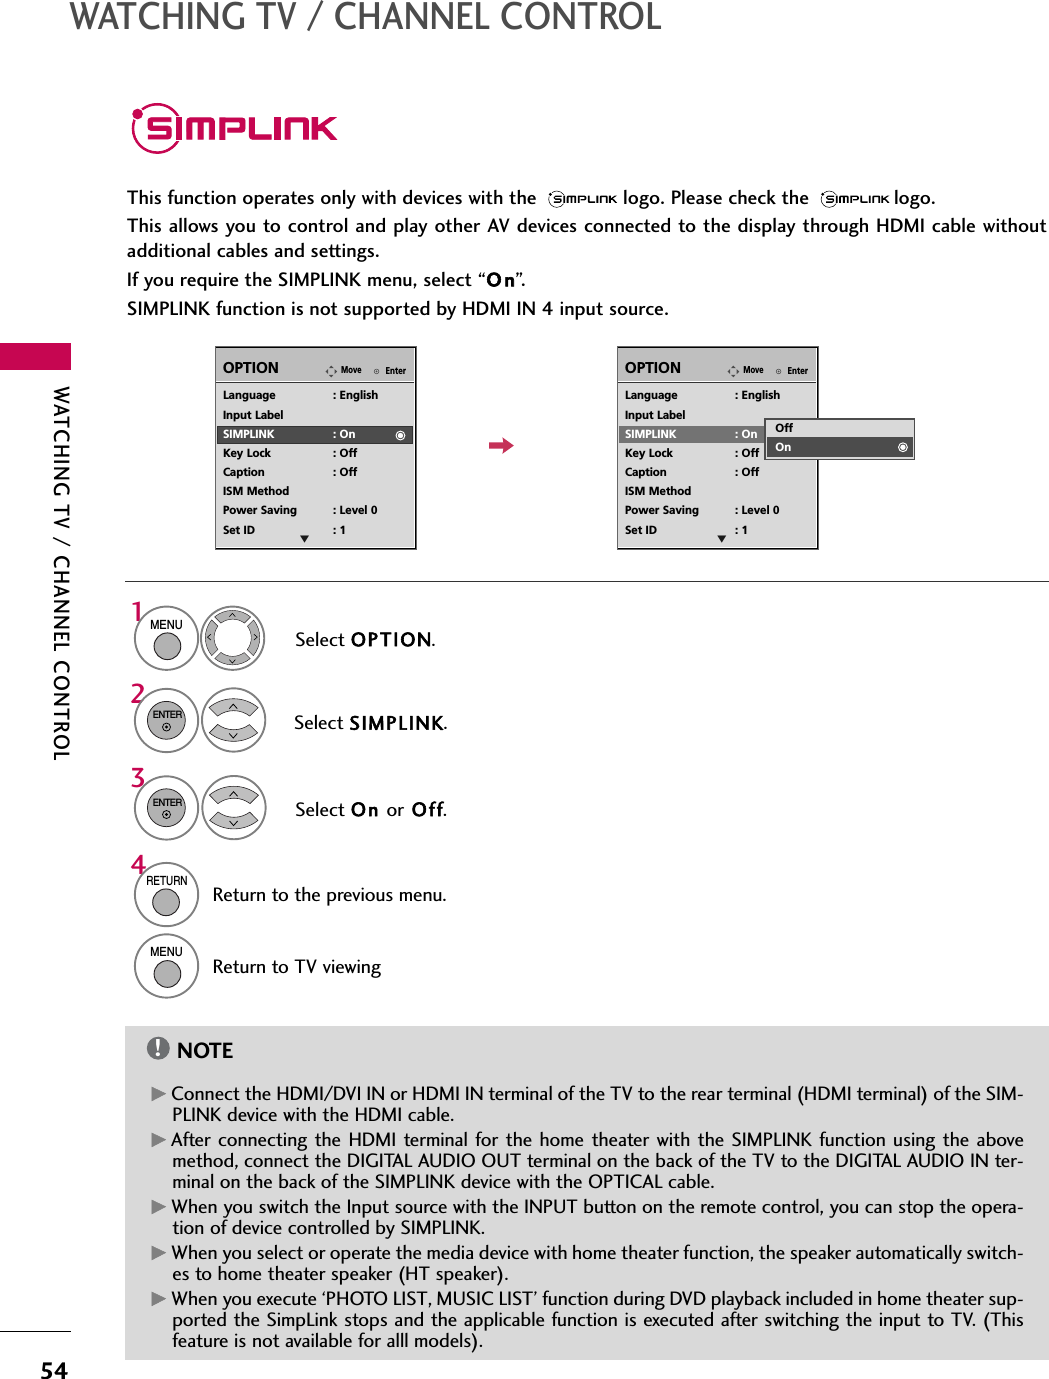
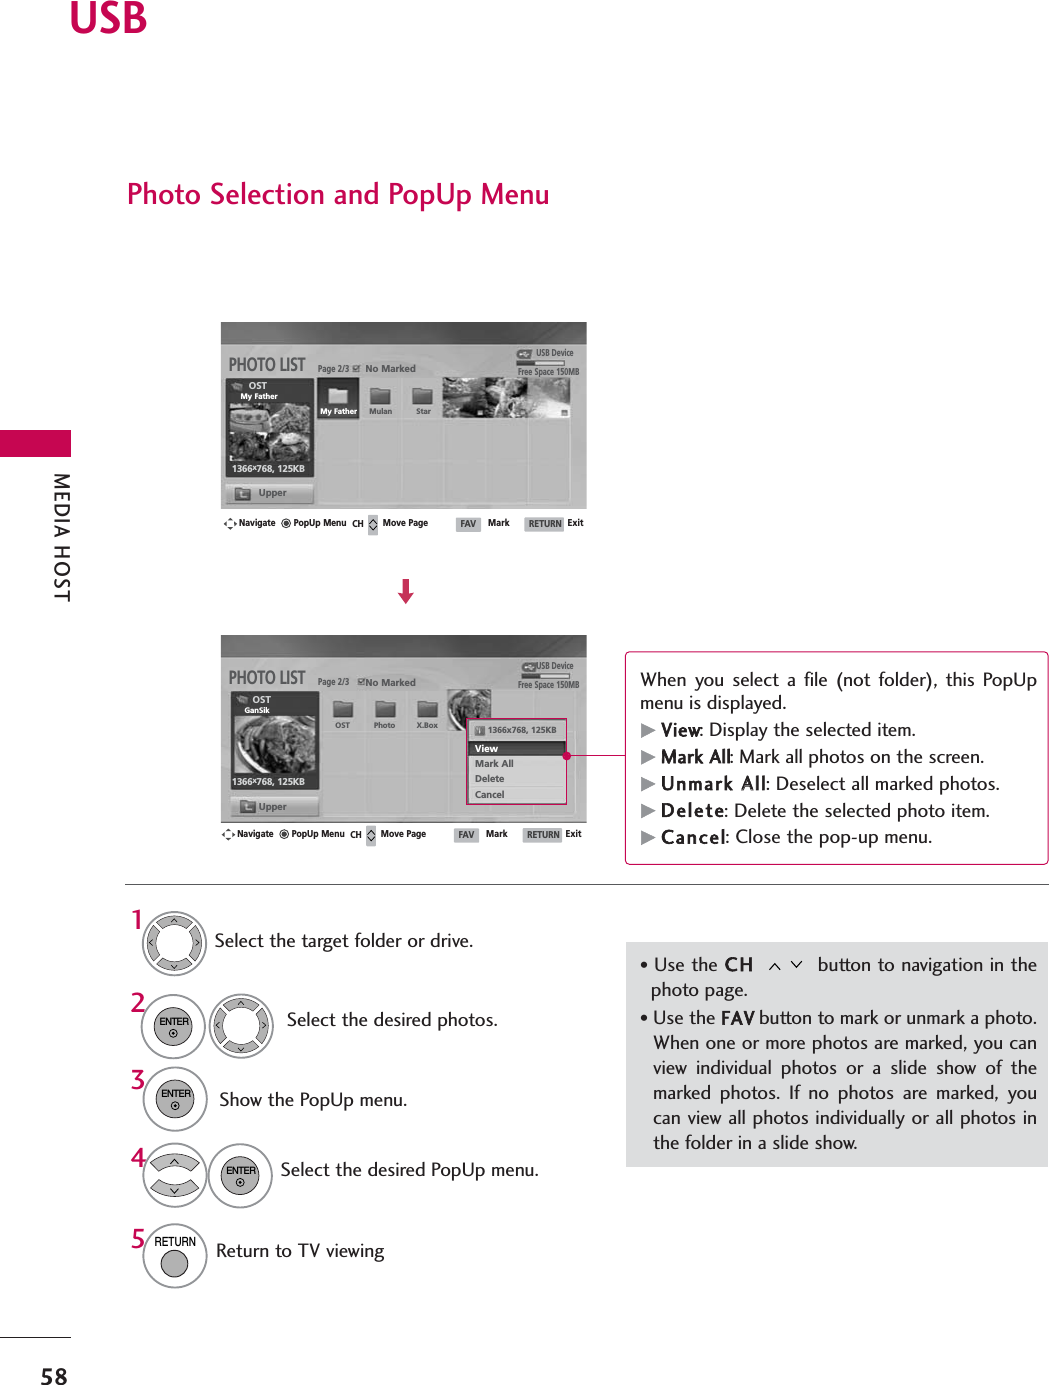
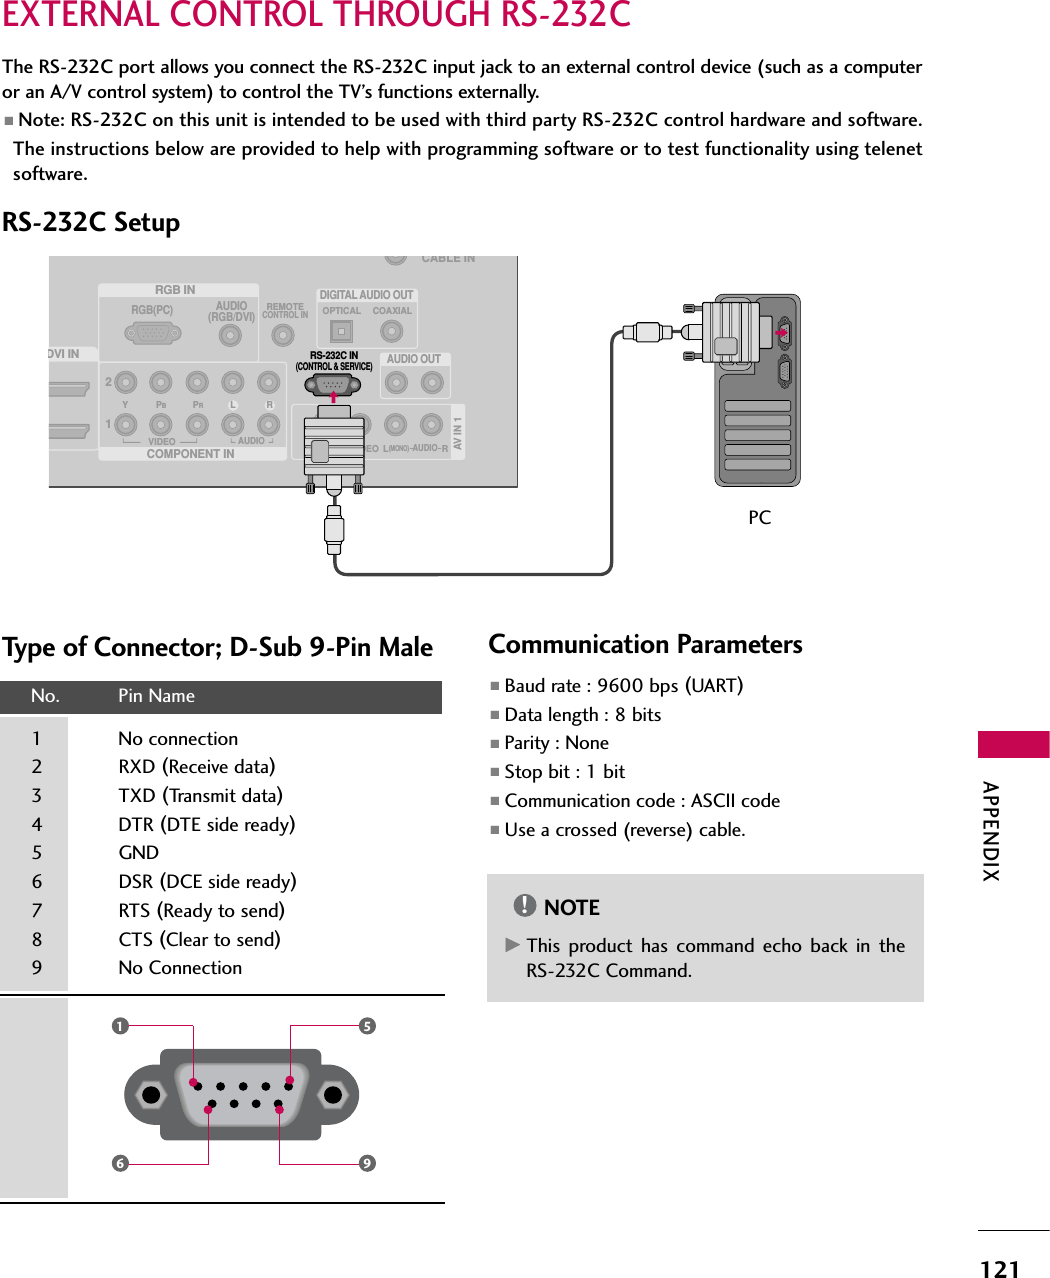
![APPENDIX126APPENDIX21. BBlue AAdjustment ((Command: kk $$)To adjust blue in color temperature.Transmission [k][$][ ][Set ID][ ][Data][Cr]Data Min: 0 ~Max: C8*Refer to ‘Real data mapping 2’. See page 125.Acknowledgement [$][ ][Set ID][ ][OK/NG][Data][x]]22. IISM MMethod ((Command2: jj pp)(Only Plasma TV model)To avoid having a fixed image remain on screen.Transmission [ j ][p][ ][Set ID][ ][Data][Cr]Data 1: Inversion 2: Orbiter4: White Wash 8: NormalAcknowledgement [p][ ][Set ID][ ][OK/NG][Data][x]23. LLow PPower ((Command2: jj qq)(Only Plasma TV model)To control the low power function on/off.Transmission [ j ][q][ ][Set ID][ ][Data][Cr]Data 0: Low Power off1: Low Power onAcknowledgement [q][ ][Set ID][ ][OK/NG][Data][x]24. CChannel TTuning ((Command: mm aa)To tune channel to following physical/major/minor number.Transmission [m][a][ ][Set ID][ ][Data0][ ][Data1] [ ][Data2][ ][Data3][ ][Data4][ ][Data5][Cr]Digital channels have a Physical, Major, and Minor channelnumber. The Physical number is the actual digital channelnumber, the Major is the number that the channel shouldbe mapped to, and the Minor is the sub-channel. Sincethe ATSC tuner automatically maps the channel to theMajor number, the Physical number is not required whensending a command.Data 0: Physical Channel NumberNTSC air: 02~45, NTSC cable: 01, 0E~7DATSC air: 01~45, ATSC cable: 01~87Data1 & 2: Major Channel Number Data1: High byte Data2: Low byteTwo bytes are available for the Major and Minor, nor-mally only the second byte is used. Data3 & 4: Minor Channel Number Not needed for NTSC.](https://usermanual.wiki/LG-Electronics-USA/32LG30UA.User-manual-2-of-2/User-Guide-883821-Page-76.png)
![APPENDIX127Data5:The table above lists the binary code which must beconverted to Hexadecimal before sending. For example:The binary code to tune the sub source to an NTSCcable channel is “1000 0001”, which translates to “81”in Hex.* 7th bit : For which source do you want to change thechannel.* 6th bit: Use a two part or one part channel. Most casesjust use 0 since it’s ignored when using NTSC.* 5th bit: Use 0 with NTSC since it can only use the phys-ical channel number. Normally use 1 for ATSC since mosttimes it doesn’t matter what the physical number is.* 4th bit: Set to 0.* 3-0 bits: Choose signal type.* Tune Command Examples:1. Tune to the analog (NTSC) cable channel 35.Data 0 = Physical of 35 = 23Data 1 & 2 = No Major = 00 00Data 3 & 4 = No Minor = 00 00Data 5 = 0000 0001 in binary = 01Total = ma 00 23 00 00 00 00 012. Tune to the digital (ATSC) local channel 30-3.Data 0 = Don’t know Physical = 00Data 1 & 2 = Major is 30 = 00 1EData 3 & 4 = Minor is 3 = 00 03Data 5 = 0010 0010 in binary = 22Total = ma 00 00 00 1E 00 03 22Acknowledgement[a][ ][Set ID][ ][OK][Data0][Data1][Data2][Data3][Data4][x][a][ ][Set ID][ ][NG][Data0][x]25. CChannel AAdd/Del ((Command: mm bb)To add and delete the channelsTransmission [m][b][ ][Set ID][ ][Data][Cr]Data 0: Channel Delete Data 1: Channel AddAcknowledgement [b][ ][Set ID][ ][OK/NG][Data][x]26. KKey ((Command: mm cc)To send IR remote key code.Transmission [m][c][ ][Set ID][ ][Data][Cr]Data Key code: Refer to page 120.Acknowledgement [c][ ][Set ID][ ][OK/NG][Data][x]27. BBack LLight ((Command: mm gg)(Only LCD TV model)To adjust screen back light. Transmission [m][g][ ][Set ID][ ][Data][Cr]Data Min:0 ~Max:64 (*transmit by Hexadecimal code)*Refer to ‘Real data mapping 1’. See page 125.Acknowledgement [g][ ][Set ID][ ][OK/NG][Data][x]StepNTSC AirNTSC CableATSC AirATSC Cable_std ATSC Cable_hrcATSC Cable_ircATSC cable_autoReserved...Reserved100110011x1200001111x1300000000x14xxxxxxxxxxReserved501UseNo UseUsing PhysicalChannel601TwoOneTwo/One Part Channel701MainSubMain/Sub Picture 001010101x1](https://usermanual.wiki/LG-Electronics-USA/32LG30UA.User-manual-2-of-2/User-Guide-883821-Page-77.png)
