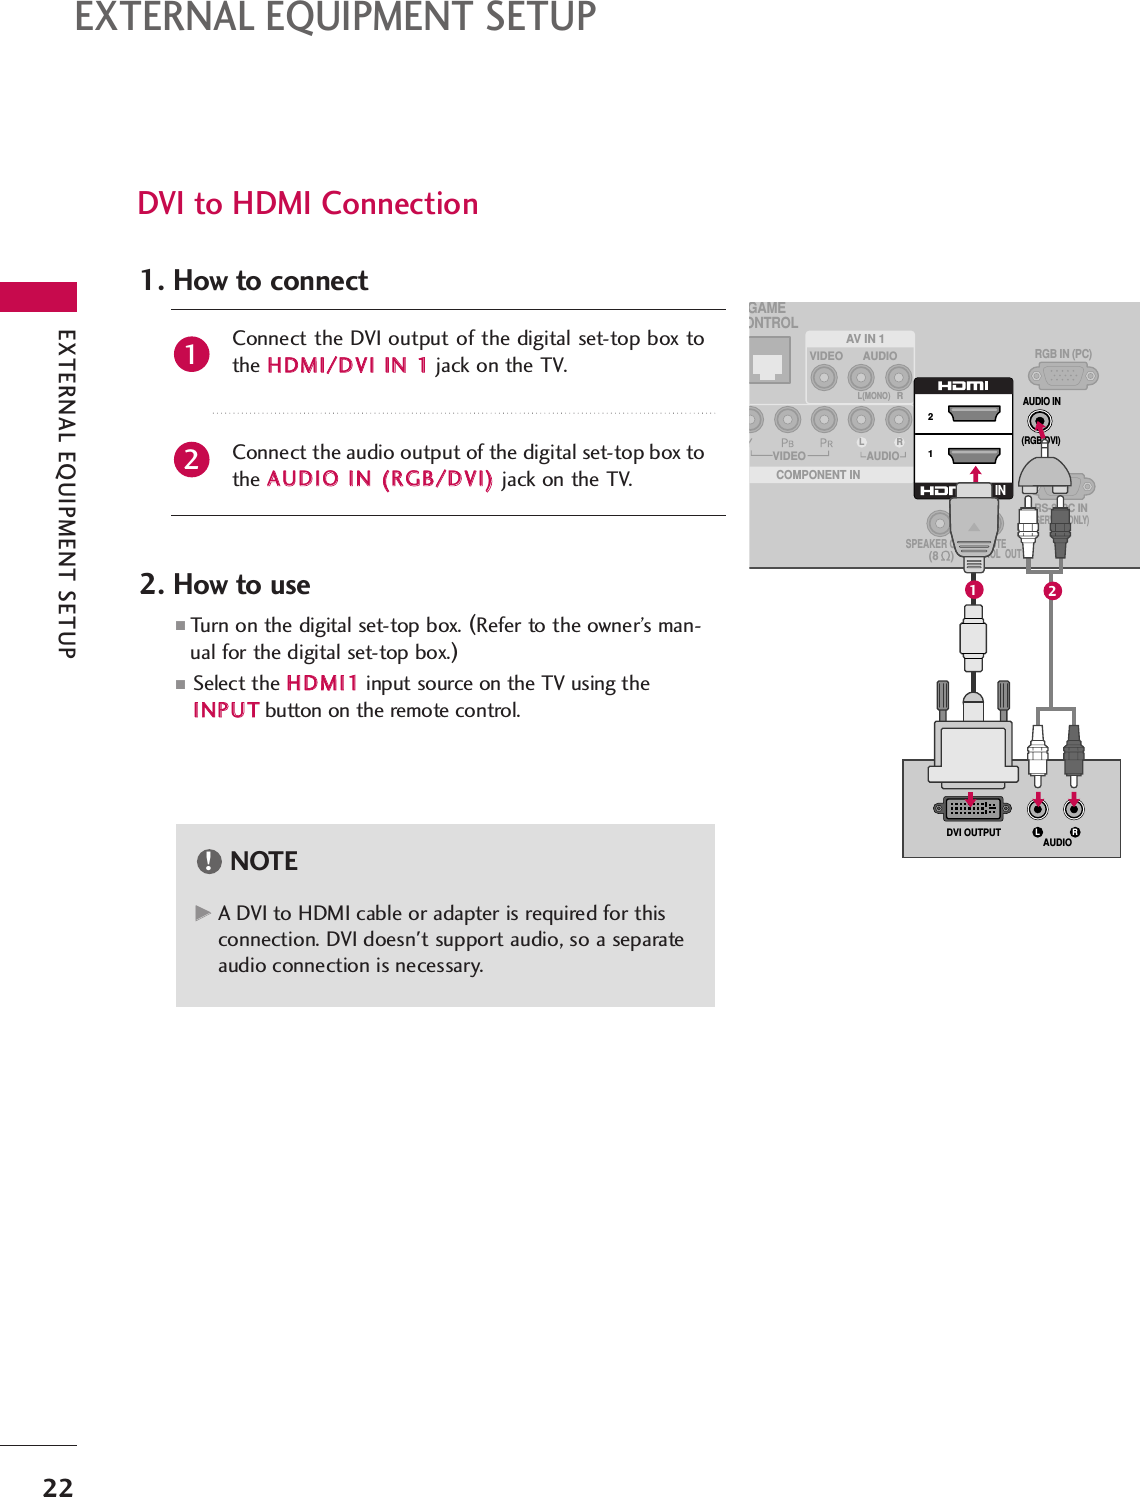
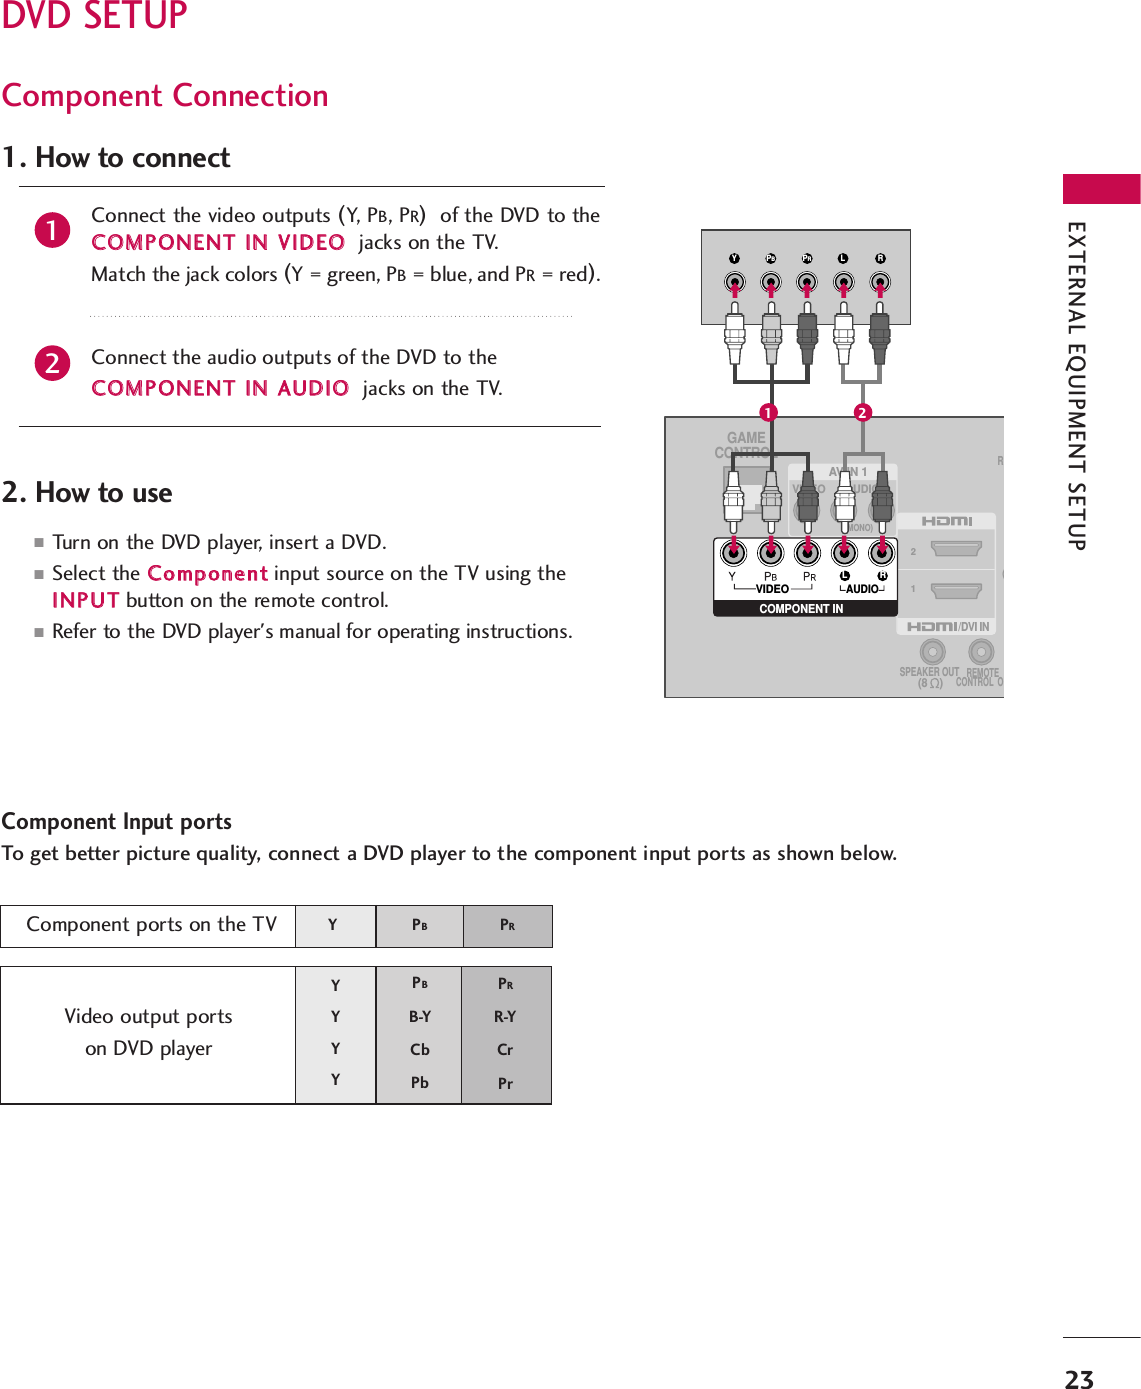
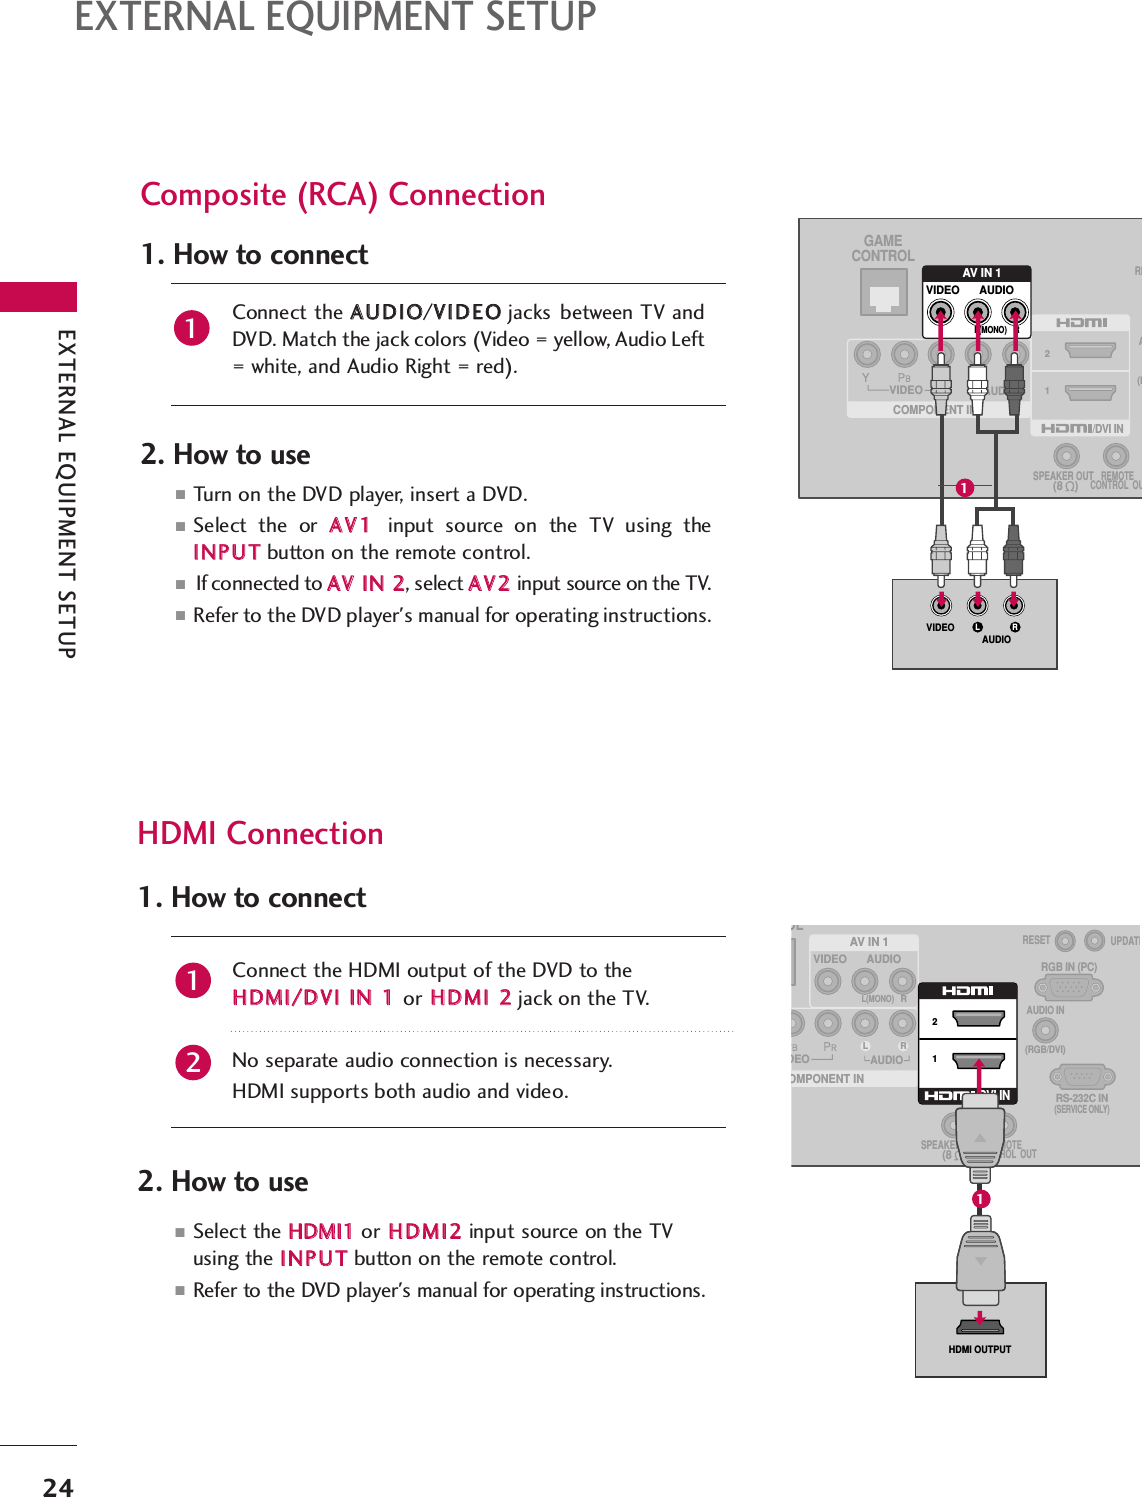
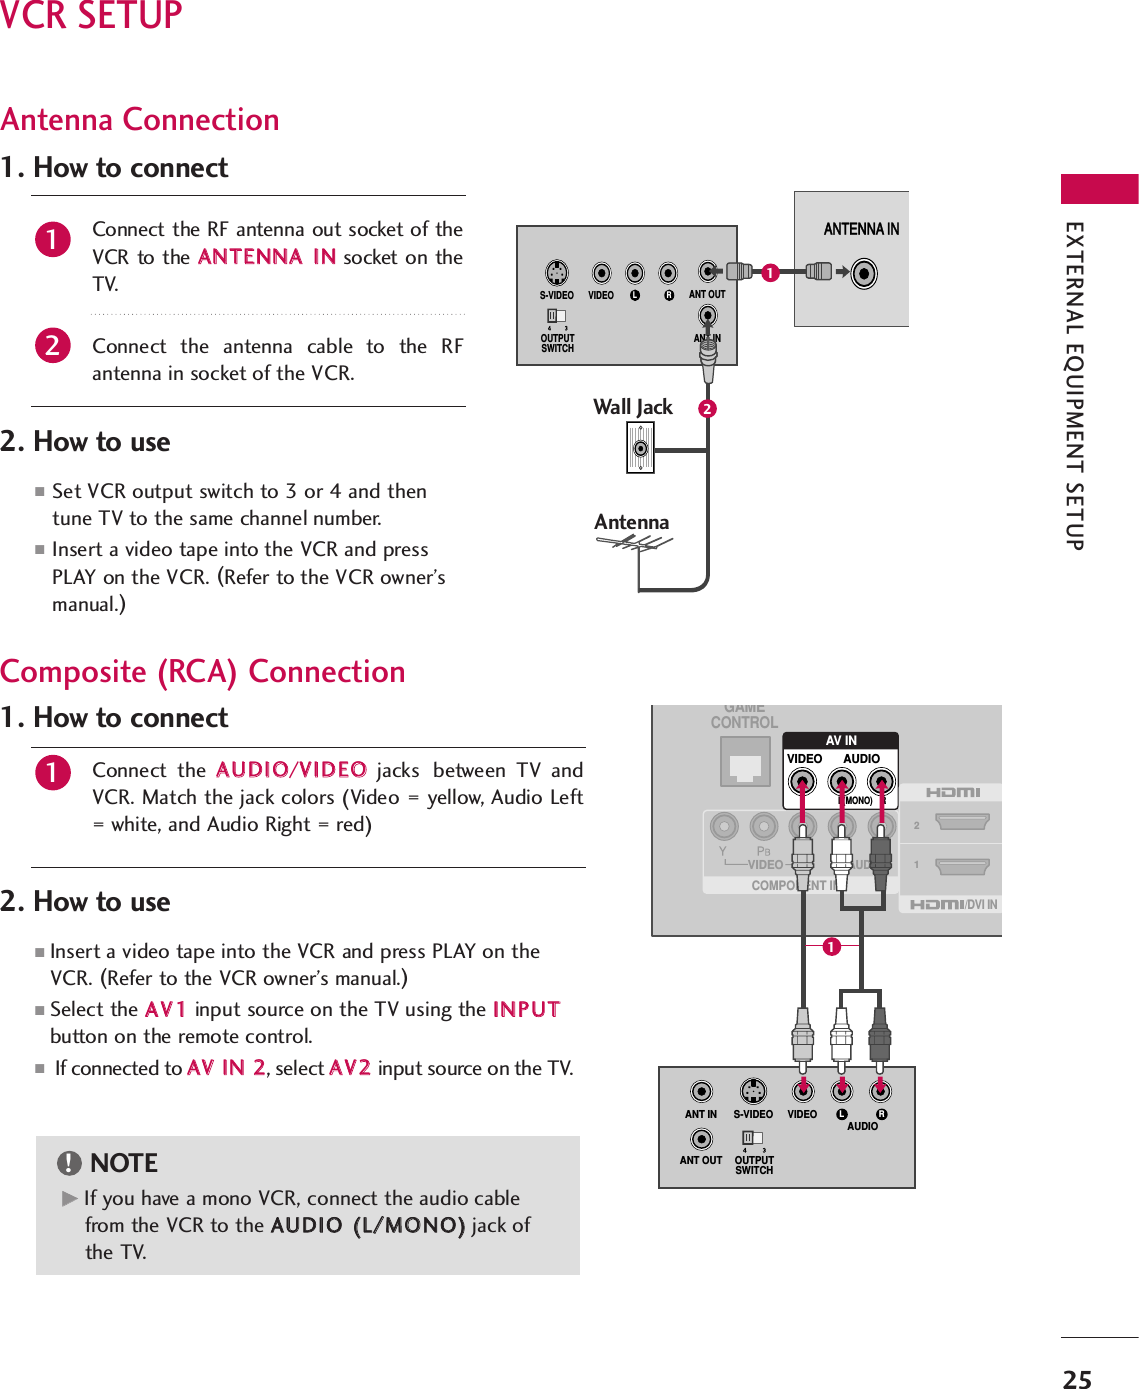
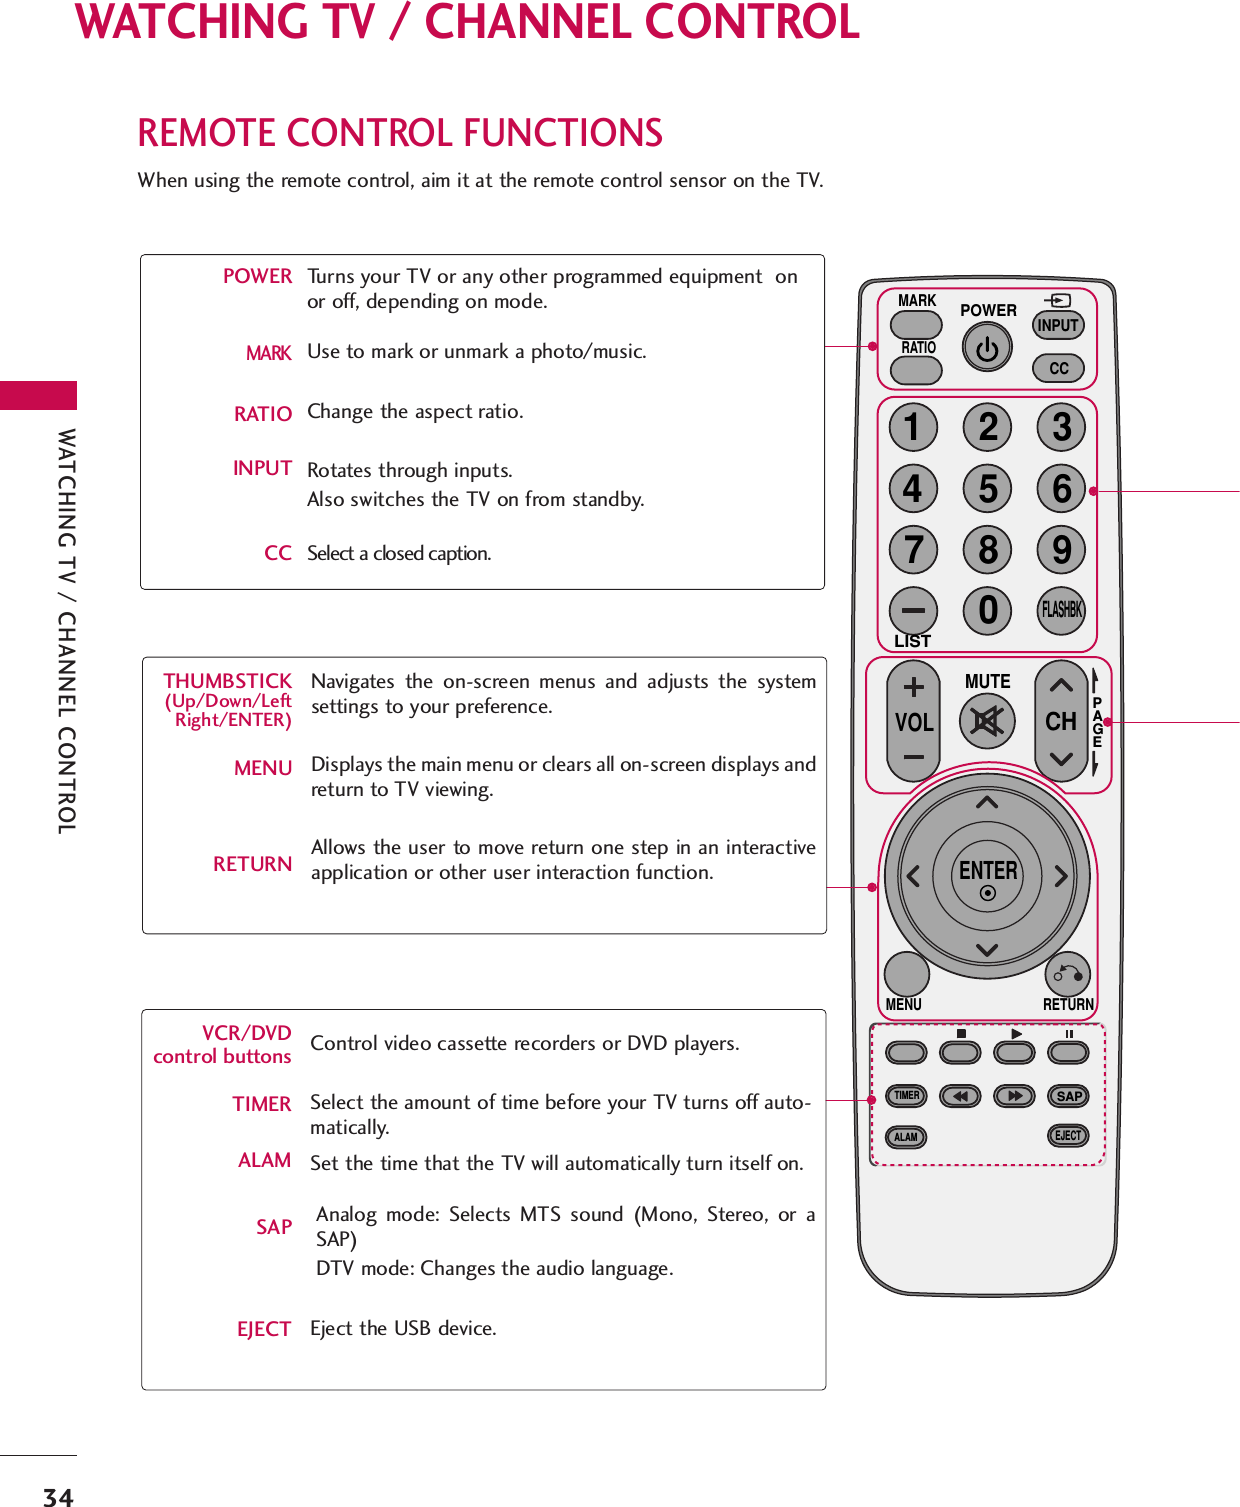
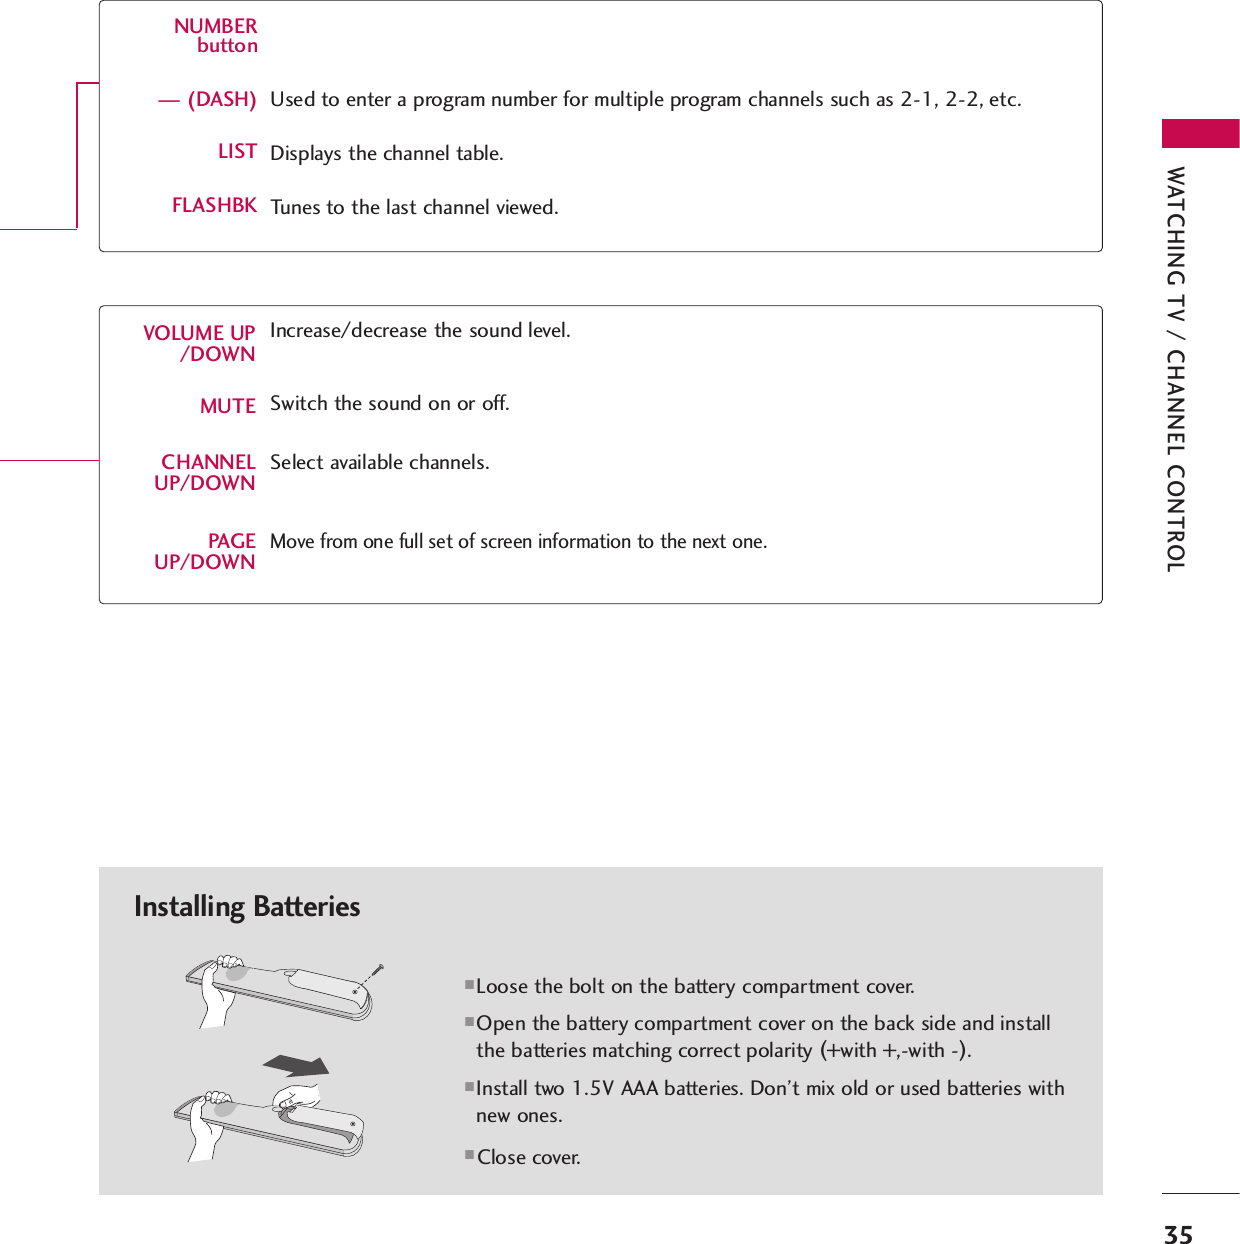
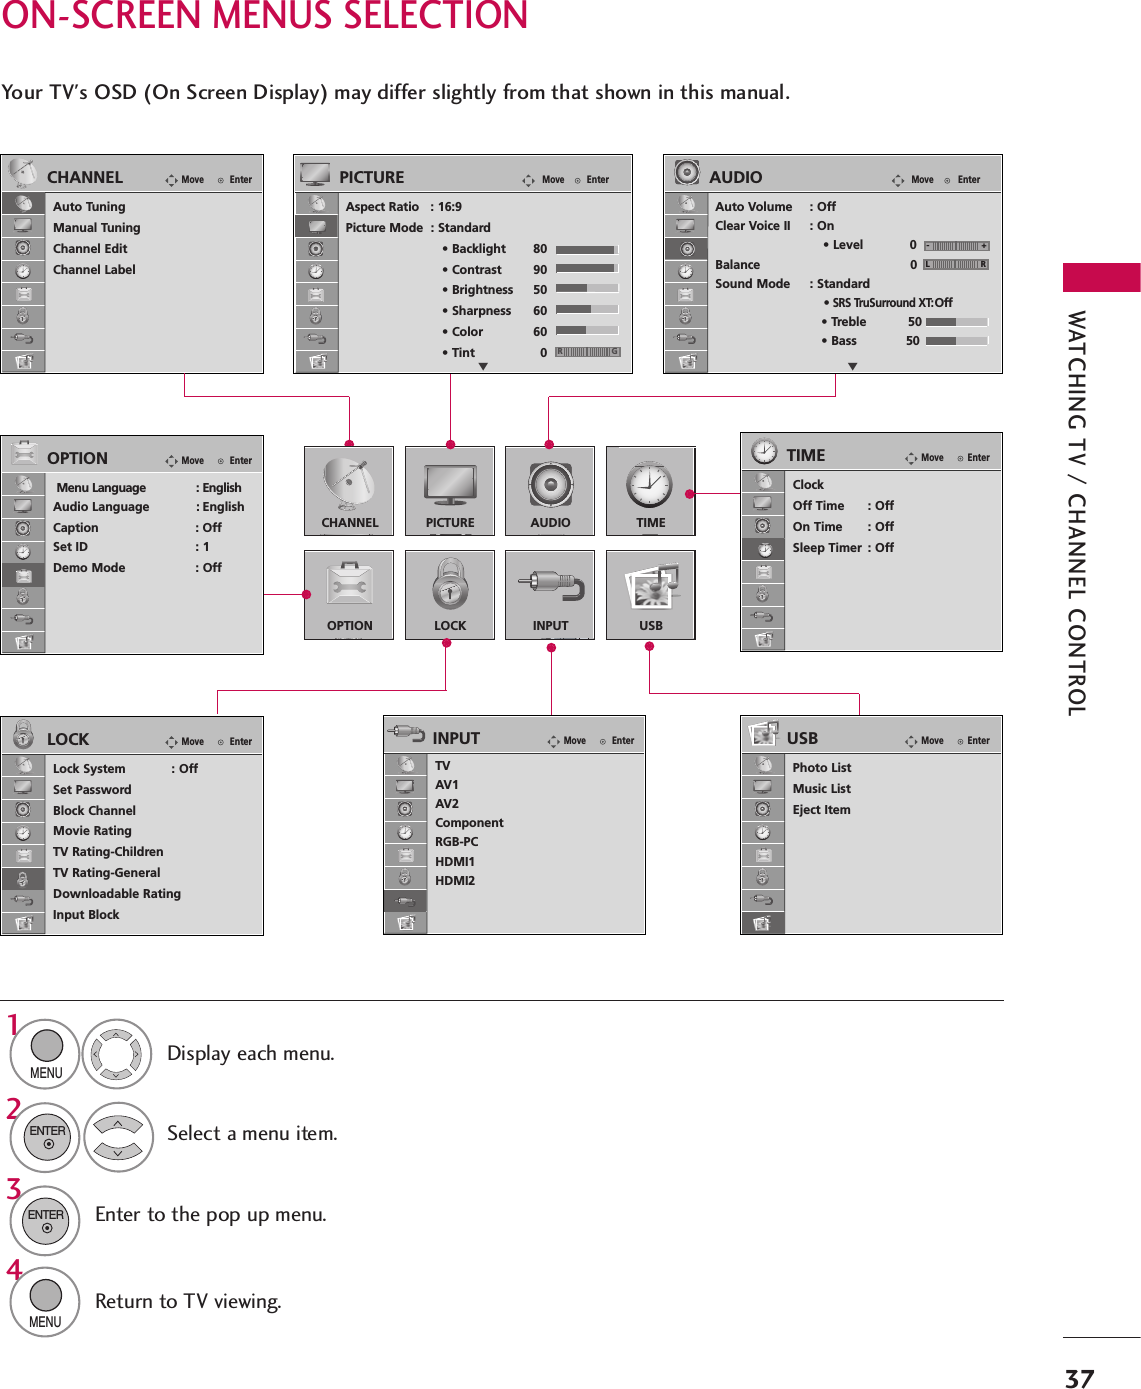
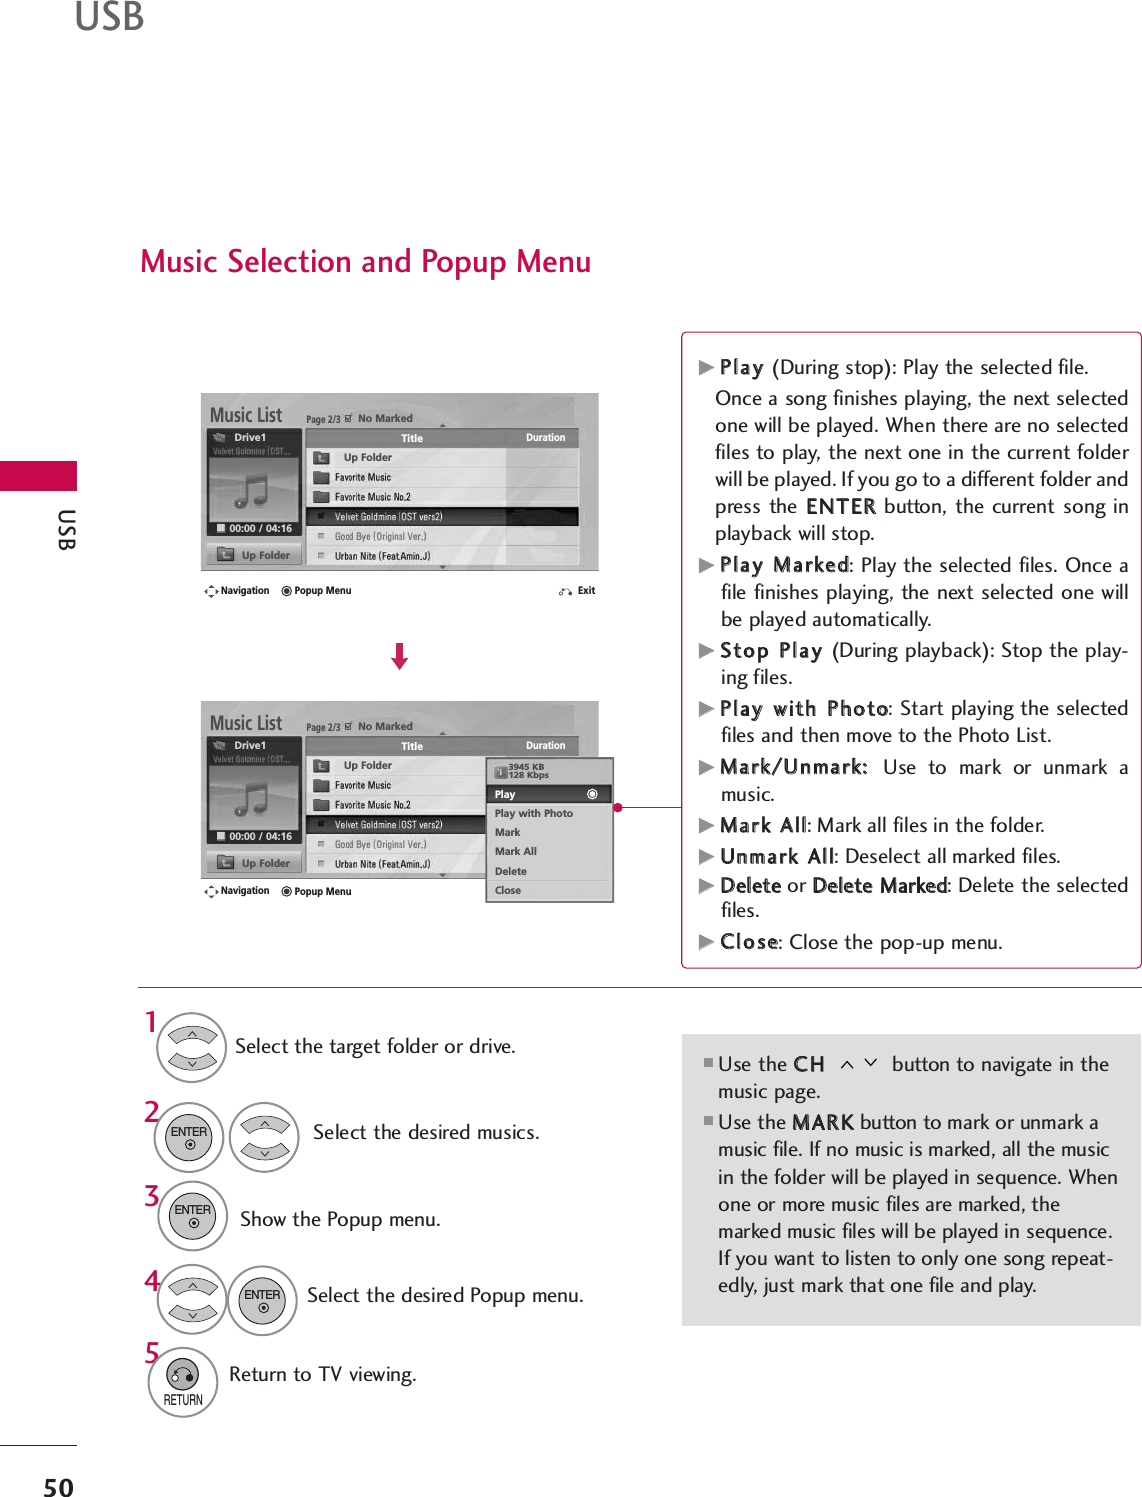
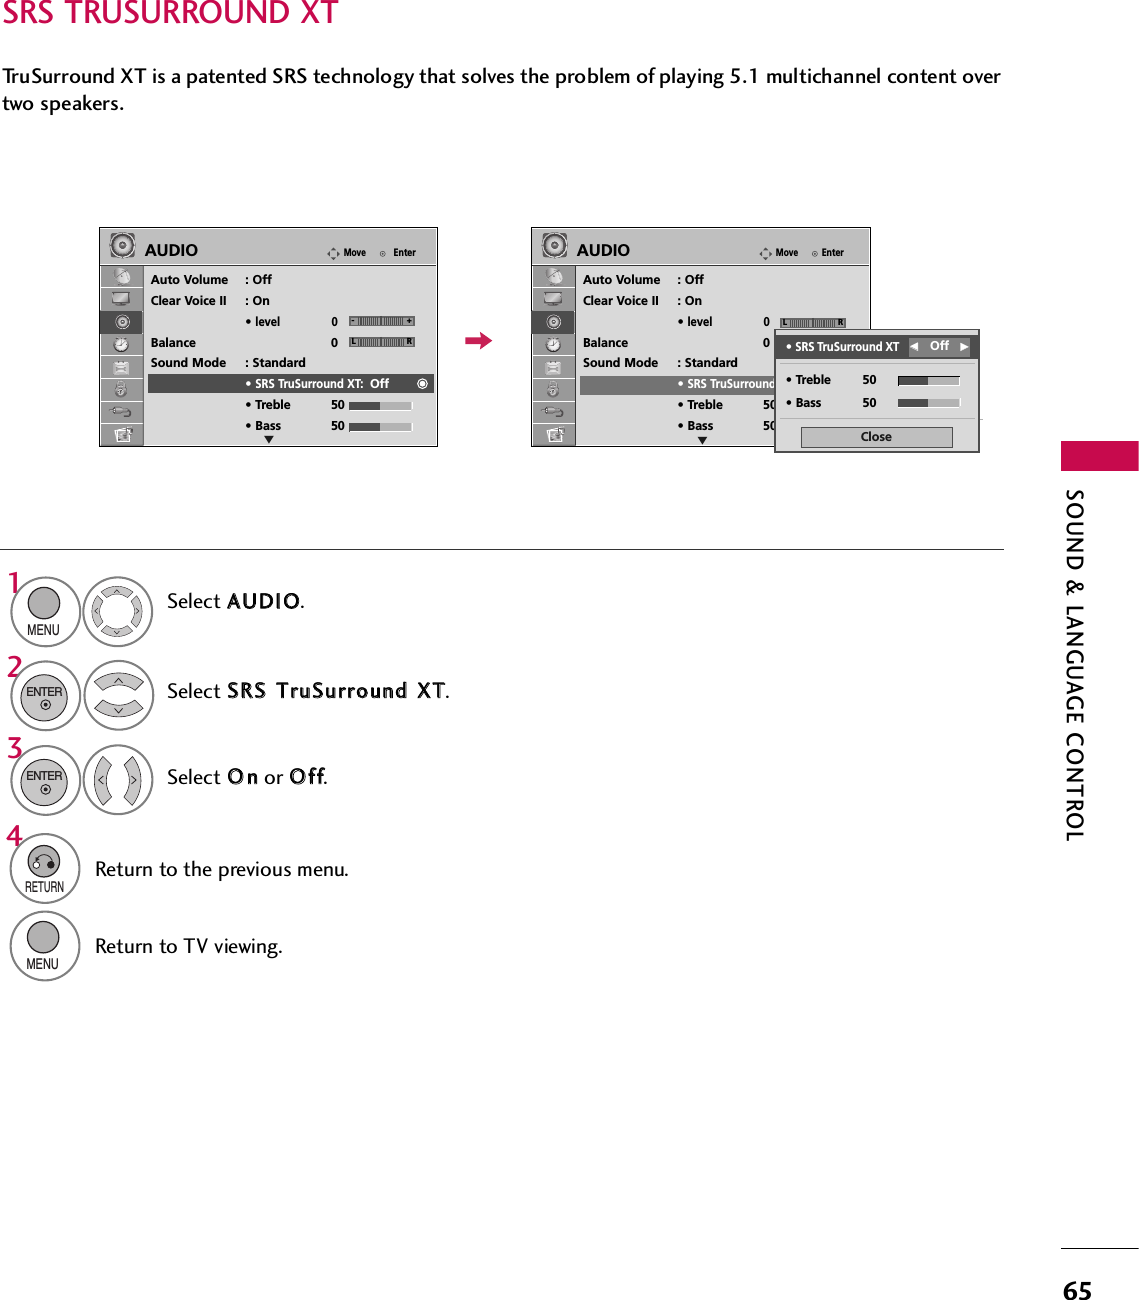
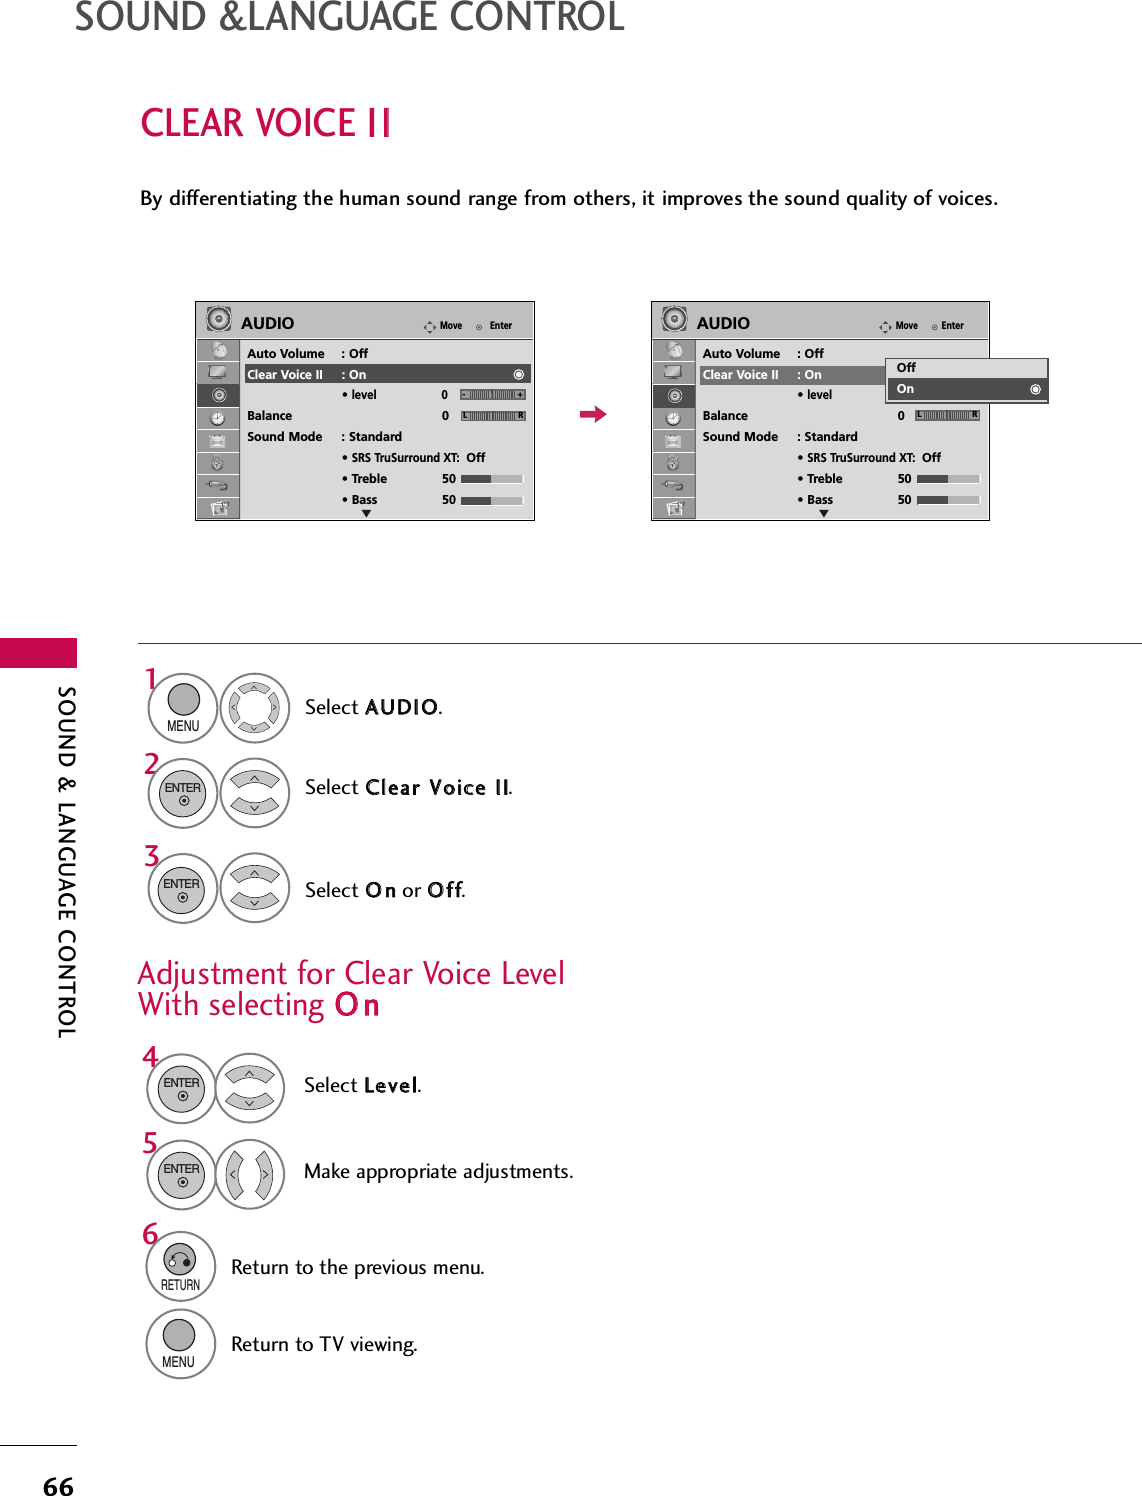
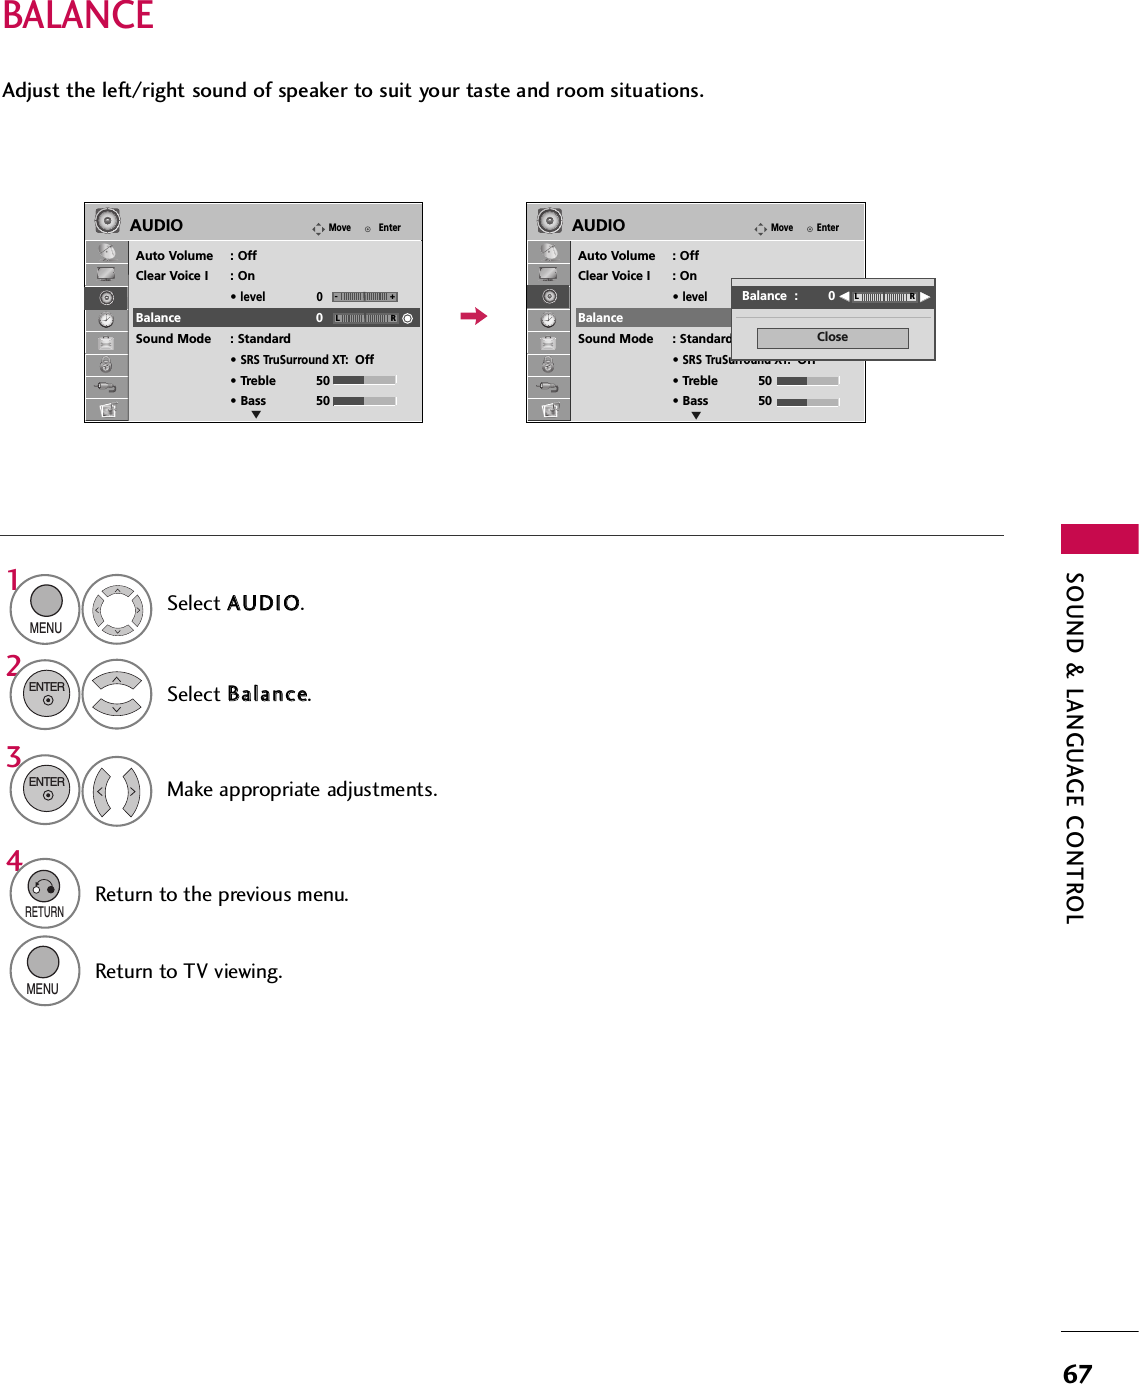
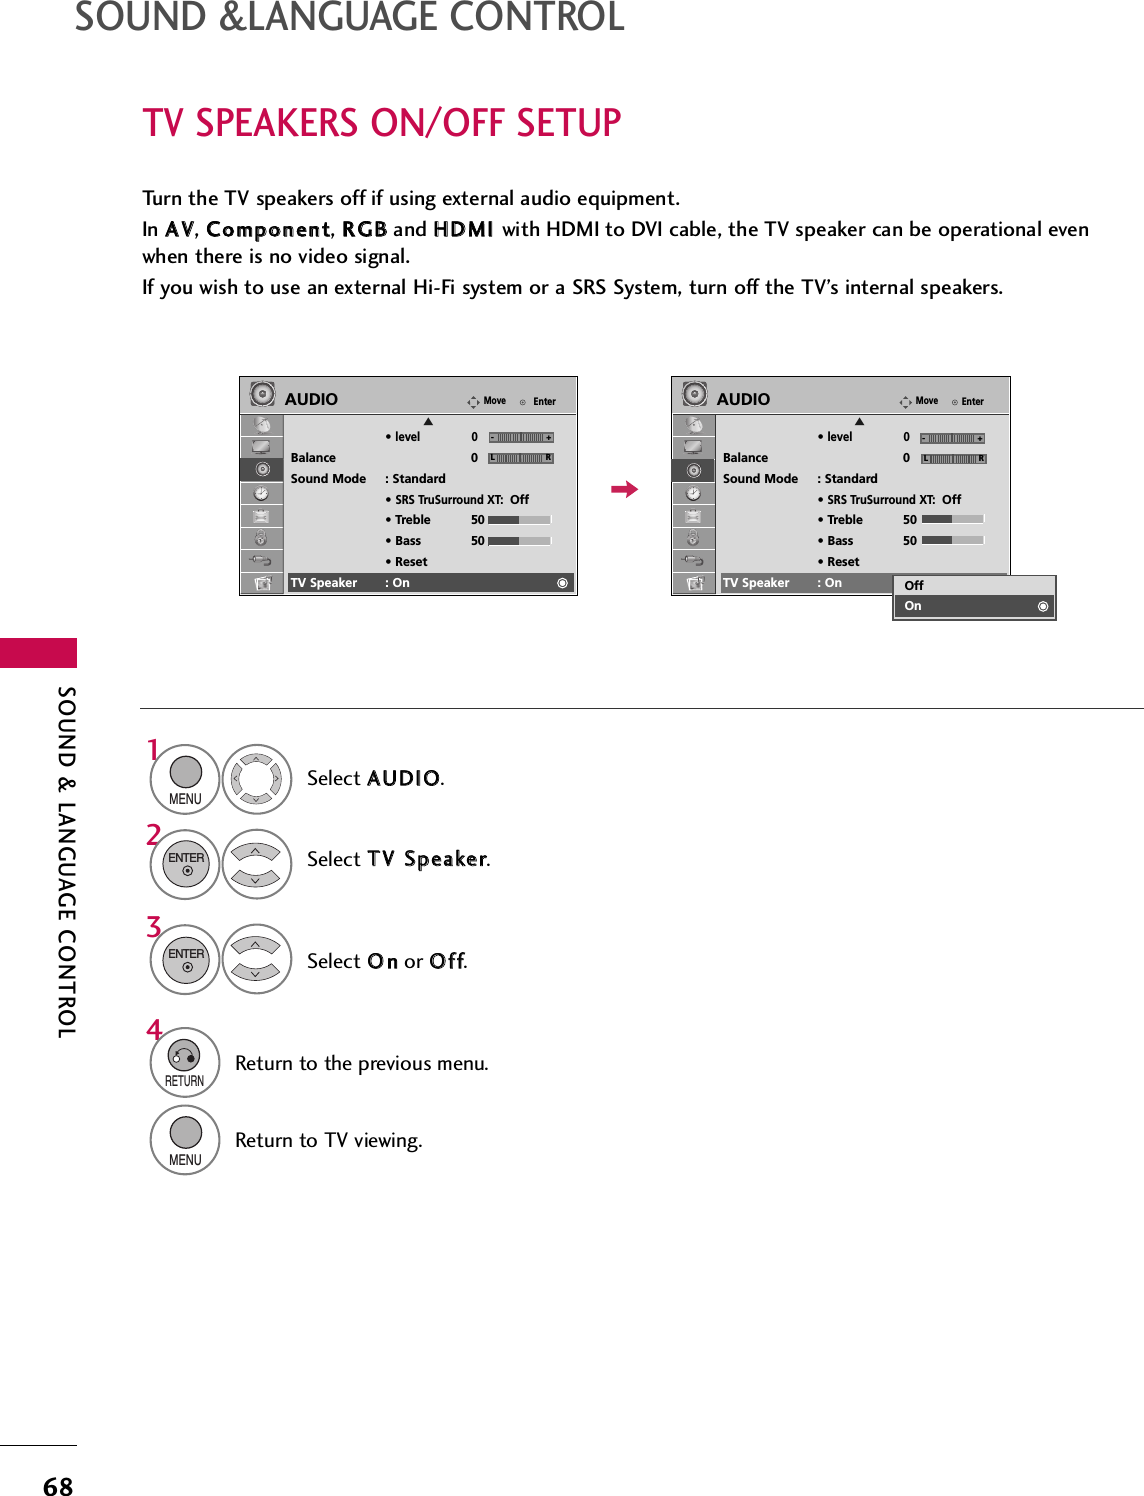
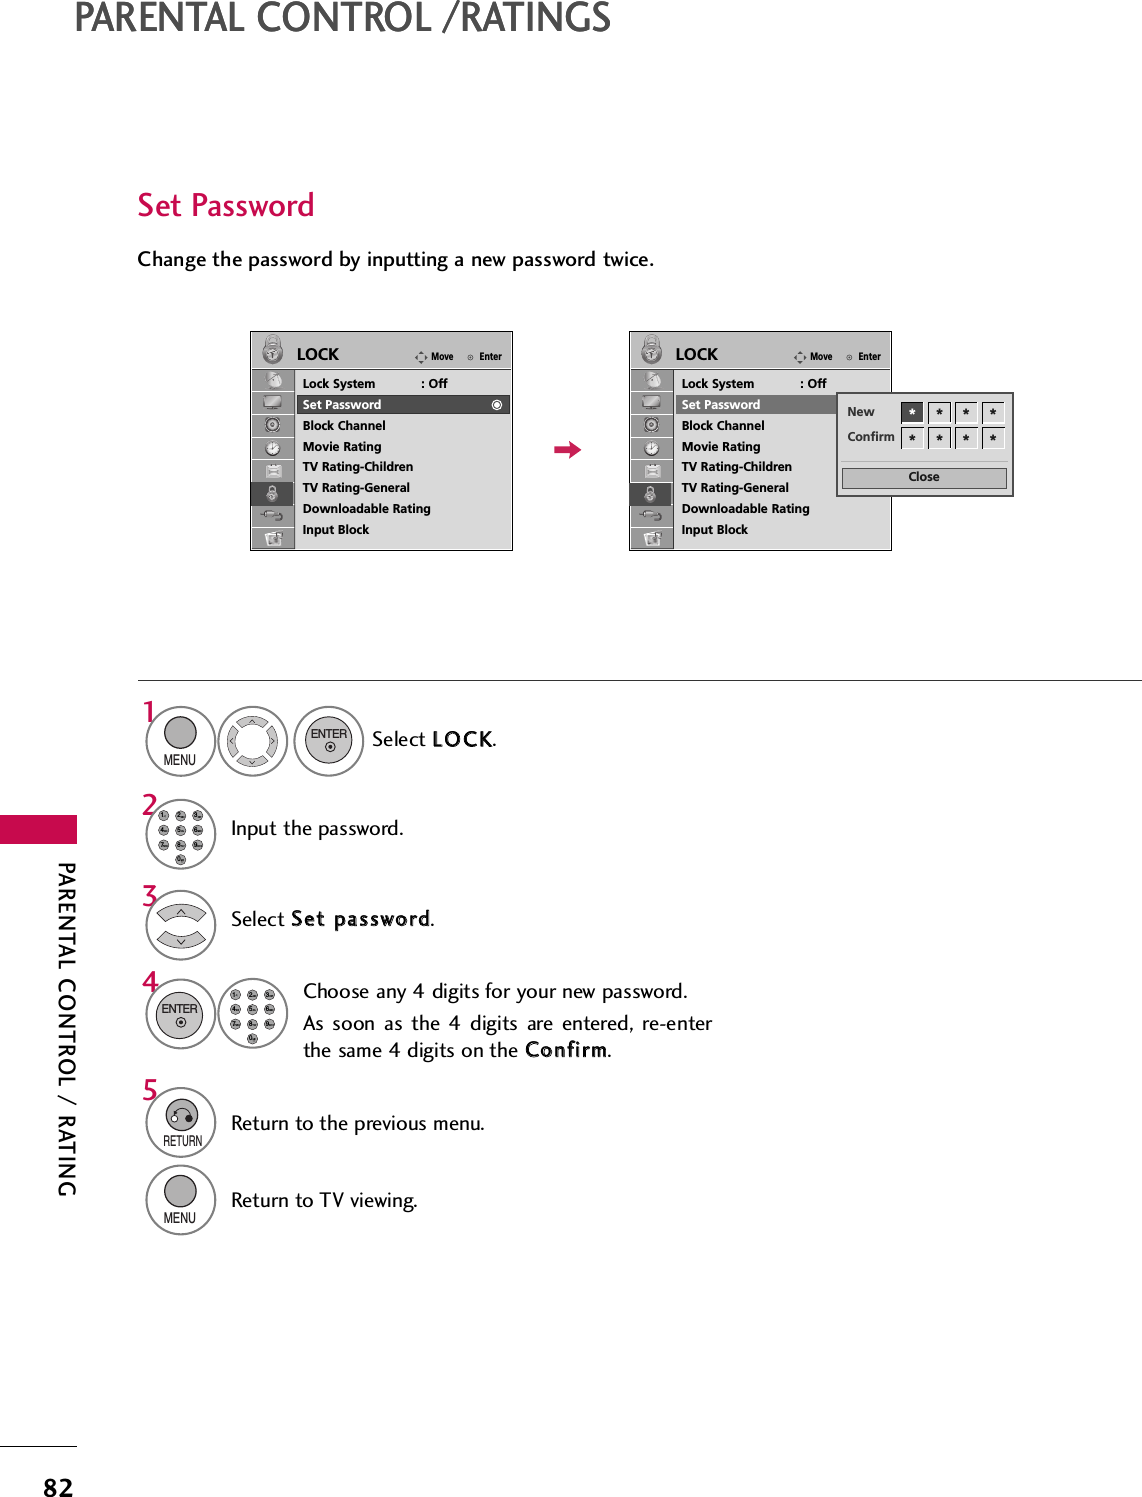
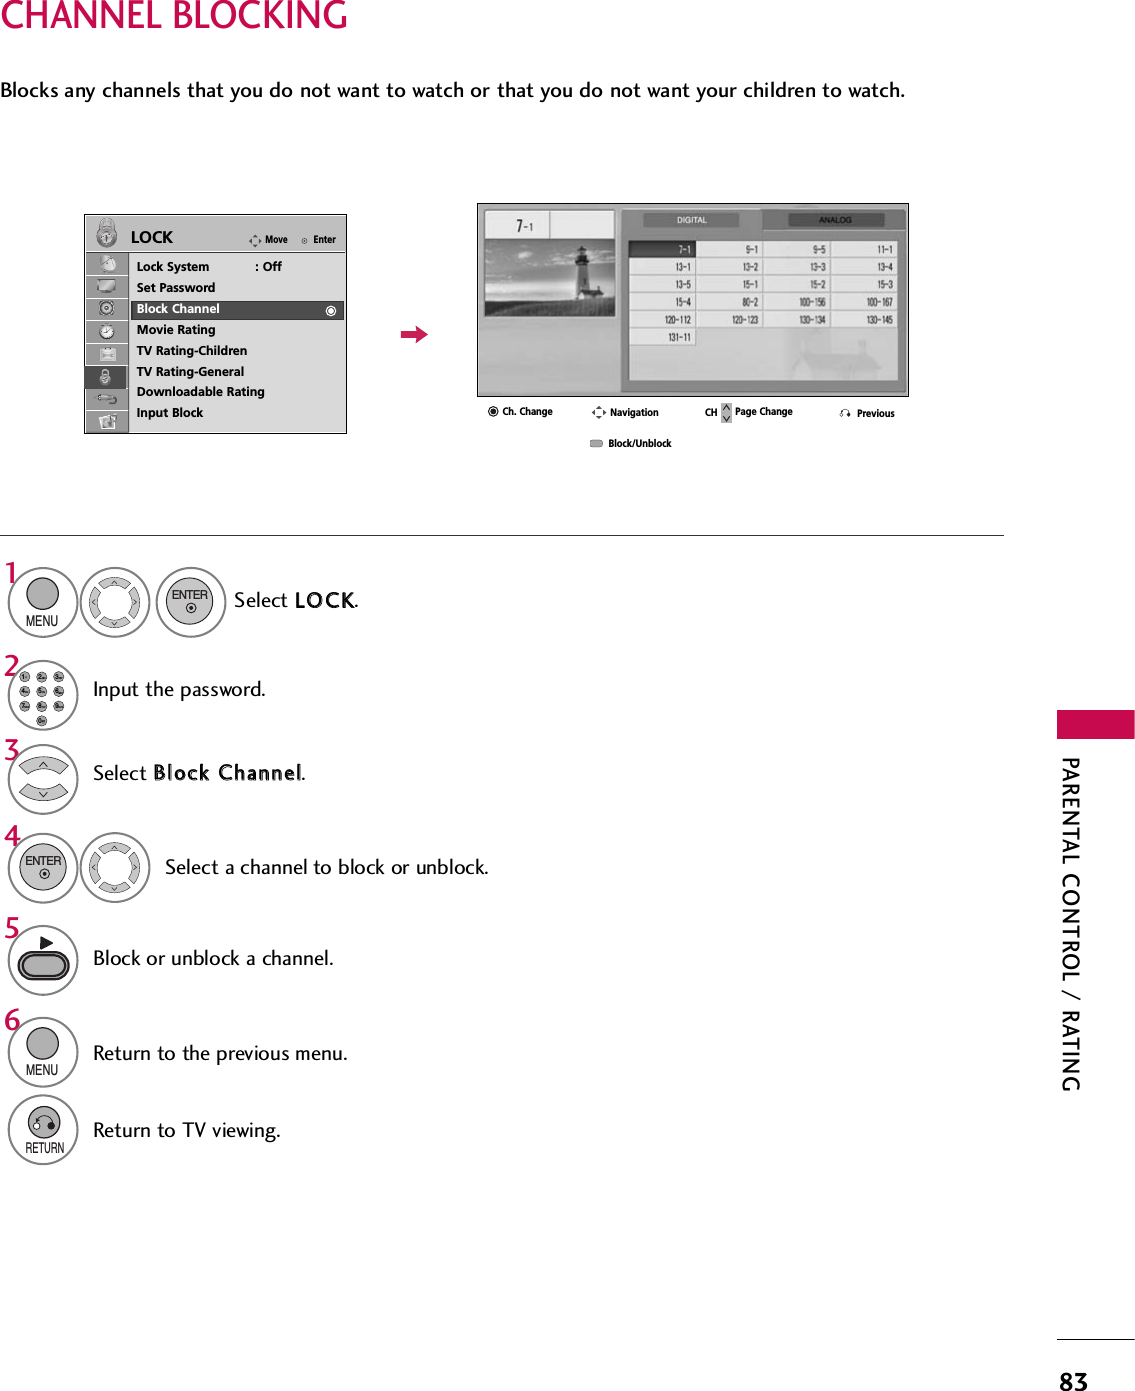
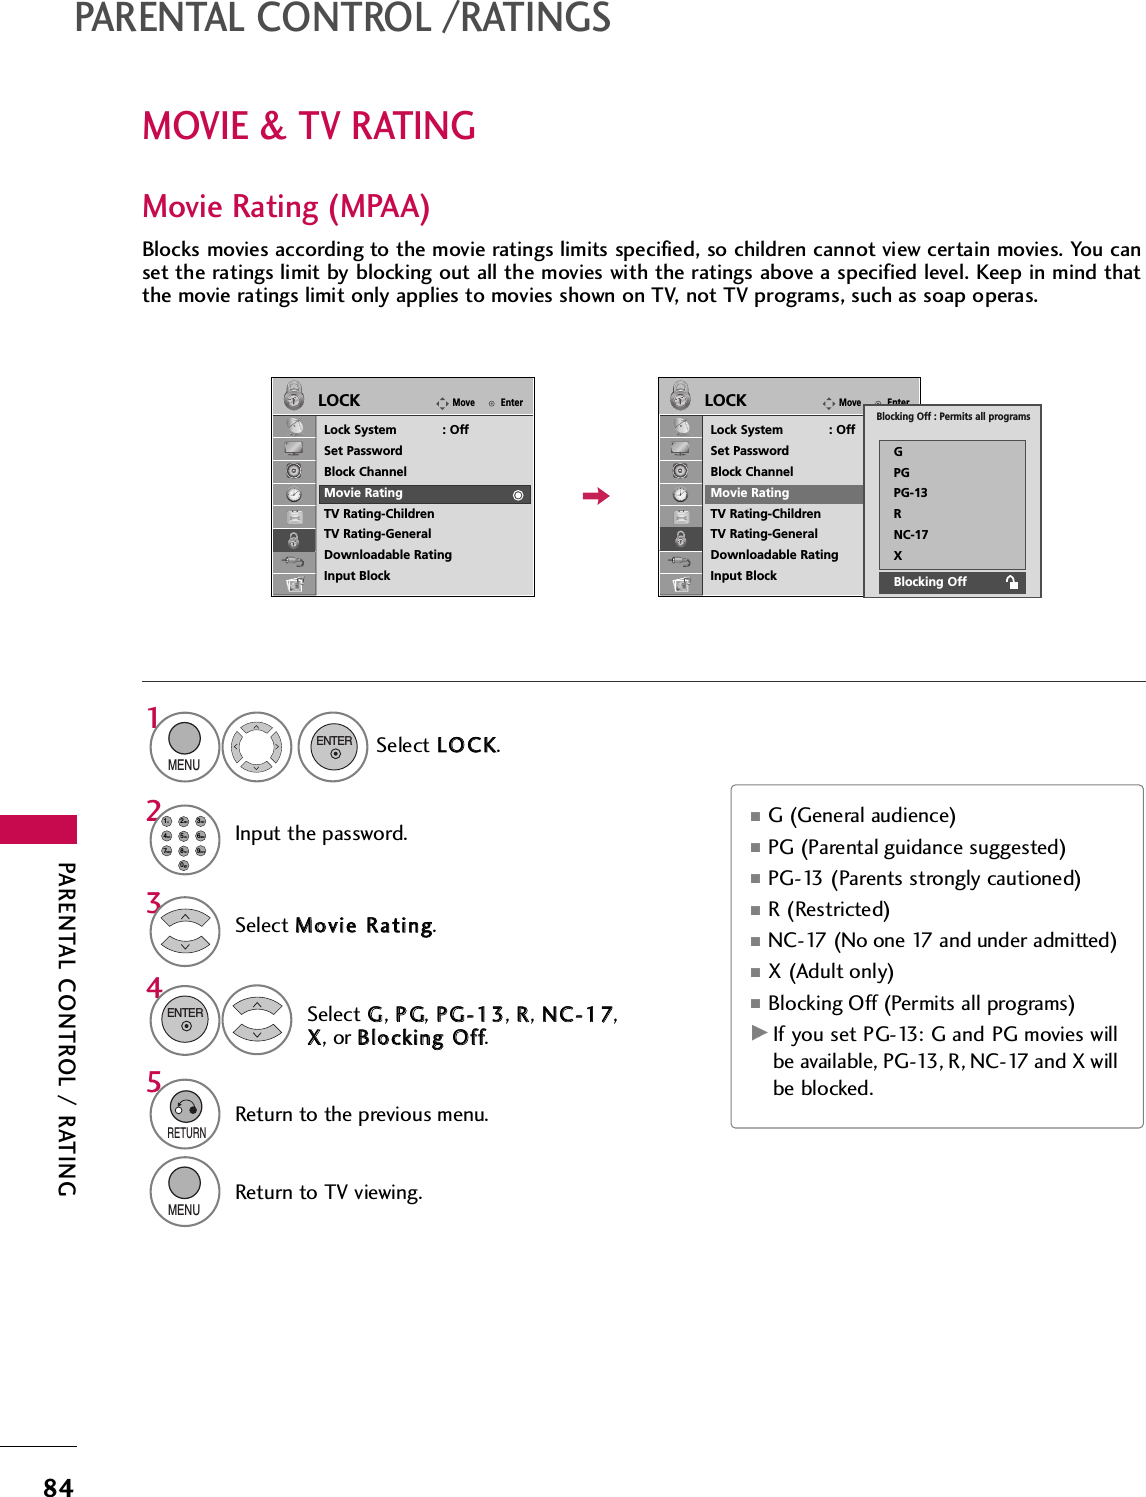
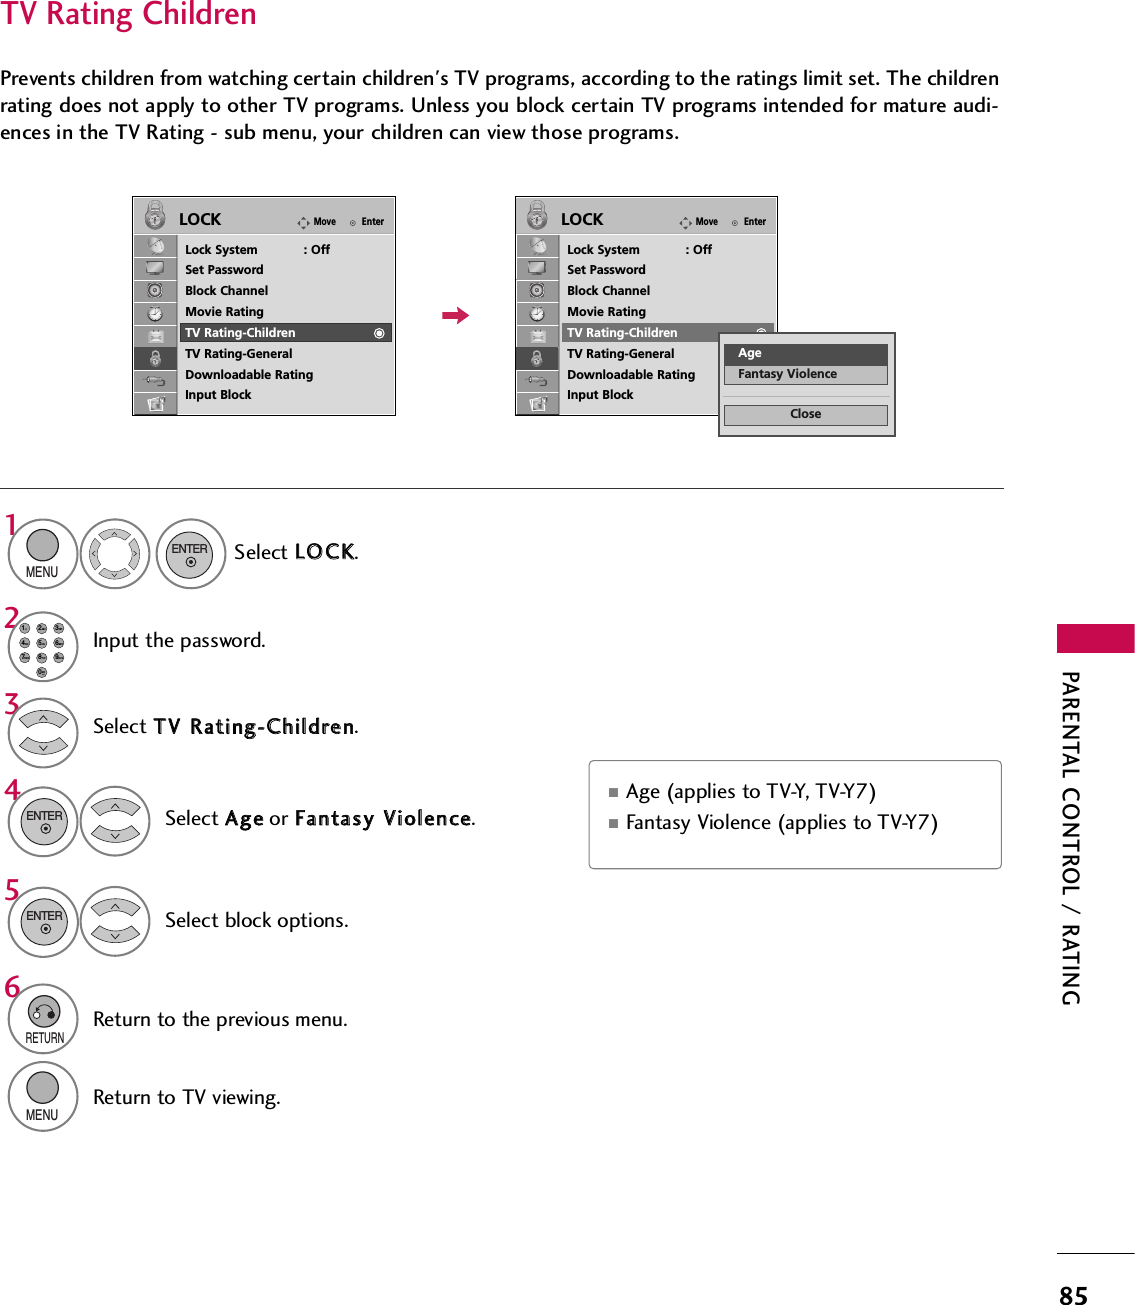
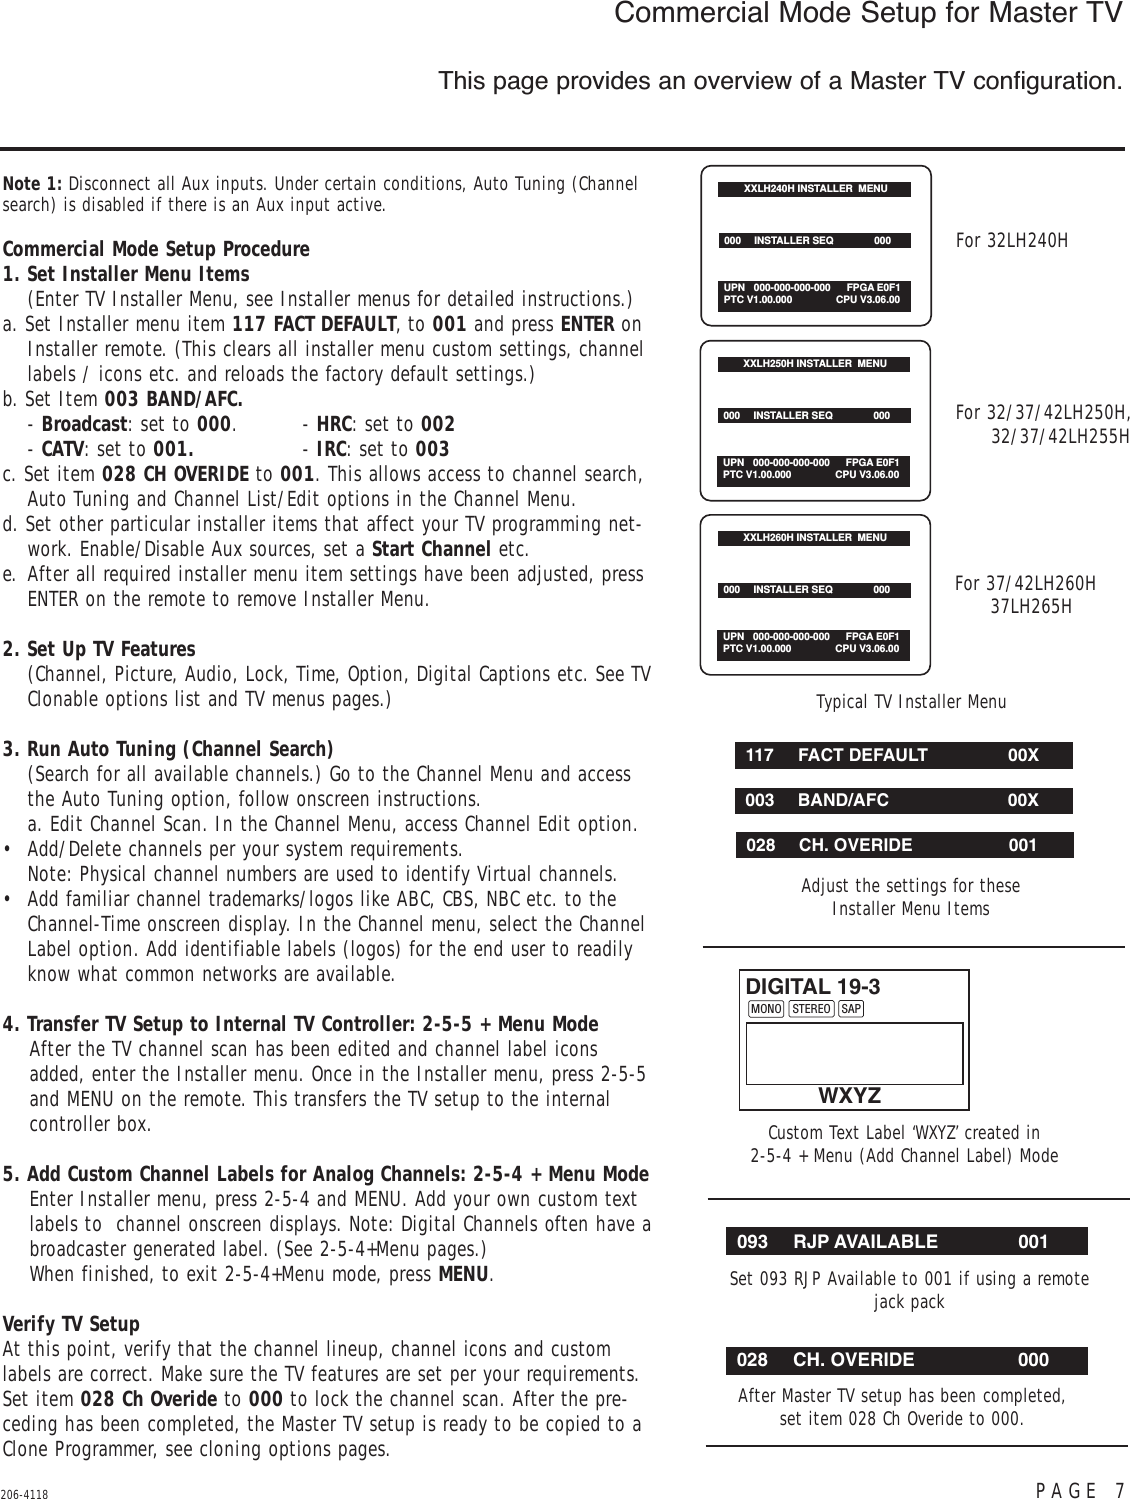
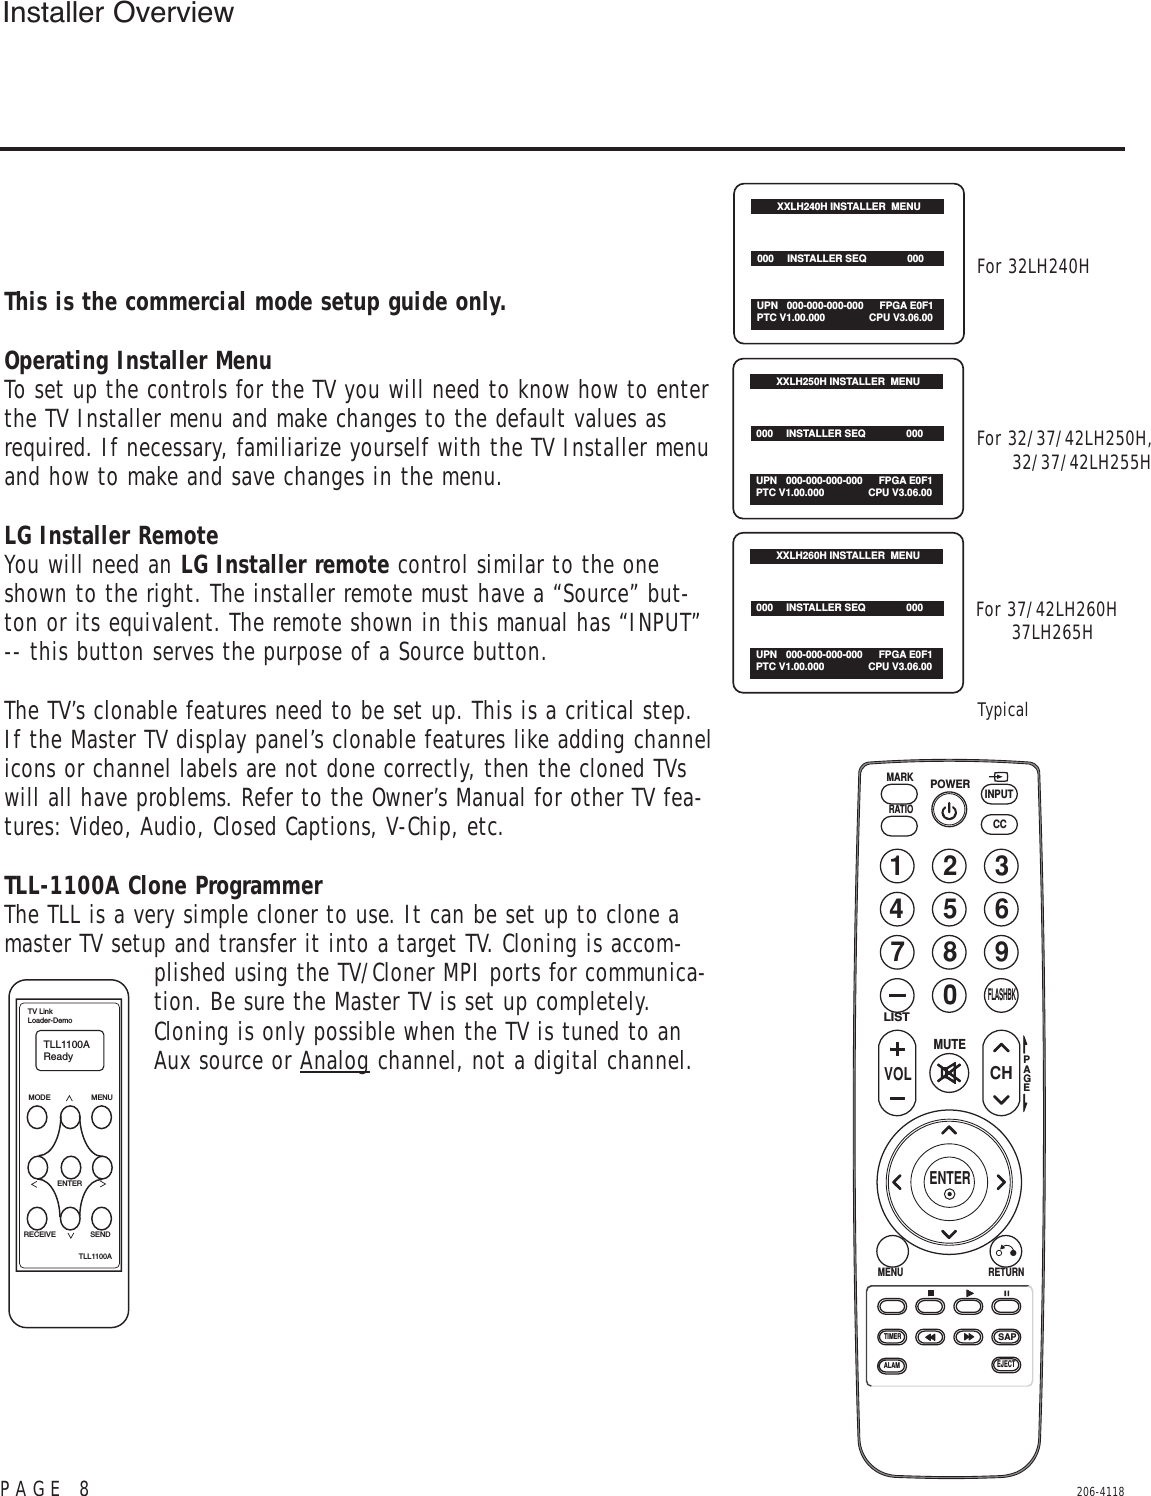
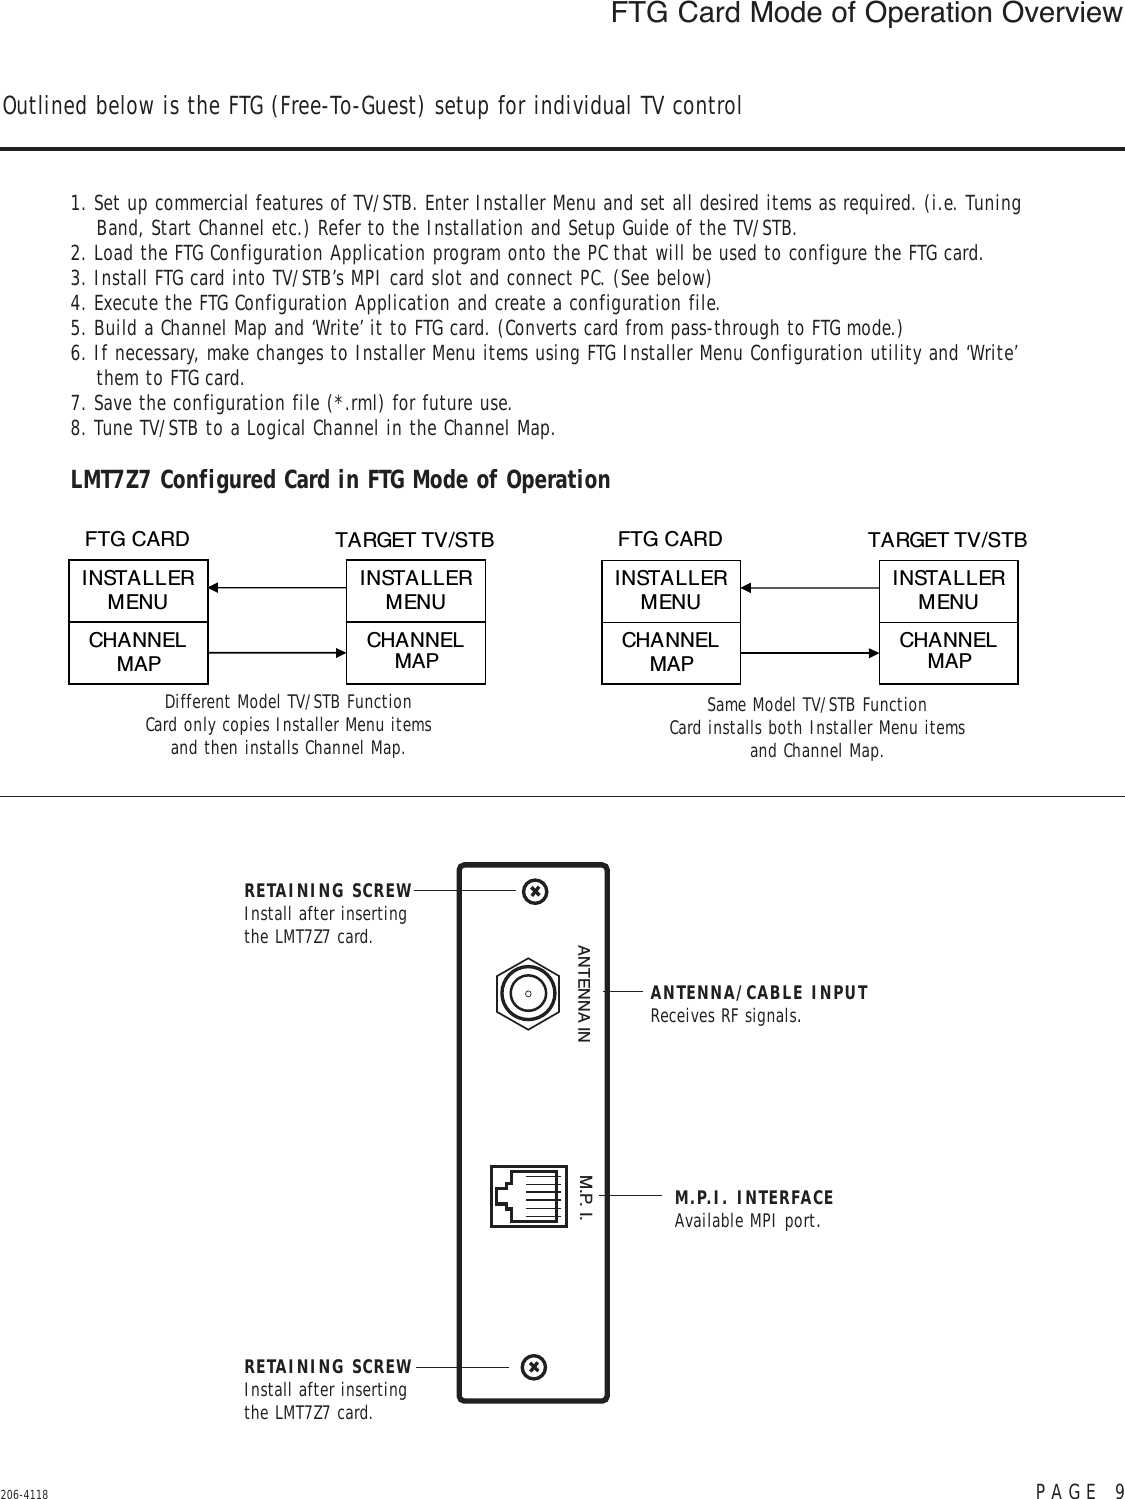
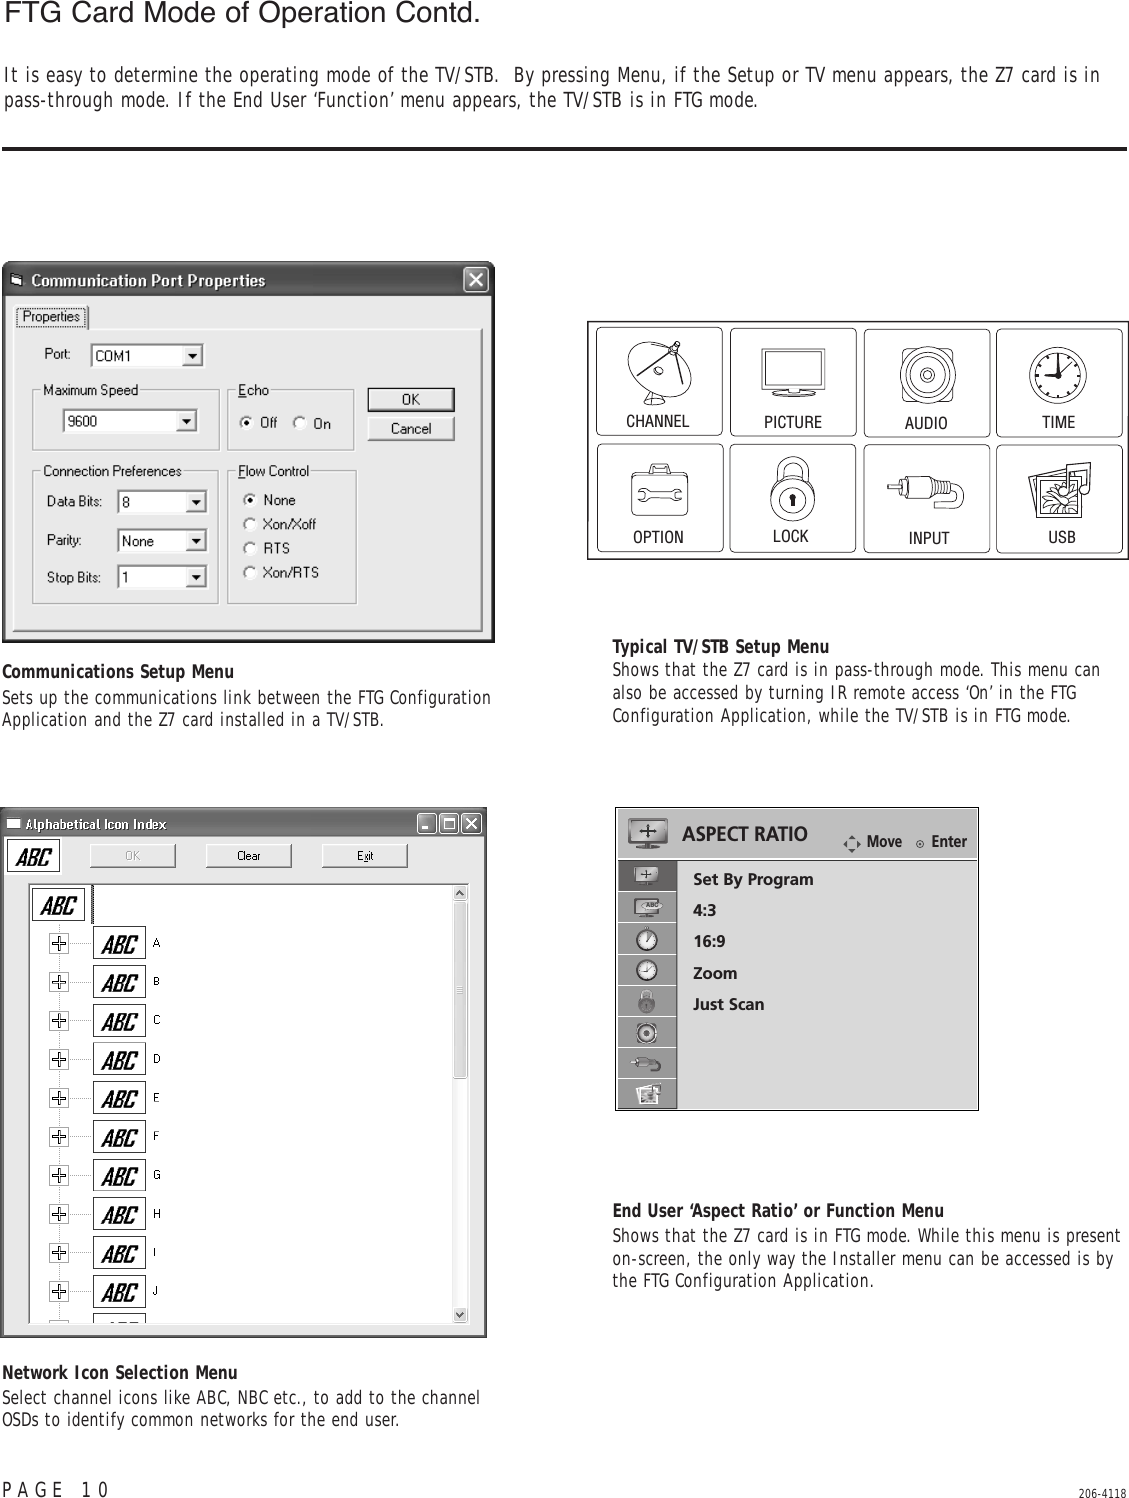
LG Electronics USA 37LD320HUA LCD TV Monitor 37LD320H-UA User Manual SAC34026004 Edit1 LD320H
LG Electronics USA LCD TV Monitor 37LD320H-UA SAC34026004 Edit1 LD320H
UserManual.wiki
>
LG Electronics USA
>
37LD320HUA User Manual
User Manual
Navigation menu
Upload a User Manual
Namespaces
Wiki Guide
HTML
PDF
Info
Views
User Manual
Discussion / Help
Navigation


![98Copyright (C) 1991, 1999 Free Software Foundation, Inc. 51Franklin Street, Fifth Floor, Boston, MA 02110-1301 USAEveryone is permitted to copy and distribute verbatim copies ofthis license document, but changing it is not allowed.[This is the first released version of the Lesser GPL. It alsocounts as the successor of the GNU Library Public License, ver-sion 2, hence the version number 2.1.]PreambleThe licenses for most software are designed to take away yourfreedom to share and change it. By contrast, the GNU GeneralPublic Licenses are intended to guarantee your freedom to shareand change free software - to make sure the software is free forall its users.This license, the Lesser General Public License, applies to somespecially designated software packages - typically libraries - ofthe Free Software Foundation and other authors who decide touse it. You can use it too, but we suggest you first think careful-ly about whether this license or the ordinary General PublicLicense is the better strategy to use in any particular case, basedon the explanations below.When we speak of free software, we are referring to freedom ofuse, not price. Our General Public Licenses are designed to makesure that you have the freedom to distribute copies of free soft-ware (and charge for this service if you wish); that you receivesource code or can get it if you want it; that you can change thesoftware and use pieces of it in new free programs; and that youare informed that you can do these things.To protect your rights, we need to make restrictions that forbiddistributors to deny you these rights or to ask you to surrenderthese rights. These restrictions translate to certain responsibilitiesfor you if you distribute copies of the library or if you modify it.For example, if you distribute copies of the library, whether gratisor for a fee, you must give the recipients all the rights that wegave you. You must make sure that they, too, receive or can getthe source code. If you link other code with the library, you mustprovide complete object files to the recipients, so that they canrelink them with the library after making changes to the libraryand recompiling it. And you must show them these terms so theyknow their rights.We protect your rights with a two-step method: (1) we copyrightthe library, and (2) we offer you this license, which gives you legalpermission to copy, distribute and/or modify the library.To protect each distributor, we want to make it very clear thatthere is no warranty for the free library. Also, if the library is mod-ified by someone else and passed on, the recipients should knowthat what they have is not the original version, so that the origi-nal author's reputation will not be affected by problems thatmight be introduced by others.Finally, software patents pose a constant threat to the existenceof any free program. We wish to make sure that a company can-not effectively restrict the users of a free program by obtaining arestrictive license from a patent holder. Therefore, we insist thatany patent license obtained for a version of the library must beconsistent with the full freedom of use specified in this license.Most GNU software, including some libraries, is covered by theordinary GNU General Public License. This license, the GNULesser General Public License, applies to certain designatedlibraries, and is quite different from the ordinary General PublicLicense. We use this license for certain libraries in order to per-mit linking those libraries into non-free programs.When a program is linked with a library, whether statically orusing a shared library, the combination of the two is legallyspeaking a combined work, a derivative of the original library. Theordinary General Public License therefore permits such linkingonly if the entire combination fits its criteria of freedom. TheLesser General Public License permits more lax criteria for linkingother code with the library.We call this license the "Lesser" General Public License becauseit does Less to protect the user's freedom than the ordinaryGeneral Public License. It also provides other free software devel-opers Less of an advantage over competing non-free programs.These disadvantages are the reason we use the ordinary GeneralPublic License for many libraries. However, the Lesser license pro-vides advantages in certain special circumstances.For example, on rare occasions, there may be a special need toencourage the widest possible use of a certain library, so that itbecomes a de-facto standard. To achieve this, non-free programsmust be allowed to use the library. A more frequent case is thata free library does the same job as widely used non-free libraries.In this case, there is little to gain by limiting the free library to freesoftware only, so we use the Lesser General Public License.In other cases, permission to use a particular library in non-freeprograms enables a greater number of people to use a large bodyof free software. For example, permission to use the GNU CLibrary in non-free programs enables many more people to usethe whole GNU operating system, as well as its variant, theGNU/Linux operating system.GNU LESSER GENERAL PUBLIC LICENSEVersion 2.1, February 1999](https://usermanual.wiki/LG-Electronics-USA/37LD320HUA/User-Guide-1322242-Page-100.png)


![10711. MISCELLANEOUS.This license represents the complete agreement concerningsubject matter hereof. If any provision of this license isheld to be unenforceable, such provision shall be reformedonly to the extent necessary to make it enforceable. ThisLicense shall be governed by California law provisions(except to the extent applicable law, if any, provides oth-erwise), excluding its conflict-of-law provisions. Withrespect to disputes in which at least one party is a citizenof, or an entity chartered or registered to do business inthe united states of america, any litigation relating to thisLicense shall be subject to the jurisdiction of the federalcourts of the northern district of california, with venuelying in santa clara county, california, with the losing partyresponsible for costs, including without limitation, courtcosts and reasonable attorneys' fees and expenses. Theapplication of the united nations convention on contractsfor the International sale of goods is expressly excluded.Any law or regulation which provides that the language ofa contract shall be construed against the drafter shall notapply to this license.12. RESPONSIBILITY FOR CLAIMS.As between initial developer and the contributors, eachparty is responsible for claims and damages arising, directlyor indirectly, out of its utilization of rights under thislicense and you agree to work with initial developer andcontributors to distribute such responsibility on an equitablebasis. Nothing herein is intended or shall be deemed toconstitute any admission of liability.13. MULTIPLE-LICENSED CODE.Initial developer may designate portions of the coveredcode as "Multiple-Licensed". "Multiple-Licensed" meansthat the initial developer permits you to utilize portions ofthe covered code under your choice of the NPL or thealternative licenses, if any, specified by the initial developerin the file described in exhibit A.EXHIBIT A -Mozilla Public License.The contents of this file are subject to the Mozilla Public LicenseVersion 1.1 (the “license”); you may not use this file except incompliance with the License. You may obtain a copy of thelicense at http://www.mozilla.org/MPL/Software distributed under the license is distributed on an "ASIS" basis, WITHOUT WARRANTY OF ANY KIND, either expressor implied. See the license for the specific language governingrights and limitations under the License.The Original Code is ______________________________________.The Initial Developer of the Original Codeis___________________.Portions created by ______________________ are Copyright (C)_______________________. All Rights Reserved.Contributor(s): ______________________________________.Alternatively, the contents of this file may be used under theterms of the _____ license (the "[___] License"), in which casethe provisions of [______] license are applicable instead of thoseabove. If you wish to allow use of your version of this file onlyunder the terms of the [____] license and not to allow others touse your version of this file under the MPL, indicate your decisionby deleting the provisions above and replace them with thenotice and other provisions required by the [___] license. If youdo not delete the provisions above, a recipient may use your versionof this file under either the MPL or the [___] license."NOTE: The text of this exhibit A may differ slightly from the textof the notices in the source code files of the original code. Youshould use the text of this exhibit A rather than the text found inthe original code/source code for Your modifications.](https://usermanual.wiki/LG-Electronics-USA/37LD320HUA/User-Guide-1322242-Page-109.png)


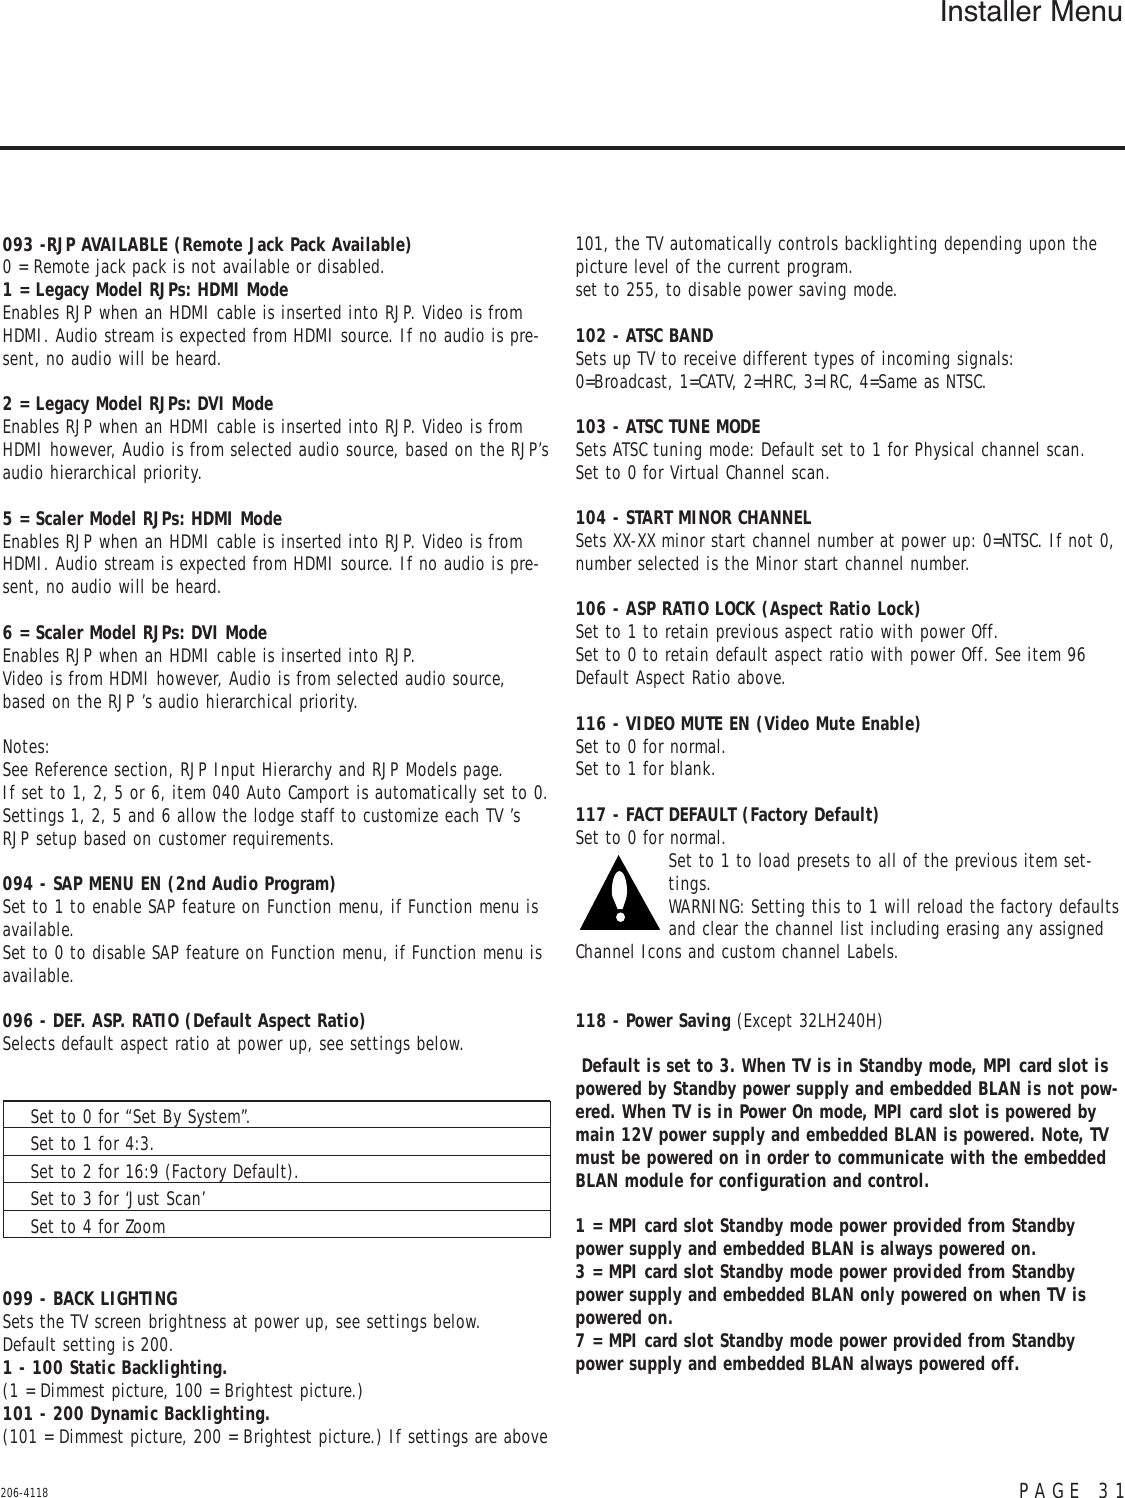
![PAGE 30 206-4118Installer Menu047 - AUX STATUSSet to 1 for M.P.I. AUX source to be reported as a channel numberinstead of channel 0. Set to 0 to disable AUX identification change.Controls M.P.I. status channel response for AUX inputs.053 - DIS. CH-TIME (Disable Channel-Time)Set to 1 to disable the Channel-Time display, Channel-Time display willnot appear.Set to 0 to enable the Channel-Time display.069 - EN. CH-T COL. (Enable Channel-Time Custom Color)Set to 1 to enable custom color for the Channel-Time display.Set to 0 to disable custom color for the Channel-Time display.070 - FOR. CH-TIME (Channel-Time Display Foreground Color)Set according to Color Chart.0 = Black 3 = Cyan 6 = Yellow1 = Blue 4 = Red 7 = White2 = Green 5 = VioletNOTE: If foreground and background color are the same, menu back-ground is transparent.071 - BCK. CH-TIME (Channel-Time Display Background Color)Set according to Color Chart.0 = Black 3 = Yellow 6 = Cyan1 = Red 4 = Blue 7 = White2 = Green 5 = VioletNOTE: If foreground and background color are the same, menu back-ground is transparent.073 - CH NOT AVBLE (Channel Not Available)If set to 1 and item 028 CHANNEL OVERRIDE is set to 0, “NOT AVAIL-ABLE” message is displayed when directly accessing a channel not inthe channel scan list available in memory.075 - REVERT CH (Revert to Start Channel)If set to 1 and loss of M.P.I. communication occurs, TV automaticallytunes to the specified Start Channel.078 - UPN MSB (UPN Most Significant Byte)User programmable number, most significant byte readable by M.P.I.command. Note: Not linked to serial number.079 - UPN MSB-1 (UPN Most Significant Byte-1)User programmable number, most significant byte-1 readable by M.P.I.command. Not linked to serial number.080 - UPN MSB-2 (UPN Most Significant Byte-2)User programmable number, most significant byte-2 readable by M.P.I.command. Not linked to serial number.081 - UPN LSB (UPN Least Significant Byte)User programmable number, least significant byte readable by M.P.I.command. Not linked to serial number.082 - CHKSM ERROR (Checksum Error)Enforces rigid M.P.I. checksum validation.Set to 1 for validation. Set to 0 to disable (does not check checksum on M.P.I. async port).SPI is always checked.083 - HANDSHK TIME (Handshake Time)Adds an additional delay to the handshake time which is 64 msec,thus relaxing M.P.I. timing requirements to be compatible with PCbased Windows controlled systems, range is 0 - 5. (Timeout = 25.5MS + [25.5 MS* Handshake time]).084 - PERMANENT BLK (Permanent Block)Allows Lock (Parental Control) blocking schemes to be permanent bydisabling the blocking hours function. Set to 1 to install Parental Control restrictions permanently. Set to 0 for user-specified hours control of blocking schemes.087 - REAR RGB EN. (Rear RGB Enable)Controls access to rear RGB input on TV. Set to 0 to disable RGB input. Set to 2 to enable for PC and Auto Configure always enabled.Set to 18 for Auto Configure one time only with power cord removaland reinsertion.088 - EN NOISE MUTE (Enable Noise Mute)If set to 1, audio mutes if no signal is present.090 - KEY LOCK If set to 1, display panel keyboard is locked out, not available to enduser. IR receiver remains functional.091 - YPrPb2 EN. (HDMI2 Enable)Set to 0 to disable display panel HDMI2 input.Set to 1 to enable DTV mode. Set to 2 to enable PC mode.Detailed Descriptions of Installer Menu Items](https://usermanual.wiki/LG-Electronics-USA/37LD320HUA/User-Guide-1322242-Page-139.png)