LG Electronics USA 47LN5390UN LED TV MONITOR User Manual MFL67651196 e indd
LG Electronics USA LED TV MONITOR MFL67651196 e indd
Contents
- 1. User Manual 1
- 2. Users Manual 2
Users Manual 2
ENGLISH
16 MAKING CONNECTIONS
Connecting to a HD receiver, DVD Player, or VCR
Connect a HD receiver, DVD Player, or VCR to the TV and select an appropriate input mode.
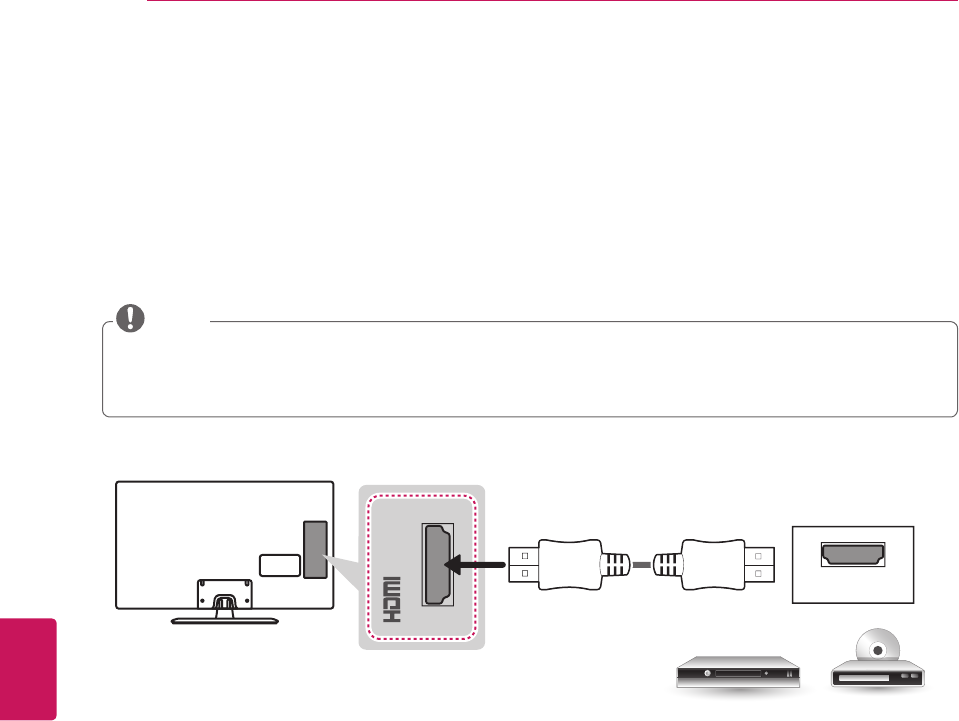
HDMI Connection
HDMI is the best way to connect a device.
Transmits digital video and audio signals from an external device to the TV. Connect the external device and the TV with
the HDMI cable as shown in the following illustration.
Use the latest High Speed HDMI™ Cable that supports CEC (Customer Electronics Control) function.
High Speed HDMI™ Cables are tested to carry an HD signal up to 1080p and higher.
HDMI Audio Supported Format: Dolby Digital, PCM (Up to 192 kHz, 32 kHz / 44.1 kHz / 48 kHz / 96 kHz / 192 kHz)
-> DTS is not supported.
NOTE
Choose any HDMI input port to connect.
It does not matter which port you use.
(*Not Provided)
IN (MHL)
HDMI
DVD / Blu-Ray / HD Cable Box / HD STB
ENGLISH
17
MAKING CONNECTIONS
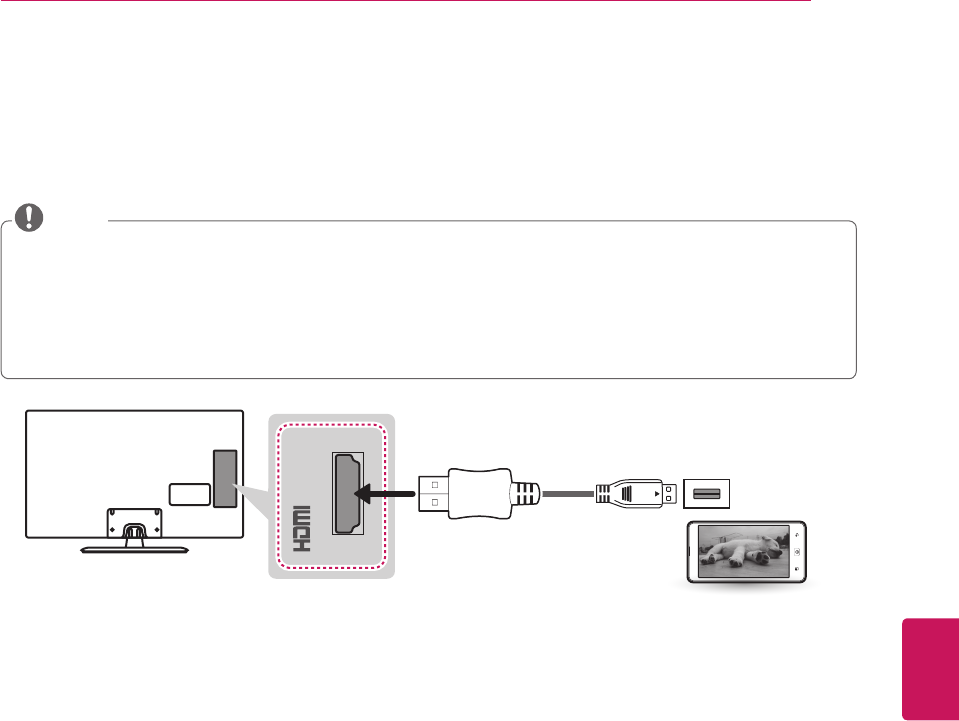
Connecting to a mobile phone
(For LN530B, LN5300, LN5310, LN5400 series)
Mobile High-definition Link (MHL) is an interface for transmitting digital audio/visual signals from mobile phones to
television sets.
Connect the mobile phone to the HDMI IN 2 (MHL) port to view the phone screen on the TV.
This only works with an MHL-enabled phones.
With some MHL supporting mobile phones, you can use the TV remote to control the phone.
An MHL supported cable is needed to connect the TV and a mobile phone.
Remove the MHL cable from the TV when:
- the MHL function is disabled.
- your mobile device is fully charged in standby mode.
NOTE
(*Not Provided)
MHL Cable
Mobile phone
IN (MHL)
ENGLISH
18 MAKING CONNECTIONS
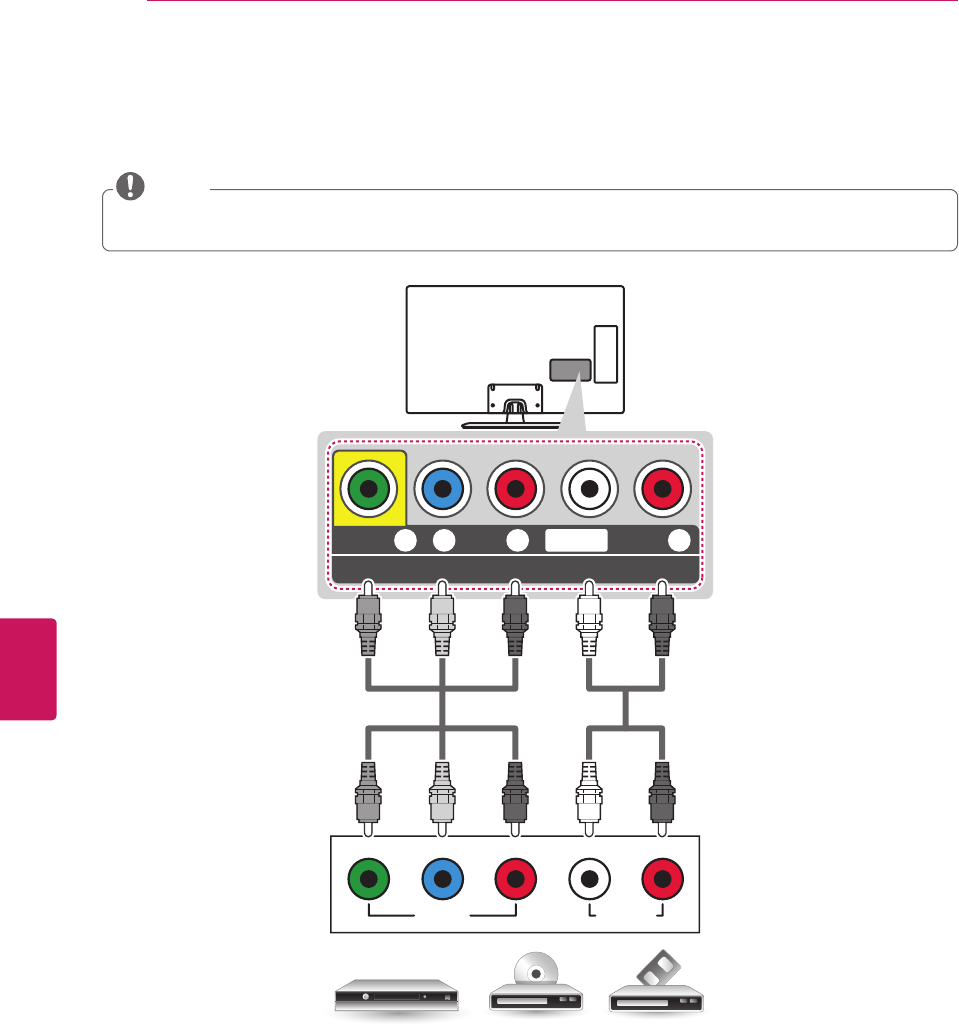
Component Connection
Transmits analog video and audio signals from an external device to the TV. Connect the external device and the TV with
a component cable as shown in the following illustration.
If cables are installed incorrectly, it could cause the image to display in black and white or with distorted color.
Check to ensure the cables are matched with the corresponding color connection.
NOTE
COMPONENT IN / AV IN
VIDEO/ PBPR
Y R
AUDIO
L/MONO
PBPR
Y RL
VIDEO AUDIO
VCR / DVD / Blu-Ray / HD Cable Box
GREEN
RED
BLUE
(*Not Provided)
RED
WHITE
GREEN
RED
BLUE
RED
WHITE
(*Not Provided)
ENGLISH
19
MAKING CONNECTIONS
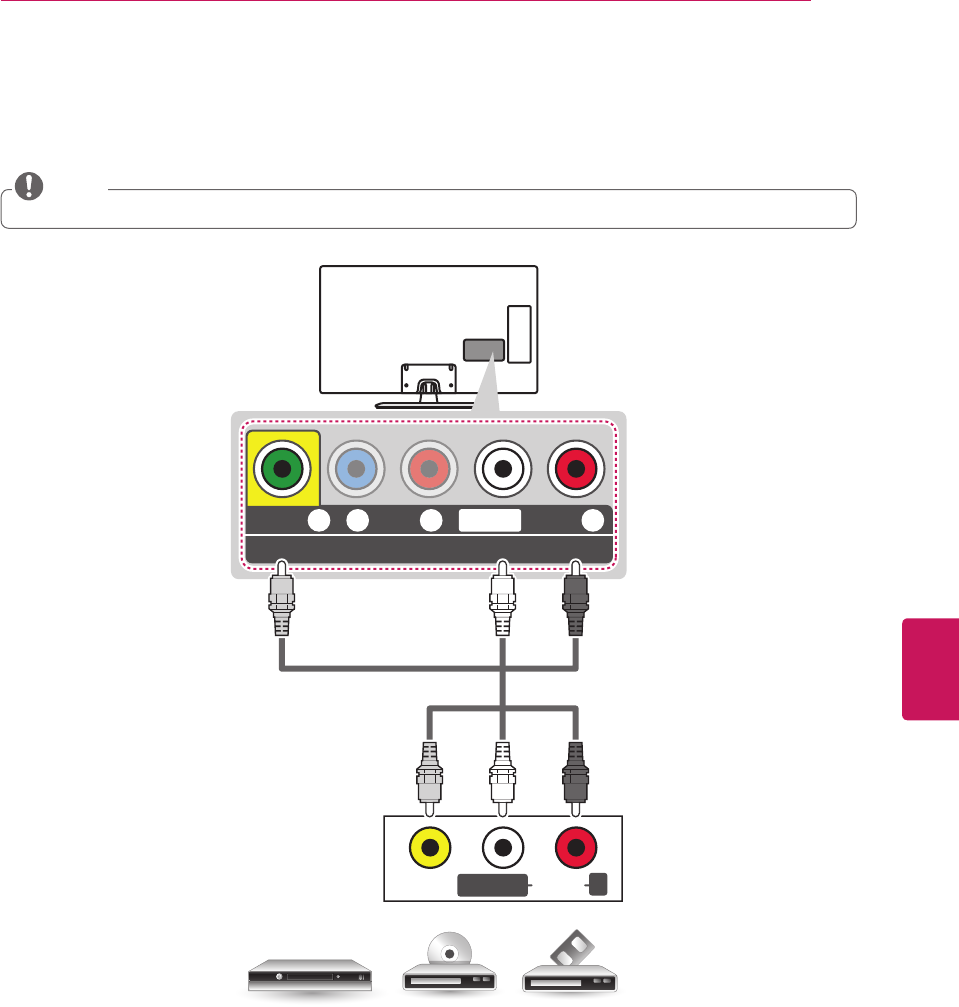
Composite Connection
Transmits analog video and audio signals from an external device to the TV. Connect the external device and the TV with
the composite cable as shown in the following illustration.
If you have a mono VCR, connect the audio cable from the VCR to the AUDIO L/MONO jack of the TV.
NOTE
COMPONENT IN / AV IN
VIDEO/ PBPR
Y R
AUDIO
L/MONO
VCR / DVD / Blu-Ray / HD Cable Box
VIDEO R
AUDIO
L/MONO
(*Not Provided)
YELLOW
RED
WHITE
YELLOW
RED
WHITE
ENGLISH
20 MAKING CONNECTIONS
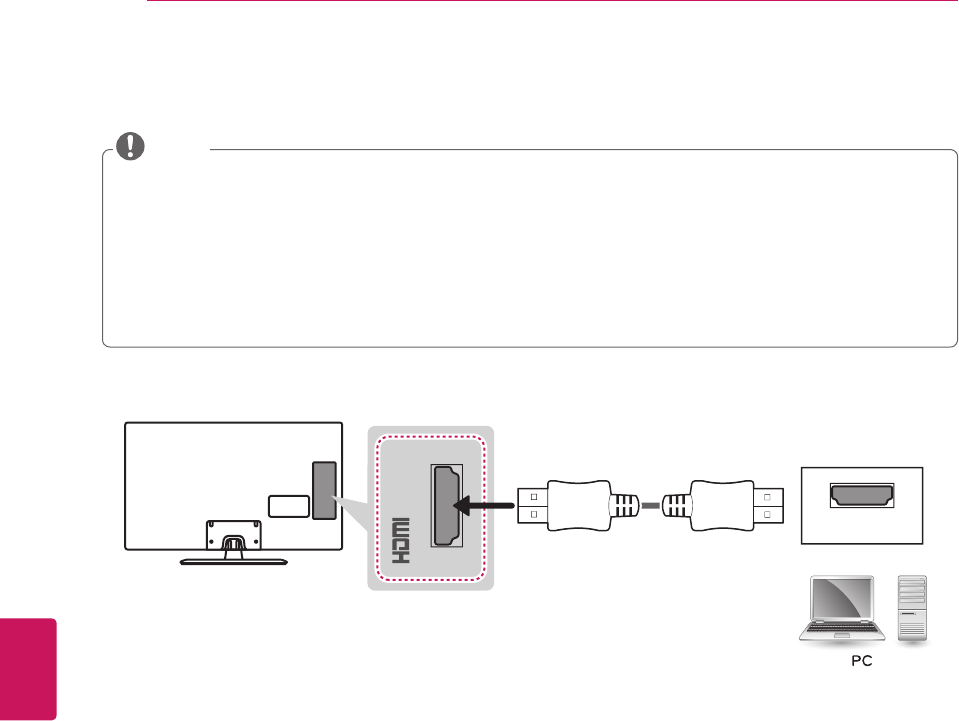
Connecting a PC
Use an HDMI connection for the best image quality.
Depending upon the graphics card, DOS mode video may not work if a HDMI to DVI Cable is in use.
In PC mode, there may be noise associated with the resolution, vertical pattern, contrast, or brightness. If noise
is present, change the PC output to another resolution, change the refresh rate to another rate or adjust the
brightness and contrast on the PICTURE menu until the picture is clear.
The synchronization input form for Horizontal and Vertical frequencies is separate.
Depending on the graphics card, some resolution settings may not allow the image to be positioned on the screen
properly.
If you use DVI to HDMI cable for PC, you have to use external speaker for PC audio sound.
NOTE
HDMI Connection
(*Not Provided)
IN (MHL)
HDMI
ENGLISH
21
MAKING CONNECTIONS
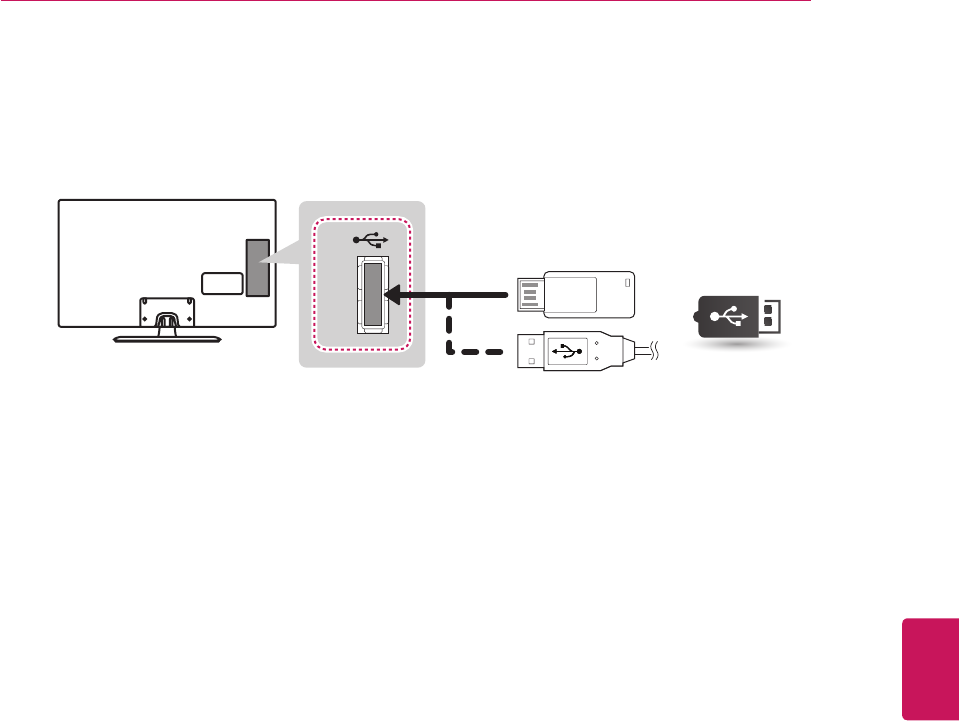
Connecting a USB Device
Connect a USB storage device such as a USB flash memory, external hard drive, or a USB memory card reader
to the TV.
USB IN
USB
(*Not Provided)

ENGLISH
22 REMOTE CONTROL
FLASHBK
AUDIO
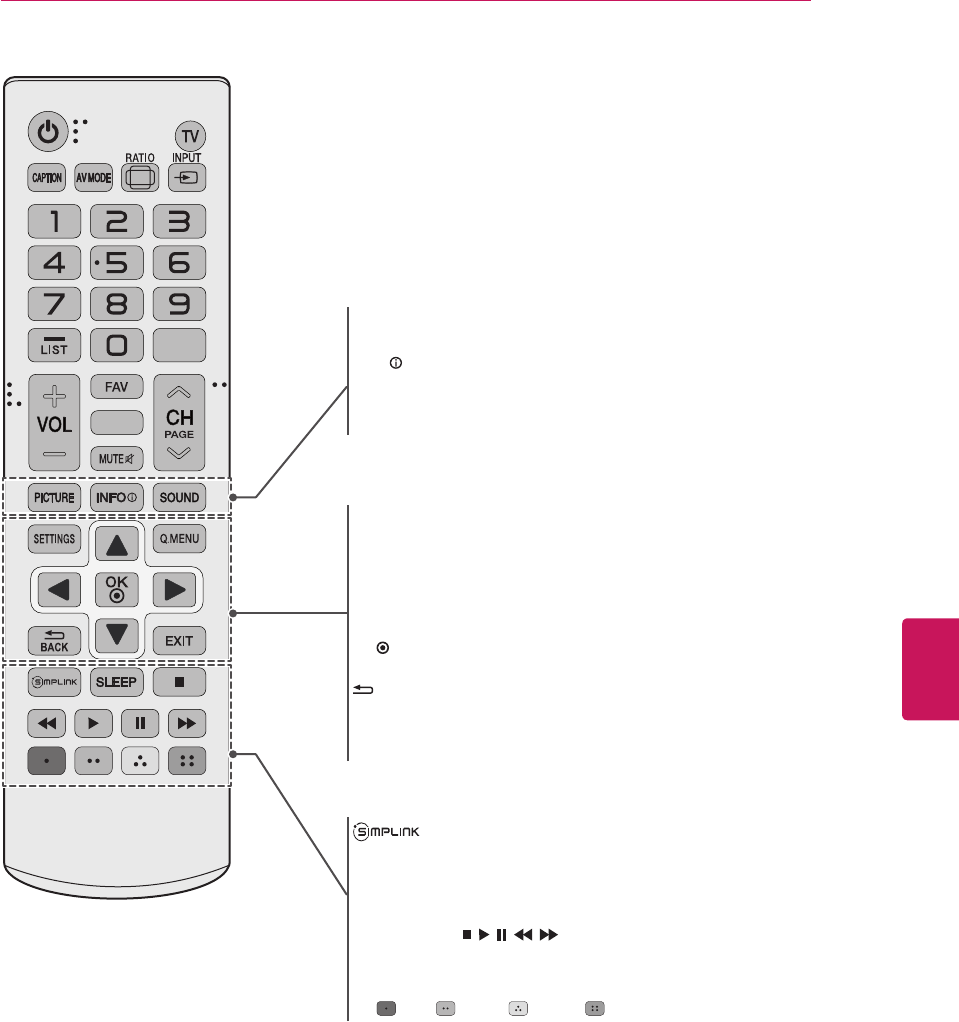
REMOTE CONTROL
The descriptions in this manual are based on the buttons on the remote control.
Please read this manual carefully and use the TV correctly. To install batteries,
open the battery cover, replace batteries (1.5 V AAA) matching the and ends
to the label inside the compartment, and close the battery cover.
To remove the batteries, perform the installation actions in reverse.
Do not mix old and new batteries, as this may damage the remote control.
CAUTION
This remote uses infrared light. When in use, it should be pointed in the direction of the TV’s remote sensor.
(POWER)
Turns the TV on or off.
TV
Returns to the last TV channel.
CAPTION
Activates or deactivate the subtitles.
AV MODE
Selects an AV mode.
RATIO
Resizes an image.
INPUT
Changes the input source. Turns the TV on if it is off.
VOL
Adjusts the volume level.
FAV
Accesses your favorite channel list.
AUDIO
Digital signal: Changes the audio language.
Analog signal: Changes the MTS sound.
MUTE
Mutes all sounds.
CH
Scrolls through the saved channels.
PAGE
Moves to the previous or next screen.
Number button
Enters numbers.
- (Dash)
Inserts a dash between numbers such as 2-1 and 2-2.
LIST
Accesses the saved channel list.
FLASHBK
Alternates between the two last channels selected (pressing repeatedly).
ENGLISH
23
REMOTE CONTROL
FLASHBK
AUDIO
PICTURE
Changes the image mode.
INFO
Shows information on the current program.
SOUND
Changes the sound mode.
Accesses the AV devices connected to the TV.
Opens the SIMPLINK menu.
SLEEP
Sets the length of time until the TV to turns off.
Control buttons ( , , , , )
Controls SIMPLINK compatible devices (USB,SIMPLINK).
Color buttons
These access special functions in some menus.
(: Red, : Green, : Yellow, : Blue)
SETTINGS
Accesses the main menu.
Q.MENU
Accesses the quick menu.
Navigation buttons (up/down/left/right)
Scrolls through menus or options.
OK
Selects menus or options and confirms your input.
BACK
Returns to the previous screen.
EXIT
Clears all on-screen displays and returns to TV viewing.
ENGLISH
24 WATCHING TV
WATCHING TV
Turning the TV on for the first time
When you turn the TV on for the first time, the Initial
setting screen appears. Select a language and customize
the basic settings.
1 Connect the power cord to a power outlet.
2 In standby mode, press the power button on the
remote control to turn the TV on.
The Initial setting screen appears when you turn the
TV on for the first time.
You can also access Initial Setting by accessing
OPTION in the main menu.
NOTE
3 Follow the on-screen instructions to customize your
TV settings according to your preferences.
Language Selects a language to display.
Mode Setting Selects Home Use for the home
environment.
Time Setting Selects the time zone and daylight
saving.
Auto Tuning Scans and saves available channels
automatically.
To display images in the best quality for your home
environment, select Home Use.
Store Demo is suitable for the retail environment.
If you select Store Demo, any customized settings
will switch back to the default settings of Store
Demo in 5 minutes.
NOTE
4 When the basic settings are complete,
press the OK.
If you do not complete the initial setting, it will
appear whenever the TV turns on.
Disconnect the power cord from the power outlet
when you do not use the TV for a long period of
time.
NOTE
5 To turn the TV off, press the power button on the
remote control.
ENGLISH
25
SPECIFICATIONS
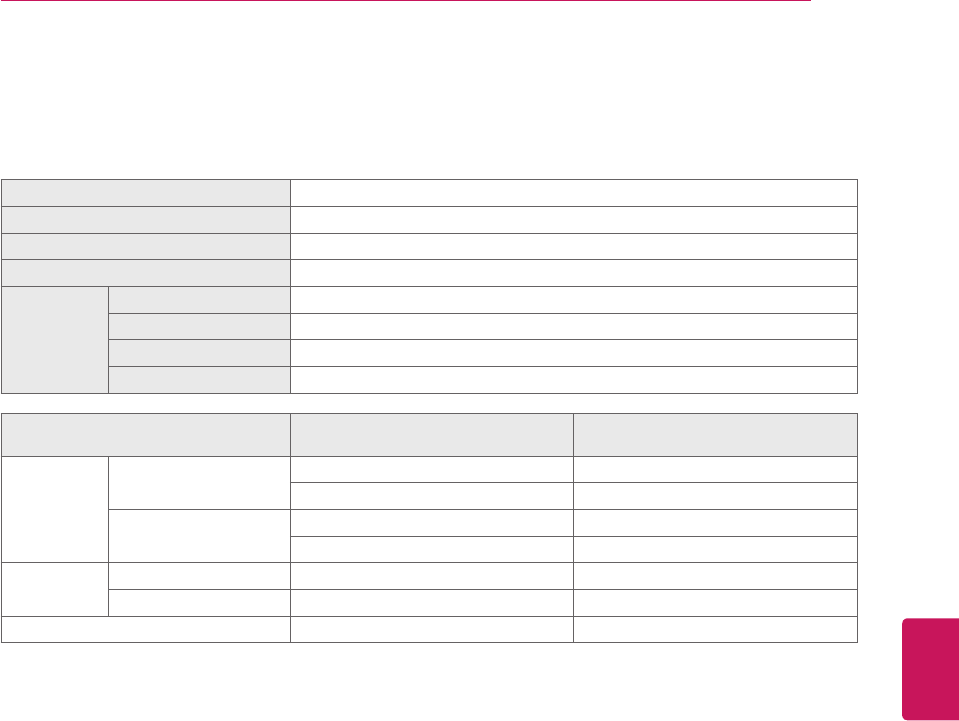
SPECIFICATIONS
Product specifications may be changed without prior notice due to upgrade of product functions.
Power requirement AC 100 - 240 V ~ 50 / 60 Hz
Television System NTSC-M, ATSC, 64 & 256 QAM
Program Coverage VHF 2-13, UHF 14-69, CATV 1-135, DTV 2-69, CADTV 1-135
External Antenna Impedance 75 Ω
Environment
condition
Operating Temperature 0 °C ~ 40 °C (32 °F ~ 104 °F)
Operating Humidity Less than 80 %
Storage Temperature -20 °C ~ 60 °C (-4 °F ~ 140 °F)
Storage Humidity Less than 85 %
MODELS 42LN5390
(42LN5390-UN)
47LN5390
(47LN5390-UN)
Dimensions
(W x H x D)
With stand 968 x 670.5 x 251.8 (mm) 1080 x TBD x TBD (mm)
38.1 x 26.3 x 9.9 (inches) 42.5 x TBD x TBD (inches)
Without stand 968 x 579 x 79 (mm) 1080 x 642 x 80.5 (mm)
38.1 x 22.7 x 3.1 (inches) 42.5 x 25.2 x 3.1 (inches)
Weight With stand 12.6 kg (15.4 lbs) TBD kg (TBD lbs)
Without stand 9.3 kg (14.1 lbs) TBD kg (TBD lbs)
Current Value / Power consumption TBD A / TBD W TBD A / TBD W
ENGLISH
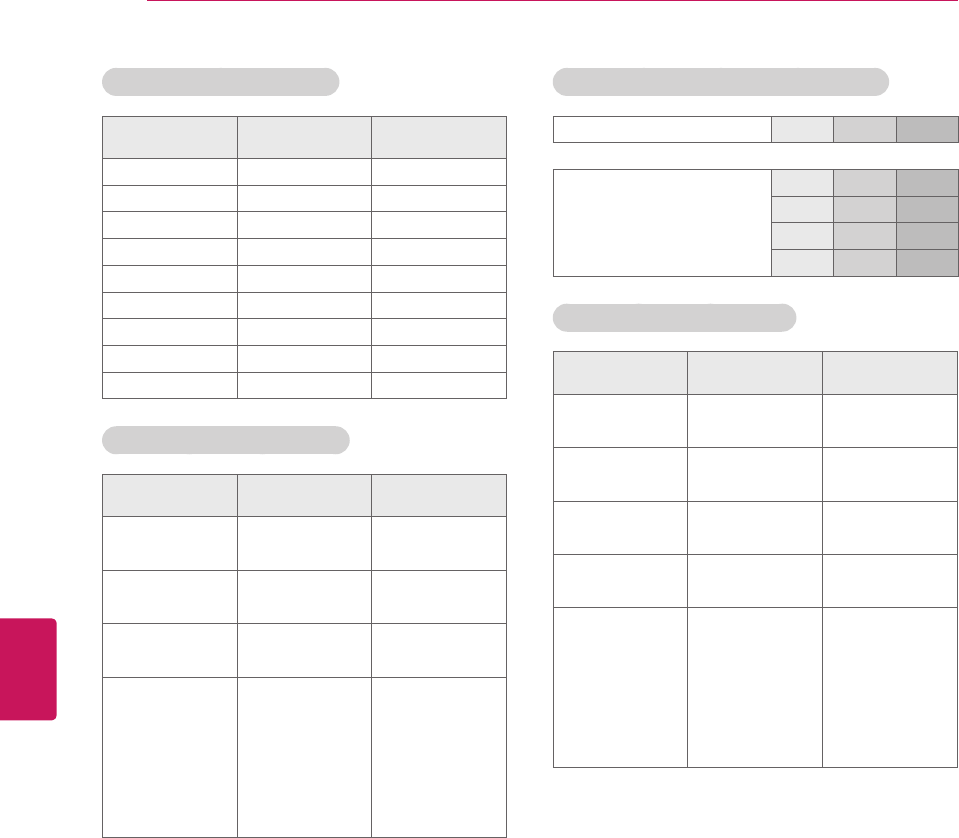
26 SPECIFICATIONS
HDMI (PC) supported mode
Resolution Horizontal
Frequency (kHz)
Vertical
Frequency (Hz)
640 x 350 31.468 70.09
720 x 400 31.469 70.08
640 x 480 31.469 59.94
800 x 600 37.879 60.31
1024 x 768 48.363 60.00
1360 x 768 47.712 60.015
1152 x 864 54.348 60.053
1280 x 1024 63.981 60.02
1920 x 1080 67.50 60.00
HDMI (DTV) supported mode
Resolution Horizontal
Frequency (kHz)
Vertical
Frequency (Hz)
720 x 480p 31.47 59.94
31.50 60.00
1280 x 720p 44.96 59.94
45.00 60.00
1920 x 1080i 33.72 59.94
33.75 60.00
1920 x 1080p
26.97 23.976
27.00 24.00
33.71 29.97
33.75 30.00
67.432 59.94
67.50 60.00
Component port connecting information
Component ports on the TV Y PBPR
Video output ports
on DVD player
Y PBPR
Y B-Y R-Y
Y Cb Cr
Y Pb Pr
Component supported mode
Resolution Horizontal
Frequency (kHz)
Vertical
Frequency (Hz)
720 x 480i 15.73 59.94
15.73 60.00
720 x 480p 31.47 59.94
31.50 60.00
1280 x 720p 44.96 59.94
45.00 60.00
1920 x 1080i 33.72 59.94
33.75 60.00
1920 x 1080p
26.97 23.94
27.00 24.00
33.71 29.97
33.75 30.00
67.432 59.94
67.50 60.00
ENGLISH
27
TROUBLESHOOTING
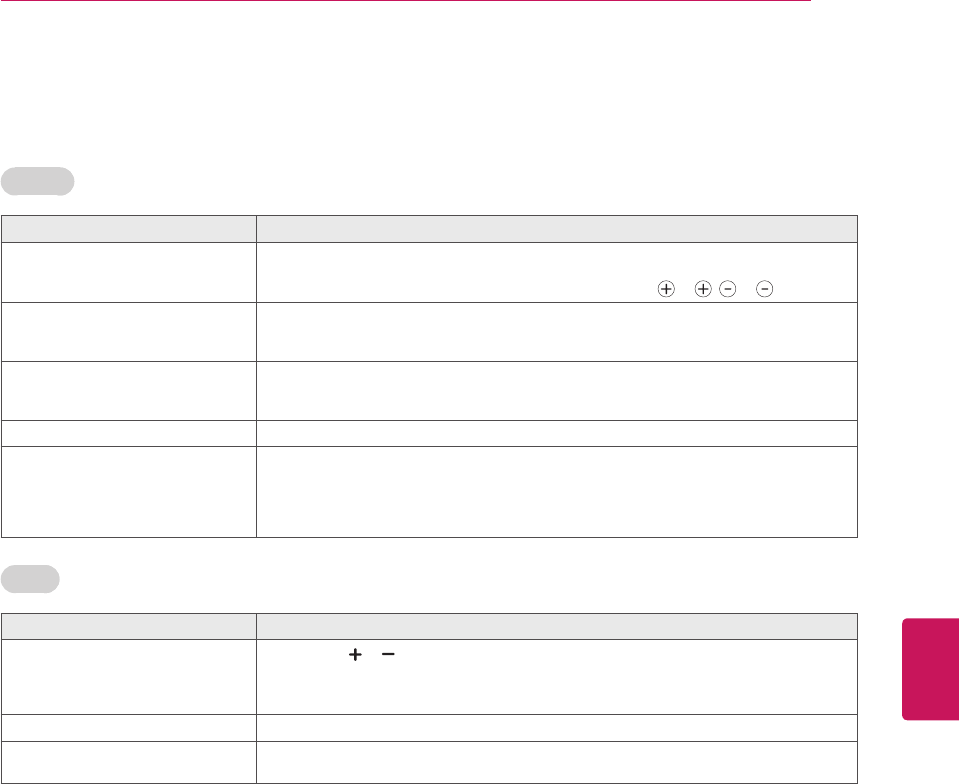
TROUBLESHOOTING
General
Problem Solution
Cannot control the TV with the remote
control.
Check the remote control sensor on the product and try again.
Check if there is any obstacle between the product and the remote control.
Check if the batteries are still working and properly installed ( to , to ).
No image display and no sound is
produced.
Check if the product is turned on.
Check if the power cord is connected to a wall outlet.
Check if there is a problem in the wall outlet by connecting other products.
Image appears slowly when the TV
turns on.
The image is muted during the product startup process. This is normal. If the image does
not appear in a few minutes, unplug the TV for 30 seconds and try again. If the image still
does not appear, contact the authorized service center in your local area.
Cannot connect external devices. Refer to the Connection Overview and connect an external device.
The TV turns off suddenly. Check the power control settings. The power supply may be interrupted.
Check if the Auto sleep feature is activated in the Time settings.
Refer to the Sleep Timer.
If there is no signal while the TV is on, the TV will turn off automatically after 15 minutes of
inactivity. (Depending on model)
Audio
Problem Solution
No sound is produced while images
are displaying.
Press VOL or button.
Check if the sound is muted by pressing MUTE.
Scroll to other channels. There may a problem with the broadcast.
Check if the TV Speaker feature is activated in the menu option.
No output from one of the speakers Adjust Balance in the menu option.
Unusual sound from inside the TV is
produced.
A change in ambient humidity or temperature may result in an unusual noise when the
product turns on or off. There is no problem with your product.

ENGLISH
28 TROUBLESHOOTING / EXTERNAL CONTROL DEVICE SETUP
Video
Problem Solution
An image displays in black and white or
the color quality is poor.
Adjust the color setting in the menu option.
Keep a sufficient distance between this product and other electronic products.
Scroll to other channels. There may a problem with the broadcast.
Horizontal or vertical bars appears or
images blur
Check if there are local interferences such as an electrical appliance or power tool.
Lines or streaks appear on images Check the antenna or aim the antenna to the proper direction.
Afterimages (ghosts) appear when the
product turns off
Pixels may have been damaged from a fixed image displayed for a long time (image burn).
Use a screen saver to prevent the pixel damage on the screen.
The power is on but the screen appears
extremely dark.
Adjust the brightness and contrast in the menu option.
“No Signal” appears on the screen. Check if the signal cable is connected between the TV and products properly.
Check the selected input source by pressing INPUT.
Black spots appear on the screen. Several pixels in red, green, white, or black may appear on the screen that can attribute to
the characteristics of the panel.
This is normal.
The display offset is wrong. Adjust the position setting in the Picture menu.
Check if the video card resolution and frequency are supported by the product. If the
frequency is out of range, set to the recommended resolution using the display settings on
the external device.
Thin lines appear in the background of
the screen.
Check the video cable connections.
The reception on some channels is
poor
Scroll to other channels. There may a problem with the broadcast.
The station signal may be weak. Aim the antenna to the proper direction.
Check if there is local interferences such as an electrical appliance or power tool.
EXTERNAL CONTROL dEVICE SETUP
To obtain the external control device setup information, please visit www.lg.com.
Congratulations on your purchase! As you enjoy your new product,
please keep these safety tips in mind:
THE ISSUE
• The home theater entertainment experience is a growing trend and
larger flat panel displays are popular purchases. However, flat panel
displays are not always supported on the proper stands or installed
according to the manufacturer’s recommendations.
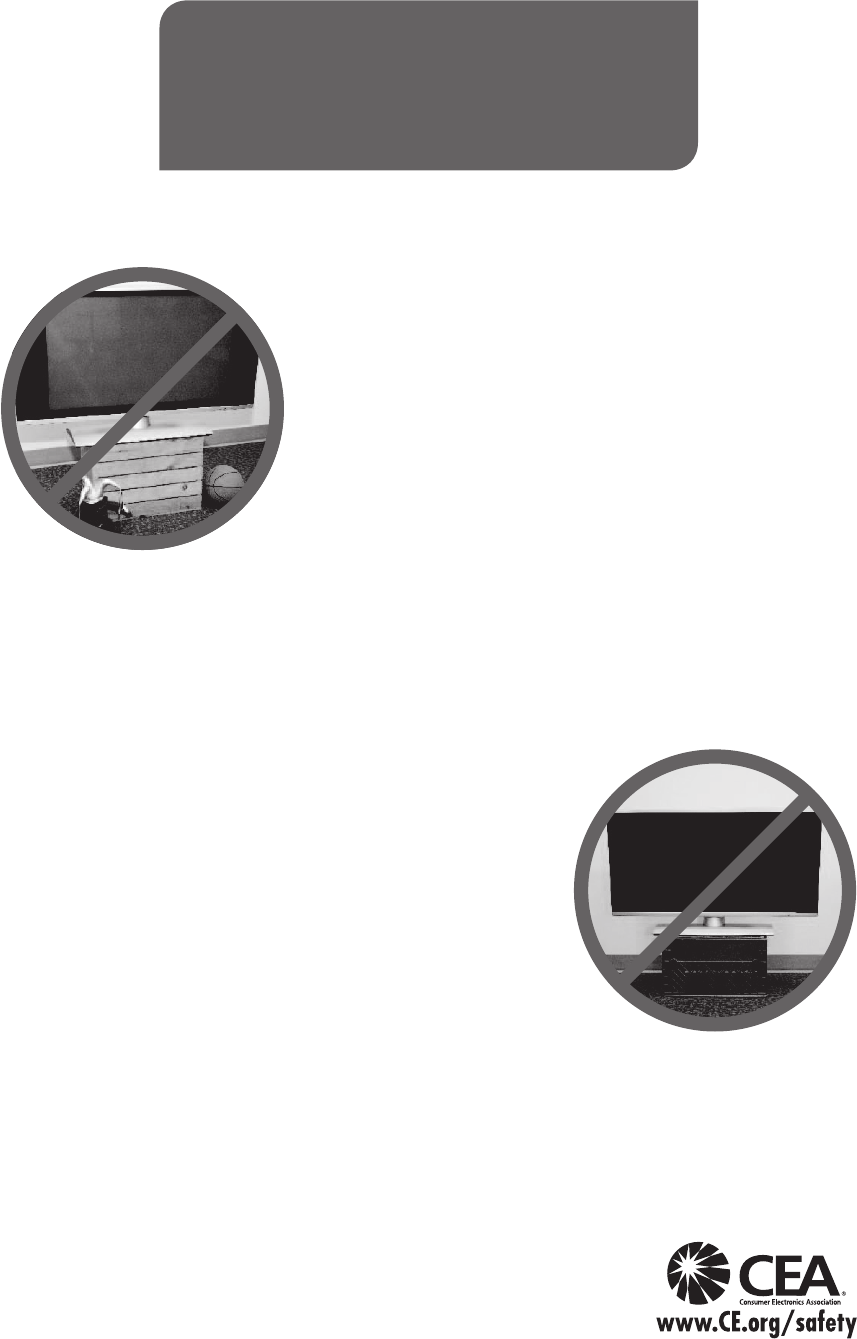
• Flat panel displays that are inappropriately situated on dressers,
bookcases, shelves, desks, speakers, chests or carts may fall over
and cause injury.
THIS MANUFACURER CARES!
• The consumer electronics industry is committed to making home
entertainment enjoyable and safe.
TUNE INTO SAFETY
• One size does NOT fit all. Follow the manufacturer’s
recommendations for the safe installation and use of your flat panel
display.
• Carefully read and understand all enclosed instructions for proper
use of this product.
• Don’t allow children to climb on or play with furniture and television
sets.
• Don’t allow place flat panel displays on furniture that can easily be
used as steps, such as a chest of drawers.
• Remember that children can become excited while watching a
program, especially on a “larger than life” flat panel display.
Care should be taken to place or install the display where it cannot
be pushed, pulled over, or knocked down.
• Care should be taken to route all cords and cables connected to the
flat panel display so that they cannot be pulled or grabbed by curious
children.
WALL MOUNTING: IF YOU DECIDE TO WALL
MOUNT YOUR FLAT PANEL DISPLAY, ALWAYS:
• Use a mount that has been recommended by the display
manufacturer and/or listed by an independent laboratory
(such as UL, CSA, ETL).
• Follow all instructions supplied by the display and wall mount
manufacturers.
• If you have any doubts about your ability to safely install your flat
panel display, contact your retailer about professional installation.
• Make sure that the wall where you are mounting the display is
appropriate. Some wall mounts are not designed to be mounted to
walls with steel studs or old cinder block construction.
If you are unsure, contact a professional installer.
• A minimum of two people are required for installation.
Flat panel displays can be heavy.
CHILD SAFETY:
It Makes A Difference How and Where
You Use Your Flat Panel Display
LG Customer Information Center
For inquires or comments, visit www.lg.com or call;
1-800-243-0000 USA, Consumer User
1-888-865-3026 USA, Commercial User
1-888-542-2623 CANADA
Register your product Online!
www.lg.com
This product qualifies for ENERGY STAR in the
factory default (Home Use) setting.
Changing the factory default settings or enabling
other features may increase power consumption
that could exceed the limits necessary to quality
for ENERGY STAR.
The model and serial numbers of the TV are
located on the back and one side of the TV.
Record them below should you ever need service.
MODEL
SERIAL
The extended owner’s manuals that contain
information on the advanced features of this LG
TV are located on the CD-ROM provided in an
electronic version.
To read these files, you will need to use a personal
computer (PC) equipped with a CD-ROM drive.