LG Electronics USA 47SL90UA LCD TV MONITOR User Manual User s Manual G
LG Electronics USA LCD TV MONITOR User s Manual G
Users Manual

Order Number : GETEC-C1-09-171 FCC Class B Certification
Test Report Number : GETEC-E3-09-090 Page 1 / 1
EUT Type: LCD TV/ Monitor
FCC ID.: BEJ47SL90UA
APPENDIX G
: USER’S MANUAL

Please read this manual carefully before operating
your set and retain it for future reference.
The model and serial number of the TV is located
on the back and one side of the TV.
Record it below should you ever need service.
LED LCD TV
OWNER’S MANUAL
42LH90
47LH90
55LH90
P/NO : SAC33601910 (0907-REV00)
www.lgusa.com / www.lg.ca
This product qualifies for ENERGY STAR in the “factory
default (Home Use)” setting.
Changing the factory default settings or enabling other fea-
tures may increase power consumption that could exceed the
limits necessary to qualify for ENERGY STAR.
Model:
Serial:
1-800-243-0000 USA, Consumer User
1-888-865-3026 USA, Commercial User
1-888-542-2623 CANADA
LG Customer Information Center
42SL80
47SL80
55SL80
42SL90
47SL90
LCD TV
OWNER’S MANUAL
2
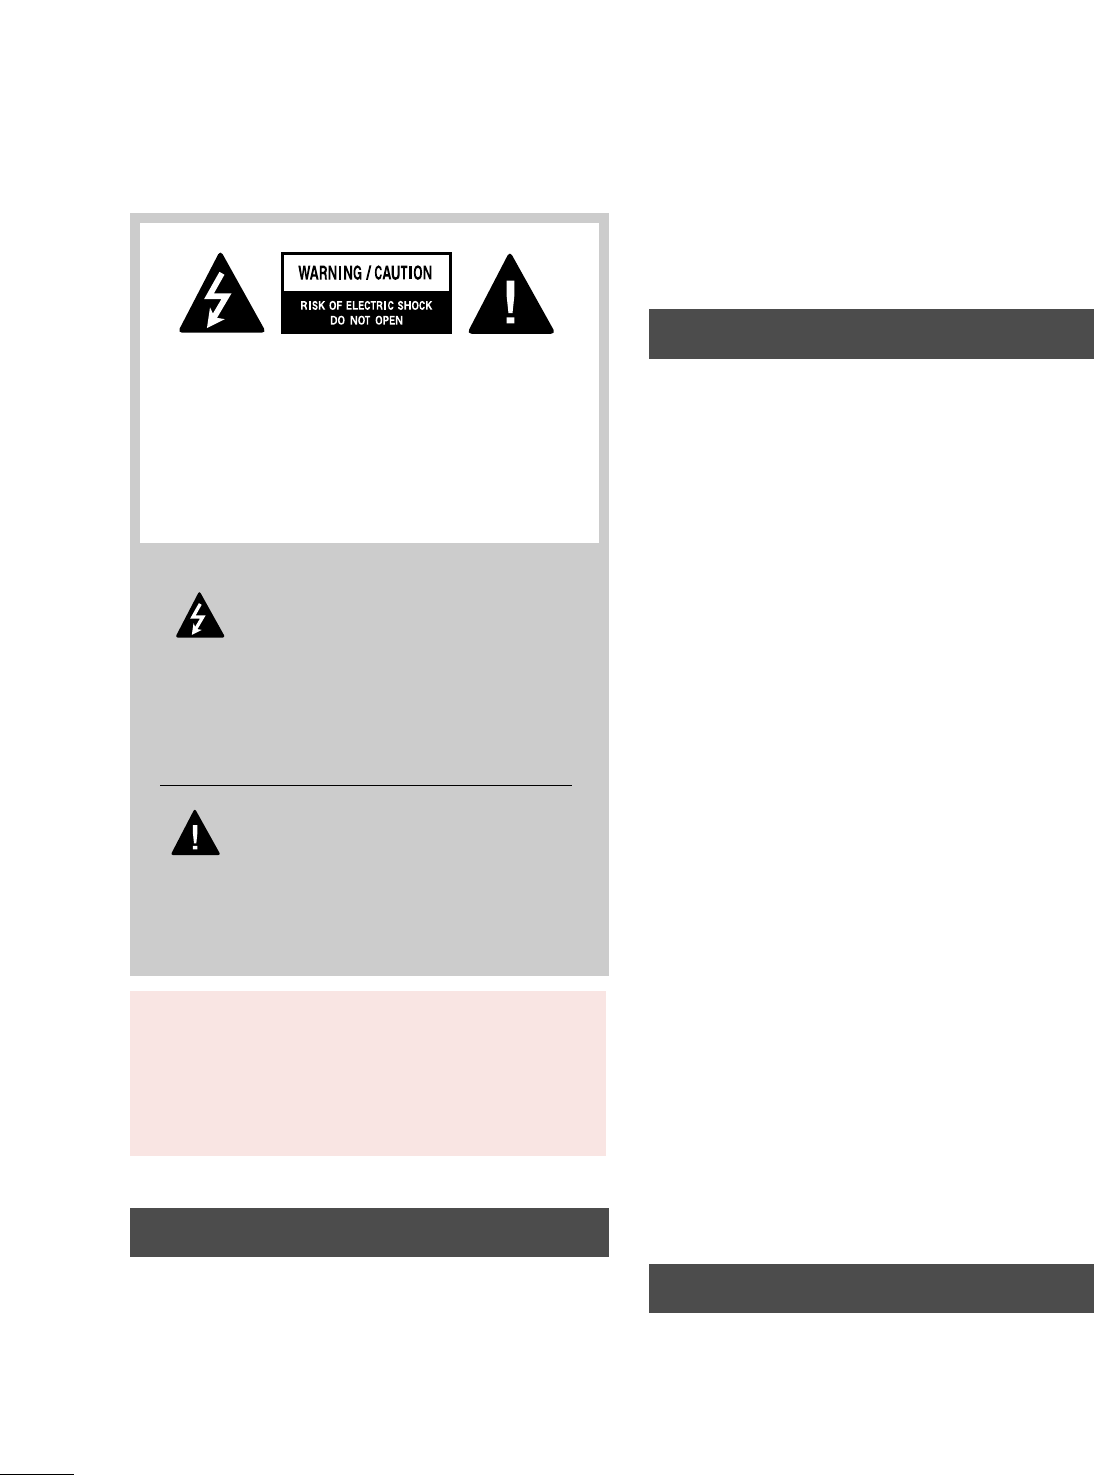
WARNING / CAUTION
The lightning flash with arrowhead
symbol, within an equilateral triangle, is
intended to alert the user to the presence
of uninsulated “dangerous voltage” within the
product’s enclosure that may be of sufficient
magnitude to constitute a risk of electric shock to
persons.
The exclamation point within an equilateral
triangle is intended to alert the user to
the presence of important operating and
maintenance (servicing) instructions in the litera-
ture accompanying the appliance.
TO REDUCE THE RISK OF ELECTRIC SHOCK
DO NOT REMOVE COVER (OR BACK). NO
USER SERVICEABLE PARTS INSIDE. REFER TO
QUALIFIED SERVICE PERSONNEL.
WARNING/CAUTION
TO REDUCE THE RISK OF FIRE AND ELECTRIC
SHOCK, DO NOT EXPOSE THIS PRODUCT TO
RAIN OR MOISTURE.
NOTE TO CABLE/TV INSTALLER
This reminder is provided to call the CATV system
installer’s attention to Article 820-40 of the National
Electric Code (U.S.A.). The code provides guidelines for
proper grounding and, in particular, specifies that the
cable ground shall be connected to the grounding system
of the building, as close to the point of the cable entry
as practical.
WARNING / CAUTION
To prevent fire or shock hazards, do not expose
this product to rain or moisture.
FCC NOTICE
Class B digital device
This equipment has been tested and found to comply
with the limits for a Class B digital device, pursuant to
Part 15 of the FCC Rules. These limits are designed
to provide reasonable protection against harmful
interference in a residential installation. This equipment
generates, uses and can radiate radio frequency energy
and, if not installed and used in accordance with the
instructions, may cause harmful interference to radio
communications. However, there is no guarantee that
interference will not occur in a particular installation.
If this equipment does cause harmful interference to
radio or television reception, which can be determined
by turning the equipment off and on, the user is
encouraged to try to correct the interference by one
or more of the following measures:
- Reorient or relocate the receiving antenna.
- Increase the separation between the equipment and
receiver.
- Connect the equipment to an outlet on a circuit
different from that to which the receiver is connected.
- Consult the dealer or an experienced radio/TV
technician for help.
This device complies with part 15 of the FCC Rules.
Operation is subject to the following two condi-
tions: (1) This device may not cause (harmful)
interference, and (2) this device must accept any
interference received, including interference that
may cause undesired operation (of the device).
Any changes or modifications not expressly approved
by the party responsible for compliance could void
the user’s authority to operate the equipment.
CAUTION
Do not attempt to modify this product in any way
without written authorization from LG Electronics.
Unauthorized modification could void the user’s
authority to operate this product
3
IMPORTANT SAFETY INSTRUCTIONS
SAFETY INSTRUCTIONS
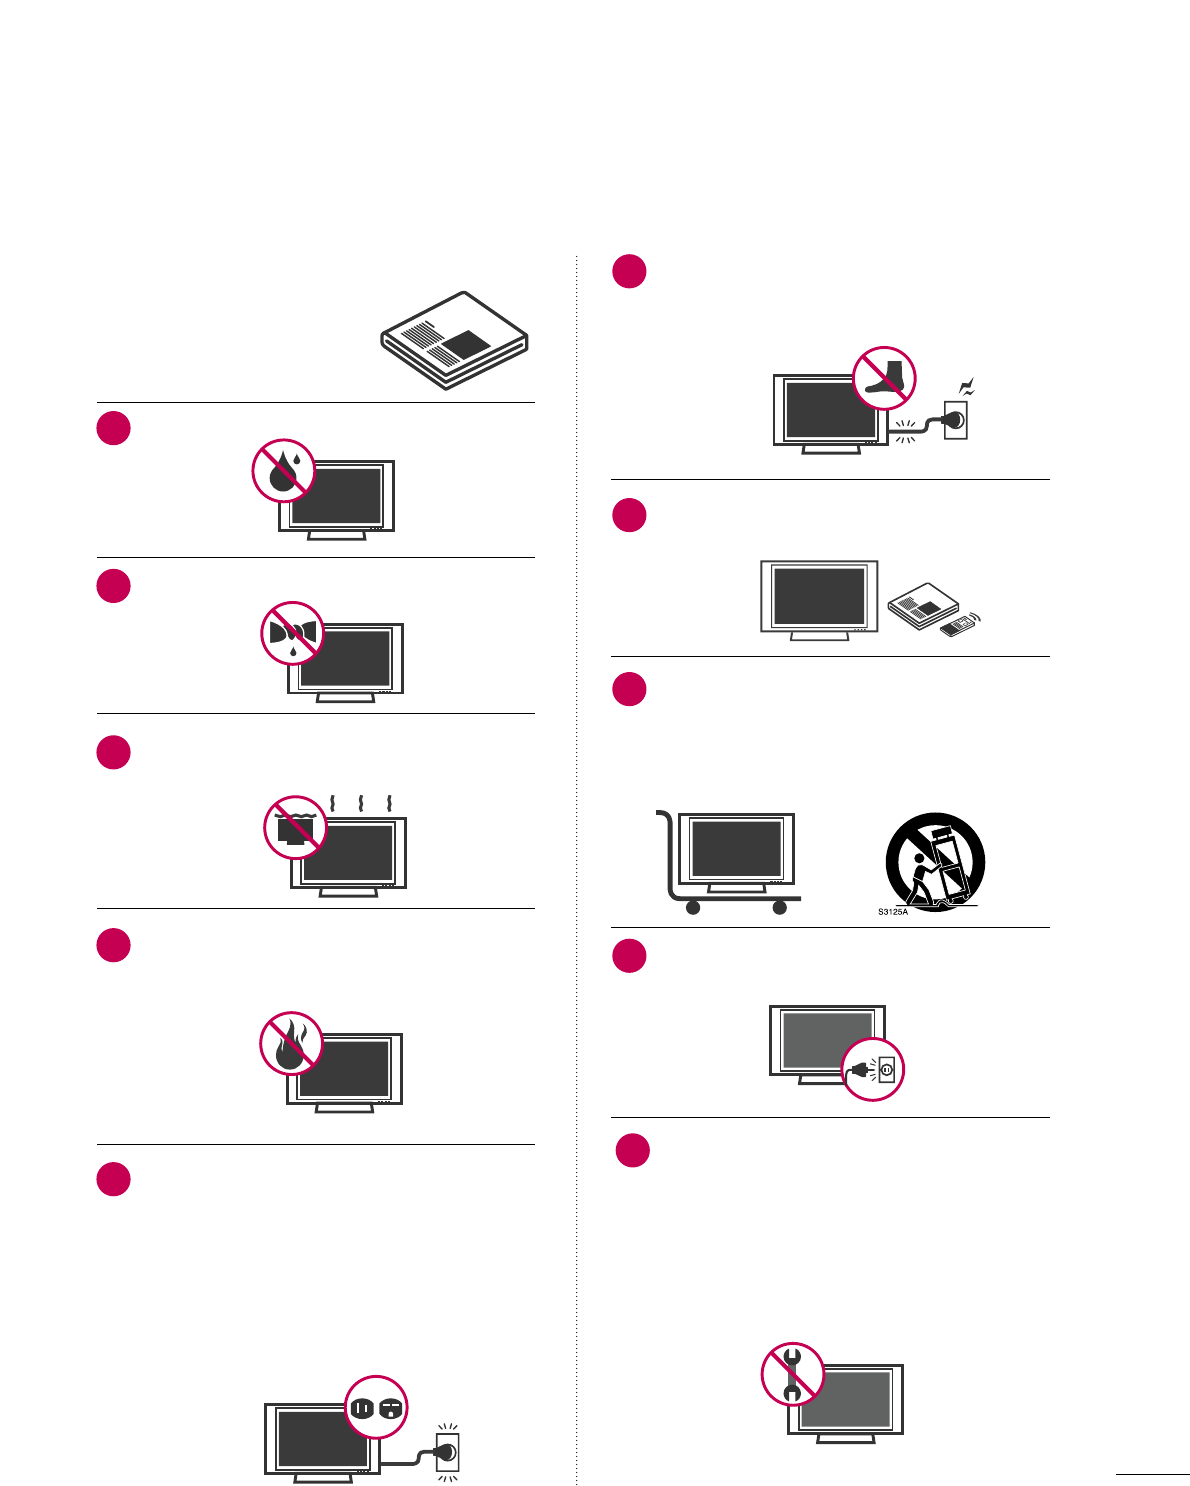
Read these instructions.
Keep these instructions.
Heed all warnings.
Follow all instructions.
Do not use this apparatus near water.
Clean only with dry cloth.
Do not block any ventilation openings. Install in
accordance with the manufacturer’s instructions.
Do not install near any heat sources such as
radiators, heat registers, stoves, or other
apparatus (including amplifiers) that produce
heat.
Do not defeat the safety purpose of the polarized
or grounding-type plug. A polarized plug has
two blades with one wider than the other. A
grounding type plug has two blades and a
third grounding prong, The wide blade or the
third prong are provided for your safety. If the
provided plug does not fit into your outlet,
consult an electrician for replacement of the
obsolete outlet.
Protect the power cord from being walked on
or pinched particularly at plugs, convenience
receptacles, and the point where they exit from
the apparatus.
Only use attachments/accessories specified by
the manufacturer.
Use only with the cart, stand, tripod, bracket,
or table specified by the manufacturer, or sold
with the apparatus. When a cart is used, use
caution when moving the cart/apparatus com-
bination to avoid injury from tip-over.
Unplug this apparatus during lighting storms
or when unused for long periods of time.
Refer all servicing to qualified service personnel.
Servicing is required when the apparatus has
been damaged in any way, such as power-
supply cord or plug is damaged, liquid has
been spilled or objects have fallen into the
apparatus, the apparatus has been exposed to
rain or moisture, does not operate normally, or
has been dropped.
1
2
3
4
5
7
8
6
9
10
4
SAFETY INSTRUCTIONS
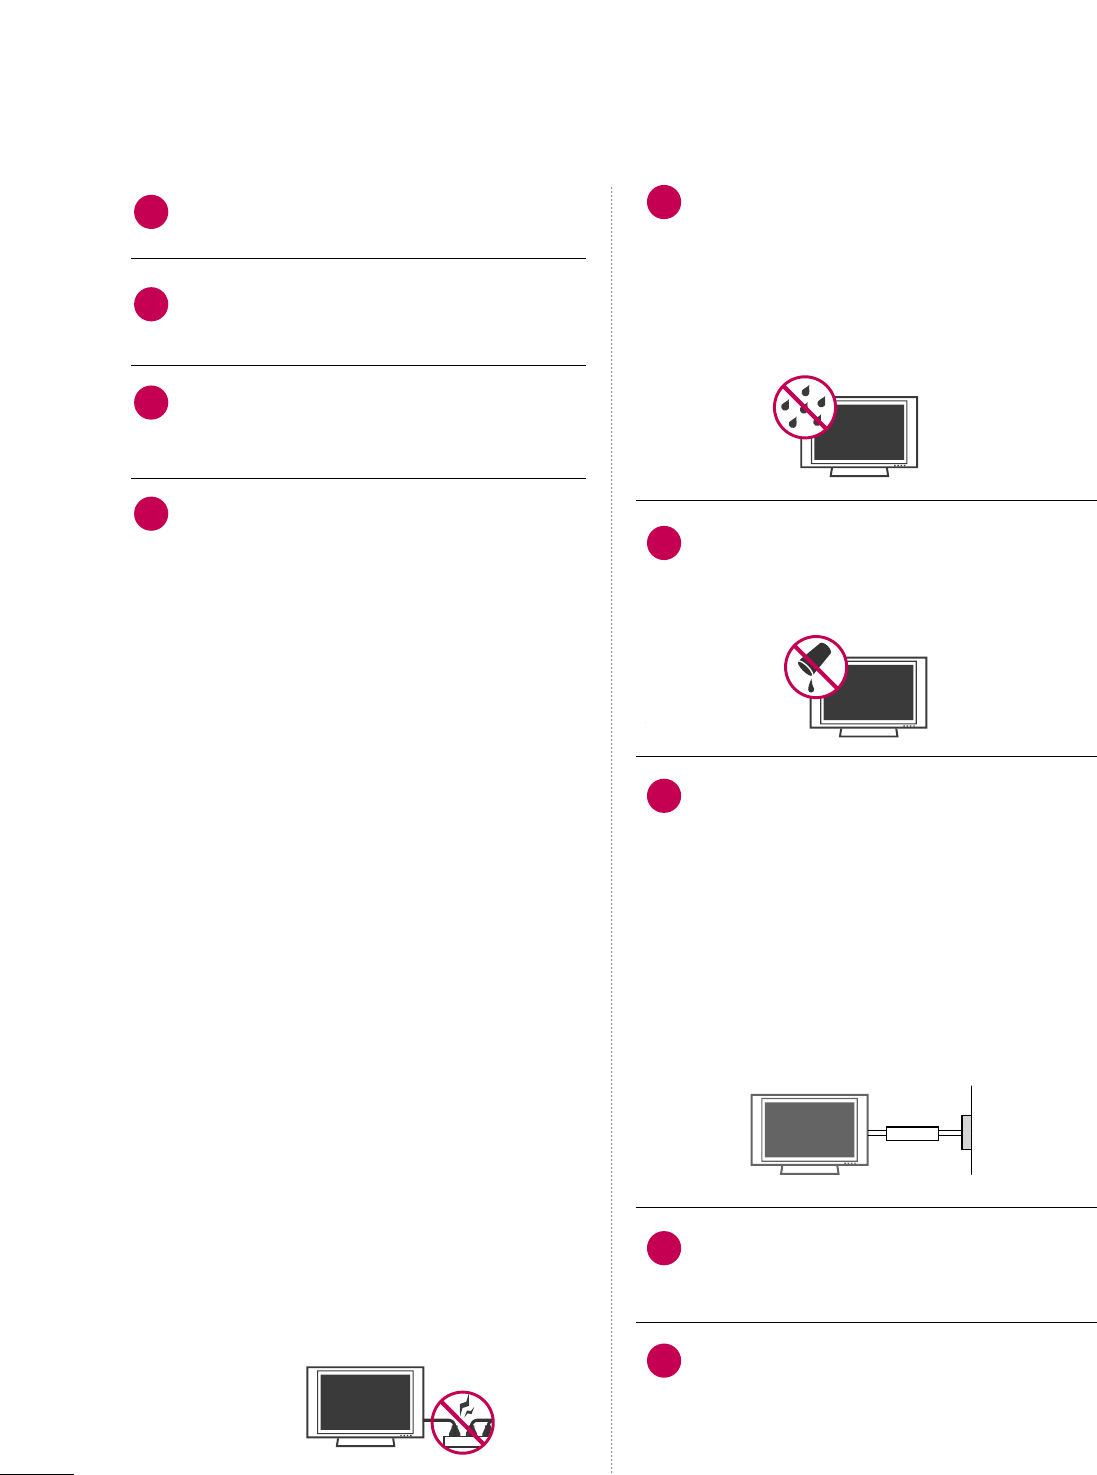
Never touch this apparatus or antenna during
a thunder or lighting storm.
When mounting a TV on the wall, make sure
not to install the TV by the hanging power and
signal cables on the back of the TV.
Do not allow an impact shock or any objects to
fall into the product, and do not drop onto the
screen with something.
CAUTION concerning the Power Cord:
It is recommend that appliances be placed
upon a dedicated circuit; that is, a single
outlet circuit which powers only that appliance
and has no additional outlets or branch
circuits. Check the specification page of this
owner's manual to be certain.
Do not connect too many appliances to the
same AC power outlet as this could result in
fire or electric shock.
Do not overload wall outlets. Overloaded wall
outlets, loose or damaged wall outlets, extension
cords, frayed power cords, or damaged or
cracked wire insulation are dangerous. Any of
these conditions could result in electric shock
or fire. Periodically examine the cord of your
appliance, and if its appearance indicates damage
or deterioration, unplug it, discontinue use of
the appliance, and have the cord replaced with
an exact replacement part by an authorized
servicer. Protect the power cord from physical
or mechanical abuse, such as being twisted,
kinked, pinched, closed in a door, or walked
upon. Pay particular attention to plugs, wall
outlets, and the point where the cord exits the
appliance.
Do not make the TV with the power cord
plugged in. Do not use a damaged or loose
power cord. Be sure do grasp the plug when
unplugging the power cord. Do not pull on the
power cord to unplug the TV.
WARNING - To reduce the risk of fire or electrical
shock, do not expose this product to rain,
moisture or other liquids. Do not touch the TV
with wet hands. Do not install this product
near flammable objects such as gasoline or
candles or expose the TV to direct air
conditioning.
Do not expose to dripping or splashing and do
not place objects filled with liquids, such as
vases, cups, etc. on or over the apparatus (e.g.
on shelves above the unit).
GGRROOUUNNDDIINNGG
Ensure that you connect the earth ground wire
to prevent possible electric shock (i.e. a TV
with a three-prong grounded AC plug must be
connected to a three-prong grounded AC out-
let). If grounding methods are not possible,
have a qualified electrician install a separate
circuit breaker.
Do not try to ground the unit by connecting it
to telephone wires, lightening rods, or gas
pipes.
DDIISSCCOONNNNEECCTTIINNGG DDEEVVIICCEE FFRROOMM MMAAIINNSS
Mains plug is the disconnecting device. The
plug must remain readily operable.
As long as this unit is connected to the AC wall
outlet, it is not disconnected from the AC
power source even if you turn off this unit by
SWITCH.
12
11
14
13
16
17
18
19
Power
Supply
Short-circuit
Breaker
15
5
AANNTTEENNNNAASS
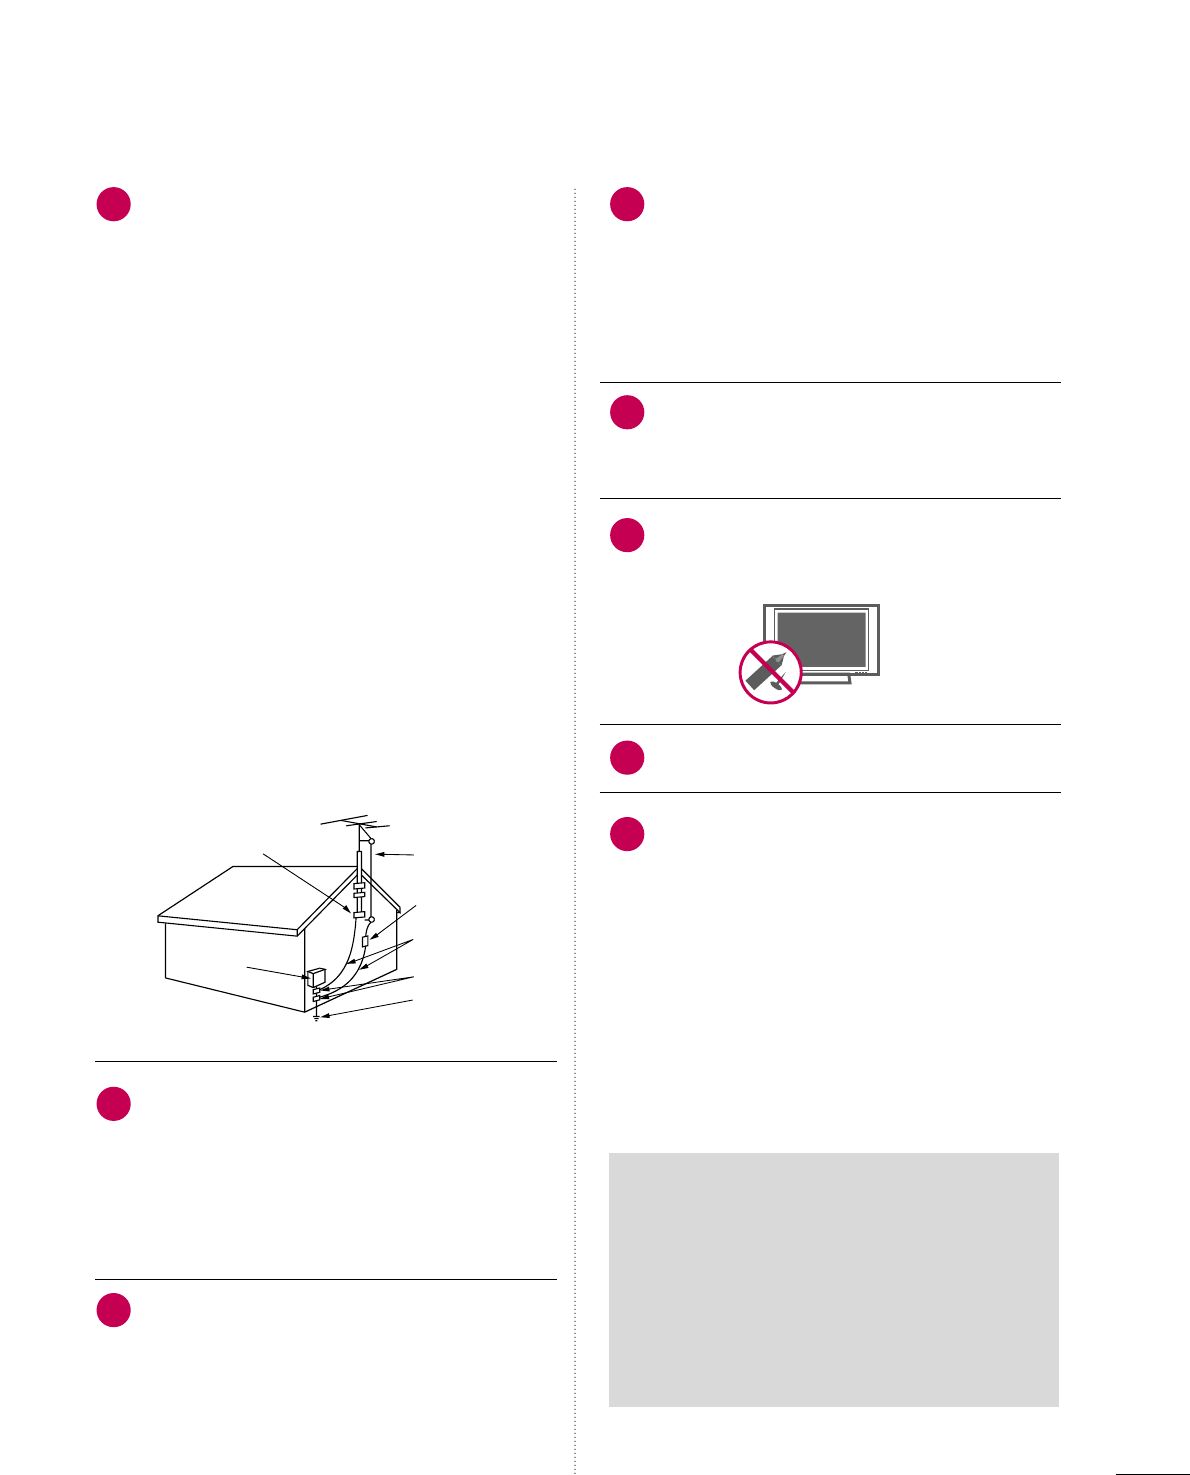
OOuuttddoooorr aanntteennnnaa ggrroouunnddiinngg
If an outdoor antenna is installed, follow the
precautions below. An outdoor antenna system
should not be located in the vicinity of over-
head power lines or other electric light or
power circuits, or where it can come in contact
with such power lines or circuits as death or
serious injury can occur.
Be sure the antenna system is grounded so as
to provide some protection against voltage
surges and built-up static charges.
Section 810 of the National Electrical Code
(NEC) in the U.S.A. provides information with
respect to proper grounding of the mast and
supporting structure, grounding of the lead-in
wire to an antenna discharge unit, size of
grounding conductors, location of antenna dis-
charge unit, connection to grounding elec-
trodes and requirements for the grounding
electrode.
AAnntteennnnaa ggrroouunnddiinngg aaccccoorrddiinngg ttoo tthhee
NNaattiioonnaall EElleeccttrriiccaall CCooddee,, AANNSSII//NNFFPPAA 7700
CClleeaanniinngg
When cleaning, unplug the power cord and
scrub gently with a soft cloth to prevent
scratching. Do not spray water or other liquids
directly on the TV as electric shock may occur.
Do not clean with chemicals such as alcohol,
thinners or benzene.
MMoovviinngg
Make sure the product is turned off,
unplugged and all cables have been removed. It
may take 2 or more people to carry larger TVs.
Do not press against or put stress on the front
panel of the TV.
VVeennttiillaattiioonn
Install your TV where there is proper ventila-
tion. Do not install in a confined space such as
a bookcase. Do not cover the product with
cloth or other materials (e.g.) plastic while
plugged in. Do not install in excessively dusty
places.
If you smell smoke or other odors coming from
the TV or hear strange sounds, unplug the power
cord contact an authorized service center.
Do not press strongly upon the panel with
hand or sharp object such as nail, pencil or
pen, or make a scratch on it.
Keep the product away from direct sunlight.
If the TV feels cold to the touch, there may be
a small “flicker” when it is turned on. This is
normal, there is nothing wrong with TV.
Some minute dot defects may be visible on the
screen, appearing as tiny red, green, or blue
spots. However, they have no adverse effect on
the monitor's performance.
Avoid touching the LCD screen or holding your
finger(s) against it for long periods of time.
Doing so may produce some temporary dis-
tortion effects on the screen.
20 23
24
25
26
27
21
22
Antenna Lead in Wire
Antenna Discharge Unit
(NEC Section 810-20)
Grounding Conductor
(NEC Section 810-21)
Ground Clamps
Power Service Grounding
Electrode System (NEC
Art 250, Part H)
Ground Clamp
Electric Service
Equipment
NEC: National Electrical Code
ON DISPOSAL
(Only Hg lamp used LCD TV)
The fluorescent lamp used in this product contains
a small amount of mercury. Do not dispose of
this product with general household waste.
Disposal of this product must be carried out in
accordance to the regulations of your local authority.
PREPARATION
9
ACCESSORIES
PREPARATION
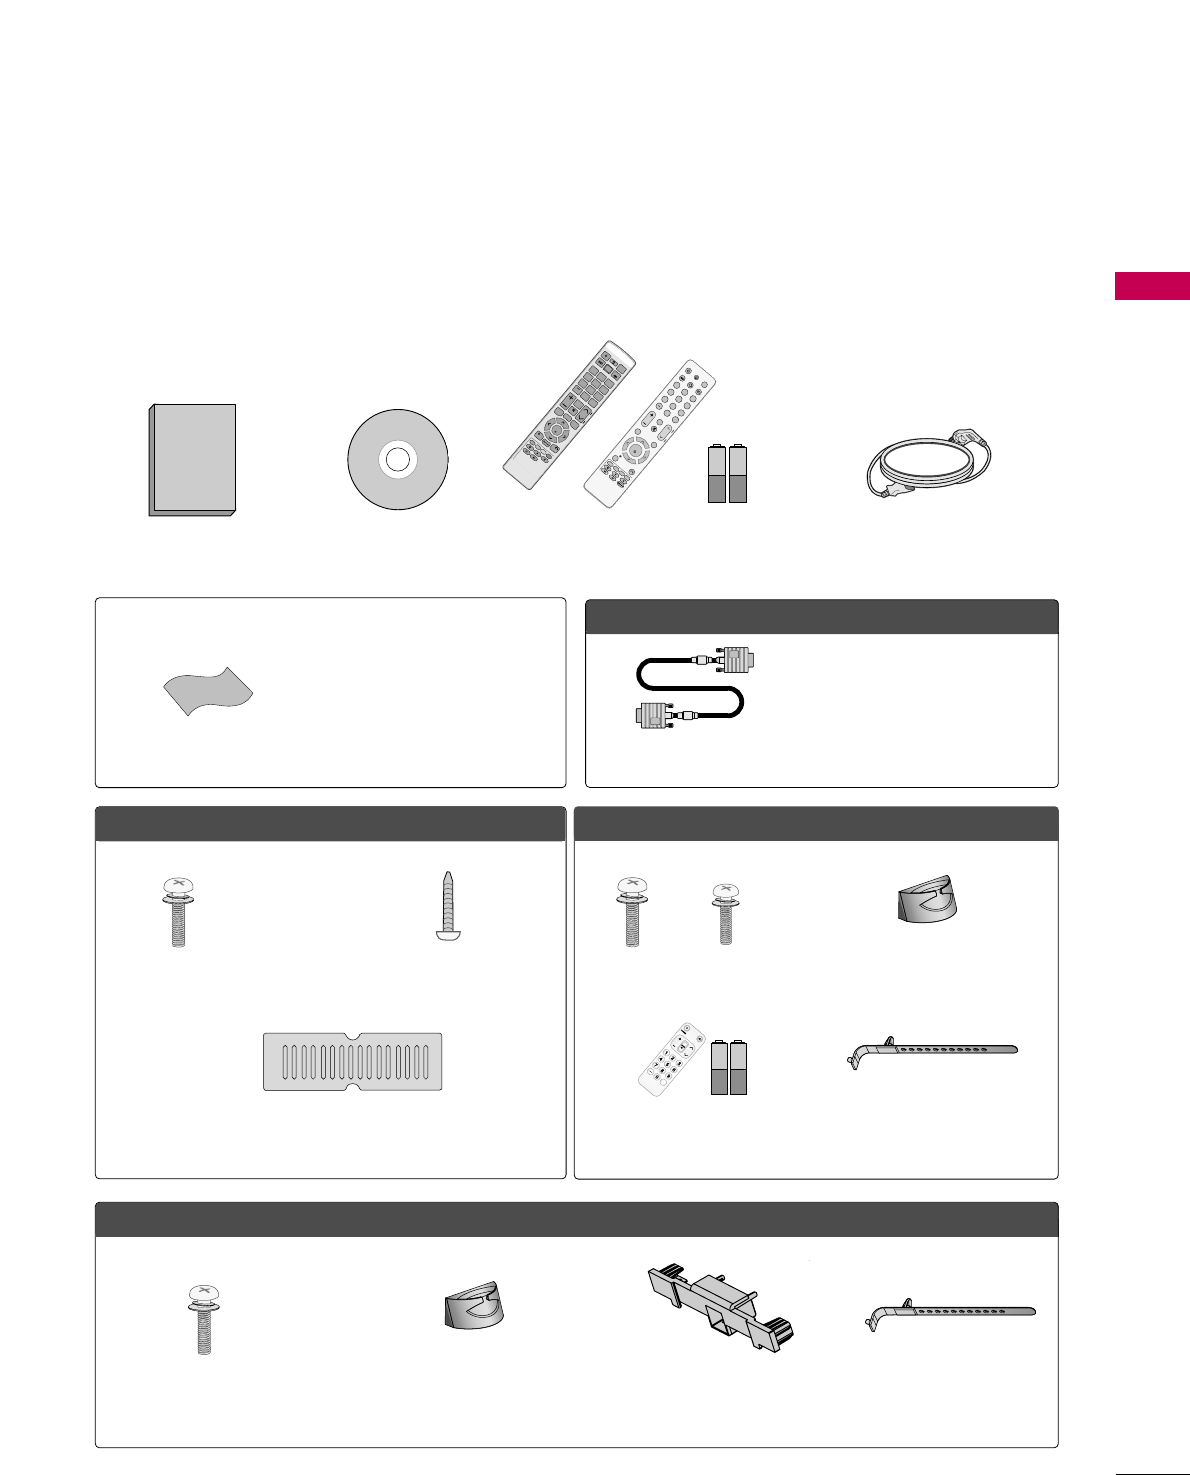
Ensure that the following accessories are included with your TV. If an accessory is missing, please contact the
dealer where you purchased the TV.
The accessories included may differ from the images below.
Owner’s Manual Power Cord
CD Manual
OOppttiioonn EExxttrraass
* Wipe spots on the exterior only with
the polishing cloth.
* Do not wipe roughly. Excessive pres-
sure may cause scratches or discol-
oration.
Polishing Cloth
Not included with all models
D-sub 15 pin Cable
When using the VGA (D-sub 15 pin
cable) PC connection, the user
must use shielded signal interface
cables with ferrite cores to maintain
standards compliance.
OOnnllyy 4422//4477//5555LLHH9900
1.5V 1.5V
Remote Control, Batteries
FAV
MUTE
Q. MENU
MENU
AV MODE
RETURN
VOL CH
123
456
78
0
9
FLASHBK
P
A
G
E
INPUT
INFO
LIST
ENTER
POWER
TV
ENERGY SAVING
ON/OFF
MARK
Protection Cover
Screws for stand assembly
(Refer to P.14)
Screw for stand fixing
(Refer to P.21)
x 4
(For 42/47LH90)
(For 42LH90)
OOnnllyy 4422//4477SSLL9900
Bolts for stand assembly
(Refer to P.16)
Cable Management Clip
(Refer to P.19)
Cable Holder
(Refer to P.19)
x 1
OOnnllyy 4422//4477//5555SSLL8800
Bolts for stand assembly
(Refer to P.15)
Cable Management Clip
(Refer to P.18)
Protection Cover
(Refer to P.15)
x 8
(Except 55SL80)
Cable Holder
(Refer to P.18)
Simple Remote Control,
Batteries
1.5V 1.5V
CH
VOL
FLASHBACK
TV/INPUT
x 3 x 4
POWER
AV
MODE
ENERGY SAVING
P
A
G
E
CHVOL
FAV
MARK/
MUTE
ON/OFF
123
45
0
6
789
LIST
FLASHBACK
INPUT
MENURATIO
Q.MENU
RETURN
INFO
ENTER
TV
or
PREPARATION
10
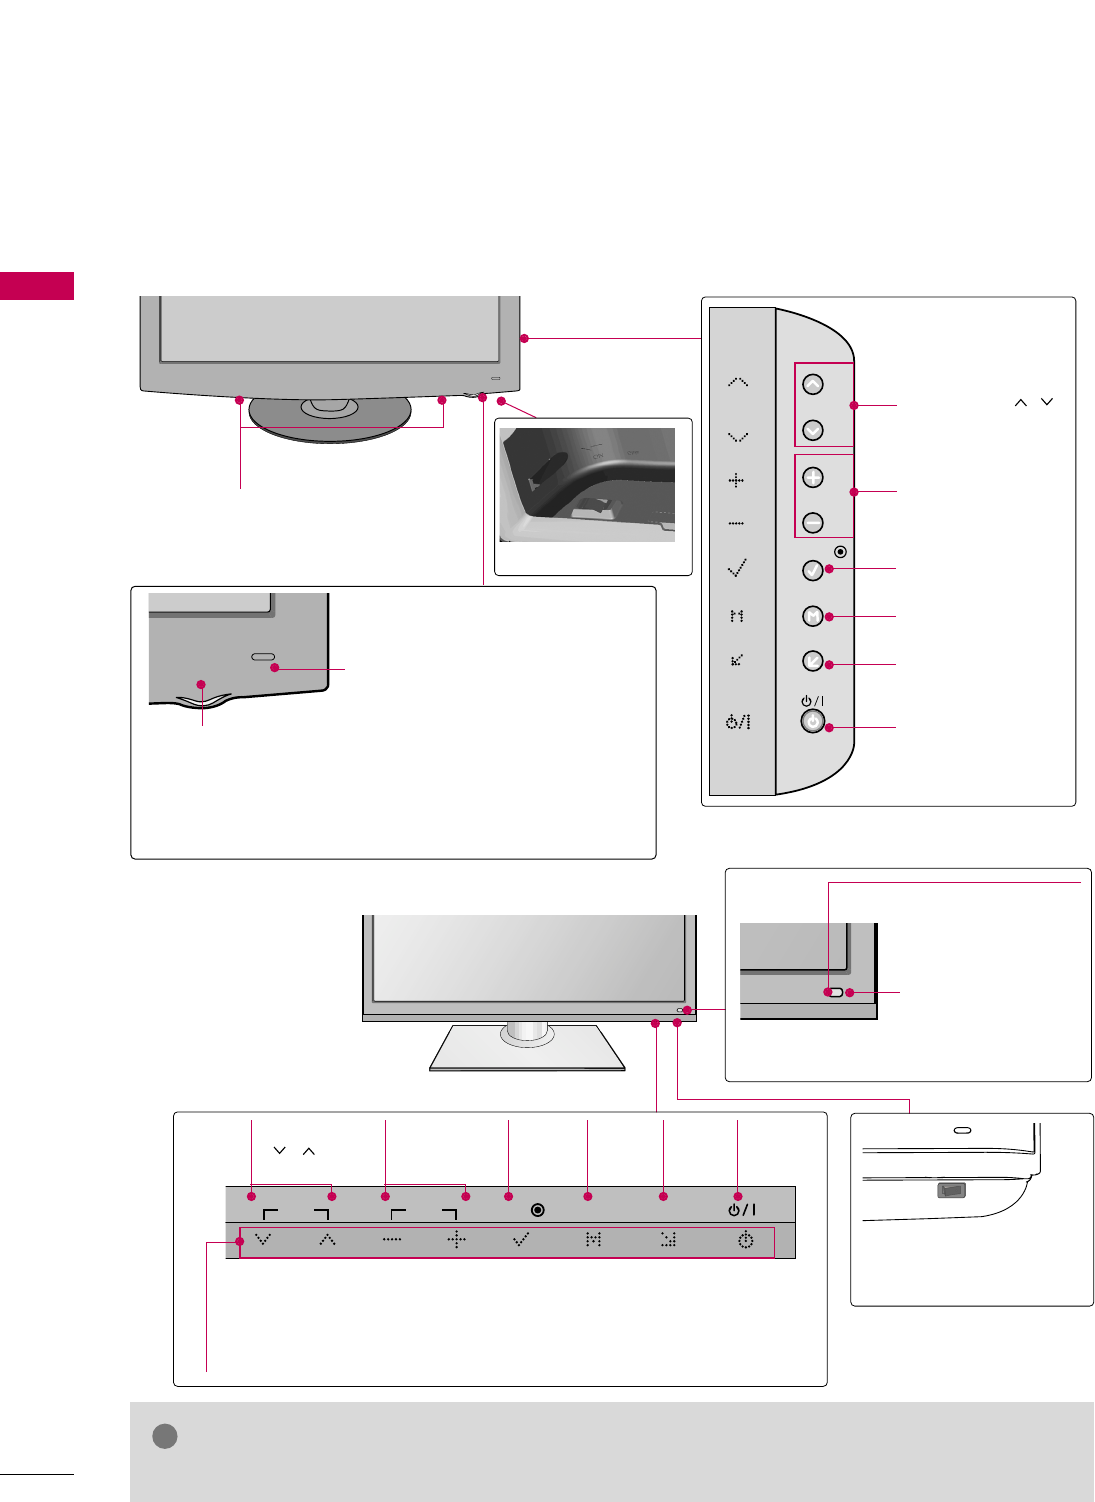
FRONT PANEL INFORMATION
PREPARATION
■
Image shown may differ from your TV.
INPUT
MENU
ENTER
CH
VOL
CHANNEL ( , )
Buttons
VOLUME (+, -)
Buttons
ENTER Button
MENU Button
INPUT Button
POWER Button
AC power control switch
SPEAKER
Power/Standby Indicator
Illuminates red in standby mode.
Illuminates white when the TV is switched on.
(Can be adjusted using the PPoowweerr IInnddiiccaattoorrin the
OPTION menu. GGpp..8844)
Remote Control Sensor,
Intelligent Sensor
Adjusts picture according to the
surrounding conditions
42/47/55LH90
42/47/55SL80
Main power switch
(For 42/47/55SL80)
OFF ON
Remote Control Sensor
INPUT
MENU
ENTER
CH
VOL
INPUT
Button
POWER
Button
MENU
Button
ENTER
Button
CHANNEL
(,)
Buttons
VOLUME
(-, +)
Buttons
Power/Standby Indicator
Illuminates red in standby mode.
Illuminates blue when the TV is switched on (Can be adjusted
using the PPoowweerr IInnddiiccaattoorrin the OPTION menu. GGpp..8844).
Intelligent Sensor
Adjusts picture
according to the
surrounding con-
ditions
GGDo not step on the glass stand or subject it to any impact.It may break, causing possible
injury from fragments of glass, or the TV may fall.
GGDo not drag the TV. The floor or the product may be damaged.
NOTE
!
PREPARATION
11
■
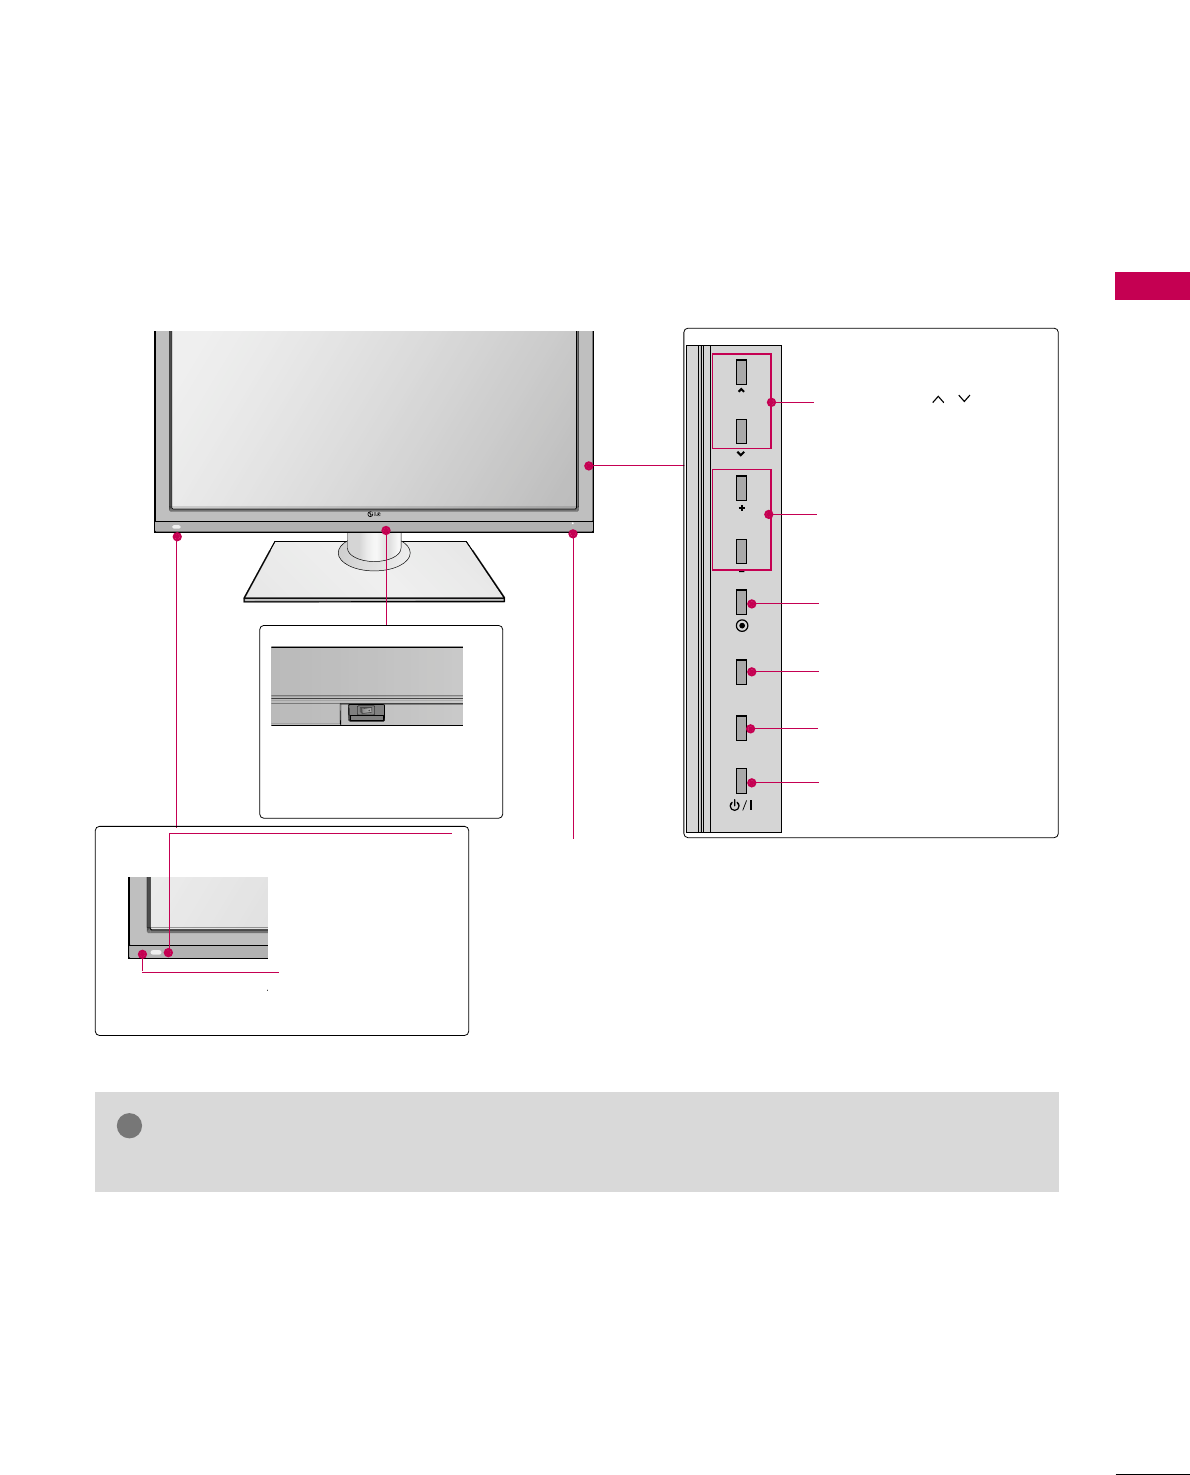
Image shown may differ from your TV.
42/47SL90
Main power switch
(For 42/47SL90)
OFF ON
Power/Standby Indicator
Illuminates red in standby mode.
Illuminates blue when the TV is switched on (Can be
adjusted using the PPoowweerr IInnddiiccaattoorrin the OPTION
menu. GGpp..8844).
GGDo not step on the glass stand or subject it to any impact.It may break, causing possible
injury from fragments of glass, or the TV may fall.
GGDo not drag the TV. The floor or the product may be damaged.
NOTE
!
INPUT
MENU
ENTER
CH
VOL
CHANNEL ( , )
Buttons
VOLUME (+, -)
Buttons
ENTER Button
MENU Button
INPUT Button
POWER Button
Sensor de Control Remoto
Sensor Inteligente
Ajusta la imagen
según las condi-
ciones del entorno.
PREPARATION
12
PREPARATION
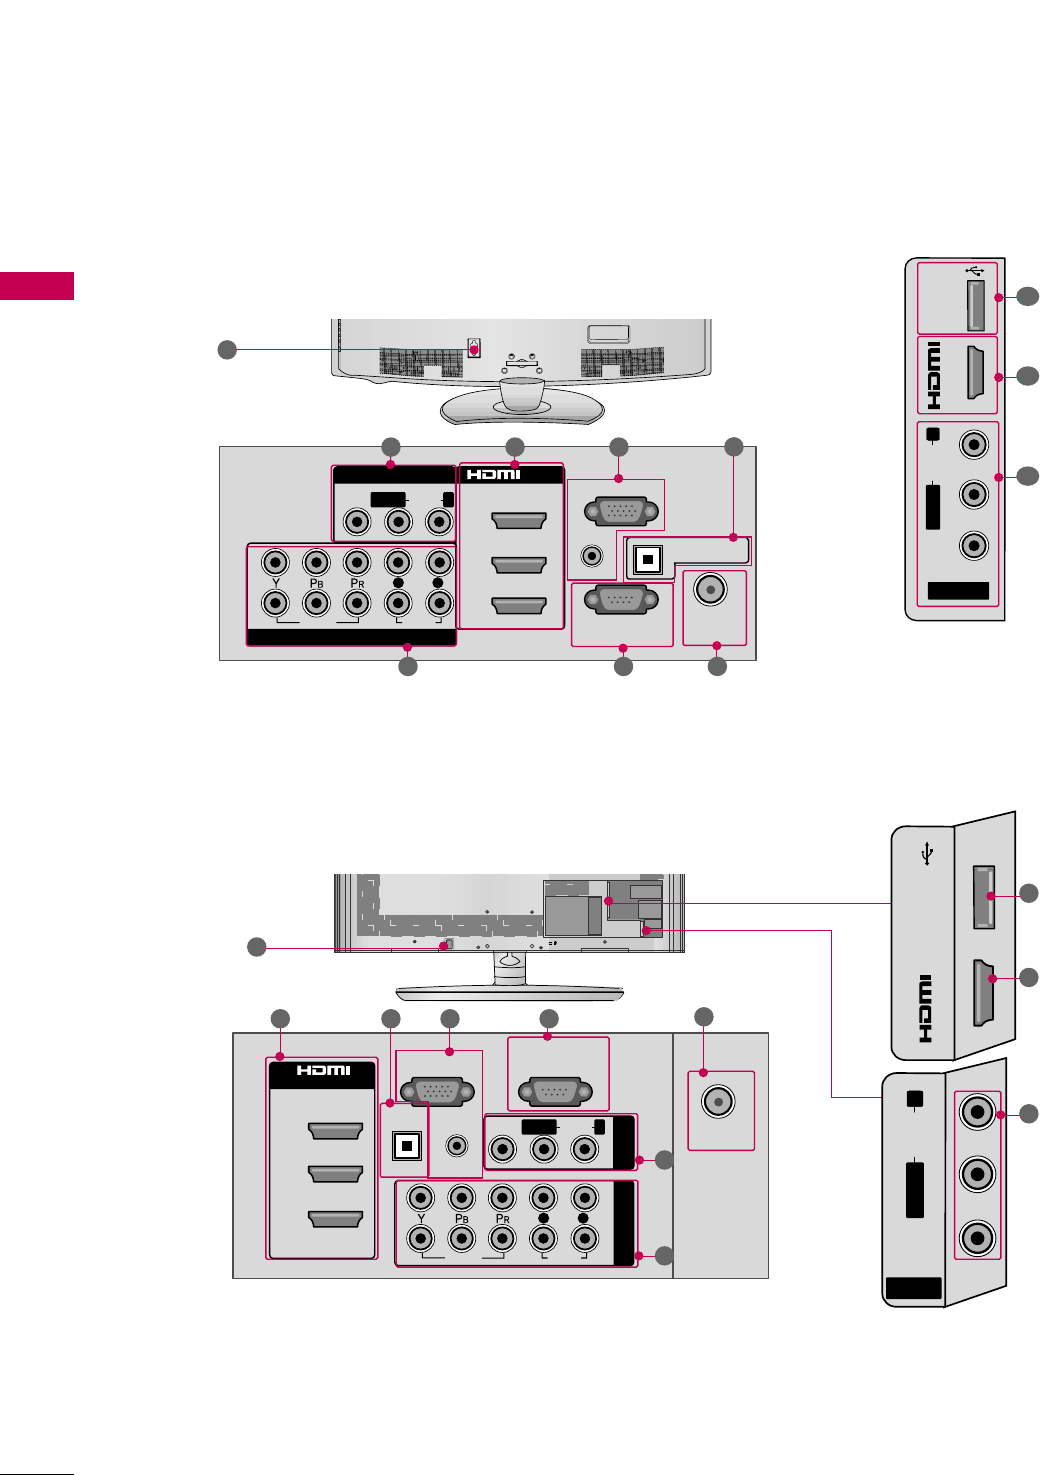
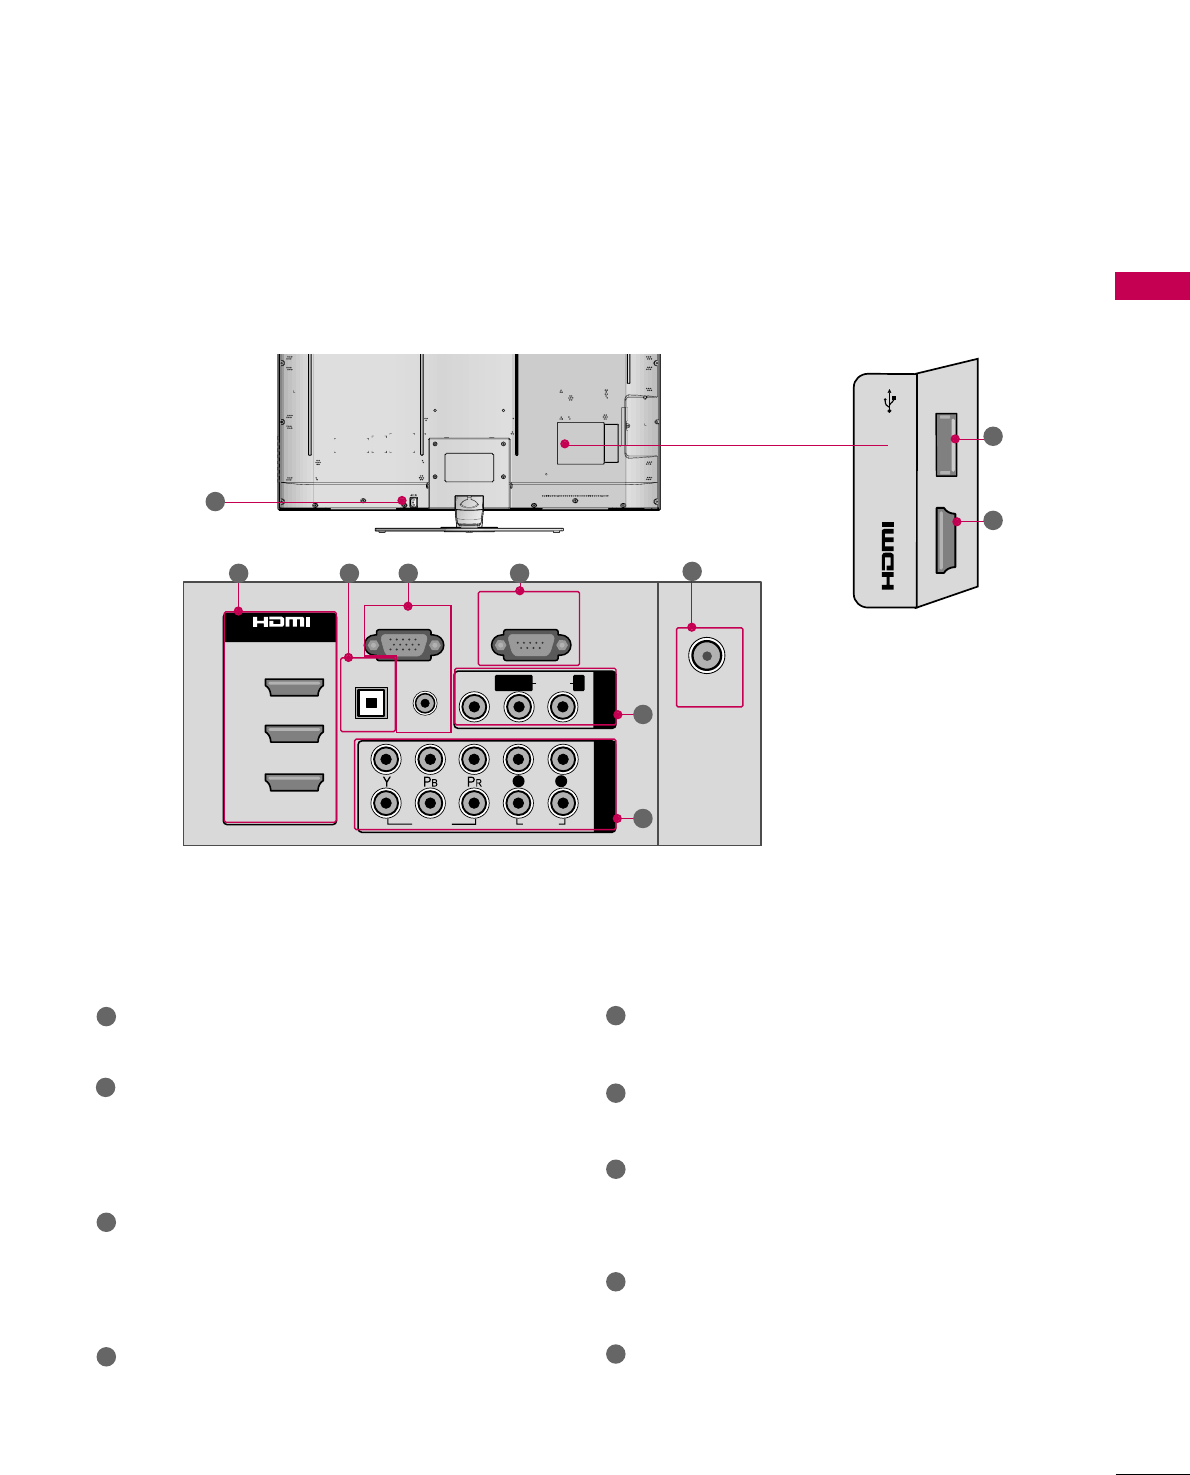
BACK PANEL INFORMATION
■
Image shown may differ from your TV.
VIDEO
AUDIO
L R
RS-232C IN
(
CONTROL&SERVICE)
AUDIO IN
(RGB/DVI)
OPTICAL DIGITAL
AUDIO OUT
ANTENNA/
CABLE IN
RGB IN (PC)
AV IN 1
COMPONENT IN
2
3
1
2
1
MONO
( )
AUDIOVIDEO
/DVI IN
( )
( )
LR
R
1 2
6 57
9
( )
( )
( )
AV IN 2
L/MONO
R
AUDIO
VIDEO
USB IN
IN 4
1
8
2
4
3
42/47/55LH90
VIDEO
AUDIO
L R
(
CONTROL&SERVICE)
RS-232C IN
AUDIO IN
(RGB/DVI)
DIGITAL
AUDIO OUT
OPTICAL
ANTENNA/
CABLE IN
RGB IN (PC)
COMPONENT IN
2
3
1
1
2
MONO
( )
AUDIOVIDEO
/DVI IN
LR
R
AV IN 1
R
2 4 3 6 5
1
7
42/47/55SL80
( )
R
R
9
( )
R
USB IN
IN 4
R
( )
R
AV IN 2
L/MONO
R
AUDIO
VIDEO
6
8
2
PREPARATION
13
42/47SL90
AV (Audio/Video) IN
Analog composite connection. Supports standard
definition video only (480i).
HDMI/DVI IN, HDMI IN
Digital Connection.
Supports HD video and Digital audio. Doesn’t
support 480i.
Accepts DVI video using an adapter or HDMI to
DVI cable (not included).
RGB IN (PC)
Analog PC Connection. Uses a D-sub 15 pin cable
(VGA cable).
AUDIO IN (RGB/DVI)
1/8" (0.32 cm) headphone jack for analog PC
audio input.
OPTICAL DIGITAL AUDIO OUT
Digital optical audio output for use with amps and
home theater systems.
Note: In standby mode, this port doesn’t work.
ANTENNA/CABLE IN
Connect over-the air signals to this jack.
Connect cable signals to this jack.
RS-232C IN (CONTROL & SERVICE) PORT
Used by third party devices.
This port is used for Service or Hotel mode.
COMPONENT IN
Analog Connection.
Supports HD.
Uses a red, green, and blue cable for video & red
and white for audio.
USB IN
Used for viewing photos/movies and listening to
MP3s.
Power Cord Socket
For operation with AC power.
Caution: Never attempt to operate the TV on DC
power.
1
2
3
4
8
9
7
6
5
VIDEO
AUDIO
L R
(
CONTROL&SERVICE)
RS-232C IN
AUDIO IN
(RGB/DVI)
DIGITAL
AUDIO OUT
OPTICAL
ANTENNA/
CABLE IN
RGB IN (PC)
COMPONENT IN
2
3
1
1
2
MONO
( )
AUDIOVIDEO
/DVI IN
LR
R
AV IN
( )
R
USB IN
IN 4
8
2
2 4 3 6 5
1
7
ANTENNA
IN
L/MONO
R
AUDIO
VIDEO
CABLE IN
9
PREPARATION
23
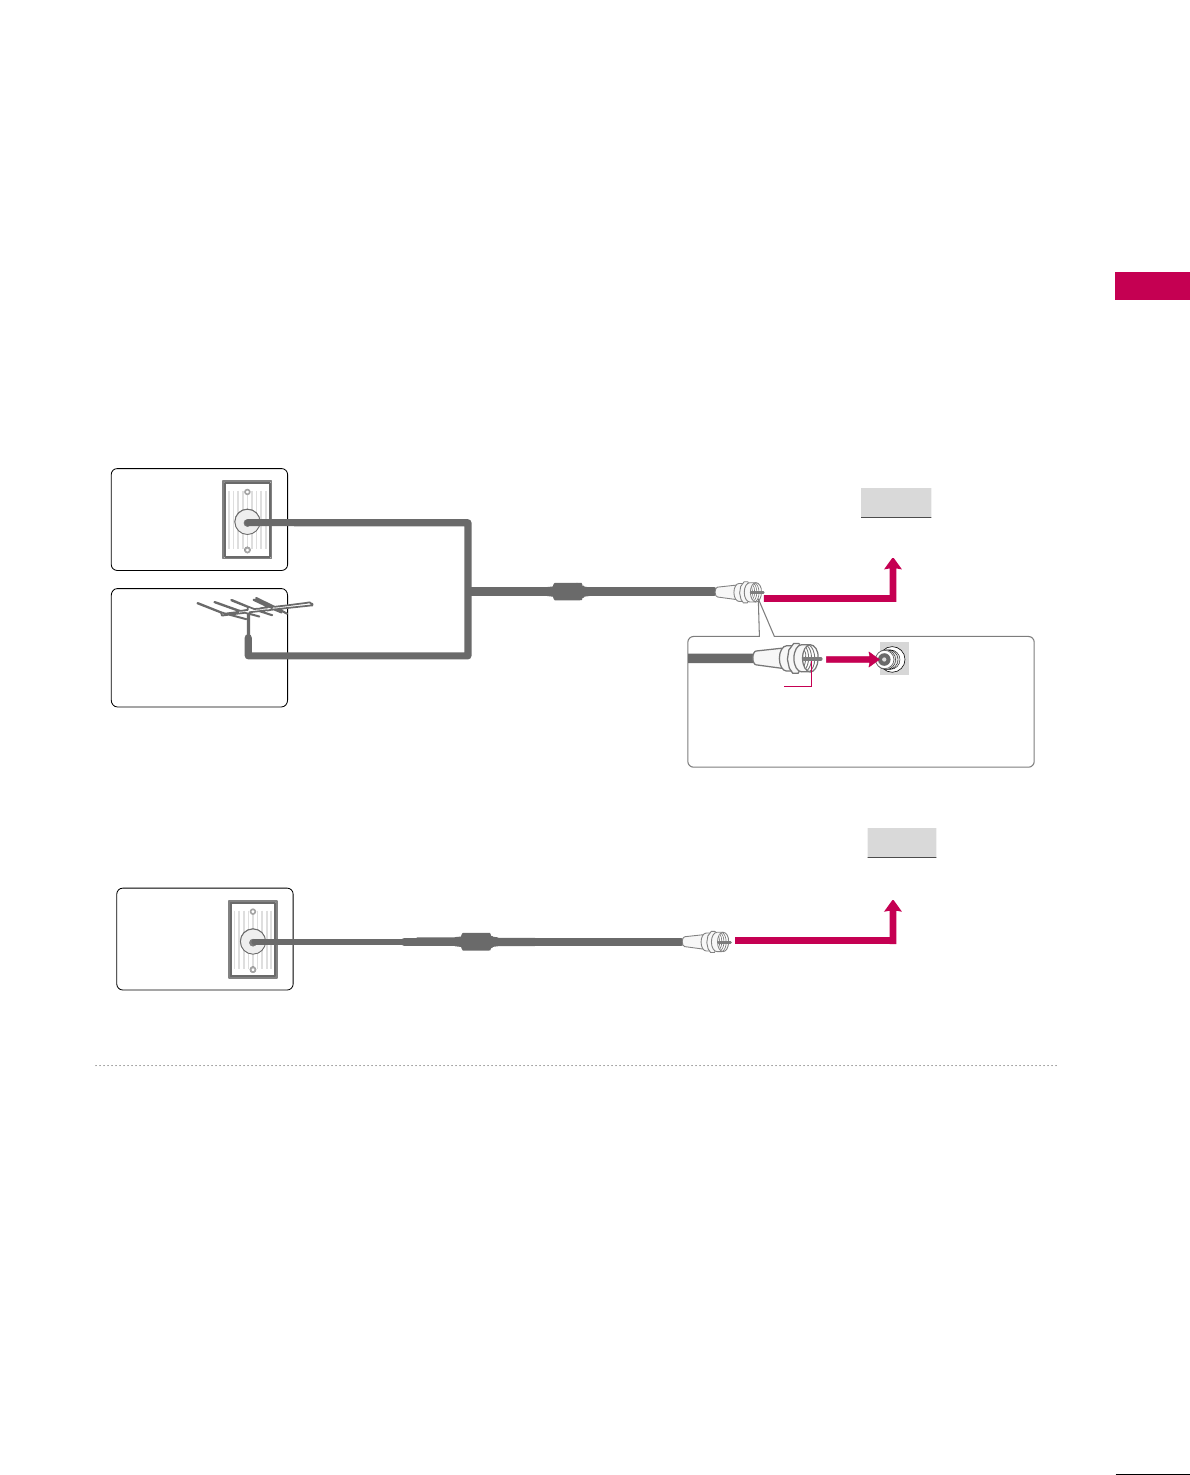
ANTENNA OR CABLE CONNECTION
■
To prevent damage do not connect to the power outlet until all connections are made between the devices.
■
Image shown may differ from your TV.
1. Antenna (Analog or Digital)
Wall Antenna Socket or Outdoor Antenna without a Cable Box
Connections.
For optimum picture quality, adjust antenna direction if needed.
2. Cable
Wall
Antenna
Socket
Outdoor
Antenna
(VHF, UHF)
Cable TV
Wall Jack
Multi-family Dwellings/Apartments
(Connect to wall antenna socket)
RF Coaxial Wire (75 ohm)
RF Coaxial Wire (75 ohm)
Single-family Dwellings /Houses
(Connect to wall jack for outdoor antenna)
Be careful not to bend the copper wire
when connecting the antenna.
Copper Wire
■To improve the picture quality in a poor signal area, please purchase a signal amplifier and install properly.
■If the antenna needs to be split for two TV’s, install a 2-Way Signal Splitter.
■If the antenna is not installed properly, contact your dealer for assistance.
( )
R
( )
R
EXTERNAL EQUIPMENT SETUP
24
EXTERNAL EQUIPMENT SETUP
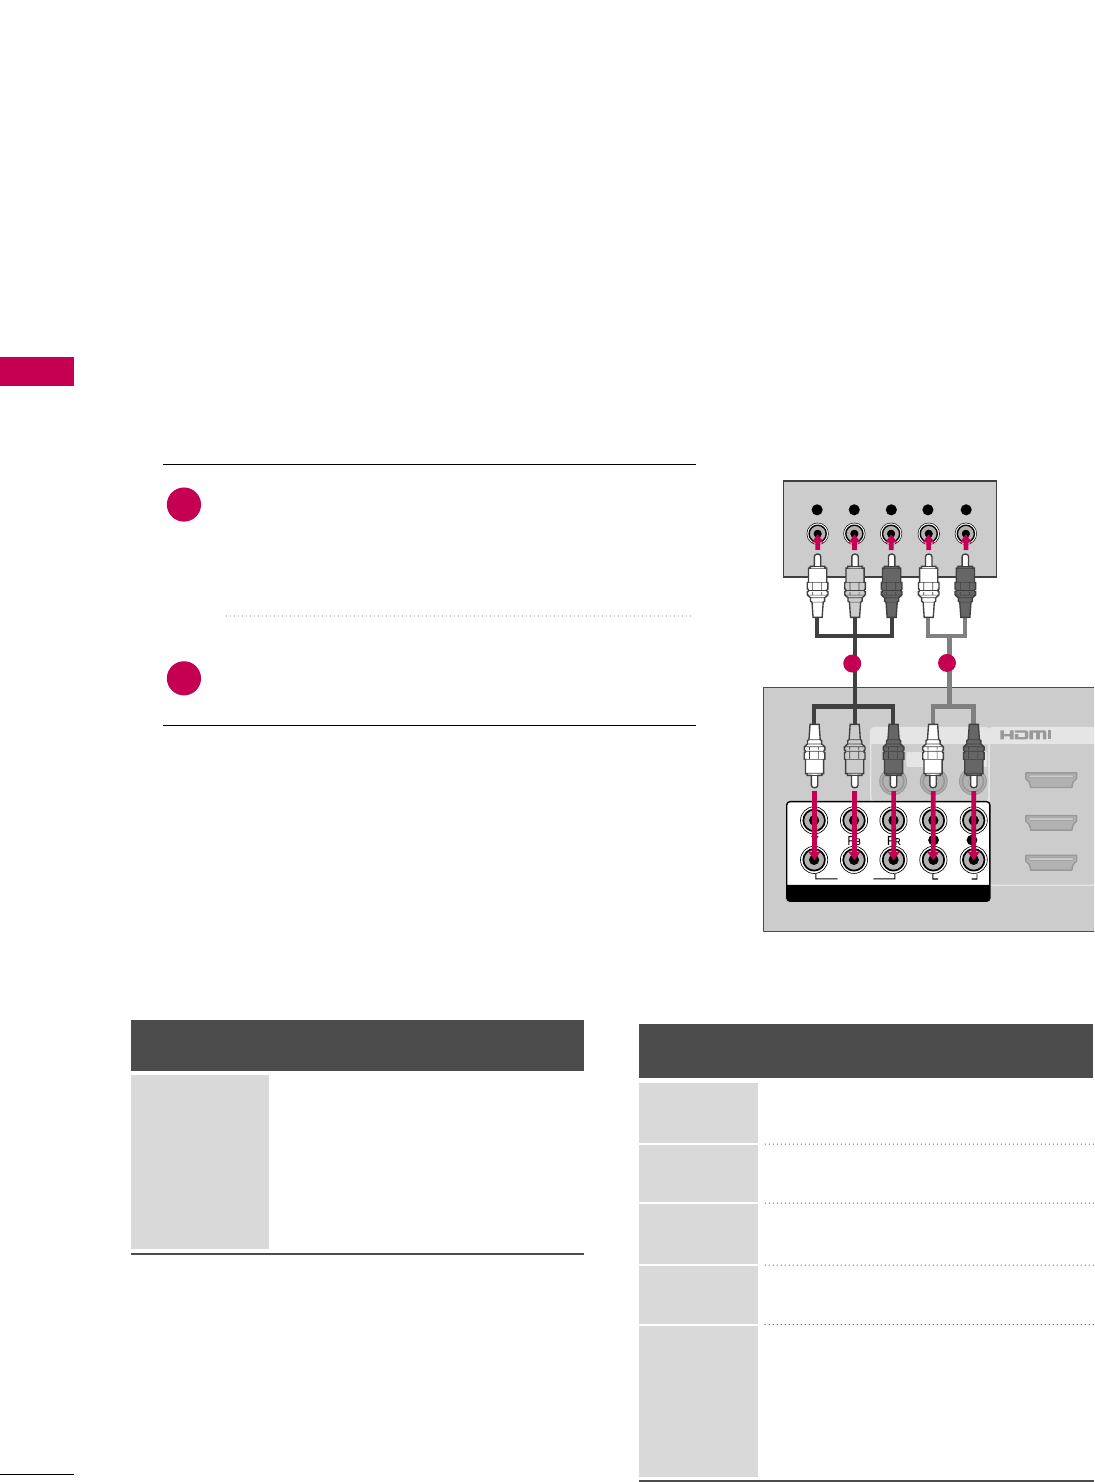
HD RECEIVER SETUP
This TV can receive digital over-the-air/digital cable signals without an external digital set-top box. However, if
you do receive digital signals from a digital set-top box or other digital external device.
Component Connection
1. How to connect
Connect the video outputs (Y, PB, PR)of the digital set-
top box to the CCOOMMPPOONNEENNTT IINN VVIIDDEEOO 11 or 22
jacks on the TV. Match the jack colors (Y = green, PB=
blue, and PR= red).
Connect the audio output of the digital set-top box to
the CCOOMMPPOONNEENNTT IINN AAUUDDIIOO 11or 22 jacks on the TV.
2
1
2. How to use
■Turn on the digital set-top box.
(Refer to the owner’s manual for the digital set-top box operation.)
■Select the CCoommppoonneenntt11or 22 input source on the TV
using the IINNPPUUTTbutton on the remote control.
■To prevent the equipment damage, never plug in any power cords until you have finished connecting all equipment.
■
This part of EXTERNAL EQUIPMENT SETUP mainly use picture for 4422//4477//5555LLHH9900.
Y, CB/PB, CR/PR
Supported Resolutions
Horizontal Vertical
Frequency(KHz)Frequency(Hz)
15.73 59.94
15.73 60.00
31.47 59.94
31.50 60.00
44.96 59.94
45.00 60.00
33.72 59.94
33.75 60.00
26.97 23.976
27.00 24.00
33.71 29.97
33.75 30.00
67.432 59.94
67.50 60.00
Resolution
720x480i
720x480p
1280x720p
1920x1080i
1920x1080p
Signal
480i
480p
720p
1080 i
1080 p
Component
Yes
Yes
Yes
Yes
Yes
HDMI
No
Yes
Yes
Yes
Yes
AV IN 1
2
3
1
MONO
( )
AUDIOVIDEO L R
/DVI IN
( )
VIDEO
AUDIO
L R
COMPONENT IN
2
1
Y L RPBPR
( )
12
EXTERNAL EQUIPMENT SETUP
25
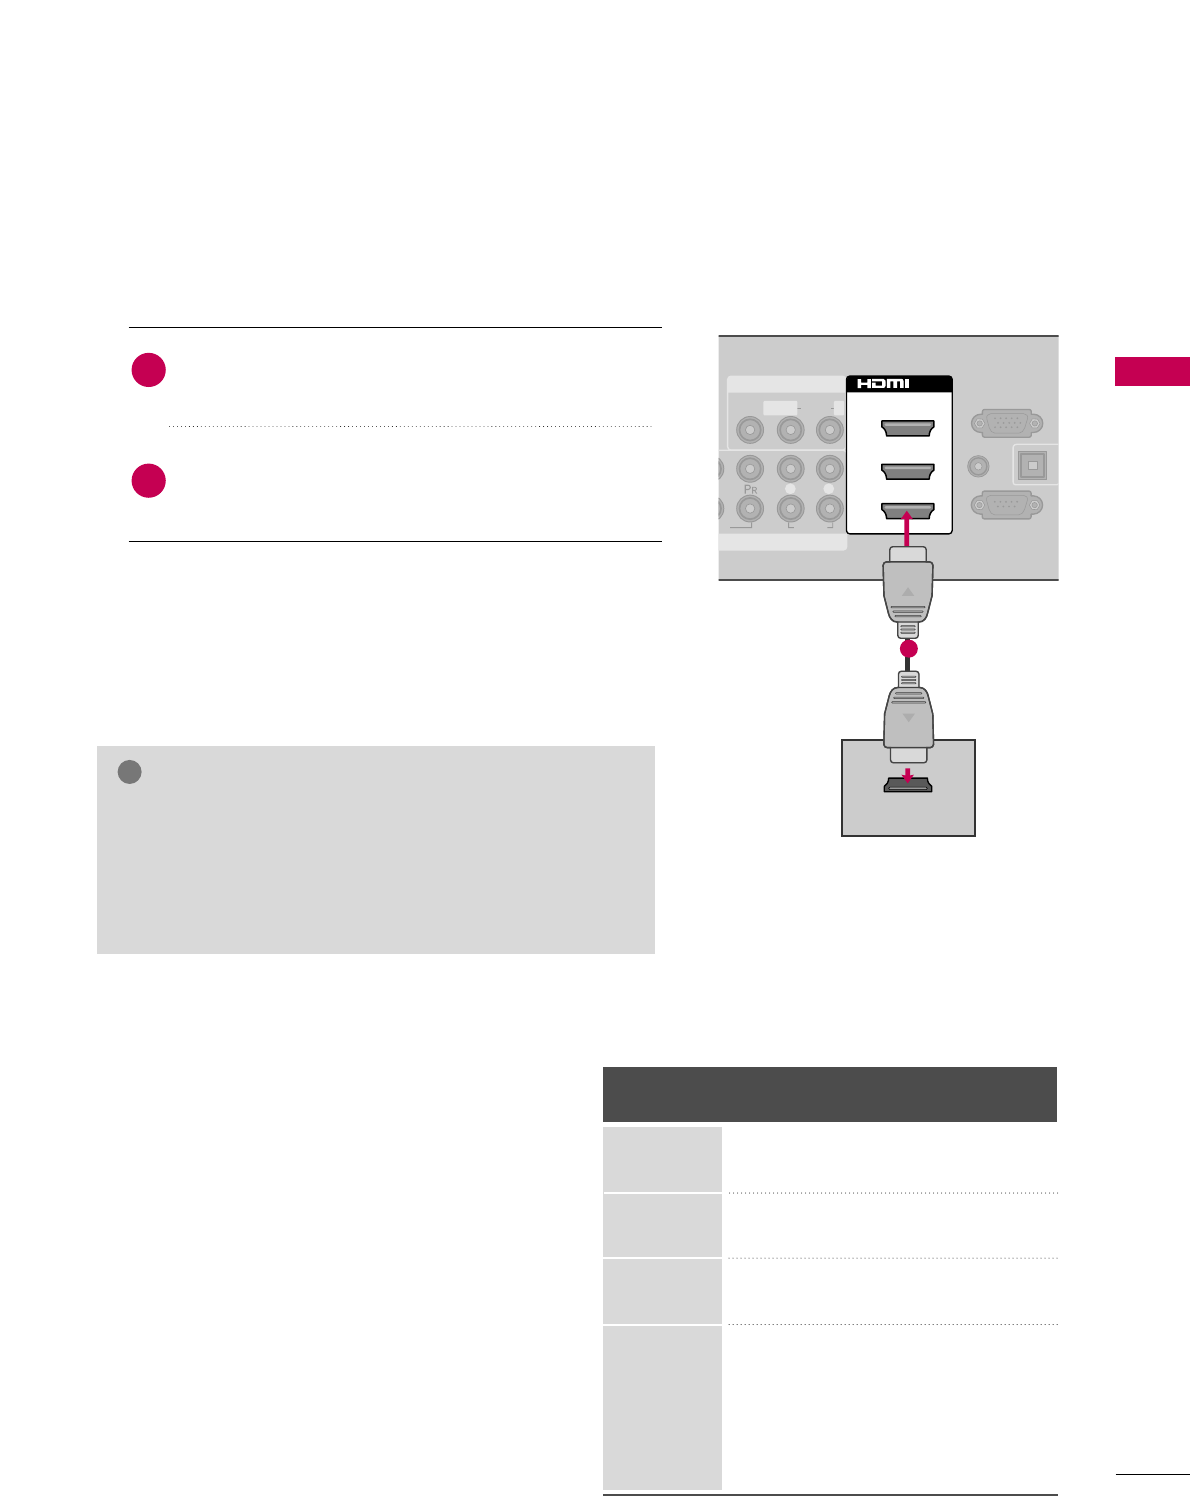
HDMI Connection
Connect the digital set-top box to HHDDMMII//DDVVII IINN 11,
22, 33, or 44 jack on the TV.
No separate audio connection is necessary.
HDMI supports both audio and video.
1. How to connect
2. How to use
■Turn on the digital set-top box.
(Refer to the owner’s manual for the digital set-top box.)
■Select the HHDDMMII11, HHDDMMII22, HHDDMMII33, or HHDDMMII44 input
source on the TV using the IINNPPUUTTbutton on the remote
control.
2
1
HDMI-DTV
Horizontal Vertical
Frequency(KHz)Frequency(Hz)
31.47 59.94
31.50 60.00
44.96 59.94
45.00 60.00
33.72 59.94
33.75 60.00
26.97 23.976
27.00 24.00
33.71 29.97
33.75 30.00
67.432 59.94
67.50 60.00
Resolution
720x480p
1280x720p
1920x1080i
1920x1080p
( )
EO
AUDIO
L R
RS-232C IN
(
CONTROL&SERVICE)
AUDIO IN
(RGB/DVI)
O
A
C
RGB IN (PC)
AV IN 1
OMPONENT IN
1
MONO
( )
AUDIOVIDEO L R
2
3
1
/DVI IN
HDMI OUTPUT
( )
1
GGCheck HDMI cable over version 1.3.
If the HDMI cables don’t support HDMI version 1.3, it can
cause flickers or no screen display. In this case use the lat-
est cables that support HDMI version 1.3.
GGHDMI mode supports PCM, Dolby Digital audio format.
NOTE
!
EXTERNAL EQUIPMENT SETUP
26
EXTERNAL EQUIPMENT SETUP
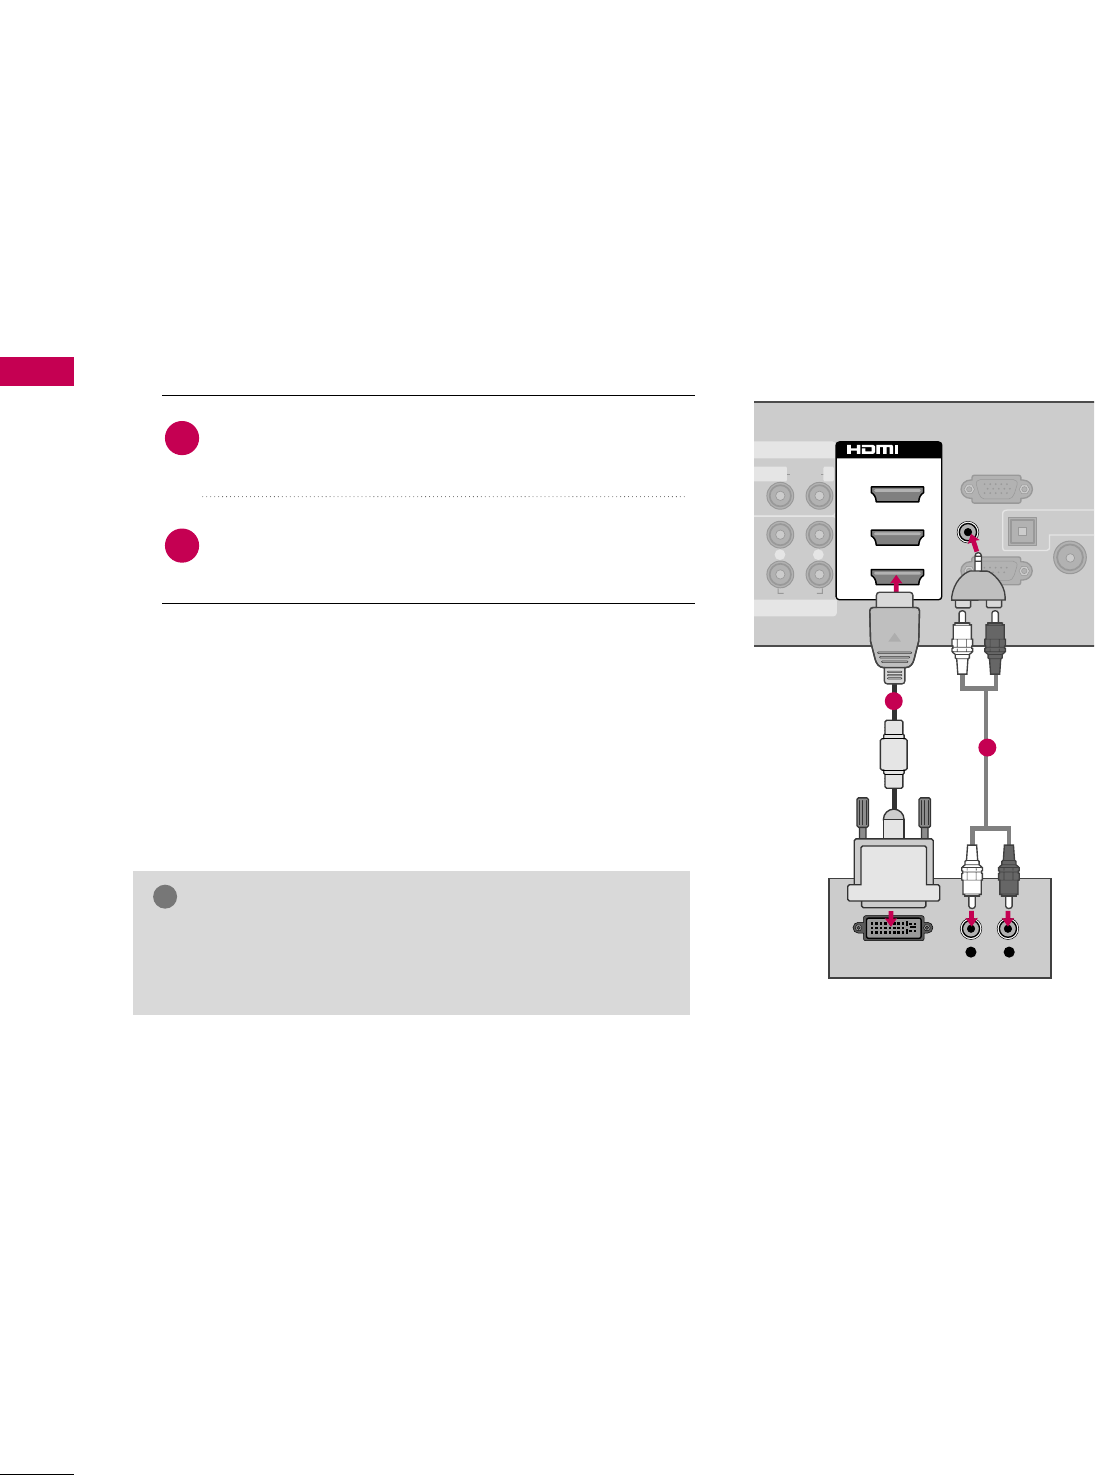
DVI to HDMI Connection
( )
( )
AUDIO
L R
RS-232C IN
(
CONTROL&SERVICE)
OPTICAL DIG
AUDIO OU
ANTENNA
CABLE IN
RGB IN (PC)
AV IN 1
ENT IN
1
MONO
( )
AUDIOLR
2
3
1
/DVI IN
AUDIO IN
(RGB/DVI)
L R
DVI OUTPUT AUDIO
1
2
GGA DVI to HDMI cable or adapter is required for this con-
nection. DVI doesn't support audio, so a separate audio
connection is necessary.
NOTE
!
Connect the DVI output of the digital set-top box to
the HHDDMMII//DDVVII IINN 11, 22, or 33jack on the TV.
Connect the digital set-top box audio output to the
AAUUDDIIOO IINN ((RRGGBB//DDVVII))jack on the TV.
1. How to connect
2. How to use
■Turn on the digital set-top box.
(Refer to the owner’s manual for the digital set-top box.)
■Select the HHDDMMII11, HHDDMMII22, or HHDDMMII33 input source on the
TV using the IINNPPUUTTbutton on the remote control.
2
1
EXTERNAL EQUIPMENT SETUP
28
EXTERNAL EQUIPMENT SETUP
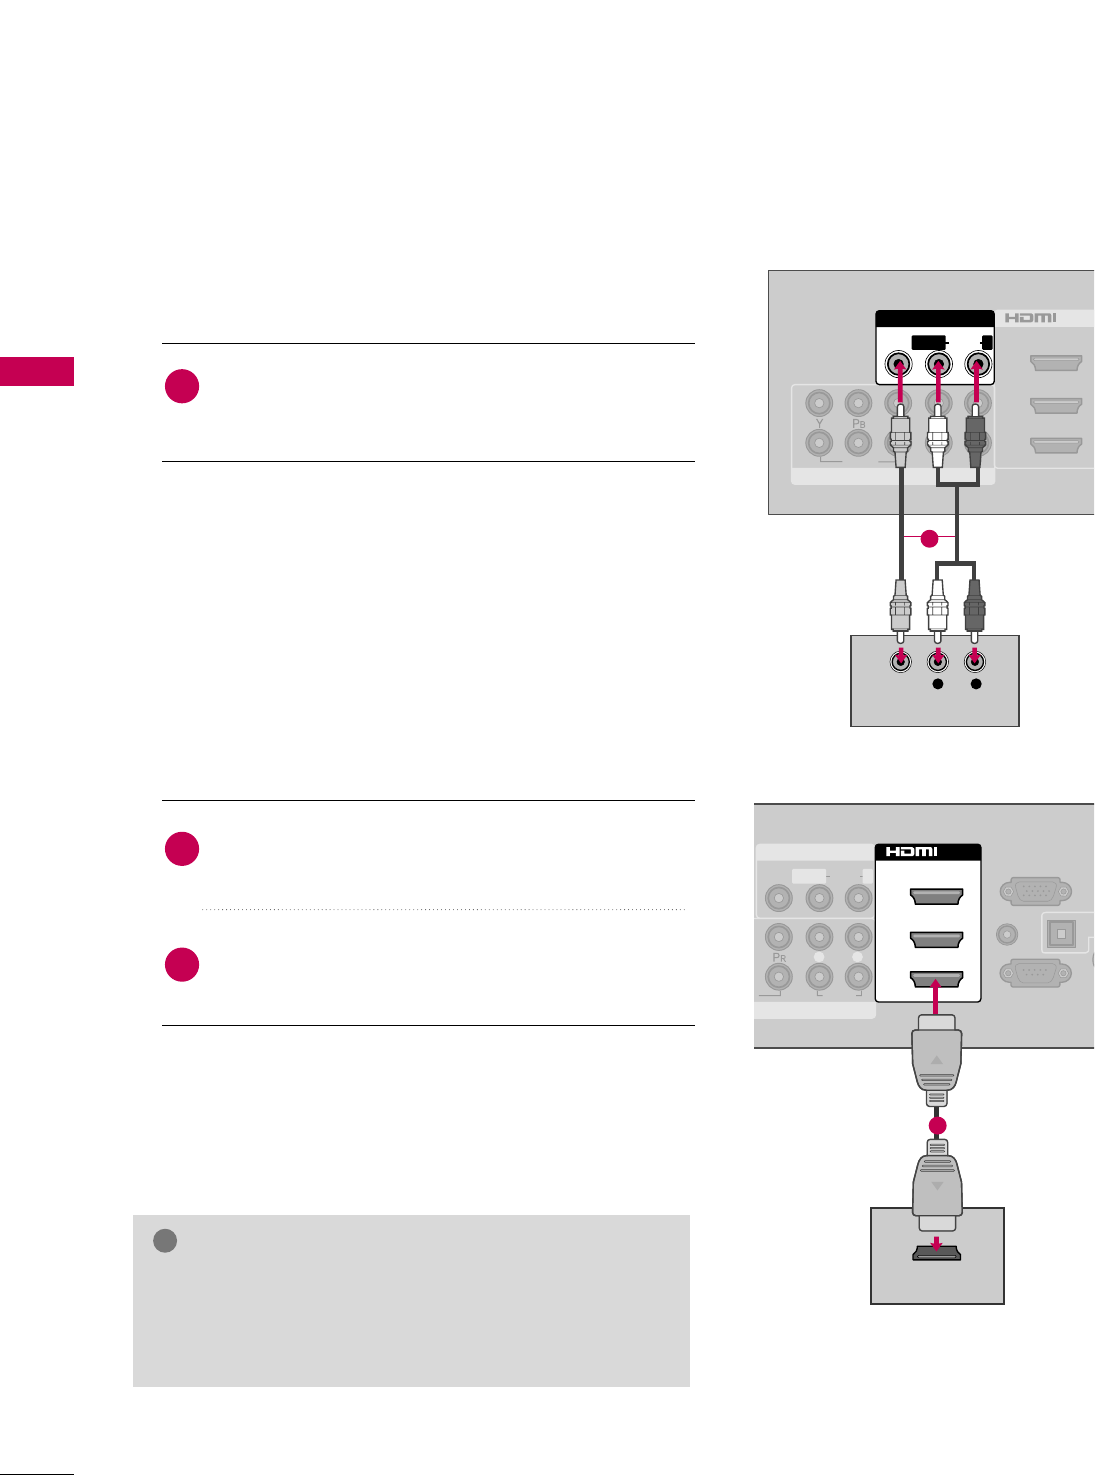
Composite (RCA) Connection
VIDEO
AUDIO
L R
COMPONENT IN
2
3
1
2
1
/DVI IN
( )
( )
AV IN 1
MONO
( )
AUDIOVIDEO LR
L R
VIDEO
AUDIO
HDMI Connection
( )
O
AUDIO
L R
RS-232C IN
(
CONTROL&SERVICE)
AUDIO IN
(RGB/DVI)
OPT
A
AN
C
RGB IN (PC)
AV IN 1
MPONENT IN
1
MONO
( )
AUDIOVIDEO L R
2
3
1
/DVI IN
HDMI OUTPUT
( )
1
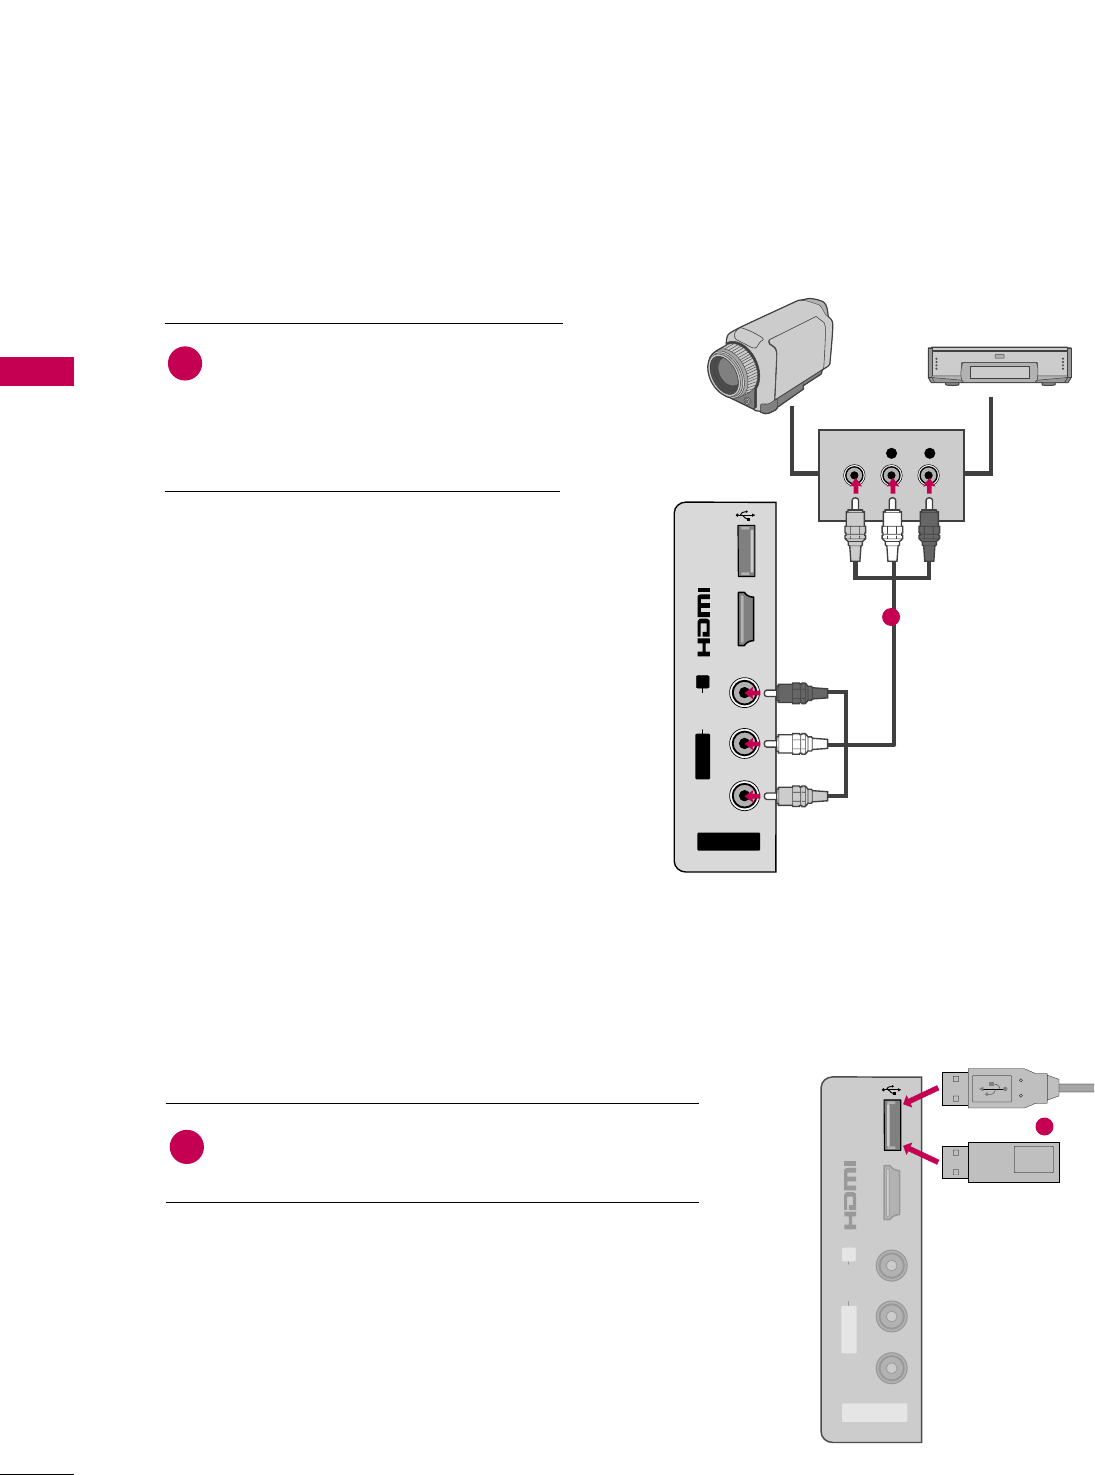
Connect the AAUUDDIIOO/VVIIDDEEOOjacks between TV and
DVD. Match the jack colors (Video = yellow, Audio Left
= white, and Audio Right = red)
1. How to connect
2. How to use
■Turn on the DVD player, insert a DVD.
■Select the AAVV11or AAVV22input source on the TV using the
IINNPPUUTTbutton on the remote control.
■Refer to the DVD player's manual for operating instructions.
1
Connect the HDMI output of the DVD to the
HHDDMMII//DDVVII IINN 11, 22, 33 or 44jack on the TV.
No separate audio connection is necessary.
HDMI supports both audio and video.
1. How to connect
2. How to use
■Select the HHDDMMII11, HHDDMMII22, HHDDMMII33, or HHDDMMII44input
source on the TV using the IINNPPUUTTbutton on the remote
control.
■Refer to the DVD player's manual for operating instructions.
2
1
GGCheck HDMI cable over version 1.3.
If the HDMI cables don’t support HDMI version 1.3, it can
cause flickers or no screen display. In this case use the lat-
est cables that support HDMI version 1.3.
NOTE
!
1
EXTERNAL EQUIPMENT SETUP
30
PC SETUP
EXTERNAL EQUIPMENT SETUP
This TV provides Plug and Play capability, meaning that the PC adjusts automatically to the TV's settings.
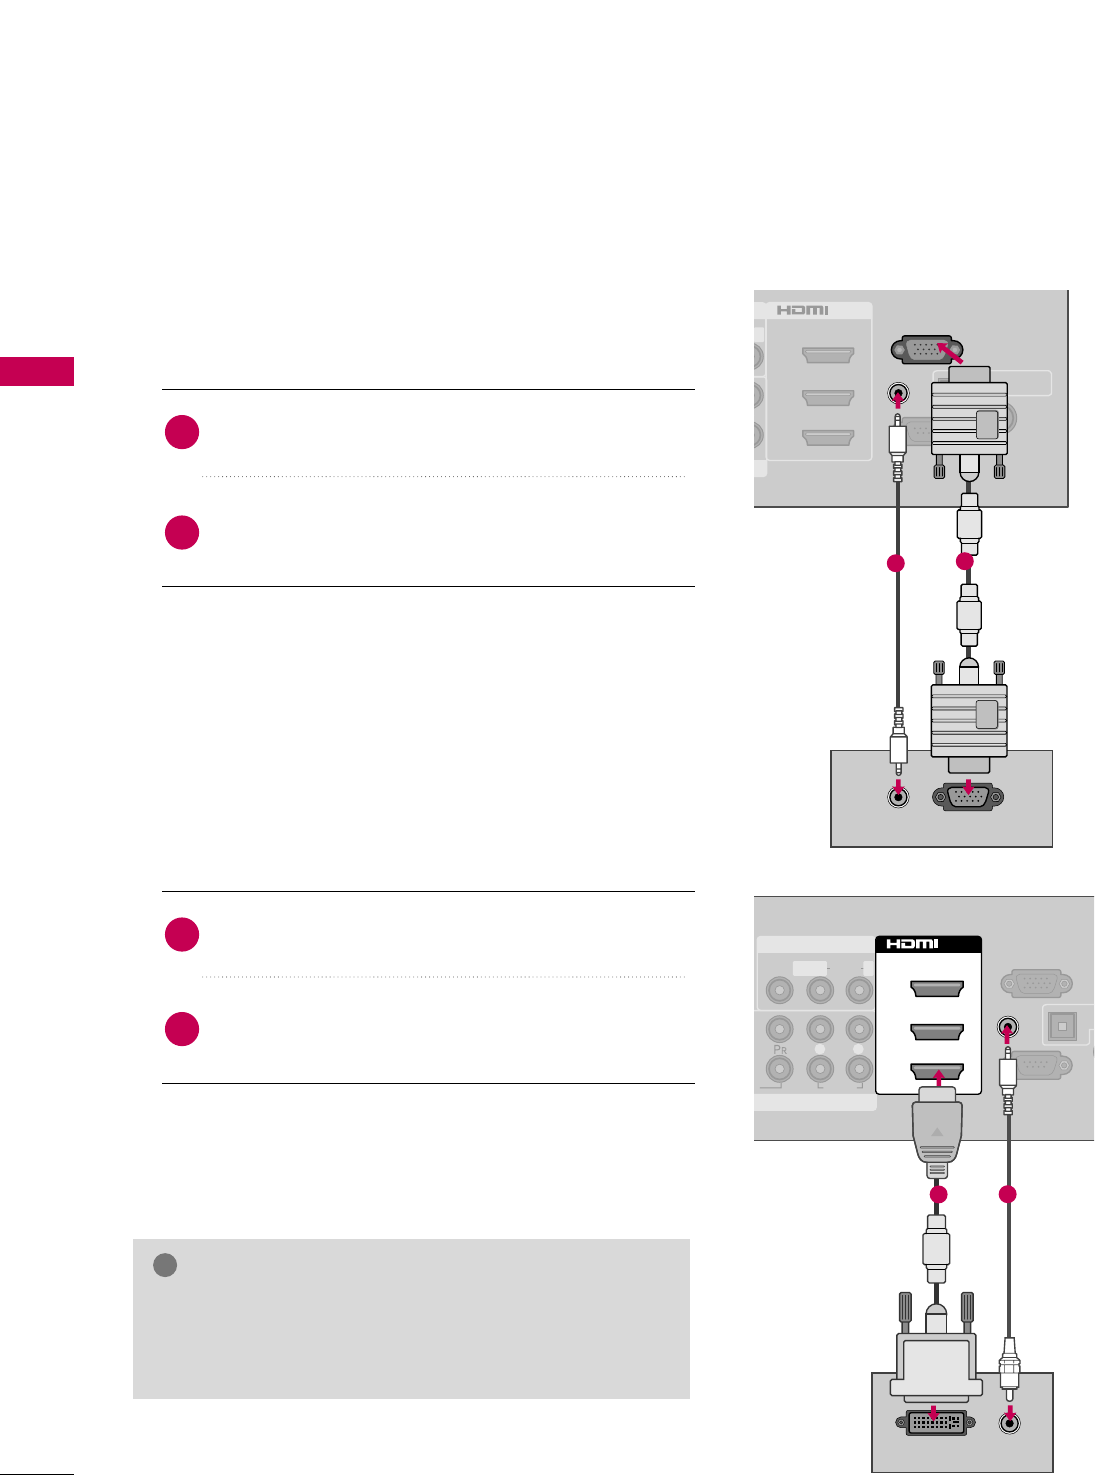
VGA (D-Sub 15 pin) Connection
RS-232C IN
(
CONTROL&SERVICE)
OPTICAL DIGITAL
AUDIO OUT
ANTENNA/
CABLE IN
2
3
1
( )
R
/DVI IN
AUDIO IN
(RGB/DVI)
RGB IN (PC)
RGB OUTPUT
AUDIO
( )
21
Connect the VGA output of the PC to the RRGGBB IINN
((PPCC))jack on the TV.
Connect the PC audio output to the AAUUDDIIOO IINN
((RRGGBB//DDVVII))jack on the TV.
1. How to connect
2. How to use
■Turn on the PC and the TV.
■Select the RRGGBB--PPCCinput source on the TV using the
IINNPPUUTTbutton on the remote control.
2
1
DVI to HDMI Connection
( )
O
AUDIO
L R
RS-232C IN
(
CONTROL&SERVICE)
OP
A
A
C
RGB IN (PC)
AV IN 1
MPONENT IN
MONO
( )
AUDIOVIDEO L R
AUDIO IN
(RGB/DVI)
2
3
1
/DVI IN
AUDIO
DVI OUTPUT
12
Connect the DVI output of the PC to the HHDDMMII//DDVVII
IINN 11, 22, or 33jack on the TV.
Connect the PC audio output to the AAUUDDIIOO IINN
((RRGGBB//DDVVII))jack on the TV.
1. How to connect
2. How to use
■Turn on the PC and the TV.
■Select the HHDDMMII11, HHDDMMII22, or HHDDMMII33input source on
the TV using the IINNPPUUTTbutton on the remote control.
2
1
GGCheck HDMI cable over version 1.3.
If the HDMI cables don’t support HDMI version 1.3, it can
cause flickers or no screen display. In this case use the lat-
est cables that support HDMI version 1.3.
NOTE
!
EXTERNAL EQUIPMENT SETUP
31
NOTES
!
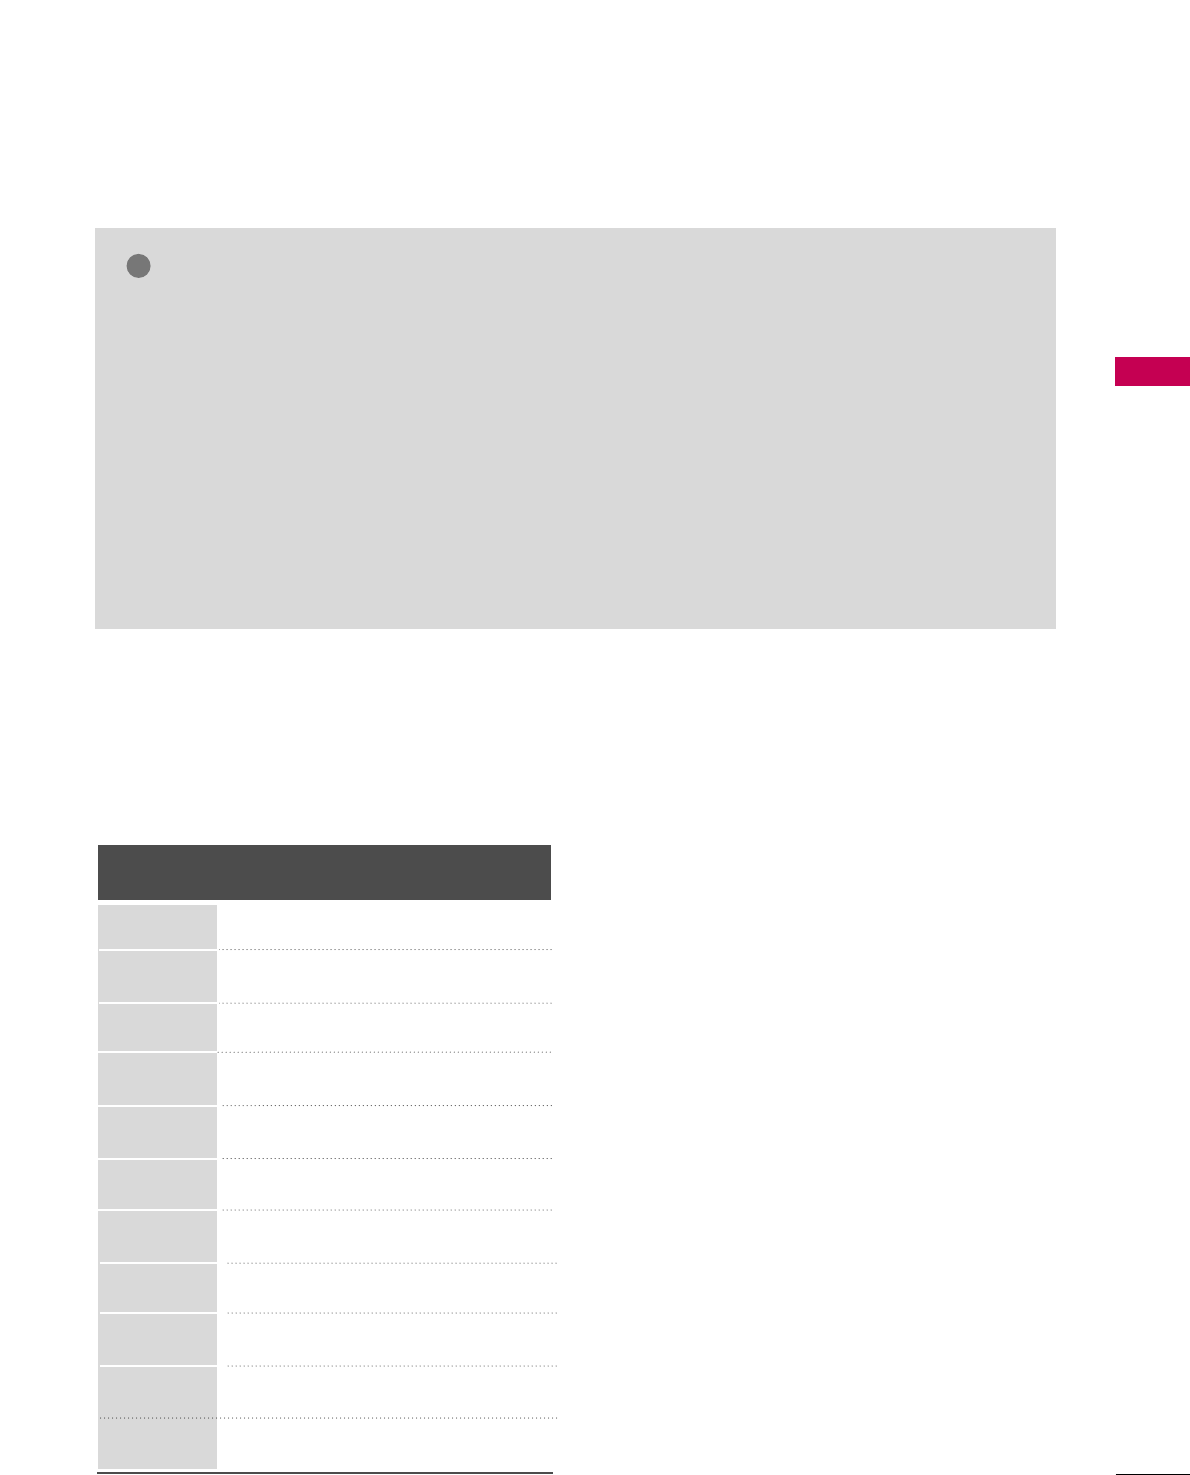
Supported Display Specifications (RGB-PC, HDMI-PC)
Resolution
720x400
640x350
Horizontal Vertical
Frequency(KHz)Frequency(Hz)
31.468 70.09
31.469 70.08
31.469 59.94
37.879 60.31
48.363 60.00
47.776 59.87
47.712 60.015
63.981 60.02
75.00 60.00
66.587 59.934
67.50 60.00
640x480
800x600
1024x768
1280x768
1280x1024
1360x768
1600x1200
1920x1080
RGB-PC
1920x1080
HDMI-PC
GGTo get the best picture quality, adjust the PC graph-
ics card to 1920x1080.
GGDepending on the graphics card, DOS mode may
not work if an HDMI to DVI Cable is in use.
GGIn PC mode, there may be noise associated with
the resolution, vertical pattern, contrast or bright-
ness. If noise is present, change the PC output to
another resolution, change the refresh rate to
another rate or adjust the brightness and contrast
on the PICTURE menu until the picture is clear.
GGAvoid keeping a fixed image on the screen for a
long period of time. The fixed image may become
permanently imprinted on the screen.
GGDepending on the graphics card, some resolution
settings may not allow the image to be positioned
on the screen properly.
GGIf the screen is truncated using HDMI-PC
1920x1080, try changing the aspect ratio to JJuusstt
ssccaann.
GGWhen selecting HDMI-PC, set the “Input Label -
PC” in the OPTION menu.
EXTERNAL EQUIPMENT SETUP
32
EXTERNAL EQUIPMENT SETUP
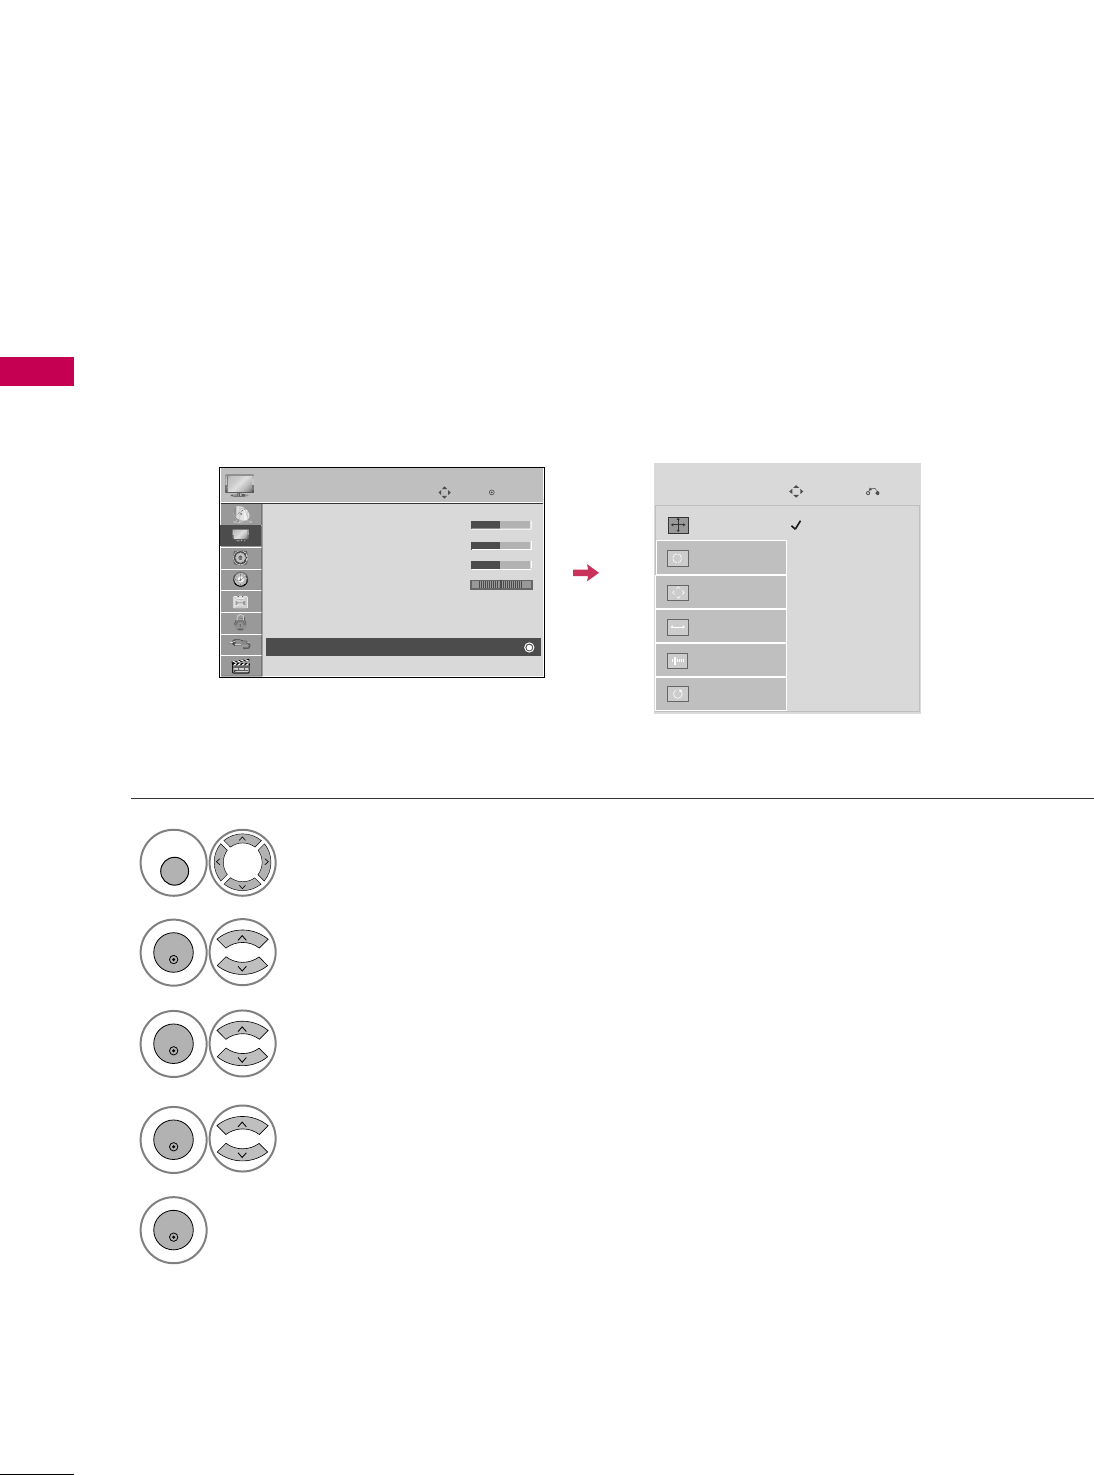
Screen Setup for PC mode
Selecting Resolution
You can choose the resolution in RGB-PC mode.
The PPoossiittiioonn, PPhhaassee, and SSiizzeecan also be adjusted.
Select PPIICCTTUURREE.
Select SSccrreeeenn ((RRGGBB--PPCC)).
Select RReessoolluuttiioonn.
Select the desired resolution.
1024 x 768
1280 x 768
1360 x 768
Auto Config.
Resolution
Position
Size
Phase
Reset
SCREEN
Move
Prev.
1
MENU
3
4
2
ENTER
ENTER
ENTER
5
ENTER
Enter
Move
PICTURE
E
RG
• Brightness 50
• Sharpness 50
• Color 50
• Tint 0
• Advanced Control
• Picture Reset
Screen (RGB-PC)
LED Local Dimming :On
EXTERNAL EQUIPMENT SETUP
33
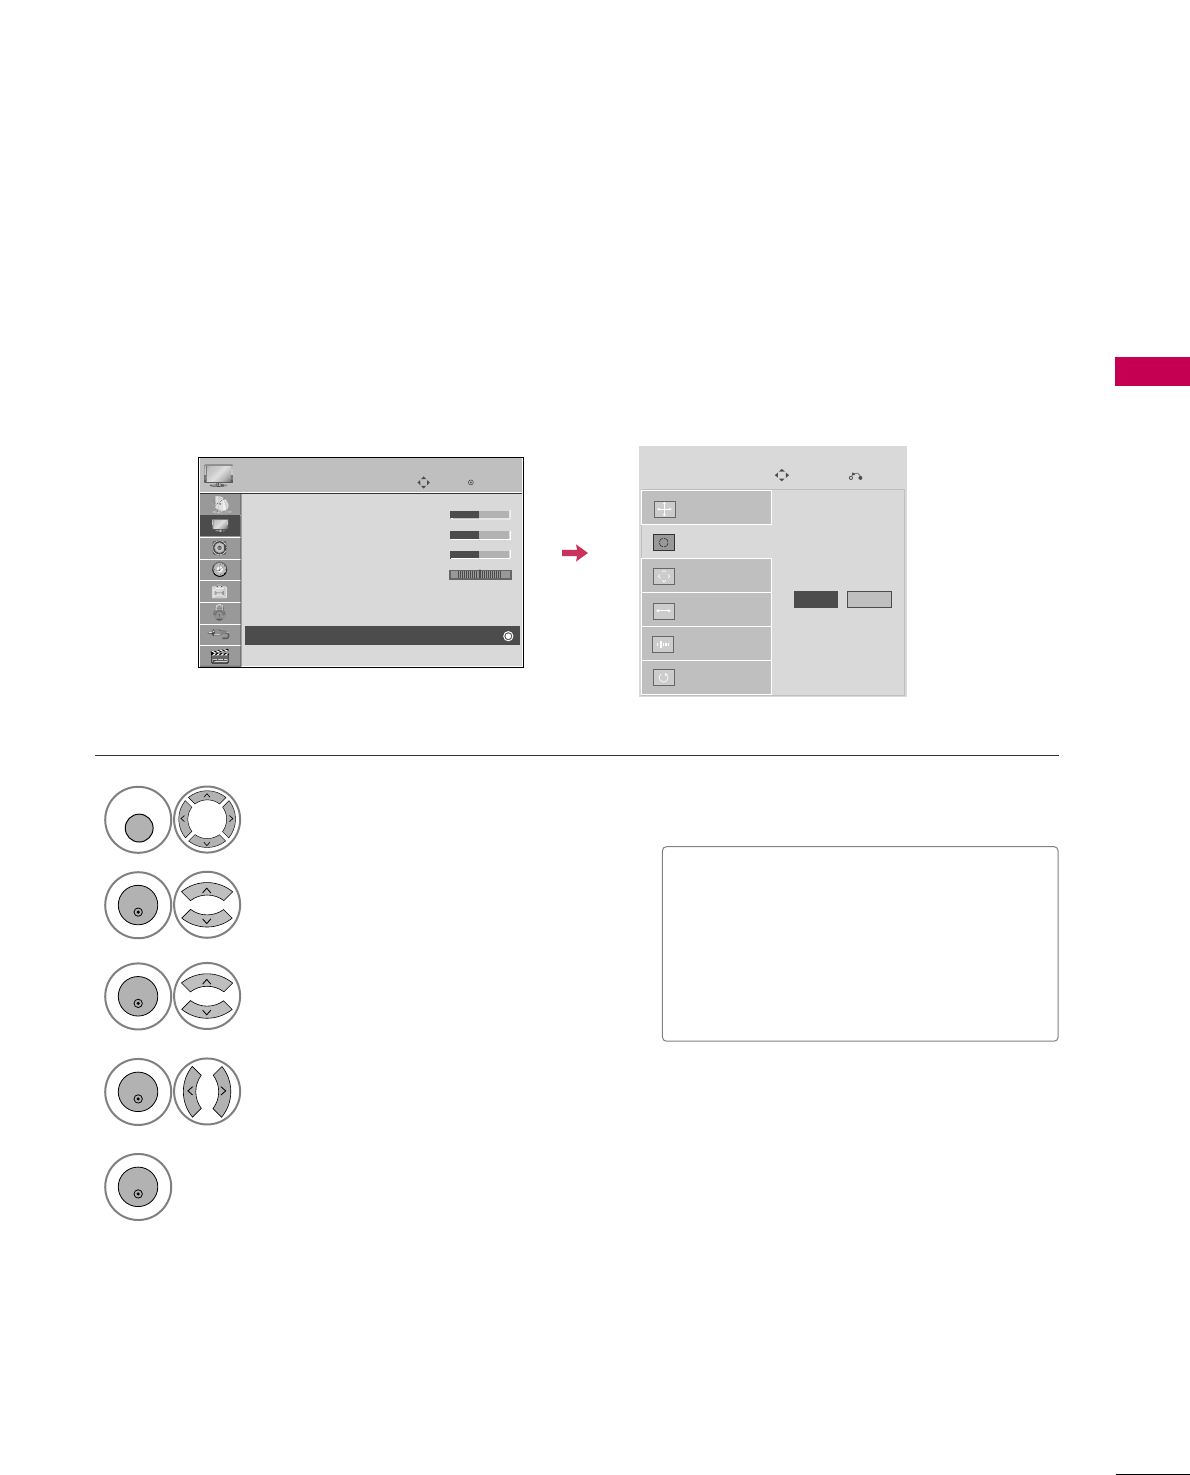
Auto Configure
Automatically adjusts picture position and minimizes image instability. After adjustment, if the image is still
not correct, try using the manual settings or a different resolution or refresh rate on the PC.
Select SSccrreeeenn ((RRGGBB--PPCC)).
Select AAuuttoo CCoonnffiigg...
Auto Config.
Resolution
Position
Size
Phase
Reset
SCREEN
Move
Prev.
To Set
3
2
ENTER
ENTER
Select YYeess.
4
ENTER
Start Auto Configuration.
5
ENTER
Select PPIICCTTUURREE.
1
MENU
■If the position of the image is still not
correct, try Auto adjustment again.
■If picture needs to be adjusted again
after Auto adjustment in RGB-PC, you
can adjust the PPoossiittiioonn, SSiizzee or
PPhhaassee.
Yes No
Enter
Move
PICTURE
E
RG
• Brightness 50
• Sharpness 50
• Color 50
• Tint 0
• Advanced Control
• Picture Reset
Screen (RGB-PC)
LED Local Dimming :On
EXTERNAL EQUIPMENT SETUP
34
EXTERNAL EQUIPMENT SETUP
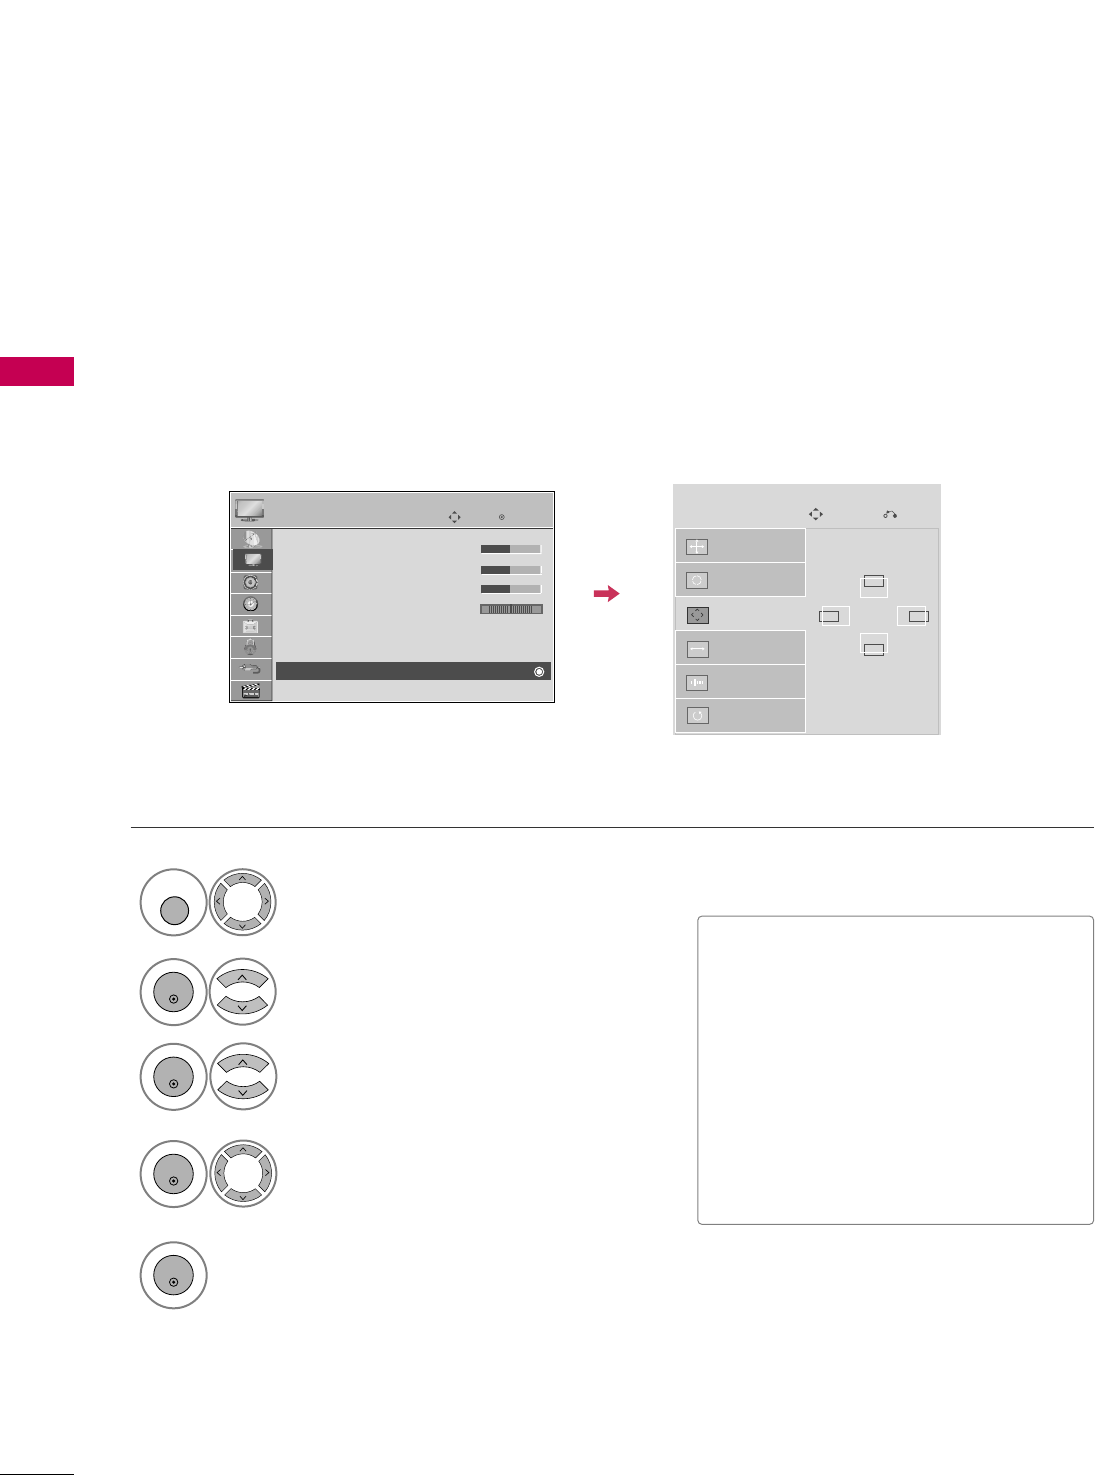
Adjustment for screen Position, Size, and Phase
If the picture is not clear after auto adjustment and especially if characters are still trembling, adjust the picture
phase manually.
This feature operates only in RGB-PC mode.
Select PPoossiittiioonn, SSiizzee, or PPhhaassee.
Make appropriate adjustments.
Auto Config.
Resolution
Position
Size
Phase
Reset
GF
D
E
SCREEN
Move
Prev.
3
ENTER
4
ENTER
■PPoossiittiioonn: This function is to adjust pic-
ture to left/right and up/down as you
prefer.
■SSiizzee: This function is to minimize any
vertical bars or stripes visible on the
screen background. And the horizontal
screen size will also change.
■PPhhaassee: This function allows you to
remove any horizontal noise and clear or
sharpen the image of characters.
Select PPIICCTTUURREE.
Select SSccrreeeenn ((RRGGBB--PPCC)).
1
MENU
2
ENTER
5
ENTER
Enter
Move
PICTURE
E
RG
• Brightness 50
• Sharpness 50
• Color 50
• Tint 0
• Advanced Control
• Picture Reset
Screen (RGB-PC)
LED Local Dimming :On
EXTERNAL EQUIPMENT SETUP
35
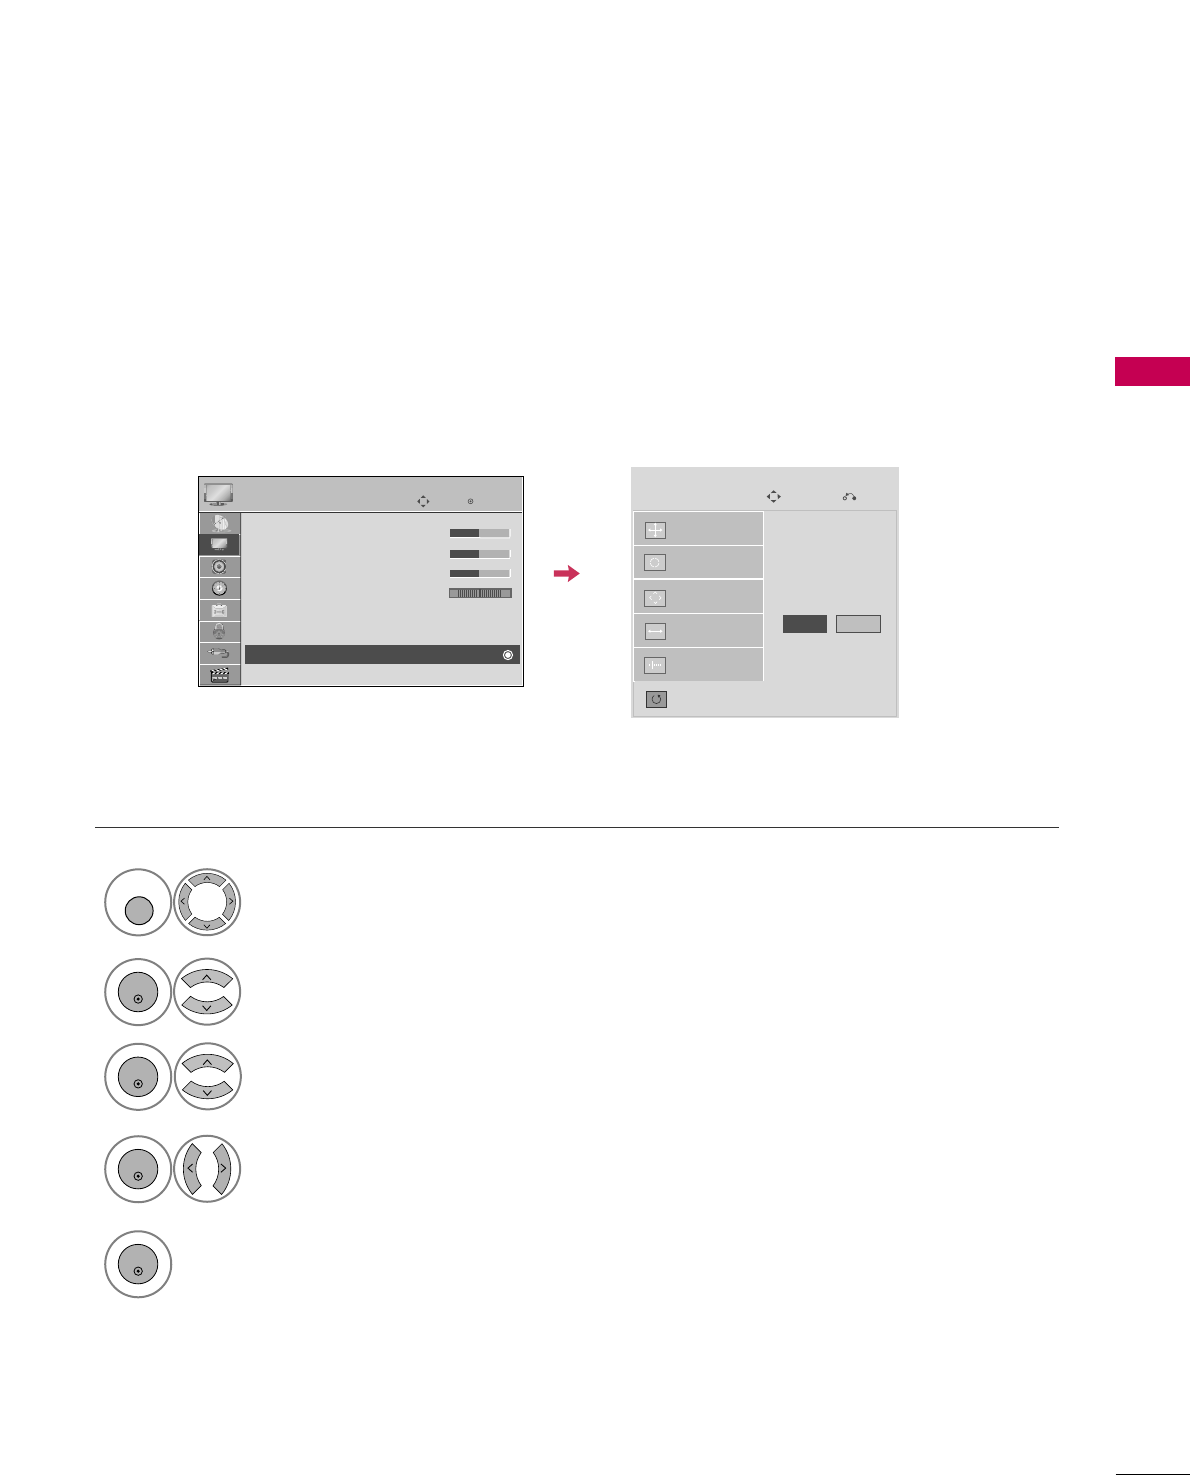
Screen Reset (Reset to original factory values)
Returns PPoossiittiioonn, SSiizzee, and PPhhaasseeto the default factory settings.
This feature operates only in RGB-PC mode.
Auto config.
Position
Resolution
Size
Phase
Reset
SCREEN
Move
Prev.
To Set
Select RReesseett.
3
ENTER
Select PPIICCTTUURREE.
Select SSccrreeeenn ((RRGGBB--PPCC)).
1
MENU
2
ENTER
Select YYeess.
4
ENTER
5
ENTER
Yes No
Enter
Move
PICTURE
E
RG
• Brightness 50
• Sharpness 50
• Color 50
• Tint 0
• Advanced Control
• Picture Reset
Screen (RGB-PC)
LED Local Dimming :On
EXTERNAL EQUIPMENT SETUP
36
OTHER A/V SOURCE SETUP
USB CONNECTION
EXTERNAL EQUIPMENT SETUP
USB IN
IN 4
AV IN 2
L/MONO
R
AUDIO
VIDEO
Memory Key
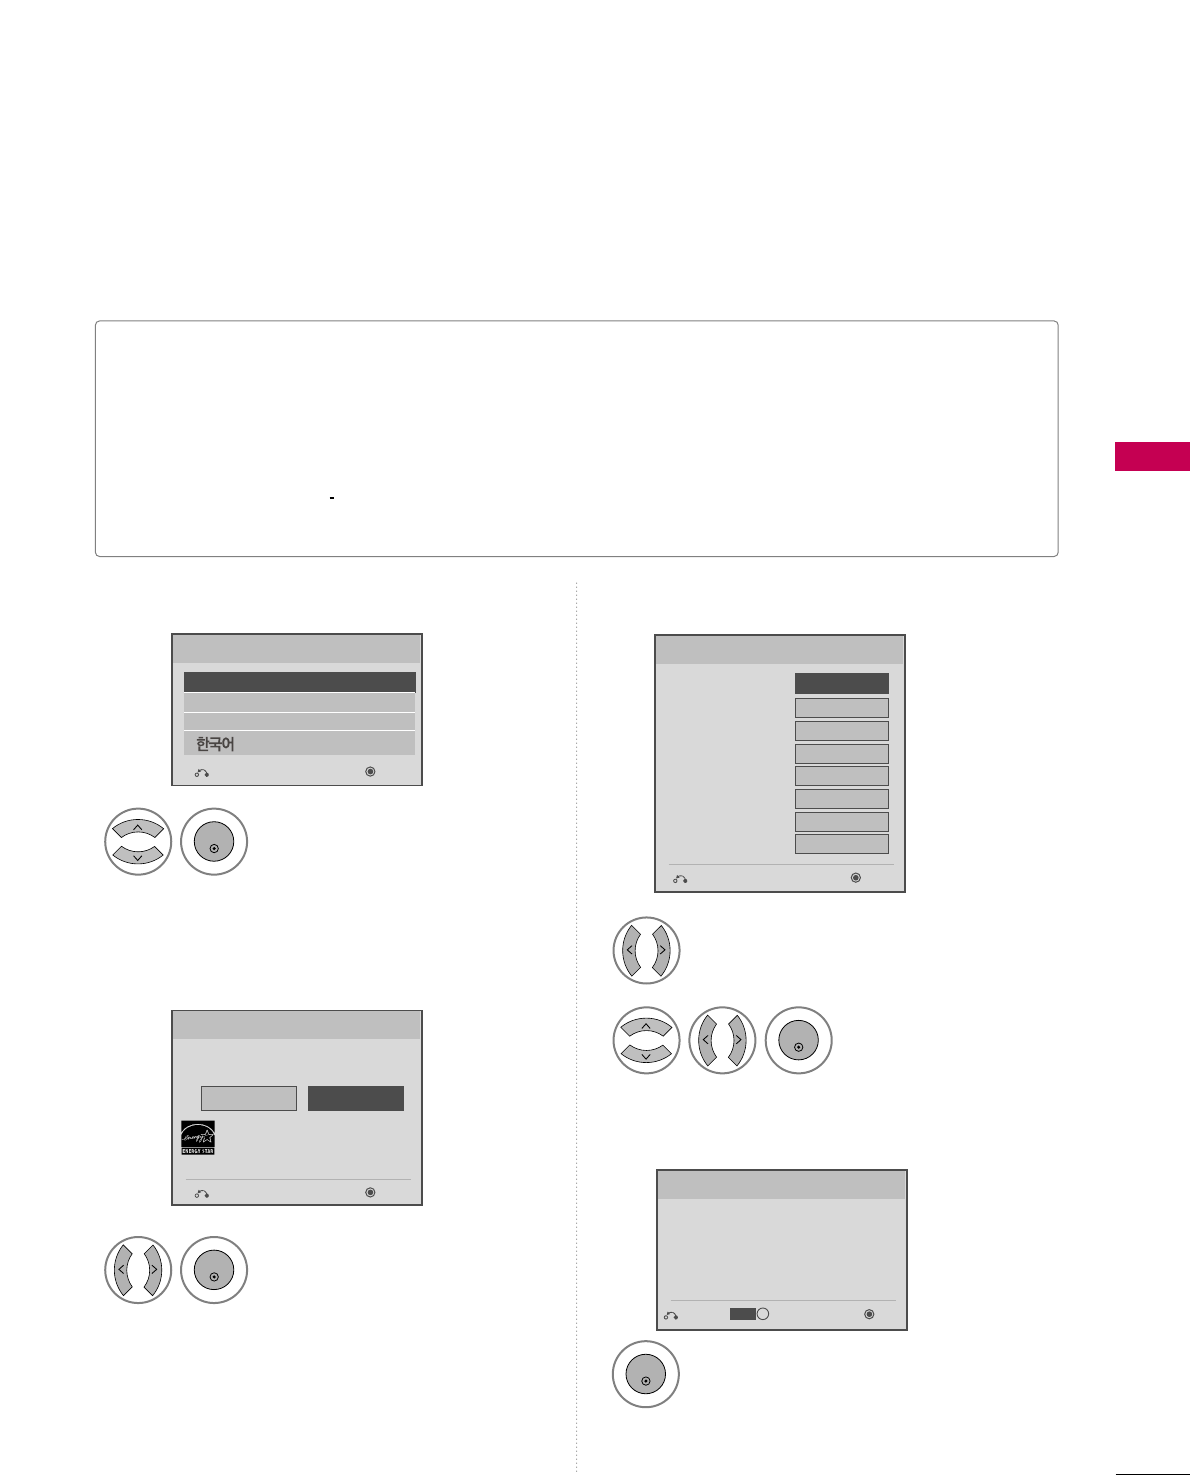
Connect the USB device to the UUSSBB IINNjack on the side
of the TV.
1. How to connect
1
2. How to use
■After connecting the UUSSBB IINNjack, you use the USB func-
tion. (GGpp..5588)
1
or
AV IN 2
L/MONO
R
AUDIO
VIDEO
USB IN
IN 4
L R
VIDEO
Camcorder
Video Game Set
Connect the AAUUDDIIOO/VVIIDDEEOOjacks
between TV and external equipment.
Match the jack colors
.
(Video = yellow, Audio Left = white, and
Audio Right = red)
1. How to connect
2. How to use
■Select the AAVV22input source on the TV using
the IINNPPUUTTbutton on the remote control.
■If connected to AAVV IINN 11input, select the AAVV11
input source on the TV.
■Operate the corresponding external equipment.
1
1
WATCHING TV / CHANNEL CONTROL
43
INITIAL SETTING
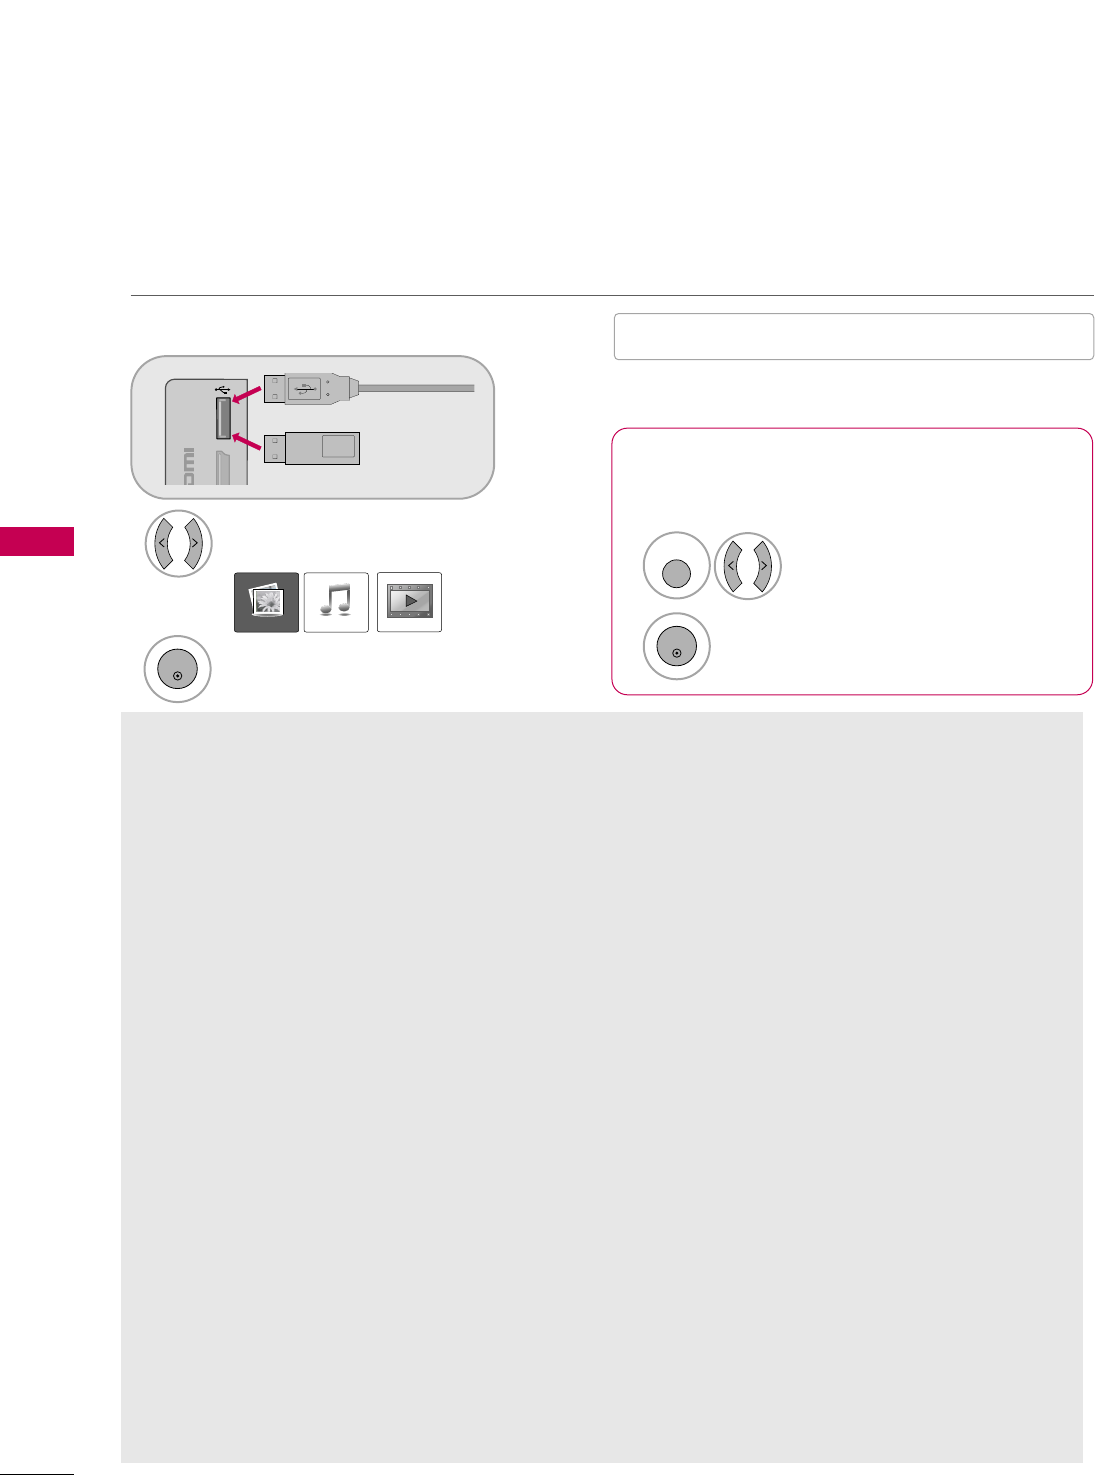
This Function guides the user to easily set the essential items for viewing the TV for the first time when pur-
chasing the TV. It will be displayed on the screen when turning the TV on for the first time. It can also be acti-
vated from the user menus.
■Default selection is “HHoommee UUssee”. We recommend setting the TV to “HHoommee UUssee” mode for the best pic-
ture in your home environment.
■“SSttoorree DDeemmoo” Mode is only intended for use in retail environments. Customers can adjust the “PPiiccttuurree
menu - PPiiccttuurree mmooddee” manually while inspecting the TV, but the TV will automatically return to preset in-
store mode after 5 minutes.
■“SSttoorree DDeemmoo” Mode is an optimal setting for displaying at stores. “Store Demo” mode initializes the TV
to set the image quality.
■You can also adjust IInniittiiaall SSeettttiinnggin the OOPPTTIIOONN menu.
Check your antenna connection and start
AAuuttoo TTuunniinngg.
1
ENTER
Step3. Time setting
Step4. Auto Tuning
Language
Step1. Selecting Language
English
Español
Français
Selecting the environment.
Choose the setting mode you want.
Select [Home Use] to use this TV at home.
To use this TV at Store, select [Store Demo].
Store Demo
Home Use
Mode Setting
Step2. Mode setting
NextPrevious
NextPrevious
Select AAuuttooor MMaannuuaall.
Select desired time
option.
1
2
ENTER
Month
Current Time Setting
02
Date 21
Year 2009
Hour 10 AM
Minute 10
Time Zone Eastern
Daylight Saving
Auto
FF Auto GG
Time Setting
NextPrevious
Before starting,
be sure that the
TV antenna is connected.
Auto Tuning
Next
Simple Manual
Previous
INFO
i
Select Menu Language.
1
ENTER
Select HHoommee UUssee.
1
ENTER
ENTRY MODES
USB
58
USB
When removing the USB device
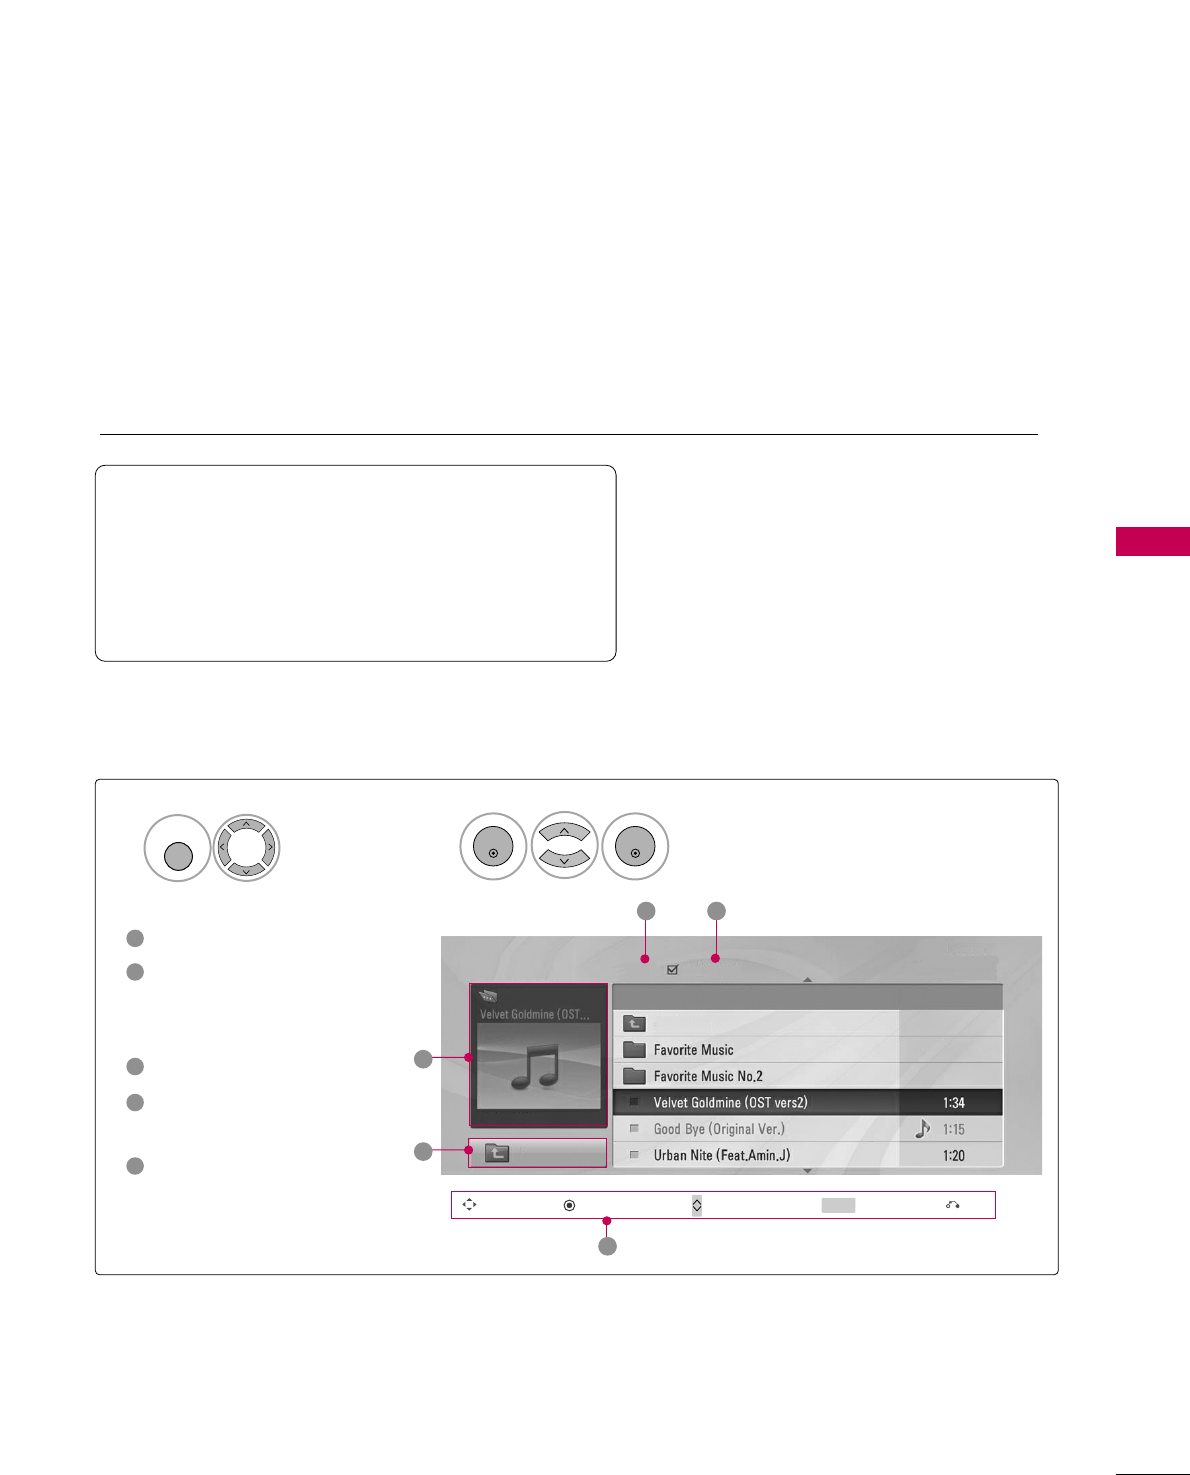
Connect the USB device to the UUSSBB IINN
jacks on the side of TV.
3
Select PPHHOOTTOO LLIISSTT, MMUUSSIICCLLIISSTTor
MMOOVVIIEELLIISSTT.
1
USB IN
IN 4
Memory Key
Select UUSSBB DDeevviiccee.
Select EEjjeecctt.
Select the UUSSBB DDeevviicceemenu before removing the
USB device.
2
ENTER
1
Q. MENU
2
ENTER
■This TV Supports on JPG, MP3 and HD Divx.
When you connect a USB device, this pop up menu is displayed automatically.
When the Pop Up menu does not appear, you can select Photo List, Music List or Movie List in the USB menu.
On a USB device, you can not add a new folder or delete an existing folder.
PHOTO LIST MUSIC LIST MOVIE LIST
or
Precautions when using the USB device
GGOnly a USB storage device is recognizable.
GGIf the USB storage device is connected through a
USB hub, the device is not recognizable.
GGA USB storage device using an automatic recogni-
tion program may not be recognized.
GGA USB storage device which uses its own driver may
not be recognized.
GGThe recognition speed of a USB storage device may
depend on each device.
GGIn case of a card reader, up to four memory cards are
concurrently recognizable.
GGPlease do not turn off the TV or unplug the USB
device when the connected USB storage device is
working. When such device is suddenly separated or
unplugged, the stored files or the USB storage
device may be damaged.
GGOnly use a USB storage device which has normal
music, image or movie files.
GGPlease connect power to a USB storage device (over
0.5A) which requires an external power supply. If
not, the device may not be recognized.
GGPlease connect a USB storage device with cable is
offered by USB maker. If connected with cable is
not offered by USB maker or an excessively long
cable, the device may not be recognized.
GGSome USB storage devices may not be supported or
operate properly.
GGFile alignment method of USB storage device is sim-
ilar to Window XP and filename can recognize up to
100 English characters.
GGPlease backup important files because data on the
USB device may be damaged. Data management is
the consumer's responsibility and as a result, the
manufacturer does not cover data damage.
GG
Please use only a USB storage device which was for-
matted as a FAT32, NTFS file system provided with the
Windows operating system. In case of a storage device
formatted as a different utility programme which is not
supported by Windows, it may not be recognized.
GG
Data in a USB storage device cannot be deleted in the
NTFS file system.
GGIf your USB memory device has multiple partitions,
or if you use a USB multi-card reader, you can use
up to 4 partitions or USB memory devices.
GG
The recommended capacity is 1TB or less for a USB
external hard disk and 32GB or less for USB memory.
GG
Any device with more than the recommended capacity
may not work properly.
GG
If a USB external hard disk with a "Energy Saving" func-
tion does not work, turn the hard disk off and on again
to make it work properly.
Refer to the user manual of
the application USB external hard disk.
GG
When using a USB HDD via the USB extensing cable,
connect a support electric power source.
■
Image shown may differ from your TV.
MUSIC LIST
USB
63
You can use the Music List menu to play MP3 files from a USB storage device.
This TV cannot play back copy-protected files.
The On-Screen Display on your model may be slightly different.
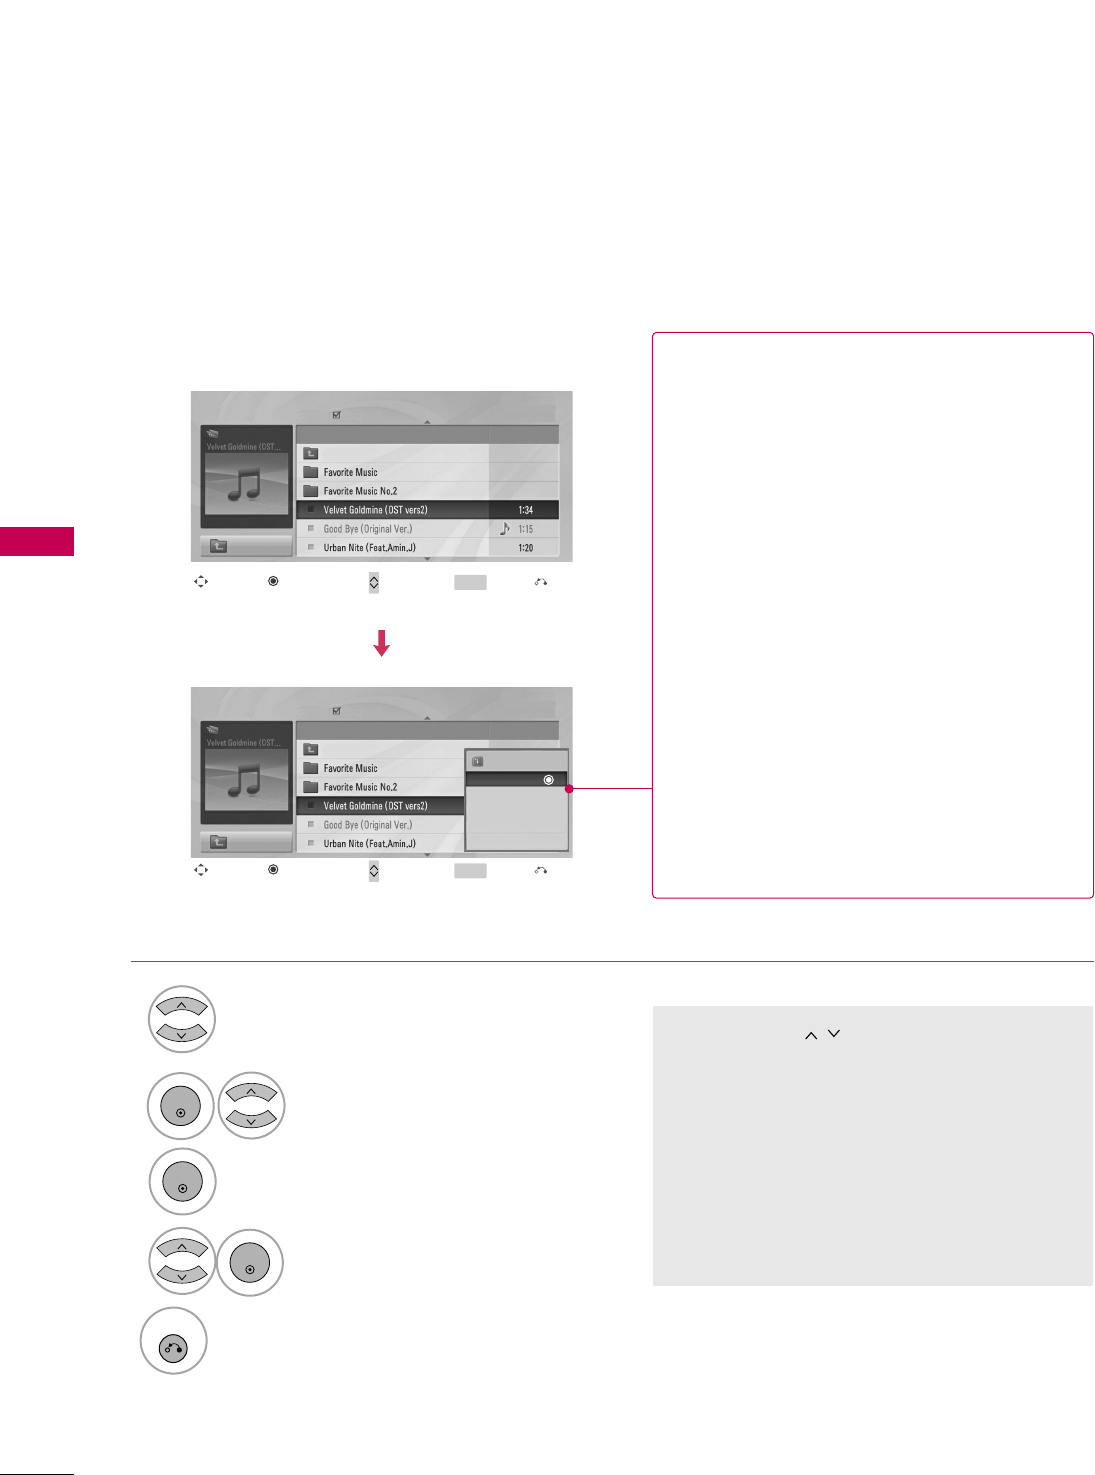
Screen Components
Moves to upper level folder
Preview: If any album jacket
for the file exists, this jack-
et is displayed.
Current page/Total pages
Total number of marked
musics
Corresponding buttons on
the remote control
1
3
4
5
2
Select UUSSBB.Select MMuussiicc LLiisstt.
12
MENU
ENTER
ENTER
Music List
Up Folder
Title Duration
3 4
2
1
Page 2/3 No Marked
Drive1
Navigation Popup Menu Page Change Mark Exit
CH MARK
5
AA 00:00 / 04:16
Up Folder
Supported music file: *.MP3
Bit rate range 32 Kbps - 320 Kbps
• Sampling rate (Sampling Frequency)
MPEG1 layer 3: 32 kHz, 44.1 kHz, 48 kHz
MPEG2 layer 3: 16 kHz, 22.05 kHz, 24 kHz
MPEG2.5 layer 3: 8 kHz, 11.025 kHz, 12 kHz
USB
64
USB
Music Selection and Popup Menu
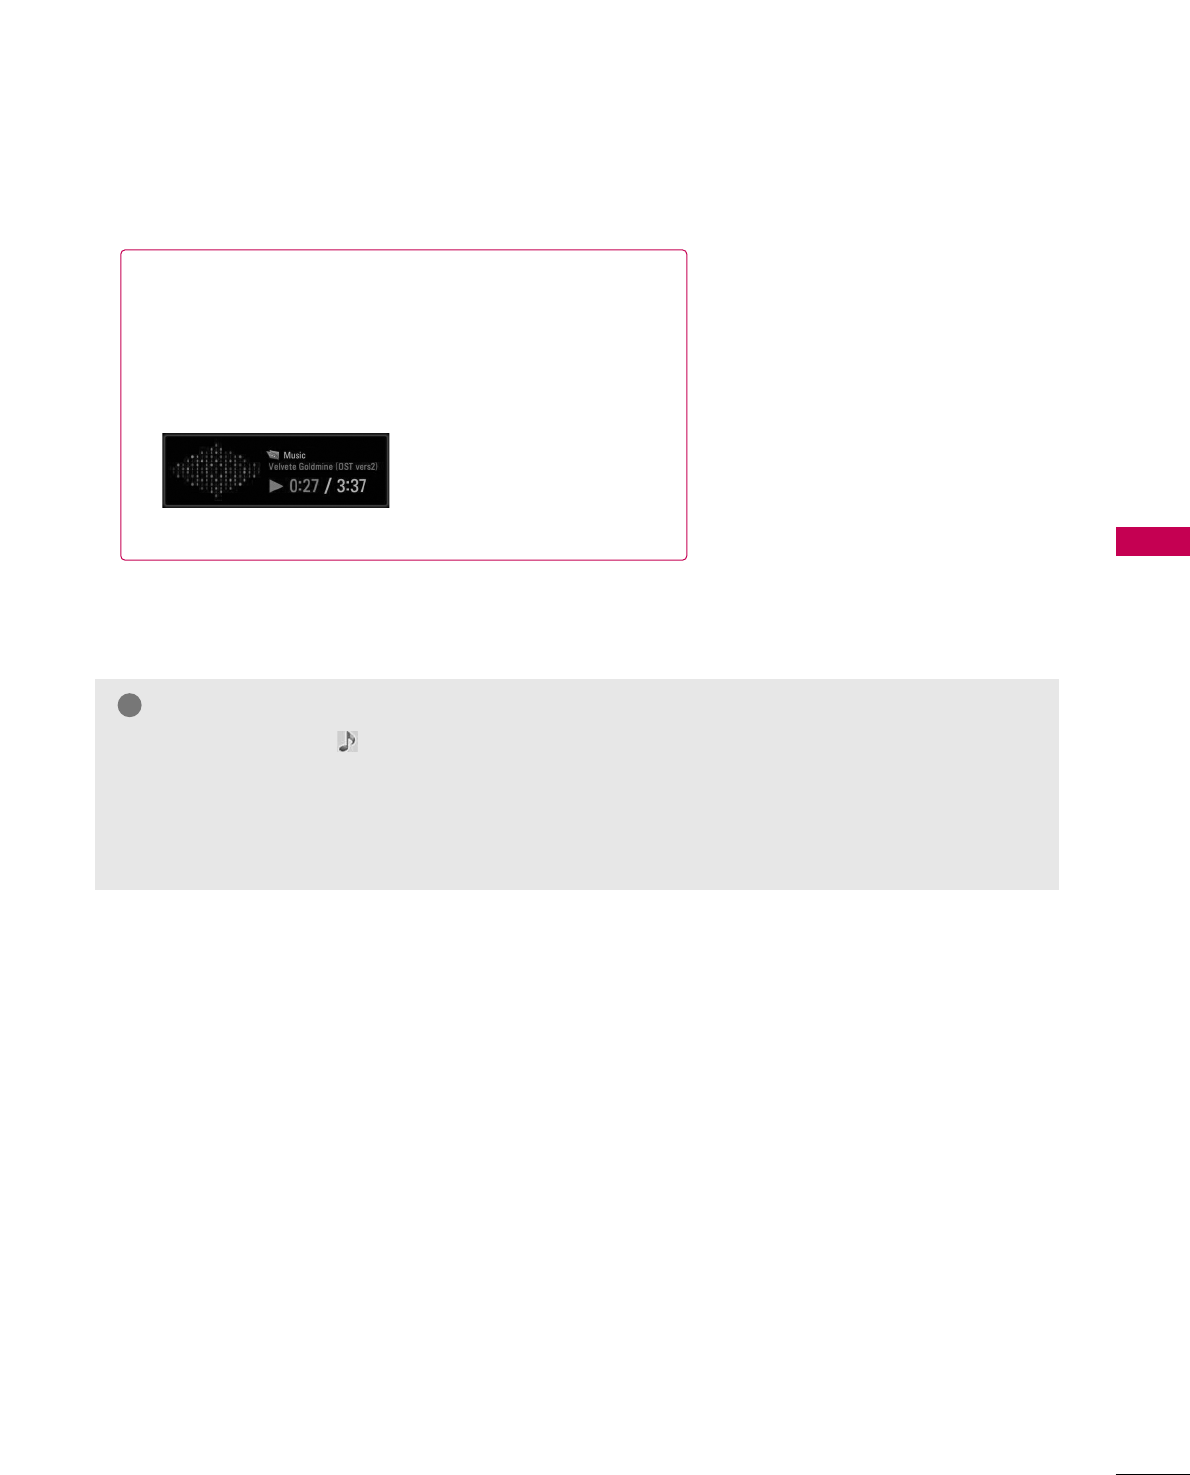
■Use the CCHH button to navigate in the
music page.
■Use the MMAARRKKbutton to mark or unmark a
music file. If no music is marked, all the music
in the folder will be played in sequence. When
one or more music files are marked, the
marked music files will be played in sequence.
If you want to listen to only one song repeat-
edly, just mark that one file and play.
Select the target folder or drive.
Select the desired musics.
Show the Popup menu.
Select the desired Popup menu.
2
3
1
4
ENTER
ENTER
ENTER
5
RETURN
Return to TV viewing.
Navigation Page Change Mark Exit
CH MARK
Popup Menu
Navigation Page Change Mark Exit
CH MARK
Popup Menu
Page 2/3
No Marked
Music List
Up Folder
AA 00:00 / 04:16
Up Folder
Drive1 Title
Duration
Page 2/3
No Marked
Music List
Up Folder
AA 00:00 / 04:16
Up Folder
Drive1 Title
Duration
3945 KB
128 Kbps
Play
Play with Photo
Mark All
Delete
Close
GGPPllaayy (During stop): Play the selected file.
Once a song finishes playing, the next selected
one will be played. When there are no selected
files to play, the next one in the current folder
will be played. If you go to a different folder and
press the EENNTTEERRbutton, the current song in
playback will stop.
GGPPllaayy MMaarrkkeedd: Play the selected files. Once a
file finishes playing, the next selected one will
be played automatically.
GGSSttoopp PPllaayy (During playback): Stop the play-
ing files.
GGPPllaayy wwiitthh PPhhoottoo: Start playing the selected
files and then move to the Photo List.
GGMMaarrkk AAllll: Mark all files in the folder.
GGUUnnmmaarrkk AAllll: Deselect all marked files.
GGDDeelleettee or DDeelleettee MMaarrkkeedd: Delete the selected
files.
GGCClloossee: Close the pop-up menu.
USB
65
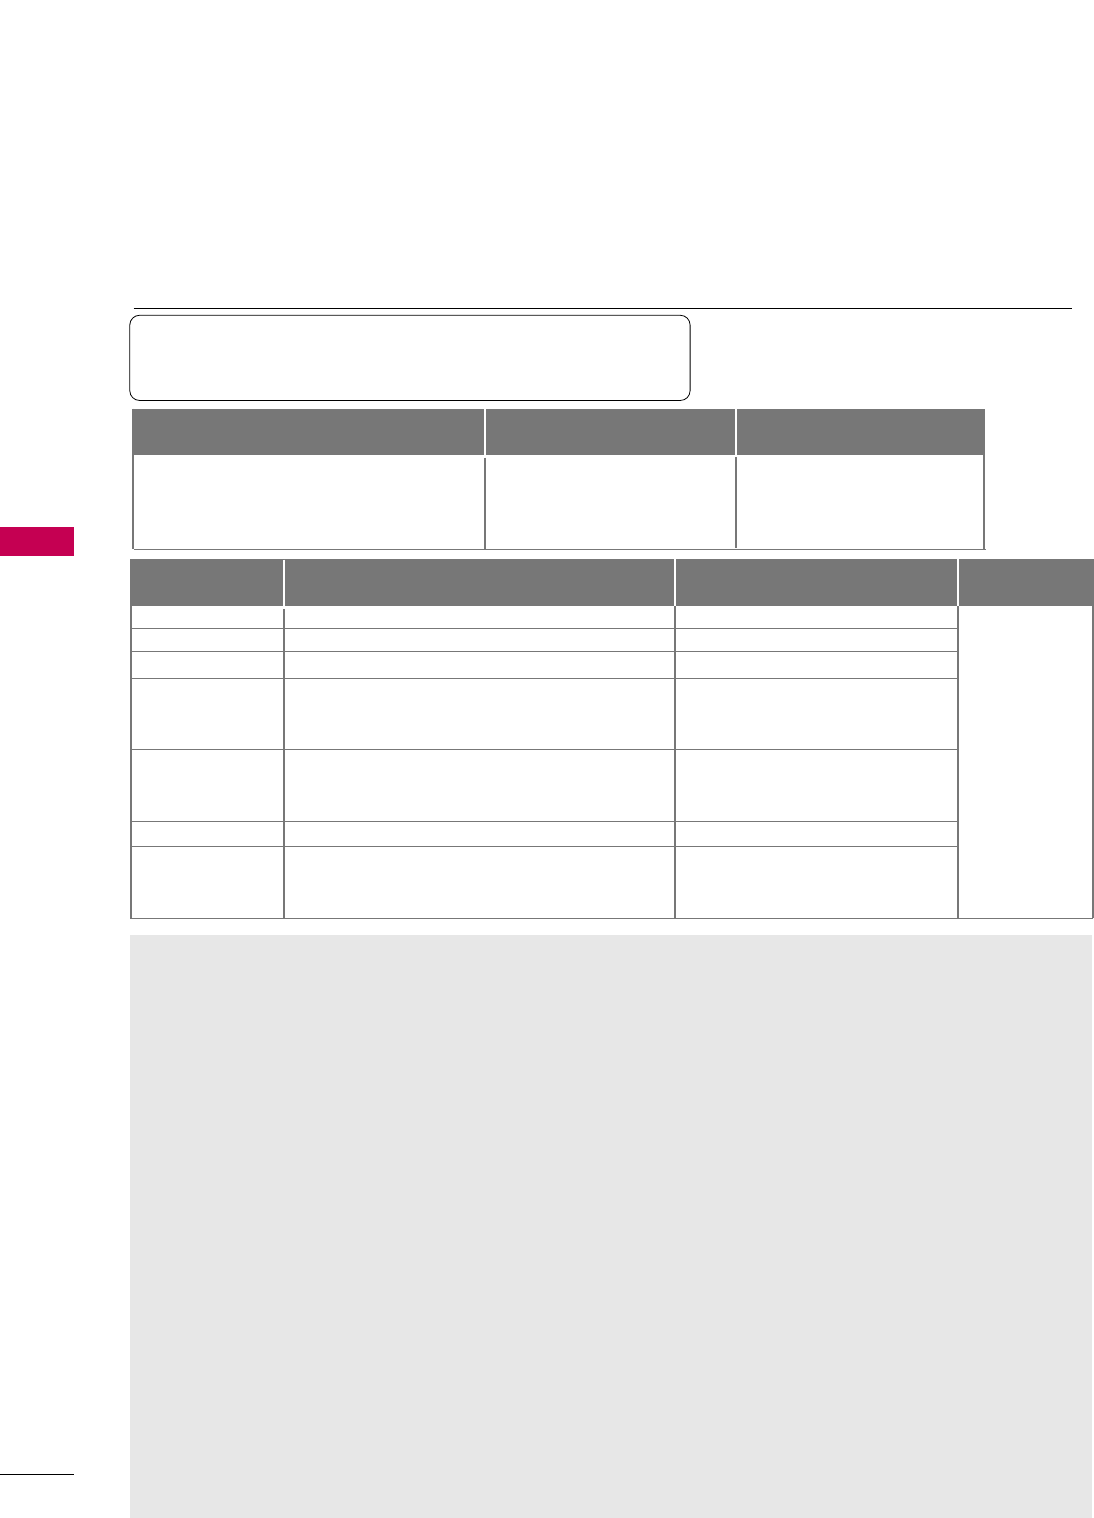
■The play information box (as shown below) will automatically
move across the screen when there is no user input to pre-
vent a fixed image remaining on the screen for a extended
period of time.
NOTE
!
GGWhen music is playing, is displayed in front of the music play time.
GGA damaged or corrupted music file that does not play displays 00:00 as the play time.
GGA music downloaded from a paid service with copyright protection does not start but displays inappro-
priate information in playtime.
GGPress EENNTTEERR, AAor RREETTUURRNN button to stop the screen saver.
MOVIE LIST
USB
66
USB
The movie list is activated once a USB drive is detected. It is used when playing movie files on TV.
Displays the movies in the USB folder and supports play.
Allows playback of all movies in the folder but you can not delete the movies.
Editing such as delete and add is not allowed. It is a movie list that displays folder information and DivX file.
Precautions when playing the movie
GG
Some user-created subtitles may not work properly.
GG
Some special characters are not supported in subtitles.
GG
HTML tags are not supported in subtitles.
GG
Subtitles in languages other than the supported lan-
guages are not available.
GGTime information in an external subtitle file should
be arranged in ascending order to be played.
GG
The screen may suffer temporary interruptions (image
stoppage, faster playback, etc.) when the audio lan-
guage is changed.
GG
A damaged video file may not play correctly, or
some player functions may not be usable.
GG
Video files produced with some encoders may not
play correctly.
GG
If the video and audio structure of recorded file is
not interleaved, either video or audio is outputted.
GG
HD videos with a maximum of 1920x1080@25/30P or
1280x720@50/60P are supported, depending on the
frame rate.
GG
Videos with resolutions higher than 1920X1080@25/30P
or 1280x720@50/60P may not work properly depending
on the frame rate.
GG
Video files other than the specified types and for-
mats may not work properly.
GG
The video file encoded by the GMC (Global Motion
Compensation) is not supported.
GG
Only the files saved in ASCII CODE is supported in
subtitles.
GG
Only 250 Korean characters, 500 alphabets and
500 numbers are supported for each line of the
subtitle.
GG
Only 10,000 of sync blocks can be supported with-
in the subtitle file.
GG
Max bitrate of playable movie file is 20Mbps.
GG
We do not guarantee smooth playback of profiles
encoded level 4.1 or higher in H.264.
GG
DTS Audio codec is not supported.
GG
A video file more than 30GB in file size is not sup-
ported for playback.
GGPlaying a video via a USB connection that doesn’t
support high speed may not work properly.
GGUSB storage devices below USB 2.0 are supported
as well. But they may not work properly in the
movie list.
GGThe video file and the subtitle file must be locat-
ed in the same folder.
GGThe name of the video file and the subtitle file
must be the same to view the subtitles normally.
GGWhen you are watching the movie by Movie List
function, you can adjust the picture by EENNEERRGGYY
SSAAVVIINNGGand AAVV MMOODDEEbutton on the remote
control. User setup for each picture mode does
not operate.
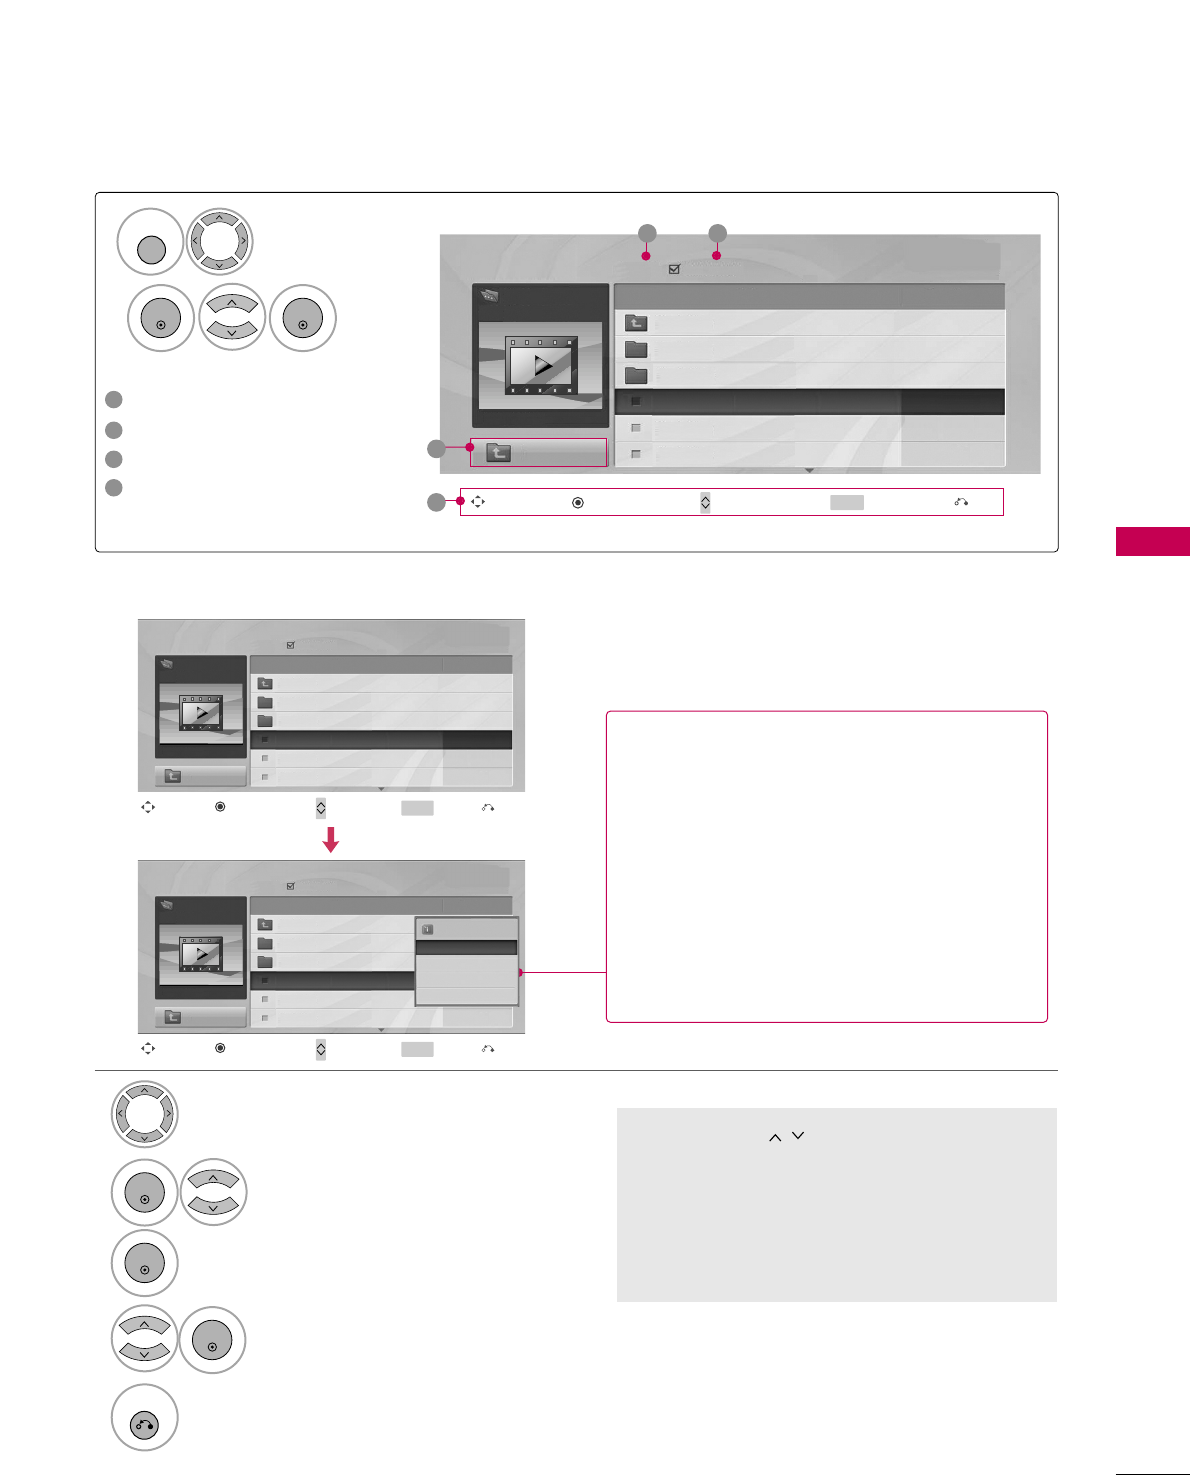
Movie(*.dat/*.mpg/*.mpeg/*.ts/*.trp/*.tp/*.vob/*.mp4/*.mkv/
*.avi/*.divx) supporting file
Bit rate : within 32 ~320kbps(MP3)
mpg, mpeg, vob
dat
ts,trp,tp
mp4
avi
mkv
divx
Video Codec
MPEG1, MPEG2
MPEG1
MPEG2, H.264/AVC
MPEG4 SP, MPEG4 ASP, Divx 3.11, Dvix 4.12, Dvix 5.x
Dvix 6, Xvid 1.00, Xvid 1.01, Xvid 1.02, Xvid 1.03
Xvid 1.10–beta 1, Xvid 1.10-beta 2, H.264/AVC
MPEG 2, MPEG 4 SP, MPEG4 ASP, Divx 3.11, Divx 4, Divx 5, Divx 6
Xvid 1.00, Xvid 1.01, Xvid 1.02, Xvid 1.03, Xvid 1.10–beta 1
Xvid 1.10–beta 2, H.264/AVC
H.264/AVC, MPEG 1, MPEG 2, MPEG 4 SP , MPEG4 ASP
MPEG 2, MPEG 4 SP, MPEG4 ASP, Divx 3.11, Divx 4, Divx 5, Divx 6
Xvid 1.00, Xvid 1.01, Xvid 1.02, Xvid 1.03, Xvid 1.10–beta 1
Xvid 1.10–beta 2, H.264/AVC
Dolby Digital, MPEG, MP3, LPCM
Dolby Digital, MPEG, MP3, LPCM
Dolby Digital, AAC, MPEG
Dolby Digital, HEAAC, AAC, MPEG, MP3,
LPCM
Dolby Digital, HEAAC, AAC, MPEG, MP3,
LPCM
Dolby Digital, HEAAC, AAC, MPEG, MP3, LPCM
Dolby Digital, HEAAC, AAC, MPEG,MP3,
LPCM
1920 x 108 0 P
@25/30P,
1280x720P
@50/60P
Audio Codec Resolution
Extension name
Video Format Audio Format Subtitle format
DivX3.11, DivX4.12, DivX5.x, DivX6, Xvid1.00,
Xvid1.01, Xvid1.02, Xvid1.03, Xvid 1.10-beta-
1/beta-2, Mpeg-1, Mpeg-2, Mpeg-4, H.264/AVC
Dolby Digital, AAC, Mpeg, MP3,
LPCM, HEAAC
*.smi/*.srt/*.sub(MicroDVD,
SubViewer1.0/2.0)/*.ass/*.ssa/*.
txt(TMPlayer)/*.psb(PowerDivx)
USB
67
Page 2/3 No Ma rked
Movie List
Up Folder
640x480, 707MB
Up Folder
Title Duration
KR1
KR2
SJS001
SJS002
SJS003
SJS001
Drive1
Navigation Page Change Mark Exit
CH MARK
Popup Menu
Movie Selection and Popup Menu
■Use the CCHH button to navigate in the
movie page.
■Use the MMAARRKKbutton to mark or unmark a
movie file. When one or more movie files are
marked, the marked movie files will be played
in sequence.
Select the target folder or drive.
Select the desired movies.
Show the Popup menu.
Select the desired Popup menu.
2
3
1
4
ENTER
ENTER
ENTER
5
RETURN
Return to the previous menu.
Page 2/3 No Ma rked
Movie List
Up Folder
640x480, 707MB
Up Folder
Title Duration
KR1
KR2
SJS001
SJS002
SJS003
00:02:08
00:00:00
00:00:00
SJS001
Drive1
Navigation Page Change Mark Exit
CH MARK
Popup Menu
624x352, 699MB
Play
Mark All
Delete
Close
00:00:00
GGPPllaayy: Play the selected file.
DivX play is executed while the screen changes.
GGPPllaayy MMaarrkkeedd: Play the selected files. Once a
movie finishes playing, the next selected one
will be played automatically.
GGMMaarrkk AAllll: Mark all files in the folder.
GGUUnnmmaarrkk AAllll: Deselect all marked files.
GGDDeelleettee or DDeelleettee MMaarrkkeedd(FAT32 file system
only): Delete the selected file.
GGCClloossee: Close the pop-up menu.
Page 2/3 No Marked
Movie List
Up Folder
640x480, 707MB
Up Folder
Drive1 Title Duration
KR1
KR2
SJS001
SJS002
SJS003
00:02:08
00:00:00
00:00:00
SJS001
2 3
1
Navigation Popup Menu Page Change Mark Exit
CH MARK
4
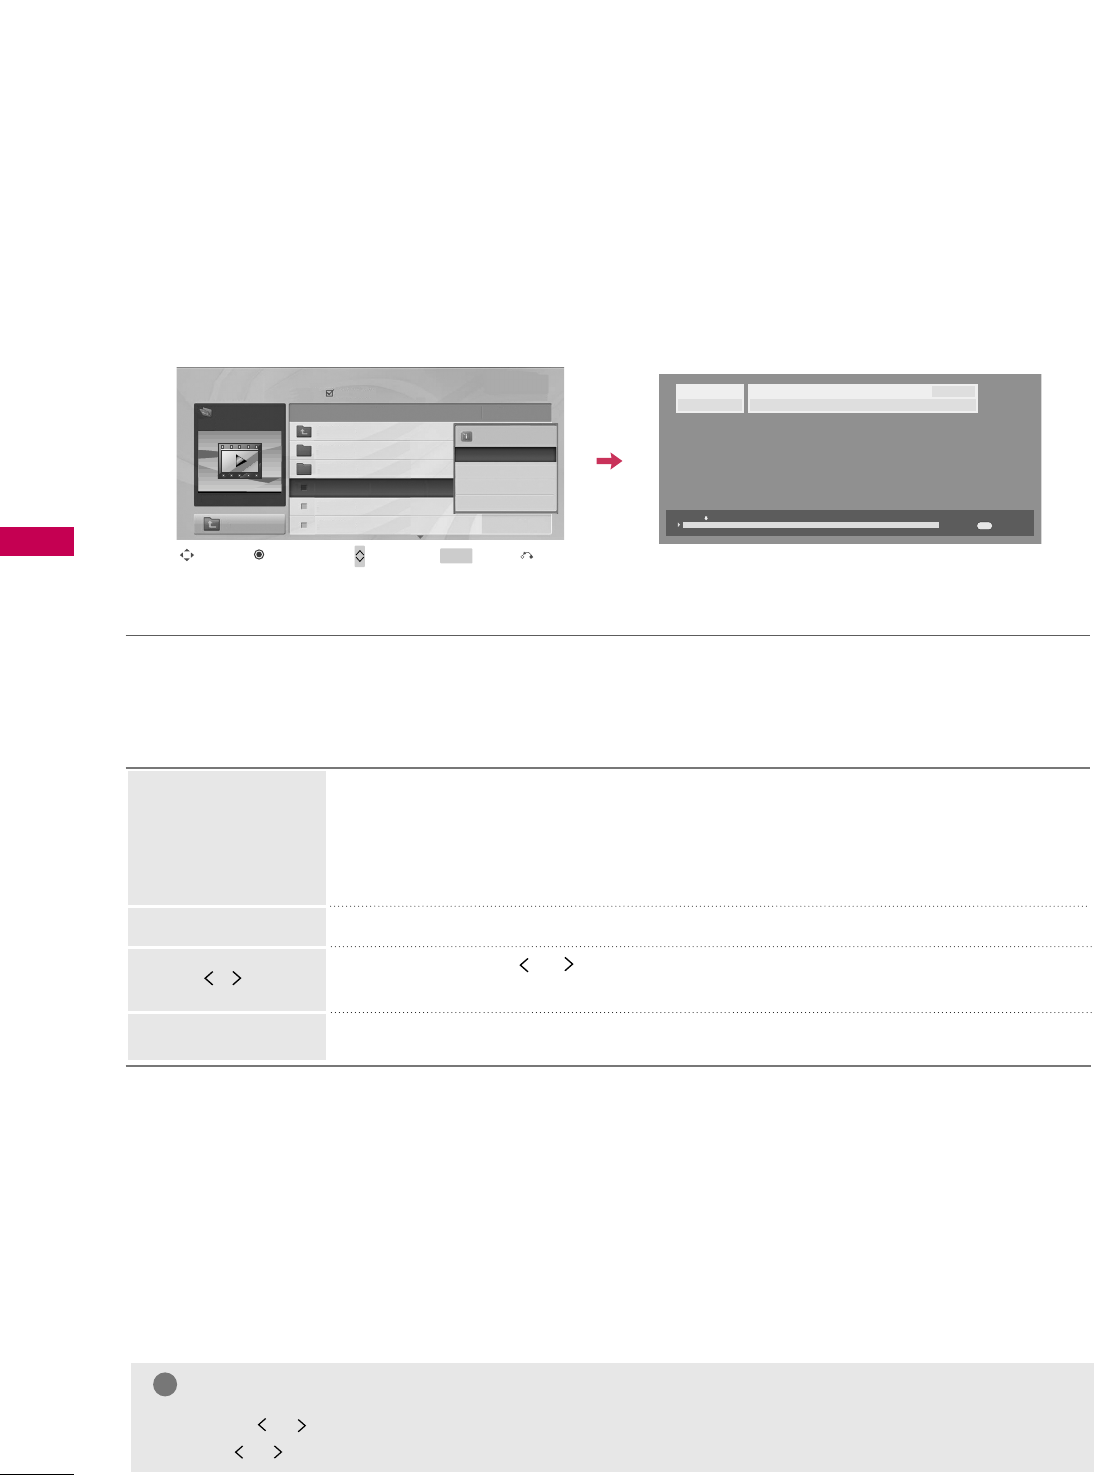
Screen Components
Select UUSSBB.
Select MMoovviieeLLiisstt.
1
2
MENU
ENTER
ENTER
Moves to upper level folder
Current page/Total pages
Total number of marked movie
Corresponding buttons on the
remote control
1
3
4
2
USB
68
USB
Option Menu Selection
Page 2/3 No Ma rked
Movie List
Up Folder
640x480, 707MB
Up Folder
Title Duration
KR1
KR2
SJS001
SJS002
SJS003
SJS001
Drive1
Navigation Page Change Mark Exit
CH MARK
Popup Menu
624x352, 699MB
Play
Mark All
Delete
Close
00:00:00
00:00:15 00:02:08
Option
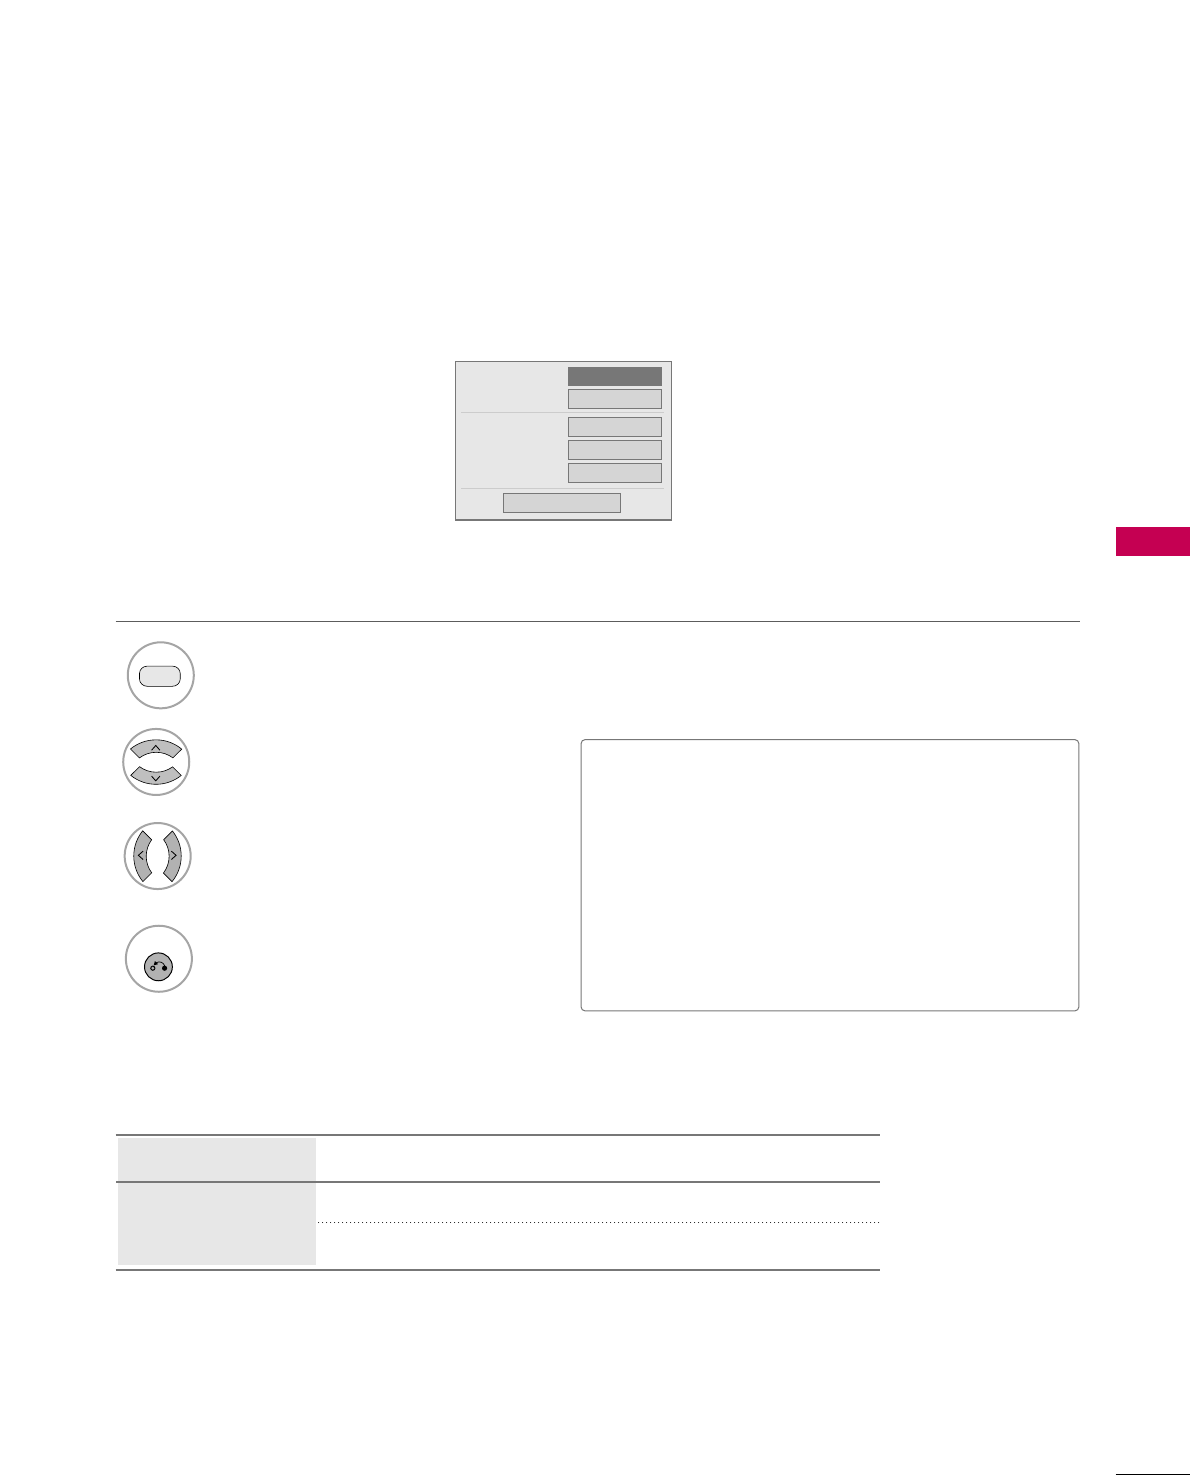
Using the remote control
When playing, repeatedly press the RREEWW((FFFF))button to speed up FFFF -> FFFFFF->
FFFFFFFF-> FFFFFFFFFF->FFFFFFFFFFFF.
repeatedly press the FFFF((GGGG))button to speed up GGGG-> GGGGGG-> GGGGGGGG-> GGGGGGGGGG
-> GGGGGGGGGGGG.
■Pressing these buttons repeatedly increases the fast forward/reverse speed.
During playback, press the PPaauussee((IIII))button and a still screen will be displayed.
■When using the or buttons during playback a cursor indicating the position
can be viewed on the screen.
Press the PPLLAAYY((GG))button to return to normal playback.
FFFF /GGGG
PPLLAAYY((GG))
IIII
You can adjust various method during movie play.
USB
640 x 480
SJS001
H.264 / AAC_HAAC
12:31AM
NOTE
!
GGUse the ( / ) bottons to move to a specific frame forward or backward while playing a movie.
(The ( / )bottons may not work properly for some files while playing a movie.)
USB
69
DivX Audio Language & Subtitle Language
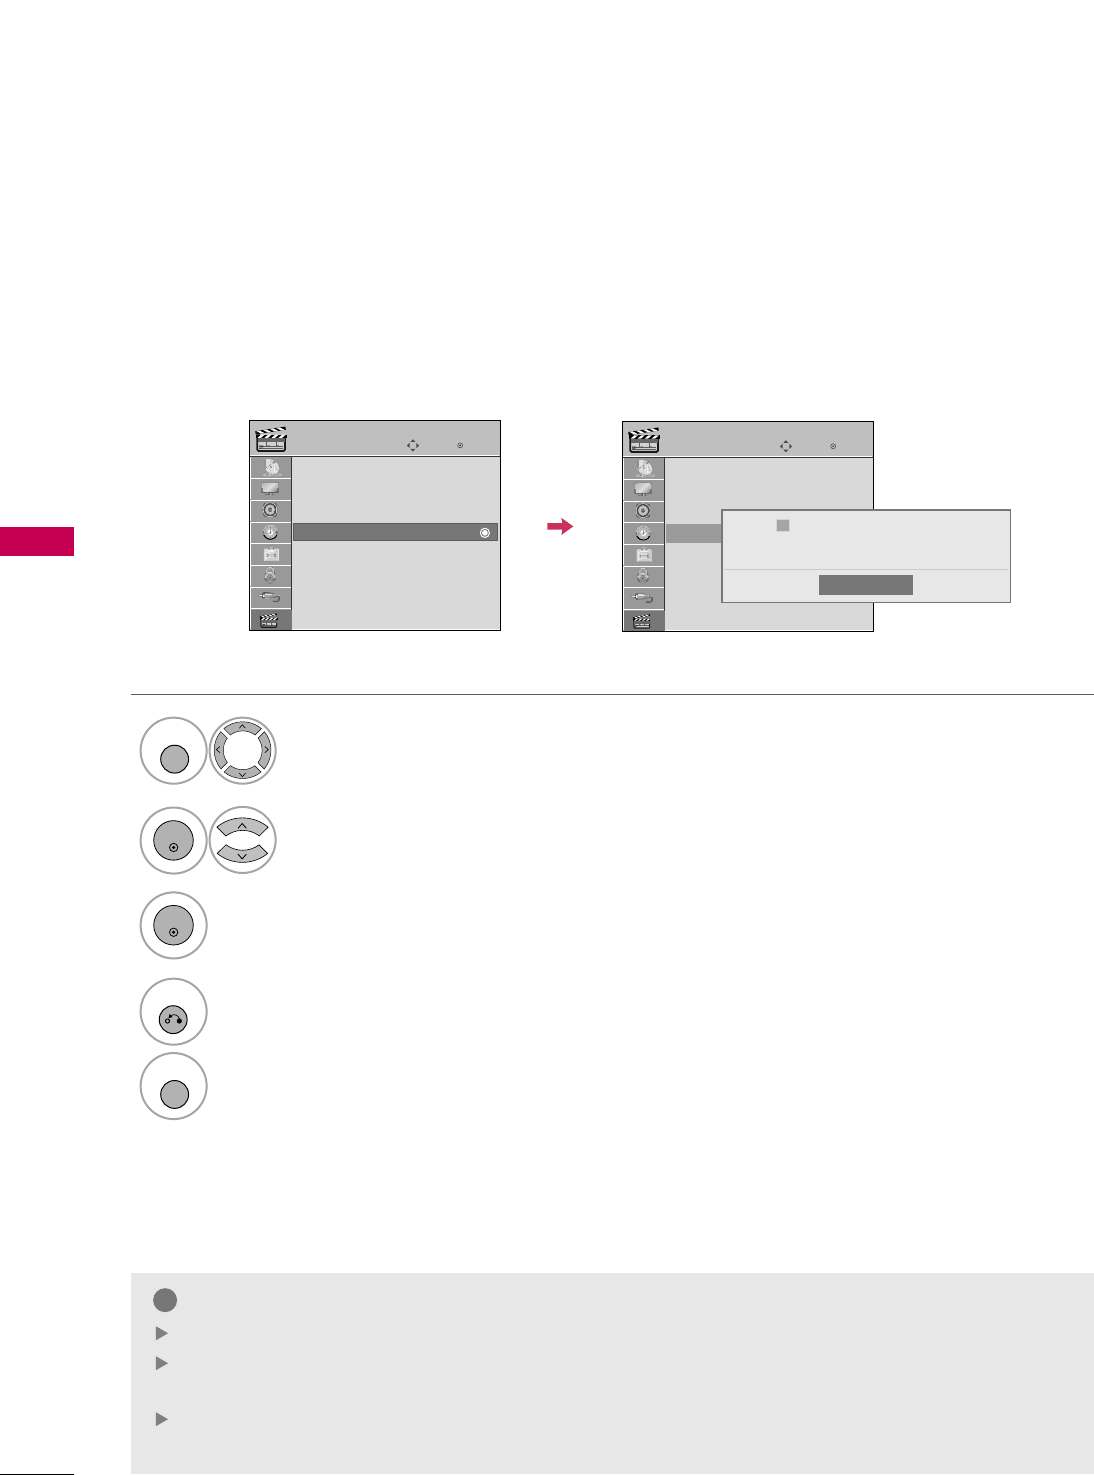
When DivX is playing, the above menu is displayed.
1
RED
3
Select PPiiccttuurree SSiizzee,, AAuuddiioo LLaanngguuaaggee,,
SSuubbttiittllee LLaanngguuaaggee,, SSyynncc or PPoossiittiioonn.
4
RETURN
Return to movie viewing.
Select the desired option.
2
Picture Size
Audio Language
Subtitle Language
. Sync
. Position
FF Full GG
1
0
0
Close
Off
GGPPiiccttuurree SSiizzee: Select the Full screen or Original size.
GGAAuuddiioo LLaanngguuaaggee: Select the language.
But, the file with only one audio can not be selected.
GGSSuubbttiittllee LLaanngguuaaggee: The subtitle can be turned on or off.
If there are two or more subtitles, you can select one of
them.
• SSyynncc: When the video is not synchronized with the caption,
it can be adjusted by the unit of 0.5 second.
• PPoossiittiioonn: Move the location of the subtitle.
Country Group Subtitle Language Group Supported Language
US English, Spanish, French
English, Korean
Latin1
Korean
DIVX REGISTRATION CODE
USB
70
USB
Display DDiivvXX RReegg.. CCooddee.
3
ENTER
Select UUSSBB.
Select DDiivvXX RReegg.. CCooddee.
1
MENU
2
ENTER
Confirm the DivX registration code number of the TV. Using the registration number, movies can be rented or pur-
chased at www.divx.com/vod.
With a DivX registration code from another TV, playback of rented or purchased DivX file is not allowed. (Only DivX
files matched with the registration code of the purchased TV are playable.)
4
RETURN
Return to the previous menu.
MENU
Return to TV viewing.
Enter
Move
USB
Photo List
Music List
Movie List
DivX Reg. Code
Deactivation
Enter
Move
USB
Photo List
Music List
Movie List
DivX Reg. Code
Deactivation
Close
DivX(R) Video On Demand
Your registration code is : XXXXXXXXXX
To learn more visit www.divx.com/vod
ii
NOTE
!
When loading, some buttons may not work.
If you use the DivX registration code of another device, the rented or purchased DivX file cannot be
played. Therefore always use the DivX registration code assigned to this product.
The video or audio of a file converted based on a standard other than the DivX codec standard may be
corrupted or unable to be played.
DEACTIVATION
USB
71
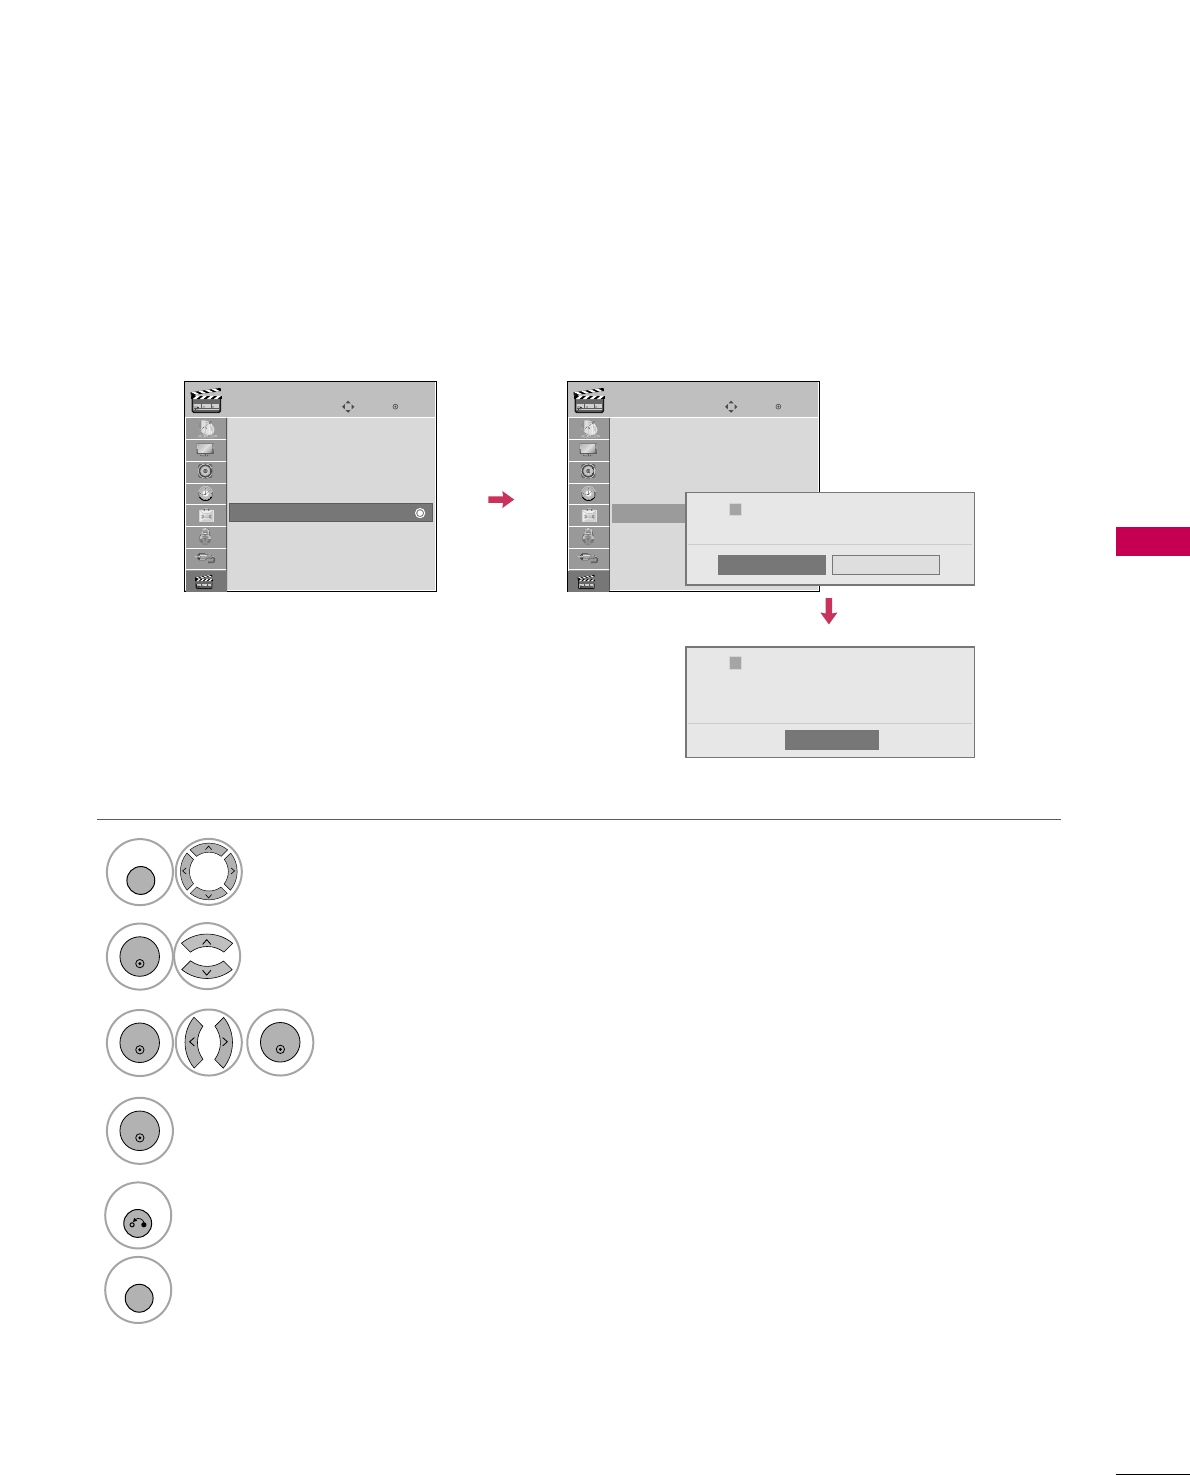
Select UUSSBB.
1
MENU
Select YYeess.
3
Select DDeeaaccttiivvaattiioonn.
2
ENTER
5
RETURN
Return to the previous menu.
Select CClloossee.
MENU
Return to TV viewing.
ENTER
ENTER
4
Delete the existing authentication information to receive a new DivX user authentication for TV.
Once this function is executed, a DivX user authentication is required again to see DivX DRM files.
Close
DivX(R) Video On Demand
This device is deactivated.
Your deactivation code is : XXXXXXXX
To learn more visit www.divx.com/vod
ii
ENTER
Enter
Move
USB
Photo List
Music List
Movie List
DivX Reg. Code
Deactivation
Enter
Move
USB
Photo List
Music List
Movie List
DivX Reg. Code
Deactivation
Yes
DivX(R) Video On Demand
Do you want to deactivate your device?
No
ii
PICTURE CONTROL
76
PRESET PICTURE SETTINGS (PICTURE MODE)
PICTURE CONTROL
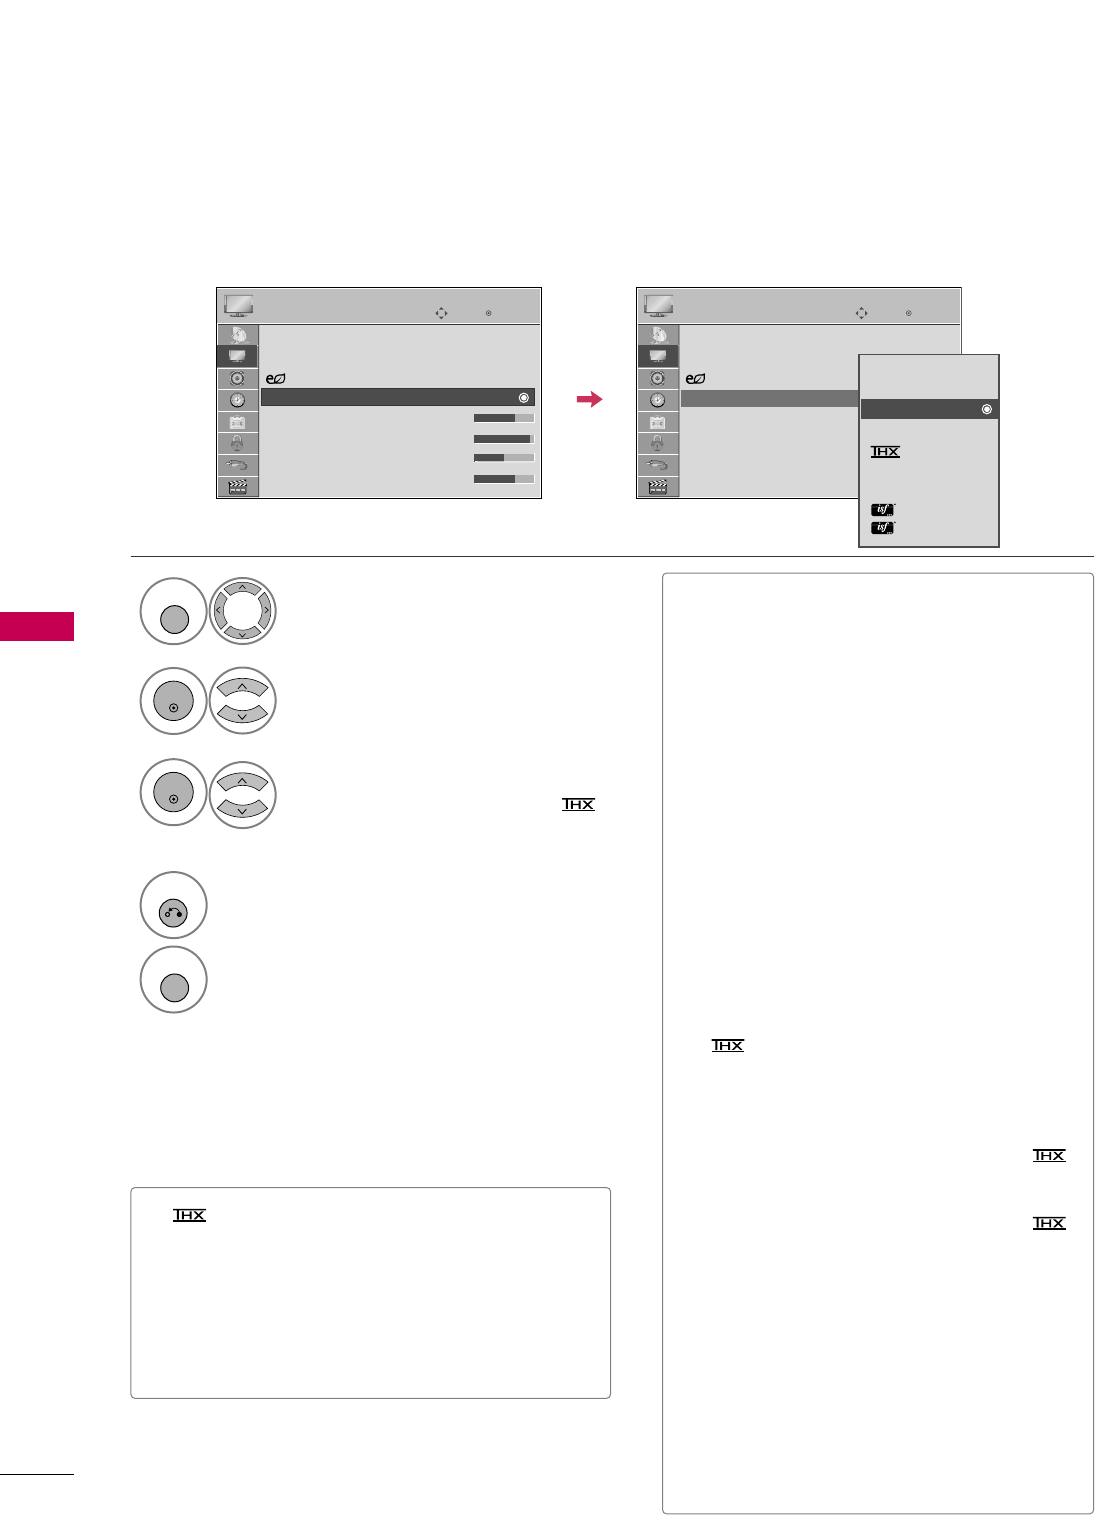
There are factory presets for picture settings available in the user menus. You can use a preset, change each
setting manually, or use the Intelligent Sensor.
Select PPIICCTTUURREE.
Select PPiiccttuurree MMooddee.
Select IInntteelllliiggeenntt SSeennssoorr, VViivviidd,
SSttaannddaarrdd, NNaattuurraall, CCiinneemmaa//
CCiinneemmaa (For 42/47/55LH90),
SSppoorrtt, or GGaammee.
1
MENU
3
2
ENTER
ENTER
4
RETURN
Return to the previous menu.
MENU
Return to TV viewing.
Enter
Move
PICTURE
E
Enter
Move
PICTURE
E
Aspect Ratio : 16:9
Picture Wizard
Energy Saving
: Off
Picture Mode : Standard
• Backlight 70
• Contrast 90
• Brightness 50
• Sharpness 70
Aspect Ratio : 16:9
Picture Wizard
Energy Saving
: Off
Picture Mode : Standard
• Backlight 70
• Contrast 90
• Brightness 50
• Sharpness 70
Intelligent Sensor
Vivid
Standard
Natural
Cinema
Sport
Game
Expert1
Expert2
■When selecting IInntteelllliiggeenntt SSeennssoorr,
EEnneerrggyy SSaavviinnggis changed to AAuuttoo auto-
matically.
■When selecting IInntteelllliiggeenntt SSeennssoorr, it is
changed contrast, brightness, sharpness,
color and tint automatically.
■Only VViivviidd, SSttaannddaarrdd, NNaattuurraall, SSppoorrtt
and GGaammeeSettings are preset for the opti-
mum picture quality at the factory.
■IInntteelllliiggeenntt SSeennssoorr: The most suitable
picture is automatically adjusted according
to the surrounding conditions.
■VViivviidd: This is the mode to maximize the
effect of the video in the retail store.
Strengthen the contrast, brightness, color
and sharpness for vivid picture.
■SSttaannddaarrdd: This is the mode to realize opti-
mum viewing condition for the general user.
■NNaattuurraall: This is the mode to display the
most natural screen status.
■CCiinneemmaa (For 42/47/55SL80): This mode
optimizes video for watching movies.
■Cinema (For 42/47/55LH90): This is
cinema quality mode to provide you the
experience of watching a movie at home.
The user will be able enjoy the best level of
satisfactory screen quality in any movie
without any separate adjustments.
Cinema expresses the optimal screen quality
when it is darkest.
■It turns to Just scan only if change
CCiinneemmaaat input source which supports Just
scan (For 42/47/55LH90).
■SSppoorrtt: This is the video mode to emphasize
dynamic video and primary color (e.g, white,
uniform, grass, sky blue etc.) by realizing the
optimal screen for sports.
■GGaammee: This is the mode to realize fast
response speed in a fast gaming screen.
■EExxppeerrtt: This is the mode to adjust the
video in detail for video quality expert and
general user.
■You can also adjust PPiiccttuurree MMooddeein the
QQ..MMEENNUU.
■(Thomlinson Holman’s Experiment) is the
audio and video certification standard of THX
established by George Lucas, who directed the
movie Star Wars, and Thomlinson.
This is the product to be certified in THX display
area and guarantees screen quality that exceeds the
display standard specification in both hardware and
software.
PICTURE CONTROL
77
MANUAL PICTURE ADJUSTMENT - USER MODE
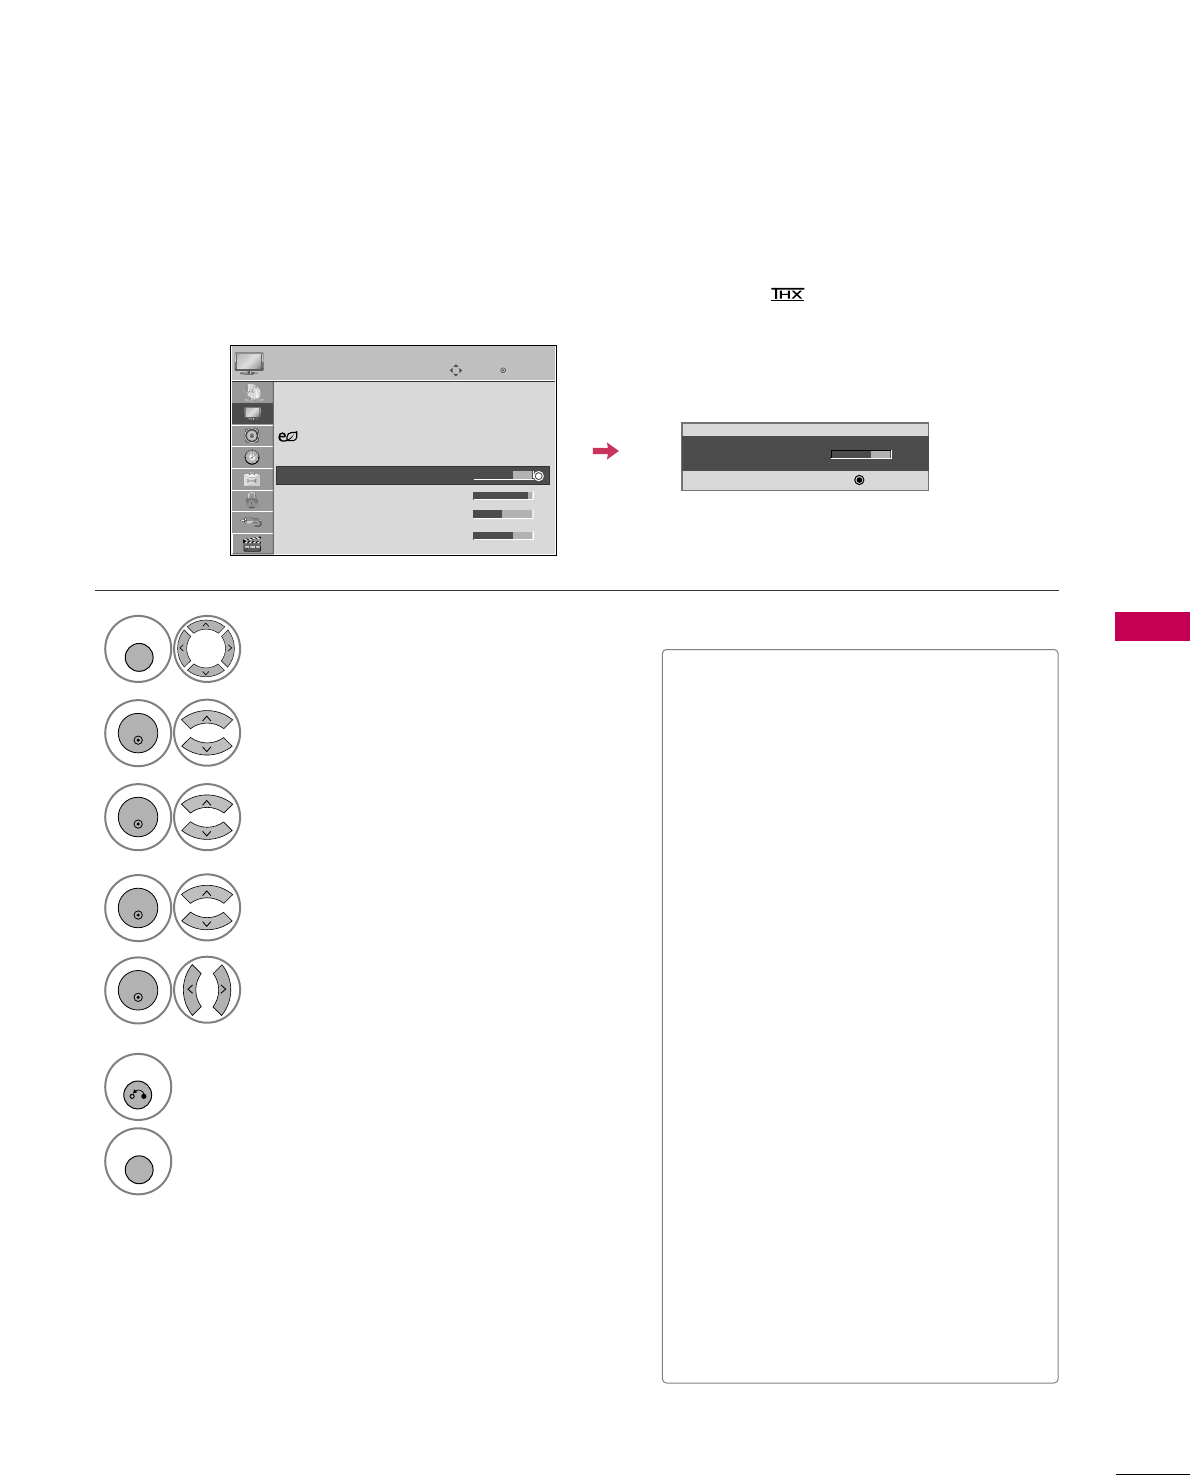
Adjust the picture appearance to suit your preference and viewing situations.
This feature is disabled in “PPiiccttuurree MMooddee- IInntteelllliiggeenntt SSeennssoorr,CCiinneemmaa//CCiinneemmaa”.
Select PPIICCTTUURREE.
1
MENU
Select PPiiccttuurree MMooddee.
2
ENTER
Enter
Move
PICTURE
E
• Backlight 70
EE
EE
EE
EE
Enter
Make appropriate adjustments.
Select BBaacckklliigghhtt, CCoonnttrraasstt, BBrriigghhttnneessss,
SShhaarrppnneessss, CCoolloorr, or TTiinntt.
Select VViivviidd,SSttaannddaarrdd, NNaattuurraall,
SSppoorrtt, or GGaammee.
3
ENTER
4
ENTER
5
ENTER
6
RETURN
Return to the previous menu.
MENU
Return to TV viewing.
■When adjusting Energy Saving, BBaacckklliigghhtt
function is disabled.
■BBaacckklliigghhtt: This function adjusts the
brightness of LCD panel, to control the
brightness of the screen. Adjusting the
backlight is recommended when setting
the brightness of the set. When decreas-
ing the backlight, the brightness of the
black becomes darker without any loss in
video signal and the power consumption
is reduced.
■CCoonnttrraasstt: Increase or decrease the gra-
dient of the video signal. You may use
Contrast when the bright part of picture
is saturated.
■BBrriigghhttnneessss: Adjusts the base level of
the signal in the picture. You may use
Brightness when the dark part of the pic-
ture is saturated.
■SShhaarrppnneessss: Adjusts the level of crisp-
ness in the edges between the light and
dark areas of the picture. The lower the
level, the softer the image.
■CCoolloorr: Adjusts intensity of all colors.
■TTiinntt: Adjusts the balance between red
and green levels.
Aspect Ratio : 16:9
Picture Wizard
Energy Saving
: Off
Picture Mode : Standard
• Backlight 70
• Contrast 90
• Brightness 50
• Sharpness 70
PICTURE CONTROL
78
PICTURE IMPROVEMENT TECHNOLOGY
PICTURE CONTROL
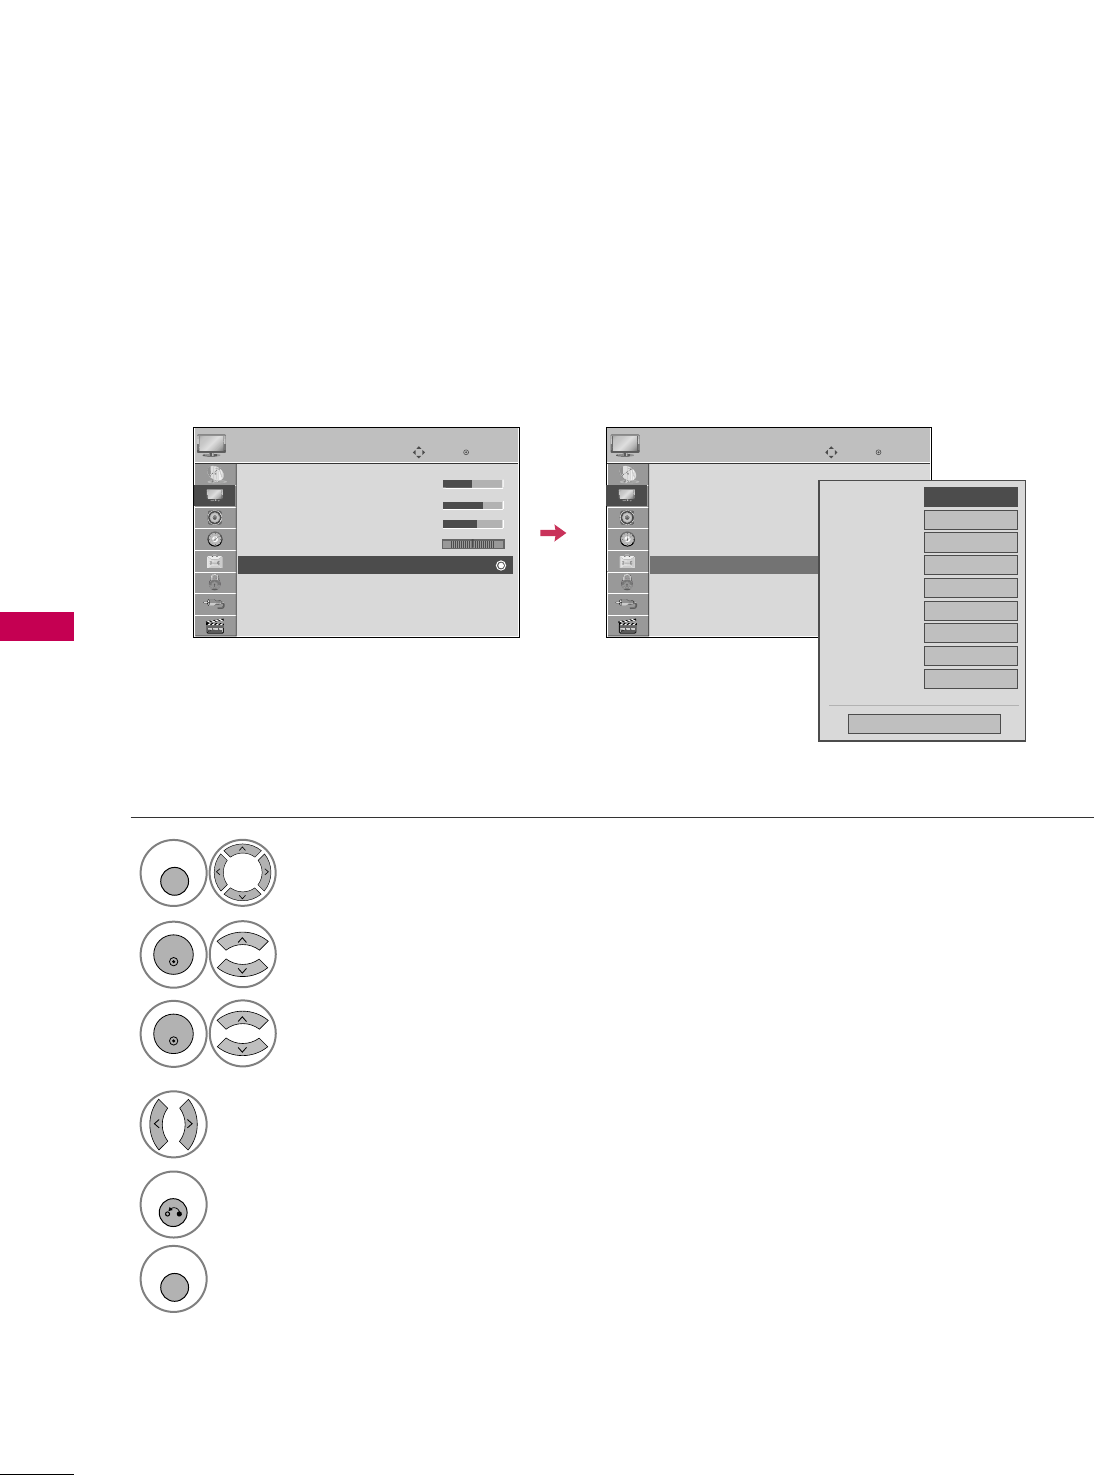
Select PPIICCTTUURREE.
Select AAddvvaanncceedd CCoonnttrrooll.
Select your desired options.
1
MENU
3
2
ENTER
ENTER
5
RETURN
Return to the previous menu.
MENU
Return to TV viewing.
Make appropriate adjustments.
4
Enter
Move
PICTURE
E
RG
• Brightness 50
• Sharpness 70
• Color 60
• Tint 0
• Advanced Control
• Picture Reset
Screen (RGB-PC)
LED Local Dimming
: On
Enter
Move
PICTURE
E
RG
• Brightness 50
• Sharpness 70
• Color 60
• Tint 0
• Advanced Control
• Picture Reset
Screen (RGB-PC)
LED Local Dimming
: On
You can calibrate the screen for each Picture Mode or set the video value according to the special video screen.
You can set the video seeing differently for each input.
To reset to the factory default after making adjustments to each input source, execute the PPiiccttuurree RReesseett
function for each Picture Mode.
Color Temperature
FFMedium GG
Dynamic Contrast
Medium
Dynamic Color
Low
Noise Reduction
Medium
Gamma
Medium
Black Level
Low
Eye Care
Off
Real Cinema
Off
TruMotion 240Hz
Low
Close
E
PICTURE CONTROL
79
EXPERT PICTURE CONTROL
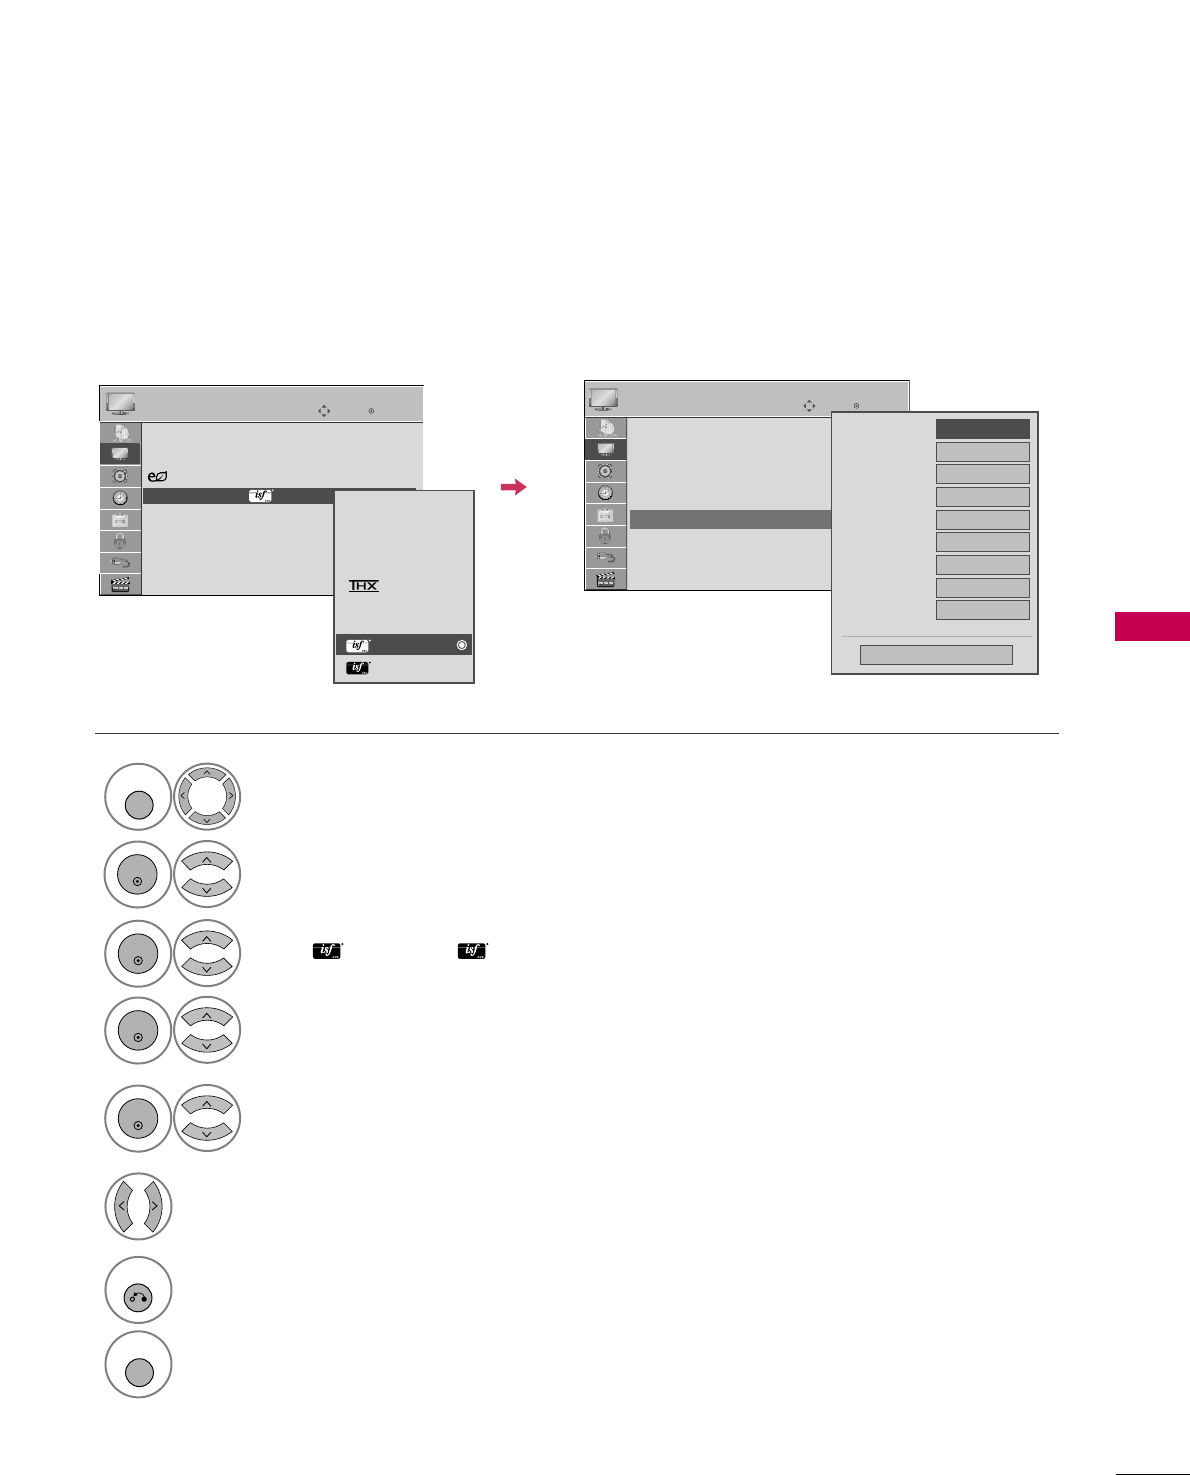
Select PPIICCTTUURREE.
Select PPiiccttuurree MMooddee.
Select EExxppeerrtt CCoonnttrrooll.
Select EExxppeerrtt11or EExxppeerrtt22.
1
MENU
3
2
ENTER
ENTER
4
ENTER
Make appropriate adjustments.
6
7
RETURN
Return to the previous menu.
MENU
Return to TV viewing.
Enter
Move
PICTURE
E
RG
• H Sharpness 50
• V Sharpness 50
• Color 50
• Tint 0
• Expert Control
• Picture Reset
Screen (RGB-PC)
LED Local Dimming
: On
Dynamic Contrast
FFOff GG
Noise Reduction
Off
Gamma Medium
Black Level
Low
Real Cinema
Off
TruMotion 240Hz
Low
Color Standard
SD
Color Gamut
Standard
Edge Enhancer
High
Close
E
Select your desired menu option.
5
ENTER
Enter
Move
PICTURE
E
Aspect Ratio : 16:9
Picture Wizard
Energy Saving
: Off
Picture Mode : Expert1
• Backlight 30
• Contrast 90
• Brightness 50
• H Sharpness 50
Intelligent Sensor
Vivid
Standard
Natural
Cinema
Sport
Game
Expert1
Expert2
By segmenting categories, EExxppeerrtt11and EExxppeerrtt22provide more categories which users can set as they see
fit, offering the optimal picture quality for users.
This may also be used be a professional to help optimize the TV performance in the environment the TV is in.
PICTURE CONTROL
82
ENERGY SAVING
PICTURE CONTROL
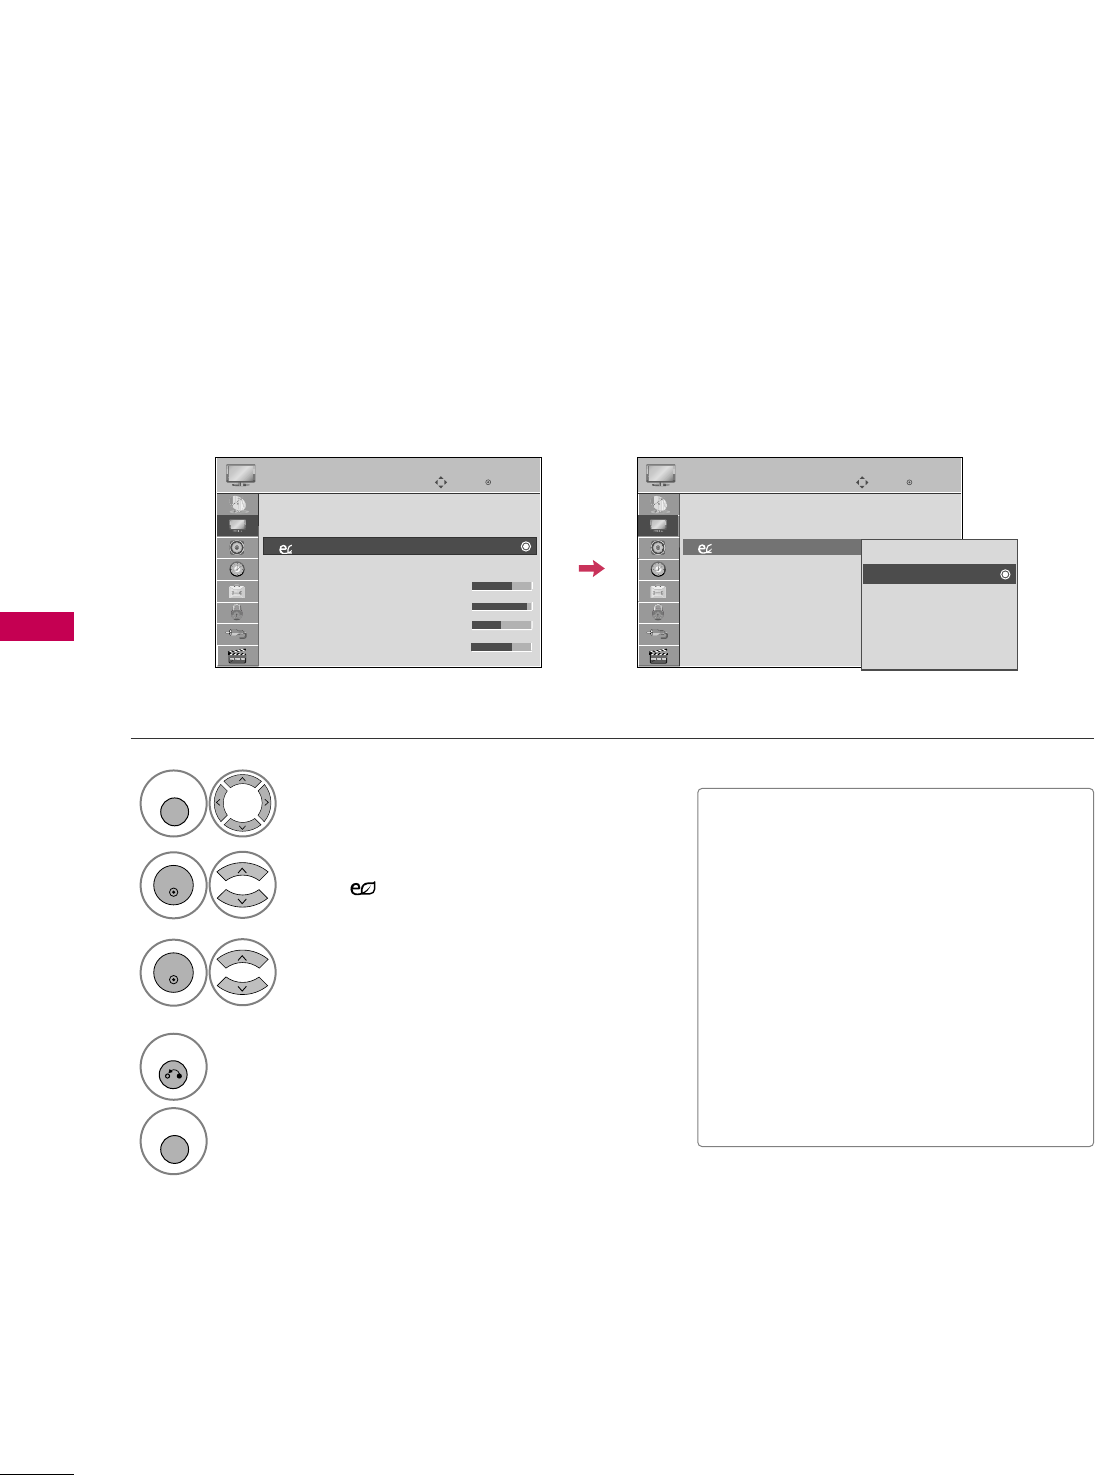
It reduces the TV’s power consumption by lowering the backlight level.
The default factory setting complies with the EEnneerrggyy SSttaarrrequirements and is adjusted to the comfortable
level to be viewed at home.
You can increase the brightness of your screen by adjusting the EEnneerrggyy SSaavviinngglevel or by setting the PPiiccttuurree
MMooddee.
■When selecting SSccrreeeenn ooffff, the screen
will turn off 3 seconds.
■If you adjust “EEnneerrggyy SSaavviinngg--AAuuttoo,
MMiinniimmuumm, MMeeddiiuumm, MMaaxxiimmuumm”,
BBaacckklliigghhttfeature will not work.
■When selecting AAuuttoo, BBaacckklliigghhttis auto-
matically adjusted through IInntteelllliiggeenntt
sseennssoorraccording to the surrounding
conditions.
■Press the EENNEERRGGYY SSAAVVIINNGGbutton
repeatedly to select the appropriate
Energy Saving setup.
Select PPIICCTTUURREE.
Select EEnneerrggyy SSaavviinngg.
1
MENU
2
ENTER
Select AAuuttoo, OOffff, MMiinniimmuumm, MMeeddiiuumm,
MMaaxxiimmuumm, or SSccrreeeenn OOffff.
3
ENTER
4
RETURN
Return to the previous menu.
MENU
Return to TV viewing.
Enter
Move
PICTURE
E
Enter
Move
PICTURE
E
Aspect Ratio : 16:9
Picture Wizard
Energy Saving
: Off
Picture Mode : Standard
• Backlight 70
• Contrast 90
• Brightness 50
• Sharpness 70
Aspect Ratio : 16:9
Picture Wizard
Energy Saving
: Off
Picture Mode : Standard
• Backlight 70
• Contrast 90
• Brightness 50
• Sharpness 70
Auto
Off
Minimum
Medium
Maximum
Screen off
PICTURE CONTROL
83
PICTURE RESET
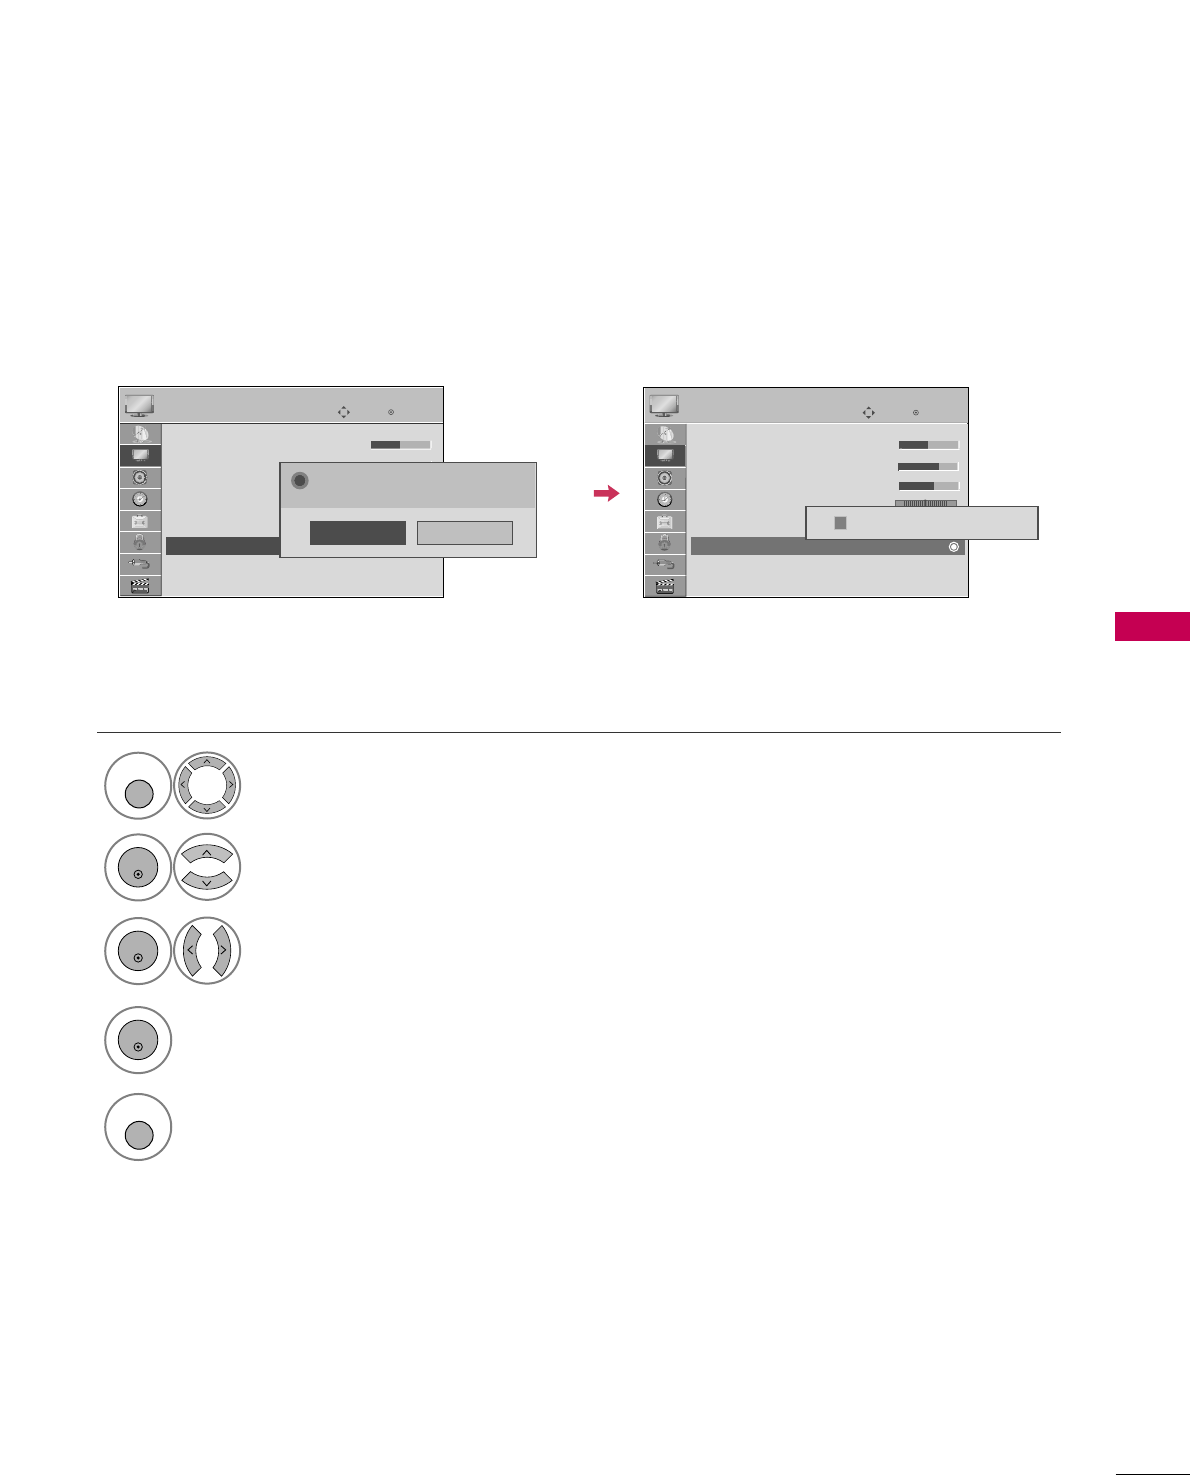
Settings of the selected picture modes return to the default factory settings.
Select PPIICCTTUURREE.
Select PPiiccttuurree RReesseett.
Initialize the adjusted value.
1
MENU
4
2
ENTER
Select YYeess.
3
ENTER
ENTER
5
MENU
Return to TV viewing.
Enter
Move
PICTURE
E
RG
• Brightness 50
• Sharpness 70
• Color 60
• Tint 0
• Advanced Control
• Picture Reset
Screen (RGB-PC)
LED Local Dimming
: On
Resetting video configuration...
ii
Enter
Move
PICTURE
E
RG
• Brightness 50
• Sharpness 70
• Color 50
• Tint 0
• Advanced Control
• Picture Reset
Screen (RGB-PC)
LED Local Dimming
: On
No
Yes
All picture settings will be resetted.
Continue?
?
PICTURE CONTROL
84
POWER INDICATOR
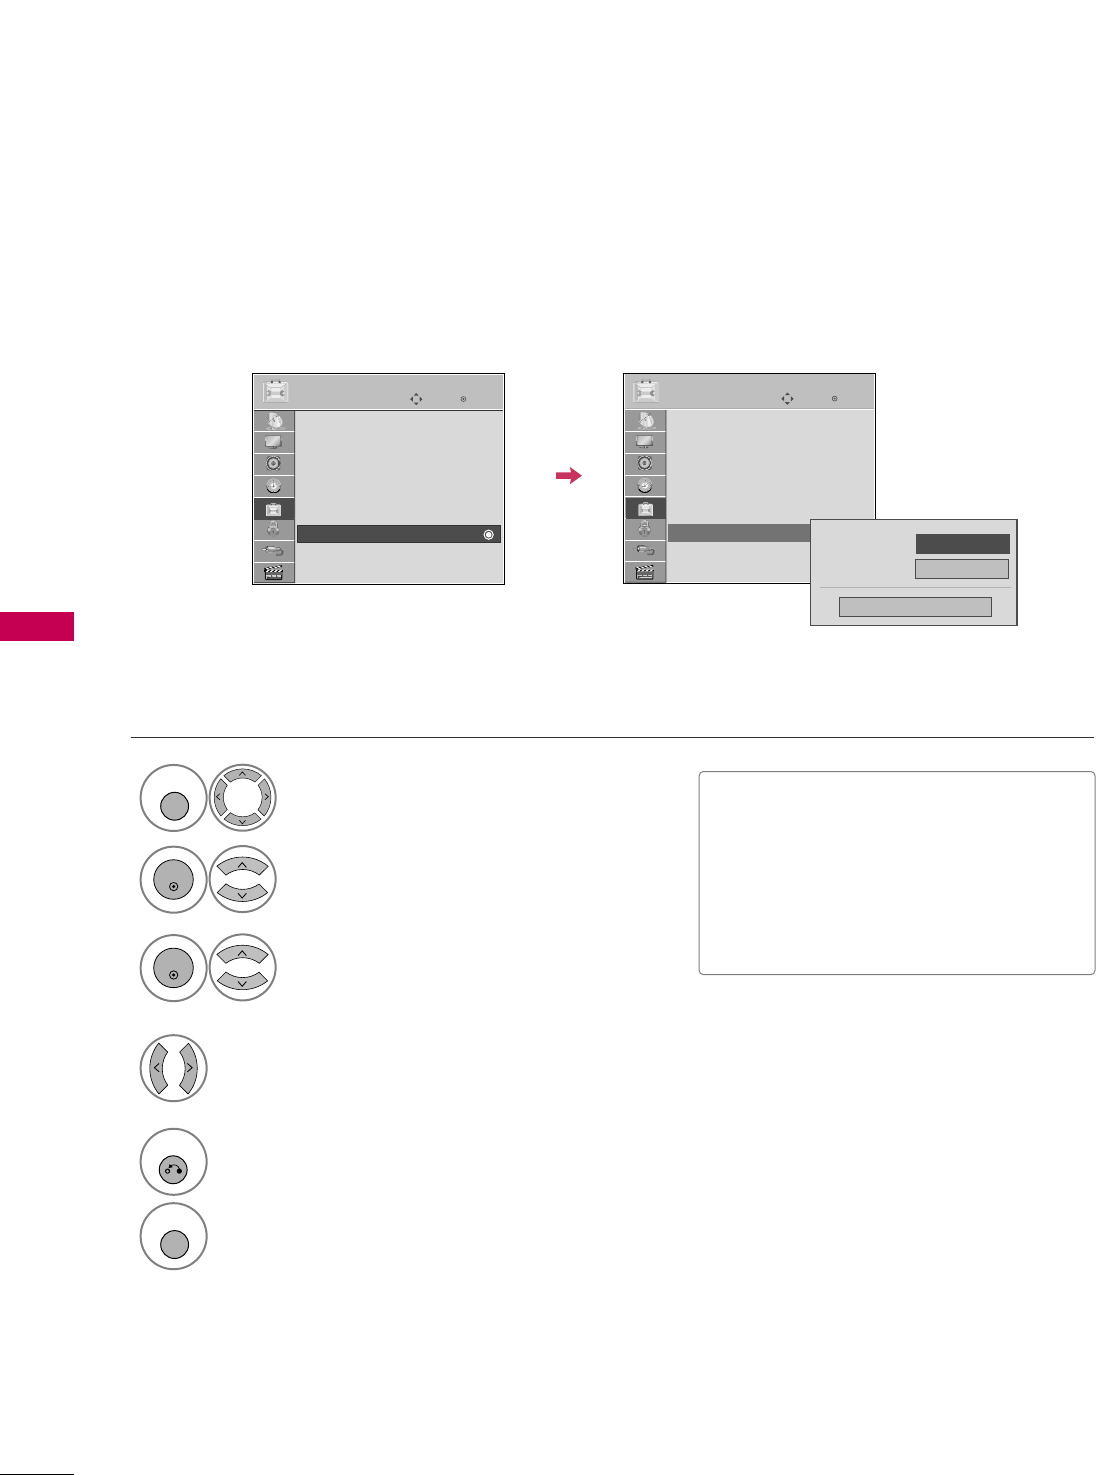
PICTURE CONTROL
Select OOPPTTIIOONN.
Select PPoowweerr IInnddiiccaattoorr.
1
MENU
2
ENTER
Select SSttaannddbbyy LLiigghhttor PPoowweerr LLiigghhtt.
3
ENTER
Select your desired options.
4
5
RETURN
Return to the previous menu.
MENU
Return to TV viewing.
■SSttaannddbbyy LLiigghhtt: Determines whether to
set the indicator light on the front of the
TV to OOnnor OOffffin standby mode.
■PPoowweerr LLiigghhtt: Determines whether to set
the indicator light on the front of the TV
to OOnnor OOffff when the power turns on.
Enter
Move
OPTION
SIMPLINK : On
Key Lock : Off
Simple Manual
Caption : Off
Set ID : 1
Power Indicator
Demo Mode : Off
Initial Setting : Home Use
Enter
Move
OPTION
SIMPLINK : On
Key Lock : Off
Simple Manual
Caption : Off
Set ID : 1
Power Indicator
Demo Mode : Off
Initial Setting : Home Use
Power Light
Standby Light
On
Close
FF On GG
EE
Adjust the power/standby indicator light on the front of the TV.
PICTURE CONTROL
85
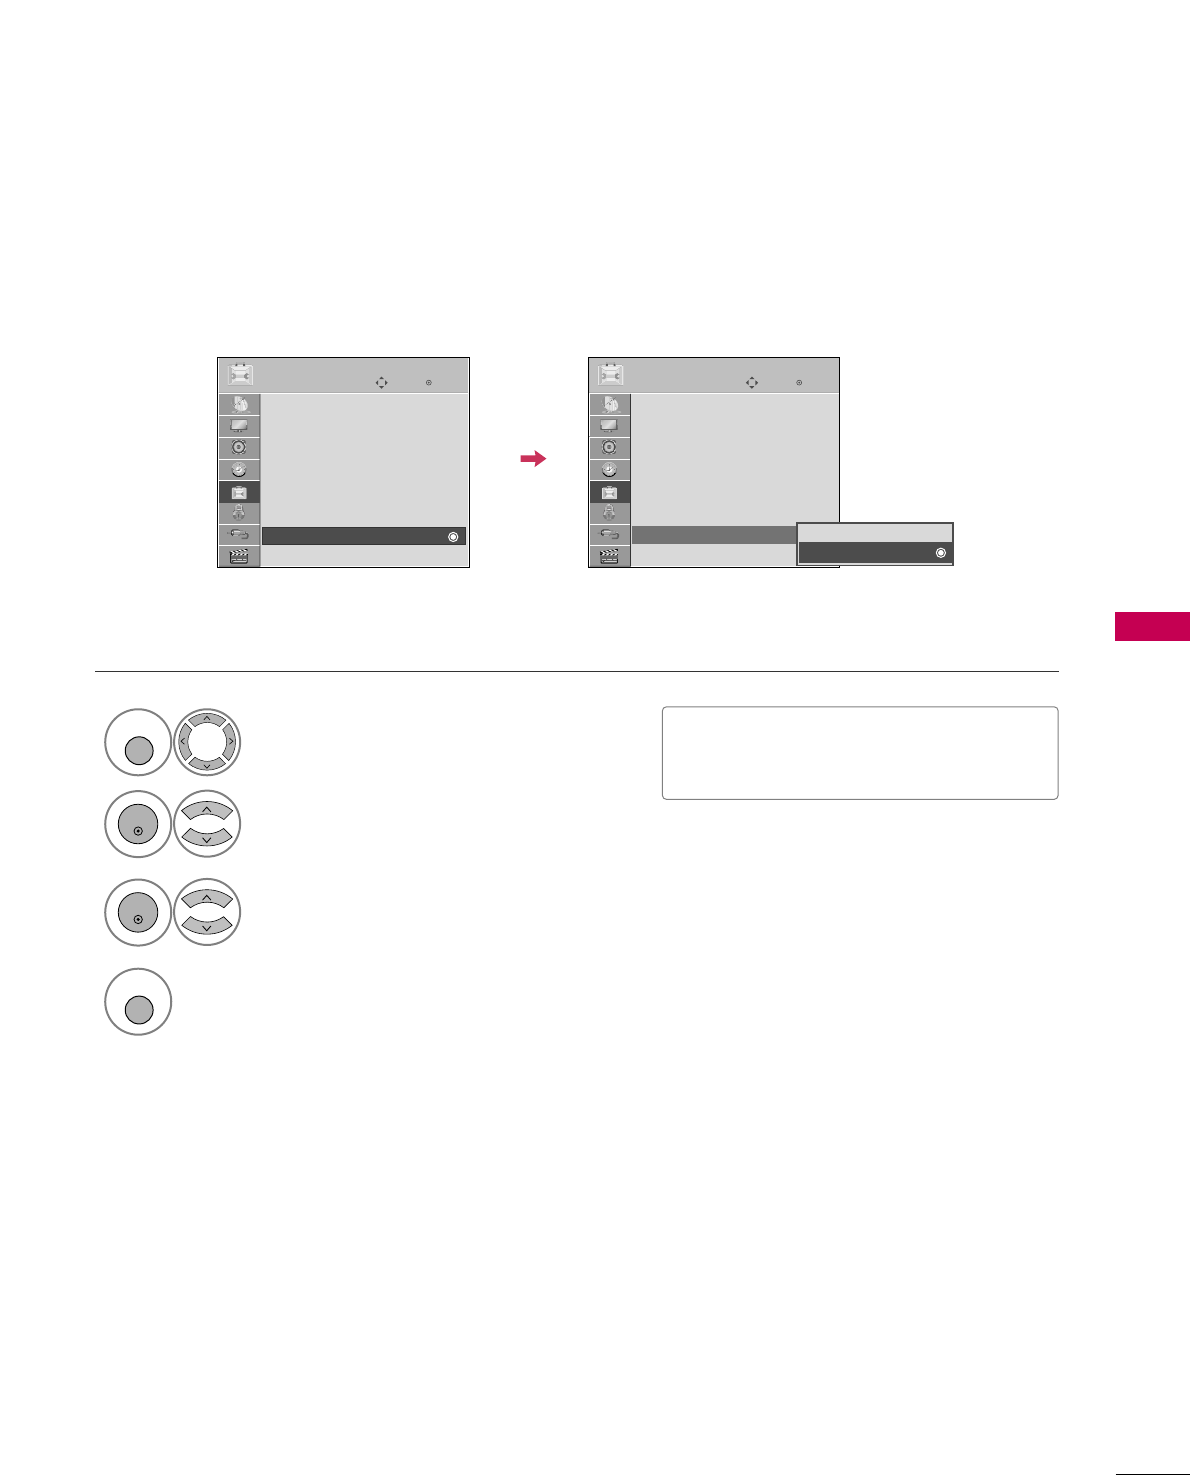
DEMO MODE
Select OOPPTTIIOONN.
Select DDeemmoo MMooddee.
1
MENU
2
ENTER
Select OOnnto show the various
feature of the TV.
3
ENTER
4
MENU
Return to TV viewing.
After a while, DDeemmoo MMooddeestarts.
If you want to stop the demo, press any button
(Except VOL +, - and MUTE button).
Enter
Move
OPTION
SIMPLINK : On
Key Lock : Off
Simple Manual
Caption : Off
Set ID : 1
Power Indicator
Demo Mode : Off
Initial Setting : Store Demo
Enter
Move
OPTION
SIMPLINK : On
Key Lock : Off
Simple Manual
Caption : Off
Set ID : 1
Power Indicator
Demo Mode : On
Initial Setting : Store Demo
EE
Off
On
Displays a slide show to explain the various feature of this TV.
■This feature is disabled in “IInniittiiaall
SSeettttiinngg--HHoommee UUssee”.
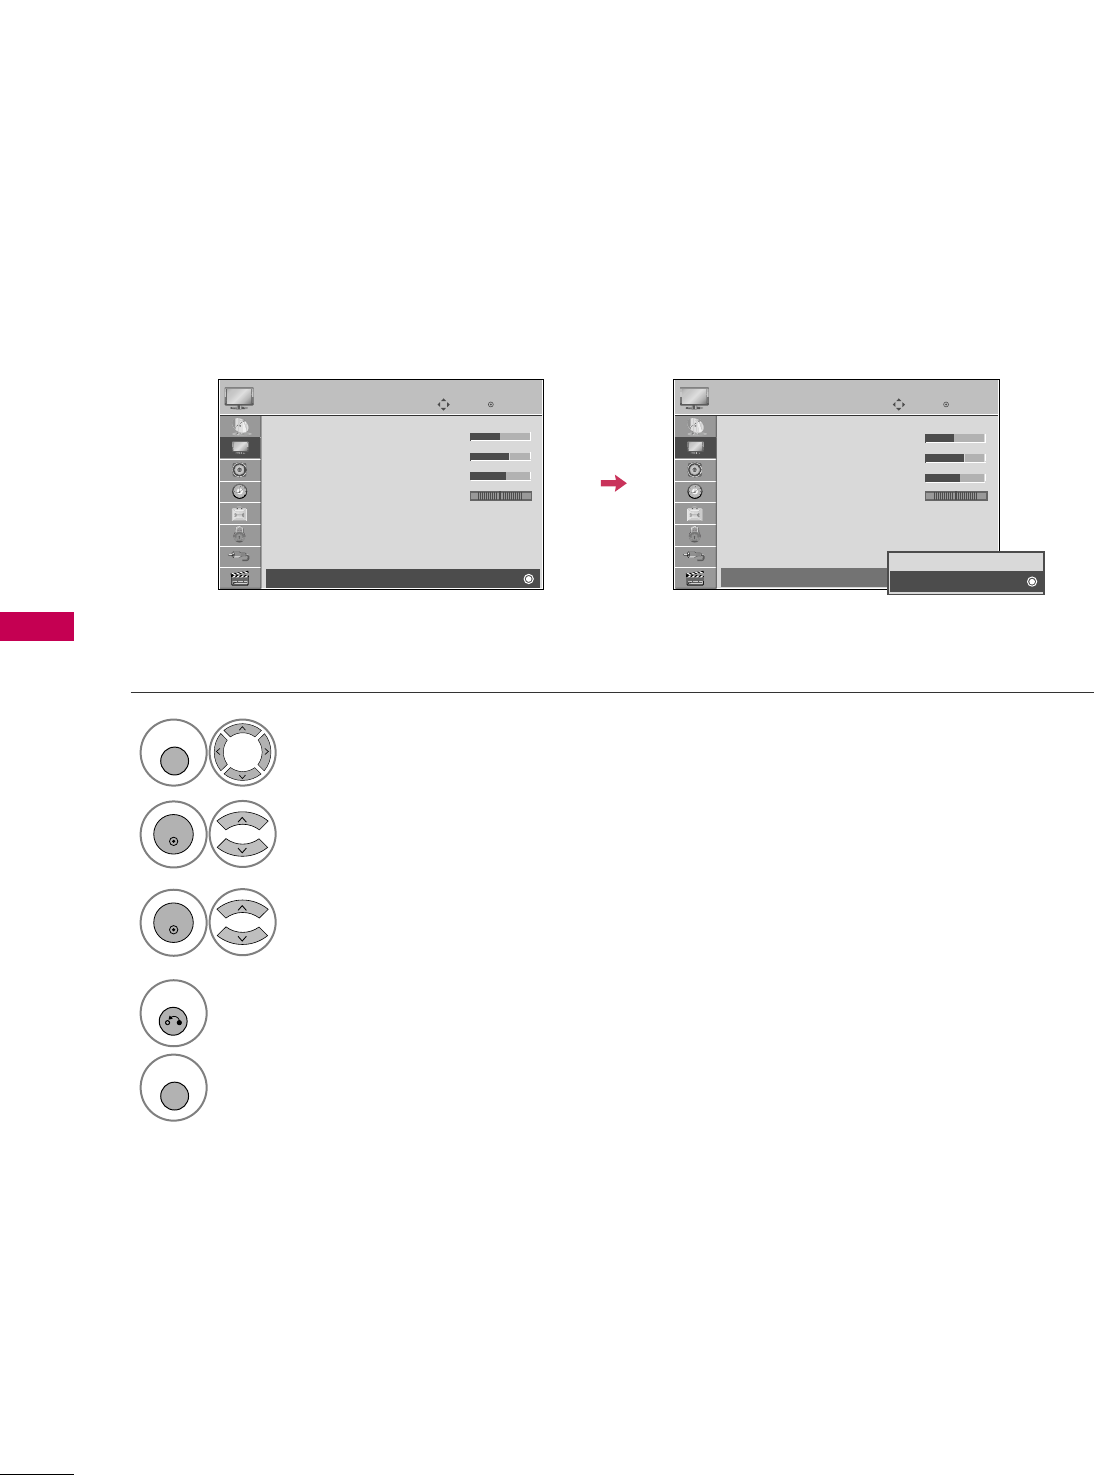
PICTURE CONTROL
86
LED LOCAL DIMMING
-
For 42/47/55LH90
PICTURE CONTROL
Select PPIICCTTUURREE.
Select LLEEDD LLooccaall DDiimmmmiinngg.
1
MENU
2
ENTER
Select OOnnor OOffff.
3
ENTER
4
RETURN
Return to the previous menu.
MENU
Return to TV viewing.
After analyzing the signal of the input video by areas of the screen, it adjusts the backlight to improve the
contrast ratio. This feature is disabled in “PPiiccttuurree MMooddee--GGaammee”.
Enter
Move
PICTURE
E
RG
• Brightness 50
• Sharpness 70
• Color 60
• Tint 0
• Advanced Control
• Picture Reset
Screen (RGB-PC)
LED Local Dimming
: On
Enter
Move
PICTURE
E
RG
• Brightness 50
• Sharpness 70
• Color 60
• Tint 0
• Advanced Control
• Picture Reset
Screen (RGB-PC)
LED Local Dimming
: On
Off
On
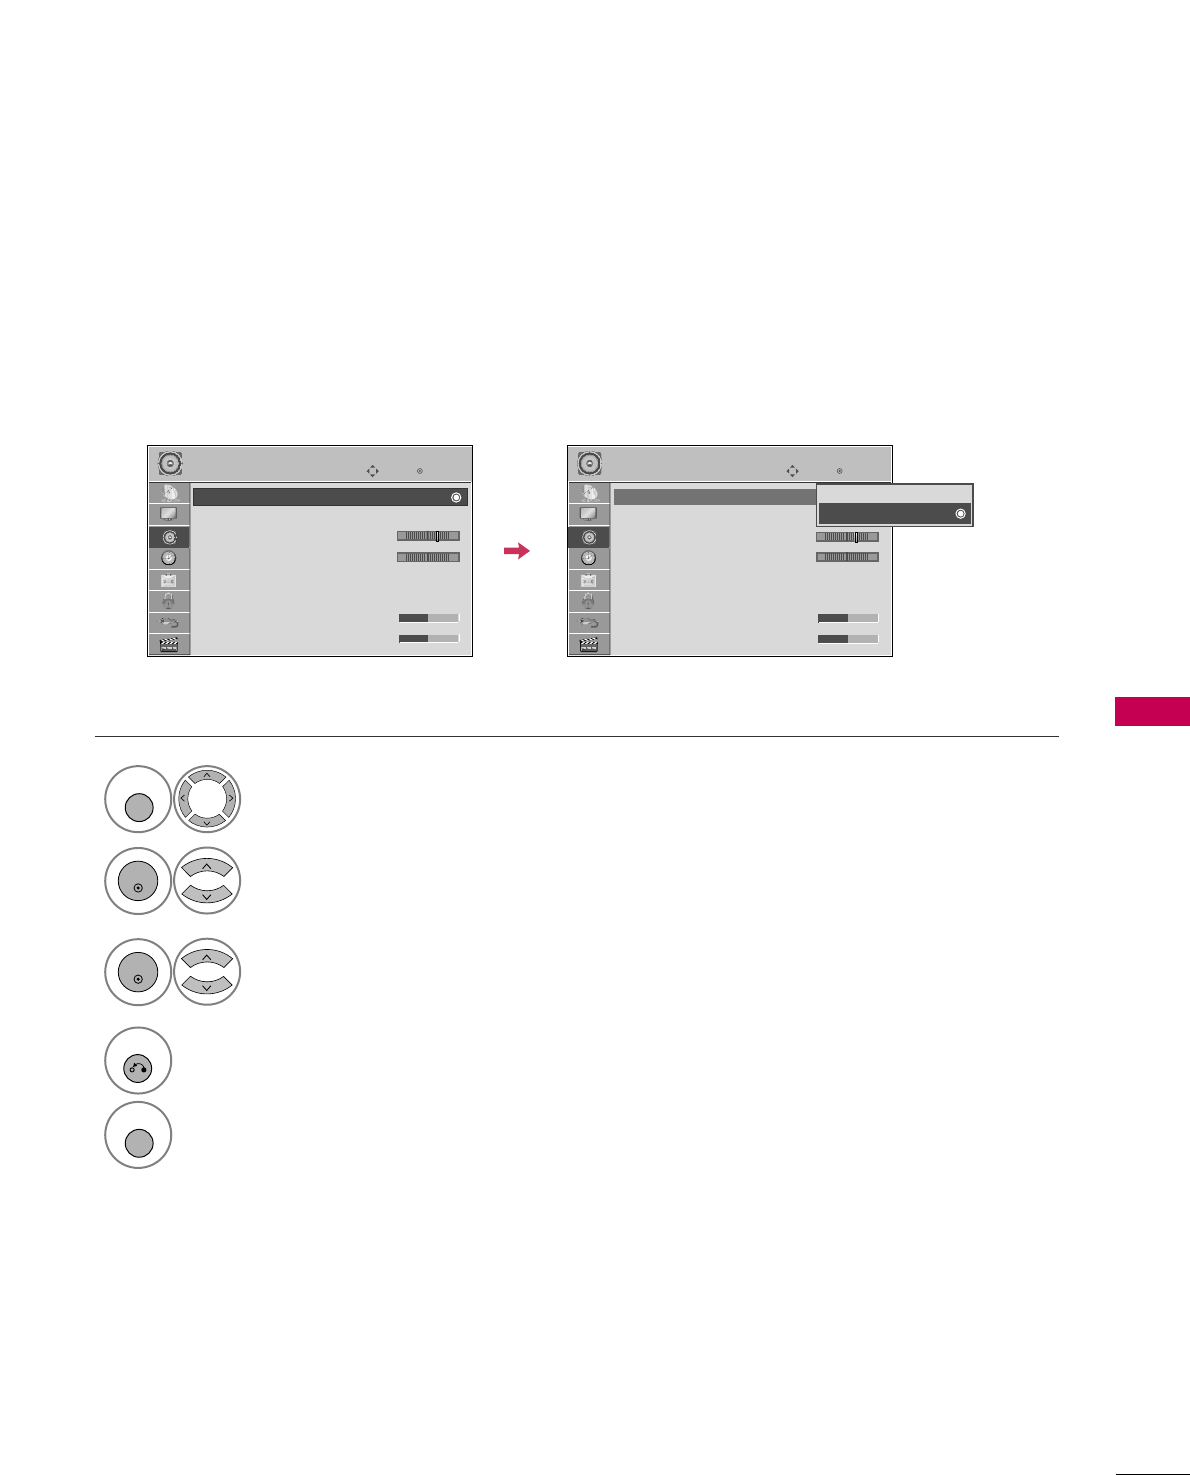
SOUND & LANGUAGE CONTROL
87
AUTO VOLUME LEVELER (AUTO VOLUME)
SOUND & LANGUAGE CONTROL
Auto Volume makes sure that the volume level remains consistent whether you are watching a commercial or a
regular TV program.
Because each broadcasting station has its own signal conditions, volume adjustment may be needed every
time the channel is changed. This feature allows users to enjoy stable volume levels by making automatic
adjustments for each program.
Select AAUUDDIIOO.
Select AAuuttoo VVoolluummee.
Select OOnnor OOffff.
Enter
Move
AUDIO
E
LR
Enter
Move
AUDIO
E
LR
1
MENU
3
2
ENTER
ENTER
Auto Volume : Off
Clear Voice II : Off
• Level 3
Balance 0
Sound Mode : Standard
•
SRS TruSurround XT:
Off
• Treble 50
• Bass 50
Auto Volume : On
Clear Voice II : Off
• Level 3
Balance 0
Sound Mode : Standard
•
SRS TruSurround XT:
Off
• Treble 50
• Bass 50
Off
On
4
RETURN
Return to the previous menu.
MENU
Return to TV viewing.
-+ -+
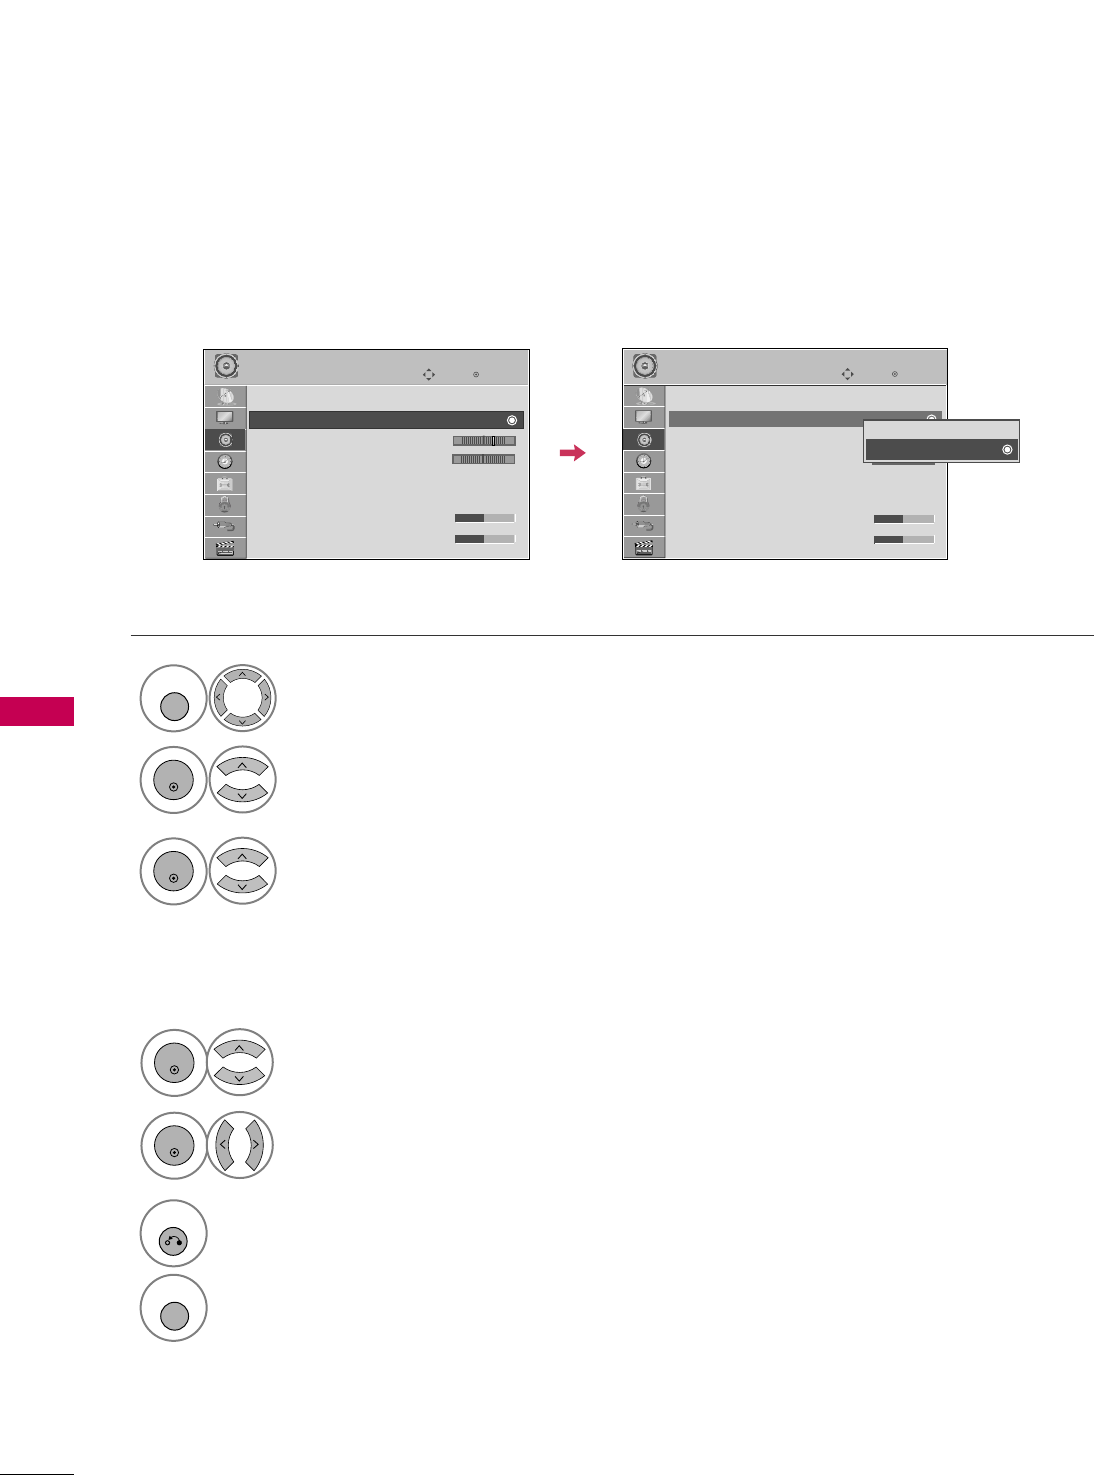
SOUND & LANGUAGE CONTROL
88
CLEAR VOICE II
By differentiating the human sound range from others, it improves the sound quality of voices.
Enter
Move
AUDIO
E
LR
Enter
Move
AUDIO
E
LR
Auto Volume : Off
Clear Voice II : Off
• Level 3
Balance 0
Sound Mode : Standard
•
SRS TruSurround XT:
Off
• Treble 50
• Bass 50
Auto Volume : Off
Clear Voice II : On
• Level 3
Balance 0
Sound Mode : Standard
•
SRS TruSurround XT:
Off
• Treble 50
• Bass 50
Select AAUUDDIIOO.
Select CClleeaarr VVooiiccee IIII.
Select OOnnor OOffff.
1
MENU
3
2
ENTER
ENTER
6
RETURN
Return to the previous menu.
MENU
Return to TV viewing.
Select LLeevveell.
4
ENTER
Make appropriate adjustments.
5
ENTER
Adjustment for Clear Voice Level
With selecting OOnn
-+ -+
Off
On
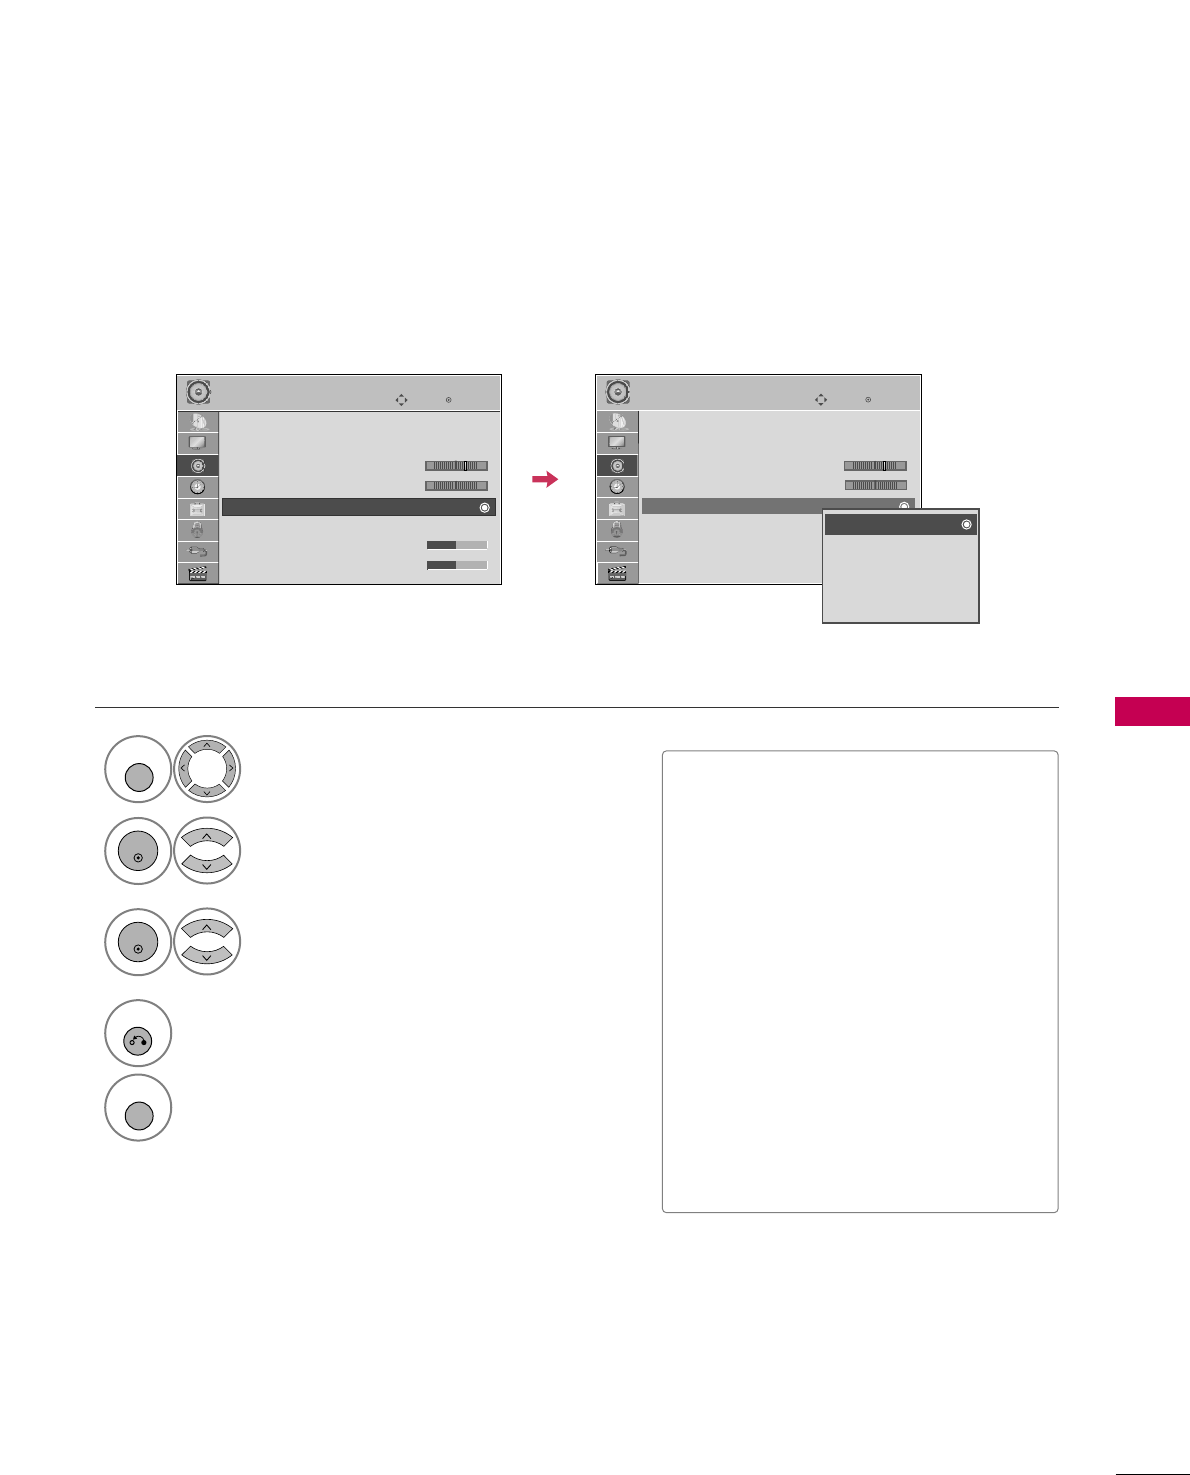
SOUND & LANGUAGE CONTROL
89
PRESET SOUND SETTINGS (SOUND MODE)
Sound Mode lets you enjoy the best sound without any special adjustment as the TV sets the appropriate
sound options based on the program content.
Select AAUUDDIIOO.
Select SSoouunndd MMooddee.
Select SSttaannddaarrdd, MMuussiicc,
CCiinneemmaa, SSppoorrtt, or GGaammee.
1
MENU
3
2
ENTER
ENTER
Enter
Move
AUDIO
E
LR
Enter
Move
AUDIO
E
LR
Auto Volume : Off
Clear Voice II : Off
• Level 3
Balance 0
Sound Mode : Standard
•
SRS TruSurround XT:
Off
• Treble 50
• Bass 50
Auto Volume : Off
Clear Voice II : Off
• Level 3
Balance 0
Sound Mode : Standard
•
SRS TruSurround XT:
Off
• Treble 50
• Bass 50
Standard
Music
Cinema
Sport
Game
■SSttaannddaarrdd, MMuussiicc, CCiinneemmaa, SSppoorrtt,
and GGaammeeare preset for optimum
sound quality at the factory.
■You can also adjust SSoouunndd MMooddeein
the QQ..MMEENNUU.
■SSttaannddaarrdd: Offers standard-quality
sound.
■MMuussiicc: Optimizes sound for listening to
music.
■CCiinneemmaa: Optimizes sound for watching
movies.
■SSppoorrtt: Optimizes sound for watching
sports events.
■GGaammee: Optimizes sound for playing
games.
4
RETURN
Return to the previous menu.
MENU
Return to TV viewing.
-+ -+
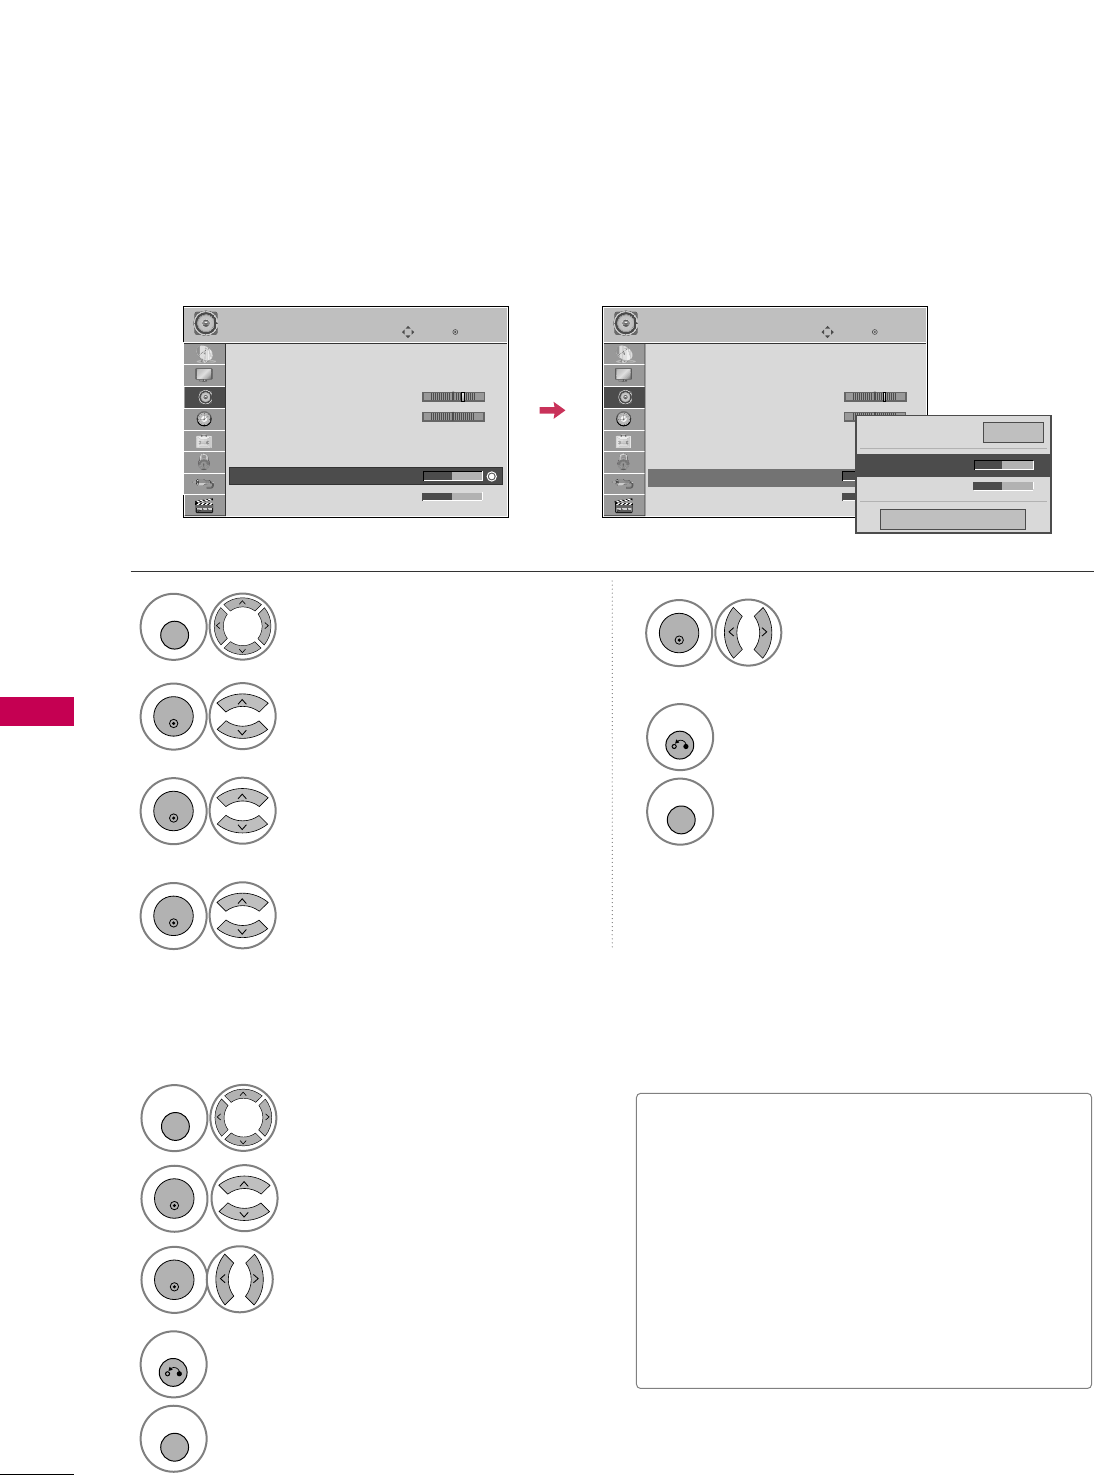
SOUND & LANGUAGE CONTROL
90
SOUND SETTING ADJUSTMENT - USER MODE
SOUND & LANGUAGE CONTROL
SRS TRUSURROUND XT
Adjust the sound to suit your taste and room situations.
Select this option to sound realistic.
Select AAUUDDIIOO.
Select SSoouunndd MMooddee.
Select TTrreebblleeor BBaassss.
1
MENU
4
2
ENTER
Select SSttaannddaarrdd, MMuussiicc,
CCiinneemmaa, SSppoorrtt, or GGaammee.
3
ENTER
ENTER
Enter
Move
AUDIO
LR
E
Auto Volume : Off
Clear Voice II : Off
• Level 3
Balance 0
Sound Mode : Standard
•
SRS TruSurround XT:
Off
• Treble 50
• Bass 50
Enter
Move
AUDIO
LR
E
Auto Volume : Off
Clear Voice II : Off
• Level 3
Balance 0
Sound Mode : Standard
•
SRS TruSurround XT:
Off
• Treble 50
• Bass 50
Select AAUUDDIIOO.
Select SSRRSS TTrruuSSuurrrroouunndd XXTT.
Select OOnnor OOffff.
1
MENU
3
2
ENTER
ENTER
6
RETURN
Return to the previous menu.
MENU
Return to TV viewing.
4
RETURN
Return to the previous menu.
MENU
Return to TV viewing.
Make appropriate adjustments.
5
ENTER
Close
EE
EE
• Treble 50
• Bass 50
•
SRS TruSurround XT
Off
-+ -+
■If sound quality or volume is not at the level
you want, it is recommended to use a separate
home theater system or amp to cope with dif-
ferent user environments.
■If you select “CClleeaarr VVooiiccee IIII--OOnn”, SSRRSS
TTrruuSSuurrrroouunndd XXTTfeature will not work.
■SSRRSS TTrruuSSuurrrroouunndd XXTT: TruSurround XT is a
patented SRS technology that solves the prob-
lem of playing 5.1 multichannel content over
two speakers.
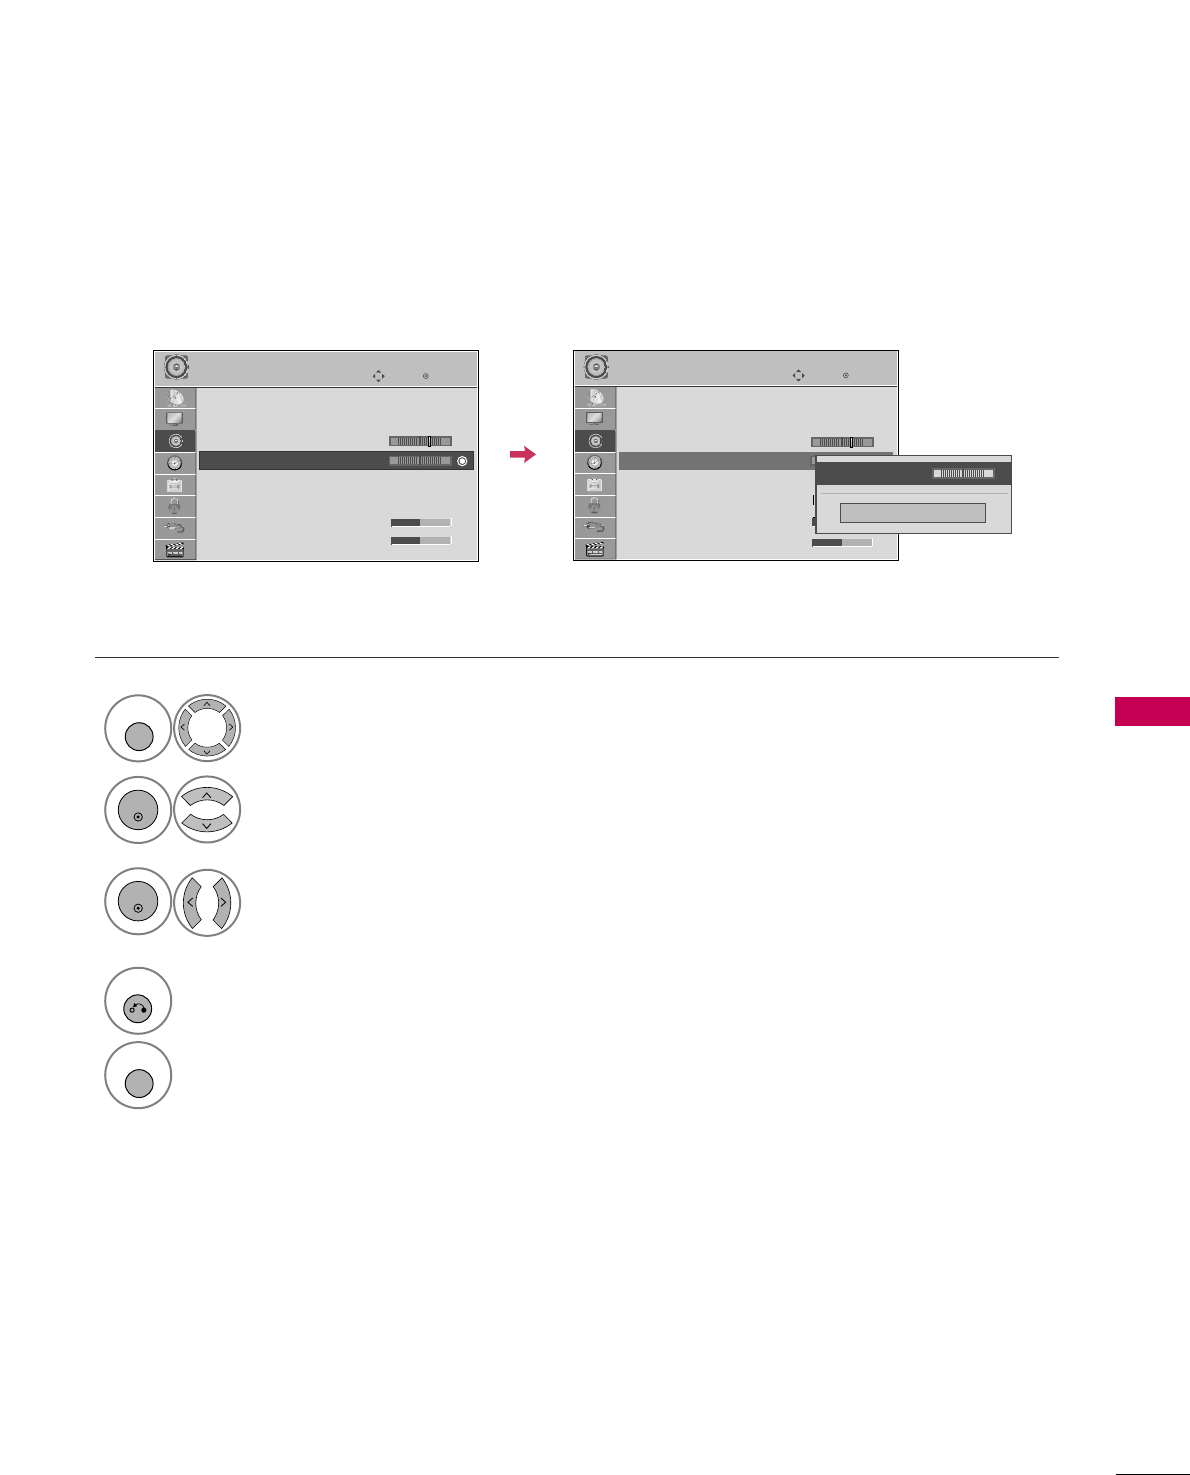
SOUND & LANGUAGE CONTROL
91
BALANCE
Select AAUUDDIIOO.
Select BBaallaannccee.
Make appropriate adjustments.
1
MENU
3
2
ENTER
ENTER
Adjust the left/right sound of speaker to suit your taste and room situations.
Enter
Move
AUDIO
Enter
Move
AUDIO
LR
E
Auto Volume : Off
Clear Voice II : Off
• Level 3
Balance 0
Sound Mode : Standard
•
SRS TruSurround XT:
Off
• Treble 50
• Bass 50
LR
E
Auto Volume : Off
Clear Voice II : Off
• Level 3
Balance 0
Sound Mode : Standard
•
SRS TruSurround XT:
Off
• Treble 50
• Bass 50
Close
EE
EE
Balance 0 LR
4
RETURN
Return to the previous menu.
MENU
Return to TV viewing.
-+ -+
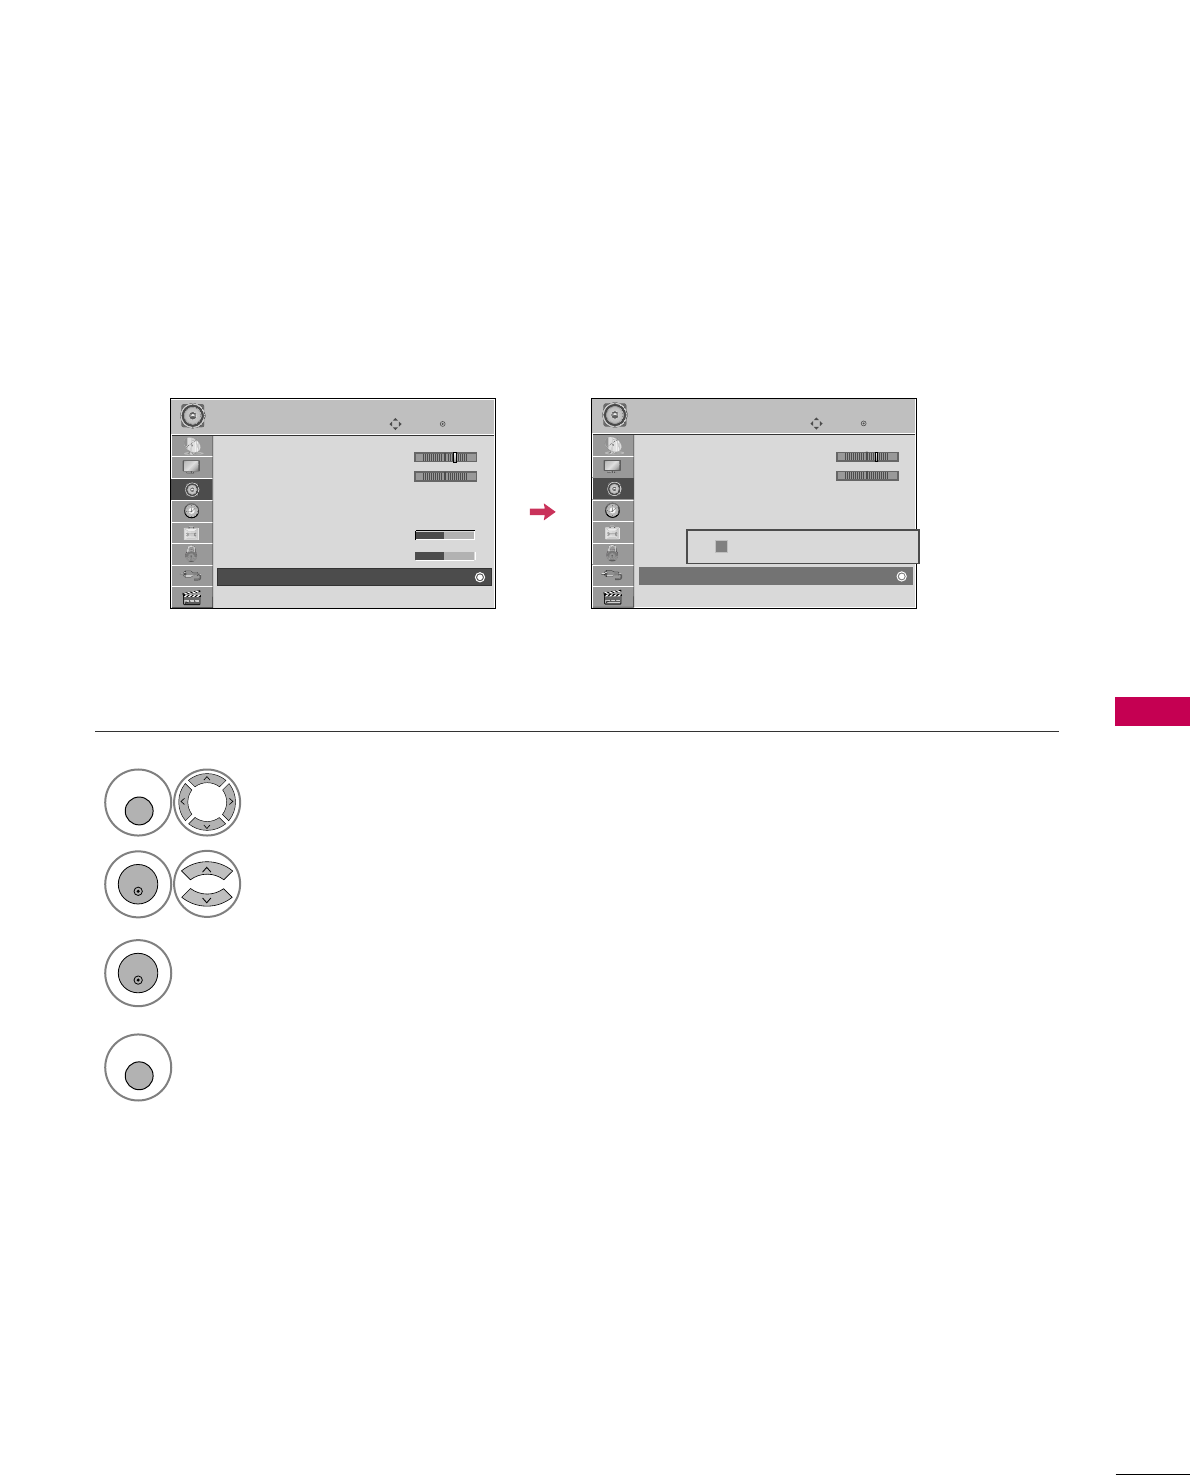
SOUND & LANGUAGE CONTROL
93
AUDIO RESET
Settings of the selected Sound Mode return to the default factory settings.
Select AAUUDDIIOO.
Select RReesseett.
1
MENU
2
ENTER
Initialize the adjusted value.
3
ENTER
4
MENU
Return to TV viewing.
Enter
Move
AUDIO
E
• Level 3
Balance 0
Sound Mode : Standard
•
SRS TruSurround XT:
Off
• Treble 50
• Bass 50
• Reset
TV Speaker : On
LR
Enter
Move
AUDIO
E
• Level 3
Balance 0
Sound Mode : Standard
•
SRS TruSurround XT:
Off
• Treble 50
• Bass 50
• Reset
TV Speaker : On
LR
Resetting audio configuration...
ii
-+ -+
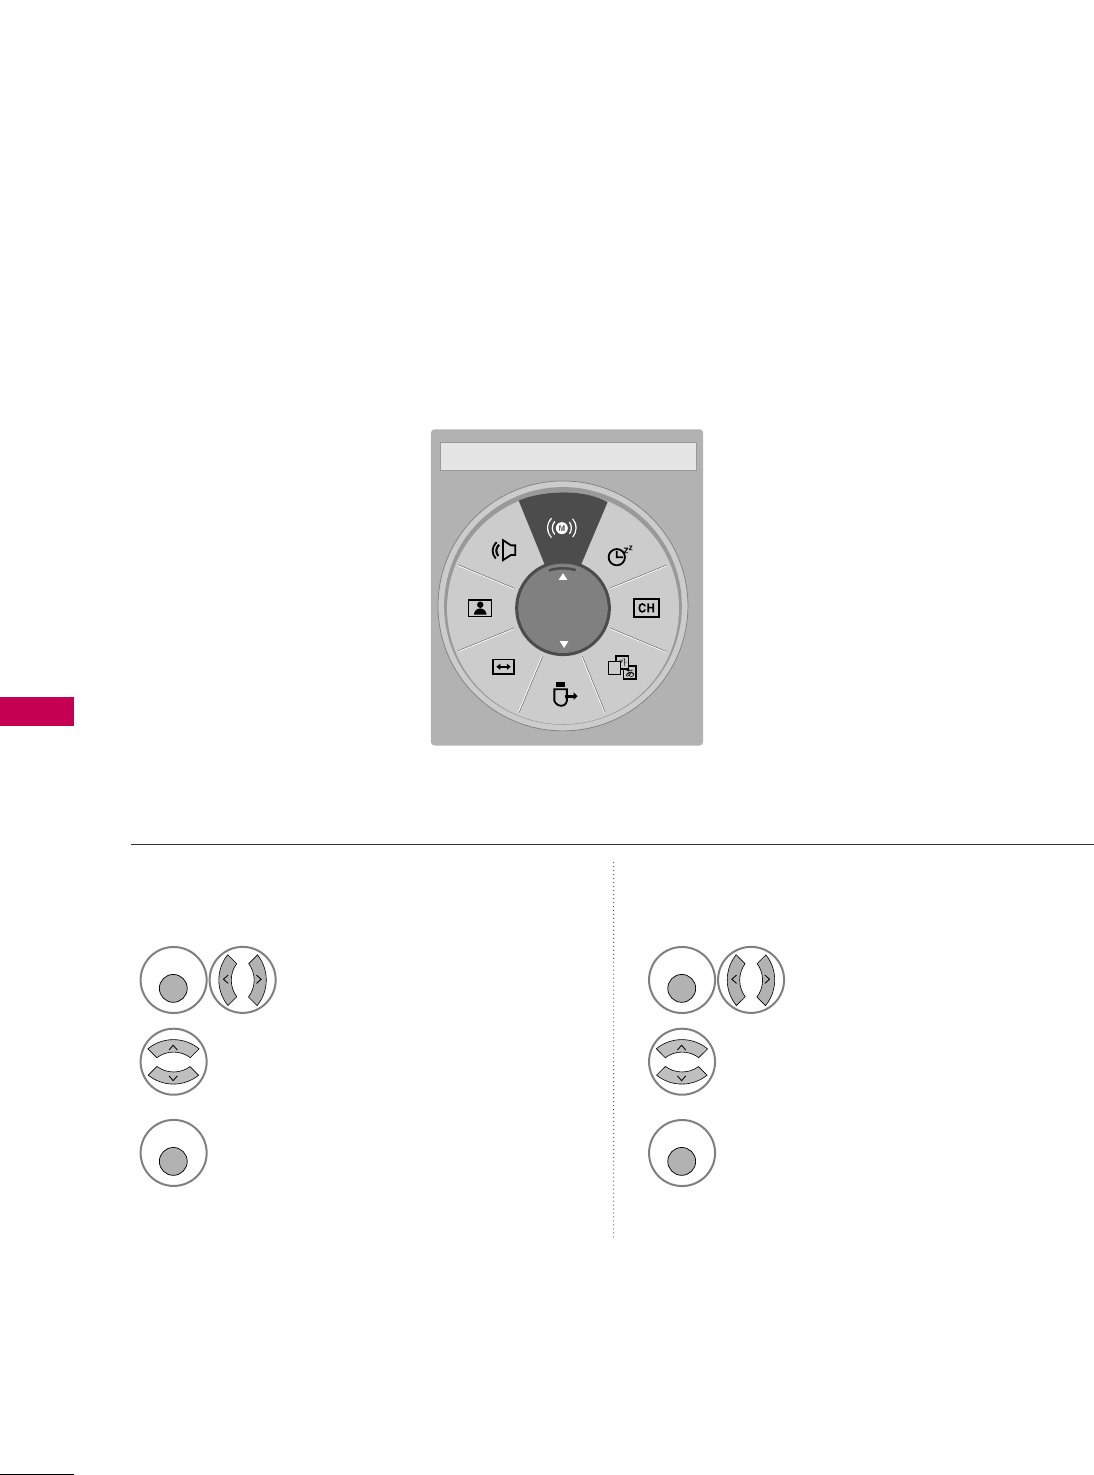
SOUND & LANGUAGE CONTROL
94
STEREO/SAP BROADCAST SETUP
SOUND & LANGUAGE CONTROL
On analog signals, this TV can receive MTS stereo programs and any SAP (Secondary Audio Program) that
accompanies the stereo program if the station transmits an additional sound signal. Mono sound is automatical-
ly used if the broadcast is only in Mono.
Select SSAAPP.
Select MMoonnoo, SStteerreeoo, or SSAAPP.
Return to TV viewing.
1
Q. MENU
3
2
Q. MENU
Select MMuullttii AAuuddiioo.
Select other languages.
Return to TV viewing.
1
Q. MENU
3
2
Q. MENU
Analog TV Digital TV
A
English
FF Multi Audio GG
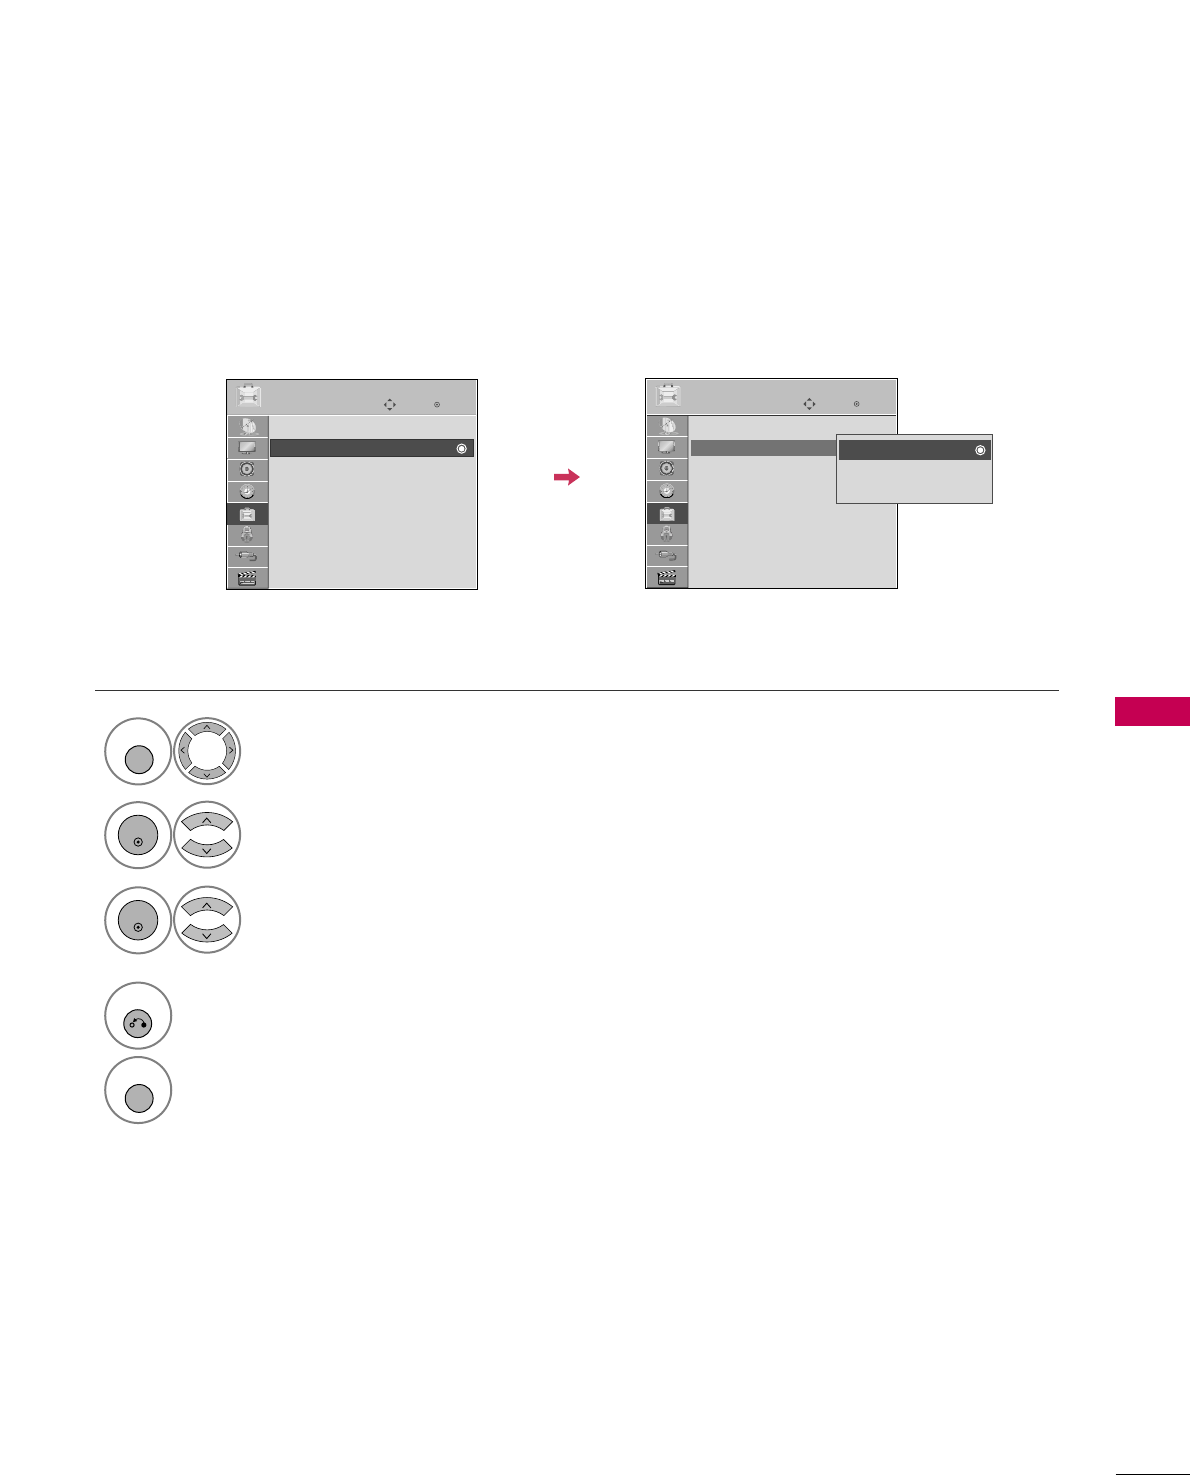
SOUND & LANGUAGE CONTROL
95
AUDIO LANGUAGE
Other languages may be available if a digital signal is provided by the broadcasting station.
This feature operates only in DTV/CADTV mode.
Select OOPPTTIIOONN.
Select AAuuddiioo LLaanngguuaaggee.
Select your desired language.
1
MENU
3
2
ENTER
ENTER
4
RETURN
Return to the previous menu.
MENU
Return to TV viewing.
Enter
Move
OPTION
Enter
Move
OPTION
Menu Language : English
Audio Language : English
Input Label
SIMPLINK : On
Key Lock : Off
Simple Manual
Caption : Off
Set ID : 1
Menu Language : English
Audio Language : English
Input Label
SIMPLINK : On
Key Lock : Off
Simple Manual
Caption : Off
Set ID : 1
English
Spanish
French
EE
EE
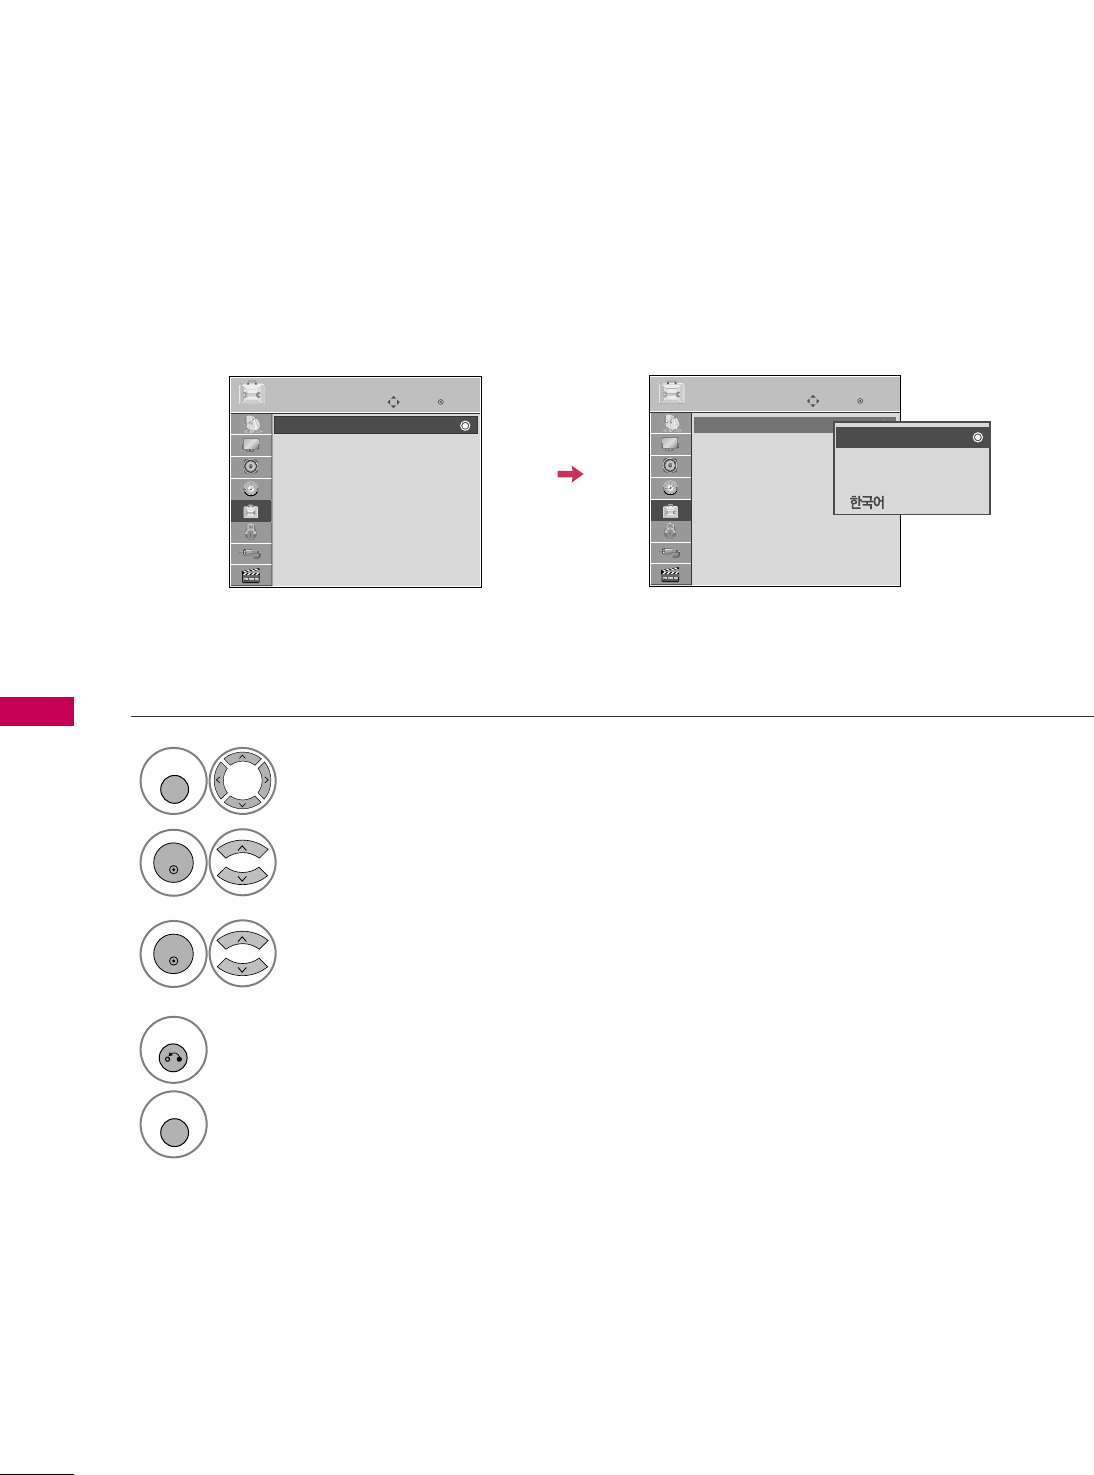
SOUND & LANGUAGE CONTROL
96
ON-SCREEN MENUS LANGUAGE SELECTION
SOUND & LANGUAGE CONTROL
The menus can be shown on the screen in the selected language.
Select OOPPTTIIOONN.
Select MMeennuu LLaanngguuaaggee.
Select your desired language.
From this point on, the on-screen menus will
be shown in the selected language.
1
MENU
3
2
ENTER
ENTER
4
RETURN
Return to the previous menu.
MENU
Return to TV viewing.
Enter
Move
OPTION
Enter
Move
OPTION
Menu Language : English
Audio Language : English
Input Label
SIMPLINK : On
Key Lock : Off
Simple Manual
Caption : Off
Set ID : 1
Menu Language : English
Audio Language : English
Input Label
SIMPLINK : On
Key Lock : Off
Simple Manual
Caption : Off
Set ID : 1
EE
EE
English
Español
Français
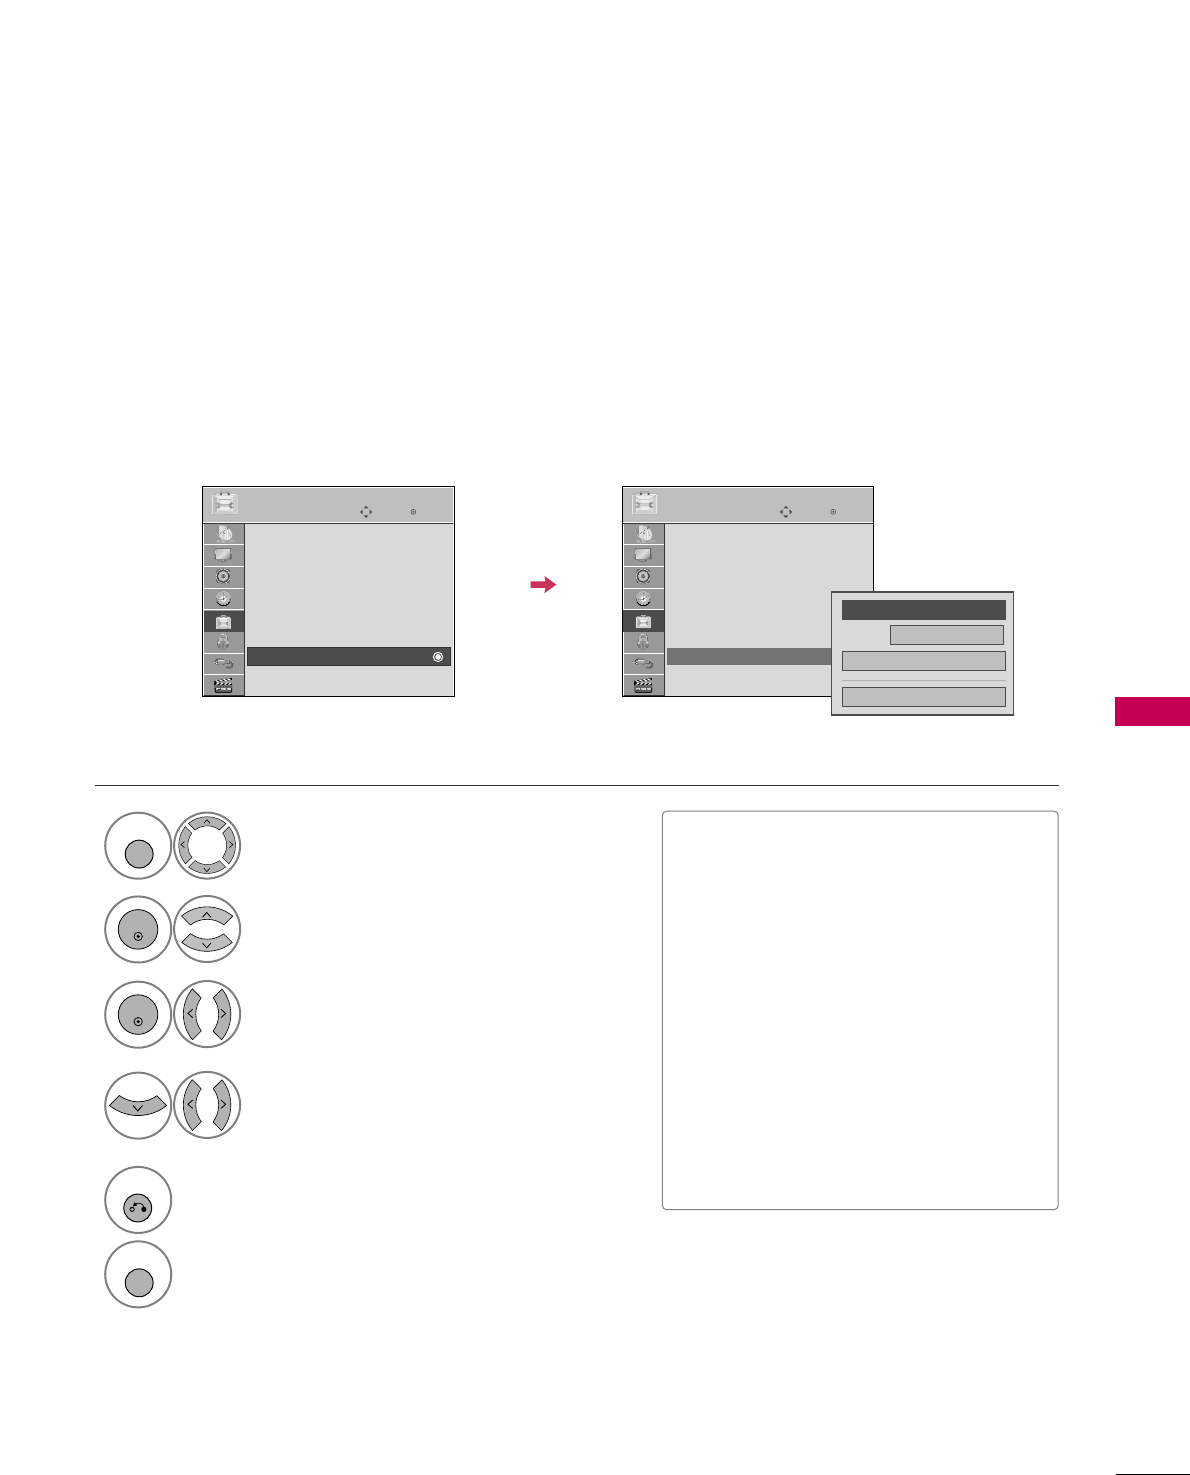
SOUND & LANGUAGE CONTROL
97
CAPTION MODE
Captions are provided to help the hearing impaired watch TV. Select a caption mode for displaying captioning
information if provided on a program. Analog caption displays information at any position on the screen and is
usually the program's dialog. Caption/Text, if provided by the broadcaster, would be available for both digital
and analog channels on the Antenna/Cable. This TV is programmed to memorize the caption/text mode which
was last set when you turned the power off. This function is only available when CCaappttiioonnMode is set OOnn.
Select OOPPTTIIOONN.
Select CCaappttiioonn.
Select OOnn.
1
MENU
3
2
ENTER
ENTER
Select CCCC11-44or TTeexxtt11-44.
4
Analog Broadcasting System Captions
■When selecting OOffff, Sub-menus for
Analog, DTV, and Digital Option become
disabled.
■CCAAPPTTIIOONN
The term for the words that scroll
across the bottom of the TV screen;
usually the audio portion of the pro-
gram provided for the hearing impaired.
■TTEEXXTT
The term for the words that appear in a
large black frame and almost cover the
entire screen; usually messages provid-
ed by the broadcaster.
5
RETURN
Return to the previous menu.
MENU
Return to TV viewing.
Enter
Move
OPTION
Enter
Move
OPTION
Menu Language : English
Audio Language : English
Input Label
SIMPLINK : On
Key Lock : Off
Simple Manual
Caption : Off
Set ID : 1
Menu Language : English
Audio Language : English
Input Label
SIMPLINK : On
Key Lock : Off
Simple Manual
Caption : CC1
Set ID : 1
EE
EE
Mode CC1
Close
Digital Option
FF
On
GG
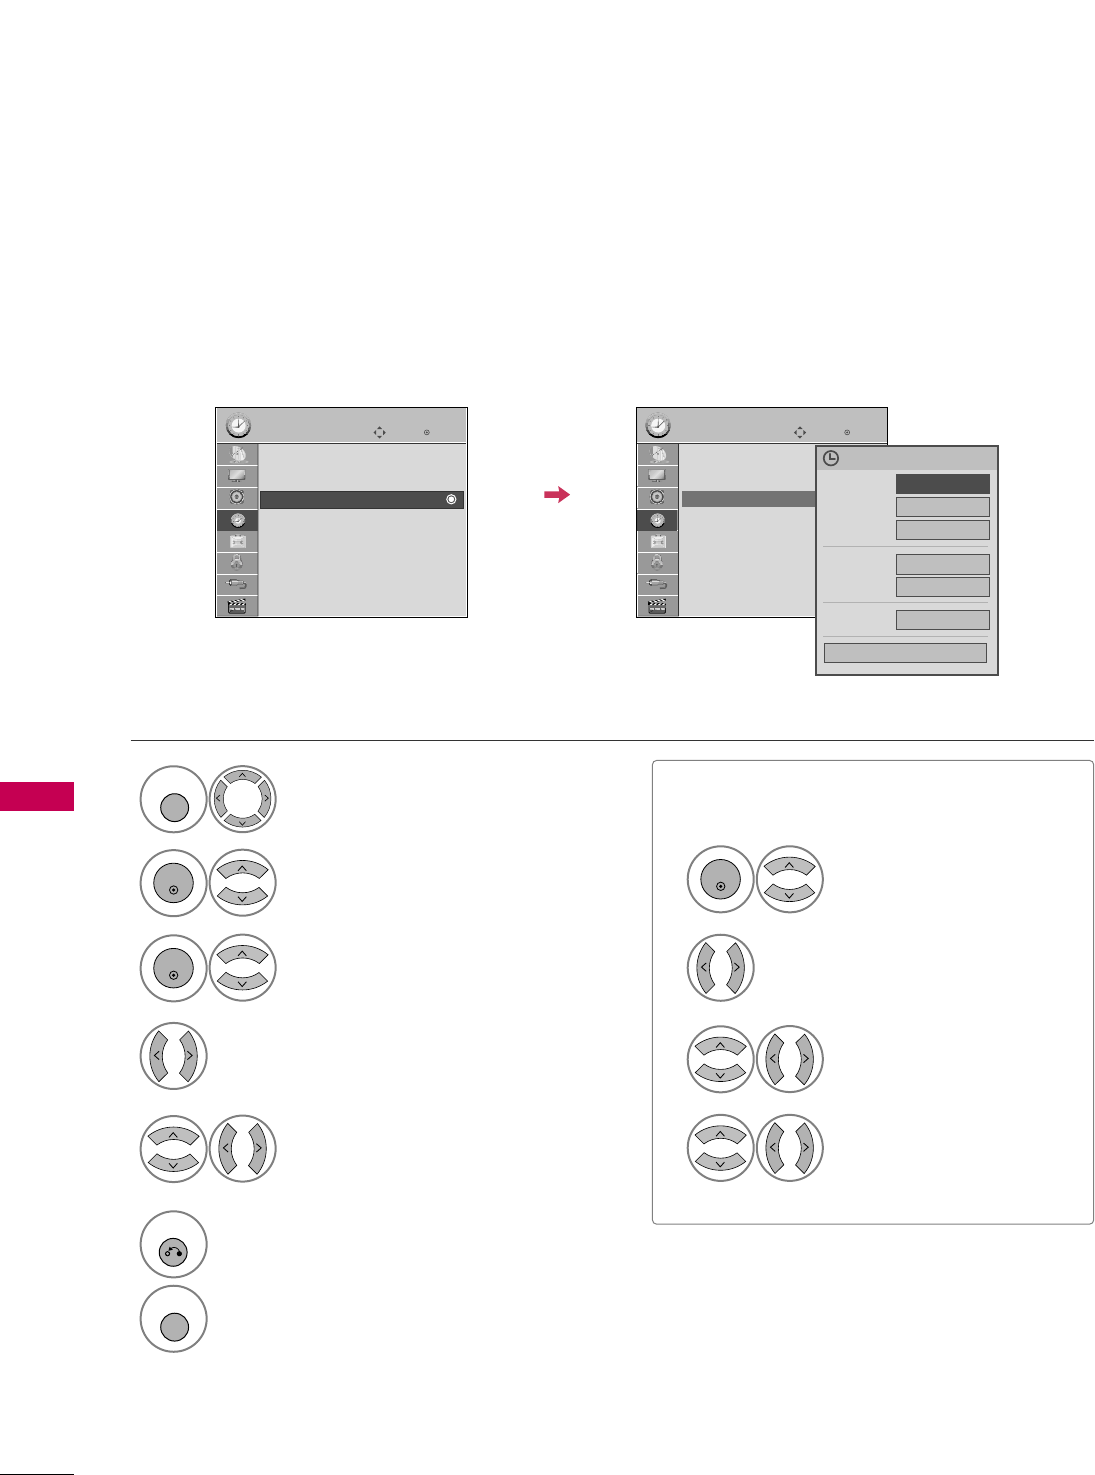
TIME SETTING
102
AUTO ON/OFF TIME SETTING
TIME SETTING
This function operates only if the current time has been set.
The OOffff TTiimmeefunction overrides the OOnn TTiimmeefunction if they are both set to the same time.
The TV must be in standby mode for the OOnn TTiimmeeto work.
If you do not press any button within 2 hours after the TV turns on with the OOnn TTiimmeefunction, the TV will
automatically revert to standby mode.
■To cancel OOnn//OOffff TTiimmeefunction, select OOffff.
■Only for On Time function
Select IInnppuutt.
Select the desired input source.
Enter
Move
TIME
Enter
Move
TIME
Clock
Off Time : Off
On Time : Off
Sleep Timer : Off
Clock
Off Time : Off
On Time : 6:30 AM (Once)
Sleep Timer : Off
Select TTIIMMEE.
Select OOffff TTiimmeeor OOnn TTiimmee.
Select RReeppeeaatt.
1
MENU
3
2
ENTER
ENTER
Select OOffff, OOnnccee, DDaaiillyy, MMoonn..~FFrrii..,
MMoonn..~SSaatt.., SSaatt..~ SSuunn.., or SSuunn...
4
Select and set HHoouurror MMiinnuuttee.
5
1
ENTER
3
4
2
When Selecting TTVV:
set the channel at turn-on.
Adjust to sound level at
turn-on.
6
RETURN
Return to the previous menu.
MENU
Return to TV viewing.
Repeat FF
Once
GG
Hour 6 AM
Minute 30
Input TV
Channel TV 2-0
Volume 30
Close
Feb. 21, 2009 10:10 AM
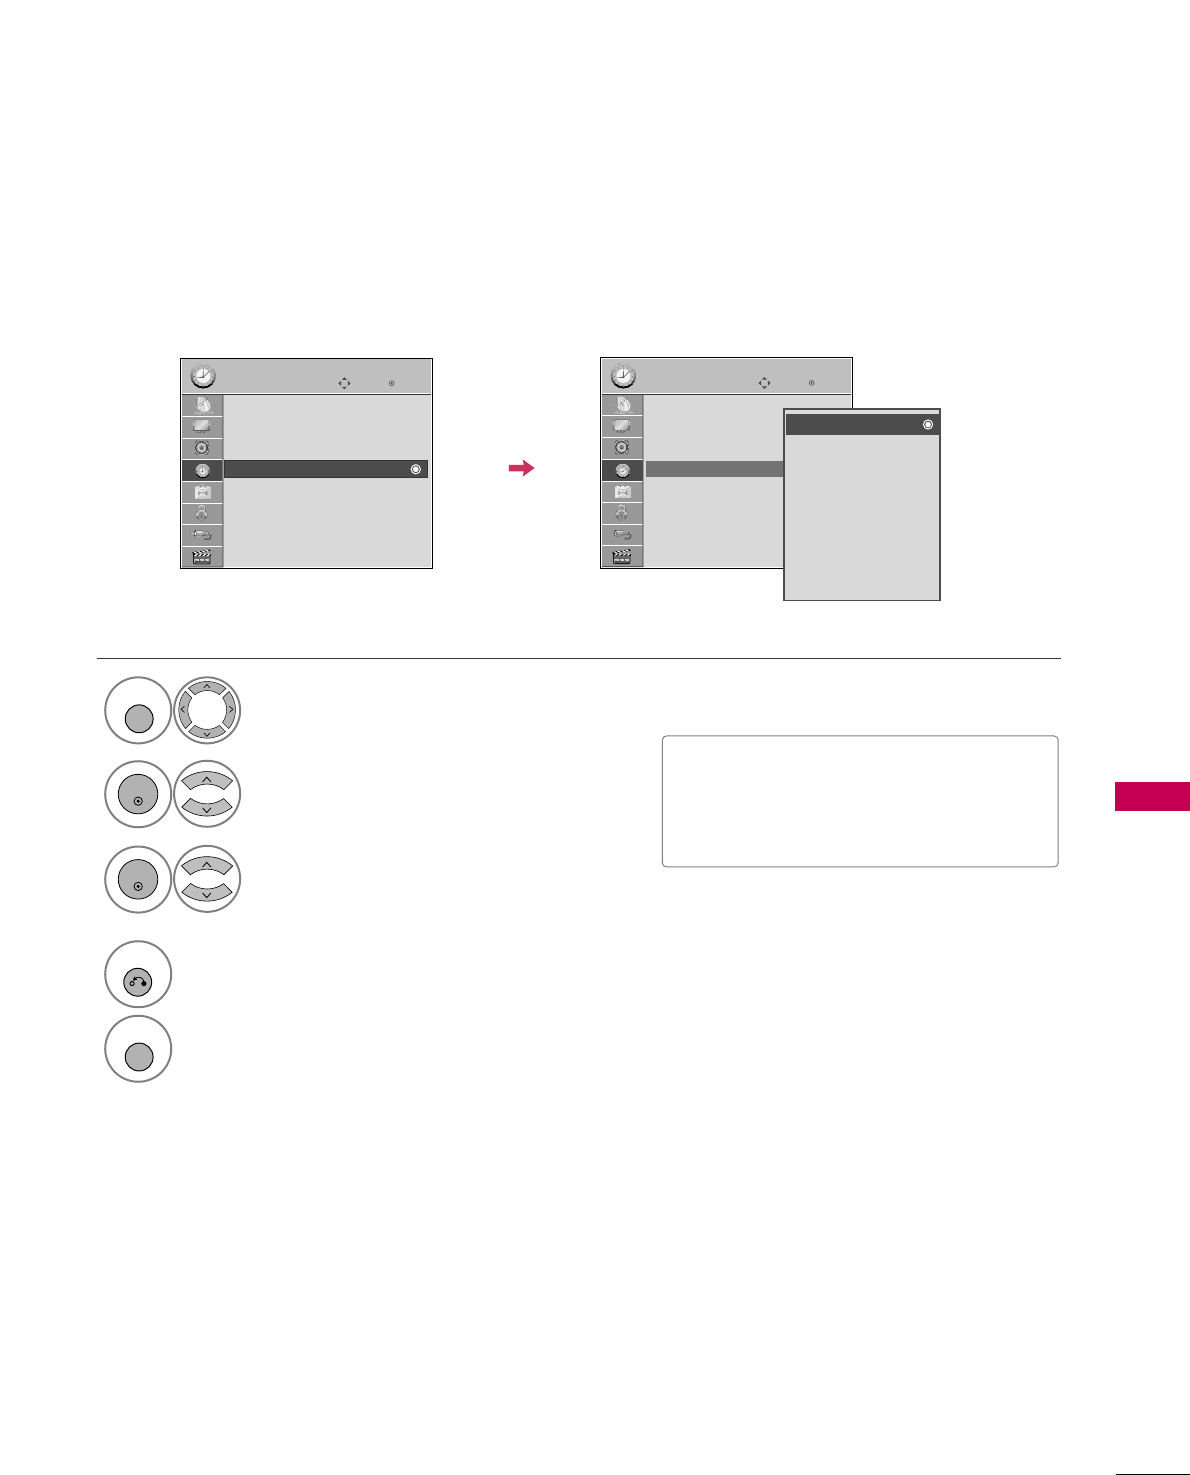
TIME SETTING
103
SLEEP TIMER SETTING
The Sleep Timer turns the TV off at the preset time.
Note that this setting is cleared when the TV is turned off.
■To cancel the SSlleeeepp TTiimmeerr, select OOffff.
■You can also adjust SSlleeeepp TTiimmeerrin the
QQ..MMEENNUU.
Enter
Move
TIME
Enter
Move
TIME
Clock
Off Time : Off
On Time : Off
Sleep Timer : Off
Clock
Off Time : Off
On Time : Off
Sleep Timer : Off
Select TTIIMMEE.
Select SSlleeeepp TTiimmeerr.
Make appropriate adjustments.
1
MENU
3
2
ENTER
ENTER
4
RETURN
Return to the previous menu.
MENU
Return to TV viewing.
Off
10 min.
20 min.
30 min.
60 min.
90 min.
120 min.
180 min.
240 min.

PARENTAL CONTROL / RATING
104
PARENTAL CONTROL / RATINGS
Parental Control can be used to block specific channels, ratings and other viewing sources.
The Parental Control Function (V-Chip) is used to block program viewing based on the ratings sent by the broad-
casting station. The default setting is to allow all programs to be viewed. Viewing can be blocked by choosing the
type of the program and the categories. It is also possible to block all program viewing for a time period. To use
this function, the following must be done :
1. Set ratings and categories to be blocked.
2. Specify a password
3. Enable the lock
V-Chip rating and categories
Rating guidelines are provided by broadcasting stations. Most television programs and television movies can be
blocked by TV Rating and/or Individual Categories. Movies that have been shown at the theaters or direct-to-
video movies use the Movie Rating System (MPAA)only.
Ratings for Television programs including made-for-TV movies:
■TV-G (General audience)
■TV-PG (Parental guidance suggested)
■TV-14 (Parents strongly cautioned)
■TV-MA (Mature audience only)
■TV-Y (All children)
■TV-Y7 (Children 7 years older)
Set up blocking schemes to block specific channels, ratings, and external viewing sources.
A password is required to gain access to this menu.
Setting up Your Password
For USA
Enter
Move
LOCK
Lock System : Off
Set Password
Block Channel
Movie Rating
TV Rating-Children
TV Rating-General
Downloadable Rating
Input Block
For Canada
Enter
Move
LOCK
Lock System : Off
Set Password
Block Channel
TV Rating-English
TV Rating-French
Downloadable Rating
Input Block
Close
Enter Password
** * *
Select LLOOCCKK.
1
MENU
ENTER
Input the password.
2
1
456
78
0
9
23
■Enter the password as requested.
■The TV is set up with the initial pass-
word “0-0-0-0”.
SET PASSWORD & LOCK SYSTEM
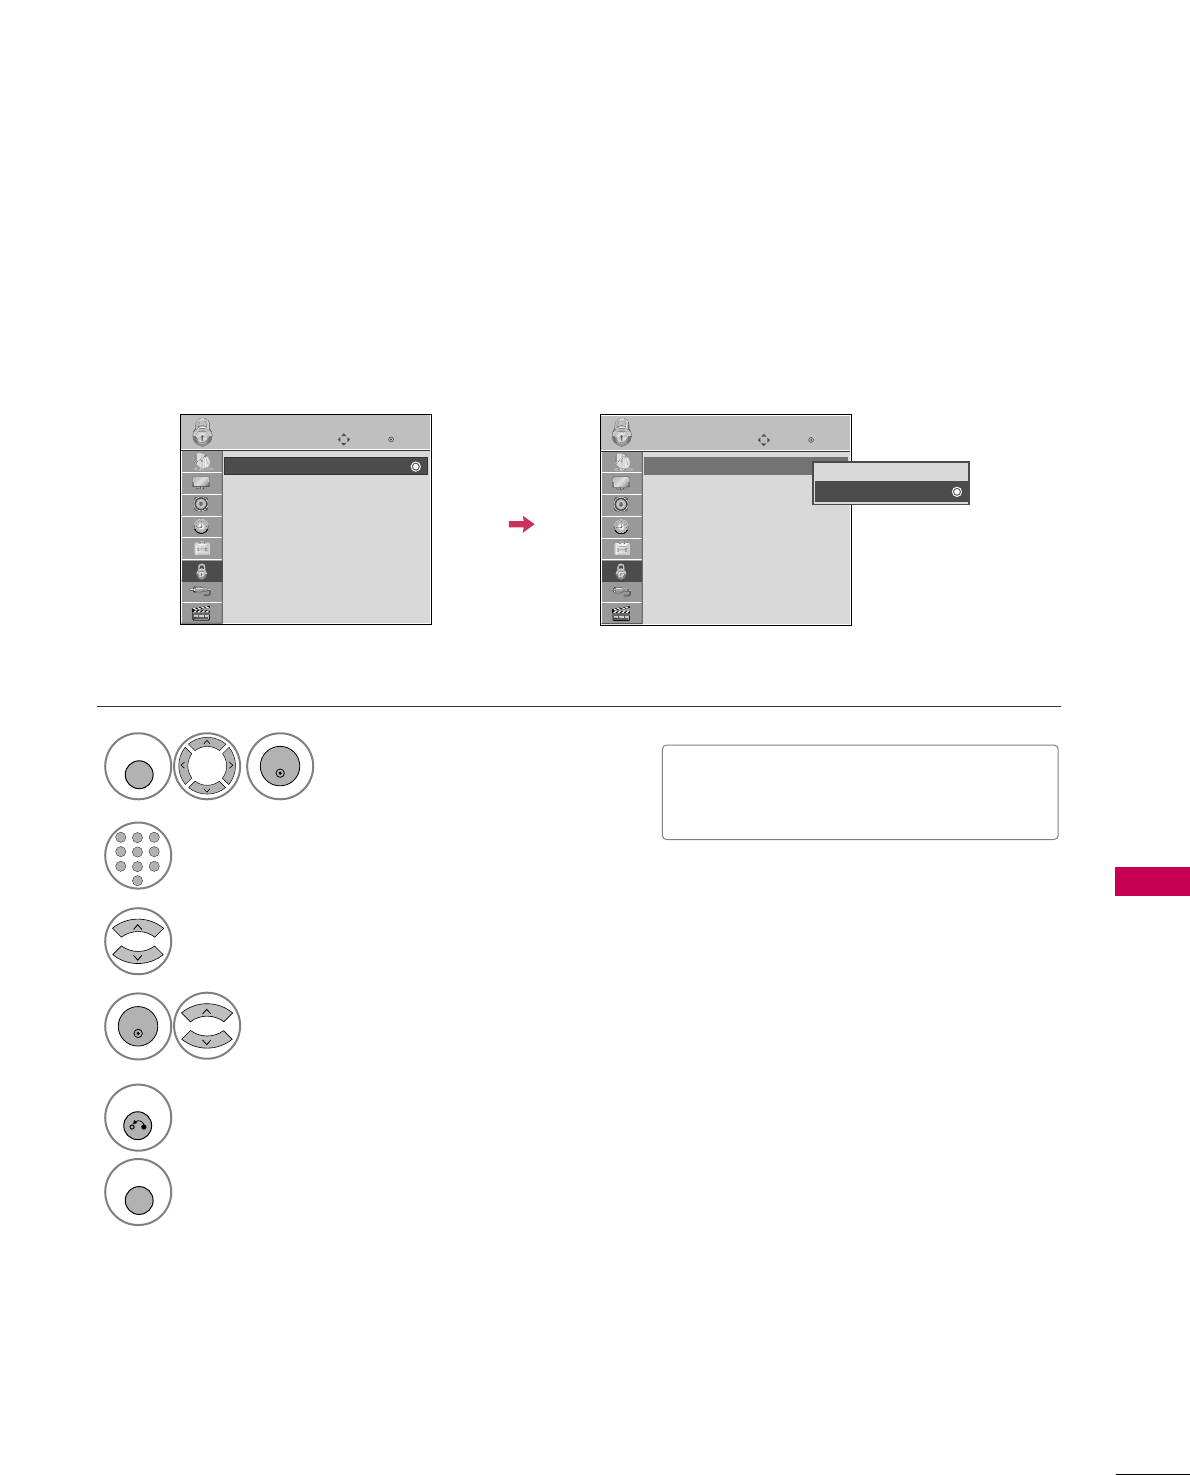
PARENTAL CONTROL / RATING
105
Enables or disables the blocking scheme you set up previously.
Lock System
Enter
Move
LOCK
Lock System : Off
Set Password
Block Channel
Movie Rating
TV Rating-Children
TV Rating-General
Downloadable Rating
Input Block
Select LLoocckk SSyysstteemm.
Select OOnnor OOffff.
4
3
ENTER
Enter
Move
LOCK
Lock System : On
Set Password
Block Channel
Movie Rating
TV Rating-Children
TV Rating-General
Downloadable Rating
Input Block
Off
On
■When you select OOnn, the Lock System
is enable.
Select LLOOCCKK.
1
MENU
ENTER
Input the password.
2
1
456
78
0
9
23
5
RETURN
Return to the previous menu.
MENU
Return to TV viewing.
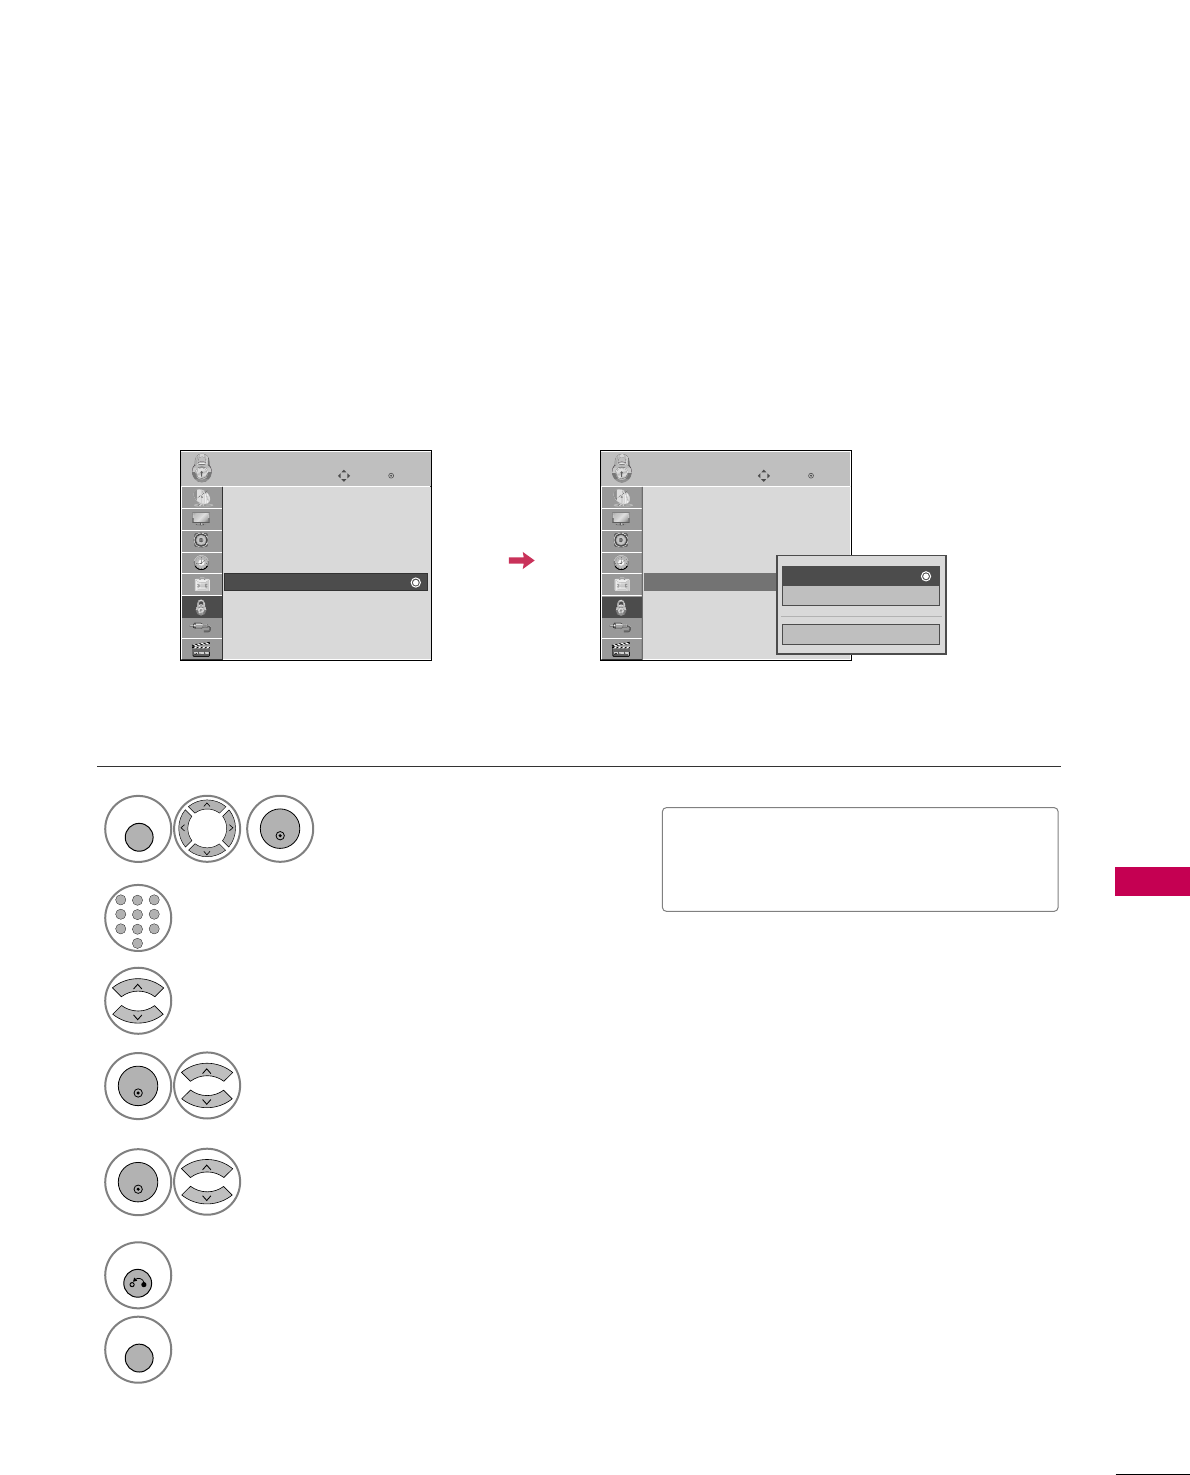
PARENTAL CONTROL / RATING
109
Enter
Move
LOCK
Lock System : Off
Set Password
Block Channel
Movie Rating
TV Rating-Children
TV Rating-General
Downloadable Rating
Input Block
Select TTVV RRaattiinngg--CChhiillddrreenn.
Select AAggeeor FFaannttaassyy VViioolleennccee.
4
3
ENTER
Select block options.
5
ENTER
Enter
Move
LOCK
Lock System : Off
Set Password
Block Channel
Movie Rating
TV Rating-Children
TV Rating-General
Downloadable Rating
Input Block
■Age (applies to TV-Y, TV-Y7)
■Fantasy Violence (applies to TV-Y7)
TV Rating Children
-
For USA
Prevents children from watching certain children's TV programs, according to the ratings limit set. The children
rating does not apply to other TV programs. Unless you block certain TV programs intended for mature audi-
ences in the TV Rating - sub menu, your children can view those programs.
Close
Age
Fantasy Violence
Select LLOOCCKK.
1
MENU
ENTER
Input the password.
2
1
456
78
0
9
23
6
RETURN
Return to the previous menu.
MENU
Return to TV viewing.
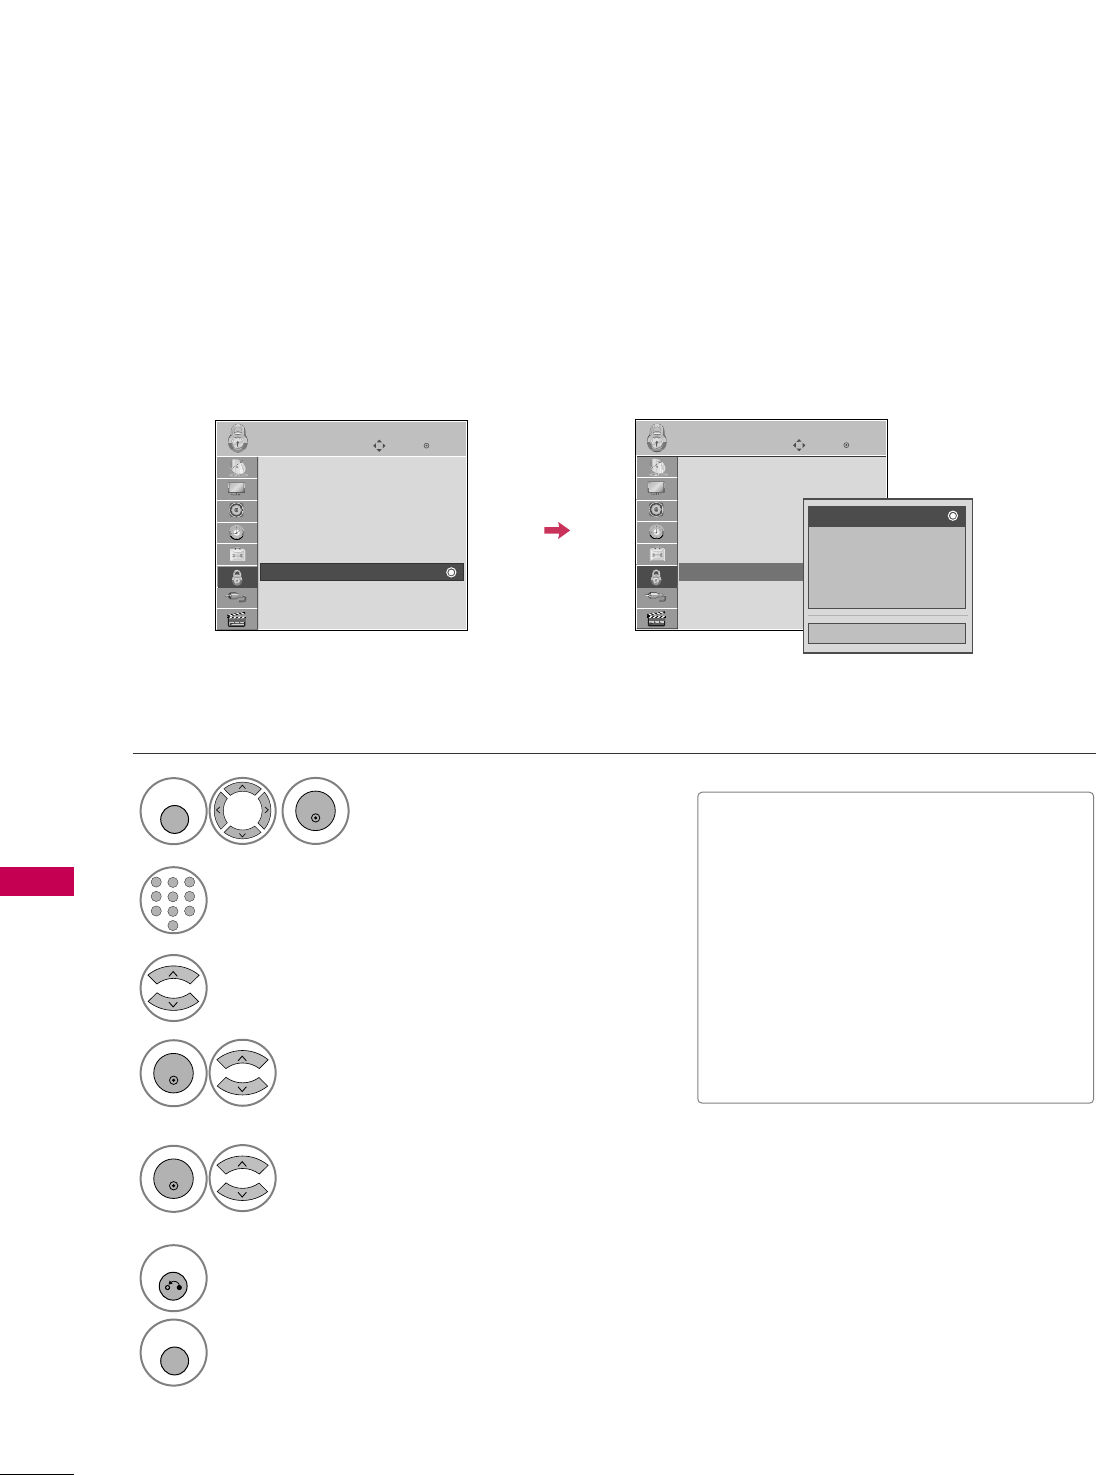
PARENTAL CONTROL / RATING
110
PARENTAL CONTROL / RATINGS
TV Rating General
-
For USA
Based on the ratings, blocks certain TV programs that you and your family do not want to view.
Enter
Move
LOCK
Lock System : Off
Set Password
Block Channel
Movie Rating
TV Rating-Children
TV Rating-General
Downloadable Rating
Input Block
Select TTVV RRaattiinngg--GGeenneerraall.
Select AAggee, DDiiaalloogguuee, LLaanngguuaaggee,
SSeexxor VViioolleennccee.
4
3
ENTER
Select block options.
5
ENTER
Enter
Move
LOCK
Lock System : Off
Set Password
Block Channel
Movie Rating
TV Rating-Children
TV Rating-General
Downloadable Rating
Input Block
■Age (applies to TV-G,TV-PG,TV-14,TV-
MA).
■Dialogue-sexual dialogue (applies to
TV-PG,TV-14).
■Language-adult language (applies to
TV-PG, TV-14, TV-MA).
■Sex-sexual situations (applies to TV-PG,
TV-14, TV-MA).
■Violence (applies to TV-PG, TV-14, TV-
MA).
Close
Age
Dialogue
Language
Sex
Violence
Select LLOOCCKK.
1
MENU
ENTER
Input the password.
2
1
456
78
0
9
23
6
RETURN
Return to the previous menu.
MENU
Return to TV viewing.
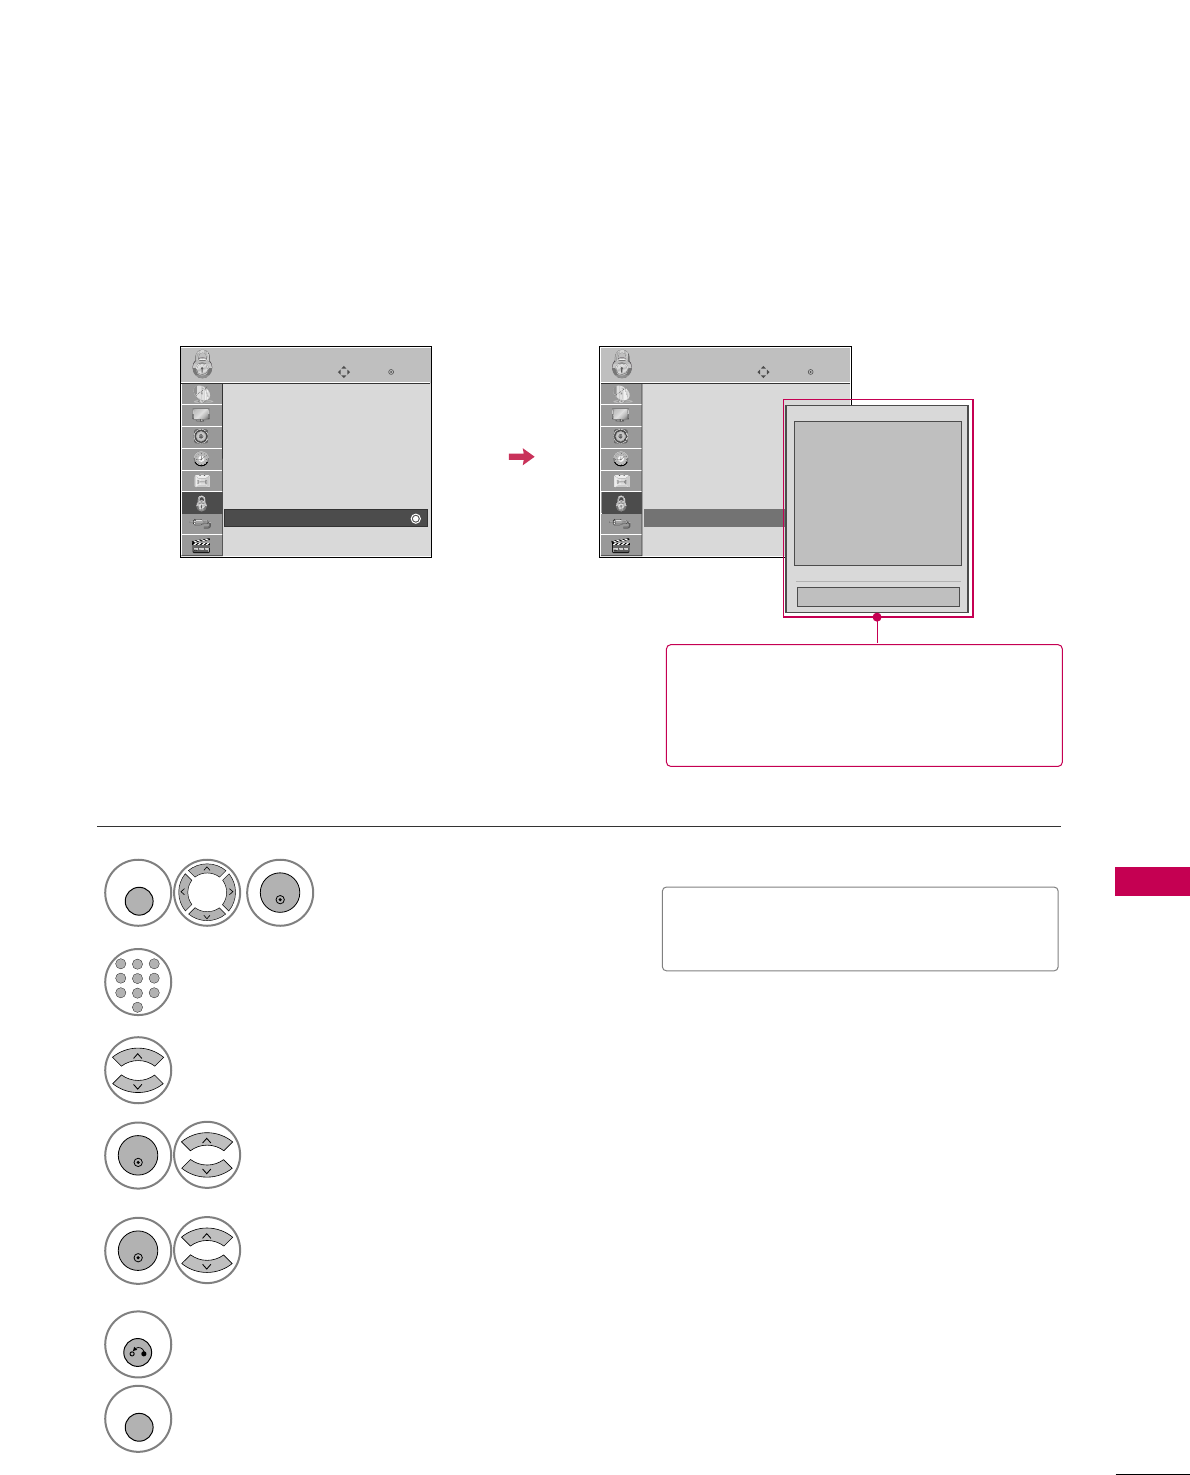
PARENTAL CONTROL / RATING
113
DOWNLOADABLE RATING
This function is available only for digital channels.
This function operates only when TV has received Region5 Rating data.
Enter
Move
LOCK
Lock System : Off
Set Password
Block Channel
Movie Rating
TV Rating-Children
TV Rating-General
Downloadable Rating
Input Block
Enter
Move
LOCK
Lock System : Off
Set Password
Block Channel
Movie Rating
TV Rating-Children
TV Rating-General
Downloadable Rating
Input Block
Humor
Sport
Cruelty
Language
Sadness
Genre
Age
Close
E
E
Select DDoowwnnllooaaddaabbllee RRaattiinngg.
Select desired DDoowwnnllooaaddaabbllee
RRaattiinngg option.
4
3
ENTER
Select desired option and block it.
5
ENTER
Select LLOOCCKK.
1
MENU
ENTER
Input the password.
2
1
456
78
0
9
23
6
RETURN
Return to the previous menu.
MENU
Return to TV viewing.
■Based on rating table, your TV's OSD
(On Screen Display) may differ slightly
from what is shown in this manual.
■If a Downloadable rating is locked, enter
the password to unlock it temporarily.
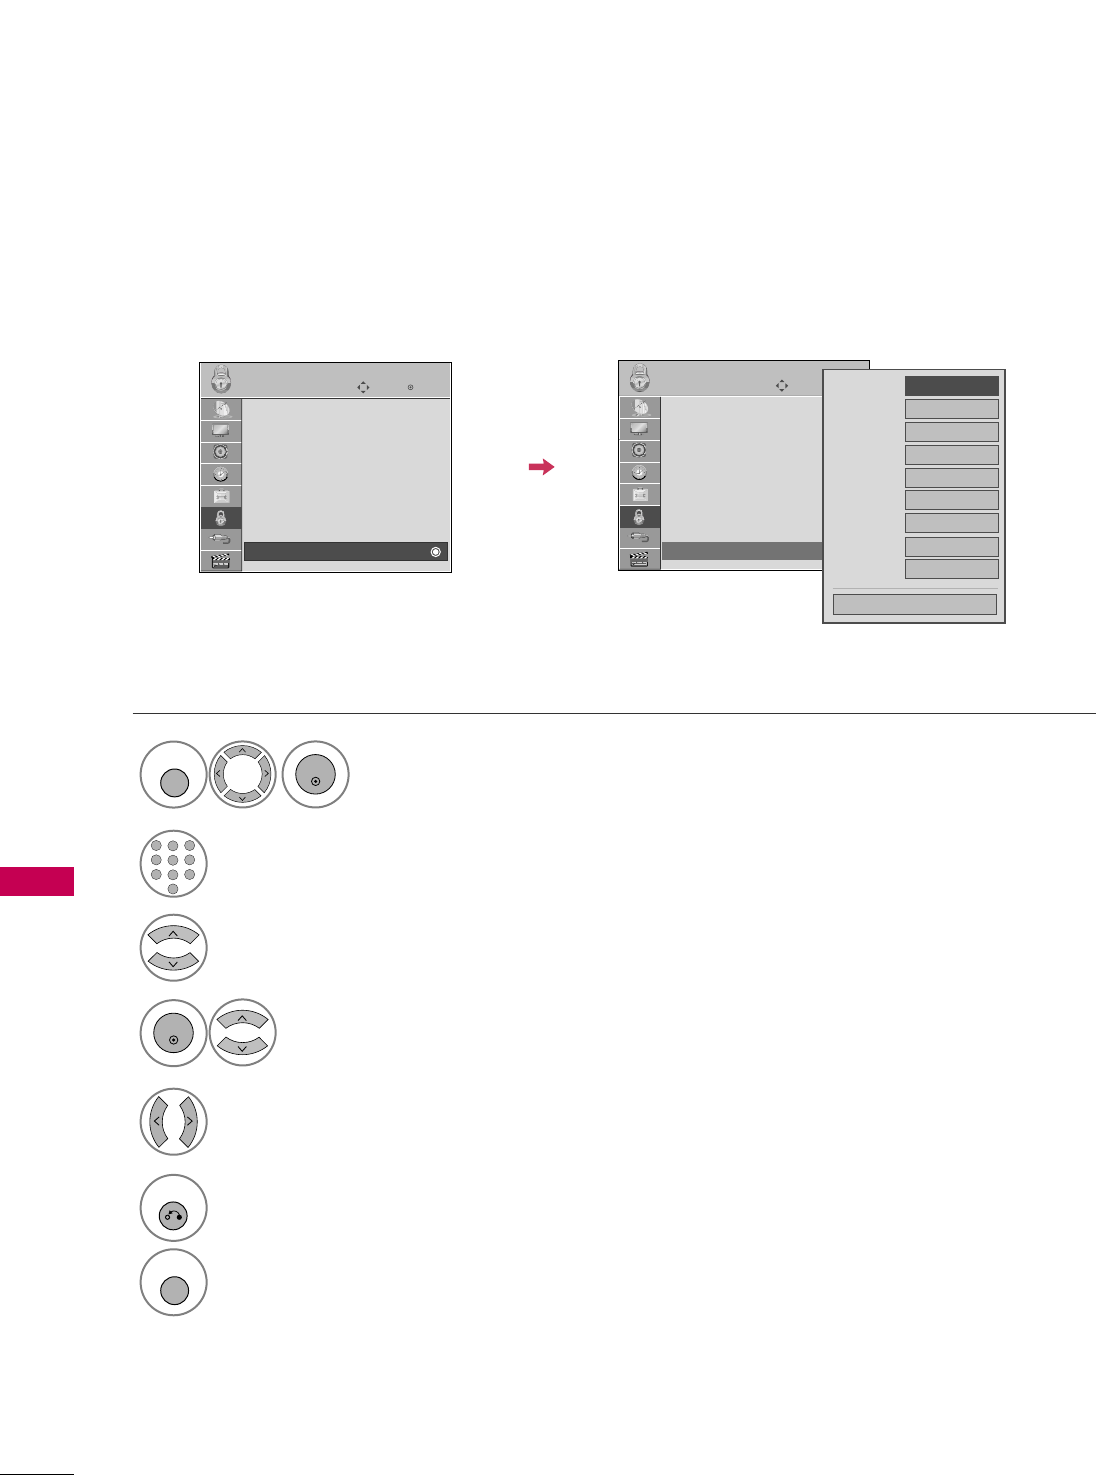
PARENTAL CONTROL / RATING
114
EXTERNAL INPUT BLOCKING
PARENTAL CONTROL / RATINGS
Enables you to block an input.
Select IInnppuutt BBlloocckk.
Select input source.
4
3
Select OOnnor OOffff.
5
ENTER
Enter
Move
LOCK
Lock System : Off
Set Password
Block Channel
Movie Rating
TV Rating-Children
TV Rating-General
Downloadable Rating
Input Block
Select LLOOCCKK.
1
MENU
ENTER
Input the password.
2
1
456
78
0
9
23
6
RETURN
Return to the previous menu.
MENU
Return to TV viewing.
AV1 FF
Off
GG
AV2 Off
Component1
Off
HDMI1 Off
RGB-PC Off
Component2
Off
HDMI2 Off
HDMI3 Off
HDMI4 Off
Close
Enter
Move
LOCK
Lock System : Off
Set Password
Block Channel
Movie Rating
TV Rating-Children
TV Rating-General
Downloadable Rating
Input Block
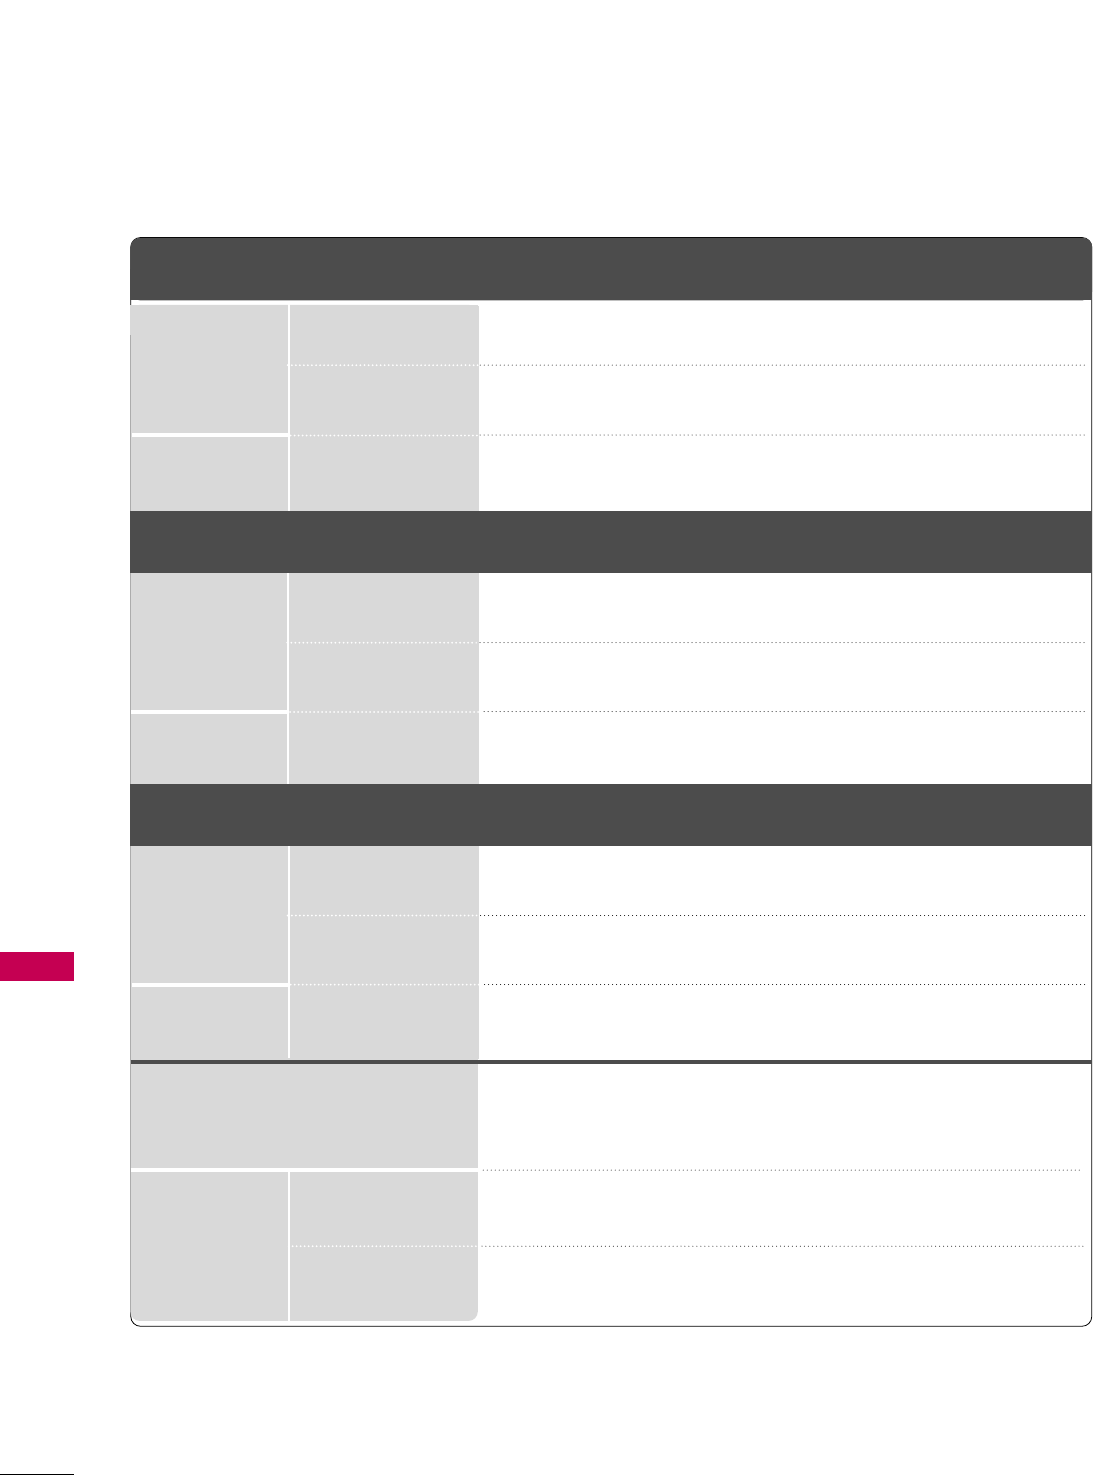
Operating Temperature
Operating Humidity
Storage Temperature
Storage Humidity
With stand
Without stand
With stand
Without stand
APPENDIX
118
APPENDIX
PRODUCT SPECIFICATIONS
■The specifications shown above may be changed without prior notice for quality improvement.
MODELS
AC100-240V ~ 50/60Hz
NTSC-M, ATSC, 64 & 256 QAM
VHF 2-13, UHF 14-69, CATV 1-135, DTV 2-69, CADTV 1-135
75 ohm
32 ~ 104°F (0 ~40°C)
Less than 80%
-4 ~ 140°F (-20 ~60°C)
Less than 85%
Dimensions
(Width x Height
x Depth)
Weight
Power requirement
Television System
Program Coverage
External Antenna Impedance
Environment
condition
With stand
Without stand
With stand
Without stand
42LH90
(42LH90-UB)
47LH90
(47LH90-UB)
55LH90
(55LH90-UB)
41.9 x 30.5 x 14.2 inches
1065.9 x 776.0 x 361.7 mm
41.9 x 28.2 x 3.7 inches
1065.9 x 716.4 x 94.4 mm
51.1 lbs / 23.2 kg
42.9 lbs / 19.5 kg
46.4 x 33.5 x 15.7 inches
1179.0 x 851.4 x 398.8 mm
46.4 x 30.7 x 4.1 inches
1179.0 x 780.6 x 105.9 mm
60.1 lbs / 27.3 kg
51.8 lbs / 23.5 kg
54.0 x 37.9 x 17.8 inches
1373.0 x 964.3 x 454.2 mm
54.0 x 34.9 x 4.2 inches
1373.0 x 888.5 x 106.9 mm
90.1 lbs / 40.9 kg
78.2 lbs / 35.5 kg
Dimensions
(Width x Height
x Depth)
Weight
With stand
Without stand
With stand
Without stand
39.4 x 27.1 x 11.2 inches
1001.2 x 688.7 x 286.5 mm
39.4 x 24.5 x 1.7 inches
1001.2 x 623.2 x 45.0 mm
54.8 lbs / 24.9 kg
46.0 lbs / 20.9 kg
43.6 x 29.6 x 11.2 inches
1109.6 x 752.7 x 286.5 mm
43.6 x 26.9 x 1.7 inches
1109.6 x 685.3 x 45.5mm
65.9 lbs / 29.9 kg
57.0 lbs / 25.9 kg
50.4 x 33.6 x 12.6 inches
1279.0 x 853.3 x 320.2 mm
50.4 x 30.7 x 1.8 inches
1279.0 x 780.5 x 45.5 mm
82.0 lbs / 37.2 kg
70.5 lbs / 32.0 kg
MODELS 42SL80
(42SL85-UA)
47SL80
(47SL85-UA)
55SL80
(55SL80-UB)
Dimensions
(Width x Height
x Depth)
Weight
39.7 x 27.3 x 11.3 inches
1009.2 x 694.5 x 286.5 mm
39.7 x 24.8 x 1.2 inches
1009.2 x 629.2 x 29.3 mm
54.2 lbs / 24.6 kg
44.3 lbs / 20.1 kg
MODELS 42SL90
(42SL90-UA)
47SL90
(47SL90-UA)
44.1 x 29.8 x 11.3 inches
1119.6 x 757.1 x 286.5 mm
44.1 x 27.2 x 1.2 inches
1119.6 x 691.3 x 29.3 mm
62.8 lbs / 28.5 kg
52.9 lbs / 24.0 kg
