LG Electronics USA 55WV70MS MONITOR SIGNAGE User Manual EMISSION TEST REPORT
LG Electronics USA MONITOR SIGNAGE EMISSION TEST REPORT
UserManual.wiki
>
LG Electronics USA
>
55WV70MS User Manual
Users Manual
Navigation menu
Upload a User Manual
Namespaces
Wiki Guide
HTML
PDF
Info
Views
User Manual
Discussion / Help
Navigation


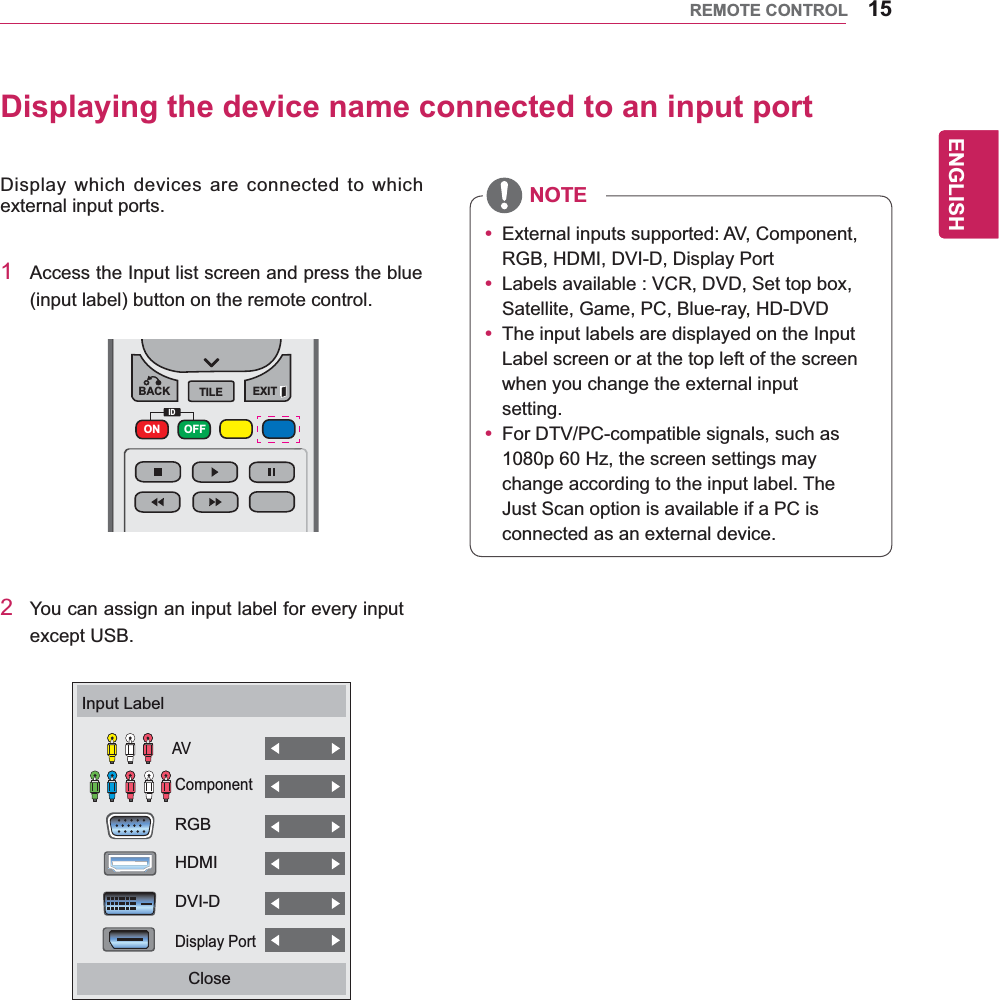
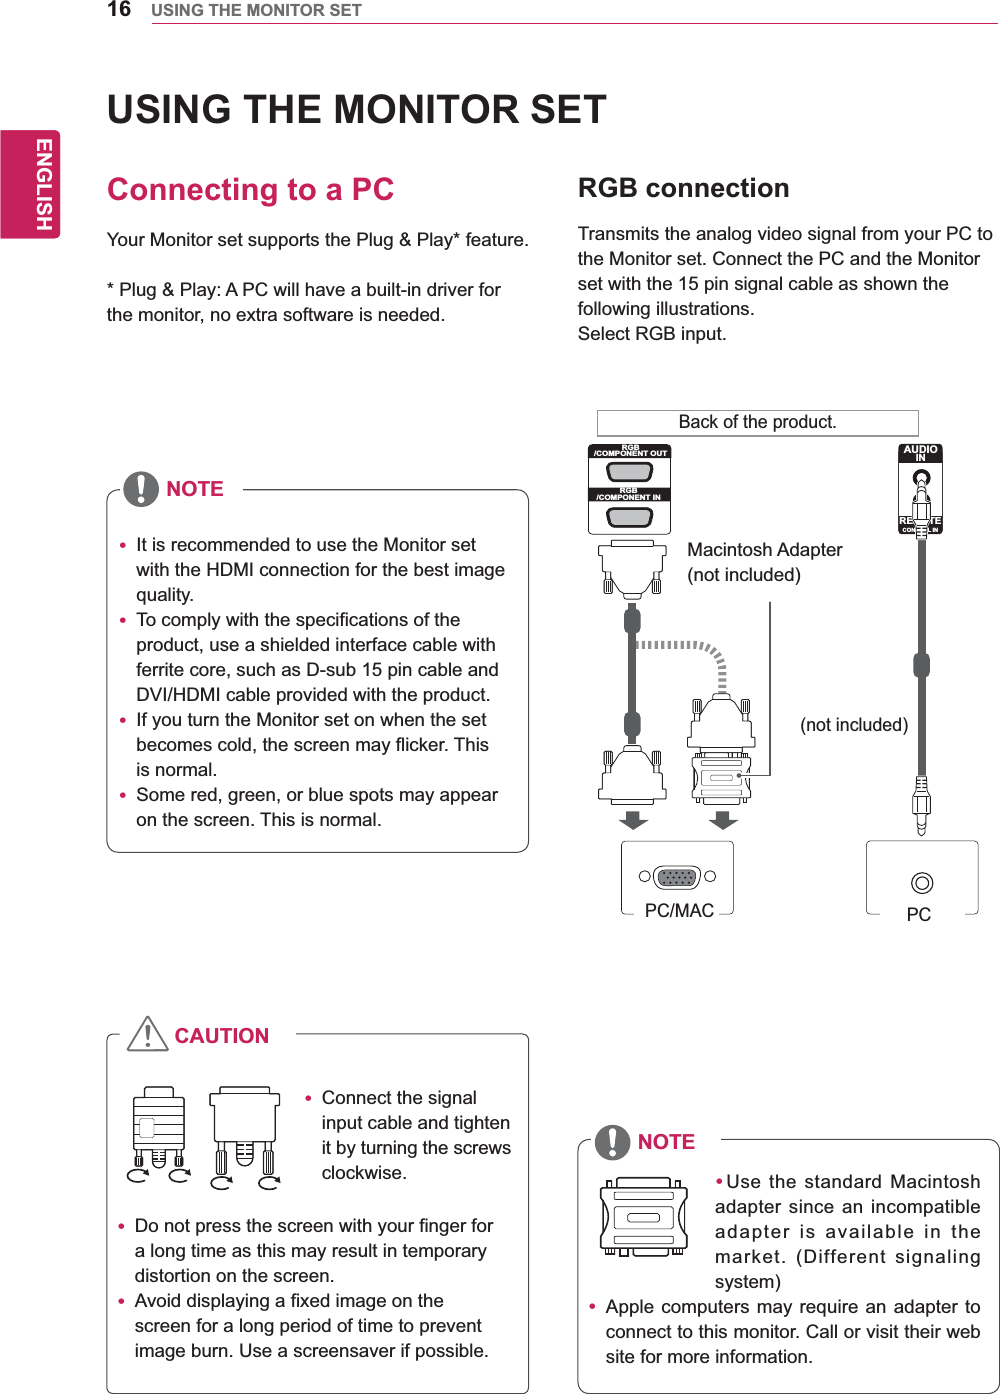
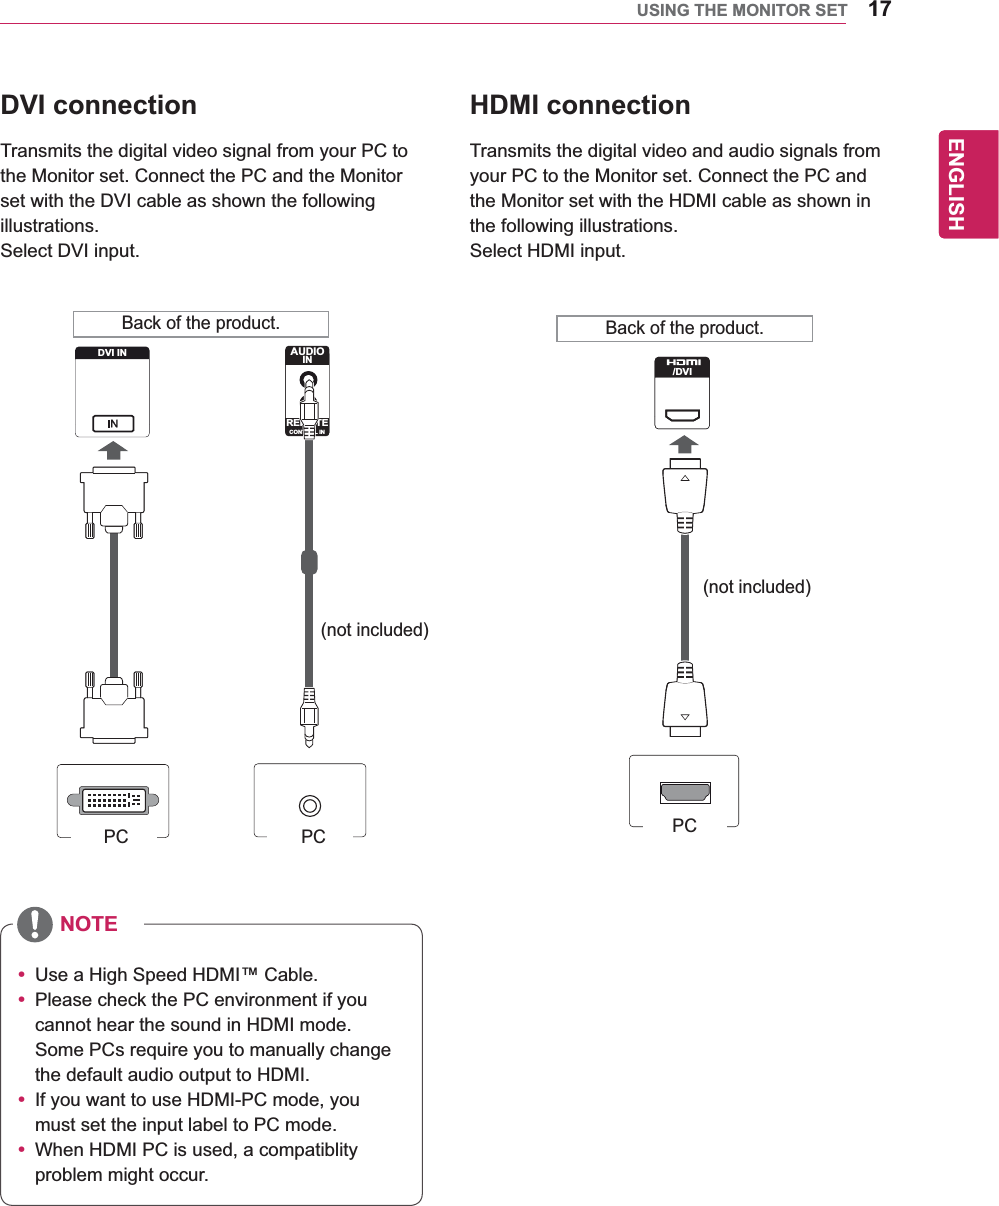
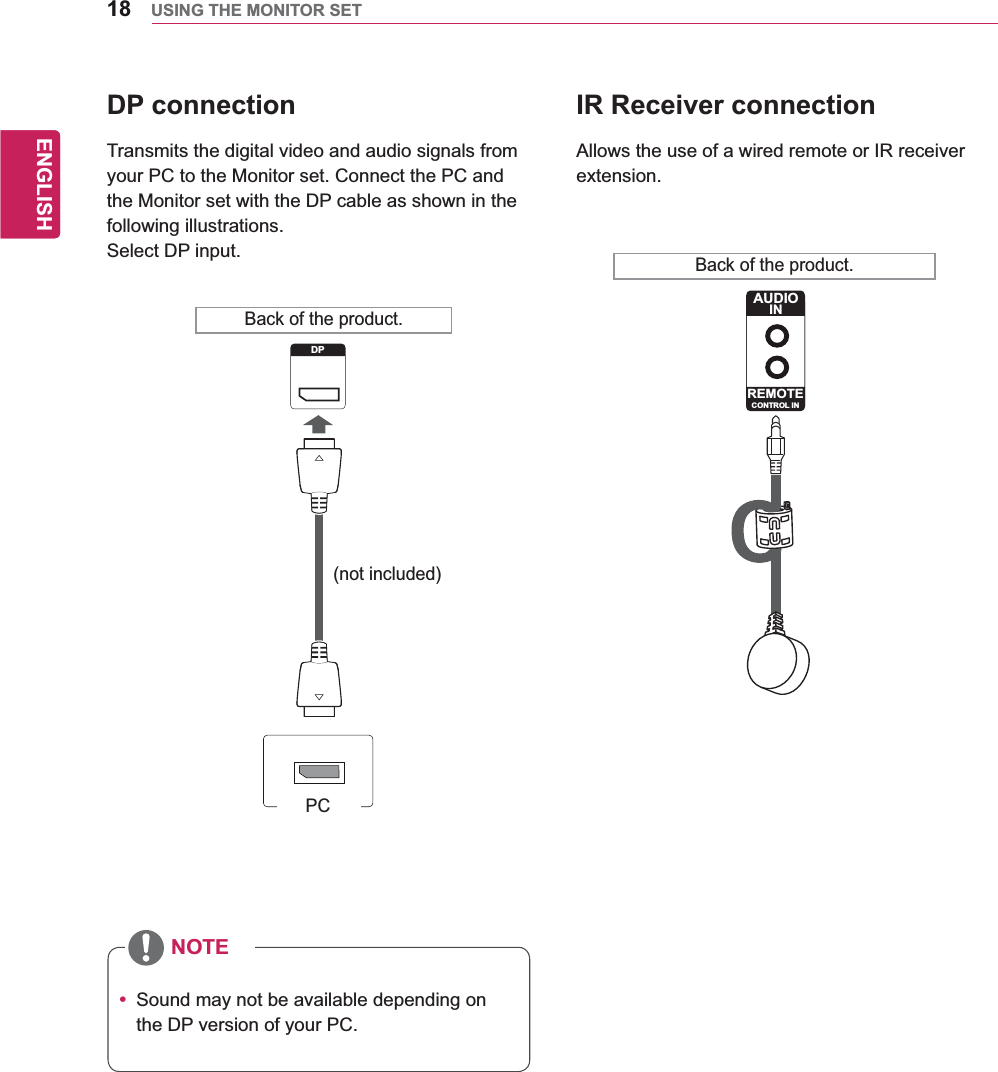
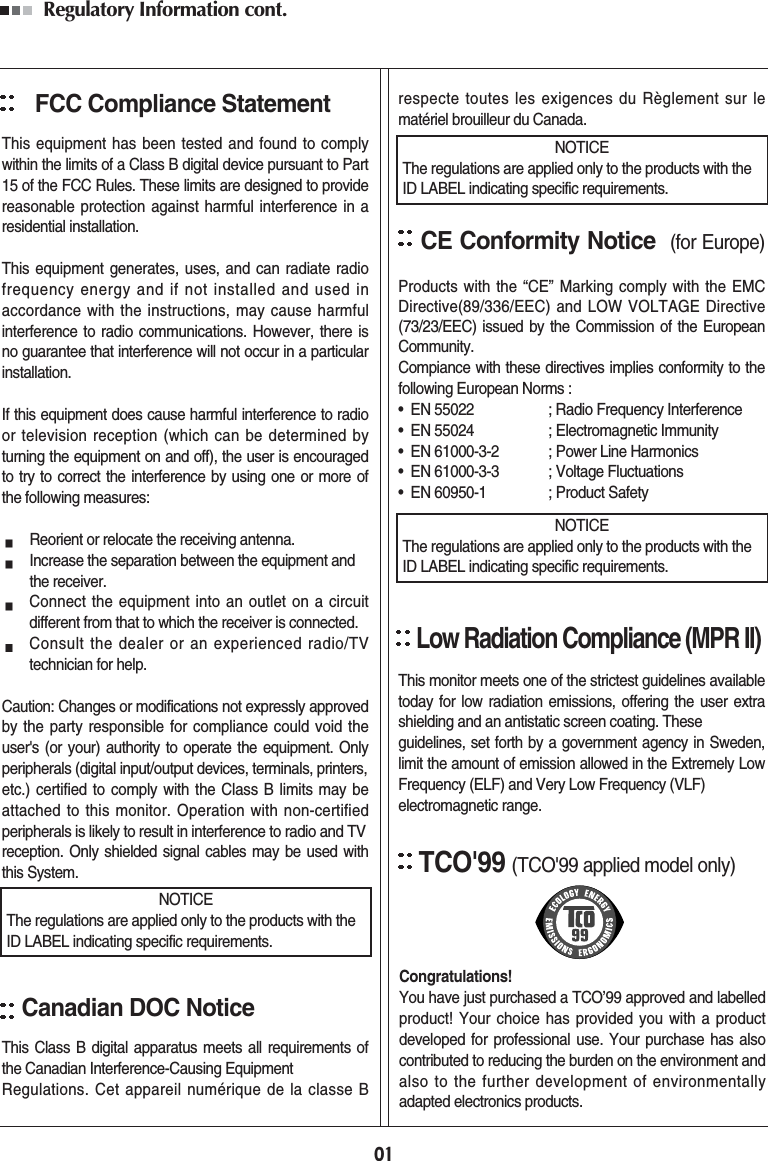
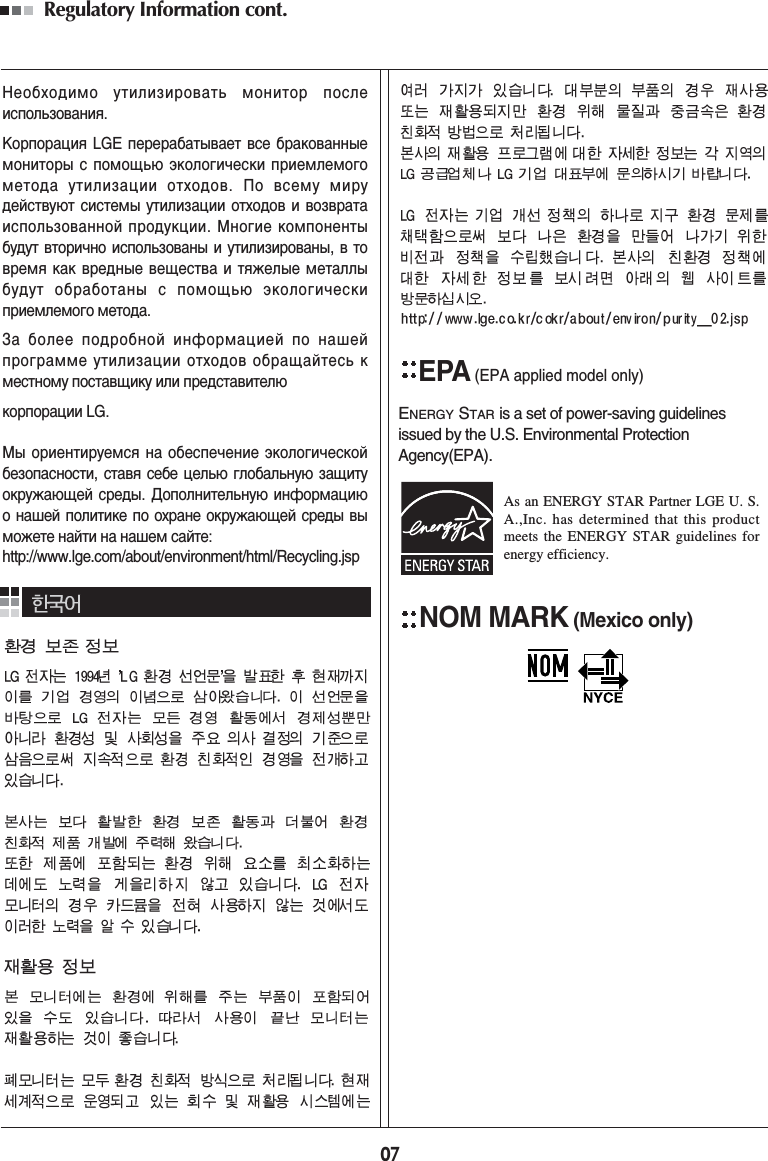
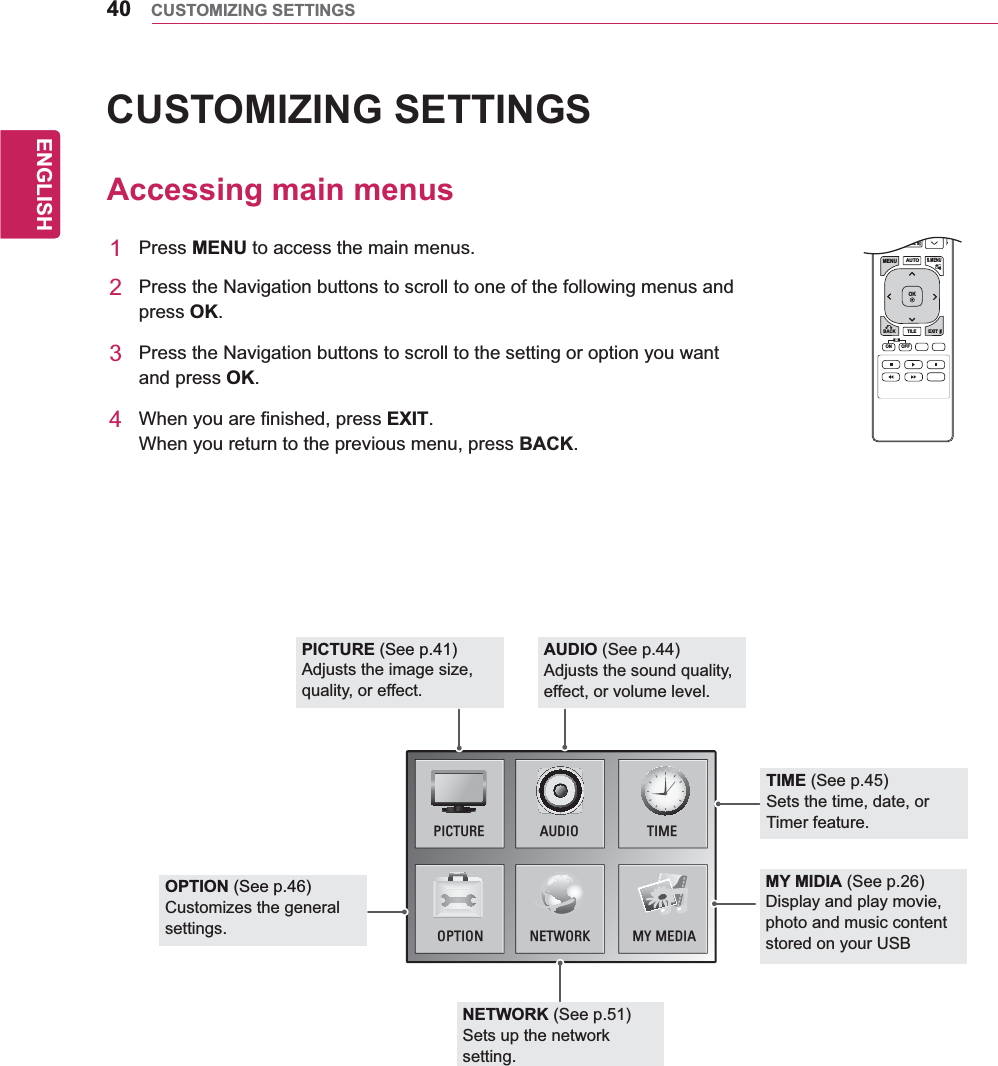
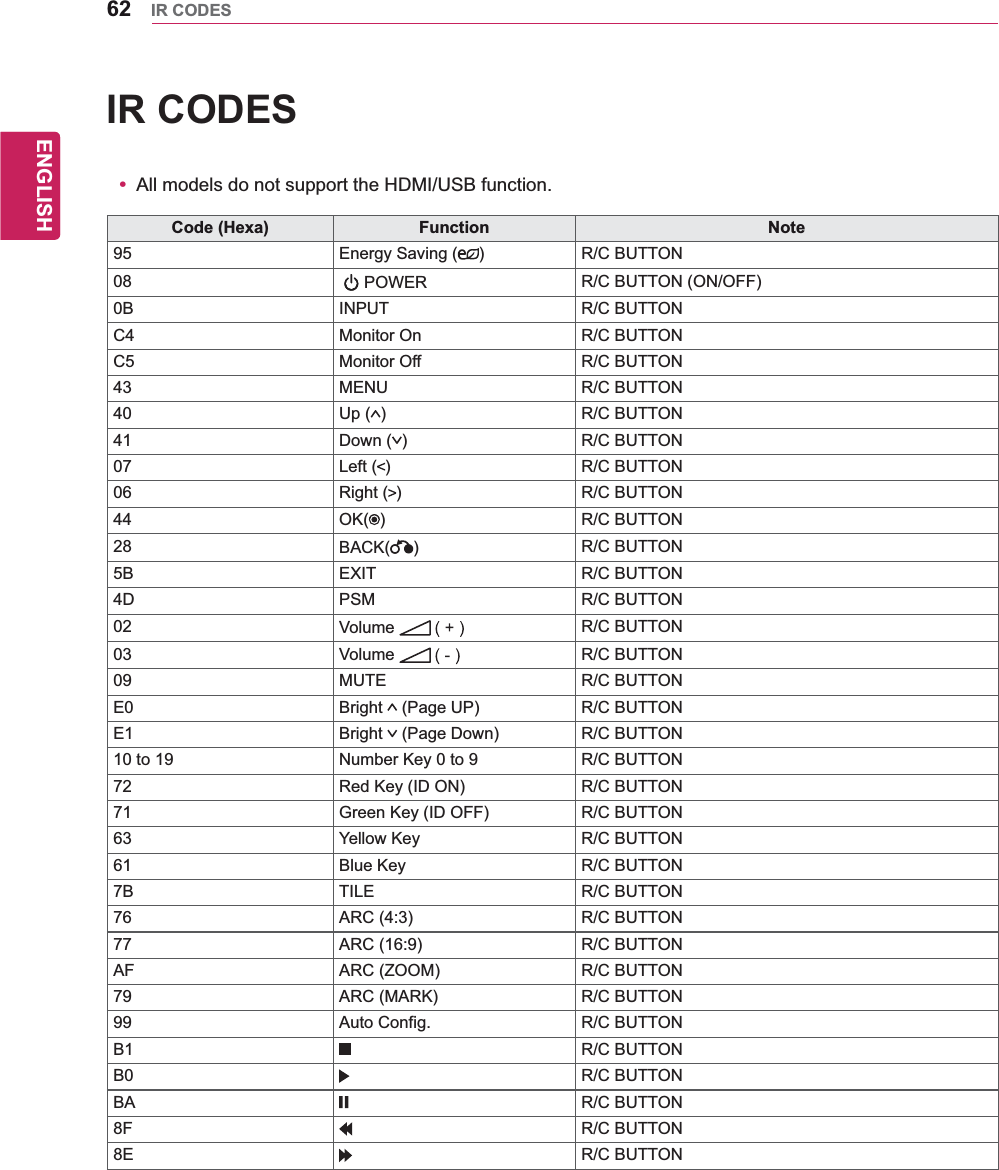
![20ENGENGLISHUSING THE MONITOR SETCustomizing PC display optionsCustomize options of each image mode for thebest image quality.y This function works in the following mode: RGB[PC] mode.1 Press MENU to access the main menus.2 Press the Navigation buttons to scroll to PICTURE and press OK.3 Press the Navigation buttons to scroll to Screen and press OK.4 Select and adjust following options, and then press OK.Option DescriptionResolution Selects a proper resolution. See “Customizing PC display options”.Auto Config.Sets to adjust the screen position, clock, and phase automatically. The displayed image may be unstable for a few seconds while the configuration is in progress. Position/Size/PhaseAdjusts the options when the picture is not clear, especially when characters are shaky, after the auto configuration.Reset Restores the options to the default setting.5 When you are finished, press EXIT.When you return to the previous menu, press BACK.Adjusting the soundSelecting an sound modePlay the sound in its optimized settings by selecting one of the preset sound modes.1 Press MENU to access the main menus.2 Press the Navigation buttons to scroll to AUDIO and press OK.3 Press the Navigation buttons to scroll to Sound Mode and press OK.4 Press the Navigation buttons to scroll to a sound mode you want and press OK.Mode DescriptionStandard Select when you want standard-quality sound.Music Select when you listen to music.Cinema Select when you watch movies.Sports Select when you watch sports events.Game Select when you watch sports events.5 When you are finished, press EXIT.When you return to the previous menu, press BACK.](https://usermanual.wiki/LG-Electronics-USA/55WV70MS/User-Guide-1639858-Page-21.png)
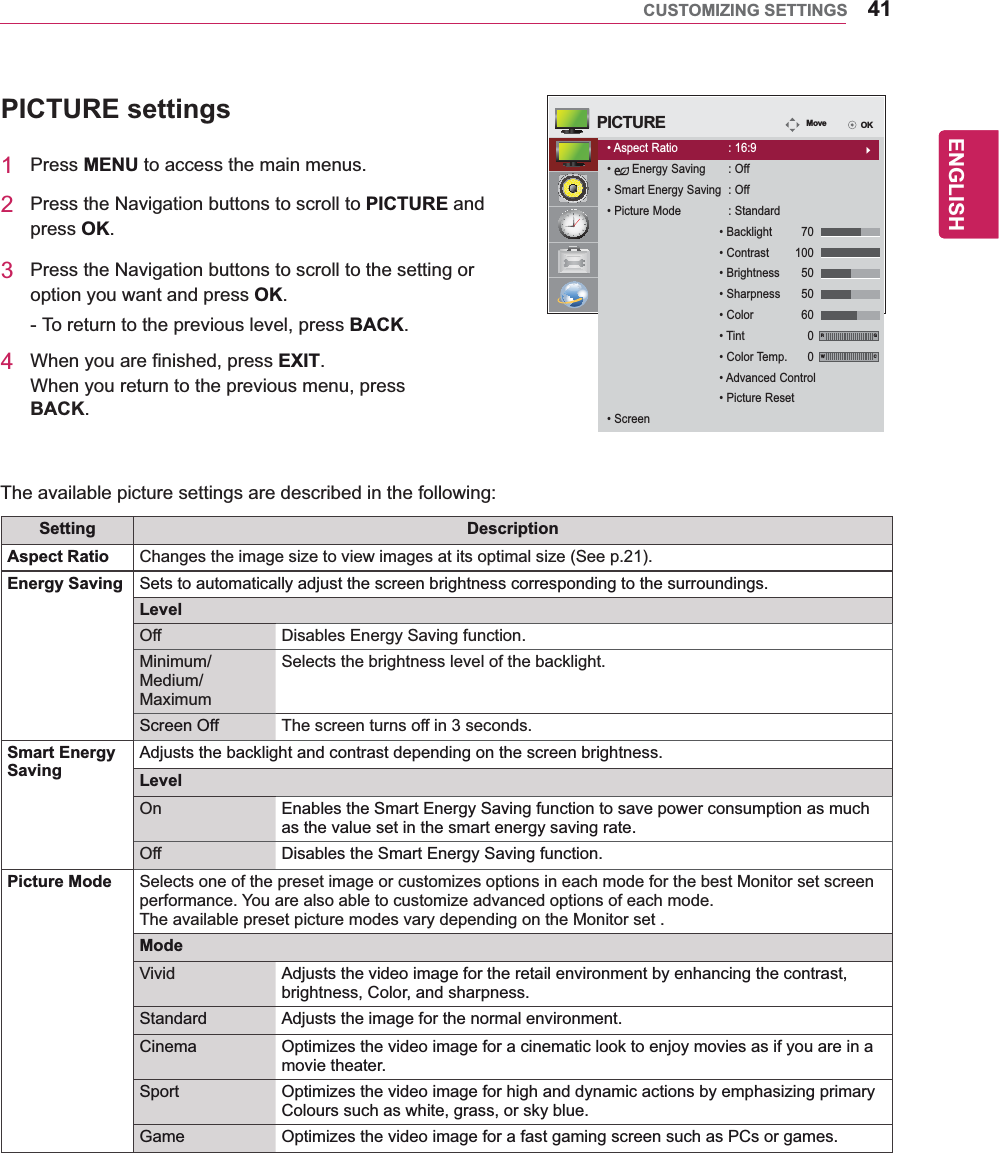


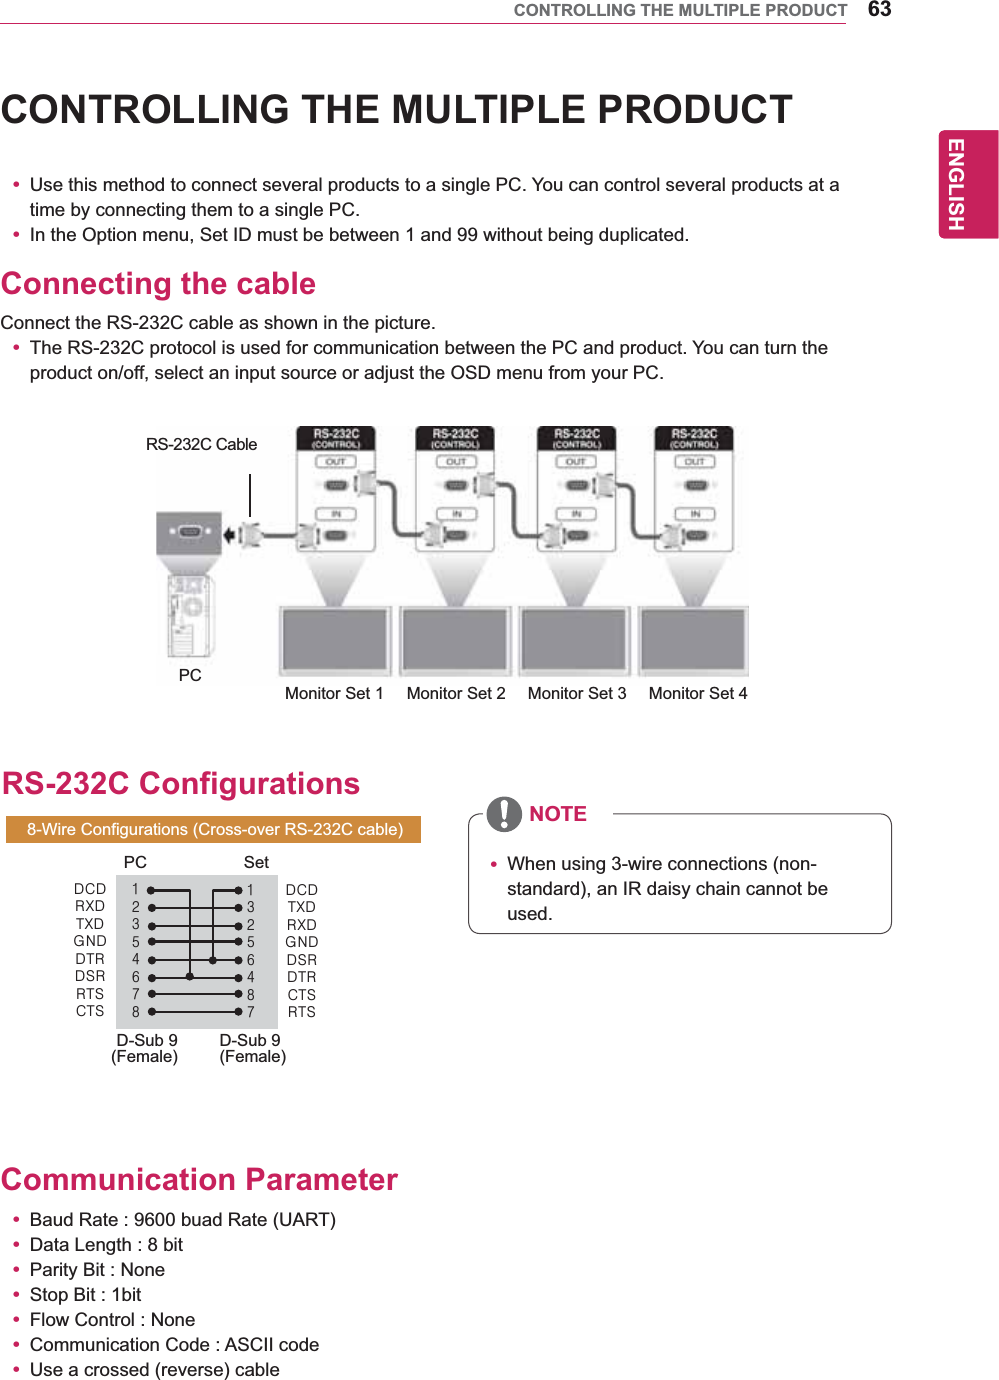
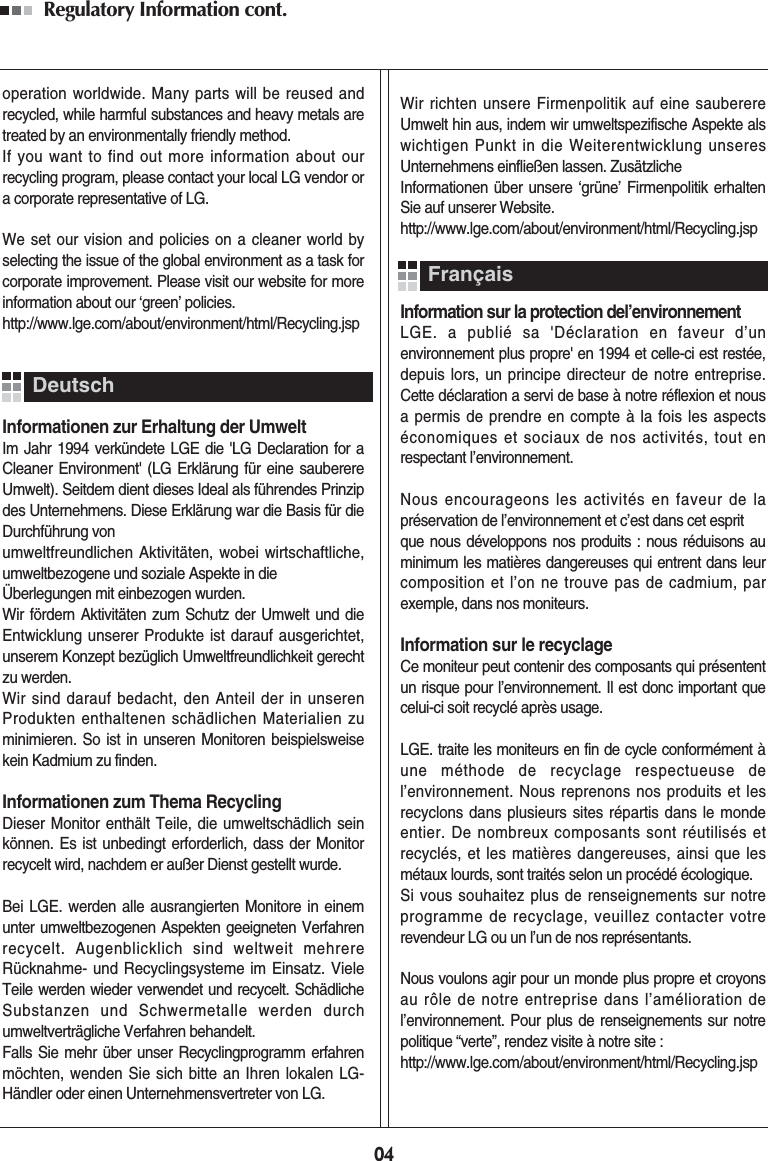
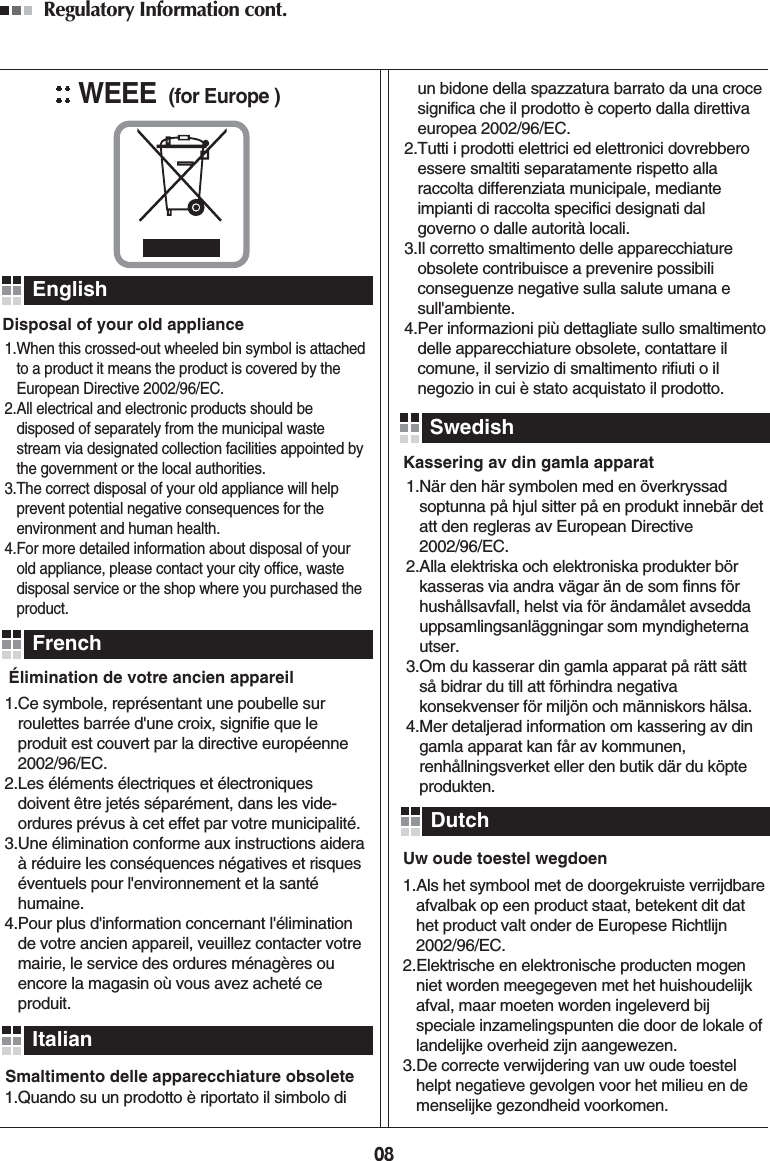
![66ENGENGLISHCONTROLLING THE MULTIPLE PRODUCTTransmission[Command1][Command2][ ][Set ID][ ][Data][Cr] or[Command1][Command2][ ][Set ID][ ][Data1][ ][Data2][ ][Data3][Cr] or[Command1][Command2][ ][Set ID][ ][Data1][ ][Data2][ ][Data3][ ][Data4][Cr]* [Command1]: First command to control the set.* [Command2]: Second command to control the set.* [Set ID]: Set ID with which you want to communicate. Etner [Set ID] = ‘00(0x00’ to communicate with all sets regardless of their Set ID numbers.* [Data]: Information passed to the set.* [Data1]: Information passed to the set.* [Data2]: Information passed to the set.* [Data3]: Information passed to the set.* [Cr]: Carriage Return. ASCII code ‘0x0D’.* [ ]: ASCII code space ‘0x20’Acknowledgement[Command2][ ][Set ID][ ][OK/NG][Data][x] or[Command2][ ][Set ID][ ][OK/NG][Data1][Data2][Data3][x] or[Command2][ ][Set ID][ ][OK/NG][Data1][Data2][Data3][Data4][x]* In a like manner, if other functions transmit ‘FF’ data based on this format, Acknowledgement data feedback presents status about each function.* Note: In this mode, display will send the acknowledgement after power on processing completion. There might be a time delay between command and acknowledgement.* Refer to ‘Real data mapping’ for hexadecimal data to decimal data.* No acknowledgement signal will be sent from display, if Set ID in transmission signal is set to ‘00’(=0x00).Transmission / Receiving protocol](https://usermanual.wiki/LG-Electronics-USA/55WV70MS/User-Guide-1639858-Page-67.png)
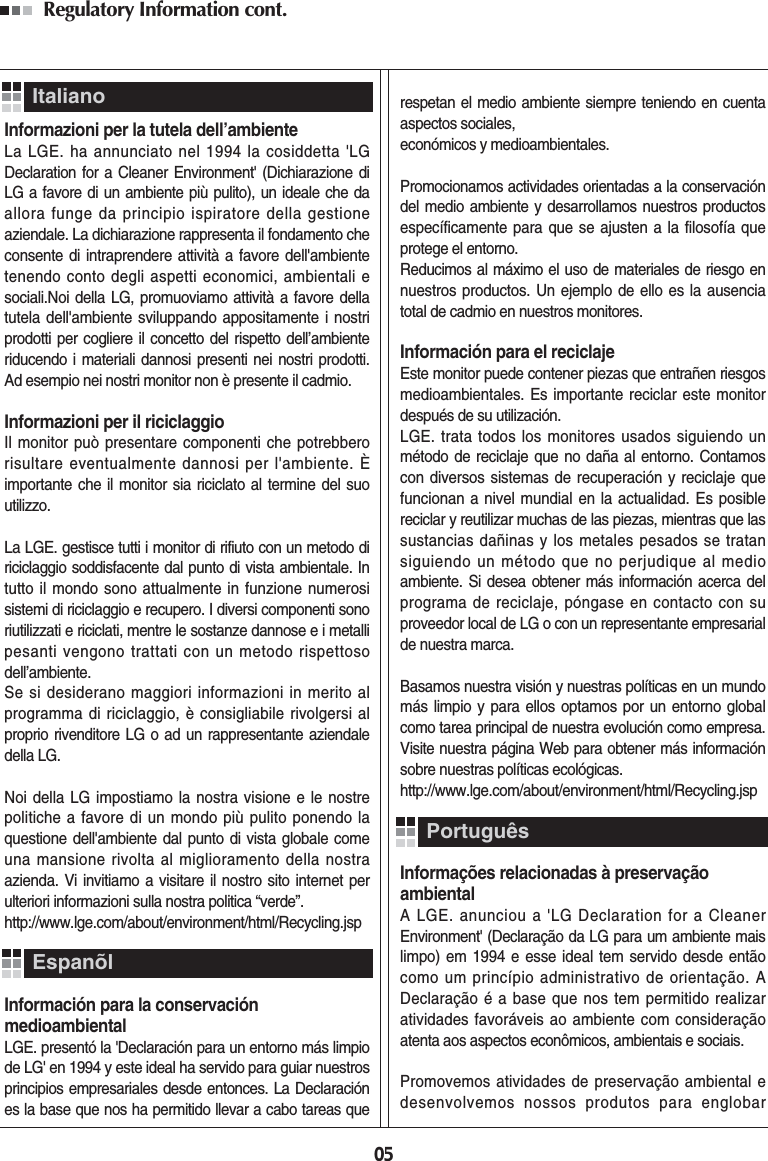
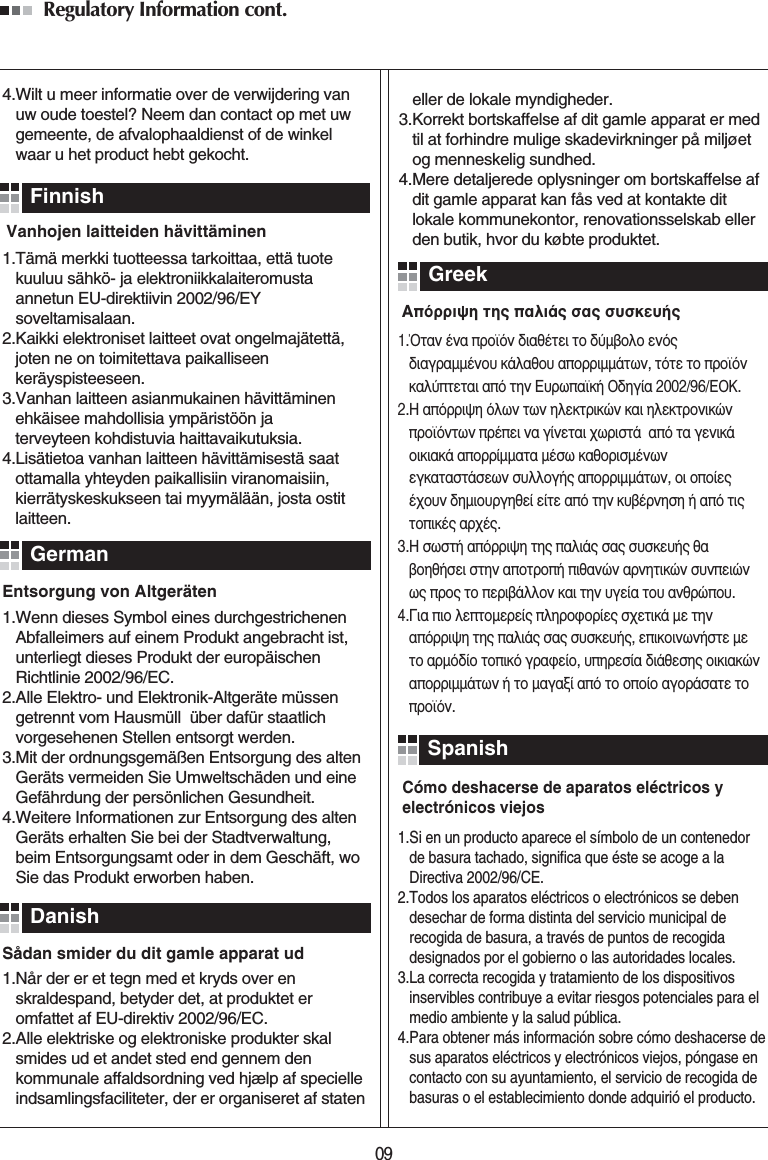
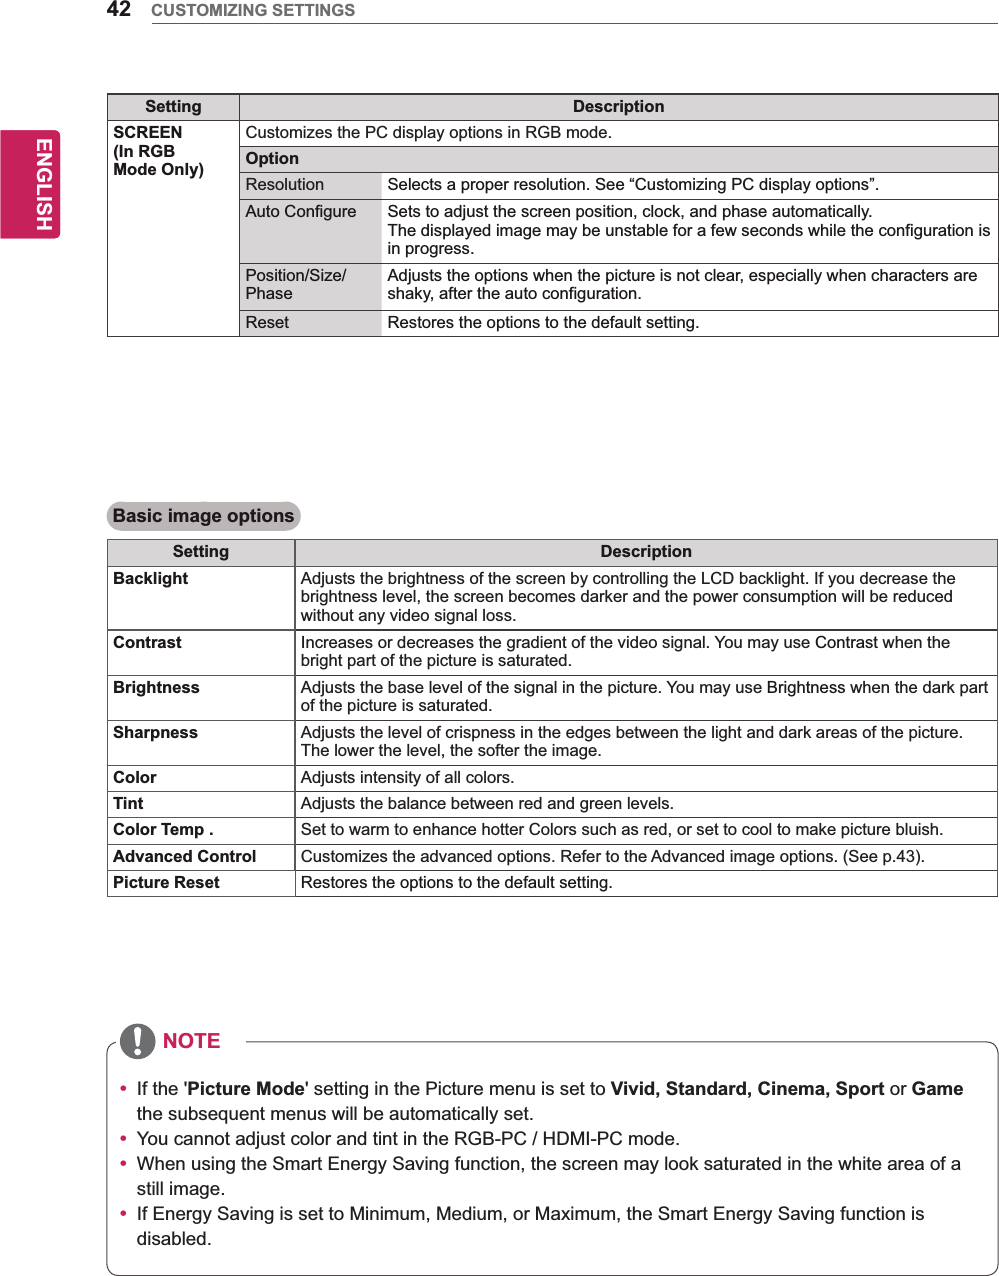
![67ENGENGLISHCONTROLLING THE MULTIPLE PRODUCT01. Power (Command: k a)To control power On/Off the display.Transmission[k][a][ ][Set ID][ ][Data][Cr]Data 00 : Power Off 01 : Power On FF : Check statusAcknowledgement[a][ ][Set ID][ ][OK/NG][Data][x]* In a like manner, if other functions transmit ‘FF’ data based on this format, Acknowledgement data feedback presents status about each function.* Note: In this modes, display will send the acknowledgement after power on processing completion. There might be a time delay between command and acknowledgement.* There might be some time delays between command and acknowledgement.04. Energy Saving (Command: j q)To control the energy saving function. Transmission[j][q][ ][Set ID][ ][Data][Cr]Data 00: Off 01: Minimum 02: Medium 03. Maximum 05. Screen OffAcknowledgement[q][ ][Set ID][ ][OK/NG][Data][x]05. Picture Mode (Command: d x)To select the picture mode.Transmission[d][x][ ][Set ID][ ][Data][Cr]Data 00: Vivid 01: Standard 02. Cinema 03. Sport 04: GameAcknowledgement[x][ ][Set ID][ ][OK/NG][Data][x] 06. Contrast (Command: k g)To adjust screen contrast.Transmission [k][g][ ][Set ID][ ][Data][Cr]Data 00 to 64: Contrast 0 to 100Acknowledgement [g][ ][Set ID][ ][OK/NG][Data][x]02. Input Select (Command: x b)To select input source for display.Transmission[x][b][ ][Set ID][ ][Data][Cr]Data 20: AV 40: Component 60: RGB PC 90: HDMI 91: DVI 92: Display PortAcknowledgement[b][ ][Set ID][ ][OK/NG][Data][x]03. Aspect Ratio (Command: k c)To adjust the screen format.Transmission[k][c][ ][Set ID][ ][Data][Cr]Data 01: 4:3 02: 16:9 04: Zoom 09: Just scan(720p or more) 10 to 1F: Cinema Zoom 1 to16Acknowledgement [c][ ][Set ID][ ][OK/NG][Data][x]](https://usermanual.wiki/LG-Electronics-USA/55WV70MS/User-Guide-1639858-Page-68.png)
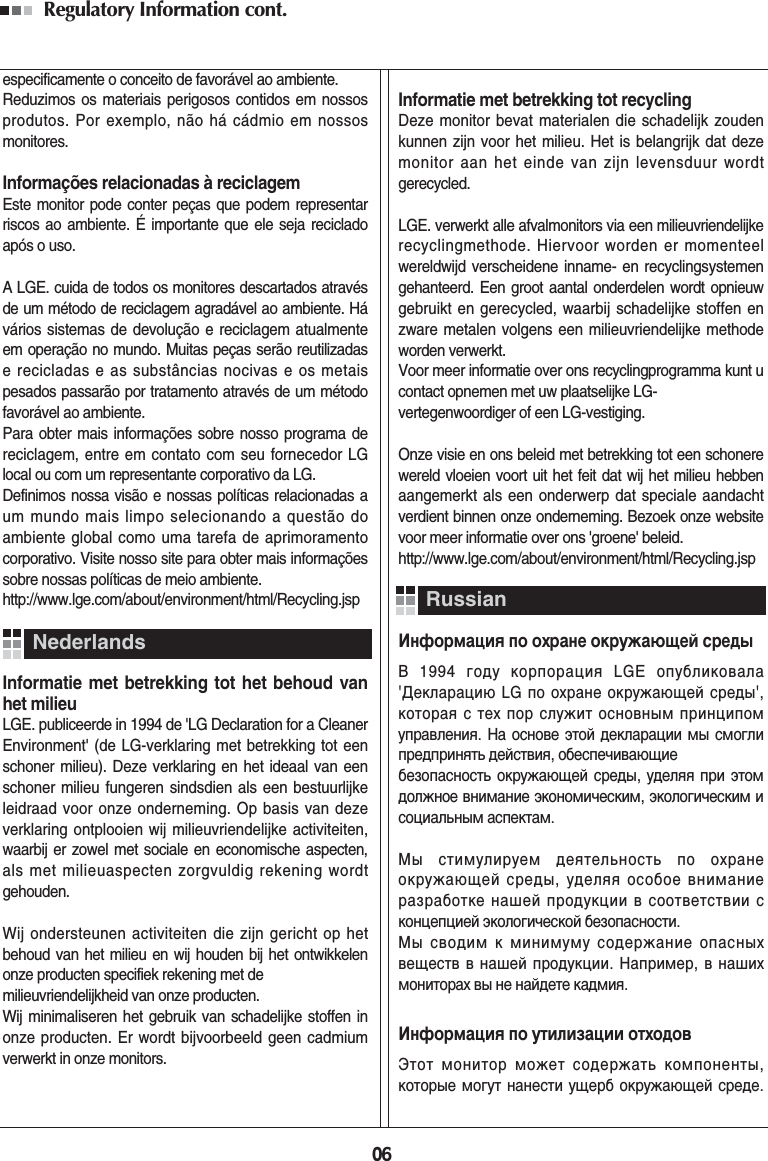
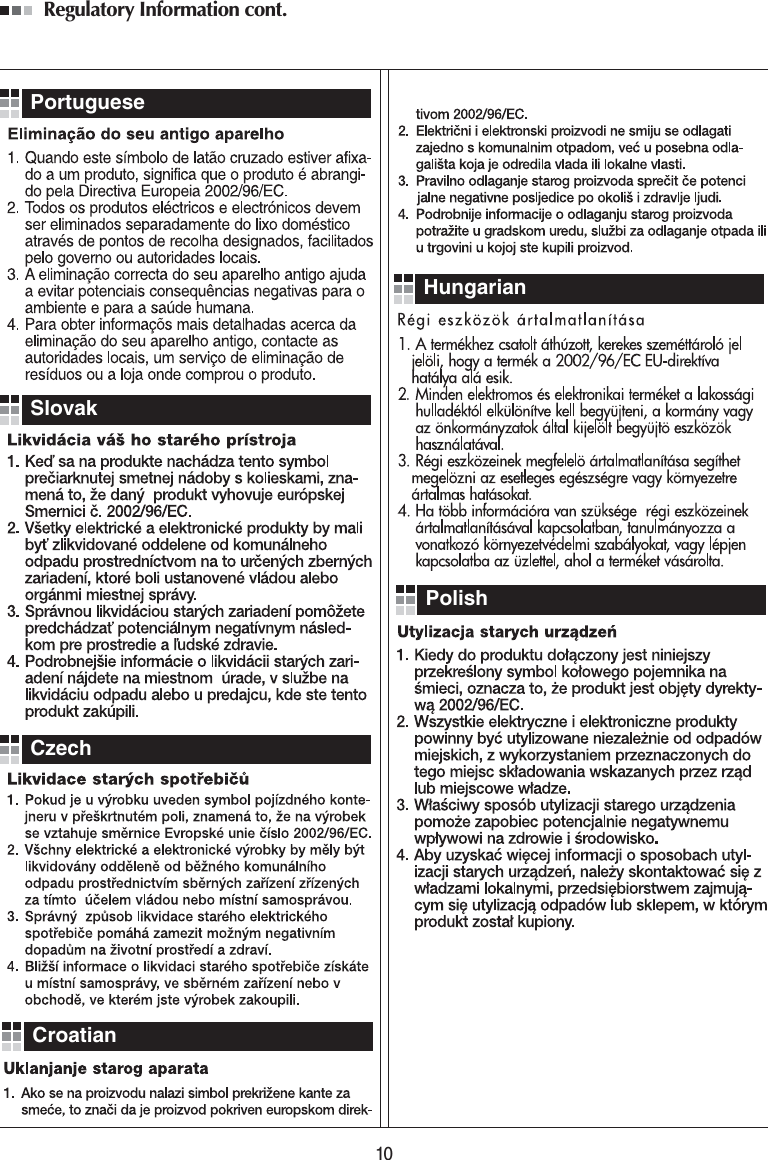
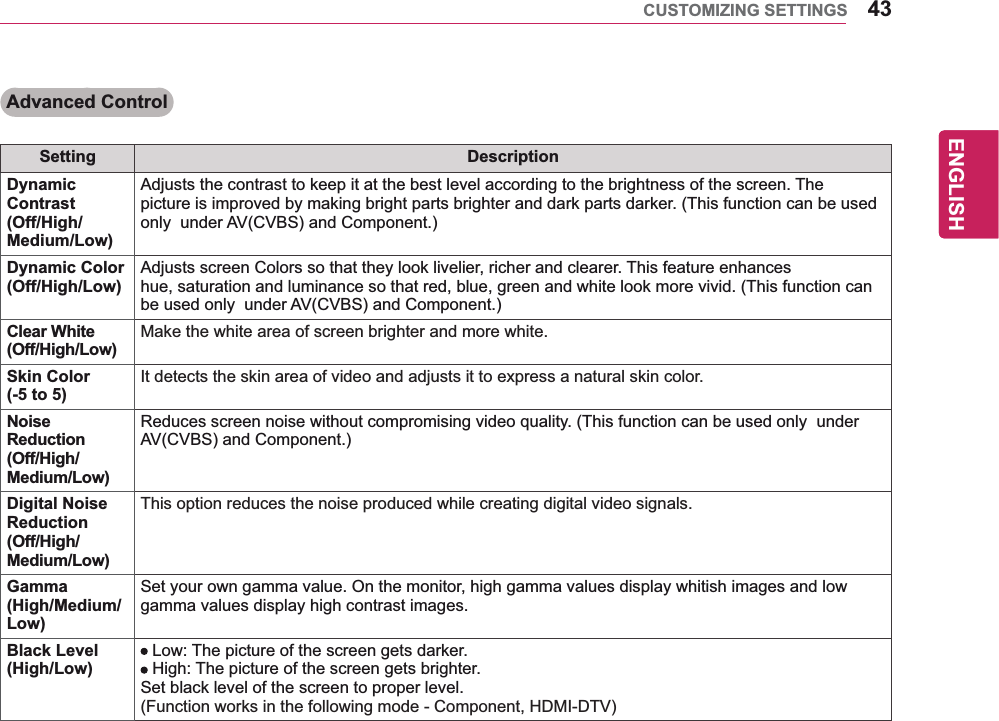
![68ENGENGLISHCONTROLLING THE MULTIPLE PRODUCT07. Brightness (Command: k h)To adjust screen brightness.Transmission[k][h][ ][Set ID][ ][Data][Cr]Data 00 to 64: Brightness 0 to 100Acknowledgement [h][ ][Set ID][ ][OK/NG][Data][x]10. Tint (Command: k j)To adjust screen tint.* Only available for AV/Component input.Transmission[k][j][ ][Set ID][ ][Data][Cr]Data 00 to 64: Tint R50 to G50Acknowledgement[j][ ][Set ID][ ][OK/NG][Data][x]11. Color Temperature (Command: x u)To adjust color temperature.Transmission[x][u][ ][Set ID][ ][Data][Cr] Data 00 to 64: Warm 50 to Cool 50Acknowledgement[u][ ][Set ID][ ][OK/NG][Data][x]12. H Position (Command: f q)To set the Horizontal position.* Only available for Tile Off mode.Transmission[f][q][ ][Set ID][ ][Data][Cr]Data 00 to 64: Left 50 to Right 50Acknowledgement[q][ ][Set ID][ ][OK/NG][Data][x] 08. Sharpness (Command: k k)To adjust screen sharpness.* Only available for AV/Component input.Transmission[k][k][ ][Set ID][ ][Data][Cr]Data 00 to 64: Sharpness 0 to 100Acknowledgement[k][ ][Set ID][ ][OK/NG][Data][x]09. Color (Command: k i) To adjust screen color.* Only available for AV/Component input.Transmission[k][i][ ][Set ID][ ][Data][Cr]Data 00 to 64: Color 0 to 100Acknowledgement [i][ ][Set ID][ ][OK/NG][Data][x]](https://usermanual.wiki/LG-Electronics-USA/55WV70MS/User-Guide-1639858-Page-69.png)
![69ENGENGLISHCONTROLLING THE MULTIPLE PRODUCT13. V Position (Command: f r)To set the Vertical position.* Only available for Tile Off mode.Transmission[f][r][ ][Set ID][ ][Data][Cr]Data 23 to 41: Bottom Max(-15) to Top Max(15)Acknowledgement[r][ ][Set ID][ ][OK/NG][Data][x] 16. Balance (Command: k t)To adjust balance.Transmission [k][t][ ][Set ID][ ][Data][Cr]Data 00 to 64: Left 50 to Right 50Acknowledgement[t][ ][Set ID][ ][OK/NG][Data][x]17. Sound Mode (Command: d y)To select the sound mode.Transmission[d][y][ ][Set ID][ ][Data][Cr]Data 01: Standard 02: Music 03: Cinema 04: Sport 05. GameAcknowledgement[y][ ][Set ID][ ][OK/NG][Data][x]18. Treble (Command: k r)To adjust treble.Transmission[k][r][ ][Set ID][ ][Data][Cr]Data 00 to 64: Treble 0 to 100Acknowledgement[r][ ][Set ID][ ][OK/NG][Data][x]14. H Size (Command: f s)To set the Horizontal size.* Only available for Tile Off mode.Transmission[f][s][ ][Set ID][ ][Data][Cr]Data 00 to 64: Size -50 to 50Acknowledgement[s][ ][Set ID][ ][OK/NG][Data][x] 15. Auto Configuration (Command: j u)To adjust picture position and minimize image shaking automatically.* Only available for RGB input.Transmission[j][u][ ][Set ID][ ][Data][Cr]Data 01 : SetAcknowledgement[u][ ][Set ID][ ][OK/NG][Data][x]](https://usermanual.wiki/LG-Electronics-USA/55WV70MS/User-Guide-1639858-Page-70.png)
![70ENGENGLISHCONTROLLING THE MULTIPLE PRODUCT19. Bass (Command: k s)To adjust bass.Transmission[k][s][ ][Set ID][ ][Data][Cr]Data 00 to 64: Bass 0 to 100Acknowledgement[s][ ][Set ID][ ][OK/NG][Data][x]22. Volume Control (Command: k f)To adjust volume.Transmission [k][f][ ][Set ID][ ][Data][Cr]Data 00 to 64: Volume 0 to 100Acknowledgement [f][ ][Set ID][ ][OK/NG][Data][x]23. Time 1(Year/ Month/ Day) (Command: f a)To set the Time 1(Year/ Month/ Day) values.Transmission [f][a][ ][Set ID][ ][Data1][ ][Data2][ ][Data3][Cr]Data 1 00 to 14: 2010 to 2030 Data 2 01 to 0C: January to DecemberData 3 01 to 1F: 1 to 31* Enter “fa [Set ID] ff” for checking Time 1 values.Acknowledgement [a][ ][Set ID][ ][OK/NG][Data1][Data2][Data3][x]24. Time 2(Hour/ Minute/ Second) (Command: f x)To set the Time 2(Hour/ Minute/ Second) values.Transmission [f][x][ ][Set ID][ ][Data1][ ][Data2][ ][Data3][Cr]Data1 00 to 17: 00 to 23 hoursData2 01 to 3B: 00 to 59 minutesData3 01 to 3B: 00 to 59 seconds* Enter “fx [Set ID] ff” for checking Time 2 values.** This command won’t work if Time 1 has not been set in advance.Acknowledgement [x][ ][Set ID][ ][OK/NG][Data1][Data2][Data3][x]20. Speaker (Command: d v)To select speaker on/off.Transmission[d][v][ ][Set ID][ ][Data][Cr]Data 00: Speaker Off 01: Speaker OnAcknowledgement[v][ ][Set ID][ ][OK/NG][Data][x21. Volume Mute (Command: k e)To select screen mute on/off.Transmission[k][e][ ][Set ID][ ][Data][Cr]Data 00 : Volume Mute On (Volume Off) 01 : Volume Mute Off (Volume On)Acknowledgement [e][ ][Set ID][ ][OK/NG][Data][x]](https://usermanual.wiki/LG-Electronics-USA/55WV70MS/User-Guide-1639858-Page-71.png)
![71ENGENGLISHCONTROLLING THE MULTIPLE PRODUCT25. Off Timer(Repeat Mode/ Time) (Command: f e)To set the Off Timer(Repeat mode/ Time) function.Transmission [f][e][ ][Set ID][ ][Data1][ ][Data2][ ][Data3][Cr]Data1 00: Repeat Off 01: Repeat Once 02. Repeat Daily 03: Repeat from Monday to Friday 04: Repeat from Monday to Saturday 05: Repeat from Saturday to Sunday 06. Repeat on SundayData2 01 to 17: 00 to 23 HoursData3 01 to 3B: 00 to 59 Minutes* Enter “fe [Set ID] ff” for checking Off Timer(Repeat mode/ Time) values.* Check if Time1 and Time2 have been set before setting this function.Acknowledgement [e][ ][Set ID][ ][OK/NG][Data1][Data2][Data3][x]27. On Timer Input (Command: f u)To set the On Timer Input function.Transmission [f][u][ ][Set ID][ ][Data][Cr]Data 20: AV 40: Component 60. RGB 90: HDMI 91: DVI 92: DISPLAY PORT* Check if Time1 and Time2 and On Timer(Repeat Mode/Time) functions have been set before setting this function.Acknowledgement [u][ ][Set ID][ ][OK/NG][Data][x]28. On Timer Volume (Command: f v)To set the On Timer Volume function.Transmission [f][v][ ][Set ID][ ][Data][Cr]Data 00 to 64: Volume 0 to 100* Check if Time1 and Time2 and On Timer(Repeat Mode/Time) functions have been set before setting this function.Acknowledgement [v][ ][Set ID][ ][OK/NG][Data][x]29. Sleep Time (Command: f f)To set sleep time.Transmission[f][f][ ][Set ID][ ][Data][Cr]Data 00: Off 01: 10 min. 02: 20 min. 03: 30 min. 04: 60 min. 05: 90 min. 06: 120 min. 07: 180 min. 08: 240 min.Acknowledgement[f][ ][Set ID][ ][OK/NG][Data][x] 26. On Timer(Repeat Mode/ Time) (Command: f d)To set the On Timer(Repeat mode/ Time) function.Transmission [f][d][ ][Set ID][ ][Data1][ ][Data2][ ][Data3][Cr]Data1 00: Repeat Off 01: Repeat Once 02. Repeat Daily 03: Repeat from Monday to Friday 04: Repeat from Monday to Saturday 05: Repeat from Saturday to Sunday 06. Repeat on SundayData2 01 to 17: 00 to 23 HoursData3 01 to 3B: 00 to 59 Minutes* Enter “fd [Set ID] ff” for checking On Timer(Repeat mode/ Time) values.* Check if Time1 and Time2 have been set before setting this function.Acknowledgement [d][ ][Set ID][ ][OK/NG][Data1][Data2][Data3][x]](https://usermanual.wiki/LG-Electronics-USA/55WV70MS/User-Guide-1639858-Page-72.png)
![72ENGENGLISHCONTROLLING THE MULTIPLE PRODUCT30. Power On Delay (Command: f h)To set the schedule delay when the power is turned on(unit: second).Transmission[f][h][ ][Set ID][ ][Data][Cr]Data 00 to 64: 0 to 100sec.Acknowledgement[h][ ][Set ID][ ][OK/NG][Data][x] 33. Language (Command: f i)To set language for OSD.Transmission[f][i][ ][Set ID][ ][Data][Cr]Data 00: Czech 01: Danish 02: German 03: English 04: Spanish(EU) 05: Greek 06: French 07: Italian 08: Dutch 09: Norwegian 0A: Portuguese 0B: Protuguese(BR) 0C: Russian 0D: Finnish 0E: Swedish 0F: Korean 10: Chinese (Mandarin) 11: Japanese 12: Yue Chinese(Cantonese)Acknowledgement[i][ ][Set ID][ ][OK/NG][Data][x] 34. ISM mode (Command: j p)To select ISM method for avoiding having a fixed image remain on screen. Transmission[j][p][ ][Set ID][ ][Data][Cr]Data 01: Orbiter 02: Inversion 04: White Wash 08. NormalAcknowledgement[p][ ][Set ID][ ][OK/NG][Data][x] 31. Automatic Standby (Command: m n)To set the Automatic Standby function.Transmission[m][n][ ][Set ID][ ][Data][Cr]Data 00: Off 01: 4 Hours OffAcknowledgement[n][ ][Set ID][ ][OK/NG][Data][x] 32. Auto Off (Command: f g)To set the Auto Off function.Transmission[f][g][ ][Set ID][ ][Data][Cr]Data 00: Auto Off Off 01: Auto Off OnAcknowledgement[g][ ][Set ID][ ][OK/NG][Data][x]](https://usermanual.wiki/LG-Electronics-USA/55WV70MS/User-Guide-1639858-Page-73.png)
![73ENGENGLISHCONTROLLING THE MULTIPLE PRODUCT35. Reset (Command: f k)To execute the Picture, Screen, Audio and Factory reset function.Transmission[f][k][ ][Set ID][ ][Data][Cr]Data 00: Picture Reset 01: Screen Reset 02: Audio Reset 03: Factory ResetAcknowledgement[k][ ][Set ID][ ][OK/NG][Data][x] 38. Tile ID (Command: d i)To set Tile ID.Transmission[d][i][ ][Set ID][ ][Data][Cr]Data 01 to E1: Tile ID 01 to 225** FF: Read Tile ID** Data could not be set over (Tile Row) x (Tile Column)Acknowledgement[i][ ][Set ID][ ][OK/NG][Data][x]*NG will be return if data is over (Tile Row) x (Tile Column), except 0xFF.39. Tile H Position (Command: d e)To set the Tile Horizontal position.*Only available when Tile Natural Mode is off.Transmission[d][e][ ][Set ID][ ][Data][Cr]Data 00 to 32: Left (-50) to Right (0)Acknowledgement[e][ ][Set ID][ ][OK/NG][Data][x]40. Tile V Position (Command: d f)To set the Tile Vertical position.*Only available when Tile Natural Mode is off.Transmission[d][f][ ][Set ID][ ][Data][Cr]Data 0 to 32: Bottom (0) to Top (50)(*Bottom/Top values depend on Tile V size.)Acknowledgement[f][ ][Set ID][ ][OK/NG][Data][x]36. Tile Mode (Command: d d)To select a Tile Mode Off/ On and Tile Row/ Column size.Transmission [d][d][ ][Set ID][ ][Data][Cr]Data 00 to FF: 1st byte - Tile Row value 2nd byte - Tile Column value*00, 01, 10, 11 means Tile Mode Off.Acknowledgement[d][ ][Set ID][ ][OK/NG][Data][x]37. Tile Mode Check (Command: d z)To check Tile Mode status.Transmission [d][z][ ][Set ID][ ][Data][Cr]Data FF: Check Tile Mode statusAcknowledgement[z][ ][Set ID][ ][OK/NG][Data1][Data2][Data3][x]Data1 00: Tile Mode Off 01: Tile Mode OnData2 00 to 0F: Tile Row ValueData3 00 to 0F: Tile Col Value](https://usermanual.wiki/LG-Electronics-USA/55WV70MS/User-Guide-1639858-Page-74.png)
![74ENGENGLISHCONTROLLING THE MULTIPLE PRODUCT41. Tile H Size (Command: d g)To set the Tile Horizontal Size.*Set Tile H Position to 0x32 (50) before setting Tile H Size.*Only available when Tile Natural Mode is off.Transmission[d][g][ ][Set ID][ ][Data][Cr]Data 00 to 32: 0 to 50Acknowledgement[g][ ][Set ID][ ][OK/NG][Data][x] 44. Fail Over Select (Command: m i) To set the Fail Over function.Transmission[m][i][ ][Set ID][ ][Data][Cr]Data 00: Off 01: Auto 02: ManualAcknowledgement[i][ ][Set ID][ ][OK/NG][Data][x]46. DPM Select (Command: f j)To set the DPM (Display Power Management) function.Transmission[f][j][ ][Set ID][ ][Data][Cr]Data 00: DPM Select Off 01: DPM Select OnAcknowledgement[j][ ][Set ID][ ][OK/NG][Data][x]42. Tile V Size (Command: d h)To set the Tile Vertical size. *Set Tile V Position to 0x00 before setting Tile V Size.*Only available when Tile Natural Mode is off.Transmission[d][h][ ][Set ID][ ][Data][Cr]Data 00 to 32: 0 to 50Acknowledgement[h][ ][Set ID][ ][OK/NG][Data][x] 43. Natural Mode (In Tile Mode) (Comman : d j)To set the Tile Natural mode.Transmission[d][j][ ][Set ID][ ][Data][Cr]Data 00: Off 01: OnAcknowledgement[j][ ][Set ID][ ][OK/NG][Data][x]45. Auto Switch Input Select (Command: m j) To select the input source for auto switch.*Only available in Fail Over manual mode.Transmission[m][j][ ][Set ID][ ][Data1][ ][Data2][ ][Data3][ ][Data4][Cr]Data 1 to 3 (Input priority: 1 to 3) 60: RGB 70: DVI 90: HDMI* C0: Display Port* If the HDMI port is set regardless of HDMI-DTV/HDMI-PC, it uses 0x90.Acknowledgement[j][ ][Set ID][ ][OK/NG][Data1][Data2][Data3][Data4][x]Data 1 to 3(Input priority: 1 to 3) 60: RGB 70: DVI 90: HDMI** C0: Display Port** If the HDMI port is set regardless of HDMI-DTV/HDMI-PC, it returns 0x90.](https://usermanual.wiki/LG-Electronics-USA/55WV70MS/User-Guide-1639858-Page-75.png)
![75ENGENGLISHCONTROLLING THE MULTIPLE PRODUCT48. OSD Select (Command: k l)To select OSD(On Screen Display) on/offTransmission[k][l][ ][Set ID][ ][Data][Cr]Data 00: OSD Off 01: OSD OnAcknowledgement[l][ ][Set ID][ ][OK/NG][Data][x] 51. S/W Version (Command: f z)To read the software version.Transmission[f][z][ ][Set ID][ ][Data][Cr]Data FF: Data should be always ff in hexadecimal.Acknowledgement[z][ ][Set ID][ ][OK/NG][Data][x] 49. Elapsed time return (Command: d l)To read the panel used time.Transmission[d][l][ ][Set ID][ ][Data][CrData FF: Data should be always ff in hexadecimal.Acknowledgement[l][ ][Set ID][ ][OK/NG][Data][x]* Returned data means used hours in hexadecimal.50. Serial No.Check (Command: f y)To read the serial numbers.Transmission[f][y][ ][Set ID][ ][Data][Cr]Data FF: Data should be always ff in hexadecimal.Acknowledgement[y][ ][Set ID][ ][OK/NG][Data][x] 47. Key (Command: m c)To send IR remote control code.Transmission[m][c][ ][Set ID][ ][Data][Cr]Data IR_KEY_CODEAcknowledgement[c][ ][Set ID][ ][OK][Data][x] When display is in the standby mode, display will turn on by Power button of remote control only.](https://usermanual.wiki/LG-Electronics-USA/55WV70MS/User-Guide-1639858-Page-76.png)