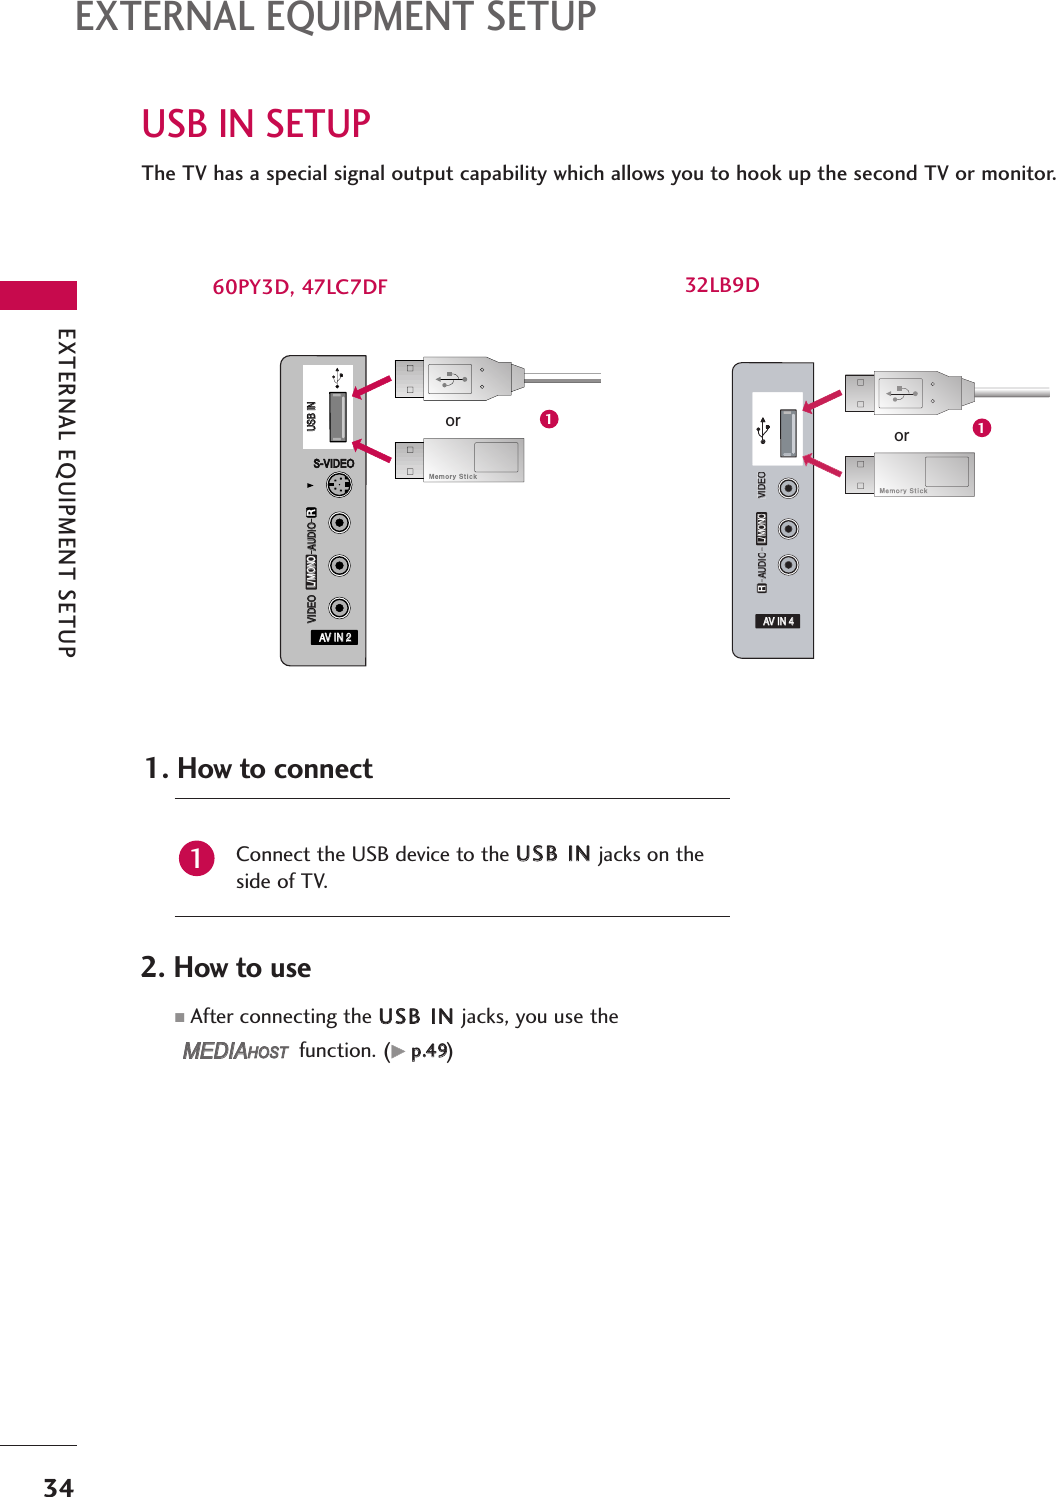
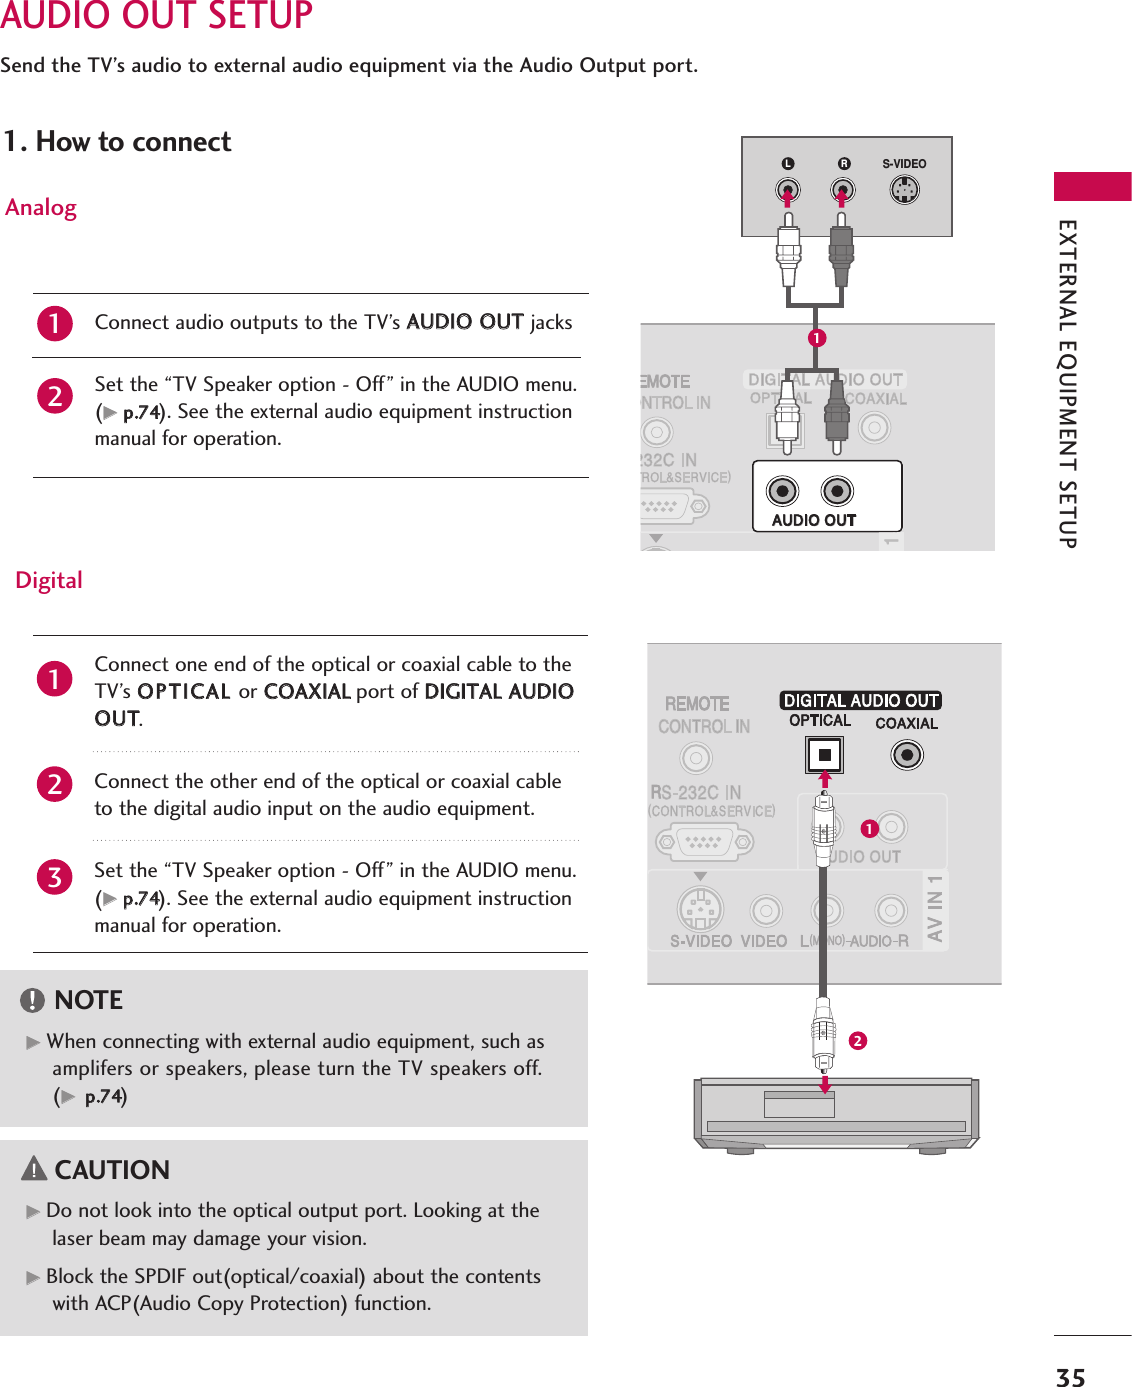
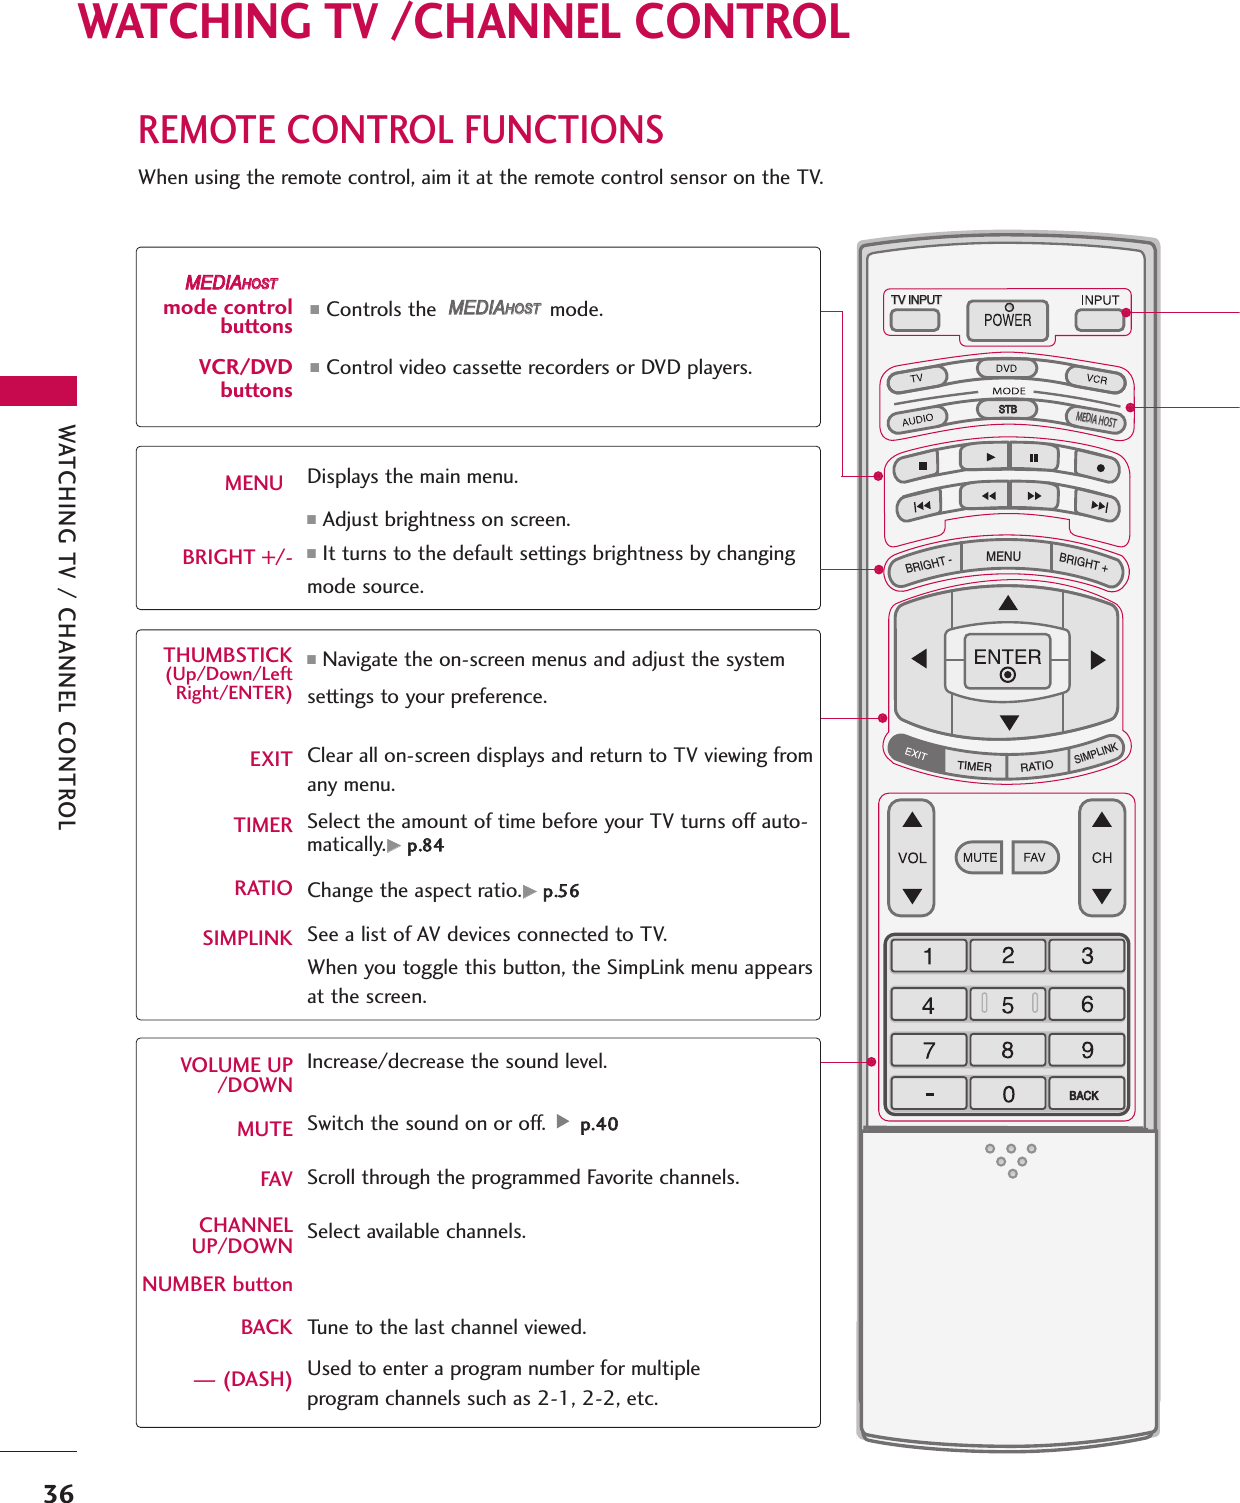
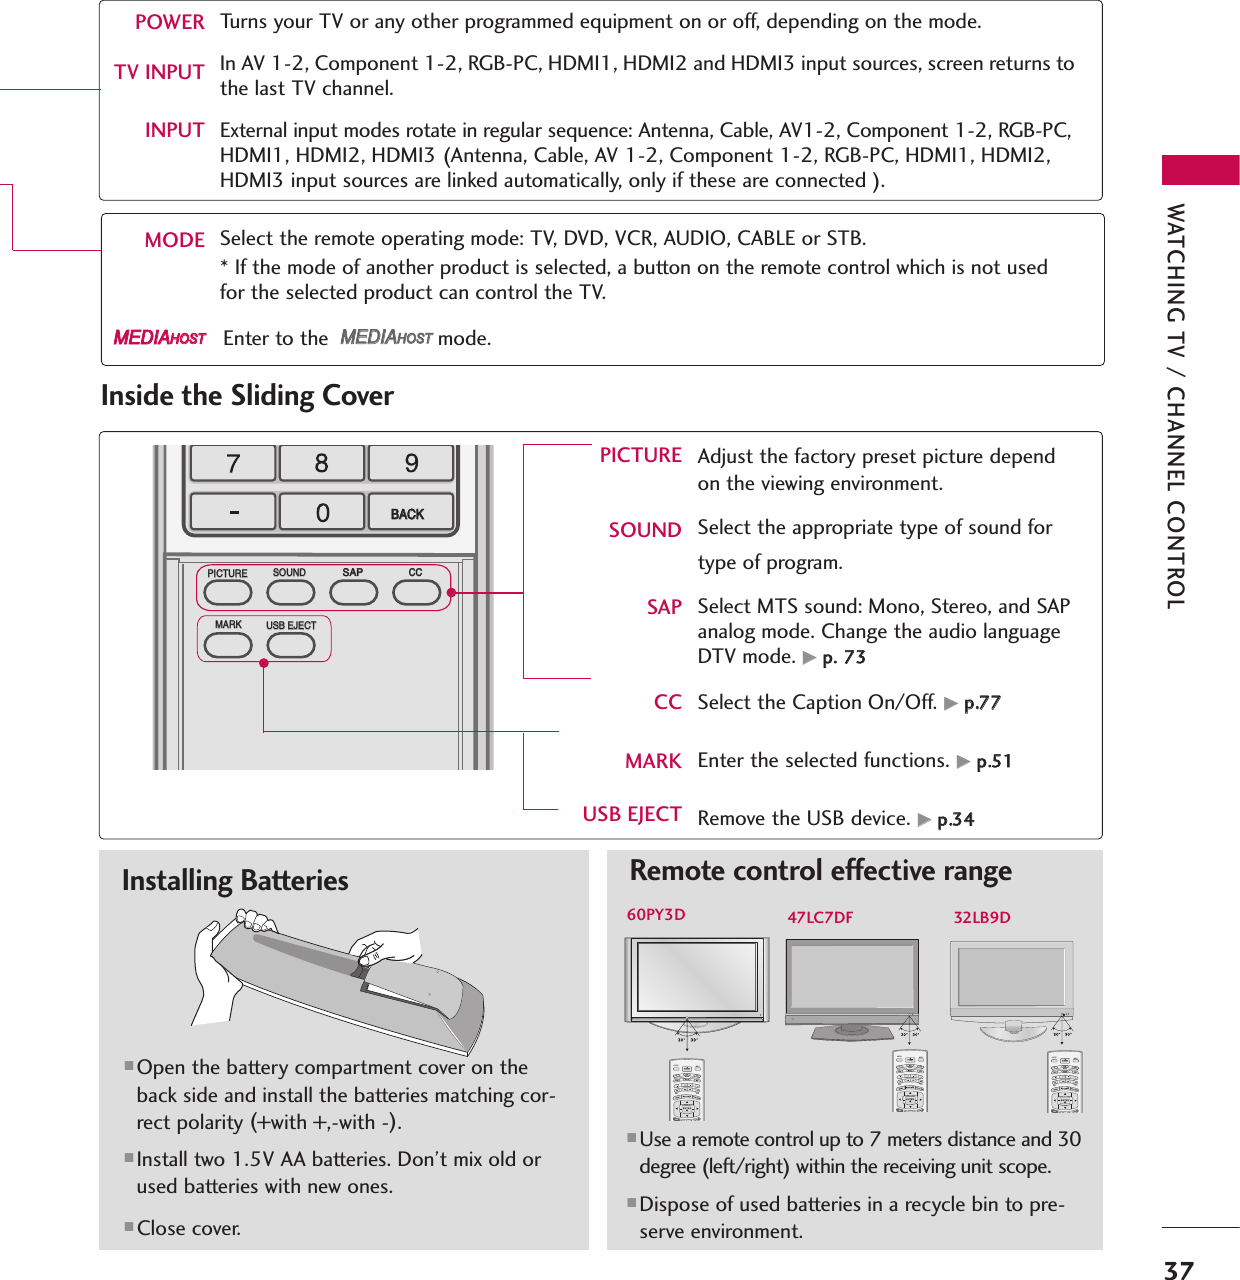
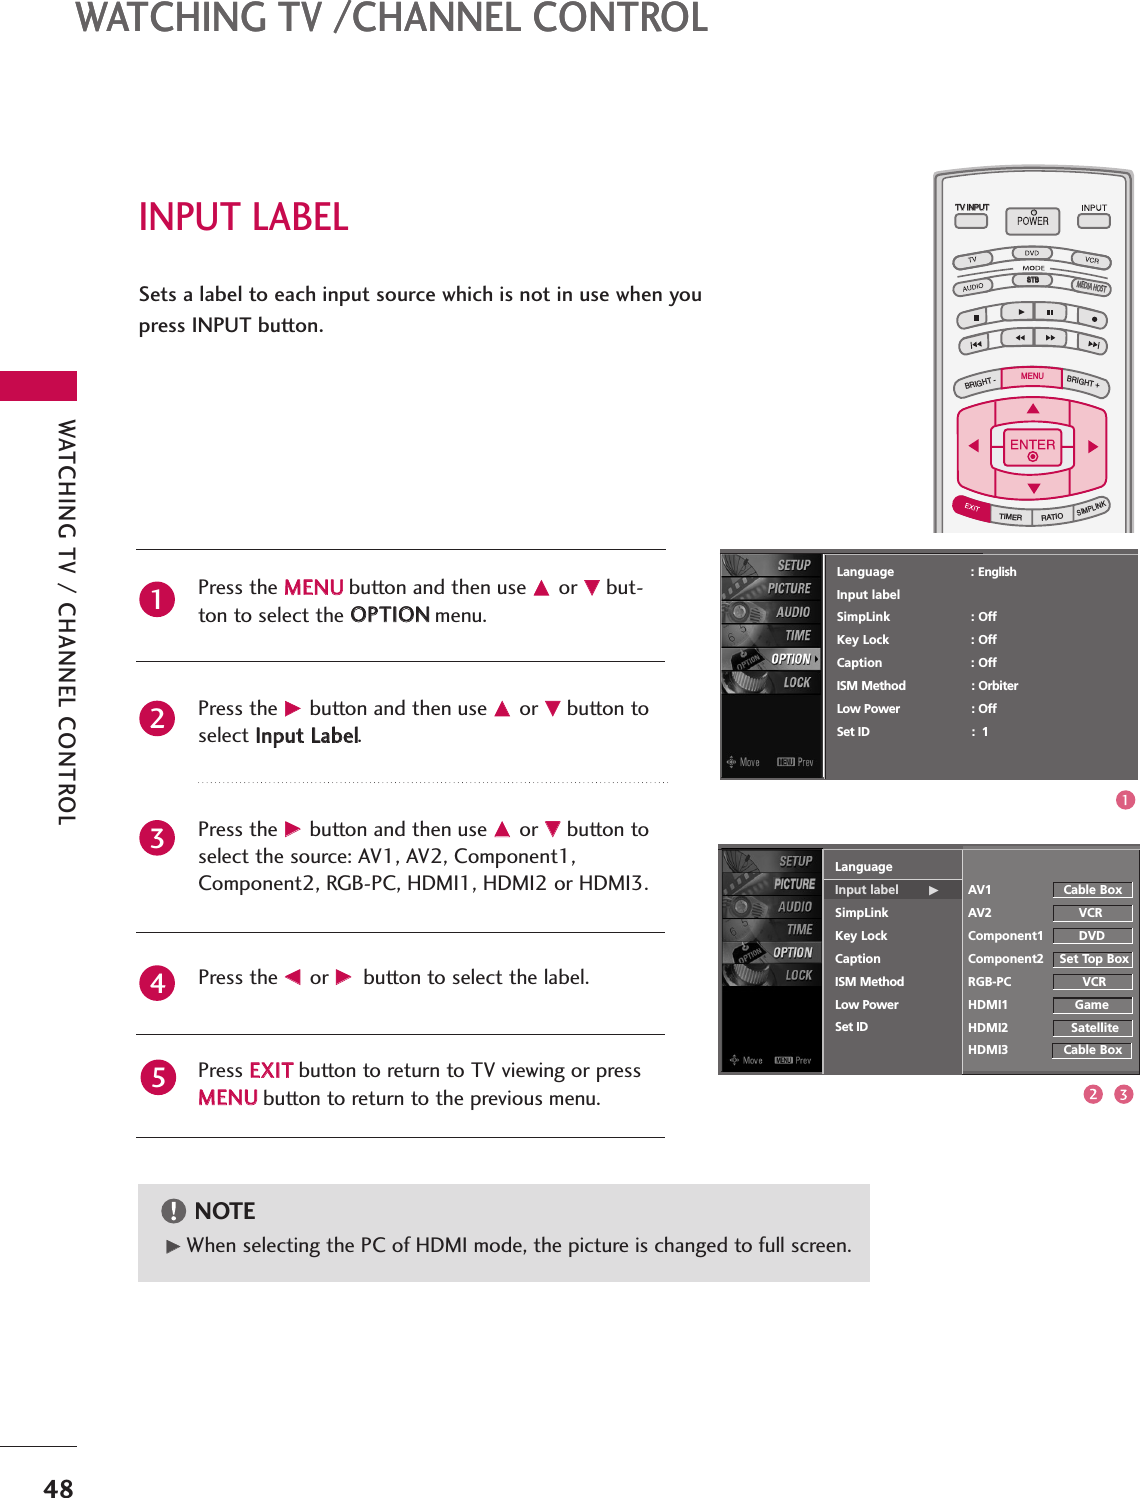
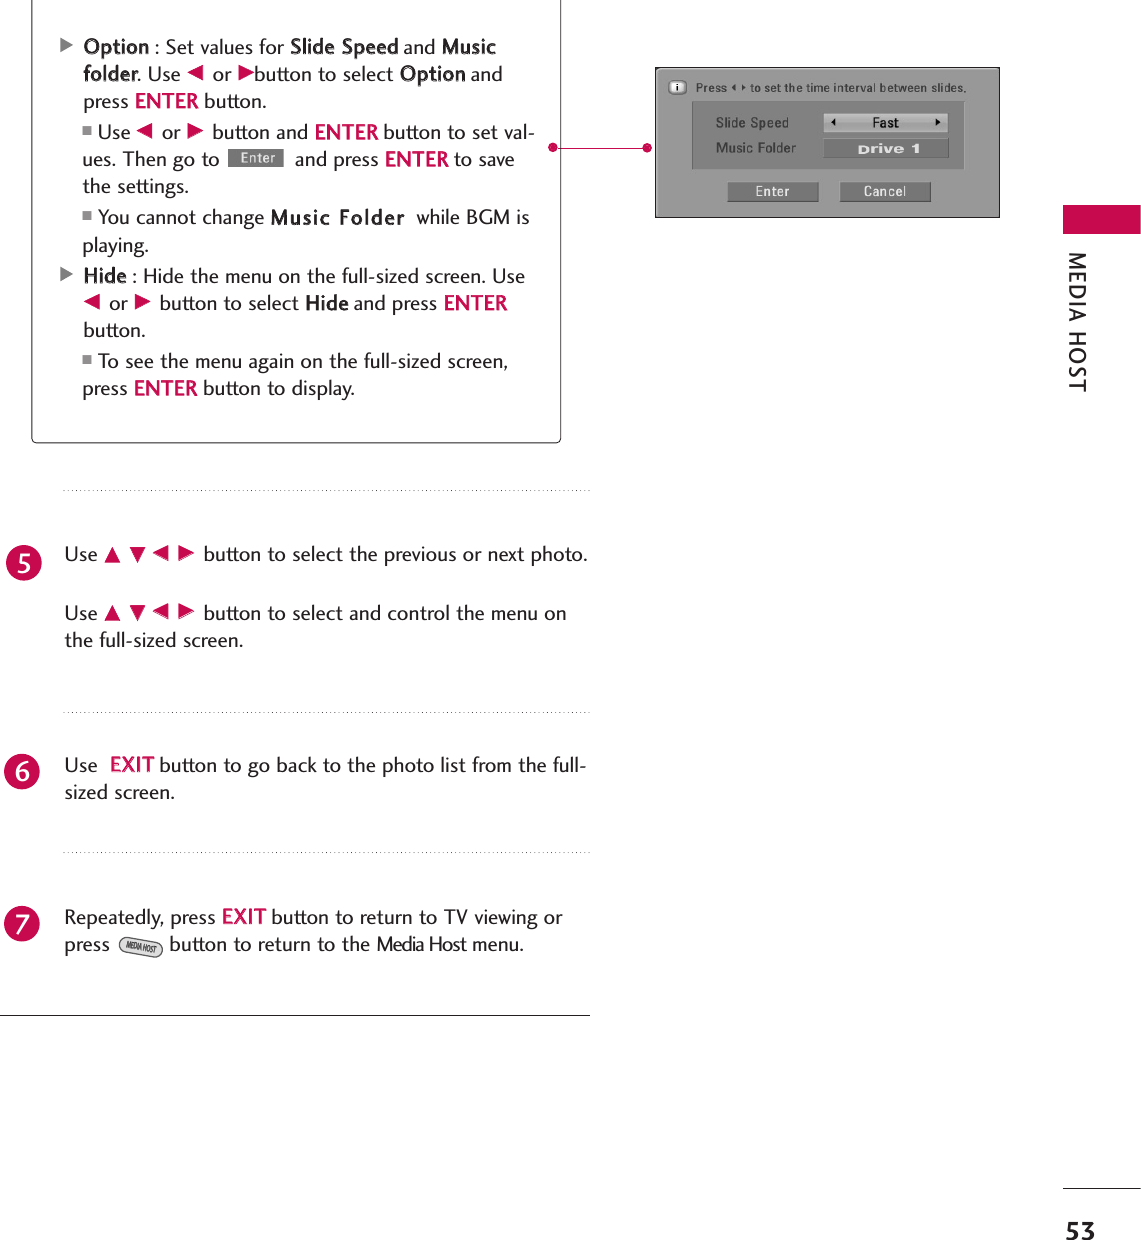
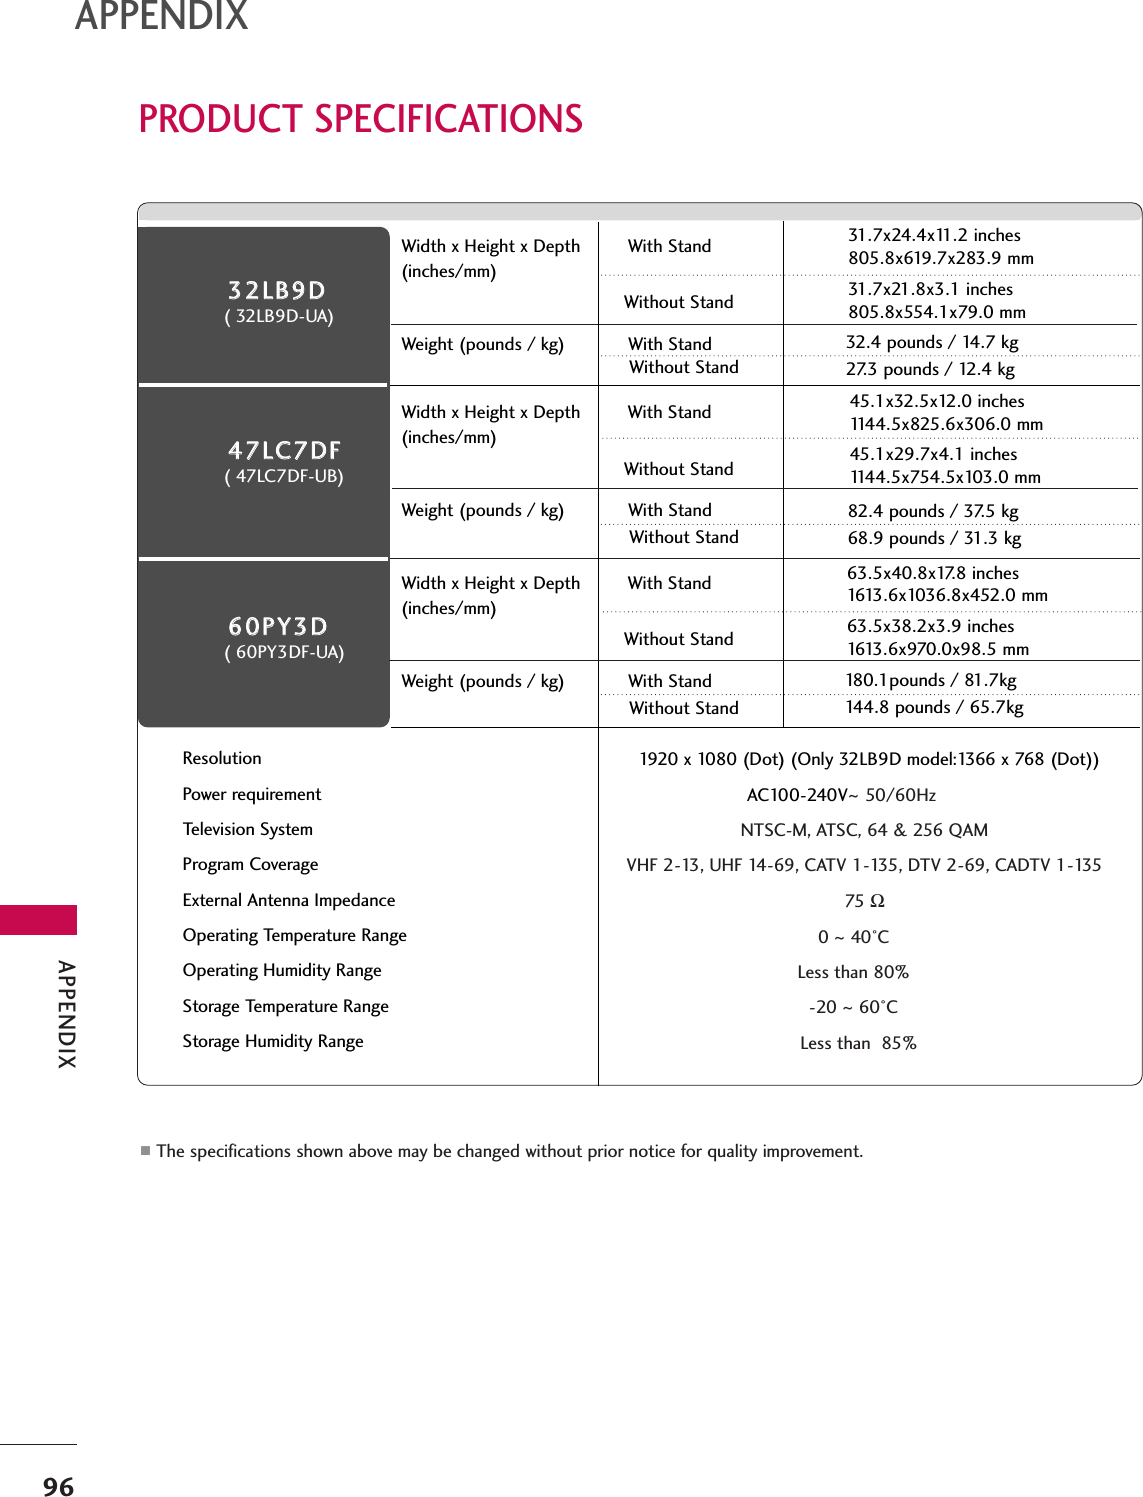
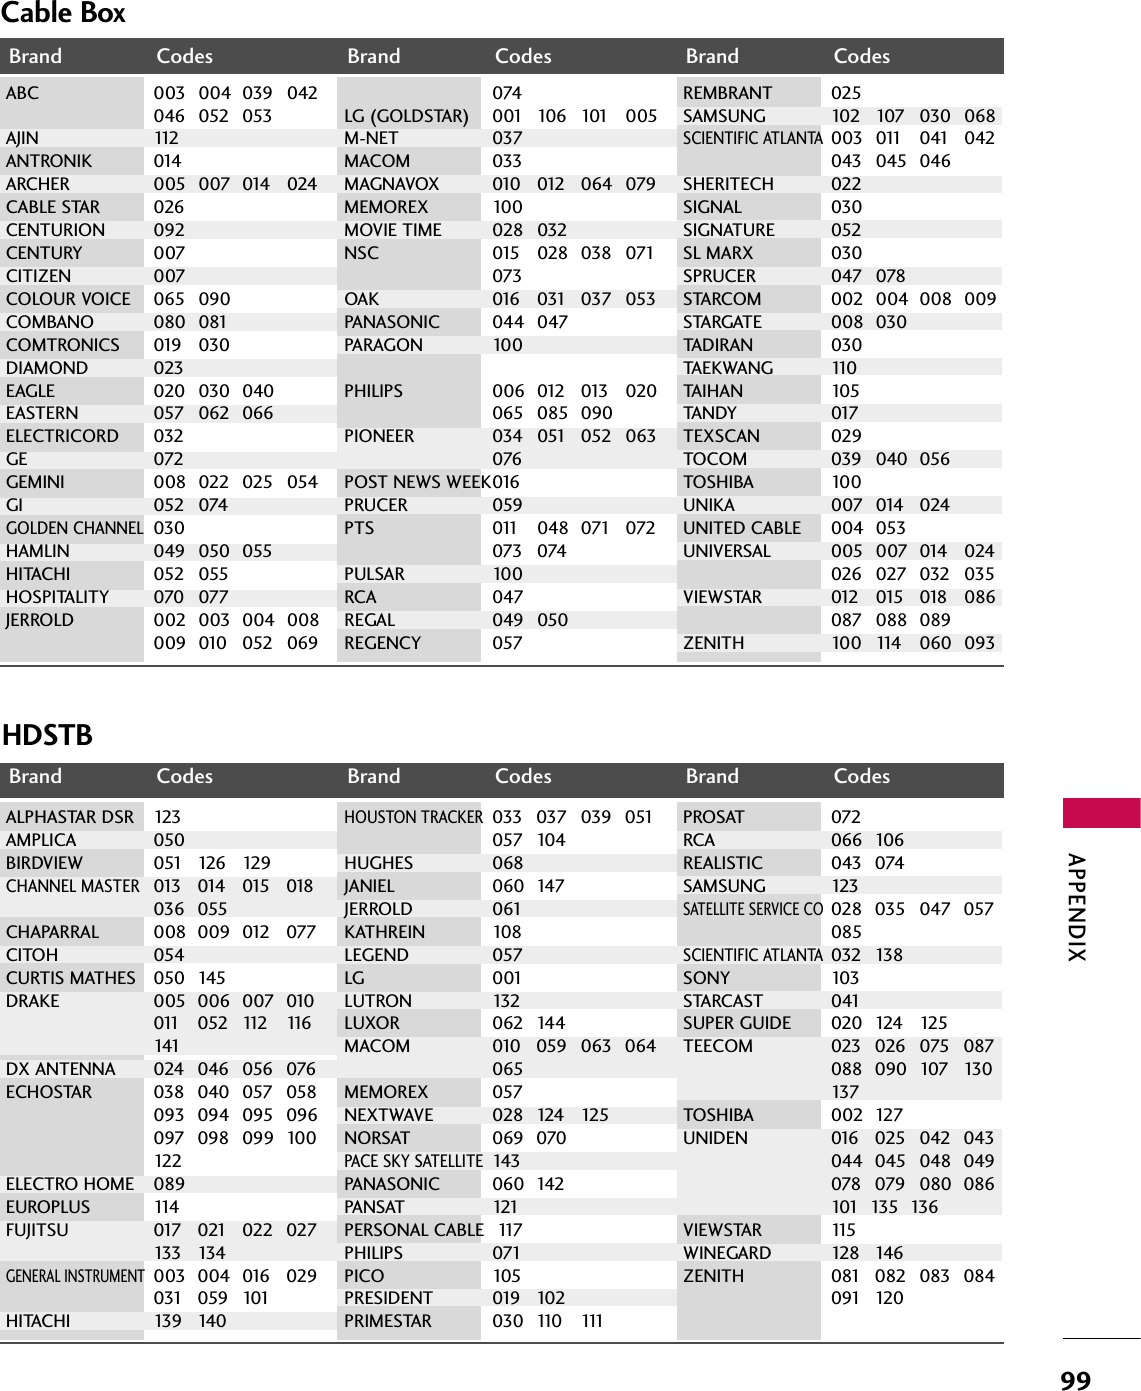
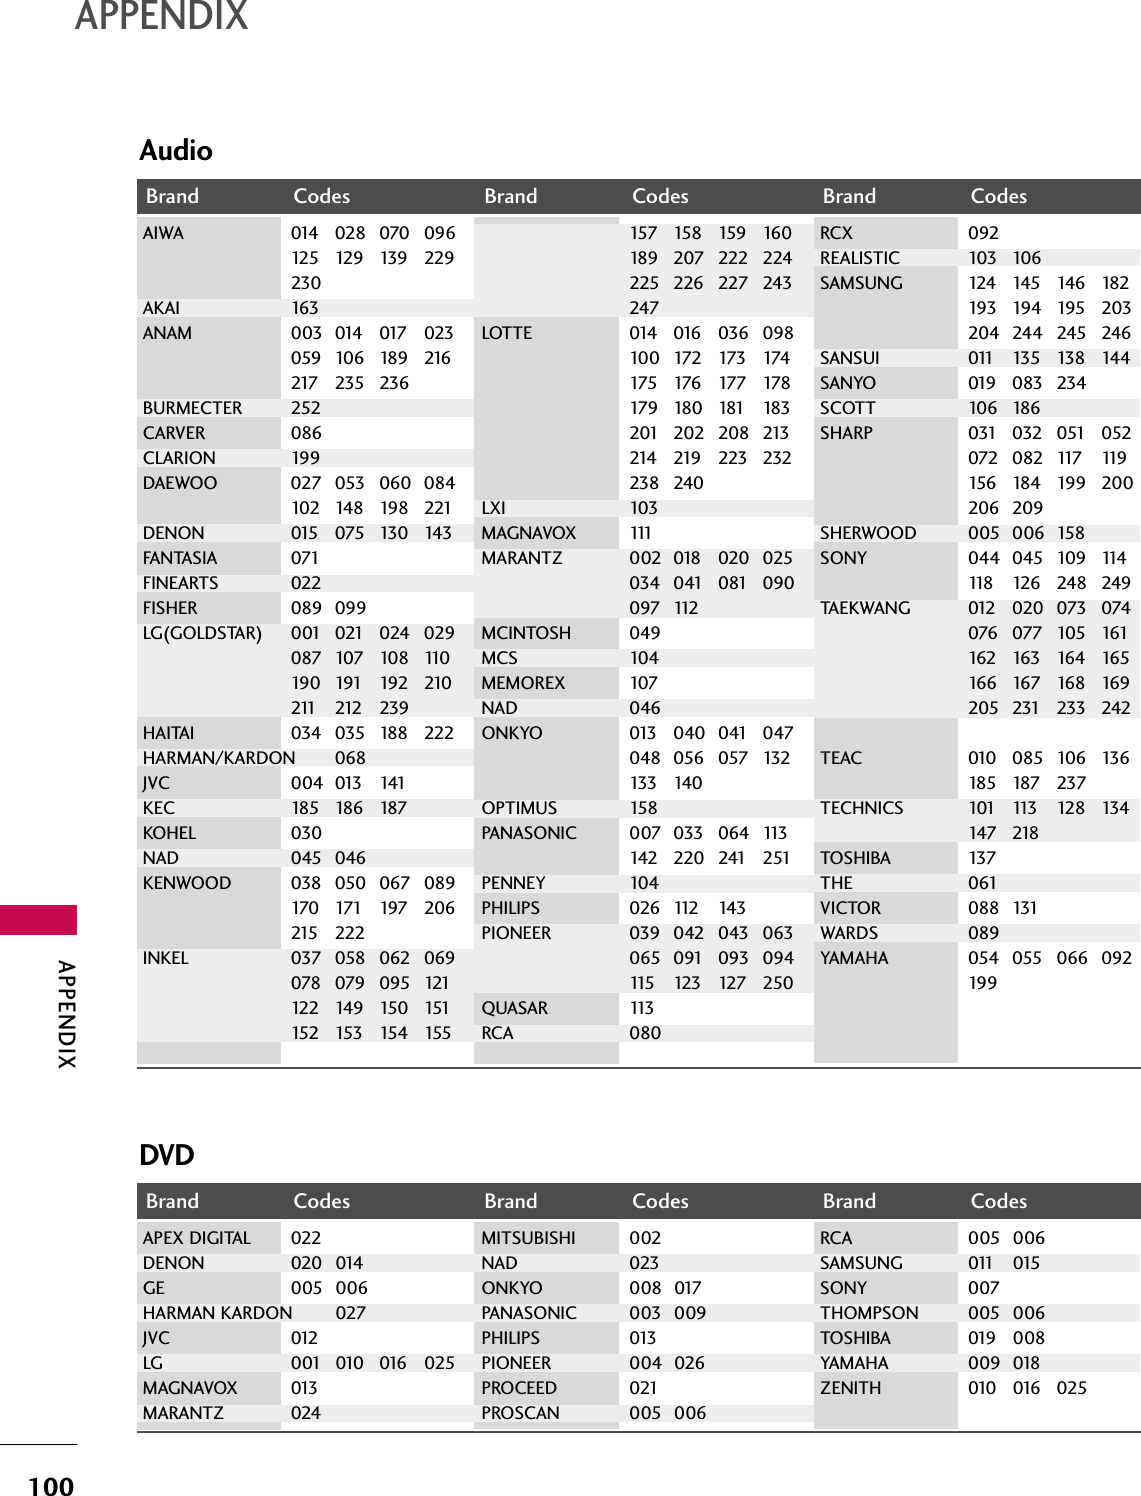
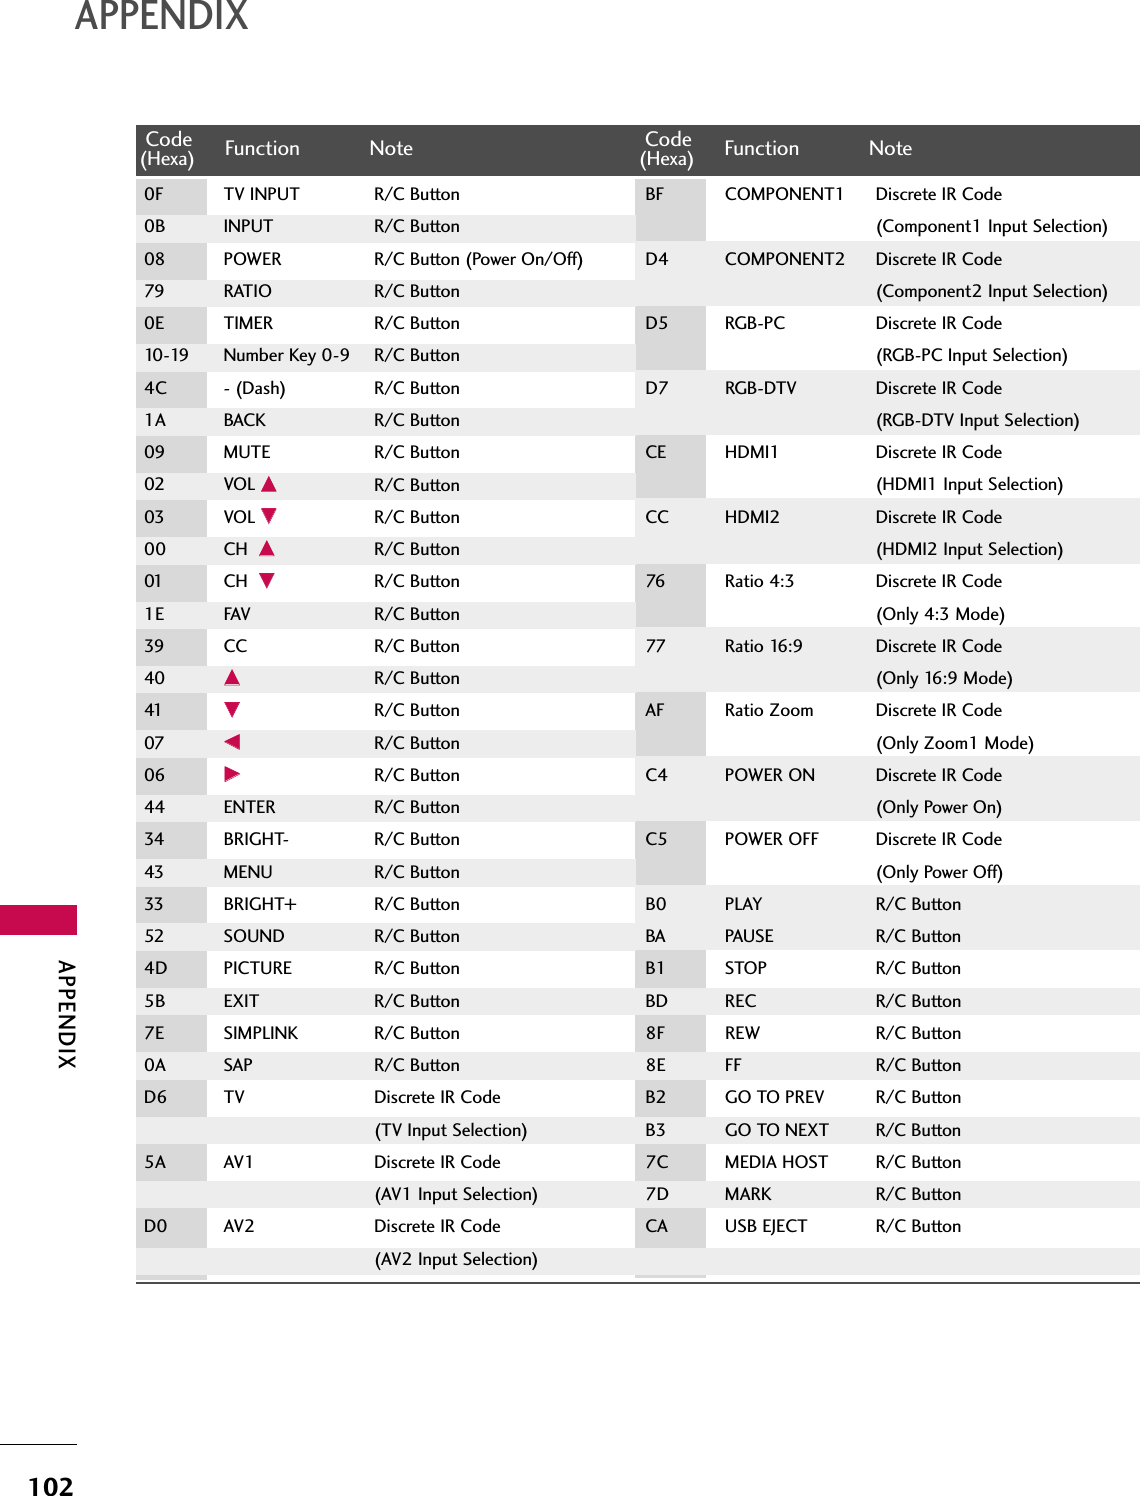
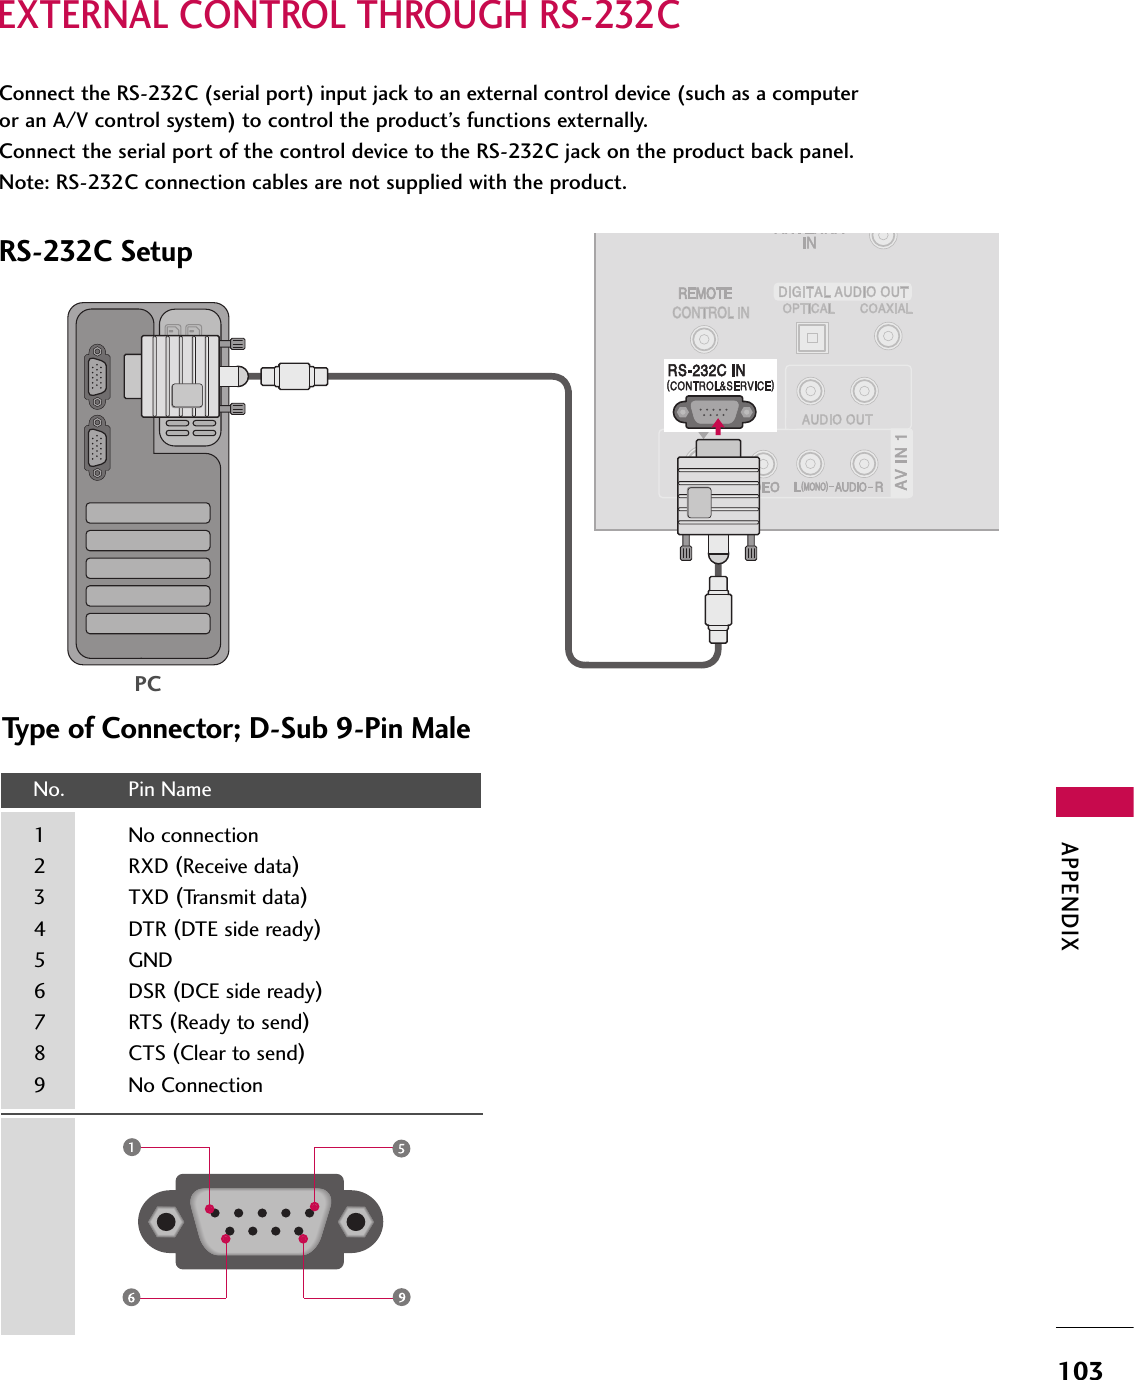
LG Electronics USA 60PY3DFUA PDP TV/MONITOR User Manual coveren 2 f b
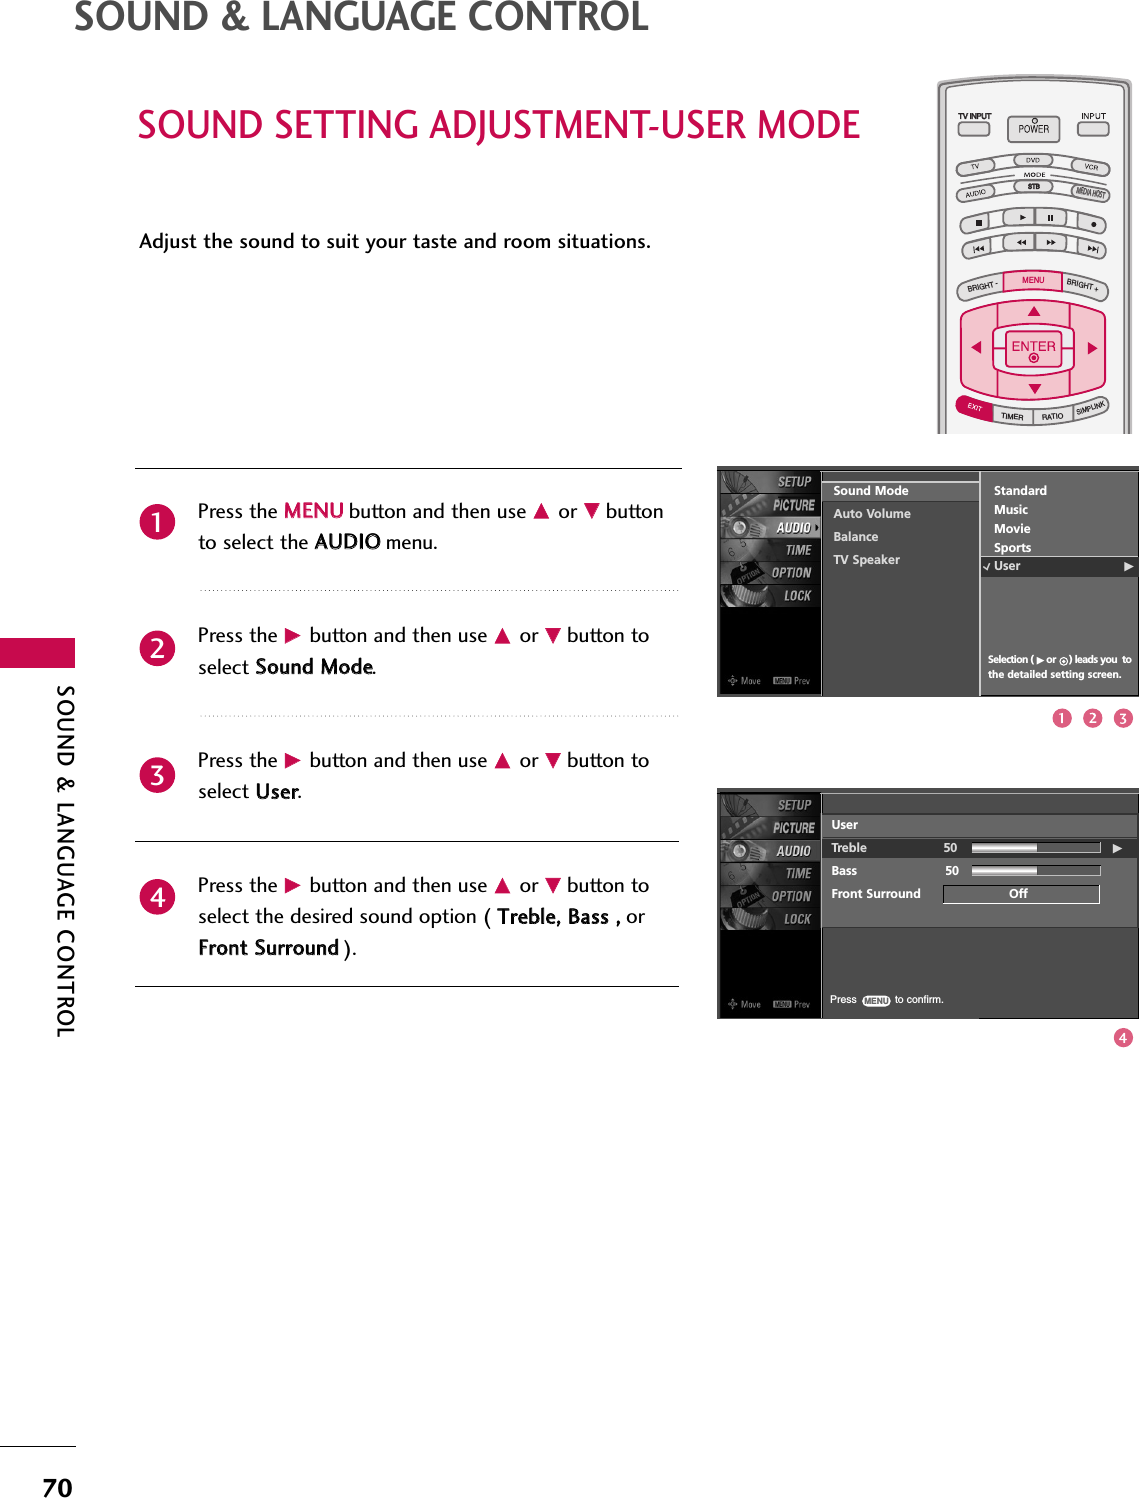
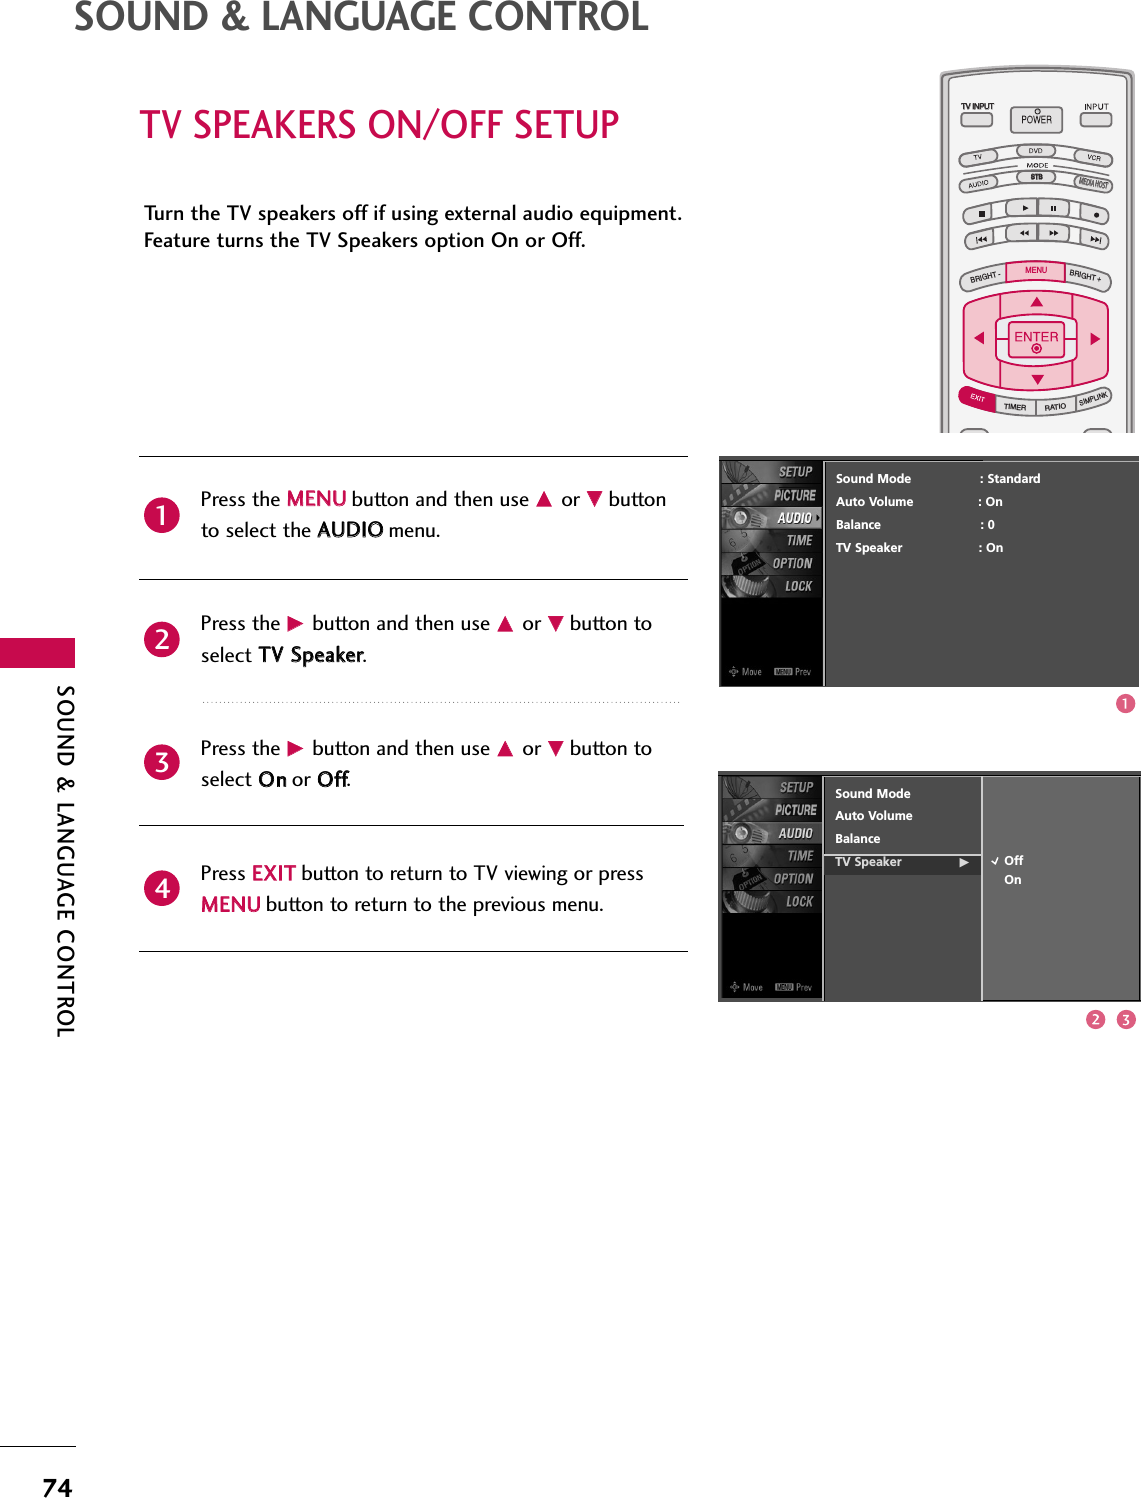
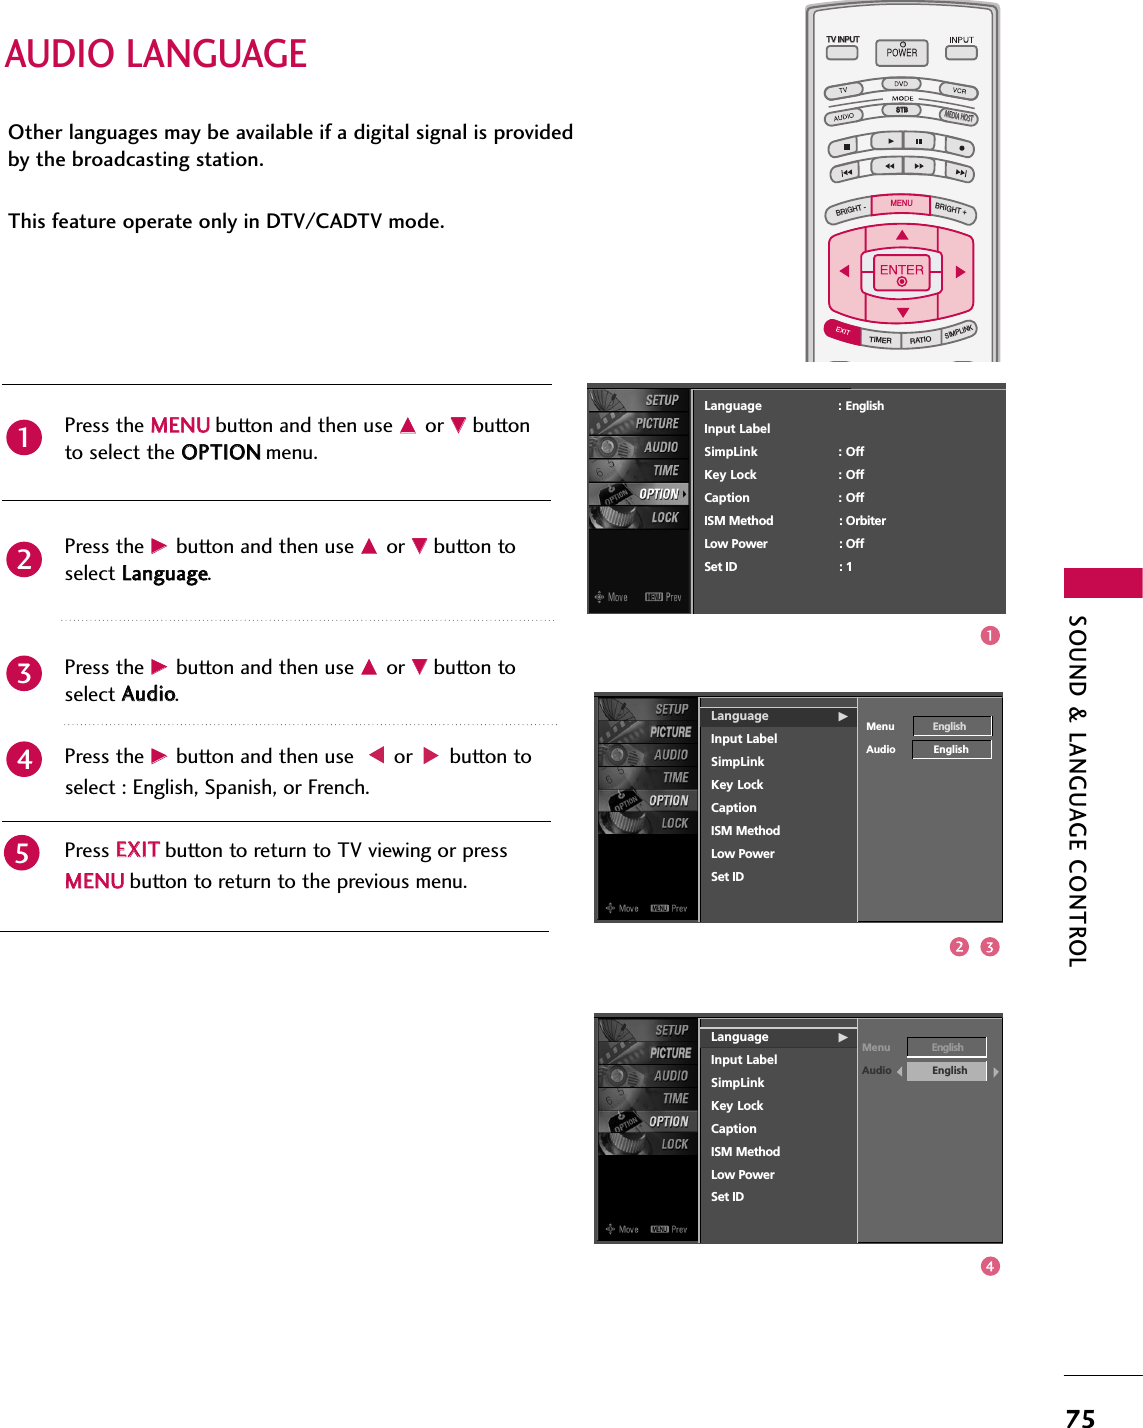
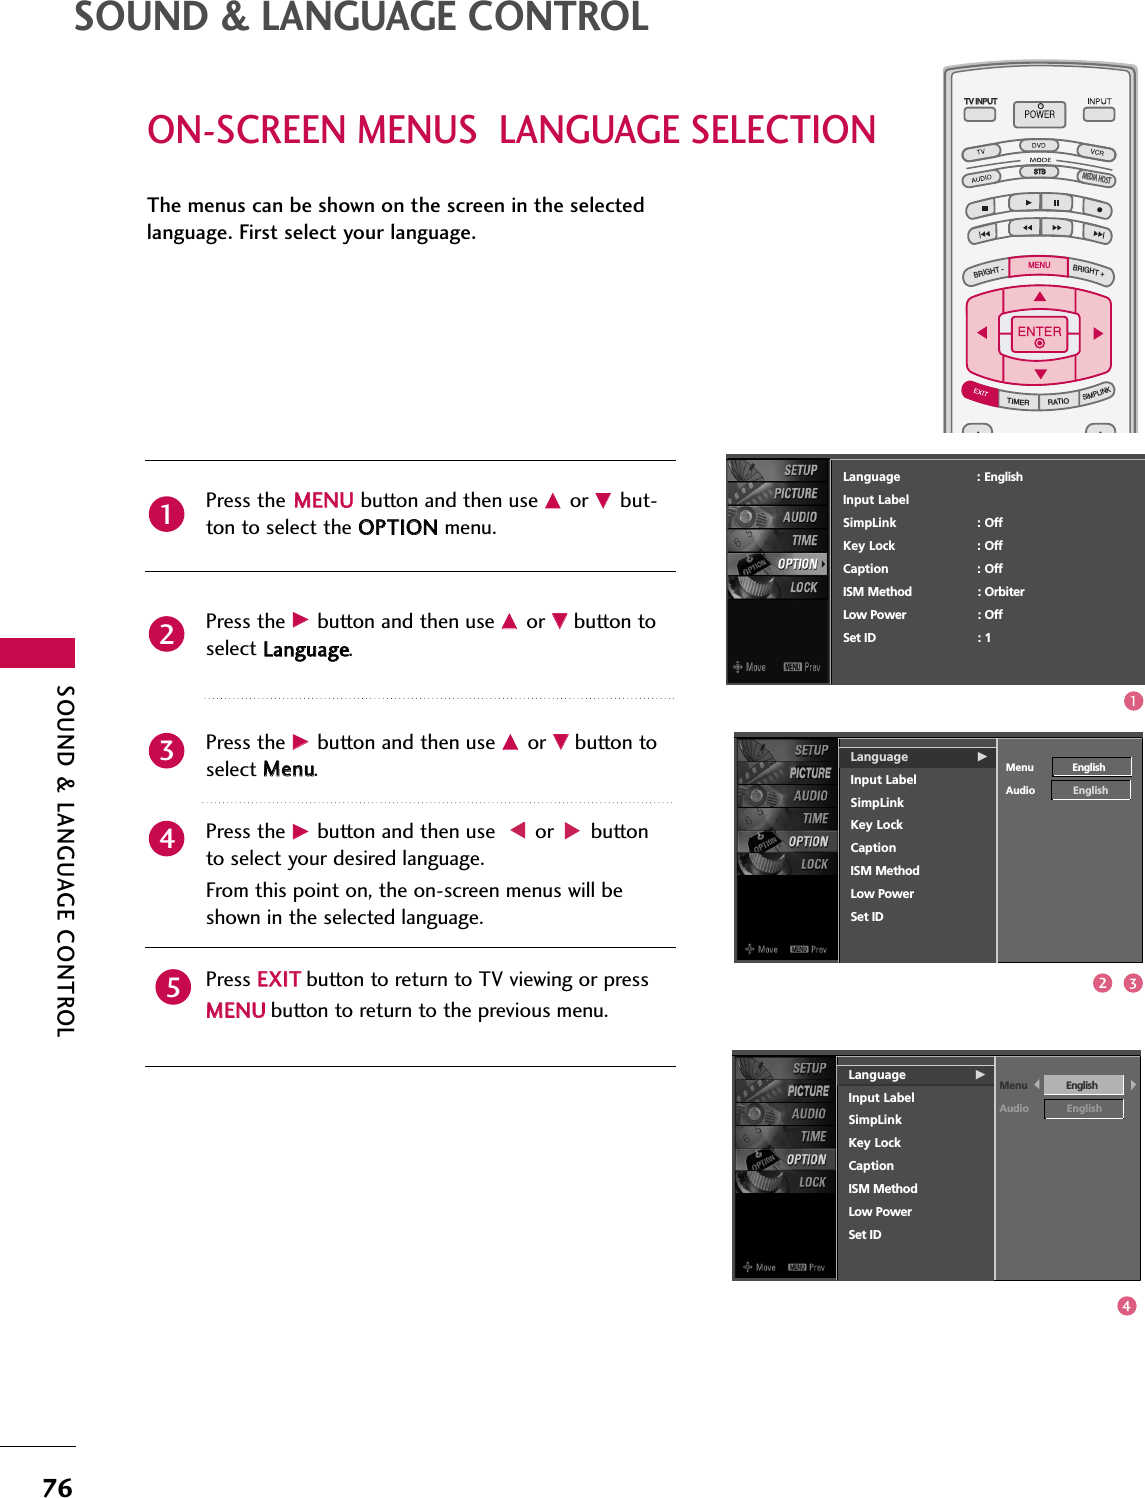
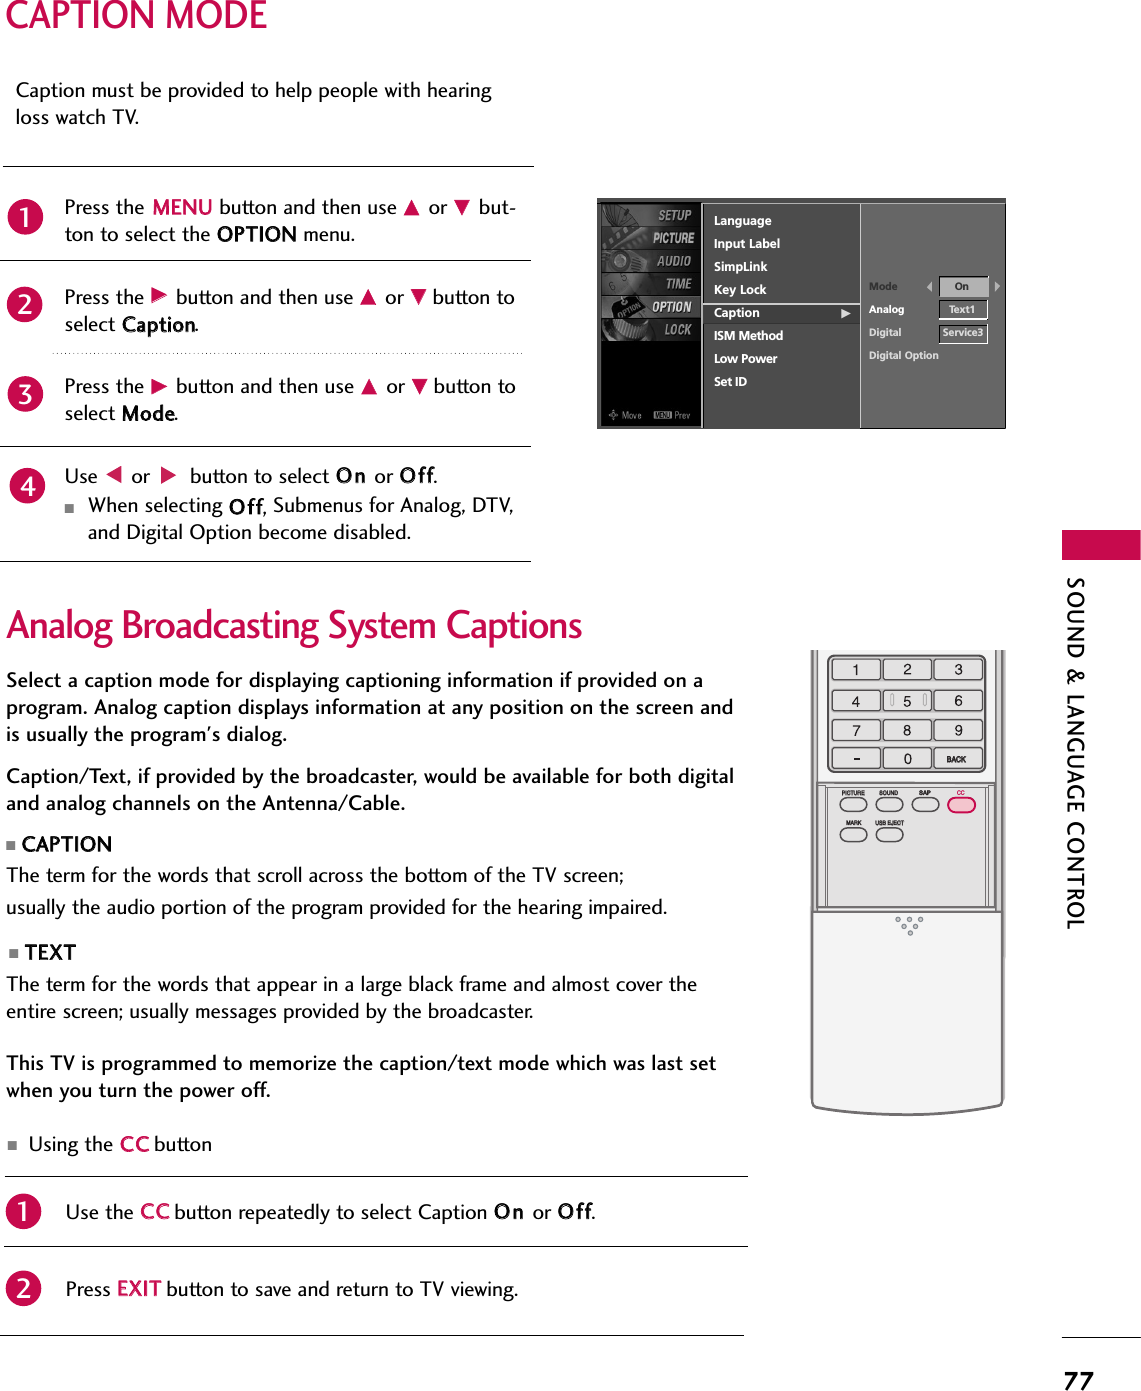
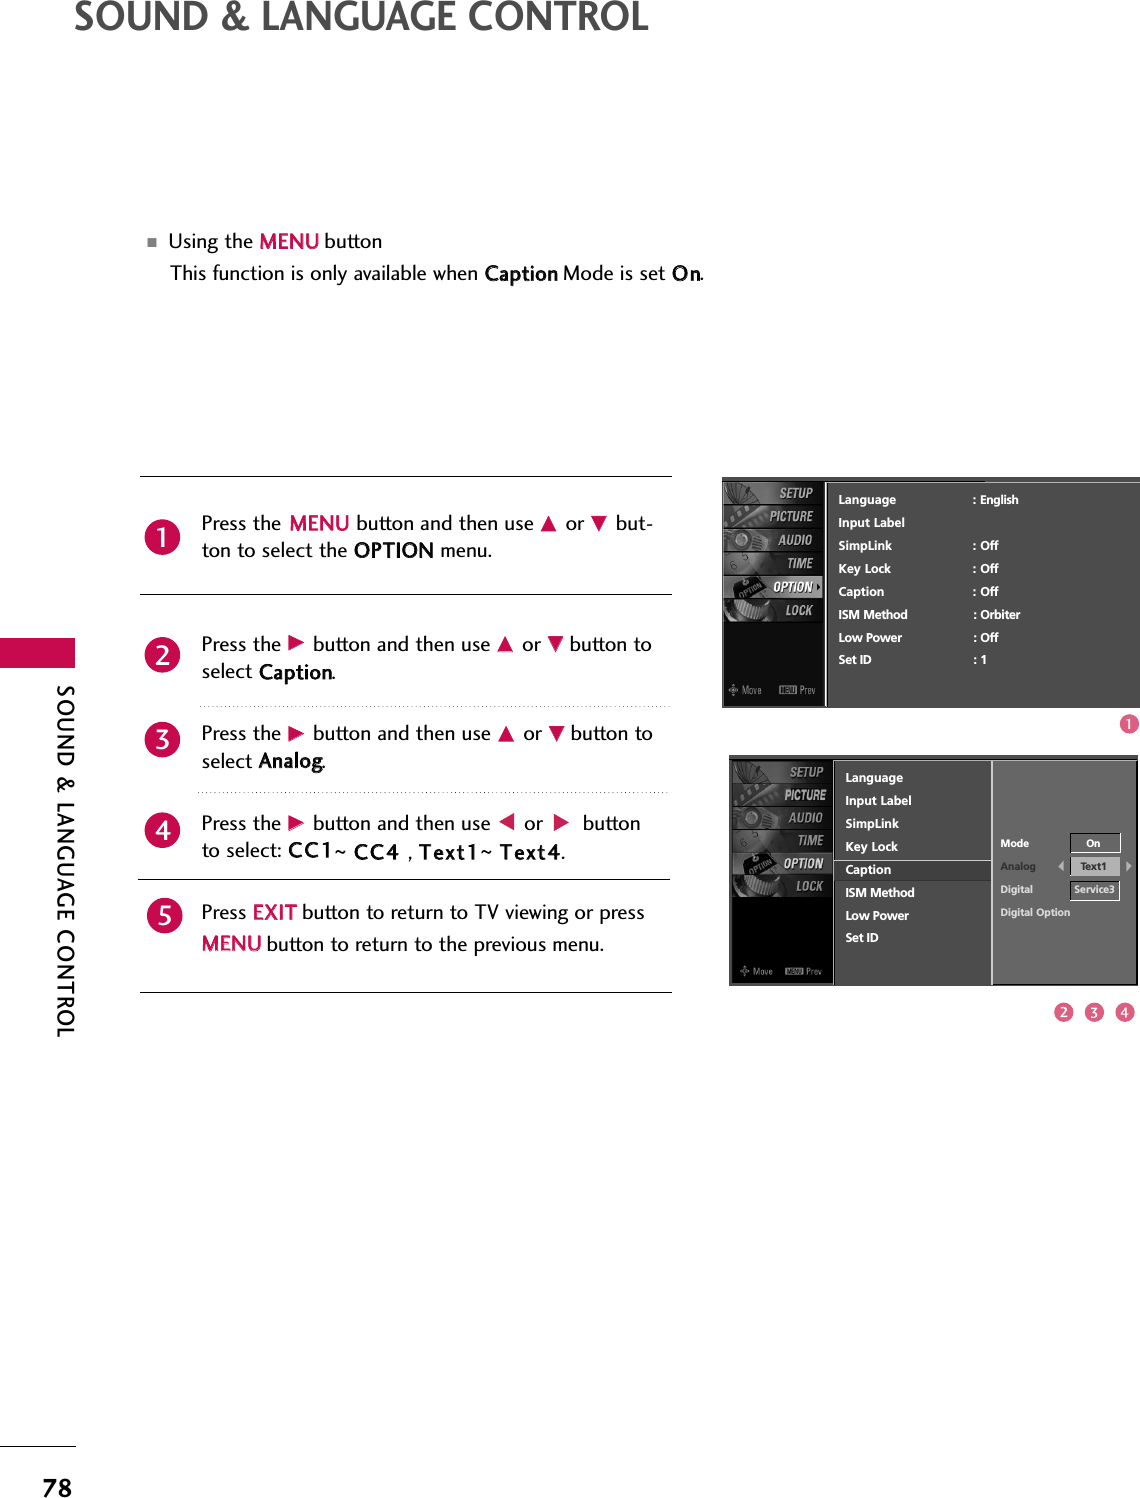
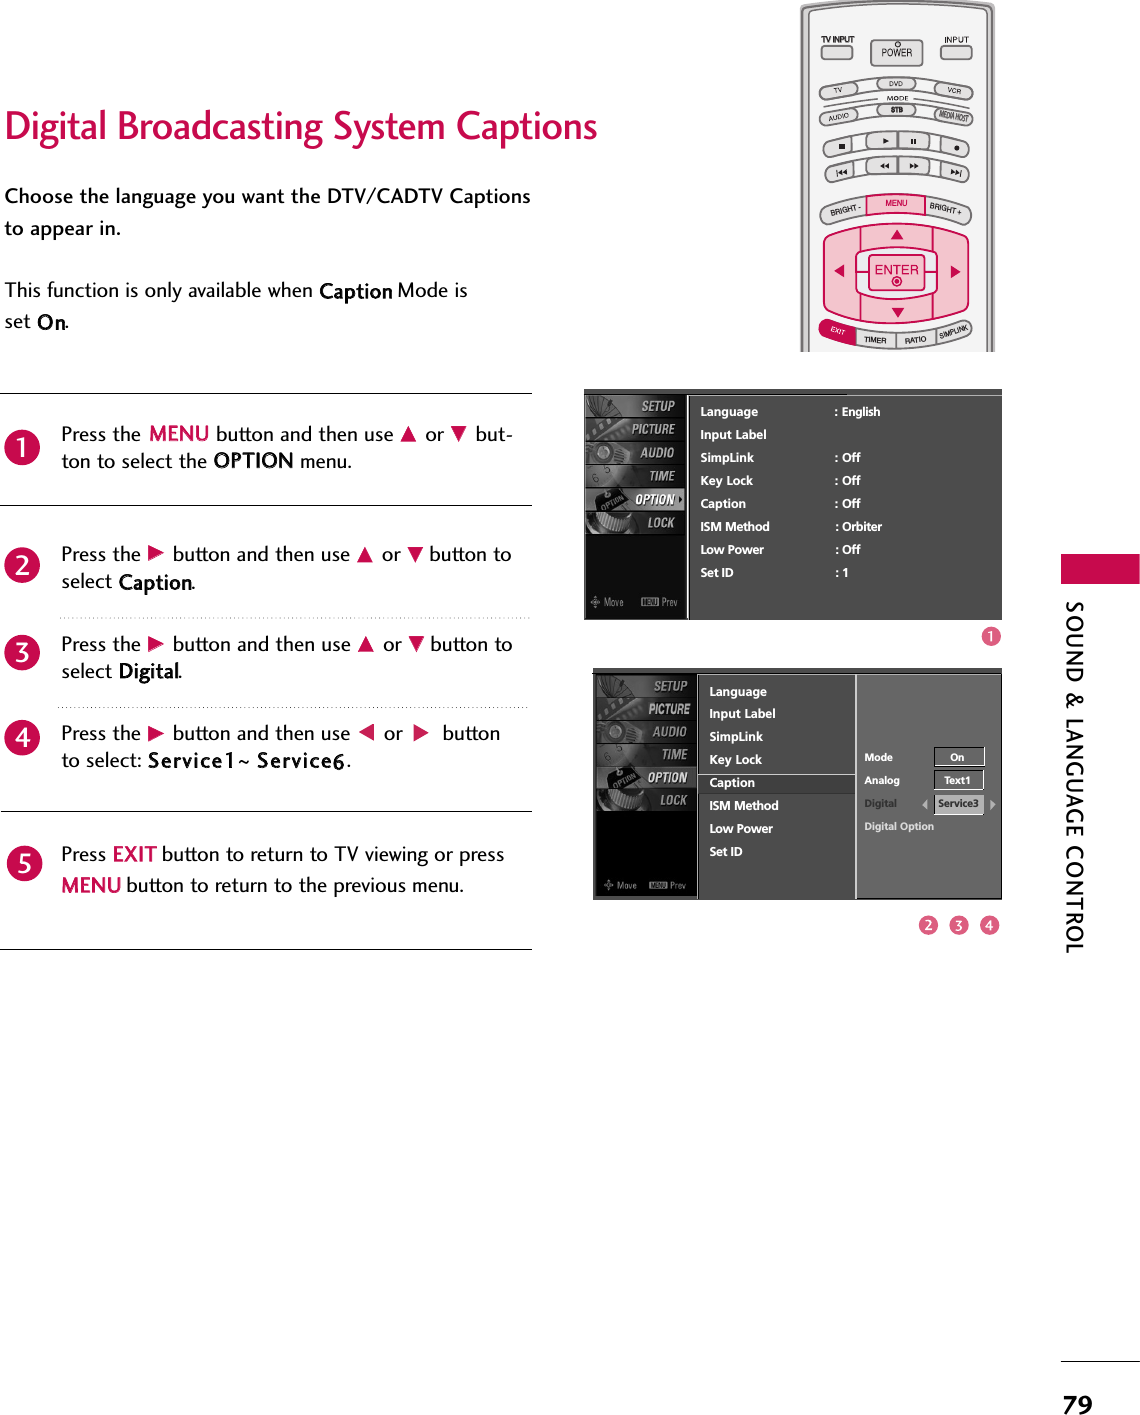
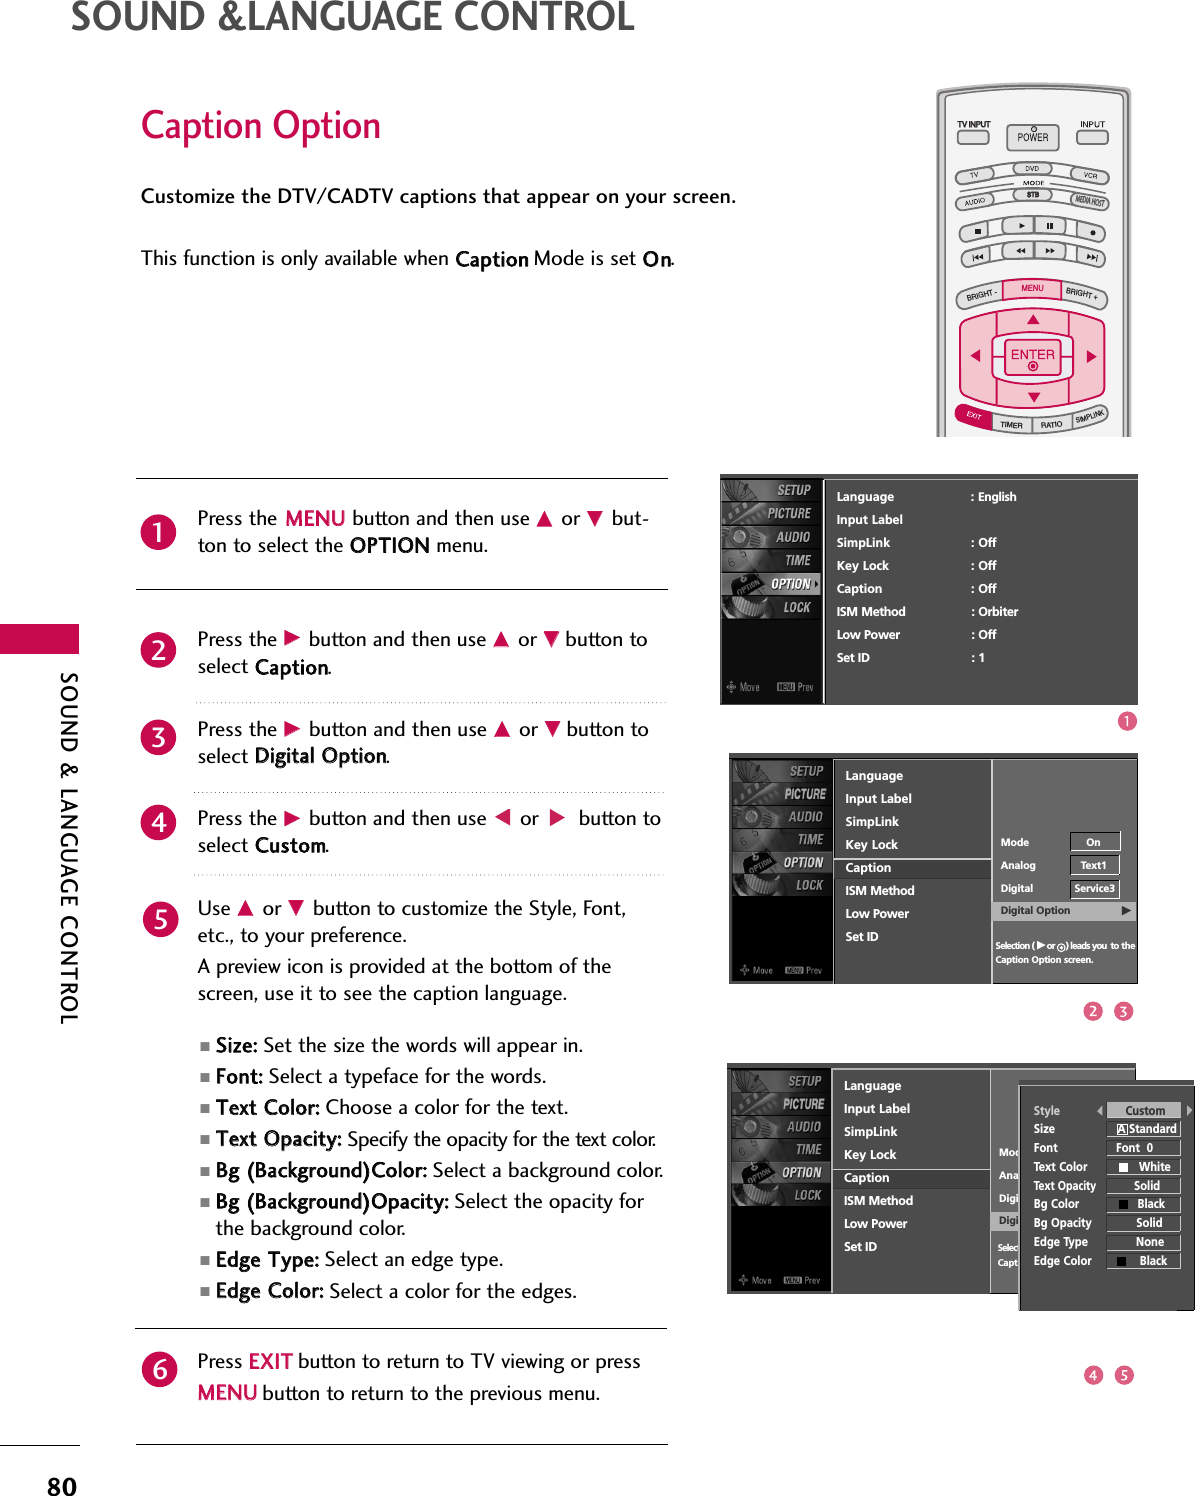
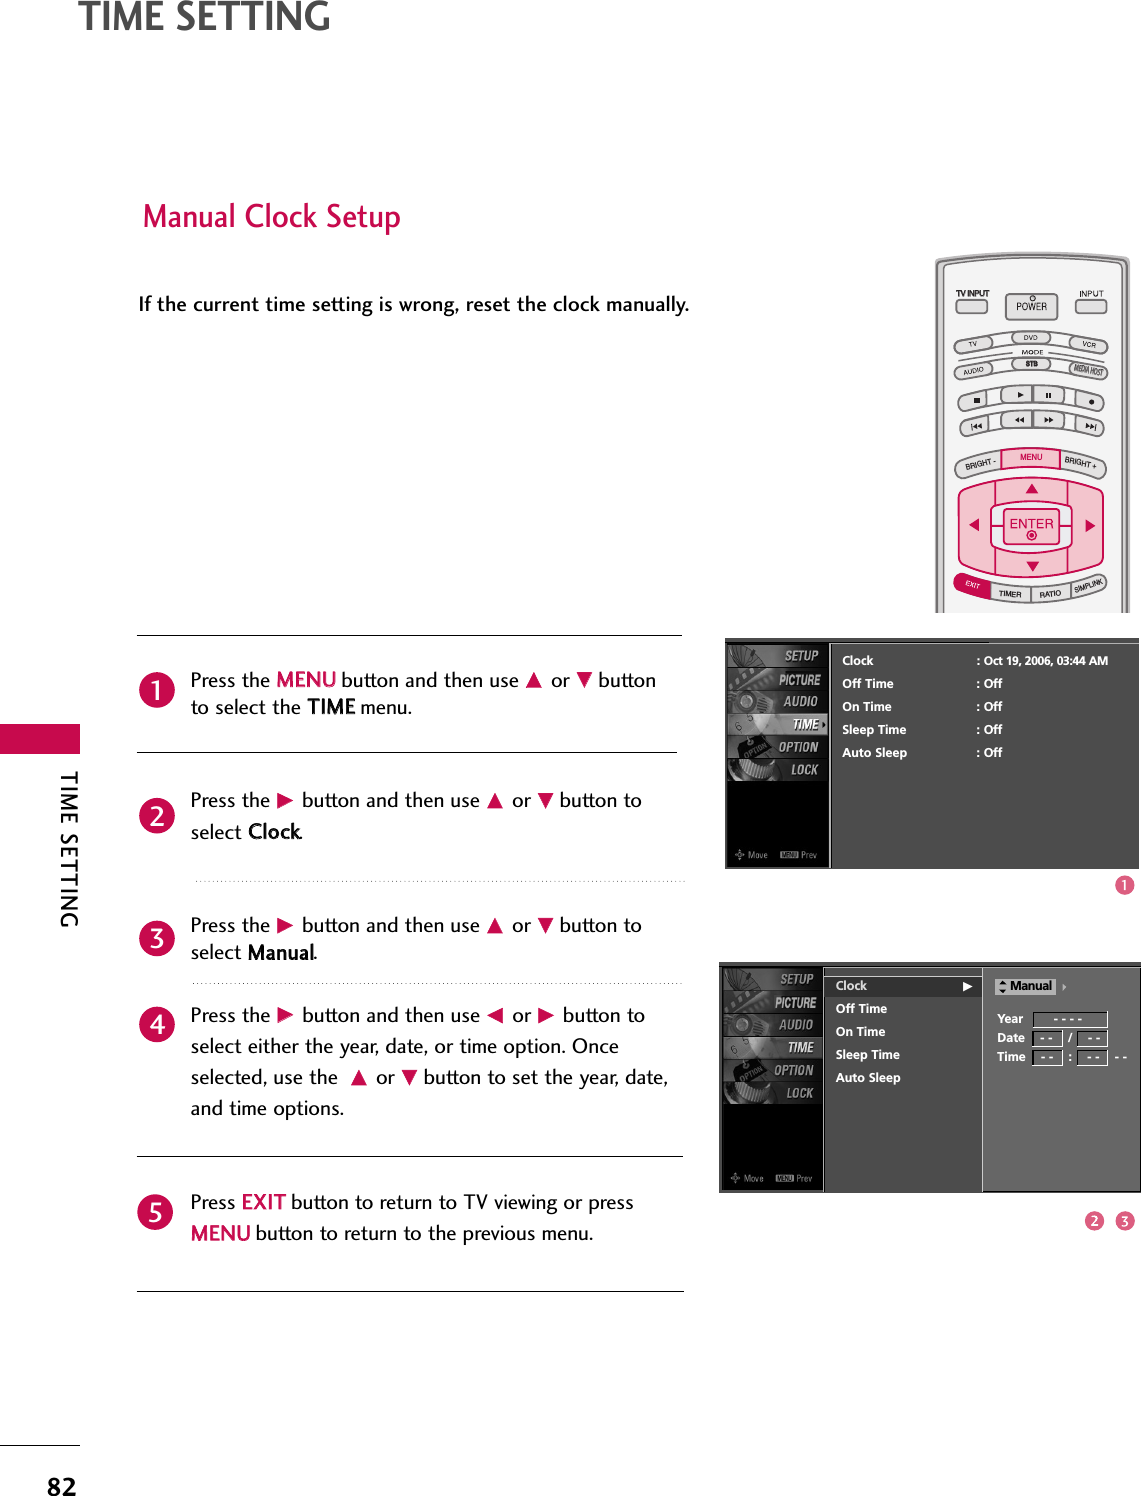
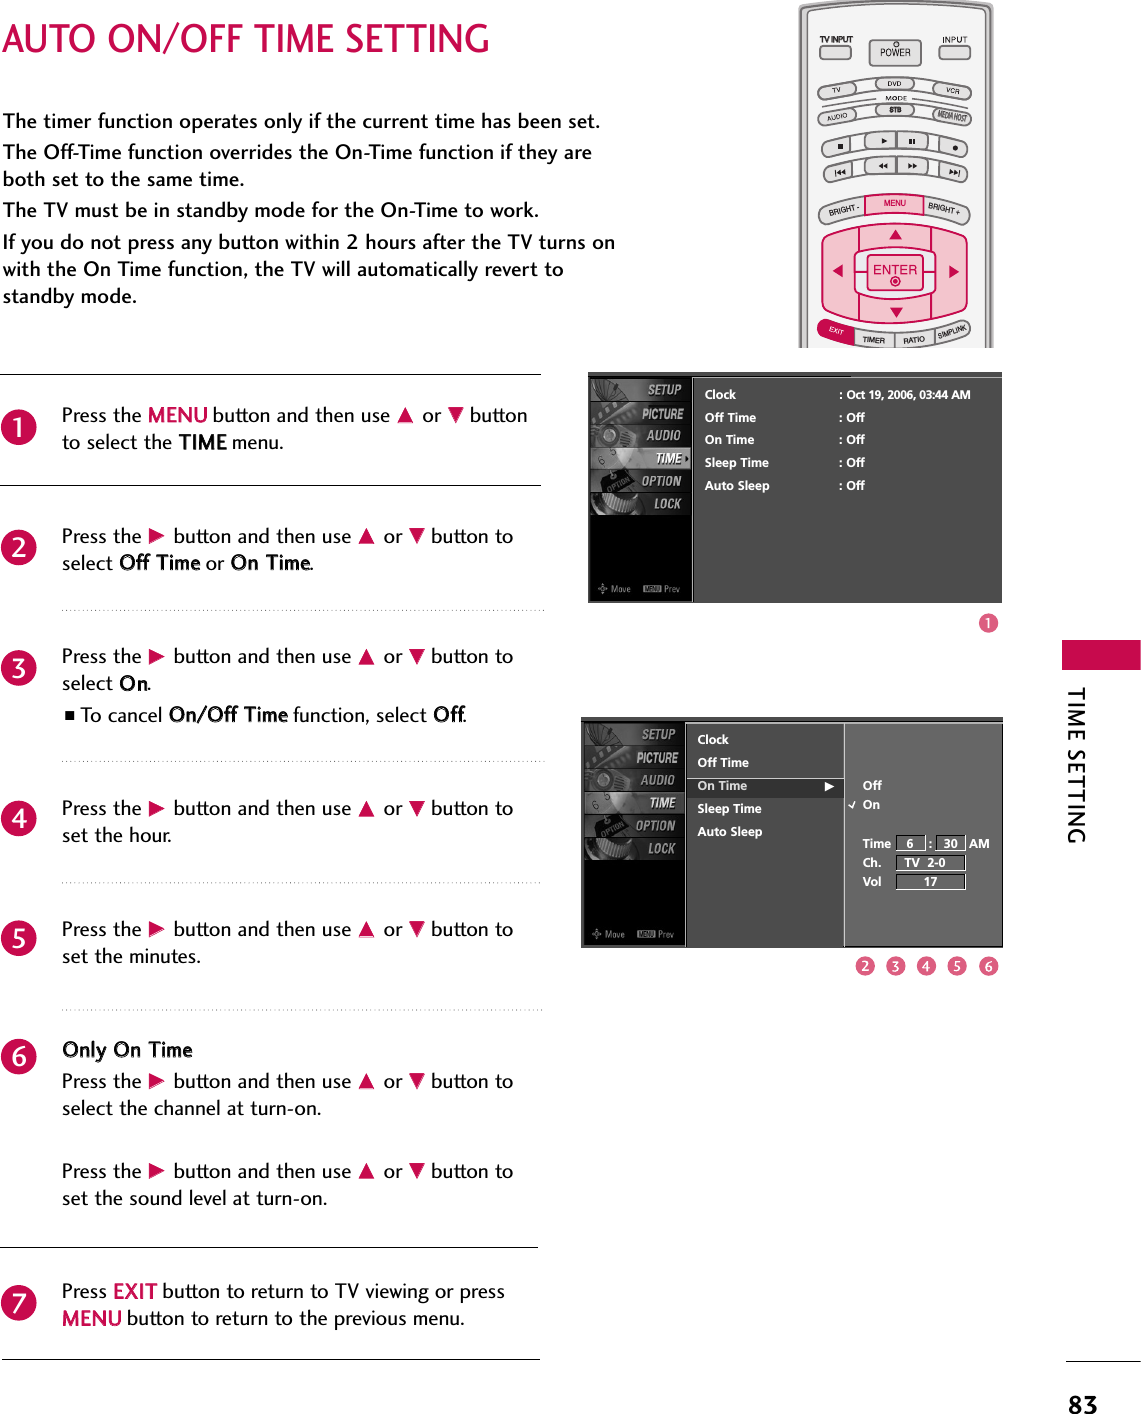
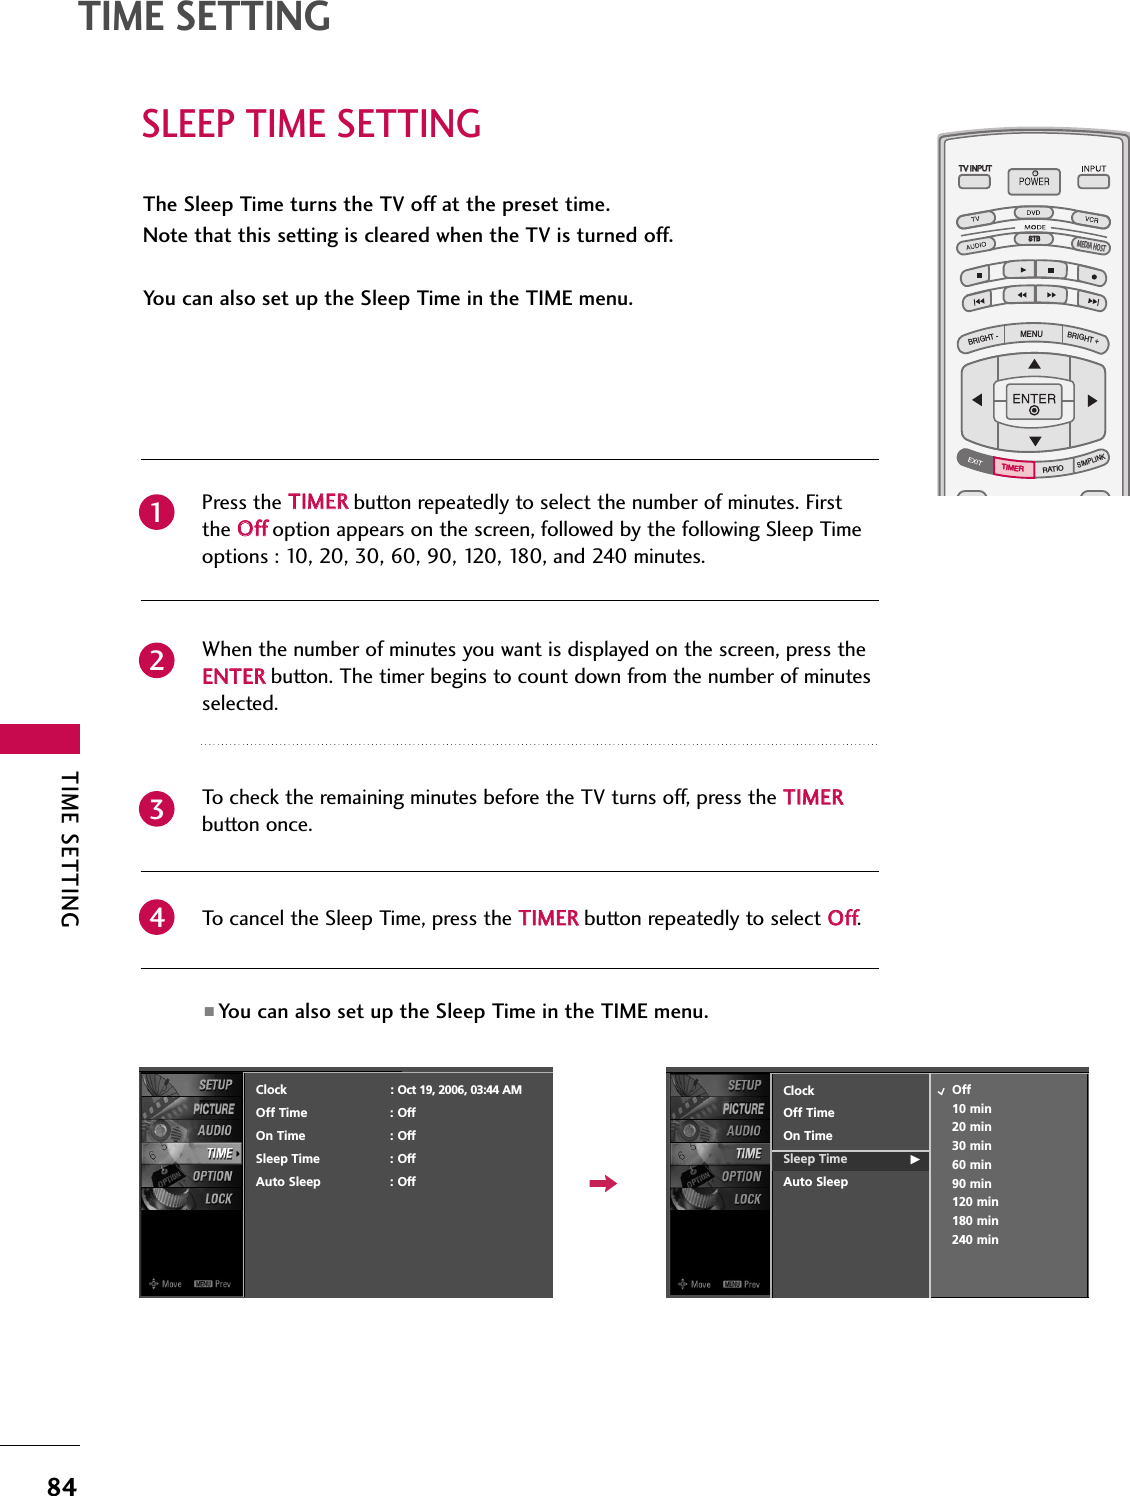
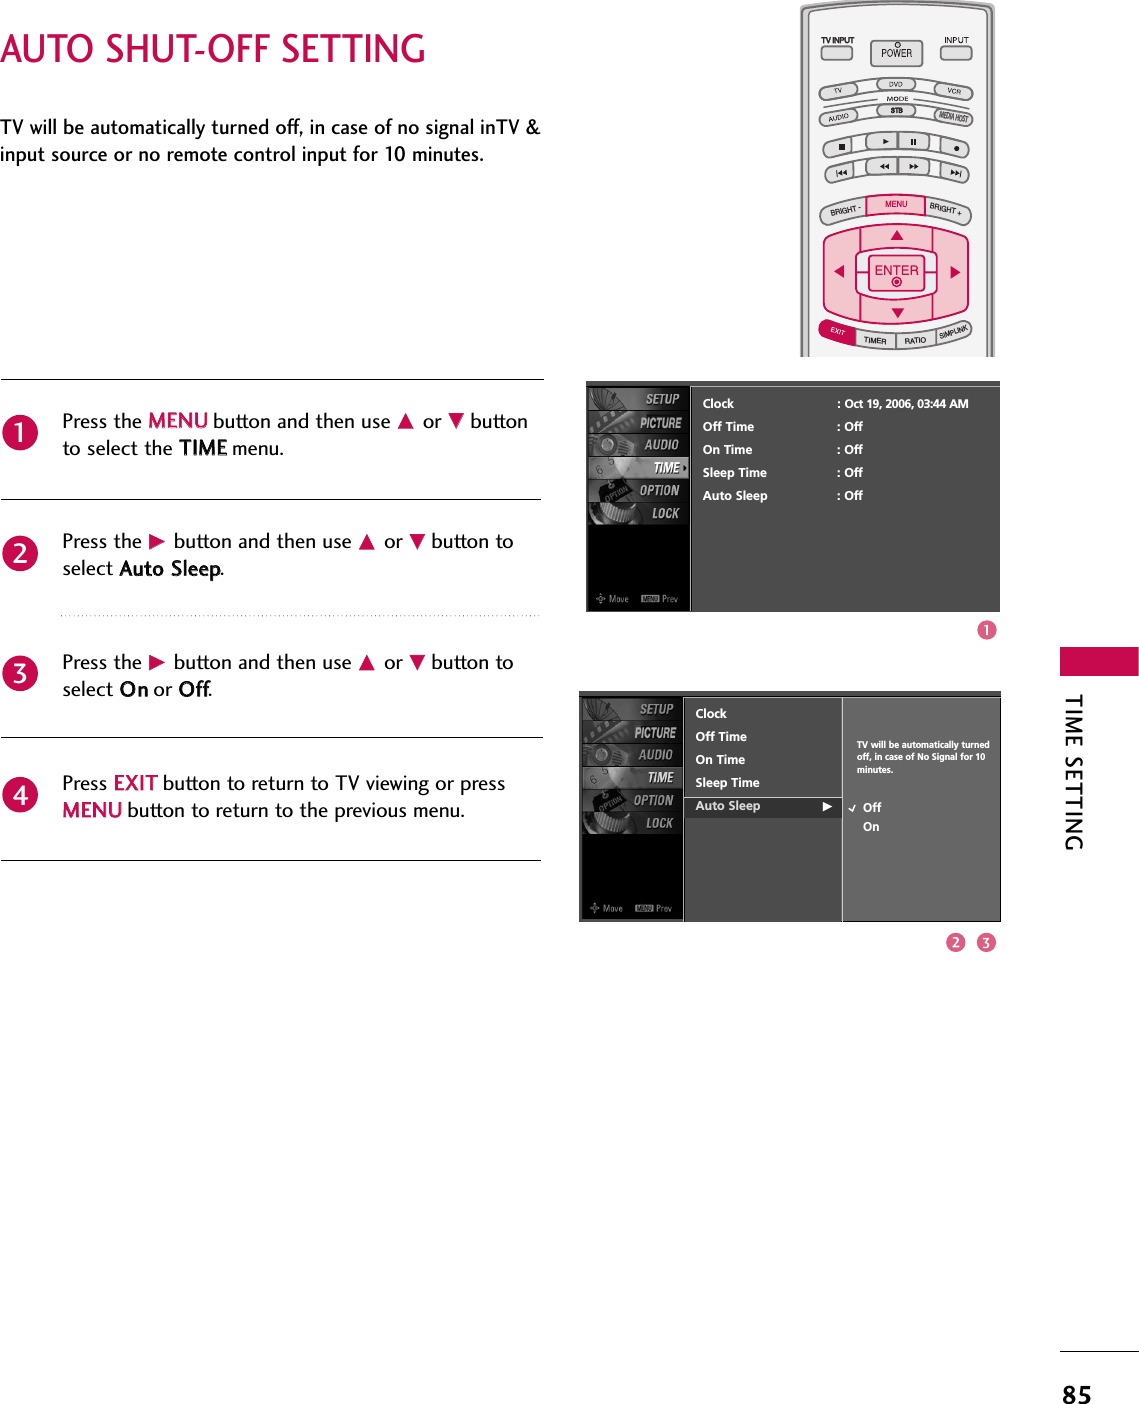
LG Electronics USA PDP TV/MONITOR coveren 2 f b
UserManual.wiki
>
LG Electronics USA
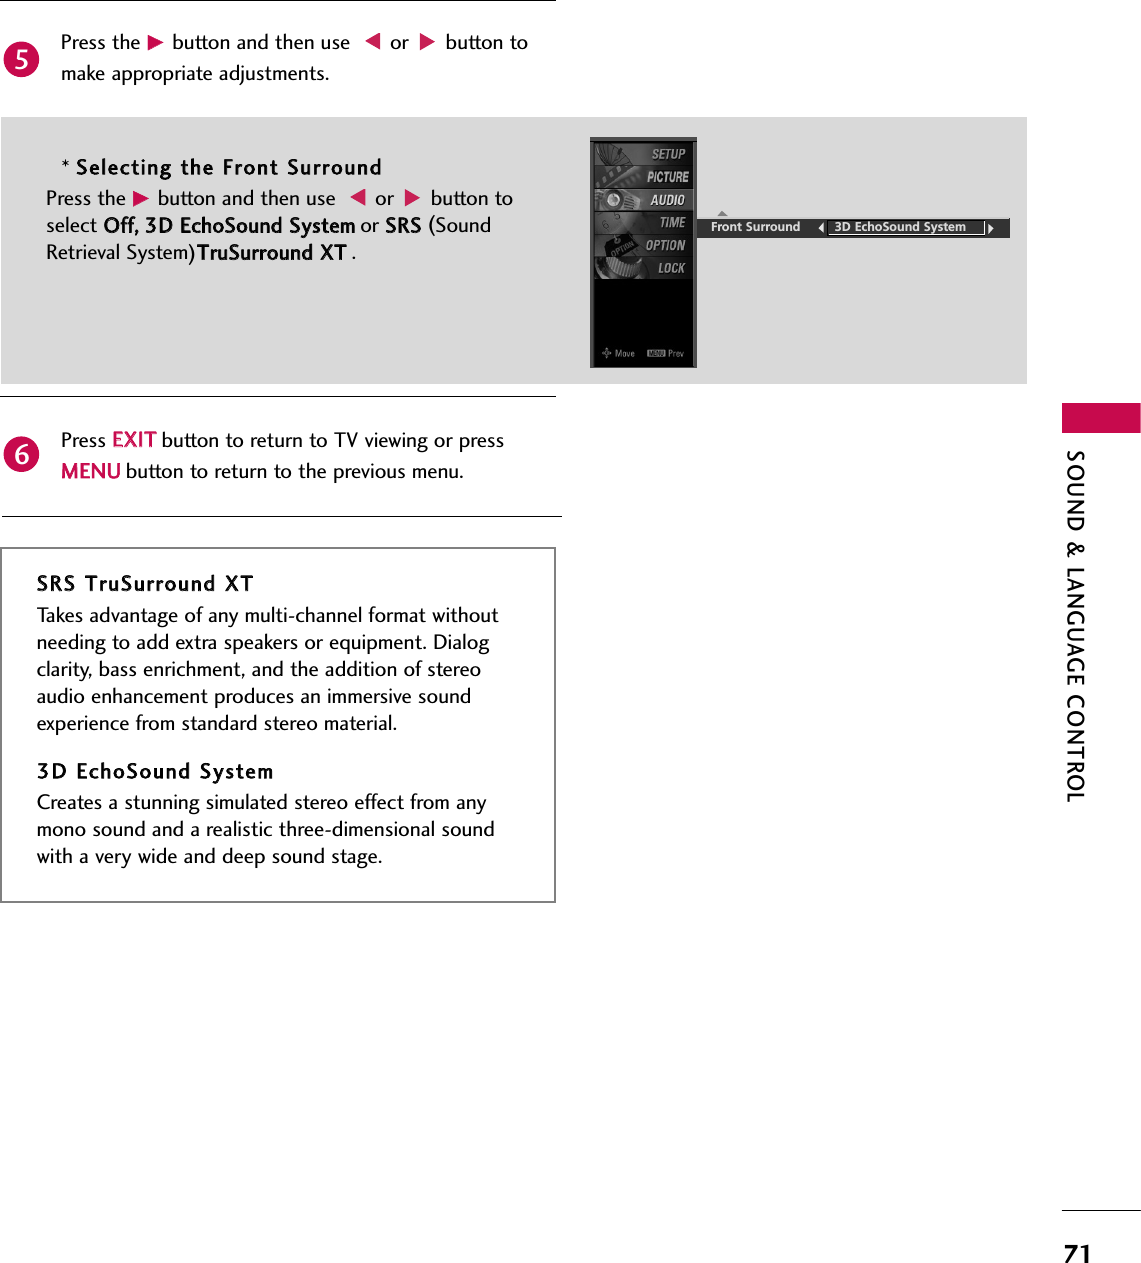
>
60PY3DFUA User Manual
>
User Manual 2 of 2
Contents
1.
User Manual 1 of 2
2.
User Manual 2 of 2
User Manual 2 of 2
Navigation menu
Upload a User Manual
Namespaces
Wiki Guide
HTML
PDF
Info
Views
User Manual
Discussion / Help
Navigation
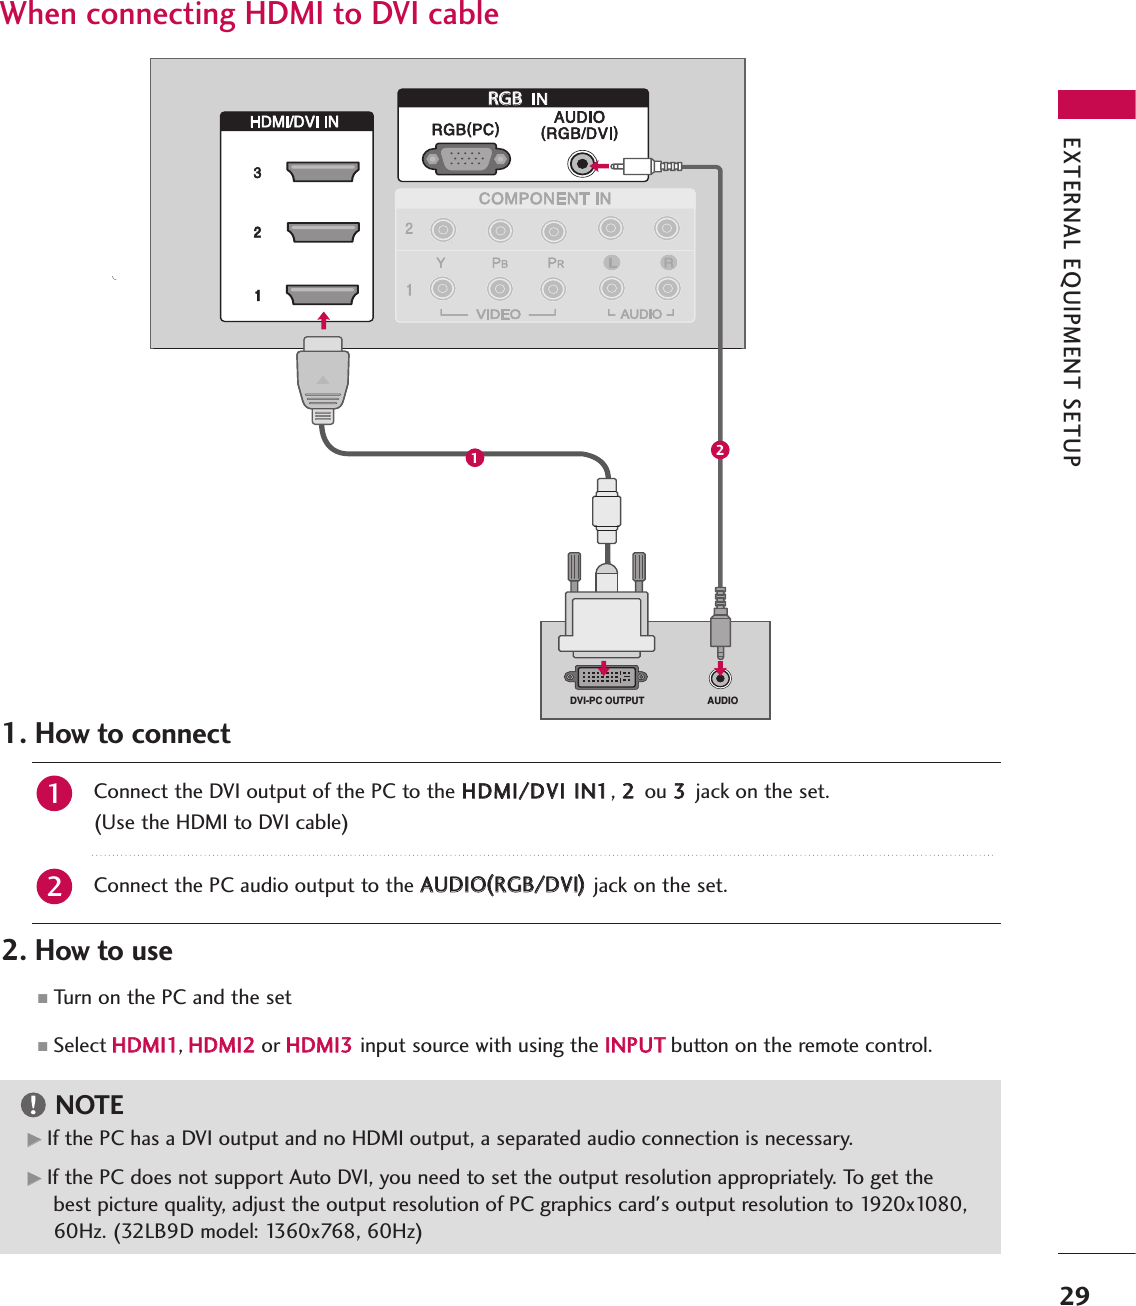


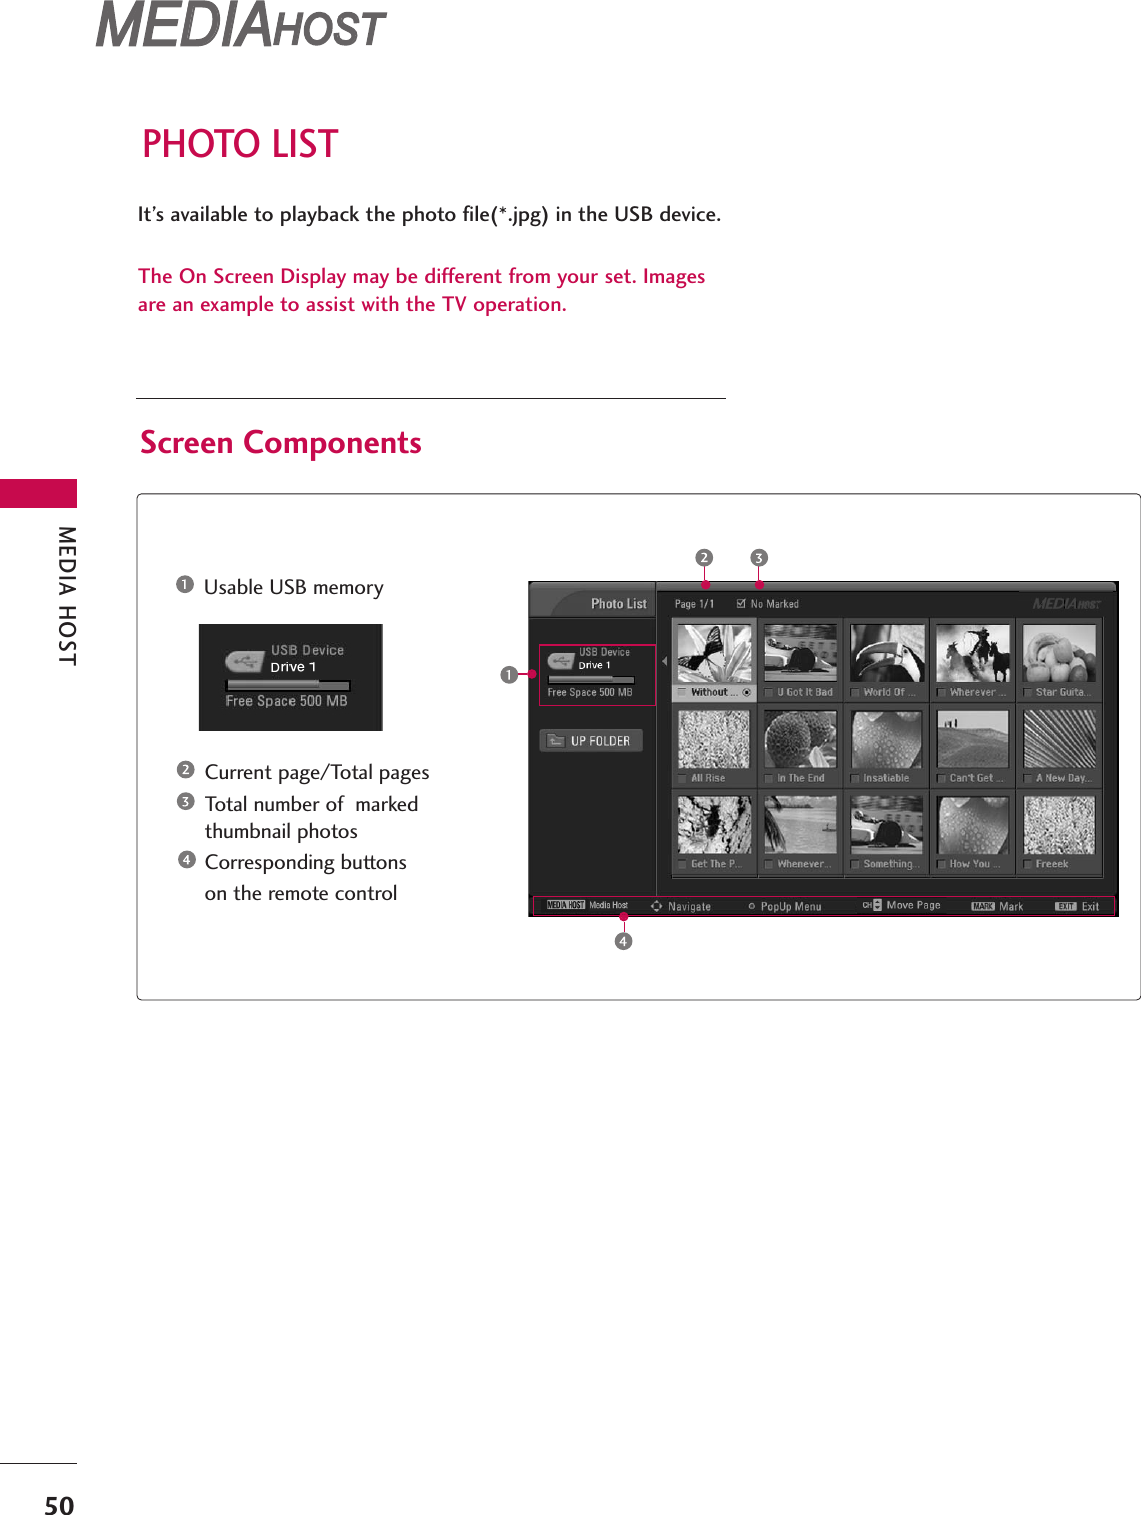
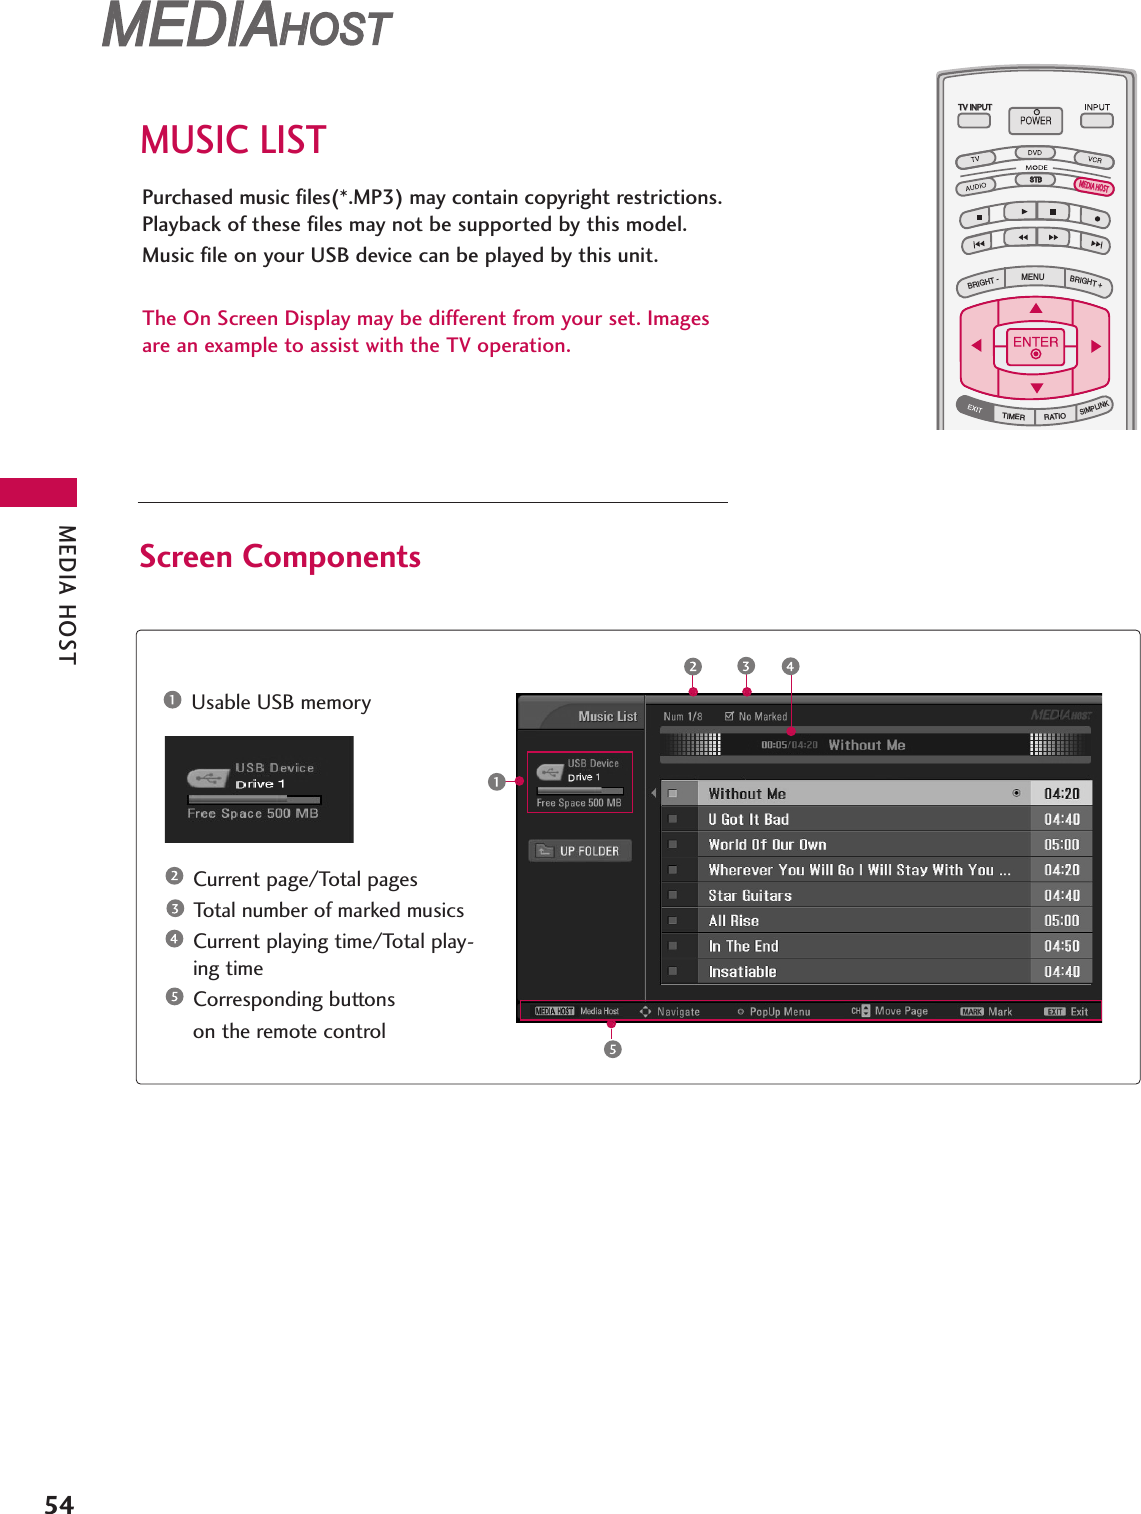
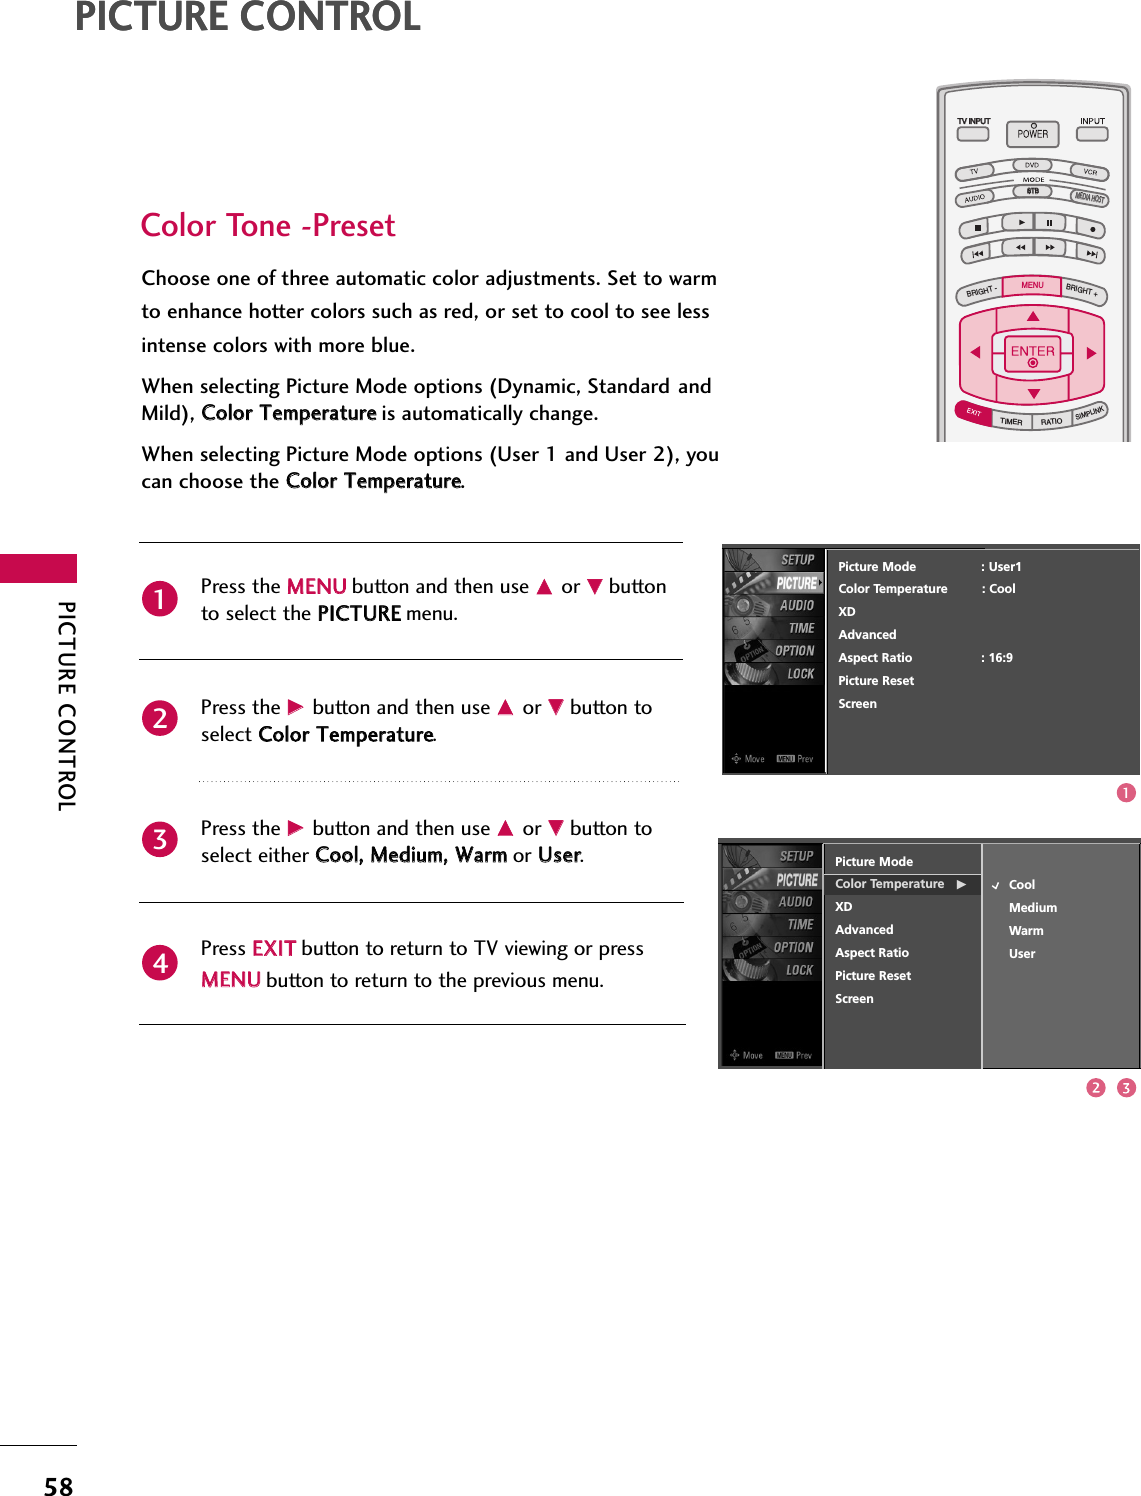
![MEDIA HOST49MEDIAMEDIAMEDIAHOST HOST HOST MEDIAHOST When you connect a USB device or press the button, this screen isdisplayed, automatically.In USB device, you can not add a new folder or delete the existing folder.MEDIA HOSTMEDIA HOSTENTRY MODESPress the DD or EEbutton to select the desired item.Press the EENNTTEERRbutton to move to PPhhoottoo LLiisstt or MMuussiicc LLiisstt of USB device.Press the UUSSBB EEJJEECCTTbutton of remote control before removingthe USB device.12NOTE3BACKBACKPICTUREPICTURE SOUNDSOUNDSAPSAPMARKMARKUSB EJECTUSB EJECTCCCC[Media Host Menu]Press the UUSSBB EEJJEECCTTbutton of remote control before removing the USB device.Only a USB storage device is recognizable. If the USB storage device is connected through a USB hub, the device is not recognizable.A USB storage device using an automatic recognition program may not be recognized.A USB storage device which uses its own driver may not be recognized.In case of a card reader, up to four memory cards are concurrently recognizable.The recognition speed of a USB storage device may depend on each device.Please do not turn off the TV or unplug the USB device when the connected USB storagedevice is working. When such device is suddenly separated or unplugged, the stored files orthe USB storage device may be damaged. To unplug the USB storage device, please press theUUSSBB EEJJEECCTTbutton on the remote control, and then unplug it safely.Please do not connect the USB storage device which was artificially maneuvered on the PC.The device may cause the product to malfunction or fail to be played. Never forget to use onlya USB storage device which has normal music files or image files.Please use only a USB storage device which was formatted as a FAT or a NTFS file system pro-vided with the Windows operating system. In case of a storage device formatted as a differentutility program which is not supported by Windows, it may not be recognized.In case of a hard disk drive (HDD) formatted as NTFS, writing and deletion are not allowable.Please connect power to a USB storage device which requires an external power supply. If not,the device may not be recognized.Please connect a USB storage device with cable is offered by USB maker. If connected withcable is not offered by USB maker or an excessively long cable, the device may not be recog-nized.Some USB storage devices may not be supported or operated smoothly.If the name of a folder or file is too long, it will not be displayed or recognized.](https://usermanual.wiki/LG-Electronics-USA/60PY3DFUA.User-Manual-2-of-2/User-Guide-761445-Page-21.png)
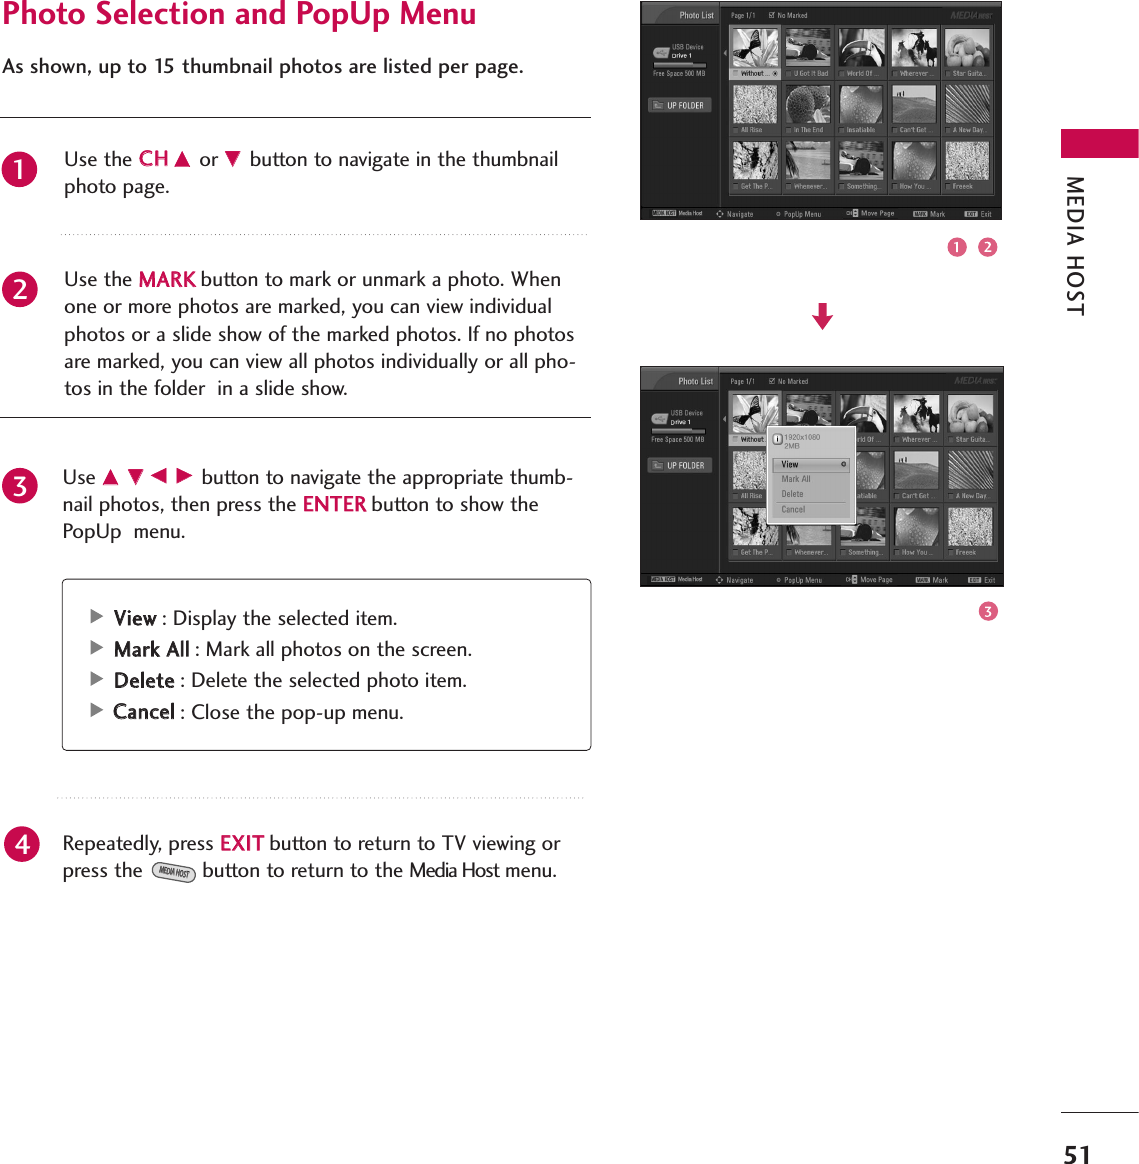

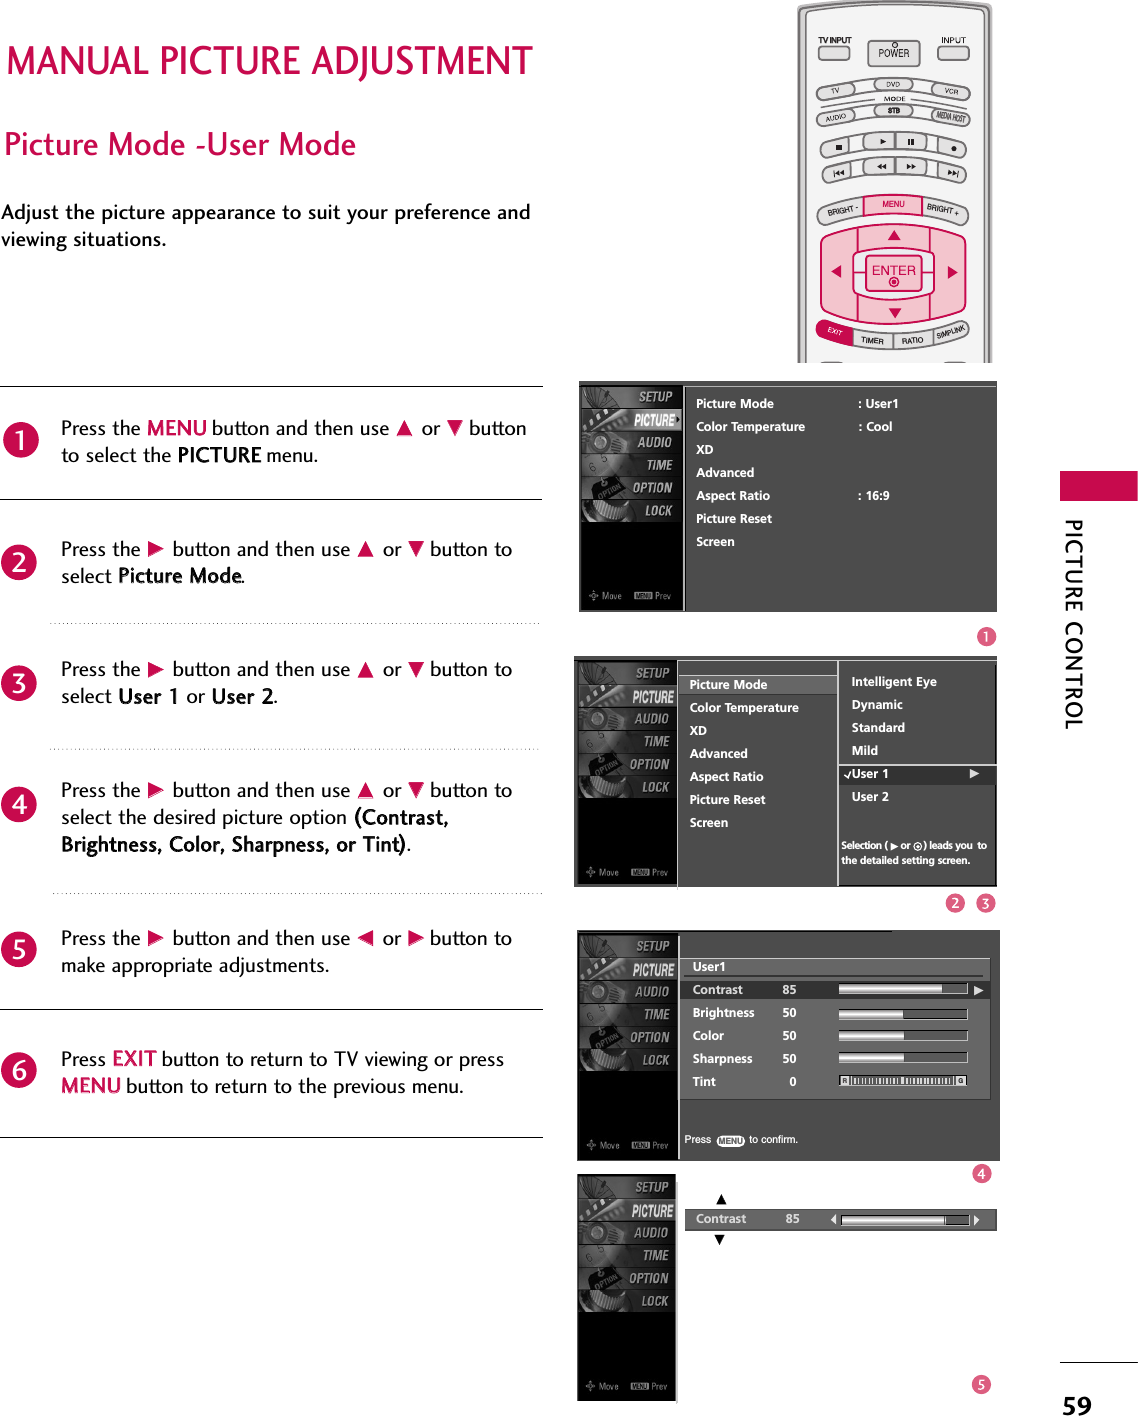


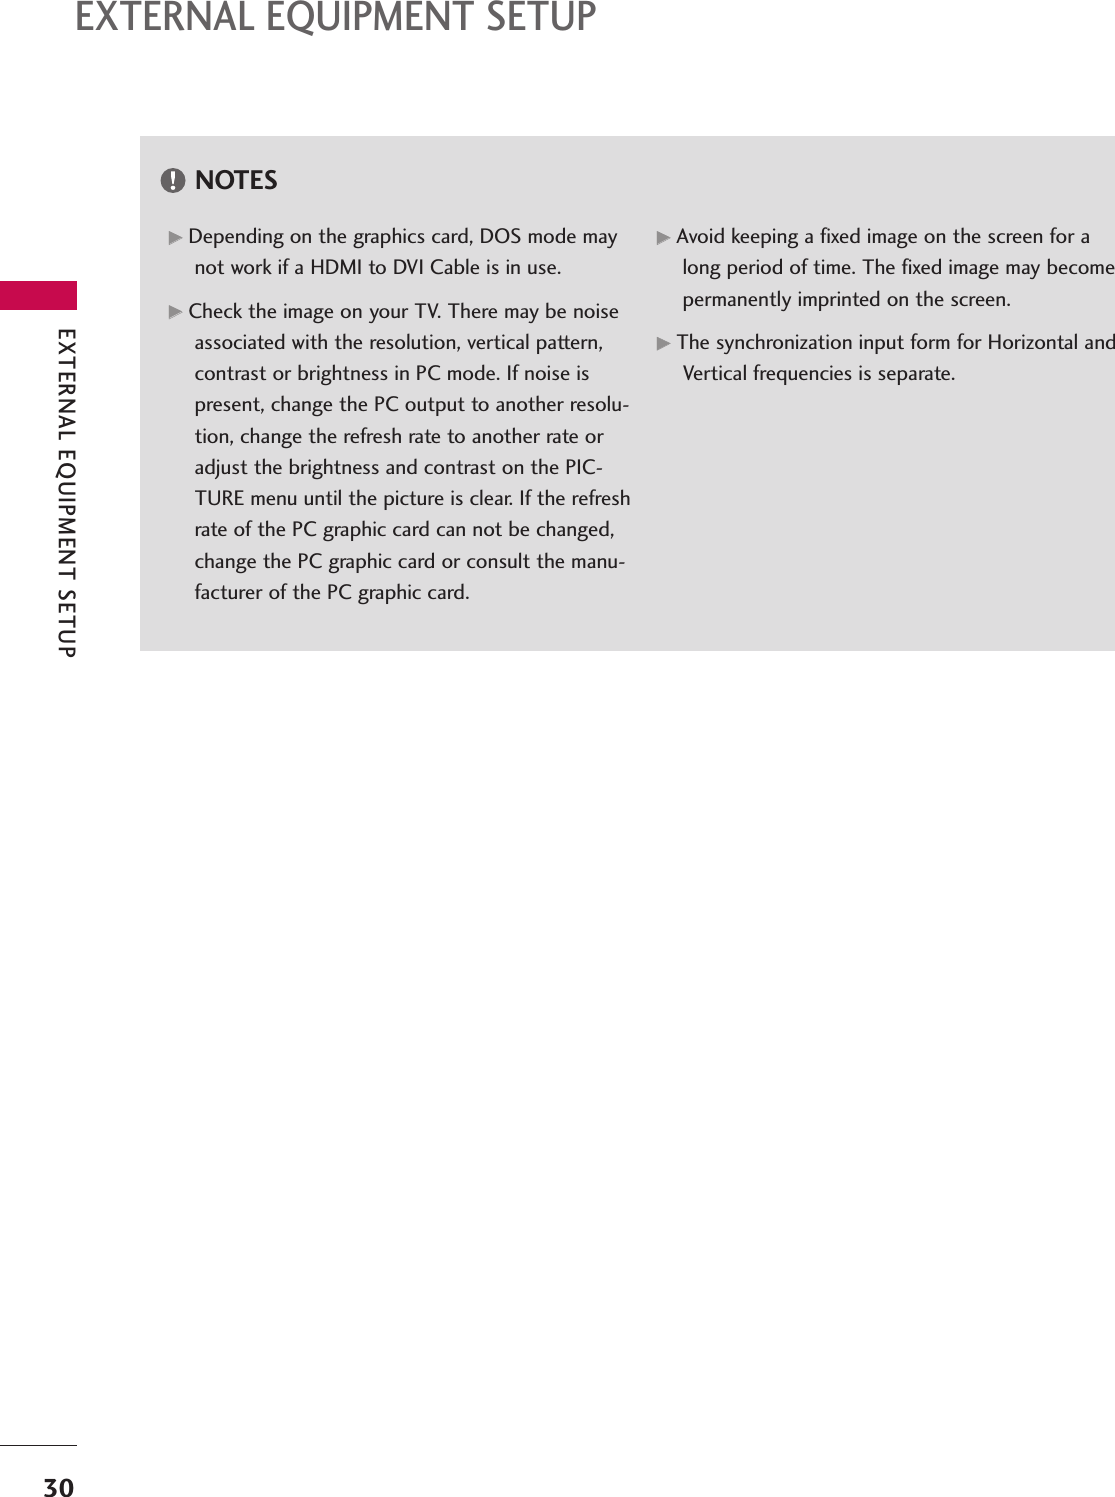
![APPENDIX106APPENDIXTransmission / Receiving ProtocolTTrraannssmmiissssiioonn[Command 1] : First command to control the set.(j, k, m or x)[Command 2] : Second command to control the set.[Set ID] : You can adjust the set ID to choose desired TV IDnumber in Setup menu. Adjustment range is 1~99.When selecting Set ID ‘0’, every connected the TVis controlled. Set ID is indicated as decimal (1~99)on menu and as Hexa decimal (0x0~ 0x63)ontransmission/receiving protocol.[DATA] : To transmit command data.Transmit ‘FF’ data to read status of command.[Cr] : Carriage ReturnASCII code ‘0x0D’[ ] : ASCII code ‘space (0x20)’*In this model, TV will not send the status during the standbymode.OOKK AAcckknnoowwlleeddggeemmeennttThe TV transmits ACK (acknowledgement) based on thisformat when receiving normal data. At this time, if the datais data read mode, it indicates present status data. If thedata is data write mode, it returns the data of the PC com-puter.*in this model, TV will not send the status during the standbymode.*data format[command 2] : use as command.[Set ID] : use the small character, if set ID is 10, it will sendthe ‘0’,’a’[Data] : use the small character, if data is 0xab, it will sendthe ‘a’, ‘b’[OK] : use the large character*in this model, TV will send the echo, CR, LF with ack mes-sage.When it send the power on ack message, it will be like below.Ex) ka 01 01(CR)(LF)a 01 OK01x(CR)(LF)[[CCoommmmaanndd11]][[CCoommmmaanndd22]][[ ]][[SSeett IIDD]][[ ]][[DDaattaa]][[CCrr]][[CCoommmmaanndd22]][[ ]][[SSeett IIDD]][[ ]][[OOKK]][[DDaattaa]][[xx]]EErrrroorr AAcckknnoowwlleeddggeemmeennttThe TV transmits ACK (acknowledgement) based on thisformat when receiving abnormal data from non-viable func-tions or communication errors.Data1: Illegal CodeData2: Not supported functionData3: Wait more time*in this model, TV will not send the status duringthe standby mode.*data format[command 2] : use as command.[Set ID] : use the small character, if set ID is 10, itwill send the ‘0’,’a’[Data] : use the small character, if data is 0xab, itwill send the ‘a’, ‘b’[NG] : use the large character*in this model, TV will send the echo, CR, LF withack message.When it send the power on ack message, it will belike below.Ex) ka 01 01(CR)(LF)a 01 NG01x(CR)(LF)[[CCoommmmaanndd22]][[ ]][[SSeett IIDD]][[ ]][[NNGG]][[DDaattaa]][[xx]]](https://usermanual.wiki/LG-Electronics-USA/60PY3DFUA.User-Manual-2-of-2/User-Guide-761445-Page-78.png)
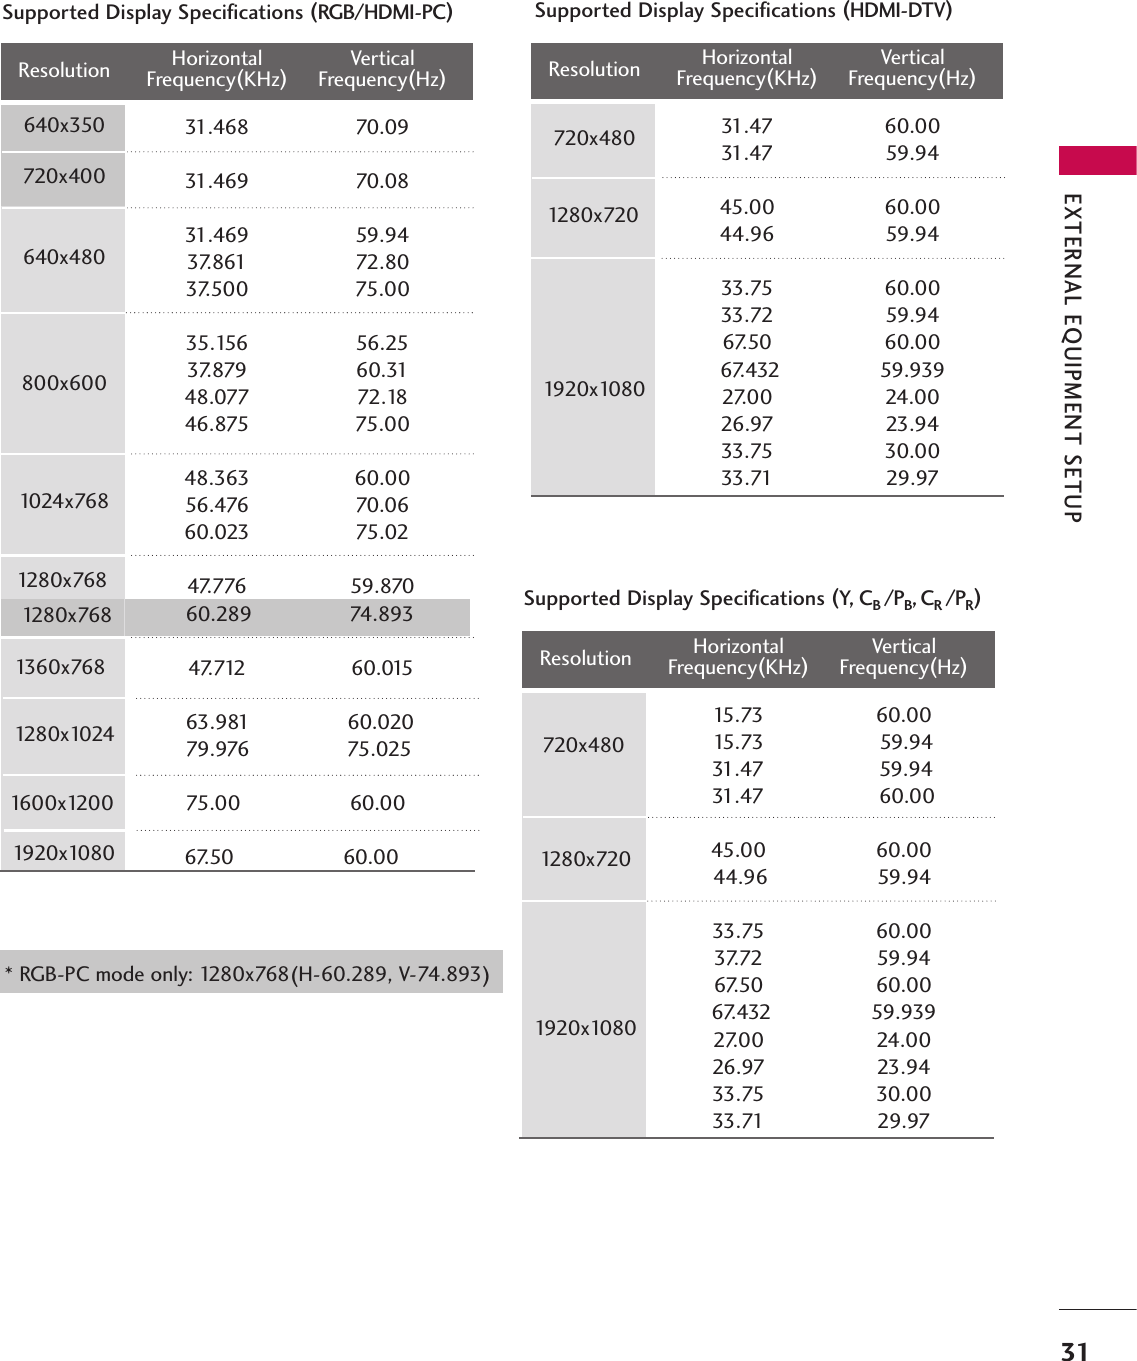
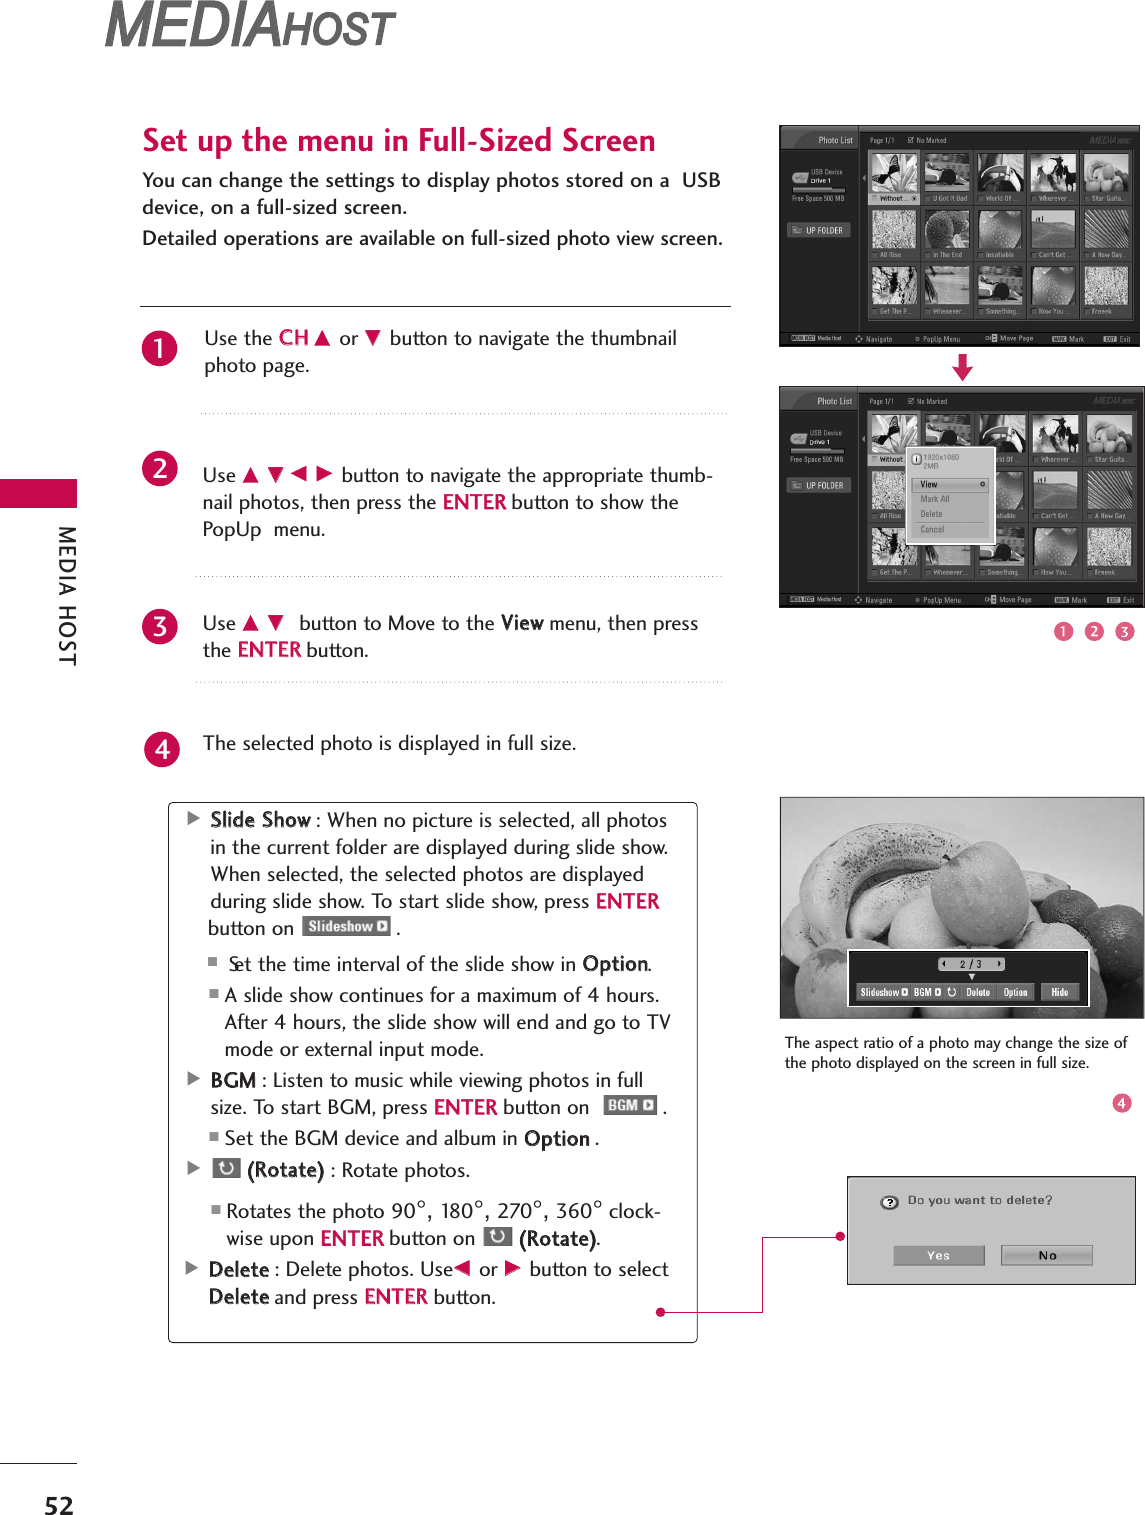
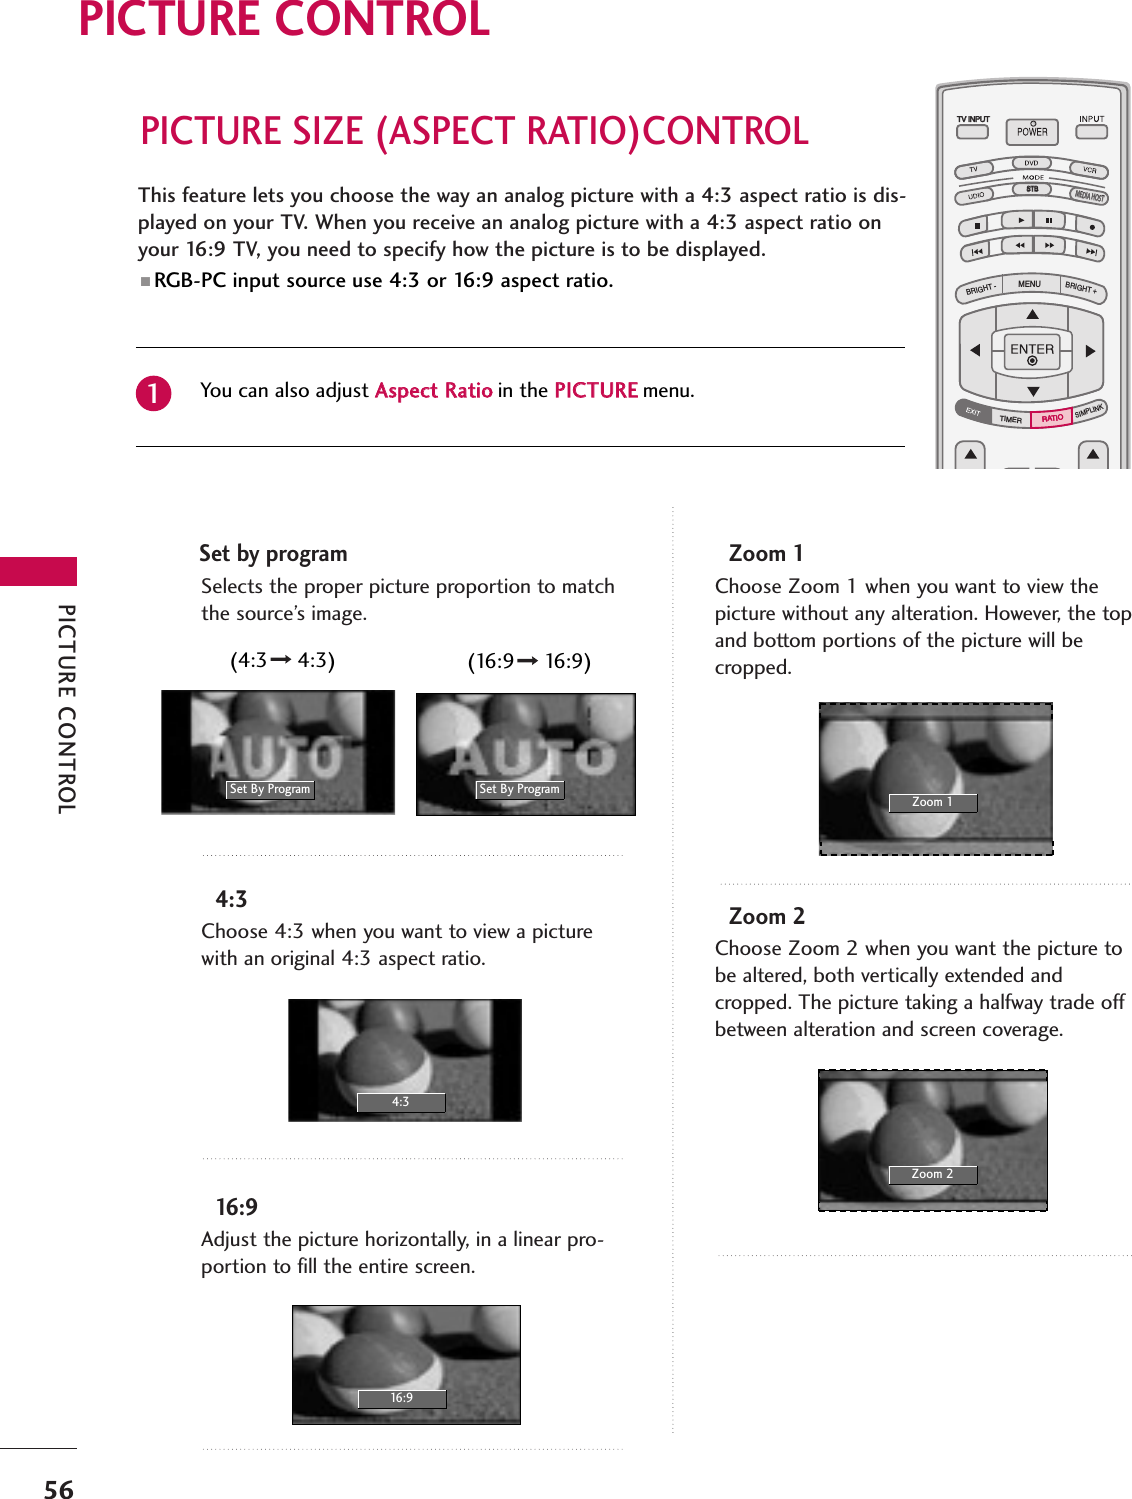
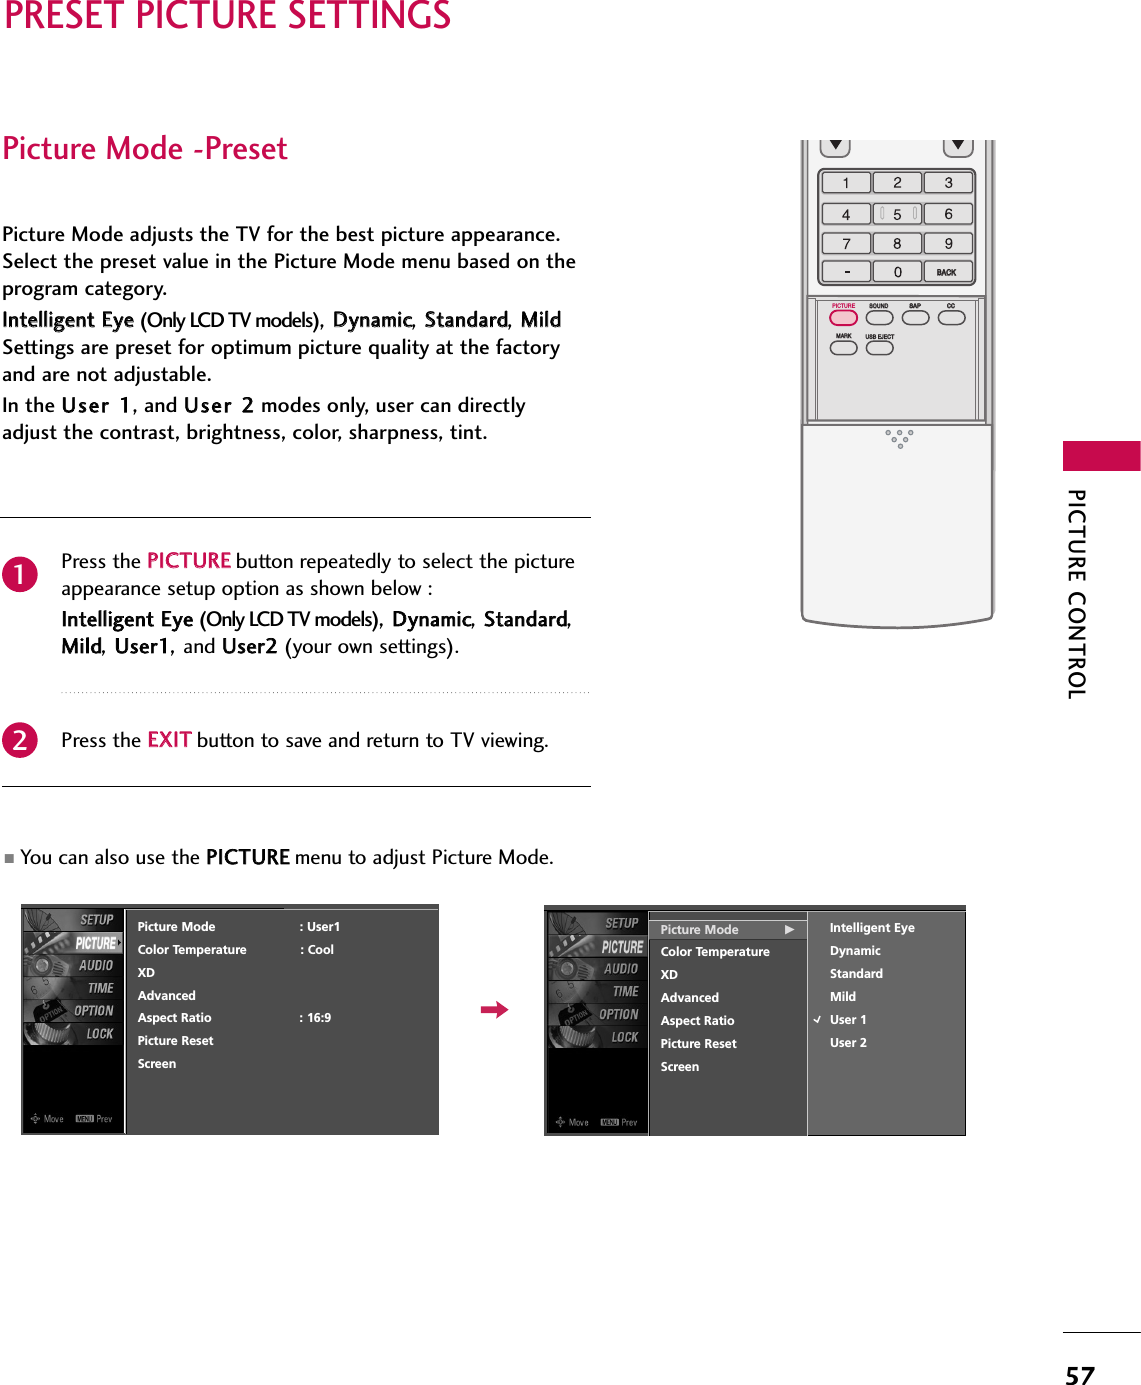
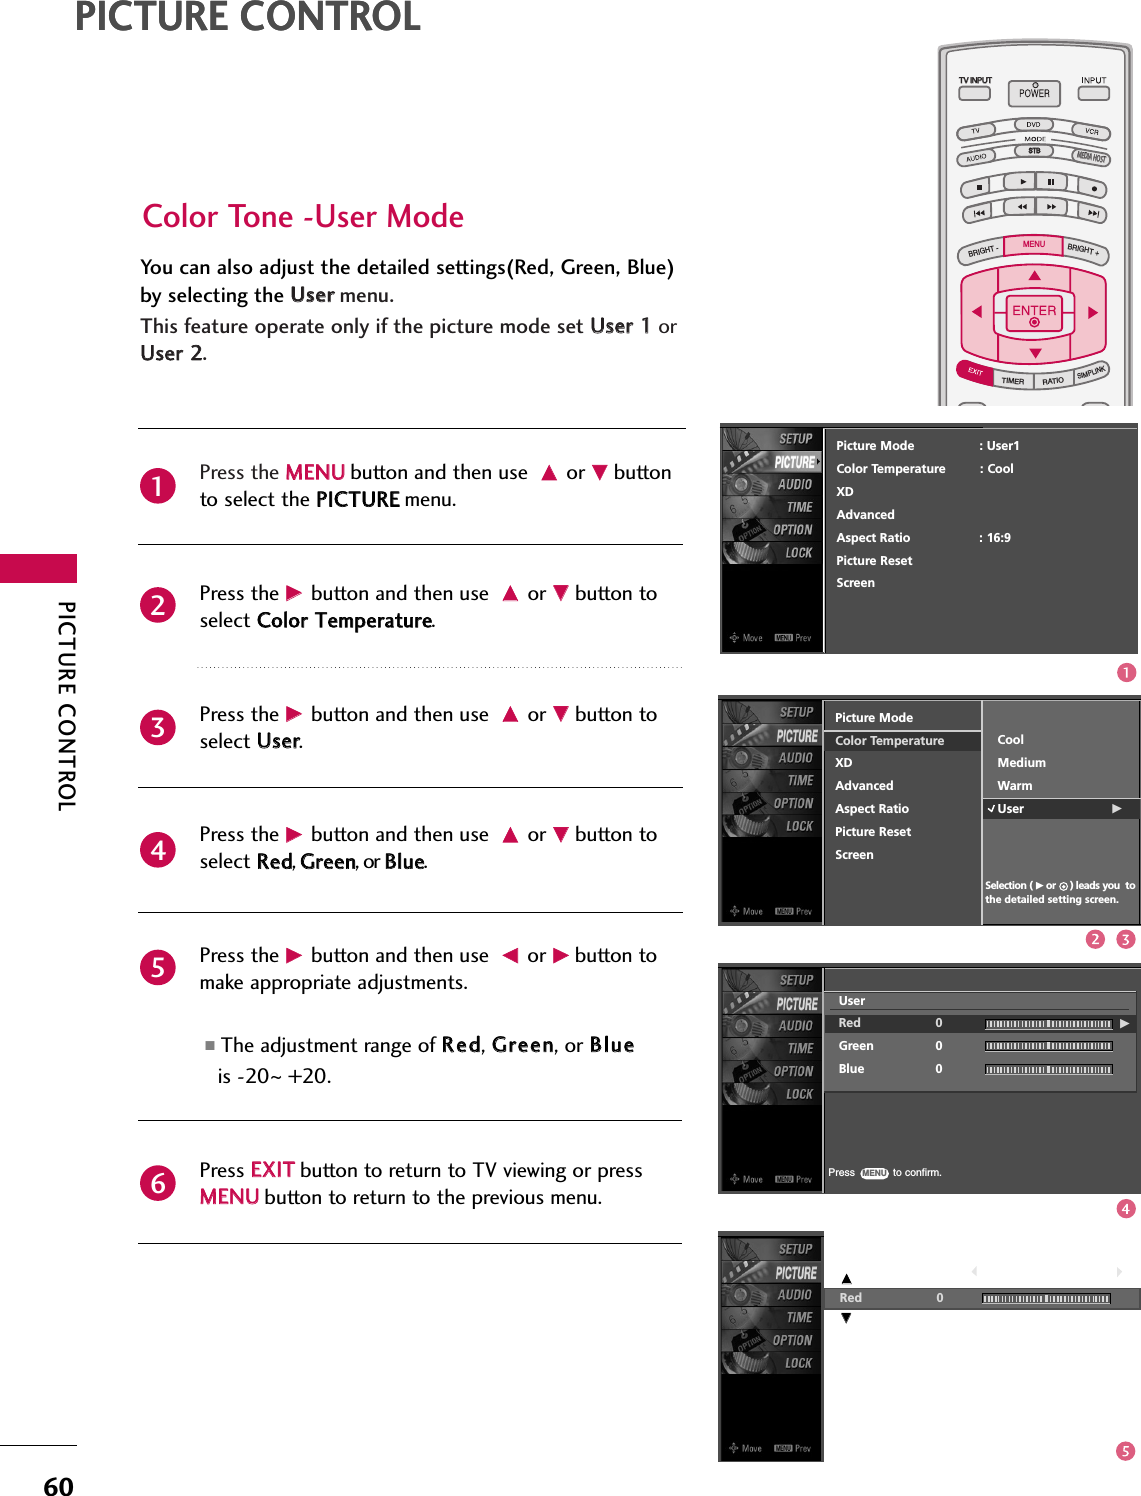
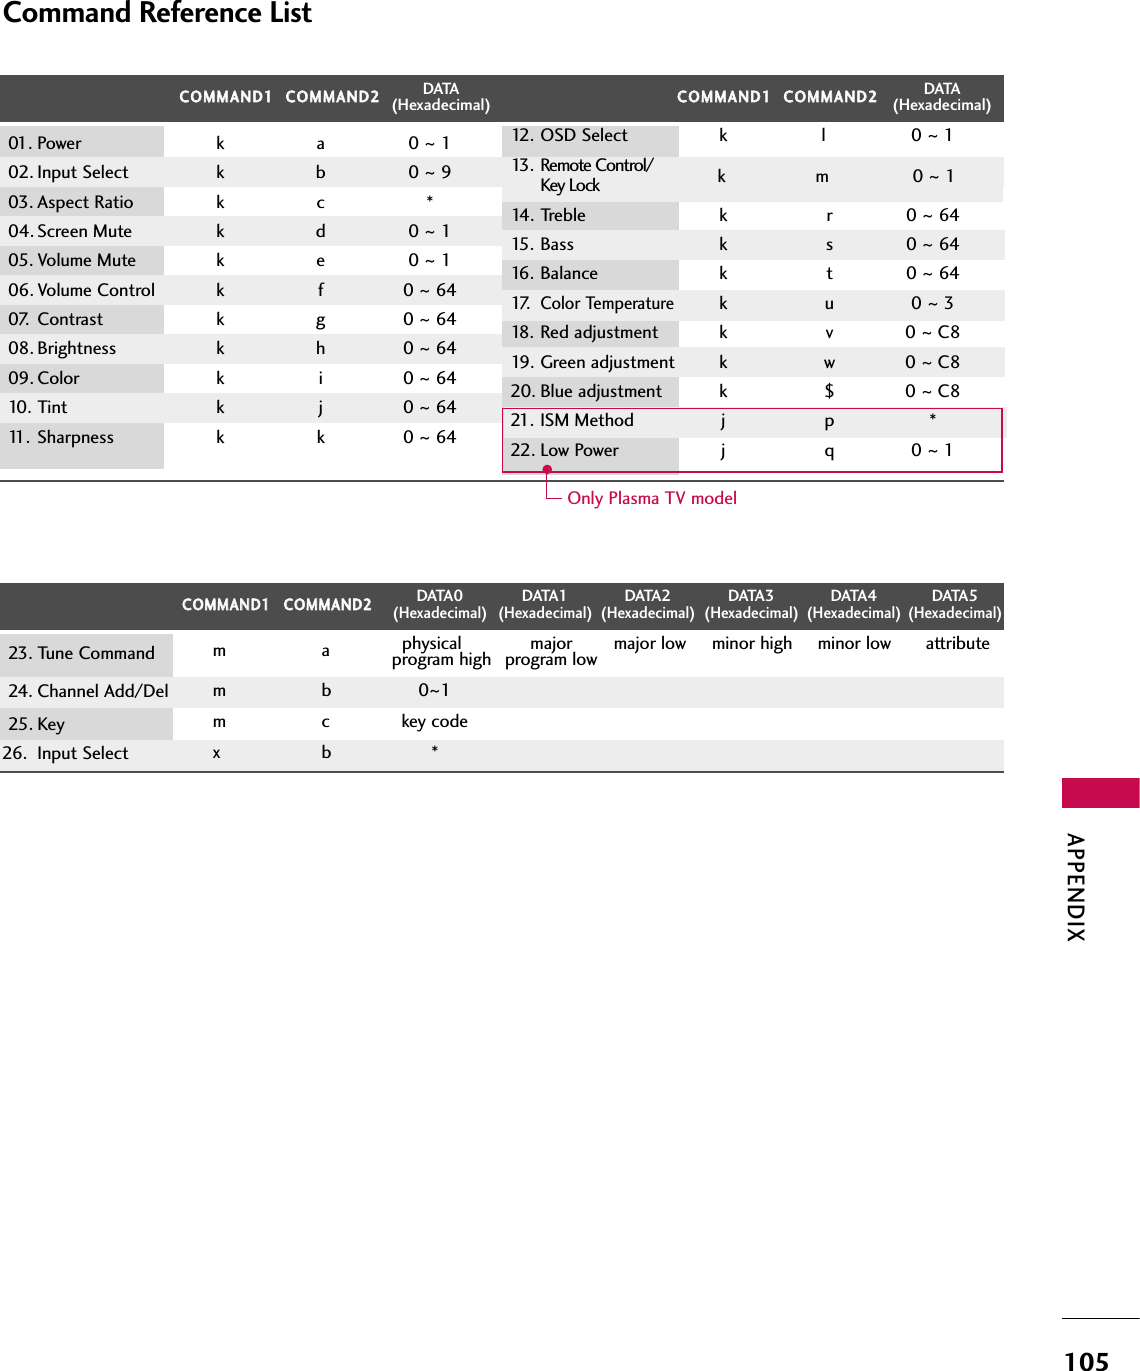
![APPENDIX1070011..PPoowweerr ((CCoommmmaanndd22::aa))To control Power On/Off of the TV.Transmission [k][a][ ][Set ID][ ][Data][Cr]Data 0 : Power Off Data 1 : Power OnAcknowledgement [a][ ][Set ID][ ][OK/NG][Data][x]* In a like manner, if other functions transmit ‘FF’ databased on this format, Acknowledgement data feedbackpresents status about each function.* Note: In this model, TV will send the Acknowledgeafter power on processing completion.There might be a time delay between command andacknowledge.0022.. IInnppuutt SSeelleecctt ((CCoommmmaanndd22::bb)) ((MMaaiinn PPiiccttuurree IInnppuutt))To select input source for the TV.Transmission [k][b][ ][Set ID][ ][Data][Cr]Data 0: DTV Data 1: AnalogData 2: AV1 Data 3: AV2Data 4: Component 1 Data 5: Component 2Data 6: RGB-PC Data 7: HDMI1Data 8: HDMI2 Data 9: HDMI3Acknowledgement [b][ ][Set ID][ ][OK/NG][Data][x]0033.. AAssppeecctt RRaattiioo ((CCoommmmaanndd22::cc)) ((MMaaiinn ppiiccttuurree ffoorrmmaatt))To adjust the screen format.You can also adjust the screen format using the RATIObutton on remote control or in the Picture menu.Transmission [k][c][ ][Set ID][ ][Data][Cr]Data 1: 4:3 4: Zoom 12: 16:9 5: Zoom 23: Horizon 6: Set by programReservedAcknowledgement [c][ ][Set ID][ ][OK/NG][Data][x]0044..SSccrreeeenn MMuuttee ((CCoommmmaanndd22::dd))To select screen mute on/off.Transmission [k][d][ ][Set ID][ ][Data][Cr]Data 0 : Screen mute off (Picture on)Data 1 : Screen mute on (Picture off)Acknowledgement [d][ ][Set ID][ ][OK/NG][Data][x]0055.. VVoolluummee MMuuttee ((CCoommmmaanndd22::ee))To control volume mute on/off.You can also adjust mute using the MUTE button onremote control.Transmission [k][e][ ][Set ID][ ][Data][Cr]Data 0 : Volume mute on (Volume off)Data 1 : Volume mute off (Volume on)Acknowledgement [e][ ][Set ID][ ][OK/NG][Data][x]0066.. VVoolluummee CCoonnttrrooll ((CCoommmmaanndd22::ff))To adjust volume.You can also adjust volume with the volume buttons onremote control.Transmission [k][f][ ][Set ID][ ][Data][Cr]Data Min : 0 ~Max : 64Refer to ‘Real data mapping 1’ as shown below.Acknowledgement [f][ ][Set ID][ ][OK/NG][Data][x]0077.. CCoonnttrraasstt ((CCoommmmaanndd22::gg))To adjust screen contrast. You can also adjust contrast in the Picture menu.Transmission [k][g][ ][Set ID][ ][Data][Cr]Data Min : 0 ~Max : 64*Refer to ‘Real data mapping 1’ as shown below.Acknowledgement [g][ ][Set ID][ ][OK/NG][Data][x]0088..BBrriigghhttnneessss ((CCoommmmaanndd22::hh))To adjust screen brightness.You can also adjust brightness in the Picture menu.Transmission [k][h][ ][Set ID][ ][Data][Cr]Data Min : 0 ~Max : 64(*transmit by Hexadecimal code)*Refer to ‘Real data mapping 1’ as shown below.Acknowledgement [h][ ][Set ID][ ][OK/NG][Data][x]*Real data mapping 10 : Step 0A : Step 10 (SET ID 10)F : Step 15 (SET ID 15)10 : Step 16 (SET ID 16)63 : Step 99 (SET ID 99)64 : Step 100](https://usermanual.wiki/LG-Electronics-USA/60PY3DFUA.User-Manual-2-of-2/User-Guide-761445-Page-79.png)
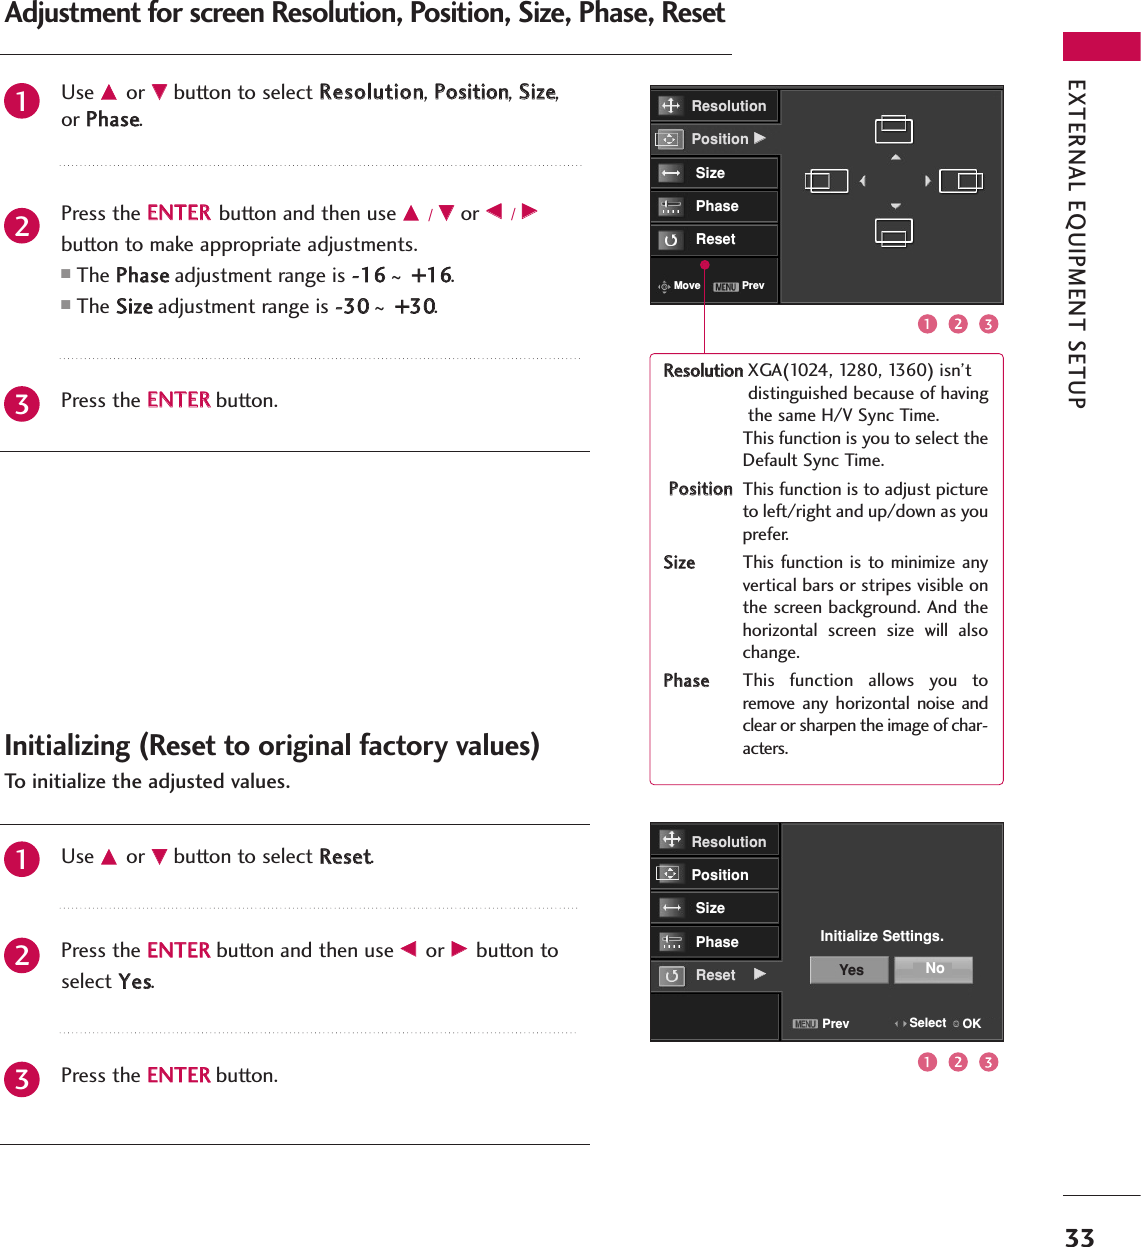
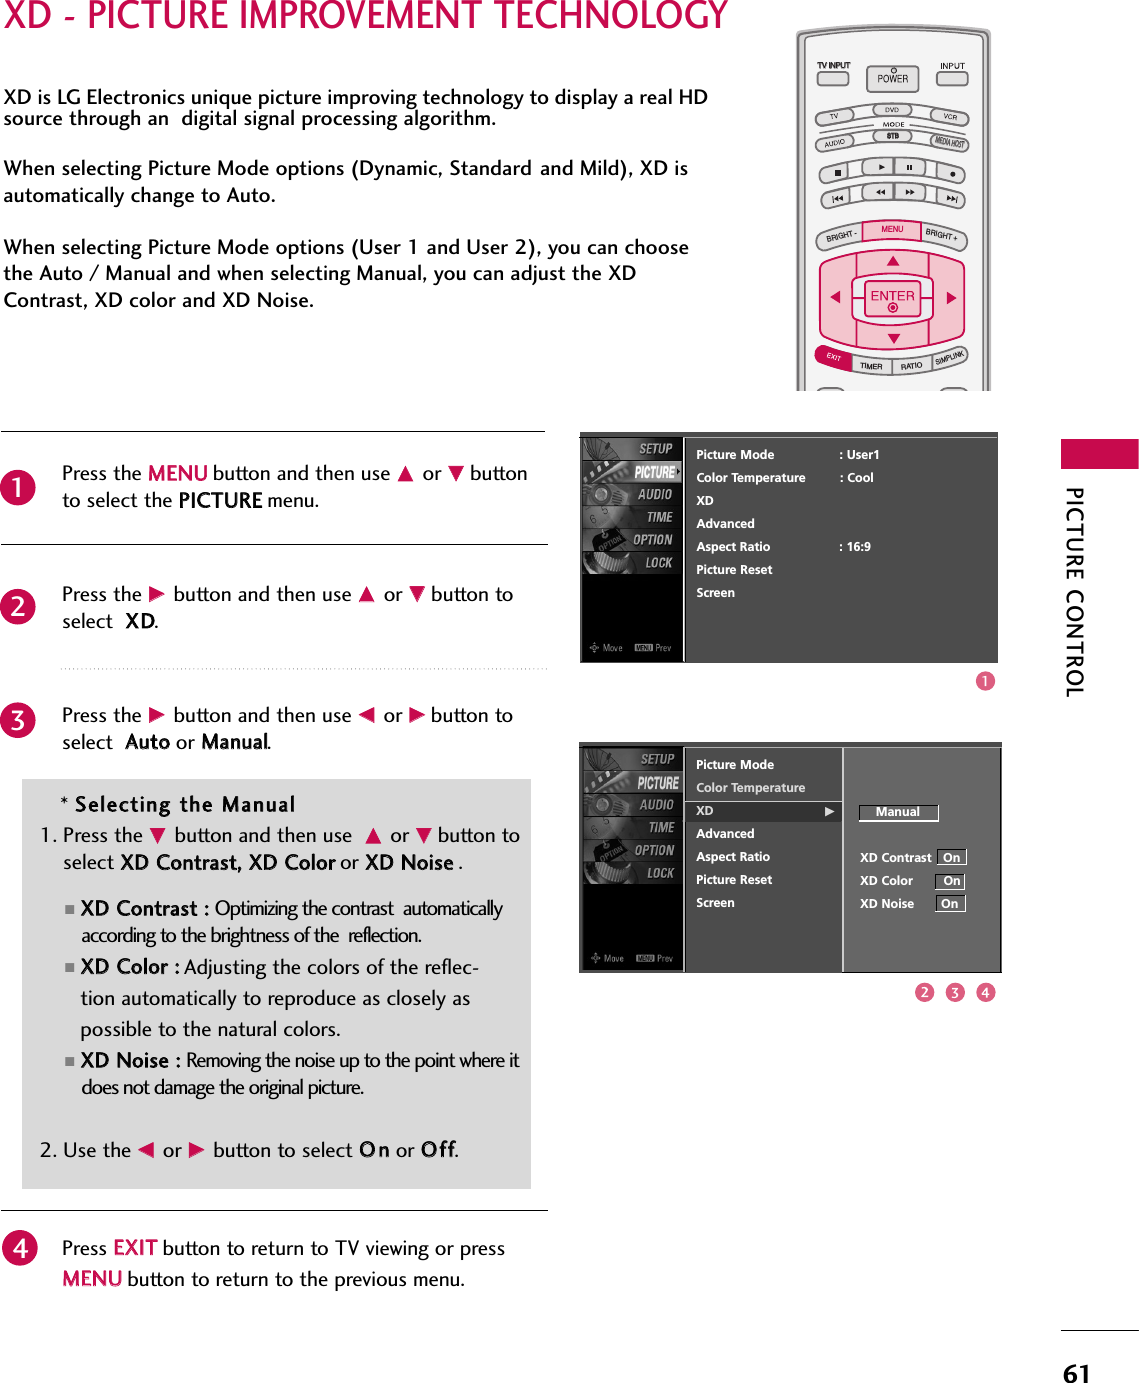
![APPENDIX108APPENDIX0099.. CCoolloorr ((CCoommmmaanndd22::ii))To adjust the screen color.You can also adjust color in the Picture menu.Transmission [k][i][ ][Set ID][ ][Data][Cr]Data Min : 0 ~Max : 64*Refer to ‘Real data mapping 1’. See page 107.Acknowledgement [i][ ][Set ID][ ][OK/NG][Data][x]1100.. TTiinntt ((CCoommmmaanndd22::jj))To adjust the screen tint.You can also adjust tint in the Picture menu.Transmission [k][j][ ][Set ID][ ][Data][Cr]Data Red : 0 ~Green : 64*Refer to ‘Real data mapping 1’. See page 107.Acknowledgement [ j ][ ][Set ID][ ][OK/NG][Data][x]1111.. SShhaarrppnneessss ((CCoommmmaanndd22::kk))To adjust the screen sharpness.You can also adjust sharpness in the Picture menu.Transmission [k][k][ ][Set ID][ ][Data][Cr]Data Min: 0 ~Max: 64*Refer to ‘Real data mapping 1’. See page 107.Acknowledgement [k][ ][Set ID][ ][OK/NG][Data][x]1122.. OOSSDD SSeelleecctt ((CCoommmmaanndd22::ll))To select OSD (On Screen Display) on/off.Transmission [k][l][ ][Set ID][ ][Data][Cr]Data 0: OSD off Data 1: OSD onAcknowledgement [l][ ][Set ID][ ][OK/NG][Data][x]1133.. RReemmoottee CCoonnttrrooll LLoocckk MMooddee ((CCoommmmaanndd22::mm))To lock the remote control and the front panel controlson the set.Transmission [k][m][ ][Set ID][ ][Data][Cr]Data 0: Lock off Data 1: Lock onAcknowledgement [m][ ][Set ID][ ][OK/NG][Data][x]If you’re not using the remote control and front panelcontrols on the TV, use this mode. When main power ison/off, remote control lock is released.1144TTrreebbllee ((CCoommmmaanndd22::rr))To adjust treble. You can also adjust treble in the Audio menu.Transmission [k][r][ ][Set ID][ ][Data][Cr]Data Min: 0 ~Max: 64(*transmit by Hexadecimal code)*Refer to ‘Real data mapping 1’. See page 107.Acknowledgement [r][ ][Set ID][ ][OK/NG][Data][x]1155..BBaassss ((CCoommmmaanndd22::ss))To adjust bass.You can also adjust bass in the Audio menu.Transmission [k][s][ ][Set ID][ ][Data][Cr]Data Min: 0 ~Max: 64(*transmit by Hexadecimal code)*Refer to ‘Real data mapping 1’. See page 107.Acknowledgement [s][ ][Set ID][ ][OK/NG][Data][x]1166.. BBaallaannccee ((CCoommmmaanndd22::tt))To adjust balance.You can also adjust balance in the Audio menu.Transmission [k][t][ ][Set ID][ ][Data][Cr]Data Min: 0 ~Max: 64(*transmit by Hexadecimal code)*Refer to ‘Real data mapping 1’. See page 107.Acknowledgement [t][ ][Set ID][ ][OK/NG][Data][x]1177.. CCoolloorr TTeemmppeerraattuurree ((CCoommmmaanndd22::uu))To adjust color temperature.You can also adjust color temperature in the Picturemenu.Transmission [k][u][ ][Set ID][ ][Data][Cr]Data 0: Medium 1: Cool 2: Warm 3: UserAcknowledgement [u][ ][Set ID][ ][OK/NG][Data][x]1188.. RReedd aaddjjuussttmmeenntt((CCoommmmaanndd::vv))To adjust red in color temperature Transmission [k][v][ ][Set ID][][Data][Cr]Data Min:0 ~ Max:C8*Refer to "Real data mapping 2". See page 109.Acknowledgement [v][ ][Set ID][ ][OK/NG][Data][x]1199.. GGrreeeenn aaddjjuussttmmeenntt((CCoommmmaanndd::ww))To adjust green in color temperature.Transmission [k][w][ ][Set ID][][Data][Cr]Max:C8*Refer to "Real data mapping 2". See page 109.Acknowledgement [w][ ][Set ID][ ][OK/NG][Data][x]](https://usermanual.wiki/LG-Electronics-USA/60PY3DFUA.User-Manual-2-of-2/User-Guide-761445-Page-80.png)
![APPENDIX1092200.. BBlluuee aaddjjuussttmmeenntt((CCoommmmaanndd::$$))To adjust blue in color temperature.Transmission [k][$][ ][Set ID][][Data][Cr]Data Min:0 ~Max:C8*Refer to "Real data mapping 2". See page 108.Acknowledgement [$][ ][Set ID][][OK/NG][Data][x]]*Real data mapping 20 : -205 : -19A : -185F: -164: 069: +1C3 : +19C8 : +202211.. IISSMM MMeetthhoodd//OOrrbbiitteerr ((CCoommmmaanndd22::pp))(Only Plasma TV model)To avoid having a fixed image remain on screen.Transmission [ j ][p][ ][Set ID][ ][Data][Cr]Data 1: Inversion 2: Orbiter4: White Wash 8: NormalAcknowledgement [p][ ][Set ID][ ][OK/NG][Data][x]2222.. LLooww PPoowweerr ((CCoommmmaanndd22::qq))(Only Plasma TV model)To control the low power function on/off.Transmission [ j ][q][ ][Set ID][ ][Data][Cr]Data 0: low power off1: low power onAcknowledgement [q][ ][Set ID][ ][OK/NG][Data][x]2233.. TTuunnee CCoommmmaanndd ((CCoommmmaanndd:: mm aa))To tune channel to following physical/major/minor number.Transmission [m][a][ ][Set ID][ ][Data0][ ][Data1] [ ][Data2][ ][Data3][ ][Data4][ ][Data5][Cr]Data 0: Physical Channel Number(Transmit byHexadecimal code) NTSC air:02~45NTSC cable: 01, 0E~7DATSC air:01~45ATSC cable:01~87Data1,Data2: Major Channel Number (two part) / Channel Number (One part) Data1: High byteData2: Low byteTwo part channel number: Major number-Minor numberOne part channel number: If the channel band is ATSC digital cable, it canbe used. In case of using one part channel num-ber, minor channel does not need. Data3, Data 4: Minor Channel Number Data3: High byte , Data4: Low byte](https://usermanual.wiki/LG-Electronics-USA/60PY3DFUA.User-Manual-2-of-2/User-Guide-761445-Page-81.png)
![APPENDIX110APPENDIXData5:All data are transmitted by Hexadecimal code* Two/One part Channel: 6th bitThis bit is used in a cable-ready system.* Using physical channel: 5th bitIf the channel band is NTSC air or NTSC cable, channeltuning can be done by only physical channel. In thiscase, using physical channel bit must be low(0).But if the channel band is ATSC air or ATSC cable, thereare two cases that physical channel enable or disable.If the physical channel sending is meaningful, you shouldset this bit low(0). If the physical channel sending ismeaningless, you should set this bit high(1).Example)1. Analog channel: NTSC cable, channel number(35),main picture Command: ma 00 23 xx xx xx xx 01attribute(0x01): main picture, two part(it’s notmandatory), using physical channel, NTSC cable ‘xx’data: don’t care major and minor channel number incase analog channel tuning. 2. Digital channel: ATSC air, channel number(don’t knowphysical channel, major(30), minor(3)), sub pictureCommand: ma 00 xx 00 1E 00 03 A2attribute(0xA2): sub picture, two part, not usingphysical channel, ATSC air ‘xx’ data: don’t care analogchannel number in case digital channel tuning.3. Digital channel: ATSC air, channel number(physi-cal(20),major(20), minor(3)), sub picture Command:ma 00 14 00 14 00 03 82 attribute(0x82): sub picture, two part, using physicalchannel, ATSC air.Acknowledgement[a][ ][Set ID][ ][OK][Data0][Data1][Data2][Data3][Data4][x][a][ ][Set ID][ ][NG][Data0][x]2244.. CChhaannnneell AAdddd//DDeell ((CCoommmmaanndd:: mm bb))To add and delete the channelsTransmission [m][b][ ][Set ID][ ][Data][Cr]Data 0: Channel Delete Data 1: Channel AddAcknowledgement [b][ ][Set ID][ ][OK/NG][Data][x]2255.. KKeeyy ((CCoommmmaanndd:: mm cc))To send IR remote key code.Transmission [m][c][ ][Set ID][ ][Data][Cr]sData Key code: Refer to page 102.Acknowledgement [c][ ][Set ID][ ][OK/NG][Data][x]2266.. IInnppuutt sseelleecctt((CCoommmmaanndd:: xx bb)) ((MMaaiinn PPiiccttuurree IInnppuutt))To select input source for TV. Transmission [x][b][][Set ID][][Data][Cr]Data 00 : DTV (Antenna) Data 01 : DTV (Cable)Data 10 : Analog (Antenna) Data 11 : Analog (Cable)Data 20 : AV1 Data 21 : AV2Data 40 : Component 1 Data 41 : Component 2Data 50 : RGB-PC Data 60 : HDMI1Data 90 : HDMI2 Data 91 : HDMI3Acknowledgement [b][ ][Set ID][ ][OK/NG][Data][x]StepNTSC AirNTSC CableATSC AirATSC Cable_std ATSC Cable_hrcATSC Cable_ircATSC cable_autoReserved...Reserved100110011x1200001111x1300000000x14xxxxxxxxxxReserved501UseNo UseUsing PhysicalChannel601TwoOneTwo/One Part Channel701MainSubMain/Sub Picture 001010101x1](https://usermanual.wiki/LG-Electronics-USA/60PY3DFUA.User-Manual-2-of-2/User-Guide-761445-Page-82.png)