LG Electronics USA 65LA9700UA LED TV User Manual EMISSION TEST REPORT
LG Electronics USA LED TV EMISSION TEST REPORT
UserManual.wiki
>
LG Electronics USA
>
65LA9700UA User Manual
User Manual
Navigation menu
Upload a User Manual
Namespaces
Wiki Guide
HTML
PDF
Info
Views
User Manual
Discussion / Help
Navigation


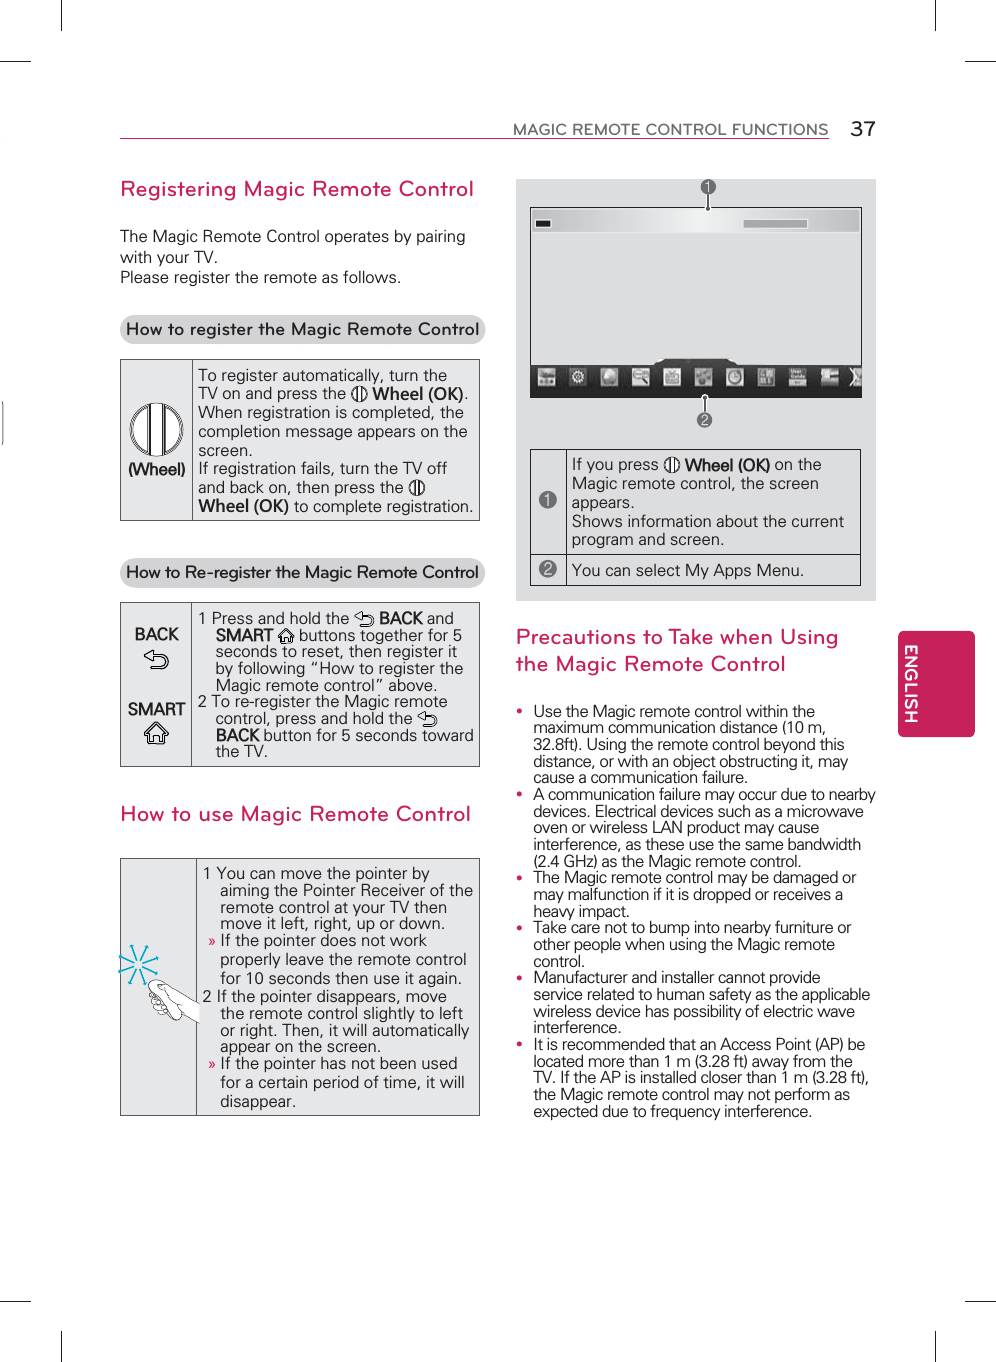
![ENGLISH39USING THE USER GUIDEUSING THE USER GUIDEUser Guide allows you to easily access detailed TV information.1 Press SMART button to access the Smart Home menus.2 Select User Guide and press the Wheel (OK) button.User GuideÖOPTION > To set languageSMART Ö Settings ¨ OPTION ¨ LanguageSelects Menu Language and Audio Language displayed on the screen.Menu LanguageAudio LanguageSelects a screen menu language.[In Digital Mode Only]Selects the desired language when watching digitalbroadcasting containing several audio languagesVoiceRecognitionLanguageSelect the language to make voice searchܩ Only the voice search adopted model support thissetting.Try NowClose121Shows the description of the selected menu. You can use / to move between pages.2Moves to the selected menu directly from the User Guide.To use input deviceTo set time optionsTo set languageTo set captionTo set other optionsTo set TV lock optionsUser GuideIndexOnline User GuideOPTIONCHANNEL SettingPICTURE, SOUND SettingLG SMART FunctionAdvanced FunctionInformation12 3 4 51Shows the video you were watching.2Guide categories.3List of topics in the current category.You can use / button to move between pages.4An index of key words present in the User Guide.5Provides the detailed information on the functions of LG Smart TV when the Internet is connected.(It may not be available depending on the country/language.)To set Magic remote control(Depending on country)IndexOnline User Guide](https://usermanual.wiki/LG-Electronics-USA/65LA9700UA/User-Guide-2002832-Page-40.png)

![८ ,QGRRUXVHRQO\)&&&DXWLRQIRULQGRRUXVHRQO\XVHRXWGRRUVRULQRWKHUPRGHVQRWFRYHUHGE\WKLVPDQXDOPD\YLRODWHWKH)&&UHJXODWLRQDQGYLRODWHWKHXVHUDXWKRULW\WRXVHWKHSURGXFW6SHFLDOO\ZLWKLQWKH*+]EDQG81,,GHYLFHLVUHVWULFWHGWRLQGRRURSHUDWLRQVWRUHGXFHDQ\SRWHQWLDOIRUKDUPIXOLQWHUIHUHQFHWRFRFKDQQHO066RSHUDWLRQV८ )&&5)5DGLDWLRQ([SRVXUH6WDWHPHQW7KLVHTXLSPHQWFRPSOLHVZLWK)&&UDGLDWLRQH[SRVXUHOLPLWVVHWIRUWKIRUDQXQFRQWUROOHGHQYLURQPHQW7KLVWUDQVPLWWHUPXVWQRWEHFRORFDWHGRURSHUDWLQJLQFRQMXQFWLRQZLWKDQ\RWKHUDQWHQQDRUWUDQVPLWWHU](https://usermanual.wiki/LG-Electronics-USA/65LA9700UA/User-Guide-2002832-Page-50.png)