LG Electronics USA 71SA1DUA 71" LCoS PROJECTION TV User Manual User s Manual H
LG Electronics USA 71" LCoS PROJECTION TV User s Manual H
USERS MANUAL

EUT Type: 71” LCoS Projection TV
FCC ID: BEJ71SA1DUA
Test Report No.: GETEC-E3-05-059
FCC Class B Certification
APPENDIX H
: USER’S MANUAL

LCoS Projection TV
OWNER’S MANUAL
MODELS: 62SA1D/71SA1D
62SA1D-UA/71SA1D-UA
LG Electronics U.S.A., Inc.
TM
R
TruSurround XT
Please read this manual carefully and completely before
operating your TV.
Retain this manual for future reference.
Record model number and serial number of the TV in the
spaces provided below.
See the label attached on the back cover and relate this
information to your dealer if you require service.
Model Number :
Serial Number :
LCoS Projection TV
WARNING/CAUTION:
TO REDUCE THE RISK OF ELECTRIC SHOCK DO NOT REMOVE COVER (OR BACK). NO USER
SERVICEABLE PARTS INSIDE. REFER TO QUALIFIED SERVICE PERSONNEL.
The lightning flash with arrowhead symbol, within an equilateral triangle, is intended to alert the user to
the presence of uninsulated “dangerous voltage” within the product’s enclosure that may be of suffi-
cient magnitude to constitute a risk of electric shock to persons.
The exclamation point within an equilateral triangle is intended to alert the user to the presence of
important operating and maintenance (servicing) instructions in the literature accompanying the appli-
ance.
WARNING/CAUTION:
TO PREVENT FIRE OR SHOCK HAZARDS, DO NOT EXPOSE THIS PRODUCT TO RAIN OR MOISTURE.
POWER CORD POLARIZATION:
CAUTION: TO PREVENT ELECTRIC SHOCK, MATCH WIDE BLADE OF PLUG TO WIDE SLOT, FULLY
INSERT.
ATTENTION: POUR ÉVITER LES CHOCS ÉLECTRIQUES, INTRODUIRE LA LAME LA PLUS LARGE
DE LA FICHE DANS LA BORNE CORRESPONDANTE DE LA PRISE ET POUSSER JUSQU’AU FOND.
NOTE TO CABLE/TV INSTALLER:
This reminder is provided to call the CATV system installer’s attention to Article 820-40 of the National
Electric Code (U.S.A.). The code provides guidelines for proper grounding and, in particular, specifies that
the cable ground shall be connected to the grounding system of the building, as close to the point of the
cable entry as practical.
REGULATORY INFORMATION:
This equipment has been tested and found to comply with the limits for a Class B digital device, pursuant to Part
15 of the FCC Rules. These limits are designed to provide reasonable protection against harmful interference in
a residential installation. This equipment generates, uses and can radiate radio frequency energy and, if not
installed and used in accordance with the instructions, may cause harmful interference to radio communications.
However, there is no guarantee that interference will not occur in a particular installation. If this equipment does
cause harmful interference to radio or television reception, which can be determined by turning the equipment off
and on, the user is encouraged to try to correct the interference by one or more of the following measures:
- Reorient or relocate the receiving antenna.
- Increase the separation between the equipment and receiver.
- Connect the equipment into an outlet on a circuit different from that to which the receiver is connected.
- Consult the dealer or an experienced radio/TV technician for help.
Any changes or modifications not expressly approved by the party responsible for compliance could void the
user’s authority to operate the equipment.
CAUTION:
Do not attempt to modify this product in any way without written authorization from LG Electronics. Unauthorized mod-
ification could void the user’s authority to operate this product.
COMPLIANCE:
The responsible party for this product’s compliance is:
LG Electronics U.S.A., Inc
1000 Sylvan Avenue, Englewood Cliffs, NJ 07632
1-800-243-0000
http://www.lgusa.com
WARNING
RISK OF ELECTRIC SHOCK
DO NOT OPEN
/CAUTION
W
Warning/Caution
arning/Caution
Warning/Caution

Owner’s Manual
TV Guide On Screen Notices for U.S.A.
TV Guide On Screen Notices for U.S.A.
Digital Cable Compatibility
Digital Cable Compatibility
This digital television is capable of receiving basic analog, digital basic and digital premium cable television programming by
direct connection to a cable system providing such programming. A security card provided by your cable operator is required
to view encrypted digital programming. Certain advanced interactive digital cable services such as video-on-demand, cable
operator enhanced program (For example, electronic program guide provided by the cable operator), and data enhanced
television service may require the use of a set top box. For more information contact your local cable operator.
In the United States, TV GUIDE and other related marks are registered marks of Gemstar-TV Guide International, Inc. and/or
one of its affiliates. In Canada, TV GUIDE is a registered mark of Transcontinental Inc., and is used under license by
Gemstar-TV Guide International, Inc.
The TV Guide On Screen system is protected by one or more of the following issued United States patents 6,498,895,
6,418,556, 6,331,877; 6,239,794; 6,154,203; 5,940,073; 4,908,713; 4,751,578; 4,706,121.
The TV Guide On Screen system is manufactured under license from Gemstar-TV Guide International, Inc. and/or one of its
affiliates.
Use of the CableCARDTM TradeMark.
“CableCARDTM is a trademark of Cable Television Laboratories, Inc.”
Trademark Notice
Aux Etats-Unis TV GUIDE et d’autres marques relatives sont des marques déposées de Gemstar-TV Guide International,
Inc. et/ou d’une de ses sociétés affiliées. Au Canada TV GUIDE est une marque déposée de Transcontinental Inc., utilisée
sous licence de Gemstar-TV Guide International, Inc.
Le système TV Guide On Screen est fabriqués sous licence de Gemstar-TV Guide International, Inc. et/ou d’une de ses sociétés
affiliées.
Le système TV Guide On Screen est protégés par un ou plusieurs brevets émis aux Etats-Unis, comme le 6,498,895,
6,418,556, 6,331,877; 6,239,794; 6,154,203; 5,940,073; 4,908,713; 4,751,578; 4,706,121.
License Notice
Patent Notice
LCoS Projection TV
Safety Instructions
IMPORTANT SAFETY INSTRUCTIONS
Important safety instructions shall be provided with each apparatus. This information shall be given in a separate booklet or
sheet, or be located before any operating instructions in an instruction for installation for use and supplied with the appara-
tus. This information shall be given in a language acceptable to the country where the apparatus is intended to be used. The
important safety instructions shall be entitled “Important Safety Instructions”. The following safety instructions shall be includ-
ed where applicable, and, when used, shall be verbatim as follows. Additional safety information may be included by adding
statements after the end of the following safety instruction list. At the manufacturer’s option, a picture or drawing that illus-
trates the intent of a specific safety instruction may be placed immediately adjacent to that safety instruction :
1. Read these instructions.
2. Keep these instructions.
3. Heed all warnings.
4. Follow all instructions.
5. Do not use this apparatus near water.
6. Clean only with dry cloth.
7. Do not block any ventilation openings. Install in accordance with the manufacturer’s instructions.
8. Do not install near any heat sources such as radiators, heat registers, stoves, or other apparatus (including ampli-
fiers)that produce heat.
9. Do not defeat the safety purpose of the polarized or grounding-type plug. A polarized plug has two blades with
one wider than the other. A grounding type plug has two blades and a third grounding prong, The wide blade or the
third prong are provided for your safety. If the provided plug does not fit into your outlet, consult an electrician for
replacement of the obsolete outlet.
10. Protect the power cord from being walked on or pinched particularly at plugs, convenience receptacles, and the
point where they exit from the apparatus.
11. Only use attachments/accessories specified by the manufacturer.
12. Use only with the cart, stand, tripod, bracket, or table specified by the manufacturer, or sold with the apparatus.
When a cart is used, use caution when moving the cart/apparatus combination to avoid injury from tip-over.
Safety Instructions
Safety Instructions
PORTABLE CART WARNING

Owner’s Manual
Safety Instructions
13. Unplug this apparatus during lightning storms or when unused for long periods of time.
14. Refer all servicing to qualified service personnel. Servicing is required when the apparatus has been damaged
in any way, such as power-supply cord or plug is damaged, liquid has been spilled or objects have fallen into
the apparatus, the apparatus has exposed to rain or moisture, does not operate normally, or has been dropped.
15. CAUTION concerning the Power Cord :
Most appliances recommend they be placed upon a dedicated circuit; that
is, a single outlet circuit which powers only that appliance and has no
additional outlets or branch circuits. Check the specification page of
this owner's manual to be certain.
Do not overload wall outlets. Overloaded wall outlets, loose or damaged
wall outlets, extension cords, frayed power cords, or damaged or
cracked wire insulation are dangerous. Any of these conditions could
result in electric shock or fire. Periodically examine the cord of your
appliance, and if its appearance indicates damage or deterioration,
unplug it, discontinue use of the appliance, and have the cord replaced
with an exact replacement part by an authorized servicer.
Protect the power cord from physical or mechanical abuse, such as being
twisted, kinked, pinched, closed in a door, or walked upon. Pay
particular attention to plugs, wall outlets, and the point where the
cord exits the appliance.
16. Outdoor Use Marking :
WARNING - To Reduce The Risk Of Fire Or Electric Shock, Do Not Expose This Appliance To Rain Or Moisture.
17. Wet Location :
Apparatus shall not be exposed to dripping or splashing and no objects filled with liquids, such as vases, shall
be placed on the apparatus.
Owner’s Manual
Introduction
Introduction
Introduction
TV GUIDE VOL CH
ENTER
MENU
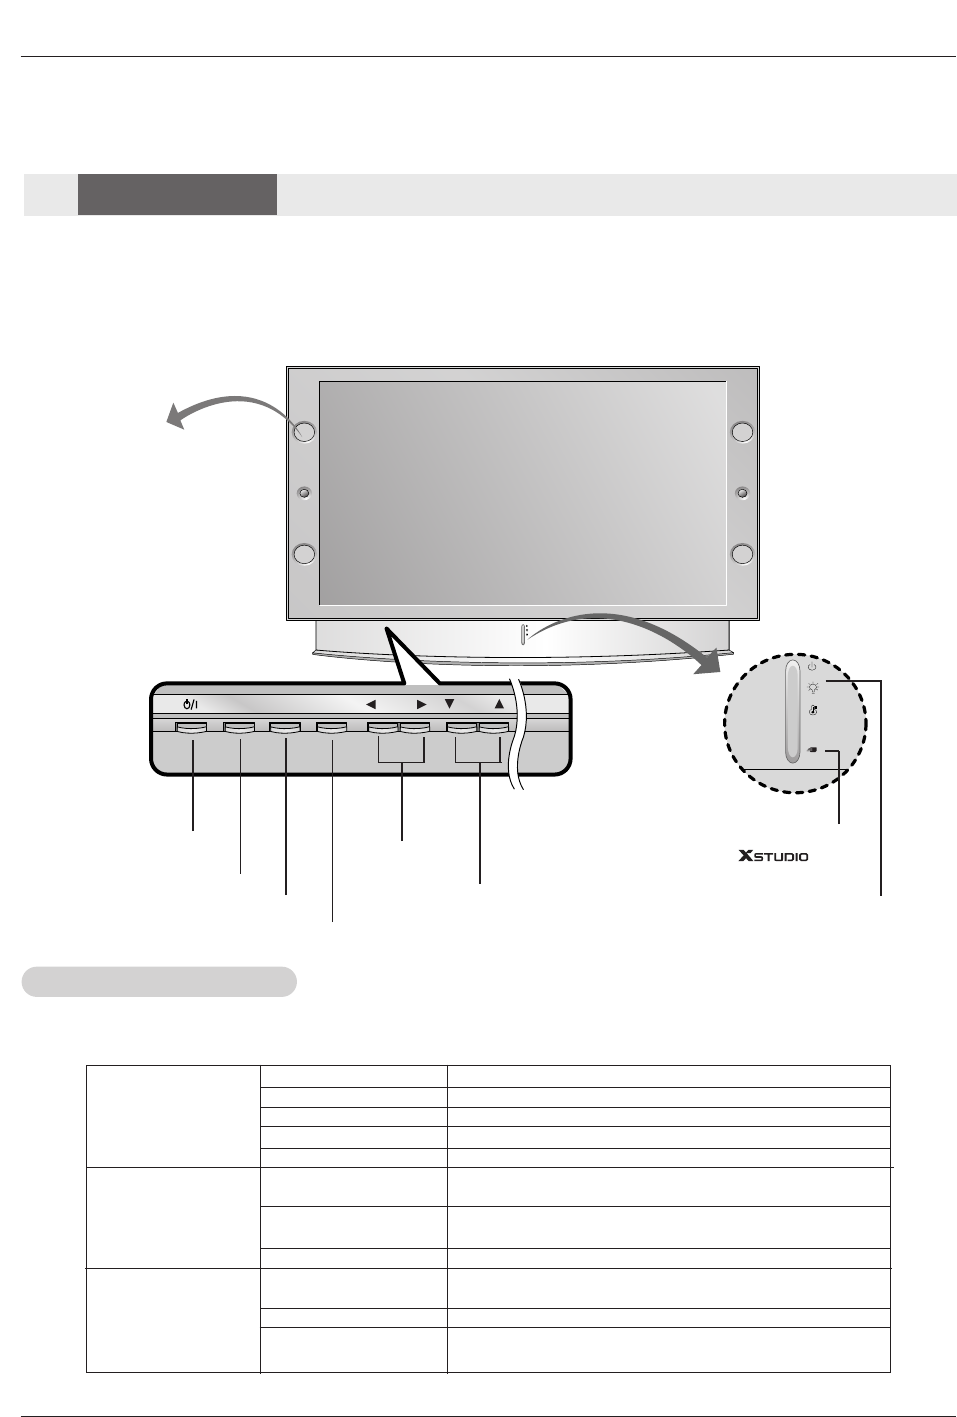
POWER Button VOLUME (F,G)
Buttons
CHANNEL (E, D) Buttons Operation Indicator/
Lamp Indicator/
Temperature Indicator
ENTER Button
TV GUIDE Button
- Lamp indicator, operation indicator, and temperature indicator located below the front panel controls, reveal the
operating status of the LCoS projection TV.
Function Status Indicators
Function Status Indicators
MENU Button
Controls
Controls
Front Panel Controls
Front Panel Controls
On operating the
mode
ENTER
VOL CH
POWER
(북미)
ENTER
VOL CH
POWER
(북미)
확인
방
송
안
내
메
뉴
조용히
이전채널
선호채널
취
소
예
약
목
록
녹
화
목
록
음량 채널
동시화면
취침예약 화면크기 화면조정 주/부전환
음성다중 자막방송
영상파레트
부채널 부채널 부화면입력
방
송
보
기
입력
외부입력
전원
제품선택
페이지
페이지
선
택
TN-60/50PY20
TN-42PX40X(한국) DN-42PX40X(한국)
확인
방
송
안
내
메
뉴
화
면
크
기
조용히
이전채널
선호채널
취
소
1
3
9
4
영
상
파
레
트
음량 채널
동시화면
화면조정
음성다중
자막방송 자동음성 주/부전환
부채널 부채널 부화면입력
입력
외부입력
전원
제품선택
페이지
페이지
취
침
예
약
자동음성
Off Power Cord is not connected.
Red Power Cord is connected, TV is in standby mode.
Green TV turns on.
Red (blinking) Power Cord is connected, TV is in booting sequence.
White (Stacking) Preparing operation in standby mode.
Orange Projection lamp is reaching the end of its life and needs to
be replaced with a new lamp. Contact your service center.
Red (blinking) There is a problem with the lamp or around it. Contact an
authorized service center.
Green (blinking) The lamp cover is not closed.
Orange The projection TV is overheating. Check the blocked vents
of the Projection TV .
Red The projection TV shuts down due to overheating.
Red (blinking) The projection TV shuts down, check the cooling fan.
Contact your service center.
Operation Indicator
Lamp Indicator
Temperature Indicator
- This is a simplified representation of a front panel.
- Here shown may be somewhat different from your TV.
* To high quality of the
sound, do not press the
speakers.
LCoS Projection TV
Introduction
PC/DTV
(XGA/
480p/
720p
1080i)
DVI
RGB/DVI
UPGRADE PORT
/
P
R
P
B
Y
DTV/DVD
RGB
PC/DTV
(XGA/
480p/
720p
1080i)
PC/DTV
(XGA
/480p
/720p
/1080i)
S-VIDEO
PR
PB
Y
MONO
CABLE
RGB INPUT
COMPONENT
INPUT2 INPUT1
DTV/DVD INPUT
RGB/DVI INPUT
(L)
(R)
AUDIO
(L)
(R)
AUDIO
VIDEO
(L)
(R)
AUDIO
(L)
(R)
AUDIO
MONITOR
OUTPUT
VIDEO
INPUT2
VIDEO
INPUT1
DIGITAL AUDIO
OPTICAL INPUT1
(COMPONENT2)
DIGITAL AUDIO
OPTICAL INPUT2
(DVI)
IEEE-1394
DIGITAL AUDIO
OPTICAL OUTPUT
ANTENNA
C
a
b
l
e
C
A
R
D
HDMI1
/DVI
VARIABLE
AUDIO OUT
G-LINK
HDMI2
UPGRADE
PORT
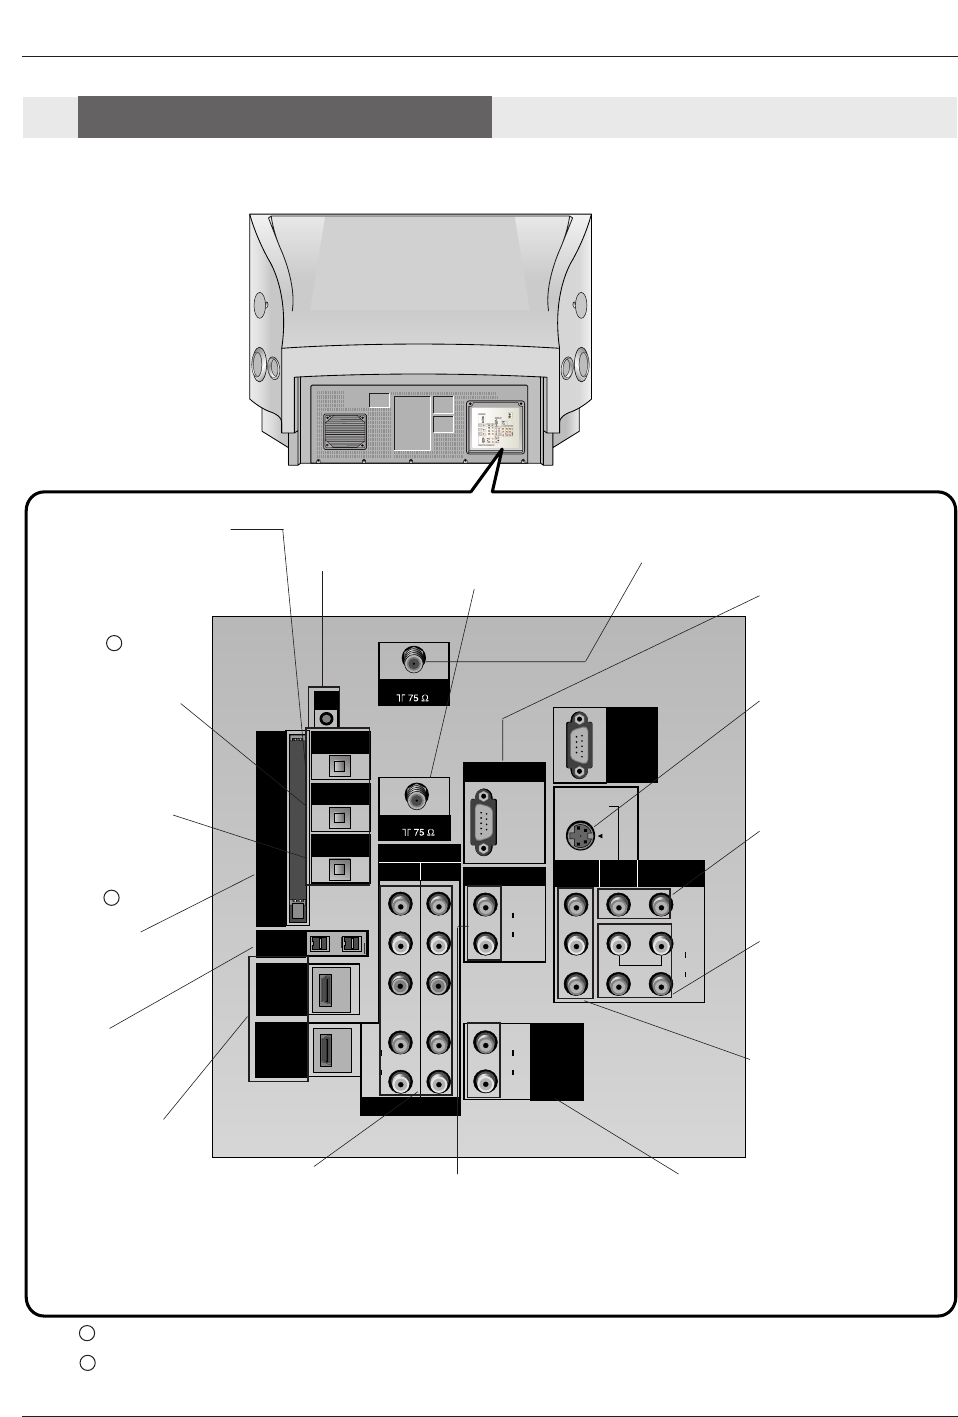
ANTENNA Inputs
Connect antenna sig-
nals to the TV directly.
DIGITAL AUDIO OPTICAL
OUTPUT
Used to connect either an exter-
nal amplifier, or add a sub-
woofer to your surround sound
system if it has a digital
audio optical input.
(Refer to )
MONITOR OUTPUT
Connect a second TV or
Monitor.
S-VIDEO In
A connection available
with some high-end
equipment that provides
even better picture qual-
ity for Video 2.
RGB/DVI INPUT
Connect the monitor
output connector from
a PC to the appropri-
ate input port.
RGB Input
Connect the TV output
connector from a PC/DTV
to the appropriate input
port.
VARIABLE AUDIO OUT
Used to connect either
an external amplifier,
or add a sub-woofer to
your surround sound
system.
COMPONENT INPUT 1-2
Connect a component
video/audio device to
these jacks. Refer to your
DVD manual for further
information.
VIDEO 1 or 2
Connects the video sig-
nals from various types
of equipment.
Left/Right AUDIO
Used for stereo sound
from various types of
equipment.
IEEE1394
Connect DVHS or
MicroMV to IEEE1394
Connector.
CableCARD™
Used for CableCARD™
received Cable Service
Provider.
CABLE Inputs
Connect cable signals to
the TV, either directly or
through your cable box.
G-LINK
Connect a G-
LINK Cable to
this jack.
DIGITAL AUDIO OPTI-
CAL INPUT1(COMPO-
NENT2)
Connect digital audio
from the equipment
connected to COMPO-
NENT 2.
DIGITAL AUDIO OPTI-
CAL INPUT2(DVI)
Connect digital audio
from the equipment
connected to
HDMI/DVI(VIDEO).
(Refer to )
Notes: In standby mode, these port will not work.
If the video is connected through HDMI-TO-HDMI cable, you don’t need to connect digital audio. This port
is used only when the video connected through DVI-TO-HDMI cable.
1
2
1
2
HDMI1/DVI, HDMI 2
Connect a HDMI signal
to HDMI1/DVI or
HDMI2. Or connect a
DVI(Video) signal to
HDMI1/DVI.
Back Connection Panel
Back Connection Panel
Connection Options
Connection Options
Owner’s Manual
Introduction
LEFT/RIGHT
AUDIO
Used for stereo
sound from vari-
ous types of
equipment.
S-VIDEO
A connection available
on some very high-end
equipment that pro-
vides better picture
quality than video input.
VIDEO
Connects the
video signals
from any piece of
equipment.
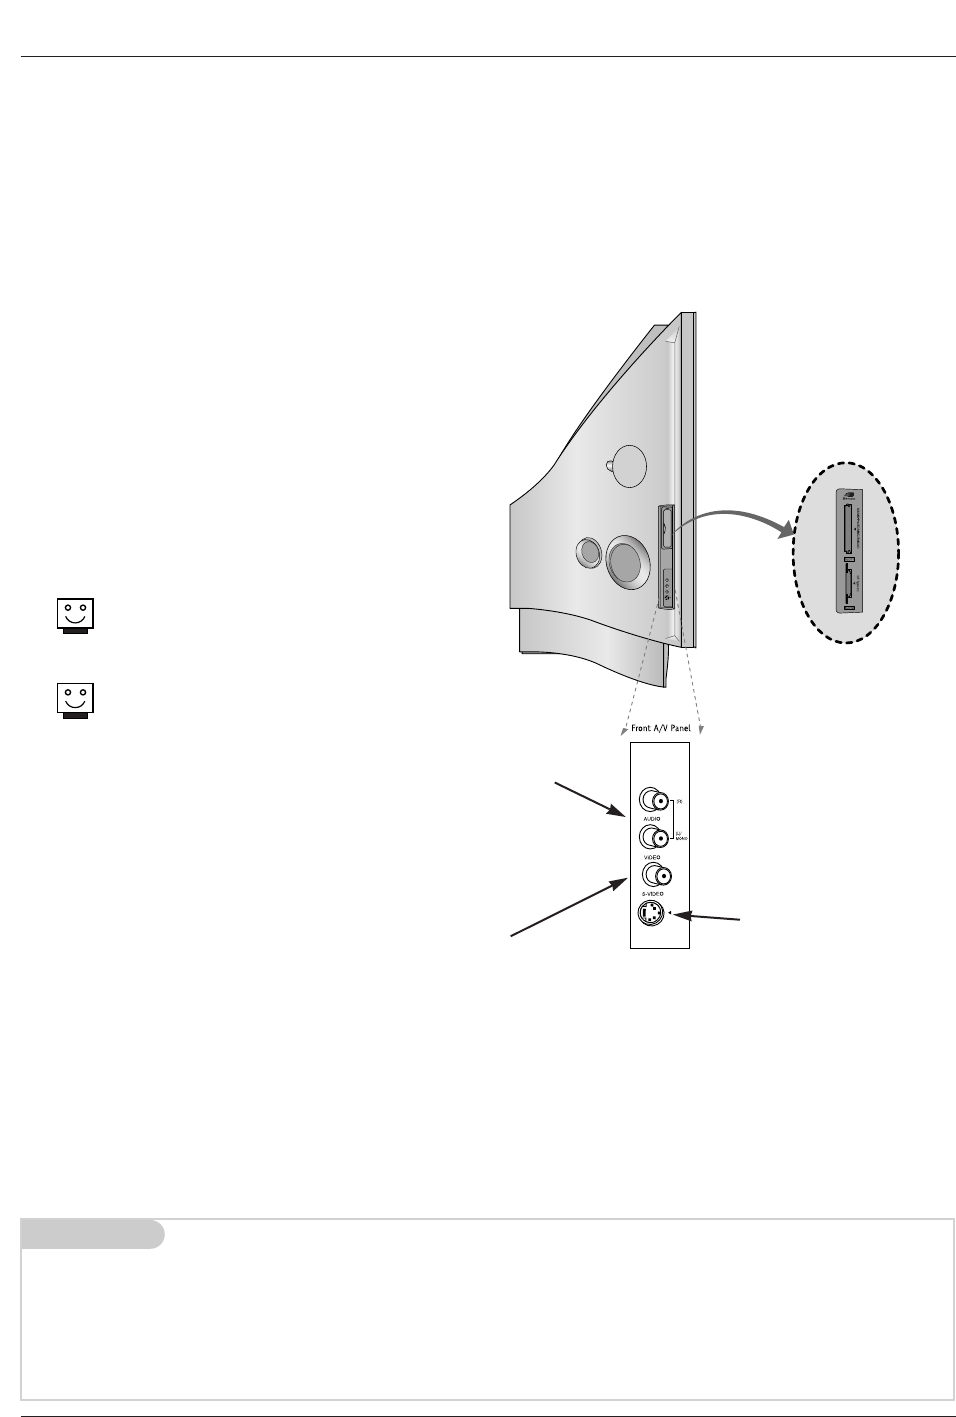
FRONT A/V
There are four jacks on the left side on your projection TV
that make connecting Audio/Video devices like video
games and camcorders very simple.
The jacks are like those found on the back jack connec-
tion panel. This means that most equipment that connects
to those types of jacks on the rear jackpack, may be con-
nected to the front connection panel.
To use the side jacks as the signal source, select them
using Main Input menu as described on page 61. They
will be named “Front Video” in the Main Input menu.
If you input both Front Video and
S-Video, only the S-Video will
work.
If you’re connecting a video game
device, make sure to change the
picture settings with the EZ
Picture option in the Video menu
(see page 62).
Mini glossary
A/V CABLESAudio/Video cables. Three cable connector—Right audio (red), Left audio (white), and Video (yellow). A/V cables are
used for stereo playback of videocassettes and for higher quality picture and sound from other A/V devices.
A/V DEVICE Any device that produces video or sound (VCR, DVD, cable box, or television).
Front Connection Panel
Front Connection Panel

LCoS Projection TV
Installation
<When the PC supports DVI>
How to connect
1. Connect the PC to HDMI1/DVI port of this TV with an HDMI-to-DVI cable(not supplied with this product).
If you do not need to connect audio, HDMI2 port is also available for the DVI video connection.
2. If the PC(or the sound card of the PC) has a fiber optic digital audio output connector, connect the PC's audio output to DIGI-
TAL AUDIO(OPTICAL) port for DVI INPUT.
3. If the PC(or the sound card of the PC) has an analog audio output connector, connect the PC's audio output to AUDIO INPUT
port located on the right side of RGB INPUT port.
How To Use
1. To get the best picture quality, adjust the PC graphics card to 1024x768, 60Hz.
2. Select HDMI1/DVI input source in main input option of SETUP menu.(Refer to P.61)
TV/VIDEO button is also available for this purpose.
3. Check the image on your TV. There may be noise associated with the resolution, vertical pattern, contrast or brightness in PC
mode. If noise is present, change the PC output to another resolution, change the refresh rate to another rate or adjust the
brightness and contrast on the VIDEO menu until the picture is clear. If the refresh rate of the PC graphic card can not be
changed, change the PC graphic card or consult the manufacturer of the PC graphic card.
<When the PC supports RGB>
How to connect
1. Connect the PC to RGB INPUT port of this TV with a RGB cable(not supplied with this product).
2. If the PC(or the sound card of the PC) has an analog audio output connector, connect the PC's audio output to AUDIO INPUT
port located on the right side of RGB INPUT port.
How To Use
1. To get the best picture quality, adjust the PC graphics card to 1024x768, 60 Hz.
2. Select RGB-PC input source in main input option of SETUP menu.(Refer to P.61)
Once you select RGB-PC in main input option of SETUP menu, TV/VIDEO button is also available for this purpose.
3. Check the image on your TV. There may be noise associated with the resolution, vertical pattern, contrast or brightness in PC
mode. If noise is present, change the PC output to another resolution, change the refresh rate to another rate or adjust the
brightness and contrast on the VIDEO menu until the picture is clear. If the refresh rate of the PC graphic card can not be
changed, change the PC graphic card or consult the manufacturer of the PC graphic card.
PC Setup
PC Setup
- This TV provides Plug and Play capability, meaning that the PC adjusts automatically to the TV's settings.
- The TV perceives 640x480, 60Hz as DTV 480p based on the PC graphic card, change the screen scanning rate for the graphic
card accordingly.
Resolution
640x350
640x480
800x600
Horizontal
Frequency(KHz)
31.468
31.469
37.861
37.500
70.09
59.94
72.80
75.00
48.363
56.476
60.023
Vertical
Frequency(Hz)
1024x768
Monitor Display Specifications (RGB-PC or HDMI/DVI Mode)
35.156
37.879
48.077
46.875
56.25
60.31
72.18
75.00
60.00
70.06
75.02
Owner’s Manual
Installation
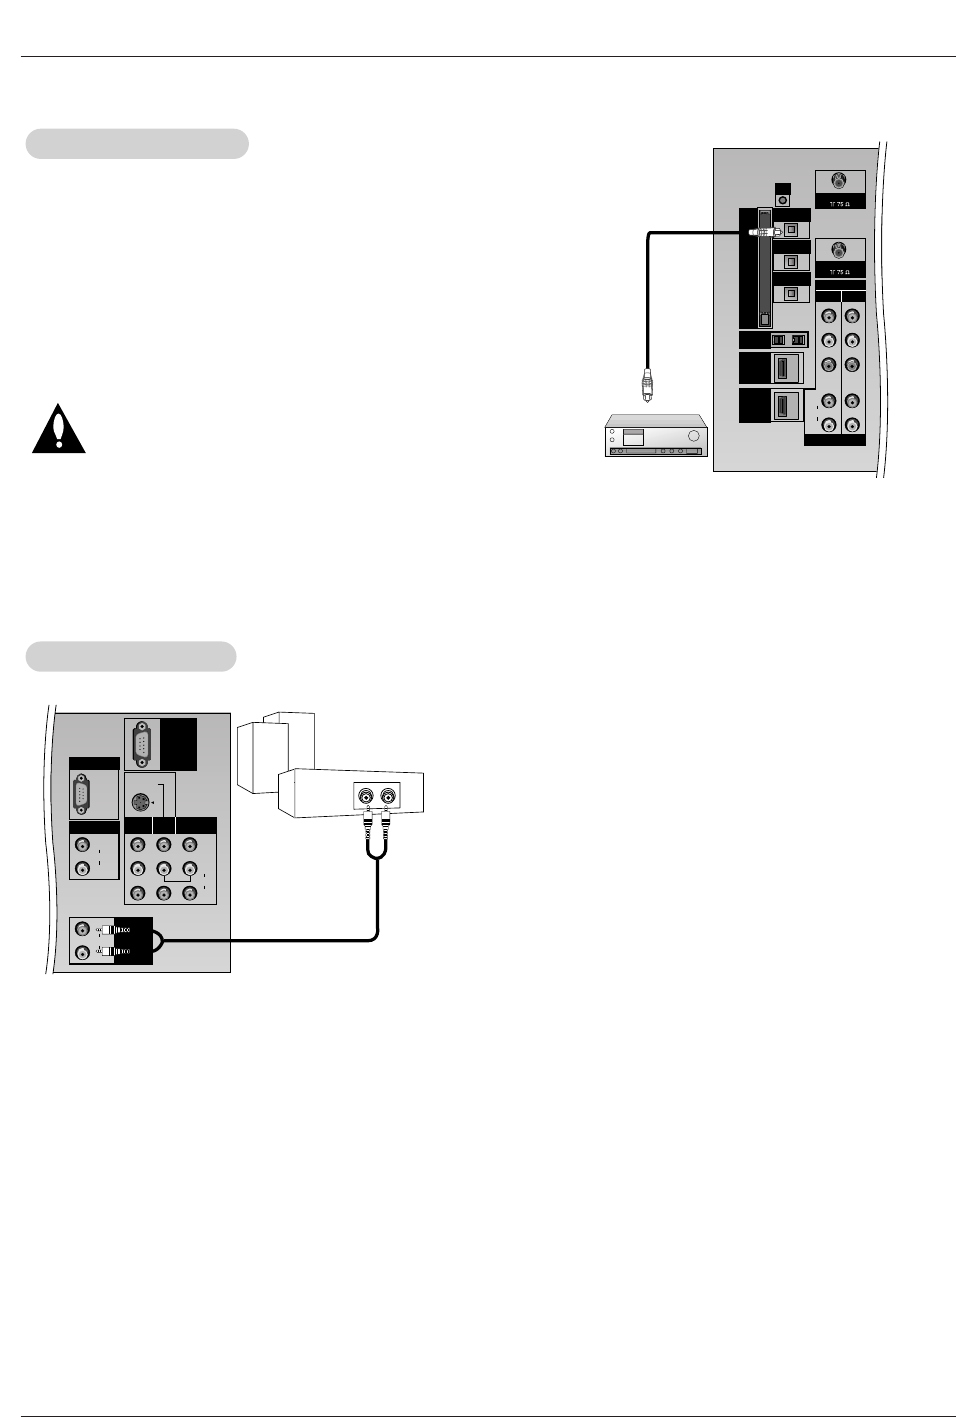
Send the TV’s audio to external audio equipment (stereo system) via
the Digital Audio Output (Optical) port.
How to connect
1. Connect one end of an optical cable to the TV Digital Audio
(Optical) Output port.
2. Connect the other end of the optical cable to the digital audio (opti-
cal) input on the audio equipment.
3. Set the “ TV Speaker option - Off”in the AUDIO menu. Refer to
page 64.
See the external audio equipment instruction manual for operation.
Caution: Do not look into the optical output port. Looking
at the laser beam may damage your vision.
Digital
Digital Audio Output
Audio Output
PR
PB
Y
CABLE
COMPONENT
INPUT2 INPUT1
DTV/DVD INPUT
(L)
(R)
AUDIO
ANTENNA
DIGITAL AUDIO
OPTICAL INPUT1
(COMPONENT2)
DIGITAL AUDIO
OPTICAL INPUT2
(DVI)
IEEE-1394
DIGITAL AUDIO
OPTICAL OUTPUT
C
A
B
L
E
C
A
R
D
DVI
G-LINK
HDMI
HDMI1
/DVI
HDMI2
C
a
b
l
e
C
A
R
D
Hook up Variable Audio Output, L-Audio-R to Amplifier system for
Left/Right front speaker sound.
How to connect
1. Locate the Variable Audio Out jacks on the back of your TV and the
Input jacks on the back of your stereo's amplifier.
2. Connect the two jacks, making sure that the right and left channels
are connected correctly.
3. Set up your speakers through your analog stereo amplifier, accord-
ing to the instructions provided with the amplifier.
External Stereo
External Stereo
PC/DTV
(XGA
/480p
/720p
/1080i)
S-VIDEO
MONO
RGB INPUT
RGB/DVI INPUT
(L)
(R)
AUDIO
(L)
(R)
AUDIO
VIDEO
(L)
(R)
AUDIO
MONITOR
OUTPUT
VIDEO
INPUT2
VIDEO
INPUT1
VARIABLE
AUDIO OUT
UPGRADE
PORT

LCoS Projection TV
Installation
- HDMITM, the HDMI logo and High-Definition Multimedia Interface is a trademark or registered trademark of HDMI Licensing.
- This TV can receive the High-Definition Multimedia Interface(HDMI) or the Digital Visual Interface(DVI).
- This TV supports HDCP(High-bandwidth Digital Contents Protection) Protocol for 720x480p, 1280x720p, and 1920x1080i resolu-
tion.
- When you connect this TV with a source device(DVD player, Set Top Box or PC) supporting Auto HDMI/DVI function, the output
resolution of the source device will be automatically set to 1280x720p.
- If the source device does not support Auto HDMI/DVI, you need to set the output resolution appropriately.
To get the best picture quality, adjust the DVD Player or Set Top Box's output resolution to 1280x720p, and the PC graphics card's
output resolution to 1024x768, 60Hz.
- If the source device has an HDMI output, no other audio connection is necessary because HDMI-to-HDMI connection includes
both video and audio.
- If the source device has a DVI output and no HDMI output, a separated audio connection is necessary.
<When the source device(DVD player or Set Top Box) supports HDMI>
How To Connect
1. Connect the source device to HDMI1/DVI or HDMI2 port of this TV with an HDMI cable(not supplied with this product).
2. No separated audio connection is necessary.
How To Use
- If the source device supports Auto HDMI function, the output resolution of the source device will be automatically set to 1280x720p.
- If the source device does not support Auto HDMI, you need to set the output resolution appropriately.
To get the best picture quality, adjust the output resolution of the source device to 1280x720p.
- Select HDMI1/DVI or HDMI2 input source in main input option on the SETUP menu.(Refer to P.61)
TV/VIDEO button is also available for this purpose.
<When the source device(DVD player or Set Top Box) supports DVI>
How To Connect
1. Connect the source device to HDMI1/DVI port of this TV with a HDMI-to-DVI cable(not supplied with this product).
Do not use HDMI2 port for DVI connection if you want to connect audio.
2. A separated audio connection is necessary.
3. If the source device has a fiber optic digital audio output, connect the audio output to DIGITAL AUDIO(OPTICAL) port for DVI
INPUT.
4. , connect the PC's audio output to AUDIO INPUT port located on the right side of RGB INPUT port.
How To Use
- If the source device supports Auto DVI function, the output resolution of the source device will be automatically set to 1280x720p.
- If the source device does not support Auto DVI, you need to set the output resolution appropriately.
To get the best picture quality, adjust the output resolution of the source device to 1280x720p.
- Select HDMI1/DVI input source in main input option on the SETUP menu.(Refer to P.61)
TV/VIDEO button is also available for this purpose.
HDMI
HDMI
Owner’s Manual
Installation
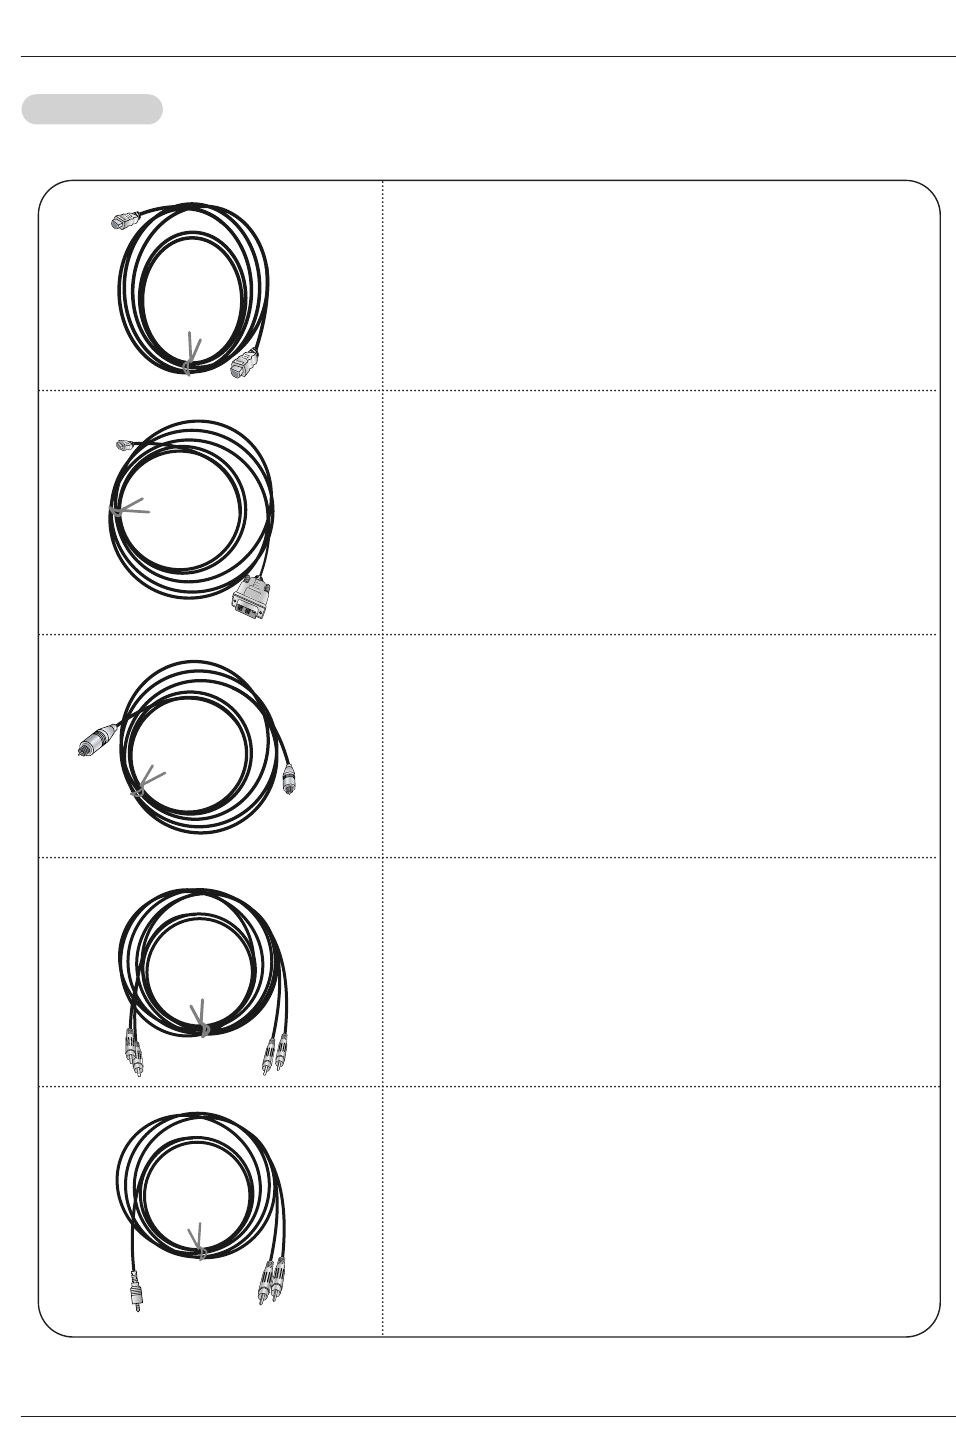
Cable sample
HDMI Cable
(not supplied with the product)
HDMI to DVI Cable
(not supplied with the product)
Fiber Optic Digital Audio Cable
(not supplied with the product)
Analog Audio Cable(RCA type)
(not supplied with the product)
Analog Audio Cable(Stereo to RCA type)
(not supplied with the product)
Reference
Reference
LCoS Projection TV
Installation
How to use
1. Connect the HDMI1/DVI Source Devices(DVD Player or Set Top Box or PC) and the TV SET.
2. Turn on the display by pressing the POWER button on the TV SET and HDMI1/DVI Source Devices remote control.
3. Select HDMI1/DVI Input source in Main Input option on the SETUP menu.(Refer to P.61)
4. Check the image on your TV SET. There may be noise associated with the resolution, vertical pattern, contrast or brightness in
HDMI1/DVI Source Devices. If noise is present, change the HDMI1/DVI Source Devices to another resolution, change the
refresh rate or adjust the brightness and contrast on the menu until the picture is clear. If the refresh rate of the PC graphics
card can not changed, change the PC graphics card or consult the manufacturer of the PC graphics card.
Notes:
- Depending on the graphics card, DOS mode may not work if a HDMI to DVI Cable is in use.
- Avoid keeping a fixed image on the screen for a long period of time. The fixed image may become permanently imprinted on the
screen.
- When Source Devices connected with HDMI1/DVI Input, output PC Resolution(VGA, SVGA, XGA), Position and Size may not fit
to Screen. As shown the picture below, press the ADJUST button to adjust the screen Position of TV SET and contact an PC
graphics card service center.
- When Source Devices connected with HDMI1/DVI Input, output TV SET Resolution(480p, 720p, 1080i) and TV SET Display fit
EIA/CEA-861-B Specification to Screen. If not, refer to the Manual of HDMI1/DVI Source Devices or contact your service cen-
ter.
- In case HDMI1/DVI Source Devices is not connected Cable or poor cable connection, "NO SIGNAL" OSD display in HDMI1/DVI
Input. In case that Video Resolution is not supported TV SET output in HDMI1/DVI Source Devices, "INVALID FORMAT" OSD
display. Refer to the Manual of HDMI1/DVI Source Devices or contact your service center.
In This Mode, the Supported TV Set Resolution Specification
- 1920 x 1080 I @ 59.94Hz / 60Hz, 16:9
- 1280 x 720 P @ 59.94Hz / 60Hz, 16:9(preferred format)
- 720 x 480 P @ 59.94Hz / 60Hz, 16:9
- 720 x 480 P @ 59.94Hz / 60Hz, 4:3
In This Mode, the Supported PC Resolution Specification
- 640 x 350 @ 70Hz
- 640 x 480 @ 60Hz
- 640 x 480 @ 72Hz
- 640 x 480 @ 75Hz
- 800 x 600 @ 56Hz
- 800 x 600 @ 60Hz
- 800 x 600 @ 72Hz
- 800 x 600 @ 75Hz
- 1024 x 768 @ 60Hz(preferred format)
- 1024 x 768 @ 70Hz
- 1024 x 768 @ 75Hz
Close
POSITION G
SIZE
PHASE
RESET
Adjust
D
FG
E
PC mode
Owner’s Manual
Operation
- You can use the JPEG and MP3 file by memorizing to Memory card in mode.
Memory Card
Memory Card
Precaution for Using the Memory Card
Precaution for Using the Memory Card
Notes on Memory Card
Notes on Memory Card
This is a device equipment to communicate the data between AV external equipment. It’s used to a digital
camera, camcorder, MP3 player, notebook or PDA.
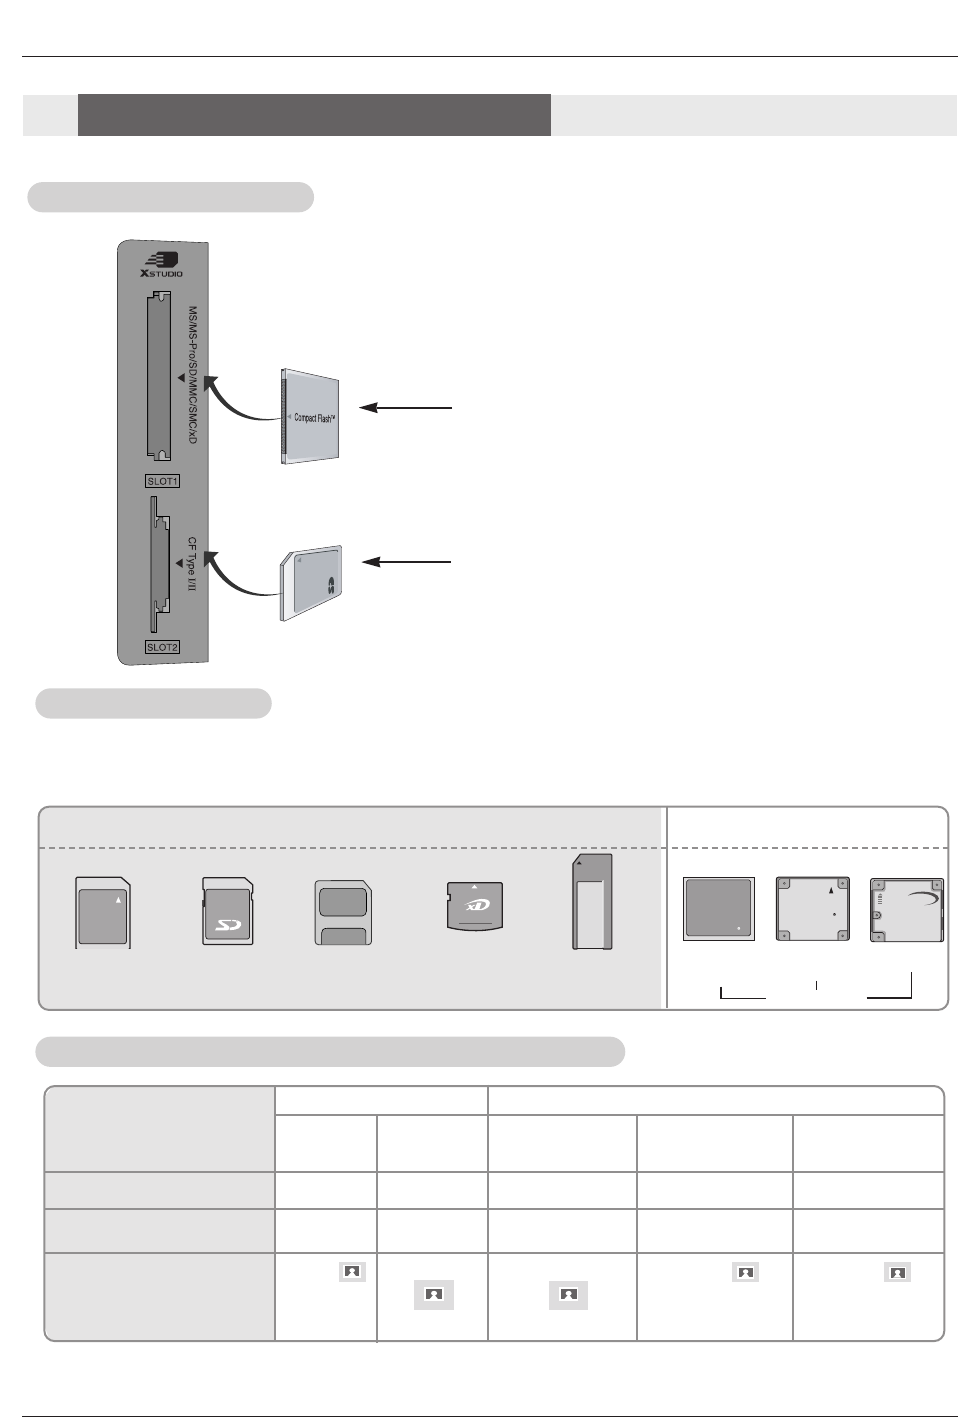
- Please be sure to insert the correct memory card type in the right direction.
(Confirm between the two memory slots before insertion.)
- Don’t insert the metal substances into the slots of the memory card.
- Do not bend, drop or apply strong shock to memory card.
- After pulling the memory card out from the TV, please keep the memory stick in a appropriate case to prevent
it from static shock.
- The stored data may be changed or lost as a result of misuse, static electricity.
- Do not turn the power off while the memory card is in operation.
- Don’t eject the memory card while in use. Otherwise, it may cause a data loss or card damage.
- Insert only one card to each slot.
- To prevent a change or loss for stored data, don’t misuse the TV or don’t let static electricity or electrical noise
for TV.
- This Company takes no responsibility for problems such as the damage or malfunction that occurs while using
the TV set, inappropriate TV settings, or any other reasons, except for defects or malfunctions intrinsic to the
product.
- Ensure to use a memory card that lists the manufacturers name and serial number.
- The manufacturer will not be responsible for any data damage. Making back up data is strongly recommend-
ed.
- Make sure to comply with the following steps when ejecting a memory card.
- Each Memory Card is complied with standard.
LCoS Projection TV
Operation
A
Available Memory Card
vailable Memory Card
Slot 2
Slot 1
Slot 1
MMC
(MultiMedia Card)
SD
(Secure Digital)
SMC
(Smart Media Card)
Slot 2
MultiMediaCardTM
Secure Digtal
TM
SmartMedia
xD-Picture Card
MEMORY STICK
CompactFlash
Microdrive
magicstor
XD
(xD-Picture Card)
MS / MS pro
(Memory Stick
/Memory Stick Pro)
CF
(CompactFlash)
MD
(Microdrive)
Magicstor
Memory Card type
Memory Card type
- Use the specified card based on the slot location.
- 8 types of Memory Card can be used for this set.
- NTFS file system is not supported.
* Check the direction of the Memory card.
(to the direction of the lower pictures)
CF Type I/II
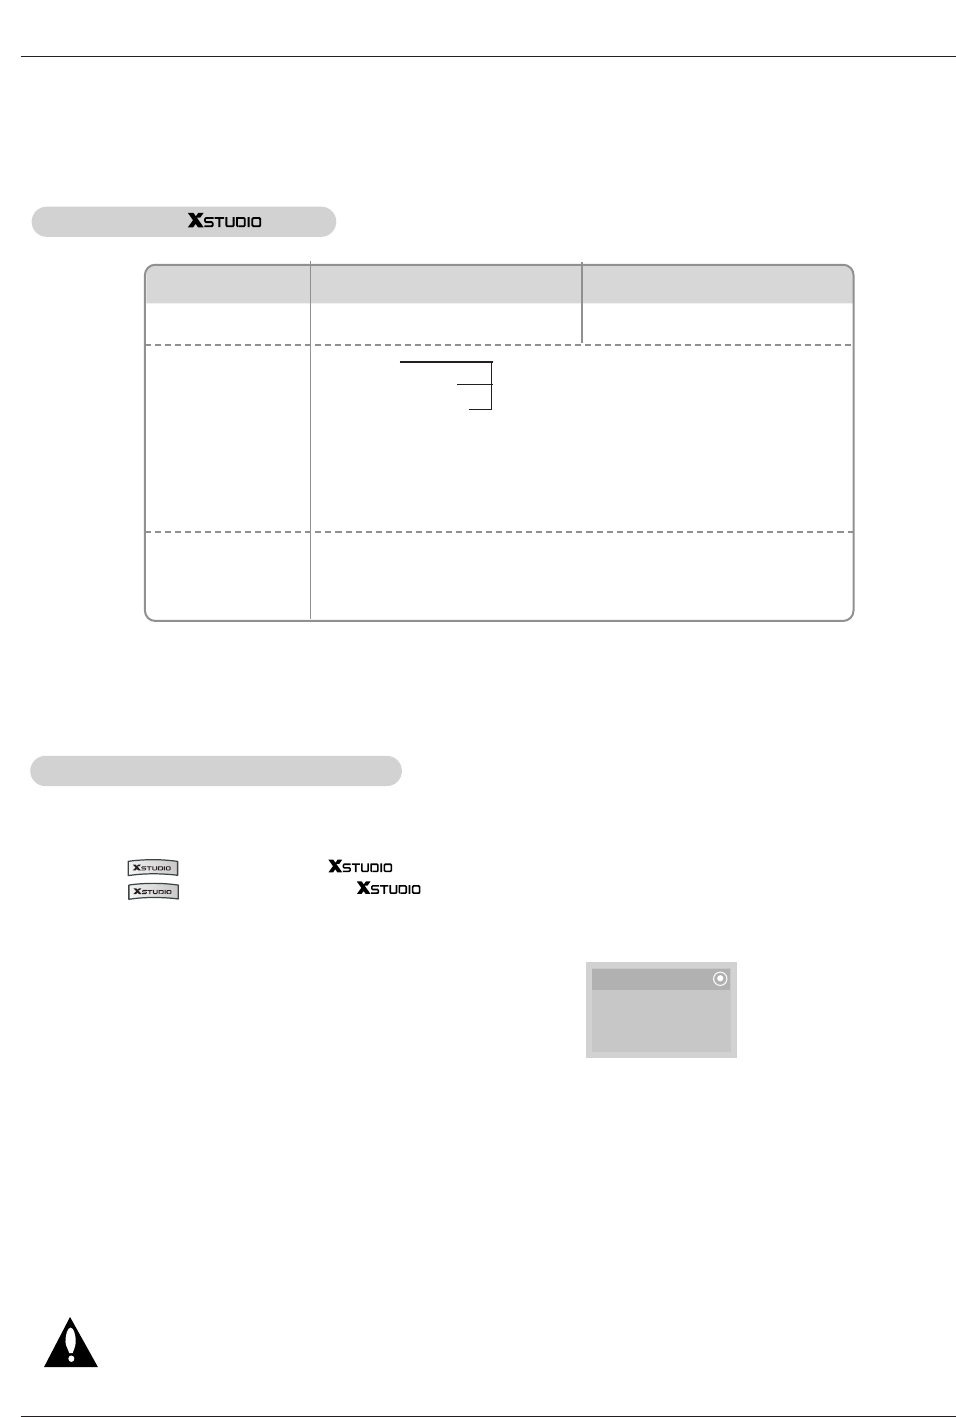
The JPEG Decoding/The Image Preview Supplied Spec
The JPEG Decoding/The Image Preview Supplied Spec
Compression Method
Baseline
Progressive
JPEG Decoding Support
Image Display
Preview Image Display
OXXOO
Image Image Image
Colour format
4:4:4
11:11:11 (Y, Cb, Cr)
4:2:2
21:11:11 (Y, Cb, Cr)
12:11:11 (Y, Cb, Cr)
4:2:0
22:11:11 (Y, Cb, Cr)
Display
when there is
no thumbnail.
Display
when there is
no thumbnail.
Display
when there is
no thumbnail.
invalid format invalid format
- If a error occur when decoding the JPEG, “Corrupted file” is displayed on screen.
Notes on Memory Card
Notes on Memory Card
Owner’s Manual
Operation
How to insert and eject the card
How to insert and eject the card
W
WInserting a Card
1. Insert the card into the Slot 1 and/or Slot 2 with the hand softly and slowly.
2. Press the button to enter the mode.
Press the button again to exit the mode.
W
WEjecting a card
1. Press the M/C EJECT button on the remote control.
2. Press D / E button to Select the Memory 1 Eject or Memory 2 Eject
based on the inserted card location.
If selecting Cancel, OSD will disapear.
3. Eject the card with the hand.
Notes:
• Screen saver will appear if you do not remove the card with the hand after operating the eject function.
• When entering the photo or music media at first, the M/C EJECT button will not work.
It’s possible to use the M/C EJECT button during using the photo or music media.
Caution: Press the M/C EJECT button of remote control before removing the memory card.
Failure to do so may damage the card.
Memory 1 Eject
Memory 2 Eject
Cancel
A sort of file
Compatilbility
Photo Image (JPEG)
*.jpg
-Some MagicStor Plus cards are not usable.
An error may occur if you use a memory card with greater than the
specified capacity.
Unsupported or damaged JPEG or MP3 files can cause errors. Do
not try to change the file extension of unsupported file types to the
file extension of supported file types.
- Playback speed can vary dependent on the card type.
- You can assign 8 characters for the file name of the card. If the file name is longer than 8
characters, it will be truncated at 6 digits and "~1, 2, 3, and 4" will be appended to the 7-8th
position.
*.mp3
Memory card
capacity
Unsupported or
damaged file
CF: 2GB
Microdrive: 2GB
Magicstor: 2.2GB
MMC: 256MB
SD: 512MB
SMC: 128MB
XD: 512MB
MS: 128MB
MS PRO: 1GB
Music File (MP3)
Available file in mode
CF Type I/II
LCoS Projection TV
Operation
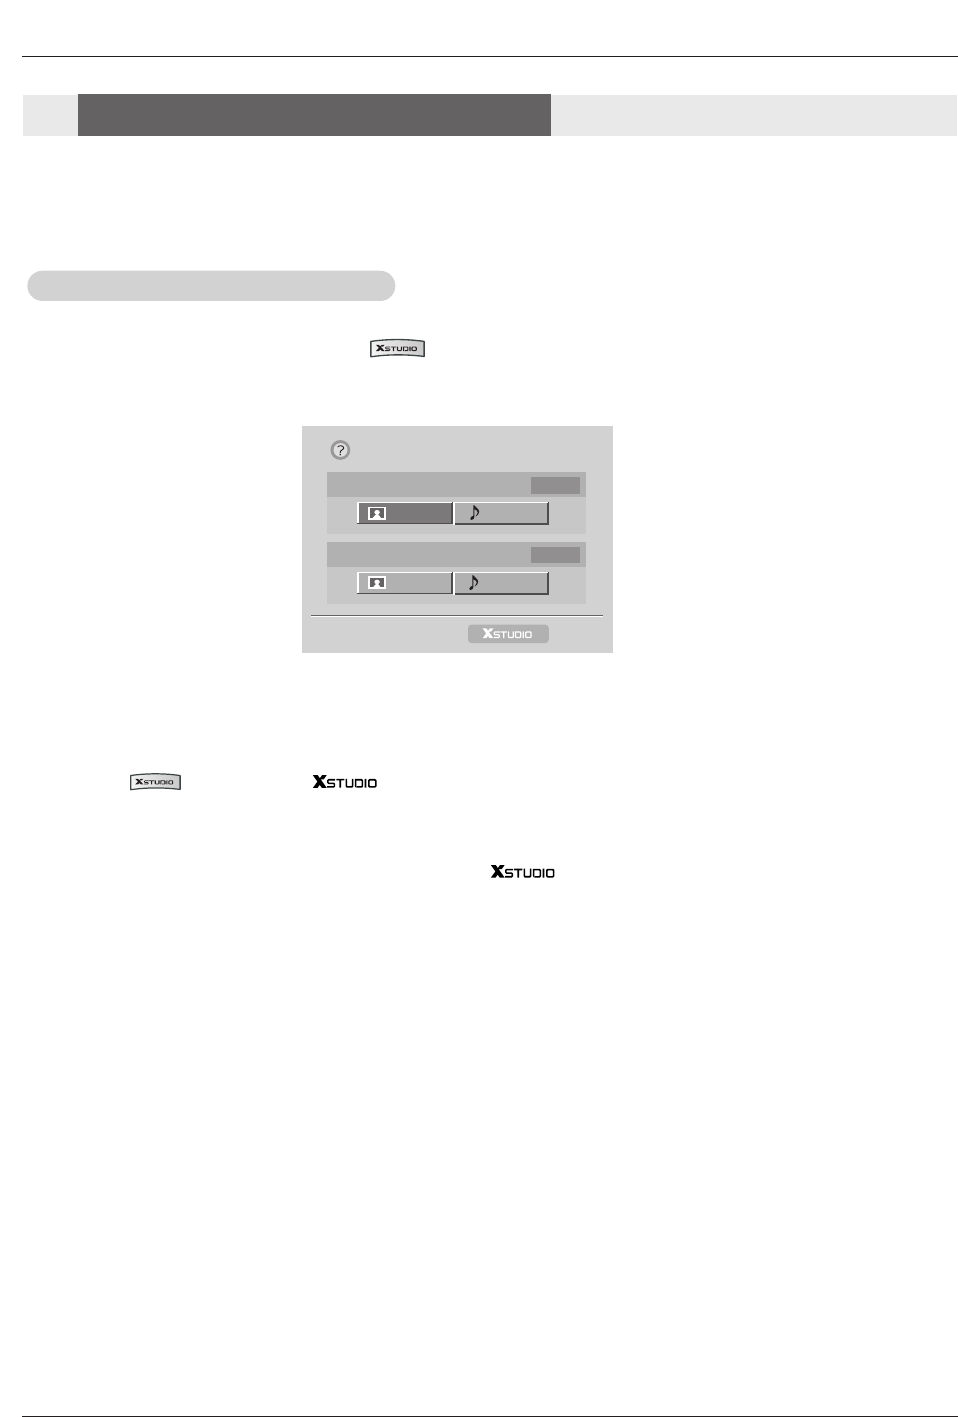
1. Press D / E / F / Gbutton to select photo or music for slot1/2.
2. Press the ENTER button to enter the photo or music media.
3. Press the button to exit the mode.
Notes:
• The OSD of the ejected card slot is inactivated when ejecting the card with the hand.
• If there is any error in a memory card, it’s impossible to enter mode.
Memory 1
Please select where to move
MS/Pro
Photo Music
Memory 2 CF/MD
Photo Music
Exit
- When you plug a memory card or press the button, the below screens will be displayed.
Select the Photo or Music Media
Select the Photo or Music Media
* In this manual, the OSD (On Screen Display) may be different from your TV’s because it is just an
example to help you with the TV operation.
Notes on Memory Card
Notes on Memory Card
Owner’s Manual
Operation
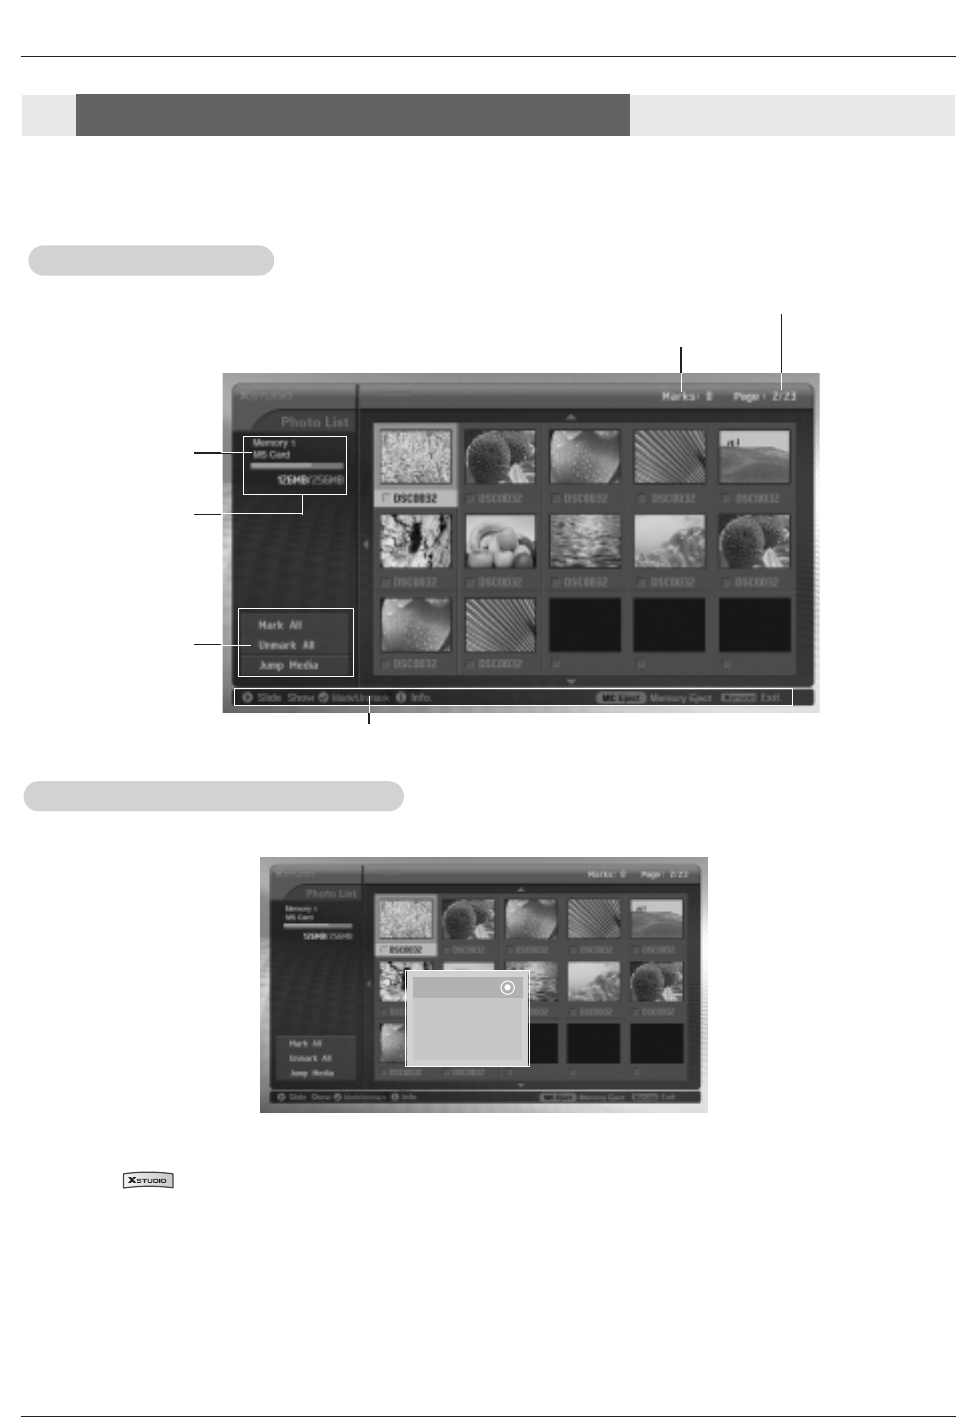
1. Insert the memory card to Slot 1 and/or Slot 2 on the TV front panel.
2. Press the button.
3. Use D / E / F / Gbutton to select photo media for slot1 or slot 2.
4. Press the ENTER button to enter the photo media.
Note: It’s possible to display 15 JPEG files per page.
5. Press the D / E / F / Gbutton to select JPEG file and then press the ENTER button.
6. Press the D / Ebutton to select View and then press the ENTER button. The selected image will display on entire
screen.
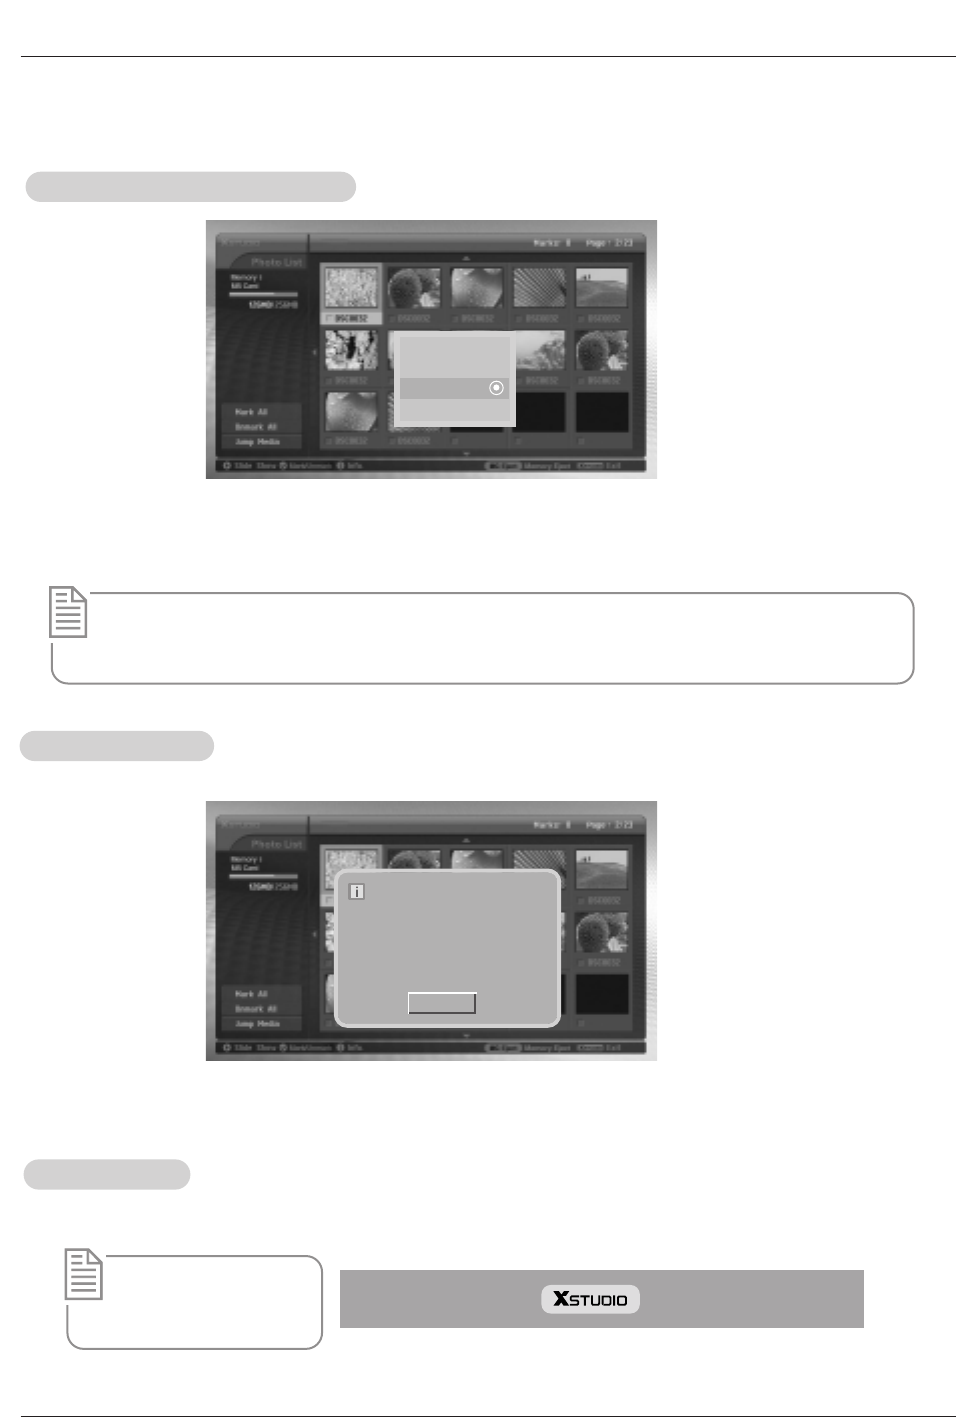
- When you select Photo in entry menu, you will now see a screen filled with thumbnail photo media.
JPEG File V
JPEG File Viewing Options
iewing Options
Screen Components
Screen Components
Left Menu
Marked JPEG file number
Current page/Total page
Direct Buttons
Using Card memory/
Total Card memory
Card type
View
Slide Show
Delete
Cancel
Photo Selection and PopUp menu
Photo Selection and PopUp menu
- Select your desired image file.
* In this manual, the OSD (On Screen Display) may be different from your TV’s because it is just an
example to help you with the TV operation.
LCoS Projection TV
Operation
JPEG File V
JPEG File Viewing Options
iewing Options
Mark/Unmark for JPEG file
Mark/Unmark for JPEG file
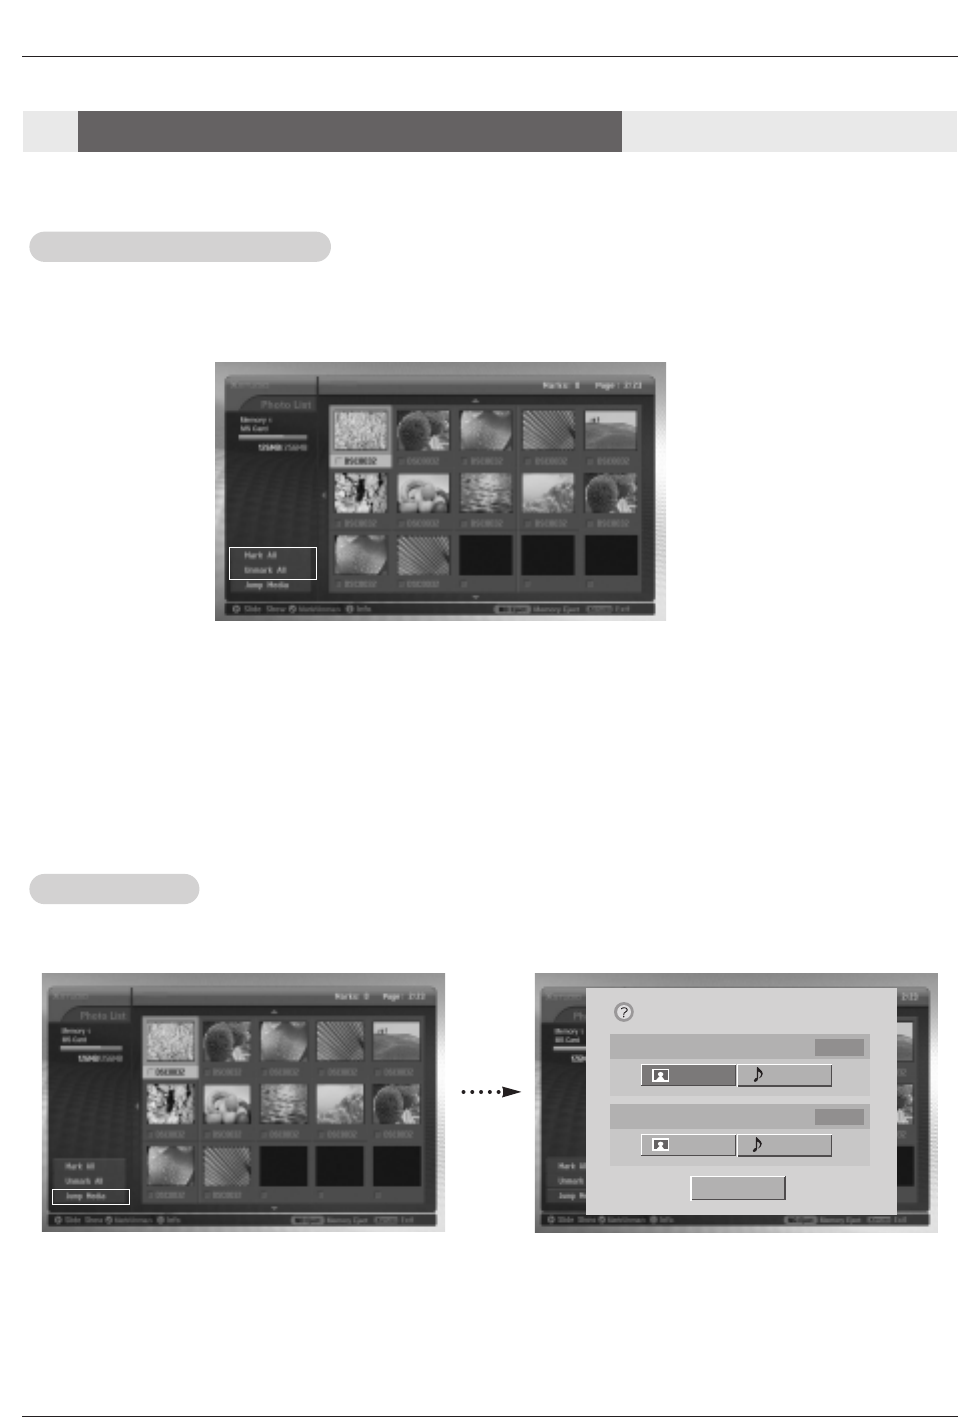
- You can mark/unmark the file to view the desired file or use slide show for desired file conveniently.
- The selected file displays orange in color.
When pressing the ENTER button after marking some a file, the marked file displays green in color.
W
WMark/Unmark for all files
1. In photo media, repeatedly press Fbutton to enter the menu on the left.
2. Press the D / Ebutton to select Mark All or Unmark All.
• If you select Mark All, every file is selected.
•If you select Unmark All, the selection for every file is released.
3. Press the ENTER button and then Gbutton to return to the photo list.
W
WMark/Unmark for some file
Press the MARK button repeatedly to mark or unmark some JPEG file.
Jump Media
Jump Media
1. In photo media, press Fbutton repeatedly to enter the left menu.
2. Press the D / Ebutton to select Jump media and then press the ENTER button.
3. Press the D / E / F / Gbutton to select desired media and then press the ENTER button. The screen displays each
media list.
- Use this funcion to jump to other media during using photo media.
Memory 1
Please select where to move
MS/Pro
Photo Music
Cancel
Memory 2 CF/MD
Photo Music
Owner’s Manual
Operation
The Image
The Image Adjustment
Adjustment
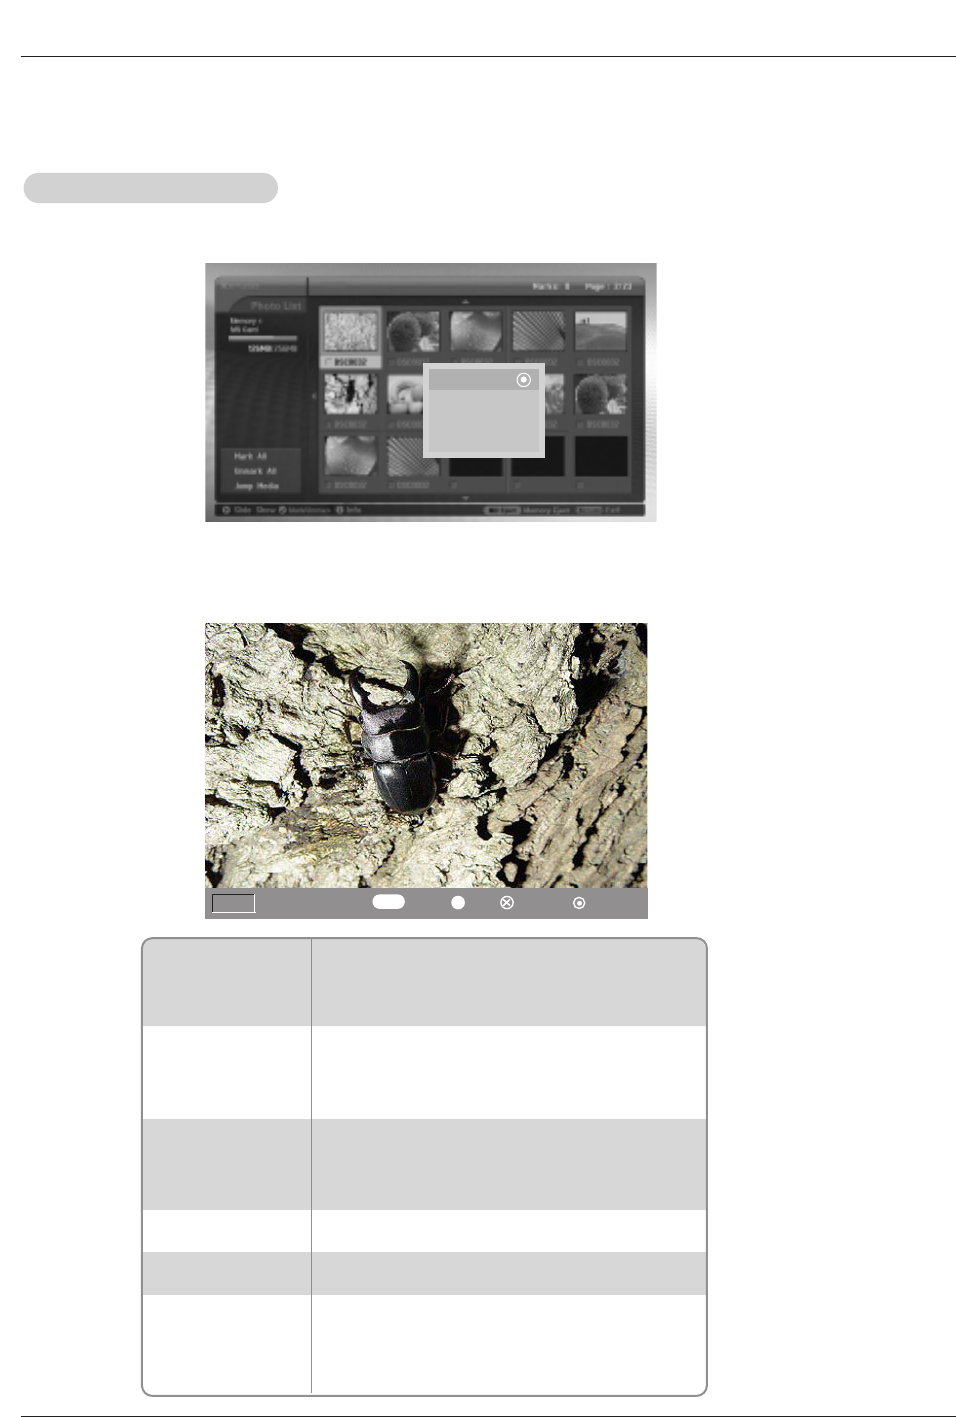
1. Press the D / E / F / Gbutton to select JPEG file and then press the ENTER button.
2. Press the D / Ebutton to select View and then press the ENTER button The selected image will display on entire screen.
3. Adjust the JPEG file.
- You can display the selected image on entire screen and do the various adjustment for the JPEG file.
Image selection
• Press the Gbutton to select next image.
• Press the Fbutton to select previous image.
• If you mark for a file, you can see only the marked
image.
Image Rotation
• Press the D / Ebutton to rotate the image.
• D: Rotate clockwise
E: Rotate counterclockwise
• The enlarged image cannot be rotated.
Image Zoom In/Out
• Press the CH D / Ebutton to enlarge or reduce the
image 2 or 4 times.
• Press the D / E / F / Gbutton to move the enlarged
image.
Go to the Menu • Press the EXIT button to return to the photo list.
• Press the MARK button to delete the current image.
• Each press of the ENTER button, the menu will tog-
gle hidden or shown.
• The OSD menu will automatically disappear after a
while.
Image Deletion
Shown/Hidden
the menu
View
Slide Show
Delete
Cancel
F G
Prev./Next
1/15
G
F
Rotate Zoom In Delete
CH ✔
Go to Menu Hide Help
G
LCoS Projection TV
Operation
JPEG File V
JPEG File Viewing Options
iewing Options
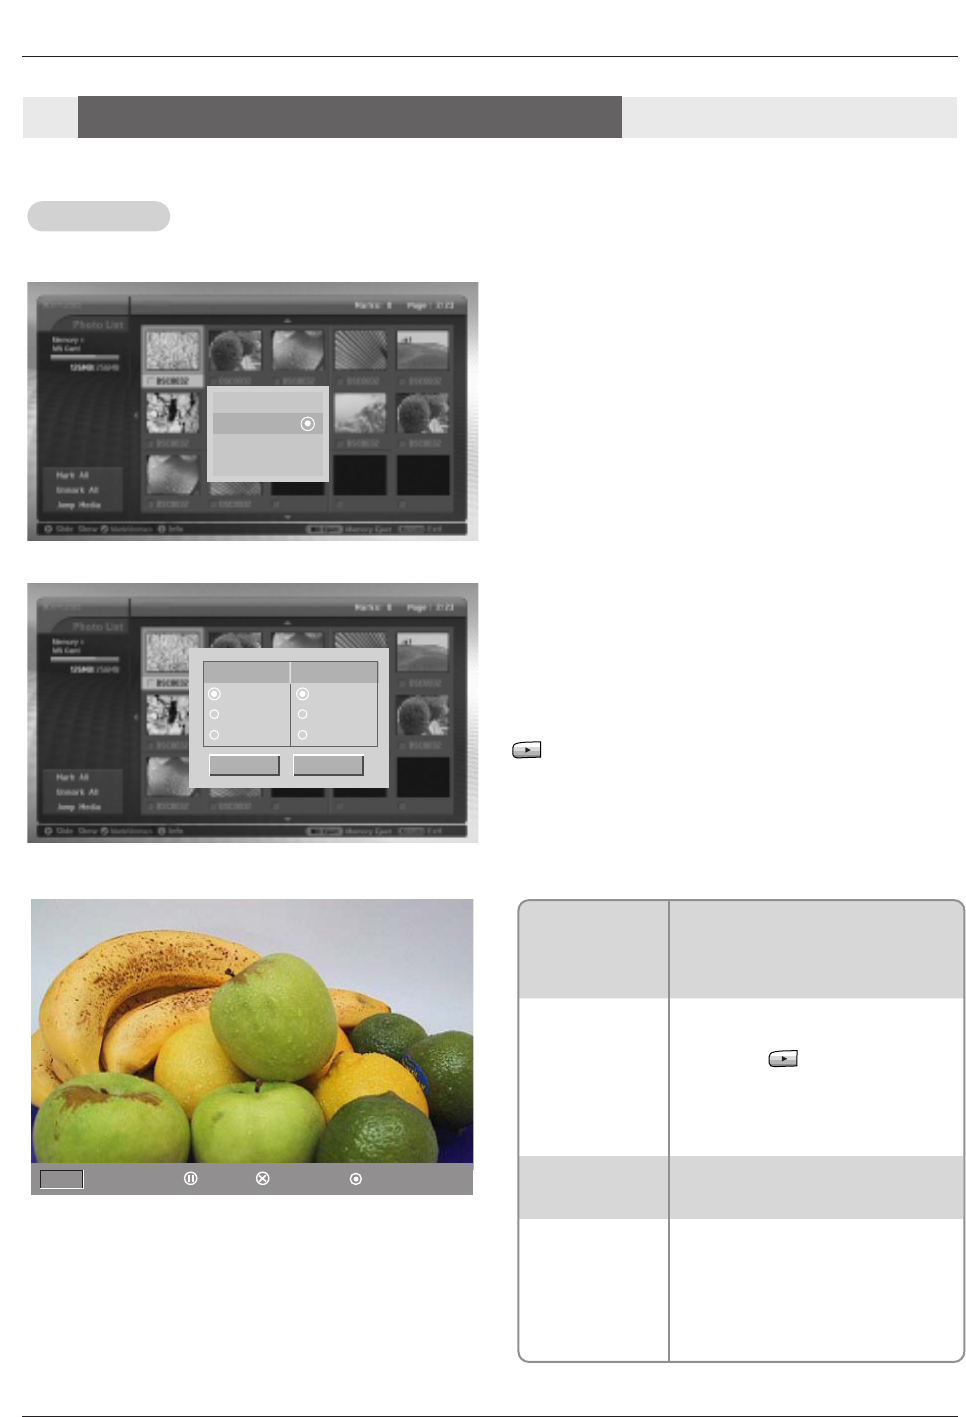
1. Press the D / E / F / Gbutton to select JPEG file and then
press the ENTER button.
2. Press the D / Ebutton to select Slide Show or Show
Marked and then press the ENTER button. (If you mark the
file with using MARK button, Show Marked is displayed on
screen.)
3. You can choose the slide show delayed time and effect.
Press the D / E / F / Gbutton to choose the slide show
delayed time and effect.
4. Press the D / E / F / Gbutton to select OK. Slide show start.
Notes:
• You can also operate the Slide Show or Show Marked with
button directly as shown.
• If you mark for a file, slide show will show only the marked
image.
F G Prev/Next Pause Go to Menu1/15 Hide Help
Next / previous
Image Selection
• Press the Gbutton to select next
image.
• Press the Fbutton to select previous
image.
Image Pause
• Press the II button to pause the cur-
rent image.
• Press the button to restart the
slide show.
• By pressing F / Gbutton, you can also
select the next or previous image
while pausing the image.
Go to the menu • Press the EXIT button to return to the
photo list.
Shown/Hidden
the menu
• Each press of the ENTER button, the
menu is toggle hidden or shown.
• The OSD menu will automatically dis-
appear after a while.
View
Slide Show
Delete
Cancel
OK Cancel
Delay
3sec
5sec
10sec
Effect
No Effect
Sliding
Fading
Slide Show
Slide Show
Owner’s Manual
Operation
1. In photo media, select your desired JPEG file.
2. Press the INFO button. The file information for selected JPEG file is displayed.
If JPEG file has no information, you can’t check it.
3. Press the ENTER, EXIT or INFO button to return to the photo list.
- Use it to check information for selected JPEG file.
1. Use the D / E / F / Gbutton to select JPEG file and then press the ENTER button.
2. To delete the file, press the D / Ebutton to select Delete and then press the ENTER button. When “Do you want to delete
the file?” message is displayed, select YES (YES or NO) with F / Gbutton. The file is deleted, all the following files are shift-
ed up one position.
3. To return to the photo list, press the D / E button to select Cancel and then press the ENTER button.
• Press the ENTER, DD / EE / FF / GG, EXIT, G(play), II, Å, IFF, GGI, INFO, CH D / E, MARK buttons to release the screen
- If you don’t press any button about 30 secondes while displaying the photo list, the screen saver is
worked.
View
Slide show
Delete
Cancel
File name: DTRC0029.JPG
Date: 2004.12.13 16:47:02
File Size: 603KB
Resolution: 1600 x 1200 Pixel
Information
OK
JPEG file Deletion and Cancel
JPEG file Deletion and Cancel
File Information
File Information
Screen Saver
Screen Saver
* The ‘Screen Saver’?
Screen saver is to prevent
screen pixel burning caused
by long time still picture.
* If you select Delete after marking some file, all of the marked file is deleted.
But in case MS,SMC,SD memory card setted the write protection, “ Protection Mode. Please push the
OK button.” message is displayed. When you select the OK, the sereen will return to the photo list.(Release the
write protection to delete a JPEG file.)
LCoS Projection TV
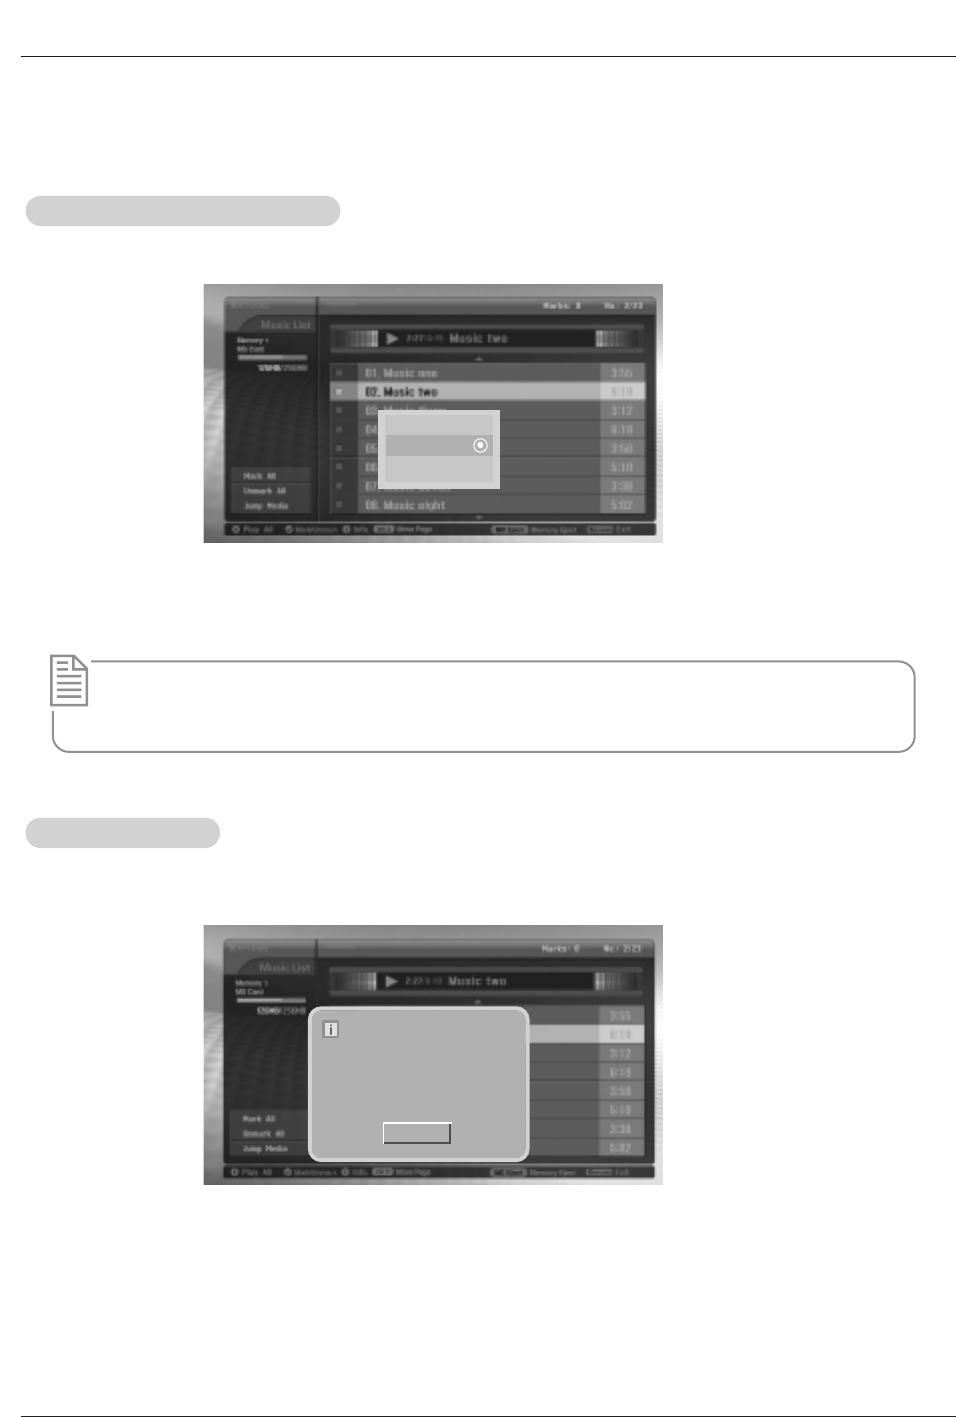
Operation
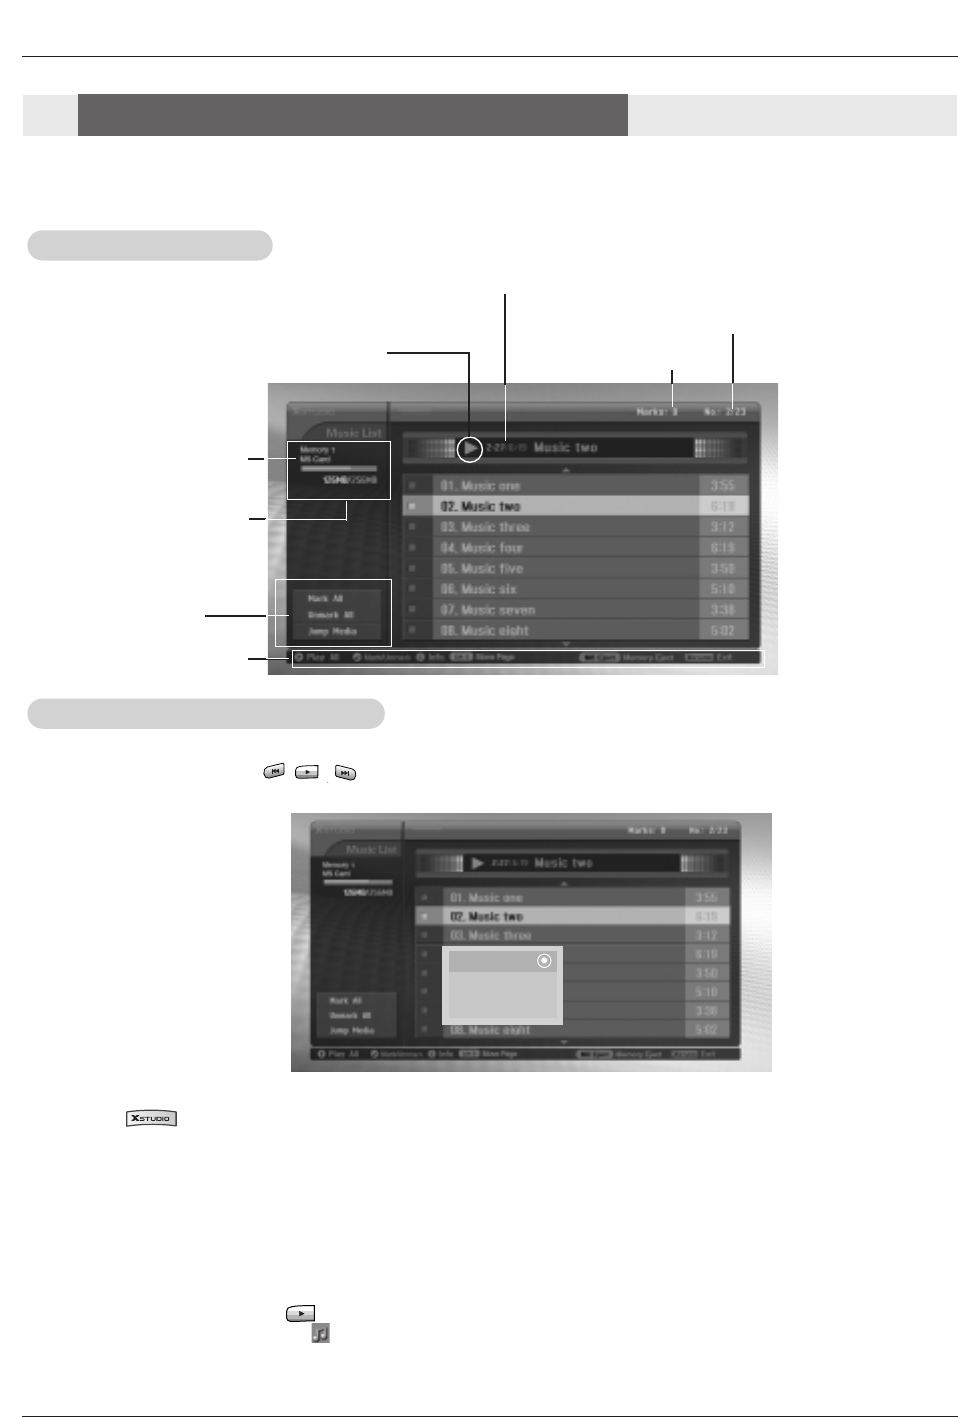
Marked MP3 file number
Current Playing Time/Total Playing Time
Current file number/Total file number
Using Card memory/
Total Card memory
Direct Buttons
Play
Delete
Cancel
1. Insert the memory card into Slot 1 and/or Slot 2 on the TV front panel.
2. Press the button.
3. Use D / E / F / Gbutton to select music media for slot1 or slot 2.
4. Press the ENTER button to enter the music media.
Note: It’s possible to display 8 MP3 files per page.
5. Press the D / Ebutton to select desired MP3 file and then press the ENTER button.
6. Press the D / Ebutton to select Play or Play Marked and then press the ENTER button.(If you mark the file with
using MARK button, Play Marked is displayed on screen.)
Notes:
Left Menu
- MP3 file Selection and deletion function don’t work while playing music.
- If pressing any button except , , button on the remote control while playing music, the music playing is stopped.
-Moves from the current 8 files list to the next files list with CH D / Ebutton.
- Purchased MP3/music files may contain copyright restrictions. Playback of these files may not be
supported by this model.
MP3 File Playing Operation
MP3 File Playing Operation
Screen Components
Screen Components
Card type
MP3 File Selection and Playback
MP3 File Selection and Playback
• You can also play the music with button directly.
• The current playing MP3 file displays in front of the title.
• While playing music, press the I
FF
or
GG
I button to select the previous or next music directly.
• If you press the I
FF
button while playing music, the MP3 will replay from beginning.
(If you press the I
FF
button within 0~1 seconds after playing the music, the MP3 plays the previous file.)
GG: Play
II : Pause
AA: Stop
Owner’s Manual
Operation
W
WStop Playback
To stop playback, press the Abutton on the remote control.
To stop playback, press the ENTER, VOL (F / G), CH (D/ E) button on the TV.
Notes:
• If you replay the MP3 file after stopping, the highlighted MP3 file on menu will play.
• On stopping, VOL (
FF
/
G
) and CH (
D
/
E
) buttons on the TV are used to navigate.
W
WPause Playback
1. Press the II button to pause playback.
2. Press the II or button to starts from the point of your paused part.
W
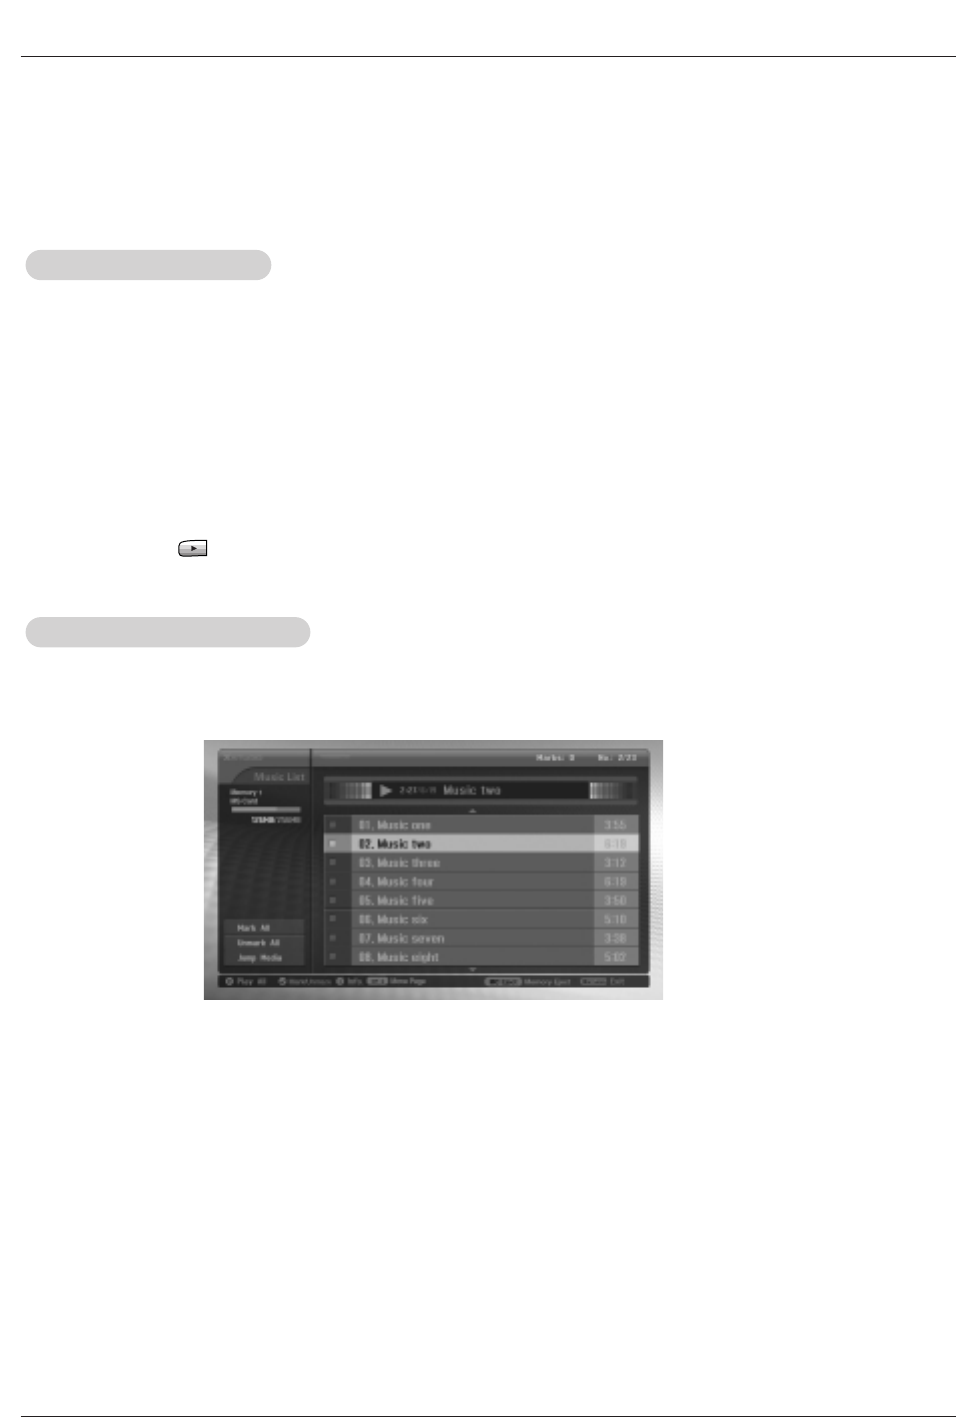
WMark/Unmark for all files
1. In music media, press the Fbutton.
2. Press the D / Ebutton to select Mark All or Unmark All.
• If you select Mark All, every file is selected.
•If you select Unmark All, the selection for every file is released.
3. Press the ENTER button and then Gbutton to return to the music list.
W
WMark/Unmark for some file
Press the MARK button repeatedly to mark or unmark some MP3 file.
- You can mark/unmark the file to play the desired file only.
- The menu on the left can be used when playback is stoped.
Stop/Pause Playback
Stop/Pause Playback
Mark/Unmark for MP3 file
Mark/Unmark for MP3 file
* In this manual, the OSD (On Screen Display) may be different from your TV’s because it is just an
example to help you with the TV operation.
LCoS Projection TV
Operation
MP3 File Playing Operation
MP3 File Playing Operation
• Press the , , buttons. The screen saver is released but the MP3 playback is restarted.
- , : Return to a initial portion of the MP3 playback.
- : Playback the next MP3.
• If you press any other button, the screen saver is released and the MP3 playback is stopped.
W
WDuring playing the MP3
• Press the DD / EE / FF / GG, EXIT, G(play), II, Å, IFF, GGI, INFO,CH D / E, MARK buttons to release
the screen saver.
W
WDuring stopping the MP3
1. In music media, press the Fbutton.
2. Press the D / Ebutton to select Jump media and then press the ENTER button.
3. Press the D / E / F / Gbutton to select desired media and then press the ENTER button. The screen dis-
plays each media list.
- Use this function to jump to other media during using music media.
- If you don’t press any button for about 30 secondes, the screen saver is activated.
Jump Media
Jump Media
Screen Saver
Screen Saver
* The ‘Screen Saver’?
Screen saver is to prevent
screen pixel burning
caused by long time still
picture.
Memory 1
Please select where to move
MS/Pro
Photo Music
Cancel
Memory 2 CF/MD
Photo Music
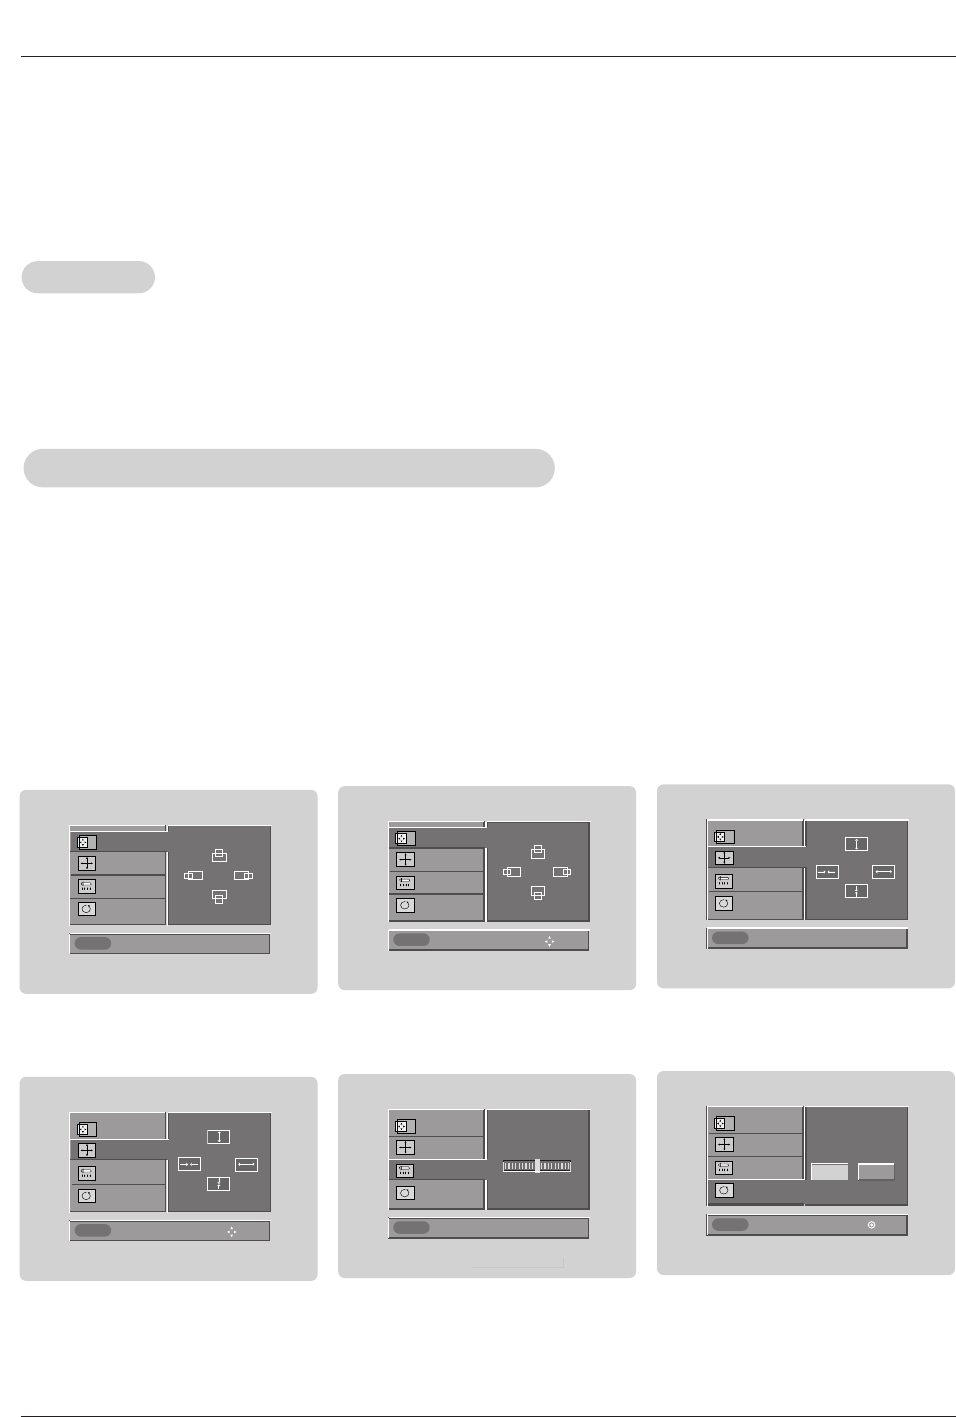
Owner’s Manual
Operation
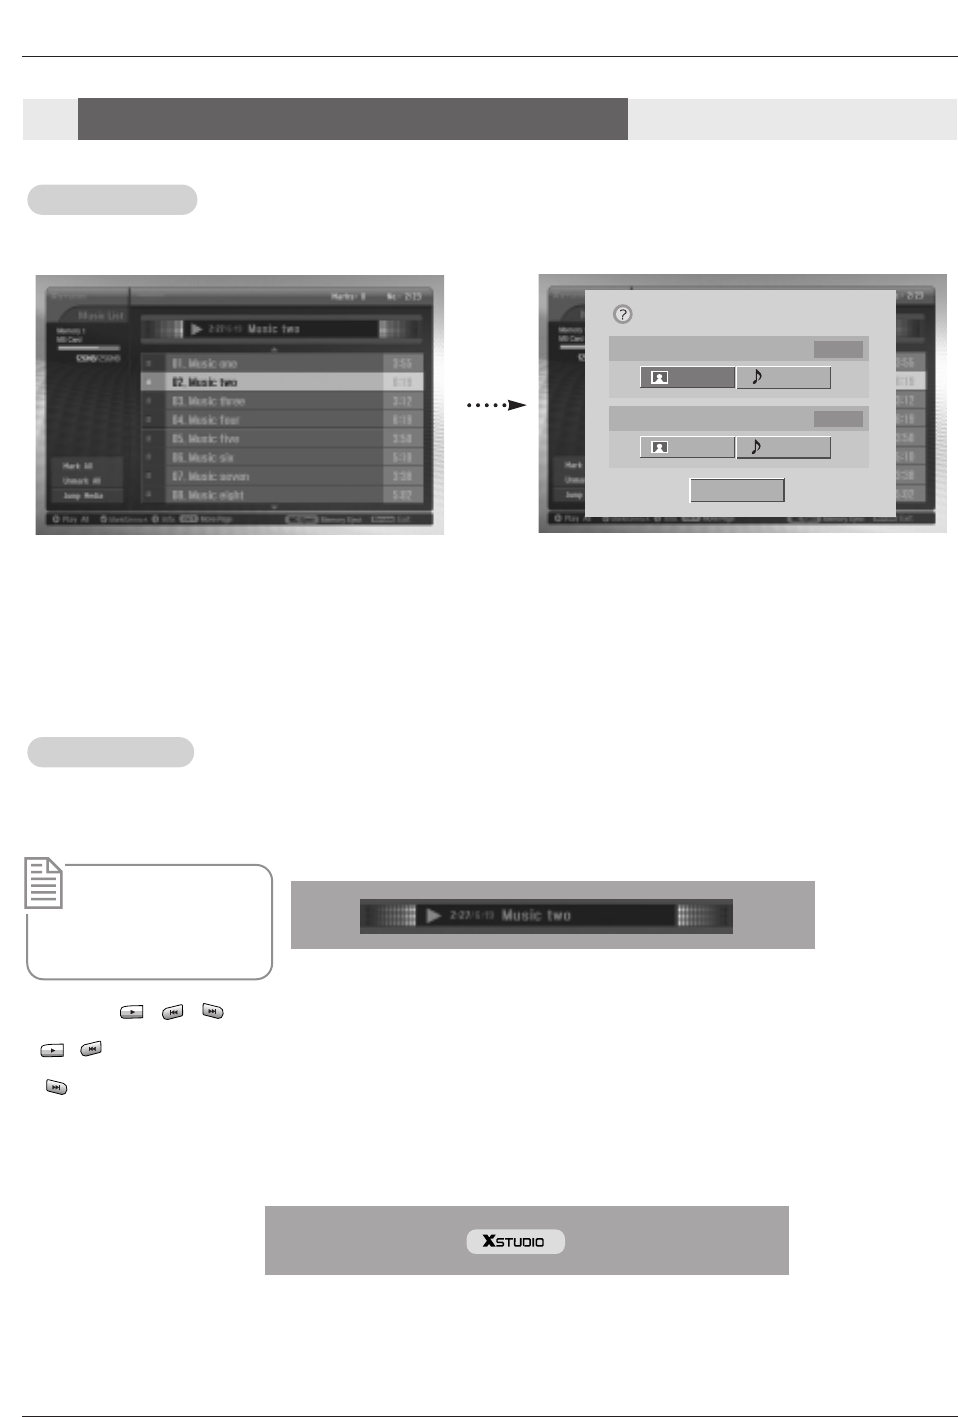
- Use it to check information for selected MP3 file.
-It’s impossible to delete the music during playback.
1. In music media, select your desired MP3 file.
2. Press the INFO button. The file information for selected MP3 file is displayed.
If MP3 file has no information, you can’t check it.
3. Press the ENTER, EXIT or INFO button to return the previous menu.
1. Use the D / Ebutton to select MP3 file and then press the ENTER button.
2. To delete the file, press the D / Ebutton to select Delete and then press the ENTER button. When “Do you want
to delete the file?” message is displayed, select YES (YES or NO) with F / Gbutton. The file is deleted, all the fol-
lowing files are shifted up one position.
3. To return to the music list, press the D / Ebutton to select Cancel and then press the ENTER button.
File name: DTRC0029.JPG
Length: 3:37
File Size: 5.25KB
Bitrate: 193Kbps
Information
OK
MP3 file deletion and Cancel
MP3 file deletion and Cancel
Play
Delete
Cancel
File Information
File Information
* If you select Delete after marking some files,, all of the marked files are deleted.
But in case MS,SMC,SD memory card setted the write protection, “ Protection Mode. Please push the
OK button.” message is displayed. When you select the OK, the sereen is returned to the photo list.(Release the
write protection to delete a MP3 file.)
Owner’s Manual
Operation
Close
POSITION G
SIZE
PHASE
RESET
Adjust
D
FG
E
Previous
POSITION
SIZE
PHASE
RESET
Adjust
Close
POSITION
SIZE G
PHASE
RESET
Adjust
D
FG
E
Previous
POSITION
SIZE
PHASE
RESET
Adjust
D
FG
E
Previous
POSITION
SIZE
PHASE
RESET
Adjust
Initialize Settings
No Yes
Control Move Select
FG
FG
Move
Phase 0
FFGG
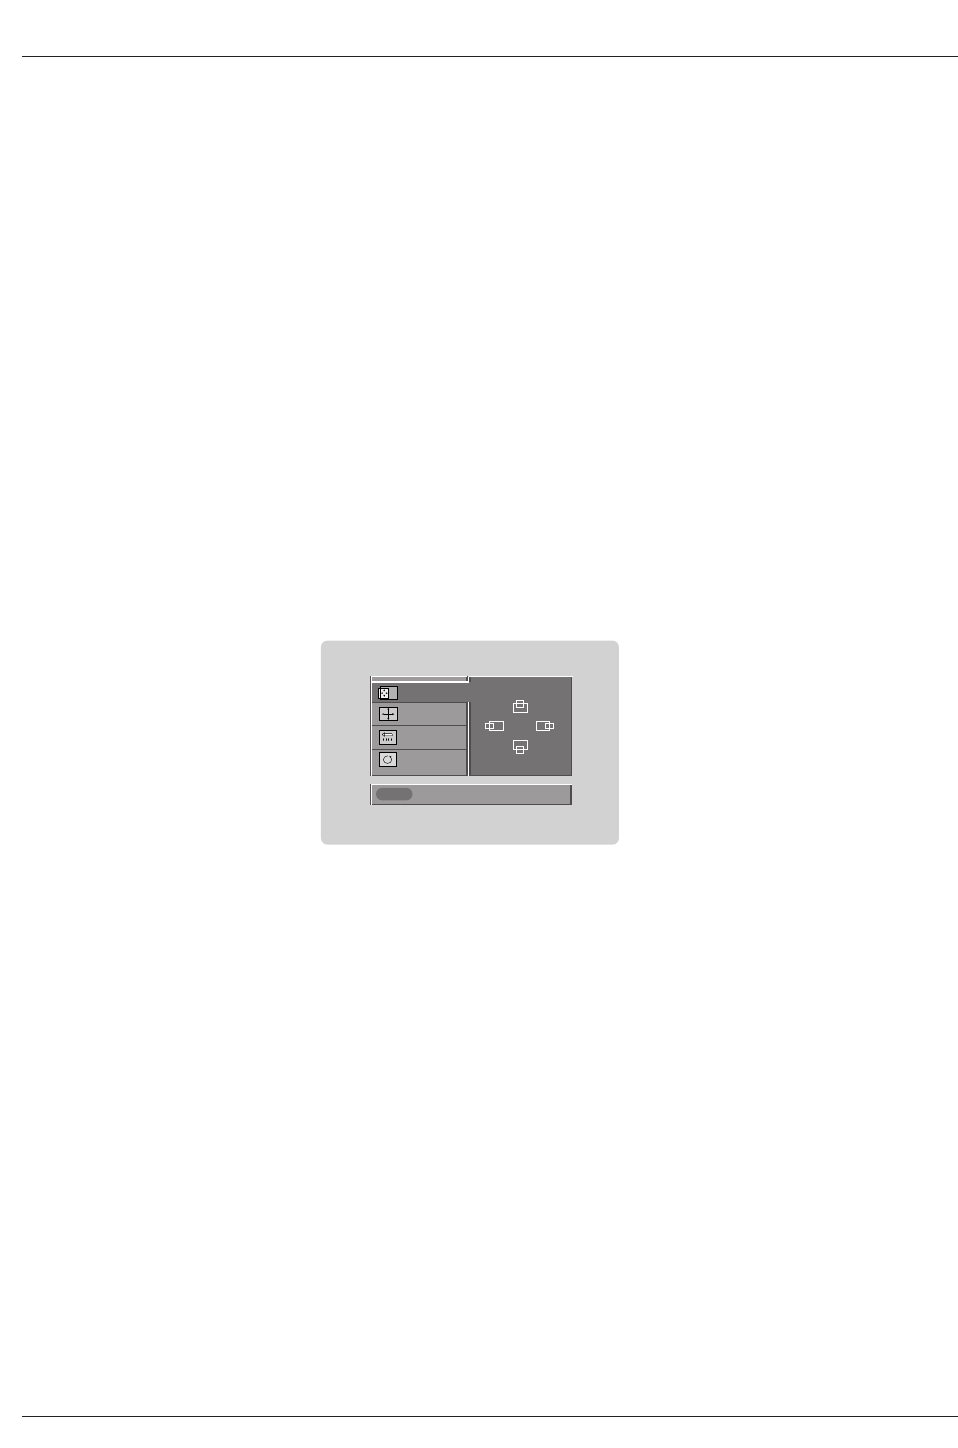
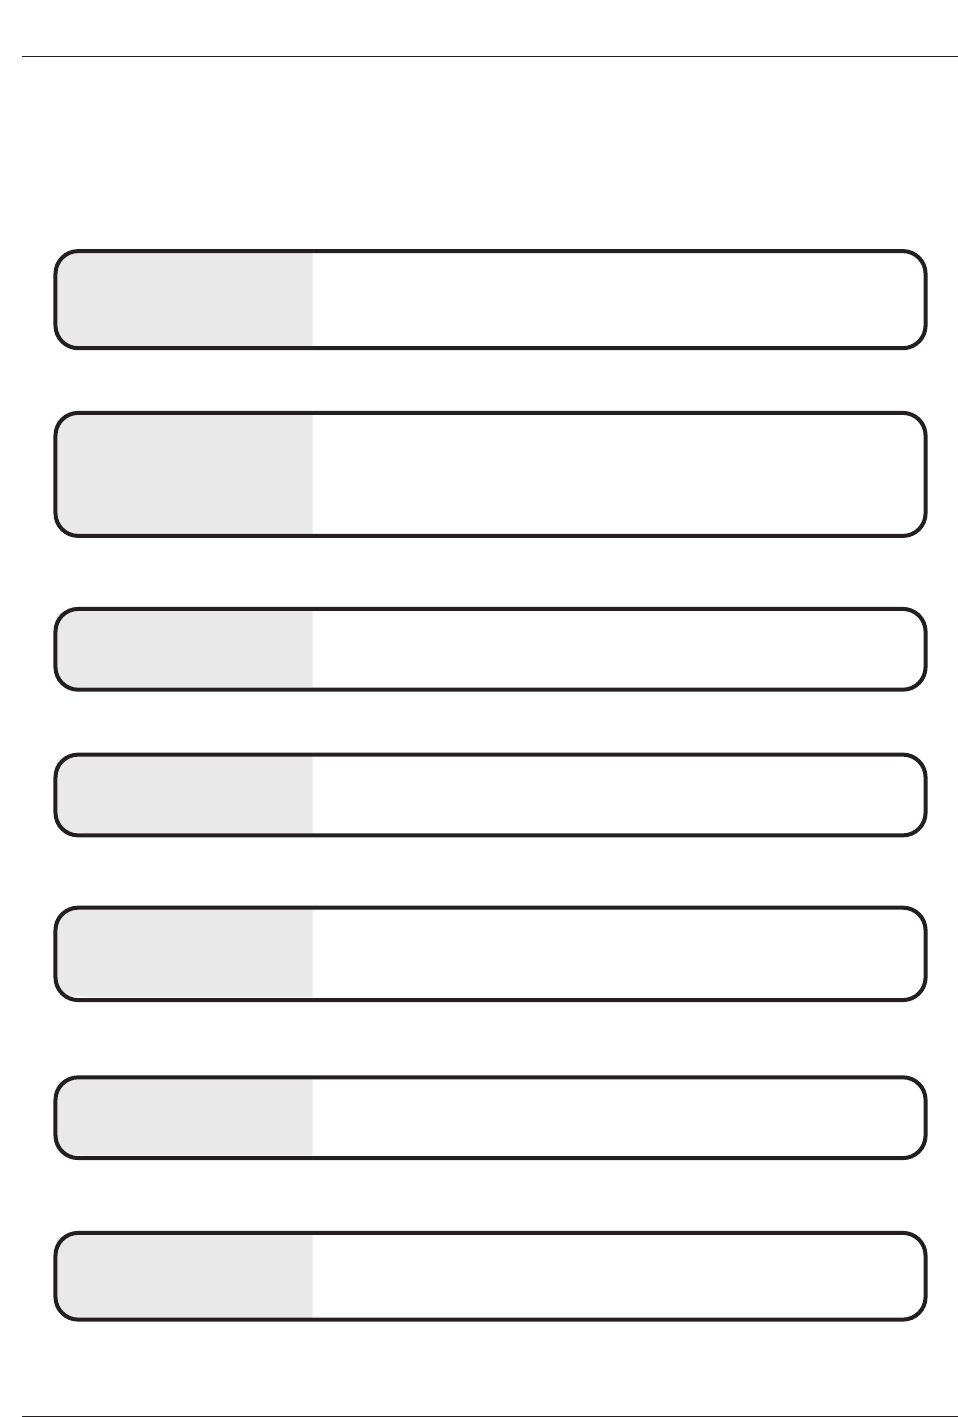
• When RGB connect to PC input and select the RGB-PC in Main Input, this function is used.
• When HDMI/DVI connect to PC input and select HDMI/DVI input, this function is used.
• In RGB-DTV mode, SIZE and PHASE is not available.
Screen Setup for PC mode
•After connecting RGB-PC or HDMI/DVI to PC input and checking the screen quality.
- Display PC Adjust Menu using ADJUST button.
- Position : Adjust the screen position. After displaying the Adjust, select the screen position.
- Size : Adjust the screen size.
- Phase : Adjust the phase of Pixel clock.
(Only available in RGB-PC mode)
- Reset : Initializating Size, Position, Phase adjustment .
Operation
Operation
Adjustment for screen Position, Size, Phase, Reset
Adjustment for screen Position, Size, Phase, Reset
Previous
POSITION
SIZE
PHASE
RESET
Adjust
D
FG
E
Size

Owner’s Manual
Troubleshooting Checklist
No picture &
No sound
•Check whether the TV is turned on.
•Is the power cord inserted into wall power outlet?
•Test the wall power outlet, plug another product’s power cord into the outlet
where the TV’s power cord was plugged in.
No or poor color
or poor picture
•Select Color in the Picture menu and press the Gbutton.
(Refer to p.62)
•Keep a sufficient distance between the TV and the VCR.
•Activate any function to restore the brightness of the picture.
(If still picture is on the screen for more than 5 minutes, the screen gets dark.)
The remote control
doesn’t work
•Check to see if there is any object between the TV and the remote control
causing obstruction.
•Are batteries installed with correct polarity (+ to +, - to -)?
(Refer to p.11)
•Correct remote operating mode set: TV, VCR etc.?
•Install new batteries. (Refer to p.11)
Picture OK &
No sound
•Press the VOLUME (G) button.
•Sound muted? Press MUTE button.
Picture appears slowly
after switching on
•This is normal, the image is muted during the TV startup process. Please
contact your service center, if the picture has not appeared after five minutes.
Horizontal/vertical bars
or picture shaking •Check for local interference such as an electrical appliance or power tool.
T
Troubleshooting Checklist
roubleshooting Checklist
LCoS Projection TV
T
Troubleshooting Checklist
roubleshooting Checklist
Troubleshooting Checklist
Poor TV input
signal •Check ANTENNA and CABLE connection.
No channel or a few
channel •Start EZ Scan.
Poor Video
signal •Check ANTENNA and CABLE connection.
Unsuitable
Aspect Ratio •You can adjust the RATIO button or Aspect Ratio in the OPTION menu.
No output from one of
the speakers •Adjust Balance in the AUDIO menu. (Refer to p.64)
Unusual sound from
inside the TV
•A change in ambient humidity or temperature may result in the unit turning off
and does not indicate a fault with the TV.
My Guide listings
disappeared after a power
failure
•You should begin to receive listings again within 24 hours.
Owner’s Manual
Troubleshooting Checklist
I set a show to Auto-Tune
and it did not.
•Check the Schedule menu and verify that the show is listed as a Reminder.
• Highlight the show under Listings and do the following:
WPress the Menu key on the remote.
WUse the down arrow to highlight Edit Reminder, and press ENTER.
WVerify the Auto-Tune option reads Yes.
• The TV must be On at the scheduled time for Auto-Tune.
• If you have a cable box, check the IR cable.
I set a show with the
Power On TV option and
it did not.
•Check the Schedule menu and verify that the show is listed as a Reminder.
• Highlight the show under Listings and do the following:
WPress the Menu key on the remote.
WUse the down arrow to highlight Edit Reminder, and press ENTER.
WVerify the Power On TV option reads Yes.
A show I set to Record
did not occur.
•Make sure your recorder is turned Off before the recording begins.
• Make sure there is a tape.
• Check the Schedule menu and verify that the show is listed before recording
begins.
• Check the placement of the IR cable in front of your recorder.
I have not received any
Guide listings.
• Listings usually appear within 24 hours after a successful Setup.
• It may take up to a week to fill the Listings grid with the full 8 days of listings.
• If you see a Listings grid with the message "No Listings" displayed you should
start to receive updated program listings within 24 hours. To receive listings:
WMake sure the cable box is left On, if applicable.
WTurn off your recorder when not in use.
• If the message "No data for this screen" is displayed:
WCheck the connections between the TV, cable, antenna, and the IR cable
if using a cable box.
WVerify Setup information under Change System Settings.
WMake sure the cable box is On, if applicable.
WIf this message is still displayed after multiple days, please contact the
LG®Brand Customer Support.
Some channel numbers
in the Guide are incor-
rect.
•You can correct them using Change Channel Display under Setup.
LCoS Projection TV
Maintenance
1. Here’s a great way to keep the dust off your screen for a while. Wet a soft cloth in a mixture of lukewarm water and
a little fabric softener or dish washing detergent. Wring the cloth until it’s almost dry, and then use it to wipe the
screen.
2. Make sure the excess water is off the screen, and then let it air-dry before you turn on your TV.
To remove dirt or dust, wipe the cabinet with a soft, dry, lint-free cloth.
Please be sure not to use a wet cloth.
If you expect to leave your TV dormant for a long time (such as a vacation), it’s a good idea to unplug
the power cord to protect against possible damage from lightning or power surges.
- Early malfunctions can be prevented. Careful and regular cleaning can extend the amount of time you will have your
new TV. Be sure to turn the power off and unplug the power cord before you begin any cleaning.
Cleaning the Screen
Cleaning the Screen
Cleaning the Cabinet
Cleaning the Cabinet
Extended
Extended Absence
Absence
Maintenance
Maintenance

Owner’s Manual
Product Specification
•The specifications shown above may be changed without prior notice for quality improvement.
Product Specifications
Product Specifications
MODEL
Horizontal Size (inches)
Height (inches)
Depth (inches)
Weight (lbs.)
Power requirement
Television System
Program Coverage
Display Resolution
Power Consumption (W)
Antenna
Audio Output (W)
Supplied Accessories
AC120V ~ 60Hz
NTSC-M, ATSC, 64 & 256 QAM
VHF 2 ~ 13, UHF 14 ~ 69, CATV 1 ~ 135, CADTV 1 ~ 135. DTV 2 ~ 69
1080p
260W
75 ohm External Terminal for VHF/UHF
20Wx2
Remote control, 2 size AA batteries, D-sub 15 pin Cable, G-LINK cable
62SA1D-UA
63.3
40.1
19.5
117.3
71SA1D-UA
72.2
45.5
22.2
138.5

LG®Brand Customer Interactive Center
P. O. Box 240007
201 James Record Road
Huntsville, Alabama 35824
ATTN: CIC
Telephone number: 1-800-243-0000
This number is a toll-free number
Follow menu prompts when the call is answered
Web address: www.lgservice.com
Telephone Center Hours of Operation:
24 hours a day, 365 days per year
Service for your LG®Brand Rear Projection Television is provided through LG Electronics Alabama, Inc., the autho-
rized LG®Brand Service Center for the United States.
LG®Brand LCOS Rear Projection Televisions are marketed and distributed in the United States by
LG Electronics Corporation, 2000 Millbrook Drive, Lincolnshire, IL 60069.
CONCERNING PIXEL FUNCTIONALITY: Your LCoS Rear Projection Television contains about 921600 individual
pixels. LCoS Projection displays typically contain a small number of pixels that do not function normally. Your display
has been inspected and is in compliance with manufacturer’s specifications, indicating that any pixel defects do not
effect the operation or use of your display.
READ YOUR OPERATING GUIDE CAREFULLY SO THAT YOU UNDERSTAND THE OPERATION OF YOUR LCoS
REAR PROJECTION DISPLAY AND HOW TO ADJUST THE CONSUMER CONTROLS.
IMPORTANT: Please fill out and mail in your Product Registration Card or go to www.lgservice.com to register your
product online. This information allows us to reach you promptly should we discover a safety or reliability problem
that could affect you.
FOR SERVICE:
For warranty service information, please contact the LG®Brand Customer Support telephone number listed below.
When calling for service, please have your product model number, serial number and the date of purchase or the date
of original installation available.
If a replacement unit is required, under some circumstances you may be asked to provide a reserve deposit to the
LG®Brand Service Center against a credit card number as surety for advanced shipment. Your credit card will not be
charged if you return the defective unit within 10 working days.
If a replacement unit is received, please use the carton and packaging from that unit in returning the defective unit to
the LG®Brand Service Center.
Parts and service in accordance with the LG®Brand warranty is our responsibility and will be provided without charge.
Other service requirements will be at the owner’s expense. If you have problems in obtaining satisfactory warranty
service, write or call the LG®Brand Customer Interactive Service.
To assure proper credit and avoid unnecessary charges, you must obtain a Return Authorization before returning any
product to the Factory Service Center. Contact the number below or your authorized LG®Brand repair facility for
details.
Before you call for warranty service, check your operating guide – you may avoid a service call.
CUSTOMER ASSISTANCE NUMBERS
To obtain customer assistance, product information,
or Dealer or Service locations
Call 1-800-243-0000
24 hours a day, 365 days per year

P/N : 3828VA0540B (3828VB0002M)
Your LG®brand LCoS Rear Projection Television will be repaired or replaced as set forth below, if it proves to be
defective in material or workmanship under normal use, during the warranty period ("Warranty Period") listed below,
effective from the date ("Date of Purchase") of original consumer purchase of the product. This warranty is good only
to the original purchaser of the product and effective only when used in the United States.
LG®Brand
LCoS Rear Projection Television
U.S. Limited Warranty
THIS WARRANTY IS IN LIEU OF ANY OTHER WARRANTY, EXPRESS OR IMPLIED, INCLUDING WITHOUT LIM-
ITATION, ANY WARRANTY OF MERCHANTABILITY OR FITNESS FOR A PARTICULAR PURPOSE. TO THE
EXTENT ANY IMPLIED WARRANTY IS REQUIRED BY LAW, IT IS LIMITED IN DURATION TO THE EXPRESS
WARRANTY PERIOD ABOVE. NEITHER THE MANUFACTURER NOR ITS U.S. DISTRIBUTOR SHALL BE LIABLE
FOR ANY INCIDENTAL, CONSEQUENTIAL, INDIRECT, SPECIAL, OR PUNITIVE DAMAGES OF ANY NATURE,
INCLUDING WITHOUT LIMITATION, LOST PROFITS, LOST OR CORRUPTED PROGRAMMING OR DATA, OR
ANY OTHER DAMAGE WHETHER BASED IN CONTRACT, TORT, OR OTHERWISE. Some states do not allow the
exclusion or limitation of incidental or consequential damages or limitations on how long an implied warranty lasts, so
the above exclusion or limitation may not apply to you. This warranty gives you specific legal rights and you may also
have other rights that vary from state to state.
THIS LIMITED WARRANTY DOES NOT APPLY TO:
The cost of repair or replacement under these excluded circumstances shall be borne by the consumer.
WARRANTY PERIOD:
LABOR: One Year from the Date of Purchase. Your unit will
be repaired or replaced with a new, substitute model or factory
reconditioned unit, at the manufacturer’s option. If repair, parts
used in the repair may be new or remanufactured.
Parts: One Year from the Date of Purchase.
Halogen Bulb: One Year from the Date of Purchase.
Replacement Units and Repair Parts are warranted for the
remaining portion of the original unit’s warranty period.
EFFECTIVE DATE OF WARRANTY: Your warranty period
begins on the date of sale to the original consumer / end user.
KEEP THE DEALER’S DATED BILL OF SALE OR PROOF
OF DELIVERY as evidence of the purchase date. You will be
required to submit a legible copy of your bill of sale or proof of
delivery when requesting warranty service.
In-Home Service is available on this Unit, as provided in
this Warranty. Please retain dealer’s dated bill of sale or deliv-
ery ticket as evidence of the Date of Purchase for proof of war-
ranty, and submit a copy of the bill of sale to the service person
at the time warranty service is provided.
Please call
1-800-243-0000
To locate your nearest LG® Brand Authorized Service
Center and to schedule a service appointment.
For further Instructions, see "For Service" below
●damage caused in shipping or transit
●service required as a result of improper installation,
including incorrect or insufficient AC supply (please
consult the owner’s manual for power supply require-
ments).
●linstallation or repair of antenna systems, cable con-
verters, cable company supplied equipment, or other
components in a video system
●set-up or adjustment on consumer controls, or dam-
age caused by improper adjustments
●damage caused by other system components
●any unit that has been modified or incorporated into
any other product
●replacement of batteries on the remote control.
●replacement of the Halogen Bulb except within the
first 90 days
●damage (including cosmetic damage), failure, loss or
personal injury due to misuse, abuse, negligence,
improper maintenance or storage, or to acts of nature
or other causes beyond our control. (Causes beyond
our control include but are not limited to lightning
strike, power surges, power outages and water dam-
age.)
●repair or replacement of warranted parts by other
than an LG®Brand authorized service centers.
●units purchased or serviced outside of the U.S.A.
●product where the original factory serial numbers
have been removed, defaced or changed in any way.
●product sold and labeled as "as is, where is" or simi-
lar disclaimer.