LG Electronics USA 9QK-DMPD239 Pocket Photo User Manual
LG Electronics USA Pocket Photo
User Manual

Owner’s manual
Please read this manual carefully before
operating your device.
MODEL :PD239, PD239W, PD239Y, PD239P, PD239T, PD239TW, PD239TY, PD239TP, PD239SP
Bluetooth®
ENGLISH
2
Safety information
CAUTION: TO REDUCE THE RISK OF ELECTRIC SHOCK
DO NOT REMOVE COVER (OR BACK) NO USER-
SERVICEABLE PARTS INSIDE REFER SERVICING TO
QUALIFIED SERVICE PERSONNEL.
This lightning ash with arrowhead
symbol within an equilateral triangle is
intended to alert the user to the presence
of uninsulated dangerous voltage within
the product’s enclosure that may be of sucient
magnitude to constitute a risk of electric shock to
persons.
The exclamation point within an
equilateral triangle is intended to alert
the user to the presence of important
operating and maintenance (servicing)
instructions in the literature accompanying the
product.
WARNING: TO PREVENT FIRE OR ELECTRIC SHOCK
HAZARD, DO NOT EXPOSE THIS PRODUCT TO RAIN
OR MOISTURE.
WARNING: Do not install this equipment in a
conned space such as a book case or similar unit.
CAUTION: Do not block any ventilation openings.
Install in accordance with the manufacturer’s
instructions.
Slots and openings in the cabinet are provided
for ventilation and to ensure reliable operation of
the product and to protect it from over heating.
The openings shall never be blocked by placing
the product on a bed, sofa, rug or other similar
surface. This product shall not be placed in a built-
in installation such as a bookcase or rack unless
proper ventilation is provided or the manufacturer’s
instruction has been adhered to.
CAUTION
RISK OF ELECTRIC SHOCK
DO NOT OPEN

3
CAUTION concerning the Power Cord
Most appliances recommend they be placed upon a
dedicated circuit;
That is, a single outlet circuit which powers only
that appliance and has no additional outlets or
branch circuits. Check the specication page of this
owner’s manual to be certain. Do not overload wall
outlets. Overloaded wall outlets, loose or damaged
wall outlets, extension cords, frayed power cords, or
damaged or cracked wire insulation are dangerous.
Any of these conditions could result in electric
shock or re. Periodically examine the cord of your
appliance, and if its appearance indicates damage
or deterioration, unplug it, discontinue use of the
appliance, and have the cord replaced with an exact
replacement part by an authorized service center.
Protect the power cord from physical or mechanical
abuse, such as being twisted, kinked, pinched, closed
in a door, or walked upon. Pay particular attention to
plugs, wall outlets, and the point where the cord exits
the appliance. To disconnect power from the mains,
pull out the mains cord plug. When installing the
product, ensure that the plug is easily accessible.
This device is equipped with a portable battery or
accumulator.
Safety way to remove the battery or the battery
from the equipment: Remove the old battery
or battery pack, follow the steps in reverse order
than the assembly. To prevent contamination of
the environment and bring on possible threat
to human and animal health, the old battery or
the battery put it in the appropriate container
at designated collection points. Do not dispose
of batteries or battery together with other
waste. It is recommended that you use local, free
reimbursement systems batteries and accumulators.
The battery shall not be exposed to excessive heat
such as sunshine, re or the like.
NOTICE: For safety making information including
product identication and supply ratings, please
refer to the main label inside the apparatus.
NOTICE: Only use the AC adaptor supplied with this
device. Do not use a power supply from another
device or another manufacturer. Using any other
power cable or power supply may cause damage to
the device and void your warranty.

4
CAUTION:
yThe apparatus should not be exposed to water
(dripping or splashing) and no objects lled with
liquids, such as vases, should be placed on the
apparatus.
yMinimum distance around the apparatus for
sucient ventilation, no less than 5 cm.
yThe ventilation should not be impeded by
covering the ventilation openings with items, such
as newspapers, table-cloth, curtains etc.
yNo naked ame sources, such as lighted candles,
should be placed on the apparatus.
yInternal lithium battery in the unit should not be
replaced by user because of danger of explosion
if battery is incorrectly replaced ,and must be
replaced with the same type battery by expert.
Disposal of your old appliance
1. When this crossed-out wheeled bin
symbol is attached to a product it
means the product is covered by the
European Directive 2002/96/EC.
2. All electrical and electronic products
shall be disposed of separately
from the municipal waste stream
via designated collection facilities
appointed by the government or the
local authorities.
3. The correct disposal of your old
appliance will help prevent potential
negative consequences for the
environment and human health.
4. For more detailed information about
disposal of your old appliance,
please contact your city oce, waste
disposal service or the shop where you
purchased the product.

5
Disposal of waste batteries/accumulators
1. When this crossed-out wheeled
bin symbol is attached to batteries/
accumulators of your product it
means they are covered by European
Directive 2006/66/EC.
2. This symbol may be combined with
chemical symbols for mercury(Hg),
cadmium(Cd) or lead(Pb) if the
battery contains more than 0.0005%
of mercury, 0.002% of cadmium or
0.004% of lead.
3. All batteries/accumulators should
be disposed separately from the
municipal waste stream via designated
collection facilities appointed by the
government or the local authorities.
4. The correct disposal of your old
batteries/ accumulators will help
to prevent potential negative
consequences for the environment,
animal and human health.
5. For more detailed information
about disposal of your old batteries/
accumulators, please contact your
city oce, waste disposal service or
the shop where you purchased the
product.
6
LG Electronics hereby declares that this/these
product(s) is/are in compliance with the essential
requirements and other relevant provisions of
Directive 1999/5/EC, 2004/108/EC, 2006/95/EC,
2009/125/EC and 2011/65/EU.
Contact oce for compliance of this product:
LG Electronics Inc
EU Representative, Krijgsman 1,
1186 DM Amstelveen, The Netherlands
yPlease note that this is NOT a Customer Service
contact point. For Customer Service Information,
see Warranty Card or contact the dealer that you
purchased this product.
Indoor use only.
RF Radiation Exposure Statement
This equipment should be installed and operated
with minimum distance 20 cm between the radiator
and your body.
Device operating temperature
When operating in cold weather, the device
shall not print. Bring it inside from the cold and
give about 10 min to adjust to the specied
operating temperature (5 °C - 40 °C). Then try
printing again. (For the appropriate use, it is
recommended not to operate it outdoors in
winter.)
, Note
CAUTION when using this product in
environments of low humidity
yIt may cause static electricity in
environments of low humidity.
yIt is recommended to use this product after
touching any metal object which conducts
electricity.
> Caution

7
Contents
Safety information ......................2
STEP 1 Getting Started ..................8
Supplied items............................8
Product Overview.........................8
Power On / O ............................9
STEP 2 Charging Battery .................9
STEP 3 Inserting Photo Paper .......... 11
Cleaning printer head using Smart Sheet 11
Paper Jam Solution ......................12
STEP 4 Installing App ................. 12
Installing App for Android phone ........12
App Setting ..............................13
Installing App for iPhone ................14
Setting Bluetooth of iPhone .............14
STEP 5 Printing Photo ................. 15
Printing using Android phone............15
Printing using iPhone ....................18
Notes on the printing.................. 20
Checking Label........................ 21
About LED Indicator ................... 22
Specications ......................... 23
Troubleshooting ...................... 24
8
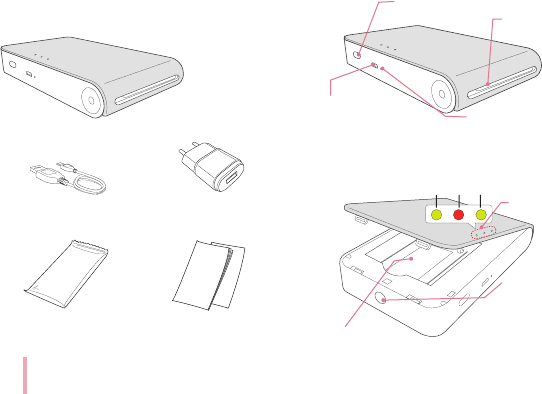
STEP 1 Getting Started
Supplied items
USB cable Charger
LG Pocket Photo Printer
ZINK Photo Paper Simple manual
Product Overview
Micro USB port
(for recharging) Reset hole
Paper exit slot
Paper insert slot
Switch (Power)
LED indicator
Upper
cover
button
a b c
9
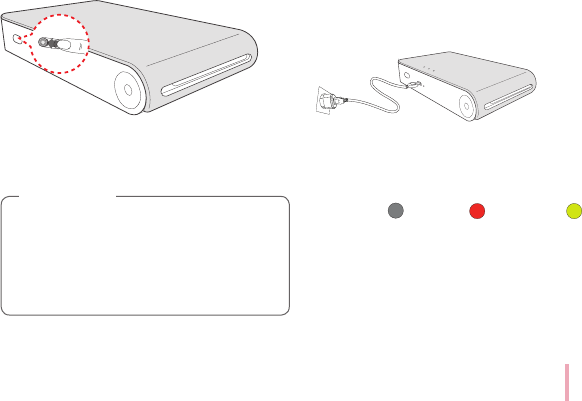
Power On / O
On: Slide the switch to direction of the arrow.
O: Slide the switch to the opposite direction.
yWhen turning the device on, LED indicator
(c) ashes for 5 sec. Then printing is
available.
yFor more information, see “About LED
indicator” on page 22.
, Note
STEP 2 Charging Battery
This device uses built-in battery. Before using it,
charge the battery in full. (Refer to below)
Battery charging time : 1 hour
Checking the charging status with LED indicators
yPower-o : Charging : Full charge :
y10 % : ashes for about 3 sec.
y0 % : ashes for about 30 sec. and turns o.
yLG Pocket Photo is always charged when
connected to the power supply except for being
printed.

10
Charger (AC Adapter)
yModel : ADS-5MA-06A 05050GPG
yManufacturer : SHENZHEN HONOR ELECTRONIC
CO. ,LTD.
yInput : 100 - 240 V ~, 50 / 60 Hz
yOutput : 5 V 0 1.0 A
yHandle with care during charging to prevent
electric shock.
yDo not place near heating appliance.
yDo not disassemble or deform.
yDo not give shock on.
yAvoid too high or low temperature or
humidity.
> Caution
yYou can connect the device to PC using the
supplied USB cable, but charging time can
be longer.
yThe operating time on battery may vary
depending on the battery status, operational
status and environment conditions.
yWhen the battery is discharged, printing is
available after charging it for more than 10
min. (Charge in full to print in a row.)
, Note
11
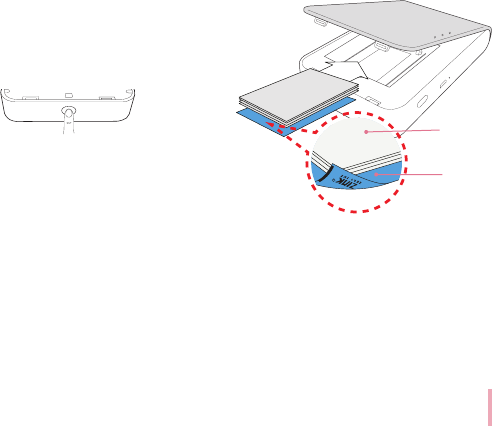
STEP 3 Inserting Photo
Paper
1. Open the Paper insert door.
2. Unwrap the pack of the photo papers.
3. Slide Smart Sheet (Blue) and photo papers
together into the Paper insert slot. Smart Sheet
will be ejected automatically before rst printing.
yWhen you purchased photo paper seperately,
do not insert more than 1 pack (10 Photo papers
and 1 Smart Sheet). Otherwise 2 papers may be
ejected at once or paper jam may occur.
yRell the device after using up the papers in.
yWhen power is turned it on, you cannot open
the cover. To open it, turn o the power.
Smart Sheet
with Barcode side
down
Photo Paper
with White
side up
Cleaning printer head using Smart
Sheet
Smart Sheet cleans printer head and calibrates colors
on photo. Keep the best print quality by using it
repeatedly.

12
Paper Jam Solution
Do not pull the paper out. Turn the device o and on
again, the paper will be ejected automatically.
If this problem is not solved, please refer to
“Troubleshooting”.
yDo not forcefully pull the paper out during
printing. It may result in malfunction.
yDo not damage or bend the papers.
yUsing soiled paper may result in malfunction.
yUsing photo papers from other company
may result in malfunction, paper jam or low
quality.
yDo not place inside a car or, expose to direct
sunlight or moisture.
yDo not leave in a place where the
temperature or humidity is too high or low. It
may reduce the quality of the printed photo.
> Caution
yHandle with care when you touch the paper
not to get dirt on.
yEnsure to use the papers within its valid
date.
yOnce unpacked, the papers may begin
to curl up after a period of time. It is
recommended to use them as soon as
possible.
, Note
STEP 4 Installing App
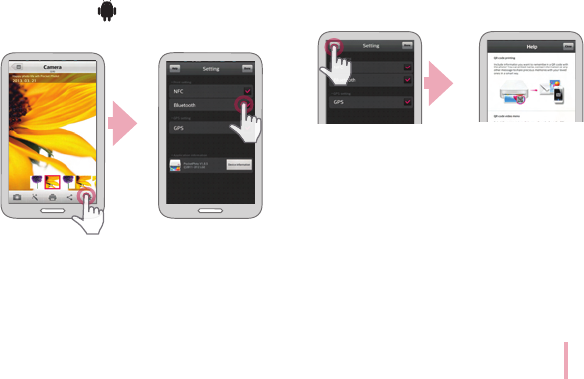
Installing App for Android phone
Bluetooth®
From Play Store (Android market)
Search for “LG Pocket Photo”.
Using QR code
Scan the QR code on the product box.
13
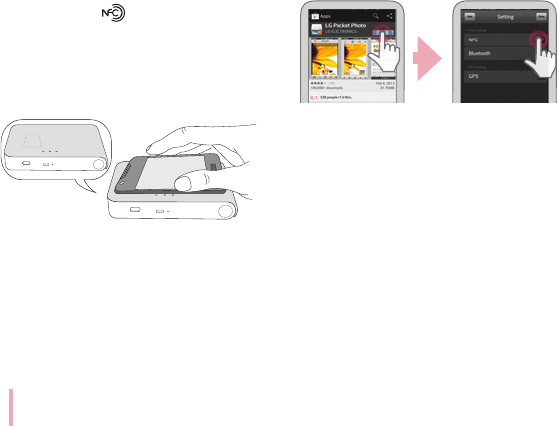
Using NFC
Refer to “Printing using NFC” on page 16.
App Setting
Bluetooth®
Set the options in [Setting].
yNFC* : Prints using NFC (NFC-enabled phone only)
yBluetooth : Prints using Bluetooth
yGPS** : Saves the location where you took a photo
* NFC : Near Field Communication
** GPS : Global Positioning System using a satellite
See “Help” for details
For more information about the App, touch “Help”.
14
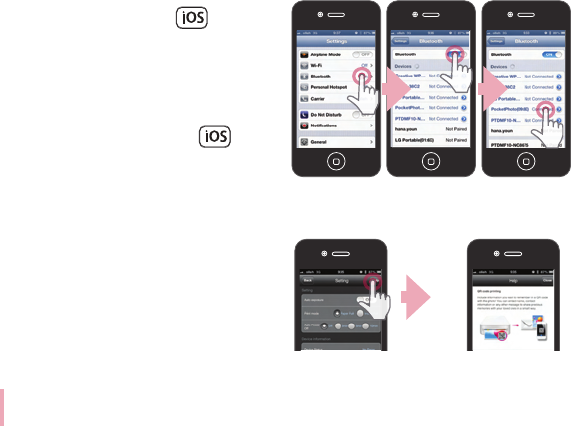
Installing App for iPhone
From App Store
Search for “LG Pocket Photo”.
Using QR code
Scan the QR code on the product box.
Setting Bluetooth of iPhone
1. On your iPhone’s home screen, touch [Settings].
2. Touch “Bluetooth” and touch the slider to turn
Bluetooth [On].
3. To connect your Pocket Photo device to the
iPhone, turn on your device and make sure it is
discoverable mode.
4. When your iPhone found the device, touch the
name of Pocket Photo on the iphone screen.
See “Help” for details
For more information about the App, touch “Help”.
15
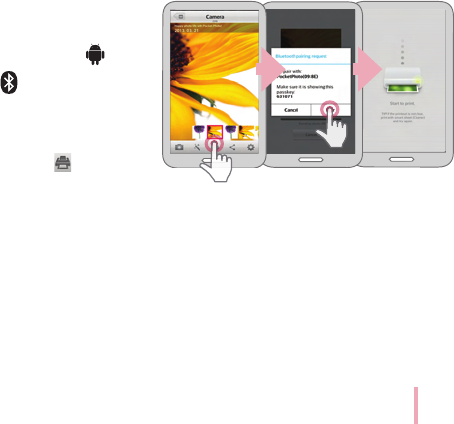
STEP 5 Printing Photo
Printing using Android phone
Bluetooth®
Printing using Bluetooth (
Bluetooth®
)
Preparation : Turn the device on, and start printing
with the LED indicator (c) turning on.
1. Run LG Pocket Photo App on Android phone.
2. Select a photo to print, and touch [ ].
3. Touch [OK], then it will start searching for
Bluetooth devices.
4.
When LG Pocket Photo is paired for the rst time,
[Bluetooth pairing request] appears. To start
printing, touch [Pairing] or input the PIN code ‘0000’.
yIf Smart Sheet is in the device, it will be ejected
before starting printing.
,You can print photos directly from Android
phones or PC via Bluetooth without the App.
Choose a photo and select [Bluetooth] in [Share]
or [Menu].
16
Printing using NFC (
Bluetooth®
)
Check whether your Android phone supports NFC
rst.
yHow to read NFC tag : Make smartphone get near
to NFC tag on the device.
NFC
1. Tagging for the rst time, it links to Play Store
where you can download LG Pocket Photo App.
2. Go to [Setting] in the App installed, and check
[NFC].
3. Choose a photo to print and tag, then printing is
started immediately. From this time, you can run
the App and print a photo by just tagging.
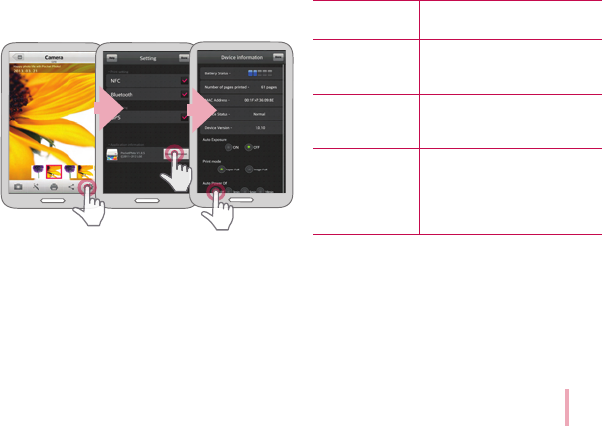
Setting Pocket Photo App of Android phone
You can check remaining battery, the number of the
photos printed, device version, MAC address, and
change the setting of print mode, etc.
1. Run LG Pocket Photo App on Android phone.
(To check [Device information], set to [On] the
Bluetooth of smartphone.)
17
2. Go to [Setting].
3. Touch [Device Information].
Auto Exposure Corrects color in the image.
(ON/OFF)
Paper Full Prints without white space. (The
edge of the image can be cut
o.)
Image Full Prints an image as a whole.
(White space can occur at the
edge of the paper.)
Auto Power O Set a time so that the device
turns itself o.
(Default is [5 min]. If you set to
[O], the device can be on for up
to 2.5 hours when fully charged.)
18
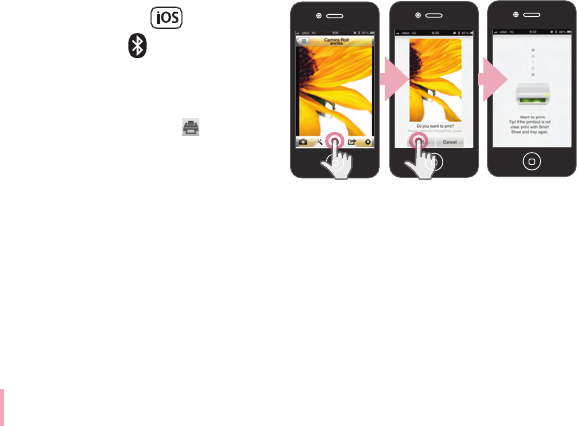
Printing using iPhone
Printing using Bluetooth (
Bluetooth®
)
Preparation : Turn the device on, and start printing
with the LED indicator (c) turning on.
1. Run LG Pocket Photo App on iPhone.
2. Select a photo to print, and touch [ ].
3. “Do you want to print?” message will be appeared.
Touch [OK] to start printing.
yIf Bluethooth is not connected, “ Paired device
not found” message is appeared. (refer to the
Bluetooth setting for iPhone.)
yIf Smart Sheet is in the device, it will be ejected
before starting printing.
19
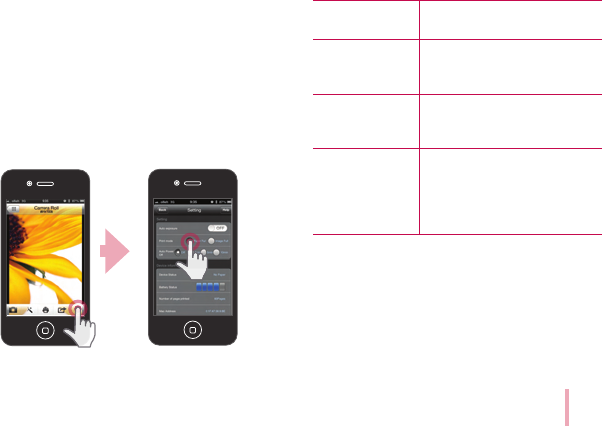
Setting iPhone Pocket Photo App
You can check remaining battery, the number of the
photos printed, device version, MAC address, and
change the setting of print mode, etc.
1. Run LG Pocket Photo App on iPhone.
(To check [Device information], set to [On] the
Bluetooth of iPhone.)
2. Go to [Setting].
3. Touch
Setting options to change.
Auto Exposure Corrects color in the image.
(ON/OFF)
Paper Full Prints without white space. (The
edge of the image can be cut
o.)
Image Full Prints an image as a whole.
(White space can occur at the
edge of the paper.)
Auto Power O Set a time so that the device
turns itself o.
(Default is [5 min]. If you set to
[O], the device can be on for up
to 2.5 hours when fully charged.)

20
Notes on the printing
yThe color of impression can be dierent between
printed photo and image on smartphone’s display.
yOnce the battery is fully charged, you can print up
to 30 papers in a row. It depends on the battery
condition.
yThe Bluetooth searching and transferring may
fail depending on its environment. Check the
Bluetooth condition on your phone and try again.
yIf there are more than a LG Pocket Photo device,
check MAC address on the label to choose one
you want to use.
(Refer to “Checking Label” on page 21.)
yDo not pull paper out by force during
printing.
yDo not open the paper insert door during
printing.
yDo not place an object at the front of the
Paper exit slot.
yIf the device is vibrated or given shock, the
quality of the printed photo may be reduced.
> Caution
21
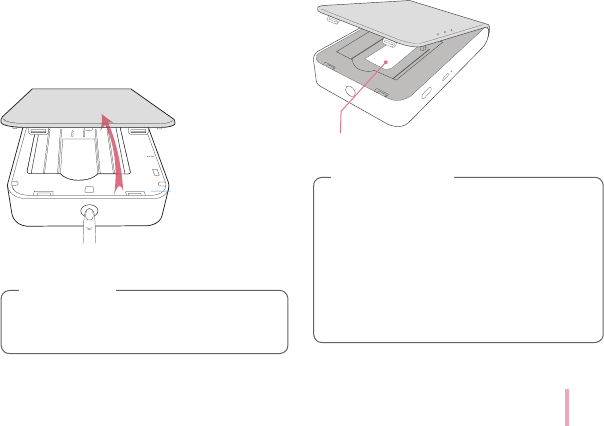
Checking Label
In case there are more than a LG Pocket Photo device,
check MAC address on the product label to choose
one you want to use.
When power is turned it on, you cannot open
the cover. To open it, turn o the power.
, Note
2. You can nd the product label.
yBe sure the device is o before opening.
Be sure the Paper insert door is opened
when you close the Upper Cover.
yIt is recommended not to open the Upper
cover as possible except for checking the
label.
yDo not detach the black rubber pad. It may
cause malfunction.
> Caution
1. Open the Paper insert cover.
22
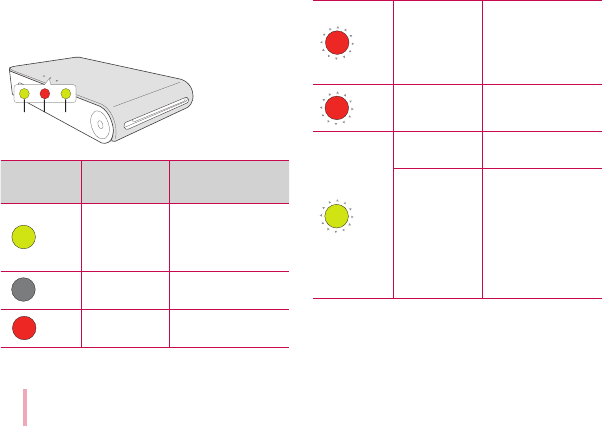
About LED Indicator
The LED indicators shows the device condition.
a b c
LED color Condition/
Power Description
/cWaiting/
On
Waits for printing.
Device turns itself o
if it is left unused for
a while.
/aFull charge/
O
To print, turn on the
device.
/aCharging/
O
To print, turn on the
device.
/bError/
On
No paper, Paper jam,
Cancelled, Opened,
Low temperature,
Unsupported le
format
/aLow battery/
On
To print, charge the
device.
/b
Printing/
On
Transferring data via
Bluetooth, Printing
Cooling mode/
On
After continuous
prints the device
may automatically
cool down
its internal
temperature. Wait
for a while to print
again.

23
Specications
Photo size 50 mm x 76 mm (Dot size : 640
x 1224)
Image le type/
size
PNG, JPEG (Baseline) / less than
10 MB
(Progressive JPEG is not
supported.)
Media paper
used
ZINKTM Photo Paper (exclusive
for LG)
Media paper
storage
environment
Temperature : 20 - 25 °C
Humidity : 40 - 55 % RH
Device
operation
environment
Temperature : 5 - 40 °C
Humidity : less than 70 % (35 °C)
(An temperature alert pops up
in the App.)
Optimum print
environment
Temperature : 15 - 32 °C
Humidity : less than 70 % (32 °C)
LED indicator
Power / Waiting / Bluetooth
transmitting / Charged /
Discharged / Error / Condition
of printer
Communication
Bluetooth 4.0 + EDR
Operation distance : about 10 m
External
connector
Micro USB port for charging
battery
Bus Power
Supply (USB) DC 5 V 0 1.0 A
Battery life
500 mAh Li-Polymer
rechargeable battery
Maximum 30 prints when fully
charged
Power supply
500 mAh Li-Polymer
rechargeable battery
AC adapter (DC 5 V 0 1.0 A)
Image
resolution More than 1280 x 2448 pixels

24
Dimensions (W
x D x H) 76 mm x 126 mm x 20 mm
Net Weight 202 g
yYour phone may be incompatible with the device
depending on its manufacturer, environment or
(Android or iOS) operating system.
yDesign and specications are subject to change
without prior notice.
Troubleshooting
Symptom Cause / Solution
No power The battery is discharged.
Be sure the device is
connected to charger or PC
properly when charging.
Bluetooth paring
does not work well.
Switch Bluetooth o and on
again on your smartphone,
then pair with the device in
the smartphone’s settings.
Turn on the device and try
printing (pairing) again in
5 sec.
Be sure the device is on.

25
The paper jammed
before printing.
1. Turn the device o and on
again then paper is ejected
automatically.
2. If above solution does
not work, open the Upper
cover and arrange the
papers. Then insert them
with Smart Sheet (Blue) or
pull the paper out slowly
and gently.
The paper jammed
during printing.
The printed photo
has lines.
Open the Upper cover,
arrange the papers and
insert them with Smart Sheet
locating at the bottom. Then
try printing again. (To open
the Upper cover, refer to
“Checking Label” on
21.)
No or incomplete
image is printed.
The edge of the
image on the
photo is cut o.
Set [Print mode] to [Image
Full] in the App’s setting
then the image is printed as
a whole.
White space
appears at the
edge of the paper.
When [Print mode] is set to
[Image Full], white space may
appears if the aspect ratio of
the paper and your image is
not the same.
When [Paper Full], the edge
of the image can be cut o or
little white space at the edge
of the paper may appear.
Quality of printed
photo is too low.
In case you magnify an image
using [ ] menu in the App,
the quality of the printed
photo may be reduced.
Turn o the device and insert
Smart Sheet locating at the
bottom of the papers. Then try
printing again.
Be sure the photo size is
bigger than the proper
resolution.(1280 x 2448 pixels)
When using Smart Sheet, it
should be used with photo
papers in the same pouch.

26
Device does not
print.
Be sure there are papers in
the device.
It may take time to print after
Smart Sheet is ejected.
Be sure the photo le is less
than 10 MB.
Baseline JPEG, PNG format is
supported only.
Device is turned o
automatically.
Check [Auto Power O] time
in the App’s setting.
Above solutions do
not work.
Press Reset hole with a
pointed thing like mechanical
pencil to initialize.

27
Notes
Changes or modifications not expressly approved by
the party responsible for compliance could void the
user’s authority to operate the equipment.
This device complies with Part 15 of the FCC Rules.
Operation is subject to the following two conditions:
(1) this device may not cause harmful interference,
and (2) this device must accept any interference
received, including interference that may cause
undesired operation.
Cet appareil radio est conforme au CNR-210
d’Industrie Canada.L’utilisation de ce dispositif est
autorisée seulement aux deux conditions suivantes :
(1) il ne doit pas produire de brouillage, et (2)
l’utilisateurdu dispositif doit être prêt à accepter tout
brouillage radioélectrique reçu, même si ce brouillage
est susceptible de compromettre le fonctionnement
du dispositif.
>
FCC/ IC Warning
經型式認證合格之低功率射頻電機,非經許可,公
司、商號或使用者均不得擅自變更頻率、加大功率
或變更原設計之特性及功能。」第十四條:「低功
率射頻電機之使用不得影響飛航安全及干擾合法通
信;經發現有干擾現象時,應立即停用,並改善至
無干擾時方得繼續使用。前項合法通信,指依電信
法規定作業之無線電通信。低功率射頻電機須忍受
合法通信或工業、科學及醫療用電波輻射性電機設
備之干擾。
> NCC