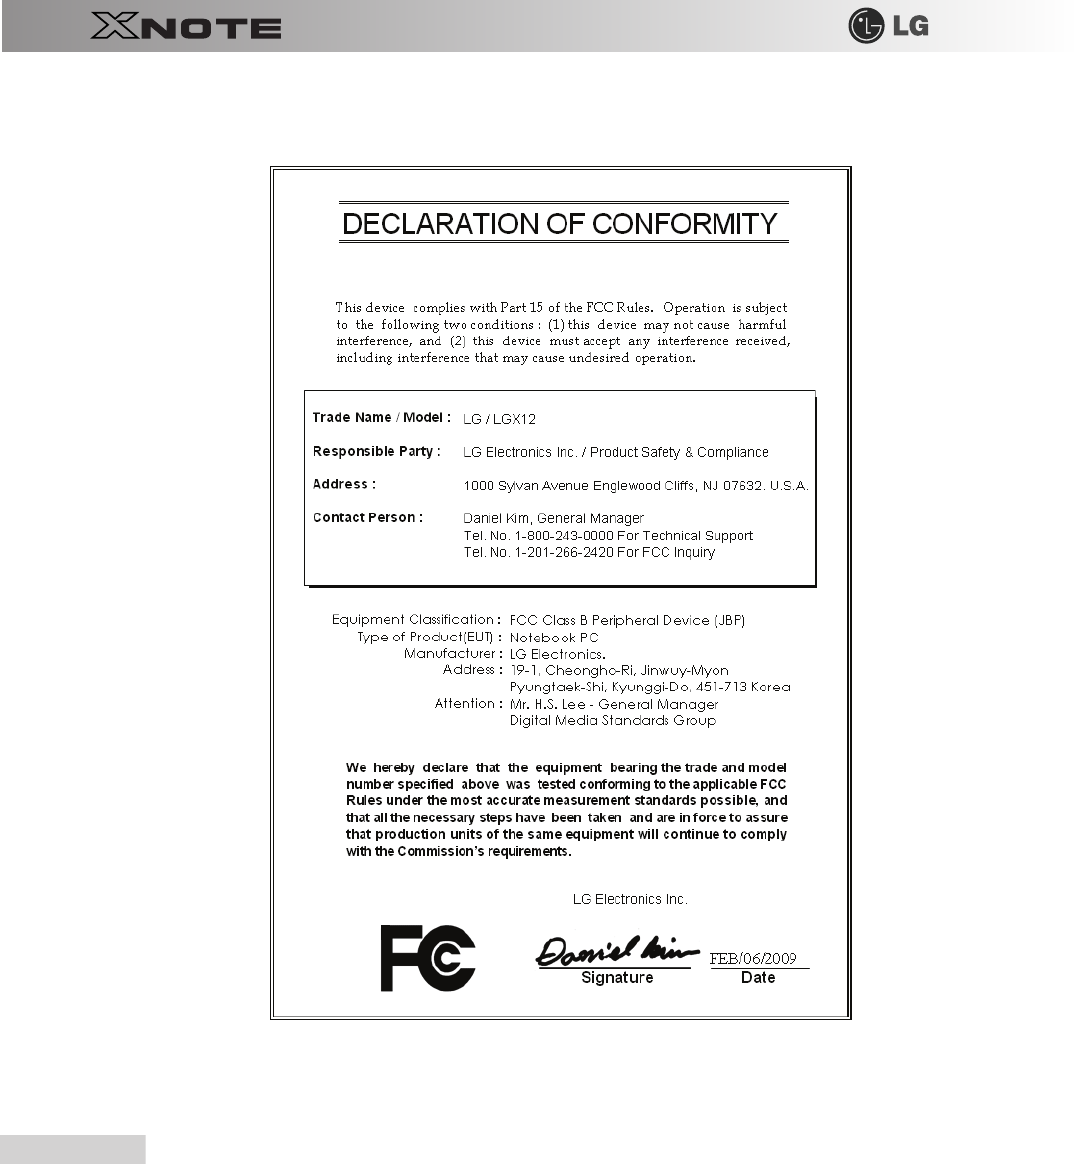
LG Electronics USA 9QK-LGX12 Notebook PC User Manual X120 ENG
LG Electronics USA Notebook PC X120 ENG
Contents
- 1. Manual
- 2. manual
Manual

Chapter 1.Tips
4
Tips
1-1. Read this carefully before using the Notebook PC.
▶
Regulatory Notices
Tips
5
6
Tips
Tips
7
8
Tips
Tips
9
10
Tips
Tips
11
12
Tips
Tips
13
▶
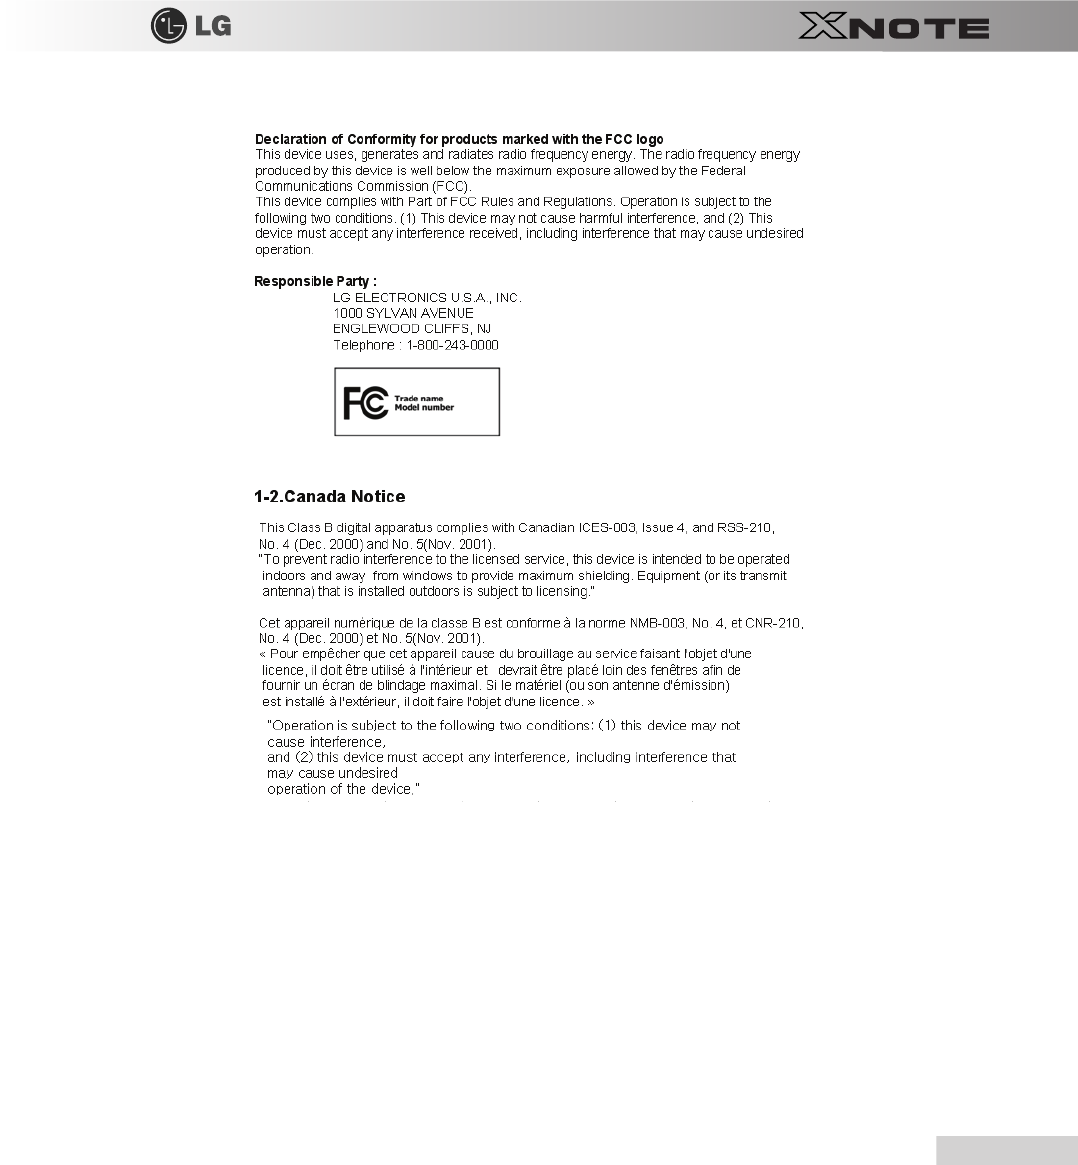
ENERGY STAR
▶
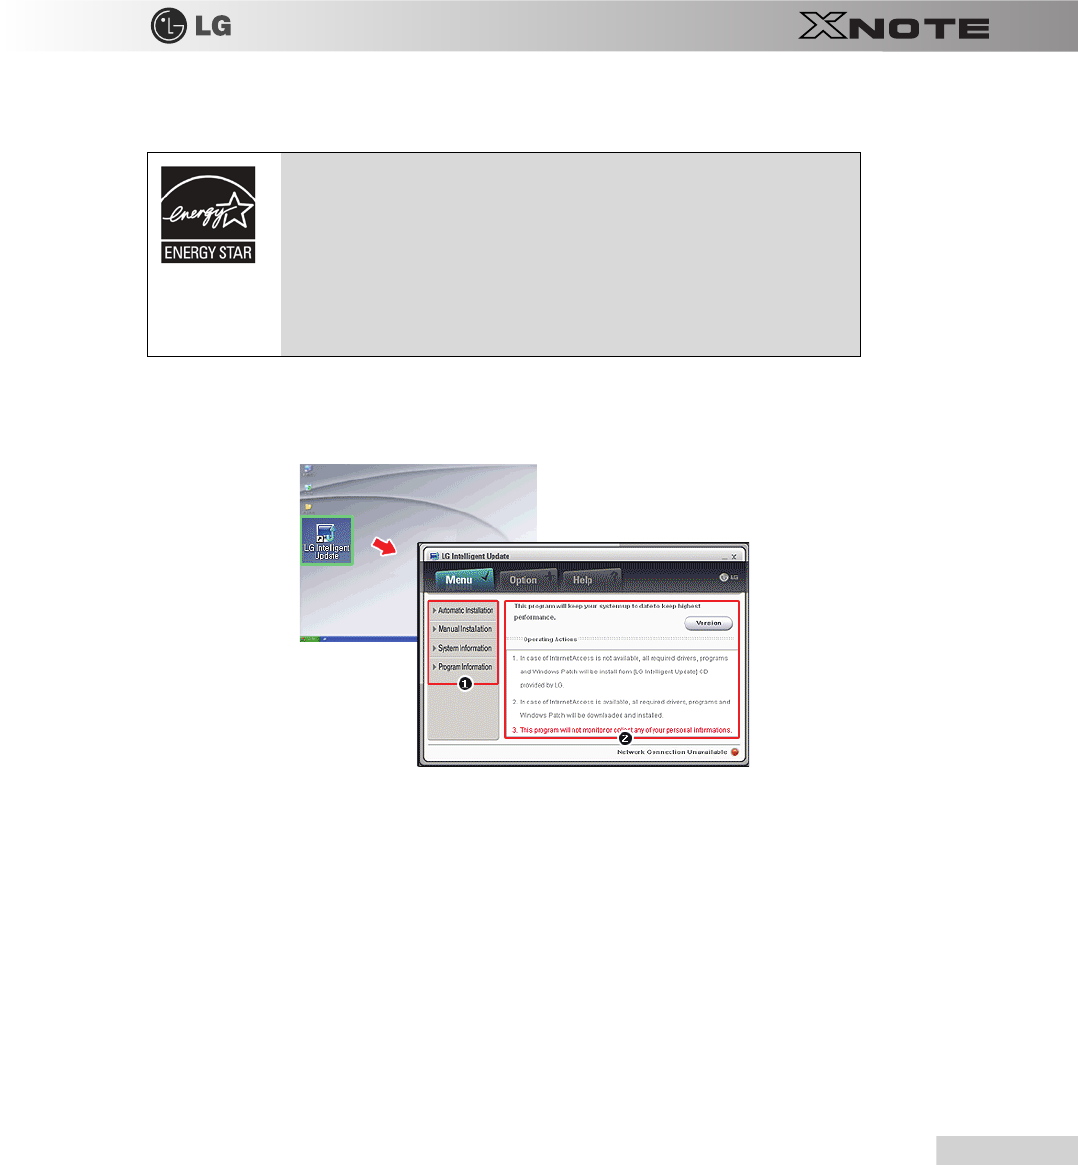
LG Intelligent Update
CD
To install a driver or application, use
LG Intelligent Update
CD provided by
LG Electronics
.
1.
Guides you to configure the optimal environment for the system.
2.
Provides you with an overview before use.
ENERGY STAR Compliance (Korea)
As an ENERGY STAR partner, LG has determined that standard configurations of this product meet the
ENERGY STAR guidelines for energy efficiency.
The ENERGY STAR program is a partnership with electronic equipment manufacturers to promote en-
ergy-efficient products.
Reducing energy consumption of products saves money and helps conserve valuable resources.
This computer is shipped with power management enabled with the computer set to sleep after 20 minutes
of user inactivity.
To wake your computer, click the mouse or touchpad button or press any key on the keyboard.
14
Tips
▶
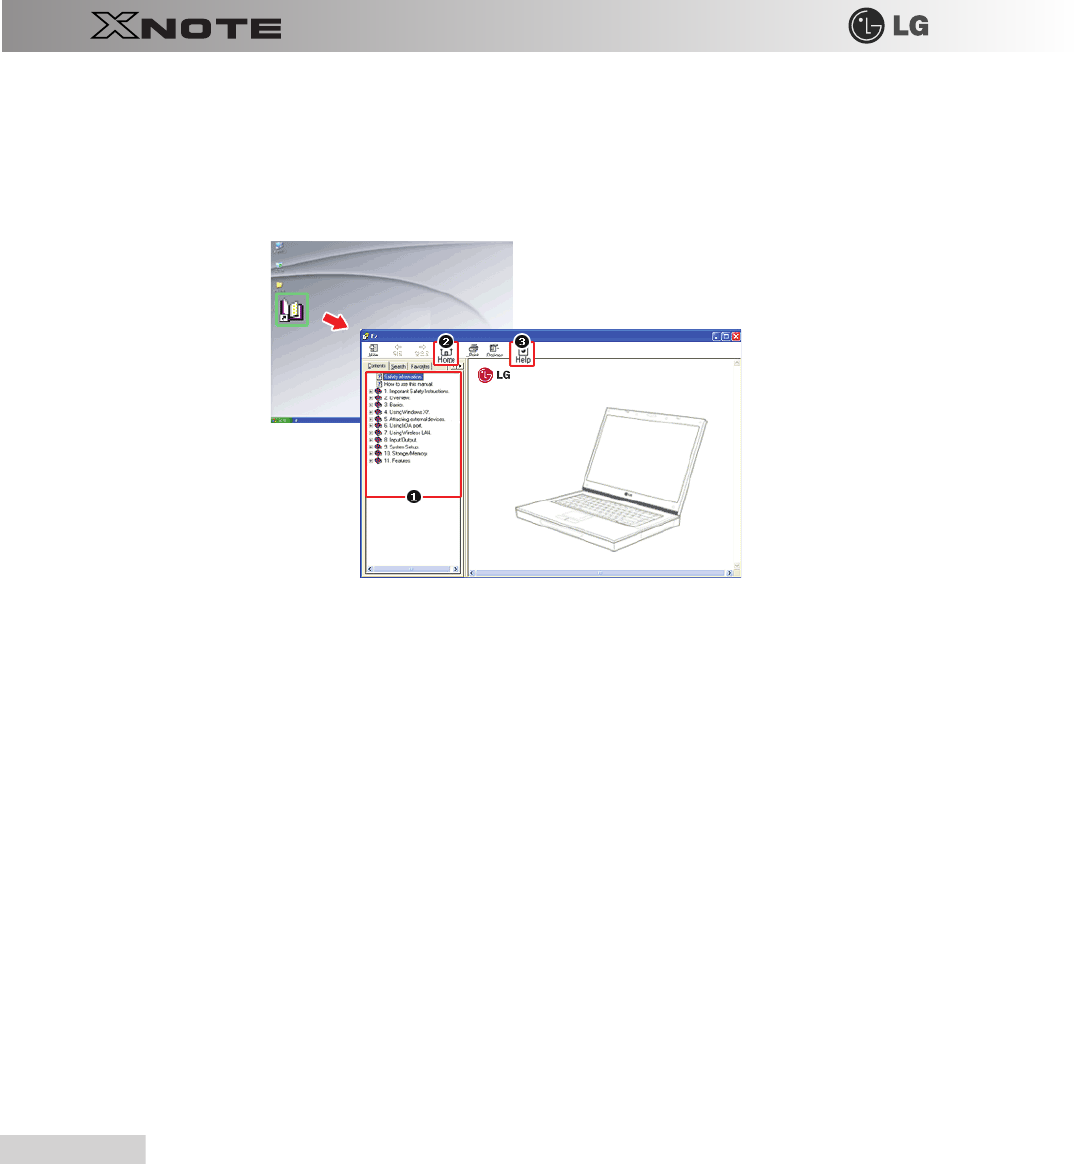
Using
Ez User Guide
/
Ez Troubleshooting
For more convenient use of the machine, we provide you with
Ez User Guide
/
Ez Troubleshooting
.
Install them by selecting
LG Intelligent Update
CD >
Manual Installation
>
Application
.
Click
Help
button and refer to Tour to learn how to use
Ez User Guide
/
Ez Troubleshooting
.
1.
Table of Contents
2.
Start
3.
Help
: Helps you to find the answers to your questions and solve problems.
▶
Ez User's Guide
Thank you for purchasing the
LG Electronics
product.
This machine is built on cutting-edge technology and has been tested reliably.
For the sake of convenient use, please read this manual in advance.
The below symbols are to inform you of dangers and safety concerns that you must be aware of. Read the symbol-indicated
instructions with caution to avoid any possible mishap.
Tips
15
Microsoft
,
MS
,
Win PE
, and
WINDOWS
are the registered trademarks of
Microsoft Corporation
.
IBM
,
IBM Personal Computer
,
PS/2
, and
PC AT
are the registered trademarks of
International Business
Machine Corporation
.
Copyright (C) 2009,
LG Electronics Inc.
,
DigitalMate
Co., Ltd.
Please be understanding that this manual may contain incorrect parts despite our dedicated efforts to perfect it.
The examplified figures in this manual may not exactly the same as the real products.
LG Electronics Inc.
has rights to modify any part of this manual for the better without prior notice.
Unauthorized reproduction or duplication of any part of this manual is strictly prohibited.
This product has been designed for household use and passed the Electromagnetic Interference Test. Thus, this product may
be used not only in residential areas but also in any other places.
Country of Origin: China
Manufacturer: LG Electronics (Kunshan) Computer Co.,Ltd.
Appears in the case of noncompliance with the instruction that may cause serious physical dam-
age or fatal injuries.
Appears in the case of noncompliance with the instruction that may cause minor damage to the
body or the machine.
LG
logo is a registered trademark of
LG
Corporation.
SONY
logo and
Memory Stick
are the registered trademarks of
SONY
Corporation.
Transcend
logo is a registered trademark of
Transcend
Corporation.
SD
logo is a registered trademark of
Secure Digital
Corporation.
16
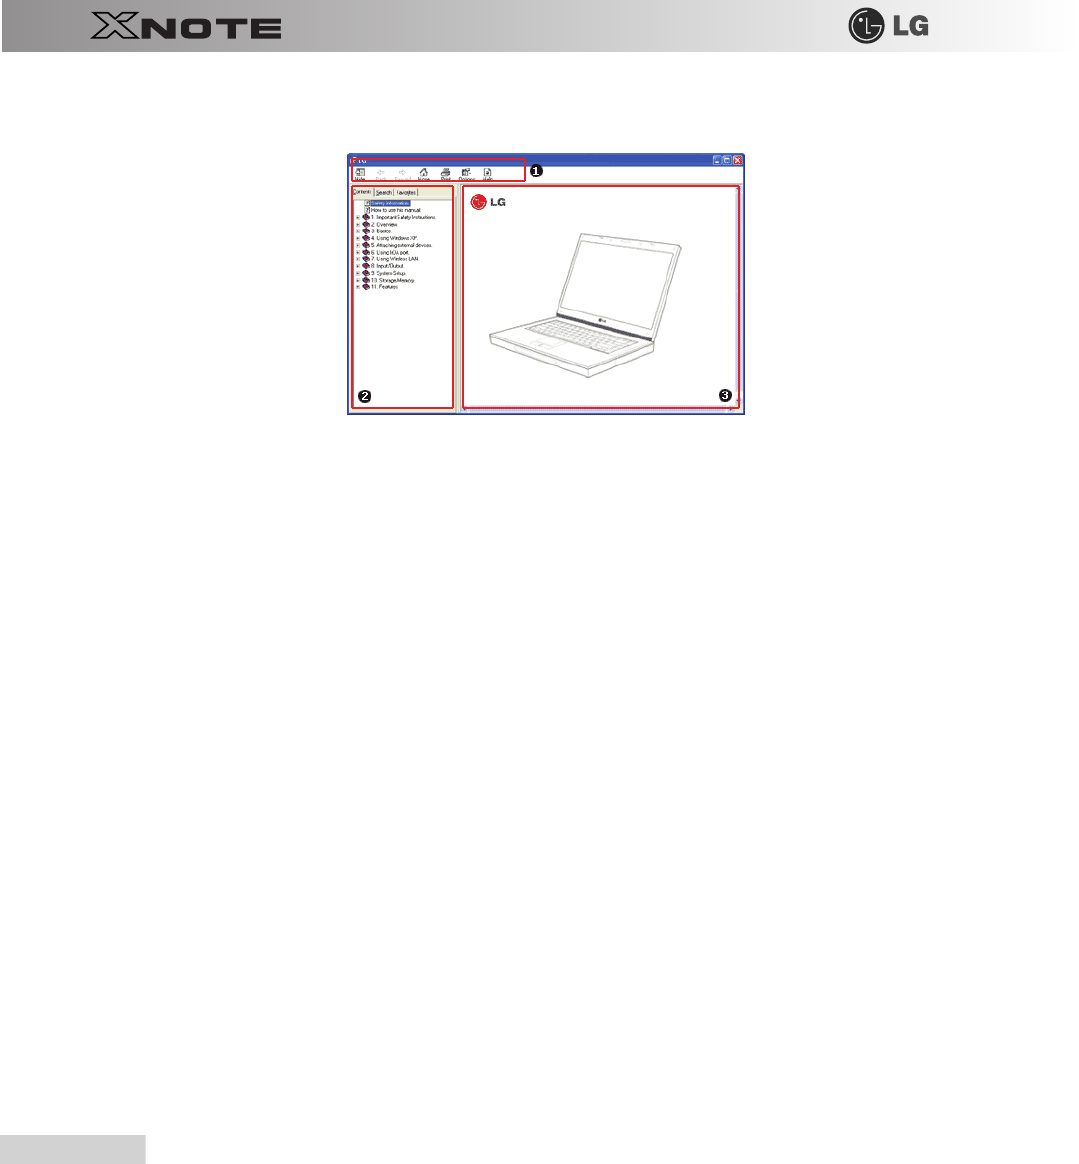
Tips
▶
Ez User Guide
Tour
1.
Toolbar
-
Hide
/
Show
: Hide or show the navigation window.
-
Back
: Displays the previous page in the navigation history.
-
Forward
: Displays the next page in the navigation history.
-
Home
: Displays the Home page.
-
Print
: Prints the current page.
-
Option
: Displays options.
-
Help
: Mostly used for touring this guide.
2.
Navigation Bar
-
Index
: Displays a categorized list of subjects.
-
Search
: Allows users to type key words and search manually.
-
Favorites
: Registers frequently searched items for more convenient future reference.
3.
Description Pane
-
Displays the explanation of the selected item.
Tips
17
1-2. Important safety information
Please avoid any undesirable environmental factor that shortens the machine's life span. Use the machine in a safe and stable
place.
※
The warranty does not cover any damage resulting from reckless use or use in undesirable environments.
▶
Installation
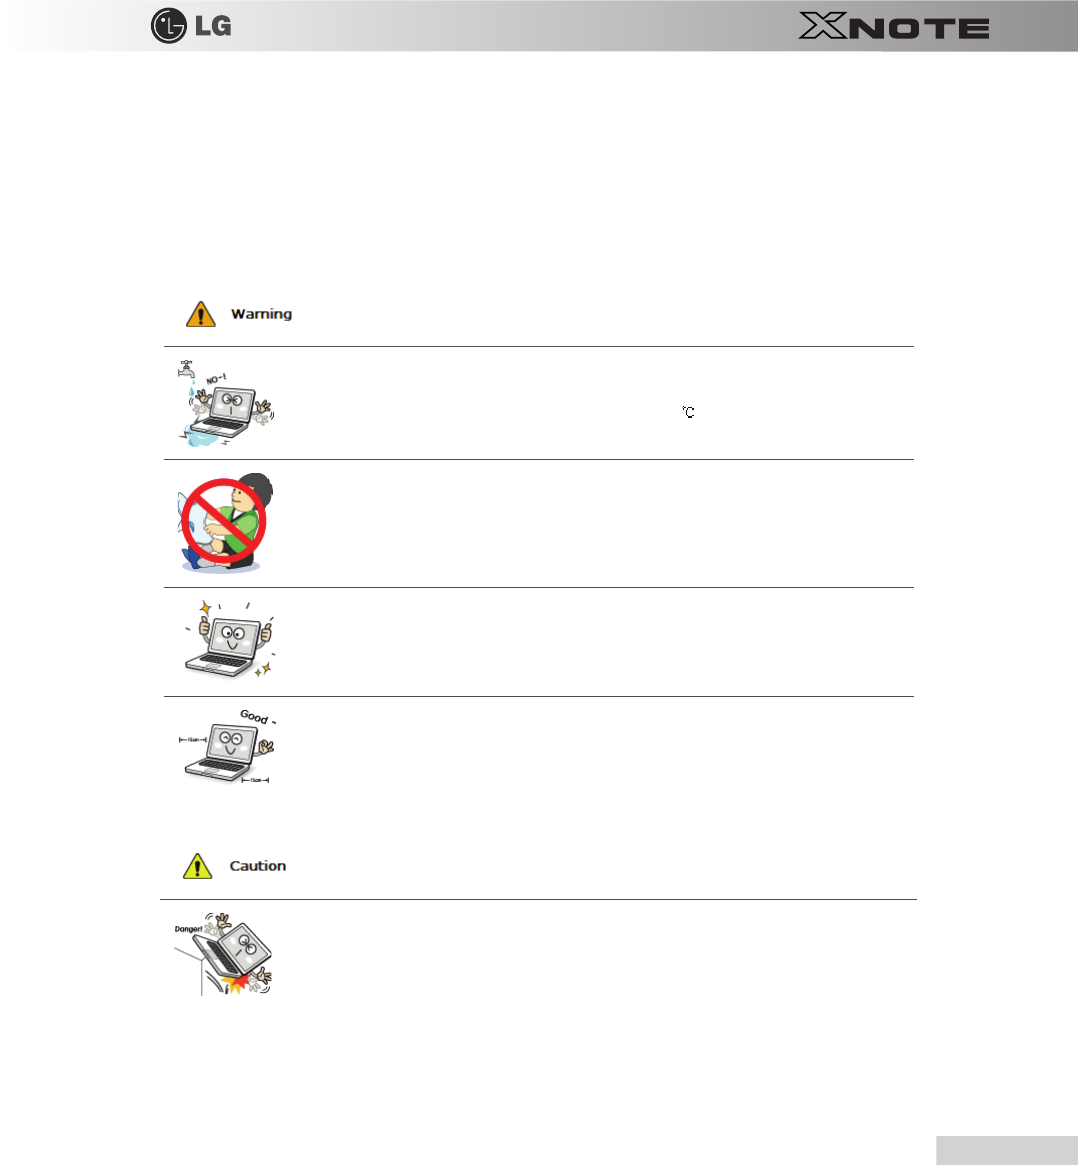
Do not use the machine in damp places like a laundry room or bathroom.
Moisture may cause a glitch or an electric shock.
The desirable temperature and humidity ranges are from 10 to 35 and from 80
%
to 20
%
, respectively.
Dispose of the desiccating agent and wrapping plastic properly.
The desiccating agent and wrapping plastic may cause suffocation.
Use the product in a dust-free environment.
Otherwise, the system may not function properly.
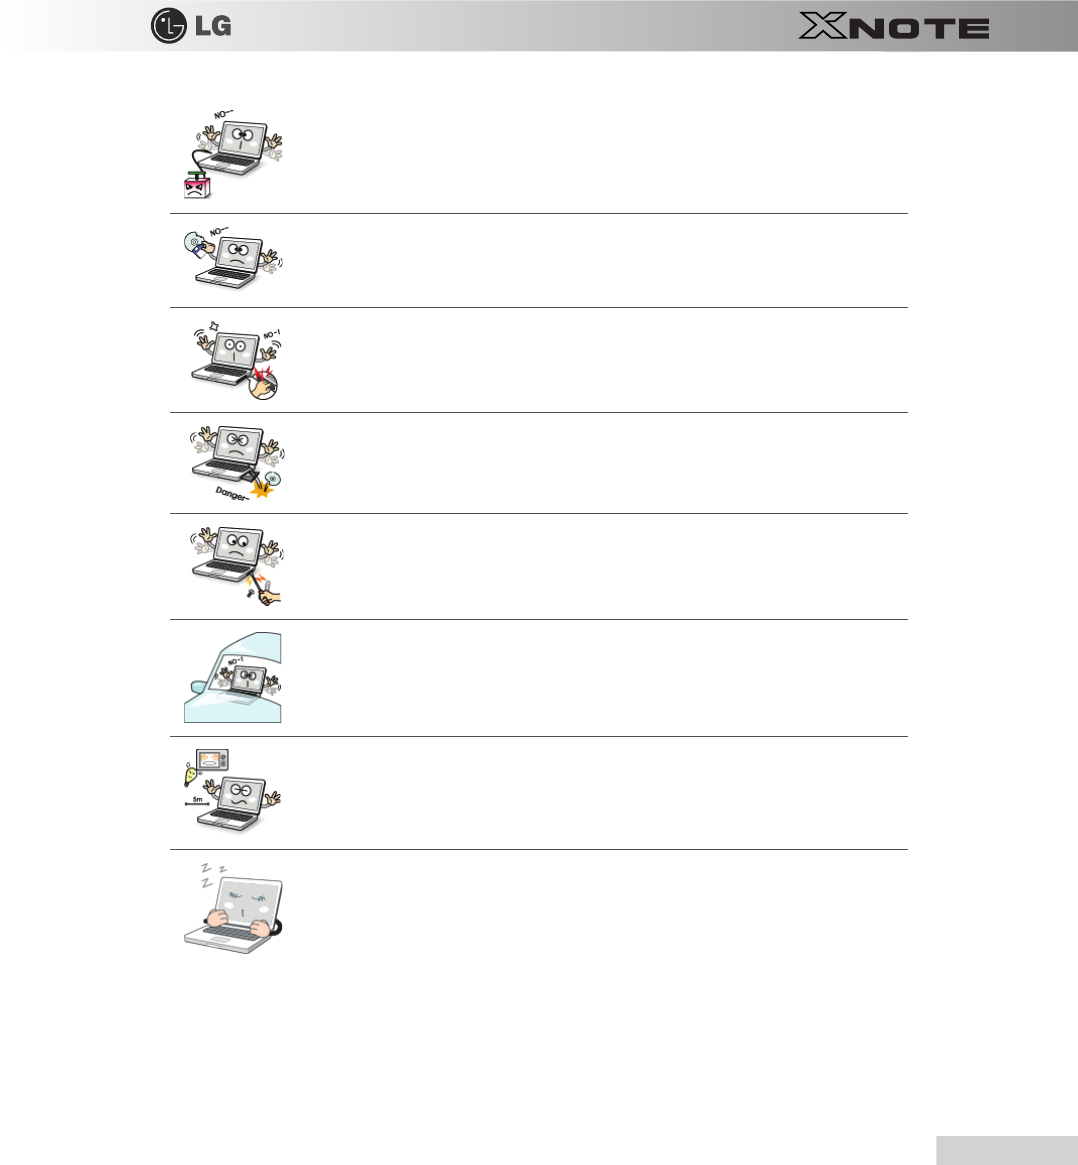
Do not leave any object nearer than 15 cm from the computer.
Otherwise, lack of ventilation could overheat the machine from inside and you could get a burn from the
heat.
Place the machine in a safe place so that it does not fall.
If dropped, the machine could be damaged and even cause an injury.
18
Tips
▶
Using Battery
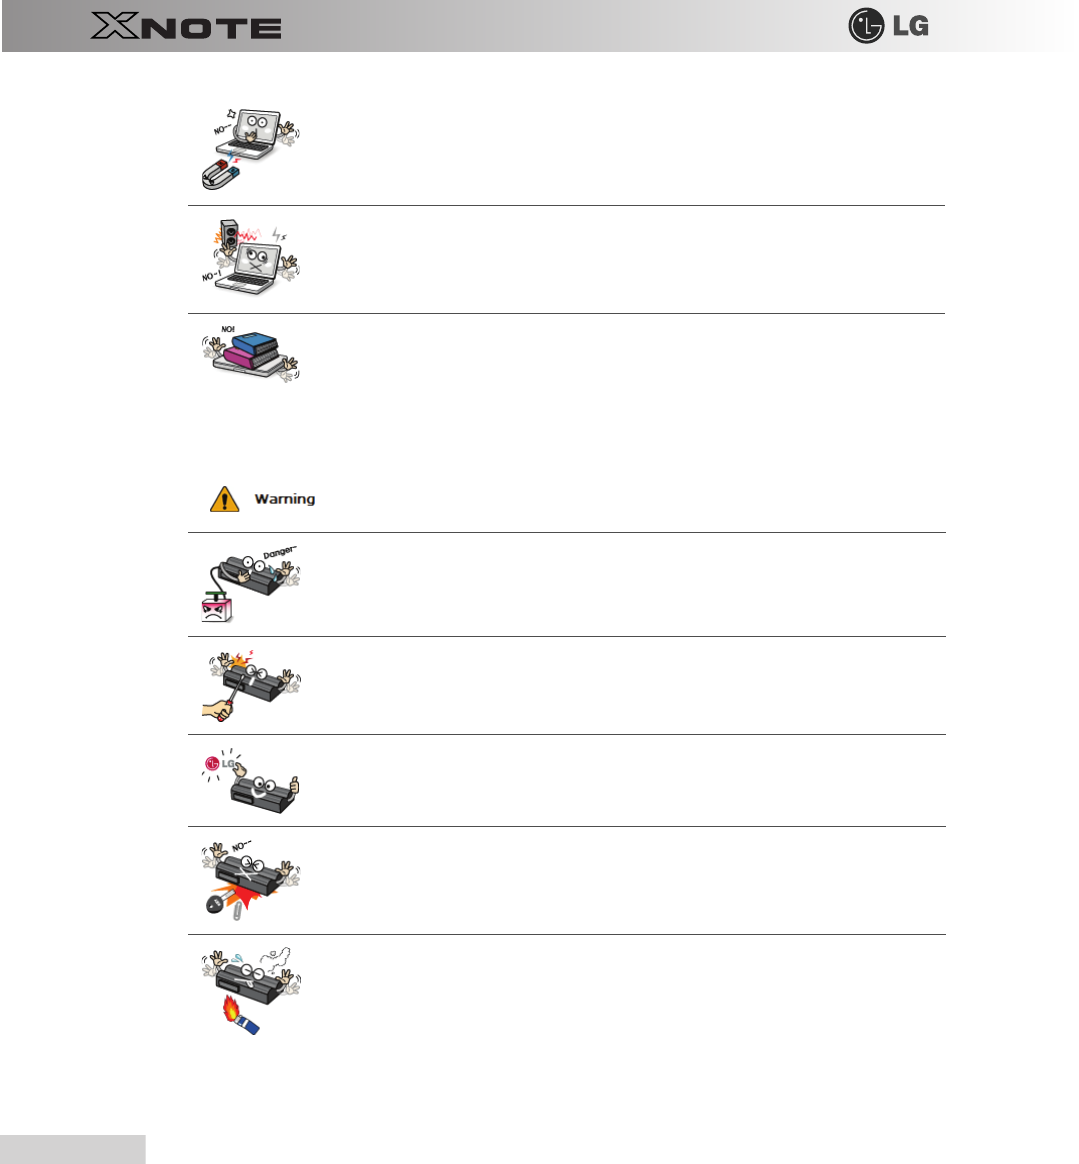
Do not leave or use the computer near a magnetic object.
Otherwise, the H
/
D and the system may be damaged and fail to operate properly.
Never place the computer on a bag with magnetic objects including magnetic buttons.
Otherwise, the H
/
D and the system may be damaged and fail to operate properly.
Operate the product in a place without electromagnetic interference.
Keep a proper distance between the computer and such electronic appliances as speakers that generate strong
magnetic fields.
Otherwise, data may be lost from the hard disk or the LCD may show impaired coloration.
Do not put any heavy object on the machine.
If falling, the object could damage the machine and cause an injury.
Charge the battery only with the provided instrument.
Otherwise, the battery may be damaged presenting a risk of fire.
Do not throw or disassemble the battery.
The resulting impairment may cause an injury, explosion, or fire.
Use batteries certified and acknowledged by
LG Electronic Inc.
Otherwise, an explosion or fire may occur.
Prevent the battery from being contact with any metallic object like a car ignition key or a paper clip.
Otherwise, the battery may be overheated to be damaged resulting in a fire or an injury.
Keep the battery away from heat.
Otherwise, an explosion or fire may occur.
Tips
19
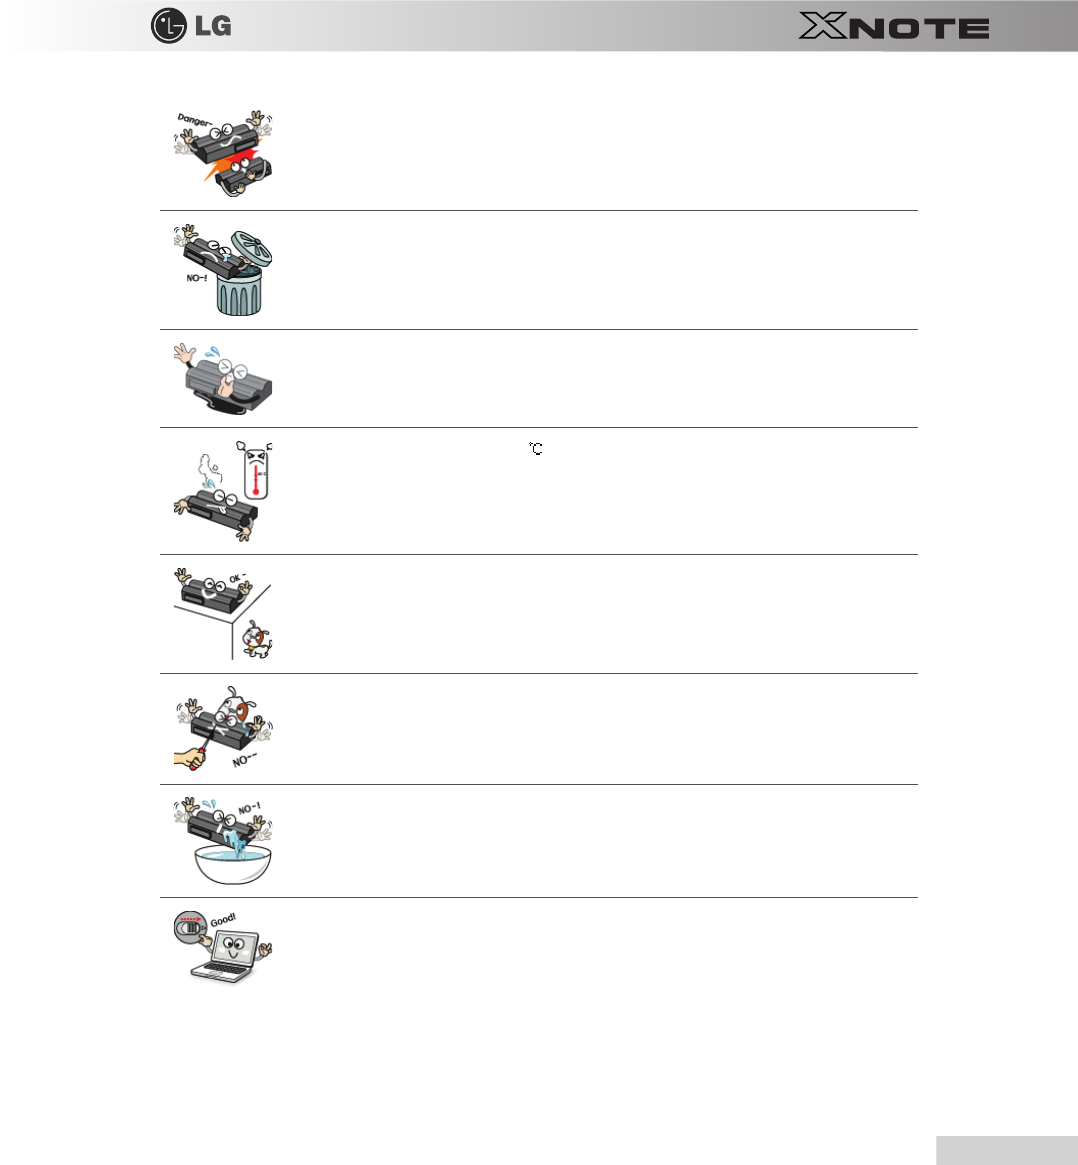
Do not short-circuit the battery.
Otherwise, it may explode.
Do not dispose of a spent (backup) battery arbitrarily.
It may explode or cause a fire.
Disposal methods may differ by country and region. Dispose of the spent battery in accordance with the laws
and safety rules of the country and region.
If you find leakage or smell bad odor from the battery, remove the battery and contact the local service center.
It may explode or cause a fire.
Avoid humidity and heat above 60 as do in cars or saunas.
It may explode or cause a fire.
Keep the battery out of reach of children or pets.
If damaged, it could cause an injury.
Keep the battery from being pierced by a sharp object or a chew of your pet.
It may explode or cause a fire.
Do not sink the battery in water.
Otherwise, the battery may be damaged presenting a risk of explosion.
Ensure that the battery pack is locked to the machine after installation.
Otherwise, the battery pack may be damaged.
20
Tips
▶
Using AC Adapter
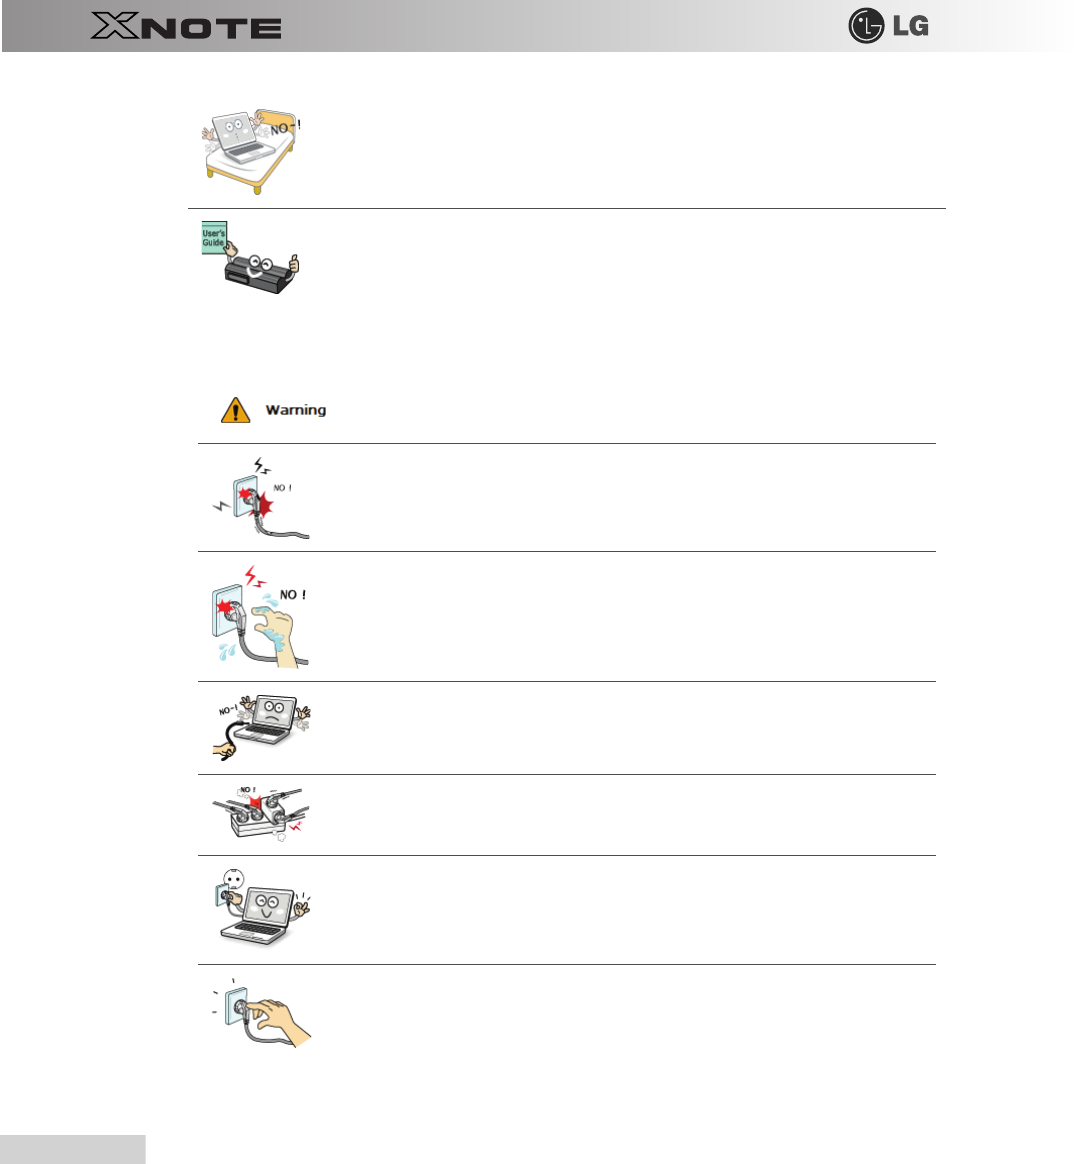
Do not use the laptop on top of carpet, blanket or bed.
The product may malfunction, cause a fire or burn the user due to temperature rise.
Read the directions printed on the battery pack carefully before use.
Keep the battery at room temperature. Refer to other Tips and directions in this guide to store the battery
properly.
Do not use loose plugs or damaged power cords.
An electric shock or fire may occur.
Do not touch the power cord with your hands wet.
Otherwise, an electric shock may occur.
Pull the plug, not the cord, to disconnect the power.
Otherwise, a fire may occur or the product may get damaged.
Operate the product at the proper voltage.
Excessive voltage may result in damage on the product, electric shock or fire.
Use power outlets with an earth pin installed and proper supply of rated electricity.
An electric leakage may cause an electric shock or fire.
Plug the power cord tightly into the outlet.
Loose connection of the power cord could cause a fire.

Tips
21
In the case that a strange noise is heard from the cord or plug, disconnect the power cord from the outlet im-
mediately and contact the service center.
A fire or electric shock may occur.
Never disassemble the power supply and adapter.
A damaged power cord may cause an electric shock or fire.
Use a socket with an earth pin equipped.
If not earthed, the product may cause an electric shock and get damaged.
Ensure that the power outlet is earthed before plugging in.
Otherwise, an electric shock from power leakage may occur.
Always keep the power cord and the outlet clean.
A fire may occur.
Do not impair the cord by bending or pressing it too hard. Keep children and pets from damaging the power
cord.
An impaired cord could damage computer parts causing a fire or electric shock.
Disconnect the machine completely from others before cleaning it.
Otherwise, an electric shock or impairment may occur.
If the power circuit and machine are soaked, disconnect the battery, AC adapter, and all others before con-
tacting the local service center.
Otherwise, an electric shock may occur.
22
Tips
▶
Using Notebook PC
Clean the computer with a proper agent and dry it completely before using it again.
If the computer is wet while used, an electric shock or fire may occur.
When lightning flashes in your area, disconnect the power, modem, LAN and other connections.
An electric shock or fire may occur.
Do not leave a cup or other containers filled with watery substance near the computer.
If the machine is soaked, a fire or electric shock may occur.
Do not connect the modem to a key telephone system.
A fire may occur or the product may get damaged.
If you have dropped or damaged the computer, disconnect the power and contact the local service center for
a safety check.
If a damaged computer is used continuously, an electric shock or fire may occur.
Do not put a lit candle or live cigarette on the computer.
A fire may occur.
The fluorescent lamps on the LCD panel contains mercury.
If you have contacted the liquid from the LCD panel, immediately wash the substance away with water. If
you feel any slightest trouble, visit your doctor immediately.
If you smell or see smoke from the computer, stop using the computer and disconnect the power before con-
tacting the local service center.
A fire may occur.
Tips
23
Do not play computer games too much.
Playing a computer game for an extensive time may cause a mental disorder. It could even inflict physical
impairments on feeble people including children and the elderly.
You may hear noise while on 3D mode.
Do not leave any object such as a pen on the keypad.
You might break the LCD panel by unwittingly shutting it down with the object remaining on the pad.
Do not press or scratch the LCD panel with a sharp object.
It may cause an impairment.
Ensure the power is off before shutting the panel.
The machine may be deformed due to temperature rise.
The bottom of the computer gets hot when the system is working. Please avoid touching it and do not put it
on your laps.
Do not impose excessive force on the LCD panel or drop it.
You could break the LCD glass panel.
Do not forcibly open the LCD panel with one hand.
The machine may be twisted.
24
Tips
To clean the LCD panel, use designated agents and soft cloth and rub the panel in one direction.
Too much force may damage the panel.
When handling computer parts, follow the instructions in the manual.
Otherwise, damage may be inflicted.
Do not put your finger or an object in the PC card slots.
An injury or electric shock may occur.
Install a vaccine program on your computer and do not download illegal programs nor access any corruptive
web site such as those pushing pornographic contents.
The system may be infected and impaired.
Ask one of our engineers to run a safety check after your computer has been repaired.
Otherwise, an electric shock or fire may occur.
For minors, we recommend a program that blocks access to illegal or pornographic web sites.
Minors' exposure to adult-only contents may inflict psychological instability or even trauma on them. Take
an extra precaution for your children if the whole family is using this machine.
Do not press Eject button while the CD-ROM drive is running.
The data may be lost or the disk may spin out unexpectedly to cause an injury.
Keep the machine away from heat-emitting devices such as a heater.
The product may get deformed or catch on fire.
Tips
25
Do not insert other devices than designated ones in the ports.
Otherwise, the product may get damaged.
Do not use a damaged CD-ROM disk or floppy disk.
It may cause product damage or physical injury.
Prevent children from thrusting their finger in the CD drive tray.
The finger may be stuck in the tray and injured.
To remove a CD, turn off the CD program and when the drive lamp is off press Eject button.
Otherwise, the fast spinning CD may spring out of the tray and hurt you.
Do not block the ventilation hole on the sides with any object.
Otherwise, an electric shock may occur.
Do not leave the machine in a car.
The battery may cause an explosion or fire.
Avoid using a wireless LAN connection within the 5m radius of a microwave or plasma lamp. If you have
to use wireless LAN and a plasma bulb within the range, however, do it through a channel between 11 and
13.
The transmission rate may drop even if the connection is made.
Turn off the computer if you are not going to use it for an extended time period.
It may overheat the battery.
26
Tips
▶
Upgrading Notebook PC
To upgrade the machine, turn off the system and disconnect the power cord and the battery. Disconnect the
telephone line linked to the modem, if any.
An electric shock or fire may occur.
When you disassemble and upgrade the machine, prevent children from swallowing any parts including
bolts.
If a child swallowed a nut, they may get suffocated.
In that case, see the doctor immediately.
Please use parts certified by
LG Electronics Inc.
Otherwise, a fire or product damage may occur.
Consult our service engineer before you use a peripheral device not manufactured by
LG Electronics Inc.
The product may get damaged.
Do not disassemble or moderate the machine arbitrarily.
You could get an electric shock and would not be able to receive the warranty service for that.
Handle devices and parts of the machine with care.
The product may get damaged.
Ensure that everything including the case is reassembled completely before connecting the machine to the
power.
Any exposed part may give you an electric shock.
Tips
27
▶
Carrying Notebook PC
Do not drop any part or device of the machine while disassembling it.
If dropped, it may be damaged and cause an injury.
To carry the machine, turn off the power and disconnect all the cables.
Otherwise, you may trip over the wire, damaging the computer and getting an injury.
During air traveling, follow the directions of flight attendants.
Using a laptop during flight may cause an aircraft accident.
Do not carry the machine with the LCD panel open.
Otherwise, the product may get damaged.
When leaving the machine in a car, keep it in shadow.
The product may be deformed or caught on fire due to temperature rise.
Protect the machine from any shock while carrying it.
System damage or an injury may result.
Carry the machine in a bag designed for it.
Carrying it in an other type of bag may result in product damage.
If the machine is not used for a long time, remove the battery pack and discharge electricity to store them.
That way, the battery can maintain the optimal state.
28
Tips
▶
Safety Notes to Prevent Data Loss (HDD Management)
▶
Safety Precaution for
Windows Vista
Capable PC Use
Do not leave the powered-on computer in a space without enough ventilation (i.e. bags) for an extended or
repeated time.
The battery may overheat and cause a fire.
Handle the computer with care to prevent a data loss.
Since the hard disk is sensitive to shocks, please make a back-up file of important data all the time.
The manufacturer will not be responsible for any hard-disk data loss caused by your mistake.
Hard disk damage and data loss may occur when:
External shocks are inflicted on the machine while disassembling or installing it.
When the computer is abruptly reset (rebooted) due to power failure, the hard disk may get damaged.
The computer is infected with a virus, tainting the data irrecoverably.
Abrupt turning-off of the computer can damage the computer.
Moving, shaking or pounding the computer while the hard disk is running, and thus causing file damage or
bad sectors.
It is recommended to back up the data to minimize damage caused by hard disk damage.
The manufacturer is not responsible for any data loss.
Tips
29
▶
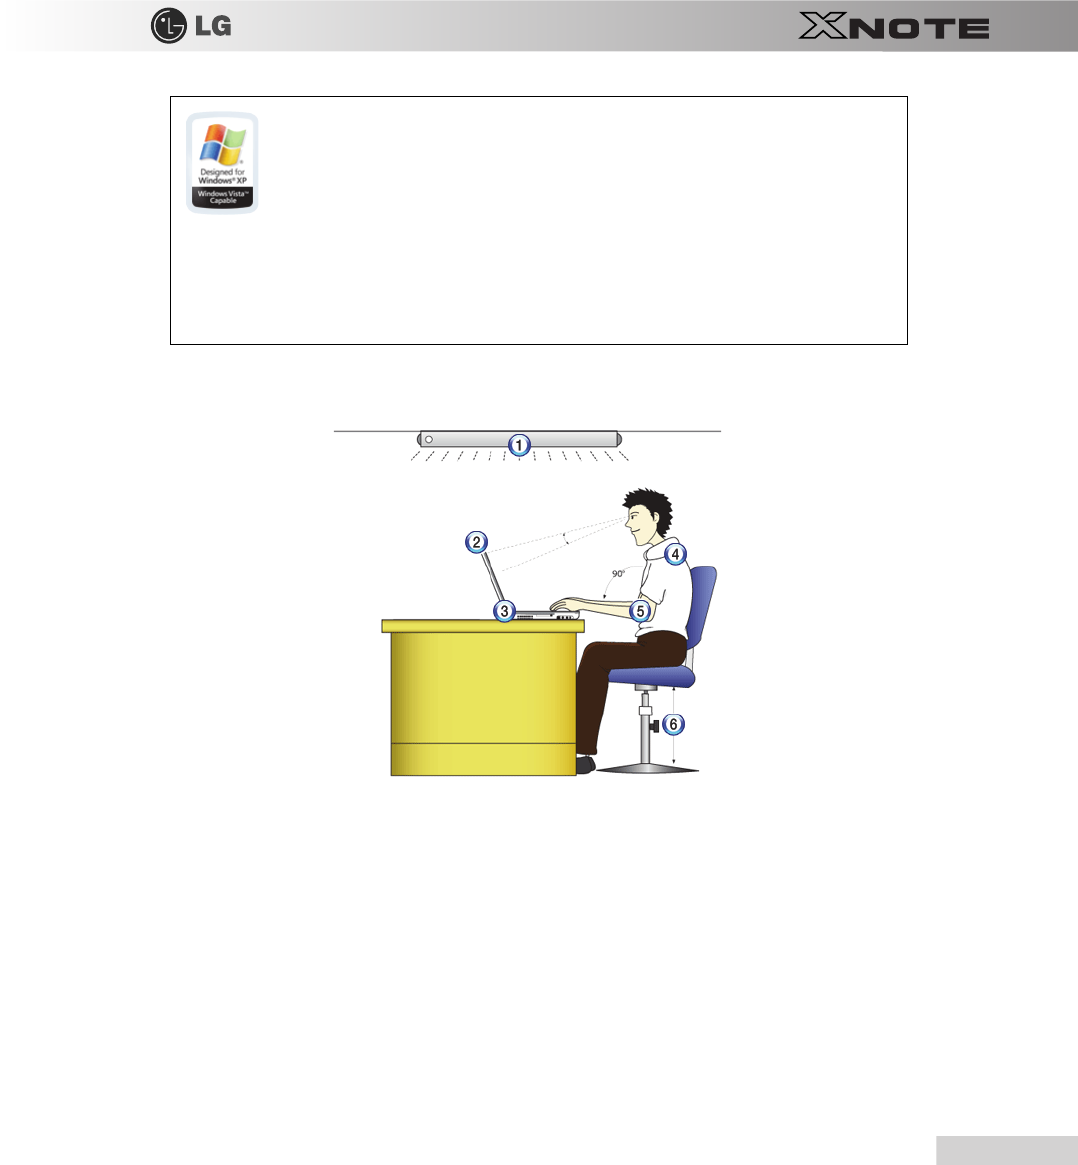
When using the computer, sit in the good posture as shown below.
1.
Do not have light directly reflected on the monitor.
2.
Set the upper part of the screen to be on the even level with or slightly lower level than your eyes.
3.
Adjust the screen while avoiding illuminated reflection.
4.
Stretch the neck and back straight.
5.
Keep the hands, wrists, and arms horizontally.
6.
Adjust the chair to set the hands and arms properly for the keyboard.
Windows Vista
Capable PC provides an environment where users can enjoy remarkable ad
-
vancements in information structuring and searching, security, and stability. However, not all
computers with the
Windows Vista
Capable PC logo can support the full range of
Windows
Vista
features. More powerful hardware combination is required for some premium features of
Windows Vista
as in the case of
Windows Aero
.
Windows Vista
Capable PC has to be equipped with the required or more powerful parts
to work flawlessly.
Although the machine bears the
Vista Capable
logo, the cost of upgrading
Windows Vista
OS
is charged to the owner.
Those other computers without the
Windows Vista
Capable logo
For more information, refer to http:
//
www.windowsvista.com
/
getready.
30
Tips
▶
Adjusting volume (headset and speakers)
Check the volume before listening to music
▶
System Protection Feature
When the internal temperature rises, the System Protection feature automatically hibernates or turns off the computer. The
computer may not be turned on until its temperature falls to the normal degree.
■
Long time use of computer may cause physical fatigue.
■
A 10 minutes break after 50 minute use is desirable. Avoid using the computer more than 2 hours a day.
■
Take a rest regularly and stretch your body.
■
Before using the headset, check if the volume is too high.
■
Do not use the headset too long.

Chapter 2.Notebook PC Tour
32
Notebook PC Tour
2-1. Opening/Closing Notebook PC
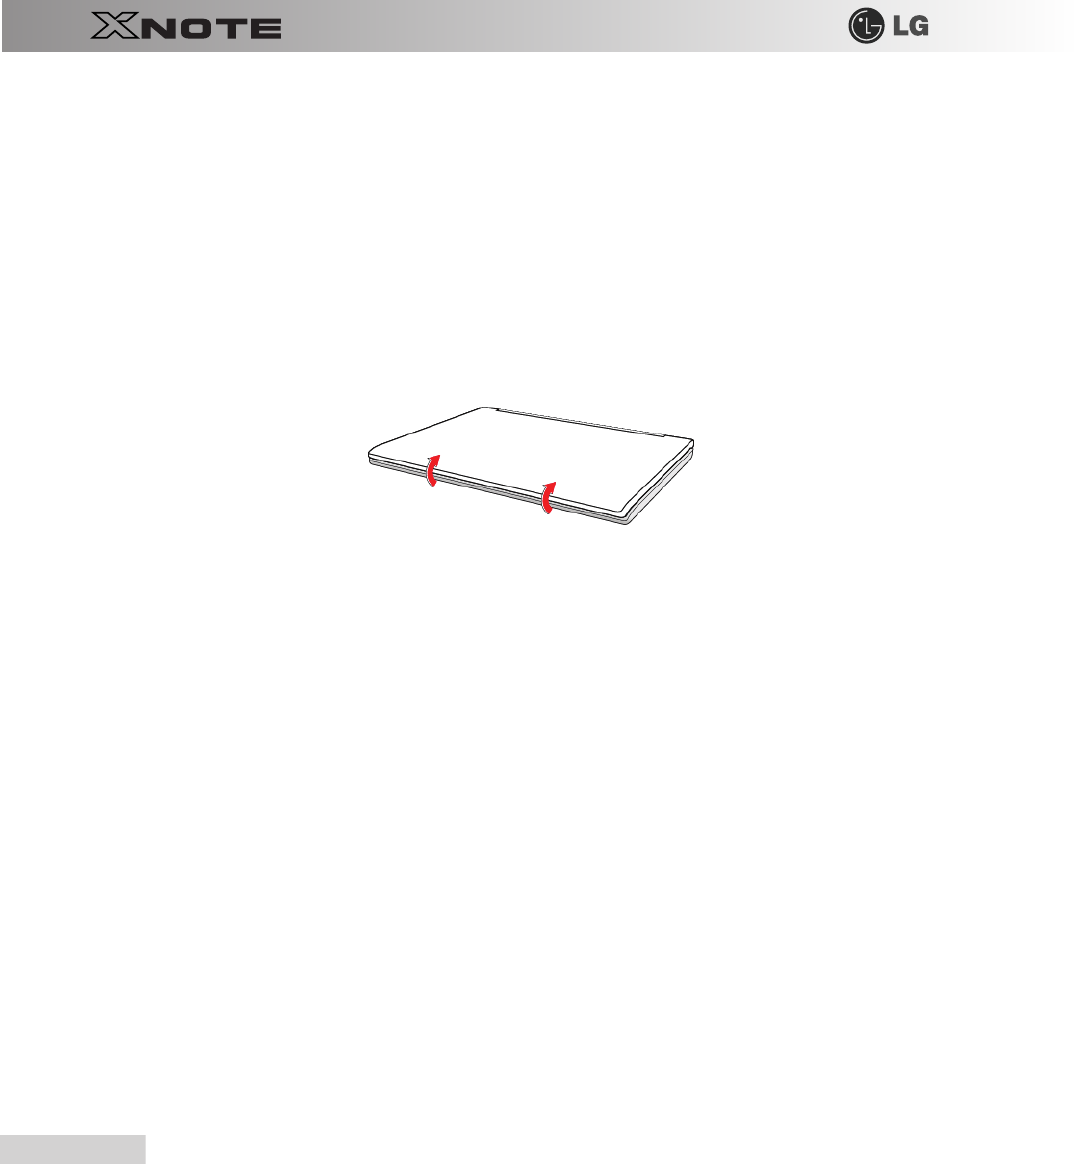
1.
Raise the Notebook PC cover upward.
※
Adjust the angle for the best convenient position.
2.
Be sure to close the computer after use.
Notebook PC Tour
33
2-2. Operation Status Lamps
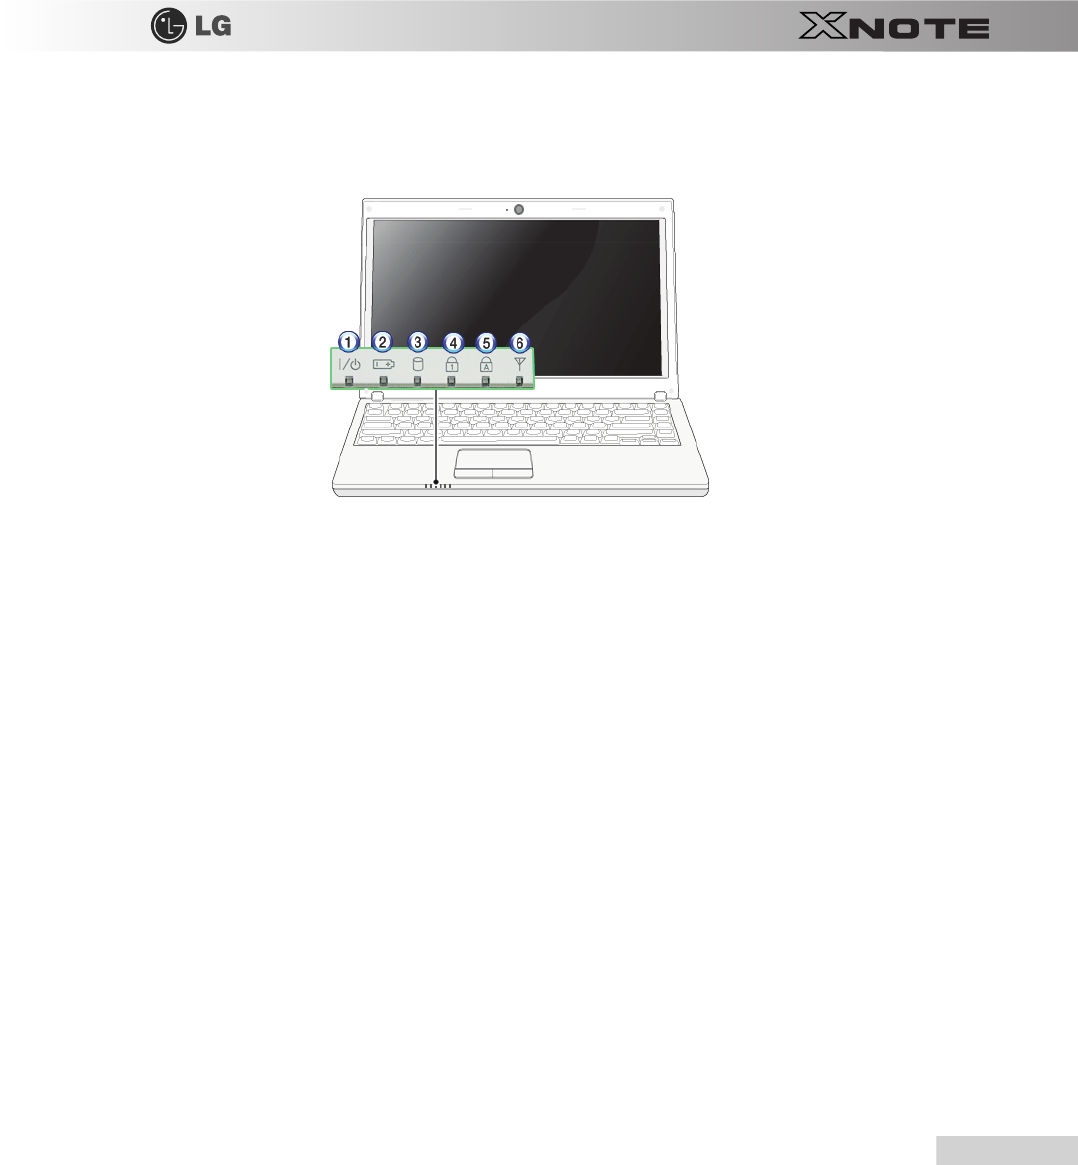
1.
Power Lamp:
-
Blinking: System Standby
-
On: The system is running on the AC power or battery.
-
Off: The system is turned off or in Hibernates.
2.
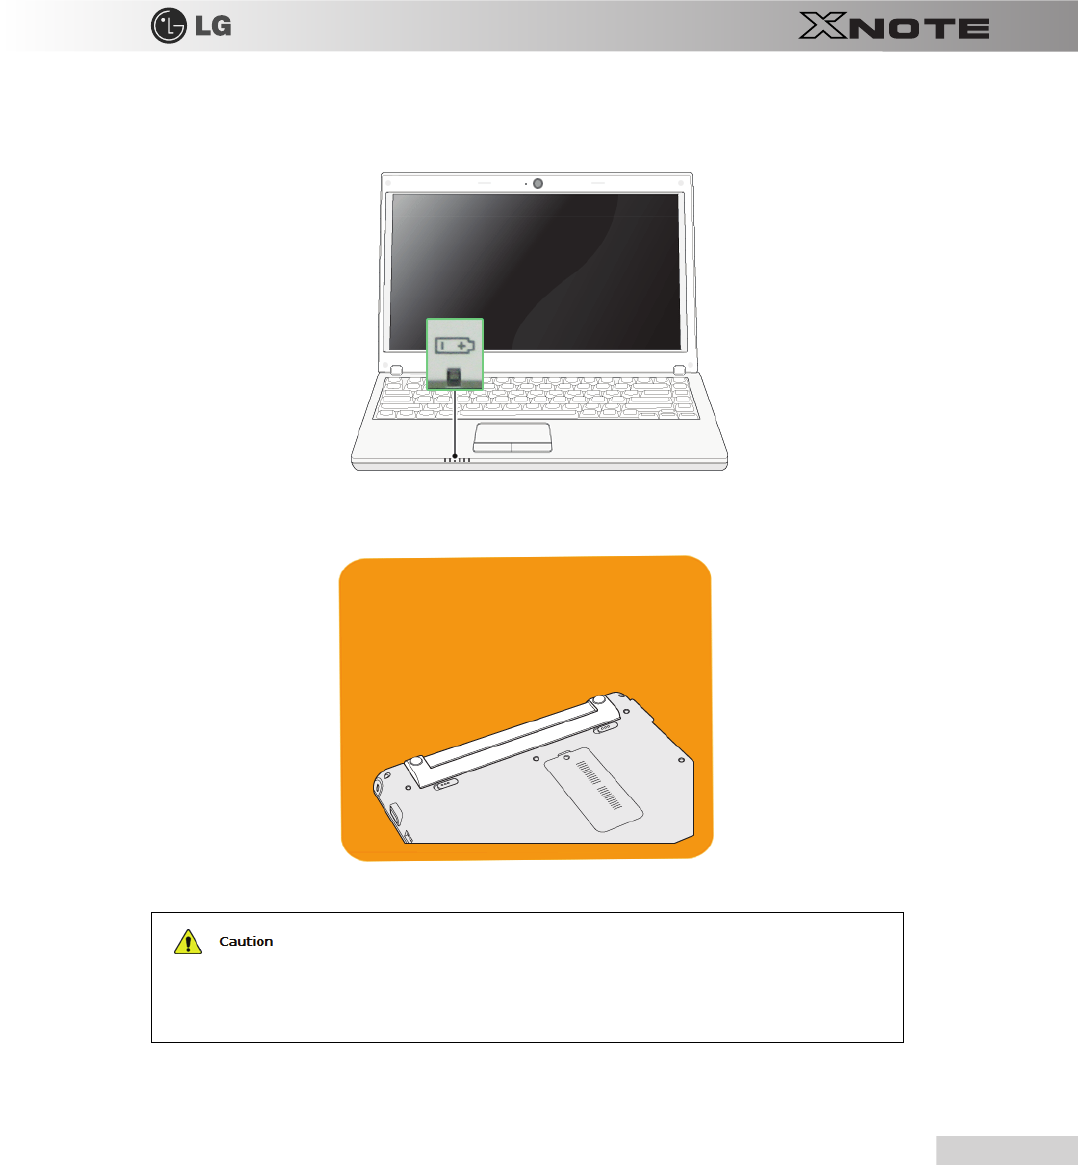
AC Power and Battery Status Lamp
-
Orange: The battery is being charged.
-
Orange/Green Blinking: Charged more than 90%
-
Off: The AC adapter is not connected and the battery is being discharged.
-
Green: The AC adapter is connected and the battery is not in charging stage, or the battery is fully charged.
-
Green Blinking: The battery is charged less than 10%
-
Red Blinking: In faulty state
-
If you try to turn on the system that has entered the Hibernates mode or been turned off after a low-battery alarm, the system will not be
turned on but the lamp will blink three times.
3.
Hard Disk Drive Lamp
-
The lamp is turned on when the HDD is running.
※
Do not turn off the power forcibly while the hard disk drive lamp is on. Otherwise, the data may get impaired.
4.
Num Lock
lamp
-
When the
Num Lock
lamp is turned on, you can enter numbers (0~9) using the embedded numeric keys. If you press
[Fn]
+
[Num Lk]
again, the
Num Lock
lamp is turned off and you can enter text characters.
5.
Caps Lock
lamp

34
Notebook PC Tour
-
Caps Lock
lamp is on when the it is active. When this lamp is on, you can type uppercase letters without holding
Shift
key.
6.
Wireless LAN lamp
-
Off: Wireless LAN is not in use.
-
Blinking (short interval): Wireless LAN/Bluetooth is connected and data are being transmitted.
-
Blinking (every 2 ~ 3 seconds): Wireless LAN/Bluetooth is not connected but Wireless Radio is on.
-
Blinking (every 3 ~ 4 seconds): An access Point is being searched for to connect Wireless LAN/Bluetooth.
-
On: An access point is being searched for or Wireless LAN is connected.
※
The Wireless LAN/Bluetooth lamp may operate differently depending on model type.
※
The Wireless LAN card and the Bluetooth device are optional, and so it may not be supported in some models.

Chapter 3.Using the system
36
Using the system
3-1. Running on Battery
Notebook PC runs on AC power or battery. This section describes the procedure that the user should take initially for a new
system. The provided AC adapter can be used on both 100V and 240V.
Charge the new battery with the AC adapter before use.
※
Refer to
[
Charging Battery with AC Adapter
]
in User's Guide.
1.
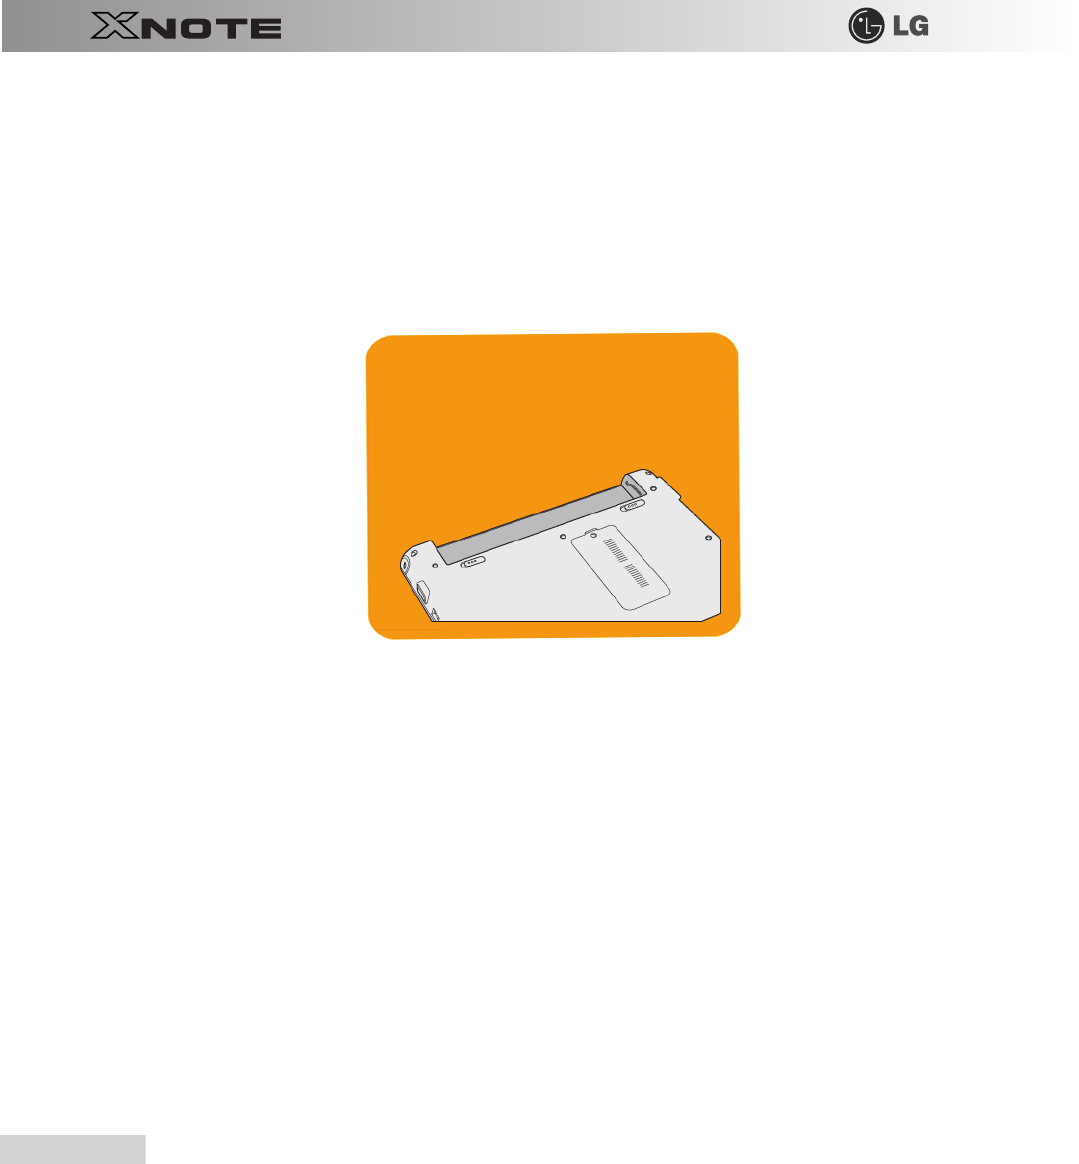
Turn the machine over to see the battery pack chamber and equip the pack.
-
Insert the battery pack into the chamber as shown in the following figure and push it in the direction of the arrow until you hear a clicking
sound.
2.
Open the machine and turn the power on.
3.
Check the battery state.
Using the system
37
-
When the battery status lamp is blinking, charge it fully with the AC adapter before using it.
4.
Remove the battery pack as shown in the diagram below.
Use batteries certified and acknowledged by LG Electronic Inc.
■
Uncertified batteries may explode.
■
Ensure the power is off before changing the battery pack.
Keep the battery pack removed when the machine is not in use.
■
Otherwise, a fire and product damage may result.
38
Using the system
For a safe and efficient use of battery, follow the below directions.
■
Do not short-circuit the battery.
■
Keep the room temperature between 0
and 60 . Do not expose the machine to the heat
hotter than 60
.
■
Keep the battery out of reach of children.
■
A visible swelling of the battery pack indicates a possible danger. When this occurs, contact your local
vendor or service center immediately.
■
Use only a certified and designated recharger.
■
Keep the battery pack away from heat. (Never put it in a microwave.)
■
Do not leave inside a car under the summar heat.
■
Do not leave or use at a hot and humid place like a sauna.
■
Do not use the machine placed on a heating blanket or other heat reserving materials.
■
Do not leave the machine turned on inside a closed space.
■
Make sure that the power ports are not touched by any metalic objects like a key, coin, necklace, and
watch.
■
Use only a lithium secondary battery certified and guaranteed by mobile device manufactures.
■
Keep the machine dry.
■
Do not disassemble or alter the battery pack.
■
Before using this machine, read this guide carefully.
For more efficient use of the battery, read the following carefully.
■Natural discharge: The battery runs low naturally even if it is kept unused.
■Periodical full (dis)charge: Repeated recharge in midway shortens the running time gradually.
To lengthen the span, charge and discharge the battery to the fullest once or twice. For optimal
use, execute the full charge/discharge every 30 to 60 days. Still better, recharge the battery after
it has run out.
The battery capacity may change due to chemical reactions during charge and discharge.
■The system checks the charge status of LG batteries frequently, and then calculates and indicates
the actual battery duration on the current system setup.
■The battery is wearable goods and thus the life span may be getting shorter as used. The battery
running time may also become shorter accordingly.
■When the battery is fully charged the machine stops recharging, and it resumes recharging when
the battery charge rate drops below 95%.
■The Battery Charging lamp may be turned off even when the battery is not fully charged, and it
may blink in orange even when the battery is fully charged. This happens because of measures
designed to prolong the battery life and the time gap between charge state recognition and charge
state update. You don't need to worry about this because it returns to normal in a while.
■When the temperature of the battery drops below 9.6, it is charged in a low current. In this case,
charging time may stretched to 32 hours or longer.
Using the system
39
3-2. Charging Battery with AC Adapter
Notebook PC runs on AC power or battery.
This section describes the procedure that the user should take initially for a new system.
※
The provided AC adapter can be used on both 100V and 240V.
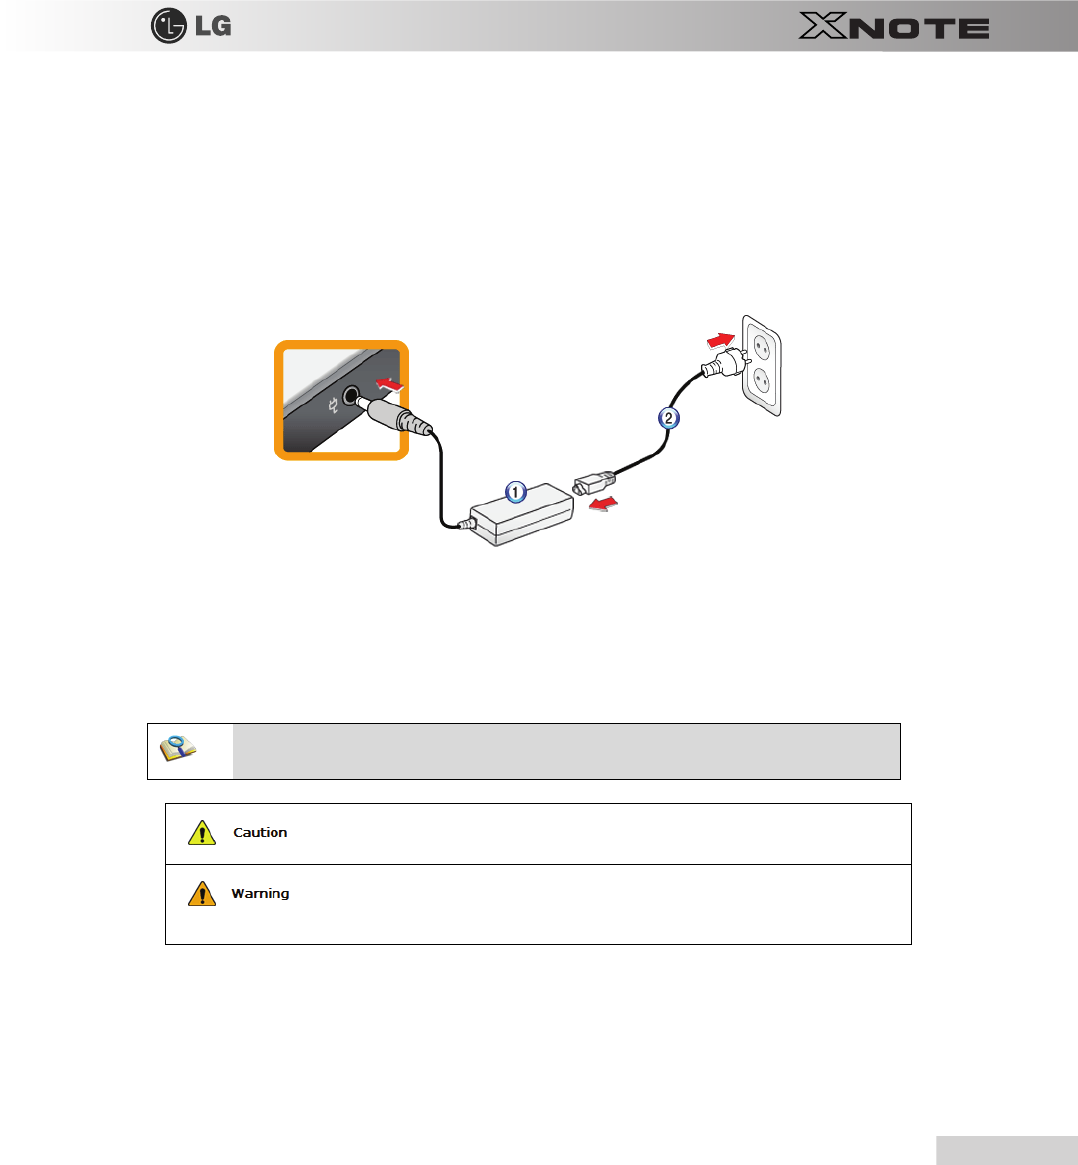
1.
Connect the AC adapter to a power outlet with the power cable.
2.
Connect the AC adapter to the power port of the notebook PC.
1.
AC Adapter
2.
Power cable
3.
Adjust the LCD panel to the most comfortable angle.
4.
Press the power button to turn on the machine.
■You need a different plug to use the AC adapter on 110V. (The extra plug for 110V is sold
separately.)
Do not leave a liquid container on the computer.
■
The system may be short-circuited and damaged.
Please use an AC adapter certified by LG Electronics.
■
Otherwise, an explosion or fire may occur.
■
It may cause a problem in battery charging or system operation.
40
Using the system
3-3. Registering Windows
Ensure that the AC adapter is connected or the battery is charged before turning on the machine.
Refer to the below directions to turn on
/
off the machine.
▶
Turning On
1.
Open the machine and adjust the panel.
2.
Press Power button and self-diagnosis begins. After self-diagnosis,
Windows XP
home screen appears.
3.
Registering the User with
Windows XP Home Edition/Professional
-
In the initial use, after turning on the system the user is required to register himself with
Windows XP
. For user registration process, refer
to the following. (The process may differ by system model type, but that difference does not affect the system use.)
▶
Registering the User with
Windows XP Home Edition
/
Professional
In the initial use, after turning on the system the user is required to register himself with
Windows XP
.
For user registration process, refer to the following. (The process may differ by system model type, but that difference does
not affect the system use.)
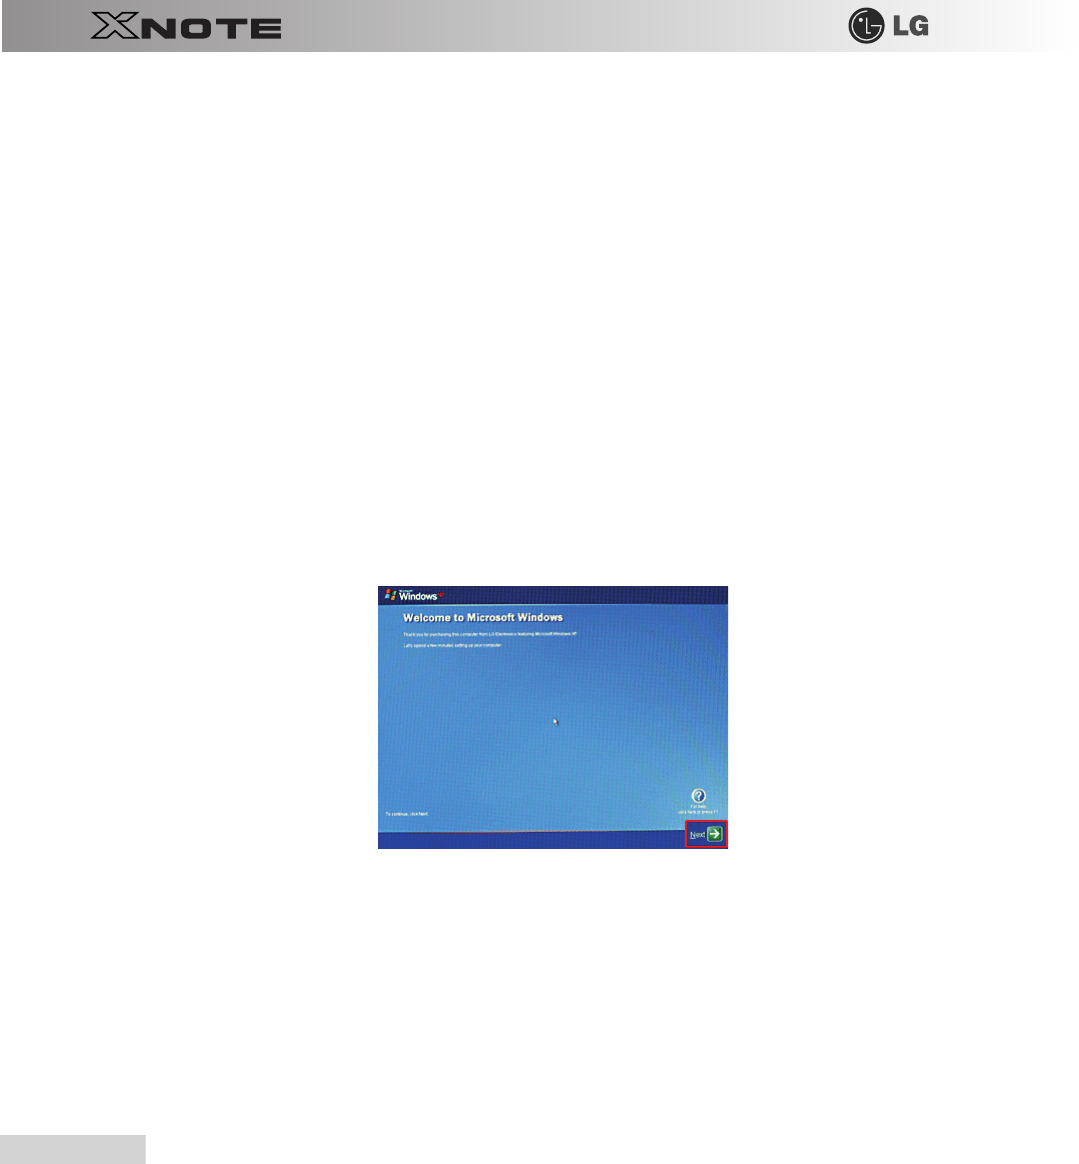
1.
When the
[
Welcome to Microsoft Windows]
screen appears, click
Next
.
Using the system
41
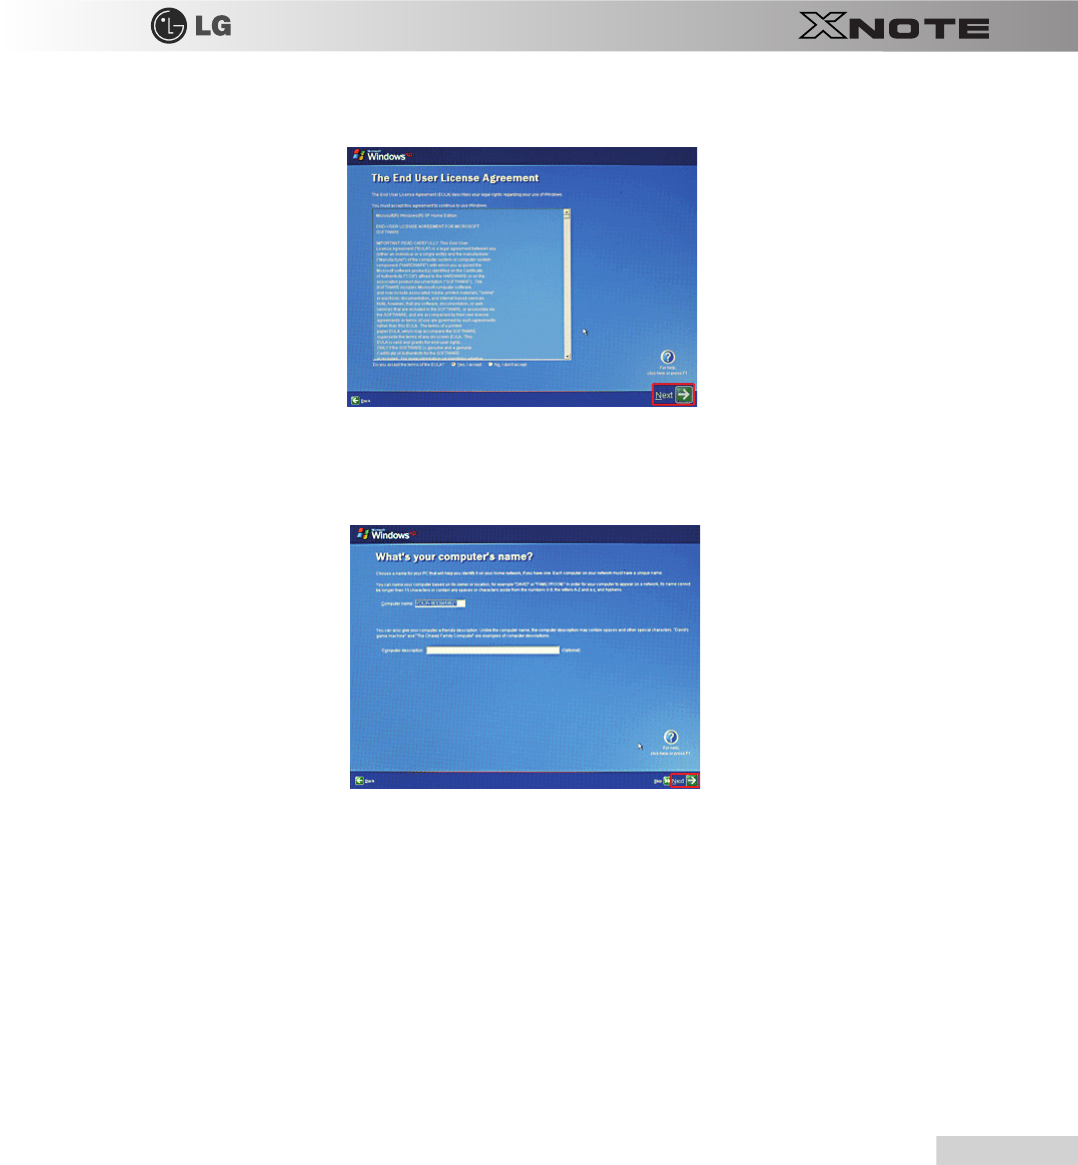
2.
When
[
End User License Agreement]
appears, read it carefully, select
Yes, I accept. (Y)
and click
Next
.
3.
The
[
Please specify a computer name.]
screen appears. Fill in
Computer Name (C)
and
Computer Description
(O)
fields and click
Skip
button to continue.
※
To set up the Internet, click
Next
and continue.
42
Using the system
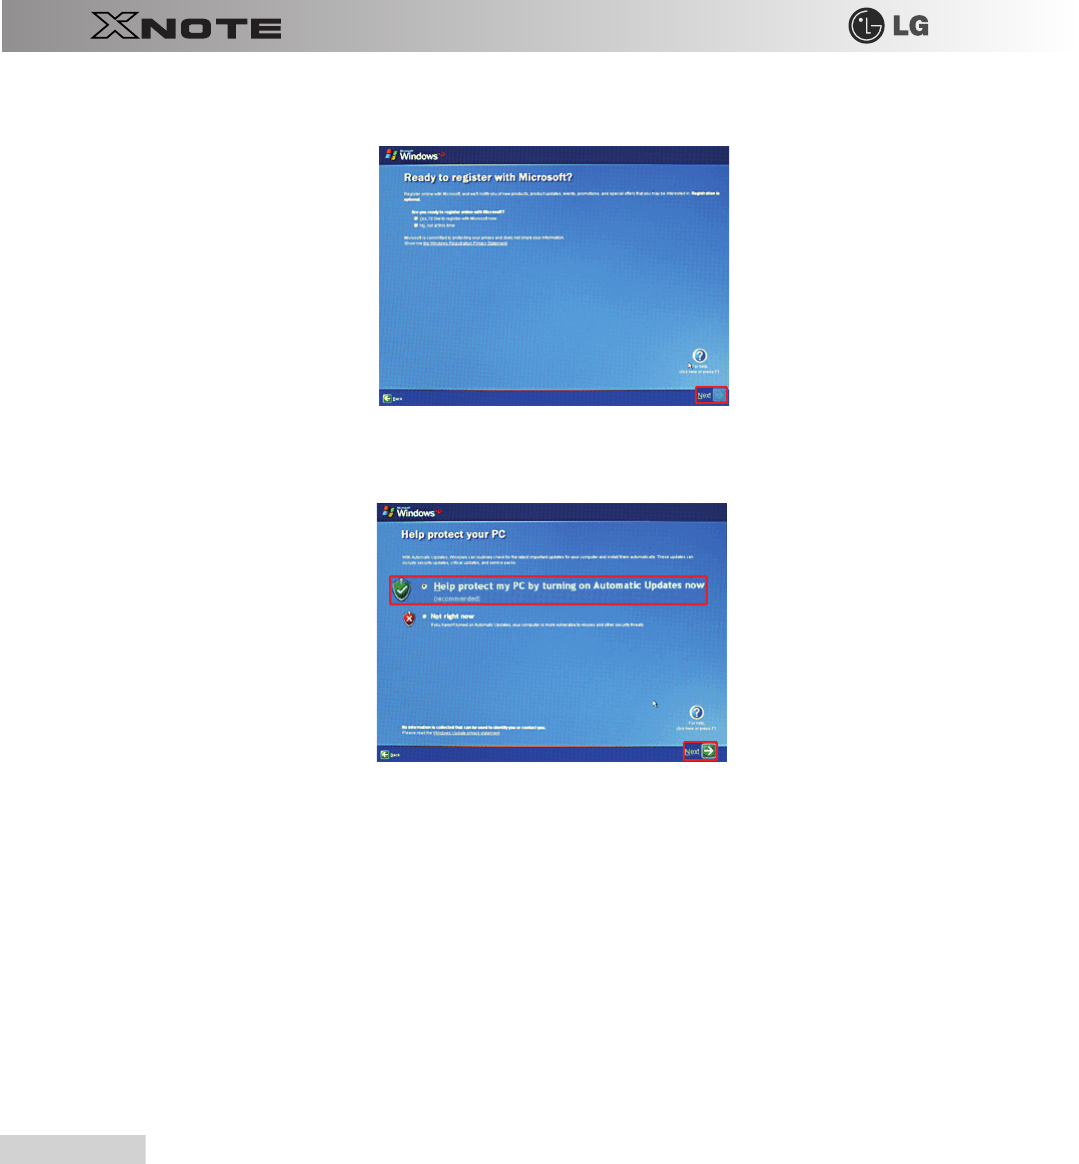
4.
When the
[
Register with Microsoft?]
screen appears, select
No, not at this time. (N)
and click
Next
.
5.
When the
[
Help protect your PC.]
screen appears, select "Help protect my PC by turning on Automatic
Update now" and click
Next
.

Using the system
43
6.
When the
[
Type the user name
]
screen appears, enter your
User Name (Y)
and click
Next
.
7.
When the
[
Thank you
]
screen appears, click
Finish (F)
. Now, you have completed the installation process.
44
Using the system
▶
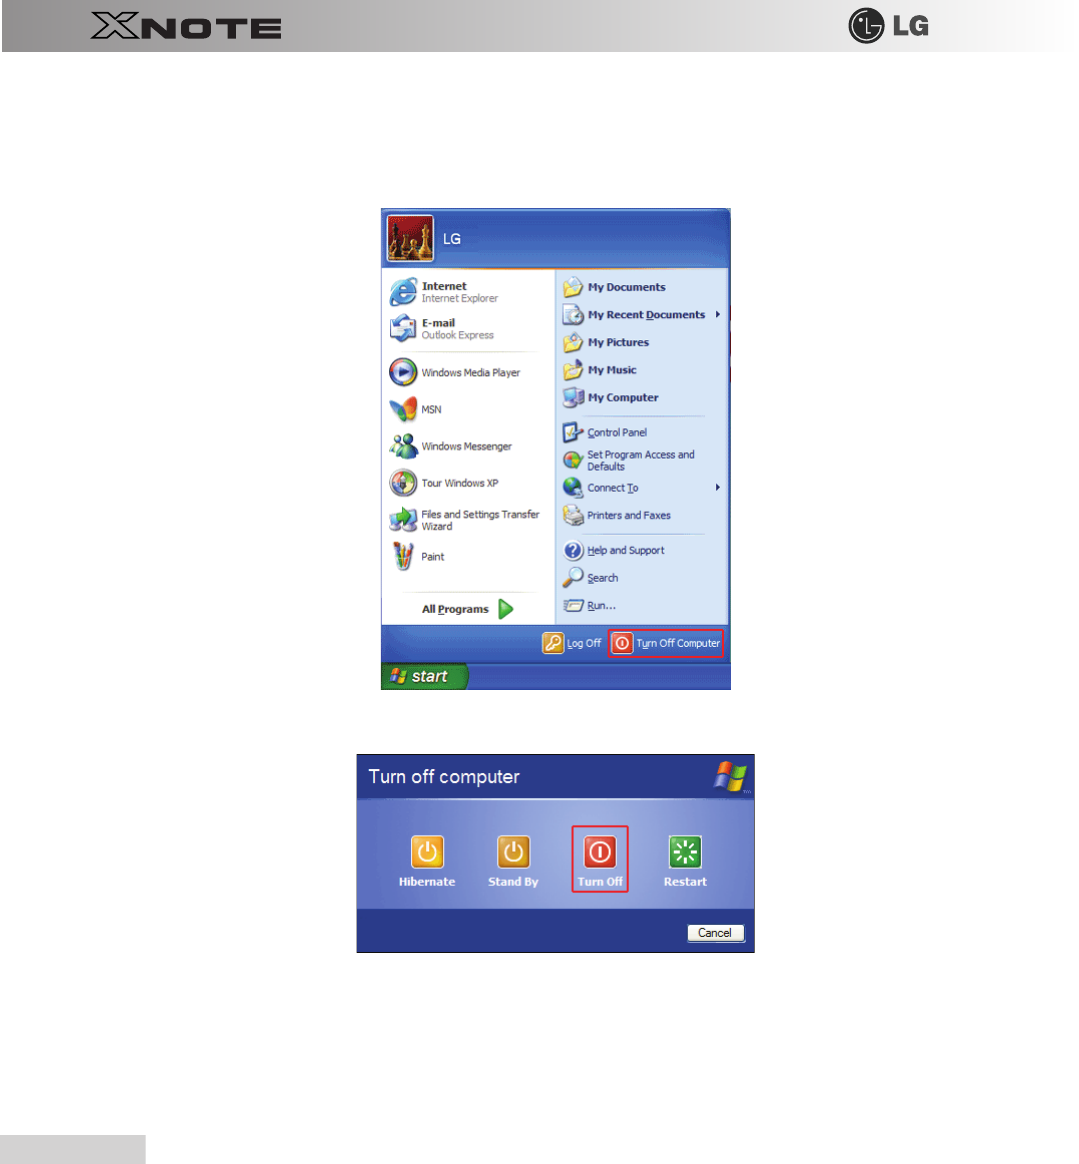
System Termination
1.
To turn off the computer, close all applications and on the
Windows XP
home screen click
Start
and
Tur ni n g Off
Computer
.
2.
When the
[
Shutdown Computer
]
screen appears, click
Shutdown
.
3.
The computer turns off automatically
4.
Close the computer.

Using the system
45
Do not turn off the power forcibly while the hard disk drive lamp is on.
■
The data may get damaged.
■
Occasionally the system on
Windows
may not be shut down automatically. When this
happens, press Power button for five seconds or longer to forcibly shut down. However,
this is an emergency measure and it may cause system errors. It is recommended to click
the
Start
button and select
[
Turn off Computer
]
menu to shut down the computer.
■
Abnormal turning-off of the computer may damage data stored in the hard disk. When the program
suddenly stops, press the
Ctrl
+
Alt
+
Delete
keys to terminate the program through
Windows
Task Manager
or restart the system. If the some
Windows
program files have been damaged
due to an abnormal shutdown, reinstall damaged programs. LG Electronics is not responsible for data
loss caused by your mistakes and negligence.
46
Using the system
3-4. Windows XP Overview
Windows XP
is stylish, novel, and easy to use. The desktop and task bar images are simplified, and you can easily access
applications through the Start menu.
There are more Desktop options for you to customize the environment.
▶
Windows XP
Tour
Windows
is an operation system based on which a computer runs. It is recommended to learn the
basic functionality of
Windows
for better use of a computer.
1.
Click
Start
button and click
Windows XP Tour
.
2.
When the window appears, select a
Windows XP
feature item to view detailed description.
3.
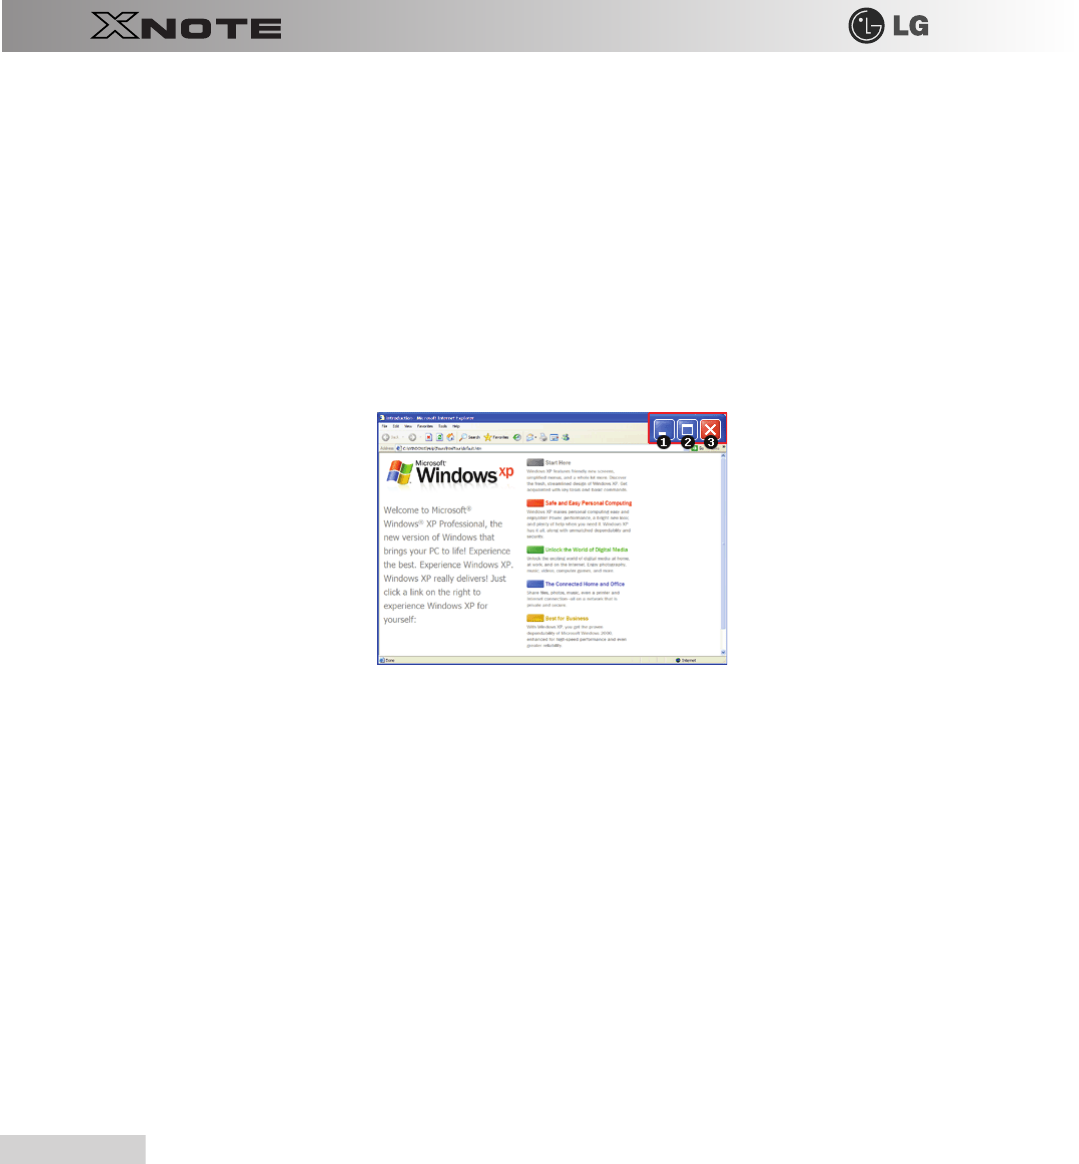
Minimize
button
4.
Maximize
button
5.
Close
button
Using the system
47
▶
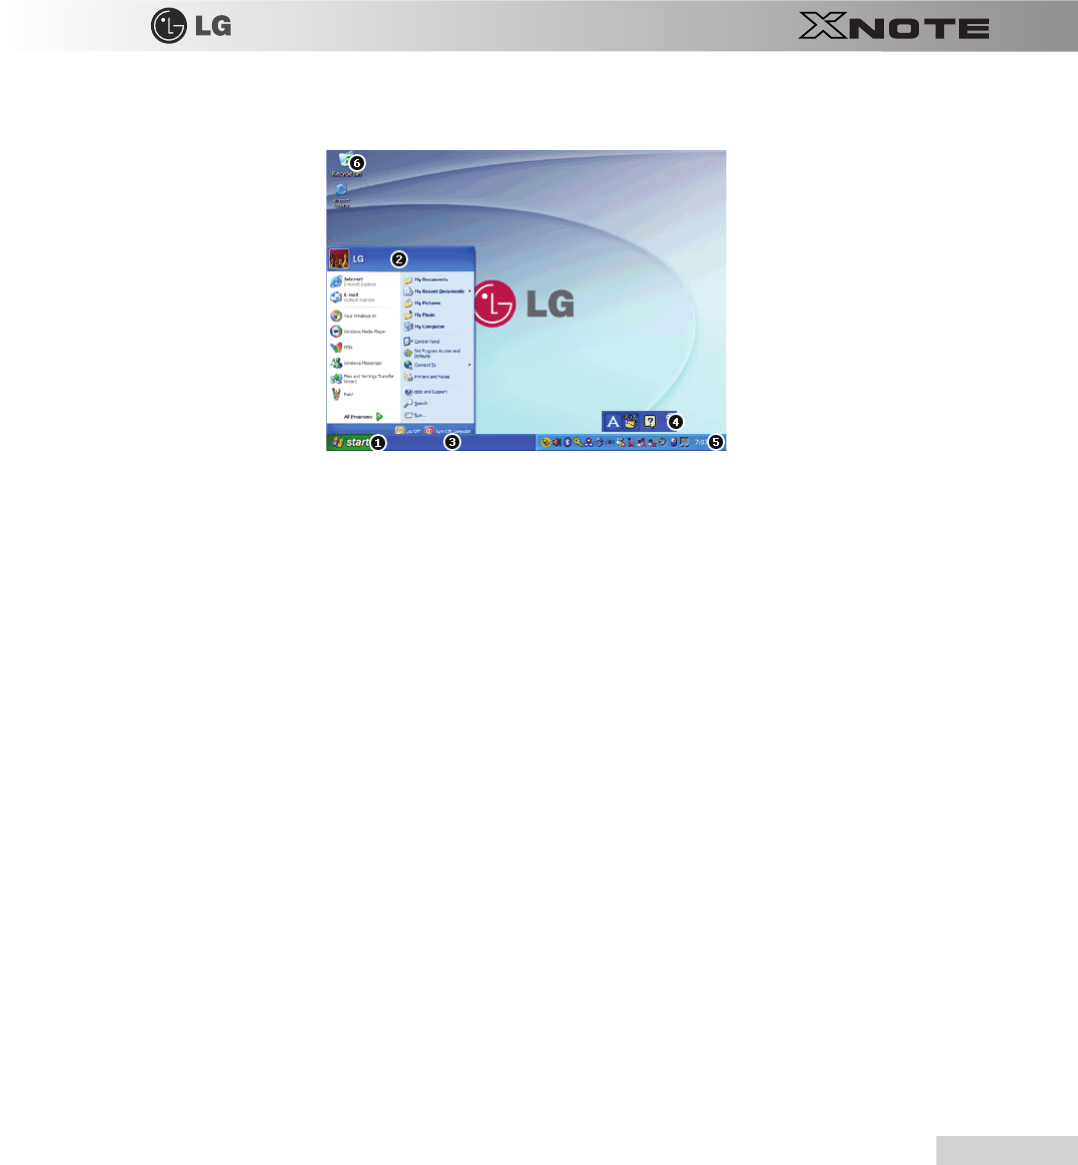
Windows XP Desktop
1.
Start
button
-
Unfolds Start menu when clicked.
2.
Start
menu
-
Includes programs needed to start Windows.
-
Clicking All Programs displays the list of all programs installed on the system.
3.
Taskb a r
-
Shows all currently running programs.
4.
Toolbar
-
Clicking the icon switches the language to another such as
Korean/English
.
-
The user can add or delete various toolbars.
5.
Taskbar icons and clock
-
Allows you to set up resolution,
Power Management
and other basic configurations.
6.
Recycle Bin
-
Keeps dropped files and folders. Empty
Recycle Bin
deletes files and folders in
Recycle Bin
from the computer.
※
Deleted files and folders can not be restored.
48
Using the system
▶
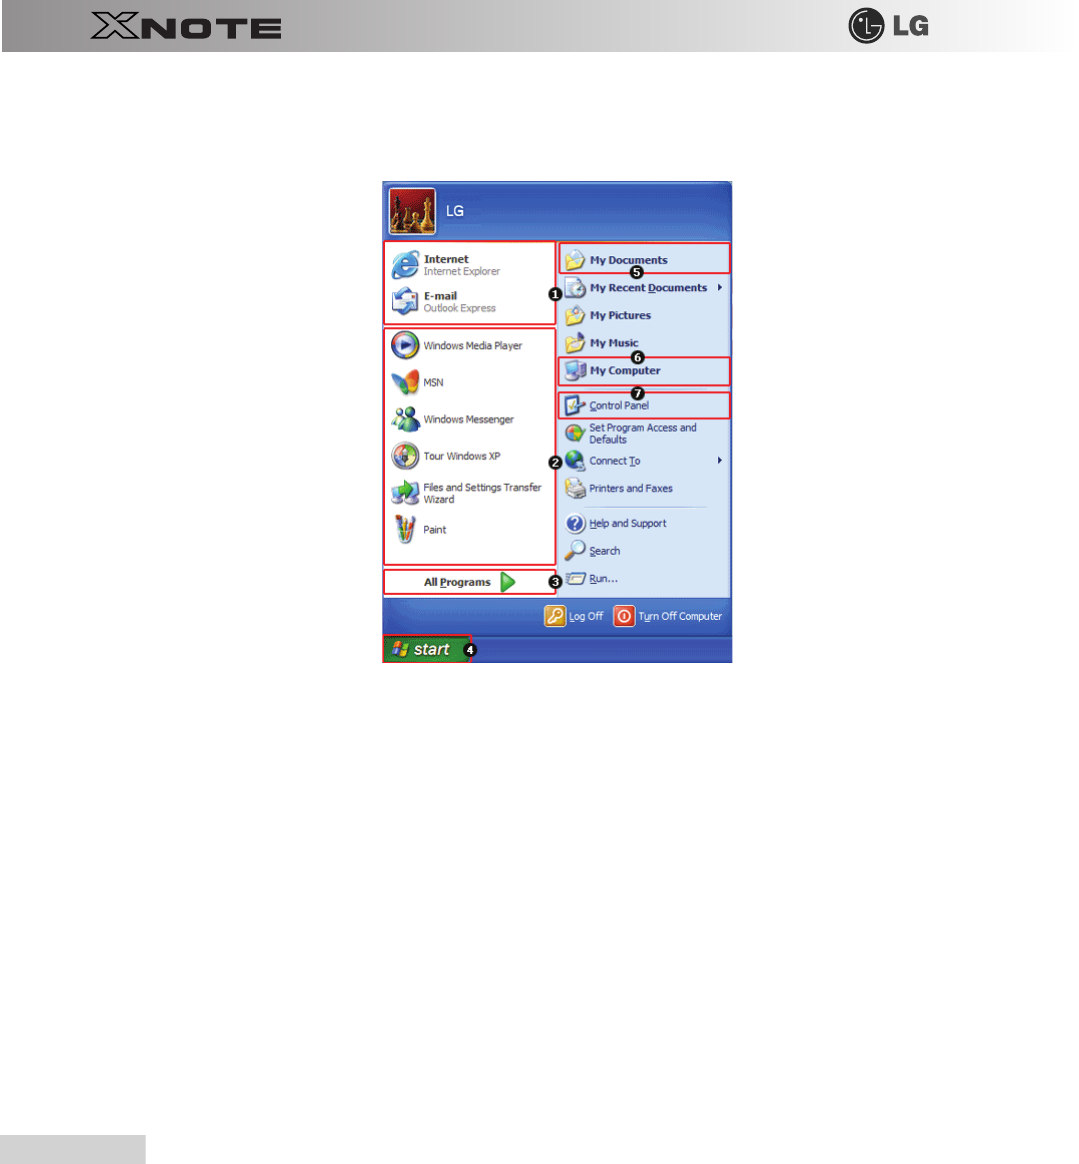
Start menu
Includes all programs needed to start
Windows
.
1.
Fixed Items
2.
Recently Used Programs
-
The order of the programs is subject to change.
3.
All Programs
4.
Start
-
Allows you to easily access most commonly used programs.
5.
My Documents
-
Keeps your documents.
6.
My computer
-
Displays information on drives and networks and allows you to retrieve or execute files and folders.
7.
Control Panel
-
Allows you to customize computer settings.
Using the system
49
▶
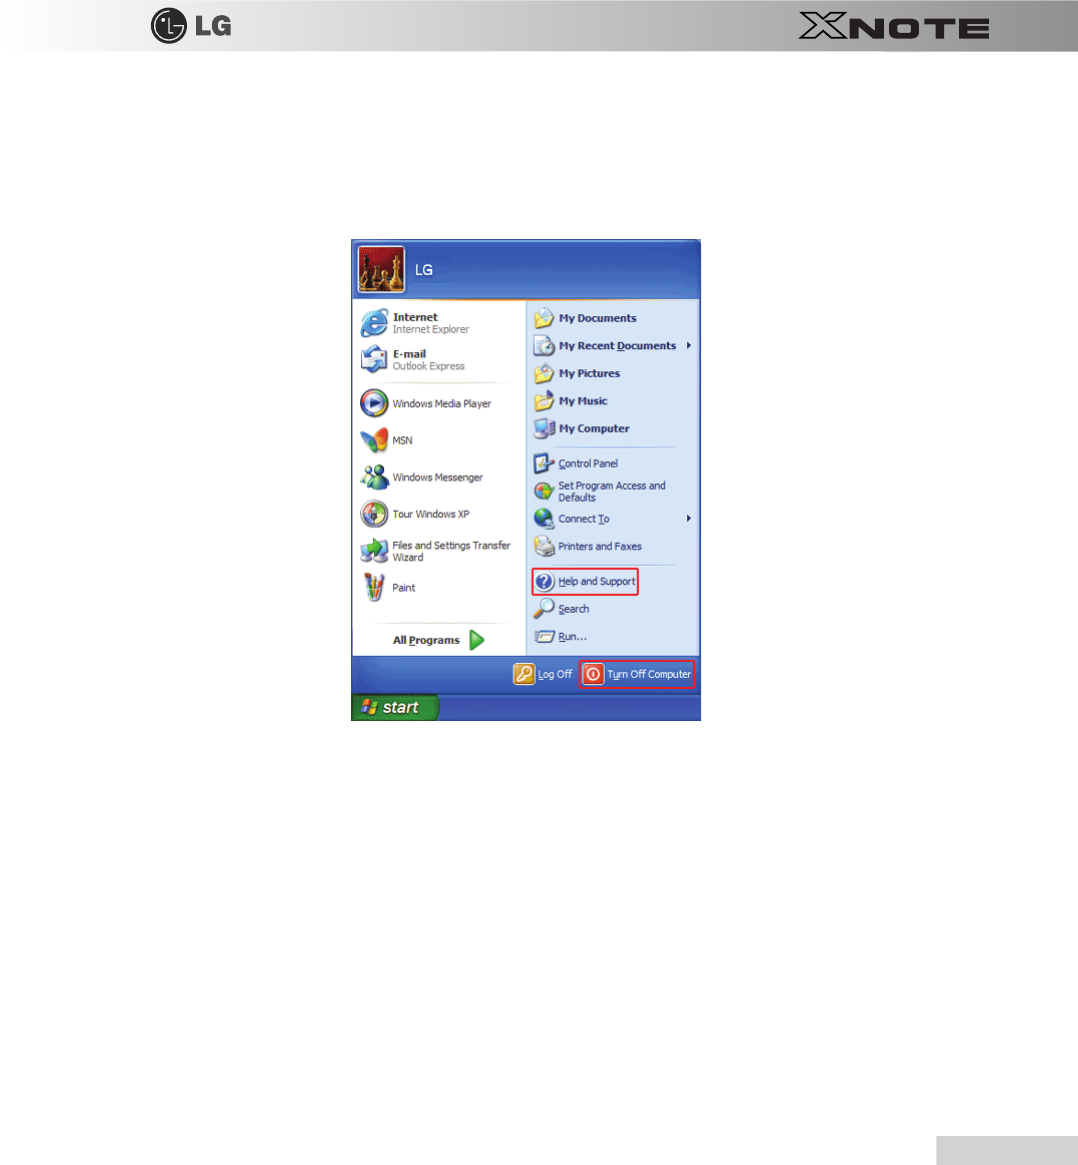
Help and Support
Allows you to learn about
Windows
use and get troubleshooting information and technical supports. Please read the menu
before using the computer.
1.
Click
Start
button and
Help and Support
on
Start
menu.
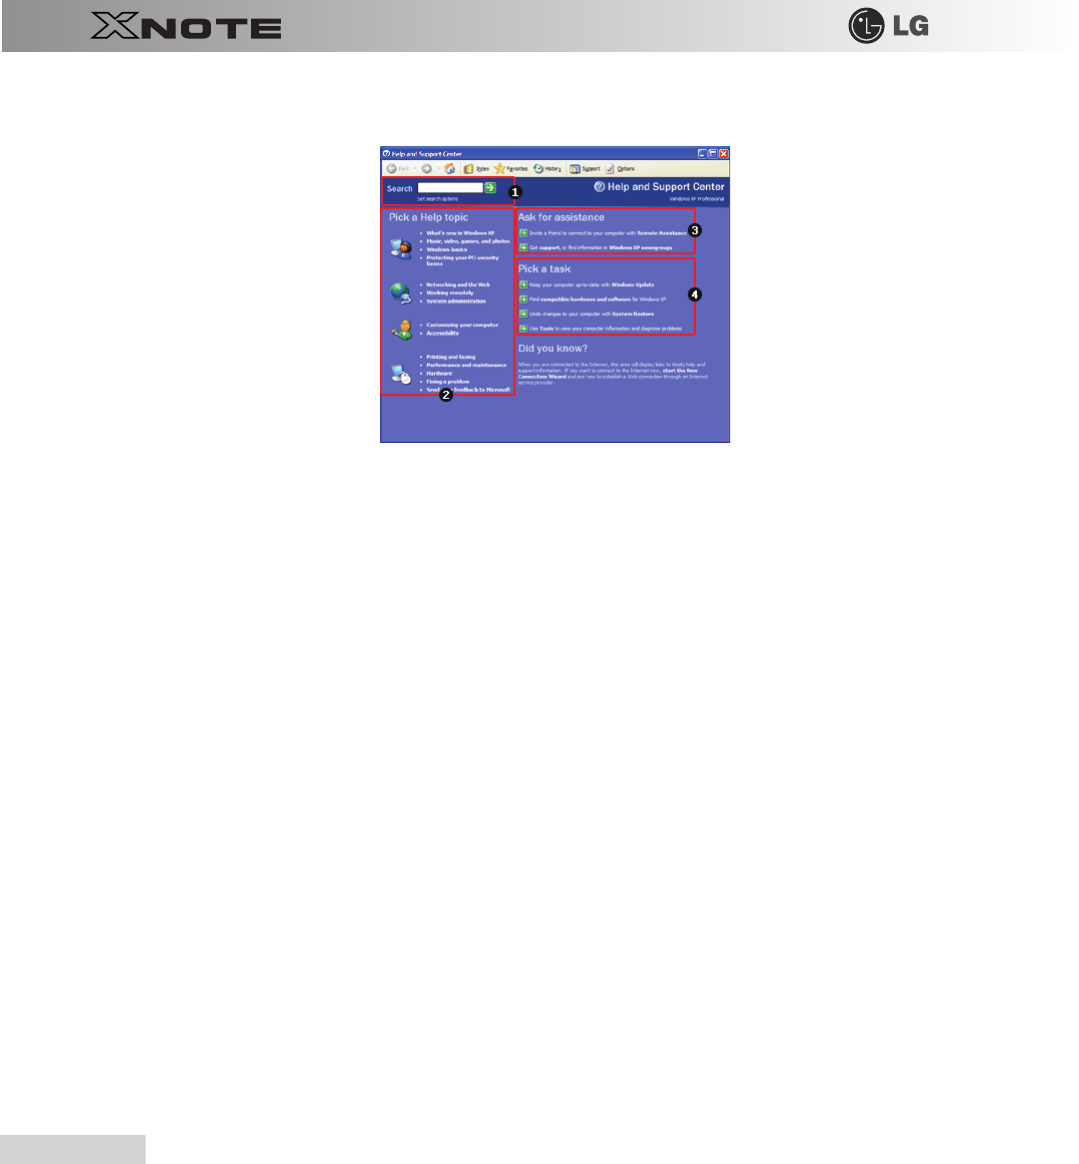
50
Using the system
2.
Then, the following screen will appear.
1.
Allows you to search for wanted items through such methods as
Suggested Topics
,
Full-text Search Matches
, and
Microsoft Knowl-
edge Base
.
Microsoft Knowledge Base
is supported only when the Internet is connected.
2.
Helps you with many such troubles as learning about the features of
Windows XP
and getting troubleshooting information through
appropriate items.
3.
Through the Internet connection, you can ask others for a help and receive the telephone number of the technical support
center.
4.
You can configure the optimal environment for computers.
Using the system
51
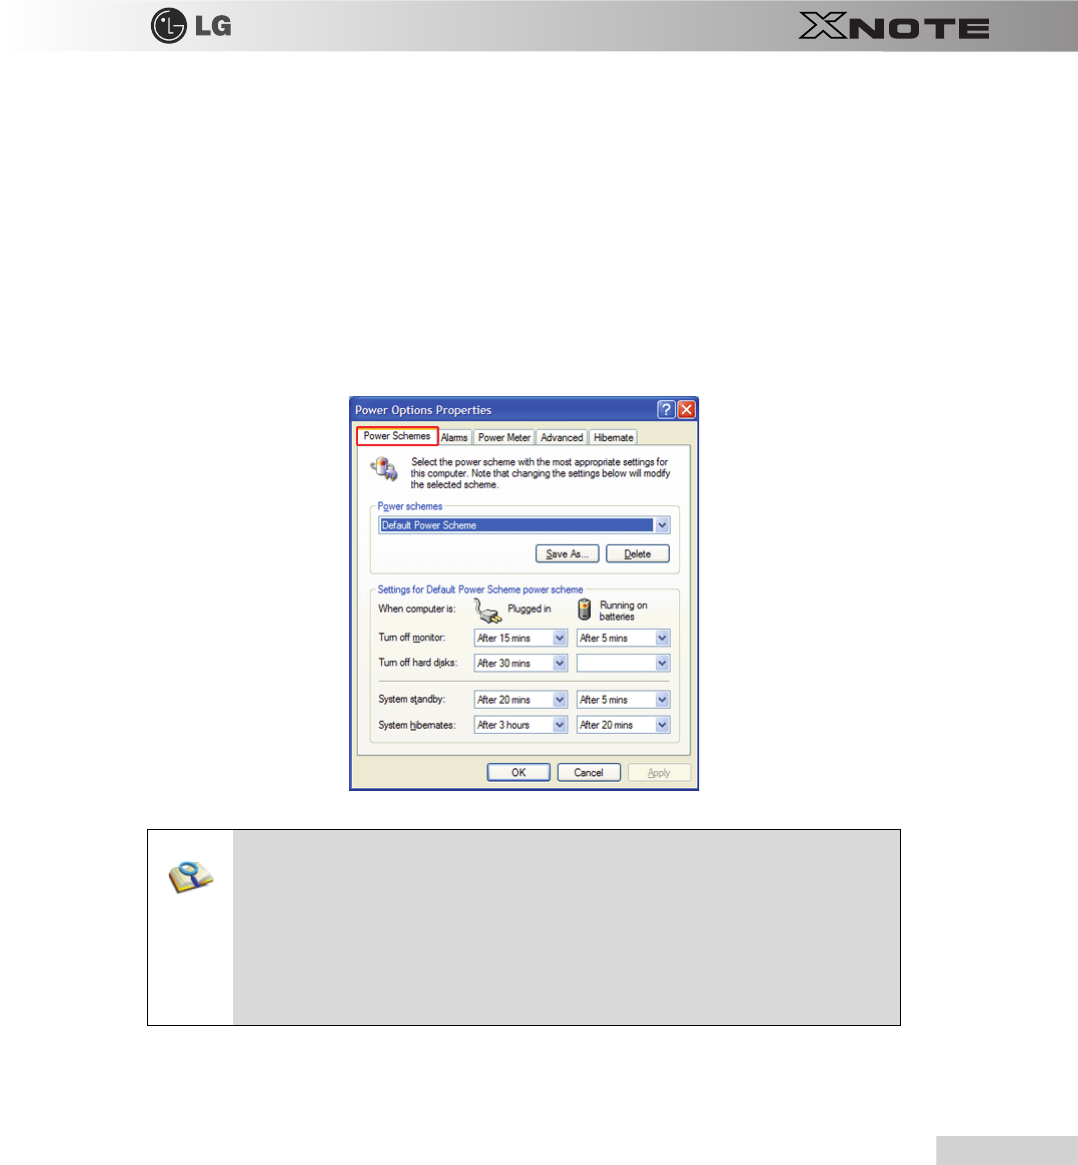
3-5. Windows XP Power Management
Windows XP
has a self-power management feature.
With that, you can lower the power consumption of Notebook PC.
▶
Power Option Registration Information
1.
On the home screen, click
Start
button and
Control Panel
.
2.
Double-click
Control panels
|
Switch to Classic View
|
Power Options
icons.
3.
When
Power Option Registration Information
window appears, on
Power Schemes
tab, customize the power
management settings for the user environments.
■To find appropriate power management settings for Notebook PC, just select Mobile Phone/
Laptop in Power Schemes dropdown menu. Then decide detailed time frames for Turn
off monitor, Turn off hard disks, System standby, and System hibernates in Power
Schemes settings of Minimal Power Management.
■In System Standby, the monitor and hard disks are turned off to save power.
■In System standby, currently worked-on data is not stored on the hard disk and so save it before
entering into the standby mode.
■In System hibernates, the computer is turned off after all the data on the memory has been
saved on the hard disk.
52
Using the system
■
If you execute
System standby
or
System hibernates
while playing a computer game, a
serious error may occur. Be sure to end the game before entering into
System standby
or
System hibernates
.
Using the system
53
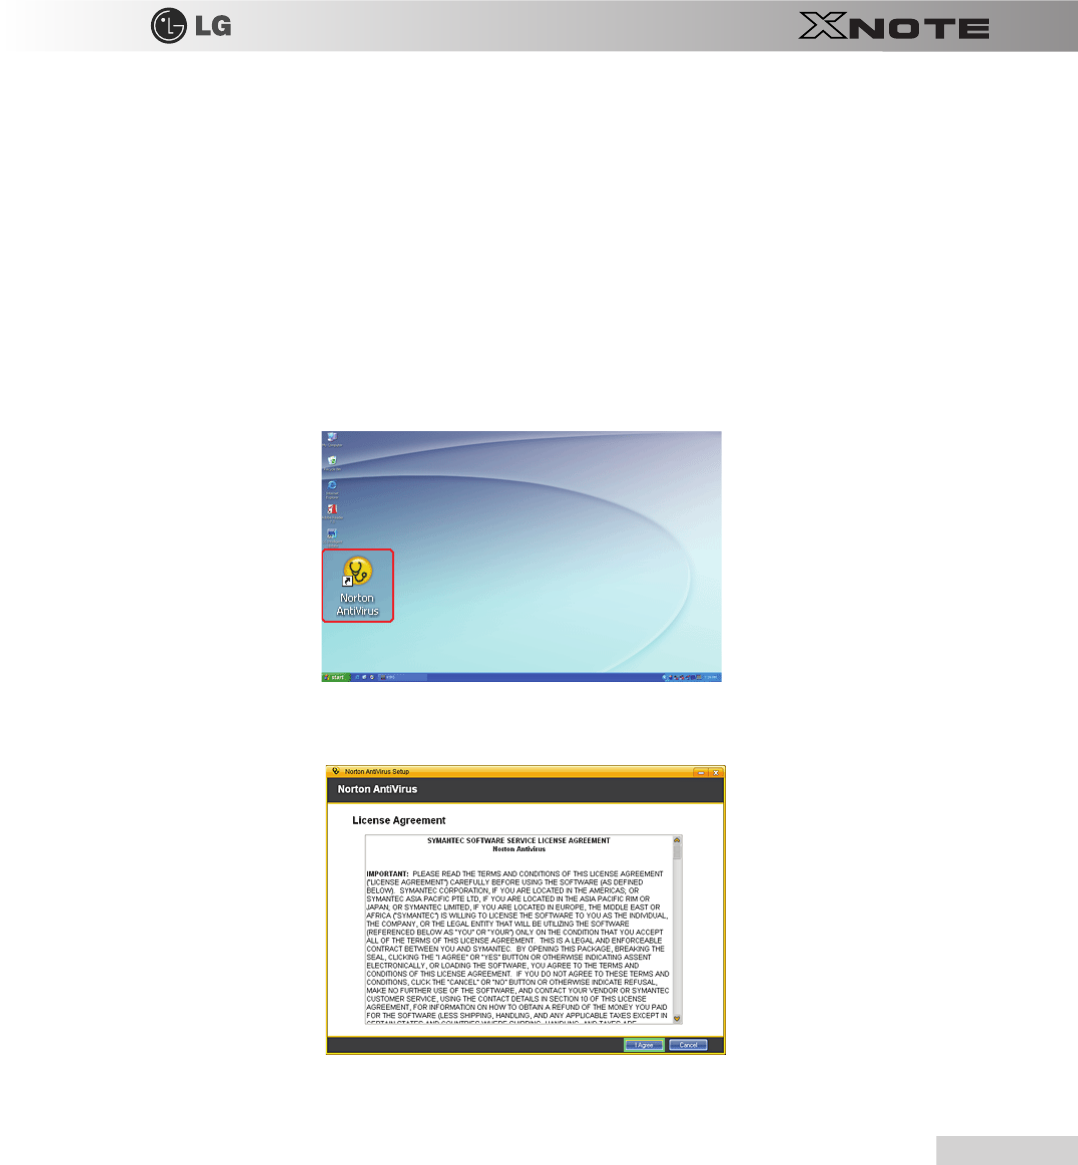
3-6. Scanning Computer Viruses
Computer viruses are programs that penetrate other programs and files. Computer viruses infect other files through replica-
tion, leaving the infected files and programs damaged and unusable. The Notebook PC comes with a vaccine program called
Norton AntiVirus
. You can use
Norton AntiVirus
and
LiveUpdate
free of charge for 90 days.
※
The displayed image can be modified without prior notice.
※
Norton AntiVirus
can also be installed using
LG Intelligent Update CD
.
▶
Installing and Registering
Norton AntiVirus
1.
Complete
Windows XP User Registration
and turn on the machine.
2.
Double-click the
[
Install Norton AntiVirus]
icon on the desktop.
※
Norton AntiVirus
can also be installed using
LG Intelligent Update CD
.
3.
When the
Norton AntiVirus
license agreement screen appears, read the agreement and click
[
I Agree
]
.

54
Using the system
4.
When the
Norton AntiVirus
installation screen appears, select the destination folder to intall the
program and click
[
Next
]
.
※
When the
Microsoft Windows installer
update window appears, install the update. (You need to be connected to the
Internet to install
Microsoft Windows installer
.)
5.
The installation program starts to install
Norton Antivius
.
Using the system
55
6.
When the installation of
Norton AntiVirus
is finished as below, click
[
Next
]
.
7.
When the following screen appears, select
[
Continue with my 90 day Subscription
]
and click
[
Next
]
.
8.
When the following screen appears, click
[
Finish
]
to complete the installation.
※
If the system is connected to the Internet, the user registration screen may appear. If you want to register the program, fill in the form as
56
Using the system
instructed on the screen and click
[
Next
]
. If you don't want to register, click
[
Skip]
.
▶
Updating
Norton AntiVirus
A modem or LAN card must be installed in the computer to update
Norton Antivirus
. Update is available
only through the Internet.
1.
Click
Start
on the taskbar and select
All Programs
>
Norton AntiVirus
>
LiveUpdate
.
2.
LiveUpdate
downloads and installs the update automatically.
Using the system
57
3.
When the update is complete, click
[
Restart
]
to reboot the system.
▶
Scanning Viruses with
Norton AntiVirus
1.
Double-click the
Norton AntiVirus
icon on the desktop, or click [Start
]
>
All Programs
>
Norton AntiVirus
>
Norton
AntiVirus
.
2.
In the
Norton AntiVirus
tab, click
[
Task & S cans]
>
[
Run a Scan]
, select the scan method, and start the scan.
3.
Scan is performed and the result is displayed.
58
Using the system
※
If the system is infected with a virus, the Repair window is displayed. Follow the instructions on the screen to repair the infected files.
4.
When the scan is complete, click
[
Finish
]
to exit the program.
Using the system
59
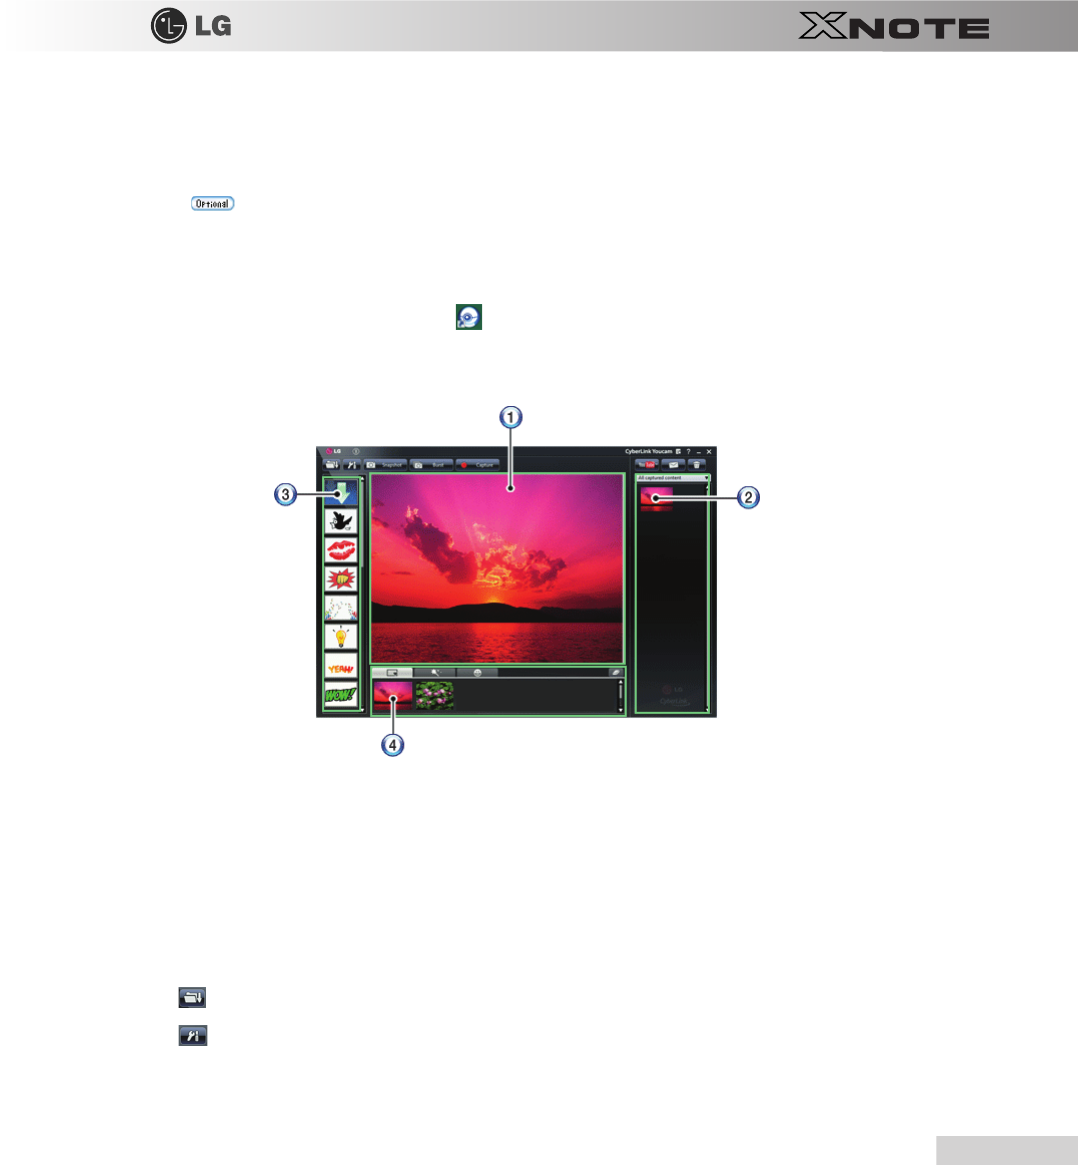
3-7. CyberLink YouCam
CyberLink YouCam
is the program that can take picture or moving images through the
Web Camera
.
※
The figures herein are subject to change without prior notice.
※
Web Camera
is optional, and so it may not be installed in some models.
※
For more information about its operations, refer to the Help of
CyberLink Youcam
.
▶
Using
Cyberlink YouCam
1.
Double-click the
CyberLink YouCam
Icon
on the Desktop to run the program.
2.
The main windows of
CyberLink YouCam
appears as follows..
3.
Viewer
: Displays the
Webcam
screen.
4.
Image Gallery
: Use to record pictures and moving images, play back or delete those images.
5.
Animation Effect menu
Can add a frame and animation effect on the screen.
6.
Frame
/
Animation Effect menu
Can add a frame and animation effect on the screen.
▶
Major Buttons
1.
Open Emotion Pictures
Opens various emotion picture files.
2.
YouCam Environment configuration
Configures the environment for
Yo u C a m
.

60
Using the system
3.
Snapshot
: Takes pictures.
4.
Burst
: Takes pictures continuously.
5.
Capture
: Takes moving images.
6.
YouTube
: Uploads the taken moving images to
Yo u Tu b e
.
7.
E-Mail
: Sends the taken pictures or moving images through E-mail.
8.
Recycle Bin
: Deletes the taken pictures or moving images.
9.
Help
: Displays the help windows for
Yo u C a m
.
Using the system
61
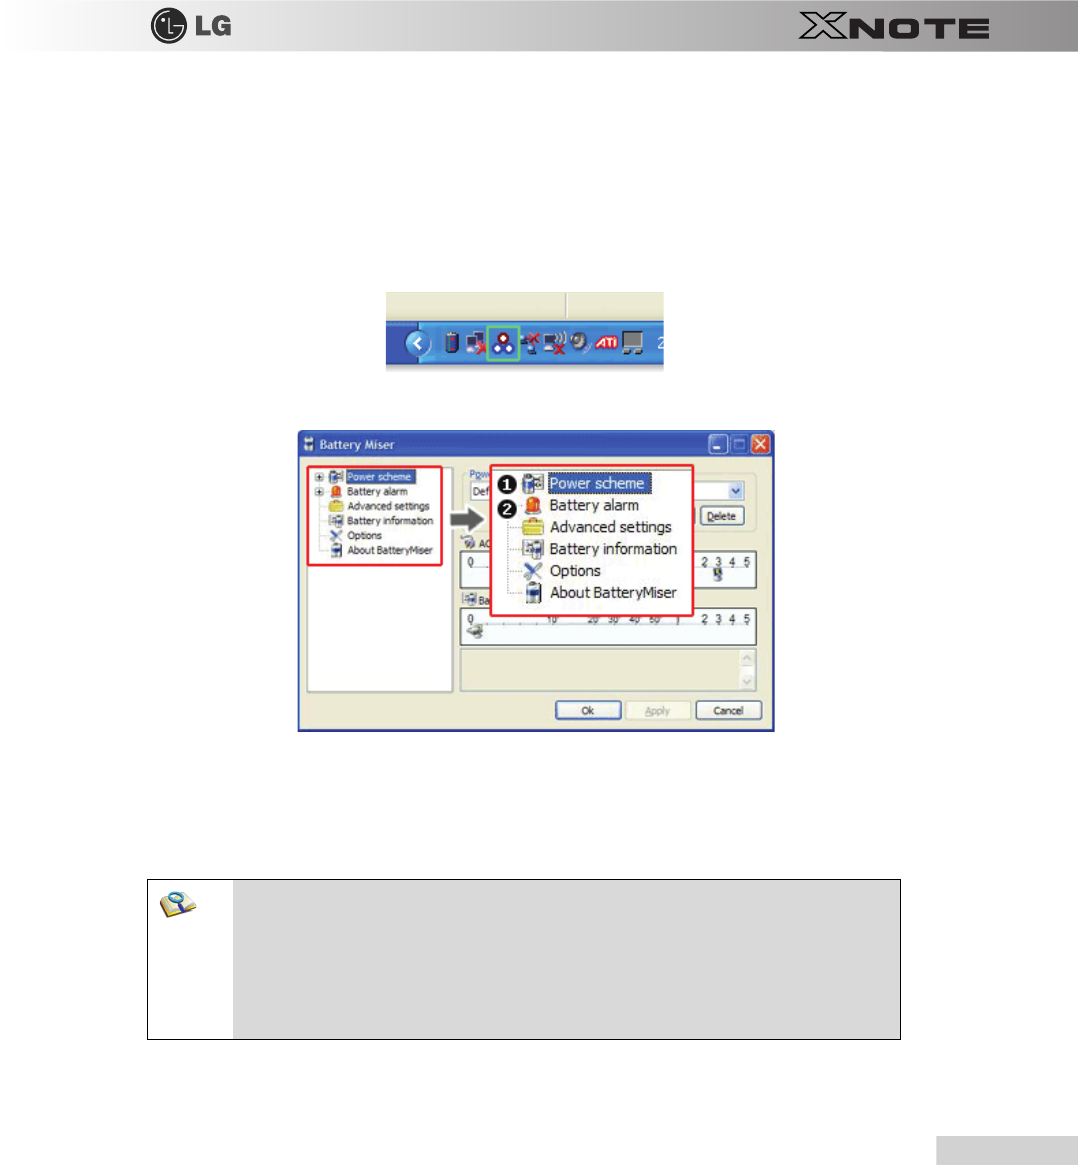
3-8. Using Battery Miser
Battery Miser
is a program that manages the power saving features to use the battery for the longest
possible hours. When used with
Windows
Default Power Management Features,
Battery Miser
provides
its unique power management features in addition.
※
For more detailed information, see the
Help
menu of
About Battery Miser
.
1.
Double-click the
Battery Miser
icon on the taskbar.
2.
Battery Miser
Home Page like follows appears.
1.
Power Schemes
: A list of settings for power use management to reduce power consumptions on every part of the system.
2.
Battery Alert
: A power option where the user can set the system to sound the alarm when the battery is running low or
worse.
■Click the Battery Miser icon on the taskbar to open the power configuration select menu. Use
this menu to change the power configuration.
■Click [Fn] + [F10] to display Battery Information.
This device supports 2 types of charging method. Execute
Advanced Settings
of
Battery Miser
to select the charging
method.
■Quick Charging: Can be charged much faster than Ordinary Charging.
■Ordinary Charging: Can be charged rather slow than Quick Charging.

62
Using the system

Chapter 4.Input/Output Device
64
Input
/
Output Device
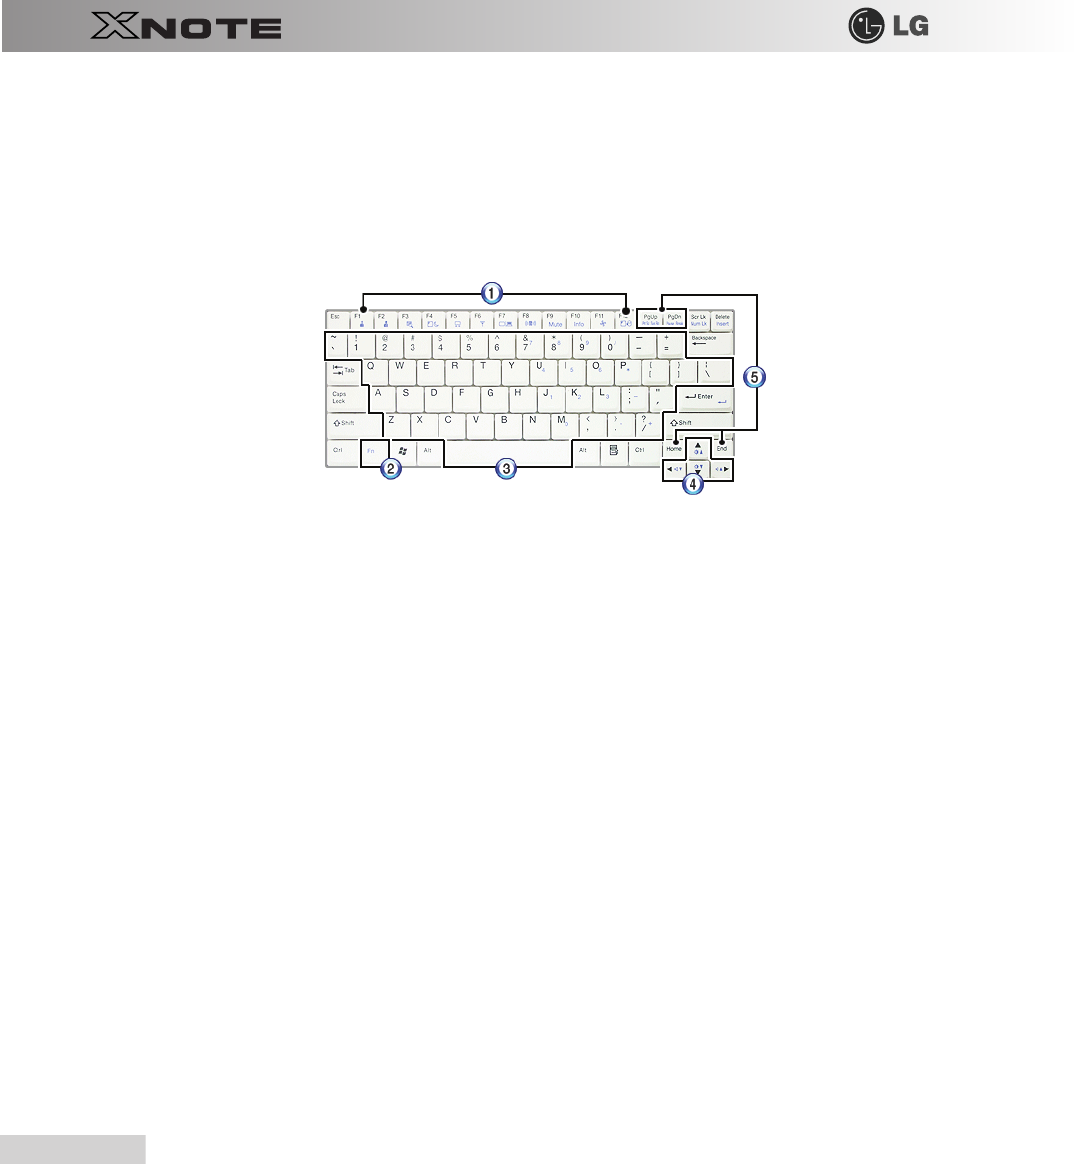
4-1. Using the Keyboard
The keyboard allows the user to input data or give commands.
▶
Keyboard Overview
The keyboard consists of character and numeric keys as well as function keys.
1.
Function keys (F1 ~ F12)
-
The usage may differ by OS or applications types.
2.
Fn key:
-
Works as part of hot keys if used with function keys.
3.
Character and Numeric Keys:
-
Consists of keys, spacebar, numeric keys (0 ~ 9), and special symbol keys.
-
Spacebar
: Inserts a white space per hit while you type.
4.
Arrow keys:
-
Moves the cursor and others in their respective directions.
5.
Pg Up and Pg Dn keys:
-
Moves a screened page up or down.
Input
/
Output Device
65
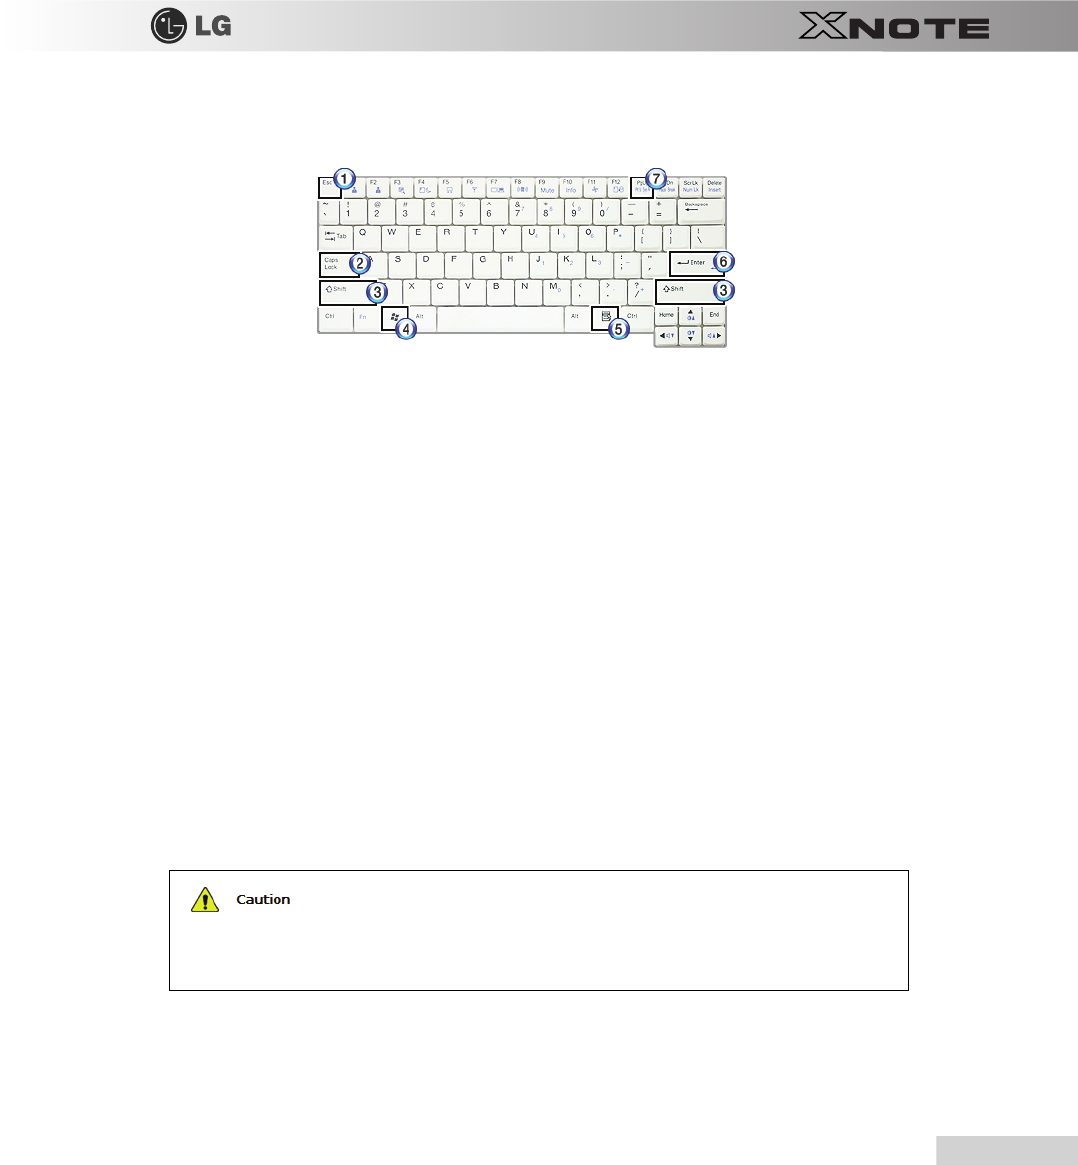
▶
Using Special Keys
1.
Esc
key
-
Terminates or stops a program.
2.
Caps Lock
key
-
Used to turn on
Caps Lock
lamp. When this lamp is on, you can type uppercase letters without holding Shift key. To type lowercase letters,
press this key again. This does not apply to Korean characters.
3.
Shift
key
-
used to type uppercase letters or as part of hot keys.
4.
Windows
key
-
Allows you to select
Windows
Start button and open Start menu .
5.
Shortcut Menu Key:
-
Allows you to open the
Windows
shortcut menus. (The shortcut menus are the same as those you can see when right-clicking a file or fold-
er.)
6.
Enter
key
-
Used to inform the computer of the completion of one command or to change the line.
7.
Prt Sc
key (
Print Screen
)
-
Prints or temporarily saves the current screen display.
■
Spilling a watery substance like coffee or juice on the keyboard may cause a fault, malfunction, or
electric shock.
■
The keys may not work properly when you use several keys at the same time while playing a PC
game. (Please change the key combination settings according to the combinations necessary for the
game play.
66
Input
/
Output Device
■Toggle Caps Lock key to turn the Caps Lock lamp ON or OFF and to maintain the
uppercase/lowercase mode. The on/off status is displayed through the lamp on the notebook
PC body.
■By holding Shift key, you can type uppercase letters when Caps Lock is off or lowercase
letters when Caps Lock is on.
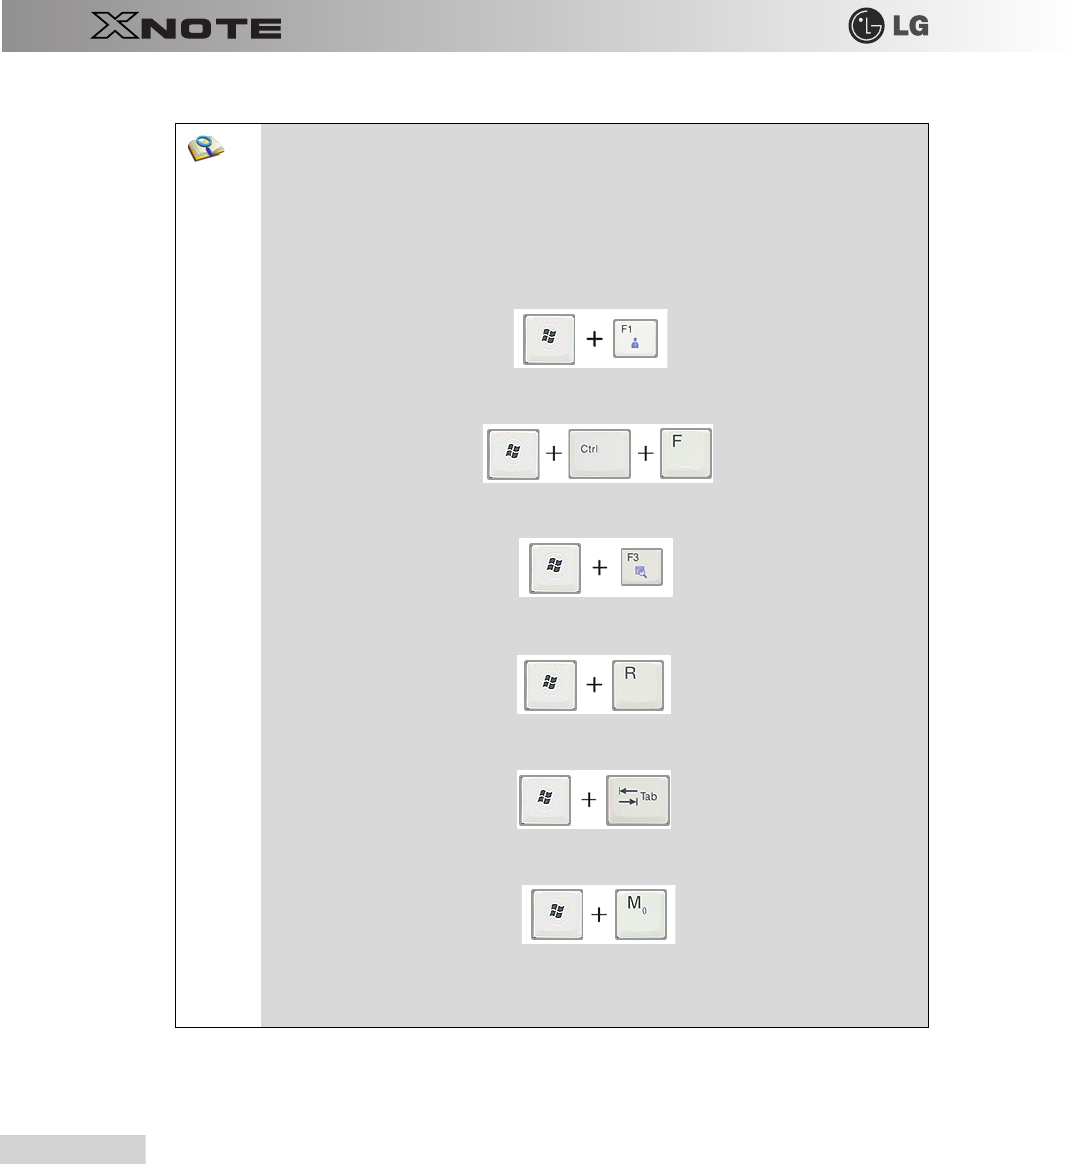
For more convenient use of Windows XP, remember the following Windows key combinations:
■Displays Windows XP Help.
■Displays "Search Result - Computer" window.
■Displays "Search Result" window.
■Displays the execution screen.
■Selects the next window in order displayed on the taskbar.
■Minimizes the current window.

Input
/
Output Device
67
▶
Hot Keys:
By pressing the following key combinations at the same time, you can immediately start the designated features (such as
adjusting the screen brightness).
Fn
+
F1
Customizable hot keys. (Configurable through OSD settings)
Fn
+
F2
Customizable hot keys. (Configurable through OSD settings)
Fn
+
F3
Magnifying hot keys
Fn
+
F4
Executes the mode defined in the
Windows
Power Save Mode
. (Example:
Standby
, Hiber-
nate)
Fn
+
F5
When the user presses
Fn
+
F5
keys, the touchpad mode alternates between
Touchpad
Disable
,
Touchpad Auto-Disable
(upon connection of external USB/PS2 mouse), and
Touch-
pad Enable
in order. (Initialization takes 1 ~ 2 seconds. It is recommended to use after the initial-
ization.)
Fn
+
F6
Turns the wireless devices (incl. Wireless LAN and Bluetooth) on and off (Bluetooth is optional,
and so it may not be installed in some models.)
Fn
+
F7
Monitor toggle. If you have an external monitor connected to the computer, press
Fn + F7
keys
to rotate the display mode between
LCD only, Monitor only,
and
LCD + Monitor both
in order.
Fn
+
F8
Switches from
SRS WOW HD
to
SRS TruSurround XT
, to
SRS Off
for each pressing.
Fn
+
F9 Mute
(Sound ON / Sound OFF)
Fn
+
F10 System Information
. Displays summarized system information.
Fn
+
F11
Fan Control feature. Switches the cooling fan mode between
Normal
and
Silent
for each press-
ing.
Fn
+
F12
Hibernates (When OSD is installed)
Fn
+ Increases LCD brightness within a nine-grade range.
Fn
+ Decreases LCD brightness within a nine-grade range.
Fn
+ Turns down the volume.
Fn
+ Turns up the volume.
Fn
+
Num Lk
When the
Num Lock
lamp is turned on, you can enter numbers (0~9) using the em
-
bedded numeric keys. If you press
[Fn]
+
[Scr Lk]
again, the
Num Lock
lamp is turned
off and you can enter text characters.

68
Input
/
Output Device
Fn
+
PgUp
You can enter
[Prt Sc Sys Rq]
button.
Fn
+
PgDn
You can enter
[Pause Break]
button.
Fn
+
Delete
You can enter
[Insert]
button.
Input
/
Output Device
69
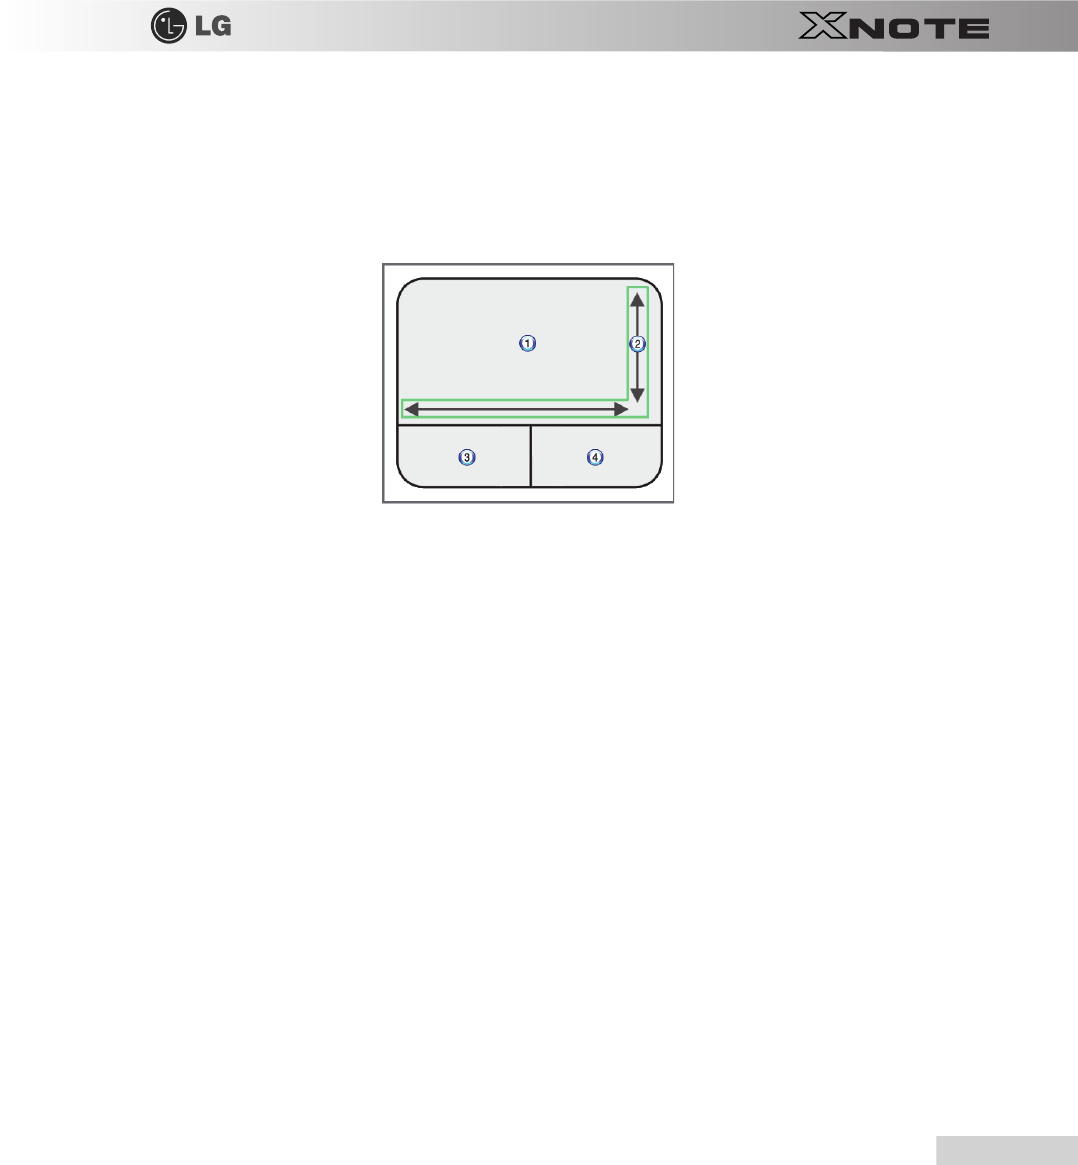
4-2. Using the Touchpad (and Mouse)
The touch pad is equipped with the scroll feature and can function as a wheel mouse. The touchpad is compatible with the
USB-type mouse in software. The touchpad functions same as the USB-type mouse and is very useful for a program support-
ing mouse use like the
Windows
.
※
The touchpad and a USB-type mouse can be used together on the same system.
1.
Touchpad
-
Moves the cursor.
2.
Scrolling area
3.
Left button
-
Used to select or execute programs.
4.
Right button
-
Functions as the right button of a mouse in most cases. However, the usage may differ depending on programs.
70
Input
/
Output Device
▶
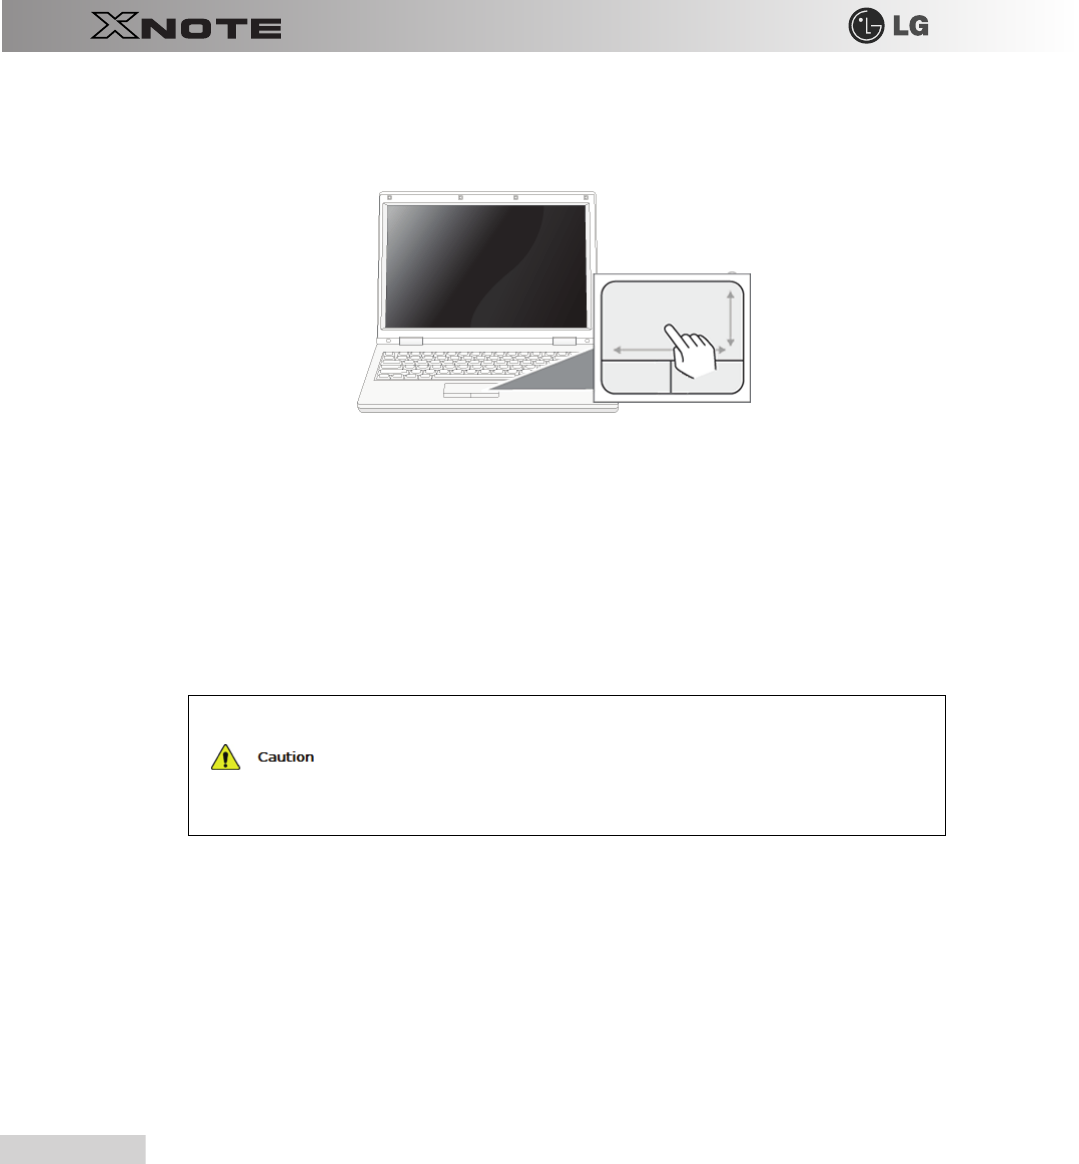
Moving the Cursor (Pointer) on the Screen
Place a finger on the touchpad and glide the finger.
▶
Click (Select)
Press and release the left button swiftly. (Or tap the touchpad once.)
Do this, for example, to select a menu or icon and to place the cursor to type on a word processor file.
▶
Double-click (Execute)
Press and release the left button twice swiftly in a series. (Or tap the touchpad twice swiftly in a series.)
Do this, for example, to run a program after selecting its execution file (or icon).
▶
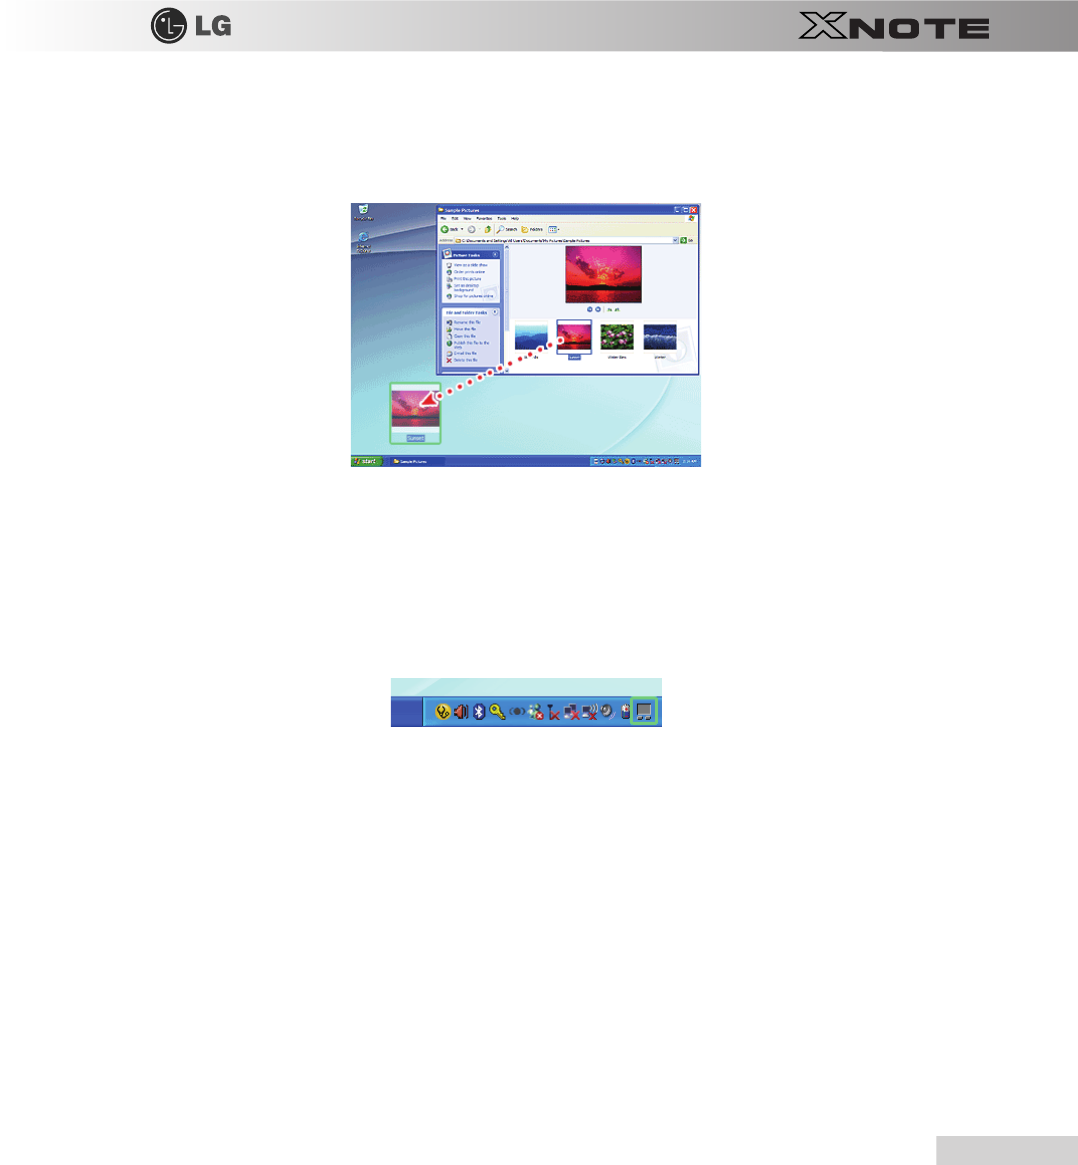
Drag
/
Drop
To drag, click and hold an icon, for example, and move it to another location.
To drop, leave a dragged icon to another location.
To move a file icon, for example, to another folder or to
Recycle Bin
, place the cursor (or the pointer) on the icon, press and
hold the left button, and glide another finger on the touchpad until the icon reaches the aimed location. After reaching the des-
tination, release the left button.
1.
Drag
Notes on Using the Touchpad
■
Do not use a sharp object such as a pen on the pad nor peel the cover. It may cause an impairment.
■
Do not place more than one finger on the pad nor use it with your hands wet or covered with gloves.
The touchpad may not function normally. Oil or dirt at the finger tip can also cause an impairment.
■
The touchpad is sensitive. Do not impose an excessive pressure on it. Use the touchpad in a
comfortable posture not to do any harm to your finger or wrist.
Input
/
Output Device
71
-
Glide one finger on the pad with another finger pressing and holding the left button.
2.
Drop
-
Release the left button to drop. (By doing this, you could drop a file into
Recycle Bin
, if you want to.)
▶
Click-free Dragging
When activated, this feature allows you to drag an icon without pressing and holding the left button.
Do the following to activate the click-free dragging feature. If it has been done, pressing the left button for an extensive time
replaces pressing and constant holding so that you can drag without holding the left button.
1.
Click [Mouse Properties
]
icon in Notification Area.
72
Input
/
Output Device
2.
Select Activate click-free dragging (T) and click
[
Setup
]
button to adjust the time span for which you should press the left
button to execute the feature.
▶
Scrolling
The touch pad supports the scrolling feature.
To scroll vertically or horizontally, glide your finger along the right or bottom edge. Now the screen follows your finger move-
ments if there is a scroll bar on either edge.
※
The width of scroll bar may differ by computer model type.

Chapter 5.Connecting Peripherals
74
Connecting Peripherals
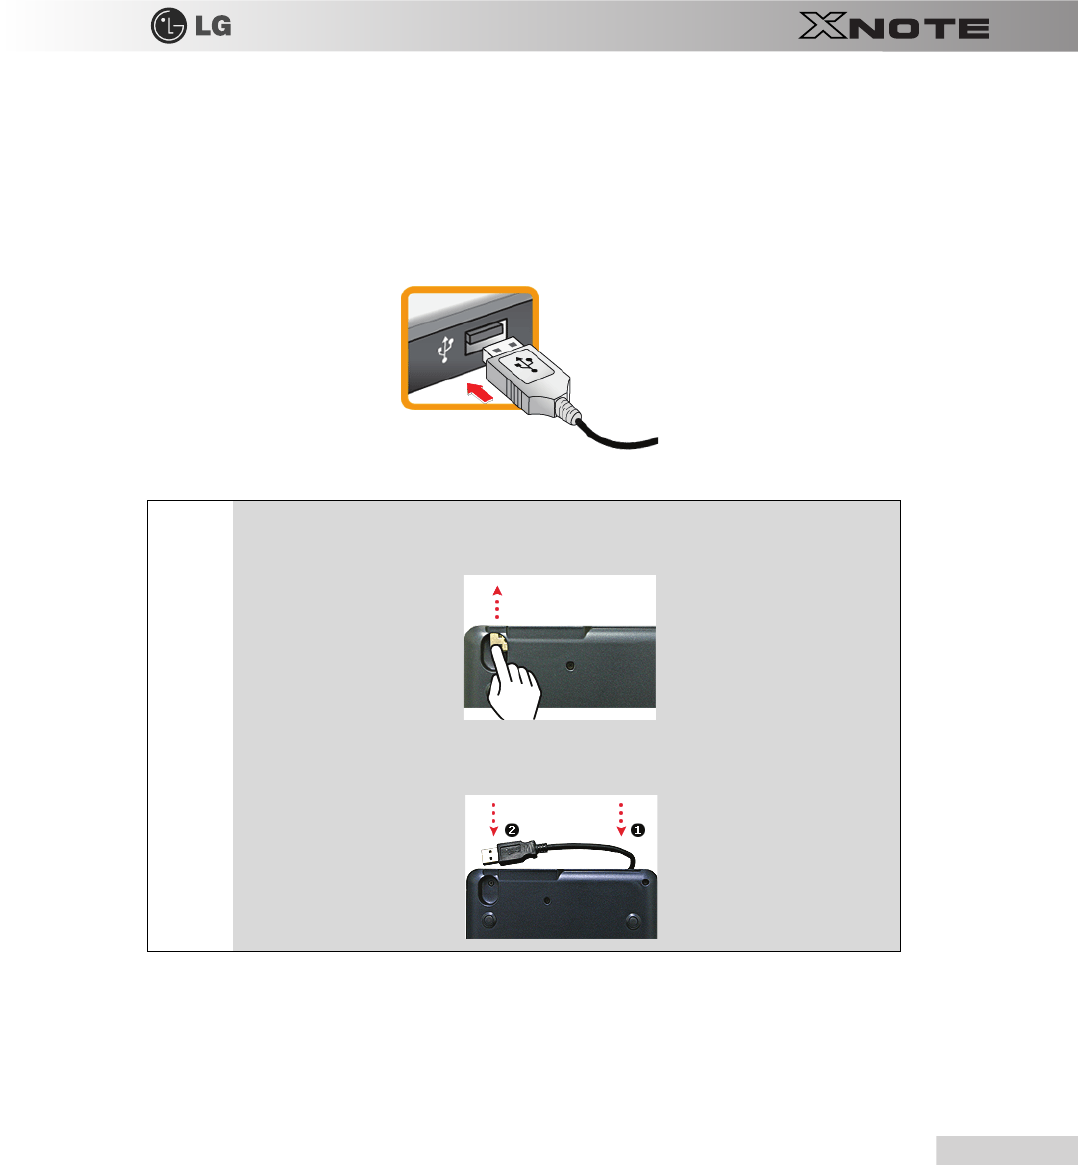
5-1. Connecting USB 2.0
Following peripherals can be connected to the Notebook PC.
※
Those peripherals need to be purchased separately.
The notebook PC can be connected with other USB supporting devices such as USB keyboard, Hub, digital camera, etc.
Connecting Peripherals
75
5-2. Connecting Monitor
Monitor Toggle Features (Converting the Screen Using the Shortcut Key)
※
If you have an external monitor connected to the computer, press Fn
+
F7 keys to rotate the display mode between LCD only, Monitor
only, and LCD
+
Monitor both in order.
■Ensure the monitor power is off before connect external monitor to the notebook pc.
76
Connecting Peripherals
5-3. Using Bluetooth
Bluetooth
establishes wireless connection between the
MS Windows
user and the various
Bluetooth
-
enabled digital devices such as camera, cell phone, headset, printer, GPS receiver, etc.
※
Bluetooth
is optional, and so it may not be installed in some models.
※
The images and contents of Using
Bluetooth
may differ depending on the
MS-Windows
version.
※
For more information, refer to the Help of the
Bluetooth
setup program.
▶
Searching for and Using
Bluetooth
Device
1.
Double-click the "My
Bluetooth
neighborhood" icon in the desktop or the
icon on the right side of the task bar
to run the Bluetooth Setup program.
2.
When the following
[
Add New Connection wizard]
appears, select
[
Fast Mode]
and click
[
Next
]
.
3.
The following screen appears after searching for all
Bluetooth
devices. Select the device you want to use and
click
[
Next
]
.
Connecting Peripherals
77
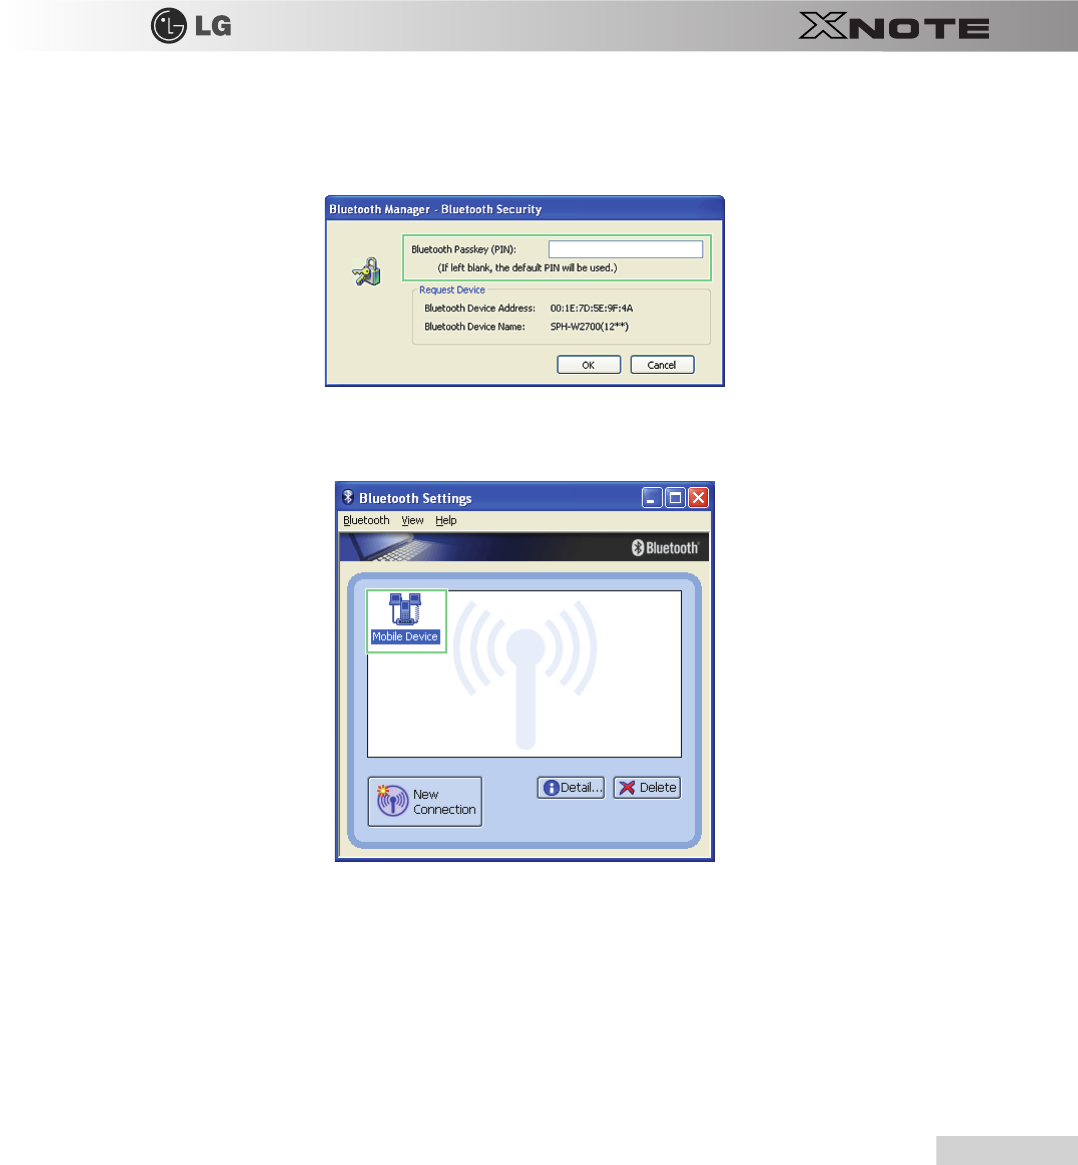
4.
When the following
[
Bluetooth Manager-Bluetooth Security
]
window appears, enter the password for the
Bluetooth
device.
※
For a password, you can use the password provided by the
Bluetooth
device manufacturer or you can set it yourself.
5.
When you added and connected the
Bluetooth
device, the corresponding icon and device name is displayed
in the
Bluetooth Setup
program as follows:
78
Connecting Peripherals
5-4. Using Smart Link
Smart Link
connects two PCs using a
Smart Link
cable. You can use
Smart Link
even if the PCs are not
connected to the network, and you don't need any special configuration on the PCs to use it.
After connecting your notebook PC to a remote PC with a
Smart Link
cable, you can share the data in one PC with another.
Also, if your notebook PC doesn't have an ODD, you can use the ODD in the remote PC.
※
Smart Link is optional, and so it may not be installed in some models.
※
Other USB devices such as HDD, ODD, MP3 Player, etc are not supported.
▶
System Requirements for Smart Link
System Requirements
CPU Intel Pentium III
1GHz or above
MEMORY
512MB or more
HDD
500MB or more
OS Windows XP
SP2,
Windows Vista
Family,
Internet Explorer
5.5 or above (6.0 recommend-
ed)
USB USB
2.0 or above
※
Smart Link
operates in the
USB
network mode. Therefore, its speed is lower than that
of
USB
2.0.
Connect the Smart Link cable directly to the USB port.
■
If you connect it to a port replicator or a USB extension cable, Smart Link may not work properly.
If the names of the two PCs are the same, Smart Link does not work properly.
■
Smart Link
requires unique names for the PCs to identify each PC. If the names are the same, the
Smart Link program does not work properly.
Before you can upgrade the Smart Link
ROM data, the notebook PC and the remote PC must be
connected with a
Smart Link cable.
■
You can upgrade the
Smart Link
ROM data using
LG Intelligent CD
or
LG Intelligent Update
.
When two notebook PCs that support Smart Link are connected to a remote PC.
■
The first notebook PC connected with
Smart Link
operates properly, but the second notebook
PC connected with
Smart Link
does not work properly. However, the Smart Link program may
not work properly in some situations.
When Smart Link does not work properly
■
Remove the Smart Link program after disconnecting the Smart Link cable. Then reconnect the cable
to use the program.
Connecting Peripherals
79
▶
Connecting Smart Link
It takes about 1 minute to 5 minutes depending on the notebook PC and the remote PC used before the
Smart Link
program
starts to operate after connecting the cable.
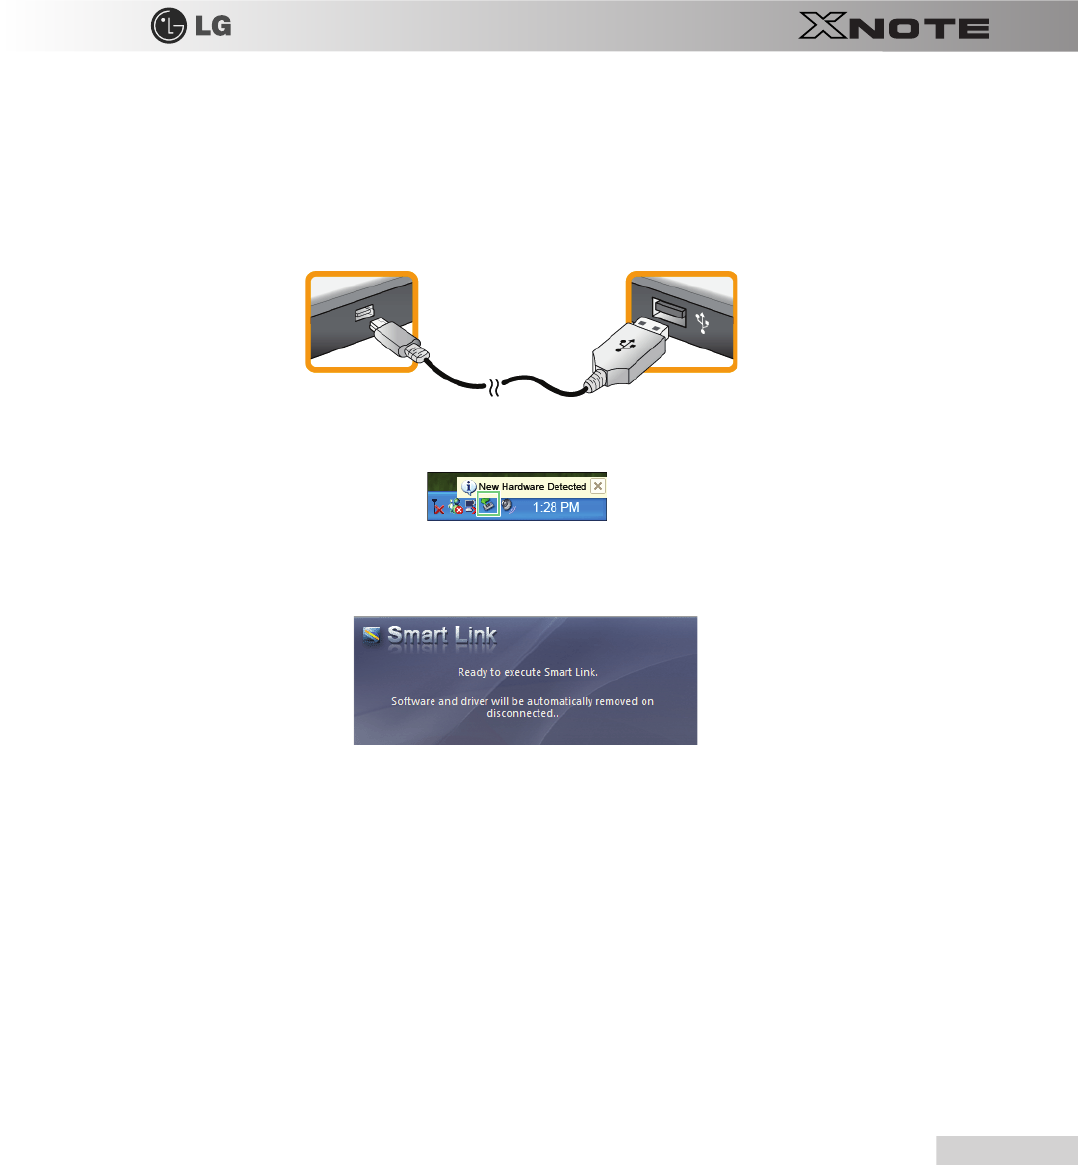
1.
Connect the
Smart Link
cable to the
Smart Link
port of the notebook PC and the USB port of the remote
PC.
※
The USB device driver is installed automatically.
※
If the operating system in the remote PC is
Windows XP
, you have to disconnect the
Smart Link
cable, remove the Smart Link
program, and reconnect the cable according to the messages displayed on the screen.

80
Connecting Peripherals
2.
Start the SmartLink.exe file, which will guide you through the installation of the
Smart Link
program. Select [Allow]
when the User Account Control window appears.
※
Once the
Smart Link
device driver is installed, the installation program starts the preparatory process for running
the
Smart Link
program.
※
After the two PCs exchange information with each other, the connection process is completed and the Folder Sharing window appears
automatically.
Connecting Peripherals
81
▶
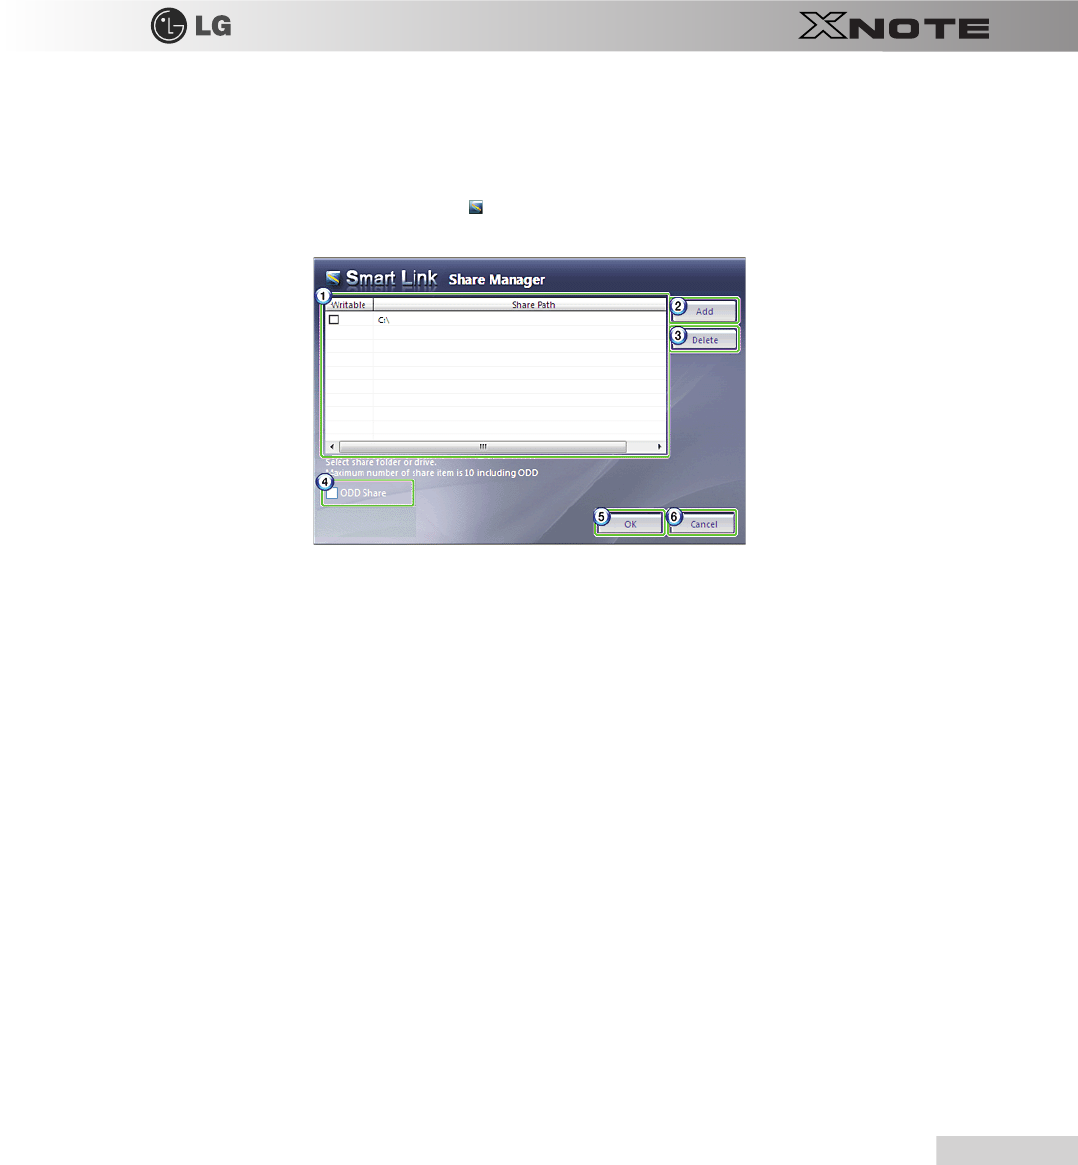
Smart Link Folder Sharing Window
When the two PCs are properly connected with
Smart Link
, the following
Smart Link
Folder Sharing window appears.
※
The
Smart Link
Folder Sharing window appears automatically. If there is no input for approximately 5 seconds
after the
Smart Link
Folder Sharing window appears, it closes automatically. If you want to reopen the
Smart
Link
Folder Sharing window, double-click
.
1.
List: You can set the read
/
write rights in the left panel. The right panel displays the path of the shared folder.
※
When the checkbox is deselected, only the read right is granted. When selected, both the read/write rights are granted.
2.
The Add button: You can add a folder to share.
3.
The Delete button: You can delete a shared folder from the list.
4.
Share ODD: This option is available when an ODD is installed. You can share the ODD by selecting the option.
5.
The OK button: Saves the settings and closes the
Smart Link
Folder Sharing window.
6.
The Cancel button: Discards the settings and closes the
Smart Link
Folder Sharing window.
▶
Sharing a Folder Using Smart Link
1.
Click Add.
※
The available local folders are displayed in a window.
2.
Select the local folder to share and click OK.
3.
Specify the read or read/write right for the selected folder and click OK.
※
If you want to share an ODD, select the Share ODD checkbox.
4.
Open the window for the remote computer. Shared local folders and ODD are displayed in the window.

82
Connecting Peripherals
Tip
■To share a folder, you can also drag-and-drop the folder to the Smart Link Folder Sharing
window instead of using the Add button.
■The Share ODD checkbox is not available if there is no ODD installed in the PC.
■You can only grant the read right for ODD.
■When you share the ODD, only its data can be shared. The media files in the disk cannot be
played.
■You can share up to 10 folders including ODD using Smart Link.
Connecting Peripherals
83
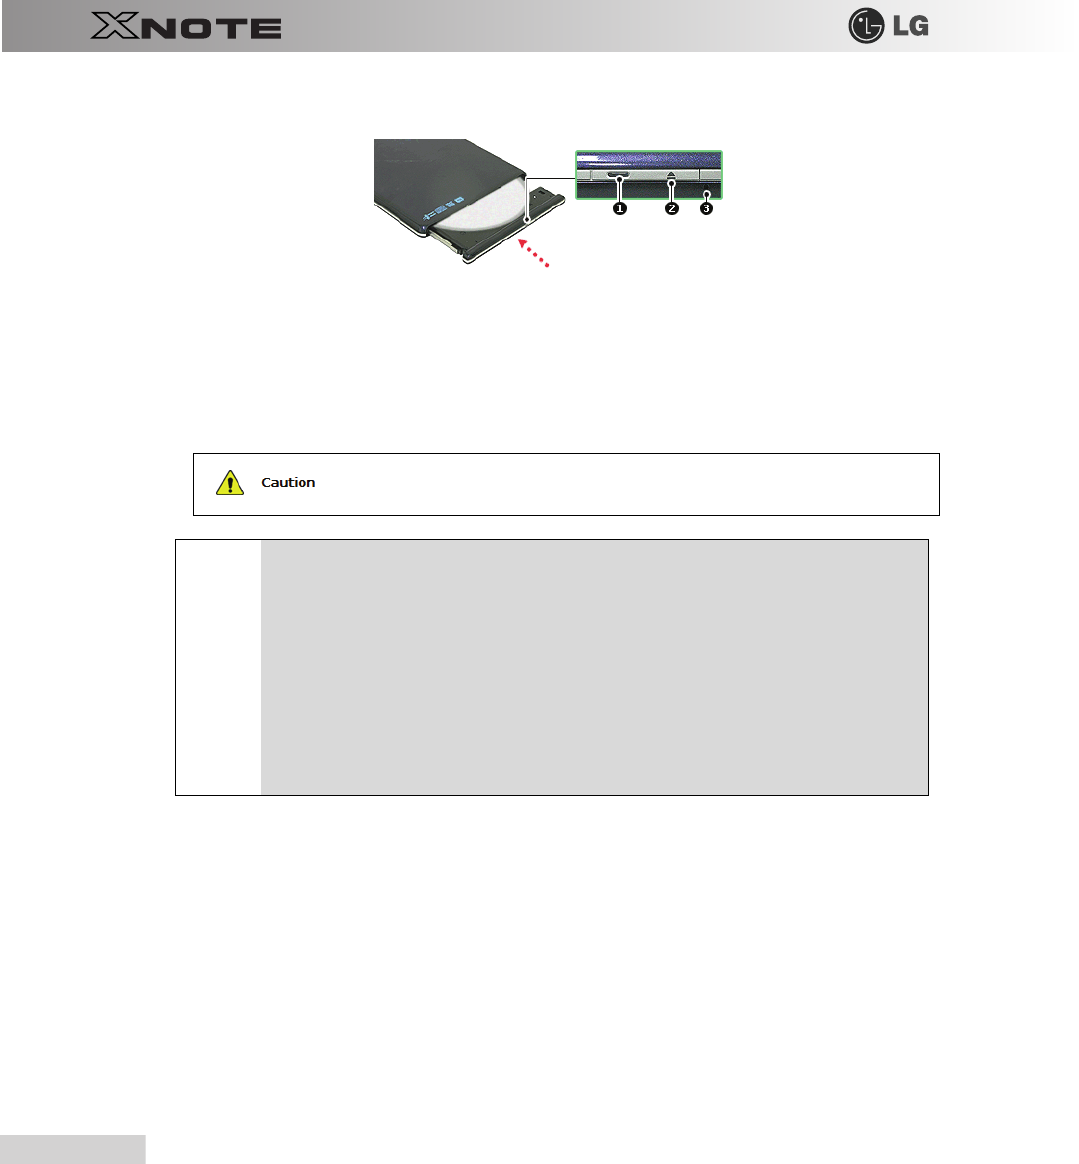
5-5. Using External Drive (LGPC-ODD)
※
External Drive is optional, and so it may not be installed in some models.
▶
Connecting External Drive
Connect the USB cable of the external drive to the USB port of the notebook PC.
▶
Inserting/Ejecting CD
1.
Boot the system and press the
Open Disk Tray
button in front of the external drive.
2.
When the tray is ejected, place the CD at the center of the tray.
Tip
■The USB cable is on the bottom side of the external drive. Insert your finger as shown in the
following figure and pull out the USB cable.
■If you want to insert the USB cable back to the external drive, first insert the cable and then insert
the USB connector as shown in the following figure.
84
Connecting Peripherals
※
(With brand name facing upward.)
1.
Operation lamp
2.
Open Disk Tray button
3.
Emergency Ejector
3.
Push the tray in.
4.
If you want to take out the CD, press the Open Disk Tray button and take out the CD when the tray is ejected.
■
LGPC-ODD
works only in
LG S210 Series
.
Tip
■Use the external drive on a leveled place, if possible. On a tilted place, the CD-ROM, CD-RW,
or DVD-ROM may not function normally.
■The external drive installed in the notebook PC is X24 speed. When a CD is inserted, the motor
will rotate at a high speed resulting in slight vibration.
■When you hold an optical disk such as CD/DVD, be careful not to smear the surface.
■Do not use benzene or thinner to clean a CD.
■Do not write anything on the readable surface of a CD.
■Do not bent a CD.
■Be sure not to drop or smash a CD.
■Do not expose a CD to the sun.
■To clean a CD or DVD, rub with smooth cloth from the center to the outer edge.
■Do not remove the CD when the CD Operation lamp is on.

Chapter 6.System Setup
86
System Setup
6-1. Starting System Setup
System setup means storing the hardware configuration information of the computer in the CMOS RAM. Through system
setup, the computer retrieves various information including current date and time, memory capacity, and H/D capacity and
type.
You setup the system when you set passwords, change the booting order, and add new peripheral devices to the machine.
※
Items displayed on the Setup screen may differ by model type and spec.
■
Refer to
[
Setting the Password
]
.
■
Refer to
[
Changing or Deleting the Password
]
.
■
Refer to
[
Restore the Default Settings
]
.
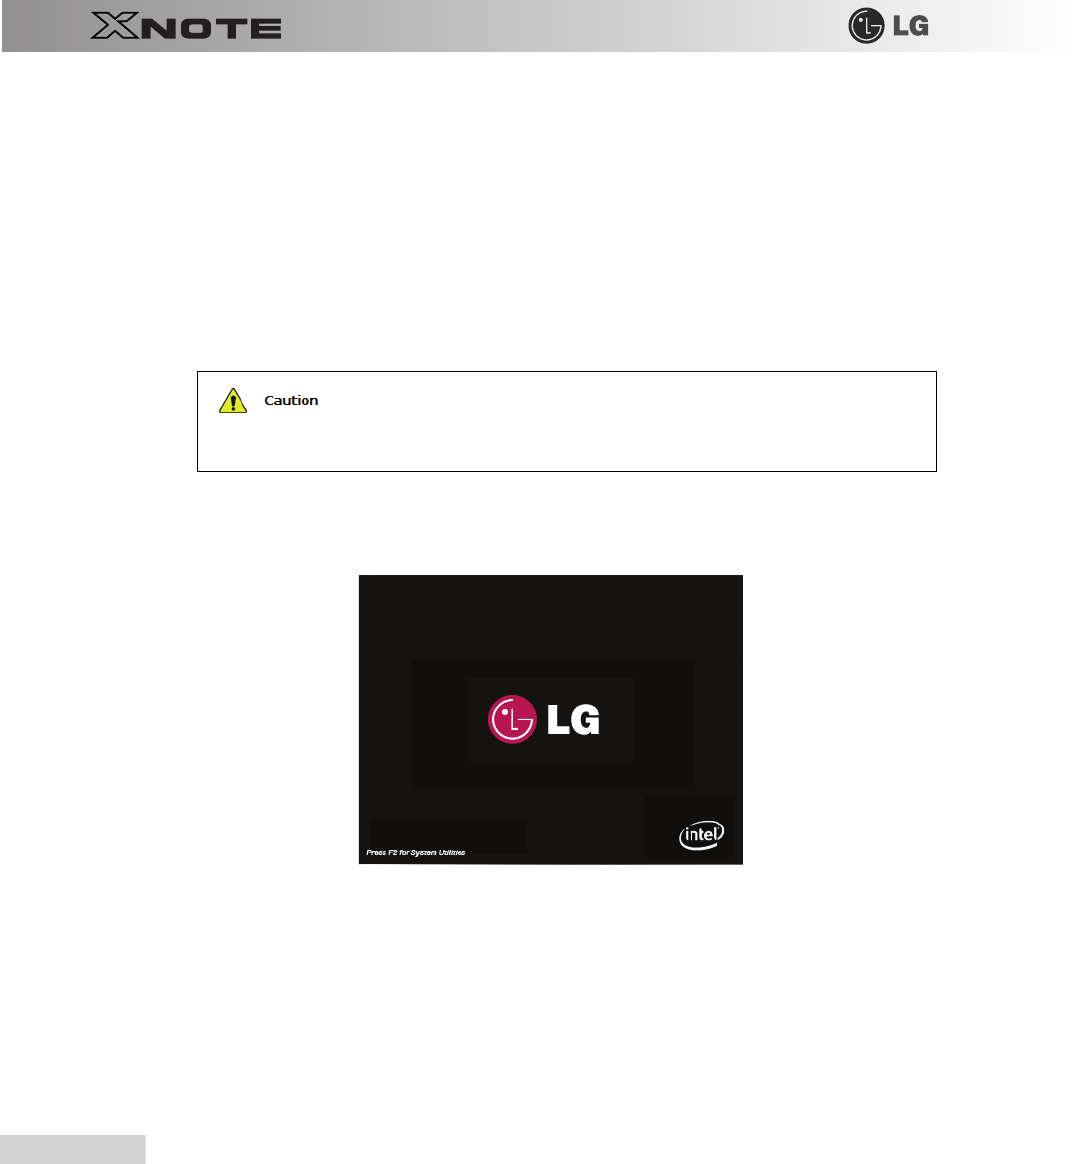
1.
Turn on the notebook PC.
2.
Press
F2
key while the "Press F2 for System Utilities" appears on the bottom of the LG logo screen.
■
A faulty system setup may cause an error during system operation. Therefore, be careful when
changing the System Setup. Do not change the setup unless it is necessary.
■
For performance improvement, the CMOS setup menu configuration and default settings may be
changed and become different from the images in User Manual.
System Setup
87
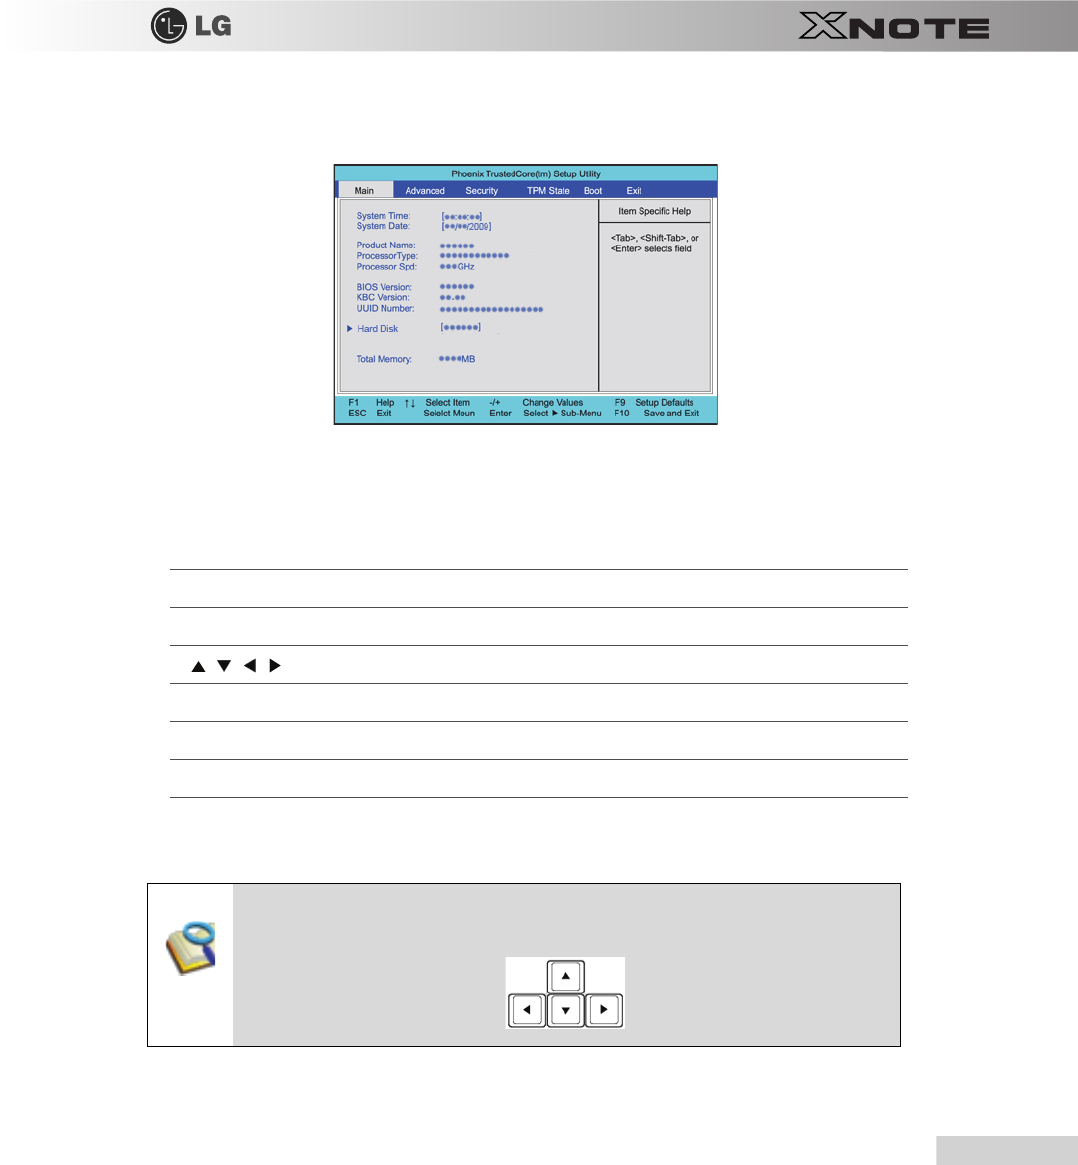
3.
A while later, the system setup home screen appears.
▶
Keys Used in System Setup
Keys Descriptions
Enter
Selects the current item.
Esc
To deselect the current item or to move to the previous screen.
,
, ,
(Arrow keys) Moves the cursor up, down, left, and right.
+
,
-
Increases or decreases the item value.
Page Up
Moves the cursor up to the beginning.
Page Down
Moves the cursor down to the end.
F10
Stores new contents or ends the system setup.
Cursor Keypad
■These keys are used to move the cursors up, down, right, and left.
88
System Setup
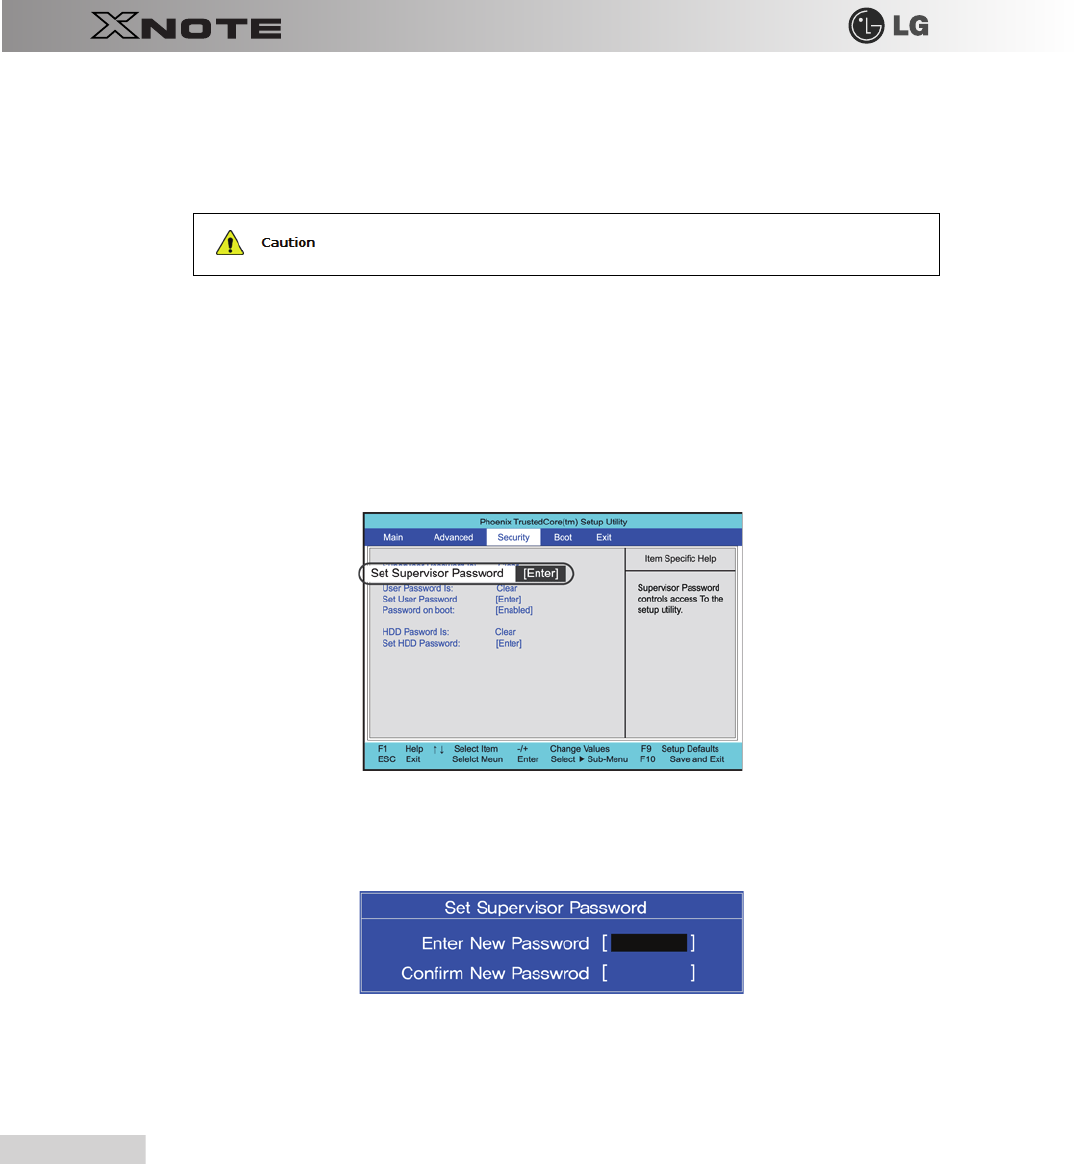
6-2. Setting the Password
This process is to set a password so that other people cannot use the notebook PC or change the settings.
The user can set a password while booting the system or setting up the system.
▶
Set Supervisor Password
The password prevents unauthorized people from accessing the notebook PC. By default, no password.is set for the machine.
In case an unauthorized person changes the CMOS setup while the notebook PC is on, a password will be set and the user
will be denied from the access to the system.
1.
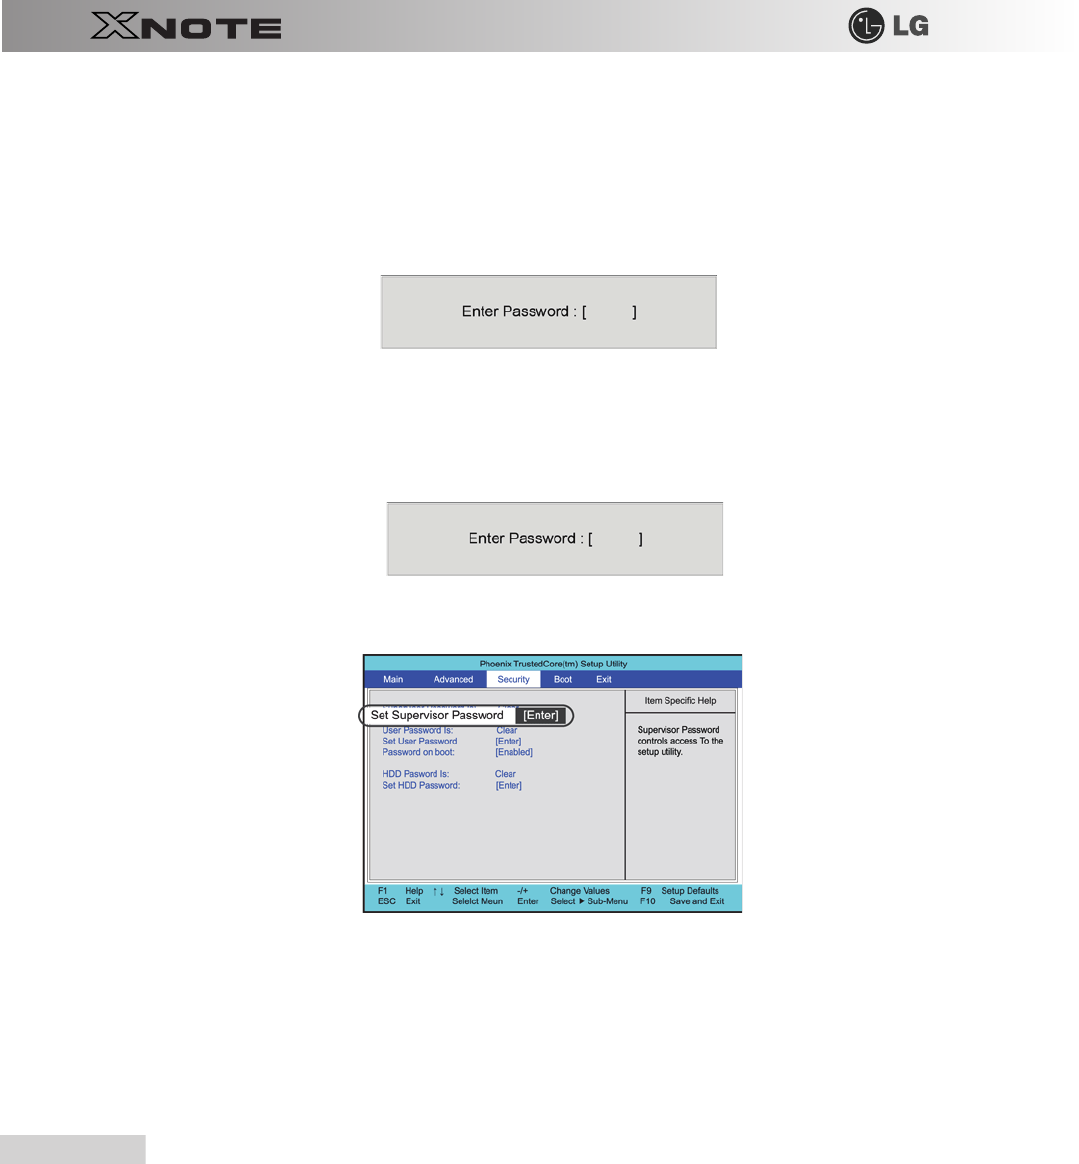
After opening the system setup screen, use the arrow keys to move to Security.
2.
When the following screen appears, select Set Supervisor Password with the arrow keys and press [Enter].
3.
When the following message appears, input the password and press [Enter]. Password would be maximum 8 characters
combined with characters (A~Z) and numbers (0~9).
■
Without the registered password, if any, access to the system will be denied. Write down and keep the
password in a safe place.
System Setup
89
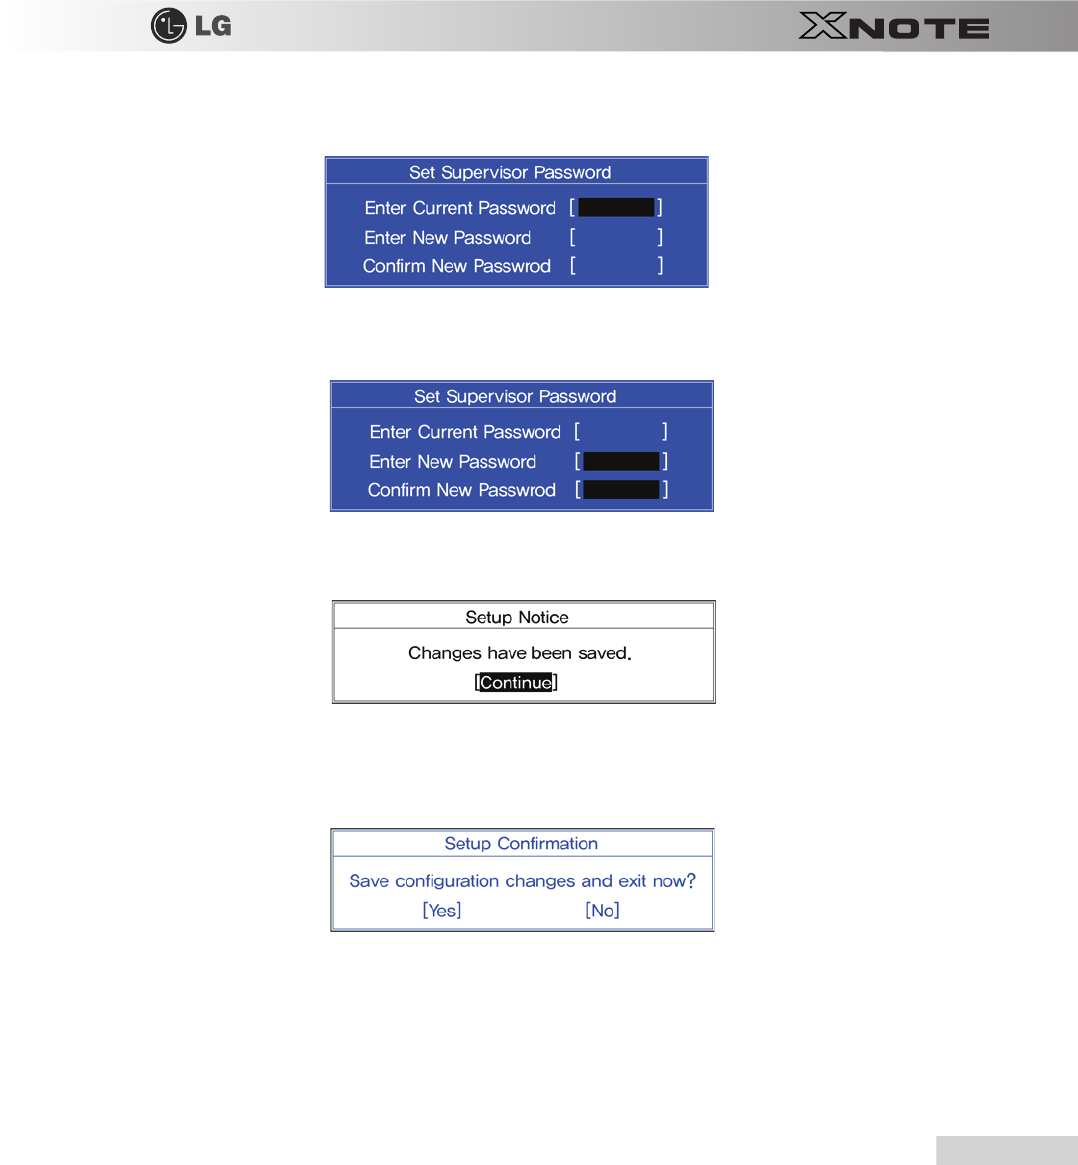
4.
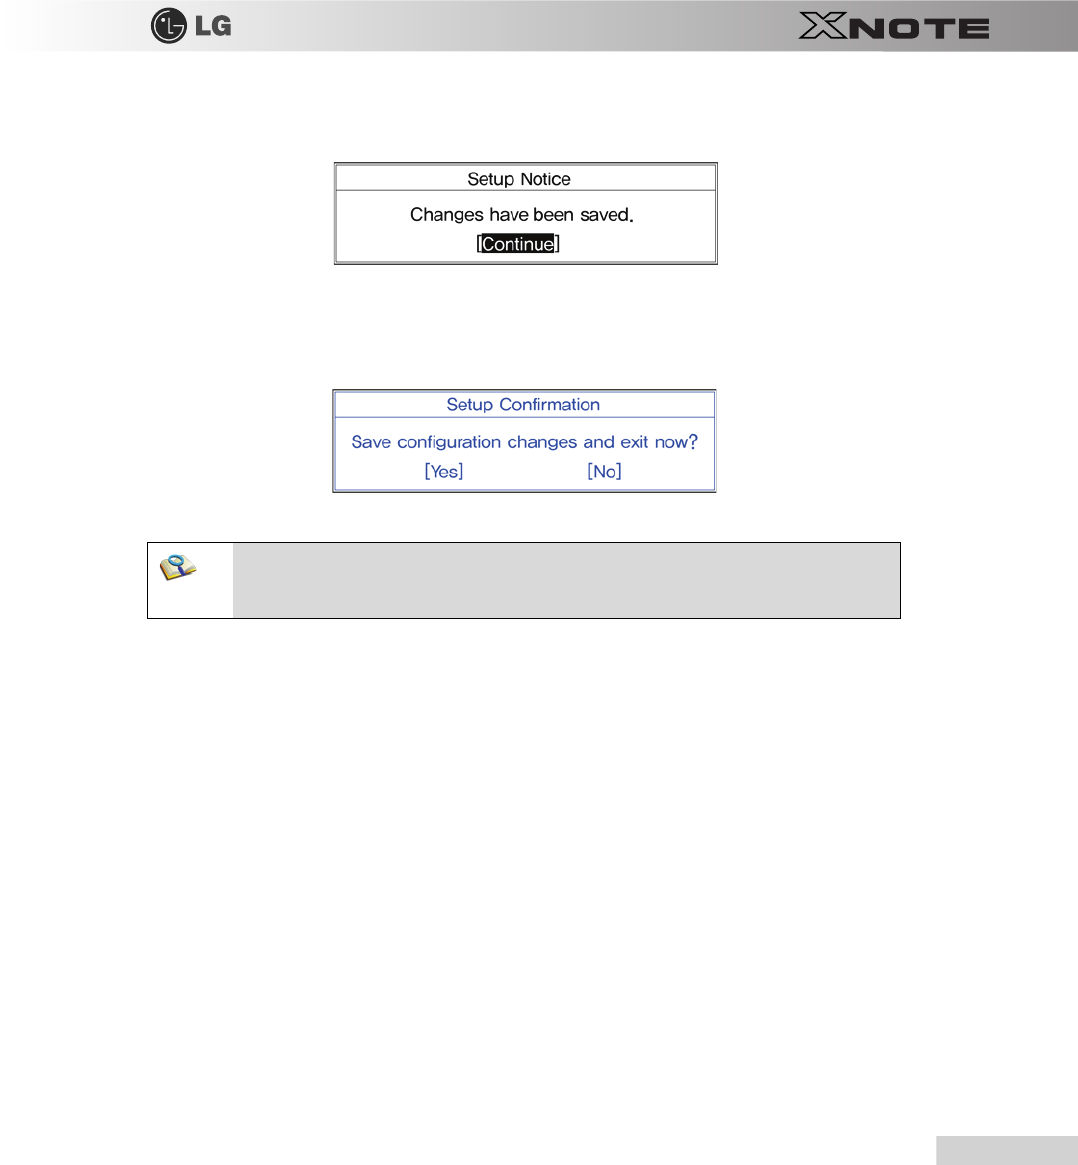
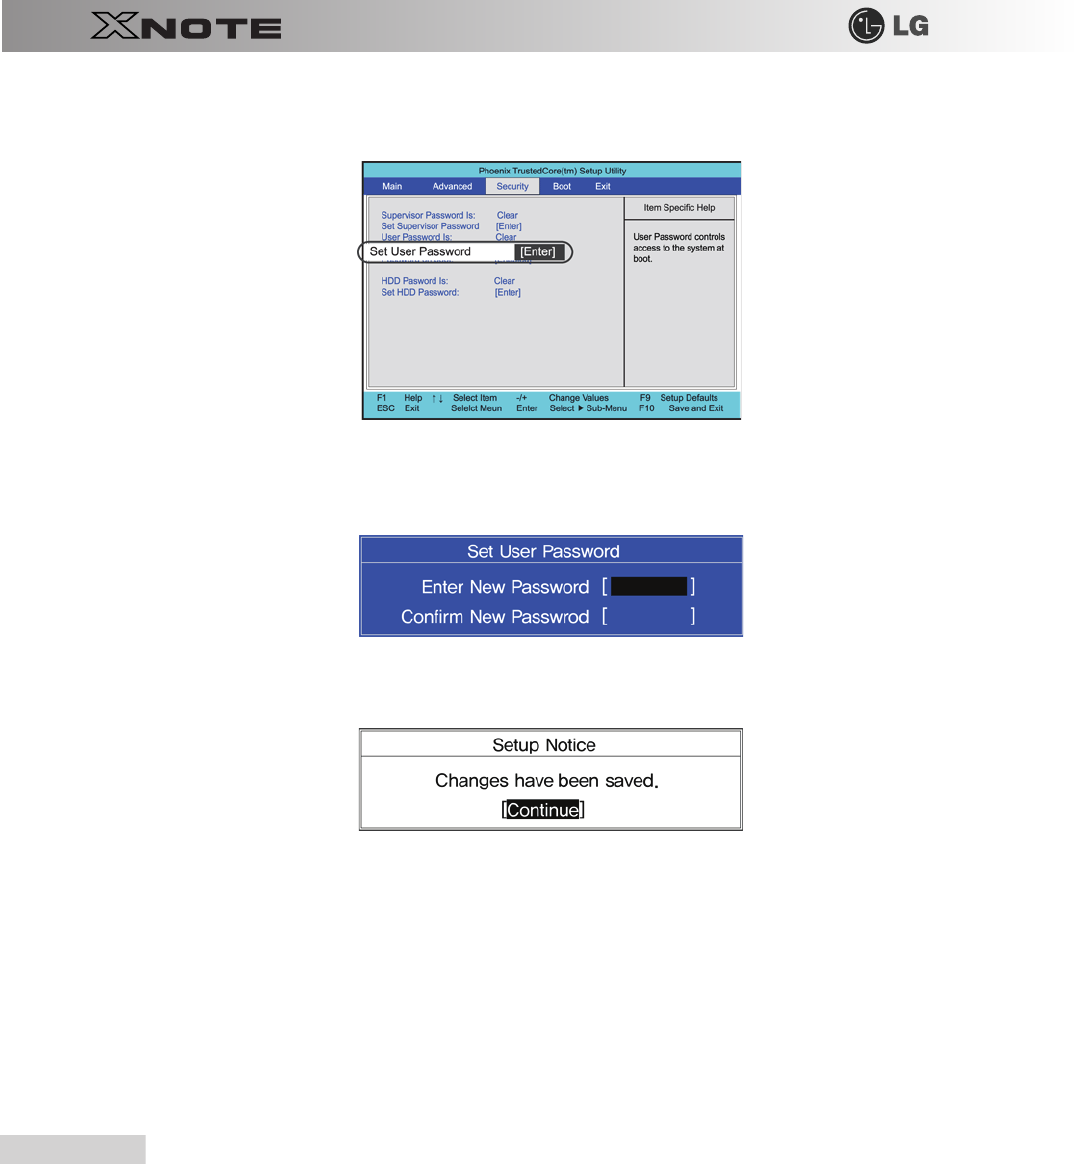
When the following message appears, press the [Enter] key.
5.
To save changes in System Setup, press the [F10] key.
6.
When the following message appears, select [Yes] and press the [Enter] key. The notebook PC will restart.
▶
Set User Password
The Set User Password is lower in priority than the Set Supervisor Password, and so the user can use the Set User Password
only after setting the Set Supervisor Password.
1.
After opening the system setup screen, use the arrow keys to move to Security.
■With the Supervisor Password, the user will be authorized to set all items in the CMOS setup
menu and to do the Power on Boot. In case other people also use the notebook PC, it is
recommended to set the User Password.
90
System Setup
2.
When the following screen appears, select Set User Password with the arrow keys and press [Enter].
3.
When the following message appears, input the password and press [Enter]. Password would be maximum 8 characters
combined with characters (A~Z) and numbers (0~9).
4.
When the following message appears, press the [Enter] key.
5.
To save changes in System Setup, press the [F10] key.
System Setup
91
6.
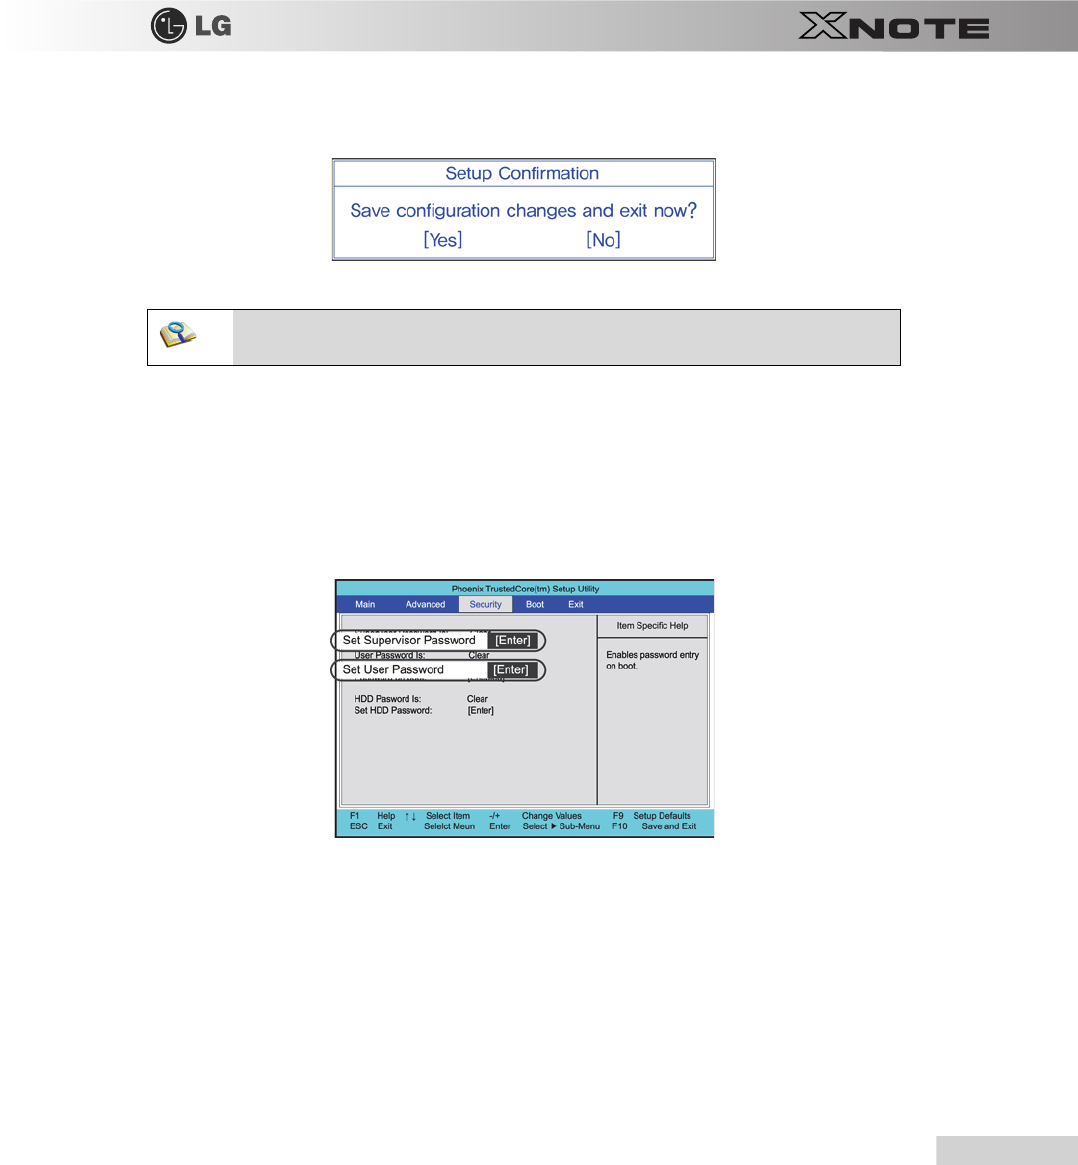
When the following message appears, select [Yes] and press the [Enter] key. The notebook PC will restart.
▶
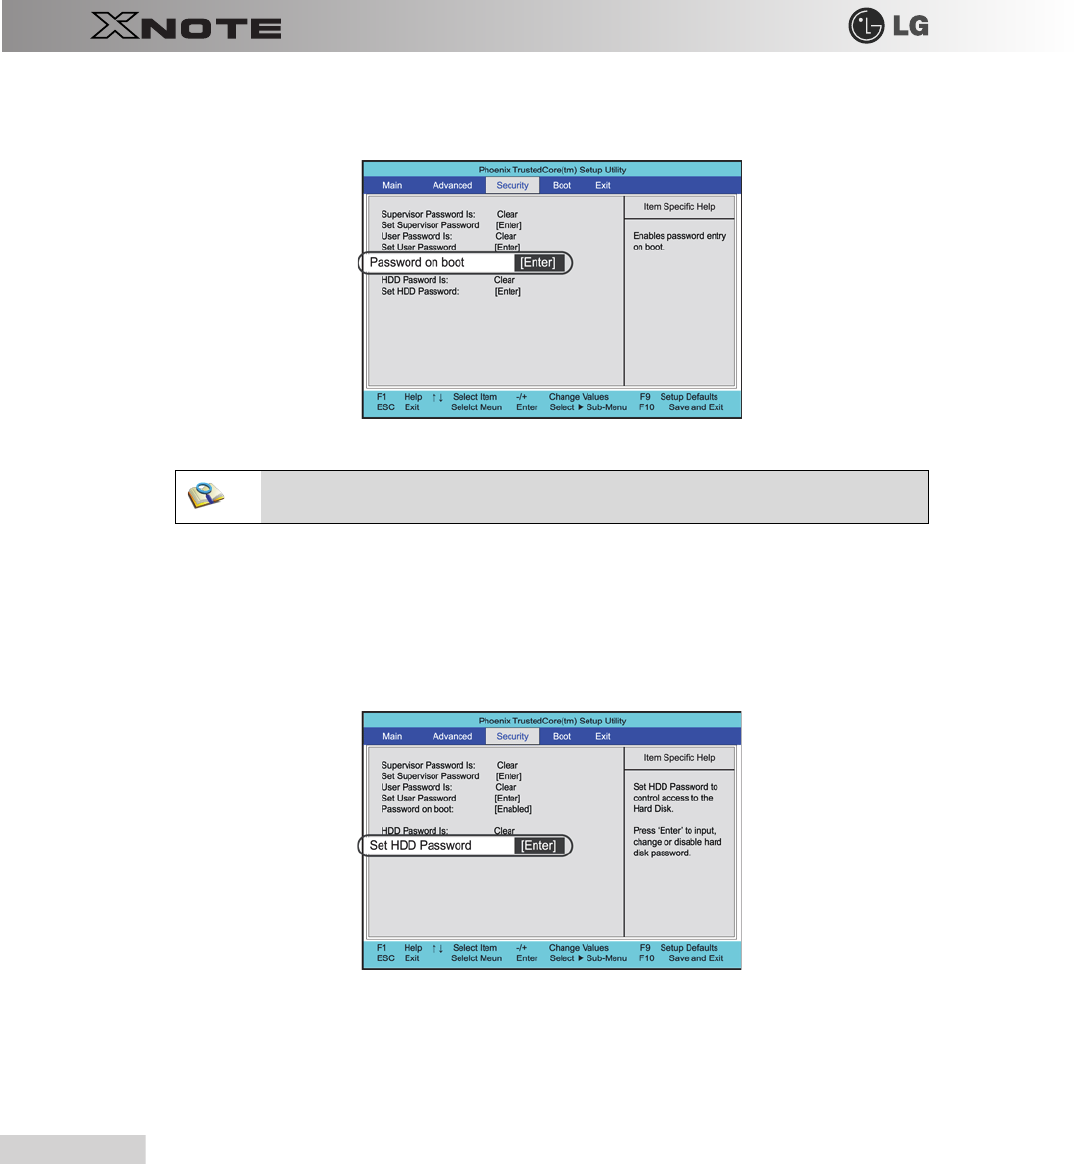
Password on boot
Password on boot feature protects the system by requesting the Set Supervisor Password or Set User Password during boot up.
1.
After opening the system setup screen, use the arrow keys to move to Security.
2.
When the following screen appears, set the password for Set Supervisor Password only or both the Set Supervisor Password
and the Set User Password.
■The User Password allows limited access to the items in CMOS setup compared to the
Supervisor Password Item.
92
System Setup
3.
Select Password on Boot, and change Disable into Enable using + and - keys.
▶
Set HDD Password
The HDD Password is to set a password in the HDD separately from the Supervisor Password.
1.
After opening the system setup screen, use the arrow keys to move to Security.
2.
When the following screen appears, select Set HDD Password with the arrow keys and press [Enter].
■You may also press the [Shift] + [+] keys to toggle between [Enabled] and [Disabled].

System Setup
93
3.
When the following message appears, input the password and press [Enter]. Password would be maximum 8 characters
combined with characters (A~Z) and numbers (0~9).
4.
When the following message appears, press the [Enter] key.
5.
To save changes in System Setup, press the [F10] key.
6.
When the following message appears, select [Yes] and press the [Enter] key. The notebook PC will restart.
Without the HDD password, it is impossible to recover the HDD.
■
The replacement of the HDD due to missing of the HDD Password is not covered by the warranty.
94
System Setup
6-3. Changing or Deleting the Password
You can delete or change the password only after inputting the current password.
▶
Changing the Password
1.
Execute the System Setup, enter the password, and press [Enter].
2.
Change the password in the same way as setting one.
▶
Deleting the Password
1.
Execute the System Setup, enter the password, and press [Enter].
2.
After opening the system setup screen, use the arrow keys to move to Security.
System Setup
95
3.
When the following message appears, input the current password in the Enter Current Password field.
4.
Press the [Enter] key in the Enter New Password and the Confirm New Password.
5.
When the following message appears, select [Continue] and press the [Enter] key.
6.
To save changes in System Setup, press the [F10] key.
7.
When the following message appears, select [Yes] and press the [Enter] key. The notebook PC will restart.
96
System Setup
6-4. Restore the Default Settings
If you have changed the system setup by mistake, you can restore the default settings.
1.
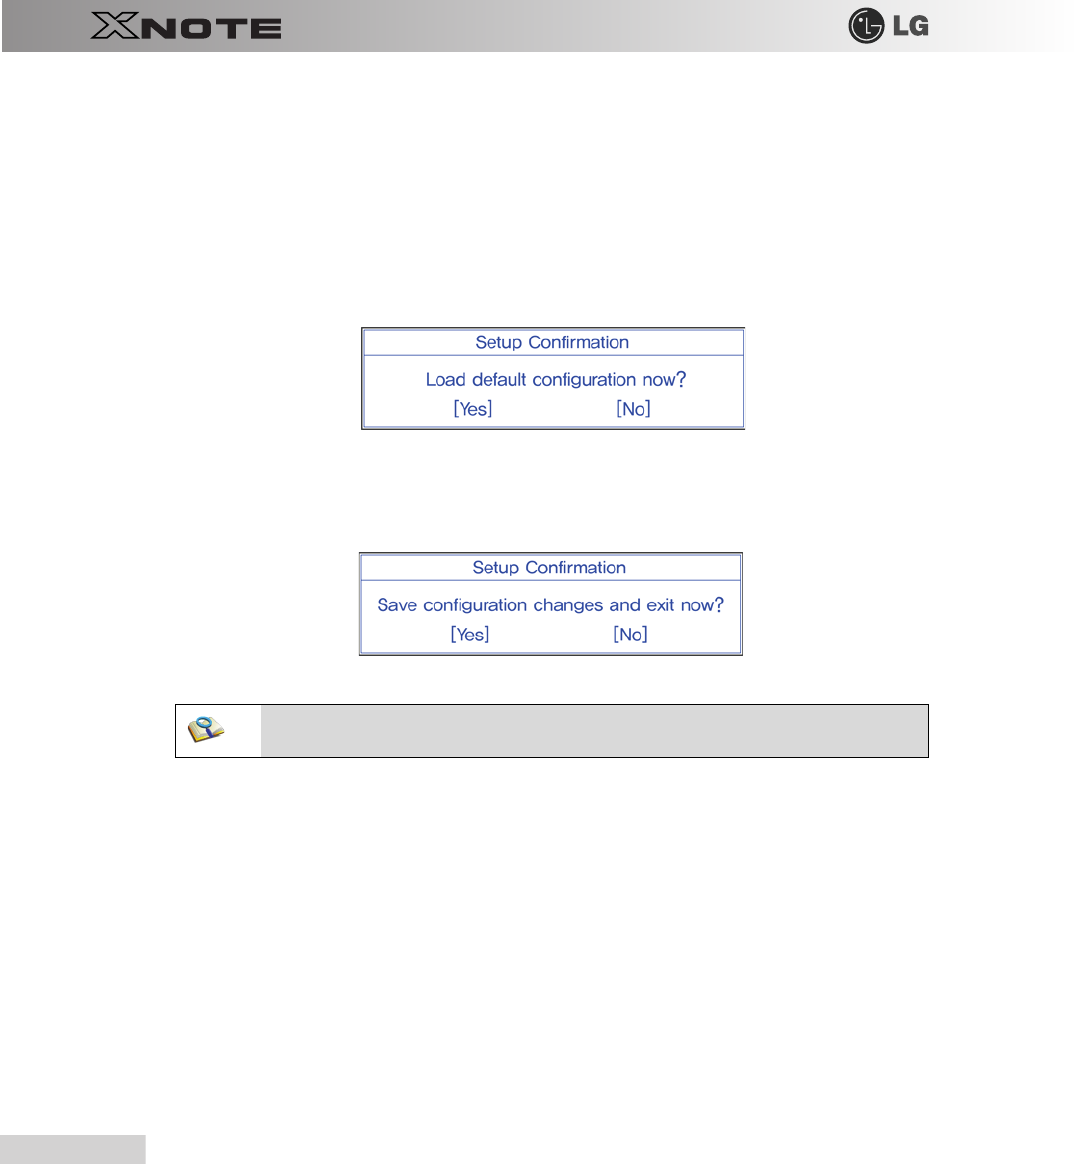
After opening the system setup screen, use the arrow keys to move to Exit.
2.
Use the arrow keys to select Load Setup Defaults, and press [Enter].
3.
When the following message appears, select [Yes] and press the [Enter] key. The settings will be reset to their original
defaults.
4.
To save the changes in system setup, press
F10
.
5.
When the following message appears, select [Yes] and press the [Enter] key. The notebook PC will restart.
■You may also use [F9] to make Load Optimal Defaults available at once.

Chapter 7.Using LG Smart Recov-

98
Using LG Smart Recovery
ery
Using LG Smart Recovery
99
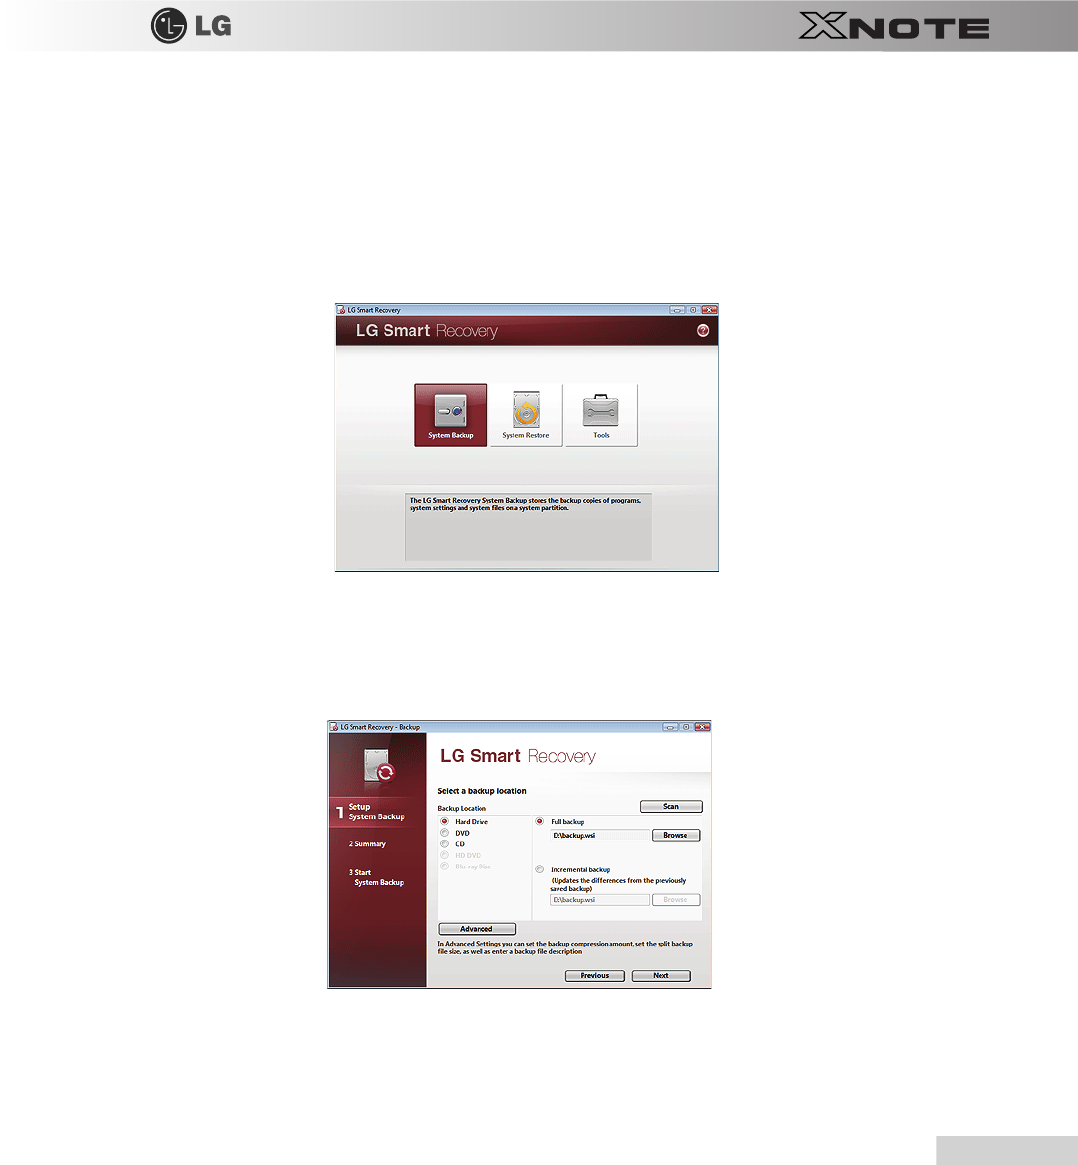
7-1. LG Smart Recovery System Backup
LG Smart Recovery
helps you safely install and recover
Windows XP
.
※
The figures herein may differ by language selection and be subject to change without prior notice.
1.
Double click the
LG Smart Recovery
icon on desktop to run the
LG Smart Recovery
.
2.
Click the System Backup icon.
3.
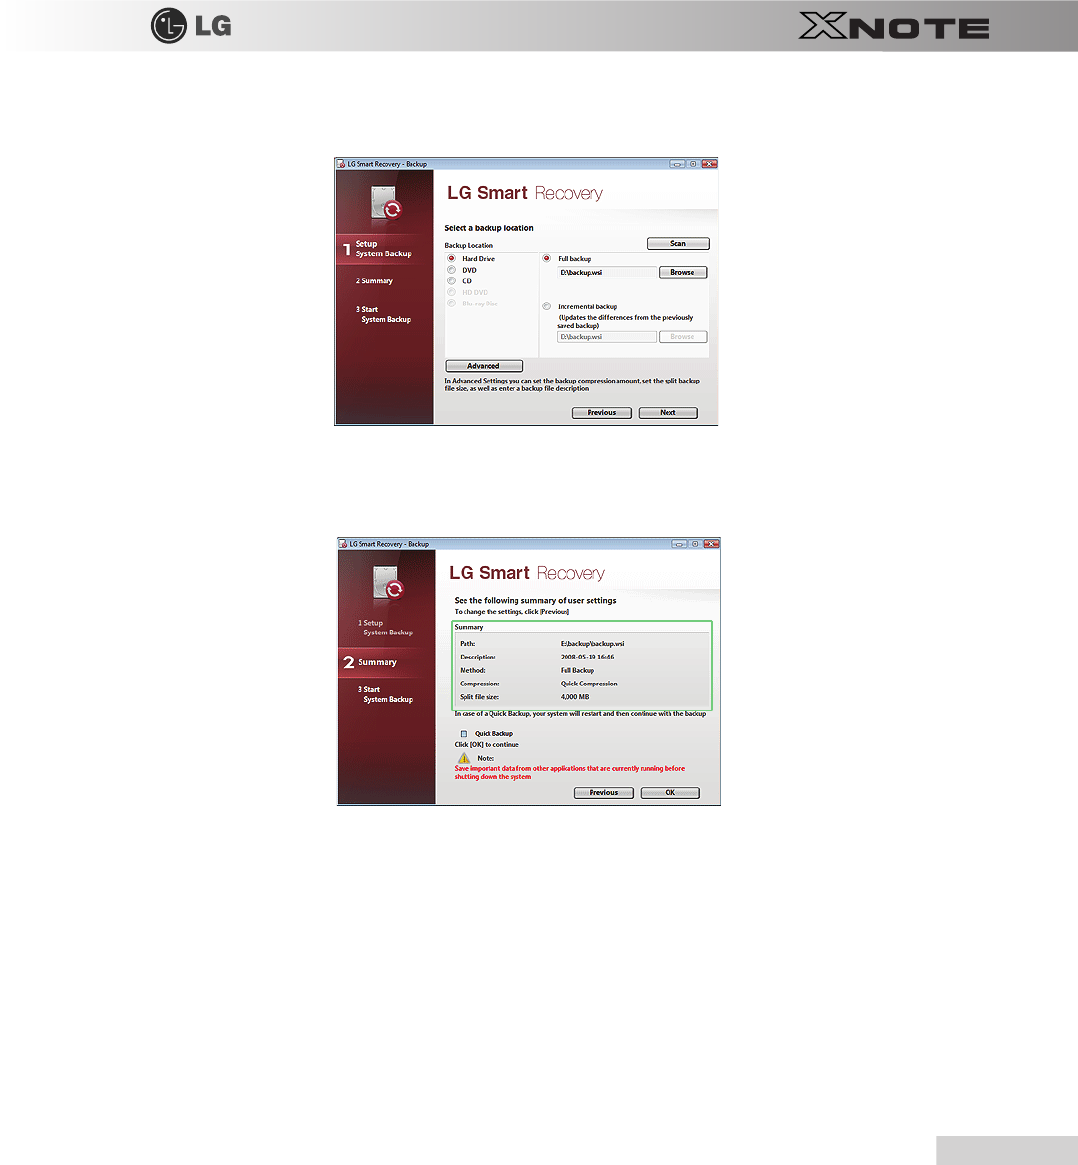
When the following screen appears, select the location to back up.
※
If you choose one among
DVD, CD, HD DVD, and Blu-ray Disc
, a Media Disc for the restoration purpose will be generated, and you
can restore system only by rebooting it with the Media Disc.
※
The backup locations may vary depending on product specifications.
4.
Choose Complete Backup or Partial Backup and click Browse button.
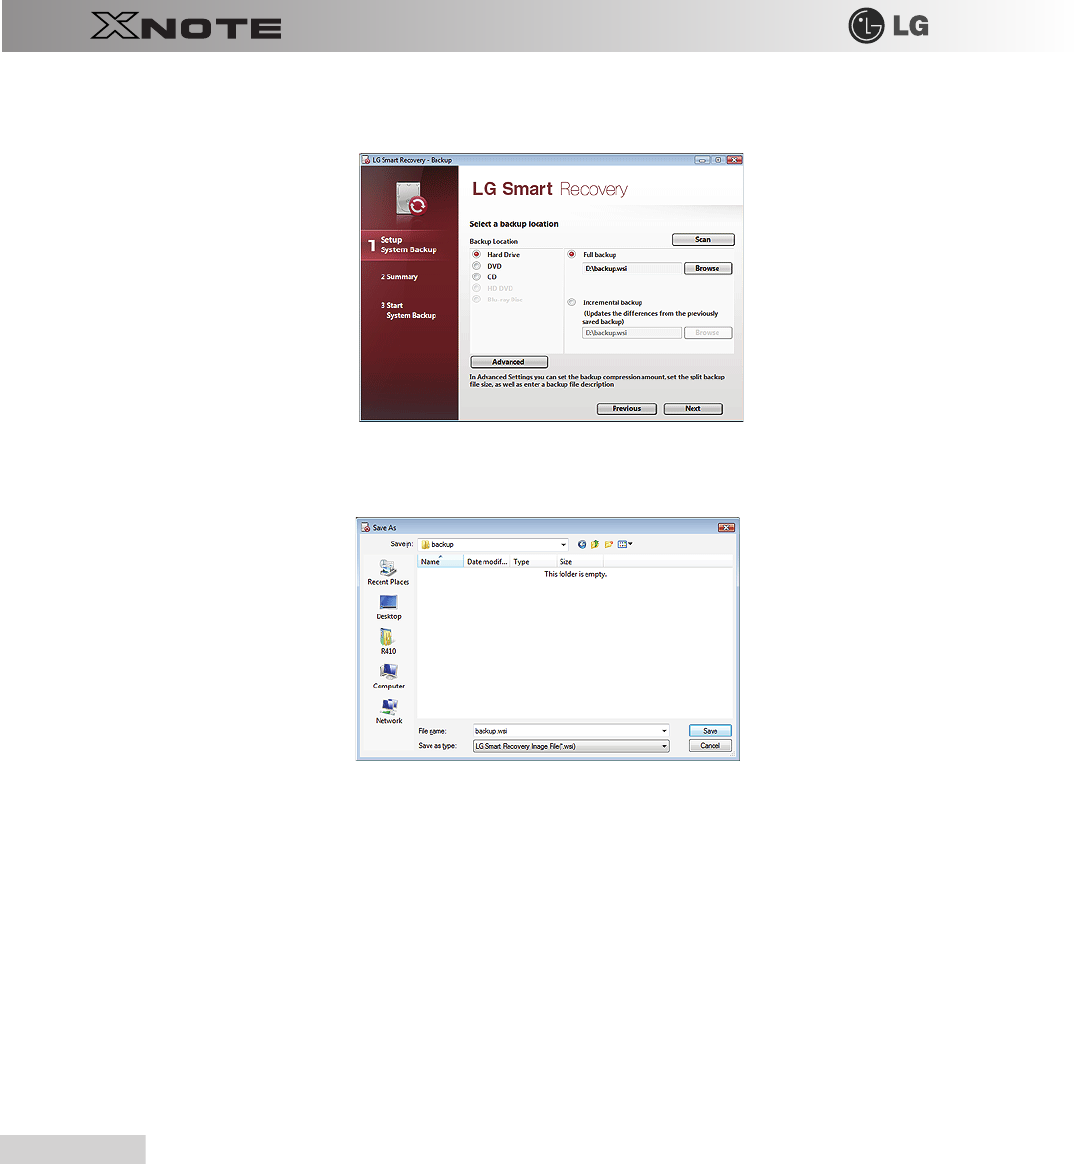
100
Using LG Smart Recovery
※
You can select Partial Backup only when you have previously run Complete Backup and the system has complete backup data.
5.
Specify the location to save the backup file, type file name and click Save button.
※
If you have selected Partial Backup, choose the existing complete backup data and click Open.
Using LG Smart Recovery
101
6.
Once you complete the process to set the Complete Backup location, click Next.
7.
Check the system backup preferences you have selected and click OK button.
※
Quick Backup reduces the time required to backup the system, and the backup is performed after rebooting the system.
8.
After the system is rebooted automatically, the screen showing the progress of system backup appears.
※
Depending on product specifications and backup file size, the system may need longer time to load the file. Do not turn off the power
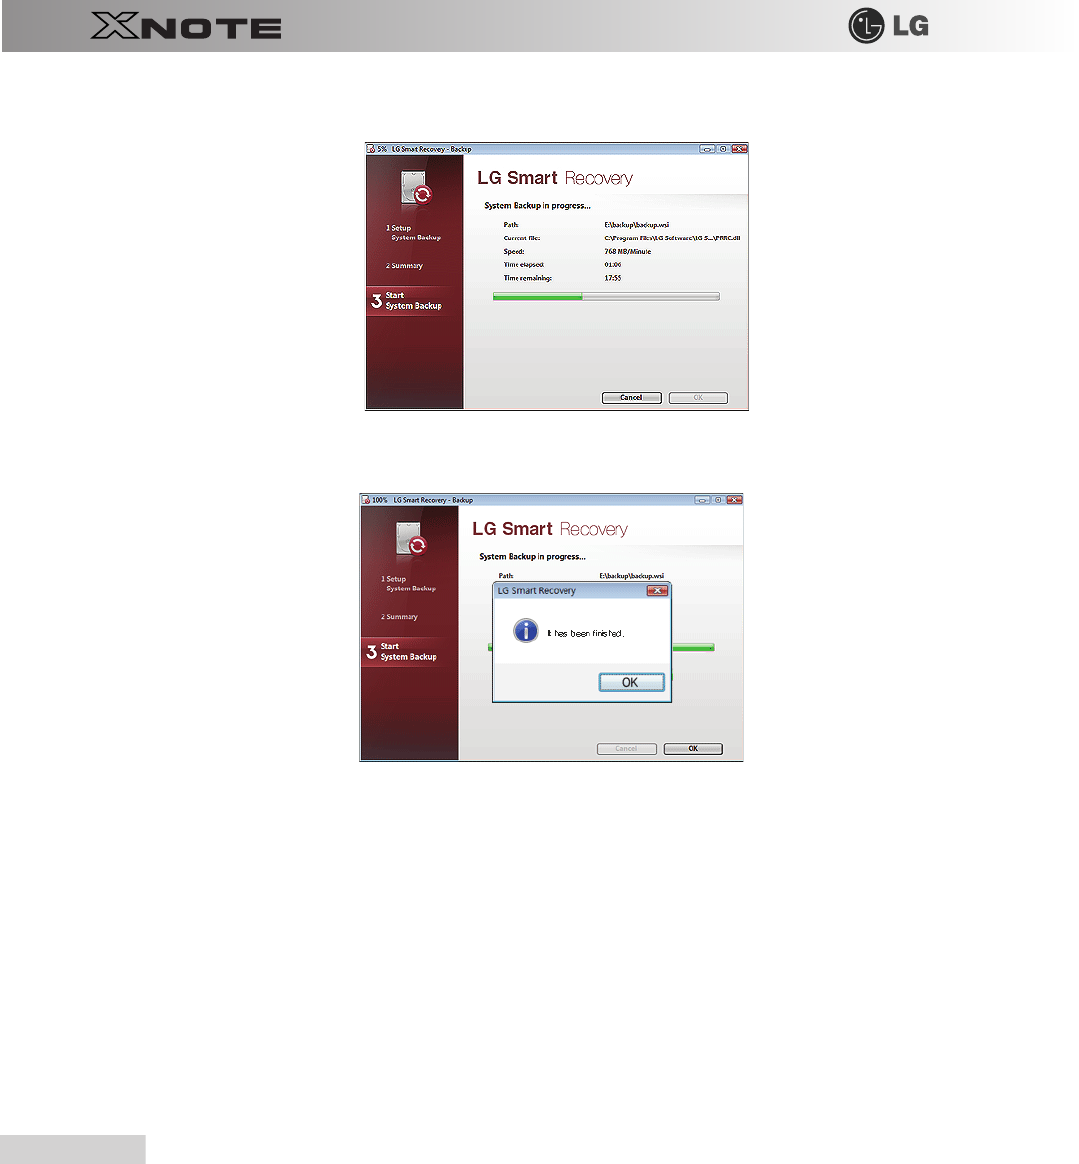
102
Using LG Smart Recovery
forcibly or reboots the system while it is loading the file.
9.
Once the system backup process completes, click OK and the system will automatically restart in 10 seconds.
Using LG Smart Recovery
103
7-2. LG Smart Recovery System Restoration
You can restore the system by using the
LG Smart Recovery
backup data.
※
The figures and instructions herein are subject to change without prior notice.
1.
Double click the
LG Smart Recovery
icon on desktop to run the
LG Smart Recovery
.
※
If
Windows XP
does not operate normally, restart the computer and when
"PRESS F11 TO RUN LG RECOVERY.."
message is displayed on the screen during the booting process, then press
F11
button to run
LG Smart Recovery
.
※
Backup important data by using Tools menu before starting the System Restoration process.
2.
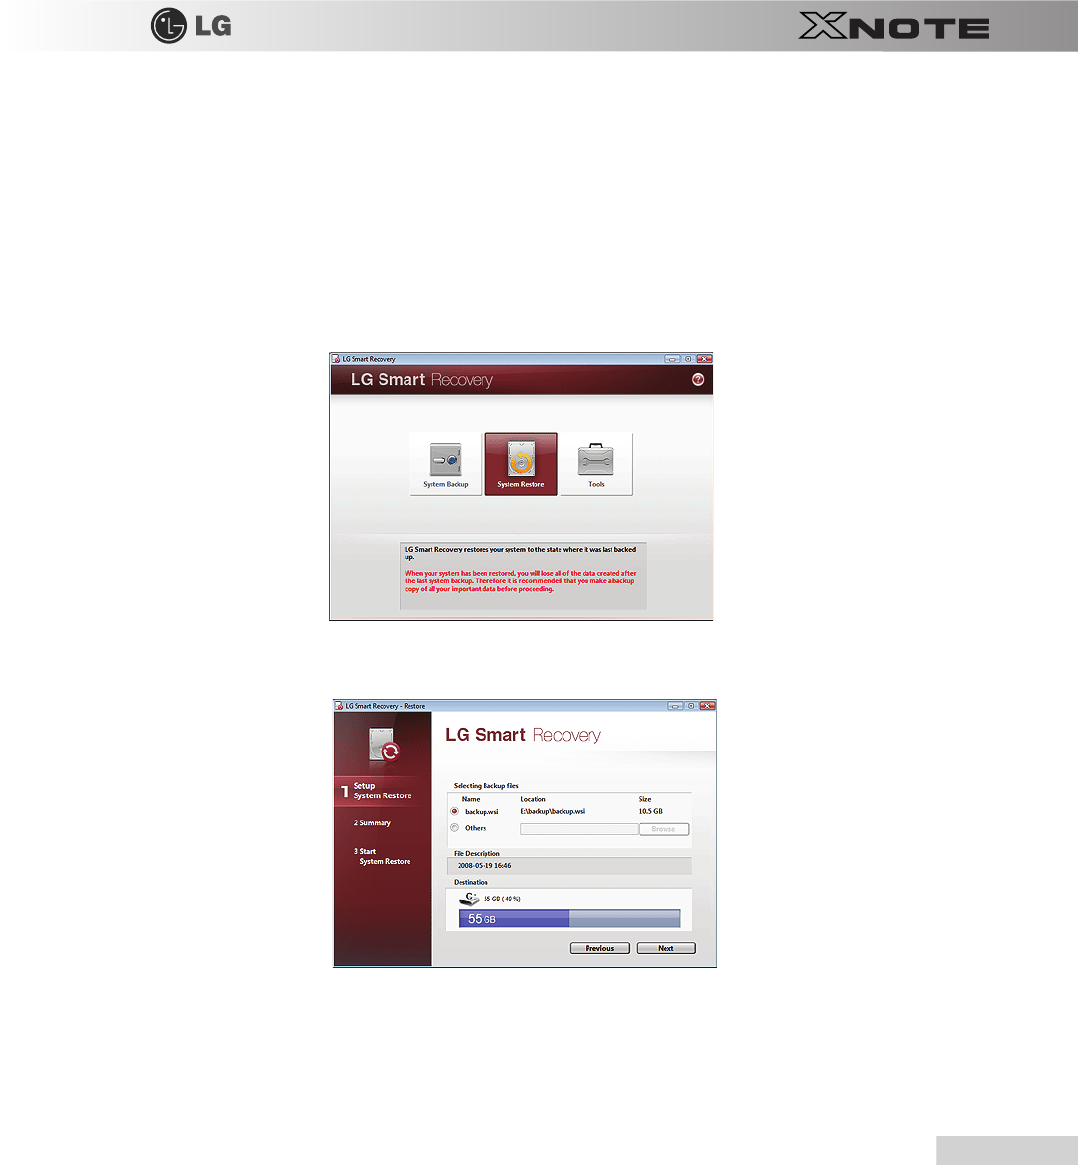
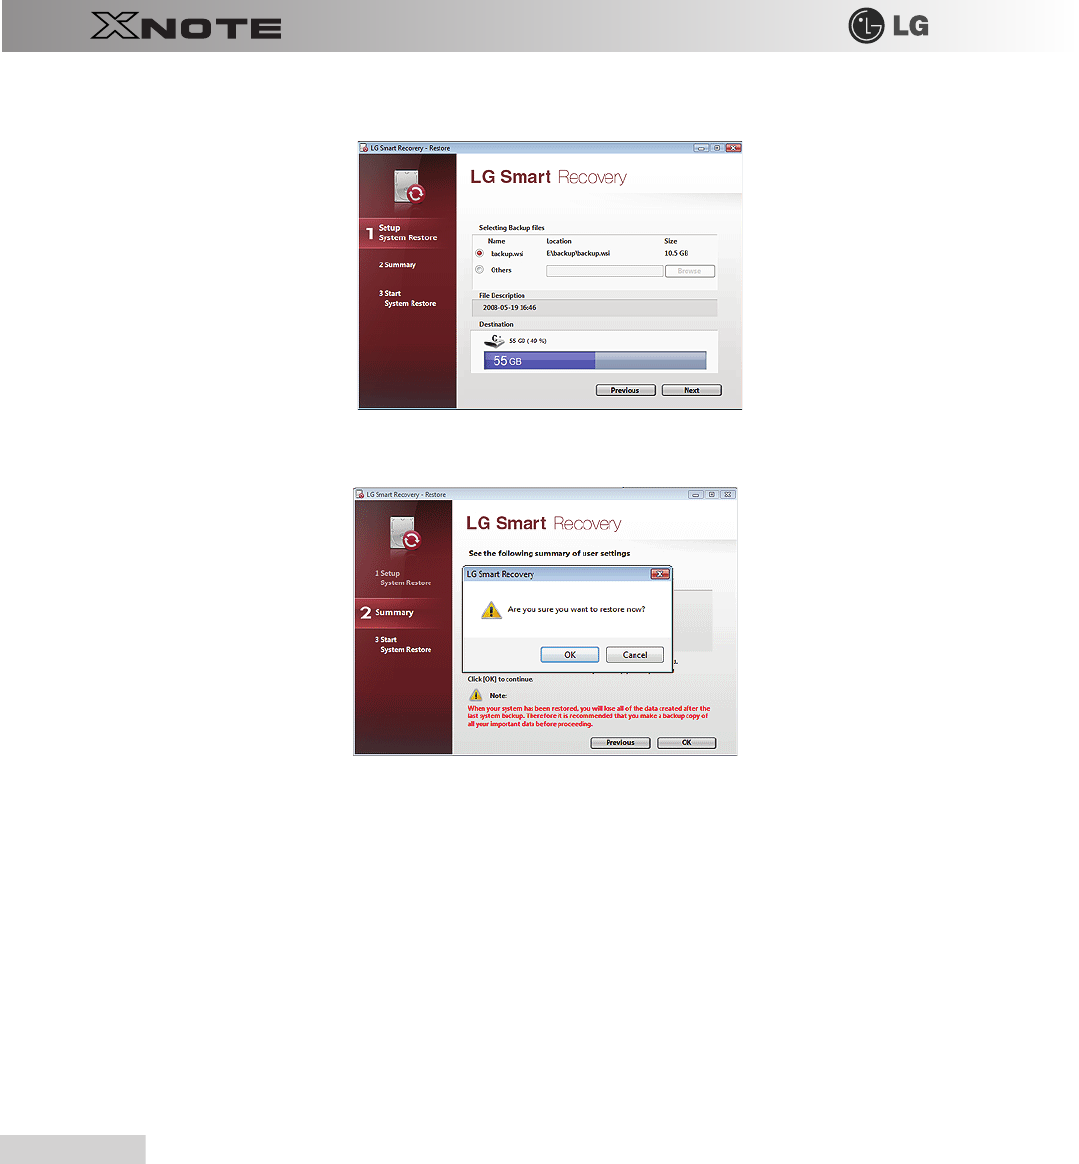
Click the System Restoration button.
3.
The System Restoration Settings screen will appear.
4.
Click the Protected Hard Disk Area or Browse to select a file you want to back up and click Next.
※
The Protected Hard Disk Area option will be presented only if you have selected the Safe Backup when you run the
LG Smart Recovery
for the first time.
104
Using LG Smart Recovery
※
If you select the Protected Hard Disk Area, the system will be restored to the initial status when you have bought it.
5.
Confirm the restoration settings and click OK. The Restoration In Process message will appear.
6.
Click Ok. The system will automatically restart in 1 minute and show the System Backup In Process screen.
※
Depending on product specifications and backup file size, the system may need longer time to load the file. Do not turn off the power
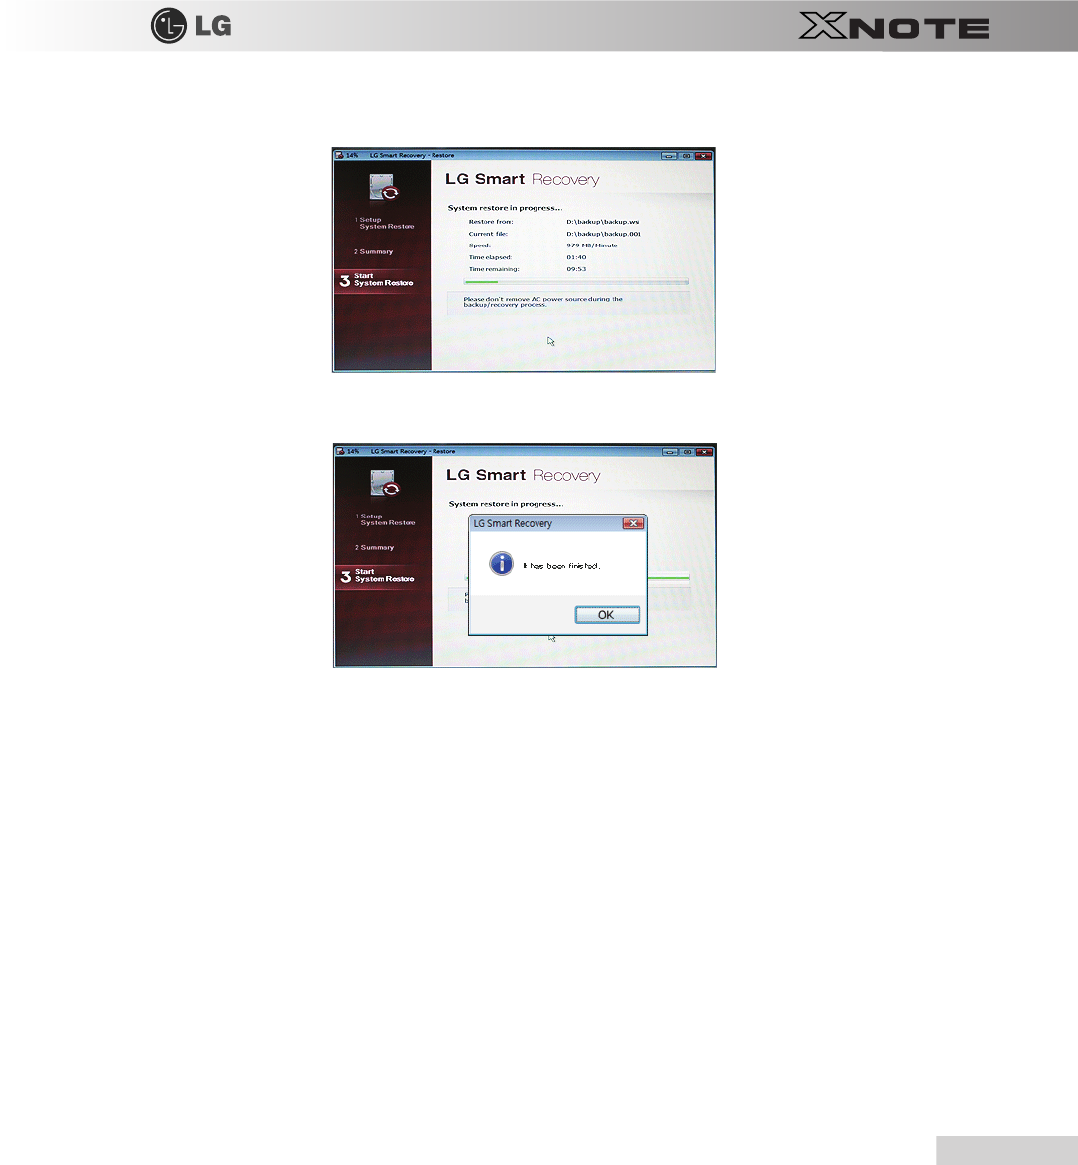
Using LG Smart Recovery
105
forcibly or reboots the system while it is loading the file.
7.
Once the system restoration process completes, click OK and the system will automatically restart in 10 seconds.
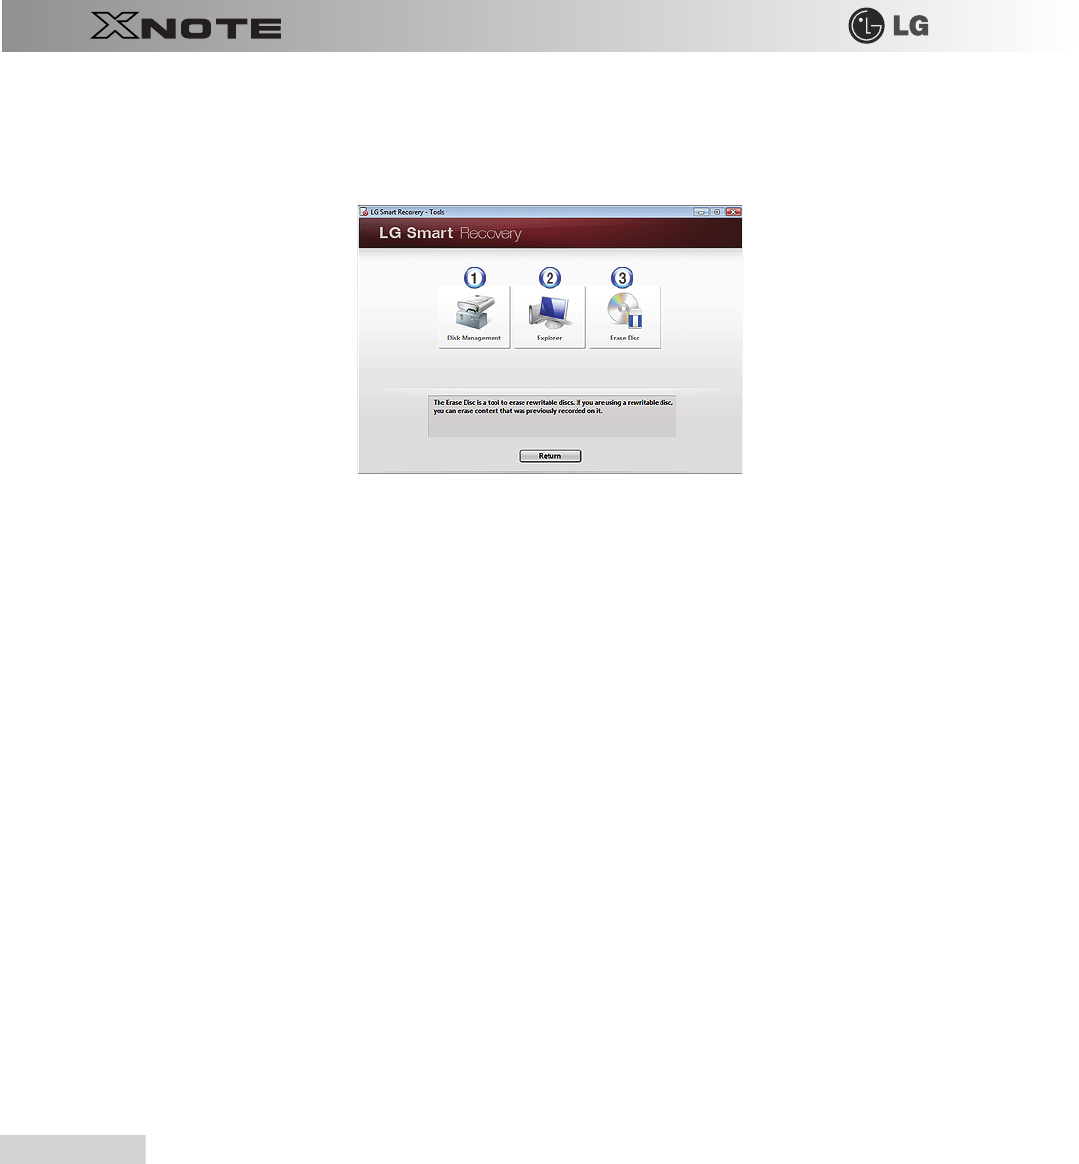
106
Using LG Smart Recovery
7-3. LG Smart Recovery Tools Menu
LG Smart Recovery
Tools menu provide useful tools to back up and restore the system efficiently.
※
The figures and instructions herein are subject to change without prior notice.
1.
Disk Management: By using the Disk Management tool, you can perform disk-related tasks including creating partition and
volume, formatting, and assigning drive letter.
2.
Explorer: This tool shows drive disks and other hardware connected to the computer.
※
By using the Explorer, you can back up user data before proceeding the system restoration.
3.
Delete Disk: You can delete rewritable disks.

Chapter 8.Using LG Smart Recov-

108
Using LG Smart Recovery Center
ery Center
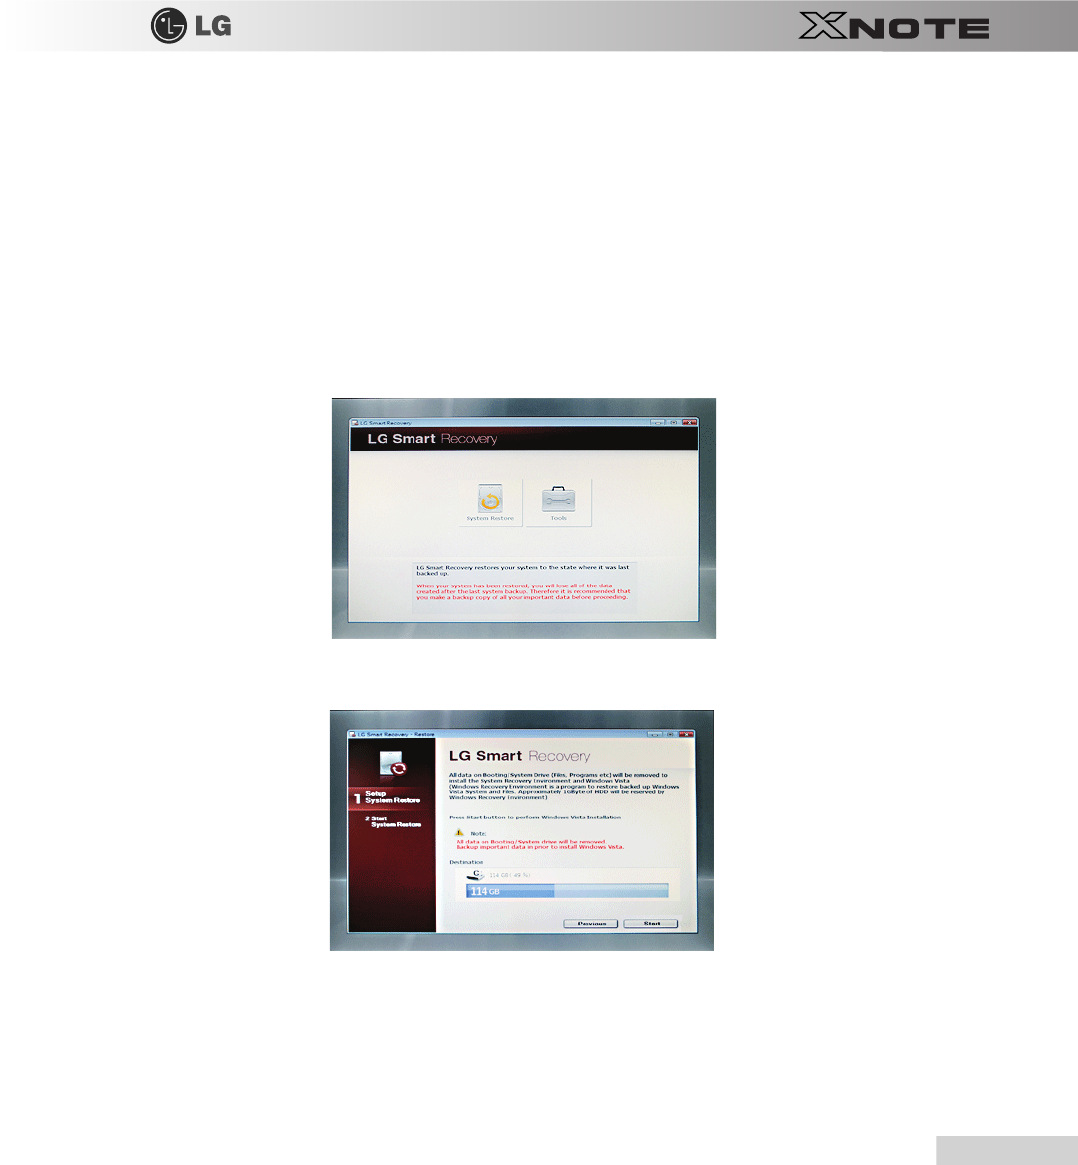
Using LG Smart Recovery Center
109
8-1. LG Smart Recovery Center
※
LG Smart Recovery Center DVD
may not be supported in some models.
When
LG Smart Recovery
fails to restore the system, you can reinstall
Windows XP
by using the
LG
Smart Recovery Center
.
1.
Insert the
LG Smart Recovery Center DVD
into the
DVD-ROM
and restart the system.
※
If the
LG Smart Recovery Center DVD
fails to boot the system, restart the computer and press
F2
to start the BIOS
SETUP and change the Booting Order option.ï
2.
When the booting completes, the System Restoration screen will appear.
3.
Click the System Restoration button.
※
Backup important data by using Tools menu before starting the System Restoration process.
4.
Click Start button.
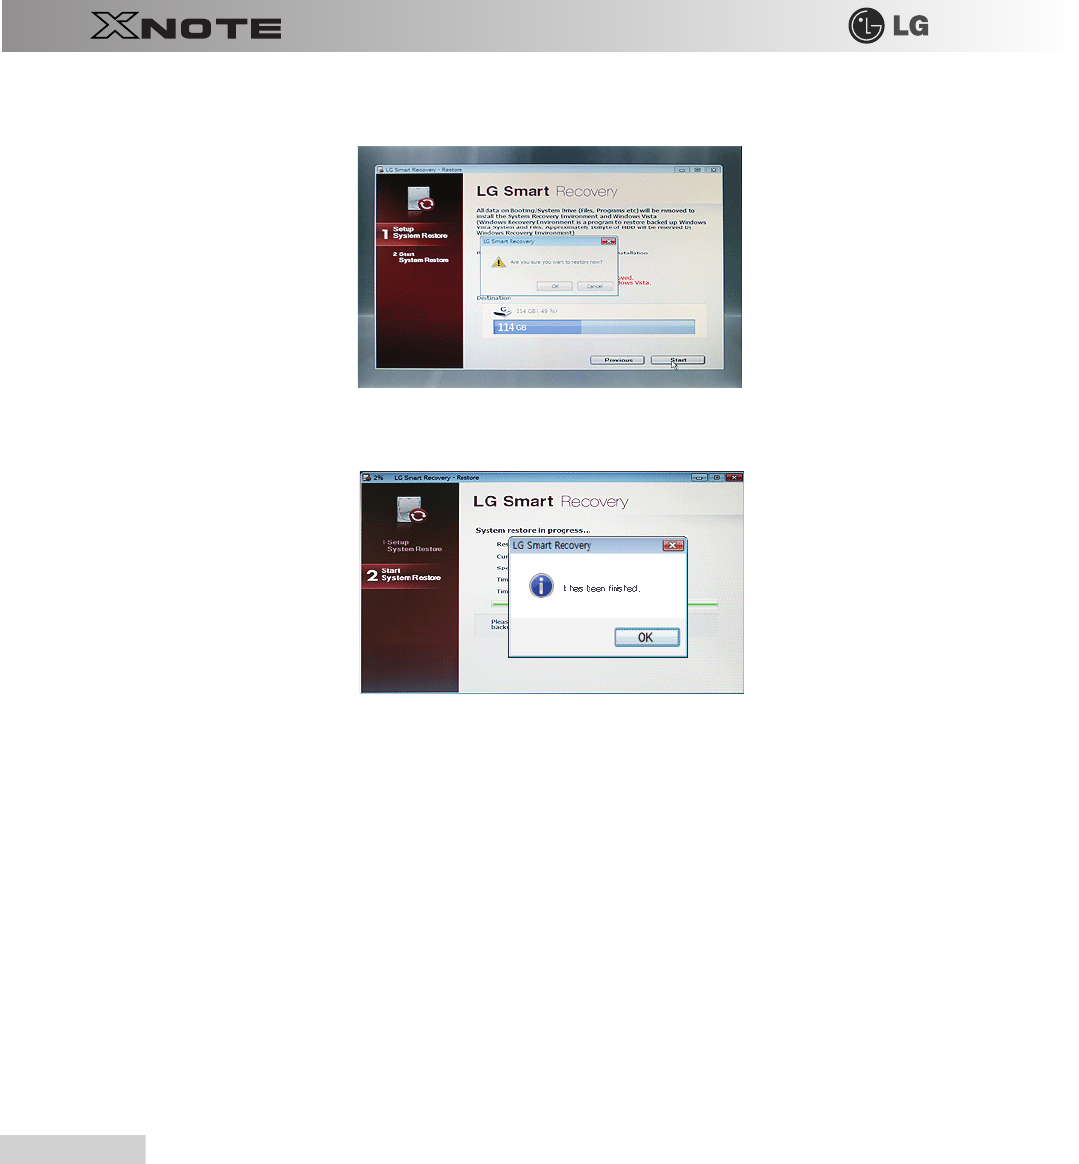
110
Using LG Smart Recovery Center
5.
When prompted to confirm to start the System Restoration, click OK.
6.
When it completes the restoration process, the system will present the Completed the Restoration message.
7.
Click OK to restart the system automatically after 10 seconds.
※
Remove the
LG Smart Recovery Center DVD
from the
DVD-ROM
once the System Restoration process completes.

Chapter 9.Reinstalling the Driver
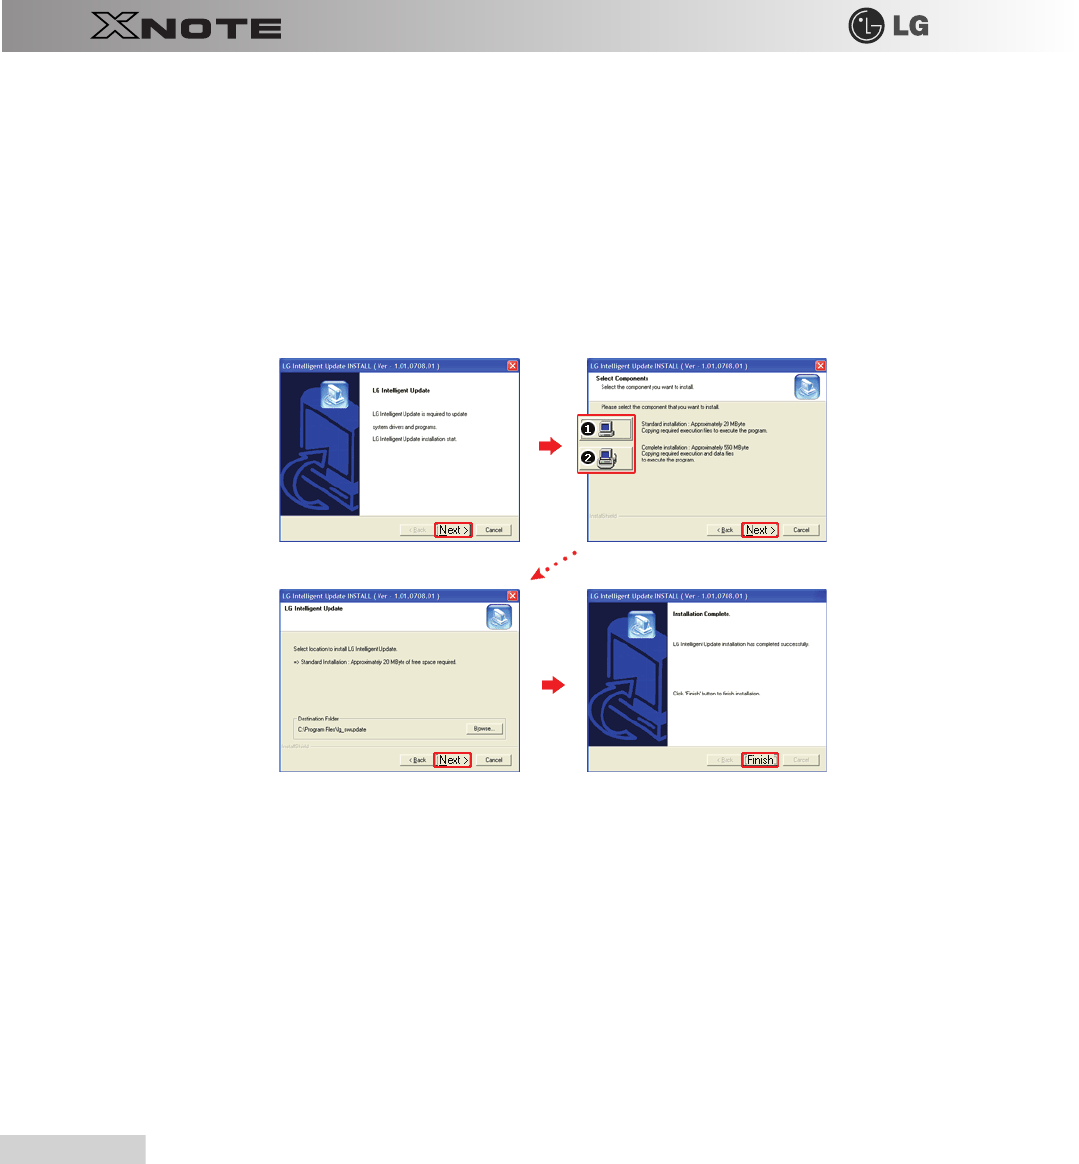
112
Reinstalling the Driver
9-1. Reinstalling the Driver
※
The user can download drivers at www.lgepc.co.kr.
※
Windows XP SP3
or higher version is recommended for driver installation.
※
The screen layout may differ by model type.
▶
Installation
1.
Insert
LG Intelligent Update
CD in the optical disk drive.
2.
When the installation screen appears, click
Next
>
Next
>
Next
>
Finish
buttons or press
Enter
to install.
1.
Standard Installation
: Copy the files which will be needed only for execution to the hard disk.
2.
Full Installation
: Copy the entire CD to the hard disk. Drivers can be installed out of the copy without the CD.
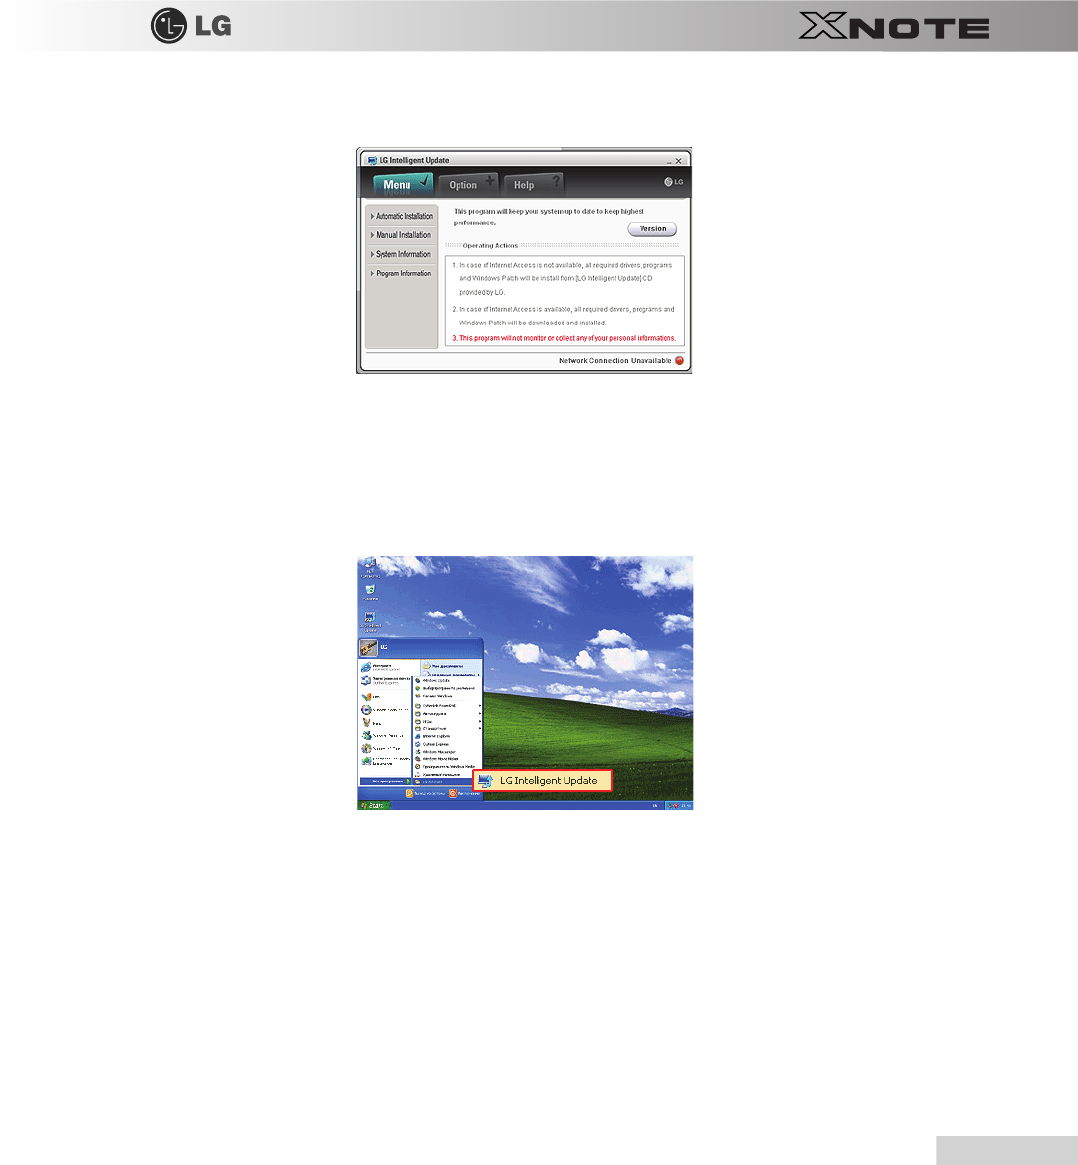
Reinstalling the Driver
113
3.
LG Intelligent Update
screen appears.
▶
Execution
1.
Insert
LG Intelligent Update
CD in the optical disk drive. Then, the program will automatically start.
※
If the
LG Intelligent Update
program is not installed,
LG Intelligent Update
installation screen will appear.
2.
Select
Start
>
All Programs
>
LG Software
>
LG Intelligent Update
to continue.
3.
Double-click
LG Intelligent Update
icon on desktop to run the program.
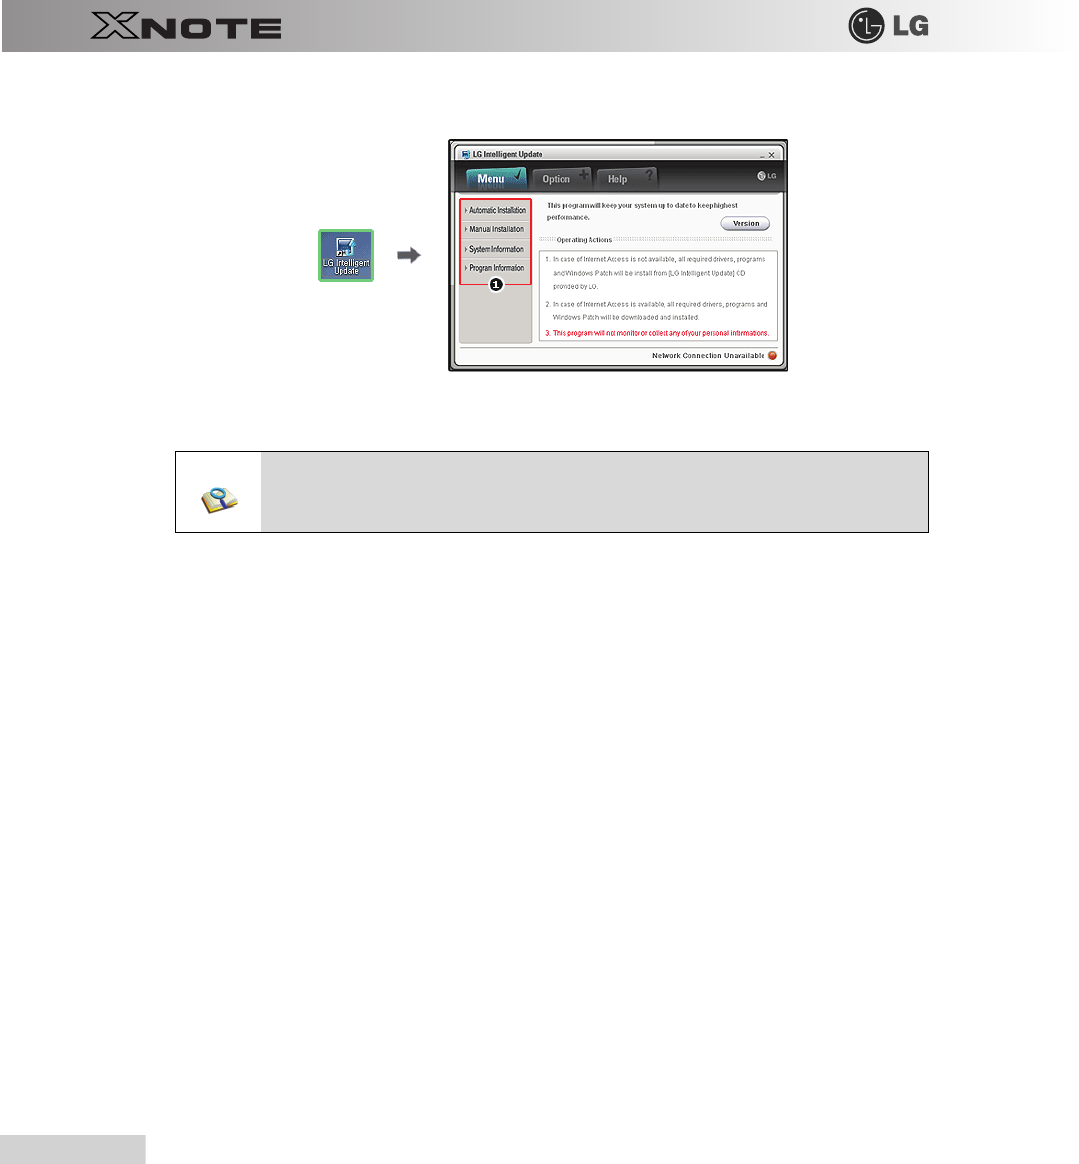
114
Reinstalling the Driver
※
For more details, refer to Help.
1.
Now, you can install drivers and applications needed for the system.
■The items that the user must install are automatically displayed on the Software Installation
Wizard screen. Read the screen carefully before installation.

Chapter 10.Using the Internet
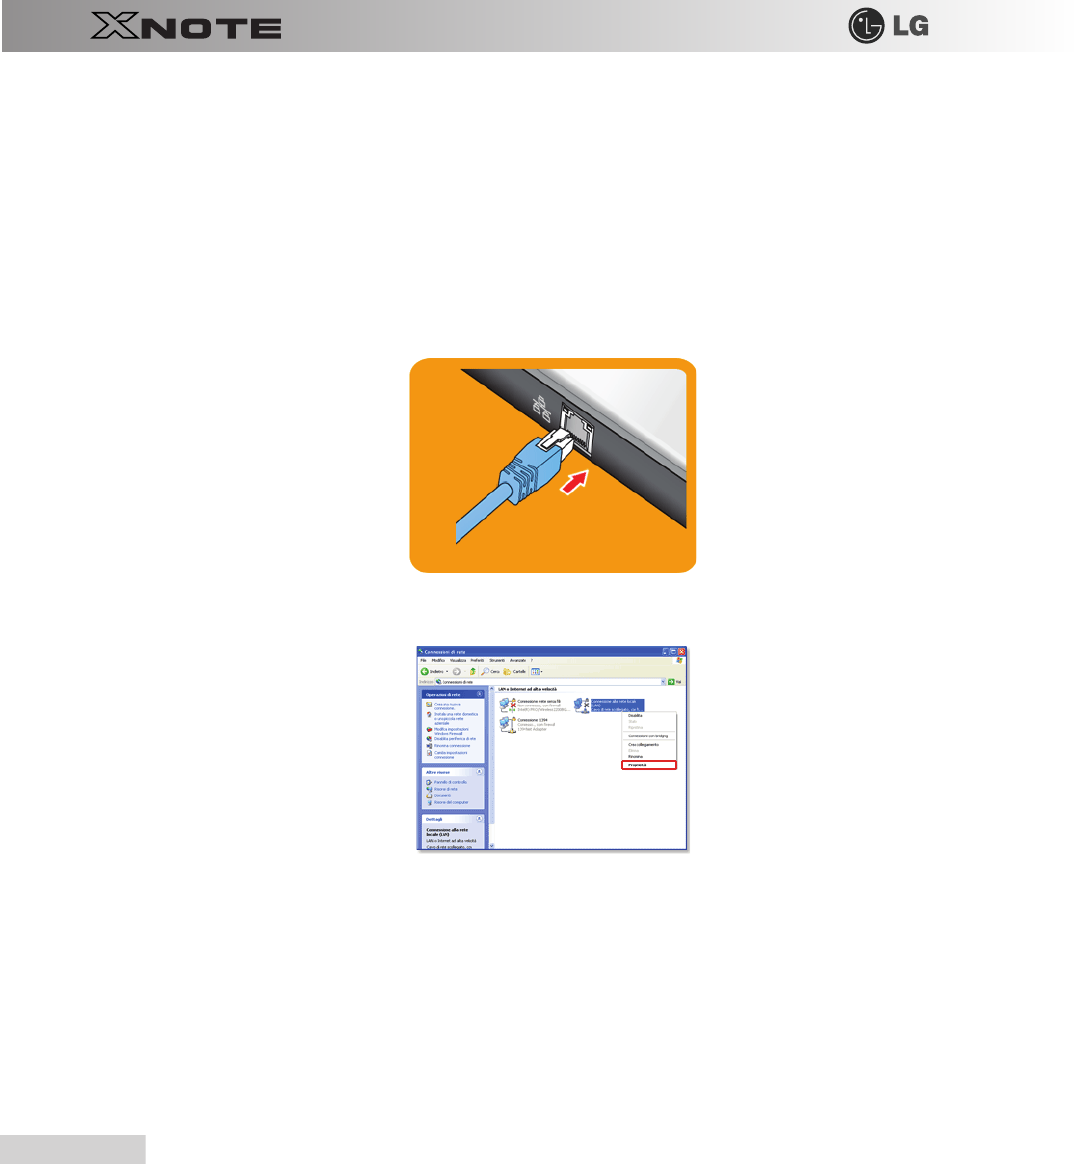
116
Using the Internet
10-1. Using the Internet
There are various methods to access the Internet. Choose the most desirable method for user environments and system
specifications.
▶
Using LAN
LAN refers to high speed network environments linking companies and households.
1.
Connect LAN cable to the LAN port. On the taskbar, click
Start
│
Control Panel
│
Switch to Classic View
│
Network
Connection
.
2.
When the following screen appears, right-click Local Area Connection and click
Properties
in the list.
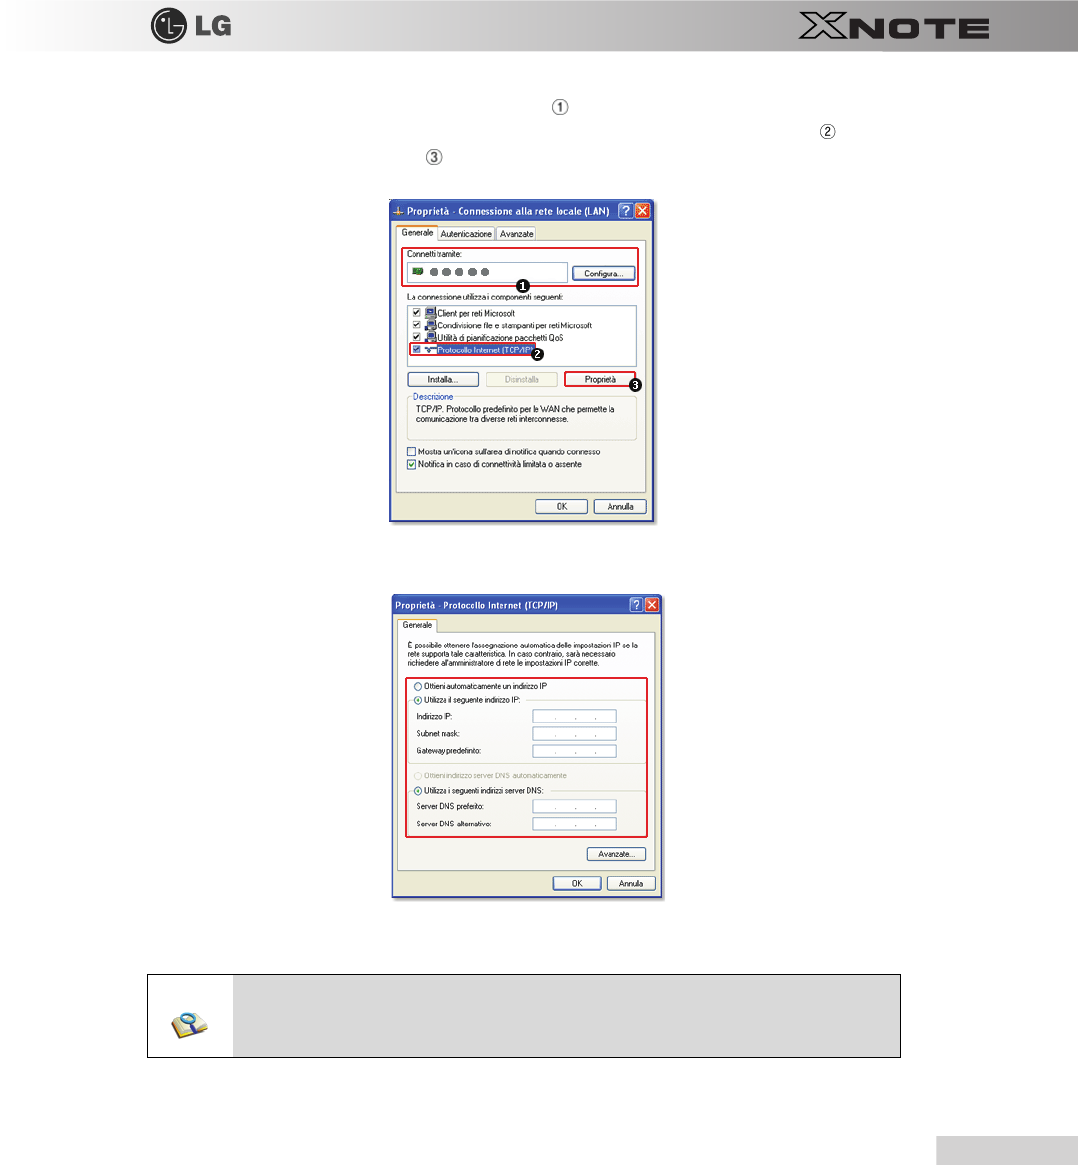
Using the Internet
117
3.
When the following screen appears, on
General
tab, check Device List for Connection to see if
Realtek
RTL8102E/RTL8103E Family PCI-E Fast Ethernet NIC
driver was installed, and select Internet
Protocol (
TCP/IP
), and then click
Properties
.
4.
On
Properties
│
General
tab, click Obtain an IP address automatically.
5.
Click the
OK
button to complete the registration of Internet Protocol (
TCP/IP
) Properties.
■For IP address registration, contact the network administrator or local network service engineer.
■IP Operator provides a user-friendly environment to manage wired/wireless network setup. The
provided IP Operator makes networking easy and convenient.
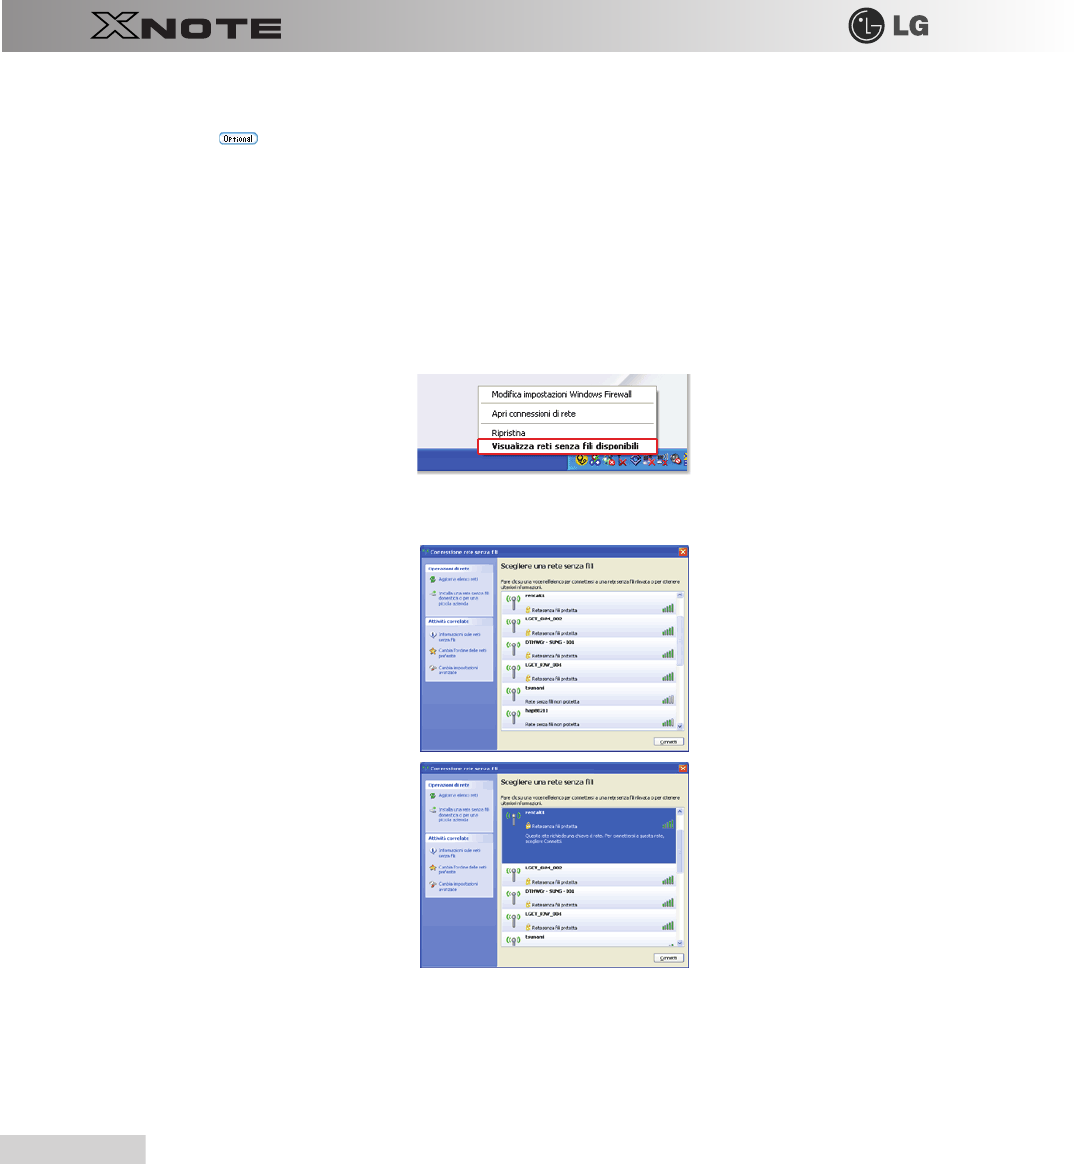
118
Using the Internet
▶
Using Wireless LAN
※
The
Wireless LAN
card is optional.
Wireless LAN supports multi-terminal networking at home and office.
Wireless network offers general network features (e.g. sharing files, folders, and a printer) and allows a computer without the
Internet connection in a small network to access the Internet through another terminal.
※
By default, this computer is set for wireless network on the
Windows
.
▶
Connecting Wireless Network By Using the Icon
1.
On the taskbar, right-click the connection icon and click
View available
wireless networks
.
2.
Select an
AP
(
Access point
) and click
Connect
.
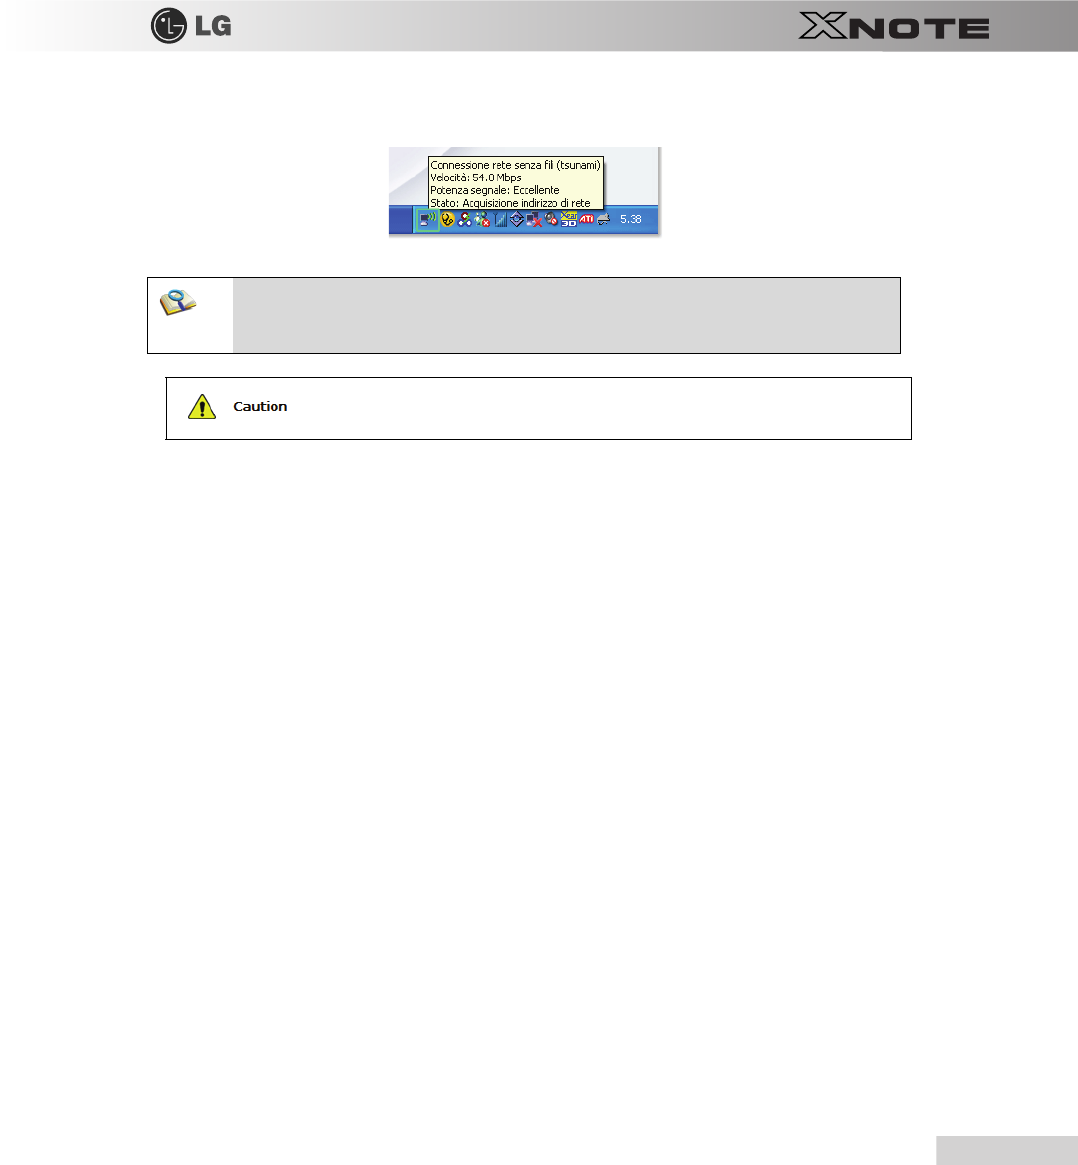
Using the Internet
119
3.
To see the connection status, place the cursor over Wireless Network Connection icon on the taskbar.
■If no network key is set for the selected AP, click "Allow me to connect to the selected wireless
network, even though it is not secure."
■Click Advanced button to check Connection Properties, if needed.
■
Ensure the network is secured to share the computer and be careful not to share confidential data.
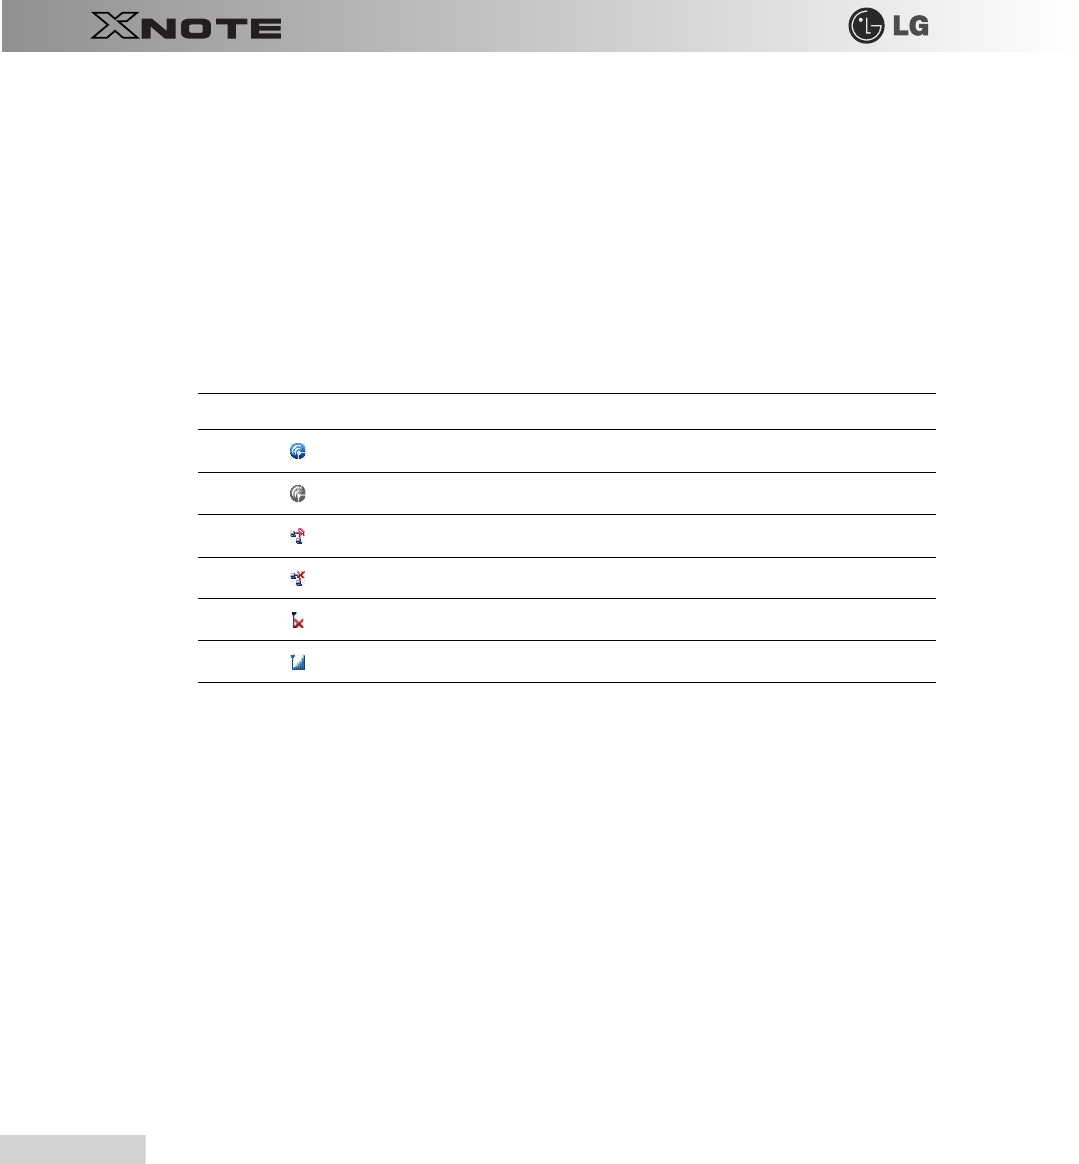
120
Using the Internet
10-2. Using IP Operator
The
IP Operator
manages the setting of the wired/wireless network in the system and helps the user easily operate the
system. IP Operator stores customized network settings to apply and analyzes the network to automatically set up
TCP/IP
for convenient use. The IP Operator also supports all types of
IEEE 802.11a, b, g
wireless networks, sets the
optimal wireless network environment and automatically switches the network environments.
※
LG
X120
Series supports
IEEE 802.11b/g
wireless networks.
※
For more information, refer to
IP Operator
Help.
▶
Using
IP Operator
IP Operator
displays the following icons describing the network status.
1.
Right-click
IP Operator
icon on the taskbar and select Open
IP Operator
.
Icons Descriptions
IP Operator
is starting. (Blue)
IP Operator
is not available. (Grey)
The network cable is connected.
The network cable is not connected.
The wireless network is not connected.
The signal strength of the current wireless network.
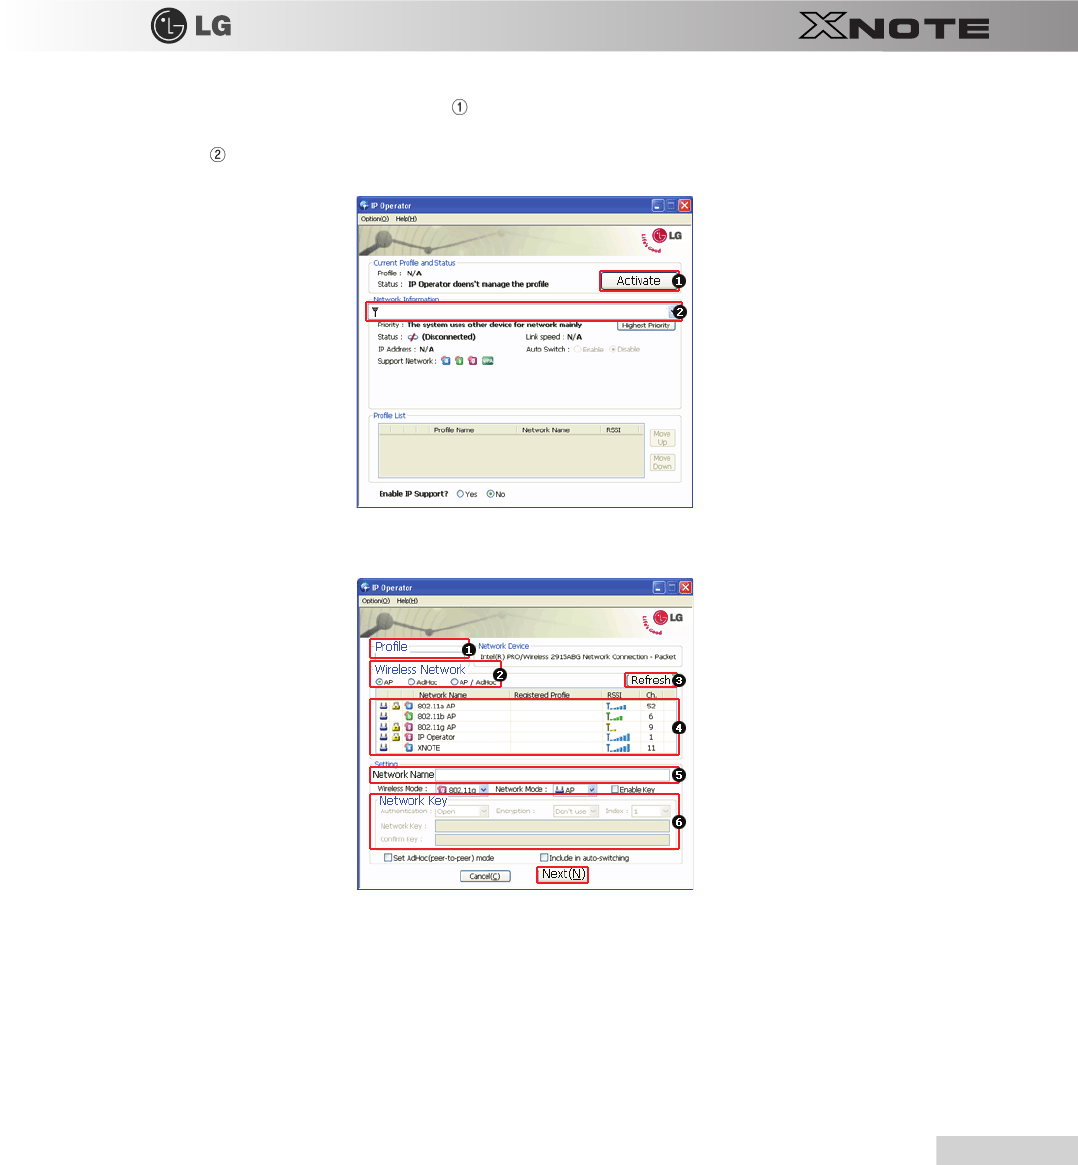
Using the Internet
121
2.
When the following screen appears, click No.
Activate administration feature
button to make the wireless
network available. When a different screen appears, select the right wireless network device from
No.
Device Name
drop-down list.
3.
Click
Add
button and click
Next
when the settings have completed as shown below.
1.
Type the profile name.
2.
Select the wireless network type to search.
3.
Click to search the wireless network again.
4.
Select one of the searched wireless networks.
5.
Type the name of the wireless network.
6.
Type the wireless network key, if necessary.
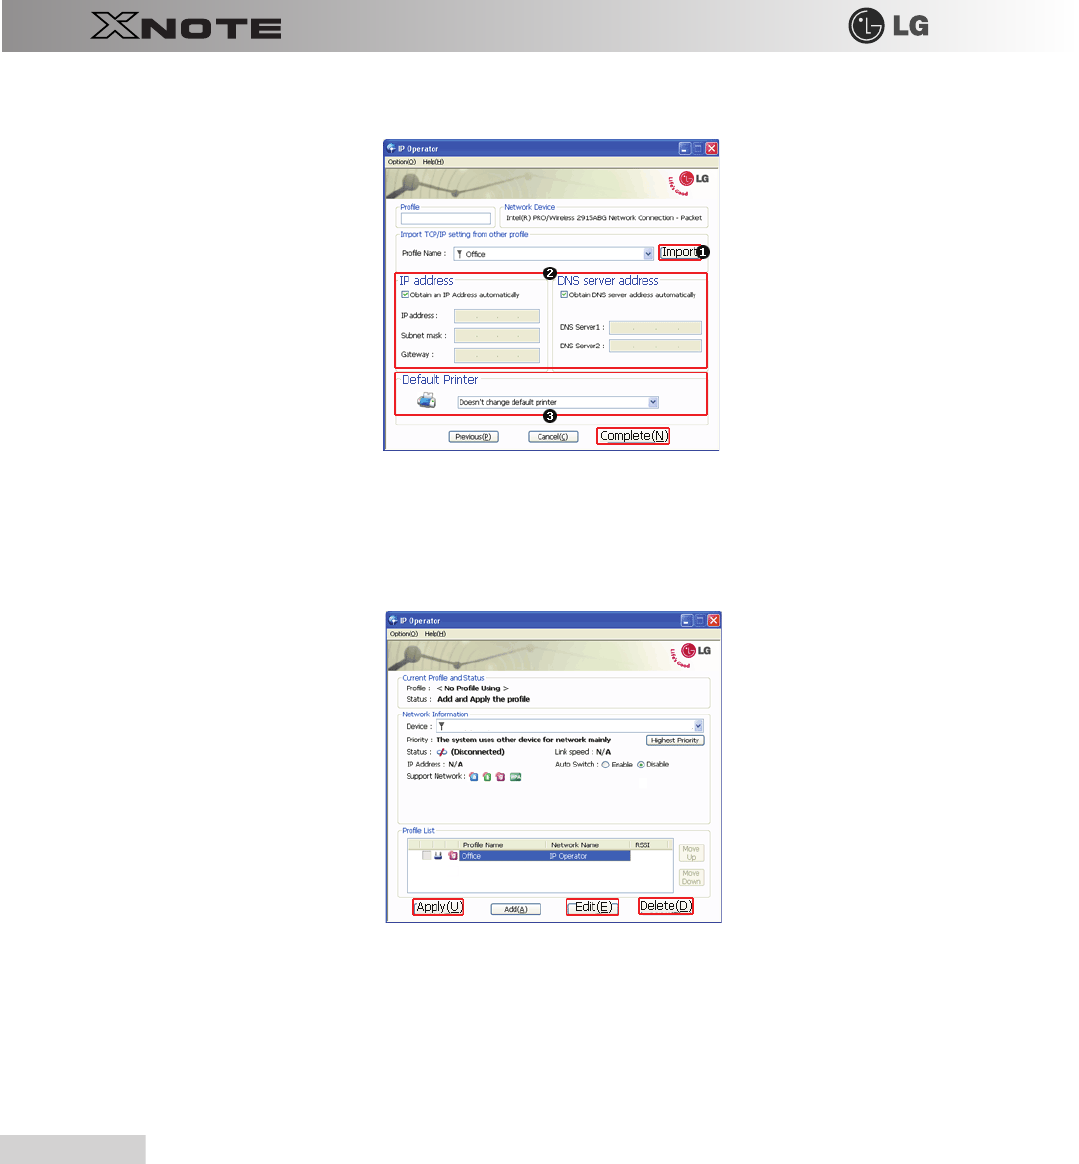
122
Using the Internet
4.
Set
TCP
/
IP
address and the printer for the profile and click
Finish
.
1.
To refer to the existing settings for
TCP/IP
and the printer, select the profile and click Get button.
2.
Set IP and DNS addresses.
3.
Select a default printer to apply the profile.
5.
Select a profile to use. The user can edit or delete the selected profile, or can apply the selected profile to the system by
clicking Apply button.

Using the Internet
123
New features provided by IP Operator are as follows:
■802.3 Automatic Switching: Analyzes the network when the network cable is connected and
automatically searches the optimal profile for the system. (Must be set in the Option menu.)
■Automatic Wireless Network Switching: Searches the most suitable network for the use of a
wireless network in various locations without manual settings.
■IP Supporting: Helps TCP/IP setup when another program, other than IP Operator, tries to set
the wireless network, or when the selected wireless network already exists in the profile.
■Device Prioritizing: Prioritizes devices for more convenient use of multiple devices in the
system.

124
Using the Internet

Chapter 11.Auxiliary Storage/Memory
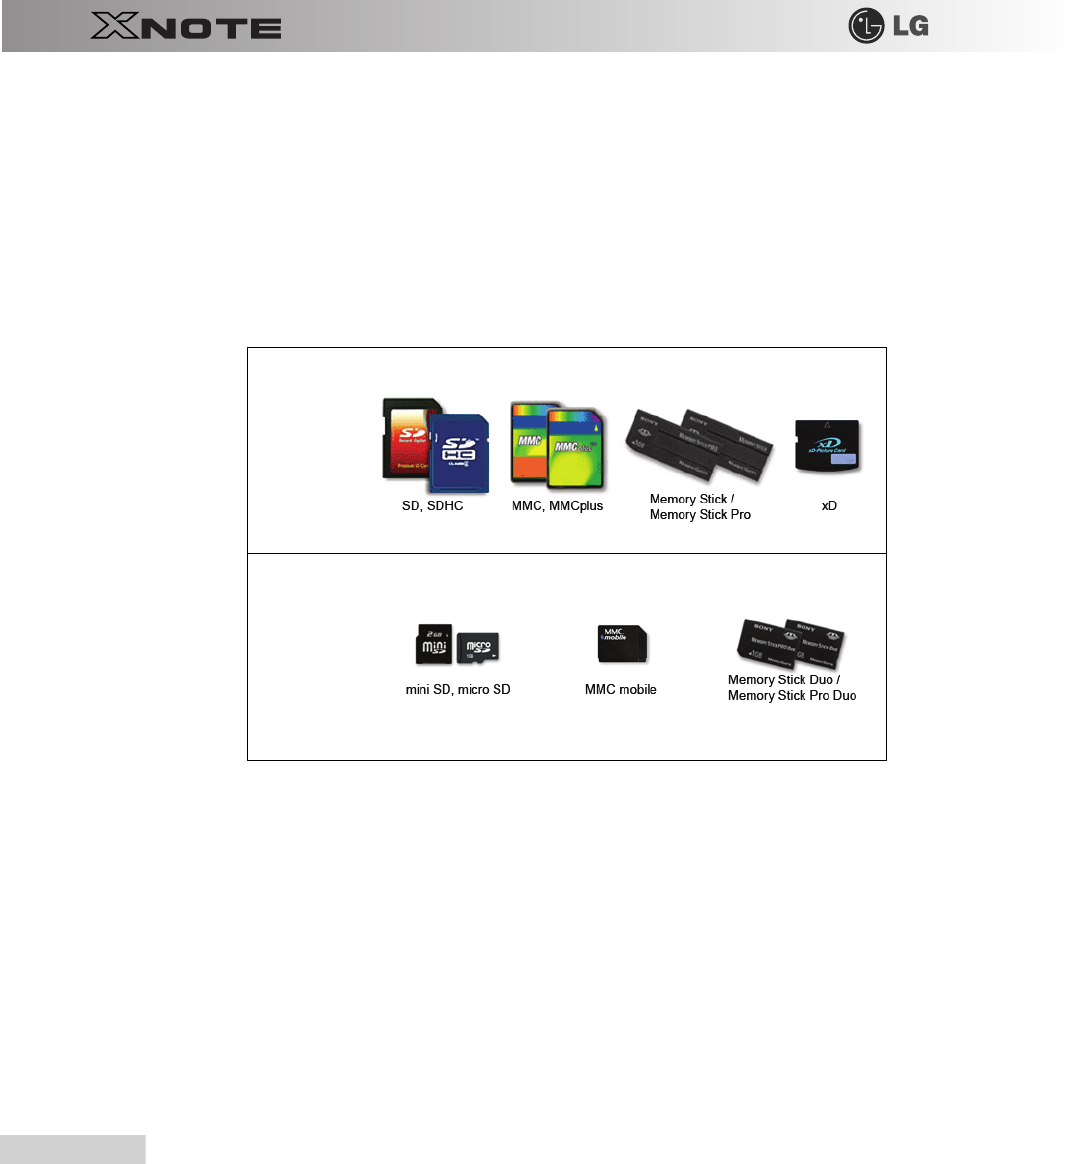
126
Auxiliary Storage/Memory
11-1. Using Memory Card
▶
Checking Available Memory Card
※
This model supports SD, MMC, Memory STick, and Memory Stick Pro.
SD
,
MMC
,
Memory Stick
and
Memory Stick Pro
cards are mobile storage devices like a floppy disk, widely used in
many digital products these days.
To use a
Memory Stick Duo
card,
Memory Stick Pro Duo
card,
mini SD
card,
micro SD
card, or an
MMC
mobile
card, mount it on the dedicated adapter and insert the adapter into the multi-card slot.
(The available memory type and capacity may differ by the computer model type.)
※
Check availability before buying a memory card.
Directly
applicable
memory cards
Memory cards
applicable
indirectly
through
dedicated
adapter
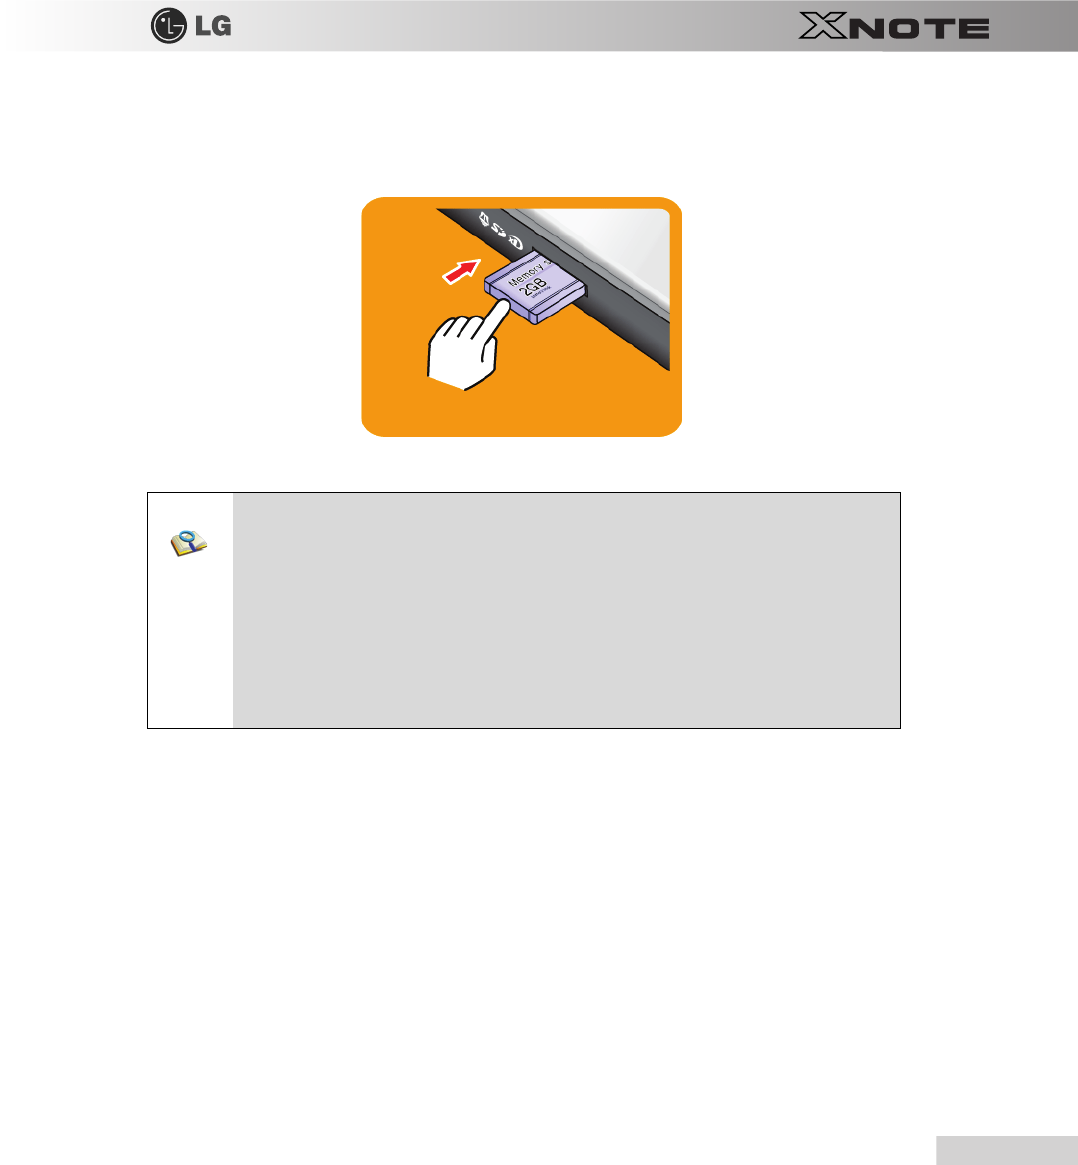
Auxiliary Storage/Memory
127
▶
Mounting and Using Memory Card
Insert the card into the multi-card slot to the fullest in the right direction.
■When the memory card is formatted, the data stored in the memory card will be deleted. Check
whether there are important data before formatting the memory stick.
■To format a memory stick, right-click Memory Stick drive and select Format. When Format
window appears, click Start to continue.
■The format feature may not be available on those Windows whose version is lower than
Windows XP. Format the card on other digital devices or format it after installing Memory Stick
Formatter.
■If the writing prevention tab of Memory Stick is locked, the user cannot format the memory
stick nor write or delete the data.
■SD, MMC, Memory Stick and Memory Stick Pro cards can be used only as storage devices,
and don't support a copyright protection feature.
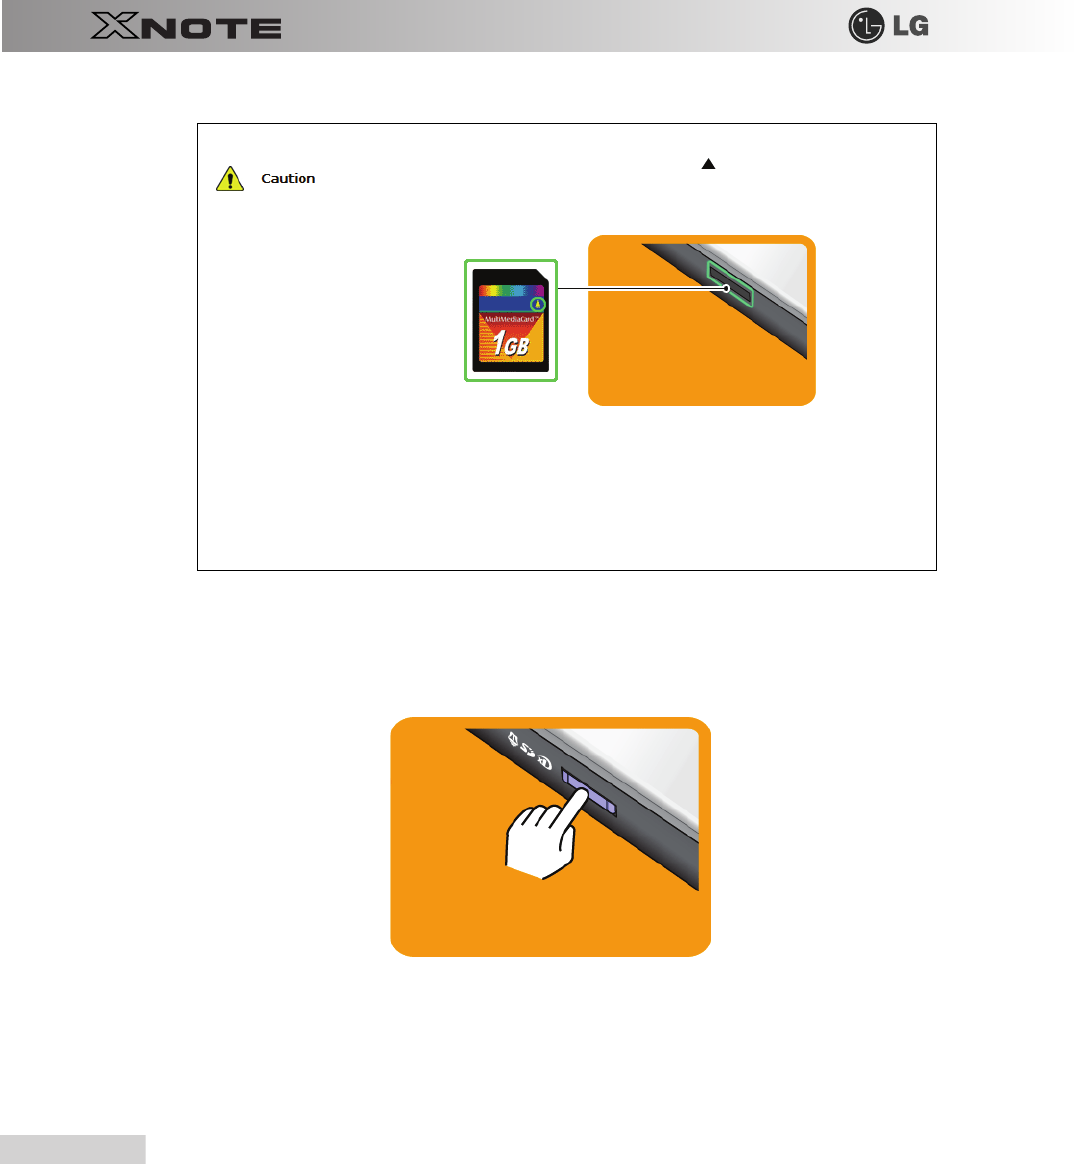
128
Auxiliary Storage/Memory
▶
Removing Memory Card
Push the card as depicted in the following picture to make the card spring out of the slot. Pull the card out in the direction of
the arrow.
When using an MMC card:
■
Place the
MMC
card with the arrow facing upward ( ), and insert it into the slot. Forcing
the
MMC
card into the slot may cause an impairment.
■
Some memory products manufactured by
Transcend
are made of metal and may cause a short circuit
when contacting with the connection port in the multi-card slot. Avoid using metallic-surfaced
memory products. They could offset the system performance.
When using a memory card through dedicated adapter:
■
Use the dedicated adapter. Otherwise a short-circuit may occur, causing damage to the computer and
the memory card.
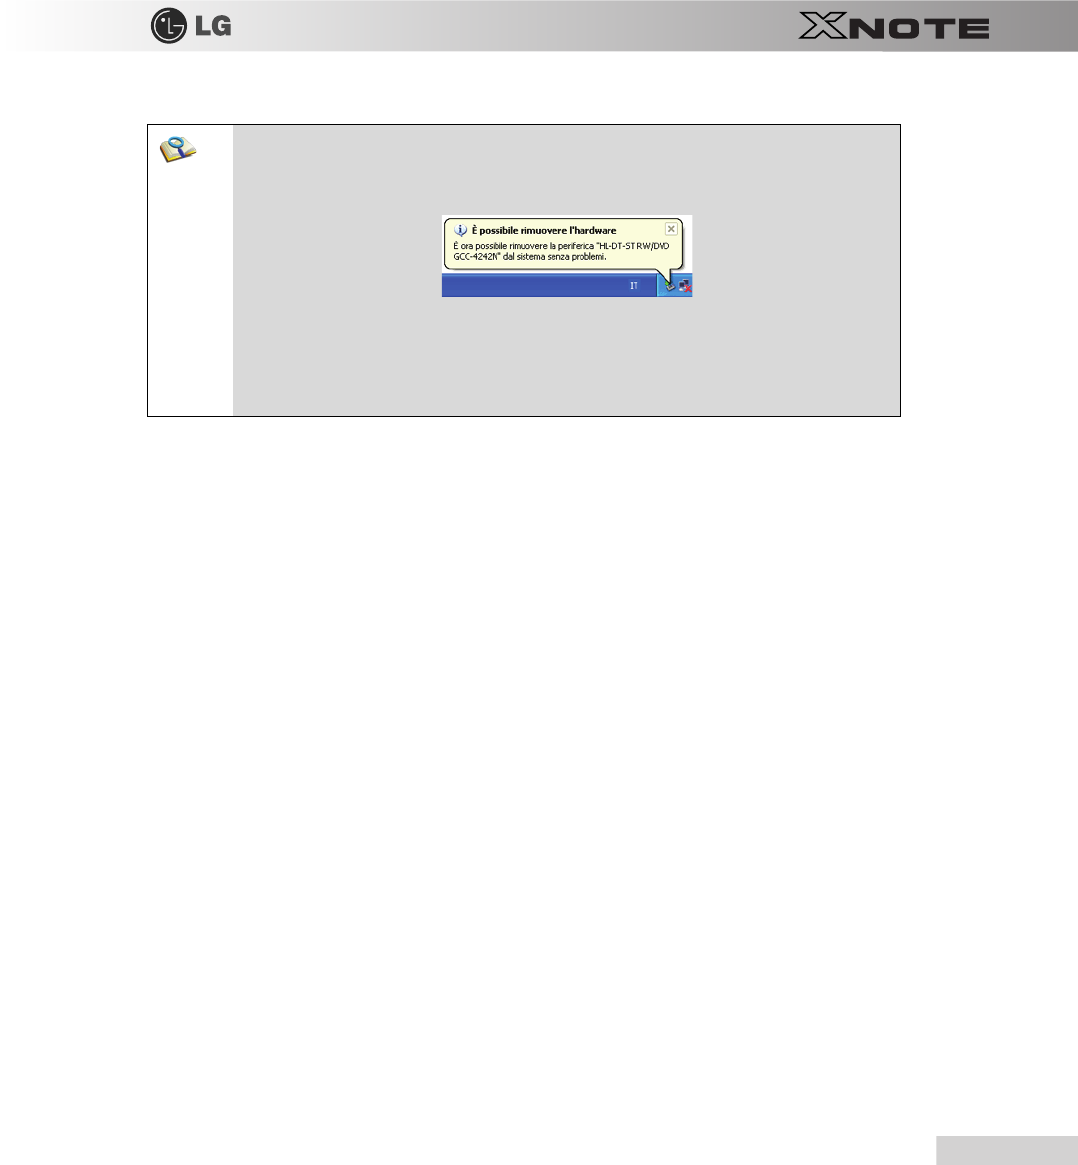
Auxiliary Storage/Memory
129
To safely removing a memory card:
6.
Click
Safely Remove Hardware
icon on the taskbar.
7.
Click
Safely Remove Hardware (S)
.
8.
When
Safety Remove Hardware
window appears, click
Stop
.
9.
When
Stop Hardware
window appears, click
OK
.
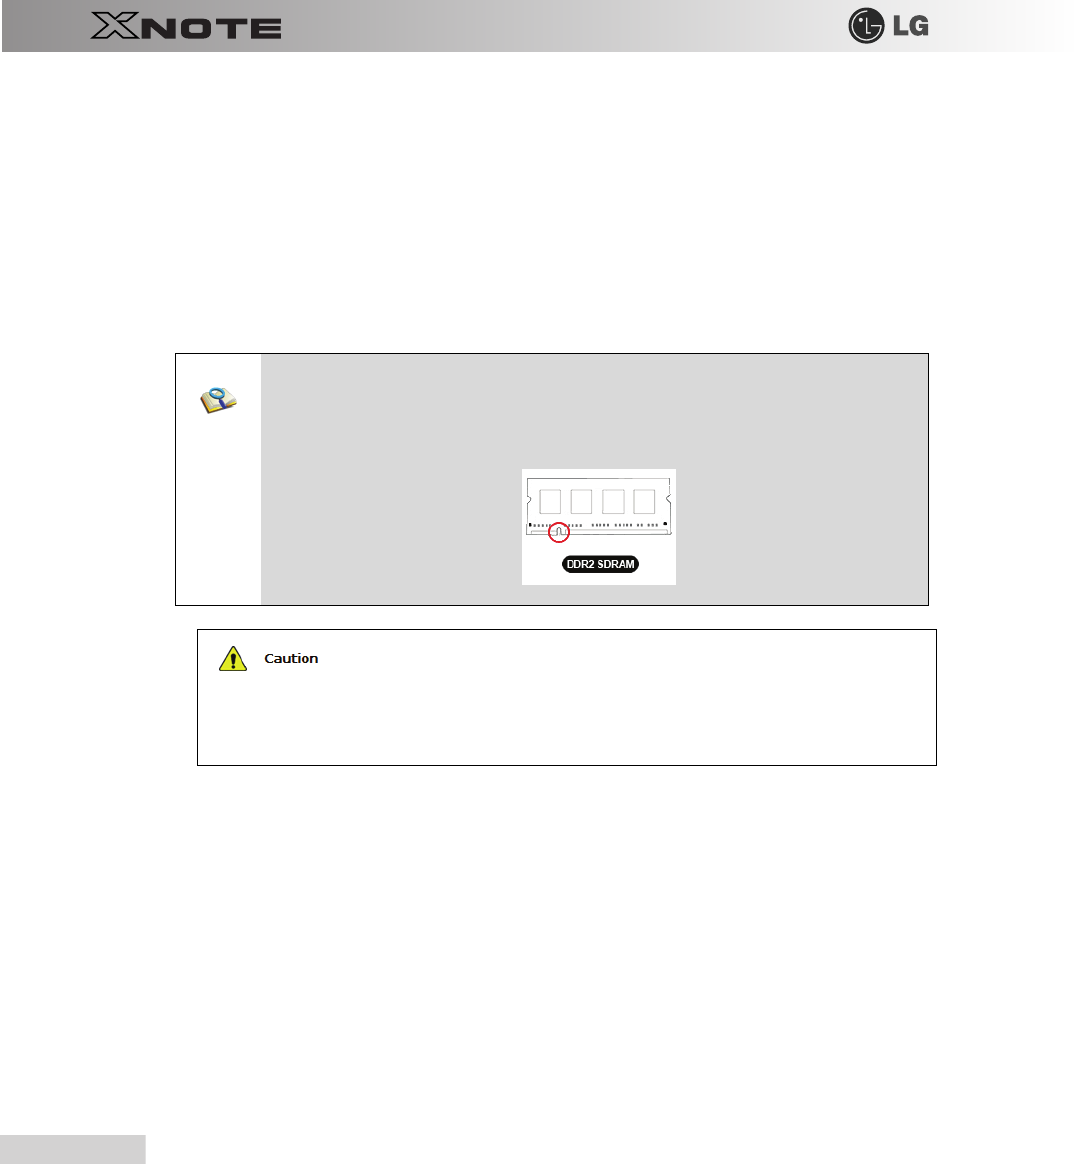
130
Auxiliary Storage/Memory
11-2. Expanding Memory Capacity
You may need to expand the notebook memory for better performance.
※
For memory expansion, we recommend that you receive a paid service from a service center certified by LG. LG disclaims any
responsibility for damage resulting from uncertified service or arbitrary disassembly.
▶
About Memory
This system uses a 200-pin,
SO-DIMM
-type (
Small Outline Dual In-Line Memory Module
)
DDR2 SDRAM
.
LG X120
Series provides 1 memory slot, and the maximum capacity of the main board is
1GB
.
▶
Preparing Memory
Before purchasing memory, study the specifications and features of the current memory.
1.
Rated Capacity:
PC2-6400S/DDR2 SDRAM SO-DIMM 800MHZ
2.
Speed:
800MHz
(
400MHz
x 2)
3.
Type:
1,024MB
▶
Adding Memory
※
Main board configuration, memory socket and memory type may differ by model.
■When expanding the memory, add a memory with the same specification (DDR2 SDRAM for
1.8V). (Subject to change depending on model type)
■The DDR2 Memory provides greatly improved transmission rate than existing memories, and
is differently shaped.
To upgrade the machine, turn off the system and disconnect the power cord and the battery.
■
Disconnect the telephone line linked to the modem, if any. An electric shock or fire may occur.
Supported Memory
■
PC2-6400S
/
DDR2 SDRAM SO-DIMM 800MHz
※
When you expand your memory capacity, make sure to use the memory from the same company.
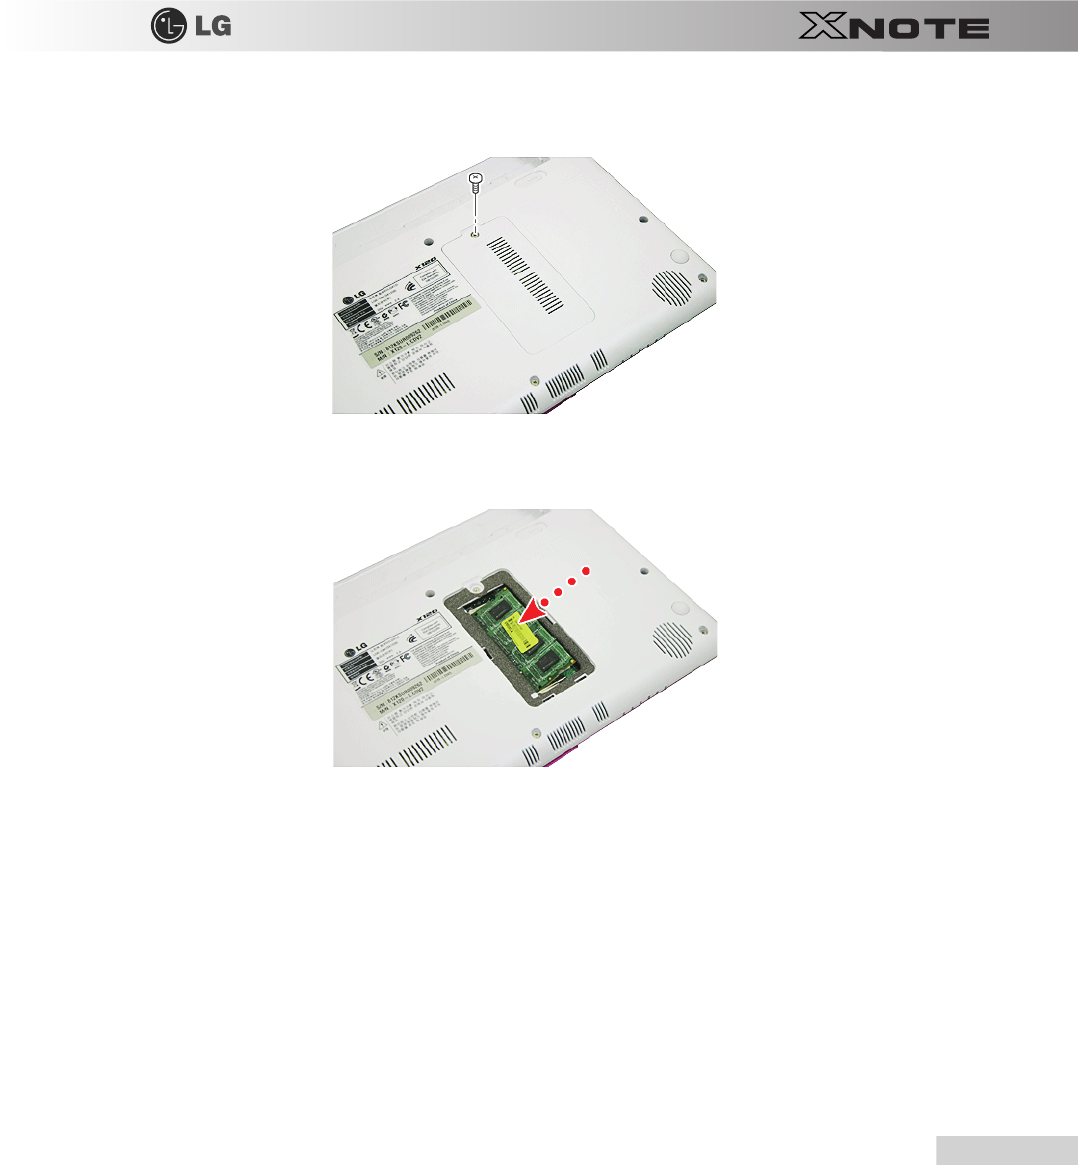
Auxiliary Storage/Memory
131
1.
Loosen the screw on the rear side of the notebook PC to remove the cover.
2.
Insert the memory into the memory socket as shown in the figure.

132
Auxiliary Storage/Memory
3.
Insert the memory until you hear a "click."
4.
After inserting the memory, fasten the cover with the screws.
5.
If an error message related to the main memory capacity is displayed during booting after the memory is expanded, press
F2
key and save the settings.
■Before remove the PC cover, turn off the AC power, and remove the battery and all peripherals.
Then, disconnect the cable.
■Push till the memory is completely fixed in the lock.
■Check the memory capacity during the second booting. If the memory capacity is not correct,
install the main memory again.
■
Use only the expandable main memory module manufactured by LG. Using a main memory module
other than recommended products may cause malfunctioning of the notebook PC.

Chapter 12.Appendix

134
Appendix
12-1. Specifications
▶
Available Processors
Intel
Atom
Processor (L2 Cache Size: 512KB ) is supported.
※
The user must not replace or expand the CPU capacity arbitrarily. The CPU capacity differs depends on model type.
▶
Main Memory
Main memory supports both 512 MB and 1024 MB, and provides 1 memory slot.
※
Memory types and specifications may differ depending on the model.
▶
Secondary Storage Devices
2.5" Hard Disk Drive (SATA)
※
The hard disk capacity and the type depend on the notebook PC model.
External Optical Disk Drive
※
It may not be provided depending on the model. Its specifications also differ depending on the model.
▶
LCD
10.1" WSVGA LED (1024 x 576) TFT Color LCD
※
Some models are equipped with Glare Type LCD. This model is enhanced the sharpness compare to the other types of LCD. So, it may
appears glaring a lot but this is the normal status.
※
The size and the resolution rate of the LCD depend on the notebook PC model.
※
When you use software (e.g. games) that does not support 1024 x 576 resolution, the screen may not work properly.
▶
Authentication for
Anticopy Technology
U.S Patent Nos.4,631,603;4,577,216;4,819,908;4,907,093;5,315,448;and 6,516,132. Patent number of
Macrovision
.
This product includes the technologies that are possessed by
Macrovision
and corresponding companies and
protected by the US Patent Law and other related laws. Use of all technologies subject to the
copyrights must be approved by
Macrovision
in advance. Otherwise, the technologies may only be used for internal
display. Do not disassemble or remodel the product.
▶
Bluetooth
Bluetooth 2.0+EDR
※
Bluetooth is optional, and so it may not be installed in some models.

Appendix
135
▶
Web Camera
1.3 Web Camera module
UVC (USB Video Class) driver supported
▶
External I/O Interface
External VGA Monitor Port: 1
Microphone: 2
Microphone Input Port (Mic in): 1
Headphone Port: 1
USB 2.0 Ports: 3
Multi-card Slot: 1
RJ 45 (LAN) Port: 1
USIM Card Slot: 1
※
USIM card slot may not be provided depending on the model.
▶
Video
Mobile Intel Graphic Media Accelerator 950 (Dynamic Video Memory Technology)
※
The DVMT actively utilizes part of the system memory when processing large graphic data like 3D graphics. Therefore, the size of the
graphic memory is displayed as the sum of the actual graphic memory size and the utilized amount of memory, which is decided by the
size of system memory.
※
Applications (graphics program, game, etc.) requiring strong graphic processing power may not work properly.
※
Specifications may differ by model type.
▶
Sound
Realtek High Definition Audio Codec (ALC269)
Built-in Stereo Speakers
▶
Modem
Ericsson F3507g (HSPA Modem)
※
The support availability may differ by model type.
▶
LAN
Realtek RTL8102E/RTL8103E Family PCI-E Fast Ethernet NIC (10/100mbps)
RJ 45 Jack

136
Appendix
※
The LAN specifications may differ depending on the model.
▶
Wireless LAN
Azurewave GE-703H (802.11bg, 1x2)
※
Wireless LAN specifications may differ by model type and cannot be arbitrarily changed by the user.
▶
Weight
Full Installation: About 1.14kg (including 3 cell battery) / 1.27kg (including 6 cell battery)
Battery: Less than 180g (3 cells) / 310g (6 cells)
※
Weight descriptions may differ by model type.
Appendix
137
12-2. Power Supply and Environments
▶
AC Adapter (Free Voltage)
Power Capacity: 40W
※
Input: AC 100V ~ 240V, 1.7A, 50Hz ~ 60Hz
※
Output: 20V DC 2.0A
※
Caution: Use a rated and legitimate AC adapter, suitable for the model.
▶
Battery (Li-Ion)
Rated Capacity: 10.8V/11.1V
Battery Make-up: 3-cell or 6-cell battery (the battery make-up may differ depending on the model.)
※
Charging Hours: At room temperature (0
~ 40
) and power turned off - Less than 3 hours (Time may differ by model type.)
※
Not charged under 0 .
※
The above temperatures are internal temperatures of the battery pack, and may be different from the actual room temperature.
▶
Operation and Storage Environments
Operating Temperature: 10 ~35
Operating Humidity: 20% RH ~ 80% RH
Storage Temperature: -10 ~60
Storage Humidity: 10% RH ~ 80% RH
▶
Power Consumption
※
The above power consumption is calculated on the assumption that the battery is fully charged.
※
Power consumption during operation or standby may differ depending on the programs the system is running and product specifications.
※
Even when the system is turned off, it consumes a minute amount of power, if supplied. To cut off power supply completely, disconnect
the power cord from the power outlet.
Operating Conditions Approximately 20W When running moving image media
Standby mode (Idle state) Approximately 10W In Display Off mode
Power Saving mode (Sleep Mode) 1.1W or lower When entering S3(Suspend)
Off Mode (Standby(off) Mode) 0.8W or lower When terminating the system