LG Electronics USA 9QK-LN790 Mini Hometheater User Manual LAN B470N43 AA1ULLK ENG
LG Electronics USA Mini Hometheater LAN B470N43 AA1ULLK ENG
Contents
- 1. User Manual 1
- 2. User Manual 2
User Manual 1
Portable Navigation
OWNER’S MANUAL
LN790 Series
ENGLISH
Please read this manual carefully before operating
your Navigation device.
Keep it for future reference.
Designs and specifications are subject to change
without prior notice for improvement.
Support - Hotline
LGEUS : 1-800-243-0000 http://www.lgusa.com
LGECI : 1-888-542-2623 http://www.lg.ca
To purchase the Upgrade Map, contact at
www.lgusa.com/navigation.

Table of contents
2
Safety note 5-14
Supplied parts 15
Part names 16-17
Front panel . . . . . . . . . . . . . . . . . . . . . . . . . . . . . . . . . . .16
Rear / Side panel . . . . . . . . . . . . . . . . . . . . . . . . . . . . . .17
Connecting devices 18-25
Installation sequence for the suction-cup mount . . . . .18-19
Detaching the suction-cup mount . . . . . . . . . . . . . . . . . .20
Installing the external GPS antenna (Optional) . . . . . .20-21
Installing Microsoft ActiveSync . . . . . . . . . . . . . . . . . . . .22
Connecting the USB cable . . . . . . . . . . . . . . . . . . . . .22-23
Downloading files: ActiveSync . . . . . . . . . . . . . . . . . . . .23
Data exchange via card reader . . . . . . . . . . . . . . . . . . . .24
Downloading files: Removable disk . . . . . . . . . . . . . . . . .24
Disconnecting the USB device . . . . . . . . . . . . . . . . . . . .25
Before operation 26-27
Starting up . . . . . . . . . . . . . . . . . . . . . . . . . . . . . . . . . . .26
Navigation features . . . . . . . . . . . . . . . . . . . . . . . . . . . . .27
Navigation Menu . . . . . . . . . . . . . . . . . . . . . . . . . . . . . .28
Address Screen . . . . . . . . . . . . . . . . . . . . . . . . . . . . . . .28
Recent Places Screen . . . . . . . . . . . . . . . . . . . . . . . . . .28
My Places Screen . . . . . . . . . . . . . . . . . . . . . . . . . . . . .28
POI Screen . . . . . . . . . . . . . . . . . . . . . . . . . . . . . . . . . .29
Route Manager Screen . . . . . . . . . . . . . . . . . . . . . . . . . .29
Traffic Info Screen . . . . . . . . . . . . . . . . . . . . . . . . . . . . .29
Setup Screen . . . . . . . . . . . . . . . . . . . . . . . . . . . . . . . .29
Menu Buttons . . . . . . . . . . . . . . . . . . . . . . . . . . . . . . . . .30
Main Map . . . . . . . . . . . . . . . . . . . . . . . . . . . . . . . . .31-32
Point on the Map . . . . . . . . . . . . . . . . . . . . . . . . . . . . . .32
Screen Buttons . . . . . . . . . . . . . . . . . . . . . . . . . . . . . . . .33
Cycling Through Screens . . . . . . . . . . . . . . . . . . . . . . . .34
Enter Address . . . . . . . . . . . . . . . . . . . . . . . . . . . . . . . . .35
Getting started with navigation 28-35
3
Table of contents
Finding a location with navigation 36-53
Symbol used in this manual
Indicates special notes and operating features.
Installation 61-63
Photo viewer 78-79
Music Player 80-81
Troubleshooting 82-86
Specifications 87
Using software 64-71
Movie Player 72-73
Bluetooth 75-77

CAUTION : TO REDUCE THE RISK OF ELECTRIC SHOCK DO NOT
SPLIT COVER(OR BACK) NO USER SERVICEABLE PARTS INSIDE.
REFER SERVICING TO QUALIFIED SERVICE PERSONNEL.
CAUTION
RISK OF ELECTRIC SHOCK
DO NOT OPEN
The lightning flash with arrowhead symbol, within an equilateral
triangle is intended to alert the user about the presence of
uninsulated dangerous voltage within the product’s enclosure that
may be of sufficient magnitude to constitute a risk of electric shock.
The exclamation point within an equilateral triangle is intended to
alert the user to the presence of important operating and
maintenance (servicing) instructions in the literature accompanying
the appliance.
To disconnect power from the mains, pull out the mains cord plug.
When install the product, ensure that the plug is easily accessible.
Battery shall not be exposed to excessive heat such as sunshine,
fire or the like.
WARNING
To reduce the risk of fire or electric-shock, do not expose this
apparatus to rain or moisture.
Do not expose this equipment to dripping or splashing and ensure
that no objects filled what liquids, such as vases, are placed on the
equipment.
Safety note
4
"Underwriters Laboratories Inc. ("UL") has not tested the performance or
reliability of the Global Positioning System ("GPS") hardware, operating
software or other aspects of this product. UL has only tested for fire, shock or
casualty hazards as outlined in UL's Standard for Safety for Audio, Video and
Similar Electronic Apparatus - Safety Requirements, UL 60065.
UL Certification does not cover the performance or reliability of the GPS hard-
ware and GPS operating software.
UL MAKES NO REPRESENTATIONS, WARRANTIES OR CERTIFICATIONS
WHATSOEVER REGARDING THE PERFORMANCE OR RELIABILITY OF
ANY GPS RELATED FUNCTIONS OF THIS PRODUCT."

5
Safety note
This Class B digital apparatus complies with Canadian ICES-003, Issue 2, and
RSS-210, Issue 4 (Dec. 2000).
"To prevent radio interference to the licensed service, this device is intended to
be operated indoors and away from windows to provide maximum shielding.
Equipment (or its transmit antenna) that is installed outdoors is subject to
licensing."
Cet appareil numérique de la classe B est conforme à la norme NMB-003, No.
2, et CNR-210, No. 4 (Dec. 2000).
<< Pour empêcher que cet appareil cause du brouillage au service faisant l'ob-
jet d'une licence, il doit être utilisé à l'intérieur et devrait être placé loin des
fenêtres afin de fournir un écran de blindage maximal. Si le matériel (ou son
antenne d'émission) est installé à l'extérieur, il doit faire l'objet d'une licence.>>
Operation is subject to the following two conditions:
This device may not cause interference, and (2) this device must accept any
interference, including interference that may cause undesired operation of the
device.
The term "IC:" before the certification/registration number only signifies that the
Industry Canada technical specifications were met.

Safety note
6
CAUTION : Changes or modifications not expressly approved by the
manufacturer responsible for compliance could void the user’s
authority to operate the equipment.
WARNING
This device complies with part 15 of the FCC Rules. Operation is
subject to the following two conditions: (1) This device may not
cause harmful interference, and (2) this device must accept any
interference received, including interference that may cause unde-
sired operation.
INFORMATION TO USER :
This equipment has been tested and found to comply with the limit
of a Class B digital device, pursuant to Part 15 of the FCC Rules.
These limits are designed to provide reasonable protection against
harmful interference in a residential installation.
This equipment generates, uses and can radiate radio frequency
energy and, if not installed and used in accordance with the
instructions, may cause harmful interference to radio
communications. However, there is no guarantee that interference
will not occur in a particular installation; if this equipment does cause
harmful interference to radio or television reception, which can be
determined by turning the equipment off and on, the user is
encouraged to try to correct the interference by one or more of the
following measures:
1. Reorient / Relocate the receiving antenna.
2. Increase the separation between the equipment and receiver.
3. Connect the equipment into an outlet on a circuit different from
that to which the receiver is connected.
4. Consult the dealer or an experienced radio/TV technician for help.

7
Safety note
IMPORTANT SAFETY INSTRUCTIONS
1. Read these instructions. - All these safety and operating
instructions should be read before the product is operated.
2. Keep these instructions. - The safety, operating and use
instructions should be retained for future reference.
3. Heed all warnings. - All warnings on the product and in the
operating instructions should be adhered to.
4. Follow all instructions. - All operating and use instructions should
be followed.
5. Do not use this apparatus near water. – For example: near a
bath tub, wash bowl, kitchen sink, laundry tub, in a wet
basement; or near a swimming pool; and other areas located
near water.
6. Clean only with dry cloth. – Unplug this product from the wall
outlet before cleaning. Do not use liquid cleaners.
7. Do not block any ventilation openings. Install in accordance with
the manufacturer's instructions. -Slots and openings in the
cabinet are provided for ventilation and to ensure reliable
operation of the product and to protect it from over-heating.
The openings should never be blocked by placing the product
on a bed, sofa, rug or other similar surface.
This product should not be placed in a built-in installation such
as a bookcase or rack unless proper ventilation is provided or
the manufacturer’s instructions have been adhered to.
8. Do not install near any heat sources such as radiators, heat
registers, stoves, or other apparatus (including amplifiers) that
produce heat.
Safety note
8
9. Do not defeat the safety purpose of the polarized or
grounding-type plug. A polarized plug has two blades with one
wider than the other. A grounding type plug has two blades and
a third grounding prong. The wide blade or the third prong are
provided for your safety. If the provided plug does not fit into
your outlet, consult an electrician for replacement of the
obsolete outlet.
10. Protect the power cord from being walked on or pinched
particularly at plugs, convenience receptacles, and the point
where they exit from the apparatus.
11. Only use attachments/accessories specified by the
manufacturer.
12. Use only with the cart, stand, tripod, bracket, or table specified
by the manufacturer, or sold with the apparatus. When a cart is
used, use caution when moving the cart/apparatus combination
to avoid injury from tip-over.
13. Unplug this apparatus during lightning storms or when unused
for long periods of time.
14. Refer all servicing to qualified service personnel.
Servicing is required when the apparatus has been damaged in
any way, such as power-supply cord or plug is damaged, liquid
has been spilled or objects have fallen into the apparatus, the
apparatus has been exposed to rain or moisture, does not
operate normally, or has been dropped.
9
Safety note
Always operate the vehicle in a safe manner. Do not become
distracted by the navigation while driving, and always be fully aware
of all driving conditions.
Minimize the amount of time spent viewing the navigation screen
while driving and use voice prompts when possible.
Do not enter destinations, change settings, or access any functions
requiring prolonged use of the unit’s controls while driving.
Pull over in a safe and legal manner before attempting such
operations.
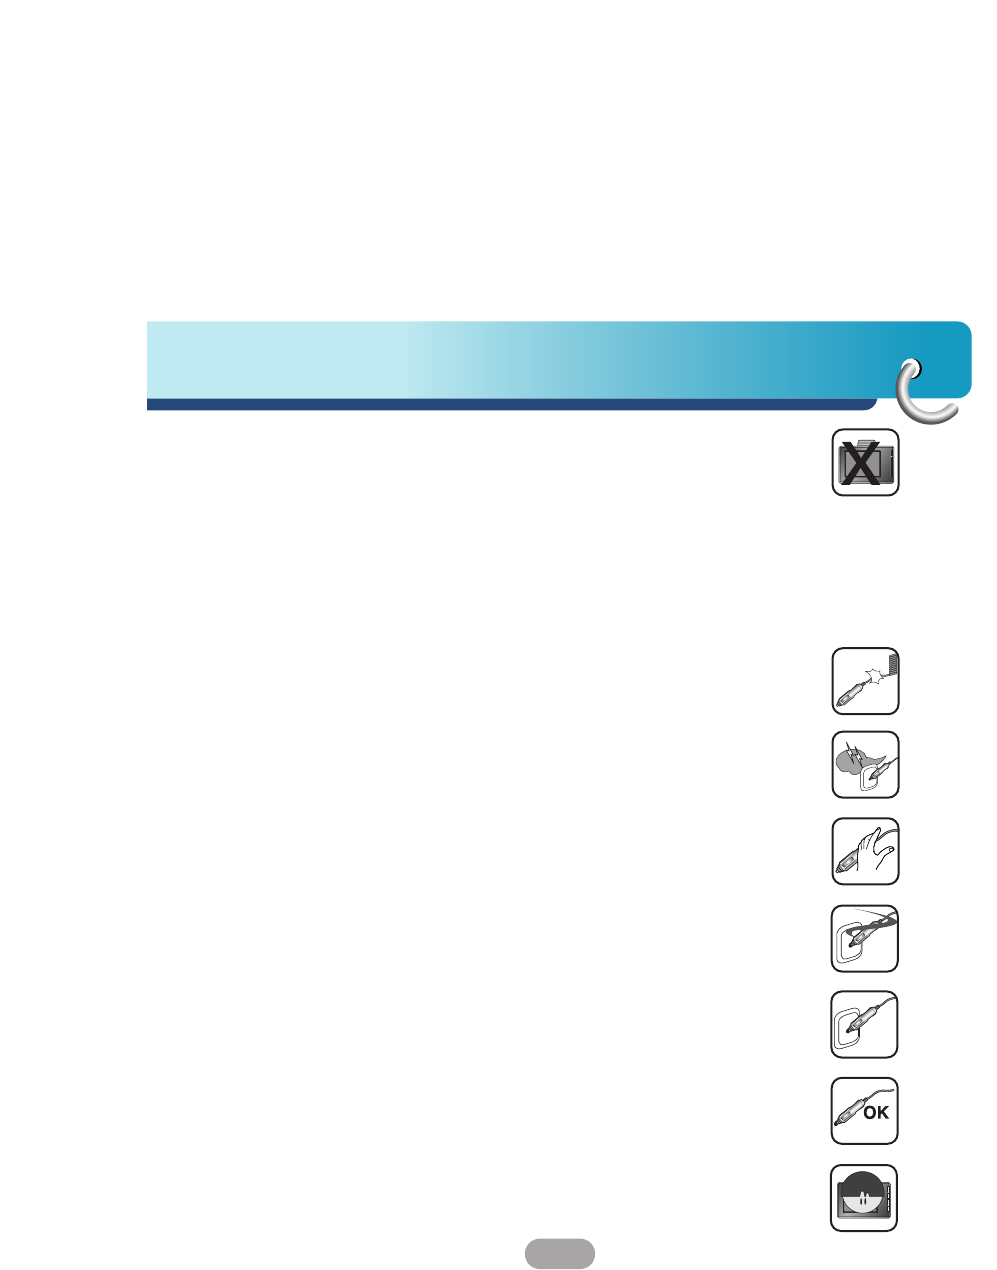
Do not kink or crease the power cable or place heavy objects on the
power cable.
Fire can result from damaged power cables.
Unplug the AC adapter during electrical storms. This may result in
electrical shock.
Do not handle the power plug nor the adapter with wet hands.
This may result in electrical shock.
Immediately power off the unit and unplug the AC adapter if you
notice smoke or odors coming from the player or adapter.
Fire can result from improper use.
Make sure to insert the power plug tightly.
Fire can result from improper use.
Use only the specified power adapter.
Using a different type of adapter may damage the product.
(DC 5 - 5.4V)
The appliance is not intended for use by children or infirm persons
without supervision.

Safety note
10
Note that malfunctions may occur if you use the product in places
where static electricity occurs frequently.
Do not use the unit near water.
Do not touch the unit with wet hands.
Do not attempt to disassemble or repair the product yourself.
Do not use the product for other purposes than those described in
this guide.
Do not use for many hours at extremely low or high temperatures.
(-10°C~60°C)
Avoid leaving the product in hot or humid places.
Take special attention when touching the product box, owner's
manual and accessories to avoid cuts.
While driving, keep the sound volume at a proper level.
Do not drop it and avoid heavy impacts at anytime.
11
Safety note
If you notice unusual odors, excessive heat coming from the
product, anything else that seems unusual, do not use the product
and contact our Customer Service Center.
Always use soft and dry cotton cloth when cleaning the product.
Do not use strong solvents such as alcohol, benzine, or thinner, as
these might damage the surface of the unit.
When attaching a navigation holder, remove impurities in the area to
attach before attaching, and press the suction lever to avoid falling.
Do not pull out the SD Memory Card while the navigator is
operating. It may cause mechanical problems.
Do not use the navigator for extended periods of time.
This may result in battery discharge.
Please obey all traffic regulations.
To aid safe driving, information on safe driving routes and routes
where accidents occur frequently is included.
Voice guidance and map route may differ from the actual traffic
conditions.
When moving the product, separate the power plug from cigarette
lighter socket and separate the main body from holder or separate
the holder from the window before moving.

Safety note
12
•If you attach the vacuum disk on the glass for a long period of
time, the pressure in the disk slowly reduces and the vacuum disk
may fall off.
•The Navigator holder may fall off at a sudden stop, thus causing a
dangerous situation. We recommend it should be installed close to
the dashboard so it can be supported properly.
•Applying too much force to adjust while the connecting arm is
tightly fixed, may deform the rubber disk connecting all the
components.
•If the holder falls off, please follow the instructions again to
reinstall and use it.
•Please note that if the product is damaged due to user negligence,
it cannot be returned or refunded.
Winter precaution
•The vacuum disk can easily come off the glass due to
differences in temperature between inside and outside the
windscreen.
Caution : Danger of explosion if battery is incorrectly replaced.
Replace only with the same or equivalent type.
Summer precautions
•When the vacuum disk can easily come off the glass due to
difference in temperature between inside and outside of the
windscreen.
•Remove the vacuum disk and store it separately when parking for
a long period of time.
•The built-in battery may be damaged when kept under direct
sunlight in the car for a long period of time due to internal
temperature rise.
Separate the unit and store it in a cool place.
Atemperature rise can reduce the battery life span or cause an
explosion.

13
Safety note
•Never leave your unit/accessories (including windshield mount, car
charger etc) visible in an unattended vehicle, since it’s an easy
target for thieves.
•Back up your data using our provided software in the CD.
•In order to protect the screen and the unit, always store it in the
carry case.
•Do not use the memory card (SD card) with any other devices
since the memory card could be damaged.
•The unit has to be outdoors to locate the current position from
satellite. It could take few minutes to locate your position when you
start it for the first time.
If it takes longer than 5 minutes, make sure there aren’t any tall
trees or buildings around you.
•When installing the unit, make sure that it does not block the view
on the windscreen.
Make sure that unit does not interfere with the safety operations of
the vehicle when installed. Eg. Deployment of air bags or other
safety equipment.
•The unit could require the external antenna kit if the vehicle has
the heat reflective shield embedded in the windshield which may
prevent the unit from locating the current position.
The external antenna kit is available as an optional accessory.
•The instructions are not 100% correct, so only use it to aid you
finding the destination.
Map data is updated annually, so it can be different to the actual
road if there are changes during that period.
•The unit is designed to provide you with route suggestions, so it
does not reflect road conditions, traffic congestion, weather
conditions or other factors that may affect safety or timing while
driving.

Safety note
14
•LG is not responsible for any injury, property damage or accidents
resulting from reliance on the navigation system.
•LG is not responsible for the accuracy of traffic-related information
and data supplied by other parties.
•LG disclaims all liability for use of the navigation that causes or
contributes to death, injury or property damage or that violates any
law including traffic laws. All the stated instructions should be
followed, because if not, it may lead to death, serious injury or
property damage.
15
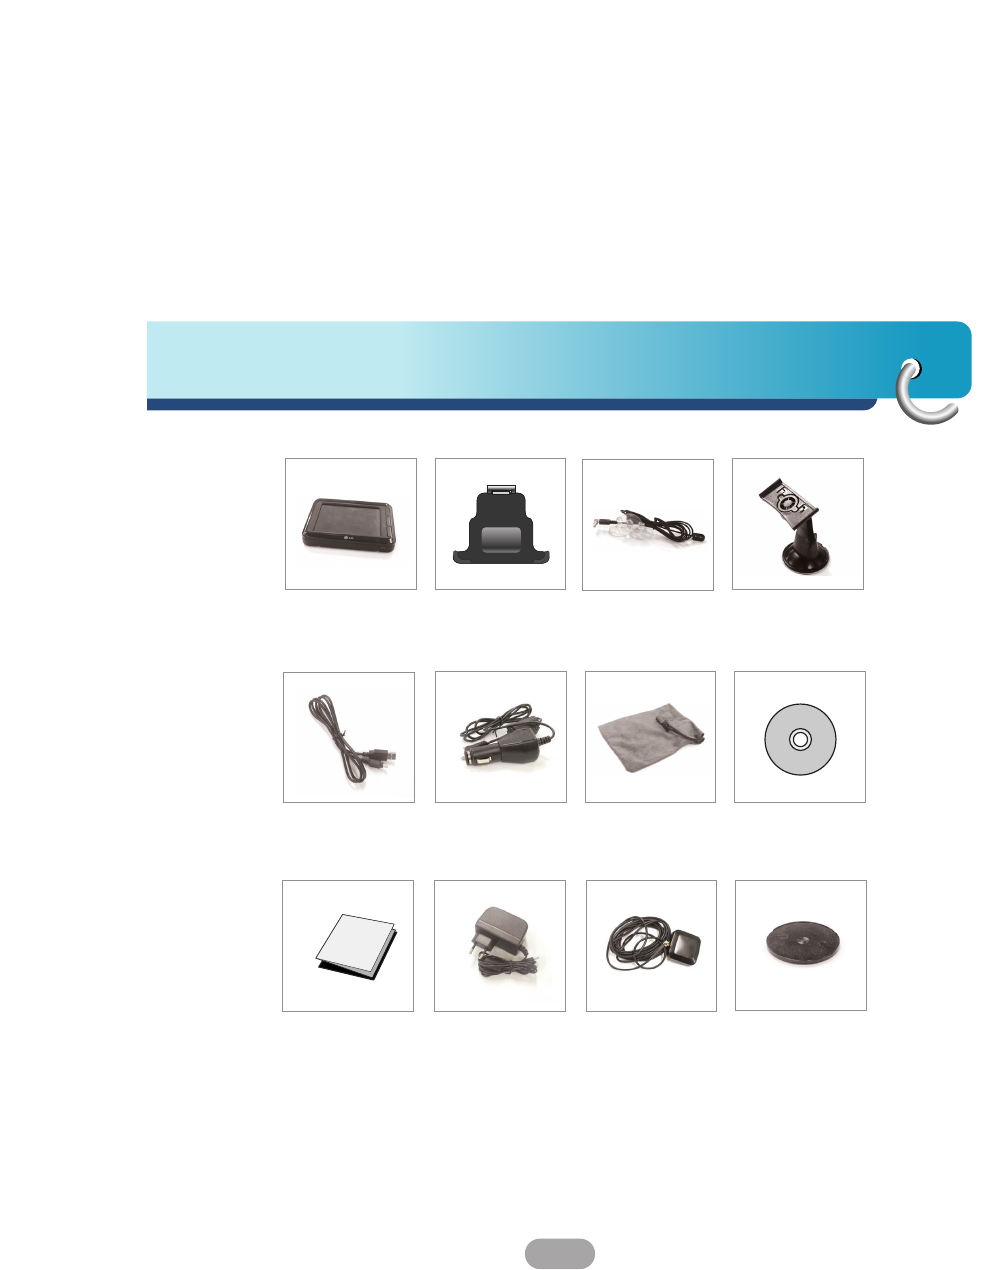
Supplied parts
Main Body Holder Suction-Cup
Mount
USB Cable Cigarette Lighter
Adapter
Carrying Case
(Optional)
Installation
CD
Quick
Reference
Guide
GPS Antenna
(Optional)
AC Adapter
(Optional)
Contents may be changed without notice.
Supporter of
Cradle
Traffic Receive
Antenna
(Optional)
Part names
16
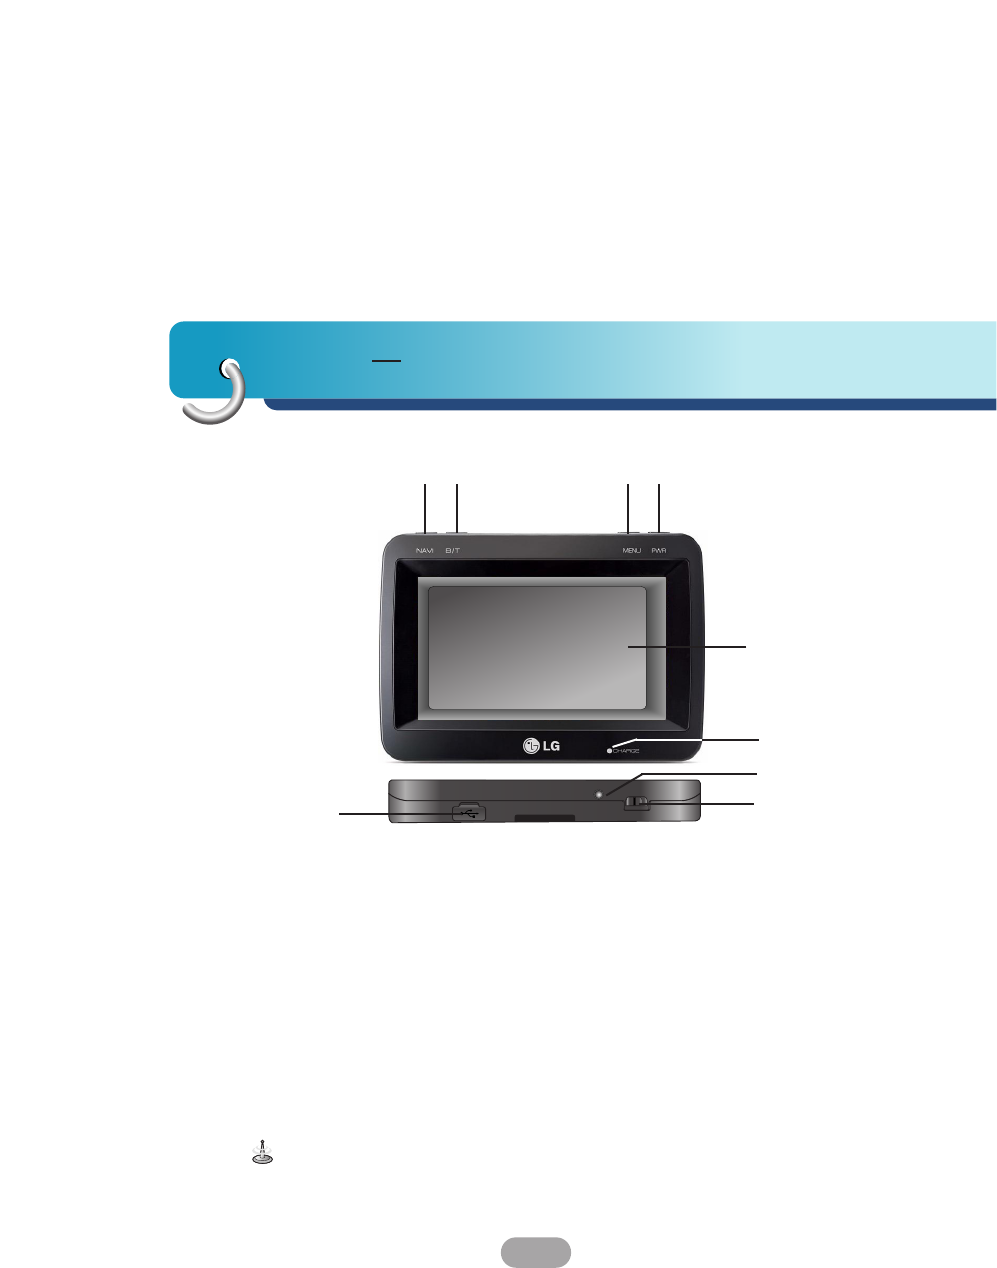
Front panel
To activate the menu function on LCD screen, touch the LCD screen with
a finger.
1. NAVI button
Moves to the navigation mode.
2. BLUETOOTH (B/T) button
Moves to the bluetooth mode.
3. MENU button
Moves to the main menu screen
or the previous screen.
4. Power (PWR) button (ON/OFF)
ON: Press this button.
OFF: Press and hold this button.
5. LCD
6. Charge indicator
7. RESET button
If the unit does not operate
properly, press the reset button.
8. Hold switch
This feature locks the unit to prevent it
from operating when you accidentally
press a button.
9. USB port
2
8
9
7
34
12
5
6
17
Part names
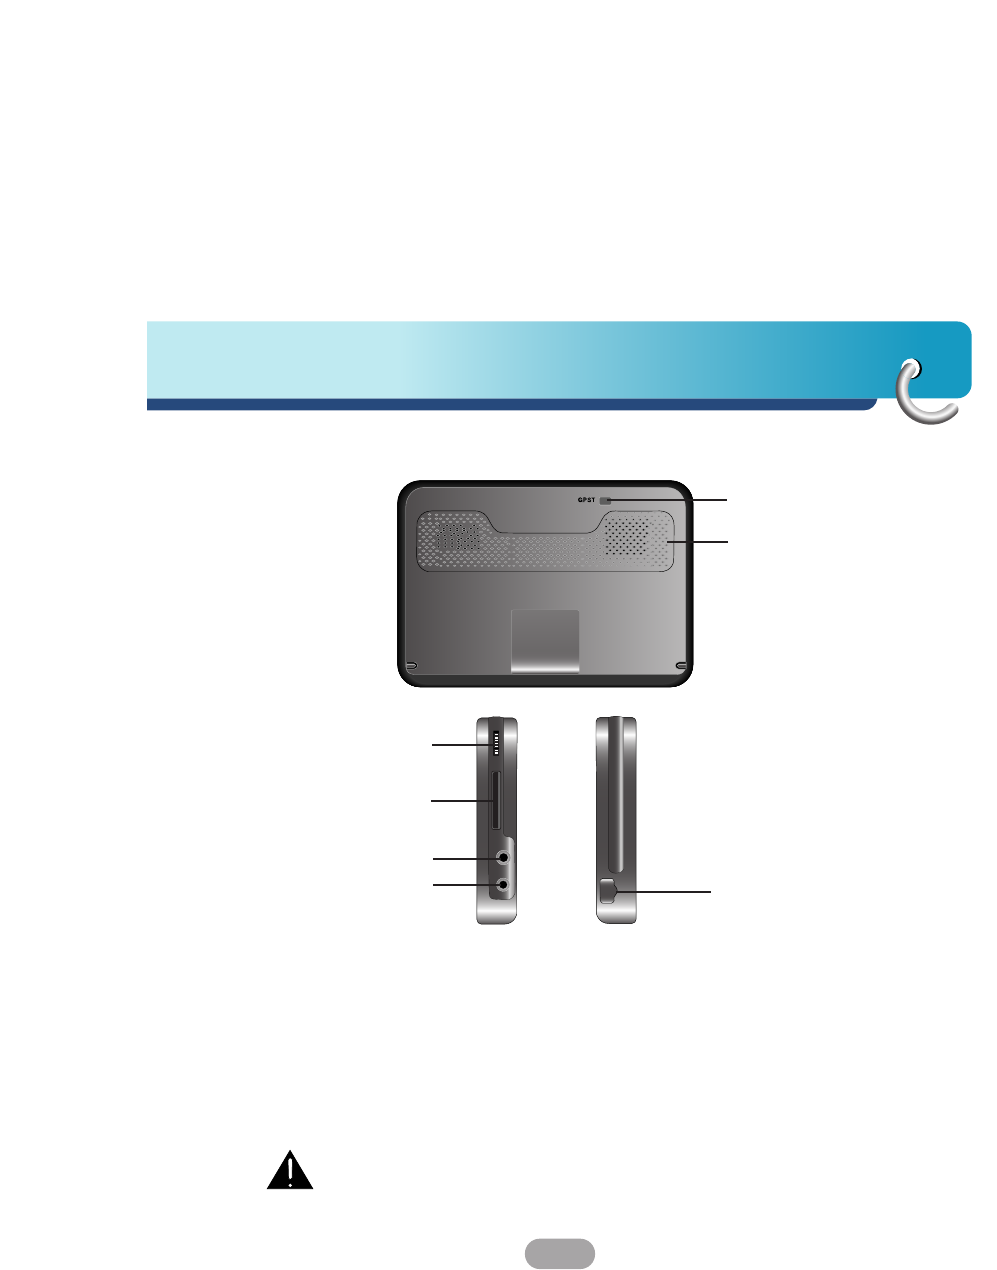
Rear / Side panel
2
7
1. External GPS Antenna Port
2. Speaker
Gives a voice guidance service.
3. Volume Up/Down
4. Memory Card Slot
Insert a SD Memory Card.
5. Earphone connector
6. Power supply connector
DC 5V
7. TMC antenna port
Insert a TMC antenna.
Deleting or altering the map data in the built-in memory or the SD
memory card randomly, may cause problems in the navigation
function.
3
5
1
4
6
Connecting devices
18
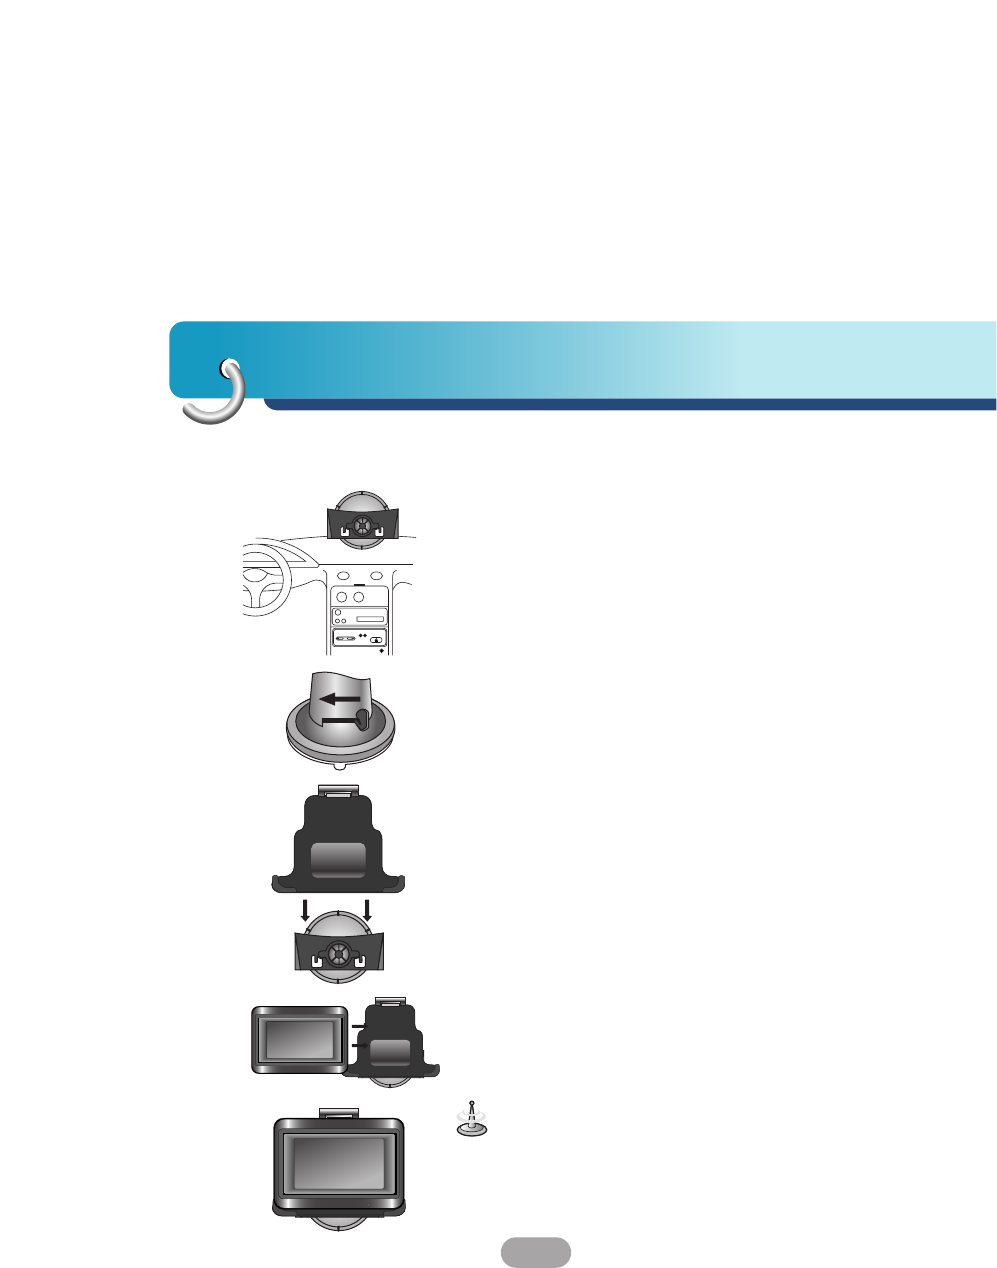
Installation sequence for the
suction-cup mount
1. Select the most suitable position on the
windscreen.
2. Clean the surface of the windscreen, to remove
any dust and grease.
3. Place the suction-cup mount on a suitable
position on the windscreen.
4. Push back the lever to the left until you hear a
click, fixing the suction-cup mount in position.
5. Align the holder at the suction-cup mount to
mount then push the unit down until you hear a
click.
6. Align the unit at the holder to mount until you
hear a click.
Standard operation temperature of the suction mount
is between -10°C and 60°C. The suction mount may
disengage under a temperature outside of what is
specified.
19
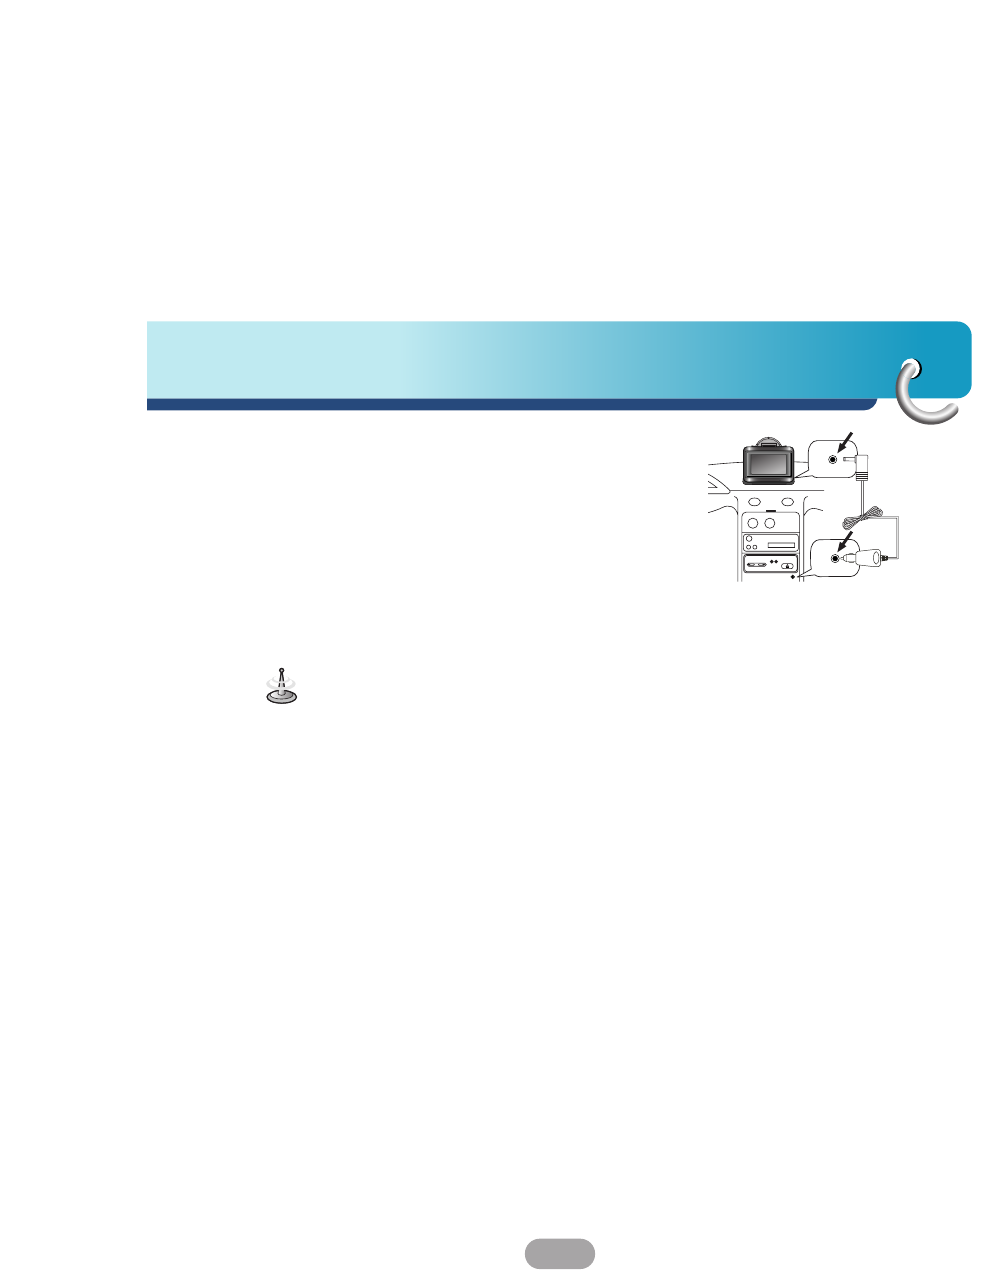
Connecting devices
6. Plug the small end of the cigarette lighter
adapter into the power supply connector at the
side of the unit.
7. Plug the other end into your vehicle’s 12V
(cigarette lighter) socket.
8.
To adjust the angle of the mount, move the holder
up and down and from side to side, you can also
rotate the holder.
•This unit and its cigarette lighter adapter are
designed for use in vehicles that have 5 -5.4V,
negative ground electrical systems.
(This is a standard for most vehicles.)
If your vehicle has a different type of electrical
system, the DC power system cannot be used.
•When attaching the mount, remove impurities from
the surface before attaching, and press the lever to
avoid falling.
•Adjust the direction of the mount to prevent it from
disturbing the driving.
•Adjust it to an angle you can see well.
•Be careful of not to make the unit fall from
windscreen when you drive.
•The arm of the mount may vibrate. Attach the mount
close to the dashboard as much as you can.

Connecting devices
20
Detaching the suction-cup mount
1. To separate the mount, pull the lever to the right.
2. If the mount still doesn’t detach from the
windscreen, pull up handle of suction cup to move
the suction rubber.
Drivers in California and Minnesota prohibit from
placing anything on the windshield of a vehicle.
The suction-cup mount is fastened with double-sided
tape.
Installing the external GPS antenna
(Optional)
This unit has a built-in GPS antenna to receive the
satellite signals.
The external GPS antenna is sold separately and may
improve the receiving condition of satellite signals
when the signals are poor.
1. Select the place to attach the external GPS
antenna.
2. Plug the jack end of the GPS antenna into the
socket on the backside of the unit.
Dash board
Double-sided tape

21
Connecting devices
When Installing the antenna inside the vehicle
(on the dashboard or shelf)
Affix the external GPS antenna on as level a surface
as possible where the external GPS antenna faces
outside the window. (The GPS antenna is fastened
with a double-sided tape.)
•Make sure the surface is free of moisture, dust,
grime, oil, etc., before affixing the sheet.
•The double-sided tape contains a strong adhesive
and may leave a mark on the dashboard if
removed.
•Some vehicles use window glass that does not
allow signals from GPS satellites to pass through.
On such vehicles, install the GPS antenna on the
outside of the vehicle.
When installing the antenna outside the
vehicle (on the body)
Place the external GPS antenna in a position as level
as possible, such as on the roof or trunk lid.
(The GPS antenna is fastened with a magnet.)
When routing the lead in from the top of the door
Make a U-shaped loop in the lead on the outside to
prevent rainwater from flowing along the lead into the
interior of the vehicle.
(The GPS antenna is fastened with a magnet.)
Connecting devices
22
Installing Microsoft ActiveSync
In order to synchronize your data between your PC
and the unit, you need the Microsoft ActiveSync
program.
1. Click ActiveSync “setup.exe”.
2. Click “Next” to install Microsoft ActiveSync on
your PC.
3. Read the following license agreement carefully
and select “I accept the terms in the license
agreement”.
4. Click “Next”.
5. Enter your information.
6. Click “Next”.
7. Click “Next” to install to this folder, or click
“Change” to install to a different folder.
8. Click “Install”.
9. Setup is ready to begin installing Microsoft
ActiveSync.
10. The installation is in progress.
11. When the Setup Wizard has successfully
installed, click “Finish”.
12. When prompted, connect your unit to your PC.
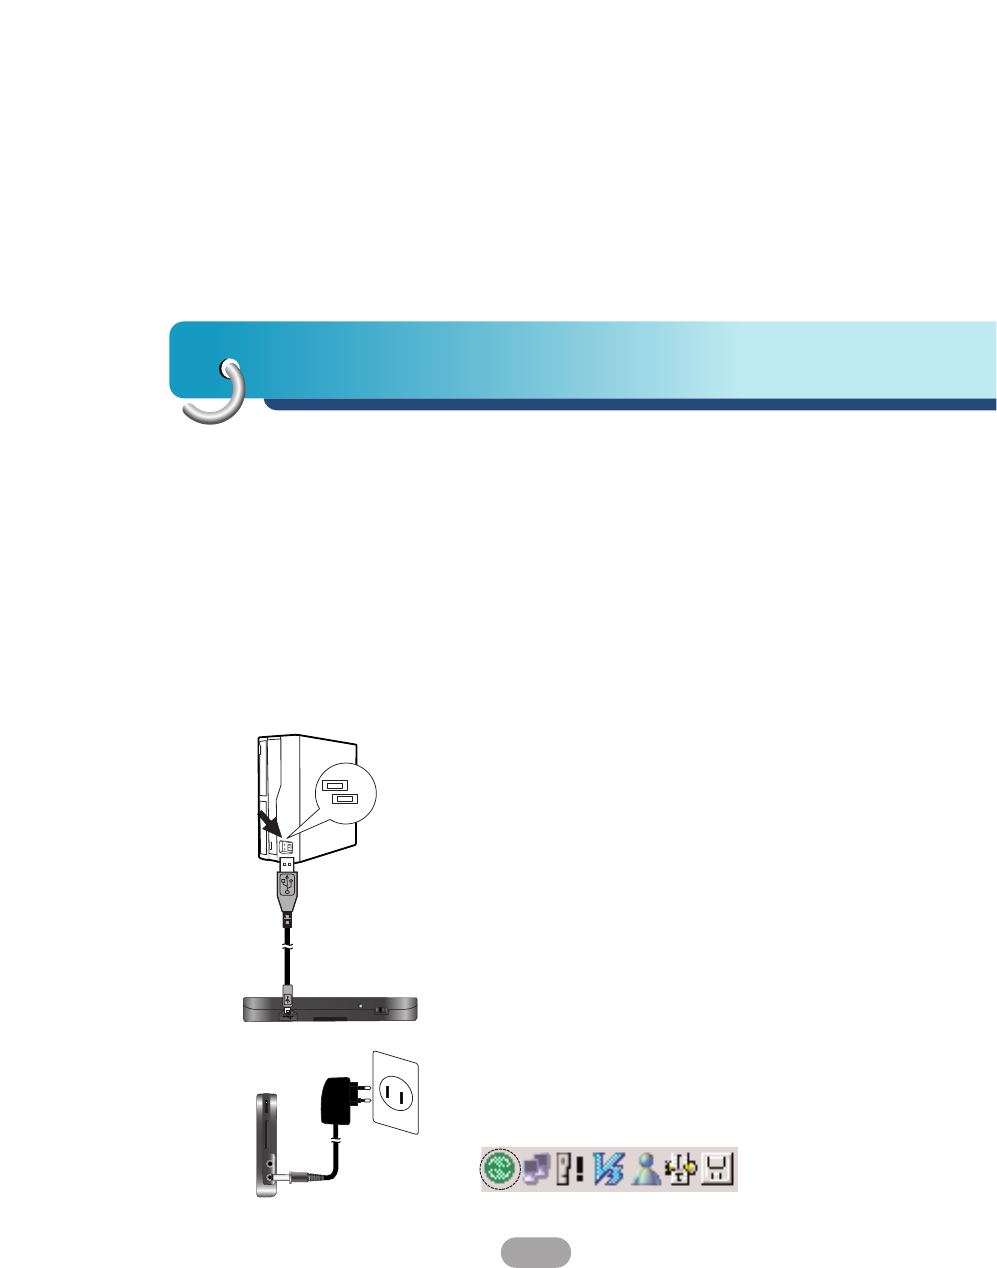
Connecting the USB cable
1. Connect the unit's power supply connector and
wall outlet using AC adapter.
2. Switch the unit on.
3. Connect one end to the USB port on your PC
and then plug the other end into your unit's USB
port.
4. The icon is displayed in the system tray if
successfully connected.
23
Connecting devices
•ActiveSync installation is required for USB
operation. Download the latest version of Microsoft
ActiveSync for your unit. ActiveSync is a very
convenient Microsoft program for synchronizing
data between your unit and your PC.
It loads itself automatically, syncs your unit with
your PC and then sits there, patiently waiting to
synchronize any piece of data that you change.
•The tray icon may be hidden in some Windows XP
systems according to your settings.
•50Mbytes of the available memory capacity is used
for the working software. Be careful not to use the
50M Byte of the memory space at any time.
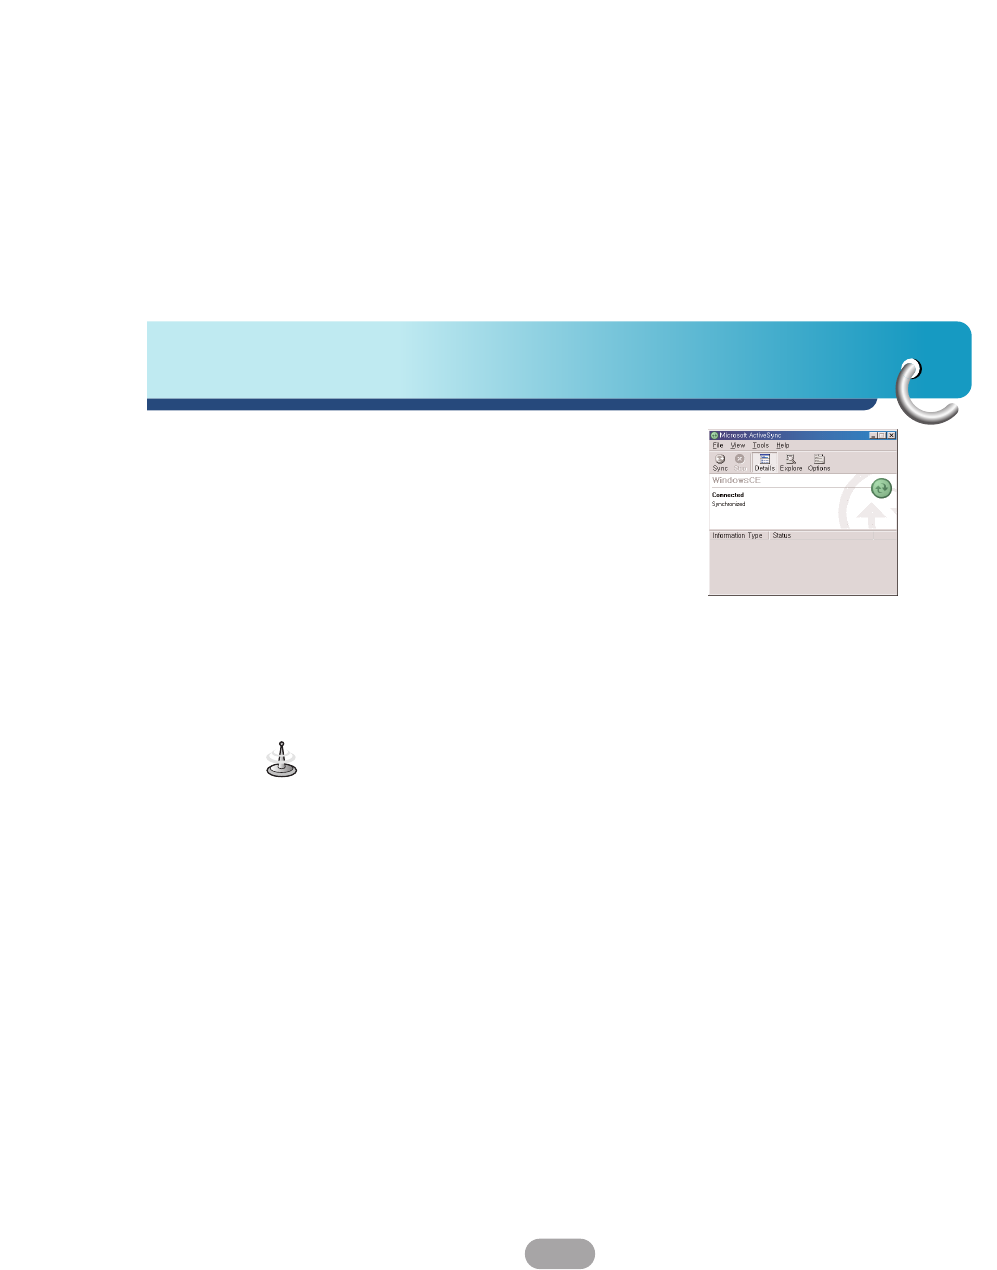
5. The “Add New Hardware Wizard” should
automatically install the USB drivers.
6. Follow the on screen instructions to establish a
partnership and synchronize your unit with your
PC.
Downloading files: ActiveSync
1. Open Windows Explorer on your PC.
The Mobile Device is displayed in Window
explorer.
2. Create the folder you want to use.
3. Select the file you want to save, then drag and
drop it to the removable disk.
Connecting devices
24
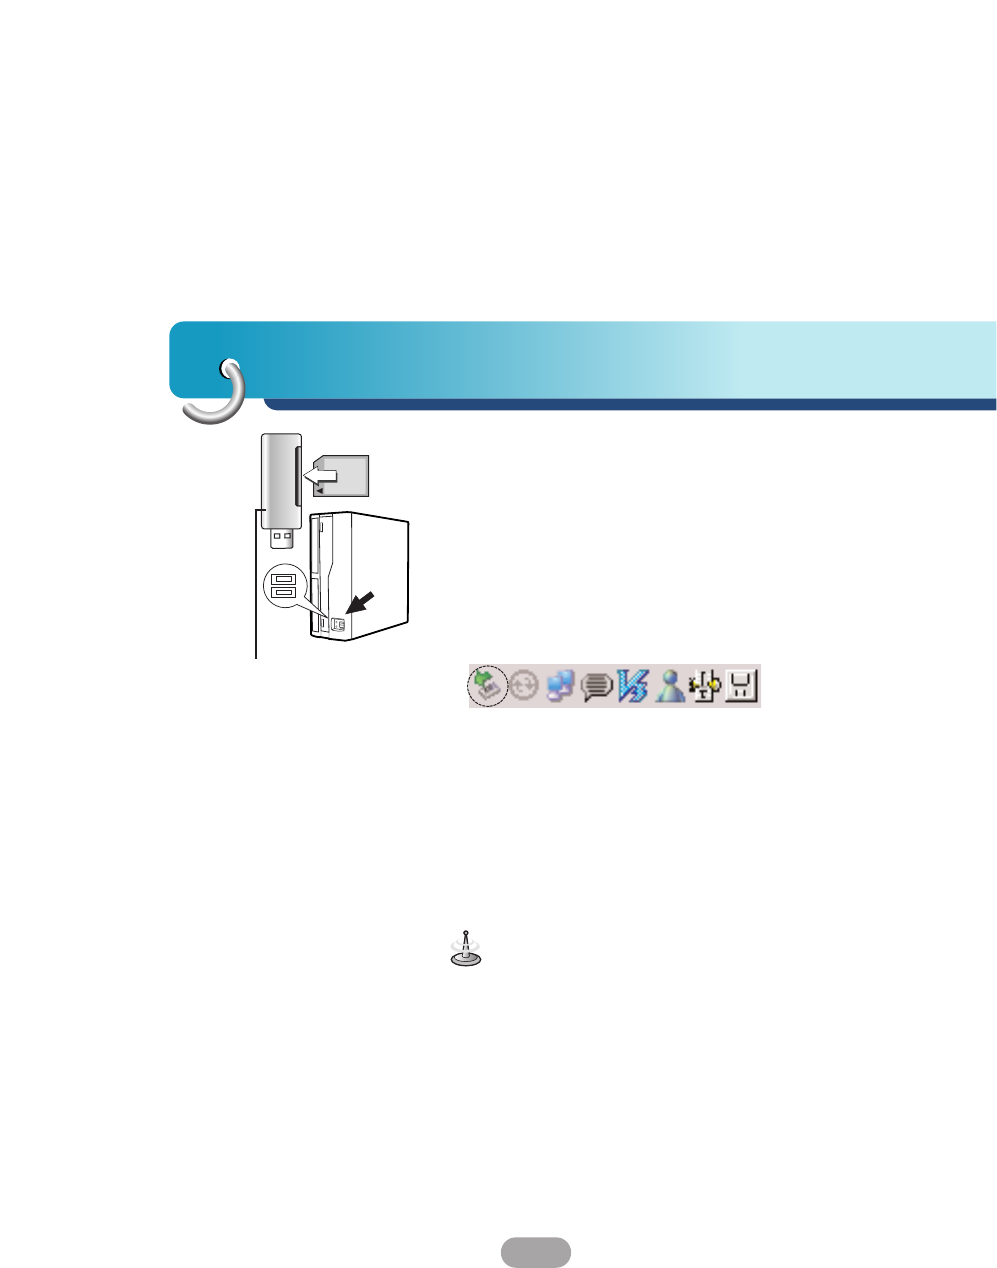
Data exchange via card reader.
You can transfer data via ActiveSync.
However, if you wish to copy large quantities of data
(Music and Photo files) to the memory card these can
also be stored directly to the memory card.
1. Insert the SD card into your card reader.
2. Insert the card reader into your computer's USB
port.
3. An icon is displayed in the system tray if
successfully connected.
Downloading files: Removable disk
1. Open Windows Explorer on your PC.
The removable disk is displayed in Window
explorer.
2. Create the folder you want to use.
3. Select the file you want to save, then drag and
drop it to the removable disk.
Not supplied.
Don’t remove the USB cable while uploading or
downloading files.
25
Connecting devices
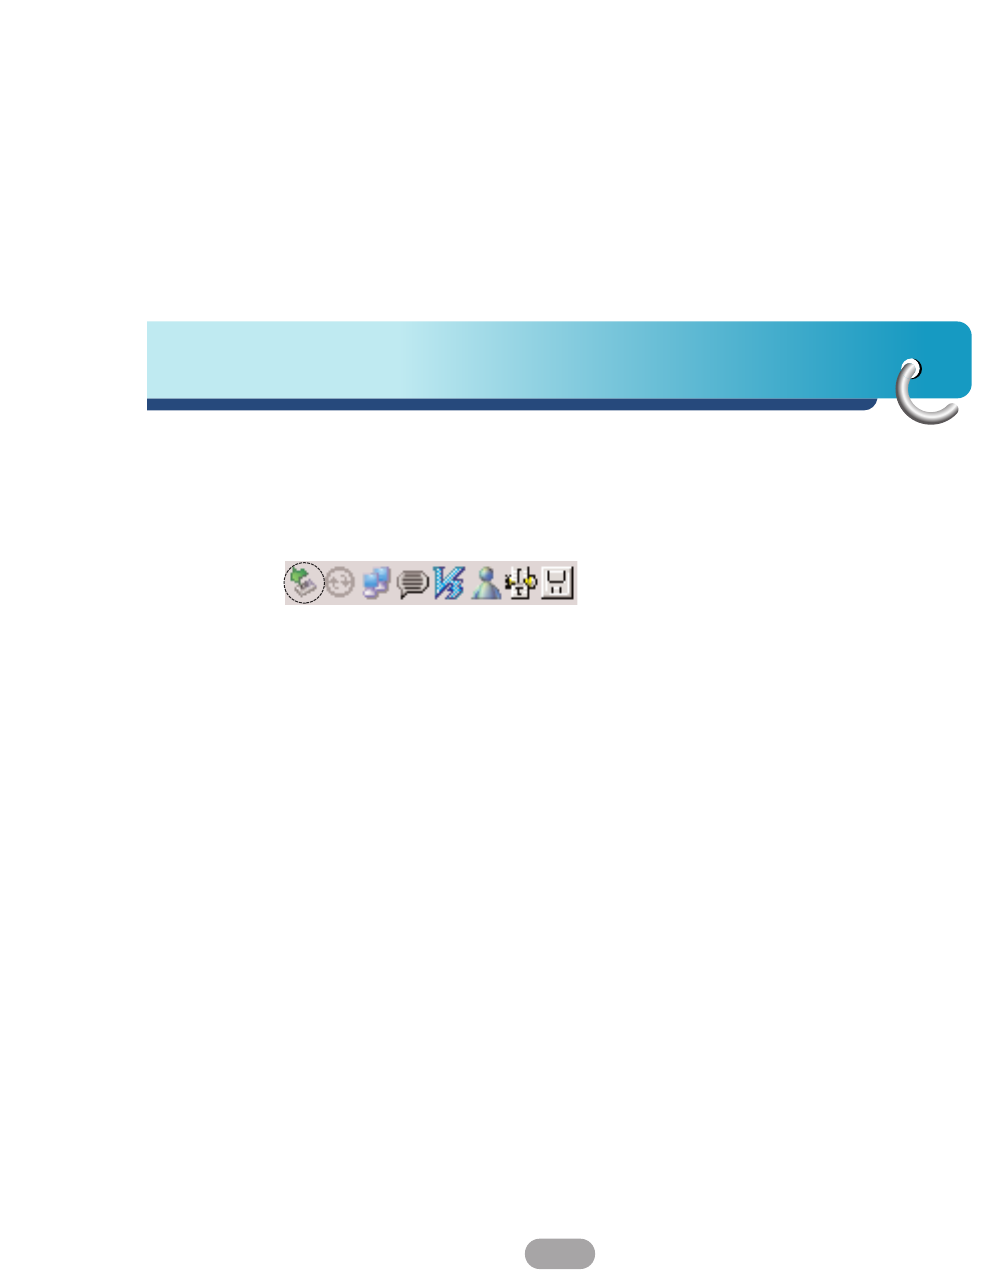
Disconnecting the USB device
Wait until you get a message that you can safely
unplug the device before disconnecting the USB
device.
1. The safe remove icon is in the system tray.
2. Click on the icon to eject the unit from the
PC and select the ‘Safely remove’ message.
3. A message will appear indicating that it is now
safe to disconnect the unit.
4. You can now go ahead and unplug the memory
card reader from the PC.

Before operation
26
Starting up
The navigation software and the digital map material
are supplied in the built-in memory. Installation is
fairly automatic.
Built-in memory :
The application and maps are stored in the built-in
memory.
Press the Power (PWR) button to turn on the device.
The Map screen is displayed.
It may take some time until the GPS receiver initially
acquires enough satellites' data during the first use of
the GPS navigation equipment.
Power (PWR)

27
Before operation
Navigation features
The Navigation System provides the following
features for easy navigation:
•Route calculation within seconds.
•High quality 2D/3D maps with display of street
names.
•Address input via a full-size keyboard optimized for
finger input address.
•Storing of any location one click away.
•Cross border navigation without switching maps.
•Address retrieval from History, Favorites, Points of
Interest (POI) or Microsoft® Outlook® contacts.
•Planning and optimizing of multi-stop trips.
•Car navigation with fastest or shortest route.
•Pedestrian navigation in parks and town centers.
•Fast installation, no activation.
•Short tutorial for an easy start.
•Day and night views or turn-by-turn information.
•Real time, high accuracy traffic data.
Getting started with navigation
28
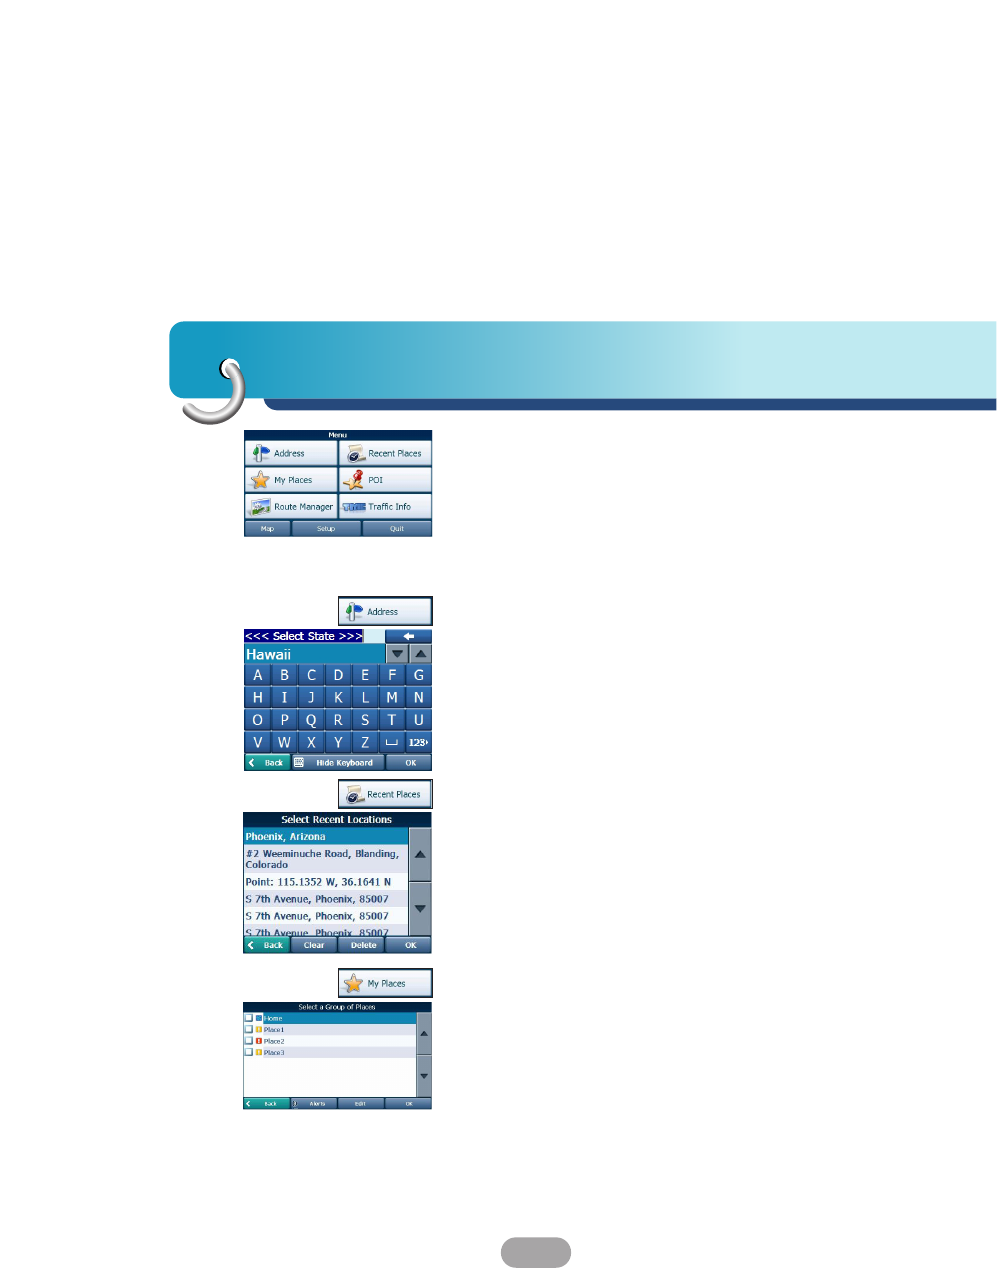
Navigation Menu
Pressing “NAVI” button brings up a menu that allows
you to access some of the most frequently used
functions of the navigator.
Address Screen
The “Address” button lets you navigate to an
address.
For a complete description of how to navigate to an
address, see "Enter Address" on the page 35.
Recent Places Screen
The “Recent Places” button lets you navigate to a
previously visited destination.
For a complete description of how to navigate to a
recent location, see "Recent Places" on the page 38.
My Places Screen
The “My Places” button lets you navigate to a favorite
location.
For a complete description of how to navigate to a
favorite location, see "My Places" on the page 39.

29
Getting started with navigation
POI Screen
When you tap the “POI” button, the first screen of
popular place categories appears.
The “POI” button lets you navigate to thousands of
interesting places, such as beaches, parks, hotels,
museums, and restaurants.
For more information, see "POI" on the page 42.
Route Manager Screen
You can tap the “Route Manager” button to determine
the map display and to show the generated route
after you have selected a location.
For more information, see "Route Manager" on the
page 49.
Traffic Info Screen
Acommunication system for informing drivers of the
latest traffic information using FM multiplex
broadcast. Information such as traffic jams or
accidents can be checked on the display.
For more information, see "Traffic Info" on the page
47.
Setup Screen
The “Setup” button provides several settings in order
to let you customize the functions of the program.
The “Setup” screen can be accessed directly from
the Main menu screen.
For more information, see "Setup" on the page 54-
60.
Getting started with navigation
30
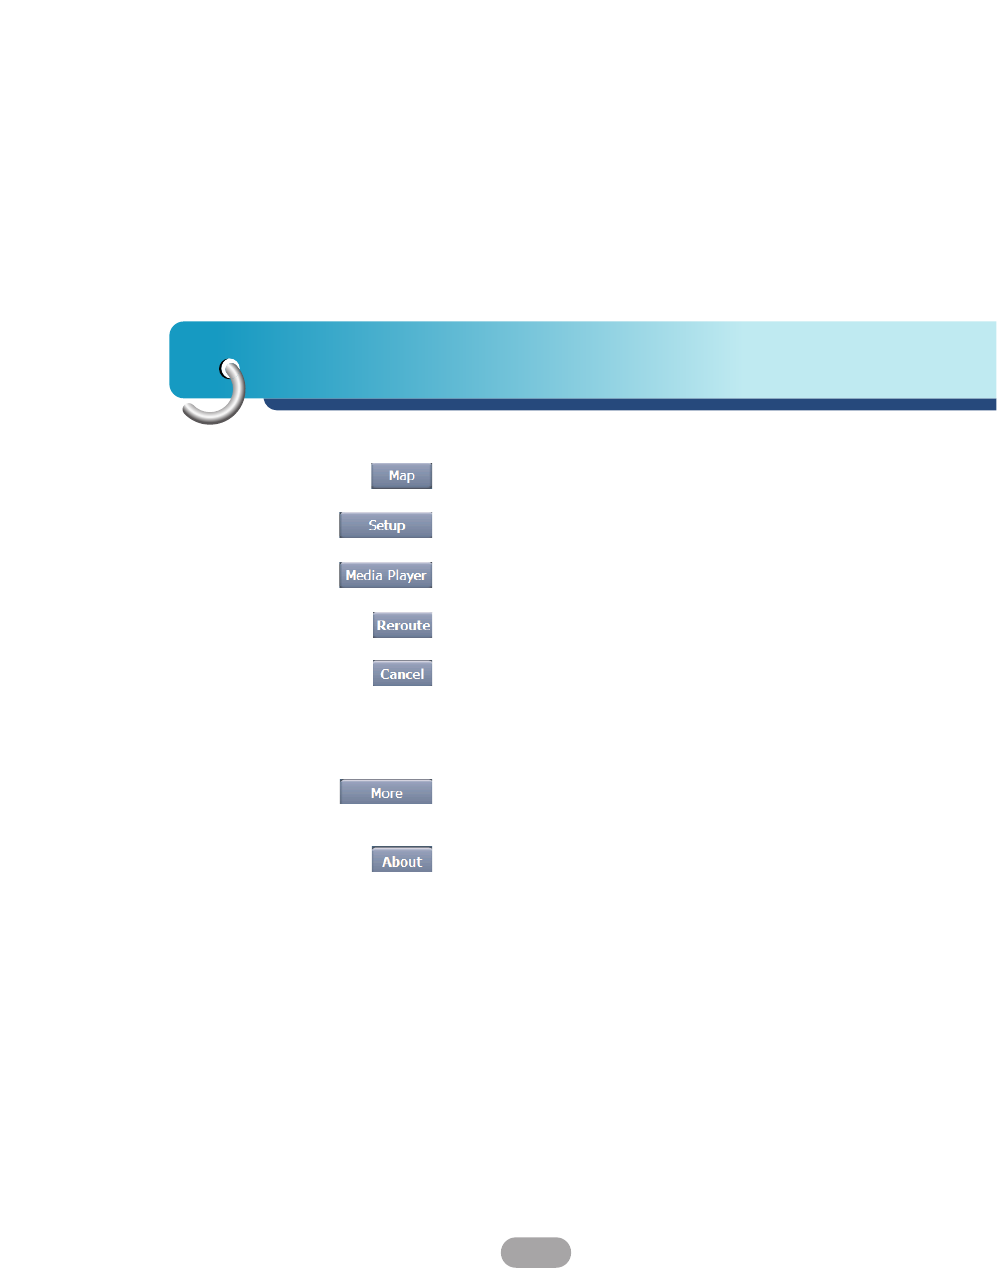
Menu Buttons
Tap this button to go to the Main Map screen.
Tap this button to configure the settings options.
Tap this button to open the Media Player.
Tap this button to recalculate the route.
The Cancel Route button, on the Route Manager
menu, stops the current navigation and clears the
route. This feature is active only after a destination
has been set.
Tap this button to move between the Setup and
Extras menus.
Tap this button to display software’s version and
copyright information.
31
Getting started with navigation
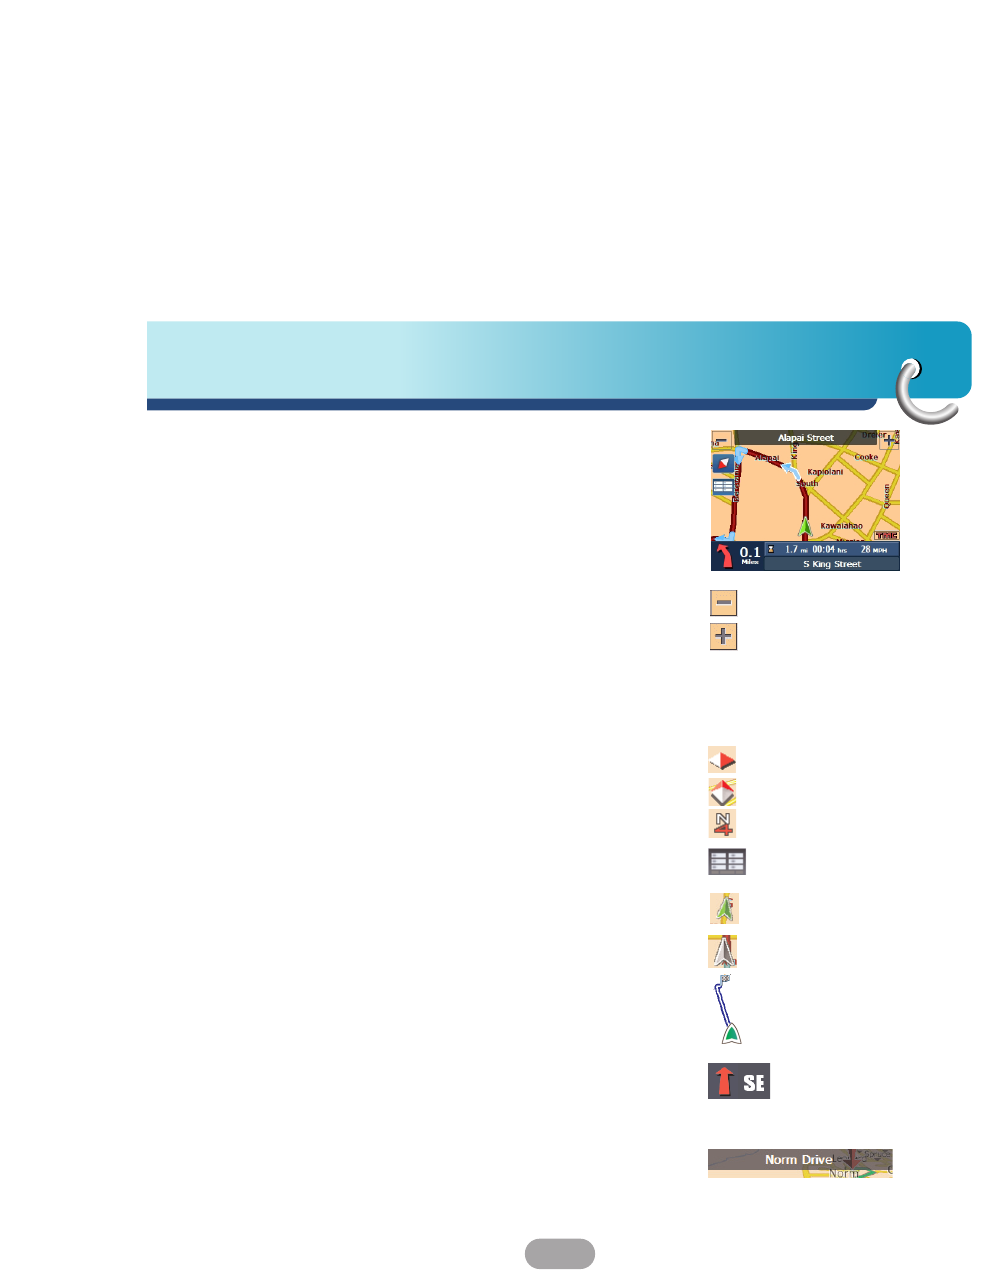
Main Map
When you tap the “Map” button on the Navigation
menu screens, the Main Map screen appears.
You can use the icons displayed on this screen to
view your route.
Tap “Zoom Out” or “Zoom In” buttons to increase or
decrease the detail of the map view. When tapping
the “Zoom Out” button, the map displays more of the
route.
Tap the compass to change the map view display as
follows:
2D map view with the forward direction at the top.
3D map view with the forward direction at the top.
2D map view with North at the top.
Tap this button to go to the Menu screen.
Current location in Vehicle (Pedestrian) Mode.
Last known location when GPS signal is unreliable.
Generated route.
When you have calculated a route, the Directions bar
displays the direction arrow and the distance to the
set destination.
The street name at the top of the map screen is the
street that you will turn on with the next turn
maneuver.
: Zoom Out
: Zoom In

Getting started with navigation
32
The GPS bar is a toggle button that displays the
remaining travel distance and travel time, and
estimated time of arrival.
The TMC icon lets you know that Navigator is TMC
enabled.
Point on the Map
You can navigate to any point by tapping its location
directly on the Main Map screen in both 2D and 3D
map view.
This feature is especially helpful when you want to
navigate to a specific point on the map, but you don’t
have the street address. When you tap on a point of
the main map, another map appears, displaying the
map, which is marked by a checkered flag.
This button lets you save a point on the map as a
favorite destination. This is helpful if you see a
location that you want to return you later.
This button lets you cancel the map point request
and returns you the main map.
This button lets you calculate a route from the map
point.
33
Getting started with navigation
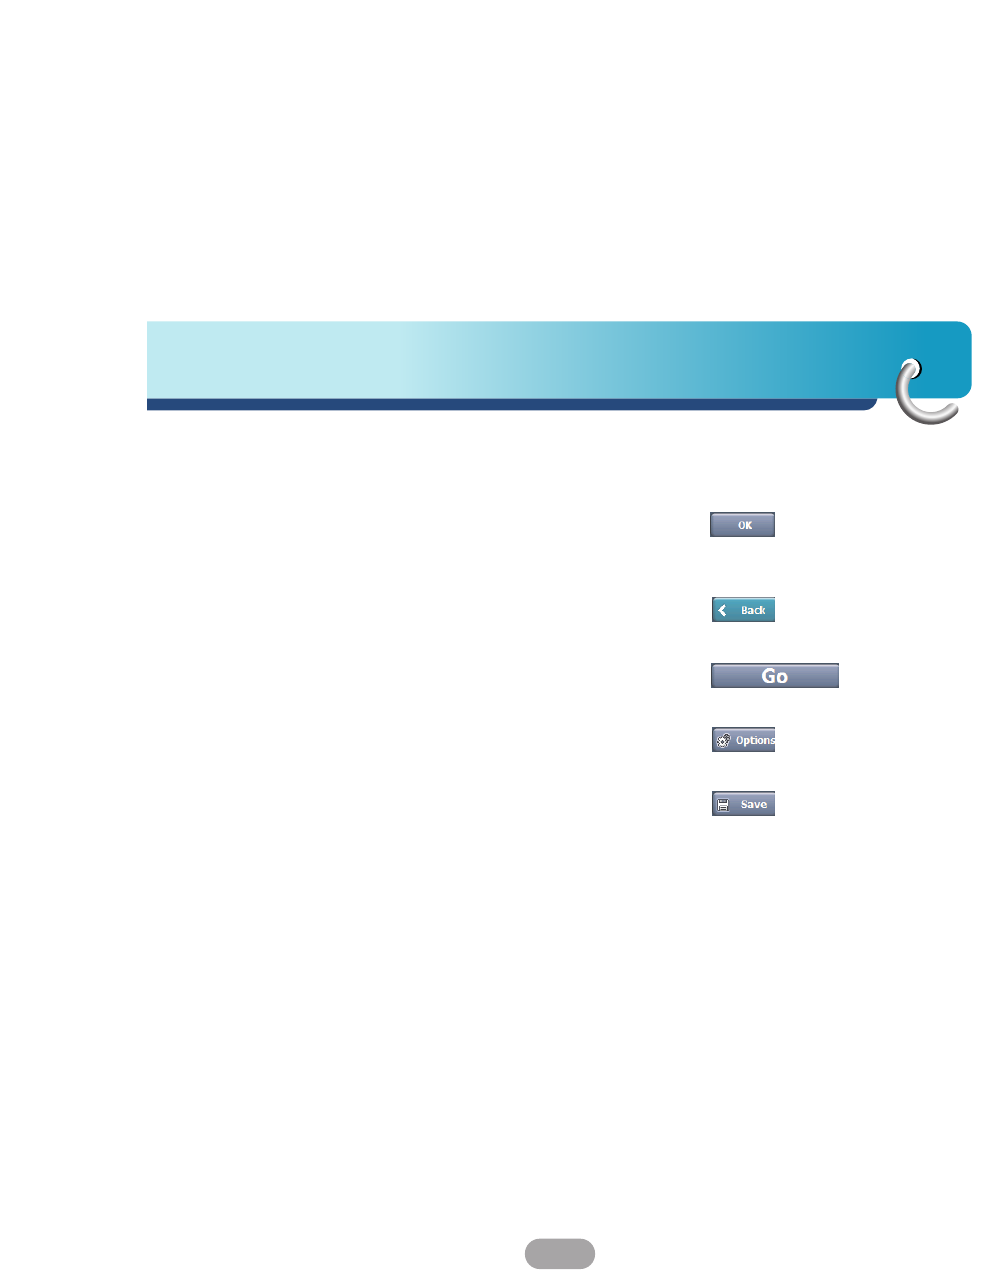
Screen Buttons
The following buttons appear on many of the
navigation screens.
When you tap the “OK” button for a selected
address, group, or place, Navigator automatically
opens the next screen in the sequence.
When you tap the “Back” button, the navigation
returns you to the previous screen.
When you tap the “Go” button, the navigation
calculates the route to your selected destination.
The Options button provides a list of command
options available for the selected address or place.
The “Save”, “OK”, or “Done” buttons confirm your
value preferences and returns you to the menu or
map.

Getting started with navigation
34
Cycling Through Screens
Every navigation function in the system, such as
Address, POI, or My Places consists of a sequence
of screens.
You can cycle through the screen sequences by
either:
• Selecting an item from the list and tapping it.
•Selecting an item form the list and tapping the “OK”
button.
The sequence ends with the Show on Map screen,
where the destination is displayed and the “Go”
button is available for you to calculate a route.
Note: You must first select an item for Options, “OK”
and “Back” buttons to be enabled.
35
Getting started with navigation
Enter Address
When you tap the “Address” button, the “Select
State” screen appears.
You can use the keyboard to enter the characters of
the state name. For more information, see "Address
screen" on the page 36.
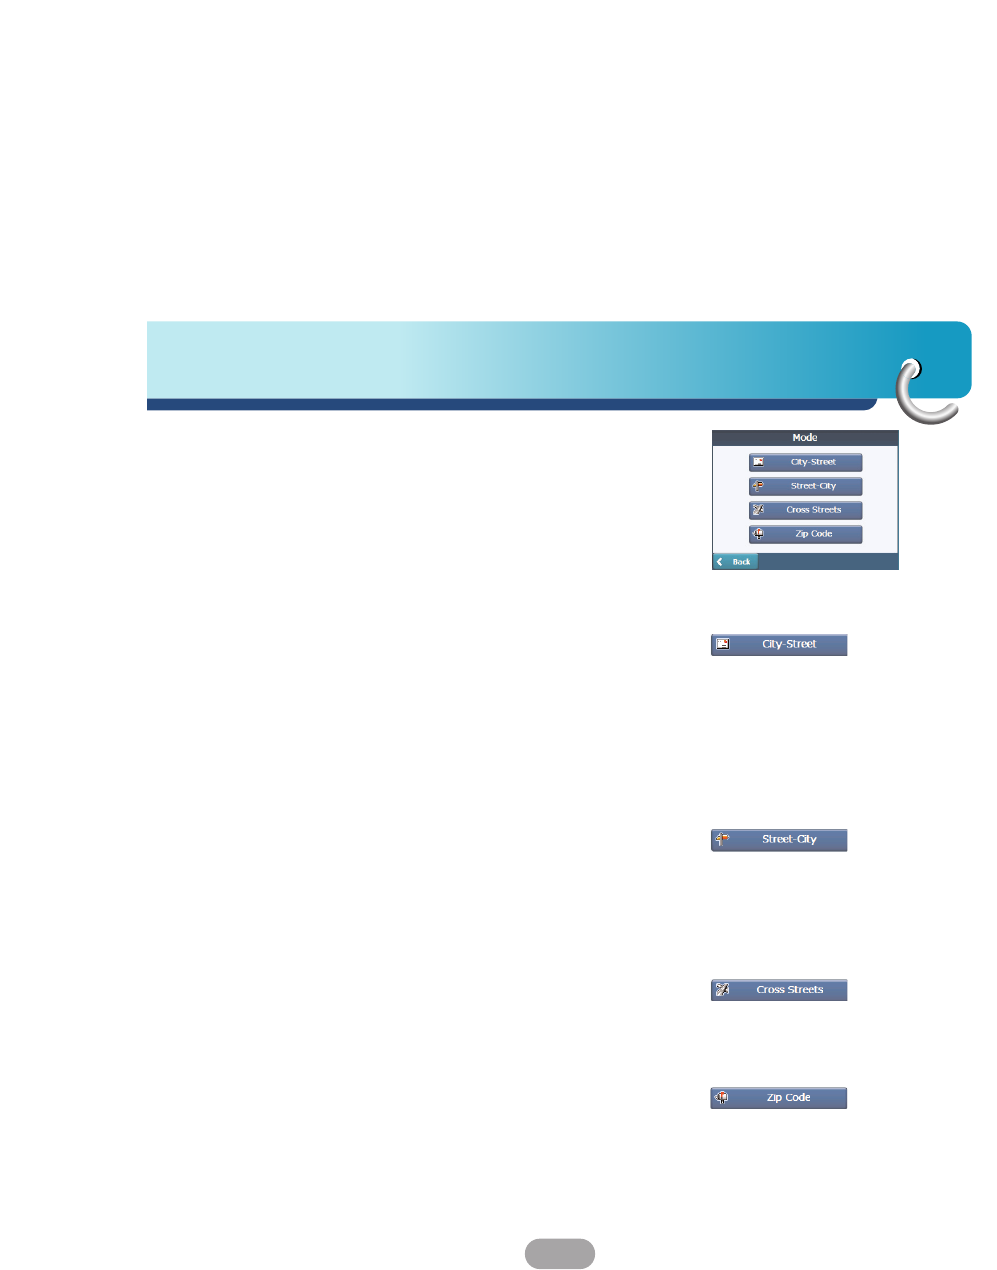
After you have selected a state, the Navigator
displays the “Mode” screen appears.
This sequence displays the following address
screens: City, Street, Address Number.
You can also navigate a city or a street only.
When you have selected a city, the first entry of the
Street Name list is City Center. When you have
selected a street, the first entry in the Address
Number list is Street Midpoint.
City-Street is the default format.
This sequence displays the following address
screens: Street, City, Address Number.
Lets you enter a street name without having to first
designate a city. Useful when you're looking for an
address in a metropolitan area where there are many
cities and towns.
This sequence displays the following address
screens: City, Street, Cross Street.
It also lets you locate an intersection or junction by
entering the names of two intersecting streets.
This sequence displays the following address
screens: Zip Code, Street, Address Number.
This mode lets you locate a street address by
entering the zip code, without entering a city name.
Useful when you have no city information or if the
city has multiple zip codes.
Finding a location with navigation
36
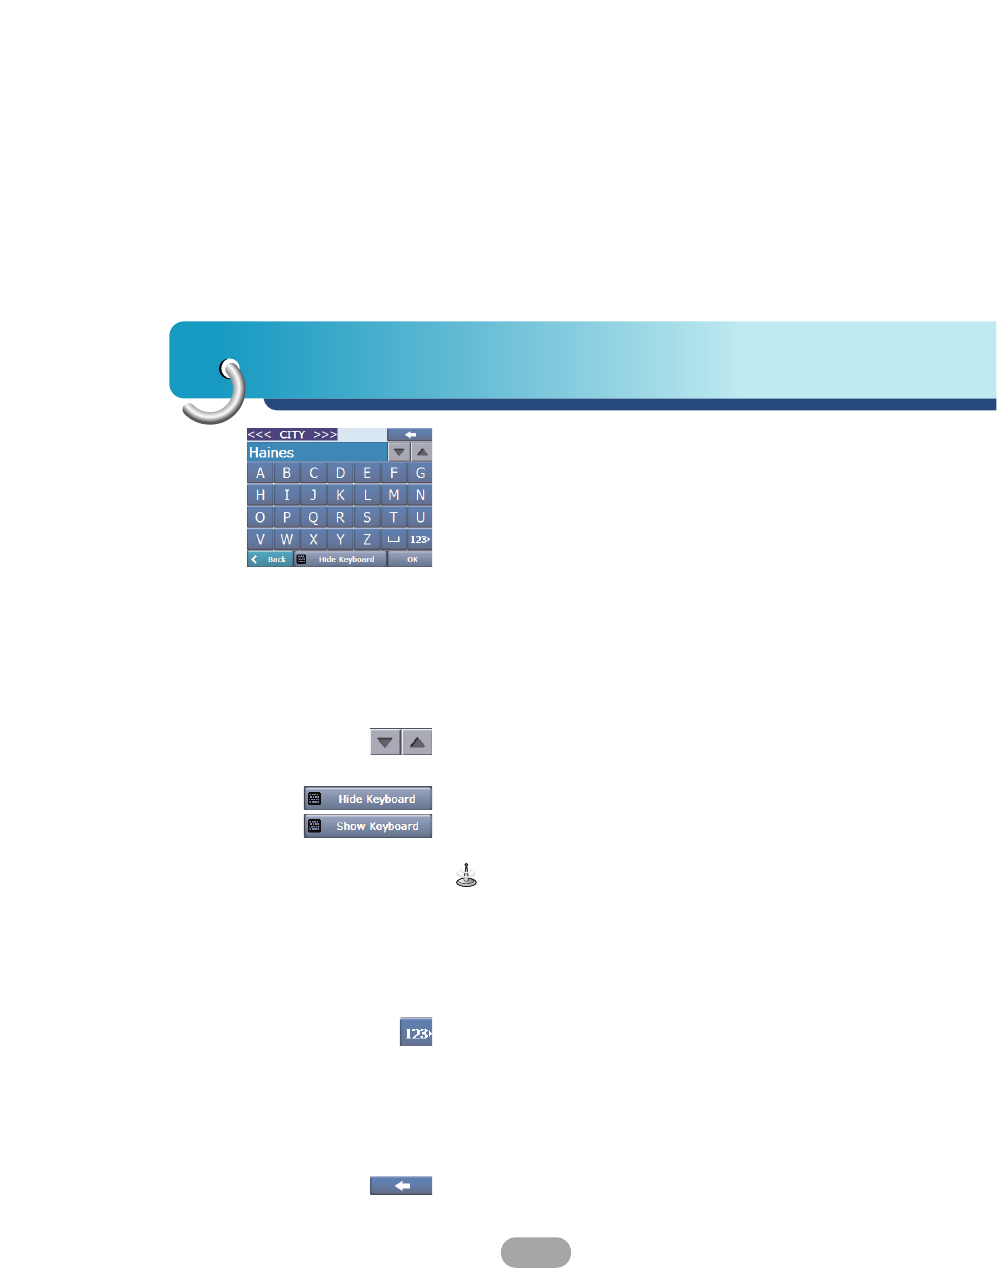
Address Screen
1. You can use the keyboard to enter the characters
of the address name.
2. The characters appear in the Address field.
The Navigator automatically searches the Address
list for the first occurrence of the entered
characters.
3. After you have selected a city, the Navigator
displays the next address field, such as street and
address number.
4. You can also tap the “OK” button to move through
the sequence of address screens.
The “Scroll” buttons let you move up or down the list
of address items, such as town or street names.
The “Hide/Show Keyboard” toggle button lets you
extend or shorten the address list by hiding or
displaying the keyboard.
When the number of address search results fit on a
single screen, the keyboard is automatically
hidden, displaying the address list only. If the search
results do not display the desired address, display
the keyboard and enter additional search characters.
The “Numeric/Umlauts/Alphabetic” toggle button lets
you display lowercase, numeric, and special
characters.
This button also displays different alphabet
characters (for example, Greek).
The operating system installed on the device must be
able to support these characters.
The “Erase” button lets you delete the last character
in an address field.
37
Finding a location with navigation
You can change your address search method by
tapping the Mode button to select from a variety of
address formats, as described in Address Modes
(See "Enter Address" on page 35).
• If the entered characters are not found at the
beginning of the name in the Address list, the Smart
Search System automatically searches for the
entered characters throughout the entire list, for
example, in the middle or the end of the name.
• The navigator lets you search for city and street
names without having special characters, such as
umlauts or accent marks, which are used in many
European languages.
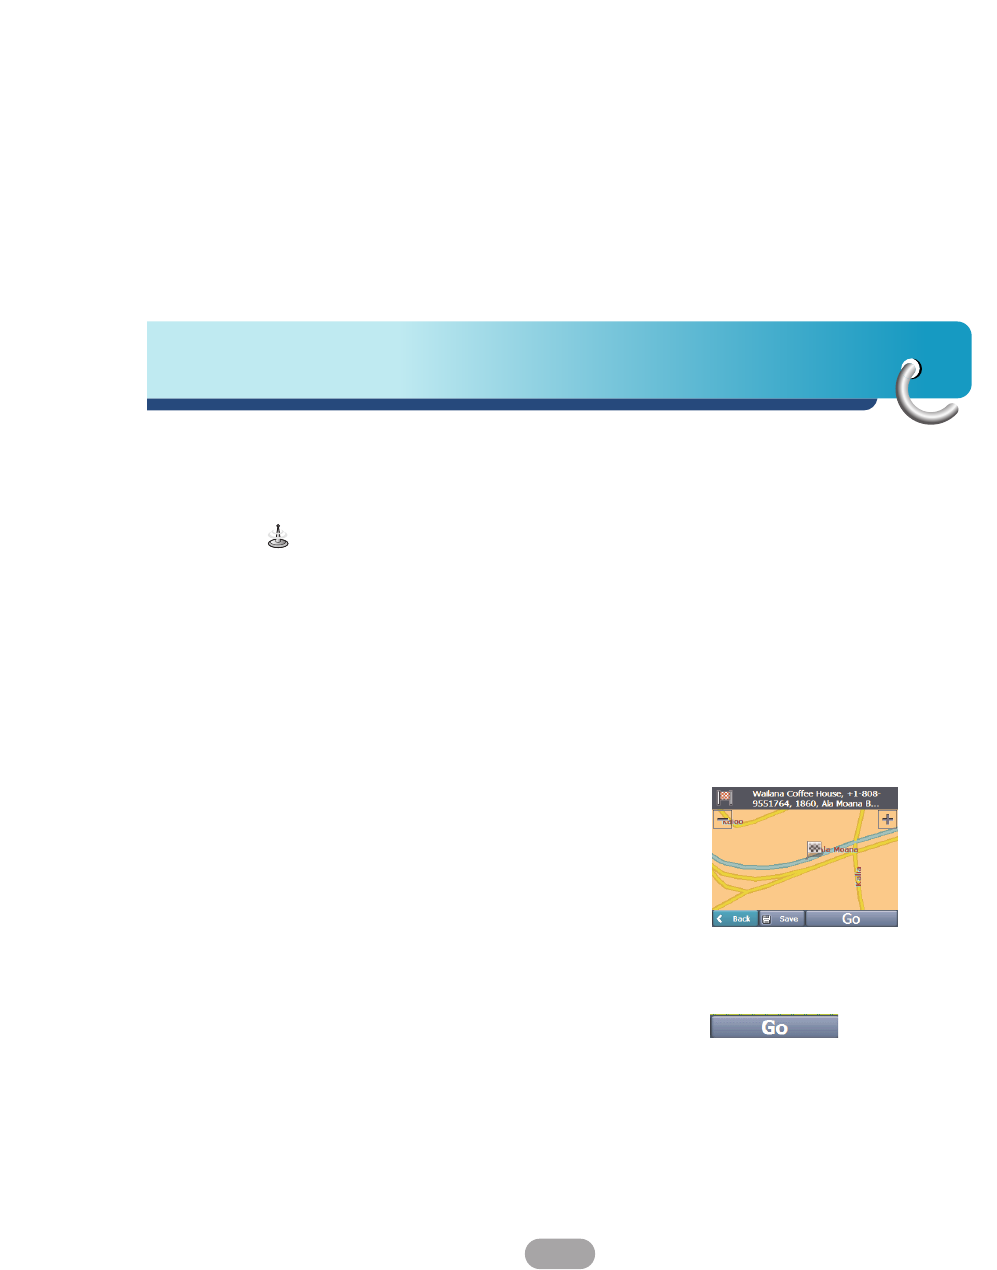
Go to your Destination
1. After you have specified the address, tap the “OK”
button.
2. The navigator shows your destination on Map
screen before calculating a route. Check that the
destination address is correct at the top of the
screen.
3. If you want to change the destination, tap the
“Back” button and change your address entries.
When you are ready, tap the “Go” button to create a
route to your selected destination.
Finding a location with navigation
38
Add to My Places
Lets you add an address to your list of favorite
locations, as shown in the figure below.
For more information, see “My Places” on page 39.
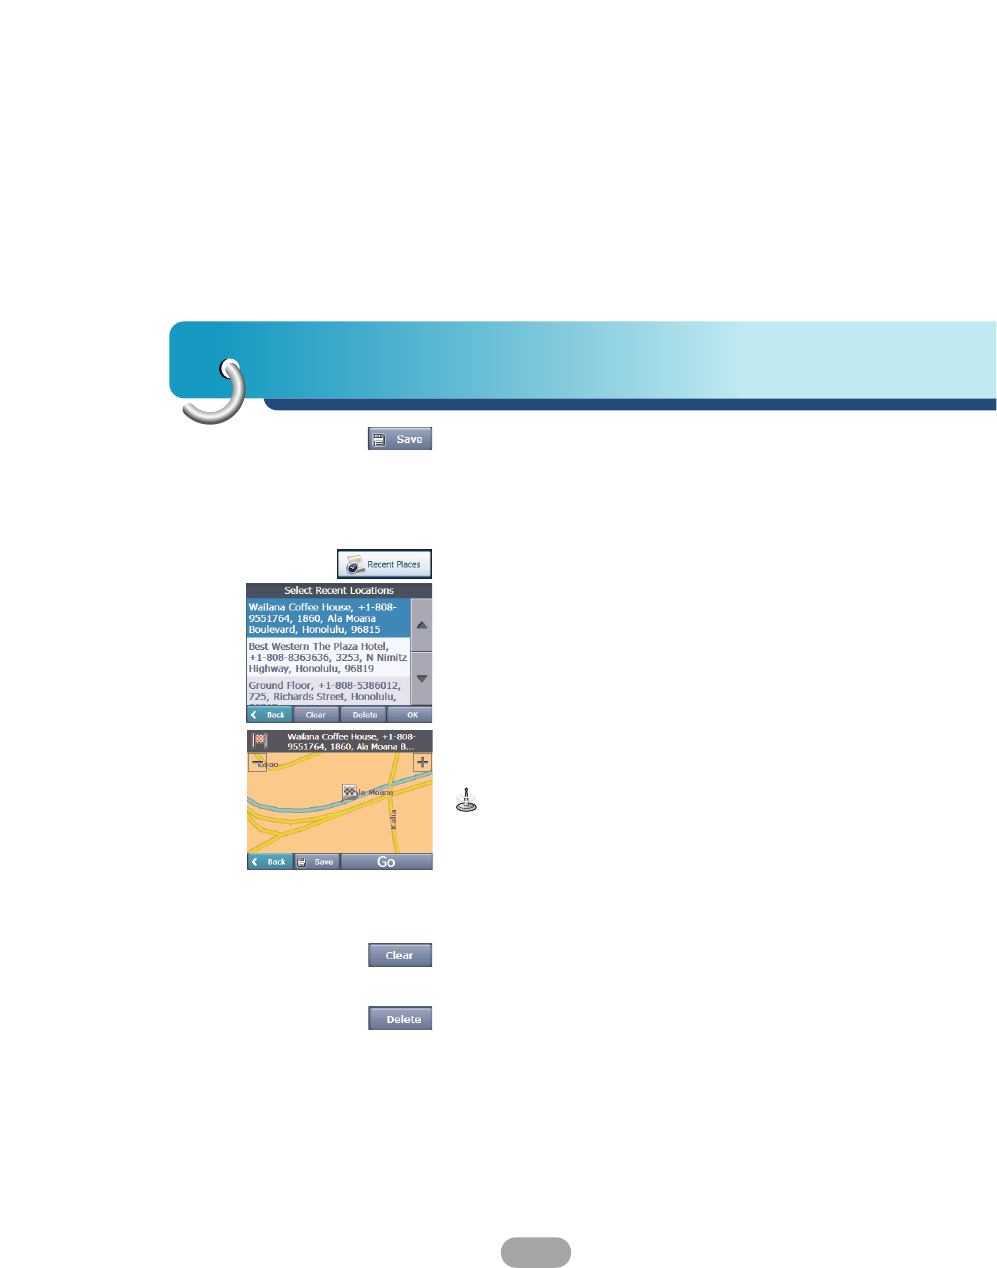
Recent Places
The Recent Locations screen lets you select an
existing destination from a list of destinations that
you have previously traveled to.
1. To navigate to a recent destination, tap the
“Recent Places” button.
2. From the Recent Locations screen, select a
location and tap the “OK” button.
3. A map appears showing the specified location.
4. Tap the “Go” button to calculate the route.
• The Navigator automatically stores the last 64
destinations in memory.
• As each new route is added to the top of the list,
the older destinations at the bottom are erased.
Lets you clear all locations in the Recent places
screen.
Lets you delete a recent location.
39
Finding a location with navigation
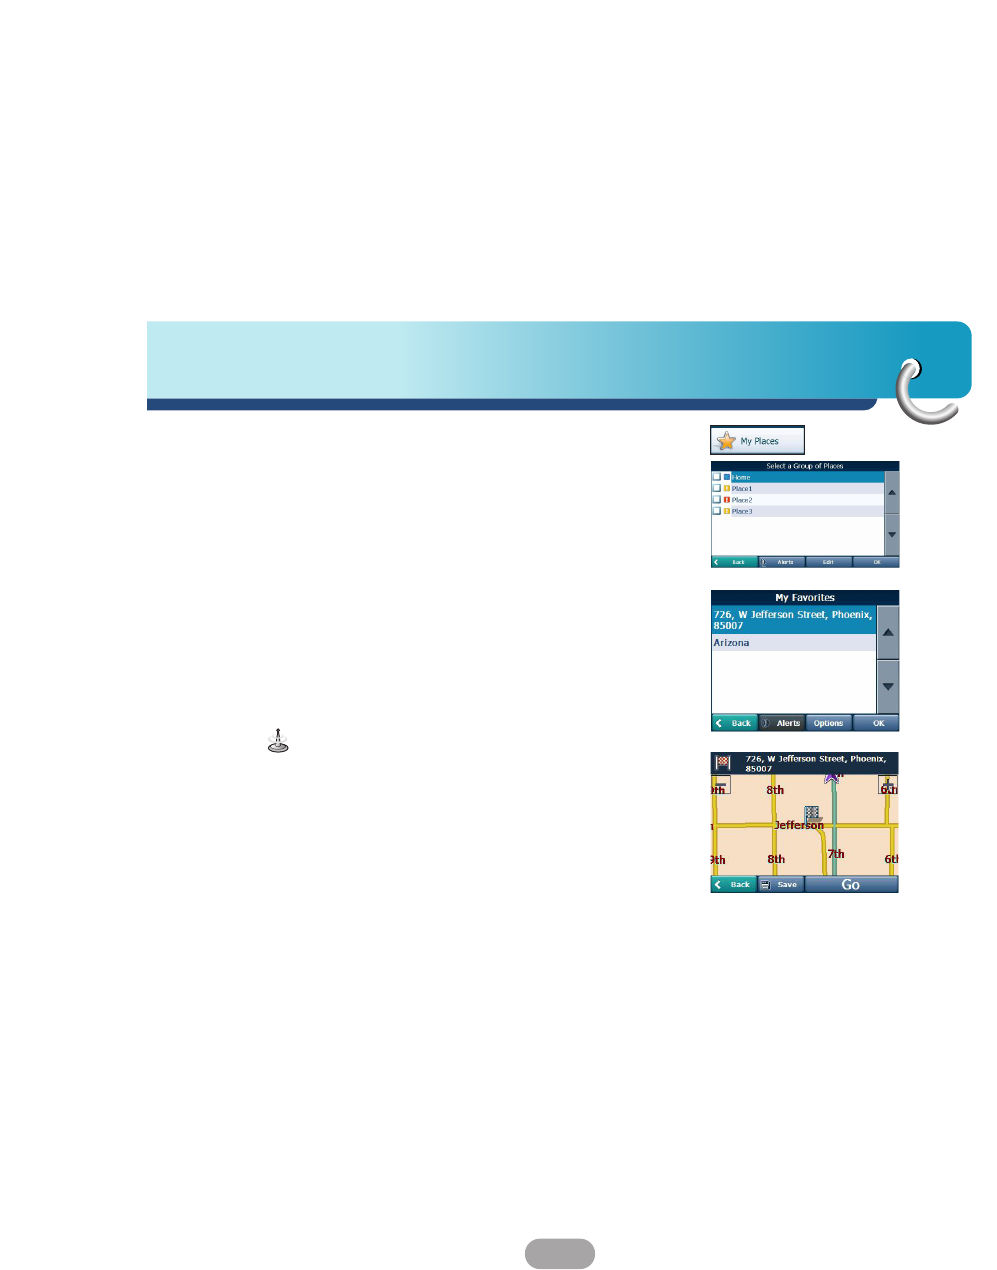
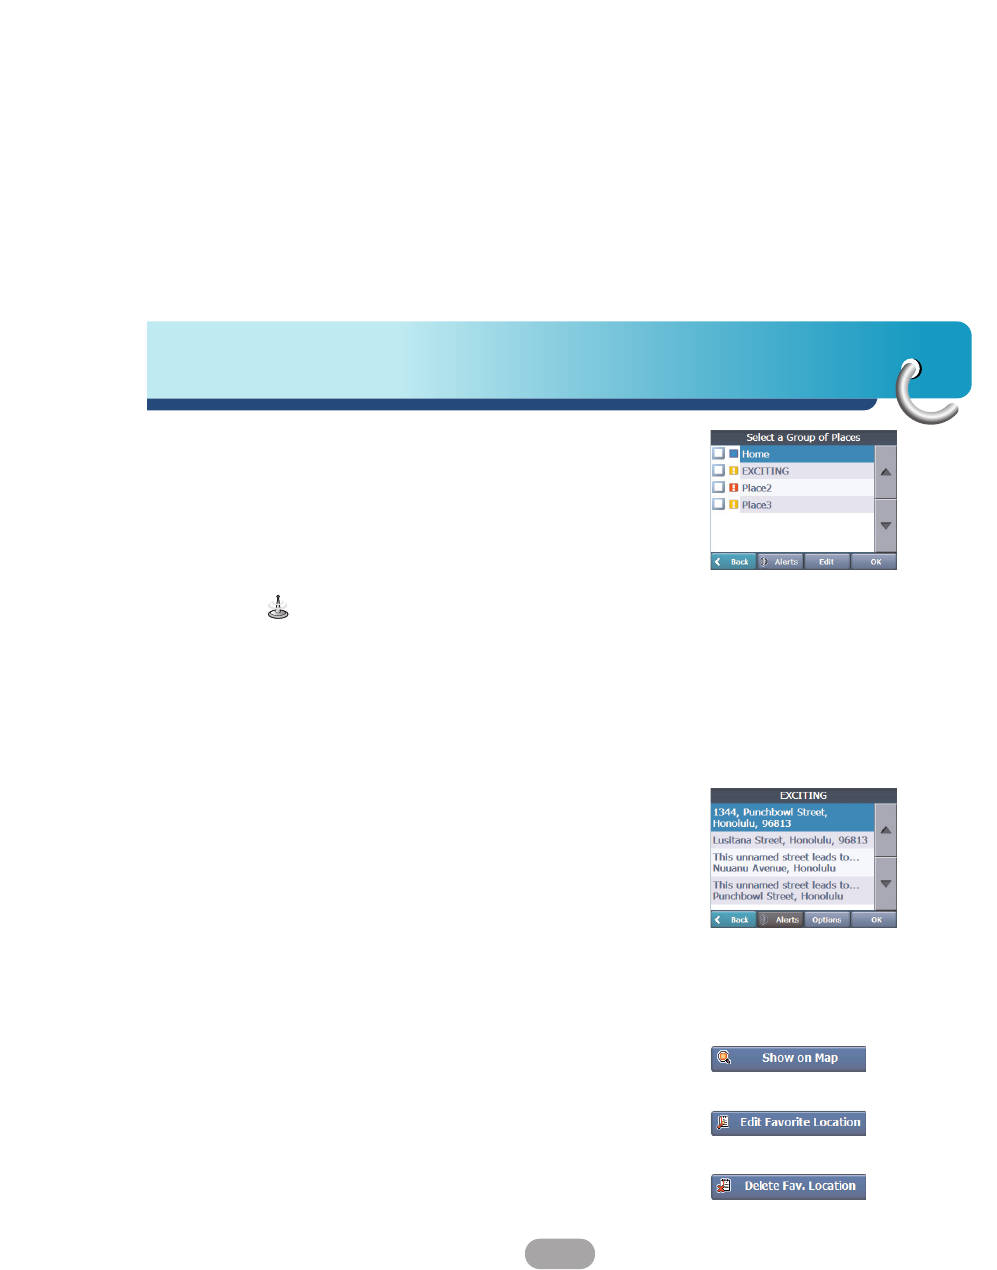
My Places
AFavorite is a destination that you have stored for
easy retrieval.
1. To access a favorite destination, open the
Navigation menu and tap the “My Places” button.
2. The My Favorites screen displays your favorites
groups.
3. When you tap on a selected group, the Navigator
automatically displays its stored locations.
4. Tap the selected location to show your destination
on a map.
5. Tap the “Go” button to calculate your route.
The My Favorites folder is the default folder where all
favorites are stored if not assigned to a group.
Finding a location with navigation
40
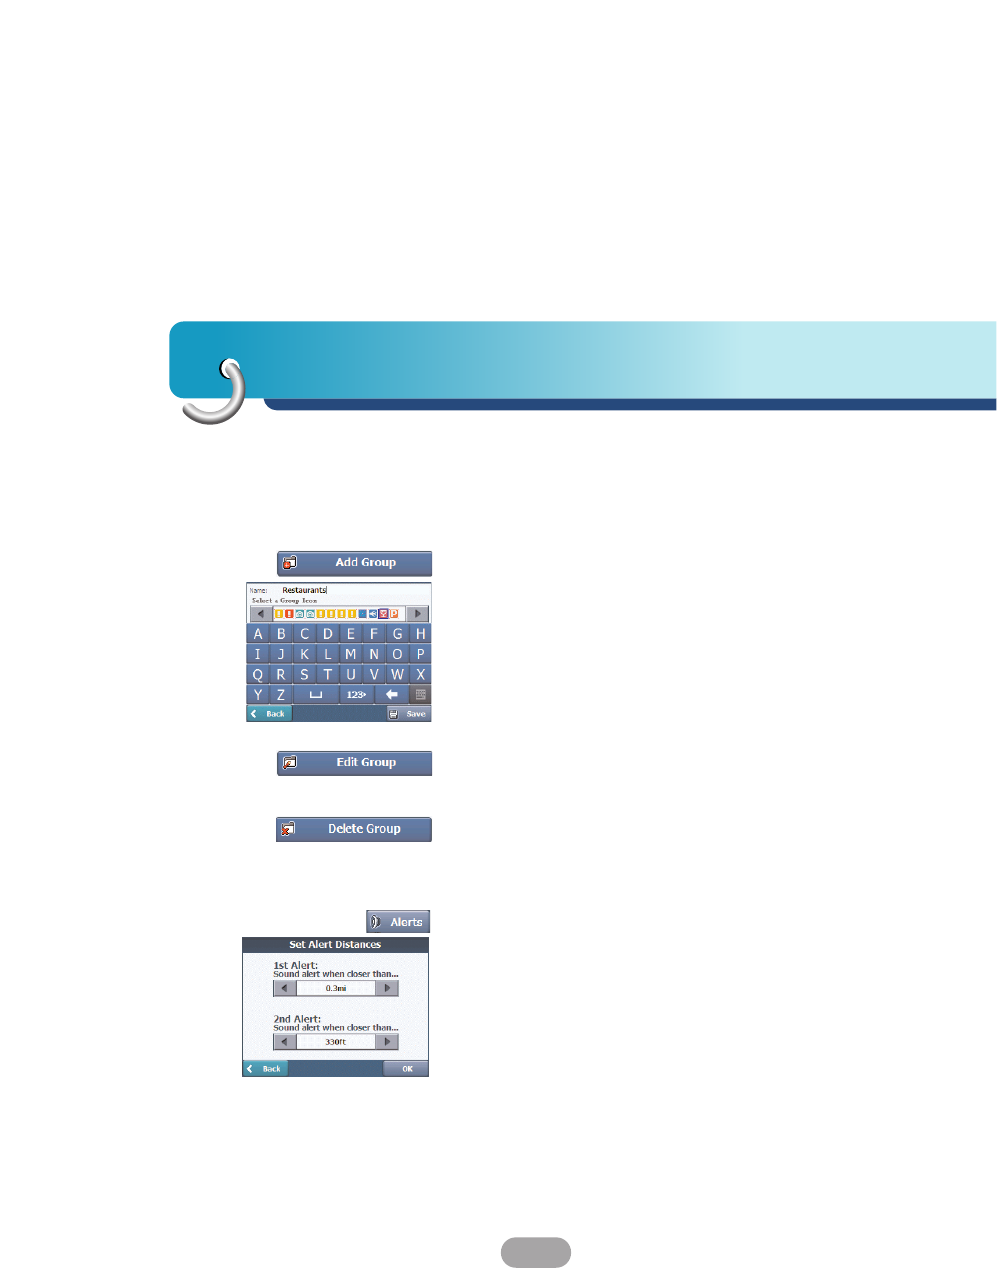
Favorite Groups
You can tap the “Edit” button from the “My Places”
screen to add, edit, or delete groups, as described
below.
Enter the group name and select an icon to identify
the group, as shown on the left.
The icon identifies all destinations located in that
group, as displayed on the map.
You can change the name and icon.
The My Friends group cannot be edited.
When you tap this button, the selected group and its
associated entries are removed. The My Friends
group cannot be deleted.
Favorite Alerts
The “Alerts” button let you know that you are within a
certain distance of a favorite location.
You can tap the “Alerts” button to set the distances
for the 1st and 2nd Alerts. When you travel closer
than the designated distance, the alert will sound.
41
Finding a location with navigation
You can disable the alerts for all groups by selecting
the 1st Alert setting to Off.
You can disable the alerts for a particular group by
clearing the checkbox next to the selected group.
Activate that disabled alert by selecting the checkbox
next to the group.
Favorite Alert settings affect all Favorites group.
The 2nd Alert must be set to go off at closer distance
than the 1st Alert.
Alerts can be set for a group but not for individual
locations. Of course, you can always create a group
that has just one location.
Add Favorite Locations
Tap My Favorites or any selected group that you
have created to display its locations.
You can save a location to your Favorites group from
the Address, Recent Locations, or POI (Point Of
Interest) screens. For more information, see "Add to
My Places" on the page 38.
Favorite Options
From this screen, you can tap the “Options” button to
display the following commands.
Lets you see the map with the selected favorite
destination for you to review before creating a route.
Lets you change the name, comment, or group
location for the selected location.
Tap the button to remove the selected location.
Finding a location with navigation
42
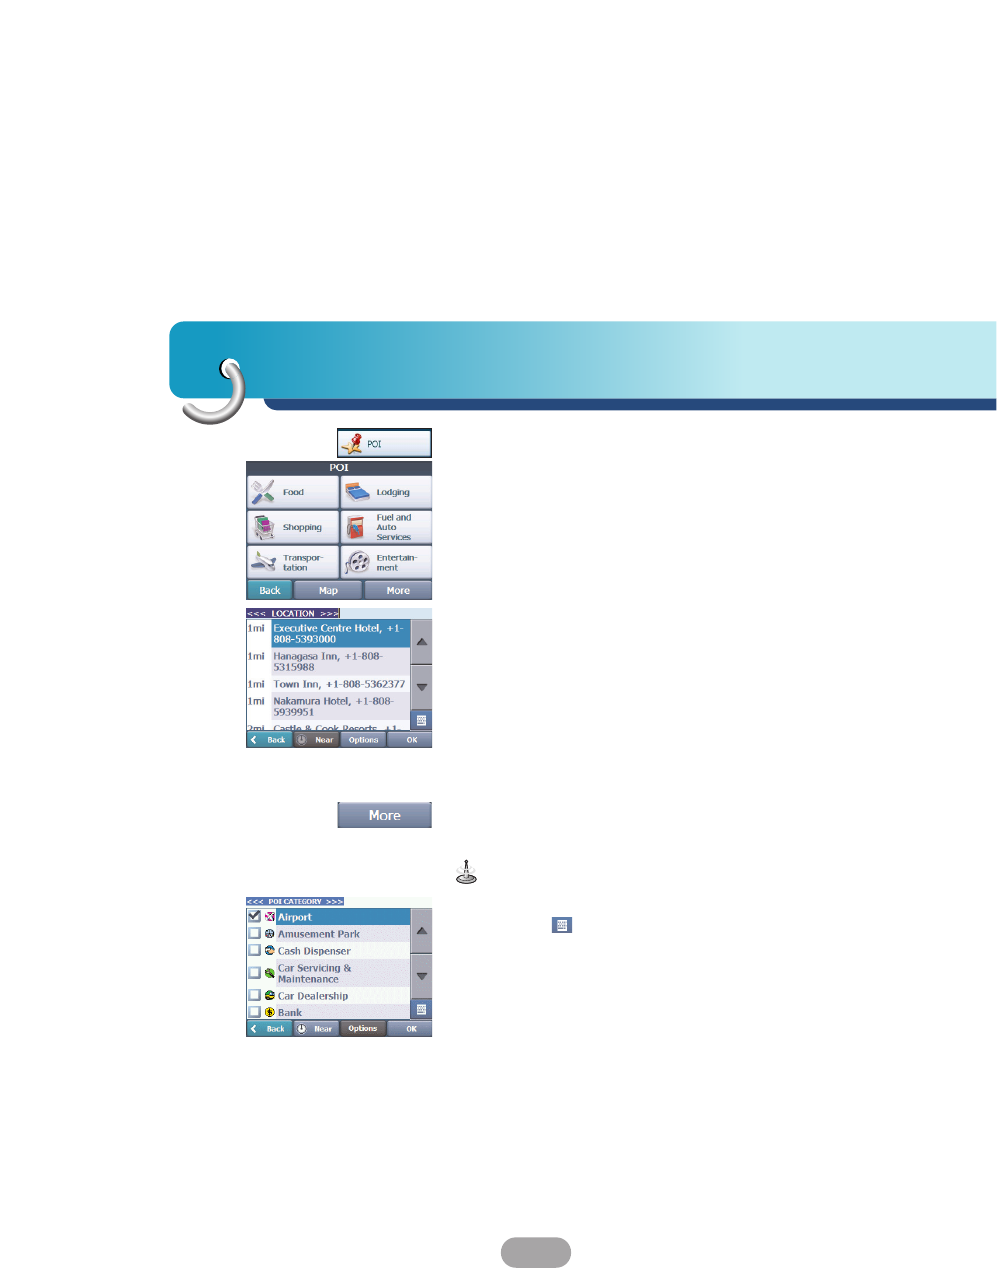
POI (Points of Interest)
The POI list is a collection of hundreds of interesting
or useful places organized by easy-to-find categories.
For example, you can use the Navigator to guide you
to a shopping center, hotel, restaurant, or gas station.
1. From the Navigation menu, tap the “POI” button.
2. The POI Popular Category screen appears, which
lets you quickly select from common points of
interest.
3. When selecting a category, the Navigator
automatically displays the category entries and the
distance each entry is from your current position.
4. Select your entry and tap or click the “OK” button
to display your selected destination on the map
and then tap on the “Go” button to calculate your
route.
For a full POI list, tap the “More” button.
• You can find a category by tapping the “Hide/Show
Keyboard” button and entering text in the POI
Category field. The Smart Search System
automatically displays the POI categories that
match the characters entered.
• From the Item Entries Options screen, click the
“Sort by ABC” button to display the category entries
in alphabetical order.
43
Finding a location with navigation
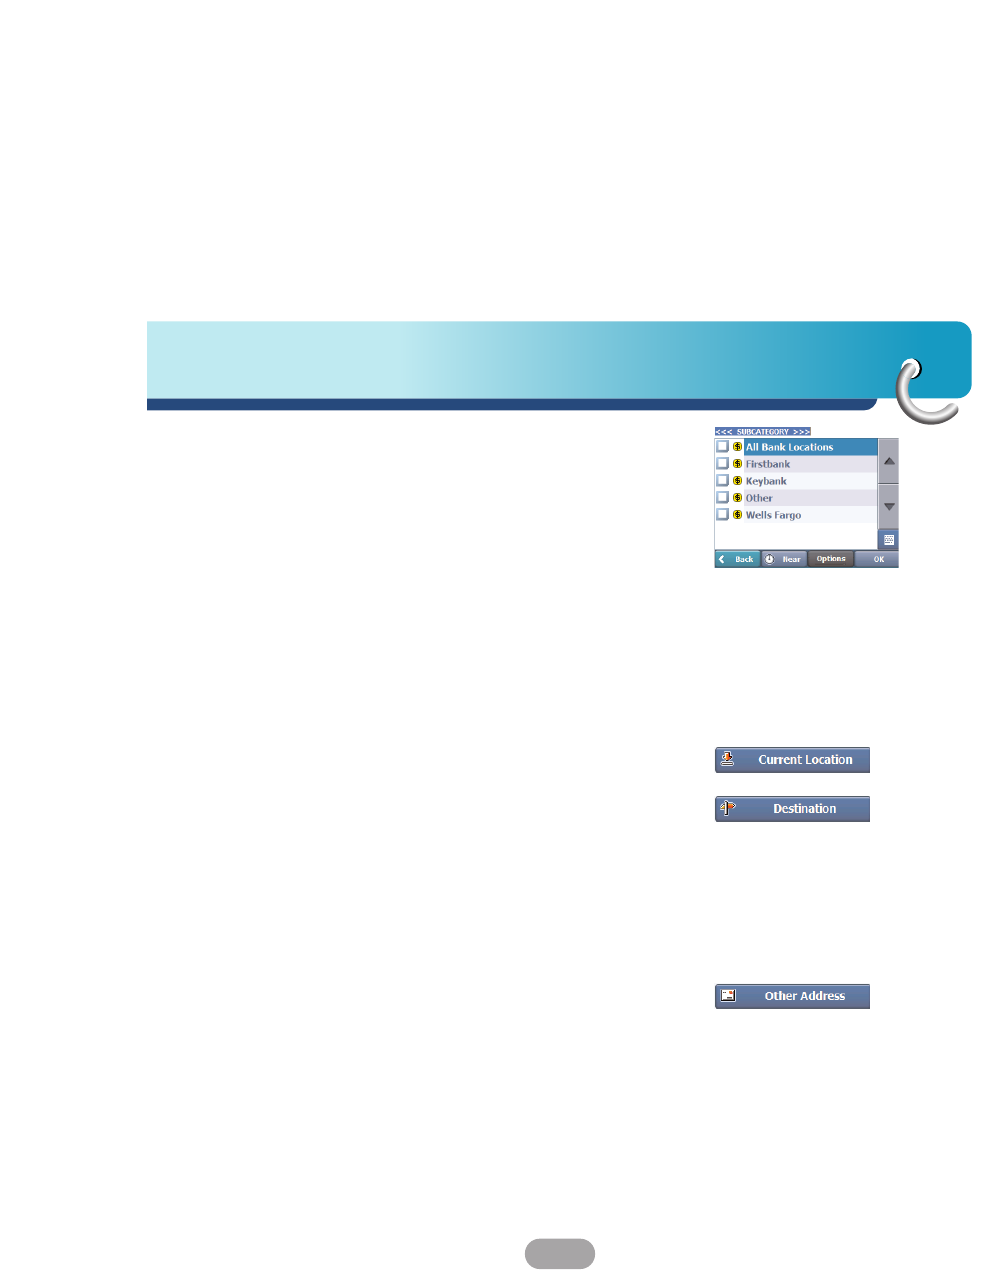
Subcategories
Many categories have subcategories to provide for
an even greater list of choices. For example, "Petrol
Station" may have many subcategories each that
representing a particular brand name.
The same is also true for "Hotels". "Restaurants"
have subcategories that represent different types of
food, such as American, Italian, and French.
Search Near a Location
You can tap the “Near” button to determine the
location area, where you want to search for a specific
place, such as a gas station, hotel, or restaurant.
Lets you search near your current location.
This is the default value.
Lets you search near a specified destination.
For example, you know your general destination, but
not very much about interesting locations in the area.
You can use the Navigator to locate the tourist
attractions most appealing to yourself, family, or
friends.
Note that this button is enabled only when a
destination is entered.
Lets you search near another address.
For example, you have set a destination, but on the
way you want to stop at another location.
You can use this feature to search near that location
for restaurants, lodging, historical sites, or anything
you want.
Finding a location with navigation
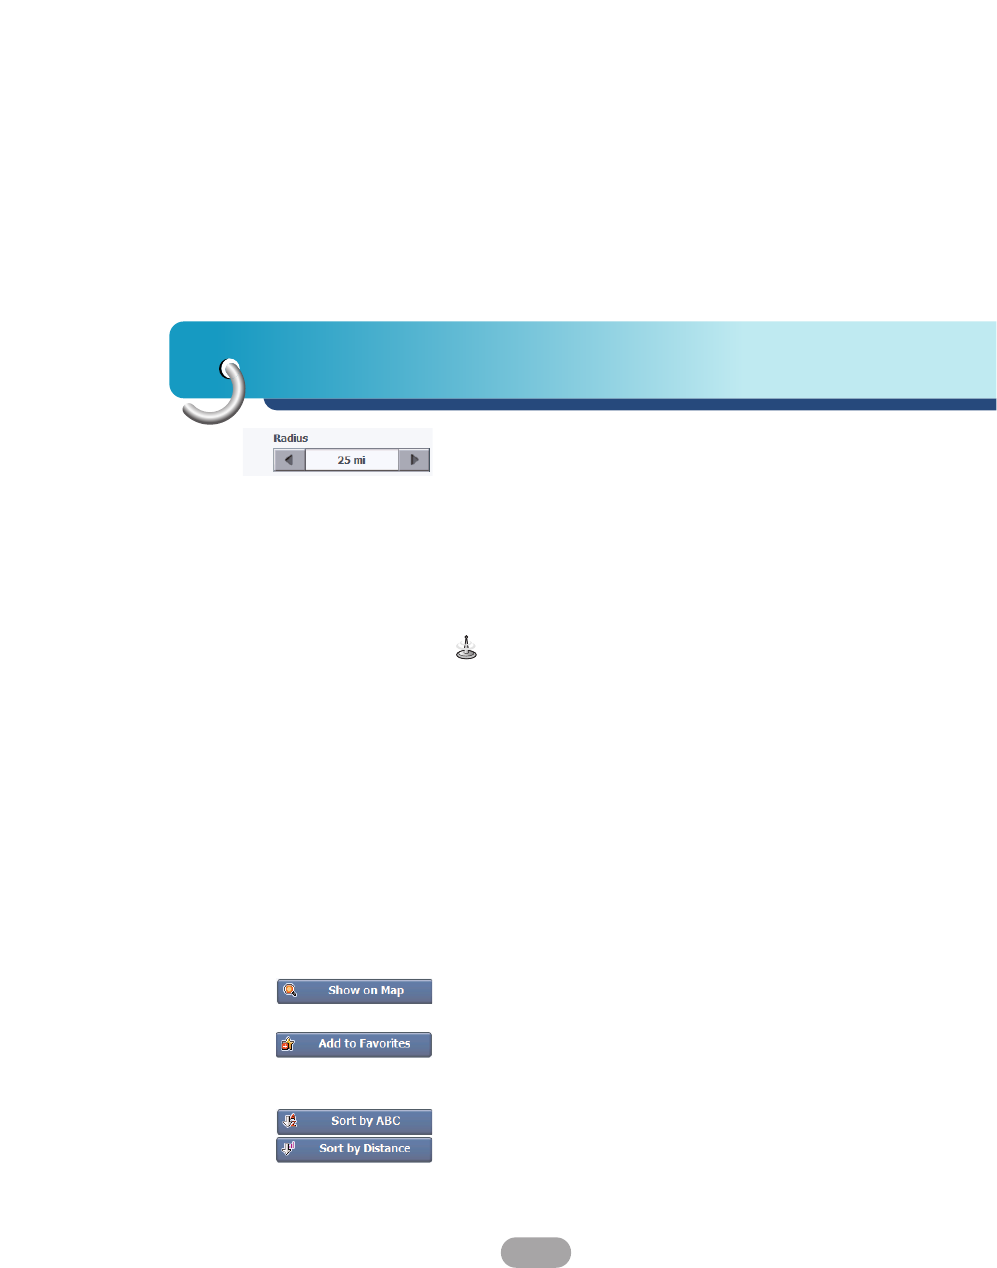
44
Enter the location distance to search for a designated
place.
For example, if you enter 5 km, the Navigator only
searches within a five kilometer radius.
When you select a large search radius, you risk the
chance of finding too many locations, which makes it
harder to find the place that you are searching for.
It is best to start with a small search radius size, and
then make it larger if necessary.
If you don’t specify a search radius, the navigator
searches the whole map.
Show or Hide Symbol on Map
You can select or clear the checkmarks next to a POI
entry to show or hide the POI symbol on the Main
Map screen.
POI Options
When you have selected a POI location, tap the
“Options” button to display the commands listed
below.
Lets you show the map with the displayed destination
for you to review before creating a route.
Lets you add a POI entry to your list of favorite
locations. For more information, see "My Places" on
the page 39.
Lets you sort the entries of the selected category
alphabetically or by distance from your current
location.
The Navigator initially displays the entries by
distance.