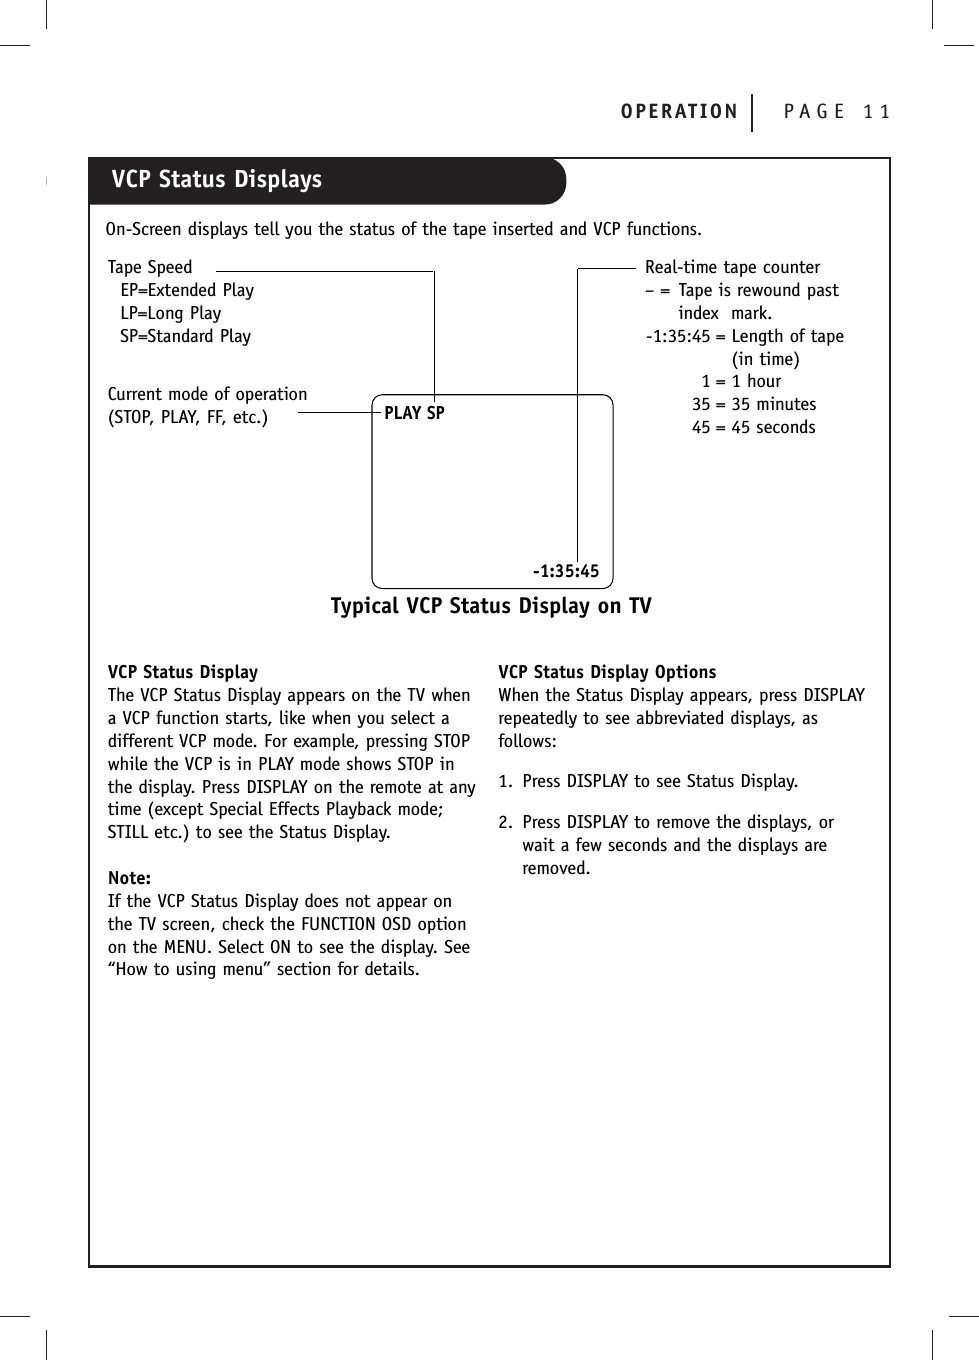
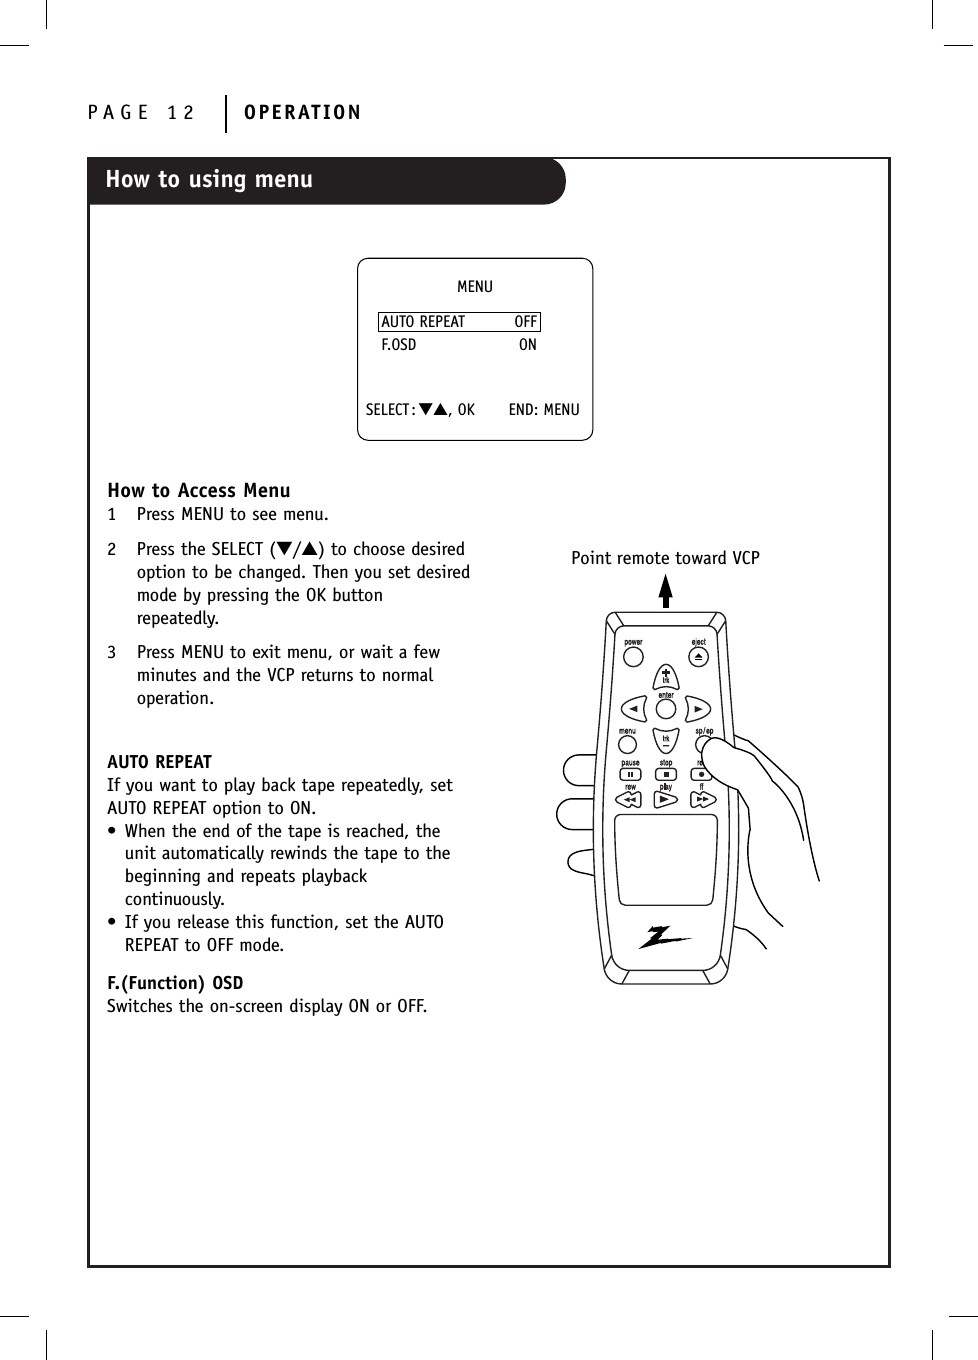
LG Electronics USA 9QKA20240 Video Cassette Player User Manual ES191M HA1UZ1 OM

LG Electronics USA Video Cassette Player ES191M HA1UZ1 OM

Users manual

© Copyright 2002, Zenith Electronics CorporationInstallation and Operating Guide | WarrantyModel Number  | ES-191M |Video Cassette Player
Safety PrecautionsThis lightning flash with arrowhead symbolwithin an equilateral triangle is intended toalert the user to the presence of uninsulateddangerous voltage within the product’s enclo-sure that may be of sufficient magnitude to constitute a riskof electric shock to persons. The exclamation point within an equilateral tri-angle is intended to alert the user to the pres-ence of important operating and maintenance(servicing) instructions in the literature accom-panying the product.NOTE TO CABLE/TV INSTALLER: This reminder is provided tocall the cable TV system installer’s attention to Article 820-40 of the National Electric Code (U.S.A.). The code providesguidelines for proper grounding and, in particular, specifiesthat the cable ground shall be connected to the groundingsystem of the building, as close to the point of the cableentry as practical.WARNING: Do not install this equipment in a confined spacesuch as a bookcase or similar unit.SERIAL NUMBER: The serial number is found on the back ofthis unit. This number is unique to this unit and not avail-able to others. You should record requested information hereand retain this guide as a permanent record of your pur-chase.Model No. ___________________________Serial No. ___________________________REGULATORY INFORMATION: FCC Part 15This product has been tested and found to comply with thelimits for a Class B digital device, pursuant to Part 15 ofthe FCC Rules. These limits are designed to provide reasonable protection against harmful interference whenthe product is operated in a residential installation. Thisproduct generates, uses and can radiate radio frequencyenergy and, if not installed and used in accordance withthe instruction manual, may cause harmful interference toradio communications. However, there is no guarantee thatinterference will not occur in a particular installation. Ifthis product does cause harmful interference to radio ortelevision reception, which can be determined by turningthe product off and on, the user is encouraged to try tocorrect the interference by one or more of the following measures: •Reorient or relocate the receiving antenna. •Increase the separation between the product andreceiver. •Connect the product into an outlet on a circuit different from that to which the receiver is connected. •Consult the dealer or an experienced radio/TV techni-cian for help. FCC WARNING: This equipment may generate or use radiofrequency energy. Changes or modifications to this equipment may cause harmful interference unless the modi-fications are expressly approved in the instruction manual.The user could lose the authority to operate this equipmentif an unauthorized change or modification is made.FCC COMPLIANCE: The responsible party for this product’scompliance is: Zenith Electronics Corporation, 2000Millbrook Drive, Lincolnshire, IL 60069, USA.Phone: 1-847-941-8000IMPORTANT COPYRIGHT INFORMATION: Many television pro-grams and films are copyrighted. In certain circumstancescopyright law may apply to private in-home video taping ofcopyrighted materials.WARNINGRISK OF ELECTRIC SHOCK DO NOT OPENCAUTION: TO PREVENT ELECTRIC SHOCK, MATCH WIDEBLADE OF PLUG TO WIDE SLOT, FULLY INSERT.ATTENTION: POUR ÉVITER LES CHOC ÉLECTRIQUES, INTRODUIRE LA LAME LA PLUS LARGE DE LA FICHE DANSLA BORNE CORRESPONDANTE DE LA PRISE ET POUSSERJUSQU’AU FOND.WARNING: TO REDUCE THE RISK OF FIRE OR ELECTRICSHOCK, DO NOT EXPOSE THIS PRODUCT TO RAIN OR MOISTURE. MOISTURE CONDENSATIONIf you pour a cold liquid into a glass, water vapor in theair will condense on the surface of the glass. This is moisture condensation. Moisture condensation on thehead drum, one of the most crucial parts of the unit, willcause damage to the tape. When the VCP is exposed to arapid temperature change from cold to warm, some condensation will occur. Under this condition, connectthe power cord to the AC line, press POWER on and allowat least two hours for the VCP to dry out.WARNING: TO REDUCE THE RISK OF ELECTRIC SHOCKDO NOT REMOVE COVER (OR BACK)NO USER-SERVICEABLE PARTS INSIDEREFER SERVICING TO QUALIFIED SERVICEPERSONNEL.
IMPORTANT SAFETY INSTRUCTIONSSAFETY TIPS PAGE 3CAUTION: PLEASE READ AND OBSERVE ALL WARNINGS AND INSTRUCTIONS IN THIS OWNER’SMANUAL. AND THOSE MARKED ON THE PRODUCT. RETAIN THIS BOOKLET FOR FUTURE REFER-ENCE.This product has been designed and manufactured to assure personal safety. Improper use canresult in electric shock or fire hazard. The safeguards incorporated in this product will protect youif you observe the following procedures for installation, use, and servicing.This product does not contain any parts that can be repaired by the user.DO NOT REMOVE THE CABINET COVER, OR YOU MAY BE EXPOSED TO DANGEROUS VOLTAGE.REFER SERVICING TO QUALIFIED SERVICE PERSONNEL ONLY.1. Read these instructions. - All these safetyand operating instructions should be readbefore the product is operated.2. Keep these instructions. - The safety,operating and use instructions should beretained for future reference.3. Heed all warnings. - All warnings on theproduct and in the operating instructionsshould be adhered to.4. Follow all instructions. - All operatingand use instructions should be followed.5. Do not use this product near water. – Forexample: near a bath tub, wash bowl,kitchen sink, laundry tub, in a wet base-ment; or near a swimming pool; and otherareas located near water.6. Clean only with dry cloth. – Unplug thisproduct from the wall outlet before clean-ing. Do not use liquid cleaners.7. Do not block any ventilation openings.Install in accordance with the manufac-turer’s instructions. - Slots and openingsin the cabinet are provided for ventilationand to ensure reliable operation of theproduct and to protect it from over- heat-ing. The openings should never be blockedby placing the product on a bed, sofa, rugor other similar surface. This productshould not be placed in a built-in installa-tion such as a bookcase or rack unlessproper ventilation is provided or the manu-facturer’s instructions have been adheredto.8. Do not install near any heat sourcessuch as radiators, heat registers, stoves,or other apparatus (including ampli-fiers) that produce heat.
IMPORTANT SAFETY INSTRUCTIONSPAGE 4 SAFETY TIPS9. Do not defeat the safety purpose of thepolarized or grounding-type plug. Apolarized plug has two blades with onewider than the other. A grounding typeplug has two blades and a third ground-ing prong. The wide blade or the thirdprong are     provided for your safety. Ifthe provided plug does not fit into youroutlet, consult an electrician forreplacement of the obsolete outlet.10. Protect the power cord from beingwalked on or pinched particularly atplugs, convenience receptacles, and thepoint where they exit from the product.11. Only use attachments/accessories speci-fied by the manufacturer.12. Use only with the cart, stand, tripod,bracket, or table specified by the manu-facturer, or sold with apparatus. When acart is used, use caution when movingthe cart/product combination to avoidinjury from tip-over.13. Unplug this product during lightningstorms or when unused for long periodsof time.14. Refer all servicing to qualified servicepersonnel. Servicing is required whenthe product has been damaged in anyway,  such as power-supply cord or plugis damaged, liquid has  been spilled orobjects have fallen into the product, theproduct has been exposed to rain ormoisture, does not operate normally, orhas been dropped.
ContentsINSTALLATION PAGE 5SAFETY TIPS  . . . . . . . . . . . . . . . . . . . . . . . . . . . . . . . . . . . . . . . . . . . . . . . . . . . . . .2-4Hook-up . . . . . . . . . . . . . . . . . . . . . . . . . . . . . . . . . . . . . . . . . . . . . . . . . . . . . . . . .6-8Operation  . . . . . . . . . . . . . . . . . . . . . . . . . . . . . . . . . . . . . . . . . . . . . . . . . . . . . . .9-13Controls and Indicators . . . . . . . . . . . . . . . . . . . . . . . . . . . . . . . . . . . . . . . . . . . .9-10The Buttons on Your Remote . . . . . . . . . . . . . . . . . . . . . . . . . . . . . . . . . . . . . . . . . .11VCP Status Displays  . . . . . . . . . . . . . . . . . . . . . . . . . . . . . . . . . . . . . . . . . . . . . . .12How to using menu . . . . . . . . . . . . . . . . . . . . . . . . . . . . . . . . . . . . . . . . . . . . . . . .13Troubleshooting & Maintenance  . . . . . . . . . . . . . . . . . . . . . . . . . . . . . . . . . . . . . . . . .14Specifications  . . . . . . . . . . . . . . . . . . . . . . . . . . . . . . . . . . . . . . . . . . . . . . . . . . . . .15Warranty  . . . . . . . . . . . . . . . . . . . . . . . . . . . . . . . . . . . . . . . . . . . . . . . . . . . Back CoverNote: This video cassette player is for video playbackonly. Recording is not possible with this unit.
Hook-upPAGE 6 INSTALLATIONRefer to the following steps to hook up your Video Cassette Player easily and quickly.Step 1: Identify the Connectors and SwitchesLocate the following connectors and switch on the back of your VCP;1. Audio Out JackAudio output must be used in conjunctionwith video out connection.2. Video Out JackVideo output must be used in conjunctionwith audio out connection.3. Audio In JackConnect the audio output cable from anexternal unit (ex. Audio system,TV/Monitor, Another VCP) to this terminal.4. Video In JackConnect the video output cable from anexternal unit (ex. Audio system,TV/Monitor, Another VCP) to this terminal.5. DC Input JackInput from optional DC power source.Note: Use of the Audio/Video Output jacks isoptional. Depending on the capability of yourTV, you may get improved picture qualitywhen using these connections.1 23 4 5
INSTALLATION PAGE 7Hook-up (Continued)1. Connect one end of the audio/video cablesupplied with your VCP to the audio/videooutput terminal of the VCP.2. Connect the other end of the cable to theaudio/video input terminal on your TV.Step 2: Connect VCP to the TVRefer to the following illustration to properly connect the VCP to your TV.1. Plug the AC adapter power cord into anoperating 120V AC outlet and the other endinto the DC input on the back of the VCP, or2. Using the adapter cord, plug one end of thecord into a 12 volt negative ground DCsource (such as the cigarette lighter socketof a car) and the other end into the DCinput on the back of the VCP.Figure 3: Connecting the VCP to Your TVStep 3: Supply Power to the VCPDC  IN  12VINVIDEOAUDIO (Back of VCP)(Back of TV)
Controls and IndicatorsPAGE 8 INSTALLATIONDescriptions of items you need to know to operate your VCP.1. POWERTurns the VCP on or off.2. STOP/EJECTStops playback, fast forward, reverse,rewind, or speed search. Cancels automaticmodes of operation.Ejects a cassette from the video cassettecompartment. If pressed while the VCP isturned off, the power will turn on, the cassette will be ejected, then the powerwill turn off automatically.3. RECPress to record input source.4. POWER IndicatorIndicates that the power is on.PLAY IndicatorIndicates tape is playing.RECORD IndicatorIndicates tape is fast forwarding.CST.IN (Cassette In) IndicatorIndicates a cassette is in the VCP.DEW IndicatorExcessive condensation. Keep power onuntil indicator turns off.5. REMOTE SENSOR WINDOW Receives infrared rays from remote controlunit.6. PAUSEPress during tape playback to pause thetape and "freeze" the picture. Press PLAY toresume normal playback. If left in the Stillmode for five minutes, the VCP will auto-matically go into Stop mode to protect thetape and the VCP from possible damage.Press during recording to pause recording .7. REW (Rewind/Reverse Search) ButtonPress while the VCP is in Stop mode torewind the tape (no picture, no sound).During tape playback, press to beginReverse Search; The picture portion of thetape is played in the reverse direction athigh speed (sound is muted). Press STOP toend rewind or search.Press and hold while Rewind mode to beginlogic search, you can check what is on thetape. When released, rewinding resumes.(continued on next page) Controls and Indicators1 2 3 4 6 7 8 9 105
OPERATION PAGE 9Controls and Indicators (Continued)8. FF (Fast Forward/Forward Search)Press while the VCP is in the Stop mode tofast forward the tape (no picture or sound).During tape playback, press to beginForward search; The picture portion of thetape is played at high speed (the sound ismuted). Press STOP to end fast forward orsearch.Press and hold while Fast forward mode tobegin logic search, you can check what ison the tape. When released, Fast forwardingresumes.9. PLAYBegins tape playback. The correct playbackspeed is automatically selected.10. Cassette Loading CompartmentInsert a VHS video cassette into the videocassette compartment until it is automatically drawn into the VCP. The cassette can be inserted even when poweris off.CAUTION: DO NOT attempt to insert a cassette into the compartment when thepower cord is unplugged.CAUTION: DO NOT insert fingers into thecassette compartment.Playing a Video Cassette•Turn on the TV.•If the connection in mode via the VCP'sAudio/Video Out jacks, your TV must be setto receive audio and video from an auxiliarysource. (Refer to your TV operating instructions.)•Press PLAY to begin playback. If necessary,use the TRK (TRACKING) control to adjust forthe best picture.
The Buttons on Your RemotePAGE 10 OPERATIONA quick list of all the buttons on your remote control and what they do.AAAInstalling BatteriesBe sure to install the batteries provided withthis remote. Match positive(+) and negative (-) with markings shown in battery compartment.Note: All VCP operationsand menu options can beaccessed by using theremote control.EJECT — Ejects the tape from the VCP.ENTER — To display functions on the TVscreen. Switches the selected item on theMENU screen.FF (Fast Forward)—Advances tape rapidly.MENU — Shows and exits main menu.PAUSE — Press during tape playback topause the tape and "freeze" the picture.Press PLAY to resume normal playback. Ifleft in the Still mode for five minutes, theVCP will automatically go into Stop modeto protect the tape and the VCP from pos-sible damage. Press during recording topause recording .PLAY — Begins tape playback.POWER — Turns VCP On and Off. Alsoturns VCP Timer Off and On, if programmed.REW — Rewinds tape to the beginning.STOP — Cancels playback record modes.REC — Press to record input source.TRK (Tracking) (+/-) — To clear streaksif they appear on the TV screen in theplayback mode. SELECT (FF/GG)— Select the desireditems on the MENU screen.SP/EP — Select recording speed.
OPERATION PAGE 11VCP Status DisplaysOn-Screen displays tell you the status of the tape inserted and VCP functions.VCP Status DisplayThe VCP Status Display appears on the TV whena VCP function starts, like when you select a different VCP mode. For example, pressing STOPwhile the VCP is in PLAY mode shows STOP inthe display. Press DISPLAY on the remote at anytime (except Special Effects Playback mode;STILL etc.) to see the Status Display.Note:If the VCP Status Display does not appear onthe TV screen, check the FUNCTION OSD optionon the MENU. Select ON to see the display. See“How to using menu” section for details.VCP Status Display OptionsWhen the Status Display appears, press DISPLAYrepeatedly to see abbreviated displays, as follows:1. Press DISPLAY to see Status Display.2. Press DISPLAY to remove the displays, orwait a few seconds and the displays areremoved.PLAY SP-1:35:45Tape SpeedEP=Extended PlayLP=Long PlaySP=Standard PlayCurrent mode of operation(STOP, PLAY, FF, etc.)Real-time tape counter– = Tape is rewound past index  mark.-1:35:45 = Length of tape (in time)1=1 hour35 = 35 minutes45 = 45 secondsTypical VCP Status Display on TV
How to using menuPAGE 12 OPERATIONHow to Access Menu1Press MENU to see menu.2Press the SELECT (▼/▲)to choose desiredoption to be changed. Then you set desiredmode by pressing the OK button repeatedly.3Press MENU to exit menu, or wait a fewminutes and the VCP returns to normaloperation.AUTO REPEATIf you want to play back tape repeatedly, setAUTO REPEAT option to ON.•When the end of the tape is reached, theunit automatically rewinds the tape to the beginning and repeats playback continuously.•If you release this function, set the AUTOREPEAT to OFF mode. F.(Function) OSD Switches the on-screen display ON or OFF.MENUAUTO REPEAT OFFF.OSD ONSELECT:▼▲, OK  END: MENUPoint remote toward VCP
OPERATION PAGE 13Troubleshooting and MaintenanceObserved ConditionNo power to the VCP.The tape will not rewindsOperating sound is audible during playback, rewind, fast forward. etc.The playback picture does notappear while the tape is running.Noise appears during search andstill pictures.Noise appears during playback.Playback picture is blurred or interrupted while normal TV pictureis clear.Cassette cannot be inserted intoVCP.Remote control does not work.DEW Indicator is lit.Operating ProblemsPossible CausePower cord is not connected.Playback ProblemsTape is already fully rewound.Normal condition.You are using the VCP audio/videoOut jacks but the TV is not set toAUX channel or Audio/Video Insource.Normal condition.The tracking needs to be adjusted.Video heads may be dirty.The cassette is being loaded backwards or upside down or another cassette is already loaded.Power cord is not connected.Batteries are not installed or old.Excessive condensation.Probable SolutionConnect it.No action is necessary.No action is necessary.Set the TV to AUX channel orAudio/Video In source.No action is necessary.Adjust tracking.Head cleaning is necessary.Consult your local Zenith videoretailer.Load cassette in direction Indicatedby arrow on cassette, or remove thecassette that is loaded already.Connect power cord.Install or replace with new batteries.Keep power on until indicator turnsoff.Before requesting Warranty service, please refer to the chart below. It may help you avoid a service call.MaintenanceVideo Head CleaningAfter long periods of use, the video heads maybecome clogged with accumulated dirt, causingdistortion (snow, streaking in picture and horizontal pulling of picture). When this occurs,use do-it-yourself VHS wet head cleaning cassettesavailable through your Zenith video product retailer.Caution: Do not use dry head cleaning systems.They may seriously damage both the video cassetteplayer an cassette.Cabinet CleaningClean the outside surfaces of the VCP with a soft,lint-free cloth as required.
SpecificationsPAGE 14 TROUBLESHOOTING AND MAINTENANCEPower RequirementsRating . . . . . . . . . . . . . . . . . . . . . . . .AC 120V, 60HzDC 12V, Neg. Ground (850mA)Environmental ConditionsOperation  . . . . . . . . . . . . . . . . . . . . .41°F to 95°F (5°C to 35°C) Temperature35 to 80% Relative HumidityStorage  . . . . . . . . . . . . . . . . . . . . . . .-4°F to 140°F (-20°C to 60°C) Temperature5 to 80% Relative HumidityPhysical CharacteristicsDimensions(W x H x D) . . . . . . . . . . . . .10.6 x 3.7 x 12.8 Inches(270 x 94 x 325 mm)Weight  . . . . . . . . . . . . . . . . . . . . . . .6.4 lbs (2.9 kg)Video SystemFormat  . . . . . . . . . . . . . . . . . . . . . . .VHS 1⁄2Inch (12.7 mm) TapeSignal  . . . . . . . . . . . . . . . . . . . . . . . .NTSC color/EIA monochrome(525 lines/60 fields)Input  . . . . . . . . . . . . . . . . . . . . . . . .1.0 Vp-pOutput  . . . . . . . . . . . . . . . . . . . . . . .1.0 Vp-pSignal-to-Noise ratio  . . . . . . . . . . . . . .≥43 dB (SP speed)Audio SystemsMonaural  . . . . . . . . . . . . . . . . . . . . . .1 channel standard VHSFrequency Response  . . . . . . . . . . . . . . .200 to 8,000 Hz (SP speed)Signal-to-Noise ratio  . . . . . . . . . . . . . .≥38 dB (SP speed)Input  . . . . . . . . . . . . . . . . . . . . . . . .Minus 6 dBm ≥47 kohmsOutput  . . . . . . . . . . . . . . . . . . . . . . .Minus 6 dB into ≤1,500 ohmsNote: Specifications, features, and appearance of this Video Cassette Player are subject to changewithout notice. Weight and dimensions are approximate.
NOTES PAGE 15Notes
ZENITH ELECTRONICS CORPORATIONVCP LIMITED WARRANTY-USAZenith will repair or replace your product, at Zenith’s option, if it proves to be defective in material orworkmanship under normal use, during the warranty period listed below from the date of original consumer purchase.  This warranty is available only to the original purchaser of the product andeffective only when used in the United States, excluding U.S. Territories.THIS WARRANTY IS IN LIEU OF ANY OTHER WARRANTY, EXPRESS OR IMPLIED,INCLUDING WITHOUT LIMITATION, ANY WARRANTY OF MERCHANTABILITY OR FITNESS FOR A PARTICULAR PURPOSE.  TO THE EXTENT ANY IMPLIED WARRANTY ISREQUIRED BY LAW, IT IS LIMITED IN DURATION TO THE EXPRESS WARRANTY PERIODABOVE.  ZENITH WILL NOT BE LIABLE FOR ANY INCIDENTAL, CONSEQUENTIAL, INDIRECT, SPECIAL, OR PUNITIVE DAMAGES OF ANY NATURE, INCLUDING WITHOUTLIMITATION LOST PROFITS, LOST OR CORRUPTED PROGRAMMING OR DATA, OR ANYOTHER DAMAGE WHETHER BASED IN CONTRACT, TORT, OR OTHERWISE.  Some states donot allow the exclusion or limitation of incidental or consequential damages or limitations on how long animplied warranty lasts, so the above exclusion or limitation may not apply to you.  This warranty gives youspecific legal rights and you may also have other rights that vary from state to state.THIS LIMITED WARRANTY DOES NOT APPLY:To damages or problems that result from shipping, installation, calibration, maintenance, or separate systemcomponents.To damages or problems that result from misuse, abuse, operation outside environmental specifications orcontrary to the requirements and precautions in the Operating Guide, accident, lightning strikes or othernatural causes, modification or alteration, incorrect electrical current or voltage, signal reception or input.Therefore, the cost of repair or replacement under these circumstances is borne by the customer.CUSTOMER ASSISTANCE NUMBERS:ZENITH ELECTRONICS CORPORATION  Zenith Part No. 206-037592000 MILLBROOK DRIVE GS# 3835RM0035SLINCOLNSHIRE, IL 60069 Printed in IndonesiaIssue OWARRANTY PERIOD:Labor: 90 Days from date of purchaseParts: One Year from the date of purchaseHOW SERVICE IS HANDLED:In-Home service: Please retain your bill of salefor proof of warrantyPlease call 1-877-9Zenith   (1-877-993-6484) tolocate your nearest Zenith Authorized ServiceCenter.Please see below for further information.To  prove warranty coverage: To  obtain where-to-buy, nearestAuthorized Service Center, product assistance or customerassistance:Retain your dated sales receipt to prove date of purchase.Legible copy of your sales receipt must be submitted at the timewarranty service is provided.Call 1-877-9Zenith (1-877-993-6484)  (Mon. - Fri. 7AM to 8 PMand Sat. 8AM to 5:00PM CT) Please select the appropriate optionfrom the menu.

Navigation menu