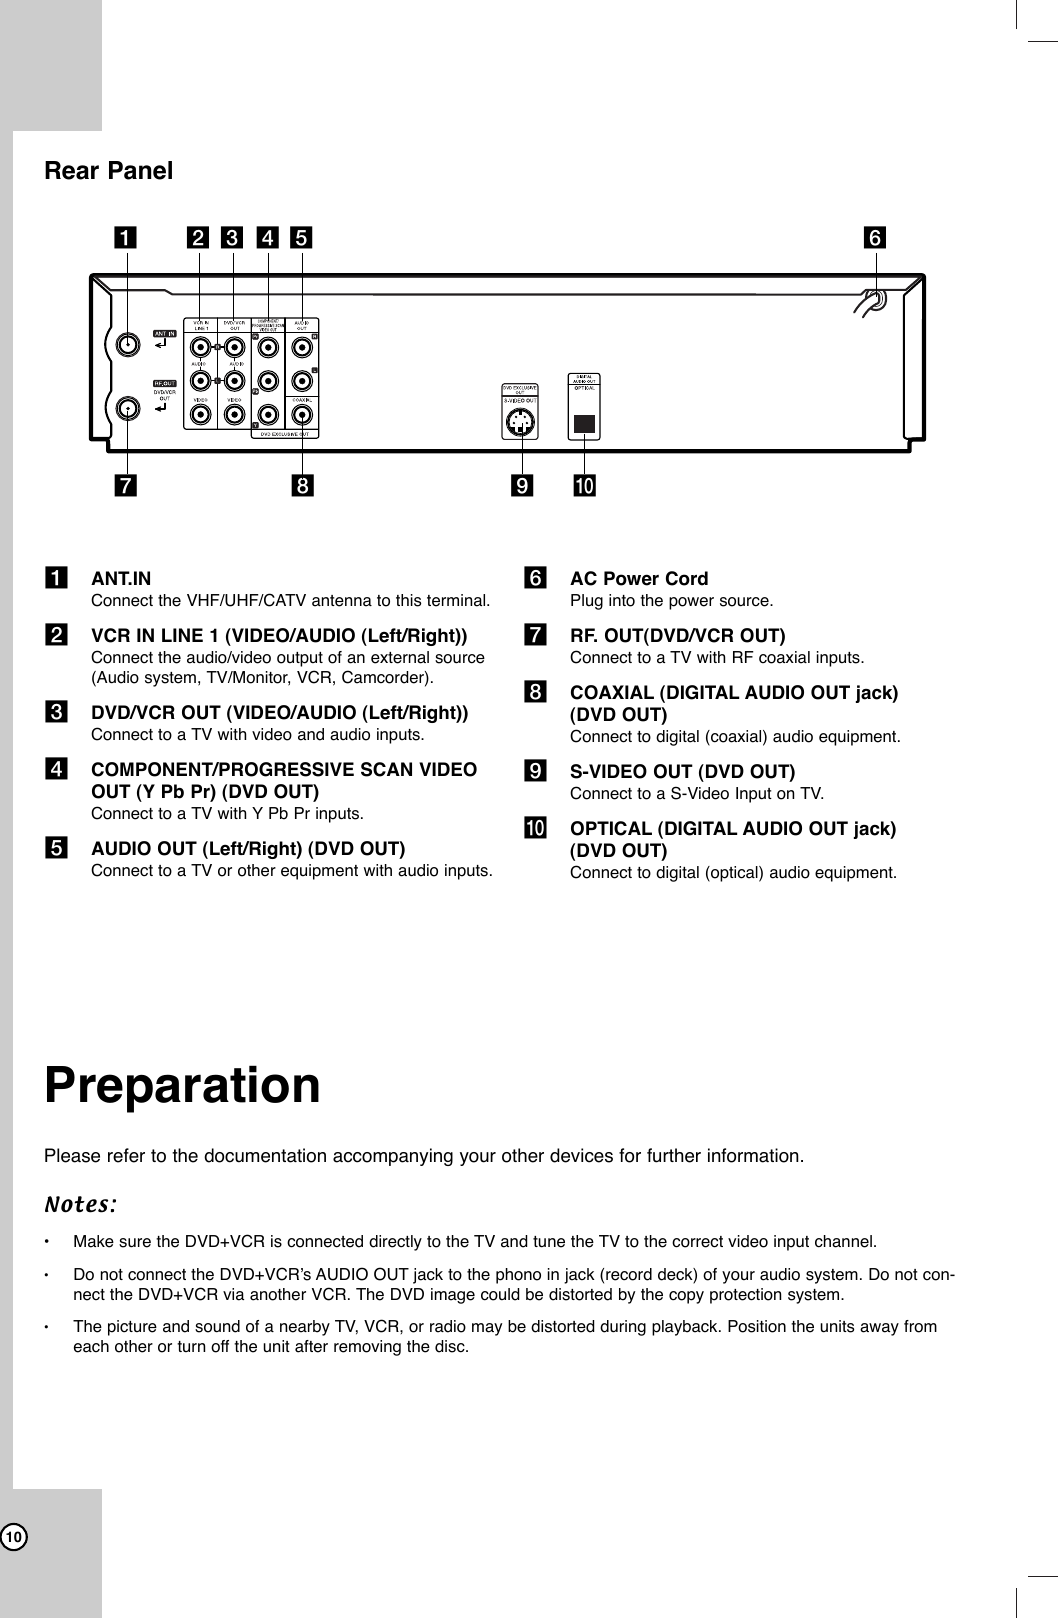
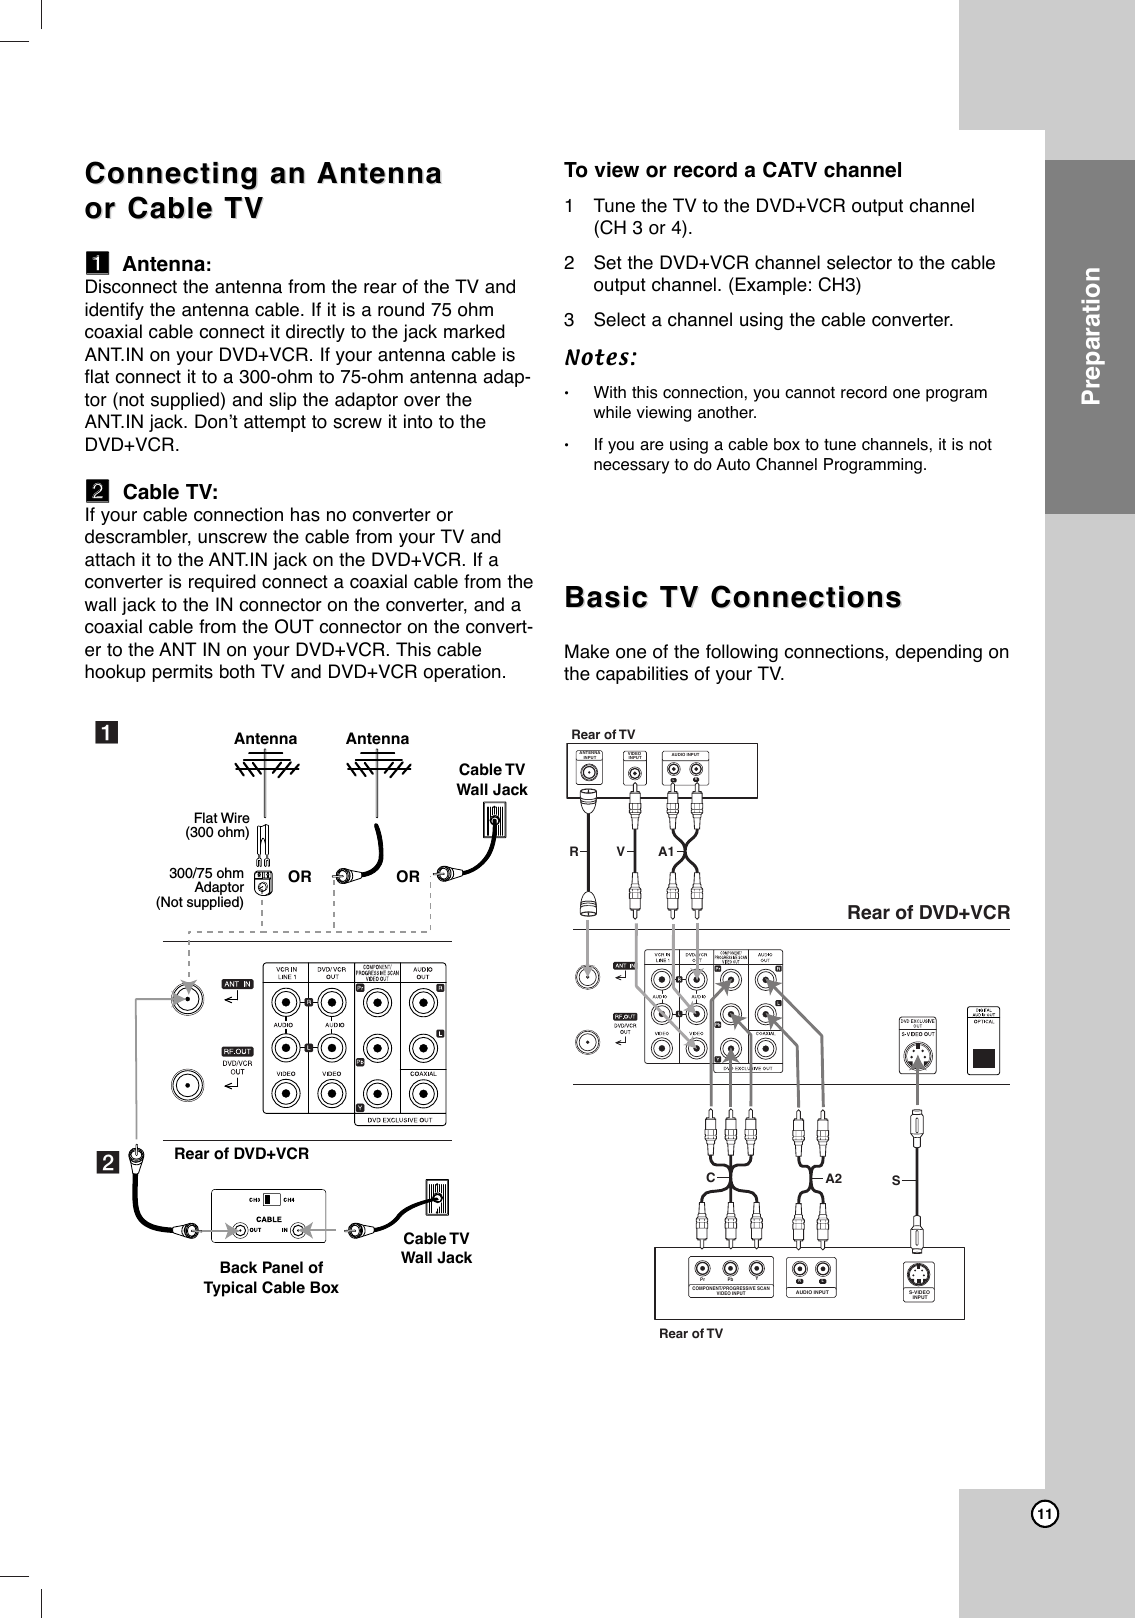
LG Electronics USA 9QKE40460 DVD Player & VCR User Manual V9720CMZ EVNT 1013

LG Electronics USA DVD Player & VCR V9720CMZ EVNT 1013

Users Manual

Before connecting, operating or adjustingthis product, please read this owner’smanual carefully and completely.DVD Player &Video Cassette RecorderOWNER’S MANUALMODEL : V9720CMZ
2Warning: To reduce the risk of electricshock, do not remove the cover or backof this product. There are no user-serv-iceable parts inside. Refer servicing toqualified service personnel.Warning: To reduce the risk of fire orelectric shock, do not expose this prod-uct to dripping or splashing water, rain,or moisture. Do not place objects filledwith water such as vases, on the prod-uct.Warning: This DVD+VCR employs a lasersystem. Use of controls, adjustments, orthe performance of procedures otherthan those specified herein may result inhazardous radiation exposure.Warning: To prevent direct exposure tolaser beam, do not open the enclosure.Visible laser radiation may be presentwhen the enclosure in opened. Warning: Never stare directly into thelaser beam. Caution: Do not install this product in aconfined space such as a book case orsimilar unit.FCC WARNING: This equipment may generate oruse radio frequency energy. Changes or modifica-tions to this equipment may cause harmful interfer-ence unless the modifications are expresslyapproved in the instruction manual. The user couldlose the authority to operate this equipment if anunauthorized change or modification is made.REGULATORY INFORMATION: FCC Part 15This product has been tested and found to complywith the limits for a Class B digital device, pursuantto Part 15 of the FCC Rules. These limits aredesigned to provide reasonable protection againstharmful interference when the product is operated ina residential installation. This product generates,uses, and can radiate radio frequency energy and, ifnot installed and used in accordance with theinstruction manual, may cause harmful interferenceto radio communications. However, there is no guar-antee that interference will not occur in a particularinstallation. If this product does cause harmful inter-ference to radio or television reception, which canbe determined by turning the product off and on, theuser is encouraged to try to correct the interferenceby one or more of the following measures: Reorient or relocate the receiving antenna. Increase the separation between the productand receiver. Connect the product into an outlet on a circuitdifferent from that to which the receiver is con-nected. Consult the dealer or an experienced radio/TVtechnician for help. SERIAL NUMBER:You can find the serial number on the back of theunit. This number is unique to this unit and not avail-able to others. You should record requested informa-tion here and retain this guide as a permanent recordof your purchase.Model No. ______________________________Serial No. ______________________________CAUTIONRISK OF ELECTRIC SHOCK DO NOT OPEN
31. Read these instructions. - All these safety and operatinginstructions should be read before the product is operated.2. Keep these instructions. - The safety, operating and useinstructions should be retained for future reference.3. Heed all warnings. - All warnings on the product and inthe operating instructions should be adhered to.4. Follow all instructions. - All operating and use instruc-tions should be followed.5. Do not use this product near water. – For example: neara bath tub, wash bowl, kitchen sink, laundry tub, in a wetbasement; or near a swimming pool; and other areaslocated near water.6. Clean only with dry cloth. – Unplug this product from thewall outlet before cleaning. Do not use liquid cleaners.7.Do not block any ventilation openings. Install in accor-dance with the manufacturer’s instructions. - Slots andopenings in the cabinet are provided for ventilation and toensure reliable operation of the  product and to protect itfrom over- heating. The openings should never be blockedby placing the product on a bed, sofa, rug or other similarsurface. This product should not be placed in a built-ininstallation such as a bookcase or rack unless proper ven-tilation is provided or the manufacturer’s instructions havebeen adhered to.8. Do not install near any heat sources such as radia-tors, heat registers, stoves, or other apparatus(including amplifiers) that produce heat.9. Do not defeat the safety purpose of the polarized orgrounding-type plug. A polarized plug has two bladeswith one wider than the other. A groundingtype plughas two blades and a third grounding prong. The wideblade or the third prong are provided for your safety. Ifthe provided plug does not fit into your outlet, consultan electrician for replacement of the obsolete outlet.10. Protect the power cord from being walked on orpinched particularly at plugs, convenience recepta-cles, and the point where they exit from the product.11. Only use attachments/accessories specified by themanufacturer.12. Use only with the cart, stand, tripod, bracket, or tablespecified by the manufacturer, or sold with appara-tus. When a cart is used, use caution when movingthe cart/product combination to avoid injury fromtip-over.13. Unplug this product during lightning storms or whenunused for long periods of time.14.Refer all servicing to qualified service personnel.Servicing is required when the product has beendamaged in any way, such as power-supply cord orplug is damaged, liquid has been spilled or objectshave fallen into the product, the product has beenexposed to rain or moisture, does not operate nor-mally, or has been dropped.IMPORTANT SAFETY INSTRUCTIONSCAUTION:PLEASE READ AND OBSERVE ALL WARNINGS AND INSTRUCTIONS IN THIS OWNER’S MANUAL. ANDTHOSE MARKED ON THE PRODUCT. RETAIN THIS BOOKLET FOR FUTURE REFERENCE.This product has been designed and manufactured to assure personal safety. Improper use can result in electric shock orfire hazard. The safeguards incorporated in this product will protect you if you observe the following procedures for installa-tion, use, and servicing.This product does not contain any parts that can be repaired by the user.DO NOT REMOVE THE CABINET COVER, OR YOU MAY BE EXPOSED TO DANGEROUS VOLTAGE. REFER SERVIC-ING TO QUALIFIED SERVICE PERSONNEL ONLY.
4ContentsIntroduction  . . . . . . . . . . . . . . . . . . . . . .5Moisture Condensation  . . . . . . . . . . . . . . . . . .5Symbol Used in this Manual   . . . . . . . . . . . . .5About the  Symbol Display   . . . . . . . . . . . .5Notes on Discs   . . . . . . . . . . . . . . . . . . . . . . . .5Types of Playable Discs   . . . . . . . . . . . . . . . . .6Disc-related terms   . . . . . . . . . . . . . . . . . . . . .6Notes on Copyrights  . . . . . . . . . . . . . . . . . . . .7Regional code    . . . . . . . . . . . . . . . . . . . . . . . .7About the Remote Control  . . . . . . . . . . . . . . .7Selecting the Viewing Source  . . . . . . . . . . . . .7Front Panel  . . . . . . . . . . . . . . . . . . . . . . . . . . .8Remote Control  . . . . . . . . . . . . . . . . . . . . . . . .9Rear Panel  . . . . . . . . . . . . . . . . . . . . . . . . . . .10Preparation . . . . . . . . . . . . . . . . . . . . . .10Connecting an Antenna or Cable TV . . . . . . .11Basic TV Connections   . . . . . . . . . . . . . . . . .11Optional TV Connections  . . . . . . . . . . . .12-13Initial Settings - VCR  . . . . . . . . . . . . . . . .14-15General Operation  . . . . . . . . . . . . . . . . . . . .14CLOCK  . . . . . . . . . . . . . . . . . . . . . . . . . . . .14• Auto Clock Set  . . . . . . . . . . . . . . . . . . . . .14• Manual Clock Set . . . . . . . . . . . . . . . . . . .14TUNING  . . . . . . . . . . . . . . . . . . . . . . . . . . .15• Auto Channel Programming  . . . . . . . . . .15• To Add or Erase Channels  . . . . . . . . . . . .15SETUP  . . . . . . . . . . . . . . . . . . . . . . . . . . . .15Initial Settings - DVD  . . . . . . . . . . . . . . . . . . .16General Operation  . . . . . . . . . . . . . . . . . . . .16LANGUAGE  . . . . . . . . . . . . . . . . . . . . . . . .16• Menu Language   . . . . . . . . . . . . . . . . . . .16• Disc Audio / Subtitle / Menu   . . . . . . . . . .16DISPLAY  . . . . . . . . . . . . . . . . . . . . . . . . . . .17• TV Aspect   . . . . . . . . . . . . . . . . . . . . . . .17• Display Mode  . . . . . . . . . . . . . . . . . . . . .17• Progressive Scan  . . . . . . . . . . . . . . . . . .17• Video Output  . . . . . . . . . . . . . . . . . . . . . .17AUDIO  . . . . . . . . . . . . . . . . . . . . . . . . . . . .18• Dolby Digital / DTS / MPEG  . . . . . . . . . . .18• Sample Freq. (Frequency)  . . . . . . . . . . . .18• DRC (Dynamic Range Control)    . . . . . . .18OTHERS  . . . . . . . . . . . . . . . . . . . . . . . . . . .18• PBC . . . . . . . . . . . . . . . . . . . . . . . . . . . . .18• Auto Play   . . . . . . . . . . . . . . . . . . . . . . . .18• B.L.E. (Black Level Expansion)  . . . . . . . .18• PLUGE (Blacker than Black)  . . . . . . . . . .18LOCK (Parental Control)   . . . . . . . . . . . . . . .19• Rating   . . . . . . . . . . . . . . . . . . . . . . . . . .19• Password (Security Code)  . . . . . . . . . . . .19• Country Code   . . . . . . . . . . . . . . . . . . . . .19Operation  . . . . . . . . . . . . . . . . . . . . . . .20VCR Tape Playback  . . . . . . . . . . . . . . . . . . .20Basic Instructions  . . . . . . . . . . . . . . . . . . . . .20Auto Tracking  . . . . . . . . . . . . . . . . . . . . . . . .20Manual Tracking . . . . . . . . . . . . . . . . . . . . . .20Search  . . . . . . . . . . . . . . . . . . . . . . . . . . . . .20Still Picture and Frame-by-Frame Playback  .20Slow Motion  . . . . . . . . . . . . . . . . . . . . . . . . .21CM SKIP (Commercial Skip) . . . . . . . . . . . . .21VHS Hi-Fi Stereo / MTS Broadcast  . . . . . . . .21Hi-Fi Stereo Audio Sound  . . . . . . . . . . . . . . .21MTS (Multi-Channel TV Sound)  . . . . . . . . . .21VCR Tape Recording  . . . . . . . . . . . . . . . . . .22Basic Instructions  . . . . . . . . . . . . . . . . . . . . .22To  pause recording . . . . . . . . . . . . . . . . . . . .22To  record one TV program while watching another  . . . . . . . . . . . . . . . . . . . . .22Timer Recording  . . . . . . . . . . . . . . . . . . .22-23Instant Timer Recording  . . . . . . . . . . . . . . . .24Dubbing and Editing  . . . . . . . . . . . . . . . . . . .24Copying from DVD to VCR  . . . . . . . . . . . . . .25On-Screen Display - VCR  . . . . . . . . . . . . . . .25Additional VCR Information  . . . . . . . . . . . . .26Auto Play System . . . . . . . . . . . . . . . . . . . . .26S-VHS Quasi Playback (SQPB) - VCR  . . . . .26EASY INFORMATION  . . . . . . . . . . . . . . . . .26Playing a DVD or Video CD   . . . . . . . . . . . . .27Playback Setup  . . . . . . . . . . . . . . . . . . . . . .27General Features   . . . . . . . . . . . . . . . . . .27-28• Moving to another TITLE  . . . . . . . . . . . . .27• Moving to another CHAPTER/TRACK   . . .27• Search . . . . . . . . . . . . . . . . . . . . . . . . . . .27• Changing the Audio Channel  . . . . . . . . . .27• Still Pictureand Frame-by-Frame Playback   . . . . . . . .28• Slow Motion  . . . . . . . . . . . . . . . . . . . . . . .28• Random . . . . . . . . . . . . . . . . . . . . . . . . . .28• Repeat A-B  . . . . . . . . . . . . . . . . . . . . . . .28• Repeat   . . . . . . . . . . . . . . . . . . . . . . . . . .28• 3D Surround  . . . . . . . . . . . . . . . . . . . . . .28• Time Search  . . . . . . . . . . . . . . . . . . . . . .28• Changing Video Mode  . . . . . . . . . . . . . . .29• Marker Search  . . . . . . . . . . . . . . . . . . . . .29• Zoom  . . . . . . . . . . . . . . . . . . . . . . . . . . . .29• Last Scene Memory  . . . . . . . . . . . . . . . . .29• Screen Saver . . . . . . . . . . . . . . . . . . . . . .29Special DVD Features    . . . . . . . . . . . . . . . .30• Checking the contents of DVD discs: Menus  . . . . . . . . . . . . . . . . . . . . . . . . . . .30• Title Menu   . . . . . . . . . . . . . . . . . . . . . . .30• Disc Menu   . . . . . . . . . . . . . . . . . . . . . . .30• Camera Angle   . . . . . . . . . . . . . . . . . . . .30• Changing the Audio Language  . . . . . . . . .30• Changing the Audio Channel  . . . . . . . . . .30• Subtitles   . . . . . . . . . . . . . . . . . . . . . . . .30On-Screen Display - DVD  . . . . . . . . . . . . . . .30Playing an Audio CD or MP3/WMA Disc   .31-32Audio CD and MP3 / WMA Disc Features   . .32• Pause   . . . . . . . . . . . . . . . . . . . . . . . . . .32• Moving to another Track   . . . . . . . . . . . .32• Repeat Track/All/Off  . . . . . . . . . . . . . . . . .32• Search . . . . . . . . . . . . . . . . . . . . . . . . . . .32• Random . . . . . . . . . . . . . . . . . . . . . . . . . .32• Repeat A-B  . . . . . . . . . . . . . . . . . . . . . . .32• 3D Surround  . . . . . . . . . . . . . . . . . . . . . .32Programmed Playback    . . . . . . . . . . . . . . . .33Viewing a JPEG Disc   . . . . . . . . . . . . . . . . . .34Slide Show  . . . . . . . . . . . . . . . . . . . . . . . . .34Still Picture . . . . . . . . . . . . . . . . . . . . . . . . . .34Moving to another File  . . . . . . . . . . . . . . . . .34Zoom  . . . . . . . . . . . . . . . . . . . . . . . . . . . . . .34To  rotate picture  . . . . . . . . . . . . . . . . . . . . . .34Controlling Your TV with the Supplied Remote  . . . . . . . . . . . . . . .35Reference  . . . . . . . . . . . . . . . . . . . . . . .36Language Codes  . . . . . . . . . . . . . . . . . . . . . .36Country Codes . . . . . . . . . . . . . . . . . . . . . . . .36Troubleshooting  . . . . . . . . . . . . . . . . . . .37-38Specifications  . . . . . . . . . . . . . . . . . . . . . . . .39
5To  ensure proper use of this product, please read thisowner’s manual carefully and retain for future refer-ence.This manual provides information on the operationand maintenance of your DVD+VCR. Should the unitrequire service, contact an authorized service loca-tion.Moisture CondensationNever operate the DVD+VCR immediately after mov-ing it from a cold location to a warm location. Leave itfor two or three hours without operating it. If you usethe DVD+VCR in such a situation, it may damagediscs/tapes and internal parts.Symbol Used in this ManualThe lightning flash symbol alerts you to thepresence of dangerous voltage within theproduct enclosure that may constitute a riskof electric shock. The exclamation point alerts you to thepresence of important operating and mainte-nance / servicing instructions.Indicates hazards likely to cause harm tothe unit itself or other material damage.Note: Indicates special notes and operating fea-tures.Tip: Indicates tips and hints for making the taskeasier.Asection whose title has one of the following sym-bols is applicable only to the disc represented by thesymbol.DVDVideo CDsAudio CDsMP3 DiscsWMA DiscsJPEG DiscsAbout the  Symbol Display“  ” may appear on your TV display during opera-tion and indicates that the function is not permitted bythis unit or the disc.Notes on DiscsHandling DiscsDo not touch the playback side of the disc. Hold thedisc by the edges so that fingerprints do not get onthe surface. Never stick paper or tape on the disc.Storing DiscsAfter playing, store the disc in its case. Do notexpose the disc to direct sunlight or sources of heatand never leave it in a parked car exposed to directsunlight.Cleaning DiscsFingerprints and dust on the disc can cause poor pic-ture quality and sound distortion. Before playing,clean the disc with a clean cloth. Wipe the disc fromthe center out.Do not use strong solvents such as alcohol, benzine,thinner, commercially available cleaners, or anti-staticspray intended for older vinyl records.JPEGWMAMP3CDVCDDVDIntroduction Introduction
6Types of Playable DiscsDVD(8 cm / 12 cm disc)Video CD (VCD) (8 cm / 12 cm disc)Audio CD (8 cm / 12 cm disc)In addition, this unit plays DVD-R, DVD+R, DVD-RW,DVD+RW, Kodak Picture CDs, SVCD, and CD-R /CD-RW that contains audio titles, MP3, WMA, and/orJPEG files.Notes:•Refer to page 7 for more informations on disc-related terms.•Depending on the conditions of the recordingequipment or the CD-R/RW (or DVD -R, DVD +R,DVD -RW, DVD +RW) disc itself, some CD-R/RW(or DVD -R, DVD +R, DVD -RW, DVD +RW) discscannot be played on the unit.•Do not attach any seal or label to either side (thelabeled side or the recorded side) of a disc.•Do not use irregularly shaped CDs (e.g., heart-shaped or octagonal) since they may result inmalfunctions.Notes on DVDs and Video CDsSome playback operations of DVDs and Video CDsmay be intentionally programmed by software manu-facturers. This unit plays DVDs and Video CDsaccording to disc content designed by the softwaremanufacturer, therefore some playback features maynot be available or other functions may be added.Disc-related termsVCD (Video CD)AVCD holds up to 74 minutes (650 MB disc) or 80minutes (700 MB disc) of MPEG-1 full-motion videoalong with quality stereo sound.MPEGMPEG is an international standard for video andaudio compression. MPEG-1 is used in encodingvideo for VCD and provides for multichannel surroundsound coding such as PCM, Dolby Digital, DTS andMPEG audio.MP3MP3 is a popular compression format used for digitalaudio files that yields very high near-CD quality. WMAWindows media audio file. A type of coding / decod-ing developed by Microsoft Corp.JPEGJoint Pictures Expert Group. JPEG is a compressedfile format that allows you to save images with nolimit on the number of colors. PBC: Playback Control (Video CD only)Playback control is available for Video CD (VCD) ver-sion 2.0 disc formats. PBC allows you to interact withthe system via menus, search functions, or other typi-cal computer-like operations. Moreover, still picturesof high resolution can be played if they are includedin the disc. Video CDs not equipped with PBC(Version 1.1) operate in the same way as audio CDs.Title (DVD only)Atitle is generally a distinct section of a DVD disc.For example the main feature could be title 1, a docu-mentary describing how the film was made could betitle 2, and cast interviews could be title 3. Each titleis assigned a reference number enabling you tolocate it easily.Chapter (DVD only)Achapter is a segment of a title such as a scene in afilm or one interview in a series. Each chapter isassigned a chapter number, enabling you to locatethe chapter you want. Depending on the disc, chap-ters may not be recorded.Scene (VCD)On a video CD with PBC (playback control) functions,moving pictures and still pictures are divided into sec-tions called “scenes”. Each scene is displayed in themenu screen and assigned a scene number, enablingyou to locate the scene you want. A scene is com-posed of one or several tracks.Track Adistinct element of audiovisual information, such asthe picture or sound track for a specific language(DVD), or a musical piece on a video  or audio CD.Each track is assigned a track number, enabling youto locate the track you want. DVD discs allow onetrack of video (with multiple angles) and severaltracks of audio.
7Notes on Copyrights:It is forbidden by law to copy, broadcast, show,broadcast via cable, play in public, or rent copyright-ed material without permission. This product featuresthe copy protection function developed byMacrovision. Copy protection signals are recorded onsome discs. When recording and playing the picturesof these discs picture noise will appear. This productincorporates copyright protection technology that isprotected by method claims of certain U.S. patentsand other intellectual property rights owned byMacrovision Corporation and other rights owners.Use of this copyright protection technology must beauthorized by Macrovision Corporation, and is intend-ed for home and other limited viewing uses onlyunless otherwise authorized by MacrovisionCorporation. Reverse engineering or disassembly isprohibited.CONSUMERS SHOULD NOTE THAT NOT ALLHIGH DEFINITION TELEVISION SETS ARE FULLYCOMPATIBLE WITH THIS PRODUCT AND MAYCAUSE ARTIFACTS TO BE DISPLAYED IN THEPICTURE. IN CASE OF 525 PROGRESSIVE SCANPICTURE PROBLEMS, IT IS ECOMMENDED THATTHE USER SWITCH THE CONNECTION TO THE‘STANDARD DEFINITION’ OUTPUT. IF THERE AREQUESTIONS REGARDING OUR TV SET COMPATI-BILITY WITH THIS MODEL 525p DVD PLAYER,PLEASE CONTACT OUR CUSTOMER SERVICECENTER.Regional code This DVD+VCR is designed andmanufactured for playback ofregion “1” encoded DVD soft-ware. This unit can play only DVDdiscs labeled “1” or “ALL”.Notes on Regional Codes•Most DVD discs have a globe with one or morenumbers in it clearly visible on the cover. Thisnumber must match your DVD+VCR’s regionalcode or the disc cannot play. •If you try to play a DVD with a different regioncode from your player, the message “CheckRegional Code” appears on the TV screen. About the Remote ControlOperation RangePoint the remote control at the remote sensor andpress the buttons.Distance: About 23 ft (7 m) from the front of theremote sensor.Angle: About 30° in each direction of the front of theremote sensor.Battery installationDetach the battery cover on the rear ofthe remote control, and insert two(R03/AAA) size batteries with  and aligned correctly.Do not mix old and new batteries and nevermix different types of batteries such as stan-dard, alkaline, etc.Introduction 1ALLSelecting the Viewing SourceYou must select one of your output sources (DVD or VCR) to view on the TV screen. •If you want to view DVD deck output source:Press DVD until DVD indicator in the display windowlights and output source of DVD deck is viewed on the TVscreen.•If you want to view VCR deck output source:Press VCR until VCR indicator in the display windowlights and output source of VCR deck is viewed on the TVscreen.Notes:•If you insert a disc while the DVD+VCR is in the VCRmode, the DVD+VCR will switch to DVD mode automati-cally.•If you insert a cassette tape without prevention tab whilethe DVD+VCR is in the DVD mode, the DVD+VCR willswitch to VCR mode automatically.Manufactured under license from DolbyLaboratories. “Dolby”, “Pro Logic”, and thedouble-D symbol are trademarks of DolbyLaboratories.DTS and DTS Digital Out are trademarks ofDigital Theater Systems, Inc.
8aDisc Tray (DVD deck) Insert a disc here.bCassette Compartment (VCR deck) Insert a video cassette here.c1 POWERSwitches the DVD+VCR ON and OFF.d../mm- DVD: Skip to beginning of current chapter or track,press twice in quick successions to go to previouschapter or track. Press and hold button for about twoseconds to search backward.- VCR: Rewinds the tape during the stop mode or forfast reverse picture search.eNNStarts playback of a disc or tape.fMM//>>DVD: Skip to next chapter or track. Press and hold fortwo seconds for a fast forward search.VCR: Advances the tape during the STOP mode orfor fast forward picture search.gxx  Stops playback of the disc or tape.hZZOPEN/CLOSEOpens or closes the disc tray.iDisplay WindowsThe DVD deck is selected.Adisc is in the DVD deck.(Lights when a disc is in the DVD deckand Flashes when no disc.)Indicates when the Progressive scan is active.Indicates repeat mode.Indicates when the DVD+VCR is locked. DVD+VCR is in timer recording or a timer recording is programmed (VCR part only).Acassette is in the VCR deck.The VCR deck is selected.DVD+VCR is Recording.(VCR part only)Indicates PM time. (AM is not displayed.)Lights when TV mode is active.Indicates total playing time, elapsed time, remaining time or current deck status (Playback, Pause, etc).jRemote SensorPoint the DVD+VCR remote control here.kZZEJECTEjects the tape in the VCR deck.lCH (VV/vv)To  scan up or down through memorized channels.mDVD/VCR (output select)Select one of your output sources to view on the TVscreen between DVD and VCR. nLINE2 (VIDEO/AUDIO (L/R) input) Connect to the audio/video output of an externalsource (Audio system, TV/Monitor, Another VCR).TVPMRECVCR[P]DVDDVDVCRRECPMTVFront Panelabcdefg h i j k l m nLOCK functionThe Lock feature disables the front panel buttons toprevent children from tampering with theDVD+VCR. Simply press LOCK on the remote con-trol to toggle this feature on and off.
9POWER Switches DVD+VCR ON and OFF.DVD Select the DVD+VCR function mode to DVD. VCR Select the DVD+VCR function mode to VCR. INPUT Selects the VCR deck’s source(Tuner, LINE 1, or LINE 2).0-9   Selects numbered options in a menu.TV/VCR To  view channels selected by the VCR tuner or by the TV tuner.DISPLAY Accesses On-Screen Display.CLK/CNT Switches between the clock, tape counter and tape remaining modes on the display.SETUP, MENU Accesses or removes DVD Setup menu and VCR menu. bBvV Selects menu options.CH/TRK(vv+/VV-) Selects VCR channels. Adjusts manually the tape’s picture onscreen.ENTER Confirms menu selections. Displays functions on the TV screen.DISC MENU   Accesses menu on a DVD disc. RETURN (OO)   Removes the menu.AUDIO   Selects an audio language (DVD) or an audio channel (VCD). SUBTITLE Selects a subtitle language.ANGLE  Selects a DVD camera angle, if available.ZOOM   Enlarges DVD video image.EJECT   Ejects the tape in the VCR deck.OPEN/CLOSE  Opens and closes the disc tray.TV Control Buttons- POWER: Switches TV ON and OFF.- INPUT: Selects the TV’s source.- CH +/–: Selects TV’s channel.- VOL +/–: Adjusts TV’s volume.- MUTE: Turns on or off TV sound.BACKWARD / FORWARD (m/M)- DVD: Search backward or forward.- VCR: Rewinds/Advances the tape during the STOPmode, for fast reverse/forward picture search.SKIP (./ >)Go to next chapter or track. Returns to beginning of current chapter or track or go to previous chapter or track.PAUSE/STEP (X)Pause playback or recording  tem-porarily, press again to exit pausemode. press repeatedly for frame-by-frame playback.NN(PLAY)   Starts playback.STOP (xx)   Stops playback or recording.REC/ITR (zz)Starts recording. Press repeatedly to setthe recording time.LOCK Locks/unlocks front panel buttons.TITLE   Displays the disc’s Title menu, if available.PROGRAM   Shows or hides Program menu.MARKER   Marks any point during playback.SEARCH   Displays Marker Search menu.CLEAR   Removes a mark on the Marker Search menu.REPEAT   Repeat chapter, track, title or all.A-B   Repeats sequence between two points (A and B). SPEED   Selects recording speed.RANDOM Plays tracks in random order.CM SKIP Fast forwards picture search through 30 seconds of recording.titleRemote Control
10aANT.INConnect the VHF/UHF/CATV antenna to this terminal.bVCR IN LINE 1 (VIDEO/AUDIO (Left/Right))Connect the audio/video output of an external source(Audio system, TV/Monitor, VCR, Camcorder).cDVD/VCR OUT (VIDEO/AUDIO (Left/Right))Connect to a TV with video and audio inputs.dCOMPONENT/PROGRESSIVE SCAN VIDEOOUT (Y Pb Pr) (DVD OUT)Connect to a TV with Y Pb Pr inputs.eAUDIO OUT (Left/Right) (DVD OUT) Connect to a TV or other equipment with audio inputs.fAC Power CordPlug into the power source.gRF. OUT(DVD/VCR OUT)Connect to a TV with RF coaxial inputs.hCOAXIAL (DIGITAL AUDIO OUT jack) (DVD OUT)Connect to digital (coaxial) audio equipment.iS-VIDEO OUT (DVD OUT)Connect to a S-Video Input on TV.jOPTICAL (DIGITAL AUDIO OUT jack) (DVD OUT)Connect to digital (optical) audio equipment.abcde fgh ijPreparationPlease refer to the documentation accompanying your other devices for further information.Notes:•Make sure the DVD+VCR is connected directly to the TV and tune the TV to the correct video input channel. •Do not connect the DVD+VCR’s AUDIO OUT jack to the phono in jack (record deck) of your audio system. Do not con-nect the DVD+VCR via another VCR. The DVD image could be distorted by the copy protection system. •The picture and sound of a nearby TV, VCR, or radio may be distorted during playback. Position the units away fromeach other or turn off the unit after removing the disc.Rear Panel
11Connecting an Connecting an Antenna Antenna or Cable TVor Cable TVaaAntenna:Disconnect the antenna from the rear of the TV andidentify the antenna cable. If it is a round 75 ohmcoaxial cable connect it directly to the jack markedANT.IN on your DVD+VCR. If your antenna cable isflat connect it to a 300-ohm to 75-ohm antenna adap-tor (not supplied) and slip the adaptor over theANT.IN jack. Don’t attempt to screw it into to theDVD+VCR.bbCable TV:If your cable connection has no converter ordescrambler, unscrew the cable from your TV andattach it to the ANT.IN jack on the DVD+VCR. If aconverter is required connect a coaxial cable from thewall jack to the IN connector on the converter, and acoaxial cable from the OUT connector on the convert-er to the ANT IN on your DVD+VCR. This cablehookup permits both TV and DVD+VCR operation. To view or record a CATV channel1Tune the TV to the DVD+VCR output channel (CH 3 or 4).2Set the DVD+VCR channel selector to the cableoutput channel. (Example: CH3)3Select a channel using the cable converter.Notes:•With this connection, you cannot record one programwhile viewing another.•If you are using a cable box to tune channels, it is notnecessary to do Auto Channel Programming.Basic TV ConnectionsBasic TV ConnectionsMake one of the following connections, depending onthe capabilities of your TV.PreparationCable TVWall JackBack Panel ofTypical Cable BoxRear of DVD+VCRAntenna AntennaFlat Wire(300 ohm)300/75 ohmAdaptor(Not supplied)Cable TVWall JackOR ORabRear of DVD+VCRLRAUDIO INPUTVIDEO INPUTANTENNAINPUTRear of TVA1VRYPbPrCOMPONENT/PROGRESSIVE SCANVIDEO INPUTLRAUDIO INPUT S-VIDEO INPUTRear of TVSA2C
12RF coaxial connectionConnect the RF.OUT jack on the DVD+VCR to theantenna in jack on the TV using the supplied 75-ohmCoaxial Cable (R).How to set the DVD+VCR’s RF output chan-nel1. When the DVD+VCR is turned off, press and holdCH (V/v) on the front panel for more than fiveseconds. “RF03” or “RF04” appears in the displaywindow.2. Press CH (V/v) to change the RF output channel(CH 03 or CH 04). Tune the TV to this channel.3. Turn off the DVD+VCR.Audio/Video connection 1. Connect the DVD/VCR VIDEO OUT jack on theDVD+VCR to the video in jack on the TV usingthe video cable supplied (V).2. Connect the Left and Right DVD/VCR AUDIOOUT jacks on the DVD+VCR to the audio left/rightin jacks on the TV (A1) using the supplied audiocables.Note:If you use this connection, set the TV’s source selector toVIDEO.Optional TV ConnectionsOptional TV ConnectionsThese connections support only DVD playback. Thetuner and VCR still output through the RF.OUT (R) orDVD/VCR OUT (A, V) jacks. When using the COMPONENT/PROGESSIVE SCANVIDEO OUT jacks, set the Video Output to “YUV” onthe setup menu. When using the S-VIDEO OUT jack,set the Video Output to “S-VIDEO” on the setupmenu. (see page 17)S-Video connection 1. Connect the S-VIDEO OUT jack on theDVD+VCR to the S-Video in jack on the TV usingthe optional S-Video cable (S).2. Connect the Left and Right AUDIO OUT jacks ofthe DVD+VCR to the audio left/right in jacks onthe TV using the supplied audio cables (A2).Component Video (Color Stream®) /Progressive Scan (ColorStream®pro) connection•If your television is a high-definition or “digitalready” television, you may take advantage of theDVD+VCR’s progressive scan output for the high-est video resolution possible. •If your TV does not accept the Progressive Scanformat, the picture will appear scrambled if you tryProgressive Scan on the DVD+VCR.1. Connect the COMPONENT/PROGRESSIVESCAN VIDEO OUT jacks on the DVD+VCR to thecorresponding in jacks on the TV using an option-al Y Pb Pr cable (C).2. Connect the Left and Right AUDIO OUT jacks ofthe DVD+VCR to the audio left/right in jacks onthe TV (A2) using the supplied audio cables.Notes:•Set the Progressive Scan to “On” on the setup menu forprogressive scan signal, see page ??.•When you use Component Video signal, set theProgressive Scan to “Off” on the setup menu.•Progressive scan does not work with the analog videoconnections (yellow VIDEO OUT jack and S-VIDEOOUT jack).Sound Connection for DVDYou can ONLY listen to DVD playback using OPTI-CAL (O), COAXIAL (X) and AUDIO OUT (A2) con-nections. The tuner and VCR will still be heardthrough the RF.OUT (R) or DVD/VCR AUDIO OUT(A1) jack. (See page 14.)Connecting to an amplifier equipped with twochannel analog stereo or Dolby SurroundConnect the Left and Right AUDIO OUT (orDVD/VCR AUDIO OUT) jacks on the DVD+VCR tothe audio left and right in jacks on your amplifier,receiver, or stereo system using the audio cables(A1, A2) supplied.
13Connecting to an amplifier equipped with two chan-nel digital stereo (PCM) or to an Audio/Video receiv-er equipped with a multi-channel decoder (DolbyDigital™, MPEG 2, or DTS)1. Connect one of the DVD+VCR’s DIGITAL AUDIOOUT jacks ( OPTICAL O, COAXIAL X) to the cor-responding in jack on your amplifier. Use anoptional digital (OPTICAL O, COAXIAL X) audiocable.2. You will need to activate the DVD+VCR’s digitaloutput. (See “AUDIO” on page 21).Digital Multi-channel soundAdigital multi-channel connection provides the bestsound quality. For this you need a multi-channelAudio/Video receiver that supports one or more of theaudio formats supported by your DVD+VCR (MPEG2, Dolby Digital and DTS). Check the receiver manualand the logos on the front of the receiver.Caution:Due to the DTS Licensing agreement, the digital out-put will be in DTS digital out when DTS audio streamis selected.Notes:•If the audio format of the digital output does not match thecapabilities of your receiver, the receiver will produce astrong, distorted sound or no sound at all. •Six Channel Digital Surround Sound via digital connec-tion can only be obtained if your receiver is equippedwith a Digital Multi-channel decoder. •To see the audio format of the current DVD in the on-screen display, press AUDIO.Accessory Audio/Video (A/V) Connections toDVD+VCRConnect the VCR IN LINE 1 or LINE 2 jacks on theDVD+VCR to the audio/video out jacks on youraccessory component, using the optional audio/videocables. (Refer to page 28 for “Dubbing and Editing”.)Preparation DIGITAL INPUTOPTICALCOAXIALLRAUDIO INPUTRear of DVD+VCRAmplifier (Receiver)A2A1 XO
14Initial Settings - VCRInitial Settings - VCRBy using the VCR Setup menu, you can make vari-ous adjustments to items such as clock setting, andtimer recordings.Your DVD+VCR allows remote control adjustment ofseveral features. General Operation1. Press VCR on the remote control.2. Press MENU and the MAIN menu will appear.3. Use v/Vto select the desired menu, then pressENTER.. 4. Use v/Vto choose a desired option on the selet-ed Menu. Then use b/Bto choose a desired set-ting.5. Press MENU when finished.Note:Menus remain on-screen for 3 minutes.CLOCKThe DVD+VCR gives you two ways to set the timeand date: the Auto Clock Feature or manually.The initial Clock Setting is JANUARY 1, 2004, 12:00AM.Auto Clock Set•AUTO CLOCK SET The Auto Clock Set feature is set to ON at the fac-tory. In the ON setting, the DVD+VCR looks for achannel carrying XDS (Extended Data Services)information. XDS updates the clock using theCoordinated Universal Time. - Use b/Bto choose ON or OFF.•DAYLIGHT SAVINGSYou can turn Daylight Savings On or Off manually.If you choose “AUTO”, the DVD+VCR sets theclock using the DST information broadcast in thesignal (channel).- Use b/Bto choose AUTO, ON or OFF•TIME ZONEYou can set your local Time Zone manually. If youchoose “AUTO”, the DVD+VCR sets the clockusing the first Coordinated Universal Time informa-tion it finds in a broadcast signal. -Use b/Bto choose the correct time zone (AUTO, EASTERN, CENTRAL, MOUNTAIN,PACIFIC, ALASKA or HAWAII).Notes:•The Auto Clock feature enables the DVD+VCR to set upthe clock while the DVD+VCR is turned off.•There are cases where the TV station does not send orsends wrong date and/or time information and theDVD+VCR sets the incorrect time. If this happens werecommend that you set the clock manually.Manual Clock SetUse v/V/b/Bto enter the necessary information.•MONTH : Choose the month.•DAY : Choose the date.The day of the week will display automatically.•YEAR : Choose the year.•TIME : Choose the time.Press and hold b/B to advance clock continuously.Notes:•If setting the clock manually, “AUTO CLOCK SET” mustset to “OFF”. If it is set to “ON”, an incorrect date and/ortime will be entered again when the DVD+VCR is turnedoff.•The clock uses the 12-hour system. Be sure to set AMand PM correctly.(AM does not appear.)
15TUNINGThis DVD+VCR is equipped with a frequency synthe-sized tuner capable of receiving up to 181 channels.These include VHF channels 2-13, UHF channels 14-69 and CATV channels 1-125. Auto Channel Programming 1. Choose the SOURCE SELECT option, then useb/Bto select TUNER.Use b/Bto switch among TUNER, LINE1, and LINE2.2. Choose the AUTO CHANNEL SET option, thenpress ENTER to find channels.•The tuner will automatically cycle through all availablechannels (TV/CATV) in the area and place them inthe tuner’s memory.•After the AUTO CHANNEL SET is complete, the TUN-ING menu will hide and return to the TV screen auto-matically.3. Make sure the TUNING BAND is set appropriately(TV or CATV).•TV : If you are using a standard antenna to receivechannels. •CATV : If you are using basic cable to receive chan-nels.To Add or Erase ChannelsThis feature allows you to add or erase channelsfrom memory manually.1. Choose the CH. ADD/DEL option, then use b/Bto select a channel to add or erase.2. Use ENTER to add or erase the channel.Repeat steps 1 and 2 to add or erase other channels.3. Press MENU to return to the TV screen.SETUPFUNCTION OSDThe on-screen display can be turned on or off.AUDIO MODEThe DVD+VCR has two separate audio playback sys-tems, the high quality VHS Hi-Fi system and standardNORMAL mono system. The same audio is generallyrecorded on both systems. The VHS Hi-Fi systemplays on separate (left and right) channels, and theNORMAL system plays monaural sound. The normaltrack is always played so the cassette can be playedon a DVD+VCR that does not have VHS Hi-Fi.BROADCAST TYPE (STEREO/SAP/MONO)Multichannel Television Sound (MTS) carries stereoand/or Second Audio Program (SAP) bilingual sig-nals. Set this display to the desired position whenboth MTS stereo and SAP signals are received.When only one of the MTS signal is received, theDVD+VCR automatically selects the correspondingreceiving mode (Stereo or SAP) regardless of theselected position. For normal operation, the displayshould be in the STEREO position. The DVD+VCRwill then record a STEREO program when available,and record a mono program IF the program is NOTIN STEREO. For weak STEREO and/or SAP broad-casts, changing the display to mono may give clearersound.AUDIO OUTPUT (STEREO/LEFT/RIGHT)Used during playback [when AUDIO MODE (HI-FI/NORMAL) is in HI-FI position] for selecting theaudio output signals from the AUDIO OUT terminals(L ch and R ch), and RF.OUT. This display settingshould normally be left in the stereo position, so thatwhen a stereo tape is played, the stereo sound willbe heard through the left and right channels. If amono tape is played and the audio output is set tostereo, the same mono sound will be heard from bothleft and right channels.title
16Initial Settings - DVDInitial Settings - DVDBy using the DVD Setup menu, you can make vari-ous adjustments to items such as picture and sound.You can also set a language for the subtitles and theSetup menu, among other things. For details on eachSetup menu item, see pages 20 to 23.To  display and exit the Menu:Press SETUP to display the menu. A second press ofSETUP will take you back to initial screen.To  go to the next level: Press Bon the remote control. To  go back to the previous level:Press bon the remote control. General Operation1. Press DVD on the remote control.1. Press SETUP. The Setup menu appears.2. Use v/Vto select the desired option then pressBto move to the second level. The screen showsthe current setting for the selected item, as wellas alternate setting(s).3. Use v/Vto select the second desired optionthen press Bto move to the third level.4.Use v/Vto select the desired setting then pressENTER to confirm your selection. Some itemsrequire additional steps.5. Press SETUP or N(PLAY) to exit the Setupmenu.LANGUAGEMenu LanguageSelect a language for the VCR and DVD’s setupmenu and information display. Disc Audio / Subtitle / Menu Select the language you prefer for the audio track(disc audio), subtitles, and the disc menu.Original: Refers to the original language in which thedisc was recorded.Other: To  select another language, press number but-tons then ENTER to enter the corresponding 4-digitnumber according to the language code list in the refer-ence chapter (see p. 41). If you enter the wrong lan-guage code, press CLEAR.DVD
17DISPLAYTV Aspect 4:3 : Select when a standard 4:3 TV is connected.16:9 Wide: Select when a 16:9 wide TV is connected.Display ModeDisplay Mode setting works only when the TV Aspectmode is set to “4:3”.LetterBox: Displays a wide picture with bands on theupper and lower portions of the screen.Panscan: Automatically displays the wide picture onthe entire screen and cuts off the portions that do notfit.Progressive Scan Progressive Scan Video provides the highest qualitypictures with less flickering.If you are using the Component Video jacks for con-nection to a TV or monitor that is compatible with aprogressive scan signal, set Progressive Scan to On.To  turn on progressive scan:Connect component/progressive out of this unit to theinput of your monitor/television, set your television ormonitor to component/progressive Input.1. Select “Progressive Scan” on the DISPLAY menuthen press B.2. Select “On” using the v/Vbuttons. 3. Press ENTER to confirm your selection. The confirm menu will appear.4. When the confirm menu appears on your screen“CANCEL” is highlighted as default. Use the bbut-ton to highlight “ENTER”.5. Pressing ENTER will set this unit to progressivescan mode.Note:You must set the Video Output to “YUV” on the DIS-PLAY menu.Video OutputSet this unit’s Vidoe Output options according to theTV connection type. S-VIDEO: When your TV is connected with the S-VIDEO OUT jack on this unit.YUV: When your TV is connected with the COMPONENT/PROGRESSIVE SCAN VIDEO OUTjacks on this unit. RGB: When your TV is connected with the RGB sig-nal jack.DVDDVDDVDPreparation
18AUDIOEach DVD disc has a variety of audio output options.Set this unit’s AUDIO options according to the type ofaudio system you use. Dolby Digital / DTS / MPEGBitstream: Select “Bitstream” if you connect theDVD+VCR’s DIGITAL AUDIO OUT jack to anamplifier or other equipment with a Dolby Digital,DTS or MPEG decoder.PCM (for Dolby Digital / MPEG): Select whenconnected to a two-channel digital stereo amplifi-er. DVDs encoded in Dolby Digital or MPEG willbe automatically downmixed to two-channel PCMaudio.Off (for DTS): If you select “Off”, the DTS signalis not output through the DIGITAL AUDIO OUTjack.Sample Freq. (Frequency)If your receiver or amplifier is NOT capable of han-dling 96 kHz signals, select 48 kHz. When this choiceis made, this unit automatically converts any 96 kHzsignals to 48 kHz so your system can decode them. If your receiver or amplifier is capable of handling 96kHz signals, select 96 kHz. When this choice ismade, this unit passes each type of signal throughwithout any further processing. Check the documentation for your amplifier to verifyits capabilities. DRC (Dynamic Range Control)With the DVD format, you can hear a program’ssoundtrack in the most accurate and realistic presen-tation possible, thanks to digital audio technology.However, you may wish to compress the dynamicrange of the audio output (the difference between theloudest sounds and the quietest ones). This allowsyou to listen to a movie at a lower volume without los-ing clarity of sound. Set DRC to On for this effect.OTHERSThe PBC, Auto Play, B.L.E. and PLUGE settings canbe changed. PBCSet Playback Control (PBC) to On or Off.On: Video CDs with PBC are played according to thePBC.Off: Video CDs with PBC are played the same wayas Audio CDs.Auto Play You can set up the DVD+VCR so a DVD disc auto-matically starts playing whenever the DVD is insert-ed.If Auto Play mode is set to On, this DVD player willsearch for title that has the longest playback time andthen play back the title automatically.On: Auto Play function is active.Off: Auto Play function is not active.Note:The Auto Play function may not work for some DVDs.B.L.E. (Black Level Expansion)To  select the black level of playback pictures. Setyour preference and monitor’s ability.On: Expanded grey scale. (0 IRE cut off)Off: Standard grey scale. (7.5 IRE cut off)PLUGE (Blacker than Black) For proper adjustment of your television brightness settings utilizing a commercially available test disc.On:Select when you adjust the level of your TV using a com-mercially available test disc that contains pluge signals.Off: For normal use.DVDDVDVCDDVDDVDDVD
19LOCK (Parental Control)  Rating  Some movies contain scenes that may not be suit-able for children to view. Many of these discs containparental control information that applies to the com-plete disc or to certain scenes on the disc. Moviesand scenes are rated from 1 to 8, depending on thecountry. DVD video discs may or may not respond tothe parental control setting if the Country code of thedisc is set wrongly. Some discs offer more suitablescenes as an alternative. The parental control feature allows you to blockaccess to scenes below the rating you input, therebypreventing your children from being able to viewmaterial you believe is unsuitable. 1. Select “Rating” on the LOCK menu then press B.2. To access the Rating, Password and CountryCode features, you must input the 4-digit securitycode you created. If you have not yet entered asecurity code you are prompted to do so. Input a 4-digit code and press ENTER. Enter itagain and press ENTER to verify. If you make amistake before pressing ENTER, press CLEAR.3. Select a rating from 1 to 8 using the v/Vbuttons. Rating 1-8: Rating one (1) has the most restric-tions and rating eight (8) is the least restrictive.UnlockIf you select unlock, parental control is not activeand the disc plays in full.Note:If you set a rating for the player, all disc scenes with thesame rating or lower are played. Higher rated scenes arenot played unless an alternate scene is available on thedisc. The alternative must have the same rating or a lowerone. If no suitable alternative is found, playback stops. Youmust enter the 4-digit password or change the rating level inorder to play the disc.4. Press ENTER to confirm your rating selection,then press SETUP to exit the menu.5. Press OPEN/CLOSE (Z)to activate parental control.Password (Security Code)You can enter or change password.1. Select “Password” on the LOCK menu then pressB. 2. Press ENTER.3. Follow step 2 as shown left (Rating). “Change” or“New” is highlighted.4. Enter the new 4-digit code, then press ENTER.Input it again to verify.5. Press SETUP to exit the menu.If you forget your Security CodeIf you forget your security code you can clear it usingthe following steps:1. Press SETUP to display the Setup menu.2. Input the 6-digit number “210499” and the securitycode is cleared. 3. Enter a new code as described above.Country Code Enter the code of the country/area whose standardswere used to rate the DVD video disc, based on thelist in the reference chapter (see p. 41).1. Select “Country Code” on the LOCK menu thenpress B.2. Follow step 2 as shown left (Rating).3. Select the first character using v/Vbuttons.4. Press ENTER and select the second characterusing v/Vbuttons.5. Press ENTER to confirm your country code selec-tion.DVDDVDtitle
20This chapter describes how to operate the VCR andDVD.VCR TVCR Tape Playbackape PlaybackPress the VCR button to select the device to be oper-ated. Basic Instructions1. Turn on the TV.2. Tune the TV to the DVD+VCR output channel(CH 3 or 4) or if a direct VIDEO/AUDIO connec-tion is made between the DVD+VCR and the TV,set the TV’s source selector to VIDEO.3. Set the output source to VCR as shown in“Selecting the Viewing source” on page 7.4. Insert a pre-recorded video cassette. The indicator lights and the DVD+VCR powers onautomatically. 5. If the  (TIMER) indicator in the display windowis lit press POWER once.6. If a tape without a safety tab is inserted the unitstarts playback automatically. If not, press PLAY(N). PLAY appears on the TV screen. Note: It is not necessary to select the tape speed for playbackbecause it is automatically selected by the DVD+VCR. Also,during playback the TV/VCR selector switches to VCRmode automatically.7. Press STOP (x)to stop playback. STOP appearson the TV screen. If the tape reaches the endbefore you press STOP (x) the DVD+VCR auto-matically stops, rewinds and ejects the tape.Auto TrackingAutomatic tracking adjusts the picture to removesnow or streaks and beings when:•Atape is played for the first time.•The tape speed (SP, LP, SLP) changes.•Streaks or snow appear due to scratches on thetape.Manual TrackingTo  manually adjust the tracking use theCH/TRK (v/V) buttons on the remote control or CH (v/V) on the front panel during playback. Notes:•Vertical jitter requires a very fine adjustment.•Tracking is automatically reset to normal when the tapeis ejected or the power cord is unplugged for more than3 seconds.SearchThis function lets you visually search for a tape sec-tion in either direction: forward and reverse. Duringthe high-speed picture search modes, the audio ismuted and horizontal lines (noise bars) appear. Also,a short time is needed to stabilize the tape speedwhen re-entering the PLAY mode so slight interfer-ence may be observed during this time.To  search:1. Press REVERSE (m) or FORWARD (M)during playback.2. To return to playback, press PLAY (N).Note: After 3 minutes in SEARCH mode the DVD+VCR returns toPLAY mode to protect the tape and video heads.Still Picture and Frame-by-Frame Playback1. Press PAUSE/STEP (X) during playback.Astill picture appears on the TV screen and theaudio is muted.2If the still picture vibrates vertically, stabilize it byusing CH/TRK (v/V)on the remote control.3. Press PAUSE/STEP (X) repeatedly to advancethe video picture one frame at a time.4. To return to playback, press PLAY (N).Note: After 5 minutes in STILL mode the DVD+VCR stops to pro-tect the tape and video heads.Operation
21Slow MotionDuring slow motion, audio is muted and horizontallines (noise bars) may appear on the TV screen. Thisis normal.1While in still mode, press FORWARD (M). Thetape is played at a speed 1/19 times slower thanthe normal speed. 2. Use CH/TRK (v/V) on the Remote Control if nec-essary to adjust the tracking. 3. To return to the normal speed, press PLAY (N).Note: After 3 minutes in SLOW MOTION mode the DVD+VCRgoes back to PLAY mode to protect the tape and videoheads.CM SKIP (Commercial Skip)This feature is useful for skipping commercials orshort program segments.1. Press CM SKIP in playback mode. TheDVD+VCR performs a fast forward picture searchthrough 30 seconds of recording. 2. Press CM SKIP again to extend the search timeby an addition 30 seconds. The maximum searchtime is 3 minutes.3. When the search is complete, the DVD+VCRgoes into playback mode automatically.VHS Hi-Fi Stereo / MTSVHS Hi-Fi Stereo / MTSBroadcastBroadcastThis DVD+VCR is equipped with the VHS Hi-Fi audiosound system for recording and playback. The infor-mation below gives a brief description of Hi-Fi audioand how to record and play a tape in the Hi-Fi audiomode.Hi-Fi Stereo Audio SoundAstereo TV with AUDIO/VIDEO input jacks or astereo audio system is required for true stereo play-back. To experience the full and rich stereo soundavailable with Hi-Fi recorded tapes, we recommendthe connection of this unit to a home stereo audiosystem.1Set the AUDIO MODE option to HI-FI on the VCRSETUP menu .2Set the AUDIO OUTPUT option to STEREO sothat the left channel sound (L) is heard from theleft speaker and the right channel sound (R) isheard from the right speaker.The other options are (LEFT) POSITION, whichresults in the left channel sound (L) being heardfrom both speakers or (RIGHT) POSITION, whichresults in the right channel sound (R) being heardfrom both speakers.3Insert a cassette and press PLAY (N). MTS (Multi-Channel TV Sound)This DVD+VCR can decode MTS stereo and bilingual(SAP) off-the-air broadcast sound signals. It alsodecodes stereo TV sound from local cable companiesas long as they operate on assigned cable frequen-cies and use the EIA-recommended MTS stereo/bilin-gual TV sound system.Multichannel TV Sound Indicator (MTS)When you press ENTER one or both of the indicatorsappears on the TV Screen.STEREO The DVD+VCR can record in stereo onto the VHS Hi-Fi audio tracks when the BROADCAST TYPE optionis in the STEREO position. The DVD+VCR can alsorecord mono audio onto the mono audio track.SAPSome stations transmit a Second Audio Program,which is used for a second language or additionalinformation. STEREO/SAPUse the BROADCAST TYPE option to select thedesired recording mode (STEREO or SAP).Operation
22VCR TVCR Tape Recordingape RecordingBasic Instructions1. Turn on the DVD+VCR and TV.2. Tune the TV to the DVD+VCR output channel(CH 3 or 4) or if a direct VIDEO/AUDIO connec-tion is made between the DVD+VCR and the TV,set the TV’s source selector to VIDEO.3. Insert a video cassette with the safety tab intact.4. Select the desired channel to tape using CH/TRK(v/V).5. If you are recording from another source viaaudio/video input jacks (at the rear or front panel),select LINE1 or LINE2 using INPUT.6. Set the desired recording speed (SP or SLP) bypressing SPEED. This DVD+VCR is not designedto record in LP mode.7. Set the MTS mode (STEREO or SAP). Set theBROADCAST TYPE option to SAP if applicable.8. Press REC/ITR (z)and recording starts. TheREC indicator appears in the display window. Note: If a cassette with no safety tab is loaded, the cassette isejected.9. Press STOP (xx)to stop recording. If the tapereaches the end before STOP (xx)is pressed, theDVD+VCR stops, rewinds and ejects the tape.Tip: Use PAUSE/STEP (X) for best results when makingchanges while recording. For example, if you want tochange channels while recording, first press PAUSE/STEP(X) to put the unit in pause mode, select the desired chan-nel on the DVD+VCR, and then press PAUSE/STEP (X)again to resume recording.To pause the recording1Press PAUSE/STEP (X) to pause the tape duringrecording. The REC indicator flashes in the dis-play window.2When you want to continue recording, pressPAUSE/STEP (X) or press REC/ITR (z)After 5minutes in PAUSE mode, the DVD+VCR stopsautomatically to protect the tape and the videoheads. To record one TV program while watchinganother1Press TV/VCR to select the TV mode duringrecording. The TV indicator appears.2Using the TV, select the channel to be viewed.TTimer Recordingimer RecordingThis DVD+VCR can be programmed to record up to8 programs within a period of 1 year. For unattendedrecording, you must input the channels to be record-ed and the starting and ending times.1. Turn on the DVD+VCR and the TV.2. Be sure the TV is set to the DVD+VCR outputchannel (3 or 4).3. Make sure the TUNING BAND in the TUNINGmenu is set appropriately (TV or CATV).4. Press MENU and the MAIN menu appears.5. Use v/Vto choose the PROGRAM menu andpress ENTER. If eight programs are already entered, the FULLYPROGRAMMED message appears for a momentand then PROGRAM 1 appears on the TVscreen. If you try to set the program timer before settingthe clock, PLEASE SET THE CLOCK appears fora moment and then CLOCK menu appears onthe TV screen. Set the time and date before pro-ceeding.Things to know before starting
236. Use the v/Vbuttons to switch between the timeroptions, and the b/Bbuttons to input the programinformation:Input the month, day, start and stop times of theprogram you want to record.Channel: Select a TV channel, LINE1 or LINE2. Ifyou have CABLE TV and use a cable box (con-verter) you must set the channel to match thecable box output channel (usually CH 3 or 4).Change channels on the cable box instead of withthe DVD+VCR. If you use a cable converter, youcan program multiple recordings only on the con-verter box output channel. This is because theconverter determines what channel you viewthrough your DVD+VCR.Speed: AUTO mode determines how much tapeis left and switches the speed from SP to SLP if itis necessary to complete recording the program. Ifthis occurs there could be some picture andsound distortion at the point where the speedchanges.Repeat: To record up to 8 programs on a certainday of every week select WEEKLY. To record upto 8 programs at the same time Monday throughFriday select DAILY. Otherwise select ONCE.7. Press MENU and the program is memorized bythe DVD+VCR.8. Additional programs may be entered by repeatingsteps 1-7.9. Ensure you insert a tape with the record safetytab intact before the first programmed time.Notes: •If you make a mistake or want to change a setting, usevto select the option and correct it using b/B.•If the program preset time is past, the PAST TIME PRO-GRAMMED message appears on the TV screen. Returnto the incorrect program and program it with the correcttime.•If you enter a past date, the timer recording will be per-formed on that date of the next year.•If the power fails or the DVD+VCR is unplugged theclock and timer settings are kept in memory for only 3seconds. Otherwise you must reset the clock and timer.Checking or Erasing the Timer ProgramProgramming can be checked whenever theDVD+VCR is turned on.1Press MENU and the MAIN menu appears.2Use v/Vto choose the PROGRAM menu andpress ENTER.3Use b/Bto select a program you want to checkor erase. To erase the program, press CLEAR.4Press MENU to return to the TV screen.Program PriorityIf the recording start and end times of preset pro-grams overlap on the same day (see the example),the second program is not recorded until the first isfinished.In this example, the first part of program numbers 2and 3 are not recorded. Operation
24Instant TInstant Timer Recordingimer RecordingWith this feature you can record for a preset lengthwithout using the program timer.1. Turn on DVD+VCR and the TV.2. Be sure the TV is tuned to the DVD+VCR outputchannel (CH 3 or 4). If a direct VIDEO/AUDIOconnection is made between the DVD+VCR andthe TV, set the TV’s source selector to VIDEO.3. Insert a video cassette with the safety tab intact.4. Select the desired channel using CH/TRK (v/V)or the number buttons (0-9). The channel numberappears on the TV screen. If you are recordingfrom another source via audio/video input jacks(at the rear or front panel), select LINE1 (rearjacks) or LINE2 (front jacks) by using INPUT.5. Set the desired recording speed (SP or SLP)using SPEED. The tape speed appears on the TVscreen.6. Press REC/ITR (z)twice. The menu appears onthe TV screen, recording starts, and the (TIMER) indicator lights. 7. Press REC/ITR (z) repeatedly to select therecording time length. Each time you press thisbutton the recording time increases 30 minutes(up to 9 hours). If you set the time to 0H00M, theDVD+VCR goes into the normal recording mode.8. Stop the recording by pressing STOP (x) If youdon’t press stop, at the end of the recording, theDVD+VCR stops and shuts off.Note: During Instant Timer Recording, you cannot change thechannel on the DVD+VCR.Checking the Recording TimePress REC/ITR (z) once to check the recording time.The recalled setting automatically returns to the TVscreen after 6 seconds.Extending the Recording TimeThe recording time can be extended anytime bypressing REC/ITR (z). Subsequent presses result inadvancing the recording time by 30-minute incre-ments.Note: If you press PAUSE/STEP (X) during instant timer record-ing, the instant timer recording is cancelled.Dubbing and EditingDubbing and EditingYou can edit or dub your camcorder or anotherVCR’s recordings to this DVD+VCR using the rearor front panel-mounted Audio and Video (A/V) inputjacks. These direct A/V jacks provide better pictureresults than using the RF jack on the rear panel. 1. Connect the camcorder’s / other VCR’s A/V outputs to your DVD+VCR.2. Set the input channel to LINE2. (press INPUTtwice to select LINE2) unless you have connectedyour DVD+VCR to the A/V input jacks on the rearof DVD+VCR. In this case, select LINE1.3. Play the tape in the camcorder or other VCR. Ifyou have a TV attached to your DVD+VCR, youcan see the video playing.4. When you want recording to begin, pressDVD+VCR’s REC/ITR (z) once to start.Note: Before recording, confirm the recording start position.INSTANT TIMER RECORDCHANNEL 2SPEED SPSTART NOWLENGTH 0H30M
25Operation Copying from DVD to VCRCopying from DVD to VCRThis unit allows you to copy the contents of a DVDto a VHS tape with a press of the COPY buttonunless the DVD is copy protected. For example, it isnot permitted to copy Macrovision encoded DVDs.LOCK is displayed in the display window.1. Insert the disc you wish to copy into the DVDdeck and close the disc tray.2. Insert a blank VHS video tape into the VCR deck.3. Press the REC/ITR (z). The DVD goes into PLAYmode and the VCR goes into RECORD mode. Ifthe DVD disc menu appears, you may need topress PLAY (N)manually to begin copying.4When the DVD is finished playing, press VCR onthe remote control and then press STOP (x)toend copying. Notes: •You must stop the copy process manually when theDVD movie ends, or the unit may replay and record overand over again.•When you stop the DVD playback during copying, therecording on VCR is stopped automatically.On-Screen Display - VCROn-Screen Display - VCRSome of these functions will be displayed every timethe DVD+VCR is operated.Each press of the ENTER changes the TV screen inthe following sequence.❶TAPE SPEED DISPLAY❷FUNCTION DISPLAY❸HI-FI DISPLAY❹CHANNEL DISPLAY❺STEREO/SAP DISPLAY(MONO is not displayed)❻DATE DISPLAY❼CLOCK/COUNT/REMAIN DISPLAYReal-Time CounterIf a tape with contents recorded on it is inserted intothe VCR, the real-time counter shows length of thetape running in hours, minutes, and seconds. PressCLK/CNT to select the real-time counter display.Every press of CLK/CNT changes the TV screen asillustrated below.Counter Memory This feature is useful if there is a section of tape youwant to view immediately after recording or if youwant to return to the same point several times.1. Begin recording or playing a tape.2. Press CLK/CNT until the real-time counter isdisplayed on the TV screen.3. At the point that you want to locate later, resetthe real-time counter to “0:00:00” by pressingCLEAR.4. Continue to play or record.5. Press STOP (x)  when recording or playbackfinishes.6Press REVERSE (.). The tape automati-cally stops when the tape counter returns toabout “0:00:00”.Tape RemainingThis function displays the amount of time remainingon the tape during recording or playback. PressCLK/CNT repeatedly until the REM indicator displayson the TV screen during recording or playback.The remaining tape length may not be displayed cor-rectly depending on the condition of the tape and thekind of the tape (T-140, T-160, or T-210 etc.).Notes:•The function displays can be seen displayed on the TVscreen for 5 seconds.  •The clock (or tape counter, tape remaining) mode will bedisplayed until you press ENTER.•The tape counter and the remaining tape length indica-tor appear only when a cassette is inserted. Also, theremaining tape length indicator appears after any tapeoperation.PLAY HI-FI  CH  4SP STEREOOCT  8 ,  FRI 2:15 PM❶❷ ❸ ❹ ❺❻❼2:15 AM 0:05:25 REM 1:07CLOCK COUNTER REMAINING TIME
26Additional VCR InformationAdditional VCR Information•During manual recording, timer recording, InstantTimer Recording, playback, or fast forwardmodes, the DVD+VCR automatically startsrewinding the tape at the end of the tape. Thecassette stops at the beginning of the tape and isejected.•After you have finished using the DVD+VCR,rewind, eject, and remove the cassette. Place thecassette in its protective sleeve to protect it fromdust. It is not necessary to rewind the cassettebefore removing it, but if you do, it is ready to playor record the next time you use it.•Be sure the DVD+VCR channel selector is on thecorrect channel you wish to record. The channelthat is being recorded can always be checked bysetting the television on the DVD+VCR channel(CH 3 or 4) and pressing the TV/VCR to turn theDVD+VCR’s VCR indicator on.•Do not attempt to hook up more than one televi-sion set to the DVD+VCR for either recording orplayback.VCR Auto Play SystemThis DVD+VCR features automatic playback.When you load a tape with the safety tab removedthe following occurs:•The Output Source is changed to VCR mode automatically.•The power turns on automatically and playback begins.•At the end of the tape, the DVD+VCR stops, thenrewinds.•The tape is ejected after rewinding and the turns itselfoff automatically.Note:Auto power off does not function during regular DVD playmode. (DVD+VCR power stays on.)S-VHS Quasi Playback (SQPB) -VCR•This DVD+VCR can play back S-VHS recordedtapes, however, it cannot make recordings usingS-VHS format tapes.•SQPB is an abbreviation for S-VHS QuasiPlayback.EASY INFORMATIONIf the Extended Data Service (XDS) signals are pro-vided along with normal TV signal in your area orduring playback of a tape recorded with ExtendedData Service (XDS) signals, the station ID, programtitle, and program details are shown on the TVscreen. When viewing a channel with Extended DataService (XDS) signals, press ENTER and the station IDwill appear on the TV screen. Press ENTER again andthe program details will appear on the TV screen.When viewing a tape recorded with Extended  DataService (XDS) signals, press ENTER twice and theprogram title and program details will appear on theTV screen.PROGRAM DETAILSLENGTH: Indicates the run length of a program.TIME REMAINING: Indicates the remaining time of a program.RATING: Indicates the rating of the current program(N/A, G, PG, PG-13, R, NC-17, X and Not Rated). Therating N/A means that the motion picture ratings are notapplicable to this program.Easy Information Screen(Program details)Easy Information Screen(Station ID)CH  4SP WABC STEREO“Home video”APR  30 , FRI 2:15 PMPROGRAM DETAILS“Home video”LENGTH 01:00TIME REMAINING 00:26RATING N/A
27Playing a DVD or VPlaying a DVD or Video CD ideo CD Playback Setup1. Turn on the TV and select the video input sourceconnected to the DVD+VCR. 2. Turn on the audio system (if applicable) andselect the input source connected to theDVD+VCR.3. Press OPEN/CLOSE (Z) to open the disc trayand load your chosen disc in the tray, with theplayback side down. 4. Press OPEN/CLOSE (Z) to close the tray.Playback starts automatically. If playback doesnot start, press N(PLAY). In some cases, the disc menu might appearinstead. 5. To stop the playback, press STOP x.The unit records the stopped point, depending onthe disc. “Xx” appears on the screen briefly.Press N(PLAY) to resume playback (from thescene point). If you press STOP xagain orunload the disc (“x” appears on the screen.), theunit will clear the stopped point.Press OPEN/CLOSE Zto remove the disc.Press OPEN/CLOSE Zto close disc tray or pressPOWER (11), the disc tray closes automaticallyand unit turns off.If a menu screen is displayedThe menu screen may be displayed first after loadinga DVD or Video CD which offer a menu.Use the bB v Vbuttons to select the title/chap-ter you want to view, then press ENTER to start.Press TITLE or DISC MENU to return to the menuscreen.Use the number buttons to select the track youwant to view and press RETURN to return to themenu screen. Menu settings and operating proce-dures may differ. Follow the instructions on eachmenu screen. You also may set PBC to Off (See“PBC” on page 22).Notes:•If parental control is set and the disc is not within therating settings you must input the password. (See “LOCK” on page 23).•DVDs may have a region code.Your player will not playdiscs that have a region code different from your player.The region code for this player is 4 (four).General FeaturesNotes:Unless stated otherwise, all operations described usethe remote control. Some features may also be avail-able on the Setup menu. Moving to another TITLE When a disc has more than one title, you can moveto another title. Press DISPLAY, then the appropriatenumber (0-9) or use b/Bto move to another title.Moving to another CHAPTER/TRACK When a title on a disc has more than one chapter ora disc has more than one track, you can move toanother chapter/track as follows:•Press SKIP >or .briefly during playback toselect the next chapter/track or to return to thebeginning of the current chapter/track.•Press SKIP . twice in quick successions tostep back to the previous chapter/track.•To go directly to any chapter during DVD play-back, press DISPLAY and press v/Vto selectthe chapter/track icon. Then, input thechapter/track number or use b/B.Search 1. Press BACKWARD mor FORWARD Mduringplayback.2. Press BACKWARD mor FORWARD Mrepeat-edly to select the required speed. DVD disc; X2, X4, X16 or X100Video CD; X2, X4 or X83. To exit SEARCH mode, press N(PLAY).Changing the Audio Channel Press AUDIO repeatedly during playback to hear adifferent audio channel (STEREO, LEFT or RIGHT).VCDVCDDVDVCDDVDDVDVCDDVDOperation
28Still Picture and Frame-by-Frame Playback 1. Press PAUSE/STEP (X) during playback.Advance the picture frame-by-frame by pressingPAUSE/STEP (X) repeatedly.2. To exit still motion mode, press N(PLAY).Slow Motion 1. Press PAUSE/STEP (X) during playback.The DVD+VCR will now go into PAUSE mode. 2. Use BACKWARD mor FORWARD Mtoselect the required speed: t 1/16, t 1/8, t1/4, or t 1/2 (reverse), or T1/16, T1/8, T1/4, or T1/2 (forward).With a DivX Disc and Video CD, the Slow speedchanges: T1/16, T1/8, T1/4 or T1/2 (for-ward).3. To exit Slow Motion mode, press N(PLAY).Note:Slow motion playback in reverse is not possible withVideo CDs and DivX Discs.Random 1. Press RANDOM during playback. The unit auto-matically begins random playback and RANDOMappears on the TV screen.2. Press RANDOM again to normal.Tip:By pressing SKIP .or >during random playback, theunit selects another title (track) and resumes Random play-back.Note:On a Video CD with PBC, You must set PBC to Off on thesetup menu to use the random function (See “PBC” on page 22). Repeat A-B To  repeat a sequence. 1. Press A-B at your chosen starting point. “ A *”appears briefly on the TV screen. 2. Press A-B again at your chosen end point. “A B” appears briefly on the TV screen and therepeat sequence begins. 3. Press A-B again to cancel.Repeat You can repeat a title/chapter/all/track on a disc.Press REPEAT during playback to select a desiredrepeat mode.DVD Video Discs - Repeat Chapter/Title/Off• CHAPTER: repeats the current chapter.• TITLE: repeats the current title.• Off : does not play repeatedly.Video CDs, DivX discs - Repeat Track/All/Off• TRACK : repeats the current track• All : repeats all the tracks on a disc.• Off : does not play repeatedly.Notes:•On a Video CD with PBC, you must set PBC to Off onthe setup menu to use the repeat function (See “PBC”on page 22). •If you press SKIP (>) once during Repeat Chapter(Track) playback, the repeat playback cancels.3D Surround To  produce a 3D surround effect that simulates multi-channel audio from two stereo speakers (instead ofthe five+ speakers normally required for multi-channelaudio from a home theater system).1. Press DISPLAY during playback.2. Use vor Vto select the sound option.The sound option will be highlighted.3. Use bor Bto to select “3D SUR”.To  turn off the 3D Surround effect, select“Normal”.Time Search To  start playing at any chosen time on the disc:1. Press DISPLAY during playback. The time searchbox shows the elapsed playing time.2. Press v/Vto select the time clock icon and“-:--:--” appears.3. Input the required start time in hours, minutes,and seconds from left to right. If you enter thewrong numbers, press CLEAR to remove thenumbers you entered. Then input the correctnumbers.4. Press ENTER to confirm. Playback starts from theselected time.DivXVCDDVDDivXVCDDVDVCDDVDA - BVCDDVDKaraoke DVDVCDDivXVCDDVDDivXVCDDVD
29Changing Video Mode •With certain discs, the playback picture may beflickering or Dot Crawl is shown on straight lines.That means Vertical interpolation or De-interlace isnot perfectly matched with the disc. In this case,the picture quality may be improved by changingthe video mode. •To  change the video mode, press and hold DISPLAY about 3 seconds during disc playback.The new video mode number selected is displayedon the TV screen. Check whether the video qualityhas improved. If not, repeat the above procedureuntil picture quality is improved.•Video mode sequence: MODE1 →MODE2 →MODE3 →MODE1•If you turn off the power, the video mode will returnto initial default state (MODE1).Detailed Description of each Video Mode MODE1 : The source material of the DVD video (film mate-rial or video material) is determined from discinformation.MODE2 : Suitable for playing film based content or videobased material recorded by the progressive scanmethod.MODE3 : Suitable for playing video based content with comparatively little motion.Note:The video mode setting only works when the ProgressiveScan option is set to “On” in the Setup menu.Marker Search To  enter a Marker You can start playback from up to nine memorizedpoints. To enter a marker, press MARKER at thedesired point on the disc. The Marker icon appearson the TV screen briefly. Repeat to enter up to ninemarkers.To  Recall or Clear a Marked Scene 1. During disc playback, press SEARCH. The mark-er search menu appears on the screen.2. Within 10 seconds, press b/ Bto select a markernumber that you want to recall or clear.3. Press ENTER and playback starts from themarked scene. Or, Press CLEAR and the markernumber is erased from the list.4. You can play any marker by inputting its numberon the marker search menu.Zoom Use zoom to enlarge the video image.1. Press ZOOM during playback or still playback toactivate the Zoom function. The square frameappears briefly in the right bottom of the picture. 2. Each press of the ZOOM button changes the TVscreen in the sequence: 100% size → 400% size→1600% size →screen fit mode →100% sizeScreen fit mode: You can change the way the image appears onthe screen when you’re playing a DVD movie.Press v/Vto select between Normal, Enhanced,and Maximum.3. Use the bBvVbuttons to move through thezoomed picture.4. To resume normal playback, press ZOOM repeat-edly or CLEAR button.Notes:•Zoom may not work on some DVDs.•Screen fit mode is available for playing the DVD disc,VR disc and movie file.Last Scene Memory This player memorizes last scene from the last discthat is viewed. The last scene remains in memoryeven if you remove the disc from the player or switchoff the player. If you load a disc that has the scenememorized, the scene is automatically recalled.Note:This player does not memorize the scene of a disc if youswitch off the player before commencing to play the disc.Screen SaverThe screen saver appears when you leave theDVD+VCR in Stop mode for about five minutes. VCDCDDVDDivXVCDDVDMARKER SEARCH1234567891 / 9DivXVCDDVDDVDOperation
30Special DVD Features Special DVD Features Checking the contents of DVD discs: MenusDVDs may offer menus that allow you to access spe-cial features. To use the disc menu, press DISCMENU. Input the corresponding number or use the bB v V buttons to highlight your selection. Then pressENTER.Title Menu 1. Press TITLE. If the current title has a menu, themenu appears on the screen. Otherwise, the discmenu may appear.2. The menu offers features such as camera angles,spoken language and subtitle options, and chap-ters for the title.3. Press TITLE to exit.Disc Menu Press DISC MENU and the disc menu is displayed.Press DISC MENU again to exit.Camera Angle If the disc contains scenes recorded at different cam-era angles, you can change to a different cameraangle during playback. Press ANGLE repeatedly dur-ing playback to select a desired angle. Note that thenumber of the current angle appears on the display.Tip:The Camera Angle icon is displayed on the TV screen whenalternate angles are available.Changing the Audio Language Press AUDIO repeatedly during playback to hear adifferent audio language or audio track.Changing the Audio Channel Press AUDIO repeatedly during playback to hear adifferent audio channel (Stereo, Left, Right).Subtitles Press SUBTITLE repeatedly during playback to seethe different subtitle languages.Note:If there is no information,  is displayed.On-Screen Display - DVD On-Screen Display - DVD You can display the general playback status on theTV screen. Some items can be changed using themenu. To use the on-screen display:1. Press DISPLAY during playback.2. Press v/Vto select an item.The selected item is highlighted.3. Press b/Bto change the setting. You can alsouse the number buttons if appropriate (e.g.inputting the title number). For some functions,press ENTER to execute the setting.Notes:•Some discs may not provide all of the features shownbelow.•If no button is pressed for 10 seconds, the on-screendisplay disappears.•If  is displayed, action prohibited or not available.DVDVCDDVDDVDDVDDVDExample: On-Screen Display during playing VCDItemsTitle NumberChapter NumberTime searchAudio language and Digital Audio Output modeSubtitle languageAngleSoundSelection Methodb/ B,Numbers ENTERb/ B,Numbers ENTERNumbers, ENTERb/ BorAUDIOb/ BorSUBTITLEb/ BorANGLEb/ B1 / 31 / 120:20:09CHABC1 ENG1 / 33D SURExample: On-Screen Display during playing DVD VideoItemsTrack Number(or PBC mode)Time searchAudio ChannelSoundSelection Methodb/ B,Numbers ENTERNumbers ENTERb/ BorAUDIOb/ B1 / 30:20:093D SUR
31Playing an Playing an Audio CD orAudio CD orMP3/WMAMP3/WMA DiscDiscThe DVD+VCR can play MP3/WMA formatted record-ings on CD-ROM, CD-R, or CD-RW discs.Audio CDOnce you insert an audio CD a menu appears on theTV screen. Press v/Vto select a track then pressN(PLAY) or ENTER and playback starts. MP3 / WMA1. Press v/Vto select a folder, and press ENTERto see the folder contents.2. Press v/Vto select a track then press N(PLAY) or ENTER. Playback starts.ID3 TAG•When playing a file containing information such astrack titles, you can see the information by pressingDISPLAY. [ Title, Artist, Album, Year, Comment ]•If there is no information, “No ID3 TAG” appear onthe menu screen.Tips:•If you are in a file list on the “MUSIC” menu and want toreturn to the Folder list, use the v/Vto highlight and press ENTER.•Press DISC MENU to move to the next page.•On a CD with MP3/WMA and JPEG you can switchMP3/WMA and JPEG. Press TITLE and “MUSIC” or“PHOTO” word on top of the menu is highlighted.Operation ListTRACK01TRACK02TRACK03TRACK04TRACK05TRACK06TRACK07TRACK08AUDIO CD1:01:471 / 12ProgramClear AllEditPROGRAMList2-Music21-Music13-Music34-Music45-Music56-Music67-Music7Program0:00:001 / 104MUSICList2-Music21-Music13-Music34-Music45-Music56-Music67-Music7Clear AllEditPROGRAMInfoDISPLAYMP3 / WMA disc compatibility with this player islimited as follows:•Sampling frequency: within 8 - 48 kHz (MP3),within 32 - 48kHz (WMA)•Bit rate: within 8 - 320kbps (MP3), 32 - 192kbps (WMA)•The player cannot read an MP3/WMA file thathas a file extension other than “.mp3” / “.wma”.•CD-R physical format should be ISO 9660•If you record MP3 / WMA files using software thatcannot create a file system (eg. Direct-CD) it isimpossible to playback MP3 / WMA files. We rec-ommend that you use Easy-CD Creator, whichcreates an ISO 9660 file system.•File names should have a maximum of 8 lettersand must incorporate an .mp3 or .wma exten-sion. •They should not contain special letters such as  /? * : “ < > l etc.•The total number of files on the disc should beless than 650.This DVD+VCR requires discs and recordings tomeet certain technical standards in order toachieve optimal playback quality. Pre-recordedDVDs are automatically set to these standards.There are many different types of recordable discformats (including CD-R containing MP3 or WMAfiles) and these require certain pre-existing condi-tions (see above) to ensure compatible playback.Customers should note that permission isrequired in order to download MP3 / WMA filesand music from the Internet. Our company hasno right to grant such permission. Permissionshould always be sought from the copyrightowner.
32Audio CD and MP3 / WMAAudio CD and MP3 / WMADisc FeaturesDisc FeaturesPause 1. Press PAUSE/STEP (X) during playback.2. To return to playback, press N(PLAY) or pressPAUSE/STEP (X) again.Moving to another Track 1. Press SKIP (> or .) briefly during playbackto go to the next track or to return to the begin-ning of the current track.2. Press SKIP .twice in quick successions to goback to the previous track.3. You can play any track by inputting its number.Repeat Track/All/Off You can play a track/all on a disc.1. Press REPEAT when playing a disc. The repeaticon appears.2. Press REPEAT to select a desired repeat mode.• TRACK: repeats the current track.• ALL: repeats all the tracks on a disc.• Off(No display): does not play repeatedly.Note:If you press SKIP (>) once during Repeat Track play-back, the repeat playback will be cancelled.Search 1. Press BACKWARD mor FORWARD Mduringplayback.  2. Press BACKWARD mor FORWARD Mrepeat-edly to select the required speed: X2, X4, X8backward or forward.3. To exit SEARCH mode, press N(PLAY).Random 1. Press RANDOM during playback. RandomPlayback begins immediately and RANDOMappears on the menu screen.2. To return to normal playback, press RANDOMrepeatedly until RANDOM disappears from themenu screen.Tip:By pressing SKIP .or >during random playback, theunit selects another track and resumes random playback.Repeat A-B 1. To repeat a sequence during disc playback pressA-B at your chosen starting point. The Repeaticon and “A” appear on the menu screen.2. Press A-B again at your chosen end point. TheRepeat icon and “A-B” appear on the menuscreen, and the sequence begins to play repeat-edly. 3. To exit the sequence and return to normal play,press A-B again. The Repeat icon disappearsfrom the menu screen.3D Surround To  produce a 3D surround effect that simulates multi-channel audio from two stereo speakers (instead ofthe five+ speakers normally required for multi-channelaudio from a home theater system).1. Press AUDIO during playback. “3D SUR.” appears on the menu screen.2. To return to normal playback, press AUDIOrepeatedly until “3D SUR.” disappears from themenu screen.CDCDWMAMP3CDWMAMP3CDWMAMP3CDWMAMP3CDWMAMP3CD
33Programmed Playback Programmed Playback The program function enables you to store yourfavourite tracks from any disc in the player memory. Aprogram can contain 30 tracks.1. Insert a disc.Audio CD or MP3/WMA Discs: AUDIO CD or MUSIC menu appears.2. Press PROGRAM.The  mark will appear to the right of the word“Program” on the right side of the menu screen.Note:Press PROGRAM again, the  mark will disappear to exitthe Program Edit mode.Video CD: Press PROGRAM while playback isstopped. The program menu appears. PressPROGRAM again to exit the menu.Note:On a Video CD with PBC, you must set PBC to Off on thesetup menu to use the programmed playback (See “PBC”on page 22).3. Select a track on the “List”, then press ENTER toplace the selected track on the “Program” list.Repeat to place additional tracks on the list.4. Press B.Select the track you want to start playing on the“Program” list.5. Press N(PLAY) or ENTER to start. Playbackbegins in the order in which you programmed thetracks. Playback stops after all of the tracks onthe “Program” list have played once.6. To  resume normal playback from pro-grammed playback, select a track of AUDIOCD (or MUSIC) list and then press N(PLAY).Repeat Programmed Tracks 1. Press REPEAT when playing a disc. The repeaticon appears.2. Press REPEAT to select a desired repeat mode.• TRACK: repeats the current track• ALL: repeats all the tracks on programmed list.• Off(No display): does not play repeatedly.Note:If you press >once during Repeat Track playback, therepeat playback will be cancelled.Erasing a Track from “Program” List1. Use vVBto select the track that you wish toerase from the Program list.2. Press CLEAR. Repeat to erase additional trackson the list.Erasing the Complete Program List1. Press Bto move to the “Program” list.2. Use v/Vto select “Clear All”, then pressENTER.Note:The programs are also cleared when the disc is removed.EEOperation ListTRACK01TRACK02TRACK03TRACK04TRACK05TRACK06TRACK07TRACK08AUDIO CD1:01:471 / 12ProgramClear AllEditPROGRAMProgramListTRACK01TRACK02TRACK03TRACK04VIDEO CDTRACK1TRACK2TRACK3TRACK4Clear AllEList2-Music21-Music13-Music34-Music45-Music56-Music67-Music7Program0:00:001 / 104MUSICList2-Music21-Music13-Music34-Music45-Music56-Music67-Music7Clear AllEditPROGRAMInfoDISPLAYAudio CD MenuMP3/WMA MenuVideo CD Menu
34VViewing a JPEG Disciewing a JPEG DiscUsing this DVD+VCR you can view Kodak PICTURECDs and discs with JPEG files. 1. Insert a disc and close the tray. The PHOTOmenu appears on the TV screen.2. Press v/Vto select a folder, and press ENTER.Alist of files in the folder appears. If you are in afile list and want to return to the previous Folderlist, use the v/Vbuttons on the remote to high-light  and press ENTER.3. If you want to view a particular file, press v/Vto highlight a file and press ENTER or N(PLAY). The selected file will appear for viewing.While viewing a file, you can press STOP to moveto the previous menu (PHOTO menu).Tip:•Press DISC MENU to move to the next page.•There are three Slide Speed options  : >>> (Fast), >> (Normal), and > (Slow). Use vVbBto highlight the Speed. Then, use b/Btoselect the option you want to use then press ENTER. •On a disc with MP3/WMA and JPEG you can switchMP3/WMA and JPEG. Press TITLE and MUSIC orPHOTO word on top of the menu is highlighted.•Press RETURN, information of file is hidden.Slide ShowUse vVbBto highlight the  (Slide Show) thenpress ENTER.Still Picture 1. Press PAUSE/STEP (X) during slide show. The player will now go into PAUSE mode. 2. To return to the slide show, press N(PLAY) orpress PAUSE/STEP (X) a gain.Moving to another FilePress SKIP (.or >) or cursor (bor B)oncewhile viewing a picture to advance to the next or pre-vious file.ZoomUse zoom to enlarge the photo image. (see page 33)To rotate picture Press v/Vduring showing a picture to rotate thepicture clockwise or counter clockwise.JPEGJPEGJPEGJPEGJPEGPreviewListJPEG Folder 1JPEG Folder 2JPEG Folder 3JPEG Folder 4JPEG Folder 5JPEG Folder 6JPEG Folder 7JPEG Folder 8>>>PHOTOJPEG disc compatibility with this player islimited as follows:•Depending upon the size and number of JPEGfiles, it could take a long time for the DVD+VCRto read the disc’s contents. If you don’t see anon-screen display after several minutes, some ofthe files may be too large — reduce the resolu-tion of the JPEG files to less than 2M pixels as2760 x 2048 pixels and burn another disc.•The total number of files and folders on the discshould be less than 650.•Some discs may be incompatible due to a differ-ent recording format or the condition of disc.•Ensure that all the selected files have the “.jpg”extensions when copying into the CD layout.•If the files have “.jpe” or “.jpeg” extensions,please rename them as “.jpg” file.•File names without “.jpg” extension will not beable to be read by this DVD+VCR. Even thoughthe files are shown as JPEG image files inWindows Explorer.
35Controlling Controlling YYour TV with theour TV with theSupplied RemoteSupplied RemoteControlling other TVs with the remoteYou can control the sound level, input source, andpower switch of non-LG TVs as well. If your TV is list-ed in the table below, set the appropriate manufactur-er code.1. While holding down TV POWER button, press thenumber buttons to select the manufacturer codefor your TV (see the table below).2. Release TV POWER button.Code numbers of controllable TVsIf more than one code number is listed, try enteringthem one at a time until you find the one that workswith your TV.Manufacturer Code NumberLG / GoldStar 1 (Default), 2Zenith 1, 3, 4Samsung 6, 7Sony 8, 9Hitachi 4Notes:•Depending on your TV, some or all buttons may notfunction on the TV, even after entering the correct man-ufacturer code.•If you enter a new code number, the code number previ-ously entered will be erased.•When you replace the batteries of the remote, the codenumber you have set may be reset to the default set-ting. Set the appropriate code number again.Reference
36ReferenceCountry CodeAfghanistan AFArgentina ARAustralia AUAustria ATBelgium BEBhutan BTBolivia BOBrazil BRCambodia KHCanada CAChile CLChina CNColombia COCongo CGCosta Rica CRCroatia HRCzech Republic CZDenmark DKEcuador ECEgypt EGEl Salvador SVCountry CodeEthiopia ETFiji FJFinland FIFrance FRGermany DEGreat Britain GBGreece GRGreenland GLIslands HMHong Kong HKHungary HUIndia INIndonesia IDIsrael ILItaly ITJamaica JMJapan JPKenya KEKuwait KWLibya LYLuxembourg LUCountry CodeMalaysia MYMaldives MVMexico MXMonaco MCMongolia MNMorocco MANepal NPNetherlands NLNetherlands Antilles ANNew Zealand NZNigeria NGNorway NOOman OMPakistan PKPanama PAParaguay PYPhilippines PHPoland PLPortugal PTRomania RORussian Federation RUCountry CodeSaudi Arabia SASenegal SNSingapore SGSlovak Republic SKSlovenia SISouth Africa ZASouth Korea KRSpain ESSri Lanka LKSweden SESwitzerland CHTaiwan TWThailand THTurkey TRUganda UGUkraine UAUnited States USUruguay UYUzbekistan UZVietnam VNZimbabwe ZWCountry Codes Choose a country code from this list.Language CodeAbkhazian 6566Afar 6565Afrikaans 6570Albanian 8381Ameharic 6577Arabic 6582Armenian 7289Assamese 6583Aymara 6588Azerbaijani 6590Bashkir 6665Basque 6985Bengali; Bangla 6678Bhutani 6890Bihari 6672Breton 6682Bulgarian 6671Burmese 7789Byelorussian 6669Cambodian 7577Catalan 6765Chinese 9072Corsican 6779Croatian 7282Czech 6783Danish 6865Dutch 7876English 6978Esperanto 6979Estonian 6984Faroese 7079Language CodeFiji 7074Finnish 7073French 7082Frisian 7089Galician 7176Georgian 7565German 6869Greek 6976Greenlandic 7576Guarani 7178Gujarati 7185Hausa 7265Hebrew 7387Hindi 7273Hungarian 7285Icelandic 7383Indonesian 7378Interlingua 7365Irish 7165Italian 7384Japanese 7465Javanese 7487Kannada 7578Kashmiri 7583Kazakh 7575Kirghiz 7589Korean 7579Kurdish 7585Laothian 7679Latin 7665Latvian, Lettish 7686Language CodeLingala 7678Lithuanian 7684Macedonian 7775Malagasy 7771Malay 7783Malayalam 7776Maltese 7784Maori 7773Marathi 7782Moldavian 7779Mongolian 7778Nauru 7865Nepali 7869Norwegian 7879Oriya 7982Panjabi 8065Pashto, Pushto 8083Persian 7065Polish 8076Portuguese 8084Quechua 8185Rhaeto-Romance 8277Rumanian 8279Russian 8285Samoan 8377Sanskrit 8365Scots Gaelic 7168Serbian 8382Serbo-Croatian 8372Shona 8378Sindhi 8368Language CodeSinghalese 8373Slovak 8375Slovenian 8376Somali 8379Spanish 6983Sudanese 8385Swahili 8387Swedish 8386Tagalog 8476Tajik 8471Tamil 8465Tatar 8484Telugu 8469Thai 8472Tibetan 6679Tigrinya 8473Tonga 8479Turkish 8482Turkmen 8475Twi 8487Ukrainian 8575Urdu 8582Uzbek 8590Vietnamese 8673Volapük 8679Welsh 6789Wolof 8779Xhosa 8872Yiddish 7473Yoruba 8979Zulu 9085Language CodesUse this list to input your desired language for the following initial settings: Disc Audio, Disc Subtitle, Disc Menu.
37Reference TTroubleshootingroubleshootingSymptomNo power.The power is on, butthe DVD+VCR does notwork.No picture.No sound.The playback picture ispoor.CauseThe power cord is disconnected.DVD or VCR button is not switchedproperly.No disc is inserted.No tape is inserted.The TV is not set to receive DVD+VCRsignal output.The video cable is not connectedsecurely.The Progressive Scan is set to On onthe setup menu but is connected to a standard(analog) television with compo-nent video input.Mismatch setting between TV and thisunit.Wrong connection.The equipment connected with theaudio cable is not set to receiveDVD+VCR signal output.The audio cables are not connectedsecurely.The power of the equipment connectedwith the audio cable is turned off.The AUDIO options are set to the wrongposition.The disc is dirty.The TV channels are not tuned in properly.Tape heads are dirty.Tape is a rental or was recorded onanother VCR.This unit can only output 525pProgressive scan picture.CorrectionPlug the power cord into the wall out-let securely.Refer to page 6.Insert a disc or tape. (Check that thedisc or tape indicator in the display window is lit.) Select the appropriate video inputmode on the TV so the picture fromthe DVD+VCR player appears on theTV screen.Connect the video cable into the jackssecurely. Set Progressive Scan to Off (see page 21).Select the correct Video Output inSETUP menu.Check the connection.Select the correct input mode of theaudio receiver so you can listen to thesound from the DVD+VCR.Connect the audio cable into the jackssecurely.Turn on the equipment connected withthe audio cable.Set the AUDIO options to the correctposition.Clean the disc.Check tuning, carry out tuning again.Clean video heads.Use PR/TRK (+/-) for manual trackingadjustment while tape is playing.Make sure that your TV can support525p Progressive scan picture or setProgressive scan to off.Check the following guide for the possible cause of a problem before contacting service.
38SymptomThe DVD+VCR doesnot start playback.Video tape cannot beinserted.No Hi-Fi soundThe remote controldoes not work properly.Camcorder image isnot shown.Camcorder image viaAV  input to DVD+VCRis not shown on TVscreen.Timer recording is notpossible.CauseAn unplayable disc is inserted.The disc is placed upside down.The disc is not placed within theguide.The disc is dirty.The Rating level is set.Is the cassette compartment empty?Audio mode is not set properly.There is an obstacle in the path of theremote control and this unit.The batteries in the remote control areexhausted.The remote control is not pointed atthe remote sensor of the DVD+VCR.The remote control is too far from theDVD+VCR.This remote control use the same but-tons for VCR and DVD functions(ex.PLAY).Camcorder is off.DVD+VCR SOURCE SELECT is notset to LINE1 or LINE2.Clock in DVD+VCR is not set to correct time.Timer has been programmed incorrectly.indicator light does not appear afterprogramming timer.CorrectionInsert a playable disc. (Check the disctype and Regional code.)Place the disc with the playback sidedown.Place the disc on the disc tray correctlyinside the guide.Clean the disc.Cancel the Rating function or changethe rating  level.Eject the tape in.Select STEREO by repeatedly pressingAUDIO on the remote control.Remove the obstacle.Replace the batteries with new ones.Point the remote control at the remotesensor of the DVD+VCR.Operate the remote control within 23ft(7m).When using a VCR, first press the VCRbutton. When using a DVD, first pressthe DVD button.Turn camcorder on and operate properly.Press INPUT SELECT to select LINEinput channel (LINE1 or LINE2).Set clock to correct time. Reprogram Timer. Reprogram Timer and turn DVD+VCRoff to enable timer.
39GeneralPower requirements 120V, 60HzPower consumption 16 W Dimensions (approx.) 16.9" X 3.1" X 10.8" (430 X 78.5 X 273 mm) (w x h x d)Weight (approx.) 8.82 lbs (4.0 kg)Operating temperature 5˚C to 40˚C (41˚F to 104˚F)Operating humidity 5 % to 90 %Signal system NTSCInputsANTENNA IN 75 ohms (VHF/UHF/CATV)VHS VIDEO IN(LINE1, 2) 1 V (p-p) 75 ohms, sync negative, RCA jack x 2VHS AUDIO IN(LINE1, 2) -6.0 dBm more than 47 ohms, RCA jack (L, R) x 2OutputsVIDEO OUT 1 V (p-p) 75 ohms, sync negativeS-VIDEO OUT (Y) 1.0 V (p-p), 75 ohms, negative sync, Mini DIN 4-pin x 1(C) 0.286 V (p-p) 75 ohmsCOMPONENT VIDEO OUT (Y) 1.0 V (p-p), 75 ohms, negative sync, RCA jack x 1(PROGRESSIVE SCAN) (Pb)/(Pr) 0.7 V (p-p), 75 ohms, RCA jack x 2Audio output (digital audio) 0.5 V (p-p), 75 ohms, RCA jack x 1Audio output (analog audio) 2.0 Vrms (1 KHz, 0 dB), 600 ohms, RCA jack (L, R) x 1RF OUT Channel 3 or 4 (Adjustable)VCR SpecificationsHead system Four head helical scan azimuth systemTimer 12-hour display type with AM, PMTape speed  SP: 33.35 mm/sec, LP: 16.67 mm/sec, SLP: 11.12 mm/secTape width 12.7 mmMaximum recording time SP: 2 HOURS (T-120), SLP: 6 HOURS (T-120)/8 HOURS (T-160)Rewind time About 3 minutes (T-120)Channel coverage VHF: 2-13, UHF: 14-69, CATV: 1-125 (4A, A-W, W+1 - W+84, A-5 - A-1)Frequency range 20 Hz to 20 kHzSignal-to-noise ratio More than 43 dBDynamic range More than 88 dBChannel separation More than 60 dB DVD SpecificationsLaser system Semiconductor laser, wavelength 650 nmFrequency response DVD (PCM 96 kHz): 8 Hz to 44 kHz, DVD (PCM 48 kHz): 8 Hz to 22 kHzCD: 8 Hz to 20 kHzSignal-to-noise ratio More than 100 dB (ANALOG OUT jacks only)Harmonic distortion Less than 0.008%Dynamic range More than 95 dB (DVD/CD)Accessories: Video cable x 1, Audio cable (L/R) x 1, RF 75-ohm Coaxial Cable x 1, Remote control x 1, Batteries (R03/AAA) x 2•Design and specifications are subject to change without prior notice.Reference Specifications
P/NO: 3834RV00???

Navigation menu